online manualgdlp01.c-wss.com/gds/3/0300019723/01/printing_and... · 2015. 7. 8. · setting paper...
TRANSCRIPT

MX450 series
Online Manual
PrintingCopying
English

Printing Printing from a Computer
Printing with Application Software that You are Using (Printer Driver) Printing Using the Operation Panel of the Machine
Printing Template Forms Such As Lined Paper or Graph Paper Printing from a Bluetooth Compliant Device
Printing from Mobile Phone via Bluetooth Communication About Bluetooth Communication
Handling Precautions Preparation to Use the Bluetooth Unit Printing Data via Bluetooth Communication Basic Procedure for Printing via Bluetooth Communication Bluetooth Settings Specifications

Printing from a Computer Printing with Application Software that You are Using (Printer Driver)

Printing Using the Operation Panel of the Machine Printing Template Forms Such As Lined Paper or Graph Paper

About Bluetooth Communication Handling Precautions Preparation to Use the Bluetooth Unit Printing Data via Bluetooth Communication Basic Procedure for Printing via Bluetooth Communication Bluetooth Settings Specifications

Copying
Making Copies Basic Setting Items Reducing or Enlarging a Copy About Special copy Menu Copying Two Pages to Fit onto a Single Page Copying Four Pages to Fit onto a Single Page Copying Thick Originals Such as Books Copying without Borders Collated Copying

Printing with Application Software that You are Using (PrinterDriver)
Printing with Easy Setup Basic Various Printing Methods Changing the Print Quality and Correcting Image Data Overview of the Printer Driver Updating the MP Drivers

Printing with Easy SetupThis section describes a simple procedure for specifying Quick Setup tab settings that allow you toperform printing suited to this machine.For details about the Quick Setup tab, see "Quick Setup Tab."
1. Check that the machine is turned onConfirming that the Power Is On
2. Load paper on the machineLoading Paper
3. Open the printer driver setup windowHow to Open the Printer Driver Setup Window
4. Select a frequently used profileIn Commonly Used Settings on the Quick Setup tab, select a printing profile suited for the purpose.When you select a printing profile, the Additional Features, Media Type, and Printer Paper Sizesettings are automatically switched to the values that were preset.
5. Select the print qualityFor Print Quality, select High, Standard, or Fast according to your purpose.

Important The print quality settings that can be selected may differ depending on a printing profile.
6. Complete the setupClick OK.When you execute print, the document is printed with settings that match your purpose.
Important When you select the Always Print with Current Settings check box, all settings specified on the
Quick Setup, Main, and Page Setup tabs are saved, and you can print with the same settings fromthe next time as well. In the Commonly Used Settings window, click Save... to register the specified settings.
Registering a Frequently Used Printing Profile.

Quick Setup TabThe Quick Setup tab is for registering commonly used print settings. When you select a registered setting,the machine automatically switches to the preset items.
Related Topics Printing with Easy Setup Setting a Page Size and Orientation Setting the Number of Copies and Printing Order Execute Borderless Printing Duplex Printing Setting Up Envelope Printing Printing on Postcards Displaying the Print Results before Printing Setting Paper Dimensions (Custom Size) Printing a Color Document in Monochrome Specifying Color Correction Adjusting Color Balance Adjusting Color Balance Using Sample Patterns (Printer Driver) Adjusting Brightness Adjusting Intensity Adjusting Contrast Adjusting Intensity/Contrast Using Sample Patterns (Printer Driver) Registering a Frequently Used Printing Profile

Setting the Media Type with the Printer DriverWhen you use this machine, selecting a media type that matches the print purpose will help you achievethe best print results.You can use the following media types on this machine.
Commercially available papersMedia name Media Type in the printer driver
Plain Paper (including recycled paper) Plain PaperEnvelopes Envelope
Canon genuine papers (Photo Printing)Media name <Model No.> Media Type in the printer driver
Photo Paper Pro Platinum <PT-101> Photo Paper Pro PlatinumGlossy Photo Paper "Everyday Use" <GP-501> Glossy Photo PaperPhoto Paper Glossy <GP-502> Glossy Photo PaperPhoto Paper Plus Glossy II <PP-201> Photo Paper Plus Glossy IIPhoto Paper Pro Luster <LU-101> Photo Paper Pro LusterPhoto Paper Plus Semi-gloss <SG-201> Photo Paper Plus Semi-glossMatte Photo Paper <MP-101> Matte Photo Paper
Canon genuine papers (Business Letter Printing)Media name <Model No.> Media Type in the printer driver
High Resolution Paper <HR-101N> High Resolution Paper
Canon genuine papers (Original Products)Media name <Model No.> Media Type in the printer driver
T-Shirt Transfers <TR-301> T-Shirt TransfersPhoto Stickers <PS-101> Glossy Photo Paper

Various Printing Methods Setting a Page Size and Orientation Setting the Number of Copies and Printing Order Setting the Stapling Margin Execute Borderless Printing Fit-to-Page Printing Scaled Printing Page Layout Printing Tiling/Poster Printing Booklet Printing Duplex Printing Stamp/Background Printing Registering a Stamp Registering Image Data to be Used as a Background Setting Up Envelope Printing Printing on Postcards Displaying the Print Results before Printing Setting Paper Dimensions (Custom Size) Editing the Print Document or Reprinting from the Print History

Setting a Page Size and OrientationThe paper size and orientation are essentially determined by the application software. When the page sizeand orientation set for Page Size and Orientation on the Page Setup tab are same as those set with theapplication software, you do not need to select them on the Page Setup tab.
When you are not able to specify them with the application software, the procedure for selecting a pagesize and orientation is as follows:You can also set page size and orientation on the Quick Setup tab.
1. Open the printer driver setup window
2. Select the paper sizeSelect a page size from the Page Size list on the Page Setup tab.
3. Set OrientationSelect Portrait or Landscape for Orientation. Check Rotate 180 degrees check box when you wantto perform printing with the original being rotated 180 degrees.
4. Complete the setupClick OK.When you execute print, the document will be printed with the selected page size and the orientation.
Note If Normal-size is selected for Page Layout, then Automatically reduce large document that the
printer cannot output is displayed.Normally, you can leave the Automatically reduce large document that the printer cannot outputcheck box checked. During printing, if you do not want to reduce large documents that cannot beprinted on the printer, uncheck the check box.

Setting the Number of Copies and Printing OrderThe procedure for specifying the number of copies and printing order is as follows:You can also set the number of copies on the Quick Setup tab.
1. Open the printer driver setup window
2. Specify the number of copies to be printedFor Copies on the Page Setup tab, specify the number of copies to be printed.
3. Specify the print orderCheck the Print from Last Page check box when you want to print from the last page in order, anduncheck the check box when you want to print from the first page.Check the Collate check box when you are printing multiple copies of a document and want to printout all pages in each copy together. Uncheck this check box when you want to print all pages with thesame page number together.
• Print from Last Page: /Collate:
• Print from Last Page: /Collate:
• Print from Last Page: /Collate:

• Print from Last Page: /Collate:
4. Complete the setupClick OK.When you execute print, the specified number of copies will be printed with the specified printing order.
Important When the application software that you used to create the document has the same function, specify
the settings on the printer driver. However, if the print results are not acceptable, specify the functionsettings on the application software. When you specify the number of copies and the printing orderwith both the application software and this printer driver, the number of copies may be multipliednumbers of the two settings or the specified printing order may not be enabled. Print from Last Page appears grayed out and is unavailable when Tiling/Poster is selected for
Page Layout. When Booklet is selected for Page Layout, Print from Last Page and Collate appear grayed out
and cannot be set. When Duplex Printing (Manual) is selected, Print from Last Page appears grayed out and cannot
be set.
Note By setting both Print from Last Page and Collate, you can perform printing so that papers are
collated one by one starting from the last page.These settings can be used in combination with Normal-size, Borderless, Fit-to-Page, Scaled, PageLayout, and Duplex Printing (Manual).

Setting the Stapling Margin
The procedure for setting the staple side and the margin width is as follows:
1. Open the printer driver setup window
2. Specify the side to be stapledCheck the position of the stapling margin from Stapling Side on the Page Setup tab.The printer analyzes the Orientation and Page Layout settings, and automatically selects the beststaple position. When you want to change the setting, select from the list.
3. Set the margin widthIf necessary, click Specify Margin... and set the margin width, and then click OK.
Note The printer automatically reduces the print area depending on the staple position margin.

4. Complete the setupClick OK on the Page Setup tab.When you execute print, the data is printed with the specified staple side and margin width.
Important Stapling Side and Specify Margin... appear grayed out and are unavailable when:
Borderless, Tiling/Poster, or Booklet is selected for Page Layout Scaled is selected for Page Layout (When Duplex Printing (Manual) is also selected, only
Stapling Side can be specified.)

Execute Borderless PrintingThe borderless printing function allows you to print data without any margin by enlarging the data so that itextends slightly off the paper. In standard printing, margins are created around the document area.However, in borderless printing function, these margins are not created. When you want to print data suchas a photo without providing any margin around it, set borderless printing.
The procedure for performing borderless printing is as follows:You can also set borderless printing in Additional Features on the Quick Setup tab.
Setting Borderless Printing
1. Open the printer driver setup window
2. Set borderless printingSelect Borderless from the Page Layout list on the Page Setup tab.
Click OK when the confirmation message appears.When a message prompting you to change the media type appears, select a media type from the listand click OK.
3. Check the paper sizeCheck the Page Size list. When you want to change it, select another page size from the list. The listdisplays only sizes that can be used for borderless printing.
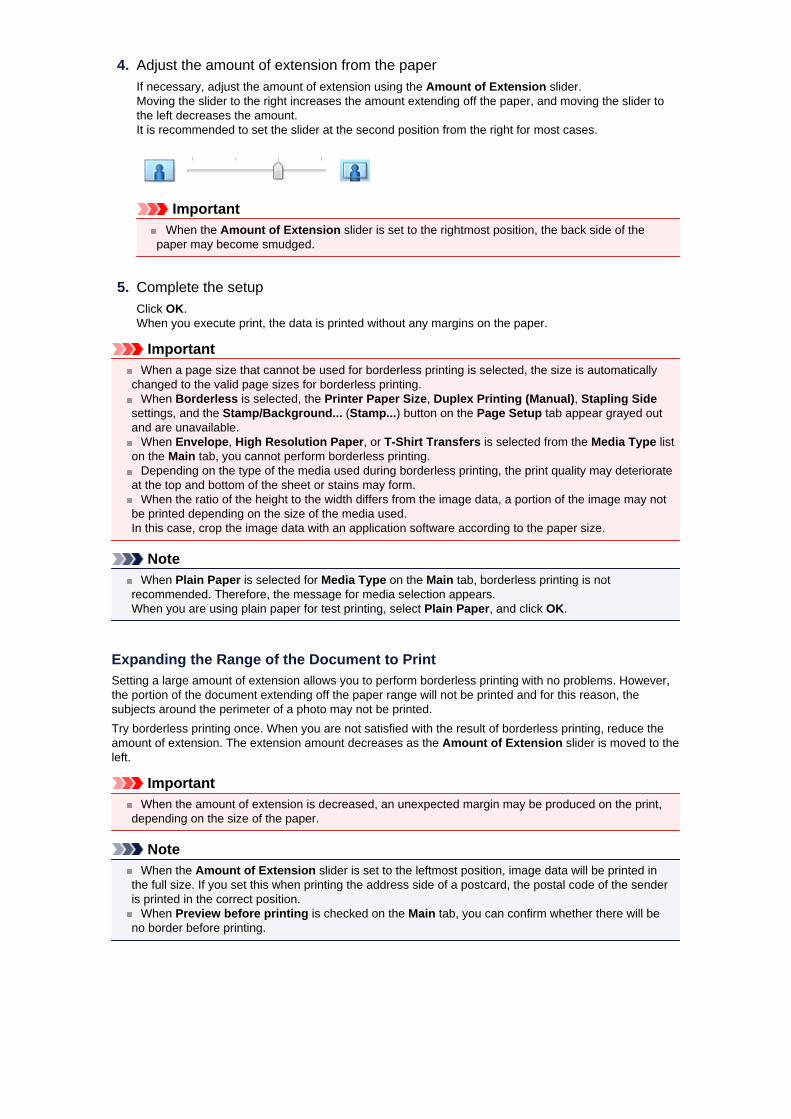
4. Adjust the amount of extension from the paperIf necessary, adjust the amount of extension using the Amount of Extension slider.Moving the slider to the right increases the amount extending off the paper, and moving the slider tothe left decreases the amount.It is recommended to set the slider at the second position from the right for most cases.
Important When the Amount of Extension slider is set to the rightmost position, the back side of the
paper may become smudged.
5. Complete the setupClick OK.When you execute print, the data is printed without any margins on the paper.
Important When a page size that cannot be used for borderless printing is selected, the size is automatically
changed to the valid page sizes for borderless printing. When Borderless is selected, the Printer Paper Size, Duplex Printing (Manual), Stapling Side
settings, and the Stamp/Background... (Stamp...) button on the Page Setup tab appear grayed outand are unavailable. When Envelope, High Resolution Paper, or T-Shirt Transfers is selected from the Media Type list
on the Main tab, you cannot perform borderless printing. Depending on the type of the media used during borderless printing, the print quality may deteriorate
at the top and bottom of the sheet or stains may form. When the ratio of the height to the width differs from the image data, a portion of the image may not
be printed depending on the size of the media used.In this case, crop the image data with an application software according to the paper size.
Note When Plain Paper is selected for Media Type on the Main tab, borderless printing is not
recommended. Therefore, the message for media selection appears.When you are using plain paper for test printing, select Plain Paper, and click OK.
Expanding the Range of the Document to PrintSetting a large amount of extension allows you to perform borderless printing with no problems. However,the portion of the document extending off the paper range will not be printed and for this reason, thesubjects around the perimeter of a photo may not be printed.Try borderless printing once. When you are not satisfied with the result of borderless printing, reduce theamount of extension. The extension amount decreases as the Amount of Extension slider is moved to theleft.
Important When the amount of extension is decreased, an unexpected margin may be produced on the print,
depending on the size of the paper.
Note When the Amount of Extension slider is set to the leftmost position, image data will be printed in
the full size. If you set this when printing the address side of a postcard, the postal code of the senderis printed in the correct position. When Preview before printing is checked on the Main tab, you can confirm whether there will be
no border before printing.

Fit-to-Page Printing
The procedure for printing a document that is automatically enlarged or reduced to fit the page size to beused is as follows:
1. Open the printer driver setup window
2. Set fit-to-page printingSelect Fit-to-Page from the Page Layout list on the Page Setup tab.
3. Select the paper size of the documentUsing Page Size, select the page size that is set with your application software.
4. Select the print paper sizeSelect the size of the paper loaded in the machine from the Printer Paper Size list.When the Printer Paper Size is smaller than the Page Size, the page image will be reduced. Whenthe Printer Paper Size is larger than the Page Size, the page image will be enlarged.The current settings are displayed in the settings preview on the left side of the printer driver.

5. Complete the setupClick OK.When you execute print, the document will be enlarged or reduced to fit to the page size.

Scaled Printing
The procedure for printing a document with pages enlarged or reduced is as follows:
1. Open the printer driver setup window
2. Set scaled printingSelect Scaled from the Page Layout list on the Page Setup tab.
3. Select the paper size of the documentUsing Page Size, select the page size that is set with your application software.
4. Set the scaling rate by using one of the following methods:
• Select a Printer Paper SizeWhen the printer paper size is smaller than the Page Size, the page image will be reduced. Whenthe printer paper size is larger than the Page Size, the page image will be enlarged.

• Specify a scaling factorDirectly type in a value into the Scaling box.
The current settings are displayed in the settings preview on the left side of the printer driver.
5. Complete the setupClick OK.When you execute print, the document will be printed with the specified scale.
Important When the application software which you used to create the original has the scaled printing function,
configure the settings on your application software. You do not need to configure the same setting inthe printer driver.
Note Selecting Scaled changes the printable area of the document.

Page Layout PrintingThe page layout printing function allows you to print more than one page image on a single sheet of paper.
The procedure for performing page layout printing is as follows:
1. Open the printer driver setup window
2. Set page layout printingSelect Page Layout from the Page Layout list on the Page Setup tab.The current settings are displayed in the settings preview on the left side of the printer driver.
3. Select the print paper sizeSelect the size of the paper loaded in the machine from the Printer Paper Size list.Setting the layout of two pages of the document from left to right is complete.
4. Set the number of pages to be printed on one sheet and the page orderIf necessary, click Specify..., specify the following settings in the Page Layout Printing dialog box,and click OK.

PagesTo change the number of pages to be printed on a single sheet of paper, select the number of pagesfrom the list.
Page OrderTo change the page arrangement order, select a placement method from the list.
Page BorderTo print a page border around each document page, check this check box.
5. Complete the setupClick OK on the Page Setup tab.When you execute print, the specified number of pages will be arranged on each sheet of paper in thespecified order.

Tiling/Poster PrintingThe tiling/poster printing function allows you to enlarge image data, divide it into several pages, and printthese pages on separate sheets of paper. You can also paste the pages together to create a large print likea poster.
The procedure for performing tiling/poster printing is as follows:
Setting Tiling/Poster Printing
1. Open the printer driver setup window
2. Set tiling/poster printingSelect Tiling/Poster from the Page Layout list on the Page Setup tab.The current settings are displayed in the settings preview on the left side of the printer driver.
3. Select the print paper sizeSelect the size of the paper loaded in the machine from the Printer Paper Size list.This completes the setup for dividing the document into 2 and performing tiling/poster printing.
4. Set the number of image divisions and the pages to be printed

If necessary, click Specify..., specify the following settings in the Tiling/Poster Printing dialog box,and then click OK.
Image DivisionsSelect the number of divisions (vertical x horizontal). As the number of divisions increases, the numberof sheets used for printing increases. If you are pasting pages together to create a poster, increasingthe number of divisions allow you to create a larger poster.
Print "Cut/Paste" in marginsTo leave out words "Cut" and "Paste", uncheck this check box.
Note This feature may be unavailable when certain printer drivers or operating environments are
used.
Print "Cut/Paste" lines in marginsTo leave out cut lines, uncheck this check box.
Print page rangeSpecifies the printing range. Select All under normal circumstances.To reprint only a specific page, select Pages and enter the page number you want to print. To specifymultiple pages, enter the page numbers by separating them with commas or by entering a hyphenbetween the page numbers.
Note You can also specify the print range by clicking the pages in the settings preview.
5. Complete the setupClick OK on the Page Setup tab.When you execute print, the document will be divided into several pages during printing.
Printing Only Specific PagesIf ink becomes faint or runs out during printing, you can reprint only the specific pages by following theprocedure below:
1. Set the print rangeIn the settings preview on the left of the Page Setup tab, click the pages that do not need to beprinted.The pages that were clicked are deleted, and only the pages to be printed are displayed.

Note Click the deleted pages to display them again. Right-click the settings preview to select Print all pages or Delete all pages.
2. Complete the setupAfter completing the page selection, click OK.When you execute print, only specified pages will be printed.
Important Since tiling/poster printing enlarges the document when printing it, the print results may become
coarse.
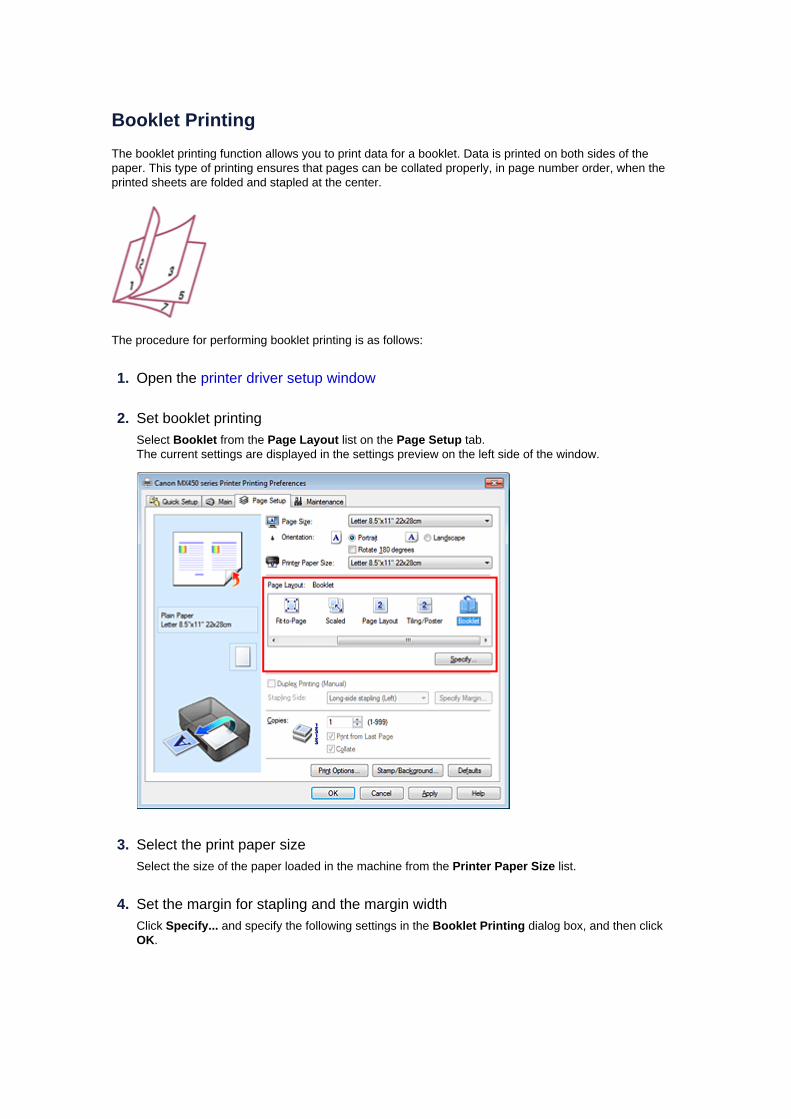
Booklet PrintingThe booklet printing function allows you to print data for a booklet. Data is printed on both sides of thepaper. This type of printing ensures that pages can be collated properly, in page number order, when theprinted sheets are folded and stapled at the center.
The procedure for performing booklet printing is as follows:
1. Open the printer driver setup window
2. Set booklet printingSelect Booklet from the Page Layout list on the Page Setup tab.The current settings are displayed in the settings preview on the left side of the window.
3. Select the print paper sizeSelect the size of the paper loaded in the machine from the Printer Paper Size list.
4. Set the margin for stapling and the margin widthClick Specify... and specify the following settings in the Booklet Printing dialog box, and then clickOK.

Margin for staplingSelect which side should the stapling margin be on when the booklet is completed.
Insert blank pageTo leave one side of a sheet blank, check the check box, and select the page to be left blank.
MarginEnter the margin width. The specified width from the center of the sheet becomes the margin width forone page.
Page BorderTo print a page border around each document page, check the check box.
5. Complete the setupClick OK on the Page Setup tab.When you execute print, the document will be printed on one side of a sheet of paper. When theprinting of one side is complete, set the paper correctly by following the message and click OK.When the printing of the other side is complete, fold the paper at the center of the margin and make abooklet.
Important Booklet cannot be selected when a media type other than Plain Paper is selected for Media Type
on the Main tab.
Note The stamp and background are not printed on the inserted blank sheets with the Insert blank page
function of booklet printing.

Duplex Printing
The procedure for printing data on both sides of a sheet of paper is as follows:You can also set duplex printing in Additional Features on the Quick Setup tab.
1. Open the printer driver setup window
2. Set duplex printingCheck the Duplex Printing (Manual) check box on the Page Setup tab.
3. Select the layoutSelect Normal-size, Fit-to-Page, Scaled, or Page Layout from the Page Layout list.
4. Specify the side to be stapledThe best Stapling Side is selected automatically from the Orientation and Page Layout settings. Tochange the setting, select another stapling side from the list.
5. Set the margin widthIf necessary, click Specify Margin... and set the margin width, and then click OK.
6. Complete the setupClick OK on the Page Setup tab.

When you execute print, the document is first printed on one side of a sheet of paper. After one side isprinted, reload the paper correctly according to the message.Then click Start Printing to print the opposite side.
Important When a media type other than Plain Paper is selected from Media Type on the Main tab, Duplex
Printing (Manual) appears grayed out and is unavailable. When Borderless, Tiling/Poster or Booklet is selected from the Page Layout list, Duplex Printing
(Manual) and Stapling Side appear grayed out and are unavailable.
Note If the back side of the paper becomes smudged during duplex printing, perform Bottom Plate
Cleaning in the Maintenance tab.
Related Topics Cleaning Inside the Machine Changing the Machine Operation Mode

Stamp/Background PrintingStamp or Background may be unavailable when certain printer drivers or operating environments areused.The Stamp function allows you to print a stamp text or a bitmap over or behind document data. It alsoallows you to print date, time and user name. The Background function allows you to print a lightillustration behind the document data.
The procedure for performing stamp/background printing is as follows:
Printing a Stamp"CONFIDENTIAL," "IMPORTANT," and other stamps that are used often in companies are pre-registered.
1. Open the printer driver setup window
2. Click Stamp/Background... (Stamp...) on the Page Setup tab
The Stamp/Background (Stamp) dialog box opens.
Note With the XPS printer driver, the Stamp/Background... button has become the Stamp... button
and only the stamp function can be used.

3. Select a stampCheck the Stamp check box, and select the stamp to be used from the list.The current settings are displayed in the settings preview on the left side of the Page Setup tab.
4. Set the stamp detailsIf necessary, specify the following settings, and then click OK.
Define Stamp... buttonTo change the stamp text, bitmap, or position, click this (see "Registering a Stamp").
Place stamp over textTo print the stamp on the front of the document, check this check box.
Note The stamp is given priority because the stamp is printed over the document data in the sections
where the stamp and the document data overlap. When this check box is unchecked, the stamp isprinted behind the document data and may be hidden in the overlapping sections depending onthe application software used. Place stamp over text cannot be used when the XPS printer driver is used.
When the XPS printer driver is used, the stamp is normally printed in the foreground of thedocument.
Print semitransparent stampCheck this check box to print a semi-transparent stamp on the document.This function is available only when the XPS printer driver is used.
Stamp first page onlyTo print the stamp only on the first page, check this check box.
5. Complete the setupClick OK on the Page Setup tab.When you execute print, the data is printed with the specified stamp.
Printing a BackgroundTwo bitmap files are pre-registered as samples.
1. Open the printer driver setup window
2. Click Stamp/Background... on the Page Setup tabThe Stamp/Background dialog box opens.
3. Select the backgroundCheck the Background check box, and select the background to be used from the list.The current settings are displayed in the settings preview on the left side of the Page Setup tab.
4. Set the background detailsIf necessary, complete the following settings, and then click OK.
Select Background... buttonTo use another background or change the layout or density of a background, click this (see"Registering Image Data to be Used as a Background").
Background first page onlyTo print the background only on the first page, check this check box.
5. Complete the setupClick OK on the Page Setup tab.When you execute print, the data is printed with the specified background.

Important When Borderless is selected, the Stamp/Background... (Stamp...) button appears grayed out and
is unavailable.
Note The stamp and background are not printed on blank sheets inserted with the Insert blank page
function of booklet printing.
Related Topics Registering a Stamp Registering Image Data to be Used as a Background

Registering a StampThis feature may be unavailable when certain printer drivers or operating environments are used.You can create and register a new stamp. You can also change and re-register some of the settings of anexisting stamp. Unnecessary stamps can be deleted at any time.
The procedure for registering a new stamp is as follows:
Registering a New Stamp
1. Open the printer driver setup window
2. Click Stamp/Background... (Stamp...) on the Page Setup tab
The Stamp/Background (Stamp) dialog box opens.
Note With the XPS printer driver, the Stamp/Background... button has become the Stamp... button
and only the stamp function can be used.
3. Click Define Stamp...The Stamp Settings dialog box opens.

4. Configure the stamp while viewing the preview window
• Stamp tabSelect Text, Bitmap, or Date/Time/User Name that matches your purpose for Stamp Type.
• For Text registration, the characters must already be entered in Stamp Text. If necessary,change the TrueType Font, Style, Size, and Outline settings. You can select the color of thestamp by clicking Select Color....
• For Bitmap, click Select File... and select the bitmap file (.bmp) to be used. If necessary,change the settings of the Size and Transparent white area.
• For Date/Time/User Name, the creation date/time and user name of the printed object aredisplayed in Stamp Text. If necessary, change the settings of TrueType Font, Style, Size, andOutline. You can select the color of the stamp by clicking Select Color....
Important Stamp Text appears grayed out and is unavailable when Date/Time/User Name is selected.
• Placement tabSelect the stamp position from the Position list. You can also select Custom from the Position listand specify coordinates for X-Position and Y-Position.You can also change the stamp position by dragging the stamp in the preview window.To change the stamp position angle, type a value in the Orientation box directly.
Important Orientation cannot be changed when Bitmap is selected for Stamp Type on the Stamp tab.
5. Save the stampClick the Save settings tab and enter a title in the Title box, and then click Save.Click OK when the confirmation message appears.
Note Spaces, tabs, and returns cannot be entered at the beginning or end of a title.
6. Complete the setupClick OK. The Stamp/Background (Stamp) dialog box opens again.The registered title appears in the Stamp list.

Changing and Registering Some of Stamp Settings
1. Select the stamp for which the settings are to be changedSelect the Stamp check box in the Stamp/Background (Stamp) dialog box. Then from the list, selectthe title of the stamp to be changed.
2. Click Define Stamp...The Stamp Settings dialog box opens.
3. Configure the stamp while viewing the preview window
4. Overwrite save the stampClick Save overwrite on the Save settings tab.When you want to save the stamp with a different title, type a new title in the Title box and click Save.Click OK when the confirmation message appears.
5. Complete the setupClick OK. The Stamp/Background (Stamp) dialog box opens again.The registered title appears in the Stamp list.
Deleting an Unnecessary Stamp
1. Click Define Stamp... in the Stamp/Background (Stamp) dialog boxThe Stamp Settings dialog box opens.
2. Select the stamp to be deletedSelect the title of the stamp you want to delete from the Stamps list on the Save settings tab. Thenclick Delete.Click OK when the confirmation message appears.
3. Complete the setupClick OK. The Stamp/Background (Stamp) dialog box opens again.

Registering Image Data to be Used as a BackgroundThis feature may be unavailable when certain printer drivers or operating environments are used.You can select a bitmap file (.bmp) and register it as a new background. You can also change and registersome of the settings of an existing background. An unnecessary background can be deleted.
The procedure for registering image data to be used as a background is as follows:
Registering New Background
1. Open the printer driver setup window
2. Click Stamp/Background... on the Page Setup tab
The Stamp/Background dialog box opens.
Note With the XPS printer driver, the Stamp/Background... button has become the Stamp... button
and Background cannot be used.
3. Click Select Background...The Background Settings dialog box opens.

4. Select the image data to be registered to the backgroundClick Select File.... Select the target bitmap file (.bmp), and then click Open.
5. Specify the following settings while viewing the preview window
Layout MethodSelect how the background image data is to be placed.When Custom is selected, you can set coordinates for X-Position and Y-Position.You can also change the background position by dragging the image in the preview window.
IntensitySet the intensity of the background image data with the Intensity slider. Moving the slider to the rightdarkens the background, and moving the slider to the left lightens the background. To print thebackground at the original bitmap intensity, move the slider to the rightmost position.
6. Save the backgroundClick the Save settings tab and enter a title in the Title box, and then click Save.Click OK when the confirmation message appears.
Note Spaces, tabs, and returns cannot be entered at the beginning or end of a title.
7. Complete the setupClick OK, then it returns to Stamp/Background dialog box.The registered title appears in the Background list.
Changing and Registering Some Background Settings
1. Select the background for which the settings are to be changedSelect the Background check box in the Stamp/Background dialog box. Then from the list, selectthe title of the background you want to change.
2. Click Select Background...The Background Settings dialog box opens.
3. Specify each item on the Background tab while viewing the preview window
4. Save the background

Click Save overwrite on the Save settings tab. When you want to save the background with adifferent title, enter a new title in the Title box and click Save.Click OK when the confirmation message appears.
5. Complete the setupClick OK, then it returns to Stamp/Background dialog box.The registered title appears in the Background list.
Deleting an Unnecessary Background
1. Click Select Background... in the Stamp/Background dialog boxThe Background Settings dialog box opens.
2. Select the background to be deletedSelect the title of the background you want to delete from the Backgrounds list on the Save settingstab, and then click Delete.Click OK when the confirmation message appears.
3. Complete the setupClick OK, then it returns to Stamp/Background dialog box.

Setting Up Envelope PrintingIf you are using the XPS printer driver, replace "Canon IJ Status Monitor" with "Canon IJ XPS StatusMonitor" when reading this information.For details on how to load an envelope into the machine, refer to "Loading Paper."The procedure for performing envelope printing is as follows:
1. Open the printer driver setup window
2. Select the media typeSelect Envelope from Commonly Used Settings on the Quick Setup tab.
3. Select the paper sizeWhen the Envelope Size Setting dialog box is displayed, select Comm. Env. #10, DL Env., Youkei 4105x235mm, or Youkei 6 98x190mm, and then click OK.
4. Set the orientationTo print the addressee horizontally, select Landscape for Orientation.
5. Select the print qualitySelect High or Standard that matches your purpose for Print Quality.
6. Complete the setupClick OK.When you execute print, the information is printed on the envelope.
Important

When you execute envelope printing, guide messages are displayed.To hide the guide messages, check the Do not show this message again check box.To show the guide again, click the View Printer Status... button on the Maintenance tab, and startthe Canon IJ Status Monitor.Then click Envelope Printing from Display Guide Message of the Option menu to enable thesetting.

Printing on PostcardsFor details about loading postcards into this machine, see "Loading Paper."This section describes the procedure for postcard printing.
1. Open the printer driver setup window
2. Select commonly used settingsDisplay the Quick Setup tab, and for Commonly Used Settings, select Standard.
3. Select the media typeFor Media Type, select Hagaki A, Ink Jet Hagaki, Hagaki K, or Hagaki.
Important This machine cannot print on postcards that have photos or stickers attached. When printing on each side of a postcard separately, you will get cleaner printing if you print the
message side first and then print the address side.
4. Select the paper sizeFor Printer Paper Size, select Hagaki 100x148mm or Hagaki 2 200x148mm.
Important Return postcards can be used only when you print them from the computer. When printing a return postcard, always set the paper size to Hagaki 2 200x148mm from your
application software or the printer driver. Do not fold the return postcard. If a crease is formed, the machine will not be able to feed the
postcard properly, and this condition will cause line shifts or a paper jam. With return postcards, borderless printing cannot be used.
5. Set the print orientationTo print the address horizontally, set Orientation to Landscape.
6. Select the print qualityFor Print Quality, select High or Standard, whichever best suits the purpose.
7. Complete the setupClick OK.When you execute printing, the data will be printed onto the postcard.
Important When you execute postcard printing, a guide message is displayed.
When the guide message is displayed, select Do not show this message again if you do not wantany guide messages to be displayed.To display guide messages again, open the Maintenance tab and click View Printer Status... to startthe Canon IJ status monitor.On the Option menu, choose Display Guide Message and click Hagaki Printing to enable thesetting. When printing on media other than postcards, load the media according to usage method of that
media, and click Start Printing.

Displaying the Print Results before PrintingIf you are using the XPS printer driver, replace "Canon IJ Preview" with "Canon IJ XPS Preview" whenreading this information.You can display and check the print result before printing.
The procedure for displaying the print result before printing is as follows:You can also set the print results display on the Quick Setup tab.
1. Open the printer driver setup window
2. Set the previewCheck the Preview before printing check box on the Main tab.
3. Complete the setupClick OK.When you execute print, the Canon IJ Preview opens and displays the print results.
Important In the Manual Color Adjustment dialog box, the Color Adjustment tab contains the Print a
pattern for color adjustment check box. When this check box is selected, the Preview beforeprinting appears grayed out and is unavailable.
Related Topic Canon IJ Preview

Setting Paper Dimensions (Custom Size)You can specify the height and width of paper when its size cannot be selected from the Page Size. Such apaper size is called "custom size."
The procedure for specifying a custom size is as follows:You can also set a custom size in Printer Paper Size on the Quick Setup tab.
1. Set the custom size in the application softwareSpecify the custom size in the paper size setting of your application software.
Important When the application software that created the document has a function for specifying the height
and width values, use the application software to set the values. When the application softwaredoes not have such a function or if the document does not print correctly, use the printer driver toset the values.
2. Open the printer driver setup window
3. Select the paper sizeSelect Custom... for Page Size on the Page Setup tab.
The Custom Paper Size dialog box opens.
4. Set the custom paper sizeSpecify Units, and enter the Width and Height of the paper to be used. Then click OK.

5. Complete the setupClick OK on the Page Setup tab.When you execute print, the data is printed with the specified paper size.

Editing the Print Document or Reprinting from the Print HistoryThis function is unavailable when the standard IJ printer driver is used.In the Canon IJ XPS preview window, you can edit the print document or retrieve the document print historyto print the document.
The procedure for using the Canon IJ XPS Preview is as follows:
Combine Documents
Delete Document
Reset Documents
View Thumbnails
Move Document
Undo
Move Page
Delete Page
Note
Click View Thumbnails to view all print pages of the print document selected from theDocument Name list.
To hide the print pages, click View Thumbnails again. Clicking Undo reverses the change that just performed.
Editing and Printing a Print DocumentWhen printing multiple documents or pages, you can combine documents, change the print sequence ofthe documents or pages, or delete documents or pages.

1. Open the printer driver setup window
2. Set the previewCheck the Preview before printing check box on the Main tab.
3. Complete the setupClick OK.The Canon IJ XPS Preview will start and the print result will be displayed before printing.
4. Editing print documents and print pages
• Combining print documentsYou can combine multiple print documents to form a single document.To select multiple print documents, hold down the Ctrl key and click the documents to be merged,or hold down the Shift key and press the upper arrow or lower arrow key.You can also click a blank area in the document list and drag the mouse to select multipledocuments.By combining print documents, you can prevent blank pages from being inserted when you executeduplex printing or page layout printing.From the Document Name list, select the documents to be combined. On the Edit menu, selectCombine Documents from Documents to combine the documents in the listed sequence. Whenyou combine documents, the documents selected before the combining are deleted from the listand the combined document is added to the list.
• Changing the sequence of print documents or print pages
• To change the sequence of the print documents, go to the Document Name list, and select theprint document to be moved. Next, on the Edit menu, select Move Document fromDocuments, and select the appropriate item. You can also click and drag a print document tochange the print sequence.
• To change the sequence of the print pages, click View Thumbnails from the Option menu, andselect the print page to be moved. Next, on the Edit menu, select Move Page from Pages, andselect the appropriate item. You can also click and drag a print page to change the printsequence.
• Deleting print documents and print pages
• To delete a print document, select the target document from the Document Name list, and onthe Edit menu, choose Documents and then Delete Document.
• To delete a print page, click View Thumbnails from the Option menu, and select the print pageto be deleted. Next, on the Edit menu, select Delete Page from Pages.
• Print page recoveryYou can recover pages that were deleted with Delete Page.To recover pages, select the View Deleted Pages check box from the Option menu, and selectthe pages to be recovered from among the displayed thumbnail pages. Then from the Edit menuchose Pages and then Restore Page.
After editing the print documents or print pages, you can change the print settings on the PageInformation, Layout and Manual Color Adjustment tabs as necessary.
Important To display the multiple documents in the list, open the preview and execute print again. To return the print documents to their original condition before they were edited in the preview,
on the Edit menu, select Reset Documents from Documents. If the documents to be combined have different print settings, a message may be displayed.
Check the contents of the displayed message before combining the documents. If the documents to be combined have different output paper sizes and duplex printing or page
layout printing is to be performed, the printer may not produce the expected print results forcertain print pages.Check the preview before printing. Depending on the print settings of the print document, some functions may not be available in
the Canon IJ XPS preview.

Note You can rename Document Name to any name.
5. Executing printClick Print.When you execute print, the printer uses the specified settings to print the data.
Reprinting from the Print HistoryWhen you click Save Print History on the File menu to enable the setting, the document printed from thepreview is saved, and you can reprint the document with the same settings.
1. Displaying the print historySelect the Start menu -> All Programs -> "Your model name" -> View Print History XPS.The saved print document is displayed in the preview.
Important To limit the number of print history registrations, click History Entry Limit on the File menu. If the limit on the number of registration is exceeded, the print history registrations are deleted
starting from the oldest one.
2. Selecting a print documentFrom the Document Name list, select the document to be printed.
3. Executing printClick Print.
Related Topic Displaying the Print Results before Printing

Changing the Print Quality and Correcting Image Data Main Tab Setting the Print Quality Level (Custom) Printing a Color Document in Monochrome Specifying Color Correction Optimal Photo Printing of Image Data Adjusting Colors with the Printer Driver Printing with ICC Profiles Adjusting Color Balance Adjusting Color Balance Using Sample Patterns (Printer Driver) Adjusting Brightness Adjusting Intensity Adjusting Contrast Adjusting Intensity/Contrast Using Sample Patterns (Printer Driver)
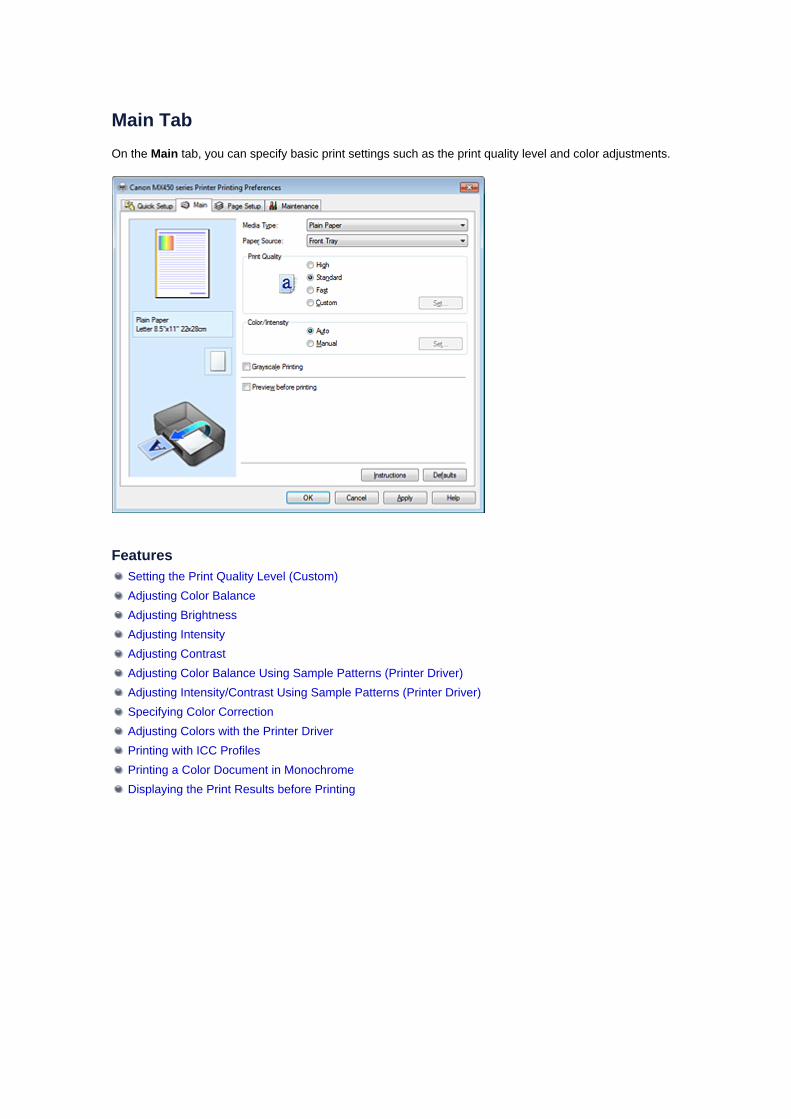
Main TabOn the Main tab, you can specify basic print settings such as the print quality level and color adjustments.
Features Setting the Print Quality Level (Custom) Adjusting Color Balance Adjusting Brightness Adjusting Intensity Adjusting Contrast Adjusting Color Balance Using Sample Patterns (Printer Driver) Adjusting Intensity/Contrast Using Sample Patterns (Printer Driver) Specifying Color Correction Adjusting Colors with the Printer Driver Printing with ICC Profiles Printing a Color Document in Monochrome Displaying the Print Results before Printing

Setting the Print Quality Level (Custom)The print quality level can be set in the Custom.
The procedure for setting the print quality level is as follows:
1. Open the printer driver setup window
2. Select the print qualityOn the Main tab, select Custom for Print Quality, and click Set....
The Custom dialog box opens.
3. Setting the print quality levelDrag the slider bar to select the print quality level and click OK.
4. Complete the setupClick OK on the Main tab.When you execute print, the image data is printed with the selected print quality level.
Important Certain print quality levels cannot be selected depending on the settings of Media Type.
Related Topics Specifying Color Correction

Adjusting Color Balance Adjusting Brightness Adjusting Intensity Adjusting Contrast

Printing a Color Document in Monochrome
The procedure for printing a color document in monochrome is as follows:You can also set a grayscale printing in Additional Features on the Quick Setup tab.
1. Open the printer driver setup window
2. Set grayscale printingCheck the Grayscale Printing check box on the Main tab.
3. Complete the setupClick OK.When you execute print, the document is converted to grayscale data. It allows you to print the colordocument in monochrome.
Important When the Grayscale Printing check box is checked, the printer driver processes image data as
sRGB data. In this case, actual colors printed may differ from those in the original image data.When using the grayscale printing function to print Adobe RGB data, convert the data to sRGB datausing an application software.
Note During Grayscale Printing, color inks may be used as well as black ink.

Specifying Color CorrectionYou can specify the color correction method suited to the type of document to be printed.Normally, the printer driver adjusts the colors by using Canon Digital Photo Color so that data is printedwith color tints that most people prefer. This method is suitable for printing sRGB data.When you want to print by using the color space (Adobe RGB or sRGB) of the image data effectively,select ICM (ICC Profile Matching). When you want to use an application software to specify a printing ICCprofile, select None.
The procedure for specifying color correction is as follows:You can also set color correction on the Quick Setup tab by choosing Photo Printing under CommonlyUsed Settings, and then choosing Color/Intensity Manual Adjustment under Additional Features.
1. Open the printer driver setup window
2. Select the manual color adjustmentOn the Main tab, select Manual for Color/Intensity, and click Set....
The Manual Color Adjustment dialog box opens.
3. Select color correctionClick Matching tab, select Color Correction setting that matches your purpose from the following,and click OK.

Driver MatchingWith Canon Digital Photo Color, you can print sRGB data with color tints that most people prefer.
ICM (ICC Profile Matching)Adjusts the colors by using an ICC profile when printing.Specify the input profile to be used.
NoneThe printer driver does not perform color correction. Select this value when you are specifying anindividually created printing ICC profile in an application software to print data.
4. Complete the setupClick OK on the Main tab.When you execute print, the document data is printed with the specified color correction.
Important When ICM is disabled in the application software, ICM is unavailable for Color Correction and the
printer may not be able to print the image data properly. When the Grayscale Printing check box on the Main tab is checked, Color Correction appears
grayed out and is unavailable.
Related Topics Optimal Photo Printing of Image Data Adjusting Colors with the Printer Driver Printing with ICC Profiles

Optimal Photo Printing of Image DataWhen people print images taken with digital cameras, they sometimes feel that the printed color tones differfrom those of actual image or those displayed on the monitor.To get the print results as close as possible to the desired color tones, you must select a printing methodthat is best suited to the application software used or to your purpose.
Color ManagementDevices such as digital cameras, scanners, monitors, and printers handle color differently. Colormanagement (color matching) is a method that manages device-dependent "colors" as a common colorspace.For Windows, a color management system called "ICM" is built into the operating system.Adobe RGB and sRGB are popularly used as common color spaces. Adobe RGB has a wider color spacethan sRGB.ICC profiles convert device-dependent "colors" into a common color space. By using an ICC profile andcarrying out color management, you can draw out the color space of the image data within the colorreproduction area that the printer can express.
Selecting a Printing Method Suited to the Image DataThe recommended printing method depends on the color space (Adobe RGB or sRGB) of the image dataor the application software to be used.There are two typical printing methods.Check the color space (Adobe RGB or sRGB) of the image data and the application software to be used,and then select the printing method suited to your purpose.
Adjusting Colors with the Printer DriverDescribes the procedure for printing sRGB data by using the color correction function of the printer driver.
• To print using Canon Digital Photo ColorThe printer prints data with color tints that most people prefer, reproducing colors of the original imagedata and producing three-dimensional effects and high, sharp contrasts.
• To print by directly applying editing and touch-up results of an application softwareWhen printing the data, the printer brings out subtle color difference between dark and light areas, whileleaving the darkest and lightest areas intact.When printing the data, the printer applies fine adjustment results, such as brightness adjustments madewith an application software.
Printing with ICC ProfilesDescribes the procedure for printing by using the color space of Adobe RGB or sRGB effectively.You can print with a common color space by setting up the application software and the printer driver sothat the color management matches the input ICC profile of the image data.The method for setting up the printer driver differs depending on the application software to be used.

Adjusting Colors with the Printer DriverYou can specify the color correction function of the printer driver to print sRGB data with color tints thatmost people prefer through the use of Canon Digital Photo Color.When printing from an application software that can identify ICC profiles and allows you to specify them,use a printing ICC profile in the application software, and select settings for color management.
The procedure for adjusting colors with the printer driver is as follows:
1. Open the printer driver setup window
2. Select the manual color adjustmentOn the Main tab, select Manual for Color/Intensity, and click Set....The Manual Color Adjustment dialog box opens.
3. Select color correctionClick Matching tab, and select Driver Matching for Color Correction.
4. Set the other itemsIf necessary, click Color Adjustment tab, and adjust the color balance (Cyan, Magenta, Yellow) andadjust Brightness, Intensity, and Contrast settings, and then click OK.
5. Complete the setupClick OK on the Main tab.When you execute print, the printer driver adjusts the colors when printing the data.
Related Topics Setting the Print Quality Level (Custom) Specifying Color Correction Adjusting Color Balance Adjusting Brightness Adjusting Intensity Adjusting Contrast

Printing with ICC ProfilesWhen the image data has a specified input ICC profile, you can print by using the color space (Adobe RGBor sRGB) of the data effectively.
The printer driver setting procedure varies depending on the application software used to print.
Specify an ICC Profile from the Application Software and Print the DataWhen you print the editing and touch-up results of Adobe Photoshop, Canon Digital Photo Professional, orany application software that allows you to specify input and printing ICC profiles, you print by effectivelyusing the color space of the input ICC profile specified in the image data.To use this printing method, use your application software to select color management items and specifyan input ICC profile and a printing ICC profile in the image data.Even if you print using a printing ICC profile that you created yourself from your application software, besure to select color management items from your application software.For instructions, refer to the manual of the application software you are using.
1. Open the printer driver setup window
2. Select the manual color adjustmentOn the Main tab, select Manual for Color/Intensity, and click Set....The Manual Color Adjustment dialog box opens.
3. Select color correctionClick Matching tab, and select None for Color Correction.
4. Set the other itemsIf necessary, click Color Adjustment tab, and adjust the color balance (Cyan, Magenta, Yellow) andadjust Brightness, Intensity, and Contrast settings, and then click OK.
5. Complete the setupClick OK on the Main tab.When you execute print, the machine uses the color space of the image data.

Specify an ICC Profile with the Printer Driver, and then PrintPrint from an application software that cannot identify input ICC profiles or does allow you to specify one byusing the color space of the input ICC profile (sRGB) found in the data. When printing Adobe RGB data,you can print the data with the Adobe RGB color space even if the application software does not supportAdobe RGB.
1. Open the printer driver setup window
2. Select the manual color adjustmentOn the Main tab, select Manual for Color/Intensity, and click Set....The Manual Color Adjustment dialog box opens.
3. Select color correctionClick Matching tab, and select ICM (ICC Profile Matching) for Color Correction.
4. Select the input profileSelect an Input Profile that matches the color space of the image data.
• For sRGB data or data without an input ICC profile:Select Standard.
• For Adobe RGB data:Select Adobe RGB (1998).
Important When the application software specifies an input profile, the input profile setting of the printer
driver becomes invalid. When no input ICC profiles are installed on your computer, Adobe RGB (1998) will not be
displayed.
5. Set the other itemsIf necessary, click Color Adjustment tab, and adjust the color balance (Cyan, Magenta, Yellow) andadjust Brightness, Intensity, and Contrast settings, and then click OK.
6. Complete the setupClick OK on the Main tab.When you execute print, the machine uses the color space of the image data.

Related Topics Setting the Print Quality Level (Custom) Specifying Color Correction Adjusting Color Balance Adjusting Brightness Adjusting Intensity Adjusting Contrast

Adjusting Color BalanceYou can adjust the color tints when printing.Since this function adjusts color balance of the output by changing the ink ratios of each color, it changesthe total color balance of the document. Use the application software when you want to change the colorbalance significantly. Use the printer driver only when you want to adjust the color balance slightly.The following sample shows the case when color balance is used to intensify cyan and to diminish yellowso that the overall colors are more uniform.
No adjustment Adjust color balance
The procedure for adjusting color balance is as follows:You can also set color balance on the Quick Setup tab by choosing Photo Printing under CommonlyUsed Settings, and then choosing Color/Intensity Manual Adjustment under Additional Features.
1. Open the printer driver setup window
2. Select the manual color adjustmentOn the Main tab, select Manual for Color/Intensity, and click Set....
The Manual Color Adjustment dialog box opens.
3. Adjust color balanceThere are individual sliders for Cyan, Magenta, and Yellow. Each color becomes stronger when thecorresponding slider is moved to the right, and becomes weaker when the corresponding slider ismoved to the left. For example, when cyan becomes weaker, the color red becomes stronger.
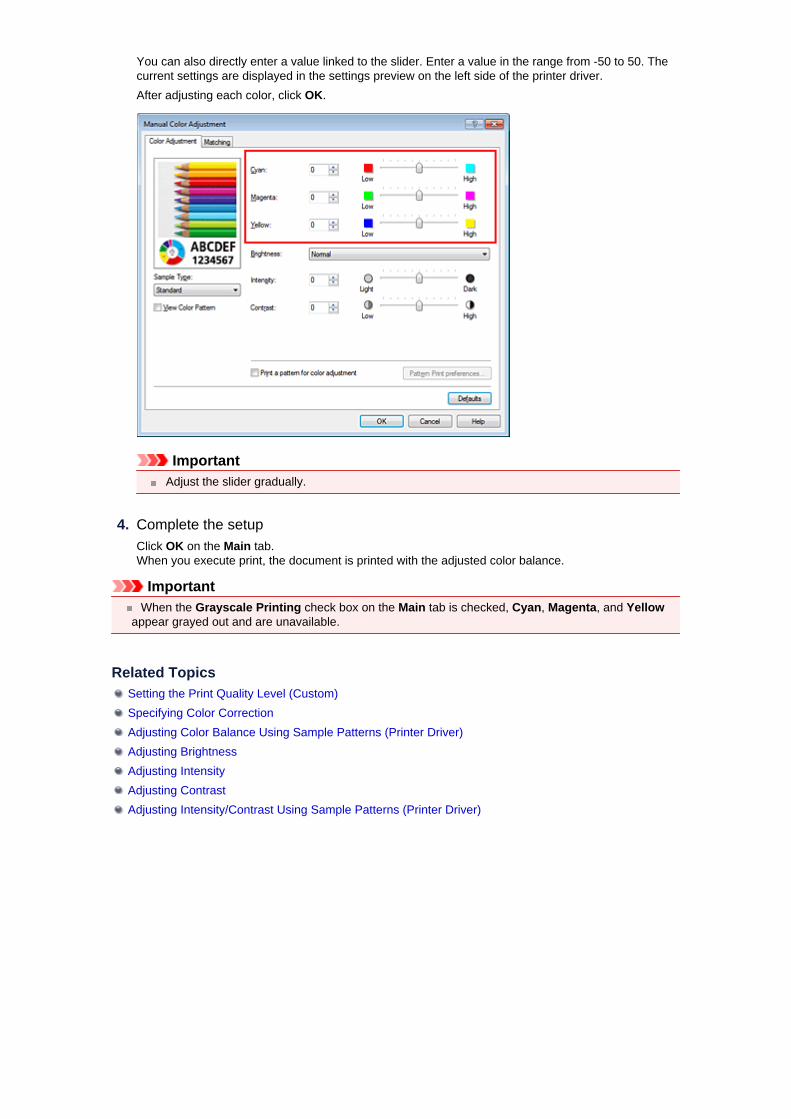
You can also directly enter a value linked to the slider. Enter a value in the range from -50 to 50. Thecurrent settings are displayed in the settings preview on the left side of the printer driver.After adjusting each color, click OK.
Important Adjust the slider gradually.
4. Complete the setupClick OK on the Main tab.When you execute print, the document is printed with the adjusted color balance.
Important When the Grayscale Printing check box on the Main tab is checked, Cyan, Magenta, and Yellow
appear grayed out and are unavailable.
Related Topics Setting the Print Quality Level (Custom) Specifying Color Correction Adjusting Color Balance Using Sample Patterns (Printer Driver) Adjusting Brightness Adjusting Intensity Adjusting Contrast Adjusting Intensity/Contrast Using Sample Patterns (Printer Driver)

Adjusting Color Balance Using Sample Patterns (Printer Driver)You can look at the print results of pattern print and adjust the color balance.When you change the color balance or intensity/contrast of a document, the pattern print function prints theadjustment results in a list, together with the adjustment values.
Described below is the procedure for adjusting the color balance while looking at the pattern.
1. Open the printer driver setup window
2. Select the manual color adjustmentOn the Main tab, select Manual for Color/Intensity, and click Set....
The Manual Color Adjustment dialog box opens.
3. Selecting pattern printOn the Color Adjustment tab, select the Print a pattern for color adjustment check box, and clickPattern Print preferences....

4. Setting pattern printWhen the Pattern Print dialog box opens, set the following items, and then click OK.
Parameters to AdjustSelect Cyan/Magenta/Yellow.
Important When the Grayscale Printing check box on the Main tab is checked, Cyan/Magenta/Yellow
appear grayed out and are unavailable.
Printer Paper SizeSelect the paper size to be used for pattern printing.
Note Depending on the paper size selected on the Page Setup tab, there may be sizes that cannot
be selected.
Amount of Pattern InstancesSelect Largest, Large, or Small to set the number of patterns to be printed.
Note Largest and Large cannot be selected when certain paper sizes or output paper sizes are
selected.
Color Variation Between InstancesSet the amount of color change between neighboring patterns.
Note Large is about double the size of Medium, and Small is about half the size of Medium.
5. Checking the print results of pattern print

On the Color Adjustment tab, select OK to close the Manual Color Adjustment dialog box.On the Main tab, select OK, and then execute printing. The machine then prints a pattern in which thecolor balance that you set is the center value.
Important Normally, patterns are printed with the color balance settings as the center values. However,
when Black Only is selected for Ink Cartridge Settings on the Maintenance tab, the colorbalance settings are not applied to pattern printing.
6. Adjusting the color balanceLook at the print results and select the image that you like best. Then enter the color balance numbersindicated at the bottom of that image into the Cyan, Magenta, and Yellow fields on the ColorAdjustment tab.Clear the Print a pattern for color adjustment check box, and click OK.
Note

You can also set color balance on the Quick Setup tab by choosing Photo Printing underCommonly Used Settings, and then choosing Color/Intensity Manual Adjustment underAdditional Features.
7. Complete the setupClick OK on the Main tab.Then when you execute printing, the document is printed with the color balance that was adjusted bythe pattern print function.
Important When Print a pattern for color adjustment is selected on the Color Adjustment tab, the following
items are grayed out and cannot be set: Preview before printing on the Main tab Stapling Side and Specify Margin... on the Page Setup tab (When Duplex Printing (Manual) is
set, only Stapling Side can be set.) You can print a pattern only if the Page Layout setting on the Page Setup tab is Normal-size or
Borderless. When the Grayscale Printing check box on the Main tab is checked, Cyan, Magenta, and Yellow
appear grayed out and are unavailable. Depending on your application software, this function may not be available.
Related Topics Adjusting Color Balance Adjusting Intensity Adjusting Contrast Adjusting Intensity/Contrast Using Sample Patterns (Printer Driver)

Adjusting BrightnessYou can change the brightness of the overall image data during printing.This function does not change pure white or pure black but it changes the brightness of the intermediatecolors.The following sample shows the print result when the brightness setting is changed.
Light is selected Normal is selected Dark is selected
The procedure for adjusting brightness is as follows:You can also set brightness on the Quick Setup tab by choosing Photo Printing under Commonly UsedSettings, and then choosing Color/Intensity Manual Adjustment under Additional Features.
1. Open the printer driver setup window
2. Select the manual color adjustmentOn the Main tab, select Manual for Color/Intensity, and click Set....
The Manual Color Adjustment dialog box opens.
3. Specify the brightnessSelect Light, Normal, or Dark for Brightness, and click OK. The current settings are displayed in thesettings preview on the left side of the printer driver.

4. Complete the setupClick OK on the Main tab.When you execute print, the data is printed at the specified brightness.
Related Topics Setting the Print Quality Level (Custom) Specifying Color Correction Adjusting Color Balance Adjusting Intensity Adjusting Contrast

Adjusting IntensityYou can dilute (brighten) or intensify (darken) the colors of the overall image data during printing.The following sample shows the case when the intensity is increased so that all colors become moreintense when the image data is printed.
No adjustment Higher intensity
The procedure for adjusting intensity is as follows:You can also set intensity on the Quick Setup tab by choosing Photo Printing under Commonly UsedSettings, and then choosing Color/Intensity Manual Adjustment under Additional Features.
1. Open the printer driver setup window
2. Select the manual color adjustmentOn the Main tab, select Manual for Color/Intensity, and click Set....
The Manual Color Adjustment dialog box opens.
3. Adjust intensityMoving the Intensity slider to the right intensifies (darkens) the colors, and moving the slider to the leftdilutes (brightens) the colors.You can also directly enter a value linked to the slider. Enter a value in the range from -50 to 50. Thecurrent settings are displayed in the settings preview on the left side of the printer driver.After adjusting each color, click OK.
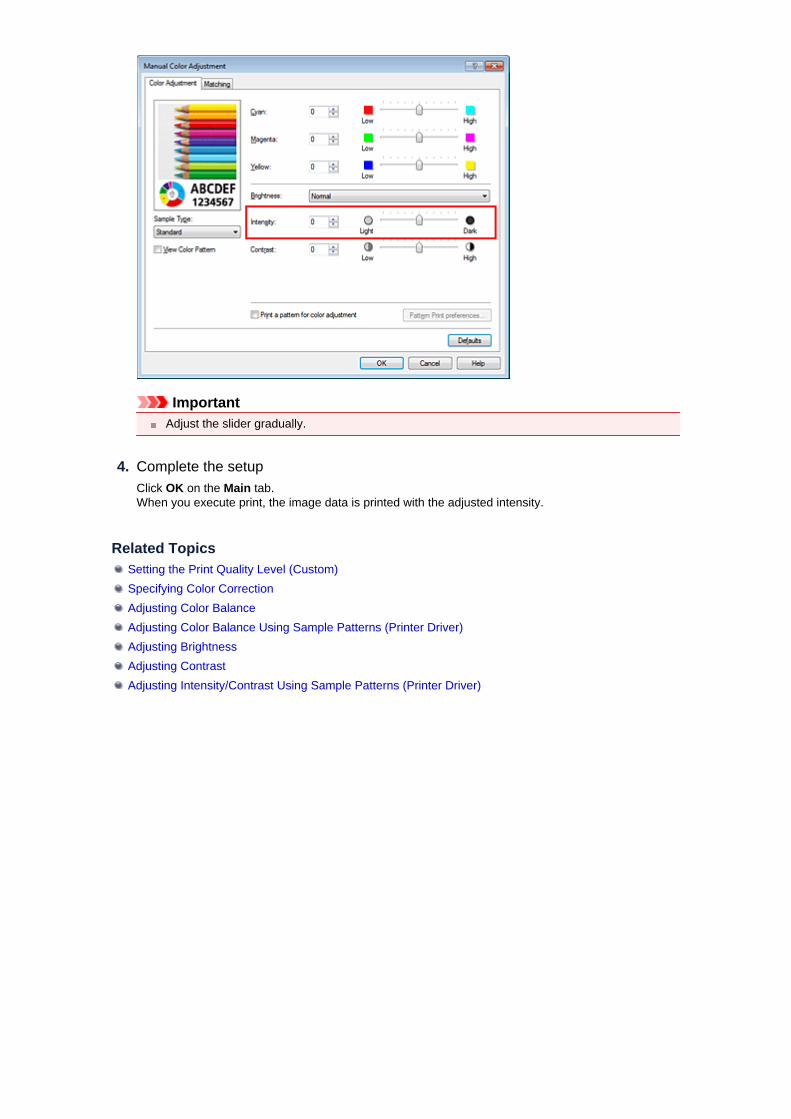
Important Adjust the slider gradually.
4. Complete the setupClick OK on the Main tab.When you execute print, the image data is printed with the adjusted intensity.
Related Topics Setting the Print Quality Level (Custom) Specifying Color Correction Adjusting Color Balance Adjusting Color Balance Using Sample Patterns (Printer Driver) Adjusting Brightness Adjusting Contrast Adjusting Intensity/Contrast Using Sample Patterns (Printer Driver)

Adjusting ContrastYou can adjust the image contrast during printing.To make the differences between the light and dark portions of images greater and more distinct, increasethe contrast. On the other hand, to make the differences between the light and dark portions of imagessmaller and less distinct, reduce the contrast.
No adjustment Adjust the contrast
The procedure for adjusting contrast is as follows:You can also set contrast on the Quick Setup tab by choosing Photo Printing under Commonly UsedSettings, and then choosing Color/Intensity Manual Adjustment under Additional Features.
1. Open the printer driver setup window
2. Select the manual color adjustmentOn the Main tab, select Manual for Color/Intensity, and click Set....
The Manual Color Adjustment dialog box opens.
3. Adjust the contrastMoving the Contrast slider to the right increases the contrast, and moving the slider to the leftdecreases the contrast.You can also directly enter a value linked to the slider. Enter a value in the range from -50 to 50. Thecurrent settings are displayed in the settings preview on the left side of the printer driver.After adjusting each color, click OK.

Important Adjust the slider gradually.
4. Complete the setupClick OK on the Main tab.When you execute print, the image is printed with the adjusted contrast.
Related Topics Setting the Print Quality Level (Custom) Specifying Color Correction Adjusting Color Balance Adjusting Color Balance Using Sample Patterns (Printer Driver) Adjusting Brightness Adjusting Intensity Adjusting Intensity/Contrast Using Sample Patterns (Printer Driver)

Adjusting Intensity/Contrast Using Sample Patterns (PrinterDriver)You can look at the print results of pattern print and adjust the intensity/contrast.When you change the color balance or intensity/contrast of a document, the pattern print function prints theadjustment results in a list, together with the adjustment values.
Described below is the procedure for adjusting the intensity/contrast while looking at the pattern.
1. Open the printer driver setup window
2. Select the manual color adjustmentOn the Main tab, select Manual for Color/Intensity, and click Set....
The Manual Color Adjustment dialog box opens.
3. Selecting pattern printOn the Color Adjustment tab, select the Print a pattern for color adjustment check box, and clickPattern Print preferences....

4. Setting pattern printWhen the Pattern Print dialog box opens, set the following items, and then click OK.
Parameters to AdjustSelect Intensity/Contrast.
Printer Paper SizeSelect the paper size to be used for pattern printing.
Note Depending on the paper size selected on the Page Setup tab, there may be sizes that cannot
be selected.
Amount of Pattern InstancesSelect Largest, Large, or Small to set the number of patterns to be printed.
Note Largest and Large cannot be selected when certain paper sizes or output paper sizes are
selected.
Color Variation Between InstancesSet the amount of color change between neighboring patterns.
Note Large is about double the size of Medium, and Small is about half the size of Medium.
5. Checking the print results of pattern printOn the Color Adjustment tab, select OK to close the Manual Color Adjustment dialog box.On the Main tab, select OK, and then execute printing. The machine then prints a pattern in which theintensity/contrast that you set is the center value.

6. Adjusting the intensity/contrastLook at the print results and select the image that you like best. Then enter the intensity/contrastnumbers indicated at the bottom of that image into the Intensity and Contrast fields on the ColorAdjustment tab.Clear the Print a pattern for color adjustment check box, and click OK.
Note You can also set intensity/contrast on the Quick Setup tab by choosing Photo Printing under
Commonly Used Settings, and then choosing Color/Intensity Manual Adjustment underAdditional Features.
7. Complete the setupClick OK on the Main tab.Then when you execute printing, the document is printed with the intensity/contrast that was adjustedby the pattern print function.

Important When Print a pattern for color adjustment is selected on the Color Adjustment tab, the following
items are grayed out and cannot be set: Preview before printing on the Main tab Stapling Side and Specify Margin... on the Page Setup tab (When Duplex Printing (Manual) is
set, only Stapling Side can be set.) You can print a pattern only if the Page Layout setting on the Page Setup tab is Normal-size or
Borderless. Depending on your application software, this function may not be available.
Related Topics Adjusting Color Balance Adjusting Color Balance Using Sample Patterns (Printer Driver) Adjusting Intensity Adjusting Contrast

Overview of the Printer Driver Canon IJ Printer Driver How to Open the Printer Driver Setup Window Maintenance Tab Canon IJ Status Monitor Checking the Ink Status from Your Computer Canon IJ Preview Deleting the Undesired Print Job Instructions for Use (Printer Driver)

Canon IJ Printer DriverThe Canon IJ printer driver (called printer driver below) is a software that is installed on your computer forprinting data with this machine.The printer driver converts the print data created by your application software into data that your printer canunderstand, and sends the converted data to the printer.Because different models support different print data formats, you need a printer driver for the specificmodel you are using.
Printer Driver TypesOn Windows Vista SP1 or later, you can install the XPS printer driver in addition to the regular printerdriver.The XPS printer driver is suited to print from an application software that supports XPS printing.
Important To use the XPS printer driver, the standard printer driver must already be installed on your computer.
Installing the Printer Driver• To install the regular printer driver, load the Setup CD-ROM that comes with the machine, and then
install the driver from Start Setup Again.
• To install the XPS printer driver, load the Setup CD-ROM that comes with the machine, and thenselect XPS Driver from Add Software.
Specifying the Printer DriverTo specify the printer driver, open the Print dialog box of the application software you are using, and select"XXX Printer" (where "XXX" is your model name) to specify the regular printer driver or select "XXX PrinterXPS" (where "XXX" is your model name) to specify the XPS printer driver.
How to Use Printer Driver HelpYou can display the Help function from the printer driver setup window.
• To view all descriptions of a tab...Click the Help button on each tab. A dialog box opens, displaying a description of each item on thetab.You can also click the link found in the description of an item to display a description of the linkeddialog box.
• To see a description for each item...Right-click the item you want to learn about and then click What's This?.Alternatively, when the Help button is found at the right end of the title bar, click that button, andthen click the item you want to learn about.A description of the item is displayed.
Related Topic How to Open the Printer Driver Setup Window

How to Open the Printer Driver Setup WindowThe printer driver setup window can be displayed through the application software in use or the Start menuof the Windows.
Open the Printer Driver Setup Window through the Application SoftwareFollow the procedure below to configure printing profile when printing.
1. Select the command that you perform printing on the application softwareIn general, select Print on the File menu to open the Print dialog box.
2. Select your model name and click Preferences (or Properties)The printer driver setup window appears.
Note Depending on application software you use, command names or menu names may vary and
there may be more steps. For details, refer to the user's manual of your application software.
Open the Printer Driver Setup Window through the Start MenuFollow the procedure below to perform machine maintenance operations such as print head cleaning, or toconfigure a printing profile that is common to all application software.
1. Select items from the Start menu as shown below:
• If you are using Windows 7, select the Start menu -> Devices and Printers.
• If you are using Windows Vista, select the Start menu -> Control Panel -> Hardware and Sound -> Printers.
• If you are using Windows XP, select the start menu -> Control Panel -> Printers and OtherHardware -> Printers and Faxes.
2. Right-click your model name icon, and then select Printing preferences from thedisplayed menuThe printer driver setup window appears.
Important Opening the printer driver setup window through Printer properties (Windows 7) or Properties
(Windows Vista, Windows XP) displays such tabs regarding the Windows functions as the Ports(or Advanced) tab. Those tabs do not appear when opening through Printing preferences orapplication software. For tabs regarding Windows functions, refer to the user's manual for theWindows.

Maintenance TabThe Maintenance tab allows you to perform machine maintenance or change the settings of the machine.
Features Cleaning the Print Heads from Your Computer Aligning the Print Head Position from Your Computer Use Your Computer to Print a Nozzle Check Pattern Setting the Ink Cartridge to be Used Cleaning Inside the Machine Cleaning the Paper Feed Rollers from Your Computer Managing the Machine Power
Related Features Reducing the Machine Noise Changing the Machine Operation Mode

Canon IJ Status MonitorIf you are using the XPS printer driver, replace "Canon IJ Status Monitor" with "Canon IJ XPS StatusMonitor" when reading this information.The Canon IJ Status Monitor is an application software that shows the status of the printer and theprogress of printing. You will know the status of the printer with graphics, icons, and messages.
Launching the Canon IJ Status MonitorThe Canon IJ Status Monitor launches automatically when print data is sent to the printer. When launched,the Canon IJ Status Monitor appears as a button on the task bar.
Click the button of the status monitor displayed on the task bar. The Canon IJ Status Monitor appears.
Note To open the Canon IJ Status Monitor when the machine is not printing, open the printer driver setup
window and click View Printer Status... on the Maintenance tab. The information displayed on the Canon IJ Status Monitor may differ depending on the country or
region where you are using your machine.
When Errors OccurThe Canon IJ Status Monitor is automatically displayed if an error occurs (e.g., if the printer runs out ofpaper or if the ink is low).
In such cases, take the appropriate action as described.

Checking the Ink Status from Your ComputerIf you are using the XPS printer driver, replace "Canon IJ Status Monitor" with "Canon IJ XPS StatusMonitor" when reading this information.
You can check the remaining ink level and the FINE cartridge types for your model.
1. Open the printer driver setup window
2. Launching the Canon IJ Status MonitorOn the Maintenance tab, click View Printer Status....The Canon IJ Status Monitor opens and displays an image of the ink status.
Note The information displayed on the Canon IJ Status Monitor may differ depending on the country
or region where you are using your machine.
3. If necessary, click Ink Details.You can check the ink-related information.If a warning or error related to the remaining ink amount occurs, a notification icon is displayed at thetop of the image in the Ink Details dialog box.In such cases, take the appropriate action as described on the screen.
Note You can also display the Ink Details dialog box by selecting the ink icon on the Canon IJ Status
Monitor.

Canon IJ PreviewThe Canon IJ Preview is an application software that displays what the print result will look like before adocument is actually printed.
The preview reflects the information that is set within the printer driver and allows you to check thedocument layout, print order, and number of pages. You can also change the media type settings.When you want to display a preview before printing, open the printer driver setup window, click the Maintab, and check the Preview before printing check box.When you do not want to display a preview before printing, uncheck the check box.
Important If you are using the XPS printer driver, see "Editing the Print Document or Reprinting from the Print
History."
Related Topic Displaying the Print Results before Printing
Deleting the Undesired Print JobIf you are using the XPS printer driver, replace "Canon IJ Status Monitor" with "Canon IJ XPS StatusMonitor" when reading this information.If the printer does not start printing, canceled or failed print job data may be remaining.Delete the undesired print job by using the Canon IJ Status Monitor.
1. Display the Canon IJ Status MonitorClick the button of the status monitor displayed on the task bar.The Canon IJ Status Monitor appears.
2. Display the print jobsClick Display Print Queue....The print queue window opens.
3. Delete the print jobsSelect Cancel All Documents from the Printer menu.When the confirmation message appears, click Yes.The deletion of the print job is complete.
Important Users who have not been granted access permission for printer management cannot delete the print
job of another user.
Note When you perform this operation, all print jobs are deleted. If the print queue list contained a
necessary print job, start the printing process over from the beginning.

Instructions for Use (Printer Driver)This printer driver is subject to the following restrictions. Keep the following points in mind when using theprinter driver.
Restrictions on the Printer Driver• With some applications, the Copies setting in the Page Setup tab of the printer driver may not be
enabled.In this case, use the copies setting in the Print dialog box of the application software.
• If the selected Language in the About dialog box of the Maintenance tab does not match theoperating system interface language, the printer driver setup window may not be displayed properly.
• Do not change the Advanced tab items of the printer properties. If you change any of the items, youwill not be able to use the following functions correctly.Also, if Print to file is selected in the Print dialog box of the application software and with applicationsthat prohibit EMF spooling, such as Adobe Photoshop LE and MS Photo Editor, the following functionswill not operate.
• Preview before printing on the Main tab
• Prevention of Print Data Loss in the Print Options dialog box on the Page Setup tab
• Page Layout, Tiling/Poster, Booklet, Duplex Printing (Manual), Specify Margin..., Print fromLast Page, Collate, and Stamp/Background... (Stamp...) on the Page Setup tab
• Print a pattern for color adjustment on the Color Adjustment tab in the Manual ColorAdjustment dialog box
• Since the resolution in the preview display differs from the printing resolution, text and lines in thepreview display may appear different from the actual print result.
• With some applications, the printing is divided into multiple print jobs.To cancel printing, delete all divided print jobs.
• If image data is not printed correctly, display the Print Options dialog box from the Page Setup taband change the setting of Disable ICM required from the application software. This may solve theproblem.
Note Disable ICM required from the application software cannot be used when the XPS printer
driver is used.
• Using the Bluetooth option under the following conditions may lock the print job with "Printing"displayed in the status monitor, even if printing has completed and the printout is ejected. If thishappens, either click the Cancel Printing button on the status monitor or cancel that print job from theprint job queue of the printer.
• When you move the machine during printing to a location where radio waves cannot reach or whenthe radio wave status becomes poor
• When you turn off the machine
• When you are using a Bluetooth printer and you cancel printing after a printer error occurs, you maynot be able to execute subsequent printing operations. If this happens, turn off the machine and turn itback on again.
• When you are using Bluetooth, you cannot use the operation panel on the machine while the statusmonitor is displayed from View Printer Status... on the Maintenance tab.
• Do not start up the Canon IJ Network Tool while printing.
• Do not print when the Canon IJ Network Tool is running.

Points to Note About Applications with Restrictions• There are following restrictions in Microsoft Word (Microsoft Corporation).
• When Microsoft Word has the same printing functions as the printer driver, use Word to specifythem.
• When selecting Fit-to-Page, Scaled, or Page Layout from the Page Layout list on the Page Setuptab, the selected printing function may not be effective, depending on the version of Word.If this happens, follow the procedure below.
1. Open Word's Print dialog box.
2. Open the printer driver setup window, specify Page Layout on the Page Setup tab, and clickOK.
3. Without starting printing, close the Print dialog box.
4. Open Word's Print dialog box again.
5. Open the printer driver setup window and click OK.
6. Start printing.
• If bitmap printing is enabled in Adobe Illustrator (Adobe Systems Incorporated), printing may take timeor some data may not be printed. Print after unchecking the Bitmap Printing check box in the Printdialog box.

Updating the MP Drivers Obtaining the Latest MP Drivers Deleting the Unnecessary MP Drivers Before Installing the MP Drivers Installing the MP Drivers

Obtaining the Latest MP DriversThe MP Drivers include a printer driver, ScanGear (scanner driver), and fax driver.By updating the MP Drivers to the latest version of the MP Drivers, unresolved problems may be solved.
You can access our website and download the latest MP Drivers for your model.
Important You can download the MP Drivers for free, but any Internet access charges incurred are your
responsibility. Before installing the latest MP Drivers, delete the previously installed version.
For information on how to delete the MP Drivers, see "Deleting the Unnecessary MP Drivers."
Related Topics Before Installing the MP Drivers Installing the MP Drivers

Deleting the Unnecessary MP DriversThe MP Drivers which you no longer use can be deleted.When deleting the MP Drivers, first exit all programs that are running.
The procedure to delete the unnecessary MP Drivers is as follows:
1. Start the uninstaller
• If you are using Windows 7 or Windows Vista, select Start menu -> Control Panel -> Programs ->Programs and Features.From the program list, select "XXX MP Drivers" (where "XXX" is your model name) and then clickUninstall.
• If you are using Windows XP, select Start menu -> Control Panel -> Add or Remove Programs.From the program list, select "XXX MP Drivers" (where "XXX" is your model name) and then clickRemove.
The confirmation window for uninstalling the model appears.
Important In Windows 7 or Windows Vista, a confirmation/warning dialog box may appear when starting,
installing or uninstalling software.This dialog box appears when administrative rights are required to perform a task.When you are logged on to an administrator account, click Yes (or Continue, Allow) to continue.Some applications require an administrator account to continue. When you are logged on to astandard account, switch to an administrator account, and restart the operation from thebeginning.
2. Execute the uninstallerClick Execute. When the confirmation message appears, click Yes.When all the files have been deleted, click Complete.The deletion of the MP Drivers is complete.
Important Printer driver, XPS printer driver, ScanGear (scanner driver), and fax driver will be deleted when you
uninstall the MP Drivers.
Before Installing the MP DriversThis section describes the items that you should check before installing the MP Drivers. You should alsorefer to this section if the MP Drivers cannot be installed.
Checking the Machine Status• Turn off the machine.
Checking the Personal Computer Settings• Terminate all running applications.
• In Windows 7, Windows Vista, log on as a user who has the administrator account.In Windows XP, log on as the computer administrator.
Important Before installing the latest MP Drivers, delete the previously installed version. For instructions on
deleting the MP Drivers, see "Deleting the Unnecessary MP Drivers."
Related Topics Obtaining the Latest MP Drivers Installing the MP Drivers

Installing the MP DriversYou can access our web site through the Internet and download the latest MP Drivers and XPS printerdriver for your model.
The procedure for installing the downloaded MP Drivers is as follows:
1. Turn off the machine
2. Start the installerDouble-click the icon of the downloaded file.The installation program starts.
Important In Windows 7 or Windows Vista, a confirmation/warning dialog box may appear when starting,
installing or uninstalling software.This dialog box appears when administrative rights are required to perform a task.When you are logged on to an administrator account, click Yes (or Continue, Allow) to continue.Some applications require an administrator account to continue. When you are logged on to astandard account, switch to an administrator account, and restart the operation from thebeginning.
3. Install the MP DriversTake the appropriate action as described on the screen.
4. Complete the installationClick Complete.
When you are using a USB connection, the procedure for installing the MP Drivers is complete.Depending on the environment you are using, a message prompting you to restart the computer may bedisplayed. To complete the installation properly, restart the computer.
Important You can install the XPS printer driver with the same procedure for installing the MP Drivers.
However, when installing the XPS printer driver, first complete installation of the MP Drivers. You can download the MP Drivers and XPS printer driver for free, but any Internet access charges
incurred are your responsibility. Before installing the latest MP Drivers, delete the previously installed version. For instructions on
deleting the MP Drivers, see "Deleting the Unnecessary MP Drivers."
Related Topics Obtaining the Latest MP Drivers Deleting the Unnecessary MP Drivers Before Installing the MP Drivers

Printing Using the Operation Panel of the Machine Printing Template Forms Such As Lined Paper or Graph Paper

Printing Template Forms Such As Lined Paper or Graph PaperYou can print a template form such as lined paper, graph paper, or checklist, etc. on A4, B5, or Letter-sizedplain paper.
Printable template formsPrinting template forms
Printable template formsThe following templates are available:
• Notebook paper
You can select three line spacing formats.Setting on the LCD:
• Notebook paper 1: 8 mm spacing• Notebook paper 2: 7 mm spacing• Notebook paper 3: 6 mm spacing
NoteYou cannot print Notebook paper on B5 sized paper.
• Graph paper
You can select two square sizes.Setting on the LCD:
• Graph paper 1: Graph 5 mm• Graph paper 2: Graph 3 mm
NoteYou cannot print Graph paper on B5 sized paper.
• Checklist
You can print a notepad with checkboxes.Setting on the LCD:Checklist
• Staff paper
You can print staff paper with 10 or 12 staves.Setting on the LCD:
• Staff paper 1: 10 staves• Staff paper 2: 12 staves
• Handwriting paper

You can print handwriting paper.Setting on the LCD:Handwriting paper
• Weekly schedule
You can print a weekly schedule form.Setting on the LCD:Weekly schedule
• Monthly schedule
You can print a monthly schedule form.Setting on the LCD:Monthly schedule
Printing template formsPrint template form following the procedure below.
1. Make sure that the machine is turned on.
Confirming that the Power Is On
2. Load A4, B5, or Letter-sized plain paper.
Loading Paper
3. Press the Setup button.
The Setup menu screen is displayed.
4. Use the button to select Template print, then press the OK button.
5. Use the button to select the template you want to print, then press the OK button.
Printable template forms
6. Use the button to specify the paper size, then press the OK button.
NoteThe * (asterisk) on the LCD indicates the current setting.
7. Make sure that Plain paper is selected, then press the OK button.
NoteIf any media type other than Plain paper is selected on the LCD, select Plain paper using the
button.

8. Use the (-) (+) button or the Numeric buttons to specify the number of copies.
9. Press the OK button to start printing.
NoteYou can also press the Color button or Black button to start printing.

Printing from a Bluetooth Compliant Device Printing from Mobile Phone via Bluetooth Communication

Printing from Mobile Phone via Bluetooth CommunicationThis section describes the procedure to print photos through Bluetooth communication from a mobilephone with the optional Bluetooth Unit BU-30.When printing from a mobile phone through Bluetooth communication, refer also to your mobile phone'sinstruction manual.For the procedure to print through Bluetooth communication from the computer, refer to About BluetoothCommunication.
NoteMobile phones supporting OPP (Object Push Profile) or BIP (Basic Imaging Profile) can be used to
print photos.Depending on your mobile phone, you may not perform printing even if your mobile phone supportsthe profiles above. For information on the profiles your mobile phone supports, refer to your mobilephone's instruction manual.
1. Make sure that the machine is turned on.Confirming that the Power Is On
2. Load paper.Loading Paper
3. Attach the optional Bluetooth Unit BU-30.Insert the Bluetooth Unit BU-30 into the USB flash drive port.
4. Specify the setting of page size and media type and so on.1. Press the Setup button.
The Setup menu screen is displayed.
2. Use the button to select Device settings, then press the OK button.
3. Use the button to select Mob. phone settings, then press the OK button.For details on the print setting:
Mob. phone settings
5. Start printing from a mobile phone.
• For the device name, select the default value "Canon XXX-1" (where "XXX" is your machine'sname).
• If you are required to input a passkey, input the default value "0000".

You can change the device name of the machine, passkey, and so on from the Bluetoothsettings screen.
Setting Bluetooth Printing
NoteCommunication is possible in a range of up to about 33 ft. / 10 m depending on the conditions
below. Printing speed may vary depending on the following conditions:Presence of obstacles between the communication equipment, and radio conditions.Presence of magnetic fields, static electricity, or electromagnetic interference.Receiver sensitivity and antenna performance of the communication equipment.Video files cannot be printed.Depending on your mobile phone, data saved on a memory card may not be printed.About transmittable data
Due to security settings on the mobile phone, downloaded content or photos downloadedfrom a URL attached to an E-mail cannot be printed.Depending on the size of a photo, it may take a while for this machine to start printing after
starting wireless communication.Printed quality and orientation (portrait or landscape) are determined automatically
according to the shot photo size.Depending on the photo size shot on the mobile phone, the edges of the image may be cut
off when performing borderless printing; the margin size may change when printing withborders.If the photo file is over 1.8 MB in size, it may not be possible to send the file.

About Bluetooth Communication Handling Precautions Preparation to Use the Bluetooth Unit Printing Data via Bluetooth Communication Basic Procedure for Printing via Bluetooth Communication Bluetooth Settings Specifications

Handling Precautions Shipping the Bluetooth Unit

Shipping the Bluetooth UnitThe Bluetooth unit may not be used in countries or regions other than the country or region where it waspurchased due to local laws and regulations. Please note that the use of the Bluetooth unit in suchcountries or regions may lead to penalties and that Canon should not be liable for such punishment.

Preparation to Use the Bluetooth Unit Bluetooth Unit Attaching to and Removing from the Printer

Bluetooth UnitThe Bluetooth Unit BU-30 (hereafter referred to as the Bluetooth unit) is an adaptor which can be used witha Canon IJ printer with Bluetooth interface.By attaching the Bluetooth unit to a Canon IJ printer with Bluetooth interface, wireless printing from aBluetooth enabled device, such as a computer or mobile phone, is possible.
NoteCommunication is possible in a range of up to about 33 ft. / 10 m depending on the conditions below.
Printing speed may vary depending on the following conditions:Presence of obstacles between the communication equipment and radio wave conditions.Presence of magnetic fields, static electricity or electromagnetic interference.Software and operating system to be used.Receiver sensitivity and antenna performance of the communication equipment.

Attaching to and Removing from the PrinterAttaching the Bluetooth Unit to the PrinterRemoving the Bluetooth Unit from the Printer
Attaching the Bluetooth Unit to the PrinterAttach the Bluetooth unit to the USB flash drive port of the printer in accordance with the followingprocedure.Refer to Front View for the position of the USB flash drive port.
1. Make sure that the printer is turned on.
Confirming that the Power Is On
2. Insert the Bluetooth unit to the USB flash drive port of the printer.
Detach the cap from the Bluetooth unit. Store the cap in a safe location.
NoteWhen the Bluetooth unit is properly attached to the printer, the message is displayed on the
LCD.
Removing the Bluetooth Unit from the PrinterRemove the Bluetooth unit from the USB flash drive port of the printer in accordance with the followingprocedure.
1. Remove the Bluetooth unit from the USB flash drive port of the printer.
Important

Make sure that the lamp on the Bluetooth unit is neither lit nor flashing before you remove theBluetooth unit.
ImportantStore the Bluetooth unit with the cap attached.

Printing Data via Bluetooth Communication Preparation Installing the MP Drivers Checking the Device Name of the Printer Registering the Printer Deleting the Printer
PreparationIn order to print via Bluetooth communication with Windows, the following system requirements must besatisfied.
• ComputerA computer in which an internal Bluetooth module is installed or a computer to which an optionalBluetooth adapter (available from various manufacturers) is attached.
• OSMicrosoft Windows 7 (Satisfying any one of the following conditions is needed)
• Add a Bluetooth Device is displayed in Hardware and Sound under Control Panel
• Bluetooth Stack for Windows by Toshiba Version 7.00.00 or later is installedMicrosoft Windows Vista (Satisfying any one of the following conditions is needed)
• Bluetooth Devices is displayed in Hardware and Sound under Control Panel
• Bluetooth Stack for Windows by Toshiba Version 5.10.04 or later is installedMicrosoft Windows XP (Satisfying any one of the following conditions is needed)
• Windows XP SP2 or later is installed, and Bluetooth Devices is displayed inPrinters and Other Hardware under Control Panel
• Bluetooth Stack for Windows by Toshiba Version 3.00.10 or later is installedFor more information about how to confirm the version of Bluetooth Stack for Windows by Toshiba,see Check 2: Is unsupported Bluetooth driver used?.
In order to connect the Bluetooth unit and print via Bluetooth communication, the following steps arerequired.
1. Check that the Bluetooth unit is properly attached to the printer.See Attaching to and Removing from the Printer.
2. Install the MP Drivers.See Installing the MP Drivers.
3. Check the device name of the printer using the LCD.See Checking the Device Name of the Printer.
4. Register the printer for Bluetooth printing.
• When using Windows 7, and when Add a Bluetooth Device is displayed inHardware and Sound under Control PanelAuthenticate the printer as a Bluetooth device on Add a Bluetooth Device in Hardware andSound under Control Panel.See Registering the Printer.
• When using Windows Vista, and when Bluetooth Devices is displayed inHardware and Sound under Control PanelAuthenticate the printer as a Bluetooth device on Bluetooth Devices in Hardware and Soundunder Control Panel.See Registering the Printer.

• When using Windows XP SP2 or later, and when Bluetooth Devices is displayedin Printers and Other Hardware under Control PanelAuthenticate the printer as a Bluetooth device on Bluetooth Devices in Printers and OtherHardware under Control Panel.See Registering the Printer.
• The operations may vary depending on your operating program. In this case,refer to your computer's operation manual.

Installing the MP Drivers
NoteIf you use the printer connecting with a computer, the MP Drivers have already been installed. In this
case, move to the next step.Checking the Device Name of the Printer
Before connecting the Bluetooth unit to the printer for wireless printing, install the MP Drivers to yourcomputer.If you reinstall the MP Drivers, reinstall the MP Drivers using the Setup CD-ROM.

Checking the Device Name of the PrinterThis section describes the procedures for checking the settings of the Bluetooth unit on the LCD of theprinter in preparation for Bluetooth printing.Canon IJ printers with the Bluetooth interface are divided into two types. One is equipped with a graphicLCD, and the other with a text LCD.If you need more information about the Bluetooth settings, see Setting Bluetooth Printing.
1. Make sure that the printer is turned on.Confirming that the Power Is On
2. Attach the Bluetooth unit.For information about how to attach the Bluetooth unit, see Attaching to and Removing from thePrinter.
3. Display the Bluetooth settings (Graphic LCD)/Bluetooth settings (Text LCD)screen on the LCD.For information about how to display the Bluetooth settings (Graphic LCD)/Bluetooth settings (TextLCD) screen, refer to Changing the Machine Settings on the LCD.
Graphic LCD
Text LCD
NoteIf the Bluetooth settings (Graphic LCD)/Bluetooth settings (Text LCD) screen is not displayed
on the LCD, the Bluetooth unit may not be attached correctly. Remove the Bluetooth unit from theprinter and attach it once again.For details, see Attaching to and Removing from the Printer.If the Bluetooth settings (Graphic LCD)/Bluetooth settings (Text LCD) screen is not yetdisplayed, the Bluetooth unit may be faulty. In this case, contact the service center.
4. Select Select device name (Graphic LCD)/Device name (Text LCD).The Select device name (Graphic LCD)/Device name (Text LCD) screen is displayed.

Graphic LCD
Text LCD
5. Check the device name.The device name is necessary to register the printer as a Bluetooth device. Be sure to note the devicename.
NoteIf multiple printer units with the same model name are connected to the system, assigning a
different device name to each printer is recommended for easy identification of the printer you willuse. See Select device name (Graphic LCD)/Device name (Text LCD) Screen.
After checking the device name, use the OK button on the printer to finish setting.After checking the Bluetooth settings using the LCD, register the printer on your computer.
Registering the Printer

Registering the PrinterRegister the printer as a Bluetooth device using Add a Bluetooth Device (Bluetooth Devices except forWindows 7) under Control Panel.
NoteBefore registering the printer on Add a Bluetooth Device (Bluetooth Devices except for Windows
7) under Control Panel, enable the Bluetooth function of your computer.For more information, refer to your computer's operation manual.If you want to re-register the printer as a Bluetooth device, first delete the registered printer, and then
re-register it.Deleting the Printer
The procedure to authenticate the computer may vary depending on the computer you are using.In Windows 7 or Windows Vista:In Windows XP:
In Windows 7 or Windows Vista:The following procedure is described using the screens in Windows 7.
1. Log into a user account with the administrator privilege.
2. Select items from Control Panel as shown below.
• In Windows 7, click Control Panel, then Add a Bluetooth Device under Hardware andSound.
• In Windows Vista, click Control Panel, Bluetooth Device under Hardware and Sound, thenAdd Wireless Device.
3. Select the device name of the printer and click Next.
Select the same device name as that checked under Checking the Device Name of the Printer.
NoteIf the device name is not displayed, see Check 3: Is the printer name which you want to register
displayed in the Printer List?.
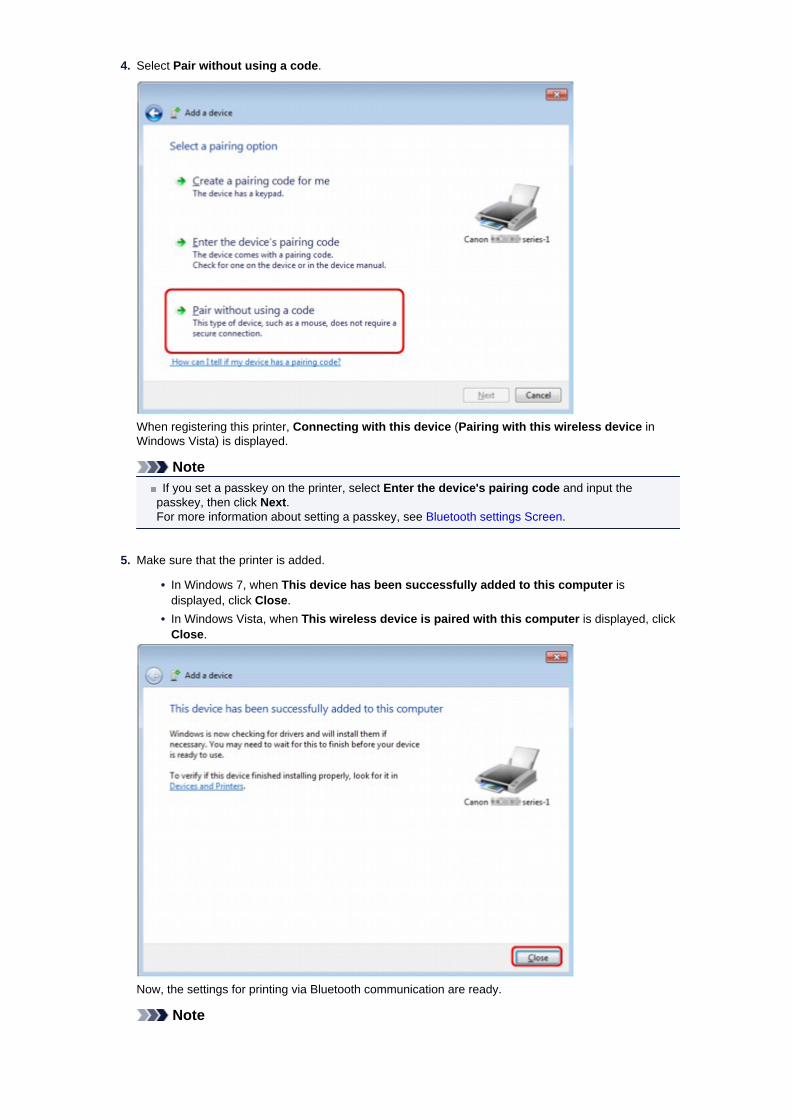
4. Select Pair without using a code.
When registering this printer, Connecting with this device (Pairing with this wireless device inWindows Vista) is displayed.
NoteIf you set a passkey on the printer, select Enter the device's pairing code and input the
passkey, then click Next.For more information about setting a passkey, see Bluetooth settings Screen.
5. Make sure that the printer is added.
• In Windows 7, when This device has been successfully added to this computer isdisplayed, click Close.
• In Windows Vista, when This wireless device is paired with this computer is displayed, clickClose.
Now, the settings for printing via Bluetooth communication are ready.
Note

In Windows Vista, the Windows needs to install driver software for your BluetoothPeripheral Device screen may be displayed automatically. In this case, click Don't show thismessage again for this device.
In Windows XP:
1. Log into a user account with the administrator privilege.
2. Click Control Panel, Printers and Other Hardware, then Bluetooth Devices.
3. Click Add on the Devices sheet.
Add Bluetooth Device Wizard will start.
4. Make sure that the printer is turned on, check the My device is set up and ready to be found checkbox and then click Next.
5. Select the device name of the printer and click Next.

Select the same device name as that checked under Checking the Device Name of the Printer.
NoteIf the device name is not displayed, see Check 3: Is the printer name which you want to register
displayed in the Printer List?.
6. Select Don't use a passkey, and then Next.
NoteIf you set a passkey on the printer, select Use the passkey found in the documentation and
input the passkey then click Next.For more information about a passkey, see Bluetooth settings Screen.
7. Click Finish.

8. Check that the device name selected at step 5 is registered on the Devices sheet, and click OK.
Now, the settings for printing via Bluetooth communication are ready.

Deleting the PrinterThis section describes the procedure to delete the registered printer.If you want to re-register the printer as a Bluetooth device, first follow the procedure below to delete theprinter, and then re-register it.For the procedure to re-register the printer, see Registering the Printer.
1. Log into a user account with the administrator privilege.
2. Select items from Control Panel as shown below.
• In Windows 7, click Control Panel, then Devices and Printers under Hardware and Sound.• In Windows Vista, click Control Panel, then Printers under Hardware and Sound.• In Windows XP, click Control Panel, then Printers and Faxes under Printers and Other
Hardware.
3. Click the icon of the printer used for printing via Bluetooth communication.
4. Delete the printer as shown below.
• In Windows 7, select Remove device.• In Windows Vista, select Delete from the Organize menu.• In Windows XP, select Delete from the File menu.
• In Windows Vista or Windows XP:Continue following the procedure below to delete the printer from Bluetooth Devices.
• In Windows Vista:1. Click Control Panel, then Bluetooth Devices under Hardware and Sound.2. Click the icon of the printer used for printing via Bluetooth communication.3. Select Remove Wireless Device.
• In Windows XP:1. Click Control Panel, then Bluetooth Devices under Printers and Other Hardware.2. On the Devices sheet click the icon of the printer used for printing via Bluetooth
communication.3. Click Remove.

Basic Procedure for Printing via Bluetooth Communication Printing with Computers Printing with Bluetooth Compliant Devices other than a Computer

Printing with ComputersWhen using Bluetooth communication, also refer to the computer's instruction manual.When printing from a Bluetooth compliant device other than a computer, see Printing with BluetoothCompliant Devices other than a Computer.
NoteDepending on your application software, operations may differ. For details, refer to your software
application's instruction manual.The steps described in this section are for printing in Windows 7.Bluetooth communication distance: Approx. 33 ft./10 m in normal environment.
The distance may vary depending on the radio conditions or the communication equipment.
1. Make sure that the printer is turned on.Confirming that the Power Is On
2. Attach the Bluetooth unit.For information about how to attach the Bluetooth unit, see Attaching to and Removing from thePrinter.
3. Load paper.Loading Paper
4. Create a document or open a file to print using an appropriate application software.
5. Open the printer properties dialog box.1. Select Print on the application software's File menu.
The Print dialog box opens.2. Select the printer to which you attached the Bluetooth unit such as "Canon XXX Printer (Copy X)"
from Select Printer.3. Click Preferences (or Properties).
The Quick Setup sheet of the Printing Preferences dialog box is displayed.
Note

The printer registered on Add a Bluetooth Device (Bluetooth Devices except for Windows7) is displayed as "Canon XXX Printer (Copy X)"."X" is a device name or a digit. The number of digits may differ depending on the printer.
6. Specify the required settings.
1. Select the print setting in Commonly Used Settings.2. Confirm the required print settings in Media Type, Printer Paper Size, and so on.
NoteYou can specify the advanced print settings on Main sheet and Page Setup sheet. For
details on the print settings, refer to Various Printing Methods.
3. Click OK.The Print dialog box is displayed.
7. Click Print (or OK) to print the document.

Printing begins.
NoteWhen you use a USB cable for printing, select "Canon XXX Printer" from Select Printer.To cancel a print job in progress, use the Stop button on the printer or click Cancel Printing on
the printer status monitor. After printing is canceled, a sheet of paper may be ejected with noprinting results.To display the printer status monitor, click "Canon XXX Printer (Copy X)" on the taskbar."X" is a device name or a digit. The number of digits may differ depending on the printer.

Printing with Bluetooth Compliant Devices other than aComputerThe LCD of the printer allows you to perform settings for printing using Bluetooth compliant devices otherthan a computer.When you print with one of these devices, also refer to your device's instruction manual.When printing from a computer, see Printing with Computers.
NoteMobile phones, PDAs and digital cameras supporting OPP (Object Push Profile) or BIP (Basic
Imaging Profile) can print photos.Depending on your device, you may not perform printing even if your device supports the profilesabove. For details of profiles, refer to your device's instruction manual.
1. Make sure that the printer is turned on.Confirming that the Power Is On
2. Attach the Bluetooth unit.For information about how to attach the Bluetooth unit, see Attaching to and Removing from thePrinter.
3. Load paper.Loading Paper
4. Display the Mobile phone print settings (Graphic LCD)/Mob. phone settings(Text LCD) screen on the LCD and set the media type and the paper size.For information about how to display the Mobile phone print settings (Graphic LCD)/Mob. phonesettings (Text LCD) screen, refer to Changing the Machine Settings on the LCD.
5. Start printing from the Bluetooth compliant device.When you select the device name, select the initial value of the printer "Canon XXX-1" (where "XXX" isyour printer's name).If you are required to input the passkey, input the initial value "0000".You can change the device name of the printer or passkey on the Bluetooth settings (Graphic LCD)/Bluetooth settings (Text LCD) screen on the LCD.
Setting Bluetooth Printing

Bluetooth Settings Setting Bluetooth Printing Bluetooth settings Screen
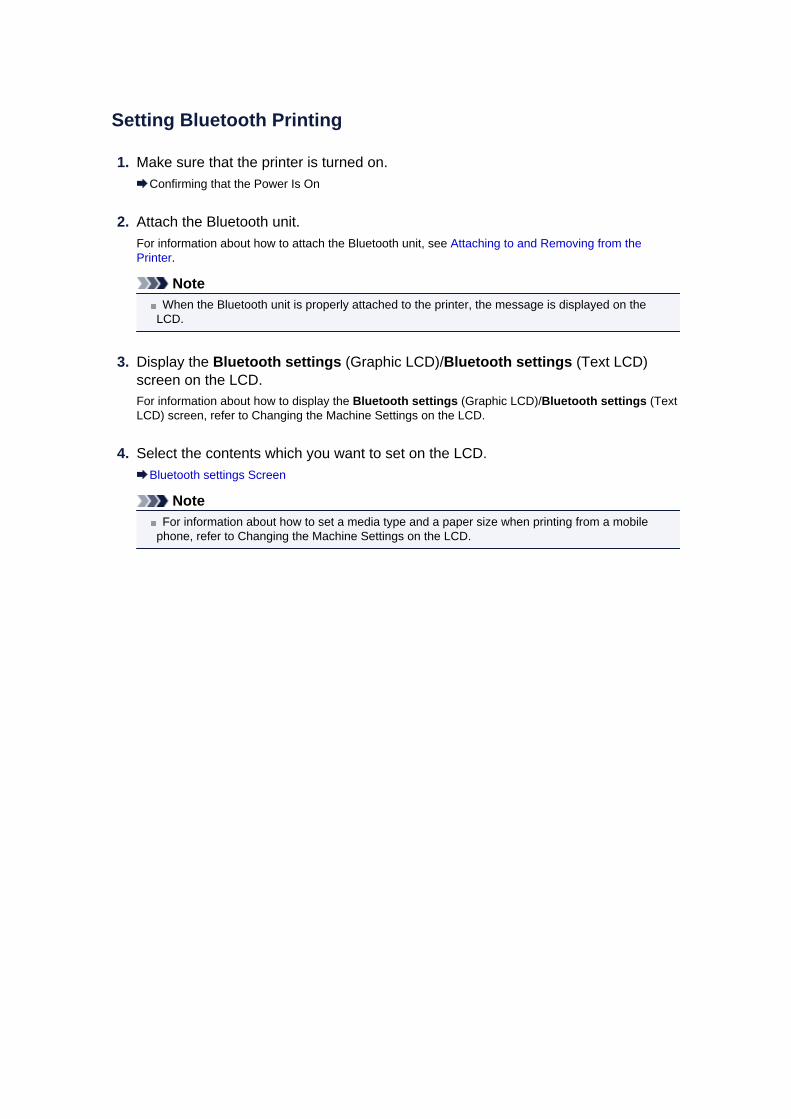
Setting Bluetooth Printing
1. Make sure that the printer is turned on.Confirming that the Power Is On
2. Attach the Bluetooth unit.For information about how to attach the Bluetooth unit, see Attaching to and Removing from thePrinter.
NoteWhen the Bluetooth unit is properly attached to the printer, the message is displayed on the
LCD.
3. Display the Bluetooth settings (Graphic LCD)/Bluetooth settings (Text LCD)screen on the LCD.For information about how to display the Bluetooth settings (Graphic LCD)/Bluetooth settings (TextLCD) screen, refer to Changing the Machine Settings on the LCD.
4. Select the contents which you want to set on the LCD.Bluetooth settings Screen
NoteFor information about how to set a media type and a paper size when printing from a mobile
phone, refer to Changing the Machine Settings on the LCD.

Bluetooth settings Screen
• Graphic LCD
• Text LCD
1. Select device name (Graphic LCD)/Device name (Text LCD)Displays the device name of the printer to which the Bluetooth unit is attached.
Select device name (Graphic LCD)/Device name (Text LCD) Screen
2. Access refusal setting (Graphic LCD)/Access refusal (Text LCD)Selecting ON (Graphic LCD)/ON (Text LCD) will disable searching of this printer by a Bluetooth-compatible device.
Access refusal setting (Graphic LCD)/Access refusal (Text LCD) Screen
3. Security settings (Graphic LCD)/Security settings (Text LCD)Select Enable (Graphic LCD)/Enable (Text LCD) and then specify the security mode to activate thepasskey set on the Change passkey (Graphic LCD)/Passkey (Text LCD) screen.
Security settings (Graphic LCD)/Security settings (Text LCD) Screen
4. Change passkey (Graphic LCD)/Passkey (Text LCD)You can change the passkey. The passkey refers to an identification number to be determined. It isused to prevent unwanted access from other Bluetooth devices. The initial value is set to "0000".
Change passkey (Graphic LCD)/Passkey (Text LCD) Screen
Select device name (Graphic LCD)/Device name (Text LCD) ScreenAllows you to set the device name of the printer on a Bluetooth device.

In the example used for this explanation, the model name is set to "MX520 series".When a model other than "MX520 series" is used, whatever appears in place of "MX520" becomes themodel name use.Ex:When you select MX520 series-2, the printer name displayed on the Bluetooth device is Canon MX520series-2.The initial value is set to MX520 series-1.
• Graphic LCD
• Text LCD
Access refusal setting (Graphic LCD)/Access refusal (Text LCD) ScreenWhen you search from a Bluetooth device, you can enable or disable the display of the printer name.
• ON (Graphic LCD)/ON (Text LCD)Disables searching from a Bluetooth device.
• OFF (Graphic LCD)/OFF (Text LCD) (Default setting)Enables searching and printing from a Bluetooth device.
Security settings (Graphic LCD)/Security settings (Text LCD) Screen
• Enable (Graphic LCD)/Enable (Text LCD)Selecting Enable (Graphic LCD)/Enable (Text LCD) allows you to choose either of the security modesbelow.
• Mode 3(recommended) (Graphic LCD)/Mode 3 (recommend) (Text LCD)This mode is activated on link level enforced security.The passkey will be required when a Bluetooth device communicates with the printer. Normallyselect this mode.
• Mode 2 (Graphic LCD)/Mode 2 (Text LCD)This mode is activated on service level enforced security.The passkey will be required when printing through the Bluetooth communication.
After setting the security mode, we recommend making a trial print through Bluetooth communication.If printing does not start, change the security mode and try again.Setting a passkey will prevent unwanted access from other Bluetooth devices. You can change thepasskey on the Change passkey (Graphic LCD)/Passkey (Text LCD) screen.
• Disable (Graphic LCD)/Disable (Text LCD) (Default setting)When you register the printer, you are not required to input a passkey.

Change passkey (Graphic LCD)/Passkey (Text LCD) ScreenWhen you select Enable (Graphic LCD)/Enable (Text LCD) on the Security settings (Graphic LCD)/Security settings (Text LCD) screen, you are required to set a passkey to register the printer on otherBluetooth devices.After you change the passkey, you may be asked to input the passkey on the Bluetooth devices you wereable to print from before the passkey was changed. In this case, input the new passkey.
• Graphic LCD
• Text LCD

Specifications
Communicationmethod Bluetooth v2.0
Maximum Speed 1.44 Mbps
Output Bluetooth Power Class 2
Communicationdistance
Line-of-sight distance: approx. 33 ft./10 m ** It may vary depending on factors including the presence of obstacles betweencommunication equipment, radio wave conditions, the presence of magnetic fieldsaround microwave ovens and locations where electrostatic and radio interferenceoccur, the types of software and operating systems used, and receiver sensitivityand antenna performance of communication equipment.
Profile
SPP (Serial Port Profile)OPP (Object Push Profile)BIP (Basic Imaging Profile)HCRP (Hardcopy Cable Replacement Profile)
Compatible PCs
A computer in which an internal Bluetooth module is installed or a computer towhich an optional Bluetooth adapter (available from various manufacturers) isattached.OS/Software:Microsoft Windows 7 (Satisfying any one of the following conditions is needed)
• Add a Bluetooth Device is displayed in Hardware and Sound under ControlPanel
• Bluetooth Stack for Windows by Toshiba Version 7.00.00 or later is installedMicrosoft Windows Vista (Satisfying any one of the following conditions is needed)
• Bluetooth Devices is displayed in Hardware and Sound under ControlPanel
• Bluetooth Stack for Windows by Toshiba Version 5.10.04 or later is installedMicrosoft Windows XP (Satisfying any one of the following conditions is needed)
• Windows XP SP2 or later is installed, and Bluetooth Devices is displayed inPrinters and Other Hardware under Control Panel
• Bluetooth Stack for Windows by Toshiba Version 3.00.10 or later is installed
Frequency band 2.4 GHz band (2.400 GHz to 2.4835 GHz)
Power supply Supplied from the USB flash drive port on the printer, DC 4.4 V to 5.25 V
Maximum powerconsumption 500 mW (MAX)
Operatingtemperature 5 to 35°C (41 to 95°F)
Operating humidity 10 to 90% RH (no condensation)
Dimensions (Width xDepth x Height)
18.5 (W) x 47.5 (D) x 8.7 (H) mm (with cap attached)0.73 (W) x 1.87 (D) x 0.35 (H) inches
Weight Approx. 7 g (0.25 oz)

Copying
Making Copies Basic Setting Items Reducing or Enlarging a Copy About Special copy Menu Copying Two Pages to Fit onto a Single Page Copying Four Pages to Fit onto a Single Page Copying Thick Originals Such as Books Copying without Borders Collated Copying

Making CopiesLoad the original to copy.This section describes the basic procedure to perform standard copying.
1. Make sure that the machine is turned on.Confirming that the Power Is On
2. Load paper.Loading Paper
3. Press the COPY button.The Copy standby screen is displayed.
4. Load the original document on the platen glass or in the ADF.Loading Originals
5. Confirm the page size and magnification.
1. Magnification2. Page size
NoteTo change or confirm the page size, magnification, or other settings, press the Menu
button, then use the button to display the desired setting item.Setting Items
Press the Stop button to reset the magnification to 100%.
6. Use the (-) (+) button or the Numeric buttons to specify the number ofcopies.
7. Press the Color button for color copying, or the Black button for black & whitecopying.The machine starts copying.Remove the original on the platen glass or from the document output slot after copying iscomplete.
ImportantIf you load the original on the platen glass, do not open the document cover or remove the
original while Scanning.. is displayed on the screen.If you load the original in the ADF, do not move the original until copying is complete.
NoteTo cancel copying, press the Stop button.If you load the original on the platen glass, you can add the copying job while printing.
Adding the Copying Job (Reserve copy)
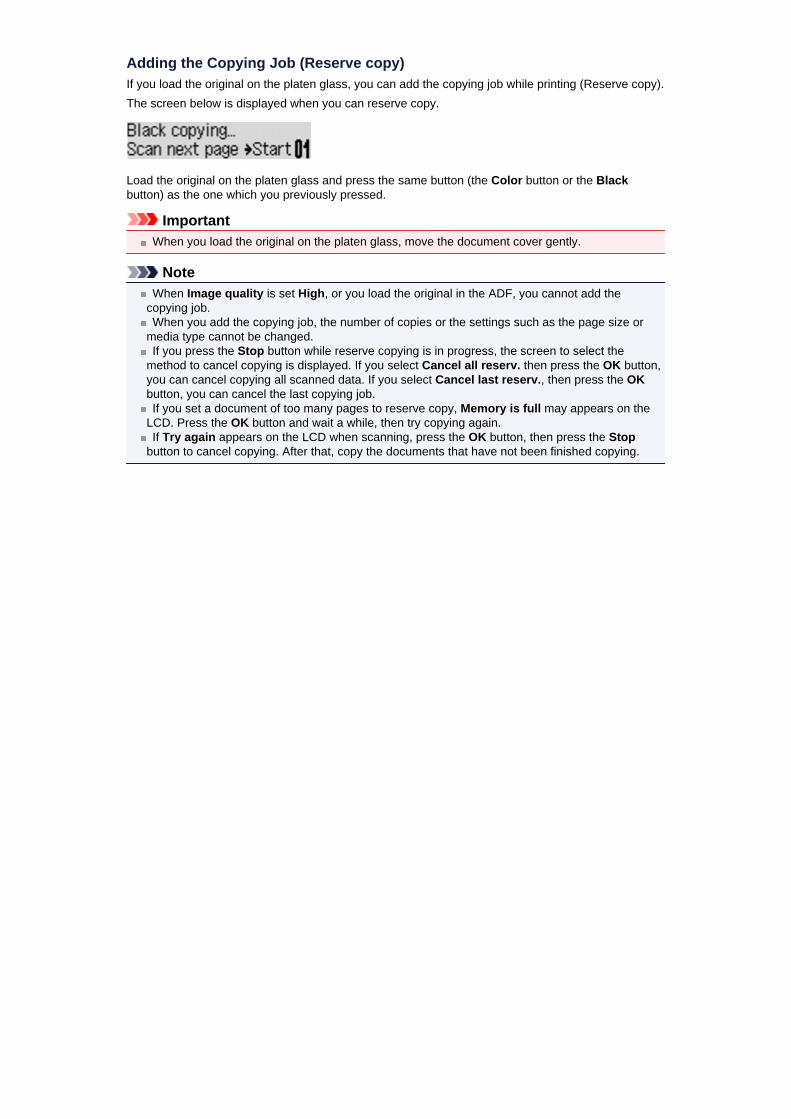
Adding the Copying Job (Reserve copy)If you load the original on the platen glass, you can add the copying job while printing (Reserve copy).The screen below is displayed when you can reserve copy.
Load the original on the platen glass and press the same button (the Color button or the Blackbutton) as the one which you previously pressed.
ImportantWhen you load the original on the platen glass, move the document cover gently.
NoteWhen Image quality is set High, or you load the original in the ADF, you cannot add the
copying job.When you add the copying job, the number of copies or the settings such as the page size or
media type cannot be changed.If you press the Stop button while reserve copying is in progress, the screen to select the
method to cancel copying is displayed. If you select Cancel all reserv. then press the OK button,you can cancel copying all scanned data. If you select Cancel last reserv., then press the OKbutton, you can cancel the last copying job.If you set a document of too many pages to reserve copy, Memory is full may appears on the
LCD. Press the OK button and wait a while, then try copying again.If Try again appears on the LCD when scanning, press the OK button, then press the Stop
button to cancel copying. After that, copy the documents that have not been finished copying.

Setting ItemsYou can change the copy settings such as the page size, media type, and intensity.
Press the Menu button, use the button to select a setting item, then press the OK button.
Use the button to adjust each setting item, then press the OK button. The next setting item isdisplayed.The LCD returns to the Copy standby screen when all the settings are complete.
NoteThe * (asterisk) on the LCD indicates the current setting.Some settings cannot be specified in combination with the setting of other setting items or the
copy menu.The settings of the page size, media type, etc. are retained even if the machine is turned off.
• Enlarge/ReduceSelect the reduction/enlargement method.
Reducing or Enlarging a CopyEx:
• Copy intensityChange the intensity.Ex:
NoteIf you select Auto adjust, load the original on the platen glass.If you select Manual adjust, use the button to decrease the intensity or the button to
increase it.
• Page sizeSelect the page size of the loaded paper.Ex:
• Media typeSelect the media type of the loaded paper.Ex:
• Image qualitySelect the image quality according to the original.Ex:

NoteIf you use Fast with the media type set to Plain paper and the quality is not as good as
expected, select Standard or High and try copying again.Select High to copy in grayscale. Grayscale renders tones in a range of grays instead of
black or white.

Reducing or Enlarging a CopyYou can specify the magnification optionally or select the preset-ratio copying or fit-to-page copying.
In the copy mode, press the Menu button, use the button to select Enlarge/Reduce, thenpress the OK button.
Use the button to select the reduction/enlargement method, then press the OK button.Ex:
NoteSome of the reduction/enlargement methods are not available depending on the copy menu.
• Preset ratioYou can select one of the preset ratios to reduce or enlarge copies.
Use the button to select a preset ratio to match the size of your original document andprinting paper, then press the OK button.
• MagnificationYou can specify the copy ratio as a percentage to reduce or enlarge copies.
Use the (-) (+) button or the Numeric buttons to specify the reduction or enlargement ratio(25 - 400%), then press the OK button.
NotePress and hold the (-) (+) button to quickly advance through the ratios. For details,
see Key repeat.
• Fit to pageThe machine automatically reduces or enlarges the image to fit the page size.
NoteWhen you select Fit to page, the document size may not be detected correctly depending
on the original. In this case, select Preset ratio or Magnification.When Fit to page is selected, load the document on the platen glass.

About Special copy MenuThe following menus are selectable in the Special copy menu.
• Frame erase copyWhen copying thick originals such as books, you can make a copy without black margins aroundthe image and gutter shadows.
Copying Thick Originals Such as Books
• Borderless copyYou can copy images so that they fill the entire page without borders.
Copying without Borders
• 2-on-1 copyYou can copy two original pages onto a single sheet of paper by reducing each image.
Copying Two Pages to Fit onto a Single Page
• 4-on-1 copyYou can copy four original pages onto a single sheet of paper by reducing each image.
Copying Four Pages to Fit onto a Single Page
• Collated copyYou can obtain sorted printouts when making multiple copies of a multi-paged original.
Collated Copying

Copying Two Pages to Fit onto a Single PageYou can copy two original pages onto a single sheet of paper by reducing each image.
1. Make sure that the machine is turned on.Confirming that the Power Is On
2. Load paper.Loading Paper
3. Press the COPY button.The Copy standby screen is displayed.
4. Press the Menu button.The Copy menu screen is displayed.
5. Use the button to select Special copy, then press the OK button.
6. Use the button to select 2-on-1 copy, then press the OK button.If a page size setting or a media type setting that cannot be used in 2-on-1 copying is selected,the LCD displays the following message.
1. Use the button to select the page size, then press the OK button.
2. Use the button to select the media type, then press the OK button.
7. Load the original document on the platen glass or in the ADF.Loading Originals
8. Use the (-) (+) button or the Numeric buttons to specify the number ofcopies.Change the print settings as necessary.
Setting Items
9. Press the Color button for color copying, or the Black button for black & whitecopying.
• When the document has been loaded on the platen glass:When the machine finishes scanning the first document, the message below is displayed.

If you have the next sheet of document to scan, load it on the platen glass and press theOK button. The machine starts copying.If you do not need more scanning, press the tone button to start copying. The machinestarts copying.
NoteYou can add the copying job while printing.
Adding the Copying Job (Reserve copy)
• When the document has been loaded in the ADF:The machine starts scanning the next sheet of document automatically after one sheet ofdocument finishes being scanned.
NoteIf Memory is full appears on the LCD when scanning, set the image quality to Standard or
reduce the number of sheets of documents, then try copying again. If the problem is notresolved, set the image quality to Fast and try copying again.

Copying Four Pages to Fit onto a Single PageYou can copy four original pages onto a single sheet of paper by reducing each image. Four differentlayouts are available.
Layout 1 Layout 2
Layout 3 Layout 4
1. Make sure that the machine is turned on.Confirming that the Power Is On
2. Load paper.Loading Paper
3. Press the COPY button.The Copy standby screen is displayed.
4. Press the Menu button.The Copy menu screen is displayed.
5. Use the button to select Special copy, then press the OK button.
6. Use the button to select 4-on-1 copy, then press the OK button.If a page size setting or a media type setting that cannot be used in 4-on-1 copying is selected,the LCD displays the following message.
1. Use the button to select the page size, then press the OK button.
2. Use the button to select the media type, then press the OK button.
7. Specify the layout.Follow the procedure below to select the layout.
1. Press the Menu button.The Copy menu screen is displayed.

2. Use the button to select 4-on-1 layout, then press the OK button.3. Select the layout, then press the OK button.
Select the layout from Layout 1, Layout 2, Layout 3, or Layout 4.
NoteThe * (asterisk) on the LCD indicates the current setting.
8. Load the original document on the platen glass or in the ADF.Loading Originals
9. Use the (-) (+) button or the Numeric buttons to specify the number ofcopies.Change the print settings as necessary.
Setting Items
10. Press the Color button for color copying, or the Black button for black & whitecopying.
• When the document has been loaded on the platen glass:When the machine finishes scanning each sheet from the first to the third document, themessage below is displayed.
If you have the next sheet of document to scan, load it on the platen glass and press theOK button. The machine starts copying.If you do not need more scanning, press the tone button to start copying. The machinestarts copying.
NoteYou can add the copying job while printing.
Adding the Copying Job (Reserve copy)
• When the document has been loaded in the ADF:The machine starts scanning the next sheet of document automatically after one sheet ofdocument finishes being scanned.
NoteIf Memory is full appears on the LCD when scanning, set the image quality to Standard or
reduce the number of sheets of documents, then try copying again. If the problem is notresolved, set the image quality to Fast and try copying again.

Copying Thick Originals Such as BooksWhen copying thick originals such as books, you can make a copy without black marginsaround the image and gutter shadows. Using this function, you can reduce unnecessary inkconsumption.
1. Make sure that the machine is turned on.Confirming that the Power Is On
2. Load paper.Loading Paper
3. Press the COPY button.The Copy standby screen is displayed.
4. Press the Menu button.The Copy menu screen is displayed.
5. Use the button to select Special copy, then press the OK button.
6. Use the button to select Frame erase copy, then press the OKbutton.
7. Load the original on the platen glass.Loading Originals
NoteWhen you use this function, load the original on the platen glass.
8. Use the (-) (+) button or the Numeric buttons to specify the numberof copies.Change the print settings as necessary.
Setting Items
9. Press the Color button for color copying, or the Black button for black &white copying.The machine starts copying.
NoteClose the document cover.There may be a narrow black margin that appears around the image. This function
removes the dark margins only. If a scanned book is too thin or when the machine is usednear a window or in a bright environment, a faint black frame may remain. Also, if the colorof an original is dark, the machine cannot distinguish the document color from the shadowand this may cause slight cropping or a shadow on the crease.

Copying without BordersYou can copy images so that they fill the entire page without borders.
1. Make sure that the machine is turned on.Confirming that the Power Is On
2. Load the photo paper.Loading Paper
3. Press the COPY button.The Copy standby screen is displayed.
4. Press the Menu button.The Copy menu screen is displayed.
5. Use the button to select Special copy, then press the OK button.
6. Use the button to select Borderless copy, then press the OK button.If a page size setting or a media type setting that cannot be used in borderless copying isselected, the LCD displays the following message.
1. Use the button to select the page size, then press the OK button.
2. Use the button to select the media type, then press the OK button.
7. Load the original document on the platen glass.Loading Originals
NoteWhen you use this function, load the original on the platen glass.
8. Use the (-) (+) button or the Numeric buttons to specify the numberof copies.Change the print settings as necessary.
Setting Items
9. Press the Color button for color copying, or the Black button for black &white copying.The machine starts borderless copying.
Note

Slight cropping may occur at the edges since the copied image is enlarged to fill the wholepage. You can change the width to be cropped from the borders of the original image asneeded. However, the cropped area will be larger if the extension amount is large.For details:
Extended copy amt.For details on the paper size and the media type available for borderless copying:
Printing Area

Collated CopyingYou can obtain sorted printouts when making multiple copies of a multi-paged original.
• When Collated copy is selected:
• When Collated copy is not selected:
1. Make sure that the machine is turned on.Confirming that the Power Is On
2. Load the paper.Loading Paper
3. Press the COPY button.The Copy standby screen is displayed.
4. Press the Menu button.The Copy menu screen is displayed.
5. Use the button to select Special copy, then press the OK button.
6. Use the button to select Collated copy, then press the OKbutton.
7. Load the original in the ADF.Loading Originals
NoteWhen you use this function, load the original in the ADF.
8. Use the (-) (+) button or the Numeric buttons to specify thenumber of copies.Change the print settings as necessary.
Setting Items

9. Press the Color button for color copying, or the Black button for black& white copying.The machine starts copying.
NoteThe number of pages the machine can read varies with the document. If Memory is
full appears on the LCD when scanning, reduce the number of document pages toscan and try copying again.