online student pre-registration user guide · pdf fileto use the online student...
TRANSCRIPT

DEPARTMENT OF DEFENSE EDUCATION ACTIVITY
ONLINE STUDENT PRE-REGISTRATION USER GUIDE
Version 1.0

TABLE OF CONTENTS
I. CHAPTER 1 – GETTING STARTED
A. INTRODUCTION ............................................................ 1
B. FREQUENTLY ASKED QUESTIONS ........................................ 1
C. GETTING STARTED ........................................................ 2
II. CHAPTER 2 – ACCOUNT MANAGEMENT
A. CREATING AN ACCOUNT .................................................. 3
B. LOGGING IN FOR THE FIRST TIME ..................................... 14
C. UPDATING YOUR ACCOUNT INFORMATION ........................... 20
D. RESETTING A FORGOTTEN PASSWORD ................................ 22
III. CHAPTER 3 – PRE-REGISTRATIONS
A. CREATING A NEW PRE-REGISTRATION ............................... 23
B. EDITING A PRE-REGISTRATION ........................................ 23
C. COMPLETING A PRE-REGISTRATION ................................... 24
1. COMPLETING THE START SECTION ............................. 26
2. COMPLETING SECTION I ......................................... 28
3. COMPLETING SECTION IIA ...................................... 34
4. COMPLETING SECTION IIB ...................................... 36
5. COMPLETING SECTION III ...................................... 38
6. COMPLETING SECTION IV ....................................... 40
7. COMPLETING THE FINISH SECTION ............................ 42
D. SUBMITTING A PRE-REGISTRATION ................................... 44
E. RECALLING A PRE-REGISTRATION ..................................... 46
F. VIEWING A PRE-REGISTRATION ....................................... 48
Page 1
I. CHAPTER 1 – GETTING STARTED
A. INTRODUCTION
Welcome to the user guide for the Department of Defense Education Activity’s Online
Student Pre-Registration application. This web-based application will enable you to pre-
register your children for DoDEA schools. It can be found at https://registration.dodea.edu/.
First, please read the frequently asked questions in the section below.
B. FREQUENTLY ASKED QUESTIONS
1. Do I have to use the online pre-registration system?
No, you can go to the school where your dependent will attend or to the centralized
registration site. It is recommended that you call or email ahead of time to find out if the
school community has a centralized site.
2. If I complete the online forms, do I still have to go to the school for any
reason?
Yes, you will still have to go to the school to update the documents (new address or phone
number), as well as complete other forms (bus routes, English as a Second Language,
media and internet), and sign the official registration request. If you did not attach a copy
of orders/source documents for enrollment, then you will need to provide them at that time.
3. Why should I complete the online pre-registration if I have to go to the school
to complete the registration process?
Completing the online registration will reduce the amount of time you will have to wait at
the registration site.
4. Can I attach documents in the online pre-registration program?
Yes. We encourage you to attach a copy of your orders, verification of birth date for
students entering kindergarten or 1st grade, immunization records, etc.
5. I'm not sure which housing community we will be living in overseas at our next
base, how do I pre-register for my dependent's school?
This system allows you to select the country and base/community if you know them. They
are not required for pre-registration. If you do know where you will be living then specifying

Page 2
the country and base/community will reduce the amount of time you will have to wait at the
registration site.
6. Can I use this system to register a student that is already enrolled and
returning to the same school next year (referred to as re-registration)?
No, this system cannot re-register a student. We are working on a module that will allow
you to do that and fully expect it to be operational for re-registration in School Year 2011-
12.
C. GETTING STARTED
To use the Online Student Pre-Registration system, you need two things: a computer with
an internet connection and a compatible web browser. This system has been tested for use
with the following web browsers:
Browser Platform
Microsoft Internet Explorer 7 or later (Windows only)
Mozilla Firefox 3.5 or later (Windows, Mac or Linux)
Apple Safari 5 or later (Windows or Mac)
Opera 10.5 or later (Windows, Mac or Linux)
If you decide to use a browser other than the ones listed in the table above, the Online
Student Pre-Registration system may not work as designed. If you would like to update
your browser to the latest version, you can browse to one of the sites below to download
and install an updated version of your preferred web browser:
Browser Upgrade Download Site
Internet Explorer http://www.microsoft.com/windows/internet-explorer/
Mozilla Firefox http://www.firefox.com/
Apple Safari http://www.apple.com/safari/download/
Opera http://www.opera.com/browser/
II. CHAPTER 2 – ACCOUNT MANAGEMENT

Page 3
A. CREATING AN ACCOUNT
Open your web browser and go to the following URL:
https://registration.dodea.edu/
When the page loads, you should see the following screen:
Click the “OK” button if you agree to the conditions. After you click the “OK” button, the
following page will load:

Page 4
There are three sections along the right hand side of this page. The first (top) section
enables you to create an account. The second (middle) section enables you to log in after
you have created your account. The third (bottom) section enables you, after you have
created your account, to have a randomly generated password emailed to you if you forget
your password. See part D – Resetting a Forgotten Password for more information.
The first (top) section is the one we are most interested in since it enables you to create
your account. Click the “Create a new account” button to begin the process of creating your
personal account. You should see the following page:

Page 5
First, the orange bar along the top of the page shows the steps that you will have to
complete in order to create your account. In this case there are three steps: Step 1, Step 2
and Finish. In Step 1 you enter a username and password of your choosing. In Step 2, you
enter basic contact information. In the Finish step you are given a chance to go back and
review your information before you create your account. Let’s begin with completing Step 1.

Page 6
As you can see in the picture above, there are many colored boxes along the right-hand
side of the page. These boxes are indicators of the completion status of each field you must
fill out in order to create your account. All but one start out red, which means they are
blank and need to be completed. The other box is blue, which means it is optional and does
not have to be filled out in order to create your account, but you can fill it out if you like.
Since you are on Step 1, you must enter a username and password of your choosing before
you can continue to the next step. Underneath the username field is a red box that indicates
the requirements of a valid username for this system. A valid username must be at least six
(6) letters and/or numbers in length but no longer than 50. Spaces, special characters and
punctuation are not allowed. The red box will turn green when you have entered a valid
username. Usernames are not case sensitive.
Examples of valid usernames:
• johnsmith
• JSmith
• smith21
• js1967one
Examples of invalid usernames:
• john.smith (has punctuation)
• J-Smith# (has special characters)
• $mith21% (has special characters)
• js 1967 one (has spaces)
After you have entered a valid username, you need to choose a valid password. Underneath
the password fields are six (6) red boxes, each of which indicates a requirement that must
be met for a valid password. They are, from top to bottom:
• Must be at least 10 characters long but not longer than 50 characters
• Must contain at least 1 uppercase letter
• Must contain at least 1 lowercase letter
• Can contain special characters (~!@#$%^&*_+-)
• Must contain at least 1 number
• Your password is valid and matches your confirmation password

Page 7
Each box will turn green as each requirement is met while you enter your password. If you
have entered an invalid username and/or password, you may see something similar to the
following picture:
Notice how the completion status boxes along the right are yellow and indicate that the
Username, Password and Confirm Password fields are invalid. In the picture above, the
username is invalid because it contains a space (the box beneath the username is also red,

Page 8
indicating the username is invalid). The entered passwords are also invalid because three
(3) of the six (6) requirements listed below the fields have not been met. The boxes that
are green indicate those requirements have been met. In the picture above, the following
requirements have been met:
• Must be at least 10 characters long but not longer than 50 characters
• Must contain at least 1 lowercase letter
• Can contain special characters (~!@#$%^&*_+-)
and the following requirements have not been met:
• Must contain at least 1 uppercase letter
• Must contain at least 1 number
• Your password is valid and matches your confirmation password
If you have not met the requirements for your username and password, please review them
and enter a new username and/or password which meets the requirements. You will not be
allowed to continue to the next step until you have successfully met the requirements for
your username and password choices.
Once you have entered a valid username and password you should see something similar to
the following picture:

Page 9
The requirements box for the username is green, indicating that a valid username has been
entered. All of the requirements boxes for the password are green as well, indicating that a
valid password has been entered and confirmed. Notice the completion status boxes on the
right are green and show that the Username, Password and Confirm Password fields are
now complete. Now that you have entered a valid username and password, click the “Next”
button at the bottom of the page to go to the next step.
Page 10
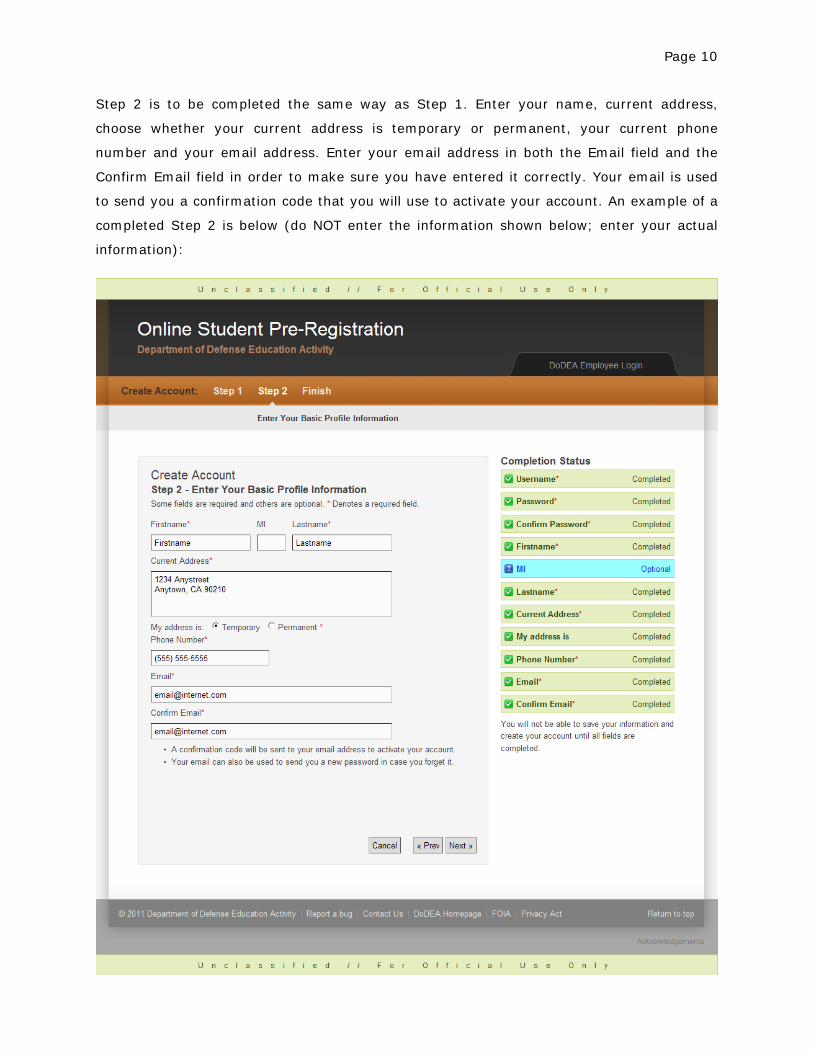
Step 2 is to be completed the same way as Step 1. Enter your name, current address,
choose whether your current address is temporary or permanent, your current phone
number and your email address. Enter your email address in both the Email field and the
Confirm Email field in order to make sure you have entered it correctly. Your email is used
to send you a confirmation code that you will use to activate your account. An example of a
completed Step 2 is below (do NOT enter the information shown below; enter your actual
information):

Page 11
Once you have successfully entered your current information, click on the “Next” button
again to go to the Finish step.
The Finish step gives you the opportunity to review your entries by clicking on the “Prev”
button to go back to the previous steps. When you have finished reviewing each step, you
can click the “Next” button to get back to the Finish step.

Page 12
The Finish step is also where you enter the letters shown in the picture. This is called a
CAPTCHA, which keeps malicious computer systems and programs, known as bots, from
creating accounts. If you would like to read more about CAPTCHAs, you can read the article
about it on Wikipedia (DoDEA does not endorse Wikipedia or its content) at:
http://en.wikipedia.org/wiki/CAPTCHA
Enter the letters you see in the picture into the box. The letters are not case sensitive, so if
a letter is shown as an “A”, you can still enter an “a”. Remember, these are letters only;
numbers are not a part of the random characters.
If you enter the wrong letters for the CAPTCHA, and you click the “Save my information and
create my account” button, you will be prompted to enter a new set of letters. If you cannot
read the letters in the picture, you can click the “Try Another” button that is next to the box
where you enter the letters. Clicking this button will load a new picture with a different set
of letters for you to enter. If have entered the wrong letters, you will see something similar
to the picture below:

Page 13
Once you have successfully entered all of your information as well as the CAPTCHA letters,
click on the “Save my information and create my account” button to do just that. Your
account will be created and you will be taken to the main page that we saw earlier. This
time it also has a message along the top of the page notifying you of the success:

Page 14
Don’t forget to check the email account you entered during your account creation for the
email from [email protected] with the subject of “DoDEA Online Student Pre-
Registration Account Confirmation”. Please wait about 10 minutes for the email to arrive. If,
after 10 minutes, you cannot find the email, it may be in your Junk email folder.
B. LOGGING IN FOR THE FIRST TIME
Once you have received your account creation confirmation email, follow the instructions in
the email to activate your account. The contents of the email should be similar to the
following:

Page 15
The activation code in the email is in the form of alternating letters and numbers. The
activation code in the example email above is J1S9-V6T4. This means that it is the letter J,
the number 1, the letter S, the number 9, the letter V, the number 6, the letter T and the
number 4.
Log into the site with the username and password you chose during account creation. If you
type in an incorrect password five (5) times in a row, when trying to log in, your account
will be locked for five (5) minutes for the safety of your data. When you successfully log in
for the first time you should see something like the picture below:

Page 16
Enter in the activation code you received in your confirmation email. You can either type the
code in manually or you can copy and paste it from your confirmation email. Once you have
entered your confirmation code, you should see something like the picture below (enter the
confirmation code you received in your email, not the one in this example):

Page 17
Click the “Activate my account” button to activate your account. If you did not enter your
confirmation code correctly, you will see something similar to the picture below and will
have to enter your code and click the “Activate my account” button again:

Page 18
If you entered your activation code correctly you should see something similar to the
following:

Page 19
Once you have activated your account, you will be able to create a new pre-registration.
First, let’s break down what you see in the picture above since this is your home page when
you log in. The screen is divided into two halves, a left half and a right half. The left half is
titled “Getting Started” and provides links to create a new pre-registration and, once you
have created your pre-registration for this school year, edit an existing pre-registration you

Page 20
have already created. The right half of the screen contains three sections. The top section,
titled “Is your information current?”, shows your contact information and provides a link
(labeled “Update
The middle section, titled “Other Document Links”, is further divided into two halves. The
left half lists documents which should be completed for every child. For example, if you
have three (3) children, then you would have to download and/or print three (3) copies of
each document listed in the left half, one for each child. Conversely, the right half lists
documents which should be completed once by the sponsor. Therefore, no matter how
many children you have, you only have to download and/or print each document listed in
the right half once. If you are registering your children into more than one school, however,
make sure to make enough copies of the completed sponsor forms so that you can turn in
one copy to every school.
”) to the right of the title to update your information. See part C – Updating
Your Account Information below for more details.
The final section, titled “Frequently Asked Questions” only provides a link (labeled “View
C. UPDATING YOUR ACCOUNT INFORMATION
”) to
view the frequently asked questions page. This page lists informative questions and answers
and may be periodically updated. A similar frequently asked questions section is provided on
pages one and two (1-2) of this document.
On your home page, you can click either the “Update” link next to the “Is your information
current?” section on the right or you can click the “My Account” link at the top right, in
between the “Home” and “Logout” links, to go to the page that will allow you to update your
account information. When you click either of the links, you may see something similar to
the picture below:

Page 21

Page 22
This page is similar to what you saw when you created your account. The information you
entered during the account creation process can be updated by using this page. Just click on
the information you would like to change and type in the new value.
If you choose to update your email address, a confirmation email will be sent to both your
old and new email addresses in order to inform you of the change. Please note that every
field is required except for the “Password” and “Confirm Password” fields. The two (2)
password fields are only required if you would like to change your password. If you decide
to change your password, keep the password requirements in mind. They are, from top to
bottom:
• Must be at least 15 characters long but not longer than 50 characters
• Must contain at least 1 uppercase letter
• Must contain at least 1 lowercase letter
• Must contain at least 1 special character (~!@#$%^&*_+-)
• Must contain at least 1 number
• Your password is valid and matches your confirmation password
When you are done entering in your updated information, click the “Update My Account”
button. If you do not want to change your account information, click the “Cancel” button.
D. RESETTING A FORGOTTEN PASSWORD
Each time you visit the Online Student Pre-Registration site, before you log in, there is a
place for you to enter your username in case you forgot your password. See page 4 if you
have forgotten where this is located. If you choose to enter your username and click the
“Generate a new password” button, a new, randomly generated password will be emailed to
the email address you provided when you created your account (or the updated email
address if you changed it when you updated your account). Follow the instructions provided
in the email to log in with the random password and do not forget to set a new password by
updating your account. Please note the random password is 15 characters long, so if you do
not type 15 characters for the password when you go to log in you will not be successful. If
you would like to read more on how to set a new password, see part C – Updating Your
Account Information above.

Page 23
Don’t forget to check the email account you entered during your account creation (or
changed when you updated your account information) for the email from
[email protected] with the subject of “DoDEA Online Student Pre-Registration New
Password”. Please wait about 10 minutes for the email to arrive. If, after 10 minutes, you
cannot find the email, it may be in your Junk email folder.
III. CHAPTER 3 – PRE-REGISTRATIONS
A. CREATING A NEW PRE-REGISTRATION
Creating a new pre-registration allows you to enter you and your child(ren)’s information
into this system in order to speed up the registration process at the local school. Remember
that even though you will have entered your information into this system, you are still
required to go to the local school to register your child(ren). Also remember that entering
information into this system does not guarantee admission into a DoDEA school.
While on your home page, right after logging in or clicking the “Home” link at the top right
of any page, click on the “New Pre-Registration
If you have already created a pre-registration, continue reading in part B – Editing a Pre-
Registration below for guidance on how to edit your pre-registration.
” link in the left half of your home page. This
will take you to the Pre-Registration page. Continue reading in part C – Completing a Pre-
Registration below for guidance on how to complete your pre-registration.
B. EDITING A PRE-REGISTRATION
If you have already created one or more pre-registrations, then you will notice that they are
listed under the “Edit Pre-Registration” section:

Page 24
The table lists the pre-registrations you have already created. It shows the school year that
each pre-registration is for, its location (if you selected one) and either an “Edit” or “View”
link. The “Edit” link allows you to continue editing your pre-registration. If you would like to
read on how to edit your pre-registration, continue reading in part C – Completing a Pre-
Registration below. The “View
C. COMPLETING A PRE-REGISTRATION
” link allows you to view an already-submitted pre-
registration. If you would like to read on how to view your pre-registration, please read part
F – Viewing a Pre-Registration.
Let’s take a look at the different parts of the pre-registration page:

Page 25
The orange bar across the top of the page lists the sections you have to complete before
you can submit your pre-registration to the registrar. In this case it is showing seven (7)
sections: “Start”, “Section I”, “Section IIa”, “Section IIb”, “Section III”, “Section IV” and
“Finish”. It also allows you to navigate from one section to another by clicking on the name
of the section. The gray bar underneath shows the description of what the section is for.
Please note that you must select your child(ren)’s entering school year on the Start section
before you can navigate to another section.

Page 26
There is a link titled “Scroll Here
Again, just like when you created your account, the right side of the page shows the
completion status. However, unlike when you created your account, it only lists the
completion status for the fields that are for currently shown section. Required fields still
have red stars next to their names and show up as a red box when not completed. Optional
fields show up as blue boxes and completed fields turn into green boxes. You can also click
the name of the field in its box to put focus to that field. Clicking the name of the field will
highlight that field and make sure it is shown on the screen so that you may complete it.
” which is immediately to the right of the “* Denotes a
required field” text. Clicking this link will scroll your page to the point where most, if not all,
of the form should be visible on your screen. For this to be most effective, please make sure
your web browser is maximized to fill your whole screen. This should allow you to see the
fields to complete as well as the “Prev” and “Next” buttons.
1. COMPLETING THE START SECTION
Try clicking the red box on the right that is labeled “Entering School Year”. Notice that it has
a star next to the name, indicating that it is a required field. After you have clicked the
underlined text, the Entering School Year dropdown field will be highlighted in a pale blue
color. Click the down arrow next to the “Select one” text in the pale-blue section to show a
list of selectable school years. You should see something similar to what is shown below:

Page 27
Select your desired school year from the dropdown list. Once you have selected your
entering school year, the status indicator for that field will turn green and you will be
allowed to navigate to another section.
Please note that you do not have to click on the completion status box to complete each
field. You can directly click on a field and complete it as well. Clicking on the completion
status box is just a convenient way to select a field if you cannot easily find it.

Page 28
Select your destination country if you know it. Notice that it is listed as optional along the
right hand side of the page and that it does not have a red star next to its name. Once you
select your destination country, another dropdown box for selecting your destination state
or base will appear. If the new dropdown box that appeared is for choosing your destination
state, and you select a state, then another dropdown box will appear to select your
destination base. If you choose to select a destination base, another dropdown will appear
to select your destination school. If there is only one DoDEA school at your chosen location,
it will automatically be selected. If there is more than one school available for you to select
from, then they will be listed along with two other options:
• At this time I am not aware of the school (this is selected by default)
• I will be enrolling my children into more than one school
Use the first option, which is selected by default, to indicate that you are not currently
aware of where your child(ren) will be attending. Use the second option to indicate that you
will be enrolling your children into more than one school. If you know the specific school
that your child(ren) will be attending, then you may select it from the dropdown list.
If you decide to change your destination base then the destination school list will update
with the school(s) at the newly selected location. If you decide to change your destination
state (if applicable) then the destination base list will update and the destination school list
will not be available until you select a new base. The same applies for when you change
your destination country. All of the later selection dropdown boxes will either update or be
unavailable until you select each new part of your location.
Once you have selected your entering school year and have selected as much as you know
about your destination, you can click the “Next” button that is near the bottom of the page.
You may have noticed there are other buttons there as well. There is a “Cancel” button
which will discard any changes you have made to the current section. There is a “Prev”
button which will navigate to the previous section (if there is one). Each time you click the
“Prev” or “Next” buttons, the information you have entered for the step you are navigating
away from is automatically saved.
In addition, there is a “Save” button which allows you to manually save the information you
have entered for the current section. This enables you to save your information if you need
to step away from your computer for a while. If the “Save” button is disabled and grayed
out then your information has already been saved.

Page 29
2. COMPLETING SECTION I
Section I is where you enter information about your child(ren). This information includes
their legal name, preferred name, current location phone number, gender, birth date,
whether or not they have previously been a DoDEA student, their relationship to the
sponsor and their citizenship status. There is also a short questionnaire that helps us better
understand the educational needs of each child. For this questionnaire, you must answer the
first four questions (1-4). If you answer “Yes” to any of the first four questions, you must
answer questions five through ten (5-10). If you answer “No” to the first four questions
then you do not have to answer questions five through ten. Regardless of how you answer
the first four questions you must review and answer questions 11 and 12 if they are
applicable.
Section I is a bit different from the other sections. An annotated picture is below which
describes all of the special elements which make up this section:

Page 30
Again, these special elements only apply to Section I. They are as follows:
1. Scrollbar – The up arrow for the scrollbar allows you to scroll up through the fields for
the current child. These fields include the basic student information as well as the special
education questionnaire.
2. Scrollbar – The down arrow for the scrollbar allows you to scroll down through the
fields for the current child. These fields include the basic student information as well as
1
2
3
4
5
6

Page 31
the special education questionnaire.
3. Student Information Panel – This shows the number of students you are choosing to
enter as well as the current student that you are working on.
You will have to scroll down (using either the mouse
wheel or clicking the down arrow) to see the additional fields initially hidden from view.
4. Student Completion Status Legend and Navigation Bar – The legend shows what
the three different completion status icons mean: (green checkmark) indicates all
fields for the student are complete; (yellow exclamation mark) indicates one or more
fields for the student have not been completed; (red dash) indicates none of the
fields for the student have been completed. An icon or number may be clicked, with the
left mouse button, to switch to that student to complete the fields for. If a number does
not have an icon over it then that student has not been added yet.
5. Add Student and Remove Current Student – The “Add Student” button enables you
to add another student to enter information for. If the current student is blank, then you
will not be able to add another student until you have completed at least one of the
required fields. The “Remove Current Student” button removes the current student as
indicated at the top of the Student Information Panel as well as the blinking number.
6. Student Navigation Buttons – These buttons allow you to navigate back and forth
between your added students. Each button click moves forward or backward one student
at a time. If navigation in a particular direction is not possible then the appropriate
button will be disabled and grayed out. If you would like to navigate to a specific student
you may also click the appropriate icon or number as described in item 4 above.
The following fields are required for each of your children:
• First Name – Enter the first name of your child
• Last Name – Enter the last name of your child
• Gender – Select the gender of your child from the dropdown list
• Birth Date – Either enter your child’s birth date in MM/DD/YYYY format or use the
calendar that appears when you click on the field
• Entering Grade – Select the grade your child will be entering for your selected
school year from the dropdown list

Page 32
• Previous DoDEA Student – Select whether or not your child was a DoDEA student
in the past from the dropdown list.
• Citizenship – Enter the country (or countries) your child is a citizen of.
• Special Education Questions (the numbered questions from 1 through 12)
1. Use the dropdown to select if your child has received any gifted education
support. If you answer “Yes” to this question then you must answer
questions 5-10 as well.
2. Use the dropdown to select if your child has an active Individual Educational
Plan (IEP). If you answer “Yes” to this question then you must answer
questions 5-10 as well. Also, use the other dropdown to select if you have a
copy of the IEP.
3. Use the dropdown to select if your child has received any specialized
educational assessment or services. If you answer “Yes” to this question
then you must answer questions 5-10 as well. Also, use the other dropdown
to select if you have copies of the necessary documentation.
4. Use the dropdown to select if your child has received any specialized social
or emotional assessment or services. If you answer “Yes” to this question
then you must answer questions 5-10 as well. Also, use the other dropdown
to select if you have copies of the necessary documentation.
5. Use the first dropdown to select if your child was enrolled in a gifted
education/honors program. Use the second dropdown to select if test scores
are available. Also, enter the name and location of the school where your
child was enrolled in the GT/honors program in the box.
Remember if you answer “No” to questions 1-4 then you do not have to answer
questions 5 through 10.
6. Use the dropdown to select if your child was enrolled in the Exceptional
Family Member Program (EFMP). Enter the name and location of where the
program evaluation was performed in the box. Also, check the appropriate
box(es) if the evaluation was for educational and/or medical needs.
7. Use the dropdown to select if your child has been in Special Education and
has an IEP. Check the appropriate box(es) for each of the applicable reasons.
Page 33
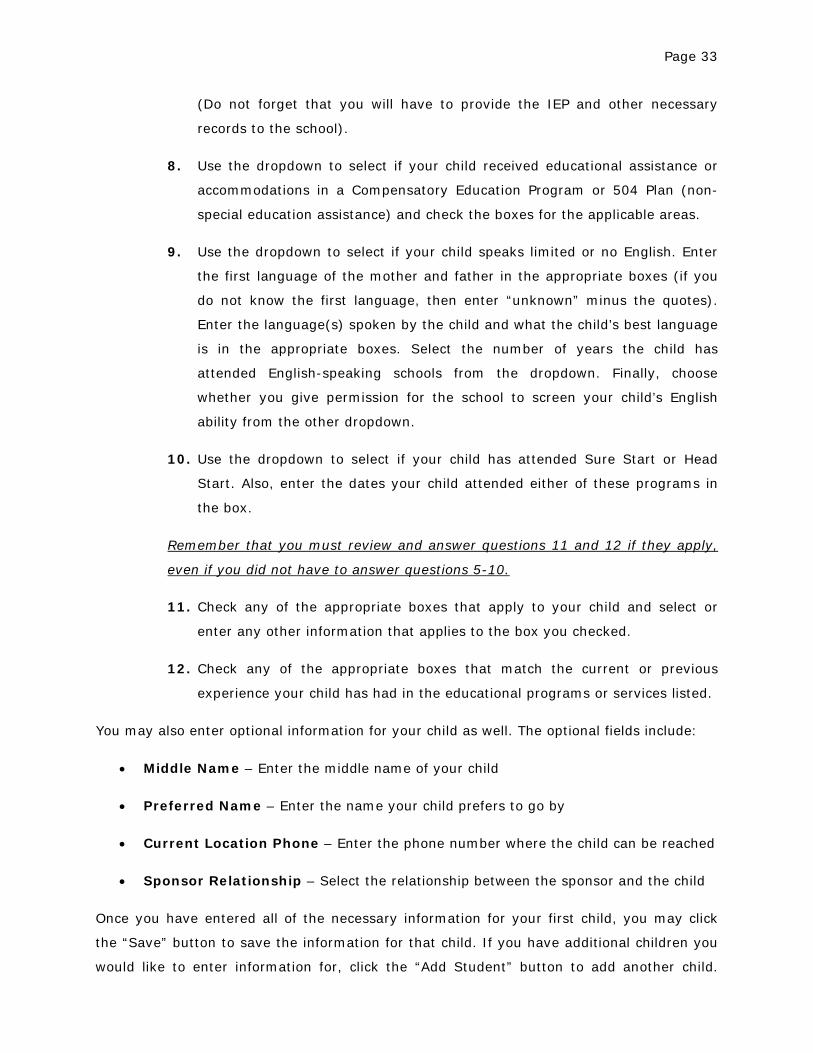
(Do not forget that you will have to provide the IEP and other necessary
records to the school).
8. Use the dropdown to select if your child received educational assistance or
accommodations in a Compensatory Education Program or 504 Plan (non-
special education assistance) and check the boxes for the applicable areas.
9. Use the dropdown to select if your child speaks limited or no English. Enter
the first language of the mother and father in the appropriate boxes (if you
do not know the first language, then enter “unknown” minus the quotes).
Enter the language(s) spoken by the child and what the child’s best language
is in the appropriate boxes. Select the number of years the child has
attended English-speaking schools from the dropdown. Finally, choose
whether you give permission for the school to screen your child’s English
ability from the other dropdown.
10. Use the dropdown to select if your child has attended Sure Start or Head
Start. Also, enter the dates your child attended either of these programs in
the box.
11. Check any of the appropriate boxes that apply to your child and select or
enter any other information that applies to the box you checked.
Remember that you must review and answer questions 11 and 12 if they apply,
even if you did not have to answer questions 5-10.
12. Check any of the appropriate boxes that match the current or previous
experience your child has had in the educational programs or services listed.
You may also enter optional information for your child as well. The optional fields include:
• Middle Name – Enter the middle name of your child
• Preferred Name – Enter the name your child prefers to go by
• Current Location Phone – Enter the phone number where the child can be reached
• Sponsor Relationship – Select the relationship between the sponsor and the child
Once you have entered all of the necessary information for your first child, you may click
the “Save” button to save the information for that child. If you have additional children you
would like to enter information for, click the “Add Student” button to add another child.

Page 34
Complete all of the fields for this child, as you did for the first child, as well. Repeat this
process for every child you would like to enter information for.
If you make a mistake and enter an extra student, or you would like to remove a student
you have already entered, select the appropriate student by clicking the student navigation
buttons or clicking the navigation bar (see page 31 for more information) and then click the
“Remove Current Student” button.
Once you have entered all of the necessary information for the children you have chosen to
provide information for, click the “Next” button to proceed to the next section.
3. COMPLETING SECTION IIA
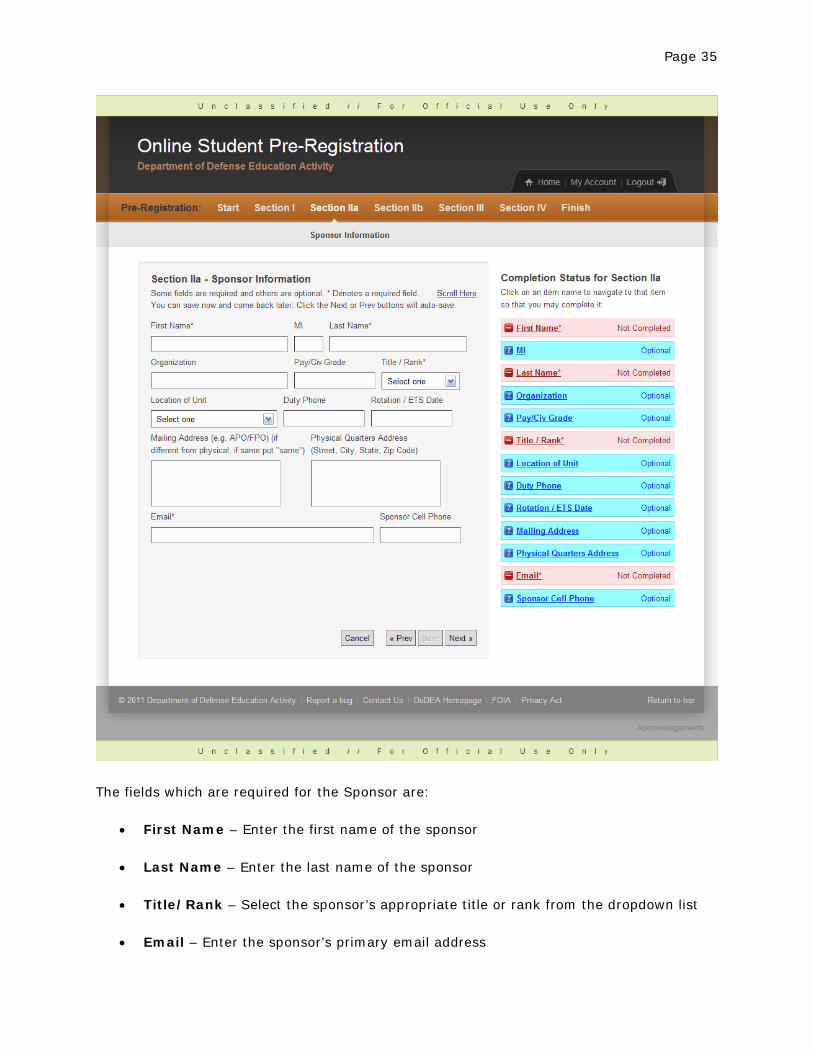
Section IIa is where you enter information about the sponsor of the children. When you
navigate to this section for the first time you will notice, as shown in the picture below, that
most of the fields are optional and only a few are required.
Page 35
The fields which are required for the Sponsor are:
• First Name – Enter the first name of the sponsor
• Last Name – Enter the last name of the sponsor
• Title/Rank – Select the sponsor’s appropriate title or rank from the dropdown list
• Email – Enter the sponsor’s primary email address
Page 36
You may also enter optional information for the sponsor as well. The optional fields include:
• MI – Enter the middle initial for the sponsor
• Organization – Enter the name of the organization the sponsor works for
• Pay/Civ Grade – Enter the grade the sponsor holds at his/her organization
• Location of Unit – Enter the new location of the sponsor’s unit
• Duty Phone – Enter the sponsor’s phone number at his/her new duty location
• Rotation/ETS Date – Enter the applicable date in a MM/DD/YYYY format or use the
calendar that appears when you click on the field
• Mailing Address – Enter the sponsor’s new location mailing address
• Physical Quarters Address – Enter the sponsor’s new location physical quarters
address
• Sponsor Cell Phone – Enter the sponsor’s cell (mobile) phone number
Once you have entered all of the necessary information for the sponsor, click the “Next”
button to proceed to the next section.
4. COMPLETING SECTION IIB
Section IIb is where you enter information about the sponsor’s spouse. When you navigate
to this section for the first time you will notice that all of the fields are optional. Only enter
information if the sponsor has a spouse. If the sponsor does not have a spouse then you
may skip this section and click the “Next” button to proceed to the next section.

Page 37
If the sponsor does have a spouse, please provide the following information:
• Spouse’s First Name – Enter the first name of the sponsor’s spouse
• MI – Enter the middle initial of the sponsor’s spouse
• Spouse’s Last Name – Enter the last name of the sponsor’s spouse
• Spouse’s Employer – Enter the name of the employer of the sponsor’s spouse

Page 38
• Spouse’s Title – Enter the title the sponsor’s spouse holds at his/her employer
• Spouse’s Duty Phone – Enter the duty phone number of the sponsor’s spouse
• Spouse’s Cell Phone – Enter the cell (mobile) phone number of the sponsor’s
spouse
Once you have entered all of the necessary information for the sponsor’s spouse (if
applicable), click the “Next” button to proceed to the next section.
5. COMPLETING SECTION III
Section III is where you enter information about the local emergency contact information at
the new location. When you navigate to this section for the first time you will notice that all
of the fields are optional. Only enter information if you know at least one (1) contact at the
new location or if you know a doctor at the new location. If you do not know at least one (1)
local emergency contact or local doctor, then you may skip this section and click the “Next”
button to proceed to the next section.

Page 39
If you know at least one local emergency contact at the new location, please provide the
following information for one or both of the local contacts:
• First Name – Enter the first name of contact 1 and optionally contact 2
• Last Name – Enter the last name of contact 1 and optionally contact 2
• Address – Enter the during-day address of contact 1 and optionally contact 2
• Duty Phone – Enter the duty phone number of contact 1 and optionally contact 2
Page 40
• Home Phone – Enter the home phone number of contact 1 and optionally contact 2
If you know a local doctor (if not a Military Clinic), then please provide the following
information:
• Doctor’s Name – Enter the name of the doctor
• Doctor’s Phone Number – Enter the doctor’s phone number
Once you have entered all of the necessary information for the local emergency contacts
and local doctor’s contact information (if applicable), click the “Next” button to proceed to
the next section.
6. COMPLETING SECTION IV
Section IV is where you enter information about the stateside emergency contact
information. When you navigate to this section for the first time you will notice that all of
the fields are required except one.

Page 41
You must provide the following information:
• Contact First Name – Enter the first name of the stateside contact
• Contact Last Name – Enter the last name of the stateside contact
• Contact Address – Enter the permanent address of the stateside contact
• Contact Home Phone – Enter the home phone number of the stateside contact

Page 42
• Relationship to Sponsor – Use the dropdown list to select the relationship of the
stateside contact to the sponsor
You may also optionally provide the middle initial of the stateside contact in the field labeled
MI. Once you have entered all of the required information for the stateside emergency
contact, click the “Next” button to proceed to the last section.
7. COMPLETING THE FINISH SECTION
The Finish section is where you can upload supporting documentation for your pre-
registration as well as finalize your information by submitting your pre-registration, along
with any uploaded files, to the registrar for review.
The Finish section is also a bit different from the other sections, as you can see in the
picture below. The different elements to the Finish step have been annotated and explained
below:
Please remember that using this system to fill out a pre-registration, and submittal to the
registrar, do not guarantee your child(ren) will be accepted for enrollment in a DoDEA
school.

Page 43
1. File Uploading – Click the button on the left (usually labeled “Browse” or “Choose File”)
to select a file to upload. After selecting a file to upload, click the “Upload File” button to
upload and attach the file to your pre-registration.
2. Uploaded File List – This list will show the files you have uploaded. If you have not
uploaded any files then there will be a blank space where the list is shown in the picture
above. Click on a file’s icon or name to open it in a new window. The file’s size and
1
2 3
4
5
6

Page 44
upload date are shown below the file’s name, along with a link to “Remove” the file (this
will permanently delete the file).
3. Scrollbar for the Uploaded File List – Use this scrollbar to scroll up and down through
the list of files that you uploaded. As shown in the picture above, the fourth file is
slightly hidden from view. Use the scrollbar to scroll the list so you can see all of your
uploaded files.
Please be aware if you open a file using its link, any changes you make to the file will
not be automatically uploaded. You will need to save the downloaded file to your
computer, make any necessary changes and then re-upload the file again. When you re-
upload a file the old one (of the same name) is overwritten and only the new one
remains.
4. Submit to the Registrar Button – Use this button to finalize your pre-registration and
submit it to the registrar. This button will be disabled and grayed out until you have
completed each section. See point 5 below for further explanation.
5. Completion Status for Each Section – This list shows the completion status for each
section. As shown in the picture above, Start, Section IIb and Section III have been
completed (the green boxes) while Section I, Section IIa and Section IV have not been
completed (the red boxes). You will be able to submit your pre-registration to the
registrar when all of the boxes are green (indicating that every section has been
completed).
6. Other Document Links and Scrollbar – These are the other document links like the
ones listed on your home page (see page 19 for an example). They include forms which
must be filled out for every child as well as forms which must be filled out once by the
sponsor. Use the scrollbar to the right of the other document links so you can see all of
the forms. Do not forget that you can download copies of these forms, complete them
and then upload copies of the completed forms using the upload buttons as described in
point 1 above.
D. SUBMITTING YOUR PRE-REGISTRATION FORM
Once you have completed each section and uploaded all of your files you can click the
“Submit to the Registrar” button. This will bring up the following dialog:
Page 45
If you have not downloaded the documents listed under the “Other Document Links”
section, then click the “No” button. This will then bring up another dialog:
This dialog provides you with links to download/view the other documents you will need to
register your child(ren) at the local school. Remember to print multiple copies of the forms
in the top section, one copy of each form for every child. You can also download these
forms, complete them and upload them to your pre-registration (see point 1 – File
Uploading on page 43). When you are done downloading the documents click the “I’m Done
Downloading” button. After you click the “I’m Done Downloading” button, you will have to
click the “Submit to the Registrar” button to bring up the first dialog again.

Page 46
If you have already downloaded and/or printed a copy of the forms for each child and for
the sponsor, then click the “Yes” button. If you click the “Yes” button, you will then be
asked if you would like to submit your form to the registrar:
You can click the “Cancel” button to continue editing your pre-registration form or click the
“OK” button to finalize and submit your pre-registration form. If you click the “Cancel”
button, and decide to click on the “Submit to the Registrar” button again, you will only be
asked if you would like to submit your pre-registration form to the registrar. You will not be
repeatedly asked if you have already downloaded the other documents.
Once you finalize and submit your pre-registration form to the registrar, by clicking the
“OK” button, it will be read only and you will not be able to make any further changes.
However, once you submit your pre-registration form, you will have some time after you
submit it to recall it so you can make changes. Recalling your pre-registration form will
allow you to edit anything on it as well as upload new files and remove previously uploaded
files.
If you do not want to submit your pre-registration form just yet, you can click the “Cancel”
button that is to the left of the “Prev” button or click on the “Home” link at the top-right of
the page.
Remember that you will have some time after you submit your pre-registration form to
recall it from the registrar so you can change/update it. Recalling your pre-registration form
is covered in part E – Recalling a Pre-Registration below.
E. RECALLING A PRE-REGISTRATION
Once you have submitted your pre-registration form it is made read-only, preventing you
from making any additional changes. However, there is a period of time where you will be
able to recall your pre-registration from the registrar in order to make it editable again.
Page 47
Recalling your pre-registration enables you to make any changes you desire. This may
include, but is not limited to: changing your destination location; adding, updating or
removing children from your pre-registration; updating emergency contact information and
even uploading additional files that you would like attached to your pre-registration for the
registrar’s review.
If the time has not expired to recall a submitted pre-registration, a link to recall the pre-
registration will be underneath the “View” link for that pre-registration, titled “Recall this
pre-registration”. This is shown in the picture below:
Clicking on this link will display a message reminding you to re-submit your pre-registration
to the registrar when you are done making your changes. After you click the “OK” button on
that message box, you will be taken back to the pre-registration page to edit your pre-
registration. Refer back to part C – Completing a Pre-Registration if you would like to review
how to complete your pre-registration.

Page 48
F. VIEWING A PRE-REGISTRATION
After you have submitted your pre-registration, you may view it for your reference later. On
your home page, under the “Edit Pre-Registration” list, click on the “View” link for the pre-
registration that you would like to view:
Clicking on the “View” link will take you to another page. This page has many parts, so an
annotated picture of it is below:

Page 49
1. Home Link – This link allows you to return to your home page, which lists your pre-
registration(s) and allows you to create new ones.
2. View Your Pre-Registration Form – This link provides you with a PDF version of your
pre-registration form for your reference. We recommend printing out a copy for your
reference.
3. View Your Special Education Forms – This link provides you with a PDF version of
your special educations forms for all of the children you entered into this pre-
registration. We recommend printing out a copy for your reference.
1
2
3
4
5
6

Page 50
4. Show Attachments Button – Clicking this button will hide the “Other Document Links”
section on the right (see point 5 below) and show the “Attached File List” instead. See
the annotated picture below for more information.
5. Other Document Links – These are links to the documents you will need to download
and/or print in order to complete them.
6. Adobe Acrobat Reader – This link will take you to the Adobe Acrobat Reader web site
which will enable you to download and install Adobe Acrobat Reader if you do not
already have it installed on your computer. This program (or another PDF reader) is
required to view PDF files on your computer. Please note that DoDEA does not endorse
Adobe or its products.
If you did not upload completed versions of these forms for the registrar then you will
need to bring the completed hard copies to the registrar when you go to the school for
registration.
If you click the “Show Attachments” button, your page may look something like the
annotated picture below:
Page 51
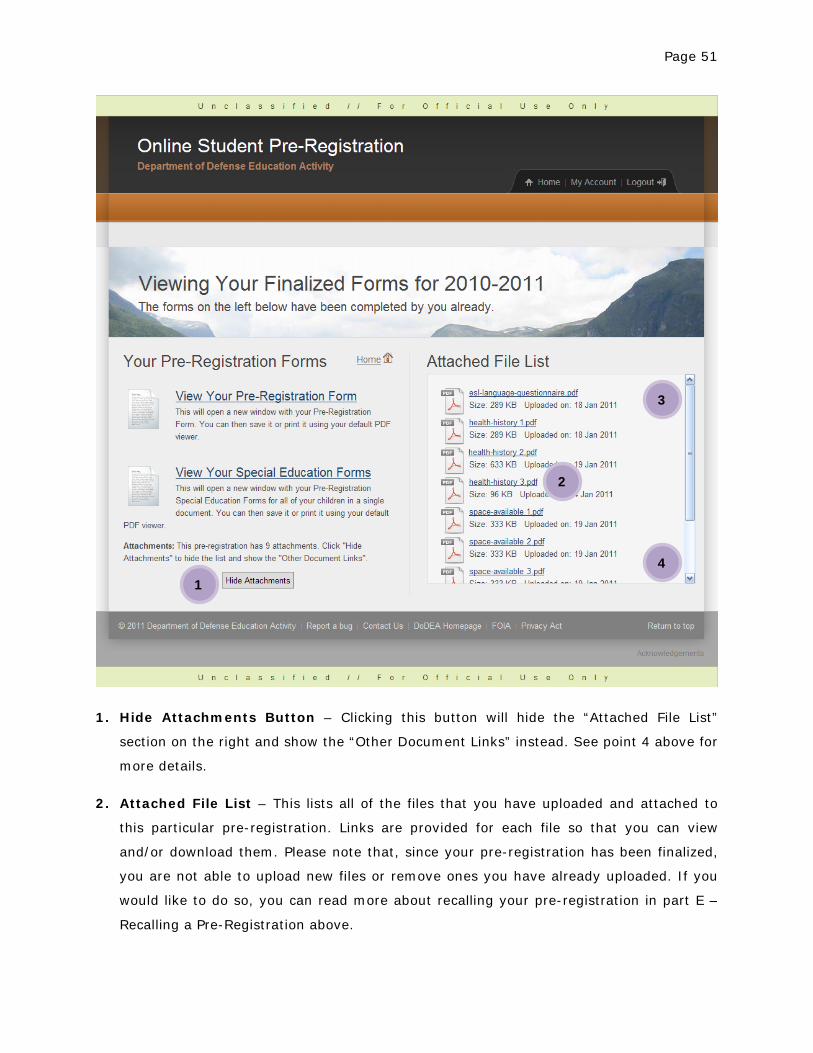
1. Hide Attachments Button – Clicking this button will hide the “Attached File List”
section on the right and show the “Other Document Links” instead. See point 4 above for
more details.
2. Attached File List – This lists all of the files that you have uploaded and attached to
this particular pre-registration. Links are provided for each file so that you can view
and/or download them. Please note that, since your pre-registration has been finalized,
you are not able to upload new files or remove ones you have already uploaded. If you
would like to do so, you can read more about recalling your pre-registration in part E –
Recalling a Pre-Registration above.
1
2
3
4

Page 52
3. Scrollbar – The up arrow for the scrollbar allows you to scroll up through the files you
have attached to this pre-registration. If you have uploaded six (6) or less files then the
scroll bar will not appear.
4. Scrollbar – The down arrow for the scrollbar allows you to scroll down through the files
you have attached to this pre-registration. If you have uploaded six (6) or less files then
the scroll bar will not appear.
If you have uploaded more than six (6) files then you will
have to scroll down (using either the mouse wheel or clicking the down arrow) to see the
additional attached files initially hidden from view.