opal quickstart guide - comrex · 2017-08-17 · opal quickstart guide introduction the comrex opal...
TRANSCRIPT

Put Comrex On The Line. Toll Free in USA: 800-237-1776 • www.comrex.com e-mail: [email protected]
19 Pine Road, Devens, MA 01434 USA Tel: +1-978-784-1776 • Fax: +1-978-784-1717
Opal Quickstart Guide
IntroductionThe Comrex Opal is a Web Audio Gateway designed for studio use. The main function of Opal is to allow two-way delivery of audio both to and from remote guests, much like a telephone call-in system. However, Opal doesn’t use phone lines. Opal receives web-based audio calls from users on computers and smartphones.There are two key advantages to using Opal:
1 Opal’s web audio uses audio encoders and decoders that delivers high-fidelity, studio quality audio while maintaining the delay of a typical mobile phone
2 Opal is designed to be extremely simple for the remote guest - non-technical callers can easily use Opal
Opal has the capability of handling two web audio calls simultaneously, and provides two input and output channels on pro-level balanced XLR or AES3. In current firmware, internal conferencing is not supported.
Opal attaches to the Internet at the studio. It has special requirements regarding networks. But these requirements all allow for the call process to be extremely simple for the guest. All the complexities are on the studio side, and the remote guest needs no special gear or setup.
All connections to Opal are incoming - no functionality is provided make outgoing connections from Opal.
Once Opal is installed and configured, connections are made to it by sending an Invite to the remote guest, via IM, email, text, snail mail, publishing the Invite, or any other means. The Invite consists of an Internet link, much like a web page. The only responsibility of the guest is to have a compatible web browser or app, a mic and headphones, and be able to click or copy the Invite.
Invites are generated by logging into Opal from the studio side via a web browser using a special password protected “Invite” account. In current firmware, Invites can be manually enabled and disabled. In future firmware, Invites can be programmed to expire after time, usage, or not at all. Invites automatically route the call to one of the two Opal audio channels, designated when the Invite is created.
CompatibilityOn the remote guest end, the caller should have access to a computer with a compatible web browser, and a microphone and headphone. Web browsers currently supported are Edge, Chrome and Opera. Firefox and Safari support is forthcoming. Opal is also compatible with Chrome on Android devices.
On iPhones and iPads, an app is available in the app store that allows connection to Opal, in advance of iOS 11, which will offer Safari support.
For best audio quality, it is recommended that the caller use a headset and wired microphone, rather than an open speaker and built-in microphone from a laptop. This is important not only with regard to noise, but isolating the local microphone from the “return” audio will make a big difference in quality. For similar reasons, for smartphone users it’s advised to use the phone as a handset, rather than a speakerphone. On smartphones, wired headsets will provide the best audio quality.

How Opal WorksOpal is installed on the studio side’s Internet connection. For best results, Opal needs a public, static IP address with a domain name assigned to it by a provider of domain names.
Invites are retrieved from Opal via the Invite web interface and transferred to the guest caller. The guest caller will click or copy the Invite in a compatible browser, and will see the Opal landing page with the “Connect” and “Mute” buttons.
Pressing “Connect” will create a high quality audio link to one of the two Opal channels. The connection will end when the caller presses the “Disconnect” button.
Opal Hardware AttachmentsThe following figure shows the Opal rear panel.
1 2 3 4 5 6 7 8
1 CH 1 INPUT - In analog mode, this XLR connector should be sent a balanced, pro-level signal that is heard by callers when they connect to Opal on Channel 1. This is usually a “mix-minus” feed created on your studio console. In digital AES3 mode, both CH 1 INPUT and CH2 INPUT are applied here (on left and right channel, respectively). AES3 available with 48KHz sampling rate only.
2 CH 2 INPUT - This analog input receives audio to be sent to callers on Channel 2. This input is disabled when in AES3 mode.
3 CH 1 OUTPUT - This analog output will deliver the audio from callers who connect to Opal Channel 1
In digital AES3 mode, both CH 1 OUTPUT and CH 2 OUTPUT are delivered here (on left and right channel, respectively). AES3 available with 48KHz sampling rate only.
4 CH 2 OUTPUT - This analog output will deliver the audio from callers who connect to Opal Channel 2. This output is disabled when in AES3.
5 Ethernet Port - Connect your network to this gigabit compatible Ethernet port.
6 Contact Closure Connector - This contains 4 contact closure input and output signals, for various remote control and tally functions as described further on.
7 Serial Port - This is an RS-232 connector that presents a serial port for future use.
8 Power Supply input - Apply the included AC desktop adapter output here. The power supply port requires 24VDC at 0.5A.
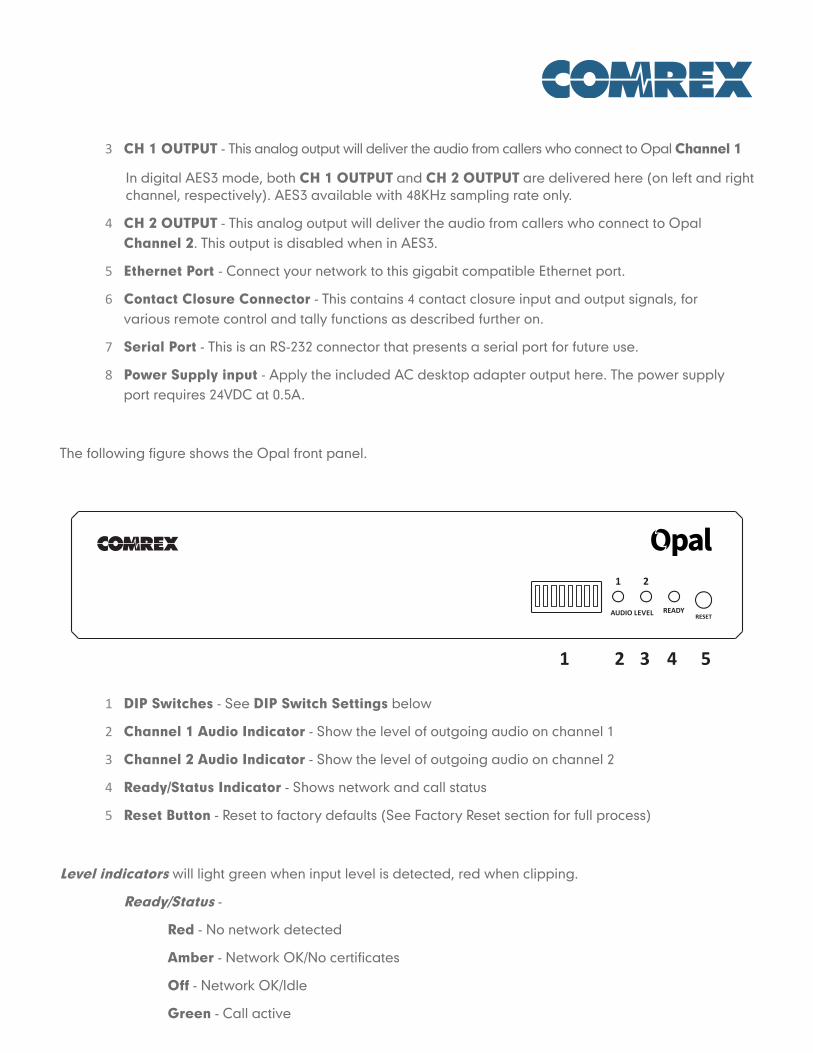
The following figure shows the Opal front panel.
1 2 3 4 5
RESETREADYAUDIO LEVEL
1 2
1 DIP Switches - See DIP Switch Settings below
2 Channel 1 Audio Indicator - Show the level of outgoing audio on channel 1
3 Channel 2 Audio Indicator - Show the level of outgoing audio on channel 2
4 Ready/Status Indicator - Shows network and call status
5 Reset Button - Reset to factory defaults (See Factory Reset section for full process)
Level indicators will light green when input level is detected, red when clipping.
Ready/Status -
Red - No network detected
Amber - Network OK/No certificates
Off - Network OK/Idle
Green - Call active

DIP Switch Settings
DIP Switch Function Default (down)1 Analog/AES3 Input Select Analog2 Analog/AES3 Output Select Analog3 Audio Loopback Disabled4 Level Indicators Send/Receive Send5-6 Future use7-8 Factory reset
Audio Loopback - This function connects the send and receive audio together before it touches the encoder - the audio is digitized and converted back to analog, but not compressed or converted to a stream.
Factory Reset
To factory reset your device using dip switches, follow these steps:
1 Put dip switch 7 & 8 up
2 Wait until the Channel 1, Channel 2 and Network/Status indicators flash red and green
3 Put dip switch 7 & 8 down
4 Remove and re-apply power to Opal
About Mix-MinusComrex support spends a lot of time discussing mix-minus, as it is not an obvious concept. Regarding studio connections to outside sources, there is a golden rule:
People connecting from outside the studio must never be sent their own audio back to themselves.
If this rule is not followed, the result will be an unpleasant echo in the caller’s ear. It is the responsibility of the studio tech to connect a feed to each “send” channel that is a mix of all important audio sources - in-studio mics, automation, other remote sources, etc., minus the caller.
Most modern consoles can do this easily. If not, other options exist and are discussed in the section at the end of this quickstart “Why Do I Hear Hear Myself Myself?”. Finally, it’s important to remember the mix-minus feeds must contain the audio from the opposite send channel. Opal does not provide any in-box conferencing options.

Audio Connections All analog XLR audio inputs have a nominal level of 0dBu (full scale +20dBu). When the input mode is changed (via DIP Switch #1) to AES3 mode, the system expects a 48KHz AES3 input. When the output mode is changed (via DIP Switch #2), a 48KHz signal will be output. 48KHz is the only supported sampling rate.
Analog input and output pinouts:
1 Ground
2 Balanced audio +
3 Balanced audio –
AES3 input and output pinouts:
1 Ground
2 Data +
3 Data –
Contact Closures Contact closure signals are available via the 9-pin mini-DIN connector.
The functions of the contact closures will be added in future firmware.
Inputs are triggered by shorting the respective input to Pin 9. Outputs consist of an open collector circuit which, when inactive, will offer a high-impedance path to Pin 9 and, when active, will offer a low-impedance path to Pin 9. These outputs are capable of sinking up to 200mA at a voltage up to 12V. Do not switch AC mains power using these contacts.
Contact Closure Pinouts:
Pin 1 Output #1 Pin 2 Output #2 Pin 3 Output #3 Pin 4 Output #4Pin 5 Input #1Pin 6 Input #2Pin 7 Input #3 Pin 8 Input #4 Pin 9 Ground

Attachment DetailsAt a minimum, Opal will need two audio connections and a network connection. Levels of all analog audio I/O is 0dBu (0.775V) nominal. This level will provide 20dB headroom before the clipping point. Input audio is reflected on the front panel LED based peak meters as indicated in the following figure. Clipping is indicated by the red LED on these meters.
1 2 3 4 5
RESETREADYAUDIO LEVEL
1 2
Opal needs a network connection to be useful. On Opal, network connections are made via a standard 1000Base-T Ethernet connection on an RJ-45 connector.
In most ways, Opal will look like an ordinary computer to this network. In fact, Opal contains an embedded computer with a Linux-based operating system and a full network protocol stack. Opal is perfectly capable of working over most LANs, but there are special considerations outlined below for Opal to work its best.
Since there may be bandwidth, firewall, and security concerns with installing Opal on a managed LAN, it is recommended that your IT manager be consulted in these environments. The details that follow assume a working knowledge of IT topics and network configuration.
Opal Network RequirementsThe key to Opal is simplicity for the guest caller. In order to provide this, Opal has some special requirements on the studio side regarding its network configuration.
Opal requires the ability to accept unsolicited data from the public Internet. The easiest way to allow this is for Opal to be connected directly to the Internet, without any routers or firewalls in its path. All Opal functions are password protected, and it’s highly recommended the user change the passwords from the default.
Often it’s not possible for Opal to reside on the public Internet, and a router or firewall must be used. In this case, forwarding of several ports is required within the router/firewall. This is outlined in the “For IT managers” section towards the end of this quickstart.
Opal requires the configuration of a static IP to be used correctly. This IP address must be directly addressable from the public Internet, and not just a local LAN address. Static IPs are usually available from your Internet Service Provider, or from your IT department in larger facilities.
Finally, Opal needs a domain name associated with its static IP address. A domain name may be leased from any domain provider. Domain names are required to enable the SSL/TSL security certificates Opal uses for connections. Browsers require these certificates in order to engage the underlying technology that makes Opal work. Otherwise, the guest caller will need to click through multiple security warnings (if the browser even allows unsecured connection at all).
Opal ConfigurationAt a minimum, you’ll need to configure Opal’s static IP address and its domain name.
Static IP address
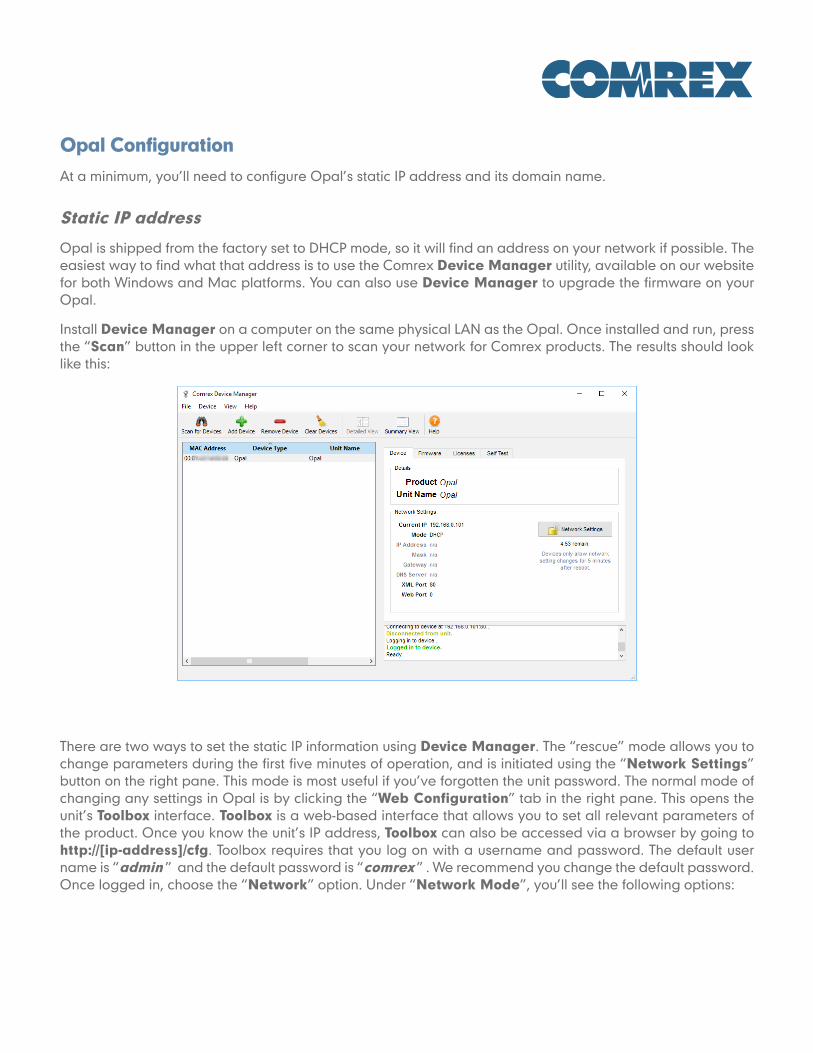
Opal is shipped from the factory set to DHCP mode, so it will find an address on your network if possible. The easiest way to find what that address is to use the Comrex Device Manager utility, available on our website for both Windows and Mac platforms. You can also use Device Manager to upgrade the firmware on your Opal.
Install Device Manager on a computer on the same physical LAN as the Opal. Once installed and run, press the “Scan” button in the upper left corner to scan your network for Comrex products. The results should look like this:
There are two ways to set the static IP information using Device Manager. The “rescue” mode allows you to change parameters during the first five minutes of operation, and is initiated using the “Network Settings” button on the right pane. This mode is most useful if you’ve forgotten the unit password. The normal mode of changing any settings in Opal is by clicking the “Web Configuration” tab in the right pane. This opens the unit’s Toolbox interface. Toolbox is a web-based interface that allows you to set all relevant parameters of the product. Once you know the unit’s IP address, Toolbox can also be accessed via a browser by going to http://[ip-address]/cfg. Toolbox requires that you log on with a username and password. The default user name is “admin ” and the default password is “comrex ” . We recommend you change the default password. Once logged in, choose the “Network” option. Under “Network Mode”, you’ll see the following options:

Change the mode to Static, and input the IP address, netmask, gateway and DNS information for your network. Click “Apply IP Settings” after all the information is correct. If you need to access Toolbox after this, you’ll need to rescan and log in again (or open a browser to the new IP address).
Domain name
Once you can log into Opal from your correct static IP address, you can set the Domain in the same “Network” option of Toolbox.
No HTTPS or // is required here, just the domain (e.g. comrex.com). If you registered a domain with a “www.” prefix, make sure it’s included in the domain name.
Once the Domain entry is set correctly, press the button labeled “Get/Renew Certificate”. Opal will reach out to its certificate server and install the required security certificates automatically.

AccountsSo far, we’ve dealt with the Admin account on Toolbox, which allows full configuration of Opal as well as generating Invites (explained in the next section). This account is always active and cannot be removed. It’s possible to create “sub accounts” on Toolbox with their own passwords and capabilities. The most common reason for this is to create an “operator” sub account. Operators are not allowed to change settings on Opal, but can only generate/delete and enable/disable Invites, and disconnect currently active calls via Toolbox.
Create an additional account on Opal using the Security->Accounts option. Set a username and password, and whether the user has Admin or Operator privileges.
InvitesOpal screens incoming calls by generating Invites. These take the form of URL-style links that can be copied and pasted, then delivered to guests.
When an incoming caller attempts to connect to Opal, the Invite is checked against its internal database. If the Invite is valid, connection proceeds. If not, the user receives an error message.
Some users may want to bypass the screening provided by Invites. In this case, simply create a universal Invite for all users. This can even be published to the public, and will remain valid until you change it in Toolbox.
In current firmware, Invites can be generated, deleted, enabled and disabled. In future firmware, Invites can be set to expire after a time limit, a date, or number of connections.
To generate an Invite, log into Opal Toolbox by pointing a browser at
http://[opal_ip_address]/cfg/
Use your admin or operator user name and password to access Toolbox, then choose “Invites”. Choose “Add Invite” to create a new Invite. You will be offered the following options:
Token - This value cannot be changed, but will be used in the Invite link to designate this caller.
Name - Name your Invite something familiar like “Crazy Larry” so you can reference who is calling.

Channel - Choose whether this caller will appear on Opal hardware port 1 or 2, or whichever is available.
Enabled - Set to “yes” by default, this option allows you to disable this Invite without deleting it.
Once your Invite is set, you can click “Copy Invite Link” and your browser will copy the Invite, so you can paste it into a browser, email, text message, etc.
You can return to the Toolbox Invite page any time to disable or delete Invites you’ve created in the past.
Making a Call to OpalYour guest will need to open the Invite link in a compatible browser (Chrome, Edge, Opera). They should see the Opal landing page:
The first time the guest connects, they will be asked to authorize the Opal page to use their microphone. The guest must choose “allow” for the connection to work.
On devices that have multiple microphones and speaker arrangements (e.g. a laptop with built-in mic/speaker but also a headset), the Opal page will offer a pull-down menu for the guest to choose which device to use.
Once the device is chosen (if necessary), the guest should see the microphone audio meter move when speech is detected. If this doesn’t happen, the browser cannot connect to Opal.
Connections are made by pressing the “Connect” button, and waiting for it to turn green. Disconnect using the same button (now labeled “Disconnect”). If at any time the guest wants to mute the local microphone, pressing the “Mute” button will accomplish this. Audio to the guest will not be affected.
Disconnecting Calls from OpalCalls cannot be made from the Opal Toolbox page, but they can be ended. Under the “Control” option, (available in both admin and operator modes), an active call can be disconnected on either channel using the “Drop Call” for that channel. In addition, the call can be dropped and the Invite disabled simultaneously using the “Drop Call and Disable Invite” button.
For IT ManagersThe following ports are required by Opal to be open for incoming connections
TCP 80* *Optional, HTTP users will be redirected to TCP 443 for HTTPSTCP 443 HTTPS serverTCP 8082 Javascript serverUDP 16390 audio RTPUDP 16391 audio RTP
In addition, Opal will make outgoing connections to the following ports:
UDP 123 NTPTCP 80, 443 SSL Certificate retrieval

Mix-Minus and Eliminating echo (Why do I hear hear myself myself?)
Studio integration with outside sources like telephones, codecs and Opal is a two-way process. The guest must send his audio to the studio, but also receive a return feed that allows him to interact with other sources, like a host. An important element of remote studio voice integration involves allowing a speaking party to hear his own voice in his own earpiece. This sidetone provides a speaker the comfort of knowing his voice is getting through, and makes two-way communication flow more easily.
But for several reasons, sidetone is always generated locally within the speaker’s equipment, rather than on the far end of the call. This is because humans have a very hard time handling even the smallest delay in this sidetone signal. In testing, we find that any delay over around 10mS starts to have an effect called “slapback” where the speaker is unable to maintain conversation and begins to halt and stutter.
Even in “old-fashioned” analog telephone circuits, it’s possible to create a 10mS round-trip delay on a long distance call. Now add in the requirement that modern VoIP-based or web audio systems have inherent windowing and buffer delays, and it’s easy to pile up over 100mS round-trip on a call. A delay of this length will typically not impede interactive conversation, but will certainly create an intolerable “slapback” environment if the caller hears his own voice delayed.
Many users installing a studio-based remote audio system for the first time make the mistake of applying audio to the outgoing “send’ port that contains the main program feed - the same audio used to feed the transmitter or webstream. Since this mix contains the caller’s own audio, and there’s an inherent delay in modern digital systems, the “slapback” effect is immediate.

The solution here is mix-minus - a term used for a special mix of audio that explicitly excludes one source - the audio coming from the place the mix-minus is being sent. To put it another way, mix-minus is the entire studio mix minus one audio source.
So how do we create this special audio mix? On modern studio systems, this is usually well defined and easy to do. Many consoles feature channels dedicated to telephone, ISDN or codec interface, and part of the channel is an automatically-created mix-minus output.
In less full-featured consoles, a mix-minus can often be created with an auxiliary or “audition” bus function. By selecting all relevant incoming sources on the bus except for the fader tied to the caller’s output, you can do this easily. The following figure shows the block diagram of a single mix-minus feed being generated on a mixing console.

The use of Opal complicates things a bit because it requires a pair of Mix-minus feeds if both channels are to be used in the same studio. This is because Opal does not conference the two callers it receives, and each caller needs a custom mix-minus in order to hear the other, along with the studio-generated audio. This is shown in the following diagram:
Finally, if you’re stuck in a studio where you need to create multiple mix-minus feeds with no resources to do so, investigate the Comrex Mix-Minus Bridge product. It’s an easy way to deliver up to six distinct mix minus feeds (e.g. for two telephone channels, two audio codecs, a two-way radio system and an RPU return channel) simultaneously while sacrificing only one console auxiliary bus.