openfiler admin guide - sourceforge adding a new network access entry ... 5 chapter 1 6.3.1...
TRANSCRIPT

openfiler
Openfiler Administration Guide
Version 2.9x

Copyright NoticeCopyright 2008 - 2012, Openfiler Ltd, UK. All Rights Reserved.
All company, brand and product names are trade or service marks, or registered trade or service marks, of Openfiler Ltd. or
of their respective owners.
THIS DOCUMENT IS PROVIDED “AS IS”, AND ALL EXPRESS, IMPLIED, OR STATUTORY WARRANTIES,
REPRESENTATIONS OR CONDITIONS ARE DISCLAIMED, INCLUDING WITHOUT LIMITATION ANY IMPLIED
WARRANTY OF MERCHANTABILITY, FITNESS FOR A PARTICULAR PURPOSE, TITLE OR NON-INFRINGEMENT.
OPENFILER LTD. AND ITS LICENSORS SHALL NOT BE LIABLE FOR DAMAGES RESULTING FROM THE USE OF
OR RELIANCE ON THE INFORMATION CONTAINED HEREIN.
Table of Contents
Copyright Notice.................................................................................................................................. ii
1 Installing Openfiler........................................................................................................................... ix
1.1 Text-based Installation ..................................................................................................................x
1.1.1 System Requirements....................................................................................................... x
1.1.2 Starting the Installation..................................................................................................xii
1.1.3 Network Configuration.................................................................................................xxi
1.1.4 Time Zone Selection.................................................................................................... xxiv
1.1.5 Set Root Password....................................................................................................... xxiv
1.1.6 Installation Complete.................................................................................................. xxix
1.2 Graphical Installation ............................................................................................................... xxx
1.2.1 Introduction................................................................................................................... xxx
1.2.2 System Requirements................................................................................................... xxx
1.2.3 Starting the Installation................................................................................................xxx
1.2.4 Keyboard Selection.....................................................................................................xxxii
1.2.5 Disk Partitioning Setup.............................................................................................xxxiii
1.2.6 Network Configuration............................................................................................ xxxix
1.2.7 Time Zone Selection...................................................................................................... xlii
1.2.8 Set Root Password........................................................................................................ xliii
1.2.9 About To Install............................................................................................................ xliv
1.2.10 Installation.................................................................................................................... xlv
1.2.11 Installation Complete.............................................................................................. xlviii
2 Getting Started...................................................................................................................................50
2.1 Introduction to Openfiler............................................................................................................ 50
2.2 Logging on to Openfiler.............................................................................................................. 51
2.3 Understanding the Openfiler Interface.....................................................................................54
2.3.1 Title Bar.............................................................................................................................55
2.3.2 Tabs....................................................................................................................................55
2.3.3 Work Area........................................................................................................................ 55
2.3.4 Menu................................................................................................................................. 55
2.3.5 Support............................................................................................................................. 55
2.3.6 Footer................................................................................................................................ 55
2.4 Openfiler Common Sections.......................................................................................................56
2.5 Logging out from Openfiler....................................................................................................... 60
3 Status Section.....................................................................................................................................61
3.1 System Overview......................................................................................................................... 62
3.1.1 Viewing the System Overview......................................................................................62
3.2 iSCSI Targets................................................................................................................................. 64
3.2.1 Viewing iSCSI Targets.................................................................................................... 64
4 Managing System............................................................................................................................. 65
4.1 Network Setup..............................................................................................................................66
4.1.1 Viewing Network Setup.................................................................................................67
4 Chapter 1 - Copyright Notice
4.1.2 Modifying Network Configuration.............................................................................. 70
4.1.3 Viewing Network Interface .......................................................................................... 71
4.1.4 Editing/Configuring a Network Interface................................................................... 73
4.1.5 Creating a Bonded Interface.......................................................................................... 75
4.1.6 Adding a new Network Access Entry..........................................................................78
4.1.7 Deleting a Network Access Entry................................................................................. 79
4.2 Setting up the Clock ....................................................................................................................80
4.2.1 Setting the system clock manually................................................................................80
4.2.2 Synchronizing the System Clock with NTP timeserver............................................ 81
4.2.3 Setting Time zone............................................................................................................82
4.3 Managing UPS.............................................................................................................................. 83
4.3.1 Configuring a UPS device..............................................................................................83
4.3.2 Editing a UPS configuration.......................................................................................... 85
4.4 Shutting down/Rebooting the System.......................................................................................86
4.5 Managing Notification Configuration...................................................................................... 87
4.6 Updating the System................................................................................................................... 88
4.7 Backup/Restore.............................................................................................................................90
4.7.1 Viewing Backup Configuration.................................................................................... 90
4.7.2 Restoring the Configuration.......................................................................................... 90
4.8 Managing Secure Console...........................................................................................................92
5 Managing Volumes...........................................................................................................................93
5.1 Managing Volumes...................................................................................................................... 94
5.1.1 Viewing Volume Group ................................................................................................ 94
5.1.2 Adding a Volume............................................................................................................ 96
5.2 Managing Volume Group......................................................................................................... 103
5.2.1 Volume Group Management.......................................................................................103
5.2.2 Creating a new Volume Group................................................................................... 107
5.3 Managing Block Devices........................................................................................................... 109
5.3.1 Block Device Management.......................................................................................... 109
5.4 Managing iSCSI Targets............................................................................................................ 113
5.4.1 Target Configuration.................................................................................................... 113
5.4.2 LUN Mapping............................................................................................................... 117
5.4.3 Managing Network ACL............................................................................................. 120
5.4.4 CHAP Authentication...................................................................................................121
5.5 Software RAID............................................................................................................................124
5.5.1 Creating a New RAID Array....................................................................................... 125
6 Managing Quota............................................................................................................................. 127
6.1 Managing Group Quota............................................................................................................128
6.1.1 Selecting a Volume........................................................................................................128
6.1.2 Editing a Group Quota.................................................................................................130
6.2 Managing User Quota............................................................................................................... 133
6.2.1 Selecting a Volume........................................................................................................133
6.2.2 Editing a User Quota.................................................................................................... 135
6.3 Managing Guest Quota............................................................................................................. 138
Openfiler Administration Guide 4

5 Chapter 1
6.3.1 Selecting a Volume........................................................................................................138
6.3.2 Editing a Guest Quota.................................................................................................. 139
7 Managing Shares.............................................................................................................................141
7.1 Managing Shares........................................................................................................................ 142
7.1.1 Viewing Existing Shares...............................................................................................142
7.1.2 Creating a Share............................................................................................................ 143
7.1.3 Editing a Share...............................................................................................................150
7.1.4 Deleting a Share.............................................................................................................160
7.2 Viewing Snapshot Shares..........................................................................................................161
8 Managing Services..........................................................................................................................162
8.1 Service Management..................................................................................................................163
8.1.1 Modifying a Service Status.......................................................................................... 163
8.2 SMB/CIFS Setup......................................................................................................................... 164
8.2.1 Modifying SMB/CIFS Setup........................................................................................ 164
8.3 LDAP Setup.................................................................................................................................167
8.3.1 Viewing the LDAP Setup............................................................................................. 167
8.3.2 LDAP Backup................................................................................................................ 168
8.3.3 Recovering LDAP..........................................................................................................169
8.3.4 Rebuilding LDAP..........................................................................................................170
8.3.5 Deleting LDAP.............................................................................................................. 171
8.4 UPS Setup....................................................................................................................................173
8.4.1 Configuring Service Mode...........................................................................................173
8.4.2 Configuring Access Control........................................................................................ 174
8.4.3 Adding a UPSD User.................................................................................................... 174
8.4.4 Deleting a UPSD User.................................................................................................. 175
8.4.5 Adding a UPS System Monitoring Entry.................................................................. 176
8.4.6 Deleting a UPS System Monitoring Entry................................................................. 178
8.5 Managing Rsync Setup..............................................................................................................179
8.6 iSCSI Target Setup......................................................................................................................180
8.6.1 Adding a Discovery CHAP user................................................................................. 180
8.6.2 Managing iSNS Server..................................................................................................181
8.7 Setting up FTP ............................................................................................................................182
9 Managing Accounts........................................................................................................................185
9.1 Authentication............................................................................................................................ 186
9.1.1 Viewing/Modifying User Information Configuration – Standard View...............186
9.1.2 Viewing/Modifying User Information Configuration – Expert View...................190
9.2 Administration............................................................................................................................199
9.2.1 Group Administration..................................................................................................199
9.2.2 User Administration..................................................................................................... 202
9.3 Viewing the User List................................................................................................................ 206
9.4 Viewing the Group List............................................................................................................. 208
9.5 Changing Admin Password......................................................................................................210
10 Advanced Configuration............................................................................................................. 211
Openfiler Administration Guide 5
6 Chapter 1 - Copyright Notice
10.1 Fibre Channel Target Setup.................................................................................................... 211
10.1.1 Components.................................................................................................................212
10.1.2 Assumptions................................................................................................................ 212
10.1.3 Configuration Outline................................................................................................ 213
10.1.4 Configuration...............................................................................................................214
11 Appendix........................................................................................................................................222
11.1 RAID Overview........................................................................................................................222
11.1.1 RAID Levels................................................................................................................. 223
11.2 Troubleshooting .......................................................................................................................227
11.2.1 Active Directory Integration .....................................................................................227
11.2.2 ISCSI Target Configuration........................................................................................228
11.2.3 CIFS Share Access....................................................................................................... 228
Openfiler Administration Guide 6

About this Guide
Purpose of this GuideThis guide provides detailed information about the Openfiler Open Source Storage
Management System.
Who should read this GuideThis guide is for administrators or users who have been assigned the task of managing
and configuring Openfiler.
Typographical ConventionsThis guide complies with the following typographical conventions:
Typeface Meaning
Hyperlinked References References to hyperlinked topics within and outside this
guide.
Bold Menus and menu options, input fields, radio buttons, check
boxes, drop-down lists, tabs, buttons, links, and messages
displayed on the page.
CAPS Keys on the keyboard.
Constant Width Program codes, files and directory names, function names,
and sample outputs.
Constant width Specific text entered by the user.
A note, providing additional information about a certain
topic.
A warning.
A checkpoint during the installation process, used to ensure
that the installation is working as expected.
An important message not to be ignored.

8 Chapter 1
How to get in TouchThe following sections provide information on how to obtain support for the
documentation and the software.
Documentation SupportOpenfiler Ltd welcomes your comments and suggestions on the quality and usefulness
of this document. For any questions, comments, or suggestions on the documentation,
you can contact us by e-mail at info@ openfiler .com .
Customer SupportIf you have any problems, questions, comments, or suggestions regarding the Openfiler
Opensource Storage Management product, contact us by e-mail at info@ openfiler .com .
Openfiler Administration Guide 8
openfiler

1 Installing Openfiler
This chapter provides detailed information on how to perform the Openfiler installation.
The Openfiler installation can be done in two methods:
Text Based Installation
Graphical Installation
1

10 Chapter 1 - Installing Openfiler
1.1 Text-based Installation This section provides detailed information on how to install Openfiler using the text-
based installation.
1.1.1 System RequirementsOpenfiler is compatible with 64-bit industry standard server hardware. It can also be
installed in a virtual machine environment as a guest OS in Citrix XenServer, Oracle
Virtualbox and VMware vSphere/ESXi.
1.1.1.1 Hardware Requirements x64 based computer with at least 1GB RAM and 8GB storage for the OS image.
At least one supported network interface card
A CDROM or DVD-ROM drive if you are performing a local install
A supported disk controller with data drives attached.
1.1.1.2 Bare Metal Installation Minimum Specifications:
64-bit 1.6GHz or higher performance processor*
1GB or higher of RAM
512MB disk space for memory swap area
8.2 GB disk space for Openfiler OS installation
100 Mb Ethernet network interface
Separate storage volumes/disks for data export
Openfiler Administration Guide 10
openfiler
11 Chapter - Installing Openfiler
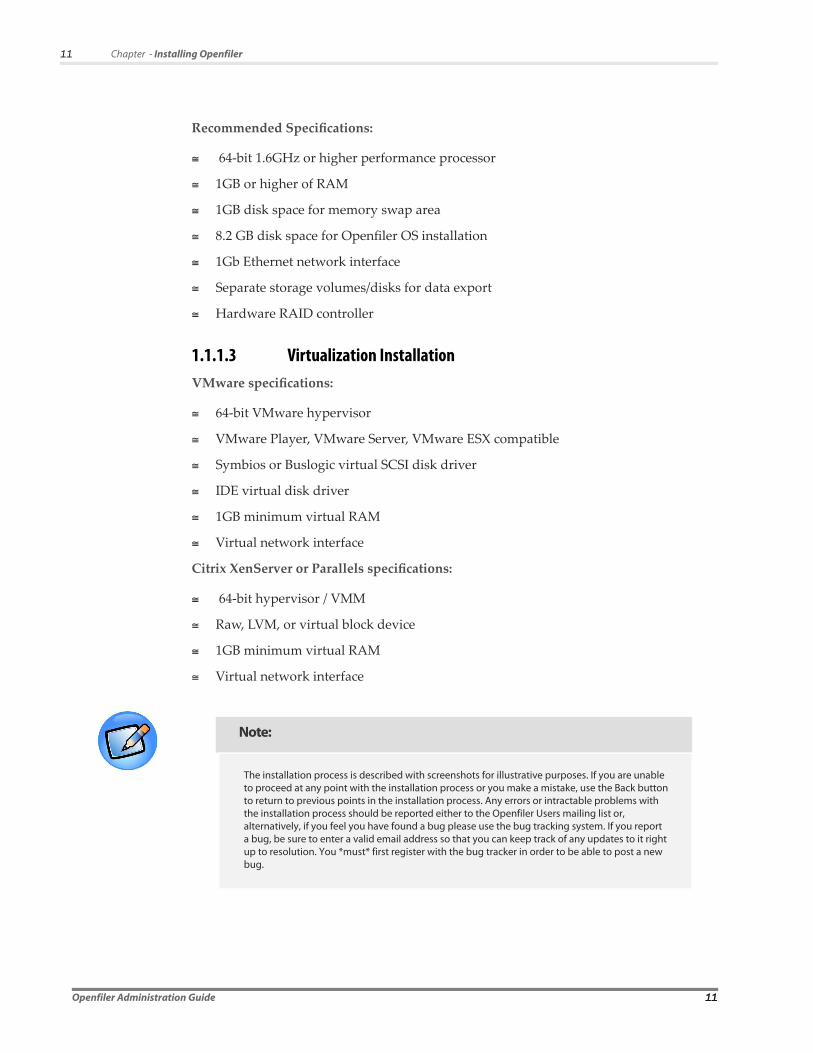
Recommended Specifications:
64-bit 1.6GHz or higher performance processor
1GB or higher of RAM
1GB disk space for memory swap area
8.2 GB disk space for Openfiler OS installation
1Gb Ethernet network interface
Separate storage volumes/disks for data export
Hardware RAID controller
1.1.1.3 Virtualization InstallationVMware specifications:
64-bit VMware hypervisor
VMware Player, VMware Server, VMware ESX compatible
Symbios or Buslogic virtual SCSI disk driver
IDE virtual disk driver
1GB minimum virtual RAM
Virtual network interface
Citrix XenServer or Parallels specifications:
64-bit hypervisor / VMM
Raw, LVM, or virtual block device
1GB minimum virtual RAM
Virtual network interface
Note:
The installation process is described with screenshots for illustrative purposes. If you are unable to proceed at any point with the installation process or you make a mistake, use the Back button to return to previous points in the installation process. Any errors or intractable problems with the installation process should be reported either to the Openfiler Users mailing list or, alternatively, if you feel you have found a bug please use the bug tracking system. If you report a bug, be sure to enter a valid email address so that you can keep track of any updates to it right up to resolution. You *must* first register with the bug tracker in order to be able to post a new bug.
Openfiler Administration Guide 11
12 Chapter 1 - Installing Openfiler
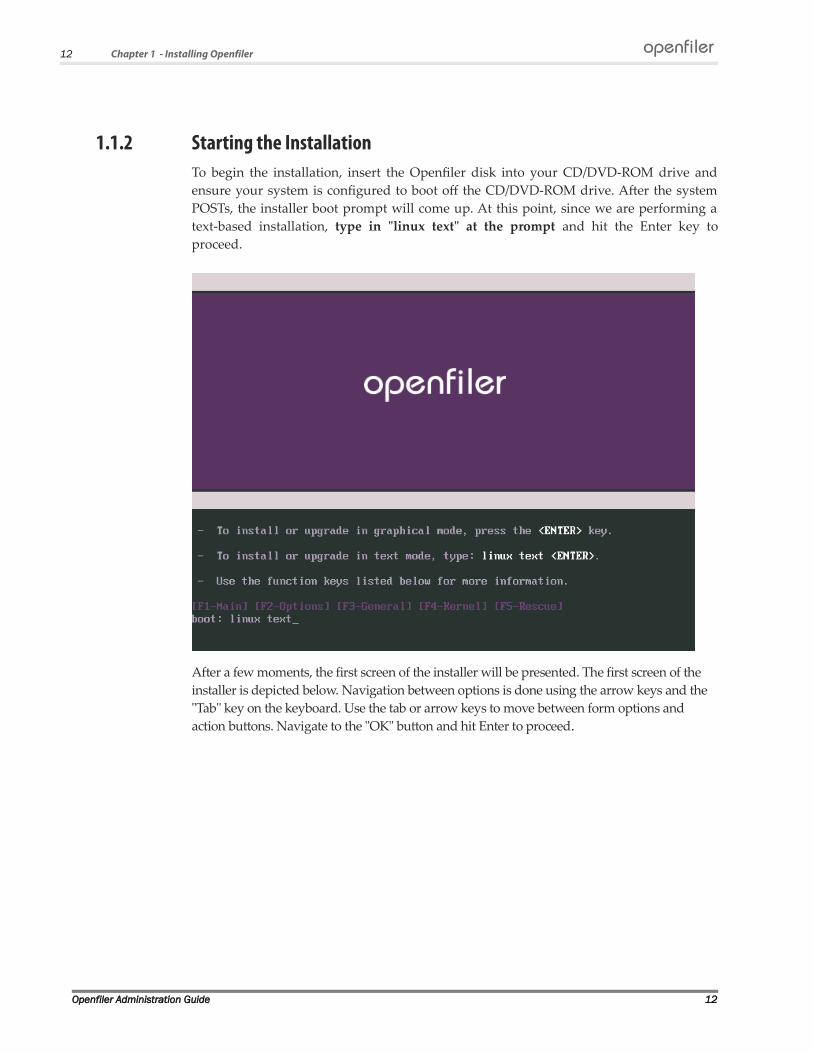
1.1.2 Starting the InstallationTo begin the installation, insert the Openfiler disk into your CD/DVD-ROM drive and
ensure your system is configured to boot of the CD/DVD-ROM drive. After the system
POSTs, the installer boot prompt will come up. At this point, since we are performing a
text-based installation, type in "linux text" at the prompt and hit the Enter key to
proceed.
After a few moments, the first screen of the installer will be presented. The first screen of the
installer is depicted below. Navigation between options is done using the arrow keys and the
"Tab" key on the keyboard. Use the tab or arrow keys to move between form options and
action buttons. Navigate to the "OK" button and hit Enter to proceed.
Openfiler Administration Guide 12
openfiler
13 Chapter - Installing Openfiler
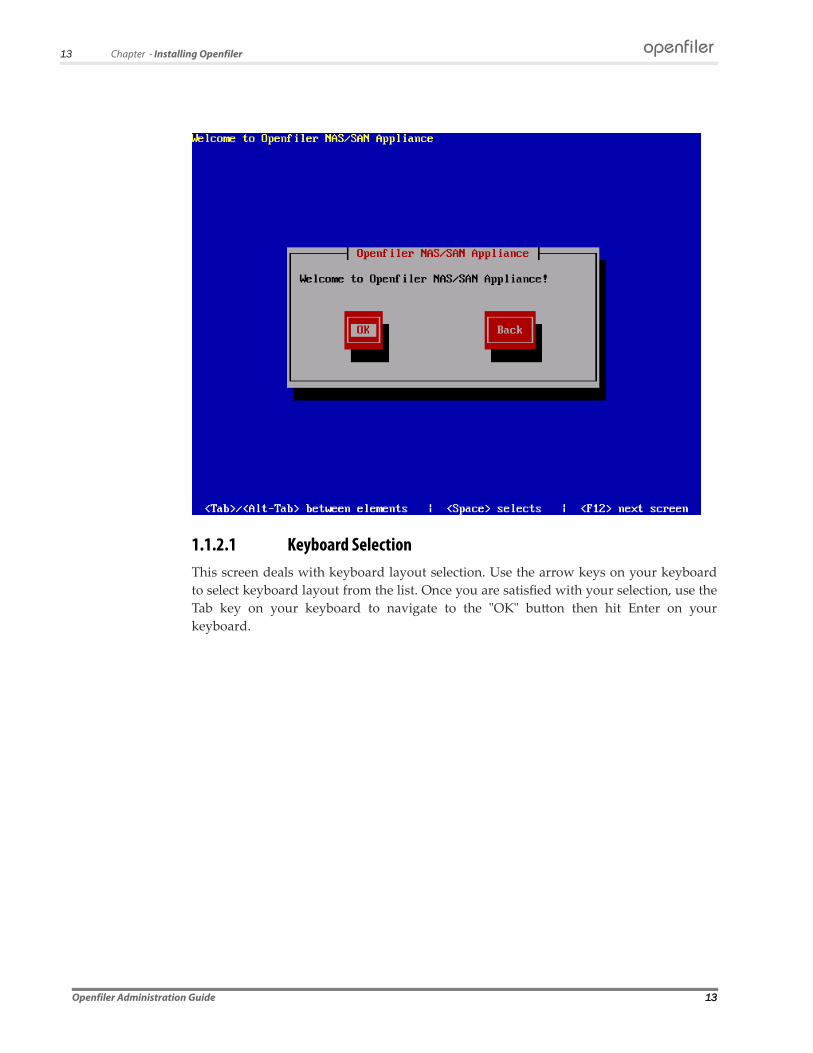
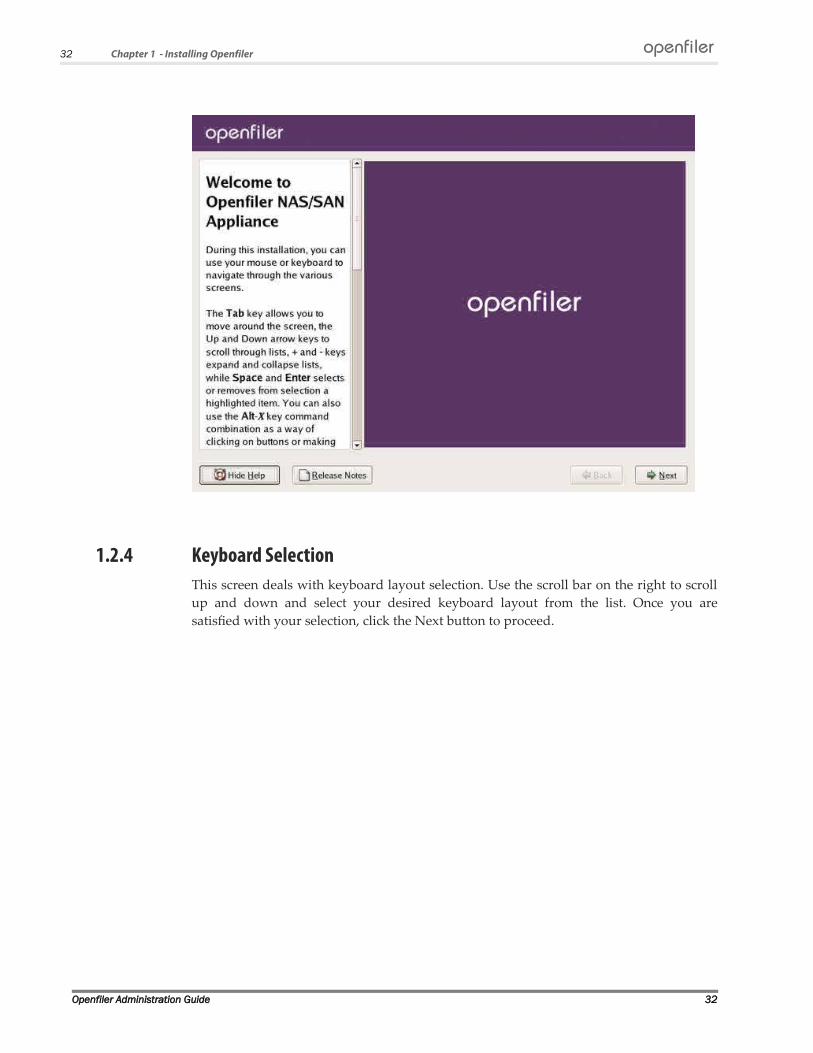
1.1.2.1 Keyboard SelectionThis screen deals with keyboard layout selection. Use the arrow keys on your keyboard
to select keyboard layout from the list. Once you are satisfied with your selection, use the
Tab key on your keyboard to navigate to the "OK" button then hit Enter on your
keyboard.
Openfiler Administration Guide 13
openfiler
14 Chapter 1 - Installing Openfiler
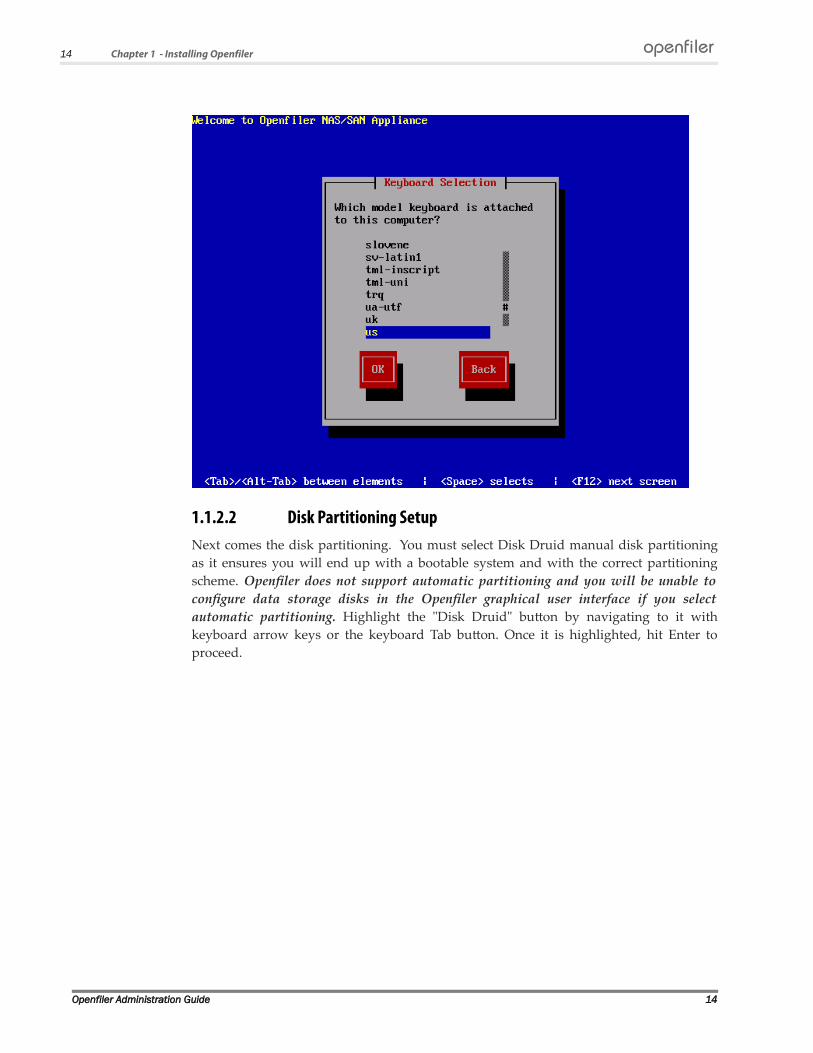
1.1.2.2 Disk Partitioning SetupNext comes the disk partitioning. You must select Disk Druid manual disk partitioning
as it ensures you will end up with a bootable system and with the correct partitioning
scheme. Openfler does not support automatic partitioning and you will be unable to
confgure data storage disks in the Openfler graphical user interface if you select
automatic partitioning. Highlight the "Disk Druid" button by navigating to it with
keyboard arrow keys or the keyboard Tab button. Once it is highlighted, hit Enter to
proceed.
Openfiler Administration Guide 14
openfiler
15 Chapter - Installing Openfiler
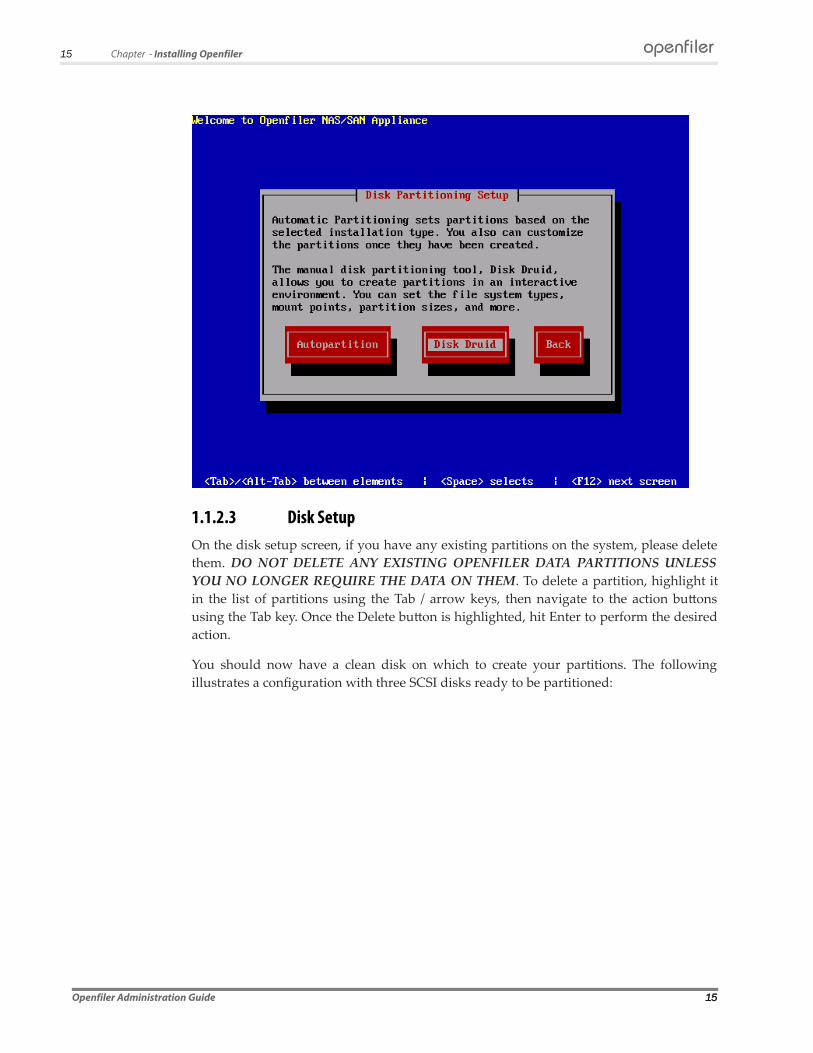
1.1.2.3 Disk SetupOn the disk setup screen, if you have any existing partitions on the system, please delete
them. DO NOT DELETE ANY EXISTING OPENFILER DATA PARTITIONS UNLESS
YOU NO LONGER REQUIRE THE DATA ON THEM. To delete a partition, highlight it
in the list of partitions using the Tab / arrow keys, then navigate to the action buttons
using the Tab key. Once the Delete button is highlighted, hit Enter to perform the desired
action.
You should now have a clean disk on which to create your partitions. The following
illustrates a configuration with three SCSI disks ready to be partitioned:
Openfiler Administration Guide 15
openfiler

16 Chapter 1 - Installing Openfiler
You need to create three partitions on the system in order to proceed with the
installation:
"/boot" - this is where the kernel will reside and the system will boot from
"swap" - this is the swap partition for memory swapping to disk
"/"- this is the system root partition where all system applications and libraries will be
installed
1.1.2.4 Create /boot PartitionYou will be presented with a form with several fields and checkboxes. Enter the partition
mount path "/boot" and the select the disk on with to create the partition. In the
illustrated example, this disk is hda (the first IDE hard disk). Your setup will very likely
be diferent as you may have several disks of diferent types. You should make sure that
only the first disk is checked and no others. If you are installing on a SCSI-only system,
this disk will be designated sda. If you are installing on a system that has both IDE and
SCSI disks, please select hda if you intend to use the IDE disk as your boot drive.
Openfiler Administration Guide 16
openfiler
17 Chapter - Installing Openfiler
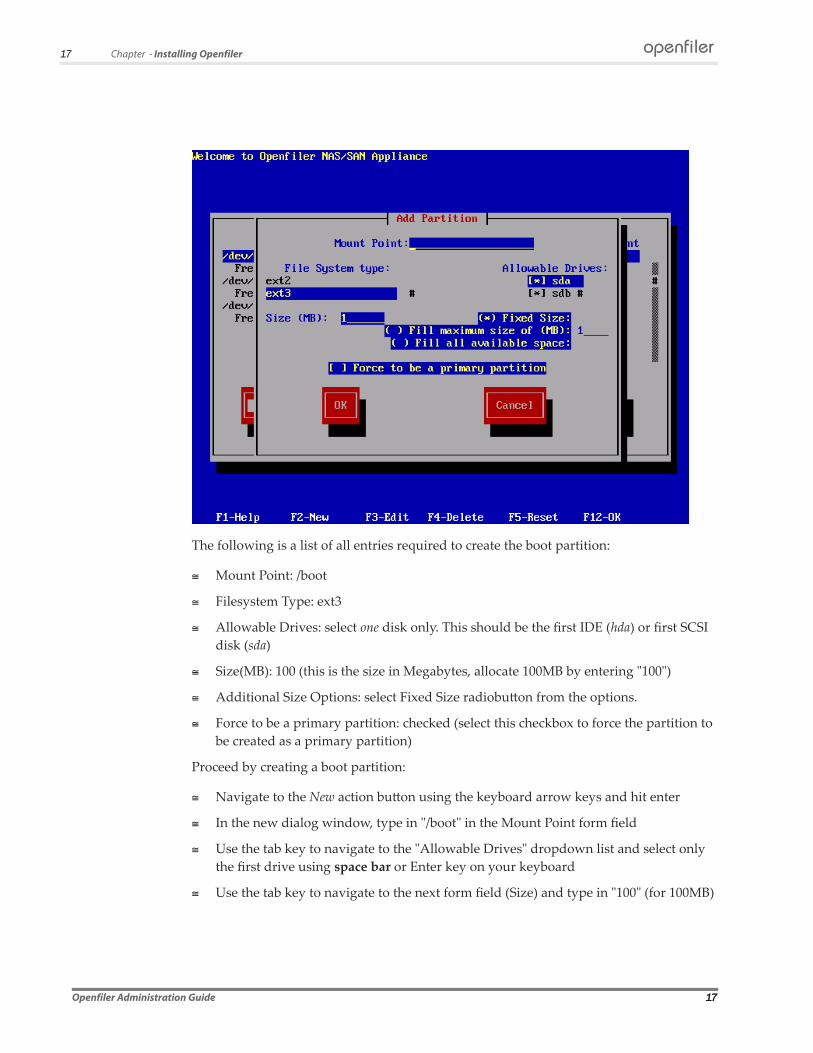
The following is a list of all entries required to create the boot partition:
Mount Point: /boot
Filesystem Type: ext3
Allowable Drives: select one disk only. This should be the first IDE (hda) or first SCSI
disk (sda)
Size(MB): 100 (this is the size in Megabytes, allocate 100MB by entering "100")
Additional Size Options: select Fixed Size radiobutton from the options.
Force to be a primary partition: checked (select this checkbox to force the partition to
be created as a primary partition)
Proceed by creating a boot partition:
Navigate to the New action button using the keyboard arrow keys and hit enter
In the new dialog window, type in "/boot" in the Mount Point form field
Use the tab key to navigate to the "Allowable Drives" dropdown list and select only
the first drive using space bar or Enter key on your keyboard
Use the tab key to navigate to the next form field (Size) and type in "100" (for 100MB)
Openfiler Administration Guide 17
openfiler

18 Chapter 1 - Installing Openfiler
Use the tab key to navigate to the next form field and ensure "Fixed Size" is checked
and the other options in that section are not
Use the tab key to navigate to the next form field and ensure "Force to be primary
partition" is checked
Use the tab key to navigate to the OK action button and hit Enter, which will create
the new partition
After configuration, your settings should resemble the following illustration:
1.1.2.5 Create / (root) PartitionProceed by creating a root partition. Click on the New button. You will be presented with
the same form as previously when creating the boot partition. The details are identical to
what was entered for the /boot partition except this time the Mount Point: should be "/"
and the Size(MB): should be 2048MB or at a minimum 1024MB.
Openfiler Administration Guide 18
openfiler
19 Chapter - Installing Openfiler
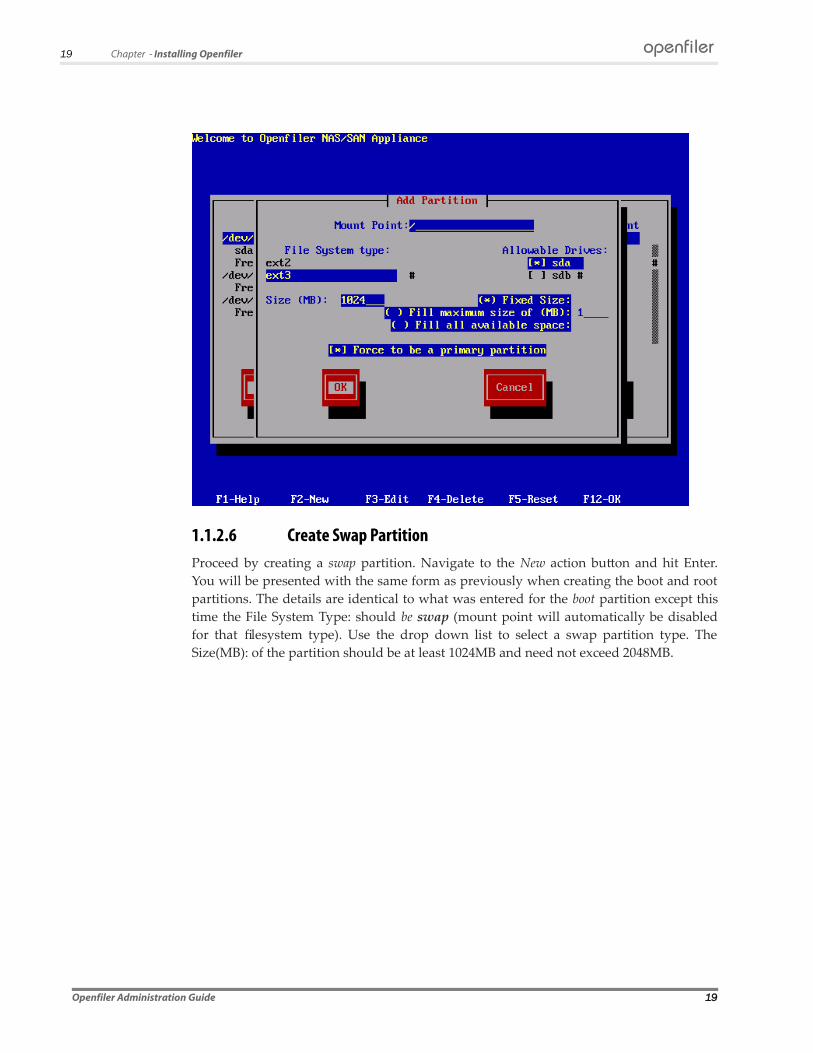
1.1.2.6 Create Swap PartitionProceed by creating a swap partition. Navigate to the New action button and hit Enter.
You will be presented with the same form as previously when creating the boot and root
partitions. The details are identical to what was entered for the boot partition except this
time the File System Type: should be swap (mount point will automatically be disabled
for that filesystem type). Use the drop down list to select a swap partition type. The
Size(MB): of the partition should be at least 1024MB and need not exceed 2048MB.
Openfiler Administration Guide 19
openfiler
20 Chapter 1 - Installing Openfiler
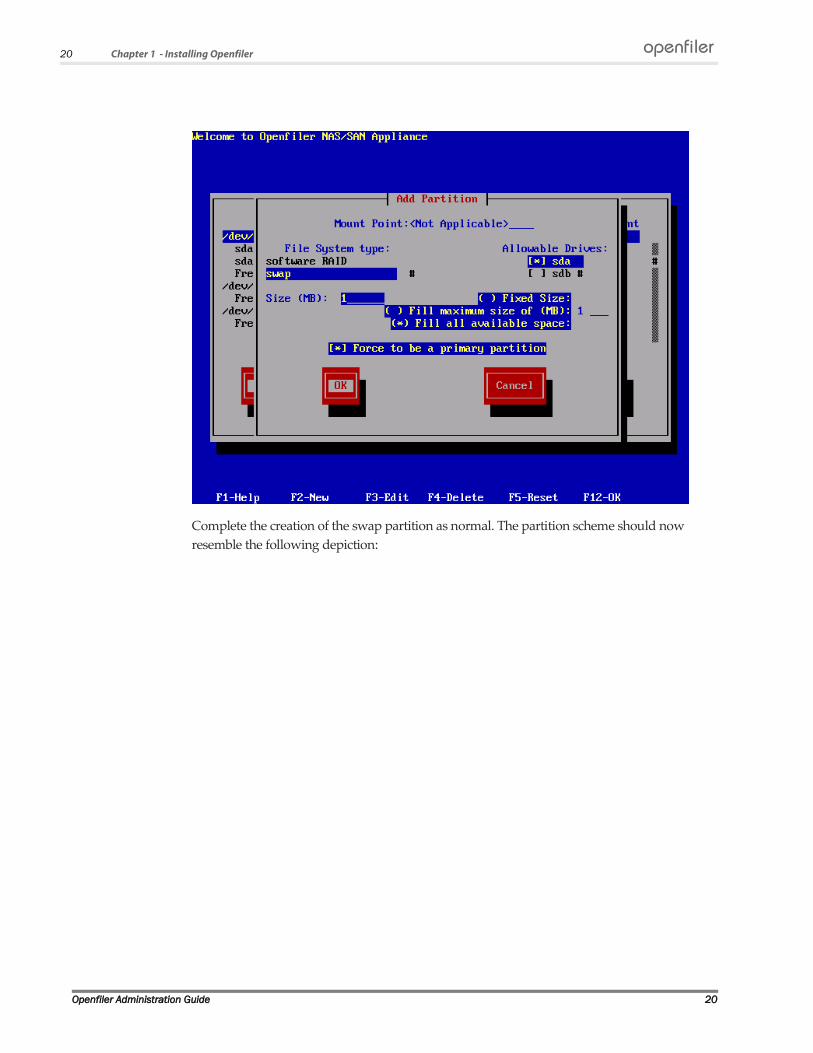
Complete the creation of the swap partition as normal. The partition scheme should now
resemble the following depiction:
Openfiler Administration Guide 20
openfiler
21 Chapter - Installing Openfiler
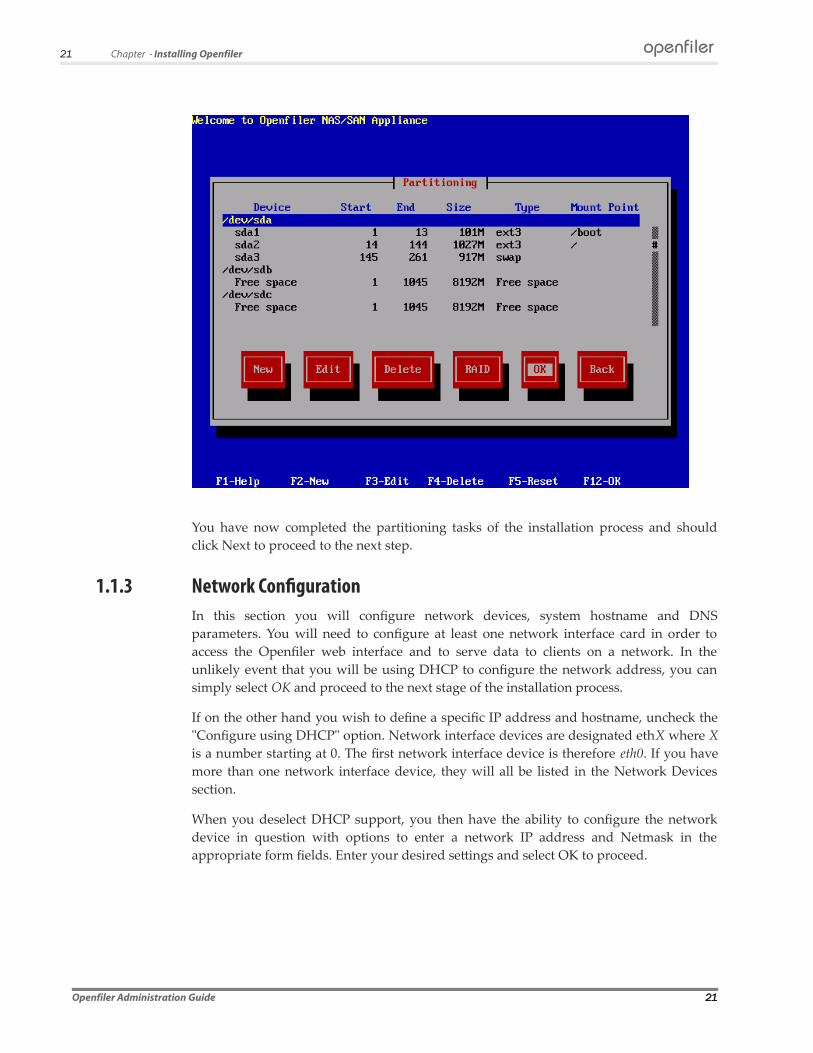
You have now completed the partitioning tasks of the installation process and should
click Next to proceed to the next step.
1.1.3 Network ConfigurationIn this section you will configure network devices, system hostname and DNS
parameters. You will need to configure at least one network interface card in order to
access the Openfiler web interface and to serve data to clients on a network. In the
unlikely event that you will be using DHCP to configure the network address, you can
simply select OK and proceed to the next stage of the installation process.
If on the other hand you wish to define a specific IP address and hostname, uncheck the
"Configure using DHCP" option. Network interface devices are designated ethX where X
is a number starting at 0. The first network interface device is therefore eth0. If you have
more than one network interface device, they will all be listed in the Network Devices
section.
When you deselect DHCP support, you then have the ability to configure the network
device in question with options to enter a network IP address and Netmask in the
appropriate form fields. Enter your desired settings and select OK to proceed.
Openfiler Administration Guide 21
openfiler

22 Chapter 1 - Installing Openfiler
Once you have configured a network IP address, you may now enter a hostname for the
system. The default hostname localhost.localdomain is not suitable and you will need to
enter a proper hostname for the system. This will be used later when you configure the
system to participate on your network either as an Active Directory / Windows NT PDC
client or as an LDAP domain member server. You will also, at this point, need to
configure gateway IP address and DNS server IP addresses. To complete this task you
will need the following information:
Desired hostname - this is the name you will call the system. Usually this will be a
fully qualified hostname e.g homer.the-simpsons.com .
Gateway IP address - this is the IP address of your network gateway to allow routing
to the Internet
Primary DNS Server - this is the DNS server on your network. Note that if you intend
to use Active Directory or LDAP as your authentication mechanism, you will need to
assign a functional DNS IP address so that the authentication mechanism is able to
resolve the authentication server hostnames.
Secondary/Tertiary DNS Server - enter a second and third DNS server if they are
available on your network.
The following illustration shows an example where a hostname has been assigned, and
gateway IP, primary and secondary DNS information has also been entered.
Openfiler Administration Guide 22
openfiler
23 Chapter - Installing Openfiler
Openfiler Administration Guide 23
openfiler
24 Chapter 1 - Installing Openfiler
Once you are satisfied with your entries, please proceed to the next section of the
installation process.
1.1.4 Time Zone SelectionSet the default system time zone. You can achieve this by following the instructions on
the left side of the screen. If your system BIOS has been configured to use UTC, check the
UTC checkbox at the top of the screen and select OK to proceed.
1.1.5 Set Root PasswordYou need to configure a root password for the system. The root password is the
superuser administrator password. With the root account, you can log into the system to
perform any administrative tasks that are not ofered via the web interface. Select a
suitable password and enter it twice in the provided textboxes. When you are satisfied
with your entries, select OK to proceed with the installation process.
Openfiler Administration Guide 24
openfiler

25 Chapter - Installing Openfiler
Note:
The root password is meant for logging into the console of the Openfiler server. The default username and password for the Openfiler web management GUI are: "openfiler" and "password" respectively.
You cannot go back to previous screens once you have gone past this point. The installer will erase any data on the partitions you defined in the partitioning section.
Openfiler Administration Guide 25
openfiler
26 Chapter 1 - Installing Openfiler
1.1.5.1 Checking dependencies:
Openfiler Administration Guide 26
openfiler
27 Chapter - Installing Openfiler
1.1.5.2 Formatting file systems:
Openfiler Administration Guide 27
openfiler

28 Chapter 1 - Installing Openfiler
1.1.5.3 Package Installation:
Openfiler Administration Guide 28
openfiler

29 Chapter - Installing Openfiler
1.1.6 Installation CompleteOnce the installation has completed, you will be presented with a congratulatory
message. At this point you simply need to click the Reboot button to finish the installer
and boot into the installed Openfiler system.
Note:
After you select Reboot remove the installation CD from the CD/DVD-ROM drive.
Once the system boots up, start configuring Openfiler by pointing your browser at the host name or IP address of the Openfiler system. The interface is accessible from https port 446. e.g.. https://homer.the-simpsons.com:446
Management Interface: https://<ip of openfiler host>:446
Administrator Username: Openfiler
Administrator Password: password
Openfiler Administration Guide 29
openfiler

30 Chapter 1 - Installing Openfiler
1.2 Graphical Installation This section provides detailed information on how to install Openfiler using the standard
graphical-based installation method.
1.2.1 IntroductionThis document describes the process of installing Openfiler using the default graphical
installation interface. If you experience any problems with the graphical install track,
such as a garbled screen due to the installer not being able to auto-detect your graphics
hardware, please try a text-based install.
Total time for installation is about 15 - 20 minutes including software installation to disk.
1.2.2 System RequirementsOpenfiler has the following hardware requirements to be successfully installed:
x64 based computer with at least 1GB RAM and 8.2GB storage for the OS image.
At least one supported network interface card
A CDROM or DVD-ROM drive if you are performing a local install
A supported disk controller with data drives attached.
Note:
The installation process is described with screenshots for illustrative purposes. If you are unable to proceed at any point with the installation process or you make a mistake, use the Back button to return to previous points in the installation process. Any errors or intractable problems with the installation process should be reported either to the Openfiler Users mailing list or, alternatively, if you feel you have found a bug please use the bug tracking system. If you report a bug, be sure to enter a valid email address so that you can keep track of any updates to it right up to resolution. You *must* first register with the bug tracker in order to be able to post a new bug.
1.2.3 Starting the InstallationTo begin the installation, insert the Openfiler disk into your CD/DVD-ROM drive and
ensure your system is configured to boot of the CD/DVD-ROM drive. After the system
Openfiler Administration Guide 30
openfiler

31 Chapter - Installing Openfiler
POSTs, the installer boot prompt will come up. At this point, just hit the Enter key to
proceed.
After a few moments, the first screen of the installer will be presented. If at this point
your screen happens to be garbled, it is likely that the installer has been unable to
automatically detect your graphics subsystem hardware. You may restart the installation
process in text-mode and proceed accordingly in that case. The first screen of the installer
is depicted below. The next step is to click on the Next button to proceed with the
installation.
Openfiler Administration Guide 31
openfiler
32 Chapter 1 - Installing Openfiler
1.2.4 Keyboard SelectionThis screen deals with keyboard layout selection. Use the scroll bar on the right to scroll
up and down and select your desired keyboard layout from the list. Once you are
satisfied with your selection, click the Next button to proceed.
Openfiler Administration Guide 32
openfiler

33 Chapter - Installing Openfiler
1.2.5 Disk Partitioning SetupNext comes the disk partitioning. You must select manual disk partitioning as it ensures
you will end up with a bootable system and with the correct partitioning scheme.
Openfler does not support automatic partitioning and you will be unable to confgure
data storage disks in the Openfler graphical user interface if you select automatic
partitioning. Click the Next button once you have selected the correct radiobutton
option.
Openfiler Administration Guide 33
openfiler

34 Chapter 1 - Installing Openfiler
1.2.5.1 Disk SetupOn the disk setup screen, if you have any existing partitions on the system, please delete
them. DO NOT DELETE ANY EXISTING OPENFILER DATA PARTITIONS UNLESS
YOU NO LONGER REQUIRE THE DATA ON THEM. To delete a partition, highlight it
in the list of partitions and click the Delete button. You should now have a clean disk on
which to create your partitions.
Openfiler Administration Guide 34
openfiler
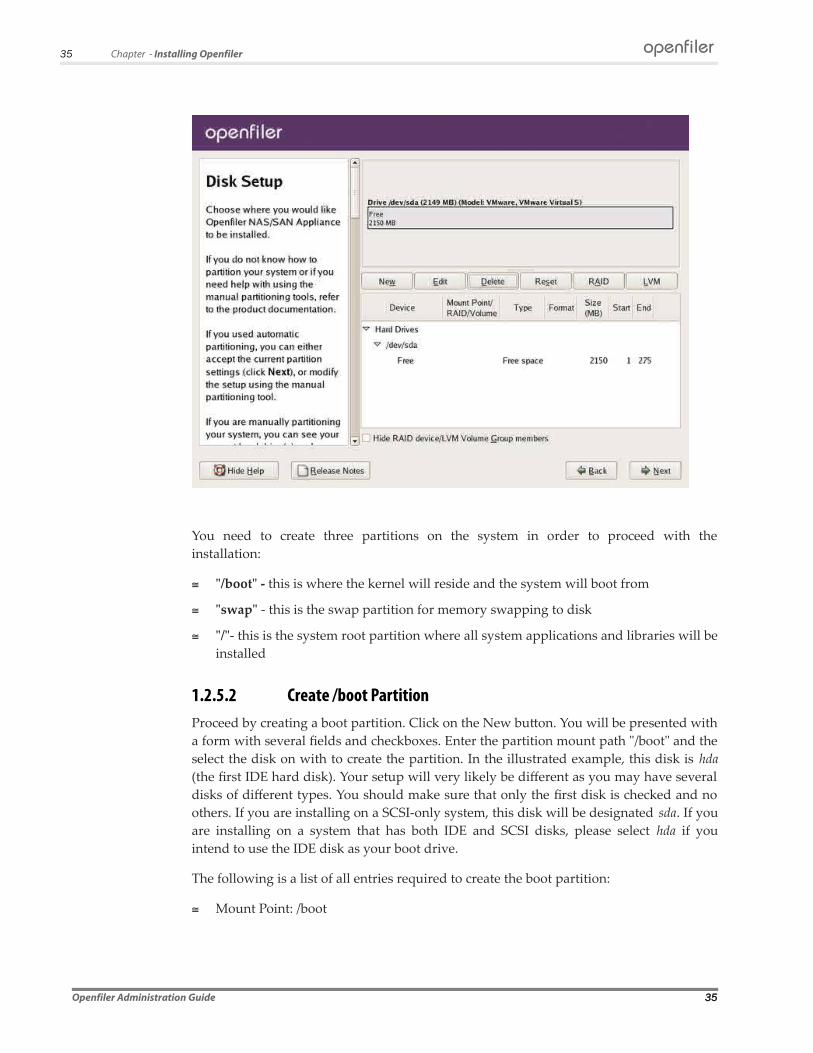
35 Chapter - Installing Openfiler
You need to create three partitions on the system in order to proceed with the
installation:
"/boot" - this is where the kernel will reside and the system will boot from
"swap" - this is the swap partition for memory swapping to disk
"/"- this is the system root partition where all system applications and libraries will be
installed
1.2.5.2 Create /boot PartitionProceed by creating a boot partition. Click on the New button. You will be presented with
a form with several fields and checkboxes. Enter the partition mount path "/boot" and the
select the disk on with to create the partition. In the illustrated example, this disk is hda
(the first IDE hard disk). Your setup will very likely be diferent as you may have several
disks of diferent types. You should make sure that only the first disk is checked and no
others. If you are installing on a SCSI-only system, this disk will be designated sda. If you
are installing on a system that has both IDE and SCSI disks, please select hda if you
intend to use the IDE disk as your boot drive.
The following is a list of all entries required to create the boot partition:
Mount Point: /boot
Openfiler Administration Guide 35
openfiler

36 Chapter 1 - Installing Openfiler
Filesystem Type: ext3
Allowable Drives: select one disk only. This should be the first IDE (hda) or first SCSI
disk (sda)
Size(MB): 250 (this is the size in Megabytes, allocate 250MB by entering "250")
Additional Size Options: select Fixed Size radiobutton from the options.
Force to be a primary partition: checked (select this checkbox to force the partition to
be created as a primary partition)
After configuration, your settings should resemble the following illustration:
Once you are satisfied with your entries, click the OK button to create the partition.
1.2.5.3 Create / (root) PartitionProceed by creating a root partition. Click on the New button. You will be presented with
the same form as previously when creating the boot partition. The details are identical to
what was entered for the /boot partition except this time the Mount Point: should be "/"
and the Size(MB): should be 8704MB or greater.
Openfiler Administration Guide 36
openfiler
37 Chapter - Installing Openfiler
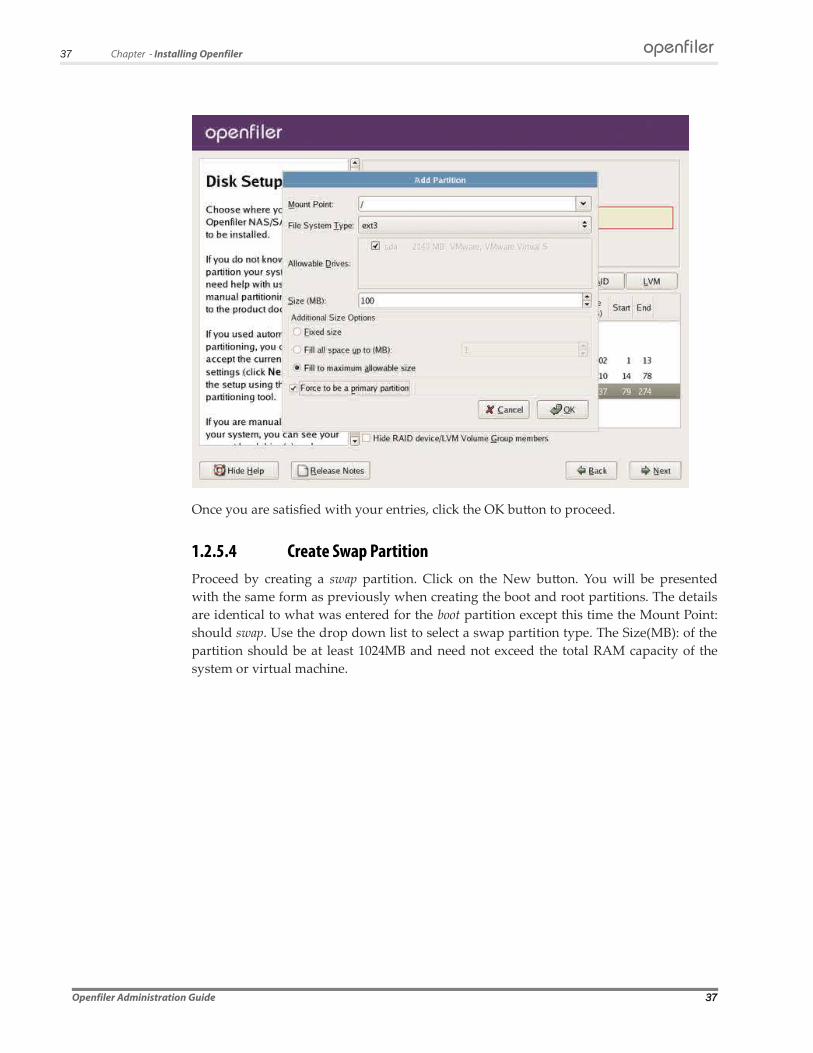
Once you are satisfied with your entries, click the OK button to proceed.
1.2.5.4 Create Swap PartitionProceed by creating a swap partition. Click on the New button. You will be presented
with the same form as previously when creating the boot and root partitions. The details
are identical to what was entered for the boot partition except this time the Mount Point:
should swap. Use the drop down list to select a swap partition type. The Size(MB): of the
partition should be at least 1024MB and need not exceed the total RAM capacity of the
system or virtual machine.
Openfiler Administration Guide 37
openfiler

38 Chapter 1 - Installing Openfiler
Once you are satisfied with your entries, proceed by clicking the OK button to create the
partition. You should now have a set of partitions ready for the Openfiler Operating
System image to install to. Your disk partition scheme should resemble the following:
Openfiler Administration Guide 38
openfiler

39 Chapter - Installing Openfiler
You have now completed the partitioning tasks of the installation process and should
click Next to proceed to the next step.
1.2.6 Network ConfigurationIn this section you will configure network devices, system hostname and DNS
parameters. You will need to configure at least one network interface card in order to
access the Openfiler web interface and to serve data to clients on a network. In the
unlikely event that you will be using DHCP to configure the network address, you can
simply click Next and proceed to the next stage of the installation process.
Openfiler Administration Guide 39
openfiler
40 Chapter 1 - Installing Openfiler
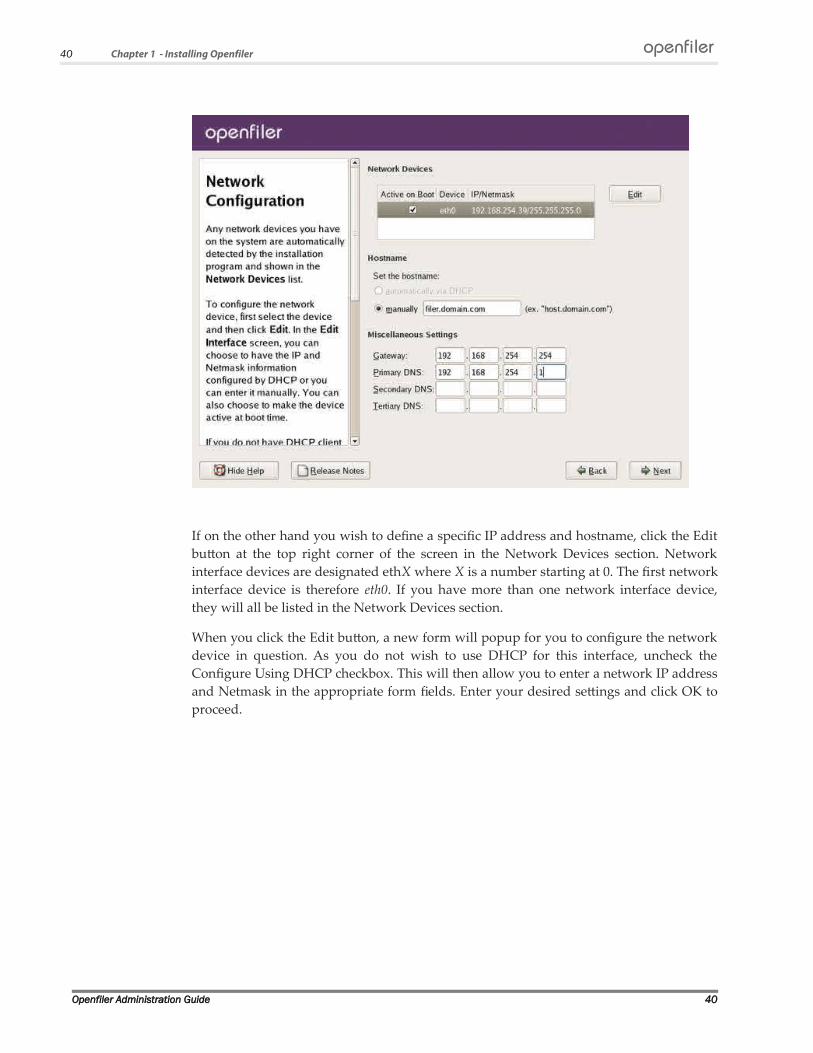
If on the other hand you wish to define a specific IP address and hostname, click the Edit
button at the top right corner of the screen in the Network Devices section. Network
interface devices are designated ethX where X is a number starting at 0. The first network
interface device is therefore eth0. If you have more than one network interface device,
they will all be listed in the Network Devices section.
When you click the Edit button, a new form will popup for you to configure the network
device in question. As you do not wish to use DHCP for this interface, uncheck the
Configure Using DHCP checkbox. This will then allow you to enter a network IP address
and Netmask in the appropriate form fields. Enter your desired settings and click OK to
proceed.
Openfiler Administration Guide 40
openfiler

41 Chapter - Installing Openfiler
Once you have configured a network IP address, you may now enter a hostname for the
system. The default hostname localhost.localdomain is not suitable and you will need to
enter a proper hostname for the system. This will be used later when you configure the
system to participate on your network either as an Active Directory / Windows NT PDC
client or as an LDAP domain member server. You will also, at this point, need to
configure gateway IP address and DNS server IP addresses. To complete this task you
will need the following information:
Desired hostname - this is the name you will call the system. Usually this will be a
fully qualified hostname e.g homer.the-simpsons.com .
Gateway IP address - this is the IP address of your network gateway to allow routing
to the Internet
Primary DNS Server - this is the DNS server on your network. Note that if you intend
to use Active Directory or LDAP as your authentication mechanism, you will need to
assign a functional DNS IP address so that the authentication mechanism is able to
resolve the authentication server hostnames.
Secondary/Tertiary DNS Server - enter a second and third DNS server if they are
available on your network.
The following illustration shows an example where a hostname has been assigned, and
gateway IP, primary and secondary DNS information has also been entered.
Openfiler Administration Guide 41
openfiler

42 Chapter 1 - Installing Openfiler
Once you are satisfied with your entries, please proceed by clicking the Next button.
1.2.7 Time Zone SelectionSet the default system time zone. You can achieve this by following the instructions on
the left side of the screen. If your system BIOS has been configured to use UTC, check the
UTC checkbox at the bottom of the screen and click Next to proceed.
Openfiler Administration Guide 42
openfiler

43 Chapter - Installing Openfiler
1.2.8 Set Root PasswordYou need to configure a root password for the system. The root password is the
superuser administrator password. With the root account, you can log into the system to
perform any administrative tasks that are not ofered via the web interface. Select a
suitable password and enter it twice in the provided textboxes. When you are satisfied
with your entries, click Next to proceed with the installation process.
Openfiler Administration Guide 43
openfiler

44 Chapter 1 - Installing Openfiler
NB: the root password is meant for logging into the console of the Openfler server. The default
username and password for the Openfler web management GUI are: "openfler" and "password"
respectively.
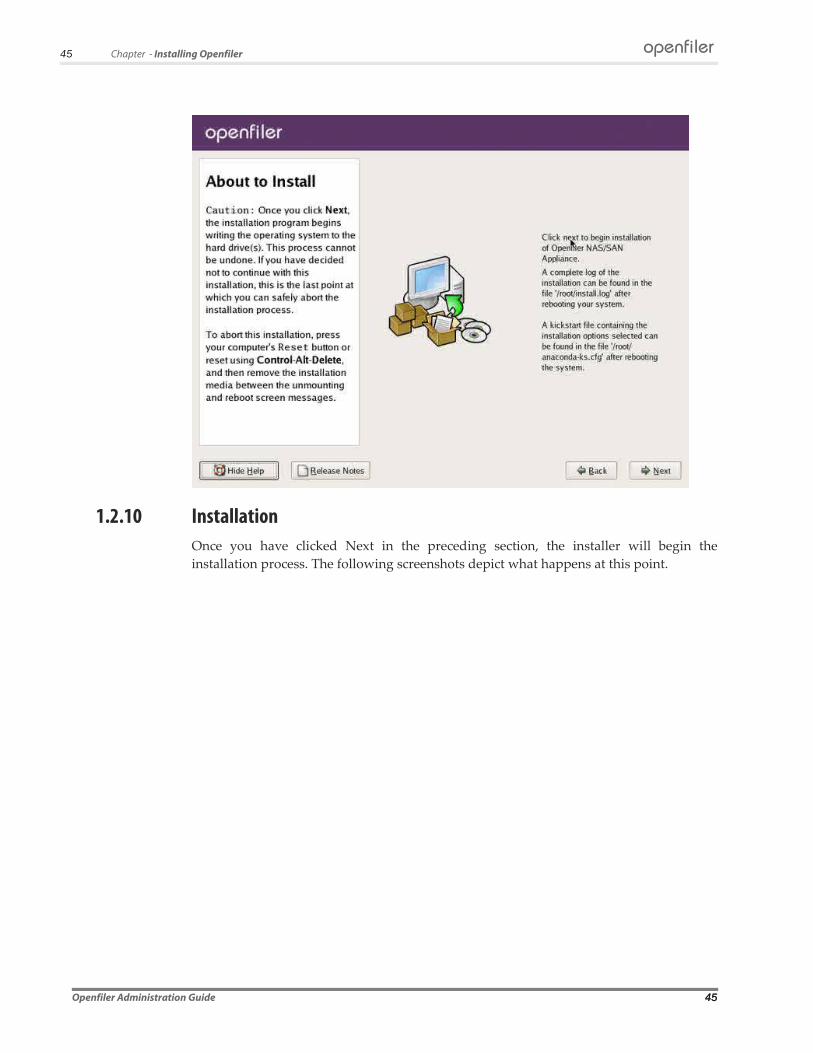
1.2.9 About To InstallThis screen informs you that installation configuration has been completed and the
installer is awaiting your input to start the installation process which will format disks,
copy data to the system and configure system parameters such as setting up the boot
loader and adding system users. Click Next if you are satisfied with the entries you have
made in the previous screens.
Note:
You cannot go back to previous screens once you have gone past this point. The installer will erase any data on the partitions you defined in the partitioning section.
Openfiler Administration Guide 44
openfiler
45 Chapter - Installing Openfiler
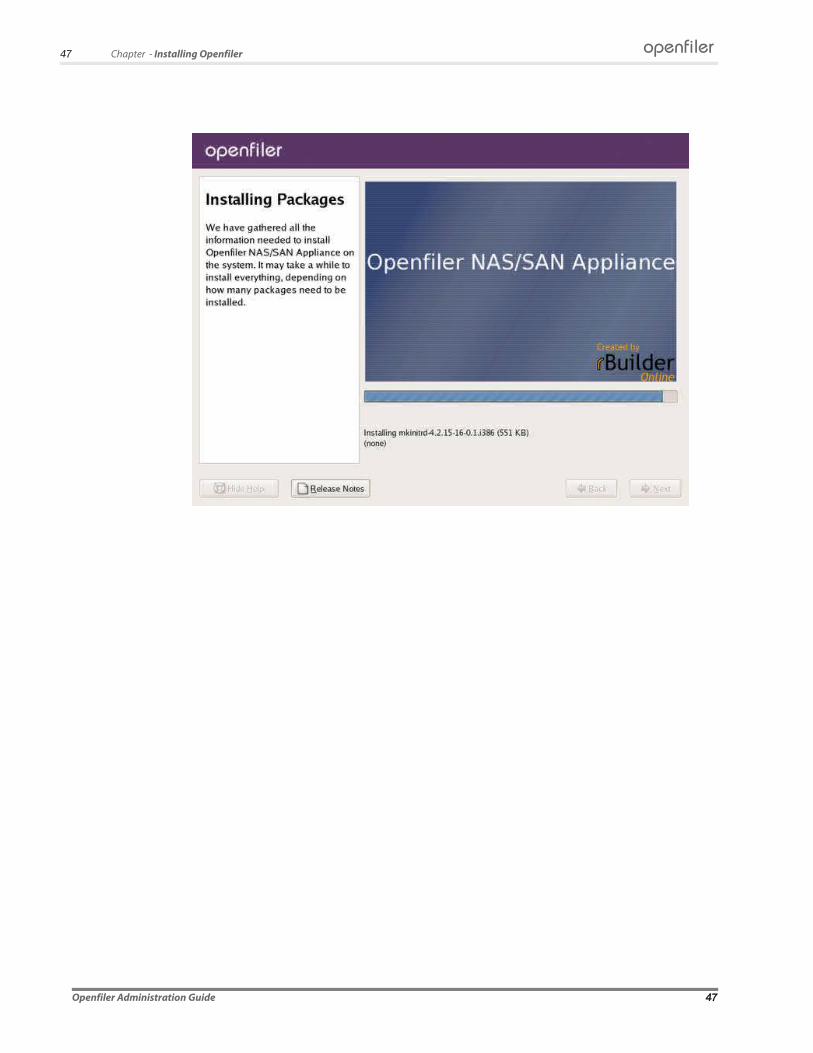
1.2.10 InstallationOnce you have clicked Next in the preceding section, the installer will begin the
installation process. The following screenshots depict what happens at this point.
Openfiler Administration Guide 45
openfiler

46 Chapter 1 - Installing Openfiler
Openfiler Administration Guide 46
openfiler
47 Chapter - Installing Openfiler
Openfiler Administration Guide 47
openfiler
48 Chapter 1 - Installing Openfiler
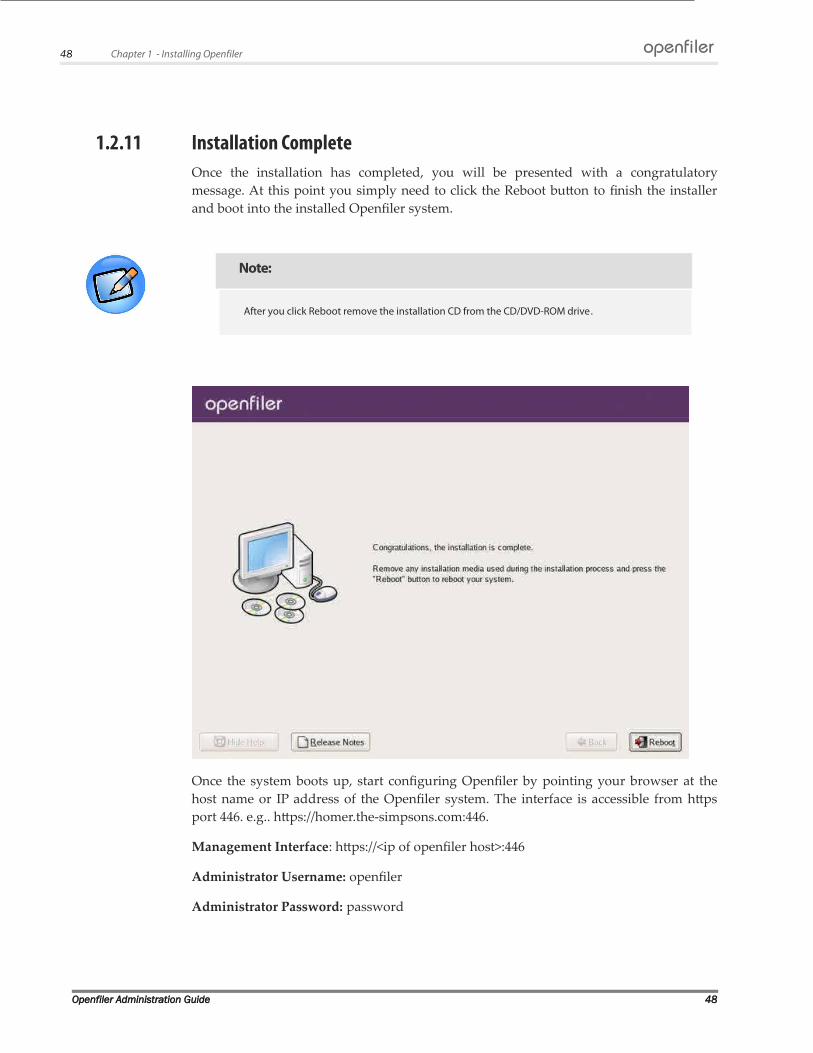
1.2.11 Installation CompleteOnce the installation has completed, you will be presented with a congratulatory
message. At this point you simply need to click the Reboot button to finish the installer
and boot into the installed Openfiler system.
Note:
After you click Reboot remove the installation CD from the CD/DVD-ROM drive.
Once the system boots up, start configuring Openfiler by pointing your browser at the
host name or IP address of the Openfiler system. The interface is accessible from https
port 446. e.g.. https://homer.the-simpsons.com:446.
Management Interface: https://<ip of openfiler host>:446
Administrator Username: openfiler
Administrator Password: password
Openfiler Administration Guide 48
openfiler

49 Chapter - Installing Openfiler
Openfiler Administration Guide 49
openfiler

2 Getting Started
2.1 Introduction to OpenfilerWelcome to the Openfiler Storage Configuration Centre Administration Guide. This
Centre is an interface designed to simplify the management of storage resources in
heterogeneous networks.
Openfiler empowers storage administrators to simplify the management of storage
resources in the enterprise via an intuitive browser-based interface. Openfiler is ideal for
multi-platform networks where workstations/servers run disparate operating systems
such as Microsoft® Windows® 98/XP/2000, Mac OS9/X®, UNIX® and Linux®. An
important feature of Openfiler is that it bridges the Storage Area Network (SAN) and
Network Attached Storage (NAS) paradigms on a network so that the entire scope of
storage management tasks on an enterprise network can potentially be managed from
one single console.
The main beneficiaries of Openfiler are storage and network administrators whose jobs
are becoming more difficult due to the proliferation of data on enterprise networks. There
is data on workstations, servers, in SAN islands and on NAS appliances scattered all over
the network. The administrator is tasked with managing these distinct storage resources -
bring all users in a certain department into a single storage domain; provide staf
responsible for Management Information System (MIS) with more space for their Oracle-
based business intelligence applications; and bring in block-based storage volumes from
SAN into the file-based NAS environment to increase storage capacity for IP clients on
the network. These are just some of the challenges that administrators face on a daily
basis, and Openfiler is designed to make solving them as simple as "point and click".
2

51 Chapter 2 - Getting Started
2.2 Logging on to OpenfilerThis section provides details about how to log on to Openfiler.
To log on to Openfiler:
1. In the web browser, type the Openfiler URL and press ENTER. The Openfiler Login
page is displayed, as shown in the following figure.
F i g u r e 1 : L o g i n P a g e
2. Enter the appropriate Username and Password and click the Login button. Openfiler
displays the Home page, as shown in the following figure.
Openfiler Administration Guide 51
openfiler
52 Chapter 2 - Getting Started
F i g u r e 2 : H o m e p a g e
Openfiler Administration Guide 52
openfiler

53 Chapter 2 - Getting Started
Note:
The Openfiler GUI is accessed by pointing a browser to the hostname or IP address of the Openfiler appliance. The GUI runs on port 446 using the HTTPS protocol. e.g
https://mysan:446
https://192.168.1.31:446
The default credentials for accessing the Openfiler GUI are:
Username: username
Password: password
It is recommended to change the administrator password immediately after the first log on to Openfiler by accessing the Accounts->Admin Password context.
Openfiler Administration Guide 53
openfiler
54 Chapter 2 - Getting Started
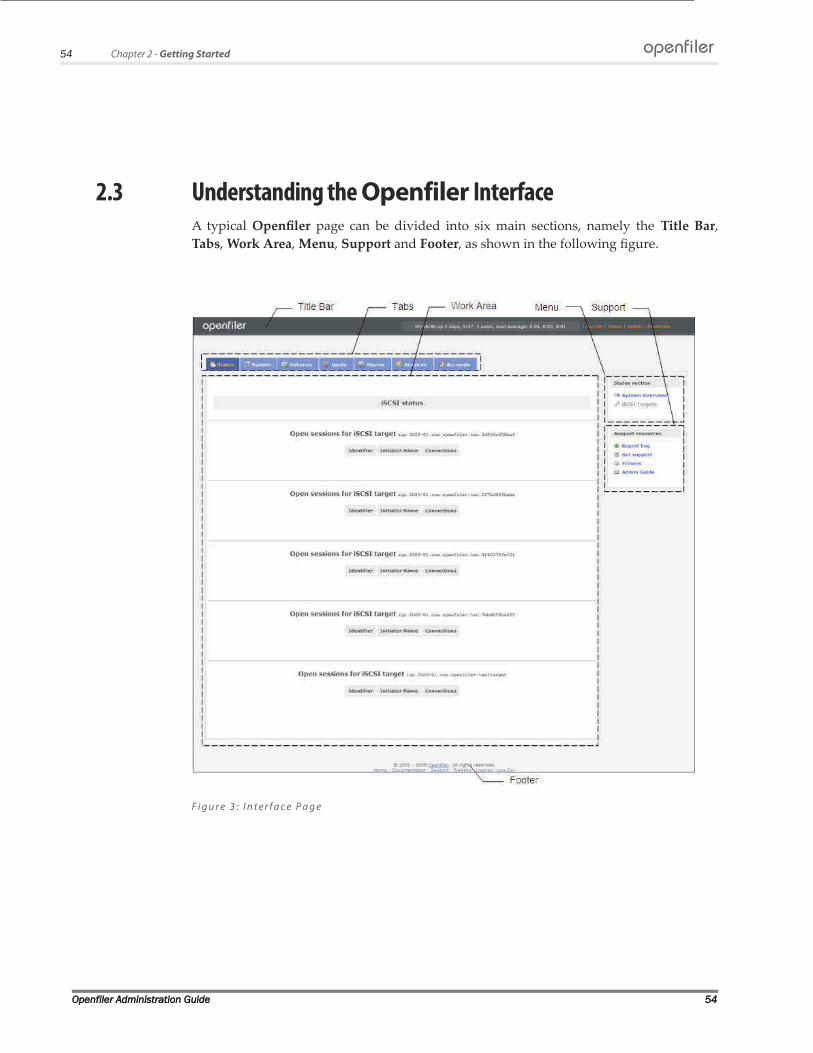
2.3 Understanding the Openfiler InterfaceA typical Openfiler page can be divided into six main sections, namely the Title Bar,
Tabs, Work Area, Menu, Support and Footer, as shown in the following figure.
F i g u r e 3 : I n t e r f a c e P a g e
Openfiler Administration Guide 54
openfiler

55 Chapter 2 - Getting Started
2.3.1 Title BarThe top strip of the Openfiler page is the Title Bar. It displays quick access links to
system-wide functions such as Log out, Status, Update and Shutdown.
2.3.2 TabsTabs help the user to navigate through the various functions of Openfiler, namely:
Status
System
Volumes
Quota
Shares
Services
Accounts
2.3.3 Work AreaThe Work Area is a rectangular space where all the contents are displayed based on your
selection of Tabs and the Menu.
2.3.4 MenuThe vertical bar on the right side is the section that contains the menus. The Menu
displays the respective the configuration contexts available for each tab that is selected.
2.3.5 SupportThis section displays the various support resources available for Openfiler, namely:
Report bug
Get support
Forums
Admin Guide
2.3.6 FooterThis is the bottom area of the application. Openfiler displays the access links to copyright
details, Homepage, Documentation, Support, Openfiler Website, License details and
Log out.
Openfiler Administration Guide 55
openfiler

3 Status Section
Status page is displayed by default when you login to Openfiler. This Status tab has two
menu options, System Overview and iSCSI targets. System overview gives an overview
of the system at any given point. iSCSI shows the connections details in your Openfiler.
3
57 Chapter 3 - Error! No text of specified style in document.
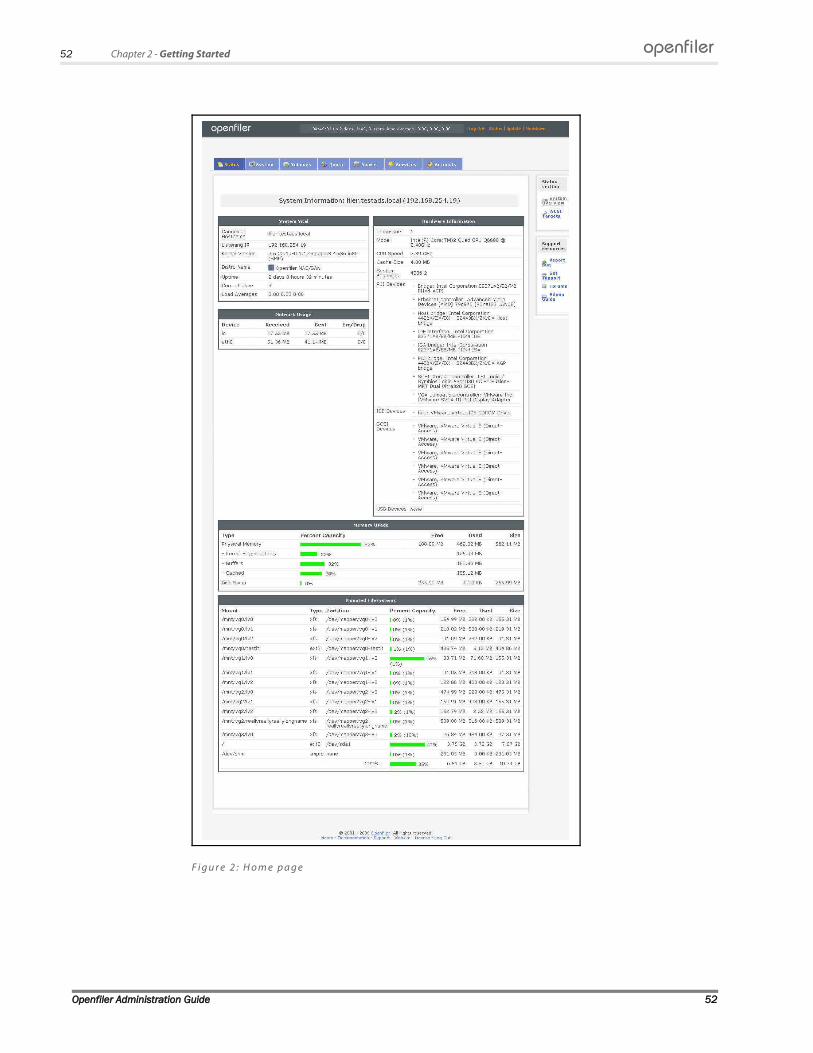
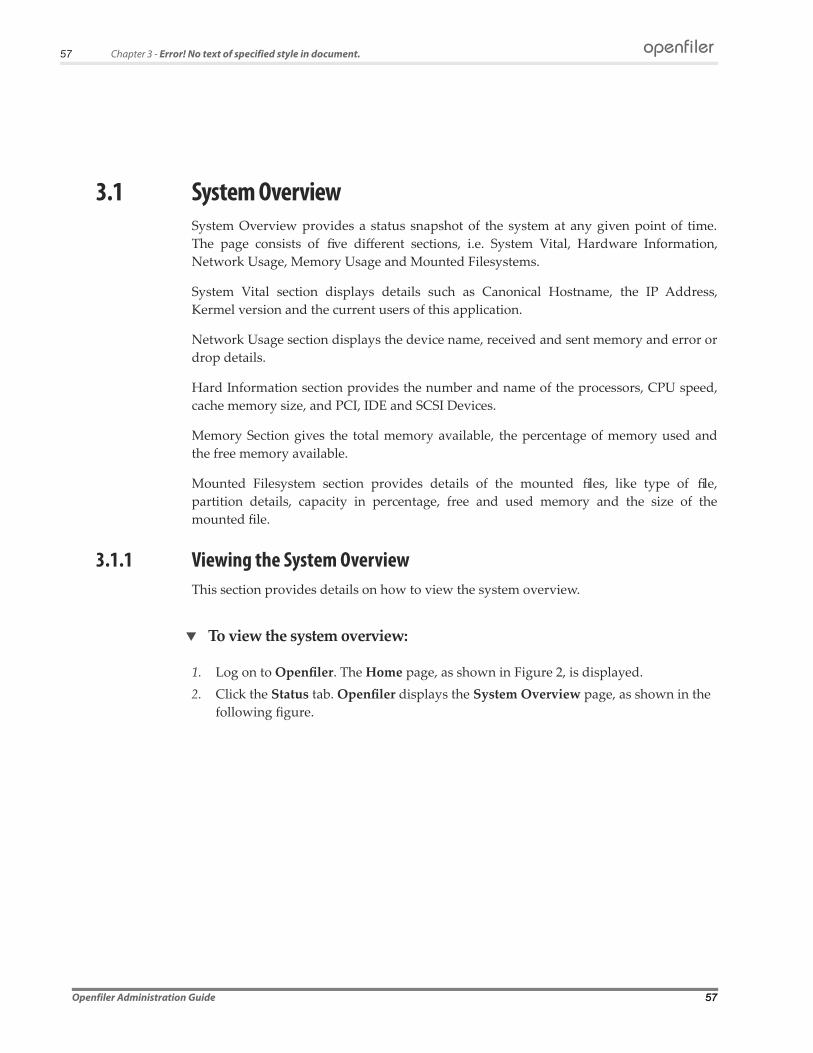
3.1 System OverviewSystem Overview provides a status snapshot of the system at any given point of time.
The page consists of five diferent sections, i.e. System Vital, Hardware Information,
Network Usage, Memory Usage and Mounted Filesystems.
System Vital section displays details such as Canonical Hostname, the IP Address,
Kermel version and the current users of this application.
Network Usage section displays the device name, received and sent memory and error or
drop details.
Hard Information section provides the number and name of the processors, CPU speed,
cache memory size, and PCI, IDE and SCSI Devices.
Memory Section gives the total memory available, the percentage of memory used and
the free memory available.
Mounted Filesystem section provides details of the mounted files, like type of file,
partition details, capacity in percentage, free and used memory and the size of the
mounted file.
3.1.1 Viewing the System OverviewThis section provides details on how to view the system overview.
To view the system overview:
1. Log on to Openfiler. The Home page, as shown in Figure 2, is displayed.
2. Click the Status tab. Openfiler displays the System Overview page, as shown in the
following figure.
Openfiler Administration Guide 57
openfiler

58 Chapter 3 - Error! No text of specified style in document.
F i g u r e 4 : S y s t e m O v e r v i e w
Note:
The default page displayed after login is the System Overview page. The user can also click the Status link on the Title Bar to view this page.
Openfiler Administration Guide 58
openfiler

59 Chapter 3 - Error! No text of specified style in document.
3.2 iSCSI TargetsiSCSI Targets page shows the details of the connections coming into your Openfiler
system, namely, Identifier- the unique identification code, Initiator Name and the number
of connections coming to the iSCSI target.
3.2.1 Viewing iSCSI TargetsThis section provides details about how to view iSCSI Targets.
To view iSCSI Targets:
1. Log on to Openfiler. The Home page, as shown in Figure 2, is displayed.
2. Click the Status tab. Openfiler displays the System Overview page as shown in
Figure 4.
3. Click iSCSI Targets menu. Openfiler displays iSCSI Targets page, as shown in the
following figure.
F i g u r e 5 : i S C S I T a r g e t
Openfiler Administration Guide 59
openfiler

4 Managing System
This chapter deals with out-of-the-box Openfiler set-up and configuration. The system
tab allows you to set up the network, the HA Cluster, the system time and time zone, and
configure the UPS. This tab also has the option to configure the notification, restart or
reboot, and to update the system.
4
61 Chapter 4 - Managing System
4.1 Network SetupThis section provides details about the network setup configuration of Openfiler. This
section covers three basic configurations namely, Network Configuration, Network
Interface Configuration and Network Access Configuration.
Network Configuration and Network Interface Configuration are for setting up of the
Openfiler server itself whereas the network access configuration sets the access control
for users of Openfiler.
Network configuration is done while installing the system. This section allows the user to
set up the hostname, primary and secondary DNS and gateway IP.
Network Interface Configuration deals with the configuration of interfaces. You can also
view or edit the existing configuration.
Network Access Configuration deals with setting access control for other users.
Openfiler allows limited access to the system services using the network host mask and
also can prevent access to iSCSI and the like. This control is based on the incoming or
outgoing IP address.
For cases where network configuration is not performed during installation, (e.g for Xen or VMware virtual machines) and there is no DHCP server available on the network; perform the following steps to configure the network:
Note:
For cases where network configuration is not performed during installation, (e.g for Xen or VMware virtual machines) and there is no DHCP server available on the network; perform the following steps to configure the network:
1) Log in as "root" <enter>
2) type: ifconfig eth0 <ip address>
e.g ifconfig eth0 192.168.1.23
3) Proceed to log in at https://192.168.1.23:446
4) Access the System tab to complete network configuration settings such as DNS and gateway information.
Openfiler Administration Guide 61
62 Chapter 4 - Managing System
4.1.1 Viewing Network SetupThis section provides details about how to view Network Setup in Openfiler.
To view Network Setup:
1. Log on to Openfiler. The Home page, as shown in Figure 2, is displayed.
2. Click the System tab. Openfiler displays the Network Setup page, as shown in the
following figure.
Openfiler Administration Guide 62
openfiler

63 Chapter 4 - Managing System
F i g u r e 6 : N e t w o r k S e t u p P a g e
Openfiler Administration Guide 63
openfiler

64 Chapter 4 - Managing System
Field Description
Network Configuration
Host Name This field displays the host name.
Primary DNS This field displays the IP address of the primary Domain
Naming Service.
Secondary DNS This field displays the IP address of the secondary Domain
Naming Service.
Gateway This field displays the gateway of the network.
Network Interface Configuration
Interface This field displays the interface name.
Boot Protocol This field displays the boot protocol of the interface.
IP Address This field displays the IP address of the interface.
Network Mask This field displays the network mask of the interface.
Speed This field displays the connection speed for the interface
MTU This field displays the Maximum Transit Unit value for the
interface.
Link This field displays the network link status for the interface.
Network Access Configuration
Name This field displays the network access configuration name.
Network/Host This field displays the network address or host of the
interface.
Netmask This field displays the netmask of the interface.
Type This field displays the type of interface. There are two
typesnamely, Share and UPS.
T a b l e 1 : N e t w o r k S e t u p
Note:
The default page displayed after clicking the System tab is the Network Setup page.
Openfiler Administration Guide 64
openfiler

65 Chapter 4 - Managing System
4.1.2 Modifying Network ConfigurationThis section provides details about how to modify the Network Configuration in
Openfiler.
To modify Network Configuration:
1. Log on to Openfiler. The Home page, as shown in Figure 2, is displayed.
2. Click the System tab. Openfiler displays the Network Setup page, as shown in
Figure 6. The Network Configuration section in the Network Setup page is as
shown in the following figure.
F i g u r e 7 : N e t w o r k C o n f i g u r a t i o n
3. Modify the appropriate details and click the Update button.
OR
Click the Cancel button to cancel the changes.
Openfiler Administration Guide 65

66 Chapter 4 - Managing System
4.1.3 Viewing Network Interface This section provides details about how to view a network interface configuration in
Openfiler.
To view network interface:
1. Log on to Openfiler. The Home page, as shown in Figure 2, is displayed.
2. Click the System tab. Openfiler displays the Network Setup page, as shown in
Figure 6. The available network interface is displayed in the Network Interface
Configuration section of the Network Setup page, as shown in the following figure.
F i g u r e 8 : N e t w o r k I n t e r f a c e C o n f i g u r a t i o n
3. Click the appropriate Interface link. Openfiler displays the Network Interface
Details page, as shown in the following figure.
F i g u r e 9 : N e t w o r k I n t e r f a c e D e t a i l s
4. View the interface details and click anywhere outside the popup dialogue to close the
popup.
Openfiler Administration Guide 66
openfiler

67 Chapter 4 - Managing System
Note:
To know more about how to add a VLAN and Virtual Interface to a network refer to Adding a VLAN and Adding a Virtual Interface sections, respectively. VLAN configuration requires hardware support. Check with your network hardware vendor for VLAN configuration support.
4.1.3.1 Adding a VLANThis section provides details about how to add a Virtual Local Area Network (VLAN)
interface configuration.
To add a VLAN:
1. Log on to Openfiler. The Home page, as shown in Figure 2, is displayed.
2. Click the System tab. Openfiler displays the Network Setup page, as shown in
Figure 6. The available network interface is displayed in the Network Interface
Configuration section of the Network Setup page, as shown in Figure 8.
3. Click the appropriate Interface link. Openfiler displays the Network Interface
Details page, as shown in Figure 9.
4. Click the Add VLAN link. Openfiler displays the VLAN Interface Configuration
page, as shown in the following figure.
F i g u r e 1 0 : V L A N I n t e r f a c e C o n f i g u r a t i o n
5. Enter an appropriate VLAN ID and click the Continue button.
OR
Click the Cancel button to cancel the process.
Openfiler Administration Guide 67
openfiler

68 Chapter 4 - Managing System
4.1.3.2 Adding a Virtual InterfaceThis section provides details about how to add a virtual interface
To add a virtual interface:
1. Log on to Openfiler. The Home page, as shown in Figure 2, is displayed.
2. Click the System tab. Openfiler displays the Network Setup page, as shown in
Figure 6. The available network interface is displayed in the Network Interface
Configuration section of the Network Setup page, as shown in Figure 8.
3. Click the appropriate Interface link. Openfiler displays the Network Interface
Details page, as shown in Figure 9.
4. Click the Add Virtual Interface link to add a virtual interface. Openfiler adds it to
the selected interface.
4.1.4 Editing/Configuring a Network InterfaceThis section provides details about how to edit a network interface configuration.
To edit/configure a Network Interface:
1. Log on to Openfiler. The Home page, as shown in Figure 2, is displayed.
2. Click the System tab. Openfiler displays the Network Setup page, as shown in
Figure 6. The Network Interface Configuration section in the Network Setup page is
displayed as shown in the following figure.
F i g u r e 1 1 : N e t w o r k I n t e r f a c e C o n f i g u r a t i o n
3. Click the icon corresponding to the interface to be edited. Openfiler displays the
edit page, as shown in the following figure.
Openfiler Administration Guide 68
openfiler
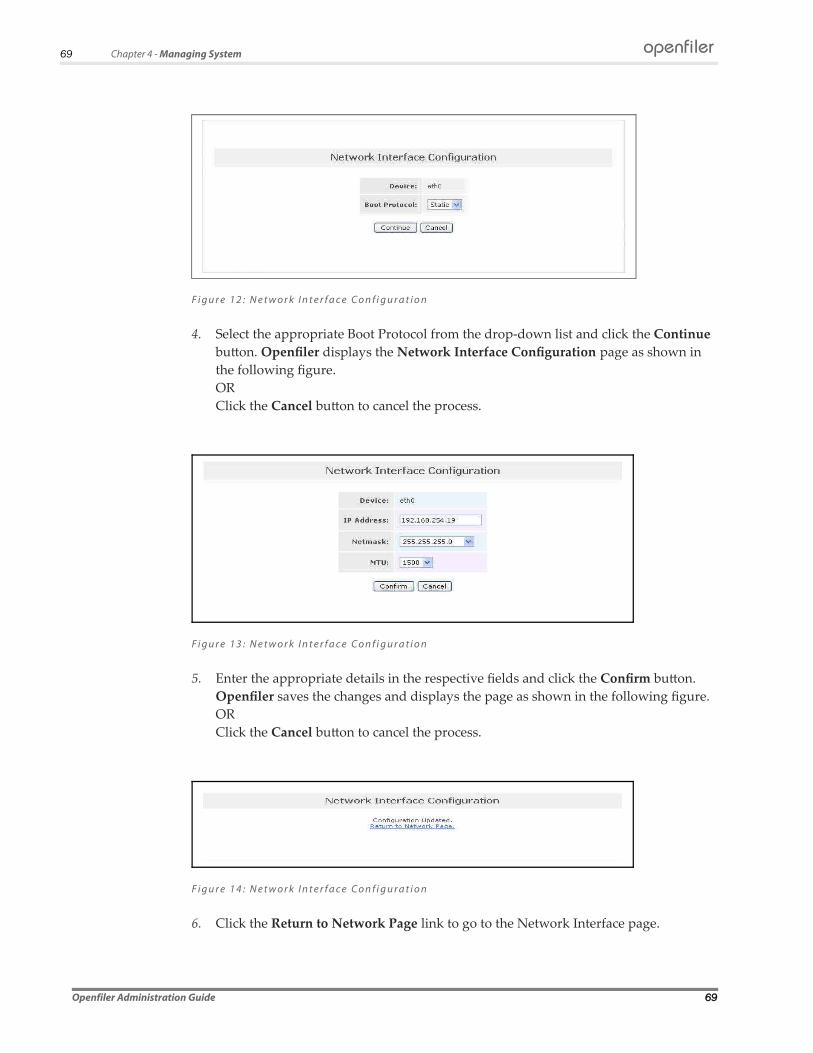
69 Chapter 4 - Managing System
F i g u r e 1 2 : N e t w o r k I n t e r f a c e C o n f i g u r a t i o n
4. Select the appropriate Boot Protocol from the drop-down list and click the Continue
button. Openfiler displays the Network Interface Configuration page as shown in
the following figure.
OR
Click the Cancel button to cancel the process.
F i g u r e 1 3 : N e t w o r k I n t e r f a c e C o n f i g u r a t i o n
5. Enter the appropriate details in the respective fields and click the Confirm button.
Openfiler saves the changes and displays the page as shown in the following figure.
OR
Click the Cancel button to cancel the process.
F i g u r e 1 4 : N e t w o r k I n t e r f a c e C o n f i g u r a t i o n
6. Click the Return to Network Page link to go to the Network Interface page.
Openfiler Administration Guide 69
openfiler

70 Chapter 4 - Managing System
4.1.5 Creating a Bonded InterfaceThis section describes how to create a bonded interface. The Linux bonding driver
provides a method for aggregating multiple network interfaces into a single logical
"bonded" interface. The behavior of the bonded interfaces depends upon the mode;
generally speaking, modes provide either hot standby or load balancing services.
Additionally, link integrity monitoring may be performed
To create a bonded interface:
1. Log on to Openfiler. The Home page, as shown in Figure 2, is displayed.
2. Click the System tab. Openfiler displays the Network Setup page, as shown in
Figure 6. The Network Interface Configuration section in the Network Setup page is
as shown in Figure 11.
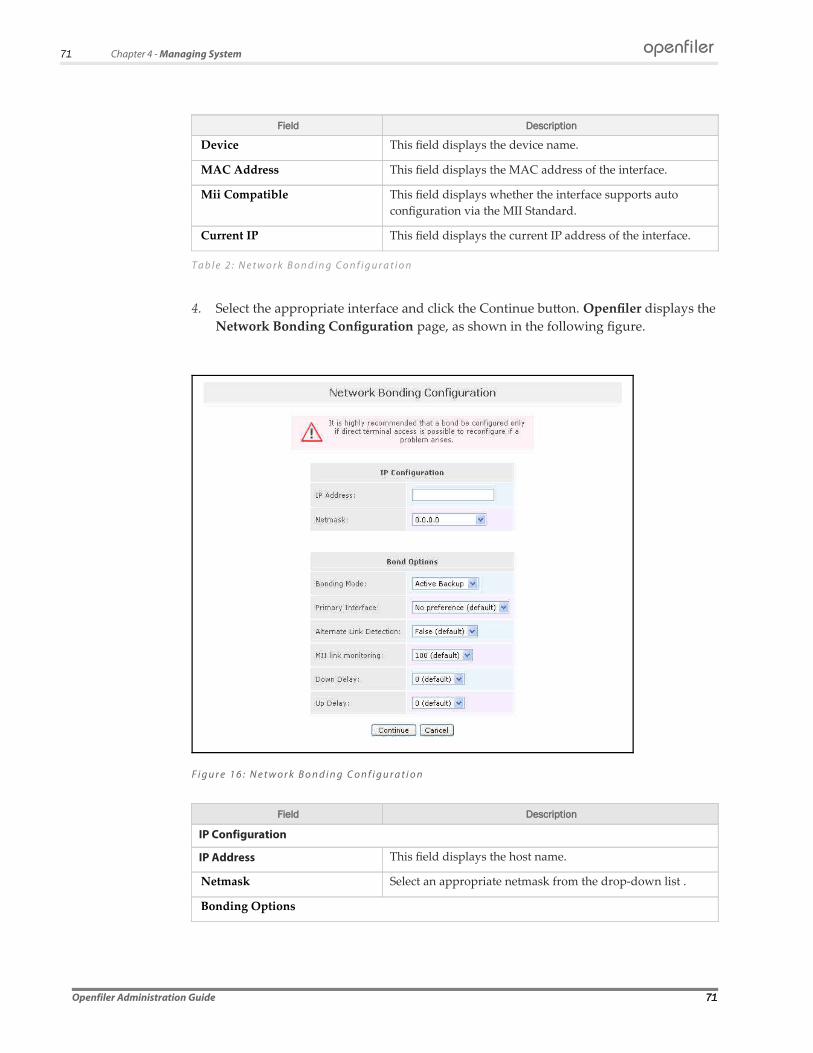
3. Click the Create bonded interface link. Openfiler displays the Network Boding
Configuration page, as shown in the following figure.
F i g u r e 1 5 : N e t w o r k B o n d i n g C o n f i g u r a t i o n
Openfiler Administration Guide 70
openfiler
71 Chapter 4 - Managing System
Field Description
Device This field displays the device name.
MAC Address This field displays the MAC address of the interface.
Mii Compatible This field displays whether the interface supports auto
configuration via the MII Standard.
Current IP This field displays the current IP address of the interface.
T a b l e 2 : N e t w o r k B o n d i n g C o n f i g u r a t i o n
4. Select the appropriate interface and click the Continue button. Openfiler displays the
Network Bonding Configuration page, as shown in the following figure.
F i g u r e 1 6 : N e t w o r k B o n d i n g C o n f i g u r a t i o n
Field Description
IP Configuration
IP Address This field displays the host name.
Netmask Select an appropriate netmask from the drop-down list .
Bonding Options
Openfiler Administration Guide 71
openfiler

72 Chapter 4 - Managing System
Field Description
Bonding Mode Select an appropriate Bonding Mode from the drop-down
list. By default balance-rr will be selected.
The available options are:
Balance-rr (Round-robin policy): Transmit packets in
sequential order from the first available slave through the last.
This mode provides load balancing and fault tolerance.
Active Backup: Only one slave in the bond is active. A diferent
slave becomes active if, and only if, the active slave fails. The
bond's MAC address is externally visible on only one port
(network adapter) to avoid confusing the switch.
Balance XOR: Transmit based on the selected transmit hash
policy. The default policy is a simple [(source MAC address
XOR'd with destination MAC address) modulo slave count].
Alternate transmit policies may be selected via the
xmit_hash_policy option.
Broadcast: transmits everything on all slave interfaces. This
mode provides fault tolerance
802.3ad (IEEE 802.3ad Dynamic link aggregation): Creates
aggregation groups that share the same speed and duplex
settings. Utilizes all slaves in the active aggregator according to
the 802.3ad specificationBalance-tlb (Adaptive transmit load
balancing): channel bonding that does not require any special
switch support. The outgoing traffic is distributed according to
the current load (computed relative to the speed) on each slave.
Incoming traffic is received by the current slave. If the receiving
slave fails, another slave takes over the MAC address of the
failed receiving slave.
Balance-alb (Adaptive load balancing): includes balance-tlb
plus receive load balancing (rlb) for IPV4 traffic, and does not
require any special switch support. The receive load balancing
is achieved by ARP negotiation. The bonding driver intercepts
the ARP Replies sent by the local system on their way out and
overwrites the source hardware address with the unique
hardware address of one of the slaves in the bond such that
diferent peers use diferent hardware addresses for the server.
Primary Interface Select an appropriate primary interface from the drop-down
list, which specifies which slave is the primary device. The
specified slave will always be the active slave while it is
available. Alternate device is used, only when the primary is
offline.
Alternate Link Detection Select appropriate link detection from the drop-down list.
The available options are True and False.
The default option selected is False.
MII link monitoring Select an appropriate MII link monitoring frequency from
the drop-down list.
Down Delay Select an appropriate Down Delay from the drop-down list.
The default option selected is ‘0’.
Up Delay Select an appropriate Up Delay from the drop-down list.
Openfiler Administration Guide 72
openfiler
73 Chapter 4 - Managing System
Field Description
The default option selected is ‘0’.
T a b l e 3 : N e t w o r k B o n d i n g C o n f i g u r a t i o n
5. Enter the appropriate details and click the Continue button.
OR
Click the Cancel button to cancel the process.
Note:
Bonding configuration can occur whether or not direct terminal access is available. However, it is recommended that configuration be done only in cases where a misconfigured bond brings down remote access and no other mechanism, aside from direct terminal access, is available to recover from the misconfiguration.
4.1.6 Adding a new Network Access EntryThis section explains how to add a new network access to the configuration.
To add a new Network Access Entry:
1. Log on to Openfiler. The Home page, as shown in Figure 2, is displayed.
2. Click the System tab. Openfiler displays the Network Setup page, as shown in
Figure 6. The Network Access Configuration section in the Network Setup page is
displayed as shown the following figure.
Openfiler Administration Guide 73
openfiler

74 Chapter 4 - Managing System
F i g u r e 1 7 : N e t w o r k a c c e s s c o n f i g u r a t i o n
3. Enter the appropriate details in the respective fields, corresponding to New, and click
the Update button.
Note:
When adding a network access entry for iSCSI initiators, be sure to enter the full network IP address of the initiator host and hostmask for the network IP address. For eg. 192.168.1.23/255.255.255.255
4.1.7 Deleting a Network Access EntryThis section explains how to delete a network access configuration.
To delete a Network Access Entry:
1. Log on to Openfiler. The Home page, as shown in Figure 2, is displayed.
2. Click the System tab. Openfiler displays the Network Setup page, as shown in
Figure 6. The Network Access Configuration section in the Network Setup page is
displayed as shown in Figure 17.
3. Select the appropriate Delete check box and click the Update button.
Openfiler Administration Guide 74
openfiler
75 Chapter 4 - Managing System
4.2 Setting up the Clock It is imperative that the system time is set correctly before users are allowed to store data
on the system. The administrator has the option of setting the system time manually or
using a remote network time protocol (NTP) server. If the system running Openfiler has
a route to the internet, it is better to set the system time using a time server. If not, the
system time must be set manually. The user can also set the system time zone.
4.2.1 Setting the system clock manuallyThis section provides details about how to set the system time manually.
To set the system clock:
1. Log on to Openfiler. The Home page, as shown in Figure 2, is displayed.
2. Click the System tab. Openfiler displays the Network Setup page, as shown in
Figure 6.
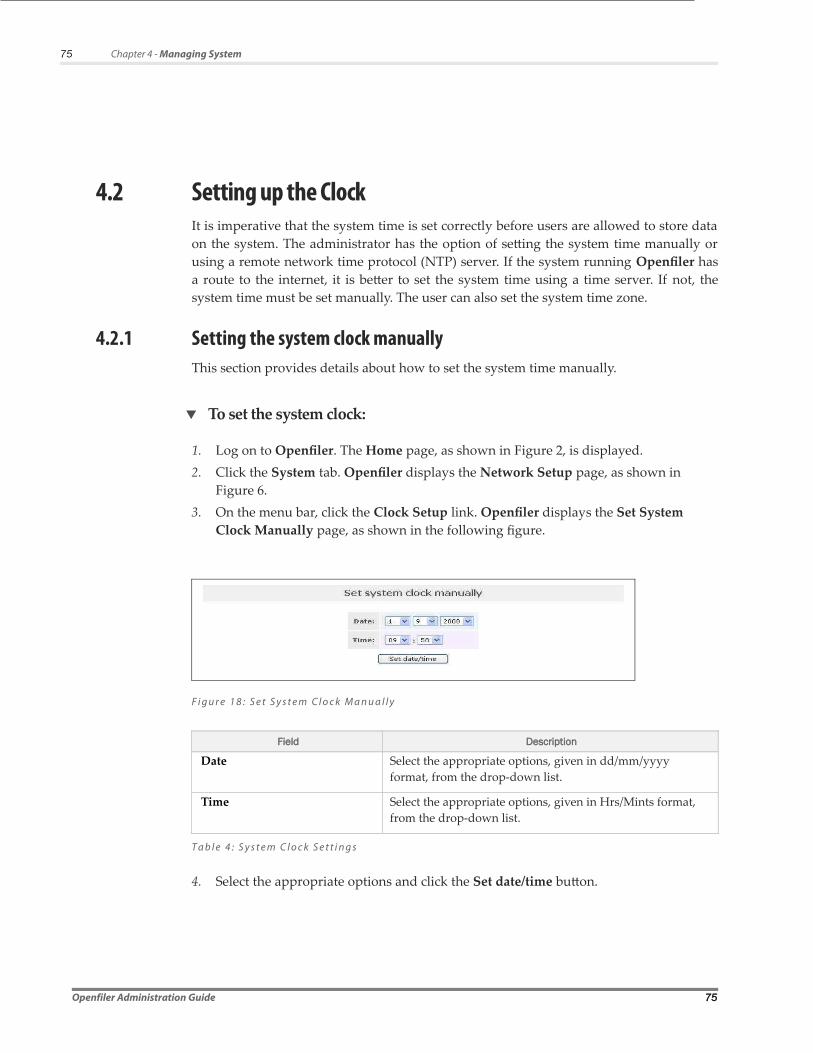
3. On the menu bar, click the Clock Setup link. Openfiler displays the Set System
Clock Manually page, as shown in the following figure.
F i g u r e 1 8 : S e t S y s t e m C l o c k M a n u a l l y
Field Description
Date Select the appropriate options, given in dd/mm/yyyy
format, from the drop-down list.
Time Select the appropriate options, given in Hrs/Mints format,
from the drop-down list.
T a b l e 4 : S y s t e m C l o c k S e t t i n g s
4. Select the appropriate options and click the Set date/time button.
Openfiler Administration Guide 75

76 Chapter 4 - Managing System
4.2.2 Synchronizing the System Clock with NTP timeserverThis section explains how to synchronize the system clock with the network time
protocol (NTP) server.
To synchronize the system clock with NTP timeserver:
1. Log on to Openfiler. The Home page, as shown in Figure 2, is displayed.
2. Click the System tab. Openfiler displays the Network Setup page, as shown in
Figure 6.
3. On the menu bar, click the Clock Setup link. Openfiler displays the Keep System
Clock Synchronized with NTP Server page, as shown in the following figure.
F i g u r e 1 9 : K e e p S y s t e m c l o c k s y n c h o r o n i z e d w i t h N T P t i m e s e r v e r
4. Enter the appropriate data in the Server field and click the Setup synchronization
button to synchronize the system clock.
Note:
Clear the Server field to disable the synchronization function.
For example, the servers you can use are: time.nist.gov, 0.pool.ntp.org,1.pool.ntp.org, and 2.pool.ntp.org.
Openfiler Administration Guide 76

77 Chapter 4 - Managing System
4.2.3 Setting Time zoneThis section explains how to set up the system time zone in Openfiler.
To set the time zone:
1. Log on to Openfiler. The Home page, as shown in Figure 2, is displayed.
2. Click on the System tab. Openfiler displays the Network Setup page, as shown in
Figure 6.
3. On the menu bar, click the Clock Setup link. Openfiler displays the Timezone page,
as shown in the following figure.
F i g u r e 2 0 : T i m e z o n e
4. Select the appropriate time zone from the drop-down list and click the Set timezone
button.
Openfiler Administration Guide 77
openfiler

78 Chapter 4 - Managing System
4.3 Managing UPSIn this chapter, you will learn how to configure a Uninterrupted Power Supply (UPS)
device and edit the existing UPS configuration.
4.3.1 Configuring a UPS deviceThis section provides a detailed description on how to configure a UPS device.
To configure a UPS device:
1. Log on to Openfiler. The Home page, as shown in Figure 2, is displayed.
2. Click the System tab. Openfiler displays the Network Setup page, as shown in
Figure 6.
3. On the menu bar, click the UPS Management link. Openfiler displays the
Uninterruptible Power Supply Device Configuration page, as shown in the
following figure.
F i g u r e 2 1 : U P S D e v i c e c o n f i g u r a t i o n
Field Description
Config Name This field displays the configuration name of the UPS.
Device This field displays the device name.
Port This field displays the port name.
Description This field displays the device description. e.g. Primary UPS.
Shutdown Order This field displays the order in which the system shuts
down.
Extra Settings This field displays the extra settings.
Openfiler Administration Guide 78
openfiler
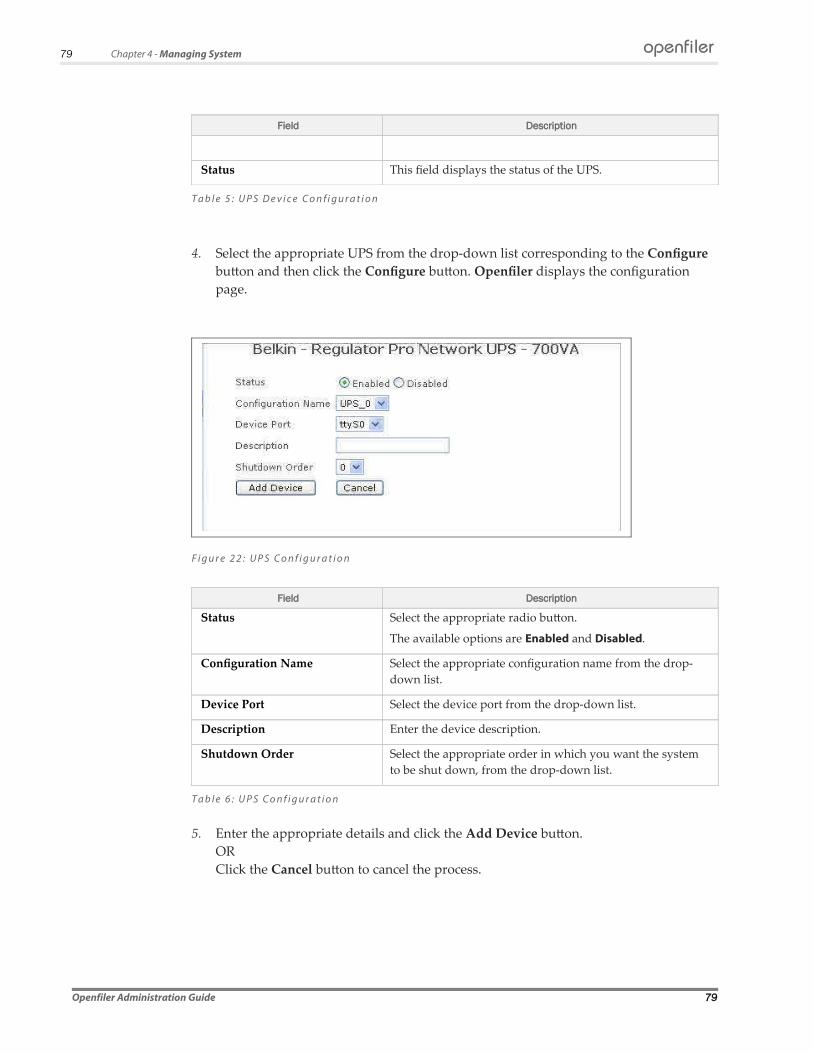
79 Chapter 4 - Managing System
Field Description
Status This field displays the status of the UPS.
T a b l e 5 : U P S D e v i c e C o n f i g u r a t i o n
4. Select the appropriate UPS from the drop-down list corresponding to the Configure
button and then click the Configure button. Openfiler displays the configuration
page.
F i g u r e 2 2 : U P S C o n f i g u r a t i o n
Field Description
Status Select the appropriate radio button.
The available options are Enabled and Disabled.
Configuration Name Select the appropriate configuration name from the drop-
down list.
Device Port Select the device port from the drop-down list.
Description Enter the device description.
Shutdown Order Select the appropriate order in which you want the system
to be shut down, from the drop-down list.
T a b l e 6 : U P S C o n f i g u r a t i o n
5. Enter the appropriate details and click the Add Device button.
OR
Click the Cancel button to cancel the process.
Openfiler Administration Guide 79
openfiler

80 Chapter 4 - Managing System
4.3.2 Editing a UPS configurationThis section provides details about how to edit a UPS configuration in Openfiler.
To edit a UPS configuration
1. Log on to Openfiler. The Home page, as shown in Figure 2, is displayed.
2. Click on the System tab. Openfiler displays the Network Setup page, as shown in
Figure 6.
3. On the menu bar, click the UPS Management link. Openfiler displays the
Uninterruptible Power Supply Device Configuration page, as shown in Figure 21.
4. Click the appropriate icon corresponding to the UPS Device to be edited.
Openfiler displays the UPS editing page, as shown in the following figure.
F i g u r e 2 3 : U P S C o n f i g u r a t i o n
5. Make the necessary changes and click the Update button.
OR
Click the Cancel button to cancel the process.
OR
Click the Delete button to delete the UPS device.
Openfiler Administration Guide 80
openfiler

81 Chapter 4 - Managing System
4.4 Shutting down/Rebooting the SystemThis option enables the administrator to shutdown the system immediately or after a
specified time interval. The administrator can elect to have file/systems checked on
startup.
To shutdown or reboot the system:
1. Log on to Openfiler. The Home page, as shown in Figure 2, is displayed.
2. Click the System tab. Openfiler displays the Network Setup page, as shown in
Figure 6.
3. On the menu bar, click the Shutdown/Reboot link. Openfiler displays the Shutdown
the System page, as shown in the following figure.
F i g u r e 2 4 : S h u t d o w n t h e s y s t e m
Field Description
Shutdown type There are two shutdown options:
Shutdown and halt:
Reboot: Select this radio button to reboot the system.
Delay before shutdown Enter in minutes the time lag before shutdown commences.
Check filesystem on startup This field displays the port name.
T a b l e 7 : S h u t d o w n / R e b o o t t h e S y s t e m
4. Enter the appropriate details in the respective fields.
5. Click the Shutdown button to shutdown or reboot the system.
Openfiler Administration Guide 81
openfiler

82 Chapter 4 - Managing System
Note:
You can also access the Shutdown page by clicking the Shutdown link on the title bar.
4.5 Managing Notification ConfigurationThis option helps you to send notifications to the users about any events taking place
during the software raid.
To view notification configuration:
1. Log on to Openfiler. The Home page, as shown in Figure 2, is displayed.
2. Click the System tab. Openfiler displays the Network Setup page, as shown in
Figure 6.
3. On the menu bar, click the Notification link. Openfiler displays the Notification
Configuration page, as shown in the following figure.
F i g u r e 2 5 : N o t i f i c a t i o n C o n f i g u r a t i o n
4. Enter the appropriate details in the respective fields and click the Send Test Message
button to send a test message.
OR
Click the Update Information button to update the changes.
Openfiler Administration Guide 82
openfiler
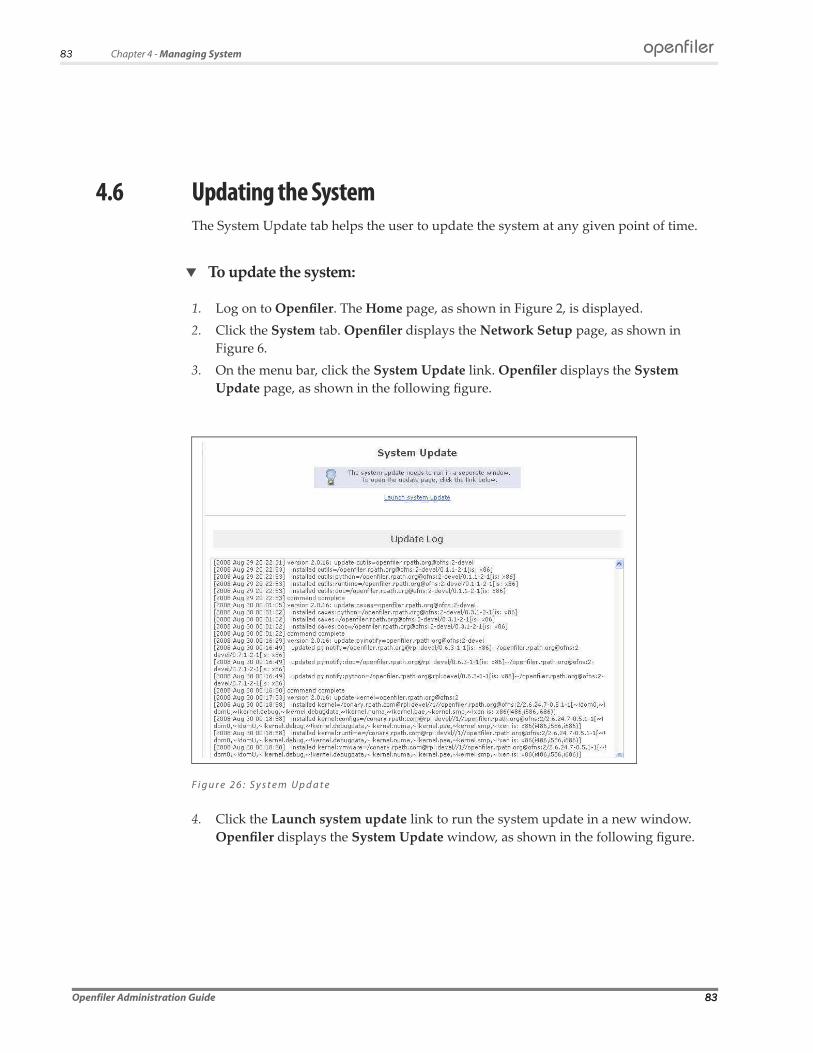
83 Chapter 4 - Managing System
4.6 Updating the SystemThe System Update tab helps the user to update the system at any given point of time.
To update the system:
1. Log on to Openfiler. The Home page, as shown in Figure 2, is displayed.
2. Click the System tab. Openfiler displays the Network Setup page, as shown in
Figure 6.
3. On the menu bar, click the System Update link. Openfiler displays the System
Update page, as shown in the following figure.
F i g u r e 2 6 : S y s t e m U p d a t e
4. Click the Launch system update link to run the system update in a new window.
Openfiler displays the System Update window, as shown in the following figure.
Openfiler Administration Guide 83
openfiler
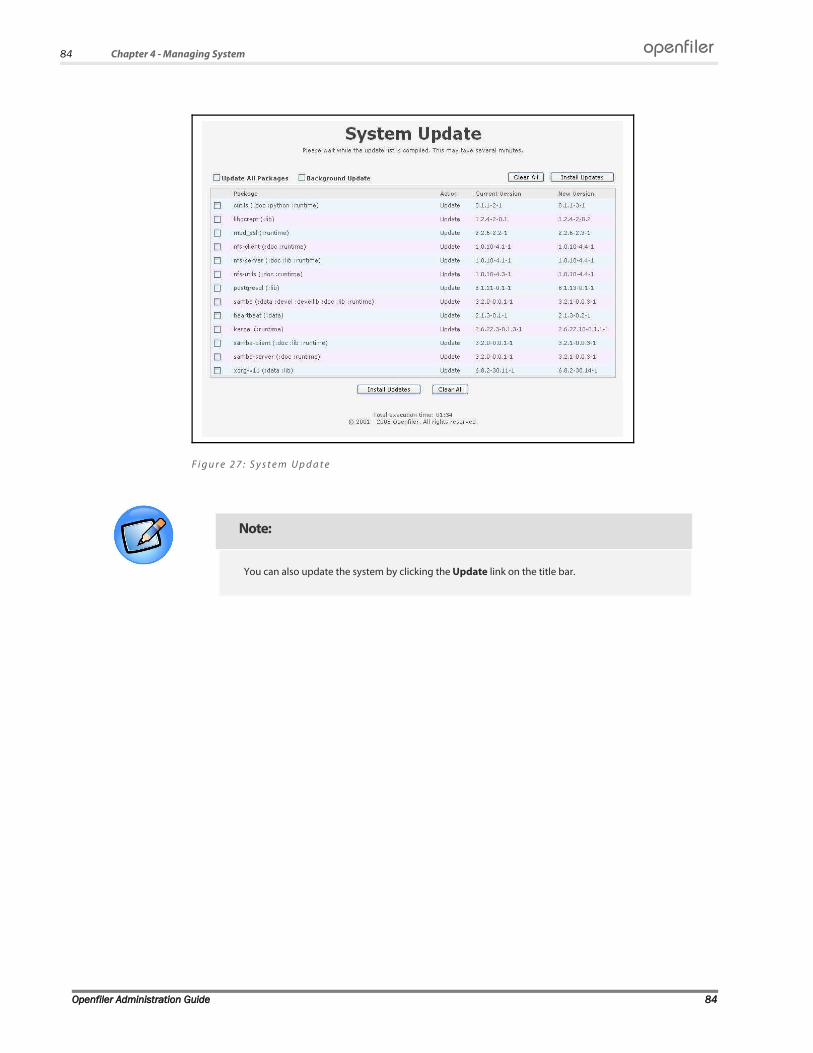
84 Chapter 4 - Managing System
F i g u r e 2 7 : S y s t e m U p d a t e
Note:
You can also update the system by clicking the Update link on the title bar.
Openfiler Administration Guide 84
openfiler

85 Chapter 4 - Managing System
4.7 Backup/RestoreThis tab allows you to take a backup of the configuration or necessary data and to restore
the configuration, when required.
4.7.1 Viewing Backup Configuration
To view the backup configuration:
1. Log on to Openfiler. The Home page, as shown in Figure 2, is displayed.
2. Click the System tab. Openfiler displays the Network Setup page, as shown in
Figure 6.
3. On the menu bar, click the Backup/Restore link. Openfiler displays the Backup
Configuration page, as shown in the following figure.
F i g u r e 2 8 : B a c k u p C o n f i g u r a t i o n
4. Click the Download button to perform an instant backup snapshot.
4.7.2 Restoring the Configuration
To restore the configuration:
1. Log on to Openfiler. The Home page, as shown in Figure 2, is displayed.
2. Click the System tab. Openfiler displays the Network Setup page, as shown in
Figure 6.
3. On the menu bar, click the Backup/Restore link. Openfiler displays the Restore
Configuration page, as shown in the following figure.
Openfiler Administration Guide 85
openfiler

86 Chapter 4 - Managing System
F i g u r e 2 9 : R e s t o r e c o n f i g u r a t i o n
4. Click the Browse button to search and select the document and then click the Upload
button to upload it. Openfiler displays a confirmation message in the Restore
Confirmation page, as shown in the following figure.
F i g u r e 3 0 : R e s t o r e c o n f i g u r a t i o n
5. Click the Yes button to continue the uploading process.
OR
Click the No button to cancel the process.
Openfiler Administration Guide 86
openfiler
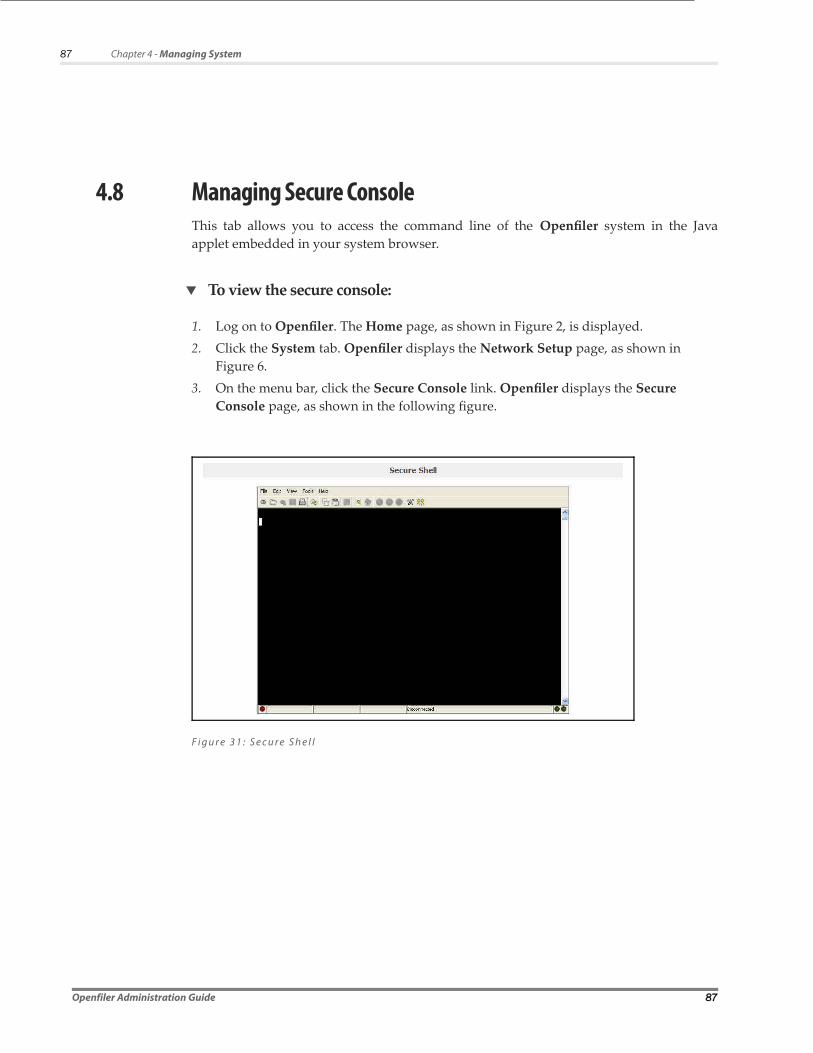
87 Chapter 4 - Managing System
4.8 Managing Secure ConsoleThis tab allows you to access the command line of the Openfiler system in the Java
applet embedded in your system browser.
To view the secure console:
1. Log on to Openfiler. The Home page, as shown in Figure 2, is displayed.
2. Click the System tab. Openfiler displays the Network Setup page, as shown in
Figure 6.
3. On the menu bar, click the Secure Console link. Openfiler displays the Secure
Console page, as shown in the following figure.
F i g u r e 3 1 : S e c u r e S h e l l
Openfiler Administration Guide 87

5 Managing Volumes
This section deals with advanced volume management such as volume group creation
and snapshot administration. Volume management deals with creating logical volumes
(volume slices) and from existing volume groups. In order to use volume groups in the
Openfiler GUI, they must be created first at the command line or should have been
created during installation process. Logical volume can be deleted from a volume group
if it is not in use. You can also modify its description and size in the volume group.
Snapshot is a read-only point-in-time view of an existing logical volume. The snapshot
preserves data as it was at that particular time. The original can be changed without
afecting the snapshot data.
5
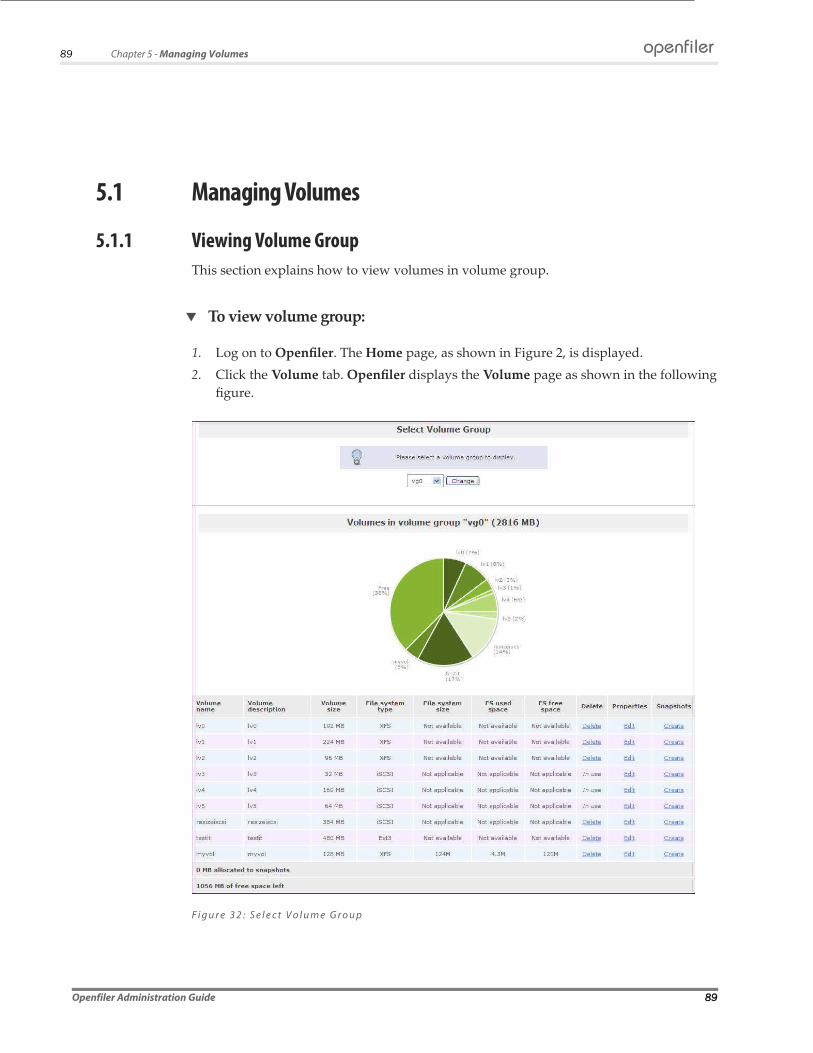
89 Chapter 5 - Managing Volumes
5.1 Managing Volumes
5.1.1 Viewing Volume Group This section explains how to view volumes in volume group.
To view volume group:
1. Log on to Openfiler. The Home page, as shown in Figure 2, is displayed.
2. Click the Volume tab. Openfiler displays the Volume page as shown in the following
figure.
F i g u r e 3 2 : S e l e c t V o l u m e G r o u p
Openfiler Administration Guide 89
openfiler

90 Chapter 5 - Managing Volumes
3. Select a volume group from the drop-down list and click Change.
4. Volumes in that group will be displayed.
Openfiler Administration Guide 90
openfiler

91 Chapter 5 - Managing Volumes
5.1.2 Adding a VolumeA logical volume (volume slice) is the fundamental storage unit within which shares are
created. A logical volume is a slice of a total disk space available. Logical volumes allow
the administrator to physically separate diferent organizational units or applications on
the storage appliance. This section provides details about how to add a new volume slice
in a volume group.
To add a volume in a volume group:
1. Log on to Openfiler. The Home page, as shown in Figure 2, is displayed.
2. Click the Volume tab. Openfiler displays the Volume page as shown in Figure 32.
3. On the menu bar, click the Add Volume link. Openfiler displays the Select Volume
Group page as shown in the following figure.
F i g u r e 3 3 : C r e a t e a V o l u m e
Openfiler Administration Guide 91
openfiler
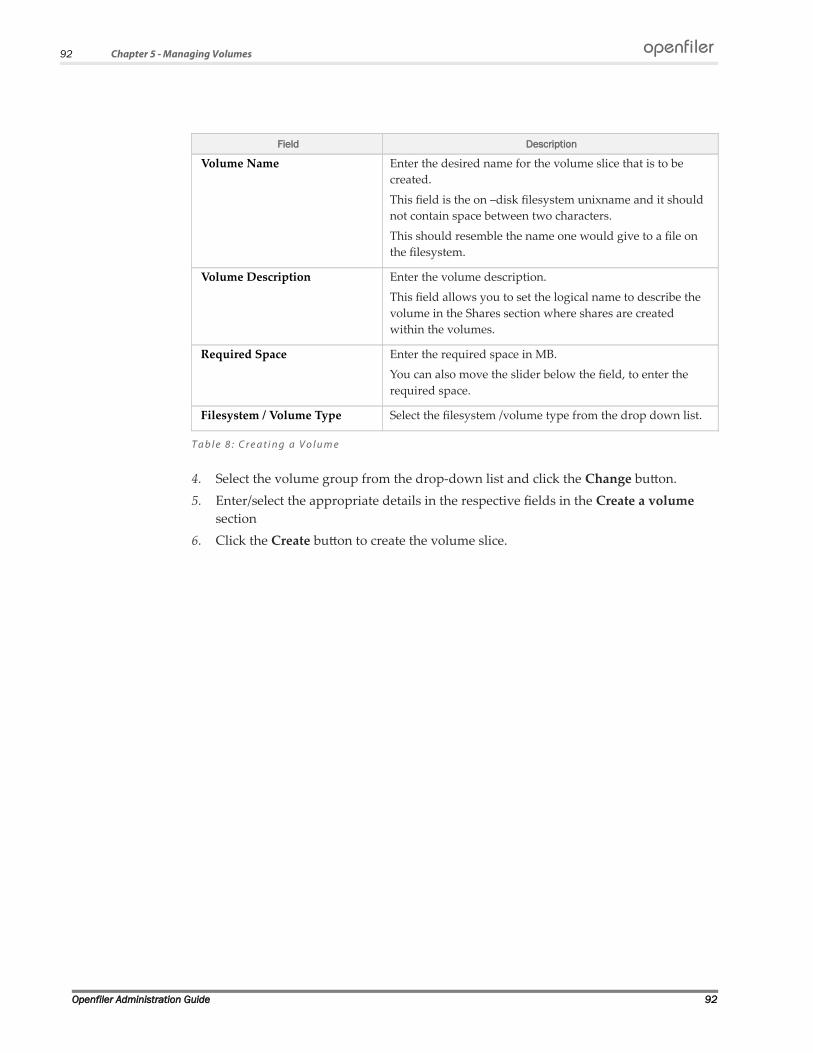
92 Chapter 5 - Managing Volumes
Field Description
Volume Name Enter the desired name for the volume slice that is to be
created.
This field is the on –disk filesystem unixname and it should
not contain space between two characters.
This should resemble the name one would give to a file on
the filesystem.
Volume Description Enter the volume description.
This field allows you to set the logical name to describe the
volume in the Shares section where shares are created
within the volumes.
Required Space Enter the required space in MB.
You can also move the slider below the field, to enter the
required space.
Filesystem / Volume Type Select the filesystem /volume type from the drop down list.
T a b l e 8 : C r e a t i n g a V o l u m e
4. Select the volume group from the drop-down list and click the Change button.
5. Enter/select the appropriate details in the respective fields in the Create a volume
section
6. Click the Create button to create the volume slice.
Openfiler Administration Guide 92
openfiler

93 Chapter 5 - Managing Volumes
5.1.2.1 Deleting Volume from Volume GroupThis section explains how to delete a volume from a volume group.
To delete volume from volume group:
1. Log on to Openfiler. The Home page, as shown in Figure 2, is displayed.
2. Click the Volume tab. Openfiler displays the Volume page as shown in Figure 32.
3. Select a volume group from the drop-down list and click Change. Openfiler displays
Volumes in volume group page as shown in the following figure.
F i g u r e 3 4 : V o l u m e s i n v o l u m e g r o u p
4. Click the appropriate Delete link in the delete a volume from the volume group.
Note:
You cannot delete a volume being used.
5.1.2.2 Editing Volume in Volume GroupThis section explains how to modify properties of volume in a volume group by
changing its description and size.
To edit volume in volume group:
1. Log on to Openfiler. The Home page, as shown in Figure 2, is displayed.
2. Click the Volume tab. Openfiler displays the Volume page as shown in Figure 32.
Openfiler Administration Guide 93
openfiler

94 Chapter 5 - Managing Volumes
3. Select volume group from the drop-down list and click Change. Openfiler displays
Volumes in volume group page as shown in following figure.
F i g u r e 3 5 : V o l u m e s i n v o l u m e g r o u p
4. Click Edit link in the Properties column of the particular volume. Openfiler displays
Edit properties of volume page as shown in the following figure.
F i g u r e 3 6 : E d i t P r o p e r t i e s o f a V o l u m e
Field Description
Current volume description This field displays the current volume description.
New volume description Enter the new volume description.
Current volume size This field displays the current volume size in MB.
New volume size in MB Enter the new volume size in MB. You can also set the value
by moving the slider.
T a b l e 9 : E d i t i n g a V o l u m e P r o p e r t i e s
Openfiler Administration Guide 94
openfiler

95 Chapter 5 - Managing Volumes
5. Enter the appropriate details in the respective fields.
6. Click Change button to modify properties of volume.
OR
Click Cancel button to cancel the process.
Note:
New volume size must be larger than or equal to the current volume size.
5.1.2.3 SnapshotA snapshot is a read-only point-in-time copy of an existing volume slice (logical volume).
The snapshot preserves the data on the logical volume as it was at the point the snapshot
of the logical volume was taken. Changes can be made to the original logical volume,
known as the snapshot source volume, without afecting the data on the snapshot.
Snapshots have the advantage that changes can continue to be made to the source
volume while a backup is taken of the point-in-time frozen copy of the source. The
snapshot can also be used to access data that might have been accidentally deleted from
the source volume - it provides a means of historical data rollback.
Snapshots are made of entire logical volumes and can be enabled for sharing to users on
the network. If the administrator enables sharing of a snapshot, all the shared folders
located on the snapshot will be enabled for sharing on the network. The access control
enabled for the shares on the source volume of the snapshot at the time the snapshot was
taken, will persist and be static for the lifetime of the snapshot even if access control is
changed on the source volume of the snapshot.
To create a snapshots:
1. Log on to Openfiler. The Home page, as shown in Figure 2, is displayed.
2. Click the Volume tab. Openfiler displays the Volume page as shown in Figure 32.
3. Click the Create link of the volume in Snapshot column. Openfiler displays the page
as shown in the following figure.
Openfiler Administration Guide 95
openfiler
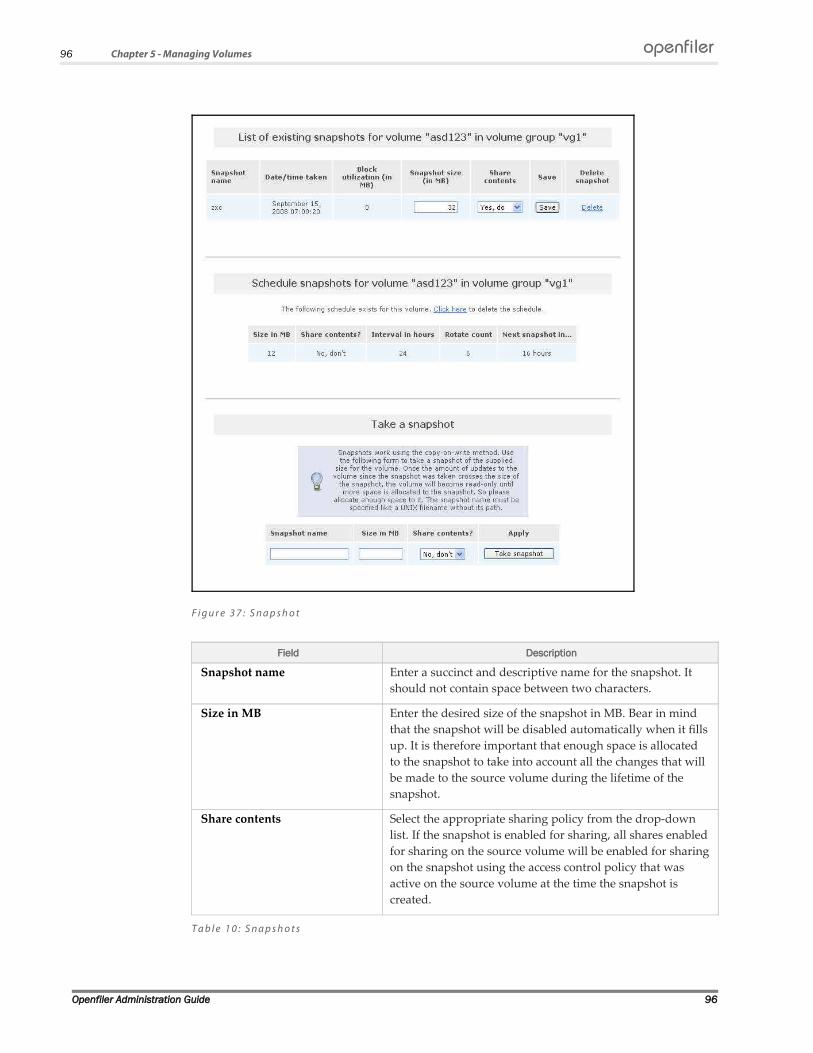
96 Chapter 5 - Managing Volumes
F i g u r e 3 7 : S n a p s h o t
Field Description
Snapshot name Enter a succinct and descriptive name for the snapshot. It
should not contain space between two characters.
Size in MB Enter the desired size of the snapshot in MB. Bear in mind
that the snapshot will be disabled automatically when it fills
up. It is therefore important that enough space is allocated
to the snapshot to take into account all the changes that will
be made to the source volume during the lifetime of the
snapshot.
Share contents Select the appropriate sharing policy from the drop-down
list. If the snapshot is enabled for sharing, all shares enabled
for sharing on the source volume will be enabled for sharing
on the snapshot using the access control policy that was
active on the source volume at the time the snapshot is
created.
T a b l e 1 0 : S n a p s h o t s
Openfiler Administration Guide 96
openfiler

97 Chapter 5 - Managing Volumes
4. Enter/select the appropriate details in the respective fields.
5. Click the Take snapshot button to take the snapshot.
Openfiler Administration Guide 97
openfiler
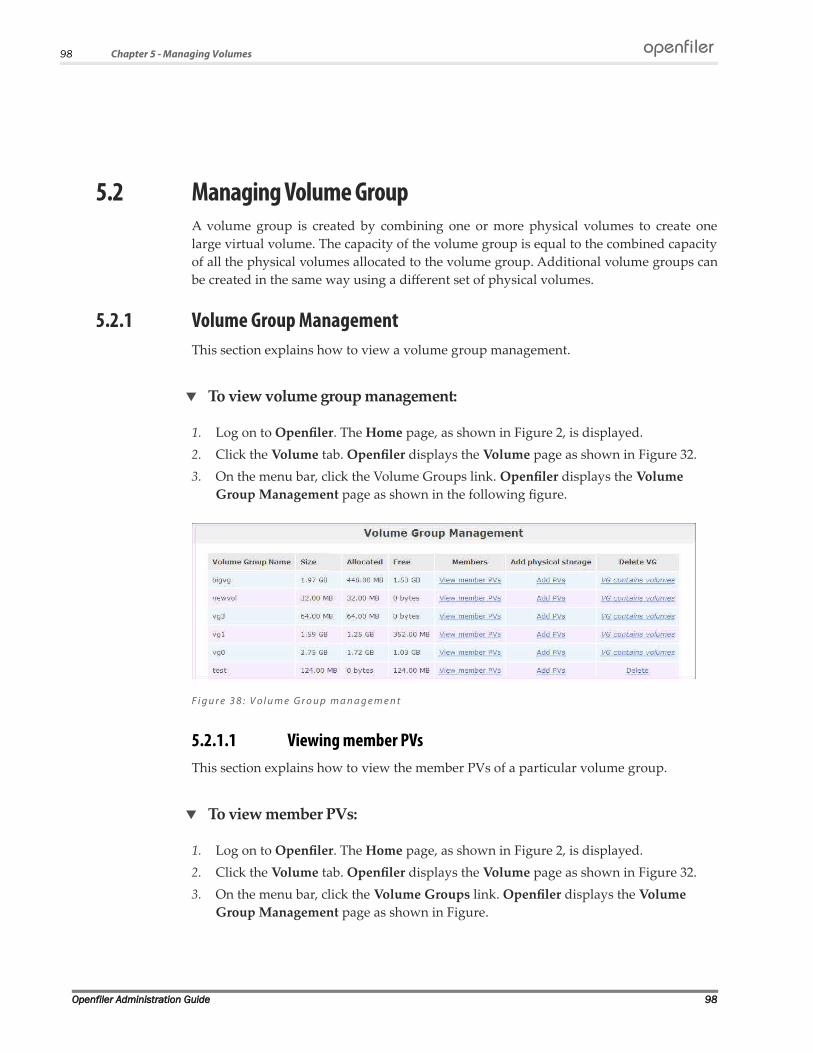
98 Chapter 5 - Managing Volumes
5.2 Managing Volume GroupA volume group is created by combining one or more physical volumes to create one
large virtual volume. The capacity of the volume group is equal to the combined capacity
of all the physical volumes allocated to the volume group. Additional volume groups can
be created in the same way using a diferent set of physical volumes.
5.2.1 Volume Group ManagementThis section explains how to view a volume group management.
To view volume group management:
1. Log on to Openfiler. The Home page, as shown in Figure 2, is displayed.
2. Click the Volume tab. Openfiler displays the Volume page as shown in Figure 32.
3. On the menu bar, click the Volume Groups link. Openfiler displays the Volume
Group Management page as shown in the following figure.
F i g u r e 3 8 : V o l u m e G r o u p m a n a g e m e n t
5.2.1.1 Viewing member PVsThis section explains how to view the member PVs of a particular volume group.
To view member PVs:
1. Log on to Openfiler. The Home page, as shown in Figure 2, is displayed.
2. Click the Volume tab. Openfiler displays the Volume page as shown in Figure 32.
3. On the menu bar, click the Volume Groups link. Openfiler displays the Volume
Group Management page as shown in Figure.
Openfiler Administration Guide 98
openfiler
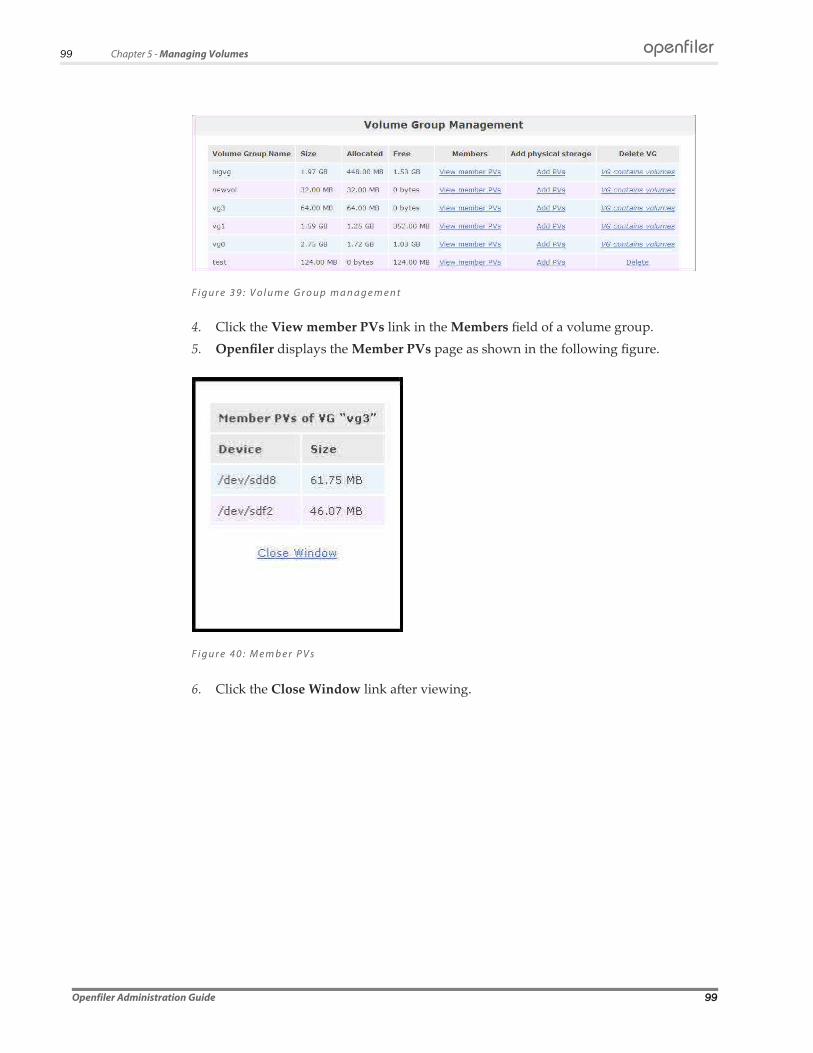
99 Chapter 5 - Managing Volumes
F i g u r e 3 9 : V o l u m e G r o u p m a n a g e m e n t
4. Click the View member PVs link in the Members field of a volume group.
5. Openfiler displays the Member PVs page as shown in the following figure.
F i g u r e 4 0 : M e m b e r P V s
6. Click the Close Window link after viewing.
Openfiler Administration Guide 99
openfiler

100 Chapter 5 - Managing Volumes
5.2.1.2 Adding PVsA physical volume in the context of the Logical Volume Manager (LVM) is a block device
(disk) that has been initialized with LVM metadata. A block device can be any local or
imported disk unit that is to be used exclusively as a volume group object i.e it can not be
used for any other purpose.This section explains how to add physical volume(s) to a
volume group.
To add a physical volume:
1. Log on to Openfiler. The Home page, as shown in Figure 2, is displayed. Click the
Volume tab. Openfiler displays the Volume page as shown in Figure 32.
2. On the menu bar, click the Volume Groups link. Openfiler displays the Volume
Group Management page as shown in Figure .
F i g u r e 4 1 : V o l u m e G r o u p m a n a g e m e n t
3. Click the Add PVs link in the Add physical storage field of a volume group.
Openfiler displays the Add PVs page as shown in the following figure.
Openfiler Administration Guide 100
openfiler
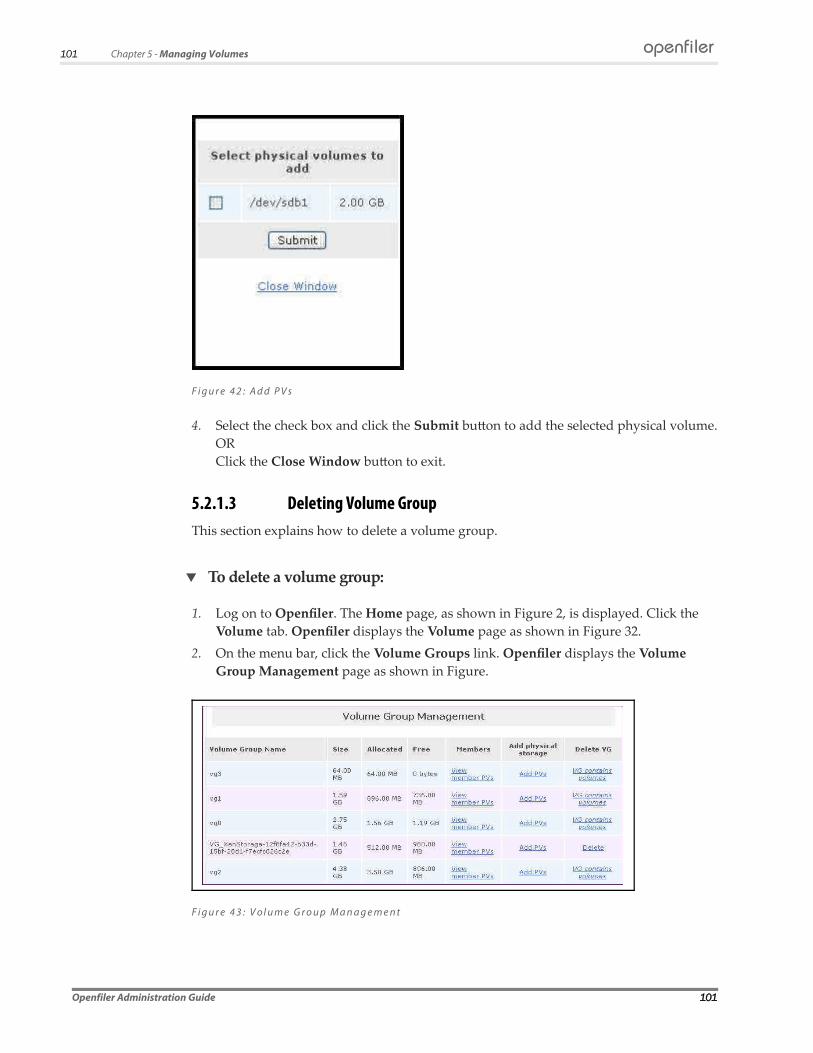
101 Chapter 5 - Managing Volumes
F i g u r e 4 2 : A d d P V s
4. Select the check box and click the Submit button to add the selected physical volume.
OR
Click the Close Window button to exit.
5.2.1.3 Deleting Volume GroupThis section explains how to delete a volume group.
To delete a volume group:
1. Log on to Openfiler. The Home page, as shown in Figure 2, is displayed. Click the
Volume tab. Openfiler displays the Volume page as shown in Figure 32.
2. On the menu bar, click the Volume Groups link. Openfiler displays the Volume
Group Management page as shown in Figure.
F i g u r e 4 3 : V o l u m e G r o u p M a n a g e m e n t
Openfiler Administration Guide 101
openfiler
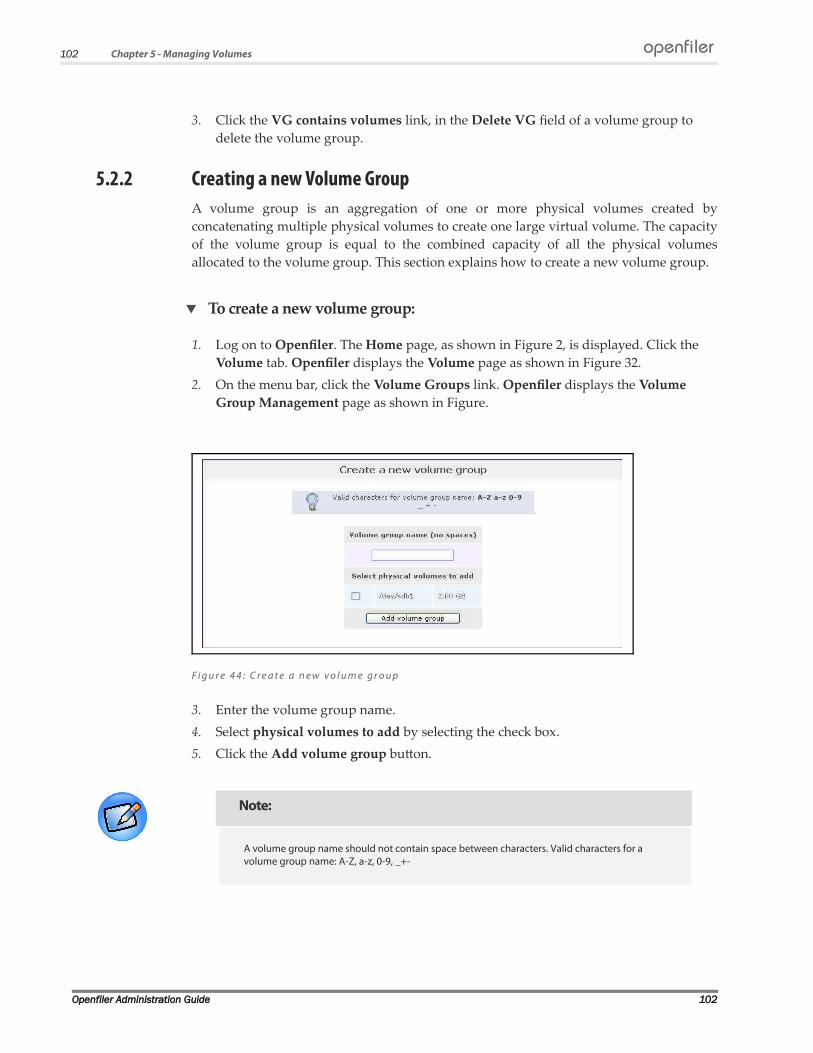
102 Chapter 5 - Managing Volumes
3. Click the VG contains volumes link, in the Delete VG field of a volume group to
delete the volume group.
5.2.2 Creating a new Volume GroupA volume group is an aggregation of one or more physical volumes created by
concatenating multiple physical volumes to create one large virtual volume. The capacity
of the volume group is equal to the combined capacity of all the physical volumes
allocated to the volume group. This section explains how to create a new volume group.
To create a new volume group:
1. Log on to Openfiler. The Home page, as shown in Figure 2, is displayed. Click the
Volume tab. Openfiler displays the Volume page as shown in Figure 32.
2. On the menu bar, click the Volume Groups link. Openfiler displays the Volume
Group Management page as shown in Figure.
F i g u r e 4 4 : C r e a t e a n e w v o l u m e g r o u p
3. Enter the volume group name.
4. Select physical volumes to add by selecting the check box.
5. Click the Add volume group button.
Note:
A volume group name should not contain space between characters. Valid characters for a volume group name: A-Z, a-z, 0-9, _+-
Openfiler Administration Guide 102
openfiler
103 Chapter 5 - Managing Volumes
Important
If there are no physical volumes, or all existing physical volumes are used, you can add a new physical volume to create a volume group.
Openfiler Administration Guide 103
openfiler

104 Chapter 5 - Managing Volumes
5.3 Managing Block DevicesThis section provides details about block device management. Using block devices, the
administrator creates physical storage devices, allocates the device type and size, edits a
disk, and views partitions of the devices.
5.3.1 Block Device ManagementThis section explains how to edit and view the partitions of a hard disk.
To view block device management:
1. Log on to Openfiler. The Home page, as shown in Figure 2, is displayed. Click the
Volume tab. Openfiler displays the Volume page as shown in Figure 32.
2. On the menu bar, click the Block Devices link. Openfiler displays the Block Device
Management page, as shown in the following figure.
F i g u r e 4 5 : B l o c k d e v i c e m a n a g e m e n t
Field Description
Type This field displays the device type.
Description This field displays the device description.
Size This field displays size of the disk.
Label Type This field displays the type of the device label.
T a b l e 1 1 : B l o c k D e v i c e M a n a g e m e n t
Openfiler Administration Guide 104

105 Chapter 5 - Managing Volumes
5.3.1.1 Editing a DiskThis section explains how to edit the partitions of a hard disk.
To edit a disk:
1. Log on to Openfiler. The Home page, as shown in Figure 2, is displayed.
2. Click the Volume tab. Openfiler displays the Volume page as shown in Figure 32.
3. On the menu bar, click the Block Devices link. Openfiler displays the Block Device
Management page as shown in Figure.
F i g u r e 4 6 : B l o c k d e v i c e m a n a g e m e n t
4. Click the link of a disk in the Edit Disk column to edit the partition. Openfiler
displays the Edit Partition page as shown in the following figure.
Openfiler Administration Guide 105
openfiler

106 Chapter 5 - Managing Volumes
F i g u r e 4 7 : E d i t P a r t i t i o n
5. Click the Back to the list of physical storage devices link to go back to the Block
Device Management page.
5.3.1.2 Viewing PartitionsThis section explains how to view partitions.
To view the Partitions:
1. Log on to Openfiler. The Home page, as shown in Figure 2, is displayed.
2. Click the Volume tab. Openfiler displays the Volume page as shown in Figure 32.
3. On the menu bar, click the Block Devices link. Openfiler displays the Block Device
Management page as shown in the following figure.
Openfiler Administration Guide 106
openfiler

107 Chapter 5 - Managing Volumes
F i g u r e 4 8 : B l o c k d e v i c e m a n a g e m e n t
4. Click the View link in the Partitions column. Openfiler displays the Partitions page
as shown in the following figure.
F i g u r e 4 9 : P a r t i t i o n s
5. Click the Close Window link to close the Partitions window after viewing.
Openfiler Administration Guide 107
openfiler

108 Chapter 5 - Managing Volumes
5.4 Managing iSCSI TargetsThis section provides details about how to manage iSCSI Targets. The iSCSI targets
module consists of Target Configuration, managing LUN Mapping, setting Network ACL
and CHAP Authentication. The administrator can add a new iSCSI target by selecting
and setting a specific iSCSI target attribute.
5.4.1 Target ConfigurationThis section explains how to view or modify the target configuration settings.
To view/modify Target Configuration:
1. Log on to Openfiler. The Home page, as shown in Figure 2, is displayed.
2. Click the Volume tab. Openfiler displays the Volume page as shown in Figure 32.
3. On the menu bar, click the iSCSI Targets link. System displays the Target
Configuration page as shown in the following figure.
Openfiler Administration Guide 108
openfiler

109 Chapter 5 - Managing Volumes
F i g u r e 5 0 : T a r g e t C o n f i g u r a t i o n
Field Description
Header Digest Select the header digest from the drop-down list.
The available options are CRC32C and None.
If you select CRC32C and the initiator is configured
accordingly , the integrity of an iSCSI PDU’s header segment
will be protected by a CRC32C checksum.
By default None will be selected.
Note that header digests are not supported during discovery
sessions.
This field is not mandatory.
DataDigest Select the data digest from the drop-down list.
Openfiler Administration Guide 109
openfiler
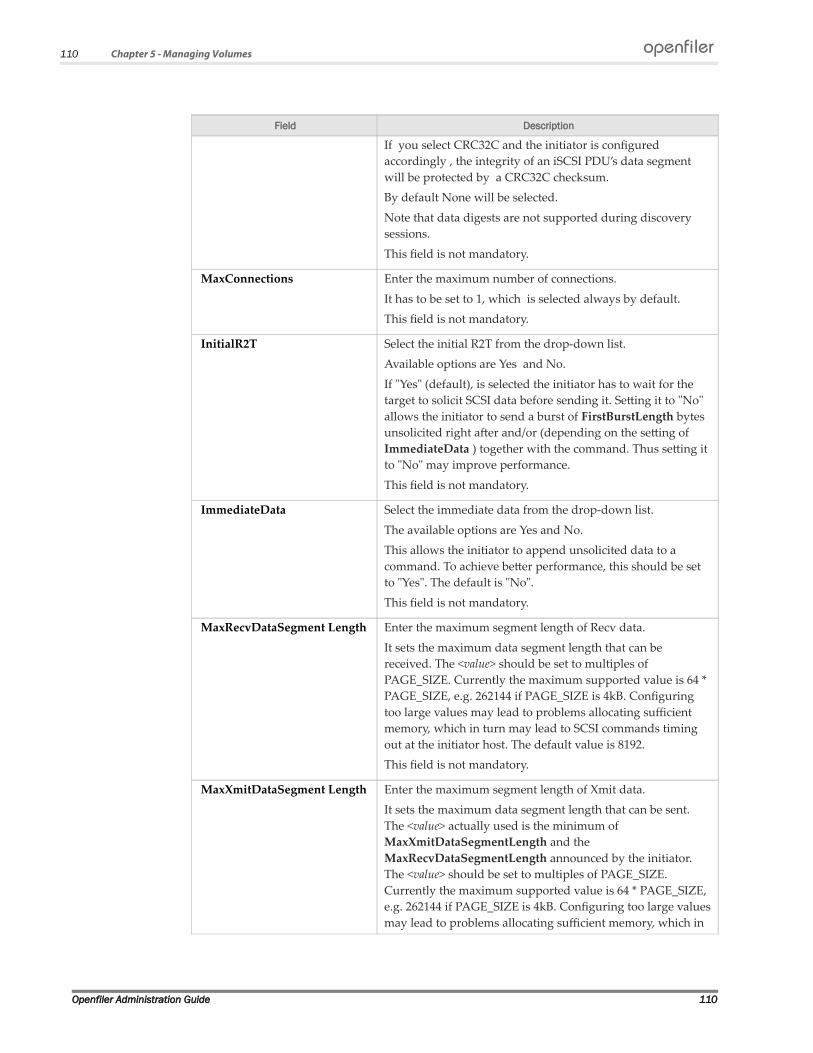
110 Chapter 5 - Managing Volumes
Field Description
If you select CRC32C and the initiator is configured
accordingly , the integrity of an iSCSI PDU’s data segment
will be protected by a CRC32C checksum.
By default None will be selected.
Note that data digests are not supported during discovery
sessions.
This field is not mandatory.
MaxConnections Enter the maximum number of connections.
It has to be set to 1, which is selected always by default.
This field is not mandatory.
InitialR2T Select the initial R2T from the drop-down list.
Available options are Yes and No.
If "Yes" (default), is selected the initiator has to wait for the
target to solicit SCSI data before sending it. Setting it to "No"
allows the initiator to send a burst of FirstBurstLength bytes
unsolicited right after and/or (depending on the setting of
ImmediateData ) together with the command. Thus setting it
to "No" may improve performance.
This field is not mandatory.
ImmediateData Select the immediate data from the drop-down list.
The available options are Yes and No.
This allows the initiator to append unsolicited data to a
command. To achieve better performance, this should be set
to "Yes". The default is "No".
This field is not mandatory.
MaxRecvDataSegment Length Enter the maximum segment length of Recv data.
It sets the maximum data segment length that can be
received. The <value> should be set to multiples of
PAGE_SIZE. Currently the maximum supported value is 64 *
PAGE_SIZE, e.g. 262144 if PAGE_SIZE is 4kB. Configuring
too large values may lead to problems allocating sufficient
memory, which in turn may lead to SCSI commands timing
out at the initiator host. The default value is 8192.
This field is not mandatory.
MaxXmitDataSegment Length Enter the maximum segment length of Xmit data.
It sets the maximum data segment length that can be sent.
The <value> actually used is the minimum of
MaxXmitDataSegmentLength and the
MaxRecvDataSegmentLength announced by the initiator.
The <value> should be set to multiples of PAGE_SIZE.
Currently the maximum supported value is 64 * PAGE_SIZE,
e.g. 262144 if PAGE_SIZE is 4kB. Configuring too large values
may lead to problems allocating sufficient memory, which in
Openfiler Administration Guide 110
openfiler
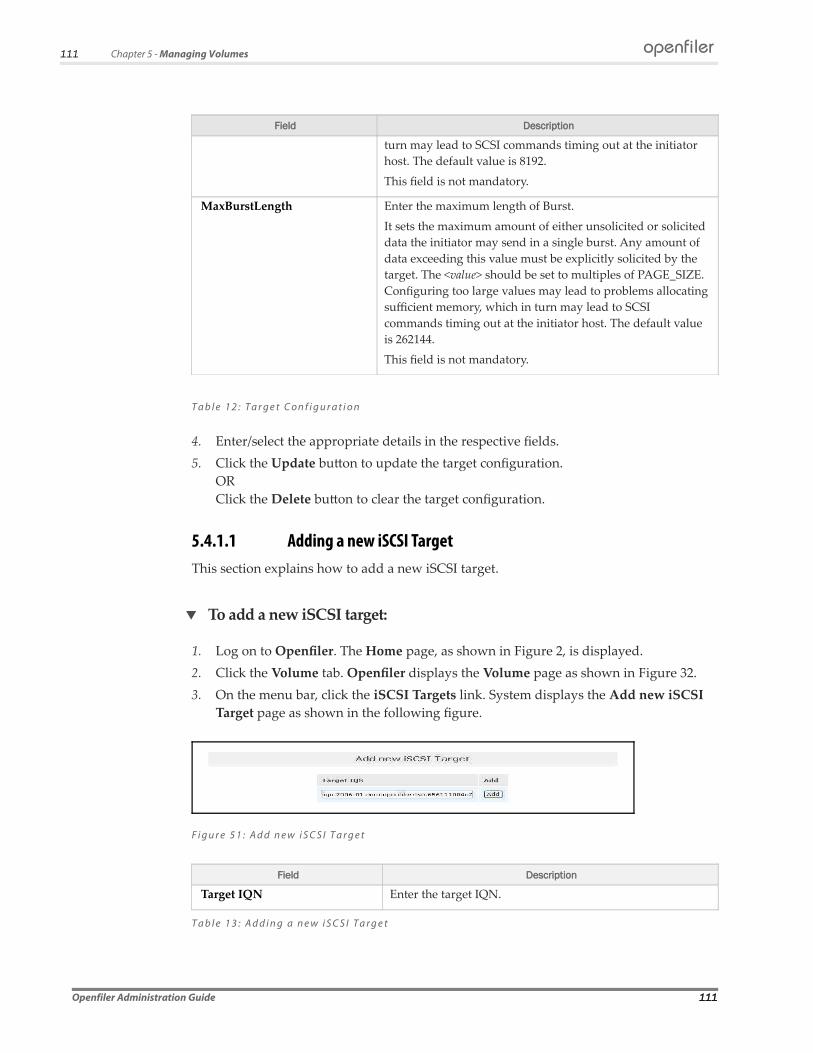
111 Chapter 5 - Managing Volumes
Field Description
turn may lead to SCSI commands timing out at the initiator
host. The default value is 8192.
This field is not mandatory.
MaxBurstLength Enter the maximum length of Burst.
It sets the maximum amount of either unsolicited or solicited
data the initiator may send in a single burst. Any amount of
data exceeding this value must be explicitly solicited by the
target. The <value> should be set to multiples of PAGE_SIZE.
Configuring too large values may lead to problems allocating
sufficient memory, which in turn may lead to SCSI
commands timing out at the initiator host. The default value
is 262144.
This field is not mandatory.
T a b l e 1 2 : T a r g e t C o n f i g u r a t i o n
4. Enter/select the appropriate details in the respective fields.
5. Click the Update button to update the target configuration.
OR
Click the Delete button to clear the target configuration.
5.4.1.1 Adding a new iSCSI TargetThis section explains how to add a new iSCSI target.
To add a new iSCSI target:
1. Log on to Openfiler. The Home page, as shown in Figure 2, is displayed.
2. Click the Volume tab. Openfiler displays the Volume page as shown in Figure 32.
3. On the menu bar, click the iSCSI Targets link. System displays the Add new iSCSI
Target page as shown in the following figure.
F i g u r e 5 1 : A d d n e w i S C S I T a r g e t
Field Description
Target IQN Enter the target IQN.
T a b l e 1 3 : A d d i n g a n e w i S C S I T a r g e t
Openfiler Administration Guide 111
openfiler

112 Chapter 5 - Managing Volumes
4. Enter the appropriate data in the respective fields.
5. Click the Add button to add a new iSCSI target.
5.4.2 LUN MappingThis section explains how to view or unmap a LUN from a target.
To view/unmap the LUN:
1. Log on to Openfiler. The Home page, as shown in Figure 2, is displayed.
2. Click the Volume tab. Openfiler displays the Volume page as shown in Figure 32.
3. On the menu bar, click the iSCSI Targets link. System displays the iSCSI Target page
as shown in Figure.
4. Click the LUN Mapping tab. Openfiler displays the LUNs mapped to target page as
shown in the following figure.
F i g u r e 5 2 : L U N s m a p p e d t o t a r g e t
5. Click the Unmap button to unmap a LUN from the target.
Openfiler Administration Guide 112
openfiler

113 Chapter 5 - Managing Volumes
5.4.2.1 Mapping a New LUN to a target This option allows you to map a new LUN to a target.
To map a new LUN to a target :
1. Log on to Openfiler. The Home page, as shown in Figure 2, is displayed.
2. Click the Volume tab. Openfiler displays the Volume page as shown in Figure 32.
3. On the menu bar, click the iSCSI Targets link. System displays the Add new iSCSI
Target page as shown in Figure 52.
4. Click the LUN Mapping tab. Openfiler displays the Map New LUN to Target page
as shown in the following figure.
F i g u r e 5 3 : M a p N e w L U N t o T a r g e t
Openfiler Administration Guide 113
openfiler
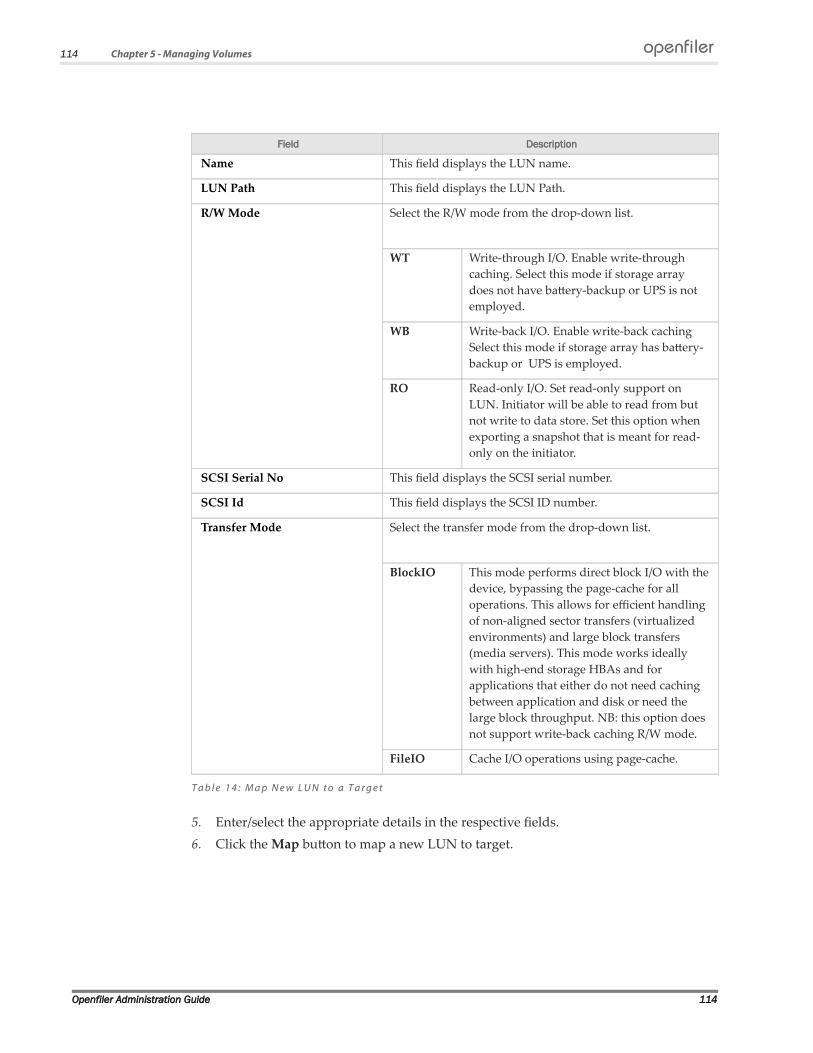
114 Chapter 5 - Managing Volumes
Field Description
Name This field displays the LUN name.
LUN Path This field displays the LUN Path.
R/W Mode Select the R/W mode from the drop-down list.
WT Write-through I/O. Enable write-through
caching. Select this mode if storage array
does not have battery-backup or UPS is not
employed.
WB Write-back I/O. Enable write-back caching
Select this mode if storage array has battery-
backup or UPS is employed.
RO Read-only I/O. Set read-only support on
LUN. Initiator will be able to read from but
not write to data store. Set this option when
exporting a snapshot that is meant for read-
only on the initiator.
SCSI Serial No This field displays the SCSI serial number.
SCSI Id This field displays the SCSI ID number.
Transfer Mode Select the transfer mode from the drop-down list.
BlockIO This mode performs direct block I/O with the
device, bypassing the page-cache for all
operations. This allows for efficient handling
of non-aligned sector transfers (virtualized
environments) and large block transfers
(media servers). This mode works ideally
with high-end storage HBAs and for
applications that either do not need caching
between application and disk or need the
large block throughput. NB: this option does
not support write-back caching R/W mode.
FileIO Cache I/O operations using page-cache.
T a b l e 1 4 : M a p N e w L U N t o a T a r g e t
5. Enter/select the appropriate details in the respective fields.
6. Click the Map button to map a new LUN to target.
Openfiler Administration Guide 114
openfiler

115 Chapter 5 - Managing Volumes
5.4.3 Managing Network ACLThis section explains how to update the network ACL settings.
To manage network ACL:
1. Log on to Openfiler. The Home page, as shown in Figure 2, is displayed.
2. Click the Volume tab. Openfiler displays the Volume page as shown in Figure 32.
3. On the menu bar, click the iSCSI Targets link. System displays the Add new iSCSI
Target page as shown in Figure 52.
4. Click the Network ACL tab. Openfiler displays the Network ACL page as shown in
the following figure.
F i g u r e 5 4 : N e t w o r k A C L
Field Description
Name This field displays the network name.
Network/Host This field displays the network/host IP address.
Netmask This field displays the sub Netmask address.
Access Select the access from the drop-down list.
Allow option will allow the iSCSI host to access the
network, where Deny will deny the access.
T a b l e 1 5 : N e t w o r k A C L
5. Enter/select the appropriate details in the respective fields.
6. Click the Update button to update the network ACL settings.
Openfiler Administration Guide 115
openfiler
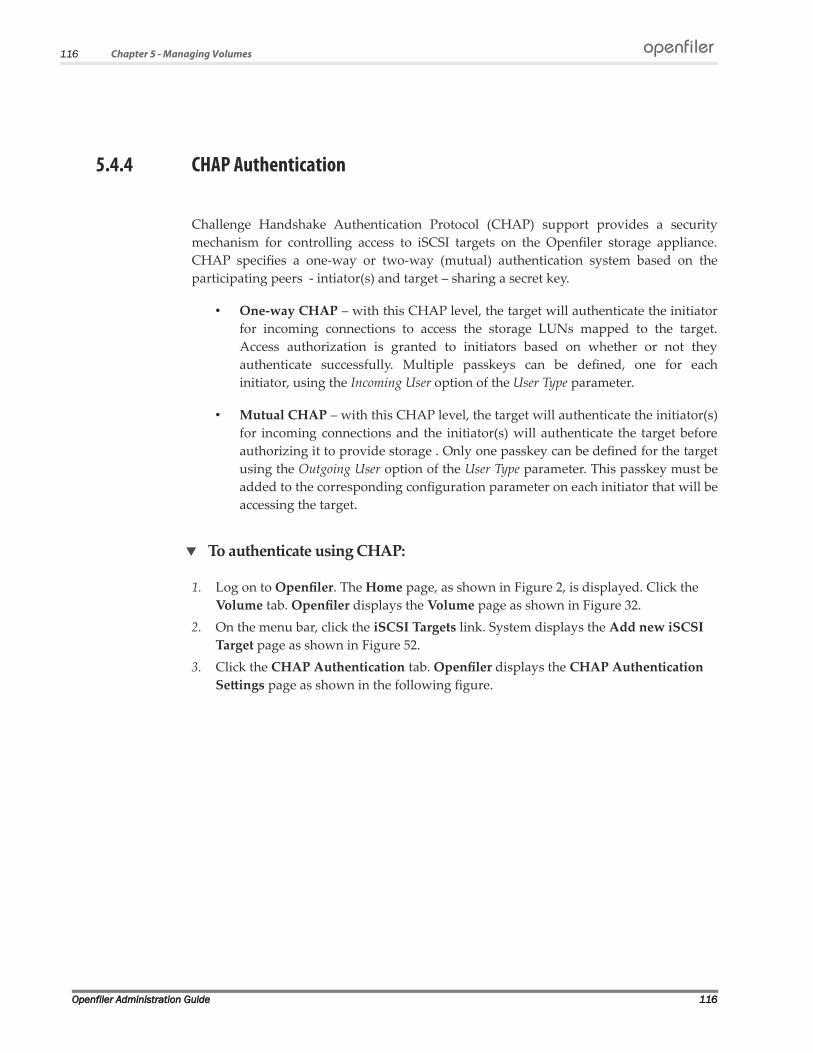
116 Chapter 5 - Managing Volumes
5.4.4 CHAP Authentication
Challenge Handshake Authentication Protocol (CHAP) support provides a security
mechanism for controlling access to iSCSI targets on the Openfiler storage appliance.
CHAP specifies a one-way or two-way (mutual) authentication system based on the
participating peers - intiator(s) and target – sharing a secret key.
• One-way CHAP – with this CHAP level, the target will authenticate the initiator
for incoming connections to access the storage LUNs mapped to the target.
Access authorization is granted to initiators based on whether or not they
authenticate successfully. Multiple passkeys can be defined, one for each
initiator, using the Incoming User option of the User Type parameter.
• Mutual CHAP – with this CHAP level, the target will authenticate the initiator(s)
for incoming connections and the initiator(s) will authenticate the target before
authorizing it to provide storage . Only one passkey can be defined for the target
using the Outgoing User option of the User Type parameter. This passkey must be
added to the corresponding configuration parameter on each initiator that will be
accessing the target.
To authenticate using CHAP:
1. Log on to Openfiler. The Home page, as shown in Figure 2, is displayed. Click the
Volume tab. Openfiler displays the Volume page as shown in Figure 32.
2. On the menu bar, click the iSCSI Targets link. System displays the Add new iSCSI
Target page as shown in Figure 52.
3. Click the CHAP Authentication tab. Openfiler displays the CHAP Authentication
Settings page as shown in the following figure.
Openfiler Administration Guide 116
openfiler

117 Chapter 5 - Managing Volumes
F i g u r e 5 5 : C H A P A u t h e n t i c a t i o n S e t t i n g s
Field Description
Username Enter the name of the user.
Password Enter the password.
User Type Select the user type from the drop-down list.
T a b l e 1 6 : C H A P A u t h e n t i c a t i o n
4. Change the password and click the Update button to update the changes.
5. Click the Delete button to delete the CHAP.
5.4.4.1 Adding a CHAP User to a targetThis section explains how to add a CHAP User to target.
To add a CHAP User to a target:
1. Log on to Openfiler. The Home page, as shown in Figure 2, is displayed.
2. Click the Volume tab. Openfiler displays the Volume page as shown in Figure 32.
3. On the menu bar, click the iSCSI Targets link. System displays the Add new iSCSI
Target page as shown in Figure 52.
4. Click the CHAP Authentication tab. Openfiler displays the Add CHAP user to
target page as shown in the following figure.
Openfiler Administration Guide 117
openfiler

118 Chapter 5 - Managing Volumes
F i g u r e 5 6 : A d d C H A P u s e r t o t a r g e t
Field Description
Username Enter the name of the user.
Password Enter the password.
User Type Select the user type from the drop-down list.
T a b l e 1 7 : A d d i n g a C H A P u s e r t o a T a r g e t
5. Enter/select the appropriate details in the respective fields.
6. Click the Add button to add CHAP User to target.
Openfiler Administration Guide 118
openfiler

119 Chapter 5 - Managing Volumes
5.5 Software RAIDRAID devices are virtual devices created from two or more real block devices. This
allows to be combined into a single device to hold a single filesystem. Some RAID level
includes redundancy and so can survive some degree of service failure.
This section provides details about how to create a new RAID array and manage the
existing software RAID in the software RAID management system.
To manage sofware RAID:
1. Log on to Openfiler. The Home page, as shown in Figure 2, is displayed. Click the
Volume tab. Openfiler displays the Volume page as shown in Figure 32.
2. On the menu bar, click the Sofware RAID link. Openfiler displays the Sofware
RAID Management page as shown in the following figure.
F i g u r e 5 7 : S o f t w a r e R A I D M a n a g e m e n t
3. Click the View members link to view the member devices of the array. Openfiler
displays the Member devices of array page as shown in the following figure.
Openfiler Administration Guide 119
openfiler
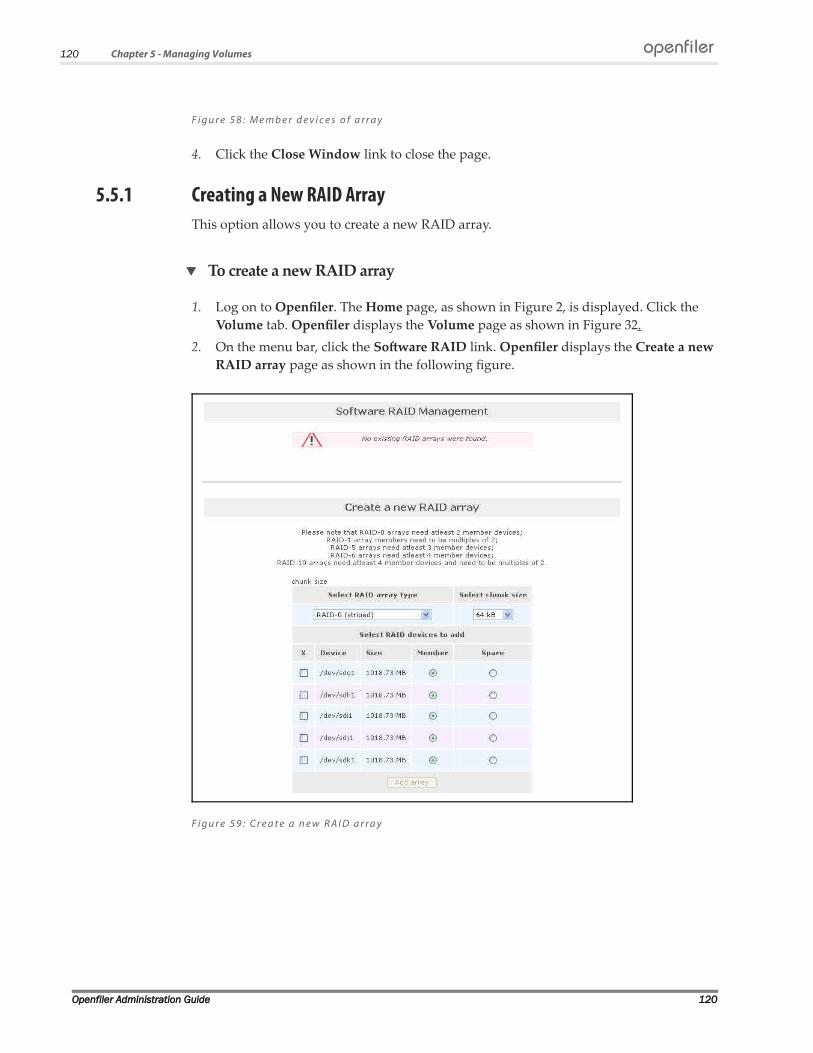
120 Chapter 5 - Managing Volumes
F i g u r e 5 8 : M e m b e r d e v i c e s o f a r r a y
4. Click the Close Window link to close the page.
5.5.1 Creating a New RAID ArrayThis option allows you to create a new RAID array.
To create a new RAID array
1. Log on to Openfiler. The Home page, as shown in Figure 2, is displayed. Click the
Volume tab. Openfiler displays the Volume page as shown in Figure 32.
2. On the menu bar, click the Sofware RAID link. Openfiler displays the Create a new
RAID array page as shown in the following figure.
F i g u r e 5 9 : C r e a t e a n e w R A I D a r r a y
Openfiler Administration Guide 120
openfiler
121 Chapter 5 - Managing Volumes
Field Description
Select RAID array type Select the appropriate RAID array type from the drop-down
list.
RAID-0 arrays require at least two member devices;
RAID-1 array members need to be multiples of 2; RAID-5
array needs at least 3 member devices; RAID-6 arrays
require minimum 4 member devices; RAID-10 arrays
require minimum 4 member devices and need to be
multiples of 2.
Select chunk size Select the RAID device size from the drop-down list. It
specifies the chunk size in kilobytes. By default 64 KB is
selected. The chunk size is important for performance and
should be tuned to the average application I/O request size.
For big I/Os the chunk size should be small in order to
spread the load across as many disks as possible and for
small I/Os the chunk size, conversely, should be set to a
larger size to reduce latency.
X Select the appropriate check box in the X column to select
the respective devices.
Device This field displays comma separated list of device names or
device name patterns.
Only one with names which match one entry in the list will
be used to assemble the array.
Size This field displays the size of the constructed RAID array.
Member Specify the number of members to expect the array to have
by selecting the member radio button(s).
Spare This field specifies the number of spare devices to expect the
array to have. Select the radio button(s) to set as spare
device.
T a b l e 1 8 : C r e a t i n g a N e w R A I D A r r a y
3. Select/enter the appropriate details in the respective fields and click the Add Array
button to add new RAID array.
Openfiler Administration Guide 121
openfiler
6 Managing Quota
By default, storage space on the Openfiler appliance must be allocated on a per-group
and per-volume slice basis. This means that once group and host access control have been
configured, quota allocation to the configured volume slices can take place. Quota
allocation in this case is a physical resource limit on the filesystem of the amount of
storage resources a group is allowed to consume. The administrator should bear in mind
that quota allocation is taking place at the volume slice level and not at the share level.
This has two implications:
If a group is given access to two or more shares that reside on diferent volumes
slices, quota allocation for that group must be done for each volume slice separately.
If a group is given access to two or more shares that reside on the same volume slice,
quota allocation applies for all shares on that volume slice combined.
The edit quota section allows you to allocate quota at the block and file level. The block
level quota allocation sets a physical limit on the amount of space a group can consume
on the volume slice. The file level quota allocation sets a physical limit on the number of
files and directories a group is allowed on the volume slice. By default, both the block
level and the file level allocations are set to zero for all groups.
6

123 Chapter 6 - Managing Quota
6.1 Managing Group QuotaThe Group Quota page allows you to set per volume quotas for individual groups
accessing Storage resource on Openfiler appliance. At least on volume must exist to
Group Quota to be visible. The administrator sets privileges for the group quota. To
select all groups, click the x link on the table header. You can assign the quota
individually by selecting the checkbox.
6.1.1 Selecting a VolumeThe select volume section allows the administrator to select the target volume slice for
quota information display and space allocation. This section provides a detailed
description on how to select and change a volume in Group Quota.
To select a volume:
1. Log on to Openfiler. The Home page, as shown in Figure 2, is displayed.
2. Click the Quota tab. Openfiler displays the Group Quota page, as shown in the
following figure.
Openfiler Administration Guide 123
openfiler
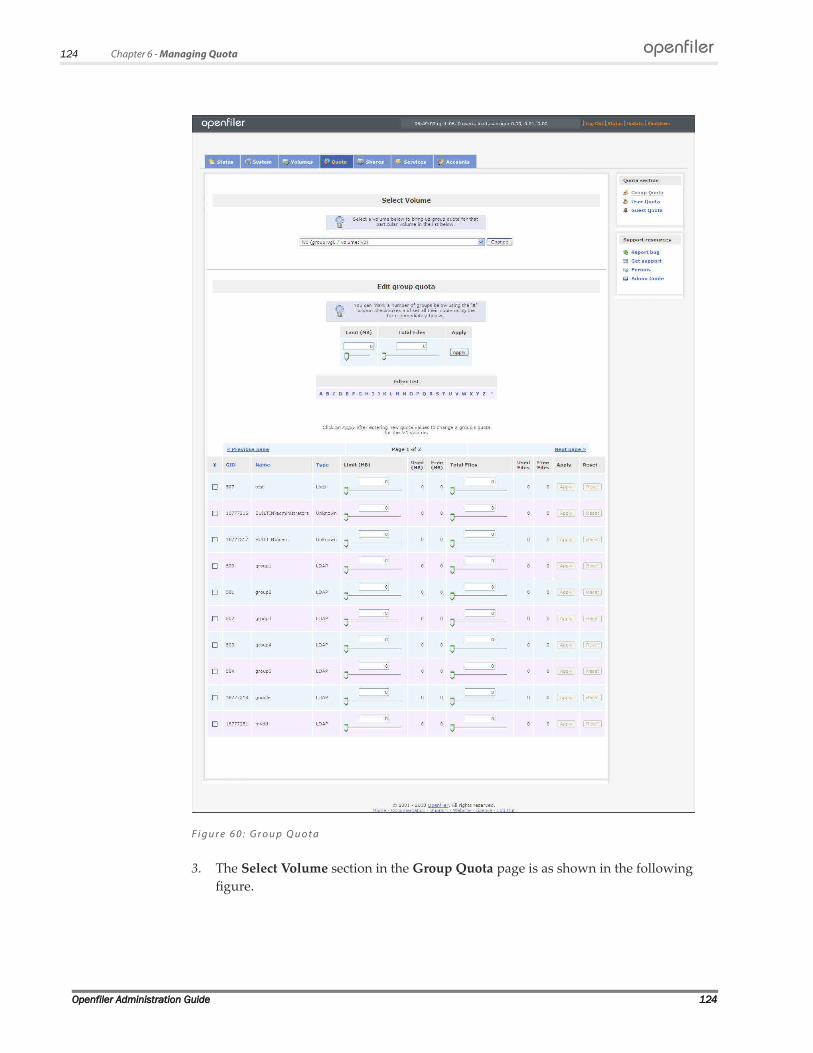
124 Chapter 6 - Managing Quota
F i g u r e 6 0 : G r o u p Q u o t a
3. The Select Volume section in the Group Quota page is as shown in the following
figure.
Openfiler Administration Guide 124
openfiler

125 Chapter 6 - Managing Quota
F i g u r e 6 1 : S e l e c t V o l u m e
4. Select the appropriate volume from the drop-down list and click the Change button.
6.1.2 Editing a Group QuotaThe edit quota option allows allocation of quota at the block and file level. Block level
quota allocation places a physical limit on the amount of space a group can consume on
the volume slice. File level quota allocation places a physical limit on the number of files
and directories a group is allowed on the volume slice.
The Edit Quota section lists all groups that have been imported from the directory
servers configured. Quota allocation for groups can be done individually, where block
and file level quota is allocated for each group respectively or it can be batched, whereby
several group can be selected at a time and quota allocated for all selected group
simultaneously.This section provides a detailed description on how to edit Group Quota.
To edit a Group Quota:
1. Log on to Openfiler. The Home page, as shown in Figure 2, is displayed.
2. Click the Quota tab. Openfiler displays the Group Quota page, as shown in Figure
60. The Edit group quota section in the Group Quota page is as shown in the
following figure.
Openfiler Administration Guide 125
openfiler

126 Chapter 6 - Managing Quota
F i g u r e 6 2 : E d i t G r o u p Q u o t a
Field Description
Limit (MB) Enter an appropriate limit, in MB, for the selected group(s).
OR
Move the slide bar, located below the respective field, to set
the limit for the selected group(s).
Note: To set the limit for an individual group, use the Limit
(MB) field corresponding to that group in the list.
Total Files Enter an appropriate total files limit, for the selected
group(s),
OR
Move the slide bar, located below the respective field, to set
the total files for the selected group(s).
Note: To set the total files limit for an individual group, use
the Total Files field corresponding to that group in the list.
Filter List Click any alphabet from the filter list to list the group quota,
starting with the selected alphabet.
X Select the appropriate corresponding check box(s) to select a
group(s).
GID This field displays the group ID.
Click the GID link to sort the data by group ID.
Name This field displays the group name.
Openfiler Administration Guide 126
openfiler

127 Chapter 6 - Managing Quota
Field Description
Click the Name link to sort the data by name.
Type This field displays the group type.
Click the Type link to sort the data by group quota type.
Used (MB) This field displays the used disk space in MB.
Free (MB) This field displays the free disk space for the group in MB.
Total Files Enter an appropriate total files limit, for the selected group.
OR
Move the slide bar, located below the respective field, to set
the total files limit for the selected group.
Used Files This field displays the number of files that belong to the
group.
T a b l e 1 9 : E d i t i n g a G r o u p Q u o t a
3. Enter/select the appropriate details and click the corresponding Apply button to save
the changes.
OR
Click the corresponding Reset button to reset the changes.
Openfiler Administration Guide 127
openfiler

128 Chapter 6 - Managing Quota
6.2 Managing User QuotaThis section shows you how to manage user quota. The administrator sets privileges for
the user quota. To select all groups, click the x link on the table header. You can assign the
quota individually by selecting the checkbox.
6.2.1 Selecting a VolumeThis section provides a detailed description on how to select and change a volume in
User Quota.
To select a Volume:
1. Log on to Openfiler. The Home page, as shown in Figure 2, is displayed.
2. Click the Quota tab. Openfiler displays the Group Quota page, as shown in Figure
60.
3. On the menu bar, click the User Quota link. Openfiler displays the User Quota page,
as shown in the following figure.
Openfiler Administration Guide 128
openfiler

129 Chapter 6 - Managing Quota
F i g u r e 6 3 : U s e r Q u o t a
4. The Select Volume section in the User Quota page is as shown in the following
figure.
Openfiler Administration Guide 129
openfiler

130 Chapter 6 - Managing Quota
F i g u r e 6 4 : S e l e c t V o l u m e
5. Select the appropriate volume from the drop-down list and click the Change button.
6.2.2 Editing a User QuotaThis section provides a detailed description on how to edit a User Quota.
To edit a User Quota:
1. Log on to Openfiler. The Home page, as shown in Figure 2, is displayed.
2. Click the Quota tab. Openfiler displays the Group Quota page, as shown in Figure
60.
3. On the menu bar, click the User Quota link. Openfiler displays the User Quota page,
as shown in Figure 63.The Edit user quota section in the User Quota page is as
shown in the following figure.
Openfiler Administration Guide 130
openfiler
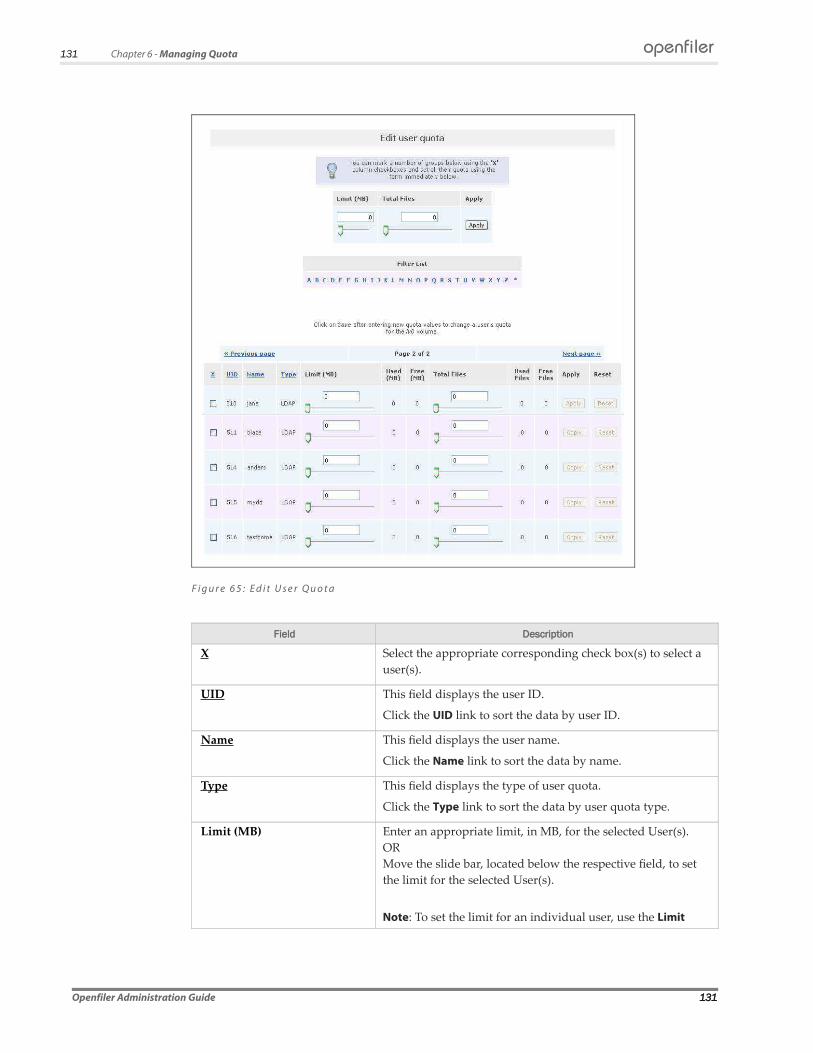
131 Chapter 6 - Managing Quota
F i g u r e 6 5 : E d i t U s e r Q u o t a
Field Description
X Select the appropriate corresponding check box(s) to select a
user(s).
UID This field displays the user ID.
Click the UID link to sort the data by user ID.
Name This field displays the user name.
Click the Name link to sort the data by name.
Type This field displays the type of user quota.
Click the Type link to sort the data by user quota type.
Limit (MB) Enter an appropriate limit, in MB, for the selected User(s).
OR
Move the slide bar, located below the respective field, to set
the limit for the selected User(s).
Note: To set the limit for an individual user, use the Limit
Openfiler Administration Guide 131
openfiler

132 Chapter 6 - Managing Quota
Field Description
(MB) field corresponding to that user in the list.
Total Files Enter an appropriate total files limit, for the selected user(s).
OR
Move the slide bar, located below the respective field, to set
the total files for the selected user(s).
Note: To set the total files limit for an individual user, use the
Total Files field corresponding to that user in the list.
Filter List Click any alphabet from the filter list to list the user quota,
starting with the selected alphabet.
Used (MB) This field displays the used quota in MB.
Free (MB) This field displays the free user quota in MB.
Total Files Enter an appropriate total files limit, for the selected user.
OR
Move the slide bar, located below the respective field, to set
the total files limit for the selected user.
Used Files This field displays the number of used files.
Free Files This field displays the number of free files available.
T a b l e 2 0 : E d i t i n g a U s e r Q u o t a
4. Enter/select the appropriate limits and then click the corresponding Apply button to
save the changes.
OR
Click the corresponding Reset button to reset the changes.
Openfiler Administration Guide 132
openfiler
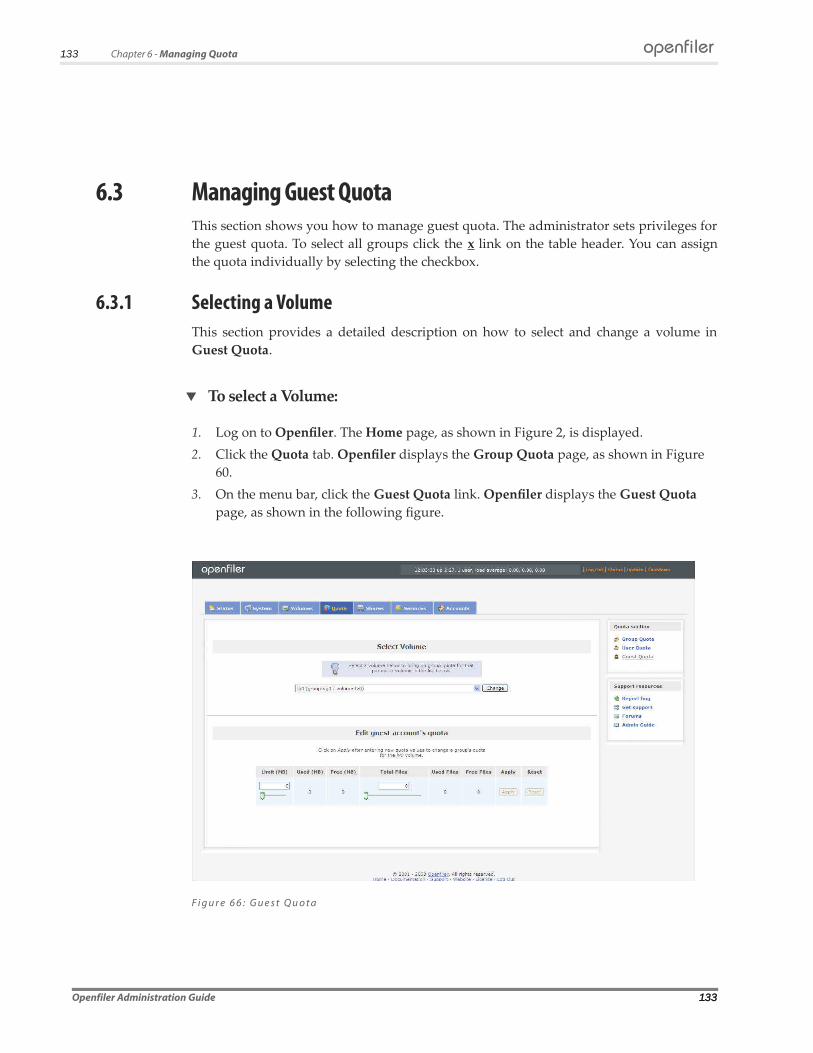
133 Chapter 6 - Managing Quota
6.3 Managing Guest QuotaThis section shows you how to manage guest quota. The administrator sets privileges for
the guest quota. To select all groups click the x link on the table header. You can assign
the quota individually by selecting the checkbox.
6.3.1 Selecting a VolumeThis section provides a detailed description on how to select and change a volume in
Guest Quota.
To select a Volume:
1. Log on to Openfiler. The Home page, as shown in Figure 2, is displayed.
2. Click the Quota tab. Openfiler displays the Group Quota page, as shown in Figure
60.
3. On the menu bar, click the Guest Quota link. Openfiler displays the Guest Quota
page, as shown in the following figure.
F i g u r e 6 6 : G u e s t Q u o t a
Openfiler Administration Guide 133
openfiler

134 Chapter 6 - Managing Quota
4. The Select Volume section in the Guest Quota page is as shown in the following
figure.
F i g u r e 6 7 : S e l e c t V o l u m e
5. Select the appropriate volume from the drop-down list and click the Change button.
6.3.2 Editing a Guest QuotaThis option allows you to edit a guest quota.
To edit a Guest Quota:
1. Log on to Openfiler. The Home page, as shown in Figure 2, is displayed.
2. Click the Quota tab. Openfiler displays the Group Quota page, as shown in Figure
60.
3. On the menu bar, click the Guest Quota link. Openfiler displays the Guest Quota
page, as shown in Figure 66. The Edit guest account’s quota section in the Guest
Quota page is as shown in the following figure.
F i g u r e 6 8 : E d i t G u e s t A c c o u n t ’ s Q u o t a
Openfiler Administration Guide 134
openfiler

135 Chapter 6 - Managing Quota
Field Description
Limit (MB) Enter an appropriate limit, in MB, for the selected guest
account.
OR
Move the slide bar, located below the respective field, to set
the limit for the selected guest.
Used (MB) This field displays the total space used by the guest, in MB .
Free (MB) This field displays the total free space available for the
guest, in MB.
Total Files Enter an appropriate total files limit, for the selected guest.
OR
Move the slide bar, located below the respective field, to set
the total files limit for the selected guest.
Used files This field displays the total number of files used by the
guest.
Free files This field displays the total free files available for the guest.
T a b l e 2 1 : E d i t i n g a G u e s t Q u o t a
4. Enter/select the appropriate limits and then click the corresponding Apply button to
save the changes.
OR
Click the corresponding Reset button to reset the changes.
Openfiler Administration Guide 135
openfiler

136 Chapter 4 - Managing System
7 Managing Shares
A shared resource, or share, is a local resource on a server that is accessible to windows
clients on the network. In Openfiler, a share is typically a location in a volume slice that
can be exported with the support of any one of the Openfiler network file system
protocols. Shares can be created and edited in the Shares page by clicking on the Shares
tab. The default shares page lists all existing volume slices. Once shares are created
within the volumes, the default shares page will show all existing volume slices, their
folders and sub folders and any shares created within these folders and sub folders. Each
share is identified by a name on the network. Shares and directories are independent
entities. Removing a share does not afect the underlying directory.
Openfiler Administration Guide 136
7
openfiler
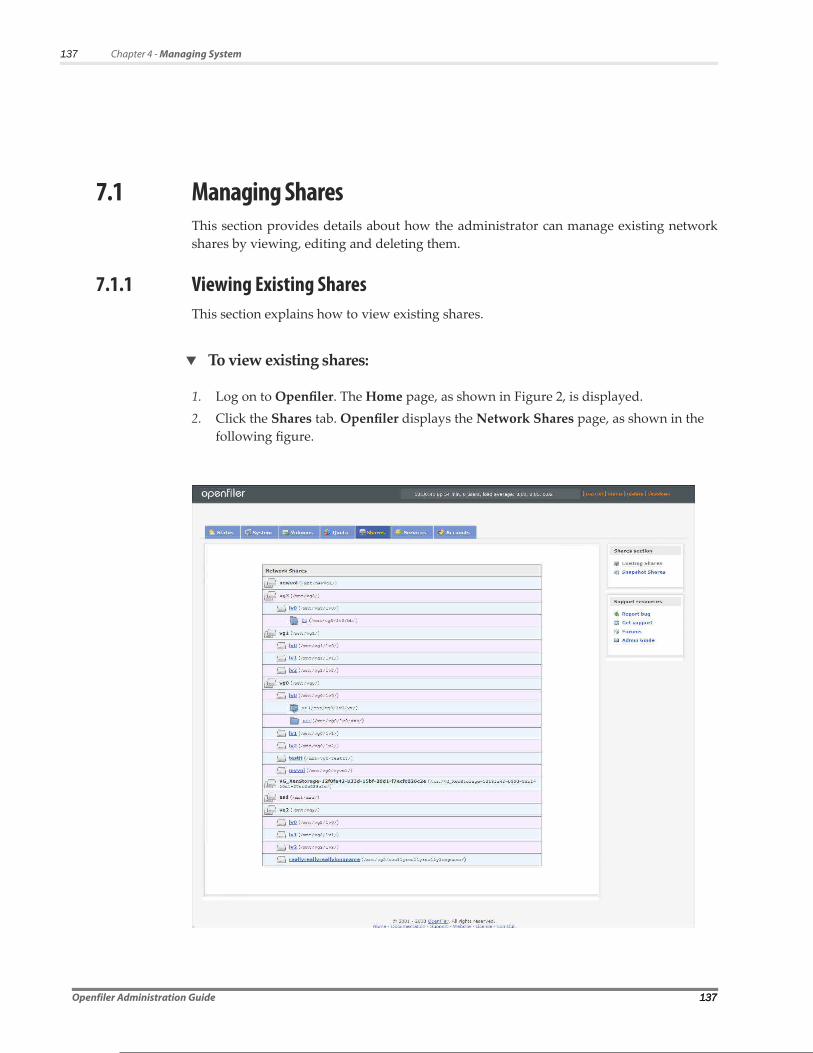
137 Chapter 4 - Managing System
7.1 Managing SharesThis section provides details about how the administrator can manage existing network
shares by viewing, editing and deleting them.
7.1.1 Viewing Existing SharesThis section explains how to view existing shares.
To view existing shares:
1. Log on to Openfiler. The Home page, as shown in Figure 2, is displayed.
2. Click the Shares tab. Openfiler displays the Network Shares page, as shown in the
following figure.
Openfiler Administration Guide 137

138 Chapter 4 - Managing System
F i g u r e 6 9 : N e t w o r k S h a r e s
7.1.2 Creating a ShareA share is a location in a volume slice that can be exported via any one of the Openfiler-
supported network filesystem protocols. Shares can be created and edited in the Shares
screen by clicking on the Shares tab. The default Shares screen lists all existing volume
slices. Once shares are created within the volumes, the default Shares screen will show all
existing volume slices, their folders and sub-folders, and any shares created within these
folders and sub-folders. Shares are created within volume slices. Clicking on a volume
slice link will open a dialog to enter the name of a sub-folder of the volume slice, which
can subsequently be converted to a share.
Clicking on the identifier for a share will open a new page "Edit Shares". The Edit Shares
page is divided into three sections. There is a section for renaming a share identifier and
description, one for setting group access control, and the final section for setting network
access control and services for the share. All the three sections are explained as a separate
sections.
To create a share:
1. Log on to Openfiler. The Home page, as shown in Figure 2, is displayed.
2. Click the Shares tab. Openfiler displays the Network Shares page, as shown in
Figure 69.
3. Click on a volume slice link from the Network Shares list. Openfiler displays a
window, as shown in the following figure.
F i g u r e 7 0 : C r e a t e a S h a r e - c r e a t i n g a F o l d e r
4. Enter the appropriate folder name and click the Create Sub-folder button. This share
will be added to the existing share.
5. Click on the newly created folder name link. Openfiler displays a pop-up window as
shown in the following figure.
Openfiler Administration Guide 138
openfiler

139 Chapter 4 - Managing System
F i g u r e 7 1 : C r e a t e N e t w o r k S h a r e s
Field Description
Folder Name Enter the new identifier for the share.
New Folder Name Enter the new folder name.
New Description Enter the new description to change the description of the
share.
T a b l e 2 2 : C r e a t i n g S h a r e s
6. Enter the appropriate data in the respective fields.
7. Click the Make Share button to create a new share. Openfiler displays the Edit
Network Shares page, as shown in the following figure
OR
Click the Delete Folder button to delete the share folder.
Openfiler Administration Guide 139

140 Chapter 4 - Managing System
Openfiler Administration Guide 140
openfiler

141 Chapter 4 - Managing System
F i g u r e 7 2 : E d i t N e t w o r k S h a r e s
7.1.2.1 Edit ShareIn this section you can rename a share identifier and change the description of the share.
Field Description
Share Name Enter the share name in the text box.
Share Description Enter the share description in the text box.
Override SMB/Rsync share
name
Enter either SMB/Rsync share name in the text box.
T a b l e 2 3 : E d i t i n g a S h a r e
7.1.2.2 Group Access ConfigurationsAccess to shares is configured at the group level and network level. Security for a share
can be loose or tight depending on the required security level for the share. For loose
security, the share can be set to public access level. With public access, any user on the
network, logged into a client machine that has network access will be able to access the
share. With controlled access, only users that have been given specific access permissions
will be able to access the share. To configure group access to a share, scroll down to the
Group access configuration sub-section. There are two selectable radio-buttons. To allow
guest access to the share, select the Public guest access radio-button and click the Update
button. Once this setting has been applied, all users on any networks that have been
given read or write access to the share will be able to access the share without having to
authenticate with a directory/authentication server.
Openfiler Administration Guide 141
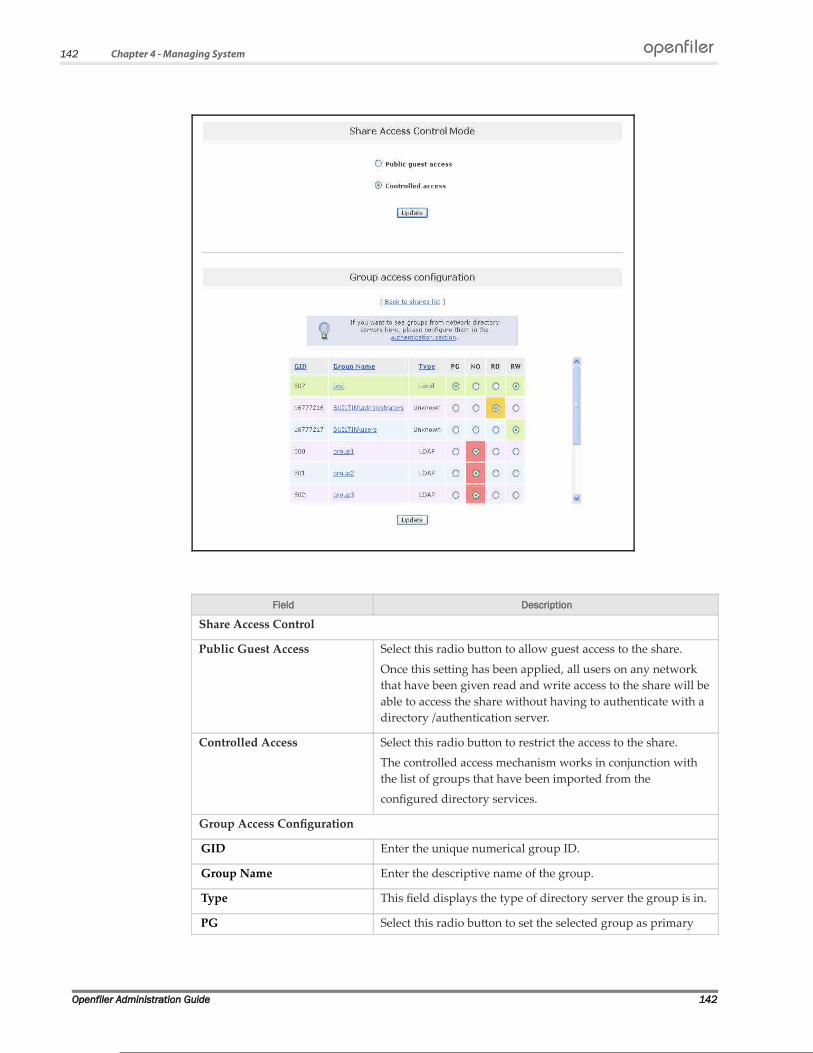
142 Chapter 4 - Managing System
Field Description
Share Access Control
Public Guest Access Select this radio button to allow guest access to the share.
Once this setting has been applied, all users on any network
that have been given read and write access to the share will be
able to access the share without having to authenticate with a
directory /authentication server.
Controlled Access Select this radio button to restrict the access to the share.
The controlled access mechanism works in conjunction with
the list of groups that have been imported from the
configured directory services.
Group Access Configuration
GID Enter the unique numerical group ID.
Group Name Enter the descriptive name of the group.
Type This field displays the type of directory server the group is in.
PG Select this radio button to set the selected group as primary
Openfiler Administration Guide 142
openfiler

143 Chapter 4 - Managing System
Field Description
group.
The primary group for share owns the share and has full
access rights on it.
This must be set for the share to be visible.
Every share must have a primary group, of which there can be
only one.
NO This radio button determines which group(s) will not be
allowed access to the share.
By default, this will be selected for all groups.
RO This radio button determines which group(s) has read only
access to the shares.
RW This radio button determines which group(s) has read and
writes access to the share.
T a b l e 2 4 : G r o u p A c c e s s C o n f i g u r a t i o n
7.1.2.3 Host Access ConfigurationsOnce access control to the share has been configured at the group-level, network-level
access control has to be configured. The host access configuration section is for
determining which hosts on the network are permitted access to shares. Groups that have
been granted access rights to the share will only be able to access or view the share from
a host that has been granted network-level access rights to the share. The Administrator
can determine what share access protocols are permitted for each individual host or
network. To configure network-level access control, scroll down to the Host access
configuration sub-section of the Edit Share page.
Openfiler Administration Guide 143

144 Chapter 4 - Managing System
Field Description
Name This field displays the name of networks and hosts that are
permitted network access to the Openfiler appliance.
Network This field displays the IP address of the networks and hosts
that are permitted to the Openfiler appliance.
SMB/CIFS Set the access control for SMB / CIFS.
Network access control for SMB /CIFS allows for diferent
settings depending on the desired efect for the share and
source of the connection. There are three options for network
access control and they are applied on a per-host or per-
network basis. The options are:
NO: If this radio button is selected, the network or host it applies
to will not have any access to the share via SMB/CIFS protocol.
RO: If this radio button is selected, the network or host it applies
to will have read only access to the share via SMB/CIFS protocol.
RW: If this radio button is selected, the network or host it applies
to will have read and write access to the share via SMB/CIFS
protocol.
NFS Set the access control for the NFS.
The administrator must ensure that any share exported via
NFS has the correct level of security settings in line with the
requirements of the network storage security policy. There are
three options for NFS and they are applied on a per-network
basis. The available options are:
NO: If this radio button is selected, the network or host it applies
to will not have any access to the share via NFS protocol.
RO: If this radio button is selected, the network or host it applies
to will have read only access to the share via NFS protocol.
RW: If this radio button is selected, the network or host it applies
to will have read and write access to the share via NFS protocol.
You can edit the NFS settings by clicking the Edit link of the
Option column.
HTTP(S) WebDAV Access control via HHTP(s)/webDAV can be set on a per-host
or per-network basis based on the access requirements for the
share. There are three options available for HTTP(s)/Web/DAV
network access control. The options are:
NO: If this radio button is selected, the network or host it applies
to will not have any access to the share via HTTP(S) and /or
WebDAV protocol.
RO: If this radio button is selected, the network or host it applies
to will have read only access to the share via HTTP(S) and /or
WebDAV protocol.
RW: If this radio button is selected, the network or host it applies
to will have read and write access to the share via HTTP(S) and
Openfiler Administration Guide 144
openfiler
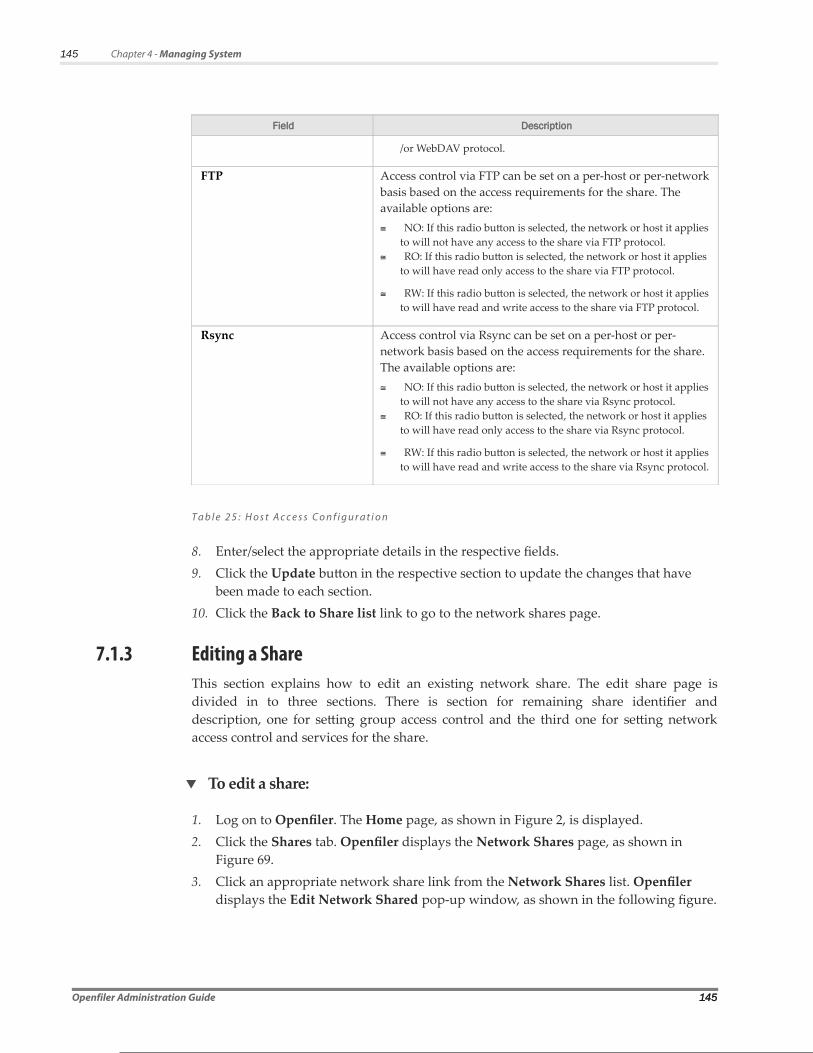
145 Chapter 4 - Managing System
Field Description
/or WebDAV protocol.
FTP Access control via FTP can be set on a per-host or per-network
basis based on the access requirements for the share. The
available options are:
NO: If this radio button is selected, the network or host it applies
to will not have any access to the share via FTP protocol.
RO: If this radio button is selected, the network or host it applies
to will have read only access to the share via FTP protocol.
RW: If this radio button is selected, the network or host it applies
to will have read and write access to the share via FTP protocol.
Rsync Access control via Rsync can be set on a per-host or per-
network basis based on the access requirements for the share.
The available options are:
NO: If this radio button is selected, the network or host it applies
to will not have any access to the share via Rsync protocol.
RO: If this radio button is selected, the network or host it applies
to will have read only access to the share via Rsync protocol.
RW: If this radio button is selected, the network or host it applies
to will have read and write access to the share via Rsync protocol.
T a b l e 2 5 : H o s t A c c e s s C o n f i g u r a t i o n
8. Enter/select the appropriate details in the respective fields.
9. Click the Update button in the respective section to update the changes that have
been made to each section.
10. Click the Back to Share list link to go to the network shares page.
7.1.3 Editing a ShareThis section explains how to edit an existing network share. The edit share page is
divided in to three sections. There is section for remaining share identifier and
description, one for setting group access control and the third one for setting network
access control and services for the share.
To edit a share:
1. Log on to Openfiler. The Home page, as shown in Figure 2, is displayed.
2. Click the Shares tab. Openfiler displays the Network Shares page, as shown in
Figure 69.
3. Click an appropriate network share link from the Network Shares list. Openfiler
displays the Edit Network Shared pop-up window, as shown in the following figure.
Openfiler Administration Guide 145

146 Chapter 4 - Managing System
F i g u r e 7 3 : E d i t N e t w o r k S h a r e s
4. Enter the appropriate data in the respective fields.
5. Click the Make Share button to create a new share. Openfiler displays the Edit
Network Shares page, as shown in the following figure
OR
Click the Delete Folder button to delete the share folder.
Openfiler Administration Guide 146
openfiler
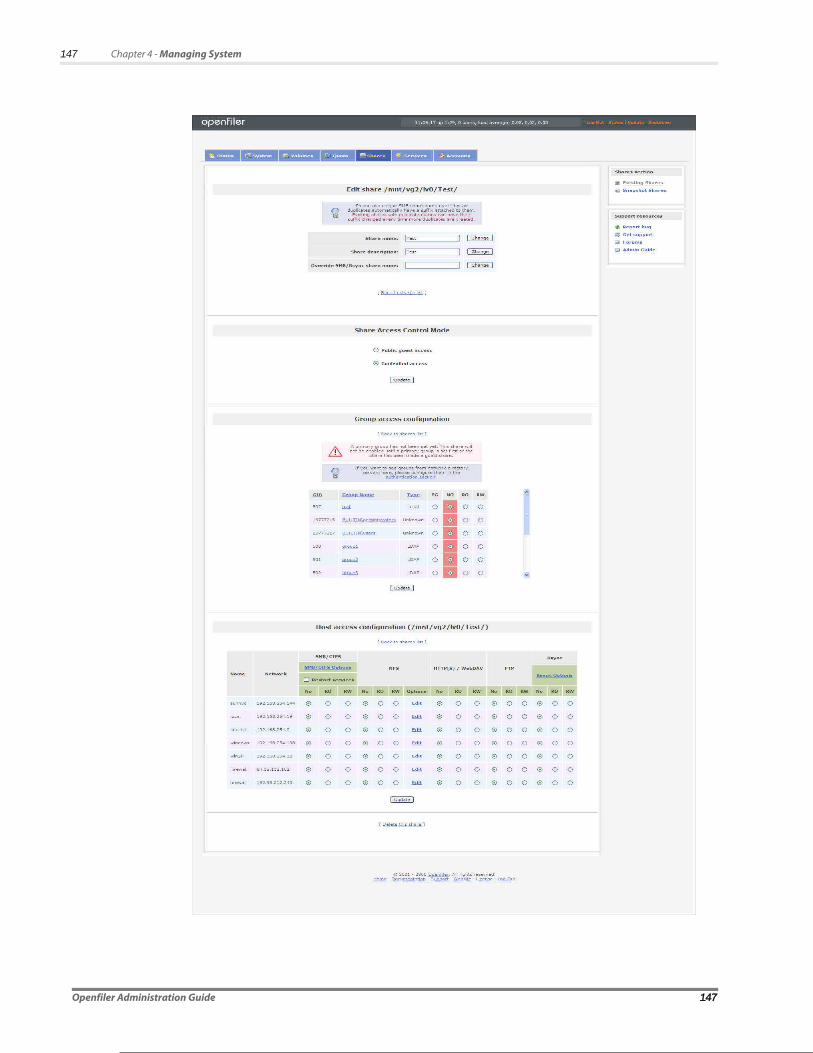
147 Chapter 4 - Managing System
Openfiler Administration Guide 147
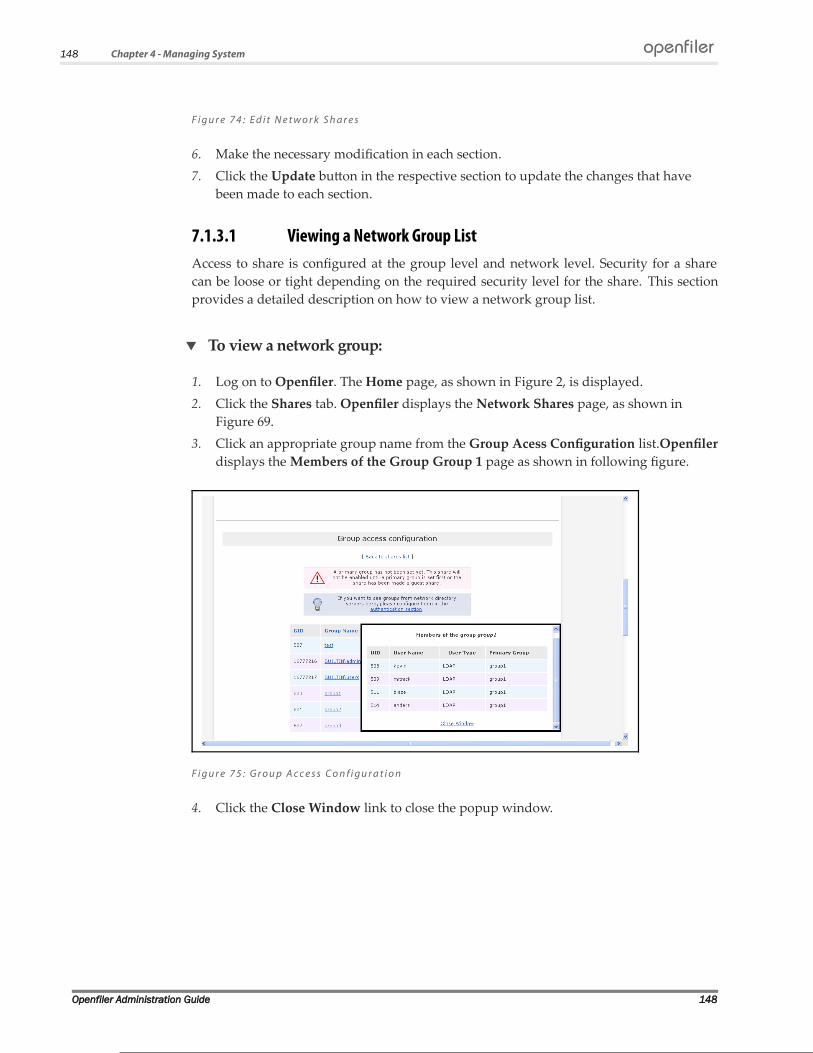
148 Chapter 4 - Managing System
F i g u r e 7 4 : E d i t N e t w o r k S h a r e s
6. Make the necessary modification in each section.
7. Click the Update button in the respective section to update the changes that have
been made to each section.
7.1.3.1 Viewing a Network Group ListAccess to share is configured at the group level and network level. Security for a share
can be loose or tight depending on the required security level for the share. This section
provides a detailed description on how to view a network group list.
To view a network group:
1. Log on to Openfiler. The Home page, as shown in Figure 2, is displayed.
2. Click the Shares tab. Openfiler displays the Network Shares page, as shown in
Figure 69.
3. Click an appropriate group name from the Group Acess Configuration list.Openfiler
displays the Members of the Group Group 1 page as shown in following figure.
F i g u r e 7 5 : G r o u p A c c e s s C o n f i g u r a t i o n
4. Click the Close Window link to close the popup window.
Openfiler Administration Guide 148
openfiler

149 Chapter 4 - Managing System
7.1.3.2 Editing SMB/CIFS Share OptionsNetwork access control for SMB/CIFS allows for diferent settings depending on the
desired efect for the share and source of the connection. This section provides a detailed
description on how to edit SMB/CIFS share.
To edit a SMB/CIFS share:
1. Log on to Openfiler. The Home page, as shown in Figure 2, is displayed.
2. Click the Shares tab. Openfiler displays the Network Shares page, as shown in
Figure 69.
3. Click an appropriate network share link from the Network Shares list. Openfiler
displays the Edit Network page.
4. In the Host Access Configuration section, click the SMB/CIFS Options link.
Openfiler displays the SMS Share Options page as shown in following figure.
F i g u r e 7 6 : S M B S h a r e O p t i o n s
Openfiler Administration Guide 149
150 Chapter 4 - Managing System
Field Description
Enable Oplocks Select the check box to enable oplocks.
Oplocks are the way that SMB clients get permission from a
server to locally cache file operations. If a server grants an
oplock (opportunistic lock) then the client is free to assume
that it is the only one accessing the file and it will
aggressively cache file data. With some oplock types the
client may even cache file open/close operations. This can
give enormous performance benefits.
If you enable this option on all read-only shares or shares that
you know will only be accessed from one client at a time such
as physically read-only media like CDROMs, you will see a
big performance improvement on many operations. If you
enable this option on shares where multiple clients may be
accessing the files read-write at the same time you can get
data corruption.
DOS Filemode Select the check box to enable DOS filemode.
Enabling this parameter allows a user who has write access to
the file (by whatever means) to modify the permissions
(including ACL) on it.
Note that a user belonging to the group owning the file will not
be allowed to change permissions if the group is only granted
read access. Ownership of the file/directory may also be
changed.
DOS Filetime Resolution Select the check box to enable DOS filetime resolution.
Under the DOS and Windows FAT filesystem, the finest
granularity on time resolution is two seconds.
Setting this parameter for a share causes Samba to round the
reported time down to the nearest two second boundary when a
query call that requires one second resolution is made to
smbd(8).
Fake Directory Create Times Select the check box to enable fake directory create times.
NTFS and Windows VFAT file systems keep a create time for all
files and directories. This is not the same as the ctime - status
change time - that Unix keeps, so Samba by default reports the
earliest of the various times Unix does keep. Setting this
parameter for a share causes Samba to always report midnight
1-1-1980 as the create time for directories.
This option is mainly used as a compatibility option for Visual
C++ when used against Samba shares. Visual C++ generated
makefiles have the object directory as a dependency for each
object file, and a make rule to create the directory. Also, when
NMAKE compares timestamps it uses the creation time when
examining a directory. Thus the object directory will be created
Openfiler Administration Guide 150
openfiler

151 Chapter 4 - Managing System
Field Description
if it does not exist, but once it does exist it will always have an
earlier timestamp than the object files it contains.
However, Unix time semantics mean that the create time
reported by Samba will be updated whenever a file is created or
or deleted in the directory. NMAKE finds all object files in the
object directory. The timestamp of the last one built is then
compared to the timestamp of the object directory. If the
directory's timestamp if newer, then all object files will be
rebuilt. Enabling this option ensures directories always predate
their contents and an NMAKE build will proceed as expected.
DOS Filetimes Select the check box to enable DOS filetimes.
Under DOS and Windows, if a user can write to a file they can
change the timestamp on it.
Under POSIX semantics, only the owner of the file or root may
change the timestamp. By default, Samba runs with POSIX
semantics and refuses to change the timestamp on a file if the
user smbd is acting on behalf of is not the file owner.
Setting this option to yes allows DOS semantics and smbd(8)
will change the file timestamp as DOS requires.
T a b l e 2 6 : S M B S h a r e O p t i o n s
5. Make the necessary changes and click the Update button to update the modifications
that have been made.
7.1.3.3 Editing Resync Share OptionsThis section provides a detailed description on how to edit the Resync share.
To edit the Resync share:
1. Log on to Openfiler. The Home page, as shown in Figure 2, is displayed.
2. Click the Shares tab. Openfiler displays the Network Shares page, as shown in
Figure 69.
3. In the Host Access Control section, click an appropriate network share link from the
Network Shares list. Openfiler displays the Edit Network page.
4. Click the Rsync Options link. Openfiler displays the SMS Share Options page as
shown in following figure.
Openfiler Administration Guide 151

152 Chapter 4 - Managing System
F i g u r e 7 7 : R s y n c S h a r e O p t i o n s
Field Description
Comments Enter the comments in the text box.
The "comment" option specifies a description string that is
displayed next to the module name when clients obtain a list
of available modules. The default is no comment.
Max Connections Enter the max connections in the text box.
This option allows you to specify the maximum number of
simultaneous connections you will allow. Any clients
connecting when the maximum has been reached will receive
a message asking them to try later.
The default is 0 which means no limit.
Use chroot Select the check box to enable use chroot.
If "use chroot" check box is selected, the rsync daemon will
chroot to the "path" before starting the file transfer with the
client. This has the advantage of extra protection against
possible implementation security holes, but it has the
disadvantages of requiring super-user privileges, of not being
able to follow symbolic links that are either absolute or
outside of the new root path, and of complicating the
preservation of usernames and groups (see below).
When "use chroot" is not selected, for security reasons,
symlinks may only be relative paths pointing to other files
Openfiler Administration Guide 152
openfiler
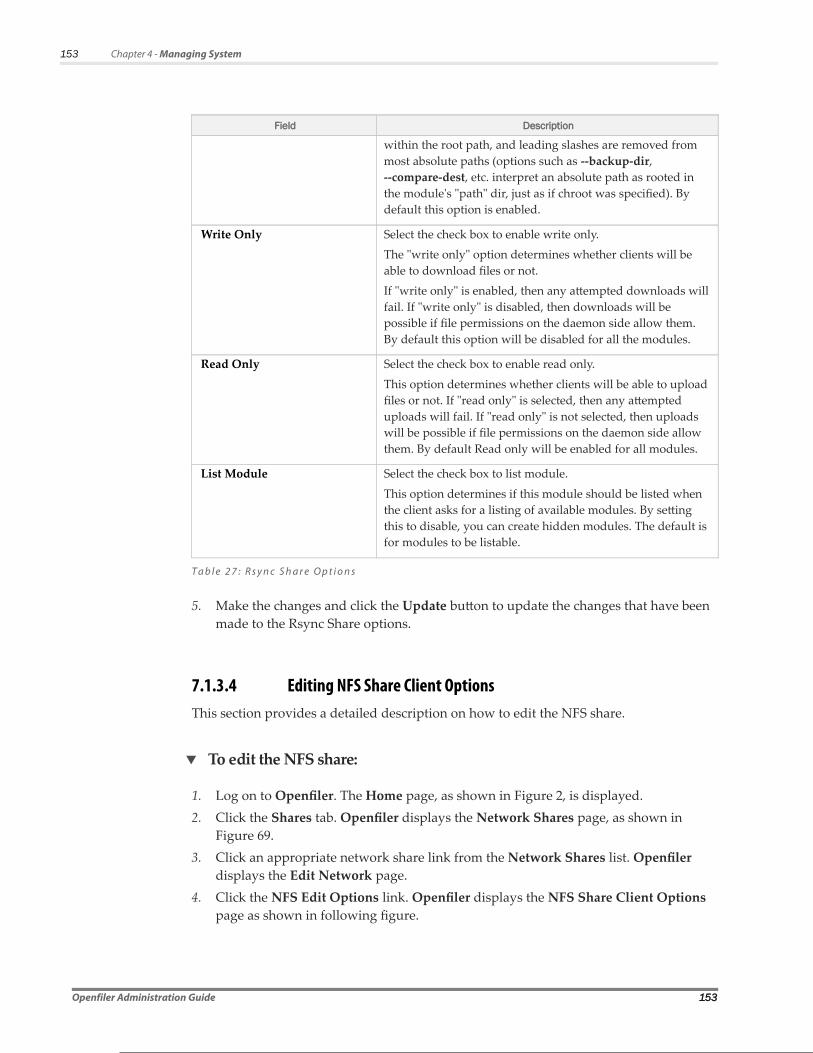
153 Chapter 4 - Managing System
Field Description
within the root path, and leading slashes are removed from
most absolute paths (options such as --backup-dir,
--compare-dest, etc. interpret an absolute path as rooted in
the module's "path" dir, just as if chroot was specified). By
default this option is enabled.
Write Only Select the check box to enable write only.
The "write only" option determines whether clients will be
able to download files or not.
If "write only" is enabled, then any attempted downloads will
fail. If "write only" is disabled, then downloads will be
possible if file permissions on the daemon side allow them.
By default this option will be disabled for all the modules.
Read Only Select the check box to enable read only.
This option determines whether clients will be able to upload
files or not. If "read only" is selected, then any attempted
uploads will fail. If "read only" is not selected, then uploads
will be possible if file permissions on the daemon side allow
them. By default Read only will be enabled for all modules.
List Module Select the check box to list module.
This option determines if this module should be listed when
the client asks for a listing of available modules. By setting
this to disable, you can create hidden modules. The default is
for modules to be listable.
T a b l e 2 7 : R s y n c S h a r e O p t i o n s
5. Make the changes and click the Update button to update the changes that have been
made to the Rsync Share options.
7.1.3.4 Editing NFS Share Client OptionsThis section provides a detailed description on how to edit the NFS share.
To edit the NFS share:
1. Log on to Openfiler. The Home page, as shown in Figure 2, is displayed.
2. Click the Shares tab. Openfiler displays the Network Shares page, as shown in
Figure 69.
3. Click an appropriate network share link from the Network Shares list. Openfiler
displays the Edit Network page.
4. Click the NFS Edit Options link. Openfiler displays the NFS Share Client Options
page as shown in following figure.
Openfiler Administration Guide 153

154 Chapter 4 - Managing System
F i g u r e 7 8 : N F S S h a r e C l i e n t O p t i o n s
Field Description
Anonymous UID Enter the Anonymous UID in the text box.
Anonymous GID Enter the Anonymous GID in the text box.
UID/GID Mapping Select UID/GID mapping from the drop-down list.
I/O Mode Select the I/O mode from the drop-down list.
Write Delay Select the write delay option from the drop-down list.
Request Origin Port Select the request origin port from the drop-down list.
T a b l e 2 8 : N F S S h a r e C l i e n t O p t i o n s
5. Click the Update button to edit the NFS Share.
Openfiler Administration Guide 154
openfiler

155 Chapter 4 - Managing System
7.1.4 Deleting a ShareThis section provides a detailed description on how to delete a share.
To delete a share:
1. Log on to Openfiler. The Home page, as shown in Figure 2, is displayed.
2. Click the Shares tab. Openfiler displays the Network Shares page, as shown in
Figure 69.
3. Select an appropriate network share name from the Network Shares list and click the
Delete this Share link. Openfiler displays the Delete this Share page.
F i g u r e 7 9 : D e l e t i n g a S h a r e
4. Click the Yes link to delete the selected share
OR
Click the NO DON’T DELETE link not to cancel the deletion.
Openfiler Administration Guide 155

156 Chapter 4 - Managing System
7.2 Viewing Snapshot SharesThis section provides details about how to view snapshot shares.
To view snapshot shares:
1. Log on to Openfiler. The Home page, as shown in Figure 2, is displayed.
2. Click the Shares tab. Openfiler displays the Network Shares page, as shown in
Figure 69.
3. On the menu bar, click the Snapshot Shares link. Openfiler displays the Network
Shares Snapshots page, as shown in the following figure.
F i g u r e 8 0 : N e t w o r k S h a r e s S n a p s h o t s
Openfiler Administration Guide 156
openfiler

8 Managing Services
File export services can be enabled after completing configuration tasks. Enabling a
service means that any shares in the service list having that service configured as one of
the supported protocols will be activated. Once the share is activated, any user on the
network who has access to that share, can access the share only via the corresponding
activated protocols.
Once a service is enabled the users in the network are able to access the shares to which
they have access rights.
8
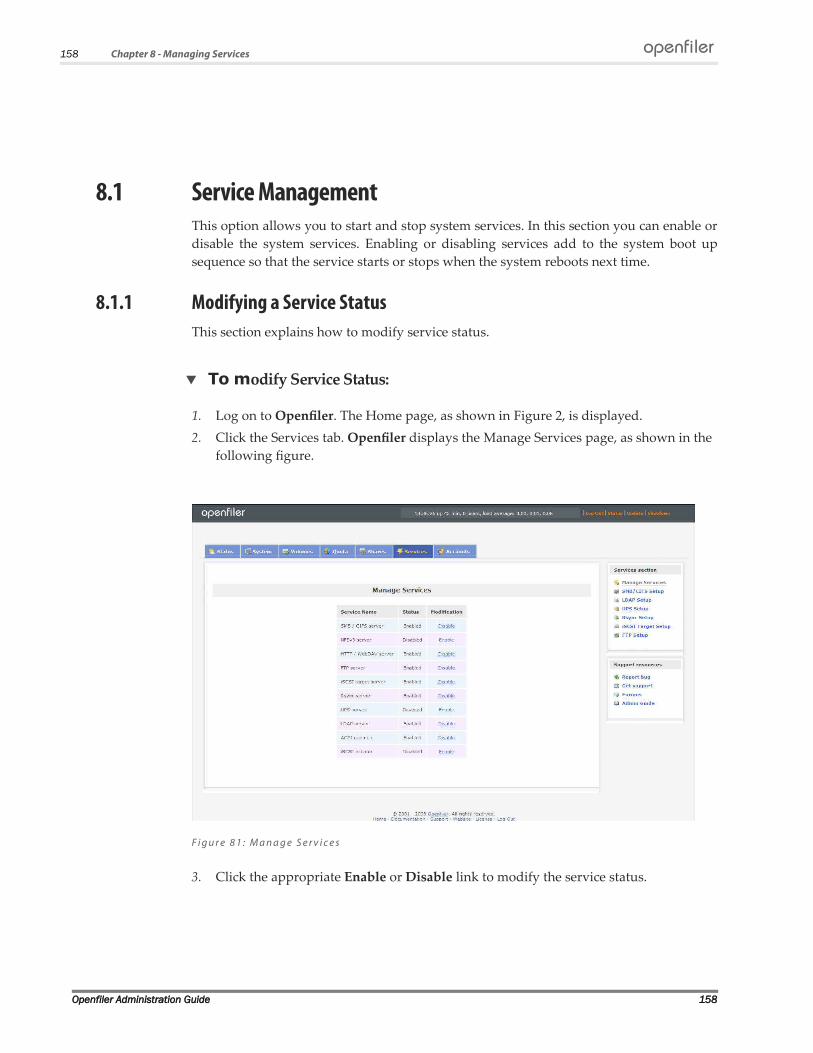
158 Chapter 8 - Managing Services
8.1 Service ManagementThis option allows you to start and stop system services. In this section you can enable or
disable the system services. Enabling or disabling services add to the system boot up
sequence so that the service starts or stops when the system reboots next time.
8.1.1 Modifying a Service StatusThis section explains how to modify service status.
To modify Service Status:
1. Log on to Openfiler. The Home page, as shown in Figure 2, is displayed.
2. Click the Services tab. Openfiler displays the Manage Services page, as shown in the
following figure.
F i g u r e 8 1 : M a n a g e S e r v i c e s
3. Click the appropriate Enable or Disable link to modify the service status.
Openfiler Administration Guide 158
openfiler
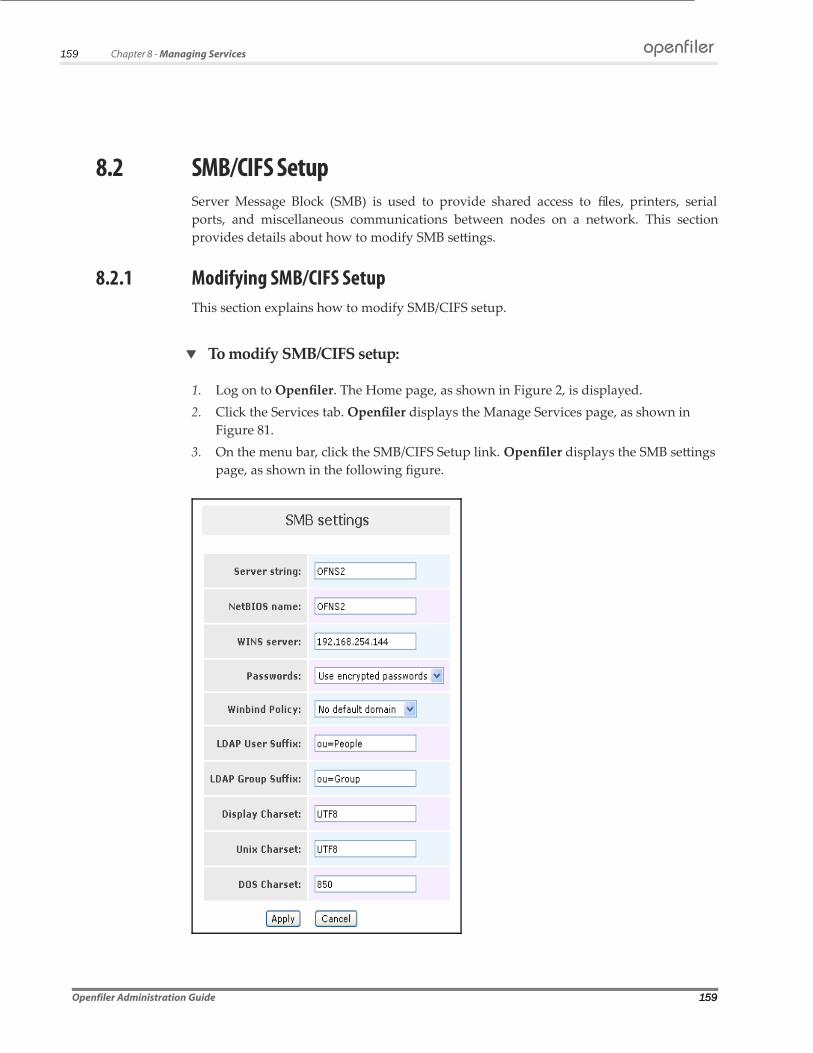
159 Chapter 8 - Managing Services
8.2 SMB/CIFS SetupServer Message Block (SMB) is used to provide shared access to files, printers, serial
ports, and miscellaneous communications between nodes on a network. This section
provides details about how to modify SMB settings.
8.2.1 Modifying SMB/CIFS SetupThis section explains how to modify SMB/CIFS setup.
To modify SMB/CIFS setup:
1. Log on to Openfiler. The Home page, as shown in Figure 2, is displayed.
2. Click the Services tab. Openfiler displays the Manage Services page, as shown in
Figure 81.
3. On the menu bar, click the SMB/CIFS Setup link. Openfiler displays the SMB settings
page, as shown in the following figure.
Openfiler Administration Guide 159
openfiler
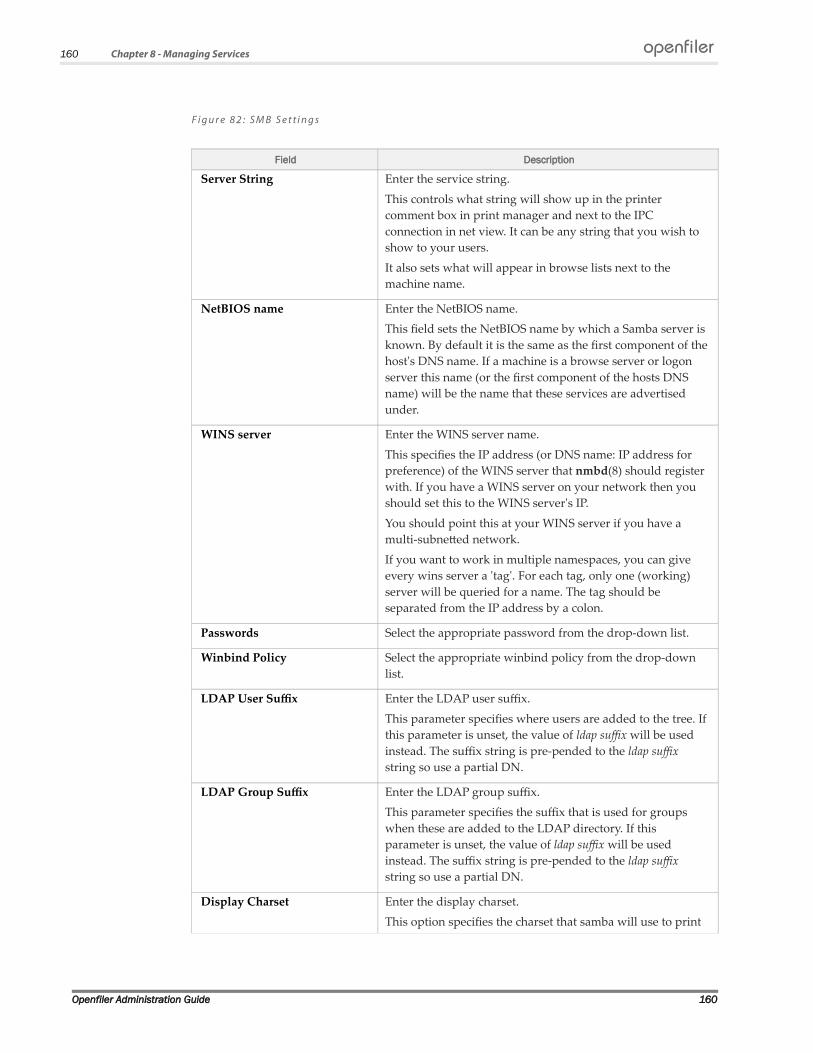
160 Chapter 8 - Managing Services
F i g u r e 8 2 : S M B S e t t i n g s
Field Description
Server String Enter the service string.
This controls what string will show up in the printer
comment box in print manager and next to the IPC
connection in net view. It can be any string that you wish to
show to your users.
It also sets what will appear in browse lists next to the
machine name.
NetBIOS name Enter the NetBIOS name.
This field sets the NetBIOS name by which a Samba server is
known. By default it is the same as the first component of the
host's DNS name. If a machine is a browse server or logon
server this name (or the first component of the hosts DNS
name) will be the name that these services are advertised
under.
WINS server Enter the WINS server name.
This specifies the IP address (or DNS name: IP address for
preference) of the WINS server that nmbd(8) should register
with. If you have a WINS server on your network then you
should set this to the WINS server's IP.
You should point this at your WINS server if you have a
multi-subnetted network.
If you want to work in multiple namespaces, you can give
every wins server a 'tag'. For each tag, only one (working)
server will be queried for a name. The tag should be
separated from the IP address by a colon.
Passwords Select the appropriate password from the drop-down list.
Winbind Policy Select the appropriate winbind policy from the drop-down
list.
LDAP User Suffix Enter the LDAP user suffix.
This parameter specifies where users are added to the tree. If
this parameter is unset, the value of ldap suffix will be used
instead. The suffix string is pre-pended to the ldap suffix
string so use a partial DN.
LDAP Group Suffix Enter the LDAP group suffix.
This parameter specifies the suffix that is used for groups
when these are added to the LDAP directory. If this
parameter is unset, the value of ldap suffix will be used
instead. The suffix string is pre-pended to the ldap suffix
string so use a partial DN.
Display Charset Enter the display charset.
This option specifies the charset that samba will use to print
Openfiler Administration Guide 160
openfiler

161 Chapter 8 - Managing Services
Field Description
messages to stdout and stderr. The default value is
"LOCALE", which means automatically set, depending on
the current locale. The value should generally be the same as
the value of the parameter unix charset.
Unix Charset Enter the unix charset.
Specifies the charset the unix machine Samba runs on uses.
Samba needs to know this in order to be able to convert text
to the charsets other SMB clients use.
This is also the charset Samba will use when specifying
arguments to scripts that it invokes.
DOS Charset Enter the DOS charset.
This option specifies which charset Samba should talk to
DOS clients. The default depends on which charsets you
have installed.
T a b l e 2 9 : S M B / C I F S S e t u p
4. Enter the appropriate details and click the Apply button to set SMB/CIFS.
OR
Click the Cancel button to reset the modified details.
Openfiler Administration Guide 161
openfiler

162 Chapter 8 - Managing Services
8.3 LDAP SetupThe Lightweight Directory Access Protocol (LDAP) is used to modify directory services
running over TCP/IP. This section provides details about how to backup, delete, restore,
and repair LDAP files .
8.3.1 Viewing the LDAP SetupThis section explains how to view the local LDAP setup.
To view the LDAP setup:
1. Log on to Openfiler. The Home page, as shown in Figure 2, is displayed.
2. Click the Services tab. Openfiler displays the Manage Services page, as shown in
Figure 81.
3. On the menu bar, click the LDAP Setup link. Openfiler displays the Local LDAP
Settings page, as shown in the following figure.
Openfiler Administration Guide 162
openfiler

163 Chapter 8 - Managing Services
F i g u r e 8 3 : L o c a l L D A P S e t t i n g s
8.3.2 LDAP BackupThis section explains how to make a backup copy of LDAP file.
To backup LDAP:
1. Log on to Openfiler. The Home page, as shown in Figure 2, is displayed.
2. Click the Services tab. Openfiler displays the Manage Services page, as shown in
Figure 81.
3. On the menu bar, click the LDAP Setup link. Openfiler displays the Local LDAP
Settings, as shown in Figure 83. The Backup LDAP section in Local LDAP Settings
page is as shown in the following figure.
Openfiler Administration Guide 163
openfiler

164 Chapter 8 - Managing Services
F i g u r e 8 4 : L o c a l L D A P S e t t i n g s
4. Click the Backup LDAP button. Openfiler displays the file download page, as shown
in the following figure.
F i g u r e 8 5 : L D A P B a c k u p
5. Click the Save button to save the LDAP file to a preferred location.
OR
Click the Cancel button to cancel the backup process.
8.3.3 Recovering LDAPThis section explains how to recover the LDAP backup files.
To recover LDAP:
1. Log on to Openfiler. The Home page, as shown in Figure 2, is displayed.
Openfiler Administration Guide 164
openfiler

165 Chapter 8 - Managing Services
2. Click the Services tab. Openfiler displays the Manage Services page, as shown in
Figure 81.
3. On the menu bar, click the LDAP Setup link. Openfiler displays the Local LDAP
Settings, as shown in Figure 83. The Recover LDAP section in Local LDAP Settings
page is as shown in the following figure.
F i g u r e 8 6 : R e c o v e r L D A P
4. Click the Browse button to locate and select the backup LDAP file and then click the
Recover LDAP button to recover the LDAP backup file.
8.3.4 Rebuilding LDAPThis section explains how to rebuild LDAP.
To rebuild LDAP:
1. Log on to Openfiler. The Home page, as shown in Figure 2, is displayed.
2. Click the Services tab. Openfiler displays the Manage Services page, as shown in
Figure 81.
3. On the menu bar, click the LDAP Setup link. Openfiler displays the Local LDAP
Settings, as shown in Figure 83. The Rebuild LDAP section in Local LDAP Settings
page is as shown in the following figure.
Openfiler Administration Guide 165
openfiler

166 Chapter 8 - Managing Services
F i g u r e 8 7 : R e b u i l d L D A P
4. Click the Rebuild LDAP button to rebuild the LDAP files.
8.3.5 Deleting LDAPThis section explains how to delete LDAP directories.
To delete LDAP:
1. Log on to Openfiler. The Home page, as shown in Figure 2, is displayed.
2. Click the Services tab. Openfiler displays the Manage Services page, as shown in
Figure 81.
3. On the menu bar, click the LDAP Setup link. Openfiler displays the Local LDAP
Settings, as shown in Figure 83. The Clear LDAP directory section in Local LDAP
Settings page is as shown in the following figure.
F i g u r e 8 8 : C l e a r L D A P D e r e c t o r y
4. Click Clear LDAP. Openfiler displays a confirmation message, as shown in the
following figure.
Openfiler Administration Guide 166
openfiler

167 Chapter 8 - Managing Services
F i g u r e 8 9 : c o n f i r m L D A P c l e a r
5. Click Yes to confirm the deletion.
OR
Click No to cancel the process.
Openfiler Administration Guide 167
openfiler
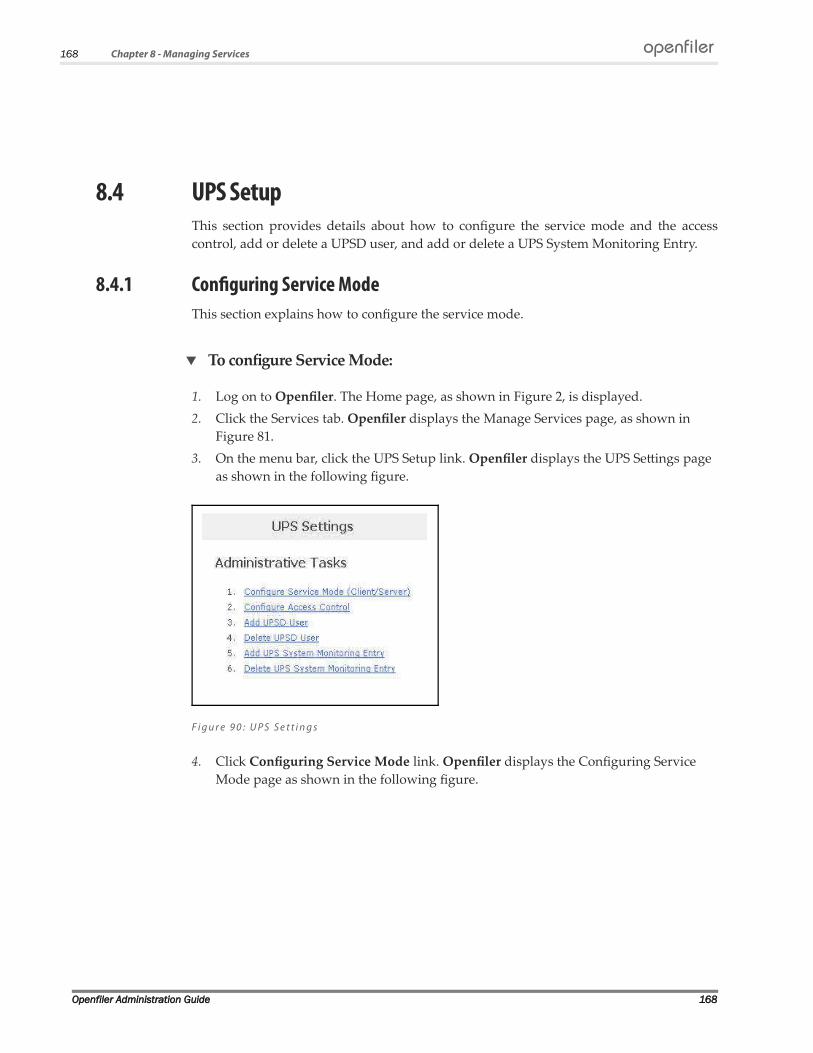
168 Chapter 8 - Managing Services
8.4 UPS SetupThis section provides details about how to configure the service mode and the access
control, add or delete a UPSD user, and add or delete a UPS System Monitoring Entry.
8.4.1 Configuring Service ModeThis section explains how to configure the service mode.
To configure Service Mode:
1. Log on to Openfiler. The Home page, as shown in Figure 2, is displayed.
2. Click the Services tab. Openfiler displays the Manage Services page, as shown in
Figure 81.
3. On the menu bar, click the UPS Setup link. Openfiler displays the UPS Settings page
as shown in the following figure.
F i g u r e 9 0 : U P S S e t t i n g s
4. Click Configuring Service Mode link. Openfiler displays the Configuring Service
Mode page as shown in the following figure.
Openfiler Administration Guide 168
openfiler
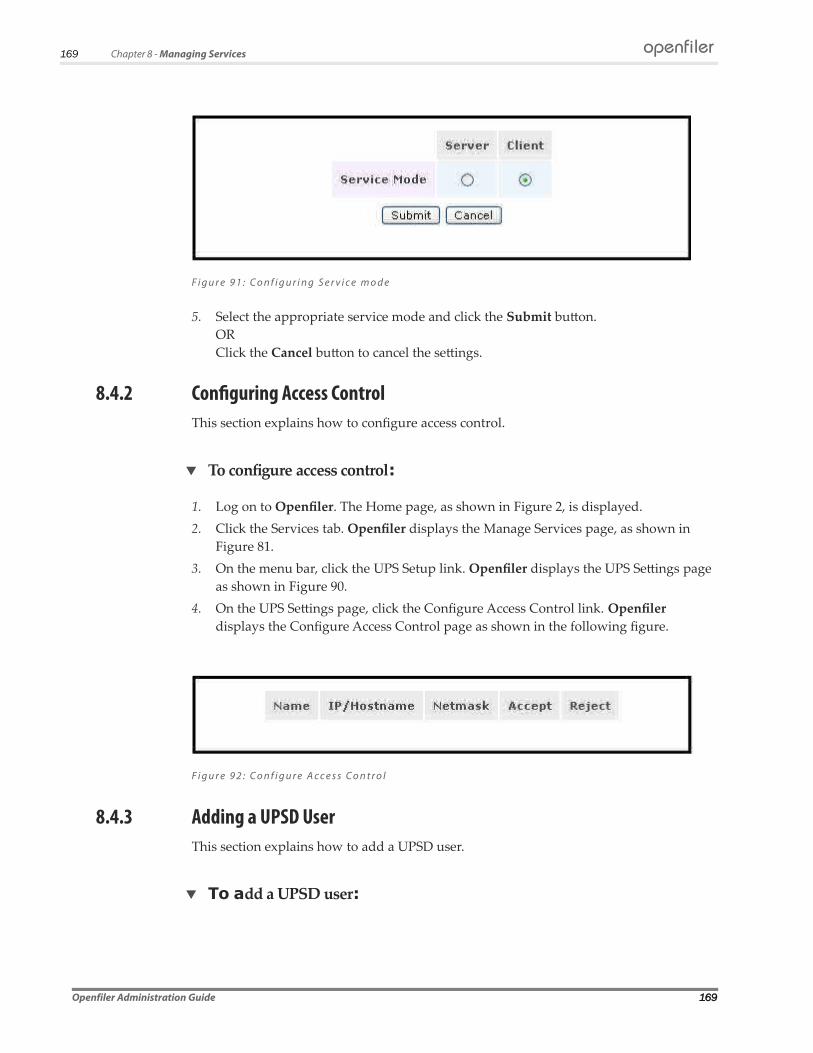
169 Chapter 8 - Managing Services
F i g u r e 9 1 : C o n f i g u r i n g S e r v i c e m o d e
5. Select the appropriate service mode and click the Submit button.
OR
Click the Cancel button to cancel the settings.
8.4.2 Configuring Access ControlThis section explains how to configure access control.
To configure access control:
1. Log on to Openfiler. The Home page, as shown in Figure 2, is displayed.
2. Click the Services tab. Openfiler displays the Manage Services page, as shown in
Figure 81.
3. On the menu bar, click the UPS Setup link. Openfiler displays the UPS Settings page
as shown in Figure 90.
4. On the UPS Settings page, click the Configure Access Control link. Openfiler
displays the Configure Access Control page as shown in the following figure.
F i g u r e 9 2 : C o n f i g u r e A c c e s s C o n t r o l
8.4.3 Adding a UPSD UserThis section explains how to add a UPSD user.
To add a UPSD user:
Openfiler Administration Guide 169
openfiler
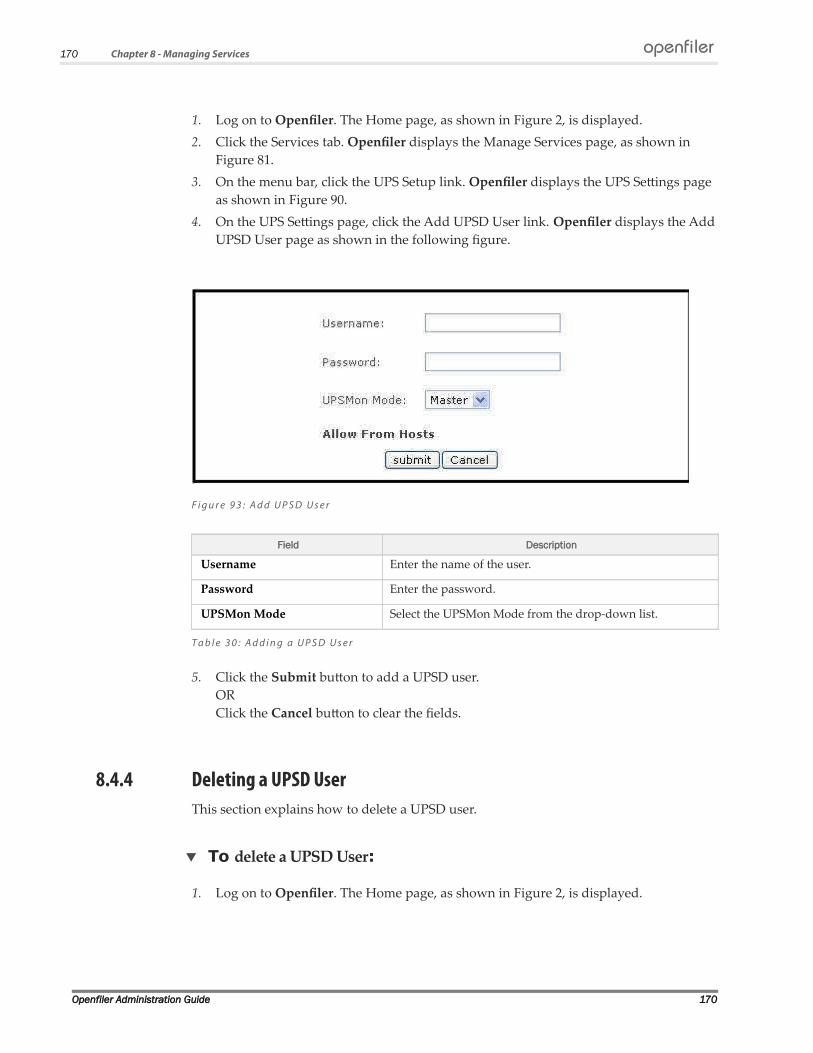
170 Chapter 8 - Managing Services
1. Log on to Openfiler. The Home page, as shown in Figure 2, is displayed.
2. Click the Services tab. Openfiler displays the Manage Services page, as shown in
Figure 81.
3. On the menu bar, click the UPS Setup link. Openfiler displays the UPS Settings page
as shown in Figure 90.
4. On the UPS Settings page, click the Add UPSD User link. Openfiler displays the Add
UPSD User page as shown in the following figure.
F i g u r e 9 3 : A d d U P S D U s e r
Field Description
Username Enter the name of the user.
Password Enter the password.
UPSMon Mode Select the UPSMon Mode from the drop-down list.
T a b l e 3 0 : A d d i n g a U P S D U s e r
5. Click the Submit button to add a UPSD user.
OR
Click the Cancel button to clear the fields.
8.4.4 Deleting a UPSD UserThis section explains how to delete a UPSD user.
To delete a UPSD User:
1. Log on to Openfiler. The Home page, as shown in Figure 2, is displayed.
Openfiler Administration Guide 170
openfiler
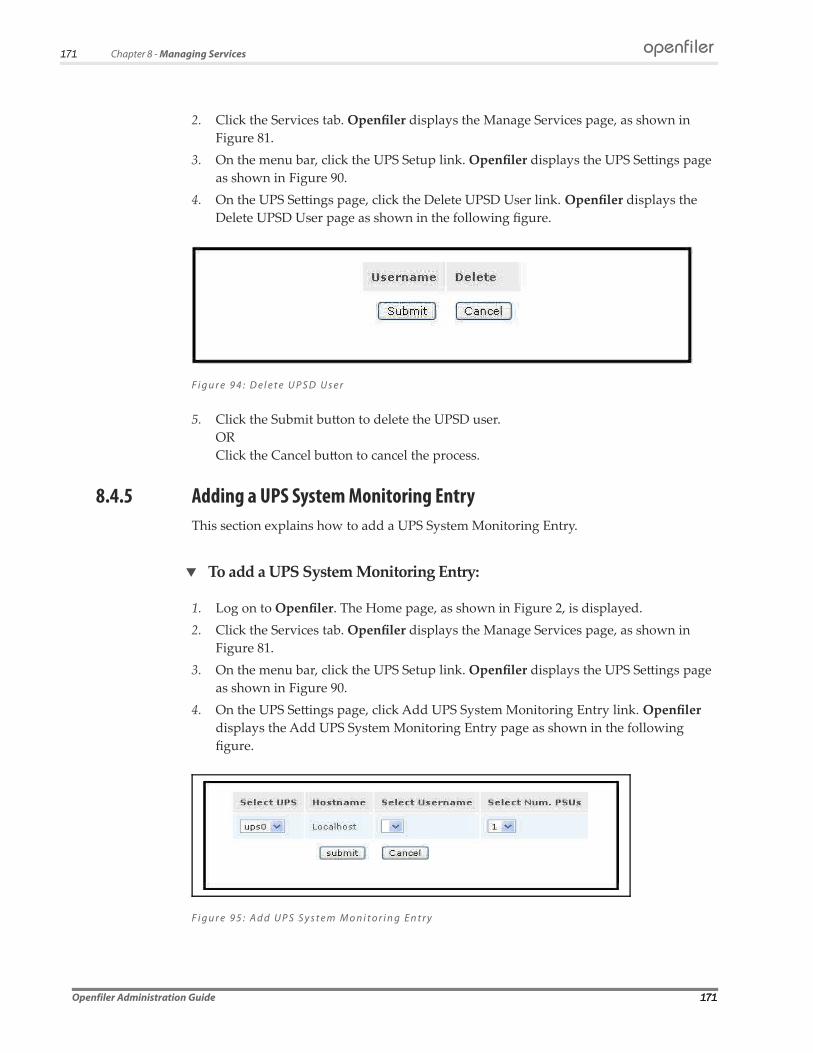
171 Chapter 8 - Managing Services
2. Click the Services tab. Openfiler displays the Manage Services page, as shown in
Figure 81.
3. On the menu bar, click the UPS Setup link. Openfiler displays the UPS Settings page
as shown in Figure 90.
4. On the UPS Settings page, click the Delete UPSD User link. Openfiler displays the
Delete UPSD User page as shown in the following figure.
F i g u r e 9 4 : D e l e t e U P S D U s e r
5. Click the Submit button to delete the UPSD user.
OR
Click the Cancel button to cancel the process.
8.4.5 Adding a UPS System Monitoring EntryThis section explains how to add a UPS System Monitoring Entry.
To add a UPS System Monitoring Entry:
1. Log on to Openfiler. The Home page, as shown in Figure 2, is displayed.
2. Click the Services tab. Openfiler displays the Manage Services page, as shown in
Figure 81.
3. On the menu bar, click the UPS Setup link. Openfiler displays the UPS Settings page
as shown in Figure 90.
4. On the UPS Settings page, click Add UPS System Monitoring Entry link. Openfiler
displays the Add UPS System Monitoring Entry page as shown in the following
figure.
F i g u r e 9 5 : A d d U P S S y s t e m M o n i t o r i n g E n t r y
Openfiler Administration Guide 171
openfiler

172 Chapter 8 - Managing Services
Field Description
Select UPS Select the UPS from the drop-down list.
Hostname This field displays the host name.
Select Username Select the name of the user from the drop-down list.
Select Num.PSUs Select the Num PSUs from the drop-down list.
T a b l e 3 1 : U P S S y s t e m M o n i t o r i n g E n t r y
5. Enter the appropriate data in the respective fields.
6. Click the Submit button to add a UPS System Monitoring Entry.
OR
Click the Cancel button to cancel the process.
Openfiler Administration Guide 172
openfiler
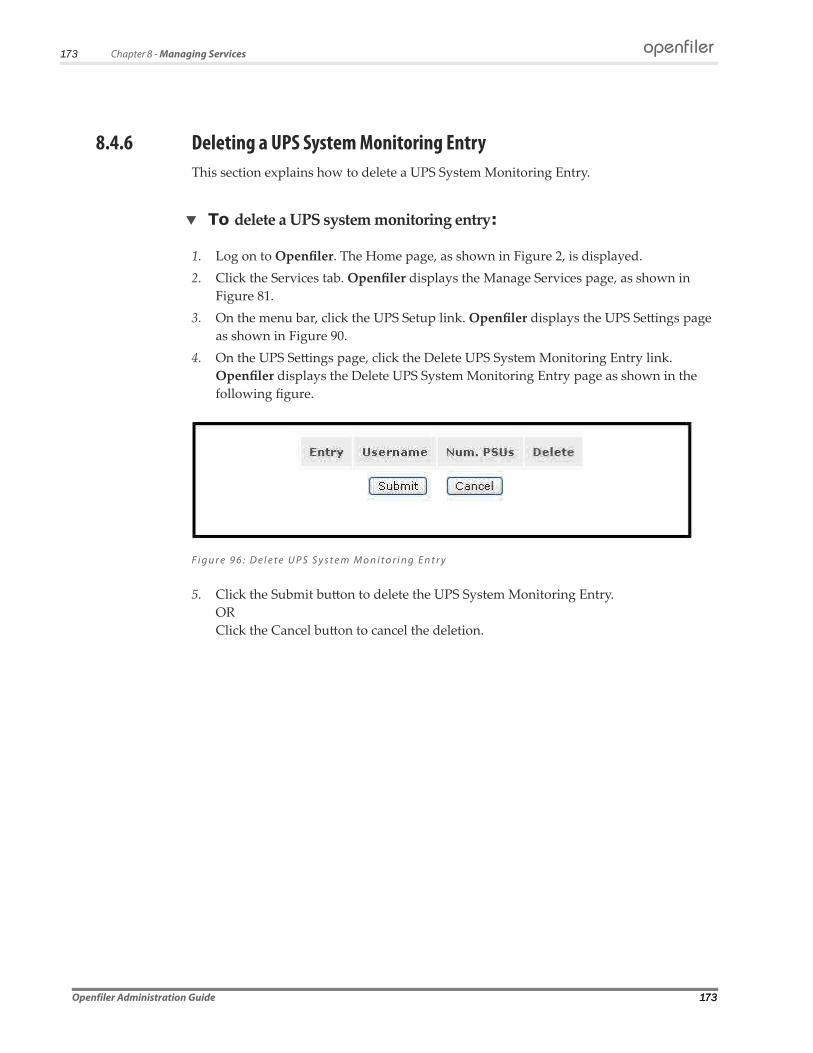
173 Chapter 8 - Managing Services
8.4.6 Deleting a UPS System Monitoring EntryThis section explains how to delete a UPS System Monitoring Entry.
To delete a UPS system monitoring entry:
1. Log on to Openfiler. The Home page, as shown in Figure 2, is displayed.
2. Click the Services tab. Openfiler displays the Manage Services page, as shown in
Figure 81.
3. On the menu bar, click the UPS Setup link. Openfiler displays the UPS Settings page
as shown in Figure 90.
4. On the UPS Settings page, click the Delete UPS System Monitoring Entry link.
Openfiler displays the Delete UPS System Monitoring Entry page as shown in the
following figure.
F i g u r e 9 6 : D e l e t e U P S S y s t e m M o n i t o r i n g E n t r y
5. Click the Submit button to delete the UPS System Monitoring Entry.
OR
Click the Cancel button to cancel the deletion.
Openfiler Administration Guide 173
openfiler
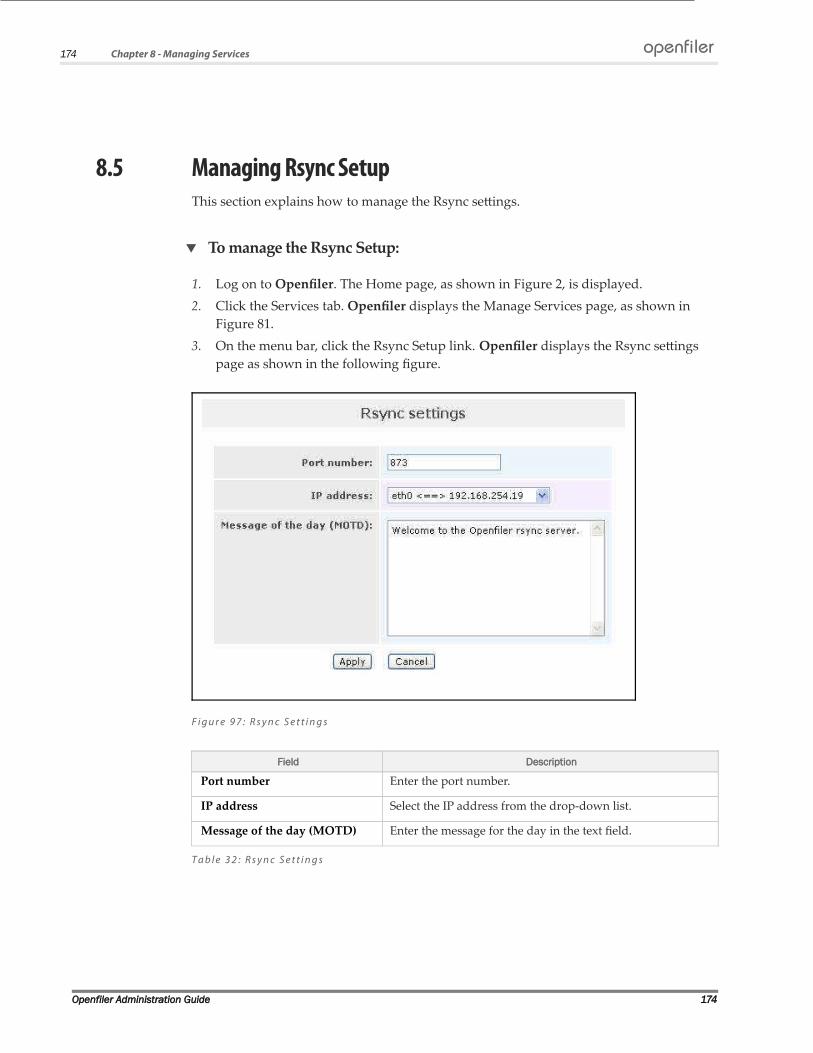
174 Chapter 8 - Managing Services
8.5 Managing Rsync SetupThis section explains how to manage the Rsync settings.
To manage the Rsync Setup:
1. Log on to Openfiler. The Home page, as shown in Figure 2, is displayed.
2. Click the Services tab. Openfiler displays the Manage Services page, as shown in
Figure 81.
3. On the menu bar, click the Rsync Setup link. Openfiler displays the Rsync settings
page as shown in the following figure.
F i g u r e 9 7 : R s y n c S e t t i n g s
Field Description
Port number Enter the port number.
IP address Select the IP address from the drop-down list.
Message of the day (MOTD) Enter the message for the day in the text field.
T a b l e 3 2 : R s y n c S e t t i n g s
Openfiler Administration Guide 174
openfiler

175 Chapter 8 - Managing Services
4. Click the Apply button to set the Rsync settings.
OR
Click the Cancel button to clear the fields.
8.6 iSCSI Target SetupiSCSI is a protocol that allows clients to send SCSI commands to storage devices in
remote servers. This section explains how to add a discovery CHAP user and modify the
iSNS sever settings.
8.6.1 Adding a Discovery CHAP userThis section explains how to add a discovery chap user.
To add a Discovery CHAP User:
1. Log on to Openfiler. The Home page, as shown in Figure 2, is displayed.
2. Click the Services tab. Openfiler displays the Manage Services page, as shown in
Figure 81.
3. On the menu bar, click the iSCSI Target Setup link. Openfiler displays the Add
Discovery CHAP user page as shown in the following figure.
F i g u r e 9 8 : A d d D i s c o v e r y C H A P u s e r
Field Description
Username Enter the name of the user.
Password Enter the password.
User Type Select the user type from the drop-down list.
T a b l e 3 3 : D i s c o v e r y C H A P U s e r
4. Enter the appropriate data in the respective fields. Click the Add button to add a
discovery CHAP user.
Openfiler Administration Guide 175
openfiler

176 Chapter 8 - Managing Services
8.6.2 Managing iSNS ServerThis section explains how to manage iSNS server settings.
To manage iSNS Server:
1. Log on to Openfiler. The Home page, as shown in Figure 2, is displayed.
2. Click the Services tab. Openfiler displays the Manage Services page, as shown in
Figure 81.
3. On the menu bar, click the iSCSI Target Setup link. Openfiler displays the iSNS
Server page as shown in the following figure.
F i g u r e 9 9 : i S N S S e r v e r
Field Description
Restart Target Daemon Select the Restart Target Daemon checkbox.
iSNS Server IP Type the iSNS server IP address.
T a b l e 3 4 : i S N S S e r v e r
4. Click the Update button to update the iSNS server settings.
5. Click the Delete button to delete the iSNS server settings.
Openfiler Administration Guide 176
177 Chapter 8 - Managing Services
8.7 Setting up FTP This section explains how to modify FTP server settings.
To set up FTP:
1. Log on to Openfiler. The Home page, as shown in Figure 2, is displayed.
2. Click the Services tab. Openfiler displays the Manage Services page, as shown in
Figure 81.
3. On the menu bar, click the FTP Setting link. Openfiler displays the FTP Settings page
as shown in the following figure.
Openfiler Administration Guide 177
openfiler
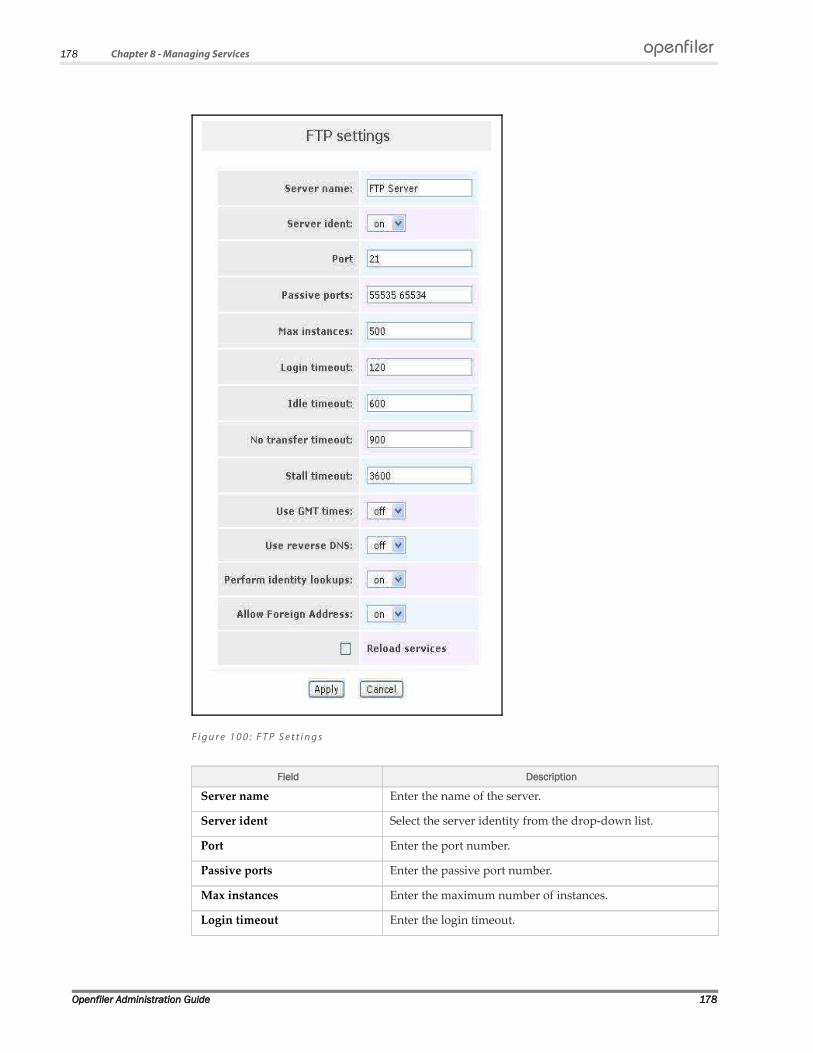
178 Chapter 8 - Managing Services
F i g u r e 1 0 0 : F T P S e t t i n g s
Field Description
Server name Enter the name of the server.
Server ident Select the server identity from the drop-down list.
Port Enter the port number.
Passive ports Enter the passive port number.
Max instances Enter the maximum number of instances.
Login timeout Enter the login timeout.
Openfiler Administration Guide 178
openfiler

179 Chapter 8 - Managing Services
Field Description
Idle timeout Enter the idle timeout.
No transfer timeout Enter the no transfer timeout.
Stall timeout Enter the stall timeout.
Use GMT times Select the use GMT times from the drop-down list.
Use reverse DNS Select the use reverse DNS from the drop-down list.
Perform identity lookups Select the perform identity lookups from the drop-down list.
Allow Foreign Address Select allow foreign address from the drop-down list.
T a b l e 3 5 : F T P S e t t i n g s
4. Click the Apply button to update FTP settings.
OR
Click the Cancel button to clear FTP settings.
Openfiler Administration Guide 179
openfiler

9 Managing Accounts
Openfiler imports user and group information from central directory servers such as
Light-weight Directory Access Protocol (LDAP), Network Information System (NIS) and
Windows Domain Controllers. Authentication of users is also done from central directory
or authentication servers. One or more user directories can be combined with one or
more authentication mechanisms. It is the responsibility of the administrator to ensure
that there are no clashes between UID and GID entries among diferent directories, if
more than one information and authentication mechanism is to be used.
9
181 Chapter 9 - Managing Accounts
9.1 Authentication
9.1.1 Viewing/Modifying User Information Configuration – Standard ViewThis section provides details about how to view/modify user information configuration
in standard view. Standard view is sufficient for most authentication configuration
requirements.
To view/modify user information configuration – standard view:
1. Log on to Openfiler. The Home page, as shown in Figure 2, is displayed.
2. Click Accounts tab. Openfiler displays the Authentication page, as shown in the
following figure.
Openfiler Administration Guide 181
openfiler
182 Chapter 9 - Managing Accounts
F i g u r e 1 0 1 : U s e r I n f o r m a t i o n C o n f i g u r a t i o n - S t a n d a r d V i e w
Openfiler Administration Guide 182
openfiler

183 Chapter 8 - Managing Accounts
9.1.1.1 LDAP AuthenticationThis section of the User Information Configuration explains how to view or modify
LDAP settings.
F i g u r e 1 0 2 : U s e r I n f o r m a t i o n C o n f i g u r a t i o n ( L D A P ) - S t a n d a r d V i e w
Field Description
LDAP
Use LDAP Select the Use LDAP check box.
Local LDAP server Select the Local LDAP server check box.
LDAP Security Select the LDAP Security check box.
Server Enter the LDAP server.
Base DN Enter the base DN.
Root bind DN Enter the root bind DN.
Root bind password Enter the root bind password.
SMB LDAP Configuration Select the SMB LDAP Configuration check box.
User password policy Select the User password policy check box.
T a b l e 3 6 : U s e r I n f o r m a t i o n C o n f i g u r a t i o n ( L D A P ) - S t a n d a r d V i e w
Openfiler Administration Guide 183
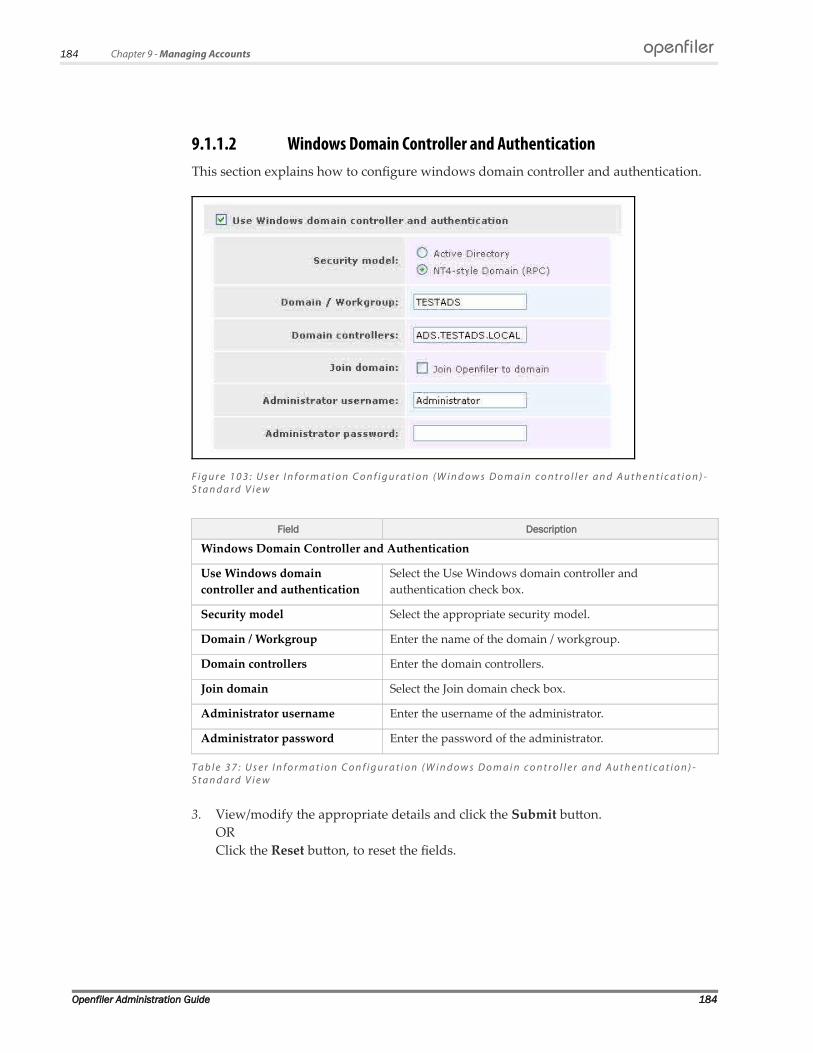
184 Chapter 9 - Managing Accounts
9.1.1.2 Windows Domain Controller and AuthenticationThis section explains how to configure windows domain controller and authentication.
F i g u r e 1 0 3 : U s e r I n f o r m a t i o n C o n f i g u r a t i o n ( W i n d o w s D o m a i n c o n t r o l l e r a n d A u t h e n t i c a t i o n ) -S t a n d a r d V i e w
Field Description
Windows Domain Controller and Authentication
Use Windows domain
controller and authentication
Select the Use Windows domain controller and
authentication check box.
Security model Select the appropriate security model.
Domain / Workgroup Enter the name of the domain / workgroup.
Domain controllers Enter the domain controllers.
Join domain Select the Join domain check box.
Administrator username Enter the username of the administrator.
Administrator password Enter the password of the administrator.
T a b l e 3 7 : U s e r I n f o r m a t i o n C o n f i g u r a t i o n ( W i n d o w s D o m a i n c o n t r o l l e r a n d A u t h e n t i c a t i o n ) -S t a n d a r d V i e w
3. View/modify the appropriate details and click the Submit button.
OR
Click the Reset button, to reset the fields.
Openfiler Administration Guide 184
openfiler

185 Chapter 9 - Managing Accounts
Note:
Standard View is sufficient for most authentication configuration requirements. Only advanced users should select Expert View.
After making the required modifications and clicking the Submit button, Openfiler takes about one minute to restart and reflect the changes. The changes can be verified in the list of groups section.
9.1.2 Viewing/Modifying User Information Configuration – Expert ViewThis section provides details about how to view/modify user information configuration
in expert view. Only advanced users should select this option.
To view/modify user information configuration – expert view:
1. Log on to Openfiler. The Home page, as shown in Figure 2, is displayed.
2. Click Accounts tab. Openfiler displays the Authentication page, as shown in Figure
101.
3. Click Expert View tab. Openfiler displays the Authentication page, as shown in the
following figure.
Openfiler Administration Guide 185
openfiler

186 Chapter 9 - Managing Accounts
Openfiler Administration Guide 186
openfiler

187 Chapter 9 - Managing Accounts
F i g u r e 1 0 4 : U s e r I n f o r m a t i o n C o n f i g u r a t i o n - E x p e r t V i e w
9.1.2.1 Viewing/Modifying LDAPAuthentication in Expert viewThis section of the User Information Configuration explains how to view or modify
LDAP settings in Expert view.
F i g u r e 1 0 5 : U s e r I n f o r m a t i o n C o n f i g u r a t i o n ( L D A P ) - E x p e r t V i e w
Field Description
User Information Configuration
LDAP
Use LDAP Select the Use LDAP check box if user and group information
should be imported from the LDAP server.
Local LDAP server Select the Local LDAP server check box.
LDAP Security Select the TLS check box if Transport Layer Security is to be
used for the communications with the LDAP Server.
Server Enter the LDAP server name as an IP address or a fully
qualified system hostname.
Openfiler Administration Guide 187
openfiler
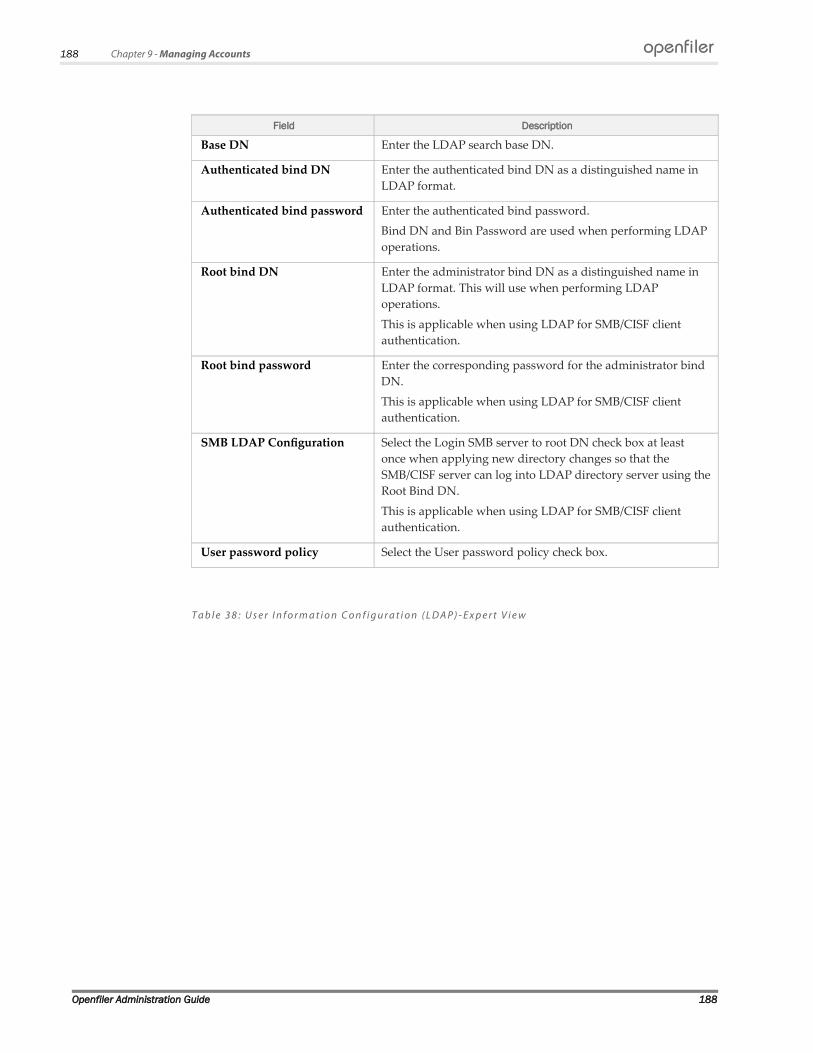
188 Chapter 9 - Managing Accounts
Field Description
Base DN Enter the LDAP search base DN.
Authenticated bind DN Enter the authenticated bind DN as a distinguished name in
LDAP format.
Authenticated bind password Enter the authenticated bind password.
Bind DN and Bin Password are used when performing LDAP
operations.
Root bind DN Enter the administrator bind DN as a distinguished name in
LDAP format. This will use when performing LDAP
operations.
This is applicable when using LDAP for SMB/CISF client
authentication.
Root bind password Enter the corresponding password for the administrator bind
DN.
This is applicable when using LDAP for SMB/CISF client
authentication.
SMB LDAP Configuration Select the Login SMB server to root DN check box at least
once when applying new directory changes so that the
SMB/CISF server can log into LDAP directory server using the
Root Bind DN.
This is applicable when using LDAP for SMB/CISF client
authentication.
User password policy Select the User password policy check box.
T a b l e 3 8 : U s e r I n f o r m a t i o n C o n f i g u r a t i o n ( L D A P ) - E x p e r t V i e w
Openfiler Administration Guide 188
openfiler

189 Chapter 9 - Managing Accounts
9.1.2.2 Viewing/Modifying Windows Domain Controller and Authentication
This section of the User Information Configuration explains how to view or modify
LDAP settings in Expert view.
Openfiler Administration Guide 189
openfiler

190 Chapter 9 - Managing Accounts
F i g u r e 1 0 6 : U s e r I n f o r m a t i o n C o n f i g u r a t i o n ( W i n d o w s D o m a i n C o n t r o l a n d A u t h e n t i c a t i o n ) -E x p e r t V i e w
Openfiler Administration Guide 190
openfiler
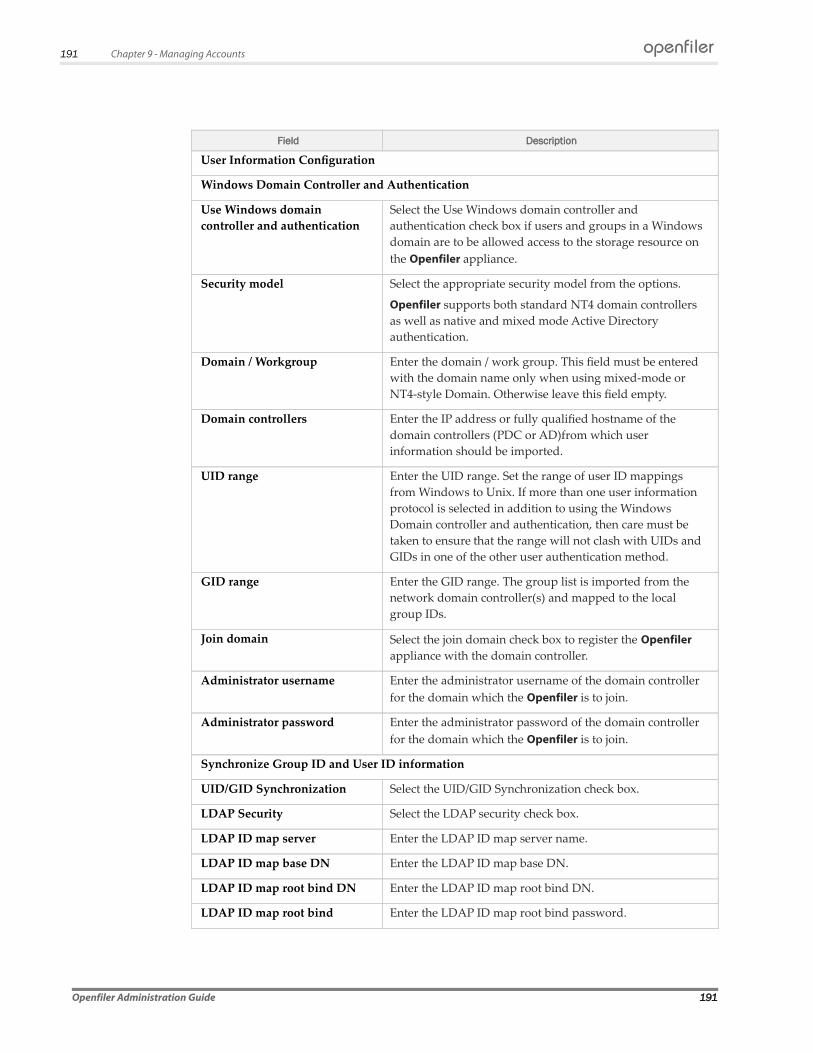
191 Chapter 9 - Managing Accounts
Field Description
User Information Configuration
Windows Domain Controller and Authentication
Use Windows domain
controller and authentication
Select the Use Windows domain controller and
authentication check box if users and groups in a Windows
domain are to be allowed access to the storage resource on
the Openfiler appliance.
Security model Select the appropriate security model from the options.
Openfiler supports both standard NT4 domain controllers
as well as native and mixed mode Active Directory
authentication.
Domain / Workgroup Enter the domain / work group. This field must be entered
with the domain name only when using mixed-mode or
NT4-style Domain. Otherwise leave this field empty.
Domain controllers Enter the IP address or fully qualified hostname of the
domain controllers (PDC or AD)from which user
information should be imported.
UID range Enter the UID range. Set the range of user ID mappings
from Windows to Unix. If more than one user information
protocol is selected in addition to using the Windows
Domain controller and authentication, then care must be
taken to ensure that the range will not clash with UIDs and
GIDs in one of the other user authentication method.
GID range Enter the GID range. The group list is imported from the
network domain controller(s) and mapped to the local
group IDs.
Join domain Select the join domain check box to register the Openfiler
appliance with the domain controller.
Administrator username Enter the administrator username of the domain controller
for the domain which the Openfiler is to join.
Administrator password Enter the administrator password of the domain controller
for the domain which the Openfiler is to join.
Synchronize Group ID and User ID information
UID/GID Synchronization Select the UID/GID Synchronization check box.
LDAP Security Select the LDAP security check box.
LDAP ID map server Enter the LDAP ID map server name.
LDAP ID map base DN Enter the LDAP ID map base DN.
LDAP ID map root bind DN Enter the LDAP ID map root bind DN.
LDAP ID map root bind Enter the LDAP ID map root bind password.
Openfiler Administration Guide 191
openfiler
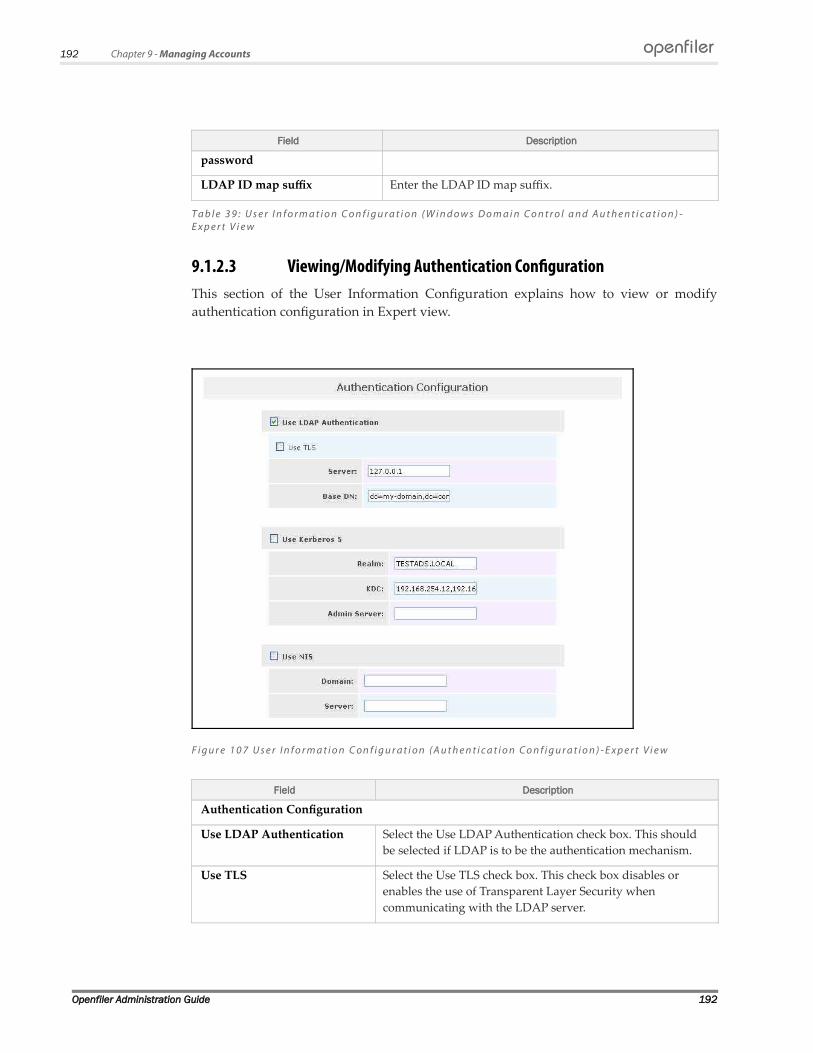
192 Chapter 9 - Managing Accounts
Field Description
password
LDAP ID map suffix Enter the LDAP ID map suffix.
T a b l e 3 9 : U s e r I n f o r m a t i o n C o n f i g u r a t i o n ( W i n d o w s D o m a i n C o n t r o l a n d A u t h e n t i c a t i o n ) -E x p e r t V i e w
9.1.2.3 Viewing/Modifying Authentication ConfigurationThis section of the User Information Configuration explains how to view or modify
authentication configuration in Expert view.
F i g u r e 1 0 7 U s e r I n f o r m a t i o n C on f i g u r a t i o n ( A u t h e n t i c a t i o n C o n f i g u r a t i o n ) - E x p e r t V i e w
Field Description
Authentication Configuration
Use LDAP Authentication Select the Use LDAP Authentication check box. This should
be selected if LDAP is to be the authentication mechanism.
Use TLS Select the Use TLS check box. This check box disables or
enables the use of Transparent Layer Security when
communicating with the LDAP server.
Openfiler Administration Guide 192
openfiler
193 Chapter 9 - Managing Accounts
Field Description
Server Enter the IP address or fully qualified hostname of the LDAP
server.
Base DN Enter the base DN. It specifies the retrieval of user
information by its Distinguished Name.
Use Kerberos 5 Select the Use Kerberos 5 check box if Kerberos is to be used
as the authentication method.
Realm Enter the realm for the Kerberos server.
The realm is analogous to do a domain in NIS and is the
network that uses Kerberos for authentication. A realm can
consist of more than one server.
KDC Enter the Key Distribution Center.
The KDC is the server responsible for issuing Kerberos
tickets.
Admin Server Enter the list of Kerberos administration servers separating
by comma.
Use NIS Select the Use NIS check box.
Domain Enter the domain name.
Server Enter the server name.
T a b l e 4 0 : U s e r I n f o r m a t i o n C o n f i g u r a t i o n ( A u t h e n t i c a t i o n C o n f i g u r a t i o n ) - E x p e r t V i e w
4. View/modify the appropriate details in each section and click the Submit button.
OR
Click the Reset button, to reset the fields.
Note:
Standard View is sufficient for most authentication configuration requirements. Only advanced users should select Expert View.
After making the required modifications and clicking the Submit button, Openfiler takes about one minute to restart and reflect the changes. The changes can be verified in the list of groups section
Openfiler Administration Guide 193
openfiler

194 Chapter 9 - Managing Accounts
9.2 AdministrationThe Administration tab allows you to manage groups and users.
9.2.1 Group AdministrationAdministrator can add a new group, edit a group, add a new user to a group and delete a
user from a group.
9.2.1.1 Viewing GroupsThis section provides details about how to view the list of groups.
To view groups:
1. Log on to Openfiler. The Home page, as shown in Figure 2, is displayed.
2. Click Accounts tab. Openfiler displays the Authentication page, as shown in Figure
101.
3. On the menu, click the Administration link. Openfiler displays the Administration
page, as shown in the following figure.
Openfiler Administration Guide 194
openfiler

195 Chapter 9 - Managing Accounts
F i g u r e 1 0 8 : A d m i n i s t r a t i o n
9.2.1.2 Adding a new GroupThis section provides details about how to add a new group.
To add a new group:
1. Log on to Openfiler. The Home page, as shown in Figure 2, is displayed.
2. Click Accounts tab. Openfiler displays the Authentication page, as shown in Figure
101.
3. On the menu, click the Administration link. Openfiler displays the Administration
page, as shown in Figure 108. The Add New Group section is as shown in the
following figure.
Openfiler Administration Guide 195
openfiler
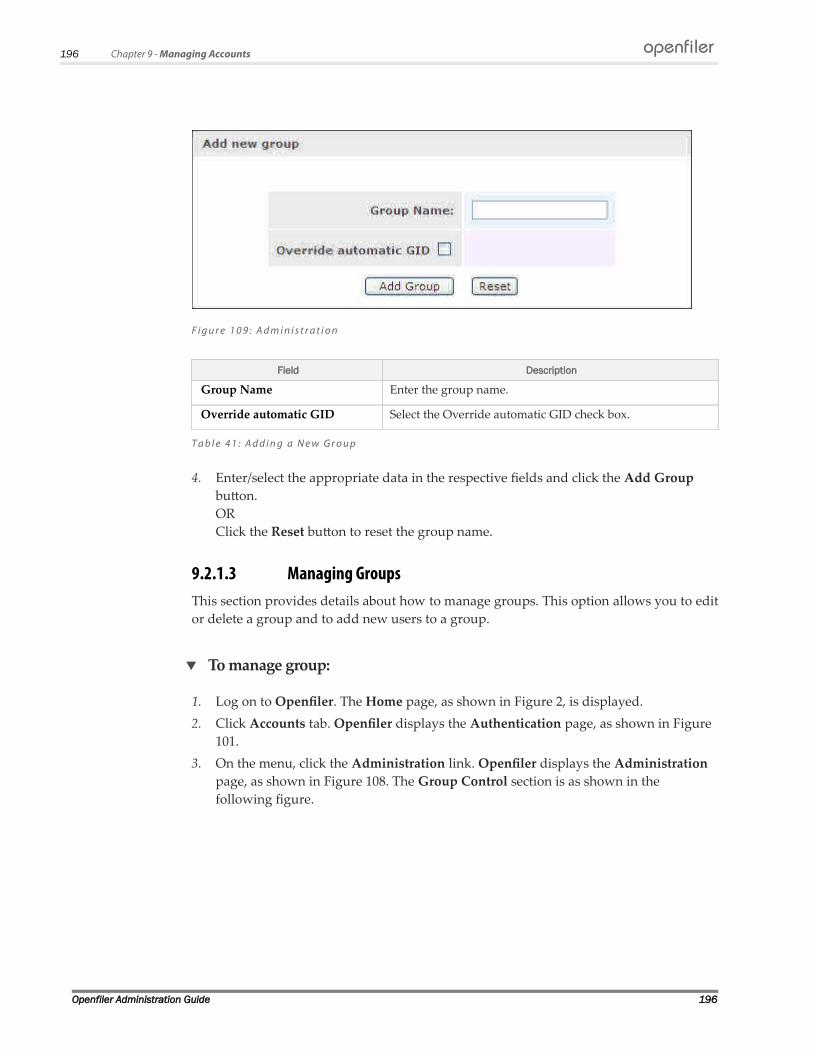
196 Chapter 9 - Managing Accounts
F i g u r e 1 0 9 : A d m i n i s t r a t i o n
Field Description
Group Name Enter the group name.
Override automatic GID Select the Override automatic GID check box.
T a b l e 4 1 : A d d i n g a N e w G r o u p
4. Enter/select the appropriate data in the respective fields and click the Add Group
button.
OR
Click the Reset button to reset the group name.
9.2.1.3 Managing GroupsThis section provides details about how to manage groups. This option allows you to edit
or delete a group and to add new users to a group.
To manage group:
1. Log on to Openfiler. The Home page, as shown in Figure 2, is displayed.
2. Click Accounts tab. Openfiler displays the Authentication page, as shown in Figure
101.
3. On the menu, click the Administration link. Openfiler displays the Administration
page, as shown in Figure 108. The Group Control section is as shown in the
following figure.
Openfiler Administration Guide 196
openfiler

197 Chapter 9 - Managing Accounts
F i g u r e 1 1 0 : G r o u p C o n t r o l
4. Click the icon corresponding to a group to edit the group.
5. Click the icon corresponding to a group/user to delete the group or a user from
the group, respectively.
6. Click the icon corresponding to a group to add a new user to the group.
9.2.2 User Administration
9.2.2.1 Viewing User AdministrationThis section provides details about how to view user administration information.
To view user administration:
1. Log on to Openfiler. The Home page, as shown in Figure 2, is displayed.
2. Click Accounts tab. Openfiler displays the Authentication page, as shown in Figure
101.
3. On the menu, click the Administration link. Openfiler displays the Administration
page, as shown in Figure 108.
Openfiler Administration Guide 197
openfiler

198 Chapter 9 - Managing Accounts
4. Click the User Administration tab. Openfiler displays the User Administration
page, as shown in the following figure.
F i g u r e 1 1 1 : U s e r A d m i n i s t r a t i o n
9.2.2.2 Adding a new UserThis section provides details about how to add a new user.
To add a new user:
1. Log on to Openfiler. The Home page, as shown in Figure 2, is displayed.
2. Click Accounts tab. Openfiler displays the Authentication page, as shown in Figure
101.
3. On the menu, click the Administration link. Openfiler displays the Administration
page, as shown in Figure 108.
4. Click the User Administration tab. Openfiler displays the User Administration
page, as shown in Figure 111. The Add New User section is as shown in the
following figure.
Openfiler Administration Guide 198
openfiler

199 Chapter 9 - Managing Accounts
F i g u r e 1 1 2 : A d d N e w U s e r
Field Description
Username Enter the name of the user.
Password Enter the password.
Retype password Re-enter the password.
Primary Group Select the primary group from the drop-down list.
Override automatic UID Select the Override automatic UID check box.
T a b l e 4 2 : A d d i n g a N e w U s e r
5. Enter/select the appropriate data in the respective fields and click the Add User
button.
OR
Click the Reset button to reset the fields.
9.2.2.3 Managing UsersThis section provides details about how to manage user details.
To manage user:
1. Log on to Openfiler. The Home page, as shown in Figure 2, is displayed.
Openfiler Administration Guide 199
openfiler
200 Chapter 9 - Managing Accounts
2. Click Accounts tab. Openfiler displays the Authentication page, as shown in Figure
101.
3. On the menu, click the Administration link. Openfiler displays the Administration
page, as shown in Figure 108.
4. Click the User Administration tab. Openfiler displays the User Administration
page, as shown in Figure 111. The User Control section is as shown in the following
figure.
F i g u r e 1 1 3 : U s e r C o n t r o l
Openfiler Administration Guide 200
openfiler

201 Chapter 9 - Managing Accounts
9.3 Viewing the User ListThis section provides details about how to view the list of available users.
To view the user list:
1. Log on to Openfiler. The Home page, as shown in Figure 2, is displayed.
2. Click Accounts tab. Openfiler displays the Authentication page, as shown in Figure
101.
3. On the menu, click the User List link. Openfiler displays the List of users page, as
shown in the following figure.
F i g u r e 1 1 4 : L i s t o f U s e r s
Openfiler Administration Guide 201
openfiler

202 Chapter 9 - Managing Accounts
Field Description
UID This field displays the user ID. Click the UID link to sort data
in the ascending order of user ID.
Username This field displays the user name. Click the User Name link
to sort data in the ascending order of user name.
User Type This field displays the user type. Click the User Type link to
sort data in the ascending order of user type.
Primary Group This field displays the primary group. Click the Primary
Group link to sort data in the ascending order of primary
group.
Group Type This field displays the group type. Click the Group Type link
to sort data in the ascending order of user ID.
T a b l e 4 3 : L i s t o f U s e r s
4. Click the Previous page or Next page links to navigate to the previous or next page,
respectively.
Openfiler Administration Guide 202
openfiler
203 Chapter 9 - Managing Accounts
9.4 Viewing the Group ListThis section provides details about how to view the list of available groups.
To view the group list::
1. Log on to Openfiler. The Home page, as shown in Figure 2, is displayed.
2. Click Accounts tab. Openfiler displays the Authentication page, as shown in Figure
101.
3. On the menu, click the Group List link. Openfiler displays the List of groups page,
as shown in the following figure.
F i g u r e 1 1 5 : L i s t o f G r o u p s
Openfiler Administration Guide 203
204 Chapter 9 - Managing Accounts
Field Description
GID This field displays the group ID. Click the GID link to sort
data in the ascending order of group ID.
Group Name This field displays the group name. Click the Group Name
link to sort data in the ascending order of group name.
Group Type This field displays the group type. Click the Group Type link
to sort data in the ascending order of group type.
T a b l e 4 4 : G r o u p L i s t
4. Click the Previous page or Next page links to navigate to the previous or next page,
respectively.
5. Click the Group Name link. Openfiler displays the Members of the group page, as
shown in the following figure.
F i g u r e 1 1 6 : M e m b e r s o f t h e G r o u p
6. Click the Close Window link to close the window.
Openfiler Administration Guide 204

205 Managing Accounts - 9
9.5 Changing Admin PasswordThis option allows you to change the administrator password. In order to do this, the
current administrator password is required for security reasons.
To change admin password:
1. Log on to Openfiler. The Home page, as shown in Figure 2, is displayed.
2. Click Accounts tab. Openfiler displays the Authentication page, as shown in Figure
101.
3. On the menu, click the Admin Password link. Openfiler displays the Change
Administrator Password page, as shown in the following figure.
F i g u r e 1 1 7 : C h a n g e A d m i n i s t r a t o r P a s s w o r d
Field Description
Current Password Enter the current password.
New Password Enter the new password.
Confirm New Password Re-enter the new password in confirmation.
T a b l e 4 5 : c h a n g i n g A d m i n i s t r a t o r P a s s w o r d
4. Enter the appropriate details in the respective fields and click the Submit button.
OR
Click the Clear button to clear the fields.
Openfiler Administration Guide 205

206 Advanced Configuration
10 Advanced Configuration
10.1 Fibre Channel Target SetupThis section outlines the steps required to configure Openfiler as a Fibre Channel (FC)
target using local storage on the Openfiler SAN appliance. Please note that Openfiler
only supports target-mode with Qlogic chipsets.
Local storage on an Openfiler SAN appliance can be configured to be exported to Fibre
Channel initiators in an FC SAN fabric. This can be achieved by installing an FC HBA –
currently Qlogic 2xxx-series chipsets only – in the Openfiler SAN appliance and running
through a few configuration steps.
This section provides the information for systems administrators to achieve this
functionality. Please note that at this time, FC target configuration - unlike iSCSI target
configuration or file-level (CIFS, NFS.. ) share configuration – has to be done almost
entirely at the command line.
As there is a potential for causing data loss if the wrong commands are applied to
existing storage components or volumes on an Openfiler SAN appliance, administrators
attempting to perform this configuration should be forewarned of the risks. It is therefore
assumed that the administrator is comfortable with working at the Linux/Unix command
line.
At this time, if an Openfiler SAN appliance is acting as an FC target , it cannot
simultaneously be an FC initiator.
Openfiler Administration Guide 206

207 Advanced Configuration - 10
10.1.1 ComponentsThe following physical components are required for FC target export from Openfiler
SAN to an FC initiator:
1) The Openfiler SAN appliance with integrated storage for export
2) Qlogic 23xx, 24xx and 25xx based FC HBA integrated in the Openfiler SAN
appliance
3) (Optional for FC-SW topology) Fibre Channel switch
4) The FC initiator system with any industry standard FC HBA integrated
5) Copper or Fiber interconnect cable between Openfiler FC HBA and Initiator FC
HBA in FC-P2P or FC-SW topology (FC-AL topology is not recommended but
should also work)
10.1.2 AssumptionsThe configuration steps described in this document show using examples of the various
subsystems involved in exporting storage via FC. All items and subsystems referenced
here should be substituted with the corresponding items in your environment. To that
end, the following assumptions are made:
10.1.2.1 On Initiator
• WWN of FC HBA: 21:00:00:e0:8b:92:85:1a (210000e08b92851a)
• FC SCSI bus rescan script or tool (e.g. on linux rescan-scsi-bus.sh)
Openfiler Administration Guide 207

208 Advanced Configuration
10.1.2.2 On Target
• WWN of FC HBA: 21:00:00:e0:8b:92:85:1b
• RAID array designated as second SCSI disk (/dev/sdb)
• The Openfiler OS image is on a separate disk (e.g /dev/sda)
• The first partition on /dev/sdb, to be designated /dev/sdb1, will be used for
volume group
• Logical Volume Group to be designated datavg
• FC storage export Logical Volume to be designated datalv
• FC storage export ACL groupname to be designated Default
It as also assumed that a connection has been established between the initiator (client
wishing to consume FC storage from Openfiler SAN) and target (Openfiler SAN
appliance) either directly via FC-PTP or indirectly via FC-SW. Use whatever tools are
available on the initiator and/or switch to confirm this before proceeding.
10.1.3 Configuration OutlineAssuming a fresh installation of the Openfiler Fibre Channel Target Plugin, the following
are the steps to use to successfully configure Fibre Channel storage.
1. Create a logical volume (LV) to expose on a Fibre Channel target
2. Create a virtual disk (vDisk) to map as an FC LUN
3. Add an FC target host LUN Mask Group
4. Map a vDisk to a FC target LUN Mask Group
5. Add initiators to a FC target LUN Mask Group
Openfiler Administration Guide 208
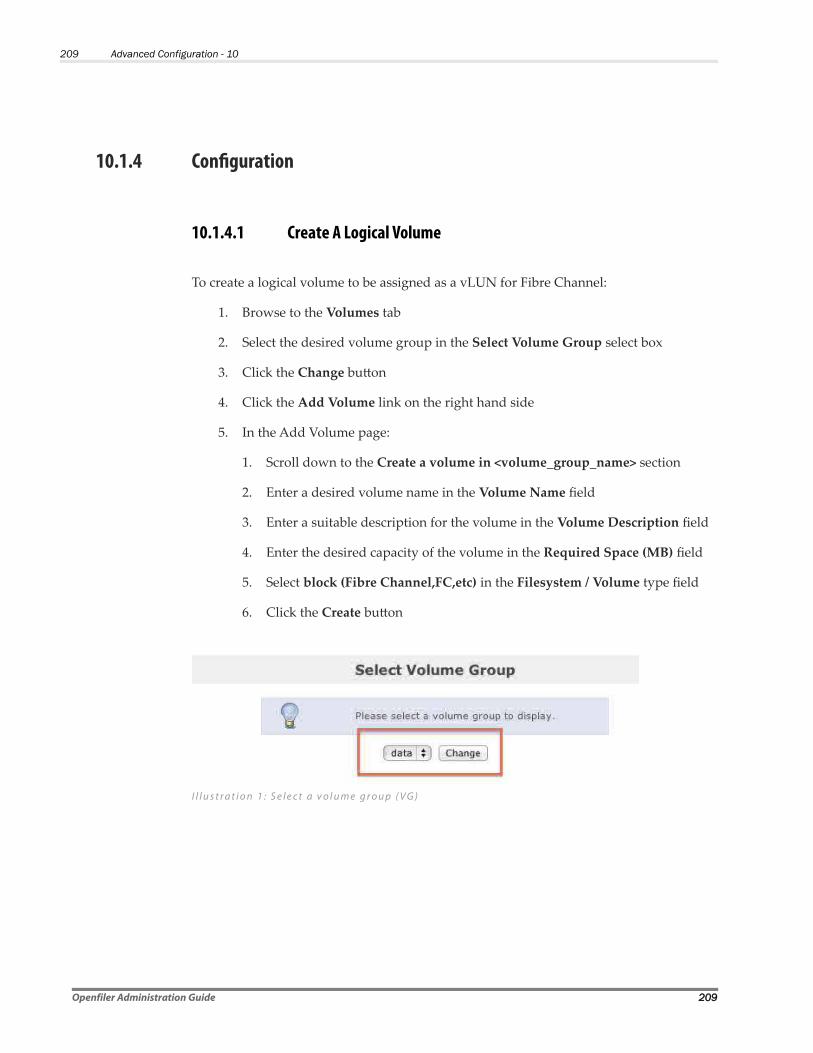
209 Advanced Configuration - 10
10.1.4 Configuration
10.1.4.1 Create A Logical Volume
To create a logical volume to be assigned as a vLUN for Fibre Channel:
1. Browse to the Volumes tab
2. Select the desired volume group in the Select Volume Group select box
3. Click the Change button
4. Click the Add Volume link on the right hand side
5. In the Add Volume page:
1. Scroll down to the Create a volume in <volume_group_name> section
2. Enter a desired volume name in the Volume Name field
3. Enter a suitable description for the volume in the Volume Description field
4. Enter the desired capacity of the volume in the Required Space (MB) field
5. Select block (Fibre Channel,FC,etc) in the Filesystem / Volume type field
6. Click the Create button
Openfiler Administration Guide 209
I l l u s t r a t i o n 1 : S e l e c t a v o l u m e g r o u p ( V G )

210 Advanced Configuration
10.1.1.1 vDisk Creation
Once a Logical Volume has been created to be assigned as a Fibre Channel LUN:
1. Browse to the Volumes → FC Target page.
2. Click the HBAs link on the left hand side
3. Select the vdisk_blockio HBA
4. Click the Add VDisk button
1. Enter a unique Device Alias. This can be any string up to 10 characters with
no spaces
2. Select vdisk_blockio in the HBA select box
3. Select the desired logical volume (LV) in the Block Device select box
4. Click the Submit button
Openfiler Administration Guide 210
I l l u s t r a t i o n 2 : A d d a l o g i c a l v o l u m e ( L V )
I l l u s t r a t i o n 3 : S e l e c t v D i s k t y p e

211 -
Openfiler Administration Guide 211
I l l u s t r a t i o n 4 : A d d a v D i s k
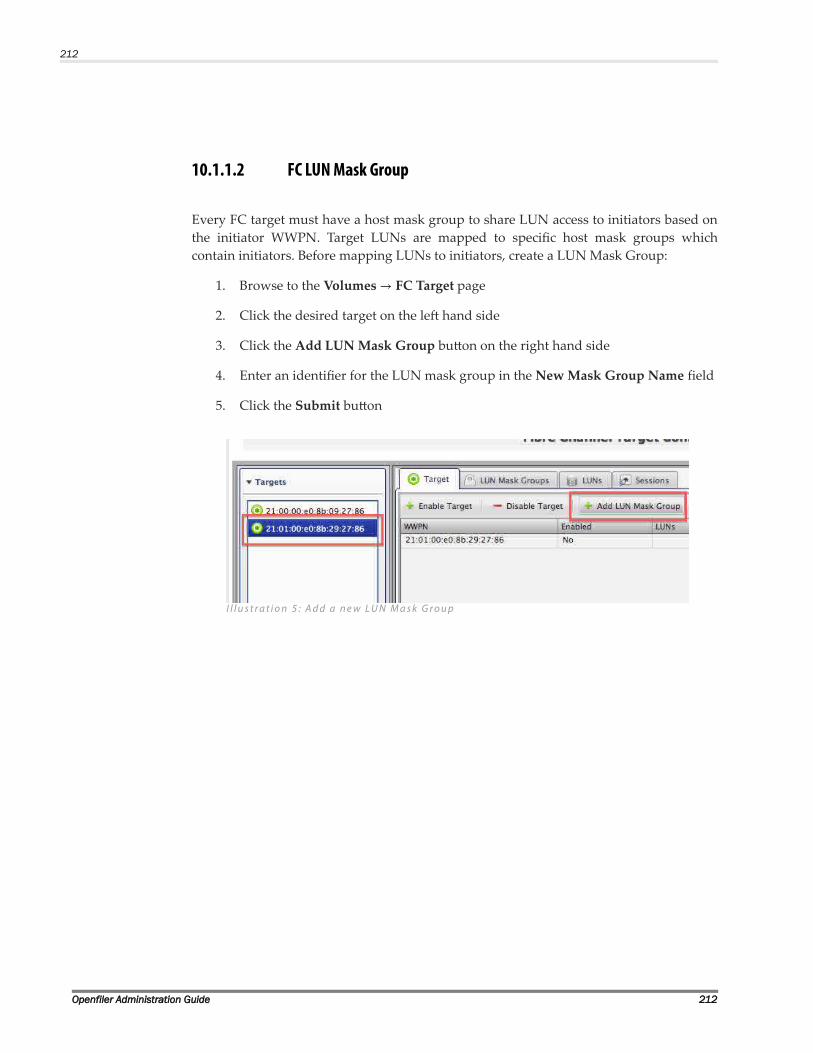
212
10.1.1.2 FC LUN Mask Group
Every FC target must have a host mask group to share LUN access to initiators based on
the initiator WWPN. Target LUNs are mapped to specific host mask groups which
contain initiators. Before mapping LUNs to initiators, create a LUN Mask Group:
1. Browse to the Volumes → FC Target page
2. Click the desired target on the left hand side
3. Click the Add LUN Mask Group button on the right hand side
4. Enter an identifier for the LUN mask group in the New Mask Group Name field
5. Click the Submit button
Openfiler Administration Guide 212
I l l u s t r a t i o n 5 : A d d a n e w L U N M a s k G r o u p

213 -
Openfiler Administration Guide 213
I l l u s t r a t i o n 6 : N e w L U N M a s k G r o u p P r o p e r t i e s

214
10.1.1.3 FC Mask Group LUN Mapping
Once a LUN mask group has been created, vDisk devices can be mapped to the mask
group which are then accessible by any initiators in the mask group for the specific
target:
To map a vDisk to an FC Target LUN Mask Group:
1. Browse to the Volumes → Fibre Channel page
2. Select the desired target on the left hand side
3. Select the LUNs tab on the right hand side
4. Click the Map LUN button
5. Select the desired mask group in the Select Mask Group select box
6. Assign a LUN ID in the New Mask Group LUN Properties field (LUN ID must
be unique)
7. Select the desired vDisk in the Select An Available Device table
8. Click the Submit button
Openfiler Administration Guide 214
I l l u s t r a t i o n 7 : C r e a t e a M a s k G r o u p L U N M a p
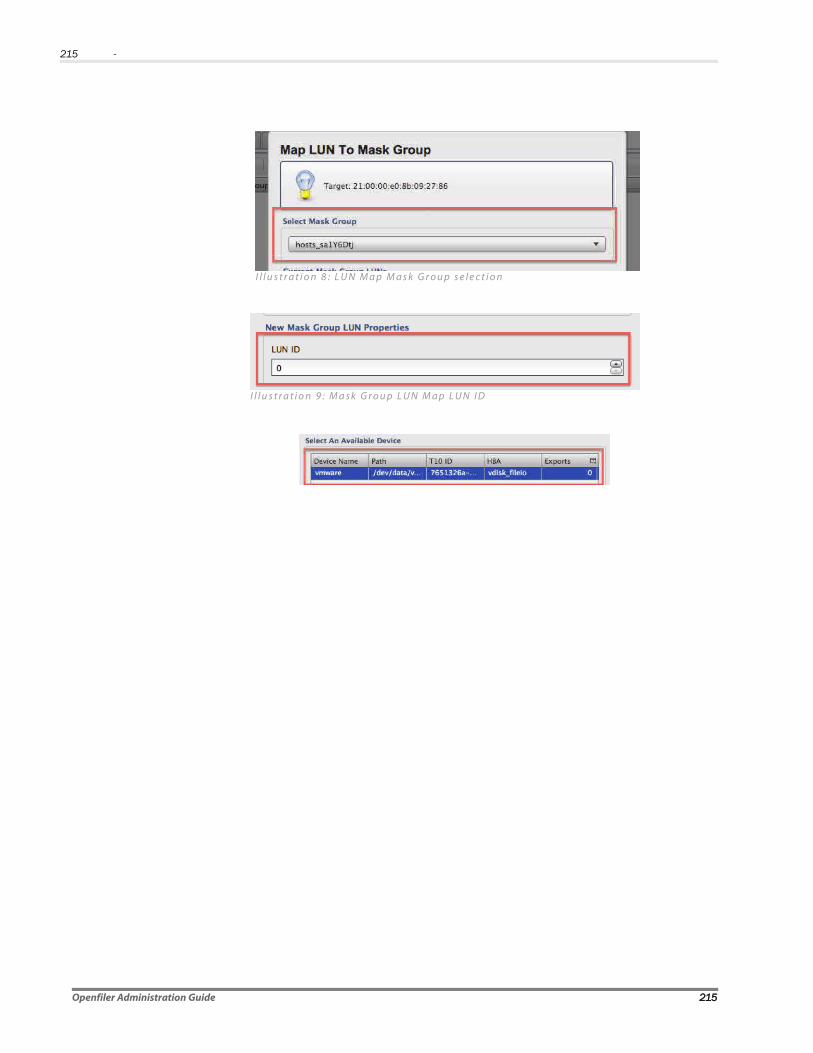
215 -
Openfiler Administration Guide 215
I l l u s t r a t i o n 8 : L U N M a p M a s k G r o u p s e l e c t i o n
I l l u s t r a t i o n 9 : M a s k G r o u p L U N M a p L U N I D
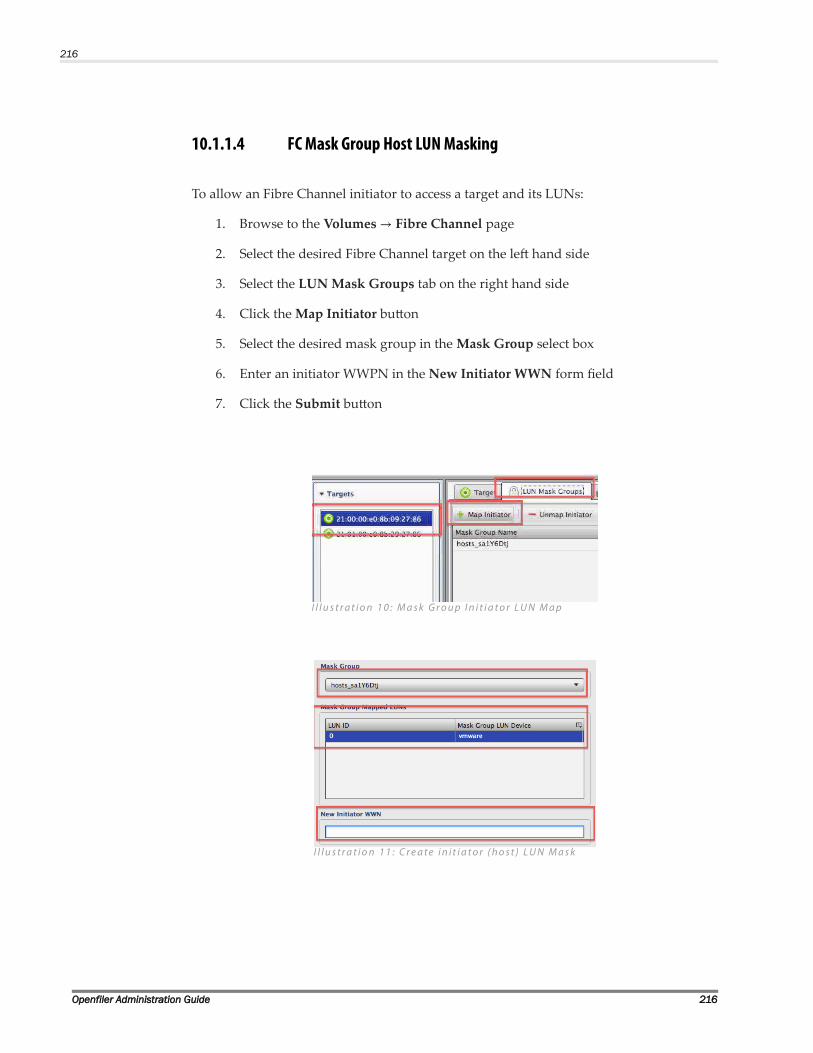
216
10.1.1.4 FC Mask Group Host LUN Masking
To allow an Fibre Channel initiator to access a target and its LUNs:
1. Browse to the Volumes → Fibre Channel page
2. Select the desired Fibre Channel target on the left hand side
3. Select the LUN Mask Groups tab on the right hand side
4. Click the Map Initiator button
5. Select the desired mask group in the Mask Group select box
6. Enter an initiator WWPN in the New Initiator WWN form field
7. Click the Submit button
Openfiler Administration Guide 216
I l l u s t r a t i o n 1 0 : M a s k G r o u p I n i t i a t o r L U N M a p
I l l u s t r a t i o n 1 1 : C r e a t e i n i t i a t o r ( h o s t ) L U N M a s k

217 -
10.2 Advanced iSCSI Target Configuration OutlineAssuming a fresh installation of the Openfiler Advanced iSCSI Target Plugin, the
following are the steps to use to successfully configure iSCSI storage.
1. Create a logical volume (LV) for iSCSI
2. Assign an LV as a iSCSI virtual LUN (vLUN)
3. Create an iSCSI target
4. Map an iSCSI vLUN to an iSCSI target
5. Add initiators to an iSCSI target to perform LUN masking
6. Assign a target portal interface to an iSCSI target
7. Mask vLUNs to initiators
10.2.1 Create A Logical Volume
To create a logical volume to be assigned as a vLUN for iSCSI:
1. Browse to the Volumes tab
2. Select the desired volume group in the Select Volume Group select box
3. Click the Change button
4. Click the Add Volume link on the right hand side
5. In the Add Volume page:
1. Scroll down to the Create a volume in <volume_group_name> section
2. Enter a desired volume name in the Volume Name field (no spaces or
dashes)
3. Enter a suitable description for the volume in the Volume Description field
4. Enter the desired capacity of the volume in the Required Space (MB) field
5. Select block (iSCSI,FC,etc) in the Filesystem / Volume type field
6. Click the Create button
Openfiler Administration Guide 217
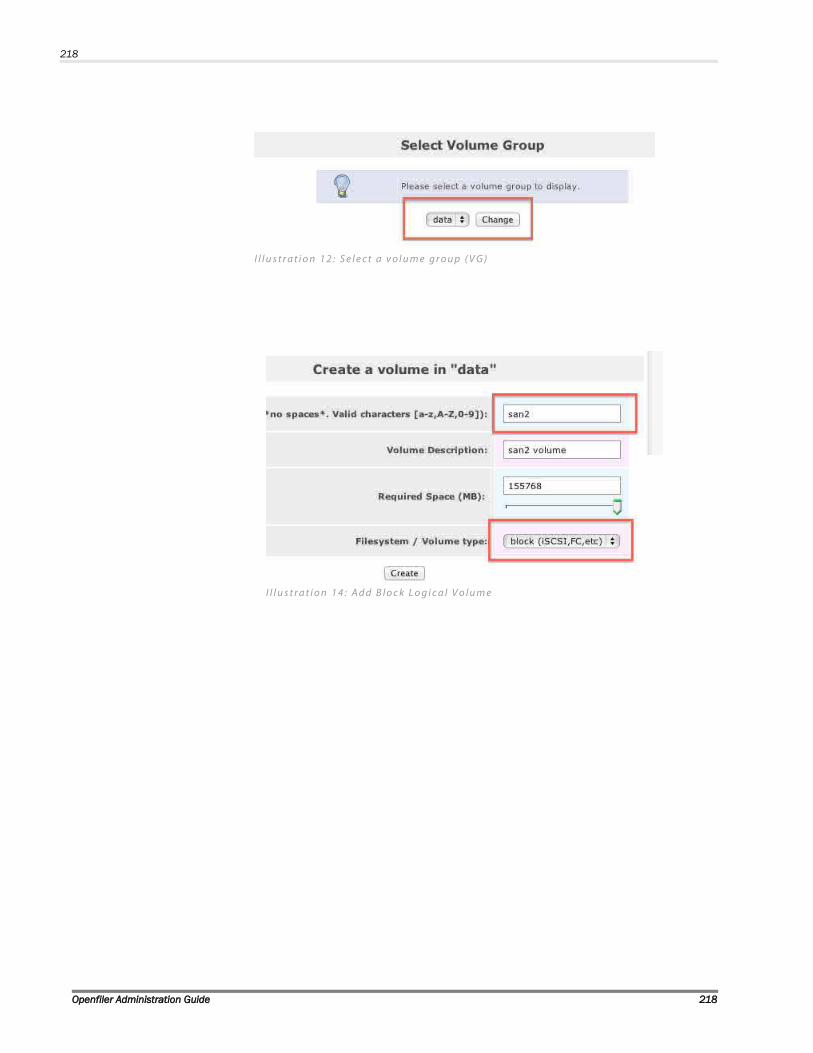
218
Openfiler Administration Guide 218
I l l u s t r a t i o n 1 2 : S e l e c t a v o l u m e g r o u p ( V G )
I l l u s t r a t i o n 1 3 : A d d a l o g i c a l v o l u m e ( L V )
I l l u s t r a t i o n 1 4 : A d d B l o c k L o g i c a l V o l u m e
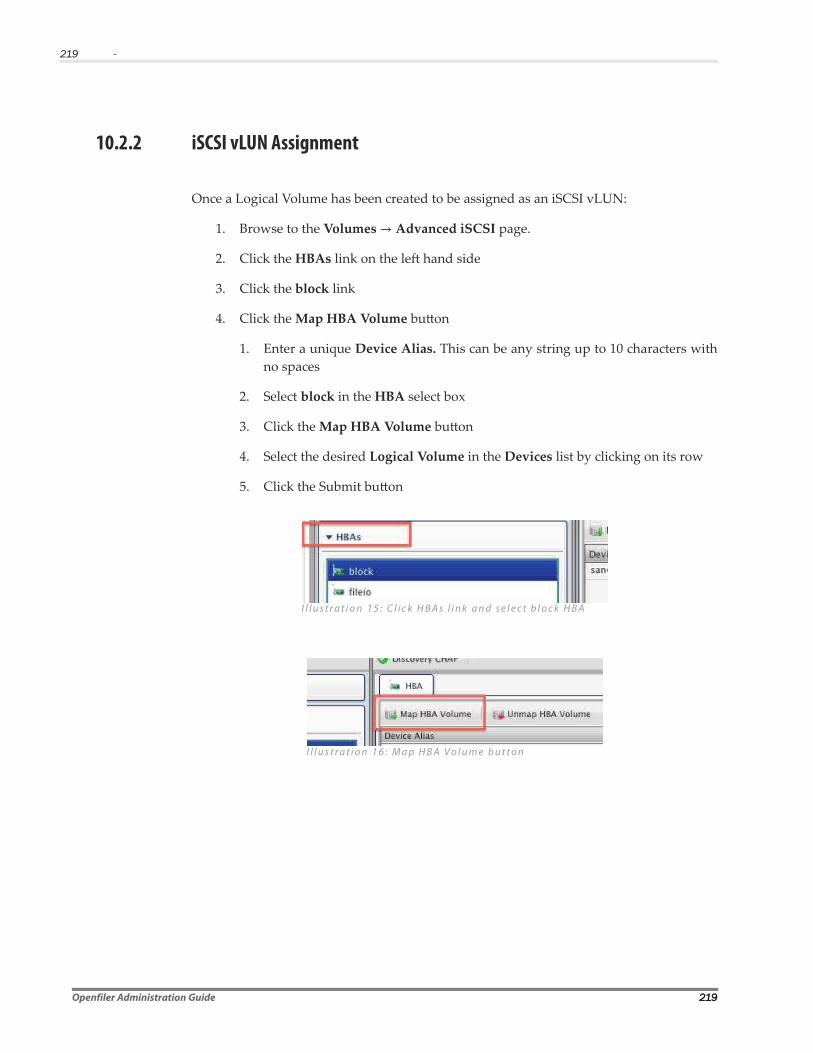
219 -
10.2.2 iSCSI vLUN Assignment
Once a Logical Volume has been created to be assigned as an iSCSI vLUN:
1. Browse to the Volumes → Advanced iSCSI page.
2. Click the HBAs link on the left hand side
3. Click the block link
4. Click the Map HBA Volume button
1. Enter a unique Device Alias. This can be any string up to 10 characters with
no spaces
2. Select block in the HBA select box
3. Click the Map HBA Volume button
4. Select the desired Logical Volume in the Devices list by clicking on its row
5. Click the Submit button
Openfiler Administration Guide 219
I l l u s t r a t i o n 1 5 : C l i c k H B A s l i n k a n d s e l e c t b l o c k H B A
I l l u s t r a t i o n 1 6 : M a p H B A V o l u m e b u t t o n

220
10.2.3 iSCSI Target Creation
To create a new iSCSI target:
1. Browse to the Volumes → Advanced iSCSI page
2. Click the Add Target button on the left hand side
3. Enter a new target name or leave the default as is
4. Click the Submit button
Openfiler Administration Guide 220
I l l u s t r a t i o n 1 7 : v L U N H B A M a p F o r m
I l l u s t r a t i o n 1 8 : A d d a n i S C S I t a r g e t
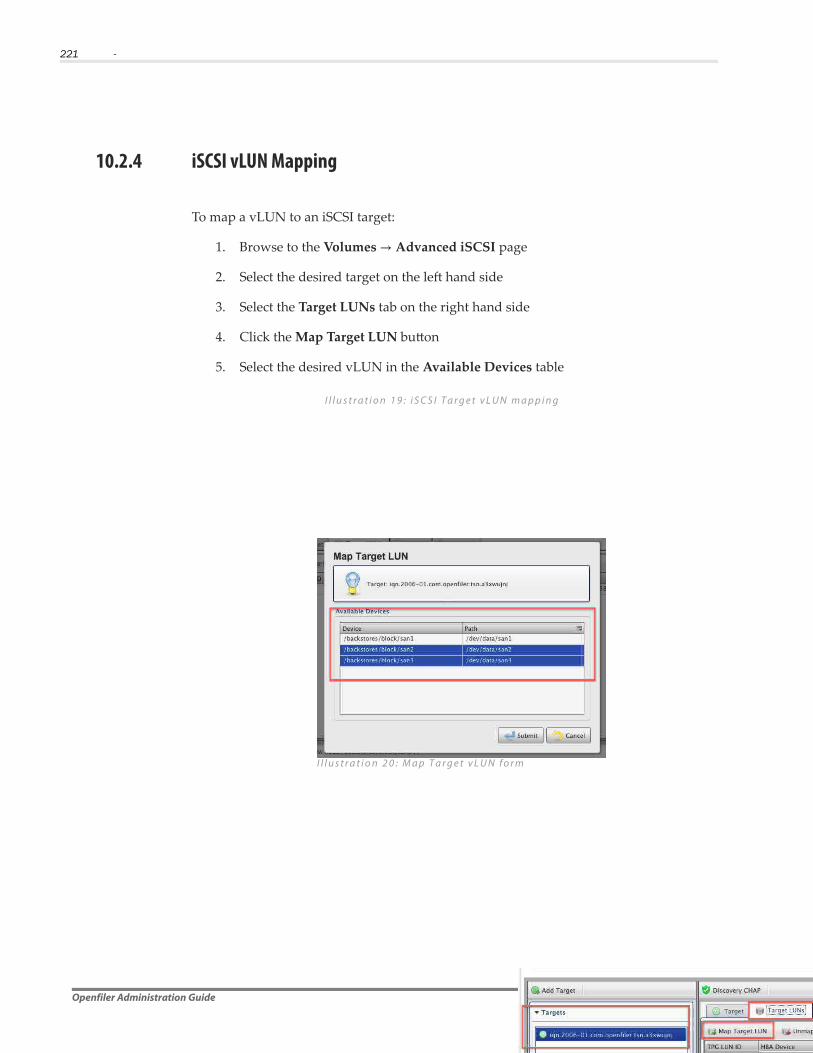
221 -
10.2.4 iSCSI vLUN Mapping
To map a vLUN to an iSCSI target:
1. Browse to the Volumes → Advanced iSCSI page
2. Select the desired target on the left hand side
3. Select the Target LUNs tab on the right hand side
4. Click the Map Target LUN button
5. Select the desired vLUN in the Available Devices table
Openfiler Administration Guide 221
I l l u s t r a t i o n 1 9 : i S C S I T a r g e t v L U N m a p p i n g
I l l u s t r a t i o n 2 0 : M a p T a r g e t v L U N f o r m
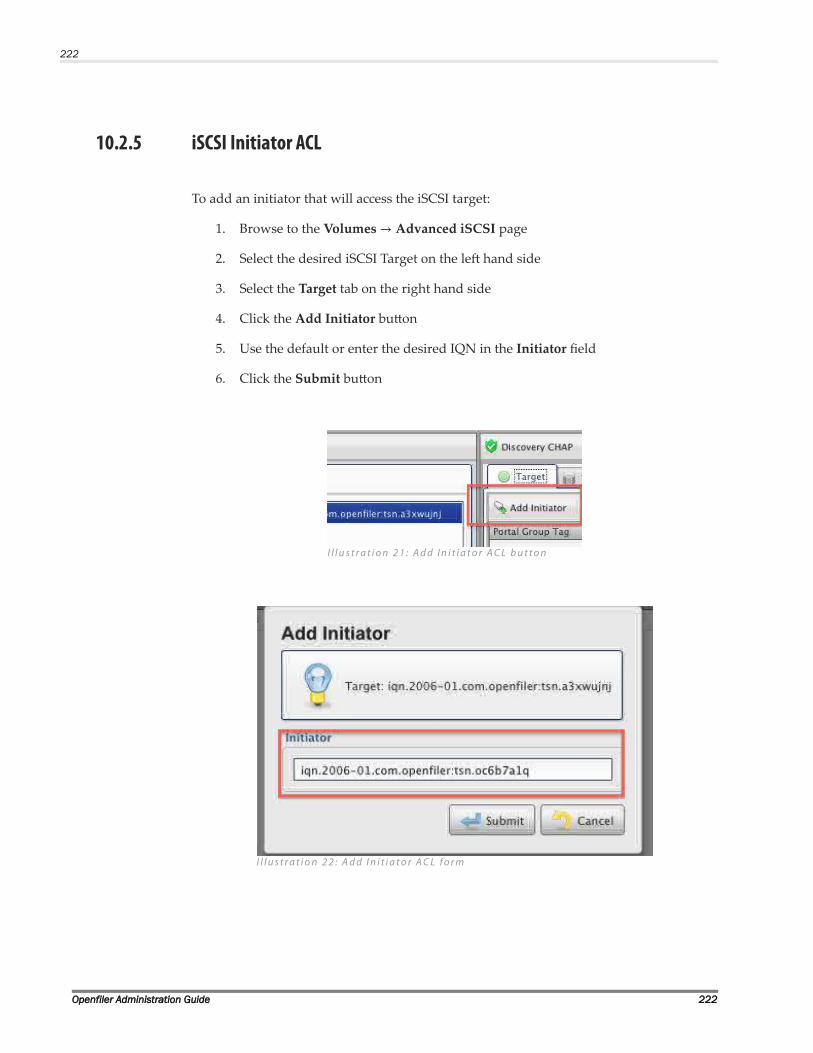
222
10.2.5 iSCSI Initiator ACL
To add an initiator that will access the iSCSI target:
1. Browse to the Volumes → Advanced iSCSI page
2. Select the desired iSCSI Target on the left hand side
3. Select the Target tab on the right hand side
4. Click the Add Initiator button
5. Use the default or enter the desired IQN in the Initiator field
6. Click the Submit button
Openfiler Administration Guide 222
I l l u s t r a t i o n 2 1 : A d d I n i t i a t o r A C L b u t t o n
I l l u s t r a t i o n 2 2 : A d d I n i t i a t o r A C L f o r m

223 -
10.2.6 iSCSI LUN Masking
To allow an iSCSI initiator to access a target and its vLUNs:
1. Browse to the Volumes → Advanced iSCSI page
2. Select the desired iSCSI target on the left hand side
3. Select the Initiators tab on the right hand side
4. Click the Add LUN Mask button
5. Select the Initiator IQN to mask a vLUN to in the Initiator select box
6. Select the desired vLUN or vLUNs to mask by highlighting the vLUN(s) in the
Available LUNs table
7. Click the Submit button
Openfiler Administration Guide 223
I l l u s t r a t i o n 2 3 : I n i t i a t o r s t a b a n d A d d L U N M a s k b u t t o n

224
Openfiler Administration Guide 224
I l l u s t r a t i o n 2 4 : A d d L U N M a s k F o r m

225 -
10.2.7 Add an iSCSI Portal
To add an iSCSI portal so that initiators may access targets and vLUNs:
1. Browse to the Volumes → Advanced iSCSI page
2. Select the desired iSCSI target on the left hand side
3. Select the Portals tab on the right hand side
4. Click the Add Portal button
5. Select desired IP address in the Portal Details → IP Address select box
6. Set the port number in the Portal Details → Port field (3260 is default iSCSI port
number)
7. Click the Submit button
Openfiler Administration Guide 225
I l l u s t r a t i o n 2 5 : P o r t a l s t a b a n d A d d P o r t a l b u t t o n
I l l u s t r a t i o n 2 6 : A d d T a r g e t P o r t a l f o r m
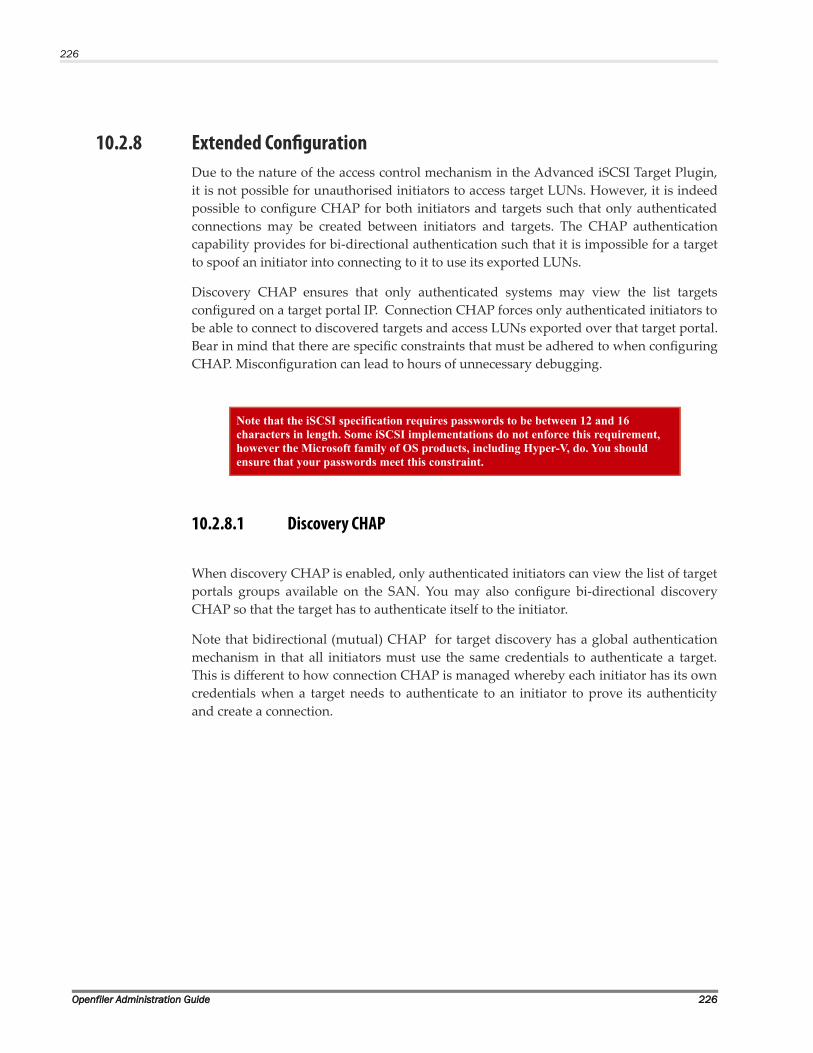
226
10.2.8 Extended Configuration Due to the nature of the access control mechanism in the Advanced iSCSI Target Plugin,
it is not possible for unauthorised initiators to access target LUNs. However, it is indeed
possible to configure CHAP for both initiators and targets such that only authenticated
connections may be created between initiators and targets. The CHAP authentication
capability provides for bi-directional authentication such that it is impossible for a target
to spoof an initiator into connecting to it to use its exported LUNs.
Discovery CHAP ensures that only authenticated systems may view the list targets
configured on a target portal IP. Connection CHAP forces only authenticated initiators to
be able to connect to discovered targets and access LUNs exported over that target portal.
Bear in mind that there are specific constraints that must be adhered to when configuring
CHAP. Misconfiguration can lead to hours of unnecessary debugging.
Note that the iSCSI specification requires passwords to be between 12 and 16 characters in length. Some iSCSI implementations do not enforce this requirement, however the Microsoft family of OS products, including Hyper-V, do. You should ensure that your passwords meet this constraint.
10.2.8.1 Discovery CHAP
When discovery CHAP is enabled, only authenticated initiators can view the list of target
portals groups available on the SAN. You may also configure bi-directional discovery
CHAP so that the target has to authenticate itself to the initiator.
Note that bidirectional (mutual) CHAP for target discovery has a global authentication
mechanism in that all initiators must use the same credentials to authenticate a target.
This is diferent to how connection CHAP is managed whereby each initiator has its own
credentials when a target needs to authenticate to an initiator to prove its authenticity
and create a connection.
Openfiler Administration Guide 226

227 -
10.2.8.2 Authenticate An Initiator
To authenticate an initiator to a target portal group for discovery:
1. Browse to the Volumes → Advanced iSCSI page
2. Click the Discover CHAP button on the right hand side
3. Tick the Check to Enable Discovery CHAP checkbox
4. Enter the desired username in the Username field
5. Enter the desired password in the Password field
6. Re-enter the desired password in the Re-enter Password field
7. Click the Submit button
Openfiler Administration Guide 227
I l l u s t r a t i o n 2 7 : A u t h e n t i c a t e I n i t i a t o r s f o r D i s c o v e r y

228
10.2.8.3 Authenticate A Target (optional)
Note that for mutual (bi-directional) authentication, you must also select Enable Discovery CHAP in the Discovery CHAP dialog box and enter valid credentials. The following assumes that discovery CHAP is already enabled for initiator to target discovery. You may perform configuration of target and initaitor CHAP authentication simultaneously in one step.
If you wish to enable bi-direction authentication for target portal group discovery:
1. Browse to the Volumes → Advanced iSCSI page
2. Click the Discover CHAP button on the right hand side
3. Tick the Check to Enable Mutual Discovery CHAP checkbox (Enable Discovery
CHAP needs to be configured already, or should be configured before
proceeding)
4. Enter the desired username in the Username field
5. Enter the desired password in the Password field
6. Re-enter the desired password in the Re-enter Password field
7. Click the Submit button
Openfiler Administration Guide 228
I l l u s t r a t i o n 2 8 : A u t h e n t i c a t e T a r g e t s f o r D i s c o v e r y

229 -
10.2.8.4 Login CHAP
Login CHAP specifies a mechanism whereby initiators and targets can be authenticated
when a connection is made to specific target portals after the discovery phase. In doing
so, it is impossible for initiators to connect to a spoofed target portal and vice-versa.
Where Login CHAP difers from Discovery CHAP is that authentication credentials are
unique for each initiator → target nexus. When authenticating an initiator against a
target, enableTarget Login CHAP. When authenticating a target against an initiator,
enable Mutual Login CHAP.
10.2.8.5 Target Login CHAP
To configure Target Login CHAP:
1. Browse to the Volumes → Advanced iSCSI page
2. Select the desired target on the right hand side
3. Select the Initiators tab on the right hand side
4. Click the Login CHAP button
5. Select the desired initiator in the Initiator drop-down field
6. Select the Check to Enable Login CHAP checkbox
7. Enter the desired username in the Username field
8. Enter the desired password in the Password field
9. Re-enter the desired password in the Re-enter Password field
10. Click the Submit button
Openfiler Administration Guide 229
I l l u s t r a t i o n 2 9 : L o g i n C H A P b u t t o n i n I n i t i a t o r s T a b

230
Openfiler Administration Guide 230
I l l u s t r a t i o n 3 0 : S e l e c t I n i t i a t o r i n L o g i n C H A P D i a l o g
I l l u s t r a t i o n 3 1 : E n t e r L o g i n C H A P C r e d e n t i a l s
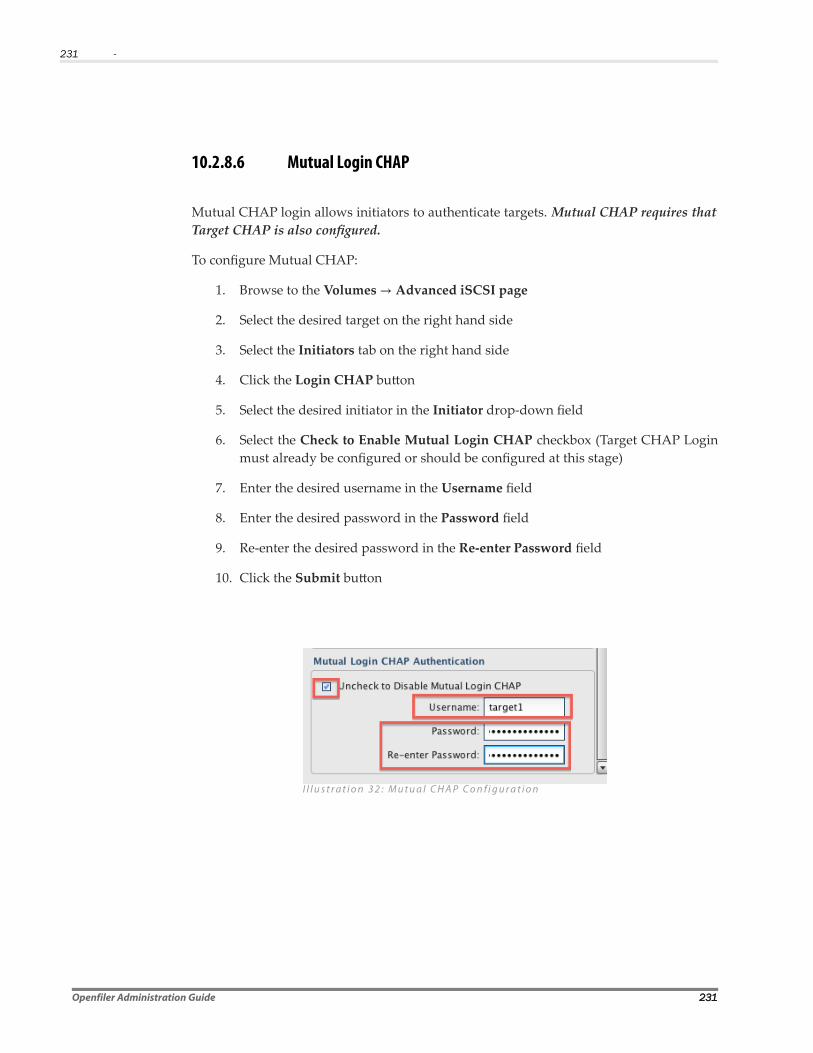
231 -
10.2.8.6 Mutual Login CHAP
Mutual CHAP login allows initiators to authenticate targets. Mutual CHAP requires that
Target CHAP is also confgured.
To configure Mutual CHAP:
1. Browse to the Volumes → Advanced iSCSI page
2. Select the desired target on the right hand side
3. Select the Initiators tab on the right hand side
4. Click the Login CHAP button
5. Select the desired initiator in the Initiator drop-down field
6. Select the Check to Enable Mutual Login CHAP checkbox (Target CHAP Login
must already be configured or should be configured at this stage)
7. Enter the desired username in the Username field
8. Enter the desired password in the Password field
9. Re-enter the desired password in the Re-enter Password field
10. Click the Submit button
Openfiler Administration Guide 231
I l l u s t r a t i o n 3 2 : M u t u a l C H A P C o n f i g u r a t i o n

232
10.2.8.7 Target Parameters
Each enabled target can be customised with a set of target parameters. Parameter settings
are unique to each target. Initiators parameters must match configured target parameters.
To configure target parameters:
1. Browse to the Volumes → Advanced iSCSI page
2. Select the desired target on the right hand side
3. Select the Target tab on the right hand side
4. Click the TPG Parameters button
5. Enter your desired settings in the form dialog window
6. Click the Submit button
Openfiler Administration Guide 232
I l l u s t r a t i o n 3 3 : T a r g e t T P G P a r a m e t e r s b u t t o n
233 -
11 Appendix
11.1 RAID OverviewRAID technology allows you to have data written to multiple sets of disks at the same
time, thereby reducing the risk of an individual disk failure destroying data. That is a
rather simplistic definition of what RAID does. In reality, over the years since RAID was
introduced, the technology has gone through multiple protocol revisions, enhancements
and extensions to the point that it can mean diferent things to diferent people
depending on application contexts.
RAID technology is divided into several protocols or levels which, alone or combined,
serve to increase data integrity, throughput, availability and capacity. A RAID level
basically specifies how disk sets are arranged and the pattern in which data is written,
read and verified for integrity (for the RAID levels that support data integrity). RAID is
not a function of the disks themselves - rather it is implemented at the disk controller
level (hardware RAID) or in the operating system (software RAID).
Hardware RAID controllers are intelligent disk controllers, usually with a dedicated
microprocessor performing the complex RAID algorithms. Software RAID on the other
hand depends on the host system microprocessor to perform RAID calculations and
would therefore reduce the raw processing power available to run applications. The
benefit of hardware RAID over software RAID is that it does not impinge on the host
system microprocessor - leaving it to perform regular computational tasks instead.
Another advantage conferred by hardware RAID circuitry is the ability to hot-swap or
hot-plug failed disks from a RAID array. What this means is that for the RAID levels that
can survive one or more disk failures, the ability to replace the failing disk(s) while the
system is still running in invaluable for mission critical applications.
The following are the most commonly used RAID levels. Others exist but are not in
widespread use and are mostly dedicated to very specific application scenarios.
Openfiler Administration Guide 233

234 Appendix
11.1.1 RAID Levels
11.1.1.1 RAID 0
RAID 0, also known as Striping, is not redundant at all and is not RAID in a pedantic
sense. What RAID 0 does is to increase performance significantly by breaking up data
blocks into smaller equally sized chunks which are then distributed across two or more
physical disks. The performance enhancement is brought about by the fact that data is
being written to or read from all disks in the array or RAID set nearly simultaneously as
opposed to sequentially from a single disk. In general, the higher the number of disks in
the RAID 0 array, the better the performance. Another advantage of RAID 0 is that the
total capacity of all disks in the RAID set is available to use for data storage.
The performance and capacity advantages do come at a price however. In fact, following
on from our initial example in the introduction above, a single disk failure in a RAID 0
array will render all data in the array irretrievable - with the only recourse being
restoration from backups. And as there are now more disks being used simultaneously,
the chances of a failure occurring increase.
RAID 0 is excellent for applications that require ultimate I/O performance with a caveat
of the ability to commit less dynamic data to longer term storage at certain intervals.
Applications such as image editing, pre-press and digital rendering can benefit greatly
form RAID 0 I/O performance and capacity characteristics.
11.1.1.2 RAID 1RAID 1 or Mirroring is the opposite of RAID 0. Rather than chunking data bits and
spreading them across two or more physical disks, mirroring writes identical data bits to
two or more physical disks so that in the event of a disk failure, at least one disk in the
RAID set still has a complete copy of the data. RAID 1 confers true redundancy and is
generally achieved and implemented as a mirror of two disks. Mirrors can however be
created with disks numbering multiples of two. The main disadvantages of RAID 1 are
that cost and capacity. Cost doubles and capacity is halved in comparison to a single disk
non-RAID configuration. Performance on writes can also slightly degrade as the data
needs to be written at least twice for the write operation to be considered complete.
RAID 1 is excellent for applications where data integrity is absolutely critical and the
inconvenience of restoring from backups is to be avoided at all cost. Accounting and
financial applications are two typical application scenarios where RAID 1 would be ideal.
Openfiler Administration Guide 234

235 Appendix - 11
11.1.1.3 RAID 0+1This RAID level, as the name suggests, combines the attributes of RAID 0 and RAID 1 to
gain benefits of both levels; performance and redundancy. RAID 0+1 requires a minimum
of four disks to implement and is a mirrored stripe set. That is to say, a RAID 1 array is
layered over two RAID 0 arrays. While getting the performance benefits of RAID 0, RAID
0+1 increases reliability as well by keeping a mirror of the data striped data. Naturally, as
multiple copies of the data is kept, the cost of the solution is double that of a RAID 0
array. A major disadvantage of this RAID level is that a single drive failure will cause the
array to become a RAID 0 array.
11.1.1.4 RAID 3RAID 3 uses byte level striping with parity information stored on a dedicated disk. RAID
3 has very high read and write data transfer rates and single disk failures do not impact
throughput significantly. RAID 3 stripes data blocks and stores the striped information in
the exact same location on the individual disks that make up the array - so parallel I/O is
not possible as data requests require seeks on all disks simultaneously to the same
position.
RAID 3 is excellent for media applications such as image editing, digital pre-press and
live streaming. The total capacity of a RAID 3 array is sum(N-1) and requires a minimum
of three disks to implement.
11.1.1.5 RAID 4RAID 4 algorithm is similar to RAID 3 except that striping is done at the block rather
than byte level. This has the advantage of blocks requests being serviced by a single disk
if the controller supports that functionality. With single disk block request serving,
multiple block requests may be services simultaneously in parallel so long as the
individual blocks reside on separate disks.
The total capacity of a RAID 4 array is sum(N-1) and requires a minimum of three disks
to implement.
Openfiler Administration Guide 235

236 Appendix
11.1.1.6 RAID 5RAID 5 or Striping with Parity is implemented with a minimum of three disks. In a
typical three-disk RAID 5 array the data is striped across two disks and parity
information is written to the third. This scheme is extended to any further number of
disks in the array. For every stripe of data that is written to disks on a RAID 5 array, a
special parity bit is calculated and stored in a round-robin fashion. The parity
information is therefore distributed and any disk in the array can fail and data can then
be restored from the remaining set of disks in the array using the parity information. The
total capacity available in a RAID 5 array is sum(N - 1), where N is the number of disks in
the set.
A RAID 5 array cannot handle more than a single disk failure without being corrupted. If
two disks fail within a short time of one another, i.e insufficient time has elapsed for the
parity calculations to rebuild the data blocks of the failed disk before another failure
occurs, then the array and its data will be lost. It is useful therefore to have a dedicated
hot-spare* disk in the array so that a rebuild can start immediately upon a disk failure.
With such a configuration, in the event of a single disk failure the RAID controller will
rebuild the data on the failed disk on the hot-spare disk using the available parity
information on the remaining array members. Once the rebuild has finished, the array
will operate as normal.
In terms of disks, a RAID 5 array is cheaper to implement than a RAID 0+1 array. RAID 5
data reads are also slightly faster than single (standalone) disk reads. The main
disadvantage of RAID 5 compared to RAID 0+1 or RAID 0 is that a disk failure has
medium to significant impact on throughput performance. RAID 5 also consumes a lot of
resources in rebuild operations, meaning implementation in software as opposed to a
dedicated hardware controller would impact the host system processor and applications
more than is desired.
RAID 5 is an excellent option for general file and application servers, database servers
and web/email/news servers. To that end, RAID 5 is the most commonly deployed RAID
level in network server environments.
Openfiler Administration Guide 236
237 Appendix - 11
11.1.1.7 RAID 6RAID 6 is an extension of RAID 5 and provides added redundancy by using two parity
sets instead of one. The advantage here is that up to two disks can fail in the array
without compromising data integrity. RAID 6 requires a minimum of four disks as
opposed to three disks for RAID 5. As it requires quite powerful computational
resources, few hardware RAID controllers have this algorithm implemented. However it
is quite common in software RAID implementations that make use of the host system
processing facilities. The total storage capacity for RAID 6 arrays is sum(N - 2) where N
is the number of disks in the set.
Like RAID 5, RAID 6 is great for database servers, file and print applications and web
and email serving. It provides an excellent amount of fault-tolerance with very little
overhead when compared to other resilient RAID levels such as RAID 5 and RAID 10.
11.1.1.8 RAID 10RAID 10 is a nested RAID level and can be described as striped mirroring. Like RAID
0+1, RAID 10 provides the benefits of both resiliency and performance. Multiple RAID 1
arrays are grouped into a single RAID 0 array and the striping of blocks is mirrored via
the child arrays. A RAID 10 array can lose all but one drive in each of the child RAID 1
arrays without compromising data integrity. However, if all the drives in one child RAID
1 array should be lost, the entire RAID 10 array will be compromised as would be the
case for a single drive loss in a RAID 0 array.
RAID 10 is very popular for high transaction applications such as databases as write
speeds are very good with quite acceptable levels of data security and integrity. The total
capacity of a RAID 10 array is sum(N/2) where N is the number of drives in the array and
count(N) is even.
11.1.1.9 RAID 50Like RAID 10, RAID 50 is a nested RAID level. It consists of striping (RAID 0) over two or
more RAID 5 arrays. RAID 50 gives an added performance boost over RAID 5 with the
caveat of being twice as expensive (assuming two RAID 5 sets are being combined into a
RAID 50). RAID 50 provides better performance than RAID 5 with limited loss in
capacity. RAID 50 is able to achieve high data transfer rates as a result of the RAID 5
segments and good I/O rates for small requests due to the RAID 0 striping layered over
the RAID 5 segments.
RAID 50 sufers from a similar intolerance as RAID 10 in terms of degradation of a child
RAID 5 set. A failed child RAID 5 set, which can occur if two drives from within the same
RAID 5 set fail, in a RAID 50 array will bring down the entire array resulting in loss of all
data.
Openfiler Administration Guide 237

238 Appendix
11.2 Troubleshooting
11.2.1 Active Directory Integration Most problems related to active directory (AD) integration are a result of
misconfiguration. When trying to integrate Openfiler into an AD domain, ensure the
following:
1. Do NOT select Expert View unless there is a specific reason for doing so.
2. The Use Windows domain controller and authentication checkbox is selected and
no other authentication mechanism checkboxes are selected (e.g Use LDAP).
3. The Active Directory security model radio button is selected.
4. System time is synchronized with the AD connection server. This is best achieved
using network time protocol (NTP) configured against a time server on the local
network or using a global NTP server on the Internet if a local NTP server is not
available.
5. Domain ADS realm is accurate and entered in uppercase only.
6. The Domain/Workgroup name is accurate and entered in uppercase only.
7. Domain controllers are entered as canonical hostname in uppercase only.
8. Openfiler appliance NetBIOS name is set explicitly in the Services->SMB Settings
section and is less than 16 characters in length. The NetBIOS name should be
uppercase.
9. DNS has been properly configured in the System->Network Confguration
section.
Openfiler Administration Guide 238
239 Appendix - 11
11.2.2 ISCSI Target ConfigurationWhen configuring iSCSI targets, ensure that a working connection has been made before
attempting to set CHAP authentication for either target discovery sessions or target
connection. The following points should also be noted:
1. iSCSI target configuration cannot be afected unless the iSCSI target service is
running.
2. When exporting targets to Vmware ESX, if the VMware management network is
on a diferent IP subnet from the VMKernel / switch network, both networks
must be enabled for network ACL before the iSCSI target can be accessed from
the VMware initiator.
3. An iSCSI target with LUNs mapped cannot be deleted. In order to delete an
iSCSI target, you must first unmap all LUNs mapped to that target.
4. When troubleshooting performance issues, ensure that Ethernet frame size
(MTU) settings are identical on the initiator and the Openfiler appliance network
interface.
5. When setting CHAP passkeys, ensure that the password entry is at least 12 and
less than or equal to 16 characters.
11.2.3 CIFS Share AccessWhen trying to debug client access problems to CIFS shares, use the following
guidelines:
1. Ensure that a primary group has been set for the share.
2. Set a unique override for the share name as the automatically generated unique
name – which is a concatenation of the directory names that make up the
filesystem path to the share – could cause file access paths to exceed 255
characters.
3. Ensure that the client is on a network that has been configured for access to the
share in the network ACL section for the share.
4. Ensure that the UID on the client trying to access the share is within a group with
access rights to the share.
5. Rebooting the client may be necessary before it can access the CIFS share(s) for
the first time.
Openfiler Administration Guide 239

240 Appendix
End of Document
Openfiler Administration Guide 240