opengts config
TRANSCRIPT
OpenGTS Installation and Configuration
Manual
Copyright © 2006-2010 GeoTelematic Solutions, Inc.All rights reserved
OpenGTS Configuration and Installation Manual Page 1 of 44
Manual Revision HIstory
Rev Date Changed Author
0.0.1 2007/03/25 Initial Release MDF
0.0.2 2007/03/30 Added information for 'User' table administration MDF
0.0.3 2007/04/22 Changed top-level ant targets for event, mologogo, and track servlet builds. Minor type changes, and paragraph/page format changes.. MDF
0.0.4 2007/05/06 Added notes for Windows users. All command-line prompts in italic font.. Added note about registering for a Google Map key. MDF
0.0.5 2007/05/25 Added notes regarding support for Microsoft Virtual Earth. Added notes for Windows users regarding setting installation environment variables. MDF
0.0.6 2007/06/03 Updated MySQL download links. Include Ant v1.7.0 download links. MDF
0.0.7 2007/06/13 Added additional database administration documentation. Added note regarding installing a Perl interpreter on Windows. Fixed minor typos. MDF
0.0.8 2007/06/30 Added additional link for MySQL WinXP download. MDF
0.0.9 2007/07/14 Additional comments regarding JavaBeans Activation Framework Minor note changes. Additional comments regarding re-deployment of "track.war". Changed command name "server_mysql.*" to "server_dmtp.*".
MDF
0.0.10 2007/07/27 Removed reference to the creation of default account "opendmtp", device "mobile", when initializing the database with "initdb". Added commands which are equivalent to running "initdb". Added comments regarding customization of the "webapp.conf" servlet runtime configuation file.
MDF
0.0.11 2007/08/09 Added some additional comments regarding the 'Events' servlet. Table admin commands changed from "bin/admin<Table>.sh ..." to "admin.sh <Table> ...". DMTP server startup script changed to "runserver.sh -s gtsdmtp".
MDF
0.0.12 2007/09/16 Added comments regarding batch file use on Windows. Added notes regarding using 'template' and 'gprmc' for creating custom device servers.. MDF
0.1.1 2007/11/30 Added additional note on using 'dbAdmin.pl' to add missing table columns. Minor text changes made. MDF
0.1.2 2008/02/06 Added comment to prerequisites regarding the installation of Tomcat on Linux. MDF
0.1.3 2008/02/17 Added section on Internationalization/Localization. Added information regarding the implementation of device communication servers. MDF
0.1.4 2008/02/20 Added additional comments regardin configuration of Tomcat on Debian/Ubuntu MDF
0.1.5 2008/03/28 Java SDK 5.0 is now required to build OpenGTS. MDF
0.1.6 2008/04/11 Added a section on installation testing MDF
0.1.7 2008/05/14 Updated "Compile" section to include "ant all". Added additional comments to Localization section.. MDF
0.1.8 2008/06/20 Updated location of 'private.xml' file. Updated the download link information for various modules. MDF
0.1.9 2008/07/08 Added additional comments regarding building the example 'template' server. MDF
0.1.10 2008/07/27 Added note regarding 'bin\dbConfig.bat' command available for Windows users. Added information regarding customization of map Pushpins.. MDF
0.1.11 2008/10/16 Various minor changes MDF
0.1.12 2008/12/01 Updated the 'Database Administration' section MDF
0.1.13 2008/12/16 Update Apache Tomcat download URL MDF
0.1.14 2009/02/01 Miscellaneous updates MDF
0.2.0 2009/04/02 Added Mac OS X configuration information. Rearranged chapters. Added additional 'device communication server' start/stop information. MDF
0.2.1 2009/05/24 Added section on installing MotoDMTP MDF
0.3.0 2009/07/01 Added notes regarding "events.war" support for exporting GPX formatted events. Added section on "Creating/Modifying Reports". Added notes on validating LocalStrings files.
MDF
0.3.1 2009/08/02 Added additional comments regarding "events.war" use for Google Earth map updates, note regarding customizing the loog-and-feel, etc. MDF
0.3.2 2009/08/23 Added comments regarding running "runserver.bat" on Windows. Updated Tomcat version to 5.5.28. MDF
0.3.3 2009/10/30 Added '-sendMail' option to 'checkInstall' command. MDF
0.3.4 2010/06/18 Updated informaton regarding 'runserver', starting/stopping device communication servers, and using 'psjava'. Added information regarding the device communication servers runtime configuration "dcservers.xml" file.
MDF
0.3.5 2010/??/?? Added GTS system architecture section. Updated various pre-requisite links. MDF
OpenGTS Configuration and Installation Manual Page 2 of 44
OpenGTS Installation/Configuration
Contents:
1 Introduction 1.1 Supported Platforms 1.2 System Architecture 1.3 Planned Enhancements 1.4 Document Conventions
2 Compiling the OpenGTS Source 2.1 Prerequisites 2.2 Compile the supporting GTS library jar files
3 Initialization and Installation Testing 3.1 Initializing the SQL Database Tables 3.2 Testing the Installation 3.3 Loading the Sample Data
4 Installing “track.war” 4.1 Configuring the “webapp.conf” file 4.2 Configuring the available reports 4.3 Configuring the Private Label look and feel 4.4 Compiling/Installing the “track.war” servlet. 4.5 Testing the installation
5 Installing “events.war” 5.1 Configuring the “webapp.conf” file 5.2 Compiling/Installing the “events.war” Java servlet 5.3 Testing the installation
6 Database Administration 6.1 Creating/Editing Accounts 6.2 Creating/Editing Users 6.3 Creating/Editing Devices 6.4 General Database Administrative Functions
7 Installing/Starting the OpenDMTP Server 7.1 Configuring the "defaults.conf" File 7.2 Starting the OpenDMTP Server 7.3 Stopping the OpenDMTP Server
8 Creating Your Own Device Communication Server 8.1 HTTP-Based Device Communication Servers 8.2 Raw Socket-Based Device Communication Server
8.2.1 Starting the Device Communication Server 8.2.2 Stopping the Device Communication Server
8.3 Runtime XML Configuration File.
9 Internationalization/Localization 9.1 Supporting a new language.
10 Creating/Modifying Reports 10.1 Report Layout. 10.2 Report Data Iterator 10.3 Report Definition XML 10.4 Available Report Specification
Appendix: A) Support for Microsoft SQL ServerB) Support for Mologogo Capable PhonesC) Installing MotoDMTP
OpenGTS Configuration and Installation Manual Page 3 of 44
1) Introduction
OpenGTS (Open Source GPS Tracking System) is intended to provide a generic back-end web-based service for querying and viewing GPS related data. It is desgined to operate independently of any specific GPS tracking device or protocol, but comes with support for several device protocol formats (such as OpenDMTP - Open Source Device Monitoring and Tracking Protocol – http://www.opendmtp.org).
It is specifically designed for use in small to medium sized commercial enterprises wishing to take advantage of GPS tracking for "fleets" of vehicles. However, OpenGTS is highly configurable and scalable to larger enterprises as well.
On the server side, OpenGTS is designed to be device and protocol independent. In order to use the features of OpenGTS, a specific device/protocol communication server will need to be implemented to communicate with the remote device and place the data in the SQL database. OpenGTS ships with support for OpenDMTP (http://www.opendmtp.org) so that OpenDMTP compliant devices will be ready to immediately utilize the services of OpenGTS. A custom device communication server can also be implemented using the included example server source code. See the chapter titled "Creating Your Own Device Communication Server" for more information.
On the web-interface side, the user presentation is easily customizable to fit the individual desired motif. Menu options and features are also easily customizable to fit specific requirements.
The source code for the OpenGTS project may be downloaded from SourceForge at the following link:https://sourceforge.net/projects/opengts/files/
(Licensed under the Apache License Version 2: http://www.apache.org/licenses/LICENSE-2.0)
DISCLAIMER:OpenGTS/OpenDMTP must not be used for any illegal activities. The providers of this project assume no responsibity for any illegal activities that may be conducted by users of this software.
1.1) Supported Platforms
OpenGTS is completely implemented in Java and should run fine on any system that fully supports the Java Runtime Environment. However, this implementation does require an SQL database server, and is therefore also limited to systems on which your chosen SQL database runs. See the respective SQL database support website for their supported systems (ie. for MySQL see "http://www.mysql.org" – which has been tested with OpenGTS on Linux, Mac OS X, FreeBSD, OpenBSD, and Windows-XP/Vista/20xx platforms).
1.2) System Architecture
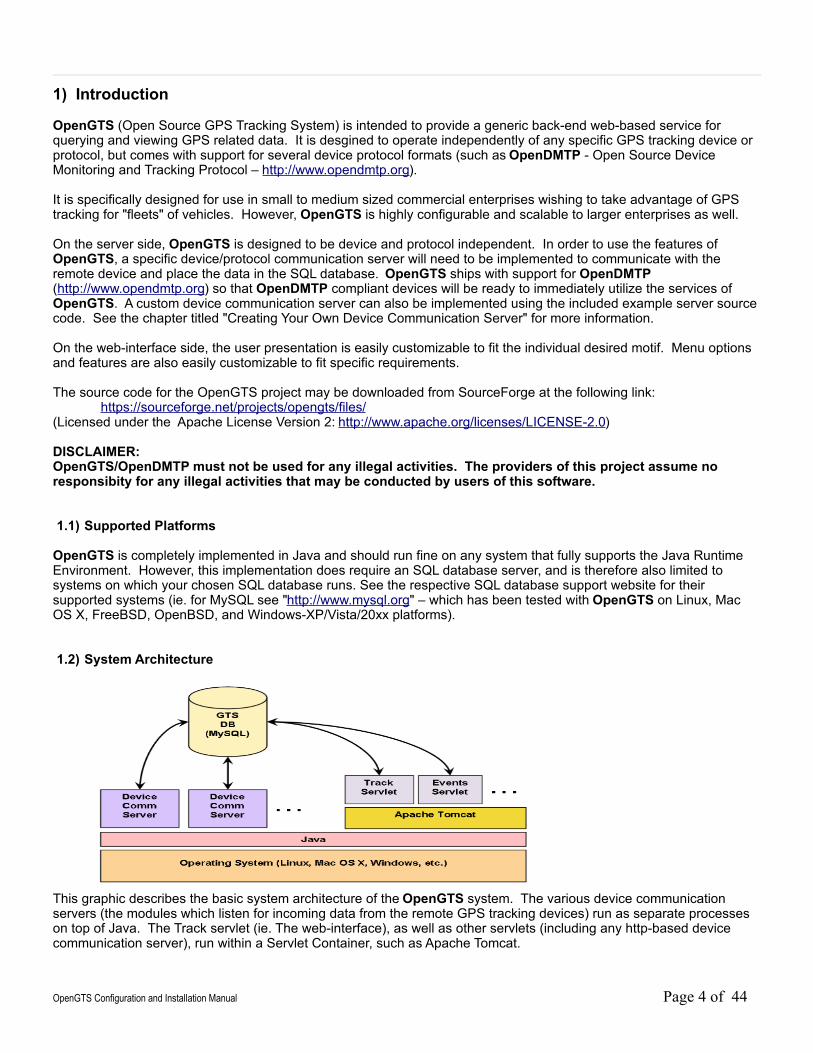
This graphic describes the basic system architecture of the OpenGTS system. The various device communication servers (the modules which listen for incoming data from the remote GPS tracking devices) run as separate processes on top of Java. The Track servlet (ie. The web-interface), as well as other servlets (including any http-based device communication server), run within a Servlet Container, such as Apache Tomcat.
OpenGTS Configuration and Installation Manual Page 4 of 44
1.3) Planned Enhancements
OpenGTS is always evolving, and new features are continually being made available. Here are some general categories of the features that are in the planning or implementation stage:
• Additonal map features.• Additional reports.
GTS Enterprise was built on OpenGTS and has several additional features available as well (more information regarding the GTS Enterprise can be found at "http://www.geotelematic.com/gts.html"):
• Ability to create Account from the web-interface.• Support for several “commercial use” mapping service providers.• Support for many additional remote GPS tracking devices.• Additional reporting options.• Simple 'Rules' engine to send notifications based on criteria from incoming events (enhanced Event Notification
Rules Engine is also available).
Contact us regarding the availability of these and other features at "[email protected]".
1.4) Document Conventions
In order to provide a generic installation/configuration document that covers various systems types (ie. Windows XP, Mac OS X, and the various Linux distributions), and the various versions of the OpenGTS system, the following conventions and assumptions have been adopted within this document:
• This document will assume that the target operating system is Linux-based. For other operating system types, the appropriate path separators and directory specifications will need to be used that match the requirements of your specific operating system. Environment variable specification may also vary between operating systems. For instance, to de-reference the JAVA_HOME environment vairable, "%JAVA_HOME%" would be specified on a Windows system, while "$JAVA_HOME" is specified on Linux and Mac OS X.
• This document will assume that the directory in which OpenGTS will be installed is "/usr/local/". If you will be installing OpenGTS in a different directory, you will need to replace the directory references in this document to the directory in which OpenGTS was installed.
• OpenGTS has a frequent release schedule. For consistency, this document will assume that the version of OpenGTS to be installed is "OpenGTS_1.2.3". So references to "OpenGTS_1.2.3" within this document should be replaced with the actual name and version of OpenGTS that you will be installing.
• On various command line examples, you may see the directory specification "/zzz". This specification is simply a placeholder name representing some current directory on your system, and not a literal directory name existing on your system.
• In various locations within this document, command-line options are specified as "-argName=value", where "argName" is the name of a command-line argument, and "value" is the value to be assigned to the command-ine argument. When entering commands in Windows at a DOS command prompt (such as when using the ".bat" version of the commands), command arguments such as -rootUser=root MUST either be enclosed in quotes, as in "-rootUser=root", or be specified with a colon instead of an equal-sign, as in -rootUser:root.
• In various locations within this document, the displayed command-line options may include example values that are to be replaced with values specific to your requirements. For example, a command-line option indicating an account may be specified as "-account=myaccount" or as "-account=<myaccount>". In this case the argument name "-account=" may be taken literally, while "myaccount" or "<myaccount>" indicates a value that should be replaced with a specific value matching your requirements.
OpenGTS Configuration and Installation Manual Page 5 of 44
2) Compiling the OpenGTS Source
Important Note: Installation of the supported OpenGTS features does require at least an intermediate knowledge of how to install and configure systems services such as the Java compiler, Apache Ant, MySQL (or other SQL database server), Apache Tomcat (or other servlet container), and other related technologies.
2.1) Prerequisites
Compiling OpenGTS requires that the following packages or applications be installed, configured, and running on the local system:
a) Java Compiler:
• JDK 6 Update XX Download page: http://java.sun.com/javase/downloads (download just JDK 6 Update XX)Important Note: To avoid potential headaches trying to get the OpenGTS code to compile, make sure you are using the "Sun Microsystems" version of the Java compiler. The 'other' versions have problems compiling this code. After installing the Java compiler, check your version with the following command:
java -versionMake sure it says "Java(TM)" and "Java HotSpot(TM) Client VM".Note: Make sure that the Java SDK installation 'bin' directory has been added to the PATH environment variable (see below). Failing to do so may result in compiler errors.IMPORTANT NOTE: Only install the JDK component, do not install the separate JRE component. The JDK already contains a JRE component, and the JDK is needed to compile the Java code. Having both the JDK and JRE installed on your system, may cause some confusion when it comes to compiling and running the application.
2.1.a.1) Note for Mac OS X users:The Java JDK v1.6.0 is likely already installed on your Mac OS X system, so it may not be necesary to download another copy of the Java JDK. Your installed version of the Java JDK v.1.6.0 may be in the following directory: /System/Library/Frameworks/JavaVM.framework/Versions/1.6.0/Home
2.1.a.2) Note for Fedora/CentOS Linux users:The Fedora/CentOS Java "OpenJDK Development Environment" can be downloaded and used instead of downloading the JDK6 directly from Sun Microsystems. The command to install the Java 1.6.0 developer environment on Fedora is as follows (must be 'root' to install): # yum install java-1.6.0-openjdk-devel.x86_64or # yum install java-1.6.0-openjdk-develDepending on the architecture of your installaed Fedora/CentOS system.The JAVA_HOME environment variable should then be set to the following: # export JAVA_HOME=/usr/lib/jvm/java-1.6.0-openjdk.x86_64or # export JAVA_HOME=/usr/lib/jvm/java-1.6.0-openjdkAgain depending on the architecture of your installed Fedora/CentOS system.
OpenGTS Configuration and Installation Manual Page 6 of 44
b) Apache Ant:
• Ant v1.7.1 [http://ant.apache.org/bindownload.cgi]Download v1.7.1: http://archive.apache.org/dist/ant/binaries/apache-ant-1.7.1-bin.zipNote: Make sure that the Ant installation 'bin' directory has been added to the PATH environment variable (see below).
2.1.b.1) Note for Mac OS X users:The latest Ant version is likely already installed on your Mac OS X system, so it may not be necesary to download another copy of the Apache Ant. Your installed version of Apache Ant may be in the following directory: /usr/share/ant
c) Apache Tomcat:
• Apache Tomcat v6.x servlet container [http://tomcat.apache.org/download-60.cgi]Dowload v6.0.26: http://www.apache.org/dist/tomcat/tomcat-6/v6.0.26/bin/apache-tomcat-6.0.26.zipNote: If your version of Linux distribution already comes with a version of Tomcat installed, it is still highly recommended that you start with a version of Tomcat downloaded directly from the Apache website. This will eliminate or reduce any permissions or classpath problems that may be encountered. Then when everything is up and working properly, if you choose to do so, you can go back and install OpenGTS in the version of Apache Tomcat that was shipped/installed with your Linux distribution.
2.1.c.1) Note for Linux users installing the downloaded Apache Tomcat:Within the Tomcat installation 'bin' directory (ie. "$CATALINA_HOME/bin"), make sure the execute permissions bit is set on all ".sh" files. If not set, the following command will set the execution bit: $ cd $CATALINA_HOME/bin $ chmod a+x *.shIf the execute bit is not set on these files, Tomcat "startup.sh" and "shutdown.sh" commands may not be able to execute.
2.1.c.2) Note for Debian/Ubuntu users using a pre-installed Apache Tomcat:If your Tomcat log files are filling up with "java.security.AccessControlException" messages when attempting to access System properties, then you may need to create/edit a Tomcat policy file in the "/etc/tomcat5/policy.d" directory that contains the following information (or similar):
grant codeBase "file:${catalina.home}/webapps/track/WEB-INF/-" { permission java.util.PropertyPermission "*", "read,write"; permission java.security.AllPermission; }; grant codeBase "file:${catalina.home}/webapps/events/WEB-INF/-" { permission java.util.PropertyPermission "*", "read,write"; permission java.security.AllPermission; }; grant codeBase "file:${catalina.home}/webapps/mologogo/WEB-INF/-" { permission java.util.PropertyPermission "*", "read,write"; permission java.security.AllPermission; };
Make sure the above values are appropriate for your installation.
d) JavaMail Support:
• Sun JavaMail API (v1.4.X) [http://java.sun.com/products/javamail/downloads/index.html]Download v1.4.X: (download/unzip file "javamail-1.4.X.zip") The jar file "mail.jar" from this downloaded zip file will be installed below.
OpenGTS Configuration and Installation Manual Page 7 of 44
e) MySQL:
• MySQL v5.X.X [http://dev.mysql.com/downloads/mysql/]Download v5.X.X [for Windows]: (download "mysql-essential-5.X.XX-m2-win64.msi")Note: Make sure that the MySQL installation 'bin' directory has been added to the PATH environment variable (see below).
2.1.e.1) Note for Mac OS X users:MySQL can be downloaded in the OS X package format from the following location:: http://dev.mysql.com/downloads/mysql/5.1.html#macosx-dmg
• MySQL Connector/J v5.1.XX JDBC driver [http://dev.mysql.com/downloads/connector/j/]Download v5.1.XX: (download/unzip file "mysql-connector-java-5.1.XX.zip ")Note: Connector/J is distributed under GPL.
Set the appropriate environment variables:
The following environment variable should be set to the installation directory of the corresponding package or application:
• JAVA_HOME – The Java JDK (NOT the JRE) installation directory.• ANT_HOME – The Apache Ant installation directory.• CATALINA_HOME – The Apache Tomcat installation directory.• GTS_HOME – The OpenGTS installation directory.
2.1.e.2) Note for Windows users:The location of the installation 'bin' directories for the Java SDK, Ant, and SQL database server installations, needs to be added to the command execution PATH environment variable (if the installation process has not already added them to the PATH variable). This can be accomplished through the "System Properties" window as follows:– Right-click on "My Computer" and select "Properties", the "System Properties" window will display.
Select the "Advanced" tab, then press the "Environment Variables" button.– In the "System Variables" section, add the following variables:
Variable Name: JAVA_HOME (required for building OpenGTS, and running Tomcat) Value: (The location of your JAVA SDK Installation Folder, NOT the JRE)
Variable Name: ANT_HOME Value: (The location of your Ant Installation Folder)
Variable Name: CATALINA_HOME (required for building OpenGTS) Value: (The location of your Apach Tomcat Installation Folder)
Variable Name: GTS_HOME Value: (The location of your OpenGTS Installation Folder)
(Quotes should NOT be used to enclose an installation directory for these environment variable specifications, even if the directory contains embedded spaces)
– Prefix the following to the "Path" environment variable in the "System Variables" section (create a new "Path" variable if one does not already exist):
.;%JAVA_HOME%\bin;%MYSQL_HOME%\bin;%ANT_HOME%\bin;(Quotes may be added to the PATH variable if necessary)
– Click "OK" on the "Environment Variable" window.
OpenGTS Configuration and Installation Manual Page 8 of 44
2.2) Compile the supporting GTS library jar files.
For the purposes of this document, we will assume that the target operating system is Linux-based, and that the location where OpenGTS will be installed is "/usr/local/OpenGTS_1.2.3/" (Note: you may need to choose another installation directory if you do not have 'root' access on the target system). Adjust the file/path separators and commands as necessary for your particular operating system, and chosen installation directory.
2.2a) Note for Windows users:– Environment variables may be defined in a command shell with the “set” command, as in the following
example: C:\> set GTS_HOME=C:\OpenGTS_1.2.3
– Environment variables are reference by enclosing them in '%'. For instance, after setting the environment variable JAVA_HOME to point to your JDK installation directory, this environment variable would be dereferenced as “%JAVA_HOME%”.
– The file path separator is the back-slash character “\”. So, while on Linux a file/directory could be referenced as “$JAVA_HOME/jre/lib/ext/.”, on Windows this same directory would be referenced as “%JAVA_HOME%\jre\lib\ext\.“
Set the environment variables:Prior to compiling the OpenGTS source code, at least the following environment variables should be set in the command shell where the code will be compiled (or set previously through the "System Properties" window):
• JAVA_HOME should point to the J2SE/JDK installation directory (NOT the JRE).• CATALINA_HOME should point to the Apache Tomcat installation directory.• GTS_HOME should point to the GTS installation directory (eg "/usr/local/OpenGTS_1.2.3/").
(Windows Users: When setting environment variables, quotes should not be used to enclose an installation directory, even if the directory contains embedded spaces)
Install the MySQL Connector/J jar file (if using MySQL server):Copy the MySQL Connector/J "mysql-connector-java-5.1.X-bin.jar" JDBC driver jar file into the following locations:
• $JAVA_HOME/jre/lib/ext/.(where $JAVA_HOME is the location of your Java installation)
2.2b) Note for Mac OS X users:On Mac OS X, the exended library directory may instead be "$JAVA_HOME/lib/ext/".
This will allow the JDBC driver to be available to all running Java code, and Tomcat servlet environments.(Important Note: make sure the permissions on the library jar files are world-readable)
Install the JavaMail API and JavaBean Activation Framework jar files:Copy the JavaMail api jar file "mail.jar" into the following location:
• $JAVA_HOME/jre/lib/ext/.(where $JAVA_HOME is the location of your Java installation)
2.2c) Note for Mac OS X users:On Mac OS X, the exended library directory may instead be "$JAVA_HOME/lib/ext/".
This will allow the JavaMail api to be available to all running Java code, and Tomcat servlet environments.(Important Note: make sure the permissions on the library jar files are world-readable)
OpenGTS Configuration and Installation Manual Page 9 of 44
Install the OpenGTS source code:Unzip the OpenGTS package in "/usr/local/" (this will need to be done as the "root" user), or other convenient directory (on Windows, choose a directory where you would like this package to be placed). For instance, if the OpenGTS package to be installed is "OpenGTS_1.2.3.zip", then the command to unzip the package would be:
/zzz> cd /usr/local/usr/local> su root/usr/local# unzip /tmp/OpenGTS_1.2.3.zip/usr/local# chown -R user:group OpenGTS_1.2.3/usr/local# exit/usr/local> export GTS_HOME=/usr/local/OpenGTS_1.2.3
(the above assumes that OpenGTS_1.2.3.zip was downloaded to "/tmp/". If the OpenGTS zip file was downloaded into a different directory, modify the above directory location and downloaded file name accordingly. Also, replace the user name "user", and group name "group", above with the name of the user:group that you wish to have own the OpenGTS installation).
(Also note that the "/zzz" directory name above is just a placeholder name which represents any current directory that may be in effect before the "cd" command is issued).
Compile the OpenGTS library ".jar "and servlet ".war" files:'cd' into the OpenGTS installation directory and compile the jar files, and servlet war files, using the supplied Ant "build.xml" script:
/usr/local> cd $GTS_HOME/usr/local/OpenGTS_1.2.3> ant all
This will build several jar files, and war files, in the "$GTS_HOME/build/" directory, including:
• "lib/gtsutils.jar" – This jar contains the base utilities and db access tools.• "lib/gtsdb.jar" – This jar contains the database access utilities and table definition.• "lib/gtsdmtp.jar" – This jar contains the SQL db datastore wrappers around the OpenDMTP server.• "lib/tools.jar" – This jar contains miscellaneous system check and administrative tools.• "track.war" – This "war" file (web-archive) contains the web-interface 'Track' servlet.• "events.war" – This "war" file contains the web accessible EventData access servlet.• "mologogo.war" – This "war" file contains the Mologogo device servlet.• "gc101.war" – This "war" file contains support for the Sanav GC-101 device.• "gprmc.war" – This "war" file contains a servlet support server for a generic http-based device server.
(Note:this is only a partial list. Other modules may be created as well).
OpenGTS Configuration and Installation Manual Page 10 of 44
3) Initialization and Installation Testing
Before using OpenGTS, it must first be initialized. This section describes the steps required for initialization and testing.
3.1) Initializing the SQL Database Tables
Before storing data in the SQL database, it must first be initialized with the tables used by OpenGTS. This can be accomplished with the "bin/init.sh" command as follows:
/zzz> cd $GTS_HOME/usr/local/OpenGTS_1.2.3> bin/initdb.sh -rootUser=<rootUser> -rootPass=<rootPass>
Where <rootUser> is the user with root access to the SQL server, and <rootPass> is the root user password (may be optional depending on the configuration of your SQL server). [NOTE: This is not the same as the Linux "root" user]
3.1a) Important note regarding ".sh" and ".bat" command files:Commands ending with ".sh" or ".bat" MUST be executed from the OpenGTS installation directory. Attempting to execute these commands from another directory may result in a "ClassNotFoundException" or ""NoClassDefFoundError" error, or similar. (This means that you must cd to $GTS_HOME, then execute the command as "bin/<command>") Windows users may wish to install a Perl interpreter on their machine in order to use the Perl versions (".pl") of the command-line scripts which do not require that they be executed from the OpenGTS installation directory. More information on possible Perl distributions available on Win32 platforms may be found at this location: "http://win32.perl.org/wiki/index.php?title=Win32_Distributions"
3.1b) Important note for Windows users:When using the ".bat" version of the commands in a DOS window, command arguments such as -rootUser=root must either be enclosed in quotes, as in "-rootUser=root", or be specified with a colon instead of an equal-sign, as in -rootUser:root. Thus, on Windows, the command is: bin\initdb.bat "-rootUser=userName" "-rootPass=userPass"Where 'userName' and 'userPass' should be replaced with the appropriate root user and password.
The "initdb.sh" command performs the following functions when initializing the OpenGTS database:• Creates a database called "gts".• Creates/Grants user "gts" with password "opengts" with access to the "gts" database.• Creates the following tables in the "gts" database (this is only a partial list):
• Account - Account owner table• User - User table• UserAcl - User Access-Control-List table• Device - Device information table• EventData - Received Event data• Geozone - Geozone/Geofence definitions• EventTemplate - Custom event packet templates (DMTP only)• PendingPacket - Packets pending transmission to device (DMTP only)
The "initdb.sh" command performs the same functions as the following sequence of commands:
/zzz> cd $GTS_HOME/usr/local/OpenGTS_1.2.3> bin/dbAdmin.pl -createdb -user=<rootUser>/usr/local/OpenGTS_1.2.3> bin/dbAdmin.pl -grant -user=<rootUser>/usr/local/OpenGTS_1.2.3> bin/dbAdmin.pl -tables=ca
OpenGTS Configuration and Installation Manual Page 11 of 44
Note for Windows Users: "bin/dbAdmin.pl" is only available for Linux users, and Windows users which are running within a Cygwin environment. "bin\dbConfig.bat" provides a subset of the features available in "bin/dbAdmin.pl" which will run from a Windows command prompt.
3.2) Testing the Installation.
3.2a) Important note regarding ".sh" and ".bat" command files:Commands ending with ".sh" or ".bat" MUST be executed from the OpenGTS installation directory. Attempting to execute these commands from another directory may result in a "ClassNotFoundException" or ""NoClassDefFoundError" error, or similar. (This means that you must cd to $GTS_HOME, then execute the command as "bin/<command>")
The following command has been included to assist in checking the installation of the system and displaying any inconsistencies that might cause problems at runtime:
/zzz> cd $GTS_HOME/usr/local/OpenGTS_1.2.3> bin/checkInstall.sh
Or, on Windows:
C:\> cd %GTS_HOME%C:\OpenGTS_1.2.3> bin\checkInstall.bat
This command will display various configured directories and environment variables. If any errors are displayed, they should be corrected (or at least understood) before continuing system deployment.
If you wish to test your SMTP email configuration (specified in one of the ".conf" runtime configuration files), you can add the option "-sendMail <emailAddress>", which will attempt to send a test email to the specified email address:
/usr/local/OpenGTS_1.2.3> bin/checkInstall.sh -sendMail [email protected]
(note that there are is a space between the '-sendMail' option and the email address)
Or, on Windows:
C:\OpenGTS_1.2.3> bin\checkInstall.bat -sendMail:[email protected]
Replate "[email protected]" with the email address you wish to have receive the test email.
3.3) Loading the Sample Data
Some sample data has been provided with the OpenGTS installation which can be loaded and viewed within the web-interface. Please refer to the document at "sampleData/README.txt" within the OpenGTS installation directory for information regarding how to load the sample data.
OpenGTS Configuration and Installation Manual Page 12 of 44
4) Installing “track.war”
The "track.war" (Web-ARchive) runs in a Java Servlet container and works with the SQL DB datastore to provide a full-featured web interface to the GPS location data captured in the SQL database from remote devices. The mapping support currently uses OpenLayers/OpenStreetMap, but can be configured to use other commercial mapping service providers.
4.1) Configuring the "webapp.conf" file
The default runtime configuration file "webapp.conf" includes the file "common.conf", which in-turn includes "system.conf" and "custom.conf". For most installations, the default values specified in this file can be left as-is. However, some items, such as your SMTP server specifications, should be configured to fit your system requirements.
4.2) Configuring the available reports
Various detail and summary reports can be defined using the file "reports.xml", which can be found at "$GTS_HOME/reports.xml".
More detailed information can be found in the above "reports.xml" file, and elsewhere in this document. Here is a summary of the available features in the "reports.xml" file (experience in the general format and editing of XML files will be necessary).
"ReportLayout" defines the expected record format and the available columns for the defined report. The specific report layout is defined by the specified Java class, and 2 report layouts have been provided:
• org.opengts.war.report.event.EventDataLayout - This layout expects to display EventData records and specifies available columns based on the fields available in the EventData record.
• org.opengts.war.report.field.FieldLayout - This layout expects to display generic "FieldData" records and specifies various available columns type which can be used to display pertinent data.
The "Report" tag specifies a Java class which is bound to a specific ReportLayout. The "Report" also specifies how it is to be presented to the user (ie. the menu option), report title, displayed columns, and report selection criteria.
4.3) Configuring the Private Label look & feel
The configuration and customization of the web user interface can be specified in the file "private.xml", which is located at "$GTS_HOME/private.xml". This file controls the following options that are available on a 'Domain' basis (the domain name of the reference URL visiting the server):
– The Date/Time formats, and displayed TimeZones.– The MapProvider used (ie. Google Maps, Microsoft Virtual Earth, Mapstraction, OpenLayers, etc). Including what
pushpin icons are to be displayed on the map.– The ReverseGeocodeProviders used to convert latitude/longitude values into a street address (Geonames, etc.).– The GeocodeProvider used to convert street addresses into a latitude/longitude (if available).– Available menu options, webpages, and customizing JSP files.– Available report options.– Access-Control-List (ACL) definitions.– And much, much more ...
Please refer to the comments contained within the "private.xml" file for more information.
OpenGTS Configuration and Installation Manual Page 13 of 44
OpenGTS includes mapping support for OpenLayers/OpenStreetMap, Google Maps, Microsoft Virtual Earth, and Mapstraction (which can support several other mapping service providers as well). Contact us regarding support for other commercial mapping service providers. If you will be using Google Maps for your map provider, you must also register for a Google Map key (make sure you comply with their terms of service) and place the returned key in the "private.xml" file at the location indicated (ie. replace "*** Place Google Maps Key Here ***" with your quoted key). To change the default displayed map pushpins, you can create your own 'Pushpins' section within your chosen MapProvider. See the 'private.xml' file Pushpins section (in the "openLayers" MapProvider section) for more information regarding customizing pushpin icons.
Consult the contents of the provided private-label file at "$GTS_HOME/private.xml" for more information on specific customizations (experiance in the general format, editing, and syntax of XML files will be necessary).
4.3a) Maintain proper XML syntax when modifying "private.xml" or "reports.xml"Make sure that any changes to the 'private.xml' file still comply with proper XML syntax. XML is very particular about proper syntax, and introducing an XML syntax error often results in an error message similar to the following when attempting to view the login page in a web browser:
Invalid 'private.xml' configuration, please contact the System Administrator
Run "bin/checkInstall.sh" to help diagnose any XML syntax errors that may have been introduced.
The general look-and-feel of the web-interface can also be changed by modifying the JSP file "$GTS_HOME/war/track/jsp/loginSession.jsp" and the various CSS files in the directory "$GTS_HOME/war/track/css/". Look for the "WebPages" tag section in the "private.xml" file for additional information regarding the customization of the "loginSession.jsp" file.
4.3b) IMPORTANT: Redeploy all servlets after modifying any runtime configuration fileChanges to any of "private.xml", "reports.xml", "webapp.conf", "common.conf", "system.conf", or "custom.conf" files (or other ".xml" or ".conf" file) will require that the "track.war" (as well as the other servlets) file be re-built and re-deployed.
4.4) Compiling/Installing the "track.war" Java Servlet
To build the "track.war" file, run the Ant build command as follows:
/zzz> cd $GTS_HOME /usr/local/OpenGTS_1.2.3> ant track
(note, the "ant all" performed above also builds the "track.war" file)
The target "track" is a wrapper for ant targets "track.compile" and "track.war". The target "track.compile" compiles all necessary classes and configuration files into the build directory "$GTS_HOME/build/track". The target "track.war" then creates the 'web archive' file "$GTS_HOME/build/track.war". If any of the runtime configuration files have changed, such as "private.xml", "reports.xml", "webapp.conf", or "common.conf" files (or possibly any other "*.conf" of "*.xml" file), then the "track.war" file must be rebuilt and redeployed. A shortcut to rebuilding the "track.war" file, if all source modules have already been compiled, is to issue the following command:
/zzz> cd $GTS_HOME /usr/local/OpenGTS_1.2.3> ant track.war
This will simply repackage the "track.war" file from the pre-built source modules, and changed runtime configuration files. If everything has already been compiled, this command typically takes only a few seconds to complete.
OpenGTS Configuration and Installation Manual Page 14 of 44
Install the created "track.war" file per the Apache Tomcat installation/configuration instructions. Typically, this means copying the "track.war" file to the directory "$CATALINA_HOME/webapps/.":
/usr/local/OpenGTS_1.2.3> cp build/track.war $CATALINA_HOME/webapps/.
Or, the following "ant" target may also be used:
/usr/local/OpenGTS_1.2.3> ant track.deploy
The above method for deployment assumes that Tomcat is set for 'autoDeploy="true"'. If your changes to not appear after rebuilding and redeploying the "track.war" file, then it may be necessary to force Tomcat to update the "track.war" servlet by following these steps:– Stop Tomcat (ie. "$CATALINA_HOME/bin/shutdown.sh")– Delete the existing "track" servlet (ie. "rm -rf $CATALINA_HOME/webapps/track*")– Deploy the new "track" servlet (ie. "cp $GTS_HOME/build/track.war $CATALINA_HOME/webapps/.")– Restart Tomcat (ie. "$CATALINA_HOME/bin/startup.sh")
4.5) Testing the installation
4.5a) Note regarding secure web access:Configuration and use of 'https' (ie. SSL) is highly recommended as the URL includes the account password and will be encrypted via 'https', but will be sent in the clear if plain 'http' is used. Instructions for configuring Tomcat to support SSL can be found on the Apache Tomcat website.
After building/deploying 'track.war', you should be able to view the login page with a URL similar to the following:
http://localhost:8080/track/Track
(replace "'localhost:8080" with your own domain name where 'track.war' was installed.)
Support for reverse-geocoding (turning a latitude/longitude into an address), using services such as Geonames (http://geonames.org) and Google, has also been included. Look for the "ReverseGeocodeProvider" tags in the 'private.xml' file for more information.
4.5b) Note on Browser Compatibility:The GPS tracking map page in the web interface makes heavy use of JavaScript and HTML formatting. Firefox v3.X.X is the platform targeted, but it also appears to work fine (with some minor differences) on Microsoft IE 6.0/7.0 (some visual anomalies have been reported with earlier versions of IE), and Safari 3.x.x/4.x.x. Other browsers have not been fully tested.
OpenGTS Configuration and Installation Manual Page 15 of 44
5) Installing “events.war”
The "events.war" (Web-ARchive) runs in a Java Servlet container and works with the SQL DB datastore to allow downloading selected portions of a sequence of events over the web. This can be used with web-based mapping applications to provide near real-time tracking of a vehicle or person. The '"events.war" servlet currently supports data retrieval in KML, GPX, or CSV file formats and can be used in mapping programs such as Google Earth, or MS MapPoints.
5.1) Configuring the "webapp.conf" file
The default runtime configuration file "webapp.conf" includes the file "common.conf", which in-turn includes "system.conf" and "custom.conf". For most installations, the default values specified in this file can be left as-is. However, some items, such as your SMTP server specifications, should be configured to fit your system requirements.
Should you wish to customize the "webapp.conf" file specifically for the "events.war" servlet, copy this file to the directory "$GTS_HOME/war/events/WEB-INF/" and modify this copy.
5.2) Compiling/Installing the "events.war" Java Servlet
To build the "events.war" file, run the Ant build command as follows:
/zzz> cd $GTS_HOME /usr/local/OpenGTS_1.2.3> ant events
(note, the "ant all" performed above also builds the "events.war" file)
The target "events" is a wrapper for ant targets "events.compile" and "events.war". The target "events.compile" compiles all necessary classes and configuration files into the build directory "$GTS_HOME/build/events". The target "events.war" then creates the 'web archive' file "$GTS_HOME/build/events.war".
Install the "events.war" file per the Apache Tomcat installation/configuration instructions. Typically, this simply involves copying the "events.war" file to the directory "$CATALINA_HOME/webapps/.". (The above method for deployment assumes that Tomcat is set for 'autoDeploy="true"')
5.3) Testing the installation
Access the data stored in the SQL DB via the web with the following constructed URL:
http[s]://localhost:8080/events/<file>.{kml|xml|csv|txt|gpx}? a[ccount]=<account> - the account name &u[ser]=<user> - the user name &p[assword]=<password> - the account/user password &d[evice]=<device> - the device name [&rf=<fromTime>] - optional 'from' data range. [&rt=<toTime>] - optional 'to' data range. [&l[imit]=<limit>] - optional 'limit' number of returned events.
Where "localhost:8080" should be replaced with the actual domain name and port used to access the Apache Tomcat web server. [Note: above items placed in square-brackets are optional. The options placed in curly braces indicate that one of the options within the curly braces should be selected].
OpenGTS Configuration and Installation Manual Page 16 of 44
Note: The 'rf' and 'rt' date ranges may be specified in 'Unix Epoch' time format (number of seconds since midnight Jan 1 1970) or in "yyyy/mm/dd/HH:MM:SS" format. If not specified, the last 100 events will be returned.
5.3a) Note regarding secure web access:Configuration and use of 'https' (ie. SSL) is highly recommended as the URL includes the account password and will be encrypted via 'https', but will be sent in the clear if plain 'http' is used. Instructions for configuring Tomcat to support SSL can be found on the Apache Tomcat website.
Some examples:
• https://localhost:8080/events/data.csv?a=opendmtp&p=mypass&d=mobile
Return a CSV formatted data file ('data.csv') containing the last 100 event record for the device 'opendmtp'/'mobile'. The data is returned via an http SSL connection. (Note: replace 'mypass' with the proper password)
• http://localhost:8080/events/data.kml?a=gts&p=mypass&d=dev&rf=1145776000&rt=1145777000
Return a KML (XML) fomatted data file ('data.kml') with the first 100 events within the specified range for the device "gts/dev".
• http://localhost:8080/events/data.gpx?a=gts&p=mypass&d=dev&rf=1145776000&rt=1145777000
Return a GPX (XML) fomatted data file ('data.gpx') with the first 100 events within the specified range for the device "gts/dev" (see "http://www.topografix.com/gpx.asp" for information regarding the GPX data format).
Google Earth has the capability of automatically polling data from this URL at specified intervals. To configure Google Earth to read event data points from the server, click on "Add" on the main menu bar, then select "Network Link". Add the KML retrieval URL to the server and click "Refresh Parameters" to be able to enter periodic refresh times. To always display the most recent events within Google Earth, omit the date range option ("rf" and "rt") and instead specify the option "limit" to cause the returned list to always include the latest set of events.
• http://localhost:8080/events/data.kml?a=gts&p=mypass&d=dev&limit=100
Return a KML (XML) fomatted data file ('data.kml') with the last 100 available events for the device "gts/dev".
• http://localhost:8080/events/data.kml?a=gts&p=mypass&d=dev&limit=1
Return a KML (XML) fomatted data file ('data.kml') with only the last (most recent) event for the device "gts/dev".
OpenGTS Configuration and Installation Manual Page 17 of 44
6) Database Administration
6a) Important note regarding ".sh" and ".bat" command files:Commands ending with ".sh" or ".bat" MUST be executed from the OpenGTS installation directory. Attempting to execute these commands from another directory may result in a "ClassNotFoundException" or ""NoClassDefFoundError" error, or similar. (This means that you must cd to $GTS_HOME, then execute the command as "bin/<command>")
6b) Important note for Windows users:When using the ".bat" version of the commands in a DOS window, command arguments such as -rootUser=root must either be enclosed in quotes, as in "-rootUser=root", or be specified with a colon instead of an equal sign, as in -rootUser:root .
Most database administration (Account, User, and Device, etc) can be performed through either the command-line utilities or through the web-interface. The example Account/User/Device editing examples shown below describe only a few of the possible fields in each of these tables. The file 'SCHEMA.txt', included with the OpenGTS package, contains a list of the current tables, and the fields in each of the available tables.
A list of the currently defined tables and fields can also be generated with the following command:
/zzz> cd $GTS_HOME/usr/local/OpenGTS_1.2.3> bin/dbAdmin.pl -schema
Or, on Windows:
C:\zzz> cd %GTS_HOME%C:\OpenGTS_1.2.3> bin\dbAConfig.bat -schema
6.1) Creating/Editing Accounts
The command "bin/admin.sh Account" supports many administrative function which act on the SQL "Account" table. Here are a few of the functions that can be performed using the "bin/admin.sh Account" command:
Creating an Account:
/usr/local/OpenGTS_1.2.3> bin/admin.sh Account -account=<acct> -create
This creates the specified Account with default values (replace "<acct>" with the account id you wish to create).
Editing an Account:
/usr/local/OpenGTS_1.2.3> bin/admin.sh Account -account=<acct> -edit
This command displays a command-line Account field editor, similar to the following:
OpenGTS Configuration and Installation Manual Page 18 of 44
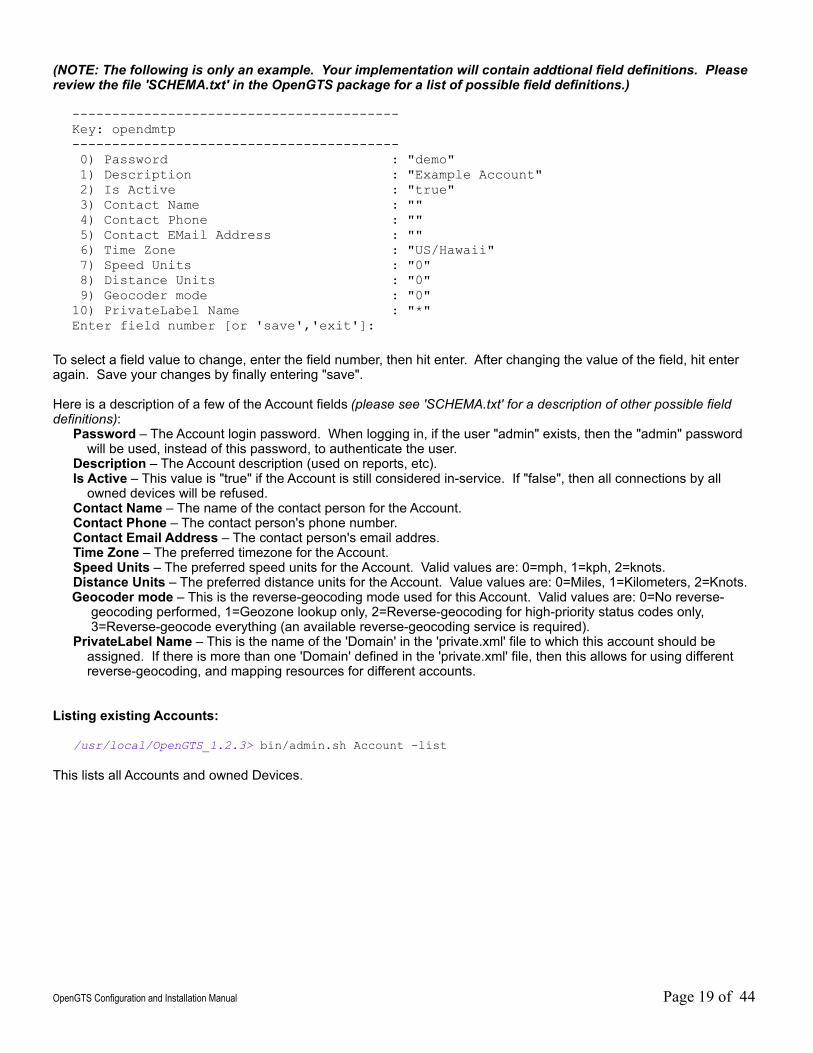
(NOTE: The following is only an example. Your implementation will contain addtional field definitions. Please review the file 'SCHEMA.txt' in the OpenGTS package for a list of possible field definitions.)
-----------------------------------------Key: opendmtp----------------------------------------- 0) Password : "demo" 1) Description : "Example Account" 2) Is Active : "true" 3) Contact Name : "" 4) Contact Phone : "" 5) Contact EMail Address : "" 6) Time Zone : "US/Hawaii" 7) Speed Units : "0" 8) Distance Units : "0" 9) Geocoder mode : "0"10) PrivateLabel Name : "*"Enter field number [or 'save','exit']:
To select a field value to change, enter the field number, then hit enter. After changing the value of the field, hit enter again. Save your changes by finally entering "save".
Here is a description of a few of the Account fields (please see 'SCHEMA.txt' for a description of other possible field definitions):
Password – The Account login password. When logging in, if the user "admin" exists, then the "admin" password will be used, instead of this password, to authenticate the user.
Description – The Account description (used on reports, etc).Is Active – This value is "true" if the Account is still considered in-service. If "false", then all connections by all
owned devices will be refused.Contact Name – The name of the contact person for the Account.Contact Phone – The contact person's phone number.Contact Email Address – The contact person's email addres.Time Zone – The preferred timezone for the Account.Speed Units – The preferred speed units for the Account. Valid values are: 0=mph, 1=kph, 2=knots.Distance Units – The preferred distance units for the Account. Value values are: 0=Miles, 1=Kilometers, 2=Knots.Geocoder mode – This is the reverse-geocoding mode used for this Account. Valid values are: 0=No reverse-
geocoding performed, 1=Geozone lookup only, 2=Reverse-geocoding for high-priority status codes only, 3=Reverse-geocode everything (an available reverse-geocoding service is required).
PrivateLabel Name – This is the name of the 'Domain' in the 'private.xml' file to which this account should be assigned. If there is more than one 'Domain' defined in the 'private.xml' file, then this allows for using different reverse-geocoding, and mapping resources for different accounts.
Listing existing Accounts:
/usr/local/OpenGTS_1.2.3> bin/admin.sh Account -list
This lists all Accounts and owned Devices.
OpenGTS Configuration and Installation Manual Page 19 of 44
6.2) Creating/Editing Users
The command "bin/admin.sh User" supports several administrative functions which act on the SQL "User" table. Here are a few of the functions that can be performed using the "bin/admin.sh User" command:
Creating a User:
/usr/local/OpenGTS_1.2.3> bin/admin.sh User -account=<acct> -user=<user> -create
This creates the specified User with default values (replace "<user>" with the user id you wish to create). The user name "admin" is reserved for use by the Account administrator. When the Account administrator logs in (by leaving the user name field blank on the log in screen), then the log in process will check to see if the user "admin" exists. If this user name does exist, then the password and access-control assigned to the "admin" user will be used for the Account administrator (Note: the default login user can be changed on the Account Admin web page, or on the Account command-line edit).
Editing a User:
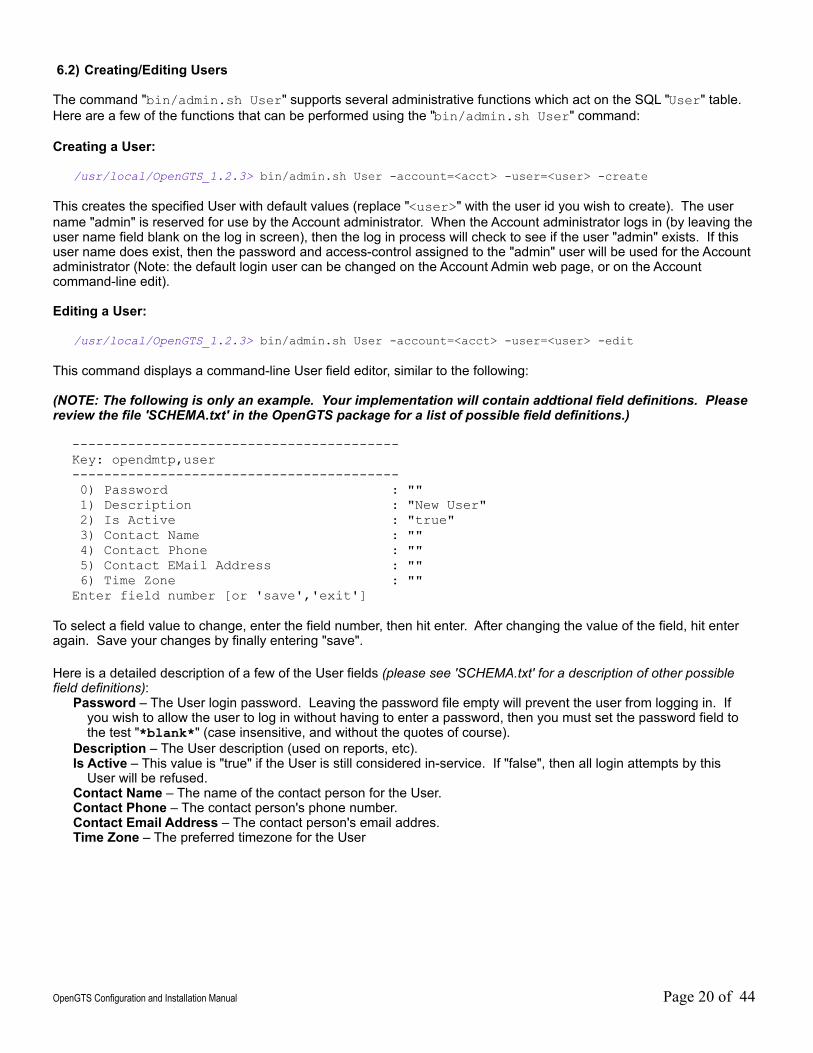
/usr/local/OpenGTS_1.2.3> bin/admin.sh User -account=<acct> -user=<user> -edit
This command displays a command-line User field editor, similar to the following:
(NOTE: The following is only an example. Your implementation will contain addtional field definitions. Please review the file 'SCHEMA.txt' in the OpenGTS package for a list of possible field definitions.)
-----------------------------------------Key: opendmtp,user----------------------------------------- 0) Password : "" 1) Description : "New User" 2) Is Active : "true" 3) Contact Name : "" 4) Contact Phone : "" 5) Contact EMail Address : "" 6) Time Zone : ""Enter field number [or 'save','exit']
To select a field value to change, enter the field number, then hit enter. After changing the value of the field, hit enter again. Save your changes by finally entering "save".
Here is a detailed description of a few of the User fields (please see 'SCHEMA.txt' for a description of other possible field definitions):
Password – The User login password. Leaving the password file empty will prevent the user from logging in. If you wish to allow the user to log in without having to enter a password, then you must set the password field to the test "*blank*" (case insensitive, and without the quotes of course).
Description – The User description (used on reports, etc).Is Active – This value is "true" if the User is still considered in-service. If "false", then all login attempts by this
User will be refused.Contact Name – The name of the contact person for the User.Contact Phone – The contact person's phone number.Contact Email Address – The contact person's email addres.Time Zone – The preferred timezone for the User
OpenGTS Configuration and Installation Manual Page 20 of 44
6.3) Creating/Editing Devices
The command "bin/admin.sh Device" supports many administrative functions which act on the SQL "Device" table. Here are a few of the functions that can be performed using the "bin/admin.sh Device" command:
Creating a Device:
/usr/local/OpenGTS_1.2.3> bin/admin.sh Device -account=<acct> -device=<dev> -create
This creates the specified Device with default values (replace "<dev>" with the device id you wish to create).
Editing a Device:
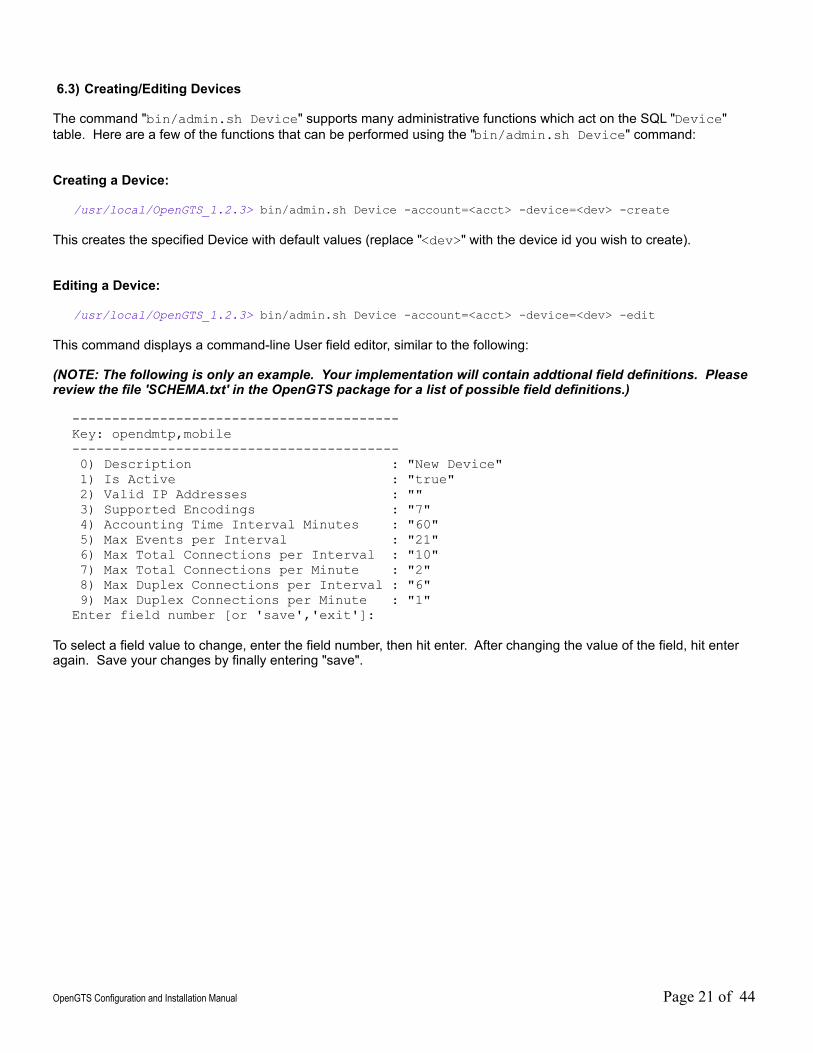
/usr/local/OpenGTS_1.2.3> bin/admin.sh Device -account=<acct> -device=<dev> -edit
This command displays a command-line User field editor, similar to the following:
(NOTE: The following is only an example. Your implementation will contain addtional field definitions. Please review the file 'SCHEMA.txt' in the OpenGTS package for a list of possible field definitions.)
-----------------------------------------Key: opendmtp,mobile----------------------------------------- 0) Description : "New Device" 1) Is Active : "true" 2) Valid IP Addresses : "" 3) Supported Encodings : "7" 4) Accounting Time Interval Minutes : "60" 5) Max Events per Interval : "21" 6) Max Total Connections per Interval : "10" 7) Max Total Connections per Minute : "2" 8) Max Duplex Connections per Interval : "6" 9) Max Duplex Connections per Minute : "1"Enter field number [or 'save','exit']:
To select a field value to change, enter the field number, then hit enter. After changing the value of the field, hit enter again. Save your changes by finally entering "save".
OpenGTS Configuration and Installation Manual Page 21 of 44
Here is a detailed description of a few of the Device fields (please see 'SCHEMA.txt' for a description of other possible field definitions):
Description – The description of the device (used on reports, etc).Is Active – "true" if this device is considered still in-service. If "false", all connections from this device will be
refused.Valid IP Addresses – The IP Address by the Device on an incoming connection is checked against this specified
block of valid IP addresses, and refused if the IP address does not match. A blank value accepts all incoming IP addresses.
Supported Encodings – This is an OpenDMTP protocol parameters, and should generally always be "7". See the OpenDMTP protocol specification for more information.
Accounting Time Interval Minutes – (OpenDMTP only) This value is used to prevent runaway clients from consuming too much bandwidth. The value here specifies the number of minutes over which the following "Max" value limits are imposed. A value of "0" disables connection accounting.
Max Events per Interval – (OpenDMTP only) The maximum number of events allowed during the above specified interval.
Max Total Connections per Interval – (OpenDMTP only) This is the maximum number of TCP or UDP connections that are allowed during the above specified interval.
Max Total Connections per Minute – (OpenDMTP only) This is the maximum number of TCP or UDP connections that are allowed during a 60 second interval.
Max Duplex Connections per Interval – (OpenDMTP only) This is the maximum number of TCP connections that are allowed during the above specified interval.
Max Duplex Connections per Minute – (OpenDMTP only) This is the maximum number of TCP connections that are allowed during a 60 second interval.
Retrieving Device Events through the command-line:
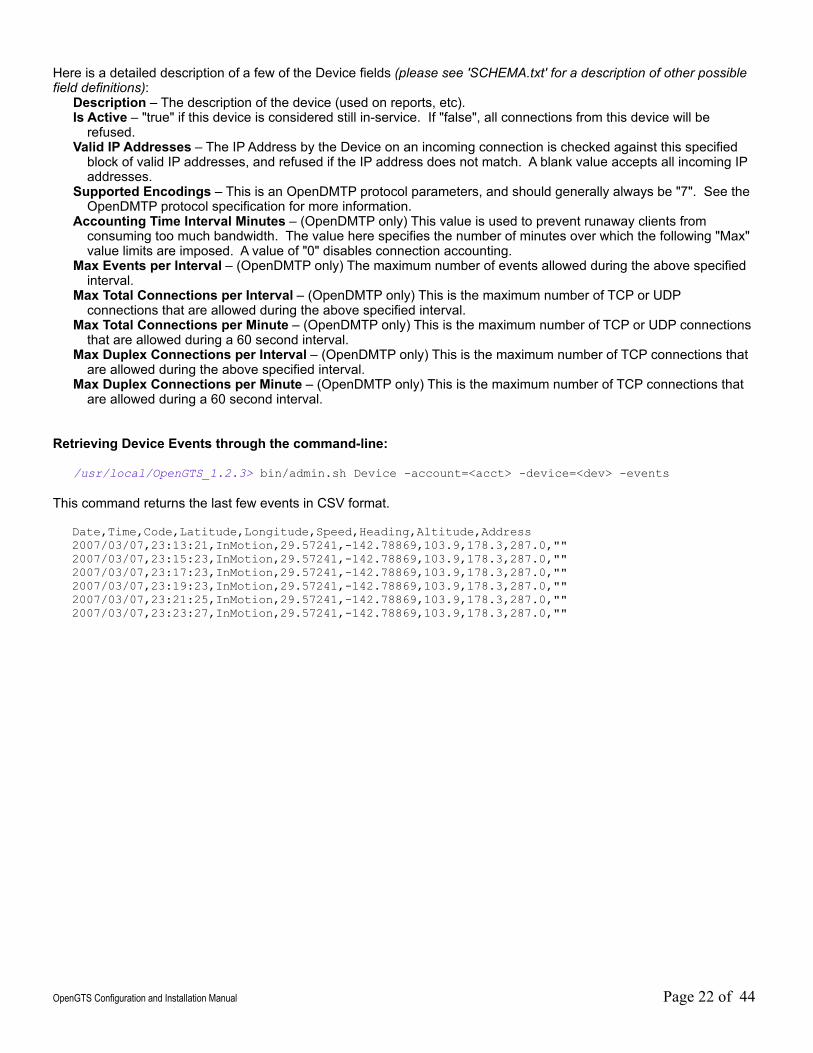
/usr/local/OpenGTS_1.2.3> bin/admin.sh Device -account=<acct> -device=<dev> -events
This command returns the last few events in CSV format.
Date,Time,Code,Latitude,Longitude,Speed,Heading,Altitude,Address2007/03/07,23:13:21,InMotion,29.57241,-142.78869,103.9,178.3,287.0,""2007/03/07,23:15:23,InMotion,29.57241,-142.78869,103.9,178.3,287.0,""2007/03/07,23:17:23,InMotion,29.57241,-142.78869,103.9,178.3,287.0,""2007/03/07,23:19:23,InMotion,29.57241,-142.78869,103.9,178.3,287.0,""2007/03/07,23:21:25,InMotion,29.57241,-142.78869,103.9,178.3,287.0,""2007/03/07,23:23:27,InMotion,29.57241,-142.78869,103.9,178.3,287.0,""
OpenGTS Configuration and Installation Manual Page 22 of 44
6.4) General Database Administrative Functions
The command "dbAdmin.pl" (only available as a Perl script) can perform various administrative functions on the SQL database (Note: the command 'bin\dbConfig.bat' is provided for Windows users, and performs a subset of the operations available to the "dbAdmin.pl" command). Here are a few of the functions that can be performed using the "dbAdmin.pl" command:
Verify/Update table columns:
/usr/local/OpenGTS_1.2.3> bin/dbAdmin.pl -tables
This command will check the column configuration of all OpenGTS tables and report on any missing columns, or other anomolies. If an OpenGTS table does not exist, it will be created.
/usr/local/OpenGTS_1.2.3> bin/dbAdmin.pl -tables=c
When upgrading to a newer version of OpenGTS in which new columns have been added to various tables, the above command will issue the required "ALTER TABLE" commands to the tables as required in order to add any new table columns. If a specific column 'type' has changed, using "-tables=ca" will cause column types to be altered.
/usr/local/OpenGTS_1.2.3> bin/dbAdmin.pl -tables=ca
Or, on Windows:
C:\OpenGTS_1.2.3> bin\dbConfig.bat -tables:ca
This command should be used whenever upgrading to a newer version of OpenGTS.
Dump tables to disk:
/usr/local/OpenGTS_1.2.3> bin/dbAdmin.pl -dump [-dir=/tmp/gts]
This command will dump all OpenGTS tables to the directory specified by the "-dir" argument ("/tmp/gts" is the default destination). If required by your MySQL installation, you may also need to specify the database root user (ie. as in "-rootUser=<user>"). Individual tables can then later be reloaded with the "-load=<table>" option.
(Note for Linux users: On some versions of Linux which employ SELinux, you may receive an error indicating that MySQL is not allowed to write into the specified directory. In these cases, you may need to either specify a directory that MySQL is allowed to write to, or change the SELinux security settings to provide MySQL with authorization to write to the "/tmp" directory.)
Load tables from Disk:
/usr/local/OpenGTS_1.2.3> bin/dbAdmin.pl -load=<table> [-dir=/tmp/gts]
This command will load the specified table from the file previously created by the "-dump" argument. During the table load, columns are matched where possible. If a column is present in the 'dumped' file, but has been removed in the current GTS table, a warning will be generated that the column has been dropped. This command is useful when small table changes need to be made in the column structure. [Note: the square brackets specified above indicate that the option within the brackets is optional. The square brackets should not be specified literally on the command-line if the optional argument within the brackets is used].
OpenGTS Configuration and Installation Manual Page 23 of 44
7) Installing/Starting the OpenDMTP server
This step is only necessary if you are planning on using OpenDMTP compliant devices.
7.1) Configuring the "defaults.conf" File
The file "dcservers.xml" contains a few configurable properties that effect the execution of the OpenDMTP server (server name "gtsdmtp" in the file). Most of the properties values should be left as their default value, but the following properties values should be set to those appropriate to your operating environment:
• tcpPort="31000"• udpPort="31000"
These are specified on the "ListenPorts" tag, and are the default ports on which the OpenDMTP server listens for incoming connections from the remote devices. You can change this port by changing the value on this tag attribute. You can also tell the OpenDMTP server to listen on more than one port by specifying them with comma separators. (ie 'tcpPort="31000,31100"').
7.2) Starting the OpenDMTP Server
The OpenDMTP server can be started as follows:
/zzz> cd $GTS_HOME /usr/local/OpenGTS_1.2.3> bin/runserver.sh -s gtsdmtp
7.2a) Important note regarding ".sh" and ".bat" command files:Commands ending with ".sh" or ".bat" MUST be executed from the OpenGTS installation directory. Attempting to execute these commands from another directory may result in a "ClassNotFoundException" or ""NoClassDefFoundError" error, or similar. (This means that you must cd to $GTS_HOME, then execute the command as "bin/<command>")
Or, the Perl version of this command can be used without needing to be in the OpenGTS installation directory:
/zzz> $GTS_HOME/bin/runserver.pl -s gtsdmtp
On Windows, the command can omit the "-s" and can be entered as follows:
C:\> cd \OpenGTS_1.2.3C:\OpenGTS_1.2.3\> \bin\runserver.bat gtsdmtp
The server will initialize and start listening on the port(s) specified by "dmtp.port" in the "defaults.conf" file for TCP & UDP connections. To change the listen port on the command line, a "-port" can be added as follows:
/zzz> $GTS_HOME/bin/runserver.pl -s gtsdmtp -port 31123
Or on Windows:
C:\OpenGTS_1.2.3\> \bin\runserver.bat gtsdmtp -port:31123
To set listening on port "31123".
You can also add the command-line option "-debugMode" to enable debug-level logging.
OpenGTS Configuration and Installation Manual Page 24 of 44
While running in "background" mode, the output logs are stored in the file "$GTS_HOME/logs/gtsdmtp.log". (The file "gtsdmtp.out" is also created by "runserver.pl" to capture output to stdout/stderr, but will typically remain empty).
When testing/debugging, you may also start a server "interactively". That is, the server is run in the foreground (ie. not 'backgrounded'), and all logging output is sent to the console instead of the log file. To start a server "interactively", add the option "-i" to the command line, as follows:
/zzz> $GTS_HOME/bin/runserver.pl -s gtsdmtp -i
(To stop the server in this mode, simply press 'Control-C')
7.3) Stopping the OpenDMTP Server
When started in "background" mode (ie. Without the "-i" option), a "Process ID" (PID) file is created at "$GTS_HOME/logs/gtsdmtp.pid", which contains the process-id of the backgrounded task. This file is used to stop the server with the command:
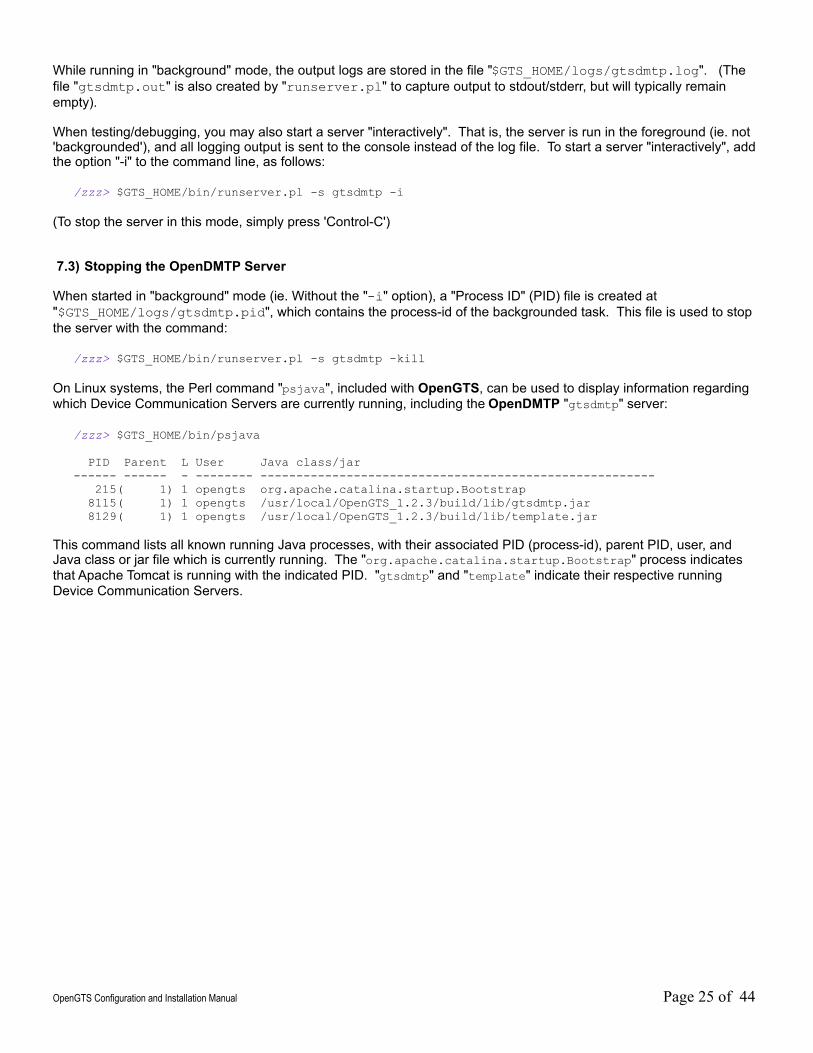
/zzz> $GTS_HOME/bin/runserver.pl -s gtsdmtp -kill On Linux systems, the Perl command "psjava", included with OpenGTS, can be used to display information regarding which Device Communication Servers are currently running, including the OpenDMTP "gtsdmtp" server:
/zzz> $GTS_HOME/bin/psjava
PID Parent L User Java class/jar------ ------ - -------- ------------------------------------------------------- 215( 1) 1 opengts org.apache.catalina.startup.Bootstrap 8115( 1) 1 opengts /usr/local/OpenGTS_1.2.3/build/lib/gtsdmtp.jar 8129( 1) 1 opengts /usr/local/OpenGTS_1.2.3/build/lib/template.jar
This command lists all known running Java processes, with their associated PID (process-id), parent PID, user, and Java class or jar file which is currently running. The "org.apache.catalina.startup.Bootstrap" process indicates that Apache Tomcat is running with the indicated PID. "gtsdmtp" and "template" indicate their respective running Device Communication Servers.
OpenGTS Configuration and Installation Manual Page 25 of 44
8) Creating your own Device Communication Server
In order for OpenGTS to receive data from a device, a customized "Device Communication Server" will need to be implemented that understands the protocol used to communicate with the remote device, and insert received events into the SQL database. This section provides a brief description of the example 'template' servers provided with OpenGTS for implementing your own remote device communication server.
The method used by remote devices to transport events to the server varies greatly with the manufacturer of the device. Some transport data to a server via SMS messages, some use an SMTP email transport to send data to a server, some use an HTTP-based protocol which encode data in the request to the server, and many use some form of raw-socket based communication (via TCP/UDP) to connect to a listener on the server to transmit data. In order to create a device communication server that is able to parse incoming data from a device, an intimate understanding of the specifics of the protocol used by the device manufacturer is required. OpenGTS includes examples for HTTP-based servers, and raw-socket based servers (supporting both TCP and UDP), however, since each device manufacturer typically has their own protocol and way of transporting data, these example servers cannot be assumed to just-work with any/every device. Depending on the particular device chosen, there may be a significant and substantial amount of work necessary in order to support the chosen hardware device.
The first, and most important, step when starting to implement a device communication server for a chosen hardware device is to obtain and fully understand the protocol documentation from the manufacturer of the device. While http-based communication can often be reverse-engineered from observing the data arriving at the server, attempting to reverse-engineer a raw-socket based protocol can prove extremely difficult, if not impossible, without proper protocol documentation.
8a) Important note regarding the implemention of a device communication server:Implementing a device communication server for a given device may take a significant and substantial amount of programming work to accomplish, depending on the device protocol. To implement a server, you will likely need an in-depth understanding of TCP/UDP based communication, and a good understanding of Java programming techniques, including socket communication, multi-threading, and possibly bitwise manipulation techniques for extracting bit fields from binary data (including knowing whether the tracking device sends data in big-endian or little-endian formats). If using an http-based protocol, you may also need an understanding of how servlets are built, and how they operate within a Servlet container, such as Apache Tomcat.
OpenGTS Configuration and Installation Manual Page 26 of 44
8.1) HTTP Based Device Communication Servers
[Skills required: Java, Servlets, HTTP based protocols]
HTTP-based communication is typically the easiest to implement. If your remote tracking device sends messages to the server using an HTTP-base communication protocol, then the example server 'gprmc' can be modified to parse received data and insert it into the SQL database. The sources for the 'gprmc' server (named after the $GPRMC record in the NMEA-0183 protocol) can be found in the OpenGTS source directory "src/org/opengts/war/gprmc" and runs as a Servlet in a servlet container such as Apache Tomcat.
This module has many built-in configurable options and may only need special customization properties which can be specified in the "webapp.conf" file. If you need to make changes to this source module to support your device, it is recommended that you copy the source files to an new directory (remember to change the Java package name, and also copy/modify the "web.xml" information found at "war/gprmc/WEB-INF/web.xml"), then modify the copied sources with the specific changes required by your tracking device.
This module will need to be configured and installed in a servlet container, similar to the installation process used for other servlets in this documentation.
Consult the 'gprmc' server source code directly for additional information.
8.2) Raw Socket Based Device Communication Server
[Skills required: Java, TCP/UDP socket communication, multi-threading, bitwise manipulation, general client/server protocols]
If your remote tracking device sends messages to the server using a socket-based communication protocol, then the example 'template' server can be modified to parse received data and insert it into the SQL database. The sources for the 'template' server can be found in the OpenGTS source directory "src/org/opengts/servers/template". This server type runs as a separate process listening on a selected socket port for incoming TCP/UDP connections.
You will likely need to make some significant changes to the source code to support your particular device. It is recommended that you copy the source files to an new directory (remember to change the Java package name), then modify the copied sources with the specific changes required by your tracking device.
Here are some of the main attributes of the protocol that need to be determined before starting to implement a TCP/UDP socket based device communication server:
• Are the protocol packets transmitted in ASCII, Binary, or both?• How is the actual length of a client packet determined (this is extremely important)?• What are the various types and content of packets received from the client?• For binary packets, are integer fields encoded in Big-Endian or Little-Endian format?• What response packets, if any, is the client expecting to receive from the server?
The example 'template' server contains the following source modules:Constants.java – This module constains most of the customized configurable options used to support your
specific remote device protocol. Such as timeouts, minimum/maximum packet lengths, ASCII/Binary encoding, etc. The basic information regarding the type of protocol should be set in this module.
Main.java – This is the main entry point for the server and will not likely need to be modified.TrackClientPacketHandler.java – The purpose of this module is to understands the specific characteristics
of the communication protocol for the remote device, and will require most of the significant customization required to support your remote device. This is where incoming client packets are identified, data is parsed and inserted into the tables, and any required responses are returned to the client device.
TrackServer.java – This is a wrapper/handler for a TCP/UDP session and delegates most control to the TrackClientPacketHandler class.
OpenGTS Configuration and Installation Manual Page 27 of 44

This server environment/framework handles listening for incoming connections and multi-threading for you (this server can handle multiple simultaneous incoming connections), as well as most error handling.
When using the example 'template' server as the basis for your own device communication server, it is recommended that you copy the 'template' files into a new folder (and thus a new Java package) named after your chosen tracking/telematic device (ie. such as "acme1000"). The "build.xml" file should also be modified to include a 'target' for your chosen server name. To build the example 'template' server, the Ant target 'template' can be used as follows:
> ant template
This 'template' target in 'build.xml' can be copied to create your own specific ant build target for your chosen device communication server name.
Consult the 'template' server source code directly for additional customization information.
The server "icare" is also available (in the source directory "src/org/opengts/servers/icare/"), which supports the ICare G3300 device. This device communication server module can also be examined for help in creating your own customized device communication server.
8.2.1) Starting the Device Communication Server
Once your server jar file has been created, you can use the "bin/runserver.sh" command (or "runserver.bat" on Windows) to start your device communication server as follows:
/zzz> cd $GTS_HOME /usr/local/OpenGTS_1.2.3> bin/runserver.sh -s template
8.2.1a) Important note regarding ".sh" and ".bat" command files:Commands ending with ".sh" or ".bat" MUST be executed from the OpenGTS installation directory. Attempting to execute these commands from another directory may result in a "ClassNotFoundException" or ""NoClassDefFoundError" error, or similar. (This means that you must cd to $GTS_HOME, then execute the command as "bin/<command>")
Or, the Perl version of this command can be used without needing to be in the OpenGTS installation directory:
/zzz> $GTS_HOME/bin/runserver.pl -s template
On Windows, the command can omit the "-s" and can be entered as follows:
C:\> cd \OpenGTS_1.2.3C:\OpenGTS_1.2.3\> \bin\runserver.bat template
The server will initialize and start listening on the port(s) specified in the "dcservers.xml" file for the "template" server. The default port is 31200. To change the listen port on the command line, a "-port" can be added as follows:
/zzz> $GTS_HOME/bin/runserver.pl -s template -port 31123
Or, on Windows:
C:\OpenGTS_1.2.3\> \bin\runserver.bat template -port:31123
To set listening on port "31123" (for example).
You can also add the command-line option "-debugMode" to enable debug-level logging.
OpenGTS Configuration and Installation Manual Page 28 of 44
While running in "background" mode, the output logs are stored in the file "$GTS_HOME/logs/template.log". (The file "template.out" is also created in this directory to catch any stdout/stderr messages which are displayed within the server that don't use the 'Print' logging feature built into OpenGTS. Typically, this file should alway be empty).
When testing/debugging, you may also start a server "interactively". That is, the server is run in the foreground (ie. not 'backgrounded'), and all logging output is sent to the console instead of the log file. To start a server "interactively", add the option "-i" to the command line, as follows:
/zzz> $GTS_HOME/bin/runserver.pl -s template -i
(To stop the server in this mode, simply press 'Control-C')
8.2.2) Stopping the Device Communication Server
When started in "background" mode (ie. Without the "-i" option), a "Process ID" (PID) file is created at "$GTS_HOME/logs/template.pid", which contains the process-id of the backgrounded task. This file is used to stop the server with the command:
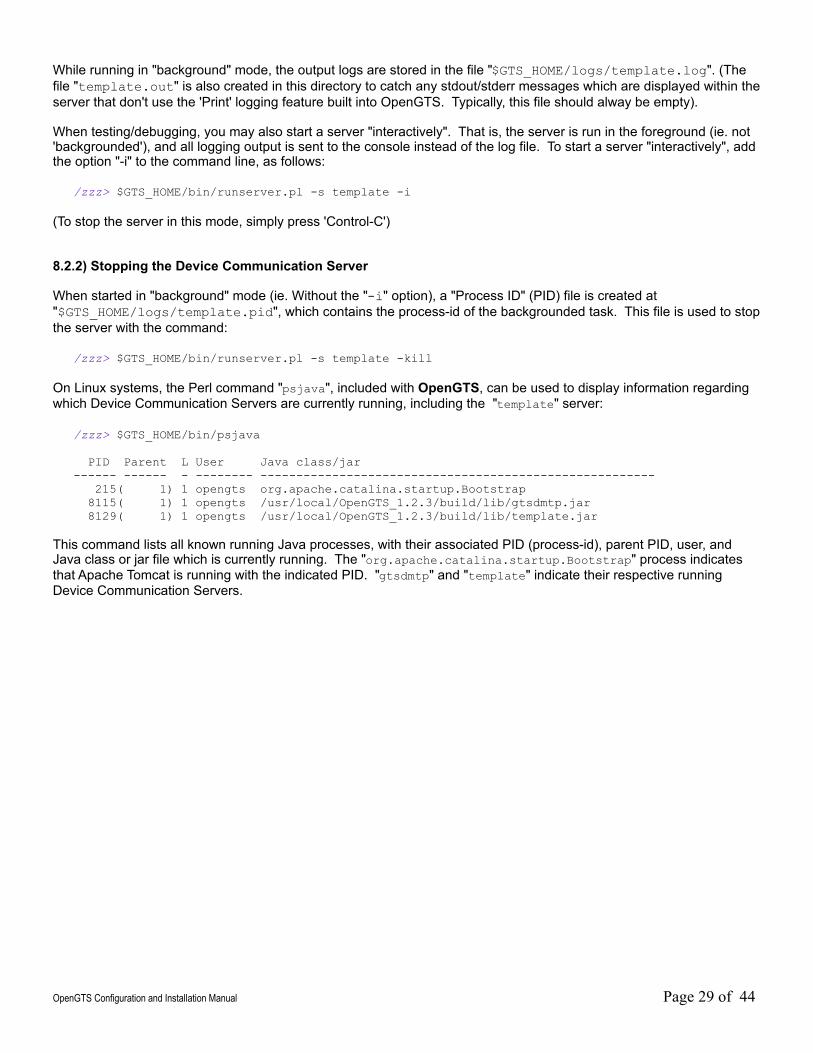
/zzz> $GTS_HOME/bin/runserver.pl -s template -kill On Linux systems, the Perl command "psjava", included with OpenGTS, can be used to display information regarding which Device Communication Servers are currently running, including the "template" server:
/zzz> $GTS_HOME/bin/psjava
PID Parent L User Java class/jar------ ------ - -------- ------------------------------------------------------- 215( 1) 1 opengts org.apache.catalina.startup.Bootstrap 8115( 1) 1 opengts /usr/local/OpenGTS_1.2.3/build/lib/gtsdmtp.jar 8129( 1) 1 opengts /usr/local/OpenGTS_1.2.3/build/lib/template.jar
This command lists all known running Java processes, with their associated PID (process-id), parent PID, user, and Java class or jar file which is currently running. The "org.apache.catalina.startup.Bootstrap" process indicates that Apache Tomcat is running with the indicated PID. "gtsdmtp" and "template" indicate their respective running Device Communication Servers.
OpenGTS Configuration and Installation Manual Page 29 of 44

8.3) Runtime XML Configuration File.
The raw socket-based device communication servers (such as the example 'template' server) support the runtime configuration using the file "dcservers.xml". An example format of the "dcservers.xml" is as follows:
<DCServerConfig bindAddress="" backlog="" portOffset="0" includeDir="dcservers" >
<Include file="dcserver_template.xml" optional="true"/>
<DCServer name="icare"> ... </DCServer> ...
</DCServerConfig>
The attributes for the DCServerConfig tag include the following:
bindAddress : This attribute specifies the local IP address or host name to which the server will bind. This is useful when the local server has more than one IP address, and needs to send UDP packets back to a client device. If left blank, the server will bind to the default local IP address.
backlog : The maximum queue length for incoming connection indications (a request to connect). If a connection indication arrives when the queue is full, the connection is refused. If left blank, or is 0 or less, then the default backlog value will be used. See the class "java.net.ServerSocket" for more information.
portOffset : This value is added to any port specification. Unless otherwise needed for specific system requirements, this value should remain "0".
includeDir : If the "DCServerConfig" tag contains any "Include" sub-tags, this is the directory that will be search for the included files.
An example "Include" tag format is as follows:
<Include file="dcserver_template.xml" optional="true"/>
The attributes for the Include tag include the following:
file : This attribute specifies the name of the file to include. The included file must also be a properly formatted DCServerConfig XML file. All device communication servers defined within this included file (as defined by the "DCServer" tags) will be added to the device communication servers defined elswhere in this XML file. Recursive Include directives are not allowed.
optional : This attribute specifies whether the include file is required to exist. If this value is "true" and the include file does not exist, and error will be displayed. If this value is "false" and the include file does not exist, then the Include directory is quietly ignored.
OpenGTS Configuration and Installation Manual Page 30 of 44

An example "DCServer" tag format is as follows:
<DCServer name="template">
<Description><![CDATA[ Example Template Server ]]></Description>
<UniqueIDPrefix><![CDATA[ template_ imei_ * ]]></UniqueIDPrefix>
<ListenPorts tcpPort="31200" udpPort="31200" />
<Properties> <Property key="minimumSpeedKPH">4.0</Property> <Property key="estimateOdometer">true</Property> <Property key="simulateGeozones">true</Property> </Properties>
</DCServer>
The attribute for the DCServer tag are as follows:
name : This attribute is required and specifies the name of the device communication server. The specified name should be unique among all loaded device communication servers. If a name of a device communication server is encountered that has already been defined, the subsequent named DCServer entry will be ignored.
"Description" sub-tag:This tag specifies the optional description of the device communication server.
"UniqueIDPrefix" sub-tag:This tag specifies the optional "Unique-ID" prefixes that will be used when looking up the device mobile-id in the Device table. In the order specified, the specified prefix is prepended to the mobile-id then the resulting ID is looked-up in the Device table "uniqueID" field. If not found, then the next prefix will be used. The prefix specification "*" means that the mobile-id will be used as-is (without any prepended prefix).
"ListenPorts" sub-tag:This tag specifies the ports on which the device communication server will listen for incoming connections from remote devices. The attribute "tcpPort" specifies the port on which a TCP listener will be started. The attribute "udpPort" specified the port on which a UDP listener will be started. If either "tcpPort" or "udpPort" is blank, or not specified, the the corresponding "listener" will not be started.
OpenGTS Configuration and Installation Manual Page 31 of 44
"Properties" sub-tag:This tag includes "Property" sub-tags which specify runtime properties which can be used to further specify the behavior of the device communication server at runtime. The standard properties that most device communication server recognize are as follows:
minimumSpeedKPH : (Double) This property specifies the minimum acceptable GPS-based speed. A speed value beow the value specified by this property will be considered a speed of '0'. This is used to mitigate GPS speed values which can indicate motion, even when the GPS receiver is stationary.
estimateOdometer : (Boolean) This property specifies the whether a GPS-based odometer value should be automatically calculated from the valid GPS locations reported by the incoming event. The odometer value of the current event is calculated by determining the distance from the previous event location to the current event location, then adding this distance to the previous odometer value.
simulateGeozones : (Boolean) This property specifies whether incoming events should be checked for Geozone arrive/depart occurances. If the current event was found to have arrive, or have departed, from a Geozone (as listed in the Geozone table), then the appropriate event, with the arrive/depart status code, will be generated and inserted into the EventData table.
Specific device communication server may also support other property specifications.
OpenGTS Configuration and Installation Manual Page 32 of 44
9) Internationalization/Localization
The OpenGTS source code is i18n ("internationalization") compliant, which means that it can adapted to various lanugages without requiring any code changes (ie. no fixed hardcoded text that cannot be changed at display time). Localization ("L10n") is the process of applying language specific text for a given Locale.
9.1) Supporting a New Language
All English text which is displayable within the OpenGTS web-interface can be found in the resource property files called "LocalStrings_en.properties" found within the various source file directories. These files contain a listing of the default English text which will be displayed if no specific locale has been chosen. The format of this file is "textKey=value", where the "textKey" is a unique id for the specific text "value".
9.1a) Download the latest Locale files for the next release:You can download a zip file containing the "LocalStrings_xx.properties" files for the next release of OpenGTS at the following URL: http://www.geotelematic.com/download.html#LocalStrings
To support a new language/locale, search for every occurance of the file "LocalStrings_en.properties" and create a copy named "LocalStrings_XX.properties" in the same directory, where "XX" in this case is the ISO-639 2-letter language code. Then in the new file, remove the prefixing "#" comment character on each key=value line, and modify the text value to match your specific language syntax and meaning. Make sure to leave the text key as-is. The contents of the "LocalStrings_XX.properties" files must be written using only ISO-8859-1 encoded characters (per "java.util.Properties" and "java.util.ResourceBundle" restrictions). Characters that cannot be directly represented in ISO-8859-1 can be included using Unicode escapes by specifying the format '\uXXXX', where 'XXXX' is the hex representation of the unicode character. The Java JDK installation includes the tool 'native2ascii' to assist with converting unicode text to unicode escaped text.
If a "LocalStrings_XX.properties" file does not contain proper Unicode encoding (ie. an invalid "\uXXXX" specification), then Java may be unable to load the properties file, and the specific LocalStrings file may not be used. To verify that no invalid "\uXXXX" specifications are present, the following CheckInstall command will validate the "LocalStrings_XX.properties" files:
/zzz> $GTS_HOME/bin/checkInstall.sh -- -localStrings=$GTS_HOME/src
This command will search for all "LocalStrings_XX.properties" files in the "$GTS_HOME/src" directory and examine their contents for invalid "\uXXXX" specifications. If any LocalStrings file contains invalid "\uXXXX" specifications, the error message "Malformed \uxxxx encoding" will be displayed for the particular file. This command will also check to see that only ISO-8859-1 characters are used in the LocalStrings files.
The specific language locale displayed on the web-interface is controlled by the "locale" attribute on the "Domain" tag in the "private.xml" file.
After making any changes to the "private.xml" file, or any of the "LocalStrings_XX.properties" files, make sure you rebuild and redeploy the "track.war" file.
OpenGTS Configuration and Installation Manual Page 33 of 44
10) Creating/Modifying Reports
(Note: This section is still under construction)
OpenGTS comes with a very simple and configurable report generation engine. Reports are comprised of 3 main components: the report layout, the report data iterator, and the report specification XML.
The report specification XML specifies a report data iterator, reporting constraints, and the columns which are to appear on the report. The report data iterator constructs the data which will be included in the report based on the reporting constraints. The report data layout then iterates through the report data and generates a report based on the column formatting information provided by the report specification XML.
The "Report Layout" and "Report Data Iterator" components must be implemented in Java code by a Java programmer, and should be configurable for a general use. The "Report Specification XML" is a report configuration text file that specifies the type, columns, and contraints for a specific report. Provided the report layout and data iterator are implemented for general use, many different kinds of reports may be created that utilize the same layout and data iterator.
10.1) Report Layout
The Report Layout is a Java module that defines what columns are available for a given report, and their respective formatting options.
A report layout must extend the abstract Java class "org.opengts.war.report.ReportLayout" and must define a "DataRow" subclass that understands how to parse report columna/fields from report row objects provided by the report data iterator.
The class "org.opengts.war.report.event.EventDataLayout" is an example ReportLayout subclass that defines the available columns and formatting options for the Event Detail and Summary reports.
10.2) Report Data Iterator
The Report Data Iterator is a Java module that constructs the list of records that are to be included in the report based on the constraints specified in the report specification XML.
A report data iterator must extend the abstract Java class "org.opengts.war.report.ReportData" and provide implementations for the "getBodyDataIterator" and "getTotalDataIterator" methods. It must also bind to a specific ReportLayout by providing an implementation for the "getReportLayout" method.
The class "org.opengts.war.report.event.EventDetailReport" is an example ReportData subclass that generates the Event Detail report.
OpenGTS Configuration and Installation Manual Page 34 of 44
10.3) Report Definition XML
The file "report.xml" defines the html style used for a column defined in a ReportLayout. If also defines specific reports by specifying which ReportData iterator, and which columns will be included in a given report. It also specifies the constraints that are to be applied to the data which the report will contain.
Here is an example report definition from the 'report.xml' file for the "Event Detail" report:
<!-- === The 'name' provides a name for the report, referenced in 'private.xml' === The 'type' provides a report group name, referenced in 'private.xml' === The 'class' specifies the report data iterator used to generate the report --><Report name="EventDetail" type="device.detail" class="org.opengts.war.report.event.EventDetailReport">
<!-- The description of the report display on the reporting menu --> <MenuDescription i18n="ReportsXML.eventDetail.menu"> Event Detail </MenuDescription>
<!-- The title displayed above the report --> <Title i18n="ReportsXML.eventDetail.title"> Event Detail </Title>
<!-- The subtitle displayed above the report --> <Subtitle i18n="ReportsXML.eventDetail.subtitle"> ${deviceDesc} [${deviceId}]\n${dateRange} </Subtitle>
<!-- The columns included in the report --> <Columns> <Column name="index" /> <Column name="date" /> <Column name="time" /> <Column name="statusDesc" /> <Column name="latitude" arg="5" /> <Column name="longitude" arg="5" /> <Column name="speedH" arg="1" /> <Column name="altitude" /> <Column name="odometer" arg="0" /> <Column name="address" /> </Columns>
<!-- The report data constraints --> <Constraints> <SelectionLimit type="first">1000</SelectionLimit> <ReportLimit>1000</ReportLimit> <OrderAscending>true</OrderAscending> </Constraints>
<!-- the map icon selector (if map display is enabled) --> <MapIconSelector ruleFactoryName="CustomRulesEngine"> <!-- this section requires an installed "RuleFactory" implementation --> <![CDATA[ ((mph<4)?"reddot":(speed<15)?"yellow":"heading") ]]> </MapIconSelector>
</Report>
OpenGTS Configuration and Installation Manual Page 35 of 44
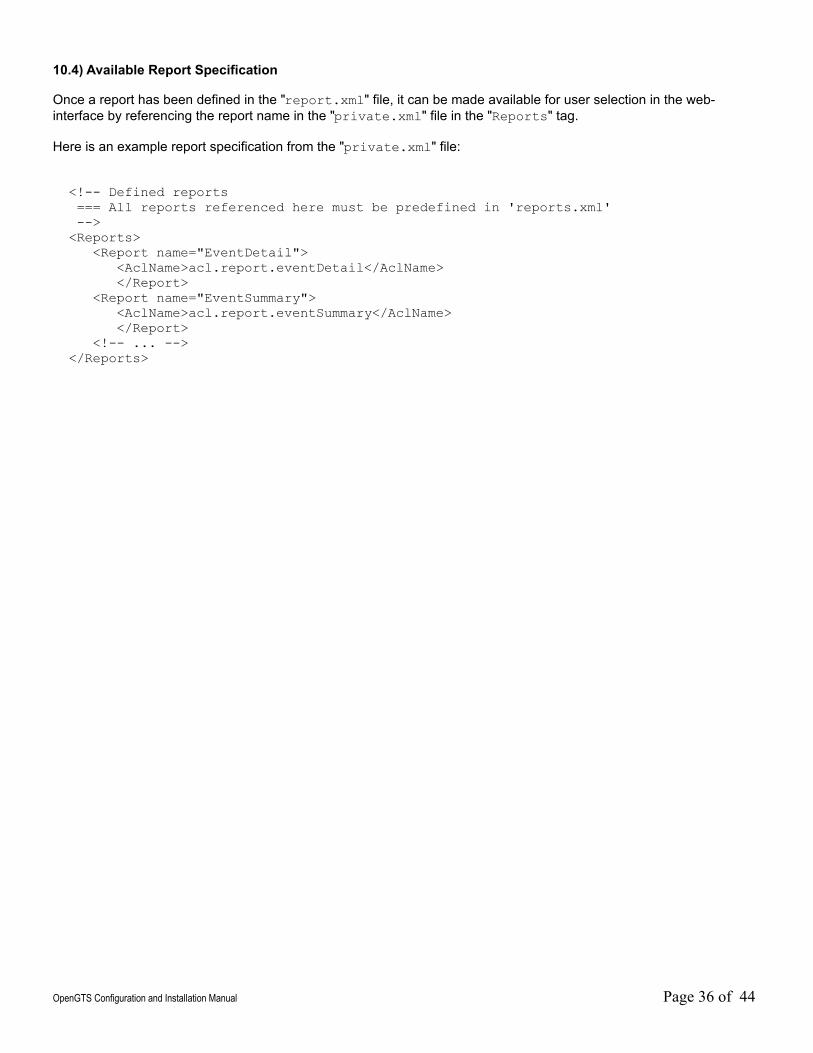
10.4) Available Report Specification
Once a report has been defined in the "report.xml" file, it can be made available for user selection in the web-interface by referencing the report name in the "private.xml" file in the "Reports" tag.
Here is an example report specification from the "private.xml" file:
<!-- Defined reports === All reports referenced here must be predefined in 'reports.xml' --> <Reports> <Report name="EventDetail"> <AclName>acl.report.eventDetail</AclName> </Report> <Report name="EventSummary"> <AclName>acl.report.eventSummary</AclName> </Report> <!-- ... --> </Reports>
OpenGTS Configuration and Installation Manual Page 36 of 44
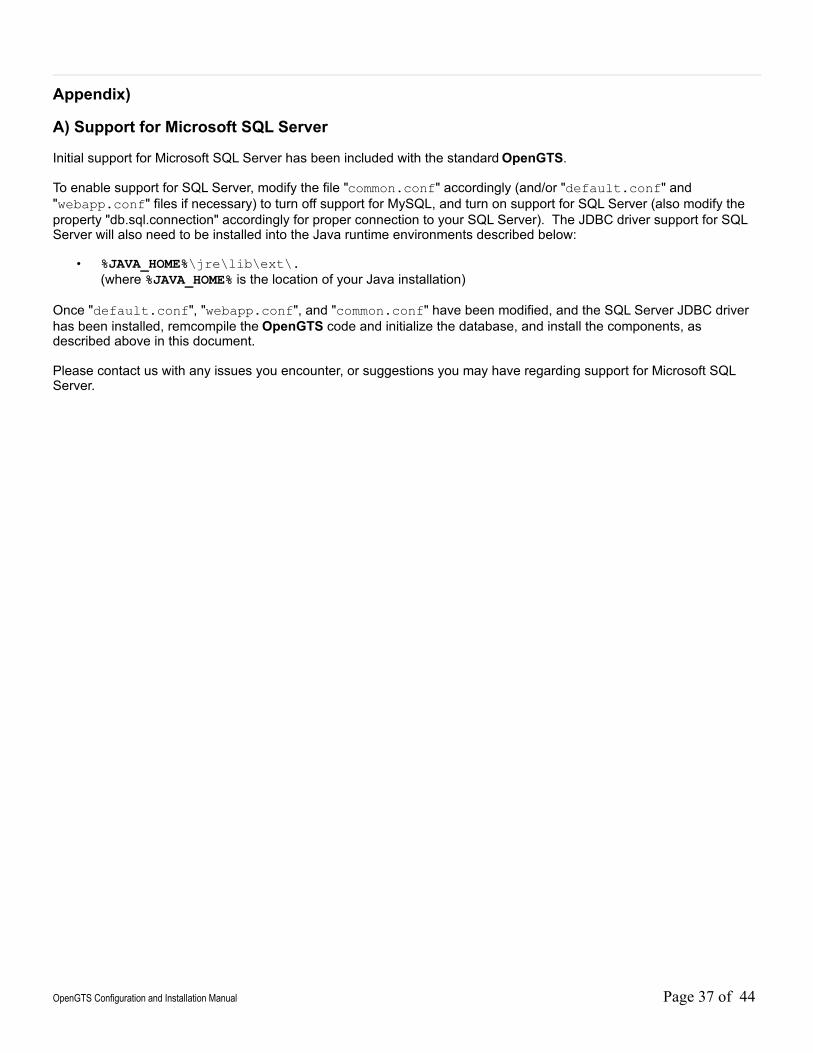
Appendix)
A) Support for Microsoft SQL Server
Initial support for Microsoft SQL Server has been included with the standard OpenGTS.
To enable support for SQL Server, modify the file "common.conf" accordingly (and/or "default.conf" and "webapp.conf" files if necessary) to turn off support for MySQL, and turn on support for SQL Server (also modify the property "db.sql.connection" accordingly for proper connection to your SQL Server). The JDBC driver support for SQL Server will also need to be installed into the Java runtime environments described below:
• %JAVA_HOME%\jre\lib\ext\.(where %JAVA_HOME% is the location of your Java installation)
Once "default.conf", "webapp.conf", and "common.conf" have been modified, and the SQL Server JDBC driver has been installed, remcompile the OpenGTS code and initialize the database, and install the components, as described above in this document.
Please contact us with any issues you encounter, or suggestions you may have regarding support for Microsoft SQL Server.
OpenGTS Configuration and Installation Manual Page 37 of 44
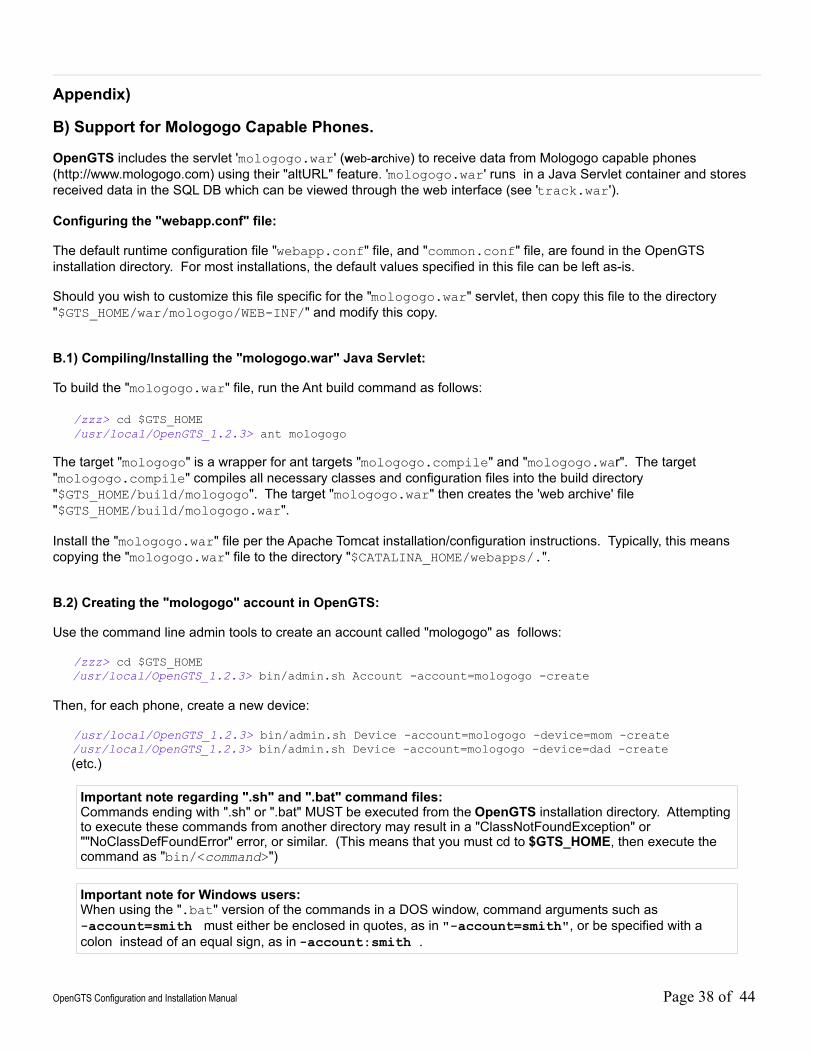
Appendix)
B) Support for Mologogo Capable Phones.
OpenGTS includes the servlet 'mologogo.war' (web-archive) to receive data from Mologogo capable phones (http://www.mologogo.com) using their "altURL" feature. 'mologogo.war' runs in a Java Servlet container and stores received data in the SQL DB which can be viewed through the web interface (see 'track.war').
Configuring the "webapp.conf" file:
The default runtime configuration file "webapp.conf" file, and "common.conf" file, are found in the OpenGTS installation directory. For most installations, the default values specified in this file can be left as-is.
Should you wish to customize this file specific for the "mologogo.war" servlet, then copy this file to the directory "$GTS_HOME/war/mologogo/WEB-INF/" and modify this copy.
B.1) Compiling/Installing the "mologogo.war" Java Servlet:
To build the "mologogo.war" file, run the Ant build command as follows:
/zzz> cd $GTS_HOME /usr/local/OpenGTS_1.2.3> ant mologogo
The target "mologogo" is a wrapper for ant targets "mologogo.compile" and "mologogo.war". The target "mologogo.compile" compiles all necessary classes and configuration files into the build directory "$GTS_HOME/build/mologogo". The target "mologogo.war" then creates the 'web archive' file "$GTS_HOME/build/mologogo.war".
Install the "mologogo.war" file per the Apache Tomcat installation/configuration instructions. Typically, this means copying the "mologogo.war" file to the directory "$CATALINA_HOME/webapps/.".
B.2) Creating the "mologogo" account in OpenGTS:
Use the command line admin tools to create an account called "mologogo" as follows:
/zzz> cd $GTS_HOME/usr/local/OpenGTS_1.2.3> bin/admin.sh Account -account=mologogo -create
Then, for each phone, create a new device:
/usr/local/OpenGTS_1.2.3> bin/admin.sh Device -account=mologogo -device=mom -create/usr/local/OpenGTS_1.2.3> bin/admin.sh Device -account=mologogo -device=dad -create
(etc.)
Important note regarding ".sh" and ".bat" command files:Commands ending with ".sh" or ".bat" MUST be executed from the OpenGTS installation directory. Attempting to execute these commands from another directory may result in a "ClassNotFoundException" or ""NoClassDefFoundError" error, or similar. (This means that you must cd to $GTS_HOME, then execute the command as "bin/<command>")
Important note for Windows users:When using the ".bat" version of the commands in a DOS window, command arguments such as -account=smith must either be enclosed in quotes, as in "-account=smith", or be specified with a colon instead of an equal sign, as in -account:smith .
OpenGTS Configuration and Installation Manual Page 38 of 44
B.3) Setting the "altURL" feature on your Mologogo phone:
Set the "altURL" feature of your Mologogo capable phone to the following URL:
"http://<mydomainname>/mologogo/Data?ID=<id>&" Replace <mydomainname> with the domain name of your server running Tomcat, and replace <id> with the ID of the specific phone ("mom" or "dad" in this case).Note that if you left Tomcat running on the default port 8080, then your URL may need to be set to the following:
"http://<mydomainname>:8080/mologogo/Data?ID=<id>&"
B.4) Testing the installation:
Once everything is set up, look for data coming in from your Mologogo enabled phone.
Note:Using the "ID=" keyword attempts to look up the identity of the device by using the default account id "mologogo". If you wish to use a specific account and device id, you can replace the "?ID=<id>" with "?acct=<acct>&dev=<dev>".
OpenGTS Configuration and Installation Manual Page 39 of 44
Appendix)
C) Installing MotoDMTP
Note:The source for the MotoDMTP GPS tracking support software is located in the OpenDMTP "client-j2me" project download from SourceForge: https://sourceforge.net/project/showfiles.php?group_id=151031
The "MotoDMTP" application is designed to work with Motorola i415/i425/i290/i335 Boost Mobile phones, and may work on other Motorola Boost Mobile phones as well. "MotoDMTP" uses the OpenDMTP protocol to send data to the OpenDMTP server, which is included with OpenGTS.
Motorola Boost Mobile phones are available at various retail outlets in the US, such as Radio Shack, Walmart, Target, Best Buy, etc, and may also be purchased from Boost Mobile directly. After purchasing one of these Motorola Boost Mobile phones, activate service on the Boost Mobile network per the instructions that accompany the phone. Make sure that you select the data-plan service ("Activate Wireless Web") to enable the phone to send data to your server. ("Motorola", "Boost Mobile", and the various mentioned retail outlets are trademarks owned by their respective companies. OpenGTS/OpenDMTP is not affiliated with Sprint/Nextel, Boost Mobile, Motorola, or any of the mentioned retail outlets, in any way) .
Important:When activating Boost Mobile service, make sure you select the data-plan option (check "Activate Wireless Web") to enable the phone to send data to the server.
Note:Installing MotoDMTP requires the use of Windows to run the Motorola "iDEN Java Application Loader" application.
C.1) Configuring the MotoDMTP.jad file:
A precompiled version of "MotoDMTP.jar" and "MotoDMTP.jad" is included in this release. To build your own version of the "MotoDMTP.jar" file, consult the MotoDMTP documentation that accomanies the OpenDMTP 'Java' implementation download..
The JAD file (MotoDMTP.jad) is used to load runtime properties and configuration information into the J2ME application. This file will need to be modified prior to installation to configure the server:port to which data will be sent, and to configure the name (account, device, etc) used to identify the phone on the server.
Edit the "MotoDMTP.jad" file using a convenient text editor (such as Windows "WordPad") and add the following property definition to the last line of the file (or edit the existing line, if one is already present):
DMTP-Access: 0,<MyServerHost>,<MyServerPort>,<MyAccountID>,<MyDeviceID>
Which specifies the server:port, and AccountID / DeviceID used to identify the phone on the server. (Note: the prefixing "0," is required and is reserved for future use).
(Note: The characters '<' and '>' in the above examples serve to delineate the various options and are NOT to be included in the final property specification. JAD file property specifications should begin at the first character in the line).
OpenGTS Configuration and Installation Manual Page 40 of 44
For example, assuming that the host is "data.example.com" and the port is "31000",and the AccountID / DeviceID is "myaccount/mydevice", a properly specified "DMTP-Access:" line whould appear as follows:
DMTP-Access: 0,data.example.com,31000,myaccount,mydevice
Important:Make sure there is a blank line at the end of the 'MotoDMTP.jad' file after the last property entry. Without this blank line, the last property entry may not be loaded into the J2ME application, and the phone may not be able to establish a connection with the server.
On the server, add the account-id and device-id, to receive data from the phone.
C.2) Setting other configurable event generation options:
You can also set the reporting interval and other configurable options in the JAD file as well. Here are some additional configurable options that can be included in the JAD file to change the tracking behavior:
(Note: The characters '<' and '>' in the examples below serve to delineate the various options and are NOT to be included in the final property specification. JAD file property specification should begin at the first character in the line).
DMTP-gps-minspd: <MinimumMotionSpeedKPH>
This option sets the minimum GPS reported speed (replace "<MinimumMotionSpeedKPH>" with the desired minimum GPS reported speed in km/h). Speeds reported by the GPS receiver which are less than this value will be set to zero before reporting them in an evemt. This helps mitigate the inaccuracies in GPS receivers that can report a 'moving' speed even when the GPS receiver is stationary sitting on a desk. The default minimum GPS speed is 12 Km/h (about 7.4 mph).
DMTP-mot-start: <MinimumStartSpeedKPH>
This option specifies the minimum speed that must be reported before a "Start Motion" event is generated (replace "<MinimumStartSpeedKPH>" with the desired minimum 'start' speed in km/h). This value should be at least as large as the value specified on the minimum GPS speed above. The default value is 16.1 km/h (about 10 mph).
DMTP-mot-inmotion: <InMotionIntervalSeconds>
This option specifies the number of seconds between reported events while the phone is in motion, after the generation of a "Start Motion" event (replace "<InMotionIntervalSeconds>" with the desired in-motion reporting interval in seconds). This value may not be less than 60 seconds. The default value is 120 seconds (2 minutes).
OpenGTS Configuration and Installation Manual Page 41 of 44
DMTP-mot-stop: <WaitForStopSeconds>
This option specifies the number of seconds to wait after the phone stops moving to report a "Stopped" event (replace "<WaitForStopSeconds>" with the desired number of seconds to wait before generating a "Stopped" event). This value is used to prevent quick stop/starts from frequently occurring at stop-lights and stop-signs, or short stops during heavy traffic. The default value is 210 seconds (3.5 minutes).
DMTP-mot-dorm-rate: <DormantIntervalSeconds>
This option specifies the number of seconds between reported events while the phone is not moving (ie. "Dormant") after the generation of a "Stopped" event (replace "<DormantIntervalSeconds>" with the desired dormant reporting interval in seconds). This value may not be less that 300 seconds. The default value is 1800 seconds (30 minutes).
DMTP-mot-exspeed: <ExcessSpeedThresholdKPH>
This option specifies the speed threshold in km/h, beyond which an excess-speed event will be gnerated (replace "<ExcessSpeedThresholdKPH>" with the desired speed threshold in km/h). The default value is '0', which does not generate an excess speed event.
Important:Make sure there is a blank line at the end of the 'MotoDMTP.jad' file after the last property entry. Without this blank line, the last property entry may not be loaded into the J2ME application, and the phone may not be able to establish a connection with the server.
C.3) Installing the application on the phone:
Download and install the "iDEN Java Application Loader" from Motorola, available from this link:
http://developer.motorola.com/docstools/idenjal/
This application installs on Windows XP or Vista. Refer to the above website for additional details regarding system requirements and installation procedures. A USB cable (type A-male to Mini-B-male) will be needed to connect your i425/i290 phone to your Windows PC (the i415 phone requires a custom cable available at your Sprint/Nextel store). You may also need to download the USB driver for Motorola handset, which can be obtained from the following link:
http://developer.motorola.com/docstools/USB_Drivers/
Loading MotoDMTP onto your phone using OpenJAL:1) Place both the "MotoDMTP.jar" and "MotoDMTP.jad" in the same directory. 2) Start up OpenJAL and configure the preferences to "Connect via USB connection". 3) Plug in the phone to your PC using the USB cable.4) Select "Connect To Phone". Within a few seconds it should connect to the phone and will indicate a red "X"over
the "Connect To Phone" icon.5) Select "Load J2ME Application", then browse to the "MotoDMTP.jad" file.6) Select "Download". Within a few seconds the download should be complete (while it may appear that only the
"MotoDMTP.jad" file is being downloaded, it is in fact loading both the "MotoDMTP.jad" and "MotoDMTP.jar" files to the phone.)
7) Once uploaded, click the "Disconnect phone" button within the OpenJAL application.
Different phones have different methods for installing/updating/starting Java applications. The following describes a rough overview of the process, but the commands on your particular phone may be different:
OpenGTS Configuration and Installation Manual Page 42 of 44
Installing the MotoDMTP application once downloaded to the phone:1) From the main phone screen (with the "Boost mobile" logo), select the menu button and traverse to the "Java
Apps" or "Games&Apps" icon, then press OK.2) If it asks to install the new downloaded app, select "Yes". Otherwise traverse to the "MotoDMTP" application and
press the menu button. If an update is available, select "Update" and go through the update process. To start the application, select OK.
Starting the MotoDMTP application:1) Traverse to the "MotoDMTP" application and press "OK".2) If any questions are asked regarding access to the phones resources (GPS, data transmission, etc), always
answer yes/ok/always/etc.
You can also set up the phone to automatically start the MotoDMTP application when the phone is turned on:1) From the main phone screen, select the menu button, then select "Settings", then select "Personalize".2) Traverse to the "Power Up" option and press the OK button.3) "App: ..." will be selected. Press the OK button.4) Traverse to the "MotoDMTP" option and press the OK button.5) Continue selecting "Back" until the main screen is displayed.
Important:The GPS receiver in the phone may not function if the phone does not have current active service through Boost Mobile. As a result, the Latitude/Longitude may not display properly on the phone if Boost Mobile service is not active.
OpenGTS Configuration and Installation Manual Page 43 of 44
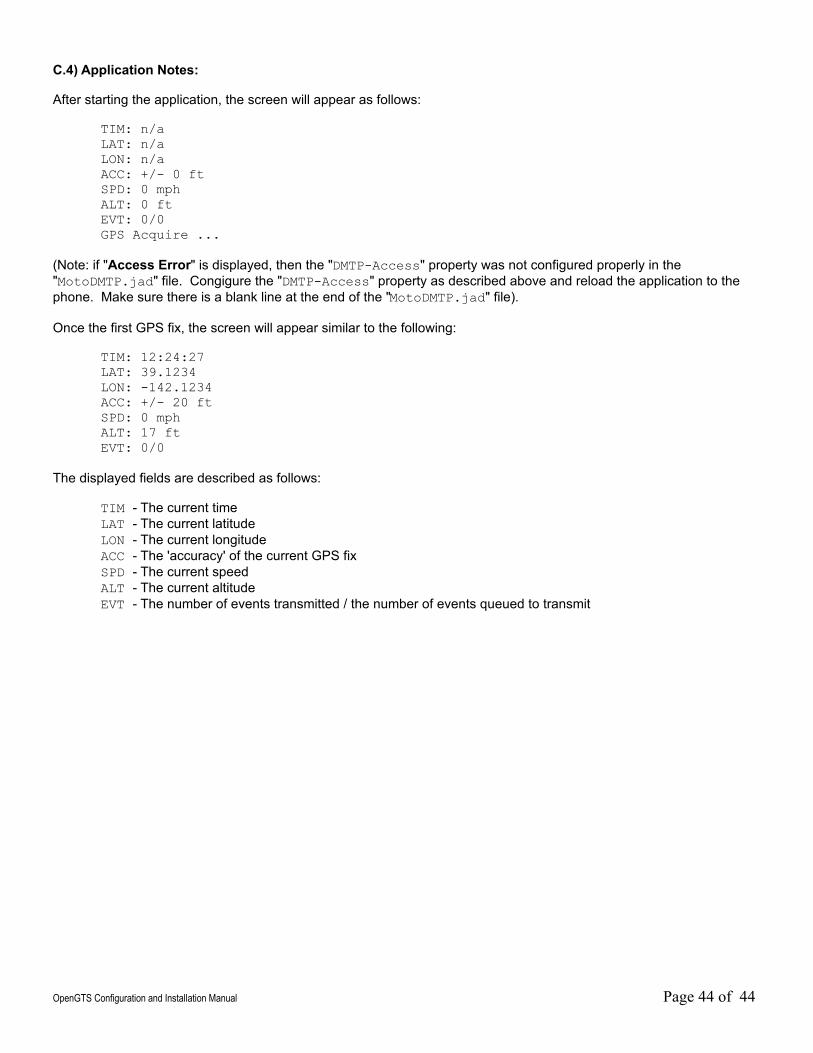
C.4) Application Notes:
After starting the application, the screen will appear as follows:
TIM: n/aLAT: n/aLON: n/aACC: +/- 0 ftSPD: 0 mphALT: 0 ftEVT: 0/0GPS Acquire ...
(Note: if "Access Error" is displayed, then the "DMTP-Access" property was not configured properly in the "MotoDMTP.jad" file. Congigure the "DMTP-Access" property as described above and reload the application to the phone. Make sure there is a blank line at the end of the "MotoDMTP.jad" file). Once the first GPS fix, the screen will appear similar to the following:
TIM: 12:24:27LAT: 39.1234LON: -142.1234ACC: +/- 20 ftSPD: 0 mphALT: 17 ftEVT: 0/0
The displayed fields are described as follows:
TIM - The current time LAT - The current latitudeLON - The current longitudeACC - The 'accuracy' of the current GPS fixSPD - The current speedALT - The current altitudeEVT - The number of events transmitted / the number of events queued to transmit
OpenGTS Configuration and Installation Manual Page 44 of 44