opennebula 4.6 quickstart centos 6 and esx...
TRANSCRIPT
OpenNebula 4.6 Quickstart CentOS 6and ESX 5.x
Release 4.6
OpenNebula Project
May 09, 2014

CONTENTS
1 Package Layout 3
2 Step 1. Infrastructure Set-up 5
3 Step 2. OpenNebula Front-end Set-up 7
4 Step 3. VMware Virtualization Node Set-up 9
5 Step 4. OpenNebula Configuration 17
6 Step 5. Using the Cloud through Sunstone 19
7 Step 6. Next Steps 21
i

ii
OpenNebula 4.6 Quickstart CentOS 6 and ESX 5.x, Release 4.6
This guide aids in the process of quickly get a VMware-based OpenNebula cloud up and running on CentOS 6.After following this guide, users will have a working OpenNebula with graphical interface (Sunstone), at least onehypervisor (host) and a running virtual machines. This is useful at the time of setting up pilot clouds, to quickly testnew features and as base deployment to build a large infrastructure.
Throughout the installation there are two separate roles: Frontend and Virtualization Nodes. The Frontend server willexecute the OpenNebula services, and the Nodes will be used to execute virtual machines.
CONTENTS 1

OpenNebula 4.6 Quickstart CentOS 6 and ESX 5.x, Release 4.6
2 CONTENTS
CHAPTER
ONE
PACKAGE LAYOUT
• opennebula-server: OpenNebula Daemons
• opennebula: OpenNebula CLI commands
• opennebula-sunstone: OpenNebula’s web GUI
• opennebula-java: OpenNebula Java API
• opennebula-node-kvm: Installs dependencies required by OpenNebula in the nodes
• opennebula-gate: Send information from Virtual Machines to OpenNebula
• opennebula-flow: Manage OpenNebula Services
• opennebula-context: Package for OpenNebula Guests
Additionally opennebula-common and opennebula-ruby exist but they’re intended to be used as de-pendencies. opennebula-occi, which is RESTful service to manage the cloud, is included in theopennebula-sunstone package.
3

OpenNebula 4.6 Quickstart CentOS 6 and ESX 5.x, Release 4.6
4 Chapter 1. Package Layout
CHAPTER
TWO
STEP 1. INFRASTRUCTURE SET-UP
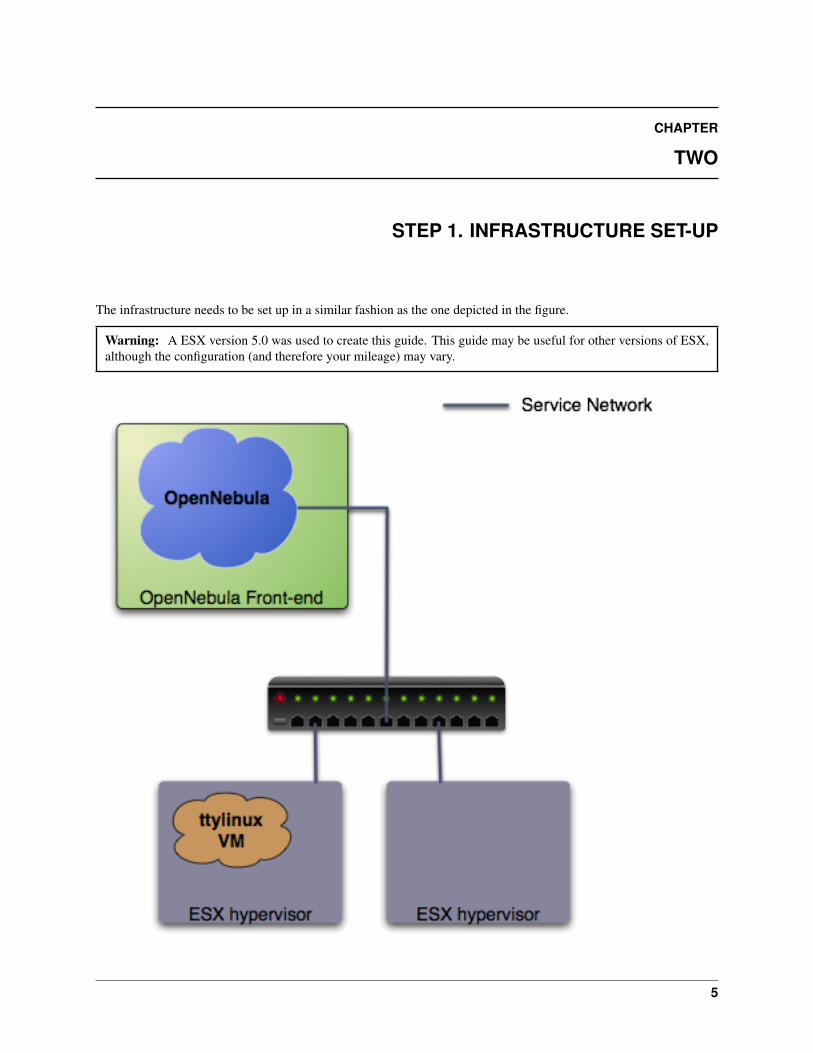
The infrastructure needs to be set up in a similar fashion as the one depicted in the figure.
Warning: A ESX version 5.0 was used to create this guide. This guide may be useful for other versions of ESX,although the configuration (and therefore your mileage) may vary.
5
OpenNebula 4.6 Quickstart CentOS 6 and ESX 5.x, Release 4.6
In this guide it is assumed that at least two physical servers are available, one to host the OpenNebula front-end andone to be used as a ESX virtualization node (this is the one you need to configure in the following section). The figuredepicts one more ESX host, to show that the pilot cloud is ready to grow just by adding more virtualization nodes.
Front-End
• Operating System: Centos 6.4
• Required extra repository: EPEL
• Required packages: NFS, libvirt
Let’s install the repository (as root) and required packages
# yum install http://dl.fedoraproject.org/pub/epel/6/i386/epel-release-6-8.noarch.rpm# cat << EOT > /etc/yum.repos.d/opennebula.repo [opennebula] name=opennebulabaseurl=http://downloads.opennebula.org/repo/CentOS/6/stable/x86_64 enabled=1 gpgcheck=0 EOT
# yum install nfs-utils nfs-utils-lib libvirt
Virtualization node
• Operating System: ESX 5.0
Warning: The ESX hosts needs to be configured. To achieve this, you will need access to a Windows machinewith the Virtual Infrastructure Client (vSphere client) install. The VI client can be downloaded from the ESX node,by pointing a browser to its IP.
Warning: The ESX hosts need to be properly licensed, with write access to the exported API (as the Evaluationlicense does). More information on valid licenses here.
6 Chapter 2. Step 1. Infrastructure Set-up
CHAPTER
THREE
STEP 2. OPENNEBULA FRONT-END SET-UP
2.1 OpenNebula installation
With the repository added, installing OpenNebula is straightforward (as root):
# yum install opennebula-server opennebula-sunstone
Warning: Do not start OpenNebula at this point, some pre configuration needs to be done. Starting OpenNebulais not due until here.
Find out the uid and gid of oneadmin, we will need it for the next section:
$ id oneadminuid=499(oneadmin) gid=498(oneadmin)
In order to avoid problems, we recommend to disable SELinux for the pilot cloud front-end (sometimes it is the rootof all evil):
# vi /etc/sysconfig/selinux...SELINUX=disabled...
# setenforce 0# getenforcePermissive
2.2 NFS configuration
The front-end needs to export via NFS two datastores (the system and the images datastore). This is required justso the ESX has access to two different datastores, and this guides uses NFS exported from the front-end to achievethis. This can be seamlessly replaced with two iSCSI backed datastores or even two local hard disks. In any case, wewill use the ‘vmfs’ drivers to manage both datastores, independently of the storage backend. See the VMFS DatastoreGuide for more details.
Let’s configure the NFS server. You will need to allow incoming connections, here we will simply stop iptables (asroot):
$ sudo su - oneadmin
$ sudo vi /etc/exports/var/lib/one/datastores/0 *(rw,sync,no_subtree_check,root_squash,anonuid=499,anongid=498)/var/lib/one/datastores/1 *(rw,sync,no_subtree_check,root_squash,anonuid=499,anongid=498)
$ sudo service iptables stop$ sudo service nfs start
7
OpenNebula 4.6 Quickstart CentOS 6 and ESX 5.x, Release 4.6
$ sudo exportfs -a
Warning: Make sure anonuid and anongid are set to the oneadmin uid and gid.
2.3 Networking
There must be connection between the front-end and the ESX node. This can be tested with the ping command:
$ ping <esx-ip>
8 Chapter 3. Step 2. OpenNebula Front-end Set-up
CHAPTER
FOUR
STEP 3. VMWARE VIRTUALIZATION NODE SET-UP
This is probably the step that involves more work to get the pilot cloud up and running, but it is crucial to ensure itscorrect functioning. The ESX that is going to be used as worker node needs the following steps:
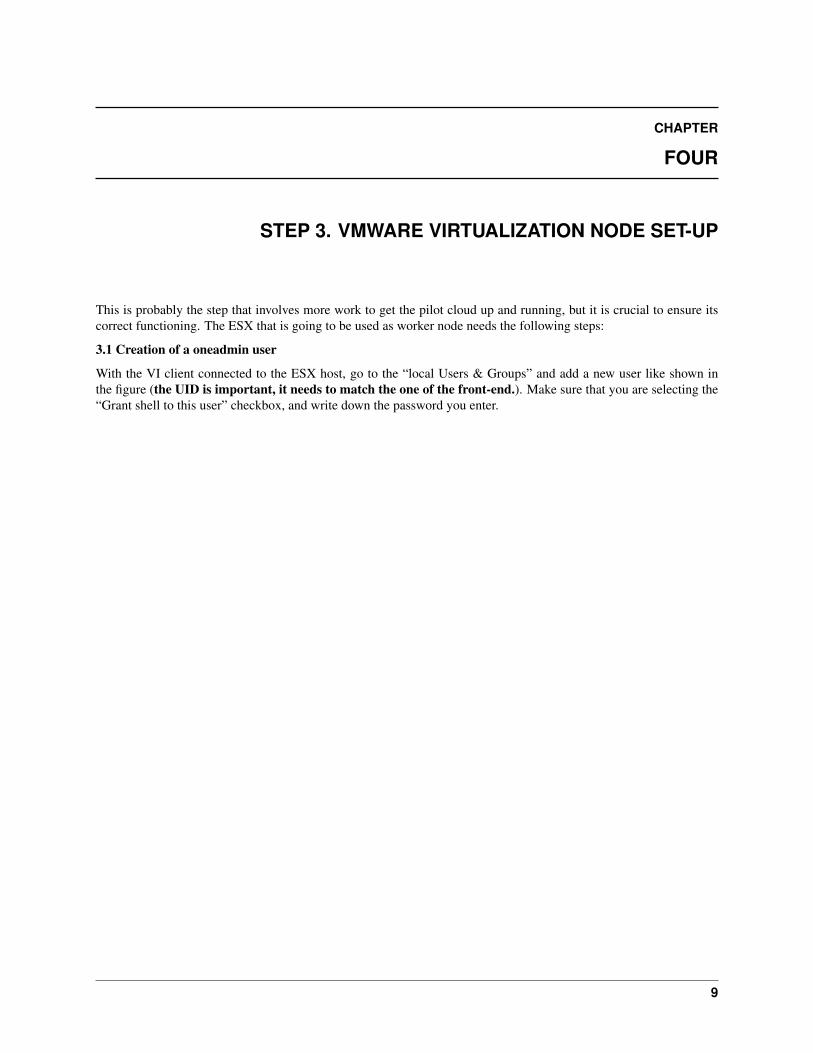
3.1 Creation of a oneadmin user
With the VI client connected to the ESX host, go to the “local Users & Groups” and add a new user like shown inthe figure (the UID is important, it needs to match the one of the front-end.). Make sure that you are selecting the“Grant shell to this user” checkbox, and write down the password you enter.
9
OpenNebula 4.6 Quickstart CentOS 6 and ESX 5.x, Release 4.6
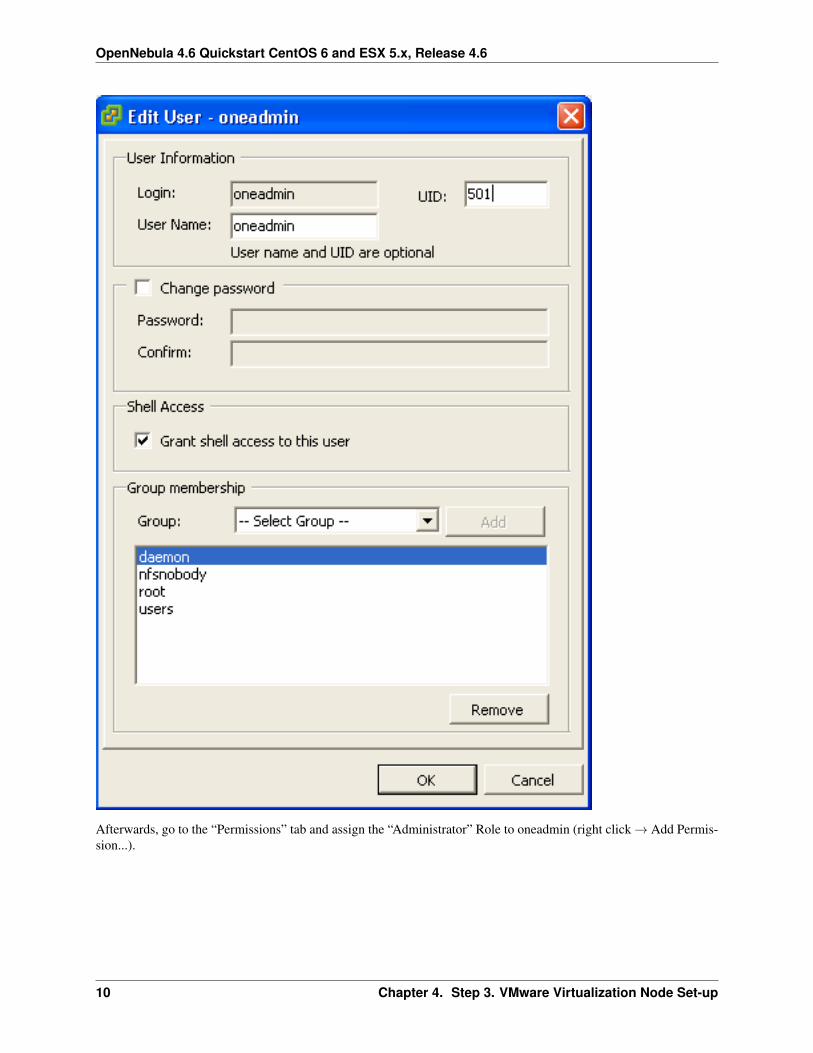
Afterwards, go to the “Permissions” tab and assign the “Administrator” Role to oneadmin (right click → Add Permis-sion...).
10 Chapter 4. Step 3. VMware Virtualization Node Set-up
OpenNebula 4.6 Quickstart CentOS 6 and ESX 5.x, Release 4.6
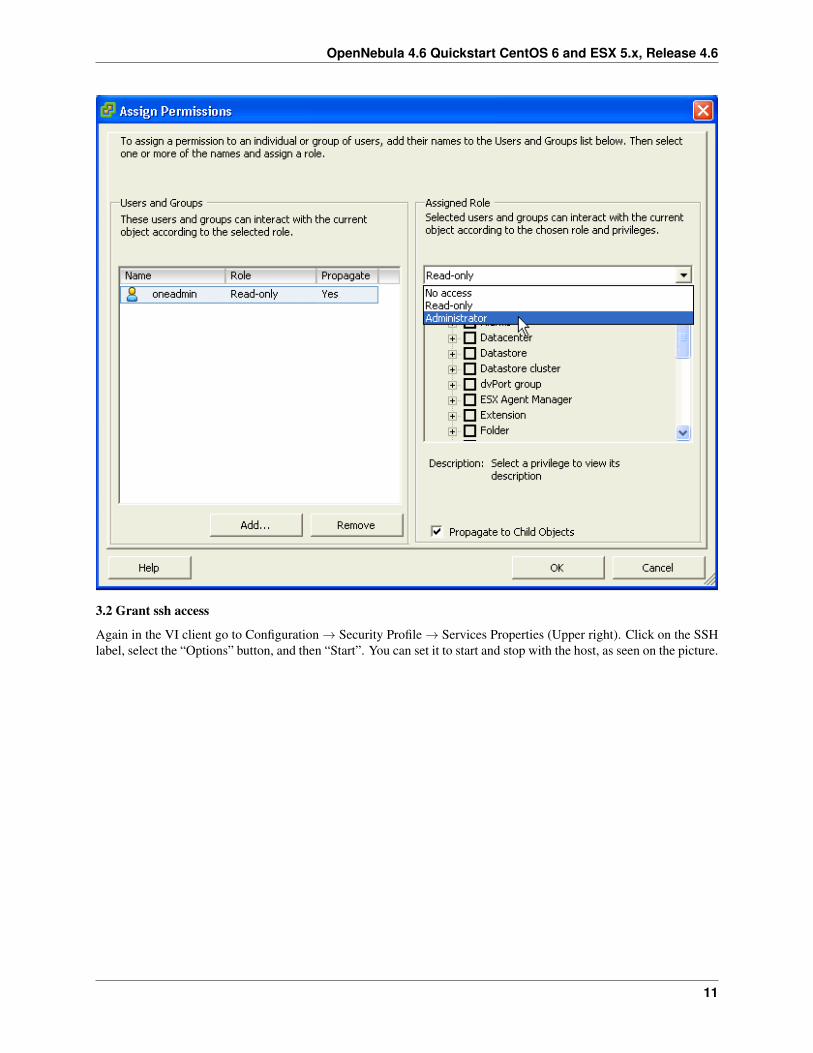
3.2 Grant ssh access
Again in the VI client go to Configuration → Security Profile → Services Properties (Upper right). Click on the SSHlabel, select the “Options” button, and then “Start”. You can set it to start and stop with the host, as seen on the picture.
11
OpenNebula 4.6 Quickstart CentOS 6 and ESX 5.x, Release 4.6
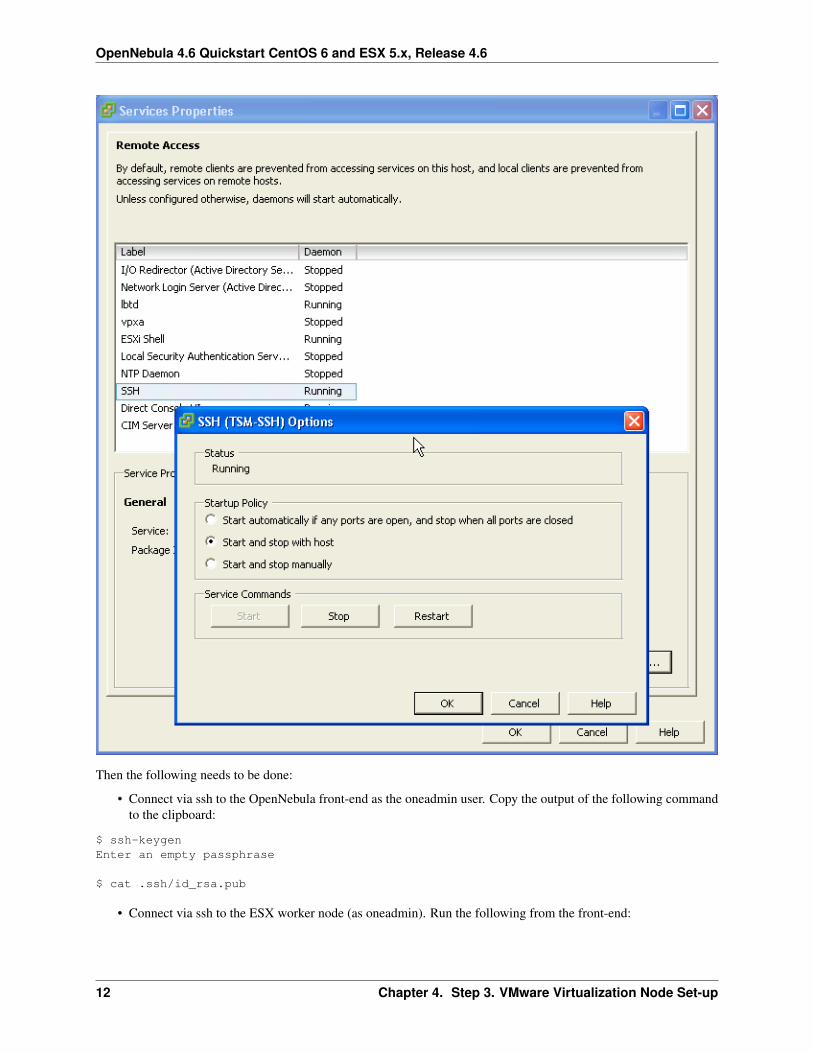
Then the following needs to be done:
• Connect via ssh to the OpenNebula front-end as the oneadmin user. Copy the output of the following commandto the clipboard:
$ ssh-keygenEnter an empty passphrase
$ cat .ssh/id_rsa.pub
• Connect via ssh to the ESX worker node (as oneadmin). Run the following from the front-end:
12 Chapter 4. Step 3. VMware Virtualization Node Set-up

OpenNebula 4.6 Quickstart CentOS 6 and ESX 5.x, Release 4.6
$ ssh <esx-ip>Enter the password you set in the step 3.1
$ su
# mkdir /etc/ssh/keys-oneadmin# chmod 755 /etc/ssh/keys-oneadmin# vi /etc/ssh/keys-oneadmin/authorized_keyspaste here the contents of oneadmin’s id_rsa.pub and exit vi# chown oneadmin /etc/ssh/keys-oneadmin/authorized_keys# chmod 600 /etc/ssh/keys-oneadmin/authorized_keys# chmod +s /sbin/vmkfstools /bin/vim-cmd # This is needed to create volatile disks
• Now oneadmin should be able to ssh without been prompted for a password
$ ssh <esx-ip>
3.3 Mount datastores
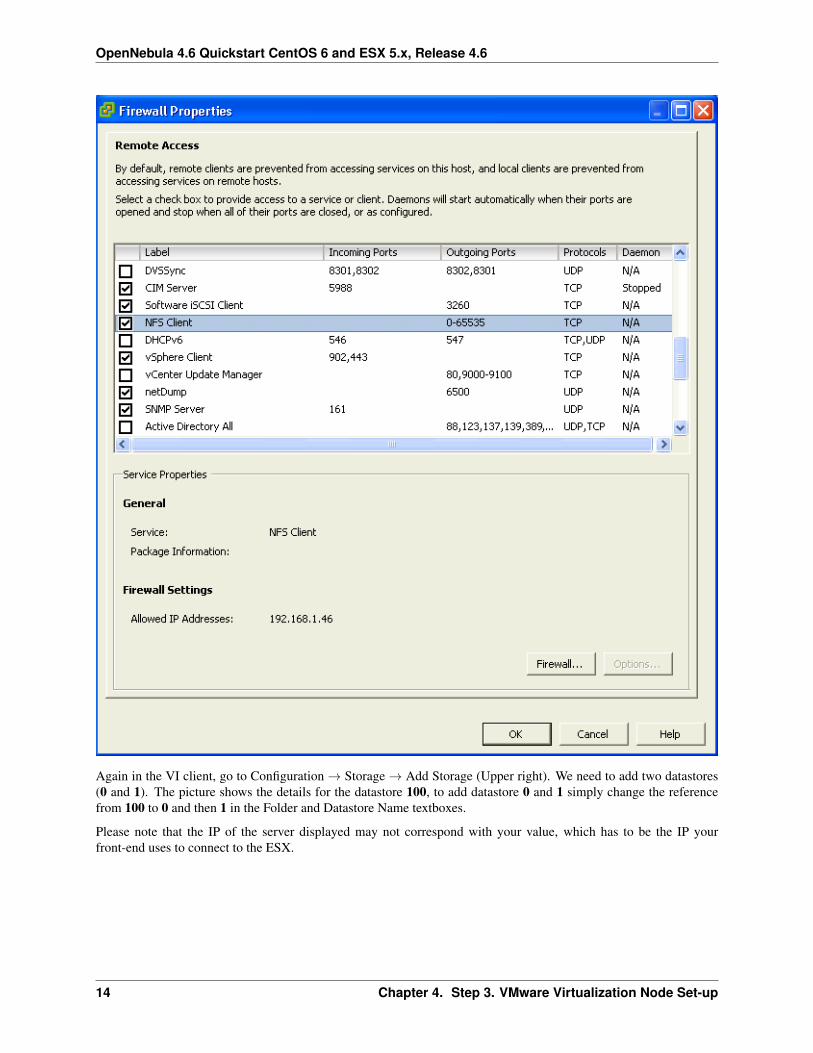
We need now to mount the two datastores exported by default by the OpenNebula front-end. First, you need to makesure that the firewall will allow the NFS Client to connect to the front-end. Go to Configuration → Software →Security Profile, and enable the row NFS Client:
13
OpenNebula 4.6 Quickstart CentOS 6 and ESX 5.x, Release 4.6
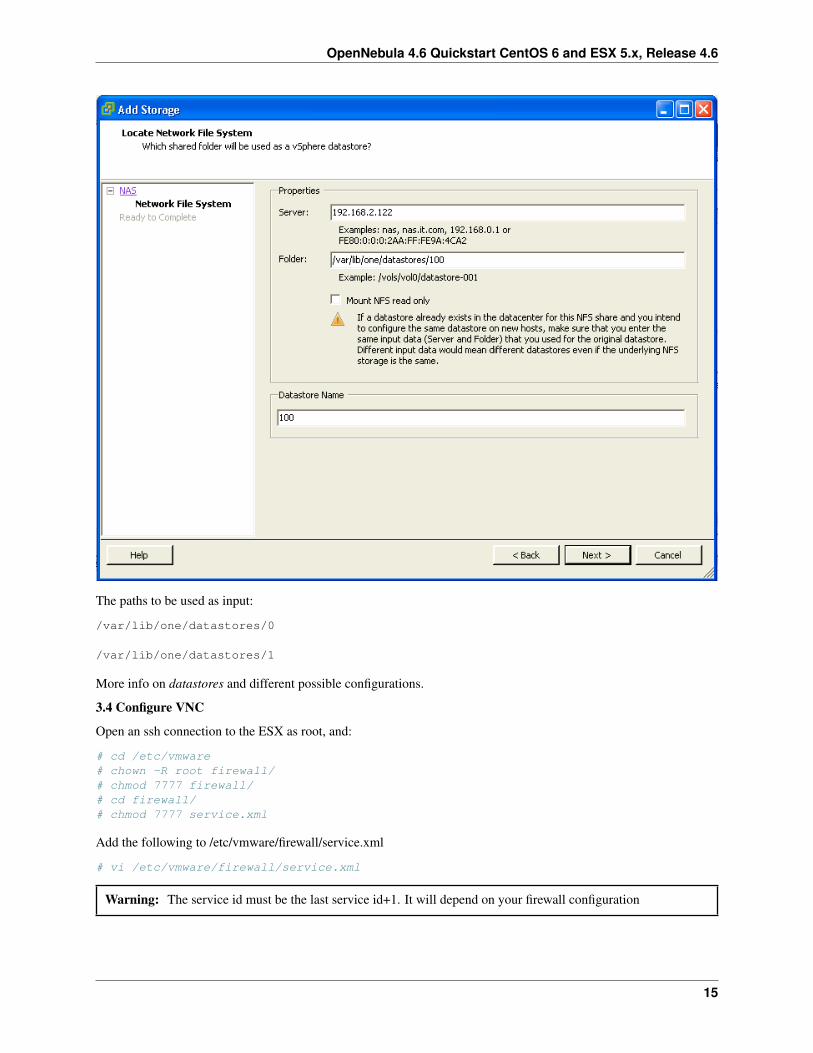
Again in the VI client, go to Configuration → Storage → Add Storage (Upper right). We need to add two datastores(0 and 1). The picture shows the details for the datastore 100, to add datastore 0 and 1 simply change the referencefrom 100 to 0 and then 1 in the Folder and Datastore Name textboxes.
Please note that the IP of the server displayed may not correspond with your value, which has to be the IP yourfront-end uses to connect to the ESX.
14 Chapter 4. Step 3. VMware Virtualization Node Set-up
OpenNebula 4.6 Quickstart CentOS 6 and ESX 5.x, Release 4.6
The paths to be used as input:
/var/lib/one/datastores/0
/var/lib/one/datastores/1
More info on datastores and different possible configurations.
3.4 Configure VNC
Open an ssh connection to the ESX as root, and:
# cd /etc/vmware# chown -R root firewall/# chmod 7777 firewall/# cd firewall/# chmod 7777 service.xml
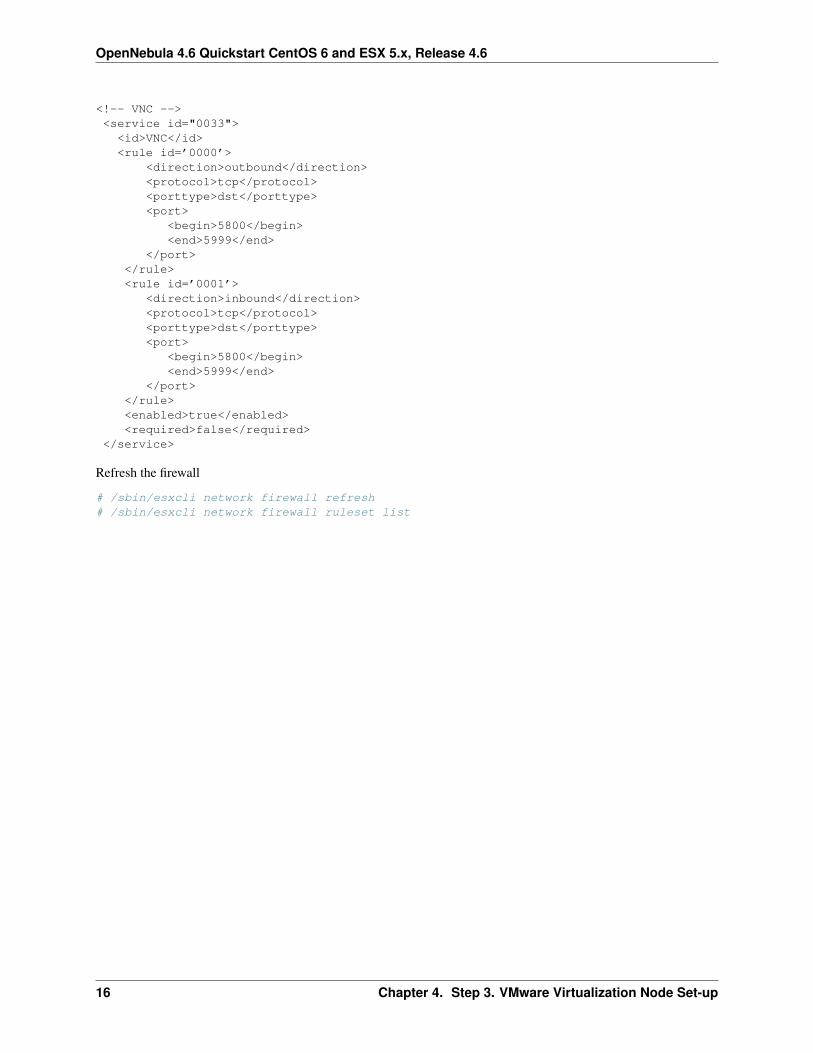
Add the following to /etc/vmware/firewall/service.xml
# vi /etc/vmware/firewall/service.xml
Warning: The service id must be the last service id+1. It will depend on your firewall configuration
15
OpenNebula 4.6 Quickstart CentOS 6 and ESX 5.x, Release 4.6
<!-- VNC --><service id="0033"><id>VNC</id><rule id=’0000’>
<direction>outbound</direction><protocol>tcp</protocol><porttype>dst</porttype><port>
<begin>5800</begin><end>5999</end>
</port></rule><rule id=’0001’>
<direction>inbound</direction><protocol>tcp</protocol><porttype>dst</porttype><port>
<begin>5800</begin><end>5999</end>
</port></rule><enabled>true</enabled><required>false</required>
</service>
Refresh the firewall
# /sbin/esxcli network firewall refresh# /sbin/esxcli network firewall ruleset list
16 Chapter 4. Step 3. VMware Virtualization Node Set-up
CHAPTER
FIVE
STEP 4. OPENNEBULA CONFIGURATION
Let’s configure OpenNebula in the front-end to allow it to use the ESX hypervisor. The following must be run underthe “oneadmin” account.
4.1 Configure oned and Sunstone
Edit /etc/one/oned.conf with “sudo” and uncomment the following:
#*******************************************************************************# DataStore Configuration#*******************************************************************************# DATASTORE_LOCATION: *Default* Path for Datastores in the hosts. It IS the# same for all the hosts in the cluster. DATASTORE_LOCATION IS ONLY FOR THE# HOSTS AND *NOT* THE FRONT-END. It defaults to /var/lib/one/datastores (or# $ONE_LOCATION/var/datastores in self-contained mode)## DATASTORE_BASE_PATH: This is the base path for the SOURCE attribute of# the images registered in a Datastore. This is a default value, that can be# changed when the datastore is created.#*******************************************************************************
DATASTORE_LOCATION = /vmfs/volumes
DATASTORE_BASE_PATH = /vmfs/volumes
#-------------------------------------------------------------------------------# VMware Information Driver Manager Configuration#-------------------------------------------------------------------------------IM_MAD = [
name = "vmware",executable = "one_im_sh",arguments = "-c -t 15 -r 0 vmware" ]
#-------------------------------------------------------------------------------# VMware Virtualization Driver Manager Configuration#-------------------------------------------------------------------------------VM_MAD = [
name = "vmware",executable = "one_vmm_sh",arguments = "-t 15 -r 0 vmware -s sh",default = "vmm_exec/vmm_exec_vmware.conf",type = "vmware" ]
Edit /etc/one/sunstone-server.conf with “sudo” and allow incoming connections from any IP:
17
OpenNebula 4.6 Quickstart CentOS 6 and ESX 5.x, Release 4.6
sudo vi /etc/one/sunstone-server.conf
# Server Configuration#:host: 0.0.0.0:port: 9869
4.2 Add the ESX credentials
$ sudo vi /etc/one/vmwarerc<Add the ESX oneadmin password, set in section 3.1># Username and password of the VMware hypervisor:username: "oneadmin":password: "password"
Warning: Do not edit :libvirt_uri:, the HOST placeholder is needed by the drivers
4.3 Start OpenNebula
Start OpenNebula and Sunstone as oneadmin
$ one start$ sunstone-server start
If no error message is shown, then everything went smooth!
4.4 Configure physical resources
Let’s configure both system and image datastores:
$ onedatastore update 0SHARED="YES"TM_MAD="vmfs"TYPE="SYSTEM_DS"BASE_PATH="/vmfs/volumes"
$ onedatastore update 1TM_MAD="vmfs"DS_MAD="vmfs"BASE_PATH="/vmfs/volumes"CLONE_TARGET="SYSTEM"DISK_TYPE="FILE"LN_TARGET="NONE"TYPE="IMAGE_DS"BRIDGE_LIST="esx-ip"
$ onedatastore chmod 1 644
And the ESX Host:
$ onehost create <esx-ip> -i vmware -v vmware -n dummy
4.5 Create a regular cloud user
$ oneuser create oneuser <mypassword>
18 Chapter 5. Step 4. OpenNebula Configuration
CHAPTER
SIX
STEP 5. USING THE CLOUD THROUGH SUNSTONE
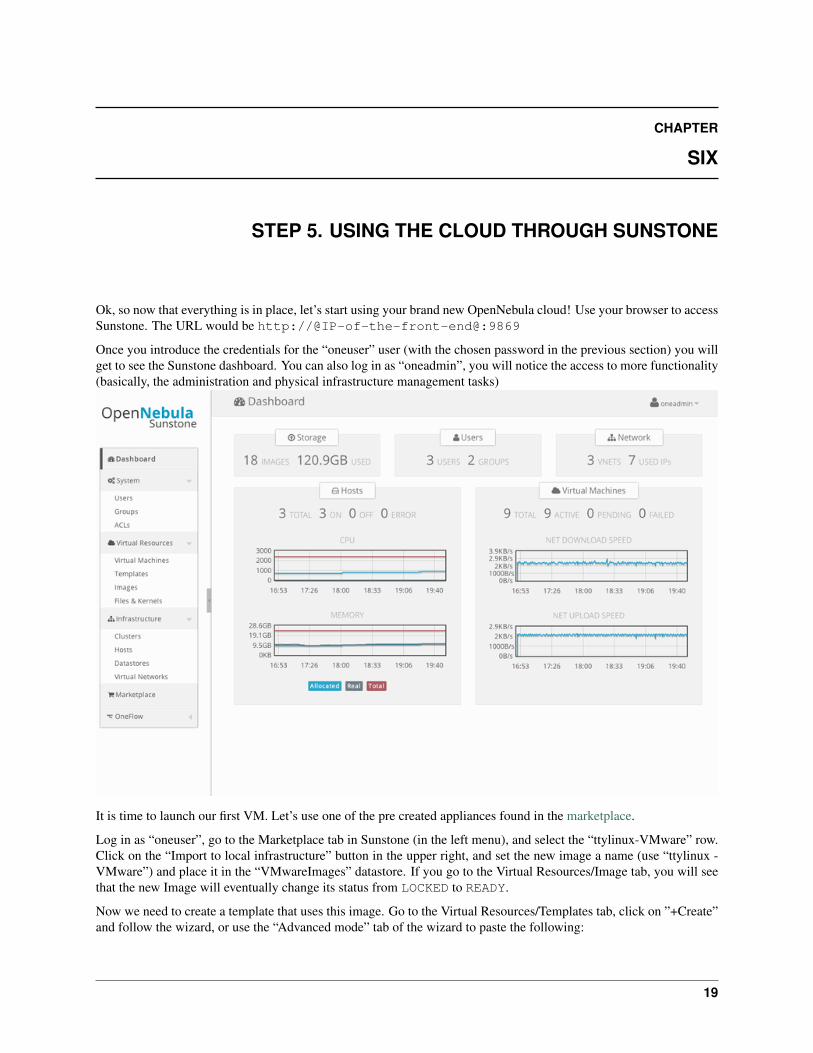
Ok, so now that everything is in place, let’s start using your brand new OpenNebula cloud! Use your browser to accessSunstone. The URL would be http://@IP-of-the-front-end@:9869
Once you introduce the credentials for the “oneuser” user (with the chosen password in the previous section) you willget to see the Sunstone dashboard. You can also log in as “oneadmin”, you will notice the access to more functionality(basically, the administration and physical infrastructure management tasks)
It is time to launch our first VM. Let’s use one of the pre created appliances found in the marketplace.
Log in as “oneuser”, go to the Marketplace tab in Sunstone (in the left menu), and select the “ttylinux-VMware” row.Click on the “Import to local infrastructure” button in the upper right, and set the new image a name (use “ttylinux -VMware”) and place it in the “VMwareImages” datastore. If you go to the Virtual Resources/Image tab, you will seethat the new Image will eventually change its status from LOCKED to READY.
Now we need to create a template that uses this image. Go to the Virtual Resources/Templates tab, click on ”+Create”and follow the wizard, or use the “Advanced mode” tab of the wizard to paste the following:
19
OpenNebula 4.6 Quickstart CentOS 6 and ESX 5.x, Release 4.6
NAME = "ttylinux"CPU = "1"MEMORY = "512"
DISK = [IMAGE = "ttylinux - VMware",IMAGE_UNAME = "oneuser"
]
GRAPHICS = [TYPE = "vnc",LISTEN = "0.0.0.0"
]
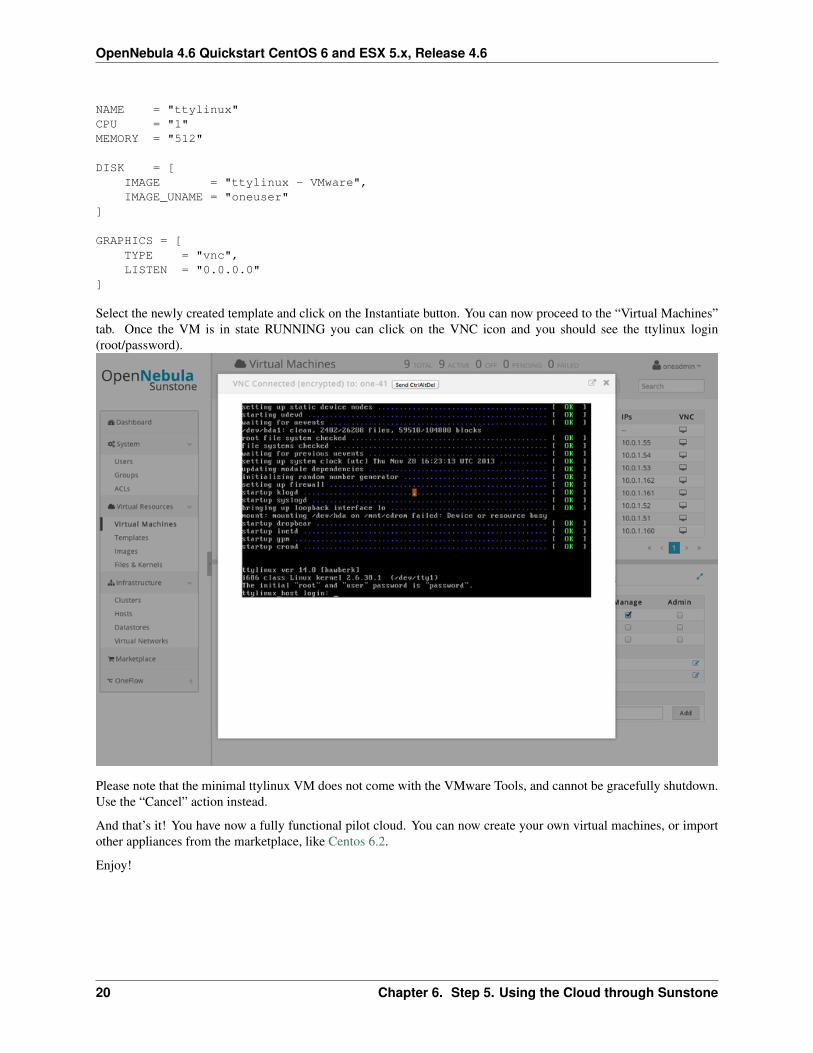
Select the newly created template and click on the Instantiate button. You can now proceed to the “Virtual Machines”tab. Once the VM is in state RUNNING you can click on the VNC icon and you should see the ttylinux login(root/password).
Please note that the minimal ttylinux VM does not come with the VMware Tools, and cannot be gracefully shutdown.Use the “Cancel” action instead.
And that’s it! You have now a fully functional pilot cloud. You can now create your own virtual machines, or importother appliances from the marketplace, like Centos 6.2.
Enjoy!
20 Chapter 6. Step 5. Using the Cloud through Sunstone

CHAPTER
SEVEN
STEP 6. NEXT STEPS
• Follow the VMware Virtualization Driver Guide for the complete installation and tuning reference, and how toenable the disk attach/detach functionality, and vMotion live migration.
• OpenNebula can use VMware native networks to provide network isolation through VLAN tagging.
Warning: Did we miss something? Please let us know!
21