openolat 8.1 - user manual -...
TRANSCRIPT

OpenOLAT 8.1 - User Manualhttp://www.frentix.com - 4.2012 v8.1

@2012 CopyrightSome rights reserved! This document is copyright protected by the owners and companies listed below under theAttribution-NonCommercial-ShareAlike Creative Commons license. For more information check:http://creativecommons.org/licenses/by-nc-sa/2.5/ch/
Responsible persons:
• Sandra Arnold (Overall), University of Zurich, MELS, [email protected]
• Renata Sevcikova (Overall), University of Zurich, MELS, [email protected]
• Kristina Isacson (Overall), University of Zurich, MELS, [email protected]
• Joël Fisler (Specials), University of Zurich, MELS, [email protected]
• Sandra Hübner (Content), Hochschule Furtwangen, [email protected]
• Christian Meier (Content), TU Dresden, [email protected]
• Sven Morgner (Content), BPS, [email protected]
• Kirsten Scherer Auberson (Content), frentix, [email protected]

OpenOLAT 8.1 - User Manual
http://www.frentix.com - 10.4.2012 1
Content
Introduction................................................................................................................................................. 4What to Expect From this Manual.........................................................................................................4Manual's Structure.................................................................................................................................. 4Further Sources of Information..............................................................................................................5
General Information on this Learning Platform........................................................................................ 6Information on OpenOLAT....................................................................................................................6Requirements when Working with OpenOLAT.................................................................................... 6The Idea of Open-Source Software....................................................................................................... 7Technology and Navigation................................................................................................................... 7Roles and Rights.....................................................................................................................................7
Registration, Login and Logout................................................................................................................. 8Your First OpenOLAT Registration...................................................................................................... 8Login Page.............................................................................................................................................. 8Session Timeout and Logout..................................................................................................................8
Home (Your Personal Homepage), Full-Text Search and Chat.............................................................. 10Settings and Menu Entries of Your Home.......................................................................................... 10Full-Text Search................................................................................................................................... 14Chat....................................................................................................................................................... 14
Groups....................................................................................................................................................... 16Project Groups...................................................................................................................................... 16Learning Groups and Learning Areas..................................................................................................18Right Groups.........................................................................................................................................21
Learning Resources.................................................................................................................................. 23Various Types of Learning Resources.................................................................................................23How to Find Learning Resources (OpenOLAT User without Author Rights).................................... 25How to Find Learning Resources (OpenOLAT Users with Author Rights)........................................26Actions in the Tab 'Learning Resources'............................................................................................. 26Detailed View of Learning Resources................................................................................................. 27
Learning Activities in Courses.................................................................................................................30Working With Course Elements.......................................................................................................... 30Additional Course Features.................................................................................................................. 37Course Problems and Error Messages................................................................................................. 38
Creating Courses.......................................................................................................................................40General Information..............................................................................................................................40Requirements.........................................................................................................................................40Just a Few Clicks and the Course Wizard Will Create Your OpenOLAT Course.............................. 40In Six Steps to Your Course With the Course Editor..........................................................................40Additional Settings in the Detailed View............................................................................................ 43
Course Elements and Course Editor........................................................................................................ 46General Configuration of Course Elements......................................................................................... 46Access Restrictions in the Expert Mode..............................................................................................48Types of Course Elements................................................................................................................... 49

OpenOLAT 8.1 - User Manual
http://www.frentix.com - 10.4.2012 2
Using Editor Tools............................................................................................................................... 61Collecting function............................................................................................................................... 62Deleting, Moving and Copying Course Elements............................................................................... 62
Creating CP Learning Content................................................................................................................. 63General Information..............................................................................................................................63In Five Steps to Your Content Package...............................................................................................63
Creating Wikis.......................................................................................................................................... 66General Information..............................................................................................................................66Four Steps to Your Wiki......................................................................................................................66Further Configurations..........................................................................................................................68
Creating Podcasts......................................................................................................................................69General Information..............................................................................................................................69Requirements.........................................................................................................................................69Four Steps to Your Podcast................................................................................................................. 69Further Configurations..........................................................................................................................71
Creating Blogs.......................................................................................................................................... 72General Information..............................................................................................................................72Four Steps to Your Blog...................................................................................................................... 72Further Configurations..........................................................................................................................74
Creating Tasks.......................................................................................................................................... 75General Information..............................................................................................................................75Requirements.........................................................................................................................................75Three Steps to Your Task.................................................................................................................... 75Further Configurations..........................................................................................................................77
Creating Portfolio Tasks...........................................................................................................................79General.................................................................................................................................................. 79Requirements.........................................................................................................................................79Five Steps to Your Portfolio Task....................................................................................................... 79
Managing Topics of Topic Assignments................................................................................................. 83General.................................................................................................................................................. 83Requirements.........................................................................................................................................83Three Steps to Create and Manage Topics.......................................................................................... 83
Creating Tests and Questionnaires...........................................................................................................86General Information..............................................................................................................................86Five Steps to Your Test, Self-test or Questionnaire............................................................................ 87Test and Questionnaire Editor in Detail.............................................................................................. 89Archiving Results of Tests and Questionnaires...................................................................................92
Course Operation...................................................................................................................................... 94Using Editors During Course Operation..............................................................................................94Using Course Tools.............................................................................................................................. 94Using Additional Course Features....................................................................................................... 97Record of Course Activities.................................................................................................................98
Supported Technologies......................................................................................................................... 100Using eLML to Create E-Learning Content...................................................................................... 100Using WebDAV..................................................................................................................................100

OpenOLAT 8.1 - User Manual
http://www.frentix.com - 10.4.2012 3
Using External Chat Clients...............................................................................................................102Index........................................................................................................................................................106

OpenOLAT 8.1 - User Manual
http://www.frentix.com - 10.4.2012 4
Introduction
What to Expect From this Manual
This user manual helps you to make yourself familiar with OpenOLAT while thoroughly explaining it'sfunctionality.
The OpenOLAT manual is meant for people interested in e-learning as well as in making use of OpenOLAT forvarious reasons. If you have not worked with OpenOLAT (former OLAT) before you will get more informationon how to get started with this learning platform step by step which includes searching for predefined learningcontent, its adaption, as well as the handling of collaborative tools.
Perhaps you were already an experienced OLAT user but now you want to provide others with learning contentin OpenOLAT. In this case the chapters on learning resources, course elements, course editor and the ones onhow to create courses or tests will assist you in your work.
If you were already an OLAT expert this manual will serve as a work of reference. Its table of contents isthere to guide you; the PDF version additionally provides an index in order to find what you are looking foras fast as possible.
This is an extended Adaption of the "OLAT 7.1 - User Manual", used under a Creative Commons Attribution-NonCommercial-ShareAlike license.
Manual's Structure
This manual consists of four parts. The chapters 1 - 3 deal with the Introduction to this Learning Platform.Chapter 2 concentrates on OpenOLAT's basics. You will learn that OpenOLAT is an open-source learningplatform with several different OpenOLAT user roles at your disposal. Chapter 3 shows you how to register inOpenOLAT, how to use further features on the login page, and finally how to log off.
In the second part you will learn How to Use OpenOLAT. Please read Chapter 4 after registering and choosingan OLAT user name in order to get further information on its structure and different possibilities to configureyour homepage, the so-called "Home." The following Chapter 5 deals with OpenOLAT's concept of groups,e.g. which group types are feasible in various scenarios. Let yourself get inspired and create your own didacticconcept. Chapter 6 concentrates on OpenOLAT's primary concern, on learning resources. There are differenttypes of learning resources and this chapter also tells you how to find learning content. Should you havedifficulties while working on some learning content you can get help in Chapter 7. Course elements as well aspossible learning activities will be explained from the participant's point of view.
Do you want to create courses for yourself? The third part of this manual is dedicated to the Creation ofLearning Content. Chapter 8 contains step-by-step instructions on how to prepare a course before authorizingcourse participants to get access. Course elements as well as feasible configurations in the course editor willbe described in detail in the following Chapter 9.
If you want to create further learning resources to be included in your course the following chapters will beuseful: "Creating CP Learning Content", "Creating Wikis", "Creating Podcasts", "Creating Blogs", "CreatingTasks", "Creating Portfolio Tasks", "Managing Topics of Topic Assignments", and "Creating Tests andQuestionnaires".

OpenOLAT 8.1 - User Manual
http://www.frentix.com - 10.4.2012 5
Your learning content is now completed, published, and frequently used by course participants. Chapter 18will tell you where to find course results, where to assess achievements or how to archive your learning contentafter your course's completion.
In the fourth part, in Chapter 19, you can make yourself familiar with technologies and tools that will facilitateyour work within OpenOLAT. We recommend these tools that complement OpenOLAT's features since manyOpenOLAT users can tell you about their positive experience they have made with OLAT over the years.
Depending on your OpenOLAT user role you will be interested in various chapters of this manual. The chapters1 - 4 and 7 describe features that are at the disposal of all OpenOLAT users. Chapter 5 and 6 first deal withinformation regarding all users. The second part then concentrates on specific author features. The chapters8 - 18 are only relevant for OpenOLAT users without any author rights if a course author has provided theseusers with certain tasks, e.g. the mentoring of groups. Chapter 19 can help authors who work with OpenOLATregularly and who want to get familiar with further auxiliary technologies.
Further Sources of Information
Context-Sensitive Help
While working with OpenOLAT you cannot only dispose of this manual but also use OpenOLAT's context-sensitive Help. This Help feature explains the options you have regarding OpenOLAT's configuration--rightwhere you are at that particular moment. You will recognize this feature by a question mark icon. Just click onthat icon to open the context-sensitive Help feature within a new window.
SupportPlease contact your local support team.

OpenOLAT 8.1 - User Manual
http://www.frentix.com - 10.4.2012 6
General Information on this Learning PlatformThis chapter gives an account of OpenOLAT's development and of the people behind this system. Then youwill learn something about the requirements you have to comply with when working in OpenOLAT and itstechnology. Finally you can acquaint yourself with all of OpenOLAT's user roles.
Information on OpenOLAT
OpenOLAT derives from OLAT which means "Online Learning and Training", and is an open-source learningplatform. In 1999 OLAT was launched by the Computer Science Department at the University of Zurich (UZH).In September 2000 the OLAT team at that time won the MEDIDA Prix. This as well as OLAT's successopened new possibilities: In 2001 the Computer Science Services at the UZH took charge of OLAT, offeringprofessional operation and support as well as further software development. OLAT has been used as a strategiclearning platform at the UZH since 2004. At present OLAT is employed at all faculties of the UZH as well asthe ETH Zurich; there are more than 50'000 registered users.
In 2011, the project host changed access to the source. As a result, the open-source project OpenOLAT wasinitiated, as a branch of the version 7.1 OLAT code.
A learning platform or Learning Management System (LMS) serves to provide learning content, to organizelearning activities, and to manage course participants. A LMS assists you in realizing didactic course concepts.You can use a LMS for virtual presentations as well as blended-learning scenarios. Blended learning is a form ofe-learning that combines classroom teaching with computer-based learning. Features such as access regulation,group management, assessment tools, or collaborative tools (forum, chat, etc.) assist you in organizing an event.
OpenOLAT is not a Content Management System (CMS). Since OLAT means "Online Learning and Training"the main objective is not the creation of learning material. Therefore additional tools should be used whencreating or editing larger amounts of learning content (e.g. eLML). Learning content that has been generatedexternally can be imported into OpenOLAT by means of standardized interfaces. However, in order to be ableto create simple pages in OpenOLAT there are applicable tools such as the HTML editor.
Further information about OpenOLAT can be found on the project website www.openolat.org and the productwebsite www.openolat.com from frentix. You can get a first impression of OpenOLAT on frentix' demo server,even if you do not have an OpenOLAT setup.
Requirements when Working with OpenOLAT
OpenOLAT is a web application. In order to work with OpenOLAT you will need an internet connection aswell as a modern web browser. OpenOLAT is optimized for Mozilla Firefox (2.0 and up), a browser thatcan be downloaded for free. Please perform a browser check to be sure that your browser will support all ofOpenOLAT's features.
If you want to offer courses in OpenOLAT you have to apply first for author rights by contacting your supportteam. You can start working in OpenOLAT after choosing your didactic concept and after adapting yourlearning content for the web. We recommend using a HTML editor such as Dreamweaver to create complexlearning content or other tools that help you generate content (e.g. eLML).

OpenOLAT 8.1 - User Manual
http://www.frentix.com - 10.4.2012 7
The Idea of Open-Source Software
OpenOLAT is an open-source software which means that its code is at your disposal for free. You can downloadit, use it, adapt it, and develop it further without having to pay license fees. Further information on this open-source project can be found on our community website www.olat.org. There you can get in contact with theopen-source community, put your name down in the mailing list, and exchange experiences.
Why open source? There are two reasons: first the OpenOLAT team benefits from the software's world-wide operation; various institutions and companies provide us with valuable input for OpenOLAT's furtherdevelopment. The second reason is the fact that thanks to translators from the open-source community we areable to offer this software in numerous languages by now.
Technology and Navigation
OpenOLAT is a web application and is mostly written in Java. Furthermore we use standard web applicationssuch as: Apache (web server), Tomcat (application server), a MySQL data base (other data bases are alsopossible), and XML (data management). Intuitive user interfaces are implemented using Web 2.0 technologies.
Web applications can cause problems when pushing the back button of your browser. OpenOLATsupports the Browser-Back, but this function is still in its beta phase which may result in unexpectedeffects.
Roles and Rights
Essential ideas of OpenOLAT are various roles and rights that can be assigned to users. Each user can takeon one of four main roles:
• Guest: Guests, who are not registered, will have only limited access to OpenOLAT. They can see learningcontent that is open to the public; however, they cannot participate in any learning activities such ascontributing to a forum discussion. The login page provides a link to that guest access.
• Registered OpenOLAT user: Each user has a distinct user name; this name cannot be altered afterregistration. Users may benefit from open learning content and participate in all learning activities. Inaddition there is storage space as well as a homepage at each user's disposal that can be configuredindividually. A registered user can furthermore create his own project groups.
• Author: An author can create or import learning content for his course participants. Additionally authorscan manage participants within learning groups before archiving or deleting them after that course hasended. Registered users can apply for author rights at their appropriate support services.
• System administrator: A system administrator assigns rights, manages users, and deletes obsoletelearning content. Get in contact with your system administrator via support services.
Besides these four main roles there are others that are seldom used such as the group administrator, the useradministrator, and the learning resource administrator. These roles are part of those responsibilities a systemadministrator bears.
The role basically dictates the rights a user has in OpenOLAT. It is also possible to assign additional rightsto users. You can for instance allow a registered OpenOLAT user to supervise groups and to evaluate groupparticipants. You can even add any author as owner (co-author) to your course which means that this newowner has the right to edit your course as well.

OpenOLAT 8.1 - User Manual
http://www.frentix.com - 10.4.2012 8
Registration, Login and LogoutIn this chapter you will learn how to register in OpenOLAT and how to log out. Additionally you will cometo know more about the information available on the login page.
Your First OpenOLAT Registration
In order to work with OpenOLAT you need an internet connection as well as a browser. Concerning your firstOpenOLAT registration, please contact the manager responsible for e-learning in your organisation.
Login Page
Login to OpenOLAT is possible anytime through your organisation's access page. In case you should forgetyour password you can contact your responsible helpdesk.
The login page provides you with further features and more information (guest access, browser check, websiteaccessibility) that can be used without any login.
Guest AccessYou can use OpenOLAT as guest as well. The so-called guest access provides an insight into OpenOLAT withlimited access to certain features: you will only get to learning content that is explicitly open to the public. Inorder to have access to other material and activities you will have to register first.
Browser CheckOpenOLAT is optimized for the Firefox browser (version 2.0 and up). This browser can be downloaded forfree at Mozilla.
If you want to use a different browser you can test that by means of the browser check. You will know if yourbrowser can be used and which OpenOLAT features will then be available.
Website AccessibilityWebsite accessibility means optimization of access for visually impaired people. Here you will get informationon shortcuts to essential system elements.
By means of the so-called Web 2.a mode you can highlight certain elements on screen. This mode can beactivated and deactivated on the user level. Check your configuration on your Home, section "Settings".
Session Timeout and Logout
OpenOLAT administers a session for all users. Each click (e.g. on a question in a test) restarts the session timeof your session. System administrators are able to set the session time according to their needs. If there are noclicks within that session time in OpenOLAT the session will be terminated.
Session timeouts will not be announced. After your session time is up you will have to log in anew.All data that have not been saved will be lost. You should therefore periodically save your work.
It is possible to log off of OpenOLAT at any time by using the logout icon on your top right. You will then getback to the login page. If you do not log off but only close the browser or the browser window your sessionwill go on till your session timeout is reached.

OpenOLAT 8.1 - User Manual
http://www.frentix.com - 10.4.2012 9
If you want to use OpenOLAT in public places it is important to log off of OpenOLAT; to only closeyour browser window is not enough. As long as your session is active another person could use yourOpenOLAT login data at that computer.

OpenOLAT 8.1 - User Manual
http://www.frentix.com - 10.4.2012 10
Home (Your Personal Homepage), Full-Text Search and Chat
After your login you will get to your Home, your personal homepage in OpenOLAT. This chapter will informyou about how to adapt your Home to your personal needs and how to use further features such as the chator the full-text search.
Settings and Menu Entries of Your Home
Each OpenOLAT user can adapt the Home area to a certain extent. On the one hand you can restructure thesections displayed according to your needs. On the other hand there are a number of personal settings you canset up in your Home.
Configuring Entries in Your HomeThe sections in your Home consist of various shortcuts to your groups, your learning resources, your calendar,your notifications, a comic strip, as well as to information on OpenOLAT in general. You can choose whichsections should be displayed in an arrangement of your choice.
Let us assume that most of the time you have to deal with groups. Therefore you may want to position thesection "My groups" more prominently: just click on "Configure page" on your top right. Then move the section"My groups" wherever you want to by means of the arrows provided.
You can further determine how many entries should be visible within a certain section. In order to do this justclick on one of the following icons: "Sort manually" or "Sort automatically." If you choose "Sort manually"you will be able to determine the selection of entries as well as their sequence.
If you do not want to see certain sections in your Home you can deactivate these sections. Deactivated sectionswill be displayed at the bottom of the page when configuring your Home. You can reactivate them anytime.
After completing your configuration you should click on "End configuration" on your top right.
SettingsIn the menu on the left just underneath the option "Settings" you can modify your personal data. This maybe necessary if you want to forward OpenOLAT e-mail messages to another mail address or if you want tocreate a visiting card.
Just indicate your data in your profile and save that information. By means of check boxes you can decidewhich data should appear on your visiting card, that is, what other users should be able to see. You can alsoupload a photo to be published on your visiting card. This photo will also be visible when publishing forumcontributions or comments.
You can further adapt the font size and your system language in the tab "System" (OpenOLAT has beentranslated into numerous languages). You can further determine how often you want to receive notificationsvia e-mail. You can choose between: off, monthly, weekly, daily, every 6 hours, and every two hours.
Your chat features can be determined by means of "Instant Messaging," e.g. your status after having logged in.

OpenOLAT 8.1 - User Manual
http://www.frentix.com - 10.4.2012 11
CalendarIn the calendar you can see your private events as well as events regarding calendars of groups and courses.In the list right underneath the active calendar day you can hide and unhide each calendar or determine whichcalendar should be displayed in a certain color.
Should your calendar remain empty or should certain events not appear, it could be that you forgot toselect that calendar in the calendar list.
In order to add a new event to your calendar you have to click inside the appropriate calendar field. If youare a group member you have to first select from the pull-down menu to which calendar (personal calendaror group calendar) you want to add your new event. Events can be edited or deleted by clicking on their timespecification.
Use the OpenOLAT event search to find events already existing. By means of the link "Go to date" you candirectly navigate to any past or future date.
By means of iCal (a standard to manage events) you can integrate various OpenOLAT calendars into anothercalendar, e.g. the Google calendar. It is therefore also possible to integrate any other calendar into theOpenOLAT calendar.
SubscriptionsThanks to OpenOLAT's notifications you are always up-to-date regarding your courses or groups: you will beinformed about new documents in a folder, about answers to forum entries or modified Wiki pages. In manyplaces you can select the option "Subscribe" to be kept informed. News will be displayed immediately in thetab "Home," section "Notifications"; OpenOLAT will send you an appropriate e-mail once a day. If you preferto receive such messages less often or not at all you can adapt these settings in your Home in the tab "System".
If you do not need your subscription any longer you can either unsubscribe it (same place as "Subscribe") oryou can select the option "Delete" in your Home, section "Subscriptions," right next to your resource.
In the section "Subscriptions" of your Home you can choose to be shown any modifications within a certainperiod of time in the tab "News" or you can choose to have sent those modifications once again via e-mail.
BookmarksBookmarks serve to get faster access to your learning resources. In the detailed view of your course you willfind a link in the box "Learning resource" to be able to set bookmarks. In your Home you can then edit ordelete these bookmarks.
Personal FolderIn your personal folder OpenOLAT provides you with storage space. Here you can store presentations youwant to use from another computer or cache a research paper, etc.
This personal folder contains two areas, the "Private" and the "Public" one. Only you will have access to yourprivate area. In the subfolder "Public" you can store files you want to share with other OpenOLAT users. Bymeans of the link "Other users" you can search for other OpenOLAT users and have access to those users'"Public" folder via the menu item "Folder."
The personal folder is WebDAV compatible, i.e. folders in OpenOLAT act as a regular network drive.Therefore it is very easy to copy, move or delete files. For more information please go to " Using WebDAV".

OpenOLAT 8.1 - User Manual
http://www.frentix.com - 10.4.2012 12
In case the memory limit (Quota) is exceeded due to large files in your personal folder you can contactyour support team to allocate more space.
NotesYou can take notes in each course. You can collect and edit your notes before even printing them.
Evidence of AchievementAn evidence of achievement is a certification of some assessment, e.g. tests, written examinations, or other taskshanded in to be reviewed. Course authors determine if OpenOLAT should create assessments in their course.Course participants will see their evidences of achievement after taking a test, etc. that has been assessed.
E-mailsThe "E-mails" section provides you with an overview of all your sent and received E-mails. OpenOLAT storesall E-mails and thus allows for an easy navigation between different contexts.
BookingsBookings displays all learning resources you booked so far within OpenOLAT. Booking list as well as thedetailed view provide you with information on booking number, date, status, booking method and costs.
Other UsersSearch for other OpenOLAT users! Have a look at their visiting card, at the "Public" area of their personalfolder, at any released portfolio folders, or send them a message by means of a contact form.
In the footer you will find a link indicating all users logged on at that moment.
ePortfolioAn ePortfolio is used to document learning results as well as learning processes and is therefore meant to assistin reflecting on someone's process of development. The menu entry ePortfolio serves to create accumulativefolders of portfolios before making those accessible to certain people (OpenOLAT users as well as guests).You can also have a look at other users' folders or perform portfolio tasks of an OpenOLAT course.
In order to create a portfolio folder or perform a portfolio task you have to create or assemble artefacts first.Artefacts are documents of your learning process as well as your work performed. Artefacts can be e.g. texts,files, posts in a forum or blog, or evidences of achievement.
You can assemble the following artefacts:
• Posts in forums
• Files in folders
• Wiki pages
• Evidences of achievement
• Posts in blogs
First you have to select the ePortfolio icon (e.g. in a post of yours) before following the steps of youraccumulative artefact tool. You can indicate the title as well as the description of your artefact; you can provideit with key words (commonly known as tags) to facilitate your search later on or you can write a text as memoryaid to justify the selection of your artefact. If you have already created an accumulative folder you will be ableto link your artefacts to that folder.

OpenOLAT 8.1 - User Manual
http://www.frentix.com - 10.4.2012 13
You can create artefacts by clicking on "Add artefact" within the menu item "My artefacts." Just select therequired artefact type before creating your text,file or blog artefact. Similar to the accumulative artefact toolyou just have to follow the directions of the artefact creation tool. You can write a text, upload a file, or createa learning journal. A learning journal is a blog to document your learning progress. Afterwards you have toindicate a title and a description before deciding on key words for your artefact. Then you confirm that youare the author of that artefact and indicate your reflections before selecting an accumulative folder. The steps"Confirm Authorship" and "Reflection" might be disabled.
You can also create text, file and blog artefacts from within a portfolio by clicking on the "Link artefact"-iconin the folder view. Within in the now open artefact browser, click on "Add artefact" and select the requiredartefact type. The new artefact is then displayed in the artefact browser, where it can be selected. Dependingon the view and sorting filter, the newly created artefact might be found at the end of the list.
After creating or assembling artefacts you can also search for artefacts by means of the menu item "Myartefacts" in order to e.g. edit artefacts or delete ones from your list. There are two possibilities to search forartefacts. The tag browser will help you to browse for key words of your artefact (tags). Then you can use theartefact search feature to additionally search for the type, the creation date, the title or the description of anartefact. Furthermore you can save your queries to avoid having to indicate your search criterion anew. Thesequeries can be adapted or deleted as required.
You can have a look at your artefacts in the detailed view or the table view. This table view presents an overviewof your artefacts and provides a possibility to sort columns alphabetically. In the detailed view you can editor delete your artefacts.
You can configure your display settings by selecting only a certain amount of artefact attributes inthe detailed view.
The Changelog page is an integral part of any portfolio. The following changes to a portfolio task or binderwill be displayed:
• new page
• new structural element
• new artefact
• new comment
• new rating
• altered rating
Changes made by you as well as your coach are displayed in the changelog. In order to be kept informedif the above mentionend changes occurred in a portfolio task or binder, you should select "Subscribe" onthe changelog page. This is especially useful if portfolios have been released for you to assess or comment.Modifications will get to you by e-mail or you will see them in your Home, section "My notifications."
Within the menu item "My accumulative folders" you can create folders or allocate artefacts. Such a folder canbe structured according to your needs by inserting pages or other structural elements. In the editing mode youcan adapt your folder as required, e.g. by determining your display settings or moving structural elements andartefacts via "Drag&Drop." Additionally you can comment on folder entries or assess them.
When copying accumulative folders you can choose between adopting only their structure or also their artefacts.You can release your accumulative folder as follows:

OpenOLAT 8.1 - User Manual
http://www.frentix.com - 10.4.2012 14
• for one or more distinctive OpenOLAT users
• for all OpenOLAT users
• for one or more OpenOLAT groups
• for one or more persons not registered in OpenOLAT
If you opt for this last-mentioned option please use a release invitation. It is also possible to limit the accessto your folder temporarily if needed.
Within the menu item "My portfolio tasks" you will find portfolio tasks of OpenOLAT courses. You canperform those tasks (i.e. link required artefacts to that folder) before submitting them. In case you have alreadyperformed those tasks you can still have a look at them.
If a course author restricts portfolio tasks you will have to abide by these rules.
Within the menu item "Released accumulative folders" you can see any folders you have access to. By changingyour view you will also be able to browse through folders released for all OpenOLAT users.
Full-Text Search
The box for the full-text search is at the top right of the status bar. The full-text search helps you to look forsearch terms in the course or group content, in a forum or even in PDF and Word files. You can furthermorelook for users, portfolio folders, artefacts, and documents in any user folder. The only exceptions are privatefolders since they will not be indexed.
You will only get search results of the course contents you have access to.
In order to search in more detail please use the advanced search. You will find it when clicking on the magnifiericon next to the full-text search box. Select the option "Advanced search." You will be provided with a list ofsearch results that is linked to the learning content along with your search term. For more detailed informationregarding the search syntax please go to Apache Lucene.
Chat
In the OpenOLAT Chat you can exchange messages with other OpenOLAT users in real time.
Sending MessagesBy clicking on those two digits (xx/xx) on the top right of the menu bar next to the Instant Messaging statussymbol (e.g. green star) a list will pop up. There you will see all members of your project group logged on atthat time. To start a chat you just have to click on the name of the one you would like to chat with.
If you want to chat with an OpenOLAT user who is not a member of any of your groups you have tocreate a project group first before inviting that user to join. Another option is to open a list in the footerwith all users logged on before clicking on a user name to start your chat.

OpenOLAT 8.1 - User Manual
http://www.frentix.com - 10.4.2012 15
Receiving messagesMessages can be received in two ways: In case the chat window is closed messages will appear as small blinkingletters on the left next to the star icon that can be found on the top right of the menu bar. When clicking onthat small letter a chat window will open containing your message. In case the chat window is already open,all new messages will be displayed there.
Changing Your StatusBy clicking on the star icon on the top right of the menu bar you can change your Instant Messaging status.That way you can show other OpenOLAT users if you would like to chat or not. While taking a test your statuswill automatically show the status "Please do not disturb." Only after that test you will be able to chat again.
If you prefer to have a different status than "available" after your login you can adapt these settingsin your Home in the tab "Instant Messaging."

OpenOLAT 8.1 - User Manual
http://www.frentix.com - 10.4.2012 16
Groups
In OpenOLAT there are three different kinds of groups: project groups, learning groups and right groups.OpenOLAT users can see their groups in their Home, section "My groups" or whenever they open the tab"Groups" on the top of the main navigation.
Project groups are meant for working in groups outside of OpenOLAT courses. Each OpenOLAT user cancreate project groups on his own to invite any number of other OpenOLAT users. Learning groups, however,are linked with courses in OpenOLAT and can only be created by course authors. Learning groups are used forenrolments or working in groups within a certain course. Right groups help course authors to allocate rights tocertain course participants to grant access to course tools such as the course editor, for example.
This chapter further explains those different group types as well as their purpose of use.
Project Groups
Project groups are meant for collaborative work outside a course context, e.g. when writing a term paper ingroups, when preparing a presentation, when working jointly on some academic publication, or when planningto communicate with other group members via forum or chat. All OpenOLAT users can create project groupsand invite another OpenOLAT user to join. Only group members will have access to that group; it is not public.
Creating Project GroupsThe tab "Groups" on top in the main navigation is your starting point for creating a project group. In the toolbox "Create" on your right you have to click on "Project group" before giving your group a name. Save yoursettings. Your project group will then appear on the list containing all groups in the tab "Groups" as well inyour Home, section "My groups."
Configuring Tools of Project GroupsHaving created a project group you can now provide it with collaborative tools in the tab "Tools." If you wantto modify your configurations later on (e.g. deactivate some tools) you have to do this via the tab "Groups."Click on that project group's title and open the menu item "Administration." In the tab "Tools" you can nowactivate or deactivate collaborative tools.
In the tab "Tools" of the context-sensitive Help you will get more detailed information on available OpenOLATtools.
If the tool "Information" is activated and saved you will be able to edit the information meant for your groupmembers right beneath the list containing all tools. If you have activated and saved the calendar setting youcan configure the write permission regarding the group calendar.
Each tool can only be used once in a project group. It is therefore not possible to e.g. provide yourmembers with more than one folder.
Managing Project GroupsIn the tab "Members" you determine if members should see each other or not. Additionally you can add moregroup owners that will hold the same rights as you do. This comprises the right to configure tools, to managemembers, or even to delete the whole group. Each group must have at least one owner.

OpenOLAT 8.1 - User Manual
http://www.frentix.com - 10.4.2012 17
How to add participants is explained in the section below. Participants can use collaborative tools and see eachother in the OpenOLAT chat.
By clicking on the icon "Download table" (underneath the button "Add user") an Excel file will be created,indicating owners and participants of your project group.
Access ControlIn the tab "Publishing and booking configuration" you configure the access control for that specific projectgroup. If no booking method is selected, only those users defined in the "Members" tab gain access to theproject group.
Three different booking methods are available:
• Access code: An access code is manually set by the owner of the project group, who then passes thecode on to authorized users. In order to open the project group, this code must be entered when openingthe group for the first time.
• Freely available: A project group marked as freely available can be used without any restrictions. Usingthis booking method adds users as participants to the group.
• PayPal and Credit card (only available if unlocked by an administrator): The price for admission to theproject group is specified here. The group is subsequently booked by paying with either PayPal or creditcard.
You can add a validity period to each booking method. Once a booking method is configured, the project groupwill be listed in the "Published groups and can thus be searched and booked by users.
Using Tools of Project GroupsAs soon as the owner has provided the project group with tools group members will see the following itemsin the group menu:

OpenOLAT 8.1 - User Manual
http://www.frentix.com - 10.4.2012 18
Information Group owners can edit this text.
Calendar Group events should be managed via the group calendar. According to the configurationyou will hold the write permission or the permission to read only.
Members Here you will see a list containing all group participants and/or its owners.
E-Mail Send all group owners or participants an e-mail.
Folder Exchange documents with other group members.
Forum Here you can discuss with other group members.
Chat You will see who else is present in the group chat. Enter the chat room to communicatewith others in real time.
Wiki Use a Wiki to jointly create learning content.
Portfolio Use a portfolio to jointly create an accumulative folder or add artefacts.
A Wiki is especially useful for recording group work and other projects, or for creating link collections.When subscribing to a Wiki OpenOLAT will notify you of any modifications.
Leaving or Deleting Project GroupsIn the tab "Groups" on top in the main navigation you will see all groups you have enrolled in. There you canleave a project group and delete all those groups you have created or have been nominated as co-owner.
Learning Groups and Learning Areas
Learning groups are always linked with courses. They are often used for the enrolment in a course, theregistration for an excursion, for assigning presentations, etc. Or you can use learning groups for granting writepermission to your course or single course elements or you can assign various tasks to course participants.Learning groups can be combined to form one learning area.
Creating Learning GroupsSince learning groups are always linked to an OpenOLAT course you have to create that course first. A relevantguide can be found in the chapter "Creating Courses". There are two different ways to create learning groups:
1. Via the group management: In the course view you will find the link "Group management" on the topright. There you can generate new learning groups or learning areas. The group management also enablesyou to edit existing groups, add new members, activate collaborative tools, or even delete groups.
2. Directly in the course editor: When configuring the registration element or when using the tabs"Visibility" and "Access" you can create learning groups directly. However, it is not possible to addmembers or to activate collaborative tools. This is what the group management is for.

OpenOLAT 8.1 - User Manual
http://www.frentix.com - 10.4.2012 19
Group NamesWhen creating groups please mind to choose appropriate group names. OpenOLAT users will appreciateto be able to draw conclusions from group names and the courses taken. You could e.g. select the name"ParticipantsSocialPolicy" instead of just "Participants."
Number of Participants and Waiting ListWhen creating a learning group there is the option to limit the number of participants; you can determine howmany members your group should have. When activating a waiting list potential members can enter their nameson that list in case the limit is exceeded. If there are members leaving the group or if the course author cancelssome previous registrations persons on the waiting list will move up automatically if the option "Transferautomatically" has been selected.
Creating Learning Areas and Allocating Learning GroupsIn the course view you have to open the group management. By means of the tool box on your right you canthen create a new learning area before allocating single learning groups to this learning area. If a learning areaalready exists you can use this one to allocate certain learning groups. All you have to do is editing the learninggroup of your choice before selecting the corresponding learning area in the tab "Learning area."
Learning areas are suitable for using the same course element within a course in several learning groupsor if there are a lot of learning groups to choose from along with only one single registration element.Learning areas spare you the selection of each single learning group.
You select learning areas in the course editor by means of the course element "Enrolment." All learning groupswithin a learning area will then be offered when registering. Additionally you can choose from learning areasin the tabs "Visibility" or "Access" if the option "Depending on groups" is activated.
Configuring Tools of Learning GroupsAfter creating a learning group you can provide it with collaborative tools in the tab "Tools." If you want tomodify your configuration later on (e.g. if you want to deactivate some tools) you start with selecting the groupmanagement in your course view. Then choose "All learning groups" and click on the link "Edit" right nextto the corresponding learning group. Alternatively you can start with selecting the link "Administration" inthe menu on your left.
In the tab "Tools" of the context-sensitive Help you will get more information on all available OpenOLAT tools.
If the tool "Information" is activated and saved you will be able to edit the information meant for your groupmembers right beneath the list containing all tools. If you have activated and saved the calendar setting youcan configure the write permission regarding the group calendar.
Each group can only be provided with one tool of the same type. If you want to work with more thanone forum or Wiki or if you want to provide documents in more than one folder it is better to usecourse elements instead. You should configure these elements to be only visible or accessible to onespecific learning group.
Managing Members of Learning GroupsThere are two different ways to allocate members to a learning group:
1. Course participants enroll on their own.2. The course owner allocates participants to corresponding learning groups.

OpenOLAT 8.1 - User Manual
http://www.frentix.com - 10.4.2012 20
The first option is suitable for courses with many participants, for participants you do not know yet or forparticipants who should decide on their own in which learning group they want to register (e.g. when assigningtasks to be performed in groups). This option is activated by means of the course element "Enrolment." Whenconfiguring your course please determine in which learning group(s) your participants should be able to register.
The second option is suitable for participants you already know in which learning groups they belong and ifyou want to make sure that only those will be able to register who qualify for your learning groups.
In the course view please open the group management if you plan to add any members. Then select "All learninggroups" on your left and click on the link "Edit" right next to the group name. In the tab "Members" you thenadd group members either as tutors or participants:
• Tutors: They can appoint or delete members as well as provide learning groups with collaborative tools.In addition they have access to the assessment tool. Being the course author you do not have to beappointed as tutor; you already hold course owner rights incl. all rights a tutor will have.
• Participants: They can use collaborative tools of a group.
The classic role of a tutor can be represented in OpenOLAT by means of those tutor rights mentionedabove.
When clicking on the icon "Download table" (underneath the button "Add users") an Excel file containing allowners or participants of a learning group will be generated.
Using Learning Group ToolsAfter enrolling in a learning group you will see the box "My learning groups" on your right in the course view.As soon as the learning group tutor has activated some group tools, group members will see the same menuitems described earlier in the section project group.
Additional Features in the Group ManagementIn the course view please open the group management. The course author has then the possibility to downloadone or more Excel files containing data regarding members of learning groups or learning areas. Please selectthe appropriate link in the tool box "Create lists" and follow the instructions.
When editing a group there will be further features at your disposal (at your right, in the bottom tool box) suchas sending an e-mail to all members.
Copying learning groups (even more than one time) will spare you the configuration of collaborativetools if those are identical in all of your groups.
Leaving or Deleting Learning GroupsIn the tab "Groups" of the main navigation at the top you will see all of your groups. Just click on the groupname you want to leave. Then select the menu item "Course" before clicking on "Start" on your right. Choosethe one registration element of the group you have enrolled in and select "Delist."
Perhaps your course author has already closed the course or does not allow you to delist on your own. In thiscase you have to contact the course author and ask for assistance.
Only course authors can delete learning groups. After examining all learning groups in the group managementjust select the link "Delete" right next to the relevant group. You can delete learning areas in the view "Alllearning areas."

OpenOLAT 8.1 - User Manual
http://www.frentix.com - 10.4.2012 21
Right Groups
Course authors can assign rights to other OpenOLAT users regarding their course; all they have to do is invitethose users to join their right group. Similar to learning groups such right groups are linked with a specificcourse.
Right groups are suitable if you do not want to appoint an OpenOLAT user as course owner (co-author)but nevertheless want him to hold certain rights (e.g. permission to use the group management, thecourse editor or the assessment tool).
Creating Right GroupsIn the course view please open the rights management, top right. Then create a new right group before givingit a name. Finally save your settings.
Configuring Tools of Right GroupsAfter creating a right group you can provide it with collaborative tools in the tab "Tools." If you want to modifyyour configuration later on (e.g. if you prefer to deactivate some tools) please go to the rights management andselect "All right groups;" then click on the link "Edit" right next to the corresponding right group.
In the tab "Tools" of the context-sensitive Help all available OpenOLAT tools will be explained in more detail.
Configuring Authorizations of Right GroupsIn the tab "Authorizations" you determine the rights your group members should have.
• Group management: Members are allowed to use the group management of their course and do what acourse author is permitted to do.
• Course editor: Members are allowed to use the course editor along with all its features.
• Data archiving: Members have access to data archiving, i.e. they are allowed to archive course data suchas forums, etc.
• Assessment tool: Members can assess and comment on the progress of course participants by means ofthe assessment tool.
• Glossary tool: Members are permitted to administer the glossary.
Managing Members of Right GroupsIn the tab "Members" you determine if members should see other group members or not. How to add membersis explained in the section below. It does not matter which role a member holds, i.e. you can grant ordinaryusers (without any author rights) access to OpenOLAT tools. Members of a right group will hold those rightsyou have configured beforehand in order to be able to use all collaborative tools.
When clicking on the icon "Download table" (underneath the button "Add users") an Excel file will be generatedcontaining all members of your right group.
Using Tools of Right GroupsAfter activating all tools of a right group, group participants will see the same menu items as described in thesection project group .
Leaving and Deleting Right GroupsParticipants of right groups cannot leave such a group on their own; they will have to ask the course authorto delist them.

OpenOLAT 8.1 - User Manual
http://www.frentix.com - 10.4.2012 22
The owner of a right group can delete such a group by clicking on the link "Delete" in the right management,next to the relevant group.

OpenOLAT 8.1 - User Manual
http://www.frentix.com - 10.4.2012 23
Learning Resources
The core of OpenOLAT are its learning resources. The term learning resources is used for filing learningcontent on the one hand (via the tab "Learning resources") and for the learning content stored there on the otherhand (e.g. courses, tests, Wikis, etc.). This chapter introduces you to various types of learning resources andexplains how to search for such resources. First this will be exemplified from the point of view of an ordinaryOpenOLAT user without author rights; then from the point of view of an OpenOLAT user with such rights.
Each learning resource will be explained in the detailed view by means of metadata. These metadata givefurther information on e.g. who has access to learning content. The owner of a learning resource can modifythe name of his learning resource, its description or access as well as add other owners.
Various Types of Learning Resources
OpenOLAT comprises eleven different types of learning resources. With the exception of courses they havein common that they can be embedded into one or more courses.
Course
An OpenOLAT course can accompany lectures, seminars or tutorials and represent diverse didactic conceptssuch as group puzzles or problem-based learning. OpenOLAT courses are unique document types. They cancontain any number of course elements. How to work with those different course elements will be explainedin the chapter "Learning Activities in Courses" in more detail. How to create courses will be illustrated in thechapter "Creating Courses". More information on course elements and the course editor can be found in thechapter "Course Elements and Course Editor".
CP Learning Content
Content Packaging (abbr.: CP) is a kind of learning content in standardized e-learning format. The specificationof this format also comes from IMS. OpenOLAT supports the IMS CP version 1.1.2. CPs are suitable forbeing either used in OpenOLAT courses or outside of it. OpenOLAT supports this format; therefore learningcontent cannot only be used in OpenOLAT but in other LMS as well. Further information on generating ContentPackaging can be found in the chapter "Creating CP Learning Content".
SCORM Learning Content
Another standardized e-learning format supported by OpenOLAT is the SCORM format (version 1.2). SCORMis short for "Sharable Content Object Reference Model" and a reference model for exchangeable electroniclearning content of the "Advanced Distributed Learning Initiative" (ADL).
SCORM learning content is suitable for courses within OpenOLAT as well as courses outside. OpenOLATsupports this format; therefore your learning content can be applied not only in OpenOLAT but also in otherLMS.

OpenOLAT 8.1 - User Manual
http://www.frentix.com - 10.4.2012 24
Wiki
Wikis are particularly suited for creating content jointly in an easy way. A Wiki can be used for working ingroups, as documentation tool or as knowledge base for your studies and projects.
For more information on how to create Wikis and embed those in your course please go to the chapter "CreatingWikis". How to generate content within a Wiki will be explained in the chapter "Learning Activities Withina Course," section "Wiki".
Podcast
A podcast allows you to upload audio or video files that can later be made available in OpenOLAT. Podcastscan either be accessed directly in OpenOLAT or they can be subscribed via online services such as iTunes inorder to copy single episodes to mobile devices later on. Your course participants will be able to easily assessor comment on such podcast episodes.
Information on how to create and embed podcasts in your course can be found in the chapter "CreatingPodcasts". Further details on how to use podcasts as course participant will be explained in the chapter"Learning Activities in Courses," section "Podcast".
Blog
In a blog you can easily publish or update personal as well as professional information. Blogs are often used asa kind of diary or journal. Course participants will be able to comfortably assess or comment on blog entries.
Information on how to create and embed a blog in your course will be found in the chapter "Creating Blogs".Further details on how to use blogs as course participant will be explained in the chapter "Learning Activitiesin Courses," section "Blog".
Portfolio Template
A portfolio task is a means to specifically document learning results as well as learning processes. Courseparticipants can perform portfolio tasks before being assessed.
Information on how to create a portfolio template and how to embed portfolio tasks in your course can be foundin the chapter "Creating Portfolio Tasks". How to perform such portfolio tasks can be learned in the chapter"Learning Activities in Courses," section "Portfolio task".
Test
Tests can be used for examinations or exercises in general. In the first case course authors can see all test resultsalong with corresponding test participants; in the second case all results are saved anonymously.

OpenOLAT 8.1 - User Manual
http://www.frentix.com - 10.4.2012 25
Each test exists in a standardized file format, the so-called IMSQTI format. IMS deals with the development ofopen standards in e-learning. QTI means "Question & Test Interoperability" and is a predefined standardizedformat used for generating tests and questionnaires online. The QTI format is also suitable for storing testresults. OpenOLAT supports this format; therefore learning content cannot only be used in OpenOLAT butin other LMS as well.
More information on using and creating tests can be found in the chapter "Creating Tests and Questionnaires".
Questionnaires
A questionnaire is generally used for data collection, e.g. for the evaluation of an event. Each course participantcan fill in a questionnaire only once. Results will be stored anonymously. Questionnaires as well as tests existin the standardized IMS QTI format. For more information on how to create and use questionnaires please goto the chapter "Creating Tests and Questionnaires".
Resource Folder
In a resource folder you can store various documents to be used in several courses, e.g. rules regarding theforum that are valid in different courses of one series. A HTML page containing those rules is stored in theresource folder and referenced by several courses.
More information on how to create resource folders and use them in a course can be found in the chapter"Creating Courses," section "Resource Folder".
Glossary
In the glossary terms will be defined. As soon as those terms are used within learning content a student willsee their explanation. Additionally you can get a list of all terms and definitions in a printable version.
More information on how to create a glossary and embed it into your course can be found in chapter "CourseOperation," section "Glossary". How to use your glossary within a course will be explained in the chapter"Learning Activities in Courses," section "Glossary".
How to Find Learning Resources (OpenOLAT User without Author Rights)
In the main navigation just click on the top tab "Learning resources." Then there are several possibilities tosearch for learning resources:
CatalogIn the catalog course authors can range their learning resources hierarchically, similar to a college or universitycatalog. Just navigate through its categories to find the learning content you are looking for.
Use the search mask in case you should not find the appropriate course in the catalog. It may be thatthe course author has not yet listed that course in the OpenOLAT catalog.
OpenOLAT 8.1 - User Manual
http://www.frentix.com - 10.4.2012 26
Search MaskThe search mask helps you to find all learning resources you have access to. You can look for titles, authorsor descriptions.
You should limit your search to certain types of learning resources to avoid too many useless hits.
Courses (Alphabetical List)Here you will see all courses you have access to in alphabetical order. In addition you will find data regardingauthors and access codes of courses.
It is advisable to set a bookmark after having found and opened your course in learning resources. Thecorresponding link will then be on your right in the box "Learning resource" in the detailed view aswell as in the box "General" in your course view. When attending that course the next time you do nothave to do this via learning resources. Just use your bookmark in your Home.
How to Find Learning Resources (OpenOLAT Users with Author Rights)
In addition to the menu items "Catalog," "Search Mask," and "Courses" you can dispose of other possibilitiesto look for learning resources have author rights. If you do not see those additional menu items please turn toyour support team to apply for author rights first.
My EntriesHere you can see all learning resources you have created or you have been appointed as owner (co-author)."My entries" is your starting point when editing those learning resources you have not published yet. You willdirectly get to this view by selecting the tab "Learning resources."
Further PossibilitiesBeneath the menu item "Courses" there are further options to see your learning resources ordered by type.
Actions in the Tab 'Learning Resources'
If you hold author rights you will find two tool boxes on your right: "Import" and "Create."
ImportLearning resources generated outside of OpenOLAT can be imported if they have a format that is compatible.Suitable formats have been commented on in the section "Various Types of Learning Resources".
You can import into learning resources either from your computer or from your personal folder in OpenOLAT.In your tool box just select the type of learning resources you want to add and follow the instructions. If youwant to import an entire course you will be asked if you want to import its referenced learning resources (e.g.a Wiki or a test) as well. Click OK if you want to do this.

OpenOLAT 8.1 - User Manual
http://www.frentix.com - 10.4.2012 27
CreateYou can create courses in the course editor (in unique OpenOLAT format). Tests and questionnaires (IMS QTIformat 1.2) can be generated in the test editor; CP learning content can be generated in the IMS CP editor.Additionally it is possible to create resource folders, Wikis, glossaries, blogs or podcasts. Wikis, blogs, podcastsand CPs can either be created in the tab "Learning resources" or within the course editor in case you want toembed your learning resource in that course.
How to use various editors will be further explained in the chapters "Creating Courses", "Creating CP LearningContent", "Creating Wikis", "Creating Podcasts", "Creating Blogs", "Creating Portfolio Tasks", and "CreatingTests and Questionnaires".
Detailed View of Learning Resources
There is a detailed view to each type of learning resource referred to in "Various Types of Learning Resources".Learning resources are listed there along with their metadata (data describing that resource). Additionally youcan dispose of further actions depending on your access authorization as well as on that resource's type.
You will get to the detailed view of a learning resource by clicking on the title of that learning resource in thelist or by selecting the link "Detailed view" in the tool box "General" within your course.
Meta dataOn top detailed view is the description of your learning resource. In the following section you will get furtherinformation.
By means of an external link your course participants can get to your course directly after logging in.
In addition you will get further information on actions other OpenOLAT authors are allowed to do. As authoror owner of a learning resource you will get a list of owners in the drop-down menu "Additional information"along with a summary of settings and information on how to use that learning resource.
Show ContentBy means of the button or the link "Show content" you will get to the course view. As owner of a learningresource you can determine in the section "Modify settings" if your course may be displayed.

OpenOLAT 8.1 - User Manual
http://www.frentix.com - 10.4.2012 28
Export ContentExport your learning resource as ZIP file. Tests, questionnaires, CP and SCORM learning content can beimported into other LMS supporting the same standard. Courses, Wikis and glossaries can be imported intoother OpenOLAT installations. As owner of a learning resource you can determine in the section "Modifysettings" if content may be exported.
Set BookmarkIt is possible to mark your learning resource by means of a bookmark to quickly find it in your Home'sbookmarks.
Edit ContentIf your learning resources can be edited (e.g. courses, glossaries, CPs, blogs, podcasts, tests or questionnaires)this link will get you to the corresponding editor.
Modify DescriptionHere you can modify the learning resource's title, its description as well as its picture. This will be the title yourlearning resource will then appear with in the course list or in queries via the search mask.
If you modify your learning resource's title here this does not imply that it will also be updated inbookmarks, catalogs, editors or in the course view. Therefore you should not forget to adapt that titlein your Home, section "Bookmarks," as well as in the catalog and the course editor.
Modify SettingsHere you can determine general settings of your learning resource as well as its assignment of user rights, e.g.if exporting your learning resource should be allowed or not.
A learning resource newly created is only accessible for its owner. There are five categories of OpenOLATusers you can grant access rights:
1. Only owners of that learning resource: All owners (co-authors) hold the same rights as the author, i.e.they can edit, copy, delete that learning resource as well as assign these rights to other OpenOLAT users.
2. Owners and other OpenOLAT authors: You enable other authors to have a look at your course beforepublication. Authors cannot edit or delete your learning resource, nor appoint new owners. It is onlypossible to copy or export your resource if an owner has granted that option.
3. All registered OpenOLAT users: OpenOLAT users will be able to find your learning resource via thesearch mask or in the course list. This setting is mandatory if you want your course to be open forparticipants.
4. Registered OpenOLAT users and guests: Even via the guest access you can search for learning resources.Guests will hold limited access to your course, i.e. they will not be able to enroll in groups, nor contributeto forums, nor perform a task, etc.
5. Members only (owners, coaches, participants): If you chose this option, only participants may open thelearning resource. The learning resource is invisible to all non-participants. Participants must be addedby the owner and cannot enrol themselves any longer. Administrators identify learning resources withthis special set of rights by the lock icon.
These settings in OpenOLAT courses allow you further to determine the use of additional features (coursechat, glossary, course calendar, resource folder, etc.). For more information please go to the section "UsingAdditional Course Features".
OpenOLAT 8.1 - User Manual
http://www.frentix.com - 10.4.2012 29
Add to CatalogAs soon as a learning resource has been activated it can be inserted in the catalog via the detailed view. Justselect the category your learning resource should be related to. Learning resources can be inserted more thanonce at different spots in your catalog. All categories selected will be displayed in the detailed view, section"Catalog entry." Here you can delete them as well.
CloseThe function "Close" will change a course's status to "Closed" (only available in the detailed view of courses).This way you inform course participants that your course will no longer be edited or updated. The course'sconfiguration (course settings, access or visibility rules) will not be affected. All users holding access rightswill still be able to access the course content according to their individual rights, however, only as long as youdo not sign them out of their groups (tutors as well as participants).
By clicking on "Close" you can determine in several steps if catalog entries of your course shall be deleted,if tutors and participants shall be signed out of learning and right groups in your course, and if tutors andparticipants shall be notified of your actions by e-mail.
Changing the course status cannot be reversed.
CopyLearning resources can be copied; therefore it is possible e.g. to use an old course structure for your next course.When copying a course its structure, folder content, its HTML pages and group names (but not the members)will be adopted. User data such as forum entries, group members, etc. not. As owner of a learning resourceyou can determine (section "Modify settings") if your learning resource can be copied by other OpenOLATauthors as well.
DeleteOnly learning resource owners have the permission to delete that resource. A learning resource can only bedeleted if it is not used within a course at that moment. When deleting imbedded learning resources (e.g. in atest) you will get a message indicating the relevant course. First you have to delete the course element "Test"in that course to be able to delete that test in learning resources.
When deleting a course its user data (e.g. test results) will not be deleted but archived as Excel filein your personal folder.
Manage ownersAs author of a learning resource you can appoint other OpenOLAT users as owners (co-authors) of yourlearning resource. These owners will hold the same rights you do.
Use right groups if you do not want others to have all of your rights to that course. It is possible togrant only certain privileges, e.g. using the course editor.

OpenOLAT 8.1 - User Manual
http://www.frentix.com - 10.4.2012 30
Learning Activities in CoursesIn this chapter learning activities within a course will be explained from the participant's point of view. Hereyou will get information on working with course elements or using additional course features. Frequent sourcesof errors and error reports will be commented on.
In the section "How to Find Learning Resources (OpenOLAT user)" you have already gotten information onhow to find an OpenOLAT course. Please select from your search results the link in "Title of learning resource"to get to the course view.
Set a bookmark. On your right you will find the corresponding link in the box "Learning resources" inthe detailed view as well as in the box "General" in your course view. When opening that course for thenext time you do not have to go to learning resources first; just use the course bookmark in your Home.
Working With Course Elements
In the following you will get a list containing the most important course elements you can use for your course.Perhaps you want to use several course elements of the same type or you want to use other terms for thatelements. For your orientation please refer to the icons to recognize the element's type.
Enrolment
In many courses you have to enroll first. There are one or more groups to choose from. Select the link"Enrolment" to become a member of a group. Per registration element only one group enrolment is allowed.Such an enrolment is followed by the appearance of the box "My learning group" on your right.
Perhaps the number of members is limited per group. If there are no more vacancies you can have the possibilityto put your name on a waiting list depending on the course configuration. You will automatically move up assoon as a group member leaves that group for good.
Most of the time you can delist from a group you have registered before. If this is not the case the courseauthor has not permitted to delist oneself; you will have to contact that author if you do not plan to participateany longer.
Forum
The forum is used most of the time for exchanging information among course participants or for contactingthe course author.
Upload a photo in your Home, section "Settings" in the tab "Profile." Instead of a standardized imageyour personal photo will then appear next to your forum entries.
Opening a TopicIf you want to write a new message in your forum just select "Open new topic." Title and contribution aremandatory. You can also attach a file. It is possible to edit or even delete your message later on--provided thatno one has already sent a reply to your message.

OpenOLAT 8.1 - User Manual
http://www.frentix.com - 10.4.2012 31
Answering Forum ContributionsIf you want to reply to an existing message in a forum just open its topics by clicking on its title. Then select"Reply with quotation" if you want the original message to appear underneath your contribution. Select "Replywithout quotation" if you only want your message to appear. You can attach a file as well. It is possible to editor even delete your contribution later on.
Mark Forum MessageForum messages can be marked with a flag. In order to do that, click on the little flag in the right upper cornerof a message. The topic overview shows the number of marked messages per topic.
Moderating a ForumWhen having the permission to moderate a forum you will learn more about additional options in the chapter"Course Elements and Course Editor," section "Forum".
Archiving a ForumWhen archiving a forum any contributions will be zipped along with their attachments before storing them inyour personal folder.
Subscribing to a ForumIn order to be kept informed on new forum entries you should select "Subscribe" in the overview of topics.Modifications will get to you by e-mail or you will see them in your Home, section "My notifications."
File Dialog
In the file dialog course participants can discuss a certain document, e.g. the draft of a seminar paper, a pictureor a concept. There is a forum to each uploaded document.
Uploading FilesSelect "Upload file" to transfer your own file. In order to have a look at that file just click on the file's name.It will open in a new window. If it is not possible to upload files it may be that your course author has notprovided you with the right to do so.
Files uploaded by mistake can only be deleted by the course author.
Opening Topics and Answering Forum ContributionsIn order to take part in discussions just click on the link "Show" next to the file name. Now it is possible toopen new topics or to reply to contributions as stated in the section "Forum".
Subscribing to File DialogsTo be kept informed on new documents in file dialogs just click on "Subscribe" on the overview page. Youcan also subscribe to each dialog and its corresponding document. Modifications will get to you by e-mail oryou will see them in your Home, section "My notifications."

OpenOLAT 8.1 - User Manual
http://www.frentix.com - 10.4.2012 32
Test
A test is meant for efficiency controls within a course. Its result will be stored and the course author is ableto assign it to the corresponding person.
Click on "Start" to begin with the test. According to its configuration you may pause and continue later on.It depends on the test's settings if you can cancel it without storing any results achieved so far. Finally click"Finish test" to save your results. All these options are available in the form of buttons on your top right.
The course author decides how often you may take that test and how often you may try each single question.According to the configuration of the test it is allowed to use the navigation or not. If not, you will have torespond to one question after the other.
It is also the course author who determines when and how detailed you will get your test results.
When finishing or cancelling your test you should click on the button "Close" on the upper right to get backto that test's homepage.
Self-test
Contrary to tests, results of self-tests will be stored anonymously. Self-tests are suitable for practicing and canbe taken as often as you like.
Click "Start" to begin with your self-test. Similar to tests it is the course author who determines the self-test'sconfiguration.
When finishing or cancelling your self-test you should click on the button "Close" on the upper right to getback to that test's homepage.
Questionnaire
Questionnaires are used for evaluations or opinion polls. Each questionnaire can only be filled in once. Itsresults will be stored anonymously.
Click on "Start" to begin with your questionnaire. Similar to tests it is the course author who determines thequestionnaire's configuration.
When cancelling your questionnaire you should click on the button "Close" on your upper right to get backto that questionnaire's homepage.
Wiki
Wikis are suitable for easily creating joint content. Each Wiki has a homepage, the so-called index, a Wikinavigation, as well as the tabs "Article," "Discussion," "Edit page," and "Versions/authors" on top of its content.
OpenOLAT 8.1 - User Manual
http://www.frentix.com - 10.4.2012 33
Wiki NavigationIn the Wiki navigation on your left you can start searching for a specific term in the section "Search." If thereare no hits you can extend your search to your course or to OpenOLAT as well. In the section "Navigation"you will find pre-set links. Owners of Wikis (most of the time these are course authors) are able to adapt thesection "Wiki menu" and add their own links. In the section "Progress" you will see those five Wiki pages youhave visited last. So you can easily get back to a previously visited page.
By means of the link "From A-Z" you will get to the table of contents of all Wiki pages. At a glanceyou will know what already exists.
Modifying the Content of a Wiki PageIn order to add content you have to navigate to the relevant page and activate the editing mode via the tab "Editpage." In the tool bar of your Wiki there are various formatting options at your disposal. It is also possible toinclude pictures, media links, mathematical formulas, internal or external links. These options as well as theWiki syntax will be further explained in the context-sensitive Help.
In order to add a file you have to upload it first via the drop-down menu "Upload file" at the bottom of yourpage. Navigate to the relevant position on the Wiki page. Then select your file via "Insert file" and click "Save."Links to other Wiki pages will be set by means of the button "Insert link."
Creating and Deleting Wiki PagesThe easiest way to create a new page is to search for a page title in the navigation via the search mask; click"Search" and open the red link. Another possibility is to create a link to your new page directly from an existingpage. For that purpose please use the following Wiki syntax: Two opening squared brackets, page title, twoclosing squared brackets. Example: [[link name]].
Articles written on your own can be deleted in the tab "Edit page."
When deleting a page all its versions will be deleted as well. It is therefore not possible to restoredeleted pages.
Viewing VersionsIn the tab "Versions/authors" you can retrace who has modified a page, how and when exactly. Contact the Wikiowner (often the course owner) if content has been deleted. Only he will be able to restore an earlier version.
Subscribing WikisSubscribe to a Wiki to be kept informed on modifications. You will be notified by e-mail or in your Home,section "My notifications." You will be told which pages have been modified. A list with the latest amendmentscan also be found in the Wiki navigation.
Exporting WikisIn the section "Tools" you can export your Wiki by means of the link "Export as CP" in order to archive a snap-shot of the entire Wiki content in your personal folder.
OpenOLAT 8.1 - User Manual
http://www.frentix.com - 10.4.2012 34
Your Wiki will be exported as IMS Content Packaging. It is only possible to import it as CP learningresource (authors) or to take a look at it offline. Importing it as Wiki is not an option. If you want toimport a file as Wiki you have to export it first from learning resources (detailed view).
Podcast
A podcast provides information in the form of audio or video files. These so-called episodes can either beaccessed directly in OpenOLAT or they can be subscribed to before being uploaded by means of online servicessuch as iTunes. After that you can copy them to your mobile device.
In order to create new episodes you have to be authorized by a course author. Each OpenOLAT user has theright to comment on episodes and to assess them by means of 1 - 5 stars. In order to write a comment or readother comments you should click on the link "Comments."
Subscribe to the RSS Feed of your podcast if you do not want to miss any new episodes.
Blog
Similar to a podcast a blog serves to provide new content. You can include text as well as pictures or moviesin your contributions.
Each OpenOLAT user has the right to assess or comment on blog entries. Such entries can be assessed bymeans of 1 - 5 stars. It is also possible to see assessments of other blog readers. In order to write a commentor read other entries you should click on the link "Comments."
Blog entries can only be created if a course author has provided his authorization. Just click on "Create newentries" to write a new blog entry. You can either publish this entry directly, determine a date for its publicationor save your entry as a draft.
Subscribe the RSS Feed of your blog if you do not want to miss any new entries.
Folder
In folders courseware is stored. In general only course authors are allowed to upload files; course participantscan only read files stored in folders. Subscribe to a folder to be notified in the case of new documents.Modifications are sent to you by e-mail or can be found in your Home, section "My notifications."
If course participants are also allowed to upload files they will find a corresponding link on their top right. Inorder to store those files in a structured way it is possible to create subfolders. If you are allowed to uploadfiles you will also be able to delete files in folders. If you want to prevent others from deleting your files youshould click on the icon "Meta data" in the tab containing all files in folders before locking your file.

OpenOLAT 8.1 - User Manual
http://www.frentix.com - 10.4.2012 35
If you want to upload many files at once there are two options at your disposal. First you can zip yourfiles on your computer, then upload those ZIP files before unzipping them in the OpenOLAT folder.ZIP files can also be used to download several files at once. Just create a ZIP file in the OpenOLATfolder before uploading it to your computer. The second option is the access via the OpenOLATnetwork drive. For further information please go to the chapter "Supported Technologies," section"WebDAV".
Assessment
The assessment feature is suitable for evaluating achievements not handed in electronically. The course authoror tutor can assess a presentation with passed/failed, a score or with an individual comment.
Tasks
By means of the course element "Task" you can provide exercises to be handed in electronically before beingassessed by a tutor. It may be that you cannot see all the sections mentioned below since it is not necessaryto use all features for a task.
Downloading an Assigned TaskAccording to your configuration there are one or more tasks of your choice at your disposal in the section"Assignment" or a task will be assigned to you automatically. If the title of a task file is linked along withseveral tasks it is possible to first have a look at a task before selecting it. If there is only the link "Select" itis not possible to have a look at it first. If a task has been selected or assigned automatically click on "Viewtask" to see it on display.

OpenOLAT 8.1 - User Manual
http://www.frentix.com - 10.4.2012 36
Uploading Solutions to the Drop BoxIf you have performed a task and saved it on your computer or in your personal folder you can transfer it tothe drop box. You will then get an acknowledgment of receipt. In the section "Drop box" you can see howmany files you have already handed in. You can hand in as many files as you want but it is not possible todelete those files later on.
Downloading Solutions and Comments from the Return BoxIn the return box you will find those files your tutor has returned. Any comments can be seen either in thesection "Assessment" at the bottom or directly within your file.
Viewing Sample SolutionsIt is possible to add a sample solution to your task; the course author can determine when that sample solutionwill be visible. Just click on the file name to download a sample solution.
Reading Tutor AssessmentsAssessments can vary. You can assess by means of passed/failed, by means of a score or by means of anindividual comment.
Portfolio Task
By means of the course element "Portfolio task" you can collect tasks allocated by course authors beforedocumenting and reflecting on your learning progress.
Just click on "Collect portfolio task" to have a look at that task before embedding required artefacts intopredefined folders. If a course author does not set any limitations you will be able to configure your folder asyou like. It may be that the author has defined a certain deadline that should be kept in mind.
After collecting your portfolio tasks you will find them in your Home, section "ePortfolio," "Myportfolio tasks."
In order to submit your solutions just click on "Submit task." After handing in your task a course author ortutor will be able to assess you.
Topic Assignment
In the topic assignment topic authors provide others with topics e.g. for writing term papers. Depending onyour configuration you can either select one or more topics, upload files and look at files returned to you bythe topic authors. Perhaps you will not be able to see all the sections mentioned below since in your topicassignment not all features are active.
If you are authorized by the course author to act as topic author you can announce a topic. For furtherinformation on accepting and supervising participants please go to the chapter "Course Elements andCourse Editor," section "Topic author".

OpenOLAT 8.1 - User Manual
http://www.frentix.com - 10.4.2012 37
Selecting TopicsAs course participant you will see any announced topics in a table. When clicking on that topic's title you willget further details regarding dates or links to files attached. Depending on your configuration you can choosebetween one or more topics. The course author is the first to determine if your selection should be accepted orif the person in charge has to accept your application as a start. As soon as your selection is definite you willsee a corresponding entry in the table. On your top right you will find a link to your learning group with thetitle of your topic. If the person in charge has accepted your application it will no longer be possible for you tosign out; in that case you have to ask the person in charge to do that for you.
Uploading Files to the Drop BoxClick on the topic's title. In the tab "Folder" you will find the drop box. Depending on your configuration youwill only be able to upload files within a certain period of time since there is a deadline to meet. For furtherinformation on deadlines please go to the tab "Description."
Downloading Files from the Return BoxIn the tab "Folder" you will find files in the section "Return box" the topic author has returned to you.
By means of an e-mail you can get in touch with your course author. Just fill in the field "Subject" and"Message" before sending your e-mail via OpenOLAT.
Calendar
The course element "Calendar" offers an alternative view on the course calendar that can be selected on yourright in the box "General." A course author can predefine a date for your calendar view, e.g. a particular week,and appoint a time for certain events during that week.
Additional Course Features
Within a course there are a number of additional course features at your disposal the course author can activateor deactivate according to his needs.
Course CalendarA course author can embed a course calendar to administer events and dates regarding his course. The link tosuch a course calendar can be found at your right in the box "General." The calendar will open in a new window.
Only course authors are allowed to add events to the course calendar. Click on the button "Add to personalcalendar" so that your deadlines will show in your personal calendar. Just select the course calendar from yourpersonal calendar list.
By means of the icon iCal in the calendar list section you can integrate your course calendar into othercalendars.

OpenOLAT 8.1 - User Manual
http://www.frentix.com - 10.4.2012 38
GlossaryIf your course author uses a glossary in your course you will see its link on your right in the box "General."The glossary will open in a new window. If you want to use it within your course activate that glossary in thetab "General." If a term from the glossary is used e.g. in a Wiki its definition will be displayed when movingyour cursor over that term.
If you follow the link to the glossary you can print the relevant page along with all glossary entries.
NotesIt is possible at any time to make notes to an OpenOLAT course. On your right in the box "General" you willfind a link to personal notes.
These notes can later be edited in your course or in your Home, section "Notes".
Evidence of AchievementAn evidence of achievement is a confirmation of an existing efficiency control, e.g. taken tests or assessed tasks.If a course author has activated the evidence of achievement option, if there are assessable course elements,if you have already taken a test and if that test has been assessed you can see on your right the box "General"along with your evidence of achievement.
All your evidences of achievement will be listed in your Home, section "Evidence of achievement". It alwaysopens in a new window and is printable.
Course ChatIf the course author has activated the course chat you will see in the box "General" a link to the chat room; youcan enter any time. Just click on "Connect to course chat" before clicking on "Enter course chat." At first youwill always be anonymous. Above the text field there is the possibility to put your user name on display.
General chat features will be further explained in the section "Chat".
Course Problems and Error Messages
If you cannot open a course or single course elements it may be that the course author has not given you therelevant rights or the course is being updated at that very moment.
Course AuthorizationGiven the case that you have just found an interesting course in learning resources and want to get to the courseview. If you are notified that you do not have enough rights to launch that course this means that the course isrestricted to a certain learning group or to a certain period of time.
Perhaps you have been able to launch a course but later on you get an error message telling you that itsauthorization has been changed. This means that the course author has restricted the access in the meantimeor closed that course.
In both cases please contact the course author to grant you access.

OpenOLAT 8.1 - User Manual
http://www.frentix.com - 10.4.2012 39
Authorization Regarding Course ElementsPerhaps not the entire content of a course is visible or you have no access to certain course elements. Thismeans that the course author grants only particular learning groups access/visibility to that element or onlyfor a certain period of time.
Contact the course author to explain why you do not have enough rights.
Course ModificationsWhen working on a course and getting the message that the course has been modified, the course author hasjust updated that course in the meantime. Click on the button "Close course and restart" to get to the updatedcourse version.

OpenOLAT 8.1 - User Manual
http://www.frentix.com - 10.4.2012 40
Creating CoursesThis chapter is meant for course authors and tells you how to create your own course. There are two possibilitiesto create and publish your course in no time. You can either work with the Wizard to create courses or usethe course editor and follow our step-by-step guide. In addition you will find information on advanced coursesettings. Further details regarding course elements and editor can be found in the chapter"Course Elementsand Course Editor".
General Information
OpenOLAT courses can represent lectures, seminars, group puzzles or problem-based learning. A maximumof flexibility is guaranteed by using any number of course elements in any order of your choice; therefore itis easy to realize your didactic concept.
Requirements
You have a certain didactic concept in mind and know what your course participants' learning target is. Youhave already adapted your learning content to be used on a learning platform in electronic format (HTMLpages, Word files, CPs, etc.).
Now you can apply for author rights at your OpenOLAT support team and get started!
Just a Few Clicks and the Course Wizard Will Create Your OpenOLATCourse
There is a new Wizard to help you create courses. This Wizard is meant for course authors who prefer to useonly the most popular course elements in OpenOLAT without having to deal with the entire range of featuresavailable in the course editor.
By selecting "Course" in the tool box "Create" inside the tab "Learning resources" you will get to this courseWizard. Just indicate title and description, click on "Next" after saving your settings. Then select "Create basiccourse with Wizard." Just follow the instructions to have your course created.
Your course can now be found in the tab "Learning resources," section "My entries" where you can edit itanytime within the course editor.
In Six Steps to Your Course With the Course Editor
If you would like to get to know how to use the course editor the following chapter will provide you with usefulinformation. Having reached the end of our illustrated guide you will have created a course similar to the onecreated with the Wizard. However, in contrast to the Wizard you will have made yourself familiar with thefeatures of the course editor and will therefore be able to edit courses or create more complex ones later on.
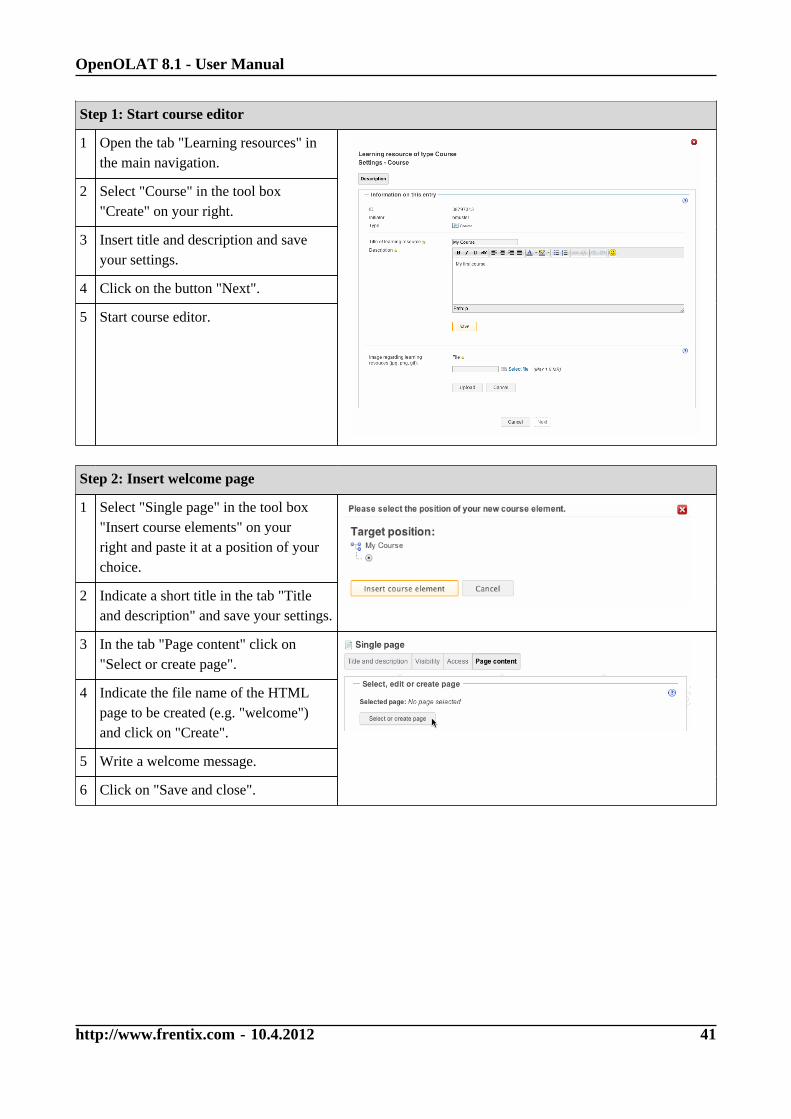
OpenOLAT 8.1 - User Manual
http://www.frentix.com - 10.4.2012 41
Step 1: Start course editor
1 Open the tab "Learning resources" inthe main navigation.
2 Select "Course" in the tool box"Create" on your right.
3 Insert title and description and saveyour settings.
4 Click on the button "Next".
5 Start course editor.
Step 2: Insert welcome page
1 Select "Single page" in the tool box"Insert course elements" on yourright and paste it at a position of yourchoice.
2 Indicate a short title in the tab "Titleand description" and save your settings.
3 In the tab "Page content" click on"Select or create page".
4 Indicate the file name of the HTMLpage to be created (e.g. "welcome")and click on "Create".
5 Write a welcome message.
6 Click on "Save and close".

OpenOLAT 8.1 - User Manual
http://www.frentix.com - 10.4.2012 42
Step 3: Insert folder for courseware before uploading documents from your computer
1 Select "Folder" in the tool box "Insert course elements" on your right and paste it at a position of yourchoice.
2 Indicate a short title in the tab "Title and description" and save your settings.
3 Click on "Open folder" in the tab "Folder configuration".
4 Select the link "Upload file."
5 Search for a document on your own computer and click "Upload".
Step 4: Insert discussion forum
1 Select "Forum" in the tool box "Insert course elements" on your right and paste it at a position of yourchoice.
2 Indicate a short title in the tab "Title and description" and save your settings.
Step 5: Publish and activate your course
1 Select "Publish" in the tool box "Editortools" on your right.
2 Click on those course elements youwant to publish.
3 Click "Next".
4 Select "All registered OpenOLATusers" in the pull-down menu, section"Modification of course access".
5 Click "Finish".
6 Select "Close editor" in the box "Editortools."
Now your course is visible for OpenOLAT users and can be used.

OpenOLAT 8.1 - User Manual
http://www.frentix.com - 10.4.2012 43
Step 6: Integrate course in the catalog (so that course participants can get faster access)
1 Open the tab "Learning resources".
2 In the menu on your left click on"Catalog".
3 Navigate to a suitable category.
4 In that category select "Learningresource" in the tool box "Add".
5 Search for your course and click on thelink "Select".
6 Optional: Adapt title and description bymeans of the link "Edit".
7 Save your settings.
Your course is now available in the catalog and course participants can find it in the corresponding category.
Additional Settings in the Detailed View
In the detailed view of a course you can modify your course description or other settings; you can activateadditional course features and appoint other course owners.
Display of Detailed ViewThere are two possibilities to get to the detailed view. To change from a course to the detailed view you haveto select the link "Detailed view" in the tool box "General" on your right. To change from learning resourcesto the detailed view just select the link "Detailed view".
Actions that can be performed in the detailed view are valid for all learning resources and will be explainedfurther in the section "Detailed View of Learning Resources". In the following you will get information oncourse-specific features of the detailed view. Select the link "Modify settings" in your "Learning resource" toolbox to activate or deactivate certain course features.
General Information
Settings regarding learning resourcesIn this tab you determine what other OpenOLAT users can do with your course. "Copying possible" meansthat your course can be copied. The option "Referencing possible" is not relevant for courses; in other learningresources (e.g. the glossary) it means that other course authors could implement those resources in their own

OpenOLAT 8.1 - User Manual
http://www.frentix.com - 10.4.2012 44
courses. "Execution possible" indicates that the course view can be started. "Export possible" says that yourcourse can be downloaded. Options selected will only be accessible for those user groups you have indicatedin the field "Access have." With the exception of "Execution possible" all other options require author rights.
Configure booking methodsDepending on the user group selected under "Settings", the view in the "General Information" tab expands toshow the booking methods for that user group, in order to configure the access control to the specific learningresource. If no booking method is selected, the previously selected user group has unrestricted access to thelearning resource.
Three different booking methods are available:
• Access code: An access code is manually set by the owner of the learning resource, who then passesthe code on to authorized users. In order to open the course, this code must be entered when openingthe course for the first time.
• Freely available: A learning resource marked as freely available can be used without any restrictions.Using this booking method adds users as participants to the resource, but will not add them to a learninggroup, thus working like the enrolment course element.
• PayPal and Credit card (only available if unlocked by an administrator): The price for admission to theresource is specified here. The resource is subsequently booked by paying with either PayPal or creditcard.
You can add a validity period to each booking method, in order to control resource access in addition to theuse of visibility and access rules.
Course ChatWhen creating a new course an active course chat is default. Possible scenarios in a course and further detailson chat rooms are explained in the section "Course Chat". If you do not want to use a course chat you candeactivate it in this tab.
If you want to record chat protocols we recommend using an external chat client. For more informationplease go to "Using External Chat Clients".
LayoutIn this tab you define how your course should look like. You can choose between altoghether 5 layout templates,including the default system layout. Additionally, a custom layout may be defined, using individual fonts andcolours for text, header, links, menus and boxes.
Resource FoldersResource folders are suitable for using the same files in several courses at once. First you create such a resourcefolder in learning resources. You will find its corresponding link in the tool box "Create" on your right. Inthe tab "Resource folder" you then select that resource folder you want to use in your course. The files storedthere can be found in the storage folder of your course when selecting the sub-folder "_sharedfolder." Onlyone resource folder per course is allowed.

OpenOLAT 8.1 - User Manual
http://www.frentix.com - 10.4.2012 45
Evidence of AchievementAn evidence of achievement is the confirmation of an efficiency control and represents taken tests or assessedtasks. If you want OpenOLAT to create such evidences of achievement please activate this option in thetab. Course participants can retrieve their evidences of achievement in their Home, section "Evidence ofachievement", starting with the beginning of the course.
If you deactivate this feature your participants will no longer see their evidences of achievement.However, they are not lost; those evidences will only no longer be on display.
CalendarWhen creating a new course an active course calendar is default. How to use that calendar is explained in section"Course Calendar". If you do not want to provide a course calendar you can deactivate that feature in this tab.
GlossaryA glossary is there to explain your course participants certain scientific terms. If you want to use such a glossaryin your course select a glossary of your choice in learning resources. First you have to create that glossaryin learning resources before defining necessary terms. A glossary can be used in several courses. For furtherinformation please go to "Glossary".

OpenOLAT 8.1 - User Manual
http://www.frentix.com - 10.4.2012 46
Course Elements and Course EditorIn this chapter course authors will learn more about adding and configuring course elements in the courseeditor. After giving general information on all course elements, further details on necessary configurations andon the use of single elements will be provided. Additionally it is illustrated how those three tools of the courseeditor work and what you can do with each course element.
First follow the instructions provided in the chapter "Creating Courses", if you have not created a course before.
General Configuration of Course Elements
Opening the Course EditorThe course editor is there to modify your course. You open it by clicking on the course's title in "My entries"in learning resources before selecting "Edit content" in the "Learning resource" tool box on your right. If thecourse view is already opened just select the link "Course editor" in the tool box "Course tools" on your right.You will recognize the activated course editor by the watermark "edit" in the background.
On your right in the tool box "Editor tools" you will find the link to three editor tools as well as the possibility toclose the editor and get back to the detailed view or the course view, resp. The tool box "Insert course elements"provides a list of all available course elements. The third tool box "Modify course elements" contains furtheractions regarding course elements (e.g. delete).
Adding Course ElementsA course can comprise any number of course elements. In a course you can use several course elements of thesame type; they can be nested as well.
Click on the course element of your choice in the tool box "Add course element" on your right and select theposition where you want your element to be inserted. Now you can configure your new course element.
In the course navigation you will see most of the time a symbol next to each course element indicating itscharacteristics or pointing out any missing or wrong settings. In the bottom part of the screen you will see thecorresponding explanations to those symbols.

OpenOLAT 8.1 - User Manual
http://www.frentix.com - 10.4.2012 47
Configuration of Title and DescriptionEach course element always comprises the tabs "Title and description," "Visibility," and "Access." In additionthere are one or more tabs to configure your course element individually.
In the tab "Title and description" you can describe your course element further. The field "Short title" ismandatory. This short title serves as labeling of your course element in the course navigation and is restrictedto 25 characters.
The content in the field "Title" serves as additional description of your course element and appears on thecourse's homepage as sub-title if you have selected "Automatic overview" in the tab "Overview." This title willalso be displayed when moving the cursor over the element's short title in the course navigation.
Avoid using slashes or full stops in the fields "Short title" and "Title." These special characters cancause problems when archiving courses later on.
In the field "Description" you can provide detailed information on your course element. That description willappear on the course homepage if you have selected "Automatic overview" in the tab "Overview".
By means of "Display" you determine what course participants will see when clicking on a course element. Aclick on course elements such as "Single page," "External page," "CP learning content," and "SCORM learningcontent" will result in displaying the default setting "Only content." All other course elements will show "Title,description and content" by default.
There is the possibility to set links on each course element. Just click on "Set link for this course element" tohave the external as well as the internal link of a course element on display.
In order to refer from outside your course to a course element you have to use an external link. In orderto set links within a course you have to use internal links.
Configuration of the Tabs Visibility and AccessYou can limit the access to course elements in two ways. If you want to limit a course element's visibility itwill no longer appear in the course navigation. If you plan to limit its access it will still appear in the coursenavigation, however, when clicking on it your participants will get a message that this course element is notaccessible.
In the tab "Visibility" there are four options: "Depending on date", "Depending on group", "Depending onassessment", and "Depending on attribute"; by means of these options you can determine who will see whenand under which circumstances a certain course element in the course navigation. OpenOLAT users excludedby those predefined rules will not be able to see certain course elements. You can e.g. determine that registrationis only possible within one week (option "Depending on date") or you can grant access to a particular folderonly to registered course participants (option "Depending on group"). You can provide a questionnaire onlyfor those course participants who have passed a test (option "Dependening on assessment") or you can offeradditional documents only for course participants of a certain field of study (option "Depending on attribute").In order to exempt course authors and tutors from these rules you have to deactivate the option "Apply rulesfor owners and tutors".
In the tab "Access" there are the same four options mentioned above: "Dependening on date," "Depending ongroup," "Depending on assessment," and "Depending on attribute;" by means of these options you determinewho will be able to access when and under which circumstances a certain course element. OpenOLAT users

OpenOLAT 8.1 - User Manual
http://www.frentix.com - 10.4.2012 48
excluded by those predefined rules will see certain course elements but will not be able to open them. In orderto exempt course authors and tutors from these rules you have to deactivate the option "Apply rules for ownersand tutors".
If a course element is visible but not accessible you can provide an explanation for excluded users inthe tab "Visibility" to clarify your reasons.
All restrictions on course elements will also apply to their sub-elements. This means that if you restrictthe top course element's visibility that rule will also apply to your entire course elements.
Access Restrictions in the Expert Mode
Use of Expert RulesIn case of more complicated visibility or access rules you can also use the expert mode. You can e.g. limita course element's access to a specific user name. It is also possible to interrelate several restrictions to eachother. Just click on "Display expert mode" in the tabs "Visibility" and "Access" in order to define your expertrules in the box provided.
Configuration of Expert RulesExpert rules certify if there is an attribute with a specific value.
Attribute Description Example Expert rule
isGuest accessible only for guests isGuest(0)
isCourseCoach available only for userstutoring a learning group
isCourseCoach(0)
isUser available only for onespecific user
isUser("pmuster")
In the tabs "Visibility" and "Access" there will be more examples of expert rules within the context-sensitive Help.
There are various options to interrelate single rules to each other. The two most important operators to combineattributes are:
• AND conjunction: &
• OR conjunction: |
Please note that an OR conjunction precedes an AND conjunction. In order to handle an ANDconjunction first you have to use brackets.
Example: The expert rule (inLearningGroup("Participants IntensiveCourse") & isCourseCoach(0)) means thateither participants of an intensive course or all tutors of learning groups will have access to a course element.

OpenOLAT 8.1 - User Manual
http://www.frentix.com - 10.4.2012 49
Use of AAI AttributesBy means of AAI attributes you can set access rules within a course to make sure that only course participantswith specific user attributes (e.g. members of a certain organization) will have access to your course material.AAI means "Authentication and Authorization Infrastructure" and allows university members to use systemsof other participating institutions with only one user name and password. For further information please goto Switch.
Available attributes and possible values are described in the AAI Attribute Specification (in English). The twomost common attributes can be found in the following table along with examples of their corresponding expertrules:
Attribute Description Example Expert rule and Explication
swissEduPerson-HomeOrganization
University or homeorganization
hasAttribute("swissEduPersonHomeOrganization","uzh.ch"): only members of the ZurichUniversity will get access.
swissEduStudyBranch3 Field of study, 3rdclassification
hasAttribute("swissEduPersonStudyBranch3","6400"): onlyveterinary medicine students will have access.
For further fields of study please go to the List of University Study Branch Codes; home organizationscan be found in the List of all Home Organizations.
In case course participants have problems when accessing course material restricted by AAI attributes you cancheck if these AAI user accounts correspond to the attributes required by the access rules. Just ask the userto log on via the AAI Attribut Viewer before sending you a screenshot. There you will see if there are anyattributes and values. Not all home organizations will provide their staff with each and every AAI attribute.Please clarify this with those home organizations that are concerned.
Registered users without appropriate attributes can be accepted in learning groups; you can then adaptyour expert rules accordingly by means of the following rule: (in LearningGroup("[group name]").
Types of Course Elements
Course Element: Structure
The course element "Structure" serves to arrange your course. By default it offers an automatic overview ofall sub-elements along with short title, title, and description. Use this course element to arrange your coursecontent and/or to clearly separate your modules.
By means of the course element "Structure" you can determine to put either an automatic overview, anautomatic overview with preview or your own HTML page on display. All necessary configurations are madein the tab "Overview." When selecting "Automatically generated overview incl. preview" you can choose up
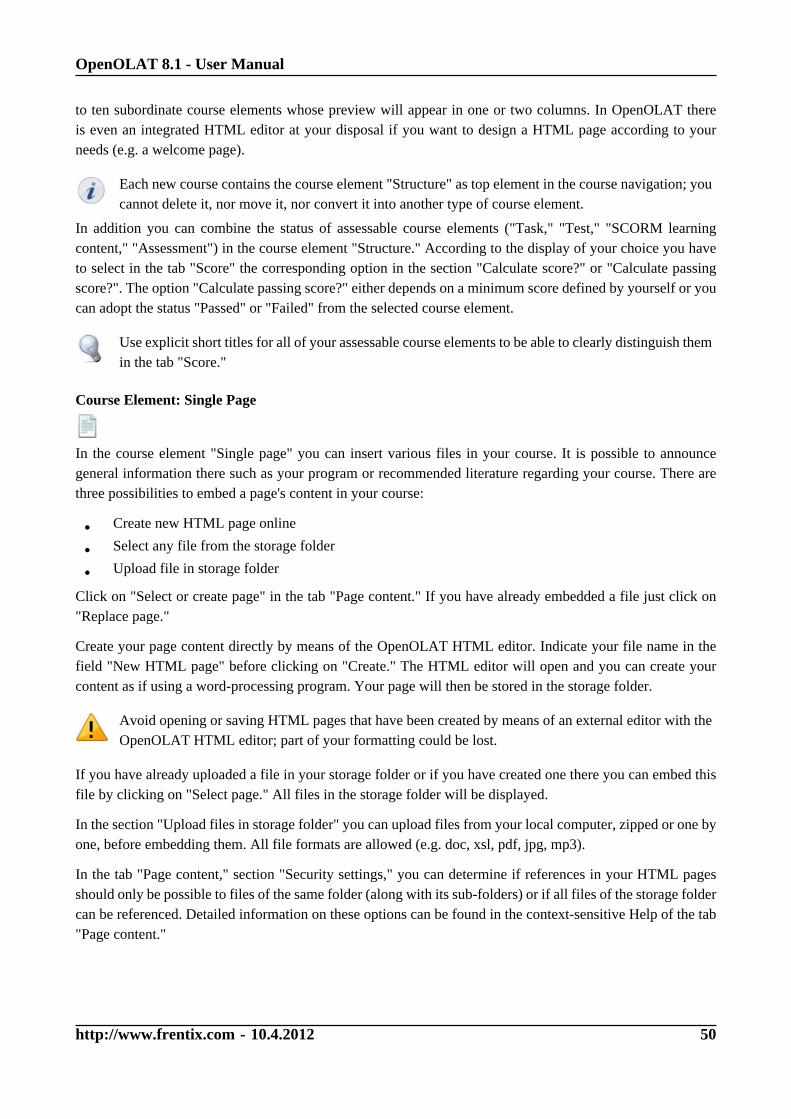
OpenOLAT 8.1 - User Manual
http://www.frentix.com - 10.4.2012 50
to ten subordinate course elements whose preview will appear in one or two columns. In OpenOLAT thereis even an integrated HTML editor at your disposal if you want to design a HTML page according to yourneeds (e.g. a welcome page).
Each new course contains the course element "Structure" as top element in the course navigation; youcannot delete it, nor move it, nor convert it into another type of course element.
In addition you can combine the status of assessable course elements ("Task," "Test," "SCORM learningcontent," "Assessment") in the course element "Structure." According to the display of your choice you haveto select in the tab "Score" the corresponding option in the section "Calculate score?" or "Calculate passingscore?". The option "Calculate passing score?" either depends on a minimum score defined by yourself or youcan adopt the status "Passed" or "Failed" from the selected course element.
Use explicit short titles for all of your assessable course elements to be able to clearly distinguish themin the tab "Score."
Course Element: Single Page
In the course element "Single page" you can insert various files in your course. It is possible to announcegeneral information there such as your program or recommended literature regarding your course. There arethree possibilities to embed a page's content in your course:
• Create new HTML page online
• Select any file from the storage folder
• Upload file in storage folder
Click on "Select or create page" in the tab "Page content." If you have already embedded a file just click on"Replace page."
Create your page content directly by means of the OpenOLAT HTML editor. Indicate your file name in thefield "New HTML page" before clicking on "Create." The HTML editor will open and you can create yourcontent as if using a word-processing program. Your page will then be stored in the storage folder.
Avoid opening or saving HTML pages that have been created by means of an external editor with theOpenOLAT HTML editor; part of your formatting could be lost.
If you have already uploaded a file in your storage folder or if you have created one there you can embed thisfile by clicking on "Select page." All files in the storage folder will be displayed.
In the section "Upload files in storage folder" you can upload files from your local computer, zipped or one byone, before embedding them. All file formats are allowed (e.g. doc, xsl, pdf, jpg, mp3).
In the tab "Page content," section "Security settings," you can determine if references in your HTML pagesshould only be possible to files of the same folder (along with its sub-folders) or if all files of the storage foldercan be referenced. Detailed information on these options can be found in the context-sensitive Help of the tab"Page content."

OpenOLAT 8.1 - User Manual
http://www.frentix.com - 10.4.2012 51
Course Element: External Page
By means of the course element "External page" you can embed web pages in your course navigation. Thecontent of the page will be displayed in an OpenOLAT window. It is recommended to use this course elementwhen planning to include pages containing database queries (e.g. research tools, online exercises, etc.). It isonly possible to link external pages via HTTP or HTTPS protocols.
First you have to indicate the URL to be referenced in the tab "Page content." In order to see that linkedpage correctly there are the following four options to choose from: "Completely embedded" (source hidden),"Embedded (source hidden)," "Embedded (source visible)," and "New browser window" (source visible). Moredetails regarding these options can be found in the context-sensitive Help in the tab "Page content." For pagesthat require authentication you can provide the corresponding values in the fields "User" and "Password."
If you are not sure which option is best in your situation you can try "Completely embedded" first totest the other alternatives till your page is displayed correctly.
You can allow your course participants to see the page content by clicking on a course element or you canprovide a homepage alternatively. This homepage will then contain short title, title and description of thatcourse element. You can find this option in the field "With homepage?".
Course Element: LTI Page
By means of the course element "LTI page" it is possible to integrate external learning applications inyour course before having their content displayed in an OpenOLAT window. LTI means "Learning ToolInteroperability" and is an IMS standard to embed external learning applications such as e.g. a chat, a mediaWiki, a test editor, or a virtual lab.
Indicate the URL to be referenced in the tab "Page content" along with its key and password. When selectingthis LTI page in the course navigation any user data, course information or keys will be transferred to theembedded application, password controlled and in the background. Your learning application will check accessrights and grant access with a valid key.
Course Element: CP Learning Content
CP means "Content Packaging" and is an e-learning standard for learning content. Use the course element "CPlearning content" to include learning content in the IMS CP format (IMS CP version 1.1.2) in your course.You can create CPs directly within OpenOLAT; further information can be found in the chapter "Creating CPLearning Content". Or you can create a CP externally, e.g. with eLML.
In the tab "Learning content" just click on "Create, select or import CP learning content" in order to assign aCP to your course element or to create a new CP. CPs can either be imported to the course editor or by meansof the tab "Learning resources;" further information can be found in the section "Import".
To change the assignment of a certain CP learning content later on just click on "Replace CP learning content"in the tab "Learning content" before selecting another CP.

OpenOLAT 8.1 - User Manual
http://www.frentix.com - 10.4.2012 52
In the section "Display" you can determine how your learning content should be presented to courseparticipants.
Course Element: SCORM Learning Content
SCORM means "Sharable Content Object Reference Model" and is another standardized e-learning formatsupported by OpenOLAT. Use the course element "SCORM learning content" to include learning content inSCORM format (SCORM version 1.2) in your course. Your SCORM package has to be created externally,e.g. with eLML.
In the tab "Learning content" just click on "Select or import SCORM learning content" to assign a SCORMlearning content to your course element. Click on "Import" to upload a new SCORM package or select anexisting SCORM package from your entries. SCORM packages can either be imported to the course editor orby means of the tab "Learning resources;" for further information please go to the chapter "Learning resources,"section "Import".
In order to change the assignment of your SCORM learning content later on you have to click on "ReplaceSCOPRM learning content" in the tab "Learning content" before selecting another SCORM package.
In the section "Display" you can determine how your learning content should be presented to courseparticipants. More detailed information can be found in the context-sensitive Help of that field.
SCORM learning content will always be presented with a homepage. If such content contains tasksas well as tests you will learn from that homepage more about your score and remaining attempts totake tests.
Course Element: Folder
In the course element "Folder" you can offer files to be downloaded. Often folders are used to provide courseparticipants with scripts or slides regarding your course.
In general all course participants have the permission to download files from that folder. All course authorsadditionally may upload files. These preset rights can be adapted according to your needs in the tab "Access"of the respective course element.
For each course element "Folder" you can dispose of ca. 100 MB storage space. If you should needmore please contact your OpenOLAT support team.
If you want to use more than one folder, e.g. one for each course event, it is recommendable to introducethe course element "Structure" before subordinating your folders to that structure. All restrictionsregarding visibility and access then have to be configured in the course element "Structure" only.
Course Element: Wiki
Use a Wiki to easily create learning content together with your course participants. A Wiki is suitable for doinggroup work; it can serve as documentation tool or as some sort of knowledge base for your studies and projects.

OpenOLAT 8.1 - User Manual
http://www.frentix.com - 10.4.2012 53
The course element "Wiki" helps you to embed a Wiki in your course. Just click on "Select, create or importWiki" in the tab "Wiki learning content" to assign a Wiki already existing or to create a new one. The chapter"Creating Wikis" will tell you how to do so step by step.
In order to change the assignment of a Wiki later on click on "Replace Wiki" in the tab "Wiki learning content"before selecting another Wiki.
In general all course participants have read and write permission in a Wiki. Only those OpenOLAT users whohave created the Wiki or users appointed as owners are allowed to delete Wiki pages. These preset rights canbe adapted in the tab "Access" of the respective course element according to your needs.
In the chapter "Learning Activities in Courses," section "Wiki", you will find more information on how toadapt the Wiki syntax, how to create new pages, and how to view different versions of a Wiki page.
Course Element: Podcast
The course element "Podcast" can either be used to easily provide others with your own audio and videofiles or with external podcast episodes in OpenOLAT. Course participants can see episodes directly withinOpenOLAT; or they can subscribe to podcasts, upload those by means of online services such as iTunes beforecopying them to a mobile device.
Add the course element "Podcast" to your course. Create your podcast in the tab "Podcast learning content"before editing it. Determine at first if you want to integrate an external podcast or if you prefer to create episodeson your own. How to create a podcast step by step and further information on other configuration possibilitiescan be found in the chapter "Creating Podcasts".
Only course authors and moderators are allowed to create podcast episodes by default. However, allcourse participants are able to comment on episodes and can assess them by means of 1 - 5 stars. Inthe tab "Access" it is possible to adapt these settings according to your needs.
Course Element: Blog
By means of a "Blog" you can inform your course participants on news in the form of texts, pictures or videos.After embedding your course element it is possible to create new entries in the course view immediately.
The course element "Blog" serves to include a blog into your course. In the tab "Blog learning content" youcan create a blog before editing it. You should determine first if you want to include an external blog or if youprefer to create new entries on your own. How to create a blog step by step and further information on otherconfiguration possibilities can be found in the chapter "Creating Blogs".
Only course authors and moderators are allowed to create blog entries by default. However, all courseparticipants are able to comment on entries and can assess them by means of 1 - 5 stars. In the tab"Access" it is possible to adapt these settings according to your needs.
Course Element: Forum

OpenOLAT 8.1 - User Manual
http://www.frentix.com - 10.4.2012 54
By means of the course element "Forum" you can provide your course with the possibility to communicateonline, e.g. to discuss questions regarding the course content among your course participants.
Generally all course participants have read and write permission in a forum. All course authors and tutorsdispose of the option to moderate a forum additionally. These preset rights can be adapted in the tab "Access"of the respective course element according to your needs.
Moderators hold the following rights:
• Editing and deleting all posts in a forum; attaching files.
• Prioritizing threads (sticky): a certain discussion subject will always appear on top of a list.
• Closing discussion: it will no longer be possible to reply to a certain discussion subject.
• Hiding discussion: a certain subject will no longer appear in the forum list.
• Displaying discussion: hidden subject will be displayed anew.
• Filter for persons: on the forum's overview page posts of every single course participant can be displayed.
• Archiving forum: posts and attached files will be zipped before storing them in your personal folder.
A course author can also use the forum to notify course participants in the short term. Just configureyour forum in the tab "Access" accordingly, i.e. that only course authors have write permission. Adviseyour course participants on subscribing to the forum to be up-to-date.
In the chapter "Learning Activities in Courses" you will get further information on opening topics and replyingto questions; see section "Forum".
Course Element: File Dialog
The course element "File dialog" provides you with preset discussion forums; in contrast to an ordinary forum,dialogs here are explicitly based on certain documents. Use such a file dialog to let your course participantsdiscuss e.g. scientific articles or papers.
In the tab "Forum/storage configuration" you can upload documents in the storage folder of your file discussionby clicking on "Upload file." You can also determine if your file dialog should be included in your course orif it should be displayed in a new window.
In general all course participants have read and write permission in a forum and may upload or download files.All course authors and tutors additionally dispose of the option to moderate a file dialog. These preset rights canbe adapted in the tab "Access" of the respective course element according to your needs. The right to moderatehas already been explained in the section "Course Element: Forum."
In the chapter "Learning Activities in Courses" you will get more information on how to upload files or howto open topics and reply to questions; see section "File Dialog".
Course Element: Assessment
The course element "Assessment" is suitable to assess achievements not handed in electronically. You canevaluate manually e.g. presentations by course participants with passed or failed, with a score or withan individual comment. The course element "Assessment" serves to preconfigure the assessment of suchachievements. Individual assessments can be inserted by using the assessment tool of your course.

OpenOLAT 8.1 - User Manual
http://www.frentix.com - 10.4.2012 55
According to your assessment you can preconfigure the display of a score, of a status or a comment in thetab "Assessment." In the field "Information for all users" and "Information for tutors" you provide generalinformation on how to assess achievements.
In order to assess a course participant personally that participant has to be member of at least onelearning group of your course.
Course Element: Task
By means of the course element "Task" you can provide exercises to be handed in electronically before beingassessed by a tutor.
To be able to assess course participants these participants must already be registered in a learninggroup! Otherwise those participants will not appear in your assessment tool.
In the tab "Sub-elements" you determine which of the following five sub-elements you want to select:
• Assignment: assign tasks to course participants.
• Drop box: this is the folder where course participants upload their solutions.
• Return box: this is the folder where course participants will find their tasks corrected.
• Assessment: create individual assessments for each course participant.
• Sample solution: provide course participants with sample solutions of their tasks.
How to create tasks step by step and further information on other configuration possibilities can be found inthe chapter "Creating Tasks".
How course participants will see the course element "Task" will be explained in the chapter "Learning Activitiesin Courses," section"Task".
Course Element: Portfolio Task
By means of the course element "Portfolio task" you can provide predefined portfolio templates to be filled byyour course participants. Their tasks can then be submitted electronically and assessed by a tutor.
In order to assess course participants with the assessment tool, they have to be registered in a learninggroup first. Otherwise you will not be able to find that participant within your assessment tool.
By means of the tab "Learning content" you can create new portfolio templates or select a predefined one. Howto create a portfolio task as course author will be explained in the chapter "Creating Portfolio Tasks".
Additionally you can determine a deadline for your portfolio task in the tab "Learning content." You can definea specific date or set a deadline in relation to that task's collection date. If the deadline is over your task willbe retracted automatically; it will no longer be possible to perform that task.
By means of the assessment tool you will have the opportunity to change a deadline for a single user.
Optionally you can create a message to be displayed when clicking on the course element "Portfolio task"within your course.

OpenOLAT 8.1 - User Manual
http://www.frentix.com - 10.4.2012 56
In the tab "Assessment" you can preconfigure the display of scores, status, as well as individual comments.Within the fields "Hint for all users" and "Hint for tutors" you can provide course participants and tutors withgeneral information on how to make assessments.
Information on how a portfolio element is seen and dealt with by course participants can be found in the chapter"Learning Activities in Courses," section "Portfolio task".
Course Element: Test
The course element "Test" is used to control achievements within a course. Course results will be archivedin a personalized way. A test has to be imported or created first in the so-called IMS QTI format (version1.2). If you have not generated a test before please follow the instructions in the chapter "Creating Tests andQuestionnaires".
By means of the course element "Test" you include that test in your course. In this course element, dataregarding course participants will be stored (number of attempts, scores, detailed assessments). Click on"Select, create or import file" in the tab "Test configuration" to assign this course element to a test or createa new one.
If you want to replace a test already embedded just click on "Replace file" in the tab "Testconfiguration" and select a new test. In case there are already test results of course participants youcan download them next.
Attention: In case participants are taking a test at that moment all their results will be lost since thattest is not complete. All results achieved between replacing and publishing a test will be lost as well.
A test will always be started along with a homepage in your course. You can edit the content of this page inthe section "Information (HTML page)".
The presentation of results, etc. can be configured in the tab "Test configuration" as well. For more informationplease go to "Display Options and Configuration", section "On the course level."
Information on how to see test results can be found in "Archiving Results of Tests and Questionnaires".
Course Element: Self-test
The course element "Self-test" is also used to control achievements in a course. In contrast to the course element"Test" self-tests are suitable to get practice; results of self-tests will be saved anonymously. Self-tests canbe taken as often as needed. The course element "Self-test" contains learning resources of the type "Test."Therefore it is up to you if you want to offer a test or a self-test. Your test has to be imported or createdfirst in the so-called IMS QTI format (version 1.2). If you have not generated a test before please follow theinstructions in the chapter "Creating Tests and Questionnaires".
By means of the course element "Self-test" you embed your test in a course. In this element data regardingcourse participants are stored anonymized (number of taken tests, scores, detailed assessments). Just click on"Select, create or import file" in the tab "Configuration self-test" to assign your course element to a test orcreate a new one.

OpenOLAT 8.1 - User Manual
http://www.frentix.com - 10.4.2012 57
If you want to replace a test already embedded just click on "Replace file" in the tab "Configurationself-test" and select a new one. In case there are already test results of course participants you candownload them next.
Attention: In case participants are taking a self-test at that moment all their results will be lost since thattest is not complete. All results achieved between replacing and publishing a test will be lost as well.
A self-test is always started along with a homepage in your course. You can design its content individually inthe section "Information (HTML page)".
The presentation of results, etc. can be configured in the tab "Self-test configuration" as well. For moreinformation please go to "Display Options and Configuration", section "On the course level."
Information on how to see test results can be found in "Archiving Results of Tests and Questionnaires".
Course Element: Questionnaire
By means of a questionnaire you can carry out online evaluations in your course, e.g. at the beginning to findout what your course participants expect. You can also process the results gained with statistic methods orevaluate your course at the end. Results will be stored anonymously. A questionnaire has to be imported orcreated first in IMS QTI format (version 1.2). If you have never generated a questionnaire before please followthe instructions in the chapter "Creating Tests and Questionnaires.
By means of the course element "Questionnaire" you embed a questionnaire in your course. Click on "Select,create or import questionnaire" in the tab "Questionnaire configuration" to assign that course element to aquestionnaire.
If you want to replace a questionnaire already embedded just click on "Replace file" in the tab"Questionnaire configuration" and select a new one. In case there are already questionnaire results ofcourse participants you can download them next.
Attention: In case participants are taking a questionnaire at that moment all their results will be lostsince that questionnaire is not complete. All results achieved between replacing and publishing aquestionnaire will be lost as well.
A questionnaire will always be started along with a homepage in your course. You can design its contentindividually in the section "Information (HTML page)."
The presentation of results, etc. can be configurated in the tab "Questionnaire configuration" as well. For moreinformation please go to "Display Options and Configuration", section "On course level."
Information on how to download questionnaire results can be found in "Archiving Results of Tests andQuestionnaires".
Course Element: Enrolment
The course element "Enrolment" is used to let course participants enroll in learning groups. It is then possibleto restrict access to certain documents or to assign group work. Just define in the tab "Configuration" in whichlearning groups participants will be able to enroll. When indicating a learning area this area will be offered to

OpenOLAT 8.1 - User Manual
http://www.frentix.com - 10.4.2012 58
all learning groups. In case you have not already created learning groups or in case you need more such groupsyou can perform this by clicking on "Select" and "Create" in the tab "Configuration." For further informationplease go to "Learning Groups and Learning Areas".
In the field "Delisting allowed" you can decide if a registered course participant should have the possibilityto delist from a learning group. In the group management you can determine while editing learning groups ifthere should be a waiting list and if moving up automatically from that list should be possible.
It is not enough to only select learning areas in the tab "Configuration." These learning areas have tobe assigned to learning groups as well. You should make such assignments in the group managementof your course. More detailed information can be found in the section "Creating Learning Areas andAssigning Learning Groups".
If you want to restrict the visibility or access of course elements to registered course participants it isnot advisable to configure the course element "Enrolment" as depending on groups; course participantswould not be able to register at all.
Course Element: Topic Assignment
The course element "Topic assignment" is useful if you want to announce e.g. topics for term papers in yourcourse before having them supervised. Course authors determine the detailed configuration of their topicassignment. This comprises e.g. who has the right to announce and supervise topics, how topics have to bedescribed, or how many topics can be selected by one course participant. What makes this course element sospecial is the fact that not course authors but topic authors will announce and supervise such topics.
How to configure topic assignmentsIn the tab "Configuration" you determine first how many topics can be selected by one participant, if thisselection is definite or if it has to be accepted by the topic author first. Furthermore you can add additionalfields to describe a topic in more detail. This description will then be displayed in the table containing all topicsannounced. Here you can also determine if registrations and submissions shall only be possible within a certainperiod of time. In the tab "Sub-elements" you can choose if there should be a drop box as well as a return boxin your topic assignment. Course participants will then upload their files to that drop box while topic authorswill return those files by means of a return box.
How to appoint topic authorsIn the tab "Persons in charge" you add those OpenOLAT users who should be able to announce and supervisetopics. These persons do not necessarily have to hold author rights.
If you remove a topic author who has already announced a topic he will still be able to supervise it.However, this person will no longer be able to announce new topics.
Role of topic authorsWhen being authorized by a course author to act as topic author you can announce as well as supervise topics.Just open the course view and navigate to your topic assignment.
OpenOLAT 8.1 - User Manual
http://www.frentix.com - 10.4.2012 59
How to create a new topicClick on "Create new topic" and indicate its title as well as a description. Depending on the configuration ofyour topic assignment you can add further details to the topic's description, determine deadlines for registrationand submission, decide how many course participants are allowed to select your topic, and upload additionalfiles if needed.
How to configure topicsIf you want to modify your configuration later on just click on the topic's title. Now you will be able to editthat topic, change its status from "Open" to "Closed" or vice versa, or delete that topic.
How to manage participantsIf the configuration of your topic assignment requires that course participants have to be accepted by the topicauthor you will see on the home page of topic assignments the note "Check participant" in a table as soon assomebody has applied for your topic. Now open the tab "Topic assignment" and accept the application of yourcandidate(s). It is also possible to add or remove participants in this tab manually.
How to upload and return filesIn the tab "Folder," section "Drop box," you will find all those files course participants have submitted. Inthe section "Return box" you can put files already corrected. There will be one sub-folder for each courseparticipant.
Course Element: Notifications
This course element allows you to embed notifications in your course structure. These notifications will bevisible in your course as well as in the notifications section of each single user. Course participants can subscribeto this element; it is also possible to establish an automated subscription. Your users will then be provided withthe portlet "Notifications" in their Home with any notifications regarding their courses taken. Course authors(in a course) as well as users (in their Home portlet) can determine the amount of notifications that shouldbe displayed.
Participant list
Unlike the member management course tool, which is only visible for course owners, the course element"Participant list" provides a list of all course members to those OpenOLAT users allowed to open the respectivecourse. Members are listed depending on their role within the course as either course administrator, coach orparticipant.
By linking the member names to their OpenOLAT visiting card as well as the OpenOLAT mail service, thiscourse element facilitates contacting your fellow course members directly from within the course.
Course Element: Calendar
By means of the course element "Calendar" you can embed a course calendar in the course structure. Thiscourse element offers an alternative view on the course calendar to be found on your right in the box "General."

OpenOLAT 8.1 - User Manual
http://www.frentix.com - 10.4.2012 60
In the tab "Calendar configuration" you can decide which date should be displayed when a course calendaris activated from the course structure. Furthermore you can initiate that dates from your course calendar willautomatically be transferred to the personal calendars of your course participants.
When displaying a certain semester week in your calendar and inserting links on course elements, thatcalendar will serve as a kind of overview showing all events and tasks of that week.
Link list
The course element "Link list" enables the author to quickly assemble a collection of links relevant to the course.No HTML proficiency is required. Simply open the course editor, navigate to the link list course element, openthe "Configuration" tab and enter the URL and name of the website you wish to add as a link. The target (URL)and description (name) fields are mandatory, while additional information on the link can be added throughthe comment field. Add or remove links using the + / - buttons.
vitero
The "vitero" course element allows you to embed the vitero system for web conferencing, e-collaboration, livee-learning and language learning into your course. vitero (virtual team room) enables you to create meetingsfor up to 12 participants plus moderator.
The virtual meeting room facilitates communication via text, audio and video as well as document and desktopsharing. The vitero system can be used for virtual team meetings, but also supports e.g. lectures ("chalk-and-talk"). All meetings work with the three temporary roles of moderator, assistant moderator and participant, thusreflecting the olat course roles administrator, coach and participant.
In order for you to be able to see and use the vitero course element, the system must be enabled by anadministrator. Additionally, your OpenOLAT provider must have a valid vitero license.
Please consult the context sensitive help for further information concerning configuration and use ofthe vitero course element.
Course Element: E-Mail
By means of the course element "E-Mail" you provide your course participants with the possibility to send ane-mail to pre-defined recipients.
There are two possibilities to send messages. You can either select groups and learning areas you want to senda message to in the tab "Recipients" or you directly indicate your e-mail addresses.
In the fields "Subject (form)" and "Message (form)" you can pre-define default values to be edited later on byyour course participants when sending e-mails.
In order to enter several addresses in the field "E-mail addresses" you have to separate them by linebreaks.

OpenOLAT 8.1 - User Manual
http://www.frentix.com - 10.4.2012 61
By means of a suitable short title for the course element "E-mail" you can provide your courseparticipants with information to whom they can send messages. For privacy reasons they will not beable to see the recipients' addresses in your e-mail form.
Using Editor Tools
Storage FolderThe editor tool "Storage folder" in a course serves to store used files, e.g. HTML pages or documents fromother folders.
You can upload files, create, copy, move or delete them in your storage folder. Additionally you can zip orunzip files. All these actions can be performed with single files and folders or with several ones at once.
All course elements of the type "Folder" used in your course can be accessed via the storage folder in the sub-folder "_courseelementdata;" you can even edit them there.
A resource folder of a certain course can be viewed in the storage folder via the sub-folder "_sharedfolder;"however, it is not possible to edit it there.
Course PreviewThe editor tool "Course preview" enables you to see course settings and content from the course participant'spoint of view. By clicking on "Course preview" you will first get to the configuration menu to simulate yourcourse at a certain point in time, as member of a distinct learning group, or with other attributes used in yourcourse.
In contrast to the view of the course content you will see all modifications or course elements not yet publishedin the course preview. Features depending on an interaction between participant and system will not be availablein the course preview, e.g. enrolling in groups, starting a test, self-test or questionnaire, and performing tasksin the course element "Task."
PublishingAs long as you have not published your course and granted access, your course participants will not be able tofind your course in the search mask or the course list. Course modifications will not be effective during yourcourse; you have to publish it once more. This means that you can prepare new course content in the courseeditor. Your participants will only see new features after publishing them. All settings and modifications willbe effective after using the tool "Publish" in the course editor.
First you have to select all those course elements you have modified and want to publish. Your choice will bereduced to course elements that are available for publishing.
Then you determine who should have access to your OpenOLAT course. See section "Modify settings" to learnmore about those four options at your disposal. Now you can complete your publishing process. Just click on"Finish."
At this stage you will be informed on course elements that may not have been configured correctly and couldcause problems when starting your course.
At last you will get a summary of your published modifications as well as a message containing the numberof course participants working on your course at that very moment.
OpenOLAT 8.1 - User Manual
http://www.frentix.com - 10.4.2012 62
In case you publish a course while others are working on it all non-saved data (such as entries in forumsor Wikis) will be lost.
Collecting function
The toolbox "Collecting function" allows you to insert multiple single pages simultaneously. Clicking"Multiple single pages" displays all files available in this course. More files can be added using the storagefolder.
Select all files you wish to add to the course as single pages, and decide whether the selected files should beadded after or as a child of the current course element.You can arrange the new pages afterwards into theircorrect order.
Deleting, Moving and Copying Course Elements
The bottom tool box "Modify course elements" helps you to delete, move or copy course elements. Your actionwill affect the currently marked course elements as well as all subordinated ones.
It is possible as well to move course elements using „Drag&Drop“ in the course structure to the left.
Modifications such as deleting, moving, copying course elements have to be published later on in order to beeffective. If you have not published a deleted course element it can still be recovered.
Copying course elements is advisable if you plan to offer team work in groups and want to reuse thesame structure.

OpenOLAT 8.1 - User Manual
http://www.frentix.com - 10.4.2012 63
Creating CP Learning ContentThis chapter explains course authors how to create Content Packagings. Additionally, you will find informationon how to embed your CPs in courses and explains the features of the CP editor.
General Information
Content Packaging (CP) is self-contained learning content in a standardized e-learning format, e.g. an onlinemodule of your subject. For further information please see the section "CP Learning Content" in the chapter"Learning resources." When creating your learning content as CP you can use it not only within OpenOLATbut in other learning platforms that support this CP format as well.
CPs in OpenOLAT are usually embedded in a course. It is possible to use the same CP in several courses. Forexample, you can use an introductory module not only within a course for beginners but also as starting pointin a more advanced course. If you have not created any courses yet you will get some guidance in the chapter"Creating courses" before creating your CP by means of the following instruction.
If you want to create large learning contents we recommend using eLML.
In Five Steps to Your Content Package
The following helps you to create a Content Package in no time before embedding it in your course andactivating it for your participants.
Step 1: Start course editor and insert CP course element
1 Search for your course in "Learningresources," section "My entries," andopen it.
2 Click on "Course editor" in the toolbox"Course tools" on your right.
3 Select "CP learning content" in thetoolbox "Insert course elements" onyour right.
4 Select position at which your CPcourse element should be inserted andsave your settings.
5 Indicate a short title for yourcourse element in the tab "Title anddescription" and save your settings.

OpenOLAT 8.1 - User Manual
http://www.frentix.com - 10.4.2012 64
Step 2: Creating CP learning content
1 Click on "Select, create or import CPlearning content" in the tab "Learningcontent."
2 Click on "Create."
3 Indicate title and description of yourCP and save your settings.
4 Click on "Next."
Now you are within the editor. A new CP usually consists of one chapter ("CP learning content") and onepage ("New page").
Step 3: Edit CP
1 Click on "Edit."
2 Edit title: Double-click on the title andinsert a new one.
3 Edit content: Edit page in the providedfield and format before saving it.
4 Insert new page: Click on icon "Addpage." Your new page will be insertedunderneath the highlighted element.
5 Copy page: Click on icon "Copy page."Your copied page will be insertedunderneath the highlighted element.

OpenOLAT 8.1 - User Manual
http://www.frentix.com - 10.4.2012 65
6 Import page: Click on "Import page."Then click on "Select file" beforeselecting a HTML page. Click on"Import."
7 Delete page: Click on icon "Deletepage" and confirm.
Now you can insert more pages following the same pattern.
You can import several HTML pages at once by zipping them before uploading the resulting ZIP file.
Click on the icon "Preview" on your top right to have a look at your CP before saving it.
Step 4: Save CP
1 Click on "Save" in the lower center.
2 Close CP tab and navigate back to your course.
Step 5: Publish and activate your course
1 Select "Publish" in the toolbox "Editortools" on your right.
2 Click on course element and then go"Next."
3 Select "All registered OpenOLATusers" from the pull-down menu in"Modification of course access."
4 Click on "Finish."
The CP is now embedded in your course and course participants can read its content. In order to edit this CPjust click on "Edit" in the tab "Learning content."

OpenOLAT 8.1 - User Manual
http://www.frentix.com - 10.4.2012 66
Creating WikisThis chapter will explain how course authors can create Wikis in OpenOLAT before embedding them in acourse. Here you will find an illustrated step-by-step instruction as well as information on how to adapt Wikisaccording to your needs.
General Information
A Wiki (Hawaiian for "fast") is a hypertext system for websites. In contrast to HTML pages users can not onlyread Wiki pages but also edit them. A Wiki can document group work or serve as a kind of knowledge basefor your course. Wiki pages are created by means of a special Wiki syntax before editing and linking themto one another.
Introduce Wikis as knowledge base created by advanced students to be used as reference in anintroductory course; or as a list of links for series of lectures that are related thematically.
A Wiki is a learning resource usually embedded in an OpenOLAT course. You can use the same Wiki in severalcourses. If you have not created a course yet you will find further information in the chapter "Creating Courses"before creating your Wiki by means of the following instruction.
Four Steps to Your Wiki
By means of this guide you will be able to create a Wiki for your course in no time before adapting it accordingto your needs.
Step 1: Open course editor and insert Wiki course element
1 Search for your course in learningresources, section "My entries" andopen it.
2 Click on "Course editor" on your rightin the toolbox "Course tools."
3 Select "Wiki" on your right in thetoolbox "Insert course element."
4 Select position at which your Wikicourse element should be inserted andsave your settings.
5 Indicate a short title for yourcourse element in the tab "Title anddescription" and save your settings.

OpenOLAT 8.1 - User Manual
http://www.frentix.com - 10.4.2012 67
Step 2: Create Wiki
1 Click on "Choose, create or importWiki" in the tab "Wiki learningcontent."
2 Click on "Create."
3 Indicate title and description and saveyour settings.
4 Click on "Next."
Step 3: Configure Wiki
1 Click on "Edit."
2 Adapt welcome page: Write a text("Index") and save your settings.Explanations regarding the Wiki syntaxby clicking on the question-mark icon.
3 Create Wiki page: Indicate a title foryour new Wiki page in the box "Createarticle" and click on "Create." Thenclick on the red link with the page'stitle in order to generate and edit thatpage.
4 Adapt Wiki menu: Click on "Modify"in the box "Wiki menu" in order toadapt that menu according to yourneeds or add external links. Save yoursettings.
5 Close Wiki tab and click on course tab.

OpenOLAT 8.1 - User Manual
http://www.frentix.com - 10.4.2012 68
Step 4: Publish and activate your course
1 Select "Publish" on your right in thetoolbox "Editor tools."
2 Click on course element beforeclicking on "Next."
3 In the pull-down menu select "Allregistered OpenOLAT users" in thesection "Modify course access."
4 Click on "Finish."
Now your Wiki is embedded and course participants can read your Wiki contents, edit pages already existing,and create new pages.
Further Configurations
By default all course participants have the right to read and write Wikis. Only those OpenOLAT users havingcreated Wiki pages or registered Wiki owners are allowed to delete those Wiki pages. These pre-set rights canbe adapted in the tab "Access" of your course element according to your needs.
Only registered Wiki owners are allowed to modify a Wiki menu.
If you do no longer wish to use a Wiki as collaborative tool but only as a kind of reference, (i.e. youdo not want its content to be altered) just lock that Wiki's access in the tab "Access" of your courseelement in the section "Edit/create article."

OpenOLAT 8.1 - User Manual
http://www.frentix.com - 10.4.2012 69
Creating PodcastsThis chapter explains step by step how course authors can create podcasts before embedding them in theircourse. Furthermore you will find information on additional configuration possibilities.
General Information
The term "Podcasting" comprises words such as "iPod" and "Broadcasting" and means producing and providingaudio as well as video files. Podcasts can be subscribed to before uploading episodes either by means of onlineservices such as iTunes to mobile devices or using them directly within OpenOLAT. Such episodes will beshown sorted by time; the latest news will always appear on top. Course participants will be able to assessepisodes and comment on them.
An advantage of podcasts is that media data can easily be provided and used regardless of location. Additionallyyou can produce as well as use episodes independently of any broadcasting time compared to radio shows.
Requirements
Produce an audio or video file for your podcast episode by means of appropriate recording software (e.g.GarageBand) before saving it in a Flash-compatible format (FLV, MP3, MP4, M4V, M4A or AAC).
In case you have not created a course yet you will get further information in the chapter "Creating Courses" onhow to proceed before generating a podcast by means of the following instruction.
Four Steps to Your Podcast
With the aid of this guideline you will be able to add a podcast to your course in no time and create your firstepisode.
Step 1: Open course editor and insert podcast course element
1 Search for your course in learningresources, section "My entries" andopen it.
2 Click on "Course editor" in the toolbox"Course tools" on your right.
3 Select "Podcast" in the toolbox "Insertcourse elements" on your right.
4 Choose position at which you want toinsert your podcast course element andsave your settings.
5 Indicate a short title for yourcourse element in the tab "Title anddescription" and save your settings.

OpenOLAT 8.1 - User Manual
http://www.frentix.com - 10.4.2012 70
Step 2: Create a Podcast
1 Click on "Select, create or importpodcast" in the tab "Podcast learningcontent."
2 Click on "Create."
3 Indicate title and description of yourpodcast. This information will appearin the header of your podcast. Saveyour settings.
4 Click on "Next."
Step 3: Fill podcast with content
1 Click on "Edit."
2 If you want to add a picture to yourpodcast header just click on "Editpodcast" and upload pic.
3 Click on "Create your own episode."
4 Indicate title, select audio or videofile from your computer, and click on"Publish."
Additional episodes can be added later on following the same pattern or directly within the course view.
Step 4: Publish and activate your course
1 Select "Publish" in the toolbox "Editortools" on your right.
2 Click on course element beforeclicking "Next."
3 Select "All registered OpenOLATusers" from the pull-down menu,section "Modify course access."
4 Click on "Finish."
OpenOLAT 8.1 - User Manual
http://www.frentix.com - 10.4.2012 71
Your podcast is now embedded and course participants can download the first episode.
Further Configurations
Tab: AccessBy default only course authors may create episodes. Course participants can download them, comment onand assess them. If you want your course participants to create episodes as well just deactivate the check box"Locked for learners" in the section "Read and write." Course participants will not be able to edit episodescreated by themselves. Only course authors or moderators are allowed to make modifications. In the section"Moderate" you determine who will have the right to moderate a podcast. This means that a course participantwill then be able to edit that podcast as well as delete all episodes and comments.
These settings are only relevant if episodes are created within OpenOLAT. When embedding anexternal podcast it will not be possible in OpenOLAT to determine who will be allowed to createepisodes or not.
Subscribing to PodcastsCourse participants can periodically check via the podcast's Newsfeed if there are new episodes beforedownloading them. On the homepage of your podcast you will find various possibilities to subscribe to apodcast via the feed URL of an online service such as iTunes.
Including External PodcastsYou can also use this podcast course element to include an external podcast. Just select "Include an externalpodcast already existing" when editing that podcast for the first time. In the field "URL" you have to indicate thefeed link of your external podcast. Usually this is a URL with an .xml add-on. Episodes will then be displayedwithin your course element.
Once you have decided on what kind of podcast you plan to embed (create episodes yourself or embedexternal podcast) you will not be able to modify your choice later on.

OpenOLAT 8.1 - User Manual
http://www.frentix.com - 10.4.2012 72
Creating BlogsIn this chapter you will learn step by step how to create and embed a blog. Further configuration options willalso be explained.
General Information
The term "Blog" comprises "World Wide Web" and "Log." Blogs usually serve as online journals for personalas well as professional information. By means of blogs you can provide your course participants with texts,pictures or videos in a swift and easy way. Entries will be displayed sorted by time; the latest news will alwaysbe on top. Course participants can subscribe to blogs via RSS Feed. They can also comment on entries andassess them.
A blog is generally used like a public diary. Its advantage is its quick, standardized publication.
In case you have not created a course yet the chapter "Creating Courses" will be helpful before generating ablog by means of the following instruction.
Four Steps to Your Blog
With the aid of the following guidelines you will create a blog for your course before adapting it accordingto your needs.
Step 1: Open course editor and insert blog course element
1 Search for your course in learningresources, section "My entries" andopen it.
2 Click on "Course editor" in the toolbox"Course tools" on your right.
3 Select "Blog" in the toolbox "Insertcourse elements" on your right.
4 Select position at which you want yourblog course element to be inserted andsave your settings.
5 Indicate a short title for yourcourse element in the tab "Title anddescription" and save your settings.

OpenOLAT 8.1 - User Manual
http://www.frentix.com - 10.4.2012 73
Step 2: Create Blog
1 Click on "Select, create or import blog"in the tab "Blog learning content."
2 Click on "Create."
3 Indicate title and description of yourblog and save your settings.
4 Click on "Next."
Step 3: Fill Blog with Content
1 Click on "Edit."
2 If you want to add a picture to yourblog header just click on "Edit blog"and upload pic.
3 Click on "Create your own entries."
4 Indicate title, description and contentbefore clicking on "Publish."
Further entries can be added later on following the same pattern or directly within the course view.
Step 4: Publish and activate your course
1 Select "Publish" in the toolbox "Editortools" on your right.
2 Click on course element beforeclicking "Next."
3 Select "All registered OpenOLATusers" from the pull-down menu,section "Modify course access."
4 Click on "Finish."
Your blog is now embedded and course participants can read the first entry.

OpenOLAT 8.1 - User Manual
http://www.frentix.com - 10.4.2012 74
Further Configurations
Tab: AccessBy default only course authors may create entries. Course participants can read them, assess, and comment onthem. If you want course participants to create entries by themselves just deactivate the check box "Locked forlearners" in the section "Read and Write." Course participants will not be able to edit entries they created. Onlycourse authors or moderators are allowed to make modifications. In the section "Moderate" you determine whowill have the right to moderate a blog. This means that a course participant may then edit that blog and deleteall entries and comments.
This configuration is only relevant if entries are created within OpenOLAT. When embedding anexternal blog you cannot determine who will be able to create entries.
Subscribing to BlogsCourse participants can subscribe to a blog via RSS Feed to be informed as soon as there are new entries.
Including External BlogsYou can also use course element to include an external blog. Just select "Include an external blog alreadyexisting" when editing it for the first time. Indicate the feed link of your external blog in the field "URL."Generally this URL will have an .xml add-on. Entries of that external blog will appear in your course element.
Once you have decided on what kind of blog you want to embed (create your own entries or includean external blog) you will not be able to modify your choice later on.

OpenOLAT 8.1 - User Manual
http://www.frentix.com - 10.4.2012 75
Creating TasksThis chapter explains how course authors can create tasks for their course participants. Here you will find anillustrated step-by-step instruction as well as information on how to adapt tasks according to your needs.
General Information
Tasks are used within an OpenOLAT course. You can assign various tasks to course participants electronicallyand collect their results via OpenOLAT as well. Furthermore you can assess those tasks and return them tocourse participants by means of a return box. Additionally you can provide sample solutions. OpenOLAT willassist you with its organization; you no longer have to keep an account of tasks, assessments or dates.
Requirements
Before adding a task all task files and sample solutions (optionally) have to be available in an established fileformat (e.g. PDF documents).
In case you have not created a course yet the chapter "Creating Courses" will help you to do so before creatingyour tasks by means of the following instruction. In addition your course participants have to be registeredmembers of learning groups in order to be able to assess and return their tasks already submitted.
Three Steps to Your Task
By following this guideline you will have created a task for your course in no time.
Step 1: Open course editor and insert task course element
1 Search for your course in learningresources, section "My entries" andopen it.
2 Click on "Course editor" in the toolbox"Course tools" on your right.
3 Select "Task" in the toolbox "Insertcourse elements" on your right.
4 Select position at which you wantyour task to be inserted and save yoursettings.
5 Indicate a short title for yourcourse element in the tab "Title anddescription" and save your settings.

OpenOLAT 8.1 - User Manual
http://www.frentix.com - 10.4.2012 76
Step 2: Configure task
1 Select favored sub-elements in the tab"Sub-elements" and save your settings.Only sub-elements selected can beconfigured in the next tab.
2 Important: In order to be able to assessyour tasks you have to assign all sub-elements selected to a learning groupin the tab "Access." Activate checkbox "Depending on group." Select orcreate learning group. In order to createa learning group indicate a name in thefield "Only for learning groups" beforeclicking on "Create." Finish and saveyour settings.
3 Click on "Open task folder" in thetab "Assignment." Upload your taskfile(s) created before. Optionally writea message for users in the section"Assign task" and configure yourallocation according to your needs.
4 Optionally adapt confirmation text inthe tab "Handing in" and configure e-mail settings.
5 Select assessment option in the tab"Assessment." Available are: "Scoregranted" (incl. minimum/maximumscore), "Display passed/failed" incl.option "Type of display" (manuallyor automatically), and "Individualcomment." Save your settings.
6 Click on "Open folder of samplesolution" in the tab "Sample solution"before uploading your samplesolutions.

OpenOLAT 8.1 - User Manual
http://www.frentix.com - 10.4.2012 77
Step 3: Publish and activate your course
1 Select "Publish" in the toolbox "Editortools" on your right.
2 Click on course element beforeclicking "Next."
3 Select "All registered OpenOLATusers" from the pull-down menu,section "Modify course access."
4 Click on "Finish."
Your task is now embedded in your course. Depending on the configuration of your task element courseparticipants will be able to select a task and submit their solution. Course authors and tutors of learning groupscan then assess and return all submitted and corrected files by means of the assessment tool.
Subscribe to your drop box in the course view. Whenever a course participant submits a file you willreceive a corresponding e-mail or a notification in your Home, section "My notifications."
Further Configurations
Tab: Sub-elementsSelect 1 - 5 of all available sub-elements. Sub-elements selected can then be configured in the next tab(exception: return box).
For each sub-element there has to be at least one learning group in the tab "Access" to be indicatedin the field "Depending on group." Thus course authors and tutors of learning groups will be able tohave a look at all files submitted by means of the assessment tool of that course before assessing andcommenting on them.
Tab: AssignmentYou upload your task files to the task folder in the tab "Assignment." In the field "Message for user" you canprovide general information for all course participants regarding your tasks. In the field "Type of assignment"you determine if a course participant can choose between all available tasks or if your tasks should be allocatedautomatically as well as randomly. Select in the field "Type of sampling" if several course participants shall beable to work on the same task (task can be reclined) or if each course participant shall work on a different task(task cannot be reclined). If a task is selected manually you can further decide in the field "Preview" if courseparticipants shall be allowed to have a look at a task before selecting it.
In case a course participant is not allowed to recline a task you have to offer at least the same numberof tasks as there are course participants.
Tab: Handing inA standard phrase confirms that course participants have submitted their solutions successfully. This text canbe adapted if necessary. The option "Send text additionally as e-mail" means that your text will be sent by e-mail as well.

OpenOLAT 8.1 - User Manual
http://www.frentix.com - 10.4.2012 78
Tab: AssessmentHere you define how each course participant shall be assessed. By default a tutor can assess tasks by meansof "Passed/failed." If you prefer to allocate points instead or in addition just modify your configuration byindicating a minimum and maximum score or by replacing "Passed/failed" automatically with a passing score.Optionally you can provide space for individual comments regarding each course participant. In addition youcan provide further information in the fields "Notice for all users" and "Notice for tutors," e.g. some generalcomment on how to assess course participants.
Tab: Sample SolutionIn order to provide all course participants with a sample solution regarding your tasks just click on "Opensample solution folder" in the tab before uploading appropriate documents to that folder.
In the tab "Access" you can configure your sample solution date-dependently in order to have itrevealed e.g. only after that task's deadline.
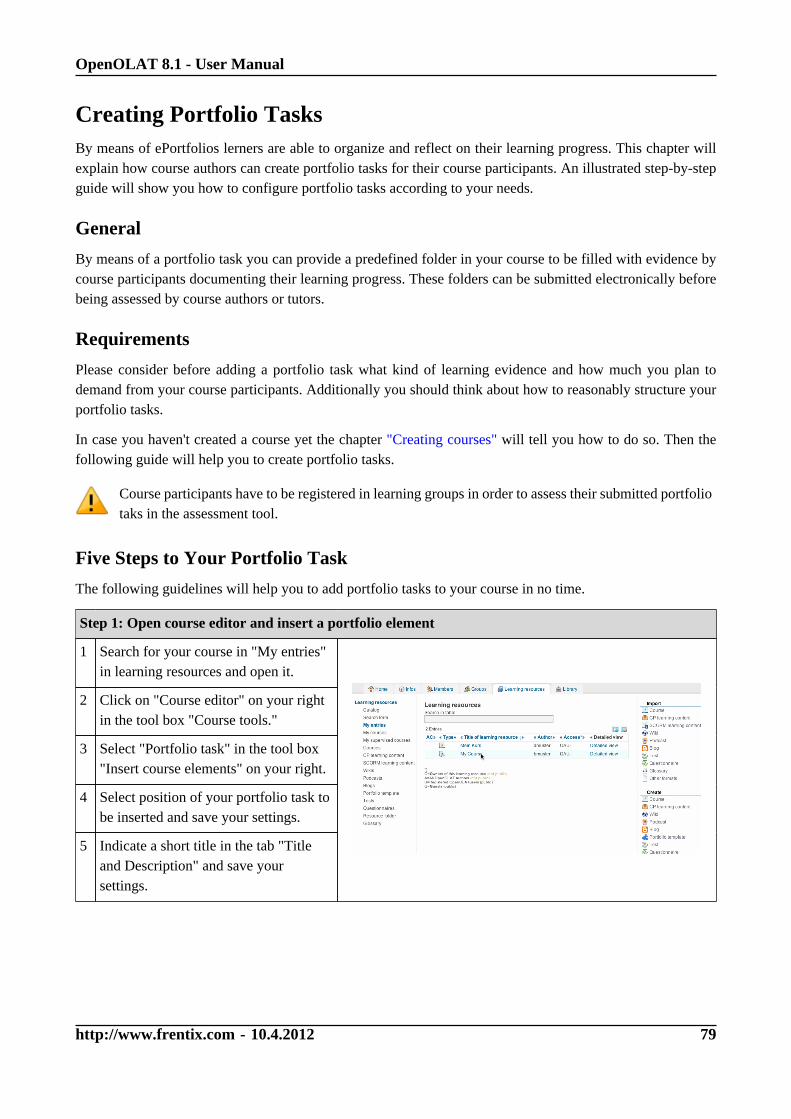
OpenOLAT 8.1 - User Manual
http://www.frentix.com - 10.4.2012 79
Creating Portfolio TasksBy means of ePortfolios lerners are able to organize and reflect on their learning progress. This chapter willexplain how course authors can create portfolio tasks for their course participants. An illustrated step-by-stepguide will show you how to configure portfolio tasks according to your needs.
General
By means of a portfolio task you can provide a predefined folder in your course to be filled with evidence bycourse participants documenting their learning progress. These folders can be submitted electronically beforebeing assessed by course authors or tutors.
Requirements
Please consider before adding a portfolio task what kind of learning evidence and how much you plan todemand from your course participants. Additionally you should think about how to reasonably structure yourportfolio tasks.
In case you haven't created a course yet the chapter "Creating courses" will tell you how to do so. Then thefollowing guide will help you to create portfolio tasks.
Course participants have to be registered in learning groups in order to assess their submitted portfoliotaks in the assessment tool.
Five Steps to Your Portfolio Task
The following guidelines will help you to add portfolio tasks to your course in no time.
Step 1: Open course editor and insert a portfolio element
1 Search for your course in "My entries"in learning resources and open it.
2 Click on "Course editor" on your rightin the tool box "Course tools."
3 Select "Portfolio task" in the tool box"Insert course elements" on your right.
4 Select position of your portfolio task tobe inserted and save your settings.
5 Indicate a short title in the tab "Titleand Description" and save yoursettings.

OpenOLAT 8.1 - User Manual
http://www.frentix.com - 10.4.2012 80
Step 2: Create portfolio task
1 Click on "Select or create portfoliotemplate" in the tab "Learningcontent."
2 Click on "Create."
3 Indicate a title as well as a descriptionand save your settings.
4 Click on "Next."
Step 3: Design portfolio task
1 Click on "Edit."
2 Just click on the "Plus" icon to adda new page. Such pages can then besupplemented by structural elements.
3 Choose appropriate titles for yourpages and structural elements beforewriting all necessary directionsfor your course participants inthe description box. Pages andstructural elements can be moved via"Drag&Drop" later on.
4 Determine in the section "Restrictions"what kind of artefacts courseparticipants should be allowed toupload and to what extent.

OpenOLAT 8.1 - User Manual
http://www.frentix.com - 10.4.2012 81
Step 4: Configure portfolio task
1 Optionally you can define a deadlinein the tab "Learning content" of thecourse editor and provide a message forcourse participants.
2 Select your assessment options inthe tab "Assessment" and save yoursettings. You can choose between:"Score granted" (incl. min./max.),"Passed/failed" with option "Type ofdisplay" (automatically or manually),and "Individual comment." Important:In order to assess portfolio tasksyour course participants have to beregistered in a group.
Step 5: Publish course
1 Select "Publish" on your right in thetool box "Editor tools."
2 Click on course element beforeclicking on "Next."
3 Select "All registered OpenOLATusers" from the pull-down in thesection "Modification of courseaccess."
4 Click on "Finish."

OpenOLAT 8.1 - User Manual
http://www.frentix.com - 10.4.2012 82
Now this portfolio task is embedded in your course. Course participants will be able to collect that task beforeembedding artefacts in their folder. Course authors as well as tutors can see all portfolio tasks submitted beforeassessing them by means of the assessment tool.

OpenOLAT 8.1 - User Manual
http://www.frentix.com - 10.4.2012 83
Managing Topics of Topic AssignmentsThis chapter helps persons responsible for a topic to manage topics of a topic assignment. Here you will findan illustrated step-by-step guide on how to create topics and how to manage participants.
General
The course element "Topic assignment" is used within an OpenOLAT course. A course author can configurethis element as needed and appoint persons responsible for a topic. Further information on how to configuretopic assignments can be found in the chapter dealing with the element "Topic assignment". Persons responsiblefor topics can offer their course participants a variety of topics before managing these participants along withtheir topics. Course participants will be able to submit expositions via drop boxes. Corrections can then bereturned via return boxes.
Requirements
A course author has already embedded the course element "Topic assignment" in a course and appointed youas person responsible for a topic.
Three Steps to Create and Manage Topics
The following guidelines will teach you in no time how to offer topics via the course element "Topicassignment" before managing your course participants.
The following example will show that the course author has configured the topic assignment to not immediatelyaccept a participant's topic choice. This choice has to be confirmed first by the person responsible for thattopic. This means that course participants have to apply for a topic before being accepted or rejected by personsresponsible for topics.

OpenOLAT 8.1 - User Manual
http://www.frentix.com - 10.4.2012 84
Step 1: Open course and create topic
1 Search for your course in learningresources and open it.
2 Navigate to the topic assignment in thecourse menu on your left.
3 Click on "Create topic" at the top of thecontent area.
4 Provide information on yourtopic (title, description) in the tab"Description." Additionally you canlimit the number of candidates, attachfiles, and establish notifications viaemail.
5 Optional: If you want to appointadditional tutors for your topic justclick on "Add user(s)" in the tab"Administration of participants,"section "Topic authors" beforeselecting the person required.
Your topic will now appear in your topic assignment and course participants will be able to apply.
If the check box "E-mail notification when selecting/deselecting Topics" is activated in your topicdescription, you will receive an email as soon as a course participant applies for your topic.

OpenOLAT 8.1 - User Manual
http://www.frentix.com - 10.4.2012 85
Step 2: Manage participants
1 Click on the title of your topic in thetopic overview before going to the tab"Administration of participants."
2 Select those people from the candidatelist to whom your topic should beassigned. Click on "Transfer asparticipant." Adapt and send emailnotification to all accepted courseparticipants if needed.
3 Select those people from the candidatelist to whom your topic should notbe appointed. Click on "Remove."Adapt and send email notification to allcandidates not accepted if needed.
4 If you do not wish other candidates toapply just click on "Topic set status to'Filled'" in the tab "Description."
Participants accepted can now submit files via drop box regarding their chosen topic in the tab "Folder."
Step 3: Manage files (optional)
1 If there are files already submitted justclick on the tab "Folder" within yourtopic before opening a participant'sfolder.
2 It is possible to return files via returnboxes. Just select the folder of aparticipant already accepted in the tab"Folder" and click on "Upload file."

OpenOLAT 8.1 - User Manual
http://www.frentix.com - 10.4.2012 86
Creating Tests and QuestionnairesThis chapter explains how tests and questionnaires can be created. A step-by-step instruction will supportcourse authors by means of the following table to efficiently work with the test and questionnaire editor. Inaddition you will get information on how to embed tests and questionnaires in your course and how to archivegained results.
General Information
What is a Test? What is a Self-test?Tests are used to control achievements in a course. By means of a test you can examine your participants'knowledge at the beginning of your course, check it after each completed module or let course participantstake tests electronically.
Tests are created with the OpenOLAT test editor. You can determine a test's duration, its type of questions aswell as other configurations. It is also possible to import tests in the IMS QTI format (version 1.2).
Tests are created as independent learning resources before embedding them in a course. You decide if a testshould be a self-test for practice purposes or a real test for examination purposes. In the first case you maywant to use the course element "Self-test" while in the second case you may prefer the course element "Test."Results of self-tests are stored anonymously; test results are stored personalized.
What is a Questionnaire?Questionnaires are used for online evaluations during a course. By means of a questionnaire you can find outmore about what your participants expect from your course at its beginning. You can then process your resultsby means of statistic methods before evaluating the success of your course at its end.
Questionnaires are created with the OpenOLAT questionnaire editor. You can determine a questionnaire'slength, its type of questions and make further configurations. It is also possible to import questionnaires in theIMS QTI format (version 1.2).
Questionnaires are created as independent learning resources before embedding them by means of the courseelement "Questionnaire." OpenOLAT guarantees that each course participant can fill in such questionnairesonly once. Results will be stored anonymously.
If you want to receive personalized data you can use a cloze as first question, asking the participant toindicate his name. However, it is not possible to check if your participants do what they are asked for.
Comparison: Test, Self-test and QuestionnaireThe following table exemplifies the difference between test, self-test, and questionnaire:
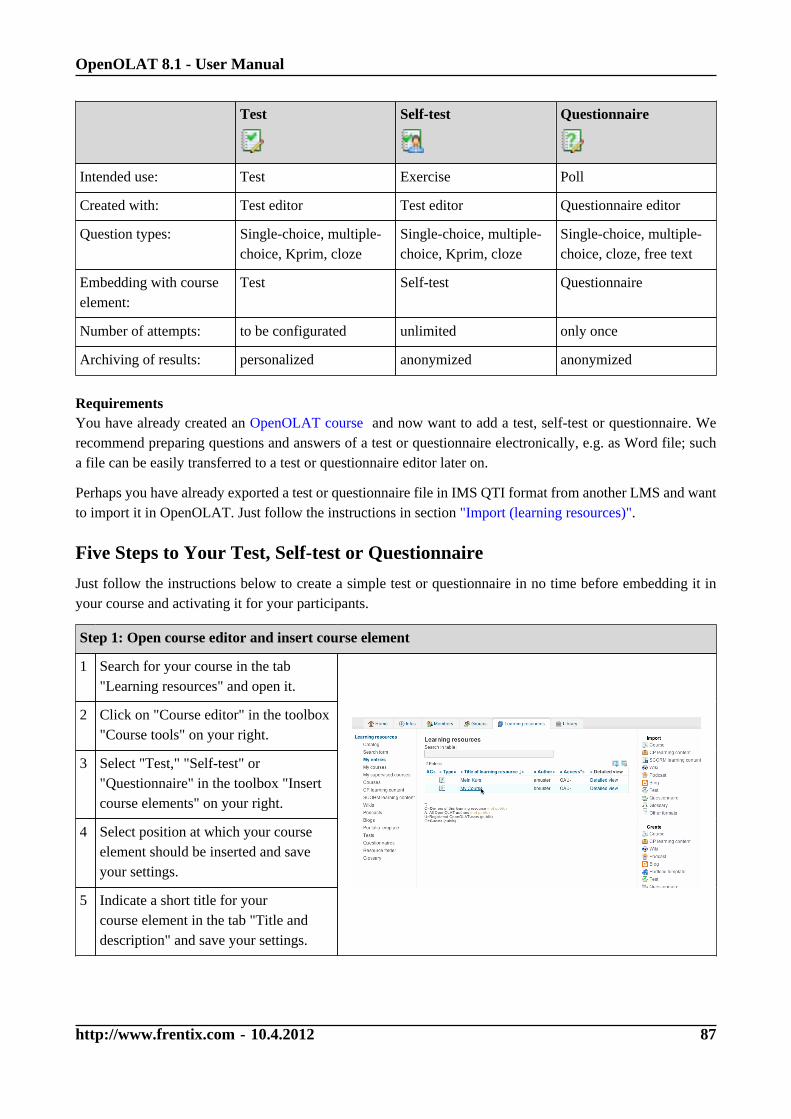
OpenOLAT 8.1 - User Manual
http://www.frentix.com - 10.4.2012 87
Test Self-test Questionnaire
Intended use: Test Exercise Poll
Created with: Test editor Test editor Questionnaire editor
Question types: Single-choice, multiple-choice, Kprim, cloze
Single-choice, multiple-choice, Kprim, cloze
Single-choice, multiple-choice, cloze, free text
Embedding with courseelement:
Test Self-test Questionnaire
Number of attempts: to be configurated unlimited only once
Archiving of results: personalized anonymized anonymized
RequirementsYou have already created an OpenOLAT course and now want to add a test, self-test or questionnaire. Werecommend preparing questions and answers of a test or questionnaire electronically, e.g. as Word file; sucha file can be easily transferred to a test or questionnaire editor later on.
Perhaps you have already exported a test or questionnaire file in IMS QTI format from another LMS and wantto import it in OpenOLAT. Just follow the instructions in section "Import (learning resources)".
Five Steps to Your Test, Self-test or Questionnaire
Just follow the instructions below to create a simple test or questionnaire in no time before embedding it inyour course and activating it for your participants.
Step 1: Open course editor and insert course element
1 Search for your course in the tab"Learning resources" and open it.
2 Click on "Course editor" in the toolbox"Course tools" on your right.
3 Select "Test," "Self-test" or"Questionnaire" in the toolbox "Insertcourse elements" on your right.
4 Select position at which your courseelement should be inserted and saveyour settings.
5 Indicate a short title for yourcourse element in the tab "Title anddescription" and save your settings.

OpenOLAT 8.1 - User Manual
http://www.frentix.com - 10.4.2012 88
Step 2: Create a test or questionnaire file
1 Click on "Choose, create or importfile" in the tab "Configuration test/self-test/questionnaire."
2 Click on "Create."
3 Indicate title and description of yourtest and save your settings.
4 Click on "Next."
Your file is now created and consists of one section as well as one single-choice question by default. If thereare no such questions in your test you can delete that default single-choice question as soon as you have addedany other question.
Step 3: Edit test or questionnaire and add new question (e.g. multiple choice)
1 Click on "Edit."
2 Select your type of question (e.g.multiple choice) in the toolbox "Add"on your right.
3 Select position at which your newquestion should be inserted and saveyour settings.
4 Indicate title and configuration(optional) in the tab "Meta data" andsave your settings.
5 Click on the pencil icon next to"New question" in the tab "Question/answers" before editing your questionand saving your settings.
6 Select "Add new answer" several times(number depending on possibilities)before editing your answers and savingyour settings.
7 In your test check all answer optionsthat are correct and save your settings.
8 Modify assessment method (optional)and save your settings.
9 Indicate feedback in the next tab(optional) and save your settings.
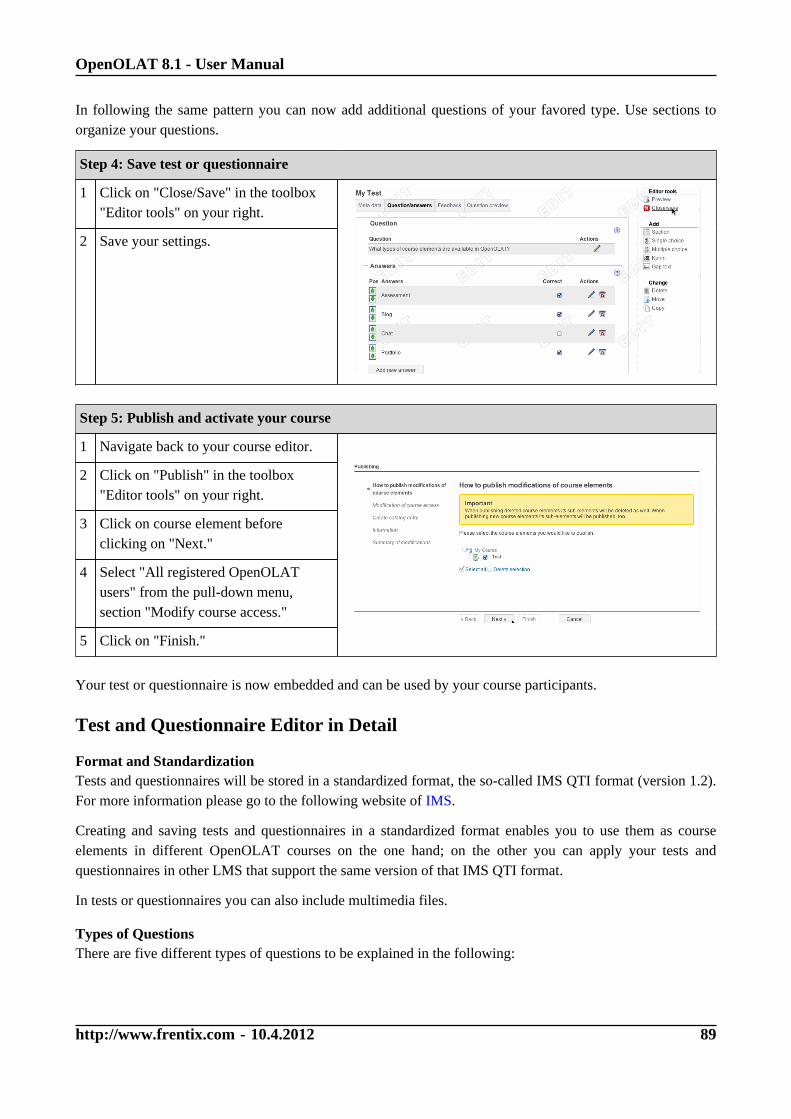
OpenOLAT 8.1 - User Manual
http://www.frentix.com - 10.4.2012 89
In following the same pattern you can now add additional questions of your favored type. Use sections toorganize your questions.
Step 4: Save test or questionnaire
1 Click on "Close/Save" in the toolbox"Editor tools" on your right.
2 Save your settings.
Step 5: Publish and activate your course
1 Navigate back to your course editor.
2 Click on "Publish" in the toolbox"Editor tools" on your right.
3 Click on course element beforeclicking on "Next."
4 Select "All registered OpenOLATusers" from the pull-down menu,section "Modify course access."
5 Click on "Finish."
Your test or questionnaire is now embedded and can be used by your course participants.
Test and Questionnaire Editor in Detail
Format and StandardizationTests and questionnaires will be stored in a standardized format, the so-called IMS QTI format (version 1.2).For more information please go to the following website of IMS.
Creating and saving tests and questionnaires in a standardized format enables you to use them as courseelements in different OpenOLAT courses on the one hand; on the other you can apply your tests andquestionnaires in other LMS that support the same version of that IMS QTI format.
In tests or questionnaires you can also include multimedia files.
Types of QuestionsThere are five different types of questions to be explained in the following:
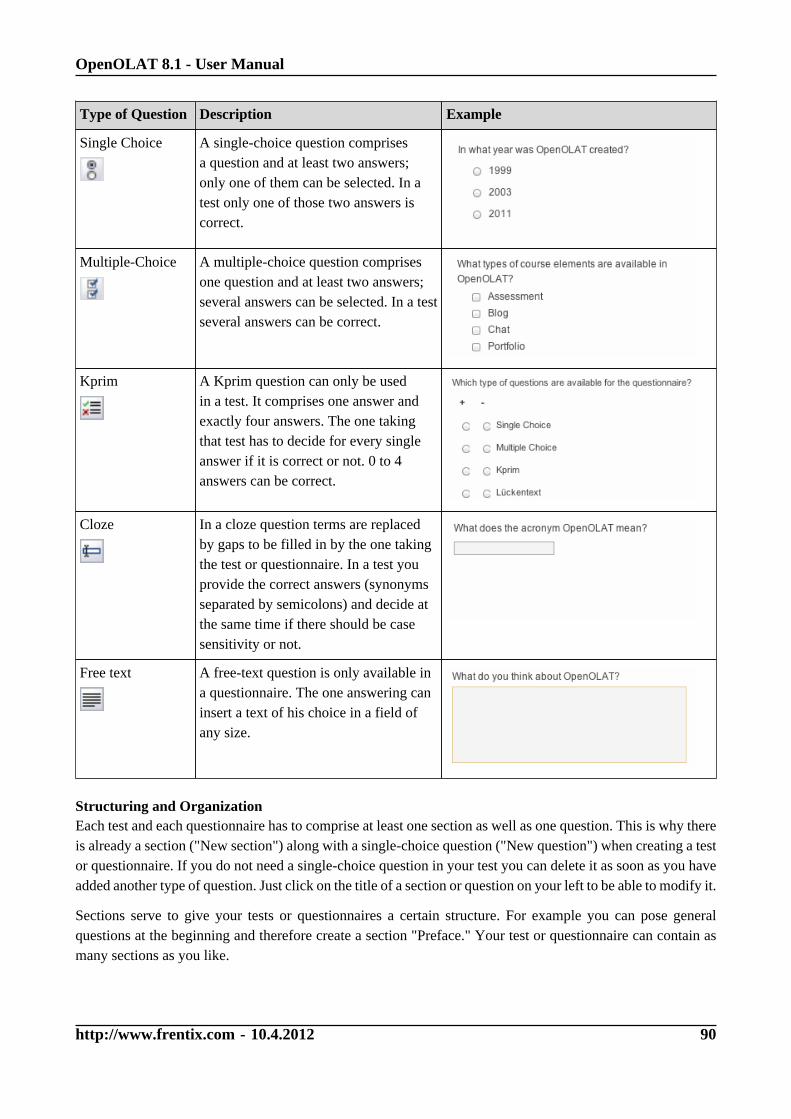
OpenOLAT 8.1 - User Manual
http://www.frentix.com - 10.4.2012 90
Type of Question Description Example
Single Choice A single-choice question comprisesa question and at least two answers;only one of them can be selected. In atest only one of those two answers iscorrect.
Multiple-Choice A multiple-choice question comprisesone question and at least two answers;several answers can be selected. In a testseveral answers can be correct.
Kprim A Kprim question can only be usedin a test. It comprises one answer andexactly four answers. The one takingthat test has to decide for every singleanswer if it is correct or not. 0 to 4answers can be correct.
Cloze In a cloze question terms are replacedby gaps to be filled in by the one takingthe test or questionnaire. In a test youprovide the correct answers (synonymsseparated by semicolons) and decide atthe same time if there should be casesensitivity or not.
Free text A free-text question is only available ina questionnaire. The one answering caninsert a text of his choice in a field ofany size.
Structuring and OrganizationEach test and each questionnaire has to comprise at least one section as well as one question. This is why thereis already a section ("New section") along with a single-choice question ("New question") when creating a testor questionnaire. If you do not need a single-choice question in your test you can delete it as soon as you haveadded another type of question. Just click on the title of a section or question on your left to be able to modify it.
Sections serve to give your tests or questionnaires a certain structure. For example you can pose generalquestions at the beginning and therefore create a section "Preface." Your test or questionnaire can contain asmany sections as you like.

OpenOLAT 8.1 - User Manual
http://www.frentix.com - 10.4.2012 91
If you want to add a new section or question just select "Add" in the tool box on your right before adding thenew element at a position of your choice. It is possible to delete or move sections or questions anytime. Youcan even copy questions.
It is advisable to copy questions if there are questions with the same possibilities to answer, e.g. ifseveral questions could be answered by selecting a value between 1 and 5.
Display Options and ConfigurationFurther options regarding tests and questionnaires can be set at different levels:
On the test level you determine if a test should be taken within a certain period of time. If a test has some timelimit this can be recognized by the hourglass icon and the display of total time and time ending.
Options regarding feedback and solutions will be explained in the section "Hints to Solutions and Feedback ina Test". Further information regarding scores can be found in "Scores in Tests".
On the section level you determine if there should be a time limit when working on a section, how manyquestions from that section should appear in your test or questionnaire, and if the sequence of your questionsshould be at random or not.
On the question level you will find more information on display and configuration options in the tab "Metadata." Here you can also give hints and/or the correct solution (further described in the section "Hints toSolutions and Feedback in a Test".
On the course level there are further display options. When embedding your test or questionnaire in a courseyou will find these options in the tab "Test configuration" or "Questionnaire configuration." You can limit thenumber of attempts to answer a question and determine how often a user may try and take a test. The maximumto be specified is 20. If you specify for the first successful attempt to be valid though, a user is no longer ableto improve his test results with more tests. As long as the user fails to pass the test, he can try as often asspecified before. In order to prohibit a user to access other OpenOLAT functions during a test, you can use theoption "Display only module, hide LMS". OpenOLAT will be hidden during the test and only be visible againafter closing or completing the test. If you plan to forbid the menu navigation, one question after the other willautomatically appear; the person taking your test will not be able to navigate to another question. To displaythe menu navigation is still possible; just use the option "Display menu navigation." You can also allow usersto make personal notes during a test. However, after that test those notes will no longer be available. Whenterminating a test no results will be saved; when pausing all answers sent so far will be saved.
If you pause in a test with time limit it can very well be that your time is up when trying to continue.
If persons taking your test should see their results immediately after completing it select the option "Showresults after completing a test." Results can also be displayed on your course's homepage. When choosing thisoption you can additionally indicate when those results should be made public. You can further determine howdetailed your display should be.
Scores in TestsThe minimum score to pass a test can be determined in the test editor on top-level. This score is only relevantif your test is included in a course with the course element "Test."

OpenOLAT 8.1 - User Manual
http://www.frentix.com - 10.4.2012 92
On the question level you determine how many points can be received with each question. The correct answerto a single-choice question will gain all points; giving a wrong answer will gain 0 points. Indicate the score toa certain question in the field "Score" of the tab "Question/answers."
Using a multiple-choice question means either scoring if all answers are correct or if one single correct answeralready counts. First decide on a method of assessment in the tab "Question/answers" and save your settings.Then indicate the score for all correct answers or the score for each correct answer (right next to your answers).
The assessment of Kprim questions is preset. Three correct answers always gain half the score, four correctanswers mean full score. Indicate your maximum score in the tab "Question/answers."
If there are several possible answers to your cloze question separate them by semicolons. You can choosebetween two different assessment methods: either scoring per all correct answers or scoring per one correctanswer. First decide on your method in the tab "Question/answers" and save your settings. Then either indicateyour score for all correct answers or for each single answer (right next to the cloze).
Hints to Solutions and Feedback in a TestYou can provide feedback immediately after having received a test result. Hints to solutions and/or the correctsolution will be displayed if the question has not been answered correctly. You determine in the tab "Metadata" if hints and/or correct solutions should be displayed. Just indicate your hints and/or correct answers inthe corresponding fields.
By displaying feedback you can provide a separate feedback to each of your answers; this feedback will begiven immediately after having sent an answer. You can indicate your feedback in the tab "Feedback."
The option "Feedback (wrong answer)" is not effective if in a multiple-choice question no wronganswers have been selected but not all correct answers have been checked.
Often feedback and hints to solutions are used in a self-test to give persons a helping hand in findingthe correct answers.
Source Code of TestsParticipants will not be able to see in the test's or self-test's source code which solutions are right or wrong;answers will be sent to the OpenOLAT server before being analyzed.
Modifications of Embedded Tests or QuestionnairesAs soon as a test or questionnaire is embedded in a course you have only limited possibility to makemodifications. For more information please go to "Using Editors During Course Operation".
Archiving Results of Tests and Questionnaires
As soon as a course participant has completed a test, self-test or questionnaire and you have conductedsome data archiving you will be able to see its results. Results of self-tests and questionnaires will be storedanonymously. After archiving you will dispose of the following data: persons (anonymized by sequentialnumber), questions dealt with, given answers, score (self-test). It is the same with test results but all data willbe stored personalized (first name, last name, user name).

OpenOLAT 8.1 - User Manual
http://www.frentix.com - 10.4.2012 93
Select the link "Data archiving" in the course view from the tool box "Course tools." On your left go to "Testand questionnaire." Start archiving and follow the instructions. Results will be available as Excel file that canalso be downloaded.

OpenOLAT 8.1 - User Manual
http://www.frentix.com - 10.4.2012 94
Course OperationYou have granted access to your course; course participants are already working on your learning content. Thischapter explains which tools can be used by course authors during course operation, which additional featuresare at their disposal and how they can archive course activities.
Using Editors During Course Operation
Modifications During Course OperationMake modifications during course operation as usual by means of the course editor. You can delete, move, addor copy course elements. As long as you do not publish your modifications they will not affect your ongoingcourse.
You decide when your modifications should be presented. When trying to publish you will get a message onhow many users are working on your course at that very moment.
All users working on your course at that moment will have to restart the course. Test results or forumcontributions that have not been saved will be lost! If there are users of your course and it is possible topublish your modifications at a later date we recommend canceling the publishing process and tryingagain later.
Most users usually work on courses from Sunday till Friday between 10 a.m. and 10 p.m. It wouldtherefore be best to publish courses on Saturday morning.
Modifications in Tests, Self-tests and QuestionnairesAs soon as a test, self-test or questionnaire is embedded in a course it is only possible to correct typing errors.Open your test or questionnaire in the editor und make your modifications.
Embedded tests, self-tests, and questionnaires cannot be modified further. Let us assume that you could addquestions or check other answers as correct; then not all participants would have the same conditions anylonger. In addition results could have been saved that would no longer be assignable to that new version ofyour test or questionnaire file. This is why editing embedded tests, self-tests and questionnaires is restricted.
If you want to add a question to your test or realize that you have checked a wrong answer as correctyou can copy and save your test in learning resources. In the course editor you can then replace yourfile in that test course element before embedding that new test file. If there are some results alreadyexisting they will be stored in your personal folder; you can then decide if OpenOLAT should notifythose course participants that have already taken that test of your modifications. Now you can edityour new test file.
Using Course Tools
In addition to the course editor there are a number of other tools that can be started in the tool box "Coursetools" in your course on your top right.

OpenOLAT 8.1 - User Manual
http://www.frentix.com - 10.4.2012 95
Members managementWould you like to know who the members of your course are, and what rights they have? The membermanagement provides an overview of all users, sorted by rights - owner, coaches and participants.
When opening the member management, you get a list of all owners of your course. By using the sections onthe left, you can navigate between the different rights. You can view the respective members, manage existingand add new.
"Participants" enlists all users with participant rights to this course as well as all users that are members oflearning groups of the course. Should you be working with bookings, olat users that booked the course canalso be found here.
"Bookings" lists all bookings for this course, sorted by status.
Group ManagementDo you want to see who has enrolled in your learning group? Or should there be another group for a plannedexcursion? All modifications regarding existing groups or groups to be created have to be made in the groupmanagement. There you will find an overview of all groups as well as group members.
When opening the group management you will get an overview of the number of learning groups, learningareas and group members in your course. By means of the sections on your left you will get to a list containingall groups. Using the option "Edit" enables you to modify groups and learning areas.
How to create and configure learning groups and how to administer group members has been described in thesection "Learning Groups and Learning Areas."
All course owners have access to the group management as well as members of a right group that hold rightsto use that group management. Tutors are only allowed to modify groups they have been assigned to.
Rights ManagementDo you want certain users to have the right to use course tools but you do not want to provide them with ownerrights? In the rights management you can create right groups and grant access to certain course tools. How tocreate and configure such groups is further described in the section "Right groups."
Tutors have the permission to use assessment tools in learning groups. It is not necessary to create a right groupfor that purpose. However, tutors can only assess members of groups they have been assigned to.
All course owners have access to the rights management.
Data ArchivingBy means of data archiving you upload files connected to your course in your personal folder. All archived datawill be stored in your personal folder, section "Private," sub-folder "Archive" by using course titles. You canarchive results of tests, self-tests or questionnaires, drop boxes containing task course elements, and log files.
Those archived files of tests, etc. will be stored in Excel format. You will dispose of information on whena certain user has taken your test, how this user has replied to your questions and what score this user hasachieved. Archived self-tests and questionnaires will comprise anonymized user data.
Course results will also be stored in Excel format. In addition to results of tests, assessments and tasks also logfiles will be archived. For further information please go to "Record of Course Activities".
OpenOLAT 8.1 - User Manual
http://www.frentix.com - 10.4.2012 96
When archiving tasks and solutions all attempts loaded into the drop box will be zipped. Contributions inforums or file dialogs will be archived in the .rtf format. Attached files as well as the content of folders willbe added. Wiki pages will be zipped along with all uploaded files.
When deleting a course all course data (but not the course elements!) will be stored in your personalfolder automatically.
All course owners have access to the data archiving tool as well as members of the respective right group.
Assessment ToolIn order to assess the course elements "Task" or "Assessment" and to assess tests manually you can disposeof the assessment tool.
Subscribe to the notification service to be informed on new test results in your drop box.
You can assess according to users, groups or according to your course's structure. In the group assessment youcan have either all assessable course elements on display or only those to be assessed by yourself. By clickingon "Display" only those elements will appear that are accessible for your group members.
When assessing tasks you should first download those results that your course participants have put in thedrop box. Then fill in the assessment form. How to assess a task (e.g. passed/failed or using a score) can bedefined in the configuration of the course element "Task." Assessment options cannot be modified within theassessment tool.
If there are a lot of files in your drop box it is advisable to download all of those files at once by meansof the data archiving tool.
To assess the course element "Assessment" just fill in the assessment form.
Tests embedded in courses will be assessed automatically but you can have a look at different attempts in theassessment tool as well as scores achieved. You can also modify the number of attempts manually or add apersonal comment.
By means of the bulk assessment you can assess several users at once. Just follow the instructions to learn howto use such a bulk assessment.
All owners of courses have access to the assessment tool as well as members of a corresponding right groupand, last but not least, all tutors. Owners may assess all course participants, tutors only those they have beenassigned to.
StatisticsThis course function provides you with statistics regarding access to your OpenOLAT course. All courseowners have access to those statistics. You will receive data in the form of tables as well as in the form ofcharts. Table data can be downloaded as Excel files (e.g. for further processing); charts can be downloadedas png files to your computer.
Relevant for your total of course accesses are user clicks on a single course element; however, clicks on thiselement's content will not be counted. If a user selects the Wiki from course navigation this click will count;it will not count when clicking on a link within that Wiki.

OpenOLAT 8.1 - User Manual
http://www.frentix.com - 10.4.2012 97
Statistics can be created per hour, per day, per weekday, per week, sorted by organization (e.g. University ofZurich), by type of organization (e.g. university), by study level (e.g. bachelor), as well as by study field (e.g.Psychology). Furthermore you can choose a certain period of time per day and per week during which anycourse access should be displayed in your statistics.
Using Additional Course Features
In addition to the course editor and course tools there are other features at your disposal. A corresponding linkto those course features can be found in your course on your right in the section "General information."
Not all course features are generally active. If you cannot see a certain link to such a course feature ithas to be activated first (cp. the descriptions in the following sub-chapters).
Course CalendarEach course has its own course calendar to be able to administer course events. Only course owners have thewrite permission regarding that calendar. Course participants only have the permission to read; they cannotcreate new events or edit existing ones.
You can also link events to a certain course element. Just select the corresponding course element in the tab"Link" when creating or editing an event.
An example for such a link is to combine a certain deadline with the relevant course element "Task."
When subscribing to a course calendar that calendar will be copied to the calendar list of your personal calendar;course events will be displayed there for you.
In the course calendar there will also be events regarding learning groups if you are member of such a group.In the group management you can determine write permissions and visibility in learning group calendars.
If you do not want to use a course calendar you can deactivate it in the detailed view of your course; just clickon "Modify settings" in the tab "Calendar."
Course ChatBy default there is a chat room for each course, the so-called course chat. It can be used as informal platform toexchange information or as forum for experts; course authors can determine a certain time to answer questionsof their course participants.
Whenever there appears a letter icon next to the course chat link there are new messages waiting in the chatroom.
When entering the chat room your name will not be displayed. Only if you select the option "Show user namein chat room" your name will be on display.
If you do not want to offer a course chat you can deactivate it in the detailed view of your course by selecting"Modify settings" in the tab "Course chat."
GlossaryA glossary serves to explain terms to be found in your course. Texts of a course will be searched for glossaryterms; results will be marked accordingly. When moving the cursor over such a term its definition will bedisplayed.

OpenOLAT 8.1 - User Manual
http://www.frentix.com - 10.4.2012 98
If you want to use such a glossary in your course you have to create one first in learning resources. Acorresponding link can be found on your right in the tool box "Create." In the tab "Term and synonyms" youcan determine the technical terms to be explained as well as these terms' synonyms. In the tab "Flexions" youcan also identify flexions of a term if a "Morphologic service" is available. Course participants will not only beable to see a term's definition when moving the cursor over that term (e.g. referendum) but also when movingit over that term's flexions (e.g. referendums, referendum's). In the tab "Definition" you can finally commenton these technical terms.
After creating your glossary open the detailed view of your course and select that glossary in the tab "Glossary,"section "Modify settings." In your course there will be a link to that glossary; course participants will be ableto activate or deactivate it.
The alphabetical index of the glossary can be deactivated in the section "Alphabetical index" in the detailedview of your glossary. The section "Write permissions" allows you to activate write permissions for all systemusers, thus creating a collaborative glossary.
In order to allow only course participants to add or edit such glossary terms, disable the write persmissions forall users, create a corresponding right group and allow that group to use the glossary tool.
If you do not need a glossary anymore or if you want to use another one you can modify your settings inthe detailed view of your course via "Modify settings" in the tab "Glossary." Per course only one glossary isallowed.
Evidence of AchievementAn evidence of achievement is the confirmation of an efficiency control and can include taken tests or submittedand assessed tasks. If you want to use such evidences in your course open the detailed view of your course andselect this option in the tab "Evidence of achievement," section "Modify settings."
The according link will only appear in your course if there is also an assessable course element. This link cannotbe operated as long as course participants have not taken a test or the assessment of a task is still lacking.
If you do not want to offer evidences of achievement anymore you can deactivate this option in the detailedview of your course in the tab "Evidence of achievement," section "Modify settings."
Evidences already existing will then no longer be visible. As soon as you offer this option anew yourparticipants can dispose of their evidences along with new data. If you choose to delete a course thatcontains evidences of achievement your users will still be able to see their own evidences.
Record of Course Activities
OpenOLAT records course activities of participants and authors in so-called log files. By using the dataarchiving tool you can download those log files to your personal folder.
There are two sorts of log files. The administrator log file records personalized data of course authors. In theuser log file activities of course participants will appear. User data in the user log file will be anonymized byusing a sequential number generated randomly. This number persists throughout the course. Thus it is possibleto observe activities of participant X in course Y but you will not be able to compare these data with courseZ since your participant will get another number in course Z. How detailed data should be stored in log files

OpenOLAT 8.1 - User Manual
http://www.frentix.com - 10.4.2012 99
can be determined in the detailed view of your course in the tab "Log files," section "Modify settings." Openthe context-sensitive Help in that tab and follow the according link if you want to learn more about availablelog file entries.
To analyze course activities it is necessary to correctly set up the data recording when creating a newOpenOLAT course. Click on "Modify settings" in the detailed view of your course before selectingthe tab "Log files." Then choose the value "Detailed (INFO + FINE)" in the section "User log file."The preset option "Normal (INFO)" only records course visits but not visits on every single page.Modifying these settings will be effective immediately.
Options to analyze log files graphically will be further described in the section "Statistics".

OpenOLAT 8.1 - User Manual
http://www.frentix.com - 10.4.2012 100
Supported TechnologiesThis chapter contains several instructions regarding technologies that can be useful when working withOpenOLAT. The following is meant for OpenOLAT authors who frequently use this software.
First you will find further information here on eLML, a means to create e-learning content. Secondly youwill get instructions regarding the use of WebDAV to make file transfer easier from your local computer toOpenOLAT folders. In addition you will learn more about using external chat clients to be able to record chatprotocols.
Using eLML to Create E-Learning Content
eLML (eLesson Markup Language) is a markup language based on XML to create structured e-learning content.It is open-source and often used for large-scale e-learning projects in case you want to provide lessons indifferent output formats and in various LMS.
There are two essential reasons to use eLML when creating learning content: unity as well as flexible outputoptions. Lessons created in eLML are built uniformly since they follow structures consistent with educationalguidelines. However, these structures are flexible enough to allow for various learning scenarios.
In eLML data will strictly be separated from their representation which means that content is independent ofits layout. Thus modifications of contents are made only in one place. If a lesson is available in eLML formatit will be possible to transform it at the push of a button into different output formats such as (X)HTML forWeb, SCORM or IMS-Content-Packaging for LMS, PDF, Corporate Identities, etc.
For further information please go to the eLML web page.
Using WebDAV
WebDAV means "Web-based Distributed Authoring and Versioning;" it is an open standard to transfer filesonline. OpenOLAT supports this protocol and thus helps you to easily transfer files from your computer toOpenOLAT folders.
Advantages of WebDAVWithout WebDAV it is only possible to upload files in OpenOLAT by means of ordinary upload forms.You can either select each single file separately or several zipped files at once. With WebDAV you can use"Drag&Drop" on your computer (e.g. via the Windows Explorer) to copy single files as well as entire directoriesinto OpenOLAT folders.
WebDAV Compatible OpenOLAT FoldersVia WebDAV you can access the following OpenOLAT folders:
• Personal folder
• Folders of project groups, learning groups, right groups
• Storage folders of courses (course owners only)
• Resource folders (resource folder owners only)
RequirementsIn order to get access to a folder in OpenOLAT via WebDAV you need:
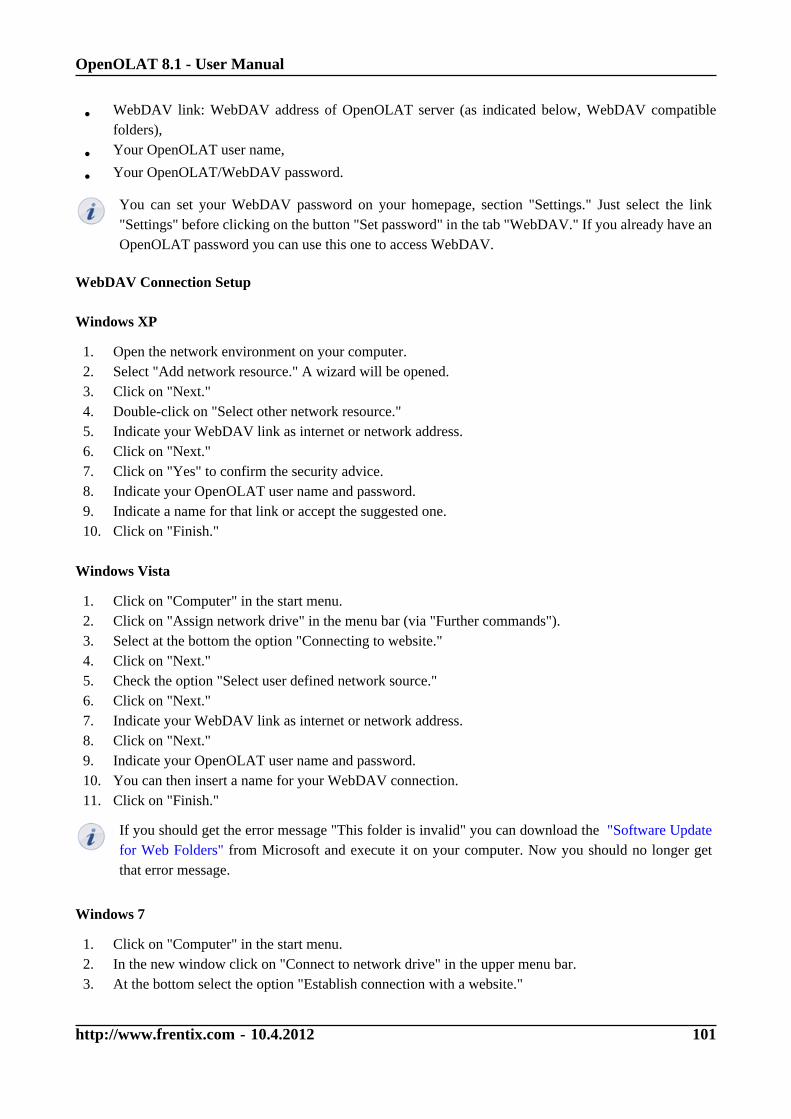
OpenOLAT 8.1 - User Manual
http://www.frentix.com - 10.4.2012 101
• WebDAV link: WebDAV address of OpenOLAT server (as indicated below, WebDAV compatiblefolders),
• Your OpenOLAT user name,
• Your OpenOLAT/WebDAV password.
You can set your WebDAV password on your homepage, section "Settings." Just select the link"Settings" before clicking on the button "Set password" in the tab "WebDAV." If you already have anOpenOLAT password you can use this one to access WebDAV.
WebDAV Connection Setup
Windows XP
1. Open the network environment on your computer.2. Select "Add network resource." A wizard will be opened.3. Click on "Next."4. Double-click on "Select other network resource."5. Indicate your WebDAV link as internet or network address.6. Click on "Next."7. Click on "Yes" to confirm the security advice.8. Indicate your OpenOLAT user name and password.9. Indicate a name for that link or accept the suggested one.10. Click on "Finish."
Windows Vista
1. Click on "Computer" in the start menu.2. Click on "Assign network drive" in the menu bar (via "Further commands").3. Select at the bottom the option "Connecting to website."4. Click on "Next."5. Check the option "Select user defined network source."6. Click on "Next."7. Indicate your WebDAV link as internet or network address.8. Click on "Next."9. Indicate your OpenOLAT user name and password.10. You can then insert a name for your WebDAV connection.11. Click on "Finish."
If you should get the error message "This folder is invalid" you can download the "Software Updatefor Web Folders" from Microsoft and execute it on your computer. Now you should no longer getthat error message.
Windows 7
1. Click on "Computer" in the start menu.2. In the new window click on "Connect to network drive" in the upper menu bar.3. At the bottom select the option "Establish connection with a website."

OpenOLAT 8.1 - User Manual
http://www.frentix.com - 10.4.2012 102
4. Click on "Next."5. Choose the option "Select user-defined network resource."6. Click on "Next."7. Indicate your WebDAV link as Internet or network address.8. Click on "Next."9. Now provide your OpenOLAT user name and password.10. You have also the possibility to choose a name for your WebDAV connection.11. Click on "Finish."
If you should get the error message "This folder is invalid" you can download the "Software Updatefor Web Folders" from Microsoft and execute it on your computer. Now you should no longer getthat error message.
Mac
1. Open the menu "Go to" in the Finder and then "Connecting to server..." Indicate your WebDAV link.2. Provide your OpenOLAT user name and password.3. Click on "OK."
LinuxThere are three possibilities for Linux users:
1. KDE: in the Konqueror indicate webdavs:// + user name + @ + WebDAV link. Example:webdavs://[email protected]/olat/webdav/.
2. Gnome: davs:// + user name + @ + WebDAV link. Example: davs://[email protected]/olat/webdav/.
3. FUSE: WebDAV directories can be mounted directly into the file system (also compatible to OSX; formore information please go to the FUSE website.
Folder StructureIf you have setup the connection successfully a directory will be opened on your computer containing thefollowing sub-directories:
• coursefolders: storage folder of all courses you own. This concerns most and for all users holding authorrights. All other users will only see an empty directory.
• groupfolders: project groups, learning groups, right groups you are enrolled in and have access tocorresponding folders.
• home: both of your personal folders (along with the sub-folders "private" and "public").
• sharedfolders: All resource folders you own. This concerns most and for all users holding author rights.All other users will find an empty directory.
Using External Chat Clients
Instead of OpenOLAT's chat features you can use other chat clients as well. Here you will learn more aboutusing the Psi Chat Client but you can also use other chat software (e.g. iChat).
Advantages of External Chat ClientsIn contrast to the OpenOLAT chat using external chat clients means

OpenOLAT 8.1 - User Manual
http://www.frentix.com - 10.4.2012 103
• recording chat protocols,
• chatting without OpenOLAT login,
• chatting even if the OpenOLAT chat is deactivated and
• knowing when your chat partner types a reply.
RequirementsWe recommend using the Psi Chat Client for free. Download its software from the Psi website and install it onyour computer. Mac users might want to use iChat as well.
Additional requirements:
• Chat server link: jabber. + address of your OpenOLAT server. Example:jabber.olat.uzh.ch,
• your OpenOLAT user name and
• your Instant Messaging password.
You will find your Instant-Messaging password on your homepage, section "Settings," in the tab"Instant Messaging."
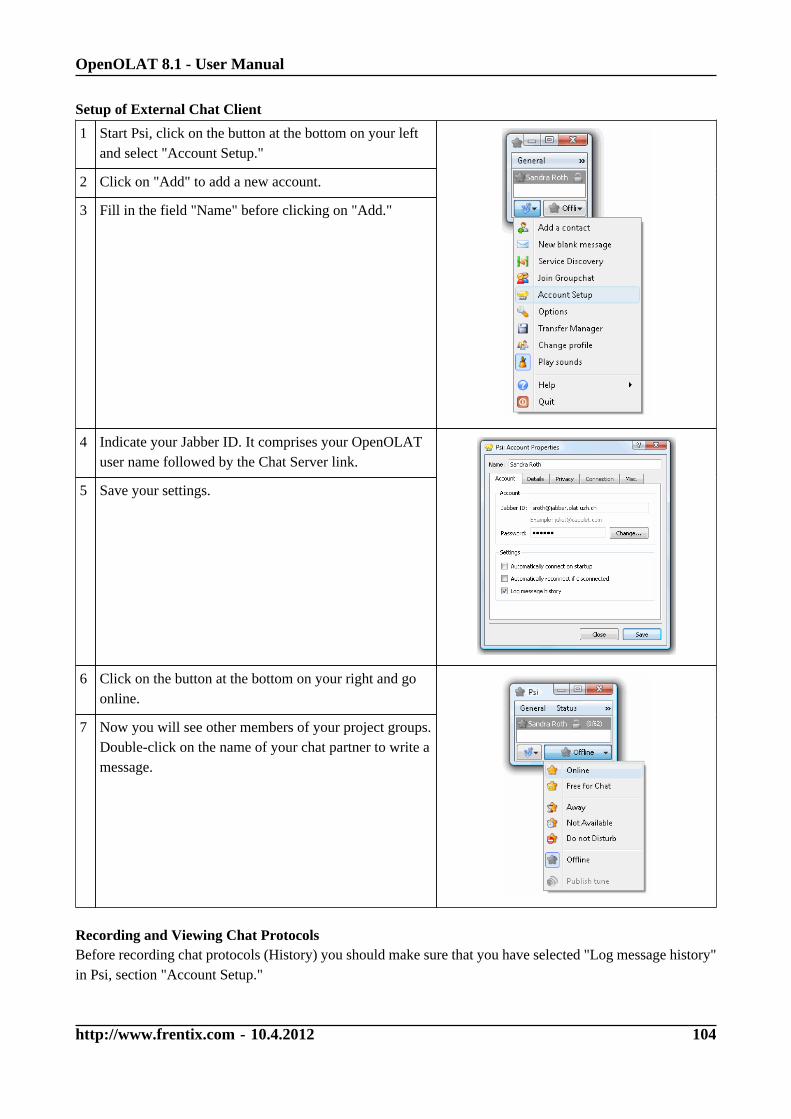
OpenOLAT 8.1 - User Manual
http://www.frentix.com - 10.4.2012 104
Setup of External Chat Client
1 Start Psi, click on the button at the bottom on your leftand select "Account Setup."
2 Click on "Add" to add a new account.
3 Fill in the field "Name" before clicking on "Add."
4 Indicate your Jabber ID. It comprises your OpenOLATuser name followed by the Chat Server link.
5 Save your settings.
6 Click on the button at the bottom on your right and goonline.
7 Now you will see other members of your project groups.Double-click on the name of your chat partner to write amessage.
Recording and Viewing Chat ProtocolsBefore recording chat protocols (History) you should make sure that you have selected "Log message history"in Psi, section "Account Setup."

OpenOLAT 8.1 - User Manual
http://www.frentix.com - 10.4.2012 105
There are two possibilities to view chat protocols:
1. Double-click on the name of your chat partner. Click on the button on your right above the input fieldand select "Message history."
2. All protocols will be stored on your computer via \PsiData\profiles\default\history. Open those protocols in a text editor to have a look at them.
Participating in a Course ChatIf you want to participate in a course chat by means of an external chat client just select in the menu on yourleft the link "Service Discovery" before choosing "Public Chatrooms." Double-click on a course, indicate a"Nickname" and enter the chat room by clicking on the button "Join."

OpenOLAT 8.1 - User Manual
http://www.frentix.com - 10.4.2012 106
Index
AAI attributes: 49Access: 47Accumulative folder: 12Administrator log file: 98Artefact: 12, 14, 36, 80Assessment (course element): 35, 54, 96Assessment tool: 54, 77, 96Assignment: 55Author rights: 6, 7, 26, 40Blog (learning resources): 24, 72Blog (course element): 34, 53, 72Blog (external): 74Booking method: 17, 44Bookings: 12, 95Bookmark: 11, 26, 28, 30Browser: 8Browser check: 8Bulk assessment: 96Calendar: 11Course calendar: 37, 37, 45, 59, 97Catalog: 25, 29, 43Chat: 10, 14, 102Chat protocols: 104Close (course): 29Cloze question: 90Collecting function: 62CP (Content Packaging): 23Context-sensitive Help: 5Course: 23, 30, 40, 94Course chat: 38, 44, 97, 105Course editor: 46, 94Course elements: 30, 46, 49Course preview: 61Course tools: 94Course view: 27CP learning content (course element): 51, 51CP editor: 63Data archiving: 92, 95Depending on assessment: 47Depending on attribute: 47Depending on date: 47Depending on group: 47
Detailed view: 27, 43Display (of course elements): 47Drop box: 36, 37, 55, 95, 96Editor tools: 46, 61eLML: 100E-mail: 37E-Mail (course element): 60E-Mail: 12Enrolment (course element): 18, 30, 57ePortfolio: 12, 79Event: 11Evidence of achievement: 12, 38, 45, 98Expert mode: 48Export: 28External chat client: 102Links (to courses): 27External page (course element): 51Feedback (in a test): 92File dialog (course element): 31, 54Folder (course element): 34, 52Font size: 10Forum (course element): 30, 54Free-text question: 90Full-text search: 14Glossary: 25, 38, 45, 97Group administrator: 7Group management: 18, 19, 20, 20, 95Guest access: 7, 8, 28Hints to solutions (in a test): 92Home: 10HTML editor: 50iCal: 37Import: 26, 28IMS: 23, 25, 51Instant Messaging password: 103Instant Messaging status: 15Kprim question: 90Languages: 10Layout: 44Learning area: 19Learning groups: 18, 57, 95Learning resource administrator: 7

OpenOLAT 8.1 - User Manual
http://www.frentix.com - 10.4.2012 107
Learning resources: 23Link list: 60Links (on course elements): 47Log files: 95, 98LTI page (course element): 51Members management: 95Quota: 12Multiple-choice question: 90My entries: 26Notes: 12, 38Notifications: 10, 11Notifications (course element): 59Open-source: 6, 7Owner: 7, 26, 27, 28, 29, 47, 60Participant list: 59Personal folder: 11, 100Person responsible for topics: 83Podcast (learning resources): 24, 69Podcast (course element): 34, 53, 69Podcast (external): 71Portfolio task: 12, 24, 36, 55, 79Profile: 10Project groups: 7, 16, 104Publish: 42, 61, 94QTI: 25, 56, 86, 87, 89Questionnaire (learning resources): 25, 86Questionnaire (course element): 32, 57Resource folder: 25, 44, 61, 100Return box: 36, 37, 55Right groups: 21, 95Rights management: 21, 95RSS: 34, 34Sample solution: 36, 55, 78SCORM learning content (learning resources): 23SCORM learning content (course element): 52Search mask: 26Section: 90Self-test (course element): 32, 56, 86Session: 8Session timeouts: 8Single-choice question: 90Single page (course element): 50Statistics: 96Storage folder: 50, 61, 100Structure (course element): 49
Subscribe: 11, 13, 31, 31, 33Subscription: 11System administrator: 7Tag: 12Task (course element): 35, 55, 75, 95, 96Test (learning resources): 25, 86Test (course element): 32, 56Test results: 24, 32, 92Time limit: 91Topic assignment (course element): 36, 58, 83Topic authors: 36, 58Tutor: 20, 35, 35, 36, 47, 55, 60, 95, 96Types of questions: 89User administrator: 7User log file: 98User name: 7, 38Visibility: 47Visiting card: 10, 12visiting card: 59vitero: 60Waiting list: 19, 58WebDAV: 11, 100WebDAV password: 101Website accessibility: 8Wiki (learning resources): 24, 66Wiki (course element): 32, 52, 66