openproject - vector controls€¦ · operating openproject. you must have knowledge about where...
TRANSCRIPT

OPENprojectShort Manual (Last updated 2016-03-11)
Version 1.0.1
OPENprojectShort Manual (Last updated 2016-03-11)
Version 1.0.1
EN

© Copyright 2016 DEOS control systems GmbHThis manual was prepared with the utmost care. DEOS control systems GmbH, however, is not liable for damage or losses resulting from or in connection with errors, ambiguities or other circumstances. Errors and changes excepted.
Note:We are pointing out that the software and hardware names and brand names of the respective companies used in this manual are generally protected by brand, trademark or patent laws.Ve
rsio
n O
PEN
proj
ect 1
.0.1
/ 11
.03.
2016
/ 2x
x / H
B_O
PEN
proj
ect_
Kurz
anle
itung
_EN
.indb
Technology for
intelligent buildings
DEOS control systems GmbHBirkenallee 7648432 RheineGermany
+49 5971 91133-20+49 5971 91133-2995
i
Table of Contents
1. Introduction .................................................................................................................................................. 2
About this manual ................................................................................................................................................ 2General icons and characters ........................................................................................................................... 2
System requirements ........................................................................................................................................... 3Operating systems ............................................................................................................................................ 3PC components / FUP XL ................................................................................................................................. 3
System description .............................................................................................................................................. 4
2. Commissioning 5
4. Updates 12
5. Managing and configuring projects / controllers 13
2
1. IntroductionAbout this manualSystem requirementsSystem description
About this manualGeneral icons and characters
This manual is intended for system administrators and provides support for installing, commissioning and operating OPENproject. You must have knowledge about where the program is used. You must have IT experience and also have knowledge of the FUP XL engineering tool, the macro library, the Windows operating system and control technology.
There are corresponding DEOS training programs offered that teach participants about the FUP XL engineering tool. We will be happy to answer any questions you may have.
The information provided in this document does not promise any technical features or intended applications of OPENproject and is thus nonbinding.
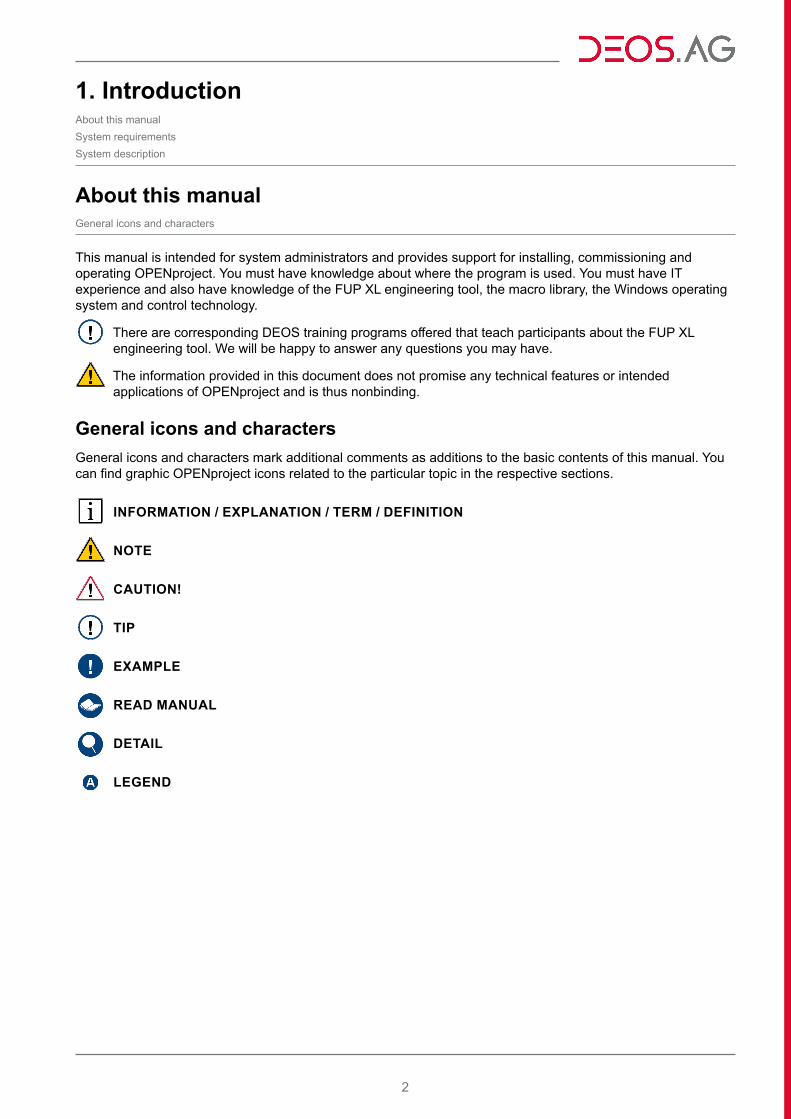
General icons and charactersGeneral icons and characters mark additional comments as additions to the basic contents of this manual. You can find graphic OPENproject icons related to the particular topic in the respective sections.
INFORMATION / EXPLANATION / TERM / DEFINITION
NOTE
CAUTION!
TIP
EXAMPLE
READ MANUAL
DETAIL
LEGEND
3
System requirementsOperating systemsPC components / FUP XL
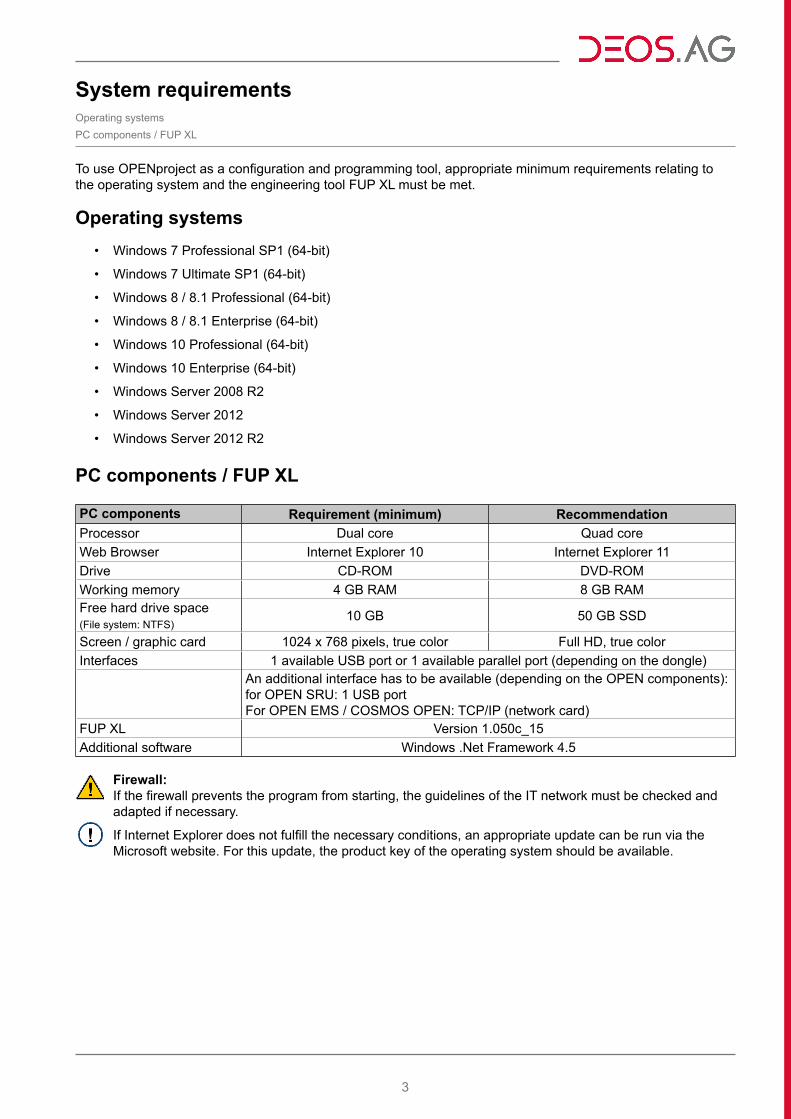
To use OPENproject as a configuration and programming tool, appropriate minimum requirements relating to the operating system and the engineering tool FUP XL must be met.
Operating systems• Windows 7 Professional SP1 (64-bit)
• Windows 7 Ultimate SP1 (64-bit)
• Windows 8 / 8.1 Professional (64-bit)
• Windows 8 / 8.1 Enterprise (64-bit)
• Windows 10 Professional (64-bit)
• Windows 10 Enterprise (64-bit)
• Windows Server 2008 R2
• Windows Server 2012
• Windows Server 2012 R2
PC components / FUP XL
PC components Requirement (minimum) RecommendationProcessor Dual core Quad coreWeb Browser Internet Explorer 10 Internet Explorer 11Drive CD-ROM DVD-ROMWorking memory 4 GB RAM 8 GB RAMFree hard drive space (File system: NTFS)
10 GB 50 GB SSD
Screen / graphic card 1024 x 768 pixels, true color Full HD, true colorInterfaces 1 available USB port or 1 available parallel port (depending on the dongle)
An additional interface has to be available (depending on the OPEN components):for OPEN SRU: 1 USB portFor OPEN EMS / COSMOS OPEN: TCP/IP (network card)
FUP XL Version 1.050c_15Additional software Windows .Net Framework 4.5
Firewall:If the firewall prevents the program from starting, the guidelines of the IT network must be checked and adapted if necessary.
If Internet Explorer does not fulfill the necessary conditions, an appropriate update can be run via the Microsoft website. For this update, the product key of the operating system should be available.
4
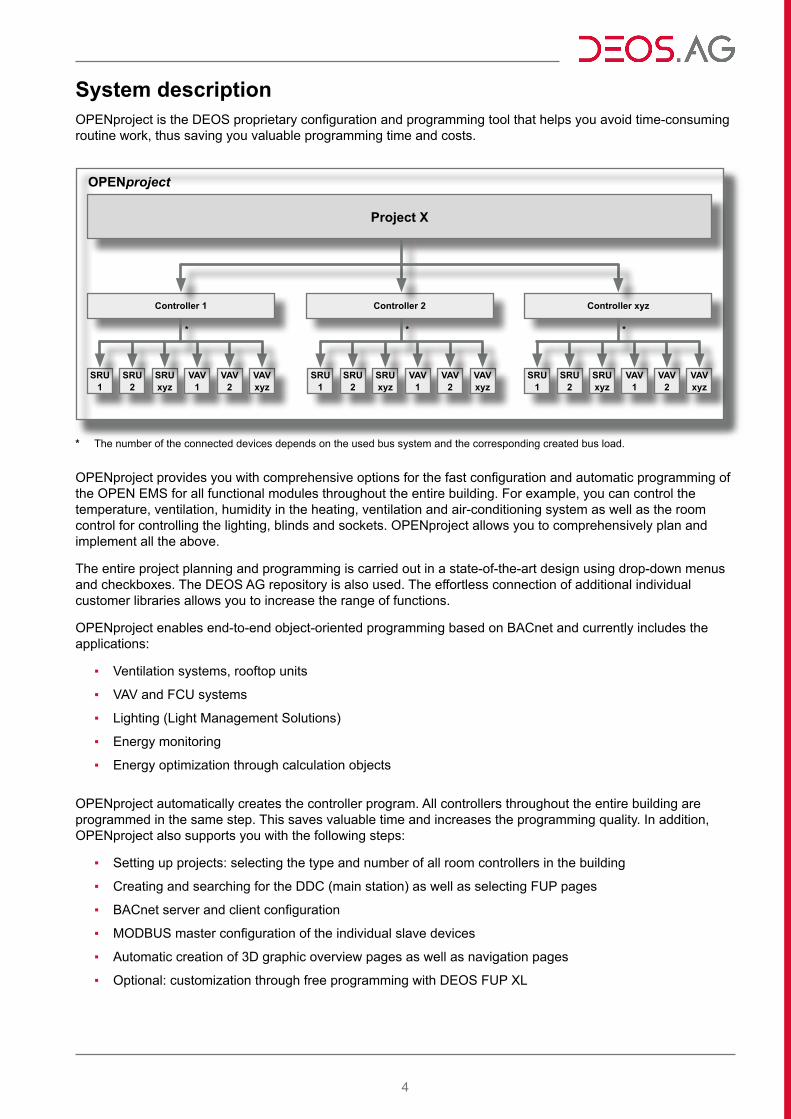
System descriptionOPENproject is the DEOS proprietary configuration and programming tool that helps you avoid time-consuming routine work, thus saving you valuable programming time and costs.
OPENproject
Controller xyzController 2
SRU 1
SRU 2
SRU xyz
VAV 1
VAV 2
VAV xyz
Project X
Controller 1
SRU 1
SRU 2
SRU xyz
VAV 1
VAV 2
VAV xyz
SRU 1
SRU 2
SRU xyz
VAV 1
VAV 2
VAV xyz
* The number of the connected devices depends on the used bus system and the corresponding created bus load.
OPENproject provides you with comprehensive options for the fast configuration and automatic programming of the OPEN EMS for all functional modules throughout the entire building. For example, you can control the temperature, ventilation, humidity in the heating, ventilation and air-conditioning system as well as the room control for controlling the lighting, blinds and sockets. OPENproject allows you to comprehensively plan and implement all the above.
The entire project planning and programming is carried out in a state-of-the-art design using drop-down menus and checkboxes. The DEOS AG repository is also used. The effortless connection of additional individual customer libraries allows you to increase the range of functions.
OPENproject enables end-to-end object-oriented programming based on BACnet and currently includes the applications:
▪ Ventilation systems, rooftop units
▪ VAV and FCU systems
▪ Lighting (Light Management Solutions)
▪ Energy monitoring
▪ Energy optimization through calculation objects
OPENproject automatically creates the controller program. All controllers throughout the entire building are programmed in the same step. This saves valuable time and increases the programming quality. In addition, OPENproject also supports you with the following steps:
▪ Setting up projects: selecting the type and number of all room controllers in the building
▪ Creating and searching for the DDC (main station) as well as selecting FUP pages
▪ BACnet server and client configuration
▪ MODBUS master configuration of the individual slave devices
▪ Automatic creation of 3D graphic overview pages as well as navigation pages
▪ Optional: customization through free programming with DEOS FUP XL
* * *
5
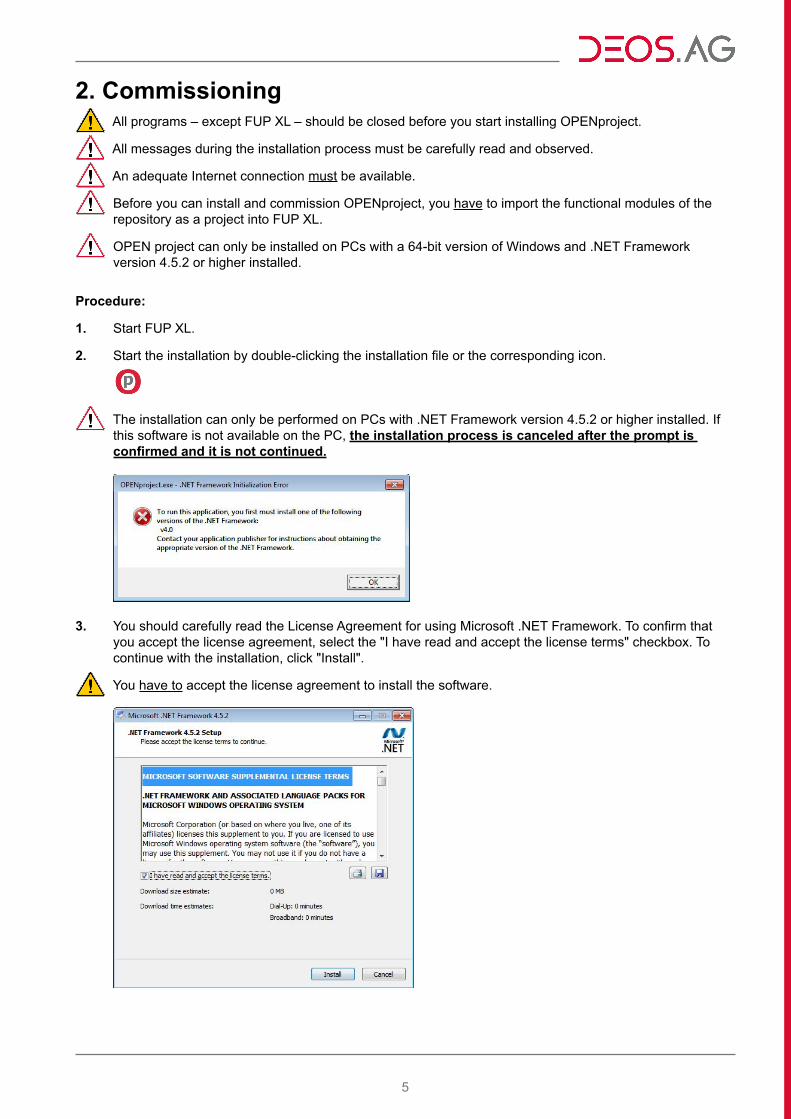
2. CommissioningAll programs – except FUP XL – should be closed before you start installing OPENproject.
All messages during the installation process must be carefully read and observed.
An adequate Internet connection must be available.
Before you can install and commission OPENproject, you have to import the functional modules of the repository as a project into FUP XL.
OPEN project can only be installed on PCs with a 64-bit version of Windows and .NET Framework version 4.5.2 or higher installed.
Procedure:
1. Start FUP XL.
2. Start the installation by double-clicking the installation file or the corresponding icon.
The installation can only be performed on PCs with .NET Framework version 4.5.2 or higher installed. If this software is not available on the PC, the installation process is canceled after the prompt is confirmed and it is not continued.
3. You should carefully read the License Agreement for using Microsoft .NET Framework. To confirm that you accept the license agreement, select the "I have read and accept the license terms" checkbox. To continue with the installation, click "Install".
You have to accept the license agreement to install the software.
6
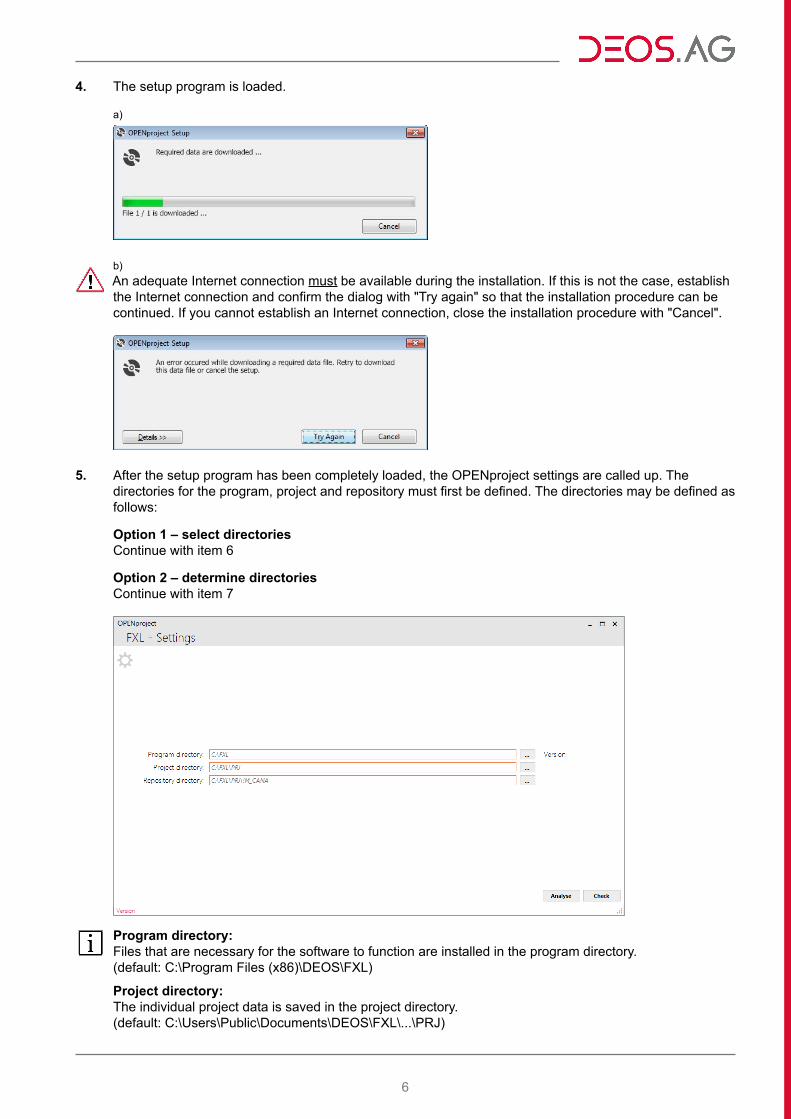
4. The setup program is loaded.
a)
b)An adequate Internet connection must be available during the installation. If this is not the case, establish the Internet connection and confirm the dialog with "Try again" so that the installation procedure can be continued. If you cannot establish an Internet connection, close the installation procedure with "Cancel".
5. After the setup program has been completely loaded, the OPENproject settings are called up. The directories for the program, project and repository must first be defined. The directories may be defined as follows:
Option 1 – select directoriesContinue with item 6
Option 2 – determine directoriesContinue with item 7
Program directory:Files that are necessary for the software to function are installed in the program directory.(default: C:\Program Files (x86)\DEOS\FXL)
Project directory:The individual project data is saved in the project directory.(default: C:\Users\Public\Documents\DEOS\FXL\...\PRJ)

7
Repository directory:Functional modules that were developed specifically for using OPENproject are saved in the repository directory.(default: C:\Users\Public\Documents\DEOS\FXL\...\PRJ)
6. Option 1 – select directoriesTo select the links to a directory, click the corresponding button, select the desired directory and confirm with "OK". The link to this directory is then added accordingly. (Continue with item 8)
Repeat this procedure for all directories.
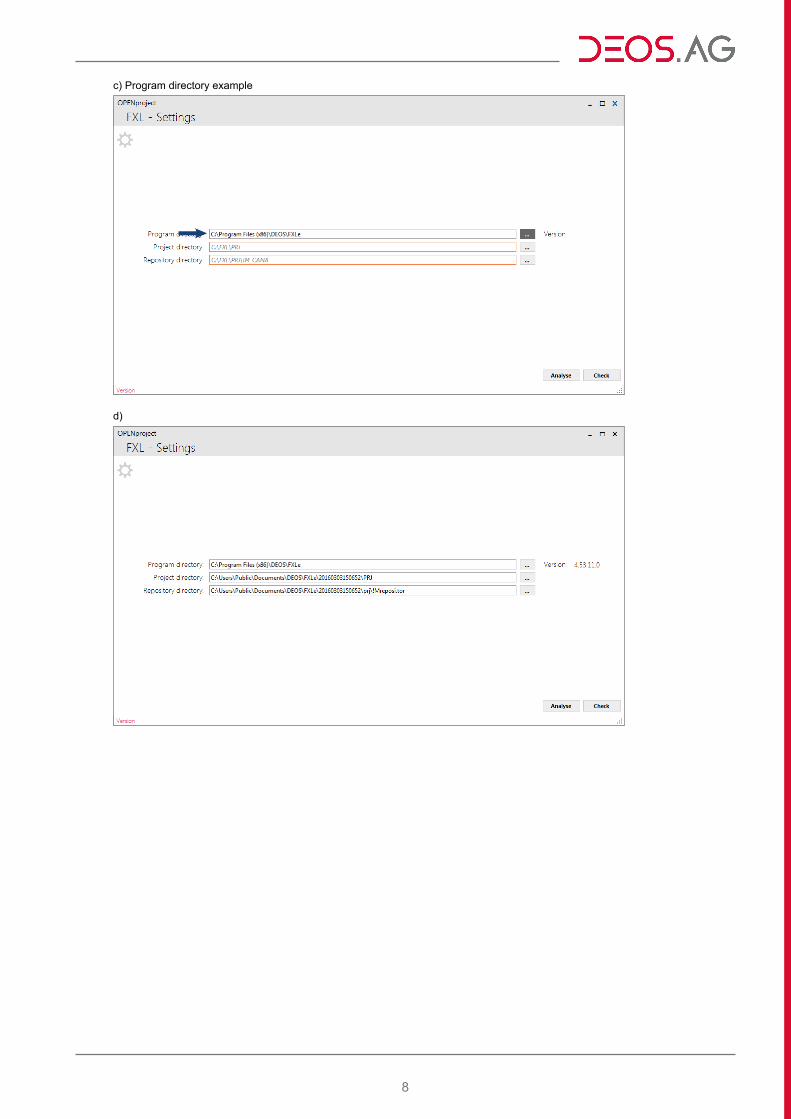
a) Program directory example
b) Program directory example
8
c) Program directory example
d)
9
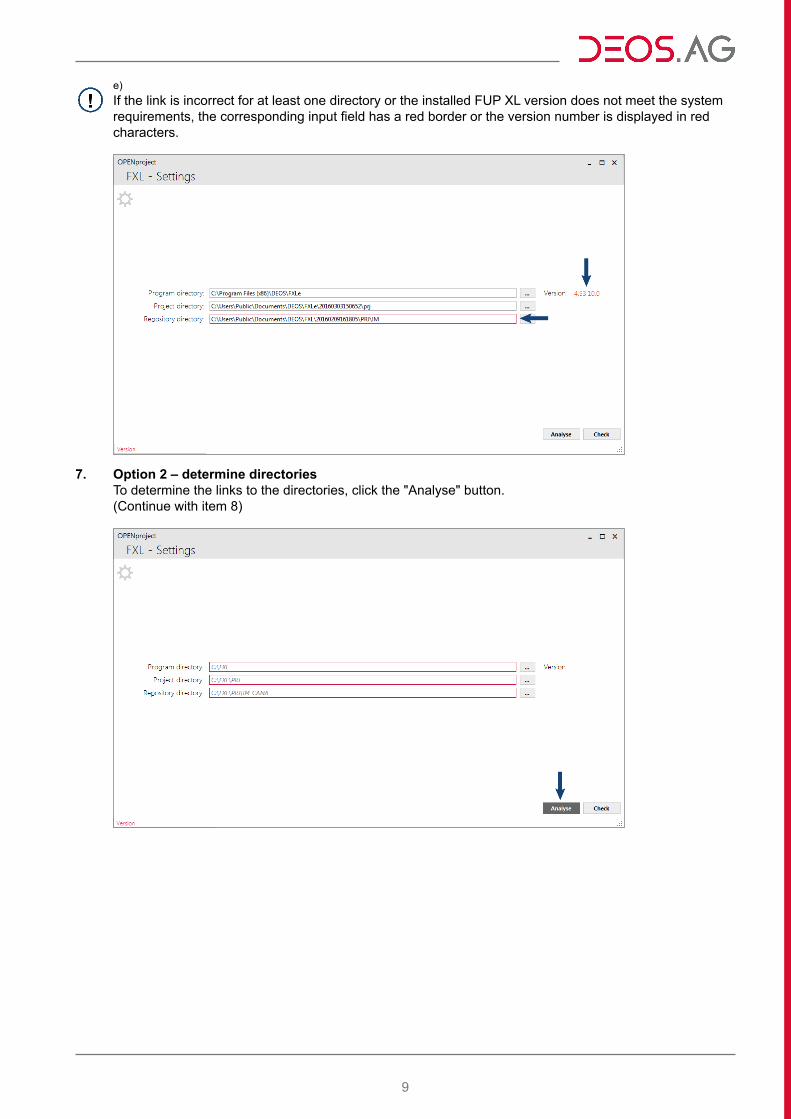
e)If the link is incorrect for at least one directory or the installed FUP XL version does not meet the system requirements, the corresponding input field has a red border or the version number is displayed in red characters.
7. Option 2 – determine directoriesTo determine the links to the directories, click the "Analyse" button.(Continue with item 8)
10
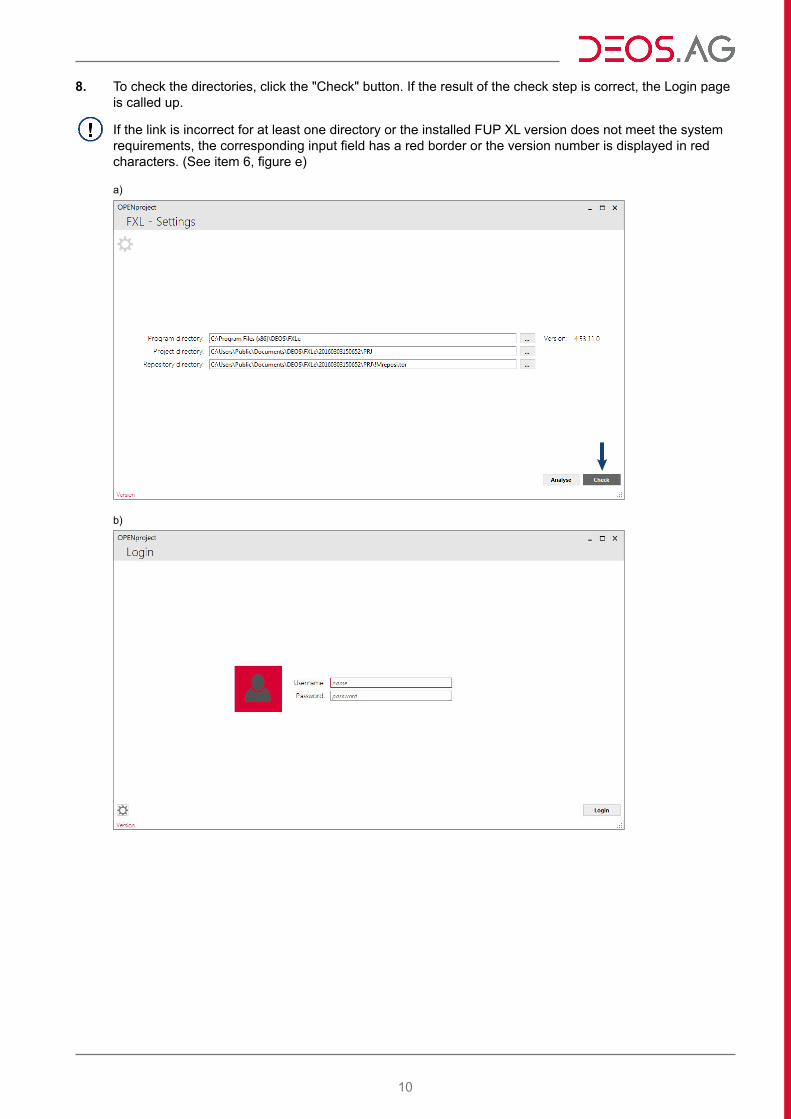
8. To check the directories, click the "Check" button. If the result of the check step is correct, the Login page is called up.
If the link is incorrect for at least one directory or the installed FUP XL version does not meet the system requirements, the corresponding input field has a red border or the version number is displayed in red characters. (See item 6, figure e)
a)
b)
11
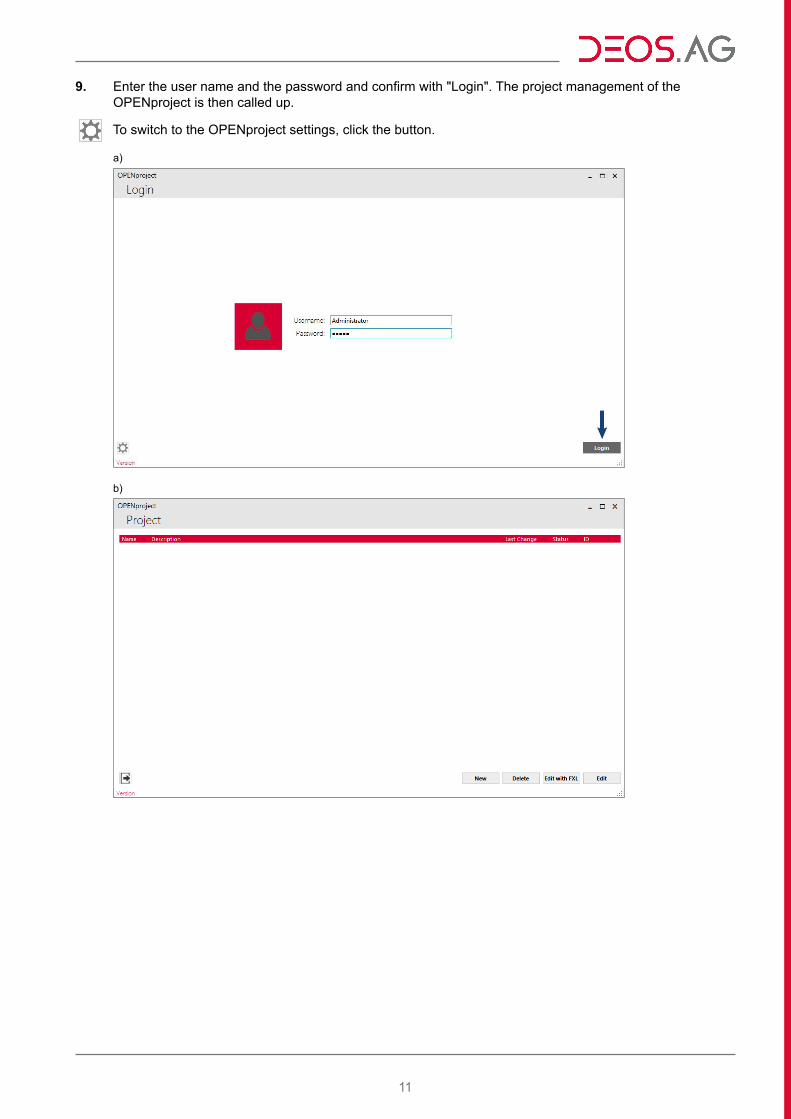
9. Enter the user name and the password and confirm with "Login". The project management of the OPENproject is then called up.
To switch to the OPENproject settings, click the button.
a)
b)
12
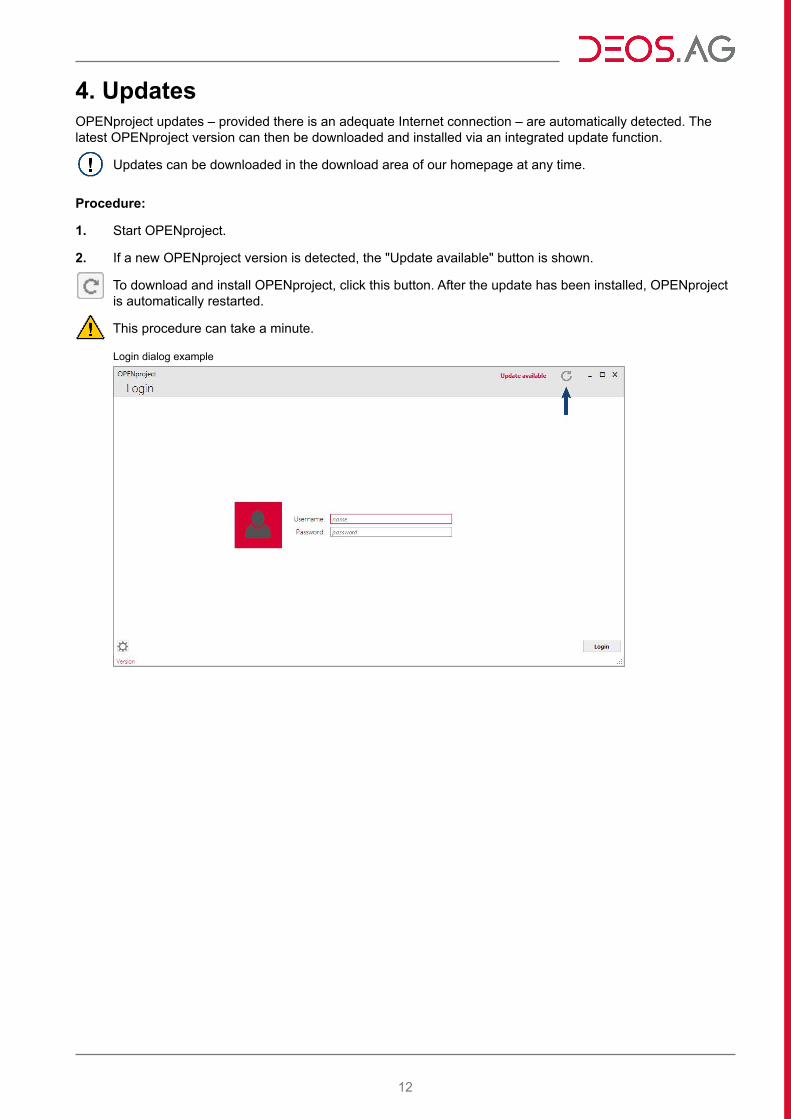
4. UpdatesOPENproject updates – provided there is an adequate Internet connection – are automatically detected. The latest OPENproject version can then be downloaded and installed via an integrated update function.
Updates can be downloaded in the download area of our homepage at any time.
Procedure:
1. Start OPENproject.
2. If a new OPENproject version is detected, the "Update available" button is shown.
To download and install OPENproject, click this button. After the update has been installed, OPENproject is automatically restarted.
This procedure can take a minute.
Login dialog example
13
FUP XL
OPENproject
Procedure:
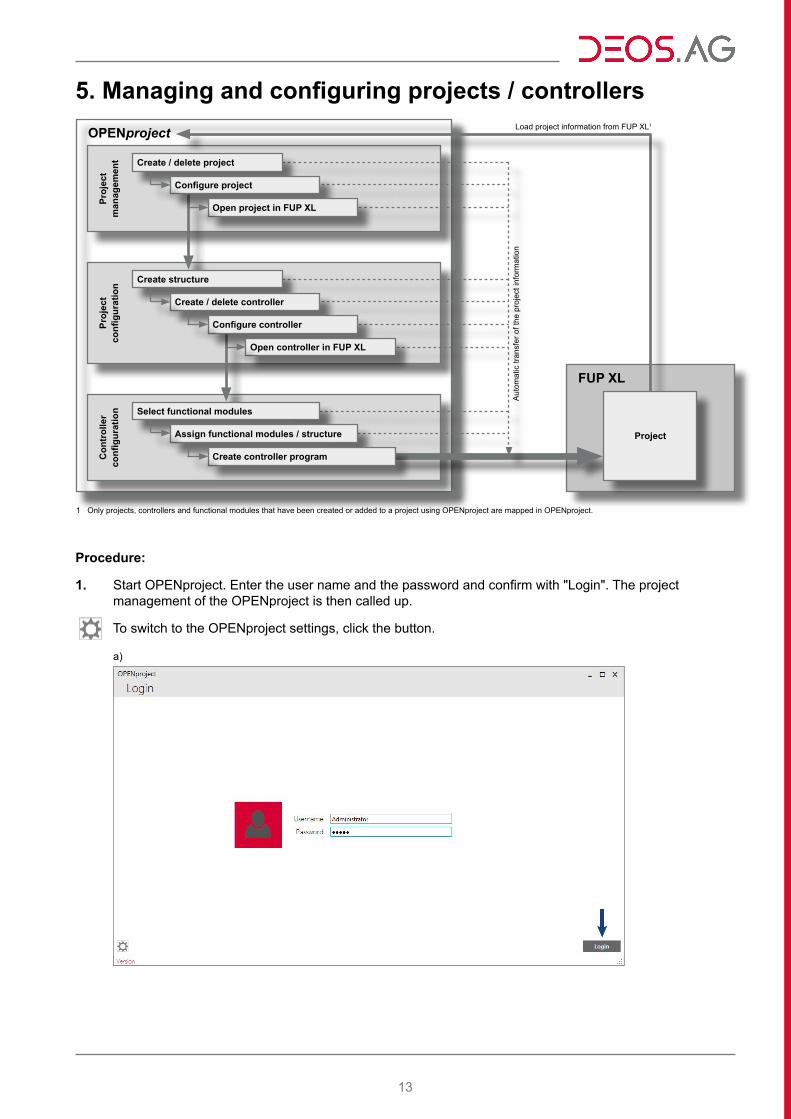
1. Start OPENproject. Enter the user name and the password and confirm with "Login". The project management of the OPENproject is then called up.
To switch to the OPENproject settings, click the button.
a)
5. Managing and configuring projects / controllersPr
ojec
t m
anag
emen
tPr
ojec
t co
nfigu
ratio
nC
ontr
olle
r co
nfigu
ratio
n Select functional modules
Assign functional modules / structure
Create controller program
Create structure
Create / delete controller
Configure controller
Open controller in FUP XL
Create / delete project
Configure project
Open project in FUP XL
Project
Load project information from FUP XL1
Auto
mat
ic tr
ansf
er o
f the
pro
ject
info
rmat
ion
1 Only projects, controllers and functional modules that have been created or added to a project using OPENproject are mapped in OPENproject.
14
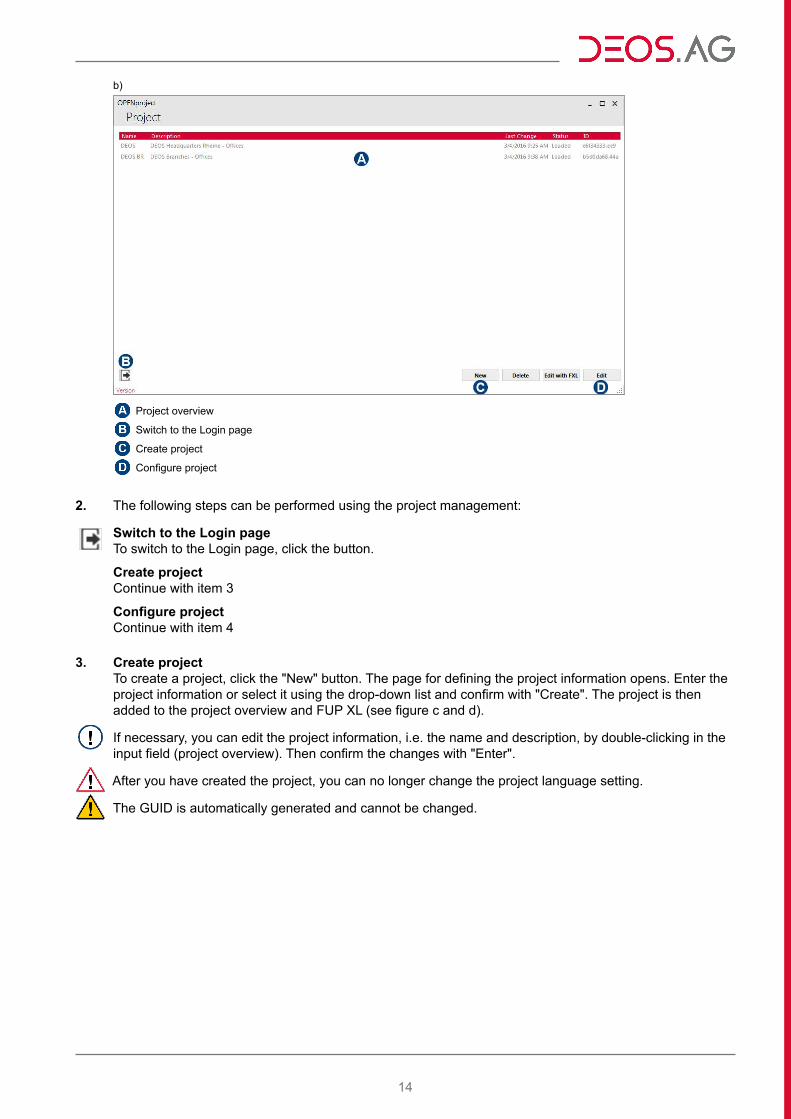
b)
Project overview
Switch to the Login page
Create project
Configure project
2. The following steps can be performed using the project management:
Switch to the Login pageTo switch to the Login page, click the button.
Create projectContinue with item 3
Configure projectContinue with item 4
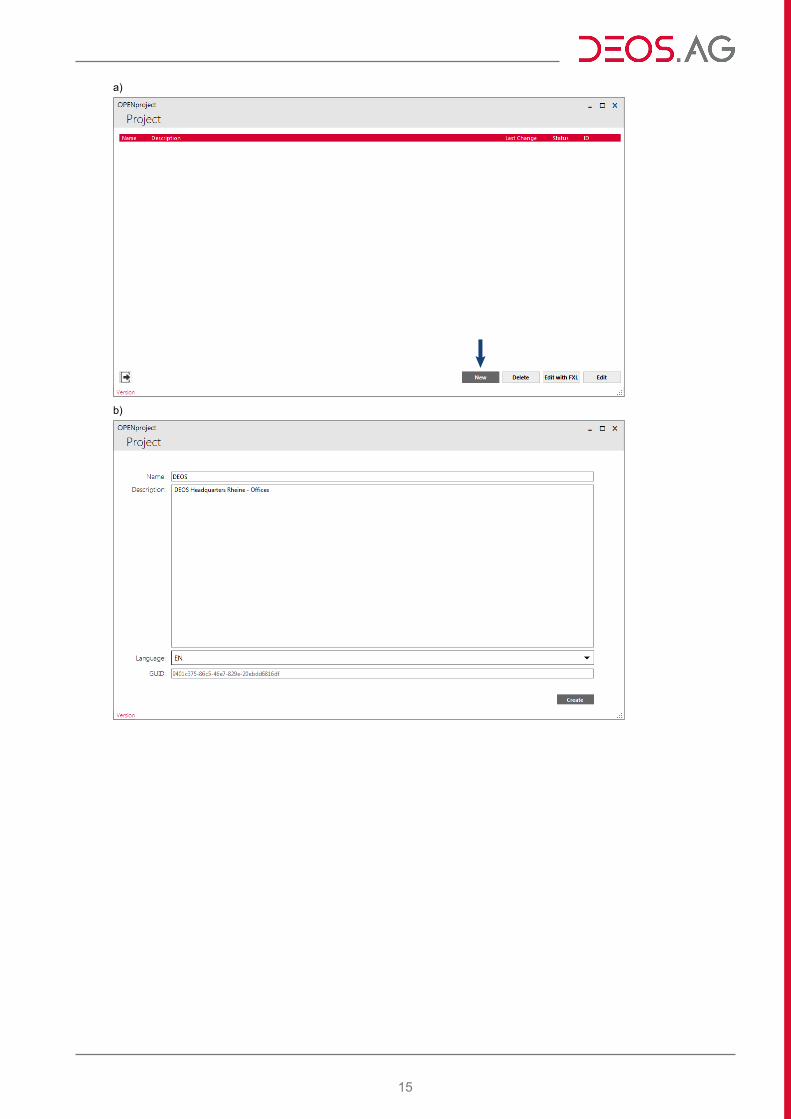
3. Create projectTo create a project, click the "New" button. The page for defining the project information opens. Enter the project information or select it using the drop-down list and confirm with "Create". The project is then added to the project overview and FUP XL (see figure c and d).
If necessary, you can edit the project information, i.e. the name and description, by double-clicking in the input field (project overview). Then confirm the changes with "Enter".
After you have created the project, you can no longer change the project language setting.
The GUID is automatically generated and cannot be changed.
15
a)
b)
16
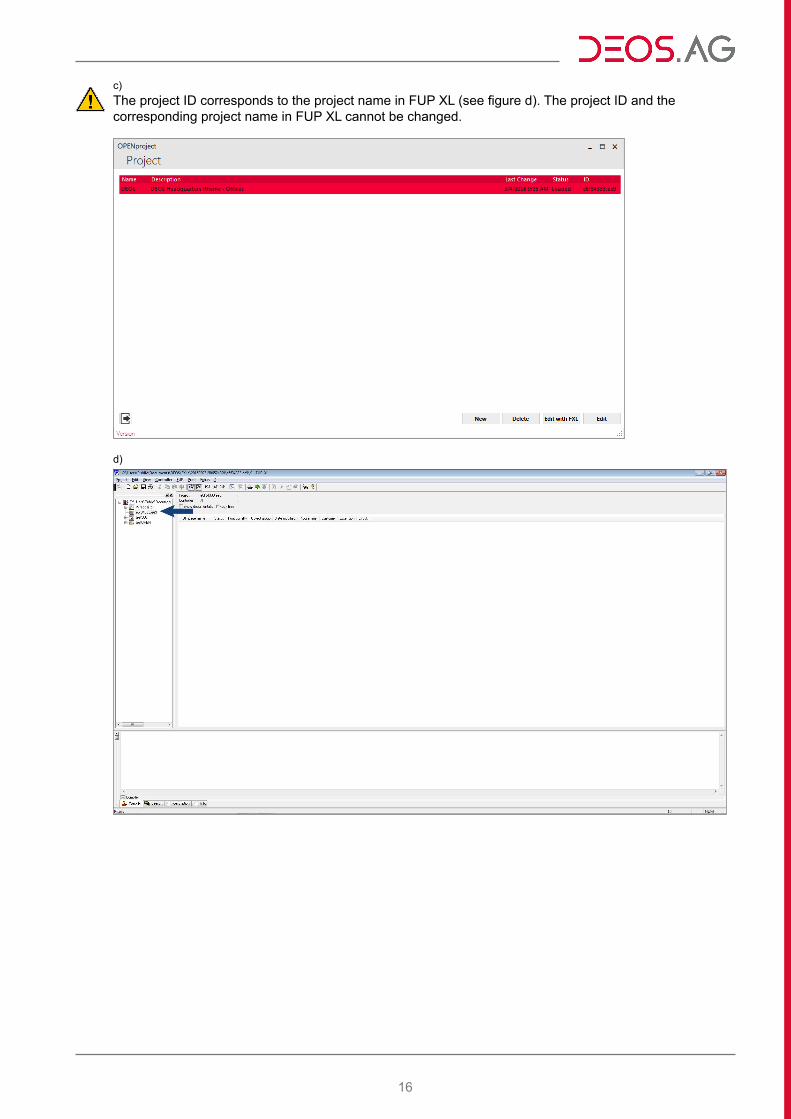
c)The project ID corresponds to the project name in FUP XL (see figure d). The project ID and the corresponding project name in FUP XL cannot be changed.
d)
17
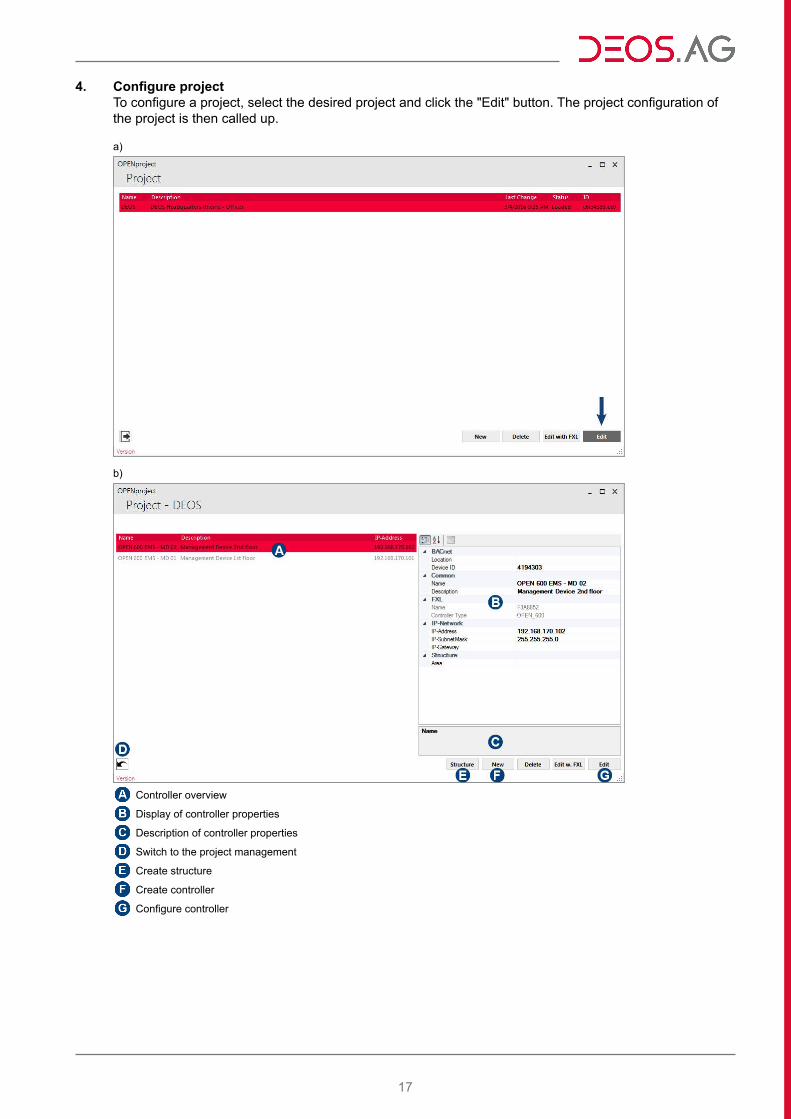
4. Configure projectTo configure a project, select the desired project and click the "Edit" button. The project configuration of the project is then called up.
a)
b)
Controller overview
Display of controller properties
Description of controller properties
Switch to the project management
Create structure
Create controller
Configure controller
18
5. The following steps can be performed using the project configuration:
Switch to the project managementTo switch to the project management, click the button.
Create structureContinue with item 6
Create controllerContinue with item 8
Configure controllerContinue with item 9
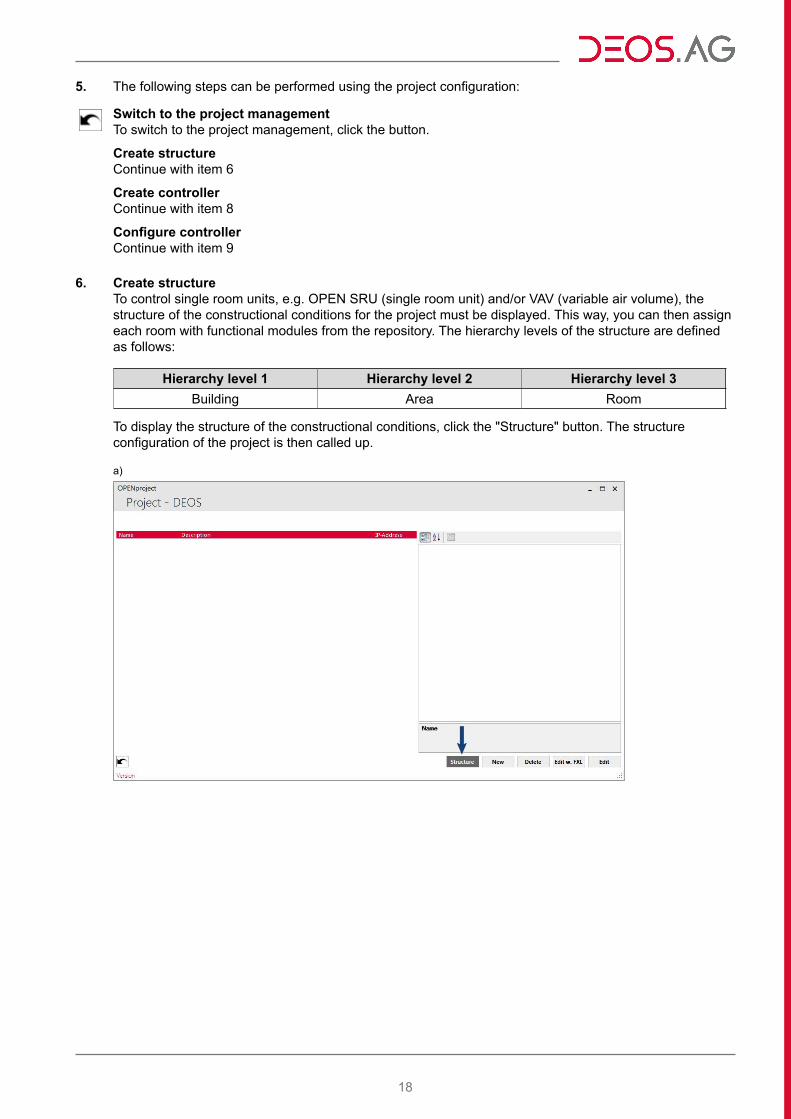
6. Create structureTo control single room units, e.g. OPEN SRU (single room unit) and/or VAV (variable air volume), the structure of the constructional conditions for the project must be displayed. This way, you can then assign each room with functional modules from the repository. The hierarchy levels of the structure are defined as follows:
Hierarchy level 1 Hierarchy level 2 Hierarchy level 3Building Area Room
To display the structure of the constructional conditions, click the "Structure" button. The structure configuration of the project is then called up.
a)
19
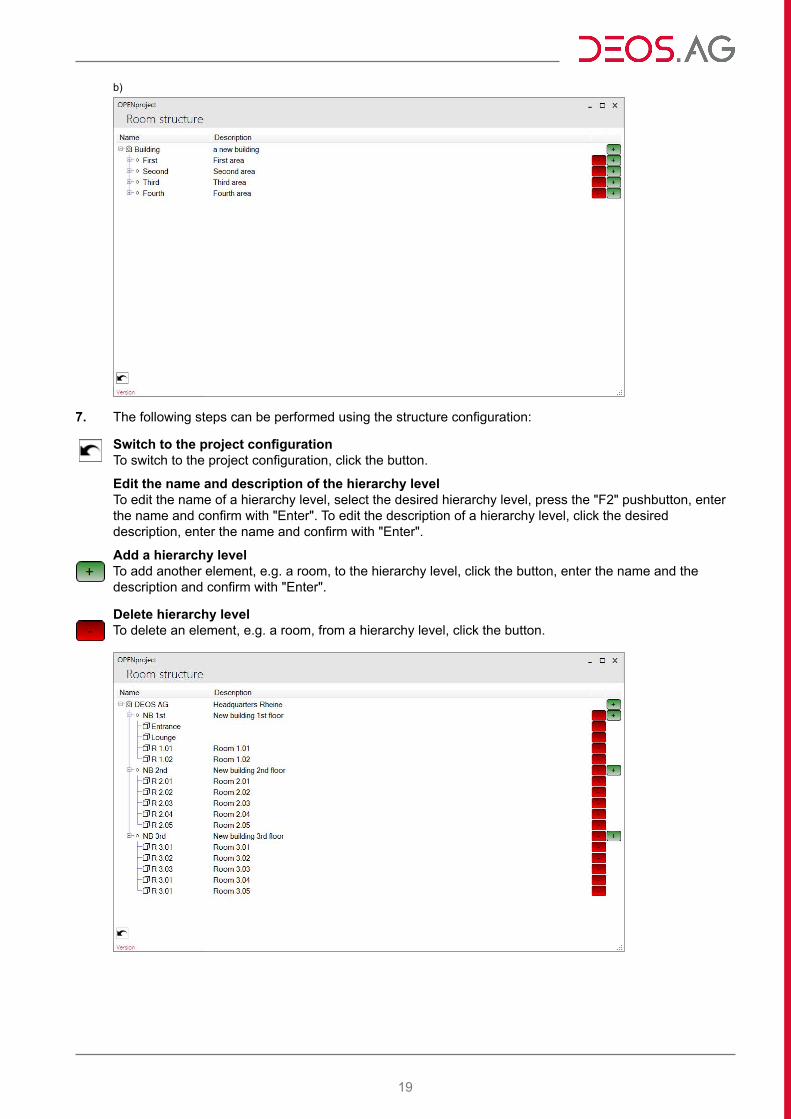
b)
7. The following steps can be performed using the structure configuration:
Switch to the project configurationTo switch to the project configuration, click the button.
Edit the name and description of the hierarchy levelTo edit the name of a hierarchy level, select the desired hierarchy level, press the "F2" pushbutton, enter the name and confirm with "Enter". To edit the description of a hierarchy level, click the desired description, enter the name and confirm with "Enter".
Add a hierarchy levelTo add another element, e.g. a room, to the hierarchy level, click the button, enter the name and the description and confirm with "Enter".
Delete hierarchy levelTo delete an element, e.g. a room, from a hierarchy level, click the button.
20
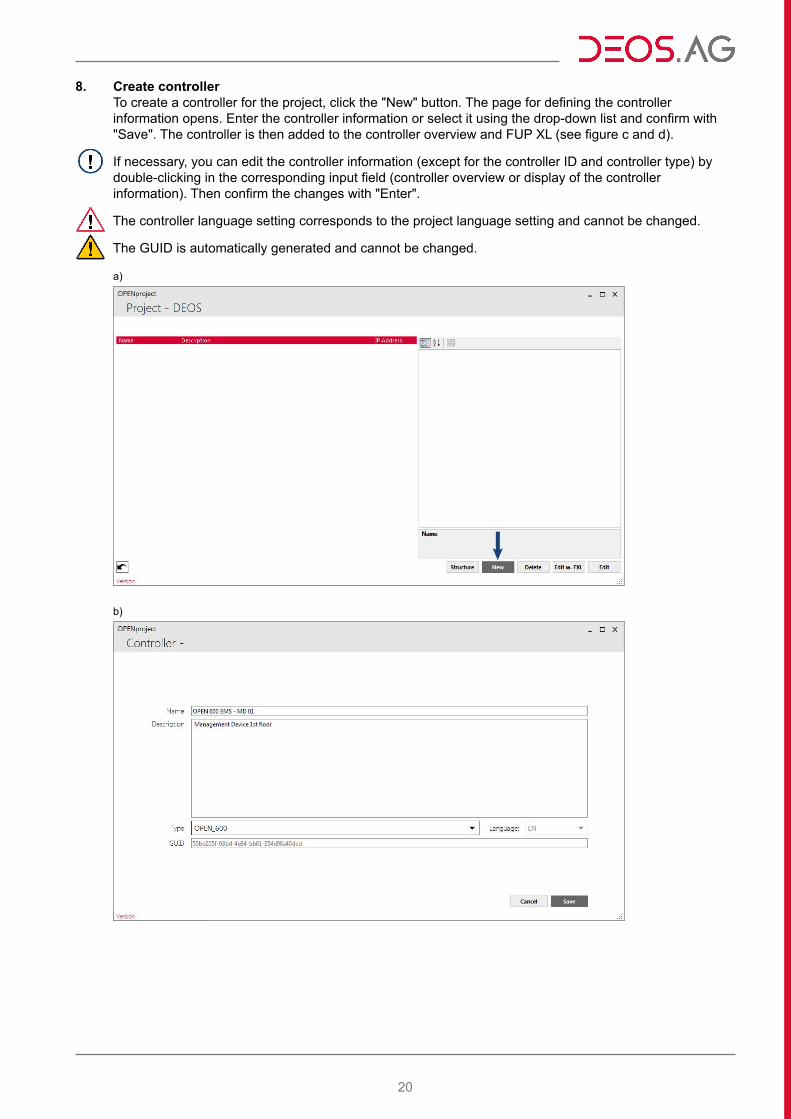
8. Create controllerTo create a controller for the project, click the "New" button. The page for defining the controller information opens. Enter the controller information or select it using the drop-down list and confirm with "Save". The controller is then added to the controller overview and FUP XL (see figure c and d).
If necessary, you can edit the controller information (except for the controller ID and controller type) by double-clicking in the corresponding input field (controller overview or display of the controller information). Then confirm the changes with "Enter".
The controller language setting corresponds to the project language setting and cannot be changed.
The GUID is automatically generated and cannot be changed.
a)
b)
21
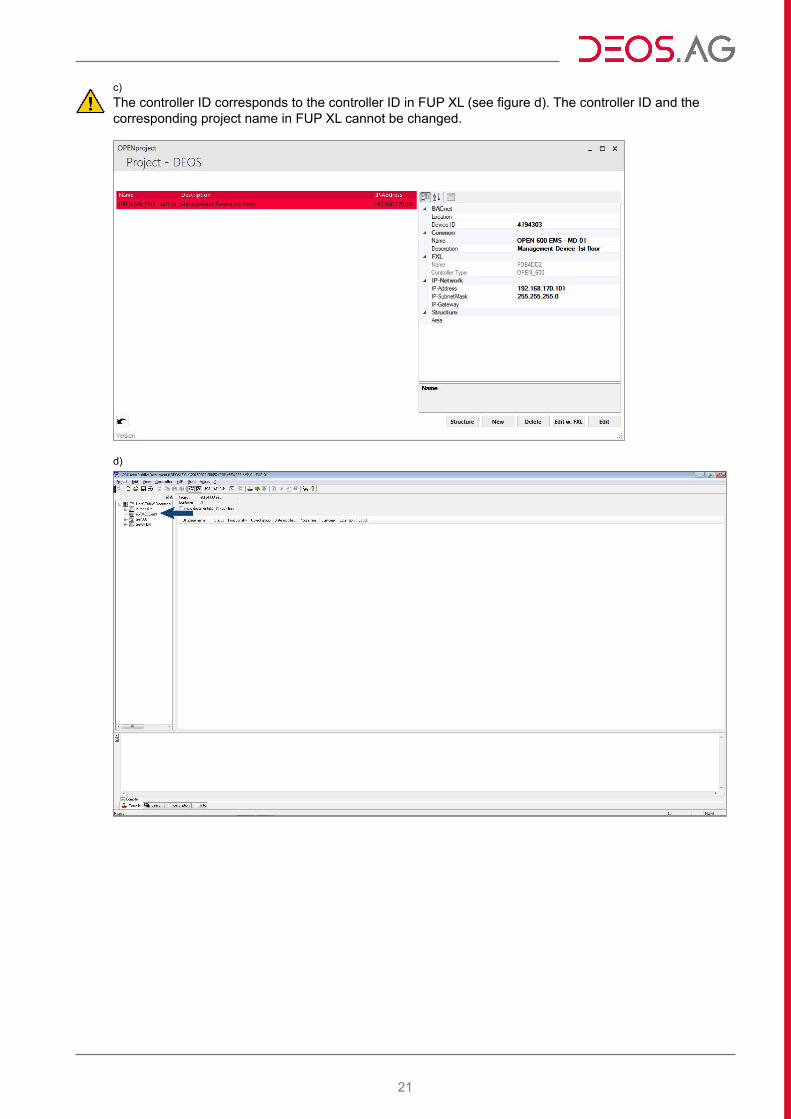
c)The controller ID corresponds to the controller ID in FUP XL (see figure d). The controller ID and the corresponding project name in FUP XL cannot be changed.
d)
22
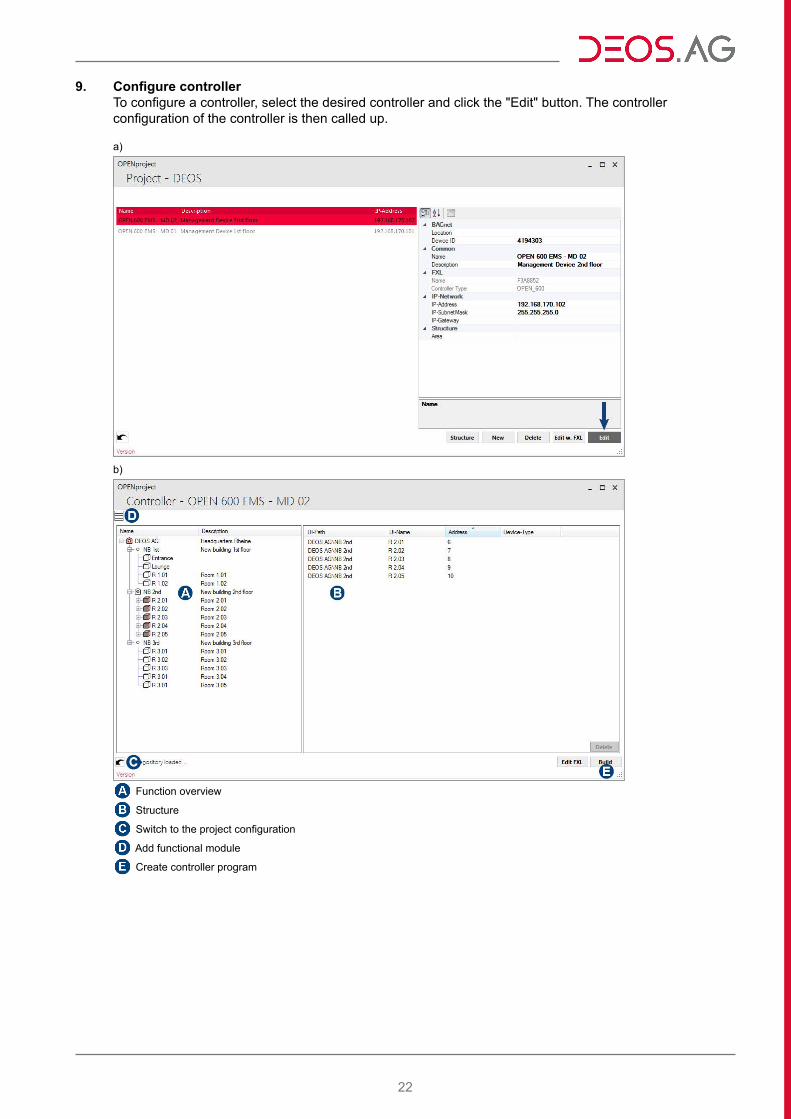
9. Configure controllerTo configure a controller, select the desired controller and click the "Edit" button. The controller configuration of the controller is then called up.
a)
b)
Function overview
Structure
Switch to the project configuration
Add functional module
Create controller program
23
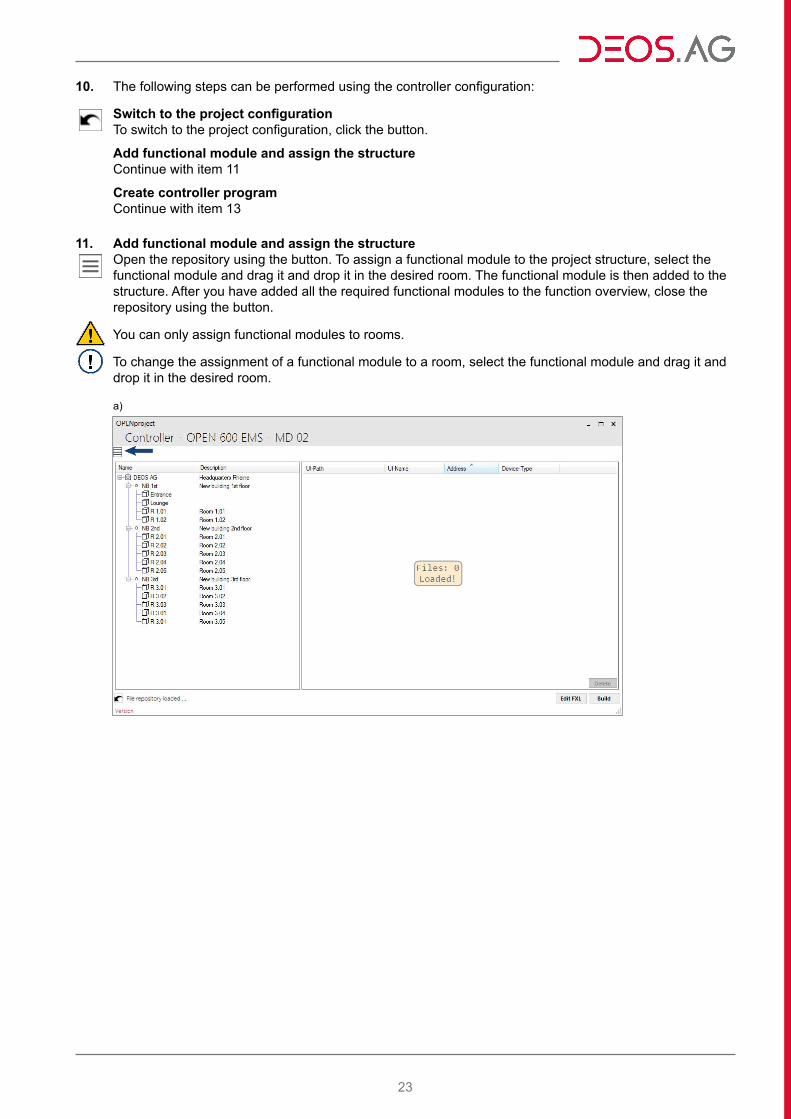
10. The following steps can be performed using the controller configuration:
Switch to the project configurationTo switch to the project configuration, click the button.
Add functional module and assign the structureContinue with item 11
Create controller programContinue with item 13
11. Add functional module and assign the structureOpen the repository using the button. To assign a functional module to the project structure, select the functional module and drag it and drop it in the desired room. The functional module is then added to the structure. After you have added all the required functional modules to the function overview, close the repository using the button.
You can only assign functional modules to rooms.
To change the assignment of a functional module to a room, select the functional module and drag it and drop it in the desired room.
a)

24
b)
c)
12. Adjust the pre-defined default properties (BDF path, BDF name and connection type) of the functional module to the individual requirements. To edit the BDF path, select the BDF path, press the "F2" pushbutton, enter the BDF path and confirm with "Enter". To edit the BDF name or the address, click the desired information, enter the BDF name or address and confirm with "Enter". Select the connection type of the device using the drop-down list in the overview of the function information.
The address must match the address of the device. At the same time, the address depends on the device connection type (BACnet or Modbus).
If necessary, you can adjust the address number using the following context menu options (→ right-click):
Reassign:The addresses of all devices – starting from the largest address of the selected devices (plus 1) – are numbered consecutively.
Renumber:The addresses of all devices – starting from the smallest address of the selected devices – are numbered consecutively.

25
a)
b)
26
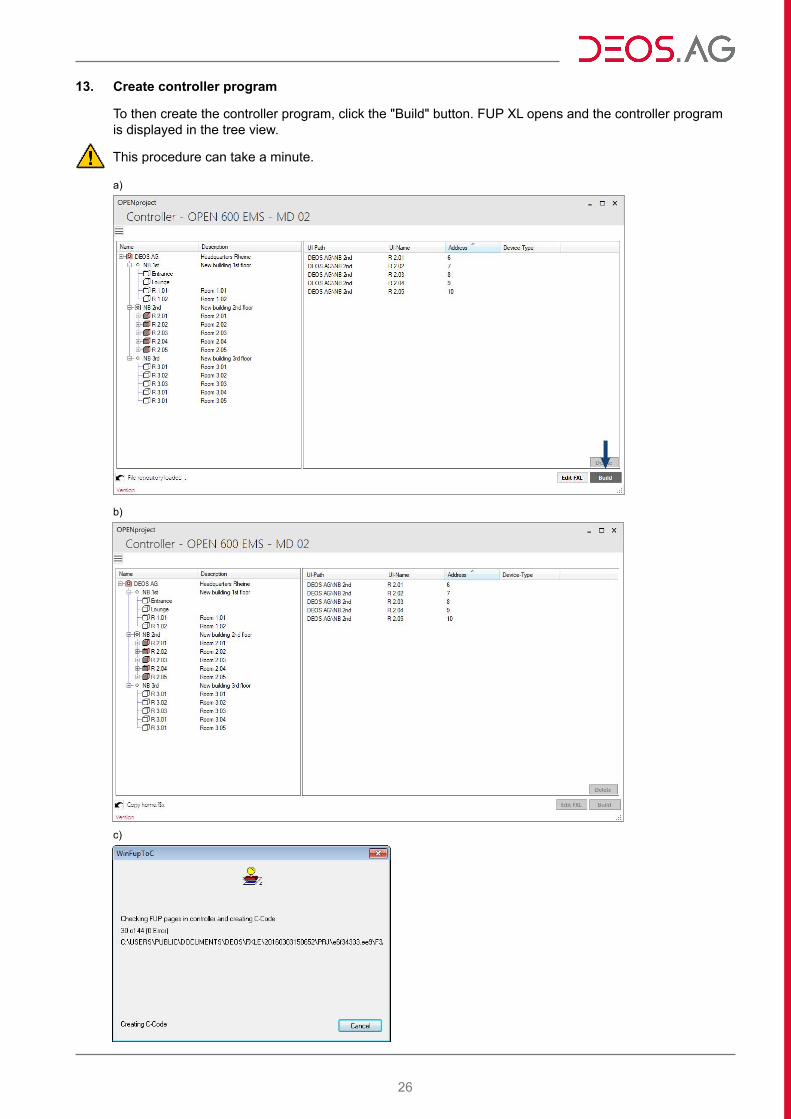
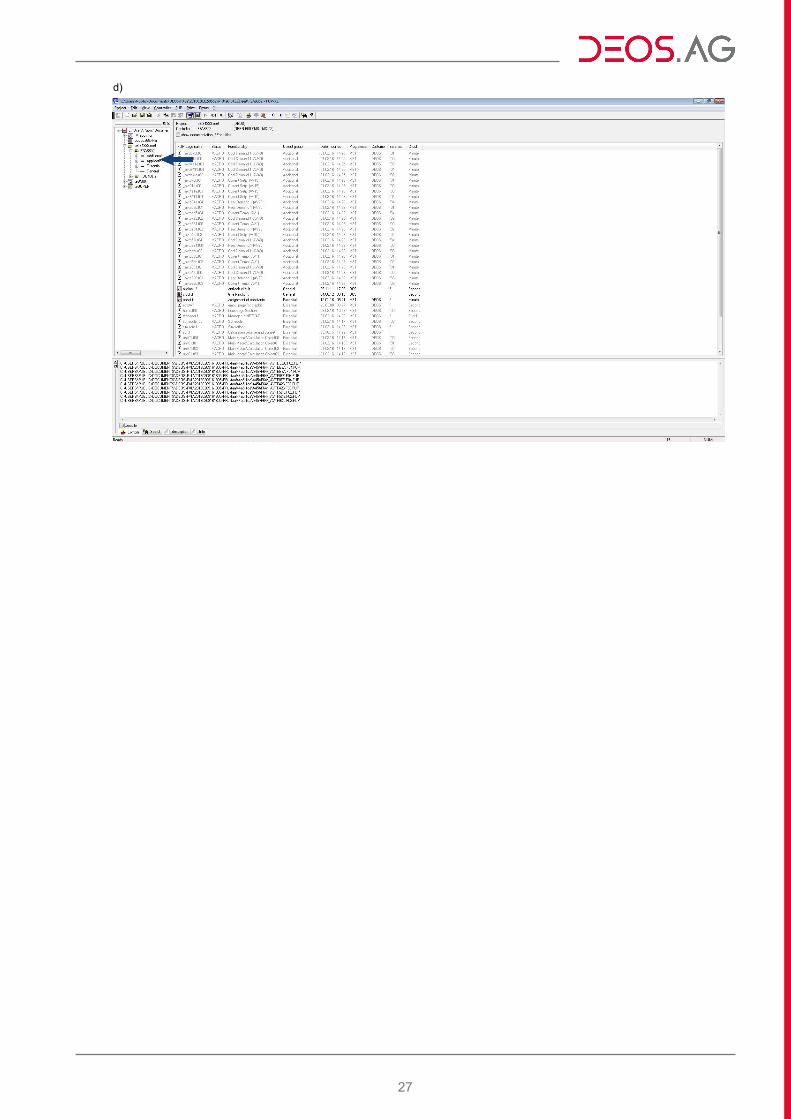
13. Create controller program
To then create the controller program, click the "Build" button. FUP XL opens and the controller program is displayed in the tree view.
This procedure can take a minute.
a)
b)
c)
27
d)