operating before use instructions -...
TRANSCRIPT

For safe and correct use, be sure to read the Safety Information in Read This First before using the machine.
Appendix
Specifications / Information
Daily Maintenance
Troubleshooting
Replacing Consumables
Other Functions
Printing with Useful Functions
Basic Operations
Before UseOperating Instructions


i
PLEASE NOTEContents of this manual are subject to change without prior notice.Some illustrations in this manual might be slightly different from the machine.Certain options might not be available in some countries. For details, please contact your local dealer.
The ENERGY STAR® Program Requirements for Imaging Equipment encourage energy conservation by promoting energy effi cient computers and other offi ce equipment.The program backs the development and dissemination of products that feature energy saving functions.It is an open program in which manufacturers participate voluntarily.Targeted products are computers, monitors, printers, facsimiles, copiers, scanners, and digital duplicator. Energy Star standards and logos are internationally uniform.
ENERGY STAR Program
ENERGY STAR® Program Requirements for Imaging Equipment
This company is a participant in the ENERGY STAR® Program.This machine is compliant with the regulations specifi ed by the ENERGY STAR® Program.
Complies with the provisions defi ned by the regulations listed below.EC Low Voltage Directive (2006/95/EC)EC Electromagnetic Compatibility Directive (2004/108/EC)EC Restriction of Hazardous Substances Directive (2011/65/EU)

ii
Our Products contain high quality components and are designed to facilitate recycling.Our products or product packaging are marked with the symbol below.
User Information on Electrical and Electronic Equipment
The symbol indicates that the product must not be treated as municipal waste. It must be disposed of separately via the appropriate return and collection systems available. By following these instructions you ensure that this product is treated correctly and help to reduce potential impacts on the environment and human health, which could otherwise result from inappropriate handling. Recycling of products helps to conserve natural resources and protect the environment.For more detailed information on collection and recycling systems for this product, please contact the shop where you purchased it, your local dealer or sales/service representatives.
Note for the Battery and/or Accumulator Symbol (For EU countries only)
In accordance with the Battery Directive 2006/66/EC Article 20 Information for end-users Annex II, the above symbol is printed on batteries and accumulators.This symbol means that in the European Union, used batteries and accumulators should be disposed of separately from your household waste.In the EU, there are separate collection systems for not only used electrical and electronic products but also batteries and accumulators.Please dispose of them correctly at your local community waste collection/recycling centre.
Users in the countries where this symbol shown in this section has been specifi ed in national law on collection and treatment of E-waste.

iii
● Pictorial Symbols and Other Notations Used in This Manual
Continue Page....
IMPORTANT
REFERENCE
: Introduces instructions for correct operation of the machine.If these instructions are ignored, the machine may not be able to operate atoptimum performance or may break down.
: Introduces information that is useful for operation and maintenance of themachine, or information about the machine’s performance, etc.
: Indicates that the description of the operating sequence is continued on the next page.
: Indicates the page number and item containing related information. (“xxxx”→ see p. xx )

iv
Functions for Master Making
The followings are a brief introduction of various functions of the machine.
Prints two different documents on one page.
Function Index
2in1
Zoom
Enlarges or reduces the size of copy as you want.
Sets paper size.Nonstandard-size paper is available.
Paper Size
Sets the size of document to be printed.
Document Size
Erases shadows by book binding and around of the periphery of the document.
Book Shadow Erasure
You can check print image before master making on the LCD.
Preview
Prints multiple copies of the document on one page.
Multiple Exposure
Adjusts the density of the master.
Darkness
Sets image mode suitable for the document.
Image Mode
Adjusts the density of scanning the document.
Scan Darkness
Rotates document on the scan image by 90 degrees.
90° Rotation
Rotates document on the scan image by 180 degrees.
180° Rotation
→P.24 , P.32
→P.40
→P.26
→P.41
→P.44 →P.48
→P.52 →P.56
→P.59 →P.68
→P.73 →P.75

v
Saves ink when printing by changing document scanning density.
Ink Saving Mode
Remakes a master of previousimage without scanning.
Document Memory
Edits the image of the document on the preview screen.
Edit Image
Scans the entire document and distinguishes the brightest part of the document.
Document Darkness Detection
Warns you if the document is not placed correctly on the exposure glass.
Document Misset Detection
Makes clear and vivid prints from the beginning of printing.
Fine Start
Disables counting a specifi ed number of prints following the start of printing operation.
Pre-print Proof Print
Makes one sheet of proof print after master making and stops.
→P.77 →P.98
→P.114 →P.119
→P.128 →P.143
→P.147 →P.151

vi
Functions for Printing
Adjusts print darkness.
Print Darkness
Adjusts the position of the printed image.
Print Position
Adjusts print speed.
Print Speed
Sets mode suitable for printing paper.
Paper Type
Enables printing on narrow paper.
Narrow Paper
Replenishes ink.
Replenishing Ink
Prohibits others from printing confi dential documents.
Confi dential Safeguard
Performs printing at regular intervals.
Interval Print
Makes prints in groups.Changes the number of prints made from each document.
Batch Print/Sequential Batch Print
Makes prints using a personal computer.
Online Mode
→P.29 →P.42
→P.46 →P.110
→P.112 →P.116
→P.117 →P.121
→P.123 →P.130

vii
Adjusts printed image to the best print darkness by print speed.
Optimize Print
Displays the same number of prints after printing completes.
Repeat Counter
Adjusts print position while printing.
Print Position Adjustment (While Printing)
→P.145 →P.149
→P.153

viii
Other Functions
Automatically turns off the machine when it is not operated for a specifi ed period of time.
Automatic Power Off
Automatically resets the machine and returns all settings to Standard Mode.
Automatic Reset
Sets date and time.
Date & Time
Sets buzzer ON/OFF and buzzer volume.
Buzzer
Saves and retrieves settings when needed.
Program
Changes settings in Standard Mode.
Initial Confi guration
Retrieves frequently used functions by touching shortcut icon at the bottom of the main screen.
Shortcut Settings
Automatically turns off the LCD when it is not operated for a specifi ed period of time. This reduces power consumption.
Energy Save Mode
Display Brightness
Adjusts the brightness of the LCD.
Information
Checks total master make count, total print count, master roll monitor, used master monitor, date & time and shortcut settings.
→P.100 →P.132
→P.135 →P.137
→P.139 →P.141
→P.155 →P.157
→P.159 →P.161

ix
Contents
Chapter 1
Chapter 2
Function Index ...........................................................................................iv
Before Use
Part Names and Their Functions .............................................................. 2Printer Appearance ................................................................................... 2Inside of Machine ...................................................................................... 3Outside/Inside of Print Output Side ........................................................... 4Control Panel ............................................................................................ 6Main Screen .............................................................................................. 7Setting Screen .......................................................................................... 7
Turning Power ON/OFF .............................................................................. 8Turning Power ON .................................................................................... 8Turning Power OFF ................................................................................... 8Standard Mode ......................................................................................... 9
Document/Printing Paper Specifi cations ............................................... 10Acceptable Documents ........................................................................... 10Acceptable Printing Paper ...................................................................... 10
Basic Operations
Preparing for Printing .............................................................................. 14How to Set Papers .................................................................................. 14When no heavy weight paper is fed or two sheets of light weight paper are fed.... 15How to Supply or Replace Paper While Printing ..................................... 16How to Set the Print Tray ........................................................................ 17How to Set the Jump Plates .................................................................... 18
Loading Documents ................................................................................. 19How to Load Document .......................................................................... 19How to Load Document on the Exposure Glass ..................................... 19Loading Document in Automatic Document Feeder (ADF)(Optional) ..... 20
Basic Printing ........................................................................................... 22Printing Using Basic Functions ............................................................... 22
Enlargement / Reduction ......................................................................... 24Enlargement and Reduction from Standard-Size Documents to Standard-Size Paper ... 24Enlargement and Reduction from Standard-Size Documents to Standard-Size Paper ... 25
Selecting Printing Paper Size .................................................................. 26Master Making Area by Paper Size [European] ...................................... 26How to Set Paper Size ............................................................................ 26Master Making Area by Paper Size [U.S.] ............................................... 27How to Set Paper Size ............................................................................ 27How to Set “CUSTOM” in Paper Size Setting ......................................... 28
Print Speed Adjustment ........................................................................... 29Print Speed Adjustment .......................................................................... 29How to Adjust Print Speed ..................................................................... 29How to Set TOP SPEED ......................................................................... 30

x
Chapter 4
Contents
Chapter 3 Printing with Useful Functions
Enlargement / Reduction ......................................................................... 32Enlargement / Reduction ........................................................................ 32Minor Reduction ...................................................................................... 34Free Zoom .............................................................................................. 36Custom Scaling ....................................................................................... 38
Adjusting Darkness .................................................................................. 40Adjusting Darkness ................................................................................. 40Scan Darkness ........................................................................................ 40How to Adjust Scan Darkness ................................................................. 40Master Darkness ..................................................................................... 41How to Adjust Master Darkness .............................................................. 41Print Darkness ........................................................................................ 42How to Adjust Print Darkness ................................................................. 42
Printing Photographs and Color Documents ........................................ 44Image Mode ............................................................................................ 44How to Set Image Mode ......................................................................... 44
Adjusting Print Position ........................................................................... 46Print Position Adjustment ........................................................................ 46
Document Size .......................................................................................... 48Document Size ........................................................................................ 48How to Set Document Size ..................................................................... 48How to Set “CUSTOM” in Document Size .............................................. 49
Other Functions
Edit Function: Preview ........................................................................... 52Checking Document To Be Printed ......................................................... 52
Edit Function: Multiple Exposure ........................................................... 56Multiple Exposure on One Page ............................................................. 56How to Set Multiple Exposure (2, 4, 8, and 16-up) ................................. 582 IN 1 ...................................................................................................... 59How to Set 2 IN 1 .................................................................................... 60How to Set 2 IN 1 Using the ADF (Option) .............................................. 63Custom .................................................................................................... 64How to Set Custom ................................................................................. 64Cut Line ................................................................................................... 66How to Set Cut Line ................................................................................ 66
Edit Function: Book Shadow Erasure .................................................... 68Book Shadow Erasure ............................................................................ 68Area of Shadow Erasure ......................................................................... 69How to Set Book Shadow Erasure .......................................................... 70
Edit Function: 90° Rotation ..................................................................... 7390° Rotation ............................................................................................ 73How to Set 90° Rotation .......................................................................... 73
Edit Function: 180° Rotation ................................................................... 75180° Rotation .......................................................................................... 75How to Set 180° Rotation ........................................................................ 75

xi
Contents
Edit Function: Edit Image ........................................................................ 77Edit Image ............................................................................................... 77Make Up .................................................................................................. 77How to Set Make Up ............................................................................... 79ADD MAKE UP, SWITCH ERASE AREA, NEW MAKE UP .................... 91Trimming ................................................................................................. 95How to Set Trimming ............................................................................... 95
Edit Function: Document Memory .......................................................... 98Document Memory .................................................................................. 98How to Set Document Memory ............................................................... 98
Special Function: Program .................................................................... 100Program ................................................................................................ 100Retrieving Settings ................................................................................ 105Clearing Settings ................................................................................... 108
Special Function: Paper Type ............................................................... 110Paper Type ............................................................................................ 110How to Set Paper Type ......................................................................... 110
Special Function: Narrow Paper ........................................................... 112Narrow Paper ........................................................................................ 112How to Set Narrow Paper ..................................................................... 112
Special Function: Ink Saving Mode ...................................................... 114Ink Saving Mode ................................................................................... 114How to Set Ink Saving Mode ................................................................. 114
Special Function: Replenish Ink ........................................................... 116Replenishing Ink ................................................................................... 116How to Replenish Ink ............................................................................ 116
Special Function: Confi dential Safeguard ........................................... 117Confi dential Safeguard ......................................................................... 117How to Set Confi dential Safeguard ....................................................... 117
Special Function: Document Darkness Detection .............................. 119Document Darkness Detection ............................................................. 119How to Set Document Darkness Detection ........................................... 119
Special Function: Interval Print ............................................................. 121Interval Print .......................................................................................... 121How to Set Interval Print ....................................................................... 121
Special Function: Batch Print Sequential Batch Print ........................ 123Batch Print / Sequential Batch Print ...................................................... 123How to Set Batch Print / Sequential Batch Print ................................... 124How to Enter Batch Print / Sequential Batch Print ................................ 126Separating Prints with Tape Strips ........................................................ 127(Available only with Tape Dispenser Unit) ............................................. 127
Special Function: Document Misset Detection ................................... 128Document Misset Detection .................................................................. 128How to Set Document Misset Detection ............................................... 128
Peripheral Function: Online Mode ........................................................ 130Making Prints Using Personal Computer ............................................. 130How to Set Online Mode ....................................................................... 130How to Cancel Reprint When in Manual Setting ................................... 131
Setting Function: Initial Confi guration ................................................. 132Initial Confi guration ............................................................................... 132How to Set Initial Confi guration ............................................................. 132

xii
Chapter 5
Contents
Setting Function: Shortcut Setting ....................................................... 135Shortcut Setting .................................................................................... 135
Setting Function: Energy Save Mode ................................................... 137Energy Save Mode ............................................................................... 137How to Set Energy Save Mode ............................................................. 137
Setting Function: Automatic Power OFF ............................................. 139Automatic Power OFF ........................................................................... 139How to Set Automatic Power OFF ........................................................ 139
Setting Function: Automatic Reset ....................................................... 141Automatic Reset .................................................................................... 141How to Set Automatic Reset ................................................................. 141
Setting Function: Fine Start .................................................................. 143Fine Start .............................................................................................. 143How to Set Fine Start ............................................................................ 143
Setting Function: Optimize Print ........................................................... 145Optimize Print ....................................................................................... 145How to Set Optimize Print ..................................................................... 145
Setting Function: Pre-print .................................................................... 147Pre-print ................................................................................................ 147How to Set Pre-print .............................................................................. 147
Setting Function: Repeat Counter ........................................................ 149Repeat Counter ..................................................................................... 149How to Set Repeat Counter .................................................................. 149
Setting Function: Proof Print ................................................................ 151Proof Print ............................................................................................. 151How to Set Proof Print .......................................................................... 151
Setting Function: Print Position Adjustment (While Printing) ........... 153Print Position Adjustment While Printing ............................................... 153How to Set Print Position Adjustment While Printing ............................ 153
Setting Function: Display Brightness .................................................. 155Display Brightness ................................................................................ 155How to Set Display Brightness .............................................................. 155
Setting Function: Date & Time ............................................................. 157Date & Time .......................................................................................... 157How to Set Date & Time ........................................................................ 157
Setting Function: Buzzer ....................................................................... 159Buzzer ................................................................................................... 159How to Set Buzzer ................................................................................ 159
Setting Function: Information ............................................................... 161Information ............................................................................................ 161How to Confi rm Information ................................................................. 161
Replacing Consumables
Replacing Ink Pack ................................................................................. 164Replacing Ink Pack ............................................................................... 164How to Replace Ink Pack ...................................................................... 164
Replacing Roll Master ........................................................................... 167Replacing Roll Master .......................................................................... 167How to Replace Roll Master ................................................................ 167
How to Dispose of Used Masters .......................................................... 170How to Dispose of Used Masters .......................................................... 170

xiii
Chapter 7
Chapter 9
Chapter 8
Chapter 6
Replacing Drum Unit .............................................................................. 172Replacing Drum Unit ............................................................................. 172How to Remove Drum Unit ................................................................... 172How to Set Drum Unit ........................................................................... 173
Replacing Separator Unit....................................................................... 175Replacing Separator Unit ...................................................................... 175
Replacing Side Separator Unit .............................................................. 176Replacing Side Separator Unit ............................................................. 176
Troubleshooting
If Trouble Occurs .................................................................................... 178If Trouble Occurs ................................................................................... 178
When Messages Appear ........................................................................ 179Supplying Paper While Printing ............................................................ 182
If Paper Runs Out During Printing ........................................................ 182Supplying Paper While Printing ............................................................ 182Changing Paper Size ............................................................................ 183
Paper Jams ............................................................................................. 185Paper Jam on the Feeder Side (Feed Tray) ......................................... 185Paper Jam on the Ejection Side (Print Tray Side) ................................. 186Paper Adhering to Drum ....................................................................... 187
When “MASTER EJECTION ERROR” is Displayed ............................. 189Removing the Master Adhering to the Drum ......................................... 189
When Master Setting Error Has Occurred............................................ 192How to Remove the Master .................................................................. 192
When “SET MASTER ROLL PROPERLY” is Displayed ....................... 193How to Set the Master Roll ................................................................... 193
Daily Maintenance
Daily Maintenance .................................................................................. 196
Specifi cations / Information
Specifi cations ......................................................................................... 198Information on Replacing Battery ......................................................... 201
Appendix
Index ........................................................................................................ 204
Contents

xiv

Chapter 11
Before U
se
Before UseThis chapter contains essential information such as the names of the machine parts, the names and functions of keys, etc., on the control panel, and the sizes of documents and printing papers that you can use. Please be sure to read this chapter carefully before attempting to use the printer.
Part Names and Their Functions ........................................................................... 2Printer Appearance ............................................................................................ 2Inside of Machine ............................................................................................... 3Outside/Inside of Print Output Side .................................................................... 4Control Panel ..................................................................................................... 6Main Screen ....................................................................................................... 7Setting Screen ................................................................................................... 7
Turning Power ON/OFF ......................................................................................... 8Turning Power ON ............................................................................................. 8Turning Power OFF ............................................................................................ 8Standard Mode .................................................................................................. 9
Document/Printing Paper Specifi cations ............................................................. 10Acceptable Documents .................................................................................... 10Acceptable Printing Paper ............................................................................... 10

2
No. Name Function Reference1 Connector (PC) Use to connect a PC. *It varies by confi guration. -
2 Scanner button Press to open the scanner unit. 167,192, 193
3 USB port Use to connect a USB fl ash drive. * It varies by confi guration. -4 Feed tray descend
switchPress to lower the feed tray. 16,182,
183,1855 Feed tray Load papers on this tray. 10,166 Support tray Use this when you set the large size papers. 147 Caster lock Locks the printer in position on the fl oor. Always lock the
caster locks when installing the printer. -
8 Cabinet (Option) Place the printer on this cabinet. *It varies by confi guration. -9 Front cover Open to replace ink pack and drum unit, etc. 164,172,
18910 Control panel Displays operations and status, and sets functions. 611 Scale Put the document along this scale. 1912 Exposure glass The document is placed on this glass. 1913 Exposure glass cover Keeps the document in contact with the document exposure glass. 19
Part Names and Their Functions
Printer Appearance
13
12
11
10
9
1
8
234
5
6
7

3
11
Before U
se
Part Names and Their Functions
No. Name Function Reference
14 Drum removal button Pressing this button rotates the drum and stops it in position to be removed. And then LED lights up.
172, 189
15 Master cover open lever
Press to open the master cover. Used when replacing the master, etc.
167, 192
16 Feed pressure adjuster lever Adjusts paper feed pressure according to paper thickness. 15
17 Separation pressure adjuster knob Adjusts separation pressure according to paper thickness. 15
18 Side separator height adjuster knob
Adjusts side separator height according to paper thickness. 15
19 Side guide Slide to match the width of the paper. 1420 Side guide lever Adjusts the side guides to paper size. 14
21 Feed tray horizontal registration adjuster dial
Use to adjust the print position (horizontal). 47
22 Scanner unit Open to set the roll master. 167,192, 193
Inside of MachineInside of the master cover area.
Master cover
Roll master Cutter
Drum release lever
Ink holder
Ink pack
Paper feed rollers
22
14
161718
19
2021
15

4
Part Names and Their Functions
No. Name Function Reference
23 Master ejection box open button Press to open the master ejection box. 170,
186, 187
24 Paper eject switch Press and hold to rotate the drum for the set time.Use to remove paper jams, etc.
185, 186, 187
25 J ump plate lever Slide to match the size of printed paper. 18
26 Master ejection box cover open lever
Press to open the master ejection box cover. Use when disposing of used master, etc. 170
27 Master ejection core Use when disposing of used master. 170
28 Master ejection box cover Open when disposing of used master. 170
29 Print tray lock lever Locked when closing the print tray. 17
Outside/Inside of Print Output Side
23
24
25
26
Master ejection section
28
27
29

5
11
Before U
se
Part Names and Their Functions
No. Name Function Reference30 Key card slot Slot a key card. *It varies by confi guration. -31 Side fence Slide to match the size of printed paper. 1732 Paper stopper Slide to match the size of printed paper. 1733 Print tray Holds printed papers. 17
34 Connectors (Optional) Use to connect options. -
30
31
32
33
34

6
Part Names and Their Functions
No. Name Function1 Clip holder Holds clips.2 Pen holder Hold a pen.3 RESET key Returns setting to standard mode. Setting not stored is cleared.4 Control keys
PRINT DARKNESS keys Controls print darkness. PRINT POSITION keys Controls print position (horizontal). PRINT SPEED keys Controls print speed.
5 Power switch Press to turn the power ON and OFF. The power switch lamp lights up when the power is ON, goes out when it is OFF, and blinks when the machine is in energy save mode.
6 LAMP Blue (lights up): Operating Whole LAMP is blinking in red.: Error message is displayed. Lower part of LAMP is blinking in red.: Message replacing consumables is displayed.
7 LCD (touch panel) Displays current settings such as number of printed sheet. Touch to change settings. Displays error messages in case of error.
8 HOME key The main screen will be displayed when this key is pressed.9 CLEAR key Returns the number of prints and the entered values to 0. 10 NUMERIC keys Enters the number of prints.11 ×
=key Enters the number of prints and sets in batch printing/sequential batch print.
12 MASTER MAKING key Starts making a master. Master making cannot be performed during printing. Clear the number of prints before master making.
13 PRINT key Starts printing. Master making is not performed. Printing cannot start when the light of the START key is red (When confi dential function is set, when a master is not set on the drum, when error is displayed, when the number of prints is not entered.)
14 STOP key Stops printing. When this key is pressed during making a master, the machine stops after making a master.
15 TEST PRINT key Prints 1 copy to check the image position and density. The machine keeps printing while this key is pressed.
Control Panel1 2 3 4 5
6 7 8 9 10 11 12 13 14 15

7
11
Before U
se
Part Names and Their Functions
Main Screen● The operation status or messages appear on the touch panel LCD.
Message appears.
Touch when you set various functions.
● When shortcut is set, the set function icon is displayed.● When function is set, the set function icon is displayed.
Number of prints
IMPORTANT
Setting Screen● When you touch PROPERTY on the main screen, the setting screen appears.
Various functions are displayed. Touch a function to set.
● When you touch the button, the page switches.
● The number of pages of each tab and page position are shown.
The main screen reappears.
When you touch each tab (EDIT, SPECIAL, PERIPHER, SETTINGS), the screen of the selected tab appears.
The current setting of PAPER SIZE, ZOOM, IMAGE MODE, DOCUMENT SIZE, and DARKNESS is displayed with an icon and characters.PRINT POSITION is displayed with numbers.
DO NOT PRESS the touch panel LCD and buttons strongly.

8
Turning Power ON/OFF
Press the power switch on the control panel.Warm-up starts.The printer is ready when the main screen appears on the touch panel LCD.“Standard Mode” is set for each function.(“Standard Mode” → see p.9)
Turning Power ON
Turning Power OFF
Outlet
Male plug ofthe powersupply cord
The following describes how to turn the power ON and OFF.
Connect the “female plug” of the power cord to the “inlet”.
Connect the “male plug” of the power cord to the “outlet”.
Press the power switch on the control panel.The printer is turned off and the power switch light goes out.
● Insert the power cord plug fi rmly into the socket, so that proper electrical contact is effected. If grounding is imperfect and electrical leakage occurs, fi re or electric shock could result.
CAUTION

9
11
Before U
se
Turning Power ON/OFF
Standard Mode
When the power is turned ON or the RESET key is pressed, the functions are set to Standard Mode.Standard Mode settings are as follows:If default settings are changed, the settings are the changed ones.
Print quantity : 0Paper size : A3Zoom : 100%Master darkness : ±0Scan darkness : ±0Image mode : TEXTDocument size : OffPrint position : 0.0 mmPrint darkness : ±0Print speed : Speed 3Ink saving mode : OFF

10
Document/Printing Paper Specifi cations
Acceptable Documents
Acceptable Printing Paper
● The following types of document cannot be used :* Documents with large fi le-binding holes* Documents with staples or paper clips attached* Documents with markedly curling ends/sides, or marked folds* Documents with tears or rough edge* Chemically treated documents with such as thermal paper and carbon paper, etc.* Highly transparent documents such as OHP fi lm and tracing paper, etc.* Documents which surface is slippery such as art paper and coated paper, etc.* Documents with correction fl uid and glue, etc.* Documents with smaller pieces of glued paper
● Always use documents of the same size. If you load documents in different length, the printer may not operate correctly.
● Acceptable printing paper and capacity on the feed tray and print trayPaper weight : 45–210 gsm (12 lb Bond–110 lb Index)Paper size : 320×450 mm (max.)
100×150 mm (min.)Paper stacking capacity : Feed tray : 1,500 sheets (64 gsm), 1,280 sheets (20 lb Bond)
1,200 sheets (80 gsm) Print tray : 1,500 sheets (64 gsm), 1,280 sheets (20 lb Bond)
1,200 sheets (80 gsm)
* 1500 sheets may not be loaded depending on paper condition such as paper type, etc.* Recycled paper of 100% recycled pulp with different basis weight can be used.* Some types of envelope cannot be used.
● Exposure glassDocuments and books not exceeding 10 kgDocument Size: 297×432 mm (max.)
● Automatic document feeder (ADF) (optional)Document weight: 64–28 gsmDocument size : 297×432 mm (max.)
100×148 mm (min.)Stacking capacity in document tray: 100 sheets (64 gsm), 85 sheets (80 gsm/20 lb Bond)
IMPORTANT

11
11
Before U
se
Document / Printing Paper Specifi cations
IMPORTANTThe following types of paper cannot be used.
* Paper with large fi le-binding holes * Paper with staples or paper clips attached* Paper with markedly curling ends/sides, or marked folds* Paper with tears or rough edge* Chemically treated paper with such as thermal paper, carbon paper, and stickers, etc.* Highly transparent paper such as OHP fi lm and tracing paper, etc.* Paper with correction fl uid and glue, etc.* Paper with smaller pieces of glued paper


Chapter 2
2
Basic O
perations
Basic OperationsThis chapter describes basic operations such as basic printing, how to set a document and how to enlarge/reduce the size of copy, etc.
Preparing for Printing........................................................................................... 14How to Set Papers ........................................................................................... 14When no heavy weight paper is fed or two sheets of light weight paper are fed .. 15How to Supply or Replace Paper While Printing .............................................. 16How to Set the Print Tray ................................................................................. 17How to Set the Jump Plates ............................................................................. 18
Loading Documents............................................................................................. 19How to Load Document ................................................................................... 19How to Load Document on the Exposure Glass .............................................. 19Loading Document in Automatic Document Feeder (ADF)(Optional) .............. 20
Basic Printing....................................................................................................... 22Printing Using Basic Functions ........................................................................ 22
Enlargement / Reduction ..................................................................................... 24Enlargement and Reduction from Standard-Size Documents to Standard-Size Paper .. 24Enlargement and Reduction from Standard-Size Documents to Standard-Size Paper .. 25
Selecting Printing Paper Size .............................................................................. 26Master Making Area by Paper Size [European] ............................................... 26How to Set Paper Size ..................................................................................... 26Master Making Area by Paper Size [U.S.] ........................................................ 27How to Set Paper Size ..................................................................................... 27How to Set “CUSTOM” in Paper Size Setting .................................................. 28
Print Speed Adjustment ....................................................................................... 29Print Speed Adjustment ................................................................................... 29How to Adjust Print Speed .............................................................................. 29How to Set TOP SPEED .................................................................................. 30

14
Open the “ support tray”.
Hold the “ side guide lever” and adjust the “ side guide” according to the paper size.
Loosen sheets and align them.
Put the sheets between the “side guides” and push them to the inside of the machine.
Preparing for Printing
How to Set Papers
IMPORTANT
REFERENCE
B5
A5A4
B4
A3 /A4
/
B5 R
R
About 1500 sheets of 64 gsm high-quality paper can be loaded.
1,500 sheets may not be loaded depending on paper conditions such as paper type, etc.

15
22
Basic O
perations
Preparing for Printing
Adjust the “ feed pressure adjuster lever” to paper thickness.
● If no paper is fed:Adjust the “feed pressure adjuster lever” to (heavy) by moving it upward.
● If 2 sheets are fed: Adjust the “feed pressure adjuster lever” to (light) by moving it downward.
Adjust the “separation pressure adjuster knob” to the separation pressure .
● If no paper is fed:Turn the “ separation pressure adjuster knob” to “heavy”.
● If 2 sheets are fed:Turn the “separation pressure adjuster knob” to “light”.
If the problem persists even after adjusting the separation pressure with the “separation pressure adjuster knob”, adjust the side separator height with the “side separator height adjuster knob”.
● If no paper is fed:Turn the “ side separator height adjuster knob” to “heavy”.
● If 2 sheets are fed:Turn the “side separator height adjuster knob” to “light”.
When no heavy weight paper is fed or two sheets of light weight paper are fed
IMPORTANT● When you print on a postcard or heavy weight
paper, turn the “side separator height adjuster knob” to “heavy”.
● If the leading edge of the paper is scratched, turn the “side separator height adjuster knob” to “heavy”.

16
Preparing for Printing
How to Supply or Replace Paper While Printing
If paper runs out during printing or when you replace paper, press the “feed tray descend switch” to lower the “ feed tray”.
Make sure that the machine stops.If printing is in progress, press the STOP key.
Press the “ feed tray descend switch”.The “feed tray” is lowered for the time that the “feed tray descend switch” is pressed.
When paper runs out or papers in the feed tray are removed, the feed tray is automatically lowered.
Follow the steps 2,3, and 4 in “How to Set Papers”
IMPORTANT
REFERENCE
(“How to Set Papers” → see p.14)
● When supplying different size paper, set the “side fences” and “paper stopper” again.
● When supplying different quality paper, adjust the “feed pressure adjuster lever”, “Separation pressure adjuster knob”, and “side separator height adjuster knob”.

17
22
Basic O
perations
Preparing for Printing
Unlock the print tray lock lever and open out the “print tray”.
Open out the “ side fences”.
Open out the “ paper stopper”.
Hold the “knobs” on the “side fences” and adjust the position according to the paper size.Adjust the “SET LINE” according to the paper size.
Hold the “knobs” on the “paper stopper” and adjust the position according to the paper size.Adjust the “SET LINE” according to the paper size.
How to Set the Print Tray
The following describes how to set the print tray.
SET LINE
SETLINE

18
Preparing for Printing
How to Set the Jump Plates
The following describes how to set the jump plates.
Hold the “ jump plate levers” and adjust the jump plates according to the paper size.
REFERENCE● When moving the “jump plate levers” from the A3/
B4/A4 position, move them while holding them up.● When you use extremely heavy weight paper, set
the “jump plate levers” outward.● When you use wider paper than 297 mm, set the
“jump plate levers” outward.● When you use narrower paper than 210 mm, set
the “jump plate levers” inward.
Inward for narrower paper than 210 mm
Outward for extremely heavy weight paper or wider paper than 297 mm
19
2
Basic O
perations
Loading Documents
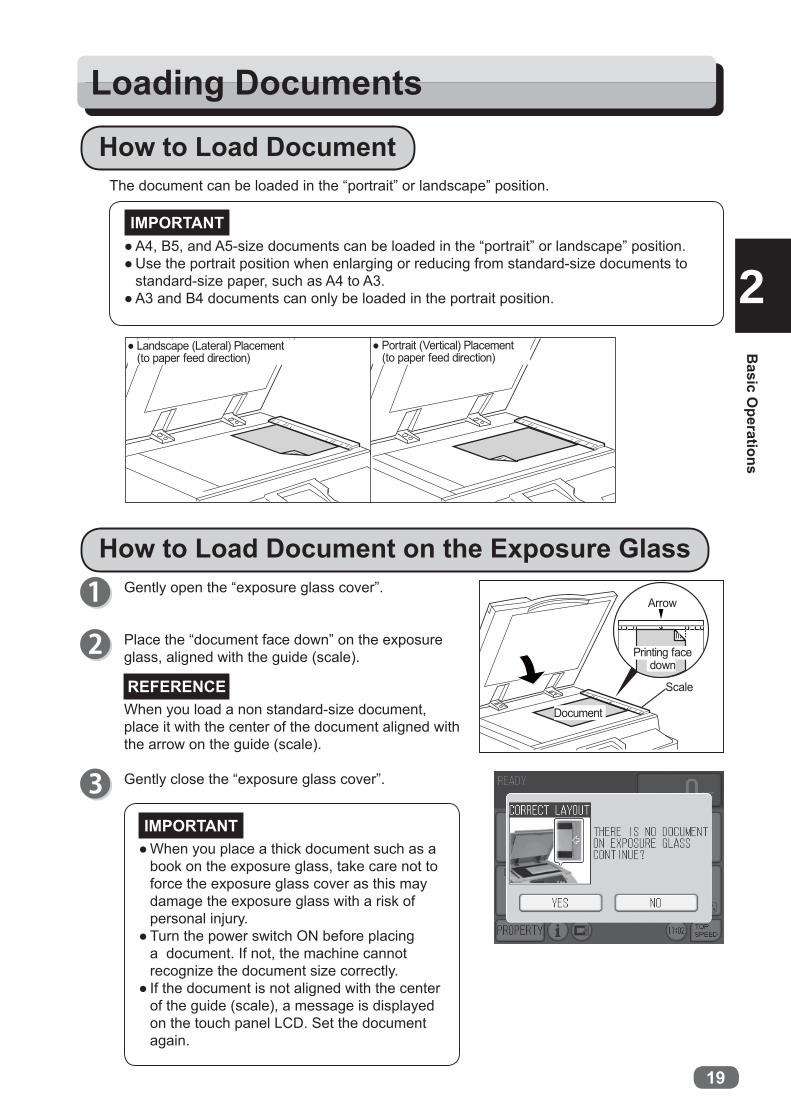
How to Load DocumentThe document can be loaded in the “portrait” or landscape” position.
Gently open the “ exposure glass cover”.
Place the “document face down” on the exposure glass, aligned with the guide (scale).
When you load a non standard-size document, place it with the center of the document aligned with the arrow on the guide ( scale).
Gently close the “exposure glass cover”.
How to Load Document on the Exposure Glass
● Landscape (Lateral) Placement (to paper feed direction)
Document
Scale
Arrow
IMPORTANT
IMPORTANT
REFERENCE
● Portrait (Vertical) Placement (to paper feed direction)
down
● A4, B5, and A5-size documents can be loaded in the “portrait” or landscape” position.● Use the portrait position when enlarging or reducing from standard-size documents to
standard-size paper, such as A4 to A3.● A3 and B4 documents can only be loaded in the portrait position.
Printing face
● When you place a thick document such as a book on the exposure glass, take care not to force the exposure glass cover as this may damage the exposure glass with a risk of personal injury.
● Turn the power switch ON before placing a document. If not, the machine cannot recognize the document size correctly.
● If the document is not aligned with the center of the guide (scale), a message is displayed on the touch panel LCD. Set the document again.

20
Loading Documents
Loading Document in Automatic Document Feeder (ADF)(Optional)
Load documents that consist of sheets to be printed in the ADF. When one or more documents are loaded in the ADF, master making and printing are automatically repeated until the document tray is empty.
The document can be loaded in the “portrait” or “landscape” position.
AA
Align the “document guides” with the marks for the size of document to be loaded in the ADF.
Document sizeDocument Guides
●Landscape(Lateral)Placement (to paper feed direction)
●Portrait(Vertical)Placement (to paper feed direction)
IMPORTANT● ADF mode is automatically selected when a document is loaded in the ADF.
The ADF then takes priority over the exposure glass in the master making process.● Document with smaller pieces of glued paper cannot be used.
IMPORTANT● A4, B5, and A5-size documents can be loaded in the “portrait” or landscape” position.● Use portrait position when enlarging or reducing from standard-size documents to
standard-size paper, such as A4 to A3.● A3 and B4 documents can only be loaded in the portrait position.● Book Shadow Erasure function cannot be available with the ADF.

21
22
Basic O
perations
Loading Documents
Place the “document face up” in the document tray.Master making starts with the top document in the tray.
Document Tray
DocumentPrinting face up
IMPORTANTDo not attempt to remove or add to the documents in the document tray while master making and printing are in progress.

22
● When the power is already turned on, press the RESET key. If the last-entered setting remains,
press the RESET key. The setting returns to Standard Mode.
Make sure that the main screen is displayed on the touch panel LCD.
Basic Printing
Printing Using Basic Functions
Set functions.
REFERENCERESET key
(“Preparing for Printing” → see p.14)
(“Loading Documents” → see p.19)
(“How to Set the Print Tray” → see p.17)
(“How to Set the Jump Plates” → see p.18)
(“Turning Power ON/OFF” → see p.8)Press the power switch on the control panel.
Load paper.
Load the document.
Set the “print tray”.
Set the jump plates.
Power switch

23
22
Basic O
perations
Basic Printing
Press the MASTER MAKING key.When the master has been made, one test print is automatically made.
You can enter the number of desired prints before pressing the MASTER MAKING key to immediately print the required number of copies.
REFERENCE
Use the NUMERIC keys to enter the “number of prints”.
Check the printing fi nish such as print position and print darkness, etc.
Press the PRINT key.The print run starts and the count displayed on the touch panel LCD is decremented by one for each print made. The printed pages are output to the “print tray”.
REFERENCE
REFERENCE
IMPORTANT● The test print is for verifi cation purposes only
and may be fainter than the fi nal print.
● You can specify up to 9999 prints.● If you want to change the “number of prints”,
press the CLEAR key and then enter the correct number.
● When you want to stop a print run, press the STOP key. To restart the print run, press the PRINT key again.
When you want to print multiple documents, repeat step 3 to 11.

24
Enlargement / Reduction
Enlargement and Reduction from Standard-Size Documents to Standard-Size Paper
Touch “ZOOM”.A list of zoom ratio is displayed on the touch panel LCD.
Touch the zoom you want to set.Zoom is set and the main screen is redisplayed.
● To return to 100%: ● Touch “ZOOM” and touch “100%”.● Press the RESET key.
In this case, all settings are reset to Standard Mode.
REFERENCE
[European]
70%81%86%
115%122%
141%
163%173%
61% 57%
You can enlarge or reduce the size of the copy to the desired size from standard-size documents to standard-size paper.
● EnlargementYou can make a copy that is enlarged from standard-size document to standard-size paper.
163% B5R→A3141% A4R→A3/B5R→B4/A5R→A4R/A5→A4122% A4R→B4/A5R→B5R/A5→B5115% B4 →A3/B5R→A4R/B5→A4
● ReductionYou can make a copy that is reduced from standard-size document to standard-size paper.
86% A3→B4 /A4R→B5R/A4→B5 81% B4→A4R/B5R→A5R/B5→A570% A3→A4R/B4 →B5R /A4R→A5R/A4→A561% A3→B5R

25
22
Basic O
perations
Enlargement/Reduction
Enlargement and Reduction from Standard-Size Documents to Standard-Size Paper
121%129%
154%
50%64%
77%
[US]
Touch “ZOOM”.A list of zoom ratio is displayed on the touch panel LCD.
Touch the zoom you want to set.Zoom is set and the main screen is redisplayed.
● To return to100%: ● Touch “ZOOM” and touch “100%”.● Press the RESET key.
In this case, all settings are reset to Standard Mode.
You can enlarge or reduce the size of the copy to the desired size from standard-size documents to standard-size paper.
● EnlargementYou can make a copy that is enlarged from standard-size document to standard-size paper.
154% 5.5×8.5→8.5×14129% 8.5×11→11×17/5.5×14→8.5×11121% 8.5×14→11×17
● ReductionYou can make a copy that is reduced from standard-size document to standard-size paper.
77% 11×17→8.5×14/8.5×14→8.5×1164% 11×17→8.5×11/8.5×11→5.5×8.550% 11×17→5.5×8.5

26
Selecting Printing Paper Size
Master Making Area by Paper Size [European]
Touch “PAPER SIZE”.A list of paper sizes is displayed on the touch panel LCD.
Touch the paper size you want to set.Paper size is set, and the main screen is redisplayed.
How to Set Paper Size
Paper Size A (±1%) × B (±1%)A3 293 mm 413 mmA4R 206 mm 290 mmA4 293 mm 203 mmB4 253 mm 357 mmA5R 206 mm 141 mmA5 144 mm 203 mmB5R 253 mm 175 mmB5 178 mm 250 mm
IMPORTANTB
A
About 8 mm cannot be printed. This margin is defi ned as top margin.
The following shows the image size that can be scanned for master making.
● When you do not select a paper size and print to a smaller paper, the internal parts of the machine and the print may be soiled.
● You will not obtain the correct layout when you start multiple printing with a wrong-sized paper selected.

27
22
Basic O
perations
Selecting Printing Paper Size
How to Set Paper Size
Paper Size A (±1%) × B (±1%)LDG 273 mm 426 mmLT(R) 210 mm 273 mmLT 273 mm 210 mmLGL 210 mm 350 mmMAX 291 mm 414 mmST(R) 134 mm 210 mmST 210 mm 134 mm
Touch “PAPER SIZE”.A list of paper sizes is displayed on the touch panel LCD.
Master Making Area by Paper Size [U.S.]
Touch the paper size you want to set.Paper size is set, and the main screen is redisplayed.
IMPORTANTB
A
About 8 mm cannot be printed. This margin is defi ned as top margin.
The following shows the image size that can be scanned for master making.
● When you do not select a paper size and print to a smaller paper, the internal parts of the machine and the print may be soiled.
● You will not obtain the correct layout when you start multiple printing with a wrong-sized paper selected.

28
Selecting Printing Paper Size
How to Set “CUSTOM” in Paper Size Setting
Touch “PAPER SIZE”.
Touch “CUSTOM”.
Up to 3 custom sizes can be stored.
Specify the sizes for A and B.Touching “+” increments the value.Touching “-” decrements the value.The value can be entered using the NUMERIC keys.
Touch “OK”.
Make sure that the main screen is displayed on the touch panel LCD.
● Custom paper sizeMin.: 100×148 mm (3.95×5.5 inches)Max.: 320×450 mm (12.6×18 inches)
REFERENCE
29
2
Basic O
perations
Print Speed Adjustment
Print Speed Adjustment
How to Adjust Print Speed
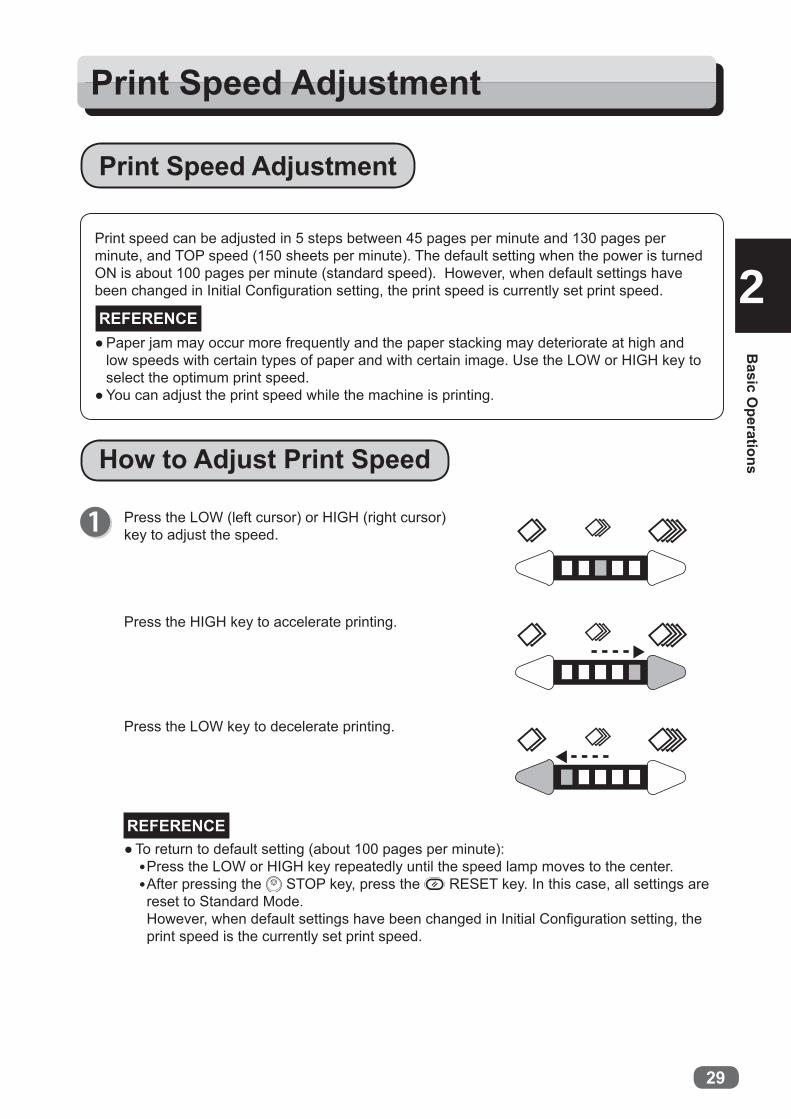
Press the LOW (left cursor) or HIGH (right cursor)key to adjust the speed.
Press the HIGH key to accelerate printing.
Press the LOW key to decelerate printing.
● To return to default setting (about 100 pages per minute):● Press the LOW or HIGH key repeatedly until the speed lamp moves to the center.● After pressing the STOP key, press the RESET key. In this case, all settings are reset to Standard Mode.However, when default settings have been changed in Initial Confi guration setting, the print speed is the currently set print speed.
REFERENCE
REFERENCE
Print speed can be adjusted in 5 steps between 45 pages per minute and 130 pages per minute, and TOP speed (150 sheets per minute). The default setting when the power is turned ON is about 100 pages per minute (standard speed). However, when default settings have been changed in Initial Confi guration setting, the print speed is currently set print speed.
● Paper jam may occur more frequently and the paper stacking may deteriorate at high and low speeds with certain types of paper and with certain image. Use the LOW or HIGH key to select the optimum print speed.
● You can adjust the print speed while the machine is printing.

30
Print Speed Adjustment
Touch “TOP SPEED”.
A message appears on the touch panel LCD.If you select “YES”, use the paper according to the restrictions below. If the paper to be used does not meet the restrictions, select “NO”.
When TOP SPEED is valid, the speed lamp blinks at the position of speed 5.
How to Set TOP SPEED
● To return to default setting (about 100 pages per minute):● Press the LOW or HIGH key repeatedly until the speed lamp moves to the center.● After pressing the STOP key, press the RESET key. In this case, all settings
are reset to standard mode.However, when default settings have been changed in Initial Confi guration setting, the print speed is the currently set print speed.
REFERENCE
IMPORTANTRESTRICTIONS in TOP SPEED● Use size B4 or smaller.● Paper stacking performance may deteriorate
when using thin paper.● Print position performance may deteriorate
slightly.● Some paper may cause wrinkles.

Chapter 3
3
Printing with U
seful Functions
Printing with Useful FunctionsThis chapter describes how to make prints using various useful functions.
Enlargement / Reduction ..................................................................................... 32Enlargement / Reduction ................................................................................. 32Minor Reduction ............................................................................................... 34Free Zoom ....................................................................................................... 36Custom Scaling ................................................................................................ 38
Adjusting Darkness.............................................................................................. 40Adjusting Darkness .......................................................................................... 40Scan Darkness ................................................................................................. 40How to Adjust Scan Darkness .......................................................................... 40Master Darkness .............................................................................................. 41How to Adjust Master Darkness ....................................................................... 41Print Darkness ................................................................................................. 42How to Adjust Print Darkness .......................................................................... 42
Printing Photographs and Color Documents ....................................................... 44Image Mode ..................................................................................................... 44How to Set Image Mode .................................................................................. 44
Adjusting Print Position........................................................................................ 46Print Position Adjustment ................................................................................. 46
Document Size .................................................................................................... 48Document Size ................................................................................................. 48How to Set Document Size .............................................................................. 48How to Set “CUSTOM” in Document Size ....................................................... 49

32
Enlargement / Reduction
Enlargement / Reduction
(90% - 99%)
(90% - 99%)
A4 document A4 printout
Document
Document
Document
500% 50%
500% 50%
50%500%
You can enlarge or reduce the size of the copy to the desired size.
● Minor Reduction → page 34 You can make a copy that is slightly smaller (90% - 99%) than the original document.
● Free Zoom → page 36 You can enlarge or reduce the size of the copy in 1% increments between 50% and 500%.
● Custom Scaling → page 38 You can enlarge or reduce the size of the copy in 1% increments between 50% and 500% in vertical/horizontal direction.
Vertical direction
Horizontal direction

33
3
Printing with U
seful Functions
Enlargement / Reduction
● To reset to 100%: * Touch “ZOOM” and then touch “100%”.* Press the RESET key.In this case, all settings are reset to Standard Mode.
● Always set the sizes of printing paper and document to be used.You cannot obtain the correct zoom ratio if you set wrong size.
● The machine cannot detect the size correctly if the document is positioned as shown on the right.
Scale
* Edge of paper not touching scale
* Document not positioned centrally against the scale.
Document
IMPORTANT
REFERENCE
* Place document centrally positioned against the scale.
Correct
Incorrect
Incorrect
Document
Document

34
Enlargement / Reduction
Minor Reduction
Touch “ZOOM”.A list of zoom ratios is displayed on the touch panel LCD.
(90% - 99%)
(90% - 99%)
A4 document
IMPORTANT
Make sure that the main screen is displayed on the touch panel LCD.
Touch “MINOR REDUCTION”.
Touch the screen switch button at the bottom of the screen.
A4 printoutThe copy is printed at 90% - 99% size of the document.Minor reduction is used when you want to make a binding margin or the document has text or illustrations in non-master making area.
Select “MINOR REDUCTION” before master making.

35
3
Printing with U
seful Functions
Enlargement / Reduction
Touch “ON” and set zoom between 90% and 99%.Touching “+” increments the value.Touching “-” decrements the value.
The value can be also entered using the NUMERIC keys.
Touch “OK”.The zoom ratio is set and the display returns to themain screen.
To reset to 100%: ● Touch “MINOR REDUCTION” again and touch “OFF”, and then touch “OK”.● Press the RESET key. In this case, all settings are reset to Standard Mode.
REFERENCE

36
Enlargement / Reduction
Free Zoom
Touch “ZOOM”.A list of zoom ratios is displayed on the touch panel LCD.
Touch “FREE ZOOM”.
DocumentIMPORTANT
Make sure that the main screen is displayed on the touch panel LCD.
500% 50%
Set zoom ratio between 50% and 500%.Touching “+” increments the value.Touching “-” decrements the value.The value can be also entered using the NUMERIC keys.
You can set a zoom ratio between 50% and 500% in 1% steps.
● Select “FREE ZOOM” before starting master making.

37
3
Printing with U
seful Functions
Enlargement / Reduction
Touch “OK”.“FREE ZOOM” is set and the display returns to the main screen.
● To reset to 100%:* Touch “ZOOM” and then touch 100%.* Press the RESET key. In this case, all settings are reset to Standard Mode.
REFERENCE
IMPORTANT● Text and lines may appear jagged at high zoom ratios.

38
Enlargement / Reduction
Custom Scaling
Touch “ZOOM”.A list of zoom ratios is displayed on the touch panel LCD.
Vertical direction
Horizontal direction
Document
Document
IMPORTANT
Make sure that the main screen is displayed on the touch panel LCD.
Touch the screen switch button at the bottom of the screen.
500% 50%
500% 50%
You can enlarge or reduce the size of the copy in 1% increments between 50% and 500% in vertical/horizontal direction.
Set “CUSTOM SCALING” before starting master making.

39
3
Printing with U
seful Functions
Enlargement / Reduction
Touch “CUSTOM SCALING”.
Set zoom ratio between 50% and 500% in A (horizontal) and B (vertical).Select A and set the zoom ratio using the “+” and “-” keys.Select B and set the zoom ratio using the “+” and “-” keys.
Touching “+” increments the value.Touching “-” decrements the value.The values can be also entered using the NUMERIC keys.
Touch “OK”.Zoom ratio is set and the display returns to the main screen.
● To reset to 100%: * Touch “ZOOM” and then touch 100%.* Press the RESET key.In this case, all settings are reset to Standard Model.
REFERENCE
IMPORTANT● Text and lines may appear jagged at high zoom ratios.

40
Adjusting Darkness
Adjusting Darkness
Scan Darkness
Touch “DARKNESS”.
Touch “DARK” if the color of the document is light.Touch “LIGHT” if the color of the document is dark.
Touch “OK”.Scan darkness adjusted in step 2 is set.
● To reset to standard: * Touch “DARKNESS” again and adjust scan darkness to “±0”, and then touch “OK”.
* Press the RESET key. In this case, all settings are reset to Standard Mode.
IMPORTANT
REFERENCE
How to Adjust Scan DarknessMake sure that the main screen is displayed on the touch panel LCD.
If the test print made after master making is too light, adjust the print darkness. If you cannot adjust the print darkness suffi ciently to give a satisfactory print, adjust the master darkness.
● You can print immediately after adjusting the print darkness.● If you adjust the master darkness, you must repeat the master making process before making prints.● If you adjust the scan darkness, you must repeat the master making process before making prints.
IMPORTANT
Scan darkness can be adjusted in 5 steps.If thin line is not printed, adjust the scan darkness.When the color of the document is light, touch “DARK”.When the color of the document is dark, touch “LIGHT”.
● Set scan darkness before starting master making.● Thin line may not be printed even scan darkness is adjusted.

41
3
Printing with U
seful Functions
Adjusting Darkness
How to Adjust Master Darkness
Touch “DARKNESS”.
Touch “DARK” if the color of the document is light.Touch “LIGHT” if the color of the document is dark.
Touch “OK”.Master darkness adjusted in step 3 is set.
● To reset to standard: * Touch “DARKNESS” again and adjust master darkness to “±0”, and then touch “OK”.* Press the RESET key.
In this case, all settings are reset to Standard Mode.
Master Darkness
REFERENCE
Make sure that the main screen is displayed on the touch panel LCD.
IMPORTANT
Master darkness can be adjusted in 5 steps.When the color of the document is light, touch “DARK”.When the color of the document is dark, touch “LIGHT”.
● Set master darkness before starting master making.

42
Adjusting Darkness
Print Darkness
How to Adjust Print Darkness
There are 2 ways to adjust print darkness.
Adjust print darkness using the PRINT DARKNESS keys.
Print darkness becomes darker by touching (DARK).
Print darkness becomes lighter by touching (LIGHT).
● To reset to standard: * Move the light of the print darkness indicating lamp to center using the PRINT DARKNESS keys.* Press the RESET key. In this case, all settings are reset to Standard Mode.However, if print darkness is changed in Initial Confi guration Mode, it returns to the one you set.
● Adjustment using PRINT DARKNESS keys on the control panel
REFERENCE
Print darkness can be adjusted in 5 steps.To make the print darker, touch “DARK” (increased ink transfer amount).To make the print lighter, touch “LIGHT” (reduced ink transfer amount).

43
3
Printing with U
seful Functions
Adjusting Darkness
Touch “DARK” if the color of the document is light.Touch “LIGHT” if the color of the document is dark.Selecting “AUTO” automatically adjusts print darkness depending on print speed.
Touch “OK”.Print darkness adjusted in step 4 is set.
● To reset to standard: * Touch “DARKNESS” again and adjust print darkness to “±0”, and then touch “OK”.* Press the RESET key.In this case, all settings are reset to Standard Mode.
Touch “DARKNESS”.
● Adjustment on the touch panel LCD
REFERENCE
Touch “MANUAL”.
Make sure that the main screen is displayed on the touch panel LCD.
IMPORTANTEven when “PRINT DARKNESS” is set to “AUTO”, if print darkness is adjusted using the PRINT DARKNESS keys, the setting will be changed from “AUTO” to “MANUAL”.

44
Printing Photographs and Color Documents
Touch “IMAGE MODE”.A list of documents is displayed on the touch panel LCD.
Select one from the list (TEXT, TEXT>PHOTO, PHOTO>TEXT, PHOTO, PENCIL, SCREENCOARSE, SCREEN FINE).“IMAGE MODE” is set and the display returns to main screen.
IMPORTANT
REFERENCETo set “SCREEN COARSE” or “SCREEN FINE”, touch the screen switch button at the bottom of the screen.
Make sure that the main screen is displayed on the touch panel LCD.
How to Set Image Mode
Image Mode
● This function includes seven modes for enhancing text and photographic documents.
Text mode : Enhances the printing of text documents. TEXT>PHOTO : Enhances the printing of documents with both text and photographs. Especially, suitable for documents containing more text than photographs. PHOTO>TEXT : Enhances the printing of documents with both text and photographs. Especially, suitable for documents containing more photographs than text. PHOTO : Enhances the printing of the subtle gradations of photographs and light
images from color documents. PENCIL : Enhances the print of penciled light-colored document. SCREEN COARSE : Coarsely processes non-screened photographs and enhances the printing. SCREEN FINE : Finely processes non-screened photographs and enhances the printing.
Set the above settings before starting master making.

45
3
Printing with U
seful Functions
Printing Photographs and Color Documents
Touch either “SCREEN COARSE” or “SCREEN FINE”.“IMAGE MODE” is set and the display returns to the main screen.

46
Adjusting Print Position
Print Position Adjustment
Press the PRINT POSITION keys to adjust.
The print position adjustment screen is displayed on the touch panel LCD. Each press of “CURSOR” keys changes the print position by 0.5mm.
● To reset to standard: * Press the center key of the PRINT POSITION key.* Press the RESET key. In this case, all settings
are reset to Standard Mode.
Adjustment keys (cursors) are also displayed on the touch panel LCD. Touching the CURSOR keys adjusts print position as well as PRINT POSITION keys. If you do not touch any PRINT POSITION key for about 5 seconds, the display returns to the main screen.
IMPORTANT
REFERENCE
Make sure that the main screen is displayed on the touch panel LCD.
REFERENCE● You can also display the print position adjustment
screen by touching “PRINT POSITION” on the touch panel LCD.
After master making has fi nished, you can fi ne-tune the position of the printed image 15mm in the vertical direction and 10mm in the horizontal direction.Adjusts only vertical print position using PRINT POSITION keys.(“Adjusting horizontal print position” → see p.47)
● You cannot adjust print position while printing.Stop the operation with the STOP key to adjust the position.
● You can adjust print position when “PRINT POSI ADJ (p)” (Print Position Adjustment While Printing) is “ON”. In this case, adjustment range is 30 steps in vertical and 20 steps in horizontal. (“Print Position Adjustment While Printing” → see p.153)
● When “ NARROW PAPER” is “ON”, print position should be “ 0.0”.(“Narrow Paper” → see p.112)

47
3
Printing with U
seful Functions
Adjusting Print Position
Turn the feed tray horizontal registration adjuster dial which is located in the right of the feed tray to adjust print position.
Turning the dial toward you moves the feed tray to the left.
Turning the dial toward the machine moves the feed tray to tray to the right.
Rightward
Paper feed direction
Paper feed direction
Leftward
IMPORTANT
Rightward
Leftward
Rightward
Leftward
Leftward
Rightward
REFERENCE
REFERENCE
● Print position moves rightward.
● Print position moves leftward.
Adjusting horizontal print position
● Check the moving distance of the feed tray from the center while watching the divisions on the feed tray.
● When you have adjusted print position, be sure to move the feed tray back to the center after printing.

48
Document Size
Document Size
How to Set Document Size
Touch “DOCUMENT SIZE”.
Touch the document size to be used.
“DOCUMENT SIZE” is set.
REFERENCE
Make sure that the main screen is displayed on the touch panel LCD.
This function sets size of the document to be printed.
Set document side when using the following documents. ● When the document is loaded in landscape position on the Automatic Document Feeder (ADF)● When the document size is nonstandard● When the machine cannot recognize the document size correctly● When the document size is smaller than set paper size, printing is performed in document size.
When you want to prioritize paper size to be printed on, set “DOCUMENT SIZE” to OFF.

49
3
Printing with U
seful Functions
Document Size
How to Set “CUSTOM” in Document SizeTouch “DOCUMENT SIZE”.
Touch “CUSTOM”.
Set the sizes for “A” and “B”.Touching “+” increments the value.Touching “-” decrements the value.The value can be also entered using the NUMERIC keys.
Touch “OK”.
● When “BOOK SHADOW ERASURE” function is selected
Select “BOOK DIRECTION”.


Chapter 4
4
Other Functions
Other FunctionsThis chapter describes various functions.
Edit Function: Preview ....................................................................................... 52Edit Function: Multiple Exposure ......................................................................... 56Edit Function: Book Shadow Erasure .................................................................. 68Edit Function: 90° Rotation .................................................................................. 73Edit Function: 180° Rotation ................................................................................ 75Edit Function: Edit Image .................................................................................... 77Edit Function: Document Memory ....................................................................... 98Special Function: Program ................................................................................ 100Special Function: Paper Type .............................................................................110Special Function: Narrow Paper .........................................................................112Special Function: Ink Saving Mode ....................................................................114Special Function: Replenish Ink .........................................................................116Special Function: Confi dential Safeguard ..........................................................117Special Function: Document Darkness Detection ..............................................119Special Function: Interval Print .......................................................................... 121Special Function: Batch Print Sequential Batch Print ........................................ 123Special Function: Document Misset Detection .................................................. 128Peripheral Function: Online Mode ..................................................................... 130Setting Function: Initial Confi guration ................................................................ 132Setting Function: Shortcut Setting ..................................................................... 135Setting Function: Energy Save Mode ................................................................ 137Setting Function: Automatic Power OFF ........................................................... 139Setting Function: Automatic Reset .................................................................... 141Setting Function: Fine Start ............................................................................... 143Setting Function: Optimize Print ........................................................................ 145Setting Function: Pre-print ................................................................................. 147Setting Function: Repeat Counter ..................................................................... 149Setting Function: Proof Print.............................................................................. 151Setting Function: Print Position Adjustment (While Printing) ............................. 153Setting Function: Display Brightness ................................................................. 155Setting Function: Date & Time .......................................................................... 157Setting Function: Buzzer ................................................................................... 159Setting Function: Information............................................................................. 161

52
Edit Function: Preview
Checking Document To Be Printed
Touch “PROPERTY”.
Touch “EDIT”.
Touch “PREVIEW”.
Touch “ON”.
Touch “END”.
REFERENCE
Make sure that the main screen is displayed on the touch panel LCD.
You can preview print image to be printed on the touch panel LCD before starting master making. For example, it is convenient to check if the print image can be fi tted in the paper size when enlarged or reduced.
When “PREVIEW” is set, the “PREVIEW” icon appears at the bottom of the main screen. When you touch the icon, the setting screen of “PREVIEW” appears and you can change the setting. However, if maximum shortcut icons are already displayed, the “PREVIEW” icon will not appear.

53
4
Other Functions
Edit Function: Preview
Set a document and press the MASTER MAKING key.
The document is scanned and the scanned data is displayed on the touch panel LCD.
Continue Page....
REFERENCE
IMPORTANT
REFERENCE● When using “ZOOM” function:
(“● Using ZOOM Function” → see p.54)● When using “SHIFT” function:
(“● Using SHIFT Function” → see p.55)
Press the MASTER MAKING key or touch “END”.“MAKE A NEW MASTER?” appears.
If you touch “YES”, master making starts.If you touch “NO”, the display returns to the main screen.If you touch “RETURN”, the display returns to the preview screen.
When no document is placed on the exposure glass, “THERE IS NO DOCUMENT ON EXPOSURE GLASS CONTINUE?” appears.Touch “NO” and set a document.Press the MASTER MAKING key.
Displayed data is processed to be fi tted in paper size.

54
Edit Function: Preview
● Using ZOOM Function
Touch “ZOOM”.Touch one from the list (ZOOM1/ZOOM2/ZOOM3/ZOOM4).The following description is when “ZOOM2” is touched.
Touch the center of the area you want to zoom in.The area you touched is zoomed in.To change “ZOOM2” to “ZOOM1”, “ZOOM3”, or “ZOOM4”, touch “ZOOM”.
● To confi rm the zoomed-in peripheral area of the document by ZOOM function, touch “SHIFT”, thentouch anywhere on the image and move the touched position to the area you want to view while touchingit. If “ZOOM1” is selected, you can not use shift function.
You can zoom in the image by touching a part of the document.ZOOM1 < ZOOM2 < ZOOM3 < ZOOM4
ZOOM1 Displays whole document on the touch panel LCD. ZOOM2 Displays the zoomed-in peripheral area of the touched position. Double zoom of ZOOM1 ZOOM3 Displays the zoomed-in peripheral area of the touched position. Quadruple zoom of ZOOM1 ZOOM4 Displays the zoomed-in peripheral area of the touched position. Octuple zoom of ZOOM1
REFERENCE

55
4
Other Functions
Edit Function: Preview
● Using SHIFT Function
Touch “SHIFT”.
● You can shift the image only when "ZOOM2”, “ZOOM3” or “ZOOM4” is selected.
When you confi rm the zoomed-in peripheral area of the document by zoom function, you can move the touched position to the area you want to view while touching it.
REFERENCE
Touch anywhere on the image and move the touched position to the area you want to view while touching it.
Release your fi nger from the image when the area you want to view appears.
● To fi nish the shift function, touch “SHIFT” again or touch other function.
REFERENCE

56
Edit Function: Multiple Exposure
Multiple Exposure on One Page
2images
4images
Document
Document
Document
Document
8images
16images
Document Printout
IMPORTANT
This mode allows you to print multiple copies of the document on one page and two different documents on one page.
● MULTIPLE EXPOSURE ( 2, 4, 8, and 16-up)This mode prints multiple copies of the document on one page.
● 2 IN1This mode prints two different documents on one page.
● CUSTOMYou can make multiple exposure as you want.
● CUT LINEYou can put a cut line on the printout.It makes cut easy after printing.
Master making for multiple exposure requires more time than that for normal printing.

57
4
Other Functions
Edit Function: Multiple Exposure
● Multiple Exposure ( 2, 4, 8, and 16-up)
Zoom ratio and orientation of the document● Copying A4 to A3 (2 prints on one page)
● Copying A4 to A3 (4 prints on one page)
Lands placement(to paper feed direction
Zoom ratio 100%
REFERENCE
Portrait placement(to paper feed direction
This mode allows you to print 2, 4, 8, or 16 copies of the document on one page.If you are reducing or enlarging, refer to the right fi gure.
Zoom ratio 70%

58
Edit Function: Multiple Exposure
How to Set Multiple Exposure ( 2, 4, 8, and 16-up)
Touch “PROPERTY”.
Touch “EDIT”.
Touch “MULTIPLE EXPOSURE”.A list of multiple exposure appears.
Touch your preferred multiple exposure (2, 4, 8, or 16-up).“2” is selected here.
Touch “END”.
REFERENCE
Make sure that the main screen is displayed on the touch panel LCD.
REFERENCETo set MULTIPLE EXPOSURE to “OFF” (standard):● Touch “MULTIPLE EXPOSURE” and then touch “OFF”.● Press the RESET key.
In this case, all settings will be returned to Standard Mode.
When “MULTIPLE EXPOSURE” is set, the “MULTIPLE EXPOSURE” icon appears at the bottom of the main screen. When you touch the icon, the setting screen of “MULTIPLE EXPOSURE” appears and you can change the setting. However, if maximum shortcut icons are already displayed, the “MULTIPLE EXPOSURE” icon will not appear.

59
4
Other Functions
Edit Function: Multiple Exposure
2 IN 1
Two-in-one (2 IN 1) function allows you to print two small documents on one page and also easily print for creating booklets that will be saddle stitched. This is called “2 IN 1 layout mode”. When you use “2 IN 1 layout mode”, the layout is as follows.
● Set “2 IN 1” before starting master making. ● If you are printing the documents at 100%, select a printing paper that is the size of the two documents. ● When you enlarge or reduce two documents size by side, select a zoom ratio so that the documents fi t exactly on one page. ● Note the followings when using 2-IN-1 layout mode: * You must select a paper size and zoom ratio that will accommodate two documents. * Correct layout may not be obtained with other than standard size papers.
B A D C
B A D C E
Printout 1
Printout 1
Printout 2
Printout 2 Printout 3
Document(even number)
Document(odd number)
IMPORTANT

60
Edit Function: Multiple Exposure
How to Set 2 IN 1
Touch “PROPERTY”.
Touch “EDIT”.
Touch “MULTIPLE EXPOSURE”.A list of multiple exposure appears.
Touch the screen switch button at the bottom of the screen.
Touch “2 IN1”.
Make sure that the main screen is displayed on the touch panel LCD.
To set 2 IN 1 to “OFF” (standard):● Touch “MULTIPLE EXPOSURE” and then touch “OFF”.● Press the RESET key.
In this case, all settings will be returned to Standard Mode.
REFERENCE

61
4
Other Functions
Edit Function: Multiple Exposure
Touch “LAYOUT DIRECTION”.
Touch layout of the documents.
Select document orientation, binding direction, and “2 IN 1” orientation, and then touch the screen.
PLACEMENT appears.Set the document according to the displayed placement.Touch “OK”.
Continue Page....

62
Edit Function: Multiple Exposure
If you experience problems with the layout, check the followings:● Document orientation● Document size, paper size, zoom ratio● Orientation of “2 IN 1”
Press the MASTER MAKING key.After the fi rst document is scanned, a messageappears on the touch panel LCD.
Set the second document and press the MASTER MAKING key.
Touch “END”.
REFERENCE
REFERENCE
REFERENCE
When “2 IN 1” is set, the “2 IN 1” icon appears at the bottom of the main screen. When you touch the icon, the setting screen of “2 IN 1” appears and you can change the setting. However, if maximum shortcut icons are already displayed, the “2 IN 1” icon will not appear.
● After the fi rst document is scanned, the following message appears.END SCANNING : “2 IN 1” is performed for the fi rst
document.STOP : Processing for the fi rst document is stopped.

63
4
Other Functions
Edit Function: Multiple Exposure
How to Set 2 IN 1 Using the ADF (Option)
REFERENCE
Proceed with steps 1 to 8 of the sequence described in “How to Set 2 IN 1”.(“How to Set 2 IN 1” → see p.60)
Select document orientation, binding direction, and “2 IN 1” orientation, and then touch the screen.Upper left is selected here.
PLACEMENT appears.Set the document according to the displayed placement.(“Loading Document in Automatic Document Feeder (ADF)(Optional)” → see p.20)Touch “OK”.
Touch “END”.
When “2 IN 1” is set, the “2 IN 1” icon appears at the bottom of the main screen. When you touch the icon, the setting screen of “2 IN 1” appears and you can change the setting. However, if maximum shortcut icons are already displayed, the “2 IN 1” icon will not appear.
Press the MASTER MAKING key.After the fi rst document is scanned by the ADF, the second document is scanned automatically, and then printing stars.

64
Edit Function: Multiple Exposure
Touch “EDIT”.
Touch “MULTIPLE EXPOSURE”.A list of multiple exposure appears.
Custom
You can specify the number to be set for multiple exposure on each side of the paper.
How to Set Custom
Make sure that the main screen is displayed on the touch panel LCD.
Touch “PROPERTY”.
Touch the screen switch button at the bottom of the screen.

65
4
Other Functions
Edit Function: Multiple Exposure
Touch “CUSTOM”.
The “CUSTOM” screen appears.Set the number to be specifi ed on each side and touch “OK”.Touching “+” increments the value.Touching “-” decrements the value.The value can be also entered using the NUMERIC keys.
Touch “END”.
REFERENCE
REFERENCE
To set CUSTOM to “OFF” (standard):● Touch “MULTIPLE EXPOSURE” and then touch “OFF”.● Press the RESET key.
In this case, all settings will be returned to Standard Mode.
REFERENCE
Up to 5 can be entered for each side.
When “CUSTOM” is set, the “MULTIPLE EXPOSURE” icon appears at the bottom of the main screen. When you touch the icon, the setting screen of “MULTIPLE EXPOSURE” appears and you can change the setting. However, if maximum shortcut icons are already displayed, the “MULTIPLE EXPOSURE” icon will not appear.

66
Edit Function: Multiple Exposure
Cut Line
You can put a cut line on the printout. It makes cut easy after printing.
How to Set Cut Line
Touch “PROPERTY”.
Touch “EDIT”.
Touch “MULTIPLE EXPOSURE”.A list of multiple exposure appears.
Touch the icon of cut line on the MULTIPLE EXPOSURE screen.

67
4
Other Functions
Edit Function: Multiple Exposure
If you want to put a cut line, touch “ON”.If not, touch “OFF”.“CUT LINE” will be set.
To set CUT LINE to “OFF” (standard):● Touch “MULTIPLE EXPOSURE” and the icon of cut
line in the lower left corner of the screen, and then touch “OFF”.
● Press the RESET key.In this case, all settings will be returned to Standard Mode.
REFERENCE
The MULTIPLE EXPOSURE screen appears.Select and touch multiple exposure.

68
Edit Function: Book Shadow Erasure
Book Shadow Erasure
This function erases the shadows caused by book binding when printing an open spread from a book or other folded document. It also erases the shadow around the periphery of the document.
If print image is light, use document darkness detection function. (“Document Darkness Detection” → see p.119)
* Select “BOOK SHADOW ERASURE” before starting master making. * This function is not available with the ADF (Automatic Document Feeder) installed. * Master making for shadow erasure requires more time than that for normal printing.
● OFF The shadow is erased from approximately 2 mm around the periphery of the document.
● Center Shadow Erasure Prints documents with 15 mm center shadow erased when printing an open spread from a book or other folded document.
The shadow is also erased from approximately 2 mm around the periphery of the document.
● Outline Shadow Erasure Prints documents with 6 mm periphery erased when printing an open spread from a book or other folded document.
● Center & Outline Shadow Erasure Prints documents with both 15 mm center shadow and 6 mm periphery erased when printing an open spread from a book or other folded document.
Center & Outline
REFERENCE
IMPORTANT
IMPORTANT
ShadowErasureDocument
OFF
ShadowErasureDocument Center
OutlineShadowErasureDocument
Document

69
4
Other Functions
Edit Function: Book Shadow Erasure
● Specify Area Prints documents with a specifi ed area erased when printing an open spread from a book or other folded document. (The erasure area can be selected within the range from 0 to 99 mm.)
* If shadow erasure (0 to 99 mm) is set at ANY, a slight error sometimes occurs. * Even if “B” or “C” is set to 2 mm or less, the shadow is erased from approximately 2 mm around the periphery of the document.
Area of Shadow Erasure
When you select “OFF”, the shadow is erased from approximately 2 mm around the periphery of the document.
The margin at the printed leading edge is for removing the paper from the drum. - SPECIFY AREA - * Even if a numeric value smaller than 8 mm is selected at ANY, a margin of 8 mm is set for this leading edge section. * Even if a margin (0 to 99 mm) is set at ANY, a slight error sometimes occurs.
The shadow erasure dimensions are as the illustrations indicate.
● OFF
● With shadow erasure
Specify Area (Set A, B & C)
Approx. 8 mm
2 mm
2 mm
2 mm
6 mm
IMPORTANT
Document Shadow Erasure
IMPORTANT
Approx.8 mm 15 mm 6 mm
6 mm

70
Edit Function: Book Shadow Erasure
How to Set Book Shadow Erasure
Make sure that the main screen is displayed on the touch panel LCD.
Touch “PROPERTY”.
Touch “EDIT”.
Touch “SHADOW ERASURE”.A list of book shadow erasure appears.
Touch one item you want to set.“CENTER” is selected here.
Touch the document size you want to set.Book shadow erasure is not performed correctly if document size is not selected.
● When you select “CUSTOM”, refer to “Document Size”. (“Document Size” → see p.48)
REFERENCE

71
4
Other Functions
Edit Function: Book Shadow Erasure
“SHADOW ERASURE” is set.
To set SHADOW ERASURE to “OFF” (standard):● Touch “SHADOW ERASURE” and then touch “OFF”.● Press the RESET key.
In this case, all settings will be returned to Standard Mode.
● When selecting “SPECIFY AREA” in step 5.
Touch the document size you want to set.Book shadow erasure is not performed correctly if document size is not selected.
Touch “END”.
● When “SHADOW ERASURE” is set, the “SHADOW ERASURE” icon appears at the bottom of the main screen. When you touch the icon, the setting screen of “SHADOW ERASURE” appears and you can change the setting. However, if maximum shortcut icons are already displayed, the “SHADOW ERASURE” icon will not appear.
Continue Page....
REFERENCE
REFERENCE

72
Edit Function: Book Shadow Erasure
Touch “END”.
REFERENCEWhen “SHADOW ERASURE” is set, the “SHADOW ERASURE” icon appears at the bottom of the main screen. When you touch the icon, the setting screen of “SHADOW ERASURE” appears and you can change the setting. However, if maximum shortcut icons are already displayed, the “SHADOW ERASURE” icon will not appear.
Specify the sizes for “A”, “B”, and “C”, and then touch “OK”.
Touch “A” and specify numeric value using the “+” or “-”.Touching “+” widens shadow erasure area.Touching “-” narrows shadow erasure area.The value can be also entered using the NUMERIC keys.Specify the sizes for “B” and “C” in the same procedure.
You can set the sizes from 0 to 99mm.REFERENCE

73
4
Other Functions
Edit Function: 90° Rotation
90° Rotation
How to Set 90° Rotation
Make sure that the main screen is displayed on the touch panel LCD.
Touch “PROPERTY”.
Touch “EDIT”.
Touch “90°ROTATION”.The 90°ROTATION screen appears.
Continue Page....
A3 document PrintoutReduced.Clockwise 90° rotation
REFERENCE
IMPORTANT
This function is for rotating documents on the digital scan image by 90 degrees clockwise.A3/A4 drum is recommended to be used for 90° rotation.
● If original image has solid black portion, set proper rotation so that the solid black portion comes to rear part of print.Example : If A3-size document has solid black
portion in the right side more than the left side, set clockwise 90° rotation. Doing this prints out the right part of the document on the rear part of the ejected printout, and prevents paper jam.
● Setting 180° rotation to “ON” enables 270° rotation.
Master making for 90° rotation requires more time than that for normal master making.

74
Edit Function: 90° Rotation
Touch “ON”.
“90° ROTATION” is set.
To set 90° ROTATION to “OFF” (standard):● Touch “90°ROTATION” and then touch “OFF”.● Press the RESET key.
In this case, all settings will be returned to Standard Mode.
Touch “END”.
● When “90°ROTATION” is set, the “90°ROTATION” icon appears at the bottom of the main screen.When you touch the icon, the setting screen of “90°ROTATION” appears and you can change the setting. However, if maximum shortcut icons are already displayed, the “90°ROTATION” icon will not appear.
REFERENCE
REFERENCE
● ON: Rotates the document image clockwise by 90 degrees.

75
4
Other Functions
This function is for rotating documents on the digital scan image by 180°.
● If original image has solid black portion on the right, set 180° rotation to “ON”. Doing this prints out the solid black portion on the rear part of the ejected printout, and prevents paper jam.
● You can use this function with “Document Memory” function.
PrintoutClockwise 180° rotation
Document
Continue Page....
Edit Function: 180° Rotation
180° Rotation
How to Set 180° Rotation
REFERENCE
Make sure that the main screen is displayed on the touch panel LCD.
Touch “PROPERTY”.
Touch “EDIT”.
Touch “180°ROTATION”.The 180°ROTATION screen appears.

76
Edit Function: 180° Rotation
Touch “ON”.
“180° ROTATION” is set.
To set 180° ROTATION to “OFF” (standard):● Touch “180°ROTATION” and then touch “OFF”.● Press the RESET key.
In this case, all settings will be returned to Standard Mode.
● When “180°ROTATION” is set, the “180°ROTATION” icon appears at the bottom of the main screen.When you touch the icon, the setting screen of “180°ROTATION” appears and you can change the setting. However, if maximum shortcut icons are already displayed, the “180°ROTATION” icon will not appear.
REFERENCE
REFERENCE
Touch “END”.

77
4
Other Functions
You can make a fi ne master for the document with both text and photographs by specifying thearea for TEXT●ERASE●OUTLINE/PATTERN●NEGATIVE IMAGE.Edit modes●TEXT Makes text, in specifi ed area of the document with both text and photograph, clear with proper density for fi ne master making.
●ERASE Erases unnecessary area of the document and makes master for necessary area only. For 2-color printing, it switches between “INSIDE” and “OUTSIDE” in the fi rst specifi ed area by “SWITCH ERASE AREA” mode. You do not have to specify the area again for 2-color printing.
●OUTLINE/PATTERN OUTLINE Outlines text easily such as title or product name etc. to give a strong impression. PATTERN Upgrades image using various kinds of pattern. You can select it from 17 types of pattern such as hatching.
Edit Function: Edit Image
Edit Image
This function edits the image of the document.There are two functions, Make Up and Trimming in Edit Image.● Make Up
Make Up function edits the image of the document with both text and photograph for fi ne master making.
● TrimmingYou can specify the necessary part of the document and print it with the unnecessary part trimmed.
Make Up
Continue Page....
A B C D E F A B C D E F
A B C D E F A B C D E F
Specifi ed area
Specifi ed area
A B C D E FA B C D E FA B C D E F
Specifi ed area

78
Edit Function: Edit Image
● NEGATIVE IMAGE Switches the specifi ed image to negative image to emphasize a title such as reference letters.
● Each mode has edit priority. If the specifi ed area is overlapped with the area in other mode, highest-priority edit mode is performed.
1. ERASE 2. NEGATIVE IMAGE 3. OUTLINE/PATTERN 4. TEXT(Smaller number has higher priority.)
● These image modes are not available with the Automatic Document Feeder (ADF) installed.● The table below shows if each edit mode of MAKE UP is available for each image mode for
the document. ○ :Available :Available only for the text in the specifi ed area in MAKE UP mode. × :Not available
IMAGE MODE MAKE UP edit modeTEXT ERASE OUTLINE/PATTERN NEGATIVE IMAGE
TEXT × ○ ○ ○TEXT/PHOTO ○ ○ ○ ○PHOTO/TEXT ○ ○ ○ ○
PHOTO ○ ○ ○PENCIL × ○ ○ ○
SCREEN(COARSE) × ○ × ○SCREEN(FINE) × ○ × ○
IMPORTANT
● Shifts the image to where you want to view when zoomed in.
A B C D E F A B C D E FB C D E
● Screen when the document is scanned
Specifi ed area
● Zooms in the image.● Specifi es the image area.
● Cancels the specifi ed image area.● Ends edit.

79
4
Other Functions
Edit Function: Edit Image
Make sure that the main screen is displayed on the touch panel LCD.
Touch “PROPERTY”.
Touch “EDIT”.
Touch “EDIT IMAGE”.
Touch “IMAGE MODE”.Set it to your preferred image mode.
How to Set Make Up
Continue Page....
Touch “MAKE UP”.
Touch the document size you want to set.
● When the image is scanned with “OFF” in “DOCUMENT SIZE”, it is scanned in the set size in “PAPER SIZE”.
REFERENCE

80
Edit Function: Edit Image
Touch “AREA”.
● If you want to zoom in some area, touch “ZOOM”. You can view the zoomed image and specify the area easily.
● When “OUTLINE/PATTERN” is touched:Specify pattern using the ▲ or ▼ button. (You can also use the NUMERIC keys.)Specify 18/18 for OUTLINE.Specify the number from 1/18 to 17/18 for PATTERN.Refer to “OUTLINE/PATTERN” on page 84.
Touch “OK”.
REFERENCE
REFERENCE
After scanning is completed, the right screenappears.The following description is when “TEXT” is touched.
A message, “SCAN DOCUMENT?”, appears on the touch panel LCD. Touch “YES”. The document will start to be scanned.Do not turn off and on the power, or do not press the RESET key while “SCANNING” or “PLEASE WAIT” is displayed.
● The image is scanned in TEXT mode regardless of the setting in “IMAGE MODE”.● The image is scanned at 100% regardless of the zoom ratio.
REFERENCE

81
4
Other Functions
Edit Function: Edit Image
Touch the area mode to be set.The following description is when “BOX” is touched.
● Select the area mode from BOX/POLYGON/PEN 1/PEN 2/PEN 3/PEN 4.If you select “BLINK” beforehand, the specifi ed area blinks when it is fi xed. If you want to cancel blinking in the specifi ed area, touch “AREA” and then touch “LIGHT”.
● When “BOX” or “POLYGON” is selected and you want to change the area mode, touch “MENU”.
Specify the area.1 Touch the start point of the area you want to specify.2 Move your fi nger while touching it to move the area.3 Release your fi nger from the screen to fi x the
specifi ed area.* If you want to change the area, repeat the above steps 1 to 3 .4 Touch “OK”.
REFERENCE
Continue Page....
5 Touch “INSIDE” or “OUTSIDE”.“INSIDE” is touched here.If you touch “OUTSIDE”, the outside of the specifi ed area is edited in the current mode.(“● Using AREA Function” → see p.86)

82
Edit Function: Edit Image
Touch “END”.
Touch “END”.
Touch “END”.“MAKE UP” is set.
● When you want to cancel the specifi ed area, touch “CLEAR”. The display changes as below.• If “ALL CL” is touched, all of the set area is cleared.• If “BOX”or “POLYGON” is touched, the specifi ed
area is cleared.• If “PEN 1”, “PEN 2”, “PEN 3”, or “PEN 4” is
touched, the area you want to cancel is cleared.
REFERENCE

83
4
Other Functions
Edit Function: Edit Image
Touch “END”.
Press the MASTER MAKING key.Master making performed with the edited setting.
● When “EDIT IMAGE” is set, the “EDIT IMAGE” icon appears at the bottom of the main screen. When you touch the icon, the setting screen of “EDIT IMAGE” appears and you can change the setting. However, if maximum shortcut icons are already displayed, the “EDIT IMAGE” icon will not appear.
REFERENCE

84
Edit Function: Edit Image
You can select the following patterns and the outlined character.
1
2
3
4
5
6
7
8
9
10
11
12
13
14
15
16
17
18

85
4
Other Functions
Edit Function: Edit Image
● Using ZOOM Function
Touch “ZOOM”.Touch one from the list (ZOOM1/ZOOM2/ZOOM3).The following description is when “ZOOM2” is touched.
Touch the center of the area you want to zoom in.The area you touched is zoomed in.To change “ZOOM2” to “ZOOM1” or “ZOOM3”, touch “ZOOM”.
● To confi rm the zoomed-in peripheral area of the document by ZOOM function, touch “SHIFT”, thentouch anywhere on the image and move the touched position to the area you want to view while touchingit. If “ZOOM1” is selected, you can not use shift function.
● Using SHIFT Function
Touch “SHIFT”.
● You can shift the image only when “ZOOM2” or “ZOOM3” is selected.
You can zoom in the image by touching a part of the document.ZOOM1 < ZOOM2 < ZOOM3
ZOOM1 Displays whole document on the touch panel LCD. ZOOM2 Displays the zoomed-in peripheral area of the touched position. Double zoom of ZOOM1 ZOOM3 Displays the zoomed-in peripheral area of the touched position. Quadruple zoom of ZOOM1
When you confi rm the zoomed-in peripheral area of the document by zoom function, you can move the touched position to the area you want to view while touching it.
REFERENCE
REFERENCE

86
Edit Function: Edit Image
Touch anywhere on the image and move the touched position to the area you want to view while touching it.
Release your fi nger from the image when the area you want to view appears.
● To fi nish the shift function, touch “SHIFT” again or touch other function.
● Using AREA Function
You can select area from 6 types (BOX, POLYGON, PEN 1, PEN 2, PEN 3, and PEN 4) according to your document. ● BOX You can specify a rectangular area. ● POLYGON You can specify a polygonal area (up to pentadecagon). ● PEN 1/PEN 2/PEN 3/PEN 4 You can specify an area.
Touch “AREA”.Touch “BOX”.
● Specifying “BOX”
REFERENCE

87
4
Other Functions
Edit Function: Edit Image
Specify the area.1 Touch the start point of the area you want to specify.2 Move your fi nger while touching it to move the area.3 Release your fi nger from the screen to fi x the
specifi ed area. * If you want to change the area, repeat the above steps 1 to 3 .4 Touch “OK”.5 Touch “INSIDE” or “OUTSIDE”. “INSIDE” is touched here. If you touch “OUTSIDE”, the outside of the specifi ed area is edited in the current mode.
When the specifi ed area is OK, touch “END”.
REFERENCE
Continue Page....
● When you want to cancel the specifi ed area, touch “CLEAR”. The display changes as below.● If “ALL CL” is touched, all of the set area is cleared.● If “BOX”or “POLYGON” is touched, the specifi ed area is cleared.● If “PEN 1”, “PEN 2”, “PEN 3”, or “PEN 4” is touched, the area you want to cancel is cleared.

88
Edit Function: Edit Image
● Specifying “POLYGON”
Touch “AREA”.Touch “POLYGON”.
Touch the start point of the area you want to specify.
● Decide each point of polygon so that each side of the polygon does not cross. If they cross, incomplete polygonal area is made.
Move your fi nger while touching the screen and release at the end of the point. (The fi rst side is specifi ed here.)
Touch the start point of the second side and move your fi nger while touching it and release at the end of the point again. (The second side is specifi ed here.) In a similar way, you can specify up to pentadecagon. If the shape is within pentadecagon, the end point and the start point are connected, which makes polygon, by touching “OK”.
● You can touch “OK” after specifying the second or more sides.● When you want to change the start point after once it is specifi ed, touch the start point.
REFERENCE
IMPORTANT
1 2Release

89
4
Other Functions
Edit Function: Edit Image
When the area is completed, touch “OK”.
Touch “INSIDE” or “OUTSIDE”.“INSIDE” is touched here.If you touch “OUTSIDE”, the outside of the specifi edarea is edited in the current mode.
● Specifying AREA with PEN 1 to PEN 4
Touch “AREA”.Touch one from the list (PEN 1/PEN 2/PEN 3/PEN 4) for specifying area size.“PEN 2” is touched here.
PEN 1/PEN 2/PEN 3/PEN 4 specify the area in different size of circular form.
REFERENCE
Continue Page....
● When you want to cancel the specifi ed area, touch “CLEAR”. The display changes as below.● If “ALL CL” is touched, all of the set area is cleared.
● If “BOX” or “POLYGON” is touched, the specifi ed area is cleared.
● If “PEN 1”, “PEN 2”, “PEN 3”, or “PEN 4” is touched, the area you want to cancel is cleared.

90
Edit Function: Edit Image
Touch the area you want to specify.
When the specifi ed area is OK, touch “END”.
● When you want to cancel the specifi ed area, touch “CLEAR”.
REFERENCE

91
4
Other Functions
Edit Function: Edit Image
When MAKE UP setting is completed, ADD MAKE UP/SWITCH ERASE AREA/NEW MAKE UPfunctions are available.
●ADD MAKE UPYou can set an additional MAKE UP function after once MAKE UP function is set.
●SWITCH ERASE AREAYou can switch erase area between INSIDE and OUTSIDE in ERASE mode underMAKE UP and perform master making and printing.
●NEW MAKE UPYou can cancel the currently set MAKE UP function and set a new one.
● If ERASE mode under MAKE UP is not set, SWITCH ERASE AREA cannot be specifi ed.
● Using ADD MAKE UP Function
After MAKE UP setting is completed, touch “EDIT IMAGE”.
Continue Page....
IMPORTANT
ADD MAKE UP, SWITCH ERASE AREA, NEW MAKE UP
A B C D E F A B C D E F
Specifi ed area
B C D E
A B C D E F A B C D E F A B C D E FErased by MAKE UP
Negative image by ADD MAKE UP
Specifi ed area
Erased by MAKE UP
SWITCH ERASE AREA

92
Edit Function: Edit Image
Touch “ADD MAKE UP”.
Touch the mode you want to add.(“Make Up” → see p.77)
Touch “END”.
Touch “MAKE UP”.

93
4
Other Functions
Edit Function: Edit Image
After ERASE mode setting of MAKE UP is completed, touch “EDIT IMAGE”.
● Using SWITCH ERASE AREA Function
Touch “MAKE UP”.
Touch “SWITCH ERASE AREA”.Switching ERASE AREA is completed.
Touch “END”.
Continue Page....

94
Edit Function: Edit Image
● Using NEW MAKE UP Function
After MAKE UP setting is completed, touch “EDIT IMAGE”.
Touch “MAKE UP”.
Touch “NEW MAKE UP”.
Follow step 8 and its following procedures in “How to Set Make Up”.(“How to Set Make Up” → see p.79)

95
4
Other Functions
Edit Function: Edit Image
Trimming
Make sure that the main screen is displayed on the touch panel LCD.
Touch “PROPERTY”.
You can cut and print the specifi ed area of the document. When zoom ratio is set, the specifi ed area is zoomed in and zoomed out depending on the set zoom ratio.Also, you can perform Make Up after Trimming is performed.
● Trimming cannot be performed after Make Up is performed. Make sure to perform Trimming before performing MAKE UP.
● Trimming function is not available with the Automatic Document Feeder (ADF) installed.
Touch “EDIT”.
Touch “EDIT IMAGE”.
Continue Page....
How to Set Trimming
IMPORTANT
Touch “TRIM”.

96
Edit Function: Edit Image
Touch the document size you want to set.
● When the image is scanned with “OFF” in “DOCUMENT SIZE”, it is scanned in the set size in “PAPER SIZE”.
A message, “SCAN DOCUMENT?”, appears on the touch panel LCD. Touch “YES”. The document will start to be scanned. Do not turn off and on the power, or do not press the RESET key while “SCANNING” or “PLEASE WAIT” is displayed.
● The image is scanned in TEXT mode regardless of the setting in “IMAGE MODE”.● The image is scanned at 100% regardless of the zoom ratio.
Touch “AREA”.
● If you want to zoom in some area, select “ZOOM”. You can view the zoomed-in image and specify the area easily.
REFERENCE
REFERENCE
REFERENCE
The area is specifi ed now.
Specify the area.1 Touch the start point of the area you want to specify.2 Move your fi nger while touching it to move the area.3 Release your fi nger from the screen to fi x the specifi ed area. * If you want to change the area, repeat the above steps 1 to 3 .4 Touch “OK”.

97
4
Other Functions
Edit Function: Edit Image
Press the MASTER MAKING key.Master making starts with Trimming function.
When you want to perform Make Up for the trimmed document, follow the procedures in “Make Up”.(“Make Up” → see p.77)
Touch “END”.
● When “EDIT IMAGE” is set, the “EDIT IMAGE” icon appears at the bottom of the main screen. When you touch the icon, the setting screen of “EDIT IMAGE” appears and you can change the setting. However, if maximum shortcut icons are already displayed, the “EDIT IMAGE” icon will not appear.
REFERENCE

98
Edit Function: Document Memory
Document Memory
Document memory function saves the data from last master making and remakes a master without scanning. Only one document image is saved.
● Saved image is cleared by turning the power off.● Saved image is cleared by pressing the RESET key.● This function is not available when the power is turned on or no master is made.● Document image of the last master making is saved.● This function is not available when Confi dential Safegaurd function is set.● You can remake a master with 180° Rotation function.
How to Set Document MemoryMake sure that the main screen is displayed on the touch panel LCD.
Touch “PROPERTY”.
Touch “EDIT”.
Touch the screen switch button at the bottom of the screen.
IMPORTANT

99
4
Other Functions
Edit Function: Document Memory
Touch “ON”.
To return to “OFF” (standard):● Touch “DOCUMENT MEMORY” and then touch “OFF”.● Press the RESET key. In this case, all settings will be returned to Standard Mode. Also, you cannot touch “DOCUMENT MEMORY” unless the image is cleared and master making is performed once.
Touch “END”.
● When “DOCUMENT MEMORY” is set, the “DOCUMENT MEMORY” icon appears at the bottom of the main screen. When you touch the icon, the setting screen of “DOCUMENT MEMORY” appears and you can change the setting. However, if maximum shortcut icons are already displayed, the “DOCUMENT MEMORY” icon will not appear.
Touch “DOCUMENT MEMORY”.
You cannot touch “DOCUMENT MEMORY” if it is masked.
IMPORTANT
REFERENCE
REFERENCE

100
Program
You can save the number of prints & sets / memory name / function settings / batch print & sequential batch print in advance. And you can retrieve the saved settings and perform master making and printing.Also, you can change and confi rm the settings when needed.
This mode enters the number of prints & sets in the memory, and changes memory name and sets function settings, batch print and sequential batch print when needed, and then saves them. These settings are not cleared even after the power has been turned off.
● Memory There are nine memories (MEMORY 1 - 9) in total. Up to 90 sets of specifi ed number of prints & sets can be collectively set.
● Changing Memory Name Memory name of factory setting is MEMORY *. Change memory name when needed.
● Function SettingsThe following settings can be saved:Print speed, print position, paper size, zoom ratio, image mode, print darkness, multiple exposure, book shadow erasure, 90° rotation, 180° rotation, document size, ink saving mode, and shortcut setting
Make sure that the main screen is displayed on the touch panel LCD.
Touch “PROPERTY”.
Special Function: Program

101
4
Other Functions
Special Function: Program
Touch “PROGRAM”.
Touch the memory no. you want to save.
Touch “SAVE/SET”.
● If nothing is saved in the memory, you cannot touch “RETRIEVE” and “CLEAR”.
Touch “SPECIAL”.
Continue Page....
REFERENCE

102
Special Function: Program
● Entering Number of Prints / Sets
Entry screen for the number of prints / number of sets appears. Enter the number of prints / number of setsusing the NUMERIC keys.(“How to Enter Batch Print / Sequential Batch Print” → see p.126)
Example:Touching “3”, “×=“, “3”, “×=“ displays as shown on the screen on the right.
● If you make a mistake, touch the mistaken value and enter correct value using the NUMERIC keys.
• When you change all values, touch “ALL CLEAR”.• Touch the screen switch button at the bottom of the
screen. The next screen appears.• When you perform sequential batch print, touch
“BATCH” and then touch “SEQUENTIAL BATCH PRINT”.
● Setting Functions
Touch “SWITCH”.
Touch the setting you want to change.
● Touch the screen switch button at the bottom of the screen. The next screen appears.
REFERENCE
REFERENCE

103
4
Other Functions
Special Function: Program
Touch “SAVE”.Do not turn the power off while the setting is being saved.
Touch the icon to save a shortcut.
You can set up to six shortcuts.
Touch the shortcut you want to save.(“Shortcut Setting” → see p.135)
● When you cancel the shortcut, touch “NO SHORTCUT”.
Touch “SWITCH”.
REFERENCE
REFERENCE

104
Special Function: Program
● Changing Memory Name
Touch “CHANGE NAME”.
● If nothing is saved, you cannot select “RETRIEVE” and “CLEAR”.
Touch the memory no. you want to set.
Touch alphanumeric characters to enter.
Switches the screen between numerical/capital letters and numerical/small letters.
Erases alphanumeric characters.
Moves the cursor under the name to the right.
Moves the cursor under the name to the left.
Sets the memory name.
Touch “OK”.Memory name is set.
REFERENCE

105
4
Other Functions
Special Function: Program
Retrieving Settings
You can retrieve the saved settings, and perform master making and printing.Also, you can add and change, and clear the retrieved number of prints / number of sets in the memory, and multiply the number of sets by 2 - 5 when needed.This change is temporary and the changed setting is not saved.
Make sure that the main screen is displayed on the touch panel LCD.
Touch “PROPERTY”.
Touch “SPECIAL”.
Touch “PROGRAM”.
Touch the memory no. you want to retrieve.
● Saved memories are prefi xed with a memoryicon.
Touch “RETRIEVE”.
Continue Page....
REFERENCE

106
Special Function: Program
● Touch the screen switch button at the bottom of the screen. The next screen appears.
● If you touch “RETRIEVE” here, saved settings are retrieved.
● Confi rming Settings
Touch “SWITCH”.Saved settings appears.
● Touch the screen switch button at the bottom of the screen. The next screen appears.
● If you touch “RETRIEVE” here, saved settings are retrieved.
You cannot change the settings here.
Touch “SWITCH”.
Shortcut setting appears.
IMPORTANT
REFERENCE
REFERENCE

107
4
Other Functions
Special Function: Program
● Modifying Number of Prints & Sets, Multiplying Number of Sets by 2 - 5
Touch “MODIFY”.
Touch “INDIVIDUAL MODIFY”.
● Touch the screen switch button at the bottom of the screen. The next screen appears.
● If you touch “ALL CLEAR”, the number of prints and sets are cleared.
● When you perform sequential batch print, touch “BATCH” and then touch “SEQUENTIAL BATCH PRINT”.● When you multiply the number of sets, touch “SET x *”. (*: 2, 3, 4 and 5)● If the number of prints is 0, the number of sets remains 1. When multiplied number of sets is over 99, the number of sets will be 99.
REFERENCE
Saved numbers of prints and sets appear.Touch the icon you want to modify and enter values using the NUMERIC keys.
Continue Page....

108
Special Function: Program
Clearing Settings
You can clear saved settings.
Touch “PROPERTY”.
Touch “SPECIAL”.
Touch “PROGRAM”.
Touch “RETRIEVE”.The saved setting is retrieved.
Touch “END”.
Make sure that the main screen is displayed on the touch panel LCD.

109
4
Other Functions
Special Function: Program
Touch the memory number you want to clear.
● Saved memories are prefi xed with a memoryicon.
Touch “CLEAR”.
You can confi rm the saved settings.
REFERENCE
Touch “CLEAR”.
The saved setting is cleared.
Touch “END”.

110
Paper Type
This function stabilizes the feeding of heavy weight paper.
How to Set Paper Type
Touch “PROPERTY”.
Touch “SPECIAL”.
Touch “PAPER TYPE”.
Touch paper type according to the paper to be used.● STANDARD Paper type is always “STANDARD” even if the feed pressure adjuster lever is set to “heavy” or “light”. ● HEAVY WEIGHTPaper type is always “HEAVY WEIGHT” even if the feed pressure adjuster lever is set to “standard” or “light”.
Special Function: Paper Type
Make sure that the main screen is displayed on the touch panel LCD.

111
4
Other Functions
Special Function: Paper Type
● When “HEAVY WEIGHT” is set, the “PAPER TYPE” icon appears at the bottom of the main screen. When you touch the icon, the setting screen of “PAPER TYPE” appears and you can change the setting. However, if maximum shortcut icons are already displayed, the “PAPER TYPE” icon will not appear.
Touch “END”.
REFERENCE

112
Special Function: Narrow Paper
Narrow Paper
This function is for printing narrow paper.
When you use this function, optional Narrow Paper Kit is required.You cannot use narrow paper that is 50mm or smaller in width even with the optional kit.
● When you use this function, you cannot adjust print position (horizontal). Print position should be 0.0mm.
How to Set Narrow Paper
Touch “PROPERTY”.
Touch “SPECIAL”.
Touch “NARROW PAPER”.
IMPORTANT
REFERENCE
Make sure that the main screen is displayed on the touch panel LCD.

113
4
Other Functions
Special Function: Narrow Paper
Touch “END”.
● When “NARROW PAPER” is set, the “NARROW PAPER” icon appears at the bottom of the main screen. When you touch the icon, the setting screen of “NARROW PAPER” appears and you can change the setting. However, if maximum shortcut icons are already displayed, the “NARROW PAPER” icon will not appear.
Touch “ON”.“NARROW PAPER” is set.
REFERENCE
REFERENCETo set NARROW PAPER to “OFF” (standard):● Touch “NARROW PAPER” and then touch “OFF”.

114
Special Function: Ink Saving Mode
Ink Saving Mode
This mode will save you up to approximately 20% of ink when printing by changing the document scanning density.
● Print image may be lighter in this mode.● Set Ink Saving Mode before making a master.● Ink-saving ratio varies widely depending on document type and function setting.● This mode is not available: in Document Memory mode, with the interface to PC, and with the USB fl ash drive option.
Touch “PROPERTY”.
Touch “SPECIAL”.
Touch “INK SAVING MODE”.
How to Set Ink Saving Mode
IMPORTANT
Touch “ON”.“INK SAVING MODE” is set.
Make sure that the main screen is displayed on the touch panel LCD.
REFERENCETo set INK SAVING MODE to “OFF” (standard):● Touch “INK SAVING MODE” and then touch “OFF”.

115
4
Other Functions
Special Function: Ink Saving Mode
Touch “END”.
● When “INK SAVING MODE” is set, the “INK SAVING MODE” icon appears at the bottom of the main screen. When you touch the icon, the setting screen of “INK SAVING MODE” appears and you can change the setting. However, if maximum shortcut icons are already displayed, the “INK SAVING MODE” icon will not appear.
REFERENCE

116
Special Function: Replenish Ink
Replenishing Ink
This function forcibly replenishes ink to the drum when a new ink pack is installed.
How to Replenish Ink
Touch “PROPERTY”.
Touch “SPECIAL”.
Touch “REPLENISH INK”.
Touch “REPLENISHING INK”.Ink replenishing starts.
When ink replenishing is completed, the machine stops with a beep.
Make sure that the main screen is displayed on the touch panel LCD.
Touch “END”.

117
4
Other Functions
Confi dential Safeguard
Confi dential safeguard function, which prevents printing unless master making has been completed, is a simple means of prohibiting others from printing sensitive documents.This function ejects the master wound around the drum and wind a new blank master around the drum.
● When confi dential safeguard function is set, printing and test printing cannot be performed and Document Memory function is not available. Other operations can be performed as normal.● Turning the power OFF does not cancel Confi dential Safeguard function.● Master making still functions even if Confi dential Safeguard function is set.● Once master making is carried out, Confi dential Safeguard function is canceled.
How to Set Confi dential Safeguard
Touch “PROPERTY”.
Touch “SPECIAL”.
Special Function: Confi dential Safeguard
IMPORTANT
Make sure that the main screen is displayed on the touch panel LCD.
Continue Page....
Touch “CONFIDENTIAL”.

118
Special Function: Confi dential Safeguard
Touch “ON”.“EJECT CURRENT MASTER AND PUT NEW BLANK MASTER ON DRUM UNIT?” appears.
If you touch “YES”, the current master wound around the drum is ejected and a new blank master is wound around the drum.
If you touch “NO”, the master that is set before setting confi dential safeguard remains wound around the drum. You cannot perform printing by pressing the PRINT key or the TEST PRINT key until the next master making is performed.
Touch “END”.
● When “CONFIDENTIAL” is set, the CONFIDENTIAL” icon appears at the bottom of the main screen. However, if maximum shortcut icons are already displayed, the “CONFIDENTIAL” icon will not appear.
REFERENCE

119
4
Other Functions
Document Darkness Detection
This function scans the document more fi nely. It scans darkness of the entire document, and distinguishes the brightest part and the darkest part of the document. This is effective for scanning and printing a saddle-stitched document such as book.
● Master making with this function (DOC DARKNESS DETECTION: ON) requires more time than that without this function (DOC DARKNESS DETECTION: OFF) in order to scan the darkness of the entire document.
● This function is not available when performing master making with the Automatic Document Feeder (ADF).
● When this function is set to OFF (DOC DARKNESS DETECTION: OFF), if the document has a solid black portion at the leading edge, the prints will be light. If this is the case, set DOC DARKNESS DETECTION to ON.Example: Book, Document that has a solid black portion at the leading edge
How to Set Document Darkness Detection
Touch “SPECIAL”.
Special Function: Document Darkness Detection
IMPORTANT
Touch “PROPERTY”.
Make sure that the main screen is displayed on the touch panel LCD.
Touch the screen switch button at the bottom of the screen.
Continue Page....

120
Special Function: Document Darkness Detection
Touch “DOC DARKNESS DETECTION”.
Touch “ON”.“DOC DARKNESS DETECTION” (document darkness detection) is set.
Touch “END”.
● When “DOC DARKNESS DETECTION” is set, the “DOC DARKNESS DETECTION” icon appears at the bottom of the main screen. When you touch the icon, the setting screen of “DOC DARKNESS DETECTION” appears and you can change the setting.However, if maximum shortcut icons are already displayed, the “DOC DARKNESS DETECTION” icon will not appear.
REFERENCE
REFERENCETo set DOC DARKNESS DETECTION to “OFF” (standard):● Touch “DOC DARKNESS DETECTION” and then
touch “OFF”.

121
4
Other Functions
Interval Print
This function performs printing at regular intervals. You can set a time interval for printing from 1 sec. to 99 sec.
● Batch Each set is printed with the specifi ed number of prints taken as one set at set intervals. This is not available when the tape dispenser (option) is used.● Each sheet Each sheet is printed at set intervals.
Touch “SPECIAL”.
Touch “INTERVAL PRINT”.
How to Set Interval Print
Special Function: Interval Print
Touch “PROPERTY”.
Make sure that the main screen is displayed on the touch panel LCD.
Touch the screen switch button at the bottom of the screen.
Continue Page....
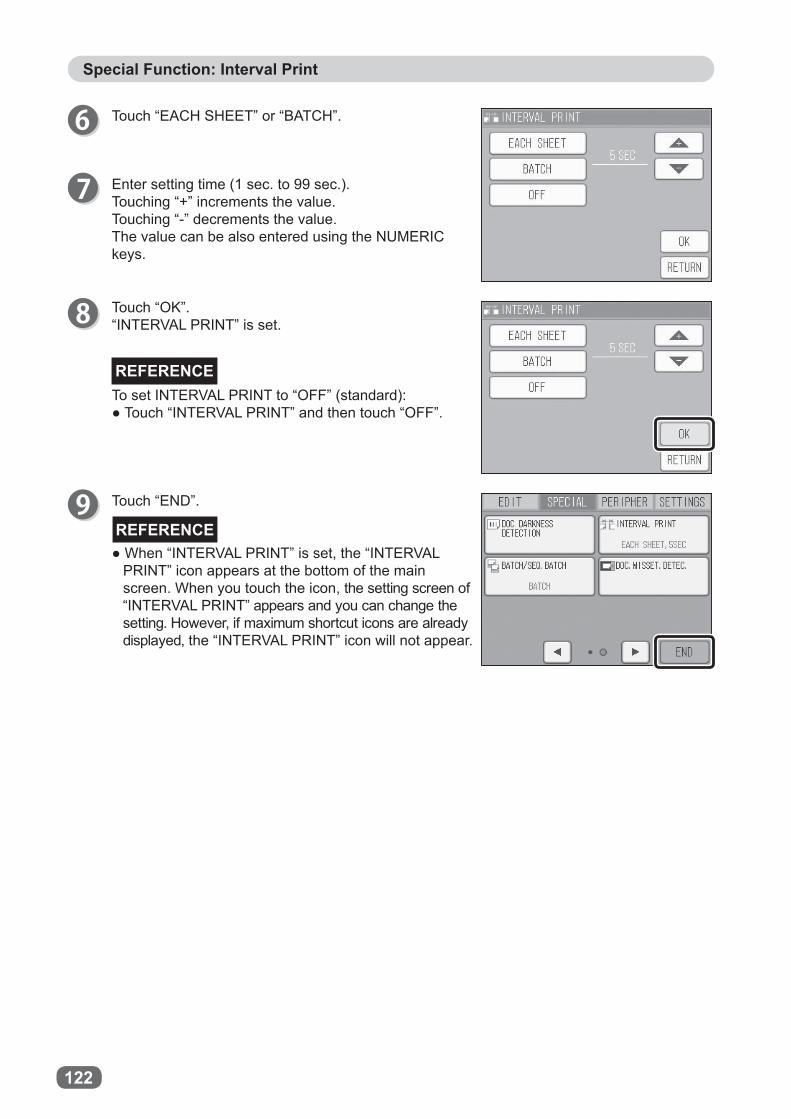
122
Special Function: Interval Print
Touch “EACH SHEET” or “BATCH”.
Enter setting time (1 sec. to 99 sec.).Touching “+” increments the value.Touching “-” decrements the value.The value can be also entered using the NUMERIC keys.
Touch “OK”.“INTERVAL PRINT” is set.
Touch “END”.
● When “INTERVAL PRINT” is set, the “INTERVAL PRINT” icon appears at the bottom of the main screen. When you touch the icon, the setting screen of “INTERVAL PRINT” appears and you can change the setting. However, if maximum shortcut icons are already displayed, the “INTERVAL PRINT” icon will not appear.
REFERENCE
REFERENCETo set INTERVAL PRINT to “OFF” (standard):● Touch “INTERVAL PRINT” and then touch “OFF”.

123
4
Other Functions
Batch Print / Sequential Batch Print
● Batch Print The specifi ed number of sets is printed with the specifi ed number of prints taken as one set. You can set up to 90 groups of ‘number of prints’ x ‘number of sets’. When the machine is equipped with the tape dispenser (option), tape strips are inserted after each set of prints.
Set “Batch Print” before starting master making.
● Sequential Batch Print This function changes the number of prints made from each document. You can enter up to 90 groups of ‘number of prints’ x ‘number of sets’.
Set “Sequential Batch Print” before starting master making.
Special Function: Batch Print Sequential Batch Print
Document 1st set4 copies x 2 sets
2nd set3 copies x 3 sets
3rd set2 copies x 4 sets
1st document4 copies x 2 sets
2nd document3 copies x 3 sets
3rd document2 copies x 4 sets
IMPORTANT
IMPORTANT
Document
Continue Page....

124
Special Function: Batch Print / Sequential Batch Print
How to Set Batch Print / Sequential Batch Print
Touch “PROPERTY”.
Touch “SPECIAL”.
Touch “BATCH/SEQ. BATCH”.
Touch “BATCH PRINT” or “SEQUENTIAL BATCH PRINT.“BATCH PRINT” or “SEQUENTIAL BATCH PRINT” is set.
Make sure that the main screen is displayed on the touch panel LCD.
Touch the screen switch button at the bottom of the screen.

125
4
Other Functions
Special Function: Batch Print / Sequential Batch Print
Touch “END”.
● When “BATCH/SEQUENTIAL BATCH PRINT” is set, the “BATCH/SEQUENTIAL BATCH PRINT” icon appears at the bottom of the main screen. When you touch the icon, the setting screen of “BATCH/SEQUENTIAL BATCH PRINT” appears and you can change the setting. However, if maximum shortcut icons are already displayed, the “BATCH/SEQUENTIAL BATCH PRINT” icon will not appear.
REFERENCE

126
Special Function: Batch Print / Sequential Batch Print
How to Enter Batch Print / Sequential Batch Print
Touch “number of prints” icon.
Enter the number of prints using the NUMERIC keys.
Press the ×= key. The number of prints is set.
Enter the number of sets using the NUMERIC keys.
Press the ×= key.The number of sets is set.
Repeat steps 3 to 6.Up to 90 sets can be entered.
Touch “OK”.
Press the MASTER MAKING key.Printing starts from the last-entered set.
● Printing starts from the last-entered prints and sets.
● The MASTER MAKING key will not function until all the sets have been printed.
● If you want to stop the print run, press the STOP key and then press the CLEAR key.
● You can also change the setting of batch print/ sequential batch print on the “ENTER PRINTS/SETS” screen.
● If you make a mistake, touch the mistaken value and enter value again using the NUMERIC keys.
IMPORTANT
Make sure that the main screen is displayed on the touch panel LCD.

127
4
Other Functions
Special Function: Batch Print / Sequential Batch Print
Separating Prints with Tape Strips(Available only with Tape Dispenser Unit)
When only the specifi ed number of sets is printed with the specifi ed number of prints taken as one set, tape strips are inserted between the sheets after each set of prints, automatically separate prints into group. You can enter up to 90 groups of 'number of prints' x 'number of sets'.
The optional tape dispenser is required for separating prints into group with tape strips.When using this function, refer to the Instruction Manual of “Tape Dispenser”.
IMPORTANT

128
Document Misset Detection
Touch “PROPERTY”.
Touch “SPECIAL”.
How to Set Document Misset Detection
Special Function: Document Misset Detection
IMPORTANT
Make sure that the main screen is displayed on the touch panel LCD.
Touch the screen switch button at the bottom of the screen.
When scanning the document, if no document is placed on the exposure glass or the document is not placed correctly, this function warns you about it. (“How to Load Document on the Exposure Glass” → see p.19)
● If the corner of the document is folded, it may be detected.
● If detection is wrong, set “DOC. MISSET. DETEC.”(document misset detection) to “OFF”.
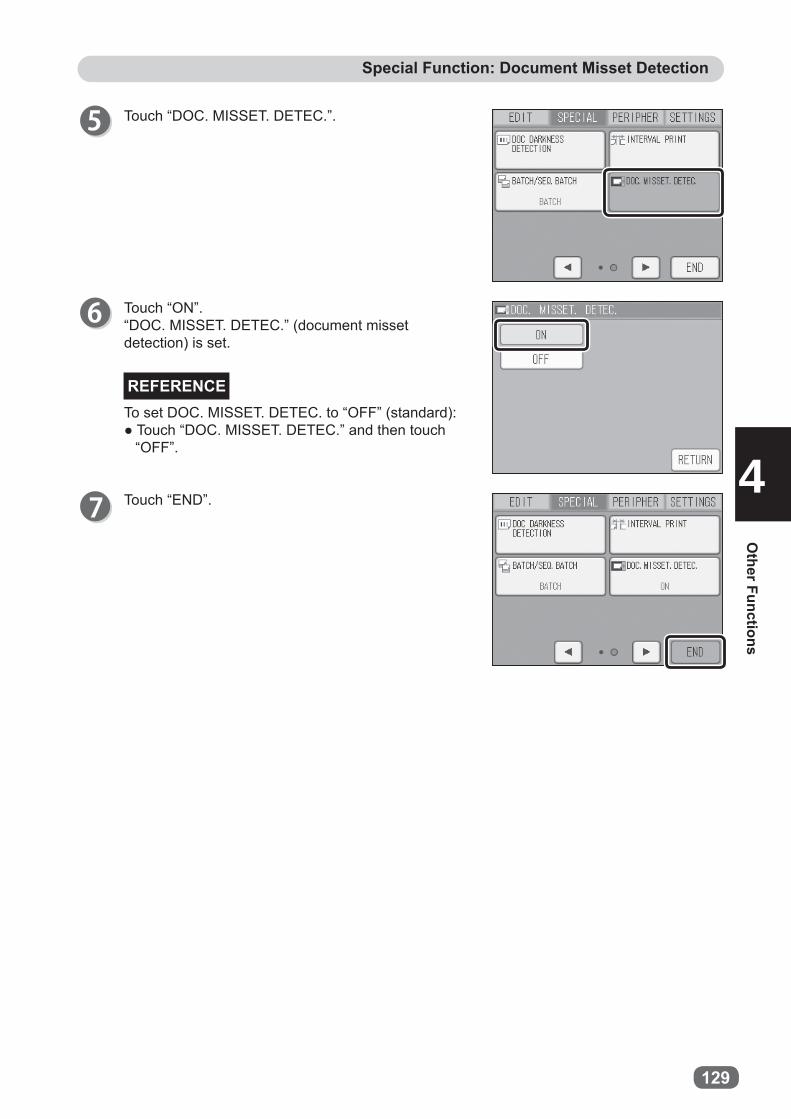
129
4
Other Functions
Special Function: Document Misset Detection
Touch “ON”.“DOC. MISSET. DETEC.” (document misset detection) is set.
Touch “END”.
Touch “DOC. MISSET. DETEC.”.
REFERENCETo set DOC. MISSET. DETEC. to “OFF” (standard):● Touch “DOC. MISSET. DETEC.” and then touch
“OFF”.

130
Making Prints Using Personal Computer
This function allows you to make prints of documents using a personal computer.
“ONLINE MODE: AUTO” Master can be made continuously when handling 2 or more documents.“ONLINE MODE: MANUAL” Printing stops every time master making and printing for each document are fi nished when handling 2 or more documents. This enables you to reprint more copies. To start master making for the following document, press the MASTER MAKING key.Default setting is “AUTO”.
When connecting with USB cable:Use AB type USB cable that is 3 m or less in length. If you use the cable that is over 3m, master making may not be performed.
How to Set Online Mode
Touch “PERIPHER”.
Touch “ONLINE MODE”.
Peripheral Function: Online Mode
IMPORTANT
Touch “PROPERTY”.
Make sure that the main screen is displayed on the touch panel LCD.

131
4
Other Functions
Peripheral Function: Online Mode
Touch “MANUAL”.
Touch “END”.“ONLINE MODE” is set.
In manual mode, printing stops every time master making and printing for each document are fi nished. To start master making for the following document, press the MASTER MAKING key.
How to Cancel Reprint When in Manual Setting
Press the MASTER MAKING key.A message appears.
Touch “YES”.Master making for the next document starts.
REFERENCE
REFERENCE
● When “MANUAL” is set, the “ONLINE MODE” icon appears at the bottom of the main screen. When you touch the icon, the setting screen of “ONLINE MODE” appears and you can change the setting. However, if maximum shortcut icons are already displayed, the “ONLINE MODE” icon will not appear.
Continue Page....

132
These defaults can be changed to make operation easier for user. Also, newly changed values can be also returned to their defaults (factory setting).
● Default setting You can change Print speed / Paper size / Zoom / Image mode / Darkness / Document size / Ink saving mode. ● Memory 1-9 You can select Program from nine memories (MEMORY 1 - 9) (“Special Function: Program” → see p.100)
Defaults are the set value in Standard Mode when the power to the machine is turned ON or the RESET key is pressed.
How to Set Initial Confi guration
Touch “SETTINGS”.
Touch “INITIAL CONFIGURATION”.
Initial Confi guration
Setting Function: Initial Confi guration
REFERENCE
Touch “PROPERTY”.
Make sure that the main screen is displayed on the touch panel LCD.

133
4
Other Functions
Setting Function: Initial Confi guration
Touch “DEFAULT SETTING”.
Touch PRINT SPEED / PAPER SIZE / IMAGE MODE / DOCUMENT SIZE / DARKNESS / INK SAVING MODE and change each setting to the one you prefer.
Touch the screen switch button at the bottom of the screen. The next screen appears.
Touch “OK”.“INITIAL CONFIGURATION” is set.
Touch “END”.
To return to “factory setting”:● Touch “RESET”.
● Default Setting
REFERENCE

134
Setting Function: Initial Confi guration
● ProgramTouch the memory no. you want to retrieve.
Touch “SWITCH”. You can confi rm saved settings. Touch the screen switch button at the bottom of the screen. The next screen appears.
● You cannot change the settings here.Any changes can be made in “Program”.(“Special Function: Program” → see p.100)
Touch “OK”.“INITIAL CONFIGURATION” is set.
Touch “END”.
REFERENCE
● Saved memories are prefi xed with a memoryicon.
REFERENCE

135
4
Other Functions
Shortcut Setting
Touch “SETTINGS”.
Touch “SHORTCUT SETTING”.
Edit Special Peripheral SettingPREVIEW PROGRAM USB FLASH DRIVE*1 DATE & TIMEMULTIPLE EXPOSURE PAPER TYPE ONLINE MODE*1 INFOSHADOW ERASURE IMAGE POSITION ON
MASTER*1TAPE DISPENSER*1
90°ROTATION NARROW PAPER PRINT TRAY SIZE*1
180°ROTATION INK SAVING MODEEDIT IMAGE CONFIDENTIALDOCUMENT MEMORY DOC DARKNESS
DETECTIONINTERVAL PRINTBATCH/SEQ.BATCHDOC.MISSET.DETEC.
● Items for which you can create shortcut icons
Setting Function: Shortcut Setting
REFERENCE
Touch “PROPERTY”.
Make sure that the main screen is displayed on the touch panel LCD.
*1: Available only when option is installed
You can create shortcut icons for frequently used functions at the bottom of the main screen and can set each function by touching the icon.Up to 6 shortcut icons can be set.
● When you select function by pressing the PROPERTY key, you can create a shortcut icon only for the functions for which icon is displayed beside the function name.
● You can save and retrieve shortcut setting in Program as well.

136
Setting Function: Shortcut Setting
Touch the number to be set.
You can set up to six shortcuts.
Touch the item to be set for shortcut.The setting is saved.
The shortcut icon appears at the bottom of the main screen.
When the icon is touched, the display changes to the function setting screen of each icon.
The icon in which settings are saved changes in color.
Touch “END”.
Touch “END”.
REFERENCE
REFERENCE

137
4
Other Functions
Energy Save Mode
This function automatically turns off the touch panel LCD when it is not operated for a specifi ed period of time. (This reduces standby power consumption.)The specifi ed time period can be set from 1 to 99 minutes.Default setting is “ECO HIBERNATE, 5 minutes”.• ECO HIBERNATE: This saves energy, but it takes some time to return the machine from
Energy Save Mode. The machine recovers from Energy Save Mode by pressing the power switch.
• ECO SLEEP: More power consumption is required than ECO HIBERNATE, but it takes less time to return the machine from Energy Save Mode. The machine recovers from Energy Save Mode by pressing any key or touching the touch panel LCD.
Energy Save Mode does not function when the exposure glass cover is open.
● The power switch lamp blinks while the machine is in Energy Save Mode.● The machine recovers from Energy Save Mode by pressing the power switch.
How to Set Energy Save Mode
Touch “SETTINGS”.
Touch “ENERGY SAVE”.
Setting Function: Energy Save Mode
REFERENCE
IMPORTANT
Touch “PROPERTY”.
Make sure that the main screen is displayed on the touch panel LCD.
Continue Page....

138
Setting Function: Energy Save Mode
Touch “OK”.“ENERGY SAVE” (Energy Save Mode) is set.
Touch “END”.
Touch “ECO HIBERNATE” or “ECO SLEEP”.
Set the time. Touching “+” increments the value.Touching “-” decrements the value.You can set time from 1 to 99 minutes.The value can be also entered using the NUMERIC keys.
REFERENCETo set ENERGY SAVE to “OFF” (standard):● Touch “ENERGY SAVE” and then touch “OFF”.

139
4
Other Functions
Automatic Power OFF
This function automatically turns off the machine when it is not operated for a specifi ed period of time. The specifi ed time period can be set from 1 to 99 minutes.Default setting is “OFF”.
How to Set Automatic Power OFF
Touch “SETTINGS”.
Touch “AUTOMATIC POWER OFF”.
Touch “ON”.
Set the time. Touching “+” increments the value.Touching “-” decrements the value.You can set time from 1 to 99 minutes.The value can be also entered using the NUMERIC keys.
Setting Function: Automatic Power OFF
Touch “PROPERTY”.
Make sure that the main screen is displayed on the touch panel LCD.
Continue Page....

140
Setting Function: Automatic Power OFF
Touch “OK”.“AUTOMATIC POWER OFF” is set.
Touch “END”.
REFERENCETo set AUTOMATIC POWER OFF to “OFF” (standard):● Touch “AUTOMATIC POWER OFF” and then touch “OFF”.

141
4
Other Functions
Automatic Reset
This function automatically resets the machine and returns all settings to Standard Mode when it is not operated for a specifi ed period of time. The specifi ed time period can be set from 1 to 99 minutes.Default setting is “OFF”.
How to Set Automatic Reset
Touch “SETTINGS”.
Touch “AUTOMATIC RESET”.
Setting Function: Automatic Reset
Touch “ON”.
Set the time. Touching “+” increments the value.Touching “-” decrements the value.You can set time from 1 to 99 minutes.The value can be also entered using the NUMERIC keys.
Touch “PROPERTY”.
Make sure that the main screen is displayed on the touch panel LCD.
Continue Page....

142
Setting Function: Automatic Reset
Touch “OK”.“AUTOMATIC RESET” is set.
Touch “END”.
REFERENCETo set AUTOMATIC RESET to “OFF” (standard):● Touch “AUTOMATIC RESET” and then touch “OFF”.

143
4
Other Functions
Fine Start
When the machine has not been operated for a long time or the drum is replaced, fi rst a few prints may be light. This function enables clear and vivid prints from the beginning of printing, and this reduces wasting paper.
● Master making for Fine Start requires more time than that for normal master making.Especially, it requires more time in the following cases:• When a long time has passed after previous printing• When temperature is low
Even when Fine Start is “ON”, fi rst a few prints may be light when master making and printing of small amount (20 sheets or less) are repeatedly performed.When “ OUT OF BATTERY” is displayed, Fine Start does not function normally.
How to Set Fine Start
Touch “SETTINGS”.
Setting Function: Fine Start
IMPORTANT
REFERENCE
Touch “FINE START”.
Touch “PROPERTY”.
Make sure that the main screen is displayed on the touch panel LCD.
Continue Page....

144
Setting Function: Fine Start
Select setting.● “SET FOR EVERY MASTER MAKE” Fine Start functions for every master making.
Touch “END”.
● “SET FOR NEXT MASTER MAKE” Fine Start functions only once and will be automatically set to “OFF” for its following master making.
“SET FOR EVERY MASTER MAKE” is touched here.
Select Fine Start level.MIN: It takes less time to make the fi rst print after a master is made than “MID”. First print image may be lighter than that of “MID”.MID: Fine Start functions by the condition according to the time elapsed.MAX: It takes more time to make the fi rst print after a master is made than “MID”. First print image may be darker than that of “MID”.“MID” is touched here.“FINE START” is set.

145
4
Other Functions
Optimize Print
This function is for adjusting print darkness and speed according to room temperature to set the best fi nish for the printed mode. You can set temperature from 0 to 35 degree (C) and print speed from 1 to 5.Default setting is “OFF”.
● Set temperature close to room temperature.● When “OPTIMIZE PRINT” is set to “ON”, print darkness switches to “MANUAL” by turning on
the power or pressing the RESET key even when “DARKNESS” in Initial Confi guration is “AUTO”.
● Print darkness setting varies depending on the set temperature.
How to Set Optimize Print
Touch “SETTINGS”.
Touch the screen switch button at the bottom of the screen.
Setting Function: Optimize Print
IMPORTANT
Touch “PROPERTY”.
Make sure that the main screen is displayed on the touch panel LCD.
Continue Page....

146
Setting Function: Optimize Print
Touch “ON”.
Set print speed.Touching “+” increments the value.Touching “-” decrements the value.The value can be also entered using the NUMERIC keys.
● “TOP SPEED” cannot be set.
Touch “OK”.“OPTIMIZE PRINT” is set.
Touch “END”.
Touch “OPTIMIZE PRINT”.
REFERENCE
REFERENCETo set OPTIMIZE PRINT to “OFF” (standard):● Touch “OPTIMIZE PRINT” and then touch “OFF”.

147
4
Other Functions
Pre-print
This function disables counting a specifi ed number of prints following the start of a printing operation. For example, if you set Pre-print Mode to 3 pages, count function ignores the fi rst three pages printed, and starts counting from the forth printed page. You can set from 1 to 99. Default setting is “OFF”.
Pages ignored to be counted in Pre-print Mode are counted to total number of prints.
How to Set Pre-print
Touch “SETTINGS”.
Touch the screen switch button at the bottom of the screen.
Touch “PRE-PRINT”.
Setting Function: Pre-print
REFERENCE
Touch “PROPERTY”.
Make sure that the main screen is displayed on the touch panel LCD.
Continue Page....

148
Setting Function: Pre-print
Touch “ON”.
Set the number of pre-print.Touching “+” increments the value.Touching “-” decrements the value.You can set the number from 1 to 99 sheets.The value can be also entered using the NUMERIC keys.
Touch “OK”.“PRE-PRINT” is set.
Touch “END”.
REFERENCETo set PRE-PRINT to “OFF” (standard):● Touch “PRE-PRINT” and then touch “OFF”.

149
4
Other Functions
Repeat Counter
You can select either displaying the number of prints again or displaying “0” on the touch panel LCD after printing completes.Default setting is “ON”.
How to Set Repeat Counter
Touch “SETTINGS”.
Touch the screen switch button at the bottom of the screen.
Touch “REPEAT COUNTER”.
Setting Function: Repeat Counter
Touch “PROPERTY”.
Make sure that the main screen is displayed on the touch panel LCD.
Continue Page....
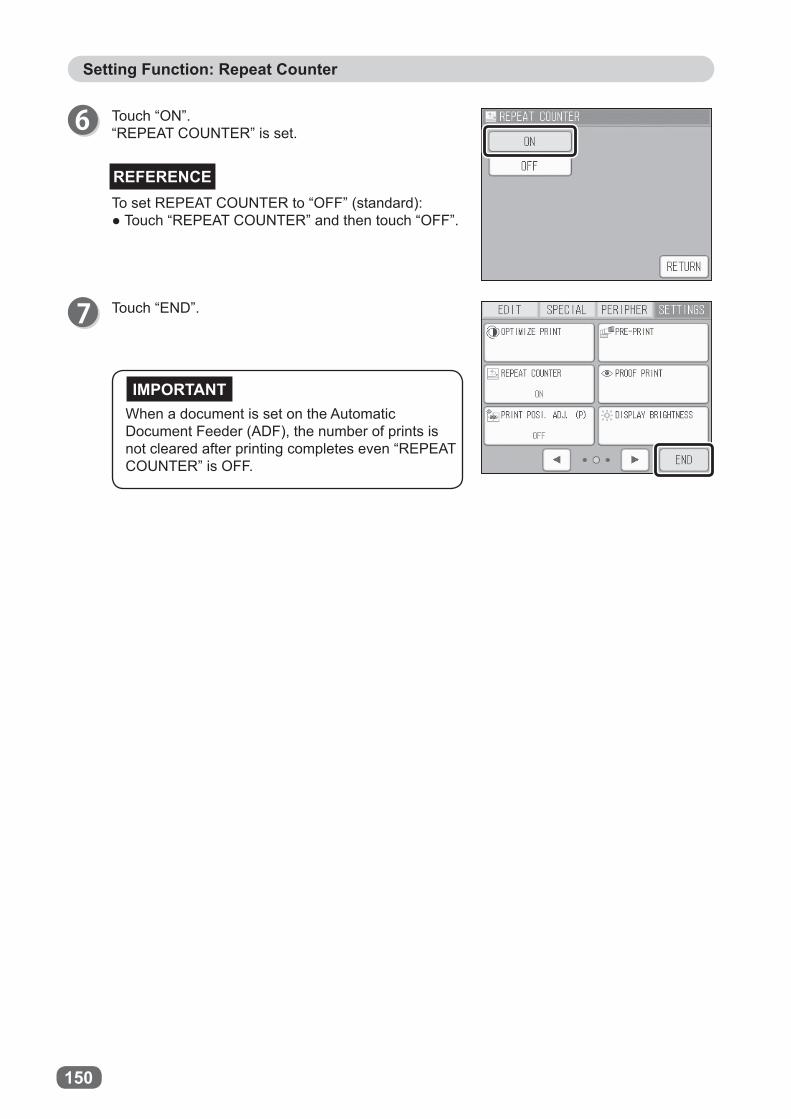
150
Setting Function: Repeat Counter
Touch “ON”.“REPEAT COUNTER” is set.
Touch “END”.
When a document is set on the Automatic Document Feeder (ADF), the number of prints is not cleared after printing completes even “REPEAT COUNTER” is OFF.
IMPORTANT
REFERENCETo set REPEAT COUNTER to “OFF” (standard):● Touch “REPEAT COUNTER” and then touch “OFF”.

151
4
Other Functions
Setting Function: Proof Print
Proof Print
How to Set Proof Print
Touch “PROPERTY”.
Touch the screen switch button at the bottom of the screen.
Touch “PROOF PRINT”.
Make sure that the main screen is displayed on the touch panel LCD.
Touch “SETTINGS”.
The machine makes one sheet of proof print after master making and stops regardless of the specifi ed number of prints.Default setting is “OFF”.
Continue Page....

152
Setting Function: Proof Print
Touch “ON”.
Touch “END”.
REFERENCETo set PROOF PRINT to “OFF” (standard):● Touch “PROOF PRINT” and then touch “OFF”.

153
4
Other Functions
Print Position Adjustment While Printing
You can adjust print position while printing by pressing the PRINT POSITION keys.
● If you adjust print position while printing, print position accuracy and paper feed performance may deteriorate.
● To adjust print position (horizontal), turn the feed tray horizontal registration adjuster dial.
How to Set Print Position Adjustment While Printing
Touch “SETTINGS”.
Touch the screen switch button at the bottom of the screen.
Touch “PRINT POSI. ADJ. (P)”.
Setting Function: Print Position Adjustment (While Printing)
IMPORTANT
Touch “PROPERTY”.
Make sure that the main screen is displayed on the touch panel LCD.
Continue Page....

154
Setting Function: Print Position Adjustment (while printing)
Print position display changes from “in mm” to “in steps”. ● Adjustment range: Vertical 30 steps ● You can adjust print position while printing by pressing the PRINT POSITION keys.
Touch “ON”.“PRINT POSI. ADJ. (P)” (Print Position Adjustment while printing) is set.
Touch “END”.
IMPORTANT
REFERENCETo set PRINT POSI. ADJ. (P) to “OFF” (standard):● Touch “PRINT POSI. AJD. (P)” and then touch
“OFF”.

155
4
Other Functions
Setting Function: Display Brightness
Display Brightness
How to Set Display Brightness
You can adjust the brightness of the LCD when it is hard to see.
Touch “PROPERTY”.
Touch the screen switch button at the bottom of the screen.
Touch “DISPLAY BRIGHTNESS”.
Make sure that the main screen is displayed on the touch panel LCD.
Touch “SETTINGS”.
Continue Page....

156
Setting Function: Display Brightness
Touch “ON”.
Touch “END”.
Touch “OK”.“DISPLAY BRIGHTNESS” is set.
Set brightness.Touching “DARK” darkens the LCD.Touching “BRIGHT” brightens the LCD.

157
4
Other Functions
Date & Time
This function sets date and time.
IMPORTANTWhen “ OUT OF BATTERY” is displayed, Fine Start does not function normally.Contact the dealer/distributor for replacing the battery.
How to Set Date & Time
Touch “SETTINGS”.
Touch “DATE & TIME”.
Setting Function: Date & Time
Touch “PROPERTY”.
Make sure that the main screen is displayed on the touch panel LCD.
Touch the screen switch button at the bottom of the screen twice.
Continue Page....

158
Setting Function: Date & Time
Touch the icon you want to change and set date and time.Touching “+” increments the value.Touching “-” decrements the value.The values can be also entered using the NUMERIC keys.
● Touching the clock time icon on the main menu also displays the setting screen for “DATE & TIME”.
Touch “OK”.“DATE & TIME” is set.
Touch “END”.
REFERENCE

159
4
Other Functions
Buzzer
This function selects buzzer ON or OFF and sets the volume of the buzzer.Default is as follows.• OPERATION BUZZER: ON• COMPLETION BUZZER: OFF• ERROR BUZZER: ON
How to Set Buzzer
Touch “SETTINGS”.
Touch “BUZZER OPTION”.
Setting Function: Buzzer
Touch “PROPERTY”.
Make sure that the main screen is displayed on the touch panel LCD.
Touch the screen switch button at the bottom of the screen twice.
Continue Page....

160
Setting Function: Buzzer
Touch “END”.
Touch “OK”.“OPERATION BUZZER” is set.
Touch buzzer sound to be set.●OPERATION BUZZER
Sets “OPERATION BUZZER” to ON or OFF andadjusts the volume.
●COMPLETION BUZZERSets “COMPLETION BUZZER” to ON or OFF andadjusts the volume.
●ERROR BUZZERSets “ERROR BUZZER” to ON or OFF and adjuststhe volume.
The following description is when “OPERATION BUZZER” is touched.
Set the volume of the buzzer.Touching “HIGH” turns the volume up.Touching “LOW” turns the volume down.Touching “OFF” does not sound.
Touch “END”.

161
4
Other Functions
Information
You can check the total number of master making, total number of prints, roll master remaining amount, used master disposal status, date & time, and the details of shortcut setting.
Touch “SETTINGS”.
Touch “INFO”.
How to Confi rm Information
Setting Function: Information
Touch “PROPERTY”.
Make sure that the main screen is displayed on the touch panel LCD.
Touch the screen switch button at the bottom of the screen twice.
Continue Page....

162
Setting Function: Information
You can check TOTAL MASTER MAKE COUNT (total number of master making), TOTAL PRINT COUNT (total number of print count), MASTER ROLL MONITOR (remaining master), USED MASTER MONITOR (used master disposal status), date & time.Touch the screen switch button at the bottom of the screen.
You can check the details of shortcut setting.Touch the screen switch button at the bottom of the screen.
Touch “END”.
Touch “RETURN”.
You can check the details of OPEN SOURCE LICENSES used for this machine.Touch the item. The LICENSE appears.

Chapter 5
5
Replacing C
onsumables
Replacing ConsumablesThis chapter describes how to replace consumables such as roll master and ink pack, etc.
Replacing Ink Pack ............................................................................................ 164Replacing Ink Pack ........................................................................................ 164How to Replace Ink Pack ............................................................................... 164
Replacing Roll Master ...................................................................................... 167Replacing Roll Master ................................................................................... 167How to Replace Roll Master ......................................................................... 167
How to Dispose of Used Masters ...................................................................... 170How to Dispose of Used Masters ................................................................... 170
Replacing Drum Unit ......................................................................................... 172Replacing Drum Unit ...................................................................................... 172How to Remove Drum Unit ............................................................................ 172How to Set Drum Unit .................................................................................... 173
Replacing Separator Unit .................................................................................. 175Replacing Separator Unit ............................................................................... 175
Replacing Side Separator Unit .......................................................................... 176Replacing Side Separator Unit ...................................................................... 176

164
Open the “ front cover”.
Grasp the “ink pack holder” and pull it down towardyou.
Lift out the “empty ink pack”.
The message “NO INK” is displayed on the touch panel LCD when the remaining ink is low.Replace the ink pack according to the following procedures.
Replacing Ink Pack
Replacing Ink Pack
How to Replace Ink Pack
IMPORTANT● Use ink packs designed only for use in this machine.● Be sure to set an ink pack. Do not operate the machine without an ink pack.

165
5
Replacing C
onsumables
Replacing Ink Pack
IMPORTANT● Push back the ink holder to its original
position by holding it. Pushing it back by holding the ink pack or by pushing the ink pack fails to set correctly. You may not be able to use up the ink.
Insert the “ink pack” so that the “groove on the lip” fi ts onto the “U” groove of the “holder”.
Make sure the “ink pack” is pushed in all the way to the bottom and then push the “ink holder” back.
● Correct ● Incorrect
Correct Incorrect

166
Replacing Ink Pack
Close the “front cover”.
Touch “REPLENISHING INK”.(“How to Replenish Ink” → see p.116)

167
5
Replacing C
onsumables
The message “NO MASTER” is displayed on the touch panel LCD when the roll master is used up. Replace the roll master according to the following procedures.
Replacing Roll Master
Replacing Roll Master
How to Replace Roll Master Press the “ scanner button” to slide the scanner unit.
Press the “ master cover open lever”.The master cover will open up.
Do not touch the heat generator of the thermal head. Doing so may cause damages, leading to a malfunction of master making.
Lift out the used roll master .
● Do not remove the cover affi xed withWarning Label.
● Personnel may be injured by the movablecutter inside the machine.
CAUTION
IMPORTANT
IMPORTANT
Thermal head heat generator
● Use a roll master designed only for use in this machine.● Do not put anything heavy on the roll master box. Master may be scratched and it causes the
machine not to perform master making normally.● Do not leave the roll master taken out from the roll master box as it is. Foreign materials may
attach to the surface of the master and cause the machine not to perform master making normally.
● Do not store a roll master in a place subject to direct sunlight, high/low temperature, and high/low humidity.

168
Replacing Roll Master
Take out a “new roll master” from the bag.
Insert the “roll master” with attention to the direction of the arrows on the seal.
Peel off and pull out the seal.
Pull out the “master” and align its leading edge as shown in the right fi gure.
● Correct ● Incorrect
Roll master
● Be sure to pull out the master in the correct direction.
● Pull out the master until it can be seen from the window and set.
IMPORTANT
Set the roll master so that its leading edge can be seen from the window.

169
5
Replacing C
onsumables
Replacing Roll Master
Close the “master cover”.
● If the roll master is not set correctly, “SET Roll master PROPERLY” is displayed. Open the master cover and gently press the master in as far as possible to set again.● Do not use already-set roll master for other machine while in use.
IMPORTANT
Slide the “scanner unit” to return it to its original position.The master will be automatically pulled in.

170
● Use a master ejection core designed only for use in this machine. ● If you use a security master ejection box, please contact a manager who control it.
The message “REMOVE USED MASTER” is displayed on the touch panel LCD when the master ejection core is full. Dispose of used masters wound onto the ejection core according to the following procedure.
How to Dispose of Used Masters
Open the “ master ejection box open button” to open the “ master ejection box”.
Open the “ master ejection box cover” while pressing the “ master ejection box cover open lever”.
Holding the edges of the “ master ejection core”, pull out the core and remove the “used master” over a trash box while tilting the core.
Ink adheres to the master ejection core. Take care to prevent ink from getting onto your hands or clothes.
How to Dispose of Used Masters
IMPORTANT
IMPORTANT

171
5
Replacing C
onsumables
How to Dispose of Used Masters
Insert the “master ejection core” after removing the core.
Gently close the “master ejection box cover”, and push it in until it locks in place.
Close the “master ejection box”, and push it in until it locks in place.

172
Replacing Drum Unit
Replacing Drum Unit
● Avoid pressing and damaging the drum surface with fi ngers etc. It can stain your clothes and the warp in the drum surface may cause bad prints.● Always place the drum unit on a fl at and stable surface. Otherwise, the drum surface may be damaged or warped and may cause bad prints.
Open the “ front cover”.
Press the drum removal button.
● LED lights up : The drum can be removed.● LED blinks: The drum cannot be removed.● LED goes out: The drum is rotating. It cannot be removed.
How to Remove Drum Unit
● Do not touch the drum or rollers when youoperate the drum removal button.
● Do not put your hands or fi ngers inside the machine while it is operating. Your hands or fi ngers may be pulled in and nipped.
WARNING
REFERENCE

173
5
Replacing C
onsumables
Replacing Drum Unit
Continue Page....
Grip the “upper drum shaft” with your other hand, and pull the drum out toward you while slightly lifting near end of the “drum”.
● Do not touch the drum surface. Ink may transfer to your clothes. ● Hold the “drum” horizontally and place it on a fl at solid surface.
When the message “NO DRUM” is displayed on the touch panel LCD, follow the procedure below to replace the “drum”.
How to Set Drum UnitHold the “drum” horizontally and place the “drum guide roller” onto the rail in the machine.
Make sure the LED lights up.Pull out the “drum” toward you while holding the “drum release lever” until it comes to a stop.
IMPORTANT

174
Replacing Drum Unit
Close the “font cover”.
Hold the “drum” horizontally and push it in gently until it comes to a stop. When it is set, a beep sounds.

175
5
Replacing C
onsumables
Replacing Separator Unit
Replacing Separator Unit
You can easily replace the separator unit (option) with the one having different hardness.
Turn off the power to the machine.
Pull the “clip” on the right side of the right paper feed roller toward you.
Slightly lift up the “shaft” as shown in the right picture and move the “right paper feed roller” and the “center paper feed roller” to the right side.
Remove the “separator unit” and replace it with a new one.
Be careful of installing direction of the “separator unit”.

176
Replacing Side Separator Unit
Replacing Side Separator Unit Turn off the power to the machine.
Pull the “clip” on the right side of the right paper feed roller towards you.
Slightly lift up the “shaft” as shown in the right picture and move the “right paper feed roller” and the “center paper feed roller” to the right side.
Remove the “separator unit”.
Be careful of installing direction of the “side separators”.
Remove the “side separators” and replace it with new ones.
Chamfered side fore and up

Chapter 6
6
Troubleshooting
TroubleshootingThis chapter describes what to do when an error has occurred and how to deal with paper jams and error messages.
If Trouble Occurs ............................................................................................... 178If Trouble Occurs ............................................................................................ 178
When Messages Appear ................................................................................... 179Supplying Paper While Printing ......................................................................... 182
If Paper Runs Out During Printing ................................................................. 182Supplying Paper While Printing ..................................................................... 182Changing Paper Size ..................................................................................... 183
Paper Jams ....................................................................................................... 185Paper Jam on the Feeder Side (Feed Tray) .................................................. 185Paper Jam on the Ejection Side (Print Tray Side) .......................................... 186Paper Adhering to Drum ................................................................................ 187
When “MASTER EJECTION ERROR” is Displayed .......................................... 189Removing the Master Adhering to the Drum .................................................. 189
When Master Setting Error Has Occurred ......................................................... 192How to Remove the Master ........................................................................... 192
When “SET MASTER ROLL PROPERLY” is Displayed .................................... 193How to Set the Master Roll ............................................................................ 193

178
If trouble occurs, fi nd the same phenomenon and message in the following tables and deal with it before contacting your service representative.If the problem still persists, then contact your service representative.
Phenomenon Check Point SolutionThe machine does not start when the power switch is turned on.
Is the power cord unplugged from the outlet or inlet of the machine?
Plug in the power cord properly (outlet/inlet of the machine).
The drum cannot be pulled out. Does the LED of the drum removable button light up?
Press the drum removable button.
There is no printing on the ejected paper.
Is the document set correctly? (printing face down?)
Set the document with printing face down.When you use the Automatic Document Feeder (ADF), set the document with printing face up.
Is the roll master set properly?(obverse side up?)
Set the roll master properly.
Is the print paper winding on the drum?
Remove the paper on the drum.
Paper is winding on the drum. Is there all black part on the upper part of the document?
If there is all black part on the upper part of the document, the paper is not easily ejected.Set the document upside down and perform master making again.
Some part of printing is missing. Is the exposure glass clean? Clean the exposure glass with a dry soft cloth.
Is the surface of the drum clean?
Pull out the drum and remove foreign material on the drum surface if any.If foreign material is between the drum and master, peel off the master to remove it. Then, set the drum and perform master making again.
Is paper size set? Set paper size.The machine cannot enter in Energy Save Mode.
Is the exposure glass cover opened?
Close the exposure glass cover.
Fine Start does not function. Is “OUT OF BATTERY” displayed?
Contact our dealer for replacing the battery.
If Trouble Occurs
If Trouble Occurs

179
6
Troubleshooting
When Messages AppearThe touch panel LCD displays messages, cause and solution. When a message appears, follow the instructions on the touch panel LCD. Error messages are displayed in one of two ways, either by text or by number.
Message Cause and SolutionNO PAPER Cause: There is no paper on the feed tray.
Solution: Load the feed tray with printing paper.PAPER JAM ON FEEDER SIDE
Cause: Paper jam has occurred in the feed tray side.Solution: Lower the feed tray and remove the jammed paper. If paper jam often occurs in the feed tray side, adjust feed pressure and separation pressure.
PAPER JAM ON EJECTION SIDE
Cause : Paper jam has occurred in the print tray side.Solution: Press the paper eject switch and remove the jammed paper.Solution: Pull out the drum and remove the paper from the drum.
PAPER JAM IN DRUM SECTION
Cause: Paper jam has occurred in the central part of the machine.Solution: Pull out the drum and remove the jammed paper.
CLOSE EXPOSURE GLASS COVER
Cause: The exposure glass cover is open.Solution: Gently close the exposure glass cover.
NO MASTER Cause: There is no master.Solution: Set a new roll master.
CLOSE MASTER ROLL COVER
Cause: The master cover is open.Solution: Close the master cover.
MASTER SET ERROR Cause: A trouble has occurred in the process of master making.Solution: Remove the jammed master in the master feed section and set roll master properly.
UNAUTHORIZED MASTER ROLL
Cause: This is not proper master roll (roll master). There are several types of master depending on models.Solution: Check roll master no. and set correct master roll (roll master).
CLOSE SCANNER Cause: The scanner unit is open.Solution: Gently close the scanner unit.
CLOSE FRONT COVER Cause: The front cover is open.Solution: Gently close the front cover.
MASTER EJECTION ERROR Cause: Master remains on the drum.Solution 1: Pull out the drum and remove the master from the
drum.Solution 2: Open the master ejection box and remove the master.Reference: This message is also displayed when master making is performed without master on the drum.
USED MASTER FULL Cause: The master ejection core is full.Solution: Remove the used master.
CLOSE MASTER EJECTION BOX
Cause: The master ejection box is open.Solution: Gently close the master ejection box.
NO USED MASTER CORE Cause: No master ejection core in the master ejection box.Solution: Set a master ejection core.

180
When Messages Appear
Message Cause and SolutionNO DRUM Cause: A drum unit is not set.
Solution: Set a drum unit.NO INK Cause: There is no ink.
Solution: Replace ink pack with a new one.DRUM IS NOT IN POSITION Cause: The drum unit is not in position to be removed.
Solution: Set the drum unit and press the drum removal button.CANNOT PRINT Cause: Cannot print.
Solution: This message is displayed if you press the PRINT key or the TEST PRINT key without making a master immediately after a master setting error or when Confi dential Safeguard function is “ON”.
DOUBLE FEED CHECK PAPER EJECTION
Cause: Two or more sheets of paper are fed.Solution: Remove the double-fed paper. If this occurs frequently, check “feed pressure” and “separation pressure” after removing the paper. Also, adjust detection sensitivity.
CALL SERVICE REPRESENTATIVE
Cause: An error has occurred inside of the machine.Solution: Take note of error code (EXXX).
Turn off the power and then turn on the power again.If the problem still persists, turn off the power and contact your service representative. If contact information is displayed in the panel touch LCD, follow it. Explain the error code (EXXX) and details of the error to the your service representative.
Machine with key card counter installed.* Refer to the Instruction Manual of Key Card Counter for the details.Message Cause and SolutionPLEASE INSERT CARD Cause: Key card is not inserted.
Solution: Insert a department card in the key card counter.READOUT ERROR Cause: Readout of card failed.
Solution: Check inserting direction of the card and reinsert the card.
CANNOT USE THIS CARD Cause: Different card is inserted.Solution: Check the card and insert correct one.
CANNOT USE THIS CARD Cause: The card is write-protected.Solution: Contact card manager.
Machine with tape dispenser installed* Refer to the Instruction Manual of Tape Dispenser for the details.Message Cause and SolutionTAPE DISPENSER EMPTY Cause: There is no tape.
Solution: Set a new tape.CLOSE TAPE DISPENSER COVER
Cause: The tape dispenser cover is open.Solution: Close the tape dispenser cover.

181
6
Troubleshooting
When Messages Appear
Machine with Automatic Document Feeder (ADF) installedMessage Cause and SolutionADF PAPER JAM Cause: Paper jam has occurred in the ADF.
Solution: Remove the jammed paper.CLOSE ADF COVER Cause: The ADF cover is open.
Solution: Close the ADF cover.NO DOCUMENT IN ADFSET DOCUMENT
Cause: There is no document set in the ADF. Solution: Set document in the ADF.
Machine with USB fl ash drive option* Refer to the Instruction Manual of USB Flash Drive Option for the details.Message Cause and SolutionSET USB FLASH DRIVE Cause: USB fl ash drive is not inserted.
Solution: Insert a USB fl ash drive.CANNOT OPEN FILECHECK IF THERE IS ANY FILE
Cause: Data cannot be read out.Solution: Check if there is any fi les saved.
FILE SAVING FAILEDTRY AGAIN
Cause: Write failureSolution: Save the data again.
CANNOT DELETE FILECHECK IF THERE IS ANY FILE
Cause: Data deletion failed.Solution: Check if any data is saved.
CANNOT FORMAT THIS CHECK USB FLASH DRIVEOR USE OTHER USB FLASH DRIVE
Cause: USB fl ash drive formatting failed.Solution: Use other USB fl ash drive.

182
Supplying Paper While Printing
If paper runs out during printing, “NO PAPER” is displayed on the touch panel LCD.Set paper according to the following procedure.
Set paper.(“How to Set Papers” → see p.14)
Press the PRINT key. Printing resumes.
Press the STOP key. Printing stops.
Press the “ feed tray descend switch” continuously. Release it when the feed tray reaches the proper height. The feed tray will stop.
If the sheet is still in the “paper feed roller”, pull it out and align it with the stack.
If paper runs out during printing, printing stops and the feed tray is lowered automatically. And “NO PAPER” message is displayed on the touch panel LCD.
Feed traydescend switch
Paper feed roller
If Paper Runs Out During Printing
Supplying Paper While Printing
IMPORTANT

183
6
Troubleshooting
Supplying Paper While Printing
Align the stack to be added and place it on top of the existing stack. Press the stack lightly toward the machine.
Press the PRINT key. The “feed tray” will rise automatically and printing will resume.
When you press the STOP key, printing stops.
If the machine is printing, press the STOP key. Printing stops.
Press the “ feed tray descend switch” continuously.Release it when the feed tray reaches the properheight. The feed tray will stop.
● If the sheet is still in the paper feed roller, pull it out.
Remove paper from the “feed tray”.The “feed tray” will automatically descend.
Hold the “side guide lever” and adjust the “sideguide” according to the size of paper to be loaded.
Set paper in different size.
Take out papers
Side guide lever
Changing Paper Size
Continue Page....
IMPORTANTPaper feed roller
REFERENCE
Feed traydescend switch

184
Supplying Paper While Printing
Press the PRINT key. The “feed tray” will rise automatically and printing will resume.
When paper size setting is other than “AUTO”, set paper size. (“How to Set Paper Size” → see p.27)

185
6
Troubleshooting
Paper Jams
●When no thick paper is fed or two sheets of thin paper are fed, adjust the paper thickness.
1. Check the “feed pressure adjuster lever” position.
2. Finely adjust the “separation pressure”. (“When no heavy weight paper is fed or two sheets of light weight paper are fed” → see p.15)
When a paper jam occurs in the feed tray side, the message “PAPER JAM ON THE FEEDER SIDE” is displayed on the LCD. Follow the procedure below to remove the jammed paper.
Paper eject switch
Paper Jam on the Feeder Side (Feed Tray)
IMPORTANT
● Do not touch the drum or rollers when you operate the paper eject switch.● Do not put your hands or fi ngers inside the machine while it is operating. Your hands may be pulled in or nipped.
WARNING
Remove the jammed paper
Press the “ feed tray descend switch” continuously.Release it when the feed tray reaches the properheight. The feed tray will stop.
Remove the “jammed paper” as shown.
● When the paper is removedThe touch panel LCD displays a message.Touch “OK” and press the PRINT key.
● When the paper is not removed Press down the “ paper eject switch”.The jammed paper is ejected.
Feed traydescend switch

186
Paper Jams
Open the “master ejection box” by pressing the “ master ejection box open button”.
Press the “paper eject switch” and remove the “jammed paper”.Press the “ paper eject switch” to eject the partially printed paper.
Close the “master ejection box” and push it until it locks.
When a paper jams ocurrs in the print tray side, “PAPER JAM ON THE EJECTION SIDE” is displayed on the LCD panel. Follow the procedure below to remove the jammed paper.
Jammed paper
Paper Jam on the Ejection Side (Print Tray Side)
Paper eject switch
IMPORTANT● When sheets of thick paper are jammed on
the ejection side, extend the side fence and the paper stopper so that the paper fi ts in.

187
6
Troubleshooting
Paper Jams
Open the “master ejection box” by pressing the “ master ejection box open button”.
Press the “ paper eject switch” repeatedly to fi nd the position of the stuck paper. Stop pressing at the position as shown.
Peel off the edge of the paper from the drum.
Press the “paper eject switch” to fi nd the edge of the paper, then stop the drum at the position shown in the illustration.
If paper has adhered to the drum, follow the procedure below to remove it.
Remove
Paper Adhering to Drum
Continue Page....
WARNING Paper eject switch
Paper adhering to the drum

188
Paper Jams
Pull the paper toward the ejection side while pressing the “ paper eject switch” to peel off the paper.
Close the “master ejection box” and push it until it locks.
Make another master.
Make sure that the peeled paper does not stick to your clothing.
Make sure there is no all-black part in the top part of document.
IMPORTANT
Remove
Paper eject switch
IMPORTANT
Paper eject switch
Jammed paper

189
6
Troubleshooting
Open the “ front cover”.
Make sure the LED lights up. If it is blinking, press the “ drum removal button”.
Pull out the “drum unit” toward you while holding the “drum release lever” until it comes to a stop.
When “MASTER EJECTION ERROR” is Displayed
● Do not press the surface of the drum unit with your fi ngers or scratch it. Doing so will not only dirty your fi ngers or clothing but will also indent the drum unit
surface, preventing normal printing.● Before placing the drum unit, check the location for other objects so that it is placed on a level surface.● Scratches or dents on the drum unit surface prevents normal printing.
●Do not touch the drum or rollers whenyou operate the paper eject switch.
●Do not put your hands or fi ngers insidethe machine while it is operating. Yourhands may be pulled in or nipped.
When an old master remains on the drum, “MASTER EJECTION ERROR” is displayed on the touch panel LCD. Remove it according to the following procedure below.
Drum removal button
Removing the Master Adhering to the Drum
Continue Page....
WARNING
WARNING

190
When "MASTER EJECTION ERROR" is Displayed
Lift up the “drum stopper” and turn the drum byhand to set the “Lever” in step 5 to an easilyoperable position.
Push down the “lever”.The “master clamp” opens and the edge of the master will be released from the clamp. If the master is stuck, release it by hand.
Return the “lever” to its original position, and turn the drum by hand to remove the “master”.Continue the above steps until the “master” is removed completely.
Turn the “drum” by hand until the “drum stopper” fi ts into the groove.
Make sure that the peeled paper does not stick to your clothing.
IMPORTANT

191
6
Troubleshooting
When "MASTER EJECTION ERROR" is Displayed
Hold the “drum” horizontally and press it in gentlyuntil it comes to a stop.
Close the “front cover”.
Press the STOP key. The message is deleted.
Make another master.

192
When Master Setting Error Has Occurred
Press the “ scanner button” to slide the scanner unit.
Remove the “master” remained in the feedsection.
Set a master again.(“How to Set the Master Roll” → see p.193)
Slide the “scanner unit” to return it to its original position.
Make another master.
The message “MASTER SETTING ERROR” is displayed on the touch panel LCD.Follow the procedure below to remove the master jammed in the feed section, and try master making again.
How to Remove the Master
Master coverRemove the master
Master cover open lever

193
6
Troubleshooting
When “SET MASTER ROLL PROPERLY” is Displayed
Press the “ scanner button” to slide the scanner unit.
Press the “master cover open lever”.The master cover will open up.
The message “SET MASTER ROLL PROPERLY” is displayed on the touch panel LCD.Follow the procedure below to set a master again.
Only use a master roll (roll master) designed for use in this machine.
How to Set the Master Roll
Continue Page....
IMPORTANT

194
When "SET MASTER ROLL PROPERLY" is Displayed
Close the “master cover”.
Slide the “scanner unit” to return it to its originalposition.The master will be automatically pulled in.
Master cover
Pull out the “master”, insert it under the “bar”,and align its leading edge with the “set line”.
● Do not touch the heat generator of thermal head. Doing so may cause damages, leading to a malfunction of master making.
Thermal head heat generatorIMPORTANT
IMPORTANT
Roll Master
Set the roll master so that its leading edge can be seen from the window.
● Be sure to pull out the master in the correct direction.
● Pull out the master until it can be seen from the window and set.

Chapter 7
7
Daily M
aintenance
Daily MaintenanceThis chapter describes daily maintenance of the machine.
Daily Maintenance ............................................................................................. 196

196
Clean the exterior of the machine according to the following procedure.1. Tightly wring a soft cloth that has been moistened with water or neutral detergent.2. Wipe off the dirt on the exterior.3. Wipe off the excess moisture on the exterior with a dry soft cloth.
● Gently wipe off the dust on the glass with a dry soft cloth.● Gently wipe off the dust on the touch panel LCD with a dry soft cloth. Never use a wet cloth. It may cause damage.
● Never use alcohol or solvent cleaner. It may tarnish or damage the exterior fi nish.● Do not put diluted petroleum or insecticide. It may cause fi re.
Dust accumulation may cause the machine to malfunction. Clean it periodically. Contact our dealer as for cleaning of inside of the machine.
● Before cleaning, be sure to turn the power off, wait until the machine cools off and unplug the power cord. Otherwise, fi re or electric shock may occur.
● Never remove covers on the machine. Never modify or adjust the machine.
● Do not spill water or any liquid inside of the machine. It may cause fi re or electric shock. If it happens, contact your service representative.
WARNING
WARNING
Daily Maintenance
● How to maintain the machineClean the machine periodically to maintain its performance.

Chapter 8
8
Specifi cations / Information
This chapter describes specifi cation and information on replacing battery.
Specifi cations / Information
Specifi cations .................................................................................................... 198Information on Replacing Battery ...................................................................... 201

198
Specifi cationsModel name DD 5450
Product category Digital Duplicator, fl oor stand modelMaster making interval
18 sec (A4, 100%)
Resolution (Pel path dir.) × (line progression dir.)
Scan (input) resolution: 300 dpi × 600 dpiPrint (output) resolution: 300 dpi ×600 dpi*(Master punch density: 600 dpi × 600 dpi)
Scanning method Flat bed scannerOptional ADFDocument weight
64–128 gsm
Optional ADF Capacity 100 sheets (64 gsm), 85 sheets (80 gsm/20 lb Bond)Document type Sheets, book (max. weight: 10 kg)Document size MAX. 297×432 mm
(With optional ADF: MIN.100×148 mm) Scanning area 293×428 mm (297×432 mm when selecting Use setting)Max. image area 290×423 mm (11.4″×16.6″)*
*With A4/Letter drum 290×207 mm (11.4″×8.1″)Feeder capacity 1,500 sheets (64 gsm), 1,280 sheets (20lb Bond), 1,200 sheets (80 gsm)Stacker capacity (print tray capacity)
1,500 sheets (64 gsm), 1,280 sheets (20 lb Bond), 1,200 sheets (80 gsm)Stacker stack height: 150 mm
Paper size MAX: 320×450 mm (12.6"×18")With optional A4/Letter drum: 320×216 mm (12.6″ x 8.5″)
MIN: 100×150 mm (3.95"×5.5")50×150 mm is possible with following conditions ● No vertical registration adjustment available ● Paper lead sensor must be turned off ● A plastic guide required on the separator.
Paper weight 45–210 gsm / 12 lb Bond – 110 lb IndexPrint speed 45–130 ppm 5 steps & Top Speed 150 ppm
Top Speed: 150 ppm for B4 / A4 / letter / Legal size (B4 or smaller)Zoom <A/B size spec>
100%Preset reduction/enlargement:A3: 61%, 70%, 81%, 86%, 115%, 122%, 141%, 163%B4: 57%, 70%, 81%, 86%, 115%, 122%, 141%, 173%Adjust X:Y Proportions 50%–500%Margin adjust 90%–99%Zoom: 50%–500%
<Inch size spec>100%Preset reduction/enlargement: 50%, 64%, 77%, 121%, 129%, 154%Adjust X:Y Proportions 50%–500%Margin adjust 90%–99%Zoom: 50%–500%

199
8
Specifi cations / Information
Specifi cations
Registration adjustment (Can be adjusted during a printing operation)Vertical 15 mm Electrical, by 0.5 mm increment Horizontal 10 mm ManualImage modes Text (default), Photo, Text/Photo (2 types), Pencil, Screen (2 types)
Contrast control Scan density: 5 stepsMaster density: 5 steps Print density: 5 steps
Ink supply method Automatic control Color print By replacing a drum unitMaster feeding AutomaticMaster ejection AutomaticUsed master capacity 55Control panel 5.7 inch QVGA color TFT panel, Touch panel
LCD language English, French, German, Spanish, Italian, Russian, Japanese, Chinese (simplifi ed), Chinese (traditional), Korean Thai, Polish
Other function
Multiple exposure (2, 4, 8 & 16-up, custom: max 5×5=25-up) Book shadow erasure (adjustable)Confi dential safeguard Panel setting memory (9 patterns of control panel settings can be stored.)Status LED90-degree rotation, 180-degree rotationOptimize print (according to print speed)Automatic pressure control (according to print speed) Initial setting (paper size / print speed / document mode / scan density /
print density on booting / ink save modeMaster re-make (save the data from last master making) Document density detection Feed heavy weight paper mode Repeat counter (default print number)Fine startPre-printEntry of sets & printsEnergy save mode (LCD turned off)Automatic power off (power turned off by time specifi ed)Ink replenishing modeAuto-reset Online print (USB2.0 High-Speed) (For compatibility, please refer to model/specifi cations.)Minimum print restriction (0–9999 sheets) Edit function (trim & make-up)Short-cut settingPrints per set/ prints per document programLCD brightness controlClock settingBuzzer setting - - Online print (Printer Driver) - -Color separation (equipped in online printer driver) (via online only)Multiple exposure (Printer Driver) (via online only)
(Multiple: 2, 4, 6, 8, 9, 16, 25-up/page, Combine: 2, 4, 6, 8, 9, 16, 25-images/page)
Model name DD 5450

200
Specifi cations
Specifi cations are subject to change without prior notice due to continual improvements.
Online
USB interface (standard USB2.0 High-Speed) (USB cable must be 3 m or shorter)(Optional)• Windows Vista• Windows 7 • Windows 8 *• Windows 8.1 *• Windows 10 **Desktop apps onlyLAN interface (FS-100U2) (Optional)• Windows Vista• Windows 7 • Windows 8 *• Windows 8.1 *• Windows 10 **Desktop apps only
Option
Exposure glass coverAuto document feederA3 color drumA4 drumTape dispenserUSB interfaceLAN interfaceUSB direct print
Power supply 100–240 V, 50/60 Hz, 200 W 2.4–1.0 A
Power consumption
Master making: 78 WPrinting (Speed6): 220 WStanding by: 8.0 WEnergy saving: 0 W (When not connected online. (Eco hibernate) When online: 4.8 W)
Energy consumption rate
When printing: 17.1 Wh/hWhen not printing: 16.8 Wh/h
Noise levelSound pressure levelWhen standing by: 0 dBWhen printing: 66.0 dB
Safety demands
Electrical Appliance and Material Safety Law, CE, CCC, EAC, FCC, RoHS, Chinese RoHS, China environmental labeling, VCCI, UL, WEEE, BSMI, Green Purchasing Law (Japan), Eco mark (Japan) Energy Start, Color Universal Design, Green Mark (Taiwan)
Dimension
With optional Exposure glass cover attached:In use: 1401 (W) × 688 (D) × 715 (H) mm Folded: 770 (W) × 688 (D) × 715 (H) mmWith optional ADF attached:In use: 1401 (W) × 688 (D) × 857 (H) mm Folded: 770 (W) × 688 (D) × 857 (H) mm
Weight 102 kg Operating temperature 10–35 degrees (C) (50–95 degrees (F))
Model name DD 5450

201
8
Specifi cations / Information
Information on Replacing Battery
Battery is replaced and retrieved by your service representative. Retrieved battery is properly disposed by our waste disposer in consideration of recycle and environment.


Appendix
AppendixThis chapter lists an index.
Index .................................................................................................................. 204

204
Drum removal button .......................3, 172, 189Drum Unit
How to Remove Drum Unit ......................172How to Set Drum Unit ..............................173Replacing Drum Unit ................................172
EEdit Image .....................................................77Energy Save Mode ......................................137Enlargement / Reduction .........................24, 32Exposure glass ................................................2Exposure glass cover ................................2, 19
FFeed pressure adjuster lever ...........................3Feed tray .........................................................2Feed tray descend switch ........2, 182, 183, 185Feed tray horizontal registration adjuster dial ...3Fine Start .....................................................143Free Zoom .....................................................36Front cover ..........................................172, 189
HHOME key .......................................................6How to Set the Jump Plates ..........................18How to Set the Print Tray...............................17
IIf Trouble Occurs .........................................178Image Mode...................................................44
How to Set Image Mode .............................44Information...................................................161Information on Replacing Battery ................201Initial Confi guration ......................................132Ink
Ink Saving Mode ......................................114Replacing Ink Pack ..................................164Replenish Ink ...........................................116
Interval Print ................................................121
JJump plate lever ..............................................4
KKey card slot ....................................................5
LLAMP ...............................................................6LCD (touch panel) ...........................................6Loading Document
How to Load Document on the Exposure Glass ...19Loading Document in Automatic Document Feeder (ADF)(Optional) ..20
Other2, 4, 8, and 16-up ..............................56, 57, 582 IN 1 .............................................................5990° Rotation ...................................................73180° Rotation .................................................75
AADD MAKE UP ..............................................91Adjusting Darkness
Master Darkness ........................................41Print Darkness ............................................42Scan Darkness ...........................................40
Automatic Power OFF .................................139Automatic Reset ..........................................141
BBasic Printing.................................................22Batch Print / Sequential Batch Print ............123
How to Enter Batch Print / Sequential Batch Print ...126How to Set Batch Print / Sequential Batch Print...124
Book Shadow ErasureCenter & Outline Shadow Erasure .............68Center Shadow Erasure .............................68Outline Shadow Erasure ............................68
Buzzer .........................................................159
CCaster lock.......................................................2CLEAR key ......................................................6Clip holder .......................................................6Confi dential Safeguard ................................117Connector(PC).................................................2Connectors (Optional) .....................................5Control keys.....................................................6Control Panel ...............................................2, 6Custom Scaling .............................................38Cut Line .........................................................66
DDaily Maintenance .......................................196Date & Time .................................................157Display Brightness .......................................155Document
Acceptable Documents ..............................10How to Load Document ..............................19How to Set “CUSTOM” in Document Size ...49How to Set Document Size ........................48
Document Darkness Detection ....................119Document Memory ........................................98Document Misset Detection.........................128Document Size ..............................................48
Index

205
Appendix
Index
MMain Screen ....................................................7Make Up ........................................................77Master
How to Dispose of Used Masters .............170Replacing Roll Master ..............................167
Master cover open lever ..................................3Master ejection box .....................................170Master ejection box cover................................4Master ejection box cover open lever ......4, 170Master ejection box open button .....4, 170, 186Master ejection core ........................................4MASTER EJECTION ERROR
When “MASTER EJECTION ERROR” is Displayed ..189MASTER MAKING key ..............................6, 23Master Setting Error
When Master Setting Error Has Occurred ...192Minor Reduction ............................................34Multiple Exposure ..........................................56
NNarrow Paper ........................................46, 112NEW MAKE UP .............................................94NUMERIC keys .........................................6, 23
OOnline Mode ................................................130Optimize Print ..............................................145OUT OF BATTERY ..............................143, 157
PPaper eject switch ...................4, 185, 187, 188Paper feed rollers ............................................3Paper Jams
Paper Adhering to Drum ...........................187Paper Jam on the Ejection Side (Print Tray Side) ...186Paper Jam on the Feeder Side (Feed Tray) ..185
Paper stopper ..................................................5Paper Type ..................................................110PENCIL..........................................................44Pen holder .......................................................6PHOTO ..........................................................44PHOTO>TEXT ..............................................44Power switch ...................................................6Pre-print .......................................................147Preview ..........................................................52PRINT DARKNESS keys .................................6Printing Paper
Acceptable Printing Paper ..........................10How to Set “CUSTOM” in Paper Size Setting ...28How to Set Papers .....................................14How to Set Paper Size ...............................26How to Supply or Replace Paper While Printing ...16
Supplying Paper While Printing ................182PRINT key .................................................6, 23Print Position Adjustment...............................46Print Position Adjustment While Printing .....153PRINT POSITION keys ...................................6Print Speed Adjustment
How to Adjust Print Speed .........................29How to Set TOP SPEED ............................30
PRINT SPEED keys ........................................6Print tray ..........................................................5Print tray lock lever ....................................4, 17Program .......................................................100
Changing Memory Name .........................104Clearing Settings ......................................108Confi rming Settings ..................................106Retrieving Settings ...................................105
Proof Print....................................................151
RRepeat Counter ...........................................149Replacing Separator Unit ............................175Replacing Side Separator Unit ....................176RESET key ......................................................6
SScale ...............................................................2Scanner button ........................................2, 192Scanner unit ....................................................3SCREEN COARSE .......................................44SCREEN FINE ..............................................44Separation pressure adjuster knob..................3SET MASTER ROLL PROPERLY
When “SET MASTER ROLL PROPERLY” is Displayed ...193Setting Screen .................................................7Shortcut Setting ...........................................135Side fence........................................................5Side guide........................................................3Side guide lever ...............................................3Side separator height adjuster knob ................3Specifi cations ..............................................198Standard Mode ................................................9STOP key ........................................................6Supplying Paper While Printing
Changing Paper Size ...............................183If Paper Runs Out During Printing ............182Supplying Paper While Printing ................182
Support tray .....................................................2SWITCH ERASE AREA.................................93
TTape dispenser ....................................121, 127TEST PRINT key .............................................6Text mode ......................................................44TEXT>PHOTO ..............................................44

206
Index
Trimming ........................................................95Turning Power OFF .........................................8Turning Power ON ...........................................8
UUSB port ..........................................................2
WWhen Messages Appear .............................179

© 2016

C284-8610AUENUSENGBEN