operating guide | warranty model number z23lz5r …diagramas.diagramasde.com/televisores/z32lz5r...
TRANSCRIPT

© Copyright 2004, LG Electronics USA, Inc.
Operating Guide | Warranty
Model Number | Z23LZ5R • Z26LZ5R • Z32LZ5R | LCD TV

2
Warning
WARNING:TO REDUCE THE RISK OF ELECTRIC SHOCK DO NOT REMOVE COVER (OR BACK). NO USERSERVICEABLE PARTS INSIDE. REFER TO QUALIFIED SERVICE PERSONNEL.
The lightning flash with arrowhead symbol, within an equilateral triangle, is intended to alert the user tothe presence of uninsulated “dangerous voltage” within the product’s enclosure that may be of suffi-cient magnitude to constitute a risk of electric shock to persons.
The exclamation point within an equilateral triangle is intended to alert the user to the presence ofimportant operating and maintenance (servicing) instructions in the literature accompanying the appli-ance.
NOTE TO CABLE/TV INSTALLER:This reminder is provided to call the CATV system installer’s attention to Article 820-40 of the National ElectricCode (U.S.A.). The code provides guidelines for proper grounding and, in particular, specifies that the cableground shall be connected to the grounding system of the building, as close to the point of the cable entry as prac-tical.
REGULATORY INFORMATIONThis equipment has been tested and found to comply with the limits for a Class B digital device, pursuant to Part15 of the FCC Rules. These limits are designed to provide reasonable protection against harmful interference ina residential installation. This equipment generates, uses and can radiate radio frequency energy and, if notinstalled and used in accordance with the instructions, may cause harmful interference to radio communications.However, there is no guarantee that interference will not occur in a particular installation. If this equipment doescause harmful interference to radio or television reception, which can be determined by turning the equipment offand on, the user is encouraged to try to correct the interference by one or more of the following measures:- Reorient or relocate the receiving antenna.- Increase the separation between the equipment and receiver.- Connect the equipment into an outlet on a circuit different from that to which the receiver is connected.- Consult the dealer or an experienced radio/TV technician for help.
Any changes or modifications not expressly approved by the party responsible for compliance could void theuser’s authority to operate the equipment.
CAUTION:Do not attempt to modify this product in any way without written authorization from Zenith ElectronicsCorporation. Unauthorized modification could void the user’s authority to operate this product.
COMPLIANCE: The responsible party for this device compliance is:Zenith Electronics Corporation1-201-816-2000Marked and Distributed in the United States by LG Electronics U.S.A., Inc.1000 Sylvan Avenue, Englewood Cliffs, NJ 07632http://www.zenith.com
CAUTIONRISK OF ELECTRIC SHOCK DO NOT OPEN
WWarningarning

WARNING :To reduce the risk of fire or electric shock, DO NOT expose this apparatus to rain or moisture.
Apparatus shall not be exposed to dripping or splashing and no objects filled with liquids, such as vases, shall be placed on theapparatus.
CAUTION : These servicing instructions are for use by qualified service personnel only. To reduce the risk of electric shock, do not perform any servicing other than that contained in the operating instructions unless you are qualified to do so.
IMPORTANT SAFETY INSTRUCTIONS
1. Read these instructions.
2. Keep these instructions.
3. Heed all warnings.
4. Follow all instructions.
5. Do not use this apparatus near water.
6. Clean only with a dry cloth.
7. Do not block any of the ventilation openings. Install in accordance with the manufacturer’s instructions.
8. Do not install near any heat sources such as radiators, heat registers, stoves, or other apparatus (including amplifiers) thatproduce heat.
9. Do not defeat the safety purpose of the polarized or grounding type plug. A polarized plug has two blades with one widerthan the other. A grounding type plug has two blades and a third grounding prong. The wide blade or the third prong isprovided for your safety. When the provided plug does not fit into your outlet, consult an electrician for replacement of theobsolete outlet.
10. Protect the power cord from being walked on or pinched particularly at plugs, convenience receptacles, and the pointwhere they exit from the apparatus.
11. Only use the attachments / accessories specified by the manufacturer.
Safety InstructionsSafety Instructions
3
Safety Instructions
4
Safety Instructions
Safety Instructions continuedSafety Instructions continued
12. Use only with a cart, stand, tripod, bracket, or table specified by the manufacturer, or sold with the apparatus. When acart is used, use caution when moving the cart / apparatus combination to avoid injury from tip-over.
13. Unplug this apparatus during lightning storms or when unused for long periods of time.
14. Refer all servicing to qualified service personnel. Servicing is required when the apparatus has been damaged in anyway, such as power supply cord or plug is damaged, liquid has been spilled or objects have fallen into the apparatus, theapparatus has been exposed to rain or moisture, does not operate normally, or has been dropped.
On Disposal a. The fluorescent lamp used in this product contains a small amount of mercury.b. Do not dispose of this product with general household waste.
Disposal of this product must be carried out in accordance to the regulations of your local authority.

5
Contents
After reading this manual, keep it handy for future reference.
Warnings . . . . . . . . . . . . . . . . . . . . . . . . . . . . . . . . . . . . .2Safety Instructions . . . . . . . . . . . . . . . . . . . . . . . . . . . . .3~4
IntroductionControls . . . . . . . . . . . . . . . . . . . . . . . . . . . . . . .6Connection Options . . . . . . . . . . . . . . . . . . . . . .7Remote Control Key Functions . . . . . . . . . . . . . .8
InstallationAccessories . . . . . . . . . . . . . . . . . . . . . . . . . . . .9Kensington Security System(Options) . . . . . . . . .9
Installation Instruction . . . . . . . . . . . . . . . . . . . . . .10External Equipment Connections . . . . . . . . . .11~14
Antenna Connection . . . . . . . . . . . . . . . . . . . . .11VCR Setup . . . . . . . . . . . . . . . . . . . . . . . . . . . .12Cable TV Setup . . . . . . . . . . . . . . . . . . . . . . . .12External A/V Source Setup . . . . . . . . . . . . . . . .13DVD Setup . . . . . . . . . . . . . . . . . . . . . . . . . . . .13DTV Setup . . . . . . . . . . . . . . . . . . . . . . . . . . . .14PC Setup . . . . . . . . . . . . . . . . . . . . . . . . . . . . .14
OperationTV Operation Overview . . . . . . . . . . . . . . . . . . . .15Menu Language Selection . . . . . . . . . . . . . . . . . .15Channel Menu Options
Memorizing the Channels with EZ Scan . . . . . .16Add/Delete Channels with Manual Program . . .16Favorite Channels Setup . . . . . . . . . . . . . . . . . .17
Picture Menu OptionsEZ Video . . . . . . . . . . . . . . . . . . . . . . . . . . . . .18Manual Picture Control (User option) . . . . . . . .18Cinema Mode Setup . . . . . . . . . . . . . . . . . . . . .18Picture Format (ARC) . . . . . . . . . . . . . . . . . . . .18
Sound Menu OptionsEZ Audio . . . . . . . . . . . . . . . . . . . . . . . . . . . . .19Equalizer Adjustments . . . . . . . . . . . . . . . . . . .19
AVL (Auto Volume Leveler) . . . . . . . . . . . . . . . .19Sound Balance . . . . . . . . . . . . . . . . . . . . . . . . .20Stereo/SAP Broadcasts Setup . . . . . . . . . . . . .20
Time Menu OptionsAuto Clock Setup . . . . . . . . . . . . . . . . . . . . . . .21Manual Clock Setup . . . . . . . . . . . . . . . . . . . . .21On/Off Timer Setup . . . . . . . . . . . . . . . . . . . . .22Sleep Timer Setup . . . . . . . . . . . . . . . . . . . . . .22Auto Off . . . . . . . . . . . . . . . . . . . . . . . . . . . . . .22
Special Menu OptionsClosed Captions . . . . . . . . . . . . . . . . . . . . . . . .23Caption/Text . . . . . . . . . . . . . . . . . . . . . . . . . . .24Captions . . . . . . . . . . . . . . . . . . . . . . . . . . . . . .24Key Lock . . . . . . . . . . . . . . . . . . . . . . . . . . . . .24
Lock Menu OptionsLock Menu Setup . . . . . . . . . . . . . . . . . . . . . . .26
PC Menu Options . . . . . . . . . . . . . . . . . . . . . . . . .27
External Control Device Setup . . . . . . . . . . . . . . . . . . .28
IR Codes . . . . . . . . . . . . . . . . . . . . . . . . . . . . . . . . . . . .32
Maintenance . . . . . . . . . . . . . . . . . . . . . . . . . . . . . . . . .34
Product Specifications . . . . . . . . . . . . . . . . . . . . . . . . .34
Troubleshooting Checklist . . . . . . . . . . . . . . . . . . . . . .35
Warranty . . . . . . . . . . . . . . . . . . . . . . . . . . . . .Back Cover
ContentsContents
6
Introduction
IntroductionIntroduction
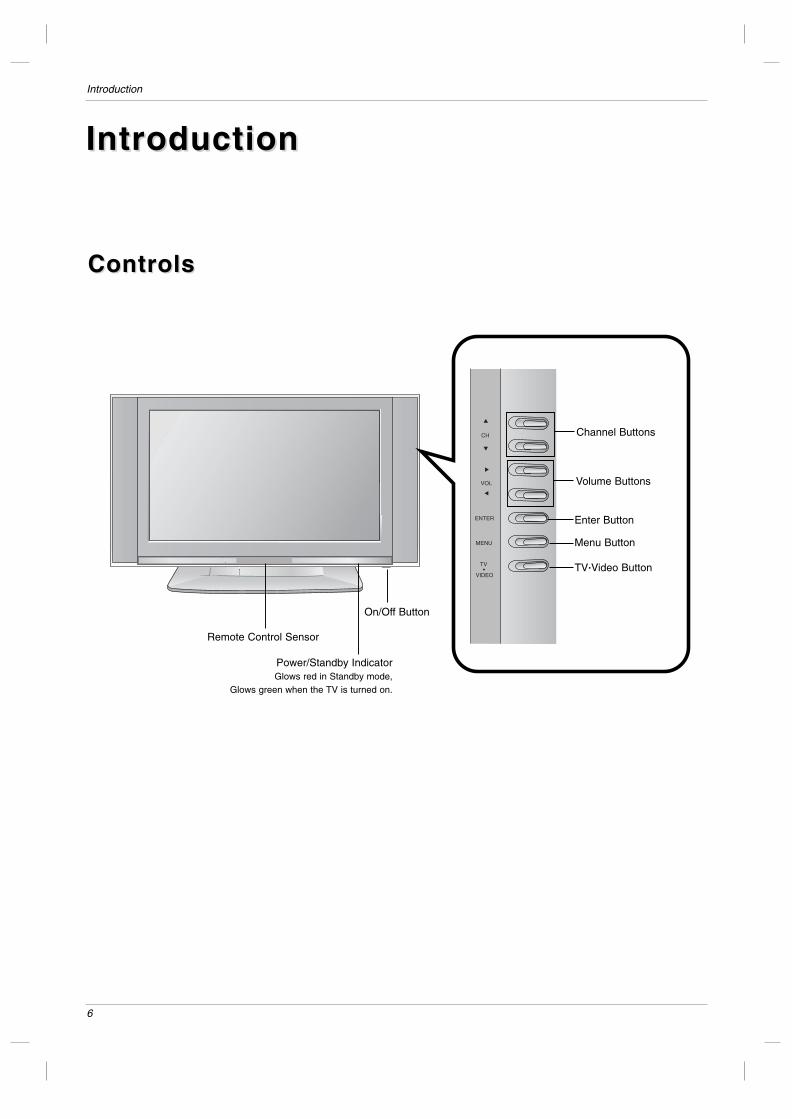
ControlsControls
CH
VOL
ENTER
MENU
TV
VIDEO
Remote Control Sensor
Channel Buttons
Volume Buttons
Enter Button
Menu Button
TV·Video Button
On/Off Button
Power/Standby IndicatorGlows red in Standby mode,
Glows green when the TV is turned on.
7
Introduction
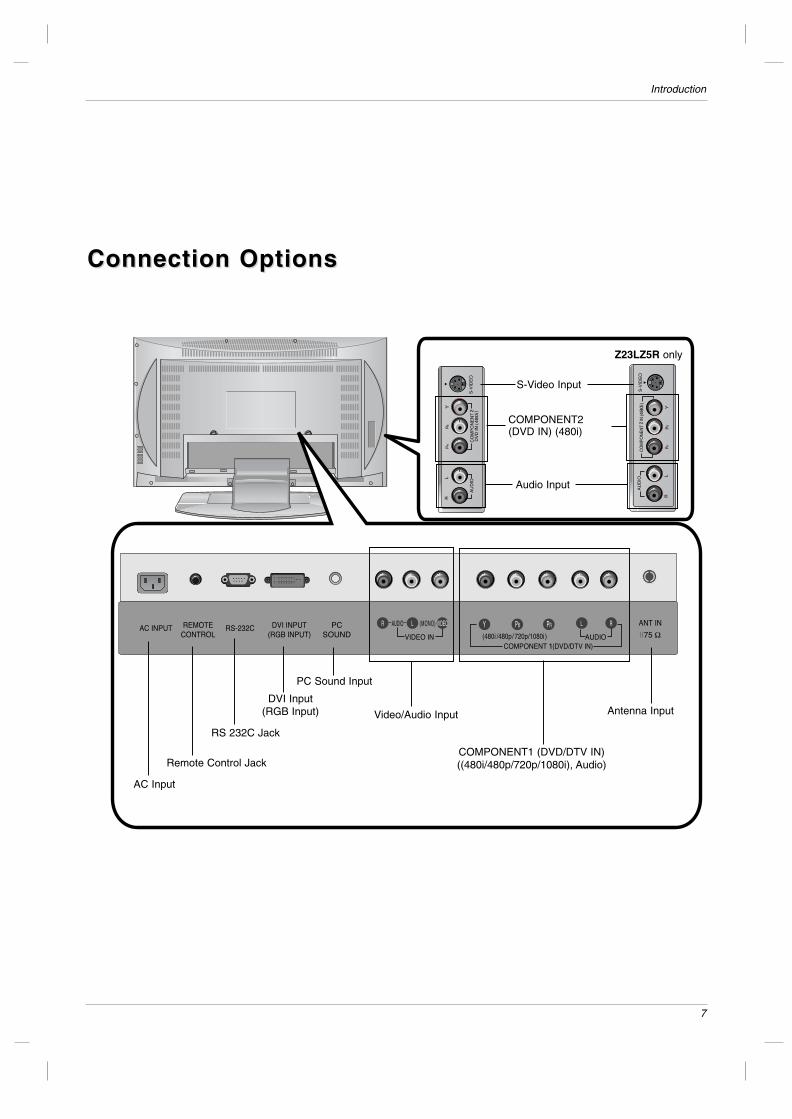
Connection OptionsConnection Options
2
1
AC Input
Remote Control Jack
RS 232C Jack
DVI Input(RGB Input)
COMPONENT1 (DVD/DTV IN)((480i/480p/720p/1080i), Audio)
Video/Audio Input
PC Sound Input
Antenna Input
S-Video Input
COMPONENT2 (DVD IN) (480i)
Audio Input
Z23LZ5R only
8
Introduction
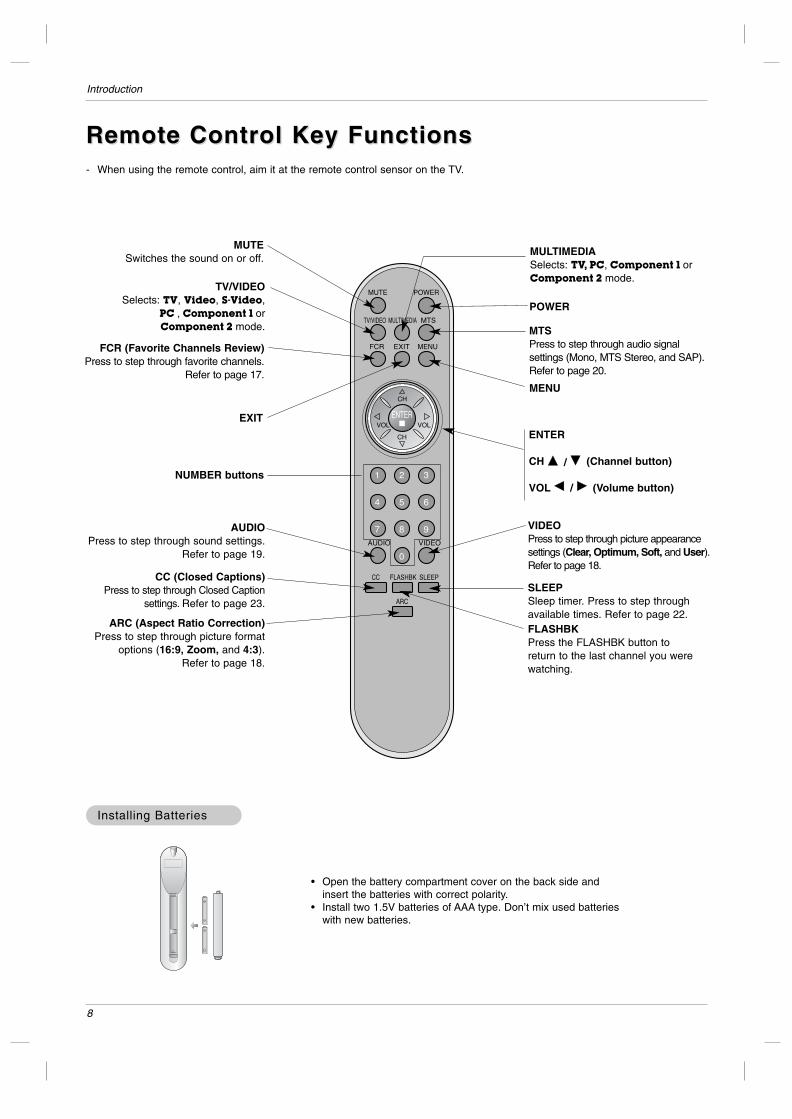
- When using the remote control, aim it at the remote control sensor on the TV.
MUTESwitches the sound on or off.
ENTER
CH DD / EE (Channel button)
VOL FF / GG (Volume button)
POWER
MTSPress to step through audio signal settings (Mono, MTS Stereo, and SAP).Refer to page 20.
EXIT
MENU
MULTIMEDIASelects: TV, PC, Component 1 orComponent 2 mode.
VIDEOPress to step through picture appearancesettings (Clear, Optimum, Soft, and User). Refer to page 18.
SLEEPSleep timer. Press to step through available times. Refer to page 22.FLASHBKPress the FLASHBK button toreturn to the last channel you werewatching.
AUDIOPress to step through sound settings.
Refer to page 19.
CC (Closed Captions)Press to step through Closed Caption
settings. Refer to page 23.
TV/VIDEOSelects: TV, Video, S-Video,
PC , Component 1 orComponent 2 mode.
FCR (Favorite Channels Review)Press to step through favorite channels.
Refer to page 17.
NUMBER buttons
• Open the battery compartment cover on the back side andinsert the batteries with correct polarity.
• Install two 1.5V batteries of AAA type. Don’t mix used batterieswith new batteries.
Installing BatteriesInstalling Batteries
Remote Control Key FunctionsRemote Control Key Functions
ARC (Aspect Ratio Correction)Press to step through picture format
options (16:9, Zoom, and 4:3). Refer to page 18.
9
Installation
InstallationInstallation
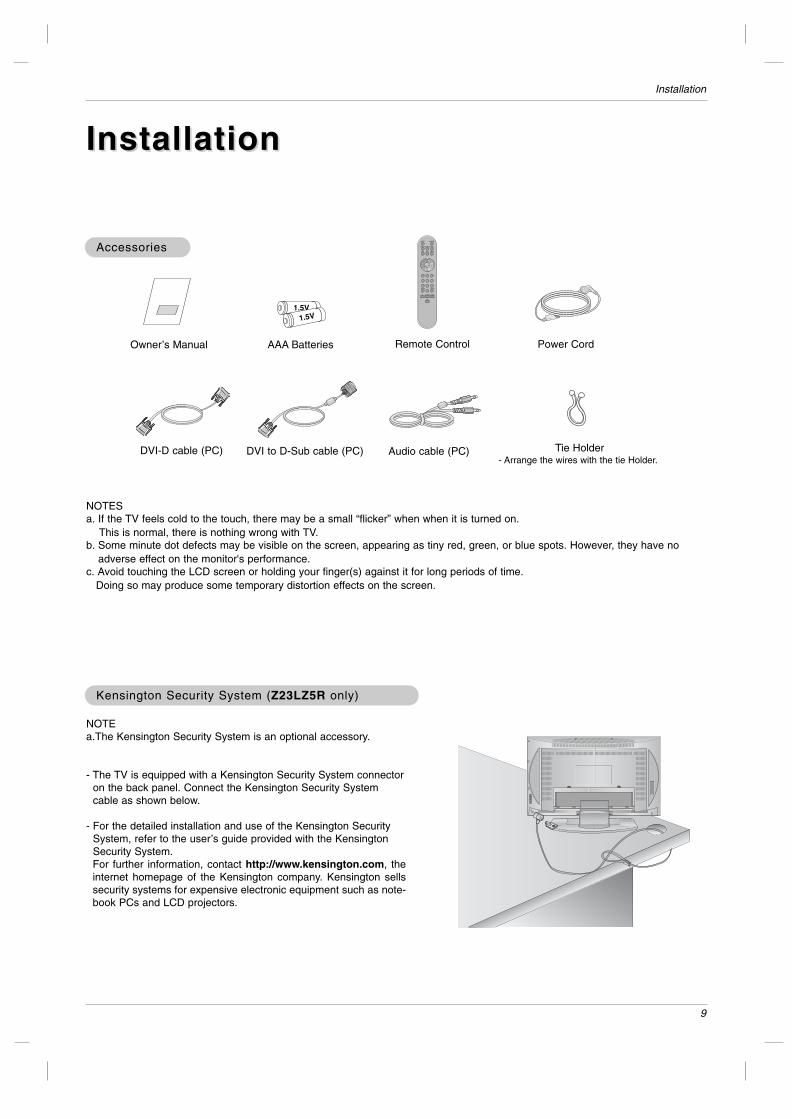
Owner’s Manual
1.5V1.5V
AAA Batteries Power CordRemote Control
DVI-D cable (PC) DVI to D-Sub cable (PC) Audio cable (PC)
NOTES a. If the TV feels cold to the touch, there may be a small “flicker” when when it is turned on.
This is normal, there is nothing wrong with TV.b. Some minute dot defects may be visible on the screen, appearing as tiny red, green, or blue spots. However, they have no
adverse effect on the monitor's performance.c. Avoid touching the LCD screen or holding your finger(s) against it for long periods of time.
Doing so may produce some temporary distortion effects on the screen.
Tie Holder- Arrange the wires with the tie Holder.
Kensington Security System (Kensington Security System (Z23LZ5RZ23LZ5R only)only)
AccessoriesAccessories
NOTEa.The Kensington Security System is an optional accessory.
- The TV is equipped with a Kensington Security System connectoron the back panel. Connect the Kensington Security Systemcable as shown below.
- For the detailed installation and use of the Kensington SecuritySystem, refer to the user’s guide provided with the KensingtonSecurity System. For further information, contact http://www.kensington.com, theinternet homepage of the Kensington company. Kensington sellssecurity systems for expensive electronic equipment such as note-book PCs and LCD projectors.
10
Installation
Adjusting the Adjusting the TV VTV Viewing iewing AngleAngle
Installation InstructionInstallation Instruction
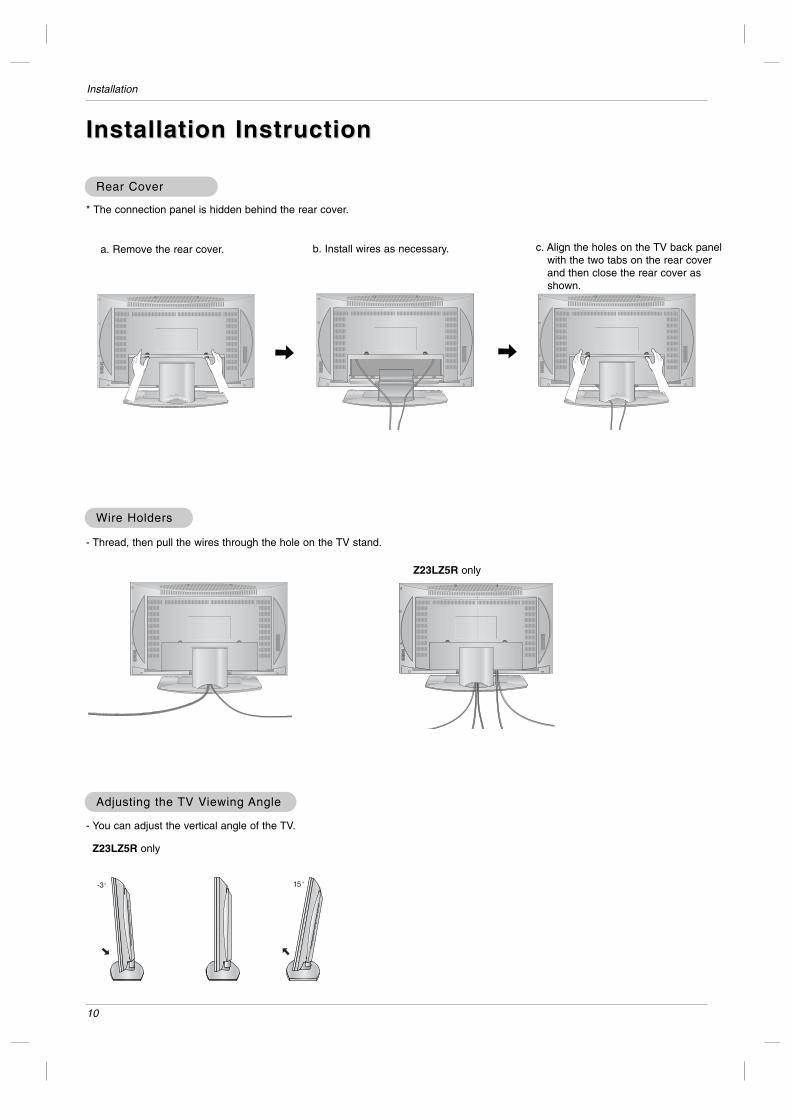
- You can adjust the vertical angle of the TV.
Rear CoverRear Cover
* The connection panel is hidden behind the rear cover.
a. Remove the rear cover. b. Install wires as necessary. c. Align the holes on the TV back panelwith the two tabs on the rear coverand then close the rear cover asshown.
Z23LZ5R only
Z23LZ5R only
WWire Holdersire Holders
- Thread, then pull the wires through the hole on the TV stand.
11
Installation
External Equipment ConnectionsExternal Equipment Connections
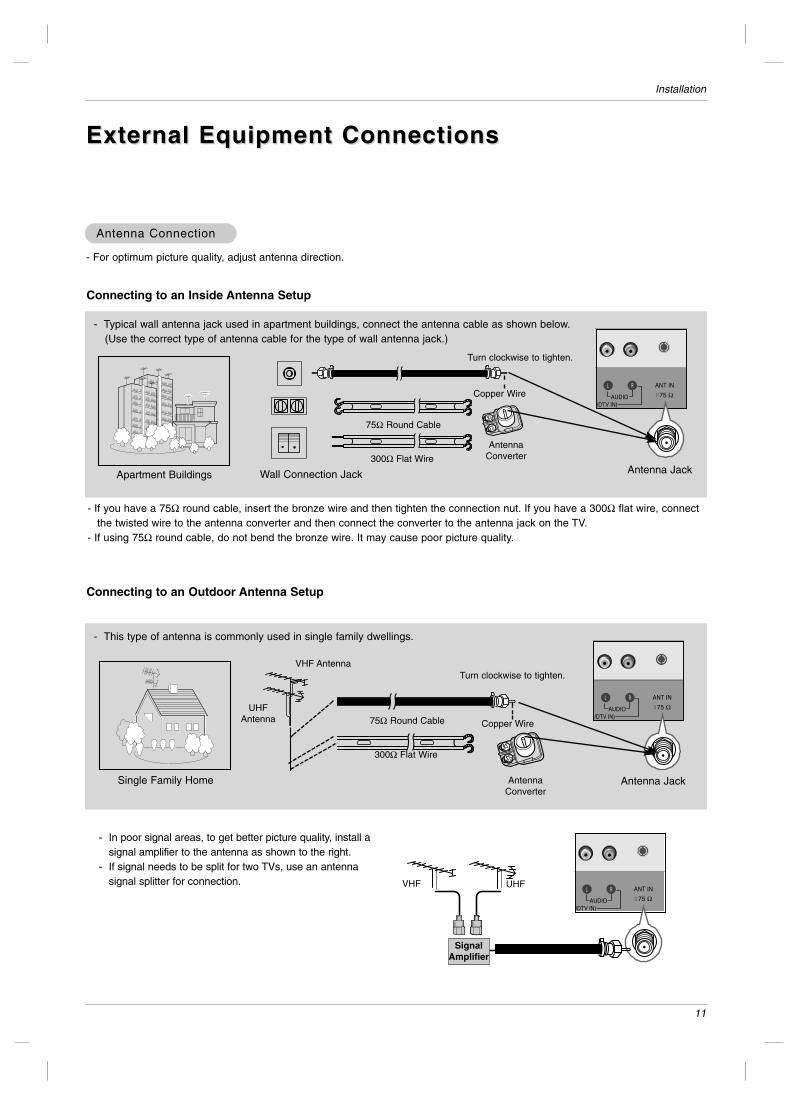
- For optimum picture quality, adjust antenna direction.
- Typical wall antenna jack used in apartment buildings, connect the antenna cable as shown below.(Use the correct type of antenna cable for the type of wall antenna jack.)
Wall Connection JackApartment Buildings Antenna Jack
Copper Wire
Turn clockwise to tighten.
AntennaConverter300Ω Flat Wire
75Ω Round Cable
- This type of antenna is commonly used in single family dwellings.
UHF Antenna
VHF Antenna
- If you have a 75Ω round cable, insert the bronze wire and then tighten the connection nut. If you have a 300Ω flat wire, connectthe twisted wire to the antenna converter and then connect the converter to the antenna jack on the TV.
- If using 75Ω round cable, do not bend the bronze wire. It may cause poor picture quality.
- In poor signal areas, to get better picture quality, install asignal amplifier to the antenna as shown to the right.
- If signal needs to be split for two TVs, use an antennasignal splitter for connection.
Signal Amplifier
UHFVHF
Single Family Home
Connecting to an Inside Antenna Setup
Connecting to an Outdoor Antenna Setup
Antenna Jack
Copper Wire
Turn clockwise to tighten.
AntennaConverter
300Ω Flat Wire
75Ω Round Cable
Antenna ConnectionAntenna Connection
12
Installation
Cable Cable TV SetupTV Setup
VCR SetupVCR Setup
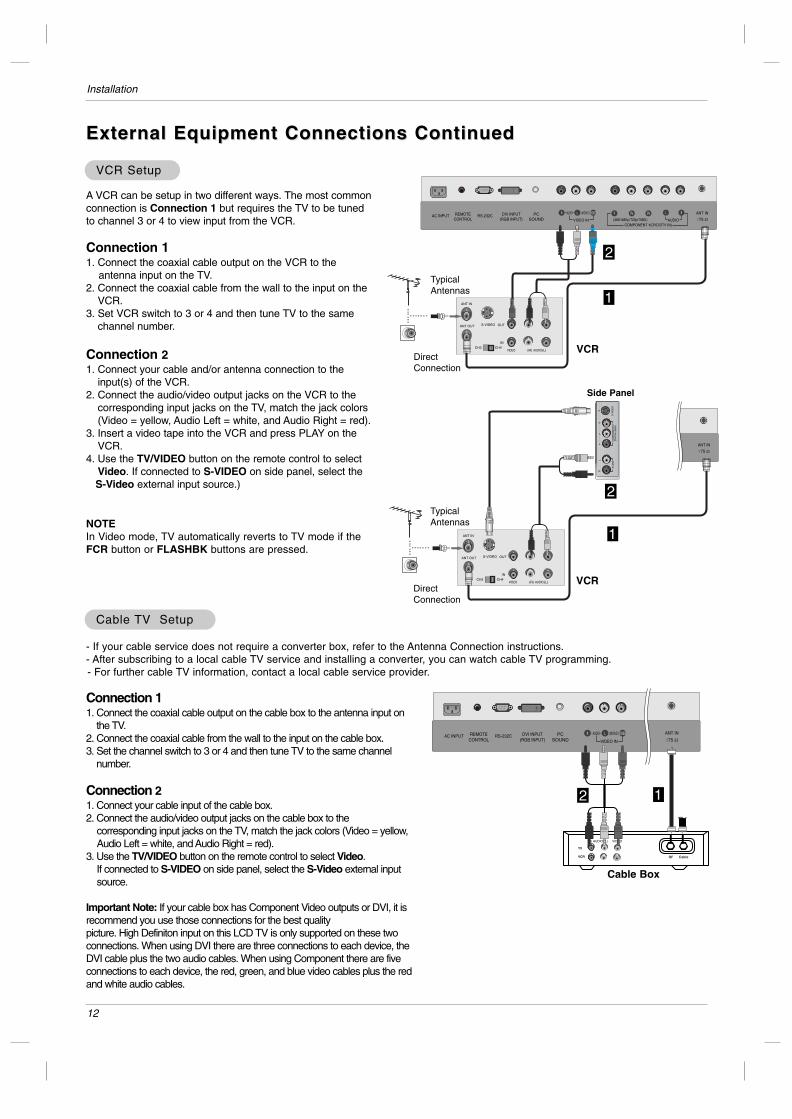
A VCR can be setup in two different ways. The most commonconnection is Connection 1 but requires the TV to be tunedto channel 3 or 4 to view input from the VCR.
Connection 11. Connect the coaxial cable output on the VCR to the
antenna input on the TV.2. Connect the coaxial cable from the wall to the input on the
VCR.3. Set VCR switch to 3 or 4 and then tune TV to the same
channel number.
Connection 21. Connect your cable and/or antenna connection to the
input(s) of the VCR. 2. Connect the audio/video output jacks on the VCR to the
corresponding input jacks on the TV, match the jack colors(Video = yellow, Audio Left = white, and Audio Right = red).
3. Insert a video tape into the VCR and press PLAY on theVCR.
4. Use the TV/VIDEO button on the remote control to selectVideo. If connected to S-VIDEO on side panel, select the S-Video external input source.)
Connection 11. Connect the coaxial cable output on the cable box to the antenna input on
the TV.2. Connect the coaxial cable from the wall to the input on the cable box.3. Set the channel switch to 3 or 4 and then tune TV to the same channel
number.
Connection 21. Connect your cable input of the cable box. 2. Connect the audio/video output jacks on the cable box to the
corresponding input jacks on the TV, match the jack colors (Video = yellow,Audio Left = white, and Audio Right = red).
3. Use the TV/VIDEO button on the remote control to select Video. If connected to S-VIDEO on side panel, select the S-Video external inputsource.
Important Note: If your cable box has Component Video outputs or DVI, it isrecommend you use those connections for the best quality picture. High Definiton input on this LCD TV is only supported on these twoconnections. When using DVI there are three connections to each device, theDVI cable plus the two audio cables. When using Component there are fiveconnections to each device, the red, green, and blue video cables plus the redand white audio cables.
- If your cable service does not require a converter box, refer to the Antenna Connection instructions.- After subscribing to a local cable TV service and installing a converter, you can watch cable TV programming.- For further cable TV information, contact a local cable service provider.
External Equipment Connections ContinuedExternal Equipment Connections Continued
OUT
INCH3 CH4
S-VIDEO
ANT IN
ANT OUT
(R) (L)AUDIOVIDEO
1
1TypicalAntennas
VCRDirectConnection
2
OUT
INCH3 CH4
S-VIDEO
ANT IN
ANT OUT
(R) (L)AUDIOVIDEO
2
1
TypicalAntennas
Side Panel
VCRDirectConnection
2
TV
VCR RF Cable
(R) AUDIO (L) VIDEO
1
Cable Box
2
NOTEIn Video mode, TV automatically reverts to TV mode if theFCR button or FLASHBK buttons are pressed.

13
Installation
External External A/V Source SetupA/V Source Setup
DVD SetupDVD Setup
Connections1. Connect the DVD video outputs to the COMPONENT (Y, PB,PR) jacks and connect the DVD audio outputs to the AUDIOjacks.
Component Video jacks on other devices may not be labeledthe same as they are on this TV, refer to the chart below for alist of other labeling schemes.
NOTE: If your DVD player does not have component videooutput, use S-Video.
Viewing Setup1. Turn on the DVD player, insert a DVD.2. Use the TV/VIDEO or MULTIMEDIA button on the remotecontrol to select Component 1 or Component 2 (If connectedto S-VIDEO, select the S-Video input source.)3. Refer to the DVD player's manual for operating instructions.
ConnectionsConnect the audio/video output jacks on the external A/Vequipment to the corresponding input jacks on the TV.When connecting the TV to external A/V equipment,match the jack colors (Video = yellow, Audio Left = white,and Audio Right = red).
Viewing Setup1. Turn on the external A/V equipment.2. Use the TV/VIDEO button on the remote control to
select Video.3. Operate the corresponding external equipment. Refer
to external equipment operating guide.
Component ports of the TV
Y PB PR
Video output ports of DVD player
YYYY
PbB-YCbPB
PrR-YCrPR
• Component Input portsTo get better picture quality, connect a DVD player tothe component input ports as shown below.
Camcorder
Video Game set
R AUDIO VIDEOL
1
ExternalEquipment
DVD
DVD
AUDIOY PB PR (L)(R)
1
AUDIO Y PB PR(L)(R)
2
Side Panel

14
Installation
- After setup, be sure to select RGB-PC source on TV.
PC SetupPC Setup
Connections1. Set the monitor output resolution on the PC before
connecting to the TV.2. Connect the TV to the PC with the PC cable.3. Connect the PC audio output to the TV's PC SOUND
input.
Viewing Setup1. Turn on the PC. 2. Use the TV/VIDEO or MULTIMEDIA button on the
remote control to select PC.
NOTESa. For optimum picture quality, use standard WXGA 1280x768 (Z23LZ5R / Z26LZ5R), 1360x768 (Z32LZ5R) computer output at a 60Hz
refresh rate . Using other formats (VGA, SVGA, etc.) or refresh rates may result in reduced picture quality. (To change the computer videooutput format, please refer to the operating manual for the computer you are using).
b. If the message “Out of range” appears on the screen, adjust the PC output to a format listed in the ‘Monitor DisplaySpecifications' chart above.
c. The synchronization input form for Horizontal and Vertical frequencies is separate.
DPM (Display Power Management) modeIf the PC goes to power saving mode, the monitor automatically switches to DPM mode.If you don’t use the PC cable provided, DPM mode may not work.
Resolution
640x480
800x600
HorizontalFrequency(kHz)
31.47
35.00
37.50
35.16
37.88
48.08
46.88
60
66.67
75
56.25
60
72.19
75
48.36
56.4860.02
47.78
60
7075
60
VerticalFrequency(Hz)
1024x768
Monitor Display Specifications
DTV SetupDTV Setup
- To watch digitally broadcast programs, purchase andconnect a digital set-top box.
ConnectionsConnect the digital set-top box video outputs to theCOMPONENT (Y, PB, PR) jacks and connect the digitalset-top box audio outputs to the AUDIO jacks.
Viewing Setup1. Turn on the digital set-top box. (Refer to the owner’s
manual for the digital set-top box.) 2. Use the TV/VIDEO or MULTIMEDIA button on the
remote control to select Component 1.
DTV Receiver (Set-top Box)
AUDIOY PB PR (L)(R)
1
1280x768
[ Z23LZ5R / Z26LZ5R ]
[ Z32LZ5R ]
Resolution
640x480
800x600
1024x768
1280x768
1360x768
1920x1080
1280x720
HorizontalFrequency(kHz)
31.469
37.879
48.363
47.693
47.649
33.750
45.000
60
60
60
60
60
60
60
VerticalFrequency(Hz)
NOTEConnect the signal cable (DVI-D cable, Not DVI to D-Sub cable) from the DVI output socket of the PC to the DVI input socket of the set when using a PC with DVI output. In some video cards, DVI-Analog output may not be supported.

15
Operation
OperationOperation
Menu Language SelectionMenu Language Selection
TV Operation OverviewTV Operation Overview
- The menus can be shown on the screen in the selected language. First select your language.
1. Press the MENU button and then use DD / EE button to select the Special menu.
2. Press the GG button and then use DD / EE button to select Language.
3. Press the GG button and then use DD / EE button to select your desired language.From this point on, the on-screen menus will be shown in the language of yourchoice.
4. Press the ENTER button to save.
1. First, make all equipment connections. Plug the AC Adapter into the TV, then plug the AC Adapter into a poweroutlet. At this time, the TV is switched to standby mode.
• In standby mode, press the POWER, CH (D,E), TV/VIDEO, MULTIMEDIA or a number button on theremote control or ON/OFF, CH (D,E), TV/VIDEO located on the TV to turn the TV on.
2. Select the viewing source by pressing TV/VIDEO or MULTIMEDIA repeatedly.
• Note: See page 16 if you have not auto programmed the TV to receive channels in your local broadcast area.
3. After viewing, press the POWER button on the remote control or ON/OFF located on the TV. The TV reverts tostandby mode.
NOTE• If you want to turn the TV off, press the on/off button located on the TV. If you intend to be away on vacation,
disconnect the power plug from the wall power outlet.
16
Operation
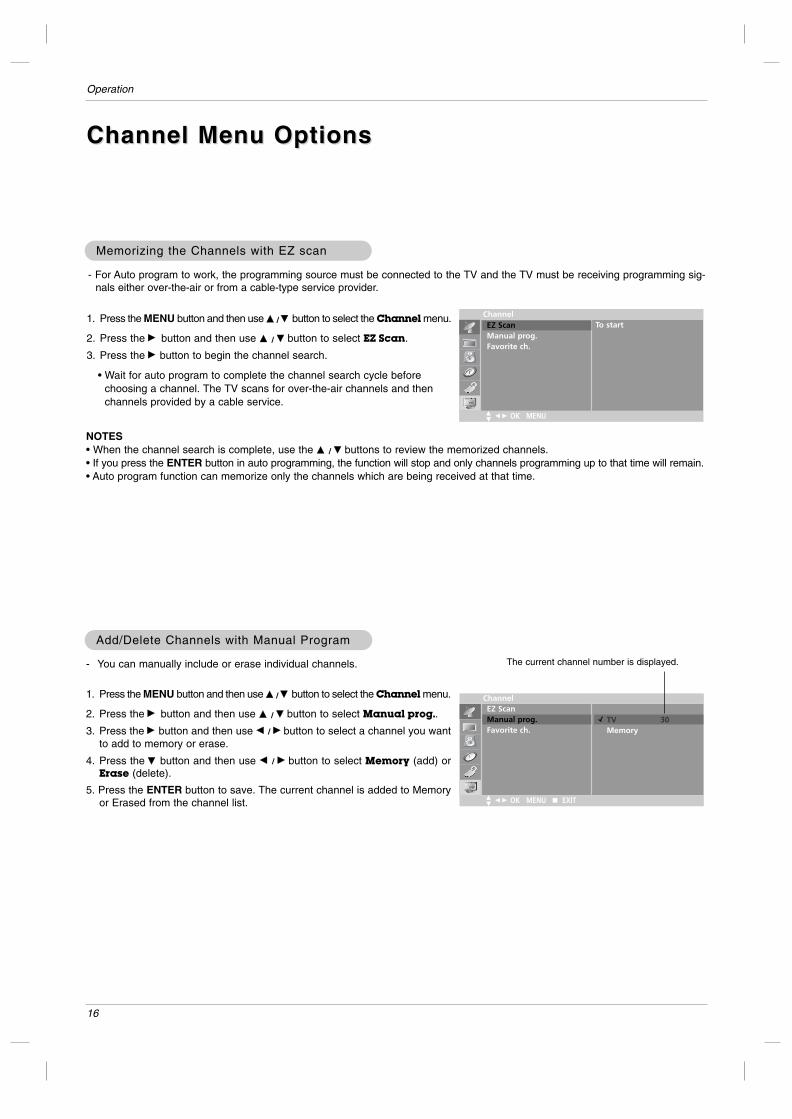
- You can manually include or erase individual channels.
1. Press the MENU button and then use DD / EE button to select the Channel menu.
2. Press the GG button and then use DD / EE button to select Manual prog..
3. Press the GG button and then use FF / GG button to select a channel you wantto add to memory or erase.
4. Press the EE button and then use FF / GG button to select Memory (add) orErase (delete).
5. Press the ENTER button to save. The current channel is added to Memoryor Erased from the channel list.
Add/Delete Channels with Manual ProgramAdd/Delete Channels with Manual Program
1. Press the MENU button and then use DD / EE button to select the Channel menu.
2. Press the GG button and then use DD / EE button to select EZ Scan.
3. Press the GG button to begin the channel search.
• Wait for auto program to complete the channel search cycle beforechoosing a channel. The TV scans for over-the-air channels and thenchannels provided by a cable service.
Memorizing the Channels with EZ scanMemorizing the Channels with EZ scan
- For Auto program to work, the programming source must be connected to the TV and the TV must be receiving programming sig-nals either over-the-air or from a cable-type service provider.
Channel Menu OptionsChannel Menu Options
NOTES• When the channel search is complete, use the DD / EE buttons to review the memorized channels. • If you press the ENTER button in auto programming, the function will stop and only channels programming up to that time will remain.• Auto program function can memorize only the channels which are being received at that time.
ChannelTo startEZ Scan
Manual prog.Favorite ch.
F G OK MENUDE
ChannelEZ ScanManual prog.Favorite ch.
F G OK MENU Â EXITDE
TV 30Memory
The current channel number is displayed.
17
Operation
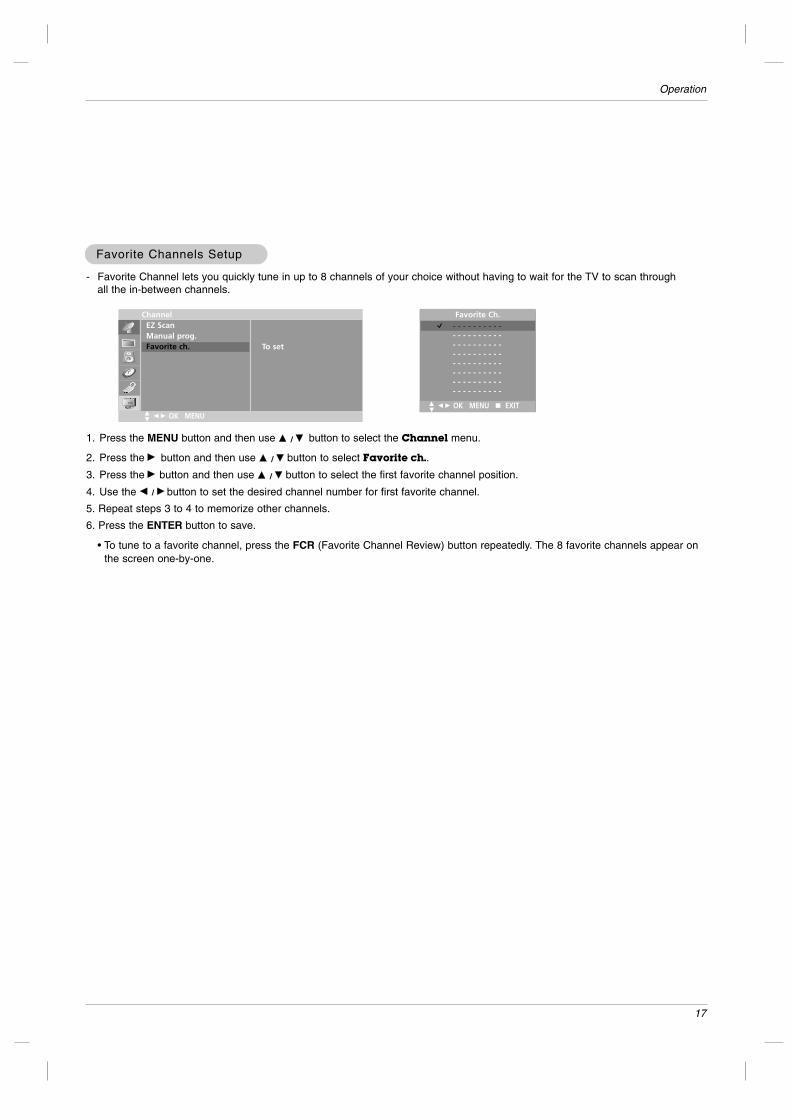
- Favorite Channel lets you quickly tune in up to 8 channels of your choice without having to wait for the TV to scan throughall the in-between channels.
1. Press the MENU button and then use DD / EE button to select the Channel menu.
2. Press the GG button and then use DD / EE button to select Favorite ch..
3. Press the GG button and then use DD / EE button to select the first favorite channel position.
4. Use the FF / GG button to set the desired channel number for first favorite channel.
5. Repeat steps 3 to 4 to memorize other channels.
6. Press the ENTER button to save.
• To tune to a favorite channel, press the FCR (Favorite Channel Review) button repeatedly. The 8 favorite channels appear onthe screen one-by-one.
Favorite Channels SetupFavorite Channels Setup
Channel Favorite Ch.EZ ScanManual prog.Favorite ch.
F G OK MENUDE
To set
- - - - - - - - - -- - - - - - - - - -- - - - - - - - - -- - - - - - - - - -- - - - - - - - - -- - - - - - - - - -- - - - - - - - - -- - - - - - - - - -
DE
F G OK MENU Â EXIT

18
Operation
- You can adjust picture contrast, brightness, color, sharpness and tint to the levels you prefer.
1. Press the MENU button and then use DD / EE button to select the Picture menu.
2. Press the GG button and then use DD / EE button to select User.3. Press the GG button and then use DD / EE button to select the desired picture
option (Contrast, Brightness, Color, Sharpness, Tint).
4. Use the FF / GG button to make appropriate adjustments.
• Contrast, Brightness, Color, and Sharpness are adjustable from 0 to 100.• Tint is adjustable from - 50 to + 50.
5. Press the ENTER button to save.
1. Press the video button repeatedly to select the picture appearance setup option as shown below.
EZ VEZ Videoideo
Manual Picture Control (Manual Picture Control (User option)option)
- This function adjusts the TV for the best picture appearance.
Picture Menu OptionsPicture Menu Options
• You can also adjust EZ Video in the Picture menu. • Clear, Optimum and Soft are preset for good picture quality at the factory and cannot be changed.
Clear Optimum Soft User
PictureEZ VideoUserCinema
F G OK MENUDE
Contrast 85 F G
- You can watch TV in various picture formats; 16:9, Zoom, 4:3.Repeatedly press the ARC button to select your desired picture format.
• 16:9Displays video in 16:9 Widescreen mode. A 4:3 signal will be stretched to fill the screen.
• ZoomA 4:3 signal is magnified to the upper / lower and left / right sides so that the signal fills the16:9 screen. The bottom and top of thepicture will be cut off.
• 4:3Standard TV format.
NOTESZoom is not available in PC mode.
Picture format (ARC - Picture format (ARC - Aspect Ratio Correction)Aspect Ratio Correction)
D
E
Contrast G
Brightness G
Color G
Sharpness G
Tint G
PictureEZ VideoUserCinema
F G OK MENUDE
- Sets up the TV for the best picture appearance for viewing movies.
1. Press the MENU button and then use DD / EE button to select the Picture menu.
2. Press the GG button and then use DD / EE button to select Cimena.
3. Press the GG button and then use DD / EE button to to select On or Off.
4. Press the ENTER button to save.
Cinema Mode SetupCinema Mode Setup
OnOff

19
Operation
Sound Menu OptionsSound Menu Options
1. Use the audio button to select the appropriate sound setup as shown below.
EZ EZ AudioAudio
1. Press the MENU button and then use DD / EE button to select the Sound menu.
2. Press the GG button and then use DD / EE button to select EZ Audio.
3. Press the GG button and then use DD / EE button to select User.
4. Press the GG button and then use FF / GG button to select the band you want to adjust. Then, use DD / EE button to adjustthe band level.
5. Press the ENTER button to save.
Equalizer Equalizer AdjustmentsAdjustments
- This function lets you enjoy the best sound without any special adjustment because the TV selects the appropriatesound option based on the program content.
• You can also adjust EZ Audio in the Sound menu.
Flat Music Movie Sports User
DE
F G Move Adjust  Exit
0.1 0.5 1 5 10 KHz
SoundEZ AudioAVLBalance
F G OK MENUDE
FlatMusicMovieSportsUser G
- AVL maintains an equal volume level automatically even if the channel is changed.
1. Press the MENU button and then use DD / EE button to select the Sound menu.
2. Press the GG button and then use DD / EE button to select AVL.
3. Press the GG button and then use DD / EE button to to select On or Off.4. Press the ENTER button to save.
AAVLVL (Auto V(Auto Volume Leveler)olume Leveler)
SoundEZ AudioAVLBalance
F OK MENUDE
OnOff
20
Operation
1. Press the MTS button repeatedly.
Stereo/SAPStereo/SAP Broadcasts SetupBroadcasts Setup
• Select mono sound mode if the signal is not clear or in poor signal reception areas.• Stereo, SAP mode are available only if included on the broadcast signal.
Mono Stereo SAP
- The TV can receive MTS stereo programs and any SAP (Secondary Audio Program) that accompanies thestereo program, if the broadcaster transmits an additional sound signal as well as the original one.
- Mono: The primary language is heard from left and right speakers. Signal mode is mono.- Stereo: The primary language is heard from left and right speakers. Signal mode is stereo.- SAP: The secondary language is heard from left and right speakers.
Sound Menu Options continuedSound Menu Options continued
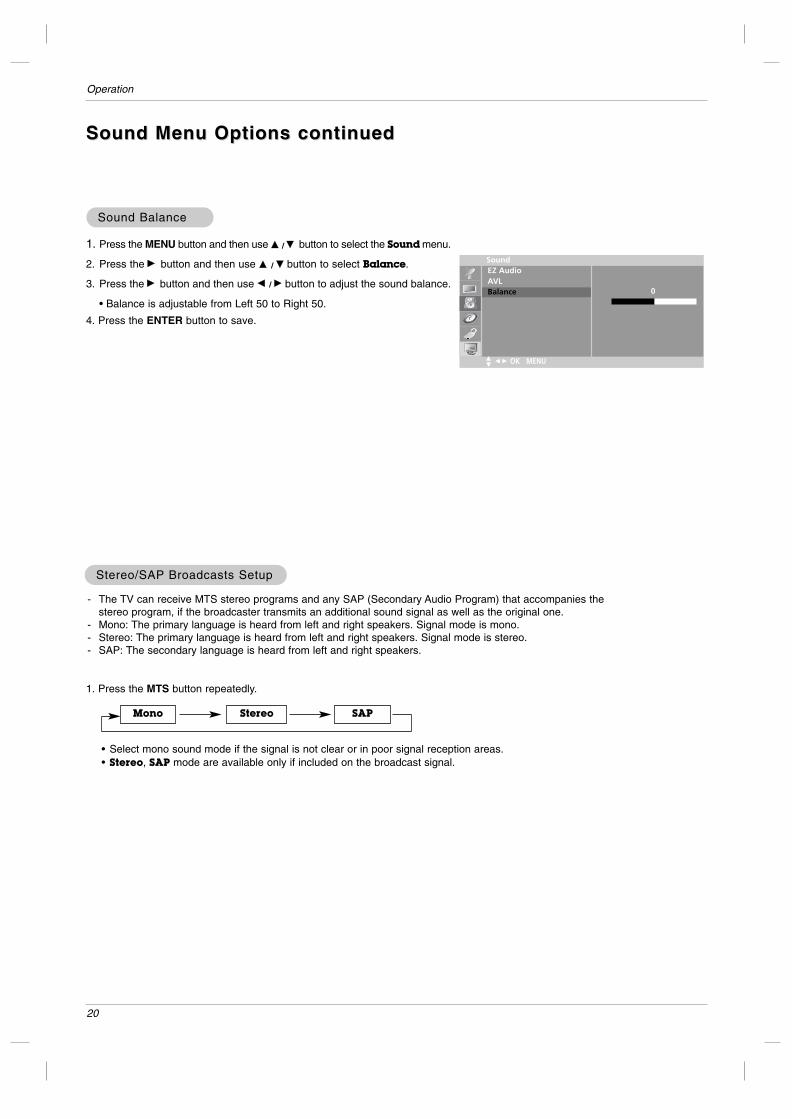
1. Press the MENU button and then use DD / EE button to select the Sound menu.
2. Press the GG button and then use DD / EE button to select Balance.
3. Press the GG button and then use FF / GG button to adjust the sound balance.
• Balance is adjustable from Left 50 to Right 50.
4. Press the ENTER button to save.
Sound BalanceSound Balance
SoundEZ AudioAVLBalance
F G OK MENUDE
0

21
Operation
TTimer Menu Optionsimer Menu Options
Auto Clock SetupAuto Clock Setup
- If the time on the clock is incorrect, reset the clock manually.
1. Press the MENU button and then use DD / EE button to select the Timer menu.
2. Press the GG button and then use DD / EE button to select Clock.
3. Press the GG button and then use DD / EE button to select Auto.
4. Press the GG button and then use DD / EE button to select the time zone for your viewing area. Your choices are:Auto, E.S.T. (Eastern Standard Time), C.S.T. (Central Standard Time), M.S.T. (Mountain Standard Time), P.S.T.(Pacific Standard Time), Alaska, and Hawaii.
5. Press the GG button and then use DD / EE button to set PBS channel.
6. Press the GG button and then use DD / EE button to set D.S.T. (Daylight Savings Time) Auto, Off or On, dependingon whether or not your viewing area observes Daylight Savings Time.
7. Press the ENTER button to save.
The time can be automatically set using information from your local PBS TV station. The PBS channel signalincludes information for the correct time and daylight savings time.
Manual Clock SetupManual Clock Setup
1. Press the MENU button and then use DD / EE button to select the Timermenu.
2. Press the GG button and then use DD / EE button to select Clock.
3. Press the GG button and then use DD / EE button to select Manual.
4. Press the GG button and then use DD / EE button to set the hour.
5. Press the GG button and then use DD / EE button to set the minutes.
6. Press the ENTER button to save.
Timer
Auto GManual
ClockOff timerOn timerAuto off
F G OK MENUDE
Timer
Auto Manual
- - : - - AM
ClockOff timerOn timerAuto off
F G OK MENUDE
Auto ClockTime zone AutoPBS Ch. TV 1D.S.T. Auto
DE
F G Move Adjust  Exit
22
Operation
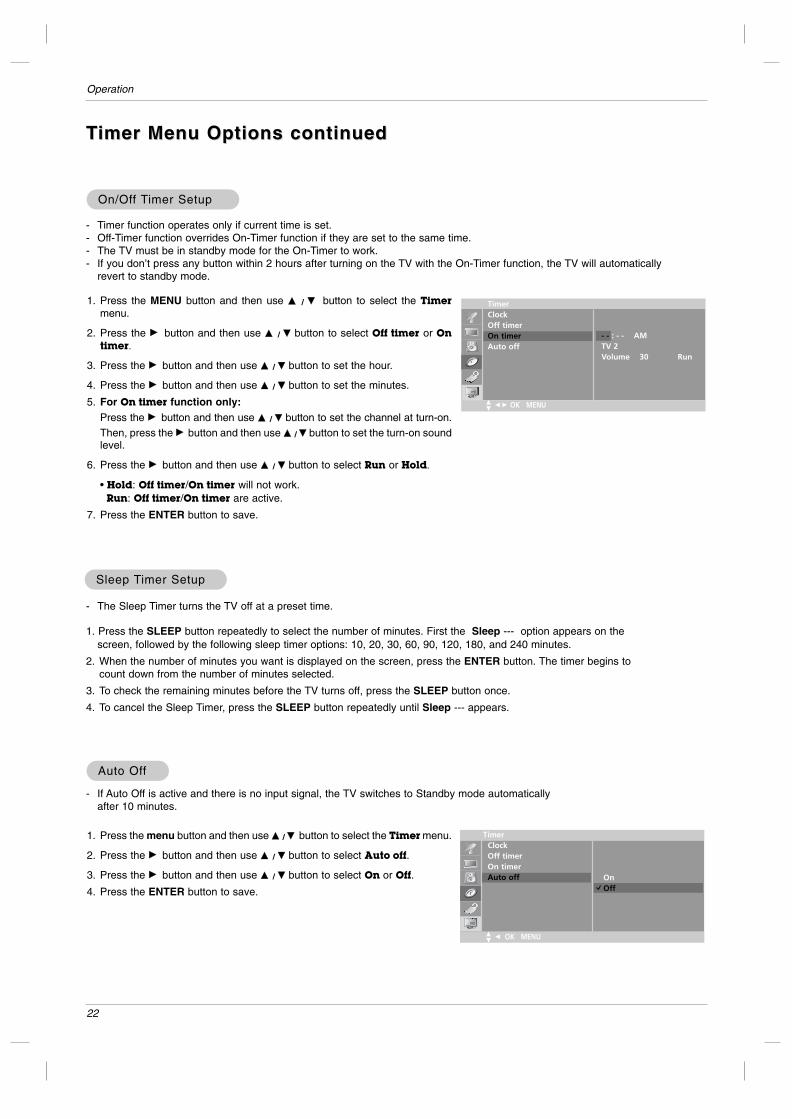
- Timer function operates only if current time is set.- Off-Timer function overrides On-Timer function if they are set to the same time.- The TV must be in standby mode for the On-Timer to work.- If you don’t press any button within 2 hours after turning on the TV with the On-Timer function, the TV will automatically
revert to standby mode.
On/OfOn/Off f TTimer Setupimer Setup
1. Press the MENU button and then use DD / EE button to select the Timermenu.
2. Press the GG button and then use DD / EE button to select Off timer or Ontimer.
3. Press the GG button and then use DD / EE button to set the hour.
4. Press the GG button and then use DD / EE button to set the minutes.
5. For On timer function only: Press the GG button and then use DD / EE button to set the channel at turn-on.Then, press the GG button and then use DD / EE button to set the turn-on soundlevel.
6. Press the GG button and then use DD / EE button to select Run or Hold.
• Hold: Off timer/On timer will not work.Run: Off timer/On timer are active.
7. Press the ENTER button to save.
TimerClockOff timerOn timerAuto off
F G OK MENUDE
- - : - - AMTV 2Volume 30 Run
Sleep Sleep TTimer Setupimer Setup
- The Sleep Timer turns the TV off at a preset time.
1. Press the SLEEP button repeatedly to select the number of minutes. First the Sleep --- option appears on thescreen, followed by the following sleep timer options: 10, 20, 30, 60, 90, 120, 180, and 240 minutes.
2. When the number of minutes you want is displayed on the screen, press the ENTER button. The timer begins tocount down from the number of minutes selected.
3. To check the remaining minutes before the TV turns off, press the SLEEP button once.
4. To cancel the Sleep Timer, press the SLEEP button repeatedly until Sleep --- appears.
Auto OfAuto Offf
- If Auto Off is active and there is no input signal, the TV switches to Standby mode automaticallyafter 10 minutes.
1. Press the menu button and then use DD / EE button to select the Timer menu.
2. Press the GG button and then use DD / EE button to select Auto off.
3. Press the GG button and then use DD / EE button to select On or Off.4. Press the ENTER button to save.
TimerClockOff timerOn timerAuto off
F OK MENUDE
OnOff
TTimer Menu Options continuedimer Menu Options continued
23
Operation
Special Menu OptionsSpecial Menu Options
Closed CaptionsClosed Captions
2. An old, bad, or illegally recorded tape is being played.3. Strong, random signals from a car or airplane interfere with the TV signal.4. The signal from the antenna is weak.5. The program wasn’t captioned when it was produced, transmitted, or taped.
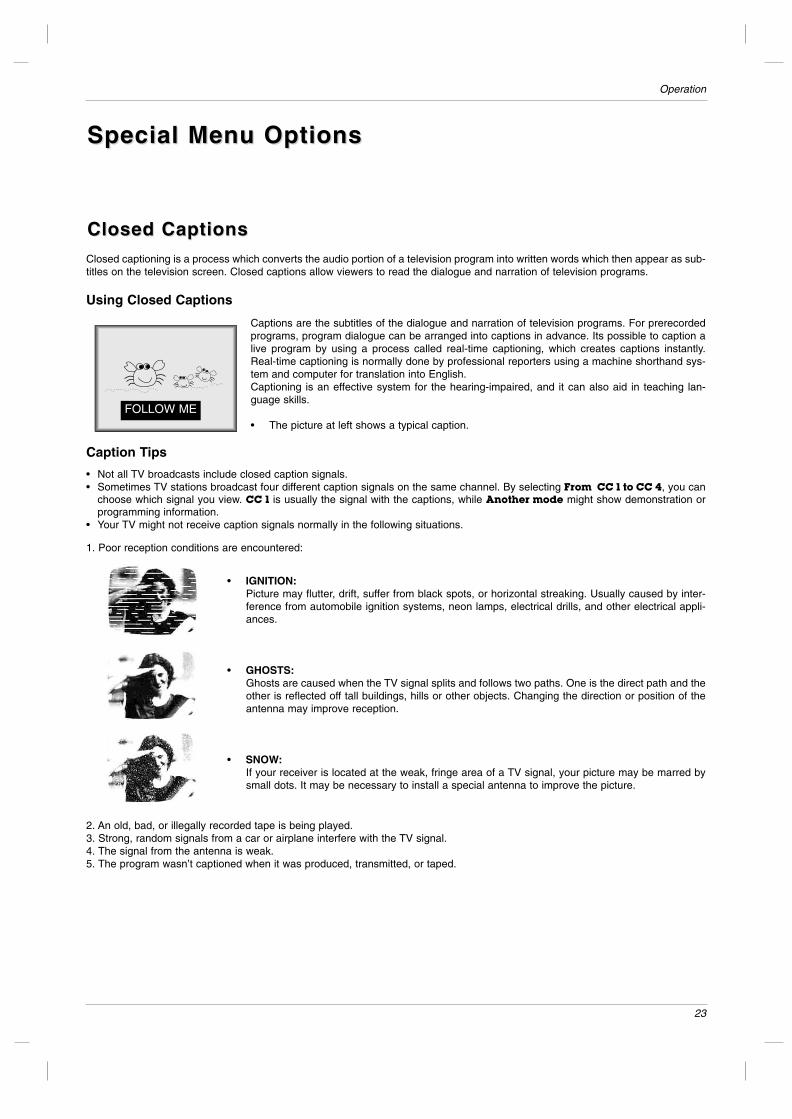
Closed captioning is a process which converts the audio portion of a television program into written words which then appear as sub-titles on the television screen. Closed captions allow viewers to read the dialogue and narration of television programs.
Captions are the subtitles of the dialogue and narration of television programs. For prerecordedprograms, program dialogue can be arranged into captions in advance. Its possible to caption alive program by using a process called real-time captioning, which creates captions instantly.Real-time captioning is normally done by professional reporters using a machine shorthand sys-tem and computer for translation into English.Captioning is an effective system for the hearing-impaired, and it can also aid in teaching lan-guage skills.
• The picture at left shows a typical caption.
• IGNITION:Picture may flutter, drift, suffer from black spots, or horizontal streaking. Usually caused by inter-ference from automobile ignition systems, neon lamps, electrical drills, and other electrical appli-ances.
• GHOSTS:Ghosts are caused when the TV signal splits and follows two paths. One is the direct path and theother is reflected off tall buildings, hills or other objects. Changing the direction or position of theantenna may improve reception.
• SNOW:If your receiver is located at the weak, fringe area of a TV signal, your picture may be marred bysmall dots. It may be necessary to install a special antenna to improve the picture.
Caption Tips
FOLLOW ME
Using Closed Captions
• Not all TV broadcasts include closed caption signals.• Sometimes TV stations broadcast four different caption signals on the same channel. By selecting From CC 1 to CC 4, you can
choose which signal you view. CC 1 is usually the signal with the captions, while Another mode might show demonstration orprogramming information.
• Your TV might not receive caption signals normally in the following situations.
1. Poor reception conditions are encountered:
24
Operation
Key LockKey Lock
The TV can be set up so that it can only be used with the remote control to prevent unauthorized viewing.
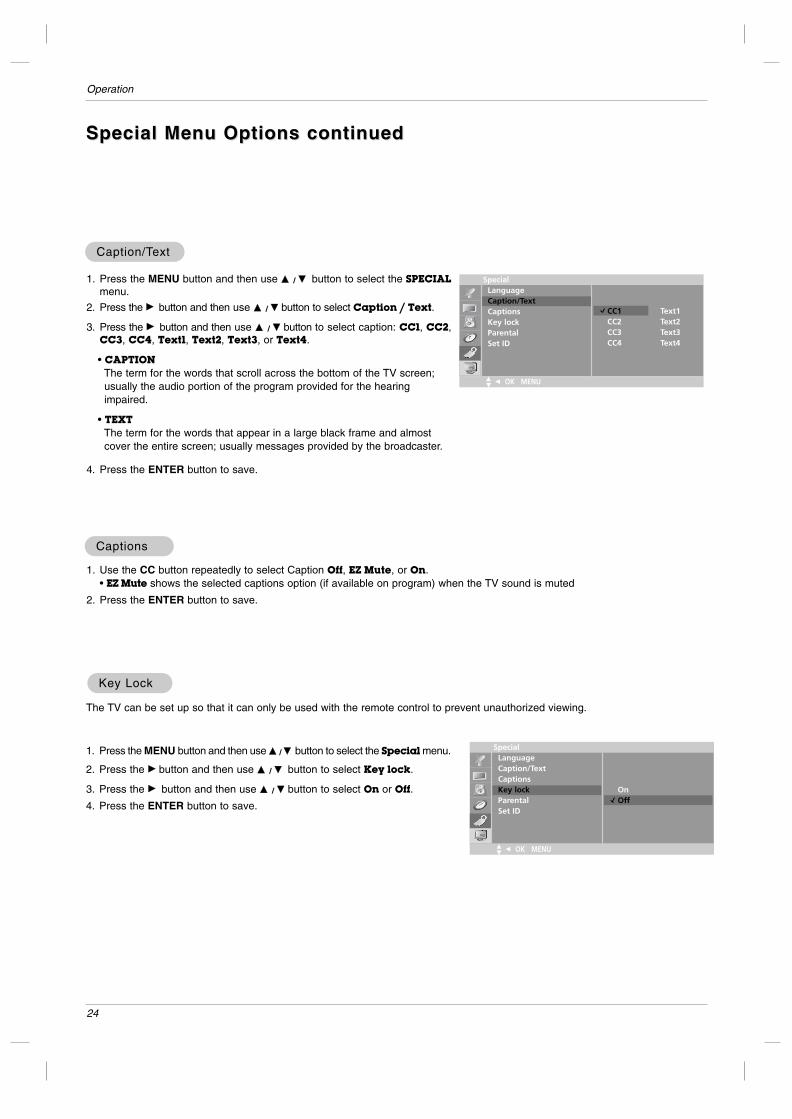
1. Press the MENU button and then use DD / EE button to select the Special menu.
2. Press the GG button and then use DD / EE button to select Key lock.
3. Press the GG button and then use DD / EE button to select On or Off.4. Press the ENTER button to save.
SpecialLanguageCaption/TextCaptionsKey lockParentalSet ID
F OK MENUDE
OnOff
SpecialLanguageCaption/TextCaptionsKey lockParentalSet ID
F OK MENUDE
CC1CC2CC3CC4
Text1Text2Text3Text4
Caption/TCaption/Textext
1. Press the MENU button and then use DD / EE button to select the SPECIALmenu.
2. Press the GG button and then use DD / EE button to select Caption / Text.
3. Press the GG button and then use DD / EE button to select caption: CC1, CC2,CC3, CC4, Text1, Text2, Text3, or Text4.
• CAPTIONThe term for the words that scroll across the bottom of the TV screen;usually the audio portion of the program provided for the hearingimpaired.
• TEXTThe term for the words that appear in a large black frame and almostcover the entire screen; usually messages provided by the broadcaster.
4. Press the ENTER button to save.
CaptionsCaptions
1. Use the CC button repeatedly to select Caption Off, EZ Mute, or On. • EZ Mute shows the selected captions option (if available on program) when the TV sound is muted
2. Press the ENTER button to save.
Special Menu Options continuedSpecial Menu Options continued
25
Operation
Lock Menu OptionsLock Menu Options
Parental Control can be used to block specific channels, ratings and other viewing sources.
The Parental Control Function (V-Chip) is used to block program viewing based on the ratings sent by the broadcast station. Thedefault setting is to allow all programs to be viewed. Viewing can be blocked by the type of program and by the categories chosento be blocked. It is also possible to block all program viewing for a time period. To use this function, the following must be set :
1. Ratings and categories to be blocked.2. Set a password3. Enable the lock
V-Chip rating and categoriesRating guidelines are provided by broadcast stations. Most television programs and television movies can be blocked by TVRating and/or Individual Categories. Movies that have been shown at the theaters or direct-to-video movies use the Movie RatingSystem (MPAA) only.
For Movies previously shown in theaters :
Movie Ratings :• Unblocked• G and Above (general audience)• PG and Above (parental guidance suggested)• PG-13 and Above (13 years and older)• R and above (restricted)• NC-17 and Above (18 years and older)• X (adult)If you set PG-13 and Above : G and PG movies will be available , PG-13, R, NC-17 and X will be blocked.
For Television programs including made-for-TV movies:
General TV Ratings:• Unblocked• TV-G and Above (general audience) (individual categories do not apply)• TV-PG and Above (parental guidance suggested)• TV-14 and Above (14 years and older)• TV-MA (mature audience)
Children TV Ratings:• Unblocked• TV-Y and Above (youth) (individual content categories do not apply)• TV-Y7 (youth, 7 years and up)
Content Categories:• Dialog - sexual dialogue (applies to TV-PG and Above, TV-14)• Language - adult language (applies to TV-PG and Above, TV-14 and Above, TV-MA)• Sex scenes - sexual situations (applies to TV-PG and Above, TV-14 and Above, TV-MA)• Violence (applies to TV-PG and Above, TV-14 and Above, TV-MA)• F Violence - fantasy violence (applies only to TV-Y7)• No Rating (blocks all viewing)
For Canadian English/French language rating system:
Canadian English language rating system:• C and Above (Children)• C8+ (8 years and older)• G and Above (General programming. Suitable for all audiences.)• PG and Above (Parental guidance suggested)• 14+ (Viewer 14 years and older)• 18+ (Adult programming)
Canadian French language rating system:• G and Above (General)• 8 ans+ (8 years and older)• 13 ans+ (13 years and older)• 16 ans+ (16 years and older)• 18 ans+ (Adults only)

26
Operation
Lock Menu SetupLock Menu Setup
1. Press the MENU button and then use DD / EE button to select the Special menu.
2. Press the GG button and then use DD / EE button to select Parental.Then, press the GG button.
• If Lock is already set, enter the password requested.• The TV is set with the initial password “0-0-0-0”.
2. Setting Lock on/off:
Press the DD / EE button to select Lock on/off.
Press the GG button and then use DD / EE button to select on or off.
3. Set password:
Press the DD / EE button to select Set password.
Press the GG button and then enter a four digit password. Enter it again when requested.
4. Press the DD / EE button to select type of blocking to be set .
5. Press the GG button and then use DD / EE button to select type of ratings to block .
• Age block, and Content block, and Canadian (option) menus, also have sub menus. So, repeat steps 4and 5 in the sub menu, to set the types of blocking and ratings .
SpecialLanguageCaption / TextCaptionsKey lockParentalSet ID
F G OK MENUDE
To set
ParentalLockSet passwordMPAAAge blockContent blockAux. blockCanadian
F G OK MENUDE
OnOff
Lock Menu Options continuedLock Menu Options continued
27
Operation
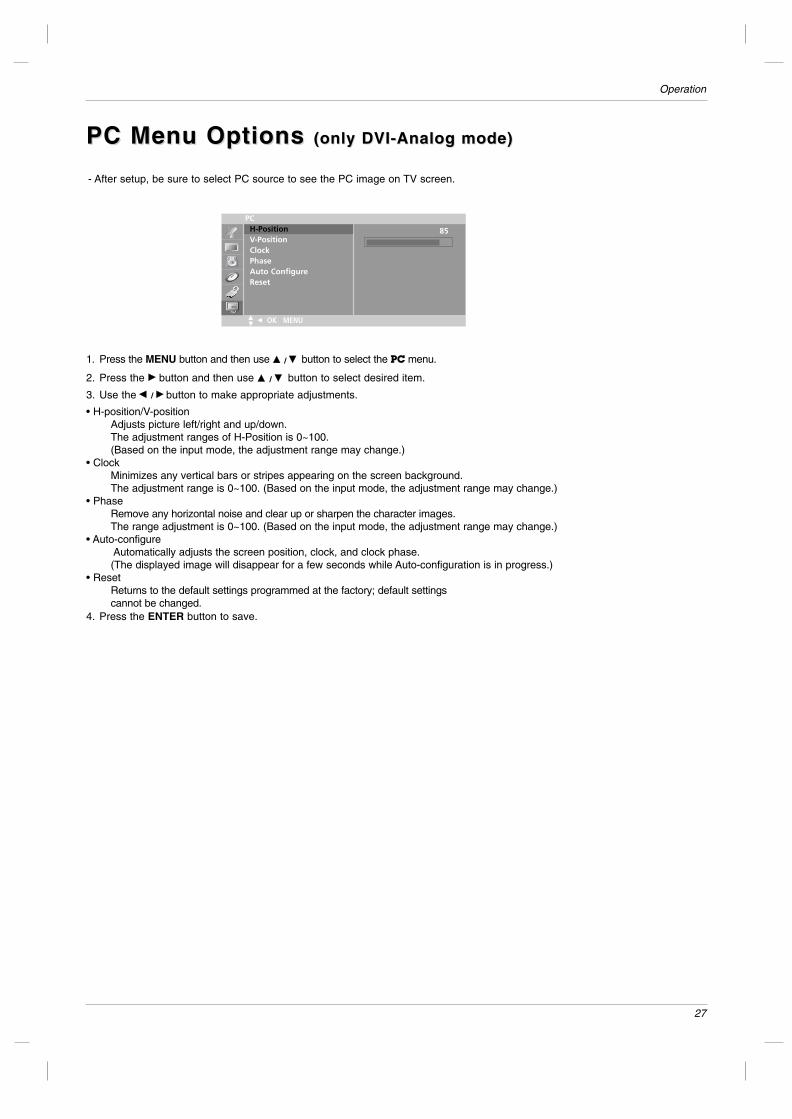
1. Press the MENU button and then use DD / EE button to select the PC menu.
2. Press the GG button and then use DD / EE button to select desired item.
3. Use the FF / GG button to make appropriate adjustments.
• H-position/V-positionAdjusts picture left/right and up/down. The adjustment ranges of H-Position is 0~100.(Based on the input mode, the adjustment range may change.)
• ClockMinimizes any vertical bars or stripes appearing on the screen background.The adjustment range is 0~100. (Based on the input mode, the adjustment range may change.)
• PhaseRemove any horizontal noise and clear up or sharpen the character images. The range adjustment is 0~100. (Based on the input mode, the adjustment range may change.)
• Auto-configureAutomatically adjusts the screen position, clock, and clock phase.(The displayed image will disappear for a few seconds while Auto-configuration is in progress.)
• ResetReturns to the default settings programmed at the factory; default settings cannot be changed.
4. Press the ENTER button to save.
PCH-PositionV-PositionClockPhaseAuto ConfigureReset
F OK MENUDE
- After setup, be sure to select PC source to see the PC image on TV screen.
PC Menu Options PC Menu Options (only DVI-Analog mode) (only DVI-Analog mode)
85

28
External Control Device SetupExternal Control Device Setup
No. Pin name1 No connection2 RXD (Receive data)3 TXD (Transmit data)4 DTR (DTE side ready)5 GND6 DSR (DCE side ready)7 RTS (Ready to send)8 CTS (Clear to send)9 No Connection
1
5
6
9
2354678
RXDTXDGNDDTRDSRRTSCTS
TXDRXDGNDDSRDTRCTSRTS
PC
7-Wire Configurations(Standard RS-232C cable)
D-Sub 9
3256487
TV
D-Sub 9
2354678
RXDTXDGNDDTRDSRRTSCTS
TXDRXDGNDDTRDSRRTSCTS
PC
3-Wire Configurations(Not standard)
D-Sub 9
3254678
TV
D-Sub 9
The RS-232 port allows you to connect the RS-232C input jack to an external control device (such as a computeror an A/V control system) and control the Monitor’s functions externally.
NOTE:RS-232 on this unit is intended to be used with third party RS-232 control software or hardware. The instructionsbelow are provided to help with programming software or to test functionallity using telenet software. A special 3wire cable, described below, will need to built/purchased to use RS-232 control on this unit.
TType of Connector; D-Sub 9-Pin Maleype of Connector; D-Sub 9-Pin Male
RS-232C ConfigurationsRS-232C Configurations
External Control Device SetupExternal Control Device Setup
RS-232C SetupRS-232C Setup
1
PC

29
External Control Device SetupExternal Control Device Setup
Set IDSet ID
- Use this function to specify a monitor ID number. - Refer to ‘Real Data Mapping 1’. See page 30.
• Baud rate : 9600 bps (UART)• Data length : 8 bits• Parity : None
* Use a crossed (reverse) cable.
• Stop bit : 1 bit• Communication code : ASCII code
Communication ParametersCommunication Parameters
1. Press the MENU button and then use DD / EE button to select the Specialmenu.
2. Press the GG button and then use DD / EE button to select Set ID.
3. Press the GG button and then use DD / EE button to adjust Set ID to choosethe desired monitor ID number. The adjustment range of Set ID is 1 ~ 99.
4. Press the ENTER button to save.
Transmission
* [Command 1]: First command. (j or k)* [Command 2]: Second command.* [Set ID]: You can adjust the set ID to choose desired monitor
ID number in Special menu. Adjustment range is 1~ 99. When selecting Set ID ‘0’, every connectedTV set is controlled. Set ID is indicated as decimal(1~99) on menu and as Hexa decimal (0x0~0x63)on transmission/receiving protocol.
* [DATA]: To transmit command data.Transmit ‘FF’ data to read status of command.
* [Cr]: Carriage ReturnASCII code ‘0x0D’
* [ ]: ASCII code ‘space (0x20)’
[Command1][Command2][ ][Set ID][ ][Data][Cr]
TTransmission / Receiving Protocolransmission / Receiving Protocol
OK Acknowledgement
* The Monitor transmits ACK (acknowledgement) based onthis format when receiving normal data. At this time, if thedata is data read mode, it indicates present status data. Ifthe data is data write mode, it returns the data of the PCcomputer.
[Command2][ ][Set ID][ ][OK][Data][x]
Error Acknowledgement
* The Monitor transmits ACK (acknowledgement) based onthis format when receiving abnormal data from non-viablefunctions or communication errors.
[Command2][ ][Set ID][ ][NG][Data][x]
Data 1: Illegal Code2: Not supported function3: Wait more time
01. Power k a 0 ~ 102. Input Select k b 0 ~ 803. Aspect Ratio k c 1 ~ 404. Screen Mute k d 0 ~ 105. Volume Mute k e 0 ~ 106. Volume Control k f 0 ~ 6407. Contrast k g 0 ~ 6408. Brightness k h 0 ~ 6409. Color k i 0 ~ 6410. Tint k j 0 ~ 6411. Sharpness k k 0 ~ 6412. OSD Select k l 0 ~ 113. Key Lock k m 0 ~ 114. Tune Command m a 01 ~ 7D 0~115. Add/Delete m b 0~116. Key m c Key Code17. Auto Configure j u 1
COMMAND 1
COMMAND 2
DATA1(Hexa)
DATA2(Hexa)
Command Reference ListCommand Reference List
SpecialLanguageCaption/TextCaptionsKey lockParentalSet ID --
F OK MENUDE

30
External Control Device SetupExternal Control Device Setup
02. Input Select (Command:b) (Main Picture Input)
G To select input source for the TV. You can also select an input source using the TV/VIDEObutton on the TV's remote control.
Transmission
Data 0 : TV2 : Video3 : S-Video4 : Component 1
5 : Component 26 or 8 : PC
[k][b][ ][Set ID][ ][Data][Cr]
Acknowledgement
[b][ ][Set ID][ ][OK][Data][x]
01. Power On (Command:a)
G To control Power On/Off of the TV.
Transmission
Data 0 : Power Off 1 : Power On
[k][a][ ][Set ID][ ][Data][Cr]
Acknowledgement
[a][ ][Set ID][ ][OK][Data][x]
05. Volume Mute (Command:e)
G To control volume mute on/off.You can also adjust mute using the MUTE button onremote control.
Transmission
Data 0 : Volume mute on (Volume off)1 : Volume mute off (Volume on)
[k][e][ ][Set ID][ ][Data][Cr]
Acknowledgement
[e][ ][Set ID][ ][OK][Data][x]
03. Aspect Ratio (Command:c) (Main picture format)
G To adjust the screen format.You can also adjust the screen format using the ARC(Aspect Ratio Control) button on remote control or in theScreen menu.
Transmission
Data 1 : Normal screen (4:3)2 : Wide screen (16:9) 4 : Zoom
* Zoom is not available in PC mode.
[k][c][ ][Set ID][ ][Data][Cr]
Acknowledgement
[c][ ][Set ID][ ][OK][Data][x]
04. Screen Mute (Command:d)
G To select screen mute on/off.
Transmission
Data 0 : Screen mute off (Picture on)1 : Screen mute on (Picture off)
[k][d][ ][Set ID][ ][Data][Cr]
Acknowledgement
[d][ ][Set ID][ ][OK][Data][x]
06. Volume Control (Command:f)
G To adjust volume.You can also adjust volume with the volume buttonson remote control.
Transmission
Data Min : 0 ~ Max : 64
• Refer to ‘Real data mapping 1’ as shown below.
[k][f][ ][Set ID][ ][Data][Cr]
Acknowledgement
[f][ ][Set ID][ ][OK][Data][x]
07. Contrast (Command:g)G To adjust screen contrast.
You can also adjust contrast in the Picture menu.
Transmission
Data Min : 0 ~ Max : 64
• Refer to ‘Real data mapping 1’ as shown below.
[k][g][ ][Set ID][ ][Data][Cr]
Acknowledgement
[g][ ][Set ID][ ][OK][Data][x]
08. Brightness (Command:h)
G To adjust screen brightness.You can also adjust brightness in the Picture menu.
Transmission
Data Min : 0 ~ Max : 64
• Refer to ‘Real data mapping 1’ as shown below.
[k][h][ ][Set ID][ ][Data][Cr]
Acknowledgement
[h][ ][Set ID][ ][OK][Data][x]
G To show Power On/Off.
Transmission
Data 0 : Power Off 1 : Power On
[k][a][ ][Set ID][ ][FF][Cr]
Acknowledgement
[a][ ][Set ID][ ][OK][Data][x]
* Real data mapping 1
0 : Step 0
A : Step 10
F : Step 15 10 : Step 16
64 : Step 100
*tint : -50 ~ +50
31
External Control Device SetupExternal Control Device Setup
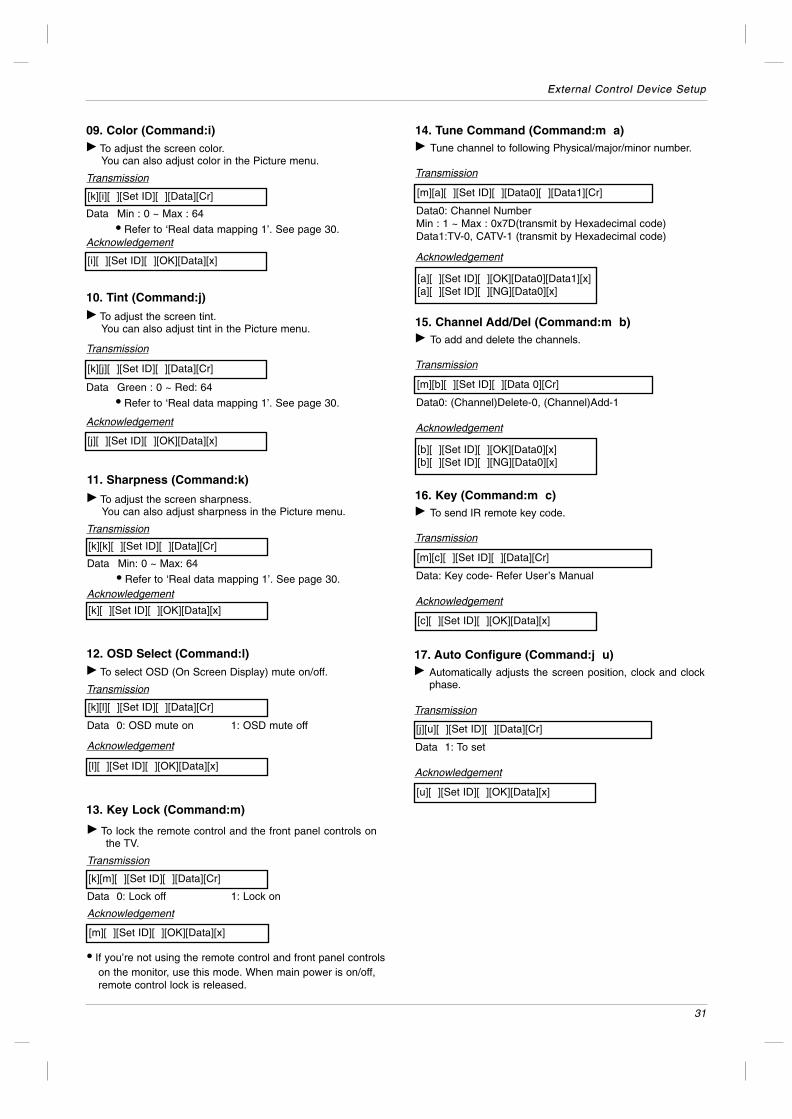
09. Color (Command:i)G To adjust the screen color.
You can also adjust color in the Picture menu.
Transmission
Data Min : 0 ~ Max : 64
• Refer to ‘Real data mapping 1’. See page 30.
[k][i][ ][Set ID][ ][Data][Cr]
Acknowledgement
[i][ ][Set ID][ ][OK][Data][x]
10. Tint (Command:j)
G To adjust the screen tint.You can also adjust tint in the Picture menu.
Transmission
Data Green : 0 ~ Red: 64
• Refer to ‘Real data mapping 1’. See page 30.
[k][j][ ][Set ID][ ][Data][Cr]
Acknowledgement
[j][ ][Set ID][ ][OK][Data][x]
13. Key Lock (Command:m)
G To lock the remote control and the front panel controls onthe TV.
Transmission
[k][m][ ][Set ID][ ][Data][Cr]
Acknowledgement
Data 0: Lock off 1: Lock on
• If you’re not using the remote control and front panel controlson the monitor, use this mode. When main power is on/off,remote control lock is released.
[m][ ][Set ID][ ][OK][Data][x]
14. Tune Command (Command:m a)G Tune channel to following Physical/major/minor number.
Transmission
[m][a][ ][Set ID][ ][Data0][ ][Data1][Cr]
Acknowledgement
[a][ ][Set ID][ ][OK][Data0][Data1][x][a][ ][Set ID][ ][NG][Data0][x]
G To adjust the screen sharpness.You can also adjust sharpness in the Picture menu.
Transmission
11. Sharpness (Command:k)
Data Min: 0 ~ Max: 64
• Refer to ‘Real data mapping 1’. See page 30.
[k][k][ ][Set ID][ ][Data][Cr]
Acknowledgement
[k][ ][Set ID][ ][OK][Data][x]
12. OSD Select (Command:l)
G To select OSD (On Screen Display) mute on/off.
Transmission
[k][l][ ][Set ID][ ][Data][Cr]
Acknowledgement
Data 0: OSD mute on 1: OSD mute off
[l][ ][Set ID][ ][OK][Data][x]
Data0: Channel Number Min : 1 ~ Max : 0x7D(transmit by Hexadecimal code)Data1:TV-0, CATV-1 (transmit by Hexadecimal code)
15. Channel Add/Del (Command:m b)G To add and delete the channels.
Transmission
[m][b][ ][Set ID][ ][Data 0][Cr]
Acknowledgement
[b][ ][Set ID][ ][OK][Data0][x][b][ ][Set ID][ ][NG][Data0][x]
Data0: (Channel)Delete-0, (Channel)Add-1
16. Key (Command:m c)G To send IR remote key code.
Transmission
[m][c][ ][Set ID][ ][Data][Cr]
Acknowledgement
[c][ ][Set ID][ ][OK][Data][x]
Data: Key code- Refer User’s Manual
17. Auto Configure (Command:j u)G Automatically adjusts the screen position, clock and clock
phase.
Transmission
[j][u][ ][Set ID][ ][Data][Cr]
Acknowledgement
[u][ ][Set ID][ ][OK][Data][x]
Data 1: To set

32
IR CodesIR Codes
G Connect your wired remote control to the Remote Control port on the Monitor.
G Output waveform
Single pulse, modulated with 37.917KHz signal at 455KHz
G Configuration of frame
G Repeat code
G Lead code
• 1st frame
Low custom code
Leadcode
High custom code
Data code Data code
TC
Tf
T1
C0
Carrier frequency
FCAR = 1/TC = fOSC/12Duty ratio = T1/TC = 1/3
• Repeat frame
C1 C2 C3 C4 C5 C6 C7 C0 C1 C2 C3 C4 C5 C6 C7 D0 D1 D2 D3 D4 D5 D6 D7 D0 D1 D2 D3 D4 D5 D6 D7
Repeat code
9 ms 4.5 ms
0.55 ms
9 ms
2.25 ms
G Bit description
G Frame interval : Tf
The waveform is transmitted as long as a key is depressed.
• Bit “0”
Tf Tf
Tf=108ms @455KHz
0.56 ms 0.56 ms
1.12 ms
• Bit “1”
2.24 ms
How to ConnectHow to Connect
Remote Control IR CodeRemote Control IR Code
IR CodesIR Codes
33
IR CodesIR Codes
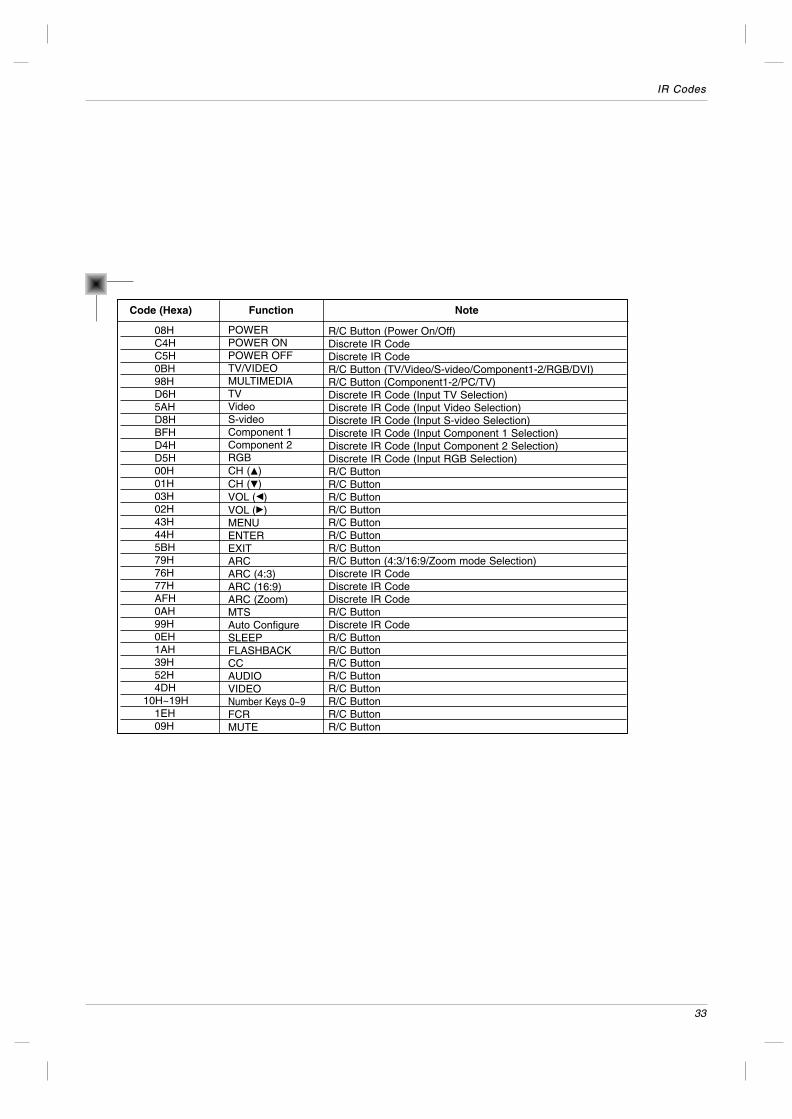
08HC4HC5H0BH98HD6H5AHD8HBFHD4HD5H00H01H03H02H43H44H5BH79H76H77HAFH0AH99H0EH1AH39H52H4DH
10H~19H1EH09H
R/C Button (Power On/Off)Discrete IR Code Discrete IR Code R/C Button (TV/Video/S-video/Component1-2/RGB/DVI)R/C Button (Component1-2/PC/TV)Discrete IR Code (Input TV Selection)Discrete IR Code (Input Video Selection)Discrete IR Code (Input S-video Selection)Discrete IR Code (Input Component 1 Selection)Discrete IR Code (Input Component 2 Selection)Discrete IR Code (Input RGB Selection)R/C ButtonR/C ButtonR/C ButtonR/C ButtonR/C ButtonR/C ButtonR/C ButtonR/C Button (4:3/16:9/Zoom mode Selection)Discrete IR Code Discrete IR CodeDiscrete IR CodeR/C ButtonDiscrete IR CodeR/C ButtonR/C ButtonR/C ButtonR/C ButtonR/C ButtonR/C ButtonR/C ButtonR/C Button
Code (Hexa) Function Note
POWERPOWER ONPOWER OFFTV/VIDEOMULTIMEDIATVVideoS-videoComponent 1Component 2RGBCH (D)CH (E)VOL (F)VOL (G)MENUENTEREXITARCARC (4:3)ARC (16:9)ARC (Zoom)MTSAuto ConfigureSLEEPFLASHBACKCCAUDIOVIDEONumber Keys 0~9FCRMUTE

34
Maintenance & Product SpecificationsMaintenance & Product Specifications
Power Requirement
Power Consumption
Television System
Television Channel
Television Screen
External Antenna Impedance
Audio Output
Z23LZ5R : AC 100-240V~ 50/60Hz 1.4A
Z26LZ5R : AC 100-240V~ 50/60Hz 1.5A
Z32LZ5R : AC 100-240V~ 50/60Hz 2.0A
Z23LZ5R : 120W
Z26LZ5R : 130W
Z32LZ5R : 160W
NTSC
VHF : 2 ~ 13, UHF : 14 ~ 69, Cable : 01 ~ 125
LCD Panel
75 Ω
Z23LZ5R / Z26LZ5R : 7 W + 7 W
Z32LZ5R : 10 W + 10 W
Product SpecificationsProduct Specifications
1. Here’s a great way to keep the dust off your screen for a while. Wet a soft cloth in a mixture of lukewarm water anda little fabric softener or dish washing detergent. Wring the cloth until it’s almost dry, and then use it to wipe thescreen.
2. Make sure the excess water is off the screen, and then let it air-dry before you turn on your TV.
To remove dirt or dust, wipe the cabinet with a soft, dry, lint-free cloth.Please be sure not to use a wet cloth.
If you leave your TV dormant for a long time (such as a vacation), it’s a good idea to unplug the powercord to protect against possible damage from lightning or power surges.
- Early malfunctions can be prevented. Careful and regular cleaning can extend the amount of time you will have yournew TV. Be sure to turn the power off and unplug the power cord before you begin any cleaning.
Cleaning the ScreenCleaning the Screen
Cleaning the CabinetCleaning the Cabinet
Extended Extended AbsenceAbsence
MaintenanceMaintenance
35
Troubleshooting Checklist
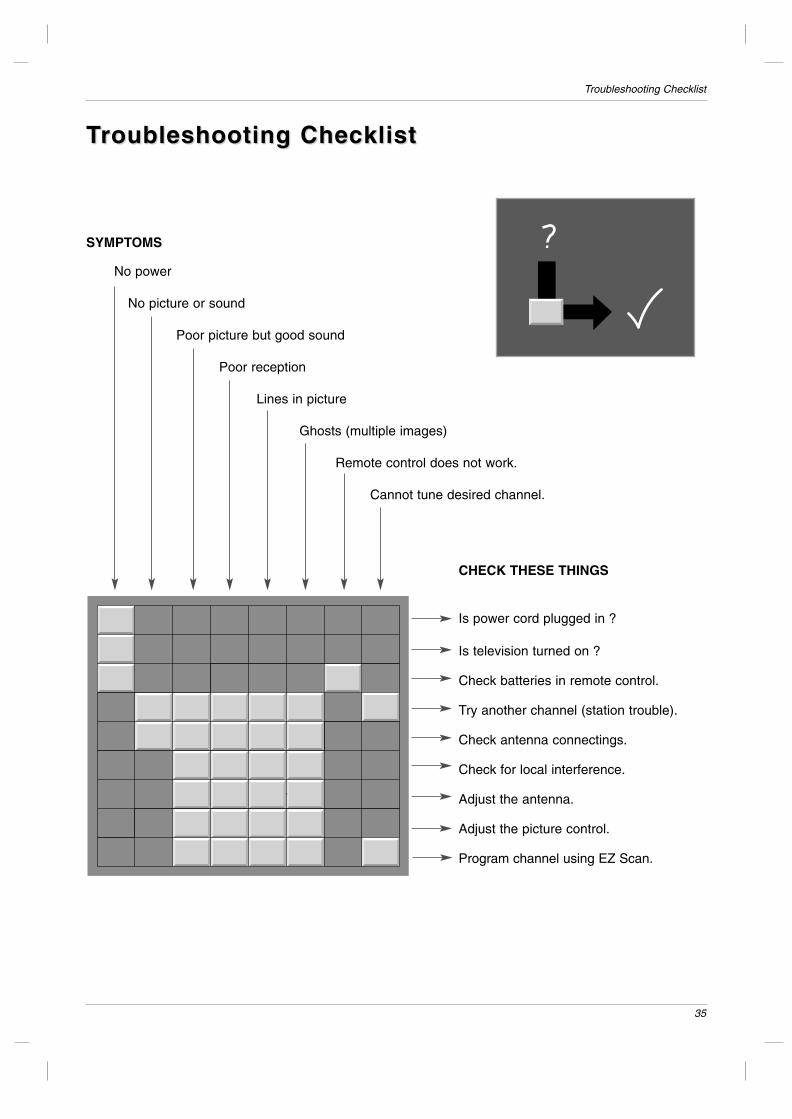
TTroubleshooting Checklistroubleshooting Checklist
SYMPTOMS
No power
No picture or sound
Poor picture but good sound
Poor reception
Lines in picture
Ghosts (multiple images)
Remote control does not work.
Cannot tune desired channel.
CHECK THESE THINGS
Is power cord plugged in ?
Is television turned on ?
Check batteries in remote control.
Try another channel (station trouble).
Check antenna connectings.
Check for local interference.
Adjust the antenna.
Adjust the picture control.
Program channel using EZ Scan.
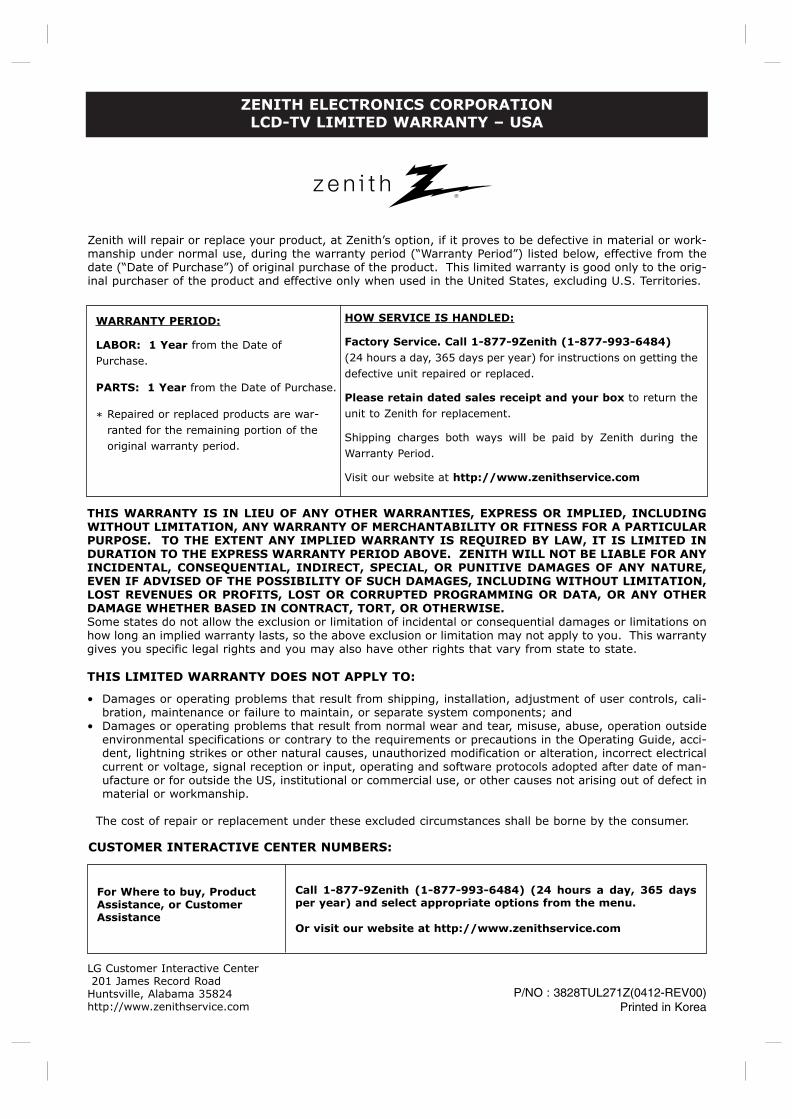
ZENITH ELECTRONICS CORPORATIONLCD-TV LIMITED WARRANTY – USA
Zenith will repair or replace your product, at Zenith’s option, if it proves to be defective in material or work-manship under normal use, during the warranty period (“Warranty Period”) listed below, effective from thedate (“Date of Purchase”) of original purchase of the product. This limited warranty is good only to the orig-inal purchaser of the product and effective only when used in the United States, excluding U.S. Territories.
THIS WARRANTY IS IN LIEU OF ANY OTHER WARRANTIES, EXPRESS OR IMPLIED, INCLUDINGWITHOUT LIMITATION, ANY WARRANTY OF MERCHANTABILITY OR FITNESS FOR A PARTICULARPURPOSE. TO THE EXTENT ANY IMPLIED WARRANTY IS REQUIRED BY LAW, IT IS LIMITED INDURATION TO THE EXPRESS WARRANTY PERIOD ABOVE. ZENITH WILL NOT BE LIABLE FOR ANYINCIDENTAL, CONSEQUENTIAL, INDIRECT, SPECIAL, OR PUNITIVE DAMAGES OF ANY NATURE,EVEN IF ADVISED OF THE POSSIBILITY OF SUCH DAMAGES, INCLUDING WITHOUT LIMITATION,LOST REVENUES OR PROFITS, LOST OR CORRUPTED PROGRAMMING OR DATA, OR ANY OTHERDAMAGE WHETHER BASED IN CONTRACT, TORT, OR OTHERWISE. Some states do not allow the exclusion or limitation of incidental or consequential damages or limitations onhow long an implied warranty lasts, so the above exclusion or limitation may not apply to you. This warrantygives you specific legal rights and you may also have other rights that vary from state to state.
• Damages or operating problems that result from shipping, installation, adjustment of user controls, cali-bration, maintenance or failure to maintain, or separate system components; and
• Damages or operating problems that result from normal wear and tear, misuse, abuse, operation outsideenvironmental specifications or contrary to the requirements or precautions in the Operating Guide, acci-dent, lightning strikes or other natural causes, unauthorized modification or alteration, incorrect electricalcurrent or voltage, signal reception or input, operating and software protocols adopted after date of man-ufacture or for outside the US, institutional or commercial use, or other causes not arising out of defect inmaterial or workmanship.
The cost of repair or replacement under these excluded circumstances shall be borne by the consumer.
THIS LIMITED WARRANTY DOES NOT APPLY TO:
LG Customer Interactive Center201 James Record Road
Huntsville, Alabama 35824 http://www.zenithservice.com
CUSTOMER INTERACTIVE CENTER NUMBERS:
For Where to buy, ProductAssistance, or CustomerAssistance
Call 1-877-9Zenith (1-877-993-6484) (24 hours a day, 365 daysper year) and select appropriate options from the menu.
Or visit our website at http://www.zenithservice.com
WARRANTY PERIOD:
LABOR: 1 Year from the Date ofPurchase.
PARTS: 1 Year from the Date of Purchase.
* Repaired or replaced products are war-ranted for the remaining portion of theoriginal warranty period.
HOW SERVICE IS HANDLED:
Factory Service. Call 1-877-9Zenith (1-877-993-6484)(24 hours a day, 365 days per year) for instructions on getting thedefective unit repaired or replaced.
Please retain dated sales receipt and your box to return theunit to Zenith for replacement.
Shipping charges both ways will be paid by Zenith during theWarranty Period.
Visit our website at http://www.zenithservice.com
P/NO : 3828TUL271Z(0412-REV00)Printed in Korea