operating instructions ba i510-c 0.25-15kw
TRANSCRIPT
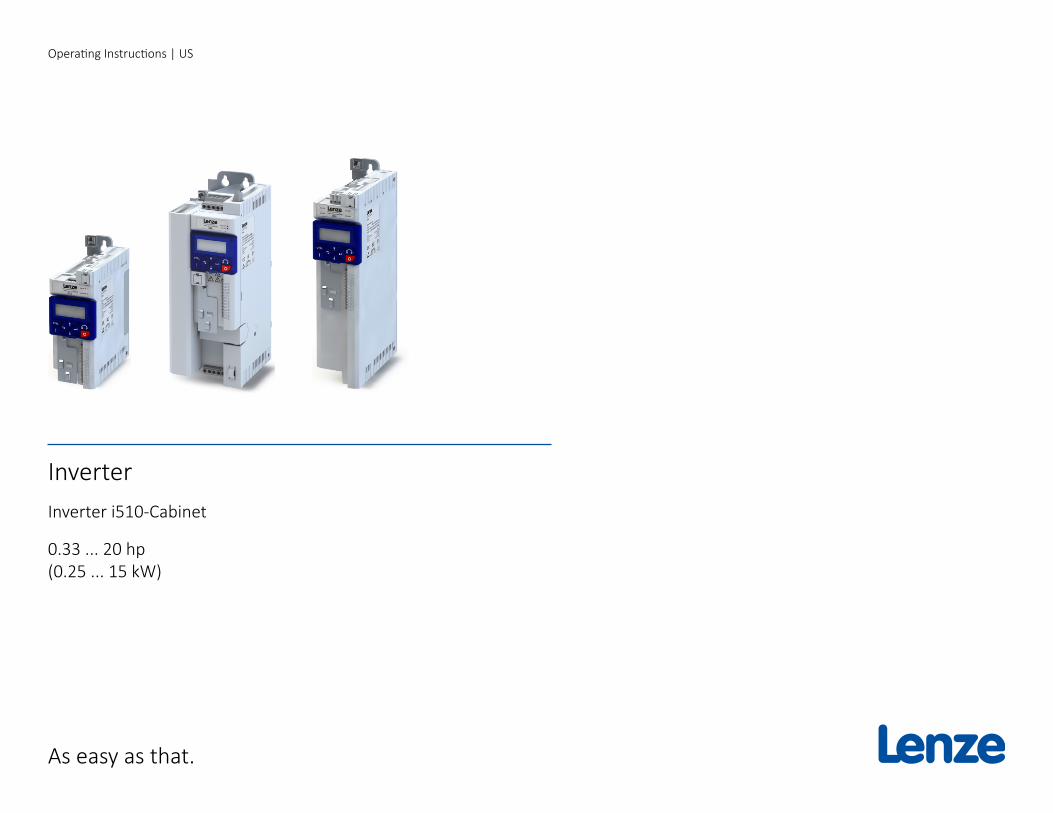
InverterInverter i510-Cabinet
0.33 ... 20 hp (0.25 ... 15 kW)
Operating Instructions | US
As easy as that.

Overview
Operating Instructions i510-Cabinet2
1 OverviewHardware overview of the inverter
Shield connecon
PE connecon Mains connecon/DC bus
Relay output
Network
Interface
Control terminals
Shielding of control conneconsIT screw
IT screw from 0.55 kW
Inverter status s LED
Motor connecon
Opon
Opon
Basic I/O
Diagnosc module
Brake resistor connecon
Memory module
Netword status sLED
Toggle switch
CANopen/Modbus
X100
X16
X3
X20
X105
X216
X9

Operating Instructions i510-Cabinet 3
Contents
Contents1 Generalinformation ....................................................................................... 4
1.1 Target group ......................................................................................................41.2 Application as directed .....................................................................................41.3 Device-specific standards and directives ..........................................................41.4 Relevant standards and directives for the operator .........................................41.5 Identification of the products ...........................................................................5
2 Safetyinstructions ......................................................................................... 52.1 Basic safety measures .......................................................................................52.2 Layout of warning notices .................................................................................62.3 Residual hazards ...............................................................................................6
3 Technical data ................................................................................................ 73.1 Standards and operating conditions .................................................................73.2 Connection to the IT system .............................................................................7
4 Mechanicalinstallation .................................................................................. 84.1 Dimensions and assembly ................................................................................8
5 Electricalinstallation ...................................................................................... 95.1 General overview of the connections ..............................................................95.2 EMC-compliant installation ...............................................................................95.3 Control terminals ........................................................................................... 105.4 Relay output ................................................................................................... 105.5 Single-phase mains connection 230/240 V ................................................... 115.6 Three-phase mains connection 230/240 V ................................................... 125.7 Three-phase mains connection 400 V ........................................................... 135.8 Three-phase mains connection 480 V ........................................................... 14
6 Initialswitch-on ........................................................................................... 15
7 Commissioning............................................................................................. 157.1 Keypad module .............................................................................................. 15
7.1.1 Functions of the keys ....................................................................... 167.1.2 Example of the keypad handling ...................................................... 167.1.3 Quick commissioning - terminal control .......................................... 167.1.4 Extended terminal control ............................................................... 17
7.2 Keypad control ............................................................................................... 177.3 Commissioning with the EASY Starter ........................................................... 177.4 The most important parameters at a glance ................................................. 18
7.4.1 Group 0: Favorites ............................................................................ 187.4.2 Group 2: Basic setting ...................................................................... 227.4.3 Group 3: Motor control ................................................................... 227.4.4 Group 7: Additional functions.......................................................... 22
8 Troubleshooting ........................................................................................... 238.1 Error message ................................................................................................ 238.2 Reset error ..................................................................................................... 238.3 Error codes ..................................................................................................... 248.4 LED status ....................................................................................................... 26
9 Further documents ...................................................................................... 2610 Disposal ....................................................................................................... 2611 Glossary ....................................................................................................... 26

General information
Operating Instructions i510-Cabinet4
1 GeneralinformationPlease read this documentation carefully before installing the inverter and observe the safety instructions!This document only includes the most frequently asked questions and presents them in a simplified form for a better overview. Detailed technical and functional explanations can be found in the comprehensive product documentation.The complete documentation, further information and tools regarding Lenze products can be found on the Internet: http://www.Lenze.com
1.1 Target groupWork on the product must only be carried out by qualified personnel. Specialist personnel must be qualified in accordance with IEC 60364 or CENELEC HD 384. Qualified personnel are persons who have the following knowledge and experience: • They are familiar with the installation, mounting, commissioning, and operation of
electrical and electronic modules.• They have the corresponding qualifications for their work.• They know and can apply all regulations for the prevention of accidents, directives,
and laws applicable at the place of use.
1.2 ApplicationasdirectedThe product is designed for the installation into electrical systems or machinery.The i500 product family is designed for the power range of 0.25 ... 15 kW. The inverter i510 is suitable for conveyor and travelling drives, pumps, fans, winders, lifting systems and many other machine tasks. The inverter is not to be used as a household appliance, but for commercial or professional purposes only.The inverter is not a machine in terms of the Machinery Directive.
1.3 Device-specificstandardsanddirectives• The product meets the protection requirements of the Low-Voltage Directive
2014/35/EU.• The harmonized standard EN 61800-5-1 is used for the inverters. (Europe).• UL 61800-5-1 and CAN/CSA C22.2 No.274 are the North American electrical safety
standards.
1.4 RelevantstandardsanddirectivesfortheoperatorApplicationasdirected
• If the product is used in accordance with the technical data, the drive systems comply with the EN 61800-3 categories.
• The inverter may only be used commercially or professionally as defined by EN 61000-3-2.
• The test voltage for insulation resistance tests between a control potential of 24 V and PE must be measured in accordance with EN 61800-5-1.
• The cables must be installed in accordance with EN 60204-1 or US National Electrical Code NFPA 70 / Canadian Electrical Code C22.1.
Commissioning
• Commissioning or starting the operation as directed of a machine with the product is prohibited until it has been ensured that the machine meets the regulations of NFPA 79 (machinery safety – US), Z432 (machinery safety – Canada), NFPA 70 (US National Electrical Code) and CEC C22.1 (Canadian Electrical Code).
• In residental areas, the product may cause EMC interferences. The operator is responsible for executing the interference suppression measures.
Safety instructions
Operating Instructions i510-Cabinet 5
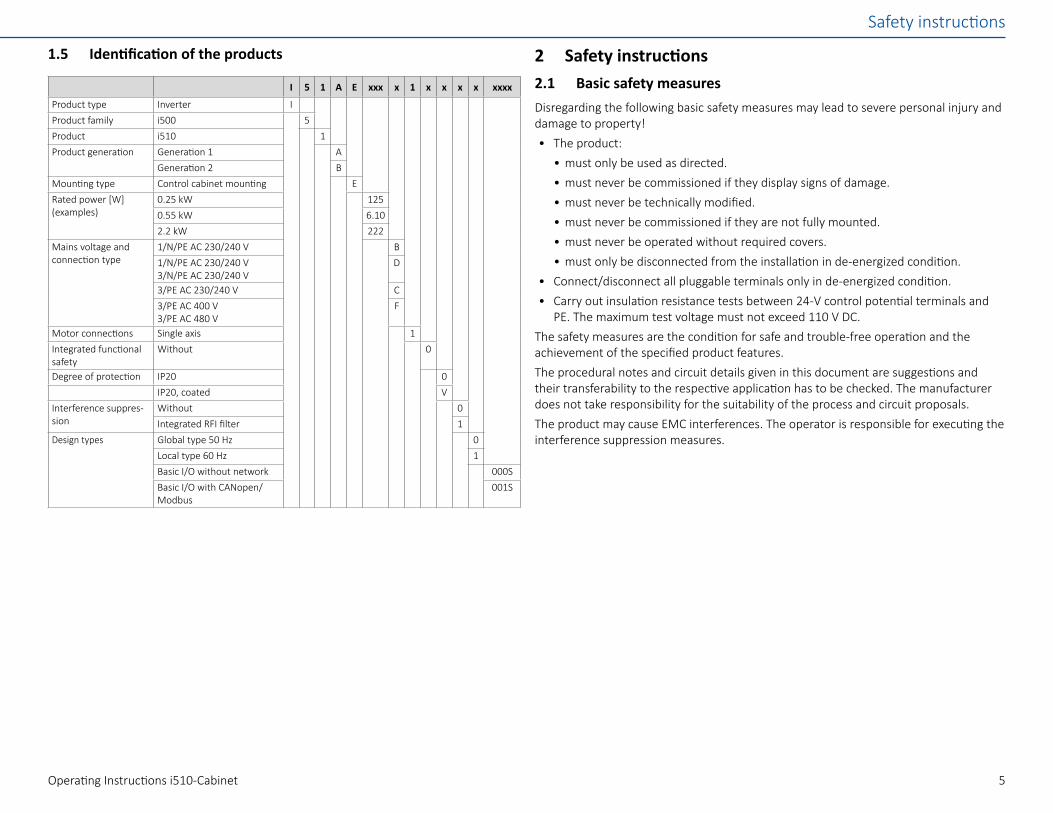
1.5 Identificationoftheproducts
I 5 1 A E xxx x 1 x x x x xxxx
Product type Inverter IProduct family i500 5Product i510 1Product generation Generation 1 A
Generation 2 BMounting type Control cabinet mounting ERated power [W] (examples)
0.25 kW 1250.55 kW 6.102.2 kW 222
Mains voltage and connection type
1/N/PE AC 230/240 V B1/N/PE AC 230/240 V3/N/PE AC 230/240 V
D
3/PE AC 230/240 V C3/PE AC 400 V3/PE AC 480 V
F
Motor connections Single axis 1Integrated functional safety
Without 0
Degree of protection IP20 0IP20, coated V
Interference suppres-sion
Without 0Integrated RFI filter 1
Design types Global type 50 Hz 0Local type 60 Hz 1Basic I/O without network 000SBasic I/O with CANopen/Modbus
001S
2 Safetyinstructions2.1 Basic safety measuresDisregarding the following basic safety measures may lead to severe personal injury and damage to property!• The product:
• must only be used as directed.• must never be commissioned if they display signs of damage.• must never be technically modified.• must never be commissioned if they are not fully mounted.• must never be operated without required covers.• must only be disconnected from the installation in de-energized condition.
• Connect/disconnect all pluggable terminals only in de-energized condition.• Carry out insulation resistance tests between 24-V control potential terminals and
PE. The maximum test voltage must not exceed 110 V DC.The safety measures are the condition for safe and trouble-free operation and the achievement of the specified product features.The procedural notes and circuit details given in this document are suggestions and their transferability to the respective application has to be checked. The manufacturer does not take responsibility for the suitability of the process and circuit proposals.The product may cause EMC interferences. The operator is responsible for executing the interference suppression measures.

Safety instructions
Operating Instructions i510-Cabinet6
2.2 LayoutofwarningnoticesSafety instructions protect against injury to persons or damage to property. The measures described for the prevention of hazards must be complied with.
DANGER
Indicates an extremely hazardous situation. Failure to comply with this instruction will result in severe irreparable injury and even death.
WARNING
Indicates an extremely hazardous situation. Failure to comply with this instruction may result in severe irreparable injury and even death.
CAUTION
Indicates a hazardous situation. Failure to comply with this instruction may result in slight to medium injury.
NOTE
Indicates a material hazard. Failure to comply with this instruction may result in material damage.
2.3 Residual hazardsThe user must take the residual hazards mentioned into consideration in the risk assessment for his/her machine/system.If the above is disregarded, this may result in injuries to persons and material damage!Product
Observe the warning labels on the product!
Icon Description
ElectrostaticchargesBefore working on the product, the staff must ensure they are free of any elec-trostatic charges.
Electrical voltage Before working on the product, check that all power connections are de-ener-gized!After the mains power has been disconnected, the power connections carry con-siderable hazardous electrical voltage for the time stated on the product!
High leakage current Implement fixed installation and PE connection!
Hot surface Use personal protective equipment or wait until the device has cooled down!
Motor
In the event of a short circuit of two power transistors, a residual movement of up to 180°/number of pole pairs on the motor may occur (e.g. 4-pole motor): residual movement max. 180 °/2 = 90°).

Technical data
Operating Instructions i510-Cabinet 7
3 Technical data3.1 Standardsandoperatingconditions
Conformities CE 2014/35/EU, 2014/30/EUEAC TR TC 004/2011, TP TC 020/2011RoHS 2 2011/65/EU
Approvals CULUS UL 61800-5-1, CSA 22.2 No. 274Energyefficiency Class IE2 EN 50598-2Protectiontype IP20 EN 60529 (except in wire range of terminals)
NEMA 250 (type 1 protection against acciden-tal contact only)
Open type Only in UL-approved systemsPower systems TT, TN Voltage against earth: max. 300 V
IT Apply the measures described for IT systems!Mains switching 3 x within one minute possibleOperationwithearth-leakagecircuitbreaker (optional) (120-Vmainsand230-Vmains)
Up to 4 kW 30 mA, above this 300 mA
Operationwithearth-leakagecircuitbreaker (optional) (400-Vmains)
Up to 4 kW 30 mA, above this 300 mA
Cable length for EMC Category C2 Max. 21 yd (≤0.37 kW max. 16 yd)Category C3 Max. 38 m (≤0.37 kW max. 16 yd)
Switching frequencies 2, 4, 8, 16 kHz. The rated output currents apply at 45 °C and switching frequencies of 2 and 4 kHz, and at 40 °C and switching frequencies of 8 and 16 kHz
Ambient temperature 55 °C (derating of 2.5 %/ °C above 45 °C)Max. Output frequency 0 Hz ... 599 HzOverload capacity (120-Vmainsand230-Vmains)
200 % for 3s; 150 % for 60 s
Overload capacity (400-Vmains)
200 % for 3 s; Heavy Duty: 150 % for 60 s; Light Duty: 125 % for 60 s
3.2 ConnectiontotheITsystem
NOTE
Electrical voltage
Internal components have ground potential if the IT screws are not removed.
The monitoring devices of the IT system will be triggered. ► Before connection to an IT system be absolutely sure to remove the IT screws.

Mechanical installation
Operating Instructions i510-Cabinet8
B
H1H
E2
E1
X X
H: Device height X: Number of top/bottom fixingsB: Device width (lower fastening not visible)T: Device depth X - X: Hole spacing over center of deviceH1: Hole dimension for top/bottom fixing E1: Top mounting clearance
E2: Bottom mounting clearance
4 Mechanicalinstallation4.1 Dimensions and assembly
InverterRated power
[hp][kW]
Weight [lb]
H [mm]
W [mm]
D [mm]
H1 [mm]
X [screws + hole spacing] [in]
E1 [mm]
E2 [mm]
1-phasemainsconnection230/240V;withintegratedRFIfilter
I51AExxxB 0.33 – 0.50.25 – 0.37 1.7 6.10 2.36 5.12 6.50 1 - M5 >1.97 >1.97
I51AExxxB 0.75 – 10.55 – 0.75 2.1 7.09 2.36 5.12 7.48 1 - M5 >1.97 >1.97
I51AExxxB 1.5 – 31.1 – 2.2 3 9.84 2.36 5.12 10.24 1 - M5 >1.97 >1.97
1-/3-phasemainsconnection230/240V;withoutintegratedRFIfilter
I51AExxxD 0.33 – 0.50.25 – 0.37 1.7 6.10 2.36 5.12 6.50 1 - M5 >1.97 >1.97
I51AExxxD 0.75 – 10.55 – 0.75 2.1 7.09 2.36 5.12 7.48 1 - M5 >1.97 >1.97
I51AExxxD 1.5 – 31.1 – 2.2 3 9.84 2.36 5.12 10.24 1 - M5 >1.97 >1.97
I51AExxxC 5.5 – 7.54 – 5.5 4.6 9.84 3.54 5.12 10.24 2 1.18 M5 >1.97 3.94
Three-phasemainsconnection400V/480V–Heavyduty;withintegratedRFIfilter
I51AExxxF 0.50.37 1.7 6.10 2.36 5.12 6.50 1 - M5 >1.97 >1.97
I51AExxxF 0.75 – 10.55 – 0.75 2.1 7.09 2.36 5.12 7.48 1 - M5 >1.97 >1.97
I51AExxxF 1.5 – 31.1 – 2.2 3 9.84 2.36 5.12 10.24 1 - M5 >1.97 >1.97
I51BExxxF 4 – 5.53 – 4 3 9.84 2.36 5.12 10.24 1 - M5 >1.97 >1.97
I51AExxxF 4 – 7.53 – 5.5 5 9.84 3.54 5.12 10.24 2 1.18 M5 >1.97 3.94
I51AExxxF 10 – 157.5 – 11.0 3.7 276 4.72 5.12 11.22 2 2.36 M5 >1.97 3.94
Three-phasemainsconnection400V/480V-Lightduty;withintegratedRFIfilter
I51AExxxF 5.5 – 104.0 – 7.5 5 9.84 3.54 5.12 10.24 2 1.18 M5 >1.97 3.94
I51AExxxF 15 – 2011.0 – 15.0 3.7 276 4.72 5.12 11.22 2 2.36 M5 >1.97 3.94

Electrical installation
Operating Instructions i510-Cabinet 9
5 Electricalinstallation5.1 GeneraloverviewoftheconnectionsThe connection diagram is considered exemplary for all voltage and power classes. Deviating mains connection diagrams can be found in the corresponding chapters.
5.2 EMC-compliantinstallationThe drive system (inverter and drive) complies with the EMC Directive 2014/30/EU if it is installed according to the guidelines for CE-typical drive systems.The structure in the control cabinet must support the EMC-compliant installation with shielded motor cables.• Please use sufficiently conductive shield connections.• Connect the housing with shielding effect to the grounded mounting plate with a
surface as large as possible, e. g. of inverters and RFI filters.• Use central earthing points.
The following figure shows an example of effective wiring with shielding on the control cabinet wall.A Shielding of control connectionsB Control cableC Electrically conductive mounting plateD Shield clampsE Low-capacitance motor cable
(C-core/core/C-core/shield < 75/150 pF/m ≤ 2.5 mm²; C-core/core/C-core/shield < 150/300 pF/m ≥ 4 mm²)
Alternatively, the motor cable can be shielded on an optional motor shield plate.
Electrical installation
Operating Instructions i510-Cabinet10
5.3 Control terminalsBasicI/O
Input/output Terminal X3 Information
Digital inputs DI1, DI2, DI3, DI4, DI5 DI3/DI4 can be optionally used as frequency or encoder input. HIGH active/LOW active switchable LOW = 0 ... +3 V, HIGH = +12 V ... +30 V
Digital outputs DO1 Digital output (max. 100 mA)Analog inputs AI1, AI2 Can be optionally used as voltage input or current input.Analog outputs AO1 Can be optionally used as voltage output or current out-
put.10-V output 10 V Primarily for the supply of a potentiometer (1 ... 10 kΩ).
Max. 10 mA24-V output 24 V Primarily for the supply of digital inputs. (Max. 100 mA)Reference potential GNDConnection system Plug-in spring terminal
rated power hp 0.33 ... 20kW 0.25 ... 15
Connection Control terminals X3Connection type Spring terminalMax. cable cross-section AWG 16Stripping length in 0.35Tightening torque lb-in -Tools required 0.4 x 2.5
Control terminals
5.4 Relay outputThe relay is not suitable for direct switching of an electromechanical holding brake. Use a corresponding suppressor circuit in case of an inductive or capacitive load.
Rated power hp 0.33 ... 20kW 0.25 ... 15
Connection Relay output X9Connection type Pluggable screw terminalMax. cable cross-section AWG 16Stripping length in 0.35Tightening torque lb-in 1.77Tools required 0.4 x 2.5
COM Common contactNC Normally-closed contactNO Normally-open contact
Max. switching voltage/switching current
AC 240 V/3 ADC 24 V/2 A
DC 240 V/0.16 A
Relay output
NC
NO
CO
M
X9
AC 240 V3 A

Electrical installation
Operating Instructions i510-Cabinet 11
5.5 Single-phasemainsconnection230/240VTerminaldata,1-phase230/240V
Inverter I51AExxxB I51AExxxD I51AExxxB I51AExxxD I51AExxxx I51AExxxB I51AExxxD
Rated power hp 0.33 ... 1 1.5 ... 3 0.33 ... 3 0.33 ... 3kW 0.25 ... 0.75 1.1 ... 2.2 0.25 ... 2.2 0.25 ... 2.2
Connection Mains connection X100 PE connection Motor connection X105Connection type Pluggable screw terminal PE screw Pluggable screw terminalMax. cable cross-section AWG 12 10 10 12Stripping length in 0.31 0.31 0.39 0.31Tightening torque lb-in 4.40 6.20 17.70 4.40Tools required 0.5 x 3.0 0.6 x 3.5 Torx 20 0.5 x 3.0
Fusingdata/performancedata
Rated power hp 0.33 0.5 0.75 1 1.5 2 3kW 0.25 0.37 0.55 0.75 1.1 1.5 2.2
Rated output current A 1.7 2.4 3.2 4.2 6 7 9.6Max. output current (15s) A 2.6 3.6 4.8 6.3 9 10.5 14.4Operation without mains chokeFuse
Characteristic gG/gL or gRLMax. rated current A 10 10 16 16 25 25 25
Circuit breakerCharacteristic BMax. rated current A 10 10 16 16 25 25 25
Earth-leakage circuit breaker1-phase mains connection ≥ 30 mA, type B
Mainsconnection
Valid for I51AExxxD inverter.
1/N/PE AC 170 V ... 264 V45 Hz ... 65 Hz
F1
Q1
X1
00
L
1
L2
/N
PEN
L3L2 3/N/PE
AC 400 V
L3
Valid for I51AExxxD inverter.
2/PE AC 170 V ... 264 V45 Hz ... 65 Hz
F1…F2
Q1
X1
00
L
1
L2
/N
PEN
L3L2 3/N/PE
AC 208 V ... 240 V
L3
Valid for I51AExxxB inverter.
F1…F2
Q1
X1
00
L
1
L2
/N
2/PE AC 170 V ... 264 V45 Hz ... 65 Hz
PEN
L2 2/N/PE AC 208 V ... 240 V
Motorconnection
X1
05
U
V
W
Rb
1
Rb
2
M3~

Electrical installation
Operating Instructions i510-Cabinet12
5.6 Three-phasemainsconnection230/240VTerminaldata,3-phase230/240V
Inverter I51AExxxD I51AExxxD I51AExxxC I51AExxxx I51AExxxD I51AxxxC
Rated power hp 0.33 ... 1 1.5 ... 3 5 ... 7.5 0.33 ... 7.5 0.33 ... 3 5 ... 7.5kW 0.25 ... 0.75 1.1 ... 2.2 4 ... 5.5 0.25 ... 5.5 0.25 ... 2.2 4 ... 5.5
Connection Mains connection X100 PE connection Motor connection X105Connection type Pluggable screw terminal Screw terminal PE screw Pluggable screw
terminalScrew terminal
Max. cable cross-section AWG 12 10 10 10 12 10Stripping length in 0.31 0.31 0.35 0.39 0.31 0.35Tightening torque lb-in 4.40 6.20 4.40 17.70 4.40 4.40Tools required 0.5 x 3.0 0.6 x 3.5 Torx 20 0.5 x 3.0 0.6 x 3.5
Fusingdata/performancedata
Rated power hp 0.33 0.5 0.75 1 1.5 2 3 5 7.5 10kW 0.25 0.37 0.55 0.75 1.1 1.5 2.2 4 5.5 7.5
Rated output current (heavy duty)
A 1.7 2.4 3.2 4.2 6 7 9.6 16.5 23 -
Max. output current (15s) A 2.6 3.6 4.8 6.3 9 10.5 14.4 24.8 34.5 -Rated output current (light duty)
A - - - - - - - - 20.6 27.6
Max. output current (15s) A - - - - - - - - 33 46OperationwithoutmainschokeFuse
Characteristic gG/gL or gRL -Max. rated current A 10 10 16 16 25 25 25 32 32 -
Circuit breakerCharacteristic B -Max. rated current A 10 10 16 16 25 25 25 32 32 -
OperationwithmainschokeFuse
Characteristic gG/gL or gRLMax. rated current A 10 10 16 16 25 25 25 32 32 32
Circuit breakerCharacteristic BMax. rated current A 10 10 16 16 25 25 25 32 32 32
Earth-leakage circuit breaker3-phase mains connection ≥ 30 mA, type B ≥ 300 mA, type B
Mainsconnection
Valid for I51AExxxC inverter.
3/PE AC 170 V ... 264 V45 Hz ... 65 Hz
F1…F3
Q1
X1
00
L
1
L2
PEN
L3L2 3/N/PE
AC 208 V ... 240 V
L3
n.c
.
n.c
.
Valid for I51AExxxD inverter.
3/PE AC 170 V ... 264 V45 Hz ... 65 Hz
F1…F3
Q1
X1
00
L
1
L2
/N
L3
PEN
L3L2 3/N/PE
AC 208 V ... 240 V
Motorconnection
X1
05
U
V
W
Rb
1
Rb
2
M3~

Electrical installation
Operating Instructions i510-Cabinet 13
5.7 Three-phasemainsconnection400VTerminaldata,3-phase400V
Inverter I51AExxxF I51BExxxF I51AExxxF I51AExxxF I51AExxxF I51AExxxF I51AxxxF I51AxxxF I51AxxxF
Rated power hp 0.5 ... 3 4 ... 5 4 ... 7.5 10 ... 15 0.5 ... 7.5 10 ... 15 0.5 ... 3 4 ... 7.5 10 ... 15kW 0.37 ... 2.2 3 ... 4 3 ... 5.5 7.5 ... 11 0.37 ... 5.5 7.5 ... 11 0.37 ... 2.2 3 ... 5.5 7.5 ... 11
Connection Mains connection X100 PE connection Motor connection X105Connection type Pluggable
screw terminal
Pluggable screw
terminal
Screw terminal PE screw Pluggable screw ter-
minal
Screw terminal
Min. cable cross-section AWG 17 16 17Max. cable cross-section AWG 12 12 9 5 9 5 12 12 5Stripping length in 0.31 0.31 0.35 0.43 0.39 0.43 0.31 0.35 0.43Tightening torque lb-in 6.20 6.20 6.20 10.62 17.70 30.09 6.20 6.20 10.62Tools required 0.5 x 3.0 0.5 x 3.0 0.6 x 3.5 0.8 x 4.0 Torx 20 PZ2 0.5 x 3.0 0.6 x 3.5 0.8 x 4.0
Fusingdata/performancedata
Rated power hp 0.5 0.75 1 1.5 2 3 4 5 7.5 10 15 20kW 0.37 0.55 0.75 1.1 1.5 2.2 3 4 5.5 7.5 11 15
Rated output current(heavy duty)
A 1.3 1.8 2.4 3.2 3.9 5.6 7.3 9.5 13 16.5 23.3 -
Max. Output current (15 s) A 2.6 3.6 4.8 6.4 7.8 11.2 14.6 19 26 33 47 -Rated output current (light duty)
A - - - - - - - 8.8 11.9 15.6 23 28.2
Max. Output current (15 s) A 14.6 19 26 33 47OperationwithoutmainschokeFuse
Characteristic gG/gL or gRL -Max. rated current A 10 10 10 16 16 16 25 25 25 32 32 -
Circuit breakerCharacteristic B -Max. rated current A 10 10 10 16 16 16 25 25 25 32 32 -
OperationwithmainschokeFuse
Characteristic gG/gL or gRLMax. rated current A 10 10 10 16 16 16 25 25 25 32 32 32
Circuit breakerCharacteristic BMax. rated current A 10 10 10 16 16 16 25 25 25 32 32 32
Earth-leakage circuit breaker3-phase mains connection ≥ 30 mA, type B ≥ 300 mA, type B
A mains choke must be used for light duty loads over 15 kW.
Mainsconnection
Valid for I51AExxxF inverter.
+U
G
3/PE AC 340 V ... 528 V45 Hz ... 65 Hz
F1…F3
Q1
X1
00
L
1
L2
L3
PEN
L3L2 3/N/PE
AC 400 V
-U
G
Motorconnection
X1
05
U
V
W
Rb
1
Rb
2
M3~

Electrical installation
Operating Instructions i510-Cabinet14
5.8 Three-phasemainsconnection480VTerminaldata,3-phase480V
Inverter I51AExxxF I51AExxxF I51AExxxF I51AExxxF I51AExxxF I51AxxxF I51AxxxF I51AxxxF
Rated power hp 0.5 ... 3 4 ... 7.5 10 ... 15 0.5 ... 7.5 10 ... 15 0.5 ... 3 4 ... 7.5 10 ... 15kW 0.37 ... 2.2 3 ... 5.5 7.5 ... 11 0.37 ... 5.5 7.5 ... 11 0.37 ... 2.2 3 ... 5.5 7.5 ... 11
Connection Mains connection X100 PE connection Motor connection X105Connection type Pluggable
screw terminalScrew terminal PE screw Pluggable
screw terminalScrew terminal
Min. cable cross-section mm² 1 1.5 1Max. cable cross-section mm² 2.5 6 16 6 16 2.5 6 16Stripping length mm 8 9 11 10 11 8 9 11Tightening torque Nm 0.5 0.5 1.2 2 3.4 0.5 0.5 1.2Tools required 0.5 x 3.0 0.6 x 3.5 0.8 x 4.0 Torx 20 PZ2 0.5 x 3.0 0.6 x 3.5 0.8 x 4.0
Fusingdata/performancedata
Rated power hp 0.5 0.75 1 1.5 2 3 4 5 7.5 10 15 20kW 0.37 0.55 0.75 1.1 1.5 2.2 3 4 5.5 7.5 11 15
Rated output current (heavy duty)
A 1.1 1.6 2.1 3 3.5 4.8 6.3 8.2 11 14 21 -
Max. Output current (15 s) A 2.2 3.2 4.2 6 7 9.6 12.6 16.4 22 28 42 -Rated output current (light duty)
A - - - - - - - 7.6 9.8 13.2 18.3 25.2
Max. Output current (15 s) A - - - - - - - 12.6 16.4 22 28 42OperationwithoutmainschokeFuse
Characteristic gG/gL or gRL -Max. rated current A 10 10 10 16 16 16 25 25 25 32 32 -
Circuit breakerCharacteristic B -Max. rated current A 10 10 10 16 16 16 25 25 25 32 32 -
OperationwithmainschokeFuse
Characteristic gG/gL or gRLMax. rated current A 10 10 10 16 16 16 25 25 25 32 32 32
Circuit breakerCharacteristic BMax. rated current A 10 10 10 16 16 16 25 25 25 32 32 32
Earth-leakage circuit breaker3-phase mains connection ≥ 30 mA, type B ≥ 300 mA, type B
A mains choke must be used for light duty loads over 15 kW.
Mainsconnection
Valid for I51AExxxF inverter.
+U
G
3/PE AC 340 V ... 528 V45 Hz ... 65 Hz
F1…F3
Q1
X1
00
L
1
L2
L3
PEN
L3L2 3/N/PE
AC 480 V
-U
G
Motorconnection
X1
05
U
V
W
Rb
1
Rb
2
M3~

Initial switch-on
Operating Instructions i510-Cabinet 15
7 Commissioning
DANGER
Electrical voltage Incorrect wiring can cause unexpected states during the commissioning phase.
► Wiring must be complete and correct. ► Check the wiring to ensure that it is free of short circuits and earth faults. ► Adapt the motor circuit configuration (star/delta) to the inverter. ► Connect the motor in the correct phase relation (rotating direction). ► Check the “Emergency off” function of the overall system. ► Clear the hazard area. ► Observe safety instructions and safety clearances.
7.1 Keypad module ► Plug the keypad onto the inverter.
The keypad can also be connected and removed during operation.
6 Initialswitch-on
DANGER
Electrical voltage Incorrect wiring can cause unexpected states during the commissioning phase.
► Wiring must be complete and correct. ► Check the wiring to ensure that it is free of short circuits and earth faults. ► Adapt the motor circuit configuration (star/delta) to the inverter. ► Connect the motor in the correct phase relation (rotating direction). ► Check the “Emergency off” function of the overall system. ► Clear the hazard area. ► Observe safety instructions and safety clearances.
Conditions
• The power connections must be wired.• The digital inputs X3/DI1 (start/stop), X3/DI3 (reversal of rotation direction) and
X3/DI4 (frequency preset 20 Hz) must be wired.• The analog input X3/AI1 must not be wired or connected to GND.
Switch on mains voltage
► Switch on mains voltage and check readiness for operation.Observe LED status displays “RDY” and “ERR” on the inverter front panel.See “LED status”. 26
Commissioning
Operating Instructions i510-Cabinet16
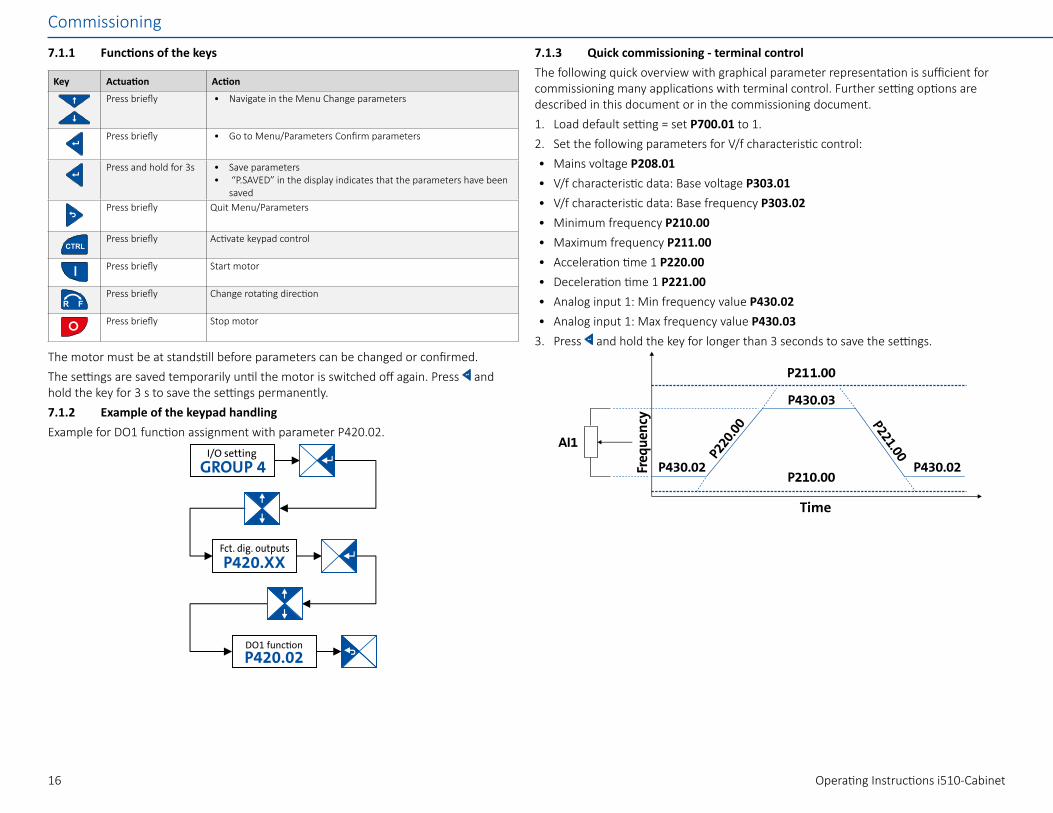
7.1.3 Quickcommissioning-terminalcontrolThe following quick overview with graphical parameter representation is sufficient for commissioning many applications with terminal control. Further setting options are described in this document or in the commissioning document.1. Load default setting = set P700.01 to 1.2. Set the following parameters for V/f characteristic control:• Mains voltage P208.01• V/f characteristic data: Base voltage P303.01• V/f characteristic data: Base frequency P303.02• Minimum frequency P210.00• Maximum frequency P211.00• Acceleration time 1 P220.00• Deceleration time 1 P221.00• Analog input 1: Min frequency value P430.02• Analog input 1: Max frequency value P430.03
3. Press and hold the key for longer than 3 seconds to save the settings.
P211.00
P430.03
P430.02 P430.02
P220.00 P221.00
P210.00
AI1
Time
Freq
uen
cy
7.1.1 Functionsofthekeys
Key Actuation Action
Press briefly • Navigate in the Menu Change parameters
Press briefly • Go to Menu/Parameters Confirm parameters
Press and hold for 3s • Save parameters• “P.SAVED” in the display indicates that the parameters have been
savedPress briefly Quit Menu/Parameters
Press briefly Activate keypad control
Press briefly Start motor
Press briefly Change rotating direction
Press briefly Stop motor
The motor must be at standstill before parameters can be changed or confirmed.The settings are saved temporarily until the motor is switched off again. Press and hold the key for 3 s to save the settings permanently.7.1.2 Example of the keypad handlingExample for DO1 function assignment with parameter P420.02.
GROUP 4
P420.XX
P420.02
I/O setting
Fct. dig. outputs
DO1 funcon

Commissioning
Operating Instructions i510-Cabinet 17
With the wiring shown below, the inverter can be operated using the control terminals (X3).• Preset 1 is activated if DI4 = HIGH.• Preset 2 is activated if DI5 = HIGH.• Preset 3 is activated if DI4 and DI = HIGH.
GND
AI1
AI2
AO1
10V
24V
DI1
DI2
DI3
DI4
DI5
Setpoint frequency
10 VDC supply
24 VDC, 100 mA supply
Start
Reset error (optional)
Change direction of rotation (optional)
Activate preset (Bit 0) (optional)
Activate preset (Bit 1) (optional)
GND
Input range [Hz]:*P430.02 - *P430.03
7.1.4 Extended terminal controlThe following illustration shows a more extensive wiring of the control terminals (X3) linked with the respective parameters.
GND
AI1
AI2
AO1
10V
24V
DI1
DI2
DI3
DI4
DI5
GND
DO1
NO
COM
NC
U/I
*P400.02
Preset 01 (*P450.01)
*P400.04*P400.13
bit 1 bit 00
011
1
1Preset 02 (*P450.02)Preset 03 (*P450.03)
*P400.18*P400.19*P420.02
*P420.01
24E
*P201.01
(congured AI1 as
standard setpoint)
Default setting
StartReset error
Mark direction of rotationActivate preset (bit 0)Activate preset (bit 1)
DO1 activated atRelease brake
Relay activated atReady for operation
Analog input 1Analog input 2Analog output 110 VDC supply for potentiometer24 VDC, 100 mA supply, reference for digital inputsDigital input 1Digital input 2Digital input 3Digital input 4Digital input 5Digital output 1GND for analog and digital signals
Relay NO contactRelay common contactRelay NC contact
Preset frequency values
*P430.01 (0 ... 10 VDC signal)
*P430.02 — *P430.03
GND for analog and digital signals
range [Hz]:cong.:
Optional external 24-V-supply (i550 only)
7.2 Keypad controlActivatetemporarykeypadcontrol
1. Press the key to activate keypad control.2. Press the key for confirming keypad control.Deactivatetemporarykeypadcontrol
1. Press the key to activate keypad control.2. Press the key for confirming keypad control.Activatepermanentkeypadcontrol
If the keypad does not have any keys, motor control is activated via the following parameters:
► Set parameter P200.00 to 1. ► Set parameter P201.01 to 1. ► Set parameter P400.01 to 1. ► Set parameter P400.02 to 1.
Then use the key to start the motor.Start/control/stopmotorwithkeypad
1. Press the key to start the motor.• The keypad shows the motor speed.
2. Change the frequency setpoint using the key or the key.3. Press the key to stop the motor.Changerotatingdirection
1. Press the key.2. Press the key to confirm the reversal of rotating direction.
7.3 Commissioning with the EASY StarterCommissioning and diagnostics can be carried out with the EASY starter engineering tool. This requires a USB module and a standard USB cable (A plug to Micro-B plug). http://www.Lenze.com

Commissioning
Operating Instructions i510-Cabinet18
7.4 The most important parameters at a glanceThis chapter contains the most important parameters and selections. You can find a detailed description in the commissioning document. http://www.Lenze.comThe parameters are divided into the following function groups:• Pxxx.xx group 0: Favorites• P1xx.xx group 1: Diagnostics• P2xx.xx group 2: Basic setting• P3xx.xx group 3: Motor control• P4xx.xx group 4: I/O setting• P5xx.xx group 5: Network setting• P6xx.xx group 6: Process controller• P7xx.xx group 7: Additional functions• P8xx.xx group 8: Sequencer
7.4.1 Group 0: FavoritesGroup 0 contains the configurable favorites that are also contained in the groups 1 to 4. In the default setting these are the most common parameters for the solution of typical applications.
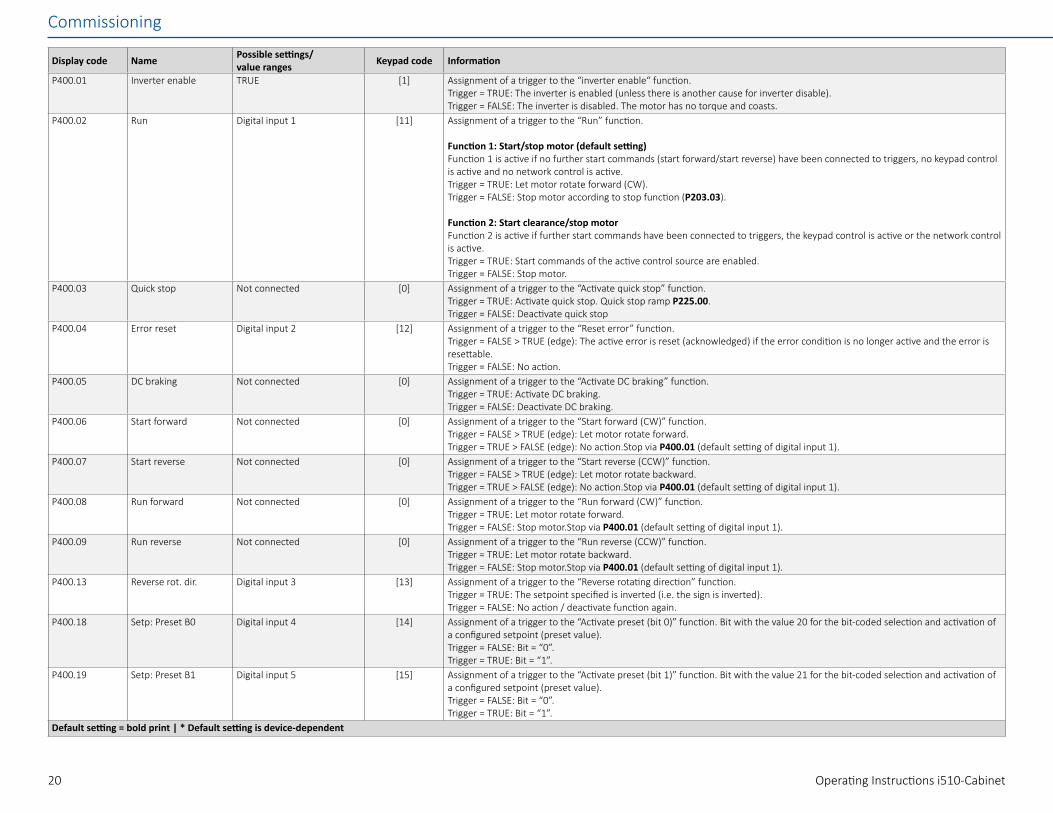
Display code Name Possiblesettings/ value ranges Keypad code Information
P100.00 Output frequency x.x Hz (read only) Display of the actual output frequency.P103.00 Current actual x.x % (read only) Display of the actual motor current.P106.00 Motor voltage x VAC (read only) Display of the actual motor voltage.P150.00 Error code - (read only) Error message.P200.00 Control selection Flexible I/O [0] This selection enables a flexible assignment of the start, stop, and rotating direction commands with digital signal sources.
Keypad [1] This selection enables the motor to start exclusively via the start key of the keypad. Other signal sources for starting the motor are ignored.
P201.01 F-setp.source Keypad [1] The setpoint is specified locally by the keypad.Analog input 1 [2] The setpoint is defined as analog signal via the analog input 1.Analog input 2 [3] The setpoint is defined as analog signal via the analog input 2.HTL input [4] The digital inputs DI3 and DI4 can be configured as HTL input to use an HTL encoder as setpoint encoder or define the setpoint as
a reference frequency ("pulse train").Network [5] The setpoint is defined as process data object via the network.Frequency preset 1 ... 15 [11] ... [25] For the setpoint selection, “preset” values can be parameterized and selected. All frequency presets are described in detail in the
commissioning manual. Lenze Doc FinderP203.01 Start method Normal [0] After start command, the standard ramps are active.
DC braking [1] After start command, the "DC braking" function is active for the time set in P704.02.Flying restart circuit [2] After the start command, the flying restart circuit is active.Premagnetization [3] After start command, the standard ramps are active and the premagnetization of the motor is activated. This reduces the motor cur-
rent and smooths the acceleration curve during the starting process (only relevant in V/f motor control mode). Defaultsetting=boldprint|*Defaultsettingisdevice-dependent

Commissioning
Operating Instructions i510-Cabinet 19
Display code Name Possiblesettings/ value ranges Keypad code Information
P203.03 Stop method Coasting [0] The motor has no torque (coasts down to standstill).Standard ramp [1] The motor is brought to a standstill with the deceleration time 1 P221.00 (or deceleration time 2 P223.00 if activated).Quick stop ramp [2] The motor is brought to a standstill over the deceleration time set for the “Quick stop” P225.00 function.Switch-off positioning [3] Is similar to the stop method “standard ramp [1]“. Depending on the actual output frequency, however, the inverter delays the
beginning of the down-ramping so that the number of motor revolutions until standstill is reached and thus the stopping position is always relatively constant.
P208.01 Mains voltage 230 Veff [0] Selection of the mains voltage for actuating the inverter.400 Veff [1]480 Veff [2]120 Veff [3]
P210.00 Min. Frequency 0.0 ... 599.0 Hz Lower limit value for all frequency setpoints.P211.00 Max. frequency Device for 50-Hz mains:
50 Hz * Device for 60-Hz mains: 60 Hz *
Upper limit value for all frequency setpoints.
P220.00 Acceleration 1 0.0 ... 5.0 ... 3600.0 s Acceleration time 1.P221.00 Deceleration 1 0.0 ... 5.0 ... 3600.0 s Deceleration time 1P300.00 Motor ctrl mode Servo control (SC ASM) [2] This control mode is used for servo control of an asynchronous motor. This motor control mode is described in the commissioning
manual. Lenze Doc FinderSensorless control (SL PSM)
[3] This control type is used for the sensorless control of a synchronous motor. This motor control mode is described in the commis-sioning manual. Lenze Doc Finder
Sensorless vector control (SLVC)
[4] This control type is used for sensorless vector control of an asynchronous motor. Observe parameters P327.04 and P327.05 for this purpose.
V/fcharacteristiccontrol(VFCopenloop)
[6] This control mode is used for the speed control of an asynchronous motor via a V/f characteristic and is the simplest control mode.
P302.00 V/f characteristic shape
Linear [0] Linear characteristic for drives with constant load torque over the speed.Square-law [1] Square-law characteristic for drives with a square-law load torque over the speed.Eco [3] Linear characteristic with energy optimization in the partial load operational range.
P303.01 Base voltage 0 ... 230 ... 5000 V * Base voltage and base frequency define the V/f ratio and thus the gradient of the V/f characteristic.• The V/f base voltage is usually set to the rated motor voltage.• The V/f base frequency is usually set to the rated motor frequency.
P303.02 Base frequency Device for 50-Hz mains: 50 Hz * Device for 60-Hz mains: 60 Hz *
Base voltage and base frequency define the V/f ratio and thus the gradient of the V/f characteristic.• The V/f base voltage is usually set to the rated motor voltage.• The V/f base frequency is usually set to the rated motor frequency.
P304.00 Limitation of rotation Only clockwise (CW) [0] The motor can only be rotated clockwise (CW). The transfer of negative frequency and PID setpoints to the motor control is prevented.
Bothrotationdirections [1] Both directions of motor rotation are enabled.P305.00 Switching frequency 8 kHz var/opt/4 * Selection of the inverter switching frequency.P306.01 Overload selection Heavy duty [0] Load characteristic for high dynamic requirements.
Light Duty [1] Load characteristic for low dynamic requirements.P308.01 Max. load for 60s 30 ... 150 ... 200 % Maximum permissible thermal motor utilization (max. permissible motor current for 60 seconds). With regard to rated motor
current (P323.00).P316.01 Fixed V/f boost 0.0 ... 2.5 ...20.0 % * Constant voltage boost for the V/f characteristic control without feedback.P323.00 Motor current 0.001 ... 1.700 ... 500.000 A * Setting of the rated motor current according to motor nameplate.P324.00 Max current 0.0 ... 200.0 ... 3000.0 % Maximum overload current of the inverter.Defaultsetting=boldprint|*Defaultsettingisdevice-dependent
Commissioning
Operating Instructions i510-Cabinet20
Display code Name Possiblesettings/ value ranges Keypad code Information
P400.01 Inverter enable TRUE [1] Assignment of a trigger to the “inverter enable“ function.Trigger = TRUE: The inverter is enabled (unless there is another cause for inverter disable).Trigger = FALSE: The inverter is disabled. The motor has no torque and coasts.
P400.02 Run Digital input 1 [11] Assignment of a trigger to the “Run” function.
Function1:Start/stopmotor(defaultsetting)Function 1 is active if no further start commands (start forward/start reverse) have been connected to triggers, no keypad control is active and no network control is active.Trigger = TRUE: Let motor rotate forward (CW).Trigger = FALSE: Stop motor according to stop function (P203.03).
Function2:Startclearance/stopmotor Function 2 is active if further start commands have been connected to triggers, the keypad control is active or the network control is active.Trigger = TRUE: Start commands of the active control source are enabled.Trigger = FALSE: Stop motor.
P400.03 Quick stop Not connected [0] Assignment of a trigger to the “Activate quick stop” function.Trigger = TRUE: Activate quick stop. Quick stop ramp P225.00.Trigger = FALSE: Deactivate quick stop
P400.04 Error reset Digital input 2 [12] Assignment of a trigger to the “Reset error” function.Trigger = FALSE > TRUE (edge): The active error is reset (acknowledged) if the error condition is no longer active and the error is resettable.Trigger = FALSE: No action.
P400.05 DC braking Not connected [0] Assignment of a trigger to the “Activate DC braking” function.Trigger = TRUE: Activate DC braking.Trigger = FALSE: Deactivate DC braking.
P400.06 Start forward Not connected [0] Assignment of a trigger to the “Start forward (CW)” function.Trigger = FALSE > TRUE (edge): Let motor rotate forward.Trigger = TRUE > FALSE (edge): No action.Stop via P400.01 (default setting of digital input 1).
P400.07 Start reverse Not connected [0] Assignment of a trigger to the “Start reverse (CCW)” function.Trigger = FALSE > TRUE (edge): Let motor rotate backward.Trigger = TRUE > FALSE (edge): No action.Stop via P400.01 (default setting of digital input 1).
P400.08 Run forward Not connected [0] Assignment of a trigger to the “Run forward (CW)” function.Trigger = TRUE: Let motor rotate forward.Trigger = FALSE: Stop motor.Stop via P400.01 (default setting of digital input 1).
P400.09 Run reverse Not connected [0] Assignment of a trigger to the “Run reverse (CCW)” function.Trigger = TRUE: Let motor rotate backward.Trigger = FALSE: Stop motor.Stop via P400.01 (default setting of digital input 1).
P400.13 Reverse rot. dir. Digital input 3 [13] Assignment of a trigger to the “Reverse rotating direction” function.Trigger = TRUE: The setpoint specified is inverted (i.e. the sign is inverted).Trigger = FALSE: No action / deactivate function again.
P400.18 Setp: Preset B0 Digital input 4 [14] Assignment of a trigger to the “Activate preset (bit 0)” function. Bit with the value 20 for the bit-coded selection and activation of a configured setpoint (preset value).Trigger = FALSE: Bit = “0”.Trigger = TRUE: Bit = “1”.
P400.19 Setp: Preset B1 Digital input 5 [15] Assignment of a trigger to the “Activate preset (bit 1)” function. Bit with the value 21 for the bit-coded selection and activation of a configured setpoint (preset value).Trigger = FALSE: Bit = “0”.Trigger = TRUE: Bit = “1”.
Defaultsetting=boldprint|*Defaultsettingisdevice-dependent

Commissioning
Operating Instructions i510-Cabinet 21
Display code Name Possiblesettings/ value ranges Keypad code Information
P400.20 Setp: Preset B2 Not connected [0] Assignment of a trigger to the “Activate preset (bit 2)” function. Bit with the value 22 for the bit-coded selection and activation of a configured setpoint (preset value).Trigger = FALSE: Bit = “0”.Trigger = TRUE: Bit = “1”.
P420.01 Relay function Running [50] TRUE if inverter and start are enabled and output frequency > 0.2 Hz. Otherwise FALSE.Readyforoperation [51] TRUE if inverter is ready for operation (no error active, no STO active and DC-bus voltage ok). Otherwise FALSE.Operation enabled [52] TRUE if inverter and start are enabled. Otherwise FALSE.Stop active [53] TRUE if inverter is enabled and motor is not started and output frequency = 0.Error active [56] TRUE if error is active. Otherwise FALSE.Device warning active [58] TRUE if warning is active. Otherwise FALSE.
P420.02 DO1 function Release brake [115] Assignment of a trigger to digital output 1.Trigger = FALSE: X3/DO1 set to LOW level.Trigger = TRUE: X3/DO1 set to HIGH level.
P430.01 AI1 input area 0...10VDC [0] Definition of the input range.0 ... 5 VDC [1]2 ... 10 VDC [2]-10 ... +10 VDC [3]4 ... 20 mA [4]0 ... 20 mA [5]
P430.02 AI1 freq @ min - 1000.0 ... 0.0 ... 1000.0 Hz Definition of the setting range for AI1.• Direction of rotation according to sign.• Standard setpoint source for operating mode is selected in P201.01.
P430.03 AI1 freq @ max 50.0 Hz * | 60.0 Hz * Definition of the setting range for operating mode “MS: Velocity mode”.• Direction of rotation according to sign.• Standard setpoint source for operating mode is selected in P201.01.
P440.01 AO1 output area Disabled [0] Definition of the output range.0...10VDC [1]0 ... 5 VDC [2]2 ... 10 VDC [3]4 ... 20 mA [4]0 ... 20 mA [5]
P440.02 AO1 function Output frequency [1] Actual output frequency (resolution: 0.1 Hz).Frequency setpoint [2] Actual frequency setpoint (resolution: 0.1 Hz).Analog input 1 [3] Input signal from analog input 1 (resolution: 0.1 %).
P440.03 AO1 min. Signal -2147483648 ... 0 ... 2147483647
Definition of the signal value that corresponds to the minimum value at analog output 1.
P440.04 AO1 max. signal -2147483648 ... 1000 ... 2147483647
Definition of the signal value that corresponds to the maximum value at analog output 1.
P450.01 Freq. preset 1 0.0 ... 20.0 ... 599.0 Hz Parameterizable frequency setpoints (preset 1).P450.02 Freq. preset 2 0.0 ... 40.0 ... 599.0 Hz Parameterizable frequency setpoints (preset 2).P450.03 Freq. preset 3 0.0 ... 50.0|60.0 ... 599.0 Hz * Parameterizable frequency setpoints (preset 3).P450.04 Freq. preset 4 0.0 ... 0.0 ... 599.0 Hz Parameterizable frequency setpoints (preset 4).Defaultsetting=boldprint|*Defaultsettingisdevice-dependent

Commissioning
Operating Instructions i510-Cabinet22
7.4.2 Group2:Basicsetting
Display code Name Possiblesettings Keypad code Information
P225.00 Quick stop decelera-tion time
1.0 s Quick stop deceleration time for “MS: Velocity mode”• If the “Quick stop” function is activated, the motor is brought to a standstill within the deceleration time set here.• The set deceleration time refers to the period of deceleration from the set maximum frequency (P211.00) to standstill. In the
case of a lower actual frequency, the actual deceleration time is reduced accordingly.• Setting is not effective in operating mode P301.00 = “CiA:Velocity mode”.
7.4.3 Group 3: Motor control
Display code Name Possiblesettings Keypad code Information
P320.04 Rated torque 50 ... 50000 rpm General motor data.Configure settings as specified by the data on the motor nameplate.
Note!Take the phase connection implemented for the motor (star or delta configuration) into account when entering the motor name-plate data. Only enter data associated with the relevant configuration.
P320.05 Rated frequency 1.0 ... 1000.0 HzP320.06 Rated power 0.00 ... 655.35 kWP320.07 Rated voltage 0 ... 65535 VP320.08 Cosine phi 0.00 ... 1.00P327.04 Identify motor data 0 ... 1 1 = start automatic identification of the motor data.
• Inverter characteristics, motor equivalent circuit data and controller settings are identified and set automatically.• The motor is energized during the procedure!
P327.05 Calibrate motor data (non-energized)
0 ... 1 1 = start automatic calibration of the motor data.• A default inverter characteristic is loaded.• The motor equivalent circuit data and controller settings are calculated on the basis of the currently set rated motor data.• The motor is not energized.
7.4.4 Group7:Additionalfunctions
Display code Name Possiblesettings Keypad code Information
P700.01 Device commands: Load default settings
Off/ready [0] Only status feedbackOn / start [1] 1 = reset all parameters in the RAM memory of the inverter to the default setting that is stored in the inverter firmware.
• All parameter changes made by the user are lost during this process!• This process may take some seconds. When the device command has been executed successfully, the value 0 is shown.• Loading parameters has a direct effect on cyclic communication: The data exchange for control is interrupted and a communi-
cation error is generated.P700.03 Device commands:
Save user dataOff/ready [0] Only status feedbackOn / start [1] Execute device commandsIn progress [2] Only status feedbackAction cancelled [3]No access [4]No access (inverter disabled)
[5]

Troubleshooting
Operating Instructions i510-Cabinet 23
8 Troubleshooting8.1 Error messageIf an error is pending, the keypad shows the following information.
1 = error text2 = error type F = fault
T = troubleW = warning
3 = error code (hexadecimal)
Faults (F) and trouble (T) are displayed continuously. The inverter is disabled.Warnings (W) are displayed every 2 seconds for a short time. The inverter is probably disabled.
8.2 Reset errorReset error via keypad
Errors can be reset using the key if the cause of the error has been eliminated and no blocking time is active.
► Press the key to reset the error. The motor is stopped. ► Press the key to revoke the stop.
Reset error via terminal control
When terminal control is used, errors can be reset in 2 ways:1. Via start signal P400.02 (default setting of digital input 1).• Cause of error has been eliminated and no blocking time is active.• The signal at the digital input 1 (P400.02) must drop and then be applied again.
2. Via P400.04 (default setting of digital input 2).• Cause of error has been eliminated and no blocking time is active.• The error is reset if a signal is applied to digital input 2 (P400.04).

Troubleshooting
Operating Instructions i510-Cabinet24
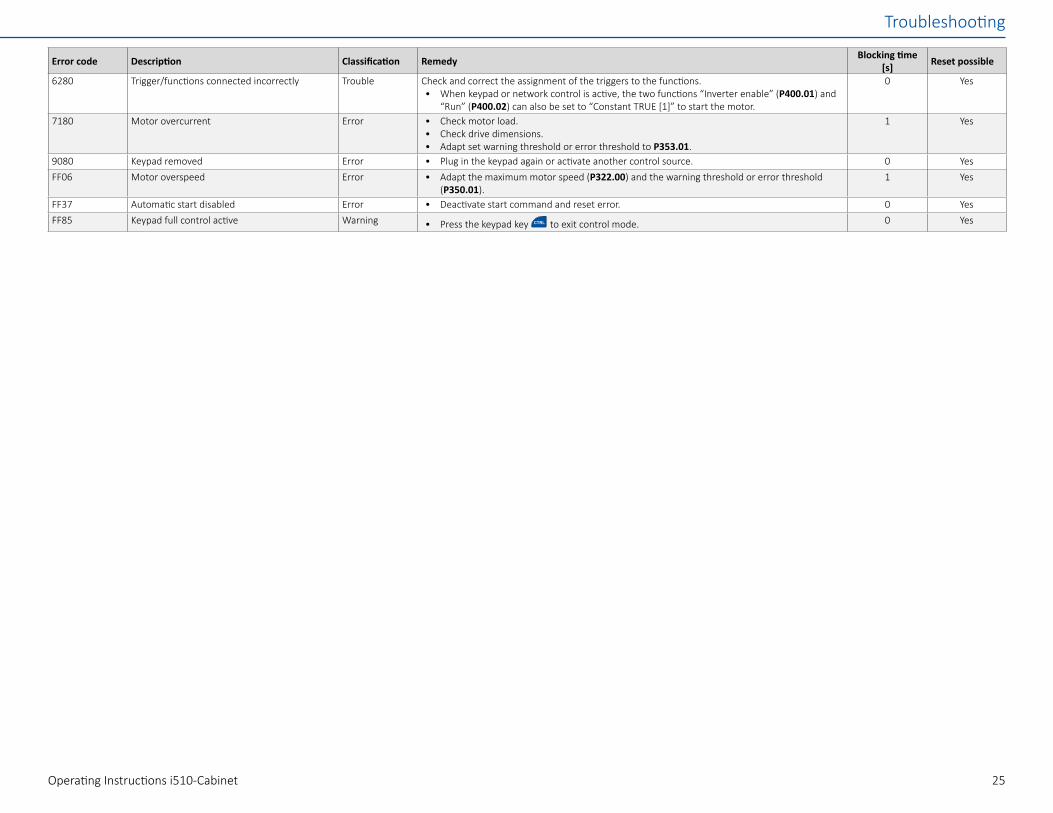
8.3 Error codes
Error code Description Classification Remedy Blockingtime[s] Reset possible
2250 CiA: Continuous overcurrent (inside the device) Error • Check motor and wiring for short circuits.• Check brake resistor and wiring.• Check motor switching.• Check motor data settings.
5 Yes
2320 Short circuit or earth leakage on the motor side Error • Check motor cable.• Check length of motor cable.• Use shorter or lower-capacitance motor cable.
5 Yes
2340 CiA: Short circuit (inside the device) Error • Check motor cable for short circuit. 5 Yes2350 CiA: i²*t overload (thermal state) Error • Check drive dimensions.
• Check machine/driven mechanics for excessive load.• Check motor data settings.• Reduce values for slip compensation (P315.01, P315.02) and oscillation damping (P318.01,
P318.02).
5 Yes
2382 Error: Device utilisation (Ixt) too high Error • Check drive dimensions.• Reduce maximum overload current of the inverter (P324.00).• In case of high mass inertias, reduce maximum overload current of the inverter (P324.00) to
150 %.
3 Yes
2383 Warning: Device utilisation (Ixt) too high Warning • Check drive dimensions. 0 Yes3120 Mains phase fault Error • Check mains connection wiring.
• Check fuses.0 Yes
3210 DC bus overvoltage Error • Reduce dynamic performance of the load profile.• Check mains voltage.• Check settings for brake energy management.• Connect brake resistor to the power unit and activate the integrated brake chopper. (P706.01
= 0: brake resistance).
0 Yes
3211 Warning: DC bus overvoltage Warning • Reduce dynamic performance of the load profile.• Check mains voltage.• Check settings for brake energy management.• Connect brake resistor to the power unit and activate the integrated brake chopper. (P706.01
= 0: brake resistance).
0 Yes
3220 DC bus undervoltage Trouble • Check mains voltage.• Check fuses.• Check DC-bus voltage (P105.00).• Check mains settings.
0 Yes
3221 Warning: DC bus undervoltage Warning • Check mains voltage.• Check fuses.• Check DC bus voltage.• Check mains settings.
0 Yes
3222 DC-bus voltage too low for switch-on Warning • Check mains voltage.• Check fuses.• Check mains settings.
0 Yes
4210 PU: Overtemperature fault Error • Check mains voltage.• Ensure sufficient cooling of the device (heatsink temperature displayed in P117.01).• Clean fan and ventilation slots. Replace fan if necessary.• Reduce switching frequency (P305.00).
0 Yes
4281 Heatsink fan warning Warning • Clean fan and ventilation slots. If required, replace fan. The fans can be unlocked via locking hooks and can then be removed.
0 Yes
4310 Error: Motor overtemperature Error • Check drive dimensions. 5 Yes
Troubleshooting
Operating Instructions i510-Cabinet 25
Error code Description Classification Remedy Blockingtime[s] Reset possible
6280 Trigger/functions connected incorrectly Trouble Check and correct the assignment of the triggers to the functions.• When keypad or network control is active, the two functions “Inverter enable” (P400.01) and
“Run” (P400.02) can also be set to “Constant TRUE [1]” to start the motor.
0 Yes
7180 Motor overcurrent Error • Check motor load.• Check drive dimensions.• Adapt set warning threshold or error threshold to P353.01.
1 Yes
9080 Keypad removed Error • Plug in the keypad again or activate another control source. 0 YesFF06 Motor overspeed Error • Adapt the maximum motor speed (P322.00) and the warning threshold or error threshold
(P350.01).1 Yes
FF37 Automatic start disabled Error • Deactivate start command and reset error. 0 YesFF85 Keypad full control active Warning • Press the keypad key to exit control mode. 0 Yes

Further documents
Operating Instructions i510-Cabinet26
8.4 LED status
LED“RDY”(blue) LED“ERR”(red) Status/meaning
off off No supply voltage.Mains voltage is switched on, inverter is initialized.
flashes
off Inverter is disabled, ready for operation.
flashes fast
Safe torque off (STO) active, warning active.
flashes
off Inverter disabled.
flashes fast
Inverter disabled, warning active.
Inverter disabled, error active.
every 1.5 s on
Inverter disabled, no DC-bus voltage.
off Inverter enabled.
off The motor rotates according to the specified setpoint or quick stop active.
flashes fast
Inverter enabled, warning active.The motor rotates according to the specified setpoint or active “Quick stop” function.
flashes
Inverter enabled, quick stop as response to fault active.
9 Further documentsFor certain tasks, information is available in further documents.
Document Contents/topicsProject planning document Fundamental information on project planning and ordering the productCommissioning document Fundamental information for the installation and commissioning of the
productMounting instructions Fundamental information on mounting the product
The documents can be found in the Lenze Doc Finder.
10 DisposalIf pollutants are disposed off improperly, they may cause a lasting damage to human health and the environment. Thus, electrical and electronic equipment must be collected separately from unsorted municipal waste so that it may be recycled or disposed of properly.If available, put the components to the company internal disposal from where it is passed on to specialized waste management companies.It is also possible to return the components to the manufacturer. For this purpose, please contact the customer service of the manufacturer.More detailed information on disposal can be obtained from the corresponding specialist firms and the competent authorities.The packaging of the component must be disposed of separately. Paper, cardboard and plastics must be recycled.
11 Glossary
Abbreviation MeaningAIE Error acknowledgement (“Acknowledge In Error”)OFF state Signal status of the safety sensor when it triggers or respondsQSP Quick stop

Overview
Operating Instructions i510-Cabinet 27

© 01/2020 | 1.0
Lenze Drives GmbHP.O. box 10 13 52, 31763 HamelnBreslauer Strasse 3, 32699 ExtertalGERMANYHR Lemgo B 6478Tel.: +49 5154 82-0Fax: +49 5154 82-2800Email: [email protected]: www.Lenze.com
Lenze Service GmbHBreslauer Strasse 3, 32699 ExtertalGERMANYTel.: 0080002446877 (24-h helpline)Fax: +49 5154 82-1112Email: [email protected]
Lenze Americas630 Douglas Street01569 UxbridgeMA United StatesPhone +1 800 217-9100 (toll free) Fax +1 508 [email protected]