operating instructions basic features ... - support.aficio.com
TRANSCRIPT
Paper type: OK Prince Eco G100(55kg), Paper Thickness=80 µm // Pages in book=116 // Print scale=81%Gap (when printed at 81% scale) = Pages in book × Paper thickness / 2 = 4.640000 mm
Operating Instructions
Basic Features
Operating Instructions
Basic Features
Operating Instructions
Basic Features
For safe and correct use of this machine, please be sure to read the Safety Information before you use it.
Getting Started
Faxing
Programming
Troubleshooting
1
2
3
4
Printed in The Netherlands
GB GB H557-8201

Paper type: OK Prince Eco G100(55kg), Paper Thickness=80 µm // Pages in book=116 // Print scale=81%Gap (when printed at 81% scale) = Pages in book × Paper thickness / 2 = 4.640000 mm
Declaration of Conformity
Notice to Users in EEA Countries
This product complies with the essential requirements and provisions of Directive 1999/5/EC of the Eu-ropean Parliament and of the Council of 9 March 1999 on radio equipment and telecommunicationsterminal equipment and the mutual recognition of their conformity.
Notice to Users Accessing Analog PSTN in EEA Countries
This product is designed to be able to access analog PSTN in all EEA countries. Local PSTN compat-ibility is dependent on software switch settings. Please contact your service representative if relocatingthis product to another country. In the event of problems, please contact your service representativein the first instance.
The CE Declaration of Conformity is available by accessing the URL:
http://www.ricoh.co.jp/fax/ce_doc/ and selecting the product applicable.
In accordance with IEC 60417, this machine uses the following symbols for the main power switch:
a means POWER ON.
b means POWER OFF.
Introduction
This manual contains detailed instructions and notes on the operation and use of this machine. For yoursafety and benefit, read this manual carefully before using the machine. Keep this manual in a handyplace for quick reference.
Notes:
Some illustrations in this manual might be slightly different from the machine.
Certain options might not be available in some countries. For details, please contact your local dealer.
Caution: Use of controls or adjustment or performance of procedures other than those specified in thismanual might result in hazardous radiation exposure. This product (see specification in the OperatingInstructions) is considered a class 1 laser device. Safety precautions and interlock mechanisms havebeen designed to prevent any possible laser beam exposure to the operator. The following marking isattached on the back of the product.
Two kinds of size notation are employed in this manual. With this machine refer to the metric version.
For good copy quality, the supplier recommends that you use genuine toner from the supplier.
The supplier shall not be responsible for any damage or expense that might result from the use of partsother than genuine parts from the supplier with your office products.
Important
Contents of this manual are subject to change without prior notice. In no event will the company be li-able for direct, indirect, special, incidental, or consequential damages as a result of handling or oper-ating the machine.
Power Source:
220–240V, 50/60Hz
Please be sure to connect the power cord to a power source as above. For details about the powersource, see Chapter 10, “Connecting the Power and Switching On” in the Advanced Features manual.
Trademarks
Adobe® and Acrobat® are registered trademarks of Adobe Systems Incorporated.
Microsoft®, Windows® and Windows NT® are registered trademarks of Microsoft Corporation in theUnited States and/or other countries.
Other product names used herein are for identification purposes only and might be trademarks of theirrespective companies. We disclaim any and all rights in those marks.
Note
The proper names of the Windows operating systems are as follows:
• Microsoft® Windows® 95 operating system
• Microsoft® Windows® 98 operating system
• Microsoft® Windows® Millennium Edition (Windows Me)
• Microsoft® Windows® 2000 Professional
• Microsoft® Windows® XP Professional
• Microsoft® Windows® XP Home Edition
• Microsoft® Windows® 2000 Server
• Microsoft® Windows NT® Server operating system Version 4.0
• Microsoft® Windows NT® Workstation operating system Version 4.0
For information about the latest available drivers, see the relevant manufacturer's Web site.
For safe and correct use of this machine, please be sure to read the Safety Information before you use it. Copyright © 2006
i
TABLE OF CONTENTSWhat Do You Want to Do with This Machine? ....................................................1Notice ......................................................................................................................3
Safety Information ......................................................................................................3Safety During Operation ..........................................................................................3
Position of the RCAUTION Label ........................................................................8User Information on Electrical & Electronic Equipment ....................................9
Users in the EU, Switzerland and Norway .................................................................9All Other Users...........................................................................................................9
ENERGY STAR Program .....................................................................................10Energy Saver Modes................................................................................................11
Remarks................................................................................................................13How to Read This Manual ...................................................................................15
Paper Mark...............................................................................................................16Manuals for This Machine ...................................................................................17
Basic Features (this manual) ...................................................................................17Advanced Features (on CD-ROM)...........................................................................17Before You Use This Machine .................................................................................17NIC FAX Unit Manual (on CD-ROM)........................................................................17NIC FAX Unit CD-ROM Manual ...............................................................................17
1. Getting Started
Guide to Components .........................................................................................19Front View ................................................................................................................19Side View .................................................................................................................21
Control Panel........................................................................................................22Reading the Display .................................................................................................25
Reading the Display and Using Keys ....................................................................25Standby Display.....................................................................................................26Communication Display.........................................................................................26Display Prompts ....................................................................................................27Energy Saver Mode Display ..................................................................................27Restricted Access Display .....................................................................................28
Turning On or Off the Power...............................................................................29Turning On the Power ..............................................................................................29Turning Off the Power ..............................................................................................29
2. Faxing
Transmission Modes ...........................................................................................31Switching between Memory Transmission and Immediate Transmission................31
Placing Originals..................................................................................................33Placing Originals in the ADF ....................................................................................34Originals Unsuitable for the Auto Document Feeder (ADF) .....................................34
Memory Transmission.........................................................................................36
StellaF26_combine_F-GB_FM_forPaper.book Page i Tuesday, January 16, 2007 10:08 AM

ii
Canceling a Memory Transmission....................................................................38Before Pressing the Start Key..................................................................................38While Scanning the Original.....................................................................................38When an Original Is Jammed...................................................................................38During Transmission ................................................................................................38While Awaiting Transmission ...................................................................................39
Immediate Transmission.....................................................................................41If the Connection Could Not Be Made......................................................................42
Canceling an Immediate Transmission .............................................................43Before Pressing the Start Key..................................................................................43After Pressing the Start Key.....................................................................................43When an Original Is Jammed...................................................................................43
Scan Settings .......................................................................................................44Resolution ................................................................................................................44Original Type............................................................................................................45Changing Scan Settings...........................................................................................46
Dialing ...................................................................................................................47Entering Numbers Directly .......................................................................................47
Pause ....................................................................................................................48Tone ......................................................................................................................48
Using Quick Dials.....................................................................................................49Using Speed Dials....................................................................................................50Using Group Dials ....................................................................................................51
When specifying a group with a Quick Dial ...........................................................52When specifying a group with the Group Key .......................................................52
Reception Modes .................................................................................................54Selecting the Reception Mode .................................................................................54Receiving Messages in Manual Receive .................................................................55
3. Programming
Own Name/Fax Header/Own Fax Number .........................................................57Own Name / Fax Header .........................................................................................58
Programming .........................................................................................................58Editing....................................................................................................................59Deleting .................................................................................................................60
Own Fax Number .....................................................................................................61Programming .........................................................................................................61Editing....................................................................................................................62Deleting .................................................................................................................63
Quick Dial .............................................................................................................64Programming............................................................................................................65Editing .....................................................................................................................67Deleting ...................................................................................................................68Quick Dial Key Label (Dial Label) ............................................................................69
Label paper............................................................................................................70Speed Dial.............................................................................................................72
Programming ...........................................................................................................73Editing ......................................................................................................................75Deleting ...................................................................................................................76
StellaF26_combine_F-GB_FM_forPaper.book Page ii Tuesday, January 16, 2007 10:08 AM

iii
Groups ..................................................................................................................78Programming ...........................................................................................................78Editing ......................................................................................................................82Deleting ....................................................................................................................84
To delete a destination from a group.....................................................................84To delete an entire group ......................................................................................85
Entering Characters.............................................................................................87Available Characters ................................................................................................87Keys .........................................................................................................................87How to Enter Characters..........................................................................................88
4. Troubleshooting
Loading Paper in the Main Paper Tray...............................................................91Replacing the Toner Cartridge ...........................................................................92Toner Cartridge Storage......................................................................................95Adjusting Volume ................................................................................................96Clearing Original Jams........................................................................................98Clearing a Copy, Fax, or Print Jam ....................................................................99Error Messages..................................................................................................101Indicators............................................................................................................103Solving Problems...............................................................................................104When Things Don't Go as Expected ................................................................106Printing the Help List.........................................................................................107
INDEX....................................................................................................... 108
StellaF26_combine_F-GB_FM_forPaper.book Page iii Tuesday, January 16, 2007 10:08 AM

iv
StellaF26_combine_F-GB_FM_forPaper.book Page iv Tuesday, January 16, 2007 10:08 AM

1
What Do You Want to Do with This Machine?
This is a summary of this machine's features including which pages to consultfor detailed information.
I want ... Reference
to specify several destinations with a single key
p.51 “Using Group Dials” and p.78 “Groups”
to print Quick Dial key labels that can be at-tached to the control panel so that I can find quickly the Quick Dial with the destination I want to specify programmed in
p.69 “Quick Dial Key Label (Dial Label)”
to check whether a fax transmission was suc-cessful or not
p.34 “Checking the Transmission Result (TX Status)”, Advanced Features
to find a stored Speed Dial quickly p.44 “Telephone Directory”, Advanced Fea-tures
to send a fax at a specific time p.5 “Sending at a Specific Time (Send Later)”, Advanced Features
to cut down on my telephone bill p.137 “Economy Transmission”, Advanced Featuresand p.20 “Transfer Request”, Ad-vanced Features
to cut down on my paper consumption p.76 “Two in One”, Advanced Featuresand p.76 “Two-sided Reception”, Advanced Features
to prevent many sheets of paper from being printed out if fax messages are received during the night or on holidays
p.138 “Energy Save Timer”, Advanced Features
to block out unwanted messages p.118 “Authorized Reception”, Advanced Fea-tures
to send a message on a two-sided original p.53 “Duplex Original Settings”, Advanced Features
to send a fax message which has the large number of pages in one transmission
p.55 “Batch Original Documents Transmis-sion”, Advanced Features
to have multiple copies of incoming messages p.75 “Multi-copy Reception”, Advanced Fea-tures
to retry a failed transmission p.31 “Retrying a Failed Transmission”, Ad-vanced Features
to change destination(s) or alter the transmis-sion time for a file queued for transmission
p.27 “Changing Transmission Files”, Ad-vanced Features
to find frequently used functions by just press-ing a single key instead of searching through several menus
p.101 “User Function Keys”, Advanced Fea-tures
to prevent my message being picked up casu-ally by anyone at the other end
p.7 “Sending Confidential Messages”, Ad-vanced Featuresand p.163 “Personal Boxes”, Advanced Features
StellaF26_combine_F-GB_FM_forPaper.book Page 1 Tuesday, January 16, 2007 10:08 AM

2
to prevent a received message being picked up casually by other people
p.37 “Printing a Confidential Message”, Ad-vanced Featuresand p.42 “Printing Personal Box Messages”, Advanced Features
to have backups automatically made of faxes I send
p.136 “Backup File Transmission Settings”, Advanced Features
to have backups automatically made of incom-ing faxes
p.131 “Forwarding”, Advanced Featuresand p.163 “Personal Boxes”, Advanced Features
to restrict access to the machine to specified us-ers
p.28 “Restricted Access”
to monitor machine usage by user or depart-ment
p.28 “Restricted Access” and p.9 “User Code Transmission”, Advanced Features
to receive messages while I am away on a trip p.131 “Forwarding”, Advanced Features
to program in memory a document I often use p.97 “Auto Documents”, Advanced Features
to perform multiple keypad operations with a single key
p.95 “Programs”, Advanced Features
I want ... Reference
StellaF26_combine_F-GB_FM_forPaper.book Page 2 Tuesday, January 16, 2007 10:08 AM

3
Notice
R CAUTION:
Use of controls, adjustments, or performance of procedures other than thosespecified herein may result in hazardous radiation exposure.
Safety Information
When using this machine, the following safety precautions should always be fol-lowed.
Safety During Operation
In this manual, the following important symbols are used:
Direct (or indirect reflected) eye contact with the laser beam may cause serious eye damage. Safety precautions and interlock mechanisms have been designed to prevent any possible laser beam exposure to the operator.
R WARNING:Indicates a potentially hazardous situation which, if instructions are not followed, could result in death or serious injury.
R CAUTION:Indicates a potentially hazardous situation which, if instructions are not followed, may result in minor or moderate injury or damage to property.
StellaF26_combine_F-GB_FM_forPaper.book Page 3 Tuesday, January 16, 2007 10:08 AM
4
R WARNING:
• Connect the power cord directly into a wall outlet and never use an
extension cord.
• Disconnect the power plug (by pulling the plug, not the cable) if the power cable or plug becomes frayed or otherwise damaged.
• To avoid hazardous electric shock or laser radiation exposure, do not remove any covers or screws other than those specified in this manual.
• Turn off the power and disconnect the power plug (by pulling the plug, not the cable) if any of the following occurs:
• You spill something into the machine.
• You suspect that your machine needs service or repair.
• The external housing of your machine has been damaged.
• Do not incinerate spilled toner or used toner. Toner dust might ig-nite when exposed to an open flame.
• Disposal can take place at our authorized dealer.
• Dispose of the used toner cartridge in accordance with the local regulations.
• Keep the machine away from flammable liquids, gases, and aero-sols. A fire or an electric shock might occur.
• Connect the machine only to the power source described on the in-side front cover of this manual. Connect the power cord directly into a wall outlet and do not use an extension cord.
• Do not damage, break or make any modifications to the power cord. Do not place heavy objects on it. Do not pull it hard nor bend it more than necessary. These actions could cause an electric shock or fire.
• If the power cord is damaged (exposure of the core, disconnec-tion,etc.), contact your service representative to change a new one. Operating the machine with a damaged power cord may cause an electric shock or fire.
StellaF26_combine_F-GB_FM_forPaper.book Page 4 Tuesday, January 16, 2007 10:08 AM

5
R CAUTION:
• Protect the machine from dampness or wet weather, such as rain and
snow.
• Unplug the power cord from the wall outlet before you move the machine. While moving the machine, you should take care that the power cord will not be damaged under the machine.
• When you disconnect the power plug from the wall outlet, always pull the plug (not the cable).
• Do not allow paper clips, staples, or other small metallic objects to fall in-side the machine.
• Keep toner (used or unused) and toner cartridge out of reach of children.
• For environmental reasons, do not dispose of the machine or expended supply waste at household waste collection points. Disposal can take place at an authorized dealer.
• The inside of the machine could be very hot. Do not touch the parts with a label indicating "hot surface". Otherwise an injury might occur.
• Our products are engineered to meet high standards of quality and func-tionality, and we recommend that you use only the expendable supplies available at an authorized dealer.
StellaF26_combine_F-GB_FM_forPaper.book Page 5 Tuesday, January 16, 2007 10:08 AM

6
• Before moving the machine, be sure to disconnect all external connec-tions, especially the power cord from the wall outlet. Damaged power cords are a fire and electric shock hazard.
• To disconnect the power cord, pull it out by plug. Do not drag the cord itself. Doing so may result in damage to the cord, leading to fire or electric shock.
• For safety reason, unplug the power cord from the wall outlet if the ma-chine will not be used for an extended period of time such as holidays.
• The fusing section of this machine might be very hot. Caution should be taken when removing misfed paper.
• Keep the machine away from humidity and dust. Otherwise a fire or an electric shock might occur. Do not place the machine on an unstable or tilted surface. If it topples over, an injury might occur.
• Do not use aluminum foil, carbon paper, or similar conductive paper to avoid a fire or a machine failure.
• Make sure the room where you are using the machine is well ventilated and spacious. Good ventilation is especially important when the machine is used heavily.
• Do not open toner cartridges forcefully. Toner can spill, dirtying your clothes or hands, and possibly resulting in accidental ingestion.
• If toner or used toner is inhaled, gargle with plenty of water and move into a fresh air environment. Consult a doctor if necessary.
• If toner or used toner gets into your eyes, flush thoroughly with eyswash or water. Consult a doctor if necessary.
• If toner or used toner is swallowed, dilute by drinking a large amount of water. Consult a doctor if necessary.
• Avoid getting toner on your clothes or skin when removing a paper jam or replacing toner. If your skin comes into contact with toner, wash the af-fected area throughly with soap and water.
• If toner gets on your clothing, wash with cold water. Hot water will set the toner into the fabric and may make removing the stain impossible.
StellaF26_combine_F-GB_FM_forPaper.book Page 6 Tuesday, January 16, 2007 10:08 AM

7
• During operation, rollers for transporting the paper and originals revolve. A safety device is being installed so that the machine can be operated safely. But take care not to touch the rollers during operation. An injury might occur.
• Fire and breakdown can result from heavy accumulation of dust inside this machine. Consult your service representative for details about and charges for cleaning the machine’s interior.
• If you have to move the machine when the optional paper tray unit is at-tached, do not push on the main unit's top section. Doing so can cause the optional paper tray unit to detach, possibly resulting in injury.
StellaF26_combine_F-GB_FM_forPaper.book Page 7 Tuesday, January 16, 2007 10:08 AM
8
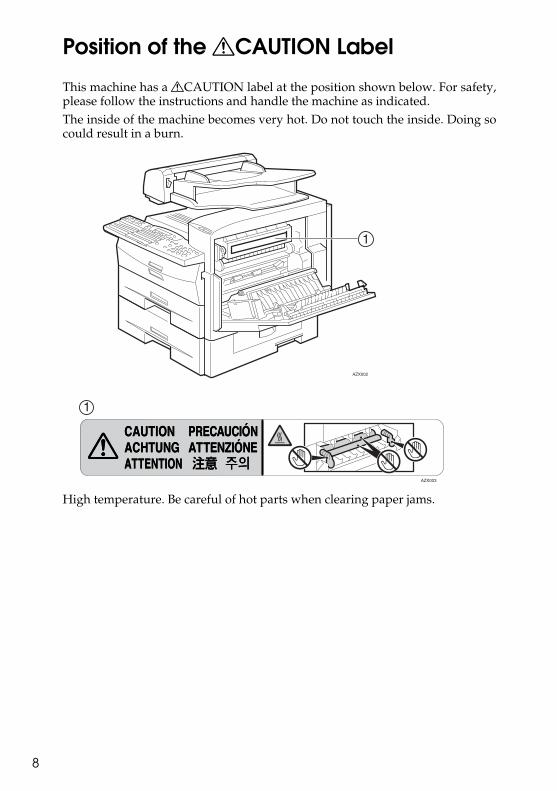
Position of the RCAUTION Label
This machine has a RCAUTION label at the position shown below. For safety,please follow the instructions and handle the machine as indicated.The inside of the machine becomes very hot. Do not touch the inside. Doing socould result in a burn.
High temperature. Be careful of hot parts when clearing paper jams.
AZX002
AZX003
StellaF26_combine_F-GB_FM_forPaper.book Page 8 Tuesday, January 16, 2007 10:08 AM

9
User Information on Electrical & Electronic Equipment
Users in the EU, Switzerland and Norway
Our Products contain high quality components and are designed to facilitate re-cycling.Our products or product packaging are marked with the symbol below.
The symbol indicates that the product must not be treated as municipal waste.It must be disposed of separately via the appropriate return and collection sys-tems available. By following these instructions you ensure that this product istreated correctly and help to reduce potential impacts on the environment andhuman health, which could otherwise result from inappropriate handling. Recy-cling of products helps to conserve natural resources and protect the environ-ment.For more detailed information on collection and recycling systems for this prod-uct, please contact the shop where you purchased it, your local dealer orsales/service representatives.
All Other Users
If you wish to discard this product, please contact your local authorities, theshop where you bought this product, your local dealer or sales/service repre-sentatives.
StellaF26_combine_F-GB_FM_forPaper.book Page 9 Tuesday, January 16, 2007 10:08 AM
10
ENERGY STAR Program
• Low-power ModeAt the factory, this fax machine was set to enter the low power mode 5 minutesafter the last operation is completed. To exit the low power mode, press the {En-ergy Saver/Clear Modes} key. The machine can start printing in about 40 secondsfrom the Energy Saving Standby mode or in about 30 seconds from the FaxStandby Mode.
❖ Specifications
ENERGY STAR® Program
The ENERGY STAR® Program encourages energy conservation by promoting energy efficient computers and other office equipment.
The program backs the development and dissemination of products that feature energy saving functions.
It is an open program in which manufacturers participate voluntarily.
Targeted products are computers, monitors, printers, facsimiles, copiers, scanners, and multi-function devices. Energy Star standards and logos are internationally uniform.
Specification Power Consumption Default Time
With NIC FAX unit installed 6.0W 5 minutes
StellaF26_combine_F-GB_FM_forPaper.book Page 10 Tuesday, January 16, 2007 10:08 AM

11
Energy Saver Modes
Energy Saver mode enables you to avoid using unnecessary power and econo-mize on electricity. Although we recommend you use this mode from the view-point of environmental consciousness, you can also turn it off.When you install this machine for the first time, Energy Saver mode is turned onby default.
Two types of Energy Saver mode are available:• Fax Standby: Use when you receive faxes regularly.• Energy Saver Standby: Use when you want to economize on power consump-
tion.Choose the one that best suits your circumstances.
Even though the control panel display isn't on in Energy Saver mode, indicatorsthat blink or light during communication or reception still work. When the Re-ceive File indicator lights, exit Energy Saver mode and take the appropriate ac-tion.
*1 When options are not installed.You can turn Energy Saver mode on or off with the User Parameters. By default,Energy Saver Standby is turned on.The machine enters Energy Saver mode when:• Nobody uses the machine for about 5 minutes (the machine automatically en-
ters Energy Saver mode).• The user holds down the {Energy Saver/Clear Modes} key for about 2 seconds.
Energy Saver mode type
Status How long be-fore you can print after exit-ing Energy Sav-er mode
Power consumption *1
Fax Standby Display is off
The machine maintains the heating roller temperature at half the full temperature; warm up takes less time. (Heater half cool)
Within about 30 seconds
20W
Energy Saver Standby
Display is off
The machine lets the heating roller cool to room tempera-ture; warm-up takes longer. (Heater off)
Within about 40 seconds
6W
StellaF26_combine_F-GB_FM_forPaper.book Page 11 Tuesday, January 16, 2007 10:08 AM

12
To exit Energy Saver mode:• In Energy Saver Standby mode, press the {Energy Saver/Clear Modes} key.• In FAX Standby mode, press any key.• Place an original.• Pick up the optional handset or the external telephone handset.
Note❒ When you load paper in Energy Saver mode, an error message will not be dis-
played even if the tray is not pushed in correctly.❒ After loading paper, press the {Energy Saver/Clear Modes} key and check that
"Ready” is shown on the display.
Reception in Energy Saver modeIn Energy Saver mode, originals that have been stored in memory are still sentand the machine can still receive messages.
When a message is received in Energy Saver mode, the machine prints it and re-turns to Energy Saver mode.
Recycled Paper
In accordance with the ENERGY STAR Program, we recommend use of recycledpaper which is environmentally friendly. Please contact your sales representa-tive for recommended paper.
StellaF26_combine_F-GB_FM_forPaper.book Page 12 Tuesday, January 16, 2007 10:08 AM

13
Remarks
Be sure to read the following information before you use this machine:• Do not turn off the power during output. Make sure that output has complet-
ed before you turn off the power.• Do not open the front cover, right cover, lower right cover, main paper tray,
or optional paper tray unit while paper is being printed out. The machine willstop printing and paper may become jammed.
• Do not move, tilt, or shake the machine during output.• Be sure to make a copy of information stored in the machine memory. This
information might be deleted when you operate the machine improperly orsome trouble occurs with the machine.
• Note beforehand that the company is not liable for damages resulting frommalfunctions of the machine, loss of information stored in memory, or use ofthe machine.
• If sending or receiving an important message by fax , confirm that the mes-sage is sent or received with a telephone call.
• Be sure to ventilate the room where the machine is used to maintain a com-fortable work environment. If the machine is used for a long period of time ina room with bad ventilation, you may notice an unpleasant odor.
• Sudden changes in temperature or humidity may cause condensation to forminside the machine. This can result in patchy output. In this case, wait a whilebefore reattempting copying or requesting a fax be sent again.
Important❒ Make sure that 100% appears on the display before you turn off the power. If
the power is turned off for 12 hours or longer, all documents stored in mem-ory are deleted.
Note❒ If the power is turned off, fax documents cannot be received. The power
should normally be turned on.The fax machines in current use are classified by communication speed. Interna-tionally defined standards include G4, G3, and G2. This machine can communi-cate with G3 fax machines.When the other party's machine does not support the same functions as this ma-chine, settings made with those functions might be invalid or transmissionmight not be possible.• If the other party's machine does not support the resolution at which you are
sending, this machine automatically switches to a resolution which is sup-ported. See p.44 “Resolution”.
• Polling Reception requires that the other party's machine can perform PollingTransmission. See p.13 “Polling Reception”, Advanced Features.
If the other party's machine does not have paper loaded of the same size and ori-entation as your original, the message may be split and printed on two or moresheets, or reduced and printed on one sheet.
StellaF26_combine_F-GB_FM_forPaper.book Page 13 Tuesday, January 16, 2007 10:08 AM

14
• For example, if the other party's machine has A5 paper loaded and it receivesa A4 size document, the A4 size image will be reduced to A5 size and printedon A5 paper. For further information, see p.79 “When There Is No Paper ofthe Correct Size”, Advanced Features.
StellaF26_combine_F-GB_FM_forPaper.book Page 14 Tuesday, January 16, 2007 10:08 AM
15
How to Read This Manual
Symbols
The following set of symbols is used in this manual.
R WARNING:This symbol indicates a potentially hazardous situation that might result indeath or serious injury when you misuse the machine without following the in-structions under this symbol. Be sure to read the instructions, all of which are de-scribed in the Safety Information section.
R CAUTION:This symbol indicates a potentially hazardous situation that might result in mi-nor or moderate injury or property damage that does not involve personal injurywhen you misuse the machine without following the instructions under thissymbol. Be sure to read the instructions, all of which are described in the SafetyInformation section.* The statements above are notes for your safety.
ImportantIf this instruction is not followed, paper might be misfed, originals might bedamaged, or data might be lost. Be sure to read this.
PreparationThis symbol indicates information or preparations required prior to operating.
NoteThis symbol indicates precautions for operation, or actions to take after abnor-mal operation.
LimitationThis symbol indicates numerical limits, functions that cannot be used together,or conditions in which a particular function cannot be used.
ReferenceThis symbol indicates a reference.
{ }Keys built into the control panel of the machine.
StellaF26_combine_F-GB_FM_forPaper.book Page 15 Tuesday, January 16, 2007 10:08 AM
16
Paper Mark
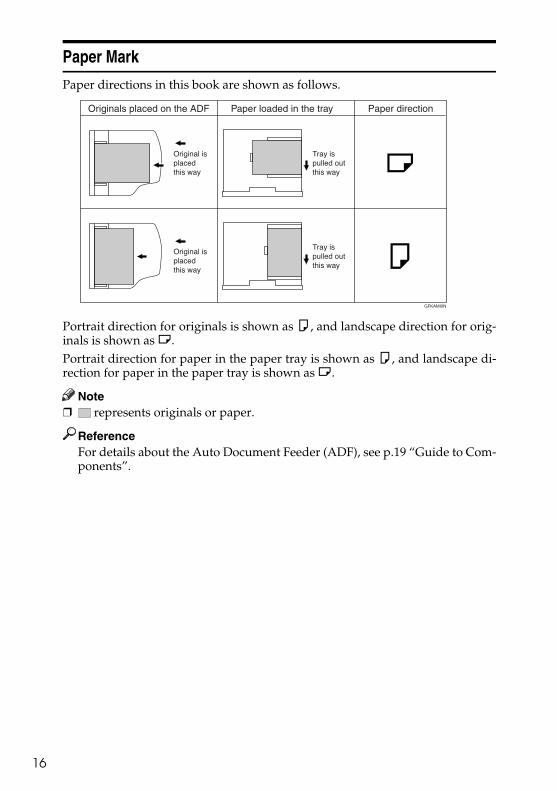
Paper directions in this book are shown as follows.
Portrait direction for originals is shown as K, and landscape direction for orig-inals is shown as L.Portrait direction for paper in the paper tray is shown as K, and landscape di-rection for paper in the paper tray is shown as L.
Note❒ represents originals or paper.
ReferenceFor details about the Auto Document Feeder (ADF), see p.19 “Guide to Com-ponents”.
GFKAMI0N
StellaF26_combine_F-GB_FM_forPaper.book Page 16 Tuesday, January 16, 2007 10:08 AM

17
Manuals for This Machine
Basic Features (this manual)
The Basic Features manual explains the most frequently used fax functions andoperations.
Advanced Features (on CD-ROM)
The Advanced Features manual describes more advanced functions and also ex-plains settings for key operators.Each language version is in an appropriate folder on the CD-ROM in PDF file.Please choose the language version of your preference. Adobe Acrobat Read-er/Adobe Reader is required in order to read these files. If Adobe Acrobat Read-er/Adobe Reader is not installed on your computer, install it from the CD-ROMcontaining the Advanced Features manual.
Note❒ A PDF file might not be displayed or printed properly depending on the en-
vironment or language you use.
❖ System requirementsTo run this CD-ROM manual, you need the following:System: Windows 95, Windows 98, Windows Me, Windows NT 4.0, Win-dows 2000, or Windows XPHowever, operation cannot be assured under all circumstances. Please beaware that the manual may not run with certain computers and/or oper-ating system versions.
Before You Use This Machine
The Before You Use This Machine manual explains how to set up your machine.
NIC FAX Unit Manual (on CD-ROM)
The NIC Fax Unit manual explains about the Scanner function, Internet Faxfunction, IP-Fax function, and LAN FAX function.
NIC FAX Unit CD-ROM Manual
Introduces the contents of the NIC FAX CD-ROM and the necessary operatingenvironment for the CD-ROM. How to access the NIC FAX unit manual in PDFfile on the CD-ROM is also explained.
StellaF26_combine_F-GB_FM_forPaper.book Page 17 Tuesday, January 16, 2007 10:08 AM

18
StellaF26_combine_F-GB_FM_forPaper.book Page 18 Tuesday, January 16, 2007 10:08 AM

19
1. Getting Started
Guide to Components
Front View
1. ADF coverCover for the ADF.
2. Release buttonPush this button to open the ADF.
3. Auto Document Feeder (ADF)Set multi-page originals here to havethem automatically scanned in one pageat a time.
4. Output trayReceived fax messages and copies arestacked here.
5. Control panelOperate the machine using keys andwatching the display on the control pan-el.
6. Front coverOpen this cover when changing the tonercartridge and the photo conductor unitinside the machine.
7. Main paper trayLoad paper here.
8. Optional paper tray unitYou can load more paper here.
9. Lower right coverOpen this cover to remove jammed paperfed from the optional paper tray unit.
AZX004
StellaF26_combine_F-GB_FM_forPaper.book Page 19 Tuesday, January 16, 2007 10:08 AM

Getting Started
20
1
10. Optional bypass tray unitA received fax message will be printed onpaper in this tray if there is no paperloaded in the paper trays. A receivedmessage also will be printed on paper inthis tray if the size of that paper is moresuitable for the message than the size ofpaper in the paper trays.When making copies on custom size pa-per, thick paper, or special paper, use thistray.
11. Status indicators• hAlarm
Blinks red when an error occurs.Check the display and read the mes-sage to identify the problem (such as apaper jam or an open the cover).
• 0CommunicatingLights during fax transmission or re-ception.
12. Right coverOpen this cover to remove jammed paperfed from the paper tray.
13. Original output tray guidePrevents originals from falling from theoriginal output tray.
14. Original output trayScanned originals are stacked here.
15. Original tray Place originals here for sending a fax andcopying.
16. Original guideAdjust the original guide to match thesize of the originals.
StellaF26_combine_F-GB_FM_forPaper.book Page 20 Tuesday, January 16, 2007 10:08 AM

Guide to Components
21
1
Side View
1. Output tray guidePull out and raise the end fence to sup-port large paper.
2. Main power switchThe power turns your machine on andoff.
Important❒ Make sure that 100% appears on
the display before you turn off thepower. If the power is turned offfor 12 hours or longer, all docu-ments stored in memory are delet-ed.
3. Ventilation HolePrevents overheating. Do not obstructthe ventilation hole by placing an objectnear it. If the machine overheats, a mal-function might occur.
4. External telephone connector
Referencep.196 “Connecting to a TelephoneLine”, Advanced Features
5. G3 line connector
Referencep.196 “Connecting to a TelephoneLine”, Advanced Features
AZX005
StellaF26_combine_F-GB_FM_forPaper.book Page 21 Tuesday, January 16, 2007 10:08 AM

Getting Started
22
1
Control Panel
1. User Function keysEach of these can be programmed forrapid access to frequently used functions.
❖ Functions programmed by default
2. {Help} keyPress the Help key when you want toprint a help list.
3. {User Tools} keyPress to access the User Tools settingsand customize various functions to meetyour specific requirements.
4. DisplayThis guides you through tasks and in-forms you of the machine status. Messag-es appear here.
5. {Cancel} keyPress to cancel an operation or return tothe previous display.
6. 0 1 keysPress to move the cursor or select func-tions.
7. {OK} keyPress to answer "Yes" to a question dis-played on the display.
8. {Job Information} keyPress to search for information about aspecific job.
9. {Trans. Option} keyPress to change the transmission optionsettings. The indicator lights when op-tion settings are changed.
10. Add Toner indicator Blinks when toner is low and lights con-tinuously when toner has completely runout. See p.92 “Replacing the Toner Car-tridge”.
11. Load Paper indicatorLights when a paper tray is empty or thepaper tray is not fully inserted.
12. Receive File indicatorLights when a message has been receivedinto memory.
ZHMS010E
Key Function
F1 Print Journal
F2 Fax Header Print
F3 Group Dial
F4 E-mail Message
F5 Internet Fax
F9 JPEG
F10 Scan to E-mail
StellaF26_combine_F-GB_FM_forPaper.book Page 22 Tuesday, January 16, 2007 10:08 AM

Control Panel
23
1
13. {Energy Saver/Clear Modes} key• Energy Saver: Hold down this key for
about 2 seconds to manually enter En-ergy Saver mode. The machine auto-matically enters Energy Saver modeabout 5 minutes after the last opera-tion is carried out. See p.203 “EnergySaving”, Advanced Features.
• Clear Modes: Cancel the current set-tings and return to the standby mode(except when accessing the UserTools).
14. {Copy} keyPress to copy the originals currently load-ed in the ADF.
15. Quick Dial keysUse to dial numbers with a single touchor to enter letters and symbols. Also usefor the Group Dial function.You can select from four types of key-board layout: QWERTY (as shown in theillustration), ABCDEF, QWERTZ, andAZERT. See p.156 “Key Layout”, Ad-vanced Features.
16. Quick Dial Key Flip PlateThere are two Quick Dial Key Flip Plates.
• To access Quick Dials {01} to {30}, flipboth plates right.
• To access Quick Dials {31} to {60}, flipone plate left.
• To access Quick Dials {61} to {90}, flipboth plates left.
Note❒ Make sure the plate is flat against the
control panel when you use QuickDial keys.
17. {Stamp} keyPress this key to switch the Stamp func-tion on. See p.53 “Stamp”, Advanced Fea-tures.
18. Original Type key• Color Scan (Optional)
Select when scanning color originalsusing the optional scanner function.
• HalftoneSelect halftone when faxing or copy-ing photographs or illustrations withfine gradations. Also it can be used forcolor originals.
19. {Memory Trans.} keyPress this key to switch between MemoryTransmission and Immediate Transmis-sion modes.When the indicator is not lit, ImmediateTransmission is selected, and when theindicator is lit, Memory Transmission isselected.
20. Resolution keyPress to select the level of detail (Stand-ard, Detail, Super Fine, Extra Super Fineor 300 dpi) to be sent. 300 dpi can be se-lected only with the scanner function.
Note❒ This machine can make copies and
send fax messages at Extra Super Fineresolution, but it cannot receive faxesthat are sent at Extra Super Fine reso-lution.
21. {Speed Dial} keyPress to specify a destination pro-grammed in a Speed Dial.
ZHMS190E
StellaF26_combine_F-GB_FM_forPaper.book Page 23 Tuesday, January 16, 2007 10:08 AM

Getting Started
24
1
22. {On Hook Dial} keyUse to dial a number from the numberkeys without having to lift the handset.
23. {Pause/Redial} keyPause: Inserts a pause when you are dial-ing or storing a fax number. A pause can-not be inserted as the first digit. See p.48“Pause”.Redial: Press to redial one of the last tennumbers. See p.44 “Redial”, AdvancedFeatures.
24. Number keys Use to dial fax numbers or enter thenumber of copies.
25. {Start} keyPress to start all tasks.
26. {Clear/Stop} keyClear: Deletes one character or digit.Stop: Interrupts the current operation(transmission, scanning, copying orprinting).
StellaF26_combine_F-GB_FM_forPaper.book Page 24 Tuesday, January 16, 2007 10:08 AM

Control Panel
25
1
Reading the Display
The machine status and instructions are shown on the display.
Important❒ Do not apply a strong shock or force of about 30N *1 (about 6.8 lbf *2 ) or more
to the panel display. Otherwise, the display might be damaged.*1 N = Newton*2 lbf = weight pound
Note❒ The functions which are shown on the display depend on what options are
installed.
Reading the Display and Using Keys
❖ Standby Display
A Display for the machine status or currently selected function.B Display for the messages.
Items which can be selected or specified.
❖ Menu Display
A Display for items which can be selected.B Press the {Cancel} key to cancel the selected function or entered value, and re-
turn to the previous display.C Press 0 or 1 to display another function on the display or move the brack-
ets to select other values.D Press the {OK} key to set a selected function or entered value, and return to
the previous display.
ZHMX100E
ZHMS230E
StellaF26_combine_F-GB_FM_forPaper.book Page 25 Tuesday, January 16, 2007 10:08 AM

Getting Started
26
1
Standby Display
While the machine is on standby (immediately after it is turned on or after the{Cancel} key is pressed), the following display is shown.
❖ Returning the machine to the standby displayTo return the machine to the standby display manually, do one of the follow-ing:
• If you have placed an original and have not pressed the {Start} key, removethe original.
• If you have not set an original, press the {Energy Saver/Clear Modes} key.• If you are in User Tools mode, press the {User Tools} key or the {Cancel} key.
Communication Display
While the machine is communicating, the status is displayed.
❖ Memory TransmissionThe destination's (Receiver's) name or fax number appears on the top of thedisplay.
❖ Memory ReceptionThe destination's (Sender's) name or fax number appears on the top of the dis-play.
Note❒ Even when the machine is sending a fax message from memory or receiv-
ing a fax message into memory, you can still scan the next original intomemory.
❖ Immediate Transmission
StellaF26_combine_F-GB_FM_forPaper.book Page 26 Tuesday, January 16, 2007 10:08 AM

Control Panel
27
1
Display Prompts
Depending on the situation, the machine will show various prompts on the dis-play.
❖ Instructions and Requests
❖ Questions
❖ Selections
❖ Status
Energy Saver Mode Display
When the machine is not used for a fixed period, the machine goes into EnergySaver Mode automatically.
-Exiting Energy Saver ModeTo exit Energy Saver mode manually:• In Energy Saver Standby mode, press the {Energy Saver/Clear Modes} key.• In Fax Standby mode, press any key.• Place an original.• Pick up the optional handset or the external telephone handset.
StellaF26_combine_F-GB_FM_forPaper.book Page 27 Tuesday, January 16, 2007 10:08 AM

Getting Started
28
1
Restricted Access Display
When the following display appears, the Restricted Access function is on.
To exit the Restricted Access display, enter your user code (the Personal Box SUBcode). You can check your Personal Box SUB code on the Personal Box list. Seep.170 “Printing the Box List”, Advanced Features.
A Enter your personal code with the number keys.
Note❒ When you make a mistake, press the {Clear/Stop} key and try again.
B Press the {OK} key.
Note❒ When you enter a user code which is not programmed, an error message
appears and the Restricted Access display is shown.
-Restricted AccessUse this function to restrict access to the machine or monitor machine usage byuser or department. When turned on, users must enter a previously assignedcode before they can use the machine.In order to use this function, you need to program user codes (Personal Box SUBcodes) beforehand. See p.163 “Personal Boxes”, Advanced Features.
Note❒ Turn this function on or off with the User Parameters (switch 05, bit 4). See
p.140 “User Parameters”, Advanced Features.❒ When Restricted Access is turned on, incoming faxes are received and printed
as normal.❒ User names printed on all reports are those used by the Personal Box func-
tion.
StellaF26_combine_F-GB_FM_forPaper.book Page 28 Tuesday, January 16, 2007 10:08 AM

Turning On or Off the Power
29
1
Turning On or Off the Power
Note❒ This machine automatically enters
Energy Saver mode if you do notuse the machine for a while.
Turning On the Power
A Confirm that the power cord isplugged into the outlet firmly.
B Turn on the power.
Turning Off the Power
Important❒ Make sure that 100% appears on
the display before you turn off thepower. If the power is turned offfor 12 hours or longer, all docu-ments stored in memory are delet-ed. The storage time might beshorter if the surrounding temper-ature is low or the machine hasbeen on for less than a week.
A Turn off the power.
StellaF26_combine_F-GB_FM_forPaper.book Page 29 Tuesday, January 16, 2007 10:08 AM

Getting Started
30
1
StellaF26_combine_F-GB_FM_forPaper.book Page 30 Tuesday, January 16, 2007 10:08 AM

31
2. Faxing
Transmission Modes
There are two types of transmission.
❖ Memory Transmission The fax is stored in memory, andthen transmitted automatically. This is convenient when you wantto remove originals quickly. You can send the same fax to morethan one destination in a single op-eration. This technique is referredto as Broadcasting.
❖ Immediate TransmissionThe machine dials immediatelyand transmits the fax while scan-ning.This is convenient when you wantto send a fax immediately andwant to check whether you havesuccessfully connected with theother party's fax machine.The fax is not stored in memory.
Important❒ Make sure that 100% appears on
the display before you turn off thepower. If the power is turned offfor 12 hours or longer, all docu-ments stored in memory are delet-ed. As soon as the power is turnedon, the Power Failure Report isprinted to help you identify delet-ed documents. See p.174 “PowerFailure Report”, Advanced Features.
Switching between Memory Transmission and Immediate Transmission
Press the {Memory Trans.} key toswitch between Memory Transmis-sion and Immediate Transmission.When the indicator of the {MemoryTrans.} key is not lit, ImmediateTransmission is selected. When theindicator of the {Memory Trans.} key islit, Memory Transmission is selected.
GDRH240E
Transmitter(This machine)
Receiver
ZHMS040E
StellaF26_combine_F-GB_FM_forPaper.book Page 31 Tuesday, January 16, 2007 10:08 AM

Faxing
32
2
Note❒ You can set whether the machine is
in Memory Transmission mode orImmediate Transmission moderight after the power is turned onor the {Energy Saver/Clear Modes}key is pressed with the User Pa-rameters (switch 00, bit 6). Seep.140 “User Parameters”, AdvancedFeatures.
❒ You can set whether the Transmis-sion mode returns to the default af-ter each transmission with theUser Parameters (switch 01, bit 7).See p.140 “User Parameters”, Ad-vanced Features.
StellaF26_combine_F-GB_FM_forPaper.book Page 32 Tuesday, January 16, 2007 10:08 AM

Placing Originals
33
2
Placing Originals
You can place your originals in theADF.
❖ How to place A4, B5 JIS (Japanese Industrial Standard), A5, 51/2"x81/2", 81/2"x11", 81/2"x14", and 8"x13" size originals
❖ How to place A5 and 81/2"x51/2" size originals
Note❒ When sending a fax, the image
output at the other end depends onthe size and orientation of paperused in the receiver's terminal. Ifthe receiver does not use paper ofthe same size and orientation asthat of the original, the fax imagesize may be reduced on output,trimmed at the both edges, or di-vided into two or more sheets.When sending an important origi-nal, we recommend that you askthe receiver about the size and ori-entation of the paper used in theirterminal.
❒ Make sure that all ink, correctingfluid, etc. has completely dried be-fore setting your original. If it issti ll wet, the scanner will bemarked and those marks will ap-pear on the received image. Whenthe scanner is dirty, a warningmessage is displayed after scan-ning is complete. See p.59 “Scan-ner Cleaning Message”, AdvancedFeatures.
❒ If you try to scan an almost com-pletely blank original (for examplethe wrong side of an original), analarm sounds. See p.59 “BlankSheet Detect”, Advanced Features.
❒ You can place the original any timeup until you press the {Start} key.
StellaF26_combine_F-GB_FM_forPaper.book Page 33 Tuesday, January 16, 2007 10:08 AM
Faxing
34
2
Placing Originals in the ADF
Use the ADF to scan a stack of origi-nals in one operation. The ADF canhandle one-sided originals.
Note❒ The maximum original length is
600 mm (23.7”) with manual assist-ance.
❒ Place all the originals to bescanned in a single stack.
❒ When scanning two-sided origi-nals, use the duplex original func-tion. See p.53 “Duplex OriginalSettings”, Advanced Features.
❒ When you want to place originalsfor a transmission individually ormore than two times, use the BatchOriginal Documents Transmissionfunction. See p.55 “Batch OriginalDocuments Transmission”, Ad-vanced Features.
❒ Do not open the ADF while it isscanning the originals or an origi-nal could become jammed.
❒ If an original jams, press the{Clear/Stop} key, and then removethe original carefully.
❒ The maximum number of originalsyou can place in the ADF is 70sheets for A4 and 81/2" x 11", 30sheets for 81/2"x14" size originals.
❒ If your original is bent or folded,flatten it before you place it.
ReferenceFor information about the sizesand number of originals that canbe placed in the ADF, see p.200“Acceptable Types of Originals”,Advanced Features.
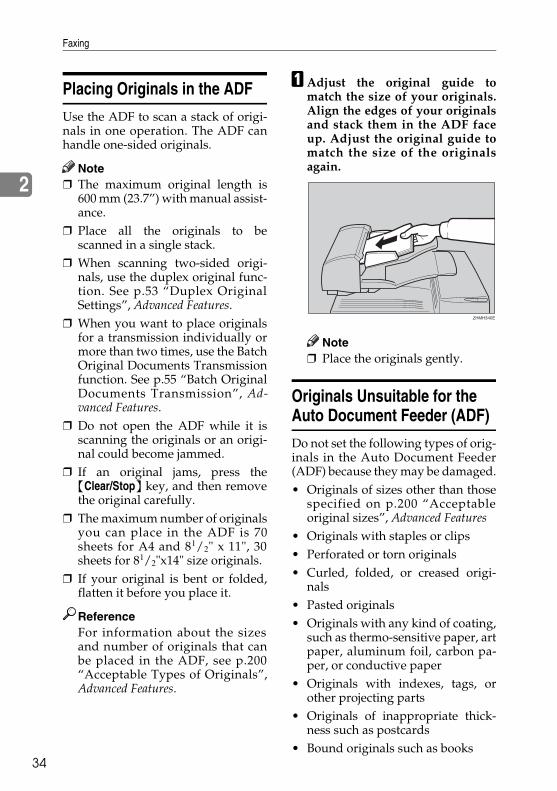
A Adjust the original guide tomatch the size of your originals.Align the edges of your originalsand stack them in the ADF faceup. Adjust the original guide tomatch the size of the originalsagain.
Note❒ Place the originals gently.
Originals Unsuitable for the Auto Document Feeder (ADF)
Do not set the following types of orig-inals in the Auto Document Feeder(ADF) because they may be damaged.• Originals of sizes other than those
specified on p.200 “Acceptableoriginal sizes”, Advanced Features
• Originals with staples or clips• Perforated or torn originals• Curled, folded, or creased origi-
nals• Pasted originals• Originals with any kind of coating,
such as thermo-sensitive paper, artpaper, aluminum foil, carbon pa-per, or conductive paper
• Originals with indexes, tags, orother projecting parts
• Originals of inappropriate thick-ness such as postcards
• Bound originals such as books
StellaF26_combine_F-GB_FM_forPaper.book Page 34 Tuesday, January 16, 2007 10:08 AM
Placing Originals
35
2
• Originals with a smooth or shinyfront surface
• Thin and soft originals• Transparent originals, such as
OHP transparencies or translucentpaper
• Originals with pencil writing onthe back
Note❒ To avoid damage to important
originals through mishaps such aspaper jams, we recommend thatyou place copies of such originals.
StellaF26_combine_F-GB_FM_forPaper.book Page 35 Tuesday, January 16, 2007 10:08 AM
Faxing
36
2
Memory Transmission
Memory Transmission is convenientbecause:• Fax originals can be scanned much
more quickly. Your fax is stored inmemory, and then sent automati-cally, meaning you do not have towait for your original to be sent.
• While your fax is being sent, an-other user can operate the machine(people do not have to wait long touse the fax machine).
• You can send the same original tomore than one place with the sameoperation. (Broadcasting)
Important❒ Make sure that 100% appears on
the display before you turn off thepower. If the power is turned offfor 12 hours or longer, all docu-ments stored in memory are delet-ed. As soon as the power is turnedon, the Power Failure Report isprinted to help you identify delet-ed files. See p.174 “Power FailureReport”, Advanced Features.
Limitation❒ If memory is full (0% appears on
the display), Memory Transmis-sion is disabled. Use ImmediateTransmission instead.
Note❒ Maximum number of destinations
per Memory Transmission: 250❒ The maximum number of destina-
tions awaiting Memory Transmis-sion that you can specify is 250.
❒ The theoretical maximum numberof destinations you can enter withthe number keys is 100, but thiswill depend on the amount ofmemory currently available.
❒ The number of pages that you canstore in memory depends on theoriginal images and the scan set-tings. You can store up to 1280standard pages (ITU-T #1 chart,Resolution: Standard, OriginalType: Halftone Off).
❒ Maximum number of MemoryTransmission files: 250
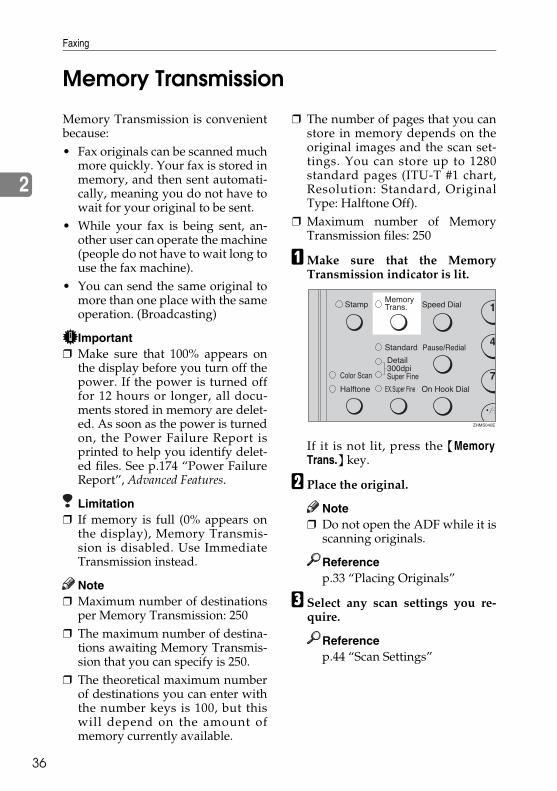
AMake sure that the MemoryTransmission indicator is lit.
If it is not lit, press the {MemoryTrans.} key.
B Place the original.
Note❒ Do not open the ADF while it is
scanning originals.
Referencep.33 “Placing Originals”
C Select any scan settings you re-quire.
Referencep.44 “Scan Settings”
ZHMS040E
StellaF26_combine_F-GB_FM_forPaper.book Page 36 Tuesday, January 16, 2007 10:08 AM

Memory Transmission
37
2
D Dial.If you want to send the same fax tomore than one destination, pressthe {OK} key, and then dial anoth-er destination. Repeat this step forall destinations.
Note❒ If you make a mistake, press the{Clear/Stop} key, and then enterthe correct number again.
❒ When destinations are specifiedusing Quick Dial keys succes-sively, those destinations can beadded without pressing the{OK} key. You can set whetherto require to press the {OK} keywhen specifying destinationsusing Quick Dial keys succes-sively with the User Parameters(switch 09, bit 6). See p.140 “Us-er Parameters”, Advanced Fea-tures.
❒ When one G3 line is set as thePSTN line (Outside) and theother as the PABX line (Exten-sion), you need to choose whichline you use for each transmis-sion with the Line Select func-tion.
Referencep.47 “Dialing”p.51 “Selecting the Line”, Ad-vanced Features
E Press the {Start} key.
The machine starts scanning theoriginal.The machine calls the destination.The name or fax number which isprogrammed as the Own Name orOwn Fax Number at the other endis shown on the top of the display.
Referencep.57 “Own Name/Fax Head-er/Own Fax Number”
After transmission, the standbydisplay reappears.
ZHMS050E
StellaF26_combine_F-GB_FM_forPaper.book Page 37 Tuesday, January 16, 2007 10:08 AM

Faxing
38
2
Canceling a Memory Transmission
Before Pressing the Start Key
A Press the {Energy Saver/Clear Modes}key.
Note❒ When you have already placed
the original, you can also cancelthe transmission by removingthe original from the machine.
While Scanning the Original
A Press the {Clear/Stop} key.
The machine will stop storing thedata from the original and the datawill not be sent.
When an Original Is Jammed
A Read the message in the display.The following displays appear oneafter the other.
B Press the {OK} key.
C Remove the original.
Referencep.98 “Clearing Original Jams”
During Transmission
Use this procedure to cancel a trans-mission after the original has beenscanned.
Note❒ If transmission finishes while you
are carrying out this procedure, itwill not be canceled.
❒ If you cancel a message while it isbeing sent, transmission is haltedas soon as you finish this proce-dure. However, some pages ofyour message may have alreadybeen sent and will be received atthe other end.
❒ During transmission, you can can-cel the transmission by pressingthe {Clear/Stop} key.
ZHMS060E
ZHMS070E
StellaF26_combine_F-GB_FM_forPaper.book Page 38 Tuesday, January 16, 2007 10:08 AM

Canceling a Memory Transmission
39
2
A Press the {Job Information} key,and confirm that " 1. Cancel TX /RX " is displayed.
The Information menu is dis-played.
B Press the {OK } key.
C Display the file you want to de-lete. Enter the file number with thenumber keys, or search using 0 or1.
“Cancel File” and “Transmit-ting...” are shown one after the oth-er in the display.
D Press the {OK} key.
E Press 0 or 1 to select " Yes "
F Press the {OK} key.
The file is deleted, and the standbydisplay reappears.
While Awaiting Transmission
Use this procedure to cancel a trans-mission after the original has beenscanned.
Note❒ If transmission finishes while you
are carrying out this procedure, itwill not be canceled.
❒ If you cancel a message while it isbeing sent, transmission is haltedas soon as you finish this proce-dure. However, some pages ofyour message may have alreadybeen sent. All pages, up to the pagebefore scanning stopped, are sentto the other end.
A Press the {Job Information} key,and confirm that "1. Cancel TX /RX" is displayed.
B Press the {OK} key.
ZHMS080E
ZHMS080E
StellaF26_combine_F-GB_FM_forPaper.book Page 39 Tuesday, January 16, 2007 10:08 AM

Faxing
40
2
C Display the file you want to de-lete. Enter the file number with thenumber keys, or search using 0 or1.
If you are unable to find the file, ithas already been sent.
D Press the {OK} key.
E Press 0 or 1 to select "Yes”.
F Press the {OK} key.
The file is deleted, and the standbydisplay reappears
StellaF26_combine_F-GB_FM_forPaper.book Page 40 Tuesday, January 16, 2007 10:08 AM

Immediate Transmission
41
2
Immediate Transmission
Immediate Transmission is conven-ient when:• You want to send an original im-
mediately as it is scanning.• You want to quickly check wheth-
er you have successfully connectedwith the other party's fax machine.
• Your machine's memory is gettingfull.
The machine dials immediately afteryou press the {Start} key. The mes-sage is scanned and transmitted pageby page without being stored inmemory.
Note❒ You can only specify one destina-
tion for Immediate Transmission.❒ When the Backup File Transmis-
sion Setting is on, ImmediateTransmission cannot be used. Seep.136 “Backup File TransmissionSettings”, Advanced Features.
A Check that the Memory Trans-mission indicator is not lit.
If it is lit, press the {Memory Trans.}key.
B Place your original.
Referencep.33 “Placing Originals”
C Select any scan settings you re-quire.
Referencep.44 “Scan Settings”
D Dial.
Note❒ If you make a mistake, press the{Clear/Stop} key, and then enterthe correct number again.
❒ When one G3 line is set as thePSTN line (Outside) and theother as the PABX line (Exten-sion), you need to choose whichline you use for each transmis-sion with the Line Select func-tion.
Referencep.47 “Dialing” p.51 “Selecting the Line”, Ad-vanced Features
ZHMS040E
StellaF26_combine_F-GB_FM_forPaper.book Page 41 Tuesday, January 16, 2007 10:08 AM

Faxing
42
2
E Press the {Start} key.
The machine calls the destination.While it is dialing, the number orname which is programmed as theOwn Name or Own Fax Numberin the machine of the other party isshown on the display. When con-nected, the machine starts scan-ning the original.
Referencep.57 “Own Name/Fax Head-er/Own Fax Number”
After transmission the standbydisplay reappears.
If the Connection Could Not Be Made
If it is not possible to make a connec-tion with the number you specifiedbecause the line was busy or therewas a line problem, the machine redi-als automatically.When you want to remove originalsquickly or want to send other faxmessages, press the {Clear/Stop} keyand then resend the fax message us-ing Memory Transmission.
Note❒ If communication stops during Im-
mediate Transmission, an originalcould be jammed. Remove thejammed original and send it again.See p.98 “Clearing Original Jams”.
ZHMS050E
StellaF26_combine_F-GB_FM_forPaper.book Page 42 Tuesday, January 16, 2007 10:08 AM
Canceling an Immediate Transmission
43
2
Canceling an Immediate Transmission
Before Pressing the Start Key
A Press the {Energy Saver/Clear Modes}key.
Note❒ When you have already placed
the original, you can also cancelthe transmission by removingthe original from the machine.
After Pressing the Start Key
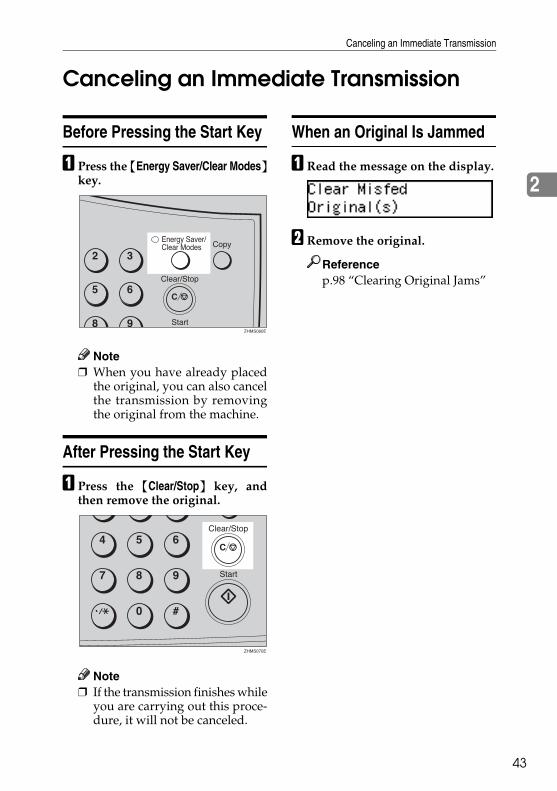
A Press the {Clear/Stop} key, andthen remove the original.
Note❒ If the transmission finishes while
you are carrying out this proce-dure, it will not be canceled.
When an Original Is Jammed
A Read the message on the display.
B Remove the original.
Referencep.98 “Clearing Original Jams”
ZHMS060E
ZHMS070E
StellaF26_combine_F-GB_FM_forPaper.book Page 43 Tuesday, January 16, 2007 10:08 AM

Faxing
44
2
Scan Settings
You may want to send many differenttypes of fax messages. Some of thesemay be difficult to reproduce at theother end. However, your machinehas two settings that you can adjust tohelp you transmit your fax messagewith the best possible image quality.
❖ Resolution: Standard, Detail, Super Fine, Ex-tra Super Fine
❖ Original Type:Halftone, Color Scan (Optional)
Note❒ You can set whether the machine
returns to the same settings afterthe power is turned on with theUser Parameters (switch 01, bit 7).See p.140 “User Parameters”, Ad-vanced Features .
Resolution
Images and text are scanned into themachine by converting them to a se-quence of dots. The frequency of dotsdetermines the quality of the imageand how long it takes to transmit.Therefore, images scanned at highresolution (Super Fine) have highquality but transmission takes longer.Conversely, low resolution (Stand-ard) scanning results in less qualitybut faster transmission. Choose thesetting that matches your needsbased upon this trade off betweenspeed and image clarity.
❖ Standard (8 × 3.85 lines/mm, 200 ×100 dpi)Select for originals containing nor-mal sized characters.
❖ Detail (8 × 7.7 lines/mm, 200 × 200 dpi)Select for originals containingsmall characters or when you re-quire greater clarity. This resolu-tion is twice as fine as Standard.
❖ 300 × 300 dpiSelect when you use the scannerfunction. For details, see Chapter3,“Using Scan to E-mail Functions”in the NIC FAX unit manual.
❖ Super Fine (16 × 15.4 lines/mm, 400 ×400 dpi)This is suitable for originals withsmall characters like newspapers.Select for originals with very finedetails or when you require finerimage clarity than Detail. This res-olution is eight times as fine asStandard.
❖ Extra Super Fine (24 × 23.1 lines/mm,600 × 600 dpi)This is suitable for originals withsmall characters or geometric fig-ures like newspapers.Select when you require finer im-age clarity than Super Fine.
Limitation❒ If the other party's machine does
not support the resolution atwhich you are sending, this ma-chine automatically switches to aresolution which is supported.This machine can send with Stand-ard, Detail, Super Fine and ExtraSuper Fine. Even if you send theoriginal with Extra Super Fine, theother party's machine may receiveit with Fine (8x15.4 lines/mm, 200x 4 0 0 d pi ) o r D et a i l ( 8x7 .7lines/mm, 200 x 200 dpi).
StellaF26_combine_F-GB_FM_forPaper.book Page 44 Tuesday, January 16, 2007 10:08 AM
Scan Settings
45
2
❒ This machine can make copies andsend fax messages at Extra SuperFine resolution, but it cannot re-ceive faxes that are sent at ExtraSuper Fine resolution.
❒ When sending with Extra SuperFine, turn on the ”Ex. Super Fine”with the User Parameters (switch20, bit 2). See p.140 “User Parame-ters”, Advanced Features.
Note❒ You can check the resolution type
with the Journal.❒ When turning on the "Ex. Super
Fine" with the User Parameters(switch 20; bit 2), sending or re-ceiving faxes on multiple linesmay not be possible. Copies andreceived documents may not beprinted either.
❒ 300 x 300 dpi can be used with thescanner function. When sendingfax messages with 300 x 300 dpi,the machine switches to Detail au-tomatically.
❒ You can set the resolution type af-ter the power is turned on or the{Energy Saver/Clear Modes} key ispressed with the User Parameters(switch 00; bit 5,4). See p.140 “UserParameters”, Advanced Features.
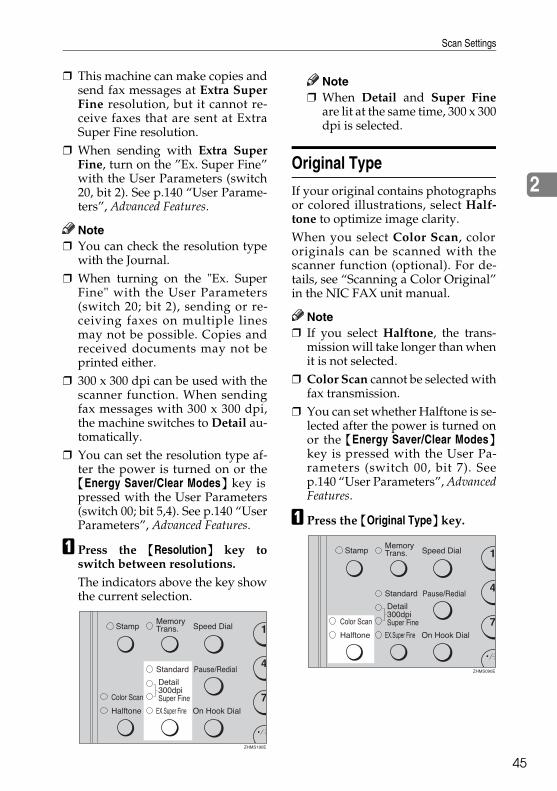
A Press the {Resolution} key toswitch between resolutions.The indicators above the key showthe current selection.
Note❒ When Detail and Super Fine
are lit at the same time, 300 x 300dpi is selected.
Original Type
If your original contains photographsor colored illustrations, select Half-tone to optimize image clarity. When you select Color Scan, colororiginals can be scanned with thescanner function (optional). For de-tails, see “Scanning a Color Original”in the NIC FAX unit manual.
Note❒ If you select Halftone, the trans-
mission will take longer than whenit is not selected.
❒ Color Scan cannot be selected withfax transmission.
❒ You can set whether Halftone is se-lected after the power is turned onor the {Energy Saver/Clear Modes}key is pressed with the User Pa-rameters (switch 00, bit 7). Seep.140 “User Parameters”, AdvancedFeatures.
A Press the {Original Type} key.
ZHMS190E
ZHMS090E
StellaF26_combine_F-GB_FM_forPaper.book Page 45 Tuesday, January 16, 2007 10:08 AM

Faxing
46
2
-Speed Mode and Standard Mode
Halftone has two modes, Speed modeand Standard mode. When you selectSpeed mode, faxes can be transmittedfaster, but the resulting images couldbe inferior to those sent with Stand-ard mode.
Note❒ You can set the mode for Halftone
with the User Parameters (switch10, bit 7). See p.140 “User Parame-ters”, Advanced Features.
Changing Scan Settings
When scanning multiple originals us-ing the ADF, you can set scan settingsfor every page.
A Check which pages you want tochange the scan settings for.
BMake the scan settings for thenext page while the previous pageis scanned.
ZHMS250E
StellaF26_combine_F-GB_FM_forPaper.book Page 46 Tuesday, January 16, 2007 10:08 AM
Dialing
47
2
Dialing
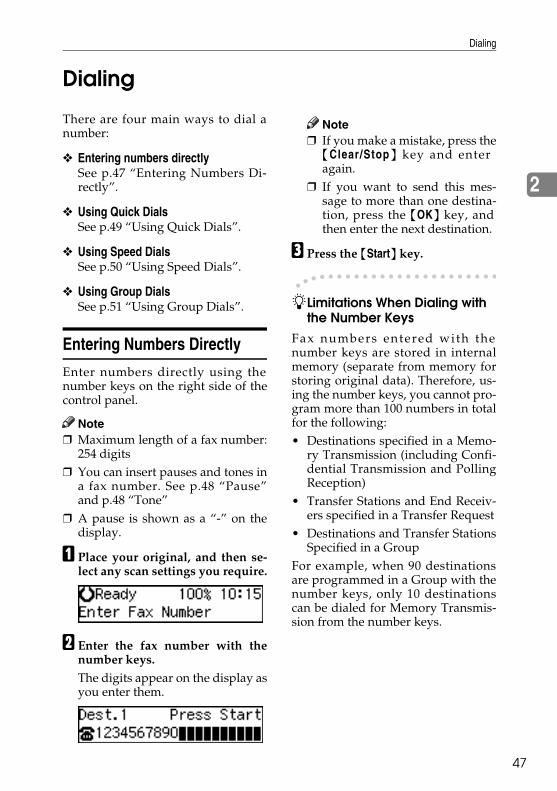
There are four main ways to dial anumber:
❖ Entering numbers directly See p.47 “Entering Numbers Di-rectly”.
❖ Using Quick DialsSee p.49 “Using Quick Dials”.
❖ Using Speed DialsSee p.50 “Using Speed Dials”.
❖ Using Group DialsSee p.51 “Using Group Dials”.
Entering Numbers Directly
Enter numbers directly using thenumber keys on the right side of thecontrol panel.
Note❒ Maximum length of a fax number:
254 digits❒ You can insert pauses and tones in
a fax number. See p.48 “Pause”and p.48 “Tone”
❒ A pause is shown as a “-” on thedisplay.
A Place your original, and then se-lect any scan settings you require.
B Enter the fax number with thenumber keys.The digits appear on the display asyou enter them.
Note❒ If you make a mistake, press the{Clear/Stop} key and enteragain.
❒ If you want to send this mes-sage to more than one destina-tion, press the {OK} key, andthen enter the next destination.
C Press the {Start} key.
-Limitations When Dialing with the Number Keys
Fax numbers entered with thenumber keys are stored in internalmemory (separate from memory forstoring original data). Therefore, us-ing the number keys, you cannot pro-gram more than 100 numbers in totalfor the following:• Destinations specified in a Memo-
ry Transmission (including Confi-dential Transmission and PollingReception)
• Transfer Stations and End Receiv-ers specified in a Transfer Request
• Destinations and Transfer StationsSpecified in a Group
For example, when 90 destinationsare programmed in a Group with thenumber keys, only 10 destinationscan be dialed for Memory Transmis-sion from the number keys.
StellaF26_combine_F-GB_FM_forPaper.book Page 47 Tuesday, January 16, 2007 10:08 AM

Faxing
48
2
Note❒ When this machine is requested to
transfer a call (i.e. becomes aTransfer Station), two fax numbersare automatically stored. There-fore, the number of destinationsthat can be dialed from the numberkeys decreases by two wheneverthis machine is requested to trans-fer a call.
❒ When a total of 100 fax numbers isstored, Memory Transmission di-aling with number keys cannot beused. Use Immediate Transmis-sion, or Memory Transmission di-aling with Quick Dial, Speed Dial,or Group Dial.
❒ If a Group is defined when thereare files queued for transmission,no additional fax numbers can bestored even if the number of desti-nations specified from the numberkeys is less than 100. That is be-cause the fax numbers have beendialed from the number keys forsome of the waiting files. When thewaiting files have been sent andtheir fax numbers are deleted frommemory, additional fax numberscan be dialed.
❒ The display shows the percentageof free space in memory for storingdocuments. Since fax numbers arestored in separate memory, dialingfax numbers from the number keysdoes not change the percentage onthe display.
Pause
Press the {Pause/Redial} key when di-aling or storing a number to insertabout a two-second pause.
Note❒ You cannot insert a pause before
the first digit of a fax number. ❒ A pause is shown as a "-" on the
display.
❖ When Entering a Pause
❒ You can insert a pause in numbersstored in Quick Dials and SpeedDials.
Tone
This function allows a machine con-nected to a pulse dialing line to sendtonal signals (for example if you wantto use a special service on a tone dial-ing line).To use Tone, perform one of the fol-lowing ways:• Press the User Function key with
the Tone function programmed in.• Press the {p} key.
ZHMS100E
StellaF26_combine_F-GB_FM_forPaper.book Page 48 Tuesday, January 16, 2007 10:08 AM

Dialing
49
2
PreparationTo use the User Function key withthe Tone function programmed in,you need to assign this function toa User Function key beforehand.See p.101 “User Function Keys”,Advanced Features.
Limitation❒ You cannot place a tone before the
first digit of a fax number.❒ Some services may not be available
when using the Tone feature.
Note❒ A tone is shown as a “ • ” on the
display. ❒ You can choose whether to use the{p} key as a Tone key with theUser Parameters. See p.140 “UserParameters”, Advanced Features.
When using Tone with On Hook Dial
A Press the {On Hook Dial} key.
B Enter the fax number with thenumber keys.
C Press the User Function key ( {F1}to {F10} ) in which“Tone”is pro-grammed.
D Enter a code number for receivinga special service with the numberkeys.
Note❒ The entered number will be sent
by tonal signals.
Using Quick Dials
You can specify a destination simplyby pressing a Quick Dial.
PreparationYou must program the destina-tion's fax number in a Quick Dialbeforehand. Additionally, you canprogram a name for the destina-tion in the Quick Dial. To program,edit, or delete a Quick Dial, seep.64 “Quick Dial”.
Note❒ To check the contents of all Quick
dials, print the Quick Dial list. Seep.105 “Reports/Lists”, AdvancedFeatures.
❒ Switch between Quick Dials {01}to {30}, {31} to {60}, and {61} to{90} with the Quick Dial Key FlipPlates.
Referencep.47 “Dialing”
ZHMS240E
ZHMS170E
StellaF26_combine_F-GB_FM_forPaper.book Page 49 Tuesday, January 16, 2007 10:08 AM
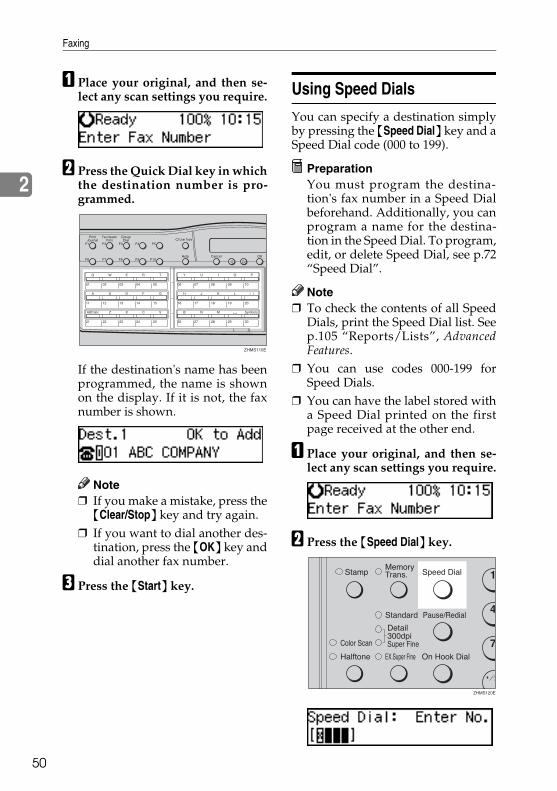
Faxing
50
2
A Place your original, and then se-lect any scan settings you require.
B Press the Quick Dial key in whichthe destination number is pro-grammed.
If the destination's name has beenprogrammed, the name is shownon the display. If it is not, the faxnumber is shown.
Note❒ If you make a mistake, press the{Clear/Stop} key and try again.
❒ If you want to dial another des-tination, press the {OK} key anddial another fax number.
C Press the {Start} key.
Using Speed Dials
You can specify a destination simplyby pressing the {Speed Dial} key and aSpeed Dial code (000 to 199).
PreparationYou must program the destina-tion's fax number in a Speed Dialbeforehand. Additionally, you canprogram a name for the destina-tion in the Speed Dial. To program,edit, or delete Speed Dial, see p.72“Speed Dial”.
Note❒ To check the contents of all Speed
Dials, print the Speed Dial list. Seep.105 “Reports/Lists”, AdvancedFeatures.
❒ You can use codes 000-199 forSpeed Dials.
❒ You can have the label stored witha Speed Dial printed on the firstpage received at the other end.
A Place your original, and then se-lect any scan settings you require.
B Press the {Speed Dial} key.
ZHMS110E
ZHMS120E
StellaF26_combine_F-GB_FM_forPaper.book Page 50 Tuesday, January 16, 2007 10:08 AM

Dialing
51
2
Note❒ “Enter No.” and “Search A/Z”
are shown one after the other inthe display above. If a searchletter is programmed with aSpeed Dial, you can find thisnumber quickly using the Tele-phone Directory function. Seep.44 “Telephone Directory”,Advanced Features.
C Enter the three digit code (000 to199) for the destination with thenumber keys.
Note❒ If the destination's name has
been programmed, the name isshown on the display. If it is not,the fax number is shown.
❒ If you want to dial another des-tination, press the {OK} key anddial another fax number.
❒ If you make a mistake, press the{Clear/Stop} key and try again.
D Press the {Start} key.
Using Group Dials
You can store multiple destinations asa single Group and easily specifythese destinations by selecting theGroup.The method for specifying Groupsdiffers according to the way theywere programmed.
❖ When programmed in a Quick DialPress the Quick Dial key in whicha Group is programmed.
❖ When not programmed in a Quick DialUse the User Function key. GroupDial is assigned to {F3} as a de-fault. If this setting is changed,program the Group function in aUser Function key ( {F1} to {F10} ).See p.101 “User Function Keys”,Advanced Features. When you wantto specify a destination, press theUser Function key with the Groupfunction programmed in, and thenpress the Group number with thenumber keys.
PreparationYou must program the destina-tions' fax numbers in a Group be-forehand. Additionally, you canprogram the destination namesand the Group name in the Group.To program, ed i t , o r de le teGroups, see p.78 “Groups”.
Note❒ Quick Dials programmed for Groups
cannot be used for any other func-tion.
❒ To check the contents of allGroups, print the Group Dial list.See p.105 “Reports/Lists”, Ad-vanced Features.
❒ You cannot use Immediate Trans-mission with Groups. You canonly use Memory Transmission.
❒ You can store up to 250 destina-tions. If you register the same des-tination with a Speed Dial, QuickDial, or number keys in differentgroups, it is only counted as oneitem.
StellaF26_combine_F-GB_FM_forPaper.book Page 51 Tuesday, January 16, 2007 10:08 AM
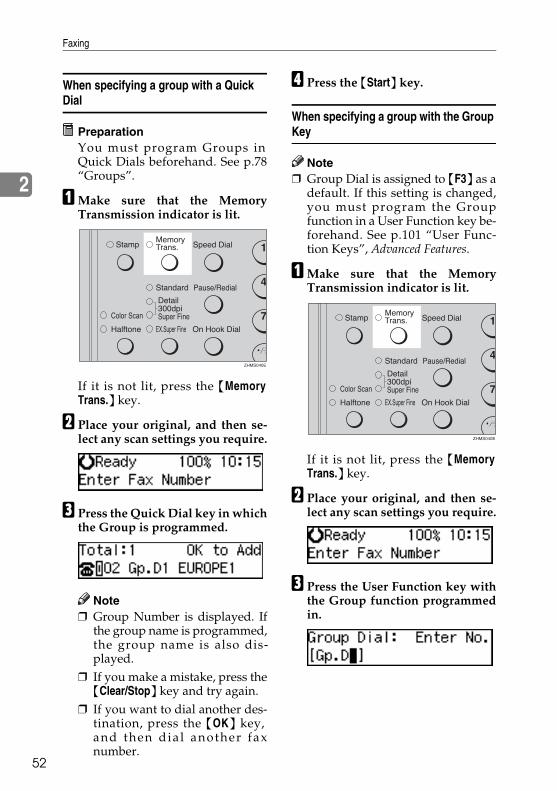
Faxing
52
2
When specifying a group with a Quick Dial
PreparationYou must program Groups inQuick Dials beforehand. See p.78“Groups”.
AMake sure that the MemoryTransmission indicator is lit.
If it is not lit, press the {MemoryTrans.} key.
B Place your original, and then se-lect any scan settings you require.
C Press the Quick Dial key in whichthe Group is programmed.
Note❒ Group Number is displayed. If
the group name is programmed,the group name is also dis-played.
❒ If you make a mistake, press the{Clear/Stop} key and try again.
❒ If you want to dial another des-tination, press the {OK} key,and then dia l another faxnumber.
D Press the {Start} key.
When specifying a group with the Group Key
Note❒ Group Dial is assigned to {F3} as a
default. If this setting is changed,you must program the Groupfunction in a User Function key be-forehand. See p.101 “User Func-tion Keys”, Advanced Features.
AMake sure that the MemoryTransmission indicator is lit.
If it is not lit, press the {MemoryTrans.} key.
B Place your original, and then se-lect any scan settings you require.
C Press the User Function key withthe Group function programmedin.
ZHMS040E
ZHMS040E
StellaF26_combine_F-GB_FM_forPaper.book Page 52 Tuesday, January 16, 2007 10:08 AM

Dialing
53
2
D Enter the Group number (1 to 9)with the number keys.
Note❒ Group Number is displayed. If
the group name is programmed,the group name is also dis-played.
❒ If you want to specify anotherGroup, press the {OK} key, andthen repeat step C above.
❒ If you make a mistake, press the{Clear/Stop} key. The displaywill return to that in step B.
E Press the {Start} key.
StellaF26_combine_F-GB_FM_forPaper.book Page 53 Tuesday, January 16, 2007 10:08 AM

Faxing
54
2
Reception Modes
The machine can treat incoming faxmessages and telephone calls in twoways.
❖ Manual ReceiveUse this mode if your line is sharedby a fax machine and a telephonebut you want to answer all callsyourself and decide whether theyare fax transmissions or telephonecalls.The machine will ring continuous-ly until you answer the call, so youhave to be near the machine at alltimes.
❖ Auto ReceiveUse this mode if you have a dedi-cated fax line. The machine as-s u m e s a l l c a l l s a r e f a xtransmissions. It will ring once toalert you of an incoming call, andthen it starts receiving.
Selecting the Reception Mode
Select the Reception Mode using thefollowing procedure.
Note❒ When the optional extra G3 inter-
face unit is installed, only Auto Re-ceive can be used with G3-2.
❒ You can assign the procedure ofselecting the Reception Mode to aUser Function key. See p.101 “UserFunction Keys”, Advanced Features.When you press the User Functionkey in which it is assigned, pro-ceed to step H in the following pro-cedure.
A Press the {User Tools} key.
B Press 0 or 1 until " 2. Fax Fea-tures " is displayed.
C Press the {OK} key.
D Press 0 or 1 until " 3. Setup " isdisplayed.
E Press the {OK} key.
F Press 0 or 1 until “ 5. ReceptionMode “ is displayed.
ZHMS130E
StellaF26_combine_F-GB_FM_forPaper.book Page 54 Tuesday, January 16, 2007 10:08 AM

Reception Modes
55
2
G Press the {OK} key.
H Press 0 or 1 to select the recep-tion mode.
I Press the {OK} key.
J Press the {User Tools} key to re-turn to the standby display.
Receiving Messages in Manual Receive
In this mode you have to answer thecall yourself and decide whether it isa fax or a telephone call.The procedure for answering a call isas follows:
A Pick up the handset of the exter-nal telephone and listen to theother end.
B If you hear a voice, continue yourconversation as you would nor-mally.
C If you hear a fax tone, remove anyoriginals from the ADF.
D Press the {Start} key.
E Replace the handset.
StellaF26_combine_F-GB_FM_forPaper.book Page 55 Tuesday, January 16, 2007 10:08 AM

Faxing
56
2
StellaF26_combine_F-GB_FM_forPaper.book Page 56 Tuesday, January 16, 2007 10:08 AM

57
3. Programming
Own Name/Fax Header/Own Fax Number
Make sure that all necessary settingsare made before connecting your ma-chine to the telephone line.
❖ Own NameThis should be your name or com-pany name in 20 characters or less.During communication, if the oth-er party's fax machine supportsOwn Name, this replaces the OwnFax Number that follows. Thisname will appear on the display ofthe other party's fax machine, andthe name programmed on that ma-chine will appear on yours.
Limitation❒ The programmed name will not
be used unless the other partyhas a machine of the same makethat supports the Own Namefunction.
❖ Fax HeaderThis is ordinarily your name orcompany name. Your fax headercan be up to 32 characters long andis printed on the header of everypage you send.You can program Fax Header1 orFax Header2. When you send orig-inals using Quick Dial or Speed Di-al , you can select which FaxHeader will be printed on the mes-sage received by the other party.
❖ Own Fax Number (Required by inter-national law)This is your fax machine's phonenumber that must include countryand area codes using up to 20 char-acters or less. During any commu-nication, your Own Fax Numberappears on their display. (Con-versely, their Own Fax Numberappears on your display.)
Note❒ In some areas, the Own Fax
Number is preprogrammed byyour service representative andcannot be re-programmed bythe user.
Important❒ When sending a fax, your Own Fax
Number is required by interna-tional law. You cannot legally con-nect a fax machine to the telephonesystem if the Own Fax Number isnot programmed.
❒ You can confirm the Own Name,Fax Header, and Own Fax Numbersettings in the User ParametersList. See p.140 “User Parameters”,Advanced Features.
Note❒ When the optional extra G3 inter-
face unit is installed, register usingthe “G3–2 Analog Line”. See p.151“G3 Analog Line”, Advanced Fea-tures.
❒ Make sure that the machine is instandby mode before performingthe following procedures.
StellaF26_combine_F-GB_FM_forPaper.book Page 57 Tuesday, January 16, 2007 10:08 AM

Programming
58
3
Own Name / Fax Header
The following procedure describeshow to program/edit/delete OwnName and Fax Header.
Programming
A Press the {User Tools} key.
B Press 0 or 1 until "2.Fax Fea-tures" is displayed.
C Press the {OK} key.
D Press 0 or 1 until " 3. Setup " isdisplayed.
E Press the {OK} key.
F Press 0 or 1 until "6. Fax Infor-mation" is displayed.
G Press the {OK} key.
Confirm that " 1. Own Name " isdisplayed.
H Press the {OK} key.
I Enter your Own Name.
Referencep.87 “Entering Characters”
J Press the {OK} key.
K Press 0 or 1 until " 2. Fax Header1" or “3. Fax Header 2”is dis-played.
ZHMS130E
StellaF26_combine_F-GB_FM_forPaper.book Page 58 Tuesday, January 16, 2007 10:08 AM

Own Name/Fax Header/Own Fax Number
59
3
L Press the {OK} key.
The programmed Own Name isdisplayed. If your Fax Header is the same asyour Own Name, proceed to stepN.
M Enter your Fax Header.
N Press the {OK} key.
Note❒ When you program both Fax
Header1 and Fax Header2, re-peat from steps K to N.
O Press the {User Tools} key. The standby display reappears.
Editing
A Press the {User Tools} key.
B Press 0 or 1 until " 2. Fax Fea-tures " is displayed.
C Press the {OK} key.
D Press 0 or 1 until " 3. Setup " isdisplayed.
E Press the {OK} key.
F Press 0 or 1 until "6. Fax Infor-mation" is displayed.
G Press the {OK} key.
H Press 0 or 1 to select the itemthat you want to edit.
I Press the {OK} key.
ZHMS130E
StellaF26_combine_F-GB_FM_forPaper.book Page 59 Tuesday, January 16, 2007 10:08 AM

Programming
60
3
J Press the {Clear/Stop} key, andthen reenter Own Name or FaxHeader.
K Press the {OK} key.
L Press the {User Tools} key. The standby display reappears.
Deleting
A Press the {User Tools} key.
B Press 0 or 1 until " 2. Fax Fea-tures " is displayed.
C Press the {OK} key.
D Press 0 or 1 until " 3. Setup " isdisplayed.
E Press the {OK} key.
F Press 0 or 1 until "6. Fax Infor-mation" is displayed.
G Press the {OK} key.
H Press 0 or 1 to select the itemthat you want to delete.
I Press the {OK} key.
J Press the {Clear/Stop} key.
K Press the {OK} key.
L Press the {User Tools} key. The standby display reappears.
ZHMS130E
StellaF26_combine_F-GB_FM_forPaper.book Page 60 Tuesday, January 16, 2007 10:08 AM
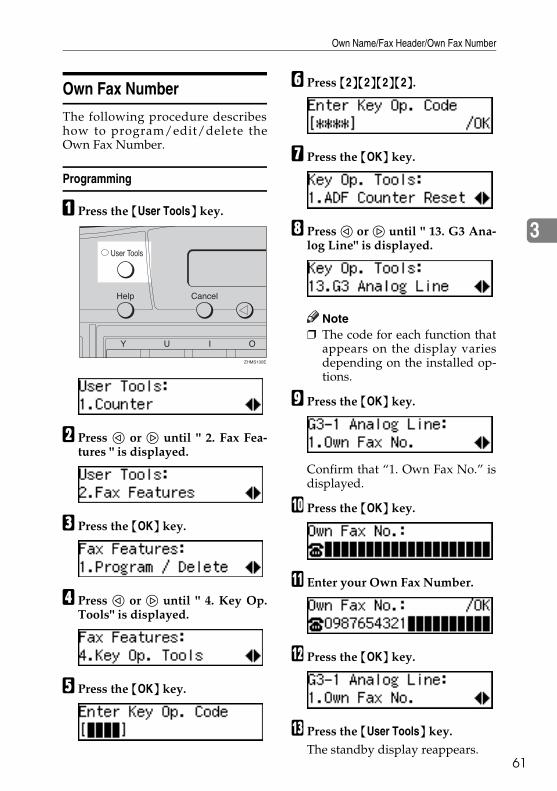
Own Name/Fax Header/Own Fax Number
61
3
Own Fax Number
The following procedure describeshow to program/edit/delete theOwn Fax Number.
Programming
A Press the {User Tools} key.
B Press 0 or 1 until " 2. Fax Fea-tures " is displayed.
C Press the {OK} key.
D Press 0 or 1 until " 4. Key Op.Tools" is displayed.
E Press the {OK} key.
F Press {2}{2}{2}{2}.
G Press the {OK} key.
H Press 0 or 1 until " 13. G3 Ana-log Line" is displayed.
Note❒ The code for each function that
appears on the display variesdepending on the installed op-tions.
I Press the {OK} key.
Confirm that “1. Own Fax No.” isdisplayed.
J Press the {OK} key.
K Enter your Own Fax Number.
L Press the {OK} key.
M Press the {User Tools} key.The standby display reappears.
ZHMS130E
StellaF26_combine_F-GB_FM_forPaper.book Page 61 Tuesday, January 16, 2007 10:08 AM

Programming
62
3
Editing
A Press the {User Tools} key.
B Press 0 or 1 until " 2. Fax Fea-tures " is displayed.
C Press the {OK} key.
D Press 0 or 1 until " 4. Key Op.Tools" is displayed.
E Press the {OK} key.
F Press {2}{2}{2}{2}.
G Press the {OK} key.
H Press 0 or 1 until " 13. G3 Ana-log Line" is displayed.
Note❒ The code for each function that
appears on the display variesdepending on the installed op-tions.
I Press the {OK} key.
Confirm that “1. Own Fax No.” isdisplayed.
J Press the {OK} key.
Th e pr og ram med Own FaxNumber is displayed.
K Press the {Clear/Stop} key, and thenreenter the Own Fax Number.
L Press the {OK} key.
M Press the {User Tools} key.The standby display reappears.
ZHMS130E
StellaF26_combine_F-GB_FM_forPaper.book Page 62 Tuesday, January 16, 2007 10:08 AM
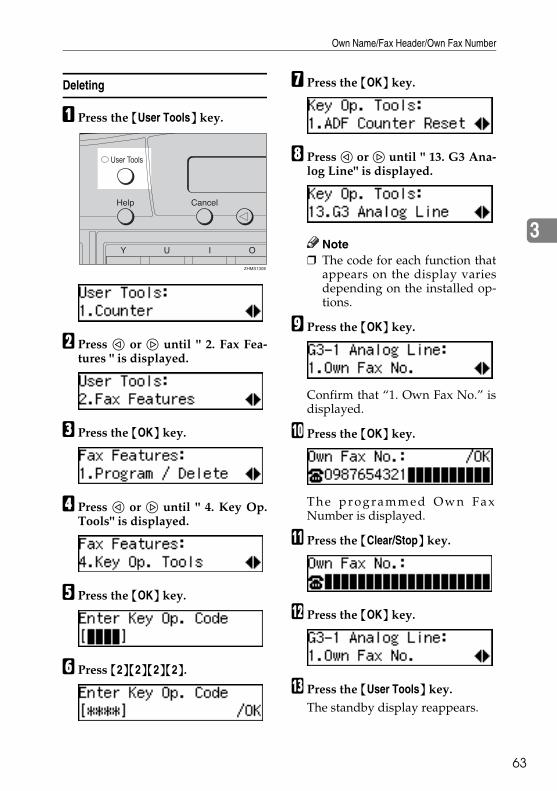
Own Name/Fax Header/Own Fax Number
63
3
Deleting
A Press the {User Tools} key.
B Press 0 or 1 until " 2. Fax Fea-tures " is displayed.
C Press the {OK} key.
D Press 0 or 1 until " 4. Key Op.Tools" is displayed.
E Press the {OK} key.
F Press {2}{2}{2}{2}.
G Press the {OK} key.
H Press 0 or 1 until " 13. G3 Ana-log Line" is displayed.
Note❒ The code for each function that
appears on the display variesdepending on the installed op-tions.
I Press the {OK} key.
Confirm that “1. Own Fax No.” isdisplayed.
J Press the {OK} key.
Th e pr og ram med Own FaxNumber is displayed.
K Press the {Clear/Stop} key.
L Press the {OK} key.
M Press the {User Tools} key.The standby display reappears.
ZHMS130E
StellaF26_combine_F-GB_FM_forPaper.book Page 63 Tuesday, January 16, 2007 10:08 AM

Programming
64
3
Quick Dial
To save time, you can program a faxnumber that you use often into aQuick Dial key. Then, whenever youare sending a message to that loca-tion, just press that Quick Dial key todial.You can program the following itemsin each key:
❖ Destination fax numberYou can program the destinationfax number using up to 254 digits.You can also select SUB code, SEPcode, SID, PWD (maximum 20 dig-its), Tone, and Pause. See p.45“SUB/SID (SUB Code Transmis-sion)”, Advanced Features; p.47“SEP/PWD (SEP Code PollingTransmission)”, Advanced Features;p.48 “Tone”, and p.48 “Pause”.
❖ Destination nameYou can program the destinationname using up to 20 characters.
❖ Others• Label (whether to print the des-
tination name on faxes sent tothis number)
• Select Fax HeaderYou can select to print FaxHeader1 or Fax Header2 on thefax messages that the other par-ty receives.
Important❒ We recommend that you print the
Quick Dial list and keep it whenyou program or change fax num-bers. See p.105 “Reports/Lists”,Advanced Features.
Note❒ When a programmed Quick Dial
key is being used for a standbyMemory Transmission, the mes-sages " This Dial is in Use.Cannot Change. ", or “ This Dialis in Use. Cannot Delete. ” isdisplayed and you cannot changeor delete the destination for thiskey.
❒ If a Quick Dial key with a pro-grammed destination is pro-grammed with Auto Document,the document is sent by just press-ing the Quick Dial key. See p.58“Auto Document”, Advanced Fea-tures.
❒ You can assign the procedure ofprogramming Quick Dial to a UserFunction key. See p.101 “UserFunction Keys”, Advanced Features.When you press the User Functionkey to which it is assigned, pro-ceed to step F in the following pro-cedure.
❒ Make sure that the machine is instandby mode before performingthe following procedure.
StellaF26_combine_F-GB_FM_forPaper.book Page 64 Tuesday, January 16, 2007 10:08 AM
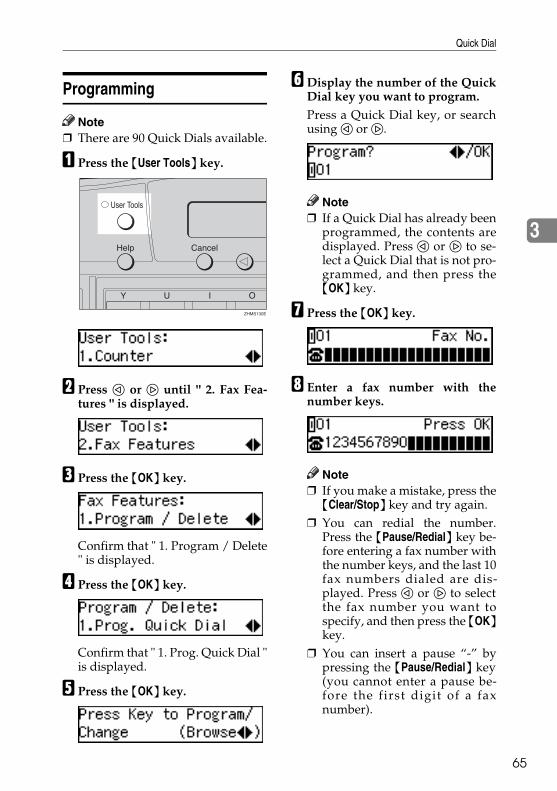
Quick Dial
65
3
Programming
Note❒ There are 90 Quick Dials available.
A Press the {User Tools} key.
B Press 0 or 1 until " 2. Fax Fea-tures " is displayed.
C Press the {OK} key.
Confirm that " 1. Program / Delete" is displayed.
D Press the {OK} key.
Confirm that " 1. Prog. Quick Dial "is displayed.
E Press the {OK} key.
F Display the number of the QuickDial key you want to program.Press a Quick Dial key, or searchusing 0 or 1.
Note❒ If a Quick Dial has already been
programmed, the contents aredisplayed. Press 0 or 1 to se-lect a Quick Dial that is not pro-grammed, and then press the{OK} key.
G Press the {OK} key.
H Enter a fax number with thenumber keys.
Note❒ If you make a mistake, press the{Clear/Stop} key and try again.
❒ You can redial the number.Press the {Pause/Redial} key be-fore entering a fax number withthe number keys, and the last 10fax numbers dialed are dis-played. Press 0 or 1 to selectthe fax number you want tospecify, and then press the {OK}key.
❒ You can insert a pause “-” bypressing the {Pause/Redial} key(you cannot enter a pause be-fore the first digit of a faxnumber).
ZHMS130E
StellaF26_combine_F-GB_FM_forPaper.book Page 65 Tuesday, January 16, 2007 10:08 AM

Programming
66
3
❒ You can program SUB, SEP,SID, and PWD in this step withthe Dial Option function. Seep.45 “SUB/SID (SUB CodeTransmission)”, Advanced Fea-tures and p.47 “SEP/PWD (SEPCode Polling Transmission)”,Advanced Features.
I Press the {OK} key.
If you do not program the destina-tion name, proceed to step K.
J Enter the destination name.
Referencep.87 “Entering Characters”
Note❒ Under rare circumstances, gar-
bled characters may appearduring name programming ifyou use the {Pause/Redial} keyto display the fax number ofparties located in other coun-tries. If this happens, simply de-lete the garbled characters using0 or 1 and the {Clear/Stop}keys, and then enter the destina-tion name.
K Press the {OK} key.
L Press 0 or 1 to select "On" or"Off".
Note❒ Label insertion allows the receiv-
er name that is programmed in aQuick Dial or Speed Dial to beprinted on the fax when it is re-ceived at the other end. See p.56“Label Insertion”, Advanced Fea-tures.
M Press the {OK} key.
N Press 0 or 1 to select "Hdr. 1" or"Hdr. 2".
O Press the {OK} key.
If you want to program anotherQuick Dial, proceed to step E.
P Press the {User Tools} key.The standby display reappears.
StellaF26_combine_F-GB_FM_forPaper.book Page 66 Tuesday, January 16, 2007 10:08 AM

Quick Dial
67
3
Editing
A Press the {User Tools} key.
B Press 0 or 1 until " 2. Fax Fea-tures " is displayed.
C Press the {OK} key.
Confirm that " 1. Program / Delete" is displayed.
D Press the {OK} key.
Confirm that " 1. Prog. Quick Dial "is displayed.
E Press the {OK} key.
F Display the number of the QuickDial key you want to edit.Press a Quick Dial key, or searchusing 0 or 1.
G Press the {OK} key.
If you do not edit the number, pro-ceed to step I.
H Press the {Clear/Stop} key, andthen reenter the fax number withthe number keys.
Note❒ If you make a mistake, press the{Clear/Stop} key and try again.
I Press the {OK} key.
If you do not edit the destinationname, proceed to step K.
J Press the {Clear/Stop} key, andthen reenter the destinationname.
Referencep.87 “Entering Characters”
ZHMS130E
StellaF26_combine_F-GB_FM_forPaper.book Page 67 Tuesday, January 16, 2007 10:08 AM

Programming
68
3
Note❒ Under rare circumstances, gar-
bled characters may appearduring name registration if youuse the {Pause/Redial} key todisplay the fax number of par-ties located in other countries. Ifthis happens, simply delete thegarbled characters using 0 or1 and the {Clear/Stop} keys,and then enter the destinationname.
K Press the {OK} key.The name is programmed.
L Press 0 or 1 to select either "On"or "Off".
M Press the {OK} key.
N Press 0 or 1 to select "Hdr. 1" or"Hdr. 2".
O Press the {OK} key.
If you want to edit another QuickDial, proceed to step E.
P Press the {User Tools} key.The standby display reappears.
Deleting
A Press the {User Tools} key.
B Press 0 or 1 until "2. Fax Fea-tures" is displayed.
C Press the {OK} key.
Confirm that "1. Program / Delete"is displayed.
D Press the {OK} key.
E Press 0 or 1 until "2. DeleteQuick Dial" is displayed.
F Press the {OK} key.
ZHMS130E
StellaF26_combine_F-GB_FM_forPaper.book Page 68 Tuesday, January 16, 2007 10:08 AM

Quick Dial
69
3
G Display the Quick Dial key thatyou want to delete.Press a Quick Dial key or search bypressing 0 or 1.
H Press the {OK} key.T h e p r o g r a m m e d d a t a ( f a xnumber and name) is deleted.
If you want to delete anotherQuick Dial key, proceed to step F.
I Press the {User Tools} key.The standby display reappears.
Quick Dial Key Label (Dial Label)
You can print a template that can beused to make labels for Quick Dialkeys. The template will have the des-t in a t io n or Gr oup names pro -grammed in Quick Dial keys on it.
A Press the {User Tools} key.
B Press 0 or 1 until "2. Fax Fea-tures" is displayed.
C Press the {OK} key.
D Press 0 or 1 until "2. Reports /Lists" is displayed.
E Press the {OK} key.
F Press 0 or 1 until "4. Quick DialLabel" is displayed.
G Press the {OK} key.
H Press the {Start} key.After Quick Dial Label is printed,the standby display reappears.
ZHMS130E
StellaF26_combine_F-GB_FM_forPaper.book Page 69 Tuesday, January 16, 2007 10:08 AM
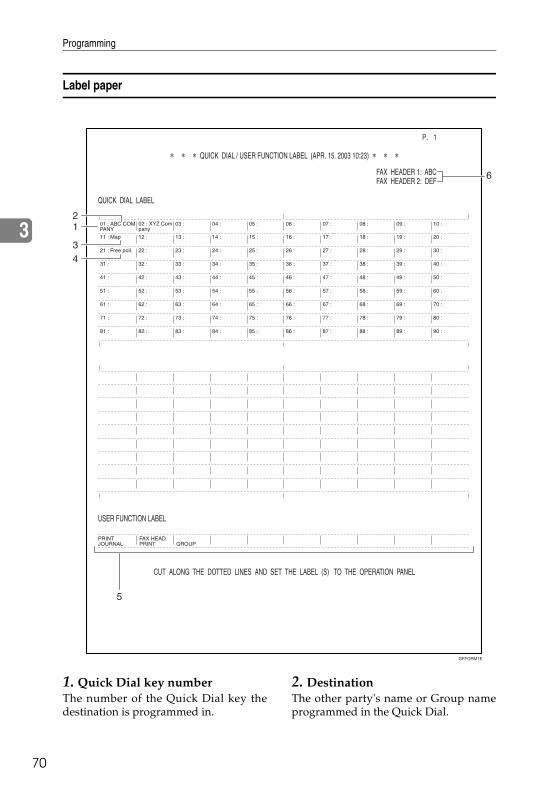
Programming
70
3
Label paper
1. Quick Dial key numberThe number of the Quick Dial key thedestination is programmed in.
2. DestinationThe other party's name or Group nameprogrammed in the Quick Dial.
GFFORM1E
StellaF26_combine_F-GB_FM_forPaper.book Page 70 Tuesday, January 16, 2007 10:08 AM

Quick Dial
71
3
3. The name of an Auto DocumentThe name for a document programmedas an Auto Document.
4. The name of a programWhen a program is stored on the QuickDial key, the name is printed.
5. The contents of the User FunctionkeysThe contents of the User Function keys isprinted.
6. F A X H E A D E R 1 a n d F A XHEADER2T h e n a m e p ro gr am m e d a s F A XHEADER1 and FAX HEADER2.
StellaF26_combine_F-GB_FM_forPaper.book Page 71 Tuesday, January 16, 2007 10:08 AM

Programming
72
3
Speed Dial
If you program numbers in Speed Di-als, you can specify the fax numbersimply by pressing the {Speed Dial}key and entering a three-digit SpeedDial number. You can program the following itemsin a Speed Dial:
❖ Destination fax numberYou can program the destinationfax number using up to 254 digitsfor each number.You can also select SUB code, SEPcode, SID, PWD (maximum 20 dig-its), Tone, and Pause. See p.45“SUB/SID (SUB Code Transmis-sion)”, Advanced Features; p.47“SEP/PWD (SEP Code PollingTransmission)”, Advanced Features;p.48 “Tone”; and p.48 “Pause”.
❖ Destination nameYou can program the destinationname using up to 20 characters.
❖ Other items• Label Insertion
If you turn Label Insertion on,the receiver name programmedin Speed Dial will be printed onthe fax message when it is re-ceived at the other end. Thename will be printed at the topof the page and will be precededby “To”. See p.56 “Label Inser-tion”, Advanced Features.
• Telephone Directory search let-terYou can program a search letter(A/a to Z/z). See p.44 “Tele-phone Directory”, Advanced Fea-tures.
• Select Fax HeaderYou can select to print FaxHeader1 or Fax Header2 on faxmessages that the other partyreceives.
Important❒ We recommend that you print the
Speed Dial list and keep it whenyou program or change a destina-tion. See p.105 “Reports/Lists”,Advanced Features.
Limitation❒ When a programmed Speed Dial is
being used for a standby MemoryTransmission, the message “ ThisDial is in Use. CannotChange. ”, or “ This Dial is inUse. Cannot Delete. ” is dis-played and you cannot change ordelete the destination for this key.
Note❒ Make sure that the machine is in
standby mode before performingthe following procedures.
StellaF26_combine_F-GB_FM_forPaper.book Page 72 Tuesday, January 16, 2007 10:08 AM
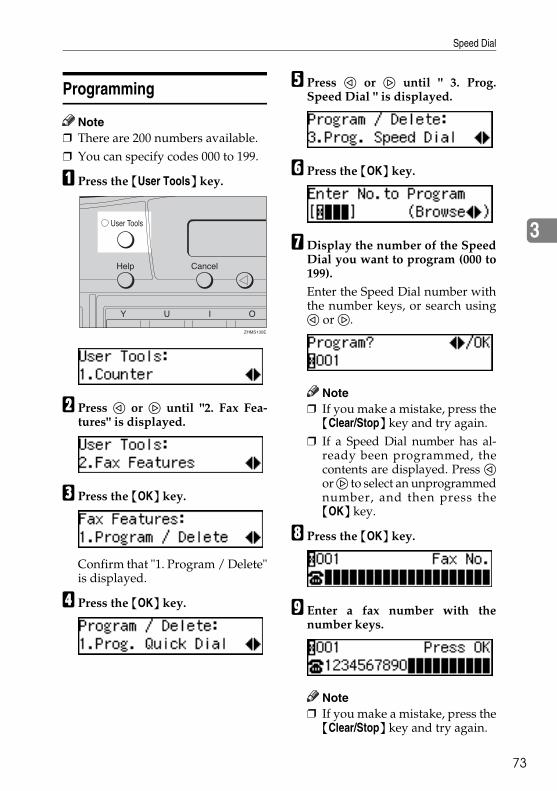
Speed Dial
73
3
Programming
Note❒ There are 200 numbers available.❒ You can specify codes 000 to 199.
A Press the {User Tools} key.
B Press 0 or 1 until "2. Fax Fea-tures" is displayed.
C Press the {OK} key.
Confirm that "1. Program / Delete"is displayed.
D Press the {OK} key.
E Press 0 or 1 until " 3. Prog.Speed Dial " is displayed.
F Press the {OK} key.
G Display the number of the SpeedDial you want to program (000 to199). Enter the Speed Dial number withthe number keys, or search using0 or 1.
Note❒ If you make a mistake, press the{Clear/Stop} key and try again.
❒ If a Speed Dial number has al-ready been programmed, thecontents are displayed. Press 0or 1 to select an unprogrammednumber, and then press the{OK} key.
H Press the {OK} key.
I Enter a fax number with thenumber keys.
Note❒ If you make a mistake, press the{Clear/Stop} key and try again.
ZHMS130E
StellaF26_combine_F-GB_FM_forPaper.book Page 73 Tuesday, January 16, 2007 10:08 AM

Programming
74
3
❒ You can redial the number.Press the {Pause/Redial} key be-fore entering a fax number withthe number keys, and the last 10fax numbers dialed are dis-played. Press 0 or 1 to selectthe fax number you want tospecify, and then press the {OK}key.
❒ You can insert a pause “-” bypressing the {Pause/Redial} key(you cannot enter a pause be-fore the first digit of a faxnumber).
❒ You can program SUB, SEP,SID, and PWD in this step withthe Dial Option function. Seep.45 “SUB/SID (SUB CodeTransmission)”, Advanced Fea-tures and p.47 “SEP/PWD (SEPCode Polling Transmission)”,Advanced Features.
J Press the {OK} key.
If you do not program the destina-tion name, proceed to step L.
K Enter the destination name.
Referencep.87 “Entering Characters”
L Press the {OK} key.
M Enter the search letter (A/a to Z/z)for Telephone Directory.
N Press the {OK} key. The search letter is programmed.
O Press 0 or 1 to select "On" or"Off".
Note❒ Label insertion allows the desti-
n a t io n n a m e t h a t i s p ro -grammed in Quick Dial orSpeed Dial to be printed on thefax when it is received at theother end. See p.56 “Label Inser-tion”, Advanced Features.
P Press the {OK} key.
Q Press 0 or 1 to select "Hdr. 1" or"Hdr. 2".
R Press the {OK} key.
If you want to program anotherSpeed Dial number, proceed tostep F.
S Press the {User Tools} key. The standby display reappears.
StellaF26_combine_F-GB_FM_forPaper.book Page 74 Tuesday, January 16, 2007 10:08 AM

Speed Dial
75
3
Editing
A Press the {User Tools} key.
B Press 0 or 1 until " 2. Fax Fea-tures " is displayed.
C Press the {OK} key.
Confirm that " 1. Program / Delete" is displayed.
D Press the {OK} key.
E Press 0 or 1 until " 3. Prog.Speed Dial " is displayed.
F Press the {OK} key.
G Display the number of the SpeedDial you want to edit (000 to 199). Enter the Speed Dial number withthe number keys, or search using0 or 1.
H Press the {OK} key.
If you do not edit the number, pro-ceed to step J.
I Press the {Clear/Stop} key, andthen reenter the fax number withthe number keys.
Note❒ If you make a mistake, press the{Clear/Stop} key and try again.
J Press the {OK} key.
If you do not edit the destinationname, proceed to step L.
K Press the {Clear/Stop} key, andthen reenter the Destinationname.
Referencep.87 “Entering Characters”
L Press the {OK} key.
ZHMS130E
StellaF26_combine_F-GB_FM_forPaper.book Page 75 Tuesday, January 16, 2007 10:08 AM
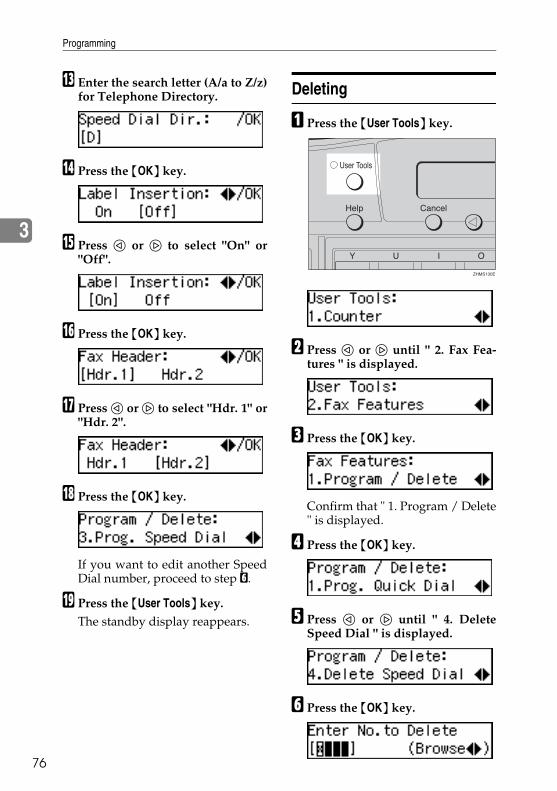
Programming
76
3
M Enter the search letter (A/a to Z/z)for Telephone Directory.
N Press the {OK} key.
O Press 0 or 1 to select "On" or"Off".
P Press the {OK} key.
Q Press 0 or 1 to select "Hdr. 1" or"Hdr. 2".
R Press the {OK} key.
If you want to edit another SpeedDial number, proceed to step F.
S Press the {User Tools} key. The standby display reappears.
Deleting
A Press the {User Tools} key.
B Press 0 or 1 until " 2. Fax Fea-tures " is displayed.
C Press the {OK} key.
Confirm that " 1. Program / Delete" is displayed.
D Press the {OK} key.
E Press 0 or 1 until " 4. DeleteSpeed Dial " is displayed.
F Press the {OK} key.
ZHMS130E
StellaF26_combine_F-GB_FM_forPaper.book Page 76 Tuesday, January 16, 2007 10:08 AM
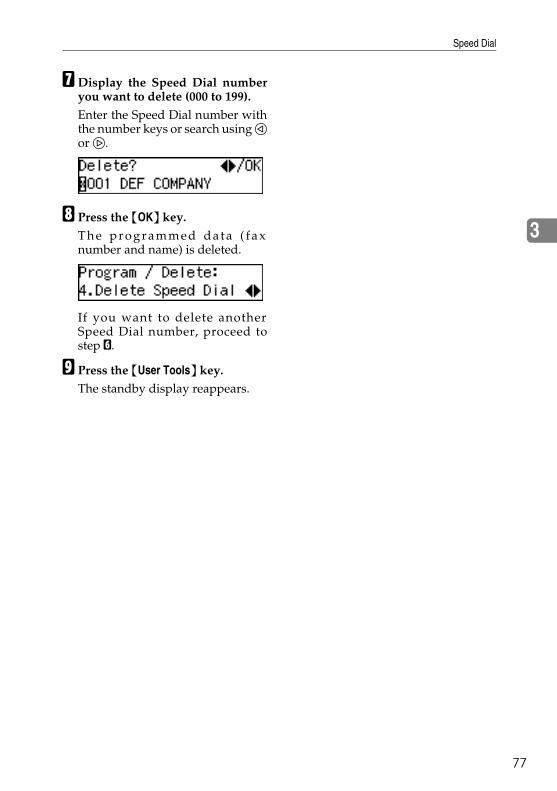
Speed Dial
77
3
G Display the Speed Dial numberyou want to delete (000 to 199). Enter the Speed Dial number withthe number keys or search using 0or 1.
H Press the {OK} key. T h e p r o g r a m m e d d a t a ( f a xnumber and name) is deleted.
If you want to delete anotherSpeed Dial number, proceed tostep F.
I Press the {User Tools} key. The standby display reappears.
StellaF26_combine_F-GB_FM_forPaper.book Page 77 Tuesday, January 16, 2007 10:08 AM

Programming
78
3
Groups
If you regularly broadcast originals tothe same set of destinations, you cancombine these numbers into a group.Then just select the group and eachnumber will be dialed in sequence au-tomatically. You can enter destination numbersusing Quick Dial keys, Speed Dials,or the number keys.You can program the following itemsin a Group:
❖ Destination fax numbers (up to 250numbers for each group)You can program the destinationfax number using up to 254 digitsfor each number.
❖ Group nameYou can program the group nameusing up to 20 characters.
Important❒ It is recommended that you print
the Group Dial list and keep it afterprogramming or editing Groups.See p.105 “Reports/Lists”, Ad-vanced Features.
Programming
There are two ways of programmingGroups:
❖ Programming groups in Quick DialkeysIf you program a group in a QuickDial key, you can specify thatgroup by pressing the Quick Dialkey. However, if you use QuickDial keys to program groups, youwill be able to program fewerQuick Dial keys .
Note❒ You cannot program another
function in a Quick Dial key al-ready used for a group. Also,you cannot program groups in aQuick Dial key already used foranother function.
❖ Assigning groups to the Group DialkeyUse the User Function key with theGroup Dial function programmedin. You need to assign the GroupDial function to a User Functionkey beforehand. Group Dial is as-signed to {F3} as a default. Seep.101 “User Function Keys”, Ad-vanced Features.To send a fax, press the Group Dialkey, and then enter the groupnumber (1 to 9). To specify a groupusing a Group Dial key, one morestep is required than when using aQuick Dial key. However, multiplegroups can be programmed in aGroup Dial key, thus leaving theQuick Dial keys to be used moreeffectively.
Referencep.51 “Using Group Dials”
Note❒ Make sure that the machine is in
standby mode before performingthe following procedures.
❒ You can program up to ninegroups.
❒ The maximum number of destina-tions you can program in a groupis 250.
StellaF26_combine_F-GB_FM_forPaper.book Page 78 Tuesday, January 16, 2007 10:08 AM

Groups
79
3
❒ The combined maximum numberof destinations you can program inall groups is 390. This number canbe composed of up to 90 QuickDial numbers, 200 Speed Dialnumbers, and 100 numbers en-tered directly with the numberkeys.
❒ If you program 100 destinationswith the number keys, MemoryTransmission using the numberkeys becomes unavailable, andonly Immediate Transmission isavailable.
❒ If you program a group with thenumber keys when a file is waitingto be transmitted, a message is dis-played. You sometimes cannotprogram any more destinationseven when the number of specifieddestination is 99 or less.
❒ It is recommended that you printthe Group Dial list and keep itwhen you program or change desti-nations. See p.105 “Reports/Lists”,Advanced Features.
❒ If you program the same destina-tion in different groups, it is onlycounted as one item.
❒ The table below shows how tocount numbers.
Referencep.47 “Limitations When Dialingwith the Number Keys”
A Press the {User Tools} key.
B Press 0 or 1 until "2. Fax Fea-tures" is displayed.
Group1 Group2 Total Number of items
Quick Dial [01]
Quick Dial [01]
8
Quick Dial [03]
Quick Dial [05]
Quick Dial [05]
Speed Dial [04]
Speed Dial [04]
Speed Dial [06]
Speed Dial [09]
Number keys 12345678
Number keys 12345678
Number keys 87654321
ZHMS130E
StellaF26_combine_F-GB_FM_forPaper.book Page 79 Tuesday, January 16, 2007 10:08 AM

Programming
80
3
C Press the {OK} key.
Confirm that " 1. Program / Delete" is displayed.
D Press the {OK} key.
E Press 0 or 1 until " 5. Prog.Group Dial " is displayed.
F Press the {OK} key.
G Display the number of the Groupyou want to program (1 to 9). Enter the group number with thenumber keys, or search using 0 or1.
Note❒ If a group has already been pro-
grammed, the contents are dis-played. Press 0 or 1 to select agroup number that is not pro-grammed, and then press the{OK} key.
H Press the {OK} key.
I Specify the destination using oneof the following three methods: Enter the fax number with thenumber keys.
Press a Quick Dial key.
Press the {Speed Dial} key, andthen enter a Speed Dial number.
Note❒ If you make a mistake, press the{Clear/Stop} key and try again.
❒ You can use “Redial” whenspecifying the destination. Seep.44 “Redial”, Advanced Fea-tures.
❒ To enter a pause (“-”), press the{Pause/Redial} key.
❒ You can program SUB, SEP,SID, and PWD in this step withthe Dial Option function. Seep.45 “SUB/SID (SUB CodeTransmission)”, Advanced Fea-tures and p.47 “SEP/PWD (SEPCode Polling Transmission)”,Advanced Features.
StellaF26_combine_F-GB_FM_forPaper.book Page 80 Tuesday, January 16, 2007 10:08 AM

Groups
81
3
J Press the {OK} key.
Confirm that “Add” is selected.
K Press the {OK} key.
L Repeat steps I to K for all the des-tinations you want to program inthe Group.
M If you finished adding a destina-tion, press the 0 or 1 to select "Exit ".
N Press the {OK} key.
If you do not program the Groupname, proceed to step P.
O Enter the Group name.
Referencep.87 “Entering Characters”
P Press the {OK} key.
Q Press 0 or 1 to select whether toassign the Group to a Quick Dialkey.
If you want to assign the Group toa Quick Dial key, select “Yes”.If you do not, select “No”, and thenproceed to step T.
R Press the {OK} key.
S Press the Quick Dial key youwant to program the Group in.
T Press the {OK} key.
U Press the {User Tools} key. The standby display reappears.
StellaF26_combine_F-GB_FM_forPaper.book Page 81 Tuesday, January 16, 2007 10:08 AM

Programming
82
3
Editing
You can edit the group name or adddestinations for programmed groups.To edit a destination:
❖ For destinations programmed in QuickDial or Speed DialEdit the contents of the pro-grammed Quick Dial or Speed Di-al.See p.64 “Quick Dial” and p.72“Speed Dial”.
❖ For destinations programmed withnumber keysDelete the destination you want toedit from the group, and then pro-gram the new destination.
Note❒ When a programmed Group is be-
ing used for a standby MemoryTransmission, you cannot edit thegroup name or add destinationsfor the group.
A Press the {User Tools} key.
B Press 0 or 1 until " 2. Fax Fea-tures " is displayed.
C Press the {OK} key.
Confirm that " 1. Program / Delete" is displayed.
D Press the {OK} key.
E Press 0 or 1 until " 5. Prog.Group Dial " is displayed.
F Press the {OK} key.
G Display the number of the Groupyou want to edit (1 to 9). Enter the group number with thenumber keys, or search using 0 or1.
ZHMS130E
StellaF26_combine_F-GB_FM_forPaper.book Page 82 Tuesday, January 16, 2007 10:08 AM

Groups
83
3
H Press the {OK} key.
Confirm that “Yes” is selected.If you do not add a destination,press 0 or 1 to select “No”, andthen proceed to step O.
I Press the {OK} key.
Confirm that “Add” is selected.
J Press the {OK} key.
K Specify the destination using oneof the following three methods:Enter the fax number with thenumber keys.
Press a Quick Dial key.
Press the {Speed Dial} key and en-ter a Speed Dial number.
Note❒ You can use “Redial” when spec-
ifying the destination. See p.44“Redial”, Advanced Features.
L Press the {OK} key.
Confirm that “Add” is selected.
M To add another destination, re-peat steps J to L.
N If you finished adding a destina-tion, press the 0 or 1 to select "Exit ".
O Press the {OK} key.
Programmed Group name is dis-played.If you do not edit the Group name,proceed to step Q.
P Press the {Clear/Stop} key, andthen enter another name.
Q Press the {OK} key.
R Press 0 or 1 to select whether toassign the Group to a Quick Dialkey.
If you want to assign the Group toa Quick Dial key, select “Yes”.If you do not, select “No”, and thenproceed to step U.
StellaF26_combine_F-GB_FM_forPaper.book Page 83 Tuesday, January 16, 2007 10:08 AM

Programming
84
3
S Perform one of the following pro-cedures:
When the group was assigned to a Quick Dial key
A Press 0 or 1 to select whetherto change the assigned QuickDial key.
If you want to assign the Groupto another Quick Dial key, select“Yes”.If you do not, select “No”, andthen proceed to step U.
B Press the {OK} key.
When the group was not assigned to a Quick Dial key
A Press the {OK} key.
T Press the Quick Dial key youwant to assign the Group.
U Press the {OK} key.
If you want to edit another Group,proceed to step F.
V Press the {User Tools} key.The standby display reappears.
Deleting
Note❒ When a programmed Group is be-
ing used for a standby MemoryTransmission, you cannot deletethe destination for the Group.
❒ When you delete a destinationfrom a group programmed in aQuick Dial or a Speed Dial, thecontents of the Quick Dial or SpeedDial are not deleted.
To delete a destination from a group
The following procedure describeshow to delete a destination from agroup.
A Press the {User Tools} key.
B Press 0 or 1 until " 2. Fax Fea-tures " is displayed.
ZHMS130E
StellaF26_combine_F-GB_FM_forPaper.book Page 84 Tuesday, January 16, 2007 10:08 AM

Groups
85
3
C Press the {OK} key.
Confirm that " 1. Program / Delete" is displayed.
D Press the {OK} key.
E Press 0 or 1 until " 5. Prog.Group Dial " is displayed.
F Press the {OK} key.
G Display the group number for thedestination you want to delete (1 to 9). Enter the group number with thenumber keys, or search using 0 or1.
H Press the {OK} key.
Confirm that “Yes” is selected.
I Press the {OK} key.
J Press 0 or 1 to select "Delete".
K Press the {OK} key.
L Press 0 or 1 to display the desti-nation you want to delete.
M Press the {OK} key.
To delete another destination, re-peat steps J to M.
N Press the {User Tools} key. The standby display reappears.
To delete an entire group
The following procedure describeshow to delete all destinations from aGroup.
A Press the {User Tools} key.
ZHMS130E
StellaF26_combine_F-GB_FM_forPaper.book Page 85 Tuesday, January 16, 2007 10:08 AM

Programming
86
3
B Press 0 or 1 until " 2. Fax Fea-tures " is displayed.
C Press the {OK} key.
Confirm that " 1. Program / Delete" is displayed.
D Press the {OK} key.
E Press 0 or 1 until " 6. DeleteGroup Dial " is displayed.
F Press the {OK} key.
G Display the number of the groupyou want to delete (1 to 9). Enter the group number with thenumber keys, or search using 0 or1.
H Press the {OK} key.
I Press the {User Tools} key. The standby display reappears.
StellaF26_combine_F-GB_FM_forPaper.book Page 86 Tuesday, January 16, 2007 10:08 AM
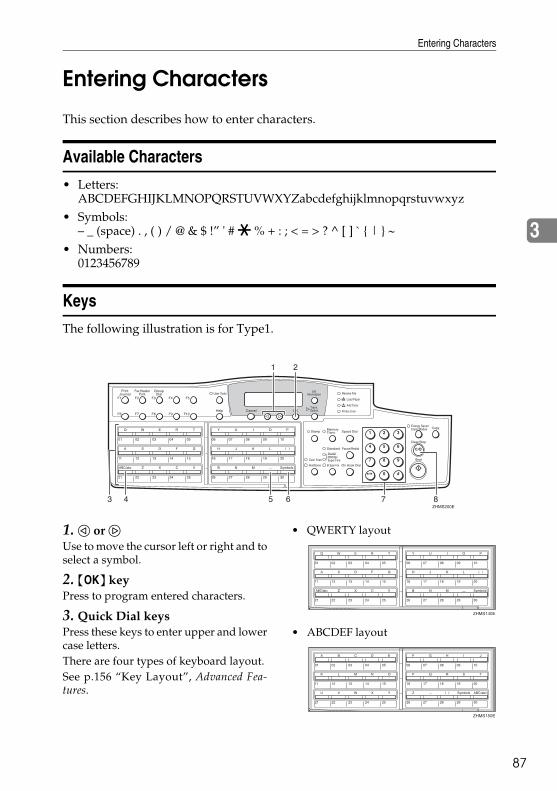
Entering Characters
87
3
Entering Characters
This section describes how to enter characters.
Available Characters
• Letters:ABCDEFGHIJKLMNOPQRSTUVWXYZabcdefghijklmnopqrstuvwxyz
• Symbols:– _ (space) . , ( ) / @ & $ !” ' # p % + : ; < = > ? ^ [ ] ` { | } ∼
• Numbers:0123456789
Keys
The following illustration is for Type1.
1.0 or 1Use to move the cursor left or right and toselect a symbol.
2. {OK} keyPress to program entered characters.
3. Quick Dial keysPress these keys to enter upper and lowercase letters.There are four types of keyboard layout.See p.156 “Key Layout”, Advanced Fea-tures.
• QWERTY layout
• ABCDEF layout
ZHMS200E
ZHMS140E
ZHMS150E
StellaF26_combine_F-GB_FM_forPaper.book Page 87 Tuesday, January 16, 2007 10:08 AM
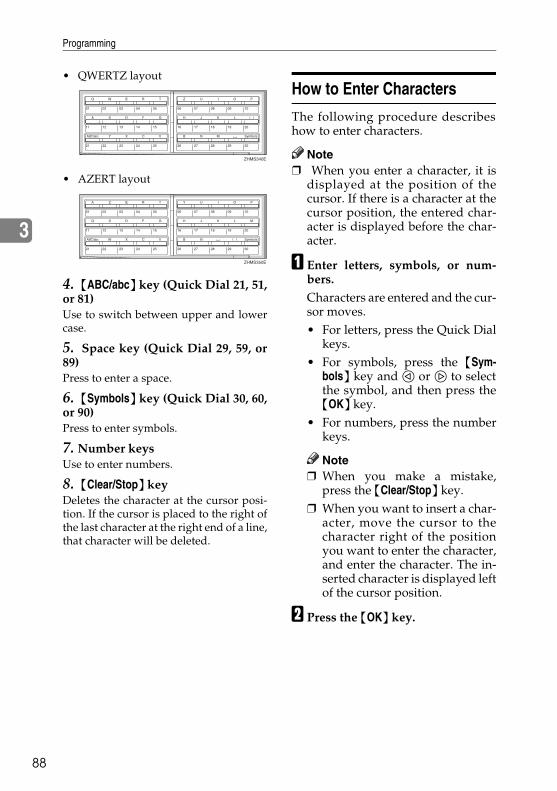
Programming
88
3
• QWERTZ layout
• AZERT layout
4. {ABC/abc} key (Quick Dial 21, 51,or 81)Use to switch between upper and lowercase.
5. Space key (Quick Dial 29, 59, or89)Press to enter a space.
6. {Symbols} key (Quick Dial 30, 60,or 90)Press to enter symbols.
7. Number keysUse to enter numbers.
8. {Clear/Stop} keyDeletes the character at the cursor posi-tion. If the cursor is placed to the right ofthe last character at the right end of a line,that character will be deleted.
How to Enter Characters
The following procedure describeshow to enter characters.
Note❒ When you enter a character, it is
displayed at the position of thecursor. If there is a character at thecursor position, the entered char-acter is displayed before the char-acter.
A Enter letters, symbols, or num-bers.Characters are entered and the cur-sor moves.• For letters, press the Quick Dial
keys.• For symbols, press the {Sym-
bols} key and 0 or 1 to selectthe symbol, and then press the{OK} key.
• For numbers, press the numberkeys.
Note❒ When you make a mistake,
press the {Clear/Stop} key.❒ When you want to insert a char-
acter, move the cursor to thecharacter right of the positionyou want to enter the character,and enter the character. The in-serted character is displayed leftof the cursor position.
B Press the {OK} key.
ZHMS340E
ZHMS350E
StellaF26_combine_F-GB_FM_forPaper.book Page 88 Tuesday, January 16, 2007 10:08 AM

Entering Characters
89
3
-Wild CardsWhen you program other parties'Own Name or Own Fax Numbers formultiple destinations, you can pro-gram a sequence of characters com-mon to these identifications as a wildcard instead of programming everyidentification.If a destination has an Own Name orOwn Fax Number containing a wildcard, the machine determines that thedestination matches the registereddestination.
❖ Not using a wild card
❖ Using a wild card
Note❒ You can program up to 50 wild
cards.❒ Spaces are neglected when the ma-
chine compares identifications.❒ You can use wild cards for the fol-
lowing functions:• Authorized Reception
See p.118 “Authorized Recep-tion”, Advanced Features.
• Memory Lock See p.121 “Memory Lock”, Ad-vanced Features.
• Multi Copy ReceptionSee p.123 “Multi-copy Recep-tion”, Advanced Features.
• Specified TraySee p.125 “Specified Tray”, Ad-vanced Features.
• Two-sided ReceptionSee p.128 “Two-sided Recep-tion”, Advanced Features.
• ForwardingSee p.131 “Forwarding”, Ad-vanced Features.
Destination to be registered (Own Name)
Number of pro-grammed identifica-tions
NEW YORK BRANCH
HONG KONG BRANCH
SYDNEY BRANCH
3
Destination to be registered (Own Name)
Number of pro-grammed identifica-tions
BRANCH 1
StellaF26_combine_F-GB_FM_forPaper.book Page 89 Tuesday, January 16, 2007 10:08 AM

Programming
90
3
StellaF26_combine_F-GB_FM_forPaper.book Page 90 Tuesday, January 16, 2007 10:08 AM

91
4. Troubleshooting
Loading Paper in the Main Paper Tray
If there is no paper in the main papertray, the B indicator on the controlpanel lights.Use the following procedure to loadpaper.
Important❒ When loading paper, be careful
not to pinch your fingers inside themachine.
❒ Before loading paper, make surethat the machine is not delivering acopy or a received fax message.
❒ Do not use stapled paper or con-ductive paper, such as carbon pa-per or silver coated paper.
Note❒ You can load up to 250 sheets in
the main paper tray.❒ Regarding paper types and sizes
that can be used, see p.201 “Rec-o m m e n d e d p a p e r s i z e s a n dtypes”, Advanced Features.
A Pull out the main paper tray untilit stops.
B Push the metal plate down, andthen square the paper and load itinto the tray.
Important❒ Do not stack paper over the lim-
it mark.
Note❒ Fan the paper before setting it in
the tray.
C Push the main paper tray in untilit stops.
StellaF26_combine_F-GB_FM_forPaper.book Page 91 Tuesday, January 16, 2007 10:08 AM

Troubleshooting
92
4
Replacing the Toner Cartridge
When the Add Toner indicator (D)starts to blink, the toner cartridge isalmost empty. About 50 pages can beprinted while the Add Toner indica-tor blinks, but replace the toner car-tridge soon.When the Add Toner indicator (D)remains lit, printing is not possible.
R WARNING:
R CAUTION:
• Do not incinerate used toner or toner cartridge. Toner dust might ignite when exposed to an open flame. Dispose of used toner cartridge in ac-cordance with local regula-tions.
• Keep toner (used or unused) and toner cartridges out of reach of children.
• Do not open toner cartridges forcefully. Toner can spill, dirty-ing your clothes or hands, and possibly resulting in accidental ingestion.
• If toner or used toner is inhaled, gargle with plenty of water and move into a fresh air environ-ment. Consult a doctor if neces-sary.
• If toner or used toner gets into your eyes, flush thoroughly with eyswash or water. Consult a doctor if necessary.
• If toner or used toner is swal-lowed, dilute by drinking a large amount of water. Consult a doc-tor if necessary.
• Avoid getting toner on your clothes or skin when removing a paper jam or replacing toner. If your skin comes into contact with toner, wash the affected area throughly with soap and water.
• If toner gets on your clothing, wash with cold water. Hot water will set the toner into the fabric and may make removing the stain impossible.
StellaF26_combine_F-GB_FM_forPaper.book Page 92 Tuesday, January 16, 2007 10:08 AM

Replacing the Toner Cartridge
93
4
Important❒ Used toner cartridges can be recy-
cled. Please contact the seller ofthis machine.
❒ Make sure the power is turned onwhen replacing the toner car-tridge.
❒ Fault may occur if you use tonerother than the recommended type.
❒ Do not leave the front cover openfor a protracted length of time. Ex-posing the toner cartridge to lightfor an extended period of time maycause it to deteriorate, so replacethe cartridge as quickly as possi-ble.
❒ Do not position the toner cartridgeupside down or at an angle.
A Open the front cover.
B Push the lever (A) and pull outthe old toner cartridge holding Aand B.
C Prepare the new toner cartridge.Hold the cartridge horizontallyand shake it gently from side toside a few times.
D Remove the tape from the tonercartridge.
E Insert the toner cartridge and makesure it locks securely into place.ZHMH090E
StellaF26_combine_F-GB_FM_forPaper.book Page 93 Tuesday, January 16, 2007 10:08 AM
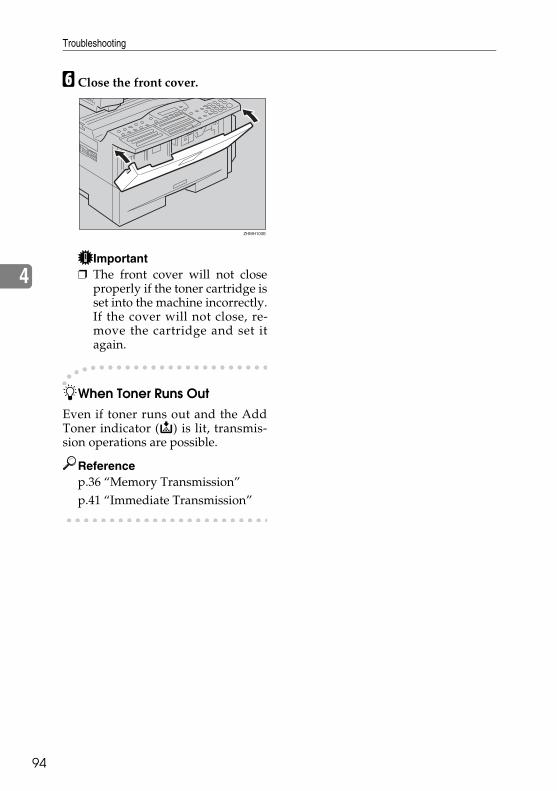
Troubleshooting
94
4
F Close the front cover.
Important❒ The front cover will not close
properly if the toner cartridge isset into the machine incorrectly.If the cover will not close, re-move the cartridge and set itagain.
-When Toner Runs OutEven if toner runs out and the AddToner indicator (D) is lit, transmis-sion operations are possible.
Referencep.36 “Memory Transmission”p.41 “Immediate Transmission”
ZHMH100E
StellaF26_combine_F-GB_FM_forPaper.book Page 94 Tuesday, January 16, 2007 10:08 AM

Toner Cartridge Storage
95
4
Toner Cartridge Storage
R WARNING:
R CAUTION:
• Store in a cool, dark place.• Never store where they may be ex-
posed to heat.• Do not eat toner.• Do not lay heavy objects on toner
cartridge.
• Do not incinerate used toner or toner cartridge. Toner dust might ignite when exposed to an open flame. Dispose of used toner cartridge in ac-cordance with local regula-tions.
• Keep toner (used or unused) and toner cartridges out of reach of children.
StellaF26_combine_F-GB_FM_forPaper.book Page 95 Tuesday, January 16, 2007 10:08 AM

Troubleshooting
96
4
Adjusting Volume
You can change the volume of the fol-lowing sounds the machine makes:
❖ On HookSounds when you press the {OnHook Dial} key.
❖ TransmissionSounds when the machine sends amessage.
❖ ReceptionSounds when the machine receivesa message.
❖ DialingAfter pressing the {Start} key, thissound is made until the line con-nects to the destination.
❖ Key ToneSounds when keys on the ControlPanel are pressed.
❖ AlarmSounds as a warning.
Note❒ When using On Hook Dial, you
can adjust the volume on the dis-play by pressing the {On Hook Dial}key. See p.49 “On Hook Dial”, Ad-vanced Features.
❒ You can assign the Monitor Vol-ume function to a User Functionkey. See p.101 “User FunctionKeys”, Advanced Features. Whenyou press the User Function keywith this function programmed in,proceed to step F in the followingprocedure.
❒ Make sure that the machine is instandby mode before performingthe following procedure.
A Press the {User Tools} key.
B Press 0 or 1 until " 2. Fax Fea-tures " is displayed.
C Press the {OK} key.
Confirm that " 1. Program / Delete" is displayed.
D Press 0 or 1 until " 3. Setup " isdisplayed.
E Press the {OK} key.
Confirm that " 1. Monitor Volume" is displayed.
ZHMS130E
StellaF26_combine_F-GB_FM_forPaper.book Page 96 Tuesday, January 16, 2007 10:08 AM

Adjusting Volume
97
4
F Press the {OK} key.
G Press 0 or 1 to select the itemyou want to adjust, and then pressthe {OK} key.
H Press 0 or 1 to adjust the vol-ume.
I Press the {OK} key.
If you want to adjust another item,repeat steps G to I.
J Press the {User Tools} key. The standby display reappears.
-Emit a Beep When a Communication Is Complete
If you set “Emit a beep when a com-munication is complete” on with theUser Parameters (switch 01, bit 6), abeep will be emitted when a commu-nication is complete. This is useful forknowing when a fax message hasbeen received or a transmission iscomplete. See p.140 “User Parame-ters”, Advanced Features.
StellaF26_combine_F-GB_FM_forPaper.book Page 97 Tuesday, January 16, 2007 10:08 AM

Troubleshooting
98
4
Clearing Original Jams
If an original is jammed, the hindica-tor blinks and “Clear Misfed Orig-inal(s)“ is displayed.Perform the following procedure toclear the jammed original.
A Open the ADF cover.
BWhile pushing the release button,lift the ADF unit.
C Remove the original.
D Close the ADF unit and ADF cov-er making sure they click firmlyinto place.
ZHMH050E
StellaF26_combine_F-GB_FM_forPaper.book Page 98 Tuesday, January 16, 2007 10:08 AM

Clearing a Copy, Fax, or Print Jam
99
4
Clearing a Copy, Fax, or Print Jam
R CAUTION:
If a copy, fax, or printed paper isjammed, the hindicator blinks and“Clear Misfed Paper“ is displayed.Perform the following procedure toclear the jammed paper.
Important❒ The fusing unit and surrounding
area inside the machine becomeshot during printing. To avoid inju-ry when removing paper jams, donot touch any parts other thanthose specified in this manual.
Note❒ If paper jams occur in the optional
paper tray unit, see p.173 “Clear-ing a Paper Jam in the Optional Pa-per Tray Unit”, Advanced Features.
A Open the right cover.
B Open the blue cover.
C Pull out the jammed paper.
When paper is caught in the lower unit
A Pull out the jammed paper.
• The fusing section of this ma-chine might be very hot. Caution should be taken when removing misfed paper.
• The inside of the machine could be very hot. Do not touch the parts with a label indicating "hot surface". Otherwise an injury might occur.
ZHMH060E
ZHMH070E
ZHMH080E
StellaF26_combine_F-GB_FM_forPaper.book Page 99 Tuesday, January 16, 2007 10:08 AM
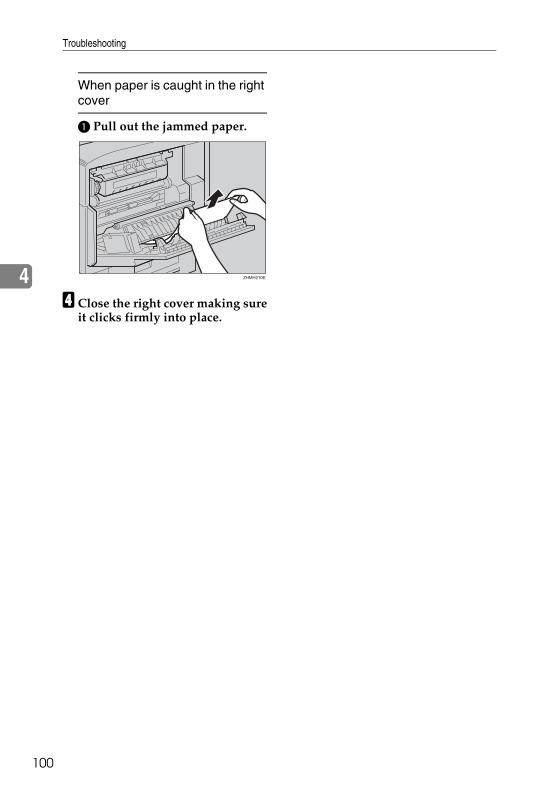
Troubleshooting
100
4
When paper is caught in the right cover
A Pull out the jammed paper.
D Close the right cover making sureit clicks firmly into place.
StellaF26_combine_F-GB_FM_forPaper.book Page 100 Tuesday, January 16, 2007 10:08 AM
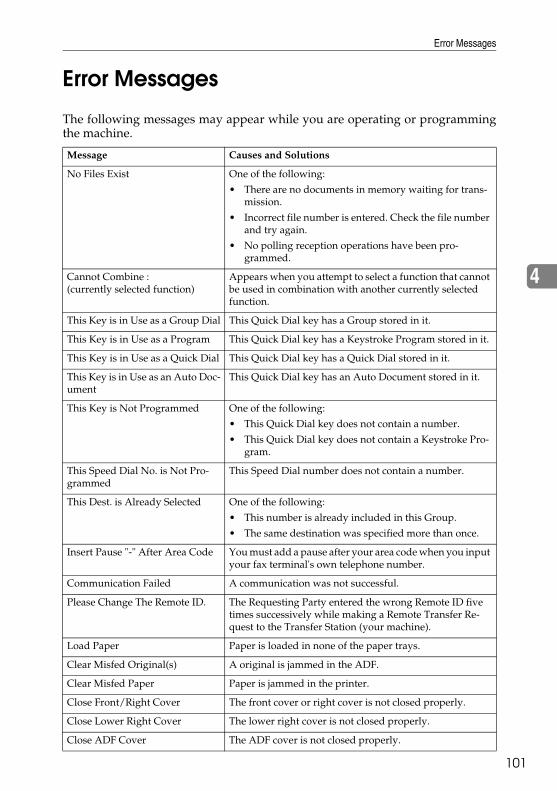
Error Messages
101
4
Error Messages
The following messages may appear while you are operating or programmingthe machine.
Message Causes and Solutions
No Files Exist One of the following:
• There are no documents in memory waiting for trans-mission.
• Incorrect file number is entered. Check the file number and try again.
• No polling reception operations have been pro-grammed.
Cannot Combine : (currently selected function)
Appears when you attempt to select a function that cannot be used in combination with another currently selected function.
This Key is in Use as a Group Dial This Quick Dial key has a Group stored in it.
This Key is in Use as a Program This Quick Dial key has a Keystroke Program stored in it.
This Key is in Use as a Quick Dial This Quick Dial key has a Quick Dial stored in it.
This Key is in Use as an Auto Doc-ument
This Quick Dial key has an Auto Document stored in it.
This Key is Not Programmed One of the following:
• This Quick Dial key does not contain a number.
• This Quick Dial key does not contain a Keystroke Pro-gram.
This Speed Dial No. is Not Pro-grammed
This Speed Dial number does not contain a number.
This Dest. is Already Selected One of the following:
• This number is already included in this Group.
• The same destination was specified more than once.
Insert Pause "-" After Area Code You must add a pause after your area code when you input your fax terminal's own telephone number.
Communication Failed A communication was not successful.
Please Change The Remote ID. The Requesting Party entered the wrong Remote ID five times successively while making a Remote Transfer Re-quest to the Transfer Station (your machine).
Load Paper Paper is loaded in none of the paper trays.
Clear Misfed Original(s) A original is jammed in the ADF.
Clear Misfed Paper Paper is jammed in the printer.
Close Front/Right Cover The front cover or right cover is not closed properly.
Close Lower Right Cover The lower right cover is not closed properly.
Close ADF Cover The ADF cover is not closed properly.
StellaF26_combine_F-GB_FM_forPaper.book Page 101 Tuesday, January 16, 2007 10:08 AM
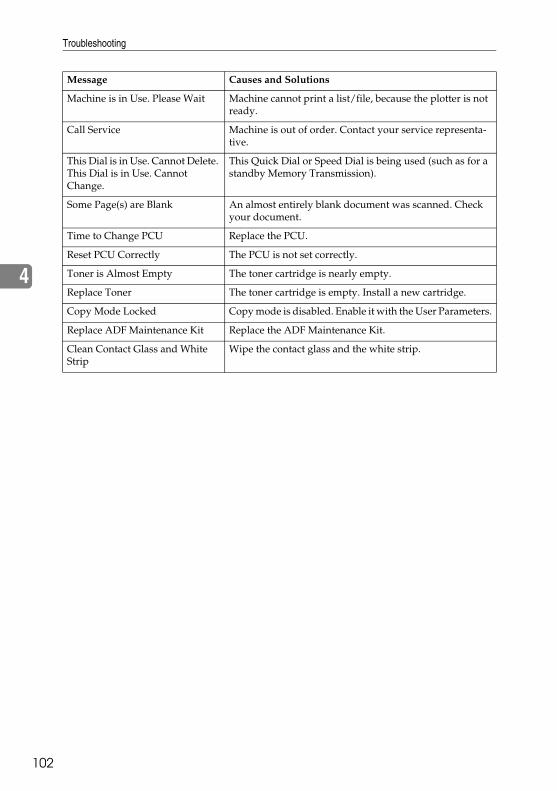
Troubleshooting
102
4
Machine is in Use. Please Wait Machine cannot print a list/file, because the plotter is not ready.
Call Service Machine is out of order. Contact your service representa-tive.
This Dial is in Use. Cannot Delete. This Dial is in Use. Cannot Change.
This Quick Dial or Speed Dial is being used (such as for a standby Memory Transmission).
Some Page(s) are Blank An almost entirely blank document was scanned. Check your document.
Time to Change PCU Replace the PCU.
Reset PCU Correctly The PCU is not set correctly.
Toner is Almost Empty The toner cartridge is nearly empty.
Replace Toner The toner cartridge is empty. Install a new cartridge.
Copy Mode Locked Copy mode is disabled. Enable it with the User Parameters.
Replace ADF Maintenance Kit Replace the ADF Maintenance Kit.
Clean Contact Glass and White Strip
Wipe the contact glass and the white strip.
Message Causes and Solutions
StellaF26_combine_F-GB_FM_forPaper.book Page 102 Tuesday, January 16, 2007 10:08 AM

Indicators
103
4
Indicators
Problem Causes Solutions
B is lit red. Paper has run out Load paper.
See p.91 “Loading Paper in the Main Paper Tray”.
D is lit red. Toner is exhausted Replace the toner cartridge.
See p.92 “Replacing the Toner Car-tridge”.
Note❒ Even if there is no toner left, you
can still send fax messages.
h is lit red. Paper is jammed Remove the jammed paper.
See p.98 “Clearing Original Jams” and p.99 “Clearing a Copy, Fax, or Print Jam”.
h is lit red. Cover is open Close the cover.
The Receive File indicator is lit.
You have received a mes-sage into memory. (Substi-tute Reception)
Print the message stored in memory if it is not printed out automatically.
See p.69 “Substitute Reception”, Ad-vanced Features.
StellaF26_combine_F-GB_FM_forPaper.book Page 103 Tuesday, January 16, 2007 10:08 AM

Troubleshooting
104
4
Solving Problems
This table lists some common problems and their solutions.
Problem Solutions Reference
Cannot transmit or receive. The telephone line may have become disconnected. Make sure it is correctly con-nected.
p.196 “Connecting to a Telephone Line”, Advanced Features
The data stored in the ma-chine memory (Memory Transmission/Reception, Substitute Reception, or Auto Document; or data of other standby document) has been deleted.
Check the Power Failure Re-port, and then request the sender to send the deleted fax message again or store the deleted document into memory once more.
p.174 “Power Failure Report”, Ad-vanced Features
Multiple sheets are fed into the ADF at the same time, or the original will not feed in at all.
If the original is too thick, too thin, or the back surface is slippery, it might not be fed into the ADF properly. Only set appropriate types of originals in the ADF.
p.200 “Acceptable Types of Origi-nals”, Advanced Features
Image background appears dirty when received at the other end.
Adjust the scan density. p.44 “Scan Settings”
Printed or sent image con-tains black lines or spots.
The ADF is dirty. Make sure that ink or eraser is dry be-fore setting originals.
p.183 “Cleaning the Scanner”, Ad-vanced Features
Message appears blank at the other end.
The original was placed with the wrong side facing down. Place it with the op-posite side facing down.
p.33 “Placing Originals”
Received image is too light. Request the sender to in-crease the image density.
p.200 “Acceptable Types of Origi-nals”, Advanced Features
When using moist, rough or processed paper, the print-ed image may be hard to see. Only use recommended paper types.
When D is blinking, toner is beginning to run out. Re-place the toner cartridge soon.
p.92 “Replacing the Toner Car-tridge”
You cannot add any desti-nations to a Group even though the maximum ca-pacity does not seem to have been reached.
100 destinations have been programmed with the number keys. Program ad-ditional destinations with Quick Dials or Speed Dials instead.
p.49 “Using Quick Dials” or p.50 “Using Speed Dials”
StellaF26_combine_F-GB_FM_forPaper.book Page 104 Tuesday, January 16, 2007 10:08 AM
Solving Problems
105
4
Cannot print onto paper even though it is of an ap-propriate size.
Make sure the paper size de-tection plate for the main paper tray or optional paper tray unit matches the paper size actually loaded in that tray or unit.
p.180 “Changing the Paper Size”, Advanced Features
Some part of a copied image is missing.
Check that the original is placed correctly.
p.33 “Placing Originals”
Select the correct sized pa-per.
p.201 “Recommended paper sizes and types”, Advanced Features
Cannot have messages or copies printed on both sides of paper.
Specify the tray for which Two-Sided Printing is turned on.
p.110 “Paper Tray for Two-sided Printing”, Advanced Features
Problem Solutions Reference
StellaF26_combine_F-GB_FM_forPaper.book Page 105 Tuesday, January 16, 2007 10:08 AM

Troubleshooting
106
4
When Things Don't Go as Expected
This table lists operations which allow you to cancel Memory Transmission, Im-mediate Transmission, or copying, or to exit Energy Saver Mode.
Problem Solutions Reference
You want to cancel a Memory Transmission.
If the original is being scanned, press the {Clear/Stop} key.
After the original is has been scanned, press the {Job Infor-mation} key.
p.38 “Canceling a Memory Trans-mission”
You want to cancel Immedi-ate Transmission.
Press the {Clear/Stop} key. p.43 “Canceling an Immediate Transmission”
You want to cancel copying. Press the {Stop} key. p.81 “Copying”, Advanced Features
You want to exit Energy Saver Mode.
Press the {Clear Modes/Energy Saver} key or place an origi-nal.
p.27 “Exiting Energy Saver Mode”
StellaF26_combine_F-GB_FM_forPaper.book Page 106 Tuesday, January 16, 2007 10:08 AM

Printing the Help List
107
4
Printing the Help List
Press the {Help} key and {Start} key toprint a copy of the Help List whichcontains brief descriptions about thefollowing features: • Immediate/Memory Transmis-
sion • Canceling Memory Transmission • Programming/Clearing Quick Di-
als • Printing lists of Quick Dials and
User Function keys • Programming/Clearing Speed Di-
als • Printing the Speed Dial List• Printing the Journal • Printing the Quick Dial Key Label
and User Function Key Label
StellaF26_combine_F-GB_FM_forPaper.book Page 107 Tuesday, January 16, 2007 10:08 AM

108
INDEX
300 × 300 dpi, 44
A
Add Toner indicator, 22ADF, 34ADF cover, 19Adjusting Volume
Alarm, 96Dialing, 96Key Tone, 96On Hook, 96Reception, 96Transmission, 96
Advanced Features (on CD-ROM), 17Auto Document Feeder (ADF), 19Auto Receive, 54
B
Basic Features (this manual), 17
C
Cancel key, 22Characters
Available Characters, 87Entering, 87Keys, 87
Clearing a Copy, Fax, or Print Jam, 99Clear Modes key, 23Clear/Stop key, 24Color Scan, 23Components, 19Control panel, 19, 22Copy key, 23CSI→Own Fax Number, 57
D
DeletingGroups, 84Quick Dial, 68Speed Dial, 76
Detail, 44Dialing, 47
Entering Numbers Directly, 47Using Group Dials, 51Using Quick Dials, 49Using Speed Dials, 50
Dial label, 69Display, 22
E
EditingGroups, 82Quick Dial, 67Speed Dial, 75
Energy Saver/Clear Modes key, 23Energy Saver key, 23Entering Characters, 87Error Messages, 101External telephone connector, 21Extra Super Fine, 44
F
Fax Header, 57Faxing, 31Front cover, 19Front View, 19
G
G3 line connector, 21Getting Started, 19Groups, 51, 78
Deleting, 84Dialing, 51Editing, 82Programming, 78
H
Halftone, 23Help key, 22How to Read This Manual, 15
I
Immediate Transmission, 31, 41Canceling, 43
Indicators, 103
J
Job Information key, 22
StellaF26_combine_F-GB_FM_forPaper.book Page 108 Tuesday, January 16, 2007 10:08 AM

109
L
Loading Paper, 91Load Paper Indicator, 22Lower right cover, 19Low-power Mode, 10
M
Main Paper Tray, 91Main paper tray, 19Manual Receive, 54, 55Manuals for This Machine, 17Memory Trans. key, 23Memory Transmission, 31, 36
Canceling, 38
N
Notice, 3Number keys, 24
Dialing, 47
O
OK key, 22On Hook Dial key, 24Optional bypass tray unit, 20Optional paper tray unit, 19Original guide, 20Original output tray, 20Original output tray guide, 20Original tray, 20Original Type, 44, 45Original Type key, 23Output tray, 19Output tray guide, 21Own Fax Number, 57Own Name, 57
P
Pause, 48Pause/Redial key, 24Placing Originals, 33Power, 21Printing the Help List, 107Programming
Fax Header, 57Groups, 78Own Fax Number, 57Own Name, 57Quick Dial, 65Speed Dial, 73
Q
Quick Dial, 64Deleting, 68Dialing, 49Dial label, 69Editing, 67Programming, 65
Quick Dial Key Flip Plate, 23Quick Dial keys, 23
R
Reading the Display, 25Receive File Indicator, 22Reception
Receiving Messages in Manual Receive, 55Reception Modes
Auto Receive, 54Manual Receive, 54Selecting, 54
Release button, 19Replacing the Toner Cartridge, 92Resolution, 44Resolution key, 23Restricted Access, 28Right cover, 20RTI→Own Name, 57
S
Scan Settings, 44Side View, 21Solving Problems, 104Speed Dial, 72, 73, 75, 76
Deleting, 76Dialing, 50Editing, 75Programming, 73
Speed Dial key, 23Stamp key, 23Standard, 44Start key, 24Status indicators, 20Super Fine, 44
StellaF26_combine_F-GB_FM_forPaper.book Page 109 Tuesday, January 16, 2007 10:08 AM

110
T
tonal signals, 48Tone, 48Toner Cartridge
Replacing, 92Storage, 95
Transmission Modes, 31Trans. Option key, 22Troubleshooting, 91
Error Messages, 101TTI→Fax Header, 57
U
User Function keys, 22User Tools key, 22
V
Ventilation Hole, 21Volume, 96
W
When Things Don't Go as Expected, 106Wild Cards, 89
StellaF26_combine_F-GB_FM_forPaper.book Page 110 Tuesday, January 16, 2007 10:08 AM

111
MEMO
StellaF26_combine_F-GB_FM_forPaper.book Page 111 Tuesday, January 16, 2007 10:08 AM

112 GB GB H557-8201
MEMO
StellaF26_combine_F-GB_FM_forPaper.book Page 112 Tuesday, January 16, 2007 10:08 AM

Paper type: OK Prince Eco G100(55kg), Paper Thickness=80 µm // Pages in book=116 // Print scale=81%Gap (when printed at 81% scale) = Pages in book × Paper thickness / 2 = 4.640000 mm
Declaration of Conformity
Notice to Users in EEA Countries
This product complies with the essential requirements and provisions of Directive 1999/5/EC of the Eu-ropean Parliament and of the Council of 9 March 1999 on radio equipment and telecommunicationsterminal equipment and the mutual recognition of their conformity.
Notice to Users Accessing Analog PSTN in EEA Countries
This product is designed to be able to access analog PSTN in all EEA countries. Local PSTN compat-ibility is dependent on software switch settings. Please contact your service representative if relocatingthis product to another country. In the event of problems, please contact your service representativein the first instance.
The CE Declaration of Conformity is available by accessing the URL:
http://www.ricoh.co.jp/fax/ce_doc/ and selecting the product applicable.
In accordance with IEC 60417, this machine uses the following symbols for the main power switch:
a means POWER ON.
b means POWER OFF.
Introduction
This manual contains detailed instructions and notes on the operation and use of this machine. For yoursafety and benefit, read this manual carefully before using the machine. Keep this manual in a handyplace for quick reference.
Notes:
Some illustrations in this manual might be slightly different from the machine.
Certain options might not be available in some countries. For details, please contact your local dealer.
Caution: Use of controls or adjustment or performance of procedures other than those specified in thismanual might result in hazardous radiation exposure. This product (see specification in the OperatingInstructions) is considered a class 1 laser device. Safety precautions and interlock mechanisms havebeen designed to prevent any possible laser beam exposure to the operator. The following marking isattached on the back of the product.
Two kinds of size notation are employed in this manual. With this machine refer to the metric version.
For good copy quality, the supplier recommends that you use genuine toner from the supplier.
The supplier shall not be responsible for any damage or expense that might result from the use of partsother than genuine parts from the supplier with your office products.
Important
Contents of this manual are subject to change without prior notice. In no event will the company be li-able for direct, indirect, special, incidental, or consequential damages as a result of handling or oper-ating the machine.
Power Source:
220–240V, 50/60Hz
Please be sure to connect the power cord to a power source as above. For details about the powersource, see Chapter 10, “Connecting the Power and Switching On” in the Advanced Features manual.
Trademarks
Adobe® and Acrobat® are registered trademarks of Adobe Systems Incorporated.
Microsoft®, Windows® and Windows NT® are registered trademarks of Microsoft Corporation in theUnited States and/or other countries.
Other product names used herein are for identification purposes only and might be trademarks of theirrespective companies. We disclaim any and all rights in those marks.
Note
The proper names of the Windows operating systems are as follows:
• Microsoft® Windows® 95 operating system
• Microsoft® Windows® 98 operating system
• Microsoft® Windows® Millennium Edition (Windows Me)
• Microsoft® Windows® 2000 Professional
• Microsoft® Windows® XP Professional
• Microsoft® Windows® XP Home Edition
• Microsoft® Windows® 2000 Server
• Microsoft® Windows NT® Server operating system Version 4.0
• Microsoft® Windows NT® Workstation operating system Version 4.0
For information about the latest available drivers, see the relevant manufacturer's Web site.
For safe and correct use of this machine, please be sure to read the Safety Information before you use it. Copyright © 2006

Paper type: OK Prince Eco G100(55kg), Paper Thickness=80 µm // Pages in book=116 // Print scale=81%Gap (when printed at 81% scale) = Pages in book × Paper thickness / 2 = 4.640000 mm
Operating Instructions
Basic Features
Operating Instructions
Basic Features
Operating Instructions
Basic Features
For safe and correct use of this machine, please be sure to read the Safety Information before you use it.
Getting Started
Faxing
Programming
Troubleshooting
1
2
3
4
Printed in The Netherlands
GB GB H557-8201