operating instructions before using ricoh pj interactive...
TRANSCRIPT
For safe and correct use, be sure to read the Safety Information in "Read This First" before using the machine.
Appendix
Troubleshooting
Managing RICOH PJ Interactive Software
Using RICOH PJ Interactive Software
Before Using RICOH PJ Interactive SoftwareOperating Instructions
Interactive Function

TABLE OF CONTENTSIntroduction......................................................................................................................................................... 3
How to Read This Manual ................................................................................................................................ 4
Symbols...........................................................................................................................................................4
Disclaimer........................................................................................................................................................4
Notes...............................................................................................................................................................4
1. Before Using RICOH PJ Interactive Software
RICOH PJ Interactive Software Overview........................................................................................................ 5
Using the Electronic Pen..................................................................................................................................... 7
Holding the Electronic Pen.............................................................................................................................7
How to Use the Electronic Pen...................................................................................................................... 7
Starting and Quitting RICOH PJ Interactive Software...................................................................................10
Starting RICOH PJ Interactive Software.....................................................................................................10
Quitting RICOH PJ Interactive Software.................................................................................................... 10
2. Using RICOH PJ Interactive Software
Switching the Screen with the Launcher......................................................................................................... 11
Viewing the Whiteboard Screen.....................................................................................................................13
Main operation panel icons........................................................................................................................13
Viewing the page operation panel.............................................................................................................14
Writing and Editing on the Whiteboard.........................................................................................................16
Writing and Drawing on the Whiteboard................................................................................................. 16
Erasing Written Information from the Whiteboard....................................................................................17
Editing Written Information on the Whiteboard........................................................................................ 18
Changing the Magnification of the Whiteboard.......................................................................................20
Editing Pages.................................................................................................................................................... 22
Selecting a Page.......................................................................................................................................... 22
Adding a Page.............................................................................................................................................22
Deleting Pages............................................................................................................................................. 23
Saving and Importing Pages........................................................................................................................... 25
Saving the Whiteboard to a File.................................................................................................................25
Importing and Displaying the File on the Whiteboard............................................................................. 25
Sharing the Whiteboard..................................................................................................................................27
Hosting Remote Whiteboard Sharing........................................................................................................ 28
Participating in Remote Whiteboard Sharing............................................................................................30
1
3. Managing RICOH PJ Interactive Software
Opening General Settings...............................................................................................................................33
Collecting Log Data.....................................................................................................................................33
Displaying the Version or Copyright Information......................................................................................34
Adding Your Remote License...................................................................................................................... 34
Managing a Remote Contact List............................................................................................................... 35
Configuring the System Update Method................................................................................................... 37
Setting the Display Language..................................................................................................................... 39
4. Troubleshooting
Messages Displayed When Using RICOH PJ Interactive Software.............................................................41
Projector Message.......................................................................................................................................41
RICOH PJ Interactive Software Message.................................................................................................. 41
When the Projected Screen Cannot Be Operated........................................................................................44
Checking Communication Status during Remote Whiteboard Sharing.......................................................45
5. Appendix
Trademarks....................................................................................................................................................... 47
2

IntroductionThis manual contains detailed instructions and notes on the operation and use of this product. For yoursafety and benefit, read this manual carefully before using the product. Keep this manual in a handyplace for quick reference.
3
How to Read This Manual
Symbols
This manual uses the following symbols:
Indicates points to pay attention to when using the product.
Indicates supplementary explanations of functions and instructions on resolving user errors.
[ ]Indicates the names of keys and buttons.
Disclaimer
To the maximum extent permitted by applicable laws, in no event will the manufacturer be liable for anydamages whatsoever arising out of failures of this product, losses of documents or data, or the use ornon-use of this product and operation manuals provided with it.
Make sure that you always copy or have backups of important documents or data. Documents or datamight be erased due to your operational errors or malfunctions of the machine. Also, you areresponsible for taking protective measures against computer viruses, worms, and other harmful software.
In no event will the manufacturer be responsible for any documents created by you using this product orany results from the data executed by you.
Notes
Contents of this manual are subject to change without prior notice.
Some illustrations or explanations in this guide may differ from your product due to improvement orchange in the product.
4

1. Before Using RICOH PJ InteractiveSoftwareThis chapter provides an overview of RICOH PJ Interactive Software and describes its basic operations.
RICOH PJ Interactive Software OverviewWith this product, you can operate a computer screen projected on the screen. With "RICOH PJInteractive Software", the software that comes with this product, you can write information and performvarious other operations on the screen.
To perform various operations on the screen, it is necessary to configure the interactive function on boththe projector and the computer. For information about how to configure the interactive function, see themanual included with this product.
CWD087
RICOH PJ Interactive Software incorporates a "launcher", which can switch the computer screenprojected on the screen, and the "whiteboard", which allows you to perform writing or various otheroperations on the screen. For details about how to use the launcher, see page 11 "Switching the
5

Screen with the Launcher". For details about how to view the whiteboard screen, see page 13"Viewing the Whiteboard Screen".
Operating a computer screen projected on the screen
You can operate the computer directly from the screen on which an image from the computer isbeing projected. You can do so even if you are standing away from the screen.
Use the electronic pen designated for this product to operate the computer on the screen. Fordetails about how to use the electronic pen, see page 7 "Using the Electronic Pen".
Using the screen as a whiteboard
You can use the screen as a whiteboard and freely write information onto it. For details about howto operate the whiteboard, see page 16 "Writing and Editing on the Whiteboard".
The information written on the whiteboard screen is managed by individual "pages", which can beadded and deleted. You can also switch between pages and edit written information, as well asadd new information to pages. For details about how to operate pages, see page 22 "EditingPages".
Writing information on the desktop screen of the computer
You can capture a screen displayed on the desktop to the whiteboard and write information on thecaptured screen. For details about how to capture a desktop screen, see page 22 "Adding aPage".
Saving the whiteboard to a file
You can save pages that were recorded on the whiteboard as a PDF file. The saved file can beimported into the whiteboard. For details about how to save pages, see page 25 "Saving theWhiteboard to a File".
Importing and displaying the file on the whiteboard
You can import the PDF file into the whiteboard and perform writing or other operations. For detailsabout how to import the file, see page 25 "Importing and Displaying the File on theWhiteboard".
Sharing a screen via a network (Remote whiteboard sharing)
You can share the whiteboard with other devices connected via a network to write information anddisplay images on the whiteboard. For details about remote whiteboard sharing, see page 27"Sharing the Whiteboard".
1. Before Using RICOH PJ Interactive Software
6

Using the Electronic PenCommunication between the electronic pen, projector, and computer is conducted wirelessly.
Do not block the area between the electronic pen, projector, and computer. In addition, do not usewireless devices near this product. Otherwise, the position of the electronic pen will not be recognizedcorrectly by the projector.
Holding the Electronic Pen
Hold the middle of the electronic pen. If the electronic pen is held by the nib or the bottom area, theposition of the electronic pen will not be recognized correctly by the projector.
CWD082
To align the point position of the electronic pen with the pen nib switch, and not the center of the pen,use the point adjustment button to move the point position up.
CWD030
How to Use the Electronic Pen
You can operate a computer screen projected onto the screen by touching it with the pen nib. You mayalso touch the pen nib twice on the same point on the screen as if to double-click a mouse.
Using the Electronic Pen
7
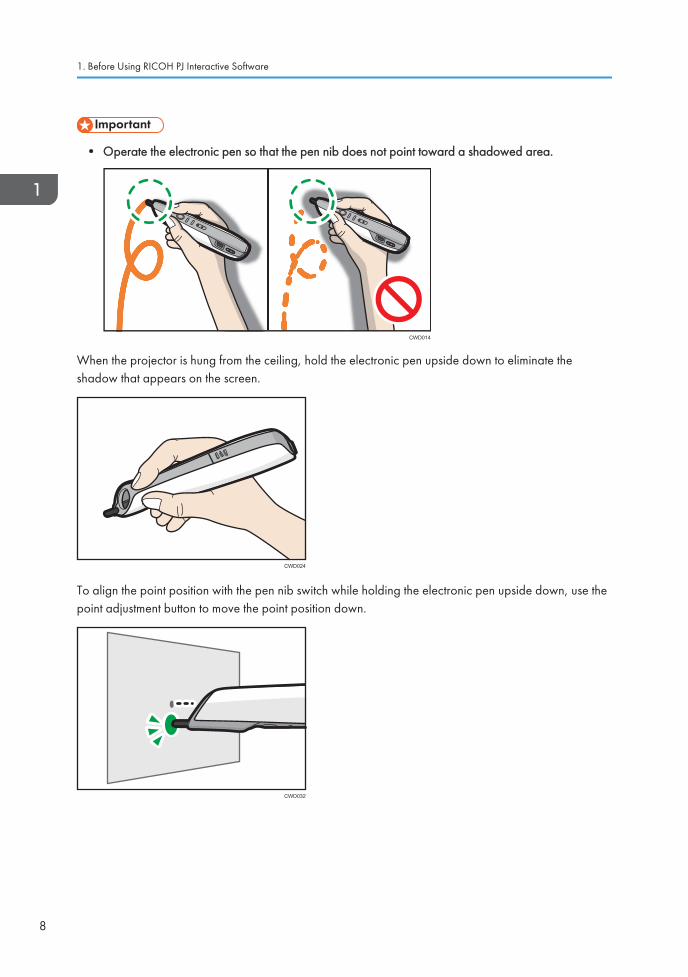
• Operate the electronic pen so that the pen nib does not point toward a shadowed area.
CWD014
When the projector is hung from the ceiling, hold the electronic pen upside down to eliminate theshadow that appears on the screen.
CWD024
To align the point position with the pen nib switch while holding the electronic pen upside down, use thepoint adjustment button to move the point position down.
CWD032
1. Before Using RICOH PJ Interactive Software
8
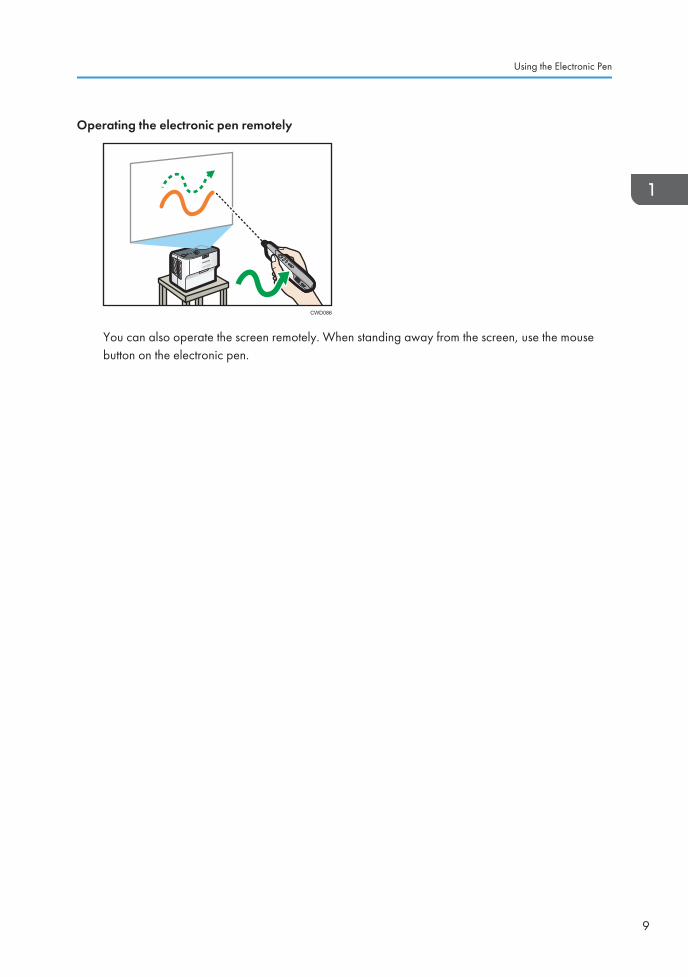
Operating the electronic pen remotely
CWD086
You can also operate the screen remotely. When standing away from the screen, use the mousebutton on the electronic pen.
Using the Electronic Pen
9
Starting and Quitting RICOH PJ InteractiveSoftware
Starting RICOH PJ Interactive Software
• Log on as a user with administrator privileges to automatically check if the system is up-to-date.
Start a computer on which RICOH PJ Interactive Software is installed. The launcher will startautomatically.
If the launcher does not start automatically, perform the following procedure.
1. Click [Start] on the desktop.
2. From [All Programs], select [Ricoh], [PJ Interactive Software].
3. Click [PJ Interactive Software].
Starts RICOH PJ Interactive Software launcher.
• If the function for checking that the system is up-to-date is enabled, an update message is displayedwhen RICOH PJ Interactive Software starts. For information about how to configure this functionand update the system, see page 37 "Configuring the System Update Method".
Quitting RICOH PJ Interactive Software
1. On the Windows task tray, right-click , the PJiS icon.
2. On the menu displayed, click [Close PJiS].
A confirmation message appears.
3. Click [OK].
All entered information and the added pages are deleted.
1. Before Using RICOH PJ Interactive Software
10

2. Using RICOH PJ Interactive SoftwareThis chapter describes how to view and use RICOH PJ Interactive Software.
Switching the Screen with the LauncherWith the launcher, you can switch between the desktop screen of the computer and the RICOH PJInteractive Software whiteboard screen. The launcher is available for operation only when the computerUSB adapter is attached to the computer.
When you start the software for the first time, the launcher appears at the upper left side of the screen.The display position of the launcher can be changed.
CWD042
1 2 3 4
1. Switching to the desktop
Switches a computer screen projected on the screen to the desktop. You can operate the pointer on the screenusing the electronic pen.
CWD079
This icon can be selected when the whiteboard is being displayed.
2. Writing on the desktop
Captures a screen displayed on the desktop to the whiteboard. You can write information on the capturedscreen.
11

CWD080
This icon can be selected when the desktop is being displayed.
3. Switching to the whiteboard
Switches a computer screen projected on the screen to the whiteboard. You can use the screen as awhiteboard.
CWD081
This icon can be selected when the desktop is being displayed.
4. Show/Hide
Hides the launcher. In addition, hides the whiteboard screen if it is active.
To display the launcher, touch , the PJiS icon on the Windows task tray.
2. Using RICOH PJ Interactive Software
12
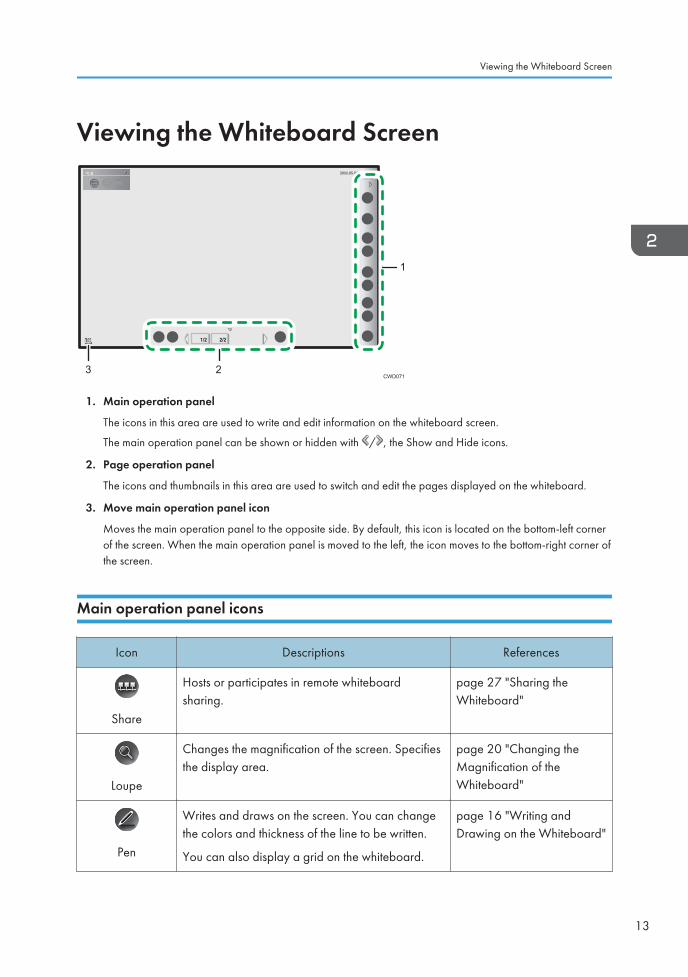
Viewing the Whiteboard Screen
CWD0713 2
1
1. Main operation panel
The icons in this area are used to write and edit information on the whiteboard screen.
The main operation panel can be shown or hidden with / , the Show and Hide icons.
2. Page operation panel
The icons and thumbnails in this area are used to switch and edit the pages displayed on the whiteboard.
3. Move main operation panel icon
Moves the main operation panel to the opposite side. By default, this icon is located on the bottom-left cornerof the screen. When the main operation panel is moved to the left, the icon moves to the bottom-right corner ofthe screen.
Main operation panel icons
Icon Descriptions References
Share
Hosts or participates in remote whiteboardsharing.
page 27 "Sharing theWhiteboard"
Loupe
Changes the magnification of the screen. Specifiesthe display area.
page 20 "Changing theMagnification of theWhiteboard"
Pen
Writes and draws on the screen. You can changethe colors and thickness of the line to be written.
You can also display a grid on the whiteboard.
page 16 "Writing andDrawing on the Whiteboard"
Viewing the Whiteboard Screen
13
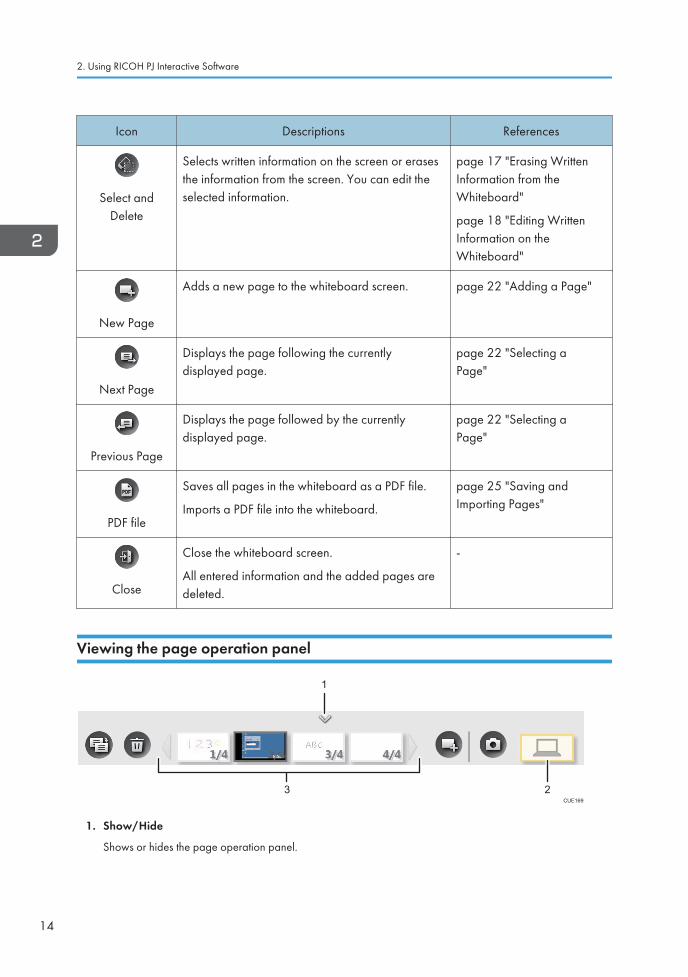
Icon Descriptions References
Select andDelete
Selects written information on the screen or erasesthe information from the screen. You can edit theselected information.
page 17 "Erasing WrittenInformation from theWhiteboard"
page 18 "Editing WrittenInformation on theWhiteboard"
New Page
Adds a new page to the whiteboard screen. page 22 "Adding a Page"
Next Page
Displays the page following the currentlydisplayed page.
page 22 "Selecting aPage"
Previous Page
Displays the page followed by the currentlydisplayed page.
page 22 "Selecting aPage"
PDF file
Saves all pages in the whiteboard as a PDF file.
Imports a PDF file into the whiteboard.
page 25 "Saving andImporting Pages"
Close
Close the whiteboard screen.
All entered information and the added pages aredeleted.
-
Viewing the page operation panel
CUE169
2
1
3
1. Show/Hide
Shows or hides the page operation panel.
2. Using RICOH PJ Interactive Software
14
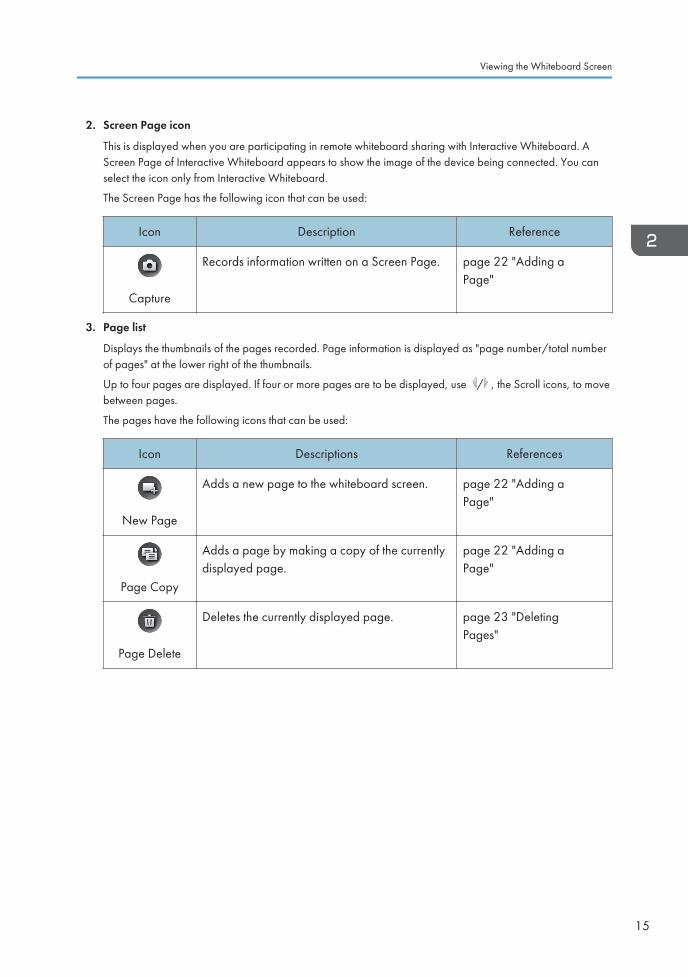
2. Screen Page icon
This is displayed when you are participating in remote whiteboard sharing with Interactive Whiteboard. AScreen Page of Interactive Whiteboard appears to show the image of the device being connected. You canselect the icon only from Interactive Whiteboard.
The Screen Page has the following icon that can be used:
Icon Description Reference
Capture
Records information written on a Screen Page. page 22 "Adding aPage"
3. Page list
Displays the thumbnails of the pages recorded. Page information is displayed as "page number/total numberof pages" at the lower right of the thumbnails.
Up to four pages are displayed. If four or more pages are to be displayed, use / , the Scroll icons, to movebetween pages.
The pages have the following icons that can be used:
Icon Descriptions References
New Page
Adds a new page to the whiteboard screen. page 22 "Adding aPage"
Page Copy
Adds a page by making a copy of the currentlydisplayed page.
page 22 "Adding aPage"
Page Delete
Deletes the currently displayed page. page 23 "DeletingPages"
Viewing the Whiteboard Screen
15
Writing and Editing on the WhiteboardWhen you write, draw, edit, or erase information directly on the screen, switch the projected computerscreen to the whiteboard screen using the launcher. For details about how to operate the launcher, seepage 11 "Switching the Screen with the Launcher".
Writing and Drawing on the Whiteboard
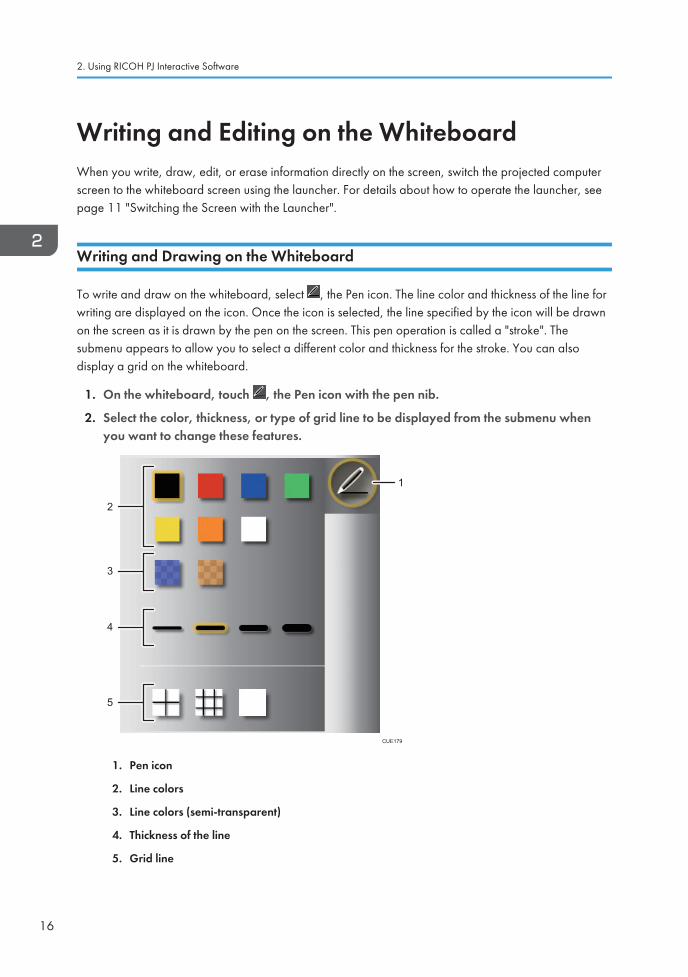
To write and draw on the whiteboard, select , the Pen icon. The line color and thickness of the line forwriting are displayed on the icon. Once the icon is selected, the line specified by the icon will be drawnon the screen as it is drawn by the pen on the screen. This pen operation is called a "stroke". Thesubmenu appears to allow you to select a different color and thickness for the stroke. You can alsodisplay a grid on the whiteboard.
1. On the whiteboard, touch , the Pen icon with the pen nib.
2. Select the color, thickness, or type of grid line to be displayed from the submenu whenyou want to change these features.
CUE179
1
2
3
4
5
1. Pen icon
2. Line colors
3. Line colors (semi-transparent)
4. Thickness of the line
5. Grid line
2. Using RICOH PJ Interactive Software
16
3. Move the pen on the screen.
While the pen nib is on the screen, you can draw lines.
• 3,000 strokes are possible per page.
• 90,000 strokes are possible on all pages.
Erasing Written Information from the Whiteboard
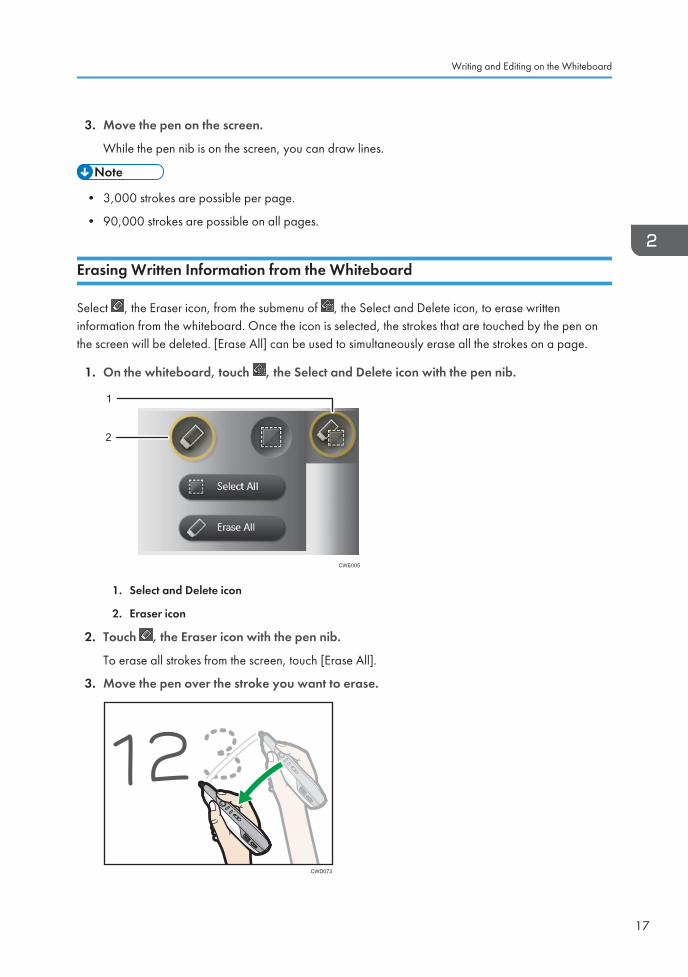
Select , the Eraser icon, from the submenu of , the Select and Delete icon, to erase writteninformation from the whiteboard. Once the icon is selected, the strokes that are touched by the pen onthe screen will be deleted. [Erase All] can be used to simultaneously erase all the strokes on a page.
1. On the whiteboard, touch , the Select and Delete icon with the pen nib.
CWE005
2
1
1. Select and Delete icon
2. Eraser icon
2. Touch , the Eraser icon with the pen nib.
To erase all strokes from the screen, touch [Erase All].
3. Move the pen over the stroke you want to erase.
CWD073
Writing and Editing on the Whiteboard
17
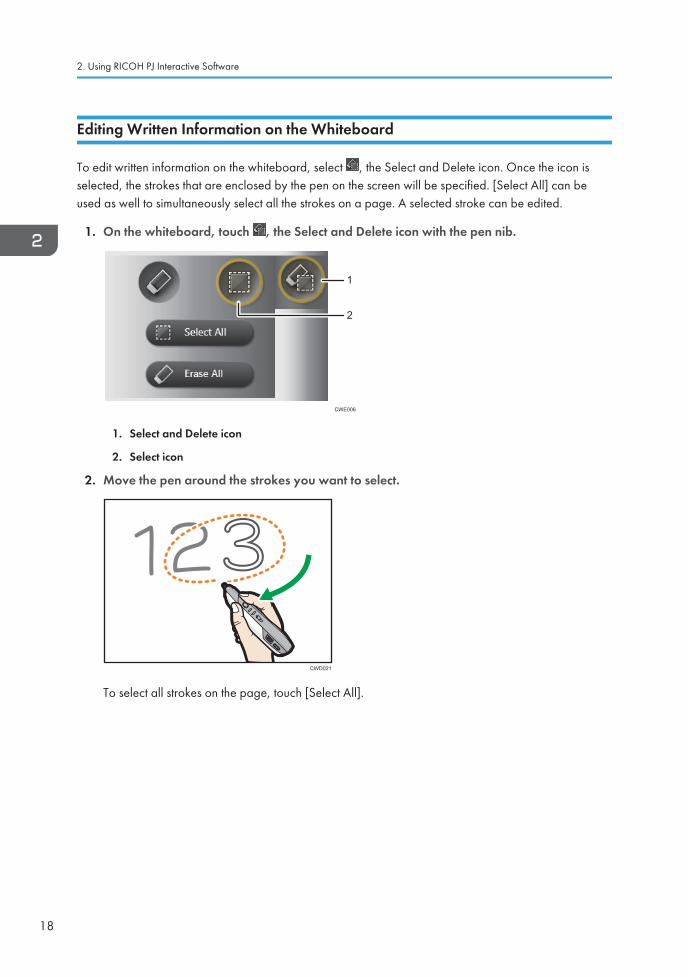
Editing Written Information on the Whiteboard
To edit written information on the whiteboard, select , the Select and Delete icon. Once the icon isselected, the strokes that are enclosed by the pen on the screen will be specified. [Select All] can beused as well to simultaneously select all the strokes on a page. A selected stroke can be edited.
1. On the whiteboard, touch , the Select and Delete icon with the pen nib.
CWE006
1
2
1. Select and Delete icon
2. Select icon
2. Move the pen around the strokes you want to select.
CWD021
To select all strokes on the page, touch [Select All].
2. Using RICOH PJ Interactive Software
18
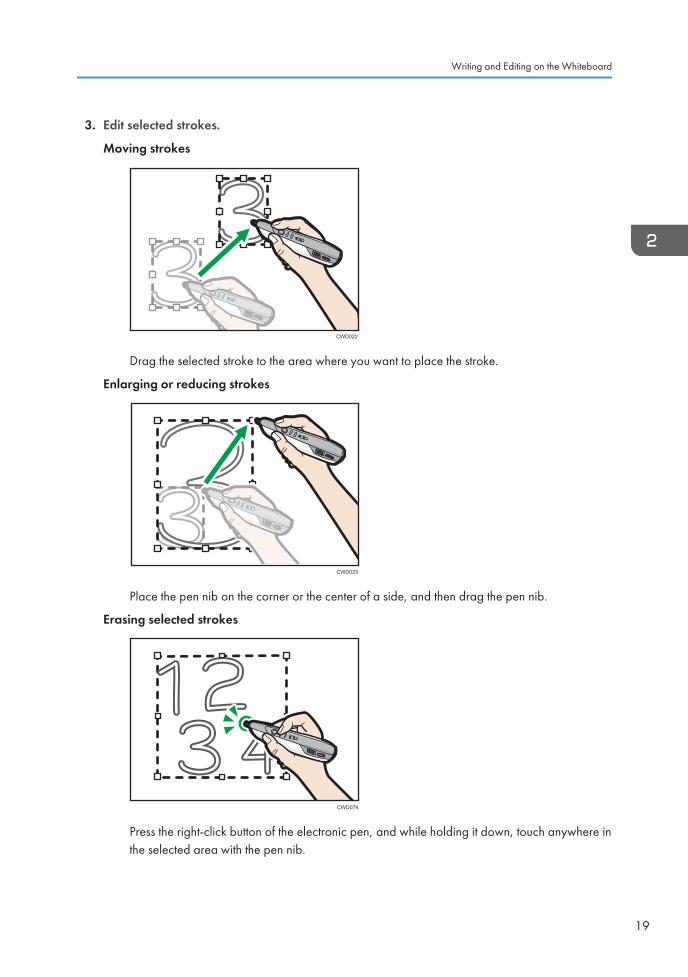
3. Edit selected strokes.
Moving strokes
CWD022
Drag the selected stroke to the area where you want to place the stroke.
Enlarging or reducing strokes
CWD023
Place the pen nib on the corner or the center of a side, and then drag the pen nib.
Erasing selected strokes
CWD074
Press the right-click button of the electronic pen, and while holding it down, touch anywhere inthe selected area with the pen nib.
Writing and Editing on the Whiteboard
19
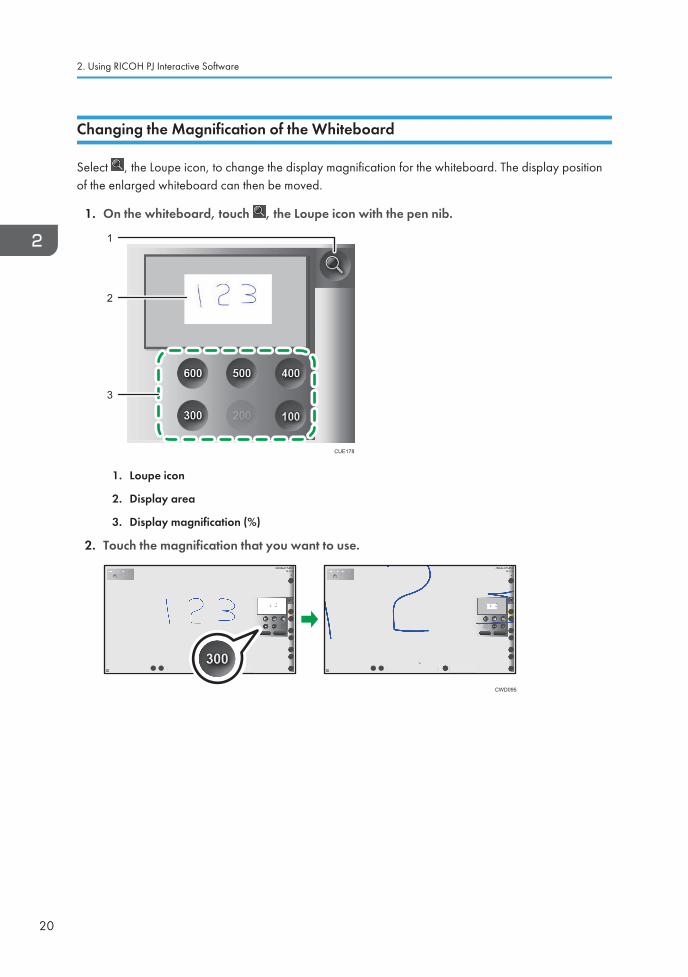
Changing the Magnification of the Whiteboard
Select , the Loupe icon, to change the display magnification for the whiteboard. The display positionof the enlarged whiteboard can then be moved.
1. On the whiteboard, touch , the Loupe icon with the pen nib.
CUE178
2
1
3
1. Loupe icon
2. Display area
3. Display magnification (%)
2. Touch the magnification that you want to use.
CWD095
2. Using RICOH PJ Interactive Software
20
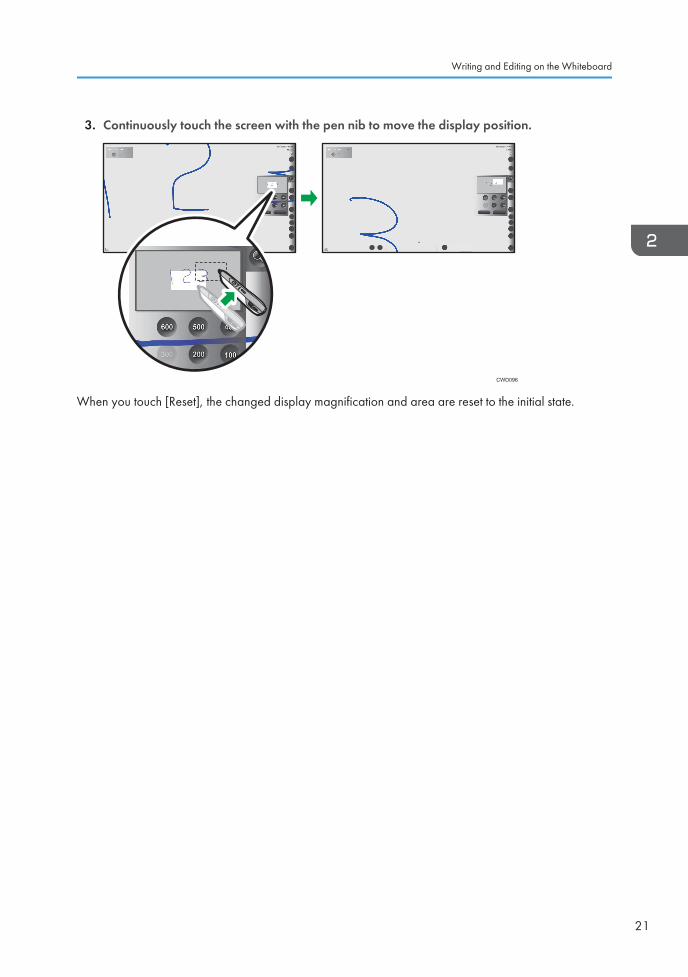
3. Continuously touch the screen with the pen nib to move the display position.
CWD096
When you touch [Reset], the changed display magnification and area are reset to the initial state.
Writing and Editing on the Whiteboard
21
Editing PagesYou can add new strokes to a page displayed on the whiteboard or edit existing strokes. You can alsoadd or delete a displayed page.
Selecting a Page
You can select the page you want to display on the whiteboard as follows:
Selecting a page from the page operation panel
Touch the corresponding thumbnail from the page list.
Turning pages with the main operation panel
When you touch , the Previous Page icon, the page followed by the currently displayed pageappears. When you touch , the Next Page icon, the page following the currently displayedpage appears.
• If the selected page is the first page in the page list, , the Previous Page icon does not work.
• If the selected page is the last page in the page list, , the Next Page icon does not work.
Adding a Page
You can add a new page or make a copy of an existing page. You can also use the launcher to captureto the whiteboard a screen displayed on the desktop.
Adding a new page
To add a new page, touch , the New Page icon.
A new blank page is created at the end of the page list. The added page appears on thewhiteboard.
Capturing a screen displayed on the desktop of the computer
Use the launcher to capture to the whiteboard a screen displayed on the desktop. For details abouthow to operate the launcher, see page 11 "Switching the Screen with the Launcher".
1. Operate the desktop to display the screen you want to capture to the whiteboard.
2. Using RICOH PJ Interactive Software
22
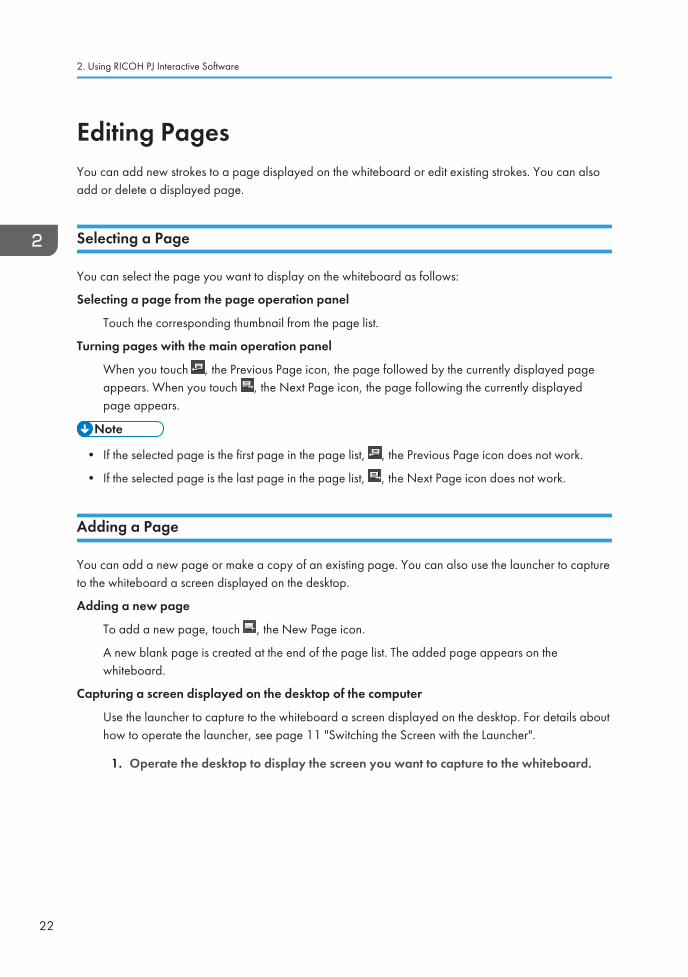
2. Use the launcher to capture a screen displayed on the desktop.
CWD080
The screen image captured to the whiteboard is displayed, allowing you to write informationon the image. The screen image is created at the end of the page list.
Making a copy of a page
To make a copy of a page, touch , the Page Copy icon.
A copy of the selected page is added immediately after the page and then displayed. The addedpage appears on the whiteboard.
Recording a Screen Page
When a Screen Page is selected, , the Capture icon, is used to record the current page.
When , the Capture icon, is touched, the written information and displayed image are added tothe end of the Pages list, with the screen page displayed. All strokes on the screen page aredeleted.
When the image of the device connected to Interactive Whiteboard is displayed, the displayedimage is also recorded.
• When a whiteboard is being shared, , the Page Copy icon, does not work.
• You can add up to 100 pages.
• If 90,000 strokes are made on all pages, a new page cannot be added.
Deleting Pages
To delete a page, touch , the Page Delete icon. When the icon is touched, a confirmation messageappears.
Select [OK] to delete the selected page. When the selected page is deleted, the corresponding page onthe whiteboard is deleted and the preceding page appears. If the deleted page is the first page, the nextpage appears.
• If there is only one page to be deleted, , the Page Delete icon does not work.
Editing Pages
23

• When a whiteboard is being shared, , the Page Delete icon does not work.
2. Using RICOH PJ Interactive Software
24
Saving and Importing Pages
Saving the Whiteboard to a File
You can save all pages in the whiteboard as a single PDF file.
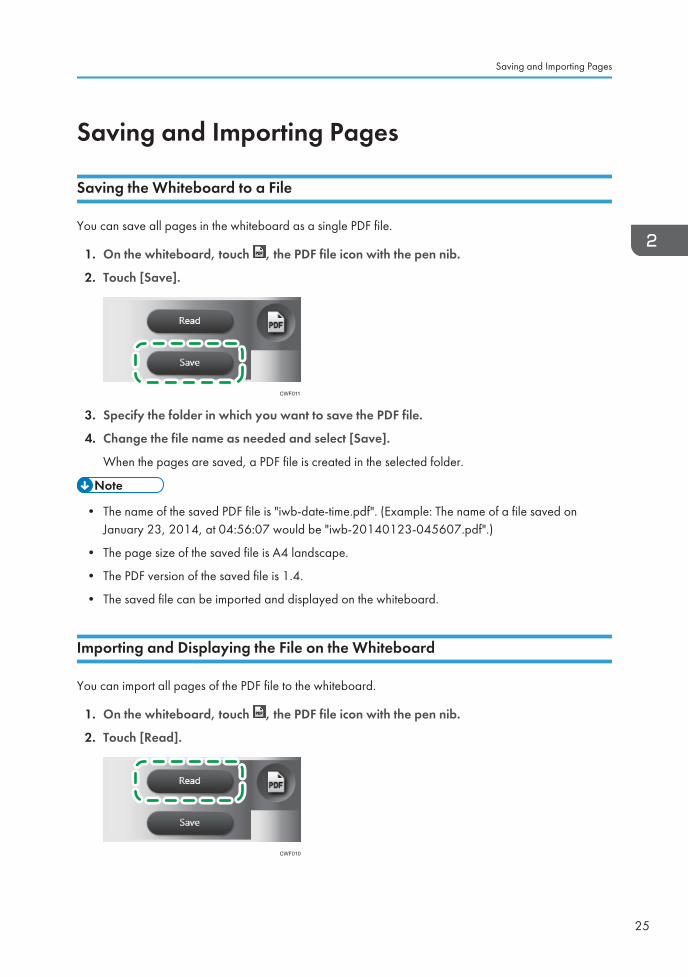
1. On the whiteboard, touch , the PDF file icon with the pen nib.
2. Touch [Save].
CWF011
3. Specify the folder in which you want to save the PDF file.
4. Change the file name as needed and select [Save].
When the pages are saved, a PDF file is created in the selected folder.
• The name of the saved PDF file is "iwb-date-time.pdf". (Example: The name of a file saved onJanuary 23, 2014, at 04:56:07 would be "iwb-20140123-045607.pdf".)
• The page size of the saved file is A4 landscape.
• The PDF version of the saved file is 1.4.
• The saved file can be imported and displayed on the whiteboard.
Importing and Displaying the File on the Whiteboard
You can import all pages of the PDF file to the whiteboard.
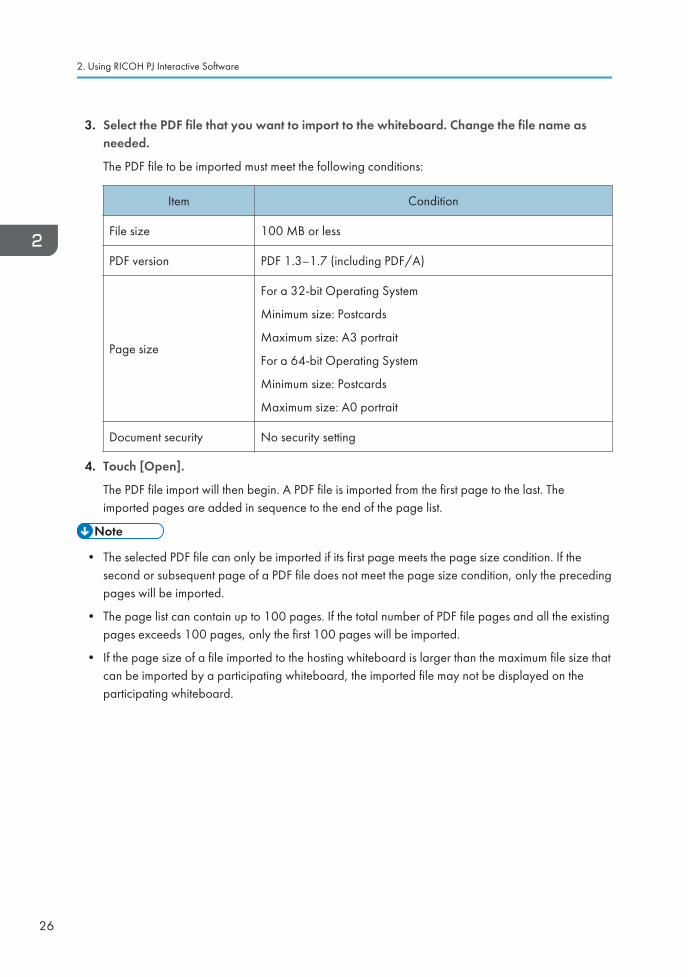
1. On the whiteboard, touch , the PDF file icon with the pen nib.
2. Touch [Read].
CWF010
Saving and Importing Pages
25
3. Select the PDF file that you want to import to the whiteboard. Change the file name asneeded.
The PDF file to be imported must meet the following conditions:
Item Condition
File size 100 MB or less
PDF version PDF 1.3–1.7 (including PDF/A)
Page size
For a 32-bit Operating System
Minimum size: Postcards
Maximum size: A3 portrait
For a 64-bit Operating System
Minimum size: Postcards
Maximum size: A0 portrait
Document security No security setting
4. Touch [Open].
The PDF file import will then begin. A PDF file is imported from the first page to the last. Theimported pages are added in sequence to the end of the page list.
• The selected PDF file can only be imported if its first page meets the page size condition. If thesecond or subsequent page of a PDF file does not meet the page size condition, only the precedingpages will be imported.
• The page list can contain up to 100 pages. If the total number of PDF file pages and all the existingpages exceeds 100 pages, only the first 100 pages will be imported.
• If the page size of a file imported to the hosting whiteboard is larger than the maximum file size thatcan be imported by a participating whiteboard, the imported file may not be displayed on theparticipating whiteboard.
2. Using RICOH PJ Interactive Software
26
Sharing the Whiteboard
• To share a screen, it is necessary to add your Remote License (page 34 "Adding Your RemoteLicense") and to configure the network settings of the computer.
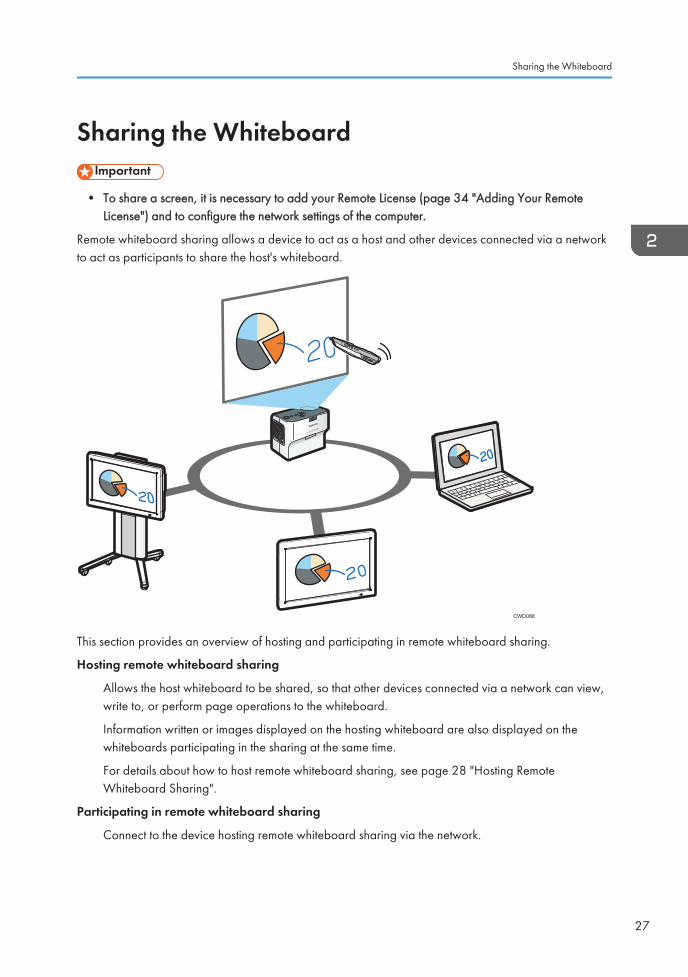
Remote whiteboard sharing allows a device to act as a host and other devices connected via a networkto act as participants to share the host's whiteboard.
CWD088
This section provides an overview of hosting and participating in remote whiteboard sharing.
Hosting remote whiteboard sharing
Allows the host whiteboard to be shared, so that other devices connected via a network can view,write to, or perform page operations to the whiteboard.
Information written or images displayed on the hosting whiteboard are also displayed on thewhiteboards participating in the sharing at the same time.
For details about how to host remote whiteboard sharing, see page 28 "Hosting RemoteWhiteboard Sharing".
Participating in remote whiteboard sharing
Connect to the device hosting remote whiteboard sharing via the network.
Sharing the Whiteboard
27
When you participate in remote whiteboard sharing, all pages that exist prior to the participationare deleted and the contents of the hosting whiteboard are imported. As a participant, you canwrite to or perform page operations to the whiteboard hosting the remote whiteboard sharing.
For details about how to participate in remote whiteboard sharing, see page 30 "Participating inRemote Whiteboard Sharing".
• Up to four devices can share the whiteboard at a time.
Hosting Remote Whiteboard Sharing
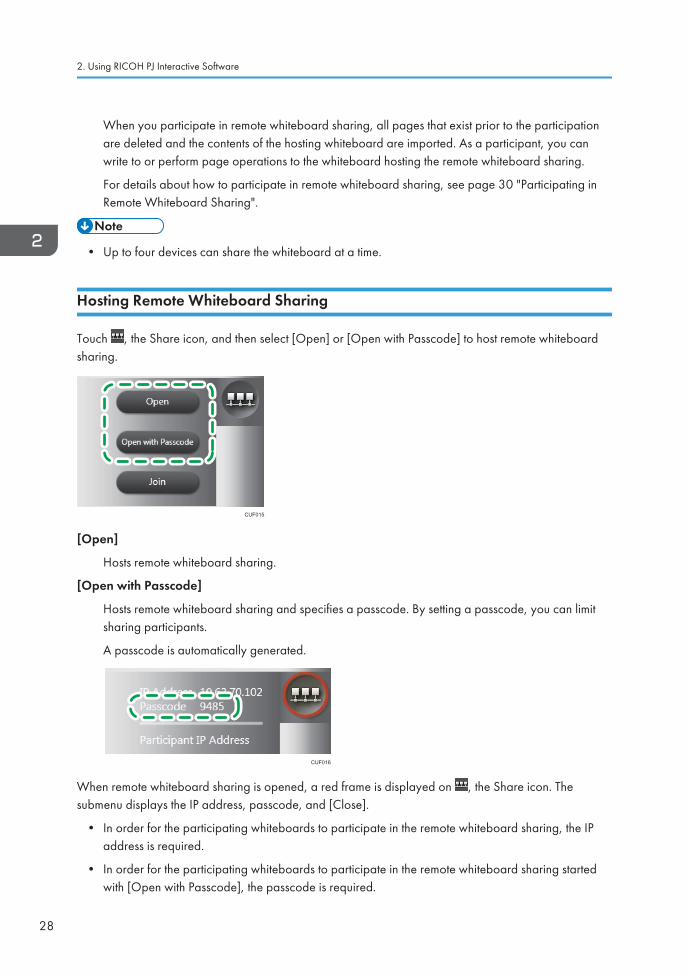
Touch , the Share icon, and then select [Open] or [Open with Passcode] to host remote whiteboardsharing.
CUF015
[Open]
Hosts remote whiteboard sharing.
[Open with Passcode]
Hosts remote whiteboard sharing and specifies a passcode. By setting a passcode, you can limitsharing participants.
A passcode is automatically generated.
CUF016
When remote whiteboard sharing is opened, a red frame is displayed on , the Share icon. Thesubmenu displays the IP address, passcode, and [Close].
• In order for the participating whiteboards to participate in the remote whiteboard sharing, the IPaddress is required.
• In order for the participating whiteboards to participate in the remote whiteboard sharing startedwith [Open with Passcode], the passcode is required.
2. Using RICOH PJ Interactive Software
28
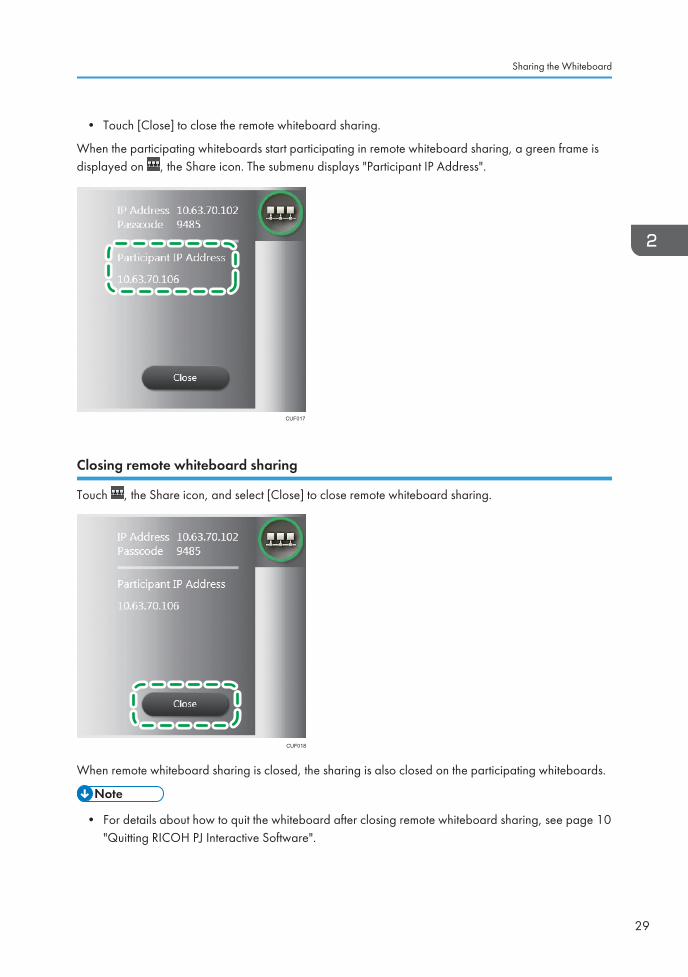
• Touch [Close] to close the remote whiteboard sharing.
When the participating whiteboards start participating in remote whiteboard sharing, a green frame isdisplayed on , the Share icon. The submenu displays "Participant IP Address".
CUF017
Closing remote whiteboard sharing
Touch , the Share icon, and select [Close] to close remote whiteboard sharing.
CUF018
When remote whiteboard sharing is closed, the sharing is also closed on the participating whiteboards.
• For details about how to quit the whiteboard after closing remote whiteboard sharing, see page 10"Quitting RICOH PJ Interactive Software".
Sharing the Whiteboard
29
Participating in Remote Whiteboard Sharing
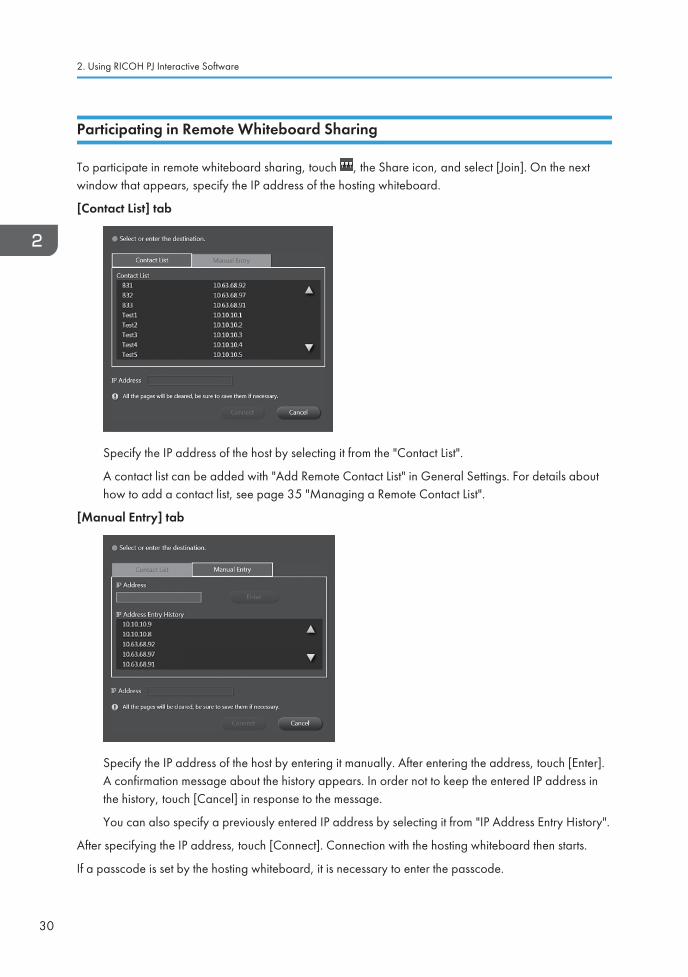
To participate in remote whiteboard sharing, touch , the Share icon, and select [Join]. On the nextwindow that appears, specify the IP address of the hosting whiteboard.
[Contact List] tab
Specify the IP address of the host by selecting it from the "Contact List".
A contact list can be added with "Add Remote Contact List" in General Settings. For details abouthow to add a contact list, see page 35 "Managing a Remote Contact List".
[Manual Entry] tab
Specify the IP address of the host by entering it manually. After entering the address, touch [Enter].A confirmation message about the history appears. In order not to keep the entered IP address inthe history, touch [Cancel] in response to the message.
You can also specify a previously entered IP address by selecting it from "IP Address Entry History".
After specifying the IP address, touch [Connect]. Connection with the hosting whiteboard then starts.
If a passcode is set by the hosting whiteboard, it is necessary to enter the passcode.
2. Using RICOH PJ Interactive Software
30
If a connection is established, the time necessary to import the pages of the hosting whiteboard appears.
When you touch [OK], all pages that exist prior to the participation are deleted and the contents of thehosting whiteboard are imported.
• "IP Address Entry History" can hold up to 100 entries. If it already reaches 100 entries, the oldestentry is deleted from the history.
• The indicated shared page import time is an estimate, depending on the actual environment.
• You can check communication status while participating in remote whiteboard sharing by checkingthe frame color of , the Share icon. For details about communication status, see page 45"Checking Communication Status during Remote Whiteboard Sharing".
Leaving remote whiteboard sharing
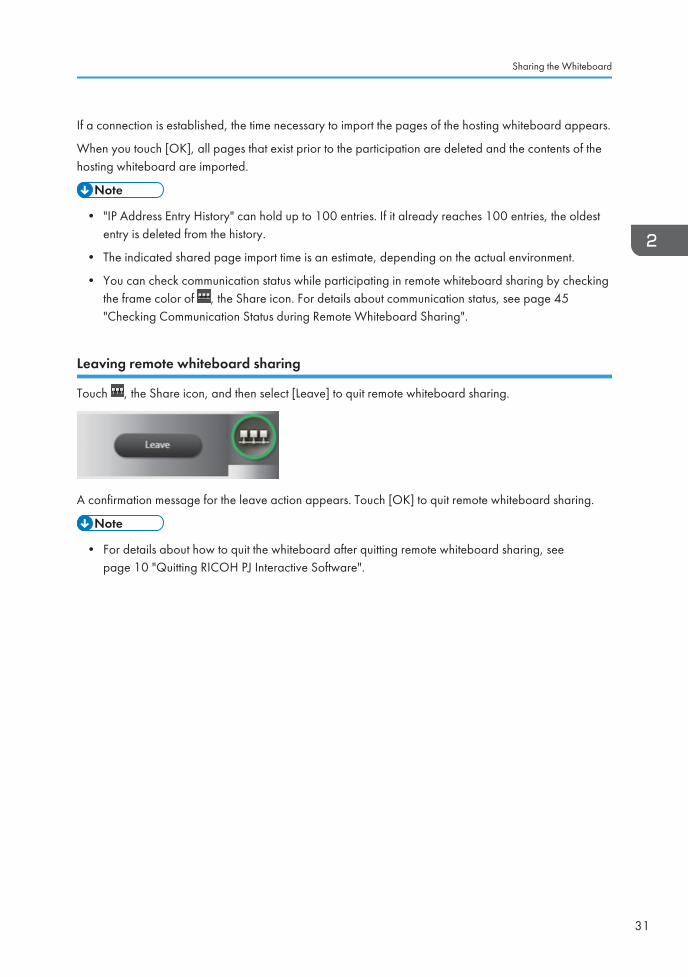
Touch , the Share icon, and then select [Leave] to quit remote whiteboard sharing.
A confirmation message for the leave action appears. Touch [OK] to quit remote whiteboard sharing.
• For details about how to quit the whiteboard after quitting remote whiteboard sharing, seepage 10 "Quitting RICOH PJ Interactive Software".
Sharing the Whiteboard
31

2. Using RICOH PJ Interactive Software
32
3. Managing RICOH PJ InteractiveSoftwareThis chapter describes how to manage RICOH PJ Interactive Software.
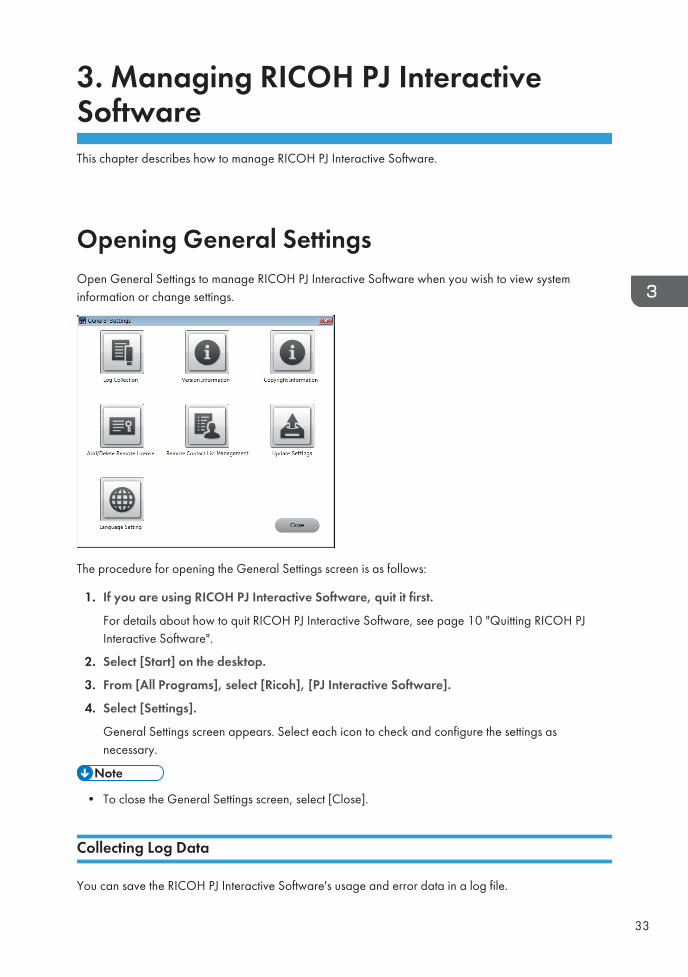
Opening General SettingsOpen General Settings to manage RICOH PJ Interactive Software when you wish to view systeminformation or change settings.
The procedure for opening the General Settings screen is as follows:
1. If you are using RICOH PJ Interactive Software, quit it first.
For details about how to quit RICOH PJ Interactive Software, see page 10 "Quitting RICOH PJInteractive Software".
2. Select [Start] on the desktop.
3. From [All Programs], select [Ricoh], [PJ Interactive Software].
4. Select [Settings].
General Settings screen appears. Select each icon to check and configure the settings asnecessary.
• To close the General Settings screen, select [Close].
Collecting Log Data
You can save the RICOH PJ Interactive Software's usage and error data in a log file.
33
A log file contains the following:
• Start time
• End time
• Screen operations
• Error occurrence information
• Time when pages are saved
• Page save destination information
• Remote whiteboard sharing information
Save log file as follows:
1. Select , the Log Collection icon.
2. Specify the folder in which you want to save a log file.
3. Select [OK].
Log file saving starts. When the save is completed, a message is displayed.
4. Select [OK].
Displaying the Version or Copyright Information
• Select , the Version Information icon, to display the product version.
• Display the version information first, and then select [Display License Agreement] to display thelicense agreement.
• Select , the Copyright Information icon, to display the copyright information of this product.
Adding Your Remote License
• Log on as a user with administrator privileges to add or delete your license code.
Before sharing the whiteboard, it is necessary to add your license code.
1. Select , the Add/Delete Remote License icon.
2. Enter your license code.
The license code is not case-sensitive. You can enter the license code in either uppercase orlowercase.
3. Select [Add].
• If the entered license code is incorrect, an error message appears. Check the license codeand enter the correct one.
3. Managing RICOH PJ Interactive Software
34
• When your license code is authenticated, a completion message appears.
4. Select [OK].
After adding your license code, close General Settings and start the whiteboard to check that , theShare icon, is now active.
20XX/05/01 22:08:3701:23:45
20XX/05/01 22:08:3701:23:45
CWD078
• When you select [Delete], the added license code can be deleted.
Managing a Remote Contact List
You can register or export a contact list. Once a contact list is registered, you can select the IP addressof a contact from the registered list when participating in remote whiteboard sharing.
Creating a Remote Contact List
You can use any file name when saving a contact list. The file is saved in the comma-separated values(CSV) format.
The file format of a CSV file is as follows:
Header
Nickname 1,IP address 1
Nickname 2,IP address 2
Nickname 3,IP address 3
• The first line can be header text. However, any entered text will be ignored.
• For each second and subsequent line, the first field must contain the nickname of a contact.
The second field must contain the IP address of the contact.
You can also enter information in the third and subsequent columns. Note that this information willbe ignored.
• The maximum number of IP addresses that can be registered is 100.
Opening General Settings
35
You can enter up to 100 IP addresses. Although you can enter a 101st address, it cannot beregistered.
Nickname format
The nickname must be 20 characters or less. If no nickname is entered, the line is registered withouta nickname. The available characters are as follows:
• Uppercase letters : [A-Z]
• Lowercase letters : [a-z]
• Numbers : [0-9]
• Symbols : (space) ! " # $ % & ' ( ) * + , - . / : ; < = > ? @ [ \ ] ^ _ ` { | } ~
IP address format
An IP address must consist of four sets of numbers, each set separated by a period (.). The numbersmust be decimal numbers between 0 and 255.
If the format of an IP address is incorrect or if no IP address is specified, the contact list is notregistered. If an invalid IP address is specified, the contact list is not also registered. Invalid IPaddresses include the following:
• IP address containing a set starting with 0 or 00 (Example: 111.222.033.004)
• 0.0.0.0
• 255.255.255.255
• 127.0.0.1
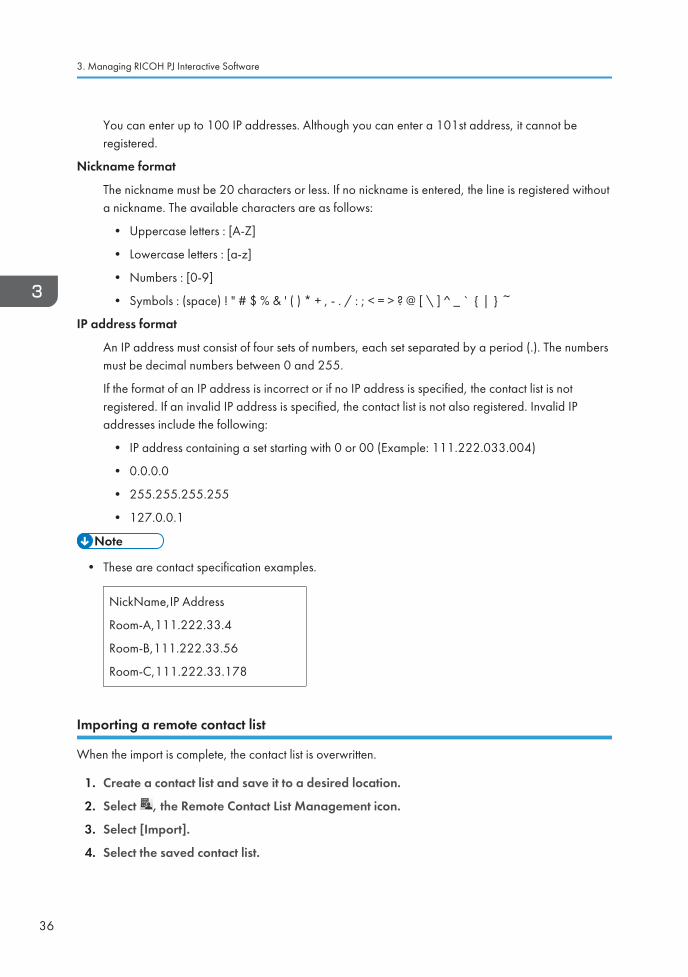
• These are contact specification examples.
NickName,IP Address
Room-A,111.222.33.4
Room-B,111.222.33.56
Room-C,111.222.33.178
Importing a remote contact list
When the import is complete, the contact list is overwritten.
1. Create a contact list and save it to a desired location.
2. Select , the Remote Contact List Management icon.
3. Select [Import].
4. Select the saved contact list.
3. Managing RICOH PJ Interactive Software
36
5. Select [Open].
A confirmation message for the import appears.
6. Select [OK].
Import of the contact list begins. When the import is completed, a message is displayed.
7. Select [OK].
Exporting a remote contact list
An already registered contact list can be exported.
1. Select , the Remote Contact List Management icon.
2. Select [Export].
3. Specify the folder in which you want to save the contact list.
4. Change the file name as needed and select [Save].
Export of the contact list begins. When the export is completed, a message is displayed.
5. Select [OK].
Configuring the System Update Method
RICOH PJ Interactive Software can be configured to automatically check that the system is up-to-datewhen the Software starts. If the system is not up-to-date, the Software can update the system.
Select , the Update Settings icon, to enable or disable the function for checking that the system is up-to-date. The function is enabled by default.
When the function is enabled, you can configure a proxy. The initial value is "Use IE Settings". Thisindicates that the proxy settings of Internet Explorer are used. Fill in the "User Name" and "Password".
• If "Do not Use Proxy" is selected, the function checks that the system is up-to-date without using aproxy.
• If "Manual Settings" is selected, configure the proxy server manually. Fill in "Address", "PortNumber", "User Name", and "Password".
• In addition, you can specify the host name of the proxy server in "Address".
Updating the System
• Log on as a user with administrator privileges to update the system.
• Do not turn the power off to the computer during a system update.
Opening General Settings
37

1. Start RICOH PJ Interactive Software.
The function automatically checks that the system is up-to-date. For information about how to startit, see page 10 "Starting RICOH PJ Interactive Software".
If it is necessary to authenticate the proxy:
An authentication screen is displayed.
If it is not necessary to authenticate the proxy:
The system update check starts.
• If the system is up-to-date, the update ends. The RICOH PJ Interactive Software launcherstarts.
• If the system is not up-to-date, a confirmation message for the download is displayed.Proceed to Step 6.
2. On the authentication screen, fill in "User Name" and "Password".
3. Check "Save the credentials" to save the entered "User Name" and "Password" in theUpdate Settings.
4. Check "Do not check for updates on startup" on the authentication screen to disable thefunction for checking that the system is up-to-date.
5. Select [OK].
If the proxy authentication is complete successfully:
A message indicating that the system up-to-date check is in progress is displayed.
• If the system is up-to-date, the update ends. The RICOH PJ Interactive Software launcherstarts.
• If the system is not up-to-date, a confirmation message for the download is displayed.
If the proxy authentication fails:
An error message is displayed. Check that the user name and password are correct and enterthem again.
6. Check "Do not check for updates on startup" in response to the confirmation message forthe download to disable the function for checking that the system is up-to-date.
7. Select [OK].
The download starts. When the download is complete, a confirmation message for the update isdisplayed.
8. Check the detailed update information and select [OK].
A message indicating that the update is in progress is displayed. When the update is complete, theRICOH PJ Interactive Software launcher starts.
• If the update is canceled or a network error occurs during the system update, the update is abortedand the RICOH PJ Interactive Software launcher starts.
3. Managing RICOH PJ Interactive Software
38
Setting the Display Language
You can change the display language to be used for RICOH PJ Interactive Software.
1. Select , the Language Setting icon.
2. Select the language from the drop-down list.
3. Select [OK].
When you close General Settings and then start RICOH PJ Interactive Software or open GeneralSettings again, the display language changes to the selected language.
Opening General Settings
39

3. Managing RICOH PJ Interactive Software
40
4. TroubleshootingThis chapter describes what to do when a message is displayed or when the product cannot beoperated as wanted.
Messages Displayed When Using RICOH PJInteractive SoftwareThe following table lists the main messages and their recommended actions.
Projector Message
Message Causes Solutions
Please wait. The product is switching wirelesschannels.
Wait until the messagedisappears.
If the message appearsfrequently, stop using the otherwireless devices.
RICOH PJ Interactive Software Message
Error messages while the software is used as a whiteboard
Message Causes Solutions
Failed to import the desktopimage.
Unintended different data wascopied to the clipboard whileimporting the screen displayedon the desktop.
Capture the screen displayedon the desktop again.
You do not have the authority towrite to the specified folder.
You are not authorized to writeto the folder that you select tosave pages.
Set the appropriate folderpermissions so that you canaccess and write to the folder.
41
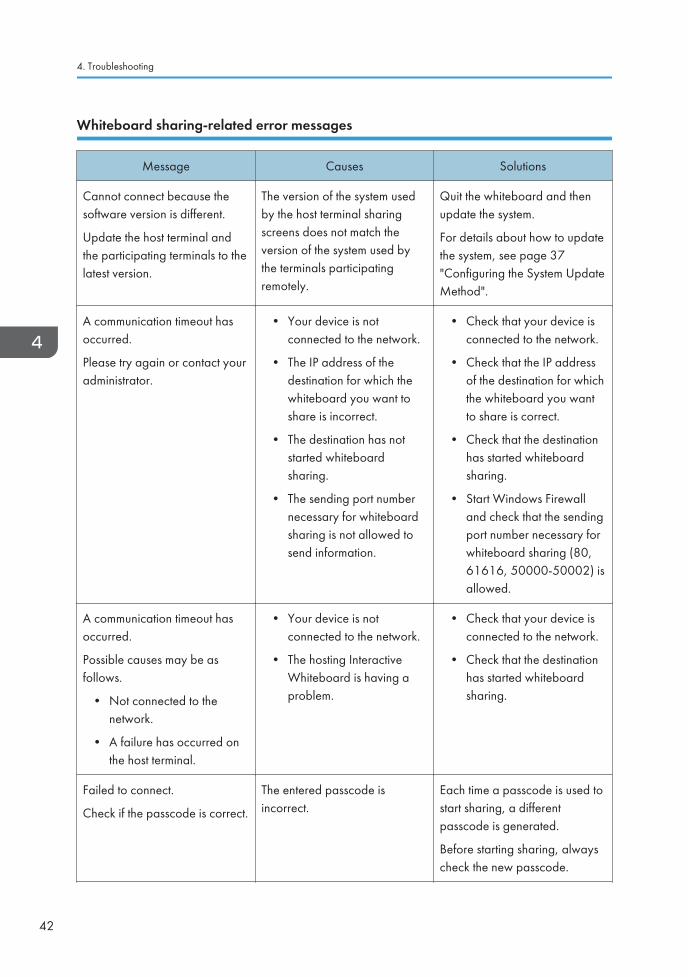
Whiteboard sharing-related error messages
Message Causes Solutions
Cannot connect because thesoftware version is different.
Update the host terminal andthe participating terminals to thelatest version.
The version of the system usedby the host terminal sharingscreens does not match theversion of the system used bythe terminals participatingremotely.
Quit the whiteboard and thenupdate the system.
For details about how to updatethe system, see page 37"Configuring the System UpdateMethod".
A communication timeout hasoccurred.
Please try again or contact youradministrator.
• Your device is notconnected to the network.
• The IP address of thedestination for which thewhiteboard you want toshare is incorrect.
• The destination has notstarted whiteboardsharing.
• The sending port numbernecessary for whiteboardsharing is not allowed tosend information.
• Check that your device isconnected to the network.
• Check that the IP addressof the destination for whichthe whiteboard you wantto share is correct.
• Check that the destinationhas started whiteboardsharing.
• Start Windows Firewalland check that the sendingport number necessary forwhiteboard sharing (80,61616, 50000-50002) isallowed.
A communication timeout hasoccurred.
Possible causes may be asfollows.
• Not connected to thenetwork.
• A failure has occurred onthe host terminal.
• Your device is notconnected to the network.
• The hosting InteractiveWhiteboard is having aproblem.
• Check that your device isconnected to the network.
• Check that the destinationhas started whiteboardsharing.
Failed to connect.
Check if the passcode is correct.
The entered passcode isincorrect.
Each time a passcode is used tostart sharing, a differentpasscode is generated.
Before starting sharing, alwayscheck the new passcode.
4. Troubleshooting
42
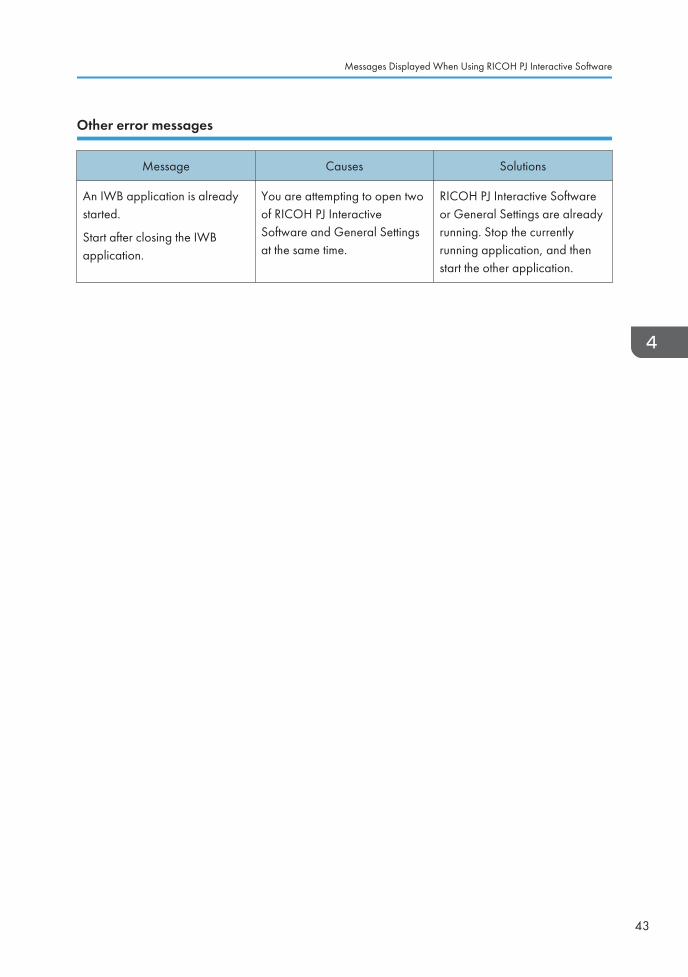
Other error messages
Message Causes Solutions
An IWB application is alreadystarted.
Start after closing the IWBapplication.
You are attempting to open twoof RICOH PJ InteractiveSoftware and General Settingsat the same time.
RICOH PJ Interactive Softwareor General Settings are alreadyrunning. Stop the currentlyrunning application, and thenstart the other application.
Messages Displayed When Using RICOH PJ Interactive Software
43
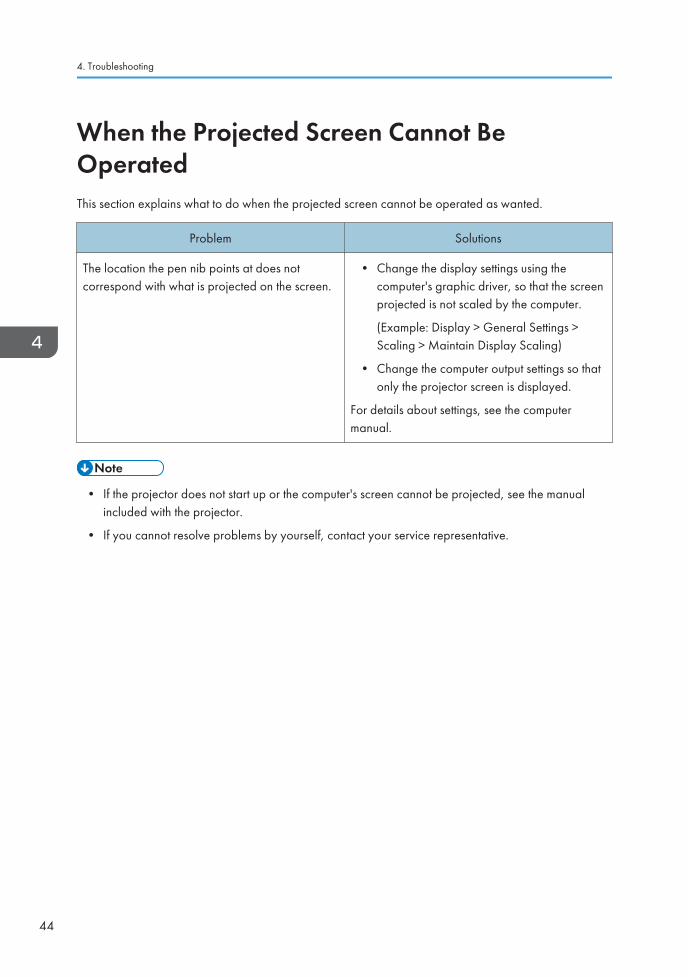
When the Projected Screen Cannot BeOperatedThis section explains what to do when the projected screen cannot be operated as wanted.
Problem Solutions
The location the pen nib points at does notcorrespond with what is projected on the screen.
• Change the display settings using thecomputer's graphic driver, so that the screenprojected is not scaled by the computer.
(Example: Display > General Settings >Scaling > Maintain Display Scaling)
• Change the computer output settings so thatonly the projector screen is displayed.
For details about settings, see the computermanual.
• If the projector does not start up or the computer's screen cannot be projected, see the manualincluded with the projector.
• If you cannot resolve problems by yourself, contact your service representative.
4. Troubleshooting
44

Checking Communication Status duringRemote Whiteboard SharingYou can check communication status while hosting or participating in remote whiteboard sharing. Thecommunication status is indicated by the border color of , the Share icon.
While hosting remote whiteboard sharing
Border color Communication status
Green
One or more devices are participating in the remote whiteboard sharing hostedby your device.
Red
No device is participating in the remote whiteboard sharing hosted by yourdevice.
While participating in remote whiteboard sharing
Border color Communication status Communication speed
Green
Excellent
There is no problem viewing or operating theshared whiteboard.
1.5 Mbps or more
Blue
Good
There is no problem viewing or operating theshared whiteboard.
512 kbps–1.5 Mbps
Yellow
Low
Some problems can occur when you operate orview the shared whiteboard.
200 kbps–512 kbps
Red
Very Low
Major problems can occur when you operate orview the shared whiteboard.
200 kbps or less
• None of these border colors are displayed if no remote whiteboard sharing is performed.
Checking Communication Status during Remote Whiteboard Sharing
45

4. Troubleshooting
46
5. Appendix
TrademarksWindows, Internet Explorer are either registered trademarks or trademarks of Microsoft Corporation inthe United States and / or other countries.
Other product names used herein are for identification purposes only and might be trademarks of theirrespective companies. We disclaim any and all rights to those marks.
Microsoft product screen shots reprinted with permission from Microsoft Corporation.
47

MEMO
48 EN GB EN US EN AU Y036-7524

© 2013 Ricoh Co., Ltd.

Y036-7524AUENUSENGBEN