operating instructions - general settings guide:...
TRANSCRIPT

Paper type: Wood Free 80g/m2, Paper Thickness=100 µm // Pages in book=84 // Print scale=81%Gap (when printed at 81% scale) = Pages in book × Paper thickness / 2 = 4.200000 mm
240WO
pera
ting Instructio
nsG
ene
ral Se
ttings G
uide
240WO
pe
rating
Instructio
nsG
ene
ral Se
ttings G
uide
RICOH COMPANY, LTD.15-5, Minami Aoyama 1-chome,Minato-ku, Tokyo 107-8544, JapanPhone: +81-3-3479-3111
240W
Operating Instructions
General Settings Guide
Read this manual carefully before you use this product and keep it handy for future reference.For safe and correct use, please be sure to read the Safety Information in this manual beforeusing the machine.
Getting Started
Combined Function Operations
User Tools (System Settings)
Troubleshooting
Remarks
Specifications
Overseas AffiliatesU.S.A.RICOH CORPORATION5 Dedrick PlaceWest Caldwell, New Jersey 07006Phone: +1-973-882-2000
The NetherlandsRICOH EUROPE B.V.Groenelaan 3, 1186 AA, AmstelveenPhone: +31-(0)20-5474111
United KingdomRICOH UK LTD.Ricoh House,1 Plane Tree Crescent, Feltham,Middlesex, TW13 7HGPhone: +44-(0)20-8261-4000
GermanyRICOH DEUTSCHLAND GmbHMergenthalerallee 38-40,65760 EschbornPhone: +49-(0)6196-9060
FranceRICOH FRANCE S.A.383, Avenue du Général de GaulleBP 307-92143 Clamart CedexPhone: +33-(0)-821-01-74-26
SpainRICOH ESPAÑA S.A.Avda. Litoral Mar, 12-14,Blue Building, Marina Village,08005 BarcelonaPhone: +34-(0)93-295-7600
ItalyRICOH ITALIA SpAVia della Metallurgia 12,37139 VeronaPhone: +39-045-8181500
ChinaRICOH CHINA CO.,LTD.29/F., Lippo Plaza, No.222Huai Hai Zhong Road,Lu Wan District,Shanghai P.C.:200021Phone: +86-21-5396-6888
SingaporeRICOH ASIA PACIFIC PTE.LTD.260 Orchard Road,#15-01/02 The Heeren,Singapore 238855Phone: +65-6830-5888
Printed in The Netherlands
GB GB B125-6500

Paper type: Wood Free 80g/m2, Paper Thickness=100 µm // Pages in book=84 // Print scale=81%Gap (when printed at 81% scale) = Pages in book × Paper thickness / 2 = 4.200000 mm
Declaration of Conformity
“The Product complies with the requirements of the EMC Directive 89/336/EEC and its amending di-rectives and the Low Voltage Directive 73/23/EEC and its amending directives.”
In accordance with IEC 60417, this machine uses the following symbols for the main power switch:
aaaa means POWER ON.
cccc means STAND BY.
In accordance with IEC 60417, this machine uses the following symbols for the anti-humidity heaterswitch:
aaaa means POWER ON.
bbbb means POWER OFF.
Introduction
This manual describes detailed instructions on the operation and notes about the use of this machine.To get maximum versatility from this machine all operators are requested to read this manual carefullyand follow the instructions. Please keep this manual in a handy place near the machine.
Important
Contents of this manual are subject to change without prior notice. In no event will the company be li-able for direct, indirect, special, incidental, or consequential damages as a result of handling or oper-ating the machine.
Notes:
Some illustrations in this manual might be slightly different from the machine.
Certain options might not be available in some countries. For details, please contact your local dealer.
Operator Safety
This machine contains LED Array in scanner and writing units.
The machine is considered a class 1 LED device, safe for both office and EDP use.
Notes:
Two kinds of size notation are employed in this manual. With this machine refer to the metric version.
For good copy quality, Ricoh recommends that you use genuine Ricoh toner.
Ricoh shall not be responsible for any damage or expense that might result from the use of parts otherthan genuine Ricoh parts with your Ricoh office products.
Power Source
220 - 240V, 50/60Hz, 10A or more
Please be sure to connect the power cord to a power source as above. For details about power source,see P.62 “Power Connection”.
Copyright © 2003 Ricoh Co., Ltd.

Introduction
This manual describes detailed instructions on the operation and notes about the use of this machine.To get maximum versatility from this machine all operators are requested to read this manual carefullyand follow the instructions. Please keep this manual in a handy place near the machine.
For safe and correct use of this machine, please be sure to read the Safety Information before you useit.
Important
Contents of this manual are subject to change without prior notice. In no event will the company be li-able for direct, indirect, special, incidental, or consequential damages as a result of handling or oper-ating the machine.
Notes:
Some illustrations in this manual might be slightly different from the machine.
Certain options might not be available in some countries. For details, please contact your local dealer.
Operator Safety
This machine contains LED Array in scanner and writing units.
The machine is considered a class 1 LED device, safe for both office and EDP use.
Notes:
Two kinds of size notation are employed in this manual. With this machine refer to the metric version.
For good copy quality, Rex-Rotary recommends that you use genuine Rex-Rotary toner.
Rex-Rotary shall not be responsible for any damage or expense that might result from the use of partsother than genuine Rex-Rotary parts in your Rex-Rotary office product.
Power Source
220 - 240V, 50/60Hz, 10A or more
Please be sure to connect the power cord to a power source as above. For details about power source,see p.62 “Power Connection”.
NeptuneC1_GBzen_F_FM_pre.book Page 1 Tuesday, December 16, 2003 5:03 PM

Introduction
This manual describes detailed instructions on the operation and notes about the use of this machine.To get maximum versatility from this machine all operators are requested to read this manual carefullyand follow the instructions. Please keep this manual in a handy place near the machine.
For safe and correct use of this machine, please be sure to read the Safety Information before you useit.
Important
Contents of this manual are subject to change without prior notice. In no event will the company be li-able for direct, indirect, special, incidental, or consequential damages as a result of handling or oper-ating the machine.
Notes:
Some illustrations in this manual might be slightly different from the machine.
Certain options might not be available in some countries. For details, please contact your local dealer.
Operator Safety
This machine contains LED Array in scanner and writing units.
The machine is considered a class 1 LED device, safe for both office and EDP use.
Notes:
Two kinds of size notation are employed in this manual. With this machine refer to the metric version.
For good copy quality, Gestetner recommends that you use genuine Gestetner toner.
Gestetner shall not be responsible for any damage or expense that might result from the use of partsother than genuine Gestetner parts in your Gestetner office product.
Power Source
220 - 240V, 50/60Hz, 10A or more
Please be sure to connect the power cord to a power source as above. For details about power source,see p.62 “Power Connection”.
NeptuneC1_GBzen_F_FM_pre.book Page 1 Tuesday, December 16, 2003 5:03 PM

Introduction
This manual describes detailed instructions on the operation and notes about the use of this machine.To get maximum versatility from this machine all operators are requested to read this manual carefullyand follow the instructions. Please keep this manual in a handy place near the machine.
For safe and correct use of this machine, please be sure to read the Safety Information before you useit.
Important
Contents of this manual are subject to change without prior notice. In no event will the company be li-able for direct, indirect, special, incidental, or consequential damages as a result of handling or oper-ating the machine.
Notes:
Some illustrations in this manual might be slightly different from the machine.
Certain options might not be available in some countries. For details, please contact your local dealer.
Operator Safety
This machine contains LED Array in scanner and writing units.
The machine is considered a class 1 LED device, safe for both office and EDP use.
Notes:
Two kinds of size notation are employed in this manual. With this machine refer to the metric version.
For good copy quality, Nashuatec recommends that you use genuine Nashuatec toner.
Nashuatec shall not be responsible for any damage or expense that might result from the use of partsother than genuine Nashuatec parts in your Nashuatec office product.
Power Source
220 - 240V, 50/60Hz, 10A or more
Please be sure to connect the power cord to a power source as above. For details about power source,see p.62 “Power Connection”.
NeptuneC1_GBzen_F_FM_pre.book Page 1 Tuesday, December 16, 2003 5:03 PM

Declaration of Conformity
“The Product complies with the requirements of the EMC Directive 89/336/EEC and its amending di-rectives and the Low Voltage Directive 73/23/EEC and its amending directives.”
In accordance with IEC 60417, this machine uses the following symbols for the main power switch:
aaaa means POWER ON.
cccc means STAND BY.
In accordance with IEC 60417, this machine uses the following symbols for the anti-humidity heaterswitch:
aaaa means POWER ON.
bbbb means POWER OFF.
Copyright © 2003
NeptuneC1_GBzen_F_FM_pre.book Page 1 Tuesday, December 16, 2003 5:03 PM

i
Manuals for This Machine
This machine can be used as a copier, printer, or scanner. Its manuals are dividedthus: a manual covering common operations and functions, and separate copier,printer, and scanner function manuals. Refer to the appropriate manual to learnabout your machine.
NeptuneC1_GBzen_F_FM_pre.book Page i Tuesday, December 16, 2003 5:03 PM

ii
What You Can Do with This Machine
If you install the options available for this machine, you can further increase itsfunctionality. If you want to add any of the options, contact your service repre-sentative.
Copier Function
The machine has all the basic copier functions, plus density adjustment, compos-ite image, and other advanced copy functions. In addition, with the stamp boardand HDD installed, you can add stamp functions that can print patterns or userstamps on your copies.
Printer Function
You can also use the machine as a printer. With options installed, you can in-crease the number of functions.
Scanner Function
You can also use the machine as a scanner. With options installed, you can in-crease the number of functions.
NeptuneC1_GBzen_F_FM_pre.book Page ii Tuesday, December 16, 2003 5:03 PM

iii
TABLE OF CONTENTSManuals for This Machine ...................................................................................... iWhat You Can Do with This Machine................................................................... ii
Copier Function.......................................................................................................... iiPrinter Function.......................................................................................................... iiScanner Function ....................................................................................................... ii
How to Read This Manual .....................................................................................1Symbols .....................................................................................................................1Names of Major Options ............................................................................................2Terms .........................................................................................................................2
Safety Information .................................................................................................3Safety During Operation.............................................................................................3
Positions of RRRRWARNING and RRRRCAUTION Labels .............................................5ENERGY STAR Program .......................................................................................7Counter ...................................................................................................................9
Total Counter .............................................................................................................9Counter for Each User Code......................................................................................9
1. Getting Started
Guide to Components .........................................................................................11Options.....................................................................................................................14
Control Panel........................................................................................................17Display .....................................................................................................................19
Turning On the Power .........................................................................................21Turning On the Main Power .....................................................................................21Turning On the Power ..............................................................................................22Turning Off the Power ..............................................................................................22Turning Off the Main Power .....................................................................................22Saving Energy..........................................................................................................23Anti-humidity Heater Switch .....................................................................................24
2. Combined Function Operations
Switching between Functions ............................................................................25Using the Machine As a Copier ..........................................................................26
Switching to Copier Mode ........................................................................................26Interrupting Other Functions to Use Copier Functions.............................................26
Using the Machine As a Printer ..........................................................................27Switching to Printer Mode ........................................................................................27
Using the Machine As a Scanner .......................................................................28Switching to Scanner Mode .....................................................................................28
NeptuneC1_GBzen_F_FM_pre.book Page iii Tuesday, December 16, 2003 5:03 PM

iv
3. User Tools (System Settings)
User Tools Menu (System Settings)...................................................................29Accessing User Tools (System Settings) ..........................................................31
Changing Default Settings .......................................................................................31Exiting User Tools ....................................................................................................32
Settings You Can Change with User Tools .......................................................33General Features .....................................................................................................33Timer Settings ..........................................................................................................42Key Op. Tools ..........................................................................................................43
4. Troubleshooting
If Your Machine Does Not Operate As You Want..............................................45General ....................................................................................................................45
Loading Paper ......................................................................................................47Loading Paper Roll...................................................................................................47Loading Cut Paper ...................................................................................................49
DDDDAdding Toner....................................................................................................50xxxxClearing Misfeeds ............................................................................................52Changing the Paper Roll Size .............................................................................56
Removing the Roll Holder ........................................................................................56Setting the Roll Holder .............................................................................................56
5. Remarks
Dos and Don'ts.....................................................................................................59Toner .....................................................................................................................60
Handling Toner.........................................................................................................60Toner Storage ..........................................................................................................60Used Toner ..............................................................................................................60
Where to Put Your Machine ................................................................................61Machine Environment ..............................................................................................61Moving......................................................................................................................61Power Connection....................................................................................................62Clearance Around the Machine................................................................................62
Maintaining Your Machine ..................................................................................63Cleaning inside the Original Cover...........................................................................63Cleaning the Main Unit .............................................................................................64
NeptuneC1_GBzen_F_FM_pre.book Page iv Tuesday, December 16, 2003 5:03 PM

v
6. Specifications
Main Unit...............................................................................................................65Options .................................................................................................................68
Roll Feeder Type 240 A or 240 B.............................................................................68Paper Cassette Type 240 ........................................................................................68Table Type 240 ........................................................................................................69Carrier Sheet............................................................................................................69Hard Disk Drive Type 240 ........................................................................................69Stamp Board ............................................................................................................69
Copy Paper ...........................................................................................................70Recommended Size and Type.................................................................................70Unusable Paper .......................................................................................................72Paper Storage ..........................................................................................................73
Handling paper.....................................................................................................74
INDEX......................................................................................................... 75
NeptuneC1_GBzen_F_FM_pre.book Page v Tuesday, December 16, 2003 5:03 PM

vi
NeptuneC1_GBzen_F_FM_pre.book Page vi Tuesday, December 16, 2003 5:03 PM

1
How to Read This Manual
Symbols
This manual uses the following symbols:
R WARNING:This symbol indicates a potentially hazardous situation that might result indeath or serious injury if you misuse the machine by not following these instruc-tions under this symbol. Be sure to read these instructions, all of which are in-cluded in the Safety Information section in the General Settings Guide.
R CAUTION:This symbol indicates a potentially hazardous situation that might result in mi-nor or moderate injury or property damage not involving bodily injury, if youmisuse the machine by not following these instructions under this symbol. Besure to read the instructions, all of which are included in the Safety Informationsection in the General Settings Guide.* The above statements are for your safety.
ImportantIf this instruction is not followed, paper might be misfed, originals damaged, ordata lost. Be sure to read this.
PreparationThis symbol indicates the prior knowledge or preparation required before oper-ation.
NoteThis symbol indicates precautions for operation, or actions to take followingmal-operation.
LimitationThis symbol indicates numerical limits, functions that cannot be used together,or conditions under which a particular function cannot be used.
ReferenceThis symbol indicates where further relevant information can be found.
[ ]Keys that appear on the machine's display.
{ }Keys built into the machine's control panel.
NeptuneC1_GBzen_F_FM_pre.book Page 1 Tuesday, December 16, 2003 5:03 PM

2
Names of Major Options
Major options for this machine are referred to as follows:• Roll Feeder Type 240A → Paper roll tray 1• Roll Feeder Type 240B → Paper roll tray 2• Paper Cassette Type 240 → Cut paper tray• Table Type 240 → Table• Stamp Board Type A→ Stamp board• Hard Disk Drive Type 240 → HDD
Terms
• Long length original/paperOriginal/paper length longer than 1,189 mm, 46.8".
NeptuneC1_GBzen_F_FM_pre.book Page 2 Tuesday, December 16, 2003 5:03 PM

3
Safety Information
When using this machine, the following safety precautions should always be fol-lowed.
Safety During Operation
In this manual, the following important symbols are used:
R WARNING:
R WARNING:Indicates a potentially hazardous situation which, if instructions are not followed, could re-sult in death or serious injury.
R CAUTION:Indicates a potentially hazardous situation which, if instructions are not followed, may re-sult in minor or moderate injury or damage to property.
• Connect the power cord directly into a wall outlet and never use an ex-tension cord.
• Disconnect the power plug (by pulling the plug, not the cable) if the power cable or plug becomes frayed or otherwise damaged.
• To avoid hazardous electric shock or laser radiation exposure, do not remove any covers or screws other than those specified in this manu-al.
• Turn off the power and disconnect the power plug (by pulling the plug, not the cable) if any of the following occurs:
• You spill something into the machine.
• You suspect that your machine needs service or repair.
• The external housing of your machine has been damaged.
• Do not incinerate spilled toner or used toner. Toner dust might ignite when exposed to an open flame.
• Disposal can take place at our authorized dealer.
• Dispose of the used toner bottle in accordance with the local regula-tions.
NeptuneC1_GBzen_F_FM_pre.book Page 3 Tuesday, December 16, 2003 5:03 PM
4
R CAUTION:
• Protect the machine from dampness or wet weather, such as rain and snow.
• Unplug the power cord from the wall outlet before you move the machine. While moving the machine, you should take care that the power cord will not be damaged under the machine.
• When you disconnect the power plug from the wall outlet, always pull the plug (not the cable).
• Do not allow paper clips, staples, or other small metallic objects to fall inside the machine.
• Keep toner (used or unused) and toner bottle out of the reach of children.
• For environmental reasons, do not dispose of the machine or expended supply waste at household waste collection points. Disposal can take place at an authorized dealer.
• The inside of the machine could be very hot. Do not touch the parts with a label indicating the “hot surface”. Otherwise, an injury might occur.
NeptuneC1_GBzen_F_FM_pre.book Page 4 Tuesday, December 16, 2003 5:03 PM

5
Positions of RRRRWARNING and RRRRCAUTION Labels
This machine has labels for RWARNING and RCAUTION at the positionsshown below. For safety, please follow the instructions and handle the machineas indicated.
ABB562S
1
4
3
2
5
3
8
6
11
12
9
10
7
NeptuneC1zenGB_Preface1 Page 5 Thursday, January 15, 2004 4:28 PM

6
31
2 4
5
Cutter Blade WarningThere is a cutter blade inside. When replacing or loading the paper roll, or clearing paper jams, do not touch the parts this label indicates. Otherwise an injury may result.
Replacing Paper Roll Warning When replacing or loading the paper roll, do not put the paper roll on the upper of the paper roll tray. Otherwise the tray may fall and an injury may result.
Holding Paper Roll WarningHold the paper roll horizontally with both hands. When you grab the paper holder and hold the paper roll vertically, the paper roll may fall off and an injury may result.
Operating Cassette Tray WarningWhen replacing or loading the paper, or clearing paper jams, pull out the cut paper tray slowly with both hands. Do not pull out the cut paper tray with a single hand.Otherwise the rear of the cut paper tray may fall and an injury may result.
6
8
9
10
12
ABB563S
Hot Surface WarningThe inside of the machine could be very hot. When replacing or loading the paper, or clearing paper jams, do not touch the parts with a label indicating the "hot surface". Otherwise it could cause a personal burn.
Anti-H
umidity H
eater Hot S
urfaceFusing S
ection Hot S
urface
7
The higher temperature(145 ) applies to plain paper. Translucent paper can cause the indicated part to reach 160 .
11
NeptuneC1zenGB_Preface1 Page 6 Thursday, January 15, 2004 4:28 PM

7
ENERGY STAR Program
❖❖❖❖ Low power modeThis product automatically lowers its power consumption 7 minutes after thelast copy or print job is completed. Printing is possible in this mode, but to usethe copier, press the {{{{Energy Saver}}}} key.• For details about changing the default interval before entering Low power
mode, see p.42 “Energy Saver”.
❖❖❖❖ Auto Off mode (Copier only)To conserve energy, this product automatically turns off 14 minutes after thelast copy or print job is completed. Printing is possible in this mode, but to usethe copier, press the operation switch.• For details about changing the default interval before entering Auto Off
mode, see p.42 “Auto Off Timer”.
As an ENERGY STAR Partner, we have determined that this machine model meets the ENERGY STAR Guidelines for energy efficiency.
The ENERGY STAR Guidelines intend to establish an international energy-saving system for developing and introducing energy-efficient office equipment to deal with environmental is-sues, such as global warming.
When a product meets the ENERGY STAR Guidelines for energy efficiency, the Partner shall place the ENERGY STAR logo onto the machine model.
This product was designed to reduce the environmental impact associated with office equip-ment by means of energy-saving features, such as Low-power mode.
NeptuneC1_GBzen_F_FM_pre.book Page 7 Tuesday, December 16, 2003 5:03 PM

8
Specification
Recycled paper
In accordance with the ENERGY STAR Program, we recommend using environ-mentally friendly recycled paper. Contact your sales representative for recom-mended paper.
Low power mode Power consumption 150 W
Default interval 7 minutes
Recovery time 1 minute
Auto Off mode Power consumption 45 W
Default interval 14 minutes
Recovery time 2 minutes
NeptuneC1_GBzen_F_FM_pre.book Page 8 Tuesday, December 16, 2003 5:03 PM

9
Counter
This keeps count of the number ofsheets output under the machine'scopy and print functions.
Total Counter
You can display the total counter val-ues for the copier or printer function.You can also print a counter list.
AAAA Press the {{{{User Tools}}}} key.
BBBB Press [Counter].
CCCC To print a counter list, press[Print].
DDDD Press the {{{{Start}}}} key.The counter total prints out.
Counter for Each User Code
If user codes are set, you can recordcopy numbers used under each. Thisallows you to check copy numbersmade by individual users. Specifywhether or not to apply user codes inSystem Settings.You can register or change a usercode, or display or print the counterfor each user code using Copier Fea-tures.
Referencep.43 “User Code Manage.”, “UserTools (Copier Features)”, Copy Ref-erence
ABB001S
NeptuneC1_GBzen_F_FM_pre.book Page 9 Tuesday, December 16, 2003 5:03 PM

10
NeptuneC1_GBzen_F_FM_pre.book Page 10 Tuesday, December 16, 2003 5:03 PM

11
1. Getting Started
Guide to Components
❖❖❖❖ Front
1. Original switching leverUse to copy or scan folded originals.See “Setting Folded Originals (theOriginal Switching Lever)”, Copy Ref-erence.
2. Upper output stackerWhen the upper output is selected,output paper is stacked at the back ofthe stacker, originals at the front. See“Copy Output Locations”, Copy Refer-ence.
3. Original coverOpen to clear jammed originals.
4. Ventilation holesPrevent overheating. Do not obstructthem by placing anything near orleaning objects against them. If themachine overheats, a failure might oc-cur.
5. Main unitOpen when paper jam or toner runsout.
ABB002S
1
7
8
9
10
11
12
13
14
15
16
17
2
18
3
4
5
6
NeptuneC1_GBzen_F_FM_pre.book Page 11 Tuesday, December 16, 2003 5:03 PM

Getting Started
12
1
6. Main unit opening leverUse to open the main unit.
Important❒ Do not leave the main unit open
more than 10 minutes, other-wise copy quality may deterio-rate.
7. Main power switchUse to turn the main power on or off.If you will not use the machine for along time, disconnect the power cord.Normally, the machine should be lefton.
Note❒ If the machine does not operate af-
te r turning o n the operationswitch, check the main powerswitch is also turned on. If off, turnit on.
8. Paper roll tray (optional)Load a paper roll here. See p.14 “Op-tions”.
9. Operation switchUse to turn the power on or off. Thepower indicator lights when the pow-er is on.
10. Control panelSee p.17 “Control Panel”.
11. {{{{Scanner Stop}}}} keyUse if originals are feeding in slanted,or to cancel scanning while an originalis feeding in.
12. Original guideSet to the width of your originals.
13. Original tablePlace originals here scanning sidedown.
14. Main unit front coverOpen when toner runs out.
15. Bypass trayUse to feed paper in manually. Loadpaper print side up.
16. Cut paper tray (optional)Load cut paper here. See p.14 “Op-tions”.
17. Lower output stackerWhen the lower output is selected,copies are stacked here. See “CopyOutput Locations”,Copy Reference.
18. Lower output auxiliary guidePull this out to insert rolled paper orlong originals.
NeptuneC1_GBzen_F_FM_pre.book Page 12 Tuesday, December 16, 2003 5:03 PM

Guide to Components
13
1
❖❖❖❖ Rear
1. Upper output guideTakes delivered paper to the upperoutput stacker.
2. Original exit switching leverTakes originals to the original outputguide, and switches delivery to therear output. See “Original Output Lo-cations”, Copy Reference.
3. Original exitOriginals are delivered here.
4. Ventilation holesPrevent overheating. Do not obstructthem by placing anything near orleaning objects against them. If themachine overheats, a failure might oc-cur.
5. Original output guideStacks originals delivered to the rearoutput.
6. Anti-humidity heater switch (op-tional)
When humidity is high, paper in thepaper roll or cut paper trays may ab-sorb moisture, which can affect copyquality. The anti-humidity heater pre-vents this. Turn this switch on whenhumidity is high. See p.24 “Anti-hu-midity Heater Switch” .
7. Upper output exitWhen the upper output is selected,copies are delivered there. See “CopyOutput Locations”, Copy Reference.
8. Lower output exitWhen the lower output is selected,copies are delivered there. See “CopyOutput Locations”, Copy Reference.
AAJ007S
1
2
3
5
4
6
7
9
8
NeptuneC1_GBzen_F_FM_pre.book Page 13 Tuesday, December 16, 2003 5:03 PM

Getting Started
14
1
9. Lower output tray (optional)Delivers copies from the lower outputexit, and then sends them to the loweroutput stacker. See “Copy Output Lo-cations”, Copy Reference.
Options
Trays
1. Paper roll tray 1You can load one paper roll. See p.68“Roll Feeder Type 240 A or 240 B”.
2. Paper roll tray 2You can load two paper rolls. See p.68“Roll Feeder Type 240 A or 240 B”.
3. TablePut the main unit on this table. You canstore cut paper and so on inside it.
4. Cut paper trayLoad cut paper here. You can load up to250 A3 sheets.
Note❒ The paper roll tray must be installed.
ABB011S
NeptuneC1_GBzen_F_FM_pre.book Page 14 Tuesday, December 16, 2003 5:03 PM

Guide to Components
15
1
❖❖❖❖ Paper roll trayThis illustration shows paper roll tray 2.
1. Paper roll 1
2. Paper roll 2
3. Cutter knobUse to manually cut paper if there arepaper jams in the cutter area of themachine. Always return the cutterknob to the left or right end.
4. Paper holderThe two paper holders grip the paperroll and are mounted on the paper rolltray's roll holder.
5. Paper feed knobUse when loading paper rolls or clear-ing paper jams. See p.47 “Loading Pa-per” and p.52 “xClearing Misfeeds”.
6. Roll holderAdjust this to the size of the paper rollyou are using. See p.56 “Changing thePaper Roll Size”.
Other Options
❖❖❖❖ Printer unitAllows you to use the printer function.
❖❖❖❖ Scanner unitAllows you to use the scanner function.
❖❖❖❖ HDDYou can increase the capacity of the HDD and the copy function, like the fol-lowing:• Repeat Copy (longer than A0(E)K)• Stamp (User Stamp, Repeat User Stamp)• User Format Overlay
❖❖❖❖ Stamp boardProvides Background Numbering, Repeat User Stamp, Preset Stamp, UserStamp, Date Stamp, and Page Numbering functions.
1
63
4 4
5
2
AAJ008S
NeptuneC1_GBzen_F_FM_pre.book Page 15 Tuesday, December 16, 2003 5:03 PM

Getting Started
16
1
❖❖❖❖ Carrier sheetUse to load bent, folded, creased, thin or pasted originals. See “Setting theCarrier Sheet”, Copy Reference.
❖❖❖❖ Paper holderUse to set a paper roll in the paper roll tray's roll holder.This is useful to change quickly to a different size paper roll from the paperholder.
ZEDP020J
ZEDP030J
NeptuneC1_GBzen_F_FM_pre.book Page 16 Tuesday, December 16, 2003 5:03 PM

Control Panel
17
1
Control Panel
This illustration shows the control panel of a machine that has all options fullyinstalled.
1. {{{{User Tools}}}}Press to change default settings and oper-ating conditions to your requirements.See p.29 “User Tools (System Settings)”.It also displays the total number of copiesmade. See p.9 “Counter” .
2. {{{{New Job}}}} key (copier mode)Press to make settings for next copy joband scan the originals during copying.See “Job Preset”, Copy Reference.
3. IndicatorsDisplay errors and machine status.
• L: Service Call indicator• x: M i s f e e d i n d i c a t o r . See p.52
“xClearing Misfeeds”.• M: Open Cover indicator• E: Used Toner Full indicator• D: Add Toner indicator. See p.50
“DAdding Toner”.• C: Load Paper indicator• Set Original: Indicates the machine is
ready to scan.
4. DisplayDisplays the keys to operate each func-tion, operation status, and error messag-es.
5. {{{{Program}}}} key (copier mode)Press to store or recall frequently usedsettings. See “Programs”, Copy Reference.
6. {{{{Clear Modes}}}} keyPress to clear the current settings.
7. {{{{Energy Saver}}}}key Press to enter Energy Saver mode. Whenyou press this key again, the machine re-turns to the ready condition. See p.23“Energy Saver mode”.
8. {{{{Interrupt}}}} keyPress to make interrupt copies duringcopying or printing. See “InterruptCopy”, Copy Reference.
9. Main power indicator and On in-dicatorThe main power indicator lights whenthe main power switch is turned on. TheOn indicator lights when the operationswitch is on.
Important❒ Do not turn off the main power
switch while On indicator is lit.Doing so may damage the harddisk.
ABB003S
1 2 5 6 7 8 10 11
21 19 1820 17 16 1415 13 12
4 93
NeptuneC1_GBzen_F_FM_pre.book Page 17 Tuesday, December 16, 2003 5:03 PM

Getting Started
18
1
10. Operation switchPress to turn the power on (the On indi-cator goes off). To turn the power off,press it again (the On indicator goes off).
11. {{{{Scanner Stop}}}} keyPress if originals are feeding in slanted,or to cancel scanning while an original isfeeding in.
12. {{{{Sample Copy/Partial Copy}}}} key(copier mode)• Sample Copy
To check the settings, copy the firstpart of an original up to a length of 280mm. See “Sample Copy”, Copy Refer-ence.
• Partial CopyYou can choose to copy a specifiedpart of the original. See “PartialCopy”, Copy Reference.
13. {{{{Start}}}} keyPress to start copying, scanning, or print-ing.
14. {{{{Clear/Stop}}}} key• Clear
Press to clear a number entered.• Stop
Press to stop printing.
15. {{{{#}}}} keyPress to confirm values entered or itemsspecified.
16. Number keysPress to enter the number of copies andother data for a selected function.
17. {{{{Original Type}}}} keyPress to select the original type. See “Se-lecting Original Type Setting”, Copy Ref-erence.
18. Image density keysPress to adjust the image density for thecopier or scanner function. See “Adjust-ing Copy Image Density”, Copy Reference.
19. Selection keysCorrespond to display items. Press to se-lect the corresponding item.
20. Copier function keys (copiermode)Press to use the various copier functions,set the paper cut length, density level,zoom, and so on.
21. Data In indicator (printer mode)Lights when data is sent from the compu-ter.
NeptuneC1_GBzen_F_FM_pre.book Page 18 Tuesday, December 16, 2003 5:03 PM

Control Panel
19
1
Display
The display shows machine status, error messages, and function menus.
Important❒ A force or impact of more than 30 N (about 3 kgf) will damage the display.The copying screen is displayed as default when the power is turned on.
When you select or specify an item on the display, it is highlighted thus: .Keys appearing as cannot be used.
Display and Key Operations
The display is not touch-sensitive. Use the following keys to select the keys anditems on the display.
1. Selection keysTo select an item on the display, press theselection key below it.Example (on the User Tools display):
• To select [Counter], press A.• To select [Exit], press B.
2. 00001111 keyPress to highlight items and select them.
3. Number keysWhen items have a number, select themusing the number keys.Example (on the User Tools display):
• To select 1 [System Settings], press thenumber key {{{{1}}}}.
NeptuneC1_GBzen_F_FM_pre.book Page 19 Tuesday, December 16, 2003 5:03 PM

Getting Started
20
1
Common key operations
The following keys are common to all screens:
❖❖❖❖ Key list
[OK] Acknowledges a selected function or entered values, and then returns to the previous display.
[Cancel] Deletes a selected function or entered values, and then returns to the previous display.
[↑↑↑↑Prev.] [↓↓↓↓Next] Moves to the previous or next display when all items cannot be shown on the display at once.
[PrevMenu] Returns to the previous menu display.
[Exit] Closes the display.
NeptuneC1_GBzen_F_FM_pre.book Page 20 Tuesday, December 16, 2003 5:03 PM
Turning On the Power
21
1
Turning On the Power
This machine has two power switch-es:
❖❖❖❖ Operation switch (right side of thecontrol panel)Press to activate the machine.When the machine finishes warm-ing up, you can make copies.
❖❖❖❖ Main power switch (left side of the ma-chine)Turning off this switch makes themain power indicator on the rightside of the control panel go off.When this is done, machine poweris completely off.
Note❒ This machine automatically enters
Energy Saver mode, Low powermode, or turns itself off if you donot use it for a certain amount oftime when the main power switchis on. See p.42 “Auto Off Timer”,p.42 “Energy Saver” and p.42“Panel Off Timer”.
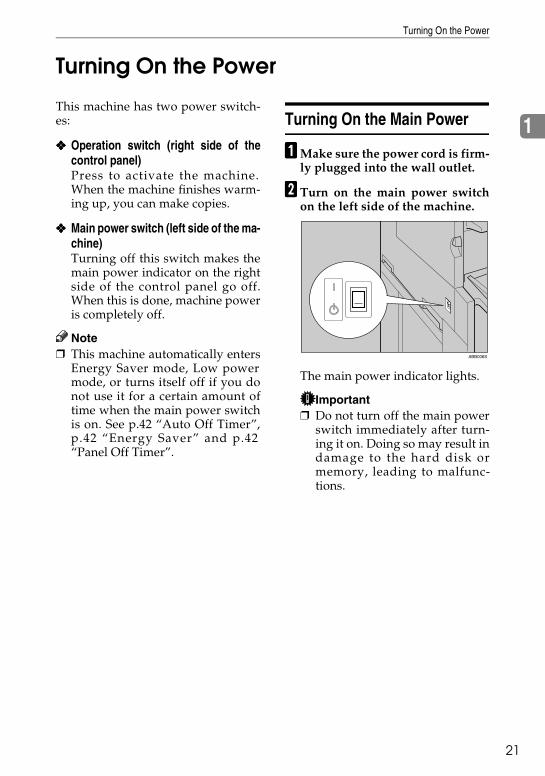
Turning On the Main Power
AAAA Make sure the power cord is firm-ly plugged into the wall outlet.
BBBB Turn on the main power switchon the left side of the machine.
The main power indicator lights.
Important❒ Do not turn off the main power
switch immediately after turn-ing it on. Doing so may result indamage to the hard disk ormemory, leading to malfunc-tions.
ABB006S
NeptuneC1_GBzen_F_FM_pre.book Page 21 Tuesday, December 16, 2003 5:03 PM

Getting Started
22
1
Turning On the Power
AAAA Press the operation switch on theright side of the control panel.
The On indicator lights.
Note❒ If the power does not come on
when the operation switch ispressed, check the main powerswitch is on. If it is off, turn it on.
Turning Off the Power
Limitation❒ You cannot turn the power off by
pressing the operation switchwhi le th e m e ssage "Pleasewait." is displayed.
❒ For 10 seconds after the power isturned on and the screen is dis-played, you cannot turn the poweroff by pressing the operationswitch.
❒ For 10 seconds after copying is fin-ished and the machine stops, youcannot turn the power off by press-ing the operation switch.
AAAA Press the operation switch.
The On indicator goes off.
Note❒ When you press the operation
switch, the indicator does notgo off in the following cases:• During communication with
external equipment.• When the hard disk is active.
Turning Off the Main Power
Important❒ When the On indicator lights, do
not turn off the main powerswitch. Doing so may result indamage to the hard disk or memo-ry, leading to malfunctions.
❒ Make sure to turn off the mainpower switch before pulling outthe power plug. Not doing thismay result in damage to the harddisk or memory.
AAAA Make sure the On indicator is notlit.
BBBB Turn off the main power switchon the left side of the machine.
The main power indicator goes off.
ABB005S
ABB005S
NeptuneC1_GBzen_F_FM_pre.book Page 22 Tuesday, December 16, 2003 5:03 PM

Turning On the Power
23
1
Saving Energy
----Energy Saver modeIf you do not use the machine for acertain period after an operation, orwhen you press the {{{{Energy Saver}}}}key, the display disappears and themachine goes into Energy Savermode. When you press the {{{{EnergySaver}}}} key again, the machine returnsto standby. The machine uses lesselectricity in Energy Saver mode.
Note❒ You can change the amount of time
the machine waits before switch-ing to Energy Saver mode aftercopying finishes or the last opera-tion is performed. See p.42 “PanelOff Timer”.
----Low power modeIf you do not use the machine for acertain period, it automatically low-ers its power consumption. Whenyou press the {{{{Energy Saver}}}} key, themachine returns to standby.
Note❒ You can change the Low power
mode. See p.42 “Energy Saver”.
----Auto Off modeIf you do not use the machine for acertain period, it automatically turnsitself off. This function is called “AutoOff”. When you press the operationswitch, the machine returns to stand-by.
Note❒ You can change the Auto Off
mode. See p.42 “Auto Off Timer”.❒ Specify whether or not to use the
Auto Off Timer function. See p.44“AOF (Always On)”.
❒ The Auto Off Timer function willnot operate in the following cases:• When a warning message ap-
pears.• When the service call indicator
is lit.• When paper is jammed.• When the cover is open.• When the “Add toner” mes-
sage appears.• When toner is being replen-
ished.• When the User Tools screen is
displayed.• When fixed warm-up is in
progress.• When the printer, scanner, or
other functions are active.• When operations are suspend-
ed during printing.• When the Data In indicator is on
or blinking.• When the sample print display
appears.• If copying is interrupted.• During copying (if only one
original is inserted when usingImage Overlay).
• During copying (if all paper inthe bypass tray has not beencopied).
NeptuneC1_GBzen_F_FM_pre.book Page 23 Tuesday, December 16, 2003 5:03 PM
Getting Started
24
1
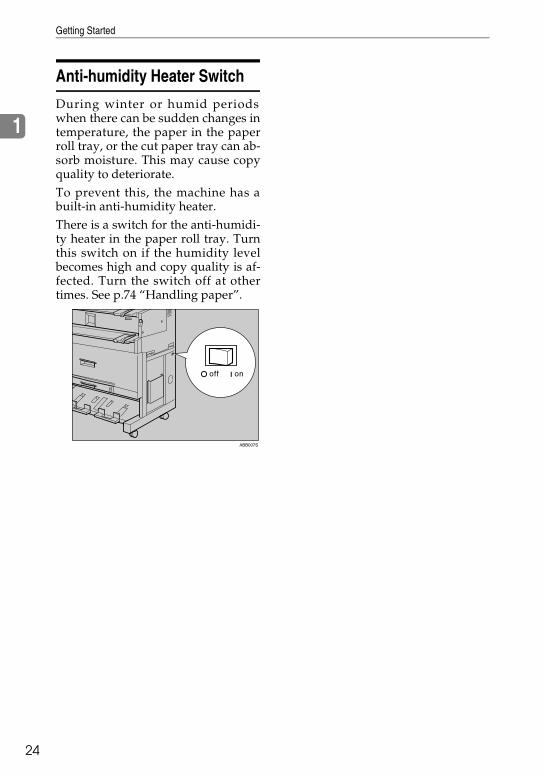
Anti-humidity Heater Switch
During winter or humid periodswhen there can be sudden changes intemperature, the paper in the paperroll tray, or the cut paper tray can ab-sorb moisture. This may cause copyquality to deteriorate.To prevent this, the machine has abuilt-in anti-humidity heater.There is a switch for the anti-humidi-ty heater in the paper roll tray. Turnthis switch on if the humidity levelbecomes high and copy quality is af-fected. Turn the switch off at othertimes. See p.74 “Handling paper”.
ABB007S
NeptuneC1_GBzen_F_FM_pre.book Page 24 Tuesday, December 16, 2003 5:03 PM

25
2. Combined FunctionOperations
Switching between Functions
You can use this machine not only as a copier, but also as a printer or scanner.
Note❒ Depending on the options you have installed, you may not be able to switch
to some functions:
Limitation❒ You cannot switch functions in the following circumstances:
• While copying.• While adjusting system settings.• While the machine is warming up.• When the machine has been turned off automatically.
----System ResetThe machine returns automatically to its initial condition when the job is fin-ished, after a certain period of time has elapsed. This function is called "SystemReset".
Note❒ You can change the System Reset time. See p.42 “System Auto Reset”.
NeptuneC1_GBzen_F_FM_pre.book Page 25 Tuesday, December 16, 2003 5:03 PM

Combined Function Operations
26
2
Using the Machine As a Copier
Switching to Copier Mode
When the printer or scanner function is not active, or has finished its job, thecopy screen is displayed as normal.
ReferenceFor details about copier functions, see Copy Reference.
Interrupting Other Functions to Use Copier Functions
You can interrupt a copy job, or another function job, and switch to the copierfunction. This is called "Interrupt Copy."
Limitation❒ You cannot use the following functions with the interrupt copy function:
• Edit• Stamp• Sort/Rotate sort• Erase
ReferenceFor details about using interrupt copy during a copy job, see Copy Reference.
AAAA Press the {{{{Interrupt}}}} key while an original is being scanned or job being cop-ied. When printing, place the originals after pressing the {{{{Interrupt}}}} key.
The interrupt copy screen appears.
BBBB Make settings, and begin copying.
CCCC When copying finishes, remove the originals and the interrupt copy joboutput.
DDDD Press the {{{{Interrupt}}}} key.
NeptuneC1_GBzen_F_FM_pre.book Page 26 Tuesday, December 16, 2003 5:03 PM

Using the Machine As a Printer
27
2
Using the Machine As a Printer
Switching to Printer Mode
When you send print job from your computer, the job is printed.
AAAA Print the job as you usually do from your computer.
The "Printing..." message is displayed, and printing starts.
NeptuneC1_GBzen_F_FM_pre.book Page 27 Tuesday, December 16, 2003 5:03 PM
Combined Function Operations
28
2
Using the Machine As a Scanner
Switching to Scanner Mode
AAAA Scan the job as you usually do from your computer.The "Scanning..." message appears.
BBBB Place your originals.
CCCC Specify the scan settings.
DDDD Scan the originals.
Limitation❒ You cannot use the machine as a scanner when originals are being scanned
for the copier function.
NeptuneC1_GBzen_F_FM_pre.book Page 28 Tuesday, December 16, 2003 5:03 PM

29
3. User Tools (System Settings)
User Tools Menu (System Settings)
❖❖❖❖ General Features (see p.33 “General Features”)
User Tools item menu Default
Adjust Cut Length • Metric version0.0 mm
• Inch version0.0 inch
Fusing Adjustment Plain Paper: 3
Translucent Paper: 2
Film: 3
Orig. Size Detect • Metric versionA Series
• Inch versionEngineering
Tray Paper Size • Metric versionBypass Tray: Under 420mm WidthPaper Roll 1 *1 : A Series 841mmPaper Roll 2 *1 : A Series 420mmCut Paper Tray *2 : A Series A4K
• Inch versionBypass Tray: Under 17" WidthPaper Roll 1 *1 : Engineering 34"Paper Roll 2 *1 : Engineering 17"Cut Paper Tray *2 : Engineering 12 × 18K
Tray Paper Type Bypass Tray: Plain
Paper Roll 1 *1 : Plain
Paper Roll 2 *1 : Plain
Cut Paper Tray *2 : Plain
Orig. Edge Hold Off
Output Tray Upper
Orig. Feed Delay1 1 sec.
Orig. Feed Delay2 Off
Auto Roll Switch. Off
Fine Ratio:Copier 0.0%
Panel Tone On
Warm Up Notice On
Copy Count Displ. Up
Feed Start Method Auto
NeptuneC1_GBzen_F_FM_pre.book Page 29 Tuesday, December 16, 2003 5:03 PM

User Tools (System Settings)
30
3
❖❖❖❖ Timer Settings (see p.42 “Timer Settings”)
❖❖❖❖ Key Op. Tools (see p.43 “Key Op. Tools”)
*1 The paper roll tray (optional) must be installed.*2 The cut paper tray (optional) must be installed.*3 The printer unit (optional) must be installed.*4 The scanner unit (optional) must be installed.*5 The HDD (optional) must be installed.
Display Contrast (Centre)
Paper Volume (printer mode) *3 Paper Roll 1: 100%
Paper Roll 2: 100%
Adj.Print Positn. • Metric versionPaper Roll 1 *1 : 0.0 mmPaper Roll 2 *1 : 0.0 mmCut Paper *2 : 0.0 mm
• Inch versionPaper Roll 1 *1 : 0.00 inchPaper Roll 2 *1 : 0.00 inchCut Paper *2 : 0.00 inch
Adj.Scan Position 0
Print Image Prior (printer mode) Thin Lines
User Tools item menu Default
Auto Off Timer 14 min.
Energy Saver 7 min.
Panel Off Timer On 60 sec.
System Auto Reset On 60 sec.
Date –
Time –
User Tools item menu Default
User Code Manage. Off
Key Operator Code Off
AOF (Always On) On
Optional HDD *5 Off
Tray Prob.Setting Do not Use Bypass
User Tools item menu Default
NeptuneC1_GBzen_F_FM_pre.book Page 30 Tuesday, December 16, 2003 5:03 PM

Accessing User Tools (System Settings)
31
3
Accessing User Tools (System Settings)
This section is for key operators incharge of this machine.User Tools allow you to change or setdefaults.
Note❒ Operations for System Settings dif-
fer from normal operations. Al-ways quit User Tools when youfinish making settings. See p.32“Exiting User Tools”.
❒ Any changes you make with UserTools remain in effect even if themain power switch or operationswitch is turned off, or the {{{{EnergySaver}}}} or {{{{Clear Modes}}}} key ispressed.
Changing Default Settings
Note❒ If a key operator code is set, the
key operator code entry displayappears. Enter the key operatorcode, and then press [OK]. See p.43“Key Operator Code”.
AAAA Press the {{{{User Tools}}}} key.
The indicator lights.
BBBB Press the number key {{{{1}}}}.
The System Settings display ap-pears.
CCCC Enter the number of the menuyou want to select using thenumber keys.
Referencep.29 “User Tools Menu (SystemSettings)”
DDDD Enter the number of the item youwant to select using the numberkeys.
Note❒ Press [↑↑↑↑Prev.] or [↓↓↓↓Next] to select
an item not displayed.
EEEE Change settings by following in-structions on the display, andthen press [OK].
Note❒ For details about specifying, or
changing settings, see p.19 “Dis-play”.
❒ To cancel changing settings andreturn to the initial display,press the {{{{Use Tools}}}} key.
ABB001S
NeptuneC1_GBzen_F_FM_pre.book Page 31 Tuesday, December 16, 2003 5:03 PM
User Tools (System Settings)
32
3
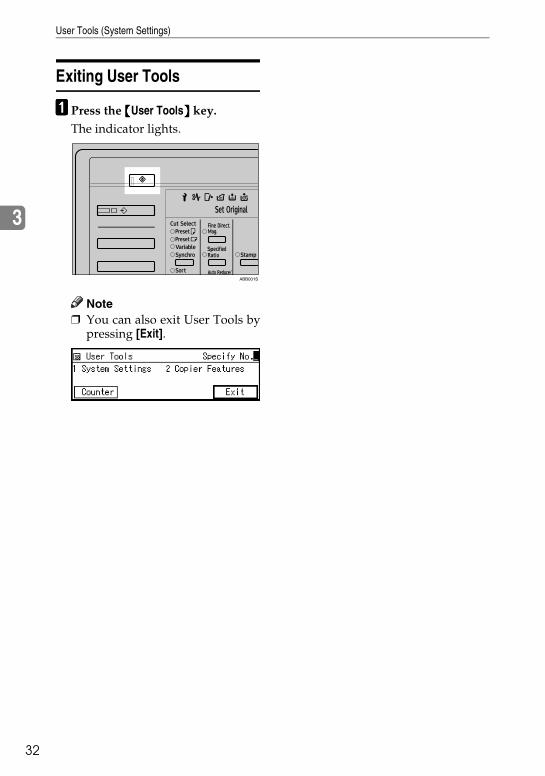
Exiting User Tools
AAAA Press the {{{{User Tools}}}} key.The indicator lights.
Note❒ You can also exit User Tools by
pressing [Exit].
ABB001S
NeptuneC1_GBzen_F_FM_pre.book Page 32 Tuesday, December 16, 2003 5:03 PM

Settings You Can Change with User Tools
33
3
Settings You Can Change with User Tools
ReferenceTo access User Tools, see p.31 “Accessing User Tools (System Settings)”.
General Features
❖❖❖❖ Adjust Cut LengthYou can specify the cut length when using synchro, preset, or variable cut.
Note❒ Default
• Metric version: 0.0 mmFrom –25 mm to +25 mm (in 1 mm increments)
• Inch version: 0.0 inchFrom –1.0 inch to +1.0 inch (in 0.1 inch increments)
❖❖❖❖ Fusing AdjustmentYou can specify the characteristics of the paper in the paper tray. If the imageon copies is scratched, or the paper wrinkles when using translucent paper,you can change the setting to get better copies.You can specify the paper thickness for the bypass tray, paper roll, and cut pa-per. You can also specify the paper type (plain, translucent, and film) for thebypass tray or paper roll tray.
Note❒ Default: 3 (Plain paper or Film), 2 (Translucent paper)❒ The paper thickness can be set from 1 (Thicker) to 5 (Thinner).
NeptuneC1_GBzen_F_FM_pre.book Page 33 Tuesday, December 16, 2003 5:03 PM

User Tools (System Settings)
34
3
❒ Refer to the chart below when selecting the mode for the paper thickness.
*1 Out of guarantee❒ Depending on paper type and operating conditions, toner fusing condi-
tions vary. To improve toner fusing, change the setting mode to 3→2→1.❒ When using thin, soft, or limp paper, toner fusing may appear wrinkled or
the image may be blurred. If this happens, change the setting to mode3→4→5.
❒ When translucent paper modes 1 or 2 are selected, and you change the pa-per type from plain or film to translucent, it may take longer for the ma-chine to get ready for copying (up to two minutes).
❖❖❖❖ Orig. Size DetectYou can specify the scanning area when detecting the size of an original.• Metric version:
• A Series• JIS B Series (JIS:Japanese Industrial Standard)
• Inch version:• Architecture• Engineering
Note❒ Default:
• Metric version: A Series
• Inch version: Engineering
❒ When you change the setting, the following changes are made to theUserAutoR/E Orig. setting in User Tools (Copier Features).
Mode 1 2 3 4 5
Paper type
Plain paper 110 g/m2
(29.3 lb)
90 g/m2
(23.9 lb)
70 g/m2
(Standard mode)
(18.6 lb)
60 g/m2 or less
(15.9 lb)
Limp paper
Translucent paper
70 – 90 g/m2 (18.6 – 29.3 lb)
70 – 80 g/m2 (18.6 – 21.3 lb)(Stand-ard mode)
70 – 80 g/m2 (18.6 – 21.3 lb)
50 – 70 g/m2 (13.3 – 18.6 lb)
Hemmed paper *1
* If the paper wrinkles when using mode 2, try using mode 1.
Film 0.07 mm – 0.095 mm (2.8 Mil – 3.7 Mil)
0.07 mm – 0.095 mm (2.8 Mil – 3.7 Mil)
0.07 mm – 0.095 mm (2.8 Mil – 3.7 Mil) (Stand-ard mode)
0.07 mm – 0.095 mm (2.8 Mil – 3.7 Mil) (Stand-ard mode)
—
NeptuneC1_GBzen_F_FM_pre.book Page 34 Tuesday, December 16, 2003 5:03 PM
Settings You Can Change with User Tools
35
3
❖❖❖❖ Metric version• For A series→JIS B series, if B1JIS or B4JIS is set for the User Auto
R/E settings, the UserAutoR/E Orig. setting is changed to vertical.• JIS B series→A series, if A0 or A4 is set for the User Auto R/E set-
tings, the UserAutoR/E Orig. setting is changed to vertical.
❖❖❖❖ Inch versionWhen switching between Engineering and Architecture, if E is set forthe User Auto R/E settings, the UserAutoR/E Orig. setting is changedto vertical.
Reference“User Auto Reduce/Enlarge”, “User Auto Reduce/Enlarge Original”,Copy Reference
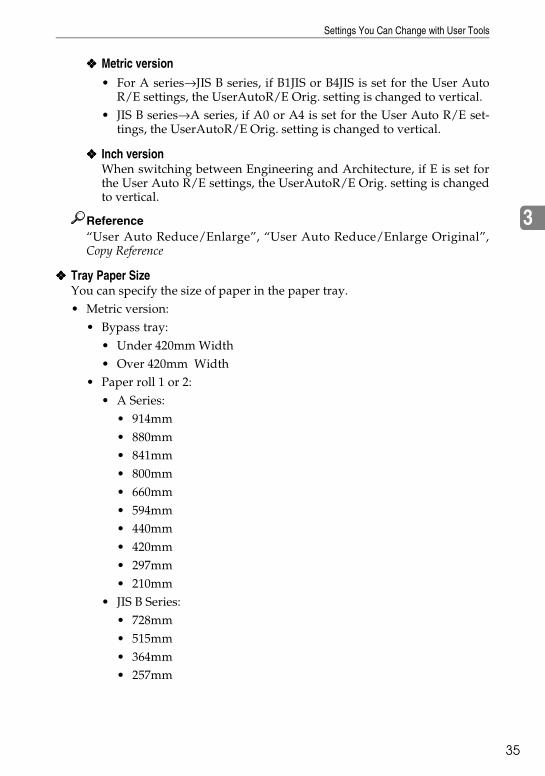
❖❖❖❖ Tray Paper SizeYou can specify the size of paper in the paper tray.• Metric version:
• Bypass tray:• Under 420mm Width• Over 420mm Width
• Paper roll 1 or 2:• A Series:
• 914mm• 880mm• 841mm• 800mm• 660mm• 594mm• 440mm• 420mm• 297mm• 210mm
• JIS B Series:• 728mm• 515mm• 364mm• 257mm
NeptuneC1_GBzen_F_FM_pre.book Page 35 Tuesday, December 16, 2003 5:03 PM

User Tools (System Settings)
36
3
• Cut Paper tray:• A Series:
• A3K• A4K
• JIS B Series:• B4JISK
• Inch version:• Bypass tray:
• Under 17" Width• Over 17" Width
• Paper roll 1 or 2:• Engineering:
• 34"• 22"• 17"• 11"• 81/2" (81/2 × 11K)• 81/2" (81/2 × 13K)• 81/2" (81/2 × 14K)
• Architecture:• 36"• 30"• 24"• 18"• 12"• 9"
• Cut paper tray:• Engineering:
• 11 × 17K• 81/2 × 14K• 81/2 × 13K• 81/2 × 11K
• Architecture:• 12 × 18K
NeptuneC1_GBzen_F_FM_pre.book Page 36 Tuesday, December 16, 2003 5:03 PM

Settings You Can Change with User Tools
37
3
Note❒ Default:• Metric version:
• Bypass tray: Under 420mm Width
• Paper roll 1, 2:• A series: 841mm (paper roll 1), 420mm (paper roll 2)
• Cut paper tray:• A series: A4K
• Inch version:• Bypass tray: Under 17" Width
• Paper roll 1, 2:• Engineering: 34" (paper roll 1), 17" (paper roll 2)
• Cut paper tray:• Engineering: 12 × 18K
❖❖❖❖ Tray Paper TypeYou can specify the type of paper in a paper tray.Specify the type of paper in each of the paper trays (bypass tray, paper rolltray 1, paper roll tray 2, and cut paper tray.)• Plain• Translucent• Film• Recycled
Note❒ Default: Plain
❒ You can specify plain or recycled paper for the cut paper tray.
❖❖❖❖ Orig. Edge HoldWhen large size originals, such as A0(E)K or A1(D)K, are delivered to thelower tray, you can have the machine gather the trailing edge of the originalso that it does not fall to the floor. This setting specifies whether or not to usethat function.• On (Always)• On (Specify)• Off
Note❒ Default: Off
❒ To use the function, select [On (Always)] or [On (Specify)]. To not use the func-tion, select [Off].
❒ When [On (Specify)] is selected, select [Over A0KKKK], [Over A1KKKK], [Over A2KKKK],[Over A3KKKK], or [Over A4KKKK] as the original size.
NeptuneC1_GBzen_F_FM_pre.book Page 37 Tuesday, December 16, 2003 5:03 PM

User Tools (System Settings)
38
3
❖❖❖❖ Output TrayYou can specify the paper output tray to use when the power is turned on orthe {{{{Clear Modes}}}} key is pressed.• Lower• Upper
Note❒ Default: Upper
❖❖❖❖ Orig. Feed Delay1You can specify the duration of delay before an original is fed into the ma-chine after being set. If originals frequently feed in slanted, or you are usingspecial originals, set the delay accordingly.
Note❒ Default: 1 sec.
❒ The time can be set from 1 to 5 seconds.
❖❖❖❖ Orig. Feed Delay2You can specify the duration of the pause immediately after originals are firstfed into the machine. If originals frequently feed in slanted, or you are usingspecial originals, set the delay accordingly.• On 1 sec.• Off
Note❒ Default: Off
❒ Select [On], the time can be set from 1 to 5 seconds.
❖❖❖❖ Auto Roll Switch.If paper roll 1 runs out during copying, the machine can automatically switchto paper roll 2. This setting specifies whether or not to automatically switchthe paper rolls.• On• Off
Note❒ Default: Off
❒ This function is only available in the paper roll tray.
NeptuneC1_GBzen_F_FM_pre.book Page 38 Tuesday, December 16, 2003 5:03 PM

Settings You Can Change with User Tools
39
3
❖❖❖❖ Fine Ratio:Copier
Depending on paper type, environment, and humidity, copy paper can ex-pand or shrink slightly. This means that the size of the copy and the originaldo not match. If this happens, you can specify the vertical and horizontal cor-rection ratio. You can specify this setting for each paper type (plain, translu-cent, film)
Note❒ Default: 0.0%
❒ From –1.0% to 1.0% (in 0.1% increments)❒ To set the Fine Ratio setting, measure the length of the original and the
copy image to calculate the ratio.
ABB009S
ZEDG010E
Calculating the Correction Value (%)
To copy at the same size as the original
Example)CopyOriginal
Horiz. Horiz.
... For the example above:
correction value(%)
Set the correction value (horizontal) to 0.8%.
NeptuneC1_GBzen_F_FM_pre.book Page 39 Tuesday, December 16, 2003 5:03 PM

User Tools (System Settings)
40
3
❖❖❖❖ Panel ToneYou can specify whether or not the machine should emit a tone when the keyson the control panel are pressed.• On• Off
Note❒ Default: On
❖❖❖❖ Warm Up NoticeYou can have the beeper sound when the machine becomes ready to copy af-ter leaving Energy Saver mode or when the power is turned on.• On• Off
Note❒ Default: On❒ If the Panel Tone setting is [Off], the beeper does not sound, regardless of
the Warm Up Notice setting.
❖❖❖❖ Copy Count Displ.You can specify the copy count display format.If you press [Up], the display counts upward, if you press [Down], the displaycounts downward.• Up• Down
Note❒ Default: Up
❖❖❖❖ Feed Start MethodYou can specify whether feeding starts automatically or after pressing the{{{{Start}}}} key.• Auto• Press Start Key
Note❒ Default: Auto
❖❖❖❖ Display ContrastYou can adjust the contrast of the display in seven increments, Lighter toDarker.
NeptuneC1_GBzen_F_FM_pre.book Page 40 Tuesday, December 16, 2003 5:03 PM

Settings You Can Change with User Tools
41
3
❖❖❖❖ Paper Volume (printer mode)When the printer unit is installed, you can specify how the paper volumeshould be displayed when a paper roll is loaded in the paper roll tray. Youcan specify this setting for each paper roll tray.• 100%• 75%• 50%• 25%
Note❒ Default: 100% (paper roll tray 1 or 2)❒ When a new 175 m roll is loaded, select [100%].
❖❖❖❖ Adj.Print Positn.You can specify the horizontal print position. You can specify this for the pa-per type (paper roll 1 or 2, cut paper)
Note❒ Default:
• Metric version: 0.0 mm (paper roll 1 or 2, cut paper)From –10.0 mm to + 10.0 mm (in 0.1 mm increments)
• Inch version: 0.00 inch (paper roll 1 or 2, cut paper)From –0.40 inch to +0.40 inch (in 0.01 inch increments)
❖❖❖❖ Adj.Scan PositionYou can adjust the position of the scan area.
Note❒ Default: 0❒ From –10 to +10 (in 1 increments)
❖❖❖❖ Print Image Prior (printer mode)When the printer unit is installed, you can specify the print mode priority.• Thin Lines• Gradation
Note❒ Default: Thin Lines
NeptuneC1_GBzen_F_FM_pre.book Page 41 Tuesday, December 16, 2003 5:03 PM

User Tools (System Settings)
42
3
Timer Settings
❖❖❖❖ Auto Off TimerAfter a specified period, following job completion, the machine automaticallyturns off, in order to conserve energy. This function is called "Auto Off". The machine status after Auto Off is referred to as "Off mode". You can spec-ify the time to elapse before Auto Off is activated.
Note❒ Default: 14 min.
❒ Enter a time interval between 1 and 240 minutes.❒ From “Off mode”, the machine is ready to use in 10 seconds.❒ Auto Off may not work when error messages appear.
❖❖❖❖ Energy SaverWhen no other key operations are performed, the machine switches to Lowpower mode after a specified period.
Note❒ Default: 7 min.
❒ The time can be set from 1 to 240 minutes.
❖❖❖❖ Panel Off TimerWhen no other key operations are performed, the machine switches to EnergySaver mode after a specified period.• On 60 sec.• Off
Note❒ Default: On 60 sec.
❒ Select [On], the time can be set from 10 to 999 seconds.
❖❖❖❖ System Auto ResetThe System Reset setting automatically switches the display to its initial con-dition when no operations are in progress, or when an interrupted job iscleared. This setting determines the system reset interval.• On 60 sec.• Off
Note❒ Default: On 60 sec.❒ Select [On], the time can be set from 10 to 999 seconds.
NeptuneC1_GBzen_F_FM_pre.book Page 42 Tuesday, December 16, 2003 5:03 PM

Settings You Can Change with User Tools
43
3
❖❖❖❖ DateSet the date for the machine's internal clock using the number keys.
Note❒ To change between year, month, and day, press the 01 key.❒ Enter the date using the number keys.
❖❖❖❖ TimeSet the time for the machine's internal clock using the number keys.
Note❒ To change between hours, minutes and seconds, press the 01 key.❒ Enter the time using the number keys.
Key Op. Tools
The key operator must set the following items (for settings or more information,contact the key operator):The key operator should program a key operator code when making settings.See p.43 “Key Operator Code”.If the key operator code is set, you cannot access key operator functions unlessyou enter the key operator code (max.eight digits).
❖❖❖❖ User Code Manage.Allows you to control who uses the machine by setting codes for users.
Note❒ Default: Off
❒ User codes must be registered for user code management. See “Key Oper-ator Tools”, Copy Reference.
❖❖❖❖ Key Operator CodeYou can specify whether or not to use passwords (max.eight digits) to accessKey Op. Tools settings for key operator codes.• On• Off
Note❒ Default: Off
❒ When [On] is selected, specify key operator code (max.eight digits).
NeptuneC1_GBzen_F_FM_pre.book Page 43 Tuesday, December 16, 2003 5:03 PM

User Tools (System Settings)
44
3
❖❖❖❖ AOF (Always On)You can specify whether or not to use Auto Off Timer.• On• Off
Note❒ Default: On
❖❖❖❖ Optional HDDWhen the optional hard disk is installed, if it fails, you can still use the ma-chine temporarily if you turn it off. (Some functions may not be available.)• On• Off
Note❒ Default: Off
Limitation❒ When the optional hard disk is installed and [Off] is selected, you cannot
use the following functions:• Repeat Copy (longer than A0(E)K)• Stamp (User Stamp, Repeat User Stamp)• Restart Copy (longer than A0(E))• User Format Overlay• Sample Copy (longer than A0(E))
❖❖❖❖ Tray Prob.SettingWhen the paper roll tray is installed, if the cutter malfunctions, select to usethe bypass tray or not.• Use Bypass• Do not Use Bypass
Note❒ Default: Do not Use Bypass
NeptuneC1_GBzen_F_FM_pre.book Page 44 Tuesday, December 16, 2003 5:03 PM

45
4. Troubleshooting
If Your Machine Does Not Operate As You Want
The following chart gives explanations of common problems and messages. Ifother messages appear, follow the instructions displayed.
Note❒ If you cannot make copies as you want because of paper type, paper size, or
paper capacity problems, use recommended paper. See p.70 “Copy Paper”.
General
Problem Causes Solutions
“Please wait.” ap-pears.
This message appears when you turn on the oper-ation switch.
If the machine does not come on af-ter two minutes, contact your serv-ice representative.
This message appears when you change the toner cartridge.
Wait for the machine to get ready.
The display is off. The display contrast is too light.
Set “Darker” in [Display Contrast] un-der System Settings. See p.40 “Dis-play Contrast”.
The machine is in Energy Saver mode.
Press the {{{{Energy Saver}}}} key to can-cel Energy Saver mode.
The operation switch is turned off.
Turn on the operation switch.
Nothing happens when the operation switch is turned on.
The main power switch is turned off.
Turn on the main power switch.
The function status indica-tor is red.
The function associated with the red indicator is in-terrupted.
Press the function key correspond-ing to the indicator. Follow the in-structions that appear on the control panel.
The user code entry dis-play appears.
Users are restricted by user management.
Enter the user code (max.eight dig-its), and then press {{{{#}}}}.
NeptuneC1_GBzen_F_FM_pre.book Page 45 Tuesday, December 16, 2003 5:03 PM

Troubleshooting
46
4
Problem Causes Solutions
The main power in-dicator does not turn off when pressed.
This occurs in the fol-lowing cases:
• The machine is communicating with external equipment.
• The hard disk is active.
When you turn the main power off, check if the machine is not communicating with a computer.
Original images are printed on the re-verse side of the pa-per.
You may have load-ed the paper incor-rectly.
Load paper correctly. Load paper into the paper roll tray or the cut paper tray print side down, and into the bypass tray print side up. See p.47 “Loading Paper”.
Misfeeds occur fre-quently.
There are folds or wrinkles in the pa-per.
Remove any folds or wrinkles from the paper.
Jammed or torn pa-per is inside the ma-chine.
Remove the paper, as necessary. See p.52 “xClearing Misfeeds”.
The tray's side or end fence may not be set properly.
Check the side or end fence is set properly. See p.49 “Loading Cut Paper”.
You may have load-ed paper of a size not shown on the paper size selector.
When using paper of a size that cannot be de-tected automatically, use Tray Paper SizeSet-tings to set the paper size. See p.35 “Tray Paper Size” and p.70 “Copy Paper”.
Originals jam fre-quently.
Originals are curled. Smooth out any curls and try again.
You forgot your key operator code.
— Contact your service representative.
Central vertical lines blur or bleed at 2.5 mm intervals.
The carriage roller's studs are pressing on the paper as it passes through.
Use [Adj. Print Positn.] to move the line incremen-tally left or right. Image moves left or right ac-cording to the number set. For details, see p.41 “Adj.Print Positn.”.
NeptuneC1_GBzen_F_FM_pre.book Page 46 Tuesday, December 16, 2003 5:03 PM

Loading Paper
47
4
Loading Paper
R CAUTION:
Important❒ When removing paper rolls, lift the paper holders on either side of the paper
roll before removing. Do not lift one side only. This could damage the ma-chine.
ReferenceFor details about paper sizes and types that can be loaded, see p.70 “Copy Pa-per”.For details about changing the paper roll size, see p.56 “Changing the PaperRoll Size”.
Loading Paper Roll
• Be careful when replacing the roll paper or removing misfed paper by follow-ing the operating instructions properly. Otherwise, an injury may result from the paper cutter inside.
1. Open the paper roll tray. Hold both sides of the empty paper roll and remove it from the unit.
2. Raise the green lever on the paper hold-er (A). Remove the paper holder from the empty paper roll core (B).
Note❒ Remove both sides of the paper holder.
AAJ018S
NeptuneC1_GBzen_F_FM_pre.book Page 47 Tuesday, December 16, 2003 5:03 PM

Troubleshooting
48
4
Note❒ When you use the printer function, set the paper volume again after loading
the paper roll. See p.41 “Paper Volume (printer mode)”
3. Set the paper holder in the new paper roll (A). Lower the lever (B).
Note❒ Insert the paper holder firmly until it
stops.
❒ Set both sides of the paper holder.
4. Hold both sides of the paper holder. Set it in the roll holder.
5. Set the paper roll.
Note❒ The edge of the paper roll should be on
the bottom.
6. Pass the paper edge under the rubber part of the roller.
7. Turn the paper feed knob in the direc-tion of the arrows until the edge of the pa-per emerges.
8. Cut the edge of the paper by sliding the cutter knob from left to right, or from right to left (A). Remove the offcut (B).
9. Turn the paper feed knob 90 degrees forward.
10. Close the paper roll tray.
NeptuneC1_GBzen_F_FM_pre.book Page 48 Tuesday, December 16, 2003 5:03 PM

Loading Paper
49
4
Loading Cut Paper
Note❒ When you change the paper size, make Tray Paper Size setting under System
Settings, see p.35 “Tray Paper Size”.
1. Pull out the cut paper tray while lifting up-ward and out.
Note❒ Be sure to load paper after all the paper in
the tray run out.
2. Hold both sides and lift the front of the tray, and then remove it from of the machine.
3. While pressing the release lever, open the side fence (A).
Note❒ When changing the paper size, adjust the
end fence to the paper size while pressing the release lever (B).
4. Load paper print face down.
Note❒ Load paper below the limit mark on the pa-
per guide.
5. While pressing the release lever, adjust the side fence to the paper size.
6. Insert the cut paper tray into the machine, push slowly until it stops.
Note❒ If you push the cut paper tray forcefully,
the tray's paper guide may become out of position.
NeptuneC1_GBzen_F_FM_pre.book Page 49 Tuesday, December 16, 2003 5:03 PM

Troubleshooting
50
4
DDDDAdding Toner
R WARNING:
R CAUTION:
Important❒ Faults may occur if you use non-recommended toner.❒ Replace toner while the machine is turned on. If you turn the machine off,
your settings will be lost and you will not be able to resume copying.❒ Always replace toner when the message appears.
Note❒ When the indicators blink, replace the toner as soon as possible.❒ If toner runs out, the message “DAdd toner” appears and you cannot make
copies.
ReferenceFor details about toner storage, see p.60 “Toner”.
• Do not incinerate used toner or toner containers. Toner dust might ig-nite when exposed to an open flame. Dispose of used toner containers in accordance with local regulations.
• Keep toner (used or unused) and toner containers out of reach of children.
1. Lift both main unit opening levers, and then open the main unit upward.
2. Open the main unit front cover.
3. Hold the toner cartridge at the edge of the right side, and then roll it in the direction of the arrow.
NeptuneC1zenGB_Chapter-4 Page 50 Thursday, January 15, 2004 4:32 PM

DAdding Toner
51
4
4. Hold the toner cartridge at the edge of the left side, and remove it from the machine.
5. Take out the new toner cartridge (A), and then shake it gently five or six times (B).
6. Insert the end of the toner cartridge into the toner holder on the left (A). Insert the toner cartridge into the right in the direction of the arrow (B).
Note❒ Do not rotate the cartridge until you re-
move the tape (next step).
7. Slowly remove the tape from the toner car-tridge.
8. Rotate the toner cartridge in the direction of the arrow until it stops.
9. Close the main unit front cover and the main unit.
NeptuneC1_GBzen_F_FM_pre.book Page 51 Tuesday, December 16, 2003 5:03 PM

Troubleshooting
52
4
xxxxClearing Misfeeds
R CAUTION:
R CAUTION:
Important❒ Do not turn off the operation switch when removing jammed originals. If you
do, your settings will be lost.❒ Remove jammed originals completely, taking care not to tear them. If scraps
of paper remain inside, originals will jam again and may cause damage to themachine.
❒ If the original misfeeds again, call your service representative immediately.
Note❒ Paper jam locations may be displayed in more than one place at a time. If this
happens, check all the locations indicated.❒ Instructions for clearing paper jams in the copy output area and paper roll
tray are contained in the stickers on the machine.
• The fusing section of this machine might be very hot. Caution should be tak-en when removing misfed paper.
• Be careful when replacing the roll paper or removing misfed paper by follow-ing the operating instructions properly. Otherwise, an injury may result from the paper cutter inside.
NeptuneC1_GBzen_F_FM_pre.book Page 52 Tuesday, December 16, 2003 5:03 PM

xClearing Misfeeds
53
4
NeptuneC1_GBzen_F_FM_pre.book Page 53 Tuesday, December 16, 2003 5:03 PM

Troubleshooting
54
4
B is displayed
1. Lift both main unit opening levers, and then open the main unit upward.
1. Open the paper roll tray, and then slowly pull up the edge of the jammed paper.
6. Rotate the paper roll until the edge of the paper is fed into the rubber part of the roller.
7. Rotate the paper feed knob in the direction of the arrow until the edge of the paper roll emerges.
8. Cut the edge of the paper roll by sliding the cutter knob right to left, or left to right to ( ), and then remove the offcut ( ).
9. Turn the paper feed knob 90 degrees forward.
10. Close the paper roll tray.
2. Cut the edge of the paper roll by sliding the cutter knob right to left, or left to right ( ), and then remove the offcut ( ).
3. Turn the paper feed knob 90 degrees forward.
4. If you cannot remove the jammed paper, rotate the paper in the direction of the arrow until the edge emerges.
5. Cut the edge of the paper using the cutter or scissors.
Be sure to return the cutter knob to the right or left end of the cutter area.
Note
Make sure the paper is not loose, and insert it straight into the roller.
Note Be sure to return the cutter knob to the right or left end of the cutter area.
Note
2. Remove the jammed original.
3. Close the main unit.
is displayed
NeptuneC1_GBzen_F_FM_pre.book Page 54 Tuesday, December 16, 2003 5:03 PM

xClearing Misfeeds
55
4
ABB013S
3. Remove the jammed paper.
4. Insert the cut paper tray while lifting upward into the machine, push slowly until it stops.
C is displayed
1. Hold both sides of the original cover with both hands, and then open the original cover.
2. Remove the jammed paper.
3. Close the original cover with both hands gently.
1. Open the rear cover holding C1 at the rear with both hands.
2. Hold the C2 knob, and then tilt the top of the fusing unit forward.
3. Remove the jammed paper.
4. Close the fusing unit and rear cover.
P is displayed
5. If you cannot remove the jammed paper or the paper misfeed display does not disappear, proceed to
B is displayed .
1. Pull out the cut paper tray while lifting upward and out.
2. Hold both sides and lift the front of the tray, and then remove it from the machine.
If the jammed paper is forcefully pulled out, it may tear and scraps may leave in the machine
Note
If you push the cut paper tray forcefully, the tray's paper guide may become out of position.
Note
is displayed
NeptuneC1_GBzen_F_FM_pre.book Page 55 Tuesday, December 16, 2003 5:03 PM

Troubleshooting
56
4
Changing the Paper Roll Size
PreparationBe sure to select the paper size with User Tools and the paper size selector. Ifyou do not, misfeeds might occur. See p.35 “Tray Paper Size”.
Change the left and right of the roll holder when you load different size paperrolls.
Important❒ Always follow the instructions below when adjusting the roll holder. Do not
force the roll holder by pulling or sliding it strongly. This could damage it.
Removing the Roll Holder
Setting the Roll Holder
1. Push the roll holder inwards, and then pull it upwards.
Note❒ The roll holder is attached with magnets
and a hook.
1. Insert the hook on the roll holder into the hole (A).
2. Hook on the outside and insert the hook into the hole (B).
Note❒ Make sure the hooks are firmly in the
holes.
NeptuneC1_GBzen_F_FM_pre.book Page 56 Tuesday, December 16, 2003 5:03 PM

Changing the Paper Roll Size
57
4
Referencep.47 “Loading Paper”.
3. Check the paper size in the windows on the inside of the roll holder.
Note❒ Make the same setting for both left and
right sides.
NeptuneC1_GBzen_F_FM_pre.book Page 57 Tuesday, December 16, 2003 5:03 PM

Troubleshooting
58
4
NeptuneC1_GBzen_F_FM_pre.book Page 58 Tuesday, December 16, 2003 5:03 PM

59
5. Remarks
Dos and Don'ts
R CAUTION:
• Do not touch areas on or aroundthe fusing unit. These areas get hot.
• When you use this machine for along time in a poorly ventilatedconfined space, you may detect anodd smell. To keep the workplacecomfortable, we recommend goodventilation.
• The area around the ventilationholes might feel warm. This iscaused by exhaust air and is not amalfunction.
• Do not turn off the operationswitch while using each function.Make sure each function is fin-ished first.
• Do not open the main unit cover,the paper roll tray, or the cut papertray while copying. If you do, mis-feeds might occur.
• Do not leave the main unit openmore than 10 minutes, otherwisecopy quality may deteriorate.
• If you do not use the machine for along time, remove the paper fromthe paper roll tray, or the cut papertray and place it in its storage bag.
• Condensation can lead to imagedeterioration. To prevent this, thismachine has an anti-condensationfunction. Even when the mainpower switch is in the standby po-sition, the anti-condensation heat-er is active, keeping the machinebody slightly warm.
• The paper roll tray has the Anti-humidity function. Even when themain power switch is in the stand-by position, the Anti-humidityheater is active if it is turned on.
• Unplug the power cord from the wall outlet before you move the machine. While moving the ma-chine, you should take care that the power cord will not be dam-aged under the machine.
NeptuneC1_GBzen_F_FM_pre.book Page 59 Tuesday, December 16, 2003 5:03 PM

Remarks
60
5
Toner
Handling Toner
R WARNING:
R CAUTION:
Important❒ Faults may occur if you use non-recommended toner.
ReferenceTo add toner, see p.50 “DAdding Toner”.
Toner Storage
When storing toner, the following precautions should always be followed:• Store toner containers in a cool, dry place free from direct sunlight.• Store on a flat surface.
Used Toner
Note❒ Toner cannot be re-used.
• Do not incinerate used toner or toner containers. Toner dust might ig-nite when exposed to an open flame. Dispose of used toner containers in accordance with local regulations.
• Keep toner (used or unused) and toner containers out of reach of children.
NeptuneC1_GBzen_F_FM_pre.book Page 60 Tuesday, December 16, 2003 5:03 PM

Where to Put Your Machine
61
5
Where to Put Your Machine
Machine Environment
Choose your machine's location care-fully. Environmental conditionsgreatly affect its performance.
Optimum environmental conditions
R CAUTION:
R CAUTION:
• Temperature: 10-30 °C (50-86 °F)• Humidity: 15-90%• A strong and level base.• The machine must be level within
5 mm, 0.2 inches: both front to rearand left to right.
• To avoid possible buildup ofozone, be sure to locate this ma-chine in a large well ventilatedroom that has an air turnover ofmore than 30 m3/hr/person.
Environments to avoid
• Areas exposed to direct sunlight orother sources of strong light (morethan 1,500 lux).
• Areas directly exposed to cool airfrom an air conditioner or warmair from a heater. (Sudden temper-ature changes can cause condensa-tion to form inside the machine.)
• Near machines generating ammo-nia, such as a diazo copy machine.
• Places where the machine will besubject to frequent strong vibra-tion.
• Dusty areas.• Areas with corrosive gases.
Moving
R CAUTION:
Important❒ Be careful when moving the ma-
chine. Take the following precau-tions:• Turn off the main power. See
p.22 “Turning Off the MainPower”.
• Keep the machine away from hu-midity and dust. Otherwise a fire or an electric shock might occur.
• Do not place the machine on an unstable or tilted surface. If it top-ples over, an injury might occur.
• If you use the machine in a con-fined space, make sure there is a continuous air turnover.
• Unplug the power cord from the wall outlet before you move the machine. While moving the ma-chine, you should take care that the power cord will not be dam-aged under the machine.
NeptuneC1_GBzen_F_FM_pre.book Page 61 Tuesday, December 16, 2003 5:03 PM

Remarks
62
5
• Unplug the power cord fromthe wall outlet. When you pullthe plug out of the socket, gripthe plug (not the cord) to avoiddamaging the cord, thereby re-ducing the risk of fire and elec-tric shock.
• Close all covers and trays, in-cluding the front cover and by-pass tray.
❒ Move the machine carefully. If youdo not, it could be damaged andstored files might be lost.
❒ Protect the machine from strongshocks. Impact can damage thehard disk and cause stored files tobe lost. As a precautionary meas-ure, files should be copied to an-other computer.
Power Connection
R WARNING:
R CAUTION:
R CAUTION:
• When the main power switch is inthe standby position, the optionalanti-condensation heaters are on.In an emergency, unplug the ma-chine's power cord.
• When you unplug the power cord,the anti-condensation heaters gooff.
• Make sure the plug is insertedfirmly in the wall outlet.
• Voltage must not fluctuate bymore than 10%.
• The wall outlet should be near themachine and be easily accessible.
Clearance Around the Machine
Place the machine near a powersource, and provide the clearance asshown.
Note❒ For the required space when op-
tions are installed, please contactyour service representative.
• Connect the machine only to the power source described on the inside front cover of this manual. Connect the power cord directly into a wall outlet and do not use an extension cord.
• Do not damage, break or make any modifications to the power cord. Do not place heavy ob-jects on it. Do not pull it hard nor bend it more than neces-sary. These actions could cause an electric shock or fire.
• Unplug the power cord from the wall outlet before you move the machine. While moving the ma-chine, you should take care that the power cord will not be dam-aged under the machine.
• When you disconnect the power plug from the wall outlet, always pull the plug (not the cable).
Standard setting
Front more than 100 cm (40")
Rear more than 60 cm (23")
Left more than 60 cm (23")
Right more than 60 cm (23")
Rear
Front
RightLeft
ABB010S
NeptuneC1_GBzen_F_FM_pre.book Page 62 Tuesday, December 16, 2003 5:03 PM

Maintaining Your Machine
63
5
Maintaining Your Machine
If the exposure glass or platen plateare dirty, you will not be able to makeclear copies. Clean them when theybecome dirty.
❖❖❖❖ Cleaning the machineWipe the machine with a soft, drycloth. If this does not remove thedirt, wipe the machine with adamp and tightly wrung cloth. If adamp cloth still does not removethe dirt, try using a mild detergent.Wipe the machine with a dry clothto remove the moisture, after usinga damp cloth.
Important❒ Do not use chemical cleaner or or-
ganic solvent, such as thinner orbenzene. If they get into the ma-chine or melt plastic parts, a failuremight occur.
❒ Do not clean parts other than thosespecified in this manual. Suchparts should be cleaned by yourservice representative.
Cleaning inside the Original Cover
If you open the original cover, youcan access the exposure glass andoriginal feed mechanism.
AAAA Open the original cover whileholding it on both sides.
Cleaning the exposure glass
A Wipe the exposure glass with asoft, dry cloth.
AAJ021S
AAJ023S
NeptuneC1_GBzen_F_FM_pre.book Page 63 Tuesday, December 16, 2003 5:03 PM

Remarks
64
5
Cleaning the platen plate
A Wipe the platen plate with asoft, dry cloth.
Cleaning the original feed guide
A Wipe the original feed guideswith a soft, dry cloth.
Note❒ If there is paper dust or fluff
inside, remove it.
BBBB Close the original cover gently.
Cleaning the Main Unit
Clean off toner that may have collect-ed on the imaging area.
AAAA Lift the main unit opening leverson either side and open the mainunit.
Important❒ Do not leave the main unit open
more than 10 minutes, other-wise copy quality may deterio-rate.
BBBB Wipe it with a soft, dry cloth.
CCCC Close the main unit cover gently.
AAJ022S
AAJ024S
AAJ025S
AAJ026S
AAJ027S
NeptuneC1_GBzen_F_FM_pre.book Page 64 Tuesday, December 16, 2003 5:03 PM

65
6. Specifications
Main Unit
❖❖❖❖ Configuration:Desktop
❖❖❖❖ Photosensitivity type:OPC drum
❖❖❖❖ Copy process:Dry electrostatic transfer system
❖❖❖❖ Development:Dry two-component magnetic brush development system
❖❖❖❖ Fusing:Heating roll pressure system
❖❖❖❖ Original scanning:Original feed image scanning over fixed contact image sensor
❖❖❖❖ Original size (W ×××× L):• Metric version: 182 × 140 mm-914 × 3600 mm• Inch version: 7" × 5"-36" × 142"
❖❖❖❖ Copy size (W ×××× L):• Metric version:
Paper roll: 210 × 280 mm-914 × 3600 mmBypass tray: 210 × 257 mm-914 × 2000 mmCut paper: A3K, B4K, A4K
• Inch version:EK-A KPaper roll: 81/2" × 11" -36" × 142"Bypass tray: 81/2" × 10"-36" × 78"Cut paper: 12" × 18"K, 11" × 17"K, 8 1/2" × 14"K, 8 1/2" × 13"K, 8 1/2" ×11"K
❖❖❖❖ Reproduction ratio:• Metric version:
Full-size: 100%Reduce: 25.0%, 35.4%, 50.0%, 70.7%Enlarge: 141.4%, 200.0%, 282.8%, 400.0%Zoom: 25.0-200.0% (0.1% increments)Zoom: 200.0-400.0% (0.2% increments)
NeptuneC1_GBzen_F_FM_pre.book Page 65 Tuesday, December 16, 2003 5:03 PM

Specifications
66
6
• Inch version (Engineering):Full-size: 100%Reduce: 25.0%, 32.4%, 50.0%, 64.7%Enlarge: 129.4%, 200.0%, 258.8%, 400.0%Zoom: 25.0-200.0% (0.1% increments)Zoom: 200.0-400.0% (0.2% increments)
• Inch version (Architecture):Full-size: 100%Reduce: 25.0%, 33.3%, 50.0%, 66.7%Enlarge: 133.3%, 200.0%, 266.7%, 400.0%Zoom: 25.0-200.0% (0.1% increments)Zoom: 200.0-400.0% (0.2% increments)
❖❖❖❖ Copying speed (full-size copying):2 copies/minute (A0K), 4 copies/minute (A1L), 3.6 mm/minute (60mm/second)
❖❖❖❖ Original:Sheet
❖❖❖❖ Warm-up time:Less than 2 minutes (23°C)
❖❖❖❖ First copy time:• Metric version:
When upper tray is selected: 22 seconds (A1L, paper roll tray), 34 seconds(A1L, bypass tray)
• Inch version:When upper tray is selected: 22 seconds (DL, paper roll tray), 34 seconds(DL, bypass tray)
❖❖❖❖ Maximum original size:914 × 3600 mm, 36" × 141.7"
❖❖❖❖ Non-reproduction area:• Metric version:
• Top: 8 mm• Bottom: 8 mm• Left and Right 2 ± 2 mm (less than 5 mm on either side)
• Inch version:• Top: 0.32"• Bottom: 0.32"• Left and Right 0.08" ± 0.08" (less than 0.20" on either side)
NeptuneC1_GBzen_F_FM_pre.book Page 66 Tuesday, December 16, 2003 5:03 PM
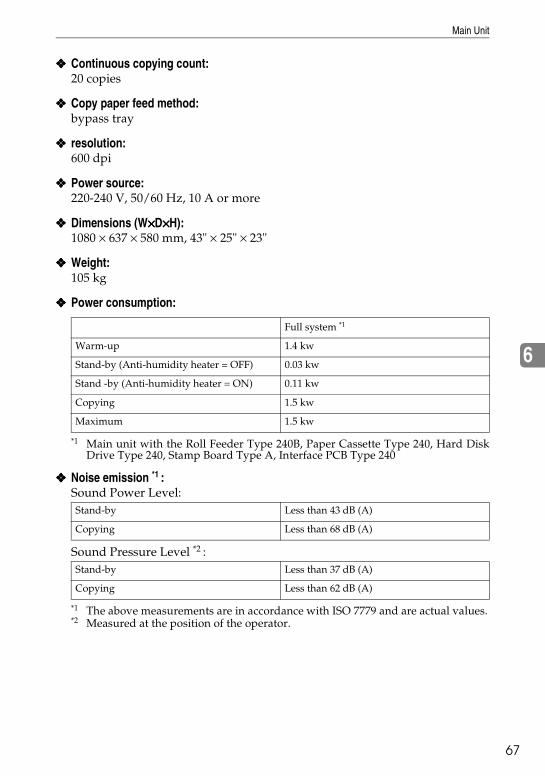
Main Unit
67
6
❖❖❖❖ Continuous copying count:20 copies
❖❖❖❖ Copy paper feed method:bypass tray
❖❖❖❖ resolution:600 dpi
❖❖❖❖ Power source:220-240 V, 50/60 Hz, 10 A or more
❖❖❖❖ Dimensions (W××××D××××H):1080 × 637 × 580 mm, 43" × 25" × 23"
❖❖❖❖ Weight:105 kg
❖❖❖❖ Power consumption:
*1 Main unit with the Roll Feeder Type 240B, Paper Cassette Type 240, Hard DiskDrive Type 240, Stamp Board Type A, Interface PCB Type 240
❖❖❖❖ Noise emission *1 :Sound Power Level:
Sound Pressure Level *2 :
*1 The above measurements are in accordance with ISO 7779 and are actual values.*2 Measured at the position of the operator.
Full system *1
Warm-up 1.4 kw
Stand-by (Anti-humidity heater = OFF) 0.03 kw
Stand -by (Anti-humidity heater = ON) 0.11 kw
Copying 1.5 kw
Maximum 1.5 kw
Stand-by Less than 43 dB (A)
Copying Less than 68 dB (A)
Stand-by Less than 37 dB (A)
Copying Less than 62 dB (A)
NeptuneC1_GBzen_F_FM_pre.book Page 67 Tuesday, December 16, 2003 5:03 PM

Specifications
68
6
Options
Roll Feeder Type 240 A or 240 B
❖❖❖❖ Paper sizes:width: 210 – 910 mm, length: 150 m (diameter: 175 mm)
❖❖❖❖ Paper widths:• Metric version210 mm, 257 mm, 297 mm, 364 mm, 420 mm, 440 mm, 515 mm, 594 mm, 660mm, 728 mm, 800 mm, 841 mm, 880 mm, 914 mm• Inch version
81/2", 9", 11", 12", 17", 18", 22", 24", 30", 34", 36"
❖❖❖❖ Power consumption90 W (supplied by main unit)
❖❖❖❖ Dimensions (W ×××× D ×××× H):1080 × 720 × 700 mm, 43" × 28" × 27"
❖❖❖❖ Weight:Approx. 70 kg (Type 240 A), 72 kg (Type 240 B)
Paper Cassette Type 240
❖❖❖❖ Paper weight:64 – 105 g/m2.
❖❖❖❖ Paper sizes:A3K, B4 K, A4K, 12" × 18"K, 11" × 17"K, 8 1/2" × 14"K, 8 1/2" × 13"K, 8 1/2"× 11"K
❖❖❖❖ Power consumption (Max):Approx. 20 W (supplied by main unit)
❖❖❖❖ Paper capacity:250 sheets
❖❖❖❖ Dimensions (W ×××× D ×××× H):620 × 130 × 570 mm, 24" × 5" × 22"
❖❖❖❖ Weight:Approx. 6 kg
NeptuneC1_GBzen_F_FM_pre.book Page 68 Tuesday, December 16, 2003 5:03 PM

Options
69
6
Table Type 240
❖❖❖❖ Dimensions:1080 × 720 × 700 mm, 43" × 28" × 27"
❖❖❖❖ Weight:Approx. 34 kg
Carrier Sheet
Allows you to load bent, folded, creased, thin, or pasted originals using thissheet.
Hard Disk Drive Type 240
Allows you to increase the copy functions, as in the following:• Repeat Copy (longer than A0(E)K)• Stamp (User Stamp, Repeat User Stamp)• User Format Overlay
Stamp Board
Adds the print capability required for Background Numbering, Preset Stamp,User Stamp, Date Stamp, Repeat User Stamp , and Page Numbering.
NeptuneC1_GBzen_F_FM_pre.book Page 69 Tuesday, December 16, 2003 5:03 PM

Specifications
70
6
Copy Paper
Recommended Size and Type
The following limitations apply to each paper roll tray and bypass tray.
❖❖❖❖ Metric version
Where paper is placed Paper type Paper size Number of sheets that can be placed
Paper roll tray (op-tional)
Plain paper
52.3 – 110 g/m2 (13.9 – 29.3 lb)
Paper roll
Diameter: less than 175 mm
Core: 75.7 mm – 77 mm
Width: 210, 257, 297, 364, 420, 440, 515, 594, 660, 728, 800, 841, 880, 914 mm
Roll length: less than 150 mm
–
Translucent paper
Recycled paper
Film
Cut paper tray (op-tional)
Plain paper
52.3-110 g/m2 (13.9-29.3 lb)
A3K, B4K, A4K 250 sheets
Recycled paper
Bypass tray Plain paper
52.3 – 110 g/m2 (13.9 – 29.3 lb)
A0K, A1KL, A2KL
A3KL, A4K, B1K, B2KL, B3KL, B4KL
Paper width: 210 – 914 mm
Paper length: 257 – 2000 mm
1 sheet
Translucent paper
Film
NeptuneC1_GBzen_F_FM_pre.book Page 70 Tuesday, December 16, 2003 5:03 PM

Copy Paper
71
6
❖❖❖❖ Inch version
Important❒ Damp or curled paper may cause misfeeds.
Note❒ When loading paper in the cut paper tray, place the copy side face down.❒ When loading paper in the bypass tray, place the copy side face up.❒ Use recommended paper.
Paper roll
• If humidity is high, and the paper roll has expanded due to moisture, be sureto cut off approximately 1000 mm (40"), before making copies.
• Use a paper roll that has a black core.• When a paper roll of 90 g/m2 (24 lb) or 110 g/m2 (29.3 lb) paper is used and
there is little paper left on the roll, copies may be faint near the leading and/ortrailing edge, or an image may be doubled. To prevent this, set 3-5 mm (0.11"-0.19") margins from the leading and trailing edges.
Where paper is placed Paper type Paper size Number of sheets that can be placed
Paper roll tray (op-tional)
Plain paper
52.3 – 110 g/m2 (13.9 – 29.3 lb)
Paper roll
Diameter: 6.7" or less
Internal diameter: 2.98" - 3.03"
Width: 81/2", 9", 11", 12", 17", 18", 22", 24", 34", 36"
Roll length: 5.9" or less
–
Translucent paper (vellum)
Film
Cut paper tray (op-tional)
Plain paper
52.3-110 g/m2 (13.9-29.3 lb)
12" × 18"K, 11" × 17"K, 81/2"×14"K, 81/2"×13"K, 81/2"×11"K
250 sheets
Recycled paper
Bypass tray Plain paper
52.3 – 110 g/m2 (13.9 – 29.3 lb)
• EngineeringE(34"×44")K, D(22"×34")K L, C(17"×22")K LB(11"×17")K L, A(81/2"×11")K
• ArchitectureE(36"×48")K, D(24"×36")K L, C(18"×24")K LB(12"×18")K L, A(9"×12")K
1 sheet
Translucent paper (vellum)
Film
NeptuneC1_GBzen_F_FM_pre.book Page 71 Tuesday, December 16, 2003 5:03 PM

Specifications
72
6
Notes on using translucent paper
Smooth out any curls in the paper before loading it.Load translucent paper lengthways when possible.
Hemmed paper
When using hemmed paper, wrinkles and other problems may occur on copies.Use the following procedure when copying onto hemmed paper:• Copy from the bypass tray.• Make sure the paper is straight, and align the paper guides of the bypass tray
to the paper size.• Load only one sheet at a time.• Remove each copy from the output tray and place it on a flat surface.
Note❒ Due to the thickness of hemmed paper, copies may be faint, blurred, or wrin-
kled, and paper jams may occur. You may be able to prevent this by copyingon the rear surface of the paper or feeding the bottom of the paper in first.
Unusable Paper
R CAUTION:
Important❒ To prevent faults, do not use any of the following kinds of paper:
• Thermal fax paper• Art paper• Aluminum foil• Carbon paper• Conductive paper• OHP transparencies for colour copying• Paper with perforated lines
❒ Do not use copy paper that has been already copied onto, or a failure couldoccur.
• Do not reuse stapled paper. Do not use aluminum foil, carbon-containing paper or other conductive paper. If you do, there is a danger of fire.
NeptuneC1_GBzen_F_FM_pre.book Page 72 Tuesday, December 16, 2003 5:03 PM

Copy Paper
73
6
Note❒ To prevent misfeeds, do not use the following kinds of paper:
• Bent, folded, or creased paper• Torn paper• Slippery paper• Perforated paper• Rough paper• Thin paper with little stiffness• Paper with a dusty surface• Adhesive labels• OHP transparencies
❒ If you copy on to rough grain paper, the copy image might be blurred.❒ When using non-recommended paper (especially chemically treated paper,
hemmed paper, film), paper jams may occur, paper wrinkle, or copy imagedeteriorate.
❒ Do not use paper that has already been copied or printed on.❒ Do not copy on both sides of paper.❒ If you use paper roll hat is not marked with a black core, paper jams might
occur when the paper ends.❒ Do not use paper printed onto with an inkjet printer, as it may become entan-
gled or jammed, which may damage the machine. In the worst event, thismay cause fire, depending on paper and ink type combination.
Paper Storage
Note❒ When storing paper, the following precautions always should be followed:
• Do not store paper where it will be exposed to direct sunlight.• Avoid storing paper in humid areas (humidity: 70% or less).• Store on a flat surface.
❒ Do not store paper vertically.❒ In high temperature and humidity environments, store paper in vinyl bags.
NeptuneC1_GBzen_F_FM_pre.book Page 73 Tuesday, December 16, 2003 5:03 PM

Specifications
74
6
Handling paper
Depending on the humidity of the storage environment, handle the paper as fol-lows:
Note❒ If humidity is above 70%, turn on the anti-humidity heater.
Referencep.24 “Anti-humidity Heater Switch”
NeptuneC1_GBzen_F_FM_pre.book Page 74 Tuesday, December 16, 2003 5:03 PM

75
INDEXA
Accessing user tools (System Settings), 31Adding toner, 50Adj.Print Positn., 41Adj.Scan Position, 41Adjust Cut Length, 33Anti-humidity heater switch, 24AOF (Always On), 44Auto off mode, 7, 23Auto Off Timer, 42Auto Roll Switch., 38
C
Changing default settings, 31Changing the paper roll size, 56Cleaning inside the original cover, 63Cleaning the main unit, 64Clearance around the machine, 62Clearing misfeeds, 52Combined function operations, 25Common key operations, 20Control panel, 17Copy Count Displ., 40Copy paper, 70Counter, 9Counter for each user code, 9
D
Date, 43Display, 19Display and key operations, 19Display Contrast, 40Do's and don'ts, 59
E
Energy Saver, 42Energy saver mode, 23ENERGY STAR program, 7Exiting user tools, 32
F
Feed Start Method, 40Fine Ratio
Copier, 39Fusing Adjustment, 33
G
General Features, 29, 33Guide to components, 11
H
Handling paper, 74
I
If your machine does not operate as you want, 45
Interrupting other functions to use copier functions, 26
K
Key Operator Code, 43Key Op. Tools, 30, 43
L
Loadingcut paper, 49paper roll, 47
Low power mode, 7, 23
M
Machine environment, 61environments to avoid, 61optimum environmental conditions, 61
Main power switch, 21Maintaining your machine, 63Main unit, 65Manuals for this machine, iMoving, 61
N
Names of major options, 2
O
Operation switch, 21Optional HDD, 44Options, 14, 68Orig. Edge Hold, 37Orig. Feed Delay1, 38Orig. Feed Delay2, 38Orig. Size Detect, 34Other options, 15Output Tray, 38
NeptuneC1_GBzen_F_FM_pre.book Page 75 Tuesday, December 16, 2003 5:03 PM

76
P
Panel Off Timer, 42Panel Tone, 40Paper storage, 73Paper Volume, 41Positions of RWARNING and RCAUTION labels, 5
Power connection, 62Print Image Prior, 41
R
Recommended size and type, 70hemmed paper, 72notes on using translucent paper, 72paper roll, 71
Removing the roll holder, 56
S
Safety information, 3Saving energy, 23Settings you can change with user tools, 33Setting the roll holder, 56Switching between functions, 25Switching to
copier mode, 26printer mode, 27scanner mode, 28
Symbols, 1System Auto Reset, 42System reset, 25
T
Terms, 2Time, 43Timer Settings, 30, 42Toner, 60
handling toner, 60toner storage, 60used toner, 60
Total counter, 9Tray Paper Size, 35Tray Paper Type, 37Tray Prob.Setting, 44Trays, 14Turning off
the main power, 22the power, 22
Turning onthe main power, 21the power, 22
U
Unusable paper, 72User Code Manage., 43User tools menu (System Settings), 29Using the machine
as a Copier, 26as a printer, 27as a scanner, 28
W
Warm Up Notice, 40What you can do with this machine, iiWhere to put your machine, 61
NeptuneC1_GBzen_F_FM_pre.book Page 76 Tuesday, December 16, 2003 5:03 PM

77
MEMO
NeptuneC1_GBzen_F_FM_pre.book Page 77 Tuesday, December 16, 2003 5:03 PM

78 GB GB B125-6500
MEMO
NeptuneC1_GBzen_F_FM_pre.book Page 78 Tuesday, December 16, 2003 5:03 PM

Paper type: Wood Free 80g/m2, Paper Thickness=100 µm // Pages in book=84 // Print scale=81%Gap (when printed at 81% scale) = Pages in book × Paper thickness / 2 = 4.200000 mm
Declaration of Conformity
“The Product complies with the requirements of the EMC Directive 89/336/EEC and its amending di-rectives and the Low Voltage Directive 73/23/EEC and its amending directives.”
In accordance with IEC 60417, this machine uses the following symbols for the main power switch:
aaaa means POWER ON.
cccc means STAND BY.
In accordance with IEC 60417, this machine uses the following symbols for the anti-humidity heaterswitch:
aaaa means POWER ON.
bbbb means POWER OFF.
Introduction
This manual describes detailed instructions on the operation and notes about the use of this machine.To get maximum versatility from this machine all operators are requested to read this manual carefullyand follow the instructions. Please keep this manual in a handy place near the machine.
Important
Contents of this manual are subject to change without prior notice. In no event will the company be li-able for direct, indirect, special, incidental, or consequential damages as a result of handling or oper-ating the machine.
Notes:
Some illustrations in this manual might be slightly different from the machine.
Certain options might not be available in some countries. For details, please contact your local dealer.
Operator Safety
This machine contains LED Array in scanner and writing units.
The machine is considered a class 1 LED device, safe for both office and EDP use.
Notes:
Two kinds of size notation are employed in this manual. With this machine refer to the metric version.
For good copy quality, Ricoh recommends that you use genuine Ricoh toner.
Ricoh shall not be responsible for any damage or expense that might result from the use of parts otherthan genuine Ricoh parts with your Ricoh office products.
Power Source
220 - 240V, 50/60Hz, 10A or more
Please be sure to connect the power cord to a power source as above. For details about power source,see P.62 “Power Connection”.
Copyright © 2003 Ricoh Co., Ltd.

Paper type: Wood Free 80g/m2, Paper Thickness=100 µm // Pages in book=84 // Print scale=81%Gap (when printed at 81% scale) = Pages in book × Paper thickness / 2 = 4.200000 mm
240WO
pera
ting Instructio
nsG
ene
ral Se
ttings G
uide
240WO
pe
rating
Instructio
nsG
ene
ral Se
ttings G
uide
RICOH COMPANY, LTD.15-5, Minami Aoyama 1-chome,Minato-ku, Tokyo 107-8544, JapanPhone: +81-3-3479-3111
240W
Operating Instructions
General Settings Guide
Read this manual carefully before you use this product and keep it handy for future reference.For safe and correct use, please be sure to read the Safety Information in this manual beforeusing the machine.
Getting Started
Combined Function Operations
User Tools (System Settings)
Troubleshooting
Remarks
Specifications
Overseas AffiliatesU.S.A.RICOH CORPORATION5 Dedrick PlaceWest Caldwell, New Jersey 07006Phone: +1-973-882-2000
The NetherlandsRICOH EUROPE B.V.Groenelaan 3, 1186 AA, AmstelveenPhone: +31-(0)20-5474111
United KingdomRICOH UK LTD.Ricoh House,1 Plane Tree Crescent, Feltham,Middlesex, TW13 7HGPhone: +44-(0)20-8261-4000
GermanyRICOH DEUTSCHLAND GmbHMergenthalerallee 38-40,65760 EschbornPhone: +49-(0)6196-9060
FranceRICOH FRANCE S.A.383, Avenue du Général de GaulleBP 307-92143 Clamart CedexPhone: +33-(0)-821-01-74-26
SpainRICOH ESPAÑA S.A.Avda. Litoral Mar, 12-14,Blue Building, Marina Village,08005 BarcelonaPhone: +34-(0)93-295-7600
ItalyRICOH ITALIA SpAVia della Metallurgia 12,37139 VeronaPhone: +39-045-8181500
ChinaRICOH CHINA CO.,LTD.29/F., Lippo Plaza, No.222Huai Hai Zhong Road,Lu Wan District,Shanghai P.C.:200021Phone: +86-21-5396-6888
SingaporeRICOH ASIA PACIFIC PTE.LTD.260 Orchard Road,#15-01/02 The Heeren,Singapore 238855Phone: +65-6830-5888
Printed in The Netherlands
GB GB B125-6500

Paper type: Wood Free 80g/m2, Paper Thickness=100 µm // Pages in book=128 // Print scale=81%Gap (when printed at 81% scale) = Pages in book × Paper thickness / 2 = 6.400000 mm
240WO
pe
rating
Instructio
nsC
op
y Refe
renc
e
240WO
pe
rating
Instructio
nsC
op
y Refe
renc
e
RICOH COMPANY, LTD.15-5, Minami Aoyama 1-chome,Minato-ku, Tokyo 107-8544, JapanPhone: +81-3-3479-3111
240W
Operating Instructions
Copy Reference
Read this manual carefully before you use this product and keep it handy for future reference.For safe and correct use, please be sure to read the Safety Information in the "General Set-tings Guide" before using the machine.
Basics
Copying
Troubleshooting
User Tools (Copier Features)
Specifications
Overseas AffiliatesU.S.A.RICOH CORPORATION5 Dedrick PlaceWest Caldwell, New Jersey 07006Phone: +1-973-882-2000
The NetherlandsRICOH EUROPE B.V.Groenelaan 3, 1186 AA, AmstelveenPhone: +31-(0)20-5474111
United KingdomRICOH UK LTD.Ricoh House,1 Plane Tree Crescent, Feltham,Middlesex, TW13 7HGPhone: +44-(0)20-8261-4000
GermanyRICOH DEUTSCHLAND GmbHMergenthalerallee 38-40,65760 EschbornPhone: +49-(0)6196-9060
FranceRICOH FRANCE S.A.383, Avenue du Général de GaulleBP 307-92143 Clamart CedexPhone: +33-(0)-821-01-74-26
SpainRICOH ESPAÑA S.A.Avda. Litoral Mar, 12-14,Blue Building, Marina Village,08005 BarcelonaPhone: +34-(0)93-295-7600
ItalyRICOH ITALIA SpAVia della Metallurgia 12,37139 VeronaPhone: +39-045-8181500
ChinaRICOH CHINA CO.,LTD.29/F., Lippo Plaza, No.222Huai Hai Zhong Road,Lu Wan District,Shanghai P.C.:200021Phone: +86-21-5396-6888
SingaporeRICOH ASIA PACIFIC PTE.LTD.260 Orchard Road,#15-01/02 The Heeren,Singapore 238855Phone: +65-6830-5888
Printed in The Netherlands
GB GB B125-6600

Paper type: Wood Free 80g/m2, Paper Thickness=100 µm // Pages in book=128 // Print scale=81%Gap (when printed at 81% scale) = Pages in book × Paper thickness / 2 = 6.400000 mm
Declaration of Conformity
“The Product complies with the requirements of the EMC Directive 89/336/EEC and its amending di-rectives and the Low Voltage Directive 73/23/EEC and its amending directives.”
In accordance with IEC 60417, this machine uses the following symbols for the main power switch:
aaaa means POWER ON.
cccc means STAND BY.
In accordance with IEC 60417, this machine uses the following symbols for the anti- humidity heaterswitch:
aaaa means POWER ON.
bbbb means POWER OFF.
Introduction
This manual describes detailed instructions on the operation and notes about the use of this machine.To get maximum versatility from this machine all operators are requested to read this manual carefullyand follow the instructions. Please keep this manual in a handy place near the machine.
Important
Contents of this manual are subject to change without prior notice. In no event will the company be li-able for direct, indirect, special, incidental, or consequential damages as a result of handling or oper-ating the machine.
Notes:
Some illustrations in this manual might be slightly different from the machine.
Certain options might not be available in some countries. For details, please contact your local dealer.
Operator Safety
This machine contains LED Array in scanner and writing units.
The machine is considered a class 1 LED device, safe for both office and EDP use.
Notes:
Two kinds of size notation are employed in this manual. With this machine refer to the metric version.
For good copy quality, Ricoh recommends that you use genuine Ricoh toner.
Ricoh shall not be responsible for any damage or expense that might result from the use of parts otherthan genuine Ricoh parts with your Ricoh office products.
Important
Do not make copies of any item for which copying is prohibited by law.
Copying the following items is normally prohibited by local law:
Bank billes, revenue stamps, bonds, stock certificates, bank drafts, checks, passports, driver's licens-es.
Power Source
220 - 240V, 50Hz/60Hz, 10A or more
Please be sure to connect the power cord to a power source as above. For details about power source,see “Power Connection” in General Settings Guide.
Copyright © 2003 Ricoh Co., Ltd.
Introduction
This manual describes detailed instructions on the operation and notes about the use of this machine.To get maximum versatility from this machine all operators are requested to read this manual carefullyand follow the instructions. Please keep this manual in a handy place near the machine.
For safe and correct use of this machine, please be sure to read the Safety Information in General Set-tings Guide before you use it.
Important
Contents of this manual are subject to change without prior notice. In no event will the company be li-able for direct, indirect, special, incidental, or consequential damages as a result of handling or oper-ating the machine.
Notes:
Some illustrations in this manual might be slightly different from the machine.
Certain options might not be available in some countries. For details, please contact your local dealer.
Operator Safety
This machine contains LED Array in scanner and writing units.
The machine is considered a class 1 LED device, safe for both office and EDP use.
Notes:
Two kinds of size notation are employed in this manual. With this machine refer to the metric version.
For good copy quality, Rex-Rotary recommends that you use genuine Rex-Rotary toner.
Rex-Rotary shall not be responsible for any damage or expense that might result from the use of partsother than genuine Rex-Rotary parts in your Rex-Rotary office product.
Power Source
220 - 240V, 50Hz/60Hz, 10A or more
Please be sure to connect the power cord to a power source as above. For details about power source,see “Power Connection” in General Settings Guide.
NeptuneC1_GBcopy_F_FM.book Page 1 Tuesday, December 16, 2003 5:31 PM

Introduction
This manual describes detailed instructions on the operation and notes about the use of this machine.To get maximum versatility from this machine all operators are requested to read this manual carefullyand follow the instructions. Please keep this manual in a handy place near the machine.
For safe and correct use of this machine, please be sure to read the Safety Information in General Set-tings Guide before you use it.
Important
Contents of this manual are subject to change without prior notice. In no event will the company be li-able for direct, indirect, special, incidental, or consequential damages as a result of handling or oper-ating the machine.
Notes:
Some illustrations in this manual might be slightly different from the machine.
Certain options might not be available in some countries. For details, please contact your local dealer.
Operator Safety
This machine contains LED Array in scanner and writing units.
The machine is considered a class 1 LED device, safe for both office and EDP use.
Notes:
Two kinds of size notation are employed in this manual. With this machine refer to the metric version.
For good copy quality, Gestetner recommends that you use genuine Gestetner toner.
Gestetner shall not be responsible for any damage or expense that might result from the use of partsother than genuine Gestetner parts in your Gestetner office product.
Power Source
220 - 240V, 50Hz/60Hz, 10A or more
Please be sure to connect the power cord to a power source as above. For details about power source,see “Power Connection” in General Settings Guide.
NeptuneC1_GBcopy_F_FM.book Page 1 Tuesday, December 16, 2003 5:31 PM

Introduction
This manual describes detailed instructions on the operation and notes about the use of this machine.To get maximum versatility from this machine all operators are requested to read this manual carefullyand follow the instructions. Please keep this manual in a handy place near the machine.
For safe and correct use of this machine, please be sure to read the Safety Information in General Set-tings Guide before you use it.
Important
Contents of this manual are subject to change without prior notice. In no event will the company be li-able for direct, indirect, special, incidental, or consequential damages as a result of handling or oper-ating the machine.
Notes:
Some illustrations in this manual might be slightly different from the machine.
Certain options might not be available in some countries. For details, please contact your local dealer.
Operator Safety
This machine contains LED Array in scanner and writing units.
The machine is considered a class 1 LED device, safe for both office and EDP use.
Notes:
Two kinds of size notation are employed in this manual. With this machine refer to the metric version.
For good copy quality, Nashuatec recommends that you use genuine Nashuatec toner.
Nashuatec shall not be responsible for any damage or expense that might result from the use of partsother than genuine Nashuatec parts in your Nashuatec office product.
Power Source
220 - 240V, 50Hz/60Hz, 10A or more
Please be sure to connect the power cord to a power source as above. For details about power source,see “Power Connection” in General Settings Guide.
NeptuneC1_GBcopy_F_FM.book Page 1 Tuesday, December 16, 2003 5:31 PM

Declaration of Conformity
“The Product complies with the requirements of the EMC Directive 89/336/EEC and its amending di-rectives and the Low Voltage Directive 73/23/EEC and its amending directives.”
In accordance with IEC 60417, this machine uses the following symbols for the main power switch:
aaaa means POWER ON.
cccc means STAND BY.
In accordance with IEC 60417, this machine uses the following symbols for the anti- humidity heaterswitch:
aaaa means POWER ON.
bbbb means POWER OFF.
Copyright © 2003
NeptuneC1_GBcopy_F_FM.book Page 1 Tuesday, December 16, 2003 5:31 PM

i
Manuals for This Machine
This machine can be used as a copier, printer, or scanner. Its manuals are dividedthus: a manual covering common operations and functions, and separate copier,printer, and scanner function manuals. Refer to the appropriate manual to learnabout your machine.
NeptuneC1_GBcopy_F_FM.book Page i Tuesday, December 16, 2003 5:31 PM

ii
What You Can Do with This Machine
Available functions depend on installed options. See p.3 “Functions That Re-quire Options”.
Zoom (see p.36)Preset Reduce/Enlarge (see p.35)
Directional Magnification (%) (see p.38)Auto Reduce/Enlarge (see p.38)
User Auto Reduce/Enlarge (see p.40)
Fine Directional Magnification (see p.19)
Directional Size Magnification (mm) (see p.39)
Types of Magnification
Sort (see p.34) Rotate Sort (see p.34)
To Put Copies into Sequentially Ordered Sets.
Horiz
Vert
ABB536S
NeptuneC1_GBcopy_F_FM.book Page ii Tuesday, December 16, 2003 5:31 PM

iii
Erase Inside (see p.45)
Types of Shift/Erase
Erase Border (see p.44)
Erase Outside (see p.46)
Margin Adjustment (see p.42) Shift (see p.43)
Erase Inside
Area
Erase Outside
Area ABB537S
NeptuneC1_GBcopy_F_FM.book Page iii Tuesday, December 16, 2003 5:31 PM

iv
Image Repeat (see p.49)
Types of Edit
Double Copies (see p.49)
Positive/Negative (see p.48) Mirror Image (see p.48)
Image Overlay (Overlay 1) (see p.50) Format Overlay (Overlay 2) (see p.51)
Date Stamp (see p.61)
Types of Stamp
User Stamp (see p.57)
Background Numbering (see p.54) Preset Stamp (see p.54)
Page Numbering (see p.63) Repeat User Stamp (see p.65)
ABB538S
FirstOriginal
SecondOriginal
ThirdOriginal
FourthOriginal
Copy
Copy
FirstOriginal
SecondOriginal
ThirdOriginal
Copy
Copy
orUser Format
NeptuneC1_GBcopy_F_FM.book Page iv Tuesday, December 16, 2003 5:31 PM
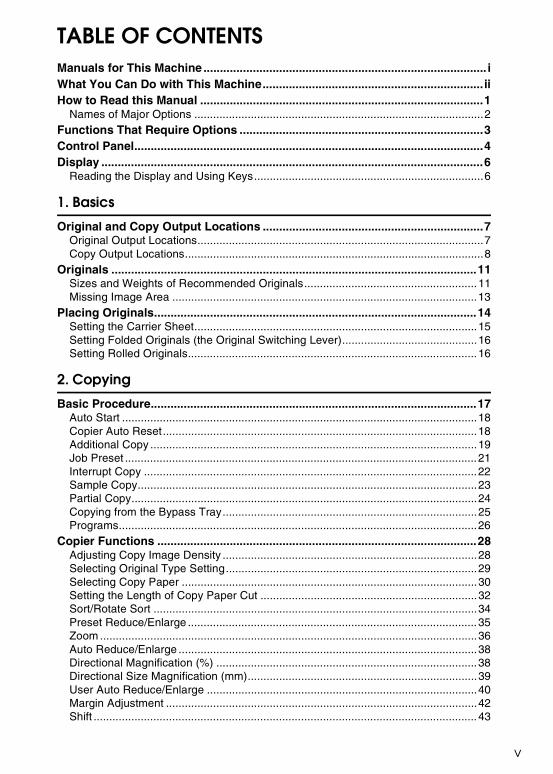
v
TABLE OF CONTENTSManuals for This Machine ...................................................................................... iWhat You Can Do with This Machine................................................................... iiHow to Read this Manual ......................................................................................1
Names of Major Options ............................................................................................2Functions That Require Options ..........................................................................3Control Panel..........................................................................................................4Display ....................................................................................................................6
Reading the Display and Using Keys.........................................................................6
1. Basics
Original and Copy Output Locations ...................................................................7Original Output Locations...........................................................................................7Copy Output Locations...............................................................................................8
Originals ...............................................................................................................11Sizes and Weights of Recommended Originals.......................................................11Missing Image Area .................................................................................................13
Placing Originals..................................................................................................14Setting the Carrier Sheet..........................................................................................15Setting Folded Originals (the Original Switching Lever)...........................................16Setting Rolled Originals............................................................................................16
2. Copying
Basic Procedure...................................................................................................17Auto Start .................................................................................................................18Copier Auto Reset....................................................................................................18Additional Copy ........................................................................................................19Job Preset ................................................................................................................21Interrupt Copy ..........................................................................................................22Sample Copy............................................................................................................23Partial Copy..............................................................................................................24Copying from the Bypass Tray.................................................................................25Programs..................................................................................................................26
Copier Functions .................................................................................................28Adjusting Copy Image Density .................................................................................28Selecting Original Type Setting................................................................................29Selecting Copy Paper ..............................................................................................30Setting the Length of Copy Paper Cut .....................................................................32Sort/Rotate Sort .......................................................................................................34Preset Reduce/Enlarge ............................................................................................35Zoom ........................................................................................................................36Auto Reduce/Enlarge ...............................................................................................38Directional Magnification (%) ...................................................................................38Directional Size Magnification (mm).........................................................................39User Auto Reduce/Enlarge ......................................................................................40Margin Adjustment ...................................................................................................42Shift .......................................................................................................................... 43
NeptuneC1_GBcopy_F_FM.book Page v Tuesday, December 16, 2003 5:31 PM

vi
Erase Border ............................................................................................................44Erase Inside .............................................................................................................45Erase Outside ..........................................................................................................46Positive/Negative .....................................................................................................48Mirror Image.............................................................................................................48Double Copies..........................................................................................................49Image Repeat...........................................................................................................49Image Overlay (Overlay 1) .......................................................................................50Format Overlay (Overlay 2)......................................................................................51User Format Overlay................................................................................................52Background Numbering ...........................................................................................54Preset Stamp ...........................................................................................................54User Stamp ..............................................................................................................57Date Stamp ..............................................................................................................61Page Numbering ......................................................................................................63Repeat User Stamp..................................................................................................65
3. Troubleshooting
If Your Machine Does Not Operate As You Want..............................................67When a Message Appears.......................................................................................67
If You Cannot Make Clear Copies.......................................................................70If You Cannot Make Copies As You Want .........................................................73
4. User Tools (Copier Features)
User Tools Menu (Copier Features) ...................................................................75Accessing User Tools (Copier Features)...........................................................80
Changing Default Settings .......................................................................................80Exiting User Tools ....................................................................................................81
Settings You Can Change with User Tools .......................................................82General Features .....................................................................................................82Reproduction Ratio ..................................................................................................86Edit ...........................................................................................................................88Stamp.......................................................................................................................90Key Operator Tools ..................................................................................................97
5. Specifications
Main Unit...............................................................................................................99Combination Chart.............................................................................................102Supplementary Specifications..........................................................................105Scan Size Limitations, by Function..................................................................111Settings Record Sheet.......................................................................................112
Magnification Ratio Chart.......................................................................................115Measure Chart .......................................................................................................116
INDEX....................................................................................................... 117
NeptuneC1_GBcopy_F_FM.book Page vi Tuesday, December 16, 2003 5:31 PM

1
How to Read this Manual
Symbols
In this manual, the following symbols are used:
R WARNING:This symbol indicates a potentially hazardous situation that might result indeath or serious injury when you misuse the machine without following the in-structions under this symbol. Be sure to read the instructions, all of which are de-scribed in the Safety Information section.
R CAUTION:This symbol indicates a potentially hazardous situation that might result in mi-nor or moderate injury or property damage that does not involve personal injurywhen you misuse the machine without following the instructions under thissymbol. Be sure to read the instructions, all of which are described in the SafetyInformation section.* The statements above are notes for your safety.
ImportantIf this instruction is not followed, paper might be misfed, originals might bedamaged, or data might be lost. Be sure to read this.
PreparationThis symbol indicates the prior knowledge or preparations required before op-erating.
NoteThis symbol indicates precautions for operation, or actions to take after misop-eration.
LimitationThis symbol indicates numerical limits, functions that cannot be used together,or conditions in which a particular function cannot be used.
ReferenceThis symbol indicates a reference.
[ ]Keys that appear on the machine's display.
{ }Keys built into the machine's control panel.
NeptuneC1_GBcopy_F_FM.book Page 1 Tuesday, December 16, 2003 5:31 PM

2
Names of Major Options
Major options for this machine are referred to as follows:• Roll Feeder Type 240A → Paper roll tray 1• Roll Feeder Type 240B → Paper roll tray 2• Paper Cassette Type 240 → Cut paper tray• Table Type 240 → Table• Stamp Board Type A → Stamp board• Hard Disk Drive Type 240 → HDD
NeptuneC1_GBcopy_F_FM.book Page 2 Tuesday, December 16, 2003 5:31 PM

3
Functions That Require Options
Available functions depend on installed options.❍Required options
Functions
Low
er O
utp
ut
Use
r Fo
rmat
Ove
rlay
Bac
kgro
und
Nu
mbe
ring
Pre
set S
tam
p
Use
r St
amp
Dat
e St
amp
Pag
e N
umbe
ring
Rep
eat U
ser
Stam
p
Opt
ions
Paper roll tray or table ❍
HDD ❍ ❍ ❍
Stamp board ❍ ❍ ❍ ❍ ❍ ❍
NeptuneC1_GBcopy_F_FM.book Page 3 Tuesday, December 16, 2003 5:31 PM

4
Control Panel
This illustration shows the control panel of a machine that has all options fullyinstalled.
1. {{{{User Tools}}}} keyPress to change the default settings andoperation conditions to match your re-quirements. See p.75 “User Tools (CopierFeatures)”. Can also be used to displayand print the total number of copiesmade, For details, see “Counter”, GeneralSettings Guide.
2. {{{{New Job}}}} keyPress to make settings for the next copyjob and scan originals during a copy run.See p.21 “Job Preset”.
3. IndicatorsShow errors or machine status. For de-tails, see “Control Panel”, General SettingsGuide.L: Service Call indicatorx: Misfeed indicatorM: Open Cover indicatorE: Used Toner Full indicatorD: Add Toner indicatorC: Load Paper indicatorSet Original: Shows the machine is readyto scan an original.
4. ScreenDisplays the keys to operate each func-tion, operation status, and error messages.
5. {{{{Program}}}} keyPress to store or select the programmode. See p.26 “Programs”.
6. {{{{Clear Modes}}}} keyPress to clear a setting's contents. Thenumber of copies is cleared when youpress and hold down this key for threeseconds.
7. {{{{Energy Saver}}}} keyPress to enter Energy Saver mode. Whenyou press this key again, the machine re-turns to the ready condition. For details,see “Saving Energy”, General SettingsGuide.
8. {{{{Interrupt}}}} keyPress to make interrupt copies during acopy run. See p.22 “Interrupt Copy”.
9. Main power indicator/On indica-torWhen the main power switch is turnedon, the main power indicator lights.The On indicator lights when the opera-tion switch is on.
10. Operation switchPress to turn the power on or off. The Onindicator lights when the power is on.
ABB501S
1 2 5 6 7 8 10 11
1918 20171614 151312
4 93
21
NeptuneC1_GBcopy_F_FM.book Page 4 Tuesday, December 16, 2003 5:31 PM

5
11. {{{{Scanner Stop}}}} keyPress if originals are feeding in slanted,or to cancel scanning while an original isfeeding in.
12. Copy function keys• {{{{Cut Select}}}} key
Press to set the length to cut the paperroll. See p.32 “Setting the Length ofCopy Paper Cut”.
• {{{{Sort/Rotate Sort}}}} keyPress to put copies into sequentially or-dered sets. See p.34 “Sort/Rotate Sort”.
• {{{{Upper Copy Output}}}} keyPress to set the copy output location.See p.7 “Original and Copy OutputLocations”.
• {{{{Fine Direct. Mag.}}}} keyPress to adjust the magnification ratioof additional copies. See p.19 “Fine Di-rectional Magnification (AdditionalCopies Only)”.
• {{{{Specified Ratio}}}} keyPress to make copies at different mag-nifications horizontally and verticallyor copy to a selected copy size for eachoriginal size. See p.38 “DirectionalMagnification (%)”, p.39 “DirectionalSize Magnification (mm)”, and p.40“User Auto Reduce/Enlarge”.
• {{{{Auto Reduce/Enlarge}}}} keyPress to make reduced/enlarged cop-ies based on the paper you select. Seep.38 “Auto Reduce/Enlarge”.
• {{{{Zoom}}}} keyPress to make reduced/enlarged copiesby the preset magnification ratio in 0.1%(or 1%) increments. See p.36 “Zoom”.
• {{{{Stamp}}}} keyPress to print the stamps, date stamps,or page numbers on copies. See p.54“Background Numbering”, p.54 “Pre-set Stamp”, p.57 “User Stamp”, p.61“Date Stamp”, p.63 “Page Number-ing”, and p.65 “Repeat User Stamp”.
• {{{{Edit}}}} keyPress to reverse black and white areasof the original or combine two origi-nals on one copy. See p.48 “Posi-tive/Negative”, p.48 “Mirror Image”,p.49 “Double Copies”, p.49 “ImageRepeat”, p.50 “Image Overlay (Over-lay 1)”, and p.51 “Format Overlay(Overlay 2)”.
• {{{{Shift/Erase}}}} keyPress to create a margin for the lead-ing and trailing edges of the originalor copy the original while erasing aspecified area. See p.42 “Margin Ad-justment”, p.43 “Shift”, p.44 “EraseBorder”, p.45 “Erase Inside”, and p.46“Erase Outside”.
13. {{{{Reduce}}}}/{{{{Enlarge}}}}/{{{{Full Size}}}}keyPress to change the magnification ratiofor copying. See p.35 “Preset Reduce/En-large”.
14. Selection keysPress to select the corresponding item onthe display. See p.6 “Reading the Displayand Using Keys”.
15. Image density keysPress to adjust copy density. See p.28“Adjusting Copy Image Density”.
16. {{{{Original Type}}}} keyPress to select the original type for copy-ing. See p.29 “Selecting Original TypeSetting”.
17. Number keysPress to enter a value, such as the numberof copies.
18. {{{{#}}}} key (Enter key)Press to confirm values entered.
19. {{{{Clear/Stop}}}} key• Clear: press to clear numbers entered.• Stop: press to cancel copying.
20. {{{{Start}}}} keyPress to start scanning originals or copy-ing.
21. {{{{Sample Copy/Partial Copy}}}} key• Sample Copy: press to make a copy of
the first part of an original to a lengthof 280 mm (11") to check the copy set-tings. See p.23 “Sample Copy”.
• Partial Copy: press to make copies ofonly a specified portion of the origi-nal. See p.24 “Partial Copy”.
NeptuneC1_GBcopy_F_FM.book Page 5 Tuesday, December 16, 2003 5:31 PM

6
Display
1. Displays operational status andmessages.
2. Displays the number of scannedoriginals and copies. When youchange the Count Display setting, itdisplays the number of sets and cop-ies. See p.85 “Count Display”.
3. Displays the types of paper set inthe machine, etc.
4. Displays the magnification set-tings.
5. Displays the number of presetjobs when you preset jobs.
6. Displays the remaining memoryicon.
Reading the Display and Using Keys
The display is not touch-sensitive. Use the following keys to select the keys anditems displayed on the screen.
1. Selection keysCorrespond to items on the bottom lineof the display.Example: initial copy display
• To select [Counter], press A.• To select [Exit], press B.
2. 00001111 keysPress to move a highlighted item in eitherdirection, step by step. Use these keys toselect function items.
3. Number keysPress to enter the number of an item youwant to select when it is displayed withthat number.Example:To select 2 [Copier Features] in the initialdisplay.Press the {{{{2}}}} key.
4
1 2
6
3
5
NeptuneC1_GBcopy_F_FM.book Page 6 Tuesday, December 16, 2003 5:31 PM

7
1. Basics
Original and Copy Output Locations
Original Output Locations
The following original output loca-tions are available:
❖❖❖❖ Original Upper OutputThis is the basic original output lo-cation. Originals are ejected ontothe upper output stacker.
Note❒ If the original is thicker than
157g/m2 (41.8 lb.), select origi-nal rear output.
❖❖❖❖ Original Rear OutputOriginals are ejected onto the orig-inal output supports. When copy-ing thick or hard originals, selectthis output location.
Original upper output
AAAA Check the upper output guideand original exit switching leverat the machine's centre rear areboth raised.
1. Upper output guide
2. Original exit switching lever
Note❒ Remove the ejected original af-
ter it is ejected by holding itsleading edge.
Original rear output
Note❒ When original rear output is set as
the original output location, thecopy output location is automati-cally set to lower output.
AAAA Remove the upper output stacker.
BBBB Lower the upper output guideand original exit switching leverat the machine's rear.
21
AAJ547S
AAJ502S
AAJ503S
NeptuneC1_GBcopy_F_FM.book Page 7 Tuesday, December 16, 2003 5:31 PM

Basics
8
1
CCCC Extend the original output sup-ports.
Note❒ Originals are ejected onto the
original output supports.
Copy Output Locations
The following copy output locationsare available.
❖❖❖❖ Upper OutputCopies come out between the up-per output stacker and upper out-put guide on the machine's top.
Note❒ When copying sizes up to A1
(D) L, we recommend selectingupper output.
❖❖❖❖ Lower OutputCopies come out to the lower out-put stacker through the lower out-put exit and lower output tray atthe machine's rear.
Note❒ When copying A1 (D) K or A0
(E) K, select lower output.❒ The optional paper roll tray or
table are required to use thisfunction.
Limitation❒ Paper capacities for each copy
output location are 25 sheets *1
for upper output; 20 sheets forlower output. If copies exceedthe upper limit, paper jams mayoccur. Remove the copies fromthe stacker.
*1 The number of sheets may be less,according to conditions, papertype, and size.
AAJ504S
AAJ518S
NeptuneC1_GBcopy_F_FM.book Page 8 Tuesday, December 16, 2003 5:31 PM

Original and Copy Output Locations
9
1
Upper output
AAAA Make sure the Upper Copy Out-put indicator lights.
Note❒ When the Upper Copy Output
indicator goes off, press the {{{{Up-per Copy Output}}}} key. The indica-tor lights.
Lower output
AAAA Press the {{{{Upper Copy Output}}}} key.
The Upper Copy Output indicatorgoes off.
Note❒ When the Upper Copy Output
indicator lights, press the {{{{UpperCopy Output}}}} key. The indicatorgoes off.
Important❒ If you copy roll originals using
the lower output auxil iaryguide, and original rear outputis selected for the copy outputlocation, the original in the low-er output auxiliary guide mayinterfere with copy output. Thismay damage originals or causepaper jams. If you use CopyStart Method, copying does notstart until you press the {{{{Start}}}}key, so you can prevent this. Seep.83 “Copy Start Method”.
ABB502S
AAJ536S
ABB502S
NeptuneC1_GBcopy_F_FM.book Page 9 Tuesday, December 16, 2003 5:31 PM

Basics
10
1
Note❒ Copies are ejected from the low-
er output exit onto the loweroutput tray, and then sent to thelower output stacker at the ma-chine's front.
❒ When using thick paper, the lastsheet to be ejected may remainin the output exit. If this hap-pens, remove it.
AAJ519S
AAJ520S
NeptuneC1_GBcopy_F_FM.book Page 10 Tuesday, December 16, 2003 5:31 PM

Originals
11
1
Originals
Sizes and Weights of Recommended Originals
❖❖❖❖ Metric version
❖❖❖❖ Inch version
Where original is placed
Original size Original weight
Original table Standard sizes: A0K, A1KL, A2KL, A3KL, A4KL, B1K, B2KL, B3KL, B4KL, B5KL
20.9 – 157 g/m2(18 – 135 kg) and 0.03 – 1 mm thick originals
Custom sizes:
Original length 140 – 3600 mm
Original width 182 – 914 mm
(Maximum width 960 mm)
Where origi-nal is placed
Original type Original size Original weight
Original table
Standard size • EngineeringE(34"×44")K, D(22"×34")K L, C(17"×22")K LB(11"×17")K L, A(81/2"×11")K L
• ArchitectureE(36"×48")K, 30"×42"K, D(24"×36")KL, C(18"×24")K LB(12"×18")K L, A(9"×12")K L
20.9 - 157 g/m2 (5.6 - 41.8 lb.) and 1.1 Mil - 40 Mil thick originals
Custom size Length: 5.6" - 141.8"
Width: 7.2" - 36"
(Maximum width: 37.8")
NeptuneC1_GBcopy_F_FM.book Page 11 Tuesday, December 16, 2003 5:31 PM

Basics
12
1
Originals that should be scanned using the carrier sheet
The following type of originals should be mounted on the carrier sheet. Youshould also use the carrier sheet for important originals and for originals youwill copy repeatedly.• Cut and pasted originals• Originals with fold lines• Wrinkled or torn originals• Waved originals• Punched originals• Originals with sticky tape or adhesive• Pasted originals• Originals with a damaged leading edge• Photos or other originals glass-attactive surfaces• Originals drawn in pencil
Referencep.15 “Setting the Carrier Sheet”
Non-recommended original
The following original types can cause jams, or may itself be damaged.• Originals other than those specified in p.11 “Sizes and Weights of Recom-
mended Originals”• Stapled or clipped originals• Perforated or torn originals• Bent, folded, or creased originals• Pasted originals• Originals with any kind of coating, such as thermal fax paper, art paper, alu-
minum foil, carbon paper, or conductive paper• Originals with indexes, tags, or other projecting parts• Sticky originals such as translucent paper• Bound originals such as books• Damp originals• Badly curled originals• Originals that vary in thickness• Originals with sticky tape or adhesive• Originals with thick leading edges• Originals with wet ink or correction fluid
NeptuneC1_GBcopy_F_FM.book Page 12 Tuesday, December 16, 2003 5:31 PM

Originals
13
1
• Carbon-backed originals• Originals not made of paper (such as glass, metal)• Originals with a roll diameter smaller than φ35 mm (φ1.4")• Originals with a roll diameter larger than φ110 mm (φ4.3")Flatten curled originals so they fit within the range shown below.• Front and back curl; R 60 mm (2.4") or more, Height 10 mm (0.4") or less
Originals that use more than 20% of the image area, may be faint.
Missing Image Area
As shown above, part of the original may not be copied (using paper roll or full-size copying).*1: Left and right, less than 5 mm (0.2")
60mm (2.4") 60mm (2.4")
10mm (0.4") 10mm (0.4")
0 - 4mm(0.16")
0 - 8mm (0.32")
0 - 8mm (0.32")
0 - 4mm(0.16")
ABB523S
NeptuneC1_GBcopy_F_FM.book Page 13 Tuesday, December 16, 2003 5:31 PM

Basics
14
1
Placing Originals
Note❒ Place the original after any correc-
tion fluid or ink has completelydried. Not taking this precautionwill result in a dirtied exposureglass and blemished copies.
❒ Dust and residue from pencil-drawn originals can result in adirtied exposure glass and blem-ished copies. We recommend us-ing the carrier sheet for this type oforiginal. See p.15 “Setting the Car-rier Sheet”.
❒ If the original's rear edge is badlycurled, smooth it out with bothhands before scanning. If the origi-nal is inserted as is, it may be dam-aged.
❒ When copying curled originals,use the lower output auxiliaryguide.
ReferenceFor details about precautions fororiginals, see p.11 “Originals”.
AAAA Make sure “Set Original” lightson the control panel.
BBBB Adjust the original guides to thesize and orientation of the origi-nal width.
Note❒ Do not push the original guide
side fence with force.
CCCC Using both hands, carefully insertthe original between the originalguides, copy side down.
Important❒ Once originals start to feed in,
do not push or pull them. Thismay damage them.
❒ After inserting an original, donot try to handle it. Support it, ifnecessary, so as not to interruptfeeding.
❒ When inserting thick paper,push it lightly against the roller.Pushing it with force may causea paper jam.
ABB503S
AAJ506S
AAJ507S
NeptuneC1_GBcopy_F_FM.book Page 14 Tuesday, December 16, 2003 5:31 PM

Placing Originals
15
1
❒ When inserting originals, be care-ful not to put the trailing edgeinto the entrance of the bypasstray. This will cause a paper jam.
Note❒ Do not release your hands until
the original is pulled in. Releasewhen it has gone slightly in.
❒ You can change the originalfeed delay setting if originalsare repeatedly feeding in slant-ed, or if you need to adjust thedelay for the type of originalsyou are using. See “Orig. FeedDelay1”, General Settings Guide.
----To stop originals feeding inIf the originals are feeding in slanted,or jamming, etc., press the {{{{ScannerStop}}}} key to stop them feeding in.
Note❒ When you press the {{{{Scanner Stop}}}}
key, the original stops immediate-ly, which can cause it to jam. Whenthis happens, see “xClearing Mis-feeds”, General Settings Guide.
❒ When you have set original rear out-put as the original output location,the rear edge of the originals are heldat the output exit. To cancel this,press the {{{{Scanner Stop}}}} key. See p.7“Original Output Locations”.
Setting the Carrier Sheet
Important❒ When using the optional carrier
sheet, set the original output loca-tion to rear original output. If theoriginal output location is set tooriginal upper output, the originalmay be damaged.
Note❒ When using the carrier sheet with
Synchro Cut selected, the paper iscut to the size of the carrier sheet.
ReferenceFor details about using the carriersheet to make copies, see p.12“Originals that should be scannedusing the carrier sheet”.
AAAA Open the carrier sheet with thetransparent sheet face up, andthen insert the original also faceup.
Note❒ Align the original with the fold
of the carrier sheet.
AAJ505S
ZEDP020E
NeptuneC1_GBcopy_F_FM.book Page 15 Tuesday, December 16, 2003 5:31 PM

Basics
16
1
BBBB Using both hands, hold the origi-nal copy side down, and carefullyinsert the folded edge of the carri-er sheet into the insertion area.
Setting Folded Originals (the Original Switching Lever)
When setting folded originals such asdrawings, you can make copies withthe fold lines erased.
Limitation❒ Originals thicker than 157 g/m2
(41.8 lb.) cannot be used.
AAAA Move the original switching le-vers at both sides of the machineto the front.
Setting Rolled Originals
When setting rolled originals, youcan make copies using the lower out-put auxiliary guide.
AAAA Pull the lower output auxiliaryguide out and forward.
BBBB Place the rolled original on thelower output auxiliary guide.
CCCC Pull the leading edge of the origi-nal up to the original table, andthen adjust the original guides tothe paper width.
DDDD Using both hands, carefully insertthe original between the originalguides, copy side to down.
Note❒ Do not apply excessive force to
the lower output auxil iaryguide.
ABB534S
AAJ539S
AAJ537S
AAJ538S
NeptuneC1_GBcopy_F_FM.book Page 16 Tuesday, December 16, 2003 5:31 PM

17
2. Copying
Basic Procedure
AAAA If user codes are set, enter it usingthe number keys, and then pressthe {{{{#}}}} key.
The machine is ready to make cop-ies.
ReferenceFor details about user codes, seep.97 “Key Operator Tools”.
BBBB Make sure the message “Ready” isdisplayed on the screen.
Note❒ When the message “Press
Start key to copy addi-tional” appears, you can makeadditional copies. See p.19 “Ad-ditional Copy”.
CCCC Make sure no previous settingsremain.
Note❒ To clear settings, press the
{{{{Clear Modes}}}} key.
DDDD Set the output locations for origi-nals and copies, and then prepareto use them.
Referencep.7 “Original and Copy OutputLocations”
EEEE Make the necessary settings.
Note❒ The settings are displayed on
the screen.
ReferenceFor details, see explanations ofeach function.If you use the {{{{Program}}}} key toaccess the program function,you can store and easily recallthe settings. See p.26 “Pro-grams”.
FFFF Enter the number of copies usingthe number keys.
Note❒ The copy quantity is from 1 to
20.
GGGG Make sure “Set Original” lightson the control panel, and thenplace your originals.Originals feed into the machine,which then starts copying.
Referencep.14 “Placing Originals”
Note❒ To stop originals feeding in,
press the {{{{Scanner Stop}}}} key. Seep.15 “To stop originals feedingin”.
NeptuneC1_GBcopy_F_FM.book Page 17 Tuesday, December 16, 2003 5:31 PM

Copying
18
2
❒ When [Press Start Key] is select-ed in the Copy Start Method,copying starts when you pressthe {{{{Start}}}} key. See p.83 “CopyStart Method”.
❒ The number of scanned origi-nals is displayed in the screen'stop right corner.
----Interrupting a multiple-sheet copy job
Press the {{{{Clear/Stop}}}} key after theoriginals have fed in. The machinestops when the current copy finishes.Press [Yes] to cancel the copy job;press [No] to resume the interruptedcopy job.
Auto Start
If you make settings and scan theoriginals while the message “Ready”is displayed, your copies will bemade as soon as the warm-up finish-es.
Copier Auto Reset
The machine automatically returns toits initial condition when your job isfinished, after a certain period oftime. This function is called ,“CopierAuto Reset”.
Note❒ Default settings are applied after
Copier Auto Reset, or after the{{{{Clea r Mode s}}}} key has beenpressed, and are as follows:
*1 Can be changed by Auto Density.*2 When optional paper roll tray 1 is
installed, it becomes On.*3 When optional paper roll tray 1 is
installed, it becomes paper roll tray1. When optional paper roll tray 2or cut paper tray is installed, it be-comes Auto.
*4 Can be changed by Ppr.Tray Prior-ity.
❒ You can change the Copier AutoReset time. See p.82 “Copier AutoReset”.
❒ In the following cases Copier AutoReset will not restore settings totheir default values:• If there is an original or paper
jam• When Service Call occurs• If a cover is open• If copying was interrupted
Auto Image Densi-ty
On
Combined Auto and Manual Densi-ty
On *1
Default image den-sity
Centre
Synchro Cut Off *2
Selected paper tray Bypass Tray *3 *4
Full size On
NeptuneC1_GBcopy_F_FM.book Page 18 Tuesday, December 16, 2003 5:31 PM

Basic Procedure
19
2
• During copying (if the specifiednumber of copies is not com-pleted)
• During copying (if there is nopaper in the bypass tray after amanual copy or iginal wasscanned)
• When the “Please wait.”message is displayed (such aswhen the machine is warmingup).
Additional Copy
You can make additional copies afteryou have finished copying until Cop-ier Auto Reset. You can make addi-tional copies using previous settingsand the scanned original's imagesaved in machine memory. Makingchanges to settings as required, andthen press the {{{{Start}}}} key.
Note❒ You can change the following
functions when using AdditionalCopy.• Number of copies• Paper tray selection• Fine Magnification• Shift• Margin• Erase Border• Double Copies• Upper output/Lower output• Paper cut method• Interrupt Copy• Print function (only when se-
lected in the original settings)❒ If paper roll tray 1, 2, or the cut pa-
per tray was selected as the papersource in the original settings, youcannot select the bypass tray.
❒ If you make a mistake when enter-ing the settings, press the functionkey again or [Cancel] to clear them.If you press the {{{{Clear Modes}}}} key,you can delete the scanned origi-nal's image from memory.
AAAA Press the {{{{Start}}}} key.
Fine Directional Magnification (Additional Copies Only)
Paper can expand or shrink, resultingin original and copy size not match-ing (such as under humid condi-t i o ns ) . T h i s fu nc t i o n u s e s t h emeasurements of the original andcopy to calculate a ratio to producecopies close to actual size.
Note❒ Fine Directional Magnification is
used for originals that have al-ready been scanned. To performfine magnification corrections forpaper that has expanded due to itstype or exposure to humidity, set“Fine Ratio:Copier” in System Set-tings. See “User Tools (System Set-tings)”, General Settings Guide.
NeptuneC1_GBcopy_F_FM.book Page 19 Tuesday, December 16, 2003 5:31 PM

Copying
20
2
❒ Set the correction ratio after meas-uring the length and width of theoriginal and copy.
❒ When the bypass tray is selected,you can set Fine Directional Mag-nification after scanning the origi-nals.
AAAA Press the {{{{Fine Direct. Mag.}}}} key.
The Fine Direct. Mag. indicatorlights.
BBBB Adjust the horizontal ratio using[-] and [+], and then press the {{{{#}}}}key.
CCCC Adjust the vertical ratio using [-]and [+], and then press [OK].
After you set the correction values,they are displayed on the screen.
Note❒ If you make a mistake, select the
ratio you want to change usingthe 01 keys, and then adjust itusing [-] and [+].
❒ These settings also appear in“Fine Ratio:Copier” settings inSystem Settings. If they are ad-justed in System Settings usingthe screen, the setting will applyto both.
ZEDG010E
Calculating the Correction Value (%)
To copy at the same size as the original
Example)CopyOriginal
Horiz. Horiz.
... For the example above:
correction value(%)
Set the correction value (horizontal) to 0.8%.
ABB504S
NeptuneC1_GBcopy_F_FM.book Page 20 Tuesday, December 16, 2003 5:31 PM

Basic Procedure
21
2
Job Preset
The following Job Preset methods areavailable (when the current copy jobis finished, your copy job will startautomatically):
❖❖❖❖ Job Preset (Standard Preset)Use this function to set up the nextcopy job and scan an original whena copy job is in progress. When thecurrent copy job is finished, yourcopy job will start automatically.
❖❖❖❖ Quick PresetUse this function to scan the origi-nal of the next copy job when eject-ing copies from the copy output.
Job preset (Standard preset)
AAAA Press the {{{{New Job}}}} key while themessage “Copying...” is dis-played.
BBBB Make the settings for the copy jobyou want to preset.
Note❒ To cancel a setting while mak-
ing the preset settings, press the{{{{Clear Modes}}}} key.
CCCC Place the originals. The machinescans them.
When copying finishes, the presetjob starts automatically.
Quick preset
AAAA Place originals when copies arebeing ejected. The machine scansthem.When copying finishes, the presetjob starts automatically.
Checking a job preset
Both Standard Preset and QuickPreset are displayed.A Press the {{{{New Job}}}} key.
Note❒ If three or more copy jobs are
preset, display the job presetyou want to check using the01 keys.
❒ If you press [Exit], the currentcopy job is displayed.
Adding a job preset
Limitation❒ If you delete a preset job when
the optional HDD is not in-stalled, you cannot add anotheruntil all remaining preset jobsare finished.
A Press the {{{{New Job}}}} key.
B Press [New Job], and then makethe settings for the copy jobyou want to preset.
ABB505S
NeptuneC1_GBcopy_F_FM.book Page 21 Tuesday, December 16, 2003 5:31 PM

Copying
22
2
C Place the originals. The ma-chine scans them.
A job preset is added.
Deleting a job preset
A Press the {{{{New Job}}}} key.
B Press [Delete].
C Enter the number of the jobyou want to delete using thenumber keys, and then pressthe {{{{#}}}} key.
Note❒ If the number of the job pre-
set you want to delete is notdisplayed, scroll to it usingthe 01 keys.
D Press [Yes].
Note❒ To delete another job preset,
repeat steps C to D.E Press [Exit].
The Job list is displayed on thescreen.
Interrupt Copy
Use this function to interrupt a longcopy job to make urgently neededcopies.
Limitation❒ You cannot use Interrupt Copy
while the following types of copy-ing are in progress.• Copying from the bypass tray• Image Overlay/Format Over-
lay
Note❒ The number of originals is counted
from “1” when you use InterruptCopy.
AAAA Press the {{{{Interrupt}}}} key.The Interrupt key indicator lights.
The current copy is ejected, and themachine stops ejecting copies.
BBBB Make the settings for the Inter-rupt Copy job.
Limitation❒ You cannot use the settings for
Sort, Rotate Sort, Double Cop-ies, Image Repeat, Image Over-lay, Format Overlay, Stamp,Erase, or Job Preset.
CCCC Place your originals.
ABB506S
NeptuneC1_GBcopy_F_FM.book Page 22 Tuesday, December 16, 2003 5:31 PM

Basic Procedure
23
2
DDDD When copying has finished, re-move the copy output for the In-terrupt Copy job.
EEEE Press the {{{{Interrupt}}}} key again.The Interrupt key indicator goesoff.
Resuming the previous copy job
A Place your originals, or pressthe {{{{Start}}}} key.
Exiting interrupt copy
A Press the {{{{Clear Modes}}}} key.
Sample Copy
Use this function to copy the first part(0 – 250 mm (0 – 10")) of an original toa length of 280 mm (11"). This allowsyou to check the copy settings beforestarting a full copy run.
Note❒ When you use cut paper, the
whole surface of the original iscopied. You can specify the startposition.
ReferenceRelated default settings:p.85 “Sample Copy Pos.”
AAAA Press the {{{{Sample Copy/PartialCopy}}}} key.
BBBB Press [Sample].
CCCC Enter the start position (Y) usingthe number keys, and then press[OK].
Note❒ To change the value entered,
press the {{{{Clear/Stop}}}} key, andthen enter the new value.
DDDD Press [Exit].
EEEE Make the necessary settings.
FFFF Place your originals.
The machine makes a 280 mm (11")copy.
Exiting sample copy
A Press the {{{{Clear Modes}}}} key.
ABB507S
NeptuneC1_GBcopy_F_FM.book Page 23 Tuesday, December 16, 2003 5:31 PM

Copying
24
2
Partial Copy
Use this function to copy only a spec-ified portion of the original.
ReferenceRelated default settings:p.85 “Partial Copy Size”
AAAA Press the {{{{Sample Copy/PartialCopy}}}} key.
BBBB Press [Partial].
CCCC Enter the scan start position (thelength from the leading edge ofthe original) using the numberkeys, and then press the {{{{#}}}} key.
DDDD Enter the copy size using thenumber keys, and then press [OK].
Note❒ To change the value entered,
press the {{{{Clear/Stop}}}} key, andthen enter the new value.
❒ The entered copy size should be280 mm (11") or more.
❒ The maximum length of copysizes is as follows:• HDD not installed:
Y1 + Y2 ≤ 1189 mm (48")• HDD installed:
Y1 + Y2 ≤ 3600 mm (141.7")❒ If the length specified by “Y1”
and “Y2” is longer than themaximum, the machine short-ens it. The value entered secondis adjusted based on the valueentered first.
EEEE Press [Exit].
FFFF Make the necessary settings.
GGGG Place your originals.
The machine copies the specifiedarea.
Exiting partial copy
A Press the {{{{Clear Modes}}}} key.
ABB507S
NeptuneC1_GBcopy_F_FM.book Page 24 Tuesday, December 16, 2003 5:31 PM

Basic Procedure
25
2
Copying from the Bypass Tray
Use the bypass tray to copy onto pa-per sizes that cannot be loaded on thepaper rolls, or cut sheet paper.
Limitation❒ You cannot use Interrupt Copy af-
ter setting the original.❒ The maximum length is 2000 mm
(78").❒ The width for paper in the bypass
tray is 210 – 914 mm (81/2" – 36").❒ Insert the paper in the bypass tray
lengthwise or sideways to fit itonto the feeding orientation.
❒ Insert the paper in the bypass traylengthwise when you use A0(E)size paper.
❒ Do not copy on both sides of thepaper.
❒ Do not use paper already copied orprinted on.
❒ You cannot use Job Preset. If youscan several originals, the last isused.
ReferenceFor details about paper type, ori-entation, and number of sheetsthat can be loaded in the bypasstray, see “Copy Paper” General Set-tings Guide.
AAAA Select [Bypass] using the 00001111keys.[Bypass] is highlighted.
BBBB Make the necessary settings.
CCCC Place your original and scan it.
Referencep.14 “Placing Originals”
DDDD Adjust the bypass tray's paperguides to the size of the paper.
EEEE Insert the paper in the bypasstray, copy side up.
The paper feeds in automaticallyand copying starts.
Important❒ Insert the paper evenly on both
sides and support it with yourhands until it feeds in.
Note❒ To make multiple copies, insert
an additional sheet after eachfeeds in.
❒ To set a rolled original, pull outthe lower output auxiliary guideto the front, and then place therolled original on it. See p.16“Setting Rolled Originals”.
AAJ512D
AAJ513S
NeptuneC1_GBcopy_F_FM.book Page 25 Tuesday, December 16, 2003 5:31 PM
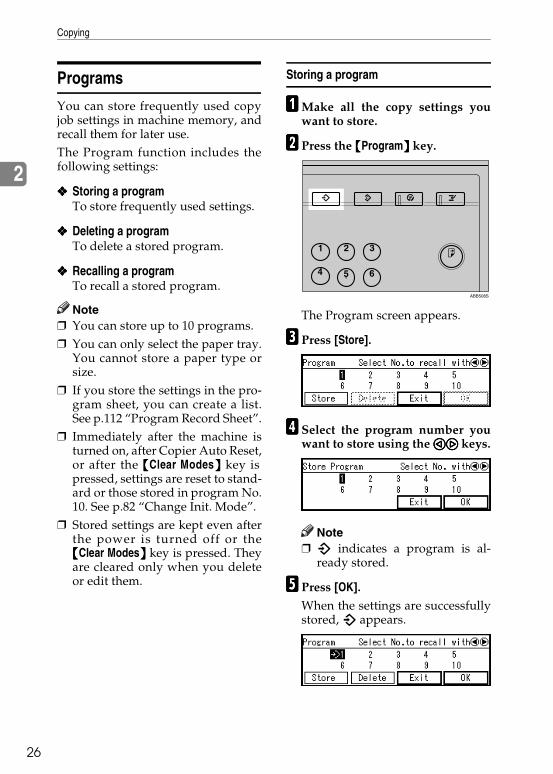
Copying
26
2
Programs
You can store frequently used copyjob settings in machine memory, andrecall them for later use.The Program function includes thefollowing settings:
❖❖❖❖ Storing a programTo store frequently used settings.
❖❖❖❖ Deleting a programTo delete a stored program.
❖❖❖❖ Recalling a programTo recall a stored program.
Note❒ You can store up to 10 programs.❒ You can only select the paper tray.
You cannot store a paper type orsize.
❒ If you store the settings in the pro-gram sheet, you can create a list.See p.112 “Program Record Sheet”.
❒ Immediately after the machine isturned on, after Copier Auto Reset,or after the {{{{Clear Modes}}}} key ispressed, settings are reset to stand-ard or those stored in program No.10. See p.82 “Change Init. Mode”.
❒ Stored settings are kept even afterthe power is turned off or the{{{{Clear Modes}}}} key is pressed. Theyare cleared only when you deleteor edit them.
Storing a program
AAAA Make all the copy settings youwant to store.
BBBB Press the {{{{Program}}}} key.
The Program screen appears.
CCCC Press [Store].
DDDD Select the program number youwant to store using the 00001111 keys.
Note❒ m indicates a program is al-
ready stored.
EEEE Press [OK].
When the settings are successfullystored, m appears.
ABB508S
NeptuneC1_GBcopy_F_FM.book Page 26 Tuesday, December 16, 2003 5:31 PM
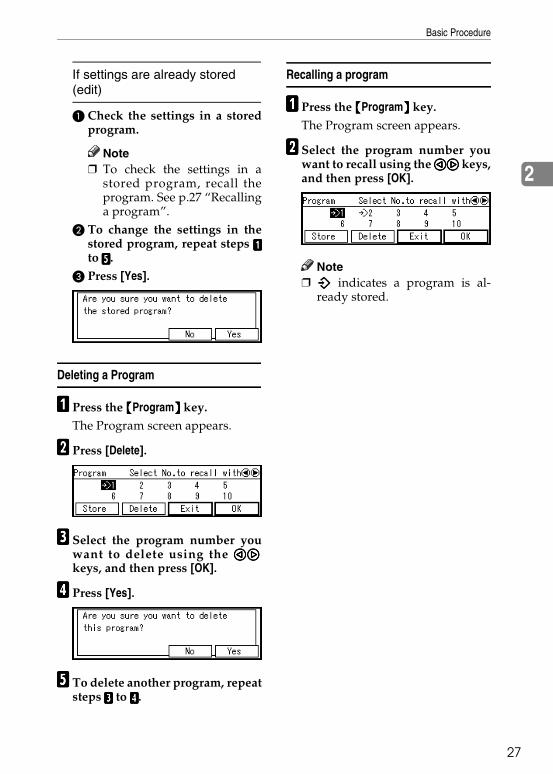
Basic Procedure
27
2
If settings are already stored (edit)
A Check the settings in a storedprogram.
Note❒ To check the settings in a
stored program, recall theprogram. See p.27 “Recallinga program”.
B To change the settings in thestored program, repeat steps AAAAto EEEE.
C Press [Yes].
Deleting a Program
AAAA Press the {{{{Program}}}} key.The Program screen appears.
BBBB Press [Delete].
CCCC Select the program number youwant to delete using the 00001111keys, and then press [OK].
DDDD Press [Yes].
EEEE To delete another program, repeatsteps CCCC to DDDD.
Recalling a program
AAAA Press the {{{{Program}}}} key.
The Program screen appears.
BBBB Select the program number youwant to recall using the 00001111 keys,and then press [OK].
Note❒ m indicates a program is al-
ready stored.
NeptuneC1_GBcopy_F_FM.book Page 27 Tuesday, December 16, 2003 5:31 PM

Copying
28
2
Copier Functions
Adjusting Copy Image Density
PreparationYou can adjust the copy density tomatch your originals. There arethree types of density function:
❖❖❖❖ Auto Image DensityTo automatically adjust the im-age density.
❖❖❖❖ Manual Image DensityTo adjust the image density ofwhole originals.
❖❖❖❖ Combined Auto and Manual Densi-tyTo copy originals with a dirtybackground (such as newspa-pers). You can adjust the fore-ground density while leavingthe background unchanged.
ReferenceRelated default settings:p.83 “Auto Density”p.83 “Adj. Scan Density”p.85 “Orig.Mode Density”
AAAA Select the method of image densi-ty adjustment.
Auto image density
A Make sure the {{{{Auto Image Den-sity}}}} key is pressed and theAuto Image Density indicatorlights.
Note❒ If the Auto Image Density
function is not selected, pressthe {{{{Auto Image Density}}}} key.
Manual image density
A If Auto Image Density is se-lected, press the {{{{Auto ImageDensity}}}} key to cancel it.
ABB509S
NeptuneC1_GBcopy_F_FM.book Page 28 Tuesday, December 16, 2003 5:31 PM
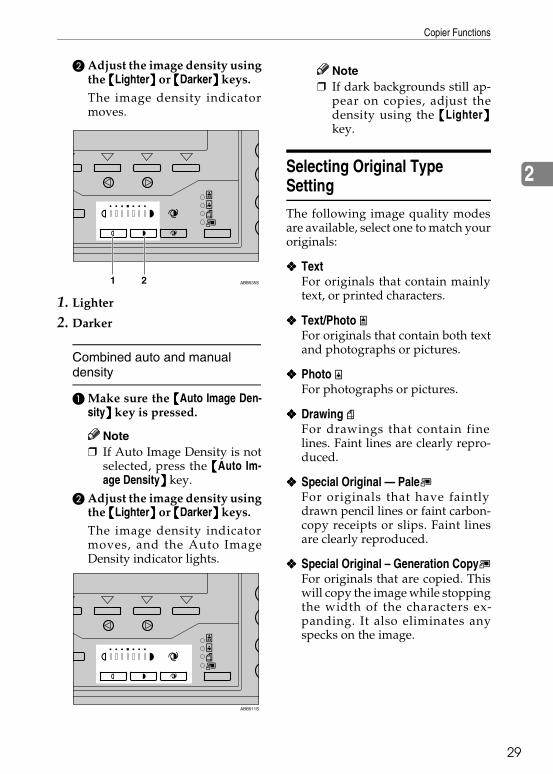
Copier Functions
29
2
B Adjust the image density usingthe {{{{Lighter}}}} or {{{{Darker}}}} keys.
The image density indicatormoves.
1. Lighter
2. Darker
Combined auto and manual density
A Make sure the {{{{Auto Image Den-sity}}}} key is pressed.
Note❒ If Auto Image Density is not
selected, press the {{{{Auto Im-age Density}}}} key.
B Adjust the image density usingthe {{{{Lighter}}}} or {{{{Darker}}}} keys.
The image density indicatormoves, and the Auto ImageDensity indicator lights.
Note❒ If dark backgrounds still ap-
pear on copies, adjust thedensity using the {{{{Lighter}}}}key.
Selecting Original Type Setting
The following image quality modesare available, select one to match youroriginals:
❖❖❖❖ TextFor originals that contain mainlytext, or printed characters.
❖❖❖❖ Text/Photo For originals that contain both textand photographs or pictures.
❖❖❖❖ Photo For photographs or pictures.
❖❖❖❖ Drawing For drawings that contain finelines. Faint lines are clearly repro-duced.
❖❖❖❖ Special Original — PaleFor originals that have faintlydrawn pencil lines or faint carbon-copy receipts or slips. Faint linesare clearly reproduced.
❖❖❖❖ Special Original – Generation CopyFor originals that are copied. Thiswill copy the image while stoppingthe width of the characters ex-panding. It also eliminates anyspecks on the image.
ABB535S1 2
ABB511S
NeptuneC1_GBcopy_F_FM.book Page 29 Tuesday, December 16, 2003 5:31 PM

Copying
30
2
❖❖❖❖ Special Original – BackgroundLinesFor images drawn on section paper(blue or green sectioned graph pa-per) without copying the lines onthe paper.Sepia lines on originals cannot beeliminated.
❖❖❖❖ Special Original – Sharpen TextFor posters that contain photoswith text overlays, requiring a highcontrast setting. Use Photo modeto copy glossy photographs andother simple pictures.
ReferenceRelated default settings:p.82 “Original Priority”p.84 “Noise Reduction”p.84 “Orig.Mode Quality”p.85 “Orig.Mode Density”
AAAA Select the original type using the{{{{Original Type}}}} key.
The indicator of the selected origi-nal type lights.
Note❒ When you press the {{{{Original
Type}}}} key, the indicator movesin the order of “Text/Photo”,“Photo”, “Drawing”, “Special”.
❒ When no indicators are lit, theoriginal type is set to “Text”.
❒ You can select the special origi-nal type such as [GenerationCopy] by pressing the {{{{OriginalType}}}} key four times.
❒ When you set the special origi-nal type, select the original typeusing the 01 keys, and thenpress [OK].
❒ When you select “Photo”, AutoImage Density is automaticallycanceled.
Selecting Copy Paper
PreparationThere are two ways to select copypaper:
❖❖❖❖ Auto Paper SelectThe machine detects the origi-nal's size, and then automatical-ly selects a suitable copy papersize based on the magnification.
❖❖❖❖ Manual Paper SelectSelect the paper roll tray, cut pa-per tray, or bypass tray contain-ing the paper you want to copyonto.
Note❒ In Auto Paper Select mode, insert
the proper size paper in the bypasstray or select the magnification ra-tio for the paper currently loadedin the paper tray, and then set youroriginal again.
ABB512S
NeptuneC1_GBcopy_F_FM.book Page 30 Tuesday, December 16, 2003 5:31 PM
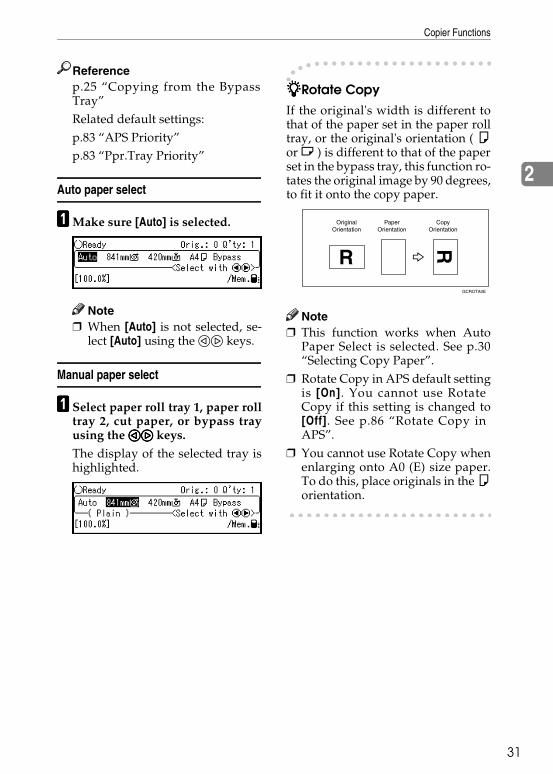
Copier Functions
31
2
Referencep.25 “Copying from the BypassTray”Related default settings:p.83 “APS Priority”p.83 “Ppr.Tray Priority”
Auto paper select
AAAA Make sure [Auto] is selected.
Note❒ When [Auto] is not selected, se-
lect [Auto] using the 01 keys.
Manual paper select
AAAA Select paper roll tray 1, paper rolltray 2, cut paper, or bypass trayusing the 00001111 keys.
The display of the selected tray ishighlighted.
----Rotate CopyIf the original's width is different tothat of the paper set in the paper rolltray, or the original's orientation ( Kor L ) is different to that of the paperset in the bypass tray, this function ro-tates the original image by 90 degrees,to fit it onto the copy paper.
Note❒ This function works when Auto
Paper Select is selected. See p.30“Selecting Copy Paper”.
❒ Rotate Copy in APS default settingis [On]. You cannot use RotateCopy if this setting is changed to[Off]. See p.86 “Rotate Copy inAPS”.
❒ You cannot use Rotate Copy whenenlarging onto A0 (E) size paper.To do this, place originals in the Korientation.
GCROTA0E
NeptuneC1copyGB_Chapter-2 Page 31 Thursday, January 15, 2004 4:42 PM

Copying
32
2
Setting the Length of Copy Paper Cut
PreparationThe following paper cut methodsare available.
❖❖❖❖ Synchro CutCuts the paper at the samelength as the original.If the copy is enlarged or re-duced, the machine calculatesthe appropriate length for themagnification ration and cutsthe paper.
❖❖❖❖ Preset CutCuts the paper at a preset size,regardless of the size of the orig-inal. You can use this to copydifferent sized originals to thesame size.
❖❖❖❖ Variable CutCuts the paper to the size en-tered.
Note❒ The maximum length for copy pa-
per is 3600 mm (141.7") regardlessof paper type, width, or paper cutmethod.
❒ You cannot cut the paper in the by-pass tray.
Synchro cut
Note❒ When using Synchro Cut, the pa-
per can be cut from 280 to 3600 mm(11" to 141.7").
Limitation❒ Depending on the original length
and paper, copy paper length maybe different from the original.
AAAA Select paper roll tray 1 or 2 usingthe 00001111 keys.
The Synchro indicator lights.
Preset cut
AAAA Select paper roll tray 1 or 2 usingthe 00001111 keys.
ABB513S
NeptuneC1_GBcopy_F_FM.book Page 32 Tuesday, December 16, 2003 5:31 PM

Copier Functions
33
2
BBBB Select “Preset KKKK” or “Preset LLLL”using the {{{{Cut Select}}}} key.The Preset K or Preset L indica-tor is lit.
Note❒ The preset cut size differs de-
pending on the ro l l paperwidth. It is cut in the followingsizes or standard lengths.
❖❖❖❖ Metric version
❖❖❖❖ Inch version (Engineering)
❖❖❖❖ Inch version (Architecture)
Variable cut
Note❒ When using Variable Cut, the pa-
per can be cut from 280 to 3600 mm(from 11" to 141.7").
AAAA Select paper roll tray 1 or 2 usingthe 00001111 keys.
Roll paper width
Preset K Preset L
841 mm A0K A1L
594 mm A1K A2L
420 mm A2K A3L
297 mm A3K —
210 mm A4K —
728 mm B1K B2L
515 mm B2K B3L
364 mm B3K —
257 mm B4K —
914 mm 1219 mm 610 mm
880 mm 1219 mm 610 mm
800 mm 1189 mm 594 mm
660 mm 1189 mm 594 mm
440 mm 594 mm 297 mm
ABB513S
Roll paper width
Preset K Preset L
34" 44" 22"
22" 34" 17"
17" 22" 11"
11" 17" —
81/2" 11" —
Roll paper width
Preset K Preset L
36" 48" 24"
30" 42" 21"
24" 36" 18"
18" 24" 12"
12" 18" —
9" 12" —
NeptuneC1_GBcopy_F_FM.book Page 33 Tuesday, December 16, 2003 5:31 PM

Copying
34
2
BBBB Select “Variable” using the {{{{CutSelect}}}} key.
CCCC Enter the length using thenumber keys, and then press [OK].
Note❒ To change the value, press the
{{{{Clear/Stop}}}} key, and then enterthe new value.
Sort/Rotate Sort
You can put copies into sequentiallyordered sets.
❖❖❖❖ SortPut copies into sequentially or-dered sets.
❖❖❖❖ Rotate sortAlternate sets are rotated (KL)and delivered to the output tray.
Note❒ You cannot select Sort for Job Pre-
set copy jobs.❒ When using Rotate Sort, make sure
original and paper image sizes arethe same. See p.105 “Supplementa-ry Specifications”.
ReferenceRelated default settings:p.85 “Copy Mode in Sort”
ABB513S
21
3 21
3 21
3 21
3
ZEDG030E
21
3 21
3 21
321
3
ZEDG040E
NeptuneC1_GBcopy_F_FM.book Page 34 Tuesday, December 16, 2003 5:31 PM

Copier Functions
35
2
AAAA Select “Sort” or “Rotate Sort” us-ing the {{{{Sort/Rotate Sort}}}} key.
BBBB Make the necessary settings.
CCCC Place your originals.After the originals are scanned, thefollowing message appears.
Note❒ You can repeat the scanning
procedure until all your origi-nals are scanned.
❒ Press [Delete] to delete scannedimages.
DDDD After the last original is scanned,press [Exit].
Copying starts.
Preset Reduce/Enlarge
You can select a preset copy ratio.You can store up to three enlargementor reduction ratios of your own.
❖❖❖❖ Metric version
❖❖❖❖ Inch version
You can store up to three ratios ofyour own for frequently used ratio,but are not preset. The ratios can beset in 0.1% increments (0.2% over200%). See p.86 “User R/E Ratio”.
Note❒ Preset ratios are set by combining
original size and paper size.
ABB514S
Enlargement Ratios: 141.4%, 200.0%, 282.8%, 400.0%
Reduction Ratios: 25.0%, 35.4%, 50.0%, 70.7%
Engineer-ing
Enlargement ratios: 129.4%, 200.0%, 258.8%, 400.0%
Reduction Ratios: 25.0%, 32.4%, 50.0%, 64.7%
Architec-ture
Enlargement ratios: 133.3%, 200.0%, 266.7%, 400.0%
Reduction Ratios: 25.0%, 33.3%, 50.0%, 66.7%
NeptuneC1_GBcopy_F_FM.book Page 35 Tuesday, December 16, 2003 5:31 PM

Copying
36
2
ReferenceFor details about the relationshipbetween the original and papersizes for preset ratios, see p.115“Magnification Ratio Chart”.Related default settings:p.86 “R/E Priority”
AAAA Press the {{{{Reduce}}}} or {{{{Enlarge}}}}key.
BBBB Select a ratio using the 00001111 keys,and then press [OK].
Zoom
You can change the magnification in0.1% (or 1%) increments.
PreparationYou can set the ratio in the follow-ing ways.• Using the number keys• Selecting a ratio close to the one
you want to set from Preset Re-duce/Enlarge, and then press [-]or [+] to adjust the ratio
Note❒ For ratios 25.0 – 200.0%, incre-
ments are 0.1%, for ratios 200.0 –400.0%, 0.2%.
Using the number keys
AAAA Press the {{{{Zoom}}}} key.
ABB515S
ZEDG060E
ABB516S
NeptuneC1_GBcopy_F_FM.book Page 36 Tuesday, December 16, 2003 5:31 PM

Copier Functions
37
2
BBBB Enter the ratio using the numberkeys, and then press [OK].
Note❒ Use the {{{{·}}}} key to enter a deci-
mal point.❒ To change the value, press the
{{{{Clear/Stop}}}} key, and then enterthe new value.
Selecting a ratio from the preset ratios, and then using [-] or [+] to adjust it
AAAA Press the {{{{Reduce}}}} or {{{{Enlarge}}}}key.
BBBB Select a ratio using the 00001111 keys,and then press [OK].
CCCC Press the {{{{Zoom}}}} key.
DDDD Press [-] or [+] to set the ratio, andthen press [OK].
Note❒ Press [-] or [+] to adjust the ratio
in 0.1% increments.❒ If you make a mistake, press [-]
and [+] to readjust the ratio.
ABB517S
ABB515S
ABB516S
NeptuneC1_GBcopy_F_FM.book Page 37 Tuesday, December 16, 2003 5:31 PM

Copying
38
2
Auto Reduce/Enlarge
The machine chooses an appropriatemagnification based on the paper andoriginal sizes you select.
Note❒ The machine selects one of the fol-
lowing ratios: • Metric version
400.0%, 282.8%, 200.0%, 141.4%,100.0%, 70.7%, 50.0%, 35.4%,25.0%
• Inch version (Engineering)400.0%, 258.8%, 200.0%, 129.4%,100.0%, 64.7%, 50.0%, 32.4%,25.0%
• Inch version (Architecture)400.0%, 266.7%, 200.0%, 133.3%,100.0%, 66.7%, 50.0%, 33.3%,25.0%
❒ This is useful to copy different sizeoriginals to same size paper.
Referencep.115 “Magnification Ratio Chart”
AAAA Press the {{{{Auto Reduce/Enlarge}}}}key.
BBBB Select paper roll tray 1, paper rolltray 2, or cut paper using the 00001111keys.
Directional Magnification (%)
Copies can be reduced or enlarged atdifferent magnifications, horizontallyand vertically. Use this function to al-ter the image.
Note❒ For ratios 25.0 – 200.0%, incre-
ments are 0.1%, for ratios 200.0 –400.0%, 0.2%.
CP2F0100
ABB518S
ZEDG090E
Horiz
Vert
NeptuneC1_GBcopy_F_FM.book Page 38 Tuesday, December 16, 2003 5:31 PM

Copier Functions
39
2
AAAA Press the {{{{Specified Ratio}}}} key.
BBBB Press [D.Mag.%].
CCCC Enter the horizontal ratio usingthe number keys, and then pressthe {{{{#}}}} key.
Note❒ Use the {{{{·}}}} key to enter a deci-
mal point.
DDDD Enter the vertical ratio using thenumber keys, and then press [OK].
Note❒ To change the value, select the
ratio you want to change usingthe 01 keys, and then enterthe new value.
EEEE Press [Exit].
Directional Size Magnification (mm)
You can specify the length for the hor-izontal and vertical of both originalsand copies separately. Use this func-tion to alter the image.
PreparationMeasure and specify the lengths ofthe original and copy by compar-ing “A” with “a”.
Note❒ You can set the ratio from 25.0 to
400.0%.❒ If the calculated ratio is less than
25%, the ratio is set to 25.0%, if it ismore than 400%, 400.0%.
❒ Enter the length of the verticalfrom 1 to 9999 mm, for the horizon-tal, 1 to 999 mm (1 mm incre-ments).
AAAA Press the {{{{Specified Ratio}}}} key.
ABB519S
ZEDG100E
ABB519S
NeptuneC1_GBcopy_F_FM.book Page 39 Tuesday, December 16, 2003 5:31 PM

Copying
40
2
BBBB Press [D.Mag.mm].
CCCC Enter the length for “Orig.:Horiz.” using the number keys,and then press the {{{{#}}}} key.
DDDD Enter the length for “Copy:Horiz.” using the number keys,and then press the {{{{#}}}} key.
EEEE Enter the length for “Orig.: Vert.”using the number keys, and thenpress the {{{{#}}}} key.
FFFF Enter the length for “Copy: Vert.”using the number keys, and thenpress [OK].
Note❒ To change a length, select the
length you want to change us-ing the 01 keys, and then re-enter the number.
GGGG Press [Exit].
Note❒ If you enter the only length of
either “Vert.” or “Horiz.” andpress [OK], the one not enteredis set at the same magnificationalso.
User Auto Reduce/Enlarge
Use this function to copy to a selectedsize for each original size.When the original is set, the machineautomatically enlarges or reduces theimage to fit the size of the copy paper.
PreparationYou can select the following com-binations:
❖❖❖❖ Metric version
JIS: Japanese Industrial Standard
❖❖❖❖ Inch version
Original size Copy size
A0K, A1K, A2K, A3K, A4K
A0, A1, A2, A3, A4
A1L, A2L, A3L, A4L
A1, A2, A3
B1 JISK, B2 JISK, B3 JISK, B4 JISK
B1 JIS, B2 JIS, B3 JIS, B4 JIS
B2 JISL, B3 JISL, B4 JISL
B2 JIS, B3 JIS
Original size
Copy size
Eng
inee
ring
E(34"×44")K, D(22"×34")K, C(17"×22")K, B(11"×17")K, A(81/2"× 11")K
E(34"×44"), D(22"×34"), C(17"×22"), B(11"×17"), A(81/2"×11")
D(22"×34") L, C(17"×22") L, B(11"×17") L, A(81/2"× 11") L
D(22"×34"), C(17"×22"), B(11"×17")
NeptuneC1_GBcopy_F_FM.book Page 40 Tuesday, December 16, 2003 5:31 PM

Copier Functions
41
2
Note❒ The default setting is to copy at
same size (full size). To change thecombination, use User Auto R/E.See p.87 “User Auto R/E”.
ReferenceRelated default settings:p.87 “User Auto R/E”
AAAA Press the {{{{Specified Ratio}}}} key.
BBBB Press [UserAuto].
CCCC Check that the combination se-lected for User Auto Reduce/En-large is the one you want.
DDDD Press [Exit].
Arc
hite
ctu
reE(36"×48")K, D(26"×36")K, C(18"×24")K, B(12"×18")K, A(9"×12")K
E(36"×48"), D(26"×36"), C(18"×24"), B(12"×18"), A(9"×12")
D(26"×36") L, C(18"×24") L, B(12"×18") L, A(9"×12") L
D(26"×36"), C(18"×24"), B(12"×18")
ABB519S
NeptuneC1_GBcopy_F_FM.book Page 41 Tuesday, December 16, 2003 5:31 PM
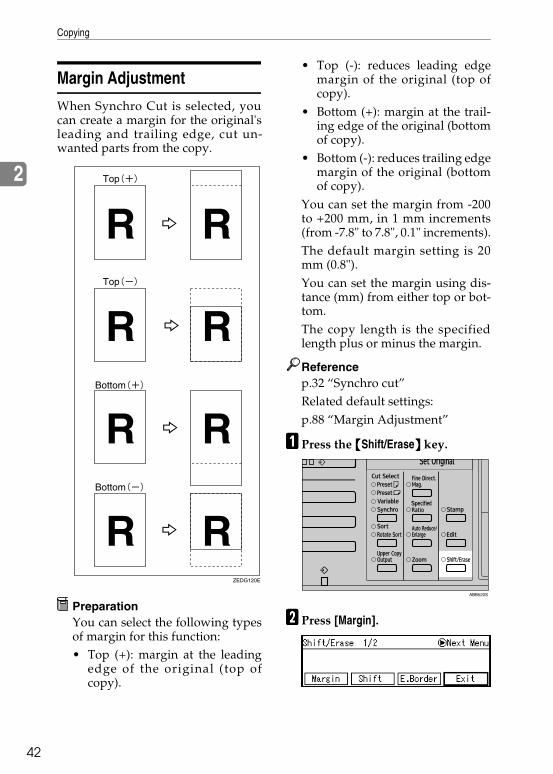
Copying
42
2
Margin Adjustment
When Synchro Cut is selected, youcan create a margin for the original'sleading and trailing edge, cut un-wanted parts from the copy.
PreparationYou can select the following typesof margin for this function:• Top (+): margin at the leading
edge of the original (top ofcopy).
• Top (-): reduces leading edgemargin of the original (top ofcopy).
• Bottom (+): margin at the trail-ing edge of the original (bottomof copy).
• Bottom (-): reduces trailing edgemargin of the original (bottomof copy).
You can set the margin from -200to +200 mm, in 1 mm increments(from -7.8" to 7.8", 0.1" increments).The default margin setting is 20mm (0.8").You can set the margin using dis-tance (mm) from either top or bot-tom.The copy length is the specifiedlength plus or minus the margin.
Referencep.32 “Synchro cut”Related default settings:p.88 “Margin Adjustment”
AAAA Press the {{{{Shift/Erase}}}} key.
BBBB Press [Margin].
ZEDG120E
ABB520S
NeptuneC1_GBcopy_F_FM.book Page 42 Tuesday, December 16, 2003 5:31 PM

Copier Functions
43
2
CCCC Use [-] or [+] to specify the topmargins, and then press the {{{{#}}}}key.
Note❒ If you set a minus margin that
makes the copy less than 280mm (11"), the paper will be cutat 280 mm (11").
DDDD Use [-] or [+] to specify the bottommargins, and then press [OK].
The Synchro indicator lights.
EEEE Press [Exit].
Shift
Use this function to move (shift) thecopy image up, down, left, or right tocreate a margin.
PreparationYou can select the following typesof margin for this function:• [↑↑↑↑] (Top): shift towards the
leading edge of the original (topof copy).
• [↓↓↓↓] (Bottom): shift towards thetrailing edge of the original(bottom of copy).
ABB513S
ZEDG110E
NeptuneC1_GBcopy_F_FM.book Page 43 Tuesday, December 16, 2003 5:31 PM

Copying
44
2
• [←←←←] (Left): shift towards the leftof the original.
• [→→→→] (Right): shift towards theright of the original.
You can shift the image from 0 to200 mm in 1 mm increments (0 to7.8" in 0.1" increments).The default setting is Up 20 mm(0.8") and Right 20 mm (0.8").You can also shift in a combinationof up/down and left/right.
ReferenceRelated default settings:p.88 “Shift Image”
AAAA Press the {{{{Shift/Erase}}}} key.
BBBB Press [Shift].
Creating a top or bottom margin
A Use [↑↑↑↑] or [↓↓↓↓] to specify thelength of shift.
Creating a left or right margin
A Press the {{{{#}}}} or 1111 key.B Use [←←←←] or [→→→→] to specify the
length of shift.
CCCC Press [OK].
DDDD Press [Exit].
Erase Border
Use this function to erase the borderarea around the original image.
PreparationThe default erase border setting is10 mm (0.4").
ReferenceRelated default settings:p.89 “Erase Brdr. Width”
ABB520S
ZEDX080E
NeptuneC1_GBcopy_F_FM.book Page 44 Tuesday, December 16, 2003 5:31 PM

Copier Functions
45
2
AAAA Press the {{{{Shift/Erase}}}} key.
BBBB Press [E.Border].
CCCC Press [-] or [+] to set the Erase Bor-der width, and then press [OK].
Note❒ The Erase Border width can be
set from 3 to 50 mm (0.1" to 2.0").
DDDD Press [Exit].
Erase Inside
Use this function to copy the originalwhile erasing a specified area.
Note❒ The area is specified by defining
two points for the top left of theoriginal (X1, Y1) and two points forthe size of the area (X2, Y2). Meas-ure the area you want to specifybefore entering the area settings.
❒ When using this function withmagnification, the actual settingwill be the specified setting multi-plied by the reproduction ratio.
❒ You can specify up to five areas.
ABB520S
Erase Inside
ABB524S
Area
ABB525S
Area
NeptuneC1_GBcopy_F_FM.book Page 45 Tuesday, December 16, 2003 5:31 PM

Copying
46
2
AAAA Press the {{{{Shift/Erase}}}} key.
BBBB Display “Shift/Erase 2/2” using the1111 key, and then press [E.Inside].
CCCC Press [Area 1].
DDDD Enter the length of “X1” using thenumber keys, and then press the{{{{#}}}} key.
EEEE Enter the length of “X2”, “Y1”,and “Y2” in the same way, andthen press [OK].
Note❒ To change a length, select the
length you want to change us-ing the 01 keys, and then en-ter the new length.
FFFF To specify multiple areas, specifyareas 1 to 5, and then repeat stepsDDDD to EEEE.
Note❒ To display [Area 4] and [Area 5],
press the 01 keys.
GGGG Press [Exit] twice.
Erase Outside
Use this function to copy the originalwhile erasing outside a specified area.
Note❒ The area is specified by defining
two points for the top left of theoriginal (X1, Y1) and two points forthe size of the area (X2, Y2). Meas-ure the area you want to specifybefore entering the area settings.
ABB520S
Erase Outside
ABB526S
Area
ABB525S
Area
NeptuneC1_GBcopy_F_FM.book Page 46 Tuesday, December 16, 2003 5:31 PM

Copier Functions
47
2
❒ When using this function withmagnification, the actual settingwill be the specified setting multi-plied by the reproduction ratio.
❒ You can specify up to five areas.
AAAA Press the {{{{Shift/Erase}}}} key.
BBBB Display “Shift/Erase 2/2” usingth e 1111 k ey , a nd th e n p r es s[E.Outsd.].
CCCC Press [Area 1].
DDDD Enter the length of “X1” using thenumber keys, and then press the{{{{#}}}} key.
EEEE Enter the length of “X2”, “Y1”,and “Y2” in the same way, andthen press [OK].
Note❒ To change a length, select the
length you want to change us-ing the 01 keys, and then en-ter the new length.
FFFF To specify multiple areas, specifyareas 1 to 5, and then repeat stepsDDDD to EEEE.
Note❒ To display [Area 4] and [Area 5],
press the 01 keys.
GGGG Press [Exit] twice.
ABB520S
NeptuneC1_GBcopy_F_FM.book Page 47 Tuesday, December 16, 2003 5:31 PM

Copying
48
2
Positive/Negative
Use this function to reverse black andwhite areas of the original.
Note❒ When making continuous copies,
image density may deteriorate. Seep.70 “If You Cannot Make ClearCopies”.
AAAA Press the {{{{Edit}}}} key.
BBBB Press [Pos./Neg].
CCCC Press [Exit].
Mirror Image
Use this function to mirror the imagealong the left/right axis, so it appearsas if in a mirror.
AAAA Press the {{{{Edit}}}} key.
BBBB Press [Mirror].
CCCC Press [Exit].
ZEDG150E
ABB521S
ZEDG160E
ABB521S
NeptuneC1_GBcopy_F_FM.book Page 48 Tuesday, December 16, 2003 5:31 PM

Copier Functions
49
2
Double Copies
Use this function to copy an originalimage twice onto one copy, as shown.
Note❒ You can erase the separation line
between the two images.❒ When using Double Copies, the
copy paper must be twice as largeas the original. When using Re-duce/Enlarge, consider the magni-fication ratio when selecting thepaper size.
ReferenceRelated default settings:p.89 “2xCopies Sep.Line”
AAAA Press the {{{{Edit}}}} key.
BBBB Press [2xCopies].
CCCC Press [Exit].
Image Repeat
The original image is copied repeat-edly.
PreparationThe number of repeated imagesdepends on original size, copy pa-per size, and reproduction ratio.• For example, you can copy eight
A4 (A) images to one sheet ofA1 (D) size paper.
Note❒ You cannot use the bypass tray
with this function.❒ You can insert separation lines
(solid, broken, crop marks) be-tween repeated images.
❒ When using Image Repeat withShift, the composite image is shift-ed.
❒ When using Image Repeat withImage Overlay, the composite im-age is repeated.
ZEDG170E
ABB521S
HE2R0100
NeptuneC1_GBcopy_F_FM.book Page 49 Tuesday, December 16, 2003 5:31 PM

Copying
50
2
ReferenceRelated default settings:p.89 “Repeat Sep. Line”
AAAA Press the {{{{Edit}}}} key.
BBBB Display “Edit 2/2” using the 1111key, and then press [Repeat].
CCCC Press [Exit].
Image Overlay (Overlay 1)
Use this function to combine twooriginals onto one copy.
ReferenceFor details about combinations forbackground and composite imageoriginals, see p.105 “Supplementa-ry Specifications”.
AAAA Press the {{{{Edit}}}} key.
BBBB Display “Edit 2/2” using the 1111key, and then press [Overlay1].
CCCC Press [Exit].
DDDD Make the necessary settings.
EEEE Place the first original of the com-posite image.
The first original is scanned.
ABB521S
ZEDG280E
FirstOriginal
SecondOriginal
ThirdOriginal
FourthOriginal
Copy
Copy
ABB521S
NeptuneC1_GBcopy_F_FM.book Page 50 Tuesday, December 16, 2003 5:31 PM

Copier Functions
51
2
FFFF Place the next original (to be over-laid on the first) of the compositeimage.
The next original is scanned andthe composite copy is output to thecopy output tray.You can continue adding furtherpairs to make overlay copies.
Format Overlay (Overlay 2)
Use this function to combine two im-ages (original + format) onto onecopy using the first original.
AAAA Press the {{{{Edit}}}} key.
BBBB Display “Edit 2/2” using the 1111key, and then press [Overlay2].
CCCC Select [1st Orig.], and then press[OK].
If the optional HDD is not in-stalled, the screen in step C doesnot appear. Proceed to step D.
DDDD Press [Exit].
EEEE Make the necessary settings, andthen place the first original.
FFFF Place the second original.
The machine makes a compositecopy of the first and second origi-nals.
GGGG Place the third original.
The machine makes a compositecopy of the first and third origi-nals.
HHHH Place any further originals, as re-quired.
FirstOriginal
SecondOriginal
ThirdOriginal
Copy
Copy
ABB530S
ABB521S
NeptuneC1_GBcopy_F_FM.book Page 51 Tuesday, December 16, 2003 5:31 PM

Copying
52
2
User Format Overlay
Two images (original + format) arecombined onto a single copy using astored image (user format).
Note❒ To use User Format Overlay, you
need to use Prog.Overlay Fmt. Seep.52 “Program/Delete OverlayFormat”.
AAAA Press the {{{{Edit}}}} key.
BBBB Display “Edit 2/2” using the 1111key, and then press [Overlay2].
CCCC Select a stored format number us-ing the 00001111 keys, and then press[OK].
DDDD Press [Exit].
EEEE Make the necessary settings, andthen place the first original to beoverlaid on the format original.
The machine makes a copy over-laying the first original onto theuser format original.
FFFF Place any further originals, as re-quired.The machine makes a copy over-laying the new original onto theuser format original.
Program/Delete Overlay Format
PreparationThe maximum size of original sizeto be stored is A0 (E). You cannotstore long length originals.
AAAA Make sure the machine is ready tocopy.
BBBB Press the {{{{User Tools}}}} key.
The User Tools key indicatorlights.
CCCC Press {{{{2}}}} ([Copier Features]) usingthe number keys.
ABB521S
ABB001S
NeptuneC1_GBcopy_F_FM.book Page 52 Tuesday, December 16, 2003 5:31 PM
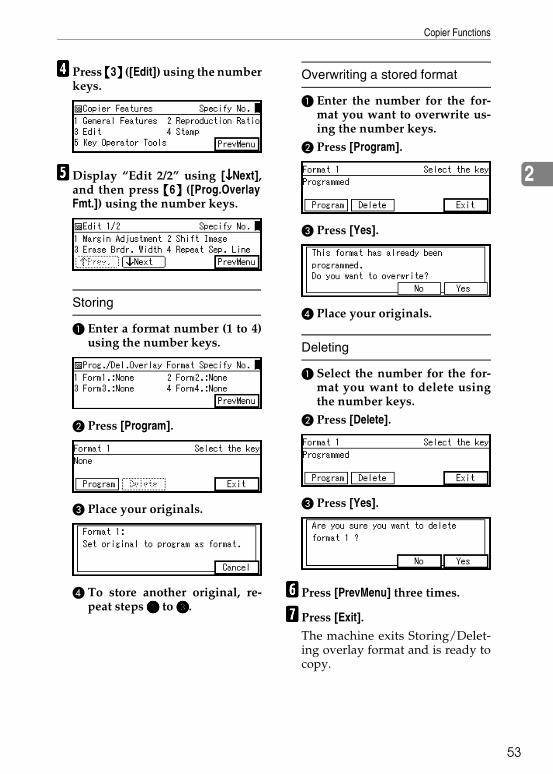
Copier Functions
53
2
DDDD Press {{{{3}}}} ([Edit]) using the numberkeys.
EEEE Display “Edit 2/2” using [↓↓↓↓Next],and then press {{{{6}}}} ([Prog.OverlayFmt.]) using the number keys.
Storing
A Enter a format number (1 to 4)using the number keys.
B Press [Program].
C Place your originals.
D To store another original, re-peat steps AAAA to CCCC.
Overwriting a stored format
A Enter the number for the for-mat you want to overwrite us-ing the number keys.
B Press [Program].
C Press [Yes].
D Place your originals.
Deleting
A Select the number for the for-mat you want to delete usingthe number keys.
B Press [Delete].
C Press [Yes].
FFFF Press [PrevMenu] three times.
GGGG Press [Exit].
The machine exits Storing/Delet-ing overlay format and is ready tocopy.
NeptuneC1_GBcopy_F_FM.book Page 53 Tuesday, December 16, 2003 5:31 PM

Copying
54
2
Background Numbering
Use this function to make number-stamped copies.
Note❒ You can set the number from 1 to
999.❒ You can combine this function
with up to two other print func-tions.
ReferenceRelated default settings:p.90 “Size”p.90 “Density”
AAAA Press the {{{{Stamp}}}} key.
BBBB Press [Backgrnd].
CCCC Enter the start number using thenumber keys, and then press [OK].
Note❒ To change the number, press
the {{{{Clear/Stop}}}} key, and thenenter the new number.
DDDD Press [Exit].
Preset Stamp
Use this function to print a stamp thatalready stored in the machine.
• Stamp types are as follows:
• You can change the position andorientation of the stamp.
• You can use this function withBackground Numbering and DateStamp (up to two types).
ZEDG190E
ABB522S
ABB527S
NeptuneC1_GBcopy_F_FM.book Page 54 Tuesday, December 16, 2003 5:31 PM

Copier Functions
55
2
❖❖❖❖ Setting Originals and Stamp Posi-tion/Orientation
Note❒ You can use only one type of
stamp at a time.
ReferenceRelated default settings:p.90 “Stamp Type Priority”p.91 “Stamp Settings”
AAAA Press the {{{{Stamp}}}} key.
BBBB Press [Preset].
CCCC Select the stamp type using the00001111 keys.
Note❒ You can change the priority of
the selected stamp. See p.90“Stamp Type Priority”.
DDDD Press [Change] to change thestamp orientation, stamp posi-tion, size, density, and stamppage.
Note❒ If you do not need to change
any of these, proceed to step F.
Setting the stamp orientation
A Press [Orientn.].
B Select the stamp orientation([Normal] or [Rotate 90deg.]) us-ing the 00001111 keys, and thenpress [OK].
ABB528S
FeedDirection
FeedDirection
Horizon
Horizon
Vertical
Vertical
ABB522S
NeptuneC1_GBcopy_F_FM.book Page 55 Tuesday, December 16, 2003 5:31 PM

Copying
56
2
Setting the stamp position
A Press [Position].
B Select the stamp position usingthe 00001111 keys, and then press[OK].
Setting the size
A Press [Size].
B Select the size ([1X], [2X], [4X],or [8X]) using the 00001111 keys,and then press [OK].
Setting the density
A Display “XXX 2/2” using the 1111key, and then press [Density].
B Select the density ([Normal],[Lighter], or [Lightest]) using the00001111 keys, and then press [OK].
Setting the stamp page
A Display “XXX 2/2” using the 1111key, and then press [Stamp Pg].
B Select the stamp page ([All Pag-es] or [1st Page Only]) using the00001111 keys, and then press [OK].
Note❒ When you select Sort or Ro-
tate Sort, you can select [AllPages] or [1st Page Only]. Ifneither is selected, the ma-chine stamps all pages.
EEEE When all settings are made, press[OK].
FFFF Press [OK].
GGGG Press [Exit].
ReferenceFor details about setting origi-nals, see p.55 “Setting Originalsand Stamp Position/Orienta-tion”.
NeptuneC1_GBcopy_F_FM.book Page 56 Tuesday, December 16, 2003 5:31 PM

Copier Functions
57
2
User Stamp
You can store frequently used charac-ters or symbols, and then use them asa stamp.
PreparationYou must have a user stamp al-ready stored. See p.59 “Pro-gram/Delete User Stamp”.
• You can store up to four types ofuser stamp.
• You can use a stored user stampfor Repeat User Stamp.
• You can use this function withBackground Numbering and DateStamp (up to two types).
• You can change the stamp positionand orientation.
ReferenceFor details about deleting storeduse r s tam ps , see p .59 “Pro -gram/Delete User Stamp”.
❖❖❖❖ Setting Originals and Stamp Posi-tion/Orientation
Note❒ When User Stamp is selected, it
may take longer to print the firstcopy.
ReferenceRelated default settings:p.92 “Program/Del. User Stamp”p.92 “Stamp Settings”
AAAA Press the {{{{Stamp}}}} key.
ZEDG220E
ABB529S
FeedDirection
FeedDirection
Horizon
Horizon
Vertical
Vertical
ABB522S
NeptuneC1_GBcopy_F_FM.book Page 57 Tuesday, December 16, 2003 5:31 PM

Copying
58
2
BBBB Press [User].
CCCC Select the number for the userstamp using the 00001111 keys.
DDDD Press [Change] to change thestamp orientation, stamp posi-tion, density, and stamp page.
Note❒ If you do not need to change
any of these, proceed to step F.
Setting the stamp orientation
A Press [Orientn.].
B Select the stamp orientation([Normal] or [Rotate 90deg.]) us-ing the 00001111 keys, and thenpress [OK].
Setting the stamp position
A Press [Position].
B Select the stamp position usingthe 00001111 keys, and then press[OK].
Setting the density
A Press [Density].
B Select the density ([Normal],[Lighter], or [Lightest]) using the00001111 keys, and then press [OK].
Setting the stamp page
A Display “User Stamp : Stamp X2/2” using the 1111 key, and thenpress [Stamp Pg].
B Select the stamp page ([All Pag-es] or [1st Page Only]) using the00001111 keys, and then press [OK].
NeptuneC1_GBcopy_F_FM.book Page 58 Tuesday, December 16, 2003 5:31 PM

Copier Functions
59
2
Note❒ When you select Sort or Ro-
tate Sort, you can select [AllPages] or [1st Page Only]. Ifneither is selected, the ma-chine stamps all pages.
EEEE When all settings are made, press[OK].
FFFF Press [OK].
GGGG Press [Exit].
ReferenceFor details about setting origi-nals, see p.57 “Setting Originalsand Stamp Position/Orienta-tion”.
Program/Delete User Stamp
PreparationIf the stamp is red or bright red, itmay not scan clearly. To store auser stamp, use a black ink stamp,or make a copy and use that as theoriginal.
AAAA Make sure the machine is ready tocopy.
BBBB Press the {{{{User Tools}}}} key.
The User Tools key indicatorlights.
CCCC Press {{{{2}}}} ([Copier Features]) usingthe number keys.
DDDD Press {{{{4}}}} ([Stamp]) using thenumber keys.
EEEE Press {{{{3}}}} ([User Stamp]) using thenumber keys.
FFFF Press {{{{1}}}} ([Program/Delete]) usingthe number keys.
Storing
A Select the number you want touse to store the stamp as (1 to 4)using the number keys.
B Press [Program].
ABB001S
NeptuneC1_GBcopy_F_FM.book Page 59 Tuesday, December 16, 2003 5:31 PM

Copying
60
2
C Place your originals.
Note❒ The area in the top right of
the original of 64×32 mm(2.6"×1.3") is stored as a userstamp.
Overwriting a stored user stamp
A Enter the number of the stampyou want to overwrite (1 to 4)using the number keys.
B Press [Program].
C Press [Yes].
D Place your originals.
Deleting
A Select the number of the stampyou want to delete (1 to 4) us-ing the number keys.
B Press [Delete].
C Press [Yes].
GGGG Press [PrevMenu] four times.
HHHH Press [Exit].
After the default settings arechanged, the machine is ready tomake copies.
32mm
64mm
ZEDG240E
(2.6")
(1.3")
NeptuneC1_GBcopy_F_FM.book Page 60 Tuesday, December 16, 2003 5:31 PM

Copier Functions
61
2
Date Stamp
Use this function to print a datestamp on copies.
• There are five formats of DateStamp:• MM/DD/YYYY• MM.DD.YYYY• DD/MM/YYYY• DD.MM.YYYY• YYYY.MM.DD
• Specify the stamp position (Topleft/Top centre/Top right/Bottomleft/Bottom centre/Bottom right)and print orientation (Horizon-tal/Vertical).
❖❖❖❖ Setting Originals and Date Stamp Po-sition/Orientation
Note❒ You can use the date stamp with
up to two other user stamps.
ReferenceRelated default settings:p.94 “Format Priority”p.94 “Stamp Settings”“Date”, General Settings Guide
AAAA Press the {{{{Stamp}}}} key.
BBBB Display “Stamp 2/2” using the 1111key, and then press [Date].
Selecting date stamp format
A Press [Format].
B Select the date format usingthe 00001111 keys.
10/20/2003
10/20/2003
10/20/2003
0/2003
10/20/2003
10/20/2003
10/20/2003
10/20/2003
ABB533S
ABB522S
NeptuneC1_GBcopy_F_FM.book Page 61 Tuesday, December 16, 2003 5:31 PM

Copying
62
2
Note❒ Press [↑↑↑↑Prev.] or [↓↓↓↓Next] to
display the date format.C Press [OK] twice.
Selecting the stamp orientation
A Press [Change].
B Press [Orientn.].
C Select the stamp orientation([Normal] or [Rotate 90deg.]) us-ing the 00001111 keys, and thenpress [OK].
D When all settings are made,press [OK] twice.
Setting the stamp position
A Press [Change].
B Press [Position].
C Select the stamp position usingthe 00001111 keys, and then press[OK].
D When all settings are made,press [OK] twice.
Setting the stamp page
A Press [Change].
B Press [Stamp Pg].
C Select the stamp page ([All Pag-es] or [1st Page Only]) using the00001111 keys, and then press [OK].
Note❒ When you select Sort or Ro-
tate Sort, you can select [AllPages] or [1st Page Only]. Ifneither is selected, the ma-chine stamps all pages.
D When all settings are made,press [OK] twice.
CCCC Press [Exit].
NeptuneC1_GBcopy_F_FM.book Page 62 Tuesday, December 16, 2003 5:31 PM

Copier Functions
63
2
Page Numbering
Use this function to print page num-bers on your copies.
• There are five formats of PageNumbering:• 1, 2,…• -1-, -2-,…• P.1,P.2...• P1,P2...• 1/5, 2/5,…• Specify the stamp position (Top
left/Top centre/Top right/Bot-tom left/Bottom centre/Bottomright) and print orientation(Horizontal/Vertical).
Note❒ You can print page numbers from
1 to 999.
ReferenceRelated default settings:p.95 “Format Priority”p.95 “Stamp Settings”
AAAA Press the {{{{Stamp}}}} key.
BBBB Display “Stamp 2/2” using the 1111key, and then press [Page].
CCCC Select the page numbering formatusing the 00001111 keys.
DDDD Press [Change] to change thestamp orientation, stamp posi-t ion , s tamp page , an d s tar tnumber.
Note❒ If you do not need to change
any of these, proceed to step F.
Selecting the stamp orientation
A Press [Orientn.].
ABB522S
NeptuneC1_GBcopy_F_FM.book Page 63 Tuesday, December 16, 2003 5:31 PM

Copying
64
2
B Select the stamp orientation([Normal] or [Rotate 90deg.]) us-ing the 00001111 keys, and thenpress [OK].
Setting the stamp position
A Press [Position].
B Select the stamp position usingthe 00001111 keys, and then press[OK].
Specifying first page/last page to print
A Press [Stamp Pg].
B Enter the first page using thenumber keys, and then pressthe {{{{#}}}} key.
C Enter the last page using thenumber keys, and then press[OK].
Note❒ To change the number, press
the {{{{Clear/Stop}}}} key, and thenenter the new number.
Selecting start number
A Display “Page No.: xxx 2/2” us-ing the 1111 key, and then press[StartNo.].
B Enter the start number usingthe number keys, and thenpress [OK].
Note❒ To change the number, press
the {{{{Clear/Stop}}}} key, and thenenter the new number.
NeptuneC1_GBcopy_F_FM.book Page 64 Tuesday, December 16, 2003 5:31 PM

Copier Functions
65
2
If [1/5,2/5…] are selected
If you select [1/5,2/5…] the screenfor setting the total pages is dis-played.A Display “Page No.:1/5, 2/5...
2/2” using the 1111 key, and thenpress [StartNo.].
B Enter the start number usingthe number keys, and thenpress the {{{{#}}}} key.
C Enter the total pages using thenumber keys, and then press[OK].
Note❒ To change the number, press
the {{{{Clear/Stop}}}} key, and thenenter the new number.
EEEE Press [OK] twice.
FFFF Press [Exit].
Repeat User Stamp
Use this function to print a storeduser stamp of letters or symbols overthe whole area of the copy.
PreparationYou must have a user stamp al-ready stored. See p .59 “Pro-gram/Delete User Stamp”.
• You can store up to four userstamps.
• You can choose to print the userstamp vertically or horizontally.
• You can use this function withBackground Numbering and DateStamp (up to two types).
Note❒ When the Repeat User Stamp func-
tion is selected, it may take longerto print the first copy.
ReferenceFor details about deleting userstamps, see p.59 “Program/DeleteUser Stamp”.Related default settings:p.92 “Program/Del. User Stamp”p.92 “Stamp Settings”
ZEDG270E
NeptuneC1_GBcopy_F_FM.book Page 65 Tuesday, December 16, 2003 5:31 PM
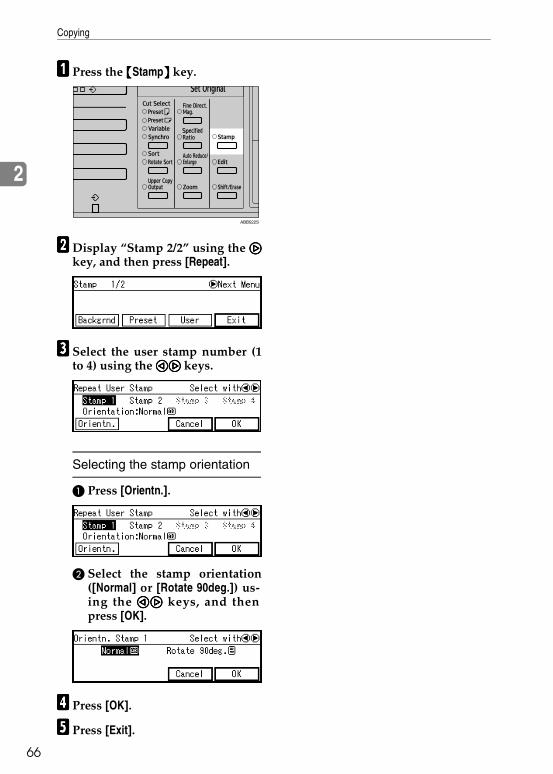
Copying
66
2
AAAA Press the {{{{Stamp}}}} key.
BBBB Display “Stamp 2/2” using the 1111key, and then press [Repeat].
CCCC Select the user stamp number (1to 4) using the 00001111 keys.
Selecting the stamp orientation
A Press [Orientn.].
B Select the stamp orientation([Normal] or [Rotate 90deg.]) us-ing the 00001111 keys, and thenpress [OK].
DDDD Press [OK].
EEEE Press [Exit].
ABB522S
NeptuneC1_GBcopy_F_FM.book Page 66 Tuesday, December 16, 2003 5:31 PM

67
3. Troubleshooting
If Your Machine Does Not Operate As You Want
When a Message Appears
The following chart contains explanations of common messages. If other mes-sages appear, follow the instructions displayed.
Note❒ Service Call messages contain a contact phone number and your machine
number.
Message Problem/Causes Solutions
Please wait. The main power has just been turned on, paper type (plain paper/translucent pa-per/film) was changed, or the machine is otherwise getting ready.
Wait for the machine to fully warm-up.
Note❒ When the “Ready” mes-
sage appears, you can make the settings for your copies and scan your origi-nals. After the originals have been scanned, the machine will automatical-ly start copying after it has warmed-up. See p.83 “Copy Start Method”.
Loading toner...
Please wait.
The machine is getting ready after loading toner.
Check original size An improper original is set. Select paper manually, do not use Auto Paper Select.
Set original length-wise
In User Auto Reduce/En-large, the original is set to L.
For User Auto Reduce/En-large, set the original to K.
Set original side-ways
In User Auto Reduce/En-large, the original is set to K.
For User Auto Reduce/En-large, set the original to L.
Memory is full.
Cannot scan.
The machine's memory is full due to scanning originals or performing a function. The number of originals that can be stored in memory depends on the size of originals and function settings.
• When Sort is selected, press [Exit] to copy scanned originals, and then copy remaining origi-nals.
• When the Job Preset func-tion is selected, check the number of preset jobs, and then try scanning the orig-inals again.
NeptuneC1_GBcopy_F_FM.book Page 67 Tuesday, December 16, 2003 5:31 PM

Troubleshooting
68
3
Out of specified pa-per
Load ***mm width pa-per
The ratio set in Auto Paper Se-lect is different to the size of the copy paper size.
• Check the settings for Re-duce/Enlarge, etc., and then try again.
• Set paper of a suitable width.
Check settings Copy paper size and original size is different.
Check the settings for Re-duce/Enlarge, etc., and then try again.
Cannot rotate sort this size orig.
Set other original, or press[Change] and cancel rotate sort.
The scanned original is too big to rotate.
You cannot use rotate sort with A0 (E) originals.
An unsuitable paper size for rotate sort has been set.
Set paper of the following di-mensions: A2 594 × 420 mm, A3 420 × 297 mm.
❖❖❖❖ Inch version (Engineer-ing)• 11" × 17"
• 17" × 22"
• 22" × 34"
❖❖❖❖ Inch version (Architec-ture)• 12" × 18"
• 18" × 24"
• 24" × 35"
Max. Copy Quantity: NN
The number of copies exceeds maximum.
Change the maximum copy quantity you can make at a time. See p.84 “Max. No. of Sets”.
Some settings cannot be changed. Press [Re-scan] and reset original to copy with current set-ting.
Function that cannot be changed are set in Additional Copy.
Check the settings, and then use Additional Copy again.
Open the part as shown and remove original.
The original has jammed (original misfeed).
Follow the on-screen instruc-tions to remove the jammed original. See “xClearing Mis-feeds”, General Settings Guide.
Open the part as shown and remove pa-per.
The copy paper has jammed. Follow the on-screen instruc-tions to remove the jammed paper. See “xClearing Mis-feeds”, General Settings Guide.
Open the Rear Cover and remove paper.
Message Problem/Causes Solutions
NeptuneC1_GBcopy_F_FM.book Page 68 Tuesday, December 16, 2003 5:31 PM

If Your Machine Does Not Operate As You Want
69
3
Toner is almost emp-ty
Add Toner
The machine is running out of toner.
Change the toner cartridge. See “DAdding Toner”, Gener-al Settings Guide.
Open the cover as shown and replace toner bottle.
The machine has run out of toner.
Follow the on-screen instruc-tions to change the toner car-tridge. See “DAdding Toner”, General Settings Guide.
Message Problem/Causes Solutions
NeptuneC1_GBcopy_F_FM.book Page 69 Tuesday, December 16, 2003 5:31 PM

Troubleshooting
70
3
If You Cannot Make Clear Copies
Problem Causes Solutions
Black or white streaks appear on copies.
Image density is too dark. Adjust image density. See p.28 “Adjusting Copy Image Den-sity”.
The exposure glass or platen plate is dirty.
Clean the exposure glass or platen plate. See “Maintaining Your Machine”, General Set-tings Guide.
The original is dusty. Clean the original and try cop-ying again.
Be particularly careful when using the following types of original:
• Hand drawn or drawn on with other forms of pencil or pen, such as a plotter.
• Film, translucent paper, or other originals that attract static electricity.
• Very long originals.
A shadow of the reverse side of an original image appears on copies.
Image density is too dark. Adjust the image density set-ting. See p.28 “Adjusting Copy Image Density”.
The background is dirty. Image density is too dark. Adjust the image density set-ting. See p.28 “Adjusting Copy Image Density”.
The edges of pasted sections are shown.
Image density is too dark. Adjust the image density set-ting. See p.28 “Adjusting Copy Image Density”.
Change the orientation of the original.
Put mending tape on the past-ed part.
The same copy area is dirty whenever making copies.
The exposure glass or platen plate is dirty.
Clean the exposure glass or platen plate. See “Maintaining Your Machine”, General Set-tings Guide.
NeptuneC1_GBcopy_F_FM.book Page 70 Tuesday, December 16, 2003 5:31 PM

If You Cannot Make Clear Copies
71
3
Copies are too light. Image density is too light. Adjust the image density set-ting. See p.28 “Adjusting Copy Image Density”.
Damp or rough grain paper is used.
For good copy quality, use recommended paper.
Note❒ If you use coated paper
(such as thermal fax paper, art paper, carbon paper), damp paper, or rough grain paper, copy image might be too light.
Toner fusing is poor. The fusing temperature is too low.
Adjust the fusing temperature for the paper. See “Fusing Ad-justment”, General Settings Guide.The copy paper is too thick.
A moire pattern appears on copies.
Your original has a dot pat-tern image or many lines.
Change the orientation of the original. This may prevent the moire pattern.
Copy using “Photo” or “Sharpen Text”.
Image density is uneven. The original has areas of solid colour, or Positive/Negative is selected when copying mul-tiple sheets.
When using Repeat Copy with originals that have areas of solid colour, set the number of originals as follows:
A0 – A2 (E – C): 1 sheet, A3 (B) or smaller: 3 sheets
Halftone originals can cause this problem.
Try using “Text/Photo” or “Photo”.
Images are blurred when us-ing translucent paper.
Translucent paper is being used when copying multiple sheets.
Adjust the fusing setting to match the paper type. See “Fusing Adjustment”, General Settings Guide.
Wrinkles appear when using translucent paper.
Fusing temperature is too low. Adjust the fusing setting to match the paper type. See “Fusing Adjustment”, General Settings Guide.
The paper type has recently been changed from plain pa-per to translucent paper.
Wait about one minute.
The background on translu-cent paper is dirty.
More than 50 copies are being made of originals longer than 1189 mm (46.9") with solid blocks of colour (2 mm × 900 mm (0.08" × 35.4") or larger.)
Adjust the fusing setting to match the paper type. See “Fusing Adjustment”, General Settings Guide.
Problem Causes Solutions
NeptuneC1_GBcopy_F_FM.book Page 71 Tuesday, December 16, 2003 5:31 PM

Troubleshooting
72
3
Streaks, scratches, or wrinkles appear in areas of solid black.
Copy paper has been changed from plain to translucent pa-per, or from translucent to plain paper.
After switching from plain to translucent paper, wait one minute. After switching from translucent to plain paper, wait two minutes before mak-ing copies.
Shadows appear on the cop-ies.
The original is two-sided, or the image density setting is too dark.
Adjust the image density set-ting. See p.28 “Adjusting Copy Image Density”.
Copies are blurred. Continuous copies have been made on small sized paper.
Wait about two minutes, and then try copying again.
Problem Causes Solutions
NeptuneC1_GBcopy_F_FM.book Page 72 Tuesday, December 16, 2003 5:31 PM

If You Cannot Make Copies As You Want
73
3
If You Cannot Make Copies As You Want
This section explains causes of, and solutions for, unexpected copy results.
Problem Causes Solutions
Misfeeds occur frequently. The size of paper is different to that of the tray.
Adjust the tray to the size of paper.
Jammed or torn paper is in-side the machine.
Remove the paper. See “xClearing Misfeeds”, Gener-al Settings Guide.
The paper is curled. Smooth out the curl and try again.
Images are cropped when us-ing Erase Border.
The Erase Border setting is too big.
The margin of the original is too small.
Reduce the size of the Erase Border setting. See p.44 “Erase Border”.
Parts of the image are not cop-ied.
The original is not placed cor-rectly.
Place the original correctly. See p.14 “Placing Originals”.
An improper size of paper is selected.
Select the proper paper. See “Copy Paper”, General Set-tings Guide.
Shift or Margin Adjustment mode is selected.
Cancel Shift or Margin Ad-justment mode. See p.42 “Margin Adjustment” and p.43 “Shift”.
Copies are blank. The original is not set correct-ly.
Place the original with the sur-face to be copied on face down.
Copies shift sideways. The paper roll is not set cor-rectly.
Set the paper roll correctly, making sure it is straight and not loose. See “CLoading Pa-per Roll”, General Settings Guide.
The original does not match the size in the original table setting.
Adjust the original guides to the specified size, and then in-sert the original along the guides. See p.14 “Placing Originals”.
The paper is not set correctly in the bypass tray.
Make sure the paper size matches the bypass tray guides. See p.25 “Copying from the Bypass Tray”.
NeptuneC1_GBcopy_F_FM.book Page 73 Tuesday, December 16, 2003 5:31 PM

Troubleshooting
74
3
Copies shift in the direction of the original feed (or opposite) direction.
Shift or Margin Adjustment mode is selected.
Cancel Shift or Margin Ad-justment mode. See p.42 “Margin Adjustment” and p.43 “Shift”.
Copies are shorter than the se-lected size, or cut off before the end.
Wrinkles appear on the copy. The paper is damp. Replace the paper with new paper.
Cut the paper to 1000 mm (40") just before copying.
The paper is damp. See “Anti-humidity Heater Switch”, General Settings Guide.
Turn on the anti-humidity heater. See “Anti-humidity Heater Switch”, General Set-tings Guide.
Copies are slanted. The original is not straight. Insert the original along the original guides, so it is straight.
Original and copy size does not match.
Dampness can cause paper to stretch.
Adjust the Fine Magnification setting for Additional Copy. See p.19 “Fine Directional Magnification (Additional Copies Only)”.
Adjust the Fine Magnification setting. See “Fine Ratio:Copi-er”, General Settings Guide.
You cannot combine several functions.
The selected functions cannot be used together.
Check the combination of set-tings, and set again. See p.102 “Combination Chart”.
Problem Causes Solutions
NeptuneC1_GBcopy_F_FM.book Page 74 Tuesday, December 16, 2003 5:31 PM

75
4. User Tools (Copier Features)
User Tools Menu (Copier Features)
ReferenceFor details about option-related functions, see p.3 “Functions That RequireOptions”.
❖❖❖❖ General Features (see p.82 “General Features”)
User Tools item menu Default
Change Init. Mode Standard
Copier Auto Reset On 60 sec.
Original Priority Text
Auto Density On
Adj. Scan Density 4
APS Priority *1 On
Ppr.Tray Priority *1 Paper Roll1
Copy Start Method Auto
Orig. Size Detect Auto
Max. No. of Sets 20 sheets
Noise Reduction Text: Off
Text/Photo: Off
Photo: Off
Drawing: Off
Pale: Off
Generation Copy: Off
Background Lines: Off
Sharpen Text: Off
Orig.Mode Quality Text: Normal
Text/Photo: Normal
Photo: Normal
Drawing: Normal
Pale: Normal
Generation Copy: Normal
Background Lines: Normal
Sharpen Text: Normal
NeptuneC1_GBcopy_F_FM.book Page 75 Tuesday, December 16, 2003 5:31 PM

User Tools (Copier Features)
76
4
❖❖❖❖ Reproduction Ratio (see p.86 “Reproduction Ratio”)
Orig.Mode Density Text: Normal
Text/Photo: Normal
Photo: Normal
Drawing: Normal
Pale: Normal
Generation Copy: Normal
Background Lines: Normal
Sharpen Text: Normal
Copy Mode in Sort *1 Copy after Scan
Sample Copy Pos. 0mm
Partial Copy Size Start Position: 0 mm
Copy Size: 280 mm
Count Display Original
Rotate Copy in APS *1 On
User Tools item menu Default
User R/E Ratio : 1-3 100.0%
R/E Priority Metric version: 100.0%
Inch version (Engineering): 100.0%
Inch version (Architecture): 100.0%
User Auto R/E Metric version
A0 : A0/ A1 : A1/ A2 : A2/ A3 : A3/A4 : A4/B1 JIS : B1 JIS / B2 JIS : B2 JIS / B3 JIS : B3 JIS / B4 JIS : B4 JIS
Inch version (Engineering)
34×44 : 34×44/22×34 : 22×34/17×22 : 17×22/11×17 : 11×17/81/2×11 : 81/2×11
Inch version (Architecture)
36×48 : 36×48/24×36 : 24×36/18×24 : 18×24/12×18 : 12×18/9×12 : 9×12
UserAutoR/E Orig. Vertical
User Tools item menu Default
NeptuneC1_GBcopy_F_FM.book Page 76 Tuesday, December 16, 2003 5:31 PM

User Tools Menu (Copier Features)
77
4
❖❖❖❖ Edit (see p.88 “Edit”)
User Tools item menu Default
Margin Adjustment Metric version
Top Margin: +20 mm
Bottom Margin: +20 mm
Inch version
Top Margin: +0.8"
Bottom Margin: +0.8"
Shift Image Metric version
Up: 20 mm
Right: 20 mm
Inch version
Up: 0.8"
Right: 0.8"
Erase Brdr. Width Metric version
10 mm
Inch version
0.4"
Repeat Sep. Line None
2xCopies Sep.Line Separation Line
Prog.Overlay Fmt. *2 —
NeptuneC1_GBcopy_F_FM.book Page 77 Tuesday, December 16, 2003 5:31 PM

User Tools (Copier Features)
78
4
❖❖❖❖ Stamp (see p.90 “Stamp”)
User Tools item menu DefaultB
ackg
roun
d N
o. *3
Size 1X
Density Normal
Pre
set S
tam
p *3
Stamp Type Priority COPY
Stamp Settings Orientation: Normal
Position: Bottom Right
Adjust:
Metric version
• Left/Right/Top/Bottom: 24 mm
• Centre (Left/Right): 0 mm
• Centre (Top/Bottom): 0 mm
Inch version
• Left/Right/Top/Bottom: 0.9"
• Centre (Left/Right): 0"
• Centre (Top/Bottom): 0"
Size: 1X
Density: Normal
Use
r St
amp
*2 *3
Program/Del. User Stamp —
Stamp Settings Orientation: Normal
Position: Bottom Right
Adjust:
Metric version
• Left/Right/Top/Bottom: 24 mm
• Centre (Left/Right): 0 mm
• Centre (Top/Bottom): 0 mm
Inch version
• Left/Right/Top/Bottom: 0.9"
• Centre (Left/Right): 0"
• Centre (Top/Bottom): 0"
Density: Normal
NeptuneC1_GBcopy_F_FM.book Page 78 Tuesday, December 16, 2003 5:31 PM

User Tools Menu (Copier Features)
79
4
❖❖❖❖ Key Operator Tools (see p.97 “Key Operator Tools”)
*1 The optional paper roll tray is required.*2 The optional HDD is required.*3 The optional stamp board is required.
Dat
e St
amp
*3
Date Format Priority MM/DD/YYYY
Stamp Settings Orientation: Normal
Position: Top Left
Adjust:
Metric version
• Left/Right/Top/Bottom: 24 mm
• Centre (Left/Right): 0 mm
Inch version
• Left/Right/Top/Bottom: 0.9"
• Centre (Left/Right): 0"
Size: 1X
Page
Nu
mbe
ring
*3
Format Priority 1, 2...
Stamp Settings Orientation: Normal
Position: Top Left
Adjust:
Metric version
• Left/Right/Top/Bottom: 24 mm
• Centre (Left/Right): 0 mm
Inch version
• Left/Right/Top/Bottom: 0.9"
• Centre (Left/Right): 0"
User Tools item menu Default
Program/Change/Delete User Code —
Display/Clear/Print Counter per Code —
User Tools item menu Default
NeptuneC1_GBcopy_F_FM.book Page 79 Tuesday, December 16, 2003 5:31 PM

User Tools (Copier Features)
80
4
Accessing User Tools (Copier Features)
This section is for key operators incharge of this machine. You canchange or set the machine's defaultsettings.
Note❒ Be sure to exit User Tools and re-
turn to the initial copy display af-ter all settings are made. See p.81“Exiting User Tools”.
❒ Any changes you make with UserTools remain in effect even if themain power switch or operationswitch is turned off, or the {{{{ClearModes}}}} key is pressed.
ReferenceFor details about System Settings,see “User Tools Menu (System Set-tings)”, General Settings Guide.
Changing Default Settings
Note❒ When a key operator code is set,
the key operator code input dis-play appears when changing thedefault settings. Enter the regis-tered key operator code before-hand. For deta i l s about keyoperator codes, see “Key Op.Tools”, General Settings Guide.
AAAA Press the {{{{User Tools}}}} key.
The User Tools key indicatorlights.
BBBB Press {{{{2}}}} ([Copier Features]) usingthe number keys.
CCCC Enter the number of the menuyou want to select using thenumber keys.The relevant settings screen ap-pears for the item selected.
Note❒ If the item you want to select is
not displayed, press [↑↑↑↑Prev.] or[↓↓↓↓Next] to scroll to it.
Referencep.75 “User Tools Menu (CopierFeatures)”
ABB001S
NeptuneC1_GBcopy_F_FM.book Page 80 Tuesday, December 16, 2003 5:31 PM

Accessing User Tools (Copier Features)
81
4
DDDD Change the settings as describedin the on-screen instructions, andthen press [OK].
Note❒ For details about selecting
items, see p.6 “Reading the Dis-play and Using Keys”.
❒ Use the {{{{·}}}} key to enter a deci-mal point.
❒ To cancel changing settings andreturn to the initial display,press the {{{{User Tools}}}} key.
Exiting User Tools
AAAA Press the {{{{User Tools}}}} key.
The User Tools key indicator goesoff.
Note❒ You can also exit User Tools by
pressing [Exit].
ABB001S
NeptuneC1_GBcopy_F_FM.book Page 81 Tuesday, December 16, 2003 5:31 PM

User Tools (Copier Features)
82
4
Settings You Can Change with User Tools
For details about displaying settings, see p.80 “Accessing User Tools (CopierFeatures)”.
General Features
❖❖❖❖ Change Init. ModeSpecifies the settings to appear in the initial copy display after the machine isturned on, after Copier Auto Reset, or after the {{{{Clear Modes}}}} key is pressed.You can select from [Standard] or the settings stored in [Program No.10].• Standard• Program No.10
Note❒ Default: Standard
❖❖❖❖ Copier Auto ResetSpecifies the time period for Copier Auto Reset. See p.18 “Copier Auto Re-set”.• On 60 sec.The machine copies using the Auto Roll Switch.• Off
Note❒ Default: On 60 sec.❒ The time can be set from 10 to 999 seconds.
❖❖❖❖ Original PrioritySpecifies the default original type to be used after the machine is turned on,after Copier Auto Reset, or after the {{{{Clear Modes}}}} key is pressed. See p.29 “Se-lecting Original Type Setting”.• Text• Text/Photo• Photo• Drawing• Pale• Generation Copy• Background Lines• Sharpen Text
Note❒ Default: Text
NeptuneC1_GBcopy_F_FM.book Page 82 Tuesday, December 16, 2003 5:31 PM

Settings You Can Change with User Tools
83
4
❖❖❖❖ Auto DensitySpecifies whether or not Auto Image Density should be used after the ma-chine is turned on, after Copier Auto Reset, or after the {{{{Clear Modes}}}} key ispressed. See p.28 “Adjusting Copy Image Density”.• On• Off
Note❒ Default: On
❖❖❖❖ Adj. Scan DensitySpecifies one of seven density levels as the scan density.
Note❒ Default: Centre
❖❖❖❖ APS PrioritySpecifies whether or not Auto Paper Select should be used after the machineis turned on, after Copier Auto Reset, or after the {{{{Clear Modes}}}} key is pressed.See p.30 “Selecting Copy Paper”.• On• Off
Note❒ Default: On
❖❖❖❖ Ppr.Tray PrioritySpecifies the default paper tray to be used after the machine is turned on, afterCopier Auto Reset, or after the {{{{Clear Modes}}}} key is pressed.• Paper Roll1• Paper Roll2• Cut Paper Tray
Note❒ Default: Paper Roll1
❖❖❖❖ Copy Start MethodSpecifies whether or not the machine should start copying automatically.To scan the originals first and then copy when the {{{{Start}}}} key is pressed, press[Press Start Key]. To start copying automatically after the originals arescanned, press [Auto].• Auto• Press Start Key
NeptuneC1_GBcopy_F_FM.book Page 83 Tuesday, December 16, 2003 5:31 PM

User Tools (Copier Features)
84
4
Note❒ Default: Auto
❖❖❖❖ Orig. Size DetectSpecifies whether or not to automatically detect the size of originals.To detect the size of original automatically, press [Auto]. To scan the originalat maximum size, press [Fixed (Max. Size)].• Auto• Fixed (Max. Size)
Note❒ Default: Auto
❖❖❖❖ Max. No. of SetsSpecifies the maximum number of copies that can be set.
Note❒ Default: 20 sheets
❒ The number can be set from 1 to 20 sheets.
❖❖❖❖ Noise ReductionSpecifies the noise (specks of dirt or dust on the image) reduction level foreach original type (Text, Text/Photo, Photo, Drawing, Pale, Generation Copy,Background Lines, Sharpen Text).If you select [Off], small scratches and specks on the original will appear oncopies.• Off• Low• Medium• High
Note❒ Default: Off
❖❖❖❖ Orig.Mode QualityAdjusts the finish for each original type (Text, Text/Photo, Photo, Drawing,Pale, Generation Copy, Background Lines, Sharpen Text).• Normal• Custom Setting
Note❒ Default: Normal
❒ [Custom Setting]: Your service representative will set this to meet your re-quirements. For details, consult your service representative.
NeptuneC1_GBcopy_F_FM.book Page 84 Tuesday, December 16, 2003 5:31 PM

Settings You Can Change with User Tools
85
4
❖❖❖❖ Orig.Mode DensitySpecifies the copy image density for each original type (Text, Text/Photo,Photo, Drawing, Pale, Generation Copy, Background Lines, Sharpen Text).• Light• Normal• Dark
Note❒ Default: Normal
❖❖❖❖ Copy Mode in SortSpecifies whether all originals should be scanned before starting copying,when using Sort. Or, whether copying should start while originals are still be-ing scanned. See p.34 “Sort/Rotate Sort”.• Copy after Scan• Copy during Scan
Note❒ Default: Copy after Scan
❖❖❖❖ Sample Copy Pos.Specifies the default dimensions for Sample Copy. See p.23 “Sample Copy”.
Note❒ Default: 0❒ The dimensions can be set from 0 to 250 mm (10").
❖❖❖❖ Partial Copy SizeSpecifies the default dimensions for the start point (Y1) and end point (Y2) inPartial Copy. See p.24 “Partial Copy”.
Note❒ Default:
• Y1: 0 (0")
• Y2: 280 mm (11")
❒ Y1 can be set from 0 to 3320 mm (0" to 131").❒ Y2 can be set from 280 to 3600 mm (11" to 142").
❖❖❖❖ Count DisplaySpecifies to show the number of sets or number of originals on the counter.• Quantity• Original
NeptuneC1_GBcopy_F_FM.book Page 85 Tuesday, December 16, 2003 5:31 PM

User Tools (Copier Features)
86
4
Note❒ Default: Original
❖❖❖❖ Rotate Copy in APSSpecifies whether to rotate paper to meet the originals when Auto Paper Se-lect is selected.• On• Off
Note❒ Default: On
Reproduction Ratio
❖❖❖❖ User R/E RatioYou can store up to three reproduction ratios, in addition to those already inPreset Ratio.Enter the reproduction ratio using the number keys.
Note❒ Default: 100.0 %❒ Use the {{{{·}}}} key to enter a decimal point.❒ The value can be set from 25.0% to 400.0%.
❖❖❖❖ R/E PrioritySpecifies the default reproduction ratio used after the machine is turned on,after Copier Auto Reset, or after the {{{{Clear Modes}}}} key is pressed.• Metric version
• 25.0%• 35.4%• 50.0%• 70.7%• 100.0%• 141.4%• 200.0%• 282.8%• 400.0%
NeptuneC1_GBcopy_F_FM.book Page 86 Tuesday, December 16, 2003 5:31 PM

Settings You Can Change with User Tools
87
4
• Inch version (Engineering)• 25.0%• 32.4%• 50.0%• 64.7%• 100.0%• 129.4%• 200.0%• 258.8%• 400.0%
• Inch version (Architecture)• 25.0%• 33.3%• 50.0%• 66.7%• 100.0%• 133.3%• 200.0%• 266.7%• 400.0%
Note❒ Default:
• Metric version: 100.0%
• Inch version (Engineering): 100.0%
• Inch version (Architecture): 100.0%
❖❖❖❖ User Auto R/ESpecifies original and copy sizes displayed when [UserAuto] is pressed. Seep.40 “User Auto Reduce/Enlarge”.Select the copy size to use with the original size.
NeptuneC1_GBcopy_F_FM.book Page 87 Tuesday, December 16, 2003 5:31 PM

User Tools (Copier Features)
88
4
Note❒ If you select a setting for A0(E), A4(A), or B1 size paper in User Auto Re-
duce/Enlarge, you cannot select [HorizontalLLLL]. When you cannot select[HorizontalLLLL] (grayed out), select the original size and copy size for Hori-zontal using this setting.
❖❖❖❖ UserAutoR/E Orig.Specifies whether an original should be processed as a vertical or horizontaloriginal when [UserAuto] is selected. See p.40 “User Auto Reduce/Enlarge”.• VerticalK• HorizontalL
Note❒ Default: VerticalK
Note❒ You cannot specify A0(E), A4(A), B1, or B4 in User Auto R/E when you se-
lect [HorizontalLLLL].
Edit
❖❖❖❖ Margin AdjustmentSpecifies the default setting for the margin size.You can set the top and bottom margin sizes. See p.42 “Margin Adjustment”.
Note❒ Default:
• Metric version: +20 mm
• Inch version: +0.8"
❒ The size can be set as follows:• Metric version: -200 mm to 200 mm (1 mm increments)• Inch version: -7.8" to 7.8" (0.1" increments)
❖❖❖❖ Shift ImageSpecifies the default setting for Shift. Use [↑↑↑↑] [↓↓↓↓] to set the shift orientationand distance. See p.43 “Shift”.
Note❒ Default:
• Metric version: Up: 20 mm/Right: 20 mm
• Inch version: Up: 0.8"/Right: 0.8"
❒ The orientation/distance can be set as follows:• Metric version: Up: 200 mm - Down: 200 mm (1 mm increments)
Right: 200 mm - Left: 200 mm (1 mm increments)
NeptuneC1_GBcopy_F_FM.book Page 88 Tuesday, December 16, 2003 5:31 PM

Settings You Can Change with User Tools
89
4
• Inch version: Up: 7.8" - Down: 7.8" (0.1" increments)Right: 7.8" - Left: 7.8" (0.1" increments)
❖❖❖❖ Erase Brdr. WidthSpecifies the default setting for Erase Border. See p.44 “Erase Border”.Use [+] or [-] to make the setting.
Note❒ Default:
• Metric version: 10 mm
• Inch version: 0.4"
❒ The width can be set as follows:• Metric version: 3 mm - 50 mm (1 mm increments)• Inch version: 0.1" - 2.0" (0.1" increments)
❖❖❖❖ Repeat Sep. LineSpecifies the separation line type. See p.49 “Image Repeat”.• None• Solid• Broken A• Broken B• Crop Marks
Note❒ Default: None
❖❖❖❖ 2xCopies Sep.LineSpecifies whether or not to use a separation line for Double Copies. See p.49“Double Copies”.The separation line is dotted.• None• Separation Line
Note❒ Default: Separation Line
❖❖❖❖ Prog.Overlay Fmt.Stores a format (background) image for use with Format Overlay.You can store up to four formats.See p.51 “Format Overlay (Overlay 2)” and p.52 “Program/Delete OverlayFormat”.
NeptuneC1_GBcopy_F_FM.book Page 89 Tuesday, December 16, 2003 5:31 PM

User Tools (Copier Features)
90
4
Stamp
Background No.
❖❖❖❖ SizeMake settings for the size of background numbers. See p.54 “BackgroundNumbering”.• 1X• 2X• 4X• 8X
Note❒ Default: 1X
❖❖❖❖ DensityMake settings for the density of background numbers. See p.54 “BackgroundNumbering”.• Light• Normal• Dark• Very Dark
Note❒ Default: Normal
Preset Stamp
❖❖❖❖ Stamp Type PrioritySpecifies the default user stamp selected as the preset stamp. See p.54 “PresetStamp”.• COPY• URGENT• PRIORITY• For Your Info.• DRAFT• PRELIMINARY• For Internal Use Only• CONFIDENTIAL
Note❒ Default: COPY
NeptuneC1_GBcopy_F_FM.book Page 90 Tuesday, December 16, 2003 5:31 PM

Settings You Can Change with User Tools
91
4
❖❖❖❖ Stamp SettingsSpecifies the stamp orientation, position, size, and density for each presetstamp (COPY, URGENT, PRIORITY, For Your Info., DRAFT, PRELIMI-NARY, For Internal Use Only, CONFIDENTIAL). You can make separate set-tings for both horizontal and vertical. See p.54 “Preset Stamp”.• Orientation (Normal, Rotate 90deg.)• Position (Top left, Top centre, Top right, Left centre, Centre, Right centre,
Bottom left, Bottom centre, Bottom right)• Adjust
• Left/Right:• Metric version: 4 - 280 mm• Inch version: 0.16 - 11.0"
• Top/Bottom:• Metric version: 4 - 400 mm• Inch version: 0.16 - 15.7"
• Centre (Left/Right):• Metric version: Left 140 - Right 140 mm• Inch version: Left 5.5 - Right 5.5"
• Centre (Top/Bottom):• Metric version: Left 200 - Right 200 mm• Inch version: Left 7.9 - Right 7.9"
• Size (1X, 2X, 4X, 8X)• Density (Normal, Lighter, Lightest)
Note❒ Default:• Orientation: Normal
• Position: Bottom right
• Adjust• Left/Right:
• Metric version: 24 mm
• Inch version: 0.9"
• Top/Bottom: • Metric version: 24 mm
• Inch version: 0.9"
• Centre (Left/Right):• Metric version: 0 mm
• Inch version: 0.0"
NeptuneC1_GBcopy_F_FM.book Page 91 Tuesday, December 16, 2003 5:31 PM

User Tools (Copier Features)
92
4
• Centre (Top/Bottom):• Metric version: 0 mm
• Inch version: 0.0"
• Size: 1X• Density: Normal
User Stamp
❖❖❖❖ Program/Del. User StampYou can store, change, or delete a design of your choice as a user stamp.
Note❒ You can store up to four user stamps. See p.57 “User Stamp”.
ReferenceFor details about deleting user stamps, see p.59 “Program/Delete User Stamp”.
❖❖❖❖ Stamp SettingsSpecifies the stamp orientation, position, and density for user stamps. Youcan set separate settings for horizontal and vertical. See p.57 “User Stamp”.• Orientation (Normal, Rotate 90deg.)• Position (Top left, Top centre, Top right, Left centre, Centre, Right centre,
Bottom left, Bottom centre, Bottom right)• Adjust
• Left/Right:• Metric version: 4 - 280 mm• Inch version: 0.16 - 11.0"
• Top/Bottom:• Metric version: 4 - 400 mm• Inch version: 0.16 - 15.7"
NeptuneC1_GBcopy_F_FM.book Page 92 Tuesday, December 16, 2003 5:31 PM

Settings You Can Change with User Tools
93
4
• Centre (Left/Right):• Metric version: Left 140 - Right 140 mm• Inch version: Left 5.5 - Right 5.5"
• Centre (Top/Bottom):• Metric version: Left 200 - Right 200 mm• Inch version: Left 7.9 - Right 7.9"
• Density (Normal, Lighter, Lightest)
Note❒ Default:
• Orientation: Normal
• Position: Bottom right
• Adjust• Left/Right:
• Metric version: 24 mm
• Inch version: 0.9"
• Top/Bottom:• Metric version: 24 mm• Inch version: 0.9"
• Centre (Left/Right):• Metric version: 0 mm
• Inch version: 0.0"• Centre (Top/Bottom):
• Metric version: 0 mm
• Inch version: 0.0"
• Density: Normal
NeptuneC1_GBcopy_F_FM.book Page 93 Tuesday, December 16, 2003 5:31 PM

User Tools (Copier Features)
94
4
Date Stamp
❖❖❖❖ Format PriorityYou can specify the date stamp format. See p.61 “Date Stamp”.• MM/DD/YYYY• MM.DD.YYYY• DD/MM/YYYY• DD.MM.YYYY• YYYY.MM.DD
Note❒ Default: MM/DD/YYYY
❖❖❖❖ Stamp SettingsSpecifies Date Stamp conditions. See p.61 “Date Stamp”.You can specify the stamp orientation, position, and size for the date stamp.
• Orientation (Normal, Rotate 90deg.)• Position (Top left, Top centre, Top right, Bottom left, Bottom centre, Bot-
tom right)• Adjust
• Left/Right:• Metric version: 4 - 280 mm• Inch version: 0.16 - 11.0"
• Top/Bottom:• Metric version: 4 - 400 mm• Inch version: 0.16 - 15.7"
• Centre (Left/Right):• Metric version: Left 140 - Right 140 mm• Inch version: Left 5.5 - Right 5.5"
• Size (1X, 2X, 4X, 8X)
Note❒ Default:
• Orientation: Normal
• Position: Top left
NeptuneC1_GBcopy_F_FM.book Page 94 Tuesday, December 16, 2003 5:31 PM

Settings You Can Change with User Tools
95
4
• Adjust• Left/Right:
• Metric version: 24 mm
• Inch version: 0.9"• Top/Bottom:
• Metric version: 24 mm
• Inch version: 0.9"
• Centre(Left/Right):• Metric version: 0 mm
• Inch version: 0.0"
• Size: 1X
Page Numbering
❖❖❖❖ Format PrioritySpecifies the page number format by pressing [Page]. See p.63 “Page Number-ing”.• 1, 2...• -1-, -2-...• P.1,P.2...• P1,P2...• 1/5, 2/5...
Note❒ Default: 1, 2...
❖❖❖❖ Stamp SettingsSpecifies Page Numbering conditions. See p.63 “Page Numbering”.You can specify stamp orientation and position for the page number.• Orientation: (Normal, Rotate 90deg.)• Position: (Top left, Top centre, Top right, Bottom left, Bottom centre, Bot-
tom right)
NeptuneC1_GBcopy_F_FM.book Page 95 Tuesday, December 16, 2003 5:31 PM

User Tools (Copier Features)
96
4
• Adjust• Left/Right:
• Metric version: 4 - 280 mm• Inch version: 0.16 - 11.0"
• Top/Bottom:• Metric version: 4 - 400 mm• Inch version: 0.16 - 15.7"
• Centre (Left/Right):• Metric version: Left 140 - Right 140 mm• Inch version: Left 5.5 - Right 5.5"
Note❒ Default:
• Orientation: Normal• Position: Top left
• Adjust• Left/Right:
• Metric version: 24 mm• Inch version: 0.9"
• Top/Bottom: • Metric version: 24 mm
• Inch version: 0.9"• Centre (Left/Right):
• Metric version: 0 mm
• Inch version: 0.0"
NeptuneC1_GBcopy_F_FM.book Page 96 Tuesday, December 16, 2003 5:31 PM

Settings You Can Change with User Tools
97
4
Key Operator Tools
If a key operator code is already entered, you cannot begin key operator settingsunless you enter the key operator code (up to eight digits).
❖❖❖❖ Program/Change/Delete User CodeYou can register, change, or delete user codes (up to eight digits).You can store up to 50 user codes.• Program
You can register new user codes.Press [Program], and then enter the user code using the number keys.
• ChangeYou can change user codes.Press [Change], and then enter the user code.
• Delete User CodeYou can delete user codes.Press [Delete], and then enter the user code you want to delete.
• Delete All User CodesYou can delete all user codes.Press [Del. All].
❖❖❖❖ Display/Clear/Print Counter per CodeYou can check or print the number of copies made under each user code. Youcan also reset each user code's counter to 0.• Print Counter List
Press [Print].• Reset Counter
Select a counter, and then press [per Code].• Reset All Counters
Press [All].
NeptuneC1_GBcopy_F_FM.book Page 97 Tuesday, December 16, 2003 5:31 PM

User Tools (Copier Features)
98
4
NeptuneC1_GBcopy_F_FM.book Page 98 Tuesday, December 16, 2003 5:31 PM

99
5. Specifications
Main Unit
❖❖❖❖ Configuration:Desktop
❖❖❖❖ Originals:Sheet
❖❖❖❖ Original size (W ×××× L):• Metric version: 182 × 140 mm-914 × 3600 mm• Inch version: 7" × 5"-36" × 142"
❖❖❖❖ Copy size (W ×××× L):• Metric version:
A0K-A4 KRoll paper: 210 × 280 mm-914 × 3600 mmBypass tray: 210 × 257 mm-914 × 2000 mm
• Inch version:EK-A KRoll paper: 81/2" × 11" -36" × 142"Bypass tray: 81/2" × 11"-36" × 78"
❖❖❖❖ Reproduction ratio:• Metric version:
Full size: 100.0%Reduce: 25.0%, 35.4%, 50.0%, 70.7%Enlarge: 141.4%, 200.0%, 282.8%, 400.0%Zoom: 25.0-200.0% (0.1% increments)Zoom: 200.0-400.0% (0.2% increments)
• Inch version (Engineering):Full size: 100.0%Reduce: 25.0%, 32.4%, 50.0%, 64.7%Enlarge: 129.4%, 200.0%, 258.8%, 400.0%Zoom: 25.0-200.0% (0.1% increments)Zoom: 200.0-400.0% (0.2% increments)
• Inch version (Architecture):Full size: 100.0%Reduce: 25.0%, 33.3%, 50.0%, 66.7%Enlarge: 133.3%, 200.0%, 266.7%, 400.0%Zoom: 25.0-200.0% (0.1% increments)Zoom: 200.0-400.0% (0.2% increments)
NeptuneC1_GBcopy_F_FM.book Page 99 Tuesday, December 16, 2003 5:31 PM

Specifications
100
5
❖❖❖❖ Copying speed (full-size copying):2 copies/minute (A0(E)K), 4 copies/minute (A1(D)L)
❖❖❖❖ Warm-up time:Less than 2 minutes (23°C)
❖❖❖❖ First copy time:• Metric version:
When selected lower output tray: 22 seconds (A1L, Paper roll tray 2), 34seconds (A1L, Bypass Tray)
• Inch version:When selected lower output tray: 22 seconds (DL, Paper roll tray 2), 34seconds (DL, Bypass Tray)
❖❖❖❖ Repeat copy:• Metric version:
• Main unit only
• Optional HDD installed3600 mm (any width)
• Inch version (Engineering): • Main unit only
• Optional HDD installed236" (any width)
Width Length
914/880 mm Up to 1219 mm
841 mm Up to 1325 mm
594 mm Up to 1875 mm
420 mm Up to 2652 mm (Transportation dis-tance: 2000 mm)
297 mm Up to 3600 mm (Transportation dis-tance: 2000 mm)
When deleting a copy size: Up to 3600 mm
Width Length
34" Up to 50.8"
22" Up to 78.5"
17" Up to 101.6"
11" Up to 157"
81/2" Up to 203.2"
When deleting a copy size: Up to 50.8"
NeptuneC1_GBcopy_F_FM.book Page 100 Tuesday, December 16, 2003 5:31 PM

Main Unit
101
5
• Inch version (Architecture):• Main unit only
• Optional HDD installed236" (any width)
❖❖❖❖ Non-reproduction area:• Metric version:
• Top: 8 mm• Bottom: 8 mm• Left and Right 2 ± 2 mm (less than 5 mm on either side)
• Inch version:• Top: 0.32"• Bottom: 0.32"• Left and Right 0.08" ± 0.08" (less than 0.2" on either side)
❖❖❖❖ Continuous copying count:20 copies
❖❖❖❖ Copy paper capacity:bypass tray
Width Length
36" (30") Up to 48"
24" Up to 72"
18" Up to 96"
12" Up to 144"
9" Up to 192"
When deleting a copy size: Up to 48"
NeptuneC1_GBcopy_F_FM.book Page 101 Tuesday, December 16, 2003 5:31 PM

Specifications
102
5
Combination Chart
The combination chart below shows modes that can be used together.
ABB531S
NeptuneC1_GBcopy_F_FM.book Page 102 Tuesday, December 16, 2003 5:31 PM

Combination Chart
103
5
ABB532S
NeptuneC1_GBcopy_F_FM.book Page 103 Tuesday, December 16, 2003 5:31 PM

Specifications
104
5
❖❖❖❖ Symbols used in the chart
Blank Can be used together.
F Cannot be used together. The first mode selected is active.
B Cannot be used together. The second mode selected is active.
R Cannot set modes after the original is scanned.
Numbers Number of modes that can used together.
1 Can be used together when copying at full size.
2 Can be used together when using Additional Copy. You can select the bypass tray after scanning the original.
3 Cannot set the stamp function. If you have already set a stamp, you can change or delete it.
4 Cannot select Auto Paper Select when you use Rotate Copy.
Symbols
❍ Can be used together. The first mode selected has priority.
× Cannot be used together. The second mode selected has priority.
— Cannot select. It is set with User Tools.
Required options
W stamp board and optional HDD
H optional HDD
NeptuneC1_GBcopy_F_FM.book Page 104 Tuesday, December 16, 2003 5:31 PM
Supplementary Specifications
105
5
Supplementary Specifications
❖❖❖❖ Fine Directional Magnification (Additional Copy)• When Fine Magnification is selected, depending on the pattern of original,
moire patterns may appear or image quality deteriorate.
❖❖❖❖ Job Preset• Number of sheets that can be set for Job Preset and each paper size are as
follows:
• You cannot use the following functions with Job Preset:• Recalling a Program• Copying from the Bypass Tray• Sort/Rotate Sort• Image Overlay/Format Overlay• Erase Inside/Erase Outside• Image Repeat• User Stamp• Repeat User Stamp• Sample Copy
• You cannot preset a job while a job is being sorted.• The maximum number of jobs that can be preset is 99.• Depending on the size of original, you may not be able to preset more jobs
even if below the maximum.
❖❖❖❖ Copying from the Bypass Tray• The width for paper in the bypass tray is 210 - 914 × 2000 mm (81/2" - 36" ×
78").
❖❖❖❖ Selecting Copy Paper• If you change the paper type, copying may take longer to start.• When Auto Paper Select is selected, copying may take slightly longer since
the machine selects the copy paper after scanning the original.
HDD installed HDD not installed
A0 50 sheets —
A1 100 sheets 2 sheets
A2 100 sheets 4 sheets
A3 100 sheets 8 sheets
A4 100 sheets 16 sheets
NeptuneC1_GBcopy_F_FM.book Page 105 Tuesday, December 16, 2003 5:31 PM

Specifications
106
5
❖❖❖❖ Sort/Rotate Sort• You can use Sort for copy sizes up to A0(E).• You can use Rotate Sort for copy sizes up to A0(E) (HDD installed), A1 (D)
(HDD not installed).• You can use the following paper sizes with Rotate Sort:
• The number of originals that can be scanned for Sort and Rotate Sort is asfollows:
*1 Sort only. You cannot use A4(A) with Rotate Sort.
❖❖❖❖ Preset Reduce/Enlarge• You can set the magnification ratio from 25.0 to 400.0%.• You can select one of 8 preset ratios (4 enlargement ratios, 4 reduction ra-
tios).• The relationship between original size and paper size enlarged/reduced
by the preset ratios is as follows:
❖❖❖❖ Metric version
Metric version 420 mm × 297 mm (A3)
594 mm × 420 mm (A2)
841 mm × 594 mm (A1)
515 mm × 364 mm (B3 JIS)
728 mm × 515 mm (B2 JIS)
Inch version
(Engineering)
11" × 17" (B)
17" × 22" (C)
22" × 34" (D)
Inch version
(Architecture)
12" × 18" (B)
18" × 24" (C)
24" × 36" (D)
HDD installed HDD not installed
A0(E) *1 100 sheets 1 sheet
A1(D) 100 sheets 2 sheets
A2(C) 100 sheets 4 sheets
A3(B) 100 sheets 8 sheets
A4(A) *1 100 sheets 17 sheets
Ratio (%) Original size → Paper size
400.0 (16 times in area ratio) A4→A0
282.8 (8 times in area ratio) A3→A0, A4→A1, B4→B1
200.0 (twice in area ratio) A2→A0, A3→A1, A4→A2, B3→B1, B4→B2
NeptuneC1_GBcopy_F_FM.book Page 106 Tuesday, December 16, 2003 5:31 PM

Supplementary Specifications
107
5
❖❖❖❖ Inch version (Engineering)
❖❖❖❖ Inch version (Architecture)
• You can select a ratio regardless of original size, or paper roll cut method.With certain ratios, parts of the image might not copy or margins will ap-pear.
❖❖❖❖ Zoom• You can set the magnification ratio from 25.0 to 400.0%.• You can select a ratio regardless of original size, or paper roll cut method.
With certain ratios, parts of the image might not copy or margins will ap-pear.
141.4 (1/2 in area ratio) A1→A0, A2→A1, A3→A2, A4→A3, B2→B1, B3→B2, B4→B3
70.7 (1/4 in area ratio) A0→A1, A1→A2, A2→A3, A3→A4, B1→B2, B2→B3, B3→B4
50.0 A0→A2, A1→A3, A2→A4, B1→B3, B2→B4
35.4 A0→A3, A1→A4, B1→B4
25.0 A0→A4
Ratio(%) Original size → Paper size
400.0 A → E
258.8 A → D, B → E
200.0 A → C, B → D, C → E
129.4 A → B, B → C, C → D, D → E
64.7 B → A, C → B, D → C, E → D
50.0 C → A, D → B, E → C
32.4 D → A, E → B
25.0 E → A
Ratio(%) Original size → Paper size
400.0 A → E
266.7 A → D, B → E
200.0 A → C, B → D, C → E
133.3 A → B, B → C, C → D, D → E
66.7 B → A, C → B, D → C, E → D
50.0 C → A, D → B, E → C
33.3 D → A, E → B
25.0 E → A
NeptuneC1_GBcopy_F_FM.book Page 107 Tuesday, December 16, 2003 5:31 PM

Specifications
108
5
❖❖❖❖ Directional Magnification• You can set the magnification ratio from 25.0 to 400.0%.• You can enter a ratio (%) regardless of original and copy paper size. With
certain ratios, parts of the image might not copy or margins will appear.• When you set Directional Magnification (mm), if the calculated ratio is less
or more than the maximum ratio, the ratio is set to the minimum or maxi-mum ratio respectively. With certain ratios, parts of the image might notcopy or margins will appear.
• You cannot use Directional Magnification if Auto Paper Select is selected.
❖❖❖❖ Margin Adjustment• If you set the margin too long for the original, parts of the image might not
copy.
❖❖❖❖ Shift• When using the print and shift settings, the print position moves according
to the orientation and length of the shift setting.• You can use Shift for copy sizes up to A0 (E).• If you set the margin too long for the original, parts of the image might not
copy.
❖❖❖❖ Erase Inside/Erase Outside• If the original is larger than A1, you can only erase one area (Metric ver-
sion).• If the original is larger than C, you can only erase one area (Inch version).
❖❖❖❖ Double Copies• You can copy an image up to A2 (C) K size using Double Copies. You can
use paper sizes up to A1 (D) L.
❖❖❖❖ Image Repeat• Depending on paper size and reproduction ratio, the repeated images may
be cropped.• You can use Image Repeat for copy sizes up to A1(D).• When Image Repeat is selected, the maximum length for Variable Cut is
1219 mm (48").• If you have used Image Repeat with the stamp function, you cannot delete
only the repeated image when using Additional Copy.
NeptuneC1_GBcopy_F_FM.book Page 108 Tuesday, December 16, 2003 5:31 PM

Supplementary Specifications
109
5
❖❖❖❖ Image Overlay• When using Image Overlay, you should use a second original larger than
the first. Because the background image (first original image) will be cut ifPreset Cut is selected, and if the second original is smaller than the first.
• You cannot shift the position of the first or second original after the com-posite image is created. To change the position, move one of the originals.Use the composite copy itself as an original, or insert originals using thecarrier sheet.
• If you use Shift with Additional Copy after creating an Image Overlaycopy, the composite image moves. You cannot move individual originalimages.
• When using the following functions, the effects are applied to the compos-ite image created using Image Overlay.• Shift• Margin Adjustment• Erase Border• Area Selection• Mirror Image• Double Copies• Image Repeat
• When you set Image Overlay with Image Repeat, the maximum size usingImage Overlay function is A0(E). However, if you create an Image Overlaycopy using A0(E) size paper, the composite image data is lost.
❖❖❖❖ Format Overlay• When selecting the programmed user format, if the sizes of the pro-
grammed user format and original to be overlaid on the programmed userformat are different, the image is created at the size of the overlaid original.
• The maximum paper size is A0 (E). However, if you create an Image Over-lay copy using A0(E) size paper, the composite image data is lost.
ZEDG130E
Secondoriginal
Firstoriginal
Copy
NeptuneC1_GBcopy_F_FM.book Page 109 Tuesday, December 16, 2003 5:31 PM

Specifications
110
5
❖❖❖❖ Background Numbering• A pattern-like image may appear in the area where an original's picture
overlaps the background number.
❖❖❖❖ Preset Stamp• You can stamp onto paper sizes up to A0 (E).• You can change the size and density of the stamp. Depending on settings,
image density may change.• When you change the size of the stamp, it may be cropped depending on
the paper size.• When you set the stamp position to “Bottom Left”/”Bottom Cen-
tre”/”Bottom Right”, and then use Rotate Sort or Rotate Copy, the stampposition may shift.
❖❖❖❖ User Stamp/Date Stamp• You can stamp onto paper sizes up to A0 (E).
❖❖❖❖ Page Numbering• When using page numbering with the bypass tray selected, the stamp po-
sition is based on original size multiplied by the magnification ratio.
❖❖❖❖ Repeat User Stamp• You can print on paper sizes up to A0 (E).• A pattern-like image may appear in the area where an original's picture
overlaps the background number.
NeptuneC1_GBcopy_F_FM.book Page 110 Tuesday, December 16, 2003 5:31 PM

Scan Size Limitations, by Function
111
5
Scan Size Limitations, by Function
The following chart shows scan size limitations for the Shift, Margin Adjust-ment, Edit, and Stamp functions.
Shift less than 3.6 m (141.8")
Margin Adjustment less than 3.6 m (141.8")
Image Overlay
Image Overlay A0(E)
Format Overlay A0(E)
Erase Erase Inside A1(D) or smaller, 5 locations
A0(E) or smaller, 1 location
Erase Outside A1(D) or smaller, 5 locations
A0(E) or smaller, 1 location
Erase Border less than 3.6 m (141.8")
Erase Inside, Erase Border, and Image Overlay Combinations
A1(D)
Erase Outside and Image Overlay Combinations
A1(D)
Erase Inside, Erase Border, and Format Overlay Combinations
A1(D)
Erase Outside and Format Over-lay Combinations
A1(D)
Positive/Negative less than 3.6 m (141.8")
HDD not installed: A0
Mirror Image less than 3.6 m (141.8")
Double Copies less than 3.6 m (141.8")
Image Repeat
with no other modes A0(E)
with Erase Border A0(E)
with Image Overlay A0(E)
with Format Overlay A0(E)
Stamp A0(E)
NeptuneC1_GBcopy_F_FM.book Page 111 Tuesday, December 16, 2003 5:31 PM

Specifications
112
5
Settings Record Sheet
❖❖❖❖ Program Record Sheet
Make copies of this sheet to keep a record of your program settings.
NeptuneC1_GBcopy_F_FM.book Page 112 Tuesday, December 16, 2003 5:31 PM

Settings Record Sheet
113
5
❖❖❖❖ Stored Format Record Sheet
Make copies of this sheet to keep a record of your format settings.
NeptuneC1_GBcopy_F_FM.book Page 113 Tuesday, December 16, 2003 5:31 PM

Specifications
114
5
❖❖❖❖ User Stamp Record Sheet
Make copies of this sheet to keep a record of your user stamps.
NeptuneC1_GBcopy_F_FM.book Page 114 Tuesday, December 16, 2003 5:31 PM

Settings Record Sheet
115
5
Magnification Ratio Chart
❖❖❖❖ Metric version (A series)
❖❖❖❖ Inch version (Engineering)
❖❖❖❖ Inch version (Architecture)
Copy size (mm)
% A0 A1/B1 A2/B2 A3/B3 A4/B4
Ori
gina
l siz
e
A0 100.0 70.7 50.0 35.4 25.0
A1/B1 141.4 100.0 70.7 50.0 35.4
A2/B2 200.0 141.4 100.0 70.7 50.0
A3/B3 282.8 200.0 141.4 100.0 70.7
A4/B4 400.0 282.8 200.0 141.4 100.0
Copy size (in)
% E D C B A
Ori
gina
l siz
e
E 100.0 64.7 50.0 32.4 25.0
D 129.4 100.0 64.7 50.0 32.4
C 200.0 129.4 100.0 64.7 50.0
B 258.8 200.0 129.4 100.0 64.7
A 400.0 258.8 200.0 129.4 100.0
Copy size (in)
% E D C B A
Ori
gina
l siz
e
E 100.0 66.7 50.0 33.3 25.0
D 133.3 100.0 66.7 50.0 33.3
C 200.0 133.3 100.0 66.7 50.0
B 266.7 200.0 133.3 100.0 66.7
A 400.0 266.7 200.0 133.3 100.0
NeptuneC1_GBcopy_F_FM.book Page 115 Tuesday, December 16, 2003 5:31 PM

Specifications
116
5
Measure Chart
❖❖❖❖ Metric version (A series)
❖❖❖❖ Inch version (Engineering)
❖❖❖❖ Inch version (Architecture)
Width × Length (mm)
A0 841 × 1189
A1 594 × 841
A2 420 × 594
A3 297 × 420
A4 210 × 297
B1 728 × 1030
B2 515 × 728
B3 364 × 515
B4 257 × 364
Width × Length (in)
E 34 × 44
D 22 × 34
C 17 × 22
B 11 × 17
A 81/2 × 11
Width × Length (in)
E 36 × 48
D 24 × 36
C 18 × 24
B 12 × 18
A 9 × 12
NeptuneC1_GBcopy_F_FM.book Page 116 Tuesday, December 16, 2003 5:31 PM

117
INDEX
2xCopies Sep.Line, 89
A
Accessing user tools (Copier Features), 80Additional copy, 19Adj. Scan Density, 83Adjusting copy image density, 28APS Priority, 83Auto Density, 83Auto Image Density, 28Auto Paper Select, 30Auto reduce/enlarge, 38Auto Reduce/Enlarge key, 5Auto start, 18
B
Background No., 90density, 90size, 90
Background numbering, 54Basic procedure, 17Basics, 7
C
Change Init. Mode, 82Clear Modes key, 4Clear/Stop key, 5Combination chart, 102Combined Auto and Manual Density, 28Control panel, 4Copier Auto Reset, 82Copier auto reset, 18Copier functions, 28Copying, 17Copying from the bypass tray, 25, 105Copy Mode in Sort, 85Copy Start Method, 83Count Display, 85Cut Select key, 5
D
Date Stamp, 94format priority, 94stamp settings, 94
Date stamp, 61Deleting a program, 27Directional magnification, 108Directional magnification (%), 38Directional size magnification (mm), 39Display, 6Display/Clear/Print Counter per Code, 97Double copies, 49, 108Drawing, 29
E
Edit, 88Edit key, 5Energy Saver key, 4Enlarge key, 5#(Enter key), 5Erase border, 44Erase Brdr. Width, 89Erase inside, 45, 108Erase outside, 46, 108
F
Fine Directional Magnification, 19, 105Fine Direct. Mag. key, 5Format overlay, 109Format overlay(Overlay 2), 51Full Size key, 5Functions that require options, 3
G
General Features, 82
NeptuneC1_GBcopy_F_FM.book Page 117 Tuesday, December 16, 2003 5:31 PM

118
I
If you cannot make clear copies, 70If you cannot make copies as you want, 73If your machine does not operate
as you want, 67Image density keys, 5Image overlay, 109Image overlay(Overlay 1), 50Image repeat, 49, 108Indicators, 4Interrupt copy, 22Interrupt key, 4
J
Job preset, 21, 105Job Preset (Standard Preset), 21
K
Key Operator Tools, 97
L
Lower Output, 8
M
Magnification ratio chart, 115Main power indicator, 4Main unit, 99Manual Image Density, 28Manual Paper Select, 30Margin Adjustment, 42, 88, 108Max. No. of Sets, 84Measure chart, 116Mirror image, 48Missing image area, 13
N
Names of major options, 2New Job key, 4Noise Reduction, 84Number keys, 5
O
On indicator, 4Operation switch, 4Original and copy output locations, 7Original Priority, 82Originals, 11Original Type key, 5Orig.Mode Density, 85Orig.Mode Quality, 84Orig. Size Detect, 84
P
Page Numbering, 63, 95format priority, 95stamp settings, 95
Page numbering, 110Partial copy, 24Partial Copy Size, 85Photo, 29Placing originals, 14Positive/negative, 48Ppr.Tray Priority, 83Preset cut, 32Preset reduce/enlarge, 35, 106Preset Stamp, 90
stamp settings, 91stamp type priority, 90
Preset stamp, 54Prog.Overlay Fmt., 89Program/Change/Delete User Code, 97Program/delete overlay format, 52Program/Delete User Stamp, 59Program key, 4Programs, 26
Q
Quick Preset, 21
R
Reading the display and using keys, 6Recalling a program, 27Reduce key, 5Repeat Sep. Line, 89Repeat user stamp, 65R/E Priority, 86Reproduction Ratio, 86Rotate copy, 31Rotate Copy in APS, 86Rotate sort, 34, 106
NeptuneC1_GBcopy_F_FM.book Page 118 Tuesday, December 16, 2003 5:31 PM

119
S
Sample copy, 23Sample Copy/Partial Copy key, 5Sample Copy Pos., 85Scanner Stop key, 5Scan size limitations, by function, 111Screen, 4Selecting copy paper, 30, 105Selecting original type setting, 29Selection keys, 5Setting folded originals, 16Setting Originals and Date Stamp
Position/Orientation, 61Setting rolled originals, 16Settings record sheet, 112Settings you can change with user tools, 82Setting the carrier sheet, 15Setting the length of copy paper cut, 32Shift, 43, 108Shift/Erase key, 5Shift Image, 88Sizes and weights of recommended originals, 11Sort, 34, 106Sort/Rotate Sort key, 5Special Original - Background Lines, 30Special Original - Generation Copy, 29Special Original - Pale, 29Special Original Sharpen Text, 30Specifications, 99Specified Ratio key, 5Stamp, 90Stamp key, 5Start key, 5Storing a program, 26Supplementary specifications, 105Synchro cut, 32
T
Text, 29Text/Photo, 29Troubleshooting, 67
U
Upper Copy Output key, 5Upper Output, 8User Auto R/E, 87User auto reduce/enlarge, 40UserAutoR/E Orig., 88User format overlay, 52User R/E Ratio, 86User Stamp, 92
program/del. user stamp, 92stamp settings, 92
User stamp, 57User Tools (Copier Features), 75User Tools key, 4
V
Variable cut, 33
W
What you can do with this machine, iiWhen a message appears, 67
Z
Zoom, 36, 107Zoom key, 5
NeptuneC1_GBcopy_F_FM.book Page 119 Tuesday, December 16, 2003 5:31 PM

120
MEMO
NeptuneC1_GBcopy_F_FM.book Page 120 Tuesday, December 16, 2003 5:31 PM

121
MEMO
NeptuneC1_GBcopy_F_FM.book Page 121 Tuesday, December 16, 2003 5:31 PM

122 GB GB B125-6600
MEMO
NeptuneC1_GBcopy_F_FM.book Page 122 Tuesday, December 16, 2003 5:31 PM

Paper type: Wood Free 80g/m2, Paper Thickness=100 µm // Pages in book=128 // Print scale=81%Gap (when printed at 81% scale) = Pages in book × Paper thickness / 2 = 6.400000 mm
Declaration of Conformity
“The Product complies with the requirements of the EMC Directive 89/336/EEC and its amending di-rectives and the Low Voltage Directive 73/23/EEC and its amending directives.”
In accordance with IEC 60417, this machine uses the following symbols for the main power switch:
aaaa means POWER ON.
cccc means STAND BY.
In accordance with IEC 60417, this machine uses the following symbols for the anti- humidity heaterswitch:
aaaa means POWER ON.
bbbb means POWER OFF.
Introduction
This manual describes detailed instructions on the operation and notes about the use of this machine.To get maximum versatility from this machine all operators are requested to read this manual carefullyand follow the instructions. Please keep this manual in a handy place near the machine.
Important
Contents of this manual are subject to change without prior notice. In no event will the company be li-able for direct, indirect, special, incidental, or consequential damages as a result of handling or oper-ating the machine.
Notes:
Some illustrations in this manual might be slightly different from the machine.
Certain options might not be available in some countries. For details, please contact your local dealer.
Operator Safety
This machine contains LED Array in scanner and writing units.
The machine is considered a class 1 LED device, safe for both office and EDP use.
Notes:
Two kinds of size notation are employed in this manual. With this machine refer to the metric version.
For good copy quality, Ricoh recommends that you use genuine Ricoh toner.
Ricoh shall not be responsible for any damage or expense that might result from the use of parts otherthan genuine Ricoh parts with your Ricoh office products.
Important
Do not make copies of any item for which copying is prohibited by law.
Copying the following items is normally prohibited by local law:
Bank billes, revenue stamps, bonds, stock certificates, bank drafts, checks, passports, driver's licens-es.
Power Source
220 - 240V, 50Hz/60Hz, 10A or more
Please be sure to connect the power cord to a power source as above. For details about power source,see “Power Connection” in General Settings Guide.
Copyright © 2003 Ricoh Co., Ltd.

Paper type: Wood Free 80g/m2, Paper Thickness=100 µm // Pages in book=128 // Print scale=81%Gap (when printed at 81% scale) = Pages in book × Paper thickness / 2 = 6.400000 mm
240WO
pe
rating
Instructio
nsC
op
y Refe
renc
e
240WO
pe
rating
Instructio
nsC
op
y Refe
renc
e
RICOH COMPANY, LTD.15-5, Minami Aoyama 1-chome,Minato-ku, Tokyo 107-8544, JapanPhone: +81-3-3479-3111
240W
Operating Instructions
Copy Reference
Read this manual carefully before you use this product and keep it handy for future reference.For safe and correct use, please be sure to read the Safety Information in the "General Set-tings Guide" before using the machine.
Basics
Copying
Troubleshooting
User Tools (Copier Features)
Specifications
Overseas AffiliatesU.S.A.RICOH CORPORATION5 Dedrick PlaceWest Caldwell, New Jersey 07006Phone: +1-973-882-2000
The NetherlandsRICOH EUROPE B.V.Groenelaan 3, 1186 AA, AmstelveenPhone: +31-(0)20-5474111
United KingdomRICOH UK LTD.Ricoh House,1 Plane Tree Crescent, Feltham,Middlesex, TW13 7HGPhone: +44-(0)20-8261-4000
GermanyRICOH DEUTSCHLAND GmbHMergenthalerallee 38-40,65760 EschbornPhone: +49-(0)6196-9060
FranceRICOH FRANCE S.A.383, Avenue du Général de GaulleBP 307-92143 Clamart CedexPhone: +33-(0)-821-01-74-26
SpainRICOH ESPAÑA S.A.Avda. Litoral Mar, 12-14,Blue Building, Marina Village,08005 BarcelonaPhone: +34-(0)93-295-7600
ItalyRICOH ITALIA SpAVia della Metallurgia 12,37139 VeronaPhone: +39-045-8181500
ChinaRICOH CHINA CO.,LTD.29/F., Lippo Plaza, No.222Huai Hai Zhong Road,Lu Wan District,Shanghai P.C.:200021Phone: +86-21-5396-6888
SingaporeRICOH ASIA PACIFIC PTE.LTD.260 Orchard Road,#15-01/02 The Heeren,Singapore 238855Phone: +65-6830-5888
Printed in The Netherlands
GB GB B125-6600