operating instructions: pf-10 plus - pet · pdf fileoperating instructions: pf-10 plus ... 16...
TRANSCRIPT

PETFEEDSTER.COM
OPERATING INSTRUCTIONS:PF-10 PLUS
*Shown with kibble theft attachment for cats

1
CONTENTS
Cautions List.............................................................
Power Usage.............................................................
Feeder Assembly.......................................................
Parts Diagram............................................................
Adjustable Flex Feeder Instructions..........................
Programming Instructions.........................................
Frequently Asked Questions.....................................
Troubleshooting Your Pet Feedster...........................
1 Year Limited Warranty............................................
Return Policy.............................................................
2
4
4
5
7
11
18
20
22
23

2
CAUTIONS LIST
• Read all directions thoroughly.• Keep all packaging and plastic bags away from children and pets to prevent suffocation.• Do not allow children to play with or around the unit.• Do not use an extension cord to plug in the unit as pets can chew on the cord, etc.• Do not use the unit with any pets that may have issues or challenges feeding from the unit.• Do not place any foreign objects into the unit.• Do not plug the feeder adapter into an outlet controlled by a light switch. Also, be careful if you plug the unit into a GFCI protected outlet as this may cause the power to be shut off accidentally. • Make sure that the food outlet stays clear. If it is blocked, it will cause the unit to jam.• We recommend using batteries for backup in case of a power outage. Also, check the power level frequently. (See timer display for battery gauge) • If you’re worried about your pet moving or knocking over the Pet Feedster, you can secure the unit by screwing it to a plank or the floor. (2 screw holes are located at the base of the unit under the bowl)• Use only with dry pet kibble. No wet or canned food.• Make sure the unit doesn’t touch anything, otherwise ants can access the food storage despite water in the

3
Ant Water Tray.• The Pet Feedster can be used indoors or outdoors, but must be covered to be protected from water, rain, sprinklers, snow, hail and other severe weather conditions. Unit should be placed out of direct sunlight.• Unit should not be placed in areas of standing water or wet conditions of any kind. • Always check the battery backup life before leaving for any extended period of time. The Pet Feedster should not replace a pet sitter or caretaker when you are gone for an extended period. This is important for the safety of your pet. • Unplug the unit when cleaning.• Do not operate the unit if the cord is damaged. Replacements are available at petfeedster.com.• Service must be performed by Pet Feedster or an authorized service provider. Do not disassemble the unit.• When unplugging the unit from the wall outlet, always pull on the plug and not the power cord.• Do not immerse or expose the main body, motor, or cord to water or wet conditions as this will damage the electronics.• Use only new batteries when installing or replacing the batteries. Remove batteries from the unit if you plan on not using the Pet Feedster for a long period of time.• Do not place anything on top of the unit. The unit should be placed on a level surface. Do not use the unit with the lid off.

4
POWER USAGE
Plug the adapter into an AC outlet rated at 110 volts or 220 volts, 60 Hz only (the rating of North America and some others). Do not plug feeder adapter into an out-let controlled by a light switch. We recommend that you use the battery backup option in case of electrical outlet failure. Install 6 “D” size batteries into the bat-tery compartment on the back of the feeder. Check the battery gauge on the timer display for battery replace-ment. The unit will run up to 4 months on batteries if you choose not to plug it into an outlet.
FEEDER ASSEMBLY
Attach food bowl to the base of the feeder by holding the bowl above the base of the feeder and interlocking the hooks on the back of the bowl to the base.
5
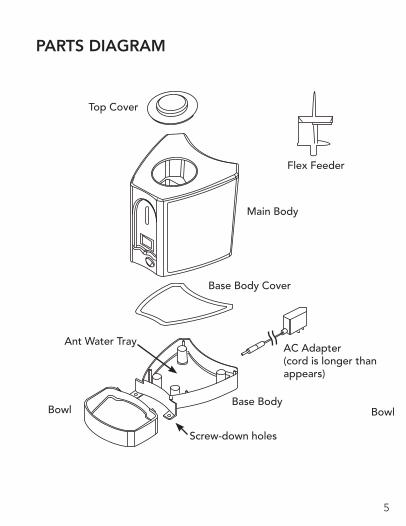
PARTS DIAGRAM
Top Cover
Main Body
Flex Feeder
Base Body Cover
Base Body
Ant Water Tray
Screw-down holes
Bowl Bowl
AC Adapter (cord is longer than appears)

6
STEP 4 Press the NEXT button for 10 seconds until the CLOCK screen with “- - - -” appears.
TIMER DISPLAY
Increase digital number
NEXTMODE ADJ
Clock
00:00 00
Feeding Pause
0QTYMEALS
7
STEP 4 Press the NEXT button for 10 seconds until the CLOCK screen with “- - - -” appears.
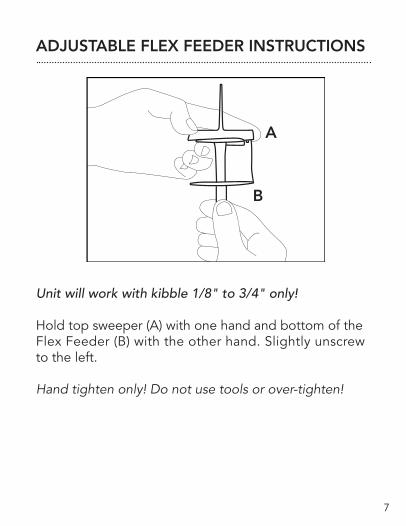
ADJUSTABLE FLEX FEEDER INSTRUCTIONS
Unit will work with kibble 1/8" to 3/4" only!
Hold top sweeper (A) with one hand and bottom of the Flex Feeder (B) with the other hand. Slightly unscrew to the left.
Hand tighten only! Do not use tools or over-tighten!
A
B
8
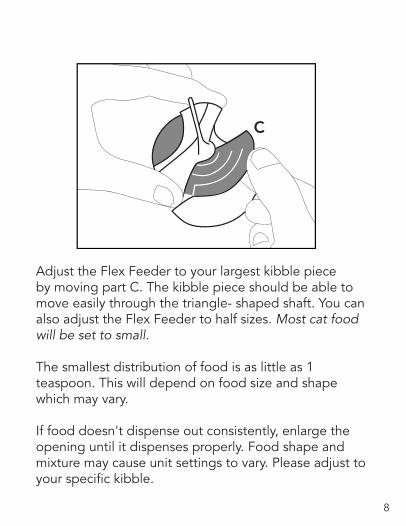
Adjust the Flex Feeder to your largest kibble piece by moving part C. The kibble piece should be able to move easily through the triangle- shaped shaft. You can also adjust the Flex Feeder to half sizes. Most cat food will be set to small.
The smallest distribution of food is as little as 1 teaspoon. This will depend on food size and shape which may vary.
If food doesn't dispense out consistently, enlarge the opening until it dispenses properly. Food shape and mixture may cause unit settings to vary. Please adjust to your specific kibble.
C
9
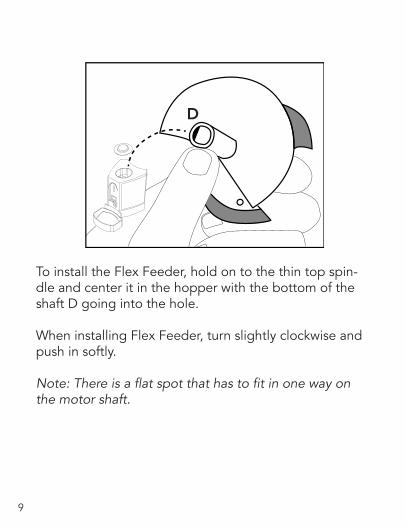
To install the Flex Feeder, hold on to the thin top spin-dle and center it in the hopper with the bottom of the shaft D going into the hole.
When installing Flex Feeder, turn slightly clockwise and push in softly.
Note: There is a flat spot that has to fit in one way on the motor shaft.
D

10
The Flex Feeder should fit flush in hopper as in picture E. It should not be sticking out as in picture F.
For video instructions, go to petfeedster.com under Owner’s Resources.
E F

11
PROGRAMMING INSTRUCTIONS
STEP 1 Insert batteries or plug in the AC adapter.
STEP 2 Adjust the Flex Feeder to S, M, or L per the size of your biggest piece of kibble. (If you are using kibble that is 3/8” do not set the Flex Feeder to large. For most cat food, the Flex Feeder is set to small)
A. Measure the size of your largest kibble piece.B. Loosen the bottom of the Flex Feeder.C. Adjust the shaft to the correct size. This is the triangle-shaped opening of the Flex Feeder. The biggest piece of kibble should be able to pass through the opening very easily. D. Finger tighten the bottom of the Flex Feeder.Note: See pages 7-11 for more details.
STEP 3 Insert the Flex Feeder into the bottom of the food container.
STEP 4 Add 3 to 5 cups of pet food.
STEP 5 Press down on both the NEXT and ADJ buttons at the same time for 3 seconds.

12
STEP 6 Find your food quantity numberA. Set a measuring cup below the food outlet.B. Press down on the MODE button for 10 seconds to show “ADJ” on the timer display. “FEEDING” will show on the top line of the timer display.C. Press the ADJ button. Food will start dispensing immediately. D. When the desired feeding portion for your pet is dispensed, press the ADJ button again. E. Write down the food quantity number for the next steps.Note: Make sure that the food outlet stays clear. If blocked, it will cause the unit to jam.
STEP 7 Set the master clockNote: You will exit out of setup mode after 60 seconds of inactivity. If you exit setup mode, start again from step 7A. Also, the Pet Feedster uses 24 hour military time (for example, 2:30PM = 14:30).
QTY
NEXTMODE ADJ
Feeding
ADJ 00

13
A. Press down on the MODE button for 3 seconds to get to the “CLOCK” menu on the timer display. B. Press the ADJ button to set the hour. Then press the MODE button when done. C. Press the ADJ button to set the minutes. Then press the MODE button when done. D. Wait for 60 seconds to exit programming.Note: The clock does not adjust for daylight savings. If you live in an area that observes daylight savings and wish to keep your pet’s feeding times you must reset the master clock.
1:00 = 1 AM
2:00 = 2 AM
3:00 = 3 AM
4:00 = 4 AM
5:00 = 5 AM
6:00 = 6 AM
7:00 = 7 AM
8:00 = 8 AM
9:00 = 9 AM
10:00 = 10 AM
11:00 = 11 AM
12:00 = 12 PM
13:00 = 1 PM
14:00 = 2 PM
15:00 = 3 PM
16:00 = 4 PM
17:00 = 5 PM
18:00 = 6 PM
19:00 = 7 PM
20:00 = 8 PM
21:00 = 9 PM
22:00 = 10 PM
23:00 = 11 PM
00:00 = 12 AM
00
NEXTMODE ADJ
Clock
00:00
14
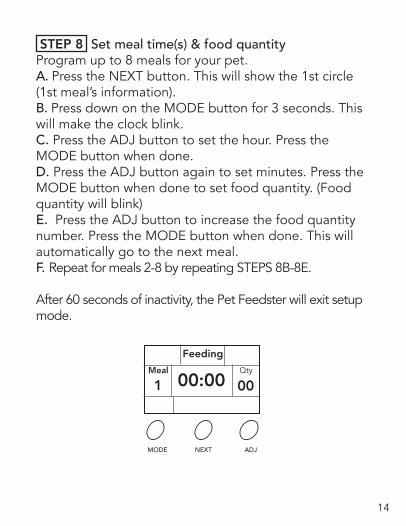
STEP 8 Set meal time(s) & food quantityProgram up to 8 meals for your pet.A. Press the NEXT button. This will show the 1st circle (1st meal’s information).B. Press down on the MODE button for 3 seconds. This will make the clock blink.C. Press the ADJ button to set the hour. Press the MODE button when done.D. Press the ADJ button again to set minutes. Press the MODE button when done to set food quantity. (Food quantity will blink)E. Press the ADJ button to increase the food quantity number. Press the MODE button when done. This will automatically go to the next meal.F. Repeat for meals 2-8 by repeating STEPS 8B-8E.
After 60 seconds of inactivity, the Pet Feedster will exit setup mode.
00
NEXTMODE ADJ
00:00Feeding
Meal Qty
1

15
TO ADJUST INDIVIDUAL MEALS (TIME OR QTY)A. Press the NEXT button.B. Press the ADJ button to scroll through all programmed meals. Arrive at the meal you would like to change.C. Press down on the MODE button for 3 seconds. The hour will start blinking. If you want to change the hour, press the ADJ button. D. When you are done or if you don’t wish to change the hour, press the MODE button. This will move to the minutes. If you wish to change your minutes, press the ADJ button. E. When you are done or if you don’t wish to change the minutes, press the MODE button. This will move to the food quantity. Press the ADJ button to adjust the food quantity.F. Wait 60 seconds to exit setup mode.
Note: To see other programmed meals or adjust other meals, wait 60 seconds and start again from step A.

16
TO PAUSE PROGRAMMINGA. Make sure you are in the master clock (not in any setup mode). If you are, wait 60 seconds to revert back to the master clock.B. Press down on the MODE and NEXT button at the same time for 3 seconds. “Pause” will appear at the top right of the timer display.C. To exit pause and turn your meals back on, press down on the MODE and NEXT button at the same time for 3 seconds.
NEXTMODE ADJ
Pause
00:00Clock
00

17
TO ERASE ALL MEAL PROGRAMMINGA. Make sure you are in the master clock (not in any setup mode). If you are, wait 60 seconds to revert back to the master clock.B. Press down on both the NEXT button and the ADJ button at the same time for 3 seconds. Note: The master clock will keep its time, but all meal information will be erased.
MANUAL FEEDING OR ADDITIONAL FEEDING BETWEEN MEALSA. Press down on the MODE button for 10 seconds to show “ADJ” on the timer display.B. Press the ADJ button and food will start dispensing. Press the ADJ button again to stop. C. When finished, allow 60 seconds for the timer display to revert back to master clock.
Watch videos, read tips, and more at petfeedster.com under Owner’s Resources.
18
FREQUENTLY ASKED QUESTIONS
Still have some questions about the Pet Feedster? Here are some frequently asked questions.
Why can’t I see the battery signal on the timer display after I plug in the AC adapter?When you unplug the AC adaptor, the timer display will show that the battery signal is on. When power fails, the Pet Feedster automatically switches to use battery power. At that time it will show battery signal.
Can I separate the main body from the base after installing the batteries to program the Pet Feedster more easily?Yes, you can!
How do I feed snacks to my pet?A. Press down on the MODE button for 10 seconds to show “ADJ” on the timer display.B. Press the ADJ button and food will start dispensing. Press the ADJ button again to stop. C. When finished, allow 60 seconds for the timer display to revert back to master clock.

19
Can I use a different bowl?Absolutely! Detach the Pet Feedster bowl and simply place your pet’s preferred bowl underneath. This is helpful if your pet must eat out of stainless steel dishes due to allergies, etc.
How do I clean the Pet Feedster?The detachable bowl is dishwasher safe on low heat, and we recommend cleaning the hopper and external surfaces of the Pet Feedster with a moist cloth every couple weeks to prevent food particles from building up.
How do I know my Pet Feedster served a meal?After each meal is successfully, served, the circle corresponding to the meal will turn into a black dot. The timer senses whether or not the motor turned and dispensed food, and marks the meal as fed or not fed by the motor’s actions.
Are there any brands of cat food you recommend?
Many customers have asked us if there are any brands of cat food that they’d recommend for use with their Pet Feedster, but all dry pet kibble between 1/8” and 3/4” in size will work.
Please consult your veterinarian for your pet’s individual nutritional needs when choosing a pet food.

20
TROUBLESHOOTING YOUR PET FEEDSTER
Your Pet Feedster has been carefully designed to give you many years of worry-free service. In the unlikely event that your new Pet Feedster does not operate satisfactorily, please try these steps.
There’s no power signal on the timer when I plug in the AC adapter. Separate the hopper from the base and clean the base’s electric plug hole. Then reinstall the base to the main body. Make sure to push down firmly on the main body to make sure the main body and base are well-connected.
It seems like an inconsistent amount of food is dispensed. This can happen with lower food quantities, but know that the total amount of food dispensed will be the same. The motor turns only so many times, so if the regular amount of food isn’t dispensed at that feeding, it’ll make up for it at the next one.
Too much food comes out at each meal. Check your Flex Feeder. Is it loose? If it’s not, adjust your Flex Feeder. For most cat food the Flex Feeder should be set to small.

21
My Pet Feedster isn’t working. 1. Check that your power is connected. Is the body firmly attached to the base? (One post connects to your AC adapter, so make sure it’s connected firmly to the base)
2. Check your Flex Feeder. Is it set to the right size? Is the largest size of food able to pass through the triangle-shaped opening easily? (Adjust to the right setting. Half sizes also work!) Is it firmly connected to the motor? (Push the Flex Feeder into the motor shaft until it catches in) Is the bottom of the Flex Feeder cracked or damaged? If so it might need to be replaced. (You can purchase replacement parts at petfeedster.com)
3. Check your timer display.
When a meal is served, the timer display will blink, the motor spins, and food is dispensed to your pet. When a meal is served sucessfully, there is a black dot for that meal’s circle.
If there were a power outage and the motor did not turn, or the connection between the motor and the timer was faulty for that meal, the timer display will read “ERR.” In that case, the circle for that meal will not be marked with a black dot, even if meals before or after were successfully served.
22
1 YEAR LIMITED WARRANTY:
The Winoe Corporation believes that you will be satisfied with our product. We warrant that our product is free from manufacturing defects when operated according to instructions enclosed with this product for a period of ninety (90) days from the date of original purchase. This warranty is non-transferable, applies solely to the original purchase, and does not extend to subsequent owners of this product.
1) Repair service is for a period of ninety (90) days from the date of original purchase at no charge for parts and labor with proof of purchase.2) Replacement of defective parts for a period of 12 months from the date of original purchase with proof of purchase. (Labor not included after initial ninety (90) days).3) This warranty does not cover costs incurred in the shipping of the product to and from consumer for service. Shipping to distributor must be prepaid and insured by UPS or another parcel delivery service.This warranty is void if the product is damaged due to: not following instructions in the manual, negligence, abuse, misuse, accidents, modification, tampering, alterations, damage from pets or other animals, faulty installation and/or acts of God, used for commercial applications or rentals, modified or repaired by anyone other than Pet Feedster.

23
RETURN POLICY:
We believe that the product we sell is of the highest quality. However, if you are not completely satisfied with the product you purchased, we would be happy to issue an exchange or refund within 30 days of the purchase date, provided the product is in its original packaging and working condition, with all parts and packing materials included. You must show proof of purchase.
If you wish to return a product within the first 30 days, please e-mail us at [email protected] or call us to let us know so that we may set up a return merchandise authorization. The maximum amount of any refund will be the cost of the merchandise minus standard or domestic ground shipping and a 15% restocking fee. We cannot refund the excess cost of expedited or overseas shipping. We do not pay for the cost of return shipping. If the product is not in working condition when it is received, you may return the product and receive a full refund. There are absolutely no refunds or returns after 60 days.

24
Manufactured and Warranted By:
Domestic and International Sales Office:[email protected]
Pet FeedsterDistributed by:
Winoe Corporation
Toll free: (877) 473-8588 Office: (909) 393-7474
Monday-Saturday, 9am-7pm [email protected]
petfeedster.com
@PetFeedster