operating manual density determination set - kern & … · operating manual . density...
TRANSCRIPT

KERN & Sohn GmbH
Ziegelei 1 D-72336 Balingen email: [email protected]
Phone: +49-[0]7433- 9933-0 Fax: +49-[0]7433-9933-149 Internet: www.kern-sohn.com
Operating Manual Density Determination Set
KERN AES-A01 Version 1.0 02/2009 GB
AES-A01-BA-e-0910
GB
KERN AES-A01 Version 1.0 02/2009 Operating Manual Density Determination Set for Analytical Balance KERN AES/AEJ
1 Introduction............................................................................................................ 3
1.1 Scope of delivery.................................................................................................................... 3
1.2 Overview of display ................................................................................................................ 5
1.3 Influencing magnitudes and error sources............................................................................. 5
2 Installing the density determination set .............................................................. 6 3 Density determination of solids............................................................................ 9
3.1 Activate function................................................................................................................... 10
3.2 Input parameter auxiliary liquid ............................................................................................ 10
3.3 Density determination sample.............................................................................................. 11
4 Density determination of solid material with a density of less than 1 g/cm3.. 13 5 Determining density of liquids............................................................................ 16
5.1 Density determination of liquids at unknown volume of the glass sinker............................. 17
5.2 Density determination of liquids at known volume of the glass sinker................................. 19
5.3 Density determination of liquids with known volume of any glass sinker ............................ 20
6 Data output in density determination mode ...................................................... 21 7 Density table of water.......................................................................................... 23 8 Recommendations............................................................................................... 24
2 AES-A01-BA-e-0910

1 Introduction These operating instructions only describe the operation of the density determination set. For further information on how to operate your balance please refer to the operating instructions supplied with each balance.
1.1 Scope of delivery
AES-A01-BA-e-0910 3

No. Designation
1 Frame
2 Thermometer
3 Immersion basket
4 Pitcher
5 Platform for glass pitcher
6 Pincers
Height adjustment device
Glass plummet
Operating Manual
4 AES-A01-BA-e-0910

1.2 Overview of display
0.0000 gD
The balance is in density determination mode
above left: density determination activated
above right: [density of sample]
center right [volume of the sample]
1.3 Influencing magnitudes and error sources Air pressure Temperature
Volume deviance of the sinker (± 0.005 cm3) Surface tension of the liquid Air bubbles Immersion depth of the sample dish of sinker Porosity of the solid
AES-A01-BA-e-0910 5

2 Installing the density determination set
Remove weighing plate and carrier of weighing plate. Do not remove shielding ring.
Screw down frame in the center acc. to. fig..
6 AES-A01-BA-e-0910

Assemble platform for pitcher according to fig.
Place pitcher in the centre of the platform
AES-A01-BA-e-0910 7

Suspend the immersion basket from the center of the frame.
• When the density set is installed, correct adjustment is not possible. For reasons of adjustment, take away the density set and place the weighing plate.
• To interrupt measuring, press the PRINT-key. [STOP] is briefly displayed, the balance returns to the weighing display.
8 AES-A01-BA-e-0910
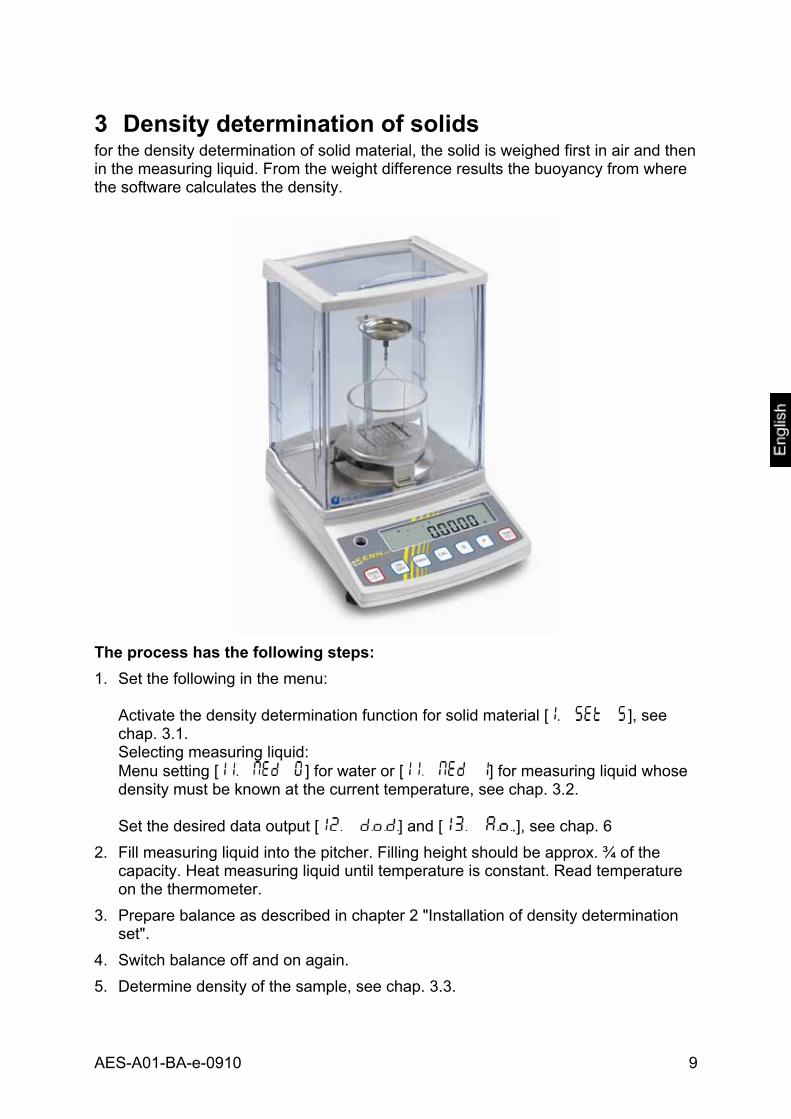
3 Density determination of solids for the density determination of solid material, the solid is weighed first in air and then in the measuring liquid. From the weight difference results the buoyancy from where the software calculates the density.
The process has the following steps: 1. Set the following in the menu:
Activate the density determination function for solid material [ ], see chap. 3.1. Selecting measuring liquid: Menu setting [ ] for water or [ ] for measuring liquid whose density must be known at the current temperature, see chap. 3.2. Set the desired data output [ ] and [ .], see chap. 6
2. Fill measuring liquid into the pitcher. Filling height should be approx. ¾ of the capacity. Heat measuring liquid until temperature is constant. Read temperature on the thermometer.
3. Prepare balance as described in chapter 2 "Installation of density determination set".
4. Switch balance off and on again. 5. Determine density of the sample, see chap. 3.3.
AES-A01-BA-e-0910 9

3.1 Activate function
In weighing mode keep the F-key pressed down until [ ] appears on the display. Release button. The first menu item showing the current setting will be displayed.
Fonm
Using the TARE button, select the density determination mode
„Density determination of solids„ or
„Density determination of liquids“ Press and hold the F-key until the next menu item
appears that is used for selecting the auxiliary liquid.
• [ 0 ] : Distilled water
• [ 1 ] : Measuring your choice of liquid, density of which is known
Confirm by pressing the S-key.
0.0000 gD
3.2 Input parameter auxiliary liquid
If distilled water [ ] was selected as measuring liquid, water temperature will be input (input range 0.0 to 99.9°). The density of distilled water at different temperatures is stored in the balance, so the temperature input is sufficient.
Press and hold the TARE-key until the flashing display used for entering water temperature appears. Each time the TARE-key is pressed, numbers will run through from 0-9 and the decimal point.
Select the number to be changed using F key (the active position flashes):
Confirm by pressing the S-key.
0.0000 gD
0⇒1⇒2~9
10 AES-A01-BA-e-0910

If a measuring liquid of your choice [ ] was selected, its density is input (input range 0.0001 to 9.9999 g/cm3).
Press and hold the TARE-key until the flashing display used for entering density appears. Each time the TARE-key is pressed, numbers will run through from 0-9 and the decimal point.
Select the number to be changed using F key (the active position flashes):
Confirm by pressing the S-key.
1.0000D
0.0000 gD
0⇒1⇒2~9
3.3 Density determination sample
1. Switch-on balance using the ON/OFF buttons and reset to zero using the TARE button. 0.0000 g
D
Weight of the sample in air 2. Place sample in the upper sample dish. 3. Wait until the weight display of the weighing
balance has become stable and then press the S-button. [ ] appears shortly, followed by a flashing M-display.
4. The weight of the „sample in air“ is displayed. [ ] indicates that the weight of the “sample in air“ has been saved.
5. [
i
n ] flashes shortly, followed by the weight display.
AES-A01-BA-e-0910 11
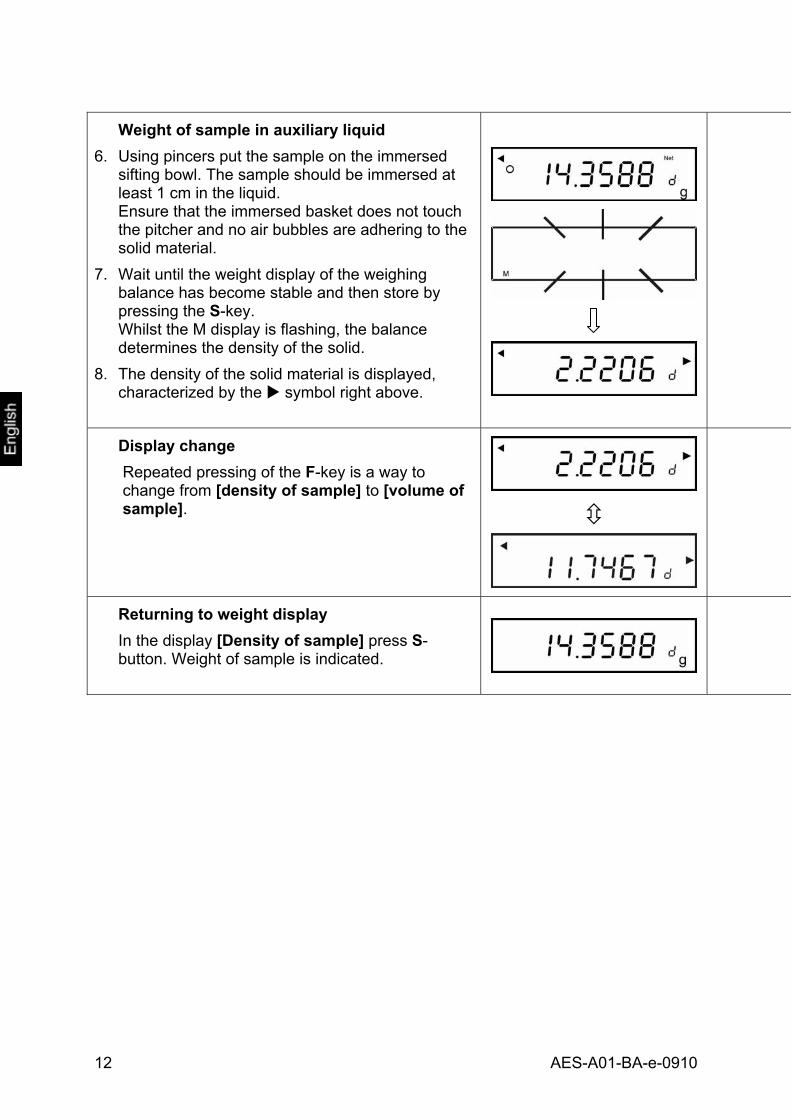
Weight of sample in auxiliary liquid 6. Using pincers put the sample on the immersed
sifting bowl. The sample should be immersed at least 1 cm in the liquid. Ensure that the immersed basket does not touch the pitcher and no air bubbles are adhering to the solid material.
7. Wait until the weight display of the weighing balance has become stable and then store by pressing the S-key. Whilst the M display is flashing, the balance determines the density of the solid.
8. The density of the solid material is displayed, characterized by the symbol right above.
Display change Repeated pressing of the F-key is a way to change from [density of sample] to [volume of sample].
Returning to weight display In the display [Density of sample] press S-button. Weight of sample is indicated.
12 AES-A01-BA-e-0910
4 Density determination of solid material with a density of less than 1 g/cm3
At solid material with density less than 1 g/cm3 , a density determination with two different methods is possible. Method 1: As measuring density a liquid with less density than that of the solid material, e.g. ethanol approx. 0.8 g/cm3. This method should be applied when the density of the solid is just slightly different from that of the distilled water. Using ethanol is not recommended, when the solid material is being attacked.
When working with ethanol, you must observe the applicable safety regulations.
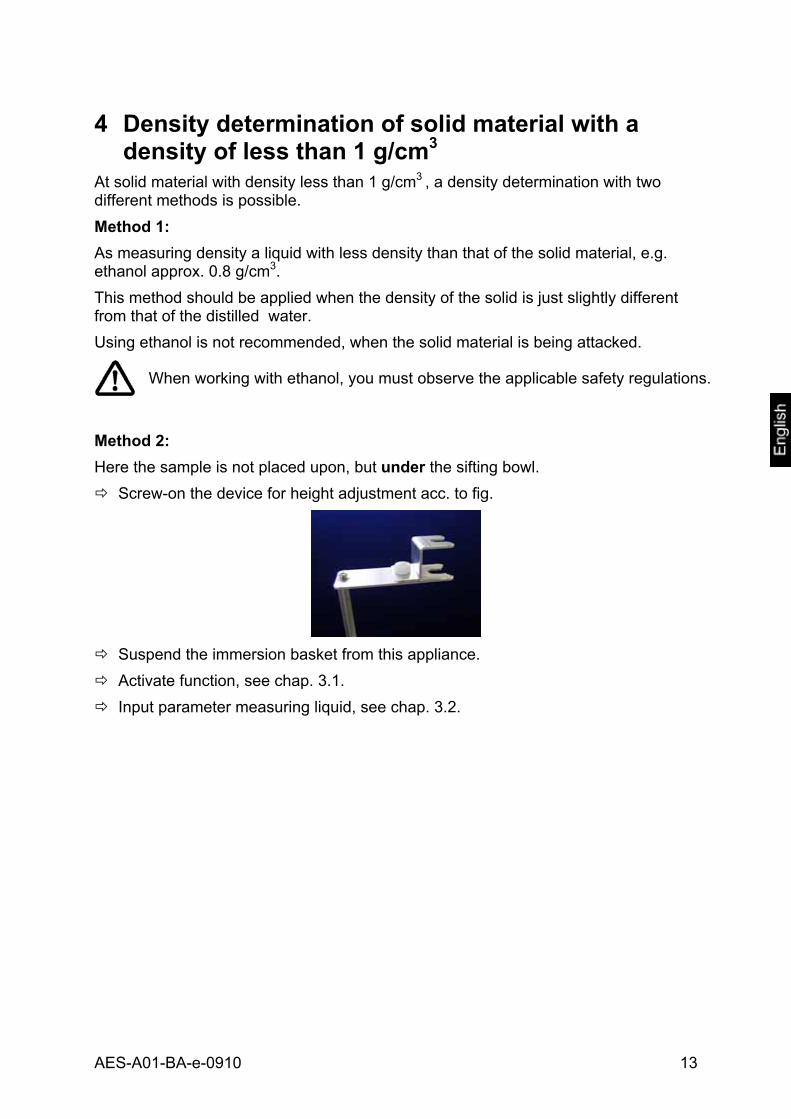
Method 2: Here the sample is not placed upon, but under the sifting bowl.
Screw-on the device for height adjustment acc. to fig.
Suspend the immersion basket from this appliance. Activate function, see chap. 3.1. Input parameter measuring liquid, see chap. 3.2.
AES-A01-BA-e-0910 13

Density determination sample
1. Switch-on balance using the ON/OFF buttons and reset to zero using the TARE button. 0.0000 g
D
Weight of the sample in air 2. Place sample in the upper sample dish. 3. Wait until the weight display of the weighing
balance has become stable and then press the S-button. [ ] appears shortly, followed by a flashing M-display.
4. The weight of the „sample in air“ is displayed. [ ] indicates that the weight of the “sample in air“ has been saved.
5. [
i
n ] flashes shortly, followed by the weight display.
Weight of sample in auxiliary liquid 6. Using pincers or similar place the sample directly
under the sifting bowl. 7. Wait until the weight display of the weighing
balance has become stable and then store by pressing the S-key. Whilst the M display is flashing, the balance determines the density of the solid.
8. The density of the solid material is displayed, characterized by the symbol right above.
14 AES-A01-BA-e-0910

Display change Repeated pressing of the F-key is a way to change from [density of sample] to [volume of sample].
Returning to weight display In the display [Density of sample] press S-button. Weight of sample is indicated.
0.0000 gD
To interrupt measuring, press the PRINT-key. [STOP] is briefly displayed, the balance returns to the weighing display.
AES-A01-BA-e-0910 15

5 Determining density of liquids For density determination of liquids, a glass sinker is used, whose volume is known. The glass sinker is weighed first in air and then in the liquid whose density is to be determined. From the weight difference results the buoyancy from where the software calculates the density. At an unknown volume of the glass sinker, this is determined before the density determination of the sample, see chap. 5.1. The process has the following steps: 1. Set the following in the menu:
Activate the density determining function for liquids [ ], see chap. 3.1. If necessary, select the measuring liquid for the volume determination of the glass sinker. Menu setting [ ] for water or [ ] for measuring liquid whose density must be known at the current temperature, see chap. 3.2. Set the desired data output [ ] and [ .], see chap. 6
2. If necessary, fill measuring liquid for volume determination of the glass sinker into the pitcher. Filling height should be approx. ¾ of the capacity. Heat measuring liquid until temperature is constant. Read temperature on the thermometer.
3. Prepare balance as described in chapter 2 "Installation of density determination set".
4. Prepare glass sinker or similar 5. Switch balance off and on again. 6. Determine volume of the glass sinker, see chap. 5.1. 7. Determine density of the sample. Fill sample liquid into the pitcher. Filling height
should be approx. ¾ of the capacity. Heat sample liquid until temperature is constant.
16 AES-A01-BA-e-0910

5.1 Density determination of liquids at unknown volume of the glass sinker
1. Switch-on balance using the ON/OFF buttons and reset to zero using the TARE button. 0.0000 g
D
Weight of the glass sinker in air 2. Place glass sinker in the upper sample dish. 3. Wait until the weight display of the weighing
balance has become stable and then press the S-key. [ ] appears shortly, followed by a flashing M-display.
4. The weight of the „glass sinker in air“ is displayed. [ ] indicates that the weight of the “glass sinker in air“ has been saved.
5. [
i
n ] flashes shortly, followed by the weight display.
Weight of the glass sinker in the measuring liquid 6. Using pincers put the glass sinker into the
immersed lower sifting bowl. The glass sinker should be immersed at least 1 cm in the liquid. Ensure that the immersed basket does not touch the pitcher and no air bubbles are adhering to the glass sinker.
7. Wait until the weight display of the weighing balance has become stable and then store by pressing the S-key. Whilst the M display is flashing, the balance determines the density of the glass sinker.
8. The density of the glass sinker is displayed, characterized by the symbol right above.
AES-A01-BA-e-0910 17
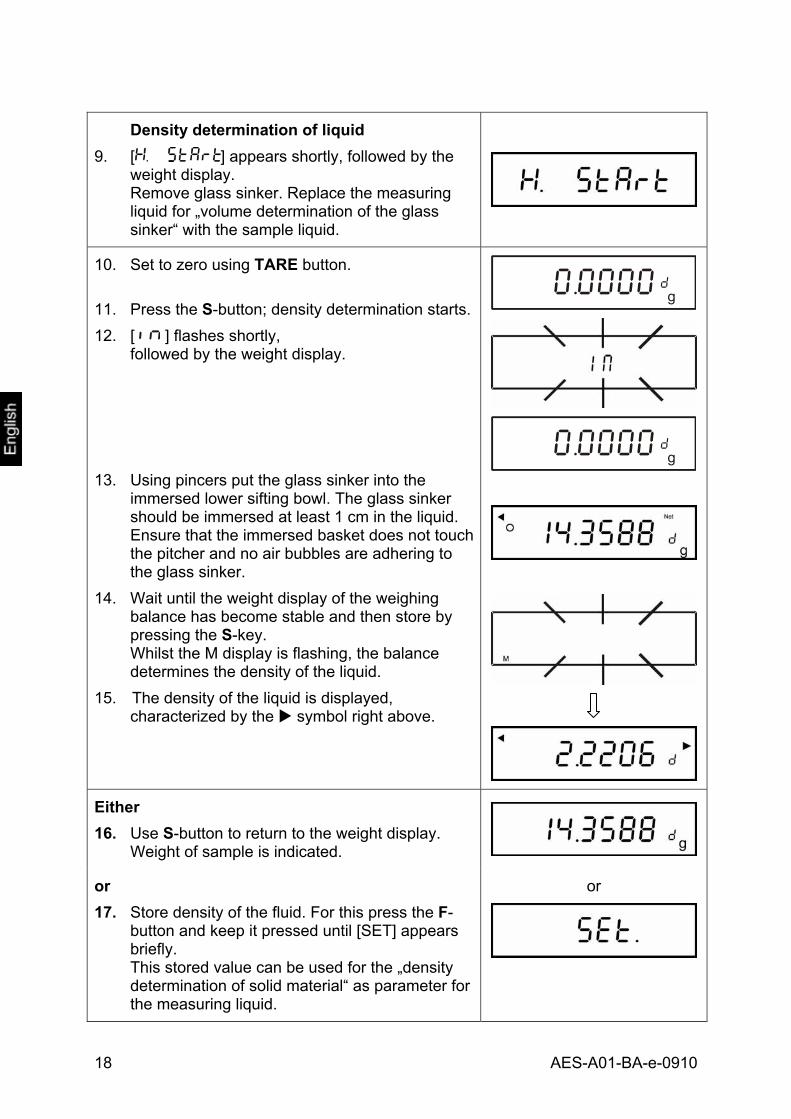
Density determination of liquid 9. [ ] appears shortly, followed by the
weight display. Remove glass sinker. Replace the measuring liquid for „volume determination of the glass sinker“ with the sample liquid.
10. Set to zero using TARE button.
11. Press the S-button; density determination starts. 12. [
i
n ] flashes shortly, followed by the weight display.
13. Using pincers put the glass sinker into the
immersed lower sifting bowl. The glass sinker should be immersed at least 1 cm in the liquid. Ensure that the immersed basket does not touch the pitcher and no air bubbles are adhering to the glass sinker.
14. Wait until the weight display of the weighing balance has become stable and then store by pressing the S-key. Whilst the M display is flashing, the balance determines the density of the liquid.
15. The density of the liquid is displayed, characterized by the symbol right above.
0.0000 gD
0.0000 gD
Either 16. Use S-button to return to the weight display.
Weight of sample is indicated.
or 17. Store density of the fluid. For this press the F-
button and keep it pressed until [SET] appears briefly. This stored value can be used for the „density determination of solid material“ as parameter for the measuring liquid.
or
18 AES-A01-BA-e-0910

5.2 Density determination of liquids at known volume of the glass sinker If the volume of the glass sinker has been determined as described in the previous chapter 5.1, this value remains stored in the balance until it will be overwritten. So in the subsequent measurements this step can be skipped.
1. Set balance to zero using TARE button. 0.0000 gD
2. Place glass sinker in the upper sample dish. 3. Wait until the weight display of the weighing
balance has become stable and then press the S-key. [ ] appears briefly, during this display press the S-button anew.
4. [ ] appears shortly, followed by the weight display.
5. Remove the glass sinker from the upper sample dish. If required, tare by using TARE button.
6. Press the S-button; density determination starts. 7. [
i
n ] flashes shortly, followed by the weight display.
8. Using pincers put the glass sinker into the
immersed lower sifting bowl. The glass sinker should be immersed at least 1 cm in the sample liquid. Ensure that the immersed basket does not touch the pitcher and no air bubbles are adhering to the glass sinker.
9. Wait until the weight display of the weighing balance has become stable and then store by pressing the S-key. Whilst the M display is flashing, the balance determines the density of the sample liquid.
10. The density of the sample liquid is displayed, characterized by the symbol right above.
0.0000 gD
0.0000 gD
AES-A01-BA-e-0910 19

Either 11. Use S-button to return to the weight display.
Weight of sample is indicated.
or 12. Store density of the fluid. For this press the F-
button and keep it pressed until [SET] appears briefly. This stored value can be used for the „density determination of solid material“ as parameter for the measuring liquid.
5.3 Density determination of liquids with known volume of any glass sinker If the mass and the density of the glass sinker are known, the software calculates the volume of the glass sinker.
Set parameter 1. Press and keep pressed TARE button. The first
parameter for water temperature input flashes.
2. Press the S-button, the parameter “mass sinker” will appear.
3. Enter desired value. Each time the TARE-key is pressed, numbers will run through from 0-9 and the decimal point.
Select the number to be changed using F key (the active position flashes):
4. Press the S-button to acknowledge input, the parameter “density sinker” will appear.
5. Repeat steps 3 and 4.
0.0000 gD
Water temperature
Mass of the sinker
Density of the sinker
0.0000 gD
How to carry out density determination of a liquid, see chapter 5.2
0⇒1⇒2~9
20 AES-A01-BA-e-0910

6 Data output in density determination mode In density determination mode, data output will take place after this was set in menu item [ .], regardless of the settings in menu item [ ], see chapter 10.1.5 „Operating Instructions of the Balance“. The content of the data output is defined in the menu item [ ].
In weighing mode keep the F-button pressed down until [ ] appears on the display. Release button. The first menu item showing the current setting will be displayed.
Fonm
Press repeatedly the F-button until [ ] appears with the current setting.
Select the desired setting by pressing the TARE-button.
• [ 0 ] : Only output measuring value density
• [ 1 ] : Output of all density parameters Confirm by pressing the S-button, the balance will
return to weighing mode. or
Use the F button to call-up the next menu item [ .].
Select the desired setting by pressing the TARE-button.
• [ 0 ] : Automatic data output OFF
• [ 1 ] : Automatic data output ON Press the S-button; balance will return to weighing
mode.
0.0000 gD
AES-A01-BA-e-0910 21
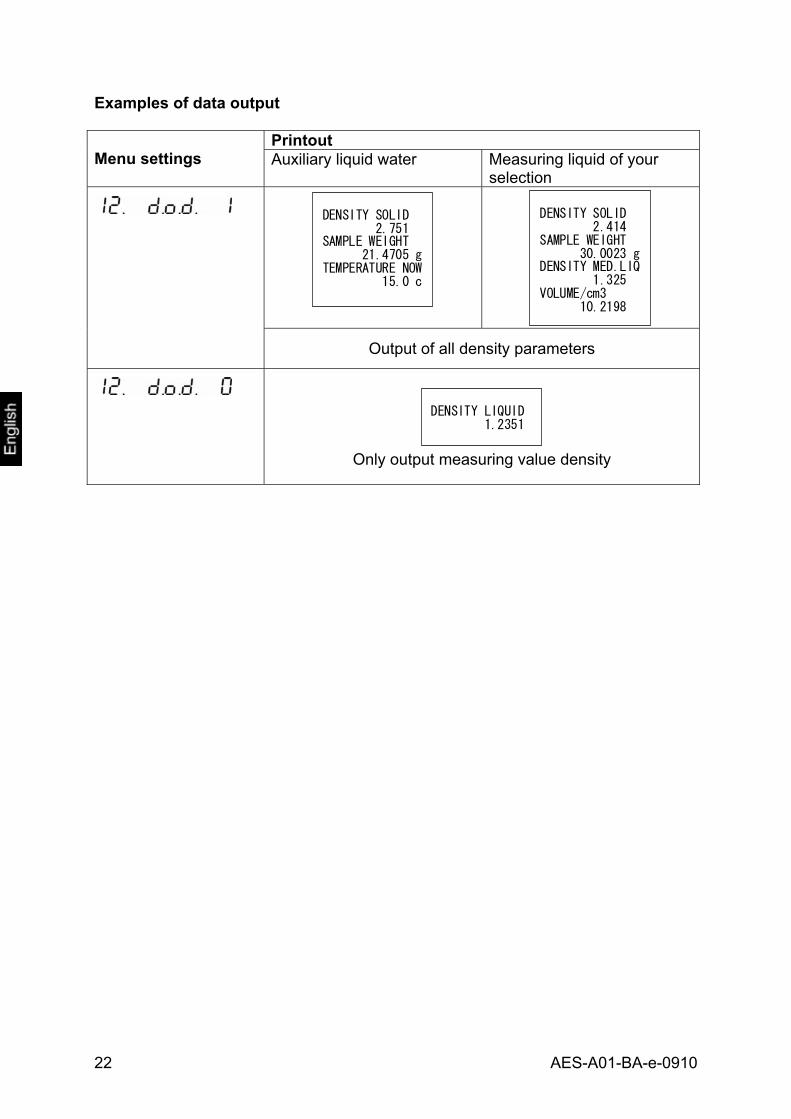
Examples of data output
Printout Menu settings Auxiliary liquid water Measuring liquid of your
selection
DENSITY SOLID2.751
SAMPLE WEIGHT21.4705 g
TEMPERATURE NOW15.0 c
DENSITY SOLID2.414
SAMPLE WEIGHT30.0023 g
DENSITY MED.LIQ1.325
VOLUME/cm310.2198
Output of all density parameters
DENSITY LIQUID
1.2351
Only output measuring value density
22 AES-A01-BA-e-0910

7 Density table of water
* the asterisk means that the cipher left from the comma is reduced by 1. Table from "Mass determination" by M. Kochsiek, M. Gläser
AES-A01-BA-e-0910 23
24 AES-A01-BA-e-0910
8 Recommendations • To form a reproducible mean value several density measurement are necessary • Remove fat from solvent-resistant sample /glass sinker /pitcher. • Regularly clean sample dishes /glass sinker /pitcher, do not touch immersed part
with your hands • Dry sample/glass sinker/pincers after each measurement. • Adjust sample size to sample dish (ideal sample size > 5 g). • Only use distilled water. • When immersing for the first time, lightly shake sample dishes and sinker, in order
to dissolve air bubbles. • Always ensure that, when re-immersing into the liquid no additional bubbles
adhere; it is better to use pincers to place the sample. • Remove firmly adherent air bubbles with a fine brush or a similar tool. • To avoid adherent air bubbles smoothen samples with rough surface. • Ensure that when weighing "Sample in measuring liquid", no water drips from the
pincers onto the upper sample dish. • In order to reduce the surface tension of water and the friction of the liquid on the
wire, add three drops of a common detergent (washing-up liquid) to the measuring liquid water occurring due to the addition of tensides can be ignored).
• Oval samples can be held more easily with pincers when you cut grooves into them.
• The density of porous solids may only be determined approximately. Buoyancy errors occur when not all the air is eliminated from the pores during immersion in the measuring fluid.
• To avoid great vibrations of the balance, place sample carefully. • Avoid static charging, e.g. Dry the glass sinker only with a cotton cloth. • If the density of your solid only deviates slightly from that of distilled water,
ethanol may be used as measuring fluid. However, check beforehand whether the sample is solvent-proof. In addition you must observe the applicable safety regulations when working with ethanol.
• Handle glass sinker with care (no warranty claims in case of damage).