operation and maintenance manual mix proof …bidonequipment.info/s/spx - waukesha cherry...read and...
TRANSCRIPT

Read and understand this manualprior to installing, operating or servicing this equipment.
Operation and Maintenance ManualMix Proof Valves
(in O.D. Tubing Sizes)W75CP PMO Mix Proof

Waukesha Cherry-Burrell Table of Contents
Waukesha Cherry-Burrell Warranty ............................................... 3Shipping Damage or Loss .............................................................................3Warranty Claim .............................................................................................3
Safety .................................................................................................... 4Care of Stainless Steel ......................................................................... 5
Stainless Steel Corrosion ..............................................................................5Elastomer Seal Replacement Following Passivation ....................................5
Introduction ......................................................................................... 6General Information ......................................................................................6Factory Inspection .........................................................................................6Models and Specifications ............................................................................6Applications ..................................................................................................6Equipment Serial Number ............................................................................6Operating Parameters ....................................................................................7
Temperature Range: ..........................................................................7Seat Options ..................................................................................................7Pressure Ratings ............................................................................................7
Installation ........................................................................................... 8Location ........................................................................................................8Welding Instructions .....................................................................................8Air Supply .....................................................................................................8Flow Direction ..............................................................................................8Fittings ..........................................................................................................8Pipeline Support ............................................................................................9Installing Valve Manifolds ...........................................................................9Installing the Valve .......................................................................................9Quality of Control Air to Control Module ....................................................9
Operation ............................................................................................. 10Solenoid Valve Port Connections .................................................................10Automatic Fail-Safe System .........................................................................11Valve Operating Conditions .........................................................................12
Valve Open .......................................................................................12Valve Closed .....................................................................................12Valve Closed, Upper Seat Lifted ......................................................12Valve Closed, Lower Seat Push ........................................................12
Test Procedures .............................................................................................13Stem Gauge .......................................................................................13Positive Fail-Safe Detection Test .....................................................13Test Procedures for confirmation of control system seat lifting
interlock during operation ...........................................................14Maintenance ......................................................................................... 15
Maintenance Intervals ...................................................................................15Inspection ......................................................................................................15Lubrication ....................................................................................................15Cleaning ........................................................................................................15
Cleaning-In-Place (CIP) ...................................................................15Cleaning Procedure ...........................................................................16
September 2008 95-03094 Page 1

Table of Contents Waukesha Cherry-Burrell
Non-Adjustable Seat Lifting .........................................................................16Removing Valve from System ......................................................................16Disassembly of Valve Stems ........................................................................17Adapter Bearings and O-rings ......................................................................17Inner O-ring and Bearing Replacement ............................................17Outer O-ring Replacement ................................................................18
Tri Ring Seat Replacement ...........................................................................18Radial Seal Installation .................................................................................19Lower Bearing Carrier O-ring and Bearing Replacement ............................20Actuator O-ring and Bearing Replacement ..................................................20Switches ........................................................................................................22
Micro Switch .....................................................................................22Proximity Switch ..............................................................................22Wiring Diagram ................................................................................23
Parts Lists ............................................................................................. 24W75CP PMO Double Seat Mix Proof Valves ..............................................24W75CP PMO Double Seat Mix Proof Valve Actuator ................................26W75CP PMO Double Seat Mix Proof Valve Bodies ...................................28W75CP PMO Double Seat Mix Proof Valve Stems .....................................28
Troubleshooting ................................................................................... 29
Page 2 95-03094 September 2008

Waukesha Cherry-Burrell Warranty
September 2008 95-03094 Page 3
Waukesha Cherry-Burrell Warranty
Seller warrants its products to be free from defect in materials and workmanship for a period of one (1) year from the date of shipment. This warranty shall not apply to products which require repair or replacement due to normal wear and tear or to products which are subjected to accident, misuse or improper maintenance. This warranty extends only to the original Buyer. Products manufactured by others but furnished by Seller are exempted from this warranty and are limited to the original manufacturer’s warranty.
Seller’s sole obligation under this warranty shall be to repair or replace any products that Seller determines, in its discretion, to be defective. Seller reserves the right either to inspect the products in the field or to request their prepaid return to Seller. Seller shall not be responsible for any trans-portation charges, duty, taxes, freight, labor or other costs. The cost of removing and/or installing products which have been repaired or replaced shall be at Buyer’s expense.
Seller expressly disclaims all other warranties, express or implied, including without limitation any warranty of merchantability of fitness for a particular purpose. The foregoing sets forth Seller’s entire and exclusive liability, and Buyer’s exclusive and sole remedy, for any claim of damages in connection with the sale of products. In no event shall Seller be liable for any special consequential incidental or indirect damages (including without limitation attorney’s fees and expenses), nor shall Seller be liable for any loss of profit or material arising out of or relating to the sale or operation of the products based on contract, tort (including negligence), strict liability or otherwise.
Shipping Damage or Loss
If equipment is damaged or lost in transit, file a claim at once with the delivering carrier. The car-rier has signed the Bill of Lading acknowledging that the shipment has been received from WCB in good condition. WCB is not responsible for the collection of claims or replacement of materials due to transit shortages or damages.
Warranty Claim Warranty claims must have a Returned Goods Authorization (RGA) from the Seller before returns will be accepted.
Claims for shortages or other errors, exclusive of transit shortages or damages, must be made in writing to Seller within ten (10) days after delivery. Failure to give such notice shall constitute acceptance and waiver of all such claims by Buyer.

Safety Waukesha Cherry-Burrell
Page 4 95-03094 September 2008
SafetyREAD AND UNDERSTAND THIS MANUAL
PRIOR TO INSTALLING, OPERATING OR SERVICING THIS EQUIPMENT
Waukesha Cherry-Burrell recommends users of our equipment and designs follow the latest Industrial Safety Standards. At a min-imum, these should include the industrial safety requirements established by:
1. Occupational Safety and Health Administration (OSHA), Title 29 of the CFR Section 1910.212- General Requirements for all Machines
2. National Fire Protection Association, ANSI/NFPA 79 ANSI/NFPA 79- Electrical Standards for Industrial Machinery
3. National Electrical Code, ANSI/NFPA 70 ANSI/NFPA 70- National Electrical Code ANSI/NFPA 70E- Electrical Safety Requirement for Employee Workplaces
4. American National Standards Institute, Section B11
Attention: Servicing energized industrial equipment can be hazardous. Severe injury or death can result from electrical shock, burn, or unintended actuation of controlled equipment. Recommended practice is to disconnect and lockout industrial equipment from power sources, and release stored energy, if present. Refer to the National Fire Protection Association Standard No. NFPA70E, Part II and (as applicable) OSHA rules for Control of Hazardous Energy Sources (Lockout-Tagout) and OSHA Electri-cal Safety Related Work Practices, including procedural requirements for:
• Lockout-tagout
• Personnel qualifications and training requirements
• When it is not feasible to de-energize and lockout-tagout electrical circuits and equipment before working on or near exposed circuit parts
Locking and Interlocking Devices: These devices should be checked for proper working condition and capability of performing their intended functions. Make replacements only with the original manufacturer’s renewal parts or kits. Adjust or repair in accor-dance with the manufacturer’s instructions.
Periodic Inspection: Industrial equipment should be inspected periodically. Inspection intervals should be based on environmental and operating conditions and adjusted as indicated by experience. At a minimum, an initial inspection within 3 to 4 months after installation is recommended. Inspection of the electrical control systems should meet the recommendations as specified in the National Electrical Manufacturers Association (NEMA) Standard No. ICS 1.3, Preventative Maintenance of Industrial Control and Systems Equipment, for the general guidelines for setting-up a periodic maintenance program.
Replacement Equipment: Use only replacement parts and devices recommended by the manufacturer to maintain the integrity of the equipment. Make sure the parts are properly matched to the equipment series, model, serial number, and revision level of the equipment.
Warnings and cautions are provided in this manual to help avoid serious injury and/or possible damage to equipment:
DANGER: marked with a stop sign. Immediate hazards which WILL result in severe personal injury or death.
WARNING: marked with a warning triangle. Hazards or unsafe practices which COULD result in severe personal injury or death.
CAUTION: marked with a warning triangle. Hazards or unsafe practices which COULD result in minor personal injury or product or property damage.

Waukesha Cherry-Burrell Care of Stainless Steel
September 2008 95-03094 Page 5
Care of Stainless Steel
Stainless Steel Corrosion
Corrosion resistance is greatest when a layer of oxide film is formed on the surface of stainless steel. If film is disturbed or destroyed, stainless steel becomes much less resistant to corrosion and may rust, pit or crack.
Corrosion pitting, rusting and stress cracks may occur due to chemical attack. Use only cleaning chemicals specified by a reputable chemical manufacturer for use with 300 series stainless steel. Do not use excessive concentrations, temperatures or exposure times. Avoid contact with highly corro-sive acids such as hydrofluoric, hydrochloric or sulfuric. Also avoid prolonged contact with chlo-ride-containing chemicals, especially in presence of acid. If chlorine-based sanitizers are used, such as sodium hypochlorite (bleach), do not exceed concentrations of 150 ppm available chlorine, do not exceed contact time of 20 minutes, and do not exceed temperatures of 104°F (40°C).
Corrosion discoloration, deposits or pitting may occur under product deposits or under gaskets. Keep surfaces clean, including those under gaskets or in grooves or tight corners. Clean immedi-ately after use. Do not allow equipment to set idle, exposed to air with accumulated foreign mate-rial on the surface.
Corrosion pitting may occur when stray electrical currents come in contact with moist stainless steel. Ensure all electrical devices connected to the equipment are correctly grounded.
Elastomer Seal Replacement Following Passivation
Passivation chemicals can damage product contact areas of WCB equipment. Elastomers (rubber components) are most likely to be affected. Always inspect all elastomer seals after passivation is completed. Replace any seals showing signs of chemical attack. Indications may include swelling, cracks, loss of elasticity or any other noticeable changes when compared with new components.

Introduction Waukesha Cherry-Burrell
Introduction For control top information, please refer to publication 95-03077 (three-piece);for two-piece, see publication 95-03083. For additional product information, please see our web site at http://www.spxpe.com/sites/wcb/literature.asp.
General Information Information in this manual should be read by all personnel involved in installation, setup, operation, and maintenance.
Always use installation tools and lubricants recommended by Waukesha Cherry-Burrell. Waukesha Cherry-Burrell products are subject to intensive intermediate and final leakage and functional tests.
Waukesha Cherry-Burrell Mix Proof valves meet standards for sanitation, design and style.
W75CP PMO Mix Proof valves are double seat shutoff valves for separating different media. Valves are equipped with a drain/vent for the space between the seats equal in size to the largest port into the valve body. Seats are tended by stems equipped with electrical switches capable of signaling whether the upper and/or lower seat is in proper location. W75CP PMO valves are air operated (air-to-raise).
Factory Inspection Each Waukesha Cherry-Burrell valve is shipped completely assembled, lubricated, and ready for use.
Models and Specifications Materials• Product Wetted: ASTM 316L (UNS-S31603); (DIN-1.4404)
AL6XN upon request
• Non-Product: ASTM 304 (UNS-S30400); (DIN-1.4301)
• Elastomers: EPDM (optional); FKM (standard); FFKM upon request
Applications W75CP PMO valves allow for separation of milk and milk products from cleaning and sanitizing solutions; single seat lift while milk is in the opposite housing; and are designed for installation in a milk processing system operating in compliance with the Pasteurized Milk Ordinance and M-A-76 Supplement #1. These valves are PMO Section 7, Item 15p(B) compliant, and meet 3-A standards for sanitation and 85 standard for double seat mix proof valves.
WARNING: PMO Double Seat Mix Proof valves cannot be used to separate raw milk and milk products from pasteurized milk, milk products, and other comestibles.
Equipment Serial Number Waukesha Cherry-Burrell valves are identified by a serial number found on the label on the actuator cylinder.
Figure 1 - Serial Number Label
Page 6 95-03094 September 2008

Waukesha Cherry-Burrell Introduction
Operating Parameters Temperature Range:The recommended operating temperature is determined by the material used for the seals. No special precautions are required for applications within a temperature range of 32°F to 180°F (0°C to 82°C).
For applications above 190°F (88°C), clearances can be affected by excessive thermal expansion when the valve is installed in compact fabrications or manifolds. Valve bodies have thicker cross-sections than tubing, but thermal expansion can affect clearances in interconnecting piping sections.
This valve is NOT designed to be used under aseptic or near aseptic conditions and temperatures.
If operating below 32°F (0°C):• Ensure that the control air has an appropriately low dew point.• Protect the valve stems from icing to ensure a long working life for the valve
stem seals.Solenoid valves should not be used in the control module in room environments below 32°F (0°C) and over 180°F (82°C), as their function cannot be guaranteed. In those cases, install the solenoid valves in a separate solenoid cabinet.
Seal Material: Fluorelastomer (FKM) EPDMThermal Range of Application:
32°F to 375°F (0°C to 190°C)
0°F to 275°F (-18°C to 135°C)
Chemical Resistance:
Contact WCB Application Engineering for other fluid compatibility.
Silicone oil and greaseAliphatic, chlorinated, and aromatic hydrocarbonsOils and fatsOzone, aging, and weather resistant
Hot water and steam up to 275°F (135°C)Many organic and inorganic acidsCleaning agents, soda and potassium alkalisSilicone oil and greaseMany polar solvents (alcohols, ketones, esters)Ozone, aging, and weather resistant
Not compatible with:
Superheated steamFormic and acetic acids
Mineral oil products (oils, greases, and fuels)
Seat OptionsNOTE: For higher temperature applications than those listed, please consult the factory. *Operating conditions such as flow rate and pressure must be considered when operating near the maximum temperature rating.
SEAT TYPE MATERIAL / MAXIMUM TEMP.
Tri Ring (TR) - Upper EPDM Operation 280°F (137°C)
Sterile 275°F (135°C)
Blocker Insert or
Radial - Lower FKM Operation 350°F (176°C) Sterile (Consult Factory)
Pressure Ratings Operating Pressure: 1-1/2"-3" sizes = 150 psi (10.3 bar) 4"- 6" size = 90 psi (6.2 bar)
Holding Pressure: All sizes = 150 psi (10.3 bar)
September 2008 95-03094 Page 7

Installation Waukesha Cherry-Burrell
InstallationCAUTION: When installing the valve, ensure that no foreign materials (e.g. tools, screws, welding wire, lubricants, cloths, etc.) are enclosed in the system.
Location The valve must be in a vertical position to ensure that the vent/drain outlet system functions properly.
Locate the valve for easy access for inspection and ensure that the valves and pipe systems drain properly.
CAUTION: Before performing maintenance, isolate all products away from the valve.
Welding Instructions Prior to installing, thoroughly inspect each valve.
For Mix Proof valves with welded connections, perform the following before installation:
CAUTION: Before attempting to buttweld an automatic valve into a line, disassemble the body from the actuator. Dissipate heat away from the valve body to prevent warping.
• Before installation, remove the stem actuator assembly and lower bearing carrier.
• Remove all seals from the body.
• Weld the body into position, ensuring that the connection is free of tension and distortion.
CAUTION: Welding must be carried out by qualified personnel.
For manifold welding, fixture tables are recommended. Matrix manifold welding requires a controlled deliberate process to maintain the alignment of the parts.
Air Supply Install the valves using dry, filtered air. Lubrication is not required. If using lubricated air, refer to the solenoid manufacturer’s specifications.
Flow Direction The valves should be installed to close against the flow to prevent hammering.
Fittings When using suitable fittings, Mix Proof valves with detachable connections can be installed in a pipe system per the fitting requirements. The valve must be installed free of tension. After the valve is installed in the pipe system, attach the control air hoses and connect them to the electrical supply.
Contact WCB at 1-800-252-5200 for more information on our wide variety of fittings for all applications.
Page 8 95-03094 September 2008

Waukesha Cherry-Burrell Installation
Pipeline Support. Install adequate supports to prevent strain on the fittings, valves, and equipmentconnections.
1. Install supports at least every 10 feet on straight runs of piping (Figure 2, item C).
2. Install supports on both sides of the valves as close as possible to the connections (Figure 2, item D).
3. Install supports at each change of pipeline direction (Figure 2, item E and F).
4. For pipelines passing through walls, floors or ceilings, provide at least 1 inch (25 mm) of clearance around the pipe to allow for expansion and contraction (Figure 2, item G).
CAUTION: In higher temperature applications, ensure proper accomodation for thermal expansion in the pipeline design to minimize stresses on the valve bodies. Excessive mechanical and thermal stresses can distort and damage the valve bodies.
Installing Valve Manifolds Install automatic valve manifolds with a uniform pitch for proper drainage. Elevate one corner of the cluster and pitch 1/16" per foot (1.59 mm per meter) if desired. Arrange the supports for the floor-mounted valve manifolds to provide alignment of the inlet and outlet lines.
Installing the Valve 1. If solenoids are mounted in a control top, connect the air supply lines to “air in.” If the solenoids are mounted externally from the control top, connect the air lines as explained in “Solenoid Valve Port Connections” on page 10.
2. Using caution, lift the actuator assembly and set the actuator in the body assembly.
3. Lower the valve slowly into the body, making sure the lower stem enters the lower bearing carrier.
4. Tightly clamp the yoke/body flange.
5. Connect the air lines to A, B, and C. See Figure 4 on page 10.
6. Connect the electrical control cord to the valve through location A shown in Figure 3.
7. Operate the valve through the four conditions (closed, open, upper seat cleaning, and lower seat cleaning). See “Solenoid Valve Port Connections” on page 10.
Quality of Control Air to Control Module
Do not exceed the following values:
• Suspended solids content: Particle size: 5 microns max. Particle Density: 5 mg/m3 max. (= quality class 3)
• Water content: Dewpoint +35°F (+1.6°C) (= quality class 3). For applications at great elevations or at low ambient temperatures, the dewpoint changes.
• Oil content (if possible, without oil): Up to 25mg/m3 max. oil (= quality class 5).
Figure 2 - Pipeline Support
Figure 3 - Control Top Wire Connection Point
September 2008 95-03094 Page 9

Operation Waukesha Cherry-Burrell
OperationAll functions of W-Series Mix Proof valves are pneumatically controlled using a 72 to 100 psi (4.9 to 6.9 bar) clean air supply.
The valve contains a large and small spring in the valve actuator. The springs hold the valve seats in the closed position.
Large Spring• Located in the top air chamber of the cylinder.
• Holds the valve in the closed position.
Small Spring• Located in the extended hub of the upper piston.
• When the valve is open, the spring acts on the upper seat stem to hold the upper and lower plugs together.
Solenoid Valve Port Connections
Up to three air supplies, controlled by solenoid valves, supply air to the valve actuator (Figure 4).
The air supply must be 72 to 100 psi (4.9 to 6.9 bar).
ON = Solenoid energized (OPEN).OFF = Solenoid de-energized (CLOSED). LED is off.Solenoids are normally closed. Air connections are 1/8" NPT.* Seat lifting requires (2) two additional air supplies.For specific air-routing and solenoid porting, please refer to control module publications 95-03077 (3-Piece) or 95-03083 (2-piece).
Table 1: Solenoid/Valve Position
ConditionSolenoid
3 1 2Closed OFF OFF OFFOpen OFF ON OFFUpper Seat Cleaning OFF OFF ONLower Seat Cleaning ON OFF OFF
Figure 4 - Solenoid Valve Port ConnectionsVA100-093C
3
1
2
Page 10 95-03094 September 2008

Waukesha Cherry-Burrell Operation
Automatic Fail-Safe SystemTable 2: Valve Stem Detection Conditions
Condition Upper Switch (NO)
Lower Switch (NC)
Yoke Switch (NC)
Switch Symbol
Valve Closed 0 1 1Valve Open 1 0 0Valve Closed with Upper Seat Lift 0 1 0
Valve Closed with Lower Seat Lift 0 0 1
1 = Energized; LED is lit 0 = De-energized; LED is off
The valve seats are part of an automatic fail-safe system preventing contamination of the product with cleaning or sanitizing solutions. Automatic fail-safe systems are unique to each particular installation. Typically, both blocking valve seats are properly seated in the blocked position before the mechanical cleaning system can be activated for the cleaning circuit containing the valve arrangement. W75CP PMO valves are spring-to-closed fail-safe into the blocked position. Waukesha Cherry-Burrell does not offer control systems, only the PMO double seat valve.
Upper Switch - Sends an input signal when the valve is properly open.Lower Switch - Sends an input signal when the valve is properly closed.Yoke Switch - Sends an input signal when the upper seat is properly closed.
September 2008 95-03094 Page 11

Operation Waukesha Cherry-Burrell
Valve Operating Conditions See Figure 4 on page 10 for port and corresponding chambers.Valve OpenThe valve is open when Chamber 1 is pressurized and Chambers 3 and 2 are vented. See Figure 5.
Valve Closed The valve is closed when Chambers 3, 1, and 2 are vented. The large spring closes the valve to fail-safe position. See Figure 6.
Figure 5 - Valve Open Figure 6 - Valve Closed
Valve Closed, Upper Seat Lifted For cleaning the upper seat on seat lifting models only. Chamber 2 is pressurized, and Chambers 3 and 1 are vented. See Figure 7.
Valve Closed, Lower Seat PushFor cleaning the lower seat. Chamber 3 is pressurized, and Chambers 1 and 2 are vented. Liquid escapes from the vent and from the lower retainer along the O.D. of the lower balancer. See Figure 8.
Figure 7 - Valve Closed, Upper Seat Lifted
Figure 8 - Lower Seat Lowering
Page 12 95-03094 September 2008

Waukesha Cherry-Burrell Operation
Test Procedures Stem GaugeConfirm the proper location of the lower valve stem. Place a test gauge (Figure 9, item A) as shown on the lower shoulder of the stem. The shoulder should line up with the gauge.
Corrective Action: Check the stem assembly, ensuring that the lower stem is fully turned in.Confirm the yoke area proximity switch location for detection of upper stem movement within 1/16". Insert a test gauge sideways between the detection cap and the switch with the valve in the closed position.
The proximity switch (Figure 10, item C) should contact the gauge (item D) without compressing the detection cap (item E).Corrective Action: Loosen the proximity switch bolt and adjust the position.
Positive Fail-Safe Detection TestPerform a test to verify the fully closed fail-safe position. Both the upper and lower valve plugs are position-detectable via proximity switches. Set the valve plug feedback proximity switches for the fully opened and fully closed positions of the valve. See Figure 4 on page 10 for port and corresponding chambers. See Figure 9 and Figure 10 to confirm the stem and switch positions using a stem gauge.
Decommission the system, drain the lines and lock out the pumps.
1. With the valve fully closed, confirm that the proximity switches conform to Table 2. Verify the switch status on the PLC control system.
2. Pressurize chamber 1 to open the valve. Confirm that the proximity switches conform to Table 2 on page 11.
3. Vent chamber 1 to close the valve.
4. Activate the upper seat lift either through the control system or manually by supplying air to the air port in chamber 2.
5. When the upper seat lifts, confirm that the proximity switches conform to Table 2. Verify the switch status on the PLC control system.
6. Vent the air in chamber 2 to deactivate the seat lift.
7. Activate the lower seat push either through the control system or manually by supplying air to chamber 3 on the valve actuator.
8. When the lower seat is pushed, confirm that the proximity switches conform to Table 2. Verify the switch status on the PLC control system.
9. Vent the air in chamber 3 to deactivate the seat lift.
10. Disconnect the air from the valve actuator, placing the valve in the fail-safe position. Verify that the proximity switches register that the valve is fully closed.
Corrective ActionIf the Double Seat Mix Proof valve fails to respond as indicated above, immediately check the valve assembly and wiring to locate and correct the cause.
• Check the proximity switch adjustment.• Check for the correct assembly and adjustment of the valve.
Figure 9 - Test Gauge and Stem Alignment
Figure 10 - Proximity Switch Location
September 2008 95-03094 Page 13

Operation Waukesha Cherry-Burrell
Test Procedures for confirmation of control system seat lifting interlock during operationThe purpose of this test is for regulatory inspectors to check and confirm that proper controls interlocking of the W75CP PMO valve is in place during active CIP operation.This test is to be performed during active CIP of either the upper or lower housing of the valve. The inspector will manually force open the protected seat lift to confirm proper interlocking.
Procedure1. Select a W75CP test valve for the interlock test. Confirm proper valve
assembly and switch status prior to testing (refer to “Positive Fail-Safe Detection Test” on page 13).
2. Choose upper body cleaning or lower body cleaning.
WARNING: Confirm that the product is not present in the valve prior to start and through the duration of this test.
3. Energize CIP for the selected body. Confirm that CIP pressure is present in the selected body.
4. Energize the seat lift of the protected seat:
• Cleaning through the upper body: energize solenoid for lower seat lift.
• Cleaning through the lower body: energize solenoid for upper seat lift.
If the control system interlocking is correct, the CIP supply pump or source will be de-activated.
5. De-energize the seat lift of the protected seat.
Corrective ActionIf the control system does not de-activate the cleaning solution pressure, shut down the control system and evaluate and revise the control interlocking.
Page 14 95-03094 September 2008
Waukesha Cherry-Burrell Maintenance
MaintenanceMaintenance Intervals Maintain an adequate stock of replacement parts. Maintenance intervals should be determined by user and specific application, based on the following conditions:
• Daily operation period.• Switching frequency• Application parameters, such as temperature, pressure, and flow• Product type
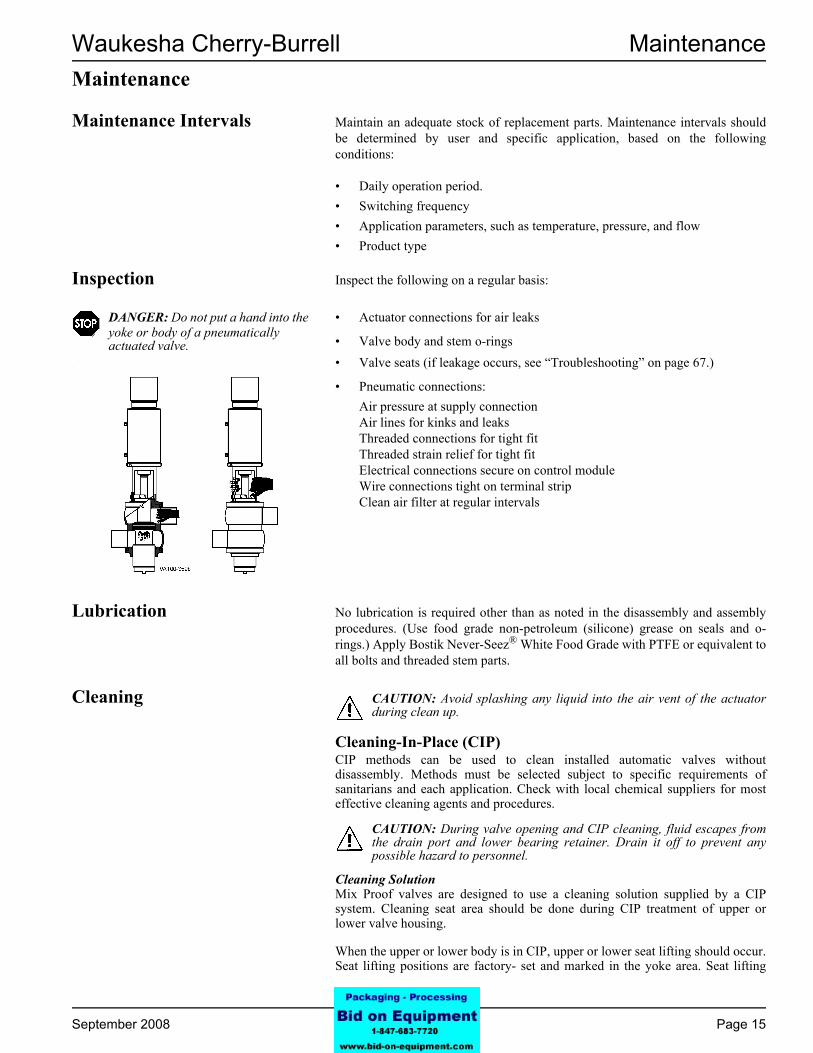
Inspection Inspect the following on a regular basis:
DANGER: Do not put a hand into the yoke or body of a pneumatically actuated valve.
• Actuator connections for air leaks
• Valve body and stem o-rings. • Valve seats (if leakage occurs, see “Troubleshooting” on page 67.)
• Pneumatic connections:Air pressure at supply connection Air lines for kinks and leaks Threaded connections for tight fit Threaded strain relief for tight fit Electrical connections secure on control module Wire connections tight on terminal strip Clean air filter at regular intervals
Lubrication No lubrication is required other than as noted in the disassembly and assembly procedures. (Use food grade non-petroleum (silicone) grease on seals and o-rings.) Apply Bostik Never-Seez® White Food Grade with PTFE or equivalent to all bolts and threaded stem parts.
Cleaning CAUTION: Avoid splashing any liquid into the air vent of the actuator during clean up.
Cleaning-In-Place (CIP)CIP methods can be used to clean installed automatic valves without disassembly. Methods must be selected subject to specific requirements of sanitarians and each application. Check with local chemical suppliers for most effective cleaning agents and procedures.
CAUTION: During valve opening and CIP cleaning, fluid escapes from the drain port and lower bearing retainer. Drain it off to prevent any possible hazard to personnel.
Cleaning SolutionMix Proof valves are designed to use a cleaning solution supplied by a CIP system. Cleaning seat area should be done during CIP treatment of upper or lower valve housing.
When the upper or lower body is in CIP, upper or lower seat lifting should occur. Seat lifting positions are factory- set and marked in the yoke area. Seat lifting
September 2008 95-03094 Page 15

Maintenance Waukesha Cherry-Burrell
will produce visible leakage from the vent outlet. Brief multiple lifts should occur for each step in the CIP program, excluding the initial rinse. Seat lifting is not recommended during the initial rinse if heavy soils are experienced.• The lower seat lift cleans the full lower stem product contact area. The cleaning solution exits the valve from both the vent cavity and the balancer O.D.
• Maximum Solution Temperature is 160°F (71°C)• Cleaning Time: the recommended cycle time is (3) three to (5) five seconds
per lift. A minimum of (5) five lifts per step is recommended.
Cleaning ProcedureEstablish cleaning procedures for each installation depending on product charac-teristics, operating parameters (temperature, velocity, valve cycles), and product velocities.
The valves are 3A design and intended for CIP cleaning. Consult a local cleaning specialist regarding cleaning of the valves. During CIP cleaning of the system, each housing can be cleaned independently. Open and close the upper and lower seats independently during CIP cleaning.
CAUTION: Proper cleaning solution pressure is required for proper cleaning of the valve. The CIP pump must be energized during seat lifting.
Every few months of operation, remove and inspect one valve in the system to ensure that complete cleaning is being achieved.
CAUTION: During lower seat lift, the cleaning solution exits the bottom from (2) two areas; the vent cavity outlet and the bottom of the lower bearing adapter.
Non-Adjustable Seat Lifting The seat lift stroke is fixed at 0.16" upper and 0.28" lower. Confirm the stroke lengths after proper assembly of the upper stem (Figure 13, item B) and nut (Fig-ure 20, item N). Both are tightened clockwise until stopped, metal to metal.
Removing Valve from System WARNING: Before removing the actuator/valve stem assembly from the valve body, drain all product lines connected to the body.
NOTE: If the valve has a control module with solenoid, air and electric must remain ON until valve is properly disassembled.
1. Clean, rinse, and drain the pipe system elements attached to the valve. Remove or block the fluid and gas lines to prevent material from entering the pipe system elements attached to the valve. If present, disconnect the flush water supply connection.
2. Shut off delivery of the control air unless required for removal of the valve stem/actuator assembly of the body.
3. Disconnect electrical supply and lock out all power.
4. Supply air to open the valve.
5. Remove the clamp between the yoke and the adapter (Figure 11, item A).
6. Remove the air pressure to cycle the valve closed, lifting the valve approximately 3/8" (9.5 mm) out of the body.
7. Lift the complete valve actuator and stems out of the valve body.
8. Move the valve to a work station.Figure 11 - Location of Adapter Clamp
Page 16 95-03094 September 2008
Waukesha Cherry-Burrell Maintenance
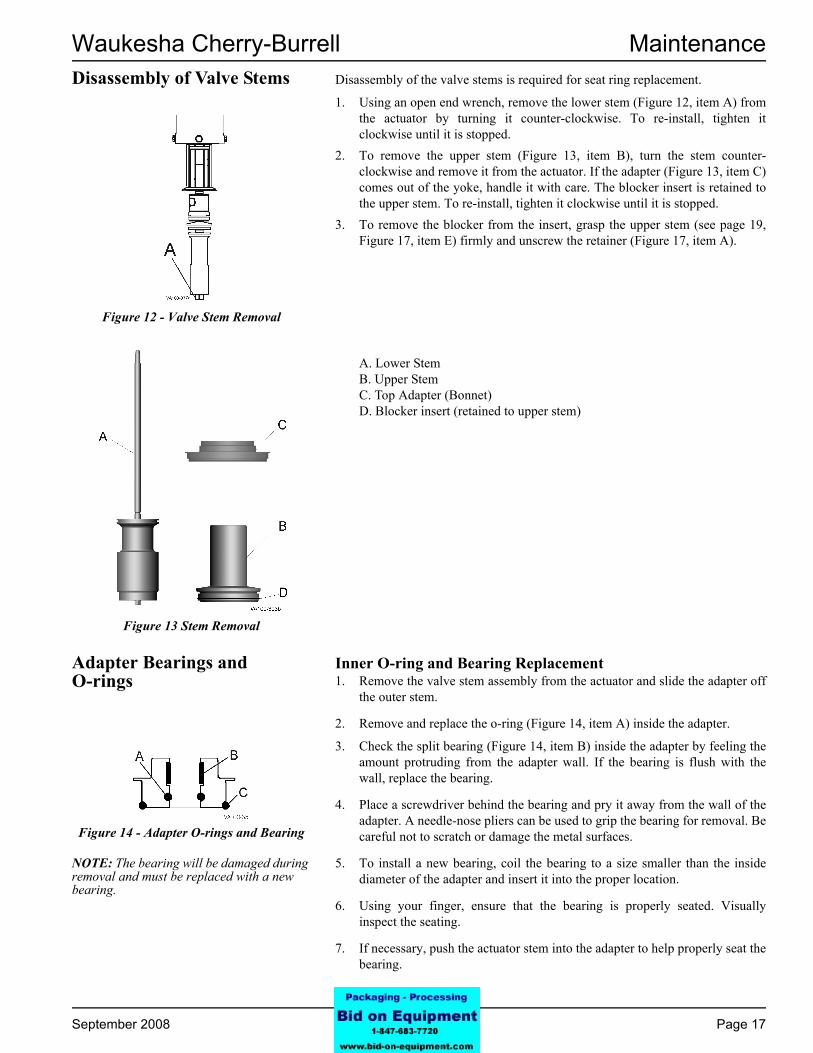
Disassembly of Valve Stems Disassembly of the valve stems is required for seat ring replacement.1. Using an open end wrench, remove the lower stem (Figure 12, item A) from the actuator by turning it counter-clockwise. To re-install, tighten it clockwise until it is stopped.
2. To remove the upper stem (Figure 13, item B), turn the stem counter-clockwise and remove it from the actuator. If the adapter (Figure 13, item C) comes out of the yoke, handle it with care. The blocker insert is retained to the upper stem. To re-install, tighten it clockwise until it is stopped.
3. To remove the blocker from the insert, grasp the upper stem (see page 19, Figure 17, item E) firmly and unscrew the retainer (Figure 17, item A).
A. Lower Stem B. Upper Stem C. Top Adapter (Bonnet) D. Blocker insert (retained to upper stem)
Adapter Bearings and O-rings
Inner O-ring and Bearing Replacement1. Remove the valve stem assembly from the actuator and slide the adapter off
the outer stem.
2. Remove and replace the o-ring (Figure 14, item A) inside the adapter.
3. Check the split bearing (Figure 14, item B) inside the adapter by feeling the amount protruding from the adapter wall. If the bearing is flush with the wall, replace the bearing.
4. Place a screwdriver behind the bearing and pry it away from the wall of the adapter. A needle-nose pliers can be used to grip the bearing for removal. Be careful not to scratch or damage the metal surfaces.
NOTE: The bearing will be damaged during removal and must be replaced with a new bearing.
5. To install a new bearing, coil the bearing to a size smaller than the inside diameter of the adapter and insert it into the proper location.
6. Using your finger, ensure that the bearing is properly seated. Visually inspect the seating.
7. If necessary, push the actuator stem into the adapter to help properly seat the bearing.
Figure 12 - Valve Stem Removal
Figure 13 Stem Removal
Figure 14 - Adapter O-rings and Bearing
September 2008 95-03094 Page 17

Maintenance Waukesha Cherry-Burrell
Outer O-ring Replacement1. Remove the valve stem assembly from the actuator and slide the adapter offthe outer stem.
2. Slide or cut the outer o-ring (Figure 14, item C) off the adapter. Do not nick or scratch the o-ring groove.
3. Lubricate the new o-ring with grease and install it.
Tri Ring Seat Replacement 1. Remove the Tri Ring seat by carefully cutting or using an o-ring tool to pull the seat out of the groove. Do not scratch or nick the metal seating surface.
2. Clean the Tri Ring groove after removing the seat.
3. Lubricate the new Tri Ring (Figure 15, item A) with an acceptable cleansing solution or lubricant.
4. Place the stem through a 1-1/8 inch (30 mm) hole bored through a board, secured by a vise.
5. Start the Tri Ring as shown in Figure 15.
6. Using the installation tool, part number 102797+ (Figure 15, item B), press the Tri Ring into the plug at locations A, B, C, and D (Figure 16). If the tool is not used, DO NOT use a knife or any other sharp item that will tear or cut the Tri Ring.
7. To finish installation, press small sections of the seal, alternating from side to side (A-B-C-D), avoiding large loops of seal.
8. When properly installed, the Tri Ring seat lip will protrude slightly from the seat edge as shown in Figure 15.
Figure 15 - Installing New Tri Ring Seat
B
VA100-082a
A
Figure 16 - Pressing Tri Ring Into Plug
B
VA100-208a
C
D
A
Page 18 95-03094 September 2008

Waukesha Cherry-Burrell Maintenance
Radial Seal Installation 1. Lubricate the o-ring seal and expand it over the stem groove.2. Place the assembly tool over the stem and extrude the o-ring seal into the groove by evenly tightening the cap screws on the installation tool.
3. Remove the tool. The dovetail groove permanently retains the o-ring seal.4. Press in the blocker insert radial seal (Figure 17, item B) by hand.
A. Retainer B. Blocker Insert Radial Seal C. Blocker Insert D. O-Ring E. Upper Stem
Figure 17 - Upper Stem
Figure 18 - Radial Seal Installation
September 2008 95-03094 Page 19

Maintenance Waukesha Cherry-Burrell
Lower Bearing Carrier O-ring and Bearing Replacement1. Remove and replace the o-ring (Figure 19, item A) located inside the lower bearing carrier.
2. Check the split bearing (Figure 19, item B) inside the lower bearing carrier by feeling the amount protruding from the lower bearing carrier wall. If the bearing is flush with the wall, replace the bearing.
3. Place a screwdriver behind the bearing and pry it away from the wall of the lower bearing carrier. A needle-nose pliers can be used to grip the bearing for removal.
4. To install the new bearing, coil the bearing to a size smaller than the inside diameter of the lower bearing carrier and insert it into the proper location.
5. Push the actuator stem into the lower bearing carrier to help seat the bearing properly.
NOTE: The bearing will be damaged during removal and must be replaced with a new bearing.
6. Using your finger, ensure that the bearing is properly seated. Visually inspect the seating.
7. To remove the outer o-ring (Figure 19, item C), slide or cut the o-ring off the lower bearing carrier. Do not nick or scratch the o-ring groove.
8. Lubricate the new o-ring with grease and install it.
Actuator O-ring and Bearing Replacement
CAUTION: The valve stems and actuator must be removed from the valve body before servicing the actuator components.
1. See “Disassembly of Valve Stems” on page 17.
2. Remove the cap screws (Figure 20, item E) and remove the yoke (item F) from the cylinder assembly. Set the yoke aside.
3. Pull the spring cage assembly (item H) and main piston (item J) from the cylinder assembly.
4. Inspect the o-rings (item D). Replace them if worn or damaged.
5. Inspect the bearings (item C). If the bearing does not extend slightly above the edge of the metal surface, replace the bearing.
NOTE: The bearing will be damaged during removal and must be replaced with a new bearing.
6. The bearing is split to allow its removal from the groove. Place a screwdriver behind the bearing and pry it away from the wall of the yoke. A needle-nose pliers can be used to grip the bearing for removal.
7. Assemble the stack components as shown in Figure 20. Install the yoke and cap screws.
Figure 19 - Lower Bearing Carrier
Page 20 95-03094 September 2008

Waukesha Cherry-Burrell Maintenance
Figure 20 - Actuator Assembly
A. Nuts F. Yoke K. Small Spring
B. Cylinder Assembly G. Indicator Stem L. Sleeve
C. Bearing H. Spring Cage Assembly M. Upper Seat Lifting Piston
D. O-ring J. Main Piston N. Nut
E. Cap Screw
September 2008 95-03094 Page 21

Maintenance Waukesha Cherry-Burrell
Switches Micro Switch• A mechanical switch using a lever arm and roller that is compressed or released by stem movement.
• AC/DC 24VDC or 110VAC
• The position of the actuator stem is felt by a rollerProximity Switch• IP67 sealed, inductive coil switch
• AC/DC
• The position of the actuator stem is detected by a sensor at the target printed on the switch
Switch AdjustmentW-Series Control Modules with proximity switches or micro switches utilize a positive switching configuration to provide discrete inputs for each valve position.
Lower Switch 1 is normally closed (NC) and passing power when the stem is down. When the stem raises, switch 1 opens and power is stopped.
Upper Switch 2 is normally open (NO) and does not pass power when the stem is down. When the stem is fully raised, Upper Switch 2 closes and passes power.
Proximity switches are supplied with incorporated LED’s which light when power is passed and are inactive when power is stopped.
1. Raise the stem to open, then loosen the cap screws holding the switch blocks (Figure 21, item A) with a 9/64" allen wrench and slide the switches to set the distance between the switches and the stem shaft at 0.040" (1 mm). If using a micro switch, place a 0.020" feeler gauge between the roller and the small diameter of the stem. Adjust the switch toward the stem until a “click” is heard.
2. Hand-tighten the cap screws (Figure 21, item A) to hold the switch position.
3. With the stem raised, adjust the vertical height of the upper switch target to slightly below the stem shoulder (Figure 22). Tighten the cap screws securely.
4. Lower the stem to close the valve and adjust the target of the lower switch to slightly above the stem shoulder (Figure 23). Tighten the cap screws securely.
CAUTION: Do not over-tighten.
NOTE: Switches should detect stem movement within 1/16 inch (0.062 in/1.58 mm).
NOTE: In this manual, “stem-raised” is understood to be when the valve stem is fully retracted into the actuator. “Stem-lowered” is understood to be when the valve stem is fully extended out from the actuator.
Figure 21: Switch Adjustment
Figure 22: Valve Open Adjustment
Figure 23: Valve Closed Adjustment
Page 22 95-03094 September 2008
Waukesha Cherry-Burrell Maintenance
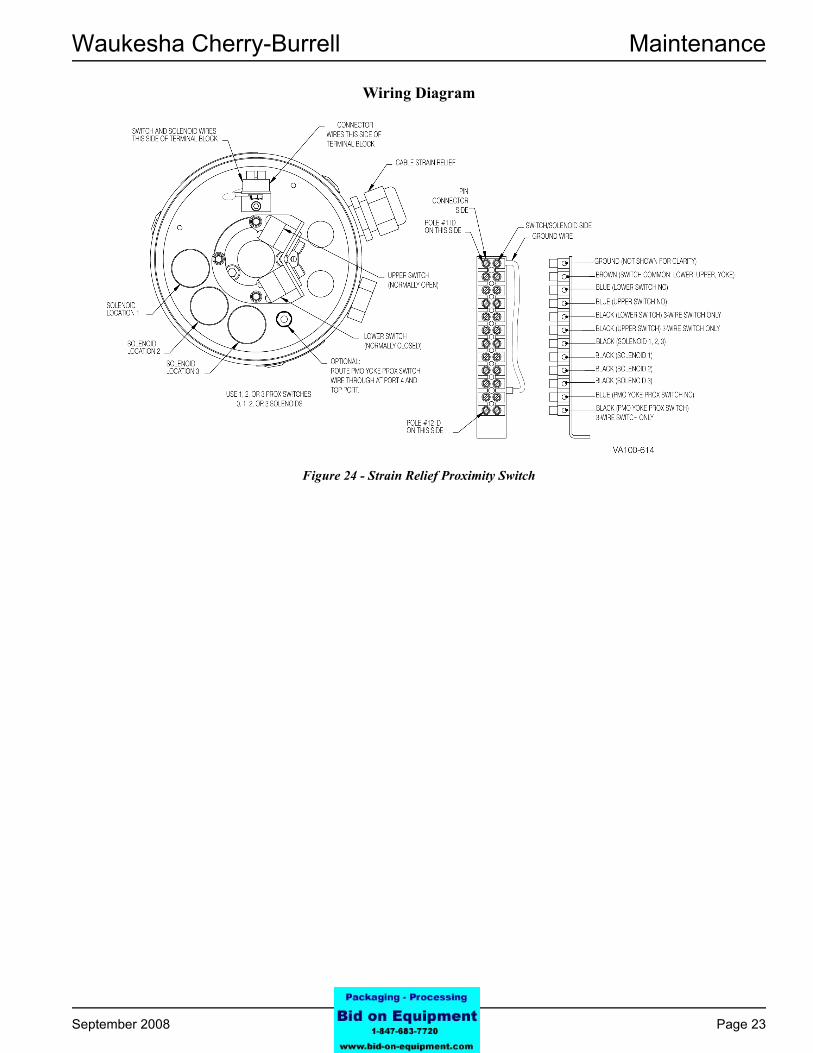
Wiring Diagram
Figure 24 - Strain Relief Proximity Switch
September 2008 95-03094 Page 23

Parts Lists Waukesha Cherry-Burrell
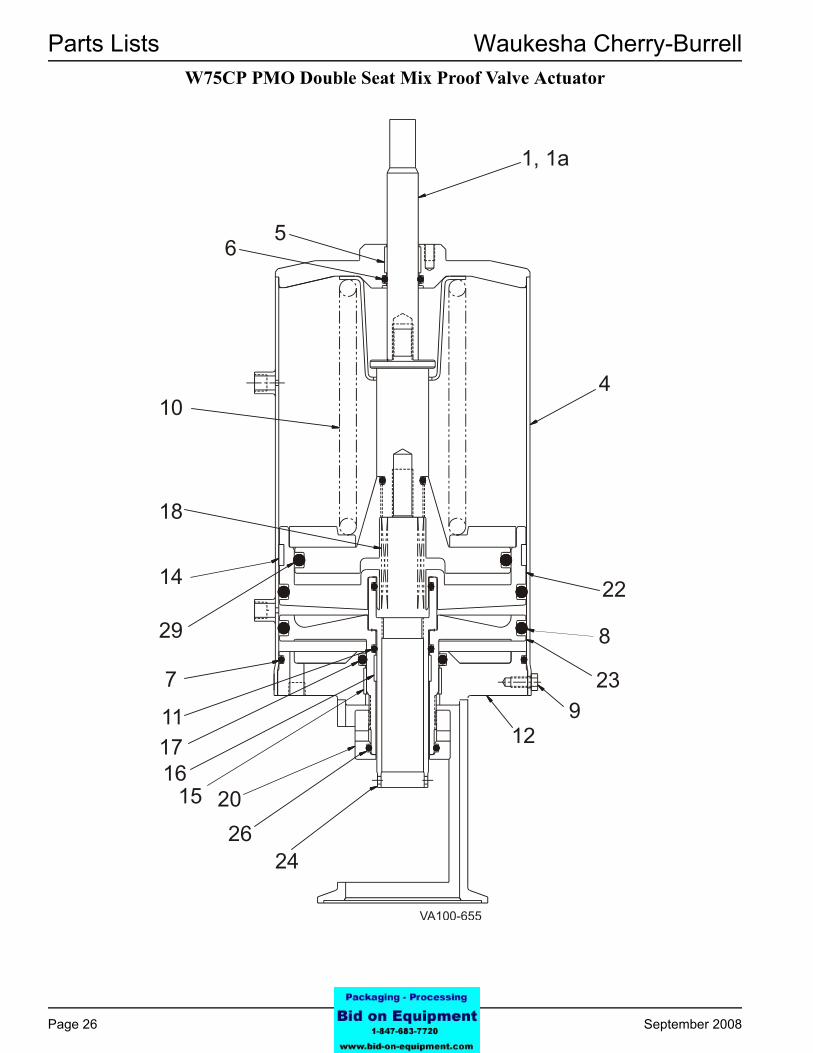
Parts ListsW75CP PMO Double Seat Mix Proof Valves
1
3
4
4443520
4241
17
15
16
18
146
11, 12
4025108
21
51
454647
48
4950
VA100-708
Page 24 95-03094 September 2008

Waukesha Cherry-Burrell Parts Lists
W75CP PMO Double Seat Mix Proof ValvesItem # 1-1/2" 2" 2-1/2" 3" 4" 6"1 Control Top3 Actuator
* 4 O-ring Nitrile N80020 N80020 N80020 N80020 N80020 N90022* 5 Bearing 106047+ 106047+ 106047+ 102002+ 114231+ 126798+* 6 O-ring, Body EPDM E70232 E70236 E70244 E70252 E70258 E70267
FKM V70232 V70236 V70244 V70252 V70258 V702678 Stem, Upper Assembly - See note 1, below
* 10 Seat Ring - Tri Ring, Upper EPDM 102487CP 111633CP 102492CP 102491CP 102738CP 126779CPFKM 107973CP 111635CP 107978CP 107977CP 108020CP 126778CP
* 11 Seat Ring - Tri Ring, Vent EPDM E80328 E80333 E80340 E80343 E80354 E80368FKM V80328 V80333 V80340 V80343 V80354 V80368
* 12 Seat Ring - O-ring, Lower EPDM E80328 E80333 E80340 E80343 E80354 E80368FKM V80328 V80333 V80340 V80343 V80354 V80368
* Wiping Stem Seal, Lower EPDM 116192+ 116197+ 116201+ 116203+ 116773+ 126776+FKM 116193+ 116198+ 116202+ 115624+ 116774+ 126775+
* 15 Bearing 106049+ 106048+ 102003+ 112560+ 114232+ 126777+16 Stem, Lower Assembly - See note 1, below17 Seal Retainer, Wiping Stem Seal 116529+ 116544+ 116559+ 116272+ 114226+ 126793+18 Clamp 113827+
30-19736-45
20 Adapter, Wiping Stem Seal 116522+ 116537+ 116552+ 116273+ 114220+ 126687+* Wiping Stem Seal, Upper EPDM 116184+ 116184+ 116184+ 116194+ 116203+ 126774+
FKM 116185+ 116185+ 116185+ 115625+ 115624+ 126773+* 25 O-ring EPDM E70111 E70111 E70111 E70111 E70111 E70206
FKM V70111 V70111 V70111 V70111 V70111 V7020640 Baffle 126291+ 126310+ 126325+ 126248+ 126349+ 126349+41 Bolt, Baffle 126292+ 126292+ 126253+ 125253+ 126341+ 126737+
* 42 O-ring EPDM E70117 E70117 E70117 E70117 E70117 E70119FKM V70117 V70117 V70117 V70117 V70117 V70119
43 Adapter, Upper 116523+ 116538+ 116553+ N/A N/A N/A44 Switch Target 126796+ 126698+ 126698+ 112558+ 114214+ 126758+45 Spring, Switch Target 60091+ 60091+ 60091+ N/A N/A N/A46 Bracket, Switch Target 111619+ 111619+ 111619+ 112556+ 114215+ 126763+47 HHCS 1/4-20 x 3/8 Bolt, Switch Target 30-68 30-68 30-68 30-68 30-68 30-6848 1/4" Washer, Switch Target 43-27 43-27 43-27 43-27 N/A 43-2749 RHMS 4-40 x 5/8 LG., Switch Target 30-69 30-655 30-655 30-655 30-69 30-65550 Prox. Switch, Switch Target 17-79 17-79 17-79 17-79 17-79 17-7951 Ring, Stop 122357+ 122357+ 122357+ 122357+ 122357+ 126750+
Notes: PL5027-CH144
* Recommended Spare Parts*** See actuator parts lists
1. For items 8 and 16, see W75CP PMO Double Seat Mix Proof Valve Stems Chart.
21
Part DescriptionContact Factory
***
14
119-34 119-51 119-87 119-71 126932+
September 2008 95-03094 Page 25
Parts Lists Waukesha Cherry-Burrell
W75CP PMO Double Seat Mix Proof Valve ActuatorVA100-655
1, 1a
56
18
10
14
29
7
4
8
9
22
12111716
15 2026
24
23
Page 26 95-03094 September 2008

Waukesha Cherry-Burrell Parts Lists
W75CP PMO Double Seat Mix Proof Valve ActuatorItem # 6" Diameter1 Indicator Stem - Visual 107951+1a Indicator Stem - Control Top 119487+4 Cylinder 1-1/2" - 4" 113112+
6" 126679+5 Bearing, Cylinder 102757+6 O-ring Nitrile N702107 O-ring, Cylinder Nitrile N702558 O-ring, Piston Nitrile N704339 Cap Screw, 1/4-20 x 3/8 lg. 30-6810 Piston & Spring Assembly 1-1/2" 122037+
2" 122038+2-1/2" 133678+3", 4" 122039+
6" 126933+11 O-ring Nitrile N7021912 Yoke 1-1/2" 116818+
2" 116776+2-1/2" 116834+
3" 116938+4" 114209+6" 126764+
Yoke (flush) 1-1/2" 119871+2" 119873+
2-1/2" 119875+3" 119877+4" 119879+6" 126934+
14 Bearing, Main Piston 102052+15 Bearing, Lifting Piston 109920+16 Bearing 109919+17 O-ring Nitrile N7032818 Spring, Upper Stem 5901106+20 Nut, Upper Seat Clean 1-1/2" - 4" 122345+
6" 126753+22 Main Piston 116472+23 Upper Seat Piston 122346+24 Adjusting Sleeve 116469+26 O-ring Nitrile N9022229 O-ring, Lower Seat Piston Nitrile N70427
PL5027-CH146
Part Description
September 2008 95-03094 Page 27

Parts Lists Waukesha Cherry-Burrell
W75CP PMO Double Seat Mix Proof Valve BodiesItem # Part Description 1-1/2" 2" 2-1/2" 3" 4" 6"1 Buttweld - A1 126299+ 126313+ 126328+ 126242+ 126344+ 126638+2 Buttweld - B1 126301+ 126315+ 126330+ 126244+ 126346+ 126640+3 Buttweld - B2 126302+ 126316+ 126331+ 126245+ 126347+ 126642+4 Buttweld - B3 126303+ 126317+ 126332+ 126246+ 126348+ 126641+5 Buttweld - C1 126300+ 126314+ 126329+ 126243+ 126345+ 126639+6 Buttweld - E1 126298+ 126312+ 126327+ 126241+ 126343+ 126637+
PL5027-CH145
W75CP PMO Double Seat Mix Proof Valve Stems
Item # 1-1/2" 2" 2-1/2" 3" 4" 6"
8 Stem, Upper Assembly1 126293+ 126318A 126336+ 126435+ 126436+ 126437+16 Stem, Lower Assembly2
126296+ 126321+ 126335+ 126251+ 126338+ 126726+Notes PL5027-CH1471. Part number includes lower stem and stem bushing, which are assembled together.2. Part number includes upper stem and coupling sleeve, which are assembled together.
Part Description
Page 28 95-03094 September 2008

Waukesha Cherry-Burrell Troubleshooting
TroubleshootingPROBLEM POSSIBLE CAUSE SUGGESTED ACTION
Leakage Leakage from vent/drain with valve closed.
Upper or lower seat ring failure Remove valve. Replace seat rings.
Debris trapped in upper seat or lower seat
Inspect/change cleaning procedure to correct.
Upper or lower seat not closed Inspect inner and outer stems for galling and burrs on adapter.
Check actuator function.
Upper or lower seat clean activated Check control sequence.
Leakage from vent/drain with valve open.
Blocker radial seal failed Replace seal.
Valve seats not meshed together Inspect inner and outer stems for galling and burrs.
Small spring not holding upper stem in place
Check and replace small spring and stems in actuator.
Leakage around yoke. Internal adapter o-ring failure Replace o-ring.
External adapter o-ring failure Replace o-ring.
Leakage through outer stem. Inner stem o-ring failure Replace o-ring.
OperationValve fails to open. Air pressure too low Set air pressure to 72 psi (5 bar)
minimum.
Control failure Check control sequence.
Check control wiring and power source.
Valve fails to close. Controls failed Check control sequence.
Check control wiring and power source.
Upper or lower seat fails to lift during seat lift.
Actuator seal failure or no air Confirm no air leaks from the actuator.
Confirm solenoid operation.
Actuator moves when valve opened. Clamp loose Tighten clamp with valve open.
Electrical No valve closed or open indication. Lower switch not adjusted properly Adjust switch. See “Switch Adjustment”
on page 22.
No valve open signal. Upper switch not adjusted Adjust switch. “Switch Adjustment” on page 22.
Moisture in switch housing. Missing and/or damaged gaskets Replace gaskets.
September 2008 95-03094 Page 29