operation guide - panasonic · as a prerequisite to using this operation guide, the following is a...
TRANSCRIPT

DSQP1001TA
Operation GuideDATA ARCHIVER ManagerLinuxR VersionVersion 2.6.0
Thank you for adopting Panasonic DATA ARCHIVER Manager.This document describes how to use the DATA ARCHIVER Manager.
Information
DATA ARCHIVER Manager is available from the following site and you can install or upgrade.Please check the website and download the DATA ARCHIVER Manager.
https://panasonic.net/cns/archiver/download/index.html

Table of contents
IntroductionIntroduction
System overview .............................................. 5Purpose ........................................................................... 5Features .......................................................................... 5System overview ............................................................. 6Swift overview ................................................................. 7Differences from standard Swift ...................................... 7Correspondence between Swift account/container/object and magazines ..................................................... 8Relationship of the magazine group and redundancy (mirror)............................................................................. 9System configuration example ...................................... 10
Scheme for writing and reading data ........... 13Processing flow ............................................................. 13Data write flow............................................................... 13Specifications on writing to magazines.......................... 15Data read flow ............................................................... 16Differences of read operations according to magazine locations ........................................................................ 18Types of batch processing ............................................ 19
System configuration and managementOverview
Functions to be used by Users/Administrators ................................................ 21
User’s roles ................................................................... 21Magazine administrator’s roles (Additions to the user roles) .......................................... 21System administrator’s roles (Additions to the magazine administrator roles) ............ 22
Getting started
Preparation of DA Manager ........................... 23Log in to DA Manager ................................................... 23DA Manager settings..................................................... 23
Use of Web interface ...................................... 25Access to the Web interface.......................................... 25Web interface menu list ................................................. 27
Settings and management
Account management .................................... 30Container Default Settings (for normal mode)............... 30Magazine Assignment ................................................... 32Setting write-protection for accounts (for share mode)............................................................ 38Finalizing accounts (for share mode) ............................ 40
Container management.................................. 41Displaying the containers list (for normal mode) ........... 42Registering containers (for normal mode) ..................... 43Modifying a container configuration (for normal mode).......................................................... 46Setting write-protection for containers (for normal mode).......................................................... 47Finalizing containers (for normal mode) ........................ 48
Magazine management .................................. 49Magazine Load Request List ......................................... 50Load/Unload Magazine.................................................. 51Unload Specified Magazine........................................... 54Magazine List................................................................. 56Magazine Assignment ................................................... 58Change Magazine Barcode ........................................... 59Copy Magazine.............................................................. 60Recovery Magazine....................................................... 62Import Magazine functions............................................. 64Import Container (for normal mode) .............................. 65Import Account (for share mode) ................................... 66Importing encryption keys.............................................. 68Magazine group ID ........................................................ 68Discard Magazine .......................................................... 69Magazine Check............................................................ 70
Magazine shelf management......................... 71Registering, changing, and deleting a shelf................... 73Changing a magazine storage shelf .............................. 74Registering and unregistering an operator .................... 75Displaying and editing an inventory title ........................ 76Magazine inventory........................................................ 79
Cache management ....................................... 81Cache Initial Settings..................................................... 82Cache Synchronization Settings.................................... 83Release Cache File ....................................................... 85
System management ..................................... 89Register/Stop DATA ARCHIVER................................... 89DATA ARCHIVER State Representation....................... 91DATA ARCHIVER Setting ............................................. 92Viewing system configuration ........................................ 93Display System Status................................................... 94Magazine Copy Settings................................................ 95User registration and management ............................... 96User Group Settings ...................................................... 96Mail Server Settings....................................................... 97Container Initial Settings (for normal mode) .................. 98Account Initial Settings (for share mode)..................... 100Storage Node Settings................................................. 101
Confirmation of system operating conditions ..................................................... 103
Dashboard overview.................................................... 103Log in to Dashboard .................................................... 104Displaying the proxy node ........................................... 104Displaying the storage node ........................................ 105
S3QL configuration andmanagementS3QL configuration and management
Preparation of S3QL..................................... 108S3QL overview ............................................................ 108Functions to be used by S3QL users/volume administrators.................................................. 109Log in to S3QL............................................................. 110S3QL settings .............................................................. 110S3QL menu list ............................................................ 111
Display volume status ................................. 112Display Volume Status................................................. 112
2

Table of contents
Volume management ................................... 113Displaying the volumes list .......................................... 114Registering volumes.................................................... 116Modifying a volume configuration (for normal mode)........................................................ 120Mounting volumes ....................................................... 122Setting write-protection for volumes ............................ 124Finalizing volumes....................................................... 125
Display system status.................................. 126Display System Status ................................................ 126
System Setting.............................................. 128System Setting ............................................................ 128Mail Server Settings .................................................... 129
FAQ TroubleshootingFAQ Troubleshooting
FAQ ................................................................ 131
AppendixAppendix
Software operating environment ................ 134Special notes ................................................ 136Glossary ........................................................ 137Index .............................................................. 141
General........................................................................ 141Menu item.................................................................... 142
3

Introduction
Introduction
System overview
PurposeDATA ARCHIVER Manager (Linux version) handles the files that are stored on the DATA ARCHIVER or SCALABLE DATA ARCHIVER optical disk library device (hereinafter referred to as DA unit) by using the OpenStack Object Storage (hereinafter referred to as Swift) API. This system allows any program that supports the Swift API to utilize the DA unit. In addition, if a cloud storage gateway (S3QL) is added to the system, it can be used as a NAS file system.DA unit is a storage device that records to magazines, and it is very different from the hard-disk-based storage expected by Swift. In order to bridge this difference, DATA ARCHIVER Manager (Linux version) expands or changes the functionality of Swift, providing an independent magazine management system. For magazine management, a magazine administrator can use either the API or Web interface. This Operation Guide describes the Web interface of the DATA ARCHIVER Manager (Linux version). For information about the API, refer to the API specification.
Features∫Objects are stored in the magazines on a DA unit, not stored in the disk storage managed by the Swift-object-
server.
∫Object supports user metadata.
∫Object can be redundant (mirror recording to more than one magazine).
∫The association of magazines and Swift container can be specified.
∫The magazine stored object can be offline (removed from a DA unit), and Swift responds to it appropriately if offline.
∫Media that has been ejected from the DA unit holds the object body, object name and user metadata.
∫DATA ARCHIVER Manager (Linux version) Version 2 allows you to control DA units (LB-DH7 series), which are compatible with 3.6 TB magazines, as well as previous DA unit models (LB-DM9, LB-DH8 series), which are designed specifically for 1.2 TB magazines.
On the subsequent pages, product names are referred to as follows.DATA ARCHIVER Manager (Linux version) DA ManagerSCALABLE DATA ARCHIVER Scalable DA (LB-DH7/LB-DH8 series)DATA ARCHIVER DA (LB-DM9)DATA ARCHIVER and SCALABLE DATA ARCHIVER DA unit* The main unit and servers connected to it are collectively referred to as the “DA unit” in the LB-DH7 series.
5

Introduction System overview
System overview
Components required for system (typical components)
Components used as requiredG Shelf, etc.
The magazines not loaded in the DA unit are stored.
About users1 User
A user reads/writes objects or data, and manages containers.2 Magazine administrator
A magazine administrator performs the management of all magazines and the shelf to store the magazines as well as general user functions. A system administrator may serve also as the magazine administrator.
3 System administratorA system administrator performs various system settings, management of DA unit, and may also serve as the magazine administrator.
A Red Hat Enterprise Linux 7 orCent OS 7 capable server
D Maria DBE HDD as the cache
B DA unit F KeystoneC At least one magazine
DA Manager
DA unit
Magazine/DA unit information writing
Magazine/DA unitinformation reading
Tentative object writing
Object reading
Object writingObject reading System administration
Database
Cache
Magazine load
Magazine eject
Magazine administration
System administrator Magazine administratorUser
Object writing (batch)Object reading (batch)
Magazine
AuthenticationKeystone
6
Introduction System overview
Swift overviewAs a prerequisite to using this Operation Guide, the following is a summary of standard Swift.
∫Swift is a distributed object storage system and delivers a storage system with the availability, robustness, and redundancy of multiple server programs on one or more nodes (machines) operating concurrently.
∫Swift configures the system with two types of nodes.≥Proxy node: The Swift-proxy-server operates as the endpoint of a Swift API. One or more nodes can be installed
and the performance will be scaled out by increasing the number of nodes.≥Storage node: Stores the data. Swift-account-server, Swift-container-server, and Swift-object-server are running
and manage the account, container, and object data in storage. The node also performs an asynchronous process for data maintenance. Normally, the number of nodes to be installed is equal to or greater than the number of replicas (redundant data). The data storage capacity will scale out by increasing the number of nodes.
∫The data is managed in the hierarchical structure as account, container, and object.≥Users are authenticated per account.≥Each account can have more than one container. As a concept, a container is similar to a file system directory,
but a container cannot have a container within it.≥Multiple objects can be stored in a container.≥One or more data can be optionally assigned to an account, container, and object respectively. The data from
Swift, such as the object creation time information (Date) and the hash value of the object (Etag) are referred to as “system meta data” in this Operation Guide. In addition, a user can assign any of the data. The data is referred to as “user meta data” in this Operation Guide.
∫To operate account, container, and object, use HTTP-based (REST) API.
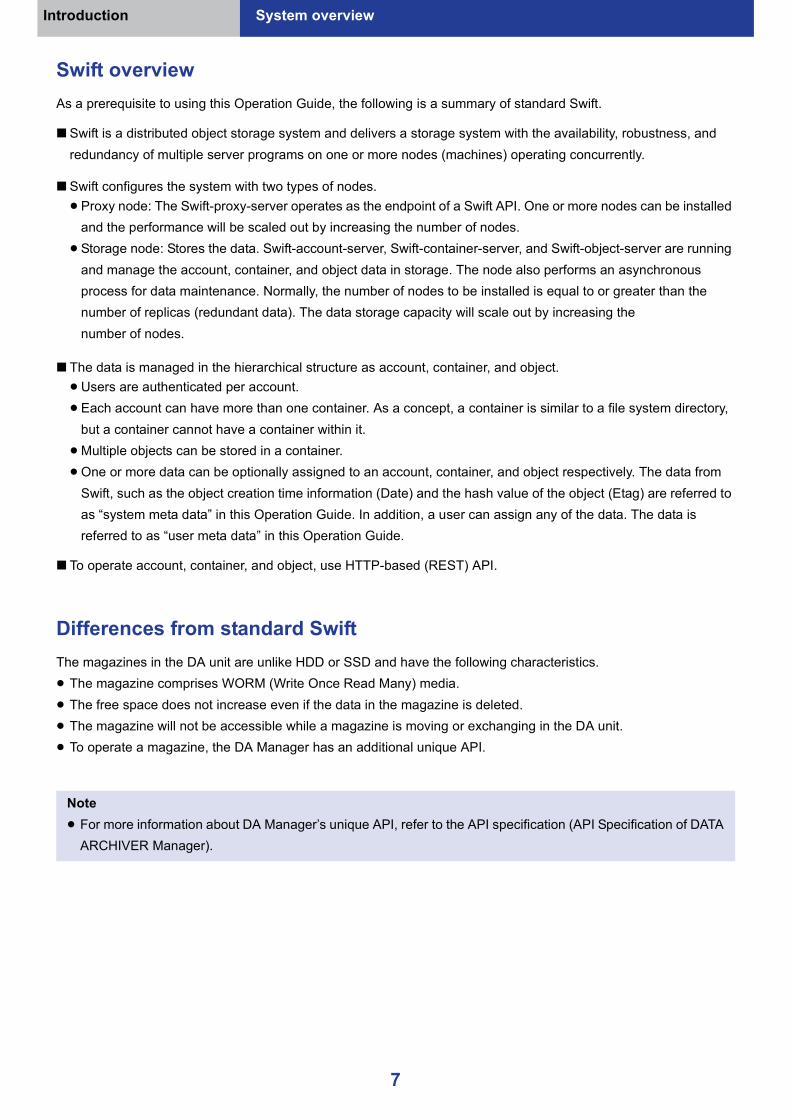
Differences from standard SwiftThe magazines in the DA unit are unlike HDD or SSD and have the following characteristics.≥ The magazine comprises WORM (Write Once Read Many) media.≥ The free space does not increase even if the data in the magazine is deleted.≥ The magazine will not be accessible while a magazine is moving or exchanging in the DA unit.≥ To operate a magazine, the DA Manager has an additional unique API.
Note≥ For more information about DA Manager’s unique API, refer to the API specification (API Specification of DATA
ARCHIVER Manager).
7
Introduction System overview
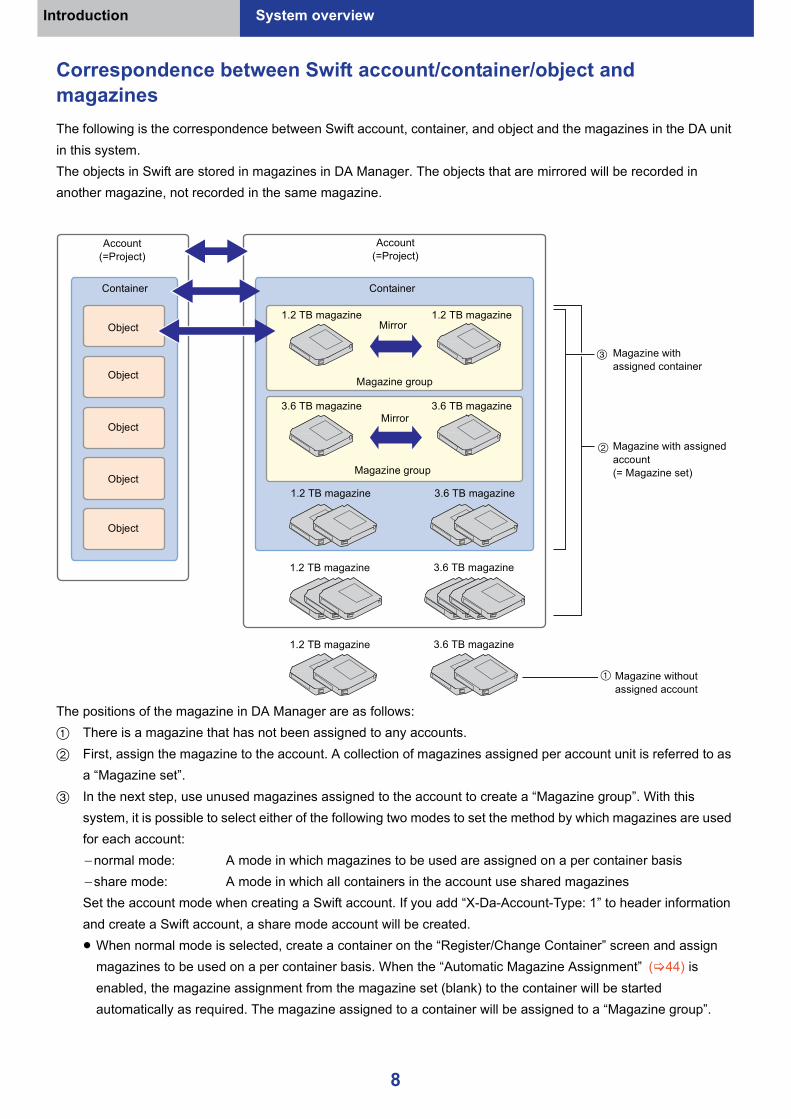
Correspondence between Swift account/container/object and magazinesThe following is the correspondence between Swift account, container, and object and the magazines in the DA unit in this system.The objects in Swift are stored in magazines in DA Manager. The objects that are mirrored will be recorded in another magazine, not recorded in the same magazine.
The positions of the magazine in DA Manager are as follows:1 There is a magazine that has not been assigned to any accounts.2 First, assign the magazine to the account. A collection of magazines assigned per account unit is referred to as
a “Magazine set”.3 In the next step, use unused magazines assigned to the account to create a “Magazine group”. With this
system, it is possible to select either of the following two modes to set the method by which magazines are used for each account:`normal mode: A mode in which magazines to be used are assigned on a per container basis`share mode: A mode in which all containers in the account use shared magazinesSet the account mode when creating a Swift account. If you add “X-Da-Account-Type: 1” to header information and create a Swift account, a share mode account will be created.≥ When normal mode is selected, create a container on the “Register/Change Container” screen and assign
magazines to be used on a per container basis. When the “Automatic Magazine Assignment” ( 44) is enabled, the magazine assignment from the magazine set (blank) to the container will be started automatically as required. The magazine assigned to a container will be assigned to a “Magazine group”.
Magazine with assigned container
3
2
1
Magazine with assigned account(= Magazine set)
Magazine without assigned account
Magazine group
Magazine group
Mirror
Mirror
Object
Object
Object
Object
Object
Container Container
Account(=Project)
Account(=Project)
1.2 TB magazine 3.6 TB magazine
1.2 TB magazine 3.6 TB magazine
1.2 TB magazine 3.6 TB magazine
1.2 TB magazine 1.2 TB magazine
3.6 TB magazine 3.6 TB magazine
8
Introduction System overview
≥ When share mode is selected, after objects are PUT to a container in the account for the first time, magazines in the magazine set will be automatically registered as recording target magazines and a “Magazine group” will be assigned to them. The recording target magazines will be used as magazines shared by all containers in the account.
≥ The number of magazines comprising each magazine group corresponds to a specified mirror value. Please note that more than one object will be stored in each magazine at the same time, as opposed to just one object.
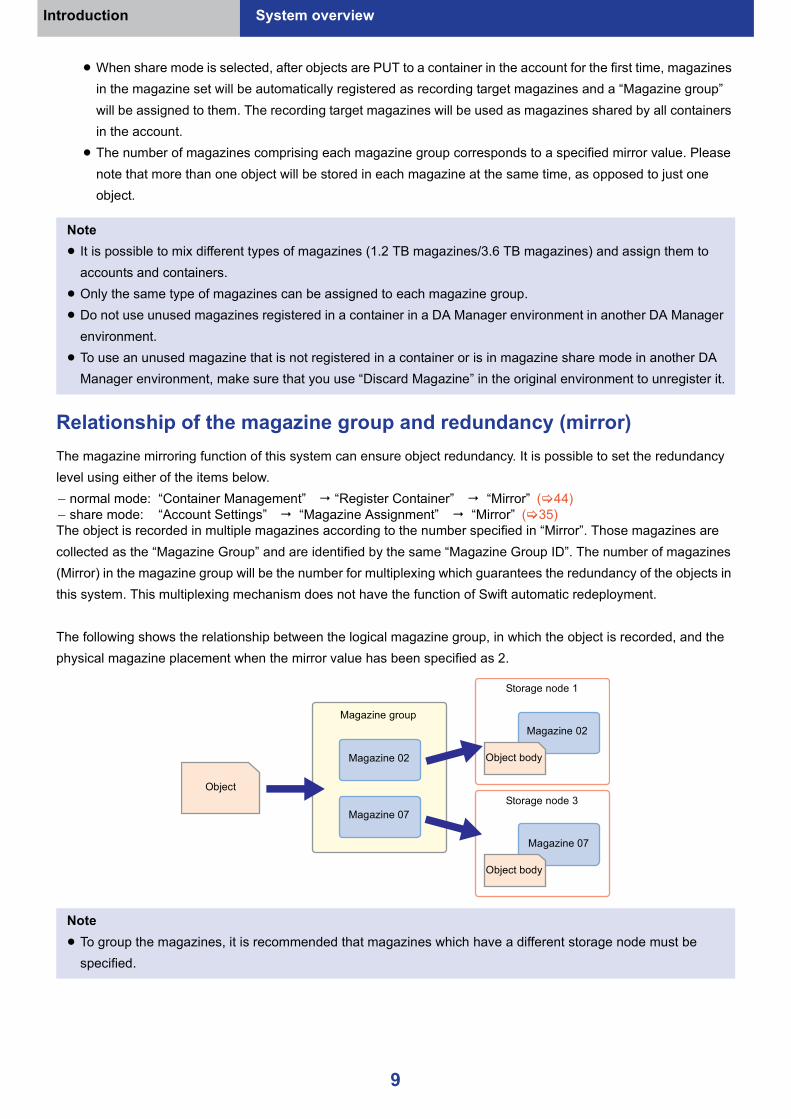
Relationship of the magazine group and redundancy (mirror)The magazine mirroring function of this system can ensure object redundancy. It is possible to set the redundancy level using either of the items below.` normal mode: “Container Management” “Register Container” “Mirror” ( 44)` share mode: “Account Settings” “Magazine Assignment” “Mirror” ( 35)The object is recorded in multiple magazines according to the number specified in “Mirror”. Those magazines are collected as the “Magazine Group” and are identified by the same “Magazine Group ID”. The number of magazines (Mirror) in the magazine group will be the number for multiplexing which guarantees the redundancy of the objects in this system. This multiplexing mechanism does not have the function of Swift automatic redeployment.
The following shows the relationship between the logical magazine group, in which the object is recorded, and the physical magazine placement when the mirror value has been specified as 2.
Note≥ It is possible to mix different types of magazines (1.2 TB magazines/3.6 TB magazines) and assign them to
accounts and containers.≥ Only the same type of magazines can be assigned to each magazine group.≥ Do not use unused magazines registered in a container in a DA Manager environment in another DA Manager
environment.≥ To use an unused magazine that is not registered in a container or is in magazine share mode in another DA
Manager environment, make sure that you use “Discard Magazine” in the original environment to unregister it.
Note≥ To group the magazines, it is recommended that magazines which have a different storage node must be
specified.
Magazine 02
Magazine 07
Magazine 07
Magazine 02
Object
Magazine group
Storage node 1
Storage node 3
Object body
Object body
9

Introduction System overview
System configuration example
The system can consist of the following configuration.≥ Distributed object storage that consists of the proxy node and the storage node that is connected to the DA unit,
and is accessible with HTTP/REST API and a proprietary API.≥ NAS storage that has a S3QL file system as a higher-layer above the proxy node, and is accessible with NFS/
CIFS protocol.
Examples of object storage configuration follow:
1 Connection configuration example with the higher-layer application server
Note≥ In each configuration example, Keystone and database can be configured on another server.≥ In each configuration, any model of support storage ( 134) can be used as a DA unit.
Application server
NAS connection (NFS/CIFS protocol)
S3QLProxy node• Keystone• DatabaseStorage node• Cache
DA unit
Application server
REST/HTTP
Proxy node• Keystone• Database
Storage node• Cache
DA unit
Example of object storage configuration Example of NAS storage configuration
10

Introduction System overview
The proxy nodes, database, storage nodes, cache, and Keystone can be deployed on the same server and connected to the DA unit.
The configuration of a server that has storage nodes and cache connected to the DA unit can be added to the object storage configuration example above in order to extend the data capacity.
2 Minimum system configuration example
3 Scale-out configuration example (1)
Application server
REST/HTTP
Proxy node• Keystone• DatabaseStorage node• Cache
DA unit
Application server
REST/HTTP
Proxy node• Keystone• Database
DA unit DA unit DA unit
Storage node• Cache
Storage node• Cache
Storage node• Cache
11
Introduction System overview
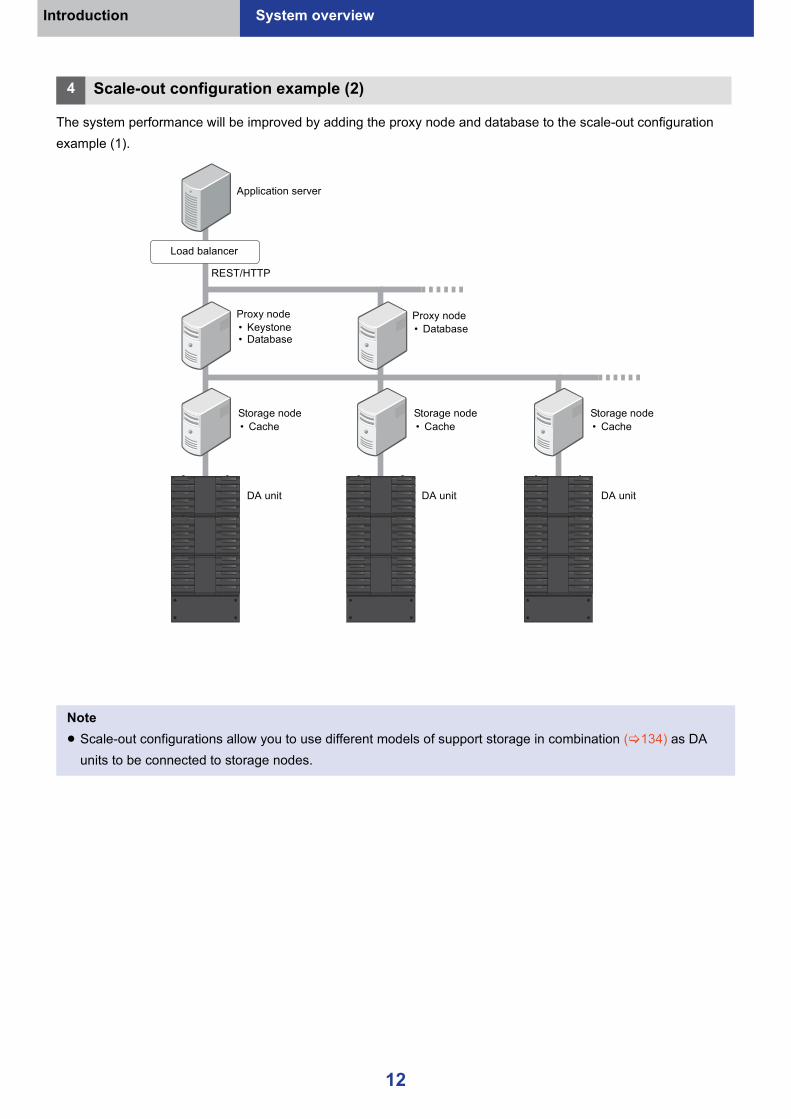
The system performance will be improved by adding the proxy node and database to the scale-out configuration example (1).
4 Scale-out configuration example (2)
Note≥ Scale-out configurations allow you to use different models of support storage in combination ( 134) as DA
units to be connected to storage nodes.
Application server
REST/HTTP
Proxy node• Keystone• Database
DA unit DA unit DA unit
Storage node• Cache
Storage node• Cache
Storage node• Cache
Proxy node• Database
Load balancer
12

Introduction
Scheme for writing and reading data
Processing flowThe server which is running the DA Manager can be seen from the client PC as the object storage or NAS (if S3QL has been installed).When files are read simultaneously by multiple PCs, DA Manager sequentially executes processing.When files are written simultaneously by multiple PCs, DA Manager temporarily stores the files in a cache* and writes them to a magazine according to a schedule.
* DA Manager uses a cache to achieve high-speed data access. DA Manager reads data not stored on the cache from and writes data to magazines in batch processing.
Data write flow
Application server
Proxy nodeSwift compatibility API
Proprietary APIDatabase
DA control APIStorage node
Scheduler
Batch Processing
Cache
Application server
Proxy nodeSwift compatibility API
Proprietary APIDatabase
DA control APIStorage node
Scheduler
Batch Processing
Cache
Object storage process NAS process
S3QL DAM API
DA unit DA unit
13

Introduction Scheme for writing and reading data
Object storage processTo write data to a magazine, DA Manager uses write cache function and batch processing capabilities.1 Application server PUTs the object that the user wishes to write into the proxy node.
2 The proxy node receives this object, and it will be stored in the cache of the storage node. The metadata can be set as required.
3 The object in the cache is recorded in the magazine by a synchronization batch that is launched at a preset time or at regular intervals.
4 When the object completes the recording to the magazine, the object remains in the expired-read cache and will be automatically deleted when the cache free space is insufficient.
NAS process1 The application server accesses the S3QL to write a file. S3QL converts the file name to the object name to
PUT the object into a proxy node.
2 The following process is the same as the behavior of the object storage above.
Note≥ Frequent magazine replacement may occur if you access more than one nearline object ( 18) at the same
time. The object transfer speed will be reduced, and the response time for an operation may be significantly longer.≥ Once an object is PUT, even if you delete or update it before synchronization, the corresponding cached object
will not be deleted/updated. The PUT object, therefore, will be recorded to a magazine by a synchronization batch.≥ Depending on the application, when the application server is used as NAS storage, temporary files/folders may
be created in the shared folder if you directly open a file in the shared folder using the application. Since temporary files/folders reduce the magazine capacity, it is recommended that you copy them to a location different from the shared folder first, and then open the file.
14

Introduction Scheme for writing and reading data
Specifications on writing to magazines
Recording methodThe magazine is a write-once medium using the optical disc technology.Writing to the magazine conforms to the ISO 9660 standard.Data is recorded to each disc in the magazine using RAID technology. A RAID level can be selected in units of containers from among RAID 0, RAID 5, and RAID 6.
EncryptionWhen data is written in a magazine, it can be encrypted and recorded in the magazine. This encryption prevents data from being read and falsified in a system not having a correct encryption key.There are four options for encryption in units of containers as shown below.
1 Non-use of encryption2 Encryption using the system key set at DA Manager installation3 Encryption using a desired account key ( 31)4 Encryption using a desired container key in units of containers ( 43)
Encryption keys are managed in a database. When the application attempts to read data stored in an encrypted magazine or to write data in the magazine, DA Manager automatically fetches an encryption key from the database and sets it in the DA unit. For this reason, the application can read and write data without being conscious of the presence of encryption.The system key, account key, and container key are saved to a file.A system key is generated in the course of DA Manager installation, and its file is stored on a DA Manager installation server.An account key is generated by executing the generate account key file when configuring “Container Default Settings” in “Account Settings”, and the file will be saved on the PC with which “Container Default Settings” is being configured.When a container key file is generated at the time of new container creation, a container key is stored on the PC in use for container creation.Usually, the system key, account key or container key is managed and used via a database, but if a fault arises in the database, it is necessary to do a recovery operation using the backup file of the key. In this case, if the system key file, account key file or container key file is not available, it becomes impossible to recover the database, thereby disabling writing to and reading from encrypted magazines. To use encrypted container on another DA Manager, the system key file, account key file or container key file is required before import. To prevent such trouble, it is strongly recommended to store and manage the system key file, account key file or container key file in a secure place.
Note≥ With a DA unit of the LB-DH7 series with one drive system, data cannot be written to 1.2 TB magazines. In this
case, use 3.6 TB magazines.
15

Introduction Scheme for writing and reading data
Data read flow
Object storage processTo read data from a magazine, DA Manager uses the read cache function and the batch processing capabilities.1 The application server specifies the object to read and sends a GET request to the proxy node. If the object
already exists in the read cache of the storage node (online object ( 18)), the application server transfers the read cache object to the application.
2 If the specified object does not exist in the read cache of the storage node (i.e., the specified object is a nearline object and the file read setting for nearline magazines is disabled, or the specified object is an offline object), the GET request results in an error. In this case, the application server sends a request to read the object from the magazine and store it in the read cache to the proxy node by using the API.
3 When the object-read is requested, a read batch is generated and registered in the scheduler. If the object requested for the read is offline, a magazine load request email will be sent to a magazine administrator at the same time.
4 When the batch runs, the magazine is loaded into the drive system and the requested object is read into the cache.
5 An application server verifies through the API as to whether the object requested for read has been read into the cache.
Application server
Proxy nodeSwift compatibility API
Proprietary APIDatabase
DA control APIStorage node
Scheduler
Batch Processing
Cache
Application server
Proxy nodeSwift compatibility API
Proprietary APIDatabase
DA control APIStorage node
Scheduler
Batch Processing
Cache
Object storage process NAS process
S3QL DAM API
DA unit DA unit
16
Introduction Scheme for writing and reading data
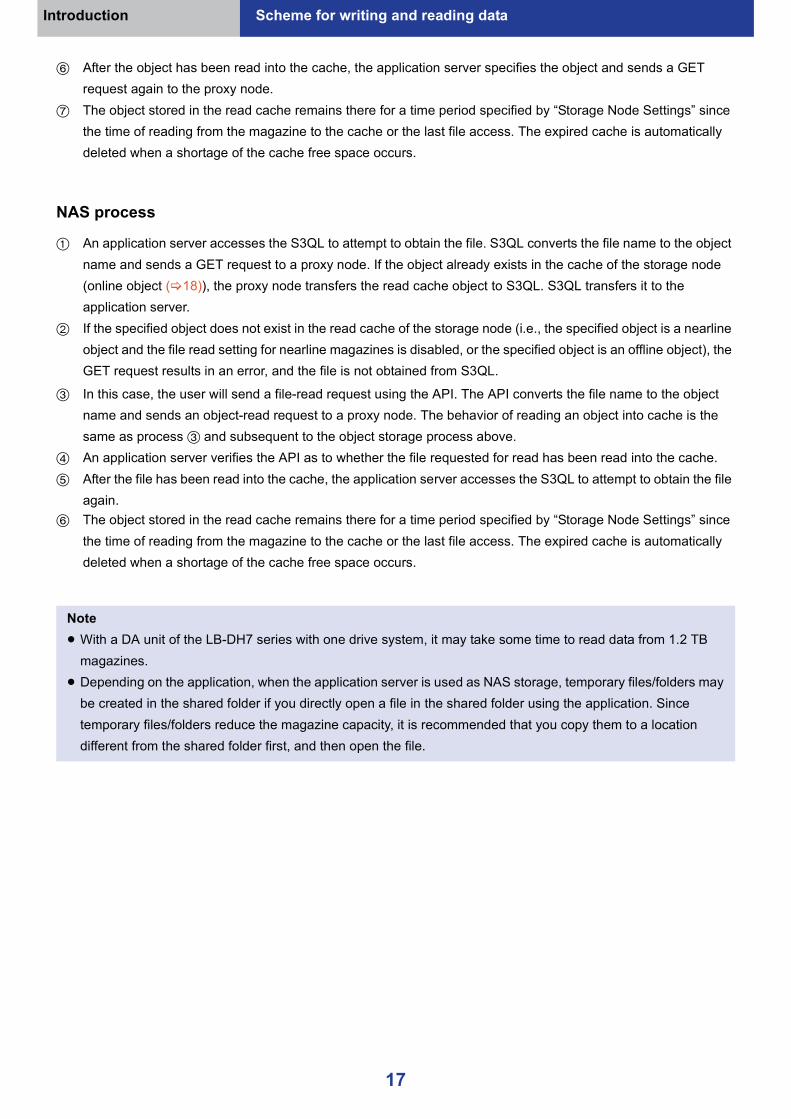
6 After the object has been read into the cache, the application server specifies the object and sends a GET request again to the proxy node.
7 The object stored in the read cache remains there for a time period specified by “Storage Node Settings” since the time of reading from the magazine to the cache or the last file access. The expired cache is automatically deleted when a shortage of the cache free space occurs.
NAS process
1 An application server accesses the S3QL to attempt to obtain the file. S3QL converts the file name to the object name and sends a GET request to a proxy node. If the object already exists in the cache of the storage node (online object ( 18)), the proxy node transfers the read cache object to S3QL. S3QL transfers it to the application server.
2 If the specified object does not exist in the read cache of the storage node (i.e., the specified object is a nearline object and the file read setting for nearline magazines is disabled, or the specified object is an offline object), the GET request results in an error, and the file is not obtained from S3QL.
3 In this case, the user will send a file-read request using the API. The API converts the file name to the object name and sends an object-read request to a proxy node. The behavior of reading an object into cache is the same as process 3 and subsequent to the object storage process above.
4 An application server verifies the API as to whether the file requested for read has been read into the cache.5 After the file has been read into the cache, the application server accesses the S3QL to attempt to obtain the file
again.6 The object stored in the read cache remains there for a time period specified by “Storage Node Settings” since
the time of reading from the magazine to the cache or the last file access. The expired cache is automatically deleted when a shortage of the cache free space occurs.
Note≥ With a DA unit of the LB-DH7 series with one drive system, it may take some time to read data from 1.2 TB
magazines.≥ Depending on the application, when the application server is used as NAS storage, temporary files/folders may
be created in the shared folder if you directly open a file in the shared folder using the application. Since temporary files/folders reduce the magazine capacity, it is recommended that you copy them to a location different from the shared folder first, and then open the file.
17

Introduction Scheme for writing and reading data
Differences of read operations according to magazine locationsAn object read operation or the time taken to read the object varies depending on whether the object is present in a cache or magazine and where is the magazine.
Online object Online object is an object that stored in the online magazine*1 or being read in the cache. The online object can be read immediately and the object will be stored in the cache if it has been read from the online magazine.When the cache effective capacity decreases, deletion takes place automatically in units of objects according to conditions defined in the “Cache Initial Settings” ( 82). Once an object is deleted from the cache, the state of the object may change from online to nearline or offline object depending on the magazine location.*1 Online magazine: a magazine that is loaded in the drive system.
Nearline object Nearline object is an object in a nearline magazine*2 that is not read into the cache. When the file read setting for nearline magazines is enabled, a magazine containing the object is automatically loaded to the drive system and the object is read into the cache in response to a reading request issued from the application.Once the object is read into the cache, it is changed to an online object and can be read immediately for a certain period of time defined in the “Cache Initial Settings” ( 82).Different behaviors will occur depending on the settings. “GET Object Settings for Nearline Magazines” ( 102)
*2 Nearline magazine: a magazine that is stored in the DA unit, but not loaded in the drivesystem.
Offline object Offline object is an object that stored in the offline magazine*3 and being not read in the cache. According to the reading request issued from the application, an email request is automatically sent to a magazine administrator to ask the person to load the magazine storing the file into the DA unit. Once the magazine is loaded into the DA unit, it is also loaded on the drive system automatically and the object is read out into a cache.Once the object is read into the cache, it is changed to an online object and can be read immediately for a certain period of time defined in the “Cache Initial Settings” ( 82).
*3 Offline magazine: a magazine that is not stored in the DA unit. If you stop the DA unit,the magazines become offline in the DA unit.
18
Introduction Scheme for writing and reading data
Types of batch processingMagazines are always subjected to batch processing that takes place in either of two modes: fixed/regular batch and immediate batch.
Fixed/regular batchThis regular batch is executed for saving an object stored in the write cache to a magazine and copying magazines. This batch runs according to a schedule specified in the “Cache Synchronization Settings” ( 83) and “Magazine Copy Settings” ( 95).
Immediate batchThis immediate batch processing applies to processing for reading an object from a magazine.In addition, when a file follows a “One-Shot” instruction in “Cache Synchronization Settings” ( 83) or “Magazine Copy Settings” ( 95), it is subjected to immediate batch processing.
19
System configuration and management

Overview
Functions to be used by Users/Administrators
DA Manager administrators are classified into administrators (system administrators) for managing the entire DA Manager, including the system configuration and management server and administrators (magazine administrators) for managing magazines. A system administrator can serve also as a magazine administrator. The following table summarizes the roles of these administrators.
User’s roles
Magazine administrator’s roles (Additions to the user roles)
Role
Function to be used
DA Manager Web interface or API
Function other than the left
Container management≥ Container registration/change,
write-protection, finalization
○(For an account of normal mode) -
Account management≥ Account parameter configuration,
write-protection, finalization
○(For an account of share mode) -
≥ Magazine set status check(Assignment from un-assigned magazines is available when authorized by the system administrator)
○ -
Role
Function to be used
DA Manager Web interface or API
Function other than the left
Loading and unloading of magazines to/from DA unit
○
[LB-DM9/LB-DH8 series]Control panel of the DA unit
[LB-DH7 series]Web interface of the DA unit
Shelf management for offline magazines≥ Shelf management≥ Magazine location management≥ Magazine inventory
○(as required) -
Note≥ For information on the control panel of the DA unit (LB-DM9/LB-DH8 series) and Web interface operations,
refer to the Operator Guide for the DA unit in use.
21

Overview Functions to be used by Users/Administrators
System administrator’s roles (Additions to the magazine administrator roles)
Role
Function to be used
DA Manager Web interface or API
Function other than the left
DA unit management≥ DA unit registration/suspension≥ System status check, etc.
○ -
Cache management≥ Cache Initial Settings≥ Cache Synchronization Settings, etc.
○ -
User account management≥ Account creation≥ Role settings, etc.
-Using OpenStack (Keystone)
functions
Database management≥ DB backup, etc. -
Management functions of Maria DB
File server/Web server management-
Management functions of OS (Linux)
Miscellaneous≥ Mail server settings≥ Container Initial Settings/Account Initial
Settings, etc.
○ -
Note≥ Except for the Web interface and API of DA Manager, the server administrator is responsible for configuring
each function. DA Manager refers to and uses the configured information. For details about each function and information on how to configure its settings, refer to the pertinent manual or reference materials commercially available on the market.≥ The magazine administrator and system administrator are not the administrators of the domains to which they
belong. Configurations performed by administrators are common configurations across all domains and the administrator menu shows information for all domains.
22
Getting started
Preparation of DA Manager
Register a DA unit and a magazine through the Web interface ( 25).
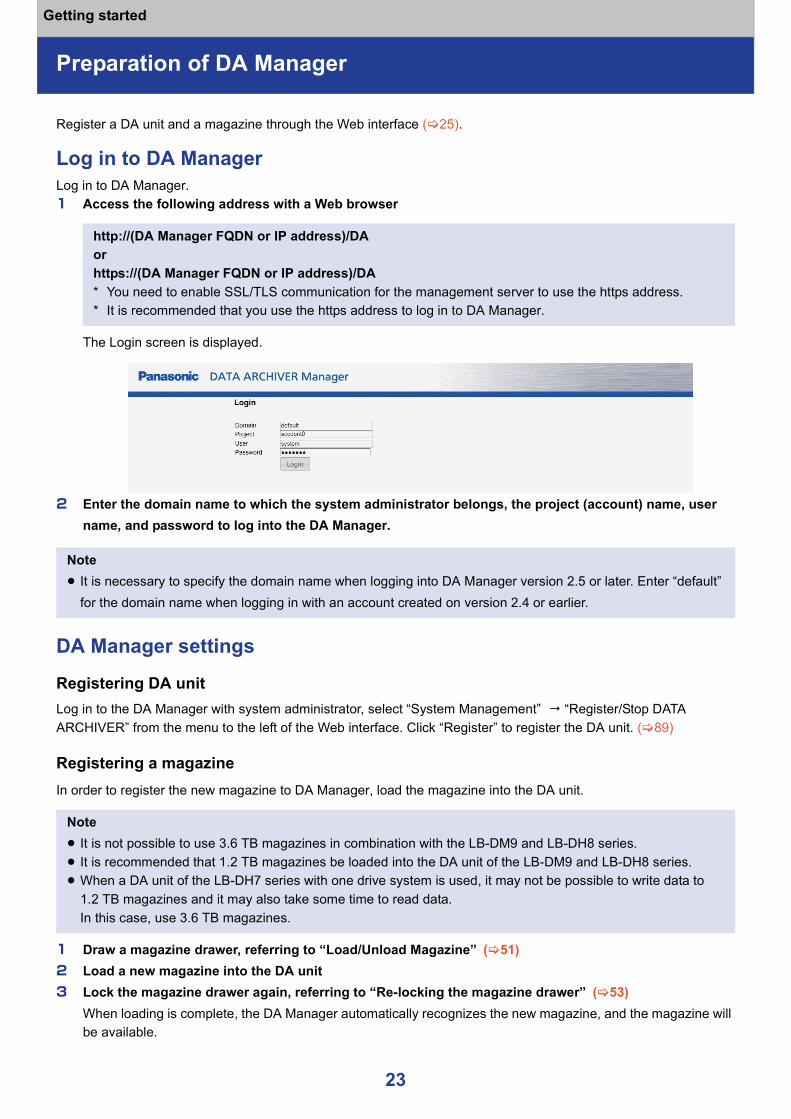
Log in to DA ManagerLog in to DA Manager.1 Access the following address with a Web browser
The Login screen is displayed.
2 Enter the domain name to which the system administrator belongs, the project (account) name, user name, and password to log into the DA Manager.
DA Manager settings
Registering DA unitLog in to the DA Manager with system administrator, select “System Management” “Register/Stop DATA ARCHIVER” from the menu to the left of the Web interface. Click “Register” to register the DA unit. ( 89)
Registering a magazineIn order to register the new magazine to DA Manager, load the magazine into the DA unit.
1 Draw a magazine drawer, referring to “Load/Unload Magazine” ( 51)2 Load a new magazine into the DA unit3 Lock the magazine drawer again, referring to “Re-locking the magazine drawer” ( 53)
When loading is complete, the DA Manager automatically recognizes the new magazine, and the magazine will be available.
http://(DA Manager FQDN or IP address)/DAorhttps://(DA Manager FQDN or IP address)/DA* You need to enable SSL/TLS communication for the management server to use the https address.* It is recommended that you use the https address to log in to DA Manager.
Note≥ It is necessary to specify the domain name when logging into DA Manager version 2.5 or later. Enter “default”
for the domain name when logging in with an account created on version 2.4 or earlier.
Note≥ It is not possible to use 3.6 TB magazines in combination with the LB-DM9 and LB-DH8 series.≥ It is recommended that 1.2 TB magazines be loaded into the DA unit of the LB-DM9 and LB-DH8 series.≥ When a DA unit of the LB-DH7 series with one drive system is used, it may not be possible to write data to
1.2 TB magazines and it may also take some time to read data. In this case, use 3.6 TB magazines.
23
Getting started Preparation of DA Manager
Other initial setupSet the following items as required.
When using an email transmission function, make the following items.
≥ “Cache Initial Settings” ( 82) ≥ “Container Initial Settings” ( 98)≥ “Cache Synchronization Settings” ( 83) ≥ “Account Initial Settings” ( 100)≥ “Magazine Copy Settings” ( 95) ≥ “Storage Node Settings” ( 101)≥ “User Group Settings” ( 96)
≥ “Mail Server Settings” ( 97) ≥ Register the user’s email address in Keystone
24

Getting started
Use of Web interface
Access to the Web interfaceAccess the following address with a Web browser.
Basic configuration of Web interface screen
A LogoutTo log out, click this button.
B MenuSelecting a menu causes its submenu to be displayed. Selecting a submenu causes its items to be displayed in C.≥ Display menu items differ depending on whether it is for users, magazine administrators, or system
administrators.≥ The available menu items vary depending on the mode of the account.
C Menu itemsThe items of a submenu selected in B are displayed.
http://(DA Manager FQDN or IP address)/DAorhttps://(DA Manager FQDN or IP address)/DA* You need to enable SSL/TLS communication for the management server to use the https address.* It is recommended that you use the https address to log in to DA Manager.
e.g., Menu for system administrators
25

Getting started Use of Web interface
Note≥ How to operate the screen to display a list
The layout of screens to display lists is essentially the same. For the operation, refer to the note below.
A SearchWhen specifying the criteria and clicking “Search”, only the results that meet the criteria will be listed.
B SortYou can sort the rows in the list by clicking the “ ” at the right of each item name.In addition, the width of items can be changed by dragging the boundary line between items.
C CheckboxThe checkbox will be appeared if the item is selectable. If you wish to select all, select the top checkbox.
D Page SelectorIf there are many results, you can enter and switch the page. Also, you can click the button and switch the page. You can change the number of results per page from the drop-down list.
26

Getting started Use of Web interface
Web interface menu listAvailable menus vary depending on which authority logs in (user/magazine administrator/system administrator).
Menu Item (qualified user) Target mode Description
normal mode share mode
Account Settings
Container Default Settings ○ ×
Enables you to specify the initial value to be used when creating the container. ( 30)
Magazine Assignment
○ ○
Enables you to assign an unassigned magazine to your account. ( 32)Enables you to configure account parameters. (for share mode) ( 35)
Write Protect Account × ○
Enables you to set or remove write-protection for an account. ( 38)
Finalize Account × ○ Finalizes an account. ( 40)
Container Management
Register/Change Container ○ ×
Enables you to register or modify a container. ( 42)
Write Protect Container ○ ×
Enables you to set or remove write-protection for a container. ( 47)
Finalize Container ○ × Finalizes a container. ( 48)
All users
All users
27
Getting started Use of Web interface
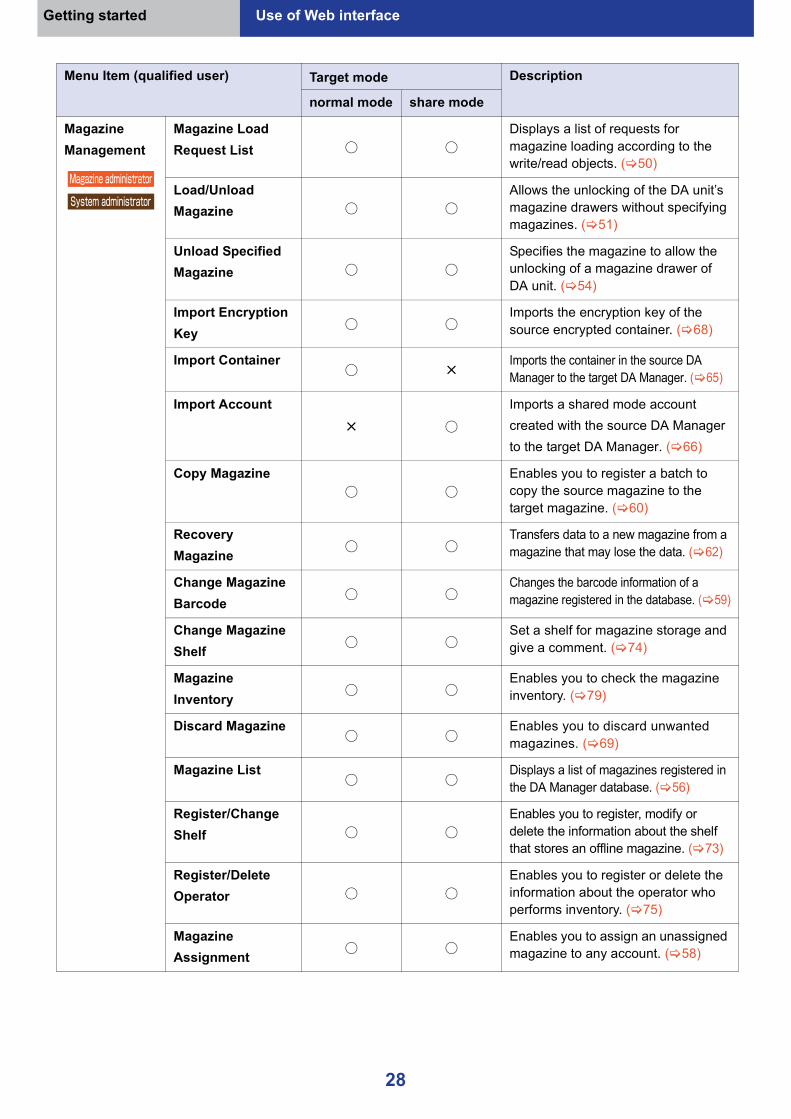
Magazine Management
Magazine Load Request List ○ ○
Displays a list of requests for magazine loading according to the write/read objects. ( 50)
Load/Unload Magazine ○ ○
Allows the unlocking of the DA unit’s magazine drawers without specifying magazines. ( 51)
Unload Specified Magazine ○ ○
Specifies the magazine to allow the unlocking of a magazine drawer of DA unit. ( 54)
Import Encryption Key ○ ○
Imports the encryption key of the source encrypted container. ( 68)
Import Container○ ×
Imports the container in the source DA Manager to the target DA Manager. ( 65)
Import Account× ○
Imports a shared mode account created with the source DA Manager to the target DA Manager. ( 66)
Copy Magazine○ ○
Enables you to register a batch to copy the source magazine to the target magazine. ( 60)
Recovery Magazine ○ ○
Transfers data to a new magazine from a magazine that may lose the data. ( 62)
Change Magazine Barcode ○ ○
Changes the barcode information of a magazine registered in the database. ( 59)
Change Magazine Shelf ○ ○
Set a shelf for magazine storage and give a comment. ( 74)
Magazine Inventory ○ ○
Enables you to check the magazine inventory. ( 79)
Discard Magazine○ ○
Enables you to discard unwanted magazines. ( 69)
Magazine List○ ○
Displays a list of magazines registered in the DA Manager database. ( 56)
Register/Change Shelf ○ ○
Enables you to register, modify or delete the information about the shelf that stores an offline magazine. ( 73)
Register/Delete Operator ○ ○
Enables you to register or delete the information about the operator who performs inventory. ( 75)
Magazine Assignment ○ ○
Enables you to assign an unassigned magazine to any account. ( 58)
Menu Item (qualified user) Target mode Description
normal mode share mode
Magazine administrator
System administrator
28

Getting started Use of Web interface
System Management
Register/Stop DATA ARCHIVER ○ ○
Enables you such as registering or deleting a DA unit. ( 89)
DATA ARCHIVER State Representation
○ ○
Enables you to check the status of a DA unit connected to a storage node.Scans a DA unit connected to a storage node. ( 91)
DATA ARCHIVER Setting ○ ○
Enables you to specify the number of write available drive systems in the Scalable DA that is connected to each storage node. ( 92)
Display System Configuration ○ ○
Displays system configuration information. ( 93)
Display System Status ○ ○ Displays system status. ( 94)
Release Cache File
○ ○
Allows you to manually switch the cache file as it expires in the case such as the cache effective capacity is insufficient. ( 85)
Cache Initial Settings ○ ○
Enables you to specify the deletion unit of an expired cache and available cache capacity lower limits. ( 82)
Cache Synchronization Settings ○ ○
Enables you to set how caches are synchronized. ( 83)
Magazine Copy Settings ○ ○
Enables you to set up a schedule of Copy Magazine. ( 95)
User Group Settings ○ ○
Enables you to set up the information of the group registered in Keystone. ( 96)
Mail Server Settings ○ ○
Make the settings on the mail server to send an email notification from the system to the system administrator/magazine administrator. ( 97)
Container Initial Settings ○ ×
Enables you to specify the default value of the Container Default Settings that is displayed on the Account Settings screen. ( 98)
Account Initial Settings × ○
Enables you to specify the default value of the account parameter configuration that is displayed on the Account Settings screen. ( 100)
Storage Node Settings
○ ○
Enables you to set up the error threshold level of RAID, Output Level of Log, DATA ARCHIVER Low power consumption control, Read Cache Lifetime, and GET Object Settings for Nearline Magazines. ( 101)
Menu Item (qualified user) Target mode Description
normal mode share mode
System administrator
29

Settings and management
Account management
* Regardless of the login authority (user/magazine administrator/system administrator), only the settings for the project (account) specified at the time of login can be managed in “Account Settings”.
Container Default Settings (for normal mode)This enables you to configure the parameters of the magazine to be registered to the container.These settings are for the initial value for creating the container using the Web interface (“Registering containers (for normal mode)” ( 43)).1 Log in to the Web interface2 Select “Account Settings” “Container Default Settings” from the menu
The Container Default Settings screen will be displayed.
3 Enter the required informationA New Container - Default RAID Level
Select the default RAID level that is to be applied when registering magazines to the container.“RAID 0” / “RAID 5” / “RAID 6”
Main functions Person in charge≥ Specifying display default settings on the Container Registration screen
of normal mode account≥ Checking magazine set status, assigning a magazine to the account≥ Configuring the account parameters of share mode accounts, setting
write protection, and performing finalization
User Magazine administrator
System administrator
30
Settings and management Account management
B EncryptionSelect the encryption level to be applied to the container.“Not Encrypted” / “Encrypted by System Key” / “Encrypted by Account Key”
The following operations are required for encryption using the account key.Create account key file: Create and Download1 Click “Execute”2 Input the account keyword and click “OK”
Downloading the account key file will start.Upload Account Key file1 Click “Browse”* and specify the file using the full path
* Note that the button name varies depending on a Web browser in use.2 Click “Upload”
C Automatic Magazine AssignmentSet whether or not to add a magazine to a container automatically if the container capacity is insufficient and there is a free magazine.“Invalid” / “Valid”
D MirrorWhen recording the data in more than one magazine simultaneously, specify the number of concurrent recordings. When not creating a mirror, specify the mirror value “1”.
E Data deduplicationSet the default deduplication status to be applied to the container.“Yes”/“No”
F Pack FilesSet the default file packing status to be applied to the container. To perform packing, it is also necessary to set the default values for Target File Size (the maximum file size at which packing will be performed) and Package Size (the file size after packing).
4 Click “Set”
Note≥ The account key file having different contents is downloaded even if the same account keyword is used in
newly creating an account key file.≥ Once the account key file is lost, it becomes impossible to read all the objects encrypted using the key.≥ The account key file is downloaded into a predetermined folder of the browser in use or a user-designated
folder. It is strongly recommend that the account key file be managed with special care and all the files be kept in a secure place.≥ The character length of a keyword for generating an account key file is unlimited, but it is recommended that
you set a keyword that is simple and easy to remember.≥ In an environment where only DA units that do not support encryption are registered, encryption-related items
gray out and cannot be selected.
31

Settings and management Account management
Magazine AssignmentA user can check a magazine set status, and when “Magazine Assignment by Account” on “Container Initial Settings” ( 98)/“Account Initial Settings” ( 100) is specified for “Valid”, a user can assign a magazine to the user account.It is also possible to set the parameters of share mode accounts.1 Log in to the Web interface2 Select “Account Settings” “Magazine Assignment” from the menu
The Magazine Assignment screen will be displayed.Account of normal mode≥ “Magazine Assignment by Account” is invalid;
A user can check the status of the magazine that has been assigned to a magazine set.
≥ “Magazine Assignment by Account” is valid;A user can register the magazine to be used by the account.
32

Settings and management Account management
Account of share mode≥ “Magazine Assignment by Account” is invalid;
A user can check the status of the magazine that has been assigned to a magazine set.It is possible to set account parameters.
33

Settings and management Account management
≥ “Magazine Assignment by Account” is valid;A user can register the magazine to be used by the account.It is possible to set account parameters.
3 Select the magazines you wish to register in the account, then clickDisplays the magazines that can be registered (blank magazines that do not belong to account) in “Registerable Magazine”. Select the magazine you want to register, move the magazine to the “Registered Magazine(blank)” column in the normal mode, and to the “Magazine Group(unregistered)” column in the share mode to register at least one magazine.
4 Click “Register”The magazine is registered to the account.
Note≥ An offline magazine cannot be displayed in “Registerable Magazine”.≥ Barcode information is left blank for magazines without registered barcode information.
34

Settings and management Account management
Configure account parameters (for share mode)Select required information and click “Register”. Registered account parameters take effect when objects are PUT to a container in the account for the first time.
A RAID LevelB Encryption
“Not Encrypted” : No encryption“Encrypted by System Key” : Encryption by system key“Encrypted by Account Key” : Encryption by account keyThe following operations are required for encryption using the account key.Create Account Key file : Create and Download1 Click “Execute”2 Input the account keyword and click “OK”
Downloading the account key file will start.Upload Account Key file1 Click “Browse”* and specify the file using the full path
* Note that the button name varies depending on a Web browser in use.2 Click “Upload”
C MirrorWhen recording the data in more than one magazine simultaneously, specify the number of concurrent recordings. When not creating a mirror, specify the mirror value “1”.
D Data deduplicationSet whether to execute deduplication when the content of objects stored in the cache and the content of PUT objects are duplicated.“Yes”/“No”
E Pack FilesSet whether or not to pack small objects. To perform packing, select the check box and set the Target File Size (the maximum file size at which packing will be performed) and the Package Size (the file size after packing).
35

Settings and management Account management
Changing account parameters (for share mode)Select required information and click “Register”. The values specified for Target File Size (the maximum file size at which packing will be performed) and Package Size (the file size after packing) will be applied as soon as the account parameters have been changed; however, the mirror value setting will be applied when the magazine group ID is changed.≥ “Magazine Assignment by Account” is invalid;
≥ “Magazine Assignment by Account” is valid;
A Mirror ( 35)B Pack Files
It is possible to change the values specified for Target File Size and Package Size when file packing is enabled.
36

Settings and management Account management
Note≥ The account key file having different contents is downloaded even if the same account keyword is used in
newly creating an account key file.≥ Once the account key file is lost, it becomes impossible to read all the objects encrypted using the key.≥ The account key file is downloaded into a predetermined folder of the browser in use or a user-designated
folder. It is strongly recommend that the account key file be managed with special care and all the files be kept in a secure place.≥ The character length of a keyword for generating an account key file is unlimited, but it is recommended that
you set a keyword that is simple and easy to remember.≥ When a magazine set contains both 1.2 TB magazines and 3.6 TB magazines, they are used automatically in
the following sequence:1 Magazines loaded in the DA unit of the LB-DM9 or LB-DH8 series2 3.6 TB magazines loaded in the DA unit of the LB-DH7 series3 1.2 TB magazines loaded in the DA unit of the LB-DH7 series≥ When registering a magazine, you are required to add magazines of the same type in multiples of the “Mirror”
value.≥ The changes will not be applied to magazine configurations to which magazine group IDs have already been
assigned even if you change the mirror value. After being changed, the mirror value is applied at the time the magazine group ID is assigned for a new magazine.≥ To use a created container in an account as NAS storage, you need to mount it on the management server with
S3QL.≥ Barcode information is left blank for magazines without registered barcode information.≥ In an environment where only DA units that do not support encryption are registered, encryption-related items
gray out and cannot be selected.≥ When “Data deduplication” is executed, and if the content of objects stored in the cache and the content of
PUT objects are duplicated, the relevant data is no longer recorded to the magazine.≥ If file packing is enabled, small objects stored in the cache will be packed when they are recorded to a
magazine.
37
Settings and management Account management
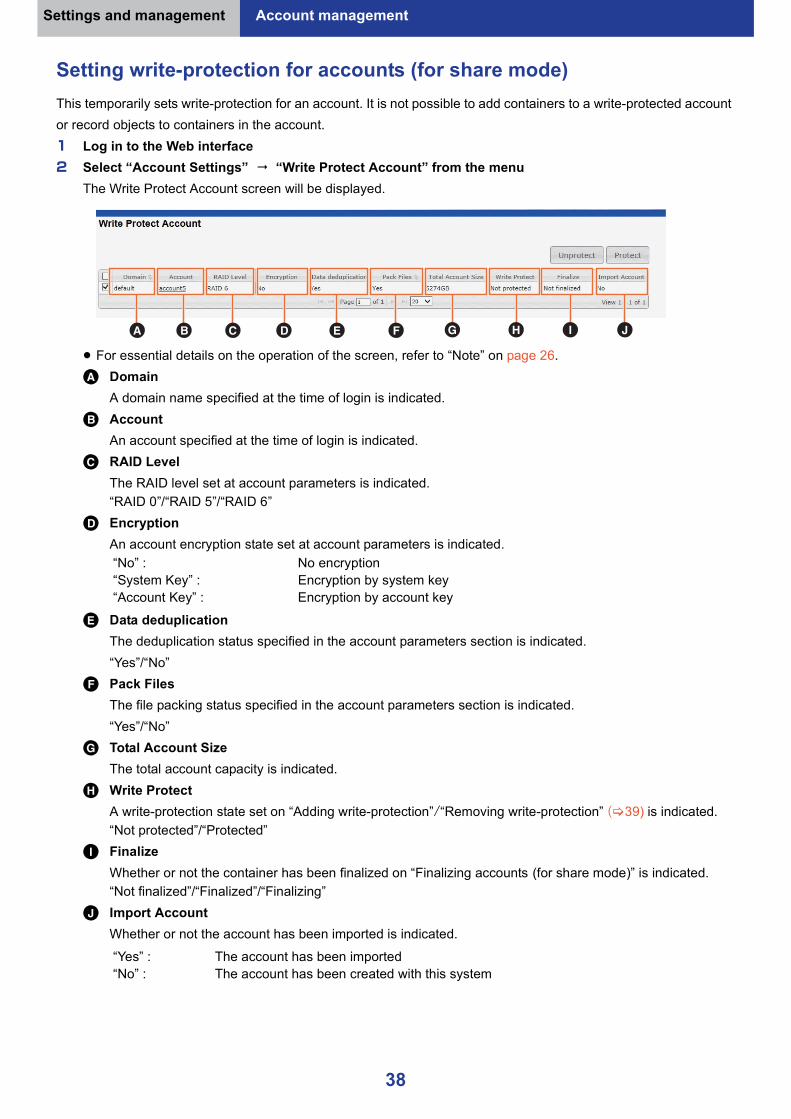
Setting write-protection for accounts (for share mode)This temporarily sets write-protection for an account. It is not possible to add containers to a write-protected account or record objects to containers in the account.1 Log in to the Web interface2 Select “Account Settings” “Write Protect Account” from the menu
The Write Protect Account screen will be displayed.
≥ For essential details on the operation of the screen, refer to “Note” on page 26.A Domain
A domain name specified at the time of login is indicated.B Account
An account specified at the time of login is indicated.C RAID Level
The RAID level set at account parameters is indicated.“RAID 0”/“RAID 5”/“RAID 6”
D EncryptionAn account encryption state set at account parameters is indicated.
E Data deduplicationThe deduplication status specified in the account parameters section is indicated.“Yes”/“No”
F Pack FilesThe file packing status specified in the account parameters section is indicated.“Yes”/“No”
G Total Account SizeThe total account capacity is indicated.
H Write ProtectA write-protection state set on “Adding write-protection”/“Removing write-protection” ( 39) is indicated.“Not protected”/“Protected”
I FinalizeWhether or not the container has been finalized on “Finalizing accounts (for share mode)” is indicated.“Not finalized”/“Finalized”/“Finalizing”
J Import AccountWhether or not the account has been imported is indicated.
“No” : No encryption“System Key” : Encryption by system key“Account Key” : Encryption by account key
“Yes” : The account has been imported“No” : The account has been created with this system
38
Settings and management Account management
Adding write-protection3 Select the checkbox of the account you wish to add write-protection to4 Click “Protect”5 Click “OK”
Removing write-protection3 Select the checkbox of the account you wish to remove write-protection from4 Click “Unprotect”5 Click “OK”
Note≥ The write-protect is a logical protection, so the magazine itself will not be modified.≥ When adding or removing write-protection for an account being used as NAS storage, make sure you use the
S3QL Web interface and perform the operations in the Write Protect Volume screen. ( 124)
39
Settings and management Account management
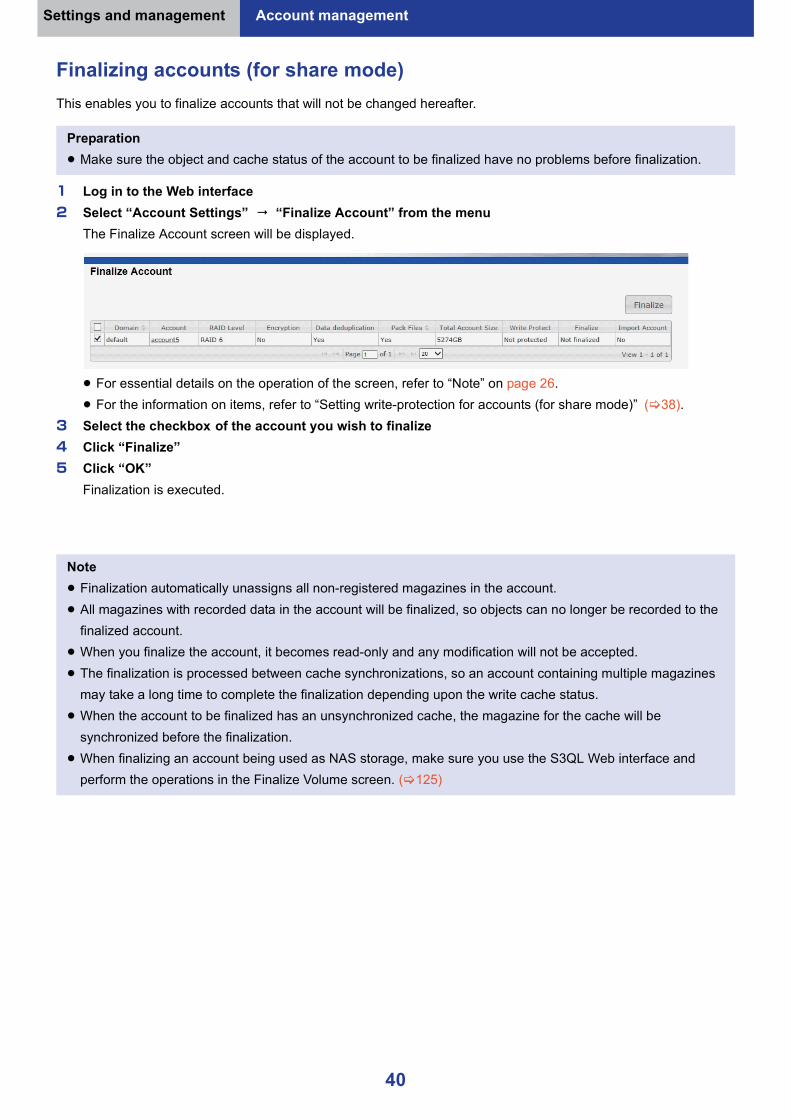
Finalizing accounts (for share mode)This enables you to finalize accounts that will not be changed hereafter.
1 Log in to the Web interface2 Select “Account Settings” “Finalize Account” from the menu
The Finalize Account screen will be displayed.
≥ For essential details on the operation of the screen, refer to “Note” on page 26.≥ For the information on items, refer to “Setting write-protection for accounts (for share mode)” ( 38).
3 Select the checkbox of the account you wish to finalize4 Click “Finalize”5 Click “OK”
Finalization is executed.
Preparation≥ Make sure the object and cache status of the account to be finalized have no problems before finalization.
Note≥ Finalization automatically unassigns all non-registered magazines in the account.≥ All magazines with recorded data in the account will be finalized, so objects can no longer be recorded to the
finalized account.≥ When you finalize the account, it becomes read-only and any modification will not be accepted.≥ The finalization is processed between cache synchronizations, so an account containing multiple magazines
may take a long time to complete the finalization depending upon the write cache status.≥ When the account to be finalized has an unsynchronized cache, the magazine for the cache will be
synchronized before the finalization.≥ When finalizing an account being used as NAS storage, make sure you use the S3QL Web interface and
perform the operations in the Finalize Volume screen. ( 125)
40

Settings and management
Container management
* Regardless of the login authority (user/magazine administrator/system administrator), only the settings of the containers managed by the project (account) specified at the time of login can be managed in “Container Management”.
Container management flow (example)1 Create a container. Register magazines and make settings for encryption. (B)2 Check a list of containers if necessary. (A)3 Further add a magazine to the container if necessary. (C)
Write protect the container if necessary. Also, remove the write-protection of the container if necessary. (D)Finalize the container if necessary. (E)
For details on each operation, refer to the pages listed below.
A Displaying the containers list (for normal mode) Page 42B Registering containers (for normal mode) Page 43C Modifying a container configuration (for normal mode) Page 46D Setting write-protection for containers (for normal mode) Page 47E Finalizing containers (for normal mode) Page 48
Main functions Person in charge≥ Creating a container, changing the configuration of a container,
write-protecting and finalizing a containerFor details on a container structure, refer to “Correspondence between Swift account/container/object and magazines” ( 8).
User Magazine administrator
System administrator
Note≥ Magazines should be registered in advance. For details, refer to “Magazine Assignment” ( 58).≥ Magazines are encrypted and finalized according to settings for encryption and finalizing of containers.≥ To use a created container as NAS storage, you need to mount it on the management server with S3QL.
Container1
Magazine1 Magazine1 Magazine2Magazine1
Container1 Container1
Account Account Account
41

Settings and management Container management
Displaying the containers list (for normal mode)1 Log in to the Web interface2 Select “Container Management” “Register/Change Container” from the menu
The Register/Change Container screen will be displayed.
A Container NameA container name set at container creation is indicated.
B RAID LevelThe RAID level set at container creation is indicated.“RAID 0” / “RAID 5” / “RAID 6”
C EncryptionA container encryption state set at container creation is indicated.
D Data deduplicationThe deduplication status set at container creation is indicated.“Yes”/“No”
E Pack FilesThe file packing status set at container creation is indicated.“Yes”/“No”
F Total Container SizeThe total container capacity is indicated.
G Write ProtectA write-protection state set on “Setting write-protection for containers (for normal mode)” is indicated.“Not protected” / “Protected”
H FinalizeWhether or not the container has been finalized on “Finalizing containers (for normal mode)” is indicated.“Not finalized” / “Finalized” / “Finalizing”
I Imported StatusWhether or not the container has been imported is indicated.
3 Select and click the container name AA container configuration Magazine List screen opens.
“No”: No encryption“System Key”: Encryption by system key“Account Key”: Encryption by account key“Container Key”: Encryption by container key
“Yes”: The container has been imported“No”: The container has been created with this system
Note≥ Set up access privileges to the container with API as required.≥ The Register/Change Container screen displays only the list of containers created with accounts that logged
into the Web interface.
42
Settings and management Container management
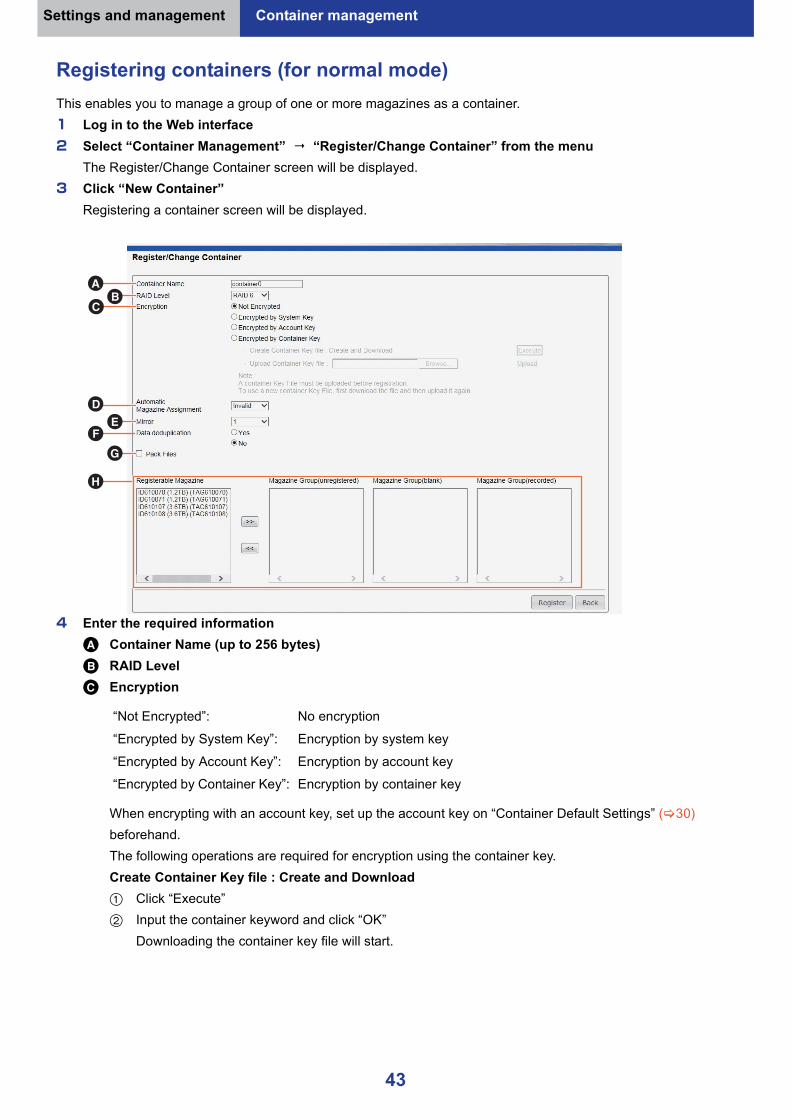
Registering containers (for normal mode)This enables you to manage a group of one or more magazines as a container.1 Log in to the Web interface2 Select “Container Management” “Register/Change Container” from the menu
The Register/Change Container screen will be displayed.3 Click “New Container”
Registering a container screen will be displayed.
4 Enter the required informationA Container Name (up to 256 bytes)B RAID LevelC Encryption
When encrypting with an account key, set up the account key on “Container Default Settings” ( 30) beforehand.The following operations are required for encryption using the container key.Create Container Key file : Create and Download1 Click “Execute”2 Input the container keyword and click “OK”
Downloading the container key file will start.
“Not Encrypted”: No encryption
“Encrypted by System Key”: Encryption by system key
“Encrypted by Account Key”: Encryption by account key“Encrypted by Container Key”: Encryption by container key
43

Settings and management Container management
Upload Container Key file1 Click “Browse”* and specify the file using the full path
* Note that the button name varies depending on a Web browser in use.2 Click “Upload”
D Automatic Magazine AssignmentIf there is not enough space in the container and a magazine will need to be added to the container. This function specifies automatic or manual magazine addition.Valid: When a container does not have enough space, add a magazine from a magazine set to the
container automatically. Check periodically that an unused magazine has been registered in a magazine set.If there is no unused magazine and the capacity of the container is insufficient, the object recording to the container will fail.
Invalid:A magazine in the magazine set must be added to the container manually.If the magazine is not added, the object recording to the container will fail.
E MirrorWhen recording the data in more than one magazine simultaneously, specify the number of concurrent recordings. When not creating a mirror, specify the mirror value “1”.
F Data deduplicationSet whether to execute deduplication when the content of objects stored in the cache and the content of PUT objects are duplicated.“Yes”/“No”
G Pack FilesSet whether or not to pack small objects. To perform packing, select the check box and set the Target File Size (the maximum file size at which packing will be performed) and the Package Size (the file size after packing).
H Registerable MagazineDisplays the magazines that can be registered (blank magazines that do not belong to container) in “Registerable Magazine”. Select the magazines you wish to register in the container, then click to move them to “Magazine Group(unregistered)”.≥ Register at least one magazine.
5 Click “Register”A new container is created.
44

Settings and management Container management
Note≥ These settings cannot be changed for the magazine that has already been registered. The settings can be
applied when a new magazine is registered.≥ The container key file having different contents is downloaded even if the same container keyword is used in
newly creating a container key file.≥ Once the container key file is lost, it becomes impossible to read all the objects encrypted using the key.≥ The container key file is downloaded into a predetermined folder of the browser in use or a user-designated
folder. It is strongly recommend that the container key file be managed with special care and all the files be kept in a secure place.≥ The character length of a keyword for generating a container key file is unlimited, but it is recommended that
you set a keyword that is simple and easy to remember.≥ When a magazine is added to the container, the management data will be synchronized during synchronization
even if the object is not recorded.≥ You cannot change the container name, RAID level, encryption, data deduplication enable/disable, or pack
files enable/disable after a container has been created.≥ An offline magazine cannot be displayed in “Registerable Magazine”.≥ When “Automatic Magazine Assignment” is enabled, if a magazine set contains both 1.2 TB magazines and
3.6 TB magazines, they are selected automatically in the following sequence:1 Magazines loaded in the DA unit of the LB-DM9 or LB-DH8 series2 3.6 TB magazines loaded in the DA unit of the LB-DH7 series3 1.2 TB magazines loaded in the DA unit of the LB-DH7 series≥ When registering a magazine, you are required to add magazines of the same type in multiples of the “Mirror”
value.≥ To use a created container as NAS storage, you need to mount it on the management server with S3QL.≥ Barcode information is left blank for magazines without registered barcode information.≥ In an environment where only DA units that do not support encryption are registered, encryption-related items
gray out and cannot be selected.≥ When “Data deduplication” is executed, and if the content of objects stored in the cache and the content of
PUT objects are duplicated, the relevant data is no longer recorded to the magazine.≥ If file packing is enabled, small objects stored in the cache will be packed when they are recorded to a
magazine.≥ When using mirrored magazines, all the magazines constituting the mirror should be loaded in the DA unit.≥ If some of the magazines being mirrored go offline, executing PUTs to the relevant containers will not be
possible under the following conditions.When file packing is enabled: When one magazine goes offlineWhen file packing is disabled: When more than half of the magazines go offline
45

Settings and management Container management
Modifying a container configuration (for normal mode)This enables you to register magazines to a container or remove them from the container.1 Log in to the Web interface2 Select “Container Management” “Register/Change Container” from the menu
The Register/Change Container screen will be displayed. ( 42)3 Click “Change” of the container you wish to modify
The changing of a container screen will be displayed.
4 Modify the settingsA Automatic Magazine Assignment ( 44)B Mirror ( 44)C Pack Files ( 44)
It is possible to change the values specified for Target File Size and Package Size when file packing is enabled.
D Registerable MagazineDisplays the magazines that can be registered (blank magazines that do not belong to container) in “Registerable Magazine”. Select the magazines you wish to register in the container, then click to move them to “Magazine Group(unregistered)”.In the “Magazine Group(recorded)”, the magazines that have already been registered and in use will be displayed.
5 Click “Register”
Note≥ When a magazine is added to the container, the management data will be synchronized during synchronization
even if the object is not recorded. After synchronization, the magazine will be displayed in “Magazine Group(recorded)”.≥ A magazine registered in “Magazine Group(blank)” or “Magazine Group(recorded)” cannot be unregistered.≥ When registering a magazine, you are required to add magazines of the same type in multiples of the “Mirror”
value.≥ The changes will not be applied to magazine configurations to which magazine group IDs have already been
assigned even if you change the mirror value. After being changed, the mirror value is applied at the time the magazine group ID is assigned for a new magazine.≥ Barcode information is left blank for magazines without registered barcode information.
46

Settings and management Container management
Setting write-protection for containers (for normal mode)This temporarily sets write-protection for a container. When write protected, a container cannot record the object and configuration changes including magazine registration ( 46) are not available.1 Log in to the Web interface2 Select “Container Management” “Write Protect Container” from the menu
The Write Protect Container screen will be displayed.
≥ For essential details on the operation of the screen, refer to “Note” on page 26.≥ For the information on items, refer to “Displaying the containers list (for normal mode)” ( 42).
3 Select the checkbox of the container you wish to add write-protection to4 Click “Protect”5 Click “OK”
Removing write-protection3 Select the checkbox of the container you wish to remove write-protection from4 Click “Unprotect”5 Click “OK”
Note≥ The write-protect is a logical protection, so the magazine itself will not be modified.≥ When adding or removing write-protection for a container being used as NAS storage, make sure you use the
S3QL Web interface and perform the operations in the Write Protect Volume screen. ( 124)
47

Settings and management Container management
Finalizing containers (for normal mode)This enables you to finalize containers that will not be changed hereafter.
1 Log in to the Web interface2 Select “Container Management” “Finalize Container” from the menu
The Finalize Container screen will be displayed.
≥ For essential details on the operation of the screen, refer to “Note” on page 26.≥ For the information on items, refer to “Displaying the containers list (for normal mode)” ( 42).
3 Select the checkbox of the container you wish to finalize4 Click “Finalize”5 Click “OK”
Finalization is executed.
Preparation≥ Make sure the object and cache status of the container to be finalized have no problems before finalization.
Note≥ All magazines in the container will be finalized. Once a container has been finalized, the object recording and
configuration changes ( 46) are not available.≥ When you finalize the container, it becomes read-only and any modification will not be accepted.≥ The finalization is processed between cache synchronizations, so a container containing multiple magazines
may take a long time to complete the finalization depending upon the write cache status.≥ When the container to be finalized has an unsynchronized cache, the magazine for the cache will be
synchronized before the finalization.≥ When finalizing a container being used as NAS storage, make sure you use the S3QL Web interface and
perform the operations in the Finalize Volume screen. ( 125)
48
Settings and management
Magazine management
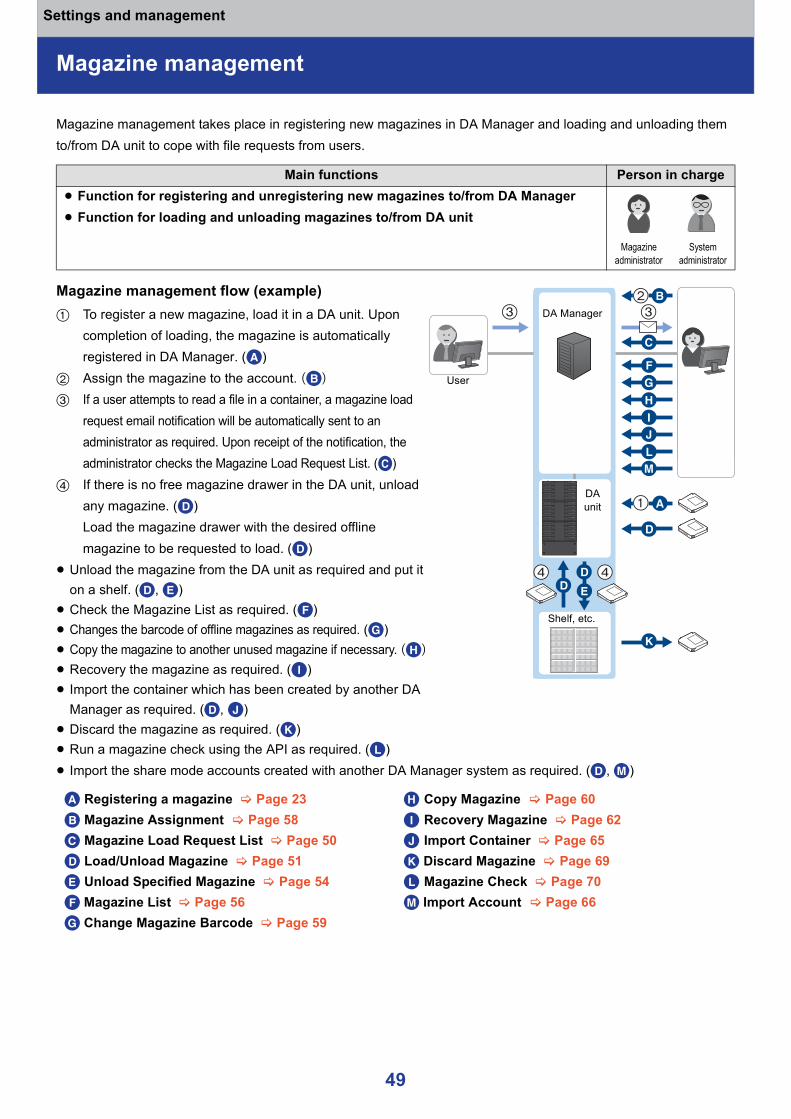
Magazine management takes place in registering new magazines in DA Manager and loading and unloading them to/from DA unit to cope with file requests from users.
Magazine management flow (example)1 To register a new magazine, load it in a DA unit. Upon
completion of loading, the magazine is automatically registered in DA Manager. (A)
2 Assign the magazine to the account. (B)3 If a user attempts to read a file in a container, a magazine load
request email notification will be automatically sent to an administrator as required. Upon receipt of the notification, the administrator checks the Magazine Load Request List. (C)
4 If there is no free magazine drawer in the DA unit, unload any magazine. (D) Load the magazine drawer with the desired offline magazine to be requested to load. (D)
≥ Unload the magazine from the DA unit as required and put it on a shelf. (D, E)
≥ Check the Magazine List as required. (F)≥ Changes the barcode of offline magazines as required. (G)≥ Copy the magazine to another unused magazine if necessary. (H)≥ Recovery the magazine as required. (I)≥ Import the container which has been created by another DA
Manager as required. (D, J)≥ Discard the magazine as required. (K)≥ Run a magazine check using the API as required. (L)≥ Import the share mode accounts created with another DA Manager system as required. (D, M)
Main functions Person in charge≥ Function for registering and unregistering new magazines to/from DA Manager≥ Function for loading and unloading magazines to/from DA unit
Magazine administrator
System administrator
A Registering a magazine Page 23 H Copy Magazine Page 60B Magazine Assignment Page 58 I Recovery Magazine Page 62C Magazine Load Request List Page 50 J Import Container Page 65D Load/Unload Magazine Page 51 K Discard Magazine Page 69E Unload Specified Magazine Page 54 L Magazine Check Page 70F Magazine List Page 56 M Import Account Page 66G Change Magazine Barcode Page 59
DA unit
DA Manager
Shelf, etc.
User
49

Settings and management Magazine management
Magazine Load Request ListA request list for offline magazine loading according to the user file requests will be displayed.1 Log in to the Web interface as a magazine or system administrator2 Select “Magazine Management” “Magazine Load Request List” from the menu
The Magazine Load Request List screen will be displayed.
3 Use the search and sort features to narrow the list≥ For essential details on the operation of the screen, refer to “Note” on page 26.A Column heading
≥ For more information on items other than the above, refer to “Magazine List” ( 56).
Note≥ For normal mode accounts, access the container management function to register magazines to containers,
encrypt magazines, add write-protection, or perform finalization. Refer to “Container management” ( 41).≥ For share mode accounts, access the account management function to encrypt magazines, add write-
protection, or perform finalization. Refer to “Account management” ( 30)≥ For details on how to manage shelves for magazine storage, refer to “Magazine shelf management” ( 71).≥ When pasting a one-dimensional or two-dimensional code on a magazine, do not use the same
one-dimensional or two-dimensional code for multiple magazines. For the specifications of one-dimensional and two-dimensional codes, refer to the Operator Guide for the DA unit.
≥ Special care should be taken when discarding a magazine.
Requested: Displays the date and time of the file request.Storage Node: Displays the name of the storage node to which the file request was made.IP: Displays the IP address of the storage node to which the file request was made.Total File Size: Displays the total capacity of the requested file.Situation: Displays the status of the file.
“Not loaded” / “Loaded”Type: The type of a request is indicated.
“S”: Magazine copy (copy source) / “D”: Magazine copy (copy destination) / “R”: Read / “W”: Write / “F”: Finalize / “C”: Magazine Check
Note≥ It is not possible to use 3.6 TB magazines in combination with the LB-DM9 and LB-DH8 series.≥ It is recommended that 1.2 TB magazines be loaded into the DA unit of the LB-DM9 and LB-DH8 series.≥ When a DA unit of the LB-DH7 series with one drive system is used, it may not be possible to write data to
1.2 TB magazines and it may also take some time to read data. In this case, use 3.6 TB magazines.≥ Barcode information is left blank for magazines without registered barcode information.
50

Settings and management Magazine management
Load/Unload MagazineIn the case such as loading a new magazine into an empty slot in a magazine drawer, allow the unlocking of the magazine drawer.
1 Log in to the Web interface as a magazine or system administrator2 Select “Magazine Management” “Load/Unload Magazine” from the menu
Note≥ The magazine drawers of the DA unit are inhibited from being unlocked while DA Manager is running. It is,
however, possible to unlock them by operating the DA unit after DA Manager allows an unlock operation.≥ When you allow the unlocking of a magazine drawer of a LB-DH7 series DA unit from the DA Manager, the
selected magazine drawer will be automatically unlocked.* It is also possible to switch to a mode that does not automatically unlock the magazine drawers.
≥ When automatic magazine drawer unlocking is enabled, if you select and unlock more than one magazine drawer, the magazine drawers will be unlocked in the order they were selected.
≥ If you wish to eject a specific magazine, the operations in “Unload Specified Magazine” ( 54) are recommended. The operations described in that section differ from this feature in the following ways:`When specifying a magazine, you can check in advance such information as access status and capacity of
desynchronized cache.≥ When unloading a magazine, the DA unit displays the location of the specified magazine.
For details of the information displayed, refer to the Operator Guide for the DA unit in use.
Operation with Scalable DA
51
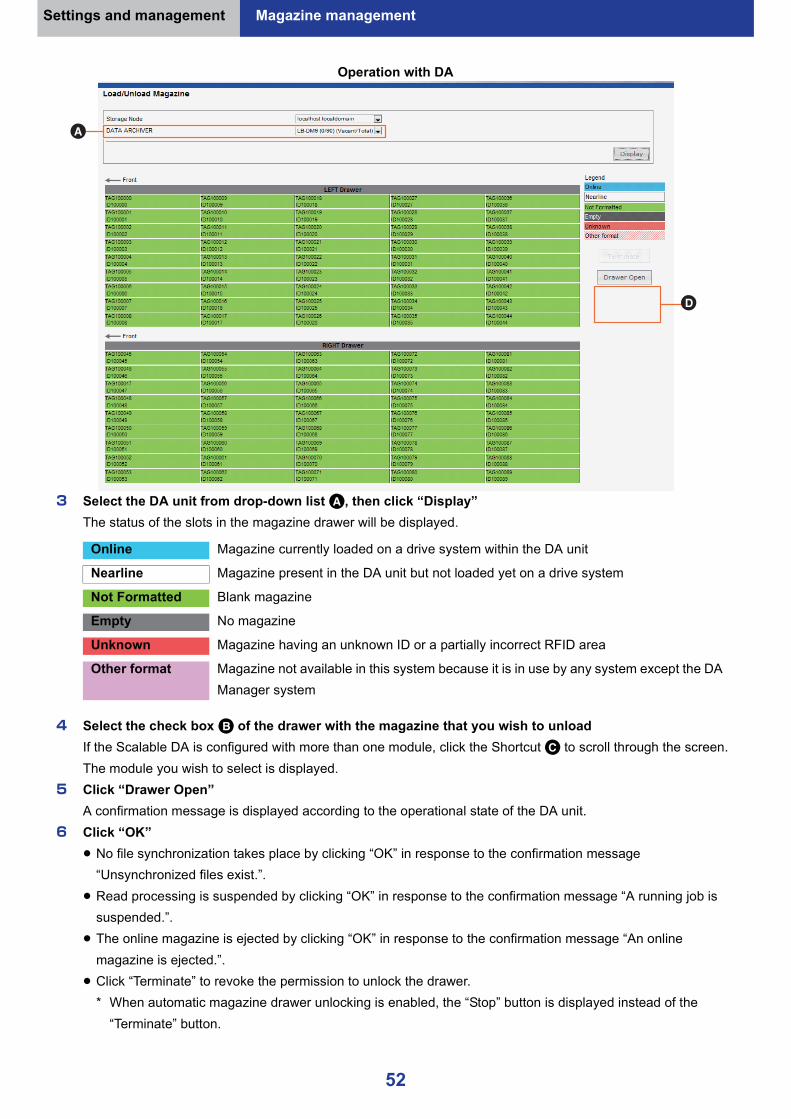
Settings and management Magazine management
3 Select the DA unit from drop-down list A, then click “Display”The status of the slots in the magazine drawer will be displayed.
4 Select the check box B of the drawer with the magazine that you wish to unloadIf the Scalable DA is configured with more than one module, click the Shortcut C to scroll through the screen. The module you wish to select is displayed.
5 Click “Drawer Open”A confirmation message is displayed according to the operational state of the DA unit.
6 Click “OK”≥ No file synchronization takes place by clicking “OK” in response to the confirmation message
“Unsynchronized files exist.”.≥ Read processing is suspended by clicking “OK” in response to the confirmation message “A running job is
suspended.”.≥ The online magazine is ejected by clicking “OK” in response to the confirmation message “An online
magazine is ejected.”.≥ Click “Terminate” to revoke the permission to unlock the drawer.
* When automatic magazine drawer unlocking is enabled, the “Stop” button is displayed instead of the “Terminate” button.
Online Magazine currently loaded on a drive system within the DA unit
Nearline Magazine present in the DA unit but not loaded yet on a drive system
Not Formatted Blank magazine
Empty No magazine
Unknown Magazine having an unknown ID or a partially incorrect RFID area
Other format Magazine not available in this system because it is in use by any system except the DA Manager system
Operation with DA
52

Settings and management Magazine management
≥ Once the message “Ready to open drawer” is displayed in D, a magazine drawer in the DA unit can be made ready for unlocking.
Unlock the magazine drawer in the DA unit, and then draw it out.
Re-locking the magazine drawerAfter completing the necessary work, insert the magazine drawer into the DA unit.≥ After inserting the magazine drawer, if you exit magazine unload mode by operating the DA unit, the magazine
drawer will be locked.
Note≥ The operation in 4 is only required for scalable DA.≥ If you wish to unload the magazine which has unsynchronized objects, it is recommended to unload it after synchronization.≥ After unloading a magazine with unsynchronized objects, be sure to return it to the DA unit connected to the
storage node from which it was unloaded. If the magazine is loaded to a DA unit connected to a different storage node, the following problems may occur:1 The unsynchronized objects may stay in the cache without being synchronized.2 It may become impossible to read the unsynchronized objects.3When a container/account which stores the magazine is finalized, the magazine may be finalized even if its
unsynchronized objects are not synchronized.≥ It will not be possible to PUT objects to containers where there are magazines subject to synchronization in the
specified drawer during the time between when the drawer is specified for drawer opening and when the drawer is relocked and the magazine returns to nearline status.≥ When a slot containing magazines is selected, magazine information is displayed.
* Check “Media Type” to see if the magazine is a 1.2 TB magazine or 3.6 TB magazine.≥ The following types of slot numbers are indicated as magazine information:
DA (LB-DM9)Consecutive numbers assigned to the slots of magazine stacks A to E, arranged in order from those of the left drawer to those of the right drawer.
Scalable DA (LB-DH7/LB-DH8 series)Consecutive numbers assigned to the slots of magazine drawers L1 to L5 and R1 to R5 in the order starting from the top row of the left drawer.
≥ The slot status of 3.6 TB magazines loaded in the DA unit of the LB-DM9 or LB-DH8 series is displayed as “Unknown”.≥ Barcode information is left blank for magazines without registered barcode information.
Note≥ After completing the procedure, press “Finish” on the DA unit to exit magazine unload mode. Because the DA
unit is present in a state where the magazine drawer can be unlocked unless “Finish” is pressed, neither writing to the magazine nor reading from the magazine can be performed from DA Manager. If “Finish” is pressed, the DA unit is ready for operation after performing inventory for checking the magazine loading state.≥ For operating method of “Finish”, refer to the Operator Guide for the DA unit in use.≥ When a magazine drawer of a LB-DH7 series DA unit is closed, the magazine unload mode ends
automatically.* It is also possible to switch to a mode that does not automatically end the magazine unload mode.
53

Settings and management Magazine management
Unload Specified MagazineWhen you eject a magazine from a DA unit, magazine details are displayed for search refinement.
1 Log in to the Web interface as a magazine or system administrator2 Select “Magazine Management” “Unload Specified Magazine” from the menu
The Unload Specified Magazine screen will be displayed.
3 Use the search and sort features to search the desired magazine≥ For essential details on the operation of the screen, refer to “Note” on page 26.A Column heading
≥ For more information on items other than the above, refer to “Magazine List” ( 56).4 Select checkbox to specify the magazine you wish to take offline5 Click “Export”6 Click “OK”
≥ No file synchronization takes place by clicking “OK” in response to the confirmation message “Unsynchronized files exist.”.
≥ Read processing is suspended by clicking the “OK” button in response to the confirmation message “A running job is suspended.”.
≥ The online magazine is ejected by clicking “OK” in response to the confirmation message “An online magazine is ejected.”.
≥ Click “Terminate” to revoke the permission to unlock the drawer.* When automatic magazine drawer unlocking is enabled, the “Stop” button is displayed instead of the
“Terminate” button.
Note≥ The magazine drawers of the DA unit are inhibited from being unlocked while DA Manager is running. It is,
however, possible to unlock them by operating the DA unit after DA Manager allows an unlock operation.≥ When you allow the unlocking of a magazine drawer of a LB-DH7 series DA unit from the DA Manager, the
magazine drawer containing the selected magazine will be automatically unlocked.* It is also possible to switch to a mode that does not automatically unlock the magazine drawers.
≥ When automatic magazine drawer unlocking is enabled, if you select and unlock more than one magazine drawer, the magazine drawers will be unlocked in the order they were selected.
DATA ARCHIVER: DA unit that stores magazines is indicated.Situation: The status of a magazine is indicated.
“Online” / “Nearline”Last Modified: Last updated date and time are indicated.Unsynchronized size: Total file size not written to the magazine is indicated.
54
Settings and management Magazine management
≥ Once the message “Ready to open drawer” is displayed in B, a magazine drawer in the DA unit can be made ready for unlocking.
When “Unload Specified Magazine” is performed, the DA unit indicates the location of the magazine in the applicable drawer.Operate the DA unit to unlock the magazine drawer, and then pull it out.≥ For details of the information displayed, refer to the Operator Guide for the DA unit in use.≥ Refer to page 53 about re-locking the magazine drawer.
Note≥ If you wish to unload the magazine which has unsynchronized objects, it is recommended to unload it after
synchronization.≥ After unloading a magazine with unsynchronized objects, be sure to return it to the DA unit connected to the
storage node from which it was unloaded. If the magazine is loaded to a DA unit connected to a different storage node, the following problems may occur:1 The unsynchronized objects may stay in the cache without being synchronized.2 It may become impossible to read the unsynchronized objects.3When a container/account which stores the magazine is finalized, the magazine may be finalized even if its
unsynchronized objects are not synchronized.≥ When a magazine in a container that is subject to synchronization is taken out, it will not be possible to PUT
objects to the container to which the specified magazine belongs until the drawer is relocked and the magazine returns to nearline status.≥ Barcode information is left blank for magazines without registered barcode information.
55

Settings and management Magazine management
Magazine List1 Log in to the Web interface as a magazine or system administrator2 Select “Magazine Management” “Magazine List” from the menu
The Magazine List screen will be displayed.
3 Use the search and sort features to narrow the listA Column heading
Magazine ID: A magazine ID is indicated.Barcode: When a one-dimensional code or a two-dimensional code has been pasted to a
magazine, the contents of the code are indicated.Group: The magazine group IDs ( 68) are indicated.Container: When the magazine has been registered in a container, the name of the container is
indicated.≥ Container names are not indicated for magazines assigned to share mode accounts.
Account: The users who own magazines are indicated.Domain: The domain name to which the account belongs is indicated.Free Space: The size of free space is indicated.Media Type: A magazine type is indicated.
“Archival Disc” : 3.6 TB Magazine / “BD-R TL” : 1.2 TB MagazineRAID Level: A RAID level is indicated.
“RAID 6” / “RAID 5” / “RAID 0” / “-”: Not assigned to a magazine group≥ Even when a magazine has not been formatted really, if it is assigned to a magazine
group, the settings are indicated as a magazine RAID level.Formatted: When the magazine has already been formatted, “Yes” is indicated. Otherwise, “No” is
indicated.Finalized: When the magazine has already been finalized, “Yes” is indicated. Otherwise, “No” is
indicated.Write Protected (Soft):
When the magazine has been write-protected logically, “Yes” is indicated. Otherwise, “No” is indicated.≥ DA Manager does not have function for logically write-protecting a magazine. Write-
protection may have been enabled by another application. (Note that this function differs from “Setting write-protection for containers”/“Setting write-protection for accounts”.)
56
Settings and management Magazine management
B ContainerWhen clicking the container name, Changing a container screen ( 46) will open.
Write Protected (Hard):
The status of the magazine write-protection switches is indicated. Until it is mounted in a drive system after being loaded in a DA unit, “Unknown” is indicated. When write-protection by the write-protection switch of a magazine remains effective after once it is mounted in the drive system, “Yes” is indicated. Otherwise, “No” is indicated.
Encryption: When a magazine has been encrypted, “System Key”, “Account Key” or “Container Key” is indicated depending on the key to be used. When the magazine has not been encrypted, “No” is indicated. When the magazine has not been assigned to a magazine group, “-” is indicated.≥ Even when a magazine has not been encrypted really, if it is assigned to a
magazine group, the settings are indicated for magazine encryption.Magazine Status: The status of a magazine is indicated.
“Online”/ “Nearline”/ “Offline”Location Category:
When a magazine has been loaded in a DA unit, “DATA ARCHIVER ( )” is indicated. The name of the DA unit subjected to magazine loading is indicated in parentheses. When the magazine has not been loaded in the DA unit, “Other Location” is indicated.
Shelf: A shelf for magazine storage is indicated. The shelf can be changed according to a procedure shown in “Changing a magazine storage shelf” ( 74).
Remarks: Remarks are indicated. The remarks can be changed according to a procedure shown in “Changing a magazine storage shelf” ( 74).
Note≥ Barcode information is left blank for magazines without registered barcode information.
57

Settings and management Magazine management
Magazine AssignmentThis enables you to register a magazine to be used in the account. (Settings screen for a magazine administrator)1 Log in to the Web interface as a magazine or system administrator2 Select “Magazine Management” “Magazine Assignment” from the menu
The Magazine Assignment screen will be displayed.
3 Enter the required informationA Domain
Select the domain for the account that you wish to register a magazine.B Account
Select the account that you wish to register a magazine.C Registerable Magazine
Displays the magazines that can be registered (blank magazines that do not belong to account) in “Registerable Magazine”. Select the magazines you wish to register in the account, then click to move them to “Registered Magazine(blank)”. Register at least one magazine.
4 Click “Register”
Note≥ Barcode information is left blank for magazines without registered barcode information.
58

Settings and management Magazine management
Change Magazine BarcodeChanges the barcode information of a magazine registered in the database.Use this function when changing the barcode of the magazine, the barcode information that is registered in the database can be changed without having to load in the DA unit.If the magazine is loaded in the DA unit, the barcode information in the database is automatically updated without this feature.
1 Log in to the Web interface as a magazine or system administrator2 Select “Magazine Management” “Change Magazine Barcode” from the menu
The Change Magazine Barcode screen will be displayed.
3 Use the search and sort features to search the desired magazine≥ For essential details on the operation of the screen, refer to “Note” on page 26.≥ For the information on items, refer to “Magazine List” ( 56).
4 Select checkbox to specify the magazine you wish to change the barcode information≥ Only the barcode information for an offline magazine can be changed. Online and nearline magazines cannot
be selected.5 Enter the barcode in the “Barcode” field A6 Click “Change”7 Click “OK”
The barcode information of the magazine you have selected will be changed.
Note≥ If a magazine selection checkbox on the Change Magazine Barcode screen is clicked twice quickly, a
magazine that should not be available for selection may be selected. In this case, clicking “Change” will not change the barcode.≥ Barcode information is left blank for magazines without registered barcode information.
59

Settings and management Magazine management
Copy MagazineThis enables you to register a batch that copies the recorded magazines that are loaded in the DA unit to the unformatted magazines you have selected.≥ When you execute the registered batch, refer to Magazine Copy Settings ( 95).
1 Log in to the Web interface as a magazine or system administrator2 Select “Magazine Management” “Copy Magazine” from the menu
The Copy Magazine screen will be displayed.
3 Set up the following itemsA Domain
Select the domain for the account that you wish to copy.B Account
Select the account that is assigned for the magazine to be copied.C Container Name
Select the account that is assigned for the container to be copied.“All” will be selected as the name of share mode containers.The source magazine in the container is narrowed down.
D Copy ModeSelect the copy mode.
E Source MagazineSelect the source magazine.
F Destination MagazineSelect the destination magazine from the unformatted magazines that are not assigned to an account.
4 Click “Register”5 Click “OK”
Preparation≥ Before starting the operation, make sure the unformatted magazines are loaded in the DA unit.≥ Magazines that have been allocated to accounts cannot be specified as copy destinations even in the
unformatted state, so do not allocate to accounts those magazines that you want to specify as copy destinations.
Normal-speed copy: Copies data on the source magazine to another magazine on a per-file basis.High-speed copy: Copies the disk image of the source magazine to another magazine.
60

Settings and management Magazine management
Note≥ When a Copy Magazine operation is started, it cannot be suspended or stopped until the copy is complete. Do
not stop / restart / power off during a Copy Magazine.≥ It is recommended that a source magazine be selected from finalized magazines or full magazines that are no
longer recordable.A magazine that can be recorded is also selectable for a source magazine. In this case, prevent the writing to the object with Write Protect Container.≥ When multiple pieces of copy information have been registered, each piece of registered copy information is
executed in order.≥ When a copy has been completed, the target magazine is handled as a mirror of the source magazine.≥ Specify the same magazine type for the source and destination magazines.≥ Barcode information is left blank for magazines without registered barcode information.
61

Settings and management Magazine management
Recovery MagazineThe Recovery Magazine function is used when the status of the magazine is as follows:≥ Read error that can be recovered by RAID occurs frequently≥ Fails to write≥ Cannot read or write RFIDThe recovery function returns magazine data, including RFID data, to a healthy state to prevent fatal errors such as data loss.You can choose to copy data to a new magazine to recover it (normal-speed recovery/high-speed recovery), or recover a specified magazine by returning it to a recordable state without using a new magazine.Depending on the state of the magazine to be recovered, high-speed recovery and magazine repair may not be executed correctly. If processing fails, re-execute the processes in the following order.≥ When Magazine repair fails Execute High-speed recovery≥ When High-speed recovery fails Execute Normal-speed recoveryIf you copy data to a new magazine with the Recovery Magazine function, the source magazine will be automaticallydiscarded when the Recovery Magazine operation has completed successfully.1 Log in to the Web interface as a system administrator2 Select “Magazine Management” “Recovery Magazine” from the menu
The Recovery Magazine screen will be displayed.
3 Set up or check the following itemsA Domain
Select the domain for the account that you wish to recover.B Account
Select the account that is assigned for the magazine to be recovered.C Container Name
Select the container that is assigned for the magazine to be recovered.“All” will be selected as the name of share mode containers.
D Recovery ModeSelect the recovery mode.
E Source MagazineSelect the source magazine from the formatted magazines that are loaded in the DA unit.
F Destination MagazineSelect a restore destination magazine from unformatted magazines that have not been allocated to an account.If you select Magazine repair for Recovery Mode, the destination magazine field will gray out and become unselectable.
G Situation of Recovery
4 Click “Recovery”5 Click “OK”
Recovery Magazine is executed.
Normal-speed recovery: Copies data on the source magazine to another magazine on a per-file basis.High-speed recovery: Copies the disk image of the source magazine to another magazine.Magazine repair: Discards information with a writing error to return the magazine to a state where
additional writing is possible.
Recovery Mode: Indicates the Recovery Mode.Status: Indicates the Recovery Magazine status. Recovering / Success / Completed with errorsSource Magazine: Indicates the magazine ID (barcode) of the source magazine.Destination Magazine: Indicates the magazine ID (barcode) of the target magazine.
62

Settings and management Magazine management
Note≥ Until the Recovery Magazine starts, the Situation of Recovery pane shows the last recovery status. ≥ Difference from Copy Magazine:
When copying a magazine, the copy source magazine is available after the completion of copying, but the recovery source magazine cannot be used after completion of Recovery Magazine.Copy Magazine is performed depending on the contents of Magazine Copy Settings, and Recovery Magazine will be performed immediately.≥ Specify the same magazine type for the source and destination magazines.≥ Barcode information is left blank for magazines without registered barcode information.
63
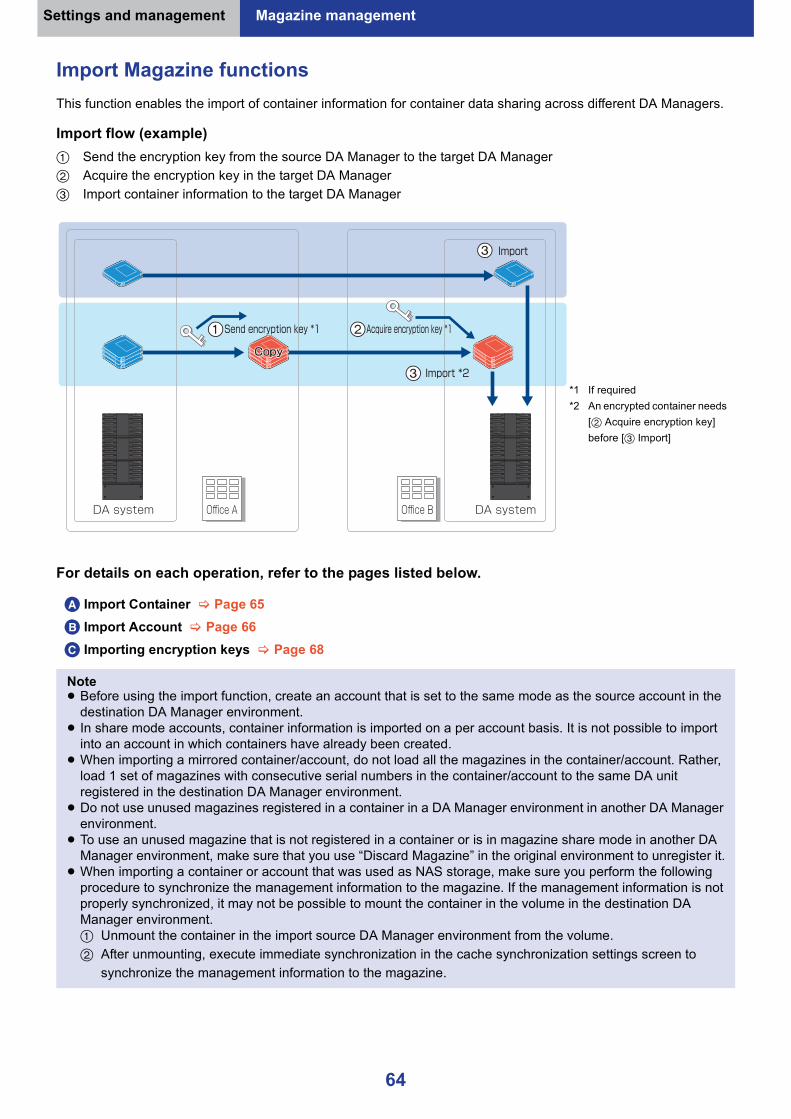
Settings and management Magazine management
Import Magazine functionsThis function enables the import of container information for container data sharing across different DA Managers.
Import flow (example)1 Send the encryption key from the source DA Manager to the target DA Manager2 Acquire the encryption key in the target DA Manager3 Import container information to the target DA Manager
For details on each operation, refer to the pages listed below.
A Import Container Page 65B Import Account Page 66C Importing encryption keys Page 68
Note≥ Before using the import function, create an account that is set to the same mode as the source account in the
destination DA Manager environment.≥ In share mode accounts, container information is imported on a per account basis. It is not possible to import
into an account in which containers have already been created.≥ When importing a mirrored container/account, do not load all the magazines in the container/account. Rather,
load 1 set of magazines with consecutive serial numbers in the container/account to the same DA unit registered in the destination DA Manager environment.≥ Do not use unused magazines registered in a container in a DA Manager environment in another DA Manager
environment.≥ To use an unused magazine that is not registered in a container or is in magazine share mode in another DA
Manager environment, make sure that you use “Discard Magazine” in the original environment to unregister it.≥ When importing a container or account that was used as NAS storage, make sure you perform the following
procedure to synchronize the management information to the magazine. If the management information is not properly synchronized, it may not be possible to mount the container in the volume in the destination DA Manager environment.1 Unmount the container in the import source DA Manager environment from the volume.2 After unmounting, execute immediate synchronization in the cache synchronization settings screen to
synchronize the management information to the magazine.
DA system Office A Office B DA system
CopyCopyCopy
Send encryption key *1 Acquire encryption key *1
Import
Import *2*1 If required*2 An encrypted container needs
[2 Acquire encryption key] before [3 Import]
64

Settings and management Magazine management
Import Container (for normal mode)This container import function enables you to import the container of the source DA Manager to the target DA Manager.
1 Log in to the Web interface as a magazine or system administrator2 Select “Magazine Management” “Import Container” from the menu
The Import Container screen will be displayed.
3 Select the import destination account≥ Click “Search” after selecting the account.
The import destination account changes after you click “Search”.4 Find the magazine in the container to import with search refinement and sort features
A Column heading
≥ For more information on items other than the above, refer to “Magazine List” ( 56).5 Select the check box of the magazine with the Magazine SN in Container 1 of the container to import
≥ If the container consists of more than one magazine, magazines with consecutive serial numbers starting with 1 will be automatically selected. The magazine that does not have a consecutive serial number in the Container will not be imported even if the magazine is stored in the same container.
≥ You cannot select magazines that were created using a different mode to the import destination account.6 Click “Execute”7 Click “OK”
Preparation≥ Load the magazine, which is for the container in the source DA Manager, to the same DA unit. Check the
inventory to verify the magazine load status is complete.≥ Import the encryption key, if necessary. ( 68)
System ID: ID of the DA Manager, which created the container, is indicated.Container ID: The ID of the container, which is stored in the DA Manager, is indicated.
Magazine SN in Container: Serial numbers of the magazines in the container are indicated. (Mirrored magazine has the same number.)
Magazines in Container: When the container is finalized, the number of magazines in the container is displayed. (The mirrored magazine is not included)When the container has not been finalized, “0” is displayed.
Status: Import status is indicated.“Not executed” / “Ready” / “Importing” / “Failed”
Share Mode: Magazines assigned to share mode accounts are indicated with “Yes”.
65

Settings and management Magazine management
Import Account (for share mode)Use Import Account to import share mode containers from the source DA Manager to the target DA Manager on a per account basis.
1 Log in to the Web interface as a magazine or system administrator2 Select “Magazine Management” “Import Account” from the menu
The Import Account screen will be displayed.
3 Select the import destination account≥ Click “Search” after selecting the account.
The import destination account changes after you click “Search”.4 Find the magazine in the account to import with search refinement and sort features
A Column heading
≥ For more information on items other than the above, refer to “Magazine List” ( 56).
Preparation≥ Load the magazines assigned to an account in the source DA Manager environment to the DA unit in the
environment, and check that the inventory to verify the magazine load status is complete.≥ Create a share mode account in the destination DA Manager environment. Do not create containers in the
account.≥ Import the encryption key, if necessary. ( 68)
System ID: ID of the DA Manager, which created the account, is indicated.Account ID: The account ID for the share mode account to which each magazine is
assigned is indicated.Magazine SN in Account: Serial numbers of the magazines in the account are indicated. (Mirrored
magazine has the same number.)Magazines in Account: When the account is finalized, the number of magazines in the account is
displayed. (The mirrored magazine is not included)When the account has not been finalized, “0” is displayed.
Status: Import status is indicated.“Not executed” / “Ready” / “Importing” / “Failed”
Share Mode: Magazines assigned to share mode accounts are indicated with “Yes”.
66

Settings and management Magazine management
5 Select the check box of the magazine with the Magazine SN in Account 1 of the account to import≥ If the account consists of more than one magazine, magazines with consecutive serial numbers starting with
1 will be automatically selected. The magazine that does not have a consecutive serial number in the account will not be imported even if the magazine is stored in the same account.
≥ Magazines cannot be simultaneously imported from more than one account.If there is more than one account that you want to import, create destination accounts as many as necessary in the destination DA Manager environment, and perform Account Import.≥ You cannot select magazines that were created using a different mode to the import destination account.
6 Click “Execute”7 Click “OK”
Notes≥ If the magazine file-read operation is executed, the import request batch will begin after the operation has
completed, therefore it may take some time.≥ The suffix “_C” will be added to the original name of the imported container if a container with the same name
already exists in the destination DA Manager.≥ It is not possible to import into share mode accounts in which containers have already been created.≥ When importing an encrypted container, the encryption key has to be acquired in the target DA Manager before
starting of the container import. ( 68)≥ During the import batch operation, the Display System Status in the System Management screen displays the
status of the import.
≥ Imported containers become read-only. As a result, data cannot be added to imported containers by their import destination accounts.≥ When some of the magazines allocated to the container in the import source DA Manager environment are
discarded, the serial numbers in the container/account will no longer be continuous due to the discarding of the magazines, so magazines allocated after the discarded magazines will not be imported.
≥ When reimporting magazines that failed to be imported, first use the API to delete the objects and containers that were created during the failed import.≥ Barcode information is left blank for magazines without registered barcode information.
67

Settings and management Magazine management
Importing encryption keysThis function enables you to import the encryption key (The system key, account key or container key) for importing an encrypted container. When the container is not encrypted, the encryption key import operation is not required.1 Log in to the Web interface as a magazine or system administrator2 Select “Magazine Management” “Import Encryption Key” from the menu
The Import Encryption Key screen will be displayed.
3 Upload the encryption key file1 Click “Browse” and specify the file using the full path
* Note that the button name varies depending on a Web browser in use.2 Click “Upload”
Magazine group IDThe Magazine Group ID will be set for magazines in the container.The magazine, which has the mirrored data, copy source and target magazine are assigned with the same magazine group ID.
A GroupThe same data can be read from a magazine that has the same Magazine group ID. When the magazines with the same Magazine group ID are registered in the database and then the nearline object written in the magazines can be read, the magazines to be loaded in the drive system may vary depending upon status.
Note≥ In an environment where only DA units that do not support encryption are registered, encryption-related items
gray out and cannot be selected.
68
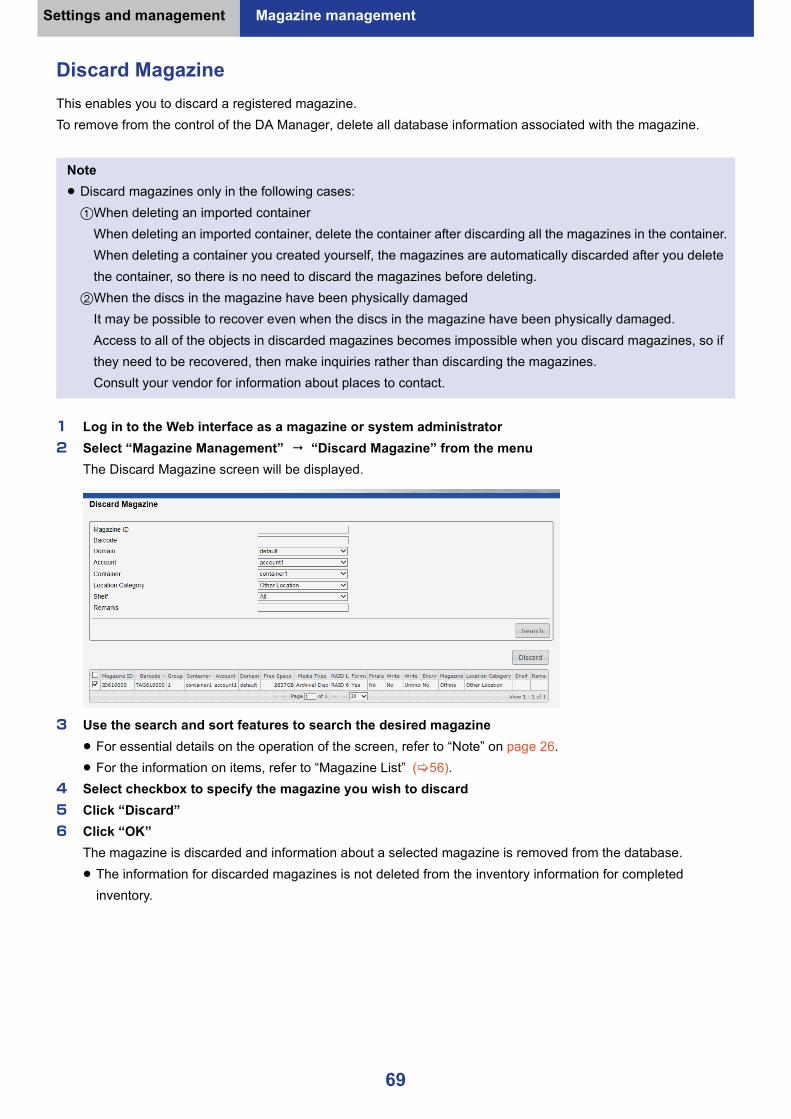
Settings and management Magazine management
Discard MagazineThis enables you to discard a registered magazine. To remove from the control of the DA Manager, delete all database information associated with the magazine.
1 Log in to the Web interface as a magazine or system administrator2 Select “Magazine Management” “Discard Magazine” from the menu
The Discard Magazine screen will be displayed.
3 Use the search and sort features to search the desired magazine≥ For essential details on the operation of the screen, refer to “Note” on page 26.≥ For the information on items, refer to “Magazine List” ( 56).
4 Select checkbox to specify the magazine you wish to discard5 Click “Discard”6 Click “OK”
The magazine is discarded and information about a selected magazine is removed from the database.≥ The information for discarded magazines is not deleted from the inventory information for completed
inventory.
Note≥ Discard magazines only in the following cases:1When deleting an imported container
When deleting an imported container, delete the container after discarding all the magazines in the container.When deleting a container you created yourself, the magazines are automatically discarded after you delete the container, so there is no need to discard the magazines before deleting.
2When the discs in the magazine have been physically damagedIt may be possible to recover even when the discs in the magazine have been physically damaged.Access to all of the objects in discarded magazines becomes impossible when you discard magazines, so if they need to be recovered, then make inquiries rather than discarding the magazines.Consult your vendor for information about places to contact.
69

Settings and management Magazine management
Magazine CheckCheck the recording quality condition of registered magazines.Magazine checks can only be run with the API.
Note≥ It is not possible to discard magazines loaded in the DA unit (Trying to do so will cause an error). Run “Unload
Specified Magazine” to remove magazines from the DA unit first, and then discard them.≥ A warning is displayed when discarding a magazine that has a loading request to read a file or folder. When a
magazine is discarded, the loading request for reading will be forcibly deleted.≥ A warning is displayed when discarding a magazine that has a finalizing request. When a magazine is
discarded, the finalizing request for the magazine will be canceled.≥ When magazines assigned to a container are discarded, the objects contained in the discarded magazine can
no longer be accessed.≥ Please be careful when discarding a magazine. Once the discard of a magazine has been performed, the
magazine cannot be registered to the system again. The magazine will be unavailable even if it is loaded into the DA unit (The slot status in the magazine drawer will be changed to “Other format” ( 52)).
≥ If all of the magazines which are assigned to a container are discarded, the container cannot be deleted. The container can be deleted only in the API. When a container has been deleted in the API, all of the magazines assigned to the container are automatically discarded.≥ When some of the magazines allocated to the container are discarded, the serial numbers in the container/
account will no longer be continuous due to the discarding of the magazines, so you will no longer be able to import magazines allocated after the discarded magazines.≥ Barcode information is left blank for magazines without registered barcode information.
Note≥ Magazine checks of the DA units of the LB-DH7 series can only be performed for 3.6 TB magazines.
70

Settings and management
Magazine shelf management
As one of the ways for more efficient management of many offline magazines, you can store the magazines separately on several shelves* to manage them.≥ When searching for a magazine subjected to a loading request, first search for a magazine storage shelves and
then search for the magazine on the shelf.≥ When performing magazine inventory to confirm that all magazines are present, perform its operations in units of
shelves for segmented processing or concurrent processing.The operations can be supported through the use of a magazine shelf management function.
* The shelves may be boxes, steps within a shelf or rooms. According to your use environment, interpret them as boxes, steps or rooms.
Shelf management flow (example)1 Register a new shelf. (A)2 Register a storage shelf for each magazine. (B)3 Change a shelf name as required. (A)4 Change a magazine storage shelf. (B)5 Discard a shelf as required. (A)
Inventory flow (example)1 Register an operator name. (C)2 Register an inventory name. (D)3 Download an inventory list as required. (D)4 Pass the inventory list to an operator to ask
inventory.5 The operator performs inventory.6 The operator reports an inventory result.7 Register the inventory result. (D and E)8 Confirm the previous inventory result as required.
(D)
Main functions Person in charge≥ Multiple shelves are supported to handle a lot of magazines.≥ Additional shelves are supported to cope with an increasing number of magazines.≥ Inventory by several people is supported.
Magazine administrator
System administrator
DA Manager
Shelf A
Shelf B Shelf C
DA Manager
Shelves
Operators
71

Settings and management Magazine shelf management
For details on each operation, refer to the pages listed below.
A Registering, changing, and deleting a shelf Page 73 D Displaying and editing an inventory title Page 76B Changing a magazine storage shelf Page 74 E Magazine inventory Page 79C Registering and unregistering an operator Page 75
Note≥ The magazine shelf management function is used for registering shelf management information in a DA
Manager database or reading the registered shelf management information from the database. Actual magazine storage on a shelf, transfer between shelves, and inventory should be performed by a magazine administrator or operator.≥ Magazines should be registered in advance. For details, refer to “Registering a magazine” ( 23).≥ The magazine shelf management function should be used as required. Even when this function is not used,
there is no impact on other than the shelf management function.
72
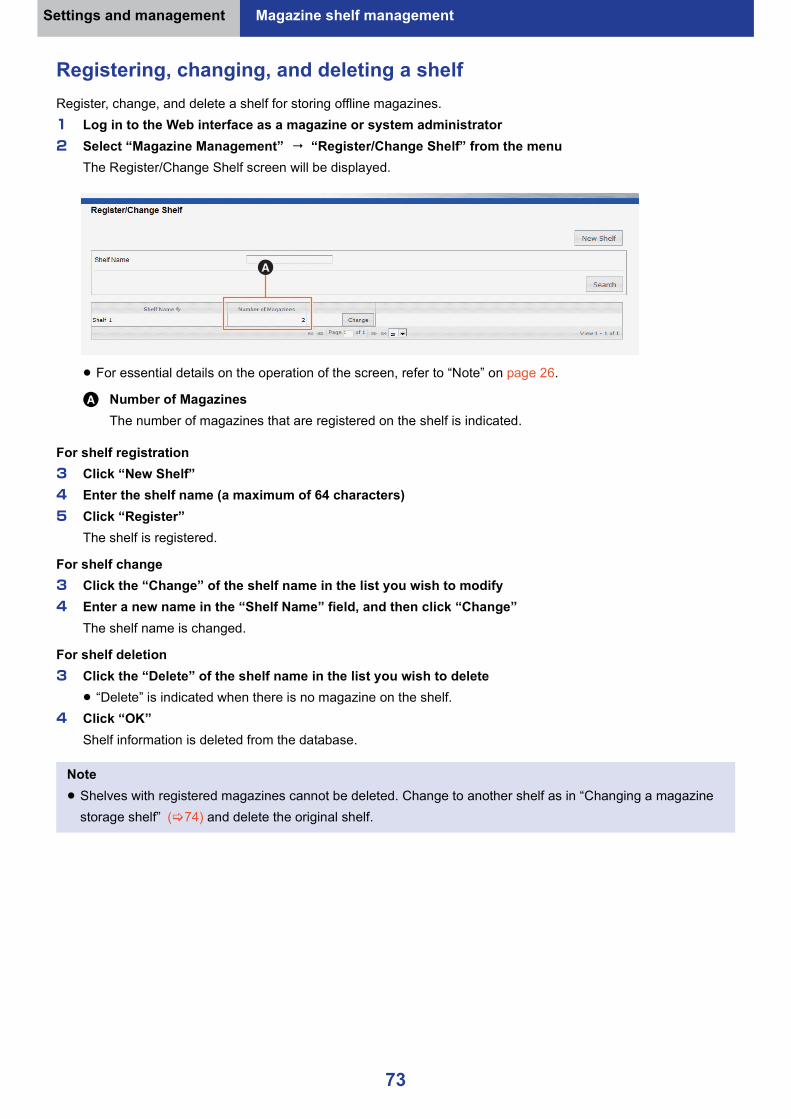
Settings and management Magazine shelf management
Registering, changing, and deleting a shelfRegister, change, and delete a shelf for storing offline magazines.1 Log in to the Web interface as a magazine or system administrator2 Select “Magazine Management” “Register/Change Shelf” from the menu
The Register/Change Shelf screen will be displayed.
≥ For essential details on the operation of the screen, refer to “Note” on page 26.
A Number of MagazinesThe number of magazines that are registered on the shelf is indicated.
For shelf registration3 Click “New Shelf”4 Enter the shelf name (a maximum of 64 characters)5 Click “Register”
The shelf is registered.
For shelf change3 Click the “Change” of the shelf name in the list you wish to modify4 Enter a new name in the “Shelf Name” field, and then click “Change”
The shelf name is changed.
For shelf deletion3 Click the “Delete” of the shelf name in the list you wish to delete
≥ “Delete” is indicated when there is no magazine on the shelf.4 Click “OK”
Shelf information is deleted from the database.
Note≥ Shelves with registered magazines cannot be deleted. Change to another shelf as in “Changing a magazine
storage shelf” ( 74) and delete the original shelf.
73

Settings and management Magazine shelf management
Changing a magazine storage shelfMake settings on each magazine storage shelf or give remarks.1 Log in to the Web interface as a magazine or system administrator2 Select “Magazine Management” “Change Magazine Shelf” from the menu
The Change Magazine Shelf screen will be displayed.
3 Use the search and sort features to search the desired magazine≥ For essential details on the operation of the screen, refer to “Note” on page 26.≥ For the information on items, refer to “Magazine List” ( 56).
4 Select the checkbox for a magazine subjected to shelf change5 Select a changed shelf from a drop-down list shown in the “Shelf” field A6 Input details in the “Remarks” field B as required (a maximum of 255 characters)7 Click “Change”8 Click “OK”
The magazine storage shelf and remarks are updated.
Note≥ Barcode information is left blank for magazines without registered barcode information.
74

Settings and management Magazine shelf management
Registering and unregistering an operatorRegister or unregister an operator who performs inventory. The registered operator is added to a list of operators on the inventory screen.1 Log in to the Web interface as a magazine or system administrator2 Select “Magazine Management” “Register/Delete Operator” from the menu
The Register/Delete Operator screen will be displayed.
≥ For essential details on the operation of the screen, refer to “Note” on page 26.
For operator registration3 Click “New Operator”4 Input an operator name (a maximum of 255 characters)
≥ When registering multiple operators, hit the Enter key for line feed just after each operator name.5 Click “Register”
The operator is registered.
For operator deletion3 Select the checkbox for an operator name to be unregistered4 Click “Delete”5 Click “OK”
Operator information is unregistered from the database.
75

Settings and management Magazine shelf management
Displaying and editing an inventory titleDisplay a list of magazine inventory titles to newly register, change or unregister a magazine inventory title, register or cancel completion of magazine inventory, and download an inventory list.1 Log in to the Web interface as a magazine or system administrator2 Select “Magazine Management” “Magazine Inventory” from the menu
The Magazine Inventory screen will be displayed.
≥ For essential details on the operation of the screen, refer to “Note” on page 26.A Column heading
B Inventory TitleComplete inventory title
Refers to a title in which the time and date are indicated in the “Finish Date” field and “Cancel” is indicated in the “Finish Inventory” field. Clicking a displayed inventory title causes the display of a list of complete inventory magazines. ( 78)
Incomplete inventory titleRefers to a title in which the time and date are not indicated in the “Finish Date” field and “Finish” is indicated in the “Finish Inventory” field. Clicking a displayed inventory title causes the display of a list of incomplete inventory magazines. ( 79)
Inventory Title: A list of magazine inventory titles is listed.
List Created Date: The time and date of title registration is indicated. (Note that this information is not time and date of title change.)
Finish Date: The time and date of completion of magazine inventory is indicated. (Note that this information is not indicated unless the magazine inventory is completed.)
76

Settings and management Magazine shelf management
Registering new inventory3 Click “New Inventory”
Entering an inventory title screen will be displayed.
4 Input a title (a maximum of 255 characters) in the “Inventory Title” field and click “Register”New inventory registration takes place.≥ Upon completion of new inventory registration, magazines registered in DA Manager at that point are
registered in an inventory list.
Finishing inventory3 Click “Finish” in the “Finish Inventory” field with respect to a title for which inventory should be
finishedThe inventory is complete.
Click “Cancel” in the “Finish Inventory” field with respect to a title for which inventory should be restored to an incomplete oneThe complete inventory is restored to an incomplete one.
Changing an inventory title3 Click “Change” in the “Change Inventory Title” field for a title to be changed
Entering an inventory title screen will be displayed.
4 Input a title in the “Inventory Title” field and then click “Change”The inventory title is changed.
Deleting inventory3 Click “Delete” in the “Delete Inventory” field for a title to be deleted4 Click “OK”
Inventory information is deleted.
Downloading an inventory list3 Click “Download” in the “Download List” field for the title of the inventory list that should be
downloadedThe inventory list is downloaded.The inventory list is a text file with the extension “.txt” in which listed items are delimited by commas.
Note≥ Magazines without barcode information are not displayed in the downloaded inventory list.
77

Settings and management Magazine shelf management
Displaying a list of magazines of which the inventory has been completedFor a complete inventory title, the time and date are indicated in the “Finish Date” field and “Cancel” is indicated in the “Finish Inventory” field.3 Click the title for the Magazine List that should be displayed
The magazine inventory list screen is indicated.
≥ For essential details on the operation of the screen, refer to “Note” on page 26.A Column heading
For more information on items other than the above, refer to “Magazine List” ( 56).≥ For “Location Category”, “Shelf” and “Remarks”, the information at inventory taking are indicated.
Inventory Checking Date: The time and date of inventory are indicated.Operator: An operator for inventory is indicated.
Inventory Check Remarks: Inventory-related remarks at inventory taking are indicated.
Note≥ Barcode information is left blank for magazines without registered barcode information.
78
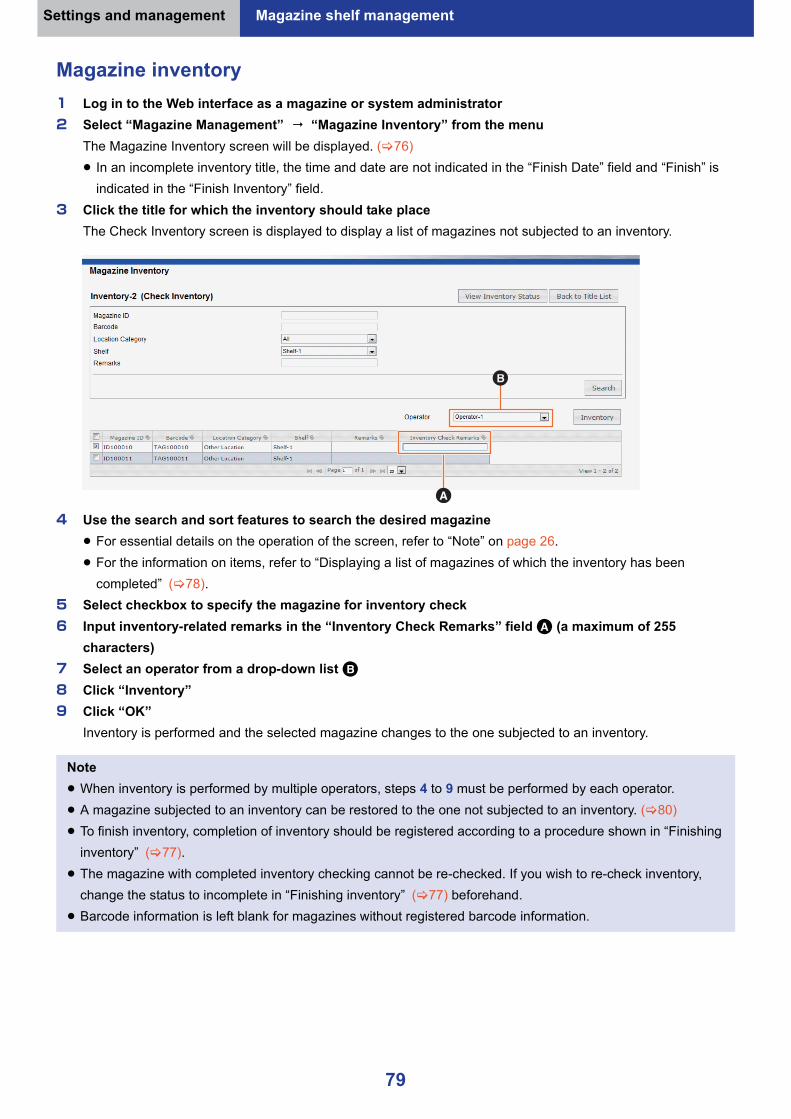
Settings and management Magazine shelf management
Magazine inventory1 Log in to the Web interface as a magazine or system administrator2 Select “Magazine Management” “Magazine Inventory” from the menu
The Magazine Inventory screen will be displayed. ( 76)≥ In an incomplete inventory title, the time and date are not indicated in the “Finish Date” field and “Finish” is
indicated in the “Finish Inventory” field.3 Click the title for which the inventory should take place
The Check Inventory screen is displayed to display a list of magazines not subjected to an inventory.
4 Use the search and sort features to search the desired magazine≥ For essential details on the operation of the screen, refer to “Note” on page 26.≥ For the information on items, refer to “Displaying a list of magazines of which the inventory has been
completed” ( 78).5 Select checkbox to specify the magazine for inventory check6 Input inventory-related remarks in the “Inventory Check Remarks” field A (a maximum of 255
characters)7 Select an operator from a drop-down list B8 Click “Inventory”9 Click “OK”
Inventory is performed and the selected magazine changes to the one subjected to an inventory.
Note≥ When inventory is performed by multiple operators, steps 4 to 9 must be performed by each operator.≥ A magazine subjected to an inventory can be restored to the one not subjected to an inventory. ( 80)≥ To finish inventory, completion of inventory should be registered according to a procedure shown in “Finishing
inventory” ( 77).≥ The magazine with completed inventory checking cannot be re-checked. If you wish to re-check inventory,
change the status to incomplete in “Finishing inventory” ( 77) beforehand.≥ Barcode information is left blank for magazines without registered barcode information.
79
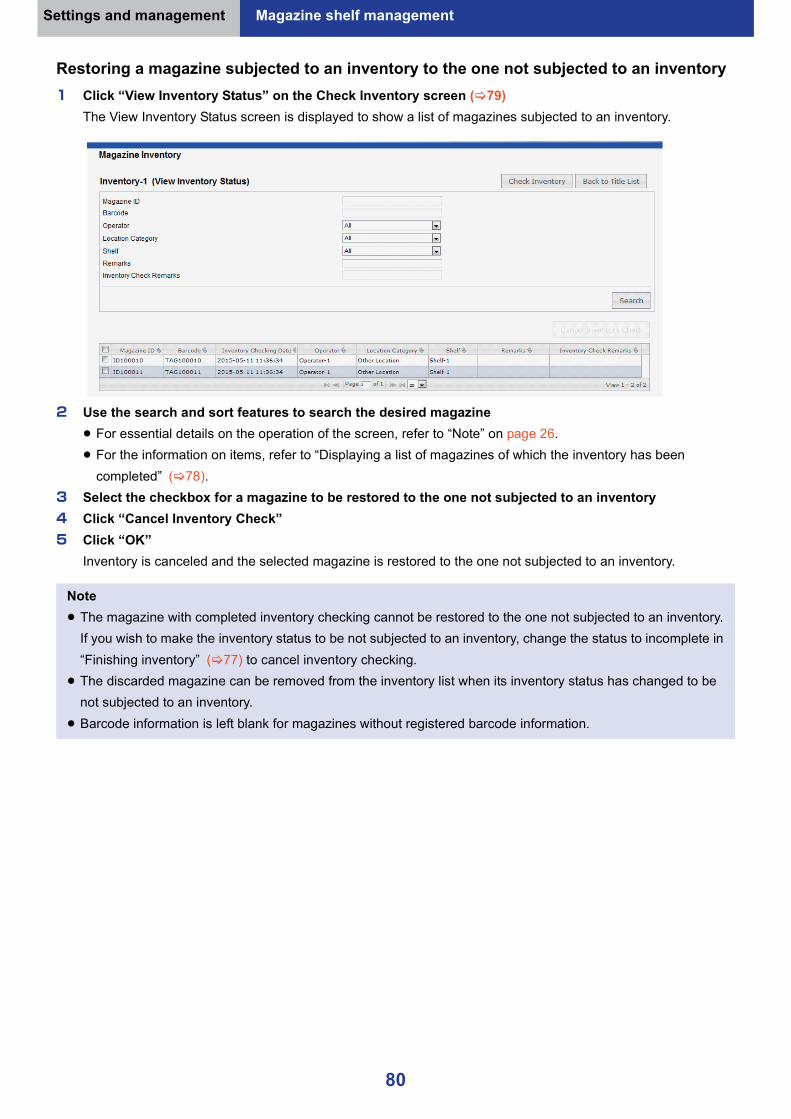
Settings and management Magazine shelf management
Restoring a magazine subjected to an inventory to the one not subjected to an inventory1 Click “View Inventory Status” on the Check Inventory screen ( 79)
The View Inventory Status screen is displayed to show a list of magazines subjected to an inventory.
2 Use the search and sort features to search the desired magazine≥ For essential details on the operation of the screen, refer to “Note” on page 26.≥ For the information on items, refer to “Displaying a list of magazines of which the inventory has been
completed” ( 78).3 Select the checkbox for a magazine to be restored to the one not subjected to an inventory4 Click “Cancel Inventory Check”5 Click “OK”
Inventory is canceled and the selected magazine is restored to the one not subjected to an inventory.
Note≥ The magazine with completed inventory checking cannot be restored to the one not subjected to an inventory.
If you wish to make the inventory status to be not subjected to an inventory, change the status to incomplete in “Finishing inventory” ( 77) to cancel inventory checking.
≥ The discarded magazine can be removed from the inventory list when its inventory status has changed to be not subjected to an inventory.≥ Barcode information is left blank for magazines without registered barcode information.
80

Settings and management
Cache management
These functions are used in the following cases.
Main functions Person in charge≥ Cache-related management functions such as making initial cache settings and
settings for synchronizing write data with a magazine and releasing cache files* Refer to “Scheme for writing and reading data” ( 13).
System administrator
Changing cache-related settings
Cache Initial Settings Page 82
Making settings for write cache synchronization
Cache Synchronization Settings Page 83
Releasing the read cache or write cache because of a shortage of the cache effective capacity or a cache full condition
Release Cache File Page 85
Note≥ A file can be neither read nor written in the event of a shortage in the cache effective capacity even after
deletion of all expired caches. In such a case, release the read cache according to a procedure shown in the section on “Release Cache File” ( 85).
81

Settings and management Cache management
Cache Initial Settings1 Log in to the Web interface as a system administrator2 Select “System Management” “Cache Initial Settings” from the menu
The Cache Initial Settings screen will be displayed.
3 Set up the following itemsA Storage Node
Select the storage node for which you wish to set up the cache.B Deletion Unit of Overdue Read Cache
Size of expired read cache files to be deleted when write cache files fill up (0.01 GB (Enter up to two decimal places.))
C Lower Limit of Available Cache SizeSize of the cache effective capacity to notify a shortage of capacity to the system administrator (GB)≥ Specify a value including a capacity of an expired read cache.
4 Click “Set”5 Click “OK”
Note≥ The Deletion Unit of Overdue Read Cache is the size of caches to be automatically deleted when there is not
enough available cache free space for reading or writing. When this value is set to a smaller one, the number of automatic deletion times increases depending on the size of a read/write file.≥ When the size of the cache effective capacity falls below the lower limit of the available cache size, email
notification is sent to the system administrator. In this case, synchronize the write cache with the magazine by Release Cache File to increase the size of the expired cache file.
82

Settings and management Cache management
Cache Synchronization SettingsThis enables you to set the schedule for the write cache synchronization.1 Log in to the Web interface as a system administrator2 Select “System Management” “Cache Synchronization Settings” from the menu
The Cache Synchronization Settings screen will be displayed.
3 Set up the following items
A ImmediateExecute synchronization immediately.
B TimeExecute synchronization once at a specified time.
C Interval - timeExecute synchronization at a regular interval. (Minute)
D Day of week1 Select the checkbox of the day for synchronization.2 Set the time to start synchronization.
E Interval - day1 Set the number of days between synchronizations.2 Set the time to start synchronization.
F OffSet the schedule to off.
G Write Cache Threshold for Automatic Magazine SynchronizationSpecify the capacity of the write cache in order to start synchronization to the magazine automatically.≥ When “0” is specified, synchronization will not start automatically.≥ If the write cache capacity for each magazine goes over the threshold, synchronization to the magazine
is executed automatically.H Cache Delete Threshold
Specify the cache free space to delete the expired cache automatically.4 A B: Click “Execute”
C D E F G H: Click “Register”5 Click “OK”
83

Settings and management Cache management
Note≥ When a file is being read from a magazine, it may take time because execution begins only after completion of
the file read operation.≥ The write cache that was added after synchronization began will be synchronized when the next
synchronization begins.≥ When a magazine synchronization is started, it cannot be suspended or stopped until the synchronization is
complete. Do not stop / restart / power off during a magazine synchronization.≥ The maximum synchronization limit is 7900 times for a 1.2 TB magazine and 15600 times for a 3.6 TB
magazine.When a magazine exceeds this maximum limit, it can no longer be synchronized regardless of its remaining capacity.≥ The API allows you to set different cache deletion thresholds for different storage nodes. Thresholds set with
the API, however, will not be reflected in the corresponding thresholds on the Web interface. Use the API to check the individual thresholds set for different storage nodes.
84
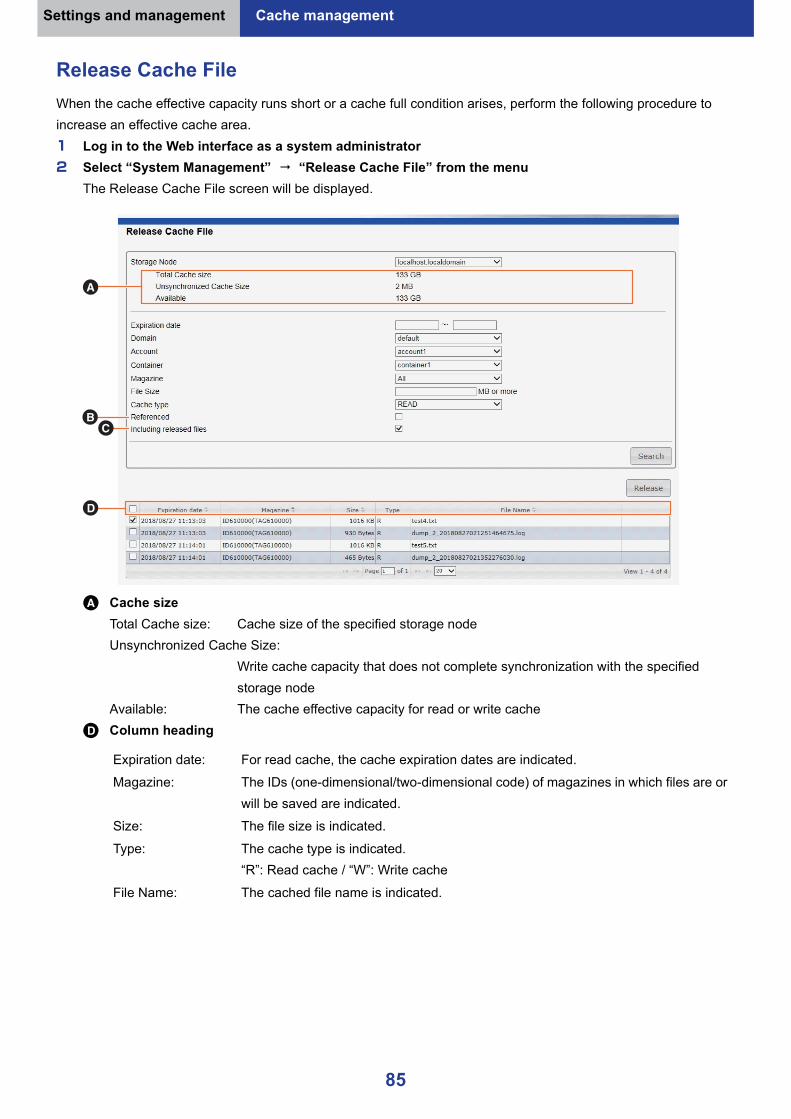
Settings and management Cache management
Release Cache FileWhen the cache effective capacity runs short or a cache full condition arises, perform the following procedure to increase an effective cache area.1 Log in to the Web interface as a system administrator2 Select “System Management” “Release Cache File” from the menu
The Release Cache File screen will be displayed.
A Cache sizeTotal Cache size: Cache size of the specified storage nodeUnsynchronized Cache Size:
Write cache capacity that does not complete synchronization with the specified storage node
Available: The cache effective capacity for read or write cacheD Column heading
Expiration date: For read cache, the cache expiration dates are indicated.Magazine: The IDs (one-dimensional/two-dimensional code) of magazines in which files are or
will be saved are indicated.Size: The file size is indicated.
Type: The cache type is indicated.“R”: Read cache / “W”: Write cache
File Name: The cached file name is indicated.
85
Settings and management Cache management
3 Narrow down a list by using search and sort functions≥ For essential details on the operation of the screen, refer to “Note” on page 26.≥ There are four types of read caches.
Select a target type of cache using a checkbox for “Referenced” B or “Including released files” C.
`Referenced lifetime read cache `Referenced overdue read cache`Unreferenced lifetime read cache `Unreferenced overdue read cache
Checkbox Target search cacheB j C j Unreferenced lifetime read cache
j Referenced lifetime read cache
j Unreferenced lifetime read cache, Unreferenced overdue read cache
Referenced lifetime read cache, Referenced overdue read cache
Note≥ Barcode information is left blank for magazines without registered barcode information.
86

Settings and management Cache management
Releasing a write cache file
4 “Synchronize” is indicated for unsynchronized files in the write cache. Click the “Synchronize” button of the file you wish to synchronize
5 Click “OK”Synchronization is executed. While the synchronization is running, “Synchronizing” is displayed.
Releasing a write cache file (Cache failure)When any abnormality occurs in a write cache file, such as the cache file is not readable or synchronization is not possible, force delete the write cache to resolve the failure.Force delete must only be performed for a cache failure.
4 “Synchronize” is displayed for an unsynchronized file in a write cache. Select the checkbox to specify the cache files you wish to delete
5 Click “Delete”6 Click “OK”
Note≥ When there is another file to be synchronized in a magazine with which a specified file is to be synchronized,
another file is synchronized as well.≥ When a read operation is in progress, it may take time to start synchronization because synchronization cannot
start unless the read operation terminates.≥ It may take time depending on the size of the file to be synchronized.≥ When a magazine synchronization is started, it cannot be suspended or stopped until the synchronization is
complete. Do not stop / restart / power off during a magazine synchronization.≥ If you update the screen after a synchronization job starts, the status indication reverts from “Synchronizing” to
“Synchronize”, but the job will continue until completed.
NoteWhen a write cache is force deleted, the process will be as follows:≥ The write cache which has been force deleted is deleted from the cache folder.
87
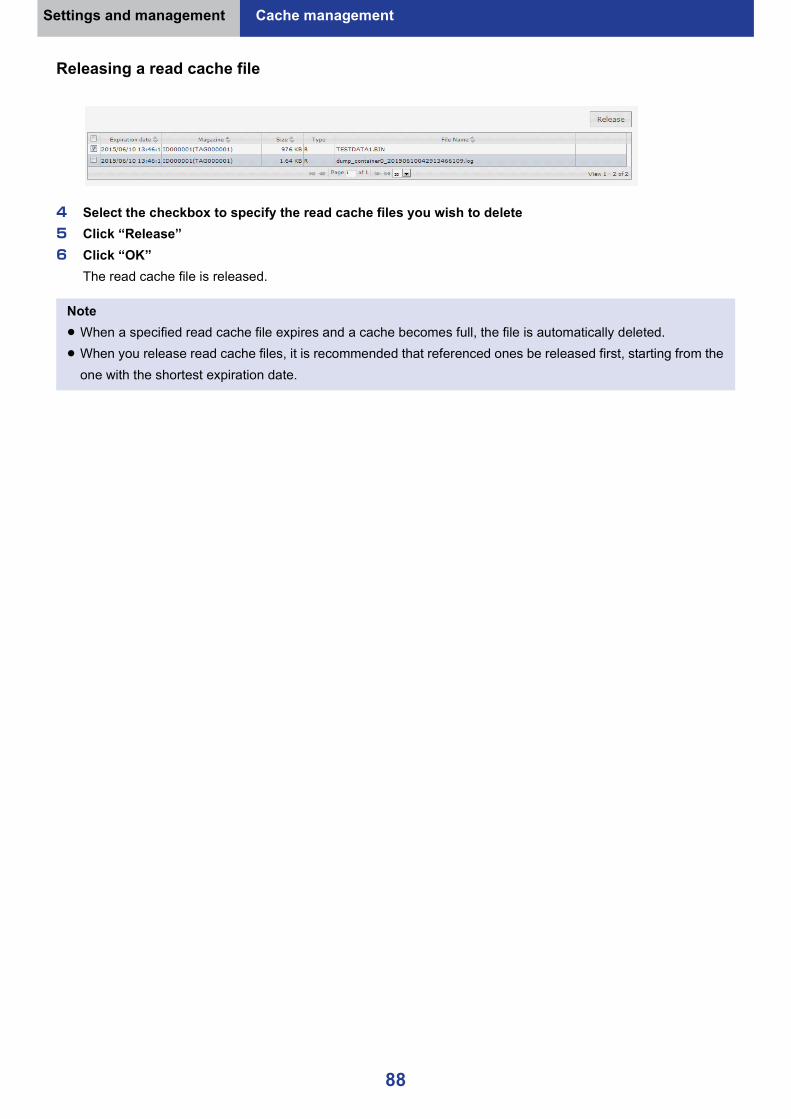
Settings and management Cache management
Releasing a read cache file
4 Select the checkbox to specify the read cache files you wish to delete5 Click “Release”6 Click “OK”
The read cache file is released.
Note≥ When a specified read cache file expires and a cache becomes full, the file is automatically deleted.≥ When you release read cache files, it is recommended that referenced ones be released first, starting from the
one with the shortest expiration date.
88

Settings and management
System management
Register/Stop DATA ARCHIVERThis enables you to add or remove a DA unit connected to the storage node to or from the DA Manager. You can also start or stop a DA unit controlled by the DA Manager.1 Log in to the Web interface as a system administrator2 Select “System Management” “Register/Stop DATA ARCHIVER” from the menu
The Register/Stop DATA ARCHIVER screen will be displayed.
≥ For essential details on the operation of the screen, refer to “Note” on page 26.B Column heading
3 Select the storage node that is connected to the DA unit to be operated (A)
Registration of DA unitRegister the DA unit that shows “Unregistered” in the “Status” column in the database.4 Click “Register”5 Click “OK”
Main functions Person in charge≥ Functions for managing entire system of the DA Manager such as registering DA
unit, displaying the system configuration.
System administrator
DATA ARCHIVER: The DA unit name is indicated.
Serial No.: The DA unit serial number is indicated.Device Node: The device node name for the internal management of DA Manager. It is not visible
from the users (general users).Status: “Active” : Operation controlled by DA Manager
“Changing state to inactive” : Transit to inactive status currently controlled by DA Manager“Inactive” : Operation stopped by DA Manager“Disconnected” : Currently this DA unit is not connected with DA Manager even though it is controlled“Unregistered” : Connected with the DA Manager and power is turned on, but not controlled by the DA Manager
89
Settings and management System management
Deletion of DA unitDelete the information about the DA unit that shows “Inactive” or “Disconnected” in the “Status” column from the database.4 Click “Delete”5 Click “OK”
≥ The DA unit is removed from the list.
Start the DA unitStart the DA unit that shows “Inactive” in the “Status” column.4 Click “Start”5 Click “OK”
Stop the DA unitStop the DA unit that shows “Active” in the “Status” column.4 Click “Stop”5 Click “OK”
Turning on a DA unitTurn on the DA unit that shows “Disconnected” in the “Status” column.≥ The power can be turned on only when “DATA ARCHIVER Low power consumption control” ( 101) is specified
to “On”.4 Click “Power-On”5 Click “OK”
Note≥ Read / Write operation is only available for a DA unit which has been registered.≥ It may take time to stop a DA unit when batch processing is running.≥ Before turning off the DA unit or removing it for maintenance, make sure that the “Status” column does not
show “Active” or “Changing state to inactive”.≥ When the DA unit has stopped, all of the magazines in the DA unit will be in the offline state. When a magazine
that is to be synchronized in a container is offline, the object can no longer be PUT to the container that contains the magazine.≥ It is possible to configure the DA unit so that it can be renamed. It is recommended that you choose a name
that clearly indicates various information on the DA unit, such as its type and installation location.
90
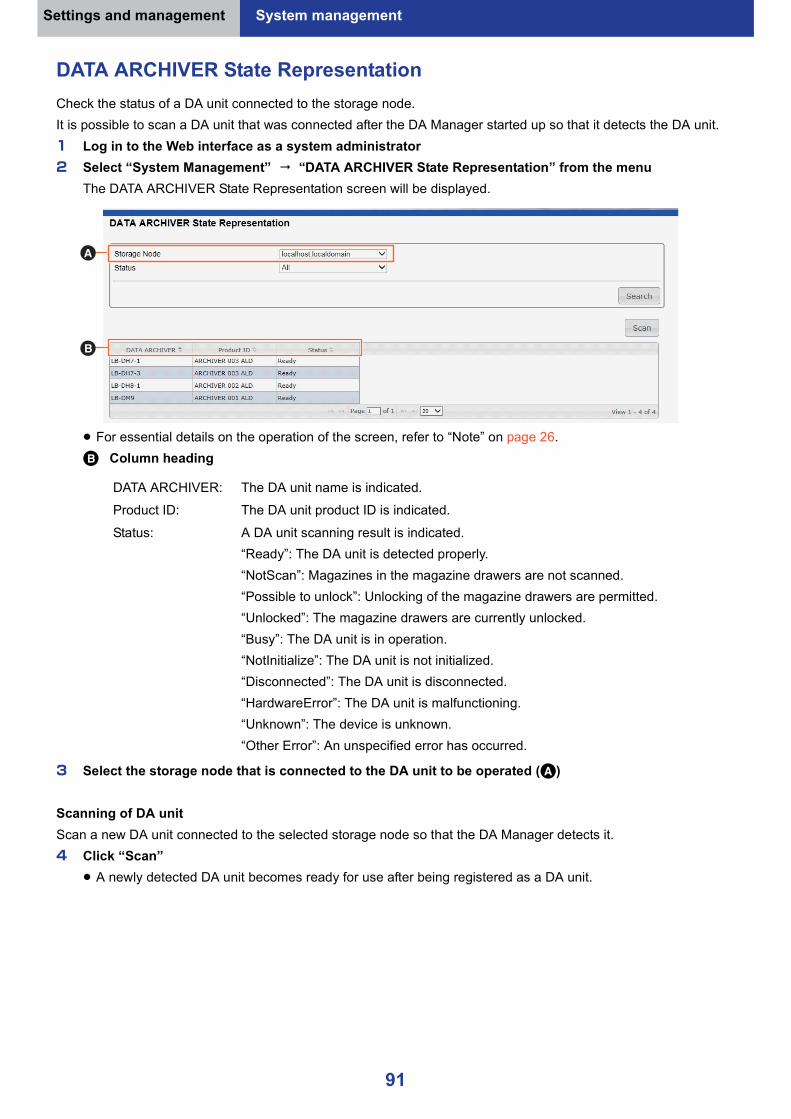
Settings and management System management
DATA ARCHIVER State RepresentationCheck the status of a DA unit connected to the storage node.It is possible to scan a DA unit that was connected after the DA Manager started up so that it detects the DA unit.1 Log in to the Web interface as a system administrator2 Select “System Management” “DATA ARCHIVER State Representation” from the menu
The DATA ARCHIVER State Representation screen will be displayed.
≥ For essential details on the operation of the screen, refer to “Note” on page 26.B Column heading
3 Select the storage node that is connected to the DA unit to be operated (A)
Scanning of DA unitScan a new DA unit connected to the selected storage node so that the DA Manager detects it.4 Click “Scan”
≥ A newly detected DA unit becomes ready for use after being registered as a DA unit.
DATA ARCHIVER: The DA unit name is indicated.Product ID: The DA unit product ID is indicated.
Status: A DA unit scanning result is indicated.“Ready”: The DA unit is detected properly.“NotScan”: Magazines in the magazine drawers are not scanned.“Possible to unlock”: Unlocking of the magazine drawers are permitted.“Unlocked”: The magazine drawers are currently unlocked.“Busy”: The DA unit is in operation.“NotInitialize”: The DA unit is not initialized.“Disconnected”: The DA unit is disconnected.“HardwareError”: The DA unit is malfunctioning.“Unknown”: The device is unknown.“Other Error”: An unspecified error has occurred.
91

Settings and management System management
DATA ARCHIVER SettingThis enables you to specify the maximum number of write available drive systems in the Scalable DA.
1 Log in to the Web interface as a system administrator2 Select “System Management” “DATA ARCHIVER Setting” from the menu
The DATA ARCHIVER Setting screen will be displayed.
3 Set up the following itemsSelect the storage node which is connected to Scalable DA in A.Select the Scalable DA B and enter the number of write available drive systems.The maximum number of write available drive systems must be less than or equal to the number of drives in the system which is connected to the Scalable DA.
4 Click “Change”
Note≥ When the number of write available drive systems has been specified, but the batch for the write process has
not been registered, the read process will start.≥ The number of write available drive systems can be specified only when the Scalable DA is connected.≥ If the number of write available drive systems is set to 0, all the drive systems connected to the system will be
used for the write process.≥ It is possible to write data to 1.2 TB magazines by using a DA unit of the LB-DH7 series regardless of the
specified number of write available drive systems if two or more drive systems are connected to the system.
92

Settings and management System management
Viewing system configurationCheck information concerning DA Manager version, and registered DA unit information.
1 Log in to the Web interface as a system administrator2 Select “System Management” “Display System Configuration” from the menu
The Display System Configuration screen will be displayed.
3 Select the item to view from the tree on the left≥ Clicking causes a tree to expand, so that both Storage Node and DA unit are displayed.≥ Clicking “Proxy Node”, “Storage Node”, “Drive”, or “Changer” causes its information to be displayed to the
right.
93

Settings and management System management
Display System StatusCheck the status of the entire system, the use status of a database or cache, and the status of a DA unit.1 Log in to the Web interface as a system administrator2 Select “System Management” “Display System Status” from the menu
The Display System Status screen will be displayed.
A RefreshClicking “Refresh” causes the latest information to be displayed.
B Total Number of ContainersDeleted containers are not counted.
C Total Number of MagazinesMagazines not recognized by DA Manager (magazines for which “Unknown” is indicated in “Magazine List”) are not counted.
D DATA ARCHIVERThe number of DA whose status is “Active” is indicated.
E UsedThe usage of the database is displayed.
F Cache StatusThe occupied size of the cache folder is indicated.
G Number of jobs to ImportThe number of jobs that can be imported and is not still imported is indicated.
H Importing Account/Container NameThe name of the container/account that is being imported is indicated.≥ Only the account name is displayed while Account Import is in progress.
I Drawer StatusThe lock status of a DA unit magazine drawer is indicated.
J Slot StatusMagazines not recognized by DA Manager (magazines for which “Unknown” is indicated in “Magazine List”) are counted as well.
“Locked”: Inhibits an unlock operation for a DA unit magazine drawer.“Unlocked”: Allows an unlock operation for a DA unit magazine drawer.
94

Settings and management System management
Magazine Copy SettingsThis settings function enables you to set up a schedule of Copy Magazine.1 Log in to the Web interface as a system administrator2 Select “System Management” “Magazine Copy Settings” from the menu
The Magazine Copy Settings screen will be displayed.
3 Set up the following items
A ImmediateExecutes Copy Magazine immediately
B TimeCopy Magazine will be executed once at the time that you specified
C Interval - timeCopy Magazine will be executed at regular intervals (Minutes)
D Day of week1 Select the check box of the day for Copy Magazine2 Specify the time to start Copy Magazine
E Interval - day1 Enter the number of days between Copy Magazines2 Specify the time to start Copy Magazine
F OffSet the schedule to “Off”
4 A B: Click “Execute”C D E F: Click “Register”
5 Click “OK”
Note≥ When a Copy Magazine operation is started, it cannot be suspended or stopped until the copy is complete. Do
not stop / restart / power off during a Copy Magazine.≥ When there is no drive system that can execute copy, it may take a longer time.≥ If you added the Magazine Copy Settings after the start time, the copy will start at the time of next Copy
Magazine.
95
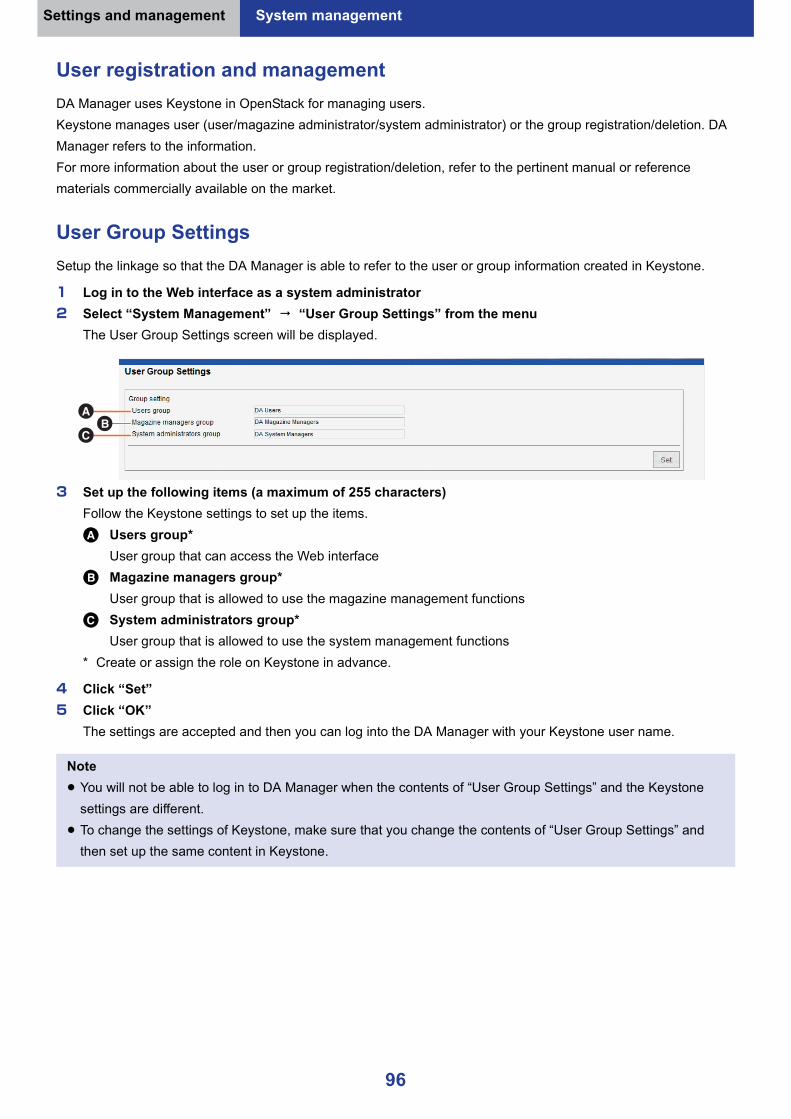
Settings and management System management
User registration and managementDA Manager uses Keystone in OpenStack for managing users.Keystone manages user (user/magazine administrator/system administrator) or the group registration/deletion. DA Manager refers to the information.For more information about the user or group registration/deletion, refer to the pertinent manual or reference materials commercially available on the market.
User Group SettingsSetup the linkage so that the DA Manager is able to refer to the user or group information created in Keystone.
1 Log in to the Web interface as a system administrator2 Select “System Management” “User Group Settings” from the menu
The User Group Settings screen will be displayed.
3 Set up the following items (a maximum of 255 characters)Follow the Keystone settings to set up the items.A Users group*
User group that can access the Web interfaceB Magazine managers group*
User group that is allowed to use the magazine management functionsC System administrators group*
User group that is allowed to use the system management functions* Create or assign the role on Keystone in advance.
4 Click “Set”5 Click “OK”
The settings are accepted and then you can log into the DA Manager with your Keystone user name.
Note≥ You will not be able to log in to DA Manager when the contents of “User Group Settings” and the Keystone
settings are different.≥ To change the settings of Keystone, make sure that you change the contents of “User Group Settings” and
then set up the same content in Keystone.
96
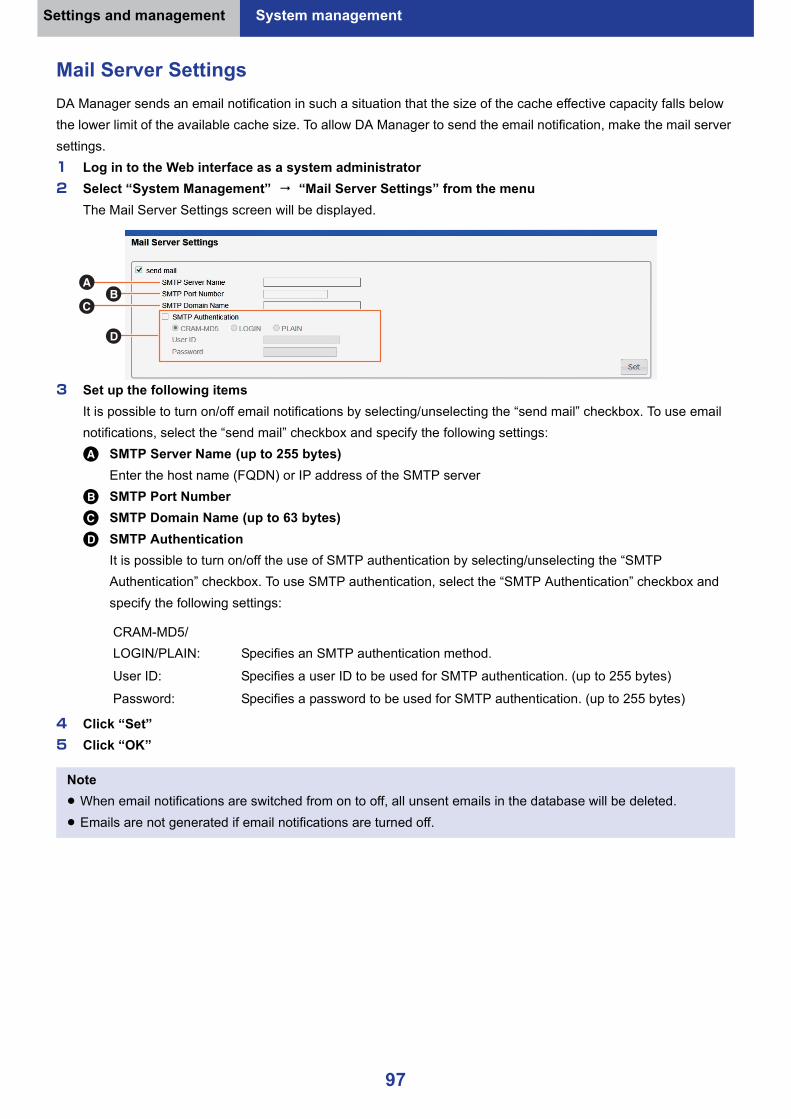
Settings and management System management
Mail Server SettingsDA Manager sends an email notification in such a situation that the size of the cache effective capacity falls below the lower limit of the available cache size. To allow DA Manager to send the email notification, make the mail server settings.1 Log in to the Web interface as a system administrator2 Select “System Management” “Mail Server Settings” from the menu
The Mail Server Settings screen will be displayed.
3 Set up the following itemsIt is possible to turn on/off email notifications by selecting/unselecting the “send mail” checkbox. To use email notifications, select the “send mail” checkbox and specify the following settings:A SMTP Server Name (up to 255 bytes)
Enter the host name (FQDN) or IP address of the SMTP serverB SMTP Port NumberC SMTP Domain Name (up to 63 bytes)D SMTP Authentication
It is possible to turn on/off the use of SMTP authentication by selecting/unselecting the “SMTP Authentication” checkbox. To use SMTP authentication, select the “SMTP Authentication” checkbox and specify the following settings:
4 Click “Set”5 Click “OK”
CRAM-MD5/LOGIN/PLAIN: Specifies an SMTP authentication method.
User ID: Specifies a user ID to be used for SMTP authentication. (up to 255 bytes)
Password: Specifies a password to be used for SMTP authentication. (up to 255 bytes)
Note≥ When email notifications are switched from on to off, all unsent emails in the database will be deleted.≥ Emails are not generated if email notifications are turned off.
97

Settings and management System management
Container Initial Settings (for normal mode)Create the settings below.≥ Default value of the Container Default Settings ( 30) for the Account≥ Assignment of the magazine to the Account by user1 Log in to the Web interface as a system administrator2 Select “System Management” “Container Initial Settings” from the menu
The Container Initial Settings screen will be displayed.
3 Set up the following itemsA New Container - Default RAID Level
The RAID level selected here will be the default value of Container Default Settings ( 30) in the Account.B New Container - Selectable Encryption Mode
≥ The Encryption Mode chosen under “Enable” can be selected on the Container Default Settings screen ( 30) and the Registering of a container screen ( 43).≥ The mode selected under “Default” is specified as the default display of the Container Default Settings
( 30) for the Account.C Automatic Magazine Assignment
Select the item for the default display of the Container Default Settings ( 30) for the Account.D Mirror
Select the item for the default display of the Container Default Settings ( 30) for the Account.E Magazine Assignment by Account
F Data deduplicationSelect the item for the default display of the Container Default Settings ( 30) for the Account.
G Pack FilesSelect the item for the default display of the Container Default Settings ( 30) for the Account.
Invalid: Only system administrator and magazine administrator can assign any magazines to the account.Valid: User can assign own magazine to the account.
98

Settings and management System management
4 Click “Set”5 Click “OK”
Note≥ In an environment where only DA units that do not support encryption are registered, encryption-related items
gray out and cannot be selected.
99
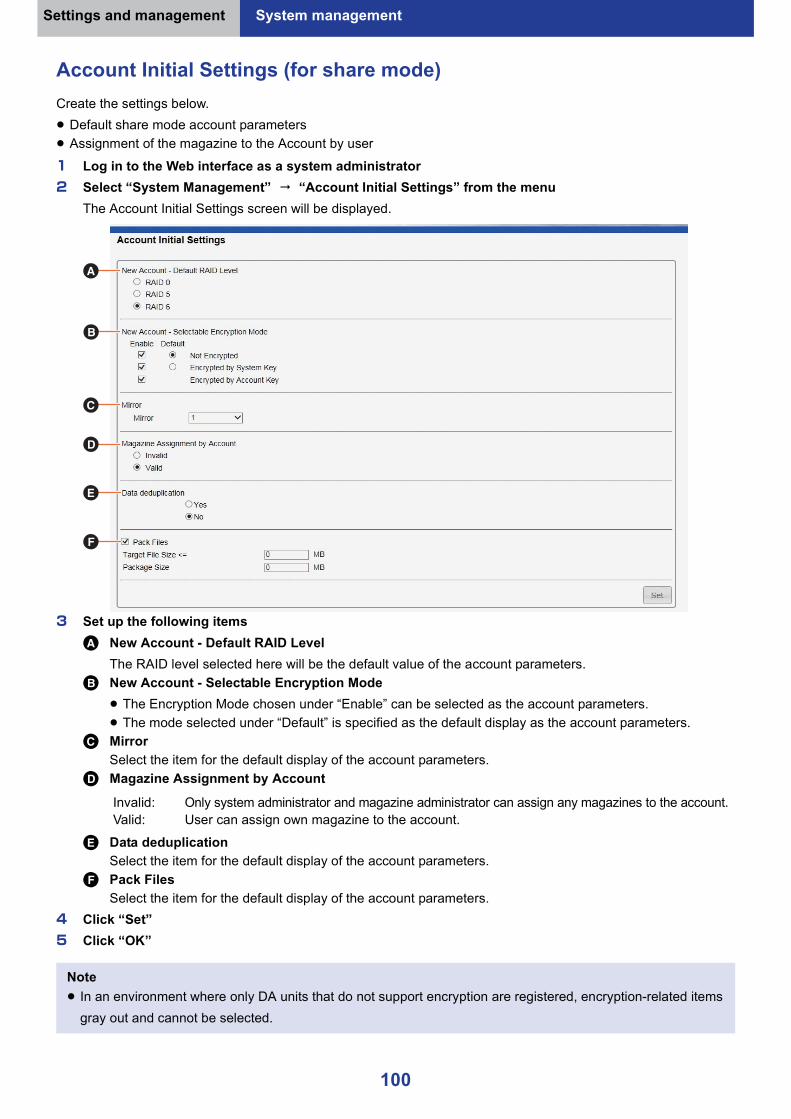
Settings and management System management
Account Initial Settings (for share mode)Create the settings below.≥ Default share mode account parameters≥ Assignment of the magazine to the Account by user
1 Log in to the Web interface as a system administrator2 Select “System Management” “Account Initial Settings” from the menu
The Account Initial Settings screen will be displayed.
3 Set up the following itemsA New Account - Default RAID Level
The RAID level selected here will be the default value of the account parameters.B New Account - Selectable Encryption Mode
≥ The Encryption Mode chosen under “Enable” can be selected as the account parameters.≥ The mode selected under “Default” is specified as the default display as the account parameters.
C MirrorSelect the item for the default display of the account parameters.
D Magazine Assignment by Account
E Data deduplicationSelect the item for the default display of the account parameters.
F Pack FilesSelect the item for the default display of the account parameters.
4 Click “Set”5 Click “OK”
Invalid: Only system administrator and magazine administrator can assign any magazines to the account.Valid: User can assign own magazine to the account.
Note≥ In an environment where only DA units that do not support encryption are registered, encryption-related items
gray out and cannot be selected.
100

Settings and management System management
Storage Node SettingsThese settings enable you to define the error threshold level of RAID, Output Level of Log, DATA ARCHIVER Low power consumption control, Read Cache Lifetime, and GET Object Settings for Nearline Magazines.1 Log in to the Web interface as a system administrator2 Select “System Management” “Storage Node Settings” from the menu
The Storage Node Settings screen will be displayed.
3 Set up the following itemsA Write Error Threshold
Set the number of errors at each RAID level (RAID 5 or RAID 6) that permits a recording operation to continue even when errors occur concurrently in multiple disks constituting a magazine during the recording operation by a DA unit.
≥ When recording takes place on a RAID 0 formatted magazine, its operation is performed assuming “0” as a recording error threshold regardless of the setting value.
B Output Level of LogThe operating status of DA Manager is output to an event log. Select an output level for an event log from the following two types of levels.
C DATA ARCHIVER Low power consumption controlLow power consumption control for DA unit settings.
2: Up to two errors are accepted (only for RAID 6)
1: One error is accepted (for RAID 5/6)
0: No errors are accepted (report an error even if only one error) (for RAID 5/6)
Minimum: Level at which the operating status of DA Manager can be checked.
Detail: Level at which the detailed operating status of DA Manager can be checked.
On: Set to control the low power consumption for DA unitOff: Set to not control the low power consumption for DA unit
Low power consumption transition period: Specify the time to change to the low power consumption state from the last access
to DA unit
101
Settings and management System management
D Read Cache LifetimeExpiration date of the data that was read into the read cache from the magazine (date)
E GET Object Settings for Nearline Magazines
4 Click “Set”5 Click “OK”
On: Load a magazine automatically and read the file.
Off: Treated as an error.
Note≥ When “DATA ARCHIVER Low power consumption control” is set to “Off”, the DA units that are turned off need
to be turned on manually.≥ To switch “DATA ARCHIVER Low power consumption control” from “On” to “Off” when there are DA units that
have been turned off by the low power consumption control, switch the setting to “Off” first, and then turn on the DA units manually.≥ When turning on the DA unit manually, restart the management server.≥ LB-DH7 series DA unit that were turned off by the low power consumption control are automatically turned on
when the DA Manager detects the DA unit.≥ When the DA Manager is restarted with DA unit that have been turned off by the low power consumption
control, the “Power-On” button is displayed on LB-DM9 and LB-DH8 series DA unit, but this button is not displayed on LB-DH7 series DA unit because the power is turned on automatically.≥ Care should be taken because the number of expired read cache files that can be automatically deleted for a
shortage of the cache free space may be insufficient, and reading and writing may be impossible when a long period of days is specified as the read cache validity term.
102

Settings and management
Confirmation of system operating conditions
Dashboard overview∫Dashboard is a function designed specifically for checking the operating status of DA Manager components
(proxy/storage nodes).
∫By placing Dashboard in a network location where proxy nodes can be accessed, the system administrator can check the operating status of DA Manager using the dedicated Web interface.
∫Dashboard can also be placed on the same server as proxy node.
Note≥ Use a Web interface designed specifically for Dashboard to check the operating status of the system.≥ Dashboard is a program separate from DA Manager. You need to install it to use it.
Object storage system
Application server
DA Manager
Database
Cache
Proxy node
Storage node
Dashboard
System administrator
DA unit
103
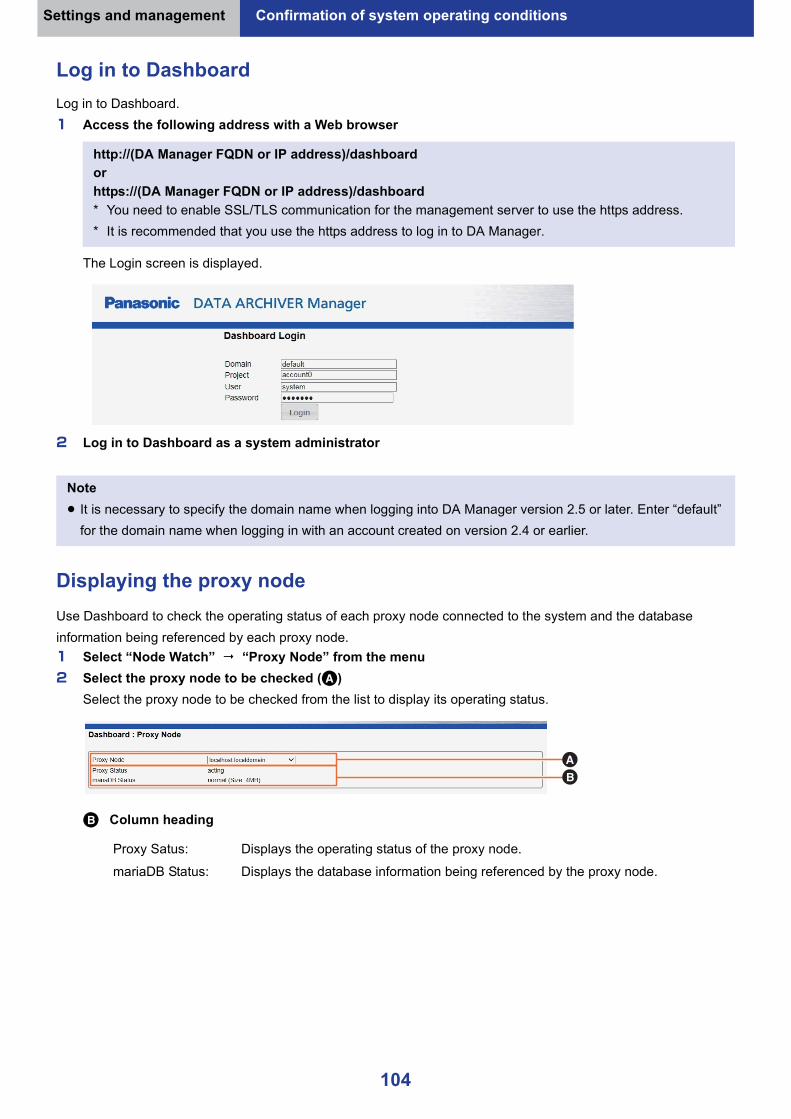
Settings and management Confirmation of system operating conditions
Log in to DashboardLog in to Dashboard.1 Access the following address with a Web browser
The Login screen is displayed.
2 Log in to Dashboard as a system administrator
Displaying the proxy nodeUse Dashboard to check the operating status of each proxy node connected to the system and the database information being referenced by each proxy node.1 Select “Node Watch” “Proxy Node” from the menu2 Select the proxy node to be checked (A)
Select the proxy node to be checked from the list to display its operating status.
B Column heading
http://(DA Manager FQDN or IP address)/dashboardorhttps://(DA Manager FQDN or IP address)/dashboard* You need to enable SSL/TLS communication for the management server to use the https address.* It is recommended that you use the https address to log in to DA Manager.
Note≥ It is necessary to specify the domain name when logging into DA Manager version 2.5 or later. Enter “default”
for the domain name when logging in with an account created on version 2.4 or earlier.
Proxy Satus: Displays the operating status of the proxy node.
mariaDB Status: Displays the database information being referenced by the proxy node.
104
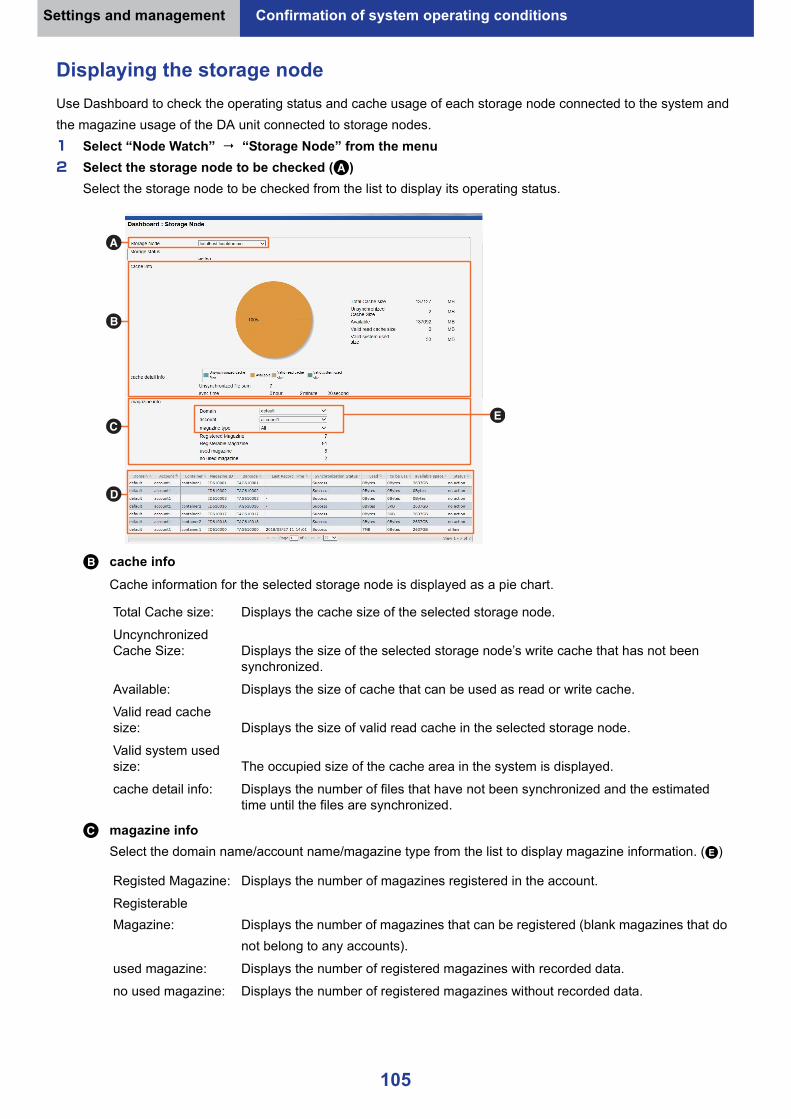
Settings and management Confirmation of system operating conditions
Displaying the storage nodeUse Dashboard to check the operating status and cache usage of each storage node connected to the system and the magazine usage of the DA unit connected to storage nodes.1 Select “Node Watch” “Storage Node” from the menu2 Select the storage node to be checked (A)
Select the storage node to be checked from the list to display its operating status.
B cache infoCache information for the selected storage node is displayed as a pie chart.
C magazine infoSelect the domain name/account name/magazine type from the list to display magazine information. (E)
Total Cache size: Displays the cache size of the selected storage node.
Uncynchronized Cache Size: Displays the size of the selected storage node’s write cache that has not been
synchronized.
Available: Displays the size of cache that can be used as read or write cache.Valid read cache size: Displays the size of valid read cache in the selected storage node.
Valid system used size: The occupied size of the cache area in the system is displayed.
cache detail info: Displays the number of files that have not been synchronized and the estimated time until the files are synchronized.
Registed Magazine: Displays the number of magazines registered in the account.Registerable Magazine: Displays the number of magazines that can be registered (blank magazines that do
not belong to any accounts).
used magazine: Displays the number of registered magazines with recorded data.no used magazine: Displays the number of registered magazines without recorded data.
105

Settings and management Confirmation of system operating conditions
D magazine use detailDetails of each magazine are displayed based on the selected domain name/account name/magazine type.≥ The following information of each magazine is displayed based on its domain name/account/container/
magazine ID/barcode information:
Last Record Time:Synchronization Status:
used:to be use:available space:Status:
The time of the last synchronization with each magazine is indicated.
The status of synchronization with each magazine is indicated as “Success”, “Waiting” or “Fail”.The size of data recorded on each magazine is indicated.The size of the unsynchronized cache to be recorded to each magazine is indicated.The recordable capacity of each magazine is indicated.The status of each magazine is indicated.The following magazine statuses are displayed:no action: synchronizing: sync waiting: reading: coping: offline:
The magazine has not been processed yet.The magazine is processing synchronizing.The magazine is waiting for a batch recording job.The magazine is being read into the read cache.The magazine is performing Copy Magazine.The magazine is offline.
Note≥ Barcode information is left blank for magazines without registered barcode information.
106

S3QL configuration andmanagement

S3QL configuration and management
Preparation of S3QL
S3QL overview∫By establishing an additional cloud storage gateway (S3QL node) in the DA Manager, it is possible to use the DA
unit as an NAS file system.
∫With S3QL, you use the dedicated Web interface to configure and manage the DA unit to be used as an NAS file system.
∫Each S3QL node is associated with one DA Manager account during installation.
∫The associated account can be freely chosen from any domain.
∫The S3QL node can only access the associated account. It cannot access any other account.
∫ If you want to access multiple DA Manager accounts from an S3QL node, prepare multiple S3QL nodes and associate each of them with accounts.
∫The NAS file system volume is created using the S3QL web interface.
∫ It is necessary to specify the container to be mounted as the volume when creating the volume, but if a container that does not exist in the account is specified, the specified container is created within the associated account.
∫When there are multiple S3QL nodes, the following information is shown in the Web interface for each S3QL node.When multiple S3QL nodes are referencing separate databases: Only the information for S3QL nodes that were accessed is shown.When multiple S3QL nodes are referencing the same database: The information for all S3QL nodes referencing the same database is shown.
∫The system settings for S3QL are saved in the database referenced by each S3QL node, so if you divide the database reference destination for each S3QL node, you will need to access the web interface for each S3QL node and make the system settings individually.
108

S3QL configuration and management
Preparation of S3QL
Functions to be used by S3QL users/volume administratorsUser/group registration and authentication is performed with an external directory service with S3QL.Users are divided into general users (S3QL user) and volume administrators. Users registered as volume administrators are able to use the additional functions in the Web interface.To register a user as a volume administrator, use the Web interface to register the group to which the user belongs as a volume administrator group.These are the functions available to each user.
Functions to be used by S3QL users≥ Checking volume status
The user can check the remaining capacity, mount status, file synchronization status, etc., of the volume
Functions to be used by volume administrators (functions in addition to those of the S3QL user)≥ Volume management
The user can register, modify, mount, unmount, write-protect, and finalize volumes≥ Checking system status
The user can check access status, remaining capacity in the S3QL cache, mount parameters, etc.≥ System management
The user can set the threshold values for warnings about available capacity, make settings for the volume administrators group, set S3QL log output, and set the mail server
109

S3QL configuration and management
Preparation of S3QL
Log in to S3QLLog in to S3QL.1 Access the following address with a Web browser
The Login screen is displayed.
2 Log in to S3QLEnter the S3QL user name and password configured on the external directory service to login.
S3QL settings
DA Manager settingsConfigure the DA Manager before configuring S3QL. ( 23)
S3QL initial setupSet the following items as required.
When using an email transmission function, make the following items.
http://(DA Manager FQDN or IP address)/s3qlorhttps://(DA Manager FQDN or IP address)/s3ql* You need to enable SSL/TLS communication for the management server to use the https address.* It is recommended that you use the https address to log in to DA Manager.
≥ “System Setting” ( 128)
≥ “Mail Server Settings” ( 129)
110

S3QL configuration and management
Preparation of S3QL
S3QL menu listThe menus available depend on the authority of the S3QL user (S3QL user, volume administrator) that logs in.
Menu Item (qualified S3QL user) Description
Display Volume Status Display Volume Status Display the status of the volumes being managed on the S3QL node. ( 112)
Volume Management Register/Change Volume Enables you to register or modify a volume. ( 114)
Mount Volume Mount or unmount volumes. ( 122)
Write Protect Volume Enables you to set or remove write-protection for a volume. ( 124)
Finalize Volume Finalizes a volume. ( 125)
Display System Status Display System Status Display system status. ( 126)
System Setting System Setting Set the threshold values for warnings about available capacity, make settings for the volume administrators group, and set S3QL log output. ( 128)
Mail Server Settings Make the settings on the mail server to send an email notification from the system to the volume administrator. ( 129)
S3QL user
Volume administrator
Volume administrator
Volume administrator
Volume administrator
111

S3QL configuration and management
Display volume status
* Only volumes that can be accessed by the S3QL user specified when logging in can be checked in “Display Volume Status”.
Display Volume StatusCheck the status of volumes registered on the S3QL node.
1 Log in to the S3QL Web interface2 Select “Display Volume Status” “Display Volume Status” from the menu
The Display Volume Status screen will be displayed.3 Select the S3QL node you want to check and start the search
The volumes registered in the selected S3QL node will be displayed in the screen.
≥ For essential details on the operation of the screen, refer to “Note” on page 26.A Column heading
Main functions Person in charge≥ Checking the status of volumes registered on the S3QL node
S3QL user
Volume administrator
Volume Name: Displays the volume name.
Volume Residual Capacity: Displays the remaining capacity for the volume.
Total Volume Capacity: Displays the total volume of containers registered in S3QL as volumes.
Write Protect: Displays the write-protect status of the volumes.“Not protected”/“Protected”
Finalize: Displays whether the volumes are finalized.“Not finalized”/“Finalized”/“Finalizing”
Imported Status: Displays whether the container that is mounted as a volume was imported.“Yes”/“No”
Mount Status: Displays whether the volumes are mounted.“Yes”/“No”
File synchronization state: Displays the synchronization status of files in the volumes.
“Unsynchronized”: There is at least one unsynchronized file in the volume.“Synchronized”: There is no unsynchronized file in the volume.
112
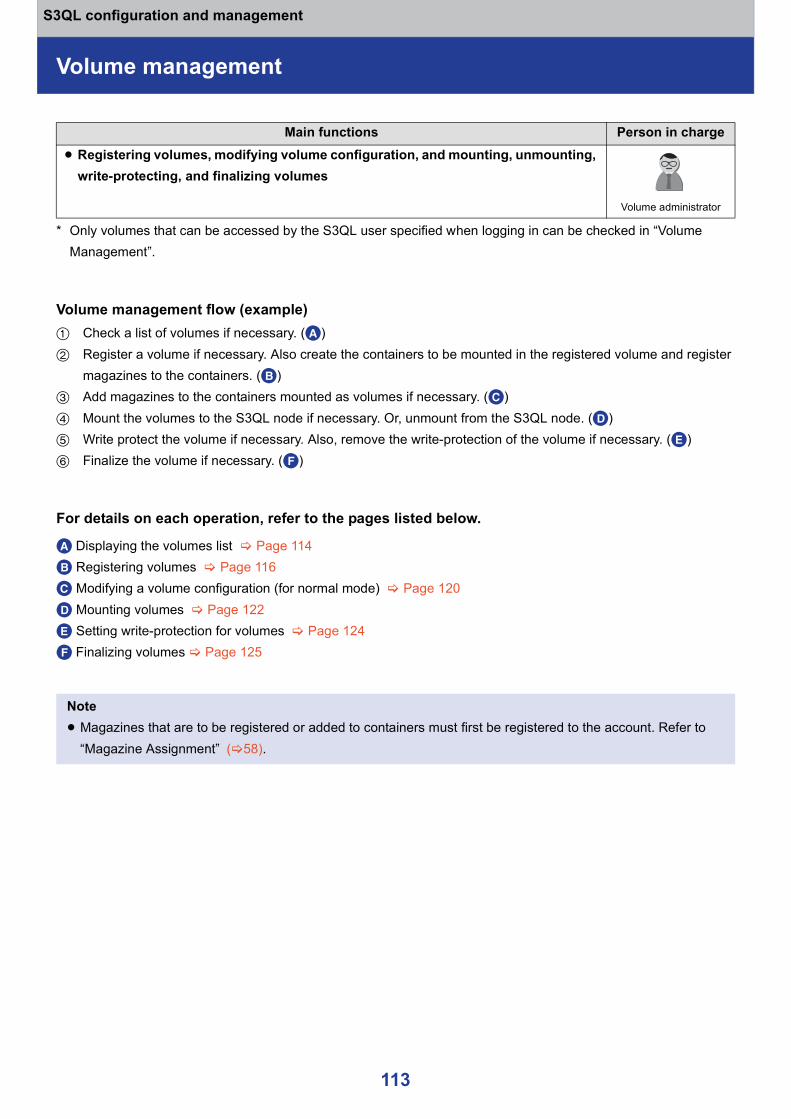
S3QL configuration and management
Volume management
* Only volumes that can be accessed by the S3QL user specified when logging in can be checked in “Volume Management”.
Volume management flow (example)1 Check a list of volumes if necessary. (A)2 Register a volume if necessary. Also create the containers to be mounted in the registered volume and register
magazines to the containers. (B)3 Add magazines to the containers mounted as volumes if necessary. (C)4 Mount the volumes to the S3QL node if necessary. Or, unmount from the S3QL node. (D)5 Write protect the volume if necessary. Also, remove the write-protection of the volume if necessary. (E)6 Finalize the volume if necessary. (F)
For details on each operation, refer to the pages listed below.
A Displaying the volumes list Page 114B Registering volumes Page 116C Modifying a volume configuration (for normal mode) Page 120D Mounting volumes Page 122E Setting write-protection for volumes Page 124F Finalizing volumes Page 125
Main functions Person in charge≥ Registering volumes, modifying volume configuration, and mounting, unmounting,
write-protecting, and finalizing volumes
Volume administrator
Note≥ Magazines that are to be registered or added to containers must first be registered to the account. Refer to
“Magazine Assignment” ( 58).
113

S3QL configuration and management
Volume management
Displaying the volumes list1 Log in to the S3QL Web interface2 Select “Volume Management” “Register/Change Volume” from the menu
The Register/Change Volume screen will be displayed.3 Select the S3QL node and start the search
A list of volumes registered in the selected S3QL node will be displayed.
≥ For essential details on the operation of the screen, refer to “Note” on page 26.A Volume Name
Displays the volume name.B Volume Residual Capacity
Displays the remaining capacity for the volume.C Total Volume Capacity
Displays the total volume of containers registered in S3QL as volumes.D Volume Mount Residual Capacity
Displays the capacity of the S3QL cache not allocated to mounted volumes.If the total of the S3QL cache allocated to mounted volumes is greater than the cache size, the Volume Mount Residual Capacity will be a negative value.
E Write ProtectDisplays the write-protect status of the volumes.“Not protected”/“Protected”
F FinalizeDisplays whether the volumes are finalized.“Not finalized”/“Finalized”/“Finalizing”
G Imported StatusDisplays whether the container that is mounted as a volume was imported.“Yes”/“No”
H Divisions Object SizeDisplays the maximum object size when S3QL PUTs objects to the proxy node. If the file written to the volume is larger than the size of the divided object, when the object is PUT to the proxy node, the file is divided into multiple objects.
I Cache SizeDisplays the capacity of the S3QL cache allocated to volumes.
J Metadata Upload IntervalDisplays the upload interval for S3QL metadata.
114
S3QL configuration and management
Volume management
K Mount StatusDisplays the mount status of the volumes.
“Mounting”: Waiting for completion of mount process“Mounted”: Volume mounted“Unmounted”: Volume unmounted“Unmounting”: Waiting for completion of unmount process“Abnormal mount”: Volume mounted but condition is irregular“Abnormal unmount”: Volume unmounted but condition is irregular
Note≥ You can delete volumes from the list of volumes screen only if a magazine has not been allocated to a
container that has been mounted as a volume.≥ The volume must be in the “Unmounted” state to delete the volume.≥ When a volume is deleted, the containers mounted in the volume are also deleted.
115

S3QL configuration and management
Volume management
Registering volumesRegister volumes in the selected S3QL node. Also create the containers to be mounted in the registered volume and mount volumes to the S3QL node. Furthermore, volume administrators in normal mode should also register magazines to the containers.1 Log in to the S3QL Web interface2 Select “Volume Management” “Register/Change Volume” from the menu
The Register/Change Volume screen will be displayed. ( 114)3 Click “New Volume”
Registering a volume screen will be displayed.
When registering volumes as a volume administrator in normal mode;
When registering volumes as a volume administrator in share mode;
116
S3QL configuration and management
Volume management
4 Enter the required informationA Volume Name (up to 251 bytes)
If you select the “Volume name and container name are same” checkbox, the container name is automatically allocated the same name as the volume name.
B Container NameStart the search after entering the container name to check if a container with the same name already exists in the DA Manager account. If there is a container with the same name and that container has never once been mounted, the settings for RAID Level, Encryption, Automatic Magazine Assignment, Mirror, Data deduplication, and Pack Files are updated according to the setting values of the existing container, and they cannot be modified. You cannot use a container name for a container that is already in use in another volume.To change the container name after executing the search, first perform a reset to clear the associations for the container.Keep the total of the container name and host name of the Keystone server 213 bytes or under.
C RAID Level“RAID 0”/“RAID 5”/“RAID 6”
D Encryption
When encrypting with an account key, set up the account key on “Container Default Settings” ( 30) beforehand.The following operations are required for encryption using the container key.Create Container Key file : Create and Download1 Click “Execute”2 Input the container keyword and click “OK”
Downloading the container key file will start.
Upload Container Key file1 Click “Browse”* and specify the file using the full path
* Note that the button name varies depending on a Web browser in use.2 Click “Upload”
E Automatic Magazine AssignmentMagazines need to be added to containers if there is not enough capacity in the containers that are mounted as volumes, and you can set whether to do this automatically or manually.“Valid”/“Invalid”
F MirrorWhen recording the data in more than one magazine simultaneously, specify the number of concurrent recordings. When not creating a mirror, specify the mirror value “1”.
Note≥ Note that share mode volume administrators cannot configure and modify parameters (RAID Level,
Encryption, Automatic Magazine Assignment, Mirror, Data deduplication, Pack Files) or register magazines from the volume registration screen. Refer to “Magazine Assignment” ( 32, 58) for information about configuring and modifying parameters and registering magazines.
“Not Encrypted”: No encryption
“Encrypted by System Key”: Encryption by system key
“Encrypted by Account Key”: Encryption by account key“Encrypted by Container Key”: Encryption by container key
117

S3QL configuration and management
Volume management
G Data deduplicationSet whether to execute deduplication when the content of objects stored in the cache and the content of PUT objects are duplicated.“Yes”/“No”
H Pack FilesSet whether or not to pack small objects. To perform packing, select the check box and set the Target File Size (the maximum file size at which packing will be performed) and the Package Size (the file size after packing).
I Mount target nodeSelect the S3QL node that is the mount destination.
J Divisions Object SizeSet the maximum object size when S3QL PUTs objects to the proxy node. If the file written to the volume is larger than the size of the divided object, when the object is PUT to the proxy node, the file is divided into multiple objects.
K Cache SizeSet the capacity of the S3QL cache to allocate to volumes.Ensure there is a larger capacity for the cache size for each volume than the maximum size of the files dealt with by each volume.File copying to the volume may fail if the cache size is insufficient.
L Metadata Upload IntervalSet the upload interval for S3QL metadata.
M Registering magazinesMagazines that can be registered are displayed in “Registerable Magazine”. Select the magazine you want to register in the container mounted as a volume, click , and move it to “Magazine Group(unregistered)”.≥ Register at least one magazine.
5 Click “Register”The volume is registered and the specified container is mounted as a volume.
118
S3QL configuration and management
Volume management
Note≥ These settings cannot be changed for the magazine that has already been registered. The settings can be
applied when a new magazine is registered.≥ You cannot register two or more volumes with the same name in a single S3QL node.≥ The container key file having different contents is downloaded even if the same container keyword is used in
newly creating a container key file.≥ Once the container key file is lost, it becomes impossible to read all the objects encrypted using the key.≥ The container key file is downloaded into a predetermined folder of the browser in use or a user-designated
folder. It is strongly recommend that the container key file be managed with special care and all the files be kept in a secure place.≥ The character length of a keyword for generating a container key file is unlimited, but it is recommended that
you set a keyword that is simple and easy to remember.≥ When a magazine is added to the container, the management data will be synchronized during synchronization
even if the object is not recorded.≥ You cannot change the container name, RAID level, encryption, data deduplication enable/disable, or pack
files enable/disable after a container has been created.≥ An offline magazine cannot be displayed in “Registerable Magazine”.≥ When “Automatic Magazine Assignment” is enabled, if a magazine set contains both 1.2 TB magazines and
3.6 TB magazines, they are selected automatically in the following sequence:1 Magazines loaded in the DA unit of the LB-DM9 or LB-DH8 series2 3.6 TB magazines loaded in the DA unit of the LB-DH7 series3 1.2 TB magazines loaded in the DA unit of the LB-DH7 series≥ When registering a magazine, you are required to add magazines of the same type in multiples of the “Mirror”
value.≥ Barcode information is left blank for magazines without registered barcode information.≥ In an environment where only DA units that do not support encryption are registered, encryption-related items
gray out and cannot be selected.≥ When “Data deduplication” is executed, and if the content of objects stored in the cache and the content of
PUT objects are duplicated, the relevant data is no longer recorded to the magazine.≥ If file packing is enabled, small objects stored in the cache will be packed when they are recorded to a
magazine.≥ When using mirrored magazines, all the magazines constituting the mirror should be loaded in the DA unit.≥ If some of the magazines being mirrored go offline, executing PUTs to the relevant containers will not be
possible under the following conditions.When file packing is enabled: When one magazine goes offlineWhen file packing is disabled: When more than half of the magazines go offline
≥ When importing and using a container that was used as NAS storage in another DA Manager environment, perform the following procedure to register the volume:1 Use the Web interface of the DA Manager to import the container/account of the relevant magazine.2 After the import is complete, specify the relevant container name in the volume registration screen and
register the volume.
119
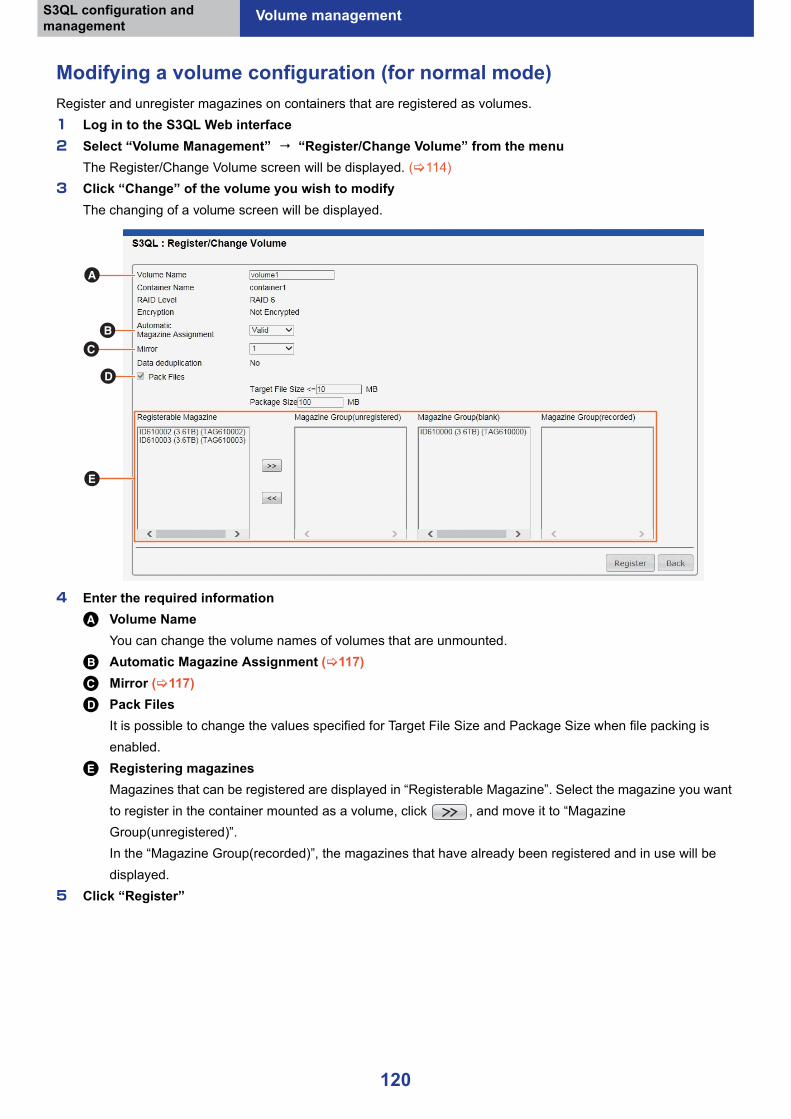
S3QL configuration and management
Volume management
Modifying a volume configuration (for normal mode)Register and unregister magazines on containers that are registered as volumes.1 Log in to the S3QL Web interface2 Select “Volume Management” “Register/Change Volume” from the menu
The Register/Change Volume screen will be displayed. ( 114)3 Click “Change” of the volume you wish to modify
The changing of a volume screen will be displayed.
4 Enter the required informationA Volume Name
You can change the volume names of volumes that are unmounted.B Automatic Magazine Assignment ( 117)C Mirror ( 117)D Pack Files
It is possible to change the values specified for Target File Size and Package Size when file packing is enabled.
E Registering magazinesMagazines that can be registered are displayed in “Registerable Magazine”. Select the magazine you want to register in the container mounted as a volume, click , and move it to “Magazine Group(unregistered)”.In the “Magazine Group(recorded)”, the magazines that have already been registered and in use will be displayed.
5 Click “Register”
120

S3QL configuration and management
Volume management
Note≥ Note that share mode volume administrators cannot configure and modify parameters (Automatic Magazine
Assignment, Mirror, Pack Files) or register magazines.≥ When a magazine is added to the container, the management data will be synchronized during synchronization
even if the object is not recorded. After synchronization, the magazine will be displayed in “Magazine Group(recorded)”.≥ A magazine registered in “Magazine Group(blank)” or “Magazine Group(recorded)” cannot be unregistered.≥ When registering a magazine, you are required to add magazines of the same type in multiples of the “Mirror”
value.≥ The changes will not be applied to magazine configurations to which magazine group IDs have already been
assigned even if you change the mirror value. After being changed, the mirror value is applied at the time the magazine group ID is assigned for a new magazine.≥ Barcode information is left blank for magazines without registered barcode information.
121

S3QL configuration and management
Volume management
Mounting volumesMount or unmount volumes. While unmounted, it is not possible to write files to the volume, but you can modify the configuration of the volume ( 120).1 Log in to the S3QL Web interface2 Select “Volume Management” “Mount Volume” from the menu
The Mount Volume screen will be displayed.3 Select the S3QL node and start the search
A list of volumes registered in the selected S3QL node will be displayed.
≥ For essential details on the operation of the screen, refer to “Note” on page 26.A Column heading
≥ For more information on items other than the above, refer to “Displaying the volumes list” ( 114).
Mount the volume4 Select the checkbox of the volume to be mounted5 Click “Mount”
The Mount Volume screen is displayed.
6 Enter the required information≥ You can change the settings for Cache Size and Metadata Upload Interval when remounting, but after
registration, it is not possible to change the Mount target node that was set when registering the volume.
Access Status: Displays the status of access to the volumes.“Accessing”: File is being written, updated, or read, or a folder is open“Idle”: Volume is not being accessed
File synchronization state: Displays the synchronization status of files in the volumes.
“Unsynchronized”: There is at least one unsynchronized file in the volume.“Synchronized”: There is no unsynchronized file in the volume.
122

S3QL configuration and management
Volume management
Unmount the volume4 Select the checkbox of the volume to be unmounted5 Click “Unmount”
A confirmation message is displayed according to the status of the volume.6 In the confirmation dialog, click either “Unmount” or “Forcibly unmount”
“Unmount” is not possible while the volume or a file is being accessed.When “Unmount” is executed, the volume goes to the “Unmounting” state and the unmount process is executed when there is no longer any access to the volume.When “Forcibly unmount” is executed, the unmount process is executed without waiting for completion of access to the volume.
Note≥ If you force an unmount without waiting for completion of access to the volume, the proper unmount process
cannot be performed, which may result in an irregular unmount status.≥ Force unmounting is a process to be executed as a remedy when some kind of error has occurred which
prevents unmounting, so do not use except in cases when a fault has happened.
123

S3QL configuration and management
Volume management
Setting write-protection for volumesTemporarily write-protect volumes. While write-protected, it is not possible to write files to the volume, and it is also not possible to modify the configuration of the volume, such as registering magazines ( 120).1 Log in to the S3QL Web interface2 Select “Volume Management” “Write Protect Volume” from the menu
The Write Protect Volume screen will be displayed.3 Select the S3QL node and start the search
A list of volumes registered in the selected S3QL node will be displayed.
≥ For essential details on the operation of the screen, refer to “Note” on page 26.≥ For the information on items, refer to “Displaying the volumes list” ( 114).
Write-protect the volume4 Select the checkbox of the volume you wish to add write-protection to5 Click “Protect”6 Click “OK”
Removing write-protection4 Select the checkbox of the volume you wish to remove write-protection from5 Click “Unprotect”6 Click “OK”
Note≥ The write-protect is a logical protection, so the magazine itself will not be modified.
124
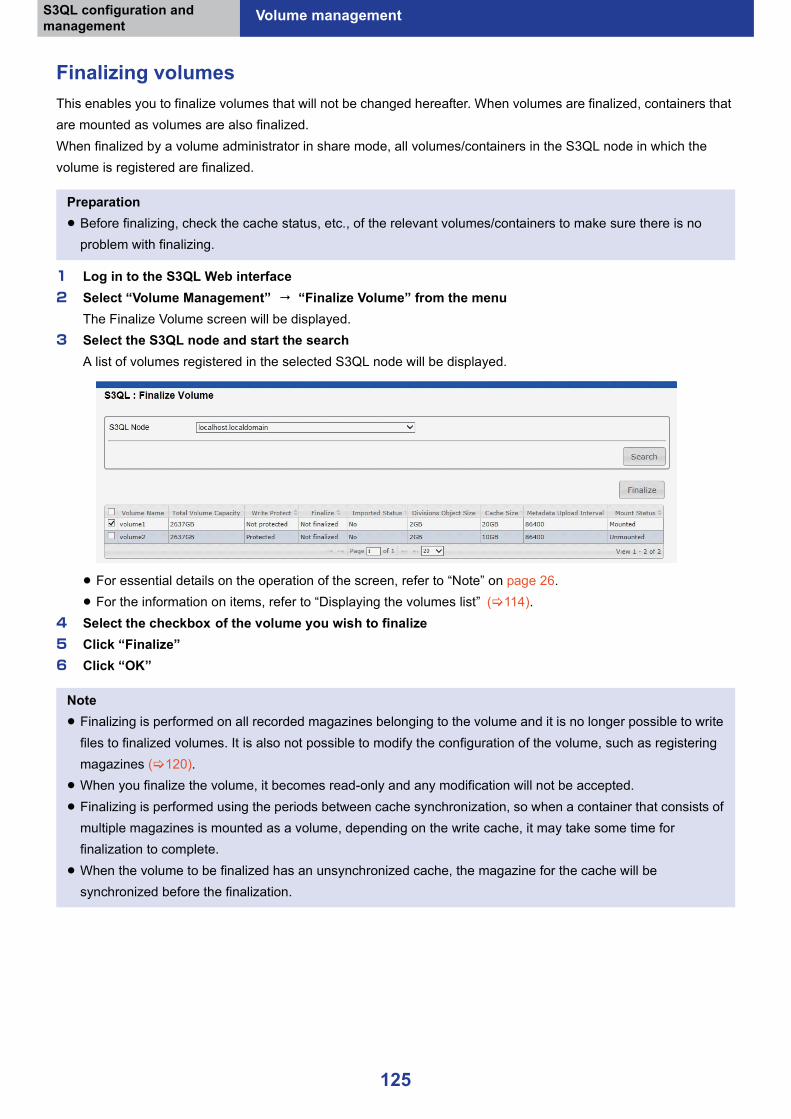
S3QL configuration and management
Volume management
Finalizing volumesThis enables you to finalize volumes that will not be changed hereafter. When volumes are finalized, containers that are mounted as volumes are also finalized.When finalized by a volume administrator in share mode, all volumes/containers in the S3QL node in which the volume is registered are finalized.
1 Log in to the S3QL Web interface2 Select “Volume Management” “Finalize Volume” from the menu
The Finalize Volume screen will be displayed.3 Select the S3QL node and start the search
A list of volumes registered in the selected S3QL node will be displayed.
≥ For essential details on the operation of the screen, refer to “Note” on page 26.≥ For the information on items, refer to “Displaying the volumes list” ( 114).
4 Select the checkbox of the volume you wish to finalize5 Click “Finalize”6 Click “OK”
Preparation≥ Before finalizing, check the cache status, etc., of the relevant volumes/containers to make sure there is no
problem with finalizing.
Note≥ Finalizing is performed on all recorded magazines belonging to the volume and it is no longer possible to write
files to finalized volumes. It is also not possible to modify the configuration of the volume, such as registering magazines ( 120).≥ When you finalize the volume, it becomes read-only and any modification will not be accepted.≥ Finalizing is performed using the periods between cache synchronization, so when a container that consists of
multiple magazines is mounted as a volume, depending on the write cache, it may take some time for finalization to complete.≥ When the volume to be finalized has an unsynchronized cache, the magazine for the cache will be
synchronized before the finalization.
125
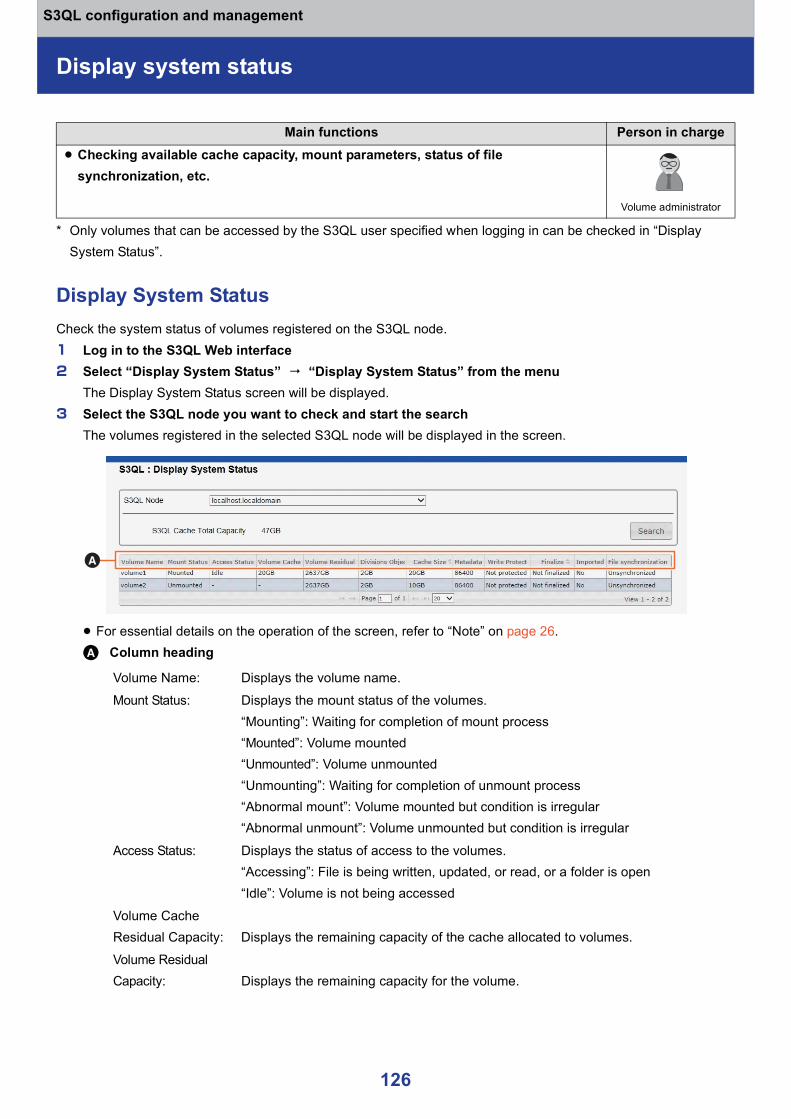
S3QL configuration and management
Display system status
* Only volumes that can be accessed by the S3QL user specified when logging in can be checked in “Display System Status”.
Display System StatusCheck the system status of volumes registered on the S3QL node.1 Log in to the S3QL Web interface2 Select “Display System Status” “Display System Status” from the menu
The Display System Status screen will be displayed.3 Select the S3QL node you want to check and start the search
The volumes registered in the selected S3QL node will be displayed in the screen.
≥ For essential details on the operation of the screen, refer to “Note” on page 26.A Column heading
Main functions Person in charge≥ Checking available cache capacity, mount parameters, status of file
synchronization, etc.
Volume administrator
Volume Name: Displays the volume name.Mount Status: Displays the mount status of the volumes.
“Mounting”: Waiting for completion of mount process“Mounted”: Volume mounted“Unmounted”: Volume unmounted“Unmounting”: Waiting for completion of unmount process“Abnormal mount”: Volume mounted but condition is irregular“Abnormal unmount”: Volume unmounted but condition is irregular
Access Status: Displays the status of access to the volumes.“Accessing”: File is being written, updated, or read, or a folder is open“Idle”: Volume is not being accessed
Volume Cache Residual Capacity: Displays the remaining capacity of the cache allocated to volumes.Volume Residual Capacity: Displays the remaining capacity for the volume.
126

S3QL configuration and management
Display system status
Divisions Object Size: Displays the maximum object size when S3QL PUTs objects to the proxy node. If
the file written to the volume is larger than the size of the divided object, when the object is PUT to the proxy node, the file is divided into multiple objects.
Cache Size: Displays the capacity of the S3QL cache allocated to volumes.Metadata Upload Interval: Displays the upload interval for S3QL metadata.Write Protect: Displays the write-protect status of the volumes.
“Not protected”/“Protected”Finalize: Displays whether the volumes are finalized.
“Not finalized”/“Finalized”/“Finalizing”
Imported Status: Displays whether the container that is mounted as a volume was imported.“Yes”/“No”
File synchronization state: Displays the synchronization status of files in the volumes.
“Unsynchronized”: There is at least one unsynchronized file in the volume.“Synchronized”: There is no unsynchronized file in the volume.
127

S3QL configuration and management
System Setting
System SettingMake settings for the S3QL system as a whole.1 Log in to the S3QL Web interface2 Select “System Setting” “System Setting” from the menu
The System Setting screen will be displayed.
3 Set up the following itemsA The Lower Limit Of Capacity Usable Amount Warning
Set the warning threshold values that notify the administrator of insufficient capacity in the cache, etc.* Set values that include the capacity for the read caches whose valid periods have expired.
B Volume administrators group (a maximum of 255 characters)Set the group to which the user belongs as a volume administrator group.* Allocate the user to a group using an external directory service beforehand.
C S3QL Log OutputSet the output destination for the S3QL logs.“S3QL Log File”/“System Log”/“System Log And S3QL Log File”
4 Click “Set”
Main functions Person in charge≥ Management functions for the S3QL system as a whole, including threshold values
for warnings about available capacity, S3QL log output settings, and mail server settings
Volume administrator
Volume: Mail notification is sent to the addressees registered in “Mail Server Settings” ( 129) when the remaining capacity in the volumes falls below the threshold values. (Units: GBytes)
S3QL Cache: Mail notification is sent to the addressees registered in “Mail Server Settings” ( 129) when the remaining capacity in the S3QL cache falls below the threshold values. (Units: GBytes)
DAM Cache: Mail notification is sent to the DA Manager system administrator when the remaining cache capacity available for use as read cache or write cache falls below the threshold value. (Units: GBytes)
128

S3QL configuration and management
System Setting
Mail Server SettingsMake mail server settings to enable mail notifications to the volume administrators when the remaining capacity of the volume cache and S3QL cache fall below warning threshold values, etc.1 Log in to the S3QL Web interface2 Select “System Setting” “Mail Server Settings” from the menu
The Mail Server Settings screen will be displayed.
3 Set up the following itemsIt is possible to turn on/off email notifications by selecting/unselecting the “send mail” checkbox. To use email notifications, select the “send mail” checkbox and specify the following settings:A SMTP Server Name (up to 255 bytes)
Enter the host name (FQDN) or IP address of the SMTP serverB SMTP Port NumberC SMTP Domain Name (up to 63 bytes)D SMTP Authentication
It is possible to turn on/off the use of SMTP authentication by selecting/unselecting the “SMTP Authentication” checkbox. To use SMTP authentication, select the “SMTP Authentication” checkbox and specify the following settings:
E Email Notification Address (up to 255 bytes)Set the addresses for mail notifications sent to volume administrators.
4 Click “Set”5 Click “OK”
CRAM-MD5/LOGIN/PLAIN: Specifies an SMTP authentication method.
User ID: Specifies a user ID to be used for SMTP authentication. (up to 255 bytes)Password: Specifies a password to be used for SMTP authentication. (up to 255 bytes)
Note≥ When email notifications are switched from on to off, all unsent emails in the database will be deleted.≥ Emails are not generated if email notifications are turned off.
129

FAQ Troubleshooting

FAQ Troubleshooting
FAQ
Check the following items to try to resolve the problem.If the problem is not resolved, please contact your vendor.
Caching and Database
Container and Magazine
Question Answer
How do I check that writing to a magazine is complete?
≥ Refer to “Release Cache File” ( 85). In order to search the magazine, select the magazine from the drop-down list and specify the Cache type as WRITE. It does not appear if the write is complete.≥ The synchronization status of each magazine can be
checked in the magazine use detail pane of the Dashboard.
The cache does not synchronize according to the schedule (unsynchronized cache size will not be reduced).
≥ Caching is performed in order that the cache synchronization process is suspended during reading from the magazine.
How do I increase the capacity of the cache? ≥ Add HDD to the volume that is assigned to the cache in each storage node.
How do I integrate another DA Manager database? ≥ DA Manager does not provide the capability.
Question Answer
How do I check that a new magazine loaded in the DA unit is registered in the DA Manager properly?
≥ Refer to “Load/Unload Magazine” ( 51) to check that the slot status of the magazine drawer in DA unit where a new magazine has been loaded shows “Not Formatted”. The new magazine is not normally recognized when the status shows “Unknown” or “Other format”.
Can I set the maximum size of the container? ≥ DA Manager does not provide the capability.
How do I change the encryption or RAID level of a container?
≥ These settings cannot be modified after the container creation.
Can I use a magazine that is used in another DA Manager?
≥ A magazine recorded by DA Manager Windows version is not available.≥ A magazine recorded by DA Manager Linux version is
available by using Import Container ( 65).
How do I delete a container? ≥ Containers cannot be deleted using the Web interface. After deleting all objects in the container on REST API, delete the container on it. When a container has been deleted, all of the magazines assigned to the container are automatically deleted.
A container is automatically unmounted when the system is used as a NAS storage system.
≥ When the server is overloaded and data can no longer be added to a container as a result, the container will be automatically unmounted to avoid data loss. You can use the unmounted container after mounting it again.
131

FAQ Troubleshooting FAQ
System
Operation with the Web interface
Others
Question Answer
I do not receive email notifications, such as request for magazine loading.
≥ Make sure the mail server is working correctly.≥ Check the email address configuration for Keystone. If you
are not sure, ask your Keystone administrator.≥ Check the “User Group Settings” ( 96) or “Mail Server
Settings” ( 97).
Question Answer
Authentication error occurs some time after login.
≥ Keystone Token has expired. Log out and log in again.
I cannot connect. ≥ Check the network settings such as DNS on the OS settings of the client PC.≥ Please consult your network administrator or system
administrator of the DA Manager.
The view is wrong. ≥ Use the recommended browser.≥ Make sure the Web browser settings are correct.
I changed the contents of the object, but the object still shows the status before the change.
≥ It may take some time to update the various states due to the characteristics of Swift (i.e. Eventual Consistency). Wait a few moments and check the status again.
Question Answer
I want to know the types of characters that can be used for container names and the Web interface.
≥ Unicode characters other than those in the surrogate range can be used for entering characters.
The message “rejecting I/O to offline device” error is displayed on the server console.
≥ All NICs went offline, so it is no longer possible to communicate with the software controlling the DA unit. Connect the server to a HUB, etc., and use so that the NICs do not go offline.
132

Appendix

Appendix
Software operating environment
Management serverThe Management server (DATA ARCHIVER Manager installation PC) must meet the following requirements:
* Resources required (Management Server configuration, CPU, memory, hard disk, database) will change subject to use.
* Successful operation is not guaranteed on all PCs with the recommended operating environment.
OthersRecommended Web Browser: WindowsR Internet ExplorerR 11
Operating system Red HatR Enterprise LinuxR 7 or Cent OS 7
CPU To satisfy the OS and the database requirements
Memory To satisfy the OS and the database requirements
Display To satisfy the OS requirements
Hard disk Software install 500 MB or greater free space
Cache 2.0 TB or greater≥ Provides its own volume for Swift and a cache.
Interface ≥ LAN≥ Interface for storage connection
Support for storage, SAS/FC/Network
Compatible magazines 1.2 TB Recordable magazine (LM-BM12LB)3.6 TB Recordable magazine (LM-BM36XB)
Others Support storage: SCALABLE DATA ARCHIVER (LB-DH7),ÉTÉ|Å[ÉgÉXÉgÉ SCALABLE DATA ARCHIVER (LB-DH8),ÉTÉ|Å[ÉgÉXÉg ÉDATA ARCHIVER (LB-DM9)
134

Appendix Software operating environment
≥ Microsoft, Windows and Internet Explorer are registered trademarks or trademarks of U.S. Microsoft Corporation in the United States and other countries.≥ Red Hat Enterprise Linux is a registered trademark or trademark of Red Hat, Inc. in the United States and other countries.≥ QR code is a registered trademark of DENSO WAVE INCORPORATED in Japan and other countries.≥ Linux is a registered trademark or trademark of Linus Torvalds in the United States and other countries.≥ UNIX is a registered trademark or trademark of The Open Group in the United States and other countries.≥ NFS is a registered trademark or trademark of Sun Microsystems, Inc. in the United States and other countries.≥ All other various names, product names and company names mentioned in this document are trademarks and/or registered trademarks of their respective
owners.
This product incorporates the following software:(1) the software developed independently by or for Panasonic Corporation,(2) the software owned by third party and licensed to Panasonic Corporation,(3) the software licensed under the GNU General Public License, Version 2.0 (GPL V2.0) or Version 3.0 (GPL V3.0),(4) the software licensed under the GNU LESSER General Public License, Version 2.1 (LGPL V2.1) or Version 3.0 (LGPL V3.0), and/or(5) open source software other than the software licensed under the GPL V2.0, GPL V3.0, LGPL V2.1 and/or LGPL V3.0.
The software categorized as (3) - (5) are distributed in the hope that it will be useful, but WITHOUT ANY WARRANTY, without even the implied warranty of MERCHANTABILITY or FITNESS FOR A PARTICULAR PURPOSE. Please refer to the detailed terms and conditions thereof shown in the attached Installation Medium.
At least three (3) years (and as long as Panasonic offers spare parts or customer support for this product, with respect to the software granted under GPL V3.0 or LGPL V3.0) from delivery of this product, Panasonic will give to any third party who contacts us at the contact information provided below, for a charge no more than our cost of physically performing source code distribution, a complete machine-readable copy of the corresponding source code covered under GPL V2.0, GPL V3.0, LGPL V2.1 and LGPL V3.0 or the other licenses with the obligation to do so, as well as the respective copyright notice thereof.
Contact Information: [email protected]
135
Appendix
Special notes
∫We assumes no responsibility whatsoever for any cost for direct or indirect damage and data loss resulting from use of this software or any other fault during/after the warranty period.
∫The management of data stored in the Data Archive magazine is the responsibility of the user. We advise that you verify operation before you using the software and make sure that you have a backup of critical data.
∫ If the password is known to third parties, there may be unauthorized use. Since the default user name and password at the time of installation can be used by anyone, the customer is responsible for creating and managing a user name and password. Panasonic is not liable for any consequences arising out of unauthorized use.
∫The software and the information contained in this document are subject to change without notice.
∫Notice for Transfer and DisposalTo transfer or discard a management server in which information relevant to DA Manager is stored, a cache storage, Maria DB server, Keystone server, client PC, or backup media which contains configuration or encryption key, initialization or physical destruction of the server or media to prevent the information leakage is recommended.
∫Operation of the DA Manager cannot be guaranteed in an environment where applications unrelated to the DA unit (excluding those that were added to the system at the time of product delivery) exist in the management server.
136
Appendix
Glossary
AccountSwift user and also an owner of the container. Same meaning as a project of Keystone.
Account keyKey to use for encryption. The key is generated during the setting of Container Default Settings.
Account userUser who can operate files.
BarcodeOne-dimensional or two-dimensional code.
Batch processingProcessing to read or write the data from/to a magazine. There are two types of batch: fixed/regular and immediate.
CacheThe temporary storage area in order to speed up the access to the data in the magazine.There are read and write caches.
Cache effective capacityCache free space combined with expired read cache space
CIFSStands for Common Internet File System. A file-sharing protocol published by Microsoft.
ContainerLocation to store the object. Equivalent to the Windows volume or folder. More than one container can be created. However, a container cannot be created within another container.
Container keyKey to use for encryption. It is generated during the creation of a new container.
DashboardA function designed specifically for checking the operating status of DA Manager components.
DATA ARCHIVERStores up to 90 magazines, reads and writes the compatible magazines under software control. Referred to as “DA” in this manual.
Directory serviceThis is a function for centralized control of servers connected to a network. Use management information associated with attributes such as access rights to control access by users.
DomainThe collective of projects, groups, and users in Keystone.
DrawerLocation to store the magazine in the DA unit.
Drive systemSystem unit used for reading data from or writing data to magazines.A model of the LB-DM9 or LB-DH8 series consists of 12 drives, while a model of the LB-DH7 series consists of 6 drives.
EncryptionAltering the written contents using an encryption key to protect from unauthorized access. The software encrypts with the encryption capability of the DA unit. The system key, Account key or container key is used as an encryption key.
FinalizePost-processing to prevent additional writing. The software performs this on a per-container basis. All magazines specified in the container will be finalized.
FormatInitializing the magazine to be able to read or write the data. The software performs the format automatically according to the prescribed conditions after the registration of a new magazine in the container.
ImportAcquire a container from the magazine that was created with another DA Manager Linux version.
InventoryChecking where the offline magazines are stored.
137

Appendix Glossary
ISO9660File system standardized for CD-ROM in 1988.
KeystoneIntegrated authentication for various services provided by OpenStack. Used to manage domains, projects, users, groups, roles, etc.
Load balancerDevice for load balancing to distribute access or isolate a server that is in failure when configured in multiple proxy nodes.
MagazineRecording media integrated with multiple-disks and RFID tag. The software treats more than one magazine as a container.
Magazine administratorUser with permission for magazine, shelf and container management.
Magazine drawerThe drawer style mechanism to install the magazine stack that contains the magazines.
Magazine groupThe data to assure redundancy can be multiplexed in magazines that are grouped.
Magazine load requestsThe request sent to a magazine administrator from the software to load a magazine in the DA unit when the read/write request for offline objects or nearline objects occurred.
Magazine setA collection of magazines assigned per Swift account.
Maria DBOpen-source relational database management system that is compatible with MySQL.
Meta-informationInformation used for search keywords that can be assigned as extended file attributes.
Nearline magazineA magazine that has been loaded in the DA unit, but it is not loaded into a drive.
Nearline objectAn object that is stored in a magazine in the DA unit, but the magazine has not been loaded into a drive system, and being not read in the cache.
NFSStands for Network File System. Distributed file system and its protocol primarily used in UNIX-like operating systems.
ObjectA piece of information to be recorded to storage. Objects are equivalent to files in Windows, and metadata can be assigned to them.
Offline magazineA magazine not stored in the DA unit. If you stop the DA unit, the magazines become offline in the DA unit.
Offline objectAn object saved in a magazine that is not stored in the DA unit and being not read in the cache.
One-dimensional or two-dimensional codeCode that is attached by the user to identify a magazine in the user label attachment area of magazine. Create by using Code 39 as one-dimensional code or QR code as two-dimensional code.
Online magazineA magazine loaded in the drive system of the DA unit.
Online objectAn object saved in a magazine that has been loaded in a drive system, or an object that is being read in the cache.
OpenStackIaaS cloud computing project initiated by Rackspace Hosting and NASA in 2010. Currently, more than 200 companies participate.
138

Appendix Glossary
OperatorA person who actually performs an inventory. A magazine administrator will register the operator.
Overdue read cacheRead cache past its expiration. It will be deleted automatically when there is not enough cache free space.
ProjectA group of users for the Keystone. The same meaning as an account for Swift.
RAIDStands for Redundant Arrays of Inexpensive Disks.Technology to improve redundancy with combined multiple disks or devices.
RESTStands for Representational State Transfer. One of the Web architecture styles to send back responses to the request for HTTP.
RFIDShort range wireless communication to read or write the information. RFID tags are embedded in the magazines, an RFID reader/writer is embedded in DA unit to manage magazine information.
SCALABLE DATA ARCHIVERStores 76 to 532 magazines with the scalable module configuration, and reads and writes the compatible magazines under the control of this software. Described as “Scalable DA” in this manual.
ShelfLocation where offline magazines ejected from the DA unit are stored separately.“Box”, “Step” or “Room” is also available as “Shelf”.
Shelf managementManaging the offline magazines stored on a shelf.Conducting an inventory to check all magazines are stored.
SwiftOne of the components that comprise the OpenStack and offers cloud storage.
System administratorUser who has privileges to manage the software.A system administrator can double as a magazine administrator.
System keyKey to use for encryption. It is generated during the installation of the software.
System metadataThe meta data assigned from Swift, such as the object creation time information (Date) and the hash value of the object (Etag). Assigned to each account, container, and object.
S3QLFile system for online data storage. Offering a standard UNIX file system.
UDFStands for Universal Disk Format. File system for optical disks to be used when the system reads or writes data.
UserEntity to issue the Swift API utilizing this system.
User metadataMetadata created from user-assigned data. Assigned to each account, container, and object.
VolumeA unit of administration for recording media. When containers are mounted by S3QL, each container is administered as a volume.
Volume administratorAn S3QL user that performs volume administration and S3QL system configurations.
Web interfaceInterface for operation of files, configuration and maintenance of the software. Use http or https to access the Web interface over the network.
139

Appendix Glossary
Write-protectionA logical write-protect attribute configured on a container. The magazine itself cannot be modified.
140

Appendix
Index
General
BBarcode ................................................................ 59Batch .................................................................... 19
CCache ............................................................. 13, 81CIFS ..................................................................... 10Container ............................................................ 7, 8Container key .................................................15, 43Container management ........................................ 41
DDashboard .................................................. 103, 104DATA ARCHIVER .................................................. 5
EEncryption................................................. 15, 31, 43
FFAQ .................................................................... 131Finalize ................................................................. 48Format .................................................................. 56
IInventory............................................................... 71Inventory list ......................................................... 77Inventory title ........................................................ 76
KKeystone........................................................... 6, 96
MMagazine .......................................................... 5, 49Magazine administrator .......................................... 6Magazine drawer .................................................. 51Magazine List ....................................................... 56Magazine Load Request List ................................ 50Magazine storage shelf ........................................ 74Mail Server ........................................................... 97Mount.................................................................. 122
NNearline magazine................................................ 18Nearline object...................................................... 18
OOffline magazine................................................... 18Offline object......................................................... 18Online magazine................................................... 18Online object......................................................... 18OpenStack...................................................... 22, 96Operator ............................................................... 75
RRAID ...............................................................15, 30Read cache .......................................................... 14Release Cache File .............................................. 85
SS3QL .................................................................. 108SCALABLE DATA ARCHIVER .............................. 5Shelf management ............................................... 71SMTP.................................................................... 97Swift ........................................................................ 7System administrator .............................................. 6System key ...............................................15, 31, 43
UUDF .................................................................... 139User ........................................................................ 6
VVolume ............................................................... 112Volume administrator.......................................... 109Volume management ......................................... 113
WWeb interface ....................................................... 25Web interface menu list ........................................ 27Write cache........................................................... 83Write-protection .................................................... 47
141
Appendix Index
Menu item
CCache Initial Settings............................................ 82
Deletion Unit of Overdue Read Cache.............. 82Lower Limit of Available Cache Size................. 82Storage Node.................................................... 82
Cache Synchronization Settings........................... 83Cache Delete Threshold ................................... 83Day of week ...................................................... 83Immediate ......................................................... 83Interval - day ..................................................... 83Interval - time .................................................... 83Off ..................................................................... 83Time .................................................................. 83Write Cache Threshold for Automatic Magazine Synchronization ................................................ 83
Change Magazine Barcode .................................. 59Change Magazine Shelf ....................................... 74Confirmation of system operating conditions...... 103Container Default Settings.................................... 30
Automatic Magazine Assignment...................... 31Encryption ......................................................... 31Mirror................................................................. 31New Container - Default RAID Level ................ 30
Container Initial Settings....................................... 98Automatic Magazine Assignment...................... 98Magazine Assignment by Account.................... 98Mirror................................................................. 98New Container - Default RAID Level ................ 98New Container - Selectable Encryption Mode ............................. 98
Copy Magazine..................................................... 60Account ............................................................. 60Container Name................................................ 60Destination Magazine ....................................... 60Source Magazine .............................................. 60
DDATA ARCHIVER Setting .................................... 92Discard Magazine................................................. 69Display System Configuration .............................. 93Display System Status.......................................... 94
Cache Status .................................................... 94DATA ARCHIVER............................................. 94Drawer Status ................................................... 94Importing Account/Container Name.................. 94Number of jobs to Import .................................. 94Refresh ............................................................. 94Slot Status......................................................... 94Total Number of Containers.............................. 94
Total Number of Magazines.............................. 94Used.................................................................. 94
Display System Status (S3QL) ........................... 126Access Status ................................................. 126Cache Size...................................................... 127Divisions Object Size ...................................... 127File synchronization state ............................... 127Finalize............................................................ 127Imported Status ............................................... 127Metadata Upload Interval ................................ 127Mount Status ................................................... 126Volume Cache Residual Capacity................... 126Volume Name ................................................. 126Volume Residual Capacity .............................. 126Write Protect ................................................... 127
Display Volume Status ....................................... 112File synchronization state ............................... 112Finalize............................................................ 112Imported Status ............................................... 112Mount Status ................................................... 112Total Volume Capacity .................................... 112Volume Name ................................................. 112Volume Residual Capacity .............................. 112Write Protect ................................................... 112
FFinalize Container................................................. 48Finalize Volume .................................................. 125
IImport Container .................................................. 65
Container ID ...................................................... 65Magazine SN in Container ................................ 65Magazines in Container .................................... 65Status................................................................ 65System ID ......................................................... 65
Import Encryption Key .......................................... 68
LLoad/Unload Magazine......................................... 51
Empty ................................................................ 52Nearline............................................................. 52Not Formatted ................................................... 52Online................................................................ 52Other format ...................................................... 52Unknown ........................................................... 52
142
Appendix Index
MMagazine Assignment .................................... 32, 58
Registerable Magazine ............................... 34, 58Registered Magazine (blank) ...................... 34, 58
Magazine Copy Settings....................................... 95Day of week ...................................................... 95Immediate ......................................................... 95Interval - day ..................................................... 95Interval - time .................................................... 95Off ..................................................................... 95Time .................................................................. 95
Magazine Inventory .................................. 76, 78, 79Finish Date........................................................ 76Inventory Check Remarks................................. 79Inventory Checking Date................................... 78Inventory Title ................................................... 76List Created Date .............................................. 76Operator............................................................ 78
Magazine List ....................................................... 56Account ............................................................. 56Barcode............................................................. 56Container .......................................................... 56Encryption ......................................................... 57Finalized............................................................ 56Formatted.......................................................... 56Free Space ....................................................... 56Group ................................................................ 56Location Category............................................. 57Magazine ID...................................................... 56Magazine Status ............................................... 57Media Type ....................................................... 56RAID Level........................................................ 56Remarks............................................................ 57Shelf .................................................................. 57Write Protected (Hard) ...................................... 57Write Protected (Soft) ....................................... 56
Magazine Load Request List ................................ 50IP....................................................................... 50Requested......................................................... 50Situation ............................................................ 50Storage Node.................................................... 50Total File Size ................................................... 50Type .................................................................. 50
Mail Server Settings ............................................. 97CRAM-MD5/LOGIN/PLAIN ............................... 97Password .......................................................... 97SMTP Authentication ........................................ 97SMTP Domain Name ........................................ 97SMTP Port Number........................................... 97SMTP Server Name.......................................... 97User ID.............................................................. 97
Mail Server Settings (S3QL) ............................... 129CRAM-MD5/LOGIN/PLAIN ............................. 129Email Notification Address .............................. 129Password ........................................................ 129send mail......................................................... 129SMTP Authentication ...................................... 129SMTP Domain Name ...................................... 129SMTP Port Number......................................... 129SMTP Server Name........................................ 129User ID ............................................................ 129
Mount Volume .................................................... 122
RRecovery Magazine .............................................. 62
Account ............................................................. 62Container Name................................................ 62Destination Magazine ....................................... 62Situation of Recovery ........................................ 62Source Magazine .............................................. 62
Register/Change Container .................................. 42Automatic Magazine Assignment...................... 44Container Name.......................................... 42, 43Encryption ................................................... 42, 43Finalize.............................................................. 42Imported Status................................................. 42Mirror................................................................. 44RAID Level .................................................. 42, 43Registerable Magazine ..................................... 44Total Container Size ......................................... 42Write Protect ..................................................... 42
Register/Change Shelf ......................................... 73Number of Magazines....................................... 73
Register/Change Volume ................................... 116Automatic Magazine Assignment.................... 117Cache Size...................................................... 118Container Name.............................................. 117Data deduplication .......................................... 118Divisions Object Size ...................................... 118Encryption ....................................................... 117Metadata Upload Interval ................................ 118Mirror............................................................... 117Mount target node........................................... 118Pack Files ....................................................... 118RAID Level ...................................................... 117Registering magazines ................................... 118Volume Name ................................................. 117
Register/Delete Operator...................................... 75Register/Stop DATA ARCHIVER.......................... 89
DATA ARCHIVER............................................. 89Device Node ..................................................... 89Serial No. .......................................................... 89Status................................................................ 89
143
Appendix Index
Release Cache File .............................................. 85Available ........................................................... 85Expiration date .................................................. 85File Name.......................................................... 85Magazine .......................................................... 85Size ................................................................... 85Total Cache size ............................................... 85Type .................................................................. 85Unsynchronized Cache Size............................. 85
SStorage Node Settings ....................................... 101
DATA ARCHIVER Low power consumption control ..................... 101GET Object Settings for Nearline Magazines.... 102Output Level of Log......................................... 101Read Cache Lifetime ...................................... 102Write Error Threshold...................................... 101
System Setting ................................................... 128S3QL Log Output ............................................ 128The Lower Limit Of Capacity Usable Amount Warning........................................................... 128Volume administrators group .......................... 128
UUnload Specified Magazine.................................. 54
DATA ARCHIVER............................................. 54Last Modified..................................................... 54Situation ............................................................ 54Unsynchronized size......................................... 54
User Group Settings ............................................. 96Magazine managers group ............................... 96System administrators group ............................ 96Users group ...................................................... 96
WWrite Protect Container ........................................ 47Write Protect Volume.......................................... 124
144

DSQP1001TAF0819QK0
Panasonic CorporationKadoma, Osaka, Japan
© Panasonic Corporation 2019