operation manual for freeze dryer - welcome · pdf file · 2015-12-08operation...
TRANSCRIPT
Operation Manual For
Freeze Dryer
FDL (-55℃)Series
(Please read the operation manual carefully before operating the machine)

Contents
Ⅰ Summary ........................................................................... 1
1, Production Information .......................................................... 1
2, Product Characteristics: ......................................................... 2
3, Working Conditions ............................................................... 3
4, Product Specification: ............................................................ 3
Ⅱ Installation......................................................................... 4
Ⅲ Operation .......................................................................... 5
1, The operation of control panel ............................................... 6
2, The freeze drying operation ................................................. 10
3, Operation for freeze drying .................................................. 12
Ⅳ Notices ............................................................................. 16
Ⅴ Common breakdown and elimination ................................ 17
Ⅵ Packing list ........................................................................ 19
Ⅶ Guarantee and maintain ................................................... 19
1
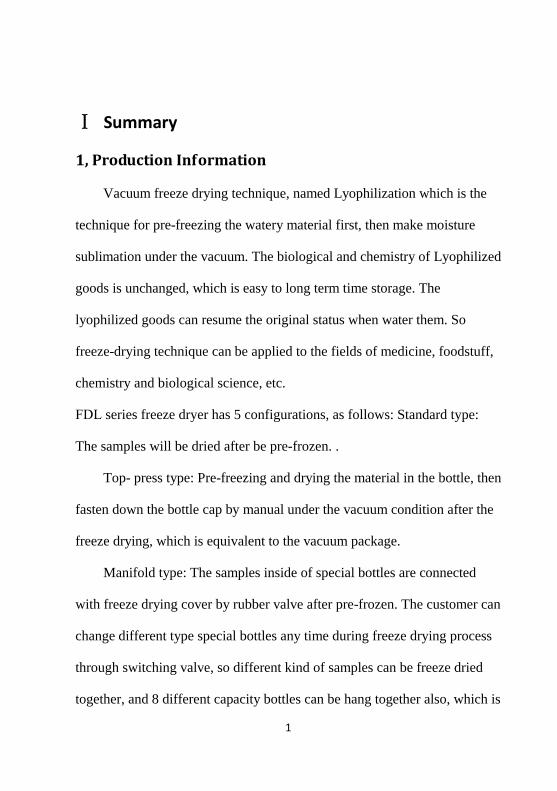
Ⅰ Summary
1, Production Information
Vacuum freeze drying technique, named Lyophilization which is the
technique for pre-freezing the watery material first, then make moisture
sublimation under the vacuum. The biological and chemistry of Lyophilized
goods is unchanged, which is easy to long term time storage. The
lyophilized goods can resume the original status when water them. So
freeze-drying technique can be applied to the fields of medicine, foodstuff,
chemistry and biological science, etc.
FDL series freeze dryer has 5 configurations, as follows: Standard type:
The samples will be dried after be pre-frozen. .
Top- press type: Pre-freezing and drying the material in the bottle, then
fasten down the bottle cap by manual under the vacuum condition after the
freeze drying, which is equivalent to the vacuum package.
Manifold type: The samples inside of special bottles are connected
with freeze drying cover by rubber valve after pre-frozen. The customer can
change different type special bottles any time during freeze drying process
through switching valve, so different kind of samples can be freeze dried
together, and 8 different capacity bottles can be hang together also, which is
2
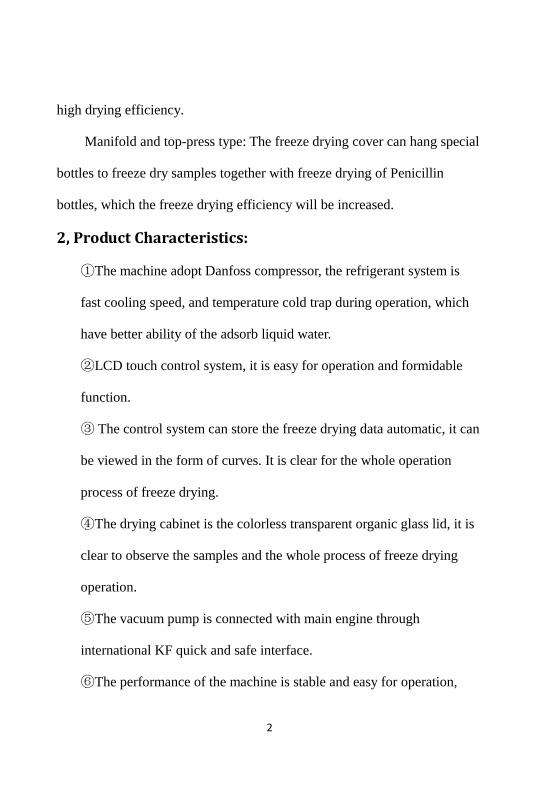
high drying efficiency.
Manifold and top-press type: The freeze drying cover can hang special
bottles to freeze dry samples together with freeze drying of Penicillin
bottles, which the freeze drying efficiency will be increased.
2, Product Characteristics:
①The machine adopt Danfoss compressor, the refrigerant system is
fast cooling speed, and temperature cold trap during operation, which
have better ability of the adsorb liquid water.
②LCD touch control system, it is easy for operation and formidable
function.
③ The control system can store the freeze drying data automatic, it can
be viewed in the form of curves. It is clear for the whole operation
process of freeze drying.
④The drying cabinet is the colorless transparent organic glass lid, it is
clear to observe the samples and the whole process of freeze drying
operation.
⑤The vacuum pump is connected with main engine through
international KF quick and safe interface.
⑥The performance of the machine is stable and easy for operation,
3
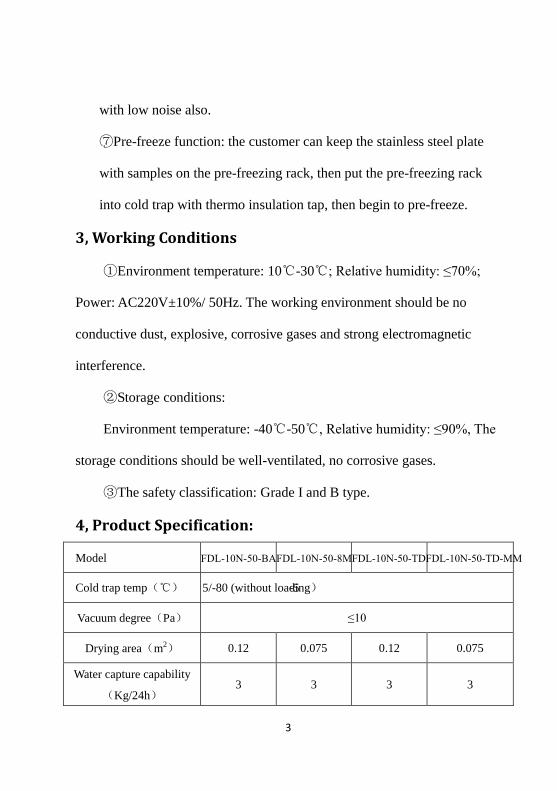
with low noise also.
⑦Pre-freeze function: the customer can keep the stainless steel plate
with samples on the pre-freezing rack, then put the pre-freezing rack
into cold trap with thermo insulation tap, then begin to pre-freeze.
3, Working Conditions
①Environment temperature: 10℃-30℃; Relative humidity: ≤70%;
Power: AC220V±10%/ 50Hz. The working environment should be no
conductive dust, explosive, corrosive gases and strong electromagnetic
interference.
②Storage conditions:
Environment temperature: -40℃-50℃, Relative humidity: ≤90%, The
storage conditions should be well-ventilated, no corrosive gases.
③The safety classification: Grade I and B type.
4, Product Specification:
Model FDL-10N-50-BAFDL-10N-50-8MFDL-10N-50-TDFDL-10N-50-TD-MM
Cold trap temp(℃) -5 5/-80 (without loading)
Vacuum degree(Pa) ≤10
Drying area(m2) 0.12 0.075 0.12 0.075
Water capture capability
(Kg/24h) 3 3 3 3
4
Tray Layer 4 3 4 3
Tray specification
(ϕ×h)mm 200×20 200×20 200×20 200×20
Load material/tray(ml) 300 300 300 300
Drying time(h) 24
Manifold / / 8 8
External dimension
(W×D×H)mm 582×625×530
Ⅱ Installation
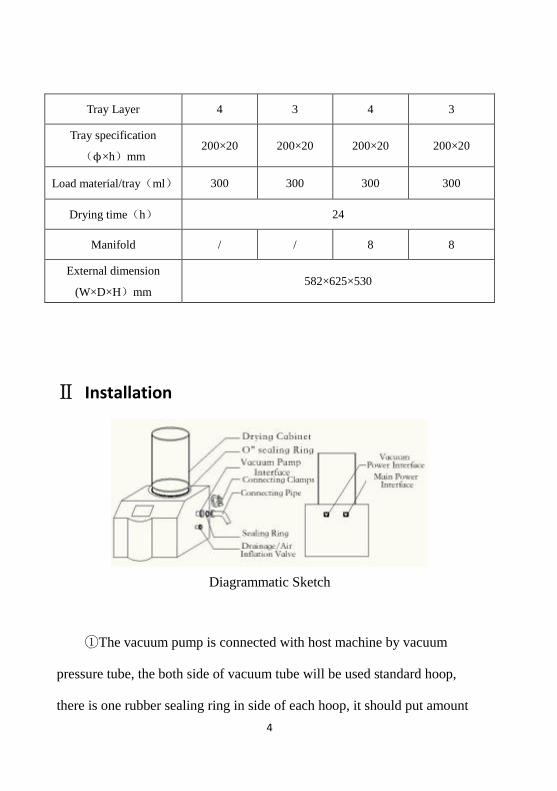
Diagrammatic Sketch
①The vacuum pump is connected with host machine by vacuum
pressure tube, the both side of vacuum tube will be used standard hoop,
there is one rubber sealing ring in side of each hoop, it should put amount
5
of vacuum grease on sealing ring before fasten the hoop.
②there is one main power socket on the back of host machine, one
end of the power line should be put in this main power socket, another end
of power line should be connected with the electric power socket. There is
another power socket on back side of host machine which is for vacuum
pump, the power line of vacuum pump should be connected with this power
socket.
③Please read the vacuum pump manual carefully and check the
vacuum pump well before operation, to confirm that the pump oil has been
added inside of pump. Don’t operate the vacuum pump without oil, the oil
line must not be lower than the oil mirror middle line.
④The “O” sealing ring on side of cold trap should be kept clean, put a
layer of vacuum grease before operation.
Ⅲ Operation
Note: Please Confirm the power and Vacuum pump connection is
ready before operation
6
1, The operation of control panel
This machine adopts color LCD touch screen operation, large capacity
FAT32 file system to store all the data values for one month at least. USB
interface: Running data can be connected USB disk to store in Computer,
the panel can display the temperature of the sample, the cold trap
temperature, vacuum degree and other working parameters in curve.
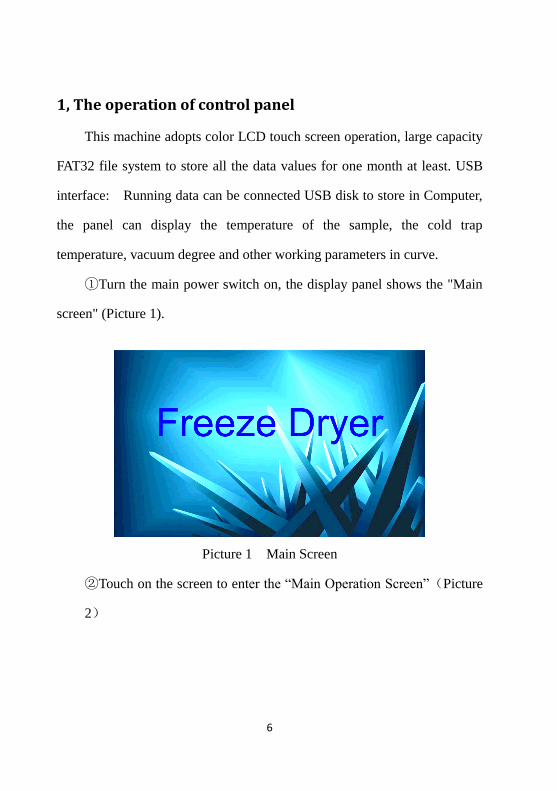
①Turn the main power switch on, the display panel shows the "Main
screen" (Picture 1).
Picture 1 Main Screen
②Touch on the screen to enter the “Main Operation Screen”(Picture
2)
7
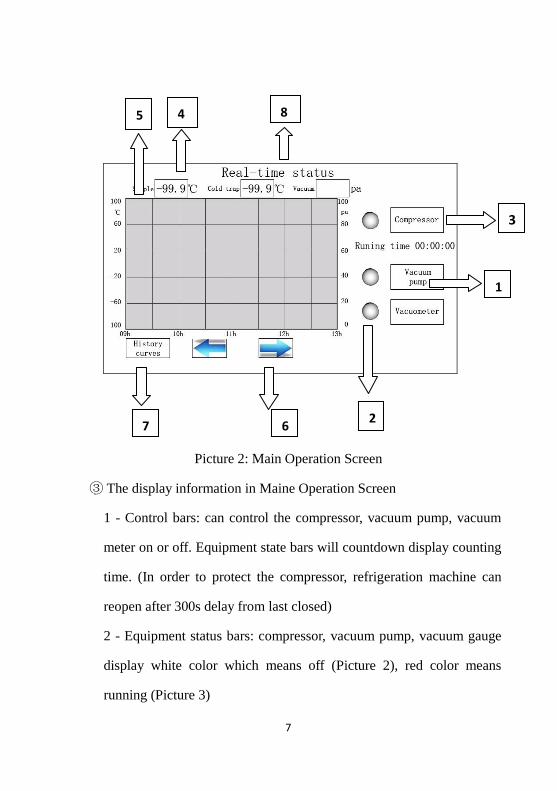
Picture 2: Main Operation Screen
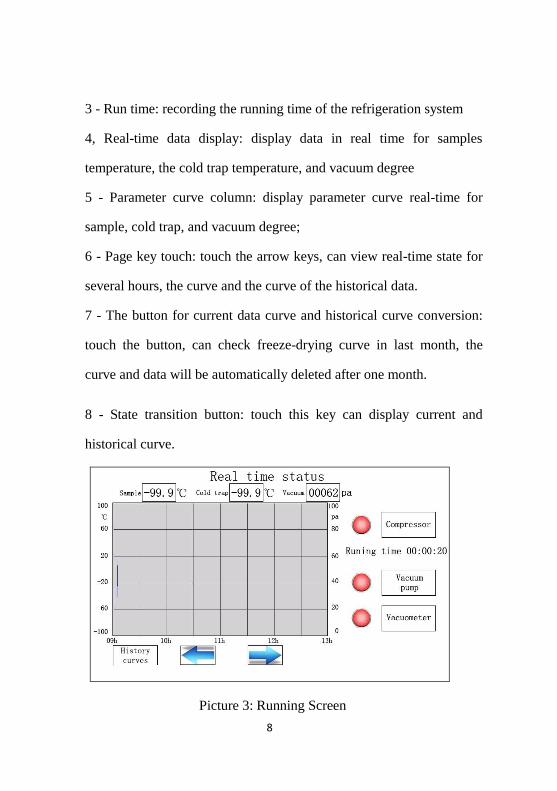
③ The display information in Maine Operation Screen
1 - Control bars: can control the compressor, vacuum pump, vacuum
meter on or off. Equipment state bars will countdown display counting
time. (In order to protect the compressor, refrigeration machine can
reopen after 300s delay from last closed)
2 - Equipment status bars: compressor, vacuum pump, vacuum gauge
display white color which means off (Picture 2), red color means
running (Picture 3)
5
7
3
1
6
4
2
8
8
3 - Run time: recording the running time of the refrigeration system
4, Real-time data display: display data in real time for samples
temperature, the cold trap temperature, and vacuum degree
5 - Parameter curve column: display parameter curve real-time for
sample, cold trap, and vacuum degree;
6 - Page key touch: touch the arrow keys, can view real-time state for
several hours, the curve and the curve of the historical data.
7 - The button for current data curve and historical curve conversion:
touch the button, can check freeze-drying curve in last month, the
curve and data will be automatically deleted after one month.
8 - State transition button: touch this key can display current and
historical curve.
Picture 3: Running Screen
9
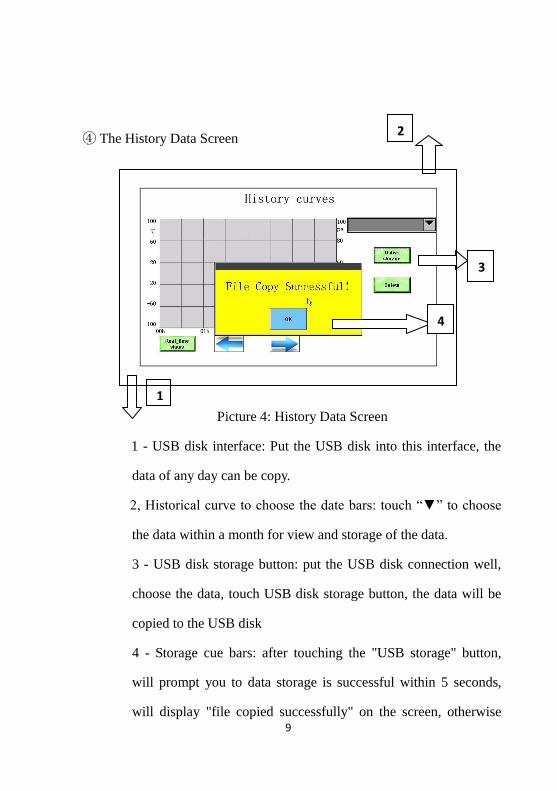
④ The History Data Screen
Picture 4: History Data Screen
1 - USB disk interface: Put the USB disk into this interface, the
data of any day can be copy.
2, Historical curve to choose the date bars: touch “▼” to choose
the data within a month for view and storage of the data.
3 - USB disk storage button: put the USB disk connection well,
choose the data, touch USB disk storage button, the data will be
copied to the USB disk
4 - Storage cue bars: after touching the "USB storage" button,
will prompt you to data storage is successful within 5 seconds,
will display "file copied successfully" on the screen, otherwise
2
1
3
4

10
means copy failure.
2, The freeze drying operation
①Samples placement
Put the samples on the trays, then put the samples and the trays in
the racks, then put the temperature sensor on the tray, then put the
rack with samples into cold trap, keep the insulation lid on the
cold trap to begin the pre-freezing, it should keep some time after
the samples are frozen.
②Sample pre-freezing:
A, Turn on the main power switch, the display panel will show
picture 1.
B, Touch the screen, and into Picture 2, touch "compressor" button,
then pre-freezing start (advise 4 hours at least).
C, Take the racks out together with the samples after the samples
completely frozen.
③The sample drying
A, Take the freeze-drying rack out from the cold trap, then put the
supporter plate on the cold trap port, then place the freeze-drying
rack on the supporter plate (Standard type and manifold type can
refer to FDL-10N-50-BA and FDL-10N-50-TD), or put the
samples on the drying rack, then put the drying rack on the cold
trap directly (Top
11
press type and manifold top press type can refer to
FDL-10N-50-8M) B, Put the sensor into the sample tray, then
put the drying cabinet cover up the drying rack.
C, Tighten the drainage and inflation valve
D, Touch "Vacuum Meter" button, the screen display the vacuum
degree 110KPa, then touch the "vacuum Pump" button, vacuum
pump begin to run. The vacuum degree in the display panel will
begin to decline rapidly, The drying officially start when vacuum
degree is less than 10Pa, (Advise drying time is more than 20
hours, it can be adjust depending on the customer requirement as
per different drying requirement
Note: the lower end of the drying cabinet must touch well with
the "O" sealing ring
④Take out the samples from drying cabinet
A, Check the sample curve and visual sample is completely dry,
touch "Vacuum Meter" to switch off the vacuum meter, then loosen
the drainage and inflation valve, touch the "Vacuum Pump" button
to switch off the vacuum pump.
B, Remove the drying cabinet which is acrylic glass cover, take out
the sample trays from freeze drying rack, then do package for
drying samples. Touch "Compressor" button to switch off
12
refrigeration system.
The freeze drying operation is finished
⑤Shut down operation
A,Switch off the “Main Power” button, then the machine is no
power.
B, Remove the electric power plug, and vacuum pump plug.
C, Clean the cold trap with soft cloth, and clean sample plates and
rack, drying cabinet, etc.
D, Cover the vent hole when the vacuum pump does not work to
prevent the dust into the vacuum pump.
⑥Water Drainage Operation:
Loosen the drainage nad inflation valve, the water will be out after
the ice melt into water in the cold trap, then using a container to
collect the water
Note: Please observe and confirm the water in the cold trap is
emission clean, otherwise affect the use effect!
3, Operation for freeze drying
◆The freeze drying operation for standard type (FDL-10N-50-BA)
①Put the samples on the trays, then put the samples and the trays in
the racks, then put the temperature sensor on the tray, then put the rack with
13
samples into cold trap, keep the insulation lid on the cold trap to begin the
pre-freezing, it should keep some time after the samples are frozen.
②Take the freeze-drying rack out from the cold trap, then put the
supporter plate on the cold trap port, then place the freeze-drying rack on
the supporter plate. Put the sensor into the sample tray, then put the drying
cabinet cover up the drying rack.
③Tighten the drainage and inflation valve, touch "Vacuum Meter"
button, the screen display the vacuum degree 110KPa, then touch the
"vacuum Pump" button, vacuum pump begin to run. The vacuum degree in
the display panel will begin to decline rapidly, The drying officially start
when vacuum degree is less than 10Pa.
④Check the sample curve and visual sample is completely dry, touch
"Vacuum Meter" to switch off the vacuum meter, then loosen the drainage
and inflation valve, touch the "Vacuum Pump" button to switch off the
vacuum pump.
⑤Remove the drying cabinet which is acrylic glass cover, take out the
sample trays from freeze drying rack, then do package for drying samples.
Touch "Compressor" button to switch off refrigeration system.
◆The freeze drying operation for top-press type (FDL-10N-50-BA)
①Put the samples into penicillin bottle, then put the bottles on the
14
trays, put the bottles and the trays in the racks, then put the temperature
sensor on the tray, then put the rack with samples into cold trap, keep the
insulation lid on the cold trap to begin the pre-freezing, it should keep some
time after the samples are frozen.
②Take the freeze rack out from the cold trap, take the penicillin
bottles trays from the freeze rack, and put the trays and bottles into drying
racks, then put the drying rack on the cold trap port, Put the sensor into the
sample tray, then put the drying cabinet cover up the drying rack.
③Tighten the drainage and inflation valve, touch "Vacuum Meter"
button, the screen display the vacuum degree 110KPa, then touch the
"vacuum Pump" button, vacuum pump begin to run. The vacuum degree in
the display panel will begin to decline rapidly, The drying officially start
when vacuum degree is less than 10Pa.
④Check the sample curve and visual sample is completely dry, Turn
the handle which is above the organic glass cover, make the screw rotation
to drive trays down one by one, the bottle caps will be pressed into the
bottle, achieve vacuum closures. Touch "Vacuum Meter" to switch off the
vacuum meter, then loosen the drainage and inflation valve, touch the
"Vacuum Pump" button to switch off the vacuum pump.
⑤Remove the drying cabinet which is acrylic glass cover, take out the
15
sample trays from freeze drying rack, then do package for penicillin bottles.
Touch "Compressor" button to switch off refrigeration system.
◆The freeze drying operation for manifold type (FDL-10N-50-BA)
①Put the sample into the lyophilized bottles selected, then put the
lyophilized bottles into one deep freezer (less than -40 ℃), keep the sample
completely frozen and maintained for a period of time, it is better to keep
the drying bottle edge rotation if possible, so that uniform samples of frozen
in the bottle wall, accelerate drying
②Take the freeze-drying rack out from the cold trap, then put the
supporter plate on the cold trap port, then place the freeze-drying rack on
the supporter plate. Put the sensor into the sample tray, then put the drying
cabinet cover up the drying rack.
③Take out the lyophilized bottles from the deep freezer, and connect
the lyophilized bottles with the drying cabinet through the switch valve, put
the valve into the lyophilized bottle center, turn round the valve wing to
keep it vertical down, then the lyophilized bottle is connected with the
drying cabinet.
④Tighten the drainage and inflation valve, touch "Vacuum Meter"
button, the screen display the vacuum degree 110KPa, then touch the
"vacuum Pump" button, vacuum pump begin to run. The vacuum degree in
16
the display panel will begin to decline rapidly, The drying officially start
when vacuum degree is less than 10Pa. If the lyophilized bottle is required
to replace during drying operation or take off the lyophilized bottle after
drying operation, please turn round the switch valve and keep valve swing
vertical upward, then the lyophilized bottle is communicated with the
atmosphere, the bottle is inflation with air at the same time, drying cabinet
is isolation with lyophilized bottle, then remove lyophilized bottle.
⑤if the samples drying finished, take off the lyophilized bottles first,
then do air inflation, swtich off the vacuum meter and vacuum pump,
remove the drying cabinet and do samples package. Do not take off the
drying cabinet together with lyophilized bottles together
◆The freeze drying operation for FDL-10N-50-TD-MM
Refer to the above information of FDL-10N-50-8M and FDL-10N-50-TD
Ⅳ Notices
①Working environment temperature should be less than or equal 30℃;
Relative humidity should be less than or equal 80%;
②The vacuum pump should be placed at the ground in order to
maintain certain height difference with the host machine, which can
prevent oil back to pump in case of power off. It should loosen the
17
drainage and inflation valve and inflate the air into the host machine if
the power is off suddenly, and take out the samples as soon as possible,
confirm the samples to be stored well.
③When shut down the machine, please inflate the host machine, then
switch off the vacuum pump in order to prevent the oil back to pump.
④The drying cabinet (acrylic glass cover) is connected with host
machine by “O” sealing ring, please confirm the “O” sealing ring clean.
⑤The user socket should be earthed. Don't clean the organic glass
cover and “O” sealing ring by organic solvent, Pay attention to the
contact surface of the organic glass cover and “O” sealing ring to avoid
injury, stroke, etc.
⑥ Don't switch on or off the power and refrigerator frequently, please
wait for 3 minutes at least if restart the machine.
Notes: The vacuum pump oil should be replaced regularly after
working 200 hours, confirm maintain the host machine and vacuum
pump well for running safe and stable.
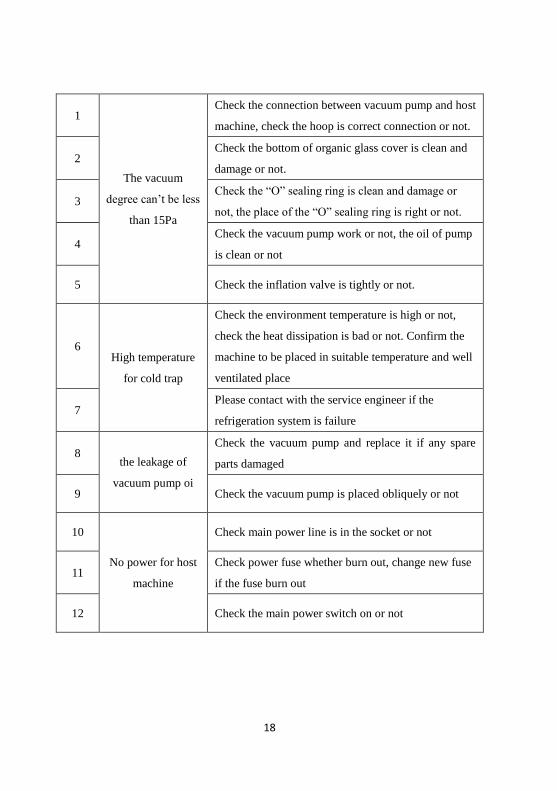
Ⅴ Common breakdown and elimination
No. Failure
phenomenon Reason and Solution
18
1
The vacuum
degree can’t be less
than 15Pa
Check the connection between vacuum pump and host
machine, check the hoop is correct connection or not.
2 Check the bottom of organic glass cover is clean and
damage or not.
3 Check the “O” sealing ring is clean and damage or
not, the place of the “O” sealing ring is right or not.
4 Check the vacuum pump work or not, the oil of pump
is clean or not
5 Check the inflation valve is tightly or not.
6 High temperature
for cold trap
Check the environment temperature is high or not,
check the heat dissipation is bad or not. Confirm the
machine to be placed in suitable temperature and well
ventilated place
7 Please contact with the service engineer if the
refrigeration system is failure
8 the leakage of
vacuum pump oi
Check the vacuum pump and replace it if any spare
parts damaged
9 Check the vacuum pump is placed obliquely or not
10
No power for host
machine
Check main power line is in the socket or not
11 Check power fuse whether burn out, change new fuse
if the fuse burn out
12 Check the main power switch on or not

19
Ⅵ Packing list
No. Name Unit Quantity
1 Host machine of Freeze dryer Piece 1
2 Lyophilized rack Piece 1
3 Trays (S、P type/T、TP type) Piece 4/3
4 Drying rack(T、TP type) Piece 1
5 Drying cabinet (acrylic glass cover Piece 1
6 Vacuum Pump Piece 1
7 Connection Pipe Piece 1
8 Pump Oil Bottle 1
9 Connection hoop (including sealing ring) piece 1
10 Operation Manual Piece 1
11 Vacuum grease box 1
Ⅶ Guarantee and maintain
①The guarantee is one year free from the date of installation
② We are responsibility for tenured attendance.
③Please keep all the accessories of machine well, check it

20
unmistakable, send the repair card by return to company sales department in
order to enter company technique service record, provide service for you
during your operation

.
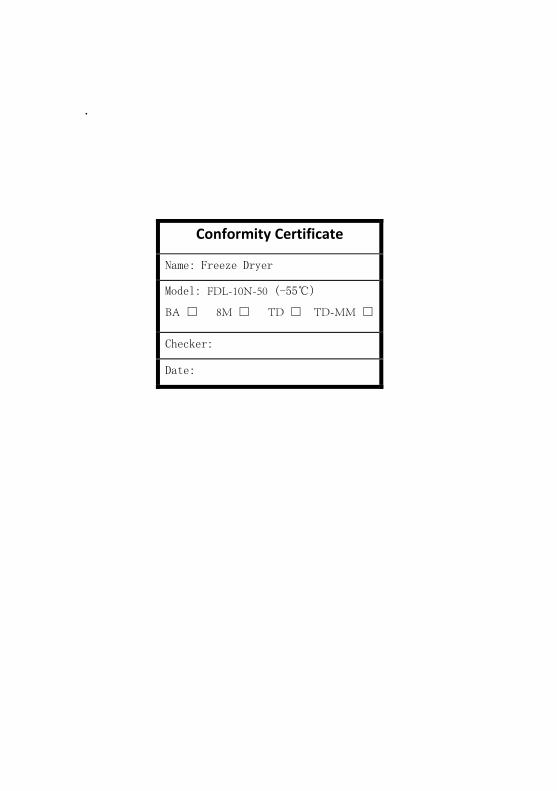
Conformity Certificate
Name: Freeze Dryer
Model: FDL-10N-50 (-55℃)
BA ☐ 8M ☐ TD ☐ TD-MM ☐
Checker:
Date: