operation manual - teledyne api - m701h manual.pdf · 06712b (dcn5875) i about this manual this...
TRANSCRIPT

OPERATION MANUAL
MODEL 701H HIGH PERFORMANCE
ZERO AIR GENERATOR
© TELEDYNE API 9970 Carroll Canyon Road
SAN DIEGO, CA 92131-1106 USA
Toll-free Phone: 800-324-5190
Phone: +1 858-657-9800 Fax: +1 858-657-9816
Email: [email protected] Website: http://www.teledyne-api.com/
Copyright 2010 06712B DCN5875 Teledyne API 08 December 2010

06712B (DCN5875) i
ABOUT THIS MANUAL
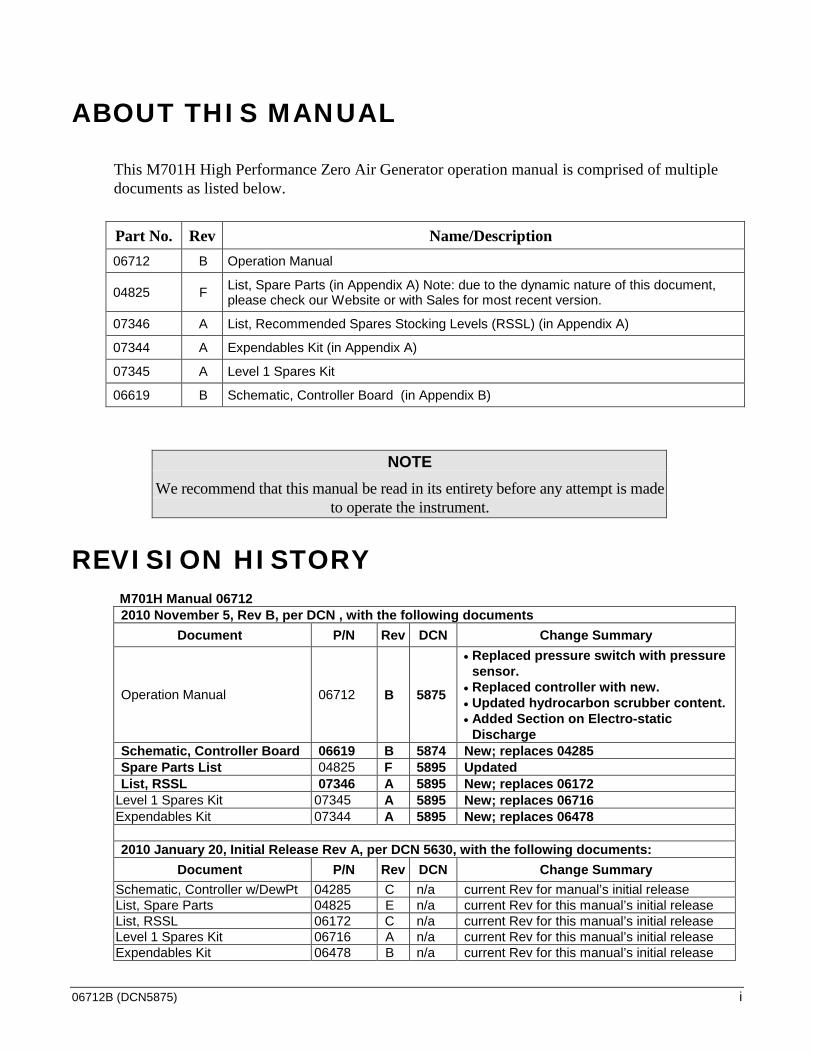
This M701H High Performance Zero Air Generator operation manual is comprised of multiple documents as listed below.
Part No. Rev Name/Description 06712 B Operation Manual
04825 F List, Spare Parts (in Appendix A) Note: due to the dynamic nature of this document, please check our Website or with Sales for most recent version.
07346 A List, Recommended Spares Stocking Levels (RSSL) (in Appendix A)
07344 A Expendables Kit (in Appendix A)
07345 A Level 1 Spares Kit
06619 B Schematic, Controller Board (in Appendix B)
NOTE
We recommend that this manual be read in its entirety before any attempt is made to operate the instrument.
REVISION HISTORY M701H Manual 06712 2010 November 5, Rev B, per DCN , with the following documents
Document P/N Rev DCN Change Summary
Operation Manual 06712 B 5875
• Replaced pressure switch with pressure sensor.
• Replaced controller with new. • Updated hydrocarbon scrubber content. • Added Section on Electro-static
Discharge Schematic, Controller Board 06619 B 5874 New; replaces 04285 Spare Parts List 04825 F 5895 Updated List, RSSL 07346 A 5895 New; replaces 06172
Level 1 Spares Kit 07345 A 5895 New; replaces 06716 Expendables Kit 07344 A 5895 New; replaces 06478 2010 January 20, Initial Release Rev A, per DCN 5630, with the following documents:
Document P/N Rev DCN Change Summary Schematic, Controller w/DewPt 04285 C n/a current Rev for manual’s initial release List, Spare Parts 04825 E n/a current Rev for this manual’s initial release List, RSSL 06172 C n/a current Rev for this manual’s initial release Level 1 Spares Kit 06716 A n/a current Rev for this manual’s initial release Expendables Kit 06478 B n/a current Rev for this manual’s initial release

ii 06712B (DCN5875)

06712B (DCN5875) iii
SAFETY MESSAGES Important safety messages are provided throughout this manual for the purpose of avoiding personal injury or instrument damage. Please read these messages carefully. Each safety message is associated with a safety alert symbol, and are placed throughout this manual and inside the instrument. The symbols with messages are defined as follows:
CAUTION This instrument should only be used for the purpose and in the manner described in this manual. If you use this instrument in a manner other than that for which it was intended, unpredictable behavior could ensue with possible hazardous consequences.
NEVER use any gas analyzer to sample combustible gas(es)!
Note
For Technical Assistance regarding the use and maintenance of this instrument or any other Teledyne API product, contact Teledyne API’s Customer Service Department:
Telephone: 800-324-5190 Email: [email protected]
or access any of the service options on our website at http://www.teledyne-api.com/
WARNING: Electrical Shock Hazard
HAZARD: Strong oxidizer
GENERAL WARNING/CAUTION: Read the accompanying message for specific information.
CAUTION: Hot Surface Warning
Do Not Touch: Touching some parts of the instrument without protection or proper tools could result in damage to the part(s) and/or the instrument.
Technician Symbol: All operations marked with this symbol are to be performed by qualified maintenance personnel only.
Electrical Ground: This symbol inside the instrument marks the central safety grounding point for the instrument.

iv 06712B (DCN5875)
CONSIGNES DE SÉCURITÉ Des consignes de sécurité importantes sont fournies tout au long du présent manuel dans le but d’éviter des blessures corporelles ou d’endommager les instruments. Veuillez lire attentivement ces consignes. Chaque consigne de sécurité est représentée par un pictogramme d’alerte de sécurité; ces pictogrammes se retrouvent dans ce manuel et à l’intérieur des instruments. Les symboles correspondent aux consignes suivantes :
AVERTISSEMENT : Risque de choc électrique
DANGER : Oxydant puissant
AVERTISSEMENT GÉNÉRAL / MISE EN GARDE : Lire la consigne complémentaire pour des renseignements spécifiques
MISE EN GARDE : Surface chaude
Ne pas toucher : Toucher à certaines parties de l’instrument sans protection ou sans les outils appropriés pourrait entraîner des dommages aux pièces ou à l’instrument.
Pictogramme « technicien » : Toutes les opérations portant ce symbole doivent être effectuées uniquement par du personnel de maintenance qualifié.
Mise à la terre : Ce symbole à l’intérieur de l’instrument détermine le point central de la mise à la terre sécuritaire de l’instrument.
MISE EN GARDE Cet instrument doit être utilisé aux fins décrites et de la manière décrite dans ce manuel. Si vous utilisez cet instrument d’une autre manière que celle pour laquelle il a été prévu, l’instrument pourrait se comporter de façon imprévisible et entraîner des conséquences dangereuses. NE JAMAIS utiliser un analyseur de gaz pour échantillonner des gaz combustibles!

06712B (DCN5875) v
TABLE OF CONTENTS ABOUT THIS MANUAL ........................................................................................................... I REVISION HISTORY ............................................................................................................... I SAFETY MESSAGES ............................................................................................................. III
1 INTRODUCTION ......................................................................................... 9
1.1 PREFACE ...................................................................................................................... 9 1.2 USING THIS MANUAL ................................................................................................... 10
2 SPECIFICATIONS AND WARRANTY ...................................................... 11
2.1 SPECIFICATIONS .......................................................................................................... 11 2.2 WARRANTY ................................................................................................................. 12
3 GETTING STARTED ................................................................................ 3-1
3.1 UNPACKING ............................................................................................................... 3-1 3.2 INSTALLATION ............................................................................................................ 3-1 3.3 FRONT AND REAR PANELS .......................................................................................... 3-3 3.4 ELECTRICAL AND PNEUMATIC CONNECTIONS ............................................................... 3-4 3.5 POWER-UP ................................................................................................................ 3-5 3.6 SHUT DOWN, STORAGE AND TRANSPORTATION ............................................................ 3-5
3.6.1 Compressor Shut Down .................................................................................... 3-5 3.6.2 Storage or Transportation Shut Down ............................................................... 3-6
4 OPTIONAL HARDWARE AND SOFTWARE ........................................... 4-1
4.1 CARRYING STRAP/HANDLE (OPT 29) .......................................................................... 4-1 4.2 RACK MOUNT KITS (OPT 20A, OPT 20B & OPT 21) ................................................... 4-2 4.3 EXPENDABLE KITS (OPT 42A) .................................................................................... 4-2 4.4 FLOW RESTRICTION (13 SLPM) (OPT 72B) ................................................................ 4-2
5 OPERATION ............................................................................................ 5-1
5.1 OVERVIEW ................................................................................................................. 5-1 5.2.1 Compressor ....................................................................................................... 5-5 5.2.2 Cooling Coil ....................................................................................................... 5-5 5.2.3 Water Trap ........................................................................................................ 5-5 5.2.4 Water Drain Valve ............................................................................................. 5-5 5.2.5 Pressure Relief Valve ........................................................................................ 5-6 5.2.6 Regenerative Dryer ........................................................................................... 5-6 5.2.7 Check Valve ...................................................................................................... 5-6 5.2.8 Storage Tank ..................................................................................................... 5-7 5.2.9 Pressure Sensor ................................................................................................ 5-7 5.2.10 Pressure Regulator .......................................................................................... 5-7 5.2.11 Pressure Gauge .............................................................................................. 5-8 5.2.12 Hydrocarbon Scrubber .................................................................................... 5-8 5.2.13 CO Scrubber .................................................................................................... 5-9
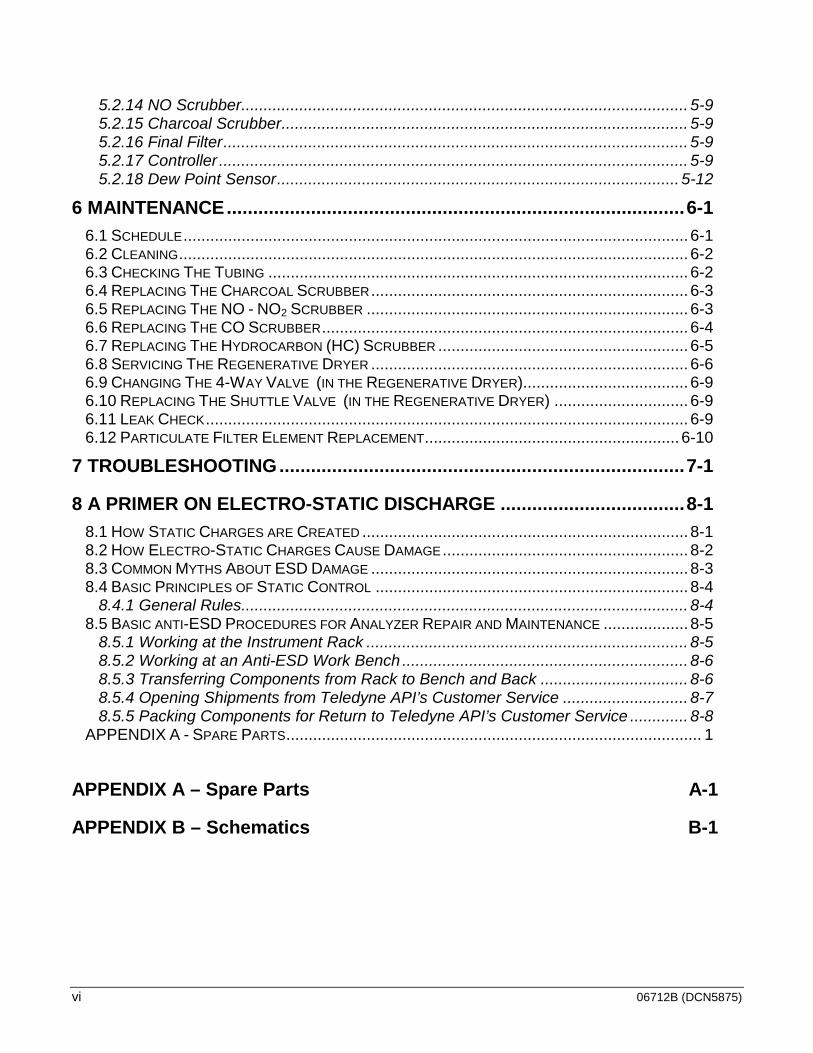
vi 06712B (DCN5875)
5.2.14 NO Scrubber .................................................................................................... 5-9 5.2.15 Charcoal Scrubber ........................................................................................... 5-9 5.2.16 Final Filter ........................................................................................................ 5-9 5.2.17 Controller ......................................................................................................... 5-9 5.2.18 Dew Point Sensor .......................................................................................... 5-12
6 MAINTENANCE ....................................................................................... 6-1
6.1 SCHEDULE ................................................................................................................. 6-1 6.2 CLEANING .................................................................................................................. 6-2 6.3 CHECKING THE TUBING .............................................................................................. 6-2 6.4 REPLACING THE CHARCOAL SCRUBBER ....................................................................... 6-3 6.5 REPLACING THE NO - NO2 SCRUBBER ........................................................................ 6-3 6.6 REPLACING THE CO SCRUBBER .................................................................................. 6-4 6.7 REPLACING THE HYDROCARBON (HC) SCRUBBER ........................................................ 6-5 6.8 SERVICING THE REGENERATIVE DRYER ....................................................................... 6-6 6.9 CHANGING THE 4-WAY VALVE (IN THE REGENERATIVE DRYER)..................................... 6-9 6.10 REPLACING THE SHUTTLE VALVE (IN THE REGENERATIVE DRYER) .............................. 6-9 6.11 LEAK CHECK ............................................................................................................ 6-9 6.12 PARTICULATE FILTER ELEMENT REPLACEMENT ......................................................... 6-10
7 TROUBLESHOOTING ............................................................................. 7-1
8 A PRIMER ON ELECTRO-STATIC DISCHARGE ................................... 8-1
8.1 HOW STATIC CHARGES ARE CREATED ......................................................................... 8-1 8.2 HOW ELECTRO-STATIC CHARGES CAUSE DAMAGE ....................................................... 8-2 8.3 COMMON MYTHS ABOUT ESD DAMAGE ....................................................................... 8-3 8.4 BASIC PRINCIPLES OF STATIC CONTROL ...................................................................... 8-4
8.4.1 General Rules .................................................................................................... 8-4 8.5 BASIC ANTI-ESD PROCEDURES FOR ANALYZER REPAIR AND MAINTENANCE ................... 8-5
8.5.1 Working at the Instrument Rack ........................................................................ 8-5 8.5.2 Working at an Anti-ESD Work Bench ................................................................ 8-6 8.5.3 Transferring Components from Rack to Bench and Back ................................. 8-6 8.5.4 Opening Shipments from Teledyne API’s Customer Service ............................ 8-7 8.5.5 Packing Components for Return to Teledyne API’s Customer Service ............. 8-8
APPENDIX A - SPARE PARTS ............................................................................................. 1
APPENDIX A – Spare Parts A-1
APPENDIX B – Schematics B-1

06712B (DCN5875) vii
LIST OF FIGURES FIGURE 3-1: INSTRUMENT LAYOUT ............................................................................................. 3-2 FIGURE 3-2: FRONT PANEL ....................................................................................................... 3-3 FIGURE 3-3: REAR PANEL ......................................................................................................... 3-3 FIGURE 4-1: CARRYING STRAP .................................................................................................. 4-1 FIGURE 5-1: PNEUMATIC DIAGRAM ............................................................................................ 5-3 FIGURE 5-2: PLAN VIEW ........................................................................................................... 5-4 FIGURE 5-3: CONTROL BOARD LAYOUT .................................................................................... 5-11 FIGURE 6-1: REGENERATIVE DRYER .......................................................................................... 6-8 FIGURE 8-1: TRIBOELECTRIC CHARGING .................................................................................... 8-1 FIGURE 8-2: BASIC ANTI-ESD WORK STATION ........................................................................... 8-4
LIST OF TABLES TABLE 2-1: SPECIFICATIONS .................................................................................................................... 11 TABLE 6-1: MAINTENANCE SCHEDULE ................................................................................................... 6-1 TABLE 7-1: TROUBLESHOOTING ............................................................................................................. 7-1 TABLE 8-1: STATIC GENERATION VOLTAGES FOR TYPICAL ACTIVITIES ................................................ 8-2 TABLE 8-2: SENSITIVITY OF ELECTRONIC DEVICES TO DAMAGE BY ESD ............................................ 8-2

viii 06712B (DCN5875)
This page intentionally left blank,

06712B (DCN5875) 9
1 INTRODUCTION 1.1 Preface
Teledyne API is pleased that you have purchased the Model 701H Zero Air System. The M701H is an excellent source of clean, dry air for dilution calibrators. It also may be used as a source of purge air for permeation tube ovens or burner air for FID analyzers. The regenerative, heatless dryer removes water and produces gas with a dew point of less than -40°C (up to 30 SLPM flow rate) independent of the inlet dew point and assists in the removal of other gases, greatly increasing the life of the chemical scrubbers. The M701H includes an oil-free and diaphragm-free pump plus scrubbers to remove SO2, NO, NO2, O3, H2S, CO, and Hydrocarbons. Inlet air is pulled into the pump and routed through a pre-cooler and water trap to remove moisture. The air then passes through the Regenerative Dryer for final drying and then to the storage tank. Tank pressure is monitored and maintained at a preset level by cycling the pump automatically as needed, thereby extending both the pump and scrubber life. Outlet air then passes through a filter to assure a clean, dry, analytical zero air supply. A microcontroller cycles the regenerative dryer and water trap valves to prevent the pump from starting against full head pressure. The M701H is an ideal accessory to the Model 700E Mass Flow Calibrator or Model 702 Single Point Calibrator as a zero air source for analyzers. M701H Features:
• Standard two year warranty • Regenerative, heatless dryer for maintenance-free water removal
independent of inlet dewpoint • Long life scrubbers for SO2, NO, NO2, O3, H2S, CO, and Hydrocarbon. • Automatic water drain • Automatic pump control based on flow demand • May be used to provide combustion air for FID • Source of purge air for permeation tube ovens • Zero air for Ozone Generators

Introduction Teledyne API M701H High Performance Zero Air Generator
10 06712B (DCN5875)
1.2 Using This Manual This manual has the following data structures:
TABLE OF CONTENTS
Outlines the contents of the manual in the order the information is presented. This is a good overview of the topics covered in the manual. There is also a list of tables, a list of figures and a list of appendices. In the electronic version of the manual, clicking on any of these table entries automatically views that section.
1.0 INTRODUCTION
A brief description of the M701H architecture, as well as a description of the layout of the manual and what information is located in its various sections and chapters.
2.0 SPECIFICATIONS AND WARRANTY
This section contains a list of the monitor’s performance specifications, a description of the conditions and configuration under which Teledyne API’s warranty statement applies.
3.0 GETTING STARTED
A concise set of instructions for setting up, installing and starting your monitor for the first time. This includes unpacking; mechanical installation; attaching all pneumatic lines; attaching all electrical and electronic connections.
4.0 OPTIONAL HARDWARE & SOFTWARE
A description of optional equipment to add functionality to your instrument.
5.0 OPERATION INSTRUCTIONS
Instructions for operating the instrument and using its basic features and functions.
6.0 MAINTENANCE
Description of certain preventative maintenance procedures that should be regularly performed on your instrument to keep it in good operating condition.
7.0 TROUBLESHOOTING
This section includes pointers and instructions for diagnosing problems with the instrument, as well as instructions on performing repairs or replacing components on the instrument.
06712B (DCN5875) 11
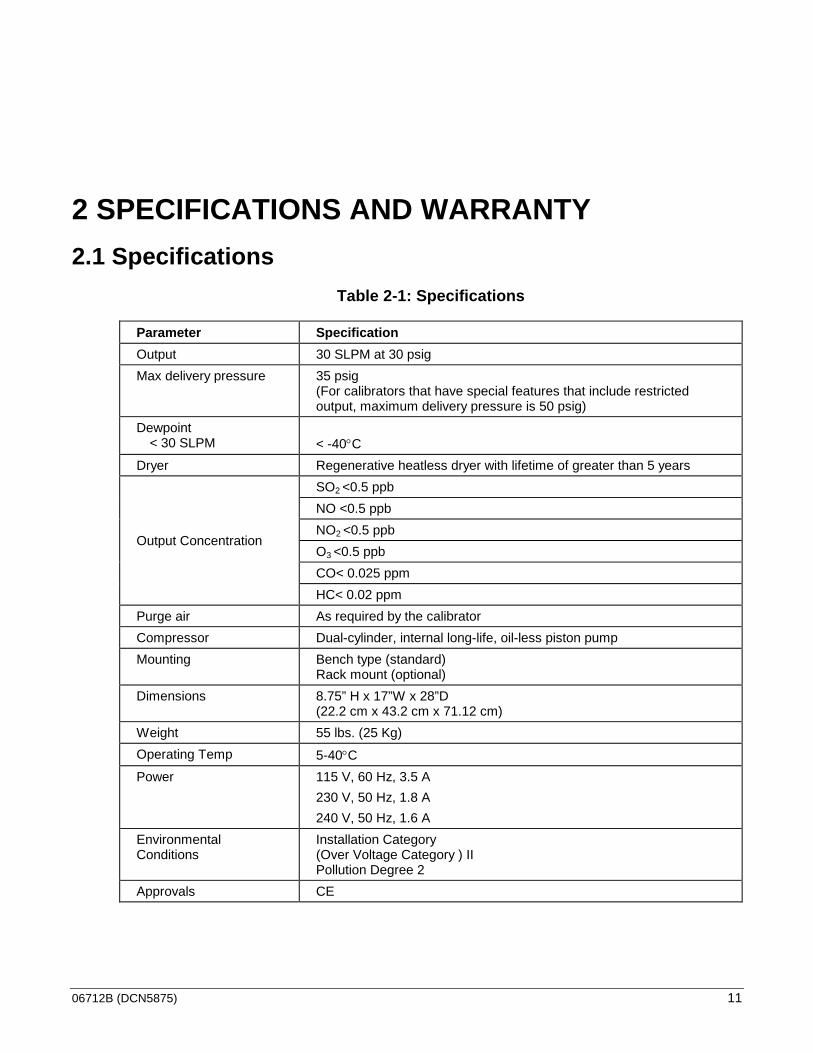
2 SPECIFICATIONS AND WARRANTY 2.1 Specifications
Table 2-1: Specifications
Parameter Specification Output 30 SLPM at 30 psig Max delivery pressure 35 psig
(For calibrators that have special features that include restricted output, maximum delivery pressure is 50 psig)
Dewpoint < 30 SLPM
< -40°C
Dryer Regenerative heatless dryer with lifetime of greater than 5 years
Output Concentration
SO2 <0.5 ppb NO <0.5 ppb NO2 <0.5 ppb O3 <0.5 ppb CO< 0.025 ppm HC< 0.02 ppm
Purge air As required by the calibrator Compressor Dual-cylinder, internal long-life, oil-less piston pump Mounting Bench type (standard)
Rack mount (optional) Dimensions 8.75” H x 17”W x 28”D
(22.2 cm x 43.2 cm x 71.12 cm) Weight 55 lbs. (25 Kg) Operating Temp 5-40°C Power 115 V, 60 Hz, 3.5 A
230 V, 50 Hz, 1.8 A 240 V, 50 Hz, 1.6 A
Environmental Conditions
Installation Category (Over Voltage Category ) II Pollution Degree 2
Approvals CE
Specifications and Warranty Teledyne API M701H High Performance Zero Air Generator
12 06712B (DCN5875)
2.2 Warranty WARRANTY POLICY (02024D) (DCN 4473) Prior to shipment, Teledyne API equipment is thoroughly inspected and tested. Should equipment failure occur, Teledyne API assures its customers that prompt service and support will be available.
COVERAGE After the warranty period and throughout the equipment lifetime, Teledyne API stands ready to provide on-site or in-plant service at reasonable rates similar to those of other manufacturers in the industry. All maintenance and the first level of field troubleshooting are to be performed by the customer.
NON-TELEDYNE API MANUFACTURED EQUIPMENT Equipment provided but not manufactured by Teledyne API is warranted and will be repaired to the extent and according to the current terms and conditions of the respective equipment manufacturer’s warranty.
GENERAL During the warranty period, T-API warrants each Product manufactured by T-API to be free from defects in material and workmanship under normal use and service. Expendable parts are excluded.
If a Product fails to conform to its specifications within the warranty period, Teledyne API shall correct such defect by, at Teledyne API's discretion, repairing or replacing such defective Product or refunding the purchase price of such Product.
The warranties set forth in this section shall be of no force or effect with respect to any Product: (i) that has been altered or subjected to misuse, negligence or accident, or (ii) that has been used in any manner other than in accordance with the instruction provided by Teledyne API or (iii) not properly maintained.
THE WARRANTIES SET FORTH IN THIS SECTION AND THE REMEDIES THEREFORE ARE EXCLUSIVE AND IN LIEU OF ANY IMPLIED WARRANTIES OF MERCHANTABILITY, FITNESS FOR PARTICULAR PURPOSE OR OTHER WARRANTY OF QUALITY, WHETHER EXPRESSED OR IMPLIED. THE REMEDIES SET FORTH IN THIS SECTION ARE THE EXCLUSIVE REMEDIES FOR BREACH OF ANY WARRANTY CONTAINED HEREIN. TELEDYNE API SHALL NOT BE LIABLE FOR ANY INCIDENTAL OR CONSEQUENTIAL DAMAGES ARISING OUT OF OR RELATED TO THIS AGREEMENT OF TELEDYNE API'S PERFORMANCE HEREUNDER, WHETHER FOR BREACH OF WARRANTY OR OTHERWISE.
TERMS AND CONDITIONS All units or components returned to Teledyne API should be properly packed for handling and returned freight prepaid to the nearest designated Service Center. After the repair, the equipment will be returned, freight prepaid.
CAUTION – Avoid Warranty Invalidation
Failure to comply with proper anti-Electro-Static Discharge (ESD) handling and packing instructions and Return Merchandise Authorization (RMA) procedures when returning parts for repair or calibration may void your warranty. For anti-ESD handling and packing instructions please refer to “Packing Components for Return to Teledyne API’s Customer Service” in the Primer on Electro-Static Discharge section of this manual, and for RMA procedures please refer to our Website at http://www.teledyne-api.com under Customer Support > Return Authorization.

06712B (DCN5875) 3-1
3 GETTING STARTED This section provides instructions on the proper installation and power up of the M701H. Refer to Figure 3-1 for the instrument layout and Table 2-1 for the specifications.
3.1 Unpacking
CAUTION TO AVOID PERSONAL INJURY, ALWAYS USE TWO PERSONS TO LIFT AND CARRY THE M701H.
1. Verify that there is no shipping damage. If there are signs of damage, immediately advise the shipper, then Teledyne API.
2. Remove the M701H from its shipping carton. 3. Remove the cover and check for damage inside. 4. Remove the four red shipping screws that secure the compressor base to the
bottom of the chassis. Refer to Figure 5-2 for the location of the screws. 5. Check the line voltage and frequency label on the rear panel to ensure that it
matches the local power source.
3.2 Installation The basic M701H has rubber feet for counter-top use. Optionally, the M701H is supplied with slides and angles for mounting in a standard 19” RETMA rack.
In order to ensure safe operation of the M701H, the following steps must be taken prior to installation:
1. At least 6” (150 mm) clearance at the back for proper fan operation. 2. At least 3” (75 mm) at each side for proper venting. 3. Adequate support for the weight; 55 lb. (25 kg.). 4. Access at the rear for making the pneumatic and electrical connections. 5. Access at the front for occasional scrubber replacement. 6. Operate the M701H with the cover on.

Getting Started Teledyne API M701H High Performance Zero Air Generator
3-2 06712B (DCN5875)
Figure 3-1: Instrument Layout
Teledyne API M701H High Performance Zero Air Generator Getting Started
06712B (DCN5875) 3-3
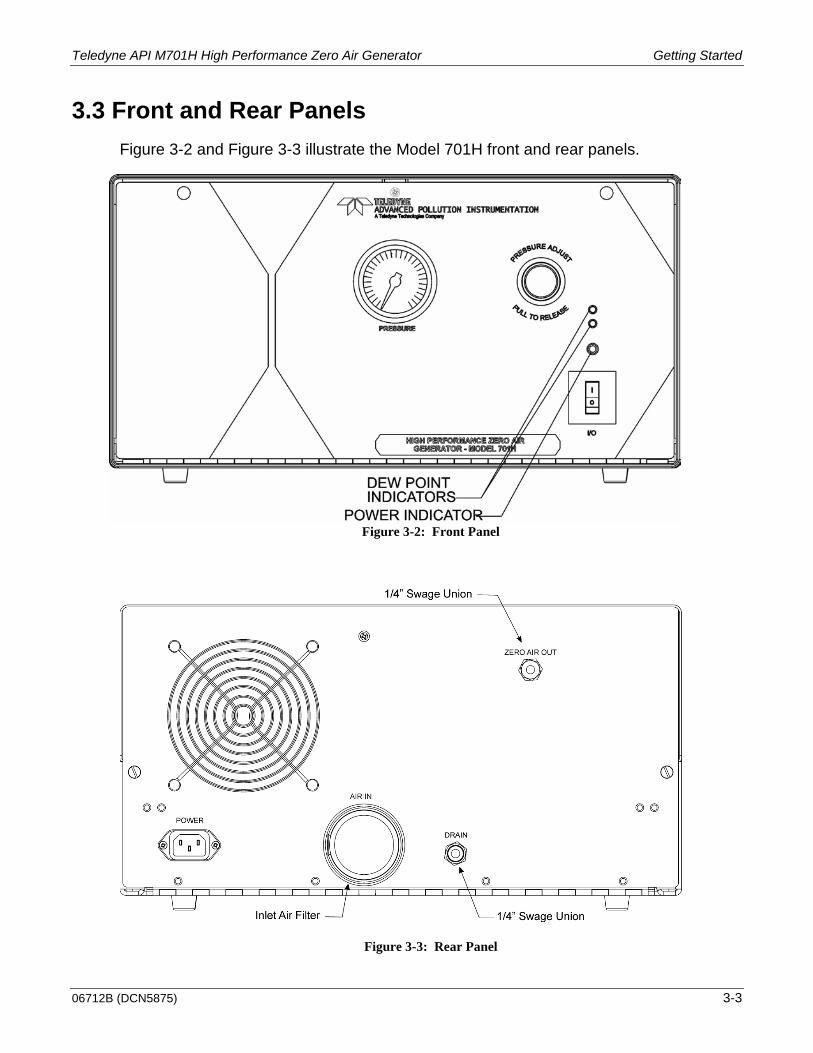
3.3 Front and Rear Panels Figure 3-2 and Figure 3-3 illustrate the Model 701H front and rear panels.
Figure 3-2: Front Panel
Figure 3-3: Rear Panel

Getting Started Teledyne API M701H High Performance Zero Air Generator
3-4 06712B (DCN5875)
3.4 Electrical And Pneumatic Connections All connections, electric and pneumatic, are made at the rear panel (Figure 3-3).
NOTE To maintain compliance with EMC standards, it is required that the cable length be no greater than 3 meters for all I/O connections, which include Analog In, Analog Out, Status Out, Control In, Ethernet/LAN, USB, RS-232, and RS-485.
Make the following pneumatic connections:
1. “AIR IN” (1/4” female pipe thread) a. Screw the inlet filter into the “AIR IN” port. Hand-tight is OK.
NOTE Operation without the filter will cause premature pump wear.
2. “DRAIN” (1/4” swage-type bulkhead union) a. Connect a 1/4” diameter tubing to the water out fitting (refer to Figure 5-2) to
avoid the occasional spurts of water on the instrument rack. Connect the other end of the tubing to a drain or, alternatively, the water can be collected in a tray or bucket and dispersed by normal evaporation.
3. ““ZERO AIR OUT” (1/4” swage-type bulkhead union) a. Connect the AIR OUT port of the M701H to the INLET fitting of the Model 700
Calibrator with clean 1/4” TFE tubing. The pressure in this line will normally be 30 psig, but could be as high as 80 psig –see following cautionary note.
NOTE:
A pressure reading above 35 psig, with the exception of some specials set to 50 psig, is a FAULT condition. Call Technical Support immediately.
b. Keep this line as short as possible to minimize pressure drops. c. POWER. Connect the power cord to the proper power source.
At 115 VAC, 60 Hz, the M701H draws 12.7 Amps upon start-up. At 230 VAC, 50 Hz, the M701H draws 6.5 Amps upon start-up. Refer to Table 2-1 for additional power specifications.

Teledyne API M701H High Performance Zero Air Generator Getting Started
06712B (DCN5875) 3-5
CAUTION ENSURE THAT THE POWER CORD IS PROPERLY GROUNDED .
5. “COOLING FAN”
The rear panel cooling fan draws air IN and requires at least 6” (150 mm) of clearance for proper operation.
3.5 Power-Up 1. Turn on the front panel POWER SWITCH (Figure 3-2). 2. The front panel POWER light should come on. 3. The cooling fan should start immediately. 4. The compressor should start after a few seconds delay. The delay is to allow the
control board to measure the local line frequency. 5. After 30 to 60 seconds, the front panel pressure gauge should read 30 psig. 6. The M701H is now producing clean dry air.
NOTE If the M701H has been unused for several days, it may take 30-60
minutes to achieve final purity and dryness.
NOTE The M701H zero air has A 30 liter/minute output restriction. It must be connected to a Model 700 or similar calibrator, to restrict the zero air
flow for lesser flow rates.
3.6 Shut Down, Storage and Transportation
3.6.1 Compressor Shut Down Remember that the M701H supplies air on demand.
If the application is not requiring zero air, the compressor will increase the pressure in the storage tank until the “cut-out” pressure switch trips and turns off the compressor.
The pressure in the storage tank will slowly subside as air is used by the Regenerative Dryer until the “cut-in” pressure switch turns the compressor on again.

Getting Started Teledyne API M701H High Performance Zero Air Generator
3-6 06712B (DCN5875)
3.6.2 Storage or Transportation Shut Down The following procedure provides instructions on the proper shut down of the M701H if it will not be used for an extended period of time or required to be transported:
1. Turn off the M701H. 2. Wait approximately 1 minute. 3. Turn on the M701H. The water drain valve will switch into the open position and vent
any accumulated water through the water drain. (Standing H20 will cause corrosion) 4. Turn the M701H off.
This shut down process will vent any water that has accumulated in the coalescing filter. It will prevent this water from passing into the M701H in the event that the instrument is inverted during storage or shipment.

06712B (DCN5875) 4-1
4 OPTIONAL HARDWARE AND SOFTWARE This section includes descriptions of the hardware and software options available for the M701H instrument. For assistance with ordering these options please contact the sales department of Teledyne API at:
TOLL-FREE: 800-324-5190 TEL: +1 858-657-9800 FAX: +1 858-657-9816
E-MAIL: [email protected] WEB SITE: http://www.teledyne-api.com/
4.1Carrying Strap/Handle (OPT 29) The chassis allows the user to attach a strap handle for carrying the instrument. The handle is located on the right side and pulls out to accommodate a hand for transport. When pushed in, the handle is nearly flush with the chassis, only protruding out about 9 mm (3/8”).
Figure 4-1: Carrying Strap
Installing the strap handle prevents the use of the rack mount slides, although the rack mount brackets, OPT 21 can still be used.

OPTIONAL HARDWARE AND SOFTWARE Teledyne API M701H High Performance Zero Air Generator
4-2 06712B (DCN5875)
CAUTION GENERAL SAFETY HAZARD
An M701H weighs about 55 lbs (25 kg). To avoid personal injury we recommend that two persons lift and carry
the instrument. Ensure to disconnect all external cables and tubing connected to the
rear panel before moving
4.2 Rack Mount Kits (OPT 20A, OPT 20B & OPT 21) There are several options for mounting the analyzer in standard 19” racks. The slides are three-part extensions, one mounts to the rack, one mounts to the analyzer chassis and the middle part remains on the rack slide when the analyzer is taken out. The analyzer locks into place when fully extended and cannot be pulled out without pushing two buttons, one on each side.
The rack mount brackets for the analyzer require that you have a support structure in your rack to support the weight of the analyzer. The brackets cannot carry the full weight of an analyzer and are meant only to fix the analyzer to the front of a rack, preventing it from sliding out of the rack accidentally.
OPTION NUMBER DESCRIPTION 20A Rack mount brackets with 26 in. chassis slides. 20B Rack mount brackets with 24 in. chassis slides. 21 Rack mount brackets only.
4.3 Expendable Kits (OPT 42A) A one-year supply of replacement particulate filters is available from Teledyne API as Option 42A. Refer to Appendix B for a list of expendables.
4.4 Flow Restriction (13 SLPM) (OPT 72B) A flow restrictor is available in order to ensure a source of dry air. It is connected to the outlet fitting and restricts the air flow to 13 SLPM.

06712B (DCN5875) 5-1
5 OPERATION 5.1 Overview
Refer to Figure 5-1, and Figure 5-2.
The M701H dries and scrubs ambient air to produce zero air.
The compressor draws air in from the rear panel bulkhead union and inlet filter. At the compressor outlet, the air is under pressure and hot from the compression. The relative humidity is high as a result of the high pressure.
The air is conducted through the cooling coil where heat is removed by transfer to the cooling fan air. With the high pressure and the temperature reduced to ambient level, the relative humidity is at its highest. At this point, the air is usually supersaturated.
From the coil, the wet air passes through a coalescing filter where the excess water is separated and settles in the bottom of the filter. The controller periodically opens the solenoid drain valve allowing the water to be expelled through a rear panel bulkhead union (drain).
The partially dried air enters the Regenerative Dryer which removes essentially all the remaining water and a portion of the other contaminants. The pressure relief valve may open occasionally and can be loud but this is a normal part of the operation for the M701H.
The dry air then passes through a check-valve to the storage tank. A pressure switch turns off the compressor when the pressure in the tank reaches a set high value, and turns the compressor on when the pressure reaches a set low value. Thus, when air demand is low, the compressor is turned off and the tank fulfills the demand. The pressure in the tank varies from approximately 45 psig to approximately 80 psig depending on the demand and the restricted output. Some special calibrators with restricted output are set to 50 psig. As the air leaves the tank, its pressure is controlled to 30 psig by an air pressure regulator mounted on the front panel. This maintains a constant pressure at the calibrator inlet and is displayed by the pressure gauge on the M701H front panel.
For a final clean-up, the dry, regulated air enters the specific scrubbers as follows:
1. The Hydrocarbon scrubber where Hydrocarbons and CO are catalytically converted to CO2 and water.

Operation Teledyne API M701H High Performance Zero Air Generator
5-2 06712B (DCN5875)
2. The NO scrubber where NO is oxidized to NO2, then, the activated charcoal scrubber where the NO2 is absorbed. Then the CO scrubber, where CO is catalytically oxidized to CO2.
3. The clean dry air passes through a fine particulate filter and leaves the M701H through the rear panel bulkhead union (Zero Air Out).
When air usage is high (approximately 25-30 LPM), the compressor may run continuously. When air usage is low, the pressure switch turns the compressor off until the storage tank pressure drops to 45 psig, and then turns the compressor on again.
NOTE It is not necessary for the user to turn off the M701H when the air usage is low.

Teledyne API M701H High Performance Zero Air Generator Operation
06712B (DCN5875) 5-3
Figure 5-1: Pneumatic Diagram

Operation Teledyne API M701H High Performance Zero Air Generator
5-4 06712B (DCN5875)
Figure 5-2: Plan View

Teledyne API M701H High Performance Zero Air Generator Operation
06712B (DCN5875) 5-5
5.2 Components This section describes the main components and their functions.
5.2.1Compressor The compressor is a dual-cylinder oscillating piston type driven by a split capacitor AC motor. The compressor is dry; that is, there are no lubricants which can contaminate the compressed air. The pistons are sealed by flexible TFE piston rings, and after a short run-in period to seat the rings, should last for years. There are no diaphragms.
The compressor is mounted on a sub-plate which is supported on four tuned vibration isolators. During shipment, the sub-plate is bolted firmly to the chassis.
CAUTION ENSURE THAT YOU HAVE REMOVED THE SHIPPING SCREWS BEFORE YOU START THE M701H.
5.2.2 Cooling Coil The cooling coil consists of several turns of copper tubing coiled to form a cylinder through which the cooling fan blows outside air.
5.2.3 Water Trap The water trap is a coalescing type. Supersaturated air enters the trap and is rapidly swirled causing the water droplets to deposit on a membrane where the drops coalesce and gather in a puddle at the bottom of the filter bowl.
5.2.4 Water Drain Valve Accumulated water is drained from the filter through a stainless steel solenoid-operated valve. The valve is sequenced by the controller and is open for approximately 2 seconds every 5 minutes.
CAUTION THE WATER/AIR SPRAY LEAVING THE REAR PANEL DRAIN
FITTING SPURTS AT A HIGH VELOCITY AND MUST BE CONDUCTED AWAY FROM ANY SENSITIVE COMPONENTS.
The operation cycle has been preset at the factory and is not adjustable.

Operation Teledyne API M701H High Performance Zero Air Generator
5-6 06712B (DCN5875)
5.2.5 Pressure Relief Valve The pressure relief valve is a safety device designed to limit the maximum pressure to which the M701H can be subjected. It is set to open at 90 psig. This can be quite loud when the valve opens and sounds like steam escaping. This is normal operation and does not mean there is a problem with the unit.
CAUTION DO NOT ADJUST THE RELIEF VALVE.
5.2.6 Regenerative Dryer The Regenerative Dryer consists primarily of two parallel columns of molecular sieve, in which alternately one column is scrubbing the air while the other is being regenerated.
The Regenerative Dryer needs no warm-up and operates at full efficiency as soon as the M701H is turned on. The molecular sieve is not consumed and is good for the life of the instrument.
When the M701H is turned on, a four-way solenoid-operated valve directs high pressure air to one of the two columns and vents the other column to atmosphere. Virtually all the water in the high-pressure air is trapped by the molecular sieve. A portion of the dried air is expanded to atmospheric pressure in the outlet shuttle valve and passes in reverse through the second column. By expanding the air, the volume increases and the relative humidity decreases thus enabling a small amount of dry purge air to evaporate the entrained water in the second column. The wet purge air leaving the column is exhausted inside the M701H. The rapid air movement inside the M701H chassis ensures that the small amount of water involved is safely vented to the atmosphere. The majority of the dry air from the first column is conducted to the storage tank.
The controller toggles the four-way valve every minute and the columns alternate their function. This cycling rate has been selected to provide the optimum balance of scrubbing efficiency and air usage and is not adjustable.
5.2.7 Check Valve The purpose of the check valve is to isolate the air in the storage tank from the components upstream. Thus when the compressor turns off, the air in the storage tank will be retained and not lost through the drier purge air path or back through the compressor.

Teledyne API M701H High Performance Zero Air Generator Operation
06712B (DCN5875) 5-7
5.2.8 Storage Tank The storage tank serves two functions. As its name implies, it stores air so that when the demand is low, the compressor can be turned off to conserve energy, allowing the storage tank to supply the air requirements. The tank also serves as “filter capacitor”, preventing pulses generated by the drier cycles or water drain valve from reaching the output port on the rear panel.
The air in the tank has been dried so there is no need for a tank drain and no concern about internal corrosion.
The tank is a commercial gas storage cylinder, rated at 1800 psi, and is not modified or altered in any way that can harm its integrity.
5.2.9 Pressure Sensor The pressure sensor senses the pressure in the storage tank and controls the compressor through the control board.
It is set at the factory to turn off (cut out) the compressor at 78-82 psig and to turn the compressor on (cut in) at 45-50 psig.
5.2.10 Pressure Regulator The Model 700 calibrator requires that its air source be stable and not subject to compressor-induced pressure surges or pressure variations with flow. The pressure regulator serves this function. It is set at 30 psig at the factory except for specially modified units. Should adjustment be desired, the regulator is accessible on the front panel. The adjustment knob has a push-pull locking ring which should be reengaged after making an adjustment to prevent the knob from turning under vibration.
When the M701H is used with the Teledyne API Model 700E Calibrator, the pressure should be between 28 and 32 psig.
WARNING THE M701H NOMINAL DELIVERY PRESSURE IS 30 PSIG. ONLY SPECIALLY MODIFIED UNITS WILL REQUIRE THAT THE DELIVERY PRESSURE BE SET HIGHER. ON THESE SPECIALLY MODIFIED UNITS NEVER SET THE DELIVERY PRESSURE HIGHER THAN 50 PSIG. TO DO SO MAY CAUSE DAMAGE TO THE M701H AND INJURY TO THE OPERATOR.
Operation Teledyne API M701H High Performance Zero Air Generator
5-8 06712B (DCN5875)
5.2.11 Pressure Gauge The front panel-mounted pressure gauge shows approximately the regulated air pressure available to a calibrator. The gauge will usually indicate 30 psig. If the flow is very low, as in a standby condition, the gauge may read slightly higher. It will move to the correct reading when the air flow is increased. When the demand on air increases dramatically, the pressure may drop below 30 psig. At maximum air flow, 30 SLPM, you may notice that the pressure drops to 29 psig for a standard operation.
5.2.12 Hydrocarbon Scrubber The High Purity Hydrocarbon Scrubber includes the CO Scrubber.
The optional Hydrocarbon scrubber catalytically converts hydrocarbons to carbon dioxide and water. The scrubber consists of a cylindrical cartridge which contains a preheat chamber and the pelletized precious-metal catalyst. The canister is heated by a band heater with an integral type-K thermocouple and is housed in a stainless steel casing with appropriate thermal insulation. The cartridge temperature is controlled by the instruments printed circuit assembly. The controller reads the thermocouple voltage, compensates for cold-junction temperature and modulates the heater to maintain a constant cartridge temperature. (Refer to Appendix B, P/N )
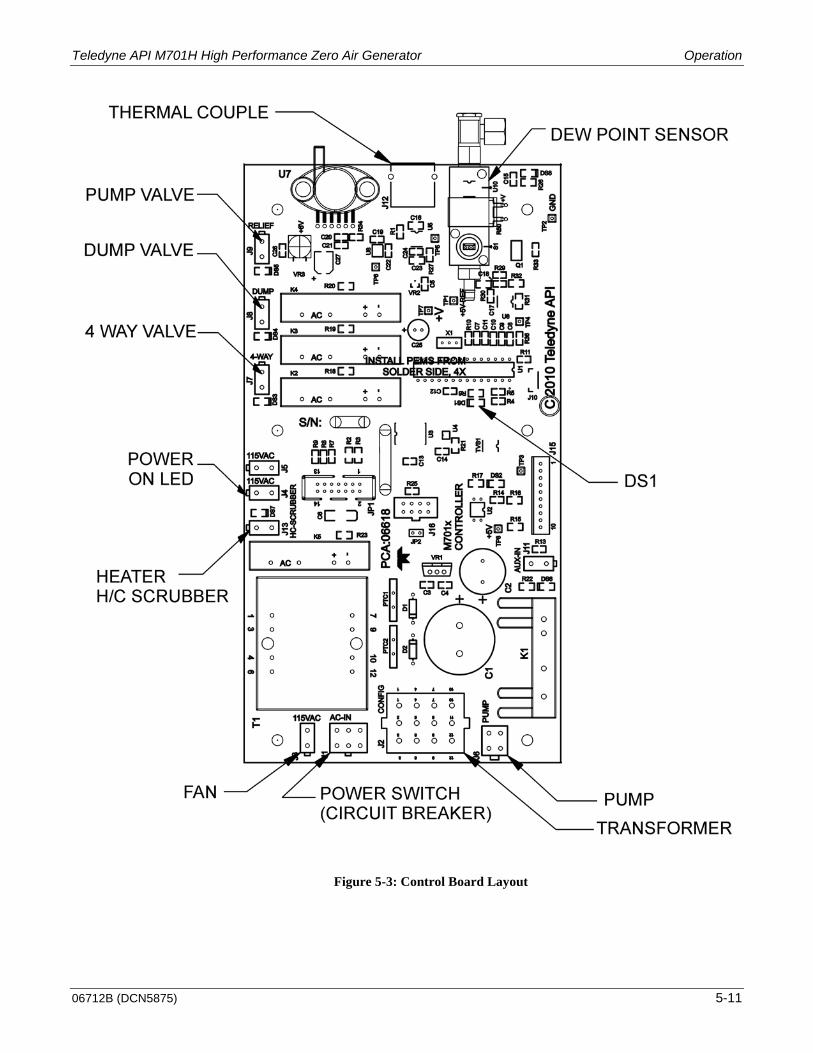
The operating temperature of the cartridge is 300ºC. The temperature can be verified by measuring the thermocouple voltage at the two terminal blocks of J12 (labeled “Thermal Couple” in Figure 5-3). At 300ºC, the thermocouple voltage is 11.2 mV in an ambient temperature of 25ºC (11.4 mV at 20º and 11.0 mV at 30º). While the controller compensates for cold-junction temperature in controlling the heater, the thermocouple voltage at the terminal block is not compensated, so allowance must be made for ambient temperature when converting the voltage to cartridge temperature.
CAUTION THE AIR LEAVING THE SCRUBBER IS AT 300°C (575°F). THE AIR IS COOLED IN THE COPPER COIL AND CASINGEXIT TUBING BEFORE IT ENTERS THE NO SCRUBBER. THIS COPPER COIL AND THE CASING CAN BE VERY HOT.
The catalyst is proprietary. It theoretically should never need changing. However, it may become contaminated or poisoned over time so we recommend that the scrubber be replaced once per year or sooner.

Teledyne API M701H High Performance Zero Air Generator Operation
06712B (DCN5875) 5-9
5.2.13 CO Scrubber The CO scrubber catalytically oxidizes CO to CO2. The catalyst is proprietary and operates at room temperature; theoretically, it should never need changing. However, it may become contaminated or poisoned over time so we recommend that it be replaced once per year or sooner if the level of CO in the air is high.
5.2.14 NO Scrubber The NO scrubber uses Purafil® to oxidize NO to NO2. Purafil® has a finite life and we recommend that it be replaced annually or sooner if the level of NO in the air is high.
5.2.15 Charcoal Scrubber Activated charcoal removes NO2, O3, SO2 and H2S. The charcoal should be replaced annually or sooner if there are high atmospheric levels of these contaminants, or if the calibrator zero air shows signs of a positive drift.
5.2.16 Final Filter The final filter, inside the rear panel retains any particulates released by the M701H. The filter rating is 10 microns. If the filter becomes restricted, it should be disassembled and cleaned, or the element be replaced.
5.2.17 Controller
WARNING DANGEROUS VOLTAGES EXIST ON THE CONTROLLER BOARD EVEN WHEN THE POWER SWITCH IS TURNED OFF.
All functions of the M701H are managed by the M701H Control PCB. The M701H Control PCB provides connections for all switched and non-switched AC components, AC input, and the front panel power switch/circuit breaker. Non-switched components include the CO or HC scrubber, fan and front panel power indicator. Switched components include the Regenerative Dryer valve, water drain valve, and the pump. Additionally, the tank pressure switch is connected to the PCB. Provision for 120v/240v AC power is via a jumper plug/autotransformer connector (J2). All connections are made by quick release electrical connectors to aid in servicing. Refer to Figure 5-3 for the layout and to Appendix B for the interconnect and other drawings.
The M701H Control PCB is microcontroller based, and all timing is derived from the AC line. It automatically senses the line frequency (50/60 Hz) and provides the following functions:

Operation Teledyne API M701H High Performance Zero Air Generator
5-10 06712B (DCN5875)
• Cycles the four-way valve of the Regenerative Dryer at 1 minute intervals. • Cycles the water drain solenoid valve at 5 minute intervals. • Starts and stops the compressor in response to the pressure sensor. This function
includes cycling the Regenerative Dryer four-way valve and momentarily opening the water drain solenoid valve before starting the compressor. This momentarily reduces the pressure at the compressor outlet to facilitate compressor starting.
LED DS1 (Figure 5-3) flashes at 1 second intervals as an indication that the controller is functioning, and a watchdog timer is enabled to prevent any power line disturbances from halting the processor.
Teledyne API M701H High Performance Zero Air Generator Operation
06712B (DCN5875) 5-11
Figure 5-3: Control Board Layout

Operation Teledyne API M701H High Performance Zero Air Generator
5-12 06712B (DCN5875)
5.2.18 Dew Point Sensor The dew point sensor ensures that the Regenerative Dryer maintains a dew point less than -40°C (up to 30 SLPM flow rate). This will increase the life of the chemical scrubbers. When the dew point rises above -16°C, the green LED (dew point indicator) on the front panel will light.
06712B (DCN5875) 6-1
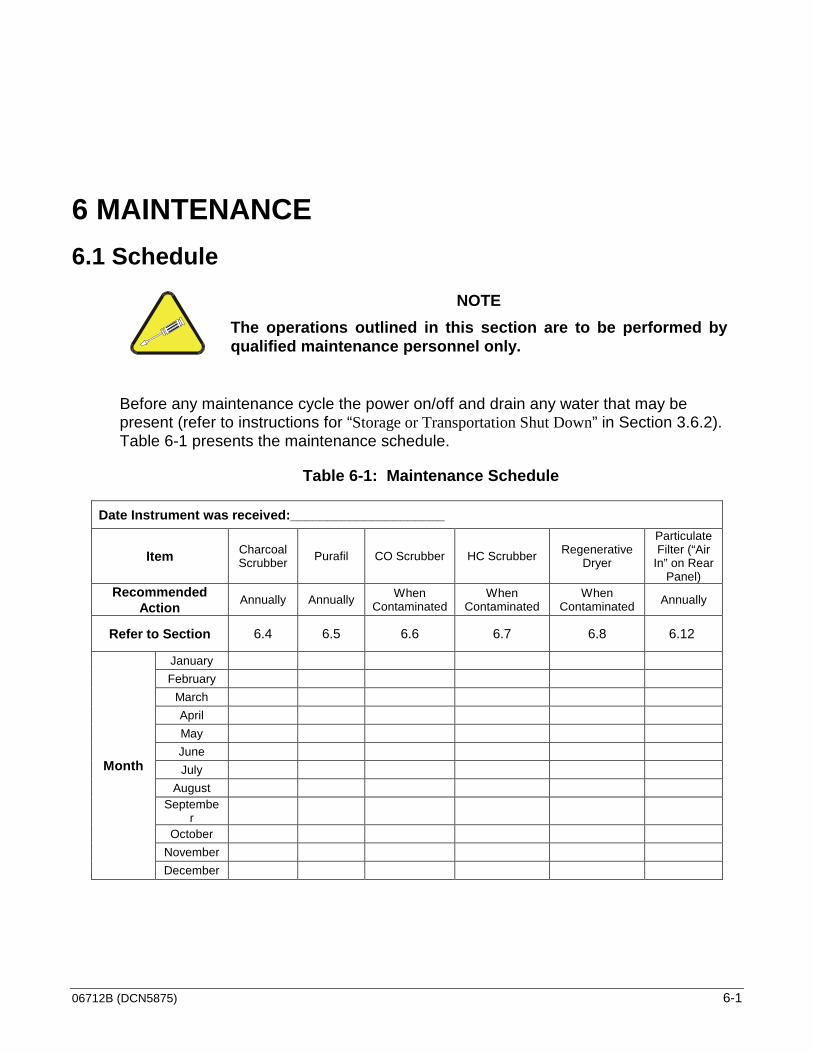
6 MAINTENANCE 6.1 Schedule
NOTE The operations outlined in this section are to be performed by qualified maintenance personnel only.
Before any maintenance cycle the power on/off and drain any water that may be present (refer to instructions for “Storage or Transportation Shut Down” in Section 3.6.2). Table 6-1 presents the maintenance schedule.
Table 6-1: Maintenance Schedule
Date Instrument was received:_____________________
Item Charcoal Scrubber Purafil CO Scrubber HC Scrubber Regenerative
Dryer
Particulate Filter (“Air
In” on Rear Panel)
Recommended Action Annually Annually When
Contaminated When
Contaminated When
Contaminated Annually
Refer to Section 6.4 6.5 6.6 6.7 6.8 6.12
Month
January February
March April May June July
August Septembe
r October
November December
MAINTENANCE Teledyne API M701H High Performance Zero Air Generator
6-2 06712B (DCN5875)
6.2 Cleaning 1. Occasionally, depending upon the local conditions, check the inside of the M701H
for excessive dirt or dust. 2. Particularly, check the cooling fan, cooling coil and compressor fan inlet. 3. Remove any dirt or dust with a vacuum cleaner.
Do not use an air jet. This will only redistribute the dirt and will not remove it.
WARNING THERE ARE HIGH VOLTAGES PRESENT WHILE THE M701H IS PLUGGED IN.
6.3 Checking The Tubing 1. Under the vibration of the compressor, it is possible for some parts of the TFE
tubing to abrade against nearby objects. This is most likely to occur with the tubing directly attached to the compressor.
2. Check to see if any signs of abrasion are present, and, if so, re-dress the tubing. 3. If any section of tubing appears to be heavily abraded, remove and replace it.
CAUTION Do not loosen any tubing connection while the M701H is running.
CAUTION BEFORE WORKING ON THE M701H PLUMBING TURN OFF THE M701H, WAIT FOR THE PRESSURE GAUGE TO READ ZERO. (THIS MAY REQUIRE THAT YOU LOOSEN THE REAR PANEL BULKHEAD UNION TO ALLOW THE AIR TO BLEED AWAY.)
WARNING EVEN THOUGH THE FRONT PANEL POWER SWITCH IS OFF, THERE IS LINE VOLTAGE PRESENT AT THE POWER ENTRY TERMINALS, POWER SWITCH TERMINALS AND ON THE CONTROL BOARD. FOR ADDED SAFETY, REMOVE THE POWER CORD FROM THE REAR PANEL RECEPTACLE.
Teledyne API M701H High Performance Zero Air Generator MAINTENANCE
06712B (DCN5875) 6-3
6.4 Replacing The Charcoal Scrubber 1. Turn off the M701H and wait for the pressure to go to zero. 2. Open the front panel, or remove the top cover. 3. Remove the 1/4” tubing connected to the top of the scrubber canister. 4. Undo the Velcro strap freeing the cannister. 5. Remove the 1/4” tubing connected to the bottom of the canister. 6. Unscrew the cap of the canister. 7. Pull out the pad from the top of the canister. 8. Pour out the charcoal and dispose of it properly. 9. There may be a little dust as you pour the charcoal out so you may want to wear a
dust mask. 10. Refill the canister with fresh charcoal, up to 3/8” to 1/4” from the top. Rap the sides
of the canister gently to settle the charcoal and add more as necessary. 11. Replace the pad on top of the charcoal. 12. Wipe any charcoal dust from the top edge of the canister. This is the surface which
seals against the washer. 13. Check that the washer is in place in the cap. 14. Replace the cap and tighten it “hand-tight”. 15. Reconnect the lower 1/4” tube connection. 16. Replace the canister and attach using the Velcro strap. 17. Replace the upper 1/4” tube connection. 18. After the compressor is turned on, it may be wise to check the scrubber for leaks
using a commercial soap solution leak finder.
6.5 Replacing The NO - NO2 Scrubber This procedure is identical to the charcoal scrubber replacement procedure except that the canister should be refilled with Purafil.
NOTE After replacing the material in these scrubbers it can take up to 48 hours for the material to dry out before the M701H is functioning optimally.

MAINTENANCE Teledyne API M701H High Performance Zero Air Generator
6-4 06712B (DCN5875)
6.6 Replacing The CO Scrubber The CO scrubber is attached to the HC scrubber housing. This is not a heated scrubber. It is secured with four screws through the body of the scrubber into the bracket.
1. Turn off power and unplug the M701H. 2. Remove the four screws to remove the scrubber.
CAUTION
THE SCRUBBER WILL BE HOT.
3. With a 9/16” wrench, remove the two unions from the top of the scrubber cartridge. 4. Pick out the retaining screens. 5. Shake out the catalyst beads and dispose. No special disposal methods required. 6. Pour in new catalyst to 1/2” from the top of the bores. Tap the cartridge sides gently
to settle the beads and top up to the 1/2” level. 7. Replace the retainer screens. 8. Replace the TFE tape on the two unions and replace the unions in the cartridge. 9. Reassemble the scrubber, replace it in the chassis and reconnect the tubing and
receptacle. 10. Turn on the M701H and leak check using soap solution.

Teledyne API M701H High Performance Zero Air Generator MAINTENANCE
06712B (DCN5875) 6-5
6.7 Replacing The Hydrocarbon (HC) Scrubber 1. Turn off power and unplug the M701H power cord. 2. Disconnect the HC scrubber power at the Controller. 3. Unplug the thermocouple from the control board. 4. Remove the heat shield from the HC scrubber. 5. Disconnect the pneumatic connections at the CHARCOAL SCRUBBER INLET AND
AT THE REAR END OF THE COPPER COOLING COIL, using 1/2″ and 9/16″ wrenches.
CAUTION WAIT FOR THE SCRUBBER TO COOL. THE SCRUBBER CASING AND THE COPPER COOLING COIL WILL BE VERY HOT.
5. Remove the four screws holding the scrubber, under the chassis. 6. Lift out the scrubber. 7. Install a new Teledyne API-supplied scrubber (these are purged at the factory). 8. Screw it down. 9. Attach and tighten the pneumatic connections.
CAUTION ENSURE THAT THE COPPER COOLING COIL IS NOT TOUCHING ANY WIRE OR CABLE.
10. Plug the scrubber into the control board.
CAUTION BE SURE THAT YOU USE A TELEDYNE API-SUPPLIED, PURGED
SCRUBBER. OTHERWISE, DOWNSTREAM COMPONENTS MAY BE DAMAGED. AN UNPURGED HYDROCARBON SCRUBBER
PRODUCES A LOT OF WATER WHEN FIRST TURNED ON.
11. Plug the thermocouple into the control board. 12. Turn on the M701H. 13. Connect a millivolt meter to J12 (labeled “Thermal Couple” in Figure 5-3) on the
temperature controller.

MAINTENANCE Teledyne API M701H High Performance Zero Air Generator
6-6 06712B (DCN5875)
Observe that the LED starts blinking at 11.2 mV (300ºC) and that the thermocouple voltage holds steady.
14. When all traces of water have disappeared from the M701H output, the output may be reconnected to the analyzers.
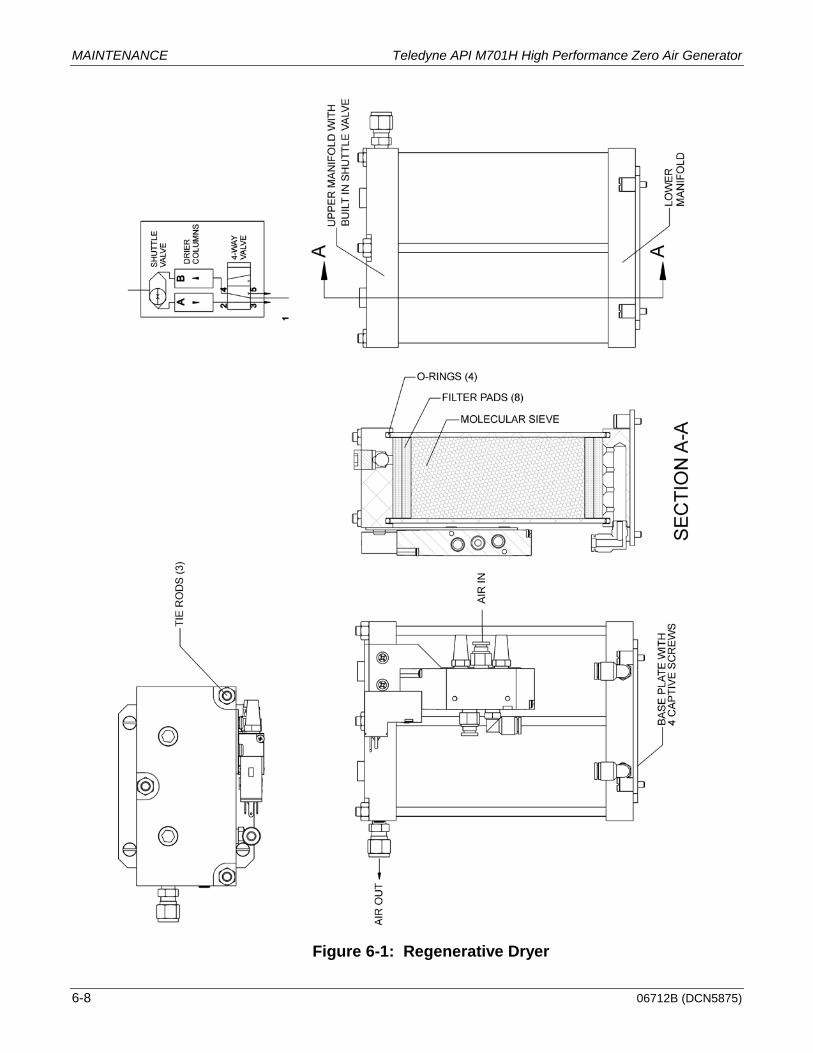
6.8 Servicing The Regenerative Dryer It is unlikely that the Regenerative Dryer should ever need service. Should the molecular sieve become contaminated by oil or other external contaminants, the scrubber will need to be cleaned and recharged. Refer to Figure 6-1.
1. Turn off and unplug the M701H, plug in and turn on again and remove any water in bowl.
2. Allow the pressure to bleed to zero. 3. Remove the two pneumatic connections and the electrical connection from the 4-
way manifold. 4. Remove the dryer from the chassis by undoing the four captive screws in the
scrubber base. 5. Remove the 4-way valve bracket from the upper manifold and let the valve hang
loose attached to the lower manifold. 6. Remove the three nuts on top of the upper manifold. 7. Remove the upper manifold. 8. Remove the two columns. 9. Remove the retainer pads from the two columns and dump the molecular sieve into
a suitable waste receptacle. (The molecular sieve is not toxic but it may be dusty so you may want to wear a mask.)
10. Wipe out the inside of the columns with a clean dry rag. 11. Examine the surface and ports in the upper and lower manifolds. If there is an
accumulation of dirt or corrosion, disassemble the manifolds and clean them. If not, proceed with step 12.
12. Place two new clean retainer pads in one end of each column. Push the pads 1/8” into the column.
13. Pour new clean molecular sieve into each column, up to 1/4” from the top. Rap the side gently, (with a screw-driver handle, for instance) to settle the molecular sieve, and then top up to the 1/4” mark again.
14. Place two new clean retainer pads on top of the molecular sieve. Push the pad 1/8” into the column.
15. Change the four o-rings in the circular grooves in the upper and lower manifolds.

Teledyne API M701H High Performance Zero Air Generator MAINTENANCE
06712B (DCN5875) 6-7
16. Place the bottom of the columns with two pads in the circular grooves in the lower manifold. Ensure that they are in the grooves and not caught up on the edge.
17. Wipe the ends of the columns. These are the surfaces which seal against the o-rings.
18. Place the upper manifold on top of the two columns. Ensure that the columns are in the grooves. (Wiggle the columns sideways to ensure that the columns are trapped in the grooves.)
19. Replace the nuts and lock-washers on the three tie rods BUT DO NOT TIGHTEN THEM.
20. Push down hard in the center of the upper manifold with one hand and finger-tighten the nuts until you feel a soft resistance.
21. With a wrench, tighten each nut in turn, 1/2 turn at a time. This will ensure that all the nuts are tightened evenly. If the nuts are tightened unevenly, the column o-rings may not seal and you may cause damage to the sealing surfaces.
22. Examine the fit of the columns in the manifold groove one more time. 23. Re-attach the 4-way valve bracket. 24. Replace the scrubber in the M701H chassis and tighten the four captive screws. 25. Reconnect the two pneumatic fittings and the valve power cord. 26. Plug in and turn on the M701H. 27. Using soap solution, check the dryer for leaks. If no leaks are detected, the M701H is ready for operation.
MAINTENANCE Teledyne API M701H High Performance Zero Air Generator
6-8 06712B (DCN5875)
Figure 6-1: Regenerative Dryer
Teledyne API M701H High Performance Zero Air Generator MAINTENANCE
06712B (DCN5875) 6-9
6.9 Changing The 4-Way Valve (in the Regenerative Dryer)
1. Remove the Regenerative Dryer from the chassis as described in Section 6.8 above.
2. Disconnect the two tubing connections and the electrical connection to the 4-way valve.
3. Remove the 4-way valve bracket from the regenerative upper manifold. 4. Remove the 4-way valve from the bracket. 5. Attach a new valve, complete with tube fittings and muffler(s). 6. Attach the bracket to the upper manifold. 7. Connect the electric cable and two pneumatic fittings. 8. Re-install the scrubber in the M701H chassis and tighten the four captive base
screws.
6.10 Replacing The Shuttle Valve (in the Regenerative Dryer)
It is not necessary to remove the Regenerative Dryer from the M701H chassis.
The Shuttle Valve is integral to upper manifold assembly. To replace the Shuttle Valve replace the upper manifold assembly (P/N 06695). Refer to Section 6.8 steps 1,2,3,5, 6, 7, & 18 through 23.
6.11 Leak Check
.
WARNING ENSURE TO UNPLUG THE POWER CORD PRIOR TO PERFORMING ANY LEAK CHECK PROCEDURE
1. Power off the unit and unplug the power cord. 2. Cap the exhaust on the rear panel and the regen dryer. 3. Disconnect the line from the T-connector threaded into the outlet filter to the dew
point sensor, and cap that fitting as well. 4. Plug in the power cord, power on the unit, and allow it to run until the pump shuts off
on its own (now it’s pressurized).

MAINTENANCE Teledyne API M701H High Performance Zero Air Generator
6-10 06712B (DCN5875)
5. Turn off the power switch and wait five minutes. The reading on the front panel pressure gauge should not change.
NOTE This procedure checks the majority of the components and
fittings. If you believe that there is still a leak, please contact Technical Support at +1 858 657-9800.
6.12 Particulate Filter Element Replacement Replace the particulate filter located at the “Air In” inlet on the rear panel (refer to Figure 5-2) as follows:
1. Remove the particulate filter (Teledyne API, P/N FL15) cap by turning it counter-clockwise.
2. Remove the old filter element and replace with a new filter element (Teledyne API P/N FL16).
3. Replace the particulate filter cap and turn it clockwise to secure in place.

06712B (DCN5875) 7-1
7 TROUBLESHOOTING This section presents possible problems and their causes and solutions.
Table 7-1: Troubleshooting
Problem Probable Cause Corrective Action
Power light does not come on.
Unplugged power cord. Plug in power cord at both ends.
Incorrect line voltage. Refer to Table 3-1 for the correct line voltage.
Tripped power switch/circuit breaker.
Untrip power switch/circuit breaker.
VDC power supply failed. Replace power supply.
Compressor does not start (after 10 seconds).
Tank pressure is above the cut-out pressure.
No action. Pressure will drop as air is used.
AIR IN filter is plugged. Replace the filter.
Compressor fan is jammed. Check for any mechanical obstruction.
Pump is not connected to controller.
Connect the pump to the controller.
Pressure switch is not connected.
Connect the pressure switch.
Pump relay (K4) is open. Replace the controller.
Compressor stops and does not restart.
Pressure in the tank has not subsided to the pressure switch cut-in setting.
No action. Wait for the pressure to subside.
Compressor does not stop when the demand is low (less than 5 LPM).
Internal leak. Check for leaks. Refer to Section 6.11.
Pump has low output pressure.
Rebuild pump.
Instrument vibrates excessively.
Shipping screws have not been completely removed.
Ensure the screws are completely removed.
Compressor shock isolator screws are loose.
Tighten the screws.

TROUBLESHOOTING Teledyne API M701H High Performance Zero Air Generator
7-2 06712B (DCN5875)
Problem Probable Cause Corrective Action
Instrument vibrates excessively. (continued)
Screws securing the compressor to the base plate are loose.
Tighten the screws.
The tubing attached to the compressor is vibrating against a component.
Adjust the placement of the tubing.
Pressure does not increase to 30 psig.
Air demand to too high. Maximum air flow is 30 SLPM.
No action. Pressure will drop as air is used.
Air Inlet impeded. Check for impediment and remove object.
Pressure regulator is set too low.
Adjust the pressure on the front panel.
Air leakage. Check for leaks. Refer to Section 6.11.
Output pressure surges. Pressure regulator is set too high and pegged.
(Please see Note at end of this table).
Output air is not “Zero”. Scrubbers may be contaminated.
Replace the scrubbers.
Output air is not dry.
4-way valve is jammed; only one column is being used.
Check to ensure the valve is plugged in; replace the valve.
Shuttle valve is jammed. Replace the upper manifold assembly.
Molecular sieve is contaminated.
Replace the molecular sieve.
Note:
WARNING THE M701H NOMINAL DELIVERY PRESSURE IS 30 PSIG. SOME APPLICATIONS MAY REQUIRE THAT THE DELIVERY PRESSURE BE SET AS HIGH AS 50 PSIG. NEVER SET THE DELIVERY PRESSURE HIGHER THAN 50 PSIG. TO DO SO MAY CAUSE DAMAGE TO THE M701H AND INJURY TO THE OPERATOR.

Teledyne API M701H High Performance Zero Air Generator A Primer on Electro-Static Discharge
06712B (DCN5875) 8-1
8 A PRIMER ON ELECTRO-STATIC DISCHARGE Teledyne API considers the prevention of damage caused by the discharge of static electricity to be extremely important part of making sure that your analyzer continues to provide reliable service for a long time. This section describes how static electricity occurs, why it is so dangerous to electronic components and assemblies as well as how to prevent that damage from occurring.
8.1 How Static Charges are Created Modern electronic devices such as the types used in the various electronic assemblies of your analyzer, are very small, require very little power and operate very quickly. Unfortunately, the same characteristics that allow them to do these things also make them very susceptible to damage from the discharge of static electricity. Controlling electrostatic discharge begins with understanding how electro-static charges occur in the first place.
Static electricity is the result of something called triboelectric charging which happens whenever the atoms of the surface layers of two materials rub against each other. As the atoms of the two surfaces move together and separate, some electrons from one surface are retained by the other.
+
+
Materials Makes
Contact
PROTONS = 3 ELECTRONS = 3
NET CHARGE = 0
PROTONS = 3 ELECTRONS = 3
NET CHARGE = 0
Materials Separate
+
PROTONS = 3 ELECTRONS = 2
NET CHARGE = -1
+
PROTONS = 3 ELECTRONS = 4
NET CHARGE = +1
Figure 8-1: Triboelectric Charging
If one of the surfaces is a poor conductor or even a good conductor that is not grounded, the resulting positive or negative charge cannot bleed off and becomes trapped in place, or static. The most common example of triboelectric charging happens when someone wearing leather or rubber soled shoes walks across a nylon carpet or linoleum tiled floor. With each step, electrons change places and the resulting electro-static charge builds up, quickly reaching significant levels. Pushing an epoxy printed circuit board across a workbench, using a plastic handled screwdriver or even the constant jostling of StyrofoamTM pellets during shipment can also build hefty static charges

A Primer on Electro-Static Discharge Teledyne API M701H High Performance Zero Air Generator
8-2 06712B (DCN5875)
Table 8-1 : Static Generation Voltages for Typical Activities
MEANS OF GENERATION 65-90% RH 10-25% RH Walking across nylon carpet 1,500V 35,000V
Walking across vinyl tile 250V 12,000V
Worker at bench 100V 6,000V
Poly bag picked up from bench 1,200V 20,000V
Moving around in a chair padded with urethane foam 1,500V 18,000V
8.2 How Electro-Static Charges Cause Damage Damage to components occurs when these static charges come into contact with an electronic device. Current flows as the charge moves along the conductive circuitry of the device and the typically very high voltage levels of the charge overheat the delicate traces of the integrated circuits, melting them or even vaporizing parts of them. When examined by microscope the damage caused by electro-static discharge looks a lot like tiny bomb craters littered across the landscape of the component’s circuitry.
A quick comparison of the values inTable 8-1 with the those shown in Table 8-2, listing device susceptibility levels, shows why Semiconductor Reliability News estimates that approximately 60% of device failures are the result of damage due to electro-static discharge.
Table 8-2. Sensitivity of Electronic Devices to Damage by ESD
DEVICE
DAMAGE SUSCEPTIBILITY VOLTAGE RANGE
DAMAGE BEGINS OCCURRING AT
CATASTROPHIC DAMAGE AT
MOSFET 10 100
VMOS 30 1800
NMOS 60 100
GaAsFET 60 2000
EPROM 100 100
JFET 140 7000
SAW 150 500
Op-AMP 190 2500
CMOS 200 3000
Schottky Diodes 300 2500
Film Resistors 300 3000
This Film Resistors 300 7000
ECL 500 500
SCR 500 1000
Schottky TTL 500 2500

Teledyne API M701H High Performance Zero Air Generator A Primer on Electro-Static Discharge
06712B (DCN5875) 8-3
Potentially damaging electro-static discharges can occur:
• Any time a charged surface (including the human body) discharges to a device. Even simple contact of a finger to the leads of a sensitive device or assembly can allow enough discharge to cause damage. A similar discharge can occur from a charged conductive object, such as a metallic tool or fixture.
• When static charges accumulated on a sensitive device discharges from the device to another surface such as packaging materials, work surfaces, machine surfaces or other device. In some cases, charged device discharges can be the most destructive.
A typical example of this is the simple act of installing an electronic assembly into the connector or wiring harness of the equipment in which it is to function. If the assembly is carrying a static charge, as it is connected to ground a discharge will occur.
• Whenever a sensitive device is moved into the field of an existing electro-static field, a charge may be induced on the device in effect discharging the field onto the device. If the device is then momentarily grounded while within the electrostatic field or removed from the region of the electrostatic field and grounded somewhere else, a second discharge will occur as the charge is transferred from the device to ground.
8.3 Common Myths About ESD Damage
• I didn’t feel a shock so there was no electro-static discharge: The human nervous system isn’t able to feel a static discharge of less than 3500 volts. Most devices are damaged by discharge levels much lower than that.
• I didn’t touch it so there was no electro-static discharge: Electro-static charges are fields whose lines of force can extend several inches or sometimes even feet away from the surface bearing the charge.
• It still works so there was no damage: Sometimes the damaged caused by electro-static discharge can completely sever a circuit trace causing the device to fail immediately. More likely, the trace will be only partially occluded by the damage causing degraded performance of the device or worse, weakening the trace. This weakened circuit may seem to function fine for a short time, but even the very low voltage and current levels of the device’s normal operating levels will eat away at the defect over time causing the device to fail well before its designed lifetime is reached.
These latent failures are often the most costly since the failure of the equipment in which the damaged device is installed causes down time, lost data, lost productivity, as well as possible failure and damage to other pieces of equipment or property.
• Static Charges can’t build up on a conductive surface: There are two errors in this statement. Conductive devices can build static charges if they are not grounded. The charge will be equalized across the entire device, but without access to earth ground, they are still trapped and can still build to high enough levels to cause damage when they are discharged.

A Primer on Electro-Static Discharge Teledyne API M701H High Performance Zero Air Generator
8-4 06712B (DCN5875)
A charge can be induced onto the conductive surface and/or discharge triggered in the presence of a charged field such as a large static charge clinging to the surface of a nylon jacket of someone walking up to a workbench.
• As long as my analyzer is properly installed, it is safe from damage caused by static discharges: It is true that when properly installed the chassis ground of your analyzer is tied to earth ground and its electronic components are prevented from building static electric charges themselves. This does not prevent discharges from static fields built up on other things, like you and your clothing, from discharging through the instrument and damaging it.
8.4 Basic Principles of Static Control It is impossible to stop the creation of instantaneous static electric charges. It is not, however difficult to prevent those charges from building to dangerous levels or prevent damage due to electro-static discharge from occurring.
8.4.1 General Rules Only handle or work on all electronic assemblies at a properly set up ESD station. Setting up an ESD safe workstation need not be complicated. A protective mat properly tied to ground and a wrist strap are all that is needed to create a basic anti-ESD workstation (refer to figure 12-2).
Wrist Strap Protective Mat
Ground Point
Figure 8-2: Basic Anti-ESD Work Station
For technicians that work in the field, special lightweight and portable anti-ESD kits are available from most suppliers of ESD protection gear. These include everything needed to create a temporary anti-ESD work area anywhere.
• Always wear an Anti-ESD wrist strap when working on the electronic assemblies of your analyzer. An anti-ESD wrist strap keeps the person wearing it at or near the same potential as other grounded objects in the work area and allows static charges to dissipate before they can build to dangerous levels. Anti-ESD wrist straps terminated with alligator clips are available for use in work areas where there is no available grounded plug.
Also, anti-ESD wrist straps include a current limiting resistor (usually around one meg-ohm) that protects you should you accidentally short yourself to the instrument’s power supply.

Teledyne API M701H High Performance Zero Air Generator A Primer on Electro-Static Discharge
06712B (DCN5875) 8-5
• Simply touching a grounded piece of metal is insufficient. While this may temporarily bleed off static charges present at the time, once you stop touching the grounded metal new static charges will immediately begin to re-build. In some conditions, a charge large enough to damage a component can rebuild in just a few seconds.
• Always store sensitive components and assemblies in anti-ESD storage bags or bins: Even when you are not working on them, store all devices and assemblies in a closed anti-Static bag or bin. This will prevent induced charges from building up on the device or assembly and nearby static fields from discharging through it.
• Use metallic anti-ESD bags for storing and shipping ESD sensitive components and assemblies rather than pink-poly bags. The famous, “pink-poly” bags are made of a plastic that is impregnated with a liquid (similar to liquid laundry detergent) which very slowly sweats onto the surface of the plastic creating a slightly conductive layer over the surface of the bag.
While this layer may equalizes any charges that occur across the whole bag, it does not prevent the build up of static charges. If laying on a conductive, grounded surface, these bags will allow charges to bleed away but the very charges that build up on the surface of the bag itself can be transferred through the bag by induction onto the circuits of your ESD sensitive device. Also, the liquid impregnating the plastic is eventually used up after which the bag is as useless for preventing damage from ESD as any ordinary plastic bag.
Anti-Static bags made of plastic impregnated with metal (usually silvery in color) provide all of the charge equalizing abilities of the pink-poly bags but also, when properly sealed, create a Faraday cage that completely isolates the contents from discharges and the inductive transfer of static charges.
Storage bins made of plastic impregnated with carbon (usually black in color) are also excellent at dissipating static charges and isolating their contents from field effects and discharges.
• Never use ordinary plastic adhesive tape near an ESD sensitive device or to close an anti-ESD bag. The act of pulling a piece of standard plastic adhesive tape, such as Scotch® tape, from its roll will generate a static charge of several thousand or even tens of thousands of volts on the tape itself and an associated field effect that can discharge through or be induced upon items up to a foot away.
8.5 Basic anti-ESD Procedures for Analyzer Repair and Maintenance
8.5.1 Working at the Instrument Rack When working on the analyzer while it is in the instrument rack and plugged into a properly grounded power supply.
1. Attach your anti-ESD wrist strap to ground before doing anything else. • Use a wrist strap terminated with an alligator clip and attach it to a bare metal portion of the
instrument chassis. This will safely connect you to the same ground level to which the instrument and all of its components are connected.
A Primer on Electro-Static Discharge Teledyne API M701H High Performance Zero Air Generator
8-6 06712B (DCN5875)
2. Pause for a second or two to allow any static charges to bleed away.
3. Open the casing of the analyzer and begin work. Up to this point, the closed metal casing of your analyzer has isolated the components and assemblies inside from any conducted or induced static charges.
4. If you must remove a component from the instrument, do not lay it down on a non-ESD preventative surface where static charges may lie in wait.
5. Only disconnect your wrist strap after you have finished work and closed the case of the analyzer.
8.5.2 Working at an Anti-ESD Work Bench When working on an instrument of an electronic assembly while it is resting on an anti-ESD work bench:
1. Plug your anti-ESD wrist strap into the grounded receptacle of the work station before touching any items on the work station and while standing at least a foot or so away. This will allow any charges you are carrying to bleed away through the ground connection of the workstation and prevent discharges due to field effects and induction from occurring.
2. Pause for a second or two to allow any static charges to bleed away. 3. Only open any anti-ESD storage bins or bags containing sensitive devices or assemblies after you
have plugged your wrist strap into the workstation. • Lay the bag or bin on the workbench surface. • Before opening the container, wait several seconds for any static charges on the outside surface
of the container to be bled away by the workstation’s grounded protective mat. 4. Do not pick up tools that may be carrying static charges while also touching or holding an ESD
Sensitive Device. • Only lay tools or ESD-sensitive devices and assemblies on the conductive surface of your
workstation. Never lay them down on any non-ESD preventative surface. 5. Place any static sensitive devices or assemblies in anti-static storage bags or bins and close the bag
or bin before unplugging your wrist strap. 6. Disconnecting your wrist strap is always the last action taken before leaving the workbench.
8.5.3 Transferring Components from Rack to Bench and Back When transferring a sensitive device from an installed Teledyne API analyzer to an Anti-ESD workbench or back:
1. Follow the instructions listed above for working at the instrument rack and workstation. 2. Never carry the component or assembly without placing it in an anti-ESD bag or bin.
3. Before using the bag or container allow any surface charges on it to dissipate:

Teledyne API M701H High Performance Zero Air Generator A Primer on Electro-Static Discharge
06712B (DCN5875) 8-7
• If you are at the instrument rack, hold the bag in one hand while your wrist strap is connected to a ground point.
• If you are at an anti-ESD workbench, lay the container down on the conductive work surface. • In either case wait several seconds.
4. Place the item in the container.
5. Seal the container. If using a bag, fold the end over and fastening it with anti-ESD tape.
• Folding the open end over isolates the component(s) inside from the effects of static fields. • Leaving the bag open or simply stapling it shut without folding it closed prevents the bag from
forming a complete protective envelope around the device. 6. Once you have arrived at your destination, allow any surface charges that may have built up on the
bag or bin during travel to dissipate:
• Connect your wrist strap to ground. • If you are at the instrument rack, hold the bag in one hand while your wrist strap is connected to a
ground point. • If you are at a anti-ESD work bench, lay the container down on the conductive work surface • In either case wait several seconds
7. Open the container.
8.5.4 Opening Shipments from Teledyne API’s Customer Service Packing materials such as bubble pack and Styrofoam pellets are extremely efficient generators of static electric charges. To prevent damage from ESD, Teledyne API ships all electronic components and assemblies in properly sealed anti-ESD containers.
Static charges will build up on the outer surface of the anti-ESD container during shipping as the packing materials vibrate and rub against each other. To prevent these static charges from damaging the components or assemblies being shipped ensure that you always unpack shipments from Teledyne API’s Customer Service by:
1. Opening the outer shipping box away from the anti-ESD work area. 2. Carry the still sealed ant-ESD bag, tube or bin to the anti-ESD work area.
3. Follow steps 6 and 7 of Section 8.5.3 above when opening the anti-ESD container at the work station.
4. Reserve the anti-ESD container or bag to use when packing electronic components or assemblies to be returned to Teledyne API.

A Primer on Electro-Static Discharge Teledyne API M701H High Performance Zero Air Generator
8-8 06712B (DCN5875)
8.5.5 Packing Components for Return to Teledyne API’s Customer Service Always pack electronic components and assemblies to be sent to Teledyne API’s Customer Service in anti-ESD bins, tubes or bags.
WARNING • DO NOT use pink-poly bags.
• NEVER allow any standard plastic packaging materials to touch the electronic component/assembly directly.
• This includes, but is not limited to, plastic bubble-pack, Styrofoam peanuts, open cell foam, closed cell foam, and adhesive tape.
• DO NOT use standard adhesive tape as a sealer. Use ONLY anti-ESD tape.
1. Opening the outer shipping box away from the anti-ESD work area. 2. Carry the still sealed ant-ESD bag, tube or bin to the anti-ESD work area. 3. Follow steps 6 and 7 of Section 8.5.3 above when opening the anti-ESD container at the work
station. 4. Reserve the anti-ESD container or bag to use when packing electronic components or assemblies to
be returned to Teledyne API. 1. Never carry the component or assembly without placing it in an anti-ESD bag or bin. 2. Before using the bag or container allow any surface charges on it to dissipate: • If you are at the instrument rack, hold the bag in one hand while your wrist strap is connected to a
ground point. • If you are at an anti-ESD workbench, lay the container down on the conductive work surface. • In either case wait several seconds.
3. Place the item in the container. 4. Seal the container. If using a bag, fold the end over and fastening it with anti-ESD tape. • Folding the open end over isolates the component(s) inside from the effects of static fields. • Leaving the bag open or simply stapling it shut without folding it closed prevents the bag from
forming a complete protective envelope around the device.
NOTE
If you do not already have an adequate supply of anti-ESD bags or containers available, Teledyne API’s Customer Service department will supply them. Follow the instructions
listed above for working at the instrument rack and workstation.

A-1
APPENDIX A - SPARE PARTS
Note Use of replacement parts other than those supplied by T-API may result in non-compliance with European standard EN 61010-1.
Note Due to the dynamic nature of part numbers, please refer to the Website at http://www.teledyne-api.com or call Customer Service at 800-324-5190for more recent updates to part numbers.
06712B (DCN5875)

A-2
This page intentionally left blank.
06712B (DCN5875)

SPARE PARTS LISTM701H
Ref: 04825F (DCN5895)
Part Number Description005960000 AKIT, EXPEND, 6LBS ACT CHARCOAL 005970000 AKIT, EXPENDABLE, 6LB PURAFIL 006900100 RETAINER PAD CHARCOAL, LARGE, 2-1/4" 066780000 ASSY, PUMP w/BRKT, M701H, 115V/60066780100 ASSY, PUMP w/BRKT, M701H, 220-240V/50073440000 AKIT, EXP KIT, M701H 016920000 AKIT, EXP KIT, MOL SIEVE 073380000 ASSY, HC SCRUBBER, M701H 017710000 HEATER, HC SCRUBBER, M701, VDE APPROVED 017960000 ASSY, FAN M701 018490000 GAUGE, PRESSURE, 60 PSI, M701(KB) 036260000 ASSY, 4-WAY VALVE, PARKER, M701 040370200 CO SCRUBBER, M701 066180000 PCA, CONTROL BD, M701H W/ INT DEW POINT 066780000 ASSY, PUMP, M701H, 115V/60HZ WITH BRACKET066780100 ASSY, PUMP, M701H 220V/50HZ WITH BRACKET057270000 GASKET, SCRUBBER FL0000044 FILTER, COALESCING, .03 MICRON(KB) FL0000015 FILTER, AIR, 150 LPM, M701 FL0000016 FILTER ELEMENT, PAPER, FOR FL15 HW0000190 NUT, PANEL MOUNT, REGULATOR, M701 HW0000396 SPACER, AL, #8 X 3/8" HW0000395 DAMPENER, UNIVERSAL MOUNT, RING HW0000396 DAMPENER, UNIVERSAL MOUNT, BUSHING OR0000058 ORING, 2-228V, DRYER PU0000090 KIT, PUMP REBUILD, GAST 2 HEAD VA0000012 VALVE, RELIEF KB VA0000014 REGULATOR VA0000016 VALVE, CHECK KB VA0000017 VALVE, 2-WAY, 115VAC KB
A-306712B (DCN5875)

Recommended Spare Parts Stocking Levels M701H
Reference 07346A (DCN5895)
1 2-5 6-10 11-20 21-30017960000 ASSY, FAN M701/M701H 1 2 4 8066180000 PCA, CONTROL BOARD, M701H 1 2 4036260000 ASSY, 4-WAY VALVE, PARKER, M701 1 2 4 8066780000 * ASSY, PUMP, W/BASE, 100-115V, GAST 1 2FL0000044 FILTER, COALESCING, .03 MICRON(KB) 1 1 2 4 8VA0000012 VALVE, RELIEF KB 1 2 4VA0000014 REGULATOR 1 1 2 4 8VA0000016 VALVE, CHECK KB 1 1 2 4 8VA0000017 VALVE, 2-WAY, 115VAC KB 1 1 2 4 8
1 2-5 6-10 11-20 21-30066780100 OPTION, PUMP ASSY, 240V 1 2
Part Number Description Units
Recommended Spare Parts Stocking Level: Standard
* Recommended Spare Parts Stocking Level: For Pump Assembly, 240V Option Installed
UnitsPart Number Description
A-4 06712B (DCN5875)

AKIT, EXPENDABLES KIT,M701H
Reference 07344A (DCN5895)
005960000 AKIT, EXP, 6LBS ACT CHARCOAL 1005970000 AKIT, EXP, 6LBS PURIFIL 1006900100 RETAINER PAD CHARCOAL, LARGE, 2-1/4" 8016920000 AKIT, EXP KIT, MOL SIEVE 1057270000 GASKET SCRUBBER 4FL0000016 FILTER ELEMENT, PAPER, FOR FL15 2OR0000058 ORING, 2-228V, DRYER 4
Part Number Description QTY
A-506712B (DCN5875)

LEVEL 1 SPARES KITM701H
Ref: 07345A (DCN5895)
Part Number Description03626000A Valve, 4-way, regenerative scrubber066180000 PCA, CONTROL BOARD, M701HCB0000004 Fuse, 3A, SB (HC temp control)FA0000006 Fan, coolingFL0000011 Filter, finalFL0000044 Filter, water coalescingHE0000017 Heater, CO scrubberOR0000058 O-ring, 2-228VPU0000090 Kit, Pump Rebuild, for M701HVA0000017 Valve, water drain
A-6 06712B (DCN5875)

B-1
APPENDIX B - Schematics
06712B (DCN5875)

B-2
This page intentionally left blank.
06712B (DCN5875)
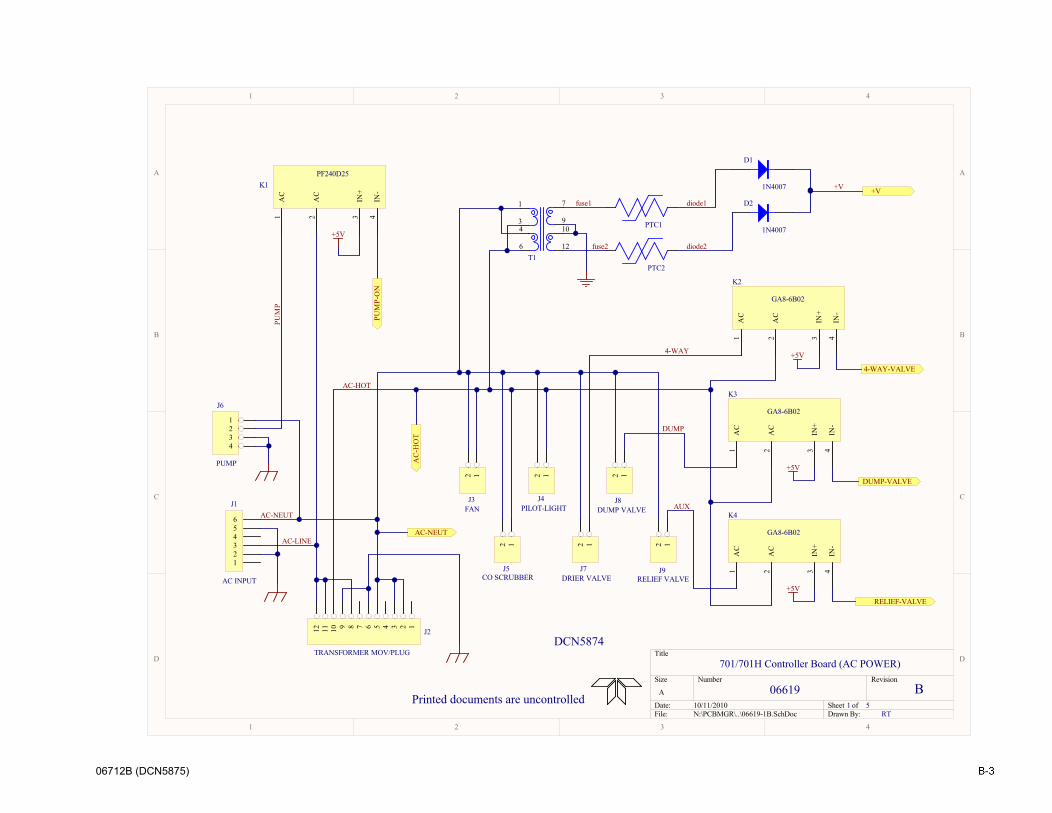
1
1
2
2
3
3
4
4
D D
C C
B B
A A
Title
Number RevisionSize
A
Date: 10/11/2010 Sheet ofFile: N:\PCBMGR\..\06619-1B.SchDoc Drawn By:
701/701H Controller Board (AC POWER)
06619 B1 5
1234
J6
PUMP
123456
J1
AC INPUT
IN-
4
IN+
3
AC
2
AC
1
K1PF240D25
IN-
4
IN+
3
AC
2
AC
1
K2
GA8-6B02
PTC1
+V
OPTIONAL
+5V
+5V
+5V
D1
1N4007
12
J3FAN
+5V
123456789101112 J2
TRANSFORMER MOV/PLUG
AC-NEUT
AC-LINE
AC-HOT
AC
-HO
T
AC-NEUT
PTC2
D2
1N4007
IN-
4
IN+
3
AC
2
AC
1
K3
GA8-6B02
IN-
4
IN+
3
AC
2
AC
1
K4
GA8-6B0212
J4PILOT-LIGHT
12
J8DUMP VALVE
12
J5CO SCRUBBER
12J7
DRIER VALVE
PUM
P-O
N4-WAY-VALVE
DUMP-VALVE
RELIEF-VALVE
PUM
P
fuse1
fuse2
diode1
diode2
+V
4-WAY
DUMP
AUX
7
6
10
1
93
12
4
T1
12
J9RELIEF VALVE
DCN5874
RT
Printed documents are uncontrolled
PID101 PID102
COD1
PID201 PID202
COD2
PIJ101
PIJ102
PIJ103
PIJ104
PIJ105
PIJ106
COJ1
PIJ201PIJ202PIJ203PIJ204PIJ205PIJ206PIJ207PIJ208PIJ209PIJ2010PIJ2011PIJ2012COJ2
PIJ301PIJ302
COJ3
PIJ401PIJ402
COJ4
PIJ501PIJ502
COJ5
PIJ601
PIJ602
PIJ603
PIJ604
COJ6
PIJ701PIJ702
COJ7
PIJ801PIJ802
COJ8
PIJ901PIJ902
COJ9
PIK101 PIK102 PIK103 PIK104
COK1
PIK201 PIK202 PIK203 PIK204
COK2
PIK301 PIK302 PIK303 PIK304
COK3
PIK401 PIK402 PIK403 PIK404
COK4
PIPTC101 PIPTC102
COPTC1
PIPTC201 PIPTC202
COPTC2
PIT101
PIT103
PIT104
PIT106
PIT107
PIT109
PIT1010
PIT1012
COT1
PO0V
PO40WAY0VALVE
POAC0HOT
POAC0NEUT
PODUMP0VALVE
POPUMP0ON
PORELIEF0VALVE
06712B (DCN5875)

1
1
2
2
3
3
4
4
D D
C C
B B
A A
Title
Number RevisionSize
A
Date: 10/11/2010 Sheet ofFile: N:\PCBMGR\..\06619-2B.SchDoc Drawn By:
701/701H Controller Board (DC POWER)
06619 B2 5
TP1
+C1
6800uF 16V
StatusPU
REC-OUT
AUX-IN
11
152
153
44
55
88
77
66
TVS1SMDA15LCC
+V
+5V
KBINT KBINT
AUX-IN
REC-OUT
StatusPU
VI1
GN
D2
VO 3
VR1
7805
+C2
1000uF, 50VC30.1uF
C40.1uF
TP2
C50.1uF
Teledyne API9480 Carroll Park Drive, San Diego, CA 92121
+5V-REFVI1
GN
D2
VO 3
VR2
LT1460KCS3-5
+VTP7
+5VTP8
+C25
100uF, 25V
VI1
GN
D2
VO 3
VR3
LF60ABDT-TR
C260.1uF
+6V
+ C27100uF
AGND
AGND
DCN5874
RTPrinted documents are uncontrolled
PIC101
PIC102
COC1
PIC201
PIC202
COC2PIC301
PIC302COC3
PIC401
PIC402COC4
PIC501
PIC502COC5
PIC2501
PIC2502
COC25
PIC2601
PIC2602COC26
PIC2701
PIC2702
COC27
COLG2
PITP101
COTP1 PITP201
COTP2
PITP701
COTP7
PITP801
COTP8
PITVS101 PITVS102 PITVS103 PITVS104
PITVS105PITVS106PITVS107PITVS108
COTVS1
PIVR101
PIVR102
PIVR103
COVR1
PIVR201
PIVR202
PIVR203
COVR2
PIVR301
PIVR302
PIVR303
COVR3
PO0V
POAUX0IN
POKBINT
POREC0OUT
POSTATUSPU
06712B (DCN5875)

1
1
2
2
3
3
4
4
D D
C C
B B
A A
Title
Number RevisionSize
A
Date: 10/11/2010 Sheet ofFile: N:\PCBMGR\..\06619-3B.SchDoc Drawn By:
701/701H Controller Board (CPU)
06619 B3 5
1
32X1
4.00 MHz
+ C610/35
123456
Program PortJ10
KBINT
SCL SDA
1 23 45 67 89 1011 1213 14
JP1
HEADER 7X2
SCLSDA
TXRX
RXTX
R22.2K
DS1GRN
HUMIDITYPRESSURE
CAL0CAL1
CAL0CAL1
AUX-IN
TEMPERATURE
(OPTIONAL)
R102M
I/O-S
PAR
E+5V
+5V
+5V
+5V
+5V
SDA
SCL
KBINT
AUX-IN
ANALOG-SPARER71K
R44.7K
12
J11
AUX INPUT
R32.2K
R54.7K
R1110K
C80.1uF
C90.1uF
C100.1uF
C110.1uF
R1310K
C120.1uF
C70.1uF
MCLR1
AN02
AN13
AN24
AN35
RA46
AN47
VSS8
OSC1/CLKIN9
OSC1/CLKOUT10
RC011
RC112
RC213
RC3/SCK/SCL14
VSS 19
RB0/INT 21RB1 22RB2 23RB3 24RB4 25RB5 26RB6 27RB7 28
VDD 20
RC/SDI/SDA 15RC5/SDO 16RC6/TX/CK 17RC7/RX/DT 18
U1PIC16F876
R62.2K
HEATER-ON
HEA
TER
-ON
+5V-REF
PIN_B5
R81K
R91K
DCN5874
RTPrinted documents are uncontrolled
PIC601
PIC602
COC6
PIC701
PIC702COC7
PIC801
PIC802COC8
PIC901
PIC902COC9
PIC1001
PIC1002COC10
PIC1101
PIC1102COC11
PIC1201
PIC1202COC12
PIDS101
PIDS102CODS1
PIJ1001PIJ1002PIJ1003PIJ1004PIJ1005PIJ1006
COJ10
PIJ1101
PIJ1102
COJ11
PIJP101 PIJP102
PIJP103 PIJP104
PIJP105 PIJP106
PIJP107 PIJP108
PIJP109 PIJP1010
PIJP1011 PIJP1012
PIJP1013 PIJP1014
COJP1
PIR201
PIR202
COR2
PIR301
PIR302
COR3
PIR401
PIR402COR4
PIR501
PIR502COR5
PIR601
PIR602
COR6
PIR701
PIR702
COR7 PIR801
PIR802
COR8 PIR901
PIR902
COR9
PIR1001
PIR1002COR10
PIR1101
PIR1102
COR11
PIR1301
PIR1302
COR13
PIU101
PIU102
PIU103
PIU104
PIU105
PIU106
PIU107
PIU108
PIU109
PIU1010
PIU1011
PIU1012
PIU1013
PIU1014 PIU1015
PIU1016
PIU1017
PIU1018
PIU1019
PIU1020
PIU1021
PIU1022
PIU1023
PIU1024
PIU1025
PIU1026
PIU1027
PIU1028
COU1
PIX101
PIX102
PIX103
COX1
POAUX0IN
POHEATER0ON
POHUMIDITY
POKBINTPOPRESSURE
POSCL
POSDA
POTEMPERATURE
06712B (DCN5875)
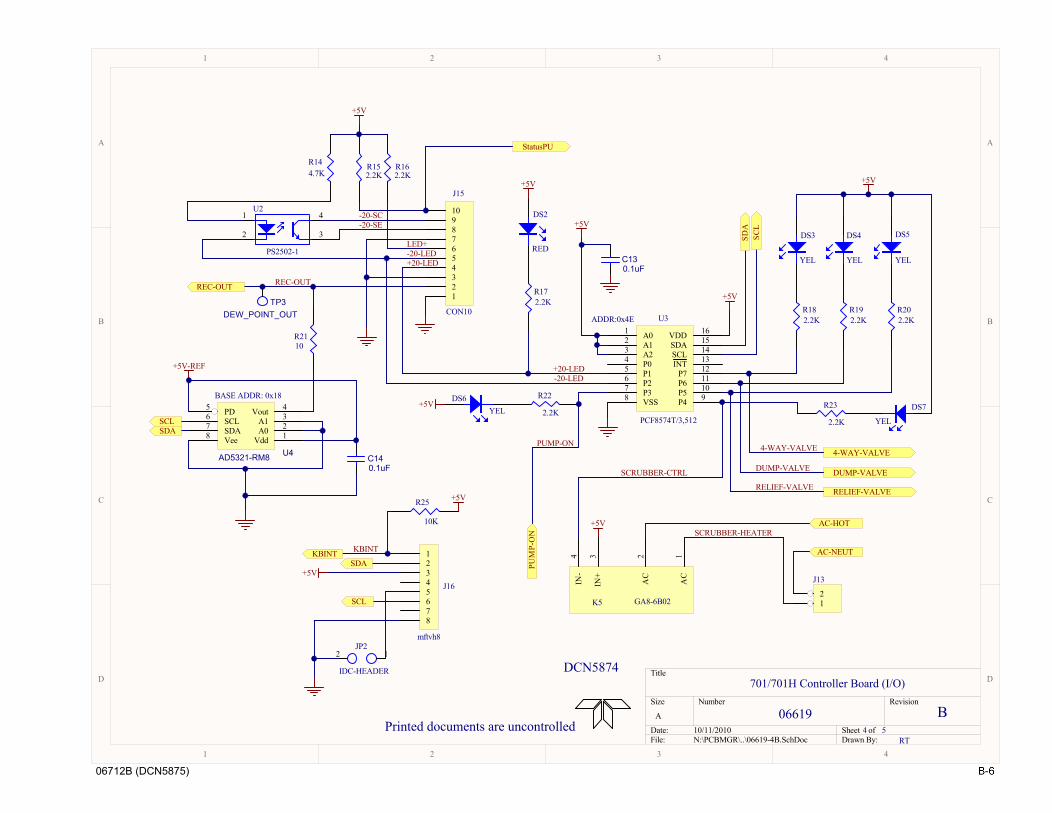
1
1
2
2
3
3
4
4
D D
C C
B B
A A
Title
Number RevisionSize
A
Date: 10/11/2010 Sheet ofFile: N:\PCBMGR\..\06619-4B.SchDoc Drawn By:
701/701H Controller Board (I/O)
06619 B4 5
A01
A12
A23
P04
P15
P26
P37
VSS8 P4 9P5 10P6 11P7 12INT 13SCL 14SDA 15VDD 16U3
PCF8574T/3,512
12JP2
IDC-HEADER
-20-SC-20-SE
LED+
+20-LED
Vdd 1A0 2A1 3Vout 4PD5
SCL6
SDA7
Vee8
U4AD5321-RM8
R2110
-20-LED
REC-OUT
BASE ADDR: 0x18
1
2
4
3
U2
PS2502-1
12345678910
J15
CON10ADDR:0x4E
DS2
RED
+5V
+5V
+5V
+5V
+5V
+5V
+5V
-20-LED+20-LED
+5V
+5V
REC-OUT
SCL
SDA
SCLSDA
SCL
SDA
StatusPU
KBINT AC-NEUT
AC-HOT
R182.2K
R192.2K
R202.2K
IN-
4
IN+
3
AC
2
AC
1
K5 GA8-6B02
DS3
YEL
DS4
YEL
DS5
YEL
DS7
YEL
DS6YEL
R162.2K
R152.2K
R144.7K
C140.1uF
R25
10K
C130.1uF
R172.2K
R22
2.2KR23
2.2K
TP3DEW_POINT_OUT
PUM
P-O
N
4-WAY-VALVE
DUMP-VALVE
RELIEF-VALVE
4-WAY-VALVE
DUMP-VALVE
RELIEF-VALVE
SCRUBBER-CTRL
PUMP-ON
SCRUBBER-HEATER
KBINT
+5V-REF
12345678
J16
mftvh8
12
J13
DCN5874
RTPrinted documents are uncontrolled
PIC1301
PIC1302COC13
PIC1401
PIC1402COC14
PIDS201
PIDS202
CODS2
PIDS301
PIDS302
CODS3PIDS401
PIDS402
CODS4PIDS501
PIDS502
CODS5
PIDS601 PIDS602CODS6
PIDS701PIDS702CODS7
PIJ1301
PIJ1302
COJ13
PIJ1501
PIJ1502
PIJ1503
PIJ1504
PIJ1505
PIJ1506
PIJ1507
PIJ1508
PIJ1509
PIJ15010
COJ15
PIJ1601
PIJ1602
PIJ1603
PIJ1604
PIJ1605
PIJ1606
PIJ1607
PIJ1608
COJ16
PIJP201PIJP202
COJP2
PIK501PIK502PIK503PIK504
COK5
PIR1401
PIR1402COR14
PIR1501
PIR1502COR15
PIR1601
PIR1602COR16
PIR1701
PIR1702
COR17 PIR1801
PIR1802
COR18
PIR1901
PIR1902
COR19
PIR2001
PIR2002
COR20
PIR2101
PIR2102COR21
PIR2201 PIR2202
COR22
PIR2301 PIR2302
COR23
PIR2501 PIR2502
COR25
PITP301COTP3
PIU201
PIU202 PIU203
PIU204
COU2
PIU301
PIU302
PIU303
PIU304
PIU305
PIU306
PIU307
PIU308 PIU309
PIU3010
PIU3011
PIU3012
PIU3013
PIU3014
PIU3015
PIU3016
COU3
PIU401
PIU402
PIU403
PIU404PIU405
PIU406
PIU407
PIU408
COU4 PO40WAY0VALVE
POAC0HOT
POAC0NEUT
PODUMP0VALVE
POKBINT POPUMP0ON
POREC0OUT
PORELIEF0VALVE
POSCLPOSDA
POSTATUSPU
06712B (DCN5875)
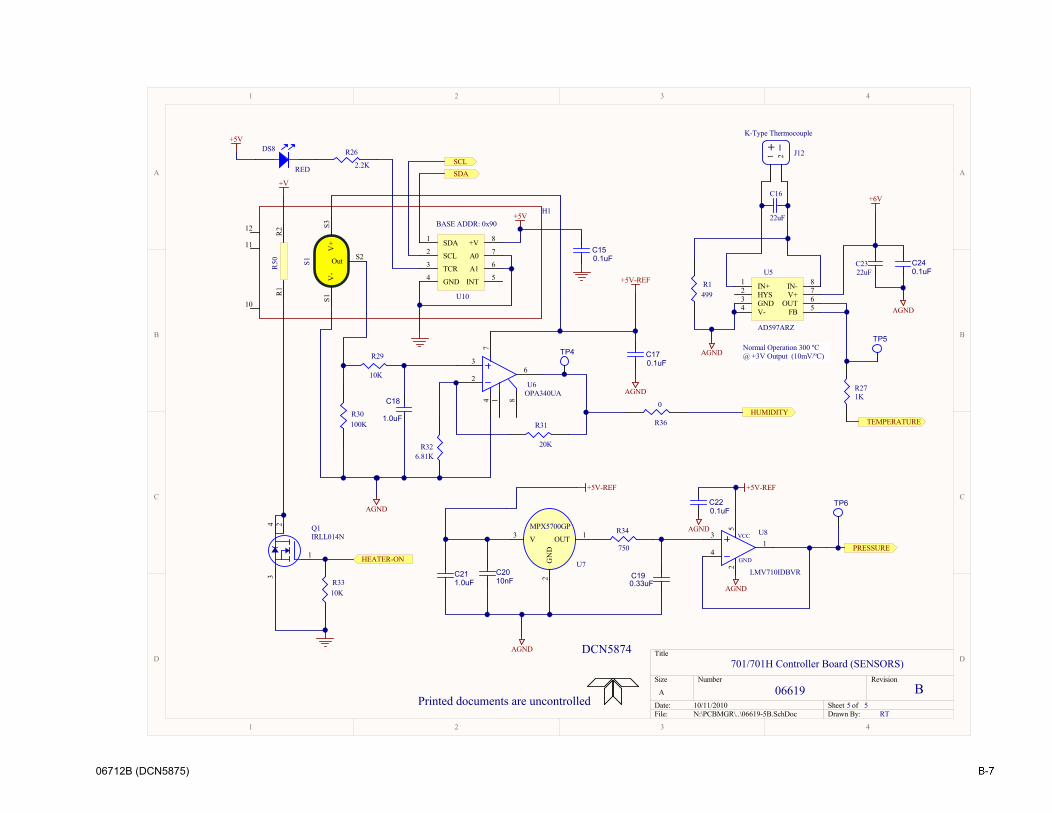
1
1
2
2
3
3
4
4
D D
C C
B B
A A
Title
Number RevisionSize
A
Date: 10/11/2010 Sheet ofFile: N:\PCBMGR\..\06619-5B.SchDoc Drawn By:
701/701H Controller Board (SENSORS)
06619 B5 5
R326.81K
R31
20K
3
26
1 8
74
U6OPA340UA
R30100K
32
1
4 Q1IRLL014N
BASE ADDR: 0x90
HUMIDITY
PRESSUREHEATER-ON
IN+1
HYS2
GND3
V-4 FB 5OUT 6V+ 7IN- 8U5
AD597ARZ
TEMPERATURE
+5V
+V
C2010nF
+ _1 2 J12
K-Type Thermocouple
+5V
SCLSDA
Normal Operation 300 ºC@ +3V Output (10mV/ºC)
V3 OUT 1
GN
D2
U7
MPX5700GP
C211.0uF
C190.33uF
C18
1.0uF
C150.1uF
R26
2.2K
DS8
RED
R29
10K
R3310K
TP4
TP5
TP6
R34
750
3
41
25
GND
VCC U8
LMV710IDBVR
V+
S3V
-S1
Out S2
R2
R1
SDA1
SCL2
TCR3
GND4 INT 5A1 6A0 7+V 8
R50 S1
U1010
11
12
H1
R1499
C240.1uF22uF
C23
C170.1uF
AGND
AGND
AGND
AGND
AGND
+5V-REF
+5V-REF
+5V-REF
R36
0
R271K
AGND
AGND
22uF
C16
C220.1uF
+6V
DCN5874
RTPrinted documents are uncontrolled
PIC1501
PIC1502COC15
PIC1601PIC1602
COC16
PIC1701
PIC1702COC17
PIC1801
PIC1802COC18
PIC1901
PIC1902COC19
PIC2001
PIC2002COC20
PIC2101
PIC2102COC21
PIC2201
PIC2202COC22
PIC2301
PIC2302COC23
PIC2401
PIC2402COC24
PIDS801 PIDS802
CODS8
PIH101
PIH102
PIH103
PIH104 PIH105
PIH106
PIH107
PIH108
PIH1010
PIH1011
PIH1012
PIH10R1
PIH10R2
PIH10S1
PIH10S2
PIH10S3COH1
PIJ1201 PIJ1202COJ12
PIQ101
PIQ102
PIQ103
PIQ104 COQ1
PIR101
PIR102COR1
PIR2601 PIR2602
COR26
PIR2701
PIR2702COR27
PIR2901 PIR2902
COR29
PIR3001
PIR3002COR30
PIR3101 PIR3102
COR31
PIR3201
PIR3202COR32
PIR3301
PIR3302COR33
PIR3401 PIR3402
COR34
PIR3601 PIR3602
COR36
PITP401
COTP4 PITP501
COTP5
PITP601
COTP6
PIU501
PIU502
PIU503
PIU504 PIU505
PIU506
PIU507
PIU508
COU5
PIU601PIU602
PIU603
PIU604PIU606
PIU607
PIU608COU6
PIU701
PIU702
PIU703
COU7
PIU801
PIU802
PIU803
PIU804
PIU805 COU8
POHEATER0ON
POHUMIDITY
POPRESSURE
POSCL
POSDA
POTEMPERATURE
06712B (DCN5875)