operations and maintenance: introduction to the cost
TRANSCRIPT
Operations and Maintenance: Introduction
to the Cost Estimating Software System Spreadsheet
Job Aid
Timothy Harvey Chief WASO-PFMD National Park Service
Elizabeth A. Dodson Training Manager
WASO-PFMD National Park Service
Jeri Mihalic Training Coordinator
WASO-PFMD National Park Service
February 2011
Completed in accordance with Task Agreement NO. J2420080122 of the National Park Service –
Indiana University Cooperative Agreement NO. H2420060015
Executive Director Stephen A. Wolter
Project Team Andrea Mercatante
Project Team Christy McCormick
Eppley Institute for Parks & Public Lands
Indiana University Research Park 501 N. Morton Street, Suite 101
Bloomington, IN 47404 812.855.3095

Acknowledgements Contributing National Park Service Staff Betsy Dodson Elizabeth Elliott Christine Freeland Timothy Harvey Mary Hudson Cheryl Marsh Dayna McClure Jeri Mihalic Ed Nelson Mark Tezel Contractors Booze Allen Hamilton DIT Eos Group Contributing Eppley Institute Staff Christy McCormick Andrea Mercatante
This publication may not be duplicated without the permission of the Eppley Institute for Parks and Public Lands, acting on behalf of Indiana University. The National Park Service and federal agencies may duplicate it for training and administrative purposes, provided that appropriate written acknowledgement is given. No other state or local
agency, university, contractor, or individual shall duplicate this publication without the permission of Indiana University.
Copyright 2011, the Trustees of Indiana University on behalf of the Eppley Institute for Parks and Public Lands

TABLE OF CONTENTS Introduction ................................................................................................................................ 6
Getting started ............................................................................................................................ 7
Cess navigation .......................................................................................................................... 8
The Menu Bar ......................................................................................................................... 8
The Tool Bar ........................................................................................................................... 9
Assembly Takeoff ..................................................................................................................... 10
Finding and Selecting Assembly Takeoffs ............................................................................ 10
Creating an Estimate Using the Assembly Takeoff ............................................................... 14
Item Takeoff ............................................................................................................................. 18
Creating an Estimate Using the Item Takeoff ....................................................................... 18
Quick Takeoff ........................................................................................................................... 22
Creating an Estimate Using a Quick Takeoff ........................................................................ 22
Model Takeoff .......................................................................................................................... 25
Creating an Estimate Using the Model Takeoff .................................................................... 25
The Model Interview ............................................................................................................. 26
Review the Assembly Section .............................................................................................. 28
Generate the Model .............................................................................................................. 29
Adjust a Model in an Estimate .............................................................................................. 34
Removing and subsitituting items ............................................................................................. 37
Deleting a Row from the Item Grid........................................................................................ 37
Substituting Items in the CESS Spreadsheet ....................................................................... 38
Deleting Items from the Spreadsheet ................................................................................... 41
Reviewing Add-ons ............................................................................................................... 42
Validating and exporting cost estimates ................................................................................... 44
Validating a Cost Estimate .................................................................................................... 44
Adjusting cost estimates ........................................................................................................... 49
Deleting cost estimates ............................................................................................................ 50
Appendices .............................................................................................................................. 56
Appendix A: assemblies in the cess database ......................................................................... 57
Appendix B: the cess glossary ................................................................................................. 58
TABLE OF FIGURES Figure 1: CESS Interface Folders Pane ..................................................................................... 7
Figure 2: Assembly Takeoff Icon in Menu Bar .......................................................................... 10 Figure 3: Go-To Icon in Menu Bar ............................................................................................ 10 Figure 4: Search Box ................................................................................................................ 10 Figure 5: Search Results .......................................................................................................... 11 Figure 6: Takeoff Abbreviations ............................................................................................... 12
Figure 7: Assembly Takeoff Window with Takeoff Highlighted ................................................. 13 Figure 8: Dimensions Pane and Item Grid ............................................................................... 14 Figure 9: Assembly Takeoff Window ........................................................................................ 15 Figure 10: Item Grid ................................................................................................................. 15 Figure 11: CESS Spreadsheet ................................................................................................. 17
Figure 12: Item Takeoff Icon in Menu Bar ................................................................................ 18
Figure 13: Go-To Icon in Menu Bar .......................................................................................... 18
Figure 14: Search Box .............................................................................................................. 18 Figure 15: Search Results ........................................................................................................ 19
Figure 16: Item Takeoff Window .............................................................................................. 19 Figure 17: Item Grid with Takeoff Quantity ............................................................................... 20
Figure 18: Dimensions Pane .................................................................................................... 20 Figure 19: Item Grid ................................................................................................................. 21 Figure 20: Estimate Spreadsheet ............................................................................................. 21
Figure 21: CESS Spreadsheet Toolbar with the Quick Takeoff Icon Highlighted ..................... 22 Figure 22: Quick Takeoff Box ................................................................................................... 22
Figure 23: Quick Takeoff Search Box....................................................................................... 23 Figure 24: Quick Takeoff Search Results ................................................................................. 23
Figure 25: Final CESS Spreadsheet ........................................................................................ 24 Figure 26: CESS Spreadsheet with Model Takeoff Icon Highlighted ....................................... 25
Figure 27: Model Takeoff Screen ............................................................................................. 25 Figure 28: Create Interview Screen .......................................................................................... 26 Figure 29: Assemblies in a Model Takeoff ............................................................................... 28
Figure 31: Model Takeoff Window with Model Reference Highlighted ..................................... 30 Figure 33: Model Generation Complete ................................................................................... 31
Figure 34: Generated Models ................................................................................................... 32 Figure 35: The Estimate Spreadsheet ...................................................................................... 33 Figure 36: CESS Spreadsheet Toolbar .................................................................................... 34 Figure 37: Model Takeoff Window with Takeoff Highlighted ..................................................... 34 Figure 38: CESS Spreadsheet Toolbar .................................................................................... 35
Figure 39: Model Takeoff Window ............................................................................................ 35
Figure 40: Model Takeoff Window ............................................................................................ 36
Figure 41: Removing an Item from the Item Grid ..................................................................... 37 Figure 42: Confirm Deletion ..................................................................................................... 37 Figure 43: Spreadsheet with Item Highlighted .......................................................................... 38 Figure 44: Menu with Substitute Item Highlighted .................................................................... 39 Figure 45: Selecting a Substitute from the Item List ................................................................. 40 Figure 46: Spreadsheet with Substituted Item .......................................................................... 40 Figure 47: Spreadsheet with Item Highlighted .......................................................................... 41

Figure 48: Drop Down Menu with Delete Row Highlighted ....................................................... 41
Figure 49: Confirm the Deletion ............................................................................................... 42 Figure 50: Finished Spreadsheet ............................................................................................. 42
Figure 51: Exiting the CESS Spreadsheet ............................................................................... 44 Figure 52: The CESS Interface ................................................................................................ 44 Figure 53: Edit Estimate Screen ............................................................................................... 45 Figure 54: Estimate with Completed Status ............................................................................. 45 Figure 55: Validation Tab ......................................................................................................... 46
Figure 56: Validate Estimate Screen ........................................................................................ 46 Figure 57: Successful Validation .............................................................................................. 47 Figure 58: Menus Used in Exporting Estimate Information ...................................................... 47 Figure 59: Estimate with Exported Status ................................................................................ 48 Figure 60: The CESS Interface ................................................................................................ 50
Figure 61: Estimate Spreadsheet ............................................................................................. 51 Figure 62: Delete Estimate ....................................................................................................... 52
Figure 63: Delete Estimate Window ......................................................................................... 53
Figure 64: Delete Estimate Files .............................................................................................. 54 Figure 65: Change Status ........................................................................................................ 55

Operations and Maintenance: Introduction to the CESS Spreadsheet
February 2011 6
INTRODUCTION The purpose of this job aid is to provide an easy-to-use desk reference to assist you in the following two tasks:
1. Perform the basic navigation and actions of the CESS Spreadsheet, and 2. Create a cost estimate.
The CESS Spreadsheet is a tool designed to assist in determining the cost for repairing
identified asset deficiencies. The CESS Spreadsheet can also be used to estimate the cost to
replace various components as part of completing the Replacement Cost field in the Asset
Record in FMSS.
The CESS Spreadsheet is the NPS name for the commercial product “Timberline Estimating”.
If you see this sign, pay particular attention to the information that follows. It is critical to your successful use of the program.

Operations and Maintenance: Introduction to the CESS Spreadsheet
February 2011 7
GETTING STARTED
All cost estimates are created in the CESS Spreadsheet. However, users must access the CESS Interface to access the estimate and the CESS Spreadsheet. The following is a brief overview of the steps necessary for accessing estimates in the CESS Interface.
Figure 1: CESS Interface Folders Pane
1. Locate the estimate in the Folders Pane of the CESS Interface.
2. Double click on the estimate number. This will automatically open the CESS Spreadsheet for the estimate.
1 & 2
Note: The first set of numbers represents the FMSS location record number. The second set of numbers represents the FMSS work order number.

Operations and Maintenance: Introduction to the CESS Spreadsheet
February 2011 8
CESS NAVIGATION A majority of CESS Spreadsheet tasks utilize the Menu Bar and the Tool Bar.
The Menu Bar The Menu Bar is located at the top of the CESS Spreadsheet and contains 10 menus (as seen below). These menus perform unique tasks that will aid you in creating a cost estimate.
Menu Bar Button Use
File Performs functions within the application such as New Estimate creation (for templates), Open Estimate, Copy Estimate, and Exit.
Edit Includes traditional “edit” menu functions, such as cut and paste. Also includes the „Go-To‟ function.
View Collapse or expand the spreadsheet, and to zoom in or out.
Database Allows users to add information, such as take-offs and addons, to the database.
Takeoff Copies cost items from the database into the estimate spreadsheet (Quick, Item, Assembly Takeoff).
Pricing Includes options for re-pricing an estimate, adjusting percentages, and clearing prices.
Reports Select and print reports.
Interface Allows users to cut and paste information from CESS Interface files.
Window When more than one estimate is open, this menu allows users to change the layout of the screen. Options include cascaded windows and tile windows.
Help Answers questions and provides support.
Operations and Maintenance: Introduction to the CESS Spreadsheet
February 2011 9
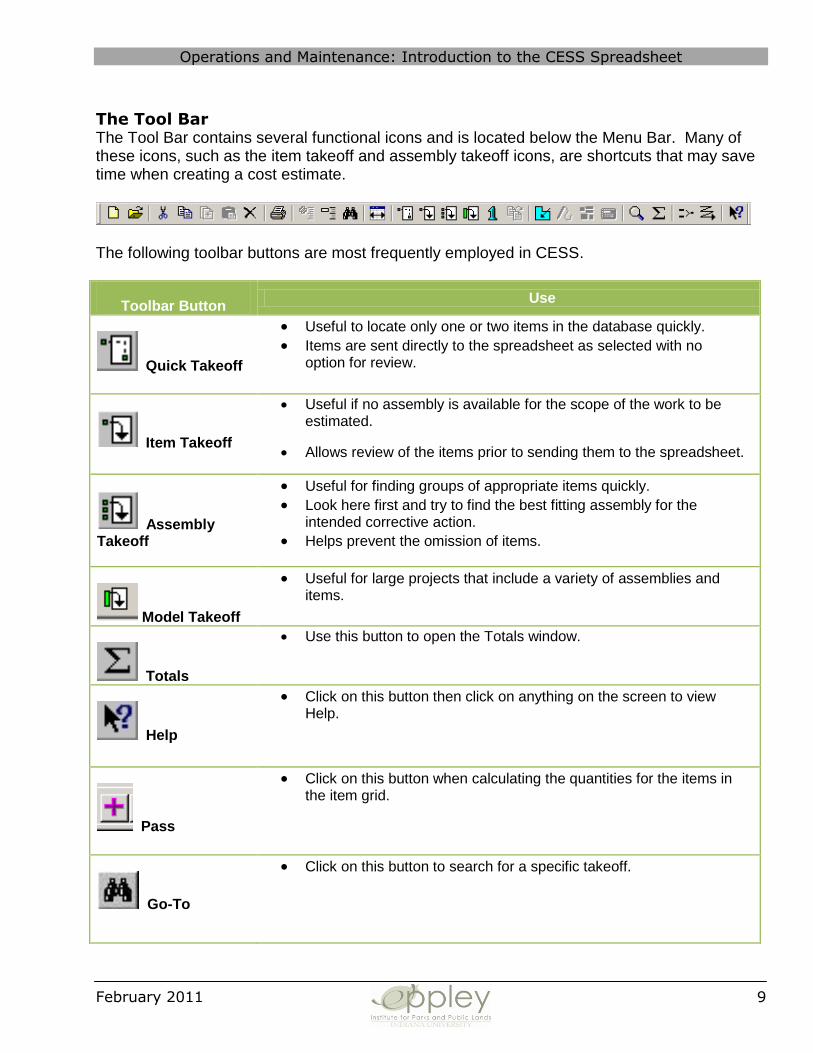
The Tool Bar The Tool Bar contains several functional icons and is located below the Menu Bar. Many of these icons, such as the item takeoff and assembly takeoff icons, are shortcuts that may save time when creating a cost estimate.
The following toolbar buttons are most frequently employed in CESS.
Toolbar Button Use
Quick Takeoff
Useful to locate only one or two items in the database quickly.
Items are sent directly to the spreadsheet as selected with no option for review.
Item Takeoff
Useful if no assembly is available for the scope of the work to be estimated.
Allows review of the items prior to sending them to the spreadsheet.
Assembly Takeoff
Useful for finding groups of appropriate items quickly.
Look here first and try to find the best fitting assembly for the intended corrective action.
Helps prevent the omission of items.
Model Takeoff
Useful for large projects that include a variety of assemblies and items.
Totals
Use this button to open the Totals window.
Help
Click on this button then click on anything on the screen to view Help.
Pass
Click on this button when calculating the quantities for the items in the item grid.
Go-To
Click on this button to search for a specific takeoff.

Operations and Maintenance: Introduction to the CESS Spreadsheet
February 2011 10
ASSEMBLY TAKEOFF
An assembly takeoff is a compilation of all the item takeoffs needed for a specific project. As assembly takeoffs are all-inclusive, it is highly recommended that CESS users use assemblies when creating an estimate. If a user opts not to use an assembly, he/she will have to add each individual item takeoff to the cost estimate.
Finding and Selecting Assembly Takeoffs To find and select assemblies in the CESS Spreadsheet:
Figure 2: Assembly Takeoff Icon in Menu Bar
1. Select Assembly Takeoff icon. The Assembly Takeoff box will appear.
Figure 3: Go-To Icon in Menu Bar
2. Click on the Find/Go to icon (binoculars).
Figure 4: Search Box
1
3
5
2
4

Operations and Maintenance: Introduction to the CESS Spreadsheet
February 2011 11
3. Enter key words to locate associated assemblies. Users can search by the material,
work activity, work location, or any combination.
4. Check the „Start from beginning‟ checkbox.
5. Click the Go button.
Note: The search may take a few minutes. Please have patience.
Figure 5: Search Results
6. Double click on the assembly you wish to use. This will highlight the assembly in the assembly list.
NOTE: To get more detail on some of the item lines, words have been abbreviated. In the
following list, some of these abbreviations are shown. Thus, if users are searching on “siding”, they should also do a search for “sdg” to see all items with siding. Sometimes the words are listed as singular; at other times they are plural.
6

Operations and Maintenance: Introduction to the CESS Spreadsheet
February 2011 12
Material Work Activity Work Location
asphalt (asph) Clearing backcountry
brick (brk) electrical (elect, or elec, or electric boardwalk
cabinets (cab) excavate is listed as excav Bridge
carpet finish (finished) campground
columns (col) foundation (fdn) fee station
concrete (conc) install (installed) fireplace
doors (dr) insulation (insul) Floor
drywall Paint foundation
joist (jsts) Plaster manhole
masonry Plastic partitions
paint prepare (prep) railroad
pipe (piping) Repair Road
plaster Replace stairs
plywood (ply) Replanting steps (stepping)
precast (prcst) roof (roofing) trail
siding (sdg) sand (sanded) walkway
steel Sawn walls (wll)
Tile Strip window
windows (wind)
wood (wd)
Figure 6: Takeoff Abbreviations
When the user finds the desired assembly, they can stop the search and select the assembly desired by simply double clicking on the required assembly.
Jump Search
Searching for assemblies and items in CESS can take a great deal of time if you search the entire database. To shorten the search time, you can highlight the group phase of an assembly, and then use the Find/Go To Icon in CESS. This shortcut will “jump” your search to start at the identified group phase.

Operations and Maintenance: Introduction to the CESS Spreadsheet
February 2011 13
Figure 7: Assembly Takeoff Window with Takeoff Highlighted
7. Double click on the assembly to complete the takeoff.
7

Operations and Maintenance: Introduction to the CESS Spreadsheet
February 2011 14
Creating an Estimate Using the Assembly Takeoff
When you select an assembly, variables or „questions‟ associated with the assembly will appear in the Dimensions Pane. The items included in the assembly will appear in the Item Grid.
Figure 8: Dimensions Pane and Item Grid
Using the directions located in the previous section, find and select the assembly you wish to use. The items linked to the assembly will immediately appear on the Item Grid, and the formula variables will appear in the Dimensions pane. The next step is to calculate the quantities for these items.
Dimensions Pane
Item Grid
Operations and Maintenance: Introduction to the CESS Spreadsheet
February 2011 15
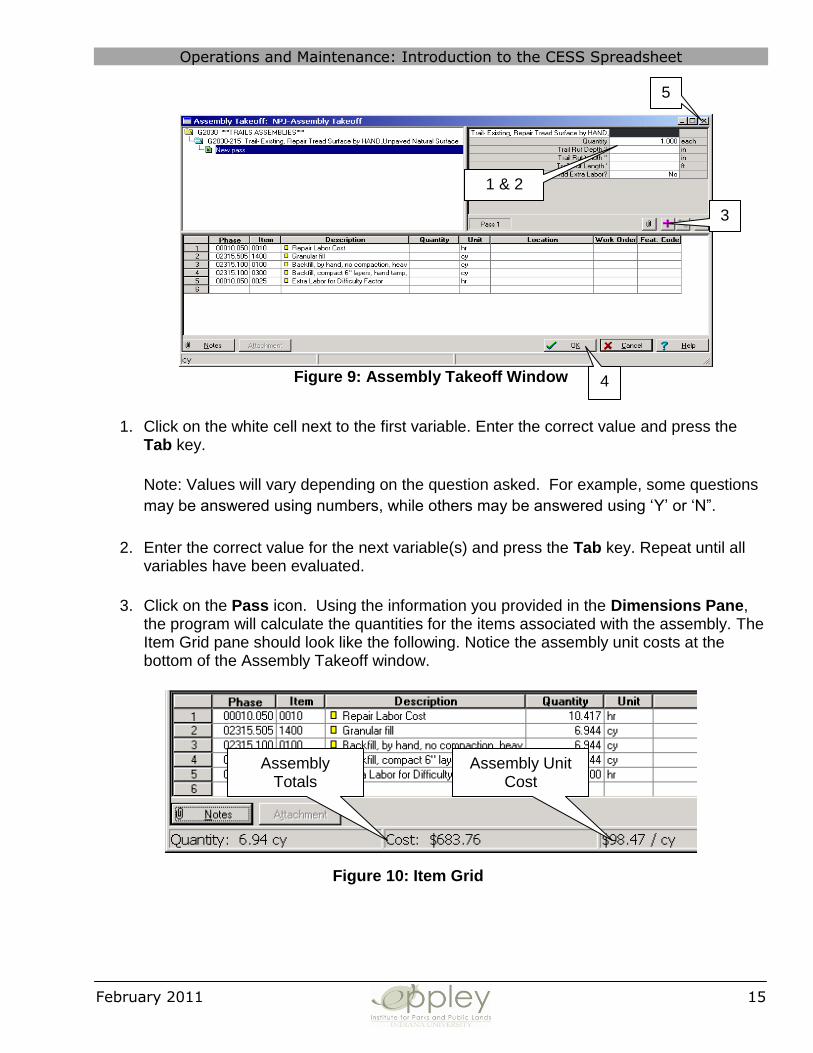
Figure 9: Assembly Takeoff Window
1. Click on the white cell next to the first variable. Enter the correct value and press the
Tab key.
Note: Values will vary depending on the question asked. For example, some questions
may be answered using numbers, while others may be answered using „Y‟ or „N”.
2. Enter the correct value for the next variable(s) and press the Tab key. Repeat until all variables have been evaluated.
3. Click on the Pass icon. Using the information you provided in the Dimensions Pane, the program will calculate the quantities for the items associated with the assembly. The Item Grid pane should look like the following. Notice the assembly unit costs at the bottom of the Assembly Takeoff window.
5
1 & 2
Figure 10: Item Grid
3
4
Assembly Totals
Assembly Unit Cost

Operations and Maintenance: Introduction to the CESS Spreadsheet
February 2011 16
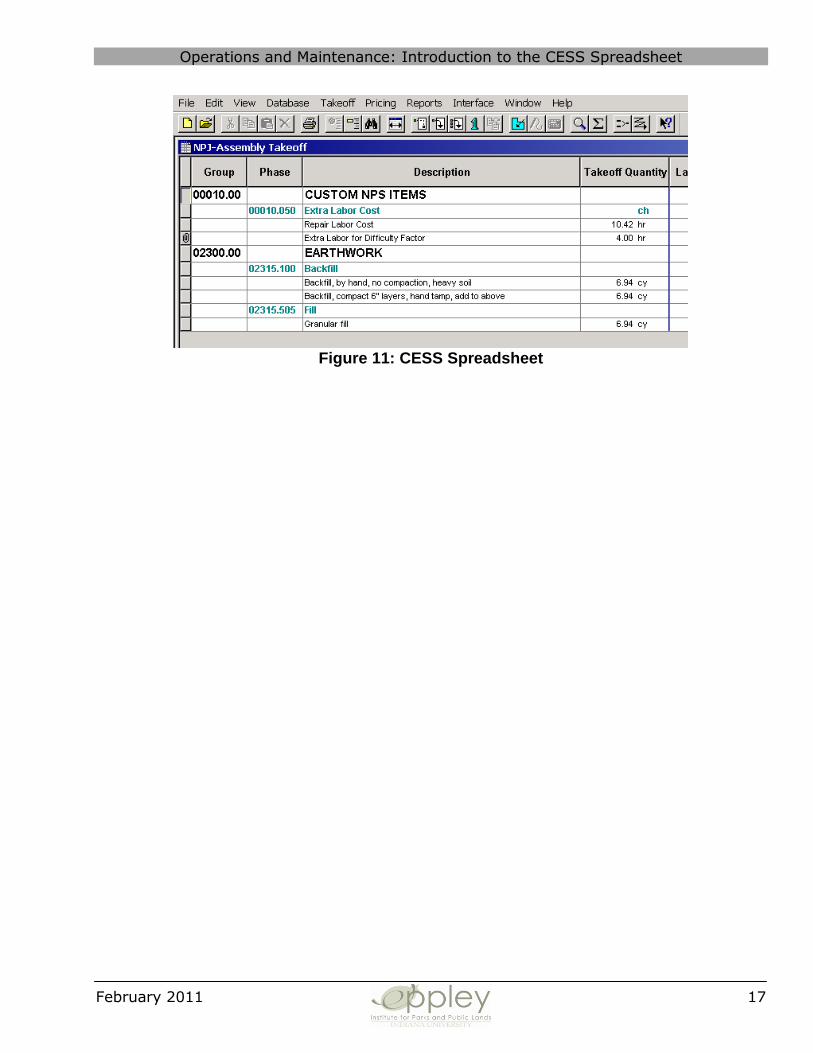
4. Inspect the items in the Item Grid. If everything is in order, click OK. If you wish to delete items, see the directions below.
5. Close the window.
After exiting the Assembly Takeoff Window, the following spreadsheet will appear.
Deleting Items Assembly takeoffs can be customized by deleting items that do not
apply. To delete an item from the takeoff, highlight the item in the Item Grid and hit the Delete key.
Creating Multiple Passes by Mistake Multiple passes can be created by mistake. By creating multiple passes, you are doubling the quantities included in the estimate. The following are examples of when more than one pass is created in error.
1. Pressing the Enter key on the last variable in the Dimension Pane will automatically create a pass. By clicking on the pass icon after pressing Enter, you will create another pass.
2. Accidentally clicking the pass icon twice. In either case, the additional pass can be deleted. To delete the additional pass, click the Undo Last Pass icon located to the far right of the Pass button.
Operations and Maintenance: Introduction to the CESS Spreadsheet
February 2011 17
Figure 11: CESS Spreadsheet

Operations and Maintenance: Introduction to the CESS Spreadsheet
February 2011 18
ITEM TAKEOFF An item takeoff provides a convenient method to takeoff groups of items and quickly calculates their takeoff quantities. Users can review items and modify them for use in the current estimate before generating them to the spreadsheet.
Creating an Estimate Using the Item Takeoff
Figure 12: Item Takeoff Icon in Menu Bar
1. Select Item Takeoff icon. The Item Takeoff box will appear.
Figure 13: Go-To Icon in Menu Bar
2. Click on the Find/Go to icon (binoculars).
Figure 14: Search Box
3. Enter key words to locate items. Users can search by the material, work activity,
work location, or any combination.
4. Click the Go button.
Note: The search may take a few minutes. Please have patience.
1
3
2
4

Operations and Maintenance: Introduction to the CESS Spreadsheet
February 2011 19
Figure 15: Search Results
5. Double click on the takeoff you wish to use. This will add the takeoff to the item grid.
Repeat until you have added all the takeoffs you need for the estimate.
Figure 16: Item Takeoff Window
5
Item Grid

Operations and Maintenance: Introduction to the CESS Spreadsheet
February 2011 20
Figure 17: Item Grid with Takeoff Quantity
Figure 18: Dimensions Pane
6. Enter information specific to the takeoff. This can be done in two ways.
a. Enter the quantity for the takeoff directly in the Item Grid. b. Depending on the type of takeoff you may be asked to answer questions in
the Dimensions Pane. Answer these questions, and click the Pass icon.
7. Click OK.
6a
7
6b 6b

Operations and Maintenance: Introduction to the CESS Spreadsheet
February 2011 21
Figure 19: Item Grid
8. Click Close. This will take you to the Estimate Spreadsheet.
Figure 20: Estimate Spreadsheet
8

Operations and Maintenance: Introduction to the CESS Spreadsheet
February 2011 22
QUICK TAKEOFF
A quick takeoff is useful when a user needs to quickly access one or two items in the database. These items are then sent directly to the spreadsheet, with no option for review. Examples of quick takeoffs include steel doors and hinges.
Creating an Estimate Using a Quick Takeoff
Figure 21: CESS Spreadsheet Toolbar with the Quick Takeoff Icon Highlighted
1. Click on the Quick Takeoff icon located in the toolbar.
Figure 22: Quick Takeoff Box
2. Click on the Search button.
1
2

Operations and Maintenance: Introduction to the CESS Spreadsheet
February 2011 23
Figure 23: Quick Takeoff Search Box
3. Enter a key word or phrase.
4. Click Go.
Figure 24: Quick Takeoff Search Results
3
4

Operations and Maintenance: Introduction to the CESS Spreadsheet
February 2011 24
5. Double-click on the Quick Takeoff you want to add. Repeat if additional takeoffs
are needed.
Figure 25: Final CESS Spreadsheet
Operations and Maintenance: Introduction to the CESS Spreadsheet
February 2011 25
MODEL TAKEOFF
Creating an Estimate Using the Model Takeoff
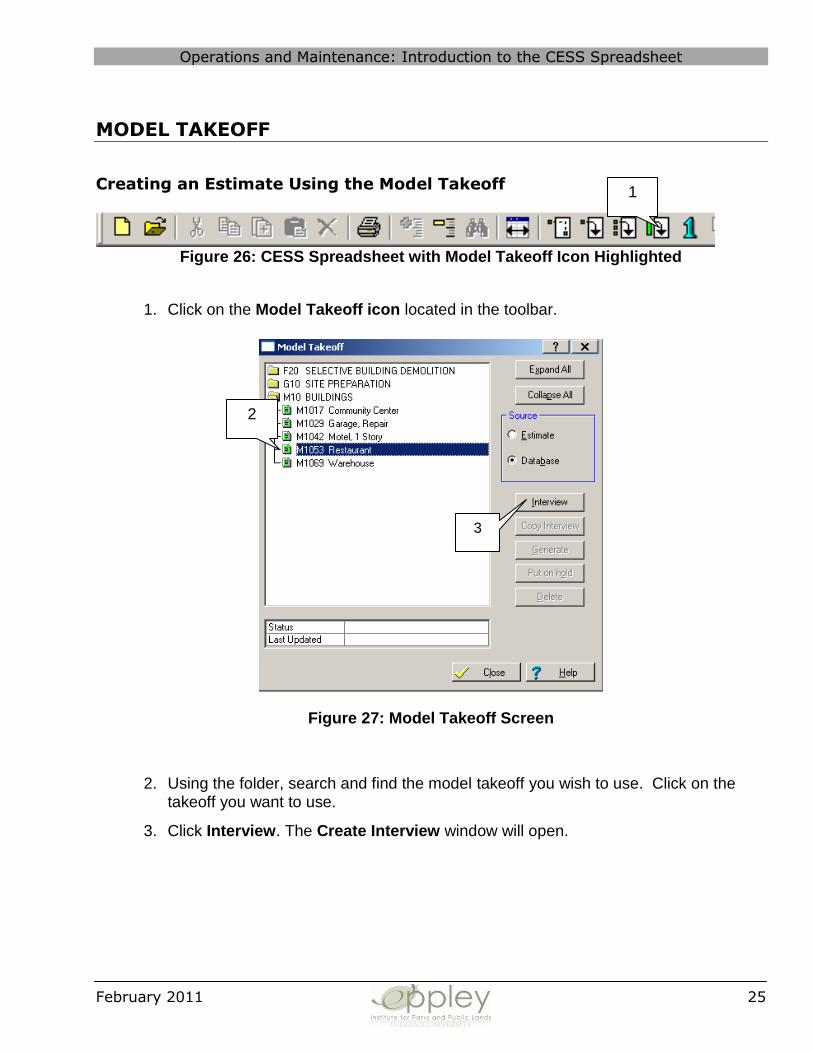
Figure 26: CESS Spreadsheet with Model Takeoff Icon Highlighted
1. Click on the Model Takeoff icon located in the toolbar.
Figure 27: Model Takeoff Screen
2. Using the folder, search and find the model takeoff you wish to use. Click on the takeoff you want to use.
3. Click Interview. The Create Interview window will open.
3
2
1
Operations and Maintenance: Introduction to the CESS Spreadsheet
February 2011 26
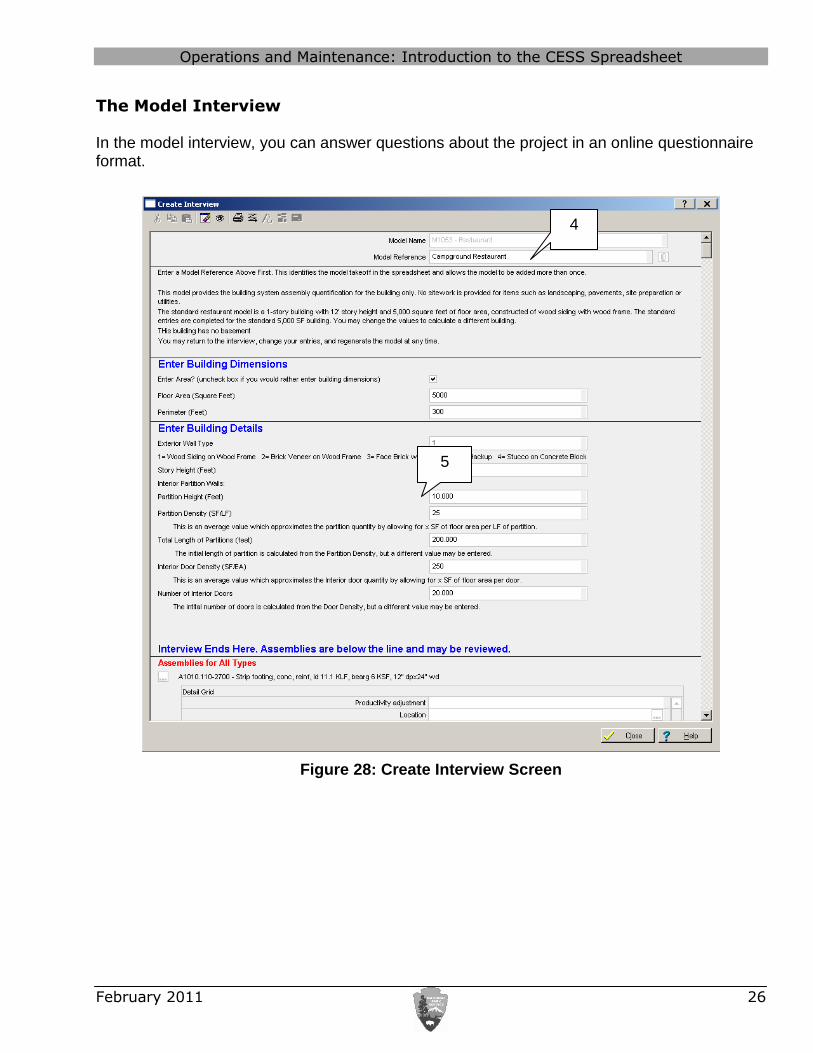
The Model Interview In the model interview, you can answer questions about the project in an online questionnaire format.
Figure 28: Create Interview Screen
4
5

Operations and Maintenance: Introduction to the CESS Spreadsheet
February 2011 27
4. Enter a Model Reference for this model. This can be a name, a number, or a code that you create. This reference will be used later when you want to make changes or adjustments to the model.
5. Answer the questions in the model.
Some questions are answered using check boxes. Others require an alpha-numeric answer.
Sometimes your answer to a particular question may cause other questions to appear or disappear.
Some questions have a specific set of acceptable answers. If this is the case, the available answers are indicated on the screen.

Operations and Maintenance: Introduction to the CESS Spreadsheet
February 2011 28
Review the Assembly Section The second half of most models shows the assemblies that are part of the takeoff. These assemblies have values that automatically fill in based on your answers to the interview questions. Reviewing the assemblies is optional. However, this review will allow you to change values if needed.
Figure 29: Assemblies in a Model Takeoff
Scroll down to the assemblies section of the model. Review the assemblies and change if needed. To adjust the variables, click the Detail Grid and adjust as necessary.
6
7

Operations and Maintenance: Introduction to the CESS Spreadsheet
February 2011 29
Generate the Model After completing the questionnaire and reviewing the assembly, the model can be generated. Generating the model will place all of the items, with the dimensions, amounts, and other information based on your interview questions, into your estimate.
6. Click OK to save the interview questions.
7. Close the window. This will return you to the Model Takeoff window.
Figure 30: Model Takeoff Window
8. Click the Estimate radio button.
This changes the folder list to show the available models in this estimate, not the available models in the database.
8 9

Operations and Maintenance: Introduction to the CESS Spreadsheet
February 2011 30
9. Double-click the folder to expand it.
Figure 31: Model Takeoff Window with Model Reference Highlighted
10. Double click the model folder. This will display the specific model interview you just filled out. Notice that the model name is the reference name you assigned to the model.
A green indicator next to the model reference shows that the model is ready to generate.
A red indicator shows that there are errors that you need to correct first.
11. Click the model reference.
12. Click Generate. This will open the Generate Models window.
10
11
12
Operations and Maintenance: Introduction to the CESS Spreadsheet
February 2011 31
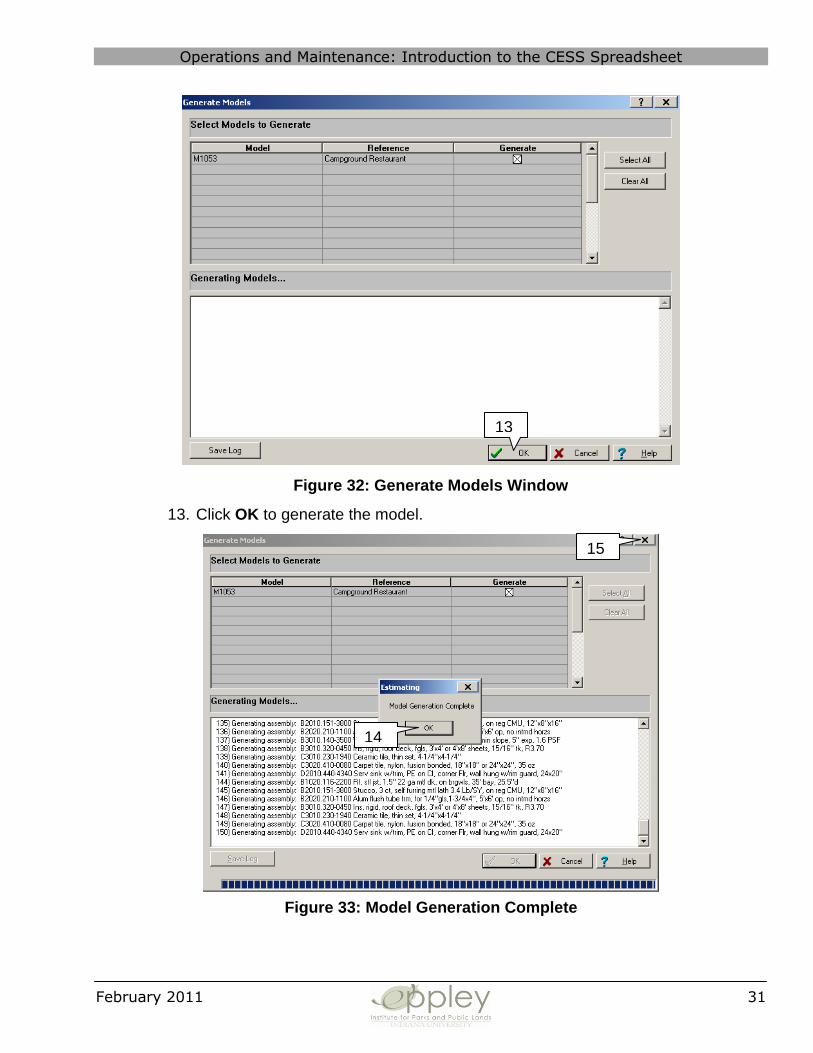
Figure 32: Generate Models Window
13. Click OK to generate the model.
Figure 33: Model Generation Complete
13
14
15

Operations and Maintenance: Introduction to the CESS Spreadsheet
February 2011 32
14. When the model generation finishes, a Model Generation Complete message will appear. Click OK.
15. Close the Generate Models window.
Figure 34: Generated Models
16. Close the Model Takeoff window. This will return you to the estimate.
Indicates generated
model
16

Operations and Maintenance: Introduction to the CESS Spreadsheet
February 2011 33
Figure 35: The Estimate Spreadsheet

Operations and Maintenance: Introduction to the CESS Spreadsheet
February 2011 34
Adjust a Model in an Estimate
After a model is created and generated, users can adjust it in three ways.
A. Make changes to the model and regenerate. The system will automatically add, change, and remove items from the estimate to match the changes made in the model interview.
Figure 36: CESS Spreadsheet Toolbar
1. Click on the Model Takeoff icon located in the toolbar.
Figure 37: Model Takeoff Window with Takeoff Highlighted
2. Find and highlight the model you want to adjust.
3. Click Interview.
4. Make changes where necessary.
5. Generate the model. For step by step procedure, see Creating an Estimate Using a Model Takeoff.
1
2
3

Operations and Maintenance: Introduction to the CESS Spreadsheet
February 2011 35
B. Add a second model to the estimate.
Figure 38: CESS Spreadsheet Toolbar
1. After you have created and generated your first model, click on the Model Takeoff
icon located in the toolbar.
Figure 39: Model Takeoff Window
2. Using the folder, search and find the model takeoff you wish to use. Click on the takeoff you want to use.
3. Click Interview. The Create Interview window will open.
It is important to give this model a unique model reference.
4. Complete the model following the procedure listed under Creating an Estimate Using a Model Takeoff.
3
2
1

Operations and Maintenance: Introduction to the CESS Spreadsheet
February 2011 36
C. Put a model on hold, allowing for users to return at a later date and complete it. 1. Create a model using steps 1 through 7 (under Creating an Estimate Using a Model
Takeoff).
Figure 40: Model Takeoff Window
2. Click Estimate.
3. Highlight the model you want to put on hold.
4. Click Put on hold.
2 3
4

Operations and Maintenance: Introduction to the CESS Spreadsheet
February 2011 37
REMOVING AND SUBSITITUTING ITEMS
Deleting a Row from the Item Grid In some cases, it might be necessary to remove items from the Item Grid. For example, an assembly for paving a parking lot may include installation of parking bumpers. If your parking lot will not have parking bumpers, this item should be removed from the takeoff. Items can be removed from any type of takeoff. By deleting the items in the Item Grid, they will not appear in the estimate spreadsheet.
Figure 41: Removing an Item from the Item Grid
1. Right-click on the row number of the item you want to delete. 2. Select Delete Row. A pop-up box will appear asking you to confirm the deletion.
Figure 42: Confirm Deletion
3. Click OK. The item has been removed from the Item Grid, and will not be added to the Spreadsheet.
1
2
3

Operations and Maintenance: Introduction to the CESS Spreadsheet
February 2011 38
Substituting Items in the CESS Spreadsheet An assembly takeoff is a compilation of item takeoffs. In some cases, you may have to substitute an item in the takeoff for another item. For example, the assembly for the installation of bathroom accessories includes a grab bar that is 42” long with a 1¼” diameter. The rest of the assembly is correct, however the grab bar needed has a 2½” diameter. This problem can be solved by substituting the incorrect grab bar with the larger grab bar. Items can be substituted in any type of takeoff.
Figure 43: Spreadsheet with Item Highlighted
1. Highlight the item you need to change.
1

Operations and Maintenance: Introduction to the CESS Spreadsheet
February 2011 39
Figure 44: Menu with Substitute Item Highlighted
2. Right click on the left-hand square.
3. Select Substitute Item.
3
2

Operations and Maintenance: Introduction to the CESS Spreadsheet
February 2011 40
Figure 45: Selecting a Substitute from the Item List
4. Select the item you want to use as a substitute.
5. Click OK.
Figure 46: Spreadsheet with Substituted Item
4
5

Operations and Maintenance: Introduction to the CESS Spreadsheet
February 2011 41
Deleting Items from the Spreadsheet A situation may arise when a user may have to delete an item from the Spreadsheet. Items can be deleted from the Spreadsheet. The process is the same, regardless of what type of takeoff was used.
Figure 47: Spreadsheet with Item Highlighted
1. Highlight the item you want to delete.
2. Right-click on the left-hand box.
Figure 48: Drop Down Menu with Delete Row Highlighted
1
2
3
Operations and Maintenance: Introduction to the CESS Spreadsheet
February 2011 42
3. Select Delete Row.
Figure 49: Confirm the Deletion
4. Confirm the deletion.
Figure 50: Finished Spreadsheet
Before closing the spreadsheet, go to the Totals symbol and review the “Add ons”.
Reviewing Add-ons Add-ons are additional considerations that drive costs for cost estimated projects. In the NPS, there are five different factors that must be considered when developing a cost estimate for. These factors must be added to the estimate to ensure that the estimate is as accurate as possible. Add-ons have a default percentage, and can be adjusted depending on the project. Keep in mind that even though add-ons can be adjusted, the new percentages may not be acceptable. Errors may occur during the validation process that will make the CESS user re-enter the CESS spreadsheet and readjust the add-on percentages.
4

Operations and Maintenance: Introduction to the CESS Spreadsheet
February 2011 43
Add-ons
Historic Preservation Factor defaults to 0%, but can be increased up to 100%, dependent upon the level of historic techniques and materials required.
Design contingency costs are miscellaneous costs, change orders, and/ “things that go wrong.” They should NOT be confused with design cost or construction contingencies. The CESS program automatically factors design contingency into the cost estimate. It defaults to 20%, but can be manually reduced to as low as 0%.
Overhead are the costs that a contractor has for doing business. A general contractor has expenses not directly related to the construction of a project but which are vital to the contractor’s business operations. These include fixed overhead (Federal and State Unemployment costs, Social Security Tax, Builder’s Risk Insurance and Public Liability Costs) and variable overhead (Worker’s Compensation Insurance, Main Office Overhead, etc.). In CESS, overhead costs default to 15%. It may adjust up to 20% or down to 0%.
Profit percentage is variable on the size of the job and a contractor’s annual billing. Contractors generally take more profit on a smaller job. However, in CESS, profit defaults to 12% and may be adjusted up to 20% or down to 0%.
General & Administrative (a.k.a., general requirements) are the costs to the government from the contractor that are the cost items defined in the Division 1 specifications for a project. Sometimes some Division 1 items (Profit & Overhead) are included in the cost of individual bid items when preparing an estimate. The following items are costs that the contractor passes on to the NPS through bid items; these are indirect costs of the construction of the project.
Administrative Requirements (Permits, Bonds, Scheduling, Submittals Quality Requirements (Testing, Sampling) Temporary Facilities (Utilities, Trailers, Scaffolding, Tarpaulins,
Barricades, Fences, Signs) Equipment Rental Cleaning Commissioning (As-Builts, Punchlists, Training O&M Manuals)
NPS pays for these even though they are lumped into the contractor’s individual bid items. They run from 4 to 20 percent depending on the size, location, and complexity and other variables of the project and estimate. CESS will default to 15% and may be adjusted up to 20% or down to 4%. If this addon is set lower than 4%, the estimate cannot be validated.
CCI factor is a CESS City Cost Index feature located in the Estimate Information screen. This percentage is variable dependent on your park location and does not appear in the totals screen.

Operations and Maintenance: Introduction to the CESS Spreadsheet
February 2011 44
VALIDATING AND EXPORTING COST ESTIMATES After you are satisfied with your cost estimate, the estimate must be validated and then exported to the Facility Management Software System (FMSS). The validation and export processes occur within the CESS Interface.
Validating a Cost Estimate
Figure 51: Exiting the CESS Spreadsheet
1. Exit out of the estimate and the CESS Spreadsheet. This will take you back to
the CESS Interface.
Figure 52: The CESS Interface
2. Double-click on the Status Field.
1 1
2

Operations and Maintenance: Introduction to the CESS Spreadsheet
February 2011 45
Figure 53: Edit Estimate Screen
3. Change the Status to COMPLETED.
4. Click Finish.
Figure 54: Estimate with Completed Status
5. Click on the Validation Tab.
3
4
5
Operations and Maintenance: Introduction to the CESS Spreadsheet
February 2011 46
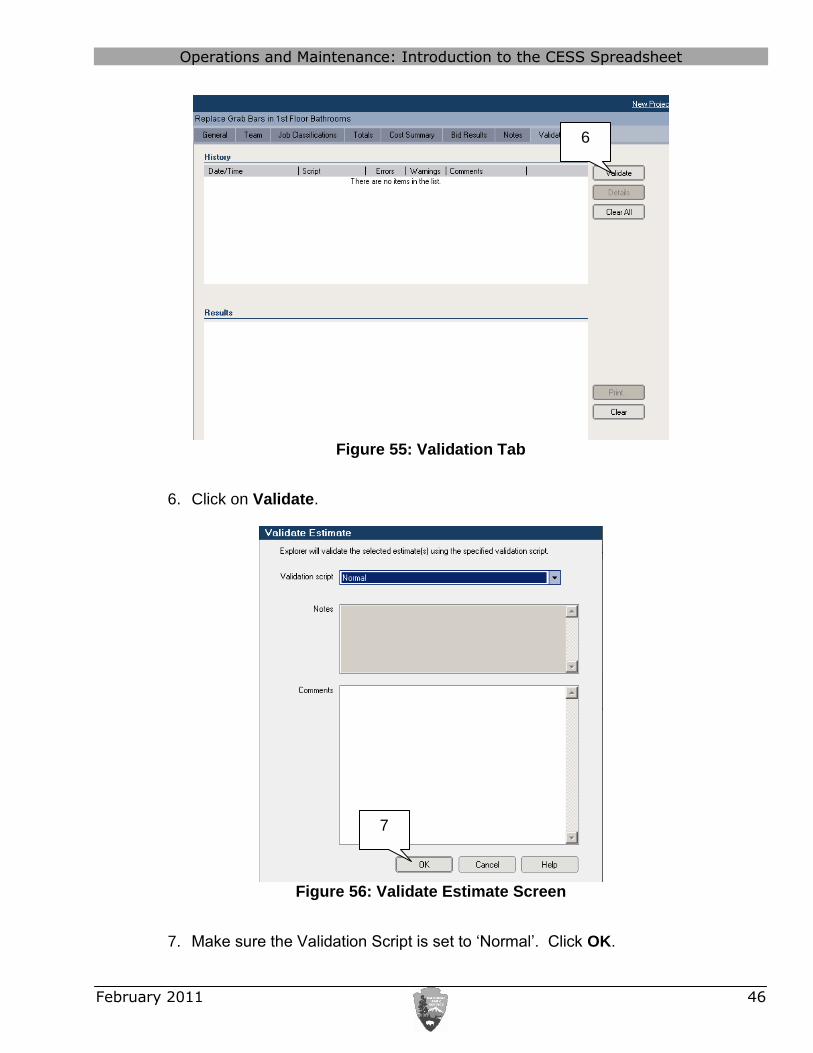
Figure 55: Validation Tab
6. Click on Validate.
Figure 56: Validate Estimate Screen
7. Make sure the Validation Script is set to „Normal‟. Click OK.
6
7

Operations and Maintenance: Introduction to the CESS Spreadsheet
February 2011 47
Figure 57: Successful Validation
Figure 58: Menus Used in Exporting Estimate Information
8
9 10

Operations and Maintenance: Introduction to the CESS Spreadsheet
February 2011 48
8. After the estimate is successfully validated, right click on the estimate number in the Folders Pane.
9. Select Send To.
10. Click Maximo. This will export the estimate information to the FMSS. If the export is successful, the status will automatically change to „EXPORTED‟ (as seen in Figure 58).
Figure 59: Estimate with Exported Status
Operations and Maintenance: Introduction to the CESS Spreadsheet
February 2011 49
ADJUSTING COST ESTIMATES There are a number of situations in which a cost estimate may need to be adjusted. For example, you may want to clear your prices and enter in supplier quotes. Or, you may want to replace historical prices with current price information. The CESS Spreadsheet allows users to update and clear prices to create more accurate estimates. A CESS Guide that outlines the procedures for re-pricing estimates and clearing estimate prices is found on InsideNPS http://inside.nps.gov/waso/custommenu.cfm?lv=4&prg=190&id=5153. Before going in to edit a cost estimate, understand that the process can be cumbersome and time-intensive and that it may be easier to simply create a new one. Also, it is important to note that if the estimate was created prior to 2008, a new cost estimate must be created.
1.
2.
Great caution should be taken before re-pricing an estimate or clearing price information. The CESS Spreadsheet saves changes automatically, thus it is highly recommended that users back up their estimates using File Tools.

Operations and Maintenance: Introduction to the CESS Spreadsheet
February 2011 50
DELETING COST ESTIMATES
Estimates created in the CESS identify the date of the cost database used. If this date is prior to the 2008 cost database, it is simpler to delete the cost estimate and re-estimate the work. Not only is the scope of work likely to have changed since 2008, but the organization of the data in CESS has changed, preventing you from re-costing the estimate. Work Orders that have major scope changes with an estimate cost from 2008 or later may also be deleted and re-estimated.
The following steps show how to delete an estimate that is initiated in the CESS interface.
Figure 60: The CESS Interface
1. Locate the estimate you wish to delete and double click on it in the Folder Pane. The
estimate spreadsheet will open in the CESS.
1

Operations and Maintenance: Introduction to the CESS Spreadsheet
February 2011 51
Figure 61: Estimate Spreadsheet
2. Close the spreadsheet using the lower „X‟. Do not use the upper „X‟, as this will close
the program.
2

Operations and Maintenance: Introduction to the CESS Spreadsheet
February 2011 52
Figure 62: Delete Estimate
3. Select File.
4. Select Delete Estimate.
3
4
Operations and Maintenance: Introduction to the CESS Spreadsheet
February 2011 53
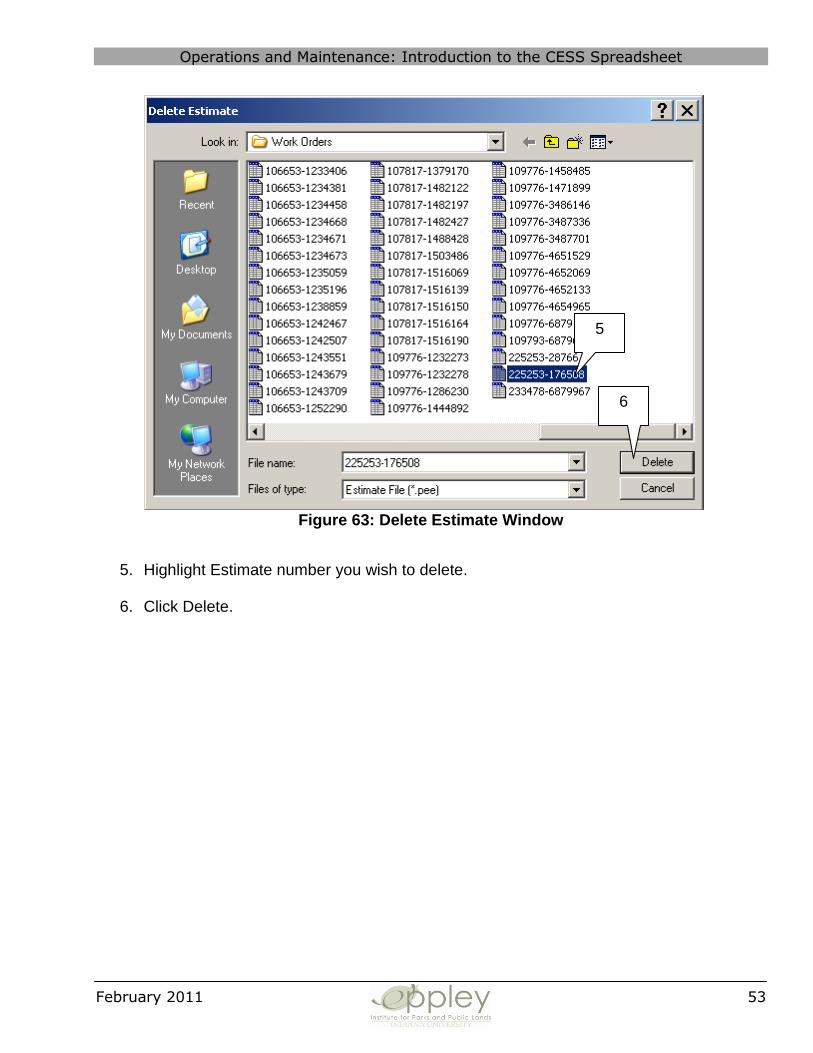
Figure 63: Delete Estimate Window
5. Highlight Estimate number you wish to delete.
6. Click Delete.
5
6

Operations and Maintenance: Introduction to the CESS Spreadsheet
February 2011 54
Figure 64: Delete Estimate Files
7. Click „Yes‟ to confirm your estimate.
The blank spreadsheet will show. Close the CESS Spreadsheet, and you will return to the CESS Interface.
8. Return to the FMSS and open the work order that the estimated was deleted from.
NOTE: Your deleted estimate will still show until you refresh the CESS Interface.
7

Operations and Maintenance: Introduction to the CESS Spreadsheet
February 2011 55
Figure 65: Change Status
9. Click on the Change Status Icon.
10. Using the New Status pick list select Waiting for Estimate (WACOST).
NOTE: Your original estimate will be retained in the Plans tab until you re-estimate. You do not need to delete it in the FMSS as it will be overwritten when the new estimate is processed.
The process to create an estimate is the same as if this work order had never been estimated. See Operations and Maintenance: Introduction to the Cost Estimating Software System (CESS) – Interface E-course. The estimate status however will be Revised until a new estimate is completed.
9
10

Operations and Maintenance: Introduction to the CESS Spreadsheet
February 2011 56
APPENDICES
Operations and Maintenance: Introduction to the CESS Spreadsheet
February 2011 57
APPENDIX A: ASSEMBLIES IN THE CESS DATABASE Assemblies in the database are organized using the CSI Uniformat II coding system. When searching for assemblies in the Assembly Takeoff window, it is possible to skip to a different section of assemblies by typing an upper-case letter.
The assemblies beginning with A through G are for new construction.
A Substructure new construction.
B Shell (superstructure) new construction.
C Interiors
D Services
E Equipment and Furnishings
F Special Construction
G Building Sitework
The remaining assemblies are divided into specific types.
H is for ADA (Americans with Disabilities Act) assemblies.
The second letter of ADA assemblies corresponds to the letters A through G describing the type of construction. For example, HB is for ADA assemblies on the shell (superstructure). HE is for ADA assemblies for equipment and furnishings, etc.
M is for maintenance and repair assemblies. The second letter corresponds to the letters A through G describing the type of construction.
P is for preventive maintenance assemblies. The second letter corresponds to the letters A through G describing the type of construction.
R is for railroad assemblies.
Operations and Maintenance: Introduction to the CESS Spreadsheet
February 2011 58
APPENDIX B: THE CESS GLOSSARY Addon: A factor that adds “mark-up” costs to the estimate. Factors include Historic Preservation, Contingencies, General Conditions, and Overhead & Profit. Allocatable: A property of an addon that causes it to be distributed among specified estimate costs (labor, material, and equipment). The Historic Preservation factor, the design contingency, the NPS factor, and the Park Location factor are distributed between the labor, material and equipment costs in the FMSS Work Order Cost tab screen. Assemblies: A collection of items needed to complete a particular activity or unit of work. Assemblies allow multiple items to be taken off in a single operation. Assemblies are grouped and indexed by Uniformat (i.e., wall systems, foundation systems, HVAC systems, etc.). City Cost Index: A CESS City Cost Index feature located in the Estimate Information screen. This percentage is variable dependent on your park location and does not appear in the totals screen.
Database: The cost data that is used to create an estimate. All cost elements are contained in the database. Equipment (Tools) Amount: The cost of equipment (machines, tools, or apparatus) required to complete a corrective action (e.g., the equipment cost for hauling excavated or borrowed material two miles round trip with a six cubic yard dump truck is $1.90/cubic yard, not including cost for loading). Estimating Factor: Assumptive conditions that drive costs for cost estimating projects. These six factors (CCI Factor, Historic Preservation Factor, Design Contingency, Overhead, Profit, and General & Administrative) must be considered when developing a cost estimate. Group Phase: A major section of the CESS cost data. These relate to the Level 1 and 2 CSI Masterformat sections. Item: Individual building block for estimates that track quantities, hours, and costs. Labor Amount: The cost of the labor (human effort or work) required to complete a corrective action (e.g., the cost to install 5/8” thick gypsum plasterboard (drywall) on walls not including finish is $0.23/square foot). Subcontract and Other amounts are treated as Labor costs in FMSS. Material Amount: The cost of the materials (parts, goods, stock) required to complete a scope or work (e.g., the material cost to install 5/8” thick gypsum plasterboard (drywall) is $0.26/square foot). Phase: A minor section of the CESS cost data which relates to the Level 3 and 4 CSI (Construction Specification Institute) Masterformat sections.

Operations and Maintenance: Introduction to the CESS Spreadsheet
February 2011 59
Service Cost: The Service Cost field in the FMSS Work Order Cost tab screen is the summation of general conditions and overhead & profit addons in CESS. Service Cost reflects the estimated costs of outsourcing the project. Spreadsheet: The primary view of the cost estimate. Cost data from the database is copied into the spreadsheet. Takeoff: A method of selecting and quantifying items or assemblies needed for a particular estimate. There are a variety of takeoffs, including Quick Takeoff, Item Takeoff, Model Takeoff, and Assembly Takeoff. Unit Price: Prices broken down by a measurable unit. For example: most excavation is generally measured in cubic yards, so prices would be given in $/cubic yard.