operator guide automixer ii plus - frank's hospital...
TRANSCRIPT
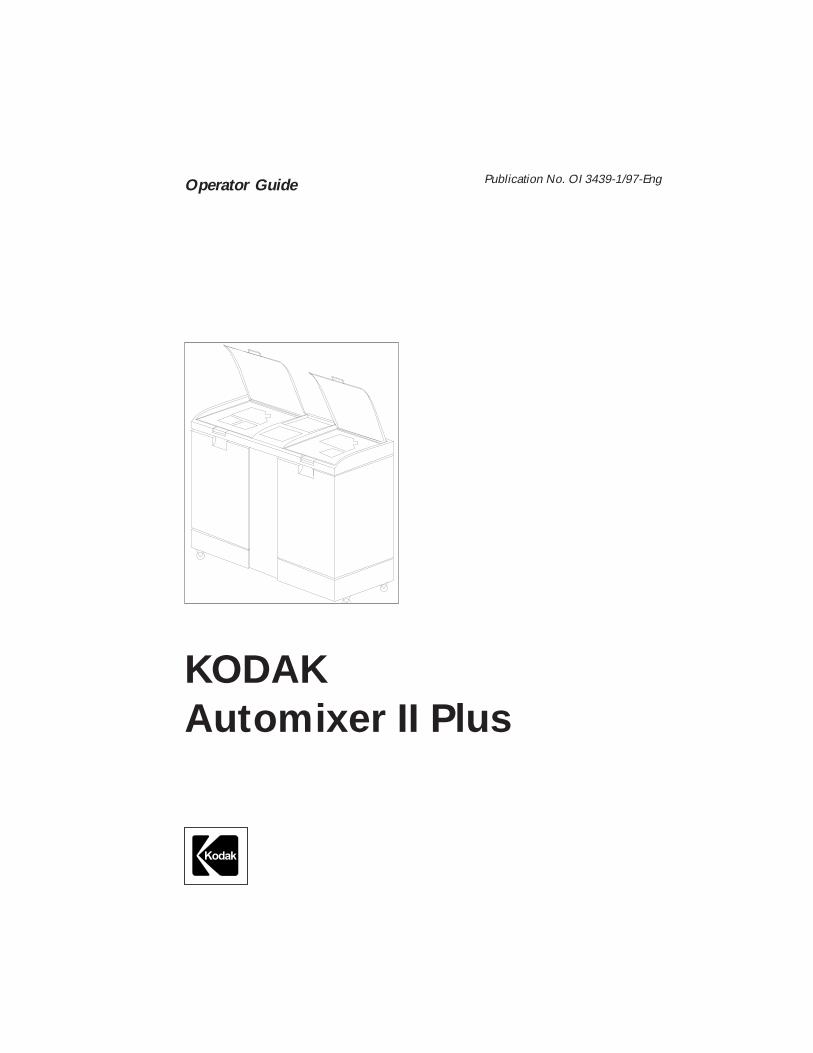
Operator Guide
KODAK
Automixer II Plus
Kodak
Publication No. OI 3439-1/97-Eng
PLEASE NOTE
The information contained herein is based on the experience and knowledge relating to the subjectmatter gained by Kodak prior to publication. No patent license is granted by this information. Kodakreserves the right to change this information without notice, and makes no warranty, expressed orimplied, with respect to this information.
© Kodak AG, Stuttgart 1996
i i
Table of Contents
1. GENERAL INFORMATION . . . . . . . . . . . . . . . . . . . . . . . . . . . . . . . . . . . . . . . . . 1
Description. . . . . . . . . . . . . . . . . . . . . . . . . . . . . . . . . . . . . . . . . . . . . . . . . . . . 1Installation . . . . . . . . . . . . . . . . . . . . . . . . . . . . . . . . . . . . . . . . . . . . . . . . . . . . 1Warnings . . . . . . . . . . . . . . . . . . . . . . . . . . . . . . . . . . . . . . . . . . . . . . . . . . . . . 2Approvals, safety standards and water requirements . . . . . . . . . . . . . . . . . . . 2Views and description of control units . . . . . . . . . . . . . . . . . . . . . . . . . . . . . . 3
Front view . . . . . . . . . . . . . . . . . . . . . . . . . . . . . . . . . . . . . . . . . . . . . . . . 3Tanks . . . . . . . . . . . . . . . . . . . . . . . . . . . . . . . . . . . . . . . . . . . . . . . . . . . . 3Rear view: Inlets/outlets/switches . . . . . . . . . . . . . . . . . . . . . . . . . . . . . . 4
Main switch . . . . . . . . . . . . . . . . . . . . . . . . . . . . . . . . . . . . . . . . . . . 5Selector switch 20 l/40 l (5 gal/10 gal). . . . . . . . . . . . . . . . . . . . . . . 5Remote alarm unit (remote indicator). . . . . . . . . . . . . . . . . . . . . . . . 5
Control panel . . . . . . . . . . . . . . . . . . . . . . . . . . . . . . . . . . . . . . . . . . . . . 6Power-on indicator . . . . . . . . . . . . . . . . . . . . . . . . . . . . . . . . . . . . . . 7Developer/fixer low level warning lights . . . . . . . . . . . . . . . . . . . . . 7Overflow warning light . . . . . . . . . . . . . . . . . . . . . . . . . . . . . . . . . . . 7Bottle rinse indicators . . . . . . . . . . . . . . . . . . . . . . . . . . . . . . . . . . . . 7
Manual control panel . . . . . . . . . . . . . . . . . . . . . . . . . . . . . . . . . . . . . . . 8Water supply buttons . . . . . . . . . . . . . . . . . . . . . . . . . . . . . . . . . . . . 9Pump buttons . . . . . . . . . . . . . . . . . . . . . . . . . . . . . . . . . . . . . . . . . . 9
Manual valves and drain/refilling outlets. . . . . . . . . . . . . . . . . . . . . . . . 10
2. OPERATION. . . . . . . . . . . . . . . . . . . . . . . . . . . . . . . . . . . . . . . . . . . . . . . . . . . . 11
Switching on . . . . . . . . . . . . . . . . . . . . . . . . . . . . . . . . . . . . . . . . . . . . . . . . . 11Switching off . . . . . . . . . . . . . . . . . . . . . . . . . . . . . . . . . . . . . . . . . . . . . . . . . 12Preparation of chemicals . . . . . . . . . . . . . . . . . . . . . . . . . . . . . . . . . . . . . . . . 13
Solution at low level. . . . . . . . . . . . . . . . . . . . . . . . . . . . . . . . . . . . . . . 14Start-up/priming . . . . . . . . . . . . . . . . . . . . . . . . . . . . . . . . . . . . . . . . . . 17
Filling the processor tanks . . . . . . . . . . . . . . . . . . . . . . . . . . . . . . . . . . . . . . . 19Draining . . . . . . . . . . . . . . . . . . . . . . . . . . . . . . . . . . . . . . . . . . . . . . . . . . . . . 22Cleaning. . . . . . . . . . . . . . . . . . . . . . . . . . . . . . . . . . . . . . . . . . . . . . . . . . . . . 25Moving the Automixer II Plus . . . . . . . . . . . . . . . . . . . . . . . . . . . . . . . . . . . . 27
3. MAINTENANCE . . . . . . . . . . . . . . . . . . . . . . . . . . . . . . . . . . . . . . . . . . . . . . . . . 28
Weekly . . . . . . . . . . . . . . . . . . . . . . . . . . . . . . . . . . . . . . . . . . . . . . . . . . . . . . 28Once a year . . . . . . . . . . . . . . . . . . . . . . . . . . . . . . . . . . . . . . . . . . . . . . . . . . 28Chemistry . . . . . . . . . . . . . . . . . . . . . . . . . . . . . . . . . . . . . . . . . . . . . . . . . . . . 28Oxidation . . . . . . . . . . . . . . . . . . . . . . . . . . . . . . . . . . . . . . . . . . . . . . . . . . . . 28
4. TROUBLESHOOTING . . . . . . . . . . . . . . . . . . . . . . . . . . . . . . . . . . . . . . . . . . . . 29
5. SPECIFICATION . . . . . . . . . . . . . . . . . . . . . . . . . . . . . . . . . . . . . . . . . . . . . . . . . 30
I

II

1. GENERAL INFORMATION
Description
The KODAK Automixer II Plus is designed to automatically prepare the processingchemicals for X-ray films from Kodak chemical concentrates supplied in sealed bottles.
The KODAK Automixer II Plus is composed of the following main parts:
- developer unit on the left- fixer unit on the right- manual control area in between,
containing all electrical parts, mechanical parts, and the tubing.
The developer unit and fixer unit both have three main sections. From top to bottom:
- concentrate input section (with bottle rinsing feature)- mixing tank- holding tank from which the solution is drawn off to the processor.
Removable parts and controls are colour-coded to avoid confusion between developer andfixer. The same colour code is used on the KODAK developer/replenisher, and KODAKfixer/replenisher bottles themselves:
Developer: REDFixer: BLUE
At the manufacturing plant all KODAK Automixers II Plus will be adjusted for developerand fixer preparation of 40 liters each. The unit is provided with a switch at the rear bymeans of which a developer and fixer preparation of 20 litres each can be chosen.
Installation
The KODAK Automixer II Plus is installed and levelled by a Kodak Service Provider andadjusted to one of the following mixing quantities:
20 l/40 l (Europe) RP Chemistry5 gal/10 gal (US) RP or RA Chemistry
On installation, the KODAK Automixer II Plus will be provided with the correct fuserating by the Kodak Service Provider, who will also adjust the correct line voltage (theadjusted voltage can be seen through the window of the FUSECAP).
OI 3439 1

WARNINGS:
The installation of the KODAK Automixer II Plus must be performed by a qualifiedKodak Service Provider.
The operation of the KODAK Automixer II Plus must be performed by qualified andinstructed personnel only.
Dangerous voltages are present in the KODAK Automixer II Plus.The operator may only open Developer Top Cover, Fixer Top Cover, Front Panel
and Back Panel (see figures 1 and 2 on pages 3 and 4).The unit may only be opened by a qualified Kodak Service Provider.
Do not change the selected voltage at the VOLTAGE SELECTOR (figure 2 on page4) yourself. It must always show the correct line voltage. A wrong voltage selection
could cause damage to the KODAK Automixer II Plus.
Before the chemicals are prepared, the operator should read the warninginstructions on the bottles of concentrate carefully.
Chemicals can be irritating to your skin. Personnel sensitive to chemicals shouldavoid contact with skin. In case of skin contact, wash relevant area with clean soap
and rinse with plenty of water. Avoid contact with eyes. In case of contact witheyes, rinse immediately with plenty of water and seek medical advice.
Wear suitable protective clothing, gloves and eye/face protection when preparingthe chemical solutions, and during cleaning and maintenance procedures.
Approvals and Safety Standards
The KODAK Automixer II Plus conforms with international safety requirements and bearsthe following safety marks:
- UL (Underwriter Laboratories) - UL 122- CUL (Canadian Standard Association) - CSA 22.2. No. 950- GS (TÜV Rhineland) - EN 60950/IEC 950
The KODAK Automixer II Plus complies with the EMC directive 89/336/EEC and bears theCE mark.
Water Requirements
DVGW Sign No. U 524DIN 1988
UK Water Byelaw
2 OI 3439

Views and description of control units
Front view
A. Control PanelB. Top Cover - DeveloperC. Top Cover - FixerD. Handling RecessE. Front PanelF. Casters
Tanks
A
B
D
E
G
H
I
J
F
C
figure 1: Front view
G. Fixer Mixing TankH. Developer Mixing TankI. Fixer Holding TankJ. Developer Holding Tank
OI 3439 3

Rear view: Inlets/outlets/switches
A. Fuse with Voltage Selector (a)Main Switch (b)Receptacle for Power Cord (c)Selector Switch 20 l/40 l or 5 gal/10 gal (d)Remote Control Socket (e)
B. Fixer Replenishment OutletC. Overflow OutletsD. Water Inlet (hose not provided)E. Developer Replenishment OutletF. Back Panel
I O
A
F
B C D C E
e
a
d
c
b
figure 2: Inlets/outlets
4 OI 3439

- Main switch (see item b of figure 2 on page 4)
The KODAK Automixer II Plus can be switched off at any time by the mainswitch which is situated at the back of the unit. When switched on again,due to its permanent memory the logic of the KODAK Automixer II Plus willbe in the same status as it was before you switched off. When switching offthe main switch, holding and mixing tanks are separated so that only thesolutions of the holding tanks are available for the processing machine. Thereis no indication in cases when the whole solution of a holding tank hasbeen used - for that reason the KODAK Automixer II Plus has to remainswitched on whenever the processing machine is on.
- Selector switch 20 l/40 l or 5 gal/10 gal (see item d of figure 2 on page 4)
This switch offers the possibility of choosing either the maximum quantity ofchemical solutions to be prepared or half of that quantity. Choosing only halfof the maximum quantity might, for example, be useful when for a certainperiod of time you have to develop less films than usual.The required switch position should be chosen before starting the refillingprocess.
- Remote alarm unit (remote indicator)
This optional unit is equipped with a 10 mcable to be plugged into the “remotecontrol socket” situated behind the rearpanel.A remote control might be helpful in caseswhen the KODAK Automixer II Plus hasbeen installed in places where theinformation on the control panel is notvisible all the time. In order to plug in theremote control, you have to remove theback panel which should be reinsertedafterwards.
This remote alarm unit repeats the alarms(lights and buzzer), except that there is onlyone light for both developer and fixer levelwarning. An overflow condition will beindicated by a light (LED) and a continuoussound.
Remote Alarm Unit
Kodak
Kodak AUTOMIXER II
figure 3: Remote alarm unit
OI 3439 5

Control panel
A. Developer Low Level Warning LightB. Overflow Warning LightC. Power-On IndicatorD. Fixer Low Level Warning LightE. Bottle Rinse Indicator - DeveloperF. Bottle Rinse Indicator - Fixer
The control panel is situated in the middle of the top of the KODAK Automixer II Plus.
DEVELOPER FIXER
KODAKAutomixer II Plus
Kodak
A
E
D
F
B
Cfigure 4: Control Panel
6 OI 3439

- Power-on indicator (see item C of figure 4 on page 6)
This red LED is illuminated when the power is on.
- Developer low level warning light (see item A of figure 4 on page 6),fixer low level warning light (see item D of figure 4 on page 6)
When one of these indicator lights is on and the buzzer soundsintermittently, the operator must recharge the corresponding mixing tank withconcentrate.
- Overflow warning light (see item B of figure 4 on page 6)
This indicator will be lit continuously whenever either tank overflows, andthe buzzer will sound continuously (see chapter “Troubleshooting”).
It will be lit intermittently whenever the water tap is closed and water isrequired from the system. In this case, the buzzer will also soundintermittently.
- Bottle rinse indicator - Developer (see item E of figure 4 on page 6),Bottle rinse indicator - Fixer (see item F of figure 4 on page 6)
While one of these indicators is blinking, you should not remove therespective bottles from the rinsing unit. The light will go off some time afterthe bottles have been rinsed. The time is necessary for the bottles to stopdripping.
OI 3439 7

Manual control panel
The manual control panel is necessary for- start-up/priming of chemicals- filling the processor with chemicals- draining the KODAK Automixer II Plus- cleaning the KODAK Automixer II Plus.
The manual control panel is situated behind the front panel. To remove the front panel,just pull out its lower end and disengage it (see figure 5). Remember: As soon as the frontpanel is removed, the KODAK Automixer II Plus goes into the manual mode. The switcheson the manual control panel are “ON/OFF” (O/I) switches. If a switch is on, “I” isilluminated (see figure 7).
CAUTION:
Never remove the front panel when either unit is in the mixing mode, i.e. less than 10minutes after the new chemicals have been added. If you do so, a quick acoustic
warning signal will start.The operation will continue when you replace the panel.
figure 5: Removing the front panel
8 OI 3439

- Water supply buttons
With the upper push buttons (A and B) on the manual control panel, thewater supply for either developer mixing tank (A) or fixer mixing tank (B) orboth, can be activated. Pressing a push button once activates the watersupply, pressing it again deactivates it. (See figure 7.)
CAUTION:
Do not press the water supply buttons, unless you want to clean theKODAK Automixer II Plus. Otherwise, your chemical solutions would be diluted.
- Pump buttons
Pressing either (or both) of the pump buttons (C and D) will start the pumpfor either mixing or draining operations, according to the position of themanual valves. Press again to stop the operation. (See figure 7.)
C
Manualcontrolpanel
fig. 6: KODAK Automixer II Plus with front panel removed
D
figure 7: Manual control panel
OI 3439 9

Manual valves and drain/refilling outlets
A. Manual valve for developer C. Drain/refilling outlet for developerB. Manual valve for fixer D. Drain/refilling outlet for fixer
- Manual valves
Always check that the corresponding manual valve is in the proper positionwhen starting and stopping the pump. The safe position of the valves is the“mixing” position, i.e. valve pointing upwards. The flow is then directed fromthe pump back to the mixing tank for mixing purposes.
CAUTION:
Chemical spills can result from incorrect positioning of the manual valves.
- Drain/refilling outlet
When the fixer or developer manual valve (or both) is in the “drain” positionand the fixer or developer pump (or both) is switched on (pump buttons onthe manual control panel), the solution is sent out through either thedeveloper outlet (C) or the fixer outlet (D). Each outlet should have a 12 mminternal diameter tube connected, so that the solution can be sent either to acontainer or to a processor tank.
NOTE:
In order to avoid an unintentional pumping out of the chemicals, the front panel canonly be reinserted when the manual valves are in the “mixing” position, i.e. pointing to
the top.
A B
DC
figure 8: Manual valves and drain/refilling outlets
10 OI 3439

2. OPERATION
Switching on
1. Please check whether the hoses for the water supply (D), overflow outlets (C),developer (E) and fixer replenishment outlet (B) have been connected.
2. Open water supply.
B C D C E
figure 9: Inlets/outlets
OI 3439 11

Fuseholder withVoltage Selector
Main Switch
Receptaclefor Power Cord
Remote Control20 l/40 l (5 gal/10 gal)Selector Switch
3. Switch on the power switch at the rear of the KODAK Automixer II Plus.The power-on indicator (see figure 4 on page 6) shows that the power is onand the unit ready for use.
Switching off
1. Shut off the water supply.
2. Switch off the power switch at the rear of the KODAK Automixer II Plus.The red LED of the power-on indicator goes off.
Whenever the processing machine is switched off for longer periods, we wouldrecommend that you switch off the KODAK Automixer II Plus as well and shut off thewater supply, thus taking some pressure off the hoses. This is advisable for safety reasons.Do not forget to switch the KODAK Automixer II Plus on again and open the water supply,when the processing machine is put into operation again.
If you forget to switch the KODAK Automixer II Plus on again, the processing machine canonly refer to the chemicals of the holding tanks, and there is no warning signal for thecase that these chemicals are finished.
figure 10: Switches and fuse at the rear
I O
... .
12 OI 3439

Preparation of chemicals
WARNING:
Wear suitable protective clothing, gloves and eye/face protection when preparingthe chemical solutions, and during cleaning and maintenance procedures.
There are two ways of preparing the necessary chemical solutions:
- Chemical preparation with solution at low levelThis is necessary whenever the intermitted acoustic signal and the low levelwarning light of the fixer and/or developer indicate that the solutions in themixing tanks are at low level and concentrates have to be added. At thatpoint the respective holding tank has left approx. 6.5 litres of chemicalsolution available for the processing machine.
- Start-up/PrimingThis is necessary for the initial start-up:
- after installation- after draining (for maintenance, cleaning, or mishandling).
low levelwarning lights
bottle rinseindicators
DEVELOPER FIXER
KODAKAutomixer II Plus
Kodak
figure 11: Control panel
OI 3439 13

Chemical preparation/solution at low level
NOTE:
The preparation of chemicals may only be started when the low level warning lightsfor the fixer or developer are on and the buzzer sounds. Otherwise, you might get a
wrong concentration of chemicals.
The chemical solutions are prepared as follows:
1. Make sure that the KODAK Automixer II Plus is switched on (power switch,power-on indicator) and that the water supply is open.
2. Open the top cover (left side for developer, right side for fixer).
figure 12: Top covers
14 OI 3439

3. Remove screw caps of the chemical bottles and place the bottlestop down into the corresponding cut-outs of the templates as follows:
- Developer REDfirst insert the bottle containing part A - the bottle remains inserted,then insert the bottle containing part B (and then the bottle containing part Cwhen using RP chemicals) - all bottles have to stay inserted until they have beenrinsed automatically (see page 16).
- Fixer BLUEfirst insert the bottle containing part A- the bottle remains inserted(then insert the bottle containing part B when using RP chemicals) -all bottles have to stay inserted until they have been rinsed automatically(see page 16).
CAUTION:
Do not remove the bottle seal from the bottles of concentrate. The piercing rods in thetemplates will automatically open the bottles.
figure 13: Inserted bottles for chemical preparation
OI 3439 15
Approx. 15 seconds after the chemicals start to run into the respective tank, the lowlevel warning light and the buzzer will go off, and the bottle rinse indicator lightstarts blinking to remind you not to remove the bottles too early. The bottles will berinsed automatically, when they are empty.
NOTE:
Should the water supply be shut off, an intermittent acoustic warning signal will begiven, while rinse LED and overflow LED are blinking.
In that case, please open the water supply.
4. Wait for the bottle rinse indicator light (see figure No. 4 on page 6) to go off,and then remove the bottles.
CAUTION:
Do not remove the bottles as long as the bottle rinse indicator light is still on.
5. If your KODAK Automixer II Plus is adjusted to a chemical preparation quantity of40 l (10 gal) you now have to repeat step 3 for a second process. This is againindicated by the low level warning light and the intermitted acoustic signal.
6. Wait for the bottle rinse indicator light (see figure No. 4 on page 6) to go off,and then remove the bottles.Do not remove them as long as the bottle rinse indicator light is still on.
7. Shut top cover again.
After one or two sets of chemicals (depending on the KODAK Automixer II Plus being setto 40 l/10 gal or to 20 l/5 gal) have been filled in, the required quantity of water will beadded automatically.Finally, the whole solution is mixed for ten minutes to ensure even mixing.
CAUTION:
Do not remove the front panel while new chemicals are added and within theperiod of 10 minutes which is required for the mixing process.
16 OI 3439
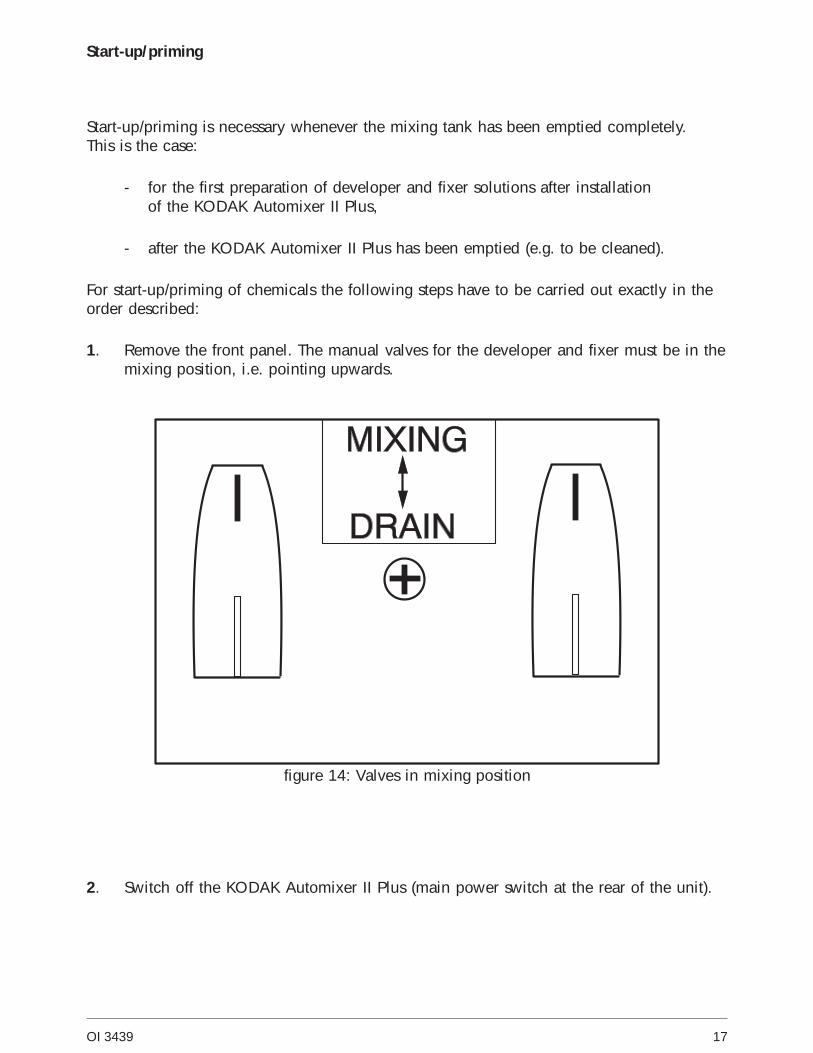
Start-up/priming
Start-up/priming is necessary whenever the mixing tank has been emptied completely.This is the case:
- for the first preparation of developer and fixer solutions after installationof the KODAK Automixer II Plus,
- after the KODAK Automixer II Plus has been emptied (e.g. to be cleaned).
For start-up/priming of chemicals the following steps have to be carried out exactly in theorder described:
1. Remove the front panel. The manual valves for the developer and fixer must be in themixing position, i.e. pointing upwards.
2. Switch off the KODAK Automixer II Plus (main power switch at the rear of the unit).
figure 14: Valves in mixing position
OI 3439 17

3. Keep the relevant water supply button/s (A and/or B) on the manual control panelpressed while switching the main power switch on again.The respective water supply button or buttons will now be blinking to indicate thismode of operation.
4. Reinsert the front cover.The water then starts to flow into the respective mixing tank.
5. Please now follow steps 2 to 7 of the chapter “Chemical preparation/solution atlow level” (described on page 14).
figure 15: Manual control panel
18 OI 3439

Filling the processor tanks
CAUTION:
Do not attempt to start the filling operation when the unit is in the dilution or mixingstatus, i.e. less than 10 minutes after the preparation of a new batch of either solution.
1. Remove the front panel. The KODAK Automixer II Plus is now in the manual mode.
2. Connect a flexible hose of 12 mm internal diameter to the relevant outlet (left fordeveloper, right for fixer) of the KODAK Automixer II Plus (figure 16). Ensure that theother end of the hose is in the correct processor tank.
CAUTION:
Use separate hoses for the developer or fixer, otherwise the processing solution will getcontaminated and cannot be used. Please mark the hoses accordingly.
Developer Fixer
figure 16: Developer and fixer outlets
OI 3439 19

3. Turn the relevant manual valve to the “drain” position, i.e., pointing to the bottom(see figure 17).
4. Switch on the relevant pump button (A and/or B).
figure 17: Manual valves
figure 18: Pump buttons
20 OI 3439

5. When the processor tank is filled, switch off the relevant pump (A and/or B) to stopthe filling process. (Please also see “Important information” described below.)
CAUTION:
Take all precautions to avoid developer or fixer contamination and chemical spillage bythe solution remaining in the hoses.
6. Immediately turn the relevant manual valve back into the “mixing” position,i.e. pointing upwards.
7. Remove the hose(s) carefully and thoroughly rinse it (or them) with water.
8. Put the front panel back in place. This will not be possible if you did not put themanual valve into the “mixing” position.
Important information:
Should the solution in the relevant mixing tank go down to low level during the fillingprocess, the pump will automatically stop, and an acoustic warning signal will be given.Do not switch on the pump again now, as the respective tank of the KODAK AutomixerII Plus would then be emptied and a start-up/priming of chemicals would becomenecessary.So, if the solution goes down to low level and the above signals occur, please take thefollowing action:
- Immediately turn the manual valve back to the mixing position.
- Remove the hose and reinsert the front panel.
- Prepare a new solution (see chapter “Chemical preparation/solution at low level”,page 14).
- Do not forget to wait 10 minutes before you continue with the filling process, i.e. beforeyou start repeating steps 1 to 8.
OI 3439 21

Draining
1. Remove the front panel. The KODAK Automixer II Plus is now in the manual mode.
WARNING:
Wear suitable protective clothing, gloves and eye/face protection when preparingthe chemical solutions, and during cleaning and maintenance procedures.
2. Connect a flexible hose of 12 mm internal diameter to the relevant outlet (left for thedeveloper, right for the fixer) of the KODAK Automixer II Plus. Make sure that theother end of the hose properly lies in a suitable container.
CAUTION:
Use separate hoses for the developer or fixer, otherwise the processing solution will getcontaminated and cannot be used. Please mark the hoses accordingly.
Developer Fixer
figure 19: Developer and fixer outlets
22 OI 3439

3. Turn the respective manual valve downwards to the “drain” position.
4. Start the circulation pump by pressing the relevant pump button (A and/or B offigure 22).The pump will automatically stop when the low level is reached (buzzer will soundintermittently). Start the circulation pump (A and/or B of figure 22) again. The buzzerwill stop, and the transfer valve to the holding tank will be opened.
5. When the mixing tank is empty, block the mixing tank outlet (A of figure 21), situatedat the bottom of the mixing tank with any suitable stopper. This will help the pump todrain the holding tank by preventing air from entering the pump.
figure 20: Manual valves
figure 21: Mixing tank
A
OI 3439 23
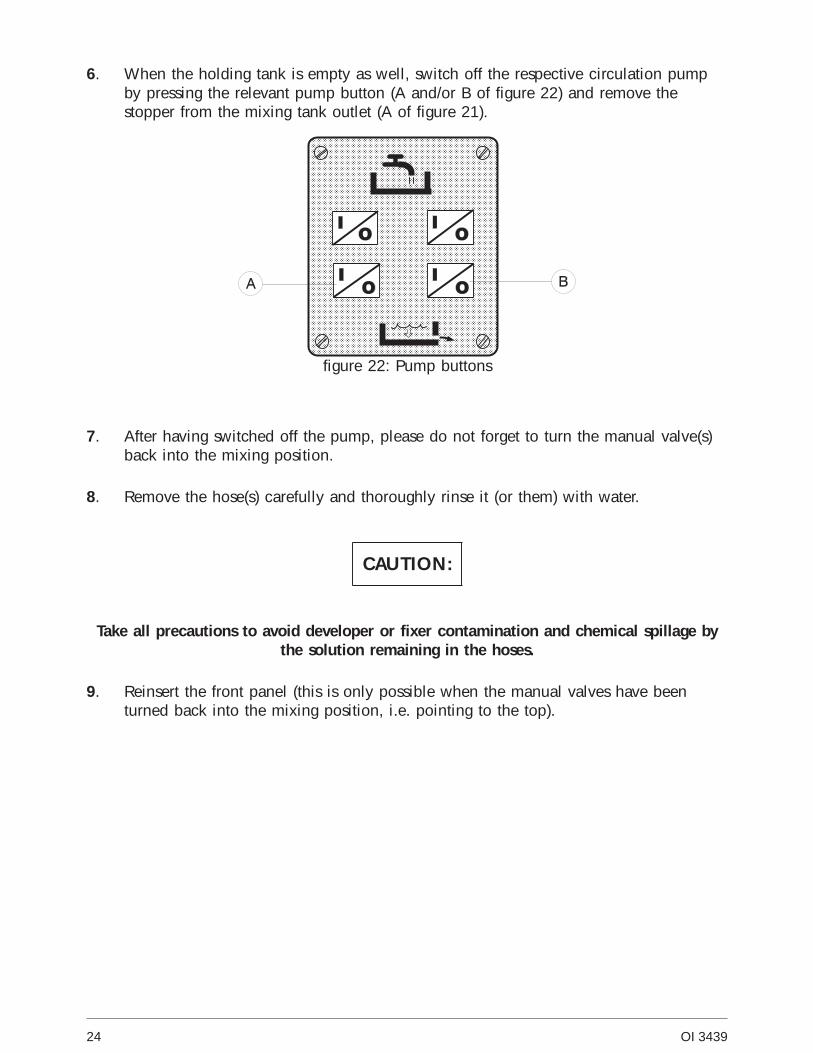
6. When the holding tank is empty as well, switch off the respective circulation pumpby pressing the relevant pump button (A and/or B of figure 22) and remove thestopper from the mixing tank outlet (A of figure 21).
7. After having switched off the pump, please do not forget to turn the manual valve(s)back into the mixing position.
8. Remove the hose(s) carefully and thoroughly rinse it (or them) with water.
CAUTION:
Take all precautions to avoid developer or fixer contamination and chemical spillage bythe solution remaining in the hoses.
9. Reinsert the front panel (this is only possible when the manual valves have beenturned back into the mixing position, i.e. pointing to the top).
figure 22: Pump buttons
24 OI 3439

Cleaning
WARNING:
Wear suitable protective clothing, gloves and eye/face protection when preparingthe chemical solutions, and during cleaning and maintenance procedures.
CAUTION:
A thorough rinsing (after draining) of both mixing and holding tanks is recommended ona yearly basis or when a solution has been contaminated.
Always keep in mind that you can usually not see the inside of the holding tank(i.e. when the intermediate tank bottom is not removed), so the holding tank might be
dirty while the mixing tank looks clean.
A thorough cleaning of the whole tank system of the KODAK Automixer II Plus means thatthe unit has to be drained, then rinsed (according to the description below), and astart-up/ priming of chemicals is necessary afterwards.Please take the following steps:
1. Remove the front cover. The KODAK Automixer II Plus is now in the manual mode.Make sure that the tank system is completely empty. Should this not be the case,please carry out steps 2 to 7 of the chapter “Draining” (see page 22).
2. Disconnect the processor tubes and shut the respective outlets with stoppers.
3. Make sure that the mixing tank outlets (A) at the bottom of the mixing tanks are free.
4. If necessary, wipe off remainders within the mixing tanks.
figure 23: Mixing tank
intermediatetank bottom
A
OI 3439 25

5. Make sure that the manual valves are in the mixing position, i.e. pointing to thetop.
To make sure that the whole unit will be rinsed thoroughly, please carry out the followingprocedure at least twice.
6. Switch on the water supply by pressing the respective water supply button(A and/or B) on the manual control panel.
7. When the water has reached the normal mixing level (depending on position ofselector switch 20 l/5 gal or 40 l/10 gal), the water supply goes off automatically.No more water will be allowed to flow in, even if you press the water supplybuttons again.
figure 24: Manual valve
figure 25: Water supply buttons
26 OI 3439

8. Reinsert the front panel, so that the transfer valve to the holding tank will be opened.Wait for approx. 5 minutes for the holding tank to fill.
9. Drain the unit (as described in the chapter “Draining” on page 22).
10. Start again with step 6 for the second procedure.
11. After the unit has been cleaned, a start-up/priming procedure is necessary(see page 17).
Moving the KODAK Automixer II Plus
Always switch off the KODAK Automixer II Plus before moving it, otherwise the solutionmay splash and start the mixing cycle at the wrong time.
Avoid moving the KODAK Automixer II Plus when either unit is full of solution.
Always lock the front casters once the KODAK Automixer II Plus is in place and levelled.For levelling, use a spirit level and adjust the casters. Then lock the two front casters.
figure 26: Levelling the KODAK Automixer II Plus
OI 3439 27

3. MAINTENANCE
WARNINGS:
Before starting any maintenance procedures, switch off the unit and pull out thepower-supply plug.
Wear suitable protective clothing, gloves and eye/face protection when preparingthe chemical solutions, and during cleaning and maintenance procedures.
Whenever chemicals have been spilled, please wipe them up immediately.
Weekly
Clean the templates and the top covers with a warm, moist cloth. If necessary, clean theoutside of the KODAK Automixer II Plus with a sponge.
WARNING:
The KODAK Automixer II Plus must not be cleaned using running water.
Once a year
Annually or after a low activity period, clean the KODAK Automixer II completely: drain(see page 22), clean (see page 25), and start-up again (see page 17).
Chemistry
Make the right choice regarding the mixing volume. Choose the 10 gallon or 40 litreversion only if your film consumption is higher than 50m2/week. The solution should beused up within 14 days. This will avoid developer oxidation.Should you, by mistake, put the wrong chemicals in a tank (developer into the fixer tankor fixer into the developer tank) you will have to drain the respective tank completely andclean it at least twice. Then start-up/priming of chemicals will be necessary.
Oxidation
After a long period of low or no activity, the developer might become oxidized (deepbrown colour). As this can affect the quality of film processing, the whole tank systemshould then be cleaned thoroughly (see chapters “Draining”, page 22, and “Cleaning”,page 25) and a chemical start-up process carried out (page 17).
28 OI 3439
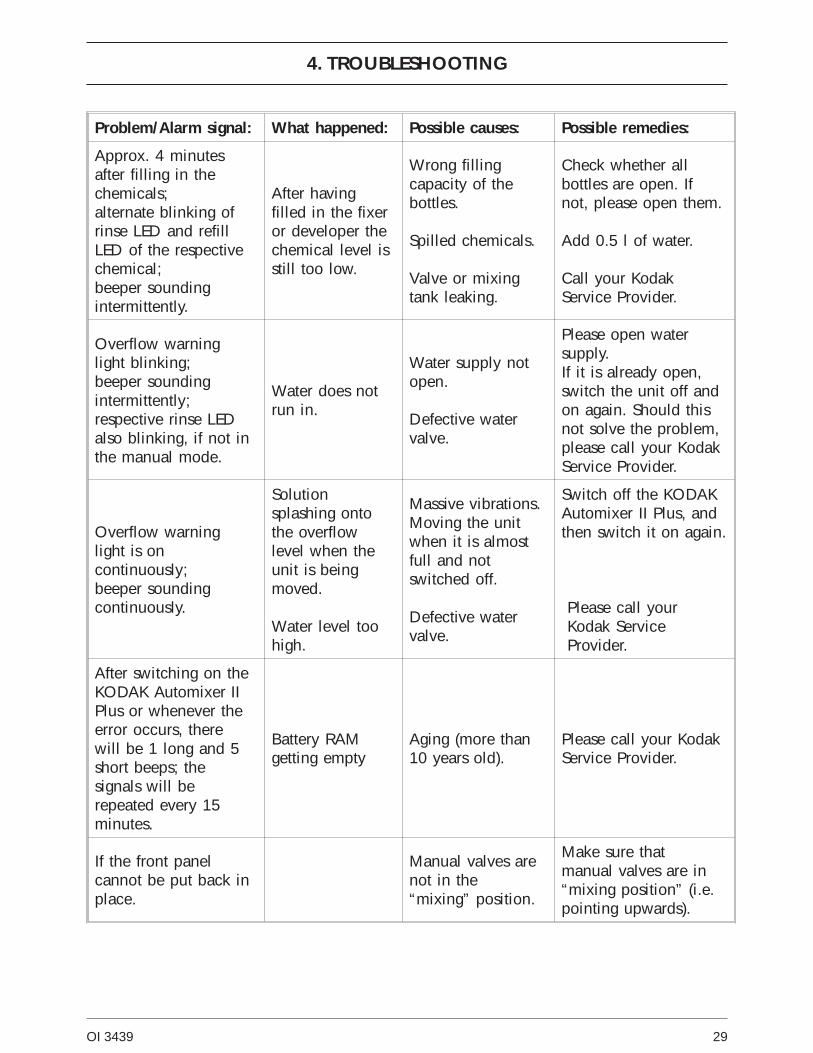
4. TROUBLESHOOTING
Problem/Alarm signal: What happened: Possible causes: Possible remedies:
Approx. 4 minutesafter filling in thechemicals;alternate blinking ofrinse LED and refillLED of the respectivechemical;beeper soundingintermittently.
After havingfilled in the fixeror developer thechemical level isstill too low.
Wrong fillingcapacity of thebottles.
Spilled chemicals.
Valve or mixingtank leaking.
Check whether allbottles are open. Ifnot, please open them.
Add 0.5 l of water.
Call your KodakService Provider.
Overflow warninglight blinking;beeper soundingintermittently;respective rinse LEDalso blinking, if not inthe manual mode.
Water does notrun in.
Water supply notopen.
Defective watervalve.
Please open watersupply.If it is already open,switch the unit off andon again. Should thisnot solve the problem,please call your KodakService Provider.
Overflow warninglight is oncontinuously;beeper soundingcontinuously.
Solutionsplashing ontothe overflowlevel when theunit is beingmoved.
Water level toohigh.
Massive vibrations.Moving the unitwhen it is almostfull and notswitched off.
Defective watervalve.
Switch off the KODAKAutomixer II Plus, andthen switch it on again.
Please call yourKodak ServiceProvider.
After switching on theKODAK Automixer IIPlus or whenever theerror occurs, therewill be 1 long and 5short beeps; thesignals will berepeated every 15minutes.
Battery RAMgetting empty
Aging (more than10 years old).
Please call your KodakService Provider.
If the front panelcannot be put back inplace.
Manual valves arenot in the“mixing” position.
Make sure thatmanual valves are in“mixing position” (i.e.pointing upwards).
OI 3439 29

5. SPECIFICATION
Size and Weight
Length: 81 cm/31.89 inWidth: 41 cm/16.14 inHeight: 84 cm/33.07 in including rollers
Weight: empty 40 kg/88.2 lbfilled with 20 l each of developer bath and fixer bath 115 kg/253.5 lbfilled with 40 l each of developer bath and fixer bath 158 kg/348.3 lb
Volume Holding Tank 6.5 litresVolume Mixing Tank 44 litres
Noise Level
Sound pressure level in operator’s position: 70 dB(A)
Electrical
100 V + 10% 50/60 Hz., convertible to120 V + 10% 50/60 Hz. or220 V + 10% 50/60 Hz. or230 V + 10% 50/60 Hz.
The unit is provided with an IEC plug
Water
Temperature: 4 - 32°CWater inlet: 3/4 inWater pressure: 14 - 88 PSI = 1 - 6 barWater inlet via filterWater discharge: For maintenance and cleaning, a water outlet
with a diameter of 20 mm/0.8 in is required(max. 55 cm/21.65 in above floor).
Replenishment
The hose diameter depends on the distance between the Automixer II Plus and theprocessor:up to 8 m/approx. 9 yd: hose diameter >10.0 mm/0.4 in8 to 15 m/approx. 9 to 16 yd: hose diameter >12.5 mm/0.5 in
When two processors are connected to one Automixer II Plus, the following hosediameters are required:up to 8 m/approx. 9 yd: hose diameter >12.5 mm/0.5 in8 to 15 m/approx. 9 to 16 yd: hose diameter >15.0 mm/0.6 in
Chemicals
Use KODAK chemicals in the Automixer II Plus.
Manufactured by
Kodak AG70323 StuttgartFederal Republic of Germany
30 OI 3439

OI 3439 31

Kodak
KODAK and X-OMAT are trademarks.
Kodak AGHedelfinger Str. 54 - 6070327 StuttgartGermany
Publication No. OI 3439-1/97-EngPrinted in France
89/336/EEC, 73/23/EEC