operator’s instruction manual - hire one ltdhireone.net/images/product_downloads/490-569 - 5-10...
TRANSCRIPT

Tier
II: i
ssue
5
©Th
wai
tes
Lim
ited
2007
T047
45 - 10 Tonne
Operator’sInstruction
Manual
Mach 564 – 6 Tonne Powerswivel Mach 565 – 6 Tonne Front Tip

Introduction
Safety symbols• Attention!• Bealert!• Yoursafetyisinvolved!
• Correctaction • Incorrectaction/procedurewhich should NOT be carried out
Signal wordsSignalwordsareusedonthemachineandwithinthismanualtoidentifylevelsofhazardseriousness:
danger warnIng cautIon
thwaites Limited puts Safety FirstItisthepolicyofThwaitesLimitedtopromotesafetyintheoperationofitsmachinesandtocreateageneralawarenessofsitesafetyandsafeworkingpracticesfortheoperatorsofitsmachines.ThisOperator’sInstructionManualisintendedforbothnewand experienced machine operators. It should remain with themachineatalltimes.Alloperatorsshouldbeawareofitslocation and contents.Itisimportantthatalloperatorsarefullytrainedandfamiliarwiththemachineandthattheyhavereadandunderstoodtheinformationcontainedwithinthisbookbeforetheyattempttooperateinthesiteconditionsforwhichthemachinewasdesigned.ThisbookdetailspracticesandoperationswhichThwaitesLimitedrecommends.DONOToperatethismachineinwaysotherthanthosedetailedwithinthisbook.Thismachineisdesignedforcustomaryconstructionsiteoperations,andthetransportationofbulkmaterialscommonlycarried on such sites; that is their ‘intended use’. Under certain controlledconditionsthedumpermaybeusedfortowing
wheeled loads.Duetothevariednatureoftheoperationofsitedumpersandtheabsenceofanagreedteststandard,anyfiguresquotedbyThwaitesinrelationtovibrationvaluesandexposureareforreferencepurposesonly.Itistheresponsibilityoftheemployertoassessvibrationexposurebasedontheactualsiteconditions,andoperatingpractices,atthepointofuse.Hand arm Vibration-ThedailyexposureAction/LimitValuesofbetween2.5-5.0m/s2(A8)areunlikelytobeexceededinaneight-hourreferenceperiod.whole Body Vibration-Thedailyexposurecanonlybeaccuratelydeterminedatthepointofuse.ThisexposuremustbemanagedinrespectoftheAction/LimitValuesof0.5and1.15m/s2(A8)respectively.Employersshouldnotrelysolelyonpublishedvibrationfigureswhenundertakingriskassessments.Dependingonthesiteconditions,cycletimesmayneedtobeadjustedinorderto reduce operator exposure levels.VibrationvaluesbasedontypicaldutycyclesareavailableonrequestfromThwaites.Thesemaybeusedforreferencepurposesonly.

1
Complete checks in section before starting the engine
read operator’s instruction manual
Before operating this machine
1. ContactyourThwaitesrepresentativeincaseoffurtherquestions
2. Learn to operate this machine3. Ensureyouarefittooperate4. Wearcorrectsafetyclothingandensurethatsafety
equipmentisavailable
Distributor

1
Complete checks in section before starting the engine
Walk around the machine
Visually check the machine1 Arethechassislockandtheskiplockdisengaged?2 Arethecontrols,crushzoneorhydraulicrams
clean,andclearofanydebris?3 IstheRoll-OverProtectiveframe(ROPSframe)
secure,fullyuprightandundamaged?4 Istheseatbeltanchoragesecureandserviceable?5 Arethecoversandmudguardssecure?6 Arethehosesfreefromfluidleaks?7 Areallsafetydecalslegible?8 Arethetyresfreeofcutsorsplits?9 Areallboltstightandinposition?10 Have the daily maintenance tasks been
performed? (See rear cover)Reportallfaultsimmediately.
Before operating this machine
do not oPerate tHe MacHIne untIL aLL FauLtS HaVe Been rectIFIed
Incorrecttyrepressuresreducemachinestability.
warnIng

1
Complete checks in section before starting the engine
Mount the machine and check the controls1 Usethegrabrailsandfootstepsprovidedto
manoevre into seating position. Face the machine at all times when mounting and dismounting
2 Istheenginecoversecureandlocked?3 Adjusttheseatpositionforcomfortandeasy
access to controls4 Fastentheseatbelt.Adjustaccordinglyforsafety
andcomfort5 IsthehandbrakeON?6 Set the transmission to neutral7 Doesthefootbrakefeelfirm?8 Donotoperatethemachinewithoutunderstanding
allitscontrolsasdescribedinthefollowingpages
AseatbeltMUSTBEWORNwhenoperatingmachinesfittedwithaROPSframe
warnIng
Before operating this machine
1
Complete checks in section before starting the engine
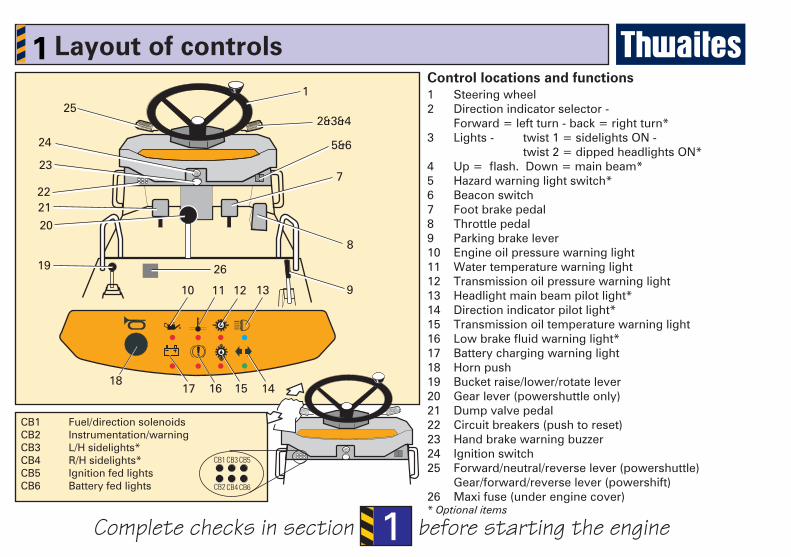
control locations and functions1 Steering wheel2 Direction indicator selector - Forward=leftturn-back=rightturn*3 Lights - twist 1 = sidelights ON - twist2=dippedheadlightsON*4 Up=flash.Down=mainbeam*5 Hazardwarninglightswitch*6 Beaconswitch7 Footbrakepedal8 Throttlepedal9 Parkingbrakelever10 Engine oil pressure warning light11 Water temperature warning light12 Transmission oil pressure warning light13 Headlightmainbeampilotlight*14 Directionindicatorpilotlight*15 Transmission oil temperature warning light16 Lowbrakefluidwarninglight*17 Batterychargingwarninglight18 Hornpush19 Bucketraise/lower/rotatelever20 Gearlever(powershuttleonly)21 Dump valve pedal22 Circuitbreakers(pushtoreset)23 Handbrakewarningbuzzer24 Ignition switch25 Forward/neutral/reverselever(powershuttle) Gear/forward/reverselever(powershift)26 Maxifuse(underenginecover)* Optional items
CB1 Fuel/directionsolenoidsCB2 Instrumentation/warningCB3 L/Hsidelights*CB4 R/Hsidelights*CB5 IgnitionfedlightsCB6 Batteryfedlights
Layout of controls

1
Complete checks in section before starting the engine
Seatbelt• Adjustlengthofbeltwhenseated• Pressbucklebladeintobucklelock• Pullbeltwebbingthroughbucklebladetoremoveslack
Seatbelt should not be worn loose. It should pass comfortably across hip bones and not the abdomen
throttle pedal - right foot• Applypressuretoincreasespeed• Releasepressuretoreducespeed
Foot brake - right foot Applypressuretosloworstopthemachine
dump valve pedal - left footPressdownbeforeeachgearchange-selectgear,thenrelease
control functions - in depthSeat adjustmentA– TurnknobtosetdriverweightB– Lifttoslideseatassemblyforwards/backwardsC– Lifthandletoadjustbackrest
1
Complete checks in section before starting the engine
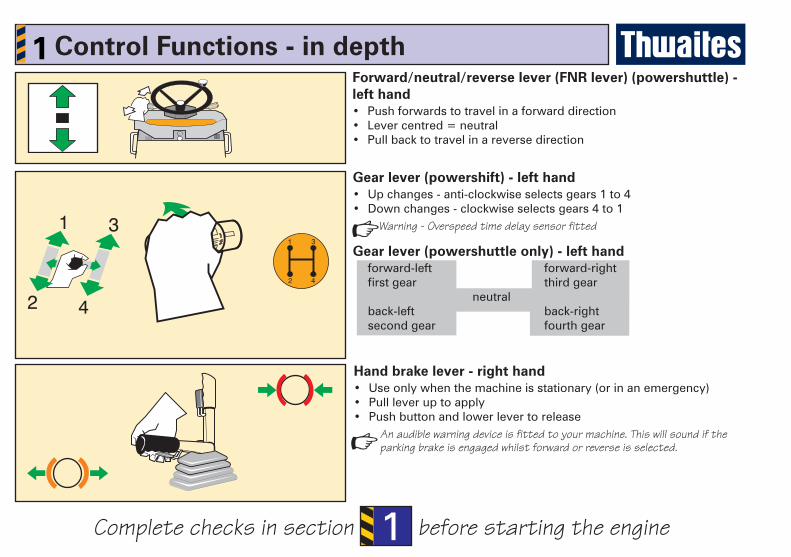
control Functions - in depthForward/neutral/reverse lever (Fnr lever) (powershuttle) - left hand• Pushforwardstotravelinaforwarddirection• Levercentred=neutral• Pullbacktotravelinareversedirection
Hand brake lever - right hand• Useonlywhenthemachineisstationary(orinanemergency)• Pullleveruptoapply• Pushbuttonandlowerlevertorelease
An audible warning device is fitted to your machine. This will sound if the parking brake is engaged whilst forward or reverse is selected.
gear lever (powershift) - left hand• Upchanges-anti-clockwiseselectsgears1to4• Downchanges-clockwiseselectsgears4to1
Warning - Overspeed time delay sensor fitted
gear lever (powershuttle only) - left hand forward-left forward-right firstgear thirdgear neutral back-left back-right second gear fourthgear

1
Complete checks in section before starting the engine
control functions - in depth
tipping control lever (front tip models) - left hand• Pushforwardtoraiseskip• Pushbackwardtolowerskip
tipping control lever (powerswivel models) - left hand• Raiseskip100mm(4”)todisengagepivotcentringlock• Rotateskiptoacentralposition(fullylowered)toautomaticallyengagecentringlock
• Raiseskipandpushlevertotherighttorotateskipclockwise• Raiseskipandpushlevertothelefttorotateskipanti-clockwise• Increasedenginespeedreducescycletimes
Movement of the bucket is disabled if the steering wheel is moved (steering is given priority)
Steering wheel - both hands• Turnthewheelclockwisetoturnmachinetoright• Turnthewheelanti-clockwisetoturnmachinetoleft
Ensure the non-steering hand is on the engine cover grabrail when using the spinner knob for low-speed single handed steering
opening and closing the engine cover • Insertignitionkeyandturnanti-clockwisetounlock• Pullhandletoreleaseandraisecover• Lowercover,secureandlockbeforedriving

1
Complete checks in section before starting the engine
Lowering and raising the roPS frame• Removelinchpinsandwithdrawframelockpins• Lowerframeandinsertlockpinsandlinchpinsinnewposition• Reversetheproceduretoraisetheframe• Ensureallpinsaresecurebeforedriving
Beacon stowage• Unplugandremovebeacon• Securebeacononbracketprovidedbeneathbonnet
Battery isolator (beneath engine cover)• Turnkeyanti-clockwisetoisolatethebatterypowersupply
control Functions - in depth
Tipping lever lock (if fitted)• Placeyokeovertippingleverandsecurewithlinchpin
2
Complete checks in section before loading the machine
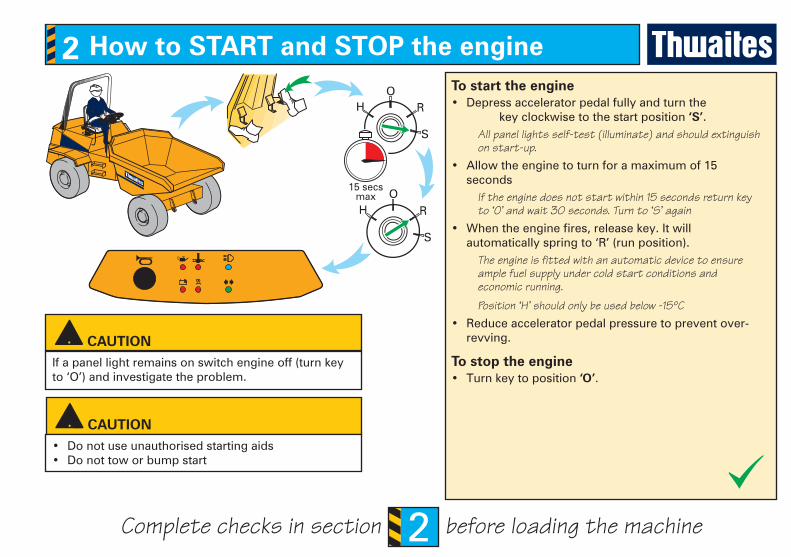
to start the engine• Depressacceleratorpedalfullyandturnthe keyclockwisetothestartposition‘S’.
All panel lights self-test (illuminate) and should extinguish on start-up.
• Allowtheenginetoturnforamaximumof15seconds
If the engine does not start within 15 seconds return key to ‘O’ and wait 30 seconds. Turn to ‘S’ again
• Whentheenginefires,releasekey.Itwillautomaticallyspringto‘R’(runposition).
The engine is fitted with an automatic device to ensure ample fuel supply under cold start conditions and economic running.
Position ‘H’ should only be used below -15ºC• Reduceacceleratorpedalpressuretopreventover-
revving.
to stop the engine• Turnkeytoposition ‘o’.
How to Start and StoP the engine
cautIonIfapanellightremainsonswitchengineoff(turnkeyto‘O’)andinvestigatetheproblem.
cautIon• Donotuseunauthorisedstartingaids• Donottoworbumpstart

2
Complete checks in section before loading the machine
Function checks - engine onBrakes• Doesthefootbrakefeelfirm?• Carryoutthehandbraketest (described on next
page)• Ifthehandbrakeison,andagearisselected,abuzzerwillsoundandthedrivemaybedisconnected.
Note: hand brake microswitch must be disconnected to carry out hand brake test (described on next page)
Steering• Rotatesteeringwheelclockwiseandanti-clockwiseElectrics• Doesthehornsound?• Doesthereversealarmsound?(optional)• Doesthebeaconflash?• Doalllightswork?(optional): side main brake
indicators hazardTipping lever• Raiseandlowerskip• Rotateskipclockwiseandanti-clockwise(swivel
model only)
Preliminary checks

2
Complete checks in section before loading the machine
1 Applyhandbrake2 Disconnectmicroswitch;connecttestsocket2 Start engine and allow a 1-minute warm-up3 Depress dump valve pedal4 Selectthirdgear(NatAsp)/fourthgear(turbo)
Note: Please check the vehicle identification plate (located on the side of the machine) to identify engine power.
5 Release dump valve pedal6 Applyfirmpressureonthefootbrakepedal7 Selectforwarddrive(thebuzzerwillsound)8 Slowlyreducebrakepedalpressure9 Ifthemachinehasnotmoved,usethethrottle
pedaltograduallyincreasetheenginespeedtofullrevs(20secondsmax)The machine should not move during these tests
10 Reduce engine speed to idle11 Select neutral12 Reconnect microswitch to original position
How to test the hand brake
warnIngDo not operate a machine that has moved during the aboveparkingbraketest.
warnIngBeforetestingthehandbrakeensurethemachineisonfirmlevelgroundandthattherearenopeoplearoundthemachine.Releasethrottleandapplyfootbrakeifthemachinemovesduringthefollowingtest.
Powershuttle
Powershift

2
Complete checks in section before loading the machine
Moving from rest and stopping• Depressdumpvalvepedal• Selectfirstgear• Releasedumpvalvepedal• Selectforwardorreverse• Releasehandbrakefully (machinemaymove)• Slowlydepressacceleratorandmoveaway• Holdsteeringwheelwithbothhands• Removefootfromacceleratorpedal• Brakegentlytoahaltusingfootbrake
changing speed/direction• Depressdumpvalvepedal• Selectnextgear• Releasedumpvalvepedal• Themachinemustbestationaryandthehandbrakemustbeengagedbeforechangingdirection
after operating - park safely• Alwaysleaveskipemptywhennotinuse• Ensuremachineisonfirmlevelground• Applyhandbrake• Engagetransmissiontoneutral• Fullylowerskip,inacentralposition• Setdrivetoneutral• Stopengineandremovekey• Ensuremachinecannotbestarted
driving procedure and safe parking
cautIon• Noviceoperatorsshouldalwaysstartwithforward
motion on clear, level ground• Alowgearshouldalwaysbeselectedwhenadriverisunfamiliarwithmachinetype
3
Attention! Section correct and incorrect working practices
danger IMMEDIATEHAZARDSWHICHwILL RESULTINSEVEREPERSONALINjURYORDEATH
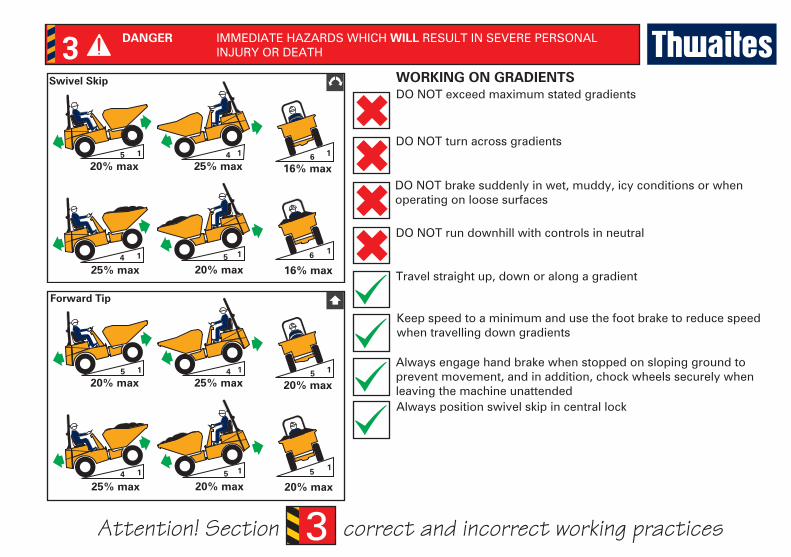
Swivel Skip
Forward tip
worKIng on gradIentSDO NOT exceed maximum stated gradients
DO NOT turn across gradients
DONOTbrakesuddenlyinwet,muddy,icyconditionsorwhenoperatingonloosesurfaces
DO NOT run downhill with controls in neutral
Travel straight up, down or along a gradient
Keepspeedtoaminimumandusethefootbraketoreducespeedwhen travelling down gradients
Alwaysengagehandbrakewhenstoppedonslopinggroundtopreventmovement,andinaddition,chockwheelssecurelywhenleaving the machine unattendedAlwayspositionswivelskipincentrallock
3
Attention! Section correct and incorrect working practices
danger IMMEDIATEHAZARDSWHICHwILL RESULTINSEVEREPERSONALINjURYORDEATH
VISIBILItYCheckaheadandbehindmachinebeforeoperation
cruSH ZoneStayclearofarticulationareawhentheengineisrunning
worKIng under a raISed SKIPLockbothskipsafetypropsduringmaintenance
Beawareoflow-visibilityareaswhenoperating
Beforeoperating,soundthehorntowarnpeopleintheimmediate area
Never operate the machine’s controls when standing on eithersideofmachine
Neverworkunderanunproppedskip
Whenusingskipsafetypropengagetippingleverlock(Iffitted)

3
Attention! section correct and incorrect working practices
warnIng HAZARDSORUNSAFEPRACTICESWHICHcouLd RESULTINSEVEREPERSONALINjURYORDEATH
LoadIng tHe MacHIneApplyhandbrake,settransmissiontoneutraL, turn engine oFF,disembarkthemachine and Stand cLeardo not exceed the machine’s rated capacityCleardebrisfromcontrols
EnsureSAFESTABLELOWloadwhichallowsgoodvisibilityMaterialscarriedmustbefree-flowing
unLoadIng tHe MacHInedo not dischargeloadwhenworkingonsloping grounddo notdischargeloadtothesideofthemachineifmaterialcarriedisnotfree-flowingDischargeloadforwardsifmaterialcarriedisnotfree-flowingDischarge load on level ground
Use StoPBoardS and SuPPort walls on trenches

3
Attention! Section correct and incorrect working practices
warnIng HAZARDSORUNSAFEPRACTICESWHICHcouLd RESULTINSEVEREPERSONALINjURYORDEATH
DO NOT drive with thebuckettipped(bulldozing)
drIVIng
NEVERdismountfroma moving machine
DONOTcarrypassengers
Sitehazardstoavoid:adverse weather conditions,icysurfaces,people
Avoidconfinedworkareas-exhaustfumesand noise can be a hazard
DO NOT operate withtheROPSframefoldeddown

3
Attention! section correct and incorrect working practices
warnIng HAZARDSORUNSAFEPRACTICESWHICHcouLd RESULTINSEVEREPERSONALINjURYORDEATH
towIng a traILerPlaceballastloadinskip.Thisloadshouldbeaminimumof25%ofthemachine’sratedpayload
tranSPortatIonReversemachineslowlyontoasuitabletrailer
AlwaysuseaThwaites-approvedtowingpin
The gross weight to be towed plus the ballast load MuSt notexceedratedpayloadofmachine
do not exceed maximum tow bar pull or vertical load
Towing must not be carried out on sloping ground
do notdrivethemachineforwardwhenloading
ApplyhandbrakeStop engineChockwheels(To prevent movement)EngagechassislockingbarSecure to trailerEnsure legal load (Height/weight of trailer)
3
Attention! Section correct and incorrect working practices
cautIon HAZARDSORUNSAFEPRACTICESWHICHcouLd RESULT IN MINOR PERSONALINjURYORPRODUCTORPROPERTYDAMAGE
uSIng a crane to LIFt tHe MacHIneTipskipfullyforward(except9and10Tonne)EngageskipsafetypropEngagechassislockingbarLiftusingcentreeyeprovided
Hand BraKedo notapplyhandbrakeifmachineismoving(exceptinanemergency)
SLoPIng SurFaceSdo notstepontherearmudguards’slopingsurfaces.Usetreadgriparea(iffitted)toraiseorlowerhingedROPS.
HInged roPSUsegrabhandles,treadgrips(iffitted)andstepswhenstandingonthemachinetolowertheROPSframe.Avoidwetsurfaces.
4
Always check panel warning lights, tripped circuit breakers or blown maxi fuse
troubleshootingProblem reason SolutionEnginewillnotstart isolatorswitchisturnedoff switchisolatorswitchon FNRlevernotinneutral shifttransmissiontoneutral batteryvoltagetoolow checkbatteryandconnections faultyfuelsupply checkfuellevelandconnections electricalstoponfuelpumpdefective checkconnections circuitbreakertripped reset(pushtoreset)Completelossofelectricalfunctions maxifuseblown rectifyelectricalfaultandreplacefuseStartermotorwillnotoperate faultybattery replaceMaxifuseblown faultystartermotor/solenoid replacestartermotor/solenoidandmaxifuse (currentdrawnbysolenoidexceeds25A) (onlyreplacewitha30ampfuse) shortcircuitonmainfeedorstartersolenoidcables locateandrepairEnginestopssoonafterstart-up blockedfuelorairfilter replacefuelorairfilter airinfuelsystem checkfuellineconnectionsBlackenginesmoke airfilterclogged(Indicatorred) replaceorcleanairfilter fuelsystemdefect contactThwaitesdealer wrongfuel replacefuelandfilterMachinewillnotmovewhenFNRlever handbrakeapplied–machinefittedwithisolator releasehandbrakelever is selected
Engine oil pressure low oil level top up engine oilHighenginetemperature radiatorchoked cleanradiator Low coolant level top up coolantIrregularalternator defectiveorloosealternatorbelt adjust,or,ifnecessary,replacealternatorbeltTransmissionoiltemperature oilcoolerchoked cleanoilcooler over/underfilledwithoil correctoillevelTransmissionoilpressure lowtransmissionfluidlevel topuptransmissionfluidLowbrakeoil checkoillevel/leaks topupbrakeoilWarningbuzzersounds handBrakeON releasehandbrake
4 data chart – Powerswivel
dimensions (mm) 5t 6t 9t
A. Length ...............................................................................4780 ..... 4780 ......5011B. Width .................................................................................2135 ..... 2280 ......2435C. Height(ROPSframe&Beacon)........................................3320 ..... 3300 ......3415D. Bucketlipheight ...............................................................1615 ..... 1670 ......1820E. Widthovertyres ...............................................................2100 ..... 2240 ......2440F. Wheelbase ........................................................................2480 ..... 2480 ......2660G. Ground clearance ...............................................................320 ..... 370 ........447H. Bucketloadheight ............................................................1795 ..... 1850 ......2002I. Axletorear .......................................................................1200 ..... 1200 ......1220J. Tipping ground clearance ................................................1050 ..... 1100 ......1134K. Tippingtyreclearance ........................................................540 ..... 550 ......1131L. Heighttipped(skip) ..........................................................3650 ..... 3694 ......4000M. MaxheightwithoutROPSframe .....................................2190 ..... 2230 ......2630N. Tipping side clearance .......................................................140 ....... 100 ........378P. Tyreclearancediameter(m) .............................................12.0 ...... 12.0 .......13.4Q. Height(ROPSframefolded) .............................................2170 ..... 2230 ......2630
weight (kg) 5t 6t 9t
unladenFront axle .......................................................1680........1780........2130Rear axle ........................................................2420........2490........3150Total ...............................................................4100........4270........5280
Laden (including driver at 80 kg)Ratedpayload ................................................5000........6000........9000Front axle .......................................................6240........7420......10030Rear axle ........................................................2940........2930........4330Total ...............................................................9180......10350......14360
towbar (Max)Pull load .........................................................3750........4500 .......6750Verticalload .....................................................300..........500..........500
tyre PressureBar(psi)front ............................................. 4.9(71)... 3.9(57).... 3.2(46) rear ............................................... 2.5(36)... 2.5(36).... 1.6(24)
noise
Airborne(10m)
Naturallyaspirated
Turbo
Operator
Hydmainlinepressure-170bar
4
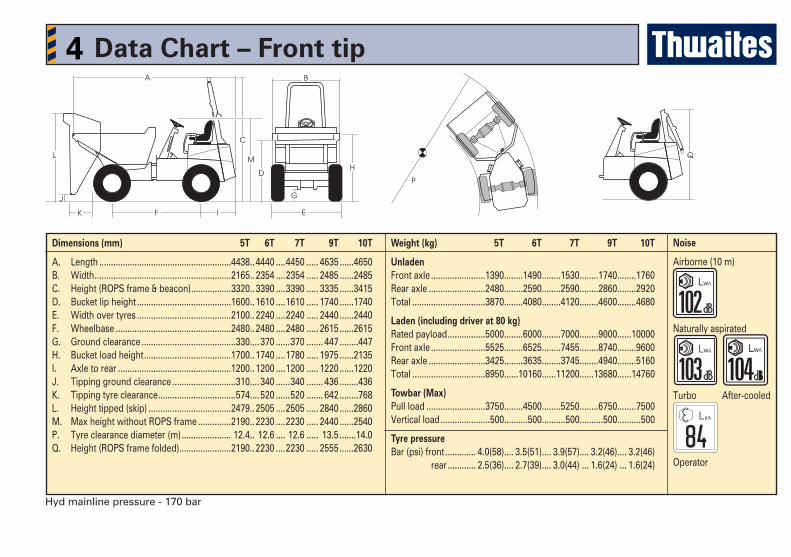
dimensions (mm) 5t 6t 7t 9t 10t
A. Length ........................................................4438 ..4440 ....4450 ..... 4635 ......4650B. Width ..........................................................2165 ..2354 ....2354 ..... 2485 ......2485C. Height(ROPSframe&beacon) .................3320 ..3390 ....3390 ..... 3335 ......3415 D. Bucketlipheight ........................................1600 ..1610 ....1610 ..... 1740 ......1740E. Widthovertyres ........................................2100 ..2240 ....2240 ..... 2440 ......2440F. Wheelbase .................................................2480 ..2480 ....2480 ..... 2615 ......2615G. Ground clearance ........................................330 ....370 ......370 ....... 447 ........447H. Bucketloadheight .....................................1700 ..1740 ....1780 ..... 1975 ......2135I. Axletorear ................................................1200 ..1200 ....1200 ..... 1220 ......1220J. Tipping ground clearance ...........................310 ....340 ......340 ....... 436 ........436K. Tippingtyreclearance .................................574 ....520 ......520 ....... 642 ........768L. Heighttipped(skip) ...................................2479 ..2505 ....2505 ..... 2840 ......2860M. MaxheightwithoutROPSframe ..............2190 ..2230 ....2230 ..... 2440 ......2540P. Tyreclearancediameter(m) ..................... 12.4 .. 12.6 .... 12.6 ..... 13.5 .......14.0Q. Height(ROPSframefolded) ......................2190 ..2230 ....2230 ..... 2555 ......2630
weight (kg) 5t 6t 7t 9t 10t
unladenFront axle .......................1390........1490........1530........1740........1760Rear axle ........................2480........2590........2590........2860........2920Total ...............................3870........4080........4120........4600........4680
Laden (including driver at 80 kg)Ratedpayload ................5000........6000........7000........9000......10000Front axle .......................5525........6525........7455........8740........9600Rear axle ........................3425........3635........3745........4940........5160Total ...............................8950......10160......11200......13680......14760
towbar (Max)Pull load .........................3750........4500........5250........6750........7500Verticalload .....................500..........500..........500..........500..........500
tyre pressureBar(psi)front ............. 4.0(58).... 3.5(51).... 3.9(57).... 3.2(46).... 3.2(46) rear ............ 2.5(36).... 2.7(39).... 3.0(44)... 1.6(24) ... 1.6(24)
Hydmainlinepressure-170bar
data chart – Front tip
noise
Airborne(10m)
Naturallyaspirated
Turbo After-cooled
Operator

4
This machine must be serviced after first 100 hoursNormal service intervals: 250 hours 500 hours 1000 hours 2000 hoursContactlocalThwaitesDistributorfordetailsorwww.thwaitesdumpers.co.ukNote:failuretouseThwaites-approvedlubricantsmayinvalidateyourwarranty
daily/weekly checks
aXLe oIL (centre case + Hubs) 1 tracteLF SF3
engIne oIL 2 BP Vanellus c5 global 15w 40
tranSMISSIon oIL 3 autran MBX
HYdrauLIc oIL 4 energol HLP HM32
droPBoX oIL 5 energear Hypoid gear + transmission 80w-90
cooLant LeVeL 6 H²o+33% anti-freeze
FueL LeVeL 7 diesel
greaSe 8 Fill all points
aIr cLeaner 9 check indicator
BraKeS 10 test hand brake & foot brake
BraKe oIL 11 BP Bartran HV32
wHeeL nutS 12 330 nm
tYre PreSSure 13 See data chart
Fan BeLt 14 check condition/tension