operator’s manual - decagon devicesmanuals.decagon.com/manuals/10711_leaf porometer_web.pdf ·...
TRANSCRIPT

Operator’s Manual
Decagon Devices, Inc.
Version: October 17, 2016 — 10:07:42

Leaf Porometer
Decagon Devices, Inc.2365 NE Hopkins Court
Pullman WA 99163
Phone: 509-332-5600Fax: 509-332-5158
Website: www.decagon.comEmail: [email protected] or [email protected]
Trademarks“Leaf Porometer” is a registered trademark of Decagon Devices, Inc.
c©2005-2014 Decagon Devices, Inc.All Rights Reserved
ii

Leaf Porometer CONTENTS
Contents
1 Introduction 11.1 Customer Support . . . . . . . . . . . . . . . . . . . . 11.2 Warranty . . . . . . . . . . . . . . . . . . . . . . . . . 11.3 Seller’s Liability . . . . . . . . . . . . . . . . . . . . . . 2
2 About the Leaf Porometer 32.1 Overview of the Leaf Porometer . . . . . . . . . . . . . 32.2 Leaf Porometer Instrument Specifications . . . . . . . 32.3 Leaf Porometer Components . . . . . . . . . . . . . . 42.4 The Sensor Head . . . . . . . . . . . . . . . . . . . . . 5
2.4.1 Setting the Time . . . . . . . . . . . . . . . . . 62.4.2 Calibration Number . . . . . . . . . . . . . . . 6
3 Sensor Head Calibration 73.1 Requirements . . . . . . . . . . . . . . . . . . . . . . . 73.2 Calibration Procedure . . . . . . . . . . . . . . . . . . 83.3 Calibration without Desiccant . . . . . . . . . . . . . . 19
4 Making Measurements 204.1 Before Making a Measurement . . . . . . . . . . . . . 204.2 Desiccant . . . . . . . . . . . . . . . . . . . . . . . . . 204.3 Manual Mode vs. Auto Mode . . . . . . . . . . . . . . 234.4 Auto Mode Measurements . . . . . . . . . . . . . . . . 244.5 Manual Mode Measurements . . . . . . . . . . . . . . 274.6 Measurements without Desiccant . . . . . . . . . . . . 284.7 Averaging Readings . . . . . . . . . . . . . . . . . . . 29
4.7.1 Measurement Precautions . . . . . . . . . . . . 304.7.2 Chemical Effects . . . . . . . . . . . . . . . . . 314.7.3 Environmental Effects . . . . . . . . . . . . . . 31
5 The Menus 335.1 The Measurement Menu . . . . . . . . . . . . . . . . . 335.2 Saving Data . . . . . . . . . . . . . . . . . . . . . . . . 335.3 The Data Menu . . . . . . . . . . . . . . . . . . . . . . 355.4 The Configuration Menu . . . . . . . . . . . . . . . . . 375.5 About Screen . . . . . . . . . . . . . . . . . . . . . . . 41
6 Leaf Porometer Utility 43
iii

CONTENTS Leaf Porometer
6.1 Downloading Your Data . . . . . . . . . . . . . . . . . 446.2 Organizing Saved Data . . . . . . . . . . . . . . . . . . 456.3 Erasing Your Data . . . . . . . . . . . . . . . . . . . . 466.4 Setting the Date and Time . . . . . . . . . . . . . . . 476.5 Retrieving Leaf Porometer Information . . . . . . . . . 476.6 The Menus and Their Functions . . . . . . . . . . . . 48
7 Leaf Porometer Theory 547.1 How the Leaf Porometer Works . . . . . . . . . . . . . 54
8 Care and Maintenance 598.1 Changing the Batteries . . . . . . . . . . . . . . . . . . 598.2 Cleaning the Sensor Block . . . . . . . . . . . . . . . . 59
8.2.1 Minor Contamination (dust and pollen) . . . . 598.2.2 Major Contamination . . . . . . . . . . . . . . 618.2.3 Maintaining the Seals & Teflon Disk . . . . . . 628.2.4 Replacing the Seal . . . . . . . . . . . . . . . . 638.2.5 Replacing the Teflon Filter Disk . . . . . . . . 63
8.3 Porometer Sensor Reconditioning . . . . . . . . . . . . 638.4 General Precautions . . . . . . . . . . . . . . . . . . . 648.5 Upgrading Firmware . . . . . . . . . . . . . . . . . . . 65
9 Troubleshooting 679.1 Repair Instructions . . . . . . . . . . . . . . . . . . . . 77
10 Further Reading 78
11 Declaration of Conformity 79
12 Appendix A - Send Feedback 80
iv

Leaf Porometer 1 INTRODUCTION
1 Introduction
Thank you for purchasing Decagon Devices Leaf Porometer. TheLeaf Porometer measures stomatal conductance in leaves. This man-ual should help you understand the functions of your Leaf Porom-eter, make high-quality stomatal conductance measurements, andhelp you get the most out of your Leaf Porometer.
1.1 Customer Support
If you ever need assistance with your Leaf Porometer, have any ques-tions, or feedback, there are several ways to contact us. Decagon hasCustomer Service Representatives available to speak with you Mon-day through Friday, between 7am and 5pm Pacific time.
Note: If you purchased your Leaf Porometer through a distributor,please contact them for assistance.
Email:[email protected] or [email protected]
Phone:509-332-5600
Fax:509-332-5158
If contacting us by email or fax, please include as part of your mes-sage your Leaf Porometer serial number (found on the inside of thebattery cover), your name, address, phone, fax number, and a de-scription of your problem or question.
1.2 Warranty
The Leaf Porometer has a one-year warranty on parts and labor thatbegins upon receipt of the instrument.
1

1 INTRODUCTION Leaf Porometer
1.3 Seller’s Liability
Seller warrants new equipment of its own manufacture against defec-tive workmanship and materials for a period of three years from thedate of receipt of equipment.
Note: We do not consider the results of ordinary wear and tear,neglect, misuse, accident and excessive deterioration due to corro-sion from any cause as defects.
The Seller’s liability for defective parts shall in no event exceed thefurnishing of replacement parts Freight On Board the factory whereoriginally manufactured. Material and equipment covered herebywhich is not manufactured by Seller shall be covered only by thewarranty of its manufacturer. Seller shall not be liable to Buyer forloss, damage or injuries to persons (including death), or to propertyor things of whatsoever kind (including, but not without limitation,loss of anticipated profits), occasioned by or arising out of the instal-lation, operation, use, misuse, non-use, repair, or replacement of saidmaterial and equipment, or out of the use of any method or processfor which the same may be employed. The use of this equipmentconstitutes the buyer’s acceptance of the terms set forth in this war-ranty. There are no understandings, representations, or warrantiesof any kind, express, implied, statutory or otherwise (including, butwithout limitation, the implied warranties of merchantability andfitness for a particular purpose), not expressly set forth herein.
2

Leaf Porometer 2 ABOUT THE LEAF POROMETER
2 About the Leaf Porometer
The Leaf Porometer is a battery-operated, menu-driven device thatmeasures stomatal conductance of leaves. Stomatal conductance is afunction of the density, size, and degree of opening, of stomata, whichare pores in plants that open to the outside air. The Leaf Porometermeasures stomatal conductance by putting the conductance of a leafin series with two known conductance elements, and comparing thehumidity measurements between them. It can display information inthree selectable units:
1. mmol/m2s (millimoles per meter squared seconds)
2. m2s/mol (meters squared seconds per mole)
3. s/m (seconds per meter)
2.1 Overview of the Leaf Porometer
The Leaf Porometer features an easy-to-use, six-button, menu-driveninterface. There are three primary menus: the Main Menu, DataMenu, and Configuration Menu (See Section Five “Menus”). Youcan navigate between each of these by pressing the Menu button.
2.2 Leaf Porometer Instrument Specifications
Operating Environment: 5 to 40 ◦C; 1 to 100% relative humiditywith desiccant chamber
Accuracy: 10%
Sample Chamber Aperture: 6.35 mm (0.25 in)
Measurement Range: 0 to 1,000 mmol/m2s1
Microcontroller Dimensions: 15.8 x 9.5 x 3.3 cm (6.2 x 3.75 x 1.3in)
Data Storage: 4,095 measurements
Data Retrieval: Direct via RS-232
3

2 ABOUT THE LEAF POROMETER Leaf Porometer
Keypad: Six-key, menu-driven
Clock: 24-hour +/− one minute per month
Interface Cable: RS-232 serial cable (included)
Power Supply: Four type “AA” batteries (included)
2.3 Leaf Porometer Components
The Leaf Porometer and its components come to you in a foam-padded carrying case. You should find the following items insidewhen your Leaf Porometer arrives.
• Leaf Porometer controller
• RS-232 cable
• Operator’s Manual and USB flash drive of Leaf Porometer Utility
• Sensor Head
• Teflon filter disks
• Replacement leaf pad/outer leaf pad
• Calibration plate/Bead Retention Screen Tool
• Bottle of USP Purified Water
• Tweezers
• Calibration filter paper disks Whatman grade #3 filter Paper
• Bottle of DesiccantDrieRite 10-20 mesh indicating desiccant
• Dispensing cap
• Spare dowel pin
• Short Dowel pin To assist with porometer head reassembly
• White Fluoropolymer agitation beadsPart# 9660K13 from McMaster Carr
• Bead retention screens
4
Leaf Porometer 2 ABOUT THE LEAF POROMETER
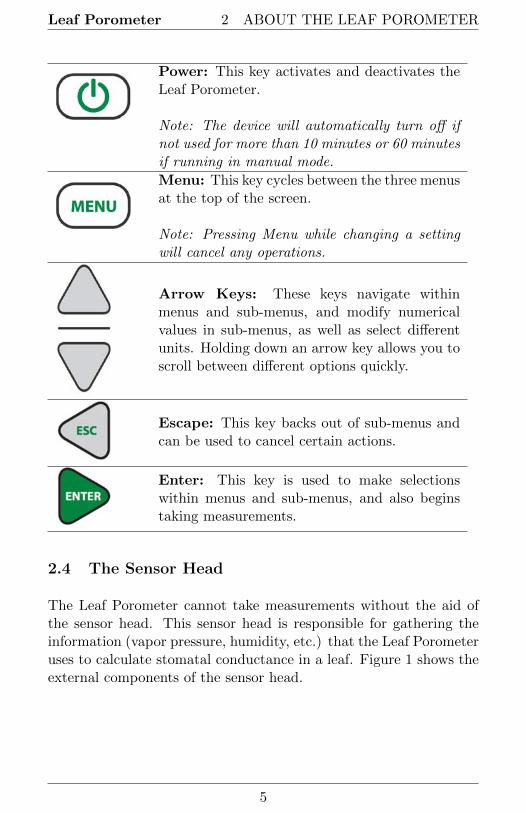
Power: This key activates and deactivates theLeaf Porometer.
Note: The device will automatically turn off ifnot used for more than 10 minutes or 60 minutesif running in manual mode.
Menu: This key cycles between the three menusat the top of the screen.
Note: Pressing Menu while changing a settingwill cancel any operations.
Arrow Keys: These keys navigate withinmenus and sub-menus, and modify numericalvalues in sub-menus, as well as select differentunits. Holding down an arrow key allows you toscroll between different options quickly.
Escape: This key backs out of sub-menus andcan be used to cancel certain actions.
Enter: This key is used to make selectionswithin menus and sub-menus, and also beginstaking measurements.
2.4 The Sensor Head
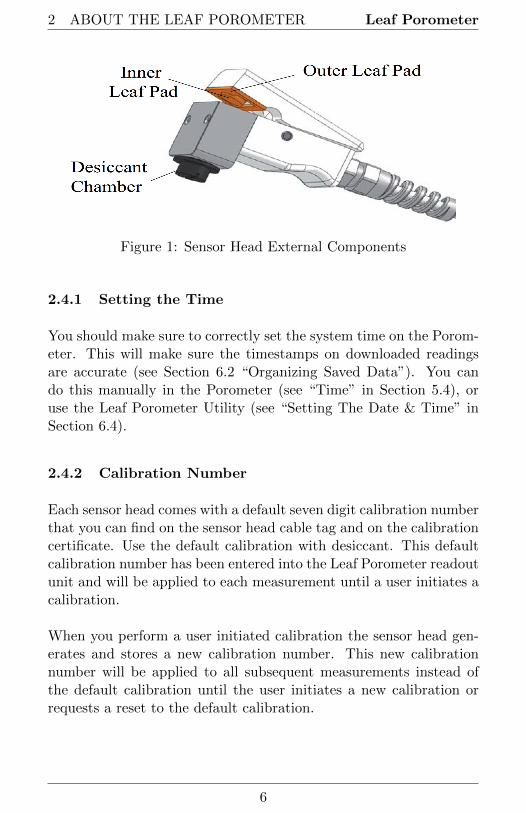
The Leaf Porometer cannot take measurements without the aid ofthe sensor head. This sensor head is responsible for gathering theinformation (vapor pressure, humidity, etc.) that the Leaf Porometeruses to calculate stomatal conductance in a leaf. Figure 1 shows theexternal components of the sensor head.
5
2 ABOUT THE LEAF POROMETER Leaf Porometer
Figure 1: Sensor Head External Components
2.4.1 Setting the Time
You should make sure to correctly set the system time on the Porom-eter. This will make sure the timestamps on downloaded readingsare accurate (see Section 6.2 “Organizing Saved Data”). You cando this manually in the Porometer (see “Time” in Section 5.4), oruse the Leaf Porometer Utility (see “Setting The Date & Time” inSection 6.4).
2.4.2 Calibration Number
Each sensor head comes with a default seven digit calibration numberthat you can find on the sensor head cable tag and on the calibrationcertificate. Use the default calibration with desiccant. This defaultcalibration number has been entered into the Leaf Porometer readoutunit and will be applied to each measurement until a user initiates acalibration.
When you perform a user initiated calibration the sensor head gen-erates and stores a new calibration number. This new calibrationnumber will be applied to all subsequent measurements instead ofthe default calibration until the user initiates a new calibration orrequests a reset to the default calibration.
6

Leaf Porometer 3 SENSOR HEAD CALIBRATION
3 Sensor Head Calibration
For the Leaf Porometer to make accurate readings of stomatal con-ductance, the two humidity sensors in the sensor head must behavein a very repeatable manner. Over the past several years, we havefound that the sensors occasionally change characteristics over time.While the endpoint humidity measurement may still be accurate, theresponse time of the sensors can change subtly which creates inac-curate conductance measurements. The best way to ensure accu-rate conductance measurements is to calibrate the Porometer beforetaking measurements. We recommend you calibrate the Porometerevery day you use it or every time you use it under a different set ofenvironmental conditions (i.e. > 15 ◦C temperature change).
It is especially important to recalibrate the Porometer after you in-stall or remove the desiccant chamber. It is also recommended thatfresh desiccant be used for each day of measurement. Visit our web-site at www.decagon.com/porocal for an Online video tutorial of thecalibration process.
3.1 Requirements
All Leaf Porometers with firmware Revision 1.30 or greater have theuser Calibration feature. If your Porometer has firmware lower thanRevision 1.30, you may upgrade the firmware. For instructions onhow to upgrade your firmware to the latest version see “UpgradingFirmware” in Section 8.5. In addition to current firmware, you willneed a Calibration Kit from Decagon to perform the calibration. Ifyou do not have a Calibration Kit, please contact Decagon ([email protected]) for a kit. Please have your sensor head serialnumber available when you contact Decagon for the kit.
Note: The Calibration Kit contains a calibration plate, tweezers, abottle of USP Purified Water, calibration filter paper disks, and whitefluoroplymer agitation beads.
7

3 SENSOR HEAD CALIBRATION Leaf Porometer
3.2 Calibration Procedure
Equilibrate to Field Conditions
It is critical that the Porometer sensor head is in thermal equilib-rium with the environment where you are taking measurements. Ifyou bring the Porometer from an air conditioned environment intohot field conditions, it can take 10 minutes or more to reach thermalequilibrium.
You can check for thermal equilibrium by putting the Porometerin “Manual” mode or using the diagnostic screen to monitor temper-ature readings until they are steady. It is also important that theUSP Purified Water and calibration plate are also in thermal equi-librium. For example, do not keep the bottle of USP Purified Waterin a pants pocket or hold the calibration block for extended periodsof time.
Check Desiccant
Remove the black plastic desiccant chamber from the bottom of theleaf clip by unscrewing it (counterclockwise). Check to see that thedesiccant is blue meaning that it is not exhausted. If the desiccantis purple, discard the exhausted desiccant and refill the desiccantchamber with fresh desiccant from the included desiccant storagecontainer. It is typical to change the desiccant each day you makemeasurements to ensure that it is not exhausted over the course ofdaily measurements.
Start Calibration
To start calibration, select the “Calibrate” option on the Config-uration/Calibration submenu.
8

Leaf Porometer 3 SENSOR HEAD CALIBRATION
Verify Sensor Head Equilibrium
You will be reminded to make sure the sensor head is in thermalequilibrium with its surroundings (see #1 above).
Press Enter to move to the next step.
Enter Serial Number
You will be prompted to enter the sensor head serial number. Youcan find this number on a tag attached to the sensor head. Select thenumber by pressing the up or down arrow keys and pressing enterafter each digit.
9

3 SENSOR HEAD CALIBRATION Leaf Porometer
Sensor Offset/Stability
The sensors must give similar humidity readings to reach accuratestomatal conductance measurements. Before beginning a calibration,the Leaf Porometer checks to make sure that the two sensors in thesensor head agree well with each other. For the sensors to agree, theair in the diffusion path should be well mixed.
One of the white fluoropolymer agitation beads can be used to mixthe air in the diffusion path. Sensor head versions with the metalscreen should already have the bead in place. If your model does nothave a screen or bead, simply open the leaf clip, insert the bead intothe diffusion path in the Aluminum block, and close the leaf clip.Now the air in the diffusion path can be mixed by shaking the bead.Shaking the leaf clip briskly in a vertical orientation results in themost efficient mixing.
As the sensors come to equilibrium, you should see the indicatorbar move closer to the 0% offset line. DO NOT open the clip. Thewater vapor in the ambient atmosphere will slow the equilibrationprocess.
10
Leaf Porometer 3 SENSOR HEAD CALIBRATION
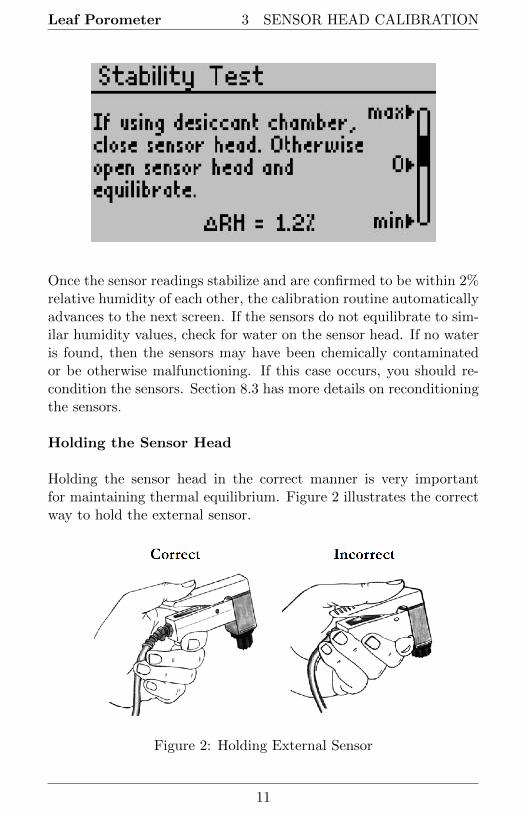
Once the sensor readings stabilize and are confirmed to be within 2%relative humidity of each other, the calibration routine automaticallyadvances to the next screen. If the sensors do not equilibrate to sim-ilar humidity values, check for water on the sensor head. If no wateris found, then the sensors may have been chemically contaminatedor be otherwise malfunctioning. If this case occurs, you should re-condition the sensors. Section 8.3 has more details on reconditioningthe sensors.
Holding the Sensor Head
Holding the sensor head in the correct manner is very importantfor maintaining thermal equilibrium. Figure 2 illustrates the correctway to hold the external sensor.
Figure 2: Holding External Sensor
11
3 SENSOR HEAD CALIBRATION Leaf Porometer
Preparing Calibration Apparatus
The Leaf Porometer calibration apparatus consists of a plastic cali-bration plate with a precisely drilled hole with known conductanceof 240 mmol m−2s−1. For the conductance value of the calibrationplate to be correct, a flat, moist surface must be placed across thehole on the side marked “Filter Paper.” This condition is achievedwith a circular disk of wet filter paper that is included in your cali-bration kit. Additional filter disks may be purchased if you run out.
Note: Do not touch the calibration filter paper disk with your fin-gers because oils in your skin will contaminate the disk and result inimproper readings. To aid in handling the filter paper disk and tokeep it clean, use the tweezers included in the calibration kit to holdthe calibration filter paper disk.
Wetting the Filter Paper
The wetness state of the filter paper is critical for an accurate cali-bration. The paper must be wet enough to provide a 100% humiditysurface, but must not be too wet. If the paper is too wet, free waterwill be pulled into the hole on the calibration plate by surface tensionand will change the effective dimensions of the hole thereby changingthe conductance.
The best method of ensuring the proper wetness state is to use the“wet and flick” method. Use tweezers to pick up the filter disk andthen add one drop of the USP Purified Water to the filter disk tosaturate it. Allow the water a couple moments to fully absorb intothe filter. Then, while holding the disk with the tweezers, give thefilter paper several sharp flicks of the wrist to knock off any excesswater.
The resulting paper should glisten, but there should be no drop ofexcess water clinging to the disk. Please see the video of properLeaf Porometer calibration technique on the Decagon website athttp://www.decagon.com/education/video-sc-1-leaf-porometer-calibration/ for visual representation of the dip and flick technique and
12
Leaf Porometer 3 SENSOR HEAD CALIBRATION
the proper filter paper wetness state.
After wetting the filter paper, use tweezers to lay the filter paperflat over the hole in the calibration plate on the side marked “FilterPaper.” It is critical that the filter paper lay flat over the hole. Makesure that the paper is not caved into the hole or bubbled out fromthe hole. The filter paper also has to cover the entire hole. Turn thecalibration plate over and carefully examine the hole to make surethat no meniscus of excess water is present in the hole. If excesswater is observed, remove the filter paper, dry the calibration plate,and repeat the wet and flick procedure with more aggressive flicks.
If during the calibration the filter paper becomes too dry to adhereto the calibration plate, then it needs to be wet again. If this occursduring a calibration, you will need to restart the calibration proce-dure. The first reading after wetting the filter paper again should beartificially low.
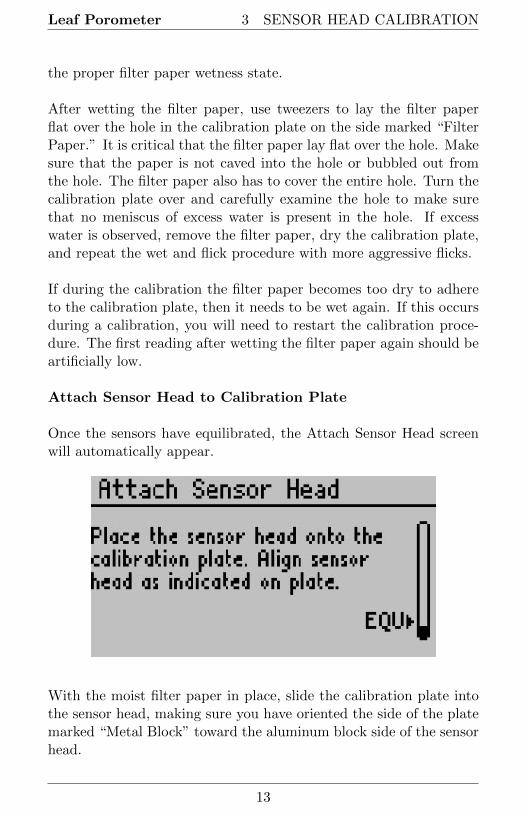
Attach Sensor Head to Calibration Plate
Once the sensors have equilibrated, the Attach Sensor Head screenwill automatically appear.
With the moist filter paper in place, slide the calibration plate intothe sensor head, making sure you have oriented the side of the platemarked “Metal Block” toward the aluminum block side of the sensorhead.
13
3 SENSOR HEAD CALIBRATION Leaf Porometer
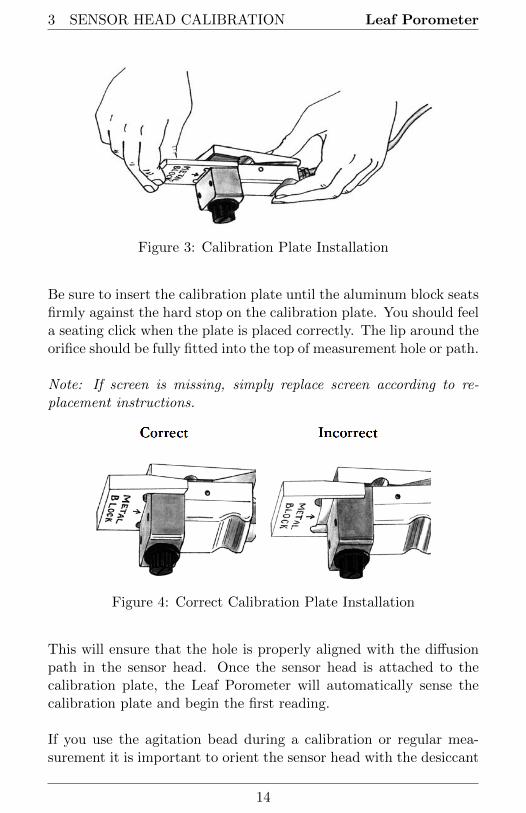
Figure 3: Calibration Plate Installation
Be sure to insert the calibration plate until the aluminum block seatsfirmly against the hard stop on the calibration plate. You should feela seating click when the plate is placed correctly. The lip around theorifice should be fully fitted into the top of measurement hole or path.
Note: If screen is missing, simply replace screen according to re-placement instructions.
Figure 4: Correct Calibration Plate Installation
This will ensure that the hole is properly aligned with the diffusionpath in the sensor head. Once the sensor head is attached to thecalibration plate, the Leaf Porometer will automatically sense thecalibration plate and begin the first reading.
If you use the agitation bead during a calibration or regular mea-surement it is important to orient the sensor head with the desiccant
14
Leaf Porometer 3 SENSOR HEAD CALIBRATION
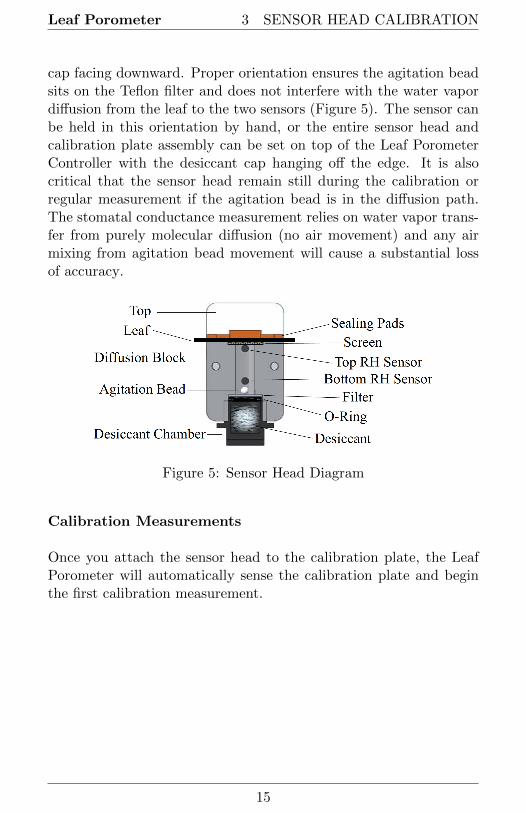
cap facing downward. Proper orientation ensures the agitation beadsits on the Teflon filter and does not interfere with the water vapordiffusion from the leaf to the two sensors (Figure 5). The sensor canbe held in this orientation by hand, or the entire sensor head andcalibration plate assembly can be set on top of the Leaf PorometerController with the desiccant cap hanging off the edge. It is alsocritical that the sensor head remain still during the calibration orregular measurement if the agitation bead is in the diffusion path.The stomatal conductance measurement relies on water vapor trans-fer from purely molecular diffusion (no air movement) and any airmixing from agitation bead movement will cause a substantial lossof accuracy.
Figure 5: Sensor Head Diagram
Calibration Measurements
Once you attach the sensor head to the calibration plate, the LeafPorometer will automatically sense the calibration plate and beginthe first calibration measurement.
15
3 SENSOR HEAD CALIBRATION Leaf Porometer
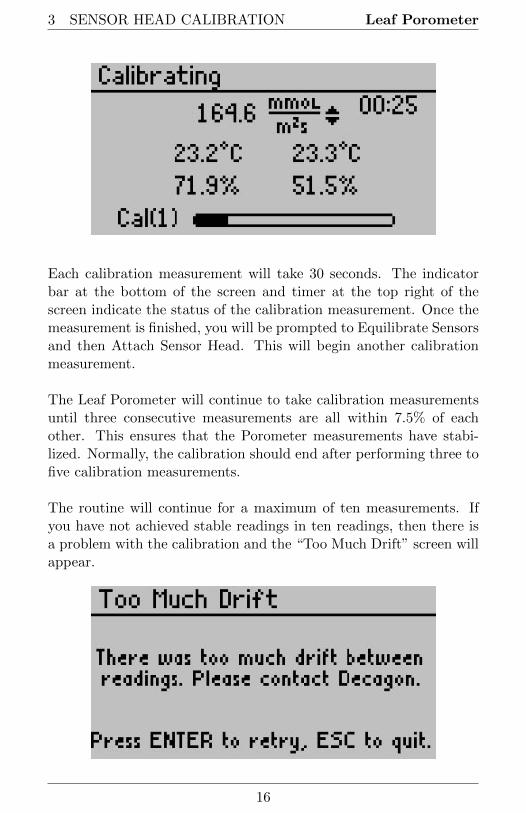
Each calibration measurement will take 30 seconds. The indicatorbar at the bottom of the screen and timer at the top right of thescreen indicate the status of the calibration measurement. Once themeasurement is finished, you will be prompted to Equilibrate Sensorsand then Attach Sensor Head. This will begin another calibrationmeasurement.
The Leaf Porometer will continue to take calibration measurementsuntil three consecutive measurements are all within 7.5% of eachother. This ensures that the Porometer measurements have stabi-lized. Normally, the calibration should end after performing three tofive calibration measurements.
The routine will continue for a maximum of ten measurements. Ifyou have not achieved stable readings in ten readings, then there isa problem with the calibration and the “Too Much Drift” screen willappear.
16

Leaf Porometer 3 SENSOR HEAD CALIBRATION
The most common problem is that thermal equilibrium has not beenreached. Let the Porometer equilibrate for a few minutes and repeatthe calibration process. If you still cannot achieve a good calibration,contact Decagon for help ([email protected]).
Equilibrate Sensors
Once a reading is complete, you will be prompted to remove thesensor head and equilibrate the sensors.
Remove the sensor head from the calibration plate and close the clip.If you are using the agitation bead, shake the sensor head to mix theair in diffusion path to speed up the equilibration process. As thesensors come to equilibrium, you should see the indicator bar movecloser to the “EQU” line. Once the sensors have equilibrated, theAttach Sensor Head screen will automatically reappear and steps 8-10 can be repeated.
High RH Reading
Once the sensors have equilibrated at similar humidity values, theLeaf Porometer checks to make sure that the air in the diffusionpath is adequately desiccated. If the relative humidity is greaterthan 10%, the next calibration measurement does not begin, and in-stead a warning screen appears. In many cases, the relative humiditywill continue to fall and you will be prompted to attach the sensorhead to the calibration block once the relative humidity falls below10%. However, if this process is slow or if the relative humidity never
17

3 SENSOR HEAD CALIBRATION Leaf Porometer
falls below 10%, you need to change out your desiccant.
Calibration Complete
Once the calibration is complete, the new calibration number is auto-matically saved into the handheld unit and the Calibration CompleteScreen appears. At this point, you are ready to take measurementswith your Leaf Porometer. The most recent saved calibration num-ber will be applied to all subsequent measurements until a new cal-ibration is completed or you apply the factory default calibrationnumber.
Accuracy Verification
It is always a good idea to verify that the calibration was effective.If you wish to do this, go to the Measurement menu and make a fewmeasurements on the calibration plate. The measured conductance
18

Leaf Porometer 3 SENSOR HEAD CALIBRATION
should be close to 240 mmol m−2s−1.
If possible, do not wet the filter paper for the verification readingsagain. If wetting is necessary, disregard the first measurement taken.
3.3 Calibration without Desiccant
We recommended you always use desiccant to take readings, but ifthe operators wish to make non-desiccated readings, we recommendan ambient humidity of less than 30%.
For calibrating without desiccant, follow the previous steps 1 through11 with these exceptions.
• Remove the black desiccant chamber to expose the Teflon filterto ambient conditions.
• Do not use an agitation bead in the diffusion path.
• On sensor head models with a bead retention screen, removethe bead by temporarily removing the o-ring and Teflon filter,removing the bead, and then replacing the filter and o-ring.
• There will be a three minute hydration period before takingcalibration readings. During this period, the sensor head isclipped on the cal block with moist filter paper applied.
• The initial stability test (step 6) and subsequent equilibrationbetween calibration measurements (step 9) are performed atambient humidity. To speed equilibration at these steps, openthe clip and wave the sensor head to mix air in the diffusionpath.
19

4 MAKING MEASUREMENTS Leaf Porometer
4 Making Measurements
4.1 Before Making a Measurement
Before beginning a measurement, make sure that the Leaf Porom-eter is turned on and that the sensor head is clean and properlyconnected. It is critical operators make sure to equilibrate the sen-sor head to the ambient temperature. Thermal disequilibrium willcause highly inaccurate measurements.
Note: Consider if you are measuring abaxial conductance (on thetop of the leaf) or abaxial (the bottom). Since the stomates of mostleaves are on the bottom of the leaf, most measurements are abax-ial. If the agitation bead is present in the chamber, you must takereadings with the black cap facing downward so the bead is not in thediffusion path.
4.2 Desiccant
Decagon highly recommends using the desiccant chamber to makemeasurements. The Leaf Porometer relies on a measurement of thehumidity gradient between the leaf evaporating surface and the am-bient atmosphere. As the ambient humidity increases the gradientbecomes smaller, which causes small errors in the measurement ofthe humidity gradient to result in very large errors in the calculatedconductance.
20
Leaf Porometer 4 MAKING MEASUREMENTS
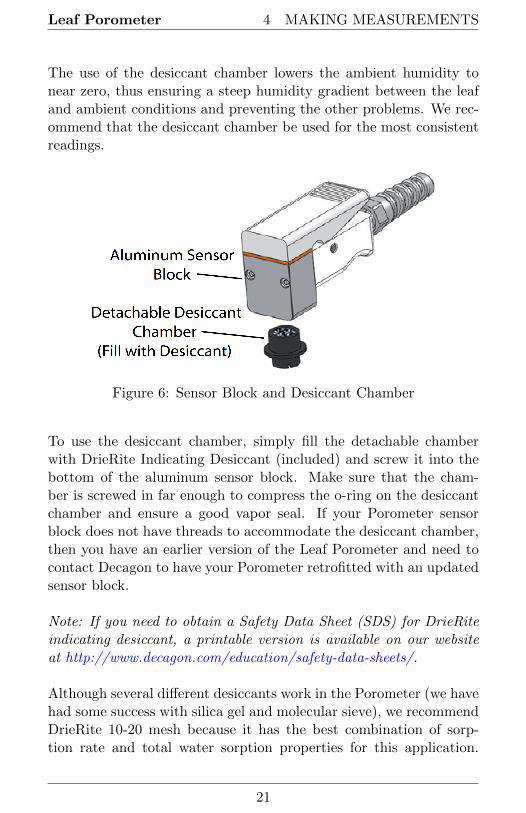
The use of the desiccant chamber lowers the ambient humidity tonear zero, thus ensuring a steep humidity gradient between the leafand ambient conditions and preventing the other problems. We rec-ommend that the desiccant chamber be used for the most consistentreadings.
Figure 6: Sensor Block and Desiccant Chamber
To use the desiccant chamber, simply fill the detachable chamberwith DrieRite Indicating Desiccant (included) and screw it into thebottom of the aluminum sensor block. Make sure that the cham-ber is screwed in far enough to compress the o-ring on the desiccantchamber and ensure a good vapor seal. If your Porometer sensorblock does not have threads to accommodate the desiccant chamber,then you have an earlier version of the Leaf Porometer and need tocontact Decagon to have your Porometer retrofitted with an updatedsensor block.
Note: If you need to obtain a Safety Data Sheet (SDS) for DrieRiteindicating desiccant, a printable version is available on our websiteat http://www.decagon.com/education/safety-data-sheets/.
Although several different desiccants work in the Porometer (we havehad some success with silica gel and molecular sieve), we recommendDrieRite 10-20 mesh because it has the best combination of sorp-tion rate and total water sorption properties for this application.
21
4 MAKING MEASUREMENTS Leaf Porometer
DrieRite can be refreshed by baking at 210 ◦C for one hour andreused. However, from our experience, refreshed DrieRite does notabsorb as much water as virgin material and therefore does not lastas long in the Porometer.
When using the desiccant chamber, it is necessary to close the leafclip in order to equilibrate the sensors in preparation for the subse-quent measurement. This results in a still air environment in the dif-fusion path, so it achieves equilibration through molecular diffusion,which is a relatively slow process. At high temperatures, diffusioncoefficients are high and the process is relatively rapid. However,at mid to low temperatures, the process can be unacceptably long(several minutes). These long equilibration times can be reducedconsiderably by using the white fluoropolymer agitation beads thatare included with the Porometer to mix the air in the diffusion path.To speed equilibration, simply shake the leaf clip briskly in a verticalorientation. You should hear the bead bouncing between the screenand the Teflon filter.
Generally speaking, the faster you shake, the faster the porometerequilibrates. The presence of the bead does not affect the stomatalconductance measurement as long as the bead does not move dur-ing the measurement and you orient the leaf clip with the desiccantchamber down so that the bead rests on the Teflon filter (Figure 7.If you wish to measure the stomatal conductance of the abaxial (top)surface of the leaf, you must turn the leaf upside down and keep theleaf clip oriented with the black desiccant chamber down. Do notinvert the leaf clip during a measurement or the bead will rest on thescreen and distort the diffusion of water vapor from the leaf throughthe diffusion path.
22

Leaf Porometer 4 MAKING MEASUREMENTS
Figure 7: Sensor Block and Desiccant Chamber Components
It is well known that low humidity conditions induces stomatal clo-sure in most plant species, so prolonged exposure to the desiccatedleaf clip should cause inaccurate stomatal conductance measurements.However, it is suggested in the literature that the minimum time nec-essary for the onset of stomatal closure in response to a change inenvironmental conditions is two minutes. Since the SC-1 Leaf Porom-eter makes an auto mode measurement in 30 seconds, the presenceof the desiccated leaf clip should not cause stomatal closure unlessmultiple measurements are made in quick succession on the samelocation of the same leaf.
4.3 Manual Mode vs. Auto Mode
When the Porometer is in Manual Mode, the stomatal conductanceis measured directly from the theory presented in section 7 and dis-played continuously. The real time conductance measurement canbe saved at any time during a Manual Mode measurement.
Note: Manual mode should only be used at low conductances (i.e.< 100 mmol m−2s−1).
At higher conductances, the readings become inaccurate and can takean exceptionally long time to complete. For the theory in Section 7 toaccurately predict the stomatal conductance using the steady statediffusion technique, true steady state conditions must exist in thediffusion path. The amount of time necessary to reach steady stateconditions is proportional to the conductance. At conductances less
23

4 MAKING MEASUREMENTS Leaf Porometer
than 20 mmol m−2s−1, steady state conditions are generally reachedin less than five minutes. At higher conductances, steady state condi-tions can take up to 30 minutes. Please note that leaving the sensorhead on the leaf surface for more than a few minutes can cause thestomatal conductance to change in response to the presence of thesensor head clip. Some common uses for manual mode are measur-ing dark conductance in plants and measuring conductance of staticconductance materials (e.g. fruit peels, waterproof fabric).
Auto Mode makes an accurate stomatal conductance measurementin 30 seconds. To do this, the Porometer takes the first 30 sec-onds of stomatal conductance data and applies a “look ahead” algo-rithm to predict the final stomatal conductance reading that wouldbe achieved if unlimited time were allowed for true steady state condi-tions to occur. Auto Mode has several advantages over Manual Modeand other Porometers. First, the 30 second Auto Mode measurementduration ensures that stomatal conductance does not change due tothe presence of the sensor head. Second, Auto Mode takes only30 seconds per measurement, ensuring that your measurements arecompleted in a timely manner.
Finally, Auto Mode sets a definite endpoint for the measurement,meaning that the user does not have to pick an arbitrary endpoint,as is common with other diffusion Porometers and with Manual Modemeasurements.
For the Porometer to “detect” the presence of a transpiring leaf andbegin the Auto Mode measurement, the measured stomatal conduc-tance must climb to 5 mmol m−2s−1. So, if you are making mea-surements on leaves with extremely low conductances, it may benecessary to make the measurements in Manual Mode.
4.4 Auto Mode Measurements
1. Select Auto mode from the Configuration menu.
2. Return to the Measurement menu. You will be prompted topress Enter to begin a reading.
24

Leaf Porometer 4 MAKING MEASUREMENTS
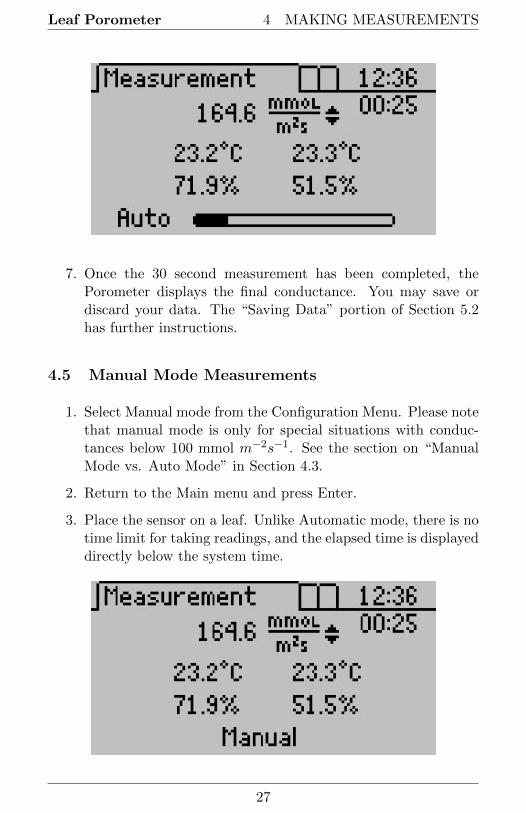
3. After pressing Enter, the Measurement screen will display.
4. The reading will begin once the sensor head is placed on a leaf,and it detects a conductance value greater than 5 mmol m−2
s−1. A progress bar will also indicate the reading is underway.
Note: If the desiccant chamber is attached, the reading willbegin shortly after opening the leaf clip regardless of whether itis clipped on a leaf. It is critical to slip the leaf clip onto a leafwithin five seconds of opening the clip or unacceptable errorsmay be introduced into the conductance measurement.
If you see the screen above, close the clip and allow the sen-sor to equilibrate. If an agitation bead is in place shake thesensor head briskly in a vertical orientation to more quicklyequilibrate.
25
4 MAKING MEASUREMENTS Leaf Porometer
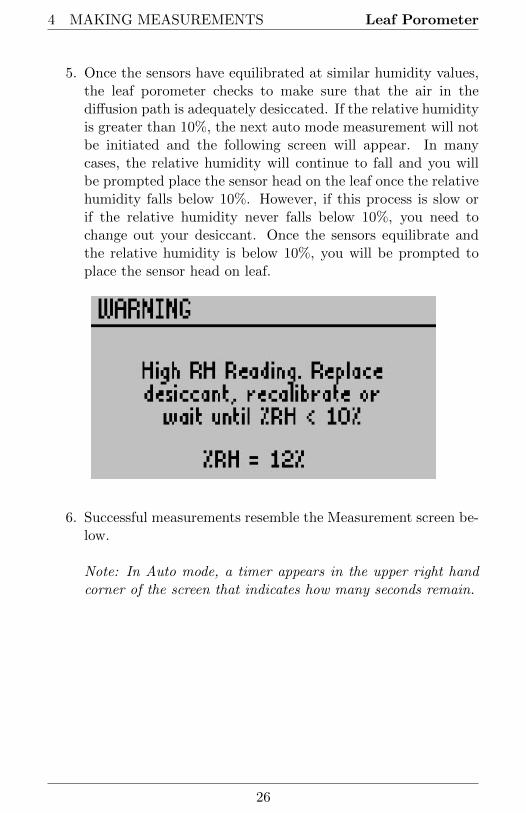
5. Once the sensors have equilibrated at similar humidity values,the leaf porometer checks to make sure that the air in thediffusion path is adequately desiccated. If the relative humidityis greater than 10%, the next auto mode measurement will notbe initiated and the following screen will appear. In manycases, the relative humidity will continue to fall and you willbe prompted place the sensor head on the leaf once the relativehumidity falls below 10%. However, if this process is slow orif the relative humidity never falls below 10%, you need tochange out your desiccant. Once the sensors equilibrate andthe relative humidity is below 10%, you will be prompted toplace the sensor head on leaf.
6. Successful measurements resemble the Measurement screen be-low.
Note: In Auto mode, a timer appears in the upper right handcorner of the screen that indicates how many seconds remain.
26
Leaf Porometer 4 MAKING MEASUREMENTS
7. Once the 30 second measurement has been completed, thePorometer displays the final conductance. You may save ordiscard your data. The “Saving Data” portion of Section 5.2has further instructions.
4.5 Manual Mode Measurements
1. Select Manual mode from the Configuration Menu. Please notethat manual mode is only for special situations with conduc-tances below 100 mmol m−2s−1. See the section on “ManualMode vs. Auto Mode” in Section 4.3.
2. Return to the Main menu and press Enter.
3. Place the sensor on a leaf. Unlike Automatic mode, there is notime limit for taking readings, and the elapsed time is displayeddirectly below the system time.
27

4 MAKING MEASUREMENTS Leaf Porometer
4. You may save your data at any point during the reading bypressing Enter. See “Saving Data” in section 5.2 for instruc-tions.
4.6 Measurements without Desiccant
Decagon recommends you always use desiccant, if operators wishes tomake non-desiccated readings, we recommend doing so at an ambienthumidity of < 30%. Note these exceptions for measurements withoutdesiccant.
• When not using desiccant, remove the desiccant chamber fromthe sensor head and do not cover the hole in the bottom of thesensor head. Keep your fingers away from the diffusion pathwhen taking measurement.
• The factory calibration is with desiccant so you need to recali-brate without desiccant as Section 3.3 describes. If you try tomeasure without the desiccant after having calibrated with des-iccant, the Porometer prompts you to calibrate again withoutdesiccant before continuing.
• Without desiccant, the equilibration between measurements isperformed at ambient humidity.
• To speed equilibration time, open the clip and wave the sensorhead to mix the air in the diffusion path. Do not insert anagitation bead into the diffusion path.
• If the desiccant chamber is not being used, the first reading inAuto mode after the sensor has been removed from a leaf formore than five minutes always reads low. Discard this readingand begin recording with the second. This is not an issue ifyou use the desiccant chamber.
Measuring Small Leaves & Needles
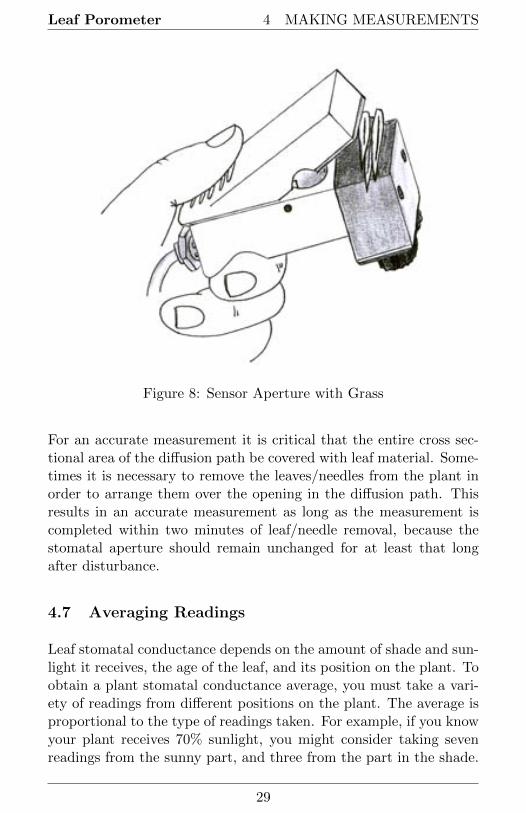
When measuring small needles or leaves, they should be insertedinto the sensor as shown below. This is because single needles orsmall leaves (including blades of grass) may not adequately coverthe aperture of the sensor.
28
Leaf Porometer 4 MAKING MEASUREMENTS
Figure 8: Sensor Aperture with Grass
For an accurate measurement it is critical that the entire cross sec-tional area of the diffusion path be covered with leaf material. Some-times it is necessary to remove the leaves/needles from the plant inorder to arrange them over the opening in the diffusion path. Thisresults in an accurate measurement as long as the measurement iscompleted within two minutes of leaf/needle removal, because thestomatal aperture should remain unchanged for at least that longafter disturbance.
4.7 Averaging Readings
Leaf stomatal conductance depends on the amount of shade and sun-light it receives, the age of the leaf, and its position on the plant. Toobtain a plant stomatal conductance average, you must take a vari-ety of readings from different positions on the plant. The average isproportional to the type of readings taken. For example, if you knowyour plant receives 70% sunlight, you might consider taking sevenreadings from the sunny part, and three from the part in the shade.
29

4 MAKING MEASUREMENTS Leaf Porometer
You can also obtain the average readings for a field of plants. Forexample, if you had a field of corn, you might decide to take a read-ing from the third leaf from the top on each stalk of corn on thatparticular plot. These readings together would give you the averagefor that field.
4.7.1 Measurement Precautions
General Precautions
• Before using the sensor, allow it to equilibrate to the ambienttemperature. This may take 10 minutes or longer to completeif the temperature of the Porometer is very different from thesampling environment, e.g. from a cool air conditioned roomto a hot outdoor environment.
• Avoid leaves that are wet or covered with dew; never take read-ings in the rain.
• If you blow into the sensor head, it takes a few minutes for thestomatal conductance reading to return to normal.
• Clean the sensor periodically to keep it free of dirt and pollenthat can build up during use and affect readings. (Section8.2“Cleaning the Sensor Block”)
• Avoid chemical fumes. Fumes can be extremely harmful to thesensor (i.e. alcohol, gasoline, volatile organics).
• Decagon recommends that you always use desiccant, but if op-erators wish to make non-desiccated readings we recommendmaintaining an ambient humidity of < 30%.
• It is critical that you recess the bead retention screen in thediffusion path. If the screen extends out of the diffusion path,it will cut the leaf and cause erroneously high conductancemeasurements.
If the stomatal conductance reaches a value beyond the recommendedrange of the instrument (0 to 1000 mmol/m2s), an “approximate”
30
Leaf Porometer 4 MAKING MEASUREMENTS
symbol appears to the left of the reading. If the stomatal conduc-tance reaches a value greater than or equal to 6000 mmol/m2s, an“infinity” symbol is shown in place of the measurement. Most often,the excessively high values are caused by water on the leaf surface.If you consistently are getting high readings, check your leaf surfacefor the presence of water.
4.7.2 Chemical Effects
Chemical vapors can interfere with the polymer layers used to formthe humidity sensors. These fumes can diffuse through the sensorand compromise sensor accuracy. It is a good idea, therefore, tonever bring the sensor into contact with any sort of chemical vapor(i.e. glue, alcohol, gasoline, volatile organics). Review “PorometerSensor Reconditioning” in Section 8.3 if you suspect your sensorshave been affected by chemical contamination.
4.7.3 Environmental Effects
When making a measurement, you must account for the followingeffects.
Light: The amount of CO2 required for a plant changes depend-ing on the amount of sunlight available to it. In broad daylight,more CO2 is required, so the stomata remain open. At dusk, thestomata close, and in darkness they are often closed completely.Readings taken on overcast days, for example, generally have lowerconductances than those taken on sunny ones. Additionally, leavesin shadow or in shade usually have lower conductances that those ingreater light. Therefore, make sure to consider the lighting condi-tions where you are take the measurements.
Temperature: Temperature also affects plant stomatal conduc-tance. For most plants, on a very hot or a very cold day, photo-synthesis slows down or stops, and the stomata narrow or do notopen, to prevent internal water loss. Therefore, be sure to considerthe temperature before conducting measurements.
31

4 MAKING MEASUREMENTS Leaf Porometer
Humidity: A factor that causes stomatal conductance to change isthe humidity at the leaf surface. As the outside humidity increases,the stomata opens. Porometers that dry the air around the stomatadecrease conductance; likewise, those that allow surface humidity toincrease do the opposite. Be sure not to make repeated measure-ments on the same spot on a single leaf especially if the desiccantchamber is used.
Carbon Dioxide (CO2): One purpose of the stomata is to regulatethe leaf usage of CO2, which is important to controlling the balanceof humidity. An increase in CO2 causes stomata to close, while adecrease causes them to open. Thus, it is important to consider theCO2 levels of your measuring environment. You, the Leaf Porometeroperator, can adversely affect readings by exhaling CO2 directly onthe plant you are measuring. This is particular important in growthchambers or greenhouse, where CO2 from an operators breath candouble or triple ambient levels.
32
Leaf Porometer 5 THE MENUS
5 The Menus
The Leaf Porometer features three main menus, designed for easynavigability and use.
5.1 The Measurement Menu
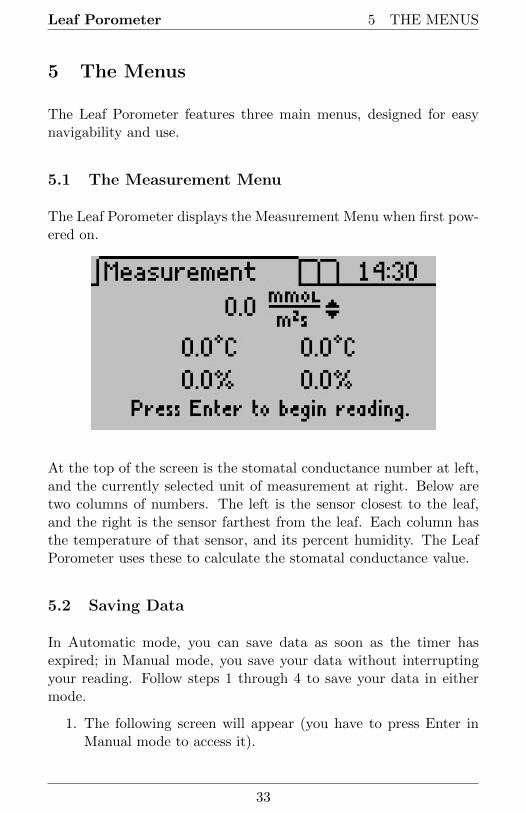
The Leaf Porometer displays the Measurement Menu when first pow-ered on.
At the top of the screen is the stomatal conductance number at left,and the currently selected unit of measurement at right. Below aretwo columns of numbers. The left is the sensor closest to the leaf,and the right is the sensor farthest from the leaf. Each column hasthe temperature of that sensor, and its percent humidity. The LeafPorometer uses these to calculate the stomatal conductance value.
5.2 Saving Data
In Automatic mode, you can save data as soon as the timer hasexpired; in Manual mode, you save your data without interruptingyour reading. Follow steps 1 through 4 to save your data in eithermode.
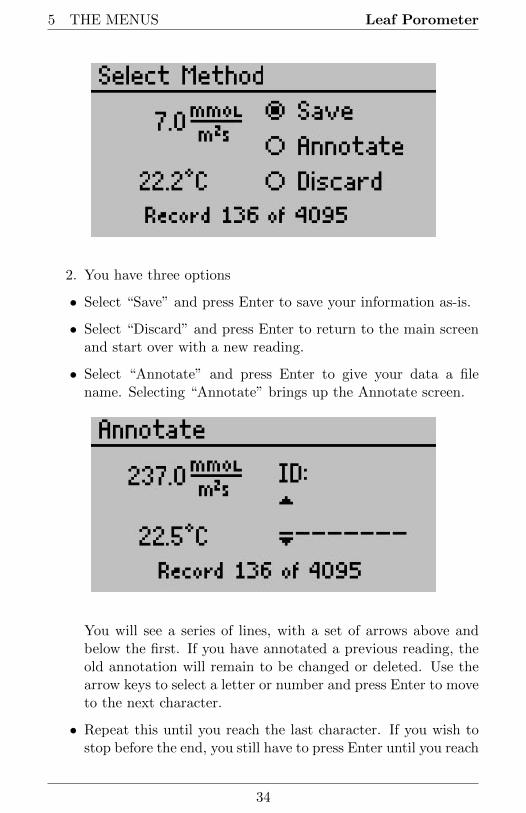
1. The following screen will appear (you have to press Enter inManual mode to access it).
33
5 THE MENUS Leaf Porometer
2. You have three options
• Select “Save” and press Enter to save your information as-is.
• Select “Discard” and press Enter to return to the main screenand start over with a new reading.
• Select “Annotate” and press Enter to give your data a filename. Selecting “Annotate” brings up the Annotate screen.
You will see a series of lines, with a set of arrows above andbelow the first. If you have annotated a previous reading, theold annotation will remain to be changed or deleted. Use thearrow keys to select a letter or number and press Enter to moveto the next character.
• Repeat this until you reach the last character. If you wish tostop before the end, you still have to press Enter until you reach
34

Leaf Porometer 5 THE MENUS
the end of the row.
5.3 The Data Menu
In this menu, you can view any saved data, download data to acomputer, and erase all data stored in the Porometer memory. Thismenu features three sub-menus.
View
Here you can view measurement data stored on your Porometer.
1. Press Enter to select the view sub-menu.
2. Each measurement shows the time acquired, stomatal conduc-
35

5 THE MENUS Leaf Porometer
tance/resistance value (depends on which unit you have setas your default) and its annotation (if that measurement wassaved with an annotation).
Download
This Download option sends the data saved in the Porometer tothe terminal software running on your computer.
Note: Your Leaf Porometer comes with the software for MicrosoftWindows. The Utility makes downloading data to your computervery easy. In general, you should use the Leaf Porometer Utility todownload data instead of this menu option on the Porometer. Reviewthe Leaf Porometer Utility in Section 6 for more information.
If you are unable to use the Leaf Porometer Utility, you can useterminal software to transfer the data from your Porometer to yourcomputer. Steps 1 through 4 apply to most terminal software pro-grams.
1. Configure your terminal software with the following settings:
• 9600 baud
• 8 data bits, 1 stop bit, no parity
• No software/hardware flow control
• Append line feeds to incoming line ends
• Echo typed characters locally.
2. Connect your Leaf Porometer to an available serial port onyour computer using the included RS-232 serial cable.
3. Set your terminal software to capture received data if you wantto save the data.
4. Select “Download” from the Data Menu of the Leaf Porometer.
Erase
This will erase all your stored data records in your Leaf Porome-ter memory.
36

Leaf Porometer 5 THE MENUS
Caution: Once this feature is activated, all data will bepermanently deleted from the Porometer, and cannot berecovered!
Follow these three steps to erase data.
1. Press Enter to select the Erase sub-menu. The following screenwill appear.
2. Press Enter again to erase the memory, or ESC if you decidenot to erase the data. “Erasing...” will be displayed as data isbeing removed, which usually takes about six seconds.
3. When this is complete, you will be returned to the Data Menu.
5.4 The Configuration Menu
37
5 THE MENUS Leaf Porometer
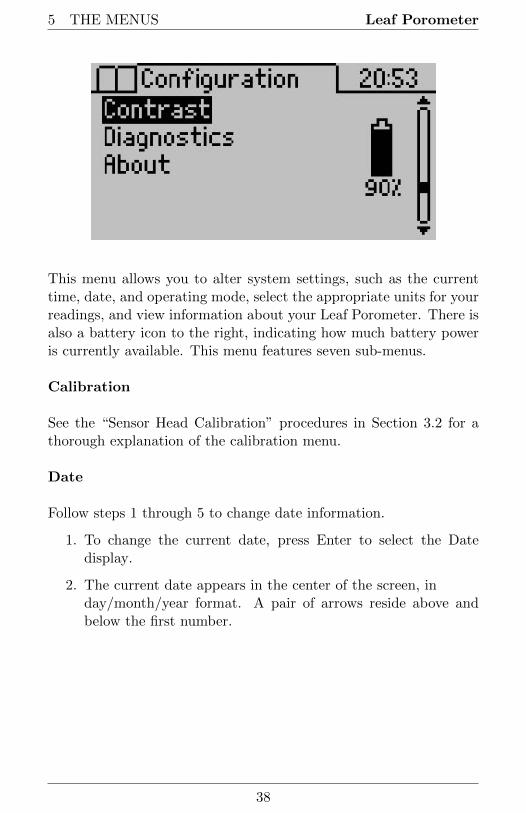
This menu allows you to alter system settings, such as the currenttime, date, and operating mode, select the appropriate units for yourreadings, and view information about your Leaf Porometer. There isalso a battery icon to the right, indicating how much battery poweris currently available. This menu features seven sub-menus.
Calibration
See the “Sensor Head Calibration” procedures in Section 3.2 for athorough explanation of the calibration menu.
Date
Follow steps 1 through 5 to change date information.
1. To change the current date, press Enter to select the Datedisplay.
2. The current date appears in the center of the screen, inday/month/year format. A pair of arrows reside above andbelow the first number.
38

Leaf Porometer 5 THE MENUS
3. Use the arrow keys to change this number. (Holding down theup/down arrow allows you to scroll quickly between values.)
4. Press Enter to move to the next value, and repeat step #3. Ifyou need to return to the previous number, press Escape.
5. When you have finished changing the last number, press Enterand it returns you to the Configuration Menu.
Time
Follow steps 1 through 5 to change the current time.
1. Press Enter to select the Time display.
2. The current time appears in the center of the screen, in 24-hourformat. A pair of arrows are present above and below the firstnumber.
39

5 THE MENUS Leaf Porometer
3. Use the arrow keys to change this number. (Holding down theup/down arrow will allow you to scroll quickly between values.)
4. Press Enter to move to the next number, and repeat step #3.If you need to return to the previous number, press Escape.
5. When you have finished changing the last number, press Enterand you will be returned to the Configuration Menu.
Mode
The Mode Menu allows you to choose which type of measurementmode to use in the Main menu. Press Enter to select a mode. (Sec-tion 4.3) for the descriptions of Manual and Auto Modes.
Auto mode: Takes readings automatically for 30 seconds. Youmust press Enter before placing the sensor on the leaf for Auto modeto work properly. In this mode, you are unable to save your infor-mation mid reading. You must wait until the timer runs out after30 seconds, then you may save your reading. Also, if initial conduc-tance is less than 5 mmol/m2s, you will see a screen prompting youto place the sensor on a leaf. Conversely, if the initial conductanceis too high, a warning screen will appear.
Manual mode: Continuously measures conductance and updatesthe screen. This mode is only suitable for low conductances (<100mmol m−2s−1). The user can decide when equilibrium has beenreached. Pressing Enter will give you the option to save your dataat any point during the reading.
Units
Data in the Leaf Porometer can display in three units accessible fromthe Main Screen and under the Configuration Menu. Select “Units”and press Enter to select a unit When in the Configuration Menu.
Diagnostics
This menu allows you to view and save real time sensor values fromyour sensor head. An error message will pop up next to a reading if
40

Leaf Porometer 5 THE MENUS
the value is out of range. Pressing Enter during this screen will savea Scan Record that you can view or download at a later time.
Contrast
The Contrast menu allows you to alter the screen contrast settings.To access it, use the Down arrow key to scroll to it and press Enter.The following screen will appear:
Use the arrow keys to alter the contrast level. Press Enter to save orEscape to cancel adjustments.
5.5 About Screen
This menu displays your Leaf Porometer serial number and firmwareversion.
41

5 THE MENUS Leaf Porometer
42

Leaf Porometer 6 LEAF POROMETER UTILITY
6 Leaf Porometer Utility
Figure 9: Leaf Porometer Utility Main Screen
The Leaf Porometer Utility is a program designed specifically for in-terfacing with the Leaf Porometer. Use this program to downloadmeasurement data to your computer, erase the Leaf Porometer data,set the date and time, and see information about your Leaf Porom-eter.
System Requirements:
To use the Leaf Porometer Utility, you must meet the following min-imum system requirements:
• Microsoft Windows 98 or NT 4 (SP 5) or better
43

6 LEAF POROMETER UTILITY Leaf Porometer
• Intel Pentium Pro or better processor
• One available serial port or one available USB port
• Microsoft Excel 97 or better (for viewing data as XLS files)
You can install the Leaf Porometer Utility using the included USBflash drive(found in the inside cover of the Leaf Porometer OperatorsManual). You can also download and install the latest version ofthe Utility from http://www.decagon.com/support/leaf-porometer-utility/.
6.1 Downloading Your Data
This transfers all saved measurement data on the Leaf Porometer toyour computer. Follow steps 1 through 5 to download your data.
1. Make sure the RS-232 cable is connected to the Leaf Porometer,and to a serial communication (COM) port on your computer.
2. Open the Leaf Porometer Utility.
3. Choose the appropriate Comm Port from the “Use computercommunication port” control on the main screen.
4. Click the Download button in the lower right-hand corner, or“Download Data” in the File Menu.
Note: If you encounter an error message after clicking thisbutton, please refer to our Troubleshooting Section on page 9for instructions.
5. The Save screen appears.
44

Leaf Porometer 6 LEAF POROMETER UTILITY
Figure 10: Save Leaf Porometer Data Dialog
Name your data file, select where it will be saved to, and inwhat format. You may choose between the following formats:
• Microsoft Excel Workbook (*.xls);
• Text (Tab delimited) (*.txt);
• CSV (Comma delimited) (*.csv);
• Raw data (Comma delimited) (*.txt)
6. Click Save to download your data to the specified location. Theprogress bar shows the status of the download process.
Note: You can cancel a download in progress using the cancel button.If you cancel, the software does not save downloaded data are saved.
6.2 Organizing Saved Data
Data are organized in the same way regardless of what format it wassaved in. The information will be divided into six columns:
1. Measurement time
2. Stomatal conductance/resistance
3. Temperature in ◦C or ◦F
45

6 LEAF POROMETER UTILITY Leaf Porometer
4. Sample ID (if saved with measurement)
5. Sensor head serial number
6. Calibration number
The utility formats measurement dates according to the WindowsLocal settings found in the Control Panel under “Regional and Lan-guage Options” (“Regional Settings” in Windows 98). You may over-ride this and set the format to day/month/year by going to the EditMenu, click Preferences, Units tab, and by clicking “Use Template”under Date/Time Format for Data Files.
Scan Records
Scan records have additional columns than other data records. Theyshow a snapshot of the sensor values at the time of measurement. Inall file types, the scan records are interleaved with the normal datarecords and can be identified because their annotations are labeled“Scan.” There are four additional columns.
1. Leaf Relative Humidity in %RH
2. Leaf Temperature in ◦ C or ◦F
3. Filter Relative Humidity in %RH
4. Filter Temperature in ◦C or ◦F
6.3 Erasing Your Data
This will erase all data stored on your Leaf Porometer.
Caution: Once this feature is activated, all data will bepermanently deleted from the Leaf Porometer, and cannotbe recovered.
Follow steps 1 through 4 to erase your data.
1. Make sure that the RS-232 cable connects to the Leaf Porom-eter and to a Comm Port on your computer.
46

Leaf Porometer 6 LEAF POROMETER UTILITY
2. Choose the appropriate Comm Port from “Use computer com-munication port” control on the main screen.
3. Click “Erase,” in the lower left-hand corner, or “Erase Data...”in the File Menu. If you encounter an error message afterclicking this button, please refer to Section 9 “Troubleshooting”for instructions.
4. The progress bar shows the status of the erase process.
6.4 Setting the Date and Time
You can set the Leaf Porometer date and time by selecting “SetPorometer Date/Time” from the Actions Menu. This will automati-cally synchronize the Leaf Porometer date and time to your computerdate and time.
6.5 Retrieving Leaf Porometer Information
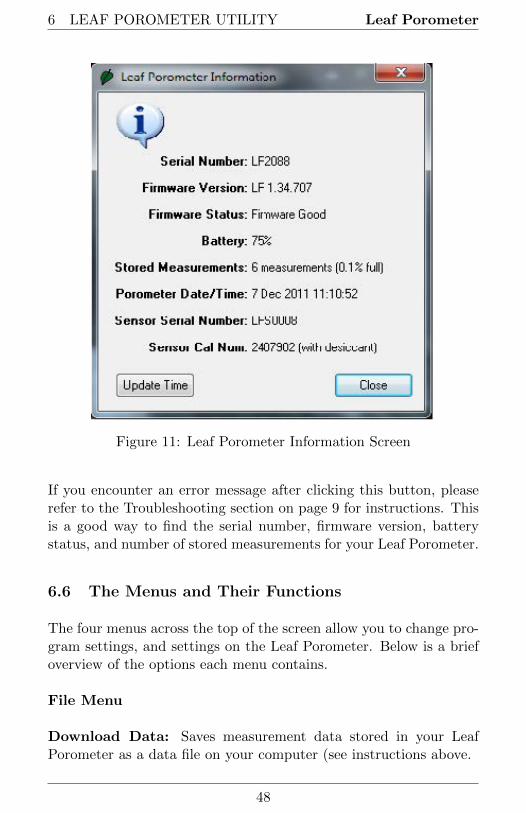
Choose “View Porometer Information...” from the Actions Menu tosee information about your Leaf Porometer. (Figure 11)
47
6 LEAF POROMETER UTILITY Leaf Porometer
Figure 11: Leaf Porometer Information Screen
If you encounter an error message after clicking this button, pleaserefer to the Troubleshooting section on page 9 for instructions. Thisis a good way to find the serial number, firmware version, batterystatus, and number of stored measurements for your Leaf Porometer.
6.6 The Menus and Their Functions
The four menus across the top of the screen allow you to change pro-gram settings, and settings on the Leaf Porometer. Below is a briefoverview of the options each menu contains.
File Menu
Download Data: Saves measurement data stored in your LeafPorometer as a data file on your computer (see instructions above.
48

Leaf Porometer 6 LEAF POROMETER UTILITY
Erase Data: Erases all data in your Leaf Porometer (see instruc-tions above).
Exit: Quits the program.
Edit Menu
The Leaf Porometer Utility Preferences has three tabs. The DataFile, Communications, and Application tabs.
1. Data File Tab
Figure 12: Preferences - Units Screen
Measurement Units: If you select “Get units from Leaf Porometersettings,” this will save all downloaded measurement data in theunits used on the Leaf Porometer. You can also choose to overridethe settings in the Leaf Porometer and save your measurement data
49
6 LEAF POROMETER UTILITY Leaf Porometer
in one of three units:
mmol/m2s - stomatal conductance (millimoles per meter squaredseconds);
m2s/mol - stomatal resistance (meters squared seconds per mole);s/m - stomatal resistance (seconds per meter).
Temperature Units: This allows you to choose what unit of tem-perature data files will be saved with ◦C (Celsius) or ◦F (Fahrenheit).
Column Headers: This option sets column headers (i.e “Date/Time,”“Temperature”) for saved data files. This feature is on by default.It does not apply to raw data files, which do not have column headers.
Date/Time Format: Here you can set the format with which thedate and time will be displayed in saved data files. By default, theprogram will use Windows Regional and Language Options (acces-sible in the Control Panel in Windows), the system settings on yourcomputer.
50

Leaf Porometer 6 LEAF POROMETER UTILITY
2. Communications Tab
Figure 13: Preferences - Communications Screen
Command Retries: If you encounter difficulty communicatingwith your Leaf Porometer, you can set the number of times the com-puter should automatically try sending communications commands(up to 10).
Maximum Baud Rate: You can set the maximum baud rate fortalking to your Leaf Porometer. Choose a lower baud rate if you arenot getting reliable communications from your device.
Force Find all Communication Ports: This will detect all CommPorts on your computer, and should be used if your serial-to-USBadapter does not appear in the dropdown menu.
51
6 LEAF POROMETER UTILITY Leaf Porometer
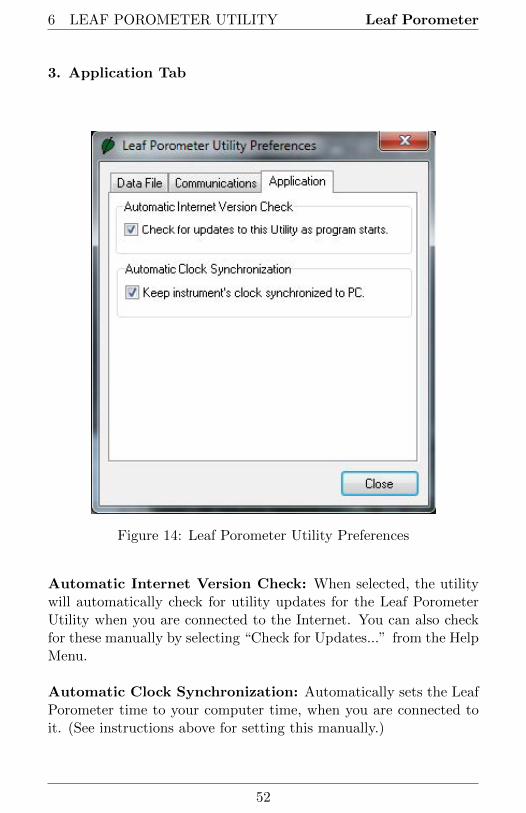
3. Application Tab
Figure 14: Leaf Porometer Utility Preferences
Automatic Internet Version Check: When selected, the utilitywill automatically check for utility updates for the Leaf PorometerUtility when you are connected to the Internet. You can also checkfor these manually by selecting “Check for Updates...” from the HelpMenu.
Automatic Clock Synchronization: Automatically sets the LeafPorometer time to your computer time, when you are connected toit. (See instructions above for setting this manually.)
52
Leaf Porometer 6 LEAF POROMETER UTILITY
Actions Menu
Set Porometer Date/Time... See the section on “Setting theDate and Time” on page 6.4.
View Porometer Information... This shows the serial number,firmware version, the number of stored readings in the Leaf Porom-eter, the firmware status, battery status, current date and time, andthe sensor calibration number.
Help Menu
Help Accesses the Leaf Porometer Utility help file that providesdetailed information on how to use the program.
Send Feedback to Decagon... Provides the user with a way tosubmit feedback to Decagon.
Check for Utility Updates... Goes Online and checks for util-ity updates.
Check for Firmware Updates... Goes Online and checks forfirmware updates for the Leaf Porometer controller.
About... Displays the current program version and Decagon con-tact information.
53

7 LEAF POROMETER THEORY Leaf Porometer
7 Leaf Porometer Theory
Stomatal Conductance
By definition, stomatal conductance is the measure of the rate ofpassage of carbon dioxide (CO2) or water vapor through the stom-ata of a leaf. Stomata are small pores on the top and bottom of a leafthat are responsible for taking in and expelling CO2 and moisturefrom and to the outside air. The Leaf Porometer measures the rateat which this happens.
7.1 How the Leaf Porometer Works
The Leaf Porometer measures the stomatal conductance of leaves byputting the conductance of the leaf in series with two known con-ductance elements. By measuring the humidity difference across oneof the known conductance elements, the water vapor flux is known.The conductance of the leaf can be calculated from these variables.
We know the humidity at three places: inside the leaf, and at both ofthe humidity sensors. The Leaf Porometer effectively calculates theresistance between the inside and outside of the leaf: the stomatalconductance. It measures resistance between the leaf and the firsthumidity sensor and the first and second sensors. The Leaf Porome-ter Function diagram represents these measurement process.(Figure15)
54
Leaf Porometer 7 LEAF POROMETER THEORY
Figure 15: Leaf Porometer Function
The parameters listed above represent the following:
• Cleaf The mole fraction of vapor inside the leaf
• C1 The mole fraction of vapor at node 1
• C2 The mole fraction of vapor at node 2
• gs Stomatal conductance of the leaf surface
• gd1 Vapor conductance of the diffusion path between leaf sur-face and node 1
• gd2 Vapor conductance of the diffusion path between node 1and node 2
• d1 Distance between the leaf surface and the first humiditysensor
• d2 Distance between the two humidity sensors
55

7 LEAF POROMETER THEORY Leaf Porometer
The variable of interest is gs or the stomatal conductance. Firstthe vapor flux along the diffusion path will be determined using therelative humidity difference between nodes 1 and 2 as follows:
Fvapor = gd2(C1 − C2) (1)
Where the C values are related to relative humidity by Equation 2.
Ci =hres(Ta)
Patm(2)
where hr is the relative humidity, es(Ta) is the saturated vapor pres-sure at air temperature, and Patm is atmospheric pressure. Saturatedvapor pressure is calculated by the Tetens formula with appropriatecoefficients for water vapor:
es(Ta) = 0.611exp
(17.502T
T + 240.97
)(3)
Note: T must be in ◦C
Next we must determine the value if gd2 by the equation 4
gd2 =ρDvapor
d2(4)
where ρ̂ is the molar density of air and Dvapor is the diffusivity ofwater vapor. Both of these quantities are temperature and pressuredependent, however when multiplied together as in equation 3 someof this dependency drops out.
ρ̂ = 44.6Pa
101.3
(273.15
T
)(5)
Dvapor(T, Pa) = Dref (273.15, 101.3)
(101.3
Pa
)(T
273.15
)1.75
(6)
IfDref (273.15, 101.3) = 2.12x10⁻⁵(m2/s)
Then
ρ̂Dvapor = (44.6)(2.12x10⁻⁵)
(T
273.15
)0.75
(7)
56
Leaf Porometer 7 LEAF POROMETER THEORY
Using these C and g values we can now solve equation 1 for the flux:
Fvapor =
[ρ̂Dvapor
d2
]1
Patm[hr1es(Ta1) − hr2es(Ta2)] (8)
Now that the vapor flux has been determined, you can find the stom-atal conductance, gs. This requires some assumptions. First, we as-sume that the relative humidity within the leaf tissue is 1.0, so byequation 9
Cleaf =es(Ta)
Patm(9)
Next, we assume that all conductance values are in series so thatthe flux is constant between any two nodes. We also assume thatthe temperature of the leaf is equal to the temperature of the firsthumidity sensor. (The sensor block head has been constructed fromaluminum to eliminate the temperature difference.) This means thatwe can write equation 1 for node 1 and the leaf node and then set itequal to equation 8.
Fvapor = gs+d1(Cleaf − C1) (10)
Fvapor = gs+d1
(1
Patm
)[es(Ta1)(1 − hr1)] (11)
gs+d1Patm
[es(Ta1)(1−hr1)] =1
Patm
(ρ̂D
d2
)[hr1es(Ta1)−hr2es(Ta2)] (12)
Solving for gs+d1:
gs+d1 =
(ρ̂Dd2
)[hr1es(Ta1) − hr2es(Ta2)]
es(Ta1)(1 − hr1)(13)
We can solve for gs using the rule for series combination of conduc-tance.
1
gs=
1
gs+d1− 1
gd1(14)
Hence,1
gs=
es(Ta1)(1 − hr1)d2ρ̂D[hr1es(Ta1) − hr2es(Ta2)]
− d1ρ̂D
(15)
so:
gs =ρ̂Dvapor
[es(Ta1)(1−hr1)]d2hr1es(Ta1)−hr2es(Ta2) − d1
(16)
57

7 LEAF POROMETER THEORY Leaf Porometer
Therefore, gs is a function of the distances between humidity sensors,temperature, and the two relative humidity readings.
When the conductance is small, the humidities are nearly the same,and the denominator of the denominator of equation 6 on page 6goes to zero, causing problems. Multiplying top and bottom by thedenominator gives
gs =ρ̂Dvapor[hr1es(Ta1) − hr2es(Ta2)]
[es(Ta1)(1 − hr1)]d2 − [hr1es(Ta1) − hr2es(Ta2)]d1(17)
Note: The resulting gs is in units of mol/m2s.
From the Leaf Porometer, the two distances are:
d1 = 3.35 mm and d2 = 11.43 mm
58

Leaf Porometer 8 CARE AND MAINTENANCE
8 Care and Maintenance
8.1 Changing the Batteries
Although the Leaf Porometer has been designed to provide an excel-lent battery lifespan, the batteries will eventually require changing.When this happens, a low-battery indicator will appear in the upperleft hand corner of the screen.
1. Carefully turn over the Leaf Porometer and locate the batterycover.
2. Place your thumb on the grooves and push upward to loosenthe cover.
3. Remove the old batteries and insert new ones. Be sure to orientthe fresh batteries properly.
4. Use the Leaf Porometer or the Leaf Porometer Utility to updatethe time and date.
8.2 Cleaning the Sensor Block
It is necessary to clean the Sensor Block periodically to remove con-tamination that can build up during routine use.
Follow steps 1 through 6 to clean minor contamination in the Sensorblock and steps 1 through 13 for major contamination.
8.2.1 Minor Contamination (dust and pollen)
1. Remove the desiccant chamber. (Figure 16)
59
8 CARE AND MAINTENANCE Leaf Porometer
Figure 16: Desiccant Chamber Assembly
2. Use the tweezers included with the calibration kit to removethe o-ring that secures the Teflon disk.
3. Carefully remove the Teflon disk with the tweezers. The TeflonDisk should be handled around the edges as much as possible,and always kept free of dust and moisture.
4. Use a dry swab to clean out the diffusion path. Swabs are in-cluded with your kit. Do not use a damp swab, alcohol or otherorganic liquids to clean the diffusion path! Direct contact withwater on the sensors as well as chemical vapors can cause dam-age! Be careful not to dislodge the bead retention screen withthe swab. If you do accidentally dislodge the screen, follow thedirections in the next section to remove the aluminum sensorblock and install the screen.
5. Insert the Teflon Disk. Remember to handle the Teflon Diskaround edges as much as possible. If the Teflon Disk becomesdamaged discard and replace. Five replacement disks are in-cluded, contact Decagon Devices you need additional disks.
6. Replace the O-ring Retainer.
60

Leaf Porometer 8 CARE AND MAINTENANCE
8.2.2 Major Contamination
When making stomatal conductance measurements on some planttypes, the sensor block can become contaminated with sap and leafexudates that can lead to inaccurate conductance measurements.This type of contamination often cannot be removed with a dry swabprocedure. Instead, follow steps 1 through 13 to clean your sensor.
1. Remove the two machine screws from the front of the aluminumsensor block using a 3/32” hex key (Allen wrench).
2. Carefully pull the aluminum sensor block off of the sensor as-sembly. This may take some force as the sensor assembly ispress-fit into the block. On some porometers, there will be athin layer of sealant between the sensor block and sensor assem-bly. Make sure to place the sensor assembly on a clean surfacewith the sensor ports facing upwards so that debris does notget stuck in the sealant and prevent effective reassembly.
3. Remove the desiccant chamber from the bottom of the alu-minum sensor block (if it is being used).
4. Use a pair of tweezers (included in calibration kit) to removethe o-ring that secures the Teflon filter inside the desiccantchamber cavity.
5. Carefully remove the Teflon disk with the tweezers as describedin the previous section.
6. If necessary, use a thin implement to press the bead retentionscreen out of the aluminum sensor block. It is best to leave thescreen in place during cleaning if at all possible.
7. Now the aluminum sensor block and bead retention screenshould be free from all accessories and can be cleaned with-out damaging the sensors. Generally, a solvent like IsopropylAlcohol is sufficient to dissolve most types of contamination,which can then easily be removed from the sensor block with acotton swab or piece of paper towel. The bead retention screencan be cleaned in the same manner.
Note: Make sure that the humidity sensors are not exposed to
61

8 CARE AND MAINTENANCE Leaf Porometer
solvent vapors. Use any solvents far from the humidity sensors.Avoid scrubbing the aluminum sensor block with abrasive ma-terials as they can remove the hydrophobic finish on the blockand affect conductance measurements.
8. Rinse the aluminum sensor block and bead retention screenthoroughly with water and allow to dry before assembling thePorometer.
9. If the bead retention screen has been removed or dislodgedduring cleaning, carefully press it snugly into the top of thediffusion path with your finger and then place plate in placeand clamp Leaf Porometer head to seat screen. Make surethat the bead retention screen is fully recessed in the diffusionpath but above the first humidity sensor port. If the screenextends out of the diffusion path, it will cut the leaf and causeerroneously high conductance measurements. If it is insertedtoo far into the diffusion path, it will interfere with the diffusionof vapor into the upper humidity sensor port.
10. Install the Teflon filter and o-ring retainer. Make sure not tocontaminate the Teflon filter with skin oils.
11. Align the aluminum sensor block correctly with the sensor as-sembly. There is a small oval tab on the sensor assembly thatshould face downwards and align with an oval cutout on thealuminum sensor block.
12. Press the aluminum sensor block onto the sensor assembly,firmly seating the sensor assembly in place.
13. Attach the sensor block assembly using the machine screws thatwere removed in step 1.
8.2.3 Maintaining the Seals & Teflon Disk
When you clean your sensor head, be sure to check the condition ofthe seals, and make sure that they are making full contact with theleaf. If the seals require replacement, a spare set has been includedin your Leaf Porometer shipment. Also, the Teflon disk should be
62
Leaf Porometer 8 CARE AND MAINTENANCE
replaced if it becomes excessively dirty. If you need more replace-ments of either component, contact Decagon.
8.2.4 Replacing the Seal
In the event a seal falls off, you can simply replace it by peeling offthe adhesive paper on the back and replacing the old seal. If theseal is very loose, it is best to peel it off and replace it in the samemanner. When you replace a seal, look to see if the area you will beapplying has dirt or soil particles, as these can prevent the adhesivefrom applying fully. You might try wiping the area with a slightlydamp cloth before applying the new seal.
8.2.5 Replacing the Teflon Filter Disk
A spare set of Teflon filter disks have also been included. To replacethe disk, use tweezers to remove the o-ring and then carefully removethe disk. Then, handling the disk around the edges (using tweezersis advised), insert the spare and replace the o-ring.
8.3 Porometer Sensor Reconditioning
In some situations, the humidity sensors in the Leaf Porometer canbe adversely affected by exposure to chemicals.
This is most commonly encountered when the Leaf Porometer hasbeen exposed to vapors from volatile organic compounds.
We have confirmed reports of sensors being affected by obvious sourcesof volatile organics such as storing the Porometer in a shed with gaso-line cans. The signs of sensor “poisoning” can be manifest as a lackof agreement in humidity measurements between the two sensors, oras nonsensical humidity values from one or both sensor (e.g. >100%).
63

8 CARE AND MAINTENANCE Leaf Porometer
If you suspect that your Leaf Porometer has been affected by chem-ical exposure, then the sensors can be reconditioned to return themto their natural state using the following procedure:
1. Remove the sensor head from the hand held readout unit aswell as the desiccant chamber.
2. Use the metal pin from the calibration kit to hold the leaf clampopen.
3. Place the entire sensor head (and cable) into an oven with goodtemperature control.
4. Bake the sensor head in dry heat at 80 ◦C for at least 24 hours.
5. Remove the sensor head and let cool.
6. hydrate the sensor head by exposing it to 70 to 80% relativehumidity at 20 to 35 ◦C for 12 hours. A 75% humidity at-mosphere can be conveniently generated by a saturated NaClsolution. To hydrate with saturated NaCl, the Porometer headshould be placed in a sealed container above a slurry of NaCl(table salt is fine) and water. There should be both liquid waterand plentiful salt crystals present in the slurry.
7. After hydration, the sensor should be left at ambient conditionsfor eight hours before calibrating the sensor.
Note that reconditioning the sensors will change the sensor cal-ibration, so the sensor must be calibrated prior to using.
8.4 General Precautions
While the Leaf Porometer has been designed for quality and durabil-ity, it should be kept clean and the batteries always fresh to ensureproper working condition. Here are a few things to remember whenusing this device
• Allow the sensor head to equilibrate to the ambient tempera-ture before using.
64

Leaf Porometer 8 CARE AND MAINTENANCE
• While this device is water-resistant, do not use it in rain, anddo not use it on leaves covered with dew or water droplets.
8.5 Upgrading Firmware
From time to time Decagon will release firmware updates for theLeaf Porometer that contain bug fixes and new features to improvethe performance of your instrument. You can view and downloadfirmware updates by going to our website (www.decagon.com) andnavigating to the Software
Downloads page. Once there, scroll down to the Leaf Porometersection and download the latest Firmware Updater.
Figure 17: Leaf Porometer Firmware Updater
Cautions:
• Any data records on the instrument will be erased dur-ing a firmware update so make sure to download any
65

8 CARE AND MAINTENANCE Leaf Porometer
data you wish to save before loading new firmware.
• If upgrading to the latest firmware, you will need toverify your Porometer is equipped with a desiccantchamber.
• Do not turn off or disconnect your instrument from thecommunications port while the firmware is updating.
Updating Firmware:
1. Open the firmware updater application.
2. Connect your Leaf Porometer to an available communicationsport on your computer.
3. Select the same communications port in the drop down list onthe firmware updater application.
4. Click Start to begin updating the firmware.
5. Wait for the firmware updater to finish before disconnectingyour Leaf Porometer and closing the firmware updater appli-cation.
66

Leaf Porometer 9 TROUBLESHOOTING
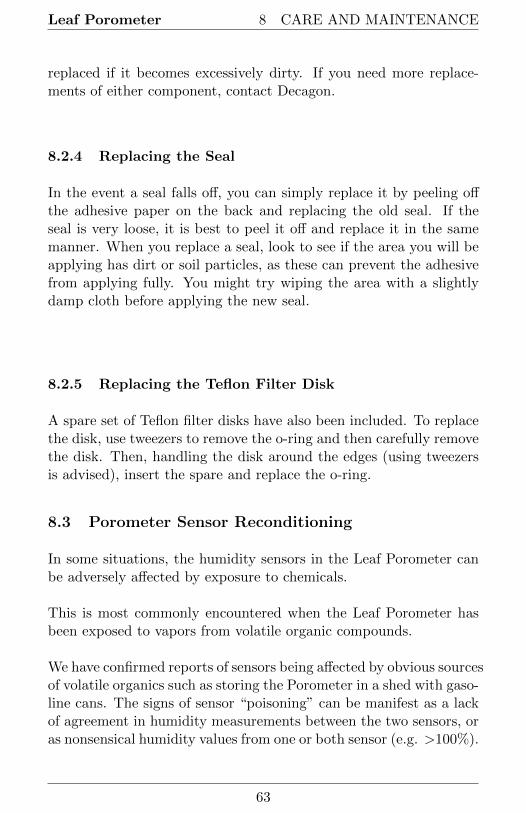
9 Troubleshooting
The Leaf Porometer is a high performance, low maintenance instru-ment, designed to have few problems if used with care. Unfortu-nately, sometimes even the best operators using the best instrumentsencounter technical difficulties.
Below is quick reference guide that will direct you to detailed so-lutions of some problems that may occur. If these remedies still donot resolve your problem, then please contact Decagon for help (seeCustomer Support in Section 1). The Troubleshooting Table listssome problems that may occur.
Note: If you purchased your Decagon instrument from one of ourinternational distributors, please contact them for local service andsupport.
Table 1: Troubleshooting Quick Guide
If this problem occurs: Refer to:
Instrument does not turn on Problem #1Display is difficult to see Problem #2Sensor head failure message Problem #3Low battery message Problem #4Date & time were reset message Problem #5Invalid Cal Num message Problem #6Missing bootstrap loader message Problem #7Firmware corrupted message Problem #8Communication port is already in use Problem #9USB to Serial Port adapter not shown Problem #10Download data to the utility failed Problem #11No information is being displayed Problem #12Conductance is not as expected Problem #13Porometer will not calibrate Problem #14Equilibration time is too long Problem #15(When using desiccant chamber)Low RH reading Problem #16High RH reading-replace desiccant Problem #17
Continued on next page
67

9 TROUBLESHOOTING Leaf Porometer
Table 1 – continued from previous page
If this problem occurs: Refer to:
High RH reading-use desiccant chamber Problem #18Bead retention screen missing Problem #19
1. PROBLEM:Instrument does not turn on.
SOLUTION:
Make sure that the batteries are inserted correctly, and/or if theyhave enough power to activate the machine.
2. PROBLEM:The display is difficult to see.
SOLUTION:
Turn off the Leaf Porometer and then turn it on again. If this doesnot fix the problem, the Leaf Porometer features a built-in screen forchanging screen contrast. See “Contrast” in Section 5.4 for details.You may be able to fix the contrast manually, which can be doneusing a terminal port program. Contact Decagon for informationregarding this procedure.
3. PROBLEM:Message on screen displays the following:
68
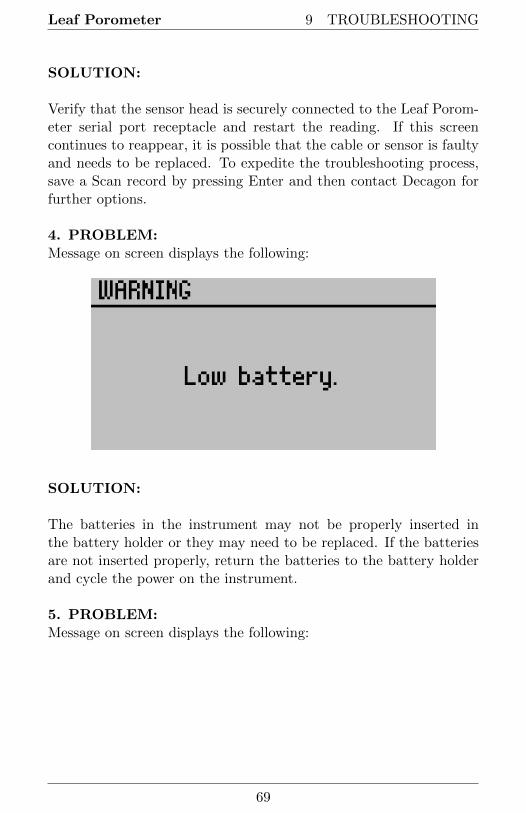
Leaf Porometer 9 TROUBLESHOOTING
SOLUTION:
Verify that the sensor head is securely connected to the Leaf Porom-eter serial port receptacle and restart the reading. If this screencontinues to reappear, it is possible that the cable or sensor is faultyand needs to be replaced. To expedite the troubleshooting process,save a Scan record by pressing Enter and then contact Decagon forfurther options.
4. PROBLEM:Message on screen displays the following:
SOLUTION:
The batteries in the instrument may not be properly inserted inthe battery holder or they may need to be replaced. If the batteriesare not inserted properly, return the batteries to the battery holderand cycle the power on the instrument.
5. PROBLEM:Message on screen displays the following:
69
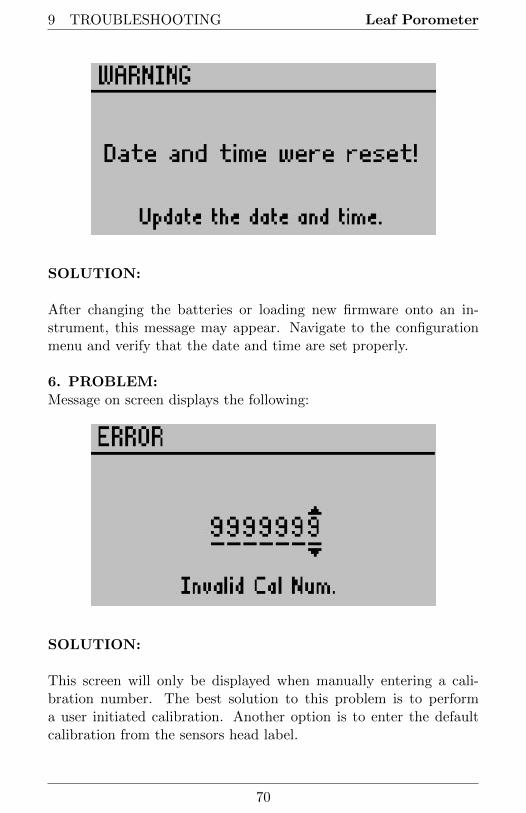
9 TROUBLESHOOTING Leaf Porometer
SOLUTION:
After changing the batteries or loading new firmware onto an in-strument, this message may appear. Navigate to the configurationmenu and verify that the date and time are set properly.
6. PROBLEM:Message on screen displays the following:
SOLUTION:
This screen will only be displayed when manually entering a cali-bration number. The best solution to this problem is to performa user initiated calibration. Another option is to enter the defaultcalibration from the sensors head label.
70
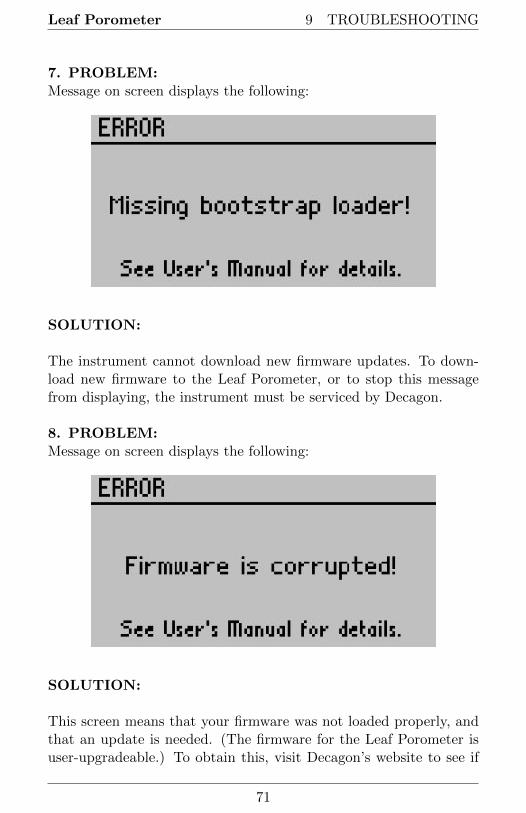
Leaf Porometer 9 TROUBLESHOOTING
7. PROBLEM:Message on screen displays the following:
SOLUTION:
The instrument cannot download new firmware updates. To down-load new firmware to the Leaf Porometer, or to stop this messagefrom displaying, the instrument must be serviced by Decagon.
8. PROBLEM:Message on screen displays the following:
SOLUTION:
This screen means that your firmware was not loaded properly, andthat an update is needed. (The firmware for the Leaf Porometer isuser-upgradeable.) To obtain this, visit Decagon’s website to see if
71

9 TROUBLESHOOTING Leaf Porometer
new updates are available; if not, contact Decagon for the newestfirmware version.
Note: You will lose any saved data records when you install thenew firmware. Therefore, download any data you wish to save be-fore reloading the new firmware. If this is not an option, contactDecagon for further help.
see the section on “Updating Firmware” on page 8.5 for more in-formation on obtaining new firmware for your Leaf Porometer.
9. PROBLEM:The Leaf Porometer Utility tells me the communication port I wantto use is in use by another application, but I do not think any otherprograms are running.
SOLUTION:
Some PDA synchronization software monitor serial communicationports. Disable Microsoft’s ActiveSync or Palm HotSync system soft-ware while using the serial port with the Leaf Porometer Utility.
10. PROBLEM:My USB to Serial adapter is not showing in the communication portpicker.
SOLUTION:
Enable “Force find all Communication Ports” in the PreferencesMenu by going to the Edit Menu, clicking Preferences, then theCommunication tab, and enabling the check box at the bottom ofthe screen.
Enabling this option may find other serial ports that are not availablefor use by the Leaf Porometer Utility (for example, modems installedin your computer).
11. PROBLEM:
72

Leaf Porometer 9 TROUBLESHOOTING
Downloading data stops in the middle with an error message sayingthe utility lost connection with the Leaf Porometer.
SOLUTION:
A noisy serial connection can disrupt the connection between theUtility and the Leaf Porometer. If this error happens regularly, youcan try setting your baud rate lower or increasing the number oftimes a command is sent to the Leaf Porometer. Choose the “Com-munications” tab in Preferences to alter this.
12. PROBLEM:No information is being displayed.
SOLUTION:
Any conductance that is lower that 5 mmol/m2s1 will not be dis-played in Automatic mode. Check to see what mode you are inbefore beginning. It is advisable to use Manual mode if you knowthat your leaf has a conductivity that is lower than the minimumthreshold for Auto mode. Also, remember that you must press En-ter in Automatic mode before you begin taking a reading. The LeafPorometer Operator could have gotten moisture inside the sensor as-sembly or Teflon disk by touching it with your finger.
This will distort the sensor abilities to take accurate readings.
13. PROBLEM:You are not getting the conductance reading you expected.
SOLUTION:
Try recalibrating the sensor head. Navigate to the Calibration op-tion in the configuration menu to begin a calibration. If you are stillhaving problems, the inside of the sensor assembly may be dirty. Re-move the Teflon disk and clean it thoroughly (Section 8.2“Cleaningthe Sensor Block”). The Teflon disk also may either be wet or dirtyand may need to be dried out or replaced. Additionally, if your sen-
73
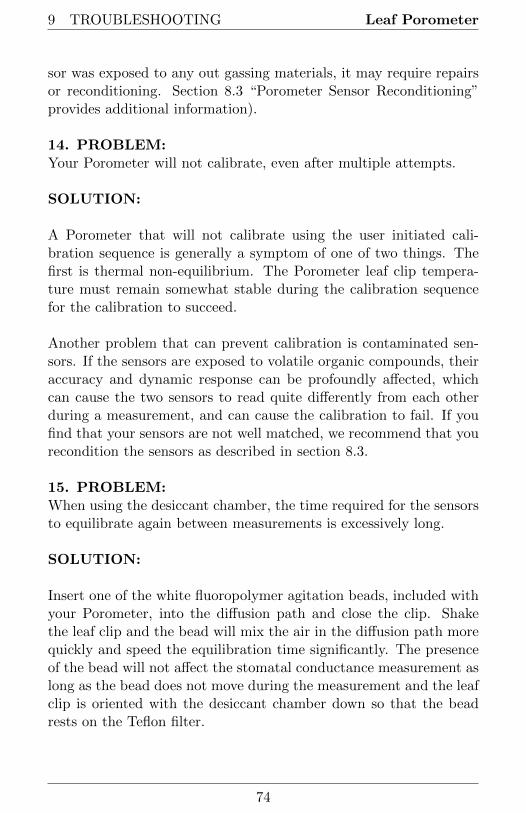
9 TROUBLESHOOTING Leaf Porometer
sor was exposed to any out gassing materials, it may require repairsor reconditioning. Section 8.3 “Porometer Sensor Reconditioning”provides additional information).
14. PROBLEM:Your Porometer will not calibrate, even after multiple attempts.
SOLUTION:
A Porometer that will not calibrate using the user initiated cali-bration sequence is generally a symptom of one of two things. Thefirst is thermal non-equilibrium. The Porometer leaf clip tempera-ture must remain somewhat stable during the calibration sequencefor the calibration to succeed.
Another problem that can prevent calibration is contaminated sen-sors. If the sensors are exposed to volatile organic compounds, theiraccuracy and dynamic response can be profoundly affected, whichcan cause the two sensors to read quite differently from each otherduring a measurement, and can cause the calibration to fail. If youfind that your sensors are not well matched, we recommend that yourecondition the sensors as described in section 8.3.
15. PROBLEM:When using the desiccant chamber, the time required for the sensorsto equilibrate again between measurements is excessively long.
SOLUTION:
Insert one of the white fluoropolymer agitation beads, included withyour Porometer, into the diffusion path and close the clip. Shakethe leaf clip and the bead will mix the air in the diffusion path morequickly and speed the equilibration time significantly. The presenceof the bead will not affect the stomatal conductance measurement aslong as the bead does not move during the measurement and the leafclip is oriented with the desiccant chamber down so that the beadrests on the Teflon filter.
74
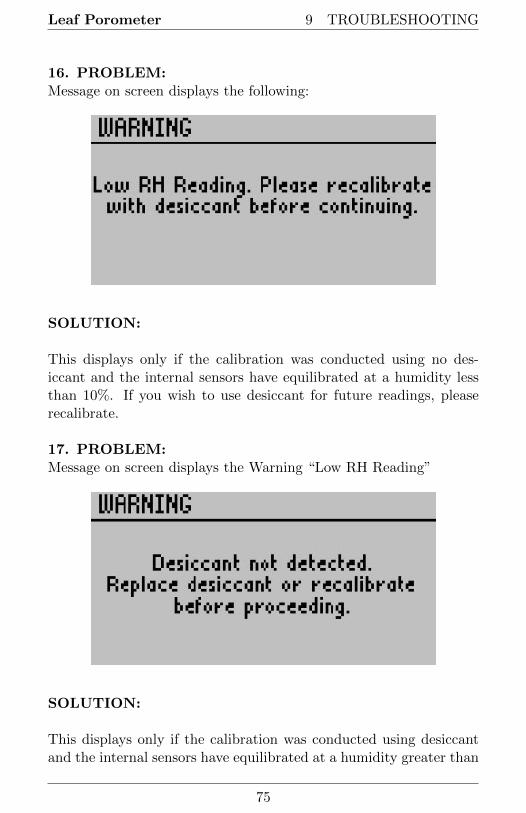
Leaf Porometer 9 TROUBLESHOOTING
16. PROBLEM:Message on screen displays the following:
SOLUTION:
This displays only if the calibration was conducted using no des-iccant and the internal sensors have equilibrated at a humidity lessthan 10%. If you wish to use desiccant for future readings, pleaserecalibrate.
17. PROBLEM:Message on screen displays the Warning “Low RH Reading”
SOLUTION:
This displays only if the calibration was conducted using desiccantand the internal sensors have equilibrated at a humidity greater than
75

9 TROUBLESHOOTING Leaf Porometer
10%. Please ensure that desiccant is in place and replace with a freshbatch.
18. PROBLEM:Message on screen displays the following:
SOLUTION:
This displays when the internal sensors have equilibrated at greaterthan 10% humidity to remind you that measurements with desiccantare generally more accurate and stable. We recommend that the des-iccant chamber is always used, but most importantly when ambienthumidity is greater than 30%. See the section 4.2 on“Desiccant.”You can press enter after seeing this display to proceed with non-desiccant measurements. 19. PROBLEM:Bead Retention Screen Missing
SOLUTION:
Replace bead retention screen with the calibration plate that servesas a bead retention screen insertion tool. Place screen in hole, pushsnug with finger, and then use the calibration plate to seat the screenfirmly in the porometer head. If screen continues to fall out, contactDecagon Devices for further instructions.
76

Leaf Porometer 9 TROUBLESHOOTING
9.1 Repair Instructions
If your Leaf Porometer should ever require a repair, call Decagon at509-332-5600. We will ask you for your address, phone number, yourLeaf Porometer serial number, and your current firmware version.For non-warranty repairs, we will also ask for a method of payment.
Before shipping your instrument to Decagon, please contact Decagonto obtain a Request Maintenance Authorization Number (RMA).This will allow Decagons repair staff to keep track of your Porome-ter. Once you have acquired an RMA, send your Leaf Porometer toDecagon. Please include a document listing the complete shippingaddress, name, and department of the person responsible for the in-strument, as well as a description of the problem. This will betterhelp our technicians and shipping department to expedite repair onyour Leaf Porometer, and ship it back to you.
Please pack your Leaf Porometer carefully. Ship it back in the car-rying case, preferably inside a cardboard box. Ship to:
Decagon Devices Inc.2365 NE Hopkins Court
Pullman, WA 99163
Repair Costs
Manufacturer defects and instruments under warranty will be re-paired at no cost. For non-warranty repairs, costs for parts, labor,and shipping will be billed to you.
77

10 FURTHER READING Leaf Porometer
10 Further Reading
For more information on porometry, stomatal conductance, and howPorometers work, consider reading:
Campbell, G. S and Norman, J.M., (1998). An Introduction toEnvironmental Biophysics. Springer-Verlag: New York, Heidelberg,Berlin. Second Ed.: pp. 90-92.
Jones, H.G., (1983). Plants and Microclimate. Cambridge Univer-sity Press: Cambridge.
Marshall, B. and Woodward, F.I., (1985). Instrumentation for En-vironmental Psychology . Cambridge University Press: Cambridge.
Pearcy, R.W. et al., (1989) Plant Physiological Ecology: Field Meth-ods and Instrumentation. Chapman and Hall: New York, London:pp. 137-158.
78
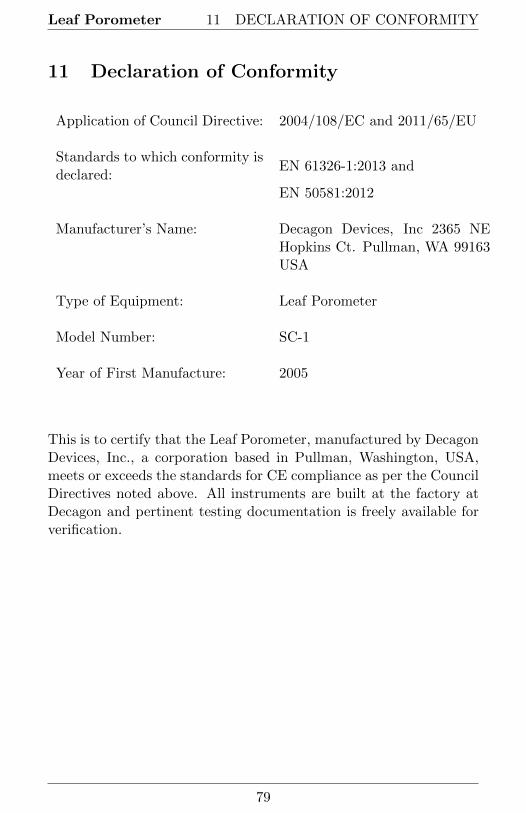
Leaf Porometer 11 DECLARATION OF CONFORMITY
11 Declaration of Conformity
Application of Council Directive: 2004/108/EC and 2011/65/EU
Standards to which conformity isdeclared:
EN 61326-1:2013 and
EN 50581:2012
Manufacturer’s Name: Decagon Devices, Inc 2365 NEHopkins Ct. Pullman, WA 99163USA
Type of Equipment: Leaf Porometer
Model Number: SC-1
Year of First Manufacture: 2005
This is to certify that the Leaf Porometer, manufactured by DecagonDevices, Inc., a corporation based in Pullman, Washington, USA,meets or exceeds the standards for CE compliance as per the CouncilDirectives noted above. All instruments are built at the factory atDecagon and pertinent testing documentation is freely available forverification.
79
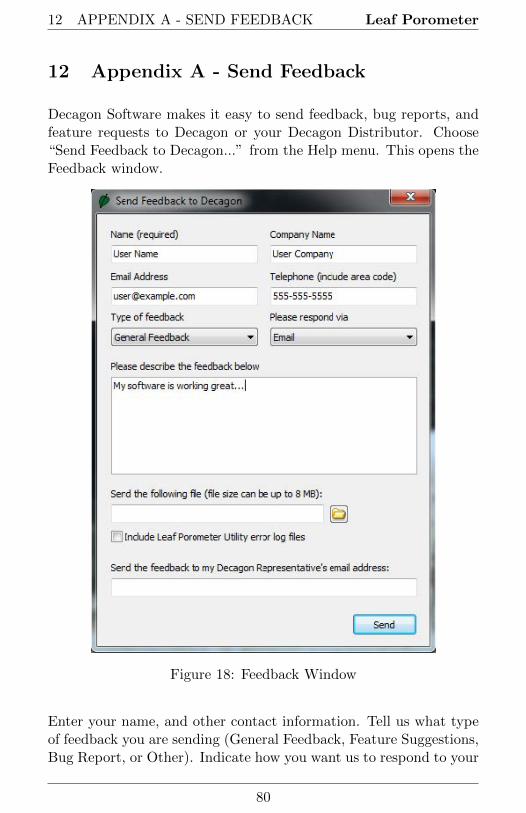
12 APPENDIX A - SEND FEEDBACK Leaf Porometer
12 Appendix A - Send Feedback
Decagon Software makes it easy to send feedback, bug reports, andfeature requests to Decagon or your Decagon Distributor. Choose“Send Feedback to Decagon...” from the Help menu. This opens theFeedback window.
Figure 18: Feedback Window
Enter your name, and other contact information. Tell us what typeof feedback you are sending (General Feedback, Feature Suggestions,Bug Report, or Other). Indicate how you want us to respond to your
80

Leaf Porometer 12 APPENDIX A - SEND FEEDBACK
feedback (E-mail or telephone).
Use the description area to give details for your feedback. If youare reporting a bug, it is very helpful for you to tell us what stepsyou took for the bug to happen and any error message you saw. Bydefault, bug reports also include the software error files.
You can send Decagon a file using this form too. This is usefulfor sending data files that you have questions about. If you workdirectly with a Decagon representative, put their E-mail address inthe field at the bottom of the form. This sends the contents of theform to them. Your Decagon representative can follow-up with youdirectly.
81

Index
Abaxial Conductance, 20Accuracy Verification, 18Agitation Beads, 15, 17, 22Annotating Data, 36Arrow Keys, 39Arrow keys, 34Averaging Readings, 29
BatteriesChanging, 59Type, 4
Bead Retention ScreenTroubleshooting, 68
ButtonArrow Keys, 5Enter, 5Escape, 5Menu, 5Power, 5
CalibrationApparatus, 12Kit, 7Number, 6Plate, 12, 14Plate Installation, 14Procedure, 8Sensor Head, 7Without Desiccant, 19
Carbon Dioxide, 32Cleaning the Sensor Block, 59Comm Port, 44, 46
Force Find, 51Components, 4Configuration Menu, 37, 40Contrast, 41
Adjustments, 68Customer Support, 1
DataAnnotating, 34Downloading, 44Erasing, 46Menu, 35Saving, 33Units, 40Units Explained, 50
DateSetting, 47
Date Display, 38Declaration of Conformity, 79Desiccant, 4
Calibration, 6, 8Chamber, 66Chamber Assembly, 60Filling, 20Troubleshooting, 68Types, 21
Diagnostics Menu, 40
Email, 1Environmental Effects on Read-
ings, 31
Filter Paper, 4Wetting, 12
FirmwareUpdates, 53Version, 41
Further Readings, 78
Humidity, 32
82

Leaf Porometer INDEX
Leaf PorometerFunction, 54
Leaf Porometer Utility, 6, 36, 43Auto Clock Synchronization,
52Command Retries, 51Edit Menu, 49Erasing Data, 49Exiting, 49Help Menu, 53Maximum Baud Rate, 51Measurement Units, 49Saved Data Organization, 50Setting Date and Time, 50System Requirements, 43Troubleshooting, 67Version Check, 52
Light, 31
Main Menus, 33Maintenance, 59
Request Authorization Num-ber, 77
MeasurementLeaves and Needles, 28Precautions, 64
MeasurementsAuto Mode, 40Manual Mode, 40
ModeAutomatic, 40Manual, 40Selecting, 40Types, 23
PrecautionsGeneral, 30
RepairsCosts, 77
Instructions, 77
Seller’s Liability, 2Send Feedback, 53Sensor Head, 17, 24
Holding, 11Serial Number, 1, 41Setting the Time, 6Specifications, 3Stomatal Conductance, 54
Temperature, 31Theory, 54Time
Setting, 47
Viewing Data, 44
Warranty, 1
83