opportunistic amazon ec2 ipsec mesh on the aws cloud · amazon web services – ipsec mesh on the...
TRANSCRIPT

Page 1 of 22
Opportunistic Amazon EC2 IPsec
Mesh on the AWS Cloud
Quick Start Reference Deployment
May 2019
Dr. Vesselin Tzvetkov, AWS Professional Services
Vinod Shukla, AWS Quick Start team
Visit our GitHub repository for source files and to post feedback,
report bugs, or submit feature ideas for this Quick Start.
Contents
Overview .................................................................................................................................... 2
Opportunistic IPsec on AWS ................................................................................................. 3
Cost and licenses .................................................................................................................... 4
Architecture ............................................................................................................................... 4
Planning the deployment .......................................................................................................... 6
Specialized knowledge ........................................................................................................... 6
AWS account .......................................................................................................................... 6
Technical requirements ......................................................................................................... 7
Deployment steps ...................................................................................................................... 7
Step 1. Sign in to your AWS account ...................................................................................... 7
Step 2. Launch the Quick Start ..............................................................................................8
Step 3. Configure the IPsec network..................................................................................... 11
Step 4. (Optional) Launch the EC2 instance for testing ..................................................... 12
Step 5. (Optional) Test the connection on the EC2 instance .............................................. 14

Amazon Web Services – IPSec Mesh on the AWS Cloud May 2019
Page 2 of 22
Operations ............................................................................................................................... 15
Changing your configuration or installing it on running instances .................................... 15
Monitoring your IPsec environment ................................................................................... 17
Troubleshooting ...................................................................................................................... 18
Security ................................................................................................................................... 20
Alternate subject names and multiple interfaces or secondary IPs ....................................... 21
Send us feedback ..................................................................................................................... 21
Additional resources ............................................................................................................... 21
Document revisions ................................................................................................................. 22
This Quick Start was created by Amazon Web Services (AWS).
Quick Starts are automated reference deployments that use AWS CloudFormation
templates to deploy key technologies on AWS, following AWS best practices.
Overview
This Quick Start reference deployment guide provides step-by-step instructions for
deploying an opportunistic Internet Protocol Security (IPsec) mesh that sets up dynamic
IPsec tunnels between your Amazon Elastic Compute Cloud (Amazon EC2) instances. The
implementation uses Libreswan, an open-source implementation of IPsec encryption and
Internet Key Exchange (IKE) version 2. Using opportunistic IPsec, you can set up an IPsec
mesh for a large number of hosts by using a simple and uniform configuration that does not
need to change when you add or remove hosts.
The Quick Start builds an architecture that delivers the following benefits on the AWS
Cloud:
Automatic configuration of opportunistic IPsec when EC2 instances are launched.
Generation of instance certificates and weekly re-enrollment.
IPsec monitoring metrics in Amazon CloudWatch for each EC2 instance.
Alarms and notifications through CloudWatch and Amazon Simple Notification Service
(Amazon SNS) in case of IPsec setup or certificate re-enrollment failures.

Amazon Web Services – IPSec Mesh on the AWS Cloud May 2019
Page 3 of 22
An initial generation of a certificate authority (CA) root key if needed, including AWS
Identity and Access Management (IAM) policies and two customer master keys (CMKs)
that will protect the CA key and instance key.
Opportunistic IPsec on AWS
IPsec is a protocol for in-transit data protection between hosts. The configuration of site-to-
site IPsec between multiple hosts can be an error-prone and intensive task. If you need to
protect n EC2 instances, you need a full mesh of n*(n-1) IPsec tunnels (Encapsulating
Security Payload Security Association, or ESP SA). You must manually propagate every IP
change to all instances, update credentials and configuration, and integrate monitoring and
metrics into the operation. The effort required to keep the full-mesh parameters in sync is
enormous.
Full-mesh IPsec, known as any-to-any IPsec, builds an underlying network layer that
protects application communication for these common use cases:
You’re migrating legacy applications to AWS, and they don’t support encryption.
Examples of protocols without encryption are File Transfer Protocol (FTP), Hypertext
Transfer Protocol (HTTP), and Lightweight Directory Access Protocol (LDAP).
You’re offloading protection to IPsec to take advantage of fast Linux kernel encryption
and automated certificate management. The Quick Start focuses on this use case.
You want to segregate duties between your application development and infrastructure
security teams.
You want to protect container or application communication that leaves an EC2
instance.
The following features are out of scope for this Quick Start:
This Quick Start deployment doesn’t deliver IPsec protection between EC2 instances
and hosts that are on premises, or between EC2 instances and managed AWS
components such as Elastic Load Balancing, Amazon Relational Database Service
(Amazon RDS), or Amazon Kinesis.
Your EC2 instances must have general IP connectivity that allows network access
control lists (network ACLs) and security groups.
This deployment cannot deliver extra connectivity, unlike VPC peering or a transit VPC.

Amazon Web Services – IPSec Mesh on the AWS Cloud May 2019
Page 4 of 22
Cost and licenses
You are responsible for the cost of the AWS services used while running this Quick Start
reference deployment. There is no additional cost for using the Quick Start.
Tip After you deploy the Quick Start, we recommend that you enable the AWS Cost
and Usage Report to track costs associated with the Quick Start. This report delivers
billing metrics to an Amazon Simple Storage Service (Amazon S3) bucket in your
account. It provides cost estimates based on usage throughout each month, and
finalizes the data at the end of the month. For more information about the report,
see the AWS documentation.
This Quick Start uses Libreswan, which is provided under the GNU General Public License,
version 2.
Architecture
The Quick Start sets up the following serverless architecture to provision IPsec mesh
between your EC2 instances, optionally restricting it to a VPC:
Three AWS Lambda functions: for issuing a certificate, for setting up IPsec on an EC2
instance, and for re-enrolling certificates. Additionally, if you don’t have a pre-existing
CA certificate and key, the Quick Start uses a fourth Lambda function to generate a CA
certificate and to store it in a new S3 bucket.
Two customer master keys (CMKs): for protecting the CA key and for protecting the host
key in transit.
Three S3 buckets: for IPsec configuration, for the CA certificate and key, and for the host
key.
A CloudWatch event upon launching the EC2 instance, and a scheduled weekly event for
re-enrollment.
A CloudWatch alarm that watches for IPsec configuration failures, and an Amazon SNS
topic that you can subscribe to, in order to receive notifications.

Amazon Web Services – IPSec Mesh on the AWS Cloud May 2019
Page 5 of 22
Figure 1: IPsec mesh on AWS
As illustrated in Figure 1, the Quick Start sets up an environment in which the following
steps are executed automatically in the background:
1. An EC2 instance launch triggers a CloudWatch event, which launches an IPsec setup
Lambda function.
2. The IPsec setup function checks whether the EC2 instance has the tag IPSec:todo. If the
tag is present, the Lambda function calls the Issue certificate Lambda function.
3. The Issue certificate Lambda function downloads the encrypted CA certificate and key.
4. The Issue certificate Lambda function decrypts the CA key with a customer master key
(CMK).
5. The Issue certificate Lambda function issues a host certificate to the EC2 instance. It
encrypts the host certificate and key with an AWS Key Management Service (AWS KMS)
generated random secret in a PKCS #12 structure. The secret is envelope-encrypted with
a dedicated CMK.

Amazon Web Services – IPSec Mesh on the AWS Cloud May 2019
Page 6 of 22
6. The Issue certificate Lambda function publishes the issued certificates to your dedicated
S3 bucket for documentation.
7. The IPsec setup Lambda function calls and runs the installation via AWS Systems
Manager.
8. The installation downloads the configuration and installs the AWS SDK for Python
(boto3), Libreswan, and curl if needed.
9. The EC2 instance decrypts the host key with the dedicated CMK and installs it in the
IPsec database.
10. A weekly scheduled event triggers re-enrollment of the certificates via the Re-enroll
certificate Lambda function.
11. The re-enroll certificate Lambda function triggers the IPsec setup Lambda function (call
event type: execution). The IPsec setup function renews the certificate only, leaving the
rest of the configuration untouched.
Note For the full names of the Lambda functions, see the CloudFormation stack
outputs (Figure 3).
Planning the deployment
Specialized knowledge
This Quick Start assumes a general understanding of security concepts and a moderate level
of familiarity with AWS services. If you’re new to AWS, visit the Getting Started Resource
Center and the AWS Training and Certification website for materials and programs that can
help you develop the skills to design, deploy, and operate your infrastructure and
applications on the AWS Cloud. For more information about AWS services used in this
Quick Start, see the Additional resources section.
AWS account
If you don’t already have an AWS account, create one at https://aws.amazon.com by
following the on-screen instructions. Part of the sign-up process involves receiving a phone
call and entering a PIN using the phone keypad.
Your AWS account is automatically signed up for all AWS services. You are charged only for
the services you use.

Amazon Web Services – IPSec Mesh on the AWS Cloud May 2019
Page 7 of 22
Technical requirements
Before you launch the Quick Start, your account must be configured as specified in the
following table. Otherwise, deployment might fail.
Resources If necessary, request service limit increases for the following resources. You might need
to do this if you already have an existing deployment that uses these resources, and you
think you might exceed the default limits with this deployment. For default limits, see
the AWS documentation.
AWS Trusted Advisor offers a service limits check that displays your usage and limits
for some aspects of some services.
Resource This deployment uses
CloudWatch Events rules 2
CloudWatch alarms 2
IAM managed policies 3
IAM roles 5
KMS keys 2
Lambda functions 5
S3 buckets 3
SNS topics 1
AWS Systems Manager The instance you will launch will need access to AWS Systems Manager, either through
NAT and internet gateways or through a private Systems Manager endpoint.
IAM permissions To deploy the Quick Start, you must log in to the AWS Management Console with IAM
permissions for the resources and actions the templates will deploy. The
AdministratorAccess managed policy within IAM provides sufficient permissions,
although your organization may choose to use a custom policy with more restrictions.
Deployment steps
Step 1. Sign in to your AWS account
1. Sign in to your AWS account at https://aws.amazon.com with an IAM user role that has
the necessary permissions. For details, see Planning the deployment earlier in this
guide.
2. Make sure that your AWS account is configured as discussed in the Technical
requirements section.

Amazon Web Services – IPSec Mesh on the AWS Cloud May 2019
Page 8 of 22
Step 2. Launch the Quick Start
Notes The instructions in this section reflect the older version of the AWS
CloudFormation console. If you’re using the redesigned console, some of the user
interface elements might be different.
You are responsible for the cost of the AWS services used while running this Quick
Start reference deployment. There is no additional cost for using this Quick Start.
For full details, see the pricing pages for each AWS service you will be using in this
Quick Start. Prices are subject to change.
1. Launch the AWS CloudFormation template into your AWS account.
Deploy IPsec mesh into
your AWS account
The deployment takes about 5 minutes to complete.
2. Check the AWS Region that’s displayed in the upper-right corner of the navigation bar,
and change it if necessary. This is where the network infrastructure for IPSec will be
built. The template is launched in the US East (Ohio) Region by default.
3. On the Select Template page, keep the default setting for the template URL, and then
choose Next.
4. On the Specify Details page, change the stack name if needed. Review the parameters
(described in the following tables) for the template. Provide values for the parameters
that require input. For all other parameters, review the default settings and customize
them as necessary.
When you finish reviewing and customizing the parameters, choose Next.
• IPsec meshDeploy

Amazon Web Services – IPSec Mesh on the AWS Cloud May 2019
Page 9 of 22
View template
IPSec Mesh Configuration:
Parameter label (name) Default Description
VPC ID
(VpcId)
any (Optional) The ID of your existing VPC that the IPsec setup should be
restricted to. By default, the Quick Start will attempt to configure IPsec
across all EC2 instances in your account. If you are not using the
default VPC, we recommend that you specify this value to limit the
scope of the Quick Start to your target VPC where the Amazon EC2
IPsec mesh will be provisioned.
Host certificate S3
bucket
(S3UserCertsBucket)
Optional An existing S3 bucket where the host certificate for EC2 instances will
be published. If you leave this parameter empty, the Quick Start will
create a new S3 bucket for this purpose.
Use setup shell script
(UseLocalShellScript)
no Choose yes to deploy this architecture by using the provided script
aws_setup.py instead of launching the CloudFormation stack
directly. You might want to use the script for advanced configuration,
such as generating a CA key on your machine using a local
cryptographic engine, performing backup of the key, and controlling
the S3 bucket names.
Amazon EC2 role ARN
(ExistingEC2RoleArn)
Optional The existing Amazon Resource Name (ARN) of the EC2 role that will
be allowed to decrypt the host certificate with a CMK.
CA S3 bucket
(S3CaBucket)
Optional An existing S3 bucket for the CA certificate and key. If you leave this
parameter empty, the Quick Start will generate a CA key and
certificate, and will place them in a new S3 bucket. If you specify an
existing bucket name, you must configure the CA manually and name
your certificate as ca.cert.pem and encrypted key as
ca.key.encrypted.pem. You must then provide the password and
encrypt it in Lambda environment variables.
AWS Quick Start configuration:
Note We recommend that you keep the default settings for the following two
parameters, unless you are customizing the Quick Start templates for your own
deployment projects. Changing the settings of these parameters will automatically
update code references to point to a new Quick Start location. For additional details,
see the AWS Quick Start Contributor’s Guide.
Parameter label
(name) Default Description
Quick Start S3 bucket
name
(QSS3BucketName)
aws-quickstart The S3 bucket you created for your copy of Quick Start assets,
if you decide to customize or extend the Quick Start for your
own use. The bucket name can include numbers, lowercase
letters, uppercase letters, and hyphens, but should not start or
end with a hyphen.
Amazon Web Services – IPSec Mesh on the AWS Cloud May 2019
Page 10 of 22
Parameter label
(name) Default Description
Quick Start S3 key
prefix
(QSS3KeyPrefix)
quickstart-ec2-ipsec-mesh/
The S3 key name prefix used to simulate a folder for your copy
of Quick Start assets, if you decide to customize or extend the
Quick Start for your own use. This prefix can include numbers,
lowercase letters, uppercase letters, hyphens, and forward
slashes.
5. On the Options page, you can specify tags (key-value pairs) for resources in your stack
and set advanced options. When you’re done, choose Next.
6. On the Review page, review and confirm the template settings. Under Capabilities,
select the two check boxes to acknowledge that the template will create IAM resources
and that it might require the capability to auto-expand macros.
7. Choose Create to deploy the stack.
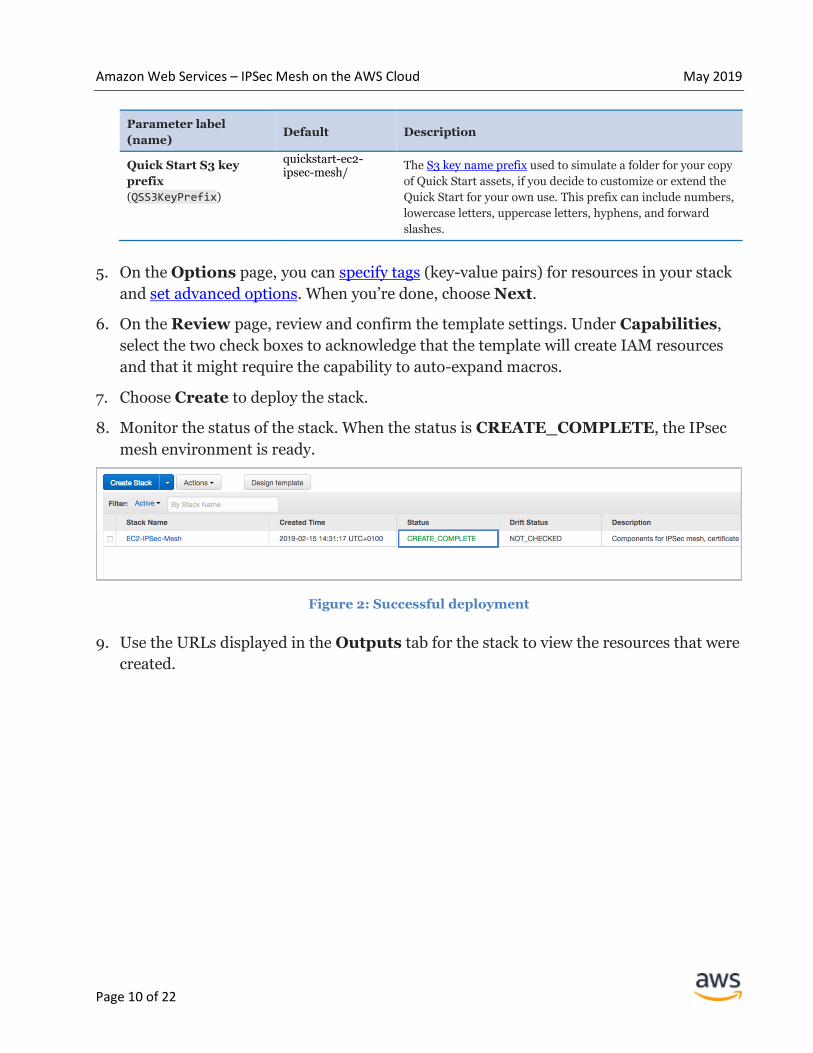
8. Monitor the status of the stack. When the status is CREATE_COMPLETE, the IPsec
mesh environment is ready.
Figure 2: Successful deployment
9. Use the URLs displayed in the Outputs tab for the stack to view the resources that were
created.

Amazon Web Services – IPSec Mesh on the AWS Cloud May 2019
Page 11 of 22
Figure 3: CloudFormation stack outputs
Step 3. Configure the IPsec network
Note The default network configuration used by the Ipsec mesh Quick Start
matches the configuration of a default VPC. If you are using your default VPC, skip
this step.
The required Libreswan configuration for IPsec and the network is stored in an S3 bucket
(shown as ConfigSourcesS3Bucket in the Outputs tab). If you need to change the
configuration, download the following files from this S3 bucket, edit them with your
favorite text editor to match your network setup, and then re-upload them to the S3 bucket:
config/private should contain all networks that require IPsec protection, such as EC2
instances that should be communicated with only through IPsec. All these hosts must
have IPsec installed.
config/private-or-clear should contain networks with optional IPsec protection.
However, these networks will start with IPsec protection and allow a fallback to
unprotected (clear) when the IPsec negotiation fails.
config/clear-or-private should contain networks that do not, by default, attempt to
add IPsec protection when initiating IP traffic, but that should respond to other nodes
requesting IPsec protection when responding to IP traffic. This also allows a fallback to
unencrypted IP traffic if the IPsec negotiation fails.
Amazon Web Services – IPSec Mesh on the AWS Cloud May 2019
Page 12 of 22
config/clear should contain exceptions to config/private that do not support IPsec
protection. For example, these might include Amazon Route 53 (DNS), Elastic Load
Balancing, or Amazon RDS. Networks that aren’t listed in config/private are not IPsec
protected and should not be added here.
oe-cert.conf is the configuration file for Libreswan. Typically you do not have to edit it.
For more information, see the Libreswan documentation.
Step 4. (Optional) Launch an EC2 instance for testing
Now that you’ve deployed the IPsec environment, you can start launching EC2 instances.
From the Amazon EC2 console, follow the steps for launching an instance using the Launch
Instance Wizard. This Quick Start supports Red Hat Enterprise Linux (RHEL), Amazon
Linux 2, and CentOS.
Note For steps or details that that aren’t explicitly mentioned here, use the default
values or your desired configuration. For step-by-step instructions, see the Amazon
EC2 documentation.
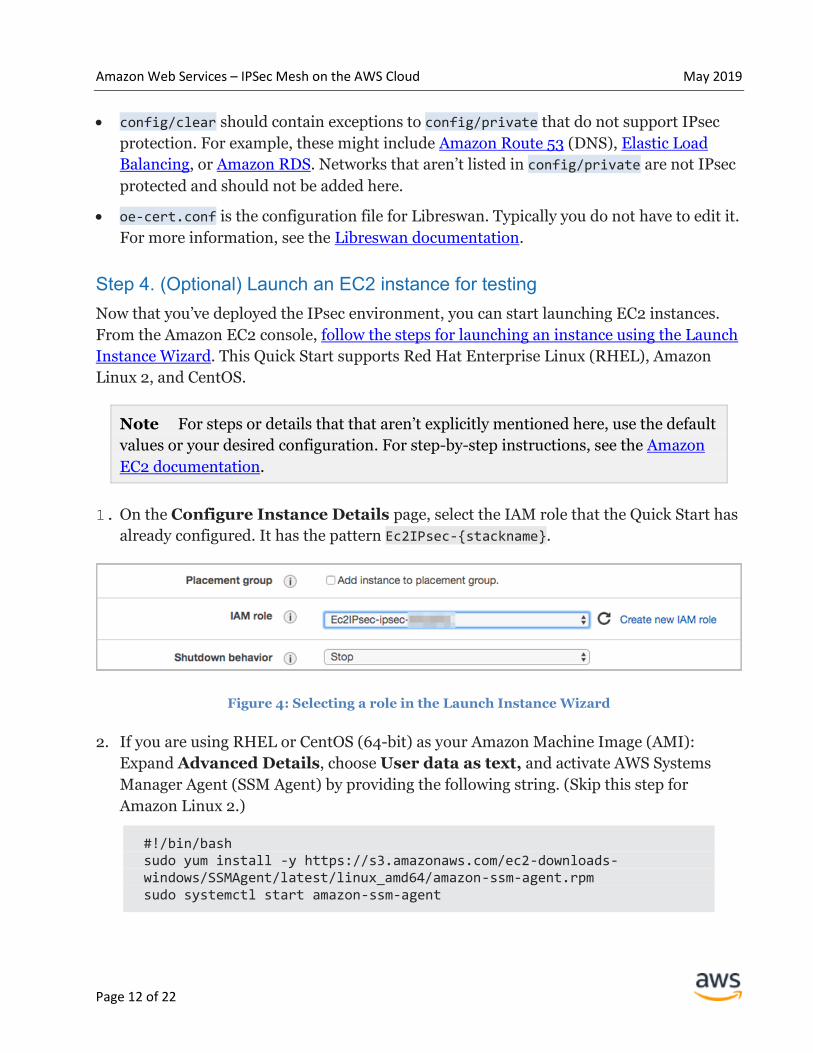
1. On the Configure Instance Details page, select the IAM role that the Quick Start has
already configured. It has the pattern Ec2IPsec-{stackname}.
Figure 4: Selecting a role in the Launch Instance Wizard
2. If you are using RHEL or CentOS (64-bit) as your Amazon Machine Image (AMI):
Expand Advanced Details, choose User data as text, and activate AWS Systems
Manager Agent (SSM Agent) by providing the following string. (Skip this step for
Amazon Linux 2.)
#!/bin/bash sudo yum install -y https://s3.amazonaws.com/ec2-downloads-windows/SSMAgent/latest/linux_amd64/amazon-ssm-agent.rpm sudo systemctl start amazon-ssm-agent

Amazon Web Services – IPSec Mesh on the AWS Cloud May 2019
Page 13 of 22
Figure 5: Activating SSM Agent
3. On the Add Tags page, set the tag name to IPSec with the value todo. This is the
identifier that triggers the installation and management of IPsec on the instance.
Figure 6: Setting the IPsec tag
4. On the Configure Security Group page, allow ESP (protocol 50) and IKE (UDP 500)
for your network (for example, 172.31.0.0/16). Enter these values as shown in Figure 7.
Figure 7: Defining a security group for IPSec communication
After a few minutes, the value of the IPSec instance tag will change to enabled,
indicating that the instance has been set up successfully.

Amazon Web Services – IPSec Mesh on the AWS Cloud May 2019
Page 14 of 22
Figure 8: Tags overview of IPsec-enabled instances
Step 5. (Optional) Test the connection on the EC2 instance
To test the connection, you can log in to the EC2 instance and ping one of the hosts in your
network. This will trigger the IPsec connection, and you should get data similar to the
following:
$ ping 172.31.1.26 PING 172.31.1.26 (172.31.1.26) 56(84) bytes of data. 64 bytes from 172.31.1.26: icmp_seq=2 ttl=255 time=0.722 ms 64 bytes from 172.31.1.26: icmp_seq=3 ttl=255 time=0.483 ms
To see a list of IPsec tunnels, run the following command:
sudo ipsec whack --trafficstatus
The command displays output similar to the following:

Amazon Web Services – IPSec Mesh on the AWS Cloud May 2019
Page 15 of 22
Figure 9: Viewing IPsec tunnels
Operations
Changing your configuration or installing it on running instances
The Libreswan configuration is stored in files in an S3 bucket (specified as
ConfigSourcesS3Bucket in CloudFormation stack output, as shown in Figure 3). If you
want to change the configuration:
1. Review and update the following files:
a. oe-cert.conf, which stores the configuration for Libreswan.
b. clear, private, private-or-clear, and clear-or-private, which should contain
your network ranges. (See step 3 for more information about these files.)
2. Change the tag for the IPsec instance to IPSec:todo.
3. Stop and Start (don’t reboot) the instance. This sequence will retrigger the setup of the
instance.

Amazon Web Services – IPSec Mesh on the AWS Cloud May 2019
Page 16 of 22
Figure 10: Starting and stopping EC2 instances
If you prefer not to stop and restart the instance, you can call the IPSecSetup Lambda
function by using a test JSON event in the following format:
{ "detail": { "instance-id": "YOUR_INSTANCE_ID" } }
Figure 11: Provisioning IPsec through a Lambda test event
For more information about creating test events, see the AWS Lambda documentation.

Amazon Web Services – IPSec Mesh on the AWS Cloud May 2019
Page 17 of 22
Monitoring your IPsec environment
This Quick Start automatically sets up IPsec and IKE metrics and Amazon SNS alarms in
case of errors. To monitor your IPsec environment, you can use Amazon CloudWatch and
view metrics for active IPsec sessions, IKE/ESP errors, and connection shunts, as shown in
Figure 12.
Figure 12: Overview of IPsec-related CloudWatch metrics
There are two SNS topics and alarms configured for IPsec setup or certificate re-enrollment
failures. You will see an alarm and an SNS message. Your administrator should subscribe to
notifications so that you can react quickly. If you receive an alarm, follow the
troubleshotting tips in the next section.

Amazon Web Services – IPSec Mesh on the AWS Cloud May 2019
Page 18 of 22
Figure 13: Overview of IPsec-related CloudWatch alarms
Troubleshooting
Q. I encountered a CREATE_FAILED error when I launched the Quick Start.
A. If AWS CloudFormation fails to create the stack, we recommend that you relaunch the
template with Rollback on failure set to No. (This setting is under Advanced in the
AWS CloudFormation console, Options page.) With this setting, the stack’s state will be
retained and the instance will be left running, so you can troubleshoot the issue.
Important When you set Rollback on failure to No, you will continue to incur
AWS charges for this stack. Please make sure to delete the stack when you finish
troubleshooting.
For additional information, see Troubleshooting AWS CloudFormation on the AWS
website.
Q. I encountered a size limitation error when I deployed the AWS CloudFormation
templates.
A. We recommend that you launch the Quick Start templates from the links in this guide or
from another S3 bucket. If you deploy the templates from a local copy on your computer or
from a non-S3 location, you might encounter template size limitations when you create the
stack. For more information about AWS CloudFormation limits, see the AWS
documentation.
Q. The IPsec tag doesn’t change to IPSec:enabled when I launch an EC2 instance.
A. If you encounter this issue:
Wait two minutes after the EC2 instance launches, so that it becomes reachable by
AWS Systems Manager.
Check that the EC2 instance has the right role assigned for SSM Agent. The role is
provisioned by the solution named Ec2IPsec-{stackname}.

Amazon Web Services – IPSec Mesh on the AWS Cloud May 2019
Page 19 of 22
Check that SSM Agent is reachable through a NAT gateway, an internet gateway, or a
private SSM endpoint.
For CentOS and RHEL, check that you’ve installed SSM Agent, as described in step 4
of the deployment steps.
Check the output of SSM Agent command execution in the Amazon EC2 console.
Check the IPSecSetup Lambda logs in CloudWatch for troubleshooting details.
Q. The IPsec connection is lost after a few hours and can only be established from one host
(in one direction).
A. If you encounter this issue:
Check that your security groups allow the ESP protocol and UDP 500. Security
groups are stateful. They might allow only a single direction when establishing IPsec.
Check that your network ACL allows the ESP protocol and UDP 500.
Q. An SNS alarm was triggered upon IPsec re-enrollment, but everything seems to work
fine.
A. Check for the following:
Certificates are valid for 30 days and rotated every week. If the rotation fails, you
have three weeks to fix the problem.
Check that your EC2 instances are reachable over AWS Systems Manager. If they
are, trigger the Lambda function for certificate rotation again.
See the IPSecSetup Lambda logs in CloudWatch for troubleshooting details.
Q. Route 53 (DNS), Amazon RDS, and other AWS managed services are not reachable.
A. Route 53, Amazon RDS, and other AWS managed services do not support IPsec. You
need to exclude them from encryption by listing them in the config/clear list. For details,
see step 3 of the deployment steps.
Q. The IPsec tag changed to IPSec:enabled when the EC2 instance launched, but there is
no network communication to any address.
A. Check the IPsec network configuration. The files clear, private, private-to-clear, and
clear-to-ipsec should contain your network ranges, as discussed in step 3 of the
deployment steps.
Q. I encountered another issue that isn’t listed here.
A. Here are some additional general IPsec commands you can use for troubleshooting:

Amazon Web Services – IPSec Mesh on the AWS Cloud May 2019
Page 20 of 22
To stop IPsec, run this Unix command:
sudo ipsec stop
If you want to stop IPsec on all instances, you can run this command in AWS Systems
Manager on all instances that have the tag IPSec:enabled. Stopping encryption means that
all traffic will be sent unencrypted.
If you want to have a fail-open case, meaning that an IKE (IPsec) failure sends the
unencrypted data, you should configure your network in the config/private-or-clear file,
as described in step 3 of the deployment steps.
To troubleshoot IPsec issues, you can use Libreswan commands such as the following:
sudo ipsec status sudo ipsec barf ipsec whack --oppohere <src-ip-address> --oppothere <dst-ip-address>
where <src-ip-address> and <dst-ip-address> are the source and destination IP
addresses to test.
Security
The CA key is encrypted using an Advanced Encryption Standard (AES) 256 CBC 128-byte
secret and stored in a bucket with server-side encryption (SSE). The secret is envelope-
encrypted with a CMK in AWS KMS. Only the certificate-issuing Lambda function can
decrypt the secret (AWS KMS resource policy). The encrypted secret for the CA key is set in
an encrypted environment variable of the certificate-issuing Lambda function.
The IPsec host private key is generated by the certificate-issuing Lambda function. The
private key and certificate are encrypted with AES 256 CBC (PKCS #12) and protected with
a 128-byte secret generated by AWS KMS. The secret is envelope-encrypted with a user
CMK. Only the EC2 instances that have an attached IPsec IAM policy can decrypt the secret
and private key.
The issuing of the certificate is a full synchronous call; that is, one request and one
corresponding response without any polling or similar sync/callbacks. The host private key
is not stored in a database or in an S3 bucket.

Amazon Web Services – IPSec Mesh on the AWS Cloud May 2019
Page 21 of 22
The issued certificates are valid for 30 days and are stored for auditing purposes in a
certificates bucket without a private key.
Alternate subject names and multiple interfaces or secondary IPs
The certificate subject name and AltSubjectName attribute contains the private DNS of
the EC2 instance and all private IPs assigned to the instance (interfaces, primary and
secondary IPs).
The default Libreswan configuration we’ve provided covers a single interface. If you want to
cover multiple interfaces—for example, to cover Amazon Elastic Container Service for
Kubernetes (Amazon EKS)—you can adjust the configuration by following the instructions
in the Libreswan documentation.
Send us feedback
To post feedback, submit feature ideas, or report bugs, use the Issues section of the
GitHub repository for this Quick Start. If you’d like to submit code, please review the Quick
Start Contributor’s Guide.
Additional resources
AWS resources
Getting Started Resource Center
AWS General Reference
AWS Glossary
AWS services
AWS CloudFormation
Amazon Elastic Block Store (Amazon EBS)
Amazon EC2
IAM
Amazon VPC

Amazon Web Services – IPSec Mesh on the AWS Cloud May 2019
Page 22 of 22
Libreswan
Home page
IPsec documentation
Other Quick Start reference deployments
AWS Quick Start home page
Document revisions
Date Change In sections
May 2019 Initial publication —
© 2019, Amazon Web Services, Inc. or its affiliates. All rights reserved.
Notices
This document is provided for informational purposes only. It represents AWS’s current product offerings
and practices as of the date of issue of this document, which are subject to change without notice. Customers
are responsible for making their own independent assessment of the information in this document and any
use of AWS’s products or services, each of which is provided “as is” without warranty of any kind, whether
express or implied. This document does not create any warranties, representations, contractual
commitments, conditions or assurances from AWS, its affiliates, suppliers or licensors. The responsibilities
and liabilities of AWS to its customers are controlled by AWS agreements, and this document is not part of,
nor does it modify, any agreement between AWS and its customers.
The software included with this paper is licensed under the Apache License, Version 2.0 (the "License"). You
may not use this file except in compliance with the License. A copy of the License is located at
http://aws.amazon.com/apache2.0/ or in the "license" file accompanying this file. This code is distributed on
an "AS IS" BASIS, WITHOUT WARRANTIES OR CONDITIONS OF ANY KIND, either express or implied.
See the License for the specific language governing permissions and limitations under the License.