oracle · 4 define implementation users 17 ... ..... 62 8 define party usages 63 party usage:...
TRANSCRIPT

OracleSales CloudImplementing Customer DataManagement
Release 13 (update 18A)

Oracle Sales CloudImplementing Customer Data Management
Release 13 (update 18A)Part Number E92304-01Copyright © 2011-2018, Oracle and/or its affiliates. All rights reserved.
Author: Abhishek Sura
Contributors: Brian Casey, Rakesh Chaudhary, Peggy Larson, Vijay Tiwary, Jacqueline Wood, Asra Alim, Catherine Bauer, Tina Brand, Angela Brown, Hema Hardikar, Essan Ni Jirman, Mary Kalway, Suzanne Kinkead, Mike Laverty, Kristin Penaskovic, P. S. G. V. Sekhar, Barbara Snyder, Rick Stober, Srinivas Vellikad, Megan Wallace, Jiri Weiss, Kathryn Wohnoutka
This software and related documentation are provided under a license agreement containing restrictions on use and disclosure and are protected byintellectual property laws. Except as expressly permitted in your license agreement or allowed by law, you may not use, copy, reproduce, translate, broadcast,modify, license, transmit, distribute, exhibit, perform, publish, or display any part, in any form, or by any means. Reverse engineering, disassembly, ordecompilation of this software, unless required by law for interoperability, is prohibited.
The information contained herein is subject to change without notice and is not warranted to be error-free. If you find any errors, please report them tous in writing.
If this is software or related documentation that is delivered to the U.S. Government or anyone licensing it on behalf of the U.S. Government, then thefollowing notice is applicable:
U.S. GOVERNMENT END USERS: Oracle programs, including any operating system, integrated software, any programs installed on the hardware, and/or documentation, delivered to U.S. Government end users are "commercial computer software" pursuant to the applicable Federal Acquisition Regulationand agency-specific supplemental regulations. As such, use, duplication, disclosure, modification, and adaptation of the programs, including any operatingsystem, integrated software, any programs installed on the hardware, and/or documentation, shall be subject to license terms and license restrictionsapplicable to the programs. No other rights are granted to the U.S. Government.
This software or hardware is developed for general use in a variety of information management applications. It is not developed or intended for use inany inherently dangerous applications, including applications that may create a risk of personal injury. If you use this software or hardware in dangerousapplications, then you shall be responsible to take all appropriate fail-safe, backup, redundancy, and other measures to ensure its safe use. OracleCorporation and its affiliates disclaim any liability for any damages caused by use of this software or hardware in dangerous applications.
Oracle and Java are registered trademarks of Oracle and/or its affiliates. Other names may be trademarks of their respective owners.
Intel and Intel Xeon are trademarks or registered trademarks of Intel Corporation. All SPARC trademarks are used under license and are trademarks orregistered trademarks of SPARC International, Inc. AMD, Opteron, the AMD logo, and the AMD Opteron logo are trademarks or registered trademarks ofAdvanced Micro Devices. UNIX is a registered trademark of The Open Group.
This software or hardware and documentation may provide access to or information about content, products, and services from third parties. OracleCorporation and its affiliates are not responsible for and expressly disclaim all warranties of any kind with respect to third-party content, products, andservices unless otherwise set forth in an applicable agreement between you and Oracle. Oracle Corporation and its affiliates will not be responsible for anyloss, costs, or damages incurred due to your access to or use of third-party content, products, or services, except as set forth in an applicable agreementbetween you and Oracle.
The business names used in this documentation are fictitious, and are not intended to identify any real companies currently or previously in existence.
Oracle customers that have purchased support have access to electronic support through My Oracle Support. For information, visit http://www.oracle.com/pls/topic/lookup?ctx=acc&id=info or visit http://www.oracle.com/pls/topic/lookup?ctx=acc&id=trs if you are hearing impaired.

Oracle Sales CloudImplementing Customer Data Management
Contents
Preface i
1 About This Guide 1Audience and Scope ................................................................................................................................................ 1
Related Guides ......................................................................................................................................................... 1
2 Overview of Customer Data Management 3Customer Data Management in Oracle Sales Cloud: Overview ................................................................................. 3
3 Perform Initial Setup Tasks 5Overview ................................................................................................................................................................... 5
Setup and Maintenance Basics ................................................................................................................................ 5
Lookups .................................................................................................................................................................. 10
Profile Options ........................................................................................................................................................ 13
4 Define Implementation Users 17Defining Setup Users: Overview .............................................................................................................................. 17
5 Define Geographies 19Overview ................................................................................................................................................................. 19
Managing Geography Mismatches .......................................................................................................................... 26
Import Geographies and Zones .............................................................................................................................. 27
Set Up Geocoding .................................................................................................................................................. 47
Define Address Cleansing ....................................................................................................................................... 50
FAQs for Define Geographies ................................................................................................................................. 51
6 Manage Personally Identifiable Information 55Protecting Personally Identifiable Information: Explained .......................................................................................... 55
Working with Protected Information: Explained ....................................................................................................... 56
Managing Personally Identifiable Information: Worked Example ............................................................................... 57
Assigning PII Privileges Using Security Console: Worked Example .......................................................................... 59

Oracle Sales CloudImplementing Customer Data Management
7 Define Source Systems 61Source Systems: Explained .................................................................................................................................... 61
Source System Entities: Explained .......................................................................................................................... 61
FAQs for Define Source Systems ............................................................................................................................ 62
8 Define Party Usages 63Party Usage: Explained ........................................................................................................................................... 63
Party Usage Filter Rules: Explained ......................................................................................................................... 63
FAQs for Define Party Usages ................................................................................................................................ 64
9 Define Names 65Additional Name Types: Explained .......................................................................................................................... 65
10 Define Identifiers 67Identifier Types: Explained ....................................................................................................................................... 67
11 Define Relationships 69Relationships Types: Explained ............................................................................................................................... 69
Relationship Groups: Explained ............................................................................................................................... 70
Manage Relationship Types .................................................................................................................................... 70
Manage Relationship Groups .................................................................................................................................. 72
12 Define Classifications 75Classifications: Explained ........................................................................................................................................ 75
FAQs for Define Classifications ............................................................................................................................... 76
13 Define Data Formats 77Data Formats and Setup Activities: How They Fit Together ..................................................................................... 77
Setup Formats: Explained ....................................................................................................................................... 77
Creating an Address Style Format: Worked Example .............................................................................................. 78
Updating Address Formats: Procedure ................................................................................................................... 80
Seeded Address Formats for Countries: Explained ................................................................................................. 80
Creating a Name Style Format: Worked Example ................................................................................................... 89
FAQs for Define Data Formats ................................................................................................................................ 91

Oracle Sales CloudImplementing Customer Data Management
14 Define Contact Points 93Telephone Numbering Plan: Explained .................................................................................................................... 93
Updating Telephone Numbering Plans: Procedure .................................................................................................. 93
How Setup Telephone Numbering Plans Fits in with the Other Setup Tasks ........................................................... 93
FAQs for Define Contact Points .............................................................................................................................. 94
15 Define File-Based Data Import 95File-Based Data Import: Highlights .......................................................................................................................... 95
FAQs for Define File-Based Data Import ................................................................................................................. 95
16 Define Resource Information 97Understanding Resources ....................................................................................................................................... 97
Identifying an Employee as a Resource: Procedure ................................................................................................ 97
Resource Information .............................................................................................................................................. 98
FAQs for Define Resource Information .................................................................................................................... 98
17 Define Resource Role Information 101Resource Role Information .................................................................................................................................... 101
FAQs for Define Resource Role Information .......................................................................................................... 102
18 Define Resource Organization Information 105Resource Organization Information ........................................................................................................................ 105
FAQs for Define Resource Organization Information .............................................................................................. 108
19 Define Resource Team Information 113Resource Team Information .................................................................................................................................. 113
FAQs for Define Resource Team Information ........................................................................................................ 114
20 Manage Bulk Data Export 117Overview ............................................................................................................................................................... 117
Defining Bulk Export Process: Procedure .............................................................................................................. 118
Bulk Export Process Components: How They Work Together .............................................................................. 120
FAQs for Manage Bulk Data Export ...................................................................................................................... 121
Oracle Sales CloudImplementing Customer Data Management
21 Configure Oracle Social Data and Insight Cloud Service for DataEnrichment and Address Verification
123
Configuring Social Data and Insight Cloud Service for Data Enrichment and Address Verification: Overview ........... 123
Creating a DaaS User and Assigning Role: Procedure .......................................................................................... 124
Configuring Sales Cloud to Data Cloud Integration: Procedure ............................................................................. 125
Managing Social Data and Insight Cloud Attribute Mapping and Preferences: Procedure ...................................... 126
Specifying the Industry Classification for Accounts ................................................................................................ 127
Enriching Sales Cloud Data Manually .................................................................................................................... 128
Enriching Sales Cloud Data Automatically ............................................................................................................. 130
Enriching Oracle Sales Cloud Data with Social Attributes ...................................................................................... 131
22 Define Data Quality 139Setting Up Data Quality Using Enterprise Data Quality: Explained ......................................................................... 139
Server Configurations ............................................................................................................................................ 141
Matching Configurations ....................................................................................................................................... 142
Cleansing Configurations ....................................................................................................................................... 149
Enabling Search Mode for Address Verification Cloud Service .............................................................................. 155
FAQs for Integrating with Oracle Enterprise Data Quality Engine ........................................................................... 156
23 Define Customer Hub Configuration 159Run Request Dispatch Job ................................................................................................................................... 159
Customer Hub Profile Options .............................................................................................................................. 159
Define Survivorship ............................................................................................................................................... 160
Source System Confidence ................................................................................................................................... 187
Agreement Rules .................................................................................................................................................. 188
Merge Requests .................................................................................................................................................... 191
High Volume Batch Deduplication: Best Practices and Guideline .......................................................................... 195
24 Integrate Customer Data Management with Other Cloud Services 199Customer Data Management Cloud Integration Approaches: Explained ................................................................ 199
Merge Operation Process During Integration Cloud Service Based Integration: Explained ...................................... 201

Oracle Sales CloudImplementing Customer Data Management
Preface
i
PrefaceThis preface introduces information sources that can help you use the application.
Oracle Applications HelpUse help icons to access help in the application. If you don't see any help icons on your page, click the Show Help
icon in the global header. Not all pages have help icons. You can also access Oracle Applications Help at https://fusionhelp.oracle.com.
Using Applications HelpWatch: This video tutorial shows you how to find help and use help features.
You can also read Using Applications Help.
Additional Resources• Community: Use Oracle Cloud Customer Connect to get information from experts at Oracle, the partner
community, and other users.
• Guides and Videos: Go to the Oracle Help Center to find guides and videos.
• Training: Take courses on Oracle Cloud from Oracle University .
ConventionsThe following table explains the text conventions used in this guide.
Convention Meaning
boldface Boldface type indicates user interface elements, navigation paths, or values you enter or select.
monospace Monospace type indicates file, folder, and directory names, code examples, commands, and URLs.
> Greater than symbol separates elements in a navigation path.
Documentation AccessibilityFor information about Oracle's commitment to accessibility, visit the Oracle Accessibility Program website at OracleAccessibility Program .
Access to Oracle SupportOracle customers that have purchased support have access to electronic support through My Oracle Support. Forinformation, visit http://www.oracle.com/pls/topic/lookup?ctx=acc&id=info or visit http://www.oracle.com/pls/topic/lookup?ctx=acc&id=trs if you are hearing impaired.

Oracle Sales CloudImplementing Customer Data Management
Preface
ii
Comments and SuggestionsPlease give us feedback about Oracle Applications Help and guides! You can send e-mail to:[email protected].
Oracle Sales CloudImplementing Customer Data Management
Chapter 1About This Guide
1
1 About This Guide
Audience and ScopeThis guide provides conceptual information and procedures needed to implement Customer Data Management-specificcomponents and features of Oracle Sales Cloud.
This guide provides guidance for implementing Customer Data Management-specific components and features of OracleSales Cloud. This guide assumes your company's sales cloud service is up and running at a basic level, as described in theuse case contained in the Oracle Sales Cloud, Getting Started with Your Implementation guide.
This guide also assumes that you have done additional setup for Core Sales following the Oracle Sales Cloud - ImplementingSales guide.
Related GuidesYou can refer to the related guides listed in the following table to understand more about the tasks covered in this guide.
Title Description
Oracle Customer Data ManagementCloud Getting Started with YourCustomer Data ManagementImplementation
Describes how to get started with the implementation of Customer Data Management cloud servicecapabilities such as duplicate identification, duplicate resolution, address verification, and dataenrichment. This guide uses the default settings provided by Oracle and does not provide detailedexplanations of all available features.
Oracle Customer Data ManagementCloud Using Customer DataManagement
Contains conceptual information and procedures needed to manage customer information andcustomer data quality. You can use this guide to work with the customer data management cloudservice capabilities such as duplicate identification, duplicate resolution, address verification, anddata enrichment.
Oracle Sales Cloud - Extending Sales
Describes how to create and extend objects and configure the user interfaces and navigationmenus.
Oracle Sales Cloud Understanding File-Based Data Import and Export
Describes how to import legacy and other data into Oracle Sales Cloud using File-Based DataImport.
Oracle Sales Cloud File-Based DataImport for Oracle Sales Cloud
Directs you to reference information that you can use to create an importable source data file for theimport of individual objects.

Oracle Sales CloudImplementing Customer Data Management
Chapter 1About This Guide
2
Oracle Sales CloudImplementing Customer Data Management
Chapter 2Overview of Customer Data Management
3
2 Overview of Customer Data Management
Customer Data Management in Oracle Sales Cloud:OverviewThe customer data management setup involves reviewing and defining the configuration required to manage customerinformation and their business relationships.
Key FeaturesYou can use customer data management functionality to:
• Prevent and identify duplicate data: You can identify duplicates during real-time or in a preconfigured batch. Real-time account and contact searching and matching prevent the creation of duplicate data. You can identify potentialduplicate data based on the preconfigured matching configurations.
• Verify and standardize addresses: You can perform real-time and batch address cleansing for account or contactaddress information. You can verify and cleanse addresses within an import batch during import. The addresses areverified against the master geography area and cleansed. The geography validation feature can also be enabled tocheck if the entered address maps to the geography hierarchy data available for the country.
• Resolve duplicate data: You can merge and link duplicate records to create master records that are the singlesource of truth. You can de-duplicate within an import batch as well as within the entire database. Customer datamanagement uses a data quality engine to consolidate high quality account and contact data from multiple sources,manage duplicate data, enhance data with third-party content, standardize addresses, and monitor data quality.These data quality checks ensure cleansed, enriched, and complete customer information that can be trusted by thesales team.

Oracle Sales CloudImplementing Customer Data Management
Chapter 2Overview of Customer Data Management
4

Oracle Sales CloudImplementing Customer Data Management
Chapter 3Perform Initial Setup Tasks
5
3 Perform Initial Setup Tasks
Overview
Performing Sales Setup TasksFor most sales setup tasks, you use the Setup and Maintenance work area to access the setup pages associated with thecomponent or feature. The Setup and Maintenance work area is also known as the Functional Setup Manager.
For Oracle Sales Cloud activities, a user with the Sales Administrator role performs many, if not most, of the setup andconfiguration tasks. For more information on typical sales administrator tasks, see the topic, About the Sales Administrator.
You navigate to the Sales offering to access setup tasks:
1. Sign in as the sales administrator or as a setup user and navigate to the Setup and Maintenance work area. TheSetup page appears with an offering selected.
Tip: To navigate to Setup and Maintenance, you can use the Navigator menu or the menu underneathyour user image or name in the global header.
2. In the Setup page, select the Sales offering.3. The Setup: Sales page appears with a list of functional areas.4. In the list of functional areas, click the functional area that has the tasks you need to access.
A list of required tasks for the area is displayed.5. In the list of tasks that appears, find the task you want and select it. (If the task you want is not in the list, show All
Tasks in the tasks filter.)
The setup page for the task appears.
For more information about Functional Setup Manager, see the Oracle Applications Cloud Using Functional Setup Managerguide and the related topics.
Related Topics
• About the Sales Administrator
• Oracle Applications Cloud Using Functional Setup Manager
• Functional Setup Manager: Overview
Setup and Maintenance Basics

Oracle Sales CloudImplementing Customer Data Management
Chapter 3Perform Initial Setup Tasks
6
Creating an Implementation Project: ProcedureBefore creating an implementation project, ensure that you configured the offerings and opted into their functional areas andfeatures you plan to use.
You need the Manage Implementation Project privilege to create and manage implementation projects.
Create an Implementation ProjectTo create an implementation project, follow these steps.
1. Click Navigator > Setup and Maintenance work area to open the Setup page.2. Select Manage Implementation Projects from the task panel to open the Manage Implementation Projects page.3. Select Create from the Actions menu, or click the Create icon to go to the Create Implementation Project: Basic
Information page.4. Enter a meaningful name and a brief description to describe your project.5. Optionally, assign the project to a user and specify a start date.6. Click Next to go to the Create Implementation Project: Select Offerings to Implement page. All enabled offerings and
functional areas are listed.7. Select the offering and its functional areas you want to use to generate the task list for this project.8. Click Save and Open Project when you complete your selection.9. A page with the name you specified for your implementation project opens, displaying its task list. The default task
list is generated based on your offering and functional area selection in the previous step. You can modify the tasklist if needed, and begin to assign the tasks to the appropriate users.
Modify an Implementation ProjectThe default task list generated for an implementation project is always organized in the proper sequence to address datadependency requirements of the setup data they represent. The best practice is to not modify the task list unless it isunavoidable for your business requirements.
You can add, remove or reorder tasks within an implementation project. Before you make any such modifications to yourimplementation projects, ensure that data dependency requirements aren't compromised.
Add TasksTo add setup tasks to an implementation project, follow these steps:
1. Click Navigator > Setup and Maintenance work area to open the Setup page.2. Select Manage Implementation Projects from the task panel to open the Manage Implementation Projects page.3. Open the implementation project you want to modify to view its task list hierarchy.4. Select the task or task list you want to add the new task after, and click the Add icon.5. In the Add Task Lists and Tasks page, search for the task or task list you want to add, select it, and click Apply.
Your selection is added after the task or task list you selected in the previous step.6. Repeat search select and apply to add additional tasks or task lists, as required. Click Done when you finished to
return to your implementation project.
Reorder TasksTo reorder setup tasks of an implementation project, follow these steps.
1. Click Navigator > Setup and Maintenance work area to open the Setup page.2. Select Manage Implementation Projects from the task panel to open the Manage Implementation Projects page.3. Open the implementation project you want to modify to view its task list hierarchy.4. Select the task you want to move.

Oracle Sales CloudImplementing Customer Data Management
Chapter 3Perform Initial Setup Tasks
7
5. Drag and drop the selected task on the task you want it to appear after in the hierarchy.
Follow the same steps to move a task list.
Remove TasksTo remove setup tasks from an implementation project, follow these steps.
1. Click Navigator > Setup and Maintenance work area to open the Setup page.2. Select Manage Implementation Projects from the task panel to open the Manage Implementation Projects page.3. Open the implementation project you want to modify to view its task list hierarchy.4. Select the task or task list you want to remove.5. Click the Remove icon.
Note: When you remove a task, any setup data you entered using the task is not removed.
Related Topics
• Managing Setup Using Implementation Projects
Entering Setup Data Using Assigned Tasks: ExplainedIf you are a user to whom setup tasks from an implementation project have been assigned, then a consolidated list of all ofyour assigned tasks is presented to you. Use each task from the list to enter setup data that the task represents. If you have along list of assigned tasks, you can filter the list by due date, task status, or implementation project name to find a task moreeasily. In addition, you can search for a specific task in the list by the task name.
Note: You must have the proper security privileges to perform a task.
Tasks with ScopeIf any setup data is segmented by a specific attribute or scope, you may need to perform the task iteratively. If so, you mustselect a qualifying scope value prior to performing the task. You can pick a scope value that was previously selected, select anew scope value, or create a new scope value and then select it. The selected value is a qualifying attribute of the setup dataand therefore, different setup data can be entered for the different scope values.
Predecessor TasksSome setup tasks may represent setup data that are a prerequisite for other setup data. These setup tasks are known as thepredecessor tasks.
Your assigned task list will indicate if any of the tasks has dependency on a predecessor task and will provide the followinginformation:
• Which tasks are the predecessors of a given task.
• What are the present statuses of the predecessor tasks.
• What statuses are recommended for each of the predecessor task before entering setup data.
Setting Task StatusBy default the status of all assigned tasks are set to Not Started. When you start to enter data for a task, you can changethe task status to In Progress and when you finish entering data you can change it to Completed. Although status of a task

Oracle Sales CloudImplementing Customer Data Management
Chapter 3Perform Initial Setup Tasks
8
does not determine whether or not you can continue to enter setup data for the task or whether you can export and importthe data, it helps the implementation manager monitor the progress of the assignments.
Adding NotesYou can add a file, URL, or free-format text as notes to your assigned tasks. These notes are accessible not only to you,but also to the implementation manager and other assignees if multiple users are assigned to the same task. This helps youcommunicate and collaborate with others assignees.
Related Topics
• Entering Setup Data Using Assigned Tasks
• Entering Setup Data Using Assigned Tasks: Procedure
Offerings: ExplainedOfferings are application solution sets representing one or more business processes and activities that you typically provisionand implement as a unit. They are, therefore, the primary drivers of functional setup of Oracle Fusion applications. Some ofthe examples of offerings are Financials, Procurement, Sales, Marketing, Order Orchestration, and Workforce Deployment. Anoffering is the highest level grouping of Oracle Fusion Applications functionality. They include functional areas, and alternativebusiness rules known as features.
Offering Related Documents: ExplainedRelated documents are intended to help you plan a successful implementation of the offerings available on the GettingStarted page. Every offering contains a default set of reports as related documents. You cannot modify the defaultdocuments. In addition to these reports, you can add reports and other related documents to help with planning andimplementation or when performing setup tasks. The documents available by default are:
Offering Content GuideThis report shows detailed information on the business processes and activities supported by the offering.
Setup Task Lists and Tasks ReportThis report shows the list of task lists and tasks that you should complete to successfully implement the offering.
Associated Features ReportThis report shows the list of functional areas and features associated with the offering.
Related Business Objects ReportThis report shows all setup data needed to implement the offering. It provides a list of all business objects that are associatedwith the setup tasks belonging to the offering.
Related Enterprise Applications ReportThis report shows the list of enterprise applications used by the functional pages and web services for the offering.

Oracle Sales CloudImplementing Customer Data Management
Chapter 3Perform Initial Setup Tasks
9
Enabling Offerings: ExplainedOfferings and their functional areas are presented in an expandable and collapsible hierarchy to facilitate progressive decisionmaking regarding whether or not you want to implement them. An offering or its functional areas can either be opted into ornot opted into for implementation. Implementation managers decide which offerings to enable for implementation. Althoughall of the functional areas that represent core functionality of an offering are automatically enabled for implementation whena parent offering is enabled for implementation, you can select which of the optional functional areas are enabled. You canidentify which functionality is already opted into by looking at the check box in the Enable column.
Related Topics
• Configuring Offerings
Configuring Offerings: ProcedureEnable offerings to modify functionality so that it matches the services you plan to implement.
You need the Configure Oracle Fusion Applications Offering privilege to enable offerings.
Enable OfferingsTo enable offerings, follow these steps:
1. Click Navigator > My Enterprise > Offerings work area to open the Offerings page.2. Select the offering you want to implement.3. Click the Opt In Features button to go to the Opt In page.4. In the Opt In page, select the Enable check box for the offering.5. Review functional area hierarchy. Select the Enable check box to opt into functional areas as applicable to your
business operations.6. Click the Edit icon in the Features column for the functional area you enabled to opt into and enable applicable
features.
◦ Depending on the feature type, a check box for Yes or No features or an Edit icon for single and multiplechoice features is displayed in the Enable column.
◦ To enable a feature, select the check box for Yes or No types or click Edit and select the appropriate choicesfor single and multiple choice features.
7. Click Done when you're finished to return to the Opt In page.8. Click Done to return to the Offerings page.
Repeat the same steps for each offering you want to implement or if you must change the opt-in configuration of anyfunctional areas or features of an enabled offering.
Related Topics
• Configuring Offerings

Oracle Sales CloudImplementing Customer Data Management
Chapter 3Perform Initial Setup Tasks
10
Opting into Features: ProcedureTo opt in to a feature:
1. First opt in to the functional area containing the feature.2. Click the features icon to open the Edit Features page.3. Locate the feature you want to implement on the Edit Features page. If needed, click Help to get more details on the
functionality that each feature supports.4. Depending on the feature type, a check box (for Yes/No features) or edit icon (for single and multi choice features)
will display in the Enable column.
◦ Select Enable for the Yes/No feature to be implemented or click Edit and select the choice(s) you want toimplement for the corresponding feature. Click Save and Close.
5. Click Done when complete.
What's a functional area?A functional area is a grouping of functionality within an offering. It may be an optional piece of functionality that you maywant to implement as part of an offering. Optional functional areas can be included or excluded from their parent offering.Functional areas may be hierarchical, and therefore may be subordinate to another functional area. An offering has at leastone base or core functional area and may have one or more optional functional areas. Additionally, one or more or featuresmay be associated to an offering.
Lookups
Lookups: ExplainedLookups are lists of values in applications. You define a list of values as a lookup type consisting of a set of lookup codes,each code's translated meaning, and optionally a tag. End users see the list of translated meanings as the available values foran object.
Lookups provide a means of validation and lists of values where valid values appear on a list with no duplicate values. Forexample, an application might store the values Y and N in a column in a table, but when displaying those values in the userinterface, Yes or No (or their translated equivalents) should be available for end users to select. For example, the two lookupcodes Y and N are defined in the REQUIRED_INDICATOR lookup type.
The following table contains an example of a lookup type for marital status (MAR_STATUS) that has lookup codes for users tospecify married, single, or available legal partnerships.
Lookup Code Meaning Tag
M
Married
Not applicable
S
Single
Not applicable
R Registered Partner +NL

Oracle Sales CloudImplementing Customer Data Management
Chapter 3Perform Initial Setup Tasks
11
Lookup Code Meaning Tag
DP
Domestic Partner
-FR, AU
In this case, tags are used for localizing the codes. All legislations list Married and Single. Only the Dutch legislation listsRegistered Partner. And all legislations except France and Australia also list Domestic Partner.
When managing lookups, you need to understand the following.
• Using lookups in applications
• Configuration levels
• Accessing lookups
• Enabling lookups
• The three kinds of lookups: standard, common, and set-enabled
Using Lookups in ApplicationsUse lookups to provide validation or a list of values for a user input field in a user interface.
An example of a lookup used for validation is a flexfield segment using a table-validated value set with values from a lookuptype. An example of a lookup in a list of values is a profile option's available values from which users select one to set theprofile option. Invoice Approval Status gives the option of including payables invoices of different approval statuses in areport. The lookup code values include All, so that users can report by all statuses: Approved, Resubmitted for approval,Pending or rejected, and Rejected.
Configuration LevelThe configuration level of a lookup type determines whether the lookups in that lookup type can be edited. This applies datasecurity to lookups.
Some lookup types are locked so no new codes and other changes can be added during implementation or later, as needed.Depending on the configuration level of a lookup type, you may be able to change the codes or their meanings. Somelookups are designated as extensible, so new lookup codes can be created during implementation, but the predefined lookupcodes cannot be modified. Some predefined lookup codes can be changed during implementation or later, as needed.
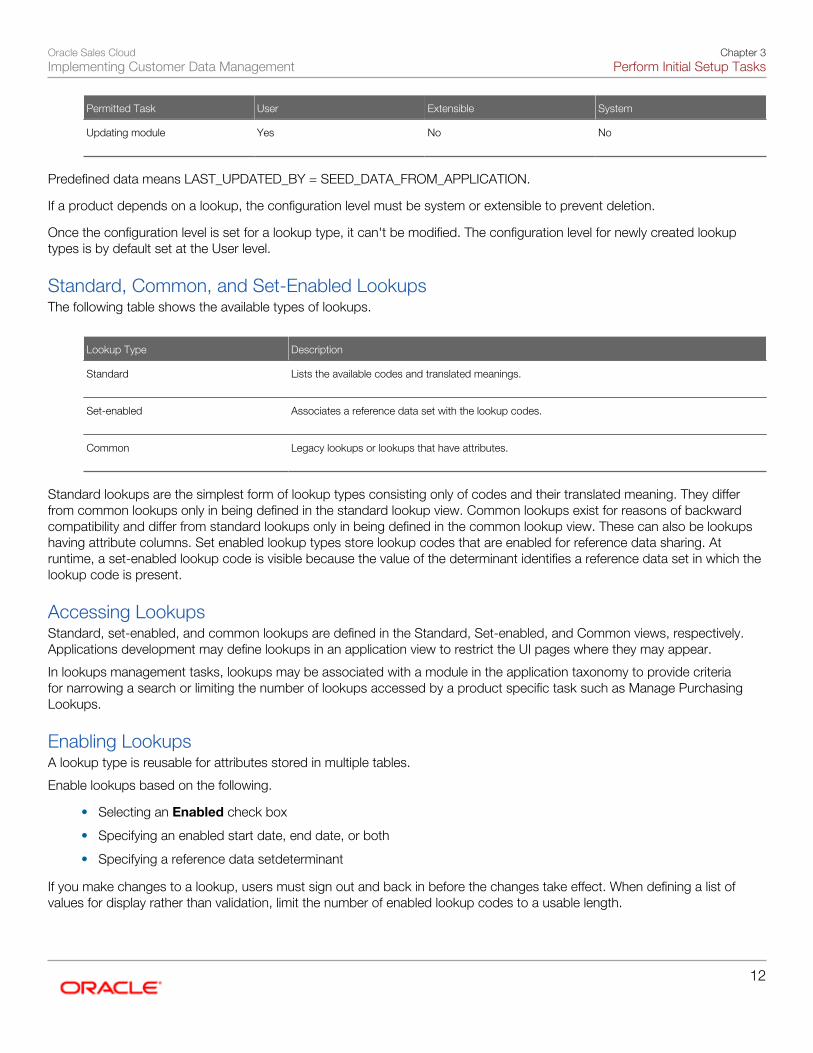
The configuration levels are user, extensible, and system. The following table shows the lookup management tasks permittedat each configuration level.
Permitted Task User Extensible System
Deleting a lookup type
Yes
No
No
Inserting new codes
Yes
Yes
No
Updating start date, end date,and enabling the lookup code
Yes
Yes, only if the code is notpredefined data
No
Deleting codes
Yes
Yes, only if the code is notpredefined data
No
Updating tags
Yes
No
No
Oracle Sales CloudImplementing Customer Data Management
Chapter 3Perform Initial Setup Tasks
12
Permitted Task User Extensible System
Updating module
Yes
No
No
Predefined data means LAST_UPDATED_BY = SEED_DATA_FROM_APPLICATION.
If a product depends on a lookup, the configuration level must be system or extensible to prevent deletion.
Once the configuration level is set for a lookup type, it can't be modified. The configuration level for newly created lookuptypes is by default set at the User level.
Standard, Common, and Set-Enabled LookupsThe following table shows the available types of lookups.
Lookup Type Description
Standard
Lists the available codes and translated meanings.
Set-enabled
Associates a reference data set with the lookup codes.
Common
Legacy lookups or lookups that have attributes.
Standard lookups are the simplest form of lookup types consisting only of codes and their translated meaning. They differfrom common lookups only in being defined in the standard lookup view. Common lookups exist for reasons of backwardcompatibility and differ from standard lookups only in being defined in the common lookup view. These can also be lookupshaving attribute columns. Set enabled lookup types store lookup codes that are enabled for reference data sharing. Atruntime, a set-enabled lookup code is visible because the value of the determinant identifies a reference data set in which thelookup code is present.
Accessing LookupsStandard, set-enabled, and common lookups are defined in the Standard, Set-enabled, and Common views, respectively.Applications development may define lookups in an application view to restrict the UI pages where they may appear.
In lookups management tasks, lookups may be associated with a module in the application taxonomy to provide criteriafor narrowing a search or limiting the number of lookups accessed by a product specific task such as Manage PurchasingLookups.
Enabling LookupsA lookup type is reusable for attributes stored in multiple tables.
Enable lookups based on the following.
• Selecting an Enabled check box
• Specifying an enabled start date, end date, or both
• Specifying a reference data setdeterminant
If you make changes to a lookup, users must sign out and back in before the changes take effect. When defining a list ofvalues for display rather than validation, limit the number of enabled lookup codes to a usable length.

Oracle Sales CloudImplementing Customer Data Management
Chapter 3Perform Initial Setup Tasks
13
For more information on the predefined lookups and lookup codes, open the Setup and Maintenance work area, and use thetasks in the Define Lookups task list.
Translating LookupsYou can translate the lookups that you defined to the preferred language(s) without changing the language session of theapplication. Use the translation option available on the lookup code table. By default, for each lookup, all the permittedlanguage rows in the translator dialog box appear in the source language (the current session language). When you edit aparticular language entry, you can modify the translated meaning and description to the language in which you want thelookup to appear. Once the updates are made, the end-users can view the lookup in the translated text.
Note: You can add the translation for only as many languages as are permitted by the administrator. Thefunctionality to limit the number of languages displayed on the dialog box is controlled through the TranslationEditor Languages profile option. It can be set at the SITE or USER level. If nothing is specified, all activelanguages are displayed.
Related Topics
• Modules in Application Taxonomy: Explained
• Managing Set-Enabled Lookups: Examples
• What's the difference between a lookup type and a value set?
• Managing a Standard Lookup: Example
• How can I access predefined lookups?
How can I edit lookups?On any of the Manage Lookups pages, you can edit the existing lookup codes of a lookup type or add new lookup codes. Toopen the page, navigate to the Setup and Maintenance work area, open the panel tab and click Search to search for any ofthe following tasks:
• Manage Standard Lookups
• Manage Common Lookups
• Manage Set-enabled Lookups
Each task contains a predefined set of lookup types classified and stored as per the functionality. Open a task to search andedit the required lookup. However, you may not be able to edit a lookup if its configuration level doesn't support editing.
Why can't I see my lookup types?Lookup types are classified using tasks that involve a group of related lookups, such as Manage Geography Lookups. Eachtask gives you access only to certain lookup types. However, the generic tasks provide access to all lookups types of a kind,such as common lookups associated with the Manage Common Lookups task.
If the lookup types in an application are available in the standard, common, or set-enabled lookups view, they are centralto an application. However, lookup types defined for a specific application are managed using the task or task list for thatapplication.

Oracle Sales CloudImplementing Customer Data Management
Chapter 3Perform Initial Setup Tasks
14
Profile Options
Hierarchy in Profile Levels: ExplainedThe hierarchy in profile levels determines the context for making a profile option effective.
You can enable a profile option at the following levels:
• Site level (lowest): The entire site of deployment
• User level (highest): A specific user
After you create or edit a profile option on the Manage Profile Options page, you must enable it. You can enable it at multiplelevels. The setting at the highest enabled level takes precedence over the lower levels. User level is the highest in thehierarchy and always takes precedence over the settings at the site level.
On the Manage Administrative Profile Values page, set the profile value at any of the enabled levels of the profile option.
Example of Profile Option HierarchyThe following table shows an example of setting the currency profile option at different levels.
Profile Level Hierarchy Currency
Site
Lowest
Euro
User
Highest
US Dollar
For this example, there are two users, John and Lisa. For John, the user-level profile value currency is set to US Dollar. If theCurrency profile option is enabled only at the site level, both John and Lisa would see Euro as the default currency. If theprofile option is enabled at the user level, users having a different currency set as their currency profile value would see onlythat currency. In this case, John would see US Dollar as the default currency. If the Currency profile option is enabled at theuser level and there is no user level currency defined, the site level setting takes effect. When both site and user levels areenabled, the value for the user level takes precedence over the site level value.
Profile Options and Related General Preferences: How They WorkTogetherThe general preferences such as Language, Territory, or Date Format that you access from the global header havecorresponding predefined profile options.
General PreferencesWhen users define their preferred Date Format, Language, or Currency, they are setting the value of a profile option at theuser level.

Oracle Sales CloudImplementing Customer Data Management
Chapter 3Perform Initial Setup Tasks
15
Profile OptionsWhen users don't specify anything as their preferences, the Site level profile option takes effect.

Oracle Sales CloudImplementing Customer Data Management
Chapter 3Perform Initial Setup Tasks
16

Oracle Sales CloudImplementing Customer Data Management
Chapter 4Define Implementation Users
17
4 Define Implementation Users
Defining Setup Users: OverviewAmong the initial activities when setting up Oracle Sales Cloud is the creation of users who perform setup tasks.
Oracle creates an initial user for you when your Oracle Sales Cloud environment is provisioned. This initial user is configuredto perform security tasks, which include the creation of other users and the granting of additional privileges. The initial usercan create other users, known as setup users, to help with application setup. The setup user performs the tasks in OracleSales Cloud implementation projects, sets up enterprise structures, creates application users, and administers security.
Use the Manage Users task in the Setup and Maintenance work area to create setup users. For information about creatingsetup users, see Oracle Sales Cloud Getting Started with Your Implementation guide.
Related Topics
• Securing Oracle Sales Cloud
• Oracle Sales Cloud Getting Started with Your Implementation

Oracle Sales CloudImplementing Customer Data Management
Chapter 4Define Implementation Users
18

Oracle Sales CloudImplementing Customer Data Management
Chapter 5Define Geographies
19
5 Define Geographies
Overview
Geography Structure, Hierarchy, and Validation: How They FitTogetherThere are three components that are dependent on each other when defining a country: geography structure, geographyhierarchy, and geography validation. Every country has to have the geography structure defined first before the hierarchy canbe defined, and the geography hierarchy has to be defined before the validation can be defined.
Geography StructureFirstly, you need to create a geography structure for each country to define which geography types are part of the countrystructure, and how the geography types are hierarchically related within the country structure. For example, you can creategeography types called State, City, and Postal Code. Then you can rank the State geography type as the highest level withinthe country, the City as the second level, and the Postal Code as the lowest level within the country structure. Geographystructure can be defined using the Manage Geographies task, or can be imported using tasks in the Define Geographiesactivity.
Geography HierarchyOnce the geography structure is defined, the geographies for each geography type can be added to the hierarchy. Forexample, in the hierarchy of United States you can create a geography called California using a State geography type.
As part of managing the geography hierarchy you can view, create, edit, and delete the geographies for each geographytype in the country structure. You can also add a primary and alternate name and code for each geography. A geographyhierarchy can be created using the Manage Geographies task, or can be imported using tasks in the Define Geographiesactivity.
Geography ValidationAfter defining the geography hierarchy, you need to specify the geography validations for the country. You can choosewhich address style formats you would like to use for the country, and for each selected address style format you can mapgeography types to address attributes. You can also select which geography types to include in geography or tax validation,and which geography types will display in a list of values during address entry in other user interfaces. The geographyvalidation level for the country, such as error or warning, can also be selected.
Geography Structures: ExplainedThis topic describes geography structures and the tasks you can perform using geography structures.
A geography structure is a hierarchical grouping of geography types for a country. The following table describes thegeography structure for the United States.

Oracle Sales CloudImplementing Customer Data Management
Chapter 5Define Geographies
20
Level Geography Type
1
State
2
County
3
City
4
Postal Code
You can use the geography structure to relate geography types for a country and define geography types for a country.
Relate Geography Types for a CountryYou can determine how a country's geographies are hierarchically related by creating the hierarchy of the geography typesin the geography structure. When you define a country's structure, the geography type Country is implicitly at the highestlevel of the geography structure with level as 1. The subsequent geography types that you add after country are numbered insequence.
You must add a geography type as a level in the country structure before you can define a geography for that geographytype in a country. For example, before defining the state of California, the State geography type must be added to the UnitedStates country structure. To quickly create country structure, you can copy a structure from another country and modify thegeography types for the country.
Define Geography Types for a CountryYou can use any of the master reference geography types to create your geography structure. If required, you can create ageography type, before adding it to the country structure. Each geography type is added at a lower level to the current lowestlevel.
Note: You cannot delete geography types that have associated geography data. You can only delete the lowestlevel geography type of the country structure.
You can use a geography type that you create within the country structure for other country structures as well.
Geography Hierarchy: ExplainedThis topic describes geography hierarchy and various aspects of geography hierarchy.
Geography hierarchy is a data model that creates conceptual parent-child relationships between geographies. At the highestlevel of the geography hierarchy is country, which is the parent, and the hierarchy contains several child geographies. Thefollowing table shows sample parent-child relationships in a geography.
California Parent of San Mateo county
San Mateo County
Parent of Redwood City
Redwood City
Parent of 94065
94065 Child

Oracle Sales CloudImplementing Customer Data Management
Chapter 5Define Geographies
21
California Parent of San Mateo county
When you enter just 94065, the application determines that the postal code is in California and the corresponding city isRedwood City.
The application uses geography hierarchy information to facilitate business processes that rely on geography information,such as, tax calculation, order sourcing rules, and sales territory definition. The geography hierarchy information is centrallylocated and shared among other application offerings.
The geography hierarchy includes:
• Geography: Geography is a physical space with boundaries that is a defined instance of a geography type, such ascountry, state, province or city. For example, San Jose is a geography of the City geography type.
• Geography type: Geography types are divisional grouping of user defined geographies, for example, Continent,Country Regions, and Tax Regions.
• Geography usage: Geography usage indicates how a geography type or geography is used in the application.
• Master reference geography hierarchy: The geography hierarchy data is considered the single source of reference forall geography related data such as geography types and geographies.
The geography usage for the entire hierarchy is the master reference, and defined geography types and geographiesare the master reference geography types and geographies. For example, you can create geography types calledState, City, and Postal Code. Then, you can rank the State as the highest level, City as the second level, and PostalCode as the lowest level within the country structure.
• User defined zones: User defined zones are a collection of geographical data, created from master reference data fora specific purpose. For example, while the territory zones are collections of master reference geographies orderedwith a hierarchy, the tax and shipping zones are without a hierarchical grouping.
Geography Validation: ExplainedGeography validation determines the geography mapping and validation for a country's address styles, as well as the overallgeography validation control for a country.
The No Styles Format address style format is the default address style format for a country. By defining the mapping andvalidation for this format you will ensure that validations can be performed for any address in the country. After the No StylesFormat is defined you can set up additional mapping for specific address styles.
For each address style format, you can define the following:
• Map to attribute
• Enable list of values
• Tax validation
• Geography validation
• Geography validation control
Map to AttributeFor every address style format, you can map each geography type to an address attribute. For example, you can mapthe State geography type to the State address attribute for the United States, or map the State geography type to theCounty address attribute for the United Kingdom. The geography types that appear are based on how the country structure

Oracle Sales CloudImplementing Customer Data Management
Chapter 5Define Geographies
22
is defined. The list of address attributes that appear are based on address formats delivered with the application, or yourcustomer defined address formats.
Note: You only need to map geography types that you want to use for geography or tax validation purposes.
Enable List of ValuesOnce a geography type is mapped to an attribute, then you can specify whether the geography type will appear in a list ofvalues during address entry in user interfaces. It is very important to review carefully if you want to enable a list of values. Youshould only enable a list of values if you have sufficient geography data imported or created for that geography. If the setupfor master geography data is incomplete, then the geography data is either not imported or created. As a result, the list ofvalues for the address attribute does not list any geography data.
Once you have enabled a list of values for an address attribute, you can only select the geography data available for thegeography type. This means that if a specific geography value is not available in the geography hierarchy, you can't create anaddress with a different geography value.
Tax ValidationYou can also specify whether a geography type will be included in tax validation. For example, for the United States NorthAmerica address style format you specify that County, State, and City are used for tax validation. This will mean that when atransaction involves an address with the North America address style, the address must have the correct county, state, andcity combination based on the geography hierarchy data, to be considered valid for tax calculation.
Geography ValidationYou can specify whether a geography type will be included in geography validation. This will mean that, for example, whenthe user enters a United States address using the North America address style format, the address must have the correctcountry, state, and postal code combination based on geography hierarchy data to be considered geographically valid.
If an address element is mapped to a geography type, but not selected for geography validation usage, then during addressentry suggested values will be provided for the address element, but the address element will not be validated.
Note: For either the tax or geography validation, do not skip more than one consecutive level unless you arecertain that the selected geography types can uniquely identify geographies. For example, the United Statescountry structure is: State, County, City, and Postal Code, and you want to select just State and Postal Codefor geography or tax validation. However, for the combination of California and 94065, the city can be eitherRedwood Shores or Redwood City. In this case, you should also select at least the City geography type forgeography or tax validation.
Geography Validation ControlYou can select the geography validation level for a country. Validation will check if the entered address maps to thegeography hierarchy data available for the country, and the geography validation control determines whether you can save anaddress that did not pass validation during address entry. For example, if the validation level is Error, then an address cannotbe saved if the values do not match the geography hierarchy data.
These are the geography validation levels you can choose:
• Error - only completely valid addresses can be saved, with all mandatory address elements entered.
• No Validation - all addresses can be saved including incomplete and invalid addresses.
Regardless of the result of validation, the validation process will try to map any address attribute to a geography of thecountry, and store any mapping it could establish based on the available data. This is called Geography Name Referencing

Oracle Sales CloudImplementing Customer Data Management
Chapter 5Define Geographies
23
and it is executed as part of validation. The result of this referencing is used in several business processes in the applicationto map an address to a specific geography or zone.
The Geography Dimension value in territories is derived from sell-to addresses of sales accounts. To use geographydimensions in territories, you must validate the geography elements in the addresses, such as state, city, and postal code.You can validate the address by enabling geography validation for each country using the Manage Geographies task. Performthe following in the Manage Geographies task:
• Enable at least one level in the geography hierarchy for geography validation.
• Enable geography validation for all geography levels that you intend to use for territory definition for each country.
• If needed, enable a list of values containing specific geography elements. This will help users search and selectappropriate geography values during addresses entry and eliminate all possibilities of wrong address entry.
You can set geography validation control to Error in the Manage Geography Validation page. This ensures that users can onlyuse valid geography elements in addresses.
Note: If you have already created addresses before setting up geography validation for a country, you mustenable geography validation and then execute the Run Maintain Geography Name Referencing task for thatcountry. This validates all your geography elements.
Managing Geography Structures, Hierarchies, and Validation: WorkedExampleThis example shows how to configure the geography structure, hierarchy, and validation for a country geography, using theUnited Kingdom country geography as an illustration.
The following table summarizes the key decisions for this scenario.
Decisions to Consider In This Example
Copy an existing country structure?
No, create a new country structure.
What is the structure of the geography types? Create geography types with the following ranking structure:
1. County2. Post Town
What is the geography hierarchy? Create the following hierarchy:
1. Country of United Kingdom2. County of Berkshire3. Post Town of Reading
Which address style format will you use when mapping geographyvalidations?
The default address style format, called the No Styles Format.
Are you using Oracle Fusion Tax for tax purposes? No, do not select Tax Validation for the geography types.

Oracle Sales CloudImplementing Customer Data Management
Chapter 5Define Geographies
24
Defining the Geography StructureAdd the County and Post Town geography types to the United Kingdom geography structure.
1. On the Manage Geographies page, enter GB in the Code field. Click Search.2. On the Manage Geographies page, click Structure Defined.3. On the Manage Geography Structure page, click the Create button next to the Copy Country Structure From
field.4. In the Geography Structure section, select the County list item in the Add Geography Type field.5. Click Add.6. Select the Post Town list item in the Add Geography Type field.7. Click Add.
Defining the Geography HierarchyTo create the geography hierarchy for United Kingdom, add the geographies for the County and Post Town geography typesusing the geography hierarchy user interfaces. You can also use the Manage File Import Activities task to import geographyhierarchies using a .csv or xml file.
1. On the Manage Geographies page, enter GB in the Code field. Click Search.2. On the Manage Geographies page, click Hierarchy Defined.3. In the Geography Hierarchy section, click United Kingdom to highlight the table row, and click Create.4. In the Create County page, Primary and Alternate Names section, enter Berkshire in the Name field.5. Click Save and Close.6. In the Geography Hierarchy section, click Berkshire to highlight the table row, and click Create.7. In the Create Post Town page, Primary and Alternate Names section, enter Reading in the Name field.8. Click Save and Close.
Defining the Geography ValidationsTo specify the geography validations for the geography types you added to United Kingdom, define the geography mappingand validation for the United Kingdom default address style format. Then, map the geography types to attributes, enable thegeography types for Lists of Values and Geography Validation, and set the geography validation level.
1. On the Manage Geographies page, click Validation Defined.2. In the Address Style section, click No Styles Format to highlight the table row.3. For the County geography type, click the County list item in the Map to Attribute field.4. Select the Enable List of Values and Geography Validation options.5. For the Post Town geography type, click the City list item in the Map to Attribute field.6. Select the Geography Validation option.7. In the Geography Validation Control section, select Error in the Geography Validation Level for Country list.8. Click Save and Close.
Managing Territory Geography Splits: ProcedureTo manage territory geography level splits, you must group territory geographies into group zones. Grouping the territorygeographies involves two steps, selecting the geography level based on which you need grouping and initiating the grouping.
Selecting the Geography Level for GroupingComplete the following steps to select the geography level based on which you want to create the group zones:
1. Sign in as a set up user such as Application Implementation Consultant.2. Navigate to the Setup and Maintenance > Manage Geographies.

Oracle Sales CloudImplementing Customer Data Management
Chapter 5Define Geographies
25
3. Search for the country for which you want to enable territory geography level grouping.4. Click Structure Defined. Manage Geography Structure page appears.5. Select the Subject to Grouping check box corresponding to the geography type level for which you want to enable
grouping.You must select the geography level that suits your business requirements. For example, if your product deliveryis based on postal code, and your territory geographies do not have higher levels of master geographies such ascounties and cities, then you may have postal code splits. In this case you must select postal code as the geographytype level for grouping.
Note: You can enable grouping for only one level at a time.
6. Click Save and Close.
Initiating GroupingComplete the following steps to initiate grouping:
1. Navigate to the setup and maintenance > Manage Territory Geographies task.2. Click Initiate Grouping.3. Click OK in response to the warning message and confirm the process.
Note: You cannot automatically un-group the grouped territory geographies. You can manually undo thegrouping process by recreating territory geography hierarchy either through the UI or import process.
When the grouping is complete, the geography level that you selected for grouping appears as an expandable GroupZone as shown in the following figure.
4. Click Save and Close.
Territory Geography Grouping ProcessThis topic describes how we can overcome the problem of territory geography splits by grouping them into group zones.
You do a territory geography grouping when any of your territory geography levels has multiple splits. A territory geographysplits occur when the lower level master geographies are added to territory geography hierarchy, while skipping thehigher level master geographies. This may cause multiple occurrences of the lower geography level members in a territorygeography hierarchy.
For example, postal code split happens when a postal code overlaps across many master geography levels such as citiesand counties. Suppose that the business firm Vision Corp. delivers its product according to the postal codes. If counties andcities are not included in the territory geography hierarchy of Vision Corp., then the end user can see the multiple occurrencesof the postal code 97229.
When there is a territory geography level split, and if you want to group the split geographies, first you must specifythe master geography level for which you want the grouping to be performed, then initiate grouping. When grouping is

Oracle Sales CloudImplementing Customer Data Management
Chapter 5Define Geographies
26
performed, all the splits of the selected master geography level get grouped under a new group zone. In the previousexample, if you select postal code in the master geographies as the level for grouping and initiate the grouping process, thenthe 12 postal code splits for the postal code 97229 gets grouped together under one group zone named 97229. So, theTerritory Manager user can define territories on a clean list of postal codes or their ranges, although some of those postalcodes would in fact be the groupings of the postal code splits. The grouped splits are hidden for the Territory Manager user.
Managing Geography MismatchesThis topic employs a couple of use cases to illustrate the best practices for setting up Oracle Sales Cloud Master ReferenceGeographies for Oracle Sales Cloud customers using the Oracle Social Data and Insight Cloud Service for data enrichmentand the Address Verification Cloud Service for address verification.
When you perform the real-time enrichment of accounts or contacts using the Oracle Social Data and Insight Cloud Service, ifthere is a geography data mismatch between the predefined master geography data and the Dun and Bradstreet (D&B) data,then the Service enriches the accounts and contacts data but you cannot edit or save the enriched data unless the mastergeography data mismatches are resolved. However, you can verify the enriched address using the Address Verification CloudService. The first use case describes how to resolve the master geography data mismatches and save the enriched or verifiedaddress.
The second use case describes the setup required to enable address verification and to avoid data conflicts between theAddress Verification Cloud Service and master reference geography data.
Use Case 1You are an Oracle Sales Cloud customer using master reference geographies for territory assignments or tax calculation andhave purchased Oracle Social Data and Insight Cloud Service for data enrichment as well as the Address Verification CloudService. In this case, while the Nokia geography reference data is configured as master geography, Tax calculation is beingdone using Vertex master geography data. Also, address validation is enabled based on the customer's requirement.
Best Practice: Review geography mapping for the countries where you do business. If the geography mapping for a specificcountry is not mapped according to the country-specific address attributes, update the mapping. Oracle recommendsperforming enrichment before verifying address.
Suppose that you are doing real time enrichment of account or contact. If there is a geography data mismatch between thepredefined master geography and the D&B data, the Oracle Social Data and Insight Cloud Service still enriches the accountsand contacts data but cannot edit or save the enriched account or contact unless the master geography data mismatchesare resolved. However, you can verify the enriched address using the address verification cloud service.
To save a verified address that has master geography data mismatch, you must add alternative names for the mismatchedhierarchy elements in master geography. The following are the steps to add alternative name for the mismatched hierarchyelement:
1. Navigate to the Setup and Maintenance work area.2. Search for the Set Up Geography Data task.3. Navigate to Manage Geographies page through the Set Up Geography Data task.4. Search for the country by the name or country code, for example US.5. Click the Go to Task button in the Hierarchy Defined column. The Manage Geographies Hierarchy page for the
particular country appears.6. Highlight the mismatched hierarchy element, for example California State, and click the Edit icon.7. Click the Add icon on the Edit page.8. Add an alternative name CA for the California state geography element.

Oracle Sales CloudImplementing Customer Data Management
Chapter 5Define Geographies
27
9. Click Save and Close
Once the alternative name is added for the mismatched hierarchy element in master geography, you can save the enrichedaddress.
Use Case 2You are an Oracle Sales Cloud customer who does not use geographies for territory assignment or tax calculation and haspurchased Oracle Social Data and Insight Cloud Service for data enrichment and the Address Verification Cloud Service foraddress verification. To enable address verification and to avoid data conflicts between the Address Verification Cloud Serviceand master reference geography data you must do the following setups:
• Deselect the Enable List of Values option in the Geography Mapping and Validation region to avoid AddressVerification Cloud Service data conflicts with master reference geography data. By deselecting this option you canavoid any UI level validation against master geographies while adding address.
• Select Geography Validation Level for Country as No validation to verify address data by Address Verification CloudService.
Perform the following steps on the Manage Geography Validation page to enable address verification and to avoid dataconflicts between the Address Verification Cloud Service and master reference geography data:
1. Navigate to the Setup and Maintenance work area.2. Search for the Set Up Geography Data task.3. Navigate to the Manage Geographies page through the Set Up Geography Data task.4. Search for the country by the name or country code, for example US.5. Click the Go to Task button in the Validation Defined column. The Manage Geography Validation page appears.6. Deselect the Enable List of Values check boxes for all the geography attributes to avoid any UI level validation against
master geographies while entering the addresses. If the Enable List of Values check boxes are selected then, in caseof data conflicts, Geography Naming References records will not be created.
Note: If any of the Geography Types listed is not applicable to the selected country's territory structure, thenyou must deselect the geography validation for that type.
If you are planning to create territories based on a particular Geography Type, such as County, then you must deselect allthe Geography Validation levels under that Geography Type (in this case City and Postal Code) based on which you want tocreate the territory.
Tip: Review the Address Style Formats that are selected on the Manage Geography Validation page. The reviewis required because on the Account or Contact Simplified UI page, address attributes are displayed based onthe address formats and verified or enriched addresses are saved in Oracle Applications Cloud based on theselected address formats.
Import Geographies and Zones
Importing Geographies: ExplainedA geography, such as Tokyo or Peru, describes a boundary on the surface of the earth. You can create new geographiesby importing data through interface tables. There are two options for populating the interface tables: using the tool of yourpreference to load the data or using file-based data import. If you plan to provide the data details in a source file, use the file-

Oracle Sales CloudImplementing Customer Data Management
Chapter 5Define Geographies
28
based import feature. If you will populate the interface table directly, run the geography loader process to import the data.Having a good understanding of the import entity, interface table, and destination table will help you prepare your import data.
Consider the following when importing geographies:
• Nokia geography reference data
• File-based import option
• Geography loader process option
• Import object entity, interface table, and destination tables
Nokia Geography Reference DataOracle Sales Cloud includes third-party (Nokia) master geography data for multiple countries that can be imported. You canimport Oracle-licensed Nokia data from Navteq, for those countries where the data is available, such as the U.S. You canimport Nokia Geography data using the Manage Geographies task. Search for the country, and select Import Nokia Datafrom the Actions menu. If the licensed Navteq data is not available for a particular country, then the Import Nokia Dataaction is disabled.
File-Based Import OptionThe file-based import process reads the data included in your XML or text file, populates the interface tables, and imports thedata into the application destination tables. The File-Based Data Import Setup and Maintenance task list includes thetasks needed to configure the geography import object, create source file mappings, and schedule the import activities.
Geography Loader Process OptionPopulate the interface table with your import data, then navigate to the Run Geography Loader Setup and Maintenancetask to schedule the import of data from the interface table to the destination table.
Import Object Entity, Interface Table, and Destination TablesThe geography import object consists of one entity and interface table that forms the geography. If you are using file-basedimport, you can map your source file data to import entity attributes that correspond to the interface table columns. Theimport activity process populates the interface table based on the mapping and your source file. If using the geographyloader scheduled process, populate the interface table directly using your preferred tool. If you need the unique IDs ofexisting application data for your import data, use the Define Data Export Setup and Maintenance task list to export theinformation.
The following table lists the object entity, the interface table, the destination tables, and the resulting application object.
File-Based Import Entities Interface Tables Destination Tables Application Object
ImpGeography
HZ_ IMP_ GEOGRAPHIES_T
HZ_GEOGRAPHIES HZ_ GEOGRAPHY_IDENTIFIERS HZ_ GEOGRAPHY_ TYPES_B HZ_ HIERARCHY_ NODES
Geography
Related Topics
• File-Based Import Processing: How it Works

Oracle Sales CloudImplementing Customer Data Management
Chapter 5Define Geographies
29
Nokia Geography Reference Data: ExplainedOracle Sales Cloud provides third-party Nokia master geography data for import. The following table lists the countries forwhich the Nokia master geography data is available for import.
Country Name Country Code
Andorra
AD
Argentina
AR
Austria
AT
Belgium
BE
Brazil
BR
Bulgaria
BG
Canada
CA
Cayman Island
KY
Chile
CL
Croatia
HR
Czech Republic
CZ
Denmark
DK
Dominican Republic
DO
Estonia
EE
Finland
FI
France
FR
Germany
DE
Greece
GR
Guadeloupe
GP

Oracle Sales CloudImplementing Customer Data Management
Chapter 5Define Geographies
30
Country Name Country Code
Hungary
HU
Iceland
IS
India
IN
Indonesia
ID
Ireland
IE
Isle of Man
IM
Israel
IL
Italy
IT
Jamaica
JM
Latvia
LV
Liechtenstein
LI
Lithuania
LT
Luxembourg
LU
Malaysia
MY
Malta
MT
Martinique
MQ
Mexico
MX
Netherlands
NL
New Zealand
NZ
Norway
NO
Peru
PE
Poland
PL

Oracle Sales CloudImplementing Customer Data Management
Chapter 5Define Geographies
31
Country Name Country Code
Portugal
PT
Puerto Rico
PR
Reunion Island
RE
Romania
RO
Russian Federation (Russia)
RU
San Marino
SM
Singapore
SG
Slovakia
SK
Slovenia
SI
South Africa
ZA
Spain
ES
Swaziland
SZ
Sweden
SE
Switzerland
CH
Taiwan
TW
Turkey
TR
United Arab Emirates
AE
United Kingdom
GB
United States
US
Uruguay
UY
Holy See (Vatican City State)
VA

Oracle Sales CloudImplementing Customer Data Management
Chapter 5Define Geographies
32
Replacing Existing Master Geography Data with Revised NokiaGeography Data: ProcedureYou must import and set up reference geography data for the countries where you do business. Using the Nokia geographyreference data, you no longer have to source geography data from a third party. You can import Oracle-licensed Nokia datafrom NAVTEQ, including the country structure and hierarchy information, either to create a new geography setup or replaceyour existing geography data.
This topic describes the steps to replace your existing master geography data with the revised Nokia geography data.
Creating an Export File of All TerritoriesYou must export all territories before deleting the master geography data because removing the master geography datainvalidates the territory definitions that are based on the Geography dimension. You can either export the definitions of allterritories to a file or make manual corrections. If there are a large number of territories, export the territories definition to a filefor the territories import process. However, if there are very few affected territories, then you can choose to either export theterritories definition to a file or make corrections manually.
This procedure is applicable only if there are territories defined using the Geography dimension.
Perform the following steps to create an export file of all territories.
1. From the Territories and Quotas work area, click View Active Territories in the Tasks pane.2. In the View Active Territories page, select the territory at the highest level.3. Click the Actions list, and select Export, and then Export Selected Territory Hierarchy.4. In the Warning dialog box, click OK.5. Click the Actions list and select Export, and then View Export Status.6. Review the status of the export job and verify if it has completed successfully.7. In the Exported Data File column, click the .zip file against your export job, and click Save. All the territories are
exported to a compressed file on your system.8. Click OK.9. Click Done in the View Active Territories page.
Deleting the Territory Geography DataA territory definition has references to the territory geography data and master geography data. Since territory geography datais based on the master geography data, you must delete the territory geography data prior to deleting the master geographydata. When you delete the territory geography data, all territories that are defined using geography dimension become invalid.
This procedure is applicable only if territory geographies are defined.
Perform the following steps to delete the territory geography data.
1. From the Setup and Maintenance work area, search for Manage Territory Geographies and click Go to Task.2. In the Manage Territory Geographies page, click View All Hierarchies.3. Select the highest level node for the country for which you want to replace the master geography data and click the
Delete icon.4. In the Warning dialog box, click OK.5. In the Confirmation dialog box, click OK. The parent node of the territory geography data and its children are
deleted.6. Repeat steps 3 to 5 to delete all the higher nodes in the territory geography data.7. Click Save and Close.

Oracle Sales CloudImplementing Customer Data Management
Chapter 5Define Geographies
33
The Territory Management application retains a copy of the dimension members referenced in the territory definitions.This copy is updated when you trigger the Load and Activate process from the Enable Dimensions and Metrics task.Therefore, although the territory geography data is deleted, the territory definitions may appear to remain valid.
Deleting the Master Geography DataTo delete the master geography data for a country, you must create a support request with proper justification. Note thatwhen the master geography data is deleted, the geography and its children are deleted and all the related territory, tax, andshipping zone references become invalid. So, you must back up this master geography data before deleting the mastergeography data.
Importing Nokia Geography Reference DataUse this procedure to import Nokia geography reference data licensed by Oracle. If the country data you want to import is notavailable, then the Import Nokia Data action is disabled.
The geography data is provided by Nokia and is third-party content. As per Oracle policy, this software and documentationmay provide access to or information about content and services from third parties. Oracle and its affiliates are notresponsible for and expressly disclaim all warranties of any kind with respect to third-party content and services. Oracle andits affiliates are not responsible for any loss, costs, or damages incurred due to your access to or use of third-party content,products, or services.
Perform the following steps to import Nokia geography reference data. Currently, the revised Nokia geography reference datais available only for US at this time.
1. From the Setup and Maintenance work area, search for Manage Geographies, and click Go to Task.2. In the Manage Geographies page, enter either the country name or the two-letter ISO code (for example, US), and
click Search.3. Select the country in the search results.4. Click the Actions list, and select Import Nokia Data.5. In the Warning dialog box, click OK.6. In the Confirmation dialog box, click OK.
The import of larger countries may require several hours to complete.
You can track the progress of the import process by selecting Scheduled Processes from the Navigator.
Note: To access the Scheduled Processes work area, you must be signed in as a user with the Employeeabstract role. The initial user does not have this role assigned, but the other users you created do.
After the import is complete, you can search for the country again in the Manage Geographies page. Check marks nowappear in the Structure Defined and Hierarchy Defined columns indicating the import completed successfully.
Next, click the Validation Defined icon to define the validations, enable List of Values, and choose address style format for acountry as set up before. For more information, see the "Geography Validation: Explained" topic.
The Geocoding Defined and Address Cleansing Defined columns are used for additional features which you must licensefrom Oracle and set up separately.
• Geocoding makes it possible to display customers in the vicinity of a mobile address. You set up GeocodingEnabled for those countries where you are using Around Me functionality in Sales Cloud Mobile.
• Cleansing makes it possible to validate addresses down to the street level.

Oracle Sales CloudImplementing Customer Data Management
Chapter 5Define Geographies
34
Running the Geography Name Referencing ProcessThe Geography Name Referencing (GNR) process validates address elements in location tables, such as HZ_LOCATIONS,against the master geography data.
Perform the following steps to run the GNR process.
1. Navigate to the Scheduled Processes work area, and click Schedule New Process.2. Click the Name list and search for Validate Geographies Against Master Geographies, and then click OK.3. Click OK in the Schedule New Process dialog box.4. In the Process Details dialog box, enter the following details:
◦ Location Table Name: HZ_LOCATIONS
◦ Run Type: ALL
◦ Usage Code: GEOGRAPHY
5. Enter the country code in the Country Code field.6. Click Submit.7. In the Confirmation dialog box, click OK.8. Click Close.9. In the Scheduled Processes page, click the Refresh icon.
10. Verify if the status of the process has completed successfully.
Recreating and Loading the Territory Geography DataYou can recreate the territory geography data, after the master geography data is imported, using either of the followingmethods:
• Import process: If you created the original territory geography data using the import process, then use the sameimport file to recreate the territory geography structure. For more information about importing the territory geographydata using the import file, see "Importing Territory Geography Hierarchies Using File-Based Data Import: Quick Start"in the Oracle Sales Cloud Understanding File-Based Data Import and Export guide.
• Manual creation process: You can manually recreate the territory geography data structures, as they existed beforetheir deletion, using the Manage Territory Geographies task. For more information about creating zones and addinggeographies to a zone, see "Managing Territory Geographies: Worked Example" topic.
After you have recreated the territory geography data, perform the following steps to load the data.
1. From the Setup and Maintenance work area, search for Enable Dimensions and Metrics, and click Go to Task.2. In the Enable Dimensions and Metrics page, click the Actions list, and select Load and Activate. The process
loads the territory geography data to make dimension members available for selection when defining territories.3. In the Confirmation dialog box, click OK.4. Click Done.
Restoring the Invalid Territory DefinitionsAfter recreating the territory geography hierarchies and running the Load and Activate option from the Enable Dimensionsand Metrics task, the geography dimensions are populated with the new geography members. The geography membersin the territory appear as invalid because your territories still reference the old copies of the dimension members that weredeleted. The new members are not referenced automatically by the territories. You must re-reference the territory definitionsfrom the old geography dimension members to the new ones.
You can restore the invalid territory definitions by either importing the previously created export file or making manualcorrections to the territories.
Oracle Sales CloudImplementing Customer Data Management
Chapter 5Define Geographies
35
To restore valid territory definitions using territories import:
1. Open the export file you saved in the "Creating an Export File of All Territories" step. The compressed file containsfour CSV files.
2. Open TERR_HEADER.CSV file.3. Enter REPLACE in the Action column for all territories that are based on geography dimension.4. Save the file in CSV format and compress it together with three other CSV files.5. From the Territories and Quotas work area, click View Active Territories in the Tasks pane.6. Click the Actions list, and select Import to Proposal, and then Import Territories.7. Select the newly created compressed file and click OK.8. Click the Actions list and select Import to Proposal, and then View Import Status.9. Review the status of the export job and verify if it has completed successfully.
10. Click OK.11. From the Tasks pane, click Manage Territory Proposals.12. In the Manage Territory Proposals page, on the Current Territory Proposals table, search for the proposal with your
import file name.13. Click the import file name to open the territory proposal.14. Click Edit Coverage to verify that the territory definitions are valid.15. Verify that there are no values listed as invalid in the Selected Dimension Members section.16. Click Save and Close.17. Click Activate. The territory proposal of your import file is activated.
To restore valid territory definitions through manual corrections:
1. From the Territories and Quotas work area, click Manage Territory Proposals in the Tasks pane.2. In the Manage Territory Proposals page, click the Create icon.3. In the Create Territory Proposals dialog box, enter a name and click Save and View.4. In the Territory Proposals page, add all the territories with the Geography dimension value other than the value "Any"
to the proposal.5. Select a territory and click Edit Coverage.6. In the Edit Coverage page, select Geography from the Dimensions list. The invalid dimension members are
displayed in the Selected Dimension Members pane.7. Expand the values in the Available Dimension Members section or search for the member that has the same name
as the one marked invalid in the Selected Dimension Members pane.8. Select one or more new geography dimension members from Available Dimension Members pane and click Add
icon to the Selected Dimension Members pane.9. Click the Remove icon to remove the invalid members from the Selected Dimension Members pane.
10. Click Save and Close.11. Repeat steps 4 to 10 for all territories that were based on Geography dimension.12. Click Activate. After the activation process is complete, your territory definitions are valid again and are referencing
to the new geography data.
Although this method is always applicable, it is most appropriate when you have to restore territory definitions for a smallernumber of territories.
To run the batch assignment process for opportunities:
1. From Navigator, click Scheduled Processes.2. In the Schedule Processes page, click Schedule New Process.3. In the Schedule New Process dialog box, search for the Revenue Territory Based Assignment process and
select it.4. Click OK.

Oracle Sales CloudImplementing Customer Data Management
Chapter 5Define Geographies
36
5. In the Process Details dialog box, enter OpenOpportunitiesByCreationDate in the View Criteria Name field. Thisselects all revenue lines belonging to open opportunities that were created in the last 'X' days.
6. Enter BindOptyCreationDateFrom= followed by the date.
For example, if BindOptyCreationDateFrom=2014-01-01, then all open opportunities which were created between1st January 2014 till the current date, are processed.
7. Click Submit to schedule the process.8. In the Confirmation dialog box, make a note of the process identifier for monitoring the process, and click OK.9. Click Close.
10. In the Schedule Processes page, click the Refresh icon.11. Review the status of the process job and verify if it has completed successfully.
Note: Review a small subset of the open opportunities to confirm that the territory assignment is asexpected.
To run the batch assignment process for sales accounts:
1. Ensure that the ZCA_SA_AUTO_ASSIGN_ON_CREATE and ZCA_SA_AUTO_ASSIGN_ON_UPDATE profileoptions are set to Yes in the Manage Customer Center Profile Options task.
2. From Navigator, click Customers.3. In the Customers page, click Create Account.4. In the Create Account page, enter a name and address of the sales account, and select the Address is sell to
check box.5. Click Save and Close.6. From Navigator, click Customers.7. In the Search pane, search for the name of the sales account you created and select it.8. In the section Customer Information, select Sales Account Team. The details of the sales account and territories
associated with the sales account are displayed.
This indicates that the sales account was created successfully and the batch assignment was run automatically toassign the matching territories to the sales account.
To run the batch assignment process manually from the Scheduled Processes page, perform the following steps.
1. From Navigator, click Scheduled Processes.2. In the Schedule Processes page, click Schedule New Process.3. In the Schedule New Process dialog box, search for the Request Sales Account Assignments process and select
it.4. Click OK.5. Enter SalesAccount_Work_Object in the Work Object Code field and
SalesAccountTerritory_Candidate_Object in the Candidate Object Code field.6. Select Territory in the Assignment Mode list.7. Enter AllSalesAccountsVC in the View Criteria Name field. This selects all sales accounts.8. Click Submit to schedule the process.9. In the Confirmation dialog box, make a note of the process identifier for monitoring the process, and click OK.
10. Click Close.11. In the Schedule Processes page, click the Refresh icon.12. Review the status of the process job and verify if it has completed successfully.
Note: Review a small subset of the accounts to confirm that the territory assignment is as expected.

Oracle Sales CloudImplementing Customer Data Management
Chapter 5Define Geographies
37
Related Topics• Managing Territory Geographies: Worked Example
Creating Countries: ProcedureThis procedure lists the steps to create countries in Oracle Sales Cloud.
In Oracle Sales Cloud, countries are seeded. If you are unable to find a specific country in the Manage Geographies page,then you can add it to the application.
Note: Oracle Sales Cloud provides support for Nokia geography data for 60 countries. For more informationon the list of countries, see the Nokia Geography Reference Data: Explained topic. For countries where Nokiageography data is not available, you can purchase the geography data from a third-party data provider andload it into the application using File-Based Data Import. For more information, see the Importing Geographieschapter in the Oracle Sales Cloud Understanding File-Based Data Import and Export guide. If countries are notavailable in the application, then use the procedure outlined in this topic to create them.
Perform the following steps to create a new country.
1. From the Setup and Maintenance work area, search for Manage Territories and click Go to Task.2. Click the New icon.3. Enter the following details:
◦ Territory Code: Enter a unique code for the territory.
◦ Territory Name: Enter a unique name for the territory.
◦ Description: Enter a description for the territory.
4. Click Save and Close.
Note: After you have added a new country in the application, if you want to import the geography datafor that country, then you must perform Step 5 to 10.
5. From the Setup and Maintenance work area, search for Manage Geographies and click Go to Task.6. In the Manage Geographies page, enter either the country name or the two-letter ISO code for the country you just
added, and click Search.7. Select the country in the search results.8. Click the Actions list, and select Create Country.9. In the Create Country dialog box, select the name of the country and click Save.
10. Click Done.
Geography Import Objects: How They Work TogetherThis topic describes the Geography import object. You use the Geography import object to import geography information.
This topic introduces the following:
• Target objects for the Geography import object
• Target import object attributes

Oracle Sales CloudImplementing Customer Data Management
Chapter 5Define Geographies
38
• Reference guide files for target import object attributes
Geography Target Import ObjectsYou can use the Geography import object to import geography hierarchy information to create or update the geography dataof a country. To map the source data in your import file to the target attributes in the application, you must understand howthe target objects are related and what attributes are included in each target object.
The target import objects in the Geography import object contain information about the geography hierarchy. When updatingan existing geography, you must provide the parent reference information of the existing geography, which connects thegeography to the country of which it is a part.
Use the ImpGeography target import object to create and update geography information.
Note: Before you import geography data for a country, you must define the country's geography structure.
Target Import Object AttributesYou must compare the attributes that you want to import with the target object attributes that are available and with theirvalid values. To evaluate your source data and Oracle Sales Cloud attributes for mapping and validation, you use a referencefile. See the File Based Data Import for Oracle Sales Cloud guide available on the Oracle Sales Cloud Help Center (https://docs.oracle.com/cloud/latest/salescs_gs/docs.htm). In the File Based Data Imports chapter, see the topic for your importobject of interest, which includes links to reference files for target import objects. A reference guide file includes attributedescriptions, default values, and validations performed by the import process. Review the validation for each attribute todetermine whether there are functional prerequisites or prerequisite setup tasks that are required.
To import your source file data, you define a mapping between your source file data and the combination of the target objectand target object attribute. You can predefine and manage import mappings using the Manage File Import Mappings task, oryou can define the mapping when you define the import activity using the Manage File Import Activities task. Both tasks areavailable in the Setup and Maintenance work area.
Note: If any of the attributes you want to import do not have an equivalent target object attribute, then reviewthe Application Composer extensibility features for geography.
Reference Files for Target Import Object AttributesTo access the reference guide files for the geography's target import objects, see the File Based Data Import for Oracle SalesCloud guide available on the Oracle Sales Cloud Help Center (https://docs.oracle.com/cloud/latest/salescs_gs/docs.htm).In the File Based Data Imports chapter, see the topic for your import object of interest, which includes links to reference filesfor target import objects. For detailed information on importing geographies using file-based import, refer to Document No.1481758.1, Importing Master Reference Geography Data, on the Oracle Support site.
The following table lists the reference file for the ImpGeography target import object.
Target Import Object Description Attribute Reference File Names
ImpGeography
Contains information that captures acountry's geography hierarchy details, suchas geography type, geography code, and soon.
HZ_ IMP_ GEOGRAPHIES_T _Reference

Oracle Sales CloudImplementing Customer Data Management
Chapter 5Define Geographies
39
Related Topics• File-Based Data Import: How It Works
• Getting Started with File-Based Import: Documentation Overview
Importing Geographies Using File-Based Import: ExplainedThis topic explains how to prepare and import geography data from an external data source using the File-Based Data Importfeature. A geography is any region with a boundary around it, regardless of its size. It might be a state, a country, a city, acounty, or a ward. You must create or import geographies before you can associate them with company-specific zones andaddresses.
Note: The application ships with third-party (Nokia) master geography data for multiple countries that canbe imported. You can import Oracle-licensed Nokia data from Navteq, for those countries where the data isavailable, such as the U.S. You can import Nokia Geography data using the Manage Geographies task. Searchfor the country, and select Import Nokia Data from the Actions menu. If the licensed Navteq data is not availablefor a particular country, then the Import Nokia Data action is disabled. For more information, see ReplacingExisting Master Geography Data with Revised Nokia Geography Data: Procedure. If Nokia geography data is notavailable for a country, then use the information in this chapter to import it using File-Based Data Import.
Consider the following questions when importing your data:
• How does your legacy system or source system represent the geography data compared to how Oracle applicationsrepresent the same data?
• Do you have to configure values in the application to map to your data values?
• What import features are available for importing your business object?
• How do you verify your imported data?
Comparing Business Object StructuresYou must understand how your geography data corresponds with the data in the application so that you can map yourlegacy data to the data that the application requires. First, you must understand how the application represents the structureof the data for a geography.
You must import a separate country structure import object for each country. Each of these import objects must containthe geography types that are used in the country's structure, organized in a hierarchy using geography level numbers. Forexample, if you are importing the country structure of Australia, the country structure could be the following: 1: Country, 2:State, 3: County, 4: Town, 5: ZIP.
Import Objects for the GeographyTo facilitate importing geographies, the application incorporates the structure of the geography into import objects. Theimport object for the geography is ImpGeography.
Comparing Business Object DataEach import object is a collection of attributes that helps to map your data to the application data and to support one-to-many relationships between the structural components that make up the geography.
You must understand the attribute details of the import objects so that you can prepare your import data. You can usereference guide files that contain attribute descriptions, values that populate attributes by default when you do not providevalues, and validation information for each import object attribute. The validation information includes the navigation path to
Oracle Sales CloudImplementing Customer Data Management
Chapter 5Define Geographies
40
the task where you can define values in the application. For example, if you have values in your data that correlate to a choicelist in the application, then the validation information for that attribute provides the task name in the Setup and Maintenancework area where you can define your values.
You can use the keyword importing geographies to search for related topics in Help.
Configurable AttributesThe application doesn't support configurable attributes for geographies. You can import only data for geography object thatalready exist by default in the application.
Importing Geographies Using File-Based Data ImportFor the geography business object, you must use the File-Based Data Import feature. You prepare XML or text sourcedata files in a form that is suitable for a file-based import. The file-based import process reads the data in your source file,populates the interface tables according to your mapping, and imports the data into the application destination tables.
The Define File-Based Data Import Setup and Maintenance task list includes the tasks that are required to configure theimport objects, to create source-file mappings, and to schedule the import activities. You submit file-based import activitiesfor each import object. When you're creating a new geography, you import the Geography object. You must be assigned theMaster Data Management Administrator job role to access and submit the import activities for geographies.
When importing geography information, you must provide the parent reference information for all parent levels for the entity.
Verifying Your Imported DataOracle applications provide File-Based Import activity reports, which you can use to verify imported data. Users with theMaster Data Management Administrator job role can also navigate to the Manage Geographies work area to view theimported geographies.
Related Topics
• File-Based Data Import: How It Works
• Getting Started with File-Based Import: Documentation Overview
Importing Geographies Using File-Based Data Import: WorkedExampleThis example demonstrates how to import data using the File-Based Data Import tool. In this example, you have a sourcefile containing geography data that you want to import into the application to make the geography data available for real timeaddress validation and tax purposes.
The following table summarizes the key decisions that you must make in this scenario.
Decisions to Consider In This Example
What type of object are you importing?
Geography
What file type are you using for your source data?
Text file
Where are you uploading your source data file from?
Your desktop

Oracle Sales CloudImplementing Customer Data Management
Chapter 5Define Geographies
41
Decisions to Consider In This Example
What data type is your source data file?
Comma separated
Which fields are you importing into the application?
All, except for the RecordTypeCode field
When do you want to process the import?
Immediately
Summary of the TasksYou perform the following steps to create an import activity and activate the import:
1. Determining what information is in the source file.2. Creating and scheduling the import activity.3. Monitoring the import results.
Prerequisites for Importing Additional Geography Data After Your Initial Import1. Ensure that the combination of the Source ID and Parent Source ID values is unique for each row of data within a
single import. However, your source data files don't need to have the same Source ID and Parent Source ID valuesas your previously imported geography data. If the geography structure levels and the parents for each geographyvalue are the same, then the changed IDs will not affect the import.
2. Ensure that all the parents of a child geography are included in your data file so that the child geography can beadded. For example, if you originally imported US, CA, and San Francisco, and now you want to import the city ofSan Jose in CA, then your data file must include US, CA, and San Jose.
3. Check that your source data file has the correct values for the geography data that you have already loaded.For example, if your initial import included the value US for country and CA as state, and in a subsequent importyou have California as a state, then your geography import creates two state records (CA and California) in theapplication data, with the US as the country parent.
Determining What Information Is in the Source File1. The source geography data files must include a unique Source ID value for each row of data and Parent Source ID
value for the parent of that row of data. The Source or Parent Source IDs should not be longer than 18 characters.2. You can structure your geography source data, as shown in the following table.
Geography Level Name Source ID Parent Source ID
1 (Country)
US
1
NA
2 (State)
CA
11
1
3 (County)
Alameda
111
11
4 (City)
Pleasanton
1111
111
4 (City)
Dublin
1112
111

Oracle Sales CloudImplementing Customer Data Management
Chapter 5Define Geographies
42
Creating and Scheduling the Import ActivityYou can create an import activity, enter the import details, and schedule the import. An import activity includes selecting thesource file or file location, mapping the source file to the database, and scheduling the import.
1. In the Setup and Maintenance work area, search for the Manage File Import Activities task. Click Go to Task.2. In the Manage Import Activities page, click Create.3. In the Create Import Activity: Map Fields page, map each field from your source file to the target object and attribute,
as shown in the following table.
Field Value
Name
Master Reference Geographies
Object
Geography
File Type
Text File
File Selection
Specific file
Upload From
Desktop
File Name
Choose relevant file from desktop
Data Type
Comma separated
Note: Ensure that the file type that you select in the Create Import Activity: Set Up page matches the filetype of the source data file.
4. Click Next.5. In the Create Import Activity: Map Fields page, map each field from your source file to the Oracle Sales Cloud
database object and attribute, as shown in the following table.
Column Header Example Value Ignore Object Attribute
Primary GeographyName
Primary GeographyName
United States
Imp Geography
Primary GeographyName
Country Code
US
No
Imp Geography
Country Code
Record Type Code
0
Yes
Imp Geography
Record Type Code
Source ID
10265
No
Imp Geography
Source ID
Parent Source ID
1053
No
Imp Geography
Parent Source ID
If you don't want to import a column in the text file, then you can select Ignore.

Oracle Sales CloudImplementing Customer Data Management
Chapter 5Define Geographies
43
Note: If you can't map the fields from your source file to the relevant target object, then see the importobject spreadsheets.
6. Click Next.7. In the Create Import Activity: Create Schedule page, select Immediate in the Schedule field so that the import will
start as soon as you activate it.Instead of immediately importing the data, you can choose a date and time to start the import. You can also specifywhether the import will be repeated and the frequency of the repeated import.
8. Click Next.
Monitoring the Import ResultsYou can monitor the processing of the import activity and view the completion reports for both successful records and errors.
1. In the Create Import Activity: Review and Activate page, verify your import details in the Import Details, File Details,Import Options, and Schedule sections. Update the import details if required by navigating to the previous screensusing the Back link.
2. Confirm your import details, and click Activate to submit the import.After the import activity has finished, the Status field value changes to Completed.
Related Topics• File-Based Import Processing: How it Works
Importing Country Structures Using File-Based Import: ExplainedThis topic explains how to prepare and import country structure data from an external data source using the File-Based DataImport feature. A country structure is a hierarchical grouping of geography types for a country. For example, the geographystructure for the United States has the geography type of State as the topmost level, followed by the County, then the City,and finally the Postal Code.
You can use the country structure to set up the following:
• The relationships between geographies within a country
• The types of geographies that you can define for a country
Consider the following questions when importing your data:
• How does your legacy system or source system represent the geography data compared to how the applicationrepresents the same data?
• Do you have to configure values in the application to map to your data values?
• Do you have to configure the application to capture additional attributes that are critical to the way you do business?
• What import features are available for importing your business object?
• How do you verify your imported data?
Comparing Business Object StructuresYou must understand how your country structure data corresponds with the data in the application so that you can map yourlegacy data to the data that the application requires. First, you must understand how the application represents the structureof the data for a country structure.

Oracle Sales CloudImplementing Customer Data Management
Chapter 5Define Geographies
44
You must import a separate country structure import object for each country. Each of these import objects must containthe geography types that are used in the country's structure, organized in a hierarchy using geography level numbers. Forexample, if you're importing the country structure of Australia, the country structure could be the following: 1: Country, 2:State, 3: County, 4: Town, 5: ZIP.
Import Objects for the Country StructureTo facilitate importing country structures, the application incorporates the structure of the country structure into importobjects. The import object for country structures is GeoStructureLevel.
Comparing Business Object DataEach import object is a collection of attributes that helps to map your data to the application data and to support one-to-many relationships between the structural components that make up the country structure.
You must understand the attribute details of the import objects so that you can prepare your import data. . You can usereference guide files that contain attribute descriptions, values that populate attributes by default when you don't providevalues, and validation information for each attribute. The validation information includes the navigation path to the task whereyou can define values in the application. For example, if you have values in your data that correlate to a choice list in theapplication, then the validation information for that attribute provides the task name in the Setup and Maintenance work areawhere you can define your values.
Configurable AttributesIf you need to configure the application object to import your legacy or source data, you must use the Application Composerto design your object model extensions and to generate the required artifacts to register your extensions and make themavailable for importing. The corresponding import object is updated with the configurable attributes, which can then bemapped to your source file data. You can use the same source file to import both configurable attributes and the standardimport object attributes.
Importing Country Structures Using File-Based Data ImportFor the country structure business object, you must use the File-Based Data Import feature. You prepare XML or text sourcedata files in a form that is suitable for a file-based import. The file-based import process reads the data in your source file,populates the interface tables according to your mapping, and imports the data into the application destination tables.
The Define File-Based Data Import Setup and Maintenance task list includes the tasks that are required to configure theimport objects, to create source-file mappings, and to schedule the import activities. You submit file-based import activitiesfor each import object. When you're creating a new country structure, you import the Country Structure object. You mustbe assigned the Master Data Management Administrator job role to access and submit the import activities for countrystructures.
Verifying Your Imported DataYou can view the list of import activities from the Manage Import Activities page. You can verify your imported data by clickingthe Status column for your import activity.
Related Topics
• File-Based Data Import: How It Works
• Getting Started with File-Based Import: Documentation Overview
• Extending Oracle Sales Cloud: How It Works

Oracle Sales CloudImplementing Customer Data Management
Chapter 5Define Geographies
45
Country Structure Import Objects: How They Work TogetherThis topic describes the Country Structure import object. You use the Country Structure import object when you submit a file-based import activity to import your country structure information. This topic introduces the following:
• Target objects for the Country Structure import object
• Target import object attributes
• Reference guide files for target import object attributes
Country Structure Target Import ObjectsThe Country Structure import object contains one target import object. The target import object organizes the individualattributes of the different aspects of the geography structure. When updating an existing country structure, you mustprovide the parent reference information of the existing country structure. This reference information connects the importedgeography structure to the existing one. Use the ImpGeoStructureLevel target import object to create and update countrystructure information.
Target Import Object AttributesYou must compare the attributes that you want to import with the target object attributes that are available and with theirvalid values. To evaluate your source data and Oracle Sales Cloud attributes for mapping and validation, you use a referencefile. See the File Based Data Import for Oracle Sales Cloud guide available on the Oracle Sales Cloud Help Center (https://docs.oracle.com/cloud/latest/salescs_gs/docs.htm). In the File Based Data Imports chapter, see the topic for your importobject of interest, which includes links to reference files for target import objects. A reference guide file includes attributedescriptions, default values, and validations performed by the import process. Review the validation for each attribute todetermine whether there are functional prerequisites or prerequisite setup tasks that are required.
To import your source file data, you define a mapping between your source file data and the combination of the target objectand target object attribute. You can predefine and manage import mappings using the Manage File Import Mappings task, oryou can define the mapping when you define the import activity using the Manage File Import Activities task. Both tasks areavailable in the Setup and Maintenance work area.
Note: If any of the attributes you want to import does not have an equivalent target object attribute, then reviewthe Application Composer extensibility features for country structures.
Reference Files for Target Import Object AttributesTo access reference files for this object's target import objects, see the File Based Data Import for Oracle Sales Cloud guideavailable on the Oracle Sales Cloud Help Center (https://docs.oracle.com/cloud/latest/salescs_gs/docs.htm). In the FileBased Data Imports chapter, see the topic for your import object of interest, which includes links to reference files for targetimport objects.
For detailed information on importing geographies using file-based import, refer to Document No. 1481758.1, ImportingMaster Reference Geography Data, on the Oracle Support site.
The following table lists the reference file for the ImpGeoStructureLevel target import object.
Target Import Object Description Reference File Names
ImpGeoStructureLevel
Information that specifies a country'sgeography structure.
HZ_ IMP_ GEO_STRUCTURE _ LEVELS_Reference

Oracle Sales CloudImplementing Customer Data Management
Chapter 5Define Geographies
46
Target Import Object Description Reference File Names
Related Topics• File-Based Data Import: How It Works
• Getting Started with File-Based Import: Documentation Overview
• Importing Country Structures Using File-Based Import: Quick Start
• Extending Oracle Sales Cloud: How It Works
Importing and Exporting Territory Geography Zones: ExplainedTerritory geography zones are geographical boundaries that you can set up to replicate your organization's regions, such asa Pacific Northwest sales region. You can set up territory geography zones in one application instance, and then after theterritory geography zones are defined you can export the territory zones and import them into another application instance.
To define your territory geography zones and then import your territory zones into another application instance, you mustcomplete the following steps:
1. Import the master reference geography data into the application.2. Define your territory geography zones using the Manage Territory Geographies task.3. Export the territory geography zones.4. Import the territory geography zones into another application instance.
Import the Master Reference Geography DataFirstly, you must import the master reference geography data. Master reference geography data includes geographyelements, such as country, state, and city, and is required for any geographical information that you store in the application,such as address information used in customer and sales records. For more information, see the topic Geography Hierarchy:Explained. Master reference geography data can be imported into the application using the Manage File Import Activities taskin Setup and Maintenance.
Define Your Territory Geography ZonesAfter the master reference geography data has been imported, you can then create your territory geography zones in theapplication using the Manage Territory Geographies task in Setup and Maintenance. For more information, see the topicManaging Territory Geographies: Worked Example.
Export the Territory Geography ZonesAfter you have completed importing the master reference geography data and defining your territory geography zone tasks,you can create a configuration package to export the territory zone data. For more information, refer to the Exporting SetupData demo listed in the related topics section.
Import the Territory Geography ZonesAfter you have downloaded your configuration package for your territory geography zone setup, you can import the territoryzones into another application instance.
Note: Ensure that you import your master reference geography data into the new application instance beforeyou import the configuration package.

Oracle Sales CloudImplementing Customer Data Management
Chapter 5Define Geographies
47
Related Topics
• Managing Territory Geographies: Worked Example
Set Up Geocoding
Geocoding: ExplainedThis topic explains geocoding and how to enable this option in the application.
Geocoding is the process of finding latitude and longitude coordinates from geographic data such as street addresses orpostal codes. Once these coordinates are available, you can use the spatial services feature to identify points of interest, suchas customer and contact addresses, in the vicinity. The application integrates the Geocoding feature with eLocation (http://elocation.oracle.com/maps_oracle_dot_com_main.html), which is a Geocoding service provided by Oracle.
By default, the Geocoding option is turned off in the application. You can enable the Geocoding option in the Setup andMaintenance, Manage Geographies page.
If the Geocoding feature is enabled, the feature can be scheduled to run at regular time intervals. This ensures that newlycreated or updated locations are picked up and geocoded whenever you create or update an address using the userinterface, web services, bulk import, or file-based import.
Setting Up Geocoding: ProcedureThis procedure lists the steps to set up geocoding in Oracle applications.
Geocoding is a process that determines the latitude and longitude coordinates for a location. By default, geocoding is turnedoff in the application. You can use geocoding to display customers in the vicinity of a mobile address.
Enabling Geocoding for a CountryTo enable geocoding for a country, complete these steps:
1. From the Setup and Maintenance work area, search for Manage Geographies and click Go to Task.2. Search the country for which you want to enable geocoding. You can either search by the country name or country
code.3. Click Search. The search results for the matching country names are displayed.4. Select the country for which you want to enable the geocoding option.5. Select Geocoding Defined for the country.
Populating Location Latitude and Longitude InformationOnce geocoding is enabled, you can schedule this feature to run at regular time intervals so that newly created or updatedlocations are picked up and geocoded. To schedule the geocoding feature to run at regular intervals, complete these steps:
1. Navigate to the Scheduled Processes work area, and click Schedule New Process.2. Click the Name list and search for Populate Location Latitude and Longitude Information, and then click OK.3. Enter the parameters such as Start Date and End Date, and click Submit.
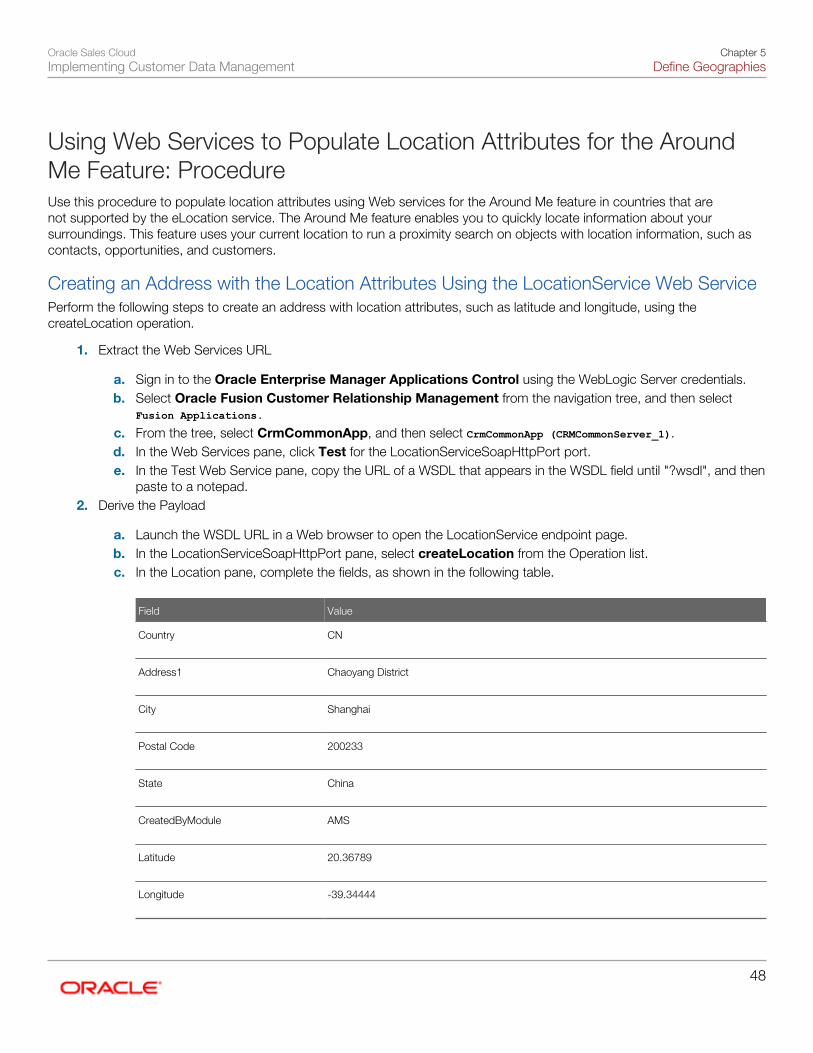
Oracle Sales CloudImplementing Customer Data Management
Chapter 5Define Geographies
48
Using Web Services to Populate Location Attributes for the AroundMe Feature: ProcedureUse this procedure to populate location attributes using Web services for the Around Me feature in countries that arenot supported by the eLocation service. The Around Me feature enables you to quickly locate information about yoursurroundings. This feature uses your current location to run a proximity search on objects with location information, such ascontacts, opportunities, and customers.
Creating an Address with the Location Attributes Using the LocationService Web ServicePerform the following steps to create an address with location attributes, such as latitude and longitude, using thecreateLocation operation.
1. Extract the Web Services URL
a. Sign in to the Oracle Enterprise Manager Applications Control using the WebLogic Server credentials.b. Select Oracle Fusion Customer Relationship Management from the navigation tree, and then select
Fusion Applications.
c. From the tree, select CrmCommonApp, and then select CrmCommonApp (CRMCommonServer_1).d. In the Web Services pane, click Test for the LocationServiceSoapHttpPort port.e. In the Test Web Service pane, copy the URL of a WSDL that appears in the WSDL field until "?wsdl", and then
paste to a notepad.2. Derive the Payload
a. Launch the WSDL URL in a Web browser to open the LocationService endpoint page.b. In the LocationServiceSoapHttpPort pane, select createLocation from the Operation list.c. In the Location pane, complete the fields, as shown in the following table.
Field Value
Country
CN
Address1
Chaoyang District
City
Shanghai
Postal Code
200233
State
China
CreatedByModule
AMS
Latitude
20.36789
Longitude
-39.34444

Oracle Sales CloudImplementing Customer Data Management
Chapter 5Define Geographies
49
Note: Deselect all the other parameters in this Location pane. Also, deselect LocationProfile,OriginalSystemReference, and LocationInformation options.
d. Click the XML Source option.
Note: This option appears next to the Operation list.
e. Copy the XML source and paste to a notepad.3. Call the Web Service
a. Open the Oracle Fusion Service Tester page.b. In the WebService URL field, paste the WSDL URL that you derived from Step 5 of the "Extracting the Web
Services URL" section.c. Enter the user name and password credentials.d. In the Payload pane, paste the XML source that you derived from Step 5 of the "Deriving the Payload"
section.e. Click Invoke. The Output Payload pane displays the output payload.
4. Test the Web Service
a. Sign in to the Oracle Fusion Applications Home Page.b. Navigate to the Customer Center work area.c. Search the address that you added.d. Click the Addresses section.e. From the Actions list, select the View Geography Information option.f. Verify the latitude and longitude details.
Updating the Location Attributes of an Address Using the LocationService Web ServicePerform the following steps to update the location attributes of an address, such as latitude and longitude, using theupdateLocation operation.
1. Extract the Web Services URL
a. Sign in to the Oracle Enterprise Manager Applications Control using the WebLogic Server credentials.b. Select Oracle Fusion Customer Relationship Management from the navigation tree, and then select
Oracle Fusion Applications.c. From the tree, select CrmCommonApp, and then select CrmCommonApp (CRMCommonServer_1)d. In the Web Services pane, click Test for the LocationServiceSoapHttpPort port.e. In the Test Web Service pane, copy the URL of a WSDL that appears in the WSDL field until "?wsdl", and then
paste to a notepad.2. Derive the Payload
a. Launch the WSDL URL in a Web browser to open the LocationService endpoint page.b. In the LocationServiceSoapHttpPort pane, select updateLocation from the Operation list.c. In the Location pane, complete the fields, as shown in the following table.
Field Value
LocationId
300100078489616

Oracle Sales CloudImplementing Customer Data Management
Chapter 5Define Geographies
50
Field Value
Note: Enter the location ID that was generated in Step 1 of the "Testing the Results"section.
Latitude
30.36789
Longitude
-40.34444
Note: Deselect all the other parameters in this Location pane. Also, deselect LocationProfile,OriginalSystemReference, and LocationInformation options.
d. Click the XML Source option.
Note: This option appears next to the Operation list.
e. Copy the XML source and paste to a notepad.3. Call the Web Service
a. Open the Oracle Fusion Service Tester page.b. In the WebService URL field, paste the WSDL URL that you derived from Step 5 of the "Extracting the Web
Services URL" section.c. Enter the user name and password credentials.d. In the Payload pane, paste the XML source that you derived from Step 5 of the "Deriving the Payload"
section.e. Click Invoke. The Output Payload pane displays the output payload.
4. Test the Web Service
a. Sign in to the Oracle Fusion Applications Home Page.b. Navigate to the Customer Center work area.c. Search the address that you updated.d. Click the Addresses section.e. From the Actions list, select the View Geography Information option.f. Verify the latitude and longitude details.
Define Address Cleansing
Defining Address Cleansing: ExplainedAddress cleansing validates, corrects, and standardizes address information that you enter in the application. Addresscleansing, unlike geography validation, validates both the geography attributes and the address line attributes.
To use the address cleansing functionality, you need to have license for the customer data quality application, because thefeature is delivered using data quality integration.

Oracle Sales CloudImplementing Customer Data Management
Chapter 5Define Geographies
51
You can specify the real-time address cleansing level for each country by choosing either of these options:
• None: Specifies no real time address cleansing.
• Optional: Provides option to cleanse addresses.
Once you have enabled address cleansing for a country, a Verify Address icon appears at address entry points in theapplication. Click the icon to perform address cleansing and receive a corrected, standardized address. If the applicationdoes not find a matching address, then an alert message is displayed.
FAQs for Define Geographies
When do I define address cleansing?When address data entered into the application needs to conform to a particular format, in order to achieve consistencyin the representation of addresses. For example, making sure that the incoming data is stored following the correct postaladdress format.
Why can't I update a geography structure by copying an existingcountry structure?You can only update a geography structure by adding existing geography types, or by creating new geography types andthen adding them to the geography structure. You can only copy an existing country structure when you are defining a newcountry structure.
Why can't I delete a level of the country geography structure?If a geography exists for a country geography structure level then you can't delete the level. For example, if a state geographyhas been created for the United States country geography structure, then the State level cannot be deleted in the countrygeography structure.
Can I add any geography to the geography hierarchy?Yes. However, the geography type for the geography that you want to add must be already added to the country geographystructure.
Can I edit a specific geography in the geography hierarchy?Yes. In the Manage Geography Hierarchy page you can edit details such as the geography's date range, primary andalternate names and codes, and parent geographies.

Oracle Sales CloudImplementing Customer Data Management
Chapter 5Define Geographies
52
How can I add a geography that is at a lower level to any geographyin a geography hierarchy?Select the geography that you want to create a geography at lower level, and then click the Create icon. This will allow youto create a geography for a geography type that is one level lower to the geography type you selected. The structure of thecountry's geography types are defined in the Manage Geography Structure page.
How can I verify whether the third-party geography structure andhierarchy I imported are available in the application?You can track the progress of the geography structure and hierarchy import process by navigating to the ScheduledProcesses page and viewing the status of the third-party geography data import process. Once the process completes, thestatus changes to Succeeded. You can then navigate to the Setup and Maintenance, Manage Geographies page, whereyou first loaded the third-party geography data, to verify the newly imported geography structure and hierarchy.
Note: Before you load geography data for a country from a third party provider, ensure that no geographystructure or hierarchy is saved for that country. If geography structure or hierarchy data is already available, theload process fails.
How can I enable geocoding?You can enable geocoding by turning the Geocoding option on in the Setup and Maintenance work area, ManageGeographies page. Search for the country for which you want to enable geocoding and click the Geocoding Defined icon.If geocoding is enabled for a country, the Geocoding Defined icon displays a check mark.
Once you have enabled geocoding for a country, you must run the Run Geocode Generation ESS job in the Setup andMaintenance work area, Run Geocode Generation page. Before you run the job, however, ensure that you have specifiedthe country code of the country for which you want to generate the geocodes.
What are Spatial Services?Spatial services allow users to find points of interest such as customers, contacts, and so on using the latitude and longitudecoordinates of an address.
The Oracle Fusion Mobile Sales application provides these services for sales representatives to discover accounts andcontacts around their location.

Oracle Sales CloudImplementing Customer Data Management
Chapter 5Define Geographies
53
Where can I update and view the geography name referenceinformation for parties?To view the geography name reference information associated with parties, you need to ensure that you have created anaddress for the party. You can create or update party addresses in the Party Center and the Customer Center pages.
Once you have updated an address, you either need to either wait for the Run Geocode Generation ESS job to runautomatically as scheduled or start geocode generation manually from the Setup and Maintenance > Run GeocodeGeneration page.
Once the Run Geocode Generation job has updated the geography information for the country associated with the partyyou updated, you can search for and view the geography name reference information associated with the party in the PartyCenter and the Customer Center pages. Navigate to the person, organization, or group whose address you want to verifyand click on Actions, View Geography Information. This displays a dialog box that displays the updated geographyinformation, complete with address values enhanced using geography name reference.
Note: Geography name reference enriched geography information display is available only when geographyvalidation is enabled for the country to which the address belongs.
How can I save an address that did not pass geography validation?Search and select for the country name in the Manage Geographies page, and then click the Validation Defined option. Inthe Manage Geography Validation page, select No Validation in the Geography Validation Level for Country drop-down list.This option saves addresses that do not pass the geography validation, including incomplete and invalid addresses.

Oracle Sales CloudImplementing Customer Data Management
Chapter 5Define Geographies
54
Oracle Sales CloudImplementing Customer Data Management
Chapter 6Manage Personally Identifiable Information
55
6 Manage Personally Identifiable Information
Protecting Personally Identifiable Information: ExplainedThe data or information that is used to uniquely identify a contact, or locate a person is called personally identifiableinformation (PII), such as social security number, addresses, bank account numbers, phone numbers, and so on. Thisinformation is considered confidential and sensitive, and must be protected to prevent unauthorized use of personalinformation for the purposes of legal regulation, financial liability, and personal reputation. For example, only authorized usersmust be allowed access to the social security numbers of people stored in a system.
In Oracle Applications Cloud, the PII data is secured and can be accessed only by the following job roles with the exceptionof mobile phone data:
• Sales Administrator
• Enterprise Scheduler Job Application Identity for CRM
• Oracle Data Integrator Application Identity for CRM
• Web Services Application Identity for CRM
Mobile phone data is accessible to all seeded job roles. However, if access to mobile phone data is needed for custom jobroles, the IT Security Manager will need to assign the required PII data policies to the custom job role in the Security Console.The IT Security Manager can also add data policies for other PII data to seeded job roles.
The following table lists the PII attributes that are secured in Oracle Applications Cloud.
PII Attribute Table Name Privilege Title Privilege Name
Taxpayer Identification Number(Social Security Number)
HZ_ PERSON_ PROFILES
View Trading Community PersonSocial Security
HZ_ VIEW_ TRADING_COMMUNITY_ PERSON_SOCIAL_ SECURITY_DATA
Taxpayer Identification Number(Social Security Number)
HZ_ PERSON_ PROFILES
Manage Trading CommunityPerson Social Security
HZ_ MANAGE_ TRADING_COMMUNITY_ PERSON_SOCIAL_ SECURITY_DATA
Citizenship Number
HZ_CITIZENSHIP
View Trading Community PersonCitizenship Number
HZ_ VIEW_ TRADING_COMMUNITY_ PERSON_CITIZENSHIP_ NUMBER_DATA
Citizenship Number
HZ_CITIZENSHIP
Manage Trading CommunityPerson Citizenship Number
HZ_ MANAGE_ TRADING_COMMUNITY_ PERSON_CITIZENSHIP_ NUMBER_DATA
Home Address
HOME Address is identifiedby party site use defined inSITE_USE_TYPE field of the HZ_PARTY_ SITE_USES table
View Trading Community PersonAddress
HZ_ VIEW_ TRADING_COMMUNITY_ PERSON_ADDRESS_DATA
Home Address
HOME Address is identifiedby party site use defined in
Manage Trading CommunityPerson Address
HZ_ MANAGE_ TRADING_COMMUNITY_ PERSON_ADDRESS_DATA

Oracle Sales CloudImplementing Customer Data Management
Chapter 6Manage Personally Identifiable Information
56
PII Attribute Table Name Privilege Title Privilege Name
SITE_USE_TYPE field of the HZ_PARTY_ SITE_USES table
Home Phone
HZ_ CONTACT_POINTS rowswith contact_ point_ purposevalue PERSONAL
View Trading Community PersonContact
HZ_ VIEW_ TRADING_COMMUNITY_ PERSON_CONTACT_DATA
Home Phone
HZ_ CONTACT_POINTS rowswith contact_ point_ purposevalue PERSONAL
Manage Trading CommunityPerson Contact
HZ_ MANAGE_ TRADING_COMMUNITY_ PERSON_CONTACT_DATA
Mobile Phone
HZ_ CONTACT_POINTS rowswith phone_type or phone_ line_type value MOBILE
View Trading Community PersonContact
HZ_ VIEW_ TRADING_COMMUNITY_ PERSON_MOBILE_ PHONE_DATA
Mobile Phone
HZ_ CONTACT_POINTS rowswith phone_type or phone_ line_type value MOBILE
Manage Trading CommunityPerson Contact
HZ_ MANAGE_ TRADING_COMMUNITY_ PERSON_MOBILE_ PHONE_DATA
Home Email
HZ_ CONTACT_POINTS rowswith contact_ point_ purposevalue PERSONAL
View Trading Community PersonContact
HZ_ VIEW_ TRADING_COMMUNITY_ PERSON_CONTACT_DATA
Home Email
HZ_ CONTACT_POINTS rowswith contact_ point_ purposevalue PERSONAL
Manage Trading CommunityPerson Contact
HZ_ MANAGE_ TRADING_COMMUNITY_ PERSON_CONTACT_DATA
Additional Identifiers
All rows that belong to PERSONparty in HZ_ ADDTNL_PARTY_IDS
View Trading Community PersonAdditional Identifier
HZ_ VIEW_ TRADING_COMMUNITY_ PERSON_ADDITIONAL_ IDENTIFIER_DATA
Additional Identifiers
All rows that belong to PERSONparty in HZ_ ADDTNL_PARTY_IDS
Manage Trading CommunityPerson Additional Identifier
HZ_ MANAGE_ TRADING_COMMUNITY_ PERSON_ADDITIONAL_ IDENTIFIER_DATA
Working with Protected Information: ExplainedSecuring and protecting customer information against data breaches, data theft, or unauthorized access is an increasingconcern in any enterprise. To address this issue, Oracle Applications Cloud provides restricted access to information that isconsidered private to an individual, also known as Personally Identifiable Information (PII).
PII is any information that uniquely identifies an individual, such as personal phone number, personal e-mail address, personaladdress, citizenship number, or Social Security Number (SSN). PII data can be used to uniquely identify, contact, or locate anindividual, or can be used with other sources to uniquely identify a person. For example, a SSN uniquely and directly identifiesan individual, whereas a telephone area code identifies a set of people.

Oracle Sales CloudImplementing Customer Data Management
Chapter 6Manage Personally Identifiable Information
57
The attributes that are identified as PII are as follows:
• Home Address
• Home Phone Number
• Personal Email Address
• Taxpayer Identification Number (Social Security Number)
In Oracle Applications Cloud, access to the PII data is restricted to a set of job roles. If you need to work with PII data forbusiness purposes, then contact the IT security manager for the necessary privileges.
Managing Personally Identifiable Information: WorkedExampleAs a setup user, you can manage PII information in Oracle Applications Cloud.
In this example, you will add or update personally identifiable information (PII) data for your contacts. Before you can add orupdate the PII data, you must expose the PII attributes from Application Composer or Page Composer in an active sandbox.
Activating a Sandbox1. Sign in as a setup user such as Sales Administrator.2. From the Administration group in the Settings and Actions menu, select Manage Sandboxes.3. Click Actions and then click New.4. Enter a name in the Sandbox Name field.5. Click Save and Close.6. In the Confirmation dialog box, click OK.7. In the Manage Sandboxes dialog box, select the sandbox you just created and click the Set as Active button.
Exposing PII Attributes from Application ComposerThe Taxpayer Identification Number and Home Phone PII attributes can be exposed from the Application Composer.
1. Click Tools, and then select Application Composer.2. From the Objects View, select Standard Objects, Contact, and then Pages. Ensure Simplified Pages is selected.3. To add the Taxpayer Identification Number and Home Phone PII attributes to the Create Contact page:
a. In the Create Contact section, select Default Layout and click the Edit icon.b. In the Create Contact region, click the Edit icon.c. Move the Taxpayer Identification Number and Home Phone PII attributes from the Available Fields list to
the Selected Fields list to add to the Create Contact page.d. Click Save and Close.e. Click Done.
4. To add the Taxpayer Identification Number and Home Phone PII attributes to the Edit Contact page:a. In the Edit Contact section, select Default Layout and click the Edit icon.

Oracle Sales CloudImplementing Customer Data Management
Chapter 6Manage Personally Identifiable Information
58
b. Click the Profile tab to add the custom field.c. In the Summary region, click the Edit icon.d. Move the Taxpayer Identification Number and Home Phone PII attributes from the Available Fields list to
the Selected Fields list to add to the Edit Contact page.e. Click Save and Close.f. Click Done
Exposing PII Attributes from Page ComposerThe PII attributes that could be exposed from the Page Composer are Home Address and Personal Email Address.
1. To expose the Personal Email Address from Page Composer:a. Navigate to Contacts.b. Activate a sandbox.c. From the login user drop-down list, select Customize Pages.d. In the Customize Pages dialog, select the Edit button next to the Site layer, and click OK. The Editing: User
Interface dialog is displayed.e. In the Contacts page, select a contact.f. In the Edit Contact page, click the Profile icon.g. Click the All E-Mails icon.h. In the Editing: User Interface dialog, click the Select button.i. In the Manage All E-Mails dialog box, click in the Primary region and select Edit Parent Component.j. Click the Children tab.
k. Select the Type option and click Apply, and then click OK. Notice that the Type row is now visible in theManage All E-Mails dialog box.
l. In the Editing: User Interface dialog, click the Design button.m. Click Add.n. In the Type drop-down list, select Home and then enter an email address in the E-Mail field.
Note: The Home option is available only after you enable it. You can enable the Homeoption by adding the tag SALES_CLOUD to HOME lookup code in the lookup typePARTY_SITE_USE_CODE.
2. To expose the Home Address from the Page Composer:a. Navigate to Contacts.b. Activate a sandbox.c. From the login user drop-down list, select Customize Pages.d. In the Customize Pages dialog, select the Edit button next to the Site layer, and click OK. The Editing: User
Interface dialog is displayed.e. In the Contacts page, select a contact.f. In the Edit Contact page, click the Profile icon.g. In the Editing: User Interface dialog, click the Select button.h. Click the Use account address field and select the Edit Parent Component option in the pop-up.i. In the Component Properties dialog, click the Children tab.j. Select the Type option, and click Apply and then OK. Notice that the Type field is now visible in the Address
region.

Oracle Sales CloudImplementing Customer Data Management
Chapter 6Manage Personally Identifiable Information
59
k. In the Editing: User Interface dialog, click the Design button.l. In the Type drop-down list, select Home and then enter the address details.
m. Click Save and Close.
Adding and Updating PII Data1. Navigate to Contacts .2. In the Contacts page, enter the name of the contact and click the Search icon.3. In the Edit Contact page of the contact, click the Profile tab.4. Enter the PII data such as the Taxpayer Identification Number and Home Phone, and click Save and Close.5. In the Contacts page, click the Create Contact button.
Note: You can proceed to create a contact or click Cancel to exit without saving.
Publishing the SandboxYou can publish a sandbox after you have tested and verified that the modifications done in that sandbox are ready to bemoved to the mainline metadata.
1. Select a sandbox link that appears on the page and click the More link.2. In the Sandbox Details dialog box, click the Publish button.3. Click Yes in the Publish confirmation message box.4. Close the Manage Sandboxes dialog box.5. From the Settings and Actions menu, click Sign Out.
Assigning PII Privileges Using Security Console: WorkedExampleAs an IT Security Manager, you can create a custom job role and assign data policies required to access PII information.Perform the following steps to create a custom role and assign PII privileges to the custom role.
In this example, as an IT Security Manager, you will create a custom job role based on the existing Sales Representativerole and assign PII privileges to access the Social Security data. After this, you must assign the custom job role to the usersyou want to assign PII privileges. For more information on assigning job roles to users, see the Oracle Sales Cloud SecuringOracle Sales Cloud guide.
Assign Job Roles1. From the Navigator, click Tools - Security Console.2. On the Security Console, ensure that Expand Toward is set to Privileges.3. Enter sales representative in the Search field and select the Job Role in the results.4. In the Search Results, click on the actions button and select Copy Role.

Oracle Sales CloudImplementing Customer Data Management
Chapter 6Manage Personally Identifiable Information
60
5. In the Copy Options window, select Copy top role and click Copy Role. The Copy Role page is displayed.6. In the Basic Information page, enter the Role name and Role Code such as Sales Representative Custom PII and
ZBS_SALES_REPRESENTATIVE_JOB_CUSTOM_PII.7. Click Next.8. Click Next.9. In the Data Security Policies page, you must create four data security policies with the details provided in the
following table. To create a data security policy, click Create Data Security Policy.
Policy Name Database Resource Data Set
Grant on Trading Community Party. This lets you view and read all SocialSecurity information.
Trading Community Party.
Select All Values from the Data Set list.In the Actions list, select View TradingCommunity Person Social Security andRead.
Grant on Trading Community Party. This ensures that you can view SocialSecurity information for all contacts.
Trading Community Party. Select Select by instance set from the
Data Set list. In the Condition Name list,select Access the trading community personfor table HZ_PARTIES for all people in theenterprise. In the Actions list, select ViewTrading Community Person Social Securityand Read.
Grant on Trading Community Party. This lets you manage all Social Securityinformation.
Trading Community Party.
Select All Values from the Data Set list.In the Actions list, select Manage TradingCommunity Person Social Security andRead.
Grant on Trading Community Party. This ensures that you can manage SocialSecurity information for all contacts.
Trading Community Party. Select Select by instance set from the
Data Set list. In the Condition Name list,select Access the trading community personfor table HZ_PARTIES for all people in theenterprise. In the Actions list, select ManageTrading Community Person Social Securityand Read.
10. Click Next.11. Click Next.12. Click Next.13. In the Summary and Impact Report page, click Save and Close.

Oracle Sales CloudImplementing Customer Data Management
Chapter 7Define Source Systems
61
7 Define Source Systems
Source Systems: ExplainedThis topic explains source systems and how to set up a source system.
You can set up source systems to enable users to identify the source of the data they are importing. You can specify whetherthe source system is a spoke system, such as a legacy system, or a purchased system, such as data from a third partyprovider. You can also specify what types of entities the source system contains. For example, you can specify that a sourcesystem will contain customer data.
You can configure the following for a source system:
• Source system code, name, and description
• Source system type
• Enable for Items, Trading Community Members, Order Orchestration and Planning, and Assets
Source System Code, Name, and DescriptionYou can create a source system code to uniquely identify the source system. Source system codes are used by theapplication to create references between source IDs and the Oracle Sales Cloud database IDs.
Note: Ensure you update the source system code before you create the source system.
Source System TypeYou must set up a source system as either a spoke system or a purchased system.
Enable for Items, Trading Community Members, Order Orchestration andPlanning, and AssetsYou can select one or more of the following entity types to import from the source system into the Oracle Sales Clouddatabase:
• Items
• Trading Community Members
• Order Orchestration and Planning
• Assets
You must enable the correct entity types because each import UI filters source systems based on their entity type. Forexample, if you set up a source system for Trading Community Members, Items, and Assets, then the source system can beselected as a data source only in this UI and not in different UI.

Oracle Sales CloudImplementing Customer Data Management
Chapter 7Define Source Systems
62
Source System Entities: ExplainedSource system entities are entities that you can import using a specified source system, such as addresses and parties.
When you import data from a source system, all the entities in the source system data are also imported. You can selectmultiple source references in the Manage Source System Entities task to allow multiple source system records to map to asingle record.
FAQs for Define Source Systems
What happens if I allow multiple source system references?When you import data from a source system, you can merge multiple or duplicate source system records and create onerecord in the Oracle Sales Cloud. This is referred to as allowing multiple source system reference.
If you do not allow multiple source system references, then for every source system record, a duplicate record is created inOracle Sales Cloud.

Oracle Sales CloudImplementing Customer Data Management
Chapter 8Define Party Usages
63
8 Define Party Usages
Party Usage: ExplainedParty usages describe how a party is used by the implementing organization. For example, a person in the businesscommunity may be a consumer or contact. You can create rules to determine how a party usage can be associated withparty.
You can define the following types of rules for a party usage:
• Assignment rules
• Exclusivity rules
• Incompatibility rules
• Transition rules
Assignment rulesAssignment rules define how the party usage can and cannot be assigned to parties. You can allow unconditional partyusage assignment, enable the assignment to be created manually, or be updated by an administrator.
Alternatively, you can also restrict the manual assignment and update of a party usage, which means that the party usagecan only be created or updated by a business event. For example, the Customer party usage is assigned to a party when youcreate an account for the party.
You can also specify whether the party usage assignment can be created or updated when a relationship is assigned to aparty. For example, when a contact has a relationship with an organization the party usage Organization Contact is assignedto the contact.
Exclusivity rulesExclusivity rules restrict party usage assignment, so that the party usage can be assigned to a party only during a specifiedtime period. For example, you can set up an exclusivity rule that the party usage Manufacturer can be assigned to parties onlybetween January 1 2011 and February 1 2011.
Incompatibility rulesIncompatibility rules specify which party usages can cannot be assigned concurrently to a party during a specific time period.For example, an incompatibility rule can specify that the party usage Sales Account usage cannot be assigned to a party witha Sales Prospect usage, during January 1 2011 and December 31 2030.
Transition rulesTransition rules specify which party usages can transition to the party usage you are creating or editing. Once a partytransitions to the current party usage, the previous party usage is set with an end date. For example, when a party with theProspective Partner party usage is assigned the Partner party usage, the Prospective Partner usage is set with an end date.

Oracle Sales CloudImplementing Customer Data Management
Chapter 8Define Party Usages
64
Party Usage Filter Rules: ExplainedParty usage filter rule is a grouping of party usages and is used to search and filter parties in the user interface. In a partyusage filter rule, you can specify the party usages to include and exclude in the rule. You can also specify if the party usageassignments should be active or inactive.
For example, an Eligible Customers filter rule can include the Sales Prospect party usage, Sales Account, Legal Entity,and Customer party usages. The Eligible Customers filter rule can then be used in the user interface to view only eligiblecustomers from the list of parties.
Note: You must compile a new filter rule before you can use it in the user interface.
FAQs for Define Party Usages
How can I compile a party usage filter rule?In the Party Usage Filter Rule page click Actions in the header section, and then click Compile Filter Rule.

Oracle Sales CloudImplementing Customer Data Management
Chapter 9Define Names
65
9 Define Names
Additional Name Types: ExplainedDefine additional name types to capture alternative names for parties. For example, create an additional name type,NICK_NAME, to capture the nicknames of parties of the Person type.
While creating an additional name type, specify the party type to which it applies. Then, the additional name type is availableas a naming option for all parties of that party type within the deploying company. You can use additional name types tocapture language-specific names as well.

Oracle Sales CloudImplementing Customer Data Management
Chapter 9Define Names
66

Oracle Sales CloudImplementing Customer Data Management
Chapter 10Define Identifiers
67
10 Define Identifiers
Identifier Types: ExplainedYou can create additional identifier types to provide extensions to party attributes. For example, you can create an additionalidentifier type to record a person's passport number.
You can select which party types can use the additional identifier type. These party types can be account or contact, or both.You can also specify whether the value of an identifier type must be unique. For example, the passport number listed undereach person's profile must be unique.
Additional identifier types do not automatically appear in the UI. To use identifier types in the application, you must call theTrading Community Member Name and Identifier Setup web service.

Oracle Sales CloudImplementing Customer Data Management
Chapter 10Define Identifiers
68

Oracle Sales CloudImplementing Customer Data Management
Chapter 11Define Relationships
69
11 Define Relationships
Relationships Types: ExplainedA relationship type categorizes relationship phrases and roles that determine the nature and purpose of a relationship.A relationship type defines the aspects of a relationship, such as the roles of the subject and object, business rules, andphrases that describe the relationship. A relationship uses the relationship type to define how a party is related to anotherparty. You can manage relationship types from the Manage Relationship Types task.
The components of a relationship type are:
• Relationship phrase pair and role pair
• Relationship characteristics
Relationship Phrase Pair and Role PairA relationship type contains a relationship phrase pair and a role pair. These pairs define the mutual roles that the two partiesplay in a relationship, as shown in the following table.
Pair Purpose Direction of Relationship Matters Example for EmploymentRelationship Type
Role Pair
Describes the roles of theentities.
No
Employee and Employer. For example, Bill has the role ofan employee, and Oracle has therole of an employer.
Relationship Phrase Pair
Describes the roles of the entitiesin the relationship.
Yes
Employee of and Employer of. For example, Bill is employee ofOracle.
Relationship CharacteristicsRelationship types include rules that define how you can use the relationship type.
When defining a relationship type, you can define the relationship to be one of the following:
• Circular
• Related to self
The following table explains these characteristics.
Relationship Characteristic Description Example
Circular
The relationships between two parties formsa loop.
A competitor relationship type links twoorganization parties. In this scenario, ABC

Oracle Sales CloudImplementing Customer Data Management
Chapter 11Define Relationships
70
Relationship Characteristic Description Example
Corp is a competitor of XYZ Corp, and XYZCorp is also a competitor of ABC Corp.
Related to self
The subject and the object of the relationshipare the same.
A subsidiary relationship type links asubsidiary organization ABC to a parentorganization XYZ. The parent organizationXYZ, in turn, is linked to itself as a subsidiaryusing the same relationship type.
Relationship Groups: ExplainedRelationship groups categorize relationship phrase and role pairs for functional purpose. For example, you can assign therelationship phrase Subsidiary Of to a group, and assign the phrase Headquarters Of to a different group.
Uses of Relationship GroupsRelationship groups are used to determine which relationship roles and phrases are displayed in specific user interfaces of theOracle applications. A relationship group can correspond to one or more Oracle Applications user interfaces. For example,you can configure an Oracle application to display only the relationship types that pertain to the Party Contacts information.
Manage Relationship Types
Creating Relationship Types: Worked ExampleYou create a relationship type to define the aspects of a relationship, such as the roles of the subject and object, businessrules, and phrases that describe the relationship.
In this example, you will create a relationship type, and add relationship roles and phrases to the relationship type. Thefollowing table lists the key decisions you must consider before creating a relationship.
Decisions to Consider In This Example
What are the subject and object party types for the relationship?
The subject type and object type is organization.
Is the relationship circular?
Yes
Can the subject related to self in this relationship?
No
You must search for the relationship type to make sure it does not already exist, before you create a relationship type.
Searching for a relationship type1. Navigate to the Manage Relationship Types task from the Setup and Maintenance work area..

Oracle Sales CloudImplementing Customer Data Management
Chapter 11Define Relationships
71
2. On the Manage Relationship Types page, in the Search region, complete the fields, as shown in the following table.
Field Operator Value
Relationship Type
Equals
Supplier
Subject Type
Equals
Organization
Object Type
Equals
Organization
3. Click Search.
Review the search results to ensure that there is no existing relationship types for the criteria.
Creating a relationship type1. In the Search Results region, click the Create icon to open the Create Relationship Type page.2. On the Create Relationship Type page, in the Overview region, enter Supplier in the Relationship Type field.3. Select the Circular check box.4. In the Relationship Roles and Phrases region, click the Create icon to open the Create Relationship Role and
Phrase Pair dialog box. When you create a relationship with a relationship phrase or role, the reverse direction isautomatically created with the other phrase or role in the pair.
5. Complete the fields, in the Create Relationship Role and Phrase Pair dialog box, as shown in the following table.
Field Value
Subject Type
Organization
Subject Phrase
Supplier of
Subject Role Singular
Supplier
Subject Role Plural
Suppliers
Object Type
Organization
Object Phrase
Buyer of
Object Role Singular
Buyer
Object Role Plural
Buyers
6. Click OK.7. Click Save and Close.

Oracle Sales CloudImplementing Customer Data Management
Chapter 11Define Relationships
72
Editing Relationship Types: Worked ExampleYou can manage relationship types from the Manage Relationship Types task. You update a relationship type, by addingrelationship roles and phrases to the relationship type, or assigning the relationship to a group.
In this example, you will add a role and phrase pair to the relationship type Employment. You will also add the Employmentrelationship type to the Party Contacts group.
Editing a relationship type1. Navigate to the Manage Relationship Types task from the Setup and Maintenance work area.2. On the Manage Relationship Types page, in the Search region, enter Employment in the Relationship Type field.3. Click Search.4. In the Search Results region, select the Employment relationship type and Edit icon to open the Edit Relationship
Type page.5. On the Edit Relationship Type page, in the Relationship Roles and Phrases region, click the Create icon.6. In the Create Relationship Role and Phrase Pair, complete the fields, as shown in the following table.
Field Value
Subject Type
Organization
Subject Phrase
Has contract employees
Subject Role Singular
Contractor
Subject Role Plural
Contractors
Object Type
Person
Object Phrase
Contract Employee of
Object Role Singular
Contract Employee
Object Role Plural
Contract Employees
7. Click OK.8. In the Relationship Groups region, click the Add Row icon.9. In the Name drop-down list, select Party Contacts.
10. Click Save and Close.
Manage Relationship Groups

Oracle Sales CloudImplementing Customer Data Management
Chapter 11Define Relationships
73
Creating Relationship Groups: Worked ExampleRelationship groups are used to categorize relationship roles and phrases, based on the user interfaces that they appear in.
In this example, you will create group for relationship types that link an organization to an external organization.
Creating a relationship group1. Navigate to the Manage Relationship Groups task from Setup and Maintenance work area.2. On the Manage Relationship Groups page, in the Search Results region, click the Create icon to open the Create
Relationship Group page.3. Complete the fields, as shown in the following table.
Field Value
Name
Related External Organizations
Code
REL_EXT_ORGS
Description
Indicates a group of relationships that link the organization to external entities.
4. In the Relationship Roles and Phrases region, click on the Add Row icon to add a relationship role and phrase pair.5. For each relationship role and phrase pair, complete the fields, as shown in the following table.
Subject Type Subject Role
Organization
Supplier
Organization
Competitor
6. Click Save and Close.

Oracle Sales CloudImplementing Customer Data Management
Chapter 11Define Relationships
74

Oracle Sales CloudImplementing Customer Data Management
Chapter 12Define Classifications
75
12 Define Classifications
Classifications: ExplainedThe classifications model provides a flexible tool to categorize entities such as parties, projects, tasks, and orders.Classifications enable you to classify an entity, such as a party, the way it is referenced within your organization.
The major components of classifications are:
• Classification categories
• Classification rules
• Classification codes
• Classification code hierarchy
• Entity assignment
Classification CategoriesClassification categories provide the ability to classify entities under a broad subject area. For example, you can classifyorganizations based on the industries in which they operate. Classification categories are a logical grouping of one or moreclassification codes that define classification code rules.
Classification RulesClassification categories can have rules that define how classifications are assigned to entities. When you set up classificationcategories, you can create specific rules. For example, allowing the parent classification code to be assigned to a party, andallowing multiple classification codes to be assigned to an entity.
Classification CodesThe individual values within the classification category are called classification codes. For example, the 1987 SIC classificationcategory has a classification code of software that you can assign to a party in the software industry. You can organizeclassification codes into a hierarchical tree. The parent classification code appears as the highest level node of the tree andchild classification codes branches off from the parent code or other classification codes.
Classification Code HierarchyYou can create hierarchies of classification codes within a classification category. For example, you can set up IT as theclassification category with hardware, keyboards, and printers as the classification codes. Then, you can set up hardware asthe parent classification code at the highest level on the tree, with keyboards and printers as the child classification codes.You can create additional child classification codes, such as dot matrix, ink-jet, and laser under the printer classification code.
Entity AssignmentYou can define the entities that you want to assign to a classification category. In SQL, enter the entity table name and createa Where clause. You can assign the classification category only to the entities that satisfy the Where clause. For example, if aclassification category called industries has the Where clause of "party_type = ORGANIZATION", then only organizations areclassified with the industries classification category.
Oracle Sales CloudImplementing Customer Data Management
Chapter 12Define Classifications
76
FAQs for Define Classifications
What happens if I allow parent code assignment?You can assign the parent classification code and its child classification codes to an object. The parent classification code isthe highest level of the classification code tree.
If you don't allow parent classification codes to be assigned to an object, then you can only assign child classification codes,or codes that are under another classification code, to an object.
What happens if I allow multiple class code assignment?You can assign more than one classification code from the classification category to an object.
If you don't allow multiple classification codes to be assigned to an object, then you can assign only one classification codefrom the classification category to an object.
Can I update an existing entity assignment rule?No. You can delete the entity assignment rule and create a new one.
Why can't I see some classification information in Customer Center?Customer Center displays the classification and classification group information of a customer in the Classifications node.All classifications are categorized under classification categories. For example, the 1987 SIC classification category has aclassification code of software that you can assign to a party in the software industry.
Customer Center displays the classification information based on the classification categories configured in the ManageClassification Group task. You must configure all classification categories, and their codes, that you want to use in the taskso that they can be displayed in the Customer Center. For example, you have imported a customer with a classification codethat belongs to the category Major Industry Codes. However, if you do not add the classification category Major IndustryCodes in the Manage Classification Group page then the classification code is not displayed in the Customer Center.

Oracle Sales CloudImplementing Customer Data Management
Chapter 13Define Data Formats
77
13 Define Data Formats
Data Formats and Setup Activities: How They Fit TogetherData Formats help you define address formats and name formats within your organization, and assign them to specificgeographies. Oracle Sales Cloud uses these formats to capture and validate party name and address information.
You must set up geography data, in addition to the address formats, to use geography-based validations for addresses.
Managing Data StylesYou can define new styles for name and address to categorize a name and address style formats. A Data Style, such asMailing Address or Concatenated Name, categorizes name and address style formats. Oracle Sales Cloud uses Data Stylesto identify a particular manner or situation for which an entity is formatted. For example, you can configure the application todisplay only certain name and address styles in the user interface.
How Data Formats Ensure Data QualityYou use Data Formats to ensure party address and party name data quality. The address formats are used to present theaddress elements in the country specific formatting, and help users during address entry. This also specifies the scope ofaddress validation. Address formats are linked to the geographic data for address verification, at the data-import level. Forexample, when creating or editing an address for a party, selecting a country displays the address format for that country.
The use of Name formats ensures that name components are stored in a decomposed manner. You can use Name formatsto construct name representations from components in a variety of different styles. You can also store phonetic names thatare required for certain geographies.
Data Formats simplify the storage of party address and party name, by storing them as components. You can use formats tovalidate addresses and name data, after setting up address and name format for a geography.
Setup Formats: ExplainedData Formats determine how names and addresses are displayed in the Oracle Sales Cloud.
There are two types of data formats.
• Address format: Address formats specify the layout of an address, such as the components in the address and theirposition in the layout. For example, an address format for US postal address can include address, city, state, andpostal code in that order.
• Name format: Name formats specify how a name is displayed in the application, based on the usage, language, andcountry. A name format includes name elements, their position, and formatting. You can create a name style formatfor either an organization name or a person name.
Name and address formats vary depending on usage, country, and language. You can create name formats and addressformats, modify them, and assign them to specific locales. This lets you create data formats for various countries, languages,and usages.

Oracle Sales CloudImplementing Customer Data Management
Chapter 13Define Data Formats
78
Additionally, you can create variations of the formats, with each variation having its own layout. For example, an addressformat may have variations such as general address, rural address, and military address.
Creating an Address Style Format: Worked ExampleThis example shows how to create an address style format for a specified address style.
To create an address style format:
• Specify the address style format and address style
• Create the format variation layout
• Assign a locale
In this example, we will create an address style to format Canadian postal addresses.
Creating the address style format name and specifying the addressstyleTo create an address style format and specify the address style:
1. Navigate to the Manage Address Formats task from the Setup and Maintenance work area.2. On the Manage Address Formats page, click Create from the actions menu.3. On the Create Address Style Format page, complete the fields in the Overview section, as shown in the following
table.
Field Value
Code
CA_POSTAL_ADDR
Name
Canadian Postal Address Format
Address Style
Postal Address
Default
No
4. Click Save.
Creating the format variation layoutTo create a format variation layout:
1. In the Format section on the Create Address Style Format page, click on the Format Layout tab.2. In the Format Variation section, select New from the Actions menu.3. Enter a variation number in the Variation field.4. In the Format Variation Layout section, select New from the Action menu.

Oracle Sales CloudImplementing Customer Data Management
Chapter 13Define Data Formats
79
5. Complete the fields as shown in the following table.
Field Value
Line
1
Position
1
Prompt
Address line 1
Address Element
Address line 1
Required
Yes
Uppercase
No
6. Create another address line as shown in the following table.
Field Value
Line
2
Position
2
Prompt
City
Address Element
City
Required
Yes
Uppercase
Yes
7. Click Expand on the City address line, then enter the value 1 in Blank Lines Before.8. You can create as many address lines as you require. Click Expand if you want to enter blank lines and delimiters
before, or after, an address line. In this section you can also create an Attribute Transform Function to change a datavalue into a different value.
Note: While creating a new address style format, make sure that the transform function is presentfor each component as in predefined address style formats. The transform function may impacttranslation.
Assigning a localeTo assign an address style format to a locale:
1. In the Format section on the Create Address Style Format page, click on the Locale Assignment tab.
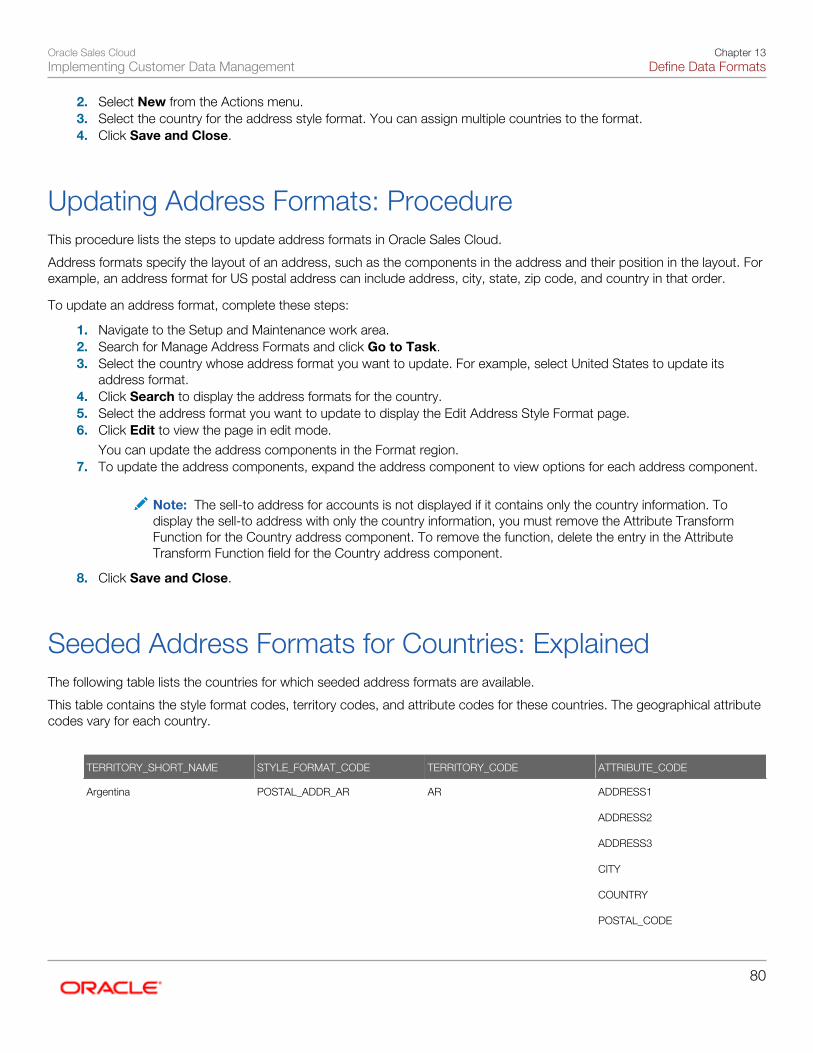
Oracle Sales CloudImplementing Customer Data Management
Chapter 13Define Data Formats
80
2. Select New from the Actions menu.3. Select the country for the address style format. You can assign multiple countries to the format.4. Click Save and Close.
Updating Address Formats: ProcedureThis procedure lists the steps to update address formats in Oracle Sales Cloud.
Address formats specify the layout of an address, such as the components in the address and their position in the layout. Forexample, an address format for US postal address can include address, city, state, zip code, and country in that order.
To update an address format, complete these steps:
1. Navigate to the Setup and Maintenance work area.2. Search for Manage Address Formats and click Go to Task.3. Select the country whose address format you want to update. For example, select United States to update its
address format.4. Click Search to display the address formats for the country.5. Select the address format you want to update to display the Edit Address Style Format page.6. Click Edit to view the page in edit mode.
You can update the address components in the Format region.7. To update the address components, expand the address component to view options for each address component.
Note: The sell-to address for accounts is not displayed if it contains only the country information. Todisplay the sell-to address with only the country information, you must remove the Attribute TransformFunction for the Country address component. To remove the function, delete the entry in the AttributeTransform Function field for the Country address component.
8. Click Save and Close.
Seeded Address Formats for Countries: ExplainedThe following table lists the countries for which seeded address formats are available.
This table contains the style format codes, territory codes, and attribute codes for these countries. The geographical attributecodes vary for each country.
TERRITORY_SHORT_NAME STYLE_FORMAT_CODE TERRITORY_CODE ATTRIBUTE_CODE
Argentina
POSTAL_ADDR_AR
AR
ADDRESS1 ADDRESS2 ADDRESS3 CITY COUNTRY POSTAL_CODE

Oracle Sales CloudImplementing Customer Data Management
Chapter 13Define Data Formats
81
TERRITORY_SHORT_NAME STYLE_FORMAT_CODE TERRITORY_CODE ATTRIBUTE_CODE
Australia
POSTAL_ADDR_AU
AU
ADDRESS1 ADDRESS2 ADDRESS3 CITY COUNTRY POSTAL_CODE STATE
Austria
POSTAL_ADDR_AT
AT
ADDRESS1 ADDRESS2 CITY COUNTRY POSTAL_CODE
Belgium
POSTAL_ADDR_BE
BE
ADDRESS1 ADDRESS2 ADDRESS3 CITY COUNTRY POSTAL_CODE
Brazil
POSTAL_ADDR_BR
BR
ADDRESS1 ADDRESS2 CITY COUNTRY POSTAL_CODE STATE
Canada
POSTAL_ADDR_CA
CA
ADDRESS1 ADDRESS2 ADDRESS3 CITY COUNTRY

Oracle Sales CloudImplementing Customer Data Management
Chapter 13Define Data Formats
82
TERRITORY_SHORT_NAME STYLE_FORMAT_CODE TERRITORY_CODE ATTRIBUTE_CODE
POSTAL_CODE PROVINCE
Chile
POSTAL_ADDR_CL
CL
ADDRESS1 ADDRESS2 CITY COUNTRY POSTAL_CODE
China
POSTAL_ADDR_CN
CN
ADDRESS1 ADDRESS2 ADDR_ ELEMENT_ATTRIBUTE2 CITY COUNTRY POSTAL_CODE PROVINCE
Colombia
POSTAL_ADDR_CO
CO
ADDRESS1 ADDRESS2 CITY COUNTRY STATE
Cuba
POSTAL_ADDR_CU
CU
ADDRESS1 ADDRESS2 CITY COUNTRY COUNTY POSTAL_CODE PROVINCE
Estonia
POSTAL_ADDR_EE
EE
ADDRESS1 ADDRESS2 CITY

Oracle Sales CloudImplementing Customer Data Management
Chapter 13Define Data Formats
83
TERRITORY_SHORT_NAME STYLE_FORMAT_CODE TERRITORY_CODE ATTRIBUTE_CODE
COUNTRY POSTAL_CODE STATE
Finland
POSTAL_ ADDR_N_EUR
FI
ADDRESS1 ADDRESS2 ADDRESS3 CITY COUNTRY POSTAL_CODE
France
POSTAL_ADDR_FR
FR
ADDRESS1 ADDRESS2 CITY COUNTRY POSTAL_CODE
Germany
POSTAL_ADDR_DE
DE
ADDRESS1 ADDRESS2 ADDRESS3 CITY COUNTRY POSTAL_CODE
Hong Kong
POSTAL_ADDR_HK
HK
ADDRESS1 ADDRESS2 ADDRESS3 CITY COUNTRY COUNTY STATE
Hungary
POSTAL_ADDR_HU
HU
ADDRESS1 ADDRESS2 CITY
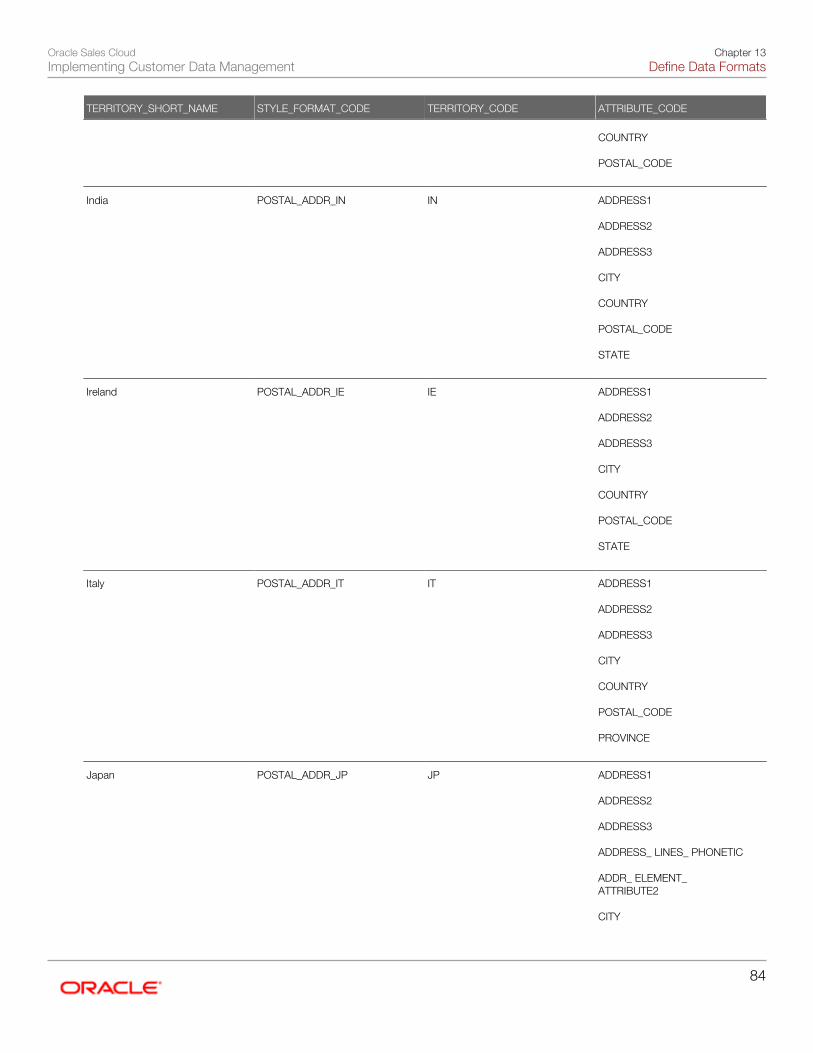
Oracle Sales CloudImplementing Customer Data Management
Chapter 13Define Data Formats
84
TERRITORY_SHORT_NAME STYLE_FORMAT_CODE TERRITORY_CODE ATTRIBUTE_CODE
COUNTRY POSTAL_CODE
India
POSTAL_ADDR_IN
IN
ADDRESS1 ADDRESS2 ADDRESS3 CITY COUNTRY POSTAL_CODE STATE
Ireland
POSTAL_ADDR_IE
IE
ADDRESS1 ADDRESS2 ADDRESS3 CITY COUNTRY POSTAL_CODE STATE
Italy
POSTAL_ADDR_IT
IT
ADDRESS1 ADDRESS2 ADDRESS3 CITY COUNTRY POSTAL_CODE PROVINCE
Japan
POSTAL_ADDR_JP
JP
ADDRESS1 ADDRESS2 ADDRESS3 ADDRESS_ LINES_ PHONETIC ADDR_ ELEMENT_ATTRIBUTE2 CITY

Oracle Sales CloudImplementing Customer Data Management
Chapter 13Define Data Formats
85
TERRITORY_SHORT_NAME STYLE_FORMAT_CODE TERRITORY_CODE ATTRIBUTE_CODE
COUNTRY POSTAL_CODE STATE
Korea, Democratic People'sRepublic of
POSTAL_ADDR_KP
KP
ADDRESS1 ADDRESS2 ADDR_ ELEMENT_ATTRIBUTE2 ADDR_ ELEMENT_ATTRIBUTE3 CITY COUNTRY PROVINCE
Korea, Republic of
POSTAL_ADDR_KR
KR
ADDRESS1 ADDRESS2 ADDR_ ELEMENT_ATTRIBUTE2 ADDR_ ELEMENT_ATTRIBUTE3 CITY COUNTRY POSTAL_CODE PROVINCE
Luxembourg
POSTAL_ ADDR_N_EUR
LU
ADDRESS1 ADDRESS2 ADDRESS3 CITY COUNTRY POSTAL_CODE
Malaysia
POSTAL_ADDR_MY
MY
ADDRESS1 ADDRESS2 ADDRESS3 CITY

Oracle Sales CloudImplementing Customer Data Management
Chapter 13Define Data Formats
86
TERRITORY_SHORT_NAME STYLE_FORMAT_CODE TERRITORY_CODE ATTRIBUTE_CODE
COUNTRY POSTAL_CODE STATE
Mexico
POSTAL_ADDR_MX
MX
ADDRESS1 ADDRESS2 ADDR_ ELEMENT_ATTRIBUTE2 ADDR_ ELEMENT_ATTRIBUTE3 CITY COUNTRY POSTAL_CODE STATE
Netherlands
POSTAL_ADDR_NL
NL
ADDRESS1 ADDRESS2 ADDRESS3 CITY COUNTRY POSTAL_CODE
New Zealand
POSTAL_ADDR_NZ
NZ
ADDRESS1 ADDRESS2 ADDRESS3 CITY COUNTRY POSTAL_CODE
Norway
POSTAL_ ADDR_N_EUR
NO
ADDRESS1 ADDRESS2 ADDRESS3 CITY COUNTRY POSTAL_CODE

Oracle Sales CloudImplementing Customer Data Management
Chapter 13Define Data Formats
87
TERRITORY_SHORT_NAME STYLE_FORMAT_CODE TERRITORY_CODE ATTRIBUTE_CODE
Poland
POSTAL_ ADDR_EUR
PL
ADDRESS1 ADDRESS2 ADDRESS3 CITY COUNTRY POSTAL_CODE
Romania
POSTAL_ ADDR_N_EUR
RO
ADDRESS1 ADDRESS2 ADDRESS3 CITY COUNTRY POSTAL_CODE
Saudi Arabia
POSTAL_ADDR_SA
SA
ADDRESS1 ADDRESS2 CITY COUNTRY POSTAL_CODE
Singapore
POSTAL_ADDR_SG
SG
ADDRESS1 ADDRESS2 ADDRESS3 BUILDING COUNTRY POSTAL_CODE
South Africa
POSTAL_ADDR_ZA
ZA
ADDRESS1 ADDRESS2 ADDRESS3 ADDR_ ELEMENT_ATTRIBUTE2 CITY COUNTRY POSTAL_CODE

Oracle Sales CloudImplementing Customer Data Management
Chapter 13Define Data Formats
88
TERRITORY_SHORT_NAME STYLE_FORMAT_CODE TERRITORY_CODE ATTRIBUTE_CODE
Spain
POSTAL_ADDR_ES
ES
ADDRESS1 ADDRESS2 CITY COUNTRY POSTAL_CODE PROVINCE
Sweden
POSTAL_ADDR_SE
SE
ADDRESS1 ADDRESS2 ADDRESS3 CITY COUNTRY POSTAL_CODE
Switzerland
POSTAL_ADDR_CH
CH
ADDRESS1 ADDRESS2 CITY COUNTRY POSTAL_CODE
United Arab Emirates
POSTAL_ADDR_AE
AE
ADDRESS1 ADDRESS2 CITY COUNTRY
United Kingdom
POSTAL_ADDR_GB
GB
ADDRESS1 ADDRESS2 ADDRESS3 CITY COUNTRY POSTAL_CODE STATE
United States
POSTAL_ADDR_US
US
ADDRESS1

Oracle Sales CloudImplementing Customer Data Management
Chapter 13Define Data Formats
89
TERRITORY_SHORT_NAME STYLE_FORMAT_CODE TERRITORY_CODE ATTRIBUTE_CODE
ADDRESS2 CITY COUNTRY POSTAL_CODE STATE
Uruguay
POSTAL_ ADDR_S_AM
UY
ADDRESS1 ADDRESS2 ADDRESS3 CITY COUNTRY POSTAL_CODE PROVINCE
Creating a Name Style Format: Worked ExampleIn this example, we will create a name style format United States Concatenated Name Format, define its format variationlayout, and assign United States to it.
Creating the name style formatTo create a name style format:
1. On the Manage Name Formats page, click Create from the Actions menu. The Create Name Style Format page isdisplayed.
2. In the Overview region, complete the fields as shown in the following table.
Field Value
Code
CONCAT_NAME_US
Name
United States Concatenated Name Format
Name Style
Concatenated Name
Default Format for Style
No

Oracle Sales CloudImplementing Customer Data Management
Chapter 13Define Data Formats
90
3. In the Format Variation region, click Add Row from the Actions menu. A blank row is added to the Format Variationtable.
4. Enter 1 in the Variation Rank field of the blank row.5. In the Format Variation Layout region, click Create from the Actions menu. A blank row is added to the Format
Variation Layout table.6. Complete the fields as shown in the following table.
Field Value
Line
1
Position
1
Prompt
Person First Name
Name Element
First Name
Required
No
Uppercase
No
You can create as many name parts as you require. Click Expand if you want to enter blank lines and delimitersbefore, or after, a name part. You can also create an Attribute Transform Function to change a data value into adifferent value.
7. Click Create from the Actions menu to create another variation layout as shown in the following table.
Field Value
Line
2
Position
2
Prompt
Person Last Name
Name Element
Last Name
Required
No
Uppercase
No
8. Click on the Locale Assignment tab.9. Click Create from the Actions menu, and complete the fields as shown in the following table.
Field Value
Country
United States

Oracle Sales CloudImplementing Customer Data Management
Chapter 13Define Data Formats
91
Field Value
Language
American English
10. Click Save and Close.
FAQs for Define Data Formats
How can I create an address style format layout?Click New in the Manage Address Formats page and add address lines in the Format Variation Layout section. If you requiremore than one address style format layout, then you can create a format variation and add a different address format layout.
How can I create a variation of an Address Style Format?You can create different variations of an address style format, with each variation having its own layout. For example, acountry's postal address may have variations such as general postal address, rural address, and military address. When youcreate an address style format, the layout defined for the format is assigned as the default variation. Click Add in the FormatVariation region of the Edit Address Style Format page, for the address style format, to add a variation of the Address style.For each address style format variation, you can enter a variation rank to define the priority of the variation.
How can I create a name style format layout?Click New in the Manage Name Formats page and add line entries for each part of the full name in the Format VariationLayout section, within the Create Name Style Format page. If you require more than one name style format layout, then youcan create a format variation and add a different name format layout.
How can I create another variation of a Name Style Format?You can create different variations of a name style format, with each variation having its own layout. For example, differentregions in a country may have different name style formats. Click Add in the Format Variation region in the Edit Name StyleFormat page, for the name style format, to add a variation of the name style. For each name style format variation, you canenter a variation rank to define the priority of the variation.

Oracle Sales CloudImplementing Customer Data Management
Chapter 13Define Data Formats
92

Oracle Sales CloudImplementing Customer Data Management
Chapter 14Define Contact Points
93
14 Define Contact Points
Telephone Numbering Plan: ExplainedA telephone numbering plan defines the pattern of digits for a country phone number. It defines the country-specificcomponents of phone numbers, display format styles, and codes. The codes include country codes, international prefixes,area codes within a country, and mobile prefixes. You can specify country-specific mobile prefixes to determine if a phonenumber is mobile or not.
You can also create multiple telephone number display formats for a country. For example, for the US phone format, youdefine the phone country code as 01, fixed area code as three numbers in length, and subscriber number as seven digitsin length. You can create a telephone format for domestic display, such as (999) 999-9999, and a format for internationaldisplay, such as 999-999-9999.
Updating Telephone Numbering Plans: ProcedureYou can update telephone number plans from the Manage Phone Numbering Plans page. You cannot edit the countryinformation if the country has area codes, mobile prefixes, or phone formats defined.
To update telephone number plans:
1. Navigate to the Manage Phone Numbering Plans task from the Setup and Maintenance work area.2. Search for the country whose telephone number plan you want to update. For example, to search for the United
States, select United States in the Country Code list or enter 1 in the Phone Country Code field.3. Select the country and click Edit to view the Edit Phone Numbering Plan page.4. You can edit the following country-specific phone information in the Scheme section:
◦ Trunk Prefix: The code to dial before long distance numbers within the country, for example 1 for the US.
◦ International Prefix: The code to dial before international numbers when calling from the country that you aresetting up, for example 011 for the US.
◦ Subscriber Number Length: The length of the subscriber number for countries where the subscriber length isfixed.
◦ Area Code Length: The length of the area code for countries where the area code length is fixed.
5. You can edit the following regional phone number information for the country in the Regional Information section:
◦ Area Codes: Allows you to define area codes that you want to use for the country.
◦ Mobile Prefixes: Allows you to define mobile prefixes that you want to use for this country. Mobile prefixescontain the area code and possible prefixes of the subscriber number. For example, the mobile prefix of650506 consists of the 650 area code and the 506 subscriber number prefix.
◦ Telephone Number Formats: Allows you to define multiple telephone number display formats for a country.
6. Click Save and Close to save your updates.
Oracle Sales CloudImplementing Customer Data Management
Chapter 14Define Contact Points
94
How Setup Telephone Numbering Plans Fits in with theOther Setup TasksTelephone Numbering Plans define the telephone number format for a country. You can define multiple formats for a countrydepending on the requirements.
How Telephone Number Plans Setup Fits in with other Setup TasksPhone number format, along with the other country-specific location information such as address and name formats, definesgeographic-specific data formats. You can manage telephone number plans in the Manage Telephone Numbering Planspage.
Oracle Sales Cloud uses the telephone number formats to display phone number in the appropriate style, and to validatephone numbers. You can define country-specific components of phone numbers, display format styles, and area codes.Oracle Sales Cloud uses the phone formats to correctly parse phone numbers and determine the correct format style fordisplaying phone numbers in user interfaces.
Oracle Sales Cloud validates phone numbers for a country, based on the format defined for the country. The phone numbersare also validated against a common set of rules that apply to all countries. You can also enter time zone information for acountry, at the country code and area code level. The time zone information is validated against the time information definedfor the country.
FAQs for Define Contact Points
Why can't I update the country information section in the EditTelephone Numbering page?You can't update the country information if regional information such as area codes, mobile prefixes, and phone formats aredefined for the country.
How can I assign relationships when creating a contact point for acontact or an account?When you create a contact point either for a contact in the Contact's Profile page or for an account in the Account's Contactspage, you can select the associated relationships using the Customer Relationship LOV.

Oracle Sales CloudImplementing Customer Data Management
Chapter 15Define File-Based Data Import
95
15 Define File-Based Data Import
File-Based Data Import: HighlightsYou can import application data from external sources into the Oracle Sales Cloud database by using the Define File-BasedData Import group of tasks available from the Setup and Maintenance work area. The primary source of documentation onfile-based data import is the File Based Data Import for Oracle Sales Cloud guide available on the Oracle Sales Cloud HelpCenter (https://docs.oracle.com/cloud/latest/salescs_gs/docs.htm).
Oracle Sales Cloud File-Based Data Import GuideThe Oracle Sales Cloud File-Based Data Import Guide is a collection of topics that helps you in using file-based data importby providing:
• High-level information about the file-based data import process, architecture, and tools
• Detailed information for importing specific objects and their related objects
• Guidance on importing a minimal set of fields for specific objects
Related Topics
• Customer Data Management Cloud Using Customer Data Management
• Sales Cloud Understanding File-Based Data Import and Export
FAQs for Define File-Based Data Import
What determines the list of File-Based Data Import objects displayed?A single import object can have multiple associated components that are considered objects by themselves. Whether or notan associated object can be grouped as a component of another object for the purpose of file import is determined by thecomplexity of the object structure and how the object is stored in the data model. Oracle Sales Cloud provides import objectspredefined to meet the file processing import requirements. Consequently, in some cases, more than one source file may berequired to capture all associated components of an object.
What happens if I inactivate an Import Activity?The Import Activity will not stop the currently running process. However, it will cause the next scheduled process plus anyfuture repeating file import activities not to start. You can always activate the process at a later stage.

Oracle Sales CloudImplementing Customer Data Management
Chapter 15Define File-Based Data Import
96
What happens if I add a marketing list in the Import Activity definition?File-based data import enables you to record consumers and organization contacts in a marketing list when importingconsumer, lead, and response import objects. Select an existing list or create a new one. A marketing list is assigned the listtype value of Imported if created while defining an import activity. After the objects are imported successfully, the consumersand contacts are added as members of the marketing list.
Why can't I retrieve duplicates using the options in the CustomerData Management Duplicates LOV when importing accounts or legalentities?When importing accounts or legal entities, you can retrieve duplicates using the Customer Data Management DuplicatesLOV only if you have licensed the data quality functionality. Once licensed, you must rebuild the keys for your matchingconfiguration using the Manage Enterprise Data Quality Matching Configurations task. After the keys are rebuilt, the matchingfunctionality uses the settings in the match configuration to identify duplicates.

Oracle Sales CloudImplementing Customer Data Management
Chapter 16Define Resource Information
97
16 Define Resource Information
Understanding ResourcesResources are application users who participate in business processes. You must identify or import resources before you canassociate them with resource organizations or work objects.
You can review and edit resource information using the Resource Directory from the Navigator. Alternatively, you can use theManage Resources task from the Setup and Maintenance work area or import data to create or update employee resources.
Related ConceptsYou must understand the following concepts to fully appreciate the resource management functionality:
• Resource Role: You use the resource roles to define role provisioning rules. For example, a provisioning rule canassign the Sales Manager job role to a user with the Sales Manager resource role.
• Resource Directory: The Resource Directory offers detailed information about all the resources within the deployingorganization. The Resource Directory also enables you to find and communicate with other resources, and tonetwork and collaborate with them. You can access the Resource Directory using the following path: Navigator> Resource Directory. You can also perform some of the functions of the resource directory using the ManageResources setup task.
• Resource Organization: You create sales resources and provision permissions the resources need to do their jobs. Inthe process, you also build the organization chart of your sales organization.
Setting Up ResourcesTo set up resources, you must:
• Identify an existing employee, contingent worker, or partner contact as a resource.
• Specify the end date for a resource's engagement with the deploying company.
• Assign resource roles to the resources. You can define resource roles using the Manage Resource Roles task fromthe Setup and Maintenance work area. Oracle also provides several predefined resource roles.
• Assign resources to organizations. Before assigning resources to organizations, you must ensure that theorganization hierarchy for your sales organization is built. You can define organizations using the Manage InternalResource Organizations task from the Setup and Maintenance work area.
Identifying an Employee as a Resource: ProcedureThis procedure describes how you can identify an employee as a resource.
To identify an employee as a resource, perform the following steps:
1. Navigate to the Identify Resources UI page using one of the following ways:
◦ Go to Navigator > Resource Directory and click Identify Resources in the Tasks region.

Oracle Sales CloudImplementing Customer Data Management
Chapter 16Define Resource Information
98
◦ Go to Navigator > Setup and Maintenance and search for the Manage Resources task. On the ManageResources page, click Create under Actions.
2. On the Identify Resources page, enter the Person Name or Registry ID and Usage and click Search.3. Select the row corresponding to the Person Name, which you are identifying as a resource and click Add as
Resource. You get a warning message requesting your confirmation to enable the person selected as a resource.4. Click OK.
Resource Information
Resource Directory: ExplainedThis topic explains the Resource Directory and how you can use it.
The Resource Directory offers detailed information about all the resources within the deploying organization. The ResourceDirectory also enables you to find and communicate with other resources, and to network and collaborate with them.
You can access the Resource Directory using the following path: Navigator > Resource Directory. You can also performsome of the functions of the resource directory using the Manage Resources setup task.
You use the Resource Directory to perform the following tasks:
• View and modify your profile
• View your organization information
• View information related to other organizations
• View the profiles of other resources
• Communicate with other resources
Note: To enable desktop pages for Resource Directory in Application Composer, set the profile optionHZ_RESOURCE_ALLOW_CUSTOMIZATION to Yes. The default value of this profile option is No.
Setting Up Resources: ExplainedThis topic explains setting up resources and the tasks involved in it.
Setting up resources involves identifying a person as a resource and specifying optional profile details as required. This is animportant step because unless you identify users as resources, you cannot assign work objects to them.
While identifying a resource is the only mandatory task in resource setup, you are also required to perform the following tasks:
• Specify the end date for a resource's engagement with the deploying company
• Assign roles to resources
• Assign resources to organizations
FAQs for Define Resource Information

Oracle Sales CloudImplementing Customer Data Management
Chapter 16Define Resource Information
99
What happens if I delete a resource?When you delete a resource, the resource is deleted from the Resource Directory and from the organizations with which theresource was associated. It is always best to check a resource's usage and remove the resource from all the organizationsbefore deleting a resource from the resource directory.
What happens if I add a resource to an organization?When you add a resource to an organization, the resource becomes a member of the organization and a part of theorganization hierarchy.
Organization membership information is part of the publicly visible details of a resource profile. This means that a resource'sorganization membership and reporting structure are visible to all active resources within the organization.
What's the difference between a partner resource and an internalresource?The differences between an internal resource and a partner resource are as follows:
• The internal resource is an employee or contingent worker of the deploying company whereas the partner resourceis an employee of the partner company.
• The partner administrator or channel manager creates a new partner resource through the Oracle Sales CloudPartner Management applications. However, you can add internal resources using the Manage Users or ImportPerson and Organization task.
• Partner resources can't access the Resource Directory while internal resources can.
Can I create an employee or contingent worker resource?No. You can only identify existing employees and contingent workers as resources in the Manage Resources task.
What happens when a resource quits?When resources quit, their status is set to inactive. This automatically removes these resources from all organizations in thedeploying company, and no new work objects can be assigned to them.
How can I identify a resource?To identify specific employees, contingent workers, or partner contacts as resources, you must search for them and enablethem as resources. You can use the Manage Resources task, Manage Users UI, and the Resource Directory to searchpersons and identify them as resources. Once you have identified these resources, you can assign them to organizations asrequired. Similarly, you can also identify newly added employees or contingent workers as resources.

Oracle Sales CloudImplementing Customer Data Management
Chapter 16Define Resource Information
100

Oracle Sales CloudImplementing Customer Data Management
Chapter 17Define Resource Role Information
101
17 Define Resource Role Information
Resource Role Information
Defining Resource Roles: ExplainedA resource role, such as salesperson, denotes the function of a resource in an enterprise. Oracle Applications Cloud comeswith some predefined resource roles. You may either use these predefined, out of the box resource roles, or you may usethe Manage Resource Roles task in the Setup and Maintenance work area to create additional resource roles or to modifypredefined resource roles. Note that you must map these newly created resource roles to one or more security roles beforeyou can use them. Access to business data and privileges to run business flows comes through security roles, such as jobroles and abstract roles.
Using Role Tags While Defining Resource RolesYou can set several tags while defining resource roles. Use these tags along with the organization hierarchy information todefine the reporting hierarchy of resources.
• Use the Manager tag to define a role as a supervisor role. You must assign a resource organization to a managerresource, who will have visibility into all opportunities assigned to the members of that resource organization.
• Use the Member tag to make a role a subordinate role in the resource hierarchy.
• Use the Administrator or Lead tag to indicate the nature of the tasks that resources who are assigned these rolesperform within the hierarchy.
Additionally, you can use these tags along with the resource organization hierarchy information to maintain manager-to-manager relationships within the organization. For example, Resource A is a manager who heads a sales organization andResource B heads his own sales organization. Then, both Resource A and Resource B report into Resource C, the SalesVice President. Similarly, you can create resource organizations and manager resources, and relate managers to higher-levelmanagers, building the resource organization and reporting hierarchies of the company.
Assigning Resource Role TypesResource role types organize roles into logical groups. This simplifies role assignment and assignment tracking. For example,the Partner resource role type defines a set of partner-specific roles, such as partner sales representative and partner salesmanager. Use the Sales resource role type and the Marketing resource role type to categorize the appropriate sales andmarketing roles for internal employees or contingent worker resources.
Provisioning Security Roles: ExplainedThis topic explains security role provisioning, and the difference between resource and security roles.
Security role provisioning automates the provisioning and deprovisioning of security roles, based on resource roleassignment. Resources can access the tasks and data enabled for the security role after the security roles are provisioned toresources.

Oracle Sales CloudImplementing Customer Data Management
Chapter 17Define Resource Role Information
102
Difference between Resource Roles and Security RolesResource roles indicate the role of a person in the deploying company. Resource roles are used to filter resources, generatereporting hierarchies, and define security policies. A resource role may be assigned to a resource without a user account,while a security role can only be provisioned to a resource who has a user account. When resource role is defined in thesame granularity as security role and used to automate security role provisioning, then the assigning roles to resources isdifferent for security roles.
Job-to-Role Mapping: ExplainedA job-to-role mapping associates human capital management jobs with specific resource roles. You can establish jobmapping for a resource role in Setup and Maintenance, Manage Resource Roles task. This mapping simplifies the task ofassigning resource roles to new employees or contingent workers, resulting in time and cost efficiency.
For example, an employee joins the IT department as a data quality manager and the employee's job is already mappedto the Data Steward Manager role. When the employee is identified as a resource in the application, the resource role isautomatically assigned. Thus, you can place new employees faster in organizational and reporting hierarchies. If security rolesare also associated with the resource role, then the new employee's access privileges are also granted automatically.
Resource Role Assignment: ExplainedResource role assignment is the task of assigning roles to active resources within the deploying company. These rolesare previously set up, and have associated security privileges. Thus, when you assign a specific role to resources, theyautomatically receive access to specific business functions within the company.
You can assign different roles to the same resource in different organizations. Thus, the same resource can have access todifferent business functions depending on the security roles associated with the resource roles assigned to them.
FAQs for Define Resource Role Information
Can I add more than one resource role to a resource?Yes. While a resource can have only one resource role within a resource organization, a resource can have multiple roles indifferent organizations across the deploying company.
Can I assign more than one resource role to a resource organizationmember?No. One resource can only have one role within an organization.

Oracle Sales CloudImplementing Customer Data Management
Chapter 17Define Resource Role Information
103
What's a duty role?A duty role is a set of privileges associated with an aspect of a resource role, and one or more duty roles roll up into aresource role. Resource roles can comprise a set of duties, and each duty has its own set of privileges. Thus, privileges roll upinto duty roles, and duty roles roll up into resource roles.

Oracle Sales CloudImplementing Customer Data Management
Chapter 17Define Resource Role Information
104

Oracle Sales CloudImplementing Customer Data Management
Chapter 18Define Resource Organization Information
105
18 Define Resource Organization Information
Resource Organization Information
Resource Organizations and Organization Usage: ExplainedYou can assign organization usage information to resource organizations to classify them based on how you want to usethem. For instance, you can assign the Sales Organization usage to resource organizations engaged in sales activities. Thisenables you to sort organizations based on their usage, simplifying your task of working with them.
Primary Resource Organization by Usage: ExplainedA resource can belong to only a single resource organization during a given period. For each organization, you can assigndifferent resource roles to a resource. When you assign a resource to one resource organization, the organization becomesthe primary organization for the resource for a specific usage.
A resource organization becomes a primary resource organization by usage for a resource, if it meets the following criteria:
• Resource must be a member of the concerned organization.
• Resource organization must be classified as an organization with the specific usage.
For example, if you classify the resource organization as a marketing organization by usage, then the resource organizationbecomes the primary resource organization for the resource for marketing.
Organization Memberships and Role Assignments: ExplainedWhen you assign a resource to an organization, you must also specify the role the resource is required to play in theorganization. This helps ensure clarity on the tasks that you can assign to a resource and helps define where the resource issituated within the organization's hierarchy.
Note: An organization can have only one manager. A resource can have only one role in a resource organizationduring a given period.
Associating Business Units with Resource Organizations: ExplainedYou can associate resource organizations with multiple business units. The first business unit that you associate with aresource organization is automatically listed as the primary unit. Associating resource organizations with business unitshelps you to view the relevant transactional details associated with the resource, such as opportunities, leads, and so on. Byassociating resource organizations with business units, you can also control access to contracts that are based on businessunits.
Users are associated with a business unit through their resource organization membership. Resource organizations aremapped to one or more BUs. When a Sales Cloud user is created, the user is assigned to a resource organization, and

Oracle Sales CloudImplementing Customer Data Management
Chapter 18Define Resource Organization Information
106
thereby gains access to each BU that is mapped to the resource organization. For example, users can access relevanttransactional data associated with their primary BU, but might also have access to relevant transactional data in other BUsthrough their resource organization.
For more information about data access and business units, see the topic, Multiple Business Units and Data Access, in theSecuring Oracle Sales Cloud guide.
You can associate a resource organization to multiple business units from the Resource Directory. For more information, seethe Associating Resource Organizations with Multiple Business Units: Procedure topic.
Related Topics
• Multiple Business Units High-Level Setup Steps
Associating Resource Organizations with Multiple Business Units:ProcedureBy associating resource organizations with business units, you can control access to the transactional data available to salesresources in business objects like opportunities and leads.
Perform the following tasks to associate resource organizations with multiple business units.
1. Sign in as a setup user, such as a Sales Administrator.2. Click Navigator > Resource Directory.3. From the Tasks pane, click View Organizations.
The View Organizations page appears.4. Search for and select the resource organization that you want to associate with a business unit.
The Organization page appears for the selected organization.5. In the Organization page, click the Business Units tab.6. Click the Add Row icon.7. Select a business unit from the Business Unit drop-down list.8. Click Save. The first business unit you selected is set as the primary business unit.9. Similarly, select additional business units from the Business Unit drop-down list.
10. Click the Set Primary option against the business unit you want to designate as the primary unit.11. Click Save and Close.
Related Topics
• Multiple Business Units High-Level Setup Steps
Create an Organization with Sales Usage: Worked ExampleThis example demonstrates how to create a resource organization with sales usage.
There are two options to create resource organizations with sales usage:
• Create an organization from an existing department
• Create a new organization
Oracle Sales CloudImplementing Customer Data Management
Chapter 18Define Resource Organization Information
107
Creating an Organization from an Existing DepartmentYou must create an organization with sales usage from an existing department if the concerned department must be reusedas a sales organization. Use the following steps:
1. Navigate to the Manage Internal Resource Organizations UI page as follows: Navigator > Setup and Maintenance> Tasks > Search > Search for Manage Internal Resource Organizations.
2. You can either search for the organization whose usage you want to modify or click the Create button, select theCreate from Existing Department option and specify the name of the organization in the Create Organization:Select Creation Method screen and click Next.
3. Click Actions > Add Row.4. Specify Sales Organization as the Usage under the Organization Usages section of the screen.5. Click Finish.
Creating a New Organization with Sales Usage1. Navigate to the Manage Internal Resource Organizations UI page as follows: Navigator > Setup and Maintenance
> Tasks > Search > Search for Manage Internal Resource Organizations.2. Click Actions > Create.3. Select the Create New Organization option on the Create Organization: Select Creation Method screen and
click Next.4. Specify the name of the new organization and select Sales Organization as its usage.5. Click Finish to save the new organization with sales usage.
Adding a Sales Organization to a Sales Organization Hierarchy:Worked ExampleThis example describes how you can add a sales organization to a sales organization hierarchy.
As new sales organizations are created within your company, you need to add these organizations to your company's salesorganization hierarchy.
Creating a New Version1. Navigate to the View Organization Hierarchies UI page as follows: Navigator > Resource Directory > Tasks >
View Organization Hierarchies.2. Search and select the sales organization hierarchy you want to edit.3. Click the Action menu. If you want to add the new organization to the sales organization hierarchy with immediate
effect, select the Edit This Hierarchy Version option. If you want the new organization to display in theorganization hierarchy only after a specific date, then select the Create Hierarchy Version option. If you choose thelatter option, then you must specify the date from which the new version of the sales organization hierarchy must beactive.
Adding a New Organization to the Sales Organization Hierarchy1. Navigate to the View Organization Hierarchies UI page as follows: Navigator > Resource Directory > Tasks >
View Organization Hierarchies.2. Search and select the sales organization hierarchy to which you want to add a new organization.3. On the Action menu, click either Edit This Hierarchy Version option or Create Hierarchy Version option.4. In the Create or Edit Organization Hierarchy Version page, select the node in the sales organization hierarchy
where you want to add the new sales organization and click the Add button.

Oracle Sales CloudImplementing Customer Data Management
Chapter 18Define Resource Organization Information
108
5. Search and select the new sales organization in the Add Tree Node screen. This adds the new organization to thesales organization hierarchy.
6. Select the new organization in the hierarchy, and drag and drop it to the node where you want to place it. Theorganization appears in the location you specified within the selected sales organization hierarchy.
7. Click Save and Close.
Assigning a Resource to an Organization: ExampleOnce you have identified a resource, you can assign the resource to organizations within the deploying company. Thisexample explains how you can assign resources to organizations.
ScenarioYou must assign a resource to an organization. A resource can belong to only one organization and can have only one role inan organization during a give period.
To assign a resource to an organization, perform the following tasks.
1. Navigate to the View Resources UI page as follows: Navigator > Resource Directory > Tasks > ViewResources.
2. Search for a resource and select it.3. Click the Organizations tab. This displays the list of organizations to which the resource belongs.4. In the Actions drop-down list, click Create.5. In the Create Organization Membership pop-up, search and select the organization you want from the
Organization drop-down list.6. In the Actions drop-down list, click Add Row and select the role the resource must play in the organization.7. Enter the From Date and To Date, and click OK.8. Click Save and Close.
You can also assign resources to organizations by searching for organizations and adding members to the concernedorganization. To assign resources to organizations by searching for organizations, perform the following operations.
1. Navigate to the View Organizations UI page as follows: Navigator > Resource Directory > Tasks > ViewOrganizations.
2. Search for an organization and select it.3. Click the organization's name to display its details.4. Click the Members tab to edit the list of members assigned to the organization.5. In the Actions drop-down list, click Create to assign a new resource to the organization.6. In the Add Resource Member pop-up, select a resource from the Resource drop-down list.7. Click the Add Row button to add a role to the newly-added resource.8. Click the Role drop-down list and select the role the resource is required to play in the organization.9. Enter the From Date and To Date, and click OK.
10. Click Save and Close.
Note:1. The date from which a resource is a member of an organization must be on or after the date which the
resource was hired.2. You can't reassign the resource to the same organization, if a resource was already a member of the
selected organization with an end date later than the current date. You also can't reassign the resourceto the same organization, if the resource was removed from the organization before the end date.

Oracle Sales CloudImplementing Customer Data Management
Chapter 18Define Resource Organization Information
109
FAQs for Define Resource Organization Information
Can I create a new organization?Yes. You can create organizations using the Manage Internal Resource Organizations task in the Functional SetupManager or the Oracle Sales Cloud Partner Management UI. You can also create resource organizations from the UserManagement UI. You can also use the UI to manage user accounts and roles, and to create employee and partner-memberusers.
How can I delete a resource from an organization?To delete a resource from an organization, you must delete the concerned resource's membership from the organization.
To manage the membership of an organization, navigate to the Manage Resource Organization Members Setup andMaintenance task and select the organization concerned. Once the organization's membership details are listed, you canadd, delete or edit them as required.
What happens if I delete a resource from an organization?When you delete a resource from an organization, you effectively delete the concerned resource's membership with theorganization. This also removes the resource from the organization hierarchy.
What's a resource organization hierarchy?A resource organization hierarchy is a hierarchically structured representation of the way resources are grouped within aresource organization. Resource organization hierarchies can contain other organizations within them. Thus, you can includeany resource organization within the deploying company to create a single global hierarchy that depicts the operationalstructure of your company.
Can I create a new organization hierarchy?No. All organizations within your deploying company are part of a large overarching global hierarchy. Therefore, you cannotadd new organization hierarchies. However, you can move existing organizations or attach new organizations to the existinghierarchy and create a new version of the hierarchy.
Once you have created a new version, specify the date from which the new version must become active. On the specifieddate, your new hierarchy version replaces the older hierarchy.
Oracle Sales CloudImplementing Customer Data Management
Chapter 18Define Resource Organization Information
110
How can I reactivate a deleted resource organization hierarchy?To reactivate the resource organization hierarchy that you deleted, navigate to the View Organization Hierarchies pageas follows: Navigator > Resource Directory > Tasks > View Organization Hierarchies. Search and select the deletedresource organization hierarchy. From the Action menu, select Edit This Hierarchy Version and set the Status to Active.
Can I copy a resource organization hierarchy?No. You can only have one resource organization hierarchy active at a time within a deploying company. If you have to createa hierarchy for an organization, you must specify the reporting structure within the concerned organization and then make theorganization a part of the existing hierarchy.
How can I reuse a resource organization in multiple organizationhierarchies at the same time?A resource organization can have one resource organization hierarchy for each internal organization and one partnerorganization hierarchy for each partner company. You can have one active version and multiple inactive versions of resourceorganization hierarchies. You can include resource organizations into any of the active or inactive organization hierarchies.
Can I create multiple resources as managers within a resourceorganization?No. An organization can have only one manager.
Can I create a new organization hierarchy version?Yes. To create a new hierarchy version, click Navigator > Resource Directory > Tasks > View Organization Hierarchiesand select the hierarchy whose new version you want to create. Click Action > Create Hierarchy Version. Make thechanges to the hierarchy as required. Specify the dates between which the organization hierarchy must be active, and clickSave and Close to save your changes.
What's a partner organization?A partner organization represents a department, section, division, business unit, or any other internal or external unit of apartner company registered with the deploying company. Partner organizations provide the framework that enables thedeploying company to engage with the partner company while performing sales and marketing activities.
You must be either the channel manager of the deploying company or a designated partner administrator to create a partnerorganization. To create a partner organization, you must first register the partner company as a partner of the deploying
Oracle Sales CloudImplementing Customer Data Management
Chapter 18Define Resource Organization Information
111
company. After the registration, you must enroll the partner company into a partner program. Then, you can create andmanage partner organizations to model the organization hierarchy of the partner company.

Oracle Sales CloudImplementing Customer Data Management
Chapter 18Define Resource Organization Information
112

Oracle Sales CloudImplementing Customer Data Management
Chapter 19Define Resource Team Information
113
19 Define Resource Team Information
Resource Team Information
Managing Resource Teams: ProcedureThis procedure describes how to manage resource teams. A resource team is a temporary group of resources formedto complete a business task. A resource team cannot be hierarchically structured and is not intended to implement anorganization.
Creating Resource TeamsTo create resource teams:
1. Navigate to the Manage Resource Teams UI page as follows: Navigator > Resource Directory > Tasks >Manage Resource Teams.
2. Click the Create action menu option or button. The Create Team page appears.3. Enter an appropriate team name.4. Optionally, enter a team description and specify team usage, resource members, and organization members.5. Click Save and Close.
Editing Resource TeamsTo edit resources teams:
1. Navigate to the Manage Resource Teams UI page as follows: Navigator > Resource Directory > Tasks >Manage Resource Teams.
2. Search for the resource team that you want to edit. You can search by entering criteria such as the team name,number, and usage. You can also use the saved searches.
3. Select the resource team you want to edit from the Search Results region and click its name to navigate to the EditTeam page.
4. On the Edit Team page, you can edit the team's details such as the team name, description, usage, resourcemembers and organization members.
5. Click Save and Close.
Resources: How They Work within a TeamThis topic explains how resources work within a team.
You can include resources from different resource organizations to work together on a work object as members of the sameresource team. You can also include the entire resource organizations into a resource team. The resource organizationmembership and their hierarchy determine what a resource can do. Resource teams provide a flexible way of bringingresources together without any organizational or hierarchy-based restrictions.
Assigning Resources to TeamsYou can assign identified resources to teams and assign them roles within the team. Each resource can have a specific rolewithin a team. Thus, a resource may play different roles in different teams.

Oracle Sales CloudImplementing Customer Data Management
Chapter 19Define Resource Team Information
114
Resource Team Membership and Role Assignment Components:How They Work TogetherThis topic explains the team membership and role assignment for resources.
Resources who are team members can be assigned different roles within the team. These roles do not necessarily reflectthe roles these resources might play in resource organizations. Depending on the task requirements of the team, roles areassigned to resources. Based on the role assignment, resources can access data related to the tasks in the team. You canmanage the resources in a team using the Manage Resource Teams task. You can access the Manage Resource Teams taskas follows: Click Navigator > Resource Directory > Tasks > Manage Resource Teams.
Resource Team MembershipA resource can belong to multiple teams depending on the requirements of these teams and the skills that the resourceoffers. This does not affect the resource's membership with organizations within the deploying company.
Role AssignmentResources have specific roles to play in the team to which they belong. Each of these roles can be different. Also, these rolescan be different from the roles assigned to the same resources in resource organizations. Thus, a resource can be a managerin one team and a member in another simultaneously.
FAQs for Define Resource Team Information
What's a resource team?A resource team is a group of resources formed to work on work objects. A resource team can comprise resourceorganizations, resources, or both. A resource team is neither hierarchically structured nor intended to implement anorganization structure. You can use resource teams as a quick reference to groups of related resources to which you canquickly assign work objects.
Note: You can either individually assign the members of a team to a task or assign entire teams to tasks.
What's the difference between a resource organization and aresource team?A resource organization is an organization whose members are resources. Resource organizations are used to implementsales organizations, partner organizations, and so on.
A resource team is a temporary group of resources formed to work on work objects. A resource team may contain aresource organization or resources or both. A resource team cannot be hierarchically structured and is not intended toimplement an organization.
Oracle Sales CloudImplementing Customer Data Management
Chapter 19Define Resource Team Information
115
Can I assign multiple resource roles to a team member at the sametime?Yes. Resources within resource teams can have multiple resource roles. You can add roles to a resource in a resource teamusing the Manage Resource Teams task. Select the resource and click the Edit button to assign additional roles to theresource.

Oracle Sales CloudImplementing Customer Data Management
Chapter 19Define Resource Team Information
116

Oracle Sales CloudImplementing Customer Data Management
Chapter 20Manage Bulk Data Export
117
20 Manage Bulk Data Export
OverviewYou can extract large volumes of data from Oracle Sales Cloud objects using bulk export. You can either extract a full set ofrecords for an object, or perform incremental extracts. For example, you can extract complete set of account data or extractupdated set of records every week. Bulk export creates comma separated or tab delimited files, which are attached to theexport process.

Oracle Sales CloudImplementing Customer Data Management
Chapter 20Manage Bulk Data Export
118
The following figure depicts the process of selecting data for export, scheduling the export activity,and delivering the data file to the customer application.
Customer System
Sales CloudSchema
ADF
Setup and Schedule Export(Export Process Definition)
Data File
Request and Retrieve Data
Defining Bulk Export Process: ProcedureYou can extract large volumes of data from Oracle Sales Cloud objects using bulk export. You can either extract full set orrecords for an object, or perform incremental extracts. Bulk export creates comma separated or tab delimited files, which areattached to the export process after export.

Oracle Sales CloudImplementing Customer Data Management
Chapter 20Manage Bulk Data Export
119
The details of the export process are as follows:
1. Create the export process definition. The export process definition is made up of the export map and the processingschedule.
2. In the export map of the export process definition:
a. Select attributes for the exportb. Filter data for the export
3. Schedule the export job.4. Activate the export job.
Defining the Bulk Export ProcessAfter defining the mapping files, you create an export process to export an object's data using the mapping files created.
To define a bulk export process:
1. Navigate to the Schedule Export Processes task from Setup and Maintenance.2. Select Create from Actions menu to view the Create Export Process Definition: Enter Basic Information page.3. Enter basic information about the export process, such as name and export map, in the page.4. Click Next to view the Create Export Process Definition: Configure Export Objects page.
In this page, you define the export object you want to export and the mapping you want use for the export process.5. Optionally, you can enter a name for the mapping if you would like to reuse this mapping for other export processes.
An object's mapping file determines what data is exported every time an object is exported. You can have multiplemapping files for an export object for various object details you want to export.
Note: The export mapping is optional. You don't need to select an existing mapping to perform anexport.
6. Select Create from Actions menu to view the Manage Export Objects dialog box.7. Select objects from the Available Objects list and move them to the Selected Objects list and click Done.8. Define the attributes you want to export in the Detail region of the page. You can define:
◦ Attributes you want to export. Select Enabled for the attributes you want to export.
◦ Header text of the attributes. Edit the header text in the Header text column. This value is used as the columnheader in the files generated by the export process
9. Define the filters to determine the data you want to export by clicking the button in the Edit Filter Criteria column.
Note: For the incremental extracts, you can create filters using time stamps to determine which rowsto export.
10. Click Next to view Create Export Process Definition: Create Schedule page.11. Select if you want to run the export process immediately or at a later time. Two types of scheduled exports are
supported:
a. Incremental Exportb. Normal Export
12. Click Next to view the Create Export Process Definition: Review page.13. Review the export process details, and click on Activate.
After each export process executes and completes, a comma or tab delimited data file is created and stored as anattachment to the export process. If the number of records matching the view criteria exceeds 1 million records, or if the

Oracle Sales CloudImplementing Customer Data Management
Chapter 20Manage Bulk Data Export
120
generated export file size exceeds 100 MB, then export process generates multiple files. The generated export files arenumbered using the extension "_NNN" starting at "_001".
You can also use web services to schedule and start an export process. In this case, you can use the getAttachment webservice to download the data file.
Bulk Export Process Components: How They WorkTogetherBulk export makes exporting data easier by leveraging the export maps. To export files using bulk export, you create aprocess definition, map files for full and incremental extract processes, and then schedule the export process.
Bulk Export Process Components
The following figure shows the bulk export process components comprising of process name, exportprocess ID, and export map ID.
Bulk Export Process Definition
Process Name Export Process ID
Export Map ID
Export Object
Object Data Filter 1
AttributesObject Data Filter 2
Object Data Filter n
.
.
.
Bulk export process includes three components:
• Process name: A name for the export process that lets you easily refer the export process rather than using thecomputer generated ID such as 100000019897192.
• Export process ID: A unique, application generated identifier for the export process definition for the export process.The process ID ties the export map with its export objects, filters, and the export schedule.

Oracle Sales CloudImplementing Customer Data Management
Chapter 20Manage Bulk Data Export
121
• Export map ID: A unique identifier for the export map. You can reuse the export map in different process definitions.For example, you create a process definition to export all the data from the Customer export object. You can thenreuse that export map and apply a new filter on the data to create an incremental export, such as data accrued sincethe last export date.
FAQs for Manage Bulk Data Export
How can I determine which data objects to select for successfulexport?Review the requirements for the data to be exported and determine the source view objects that hold the attributes you want.
How can I create a subset of data for export?Full sets of data are not always required for export. To create a subset of data, use filter criteria to determine the time frameor scope of data, based on values of the attributes. To find activities for a specific date range, for example 1/1/11 through3/31/11, navigate to the Export Objects Detail Sub Page and click the filter icon. Fill in the filter criteria dialog for the projectstart dates to select the data to be exported. You run the export by navigating to the Setup and Maintenance menu,selecting Manage Task Lists and Tasks. Then, search for Schedule Export Processes and click the Go to Task icon onthe line for this task.
How can I see my exported data?You can look on the Schedule Export Processes, Overview page to see the History subpage. The column Exported Data Fileshows a hyperlink to your output file This file will be a comma separated variable or a tab delimited file. Click that link to openthe file and see the exported data.
What happens if you change the sequence number or header text inan exported data file?Changing the sequence number changes the order of the attributes in the exported data file. Changing the header textenables you to give a more intuitive meaning to the attribute and the associated data.
What happens if I need data from multiple export view objects?Select as many view objects as required for the export process. Choose the individual attributes required from each exportobject.

Oracle Sales CloudImplementing Customer Data Management
Chapter 20Manage Bulk Data Export
122

Oracle Sales CloudImplementing Customer Data Management
Chapter 21Configure Oracle Social Data and Insight Cloud Service for
Data Enrichment and Address Verification
123
21 Configure Oracle Social Data and InsightCloud Service for Data Enrichment andAddress Verification
Configuring Social Data and Insight Cloud Service for DataEnrichment and Address Verification: OverviewYou use the Oracle Social Data and Insight Cloud service to enrich your account and contact data in Oracle Sales Cloud.This cloud service uses Dun and Bradstreet data for more than 200 countries as the primary source for enrichment. Dataenrichment improves the quality of your existing account or account contact data, address information, and also enriches thatdata with additional information. Using this cloud service sales representative can enrich accounts and contacts in real-timeand sales administrators can run batch enrichment using bulk import and export templates.
You can enrich Sales Cloud data either manually or automatically. Additionally, you can also download enriched account andcontact data from the Oracle Social Data and Insight Cloud service.
The manual enrichment process flow is comprised of the following steps:
1. Export data from Sales Cloud to a CSV file2. Enrich the data using Oracle Social Data and Insight Cloud service3. Download the enriched data file from Oracle Social Data and Insight Cloud service4. Import the enriched data file into Oracle Sales Cloud
The automated enrichment process flow is comprised of the following steps:
1. Set up automatic enrichment preferences2. Manage Sales Cloud and Data Cloud integration3. Enrich Account and Account Contact Data automatically

Oracle Sales CloudImplementing Customer Data Management
Chapter 21Configure Oracle Social Data and Insight Cloud Service for
Data Enrichment and Address Verification
124
The following figure illustrates the process flows for manual and automated enrichment.
For more information, see Using Oracle Social Data and Insight Cloud Service guide.
To associate a Sales Cloud subscription to a Data Cloud subscription, you complete the following three tasks:
1. Create a DAAS user and assign role.2. Configure the Manage Sales Cloud to Data Cloud Integration task in Sales Cloud.3. Configure Manage Administrator Profile Values task in Sales Cloud.
Creating a DaaS User and Assigning Role: ProcedureHere are the key steps to create a DaaS user and to assign Data Service Client API AppID role:
1. Subscribe to DaaS for Sales (Social Data and Insight) or request a trial account:
a. Log on to the My Services application at http://cloud.oracle.com.b. Navigate to Data Center where the service is located and request a trial or purchase a subscription to Data as
a Service (DaaS).
For more details, see Subscribing to an Oracle Cloud Service Trial in the Getting Started with Oracle Cloud.
Oracle Social Data and Insight Cloud Service and Oracle Address Verification Cloud Service offer a combinedtrial subscription. When you order a trial for one service, you also get the other. Each service must be purchasedseparately, but they can be part of the same subscription order. For more information about subscriptions, seeUnderstanding Subscriptions and FAQ Subscriptions.

Oracle Sales CloudImplementing Customer Data Management
Chapter 21Configure Oracle Social Data and Insight Cloud Service for
Data Enrichment and Address Verification
125
When you request a trial subscription, you receive a welcome e-mail. An activation e-mail contains the ActivateMy Trial button along with service details. Service details consist of information such as name of the data center,subscription details, and identity domain.
2. Activate your account:a. Open the welcome e-mail you received from Oracle Cloud.b. Click the Activate My Trial button.
When the activation of your trial subscription to an Oracle Cloud service is complete, you get a post activation e-mailfrom Oracle Cloud. This e-mail contains the sign-in credentials, My Services URL, and Identity domain information.
Tip: You can see the DaaS subscription URL under the My Account Administration Details section ofthe e-mail.
3. Reset your password:a. Click the My Service URLb. Log on to the My Services Dashboard using the temporary password.c. Reset your password when you are prompted.
When you sign in successfully, the My Services Dashboard page displays a list of your activated services and theREST service endpoint URLs for both Address Verification API and Company and Contact Data API.
4. Set up DaaS by creating a user and assigning the Data Service Client API AppID role to the new user.a. Navigate to My Services Dashboard.b. Click the Users tab on the My Services Users page. Add User page appears.c. Enter your credentials.d. Expand the Advanced Roles section and add the role Data Service Client API AppID.e. Click Add to assign this role to the user.
Configuring Sales Cloud to Data Cloud Integration:ProcedureYou can configure the Sales Cloud to the Data Cloud Integration after you set up the DaaS user. To configure the Sales Cloudto the Data Cloud Integration you navigate to Sales Cloud for adding DaaS URL and credentials. The following are the stepsto configure sales Cloud to Data Cloud Integration:
1. Navigate to Setup and Maintenance.2. Enter Manage Sales Cloud to Data Cloud Integration in the task search box.3. Click Search.4. Navigate to Manage Sales Cloud to Data Cloud Integration page.5. Enter the following information:
a. URL of your DaaS instance - This service instance URL is available in the post-activation email and on the MyServices application.
b. Select oracle/wss_username_token_over_ssl_client_policy as Security Policy.c. Enter the DaaS user name and password you created in DaaS setup.
6. Click Save and Close.
Oracle Sales CloudImplementing Customer Data Management
Chapter 21Configure Oracle Social Data and Insight Cloud Service for
Data Enrichment and Address Verification
126
Managing Social Data and Insight Cloud Attribute Mappingand Preferences: ProcedureThis topic illustrates configuring the enrichment preferences and attribute mappings for Oracle Social Data and Insight CloudService. You must configure the enrichment preferences and attribute mappings before enriching accounts or contacts.
To configure enrichment preferences, you must:
• Enable and configure enrichment preferences for account and contact.
• Configure attribute mappings.
• Set administrator profile options.
Enabling and Configuring Enrichment PreferencesYou can configure the enrichment preferences to define what data is updated in an enriched account or contact.
Perform the following steps to enable and configure enrichment preferences:
1. Navigate to the Setup and Maintenance work area.2. Enter Manage Social Data and Insight Cloud Attribute Mapping and Preferences in the task search box.3. Click Search.4. In the search results, click the Go to Task button for the task. The Manage Social Data and Insight Cloud Attribute
Mapping and Preferences page appears.
Note: The Manage Social Data and Insight Cloud Attribute Mapping and Preferences page includestwo regions, one each for account and contact. You can use these to enable enrichment for accountand contact, and configure the data that should be included in the enriched account.
5. Select Enable Enrichment for Account or Enable Enrichment for Contact to enable enrichment for account orcontact respectively.
6. To define the data in an enriched account or contact, you can do one of the following:
◦ Select Auto fill blank fields in record to update all blank Sales Cloud fields with the data from the OracleSocial Data and Insight Cloud service. This updates all fields in an account or contact record with the datafrom the Oracle Social Data and Insight Cloud service.
◦ Select Configure Settings by Field to define what data should be updated for each field in the enrichedaccount or contact.
7. To define the data at the field level, select:
◦ Auto fill Blank: To update the field with data from Oracle Social Data and Insight Cloud service if it is blank.
◦ Update with Data Cloud Value: To update all blank fields with data from Oracle Social Data and InsightCloud service.
◦ Display on Select Fields to Enrich page: To display the value in the Select Fields on the Enrich page andprompt the user to select the field value.
8. Enter a match threshold for account and contact in the Match Threshold field.9. Enter the maximum number of records that should be enriched in the Maximum Number of Accounts for Real-
Time Enrichment and Maximum Number of Contacts for Real-Time Enrichment fields.

Oracle Sales CloudImplementing Customer Data Management
Chapter 21Configure Oracle Social Data and Insight Cloud Service for
Data Enrichment and Address Verification
127
10. Enter the maximum number of new contacts you want to create during enrichment in the Maximum Number ofNew Contacts field.
11. Click Save.
Note: Make sure that you have set the administrator profile options using the procedures documented in theManage Administrator Profile Values section of this document.
If you have a preproduction or staging environment for Oracle Sales Cloud, then test the service association between yourSales Cloud preproduction environment and your Data Cloud trial subscription. You must limit testing to 500 records. Whenyou go to production, do the service association between your Sales Cloud production environment and your Data Cloudproduction environment. The service association steps are the same, but the trial or production service URLs are different.The service URLs are listed in your welcome e-mail and in the My Services application.
Setting up Administrator Profile OptionsComplete the following steps to set administrator profile options:
1. Navigate to Setup and Maintenance.2. Enter Manage Administrator Profile Values in the task search box.3. Click Search.4. Navigate to Manage Administrator Profile Values task. The Manage Administrator Profile Values page appears.5. Enter DAAS_PRODUCTION_MODE as the Profile Option Code on the Manage Administrator Profile Values page.6. Click Search. The Manage Administrator Profile Values page with the specified Profile Option appears.7. Make sure that the Profile Level Site value is set to No.
Note: Do not set the Profile Level Site value to Yes. The only supported value today is No.
8. Click Save and Close.
Specifying the Industry Classification for AccountsUse the following procedure to specify which industry classification category you want to use for accounts. The classificationsfor the category you select appear in the list of values for the Industry field in the Account user interface. By default, the profileis set to CUSTOMER_CATEGORY.
1. While signed in as a setup user, open the Manage Administrator Profile Values task from the implementation project.Alternatively, you can search for the task by name in the Setup and Maintenance work area.
The Manage Administrator Profile Values page appears.2. In the Search: Profile Option region, Profile Option Code field, enter MOT_INDUSTRY_CLASS_CATEGORY3. Click Search.4. Select the classification category from the Profile Value list. The available values are:
◦ 1972 SIC
◦ 1977 SIC
◦ 1987 SIC
◦ CUSTOMER_CATEGORY
◦ NACE

Oracle Sales CloudImplementing Customer Data Management
Chapter 21Configure Oracle Social Data and Insight Cloud Service for
Data Enrichment and Address Verification
128
◦ NAF
◦ NAICS_1997
◦ NAICS_2002
5. Click Save and Close.
Enriching Sales Cloud Data Manually
Enriching Account and Account Contact Data Manually: ExplainedYou could manually enrich account and account contact data using the Oracle DaaS for Sales service.
To manually enrich account and account contact data:
1. Export the data you want to enrich from Oracle Sales Cloud to a CSV file.2. Enrich the exported data using the Oracle DaaS for Sales service.3. Download the enriched data file from Oracle DaaS for Sales service.4. Import the enriched data file into Oracle Sales Cloud.
Exporting Data from Oracle Sales CloudYou export account or account contact data from Oracle Sales Cloud using the Schedule Export Processes task. The exportprocess provides two predefined objects, one each for exporting account and account contact data. While exporting data,select the Organization for Data Cloud Enrichment object to export account data and the Person for Data Cloud Enrichmentobject to export account contact data.
Enriching Data in the Oracle DaaS for Sales ServiceYou can manually enrich account or account contact data using the Enrich Data functionality of the Oracle DaaS for Salesservice.
To enrich data, select the CSV file exported from Oracle Sales Cloud in the Enrich Data Records page of the Oracle DaaSfor Sales service. You must select the CRM template during enrichment, so that the enriched file can be later downloaded inOracle Sales Cloud. After enrichment is complete, a CSV file with the enriched data is available for download from the Jobslist.
For more information about Oracle DaaS for Sales service, see Using Oracle DaaS for Sales Service guide.
Importing Enriched Data into Oracle Sales CloudYou must import the CSV file generated in the Oracle DaaS for Sales service into Oracle Sales Cloud. Use the file-basedimport functionality to import the enriched account or account contact data.
To import data into Oracle Sales Cloud using file-based import:
1. Create an import activity.2. Enter the appropriate import details. While specifying the import object, select the Account to import account data
and the Contact to import account contact data.3. Provide the file mapping. Mapping defines the mapping between the columns provided in a source file and object
attributes in the import file. Oracle Sales Cloud provides preconfigured mappings to import account data or accountcontact data from Oracle DaaS for Sales service. You must select Preconfigured Data to view the availablepreconfigured mappings.

Oracle Sales CloudImplementing Customer Data Management
Chapter 21Configure Oracle Social Data and Insight Cloud Service for
Data Enrichment and Address Verification
129
While specifying the import mapping, select Data Cloud Account Import mapping to import account data andData Cloud Contact Import mapping to import contact data. Oracle Sales Cloud then automatically maps the datain the CSV file to object attributes.
4. Schedule the import process.
Note: In some cases, the import activity may display a warning about source and target attributes. Youcan ignore the warning message and click OK to submit the import process.
Importing New Records into Oracle Sales Cloud from Oracle SocialData and Insight Cloud Service: ExplainedYou can import accounts or account contacts from Oracle Social Data and Insight Cloud service into your sales cloudinstance.
To import data from Oracle Social Data and Insight Cloud service to Oracle Sales Cloud:
1. Export the accounts or account contacts from Oracle Social Data and Insight Cloud service.2. Import the CSV file into Oracle Sales Cloud.
Before importing account contacts, you must ensure that the accounts related to the contacts you want to import exist inOracle Sales Cloud.
Exporting Accounts or Account Contacts from Oracle Social Data and Insight CloudServiceYou can either export a set of account or account contact data or export all available accounts and account contacts fromthe Oracle Social Data and Insight Cloud service.
You can search for accounts and account contacts you want to import from the Search window. After searching for therecords you want to export, click Export to export the data. You must select Use CRM Template as the export template sothat the exported file can be later imported in Oracle Sales Cloud.
For more information about Oracle Social Data and Insight Cloud service, see Using Oracle Social Data and Insight CloudService guide.
Importing Accounts or Account Contacts into Oracle Sales CloudYou can import the account or account contact data exported from Oracle Social Data and Insight Cloud service into OracleSales Cloud using the file-based import functionality. You create an import activity, enter the appropriate import details,provide the file mapping, and schedule the import to import the data from the CSV file into staging tables. Import processingis subject to the settings defined for the import object, mapping, and import activity.
To import data into Oracle Sales Cloud using file-based import:
1. Create an import activity.2. Enter the appropriate import details. While specifying the import object, select Account to import account data and
Contact to import account contact data.3. Provide the file mapping. Mapping defines the mapping between the columns provided in a source file and object
attributes in the import file. Oracle Sales Cloud provides seeded mappings to import account data or accountcontact data from Oracle Social Data and Insight Cloud service. You must select Seeded Data to view the availableseeded mappings.

Oracle Sales CloudImplementing Customer Data Management
Chapter 21Configure Oracle Social Data and Insight Cloud Service for
Data Enrichment and Address Verification
130
While specifying the import mapping, select Data Cloud Account Import to import account data and Data CloudContact Import to import account contact data. Oracle Sales Cloud then automatically maps the data in the CSVfile to object attributes.
4. Schedule the import process.
Enriching Sales Cloud Data Automatically
Enriching Sales Cloud Automatically: OverviewYou can enrich sales cloud data automatically using the Oracle Social Data and Insight Cloud service. Before you can enrichdata, you must first purchase a third-party data service subscription and your administrator must create a new user with theData Service Client API AppID role. This user is used by Oracle Sales Cloud to securely communicate with the OracleSocial Data and Insight REST APIs.
Before you start enriching sales cloud data, you must:
• Set up Sales Cloud and Data Cloud integration
• Set up automatic enrichment preferences and administrator profile options.
After setting up the enrichment and integration preferences, you can enrich an account or contact from the Accounts orContacts pages.
Enriching Account and Account Contact Data Automatically:ProcedureThis topic illustrates how you can enrich account and account contact data automatically from Sales Cloud, using OracleSocial Data and Insight Cloud Service. Oracle Social Data and Insight Cloud Service includes authenticated D&B records ofcompanies and contacts. You can use the service to authenticate and enrich account and contact data from Sales Cloud.
Enrich Account Data AutomaticallyYou enrich account data from the Accounts page.
To enrich account data:
1. In the Account page, select the accounts you want to enrich.2. Select Enrich Selected Account from the Actions menu.
If you select multiple accounts for enrichment, Sales Cloud automatically enriches the accounts and displays theresults. The result includes information about the accounts enriched and the status of each account.
If you select one account for enrichment, the Select Fields to Enrich page is displayed. In the page, you can selectwhat data values you would like use in the enriched account record for each of the fields.
3. For each of the field, select if you want to use existing value or the Data Cloud value.4. Optionally, click on Hide Identical Fields to hide the fields where the Sales Cloud data is same as the Data Cloud
data.5. Click Enrich.
Oracle Sales CloudImplementing Customer Data Management
Chapter 21Configure Oracle Social Data and Insight Cloud Service for
Data Enrichment and Address Verification
131
Enrich Account Contact Data AutomaticallyYou enrich account contact data from the Contacts page.
To enrich contact data:
1. In the Contacts page, select the contacts you want to enrich.2. Select Enrich Selected Contacts from the Actions menu.
If you select multiple contacts for enrichment, Sales Cloud automatically enriches the contacts and displays theresults. The result includes information about the contacts enriched and the status of each contact.
If you select one contact for enrichment, the Select Fields to Enrich page is displayed. In the page, you can selectwhat data values you would like use in the enriched contact record for each of the fields.
3. For each of the field, select if want to use the existing value or the Data Cloud value.4. Optionally, click on Hide Identical Fields to hide the fields where the Sales Cloud data is same as the Data Cloud
data.5. Click Enrich.
Enriching Oracle Sales Cloud Data with Social Attributes
About the Oracle Social Data and Insight Cloud service: OverviewYou use the Oracle Social Data and Insight Cloud service to enrich your account and contact data in Oracle Sales Cloud.Data enrichment improves the quality of your existing account or account contact data, address information, and alsoenriches that data with additional information.
You can enrich Sales Cloud data either manually or automatically. Additionally, you can also download enriched account andcontact data from the Oracle Social Data and Insight Cloud service.
The manual enrichment process flow is comprised of the following steps:
1. Export data from Sales Cloud to a CSV file2. Enrich the data using Oracle Social Data and Insight Cloud service3. Download the enriched data file from Oracle Social Data and Insight Cloud service4. Import the enriched data file into Oracle Sales Cloud
The automated enrichment process flow is comprised of the following steps:
1. Set up automatic enrichment preferences2. Manage Sales Cloud and Data Cloud integration3. Enrich Account and Account Contact Data automatically

Oracle Sales CloudImplementing Customer Data Management
Chapter 21Configure Oracle Social Data and Insight Cloud Service for
Data Enrichment and Address Verification
132
The following figure illustrates the process flows for manual and automated data enrichment.
For more information, see Using Oracle Social Data and Insight Cloud Service guide.
Enriching Oracle Sales Cloud Data with Social Attributes: ProcessOverviewEnriching Oracle Sales Cloud Data with Social Attributes consist of two set of tasks. They are as follows:
• Set up the social attributes supported by Oracle Social Data and Insight Cloud Service also known as Data as aService (DaaS) in Oracle Sales Cloud (OSC).
• Enrich the Oracle Sales Cloud account and contact data with the social data downloaded from the Oracle SocialData and Insight Cloud service.
Perform the following seven tasks to set up DaaS social attributes and enrich the Oracle Sales Cloud account and contactdata:
• Identifying the social attributes supported by Data as a Service
• Creating custom fields for social attributes in Sales Cloud
• Adding custom social attributes to UI pages
• Mapping custom social attributes with the DaaS supported social attributes
• Adding the custom social attributes to select fields to enrich page
• Enriching account and contact data with custom social attributes

Oracle Sales CloudImplementing Customer Data Management
Chapter 21Configure Oracle Social Data and Insight Cloud Service for
Data Enrichment and Address Verification
133
• Publishing the sandbox used for creating custom fields
Social Attributes Supported by Data as a Service (DaaS): ExplainedData as a Service (DaaS) supports the following social attributes or handles for accounts (companies) and contacts.
For a complete list of account (company) and contact attributes, see the Understanding Attributes chapter in the Using OracleSocial Data and Insight Cloud Service guide. The following table lists all the supported Data Cloud account (company) socialattributes or handles.
Company Data Attribute Geographic Availability Length of Data inCharacters
Subscription Level Description
Blog URL
Global
350
D&B Company EnterpriseRecords
Blog URL for thecompany.
Twitter URL
Global
350
D&B Company EnterpriseRecords
Twitter URL for thecompany.
Twitter Followers
Global
9
D&B Company EnterpriseRecords
Number of Twitterfollowers for thecompany Twitter URL.
Note: All the attributes listed here are of the data type VARCHAR2. This data type can be either a Text or aLong Text depending on the length of data. While creating custom fields using the application composer, youmust select the type of the field according to the listed length of data in characters.
For a list of all the supported Data Cloud contact social attributes or handles, see the Related Links section.
Related Topics• Supported Data Cloud contact social attributes or handles
Creating Custom Fields for Social Attributes in Sales Cloud:ProcedureEnriching the Oracle Sales Cloud account and contact data with social attributes requires the creation of custom fields inOracle Sales Cloud for the social attributes.
You must create a sandbox before you create custom fields using the Application Composer.
Creating a Sandbox for Creating Custom FieldsComplete the following steps to create a sandbox to create custom fields:
1. Sign in to Oracle Sales Cloud as Sales Administrator.2. Click the Settings and Actions menu.3. Click Manage Sandboxes. The Manage Sandboxes page appears.4. Click the Actions menu on the Manage Sandboxes page.

Oracle Sales CloudImplementing Customer Data Management
Chapter 21Configure Oracle Social Data and Insight Cloud Service for
Data Enrichment and Address Verification
134
5. Select New.6. Enter the sandbox name and description in the Create Sandbox dialog box.7. Click Save and Close. A confirmation message dialog box appears.8. Click OK in response to the confirmation message9. Navigate to the Manage Sandbox page.
10. Search for the newly created sandbox in the Manage Sandbox page.11. Select the newly created sandbox.12. Click Set as Active.13. Click Yes in response to the warning message.
Now you are in the new sandbox and are ready to create social attributes.
Creating Custom Fields Using the Application ComposerComplete the following steps to create a custom field using the Application Composer:
1. Sign in to Oracle Sales Cloud as Sales Administrator.2. Navigate to the Application Composer from the Tools section of the Navigator work area.3. Expand Standard Objects, expand Account or Contact, and click Fields.
Note: This section describes how to create a custom field for the account object. The procedures forcreating a custom field for the account and contact objects involve the same steps. You may navigate toAccount or Contact under the Standard Objects in the Application Composer UI accordingly.
4. Click Actions in the Fields page.5. Select the Create option to add a new custom field. The Select Field Type dialog box appears.6. Select the field type as Text or Long Text or Number.
Note: You must select the type of the field according to the length of the data in characters listed in the"Identifying the Social Attributes Supported by Data as a Service (DaaS)" section. All the attributes listed inthe section are of the data type VARCHAR2. VARCHAR2 can be either a Text or a Long Text dependingon the length of the data in characters.
7. Click OK. The Create Text Fields page appears.8. Enter the Display Label and Help Text of the social attribute. Name is auto populated based on the display label.9. Change the attribute data length if required.
Note: The maximum data length for all the supported social URLs is 2080 characters.
10. Click Save and Close.
Once the attribute is created, you can see it on the Fields page, under the Custom tab.
Repeat this procedure to create additional custom fields or attributes.
Adding Custom Sales Cloud Social Attributes to UI Pages: ProcedureTo enrich newly created custom fields for social attributes in Sales Cloud, you must add the attributes to the simplified pagesin the Application Composer. When you add the attributes in the simplified page, it is displayed in the details page of Accountand Contact.

Oracle Sales CloudImplementing Customer Data Management
Chapter 21Configure Oracle Social Data and Insight Cloud Service for
Data Enrichment and Address Verification
135
Adding Account Custom Fields to Simplified PagesComplete the following steps to add the account custom fields to simplified UI pages:
1. Navigate to Pages through Account in the Application Composer.2. Select the Simplified Pages tab on the Accounts: Pages UI.3. Click Actions under the Details Page layouts. To add new custom fields, you must create a duplicate page layout
based on the default page layout.4. Select Duplicate Layout. The Duplicate Layout dialog box page appears.5. Specify the New Layout Name and select Default Layout as the Source Layout.6. Click Save and Edit. The Creation layout: Social Attributes page appears.7. Click the Edit icon next to FUSE Customer ObjectCreation View. The Edit Creation page appears.8. Select the newly created fields from the Available Fields pane of the box and use the arrow buttons to move the
required into the Selected Fields pane.9. Click Save and Close after editing and adding these custom fields.
Accounts Custom fields (social attributes) are now added to the Simplified Pages.
Adding Contact Custom Fields to Simplified PagesComplete the following steps to add contact custom fields to the simplified UI pages:
1. Navigate to Pages through Contact in the Application Composer.2. Select the Simplified Pages tab in the Contact: Pages UI.3. Click Actions under the Details Page Layouts. To add new custom fields, you must create a duplicate page layout
based on the default page layout.4. Select Duplicate Layout. The Duplicate Layout page appears.5. Specify the New Layout Name and select the Default Layout as the Source Layout.6. Click Save and Edit. The Details Layout: Social Attributes page appears.7. Click the Edit icon next to Contact Overview Form. The Edit Details Page Summary Form page appears.8. Select the newly created fields from the Available Fields pane of the box and use the arrow buttons to move the
required into the Selected Fields pane.9. Click Save and Close after editing and adding these custom fields.
The Contact Custom fields (social attributes) are now added to the Simplified Pages.
Mapping Custom Social Attributes with the DaaS Supported SocialAttributes: ProcedureA newly created custom field must be mapped to the Data Cloud social attributes to show the fields on the data matchingscreen. This enables you to enrich Oracle Sales Cloud account and contact data with the enriched social data downloadedfrom the Oracle Social Data and Insight Cloud service.
Mapping the Sales Cloud Account Attributes with the Data Cloud Social AttributesThe following are the steps to map Sales Cloud account attributes with the Data Cloud Social attributes:
1. Navigate to the Setup and Maintenance page.2. Enter Manage Social Data and Insight Cloud Attribute Mapping and Enrichment Preferences in the tasks search box.3. Click Search.4. Navigate to Manage Social Data and Insight Cloud Attribute Mapping and Enrichment Preferences UI.

Oracle Sales CloudImplementing Customer Data Management
Chapter 21Configure Oracle Social Data and Insight Cloud Service for
Data Enrichment and Address Verification
136
5. Click the Attribute Mappings tab on the Manage Social Data and Insight Cloud Attribute Mapping and EnrichmentPreferences page.
6. Search for the social attributes in the Social Data Cloud and Insight Attribute column that you must map with thecustom fields.
7. Select Account as the Sales Cloud Object.8. Click the corresponding Sales Cloud Attribute drop-down list. The Search and Select FusionAttributeName dialog
box appears.9. Enter the name of the custom attribute that you created.
10. Click Search.11. Select the Custom attribute from the search results table.12. Click OK.13. Click Save and Close on the Manage Social Data and Insight Cloud Attribute Mapping and Enrichment Preferences
Page.
The mapping of the Sales Cloud account attributes with the Data Cloud Social attributes is now complete.
Mapping the Sales Cloud Contact Attributes with the Data Cloud Social AttributesThe following are the steps to map Sales Cloud contact attributes with the Data Cloud Social attributes:
1. Navigate to the Contact Attributes section on the Manage Social Data and Insight Cloud Attribute Mapping andEnrichment Preferences page.
2. Search for the Data Cloud contact social attributes in the Social Data Cloud and Insight Attribute column.3. Select Contact from the Sales Cloud Object drop-down list.4. Click the corresponding Sales Cloud Attribute drop-down list. The Search and Select: FusionAttributeName dialog
box appears.5. Enter the name of custom attribute that you created.6. Click Search.7. Select the custom attribute from the search results.8. Click OK.9. Click Save and Close on the Manage Social Data and Insight Cloud Attribute Mapping and Preferences page.
The mapping of the Sales Cloud contact attributes with the Data Cloud Social attributes is now complete.
Adding the Custom Social Attributes to Select Fields to Enrich Page:ProcedureTo enrich a Sales Cloud custom social attribute it must be displayed on the Select Fields to Enrich page. The following are thesteps to add the custom social attributes to display on the Select Fields to Enrich page:
1. Click the Preferences tab on the Manage Social Data and Insight Cloud Attribute Mapping and EnrichmentPreferences Page.
2. Search for the newly mapped attributes in the Social Data Cloud and Insight Attribute column.3. Select the Display on Select Fields to Enrich page options for the newly mapped attributes.4. Click Save and Close.
You can see the newly created attributes on the Select Fields to Enrich page. In the matching screen, you can selectthe Data Cloud data to overwrite Sales Cloud data.
Similarly, you can enable the contact social attributes to display on the Select Fields to Enrich page by navigating to theContact Enrichment Preference section on the Manage Social Data and Insight Cloud Attribute Mapping and EnrichmentPreferences page.

Oracle Sales CloudImplementing Customer Data Management
Chapter 21Configure Oracle Social Data and Insight Cloud Service for
Data Enrichment and Address Verification
137
Enriching Oracle Sales Cloud Account and Contact Data with SocialAttributes: ProcedureYou can enrich Oracle Sales Cloud account and contact data with social attributes using the Sales Cloud simplified userinterface.
Enriching Oracle Sales Cloud Account Data with Social AttributesComplete the following steps to enrich Oracle Sales Cloud Account and Contact Data with Social Attributes:
1. Navigate to the Accounts simplified UI page.2. Select the account that you must enrich with new custom fields.3. Click on Actions on the Edit Account: {Account Name} page.4. Select the Enrich Account option.
The Select Fields to Enrich page appears with the newly added social attributes.5. Select the Data Cloud values as the source for the fields that you must enrich.6. Click Enrich.
You can view the enriched fields in the Edit Account: {Account Name} page if data cloud has values.7. Click Save and Close.
Enriching Oracle Sales Cloud Contact Data with Social AttributesComplete the following steps to enrich the Oracle Sales Cloud contact data with social attributes:
1. Navigate to the Contacts simplified UI page.2. Select the contact that you must enrich with new custom fields.3. Click Actions.4. Select the Enrich Contact option.
The Select Fields to Enrich page appears with the newly added social attributes.5. Select the Data Cloud values as the source for the fields that you must enrich.6. Click Enrich.
You can view the fields in the Edit Contact {Contact Name}: Profile page if data cloud has values.7. Click Save and Close.
Publishing the Sandbox Used for Creating Custom FieldsThe final step is to publish the sandbox used to create custom fields to get these changes across. Complete the followingsteps to publish the sandbox.
1. Navigate to the Manage Sandboxes page.2. Select the appropriate sandbox.3. Click Publish.4. Click Close.

Oracle Sales CloudImplementing Customer Data Management
Chapter 21Configure Oracle Social Data and Insight Cloud Service for
Data Enrichment and Address Verification
138

Oracle Sales CloudImplementing Customer Data Management
Chapter 22Define Data Quality
139
22 Define Data Quality
Setting Up Data Quality Using Enterprise Data Quality:ExplainedOracle provides a robust data quality solution for all Oracle Sales Cloud applications through a ready-to-use integration witha product called Oracle Enterprise Data Quality (EDQ). EDQ is a complete data quality product with capabilities such asprofiling, standardization, matching and merging, and address verification, which is also available as a standalone product.
Setting up data quality using EDQ involves two operations, matching and address cleansing.
Matching is a process that identifies the potential duplicates for account, contact, and address. You can identify the potentialduplicate records in real-time when you create a customer record, and in batch mode for existing records.
Address cleansing is a process that corrects and validates address data, based on postal requirements. For example, if youenter valid values for postal code, city, and country, the data quality functionality may return a value for state. Likewise, if youenter valid values for city, state, and country, the data quality functionality automatically supplies a postal code value.
The data quality services receive matching or cleansing requests, such as duplicate prevention or address validation, from avariety of consuming applications. The data quality service then calls the EDQ service based on the configuration for furtherprocessing. The primary components of the Oracle Sales Cloud data quality architecture are as follows:
• OSC-EDQ Connector in the Oracle Sales Cloud CRM Server - Receives requests from Oracle Sales Cloudapplications for address validation, matching, and so on
• Oracle Address Validation Service - Performs address validations
• Shared Sharing Database - Handles batch jobs
• EDQ Matching Server - Performs address matching

Oracle Sales CloudImplementing Customer Data Management
Chapter 22Define Data Quality
140
The following figure illustrates the various architecture components of the Oracle Sales Cloud data quality solution and howOracle Sales Cloud applications interface with the EDQ engine.
Oracle Sales Cloud CRM Server
OSC-EDQ Connector
EDQ Matching Server
Customer Data Service Pack
Web Services Jobs
Shared SharingDatabaseOracle Address Validation
Service
Real-tim
e Requests
`
Batch Jobs
Defining data quality involves setting up two components, matching and address cleansing. As part of implementing thesecomponents, you must perform the related regular setup tasks in the Setup and Maintenance work area:
• Manage Server Configurations
• Manage Enterprise Data Quality Matching and Cleansing Configurations
Note: You must set up the server configurations prior to implementing EDQ matching or cleansing, dependingon the data quality requirements.

Oracle Sales CloudImplementing Customer Data Management
Chapter 22Define Data Quality
141
Manage Server ConfigurationsYou have the option of enabling or disabling the predefined server configurations for EDQ integration by selecting ordeselecting the related server configuration. Enabling a predefined matching or cleansing server configuration lets you benefitfrom both the real-time and batch matching or cleansing capabilities.
• For more information on managing EDQ server configurations, see Enterprise Data Quality Server Configurations:Explained.
Manage Enterprise Data Quality Matching ConfigurationsYou have the option of using either the predefined matching configurations shipped ready-to-use or copying and adaptingit to your address matching requirements. Real-time matching identifies duplicate account, contact, and address entries inOracle Sales Cloud. Batch matching identifies duplicate entries within a set of records or a batch of the same type in thedatabase. For more information, see Managing Enterprise Data Quality Matching Configurations: Procedures.
Manage Enterprise Data Quality Cleansing ConfigurationsYou have the option of using either the predefined cleansing configuration shipped ready-to-use or copying and adapting itto your address cleansing requirements. Real-time address cleansing performs cleansing, standardization, and validation ofaddresses during the data entry process. Batch address cleansing performs cleansing operations on a set of address recordsin the database. For more information, see Managing Enterprise Data Quality Cleansing Configurations: Procedures.
Server Configurations
Enterprise Data Quality Server Configurations: ExplainedEnterprise Data Quality (EDQ) server configurations are predefined configurations for EDQ integration. Each EDQ serverconfiguration is associated with a data quality management operation such as matching or cleansing. You can enable anddisable a data quality management operation by selecting or deselecting the related EDQ server configuration.
Two predefined server configurations are available for EDQ:
• EDQ Real-Time and Batch Basic Match Server
• EDQ Real-Time and Batch Basic Cleanse Server
EDQ Real-Time and Batch Basic Match ServerEnable this configuration if you want to use the matching capabilities. Enabling this configuration lets you benefit from bothreal-time and batch matching features in Oracle Sales Cloud. Real-time matching is used to prevent entry of duplicaterecords. Batch data matching is used for identifying duplicates of existing records.

Oracle Sales CloudImplementing Customer Data Management
Chapter 22Define Data Quality
142
EDQ Real-Time and Batch Basic Cleanse ServerEnable this configuration if you want to use the cleansing capabilities. Enabling this configuration lets you benefit fromboth real-time and batch cleansing features in Oracle Sales Cloud. Real-time address cleansing service enables the salesrepresentative to verify the addresses while creating a contact or an account. Batch address cleansing enables the salesadministrator or data steward to cleanse a set of addresses that already exist in Oracle Sales Cloud in bulk and during importprocess.
Matching Configurations
Enterprise Data Quality Matching Configurations: ExplainedEnterprise Data Quality (EDQ) matching configurations comprise attributes and parameters for real-time and batch matchingof Oracle Sales Cloud entities to prevent duplicate entries and identify existing duplicates. EDQ real-time and batch matchingare available for account, contact, and address entities. You have the option of using either the predefined ready-to-useconfiguration or copying and adapting it to your address matching requirements.
The predefined EDQ matching configurations applicable for both real-time and batch matching are:
• Account Duplicate Identification
• Contact Duplicate Identification
• Address Duplicate Identification
These configurations are used to identify the duplicate account, contact, and address entries in Oracle Sales Cloud. You canreview and edit these predefined matching configurations to optimize the matching functionality to meet your needs.
EDQ Matching ProcessIn EDQ matching process, the record added or updated to the application for comparison is called a driver record. And, therecords that are compared with the driver record are called the candidate records. Driver records are compared with eachother, but candidate records are never compared with other candidates. The EDQ real-time matching process comparesa single driver record against many candidates and returns possible duplicate records based on matching attributes andthreshold. The batch matching process compares all driver records of the same type, such as account, contact, and address,and identifies all possible matches within these sets of records.
The batch matching process runs in two modes, full batch and incremental batch. While the full batch mode matches allrecords against each other, the incremental mode matches a subset of records against all of their selected candidates. Inbatch matching, separate matching templates are provided that lets you specify different match rules. For example, you maywant to minimize user intervention of adding customers in front end applications, and perform an exhaustive match on aregular basis.
The EDQ matching process for real-time and batch matching runs the EDQ Cluster Key Generation service and EDQmatching service for duplicate identification. The EDQ Cluster Key Generation service is called whenever a record is added orupdated in an application. This service generates keys for records added as well as for the records that are updated in OracleSales Cloud. These generated keys are stored in Oracle Sales Cloud, which are then used to select the candidate recordsthat may match to the data in the application.
The selected candidate records along with the driver record are returned to the EDQ matching service. Then, this serviceexamines the records and decides which of the candidate records are a good match with the driving record. Once EDQmatching service arrives at the best match, it assigns a score to every duplicate record identified based on the strength of thematch.

Oracle Sales CloudImplementing Customer Data Management
Chapter 22Define Data Quality
143
For more information about the EDQ matching process, see the Oracle Enterprise Data Quality Customer Data Services PackMatching Guide at
http://docs.oracle.com/cd/E48549_01/doc.11117/e40737/toc.htm
Match AttributesMatch attributes define the attributes that are used for real-time and batch matching of the account, contact, and addressentities to identify duplicate entries. You use two types of attributes for matching:
• EDQ Match Identifier: Specifies the EDQ attribute that you want to use for matching
• Oracle Sales Cloud Attributes: Specifies the Oracle Sales Cloud attribute that you want to use for matching
You can map the attributes in Oracle Sales Cloud with the corresponding EDQ attributes to create an attribute mapping. Forexample, for the Name EDQ attribute, you can select the Org.OrganizationName as the corresponding Organization attributeto create a mapping. You can define such attribute mappings for real-time matching, batch-data matching, or both.
When you map the attributes in Oracle Sales Cloud with the corresponding EDQ attributes, you create a matchingconfiguration setting for identifying duplicate entries. These settings are stored as matching keys in Oracle Sales Cloud.Whenever you change the attribute mappings, you must regenerate matching key values for the new or updated accounts,contacts, and addresses. You can regenerate matching key values using the Rebuild Keys option in the Edit MatchingConfiguration page.
Match Configuration ParametersMatching configuration parameters are system-level parameters that control aspects of the data quality matching services.
The following parameters control matching operations for identification of duplicate entries such as account, contact, andaddress in the database, between database and sets of data, such as import batches, or within sets of data to resolve themfrom merging or linking.
Score Threshold
• Parameter Value: Between 0 and 100. Default Value: 90
• Parameter Description: Specifies the score above which the matched records are returned by the matching service.Records equal to or greater than the score are considered as matches and the records with scores less than thethreshold are rejected.
Match Results Display Threshold
Note: This match configuration parameter is enabled only for real-time matching.
• Parameter Value: Between 0 and 100. Default Value: 10
• Parameter Description: Controls the number of matched records that are returned by the real-time matching.
Preview ConfigurationThe Preview Configuration option lets you enter the following parameters to identify and view the duplicate matching recordsin real-time without rebuilding the keys.
• Cluster Key Level: Returns records based on the cluster key level.
• Score Threshold: Returns records based on score threshold.
• Maximum Candidates: Returns records based on maximum candidates.
• Match Results Display Threshold: Returns records based on the match results display threshold value.

Oracle Sales CloudImplementing Customer Data Management
Chapter 22Define Data Quality
144
Review Configuration ResultsThe Review Configuration Results option lets you check if the input address entered for matching in the Edit MatchingConfiguration page returns the expected matched address after the rebuilding of keys. Alternatively, in the ReviewConfiguration Results page, you can enter the attribute information for one or more of the following matching configurationparameters that you want to match:
• Cluster Key Level: Returns records based on the cluster key level.
• Score Threshold: Returns records based on score threshold.
• Maximum Candidates: Returns records based on maximum candidates.
• Match Results Display Threshold: Returns records based on the match results display threshold value.
Managing Enterprise Data Quality Matching Configurations:ProceduresYou can perform the following tasks as part of managing Enterprise Data Quality (EDQ) matching configurations.
• Copying a predefined Enterprise Data Quality matching configuration
• Editing a copy of the predefined Enterprise Data Quality matching configuration
Copying a Predefined Enterprise Data Quality Matching ConfigurationTo copy or make a duplicate of a predefined Enterprise Data Quality matching configuration, complete these steps:
1. From the Setup and Maintenance work area, search for Manage Enterprise Data Quality Matching Configurationsand click Go to Task.
2. Select the Account Duplicate Identification match configuration, and click Duplicate.3. Click Yes in the Warning dialog box.4. Click Save to save the copy of the predefined configuration.
Note: You must save the copy of the predefined configuration, if you want to edit it.
5. Repeat Steps 2 to 4 to create copies of the predefined configuration for the Contact Duplicate Identification orAddress Duplicate Identification match configurations.
Editing a Copy of the Predefined Enterprise Data Quality Matching ConfigurationTo edit a copy of the predefined Enterprise Data Quality matching configuration, complete these steps:
Note: You can't edit the predefined Enterprise Data Quality configurations. You can only make a copy of it andedit it by following this procedure.
1. From the Setup and Maintenance work area, search for Manage Enterprise Data Quality Matching Configurationsand click Go to Task.
2. Select the copy of Account Duplicate Identification match configuration that you created in "Copying aPredefined Enterprise Data Quality Matching Configuration" section, and click Edit.
3. Select the Active check box to set the Account Duplicate Identification match configuration as the activeconfiguration.

Oracle Sales CloudImplementing Customer Data Management
Chapter 22Define Data Quality
145
Note: By default, the predefined configurations are always set to active. If there are one or more copies ofthe predefined configurations, then you can set any of them to active by selecting the Active check box. Atany given point in time, only one configuration can be active.
Note: Also, note that the Usage option is set to Both, which indicates that the configuration is for bothreal-time and batch matching.
4. Click Yes in the Warning dialog box to set this configuration as active.5. In the Match Attributes section, perform the following steps:
a. Select a row to edit the mapping, and click the drop-down button for the selected row.b. Select the relevant attribute from the list.c. If the list doesn't display the attribute that you want for the mapping, then click Search to search for the
attribute.d. Select the relevant option and click OK.
6. In the Cluster Key Level drop-down list, select Typical.7. In the Score Threshold field, enter 85. In the Match Results Display Threshold field, enter 20.
Note: The Match Results Display Threshold option isn't available for Batch.
8. Click Save to save your changes.
Managing Custom Match Rules and Scoring: ExplainedThis topic describes how to enable the custom match rules and scoring functionality.
Use the following procedure to enable custom match rules for account and contact. Note that custom match rules areavailable only for account and contact.
1. Navigate to: Setup and Maintenance > Customer Data Management offering > Setup >Data Quality functional area >Define Data Quality > Manage Enterprise Data Quality Matching Configuration.
2. Drill down on the predefined or the user-defined matching configuration, on the Manage Enterprise Data QualityMatching Configurations UI page, for which you want to enable or disable custom match rules and scoring.
3. Select Custom from the Scoring Type drop-down list on the Edit Match Configuration page.4. Click Save or Save and Close
Creating Custom Match Rules: ProcedureYou can use the custom match rule and scoring functionality to create your own match rules and scores based on yourbusiness requirements.
Use the following procedure to create custom match rules.
1. Navigate to: Setup and Maintenance > Customer Data Management offering > Setup > Data Quality functional area> Define Data Quality> Manage Enterprise Data Quality Matching Configurations.
2. Drill down on the predefined or the user-defined matching configuration, on the Manage Enterprise Data QualityMatching Configurations UI page, for which you want to create or update predefined rules.
3. Click Manage Match Rules on the Edit Match configuration page.

Oracle Sales CloudImplementing Customer Data Management
Chapter 22Define Data Quality
146
4. On the Manage Match Rules page click New. Alternatively, you can click Duplicate to create a new rule based on anexisting predefined or user-defined match rule.
5. Enter the following valued for the for the newly created or copied match rule:
◦ Rule Name: The name of the new rule.
◦ Match Rule Score: The score that you assign to the rule. The value must be between 1 and 100.
◦ Rule Attribute: The standard or predefined attributes that must be used in the custom match rules. Ensurethat the syntax and spelling are exact.
6. Click Save or Save and Close.
Selecting Sources of Match Rules and Scoring: Points to ConsiderThe Customer Data Quality application comes with two options for match rules and scoring, predefined match rules (EDQmatch rules) and custom match rules (Customer Data Management match rules). You can use a drop-down button onthe Enterprise Data Quality Matching Configuration page to select the match rules and scoring option best suited for yourbusiness requirements.
The predefined EDQ match rules include a single, view-only matching rule for each object such as account, contact, andaddress. These match rules cannot be edited, scores cannot be changed, and no new rules can be added.
In case the predefined match rules are not suitable for your business requirements, you should enable custom match rulesand scoring. You should be able to turn on custom scoring by selecting Custom from the Scoring Type drop-down list on theManage Enterprise Data Quality Matching Configurations UI page. You can use this functionality to create your own matchrules and scores.
Managing Key Generation: ExplainedThe EDQ matching process for real-time and batch matching makes use of the EDQ Cluster Key Generation service andthe EDQ matching service for duplicate identification. Successful key generation is critical to duplicate identification. Keygeneration identifies similar parties and assigns a key to each. When a matching configuration is made active, the applicationpasses a set of keys (subset of parties) to the EDQ matching service to process for duplicate identification.
The EDQ Cluster Key Generation service must be run whenever a record is added or updated in the application. This servicegenerates keys for records added as well as for the records that are updated in the application. If keys are not generated,duplicate identification fails.
Scheduling Key GenerationYou can schedule key generation for a matching configuration using the schedule key generation option on the Edit MatchingConfiguration page.
Rebuilding KeysYou must regenerate matching key values for the new or updated accounts, contacts, and addresses. You can regeneratematching key values using the Rebuild Keys option in the Edit Matching Configuration page.
Specifying Real-time and Batch Key Generation OptionsYou can specify different key generation options for batch matching and real-time matching. Take for example the clusterkey level parameter that has the values, limited, typical, or exhaustive. It is possible to select one value of this parameter, say

Oracle Sales CloudImplementing Customer Data Management
Chapter 22Define Data Quality
147
limited, for batch matching and another, say exhaustive, for real-time matching, depending on how tightly you want the dataquality engine to match records.
Reviewing Key Generations StatusYou can search for key generation jobs and review the status of each key generation job on the Manage Key Generationpage. The following table describes the various possible key generation statuses for a matching configuration.
Key Generation Status Description
Pending
Key generation for the configuration is required.
Processing
Key generation for the configuration is in progress.
Review Required
Key generation for this configuration needs review.
Ready
Key generation for this configuration is complete.
Identifying Duplicates Using Web Services: Worked ExampleThis example describes how to identify duplicates using Web services leveraging the Enterprise Data Quality (EDQ) engine.
The following table summarizes key decisions for this scenario.
Decisions to Consider In This Example
What type of service is set up in OracleEnterprise Manager?
DQRealTimeService
Which duplicate entries do I want toidentify using Web Services?
Contact
What is the associated configurationcode for Contact?
DQ_ SEED_ CONTACT_ DUP_ IDENTIFICATION
What record type is associated with thedata quality engine?
Driver
To identify duplicates using Web services, complete the following tasks:
• Extract the web services URL
• Derive the request payload
• Test the web service
• Test the match results
Prerequisites1. Enable EDQ Real time and Batch Basic Match Server in the Manage Data Quality Server Configurations page.

Oracle Sales CloudImplementing Customer Data Management
Chapter 22Define Data Quality
148
2. Identify the configuration code for the EDQ match configuration that you want to perform from the Setup andMaintenance, Enterprise Data Quality Matching Configuration task. The configuration code is displayed in theManage Enterprise Data Quality Matching Configurations page.
Extracting the Web Services URL1. Sign in to the Oracle Enterprise Manager using the Web Logic Server credentials.2. Select Oracle Fusion Customer Relationship Management from the navigation tree, and then select Oracle
Fusion Applications.3. From the tree, select CrmCommonApp, and then select CrmCommonApp (CRMCommonServer_1).4. In the Web Services pane on the page, click Test for the DQRealTimeServiceSoapHttpPort port.5. In the Test Web Service pane, copy the URL of a WSDL that appears in the WSDL field until "?wsdl", and then
paste to a notepad.
Deriving the Request Payload1. Launch the WSDL URL in a Web browser to open the DQRealTimeService endpoint page.2. In the DQRealTimeServiceSoapHttpPort pane, select matchPerson from the Operation list.3. In the Request Payload pane, complete the fields, as shown in the following table.
Field Value
DataQualityRequestId1
ConfigCodeDQ_ SEED_ CONTACT_ DUP_ IDENTIFICATION
4. In the DataQualityParam section, complete the fields, as shown in the following table.
Field Value
ParamNameScoreThreshold
ParamValue10
5. In the DataQualityPerson section, enter the minimum details of the person such as the first name, last name, andaddress that you want to match. The following table contains sample details of a person that you want to match.
Field Value
DataQualityRequestId1
DataQualityRecordTypeDriver
PersonFirstNameSmith
PersonLastNameWilson
AddressLine1401 Island Parkway
CityRedwood

Oracle Sales CloudImplementing Customer Data Management
Chapter 22Define Data Quality
149
Field Value
CountryUS
6. Click the XML Source option.
Note: This option appears next to the Operation list.
7. Copy the XML source and paste to a notepad.8. Select matchLocation and repeat steps 1 to 7 to identify duplicates for address or select matchOrganization and
repeat steps 1 to 7 to identify duplicates for account.
Testing the Web Service1. Open the Oracle Fusion Service Tester page.2. In the WebService URL field, paste the WSDL URL that you derived from Step 5 of the "Extracting the Web
Services URL" section.3. Enter the user name and password credentials.4. In the Input Argument pane, paste the XML source that you derived from Step 7 of the "Deriving the Request
Payload" section.5. Click Test Web Service. The Output Payload pane displays the output payload.
Testing the Match Results1. Copy and paste the output payload to a notepad.2. Verify if the COMPLETED and SUCCESS messages are displayed in the ErrorCode and Message tags, respectively.3. Search by the person first name to identify the number of duplicates displayed.4. Verify the match results.
Cleansing Configurations
Enterprise Data Quality Cleansing Configurations: ExplainedEnterprise Data Quality (EDQ) cleansing configurations comprise attributes and parameters for real-time and batch cleansingof addresses. You have the option of using either the predefined configuration shipped out-of-the-box or copying andadapting it to your address cleansing requirements. The predefined EDQ address cleansing configuration is named as Real-Time and Batch Address Cleansing. As part of defining and managing EDQ cleansing configurations, you can review and editthe predefined cleansing configuration.
EDQ real-time address cleansing includes an online, interactive service to cleanse and validate addresses during the dataentry process either through a UI or any other service creating address data into the registry. The real-time address cleansingservice parses the input address and validates it against the country-specific postal address reference databases, such asUnited States Postal Service (USPS), Canada Post. The real-time address cleansing service runs in two modes:
• Verify: The verify mode lets you parse, verify, cleanse, transliterate, and format the input address data. This modechecks the reference data and returns the best match (1 to 1).
• Search: The search mode lets you search all installed data and return multiple results (1 to Many).
EDQ batch address cleansing performs address cleansing, verification, standardization, and validation for a subset or entiretyof the address records in the registry, or as part of a data import process. Batch address cleansing service can only be run

Oracle Sales CloudImplementing Customer Data Management
Chapter 22Define Data Quality
150
in the Verify mode that parses and cleanses the input address data and enables output to be displayed in either native orRoman characters.
Note: For more information on address verification, see the "Manage Sales Cloud and Data Cloud Integration:Explained" topic in the Related Topics section.
Cleansing Attributes MappingThe mapping of the EDQ cleansing attributes with the corresponding Oracle Sales Cloud attributes to create cleansingconfigurations is called cleansing attributes mapping. Oracle Sales Cloud provides the following attributes for addresscleansing:
• Input Address Attribute: The attribute used to describe the input Oracle Sales Cloud address for address cleansing iscalled the input address attribute.
• Output Address Attribute: The attribute used to describe the output Oracle Sales Cloud address after the addresscleansing process is called the output address attribute.
• EDQ Attribute: The Oracle Sales Cloud attribute that is used for cleansing.
You can determine what input address attribute you want to map to the Oracle Sales Cloud EDQ attribute for addresscleansing. An EDQ attribute is used to describe a distinct item of information that relates to a record. For example a Cityattribute might describe the city details of a Customer record. Once the mapping is established, the input address is verified,cleansed, and validated in Oracle Sales Cloud. You can map the cleansed address described in the Oracle Sales Cloud EDQattribute to the corresponding output address attribute.
In this example, the sample input data contains a part of the postal address and lacks the complete street address and stateinformation as shown in the following table.
Input Address Attribute Value
Address1
8500 Normandale Lake Suite 710
City
Bloomington
Postal Code
55437
After the mapping, the input address is verified, validated, and corrected. The cleansed output address data is shown in thefollowing table.
Output Address Attribute Value
Address1
8500 NORMANDALE LAKE BLVD
Address2
STE 710
City
BLOOMINGTON
State
MN
Postal Code 55437-3813

Oracle Sales CloudImplementing Customer Data Management
Chapter 22Define Data Quality
151
Output Address Attribute Value
Cleansing Configuration ParametersCleansing configuration parameters are system-level parameters that control aspects of the data quality cleansing services.The EDQ cleansing configuration includes real-time and batch cleansing configuration parameters.
The following parameters control real-time and batch address cleansing, standardization, and validation operations for asubset or entirety of the address records in the database, or as part of a data import process.
Default Country
• Parameter Description: Used to specify the country to cleanse the address, if no identifiable country can be found inan input address.
Output Casing
• Parameter Value: Upper case, Lower case, Mixed case. Default Value: Mixed
• Parameter Description: Used to specify the letter case for an output address.
Minimum Verification Level
• Parameter Value: Between 1 and 5. Default Value: 3
• Parameter Description: Used to specify the level of verification to which the input data matches the availablereference data during the verification process.
Minimum Verification Score
• Parameter Value: Between 0 and 100. Default Value: 90
• Parameter Description: Used to specify the similarity between the address entry and closest reference data match asa percentage between 0 (no match) and 100 (perfect match).
Correct Partially Verified Addresses: Determines if you want to correct the addresses entry that are partially verified.
Correct Ambiguous Addresses: Determines if you want to correct the unclear addresses entry and resolve it to the correctaddress.
Review Configuration ResultsThe Review Configuration Results option lets you check if the input address entered for cleansing in the Edit CleansingConfiguration page returns the expected cleansed address. Alternatively, in the Review Configuration Results page, you canenter the attribute information for one or more of the following cleansing configuration parameters that you want to cleanse:
• Minimum Verification Level: Returns records based on the minimum verification level.
• Minimum Verification Score: Returns records based on the minimum verification score.
• Processing Mode: Returns records based on the processing mode.
Then, verify if the records returned for the cleansed address meets your expectations.
Related Topics
• Configuring Sales Cloud to Data Cloud Integration: Procedure

Oracle Sales CloudImplementing Customer Data Management
Chapter 22Define Data Quality
152
Managing Enterprise Data Quality Cleansing Configurations:ProceduresYou can perform the following tasks as part of managing Enterprise Data Quality (EDQ) cleansing configurations:
• Copying a predefined Enterprise Data Quality cleansing configuration
• Editing a copy of the predefined Enterprise Data Quality cleansing configuration
Copying a Predefined Enterprise Data Quality Cleansing ConfigurationTo copy or make a duplicate of a predefined Enterprise Data Quality cleansing configuration, complete these steps:
1. From the Setup and Maintenance work area, search for Manage Enterprise Data Quality Cleansing Configurationsand click Go to Task.
2. Select the Address Cleansing configuration, and click Duplicate.3. Enter a name in the Name field and click Save to save your changes.
Editing a Copy of the Predefined Enterprise Data Quality Cleansing ConfigurationTo edit a copy of the predefined Enterprise Data Quality cleansing configuration, complete these steps:
Note: You can't edit the predefined Enterprise Data Quality configurations. You can only make a copy of it andedit it by following this procedure.
1. From the Setup and Maintenance work area, search for Manage Enterprise Data Quality Cleansing Configurationsand click Go to Task.
2. Select the Address Cleansing configuration and click Edit.3. Select the Active check box to set the address cleansing configuration as the active configuration.
Note: By default, the predefined configurations are always set to active. If there are one or more copies ofthe predefined configurations, then you can set any of them to active by selecting the Active check box. Atany given point in time, only one configuration can be active.
Note: Also, note that the Usage option is set to Both, which indicates that the configuration is for bothreal-time and batch matching.
4. Click Yes in the Warning dialog box to set this configuration as active.5. In the Cleansing Attributes Mapping section, select an attribute in the Address column, enter a corresponding
attribute in the Attributes column, and then map it with the corresponding attributes in the Attributes column tocreate an attribute mapping.
6. In the Cleansing Configuration Parameters section, perform the following tasks:
a. In the Default Country drop-down list, select the relevant country name.b. In the Output Casing drop-down list, select Upper Case to print the address in upper case.c. In the Minimum Verification Level drop-down list, select 3-Verified to Thoroughfare Level.d. In the Minimum Verification Score drop-down list, select 80.e. Select the Correct Partially Verified Addresses check box.f. Select the Correct Ambiguous Addresses check box.

Oracle Sales CloudImplementing Customer Data Management
Chapter 22Define Data Quality
153
7. Click Save to save your changes.
Cleansing Addresses Using Web Services: Worked ExampleThis example describes how to cleanse addresses using Web services leveraging the Enterprise Data Quality (EDQ) engine.
The following table summarizes key decisions for this scenario.
Decisions to Consider In This Example
What type of service is set up in OracleEnterprise Manager?
DQRealTimeService
Which processing mode do I want touse for address cleansing?
Search: This mode lets you search all installed data and return multiple results.
What is the associated configurationcode for address cleansing?
DQ_ SEED_ LOC_CLEANSE
What record type is associated with thedata quality engine?
Driver
To cleanse addresses using Web services, complete the following tasks:
• Extract the web services URL
• Derive the request payload
• Test the web service
• Test the cleanse results
Prerequisites1. Enable EDQ Real time and Batch Basic Cleanse Server in the Manage Data Quality Server Configurations page.2. Identify the configuration code for the EDQ cleansing configuration that you want to perform from the Setup and
Maintenance, Enterprise Data Quality Cleansing Configuration task. The configuration code is displayed in theManage Enterprise Data Quality Cleansing Configurations page.
Extracting the Web Services URL1. Sign in to the Oracle Enterprise Manager using the WebLogic Server credentials.2. Select Oracle Fusion Customer Relationship Management from the navigation tree, and then select Oracle
Fusion Applications.3. From the tree, select CrmCommonApp, and then select CrmCommonApp (CRMCommonServer_1).4. In the Web Services pane on the page, click Test for the DQRealTimeServiceSoapHttpPort port.5. In the Test Web Service pane, copy the URL of a WSDL that appears in the WSDL field until "?wsdl", and then
paste to a notepad.
Deriving the Request Payload1. Launch the WSDL URL in a Web browser to open the DQRealTimeService endpoint page.2. In the DQRealTimeServiceSoapHttpPort pane, select cleanseAddress from the Operation list.3. In the Request Payload pane, complete the fields, as shown in the following table.

Oracle Sales CloudImplementing Customer Data Management
Chapter 22Define Data Quality
154
Field Value
DataQualityRequestId1
ConfigCodeDQ_ SEED_ LOC_CLEANSE
4. In the DataQualityParam section, complete the fields, as shown in the following table.
Field Value
ParamNameProcessingMode
ParamValueSearch
Note: In the ParamValue field, if you enter Verify, it checks the input address data and returns the bestmatch.
5. In the DataQualityPerson section, enter the address that you want to cleanse. For example, complete the fields, asshown in the following table.
Field Value
DataQualityRequestId1
DataQualityRecordTypeDriver
AddressLine1401 Island Parkway
CountryUS
6. Click the XML Source option.
Note: This option appears next to the Operation list.
7. Copy the XML source and paste to a notepad.
Calling the Web Service1. Open the Oracle Fusion Service Tester page.2. In the WebService URL field, paste the WSDL URL that you derived from Step 5 of the "Extracting the Web
Services URL" section.3. Enter the user name and password credentials.4. In the Input Argument pane, paste the XML source that you derived from Step 7 of the "Deriving the Request
Payload" section.5. Click Test Web Service. The Output Payload pane displays the output payload.
Testing the Cleanse Results1. Copy and paste the output payload to a notepad.

Oracle Sales CloudImplementing Customer Data Management
Chapter 22Define Data Quality
155
2. Verify if the COMPLETED and SUCCESS messages are displayed in the ErrorCode and Message tags, respectively.3. Verify the cleansed address.
Enabling Search Mode for Address Verification CloudServiceThe Address Verification Cloud Service comes with two processing modes, Verify and Search. You can use this functionalityto verify an address in real-time while entering information on the Create Accounts or the Create Contacts page.
Out of the box, only the Verify mode is available to customers. When the Verify mode is enabled and you do real-time addressverification on the Create or Edit Accounts or Contacts page, the service returns a single verified address that matches theaddress information you entered on the page.
The search mode is available only to the Oracle Data Cloud Address Verification Unlimited License customers from Release11 Patch Bundle 15. When the Search mode is enabled and you do real-time address verification on the Create or EditAccounts or Contacts page, the service returns a list of the suggested verified addresses that match the address informationyou entered. You can then select the appropriate address from the list. You must create a new profile option and configurethe address verification process mode to enable search mode. This topic describes how Oracle Data Cloud AddressVerification Unlimited License customers can enable the DaaS Address Verification Search Mode.
Create New Profile Option for Enabling Search ModePerform the following steps to create a new profile option that you require to enable search mode.
1. Sign in as a setup user such as, Sales Administrator, Master Data Management Application Administrator, orApplication Implementation Consultant.
2. Navigate to Setup and Maintenance > Manage Applications Core Profile Options task.3. Click New from Actions. The Create Profile Option page appears.4. Enter the following information in the Create Profile Option page:
◦ Profile Option code: ORA_ZCQ_AV_UNLIMITED_LIC
◦ Profile Display Name: ORA_ZCQ_AV_UNLIMITED_LIC
◦ Application: Trading Community Data Quality
◦ Module: Application Common
◦ Provide appropriate Description
◦ Provide appropriate Start Date and End Date.
5. Click Save and Close.
Now you can see the new profile option in the Manage Applications Core Profile Options page.6. Select the SiteEnabled and Updatable check boxes in the Profile Options Levels section.7. Click Save and Close.8. Navigate to the Manage Applications Core Administrator Profile Values task.9. Search for the Profile Option Code ORA_ZCQ_AV_UNLIMITED_LIC.
10. Click New under the ORA_ZCQ_AV_UNLIMITED_LIC: Profile Values section.11. Select Site as the profile level and Y as the profile value.12. Click Save and Close.

Oracle Sales CloudImplementing Customer Data Management
Chapter 22Define Data Quality
156
Configure Address Verification Processing ModeYou can configure the address verification process mode by performing the following tasks:
1. Navigate to the Setup and Maintenance work area > > Manage Enterprise Data Quality CleansingConfigurations task.
2. Click Address Cleansing.
The Edit EDQ Cleansing Configuration: Address Cleansing page appears.3. Select Search from the Processing Mode drop down list in the Cleansing Configuration Parameters section.
Note: You can select either Verify or Search mode form the Processing Mode drop down listaccording to your requirements. Select Verify mode if you want only one verified address to be returnedwhile verifying an address on the Create Accounts or Create Contacts page. Select Search mode toget a list of the suggested verified addresses that match the address you entered so that you canselect the appropriate address from the list.
4. Click Save and Close.
Verify Search Mode on Account or Contact Creation PageYou can verify the functionality of the Search mode while creating a new account or contact. Perform the following steps toverify an address in the search mode while creating a new account:
1. Navigate to Accounts work area.2. Click Create Account.3. Enter Address Line 1, City, and State of the account that you want to create on the Create Accounts page.4. Click Verify Address.
Note: If you click Verify Address after populating all the fields in the Address section of the CreateAddress page, you will get only one verified address with the complete match.
5. Select the correct address by clicking Select for the appropriate address from the list of suggested verifiedaddresses.
6. Click OK.
When you click OK the selected address gets populated in the Address section of the Create Account page.7. Enter account details on the Create Account page.8. Click Save and Close.
FAQs for Integrating with Oracle Enterprise Data QualityEngine
Oracle Sales CloudImplementing Customer Data Management
Chapter 22Define Data Quality
157
What's the difference between matching configurations and matchingserver configurations?Matching configurations include parameters that can be set at the matching configuration level and modified depending oncleansing strategy, data, and result requirements. You can use these configurations during real-time matching to preventduplicate entries and during batch matching to identify existing duplicates.
Matching server configurations provide the address and port of the data quality server used to process match requests.These configurations show both matching configuration and server configuration level parameters along with their type andcardinality. The parameters set at the server level are applicable to all the matching configurations.
What's the difference between cleansing configurations and cleansingserver configurations?Cleansing configurations include parameters that can be set at the cleansing configuration level and modified depending oncleansing strategy, data, and result requirements. You can use these configurations to cleanse address during data entry, andto cleanse and validate existing addresses to ensure data accuracy.
Cleansing server configurations provide the address and port of the data quality server used to process cleanse requests.There are no server configuration parameters for cleansing.
What's the difference between real-time duplicate prevention andduplicate identification?Real-time duplicate prevention identifies all possible duplicate records that may exist in the database for an entered record.This prevents entering of duplicate entities, such as organization, person, or location, into the database.
Duplicate identification identifies potential duplicate entities already existing in the database using batch matching, andresolves the actual duplicates by merging or linking.
What's the difference between real-time address cleansing and batchaddress cleansing?Real-time address cleansing is an online, interactive service to cleanse and validate addresses during the data entry process.
Batch address cleansing cleanses and validates addresses that already exist in the database or are imported into it.
Oracle Sales CloudImplementing Customer Data Management
Chapter 22Define Data Quality
158

Oracle Sales CloudImplementing Customer Data Management
Chapter 23Define Customer Hub Configuration
159
23 Define Customer Hub Configuration
Run Request Dispatch Job
Run Request Dispatcher Process: ExplainedYou can use the Run Request Dispatcher process to manage and monitor cleansing and duplicate identification batches, andduplicate resolution requests.
Run the request dispatcher process in the following modes:
• Basic: To submit the request dispatcher job for immediate processing.
• Advanced: To schedule the process to run either immediately or at specified intervals, such as every hour or everyday.
Customer Hub Profile Options
Customer Hub Profile Options: ExplainedCustomer Hub profile options configure data access and processing for data governance, duplicate identification processes,data cleansing processes, and duplicate resolution requests.
You can set the Hub profile option values only at the site level using the predefined profile option definitions. The followingtable lists the Customer Hub profile options that you can configure using the Setup and Maintenance, Manage Customer HubProfile Options page.
Profile Option Name Profile Option Definition Description Default Value
ZCH_ CLNS_ PROC_BT_SIZE
Data Cleansing Process BatchSize
The transaction batch size forthe data cleansing process. Setthis value based on availablesystem resources.
10000
ZCH_ DEDUP_ REQUEST_TYPE_OPTION
Resolution Request Type Default
The default request type for theduplicate resolution requests.
Merge
ZCH_ DI_ PROC_BT_SIZE
Duplicate Identification ProcessBatch Size
The transaction batch sizefor the duplicate identificationprocess. It's used to grouprecords in the batch and processeach group in a loop as aseparate transaction.
100
ZCH_ USER_ MERGE_REQUESTS
User Merge Requests
The processing options formerge requests.
Unspecified (NULL)

Oracle Sales CloudImplementing Customer Data Management
Chapter 23Define Customer Hub Configuration
160
Profile Option Name Profile Option Definition Description Default Value
ZCH_ ENABLE_ SURVIVORSHIP
Survivorship Enabled
The option to enable survivorshiprules for duplicate resolution.
Yes
ZCH_ AUTO_ LINK_THRESHOLD
Auto Link Threshold
The threshold for auto link. Datastewards review link requestswith lower scores.
0
ZCH_ AUTO_ MERGE_THRESHOLD
Auto Merge Threshold
The threshold for auto merge.Data stewards review mergerequests with lower scores.
100
ZCH_ DI_ MERGEREQ_REC_SIZE
Duplicate Set Record Number
The maximum number ofrecords in a duplicate set thatcan be automatically convertedto duplicate resolution requests.
10
You can set the following values for the User Merge Requests profile option:
• Allow Processing Without Approval: Merge requests are processed immediately without approval by data steward.
• Process Subject to Approval: Merge requests are reviewed by data steward, who can decide to approve or not.
• Unspecified (NULL): Merge requests are processed immediately without data steward approval. This indicates thatthe Customer Hub is not configured. The option is enabled only if the user has the Submit Trading CommunityMerge Request and Enter Trading Community Merge Request privileges.
Note: Data stewards must review sales accounts merges initiated from the Customer Center, Enter MergeRequest setup task, Automerge web service, or the Duplicate Resolution Request service. Data stewards canreview merge requests only if the User Merge Requests profile option is set to Process Subject to Approval, elsethe merge requests will error.
Define Survivorship
Manage Survivorship Rules
Survivorship Rules: ExplainedSurvivorship rules are a collection of business rules that determine the master or surviving record and its attributes during themerge operation.
Survivorship rules create the best version of a record from multiple source systems, based on business rules. You canconfigure survivorship rules to resolve conflicts while merging duplicate records.
Oracle Sales CloudImplementing Customer Data Management
Chapter 23Define Customer Hub Configuration
161
Understanding Survivorship Rules TypesThere are two types of survivorship rules. You can configure them based on your business needs. They are as follows:
• Set master record: Configure the set master record rule to define the criteria for selecting the master record from aset of potential duplicate records.
• Set attribute value: Configure the set attribute value rule to define the criteria for selecting the best attribute valuesfrom multiple input records.
Understanding the Predefined Survivorship RulesSix predefined set attribute value rules are provided ready-to-use with the application:
• Least Recently Updated Organization Attribute (History Wins): This rule selects the organization attributes thathave the oldest updated date.
• Most Recently Updated Organization Attribute (Recent Wins): This rule selects the organization attributes thathave the most recent updated date.
• Highest Source Confidence Level Wins for Organization: This rule selects the organization attribute values thathave the highest source confidence.
• Least Recently Updated Person Attribute (History Wins): This rule selects the person attributes that have theoldest updated date..
• Most Recently Updated Person Attribute (Recent Wins): This rule selects the person attributes that have themost recent updated date.
• Highest Source Confidence Level Wins for Person: This rule selects the person attribute values that have thehighest source confidence.
In addition, you can use predefined templates to create new Set Attribute Value rules.
To see these predefined attribute rules, click Search button on the Manage Survivorship Rules task. You can use thesepredefined survivorship rules as a starting point to define the criteria that is best for your business. These rules are updatedwith every release. You can also create, edit, and delete these rules. However, deleting an existing rule is not recommended.By default, these predefined survivorship rules are in the inactive status and you can activate these rules from the ManageSurvivorship Rules task.
Enabling Survivorship RulesYou can enable the survivorship functionality by setting the ZCH_ENABLE_SURVIVORSHIP profile option to Yes in theSetup and Maintenance work area, Manage Customer Hub Profile Options task.
Managing Survivorship RulesYou can create, edit, and delete survivorship rules in the Setup and Maintenance work area, Manage Survivorship Rulessetup task. The rules use source system confidence level and other criteria to determine the attributes of the record thatshould be retained from a particular source system, and are stored in the survivorship rules dictionary XML file.
Note: The application does not support changing survivorship rules inside the Application Composer sandbox.Therefore, the merge engine does not pick up the changes made to these rules inside the Application Composersandbox. When you define custom attributes or custom objects in an Application Composer sandbox, youshould Publish and Exit the sandbox before changing a survivorship rule in the Manage Survivorship Rules setuptask.
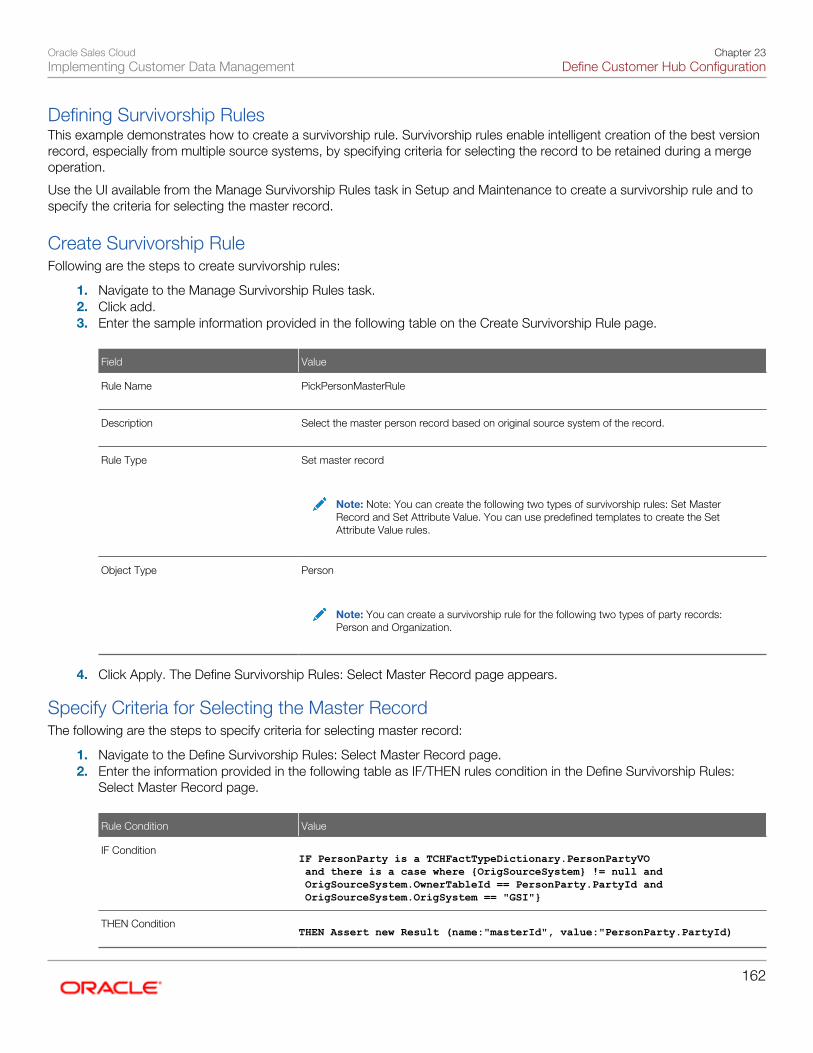
Oracle Sales CloudImplementing Customer Data Management
Chapter 23Define Customer Hub Configuration
162
Defining Survivorship RulesThis example demonstrates how to create a survivorship rule. Survivorship rules enable intelligent creation of the best versionrecord, especially from multiple source systems, by specifying criteria for selecting the record to be retained during a mergeoperation.
Use the UI available from the Manage Survivorship Rules task in Setup and Maintenance to create a survivorship rule and tospecify the criteria for selecting the master record.
Create Survivorship RuleFollowing are the steps to create survivorship rules:
1. Navigate to the Manage Survivorship Rules task.2. Click add.3. Enter the sample information provided in the following table on the Create Survivorship Rule page.
Field Value
Rule Name
PickPersonMasterRule
Description
Select the master person record based on original source system of the record.
Rule Type
Set master record
Note: Note: You can create the following two types of survivorship rules: Set MasterRecord and Set Attribute Value. You can use predefined templates to create the SetAttribute Value rules.
Object Type
Person
Note: You can create a survivorship rule for the following two types of party records:Person and Organization.
4. Click Apply. The Define Survivorship Rules: Select Master Record page appears.
Specify Criteria for Selecting the Master RecordThe following are the steps to specify criteria for selecting master record:
1. Navigate to the Define Survivorship Rules: Select Master Record page.2. Enter the information provided in the following table as IF/THEN rules condition in the Define Survivorship Rules:
Select Master Record page.
Rule Condition Value
IF Condition IF PersonParty is a TCHFactTypeDictionary.PersonPartyVO
and there is a case where {OrigSourceSystem} != null and OrigSourceSystem.OwnerTableId == PersonParty.PartyId and OrigSourceSystem.OrigSystem == "GSI"}
THEN Condition THEN Assert new Result (name:"masterId", value:"PersonParty.PartyId)

Oracle Sales CloudImplementing Customer Data Management
Chapter 23Define Customer Hub Configuration
163
Note the following specification in the Define Survivorship Rules: Select Master Record page.
◦ Click the + icon to add additional patterns to include additional conditions
◦ Click the Surround with Parenthesis option to add more features to the conditions
◦ Select the + Simple Test option to add additional clauses
The following figure shows the Define Survivorship Rules: Select Master Record page with the Surround iconhighlighted.
3. Click the Advanced Settings button to verify the effective date of the rule that you are going to create.
The following figure shows Advanced Settings icon on the Define Survivorship Rule: Select Master Record page.

Oracle Sales CloudImplementing Customer Data Management
Chapter 23Define Customer Hub Configuration
164
4. Select an effective date, as appropriate. The default effective date is Always. You can select an Effective From orEffective To date, or you can select an Effective Date range.
5. Select a priority for the rule, as appropriate.
The default priority of the Survivorship rules is Medium. These rules get executed in the order of their priority.6. Ensure that the Rules Active option is selected.
The following figure shows how the survivorship rule looks like when fully defined. The details include the rule nameand the IF and THEN conditions for determining the master.
7. Click Save and Close. You can view the newly created rule in the Manage Survivorship Rules page by searching forit.
8. Click Submit.
Tip: To activate the rule you must click Submit. You may have selected the Active mode, but that will notactivate a rule unless submitted.
Related Topics
• Implementing Customer Data Management: Define Survivorship
• MOS document: Define Survivorship Rules

Oracle Sales CloudImplementing Customer Data Management
Chapter 23Define Customer Hub Configuration
165
Defining Set Master Record RulesThis procedure demonstrates how to create a survivorship rule of the type Set Master Record. You can determinesurvivorship at the record level using the set master record rule type. Set master rules are used in party merge to set a singlerecord as the master record.
Defining Set Master Record RulesThe input to the survivorship rule is given in the IF clause. In a set master rule, the input is a set of party records. The THENclause contains the output that determines the master record. In the Set Master Record rule, the output is a result object thatcontains a specific Party ID. If multiple records with different Party IDs are returned, then it results in a conflict error. To createSet Master rules, you may perform the following steps:
To create Set Master rules, you perform the following steps:
1. Navigate to the Manage Survivorship Rules task.2. Click Add. The Create Survivorship Rule page appears.3. Enter the information provided in the following table on the Create Survivorship Rule page.
Field Value
Rule Name
PickOrganizationMasterRule
Description
Select the master organization record based on the specified criteria for setting the master record.
Rule Type
Set master record
Object Type
Organization
4. Click Apply. You are taken to the Define Survivorship Rules: Select Master Record page.
In the Define Survivorship Rules: Select Master Record page, you specify criteria for picking the master record. The criteriathat you define in this page determine the output of the rule.
The following topics contains three worked examples that show different ways of defining criteria in the Define SurvivorshipRules: Select Master Record page to set a master records:
• Set the Record with Oldest Creation Date as Master
• Set the Record with D-U-N-S Number and Smallest Party ID as Master
• Set the Record with D-U-N-S Number and Highest Number of Party Site as Master
Set the Record with the Oldest Creation Date as MasterThis rule has a single condition to set a record that has the oldest creation date as the master.
1. Navigate to the Define Survivorship Rules: Select Master Record page.2. Enter the information provided in the following table as IF/THEN rules condition in the Define Survivorship Rule:
Select Master Record page.
Rule Condition Value
IF Condition IF master is an HZ_PERSON_FactType.PersonPartyVO
and there is no case where {nonmaster == HZ_PERSON_FactType.PersonPartyVO and master.PartyId isn't

Oracle Sales CloudImplementing Customer Data Management
Chapter 23Define Customer Hub Configuration
166
Rule Condition Value
nonmaster.PartyId and master.creationDate is more than nonmaster.CreationDate}
THEN Condition THEN Assert new Result (name:"masterId", value:" master.PartyId)
The following figure displays the Define Survivorship Rules: Select Master Record page withcompletely filled IF and THEN rules conditions for setting a record that has the oldest creation date asthe master.
Set the Record with D-U-N-S Number and Smallest Party ID as MasterThis rule identifies and returns the master record based on the following three conditions in the order of priority listed:
1. Pick master that has D-U-N-S Number.2. If more than one record has D-U-N-S Number, pick one based on the smallest Party ID.3. If no record has D-U-N-S Number, pick one based on the smallest Party ID.
The following are the use cases for a set master record rule to pick the master based on the D-U-N-S number and thesmallest Party ID.
Use Case 1

Oracle Sales CloudImplementing Customer Data Management
Chapter 23Define Customer Hub Configuration
167
In this case, there are two records with D-U-N-S number. Therefore, the record with the smaller party ID is picked as themaster record. The following table contains the sample record information for this use case.
Record Name Party ID D-U-N-S Number Master
Record 1
11
998837472
Yes
Record 2
12
null
No
Record 3
13
984939234
No
The following table lists the IF and THEN rules condition values that you must enter on the Define Survivorship Rules: SelectMaster Record page for this use case.
Rule Condition Value
IF Condition Pick D-U-N-S number{IF master is an
HZ_PERSON_FactType.OrganizationPartyVOmaster.DUNsNumberC isn't null}masterPartyID is the minimum of masterPartyIDwhere{master= HZ_PERSON_FactType.OrganizationPartyVO andmaster.DUNsNumberC isn't null}
THEN Condition THEN
Assert new Result (name:"masterId", value:" master.PartyId)

Oracle Sales CloudImplementing Customer Data Management
Chapter 23Define Customer Hub Configuration
168
The following figure shows the Define Survivorship Rules: Select Master Record page with IF andTHEN rules conditions for picking the record with D-U-N-S number and minimum party ID as master.
Use Case 2
In this case, there is no record with D-U-N-S number. Therefore, the record with smallest party ID is picked as the masterrecord. The following table lists the sample record information for this use case.
Record Name Party ID D-U-N-S Number Master
Record 1
21
null
Yes
Record 2
22
null
No
Record 3
23
null
No

Oracle Sales CloudImplementing Customer Data Management
Chapter 23Define Customer Hub Configuration
169
The following table lists the IF and THEN rules condition values that you must enter on the Define Survivorship Rules: SelectMaster Record page for this use case.
Rule Condition Value
IF Condition Pick D-U-N-S number
{IF master is an HZ_PERSON_FactType.OrganizationPartyVOmaster.DUNsNumberC isn't null}and masterPartyID is the minimum of masterPartyIDwhere{master= HZ_PERSON_FactType.OrganizationPartyVO andmaster.DUNsNumberC isn't null}
THEN Condition THEN
Assert new Result (name:"masterId", value:" master.PartyId)
The following figure displays the Define Survivorship Rules: Select Master Record page withcompletely filled IF and THEN rules conditions to set the record that has the smallest party ID as themaster when no record with D-U-N-S number is found.
In this example, you have created two set master rules for Organization. First rule is for the cases where the input recordshave at least one record with D-U-N-S number. The second is for the case where no records have D-U-N-S Number.
Note: You can activate more than one survivorship rule at a time. When you activate multiple rules, make surethat the rules are not conflicting and the conditions in the rule are set according to the priority.

Oracle Sales CloudImplementing Customer Data Management
Chapter 23Define Customer Hub Configuration
170
Set the Record with D-U-N-S Number and Highest Number of Party Sites as MasterThis rule identifies and returns the master record based on the following three conditions in the order of priority listed:
1. Pick master that has D-U-N-S Number.2. Pick master that has more party sites.3. Pick master that has the smallest Party ID.
The following are two use cases for creating a set master rule to select the master record based on D-U-N-S number,number of party sites, and party ID:
Use Case 1
In this case, there are three records with D-U-N-S number and two records with highest number of party sites. Among thosetwo records, the one with the lower value for party ID is selected as master. The following table contains the sample recordinformation for this use case.
Record Name Party ID Number of Party Sites D-U-N-S Number Master
Record 1
11
3
198837472
Yes
Record 2
12
3
489203901
No
Record 3
13
2
384792392
No
Record 4
14
1
null
No
Use Case 2
In this case, there are no records with D-U-N-S number. So, among the two records with higher number of party sites, therecord with the smaller party ID is picked as the master record. The following table contains the sample record information forthis use case.
Record Name Party ID Number of Party Sites D-U-N-S Number Master
Record 1
21
1
null
No
Record 2
22
2
null
Yes
Record 3
23
3
null
No
To create a master record with D-U-N-S number, number of party sites, and party ID, you add one more condition to theprevious example where you set a master record with D-U-N-S number. Adding a condition to the previous example makesthe rules complicated and cumbersome. Instead, you can create a simple rule for each condition to narrow down the list ofpotential master records and create another simple rule in the end to pick one record from the remaining potential masterrecords.
Note: You can activate more than one survivorship rule at a time. When you activate multiple rules, make surethat the rules are not conflicting and the conditions in the rule are set according to the priority.

Oracle Sales CloudImplementing Customer Data Management
Chapter 23Define Customer Hub Configuration
171
The following figure displays the Survivorship Rules: Select Master Record page with the IF and THEN rules condition valuesfor creating a set master rule to set the record that has D-U-N-S Number as master. The priority of the rule is set as highest.The details of the conditions are as follows:
Priority: Highest
IF condition: If number of non-null DUNS records is the count where {master is aHZ_ORGANIZATION_FactType.OrganizationPartyVO and master.DUNSNumberC isn't null} and number of non-null DUNS
records more than 0 and master is a HZ_ORGANIZATION_FactType.OrganizationPartyVO and master.DUNSNumberC is null
THEN condition: Then retract master
Now, you set the conditions to set the record with the maximum number of party sites as the master.

Oracle Sales CloudImplementing Customer Data Management
Chapter 23Define Customer Hub Configuration
172
The following figure shows the Survivorship Rules: Select Master Record page with the IF and THEN condition values to setthe record with the maximum number of party sites as the master from the remaining potential records. The priority of the ruleis set as higher. The details of the conditions are as follows.
Priority: Higher
IF condition: If maximum party site number is the maximum of master.PartySite.size() where {master is aHZ_ORGANIZATION_FactType.OrganizationPartyVO} and master is a HZ_ORGANIZATION_FactType.OrganizationPartyVO and
master.PartySite.size() isn't maximum party site number
THEN condition: Then retract master
When the records are screened with two previous conditions, you create a third condition to screen all remaining potentialrecords with the smallest party ID.
The following figure shows the Survivorship Rules: Select Master Record page with the IF and THEN condition values forcreating a set master rule to set the record with the smallest party ID as the master. The priority of the rule is set as medium.The details of the conditions are as follows.
Priority: Medium
IF condition: If masterPartyId is the minimum of master.PartyId where {master is aHZ_ORGANIZATION_FactType.OrganizationPartyVO}
THEN condition: Assert new Result(name: "masterId",value:masterPartyId)
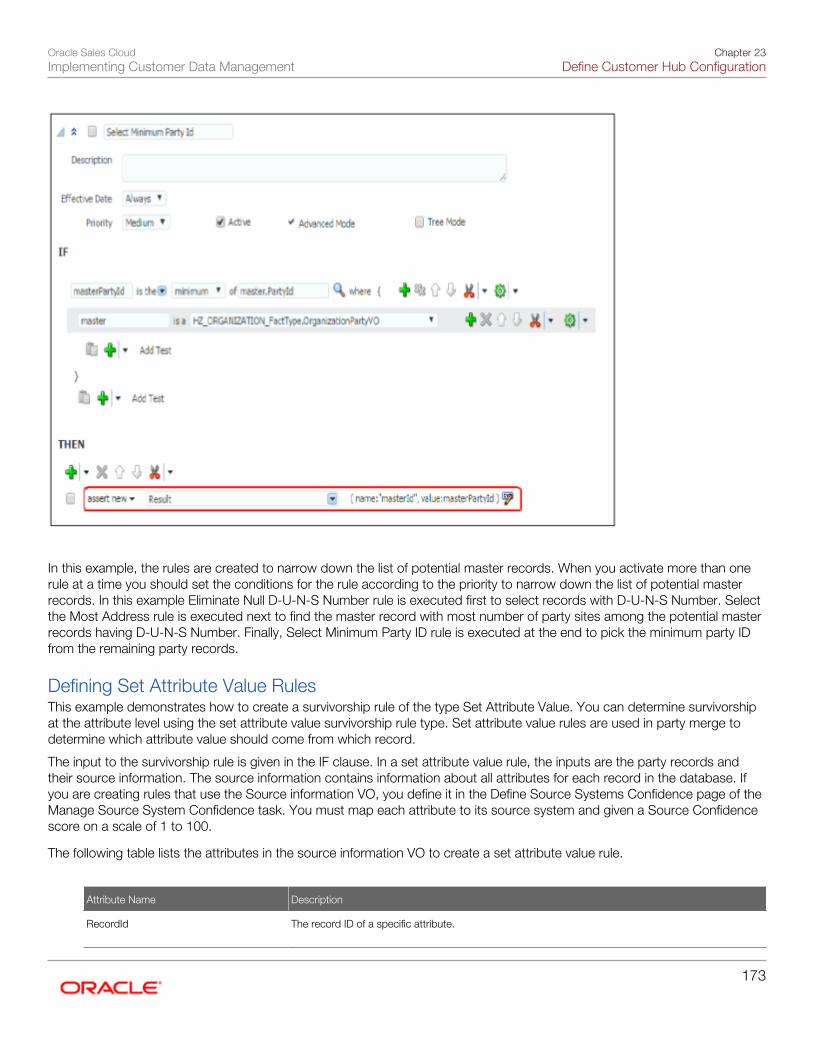
Oracle Sales CloudImplementing Customer Data Management
Chapter 23Define Customer Hub Configuration
173
In this example, the rules are created to narrow down the list of potential master records. When you activate more than onerule at a time you should set the conditions for the rule according to the priority to narrow down the list of potential masterrecords. In this example Eliminate Null D-U-N-S Number rule is executed first to select records with D-U-N-S Number. Selectthe Most Address rule is executed next to find the master record with most number of party sites among the potential masterrecords having D-U-N-S Number. Finally, Select Minimum Party ID rule is executed at the end to pick the minimum party IDfrom the remaining party records.
Defining Set Attribute Value RulesThis example demonstrates how to create a survivorship rule of the type Set Attribute Value. You can determine survivorshipat the attribute level using the set attribute value survivorship rule type. Set attribute value rules are used in party merge todetermine which attribute value should come from which record.
The input to the survivorship rule is given in the IF clause. In a set attribute value rule, the inputs are the party records andtheir source information. The source information contains information about all attributes for each record in the database. Ifyou are creating rules that use the Source information VO, you define it in the Define Source Systems Confidence page of theManage Source System Confidence task. You must map each attribute to its source system and given a Source Confidencescore on a scale of 1 to 100.
The following table lists the attributes in the source information VO to create a set attribute value rule.
Attribute Name Description
RecordId
The record ID of a specific attribute.

Oracle Sales CloudImplementing Customer Data Management
Chapter 23Define Customer Hub Configuration
174
Attribute Name Description
AttributeName
The name of the attribute.
Source
The source system from where the attribute is updated.
SourceConfidenceLevel
The source confidence level assigned to the source system.
SourceUpdateDate
The date when the attribute was last updated.
The THEN clause determines the output object that picks the survivor record. In this case, setAttribute function creates theoutput object. To create Set Attribute Value rules, you perform the following steps:
1. Navigate to the Manage Survivorship Rules task.2. Click Add. The Create Survivorship Rule page appears.
Tip: You can select attributes from the available attributes in the Create Survivorship Rule page. It pre-populates the rule template with the selected attributes. It is not mandatory to set attributes from theavailable attribute.
3. Enter the sample information provided in the following table on the Create Survivorship Rule page.
Field Value
Rule Name
PickAttributeValueRule
Description
Select the survivor value for a specific attribute based on specified survivor selection criteria.
Select the survivor value for a specificattribute based on specified survivorselection criteria.
Set attribute value
Object Type
Organization
Template
Select the Attribute Based template to select the surviving value based on the characteristic ofthe attributes. For example, you need an Attribute Based template to pick an attribute with thehighest or lowest value such as a party number, or salary, or the earliest incorporated year. Selectthe Source Confidence Based template to select the surviving value based on the confidence inthe source information.
4. Select attributes from the available attributes to pre-populate the rules template. In case you want to use thepredefined set attribute rules, do not select any attributes.
5. Click Apply. You are taken to the Define Survivorship Rules: Select Attribute Value page.
In the Define Survivorship Rules: Select Attribute Value page, you specify criteria for selecting the survivor attribute value. Thecriteria that you define in this page determine the feature of the rule. You also have the option of using one of the followingthree predefined templates:
• Highest Source Confidence Level Wins for Organization (or Person): Use this rule to select the attribute values withthe highest source confidence level.

Oracle Sales CloudImplementing Customer Data Management
Chapter 23Define Customer Hub Configuration
175
• Most recently updated Organization (or person) attribute: Use this rule to select the attribute values with the mostrecently updated date.
• Least recently updated Organization (or person) attribute: Use this rule to select the attribute values with the oldestupdated date.
The following sections of this topic contain three worked examples that show different ways of manually setting survivorattribute values in the Define Survivorship Rules: Select Attribute Value page. They are as follows:
• Set the Values with the Earliest Update Date as the Surviving Attribute Values
• Set the Value with the Highest Source Confidence Level as the Surviving Attribute Value for D-U-N-S Number
• Set the Values with the Earliest Incorporated Year as the Surviving Attribute Values
Set the Values with the Earliest Update Date as Surviving Attribute ValuesThis rule has a single condition to set all the surviving attribute values based on the earliest update date. The following is a usecase for a set attribute rule to select the values with the earliest update date as surviving attribute values:
Use Case 1
Party Record
The following table contains information for party records.
Record Name Party ID Party Name D-U-N-S Number
Record 1
1
Oracle Corp
198837472
Record 2
2
Oracle USA Corp
489203901
Record 3
3
Oracle
null
Source Information
The following table contains information for source information records.
Record ID Attribute Name Source Source Confidence Level Source Update Date
1
Party Name
FUSION
95
1/5/2016
2
Party Name
FUSION
95
1/5/2010
3
Party Name
SIEBEL
90
1/5/2000
1
D-U-N-S Number
DNB
100
2/5/1990
2
D-U-N-S Number
FUSION
95
1/5/2016

Oracle Sales CloudImplementing Customer Data Management
Chapter 23Define Customer Hub Configuration
176
In this case:
• The D-U-N-S number attribute value from the record with ID 1 is selected as survivor because the source informationindicates that it has the earliest source update date.
• The Party Name attribute value from the record with the ID 3 is selected as survivor because the source informationindicates that it has the earliest source update date.
Populate the Define Survivorship Rules: Select Attribute Values page with the IF and THEN rules condition values provided inthe following table.
Rule Condition Value
IF Condition IF picked attribute is a AttributeSourceInfoVO
and there is no case where {Other Attribute == AttributeSourceInfoVO andthere is no case whereOther Attribute is a AttributeSourceInfoVOPicked Attribute.Attributename is OtherAttributename andPickedAttribute.RecordId isn't Other Attribute.recordId andPicked Attribute.SourceUpdateDate more than OtherAttribute.SourceUpdateDate}
THEN Condition THEN
call setAttribute (picked attribute.Attributename, Picked Attribute.RecordId)
The following figure displays the Define Survivorship Rules: Select Attribute Values page with the IF and THEN rulesconditions to create the set attribute value rule that selects the values with the earliest source update date as the survivingattribute value. The figure provides the following details.
Name of the rule: History Wins
IF condition: If picked attribute is a AttributeSourceInfoVO and there is no case where {Other Attributeis AttributeSourceInfoVO and Picked Attribute.AttributeName is Other Attribute.AttributeName and
PickedAttribute.RecordId isn't Other Attribute.RecordId and Picked Attribute.SourceUpdateDate more than Other
Attribute.SourceUpdateDate}
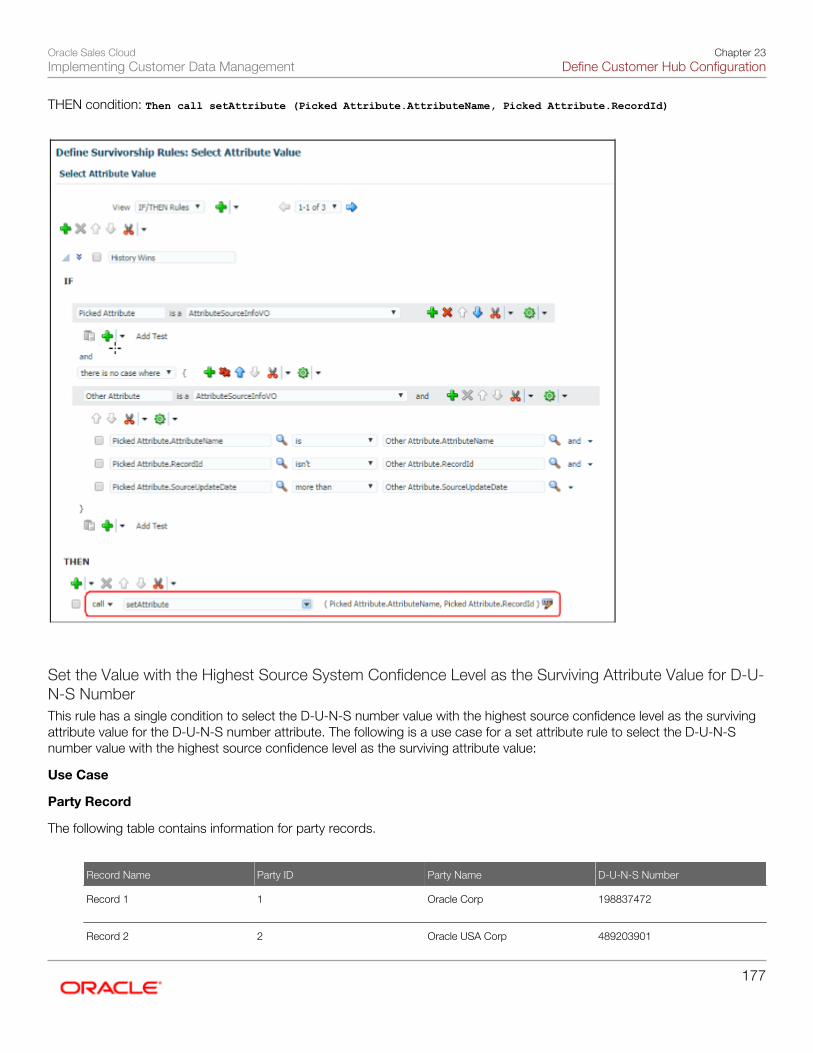
Oracle Sales CloudImplementing Customer Data Management
Chapter 23Define Customer Hub Configuration
177
THEN condition: Then call setAttribute (Picked Attribute.AttributeName, Picked Attribute.RecordId)
Set the Value with the Highest Source System Confidence Level as the Surviving Attribute Value for D-U-N-S NumberThis rule has a single condition to select the D-U-N-S number value with the highest source confidence level as the survivingattribute value for the D-U-N-S number attribute. The following is a use case for a set attribute rule to select the D-U-N-Snumber value with the highest source confidence level as the surviving attribute value:
Use Case
Party Record
The following table contains information for party records.
Record Name Party ID Party Name D-U-N-S Number
Record 1
1
Oracle Corp
198837472
Record 2 2 Oracle USA Corp 489203901
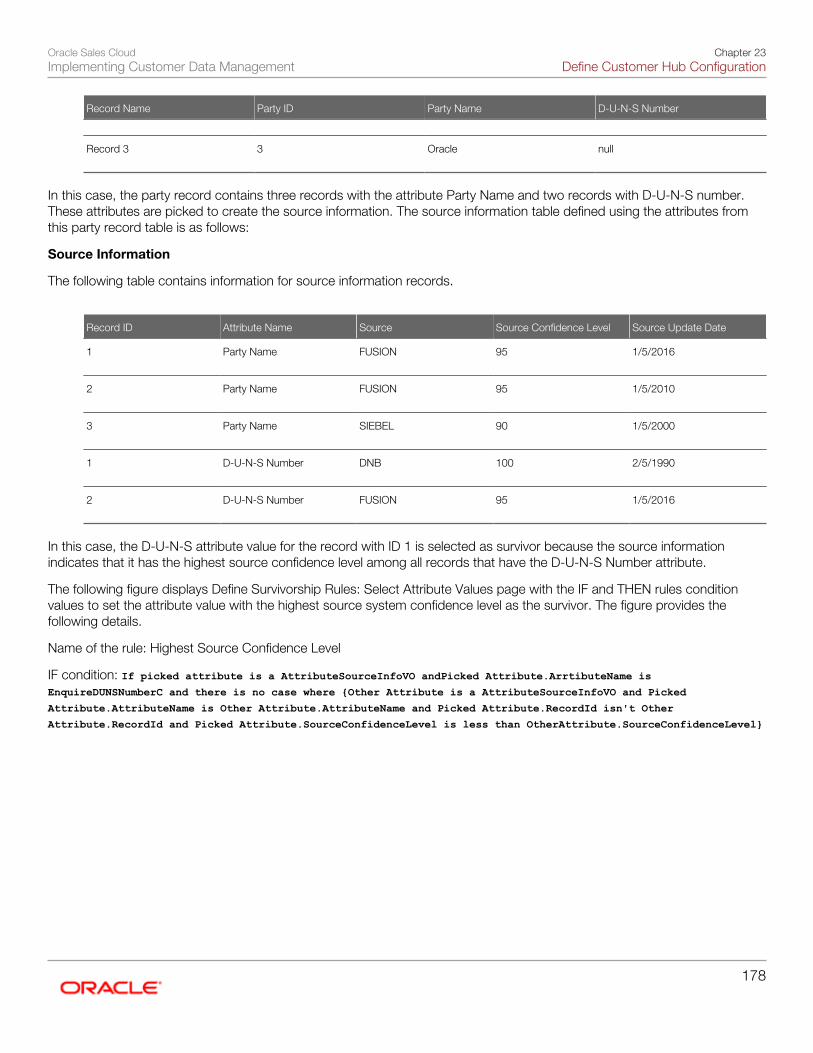
Oracle Sales CloudImplementing Customer Data Management
Chapter 23Define Customer Hub Configuration
178
Record Name Party ID Party Name D-U-N-S Number
Record 3
3
Oracle
null
In this case, the party record contains three records with the attribute Party Name and two records with D-U-N-S number.These attributes are picked to create the source information. The source information table defined using the attributes fromthis party record table is as follows:
Source Information
The following table contains information for source information records.
Record ID Attribute Name Source Source Confidence Level Source Update Date
1
Party Name
FUSION
95
1/5/2016
2
Party Name
FUSION
95
1/5/2010
3
Party Name
SIEBEL
90
1/5/2000
1
D-U-N-S Number
DNB
100
2/5/1990
2
D-U-N-S Number
FUSION
95
1/5/2016
In this case, the D-U-N-S attribute value for the record with ID 1 is selected as survivor because the source informationindicates that it has the highest source confidence level among all records that have the D-U-N-S Number attribute.
The following figure displays Define Survivorship Rules: Select Attribute Values page with the IF and THEN rules conditionvalues to set the attribute value with the highest source system confidence level as the survivor. The figure provides thefollowing details.
Name of the rule: Highest Source Confidence Level
IF condition: If picked attribute is a AttributeSourceInfoVO andPicked Attribute.ArrtibuteName isEnquireDUNSNumberC and there is no case where {Other Attribute is a AttributeSourceInfoVO and Picked
Attribute.AttributeName is Other Attribute.AttributeName and Picked Attribute.RecordId isn't Other
Attribute.RecordId and Picked Attribute.SourceConfidenceLevel is less than OtherAttribute.SourceConfidenceLevel}

Oracle Sales CloudImplementing Customer Data Management
Chapter 23Define Customer Hub Configuration
179
THEN condition: Then call setAttribute (Picked attribute.AttributeName, Picked Attribute.RecordId)
Set the Values with the Earliest Incorporated Year as the Surviving Attribute ValuesThis rule has a single condition to select values with the earliest incorporated year as the surviving attribute values. Thefollowing is a use case for creating such a set attribute value rule:
Use Case 1
Party Record
The following table contains information for party records.
Record Name Party ID Party Name Incorporated Year
Record 1
1
Oracle Corp
1980
Record 2
2
Oracle USA Corp
1990
Record 3
3
Oracle
2000
In this case, the party record table contains three records with the attributes Party Name, Party ID, and Incorporated Year.The attribute values for the record with the earliest incorporated year are picked as survivor attribute values.

Oracle Sales CloudImplementing Customer Data Management
Chapter 23Define Customer Hub Configuration
180
The following figure displays Define Survivorship Rules: Select Attribute Values page with the IF and THEN rules conditionvalues to set the attribute with the earliest incorporated year as the survivor. The figure provides the following details.
Name of the rule: Selecting the Earliest Incorporated Year
IF condition: If for each case where org is a OrganizationDVO and org.IncorpYear isn't null and there is no casewhere another org is a OrganizationDVO and org.PartyId is not another org.PartyId and another org.IncorpYear
isn't null and org.IncorpYear.intvalue() is more than another org.incorpyear.intValue()
THEN condition: Then call setAttribute ("IncorpYear", org.PartyId)
Defining Survivorship Rules for Parties with Custom Objects and Attributes: ExplainedThis topic describes how to define survivorship rules for merging parties having custom objects and attributes. For example,you can define a survivorship rule of the type Set Master Record to select the party with the maximum number of customobjects or the party with a specific attribute as the master. You can also define a survivorship rule of the type Set AttributeValue to select the smallest value for a specific attribute.
Understanding Custom Objects and AttributesYou can use Oracle Application Composer to configure and extend Sales Cloud applications. The Application composerprovides you the ability to extend an Oracle Sales Cloud application's object model. You can configure Sales Cloud objects
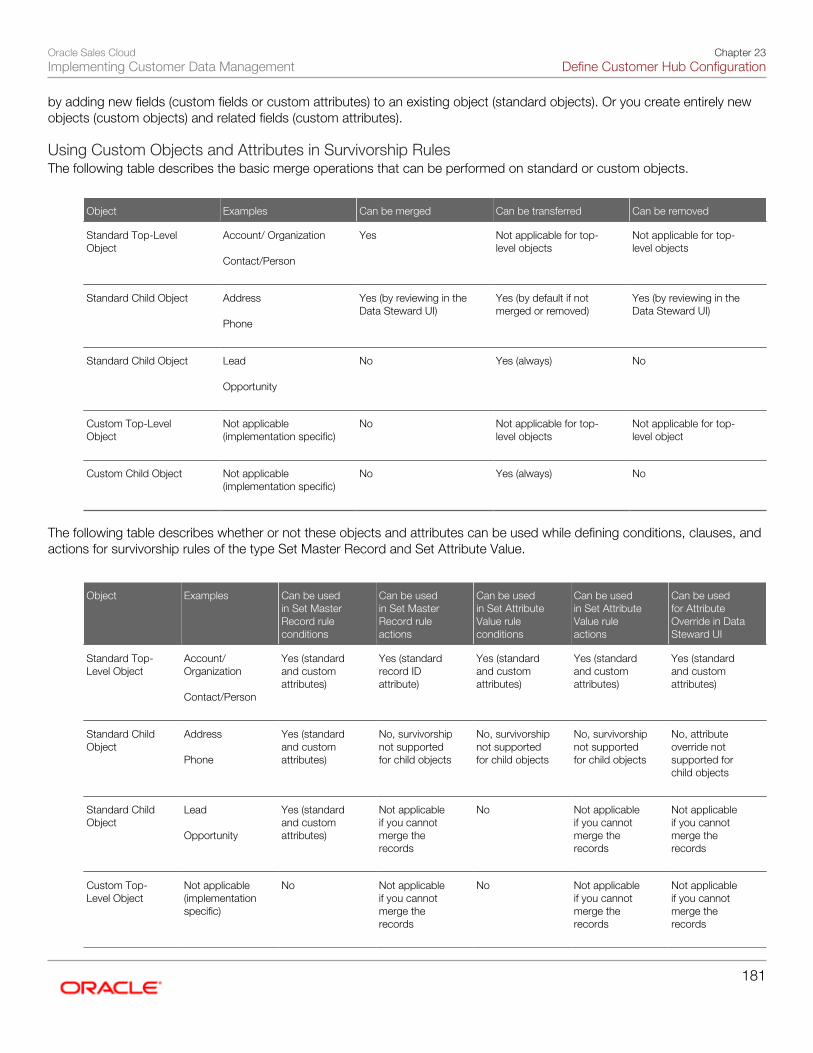
Oracle Sales CloudImplementing Customer Data Management
Chapter 23Define Customer Hub Configuration
181
by adding new fields (custom fields or custom attributes) to an existing object (standard objects). Or you create entirely newobjects (custom objects) and related fields (custom attributes).
Using Custom Objects and Attributes in Survivorship RulesThe following table describes the basic merge operations that can be performed on standard or custom objects.
Object Examples Can be merged Can be transferred Can be removed
Standard Top-LevelObject
Account/ Organization Contact/Person
Yes
Not applicable for top-level objects
Not applicable for top-level objects
Standard Child Object
Address Phone
Yes (by reviewing in theData Steward UI)
Yes (by default if notmerged or removed)
Yes (by reviewing in theData Steward UI)
Standard Child Object
Lead Opportunity
No
Yes (always)
No
Custom Top-LevelObject
Not applicable(implementation specific)
No
Not applicable for top-level objects
Not applicable for top-level object
Custom Child Object
Not applicable(implementation specific)
No
Yes (always)
No
The following table describes whether or not these objects and attributes can be used while defining conditions, clauses, andactions for survivorship rules of the type Set Master Record and Set Attribute Value.
Object Examples Can be usedin Set MasterRecord ruleconditions
Can be usedin Set MasterRecord ruleactions
Can be usedin Set AttributeValue ruleconditions
Can be usedin Set AttributeValue ruleactions
Can be usedfor AttributeOverride in DataSteward UI
Standard Top-Level Object
Account/Organization Contact/Person
Yes (standardand customattributes)
Yes (standardrecord IDattribute)
Yes (standardand customattributes)
Yes (standardand customattributes)
Yes (standardand customattributes)
Standard ChildObject
Address Phone
Yes (standardand customattributes)
No, survivorshipnot supportedfor child objects
No, survivorshipnot supportedfor child objects
No, survivorshipnot supportedfor child objects
No, attributeoverride notsupported forchild objects
Standard ChildObject
Lead Opportunity
Yes (standardand customattributes)
Not applicableif you cannotmerge therecords
No
Not applicableif you cannotmerge therecords
Not applicableif you cannotmerge therecords
Custom Top-Level Object
Not applicable(implementationspecific)
No
Not applicableif you cannotmerge therecords
No
Not applicableif you cannotmerge therecords
Not applicableif you cannotmerge therecords

Oracle Sales CloudImplementing Customer Data Management
Chapter 23Define Customer Hub Configuration
182
Object Examples Can be usedin Set MasterRecord ruleconditions
Can be usedin Set MasterRecord ruleactions
Can be usedin Set AttributeValue ruleconditions
Can be usedin Set AttributeValue ruleactions
Can be usedfor AttributeOverride in DataSteward UI
Custom ChildObject
Not applicable(implementationspecific)
Yes (all attributesare custom)
Not applicableif you cannotmerge therecords
No
Not applicableif you cannotmerge therecords
Not applicableif you cannotmerge therecords
Defining Set Master Record Rules for Parties with Custom Child Objects: WorkedExampleThis topic explains how to define a survivorship rule of the type Set Master Record to select the party with the maximumnumber of custom child objects.
This rule identifies and returns the master record based on the following two conditions:
1. Pick master that has the most custom child objects.2. Pick master that has the highest party ID.
The following table provides the details of a use case for set master record rule to select the party with the maximum numberof custom child objects and the highest party ID as the master record.
Record Number Party ID Number of Custom ChildObjects
Master
Record 1
11
3
No
Record 2
12
3
Yes
Record 3
13
3
No
Record 4
14
1
No
In this case, there are two records with the same number of custom child objects. Therefore, the record with the highest partyID is picked up as the master record.
Note: The number of child objects of the custom object is shown up as Fact Types. You can also find out thenumber of child objects using the accessor inside OrganizationDVO or PersonDVO.

Oracle Sales CloudImplementing Customer Data Management
Chapter 23Define Customer Hub Configuration
183
The following figure displays Define Survivorship Rules: Select Master Record page with the IF andTHEN rules condition values for creating the set master rule to pick up the record with the highestparty ID and maximum custom child objects as the master record.
Defining Set Master Record Rules for Parties with Custom Attributes: Worked ExampleThis topic explains how to define a survivorship rule of the type Set Master Record to select the party with a specific customattribute as the master.
This rule identifies and returns the master record based on the following two conditions:
1. Pick master that has a specified custom attribute. In this case the custom attribute is Testfieldone_c.2. Pick master that has the highest Party ID.
The following table provides the details of a use case for setting master record rule to select the party with a specific customattribute as the master.
Record Number Party ID Testfieldone_c Master
Record 1
11
Test
No
Record 2 12 Test Yes

Oracle Sales CloudImplementing Customer Data Management
Chapter 23Define Customer Hub Configuration
184
Record Number Party ID Testfieldone_c Master
Record 3
13
None
No
Record 4
14
None
No
In this case, there are two records with the custom attribute Testfieldone_c. Therefore, the record with highest party ID ispicked as the master record.
The following figure displays Define Survivorship Rules: Select Master Record page with the IF and THEN rules conditionvalues to create the set master record rule to pick the record with specified attributes as the master. The details of theconditions are as follows:
IF condition: If masterPartyId is the maximum of master.PartyId where {master is a HZ_PERSON_FactType.PersonDVOand master.Testfielddone_c isn't null}
THEN condition: Then Assert new Result (name:"masterId", value:masterPartyId)
Defining Set Attribute Value Rules for Custom Attributes: Worked ExampleThis topic explains how to define a survivorship rule of the type Set Attribute Value to select the smallest value for a specificattribute. This rule has a single condition where it picks a record that has the smallest value for the specified custom attribute.

Oracle Sales CloudImplementing Customer Data Management
Chapter 23Define Customer Hub Configuration
185
The following table contains the details of a use case for a set attribute value rule to select the smallest value for a specificcustom attribute as the survivor. In this case the example attribute name is CustomField1_c.
Record Number Party ID CustomField1_c AttributeValue
Party Name Survivor
Record 1
11
123
Oracle Corp
Yes
Record 2
12
1456
Oracle USA Corp
No
Record 3
13
239940
Oracle
No
In this case, there are three records with CustomField1_c custom attribute. The value 123 is picked up as the survivor valuefor the CustomField1_c custom attribute because it is the smallest value for that attribute.
The following figure displays the Define Survivorship Rules: Select Attribute Value page with the IF and THEN rules conditionvalues to create the set attribute value rule to pick the smallest value for the CustomField1_c custom attribute as the survivor.The details of the conditions are as follows:
IF condition: If (for each case where) {org is a OrganizationDVO and org.CustomField1_c isn't null } and there isno case where {another org is a OrganizationDVO and another org.CustomField1_c isn't null and org.PartyId isn't
another org.PartyId and org.CustomField1_c.length() more than another org.CustomField1_c.length()}

Oracle Sales CloudImplementing Customer Data Management
Chapter 23Define Customer Hub Configuration
186
THEN condition: Then call setAttribute("CustomField1_c", org.PartyId)
FAQs for Manage Survivorship Rules
What's the difference between survivorship rules and merge agreement rules?Survivorship rules are a collection of business rules defined for the creation of the best version record intelligently, especiallyfrom multiple source systems, by specifying criteria for selecting record and attributes to be retained during merge or link, orupdate operations.
A merge agreement rule is a collection of patterns and conditions that are defined to determine whether a merge requestshould be vetoed by the application or not. Merge requests that violate these rules are either rejected or end in error.
Oracle Sales CloudImplementing Customer Data Management
Chapter 23Define Customer Hub Configuration
187
How can I check if the survivorship rules that I created work?You can create two parties and merge them into a single record to check if your survivorship rules are working. You mustensure that your survivorship rules are active before merging the parties.
What are the seeded sample survivorship rules that Oracle Fusion Applications provide bydefault?Oracle Fusion Applications offer the following sample survivorship rules:
• For organizations, history wins: The attribute value with earlier source update date wins. This rule is applicable for allorganization attributes.
• For persons, recent wins: The attribute value with later source update date wins. This rule is applicable for all personattributes
• For organizations, assign the highest source confidence level to the D-U-N-S number.
The seeded survivorship rules are in inactive status out-of-the-box. These rules are updated with every release. However,once you change these rules, they are not updated.
Source System Confidence
Source System Confidence Levels: ExplainedSource system confidence levels indicate the reliability of a particular source system for specific attributes. They are used todetermine the master or surviving record among multiple duplicate records from different source systems.
For each source system, you can set source confidence score for attributes in the Person and Organization objects. Thescores are used to select attributes for the master record during merge, insert, or update. The scores are used to selectattributes, based on the survivorship rules, for the master record during merge, insert, or update. You assign sourceconfidence levels based on your understanding of the quality of the data stored in the various source systems within yourorganization.
Source system confidence levels range from 0 to 100, and are set by default to 0. When all source system confidence levelsare set to 0, all conflicts are listed for the Master Data Applications Administrator. The Master Data Applications Administratorreviews the list and decides the source system attributes that must be included into the master record.
The confidence scores are valid only during the date range specified. When you update a confidence score, the masterrecords are also updated based on the new confidence score.
FAQs for Source System Confidence
What are Set Master and Set Attribute rules?Set Master rules enable you to define the logical business criteria for selecting the master record from a set of potentialduplicate records for merge operations.
Set Attribute rules enable you to define the logical business criteria for selecting the best attribute values from multiple inputrecords during merge and insert or update operations.

Oracle Sales CloudImplementing Customer Data Management
Chapter 23Define Customer Hub Configuration
188
Can multiple attributes of an object type have the same source system confidence level?Yes, you can apply the same source system confidence level to multiple attributes of an object type. You can manage sourcesystem confidence levels using the Setup and Maintenance, Manage Source System Confidence page.
Agreement Rules
Agreement Rules: ExplainedAn agreement rule is a collection of patterns and conditions that are defined to determine whether a merge request should bevetoed by the application or not. Merge requests that violate these rules are either rejected or end in error.
Agreement rules let you check a merge request for any veto conditions that can prevent a merge from occurring. These rulessave resources and time by obviating the need to review merge requests to prevent undesired merge from being processed.Besides, agreement rules prompt you to consider alternative duplicate resolution mechanism such as linking.
Agreement rule can be of the following two types:
• Predefined
• User-defined
Predefined Agreement RulesThese are agreement rules that are predefined in the application. You can only view the predefined agreement rules.
The following table describes the predefined agreement rules shipped out of the box with the application. Merge requests thatviolate these rules are automatically rejected.
Name Description
HR_ APPLICANT_ VETO
Prevents a person party with an active party usage of HR_APPLICANT from merging with anotherparty.
HR_ EMPLOYEE_VETO
Prevents a person party with an active party usage of HR_EMPLOYEE from merging with anotherparty.
HR_ CONTINGENT_ WORKER_VETO
Prevents a person party with an active party usage of HR_ CONTINGENT_ WORKER from mergingwith another party.
HR_ PARTY_ SITE_VETO
Prevents a party site with active original system reference from Oracle Fusion HCM system frommerging with another party site.
RESOURCE_ PERSON_VETO
Prevents a person party with an active party usage of RESOURCE from merging with another party.
BANK VETO
Prevents an organization party with an active party usage of BANK from merging with another party.
CLEARINGHOUSE_ VETO
Prevents an organization party with an active party usage of CLEARINGHOUSE from merging withanother party.
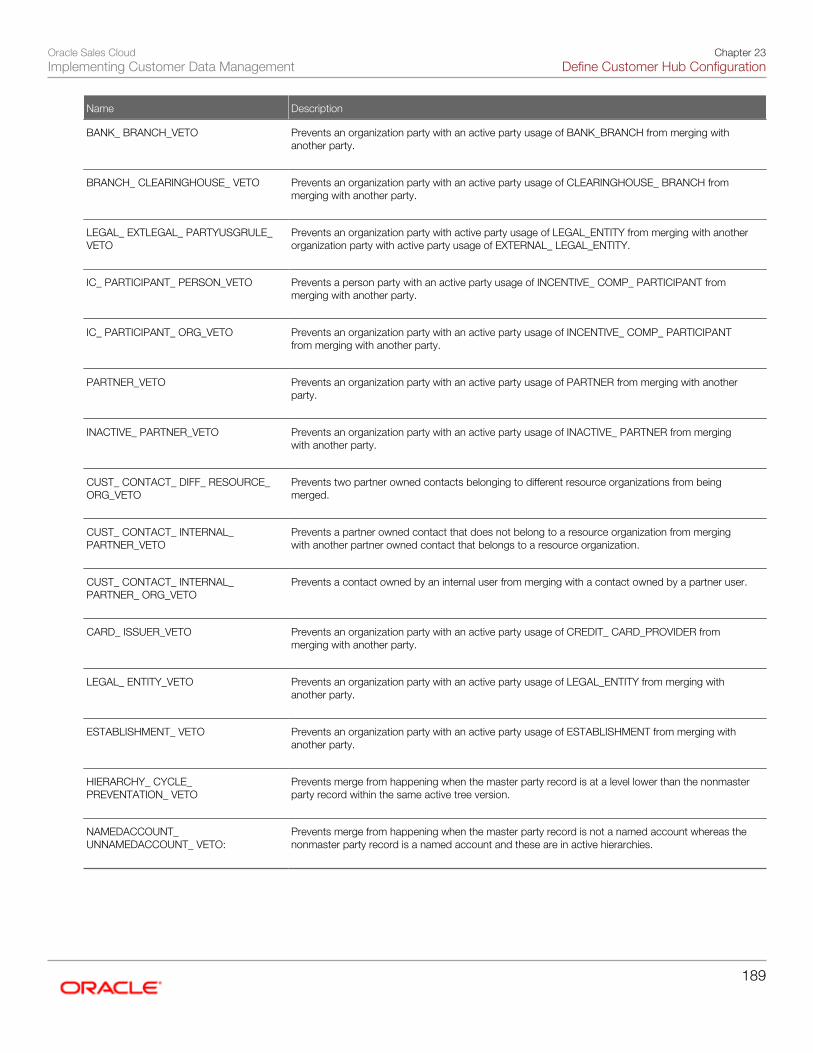
Oracle Sales CloudImplementing Customer Data Management
Chapter 23Define Customer Hub Configuration
189
Name Description
BANK_ BRANCH_VETO
Prevents an organization party with an active party usage of BANK_BRANCH from merging withanother party.
BRANCH_ CLEARINGHOUSE_ VETO
Prevents an organization party with an active party usage of CLEARINGHOUSE_ BRANCH frommerging with another party.
LEGAL_ EXTLEGAL_ PARTYUSGRULE_VETO
Prevents an organization party with active party usage of LEGAL_ENTITY from merging with anotherorganization party with active party usage of EXTERNAL_ LEGAL_ENTITY.
IC_ PARTICIPANT_ PERSON_VETO
Prevents a person party with an active party usage of INCENTIVE_ COMP_ PARTICIPANT frommerging with another party.
IC_ PARTICIPANT_ ORG_VETO
Prevents an organization party with an active party usage of INCENTIVE_ COMP_ PARTICIPANTfrom merging with another party.
PARTNER_VETO
Prevents an organization party with an active party usage of PARTNER from merging with anotherparty.
INACTIVE_ PARTNER_VETO
Prevents an organization party with an active party usage of INACTIVE_ PARTNER from mergingwith another party.
CUST_ CONTACT_ DIFF_ RESOURCE_ORG_VETO
Prevents two partner owned contacts belonging to different resource organizations from beingmerged.
CUST_ CONTACT_ INTERNAL_PARTNER_VETO
Prevents a partner owned contact that does not belong to a resource organization from mergingwith another partner owned contact that belongs to a resource organization.
CUST_ CONTACT_ INTERNAL_PARTNER_ ORG_VETO
Prevents a contact owned by an internal user from merging with a contact owned by a partner user.
CARD_ ISSUER_VETO
Prevents an organization party with an active party usage of CREDIT_ CARD_PROVIDER frommerging with another party.
LEGAL_ ENTITY_VETO
Prevents an organization party with an active party usage of LEGAL_ENTITY from merging withanother party.
ESTABLISHMENT_ VETO
Prevents an organization party with an active party usage of ESTABLISHMENT from merging withanother party.
HIERARCHY_ CYCLE_PREVENTATION_ VETO
Prevents merge from happening when the master party record is at a level lower than the nonmasterparty record within the same active tree version.
NAMEDACCOUNT_UNNAMEDACCOUNT_ VETO:
Prevents merge from happening when the master party record is not a named account whereas thenonmaster party record is a named account and these are in active hierarchies.

Oracle Sales CloudImplementing Customer Data Management
Chapter 23Define Customer Hub Configuration
190
User-defined Agreement RulesThese are additional agreement rules that you can define to determine whether a merge request should be vetoed by theapplication. You can create, view, update, and delete user-defined agreement rules.
Note: The application does not support changing agreement rules inside the Application Composer sandbox.Therefore, the merge engine does not pickup the changes made to these rules inside the Application Composersandbox.
Agreement Rules Dictionary: ExplainedAn agreements rules dictionary is a collection of predefined terms and attributes that can be used to define agreementrules. The Oracle Customer Data Hub comes with a single predefined dictionary (HZ_Parties) that contains all the predefinedAgreement Rules shipped out of the box with the application. You can also use this dictionary to define custom agreementrules according to your business requirements. Note that you can only view the predefined agreement rules. You cannotedit them. In contrast, you can create, view, update, and delete user-defined agreement rules. Merge requests that violateagreement rules are rejected.
Before using this dictionary to define custom agreement rules, you must review whether the agreement rule terms and termattributes existing in the predefined agreement rules dictionary are sufficient to define custom agreement rules needed tomeet your business requirements. If required, refresh terms to import the latest terms, term attributes, and related metadata,for example, fact types such as entities and objects. Refreshing the dictionary help you pull in all the newly added customattributes for accounts and contacts.
Defining Agreement RulesThis example demonstrates how to create user-defined agreement rules that you can use to prevent a merge request frombeing processed.
Agreement rules are collections of patterns and conditions that are defined to determine whether a merge request should bevetoed by the application or not. Perform the following tasks to define agreement rules:
• Review and refresh terms in the predefined agreement rules dictionary shipped out of the box
• Add a new agreement rule
For more information on agreement rules, see Oracle Fusion Middleware User's Guide for Oracle Business Rules on OracleTechnology Network at http://www.oracle.com/technetwork.
Review and Refresh Terms in the Predefined Agreement Rules DictionaryThe Customer Hub application is shipped with a predefined agreement rules dictionary that contains all the predefinedAgreement Rules shipped out of the box with the application. Before using this dictionary to define custom agreement rules,you must review whether the agreement rule terms and term attributes existing in the predefined agreement rules dictionaryare sufficient to define custom agreement rules needed to meet your business requirements. If required, refresh terms toimport the latest terms, term attributes, and related metadata, for example, fact types such as entities and objects. Refreshingthe dictionary helps you pull in all the newly added custom attributes for accounts and contacts. Use the following steps toreview and refresh the agreement rules dictionary:
1. Navigate to the Setup and Maintenance work Navigate to: Setup and Maintenance > Customer Data Managementoffering > Setup > Customer Hub functional area > Manage Agreement Rules task.

Oracle Sales CloudImplementing Customer Data Management
Chapter 23Define Customer Hub Configuration
191
2. Review whether the agreement rule terms and term attributes existing in the predefined agreement rules dictionaryare sufficient to define custom agreement rules needed to meet your business requirements.
3. Click Refresh Terms to import the latest terms, term attributes, and related metadata.4. Click OK in response to the confirmation message.
Add a New Agreement RuleAfter reviewing and refreshing the Agreement Rules Dictionary using the earlier steps, perform thefollowing steps to create a new custom agreement rule:
1. Click Next to navigate to the Manage Agreement Rules: Define Rules page.2. Click Add form the Actions menu to add a new rule.3. Enter a rule name.4. Click Define Rule.5. Enter the reason for creating the agreement rule in the Justification Reason.6. Click Add form the Actions menu to create a new pattern.7. Complete the fields in the new pattern field using the sample information provided in the following table. Use the
default values except where indicated. Note that the relation is always AND between patterns and cannot be edited.You must include the Dictionary Terms OrganizationPartyVO and PersonPartyVO, with defined MergeType, into theDefine Patterns column. These patterns determines the master and nonmaster records.
Pattern Dictionary Term Term Alias Relation
for each case where
PersonPartyVO
Person
AND
for each case where
OrganizationPartyVO
NonmasterParty
AND
there is a case where
PartyUsageAssignmentVO
PartyUsageAssignment
AND
8. Navigate to the Conditions table.9. Click Add from Actions to add a new condition and complete the fields using the sample information provided in the
following table. Use the default values except where indicated.
Term Attribute Operator Value Relation
Person. PartyNumber
is not
1234
AND
NonmasterParty. MergeType
=
Nonmaster
AND
UsageAssignment.PartyUsageCode
=
HR_APPLICANT
AND
10. Click Save or Save and Close.11. Click Submit.
Related Topics
• Agreement Rules: Explained

Oracle Sales CloudImplementing Customer Data Management
Chapter 23Define Customer Hub Configuration
192
Merge Requests
Manual Merge: ExplainedManual merge lets you select duplicate records, unlike system merge in which the matching configuration selects duplicates.
You can merge only two records using manual merge, unlike system merge in which you can merge multiple records.
You can use one of the following two methods to manually merge two duplicate records:
• Immediate manual merge: This lets you merge two records immediately. You can specify one of the two duplicaterecords as the master record, and also map some attributes of the duplicate records to the master record. The otherattributes of the duplicate record are automatically mapped to the master record.
• Deferred manual merge: This lets you defer the merge request for a data steward's review and approval. The datasteward can then review the merge request and approve it for merge.
Merging Records Manually: Worked ExampleThis example demonstrates how you can manually merge two duplicate records. This example illustrates only the genericprocess for merging records using the Enter Merge Request task. You can also merge two duplicate records from certainother UI pages.
Merging records manually involves the following tasks:
• Identifying duplicate records
• Selecting the master and duplicate records
• Submitting the merge
Identifying Duplicate Records1. Navigate to the Search and Select: Record to Merge page as follows: Set Up Tasks Enter Merge Request
Search and Select: Record to Merge.2. To search and select the record to be merged, complete the search criteria using the sample information provided in
the following table. Use the default values except where indicated.
Name Registry ID (Optional)
John
15918
3. Click Search.4. From the search results, select the first record to be merged.5. Select Merge Record from the Actions menu
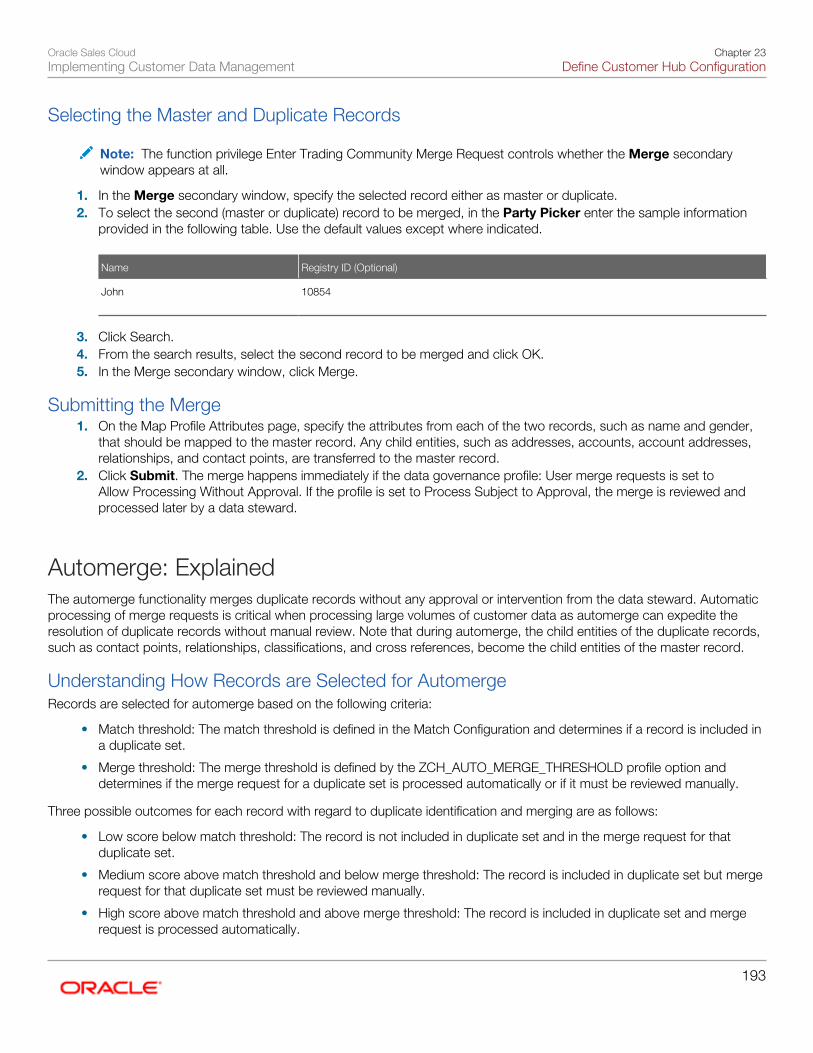
Oracle Sales CloudImplementing Customer Data Management
Chapter 23Define Customer Hub Configuration
193
Selecting the Master and Duplicate Records
Note: The function privilege Enter Trading Community Merge Request controls whether the Merge secondarywindow appears at all.
1. In the Merge secondary window, specify the selected record either as master or duplicate.2. To select the second (master or duplicate) record to be merged, in the Party Picker enter the sample information
provided in the following table. Use the default values except where indicated.
Name Registry ID (Optional)
John
10854
3. Click Search.4. From the search results, select the second record to be merged and click OK.5. In the Merge secondary window, click Merge.
Submitting the Merge1. On the Map Profile Attributes page, specify the attributes from each of the two records, such as name and gender,
that should be mapped to the master record. Any child entities, such as addresses, accounts, account addresses,relationships, and contact points, are transferred to the master record.
2. Click Submit. The merge happens immediately if the data governance profile: User merge requests is set toAllow Processing Without Approval. If the profile is set to Process Subject to Approval, the merge is reviewed andprocessed later by a data steward.
Automerge: ExplainedThe automerge functionality merges duplicate records without any approval or intervention from the data steward. Automaticprocessing of merge requests is critical when processing large volumes of customer data as automerge can expedite theresolution of duplicate records without manual review. Note that during automerge, the child entities of the duplicate records,such as contact points, relationships, classifications, and cross references, become the child entities of the master record.
Understanding How Records are Selected for AutomergeRecords are selected for automerge based on the following criteria:
• Match threshold: The match threshold is defined in the Match Configuration and determines if a record is included ina duplicate set.
• Merge threshold: The merge threshold is defined by the ZCH_AUTO_MERGE_THRESHOLD profile option anddetermines if the merge request for a duplicate set is processed automatically or if it must be reviewed manually.
Three possible outcomes for each record with regard to duplicate identification and merging are as follows:
• Low score below match threshold: The record is not included in duplicate set and in the merge request for thatduplicate set.
• Medium score above match threshold and below merge threshold: The record is included in duplicate set but mergerequest for that duplicate set must be reviewed manually.
• High score above match threshold and above merge threshold: The record is included in duplicate set and mergerequest is processed automatically.

Oracle Sales CloudImplementing Customer Data Management
Chapter 23Define Customer Hub Configuration
194
The score for all the records in a duplicate set must be above the merge threshold for automated processing. If one record inthe duplicate set is below merge threshold, and the other records are above the merge threshold, the merge request must bereviewed manually.
Note: When you merge two or more records with exactly same children information under phone, email, oraddress the children information is merged and rolled up to the survivor record.
Configuring AutomergeEnabling Automerge involves several implementation steps that must be completed by an implementor using the followingSetup and Maintenance tasks:
• Manage Customer Hub Profile Options: Navigate to this Setup and Maintenance task to perform the followingimplementation steps:
◦ Set Auto Merge Threshold profile option (ZCH_AUTO_MERGE_THRESHOLD) to the required value. Thisprofile option specifies the threshold for auto merge. Merge requests with lower scores need data stewardreview. An exact match is 100.
◦ Review the Record Size Limit of Duplicate Set (ZCH_DI_MERGEREQ_REC_SIZE). This profile optiondetermines the maximum number of records in the duplicate set that can be merged automatically. By default,the maximum number is set to 10 records.
◦ Set the Survivorship Enabled profile option (ZCH_ENABLE_SURVIVORSHIP) to Yes. This profile optionenables the survivorship rules to select the master record and retain the attributes during a merge or updateoperation.
• Define Survivorship: Navigate to this Setup and Maintenance task to create Set Master survivorship rules to choosethe master record for merge requests created from the duplicate identification batch and set the rule to active.
If there are no active Set Master rules or if the Set Master rules did not trigger, the merge request must be reviewedmanually, even if the ZCH_AUTO_MERGE_THRESHOLD profile option is set, the score for all records is above thethreshold value, and the number of records is below the record size limit.
Note: You can use the Set Attribute rules with Set Master rules to determine the Golden Master record.For automerge, Set Master rule is mandatory.
• Define Data Quality: Navigate to this Setup and Maintenance task to perform the following implementation steps:
◦ Create an active Match Configuration in Manage Enterprise Data Quality Matching Configurations task or usea predefined Match Configuration. Rebuild the keys if necessary.
◦ Enable EDQ Real Time and Batch Basic Match Server in Manage Server Configurations task.
Running AutomergeThis task involves the following two steps:
1. Create a duplicate identification batch and select Create Merge Request as the Automatic Processing Option.2. Perform the task Run Request Dispatch Job to disposition the duplicate resolution sets.
The Dispatch Job processes any resolution request in Pending or Submitted status. You can run this job in two modes:
• On demand: Run Request Dispatch Job > Submit
• Per a specific schedule: Do the following steps to set up a recurring job:
a. Click Advanced on the Run Request Dispatch Jobtask.

Oracle Sales CloudImplementing Customer Data Management
Chapter 23Define Customer Hub Configuration
195
b. Click Schedule tab and select the Using a Schedule radio button.c. Select the frequency you want and click Submit.
To see the list of dispatch jobs, and their statuses, navigate to Scheduled Processes under Tools.
Troubleshooting Automerge IssuesAfter you create your Duplicate Identification Batch, drill down into the completed batch to see the results. If duplicate setshave been found, and automerge is enabled, resolution requests are automatically submitted for merge.
If the resolution request was not submitted automatically, you can drill down to the duplicate set and compare the score foreach record with the threshold in the ZCH_AUTO_MERGE_THRESHOLD profile option and the number of records with thelimit in the ZCH_DI_MERGEREQ_REC_SIZE profile option. If all scores are above the threshold and the number of records isbelow the limit, verify that the following are true:
• Set Master rules are active and triggered to choose a master for the records in the duplicate set.
• ZCH_ENABLE_SURVIVORSHIP is set to yes.
High Volume Batch Deduplication: Best Practices andGuidelineBatch deduplication of account or contact records in Customer Data Management (CDM) Cloud Service consists of thefollowing two steps:
• Duplicate Identification: This step includes the identification of duplicate records by submitting a DuplicateIdentification Batch job.
You can define and submit this job from the Duplicate Identification page.
• Duplicate Resolution: This step includes the resolution of the duplicates, typically by merging each set of duplicaterecords.
You can resolve the duplicates either automatically by submitting the Duplicate Identification Batch job (calledAutomerge) or manually by submitting records in bulk from the Duplicate Identification Batch results review page.
For more details on these steps and for configuration of Automerge, see Merge Requests, Implementing Customer DataManagement.
Both of these jobs are data-intensive operations that can read or update millions of rows of data in various Oracle ApplicationCloud tables. This document is intended to provide the guidelines and best practices for planning the data-sets, andapplying appropriate configurations to achieve optimal throughput for high volume deduplication in CDM Cloud Service.Each customer's data set is unique. The time required to process a duplicate identification batch varies on the data shape.Approximately 15,000 to 20,000 records per batch take 3 to 4 hours to process.
Best Practices and GuidelinesCustomer Data Management merge is a data-intensive process that scans and updates a large number of tables in OracleApplications Cloud, to correctly merge two or more Accounts or Contacts.

Oracle Sales CloudImplementing Customer Data Management
Chapter 23Define Customer Hub Configuration
196
This section describes how you can use the following profile options to optimize the merge process:
• Scope of Merge Process (ORA_ZCH_MERGE_SCOPE_LOOKUP): You can use this profile option to define thescope of the merge process.
• Master Record Selection Method (ORA_ZCH_SETMASTER_LOOKUP): You can use this profile option to specifythe method for selecting the master record in a merge request.
• Create Automerge with Review (ORA_ZCH_AUTOMERGE_REVIEW): You can use the profile option to select anappropriate processing option for Automerge.
• Maximum Number of Concurrent Merge Jobs (ORA_ZCH_MERGE_MAX_REQUEST_LIMIT): Specify themaximum number of merge jobs to be processed at a time. If you do not set the maximum limit, all merge jobs aresubmitted for concurrent processing.
You can set these profile options from the Manage Customer Hub Profile Options Setup and Maintenance task.
Defining the Scope of the Merge ProcessWhen you merge two or more records, the application scans hundreds of transactional and reference tables acrossall modules in the Oracle Applications Cloud such as, Core CDM, CRM, Financials, and Manufacturing. This canmake merge a data-intensive and time consuming process. However, you can use the Scope of Merge Process(ORA_ZCH_MERGE_SCOPE_LOOKUP) profile option to define and limit the scope of merge process in an implementationso that the application scans only the necessary business areas. This optimizes the size of the merge memory and executionprofile.
The following options are supported by the Scope of Merge Process profile option:
• All Functional Areas (ALL): This is the default option and scans across all areas of Oracle Applications Cloud. Youuse this option when there is a global implementation running various modules of Oracle Applications Cloud such as,Core CDM, CRM, Financials, and Manufacturing.
• All Customer Relationship Management Related Areas (CRM): This option limits the scope of the process to handleall the CRM entities such as, Opportunities, and Leads, core Customer Data, Common Entities such as, Notes,and Activities, and Custom Objects. You use this option when there is a CRM implementation along with the use ofCustomer Data Management functionality.
• Customer Data Management Specific Areas (CDM): This option limits the scope of the process to core CustomerData, Common Entities such as Notes and Activities, and Custom Objects. You use this option during the initialcustomer data consolidation and to achieve best performance for Customer Data management, implementations.
Note: The profile option settings can be changed at any time, if additional modules are turned on the instance.For instance, the CDM option might be used during initial consolidation and cleanup of customer data and thenchanged to CRM or ALL options if other modules are implemented later.
Defining the Master Record Selection MethodThe performance of the merge process also depends on the method used to select the master record. You can use theMaster Record Selection Method (ORA_ZCH_SETMASTER_LOOKUP) profile option to specify an appropriate option forselecting the master party automatically during merge. The following options are supported by the Master Record SelectionMethod profile option:
• Select master record using survivorship rule (RULE): This is set as the default master selection option. This optionselects the master record based on the Set Master rules defined in the Manage Survivorship task. These rules areapplied using the Oracle Business Rules component. You use this option when there are complex business rulesrequired to pick the master.

Oracle Sales CloudImplementing Customer Data Management
Chapter 23Define Customer Hub Configuration
197
• Select the oldest record as master (OLDEST): This option selects the party with the earliest creation date as themaster.
• Select the newest record as master (NEWEST): This option selects the party with the newest creation date as themaster.
• Select master based on duplicate identification results (ANY) - This option randomly selects one of the parties in theset as a master.
Configuring Automerge ActionAutomerge is the process of automatically merging identified duplicate sets that exceed the automerge threshold. Theprocess is initiated by creating a duplicate identification batch with the Create Merge Request option. You can use theCreate Automerge with Review (ORA_ZCH_AUTOMERGE_REVIEW) profile option that has Yes and No values to select anappropriate processing option for Automerge:
• Create merge requests only for duplicate sets exceeding the automerge threshold: To enable this processing option,select No as the value for the Create Automerge with Review (ORA_ZCH_AUTOMERGE_REVIEW) profile option. Ifyou select this option, the application processes duplicate sets as follows:
◦ The application preprocesses the duplicate sets exceeding the automerge threshold and merges them into asingle job. This option is ideal for processing high volumes of merge requests when the duplicate sets requireno review or any further action.
◦ Duplicate sets not exceeding the automerge threshold remain in Not Reviewed status in the DuplicateIdentification page, from where they can be manually converted to merge requests, or rejected, if needed.
• Create Merge Requests for all duplicate sets: To enable this processing option, select Yes as the value for the CreateAutomerge with Review (ORA_ZCH_AUTOMERGE_REVIEW) profile option. If you select this option, merge requestsare created for all duplicate sets. All requests are first pre-processed. Then they are either merged (if they exceedthe automerge threshold), or put in "New" status (so that they can be reviewed) if they don't exceed automergethreshold.
Controlling the Concurrency of Merge ProcessesEach merge request executes as a single batch process in the Enterprise Service Scheduler (ESS). The number of mergerequests executing concurrently is limited by the number of batches being concurrently processed. Therefore, if thereare other ESS processes competing for threads when there are a large number of merge requests queued up, then thescheduling of those jobs could get delayed.
During initial consolidation of customer data, it's advantageous to use the maximum available threads. However, in steadystate when there are other processes running in the system, it may be necessary to limit and control the number ofconcurrent merge ESS jobs.
To achieve this, set the following profile option to an appropriate value:
• Profile Option Name: Maximum Number of Concurrent Merge Jobs
• Profile Option Code: ORA_ZCH_MERGE_MAX_REQUEST_LIMIT
◦ When the profile option value is left blank or when no value is defined, the ESS will allocate merge requestsaccording to the threads available. This is recommended during initial high volume data processing.
◦ After initial data load, set the profile option value to ten or lower if other processes such as Web services orother ESS jobs are running.
Oracle Sales CloudImplementing Customer Data Management
Chapter 23Define Customer Hub Configuration
198
Initial Data Consolidation and CleanupIf during initial data consolidation the data is expected to have a large percentage of duplicates, then it is recommendedto decompose the data sets for duplicate identification into smaller chunks of data. Chunk refers to the number of recordsdefined by the selection criteria when submitting a duplicate identification batch. This enables the duplicate identification andresolution process to be robust, reliable, and manageable.
The recommended size of a chunk depends on the number of duplicates expected to be identified. Approximately, you canset the selection criteria for duplicate identification such that, each batch produces not more than 50,000 duplicate sets. Theselection criteria for defining a duplicate identification batch can be based on some functional decomposition criteria. Forexample, the selection criteria can be based on the State or the starting alphabet of the name.

Oracle Sales CloudImplementing Customer Data Management
Chapter 24Integrate Customer Data Management with Other Cloud
Services
199
24 Integrate Customer Data Managementwith Other Cloud Services
Customer Data Management Cloud IntegrationApproaches: ExplainedYou can integrate Customer Data Management Cloud with other cloud services using REST APIs, SOAP APIs, or theIntegration Cloud Service to provide address cleansing, duplicate identification, and duplicate resolution capabilities.
Customer Data Management Cloud Integration Using REST APIsOracle Customer Data Management (CDM) Cloud provides multiple public REST APIs that can be used to access data storedin CDM Cloud and construct integrations to other systems. The APIs include resources to Get, Post (create), Patch (update),and Delete organizations (accounts) and persons (contacts) as well as resources to identify and create resolution request forduplicate parties.
For more information on public REST APIs, see REST API for Oracle Sales Cloud in the Related Topics section.
Customer Data Management Cloud Integration Using SOAP APIsOracle Customer Data Management (CDM) Cloud provides SOAP services to create and update organizations (accounts) andpersons (contacts). You can also use these services to identify and resolve duplicate parties.
For more information on SOAP APIs, see SOAP Web Services for Sales Cloud in the Related Topics section.
Customer Data Management Cloud Integration with Import and ExportOracle Customer Data Management (CDM) Cloud lets you use File-Based Data Import and Export, Bulk Export, and DataImport to import and export application data using text or XML files. You can also use import to create or update records inOracle Customer Data Management Cloud.
You can configure the import process to:
• Define deduplication within the data being loaded.
• Define deduplication of the data being loaded against the records that exist in the database.
You can also select a matching configuration to identify duplicates and specify the action to perform on the duplicate recordsduring the import process.
For more information on File-Based Data Import and Export, see Understanding File-Based Data Import and Export in theRelated Topics section.
Customer Data Management Cloud Integration Using the Integration CloudServiceYou can use the Integration Cloud Service to leverage predefined integrations between Customer Data Management Cloud,other cloud services, and on premise applications. For example, you can integrate Oracle Sale Cloud and Oracle Service

Oracle Sales CloudImplementing Customer Data Management
Chapter 24Integrate Customer Data Management with Other Cloud
Services
200
Cloud with Customer Data Management Cloud to provide the duplicate resolution capability. Using this capability, you canmerge an Oracle Sales Cloud account (organization) or contact (person) with an Oracle Service Cloud account (organization)or contact (person).
For more information on the Integration Cloud Service, see Oracle Integration Cloud Service in the Related Topics section.
Customer Data Management Integrations for Accounts (Organization) andContacts (Persons)The following table shows the possible integrations options for Oracle Customer Data Management Cloud:
CDMProcess(Batch Job)
SOAPService
RESTService
Data Import(for accountReceivablesonly)
File-BasedData Import
File-BasedData Import(SimplifiedView)
File-BasedData Export
ICS Events Comments
AddressCleansing
No
AddressCleansing isavailable bythe RESTservice fromAddressVerificationCloudServiceonly.
Yes
No
No
Yes (BatchSummaryonly). Doesnot includechild objectsuch asduplicateaddress andrelationships.
No
File Exportis onlyavailablefromCustomerDataManagementwork area.
DuplicateIdentification
No
No
Yes
Yes
No
Yes (BatchSummaryonly). Doesnot includechild objectsuch asduplicateaddress andrelationships.
No
File Exportis onlyavailablefromCustomerDataManagementwork area.
DuplicateResolutionandMerging
Yes. SOAPservice cancreate newresolutionrequestsand queryexistingresolutionrequestsbut cannotupdate theexistingrequests.
Yes. Restservice cancreate newresolutionrequestand queryexistingresolutionrequestsbut cannotupdate theexistingrequests.
Yes
No
No
Yes. Doesnot includechild objectsuch asduplicateaddress andrelationships.
Yes. PublicResolutionRequestUpdated.
Bulk Exportcan be usedfor duplicateparty detailsin theDuplicateResolution.See,ImplementingCDM in theRelatedTopicssection.
DataEnrichment
No
Dataenrichmentis availableby RESTservicefrom OracleSocial Dataand Insight
No
No
No
Yes
No

Oracle Sales CloudImplementing Customer Data Management
Chapter 24Integrate Customer Data Management with Other Cloud
Services
201
CDMProcess(Batch Job)
SOAPService
RESTService
Data Import(for accountReceivablesonly)
File-BasedData Import
File-BasedData Import(SimplifiedView)
File-BasedData Export
ICS Events Comments
CloudServiceonly.
Related Topics
• REST API for Oracle Sales Cloud
• SOAP Web Services for Sales Cloud
• Understanding File-Based Data Import and Export
• Oracle Integration Cloud Service
• Implementing CDM
Merge Operation Process During Integration Cloud ServiceBased Integration: ExplainedOracle Customer Data Management (CDM) Cloud acts as the customer master during Integration Cloud Service basedintegration between different cloud services (also known as spoke systems). You can use CDM Cloud to cleanse,consolidate, and share customer data across integrated cloud services, such as Oracle Sales Cloud and Oracle Servicecloud. This topic explains how the duplicate resolution capability of the CDM Cloud merges records across integrated cloudservices, for example, how it merges an Oracle Sales Cloud account or contact with an Oracle Service Cloud account orcontact.
Merge Operation Process for Point to Point IntegrationIn this integration scenario, the Customer Data Management Cloud provides the duplicate resolution capability to a singlespoke system.

Oracle Sales CloudImplementing Customer Data Management
Chapter 24Integrate Customer Data Management with Other Cloud
Services
202
The following diagram shows the before merge status of two contacts, Contact A and Contact B, of an account from Spoke1.
Contact AFirst Name = JohnMiddle Name = D.
Contact AFirst Name = JohnMiddle Name = D.
ActiveActive
Contact BFirst Name = John
Middle Name = David
Contact BFirst Name = John
Middle Name = David
Active Active
Original System Reference A300012345634567862
Original System Reference B300012987489378234
External Reference A300012345634567862
External Reference B300012987489378234
CDM Spoke 1
The following diagram illustrates how the two contacts, A and B, of the account from Spoke 1 are being merged in CDMCloud and how the Contact A emerges as the survivor and the Contact B becomes the victim.

Oracle Sales CloudImplementing Customer Data Management
Chapter 24Integrate Customer Data Management with Other Cloud
Services
203
Contact AFirst Name = JohnMiddle Name = D.
Contact AFirst Name = JohnMiddle Name = D.
Integration for Contact A stays intact
ActiveActive
Contact BFirst Name = John
Middle Name = David
Contact BFirst Name = John
Middle Name = DavidIntegration should delete Contact B
Inactive Active
Original System Reference A
300012345634567862
Original System Reference B
300012987489378234
External Reference A300012345634567862
External Reference B300012987489378234
CDM Spoke 1
Spoke 1 Identification for Contact B
The following diagram shows the after merge status of two contacts, A and B, of the account. Note that in Spoke 1 onlyContact A has survived and remained active after the merge.

Oracle Sales CloudImplementing Customer Data Management
Chapter 24Integrate Customer Data Management with Other Cloud
Services
204
Contact AFirst Name = JohnMiddle Name = D.
Contact AFirst Name = JohnMiddle Name = D.
Integration for Contact A stays intact
ActiveActive
Contact BFirst Name = John
Middle Name = David
Inactive
Original System Reference A300012345634567862
Original System Reference B300012987489378234
External Reference A300012345634567862
CDM Spoke1
Merge Operation Process for Publish and Subscribe IntegrationIn this integration scenario, the Customer Data Management Cloud provides the duplicate resolution capability to two or moreintegrated cloud services or spoke systems. Duplicate data from spoke systems is consolidated in the CDM cloud and themastered data is published to the subscribing spoke systems.

Oracle Sales CloudImplementing Customer Data Management
Chapter 24Integrate Customer Data Management with Other Cloud
Services
205
The following diagram shows the before merge status of two contacts, A and B, of an account that exists both in Spoke 1and Spoke 2.
Contact AFirst Name = JohnMiddle Name = D.Last Name = Doe
Contact AFirst Name = JohnMiddle Name = D.Last Name = Doe
ActiveActive
Contact BFirst Name = John
Middle Name = DavidLast Name = Doe
Contact BFirst Name = John
Middle Name = DavidLast Name = Doe
Active Active
Original System Reference A
300012345634567862
Original System Reference B
300012987489378234
External Reference A300012345634567862
External Reference B300012987489378234
CDM Spoke 1
Contact AFirst Name = JohnMiddle Name = D.Last Name = Doe
Contact BFirst Name = John
Middle Name = DavidLast Name = Doe
External Reference A300012345634567862
External Reference B300012987489378234
Active
Active Spoke 2
The following diagram shows the after merge status of two contacts, A and B, of the account.

Oracle Sales CloudImplementing Customer Data Management
Chapter 24Integrate Customer Data Management with Other Cloud
Services
206
Contact AFirst Name = JohnMiddle Name = D.Last Name = Doe
Contact AFirst Name = JohnMiddle Name = D.Last Name = Doe
ActiveActive
Contact BFirst Name = John
Middle Name = DavidLast Name = Doe
Contact BFirst Name = John
Middle Name = DavidLast Name = Doe
InactiveDeleted
Original System Reference A
300012345634567862
Original System Reference B
300012987489378234
External Reference A300012345634567862
External Reference B300012987489378234
CDM
Spoke 1
Contact AFirst Name = JohnMiddle Name = D.Last Name = Doe
Contact BFirst Name = John
Middle Name = DavidLast Name = Doe
External Reference A300012345634567862
External Reference B300012987489378234
Active
DeletedSpoke 2
Take note of the following:
• Data about Contacts A and B comes in the Customer Data Management cloud from both the spoke systems.
• The merge is taking place in the Customer Data Management cloud and any owned objects by the victims aremoved (re-parented) to survivor record in CDM.
• The mastered data is published to both the spoke systems and, consequently, Contact B is deleted from both thespoke systems.

Oracle Sales CloudImplementing Customer Data Management
Glossary
207
Glossary
address style format
Specifies the layout of an address, such as how many address lines it contains, and whether a city name is mandatory.
classification category
A grouping of classification codes, categorizing entities such as parties, tasks, and orders. Allows classification codeassignment rules to be defined.
determinant
A value that specifies the use of a reference data set in a particular business context.
external system or external application
A system or application that is external to and not part of Order Management. An order capture system that resides upstreamof Order Management is an example of an external system. A fulfillment application that resides downstream of OrderManagement is an example of an external application.
flexfield segment
An extensible data field that represents an attribute and captures a value corresponding to a predefined, single extensioncolumn in the database. A segment appears globally or based on a context of other captured information.
global header
The uppermost region in the user interface that remains the same no matter which page you're on.
hierarchy version
Hierarchy version refers to a specific version of a hierarchy. You can create any number of versions, but only one hierarchyversion can be active on a specific date. In tree terminology, hierarchy versions are also called tree versions.
identifier type
An identifier type is a specific category of additional identifiers, numeric or otherwise, which can identify members. Examplesof identifier types could be bank account numbers, passport numbers, and so on.
interface table
A database table that stores data during data transfer between applications or from an external system or data file.
Items
Entries within the Product master database. For example, items for a manufacturing company can include nuts, bolts, andscrews.

Oracle Sales CloudImplementing Customer Data Management
Glossary
208
lookup code
An option available within a lookup type, such as the lookup code BLUE within the lookup type COLORS.
lookup type
The label for a static list that has lookup codes as its values.
marketing list
A static selection of contacts for the purpose of communicating a marketing message by email, direct mail or phone.
name style format
Specifies the layout of a name, such as first name, last name, and phonetic last name.
name type
A name type is a specific category of additional names that can identify trading community members. Examples of nametypes could be maiden names, aliases, doing-business-as names, and so on.
organization hierarchy
A tree structure that determines the relationship between organizations.
profile option
User preferences and system configuration options that users can configure to control application behavior at different levelsof an enterprise.
reference data set
Contains reference data that can be shared across a number of business units or other determinant types. A set supportscommon administration of that reference data.
resource
People designated as able to be assigned to work objects, for example, service agents, sales managers, or partner contacts.A sales manager and partner contact can be assigned to work on a lead or opportunity. A service agent can be assigned to aservice request.
resource organization
An organization whose members are resources. Resource organizations are used to implement sales organizations, partnerorganizations, and so on.

Oracle Sales CloudImplementing Customer Data Management
Glossary
209
resource role
Resource roles indicate the role a resource plays as an individual, or within a resource team.
resource team
A resource team is a temporary group of resources formed to work on work objects. A resource team may contain aresource organization or resources or both. A resource team cannot be hierarchically structured and is not intended toimplement an organization.
set enabled
A property that describes entities that an organization shares as reference data. For example, you can indicate a lookup,customer, location, or document attachment as set enabled.

Oracle Sales CloudImplementing Customer Data Management
Glossary
210