oracle application server cdc adapters for adabas … · oracle® application server cdc adapters...
TRANSCRIPT
Oracle® Application ServerCDC Adapters for Adabas User’s Guide
11g Release 1 (11.1.1)
E16090-01
March 2010

Oracle Application Server CDC Adapters for Adabas User's Guide, 11g Release 1 (11.1.1)
E16090-01
Copyright © 2009, 2010, Oracle and/or its affiliates. All rights reserved.
Primary Author: David Goldman
This software and related documentation are provided under a license agreement containing restrictions on use and disclosure and are protected by intellectual property laws. Except as expressly permitted in your license agreement or allowed by law, you may not use, copy, reproduce, translate, broadcast, modify, license, transmit, distribute, exhibit, perform, publish, or display any part, in any form, or by any means. Reverse engineering, disassembly, or decompilation of this software, unless required by law for interoperability, is prohibited.
The information contained herein is subject to change without notice and is not warranted to be error-free. If you find any errors, please report them to us in writing.
If this software or related documentation is delivered to the U.S. Government or anyone licensing it on behalf of the U.S. Government, the following notice is applicable:
U.S. GOVERNMENT RIGHTS Programs, software, databases, and related documentation and technical data delivered to U.S. Government customers are "commercial computer software" or "commercial technical data" pursuant to the applicable Federal Acquisition Regulation and agency-specific supplemental regulations. As such, the use, duplication, disclosure, modification, and adaptation shall be subject to the restrictions and license terms set forth in the applicable Government contract, and, to the extent applicable by the terms of the Government contract, the additional rights set forth in FAR 52.227-19, Commercial Computer Software License (December 2007). Oracle USA, Inc., 500 Oracle Parkway, Redwood City, CA 94065.
This software is developed for general use in a variety of information management applications. It is not developed or intended for use in any inherently dangerous applications, including applications which may create a risk of personal injury. If you use this software in dangerous applications, then you shall be responsible to take all appropriate fail-safe, backup, redundancy, and other measures to ensure the safe use of this software. Oracle Corporation and its affiliates disclaim any liability for any damages caused by use of this software in dangerous applications.
Oracle is a registered trademark of Oracle Corporation and/or its affiliates. Other names may be trademarks of their respective owners.
This software and documentation may provide access to or information on content, products, and services from third parties. Oracle Corporation and its affiliates are not responsible for and expressly disclaim all warranties of any kind with respect to third-party content, products, and services. Oracle Corporation and its affiliates will not be responsible for any loss, costs, or damages incurred due to your access to or use of third-party content, products, or services.
iii
Contents
Preface ................................................................................................................................................................. ix
Audience....................................................................................................................................................... ixDocumentation Accessibility ..................................................................................................................... ixRelated Documents ..................................................................................................................................... xConventions ................................................................................................................................................. x
1 Introduction
OracleAS CDC Adapter for Adabas Overview .................................................................................. 1-1OracleAS CDC Adapter for Adabas Architecture.............................................................................. 1-2
The Staging Area ................................................................................................................................ 1-4
2 Configuring the OracleAS CDC Adapter for Adabas
Setting Up the IBM z/OS Platform in Oracle Studio ........................................................................ 2-1Securing Access to Oracle Connect....................................................................................................... 2-2
Setting Password Access to Oracle Studio ..................................................................................... 2-2Specifying Users with Administrative Rights................................................................................ 2-3Setting Up Run-Time User Access to the IBM z/OS Platform.................................................... 2-5
Setting up Metadata for the OracleAS Adabas Data Source ........................................................... 2-6Setting Up the Adabas Data Source (ADD Data only) ................................................................. 2-6Configuring the Data Source Driver ............................................................................................... 2-7
Adabas (ADD) Properties.......................................................................................................... 2-8Configuring the Data Source Driver Advanced Properties............................................... 2-10
Importing Metadata for the Adabas Data Source ...................................................................... 2-12Importing Metadata from DDM Files................................................................................... 2-12
Verifying the Metadata Definition................................................................................................ 2-12Adding Adabas Data Tracing to the Log ............................................................................. 2-13
Setting Up a Change Data Capture with the OracleAS CDC Adapter for Adabas .................. 2-13Setting up the ATTSRVR Started Task......................................................................................... 2-13Setting up a Change Data Capture in Oracle Studio ................................................................. 2-13
Create a CDC Project ............................................................................................................... 2-14Set up the CDC Server............................................................................................................. 2-17Set up the Staging Area Server .............................................................................................. 2-24
Setting up the Tracking File........................................................................................................... 2-33Create the Tracking File .......................................................................................................... 2-33Registering the Archived PLOG Files ................................................................................... 2-34
iv
Registering the PLOG Files using a Generation Data Group (GDG) ............................... 2-34Deploying a Change Data Capture .............................................................................................. 2-35
Activating and Deactivating Solution Workspaces ............................................................ 2-38
3 WebLogic Deployment and Adapter Integration
Configuring the Adabas CDC Adapter In the Application Server ................................................ 3-1CDC Stream Positions Table Definition.......................................................................................... 3-1Configuring the Adabas CDC Adapter Connection Factory....................................................... 3-2
Configuring the JCA Configuration Files for the OracleAS CDC Adapter for Adabas ............ 3-3Creating JCA Configuration Files.................................................................................................... 3-3Configuring the Binding File............................................................................................................ 3-4
High Availability...................................................................................................................................... 3-5Troubleshooting Rollback Loops.......................................................................................................... 3-6
4 Configuring an Adabas CDC Adapter
Creating Outbound Interactions with the OracleAS Adapter for Adabas ................................... 4-1Requirements ...................................................................................................................................... 4-1
Adding the Adabas Hospital Data Source .......................................................................................... 4-1Prepare the System............................................................................................................................. 4-1Set up Machine Access to Oracle Connect...................................................................................... 4-2
Create a Change Data Capture............................................................................................................... 4-3Setting up a Change Data Capture .................................................................................................. 4-3Deploy the Solution ........................................................................................................................... 4-5
Create the JCA Configuration Files ...................................................................................................... 4-5
5 Creating the Project in JDeveloper Examples
Getting Started .......................................................................................................................................... 5-1Prerequisites........................................................................................................................................ 5-1Beginning Tasks ................................................................................................................................. 5-2
Deploy a BPEL Inbound Process........................................................................................................... 5-2Design-Time Configuration.............................................................................................................. 5-3
Create a BPEL Inbound Process................................................................................................ 5-3Use a Third-Party Adapter for the Inbound Process ............................................................. 5-4Design the BPEL Inbound Process ........................................................................................... 5-6Deploy the Project....................................................................................................................... 5-9
Run-time Configuration .................................................................................................................... 5-9Triggering the Event using the XML Utility ........................................................................... 5-9
Mediator Inbound Process .................................................................................................................. 5-10Beginning Tasks .............................................................................................................................. 5-11Create a Mediator Inbound Process ............................................................................................. 5-11Use a Third-Party Adapter for the Inbound Process ................................................................. 5-13Create a File Adapter ...................................................................................................................... 5-14Design an Inbound Mediator ........................................................................................................ 5-16Create Mapping Rules and Map the Files ................................................................................... 5-17Deploy the Project ........................................................................................................................... 5-17
v
6 Run-time Tasks and Troubleshooting
Adding and Removing Tables ............................................................................................................... 6-1Handling Metadata Changes ................................................................................................................. 6-2Staging Area Maintenance ..................................................................................................................... 6-3Monitoring the Change Data Capture.................................................................................................. 6-4
Service Context Table ........................................................................................................................ 6-4Monitoring the Status ........................................................................................................................ 6-5
Daemon Life-Cycle Tasks....................................................................................................................... 6-7Starting the Daemon .......................................................................................................................... 6-7
Task: Starting the Daemon ........................................................................................................ 6-7Shutting Down the Daemon............................................................................................................. 6-7Monitoring the Daemon During Run Time.................................................................................... 6-8
Daemon (Computer) Options ................................................................................................... 6-8Workspace Options .................................................................................................................... 6-9Server Options............................................................................................................................. 6-9
Daemon Logs ................................................................................................................................... 6-10The Log Monitor ..................................................................................................................... 6-10
Resolving Communication Errors...................................................................................................... 6-11Resolving Specific Errors..................................................................................................................... 6-12
7 Advanced Features of OracleAS CDC Adapter for Adabas
Configuring the Daemon for High Availability ................................................................................ 7-1Adding a New Daemon Workspace Configuration...................................................................... 7-1Editing the Workspace ...................................................................................................................... 7-2Configuring the Server Mode........................................................................................................... 7-2
Configuring a Binding Environment ................................................................................................... 7-6Debug................................................................................................................................................... 7-7General................................................................................................................................................. 7-8Language ............................................................................................................................................. 7-8Modeling ............................................................................................................................................. 7-9ODBC ................................................................................................................................................... 7-9OLEDB ................................................................................................................................................. 7-9Optimizer ............................................................................................................................................ 7-9Parallel Processing .......................................................................................................................... 7-10Query Processor .............................................................................................................................. 7-10Transactions ..................................................................................................................................... 7-13Tuning............................................................................................................................................... 7-13XML................................................................................................................................................... 7-14
Migration Considerations.................................................................................................................... 7-15Security Considerations ....................................................................................................................... 7-15
Setting Design Time Security ........................................................................................................ 7-16Setting Run Time Security ............................................................................................................. 7-16
Transaction Support ............................................................................................................................. 7-17
A Advanced Tuning of the Metadata
Metadata for the Adabas Data Source................................................................................................. A-1
vi
General Tab ........................................................................................................................................ A-2Columns Tab...................................................................................................................................... A-3
Column Definition Section ....................................................................................................... A-4Column Properties..................................................................................................................... A-5
Indexes Tab ........................................................................................................................................ A-7Table Information ...................................................................................................................... A-7Properties .................................................................................................................................... A-8
Statistics Tab....................................................................................................................................... A-9Generating Statistics ................................................................................................................ A-10
Advanced Tab.................................................................................................................................. A-11Adapter Metadata .................................................................................................................................. A-13
Adapter Metadata General Properties ......................................................................................... A-13Adapter Metadata Interactions ..................................................................................................... A-15
Interaction Advanced Tab ...................................................................................................... A-16Adapter Metadata Schema Records ............................................................................................. A-18Adapter Metadata XML ................................................................................................................. A-20
B Advanced Tuning of the Daemon
Control ....................................................................................................................................................... B-1Logging...................................................................................................................................................... B-3 Security..................................................................................................................................................... B-5Workspaces ............................................................................................................................................... B-7
General................................................................................................................................................ B-7Server Mode ..................................................................................................................................... B-11Security ............................................................................................................................................. B-16
C Editing Properties for the OracleAS CDC Adapters for Adabas
Editing Properties in Oracle Studio..................................................................................................... C-1Editing the OracleAS CDC Adapter Properties............................................................................ C-1
Configuration Properties ....................................................................................................................... C-2Data Source Properties ..................................................................................................................... C-2CDC Logger Properties .................................................................................................................... C-2
The Tracking File........................................................................................................................ C-2OracleAS CDC Adapter Configuration Properties ...................................................................... C-3
CDC Queue Adapter Properties .............................................................................................. C-3Common CDC Adapter Properties ......................................................................................... C-3
Change Router Properties................................................................................................................ C-4Referential Integrity Considerations .............................................................................................. C-7
Access to Change Events ........................................................................................................................ C-9Transaction Support ............................................................................................................................. C-11Security.................................................................................................................................................... C-11
D Back-end Adapter Data Type Support
Data Type Mapping ................................................................................................................................ D-1
vii
E Globalization Settings
Defining the Language and Code Page............................................................................................... E-1
F Editing XML Files in Oracle Studio
Preparing to Edit XML Files in Oracle Studio ................................................................................... F-1Making Changes to the XML File ........................................................................................................ F-2
Remove Objects ................................................................................................................................. F-2Add DTD Information...................................................................................................................... F-2Edit Namespaces ............................................................................................................................... F-3Add Elements and Attributes.......................................................................................................... F-5Replace an Element........................................................................................................................... F-5
Index

viii
ix
Preface
This guide is the primary source of user and reference information on the OracleAS CDC Adapter for Adabas, which enables Oracle users to use change data capture in their integration architecture, working with the Oracle Application Server. This preface includes the following topics:
■ Audience
■ Documentation Accessibility
■ Related Documents
■ Conventions
AudienceThis guide is intended for Oracle integration administrators and developers who perform the following tasks:
■ Installing and configuring OracleAS CDC Adapter for Adabas
■ Diagnosing errors
■ Using OracleAS for developing integration solutions using change data capture
Documentation AccessibilityOur goal is to make Oracle products, services, and supporting documentation accessible to all users, including users that are disabled. To that end, our documentation includes features that make information available to users of assistive technology. This documentation is available in HTML format, and contains markup to facilitate access by the disabled community. Accessibility standards will continue to evolve over time, and Oracle is actively engaged with other market-leading technology vendors to address technical obstacles so that our documentation can be
Note: You should understand the fundamentals of OracleAS, WebLogic, the UNIX and Microsoft Windows operating system before using this guide to install or administer OracleAS Adapters for Adabas.
Note: For the purposes of this version of the Oracle Weblogic Server, Oracle Application Server refers to the Oracle WebLogic Server and OracleAS refers to Oracle WLS.
x
accessible to all of our customers. For more information, visit the Oracle Accessibility Program Web site at http://www.oracle.com/accessibility/.
Accessibility of Code Examples in DocumentationScreen readers may not always correctly read the code examples in this document. The conventions for writing code require that closing braces should appear on an otherwise empty line; however, some screen readers may not always read a line of text that consists solely of a bracket or brace.
Accessibility of Links to External Web Sites in DocumentationThis documentation may contain links to Web sites of other companies or organizations that Oracle does not own or control. Oracle neither evaluates nor makes any representations regarding the accessibility of these Web sites.
Access to Oracle SupportOracle customers have access to electronic support through My Oracle Support. For information, visit http://www.oracle.com/support/contact.html or visit http://www.oracle.com/accessibility/support.html if you are hearing impaired.
Related DocumentsFor more information, see the following documents in the Oracle Other Product One Release 10.0 documentation set or in the Oracle Other Product Two Release 6.1 documentation set:
■ Oracle Application Server Adapter Concepts Guide
■ Oracle Application Server Adapter Installation Guide
■ Oracle Application Server Adapter Concepts Guide
■ Oracle Application Server Containers for J2EE User’s Guide
■ Oracle Application Server Containers for J2EE Services Guide
■ Oracle Application Server Containers for J2EE Security Guide
ConventionsThe following text conventions are used in this document:
Convention Meaning
boldface Boldface type indicates graphical user interface elements associated with an action, or terms defined in text or the glossary.
italic Italic type indicates book titles, emphasis, or placeholder variables for which you supply particular values.
monospace Monospace type indicates commands within a paragraph, URLs, code in examples, text that appears on the screen, or text that you enter.

xi

xii
1
Introduction 1-1
1 Introduction
Change data capture (CDC) is an integration technology that enables efficient near real-time integration by capturing changes made to enterprise data sources and providing them for processing in integration middleware, such as Oracle Fusion Middleware. The CDC Adapter can be used by Oracle SOA Suite (BPEL Process Manager, Oracle Enterprise Service Bus) and Oracle Data Integrator (ODI).
The OracleAS CDC Adapter for Adabas captures changes made to the Adabas files that are written to archive files using the User Exit 2 (UE2) procedure. The UE2 procedure is activated by Adabas when the current PLOG file is full.
The OracleAS CDC Adapter for Adabas CDC solution works with Adabas data sources that use either ADD or Predict data.
This chapter provides an overview of the features and architecture of the OracleAS CDC Adapter for Adabas. It includes the following topics:
■ OracleAS CDC Adapter for Adabas Overview
■ OracleAS CDC Adapter for Adabas Architecture
OracleAS CDC Adapter for Adabas OverviewThe OracleAS CDC Adapter for Adabas captures and delivers changes (such as insert, update, and delete operations) made to data in Adabas data sources. By using the CDC Adapter, you can build efficient data integration solutions that use Adabas data, synchronize systems to ensure data integrity, update data warehouses and operational data stores in near real-time, and enable event-driven business activity monitoring and processing.
The OracleAS CDC Adapter for Adabas has the following capabilities:
■ Non-intrusive change capture: The OracleAS CDC Adapter for Adabas is a log-based CDC technology. The CDC agent accesses a logstream that is polled to access the changes. The agent begins polling from a specific point called the stream position (or agent context). The last position read is saved as the stream position. This next time the agent polls the logstream for information, it starts at the saved stream position.
■ Real-time data capture: The OracleAS CDC Adapter for Adabas captures changes to data in near-real-time for applications that demand zero latency and require the most up-to-date data. Unlike scheduled CDC solutions, near real-time data capture guarantees that a change event is can be made available in a matter of seconds at the consumer. The term near-real-time data capture is used because after a period of inactivity changes may be available after a few seconds.
OracleAS CDC Adapter for Adabas Architecture
1-2 Oracle Application Server CDC Adapters for Adabas User's Guide
■ Change storage: The Oracle CDC Adapter for Adabas provides a staging area that stores the captured changes in a format that is easy to access and process.The staging area ensures that changes are persisted until they are processed, and provides facilities to clean up old change records.
■ Change access and delivery: The Oracle CDC Adapter for Adabas includes a JCA Resource Adapter that can be configured in BPEL and ESB as an inbound endpoint, delivering changes in XML format.
■ Filtering: The OracleAS CDC Adapter for Adabas enables you to filter captured data based on the type of operation (INSERT, UPDATE, DELETE), based on column selection and even based on specific column values.
■ Reliable delivery and recovery: The Oracle CDC Adapter for Adabas stores changes in a reliable persistent storage and uses the concept of a 'stream position' that indicates the location in the change stream that was successfully moved and processed. By storing stream positions, the CDC Adapter can always restart after failure, recover, and continue moving and delivering changes from wherever it was stopped
■ Ease of use: The OracleAS CDC Adapter for Adabas provides an easy and intuitive way to confugure CDC solutions using Oracle Studio.
Using the OracleAS CDC Adapter for Adabas makes ETL (extract, transform, and load) processes more efficient and less disruptive to the operation of the source database systems, eliminating the need for the traditional ETL downtime window.
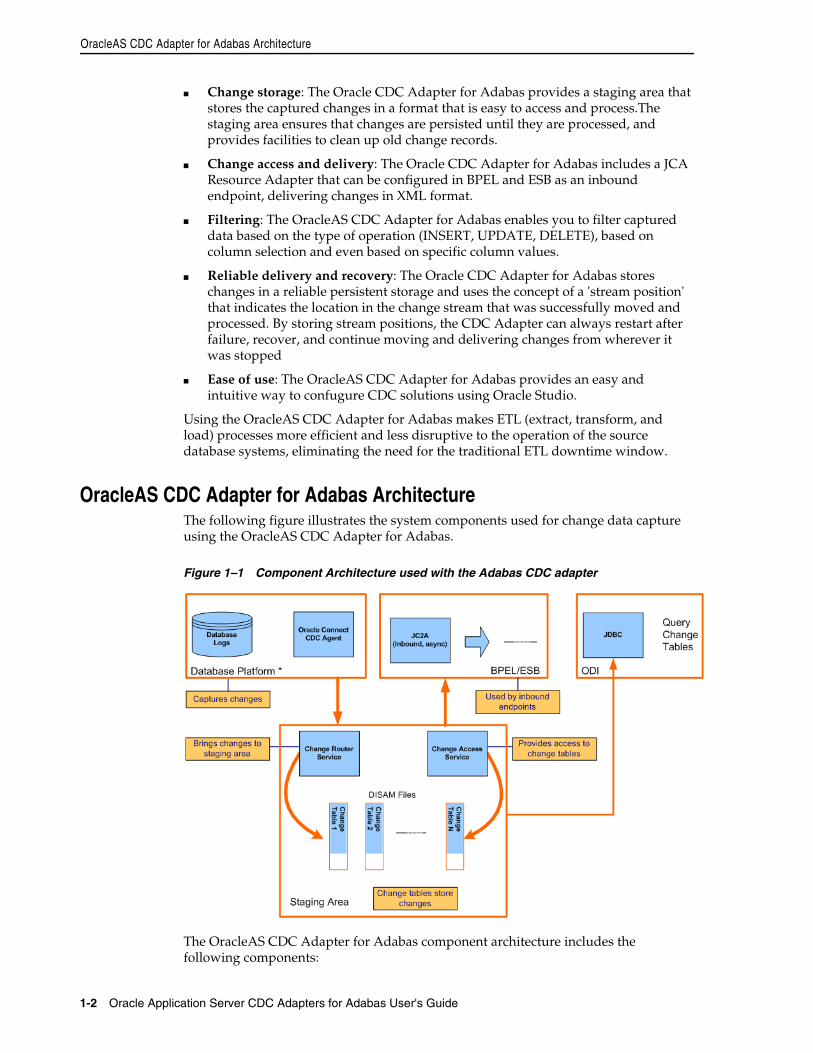
OracleAS CDC Adapter for Adabas ArchitectureThe following figure illustrates the system components used for change data capture using the OracleAS CDC Adapter for Adabas.
Figure 1–1 Component Architecture used with the Adabas CDC adapter
The OracleAS CDC Adapter for Adabas component architecture includes the following components:
OracleAS CDC Adapter for Adabas Architecture
Introduction 1-3
■ Database Platform: The database platform is the data source that contains the data to be captured.
■ Database Log: The database log is a log stream that contains the raw change data.
■ Oracle Connect: Oracle Connect runs on the back-end system and handles the special J2CA adapter that runs on the Oracle Application Server.
■ CDC agent: This is an OracleAS CDC Adapter for Adabas component that runs under the control of the daemon (a listener process) on the computer where the back-end data is located. The capture agent provides access to change events in the transaction log for the change router.
The agent is located on the same computer as the changes to be captured. It maintains the last position read in the journal (the stream position or context) and starts at this point the next time it polls the journal. The context is stored in the repository where the adapter definition is stored. The adapter definition includes a single primary interaction, which is used to access the appropriate journal and includes the list of tables to monitor for changes.
■ BPEL/ESB: This is where the change events are consumed by a JCA provider that sends change records to an end point configured in either ESB or BPEL.
■ JC2A Resource Adapter: This is a special version of the J2CA 1.5 Adabas adapter that can read change records from the staging area. It implements inbound endpoints for BPEL and ESB that pulls change events from the staging area and deliver them as XML change documents. Each endpoint handles change records for a single captured table at the source database.
The J2CA adapter uses multiple connections to the staging area to process changes from multiple tables in parallel.
■ JDBC Driver: This enables access to changes in the staging area using SQL queries.
■ WebLogic / BPEL Components: Any OracleAS component that hosts and gets messages from the JC2A adapter.
■ Staging Area: This is a set of change tables where change records are stored before being sent to BPEL/ESB. Old records from the Staging Area are deleted based upon the specified aging policy.
The Staging Area contains a DISAM data source for SQL access and a Database Events adapter for the XML access. For more information, see The Staging Area for more information.
The staging area includes the following components:
– Change Router: This is an OracleAS CDC Adapter for Adabas service that runs under the control of the daemon (a listener process) on the Oracle platform. The change router reads the change stream from the CDC agent, sorts them in transaction/commit order eliminating rolled-back changes, and distrubutes the changes into the various change tables.
Only one instance of the change router is active at a time against a captured database. The change router also deletes old changes from the change tables according to a configurable aging policy. policy (48 hours is the default, which means that records that have been in the staging area for more than 48 hours are deleted).
– Change Tables: These are tables in the staging area that contain changes to one captured table in the source database. These change tables maintain change events in transaction order and in occurrence order within a
OracleAS CDC Adapter for Adabas Architecture
1-4 Oracle Application Server CDC Adapters for Adabas User's Guide
transaction for each captured table. The change tables are DISAM files that are indexed to support fast access to the change data, that can be accessed directly using the stream position.
– Change Access Service. This is an instance Oracle Connect that is installed on a separate computer or the same computer as BPEL/ESB that allows access to the change tables. This instance of Oracle Connect is configure as the staging area.
■ Oracle Studio: Provides the developer or administrator with a graphical user interface for setting up the CDC Agent and Staging Area,using intuitive wizards. Oracle Studio can be installed on Linux, UNIX, or Windows.
The Staging AreaThe staging area is an area used by Oracle Connect to store captured data from a journal. The journal is scanned once and changes for every required table read during that scan are passed to the staging area, where they are stored. Therefore, the journal is scanned once each time it is polled. After the changes are written to the staging area, processing of these changes is carried out independently of the journal.
The staging area is a benefit when transactions are used. The changed data is not written to the change queue until the transaction is committed. Thus, if the transaction fails, there is no overhead of having to back out any processing done with the steps in the failed transaction.
The staging area can be on any computer with a Windows, Linux, or UNIX operating system that is running the Oracle Application Server and does not need to be run on the same server as the Adabas CDC adapter. Once the information is extracted from the journal and written to the staging area, processing of changes is carried out on the staging area only. Thus, the staging area should be set up to consider the network configuration and where the consumer application runs.
The staging area maintains the last position read by the consumer application (the staging area context) and starts at this point the next time a request from the consumer application is received. The context is stored in the repository where the staging area is maintained.
The staging area is indexed so that access to the staging area for a specific stream is quick.
The staging area is automatically cleared every 48 hours. All events that have been in the staging area for more than 48 hours are deleted.
2
Configuring the OracleAS CDC Adapter for Adabas 2-1
2 Configuring the OracleAS CDC Adapter forAdabas
This chapter describes how to configure a change data capture using the OracleAS CDC Adapter for Adabas.
Most of the configurations are done using Oracle Studio. To use Oracle Studio, you first configure it to enable access to the z/OS computer where the Adabas data resides. If you are using Adabas with ADD data, you set up an Adabas data source and then create the change data capture solution. If you are using Adabas with Predict data, you only set up the CDC solution.
This chapter contains the following topics:
■ Setting Up the IBM z/OS Platform in Oracle Studio
■ Securing Access to Oracle Connect
■ Setting up Metadata for the OracleAS Adabas Data Source
■ Setting Up a Change Data Capture with the OracleAS CDC Adapter for Adabas
Setting Up the IBM z/OS Platform in Oracle StudioUsing Oracle Studio, perform the following steps to configure the IBM z/OS platform:
1. From the Start menu, select Programs, Oracle, and then select Studio. Oracle Studio opens.
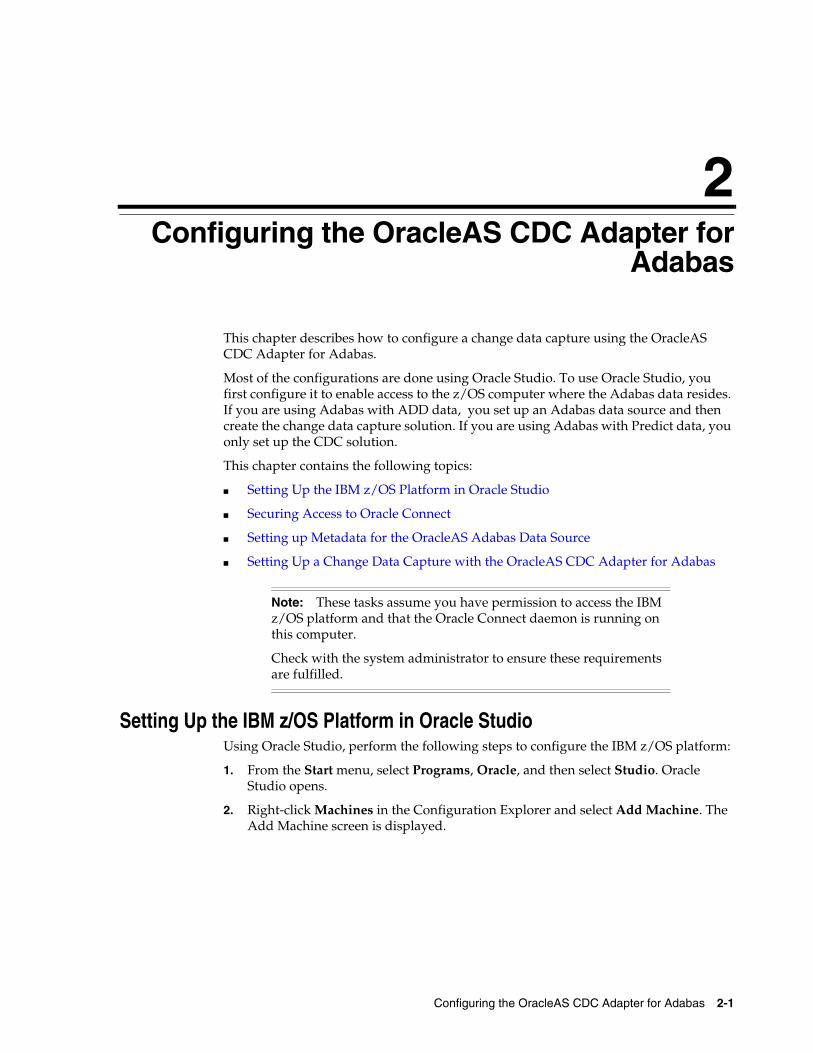
2. Right-click Machines in the Configuration Explorer and select Add Machine. The Add Machine screen is displayed.
Note: These tasks assume you have permission to access the IBM z/OS platform and that the Oracle Connect daemon is running on this computer.
Check with the system administrator to ensure these requirements are fulfilled.
Securing Access to Oracle Connect
2-2 Oracle Application Server CDC Adapters for Adabas User's Guide
Figure 2–1 The Add Machine screen
3. Enter the name of the computer you want to connect to, or click Browse to select the computer from the list of computers that is displayed and which use the default port 2551.
4. Specify the user name and password of the user who was specified as the administrator when Oracle Connect was installed.
5. Click Finish.
The computer is displayed in the Configuration Explorer.
Securing Access to Oracle ConnectOracle Studio includes mechanisms to secure access to Oracle Connect both during modeling and run time.
During modeling the following security mechanisms can be applied:
■ Setting Password Access to Oracle Studio
■ Specifying Users with Administrative Rights
During run time client access to Oracle Connect is provided by the user profile:
■ Setting Up Run-Time User Access to the IBM z/OS Platform
Setting Password Access to Oracle StudioInitially, any operation performed using Oracle Studio does not require a password. You can set a password so that the first operation that involves accessing the server from Oracle Studio requires a password to be entered.
Perform the following steps to set the password:
Note: Selecting Anonymous connection enables anyone having access to the computer to be an administrator, if this was defined for the computer.

Securing Access to Oracle Connect
Configuring the OracleAS CDC Adapter for Adabas 2-3
1. From the Start menu, select Programs, Oracle, and then select Studio.
2. Select Window from the menu bar and then select Preferences. The Preferences screen is displayed.
3. Select the Studio node, as shown in the following figure:
Figure 2–2 The Preferences screen
4. Click Change master password. The Change Master Password screen is displayed as shown in the following figure:
Figure 2–3 The Change Master Password screen
5. Leave the Enter current master password field blank and type a new master password in the Enter new master password field.
6. Enter the new passoword again in the Confirm new master password field.
7. Click OK.
Specifying Users with Administrative RightsBy default, only the user who was specified during the installation as an administrator has the authorization to modify settings on that computer from Oracle Studio. This
Securing Access to Oracle Connect
2-4 Oracle Application Server CDC Adapters for Adabas User's Guide
user can then authorize other users to make changes or to view the definitions for a selected computer. Adding a computer to Oracle Studio is described in "Setting Up the IBM z/OS Platform in Oracle Studio".
1. From the Start menu, select Programs, Oracle, and then select Studio.
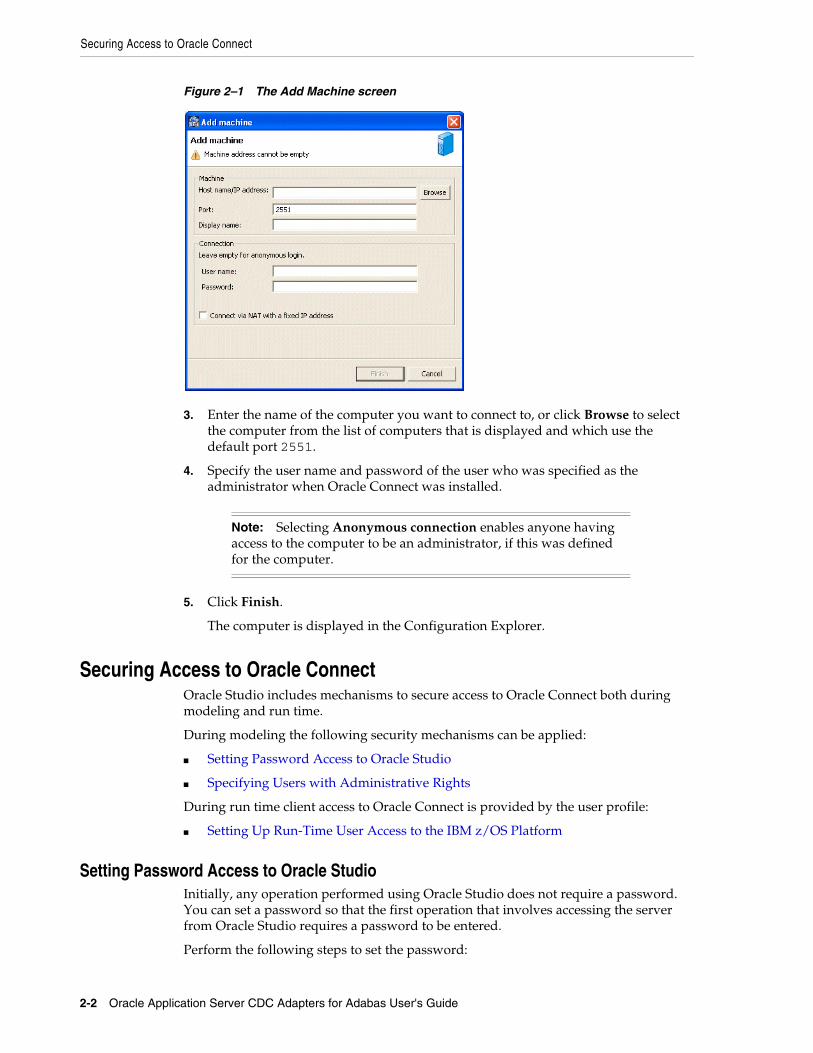
2. In the Design perspective Configuration view, Right-click the computer and select Administration Authorization.
The Administration Authorization screen is displayed as shown in the following figure.
Figure 2–4 The Administration Authorization Identities tab
The screen has the following sections:
Administrators: Administrators can view and modify all the definitions in Oracle Studio for the selected computer. On initial entry to Oracle Studio, every user is defined as a system administrator.
Designers: Designers can view all the definitions for the computer in Oracle Studio and can modify any of the definitions under the Bindings and Users nodes for the selected computer. For example, Oracle Studio database administrator can add new data sources and adapters and can change metadata definitions for a table in a data source.
Users: Users can view all the definitions for the computer in Oracle Studio for the selected computer. Regular users cannot modify any of the definitions.
3. Add users or groups of users by clicking Add User or Add Group for the relevant sections.
Note: The default during installation is to enable all users to be administrators.
Securing Access to Oracle Connect
Configuring the OracleAS CDC Adapter for Adabas 2-5
The user or group that is added must be recognized as a valid user or group for the computer. Once a name has been added to a section, only the user or group that logs on with that user name has the relevant authorization.
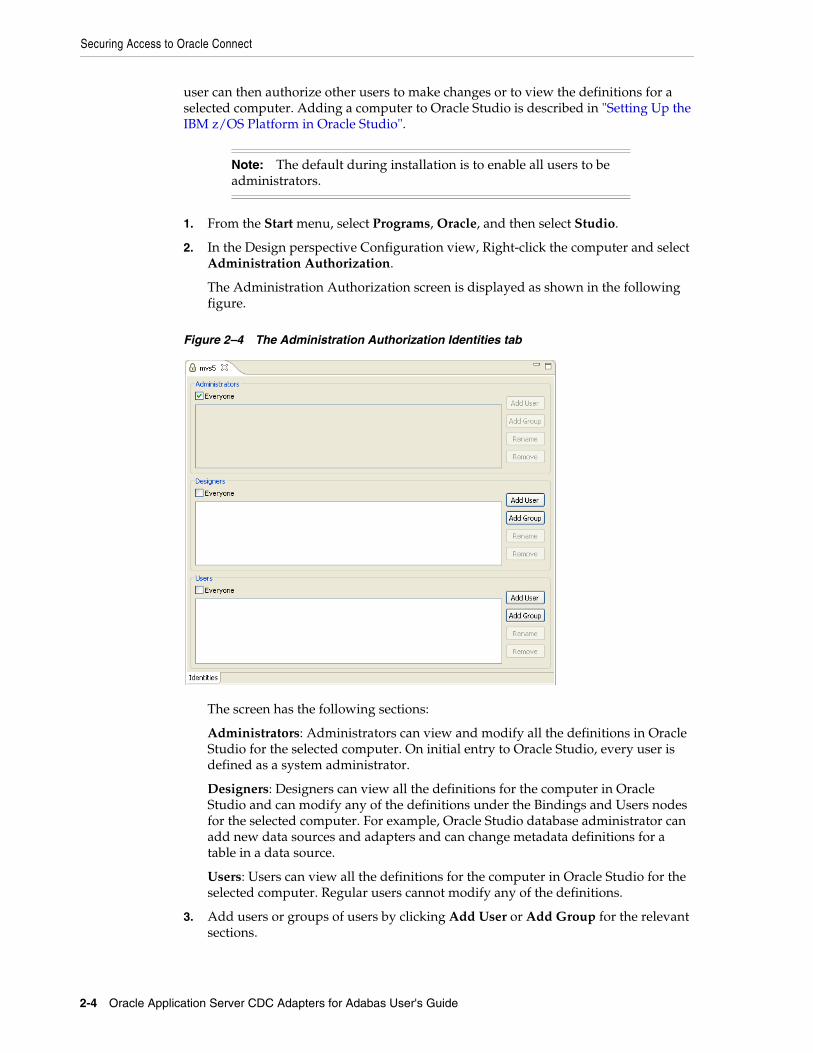
Setting Up Run-Time User Access to the IBM z/OS PlatformDuring run time, client access to Oracle Connect is provided by the user profile. A user profile contains name and password pairs that are used to access a computer, data source or application at run time, when anonymous access is not allowed.
1. From the Start menu, select, Programs, Oracle, and then select Studio. Oracle Studio opens.
2. From the Design perspective, Configuration view, expand the Machines folder, then expand the machine where you want to set the user name and password.
3. Expand Users.
4. Right-click NAV and select Open The NAV user profile editor is displayed:
Figure 2–5 The User Editor
5. In the User editor, click Add. The Add Authenticator screen is displayed:
Setting up Metadata for the OracleAS Adabas Data Source
2-6 Oracle Application Server CDC Adapters for Adabas User's Guide
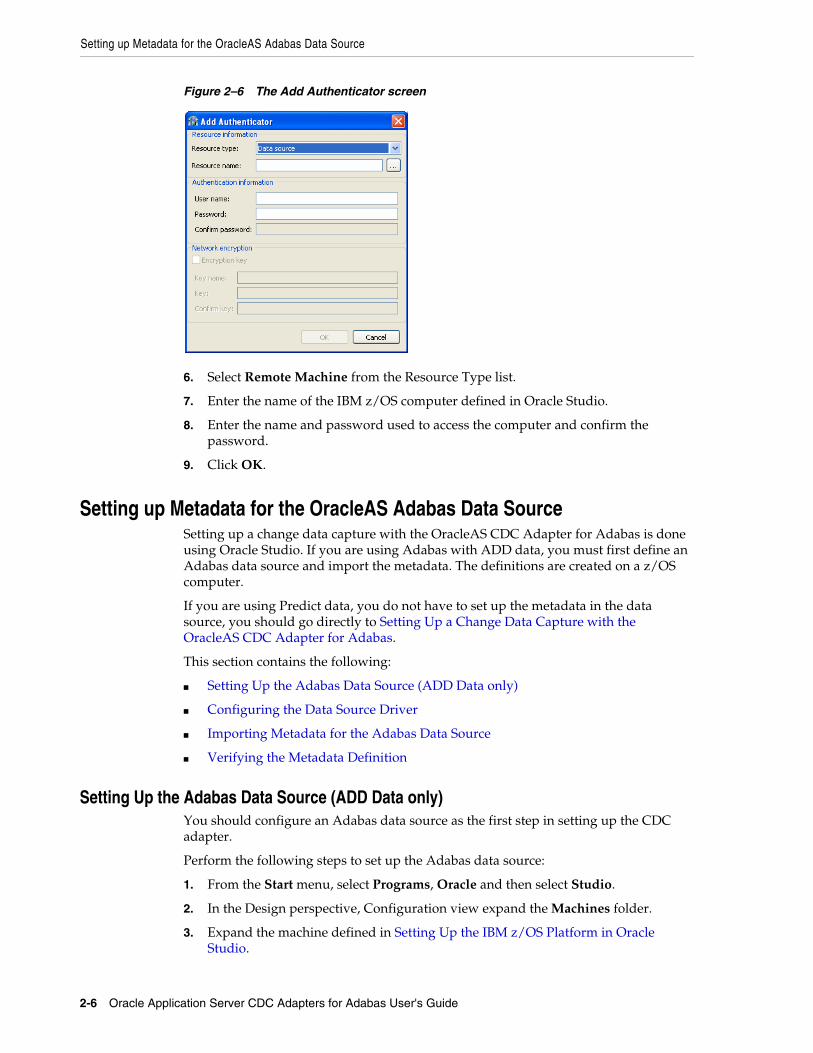
Figure 2–6 The Add Authenticator screen
6. Select Remote Machine from the Resource Type list.
7. Enter the name of the IBM z/OS computer defined in Oracle Studio.
8. Enter the name and password used to access the computer and confirm the password.
9. Click OK.
Setting up Metadata for the OracleAS Adabas Data SourceSetting up a change data capture with the OracleAS CDC Adapter for Adabas is done using Oracle Studio. If you are using Adabas with ADD data, you must first define an Adabas data source and import the metadata. The definitions are created on a z/OS computer.
If you are using Predict data, you do not have to set up the metadata in the data source, you should go directly to Setting Up a Change Data Capture with the OracleAS CDC Adapter for Adabas.
This section contains the following:
■ Setting Up the Adabas Data Source (ADD Data only)
■ Configuring the Data Source Driver
■ Importing Metadata for the Adabas Data Source
■ Verifying the Metadata Definition
Setting Up the Adabas Data Source (ADD Data only)You should configure an Adabas data source as the first step in setting up the CDC adapter.
Perform the following steps to set up the Adabas data source:
1. From the Start menu, select Programs, Oracle and then select Studio.
2. In the Design perspective, Configuration view expand the Machines folder.
3. Expand the machine defined in Setting Up the IBM z/OS Platform in Oracle Studio.
Setting up Metadata for the OracleAS Adabas Data Source
Configuring the OracleAS CDC Adapter for Adabas 2-7
4. Expand the Bindings folder. The binding configurations available on this computer are listed.
5. Expand the NAV binding. The NAV binding configuration includes branches for data sources and adapters that are located on the computer.
6. Right-click Data sources and select New Data source.
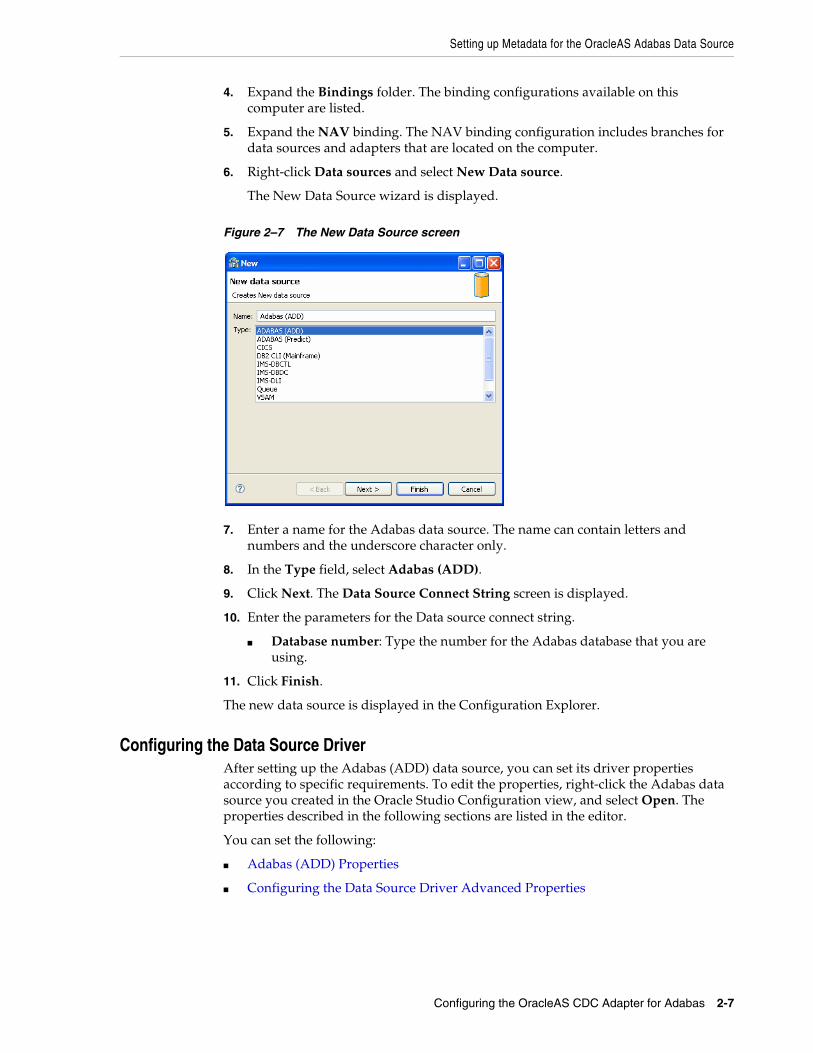
The New Data Source wizard is displayed.
Figure 2–7 The New Data Source screen
7. Enter a name for the Adabas data source. The name can contain letters and numbers and the underscore character only.
8. In the Type field, select Adabas (ADD).
9. Click Next. The Data Source Connect String screen is displayed.
10. Enter the parameters for the Data source connect string.
■ Database number: Type the number for the Adabas database that you are using.
11. Click Finish.
The new data source is displayed in the Configuration Explorer.
Configuring the Data Source DriverAfter setting up the Adabas (ADD) data source, you can set its driver properties according to specific requirements. To edit the properties, right-click the Adabas data source you created in the Oracle Studio Configuration view, and select Open. The properties described in the following sections are listed in the editor.
You can set the following:
■ Adabas (ADD) Properties
■ Configuring the Data Source Driver Advanced Properties
Setting up Metadata for the OracleAS Adabas Data Source
2-8 Oracle Application Server CDC Adapters for Adabas User's Guide
Adabas (ADD) PropertiesThe following properties can be configured for the Adabas (ADD) data source. You set the properties in Oracle Studio, Design perspective. For information on how to set data source properties in Oracle Studio.
1. In the Configuration view, right-click the Adabas data source that you created and select Open.
2. Click the Configuration tab.
The Adabas (ADD) data source configuration is displayed in the editor. This editor has two sections.
The Connection section shows the connections you defined when Setting Up the Adabas Data Source (ADD Data only).
The Properties section displays thefollowing properties, which can be configured for the Adabas (ADD) data source:
■ svcNumber: The installation on MVS places the SVC number of Adabas in the GBLPARMS file. Alternatively, you can specify the SVC number using this attribute. This simplifies configuration in sites where several Adabas installations on different SVC numbers must be accessed from a single installation. Each SVC requires a different workspace, but the same GBLPARAMS and the same RACF profile can be used for the different workspaces.
■ addMuInPeCounter: Until version 4.6 Oracle Connect did not support counters for MUs inside of PEs. In version 4.6 this support was added, but since it changes behavior for existing users, this attribute was added to allow existing users to turn off this new feature to preserve compatibility. Default: addMuInPeCounter='true'.
■ disableExplicitSelect: This attribute indicates whether the Explicit Select option is disabled. If disables, a select * query on an Adabas table returns all fields in the table, including ISN and subfields which are normally suppressed unless explicitly requested in the query (for example, select ISN, *…). Default: disableExplicitSelect='false'.
■ disregardNonselectable: (Predict, ADD) This attribute enables you to configure the data source to ignore descriptors defined on a multiple value (MU) field, a periodic group (PE) field or phonetic/hyper descriptors. The special ACSEARCH fields which are normally created for a table are referred to as ’non-selectable’ because you cannot specify them in the select list of a query. Setting the disregardNonselectable attribute to 'true' prevents these fields from being created. Default: disregardNonselectable='false'.
■ fileList: This attribute is passed as the record buffer to the OP command. Adabas allows a list of file numbers to be provided in the record buffer of the OP command, along with the operations allowed on each file. By using this attribute a user can restrict access to the database, allowing only specific operations on specific files. For more information, see the Software AG documentation of the OP command for more information on the syntax allowed. Note that the value provided in this attribute is passed ’as-is’ to Adabas - no validation is performed. Default: fileList='.' (unrestricted access to all files in the database).
■ lockWait: This attribute specifies whether the data source waits for a locked record to become unlocked or returns a message that the record is locked. In Adabas terms, if this attribute is set to true a space is passed in command

Setting up Metadata for the OracleAS Adabas Data Source
Configuring the OracleAS CDC Adapter for Adabas 2-9
option 1 of the HI/L4 commands. Otherwise an 'R' is passed in command option 1. Default: lockWait='false'.
■ multiDatabasePredict: Turn this flag on if your Predict file includes metadata for several different databases. This has two effects on the way that the Predict information is read:
– Only tables that belong to the current database are returned in the table list.
– The file number for a table is read separate from the metadata as different databases may include the same table using a different file number.
■ multifetch: This parameter controls the number of records to be retrieved in a single read command (L2, L3, S1-L1). The value provided in this attribute controls the value passed in the ISN lower limit control block field. By default no multifetch is used. The multifetch buffer size can be controlled as follows:
– multifetch='0': Lets the driver decide the number of records to retrieve. The driver retrieves rows to fill a 10k buffer. No more than 15 rows are fetched simultaniously.
– multifetch='n': Causes n rows to be read at a time, where n is a number from 2 to 15.
– multifetch='-n': Defines a read-ahead buffer with a fixed size, where n is less than or equal to 10000 bytes.
– multifetch='1': Disables the read-ahead feature. (default)
■ nullSuppressionMode: This attribute controls the behavior of the Adabas driver for Null Suppression Handling. This attributes allows a user to change this default NULL suppression policy. Note that changing this setting improperly may result in incomplete query results. The following values can be selected:
– full: (default) NULL suppressed fields are exposed as NULLABLE and must be qualified for the Oracle optimizer to consider using a descriptor based on a NULL suppressed field.
– disabled: NULL suppressed fields are handled like any other field. Use this setting only if you completely understand the potential implications as incomplete query results may returned.
– indexesOnly: Only NULL suppressed fields that are part of a descriptor/super-descriptor are exposed as NULLABLE. Other NULL suppressed fields are handled normally. This setting is as safe as the ’full’ setting and does not include the risk of incomplete results as the ’disabled’ option does.
■ scanUsingL1: A scan strategy on a table is normally implemented by an L2 command. It is possible, however, to turn on this attribute to scan using the L1 command. This has the advantage of providing better data consistency at some performance penalty. Default: scanUsingL1='false'.
■ supportL3Range: Older versions of Adabas did not allow for a range specification on an L3 command (for example, AA,S,AA in the search buffer). Only the lower limit could be provided. If your version of Adabas supports a range in the L3 command you can turn on this attribute to enjoy better performance in some queries. Default: supportL3Range='false'.
■ traceValueBuffer: This is a debugging tool to be used when driverTrace='true' in the environment. Turning on driverTrace
Setting up Metadata for the OracleAS Adabas Data Source
2-10 Oracle Application Server CDC Adapters for Adabas User's Guide
records the Adabas commands executed in the server log file. If you also want a binary dump of the value buffer and record buffer, set this attribute to true. Default: traceValueBuffer='false'.
■ userInfo: This attribute specifies the value passed as a null-terminated string to Adabas as the seventh parameter on the adabas call. The value provided is then available in Adabas user exits. This has no affect at all on Oracle Connect, but some users have taken advantage of this feature to implement specific types of auditing. Note that it is possible to control the value of the userInfo attribute dynamically at run time using the nav_proc:sp_setprop stored procedure. Default: userInfo=''.
■ useUnderscore: This attribute indicates whether to convert hyphens (-) in table and column names into underscores (_). The inclusion of hyphens in Adabas table names and field names poses an inconvenience when accessing these tables from SQL because names that include a dash must be surrounded with double quotes. To avoid this inconvenience, the data source can translate all hyphens into underscores. Default: useUnderscore='true'.
■ verifyMetadata: This attribute indicates whether to cross-check the Predict or ADD metadata against the LF command. Resulting discrepancies are written to the log and removed from the metadata at run time. It is usually unnecessary to use this attribute. Default: verifyMetadata='false'.
3. Click Save to save the changes you made to the configuration properties.
Configuring the Data Source Driver Advanced PropertiesYou configure the advanced properties for a data source in the Advanced tab of the data source editor. The advanced settings are the same for every data source. Advanced settings let you do the following:
■ Define the transaction type
■ Edit the syntax name
■ Provide a table owner
■ Determine if a data source is updatable or readable
■ Provide repository information
■ Set the virtual view policy
Use the following procedure to configure the data source advanced features.
1. Open Oracle Studio.
2. In the Design Perspective Configuration View, expand the Machine folder and then expand the machine where you want to configure the data source.
3. Expand the Data sources folder, right click the data source you are configuring, then select Open.
4. Click the Advanced tab to make changes. The following table describes the available fields:
Table 2–1 Data Source Advanced Configuration
Field Description
Properties
Setting up Metadata for the OracleAS Adabas Data Source
Configuring the OracleAS CDC Adapter for Adabas 2-11
Transaction type The transaction level (0PC, 1PC or 2PC) that is applied to this data source, no matter what level the data source supports. The default is the data source’s default level.
Syntax name A section name in the NAV.SYN file that describes SQL syntax variations. The default syntax file contains the following predefined sections:
■ OLESQL driver and the SQL Server 7 OLE DB provider (SQLOLEDB):
syntaxName="OLESQL_SQLOLEDB"
■ OLESQL driver and JOLT:
syntaxName="OLESQL_JOLT"
■ Rdb driver and Rdb version:
syntaxName="RDBS_SYNTAX"
■ ODBC driver and EXCEL data:
syntaxName="excel_data"
■ ODBC driver and SQL/MX data:
syntaxName="SQLMX_SYNTAX"
■ ODBC driver and SYBASE SQL AnyWhere data:
syntaxName="SQLANYS_SYNTAX"
■ Oracle driver and Oracle case sensitive data:
syntaxName="ORACLE8_SYNTAX" or,
syntaxName="ORACLE_SYNTAX"
For case sensitive table and column names in Oracle, use quotes (") to delimit the names. Specify the case sensitivity precisely.
Default table owner The name of the table owner that is used if an owner is not indicated in the SQL
Read/Write information Select one of the following:
■ Updatable data: Select this to update the data on the data source.
■ Read only data: Select this to allow users to only view the data on the data source.
Repository Directory
Repository directory Enter the location for the data source repository.
Repository name Enter the name of a repository for a data source. The name is defined as a data source in the binding configuration. It is defined as the type Virtual and is used to store Oracle Connect views and stored procedures for the data source, if required instead of using the default SYS data.
Virtual View Policy
Generate sequential view Select this to map a non-relation file to a single table. This parameter is valid only if you are using virtual array views. You configure virtual array views in the Modeling section of thewhen Configuring a Binding Environment.
Table 2–1 (Cont.) Data Source Advanced Configuration
Field Description
Setting up Metadata for the OracleAS Adabas Data Source
2-12 Oracle Application Server CDC Adapters for Adabas User's Guide
Importing Metadata for the Adabas Data SourceOracle Connect requires metadata describing the Adabas (ADD) data source records and the fields in these records. Use the Import Metadata procedure to import metadata for the Adabas data source from DDM declaration files, which describe the data.
The metadata import procedure is described in Importing Metadata from DDM Files.
Importing Metadata from DDM FilesIf the metadata exists in DDM files, you can use the DDM_ADL import utility to import this metadata to Oracle metadata. This utility is available on Windows and UNIX, from the platform’s command line interface. This utility is not available on z/OS platforms. You must perform the import on a Windows or UNIX computer and then move the generated metadata to the z/OS computer with Oracle Connect.
The metadata is not imported using Oracle Studio.
To display online help for this utility, run the command DDM_ADL HELP.
To generate the ADD metadata, use the appropriate command according to the platform type.
The following table lists the MDD file list format according to platform type.
Verifying the Metadata DefinitionAfter you finish Importing Metadata for the Adabas Data Source, you must verify that the metadata is correct. Do the following to verify that the metadata was imported correctly.
1. From the Start menu, select Programs, Oracle and then select Studio.
2. In the Design perspective, Configuration view expand the Machines folder.
Generate virtual views Select this to create an individual table for every array in the non-relational file. This parameter is valid only if you are using virtual array views. You configure virtual array views in the Modeling section when Configuring a Binding Environment.
Include row number column
Select this to include a column that specifies the row number in the virtual or sequential view. This parameter is valid only if you are using virtual array views. You configure virtual array views in the Modeling section when Configuring a Binding Environment.
All parent columns Select this for virtual views to include all the columns in the parent record. This parameter is valid only if you are using virtual array views. You configure virtual array views in the Modeling section when Configuring a Binding Environment.
Table 2–2 DDM File List Format
Platform Type Format
UNIX This parameter is at the end of the command. Separate the files in this list with spaces.
Windows The name of the file containing the list and the names of the files in the list must be less than or equal to eight characters (with a suffix of three characters). Separate the files in this list with commas.
Table 2–1 (Cont.) Data Source Advanced Configuration
Field Description
Setting Up a Change Data Capture with the OracleAS CDC Adapter for Adabas
Configuring the OracleAS CDC Adapter for Adabas 2-13
3. Expand the machine defined in Setting Up the IBM z/OS Platform in Oracle Studio.
4. Expand the Bindings folder. The binding configurations available on this computer are listed.
5. Expand the NAV binding. The NAV binding configuration includes branches for data sources and adapters that are located on the computer.
6. Expand the Data Sources folder.
7. Right-click the data source that you set up when Setting Up the Adabas Data Source (ADD Data only), and select Show Metadata View. The Metadata view opens with the data source you selected expanded.
8. Expand the Tables folder.
9. Right-click the table or tables where you carried out the metadata import and select Test. The Test wizard opens.
10. Click Next to view the metadata. The tables are displayed from the metadata. Check to see that the correct information is displayed.
Adding Adabas Data Tracing to the LogSelect the General Trace environment parameter in the Debug section to generate entries in the standard log tracing the access to Adabas data.
Setting Up a Change Data Capture with the OracleAS CDC Adapter for Adabas
You must set up the Oracle Connect CDC adapter for Adabas on the z/OS platform to handle capture changes to the Adabas data.
To work with the Adabas CDC adapter, you must set up the ATTSRVR started task, set up the tracking file, and register archived PLOG files. After you finish making the required configurations on the z/OS computer, configure the change data capture using the Oracle Studio CDC Solution perspective. Oracle Studio must be installed on a Windows or UNIX computer
Do the following to set up the change data capture and configure the OracleAS CDC Adapter for Adabas:
■ Setting up the ATTSRVR Started Task
■ Setting up a Change Data Capture in Oracle Studio
■ Setting up the Tracking File
■ Deploying a Change Data Capture
Setting up the ATTSRVR Started TaskIn the ATTSRVR started task STEPLIB, check that there is a DD card that defines the used Adabas load library.
Setting up a Change Data Capture in Oracle StudioYou set up the change data capture in Oracle Studio. Oracle Studio can be installed on Windows XP or Vista operating systems, or on UNIX.
Setting Up a Change Data Capture with the OracleAS CDC Adapter for Adabas
2-14 Oracle Application Server CDC Adapters for Adabas User's Guide
A change data capture is defined in the CDC Solution perspective, which contains a series of links to guide you through the CDC set up process. The CDC solution perspective guides display the following symbols in front of a link to show you what tasks should be done, and what tasks were completed.
■ Triangle: This indicates that there are subtasks associated with this link. When you click the link, the list expands to display the subtasks.
■ Asterisk (*): This indicates that you should click that link and perform the tasks and any subtasks presented. If multiple links have asterisks, you can perform the marked tasks in any order.
■ Check mark (✓): This indicates that the tasks for this link and any sublink are complete. You can double click the link to edit the configuration at any time.
■ Exclamation mark (!): This indicates a potential validation error.
Carry out the following to set up a change data capture:
■ Create a CDC Project
■ Set up the CDC Server
■ Set up the Staging Area Server
Create a CDC ProjectDo the following to create a CDC Project
1. From the Start menu, select, Programs, Oracle, and then select Studio.
2. Open the CDC Solution perspective, click the Perspective button on the perspective toolbar and select CDC Solution from the list.
The CDC Solution perspective opens with the Getting Started guide in the left pane of the workbench.
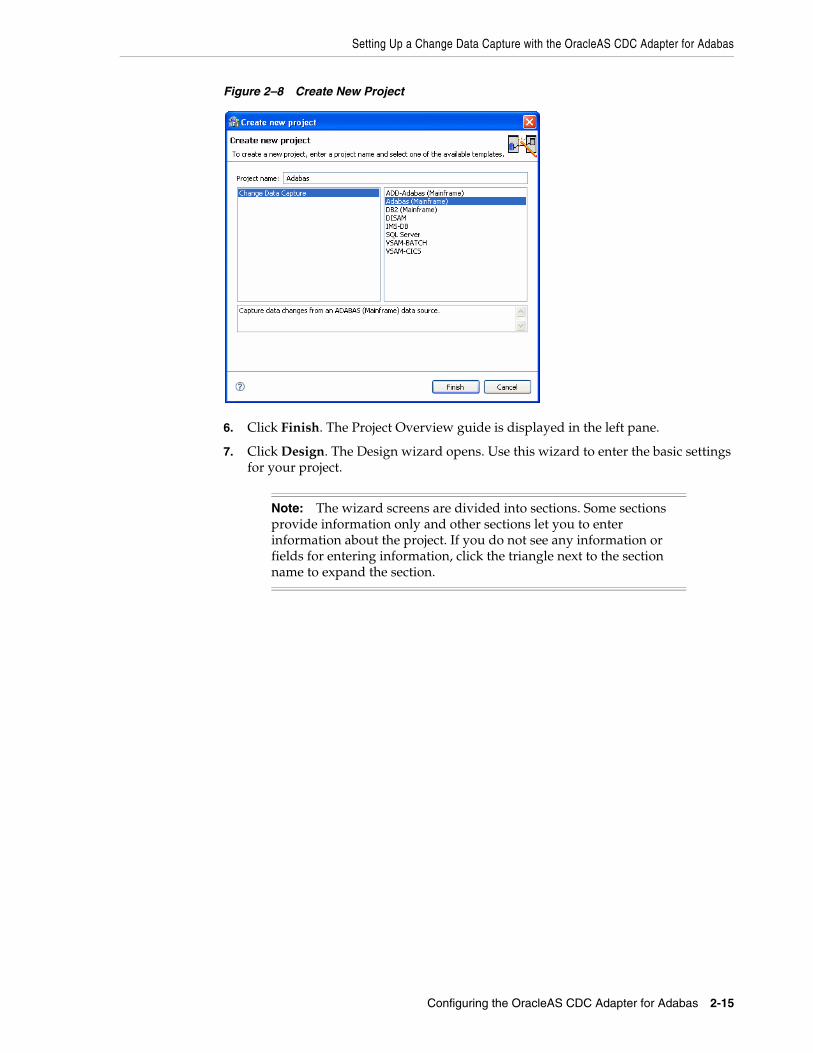
3. Click Create new project.
The Create new project screen opens.
4. In the Project name field, enter a name for your project.
The types of projects available are listed in the left pane.
5. Select Change Data Capture.
From the right pane, select ADD Adabas (Mainframe) if you are using ADD data or Adabas (Mainframe) if you are using Predict data.
Setting Up a Change Data Capture with the OracleAS CDC Adapter for Adabas
Configuring the OracleAS CDC Adapter for Adabas 2-15
Figure 2–8 Create New Project
6. Click Finish. The Project Overview guide is displayed in the left pane.
7. Click Design. The Design wizard opens. Use this wizard to enter the basic settings for your project.
Note: The wizard screens are divided into sections. Some sections provide information only and other sections let you to enter information about the project. If you do not see any information or fields for entering information, click the triangle next to the section name to expand the section.
Setting Up a Change Data Capture with the OracleAS CDC Adapter for Adabas
2-16 Oracle Application Server CDC Adapters for Adabas User's Guide
Figure 2–9 Design Wizard (Design Options)
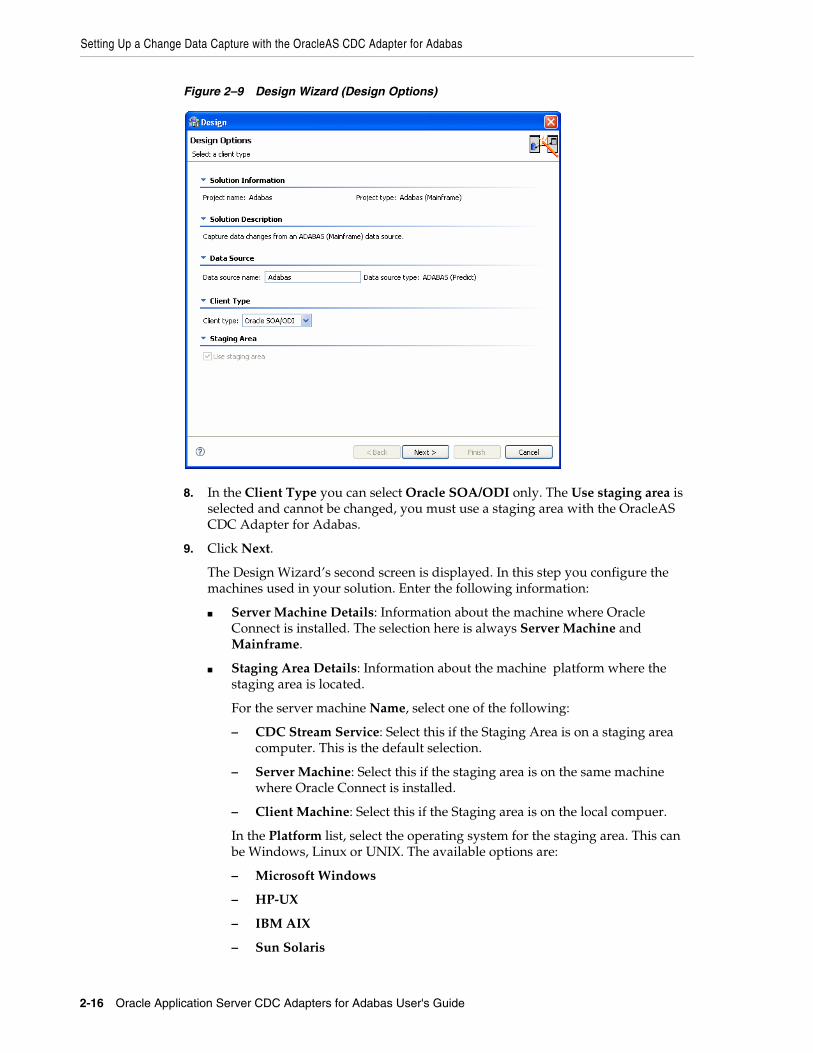
8. In the Client Type you can select Oracle SOA/ODI only. The Use staging area is selected and cannot be changed, you must use a staging area with the OracleAS CDC Adapter for Adabas.
9. Click Next.
The Design Wizard’s second screen is displayed. In this step you configure the machines used in your solution. Enter the following information:
■ Server Machine Details: Information about the machine where Oracle Connect is installed. The selection here is always Server Machine and Mainframe.
■ Staging Area Details: Information about the machine platform where the staging area is located.
For the server machine Name, select one of the following:
– CDC Stream Service: Select this if the Staging Area is on a staging area computer. This is the default selection.
– Server Machine: Select this if the staging area is on the same machine where Oracle Connect is installed.
– Client Machine: Select this if the Staging area is on the local compuer.
In the Platform list, select the operating system for the staging area. This can be Windows, Linux or UNIX. The available options are:
– Microsoft Windows
– HP-UX
– IBM AIX
– Sun Solaris
Setting Up a Change Data Capture with the OracleAS CDC Adapter for Adabas
Configuring the OracleAS CDC Adapter for Adabas 2-17
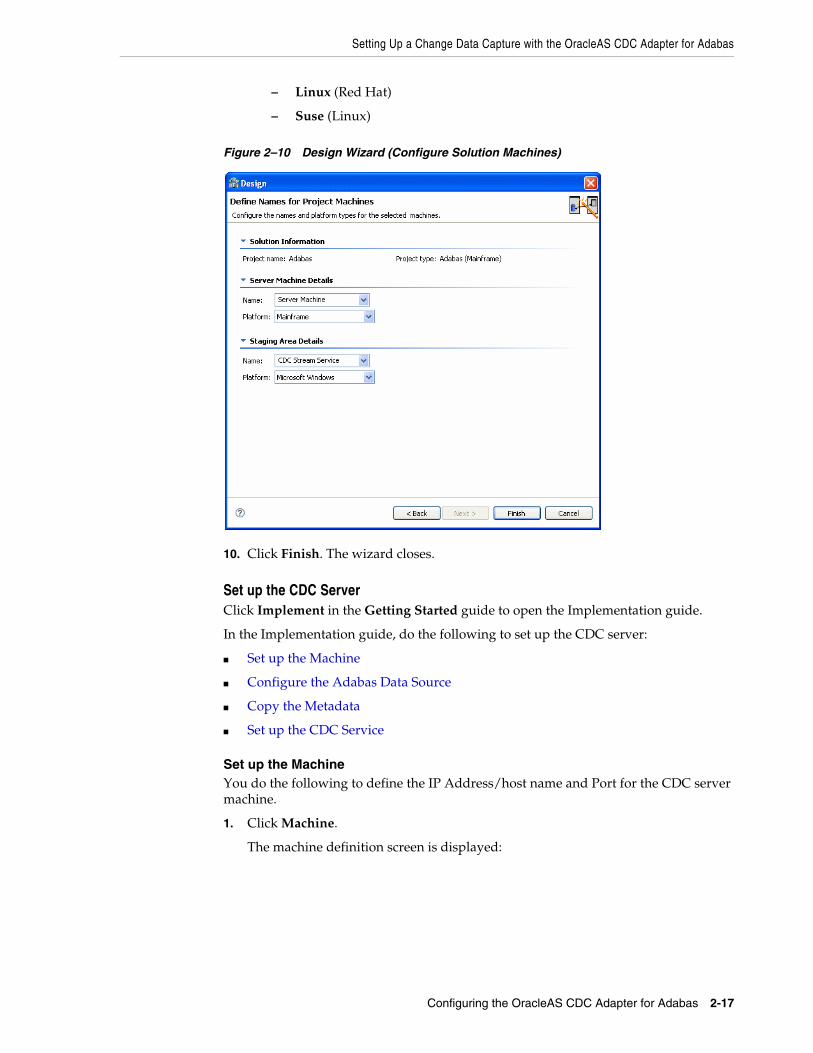
– Linux (Red Hat)
– Suse (Linux)
Figure 2–10 Design Wizard (Configure Solution Machines)
10. Click Finish. The wizard closes.
Set up the CDC ServerClick Implement in the Getting Started guide to open the Implementation guide.
In the Implementation guide, do the following to set up the CDC server:
■ Set up the Machine
■ Configure the Adabas Data Source
■ Copy the Metadata
■ Set up the CDC Service
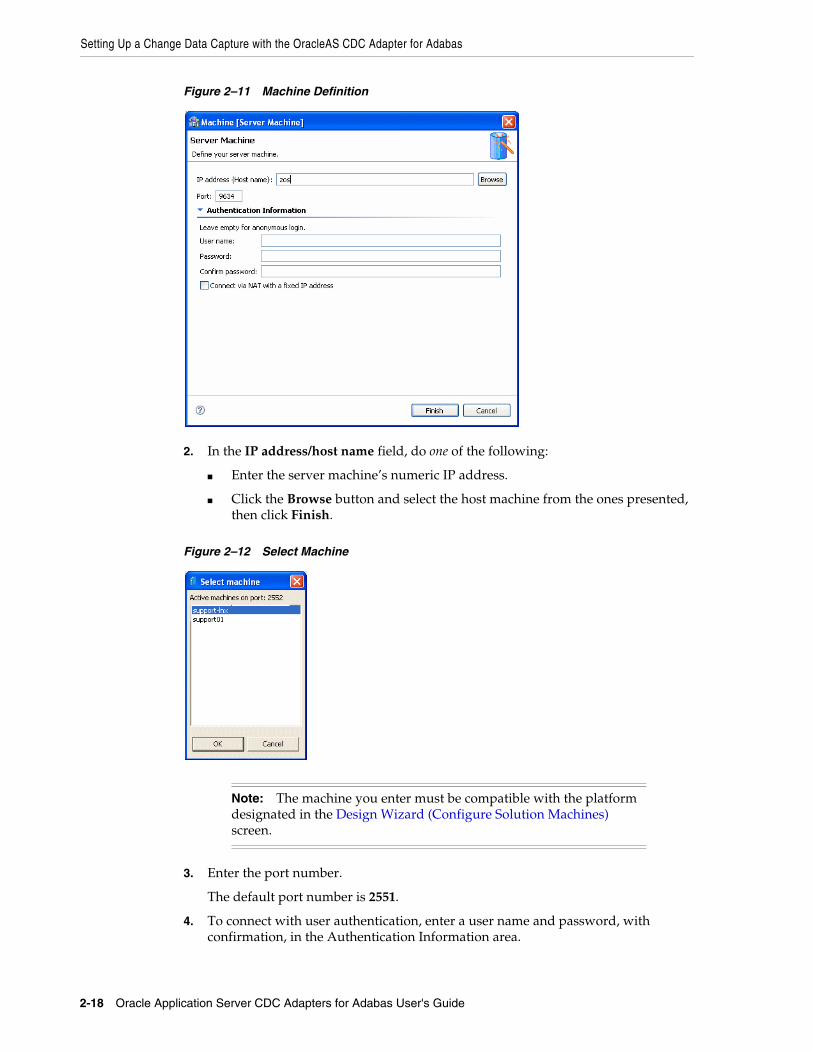
Set up the MachineYou do the following to define the IP Address/host name and Port for the CDC server machine.
1. Click Machine.
The machine definition screen is displayed:
Setting Up a Change Data Capture with the OracleAS CDC Adapter for Adabas
2-18 Oracle Application Server CDC Adapters for Adabas User's Guide
Figure 2–11 Machine Definition
2. In the IP address/host name field, do one of the following:
■ Enter the server machine’s numeric IP address.
■ Click the Browse button and select the host machine from the ones presented, then click Finish.
Figure 2–12 Select Machine
3. Enter the port number.
The default port number is 2551.
4. To connect with user authentication, enter a user name and password, with confirmation, in the Authentication Information area.
Note: The machine you enter must be compatible with the platform designated in the Design Wizard (Configure Solution Machines) screen.
Setting Up a Change Data Capture with the OracleAS CDC Adapter for Adabas
Configuring the OracleAS CDC Adapter for Adabas 2-19
5. Select the Connect via NAT with a fixed IP address check box if you are using Network Access Translation and want to always used a fixed IP address for this machine.
6. Click OK.
Continue setting up the CDC Server on the z/OS computer.
Configure the Adabas Data SourceIn this step, configure the Adabas data source that is part of the Adabas ADD or Adabas Predict solution. Do the following to configure the data source.
1. In the CDC Solution perspective, click Implement.
2. In the Server Configuration section, click Data Source. The Data Source Configuration window is displayed.
3. Define the parameters for your data source in the Data Source Configuration window.
■ Database number: The Adabas database number.
■ PREDICT file number: The Precict file number. (For Adabas with Predict data only).
■ PREDICT database number: When the Predict file resides in a different database than the data indicate the database number in which the Predict file resides. If the Predict file resides in the same database, enter -1. (For Adabas with Predict data only).
4. Click Finish.
Continue setting up the CDC Server on the z/OS computer.
Copy the MetadataUse this step for Adabas with ADD data only. If you are using Predict data, go to the Set up the CDC Service step. In this step, copy the metadata that you imported when Importing Metadata for the Adabas Data Source. Do the following to copy the metadata.
1. Click Metadata.
The Create metadata definitions view is displayed.
2. Click the Select Metadata Source link.
3. Select Copy from existing metadata.
4. Click Finish. The screen closes.
5. Click Copy from existing metadata source.
The Copy Existing Metadata Source screen is displayed showing your local machine and with metadata compatible with the data source selected.
Note: The Select Metadata Source link has an asterisk (*) next to it to indicate that you must perform this operation first.
Setting Up a Change Data Capture with the OracleAS CDC Adapter for Adabas
2-20 Oracle Application Server CDC Adapters for Adabas User's Guide
Figure 2–13 Copy Existing Metadata Source
6. From the sources in the left pane, expand the list until you see the tables from the data source you configured when Importing Metadata for the Adabas Data Source.
7. Using the arrow buttons, select the required tables and move them into the right pane.
8. Once you have selected all the desired tables, click Finish.
9. Click Customize Metadata.
The customize metadata screen is displayed.
Note: If you do not want to make any custimizations to the metadata, click Finish to close this screen. A check mark (✓) appears next to Customize Metadata indicating that this step is complete.
Continue with another step in the design wizard.
Setting Up a Change Data Capture with the OracleAS CDC Adapter for Adabas
Configuring the OracleAS CDC Adapter for Adabas 2-21
Figure 2–14 Customize Metadata
10. To change a table name, right-click in the any field under Customize Metadata, and select Add.
11. Enter the table name in the field presented, and click OK.
12. To make changes to any field in a table, right-click the table created and select Fields Manipulation.
The Field Manipulation screen is displayed.
Note: You may have validation errors in the tables created, which you can correct by the end of the procedure.
Setting Up a Change Data Capture with the OracleAS CDC Adapter for Adabas
2-22 Oracle Application Server CDC Adapters for Adabas User's Guide
Figure 2–15 Field Manipulation
13. Right-click in the upper pane and select Field|Add|Field.
14. Enter the name of the field in the screen provided, and click OK.
15. Default values are entered for the table. To manipulate table information or the fields in the table, right-click the table and choose the option you want. The following options are available:
■ Add table: Add a table.
■ Field manipulation: Access the field manipulation window to customize the field definitions.
■ Rename: Rename a table name. This option is used especially when multiple tables with the same name are generated from the COBOL.
■ Set data location: Set the physical location of the data file for the table.
■ Set table attributes: Set table attributes.
■ XSL manipulation: You specify an XSL transformation or JDOM document that is used to transform the table definition.
The Validation tab in the bottom half of the window displays information about what you must do to validate the tables and fields generated from the COBOL. The Log tab displays a log of what has been performed (such as renaming a table or specifying a data location).
16. Correct any remaining validation errors.
17. Click Finish to generate the metadata.
Continue setting up the CDC Server on the z/OS computer.
Set up the CDC ServiceIn this step you define the starting point or event for the change capture and then indicate the name of the change logger. Do the following to set up the CDC service.
1. In the CDC Solution perspective, click Implement.
Setting Up a Change Data Capture with the OracleAS CDC Adapter for Adabas
Configuring the OracleAS CDC Adapter for Adabas 2-23
2. In the Server Configuration section, click CDC Service. The CDC Service wizard is displayed.
3. In the first screen select one of the following to determine the Change Capture starting point:
■ All changes recorded to the journal
■ On first access to the CDC (immediately when a staging area is used, otherwise, when a client first requests changes
■ Changes recorded in the journal after a specific date and time.
When you select this option, click Set time, and select the time and date from the dialog box that is displayed.
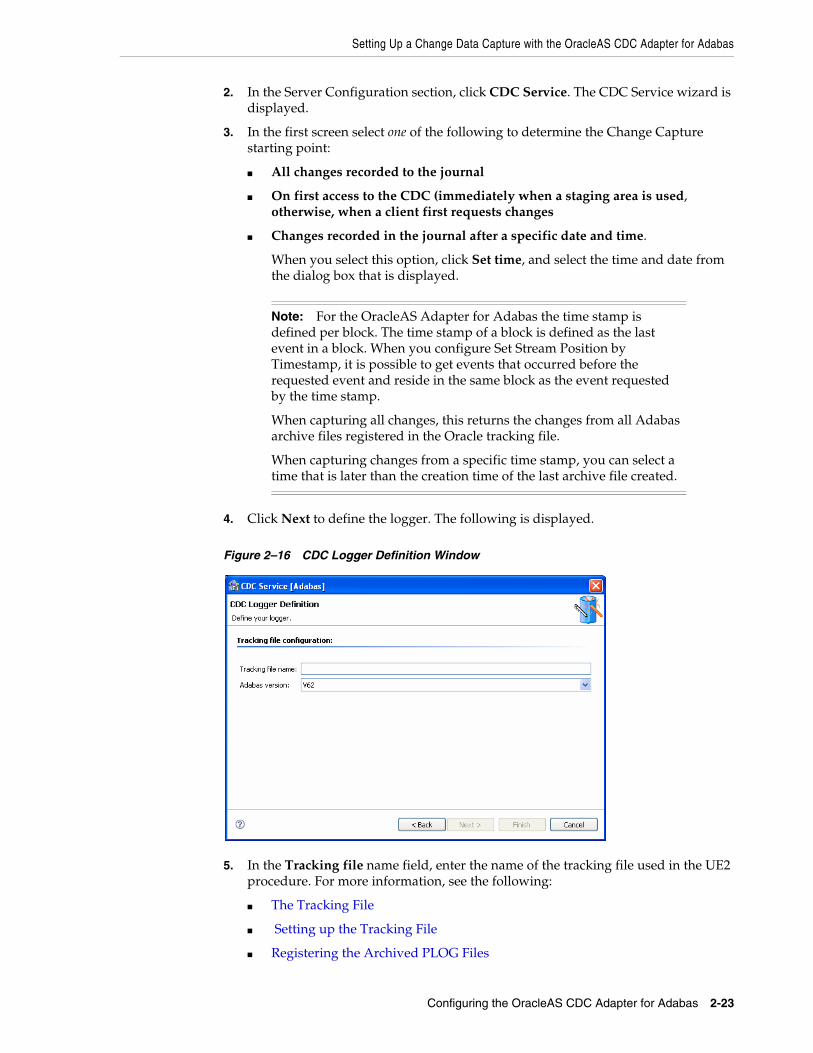
4. Click Next to define the logger. The following is displayed.
Figure 2–16 CDC Logger Definition Window
5. In the Tracking file name field, enter the name of the tracking file used in the UE2 procedure. For more information, see the following:
■ The Tracking File
■ Setting up the Tracking File
■ Registering the Archived PLOG Files
Note: For the OracleAS Adapter for Adabas the time stamp is defined per block. The time stamp of a block is defined as the last event in a block. When you configure Set Stream Position by Timestamp, it is possible to get events that occurred before the requested event and reside in the same block as the event requested by the time stamp.
When capturing all changes, this returns the changes from all Adabas archive files registered in the Oracle tracking file.
When capturing changes from a specific time stamp, you can select a time that is later than the creation time of the last archive file created.

Setting Up a Change Data Capture with the OracleAS CDC Adapter for Adabas
2-24 Oracle Application Server CDC Adapters for Adabas User's Guide
6. In the Adabas version field, select the Adabas version you are working with from the list. If you are using a version earlier than version 7.4, then select V62; if you are using version 7.4, select V74.
7. Click Next to go to the next step where you set the CDC Service Logging. Select the log level to use from the Logging level list.
Figure 2–17 Logging Level
Select one of the following from the list:
■ None
■ API
■ Debug
■ Info
■ Internal Calls
8. Click Finish.
Continue setting up the CDC Server on the z/OS computer.
Set up the Staging Area ServerClick Implement in the Getting Started guide to open the Implementation guide.
In the Implementation guide, do the following under the Stream Service Configuration section, to set up the staging area server:
■ Set Up the Staging Area Machine
■ Set up the Stream Service
■ Configure the Access Service Manager
Set Up the Staging Area MachineTo set up the machine for the staging area, do the following.
1. Under the Stream Service Configuration section, click Machine.
2. Use the same configurations used to Set up the Machine for the CDC server.
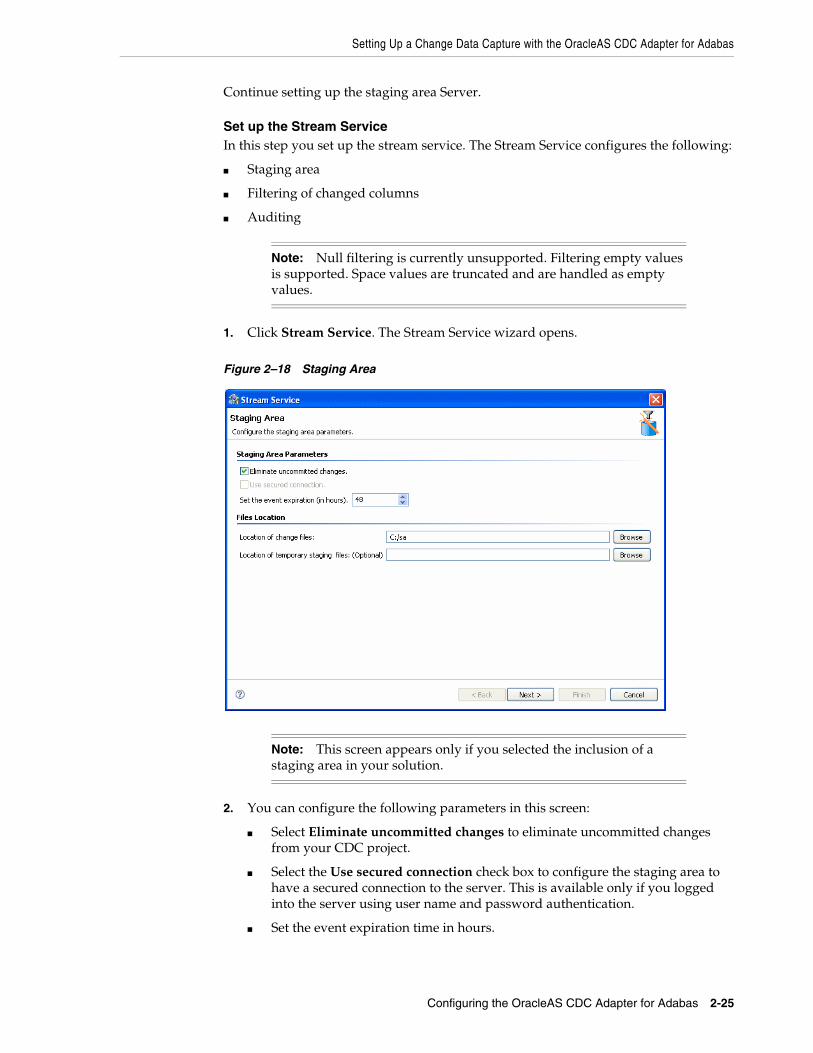
Setting Up a Change Data Capture with the OracleAS CDC Adapter for Adabas
Configuring the OracleAS CDC Adapter for Adabas 2-25
Continue setting up the staging area Server.
Set up the Stream ServiceIn this step you set up the stream service. The Stream Service configures the following:
■ Staging area
■ Filtering of changed columns
■ Auditing
1. Click Stream Service. The Stream Service wizard opens.
Figure 2–18 Staging Area
2. You can configure the following parameters in this screen:
■ Select Eliminate uncommitted changes to eliminate uncommitted changes from your CDC project.
■ Select the Use secured connection check box to configure the staging area to have a secured connection to the server. This is available only if you logged into the server using user name and password authentication.
■ Set the event expiration time in hours.
Note: Null filtering is currently unsupported. Filtering empty values is supported. Space values are truncated and are handled as empty values.
Note: This screen appears only if you selected the inclusion of a staging area in your solution.
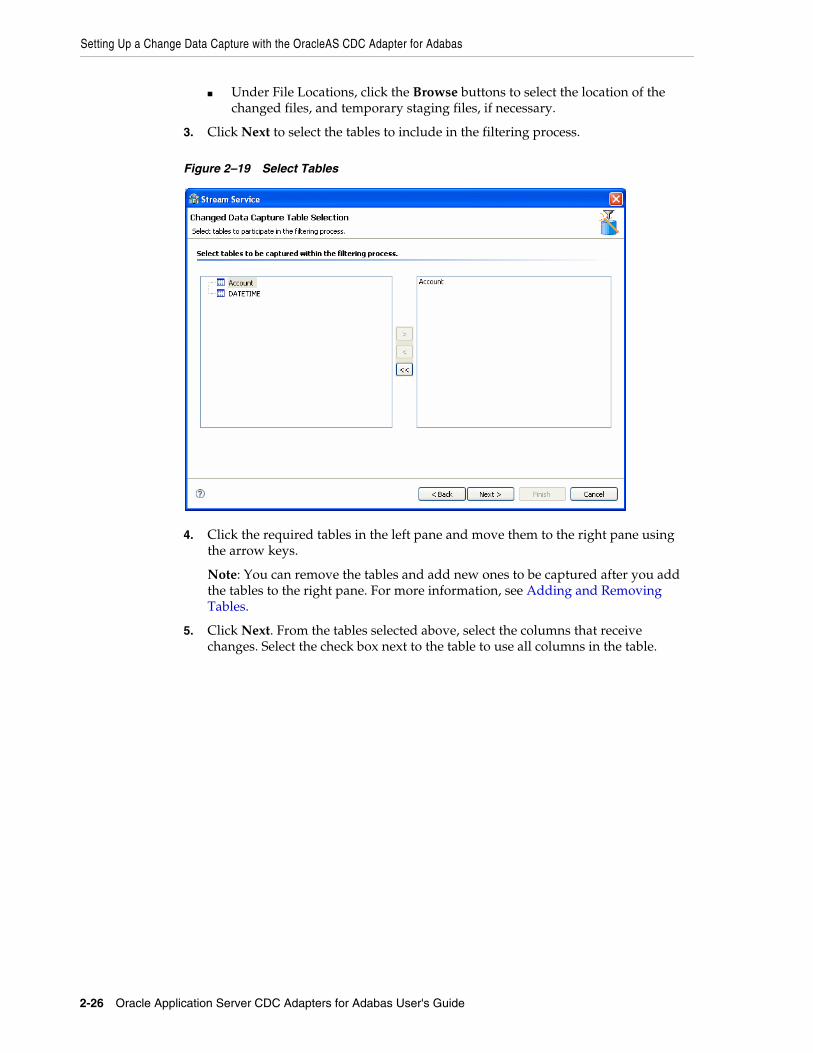
Setting Up a Change Data Capture with the OracleAS CDC Adapter for Adabas
2-26 Oracle Application Server CDC Adapters for Adabas User's Guide
■ Under File Locations, click the Browse buttons to select the location of the changed files, and temporary staging files, if necessary.
3. Click Next to select the tables to include in the filtering process.
Figure 2–19 Select Tables
4. Click the required tables in the left pane and move them to the right pane using the arrow keys.
Note: You can remove the tables and add new ones to be captured after you add the tables to the right pane. For more information, see Adding and Removing Tables.
5. Click Next. From the tables selected above, select the columns that receive changes. Select the check box next to the table to use all columns in the table.
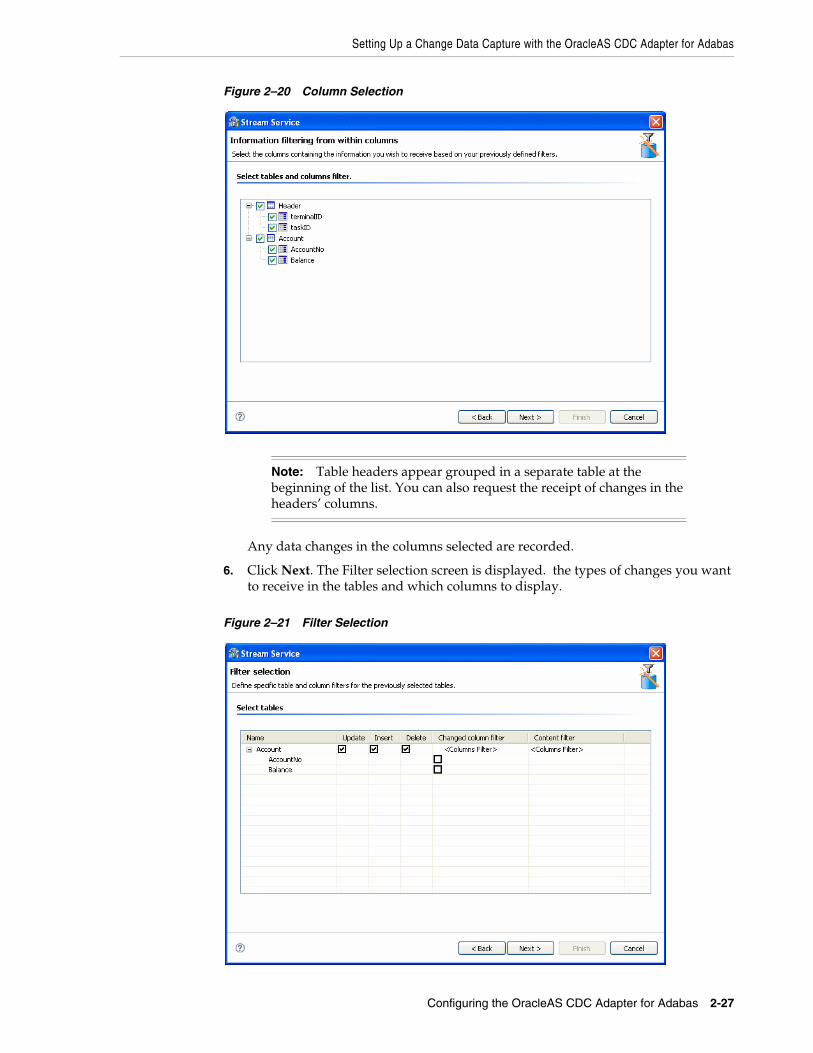
Setting Up a Change Data Capture with the OracleAS CDC Adapter for Adabas
Configuring the OracleAS CDC Adapter for Adabas 2-27
Figure 2–20 Column Selection
Any data changes in the columns selected are recorded.
6. Click Next. The Filter selection screen is displayed. the types of changes you want to receive in the tables and which columns to display.
Figure 2–21 Filter Selection
Note: Table headers appear grouped in a separate table at the beginning of the list. You can also request the receipt of changes in the headers’ columns.
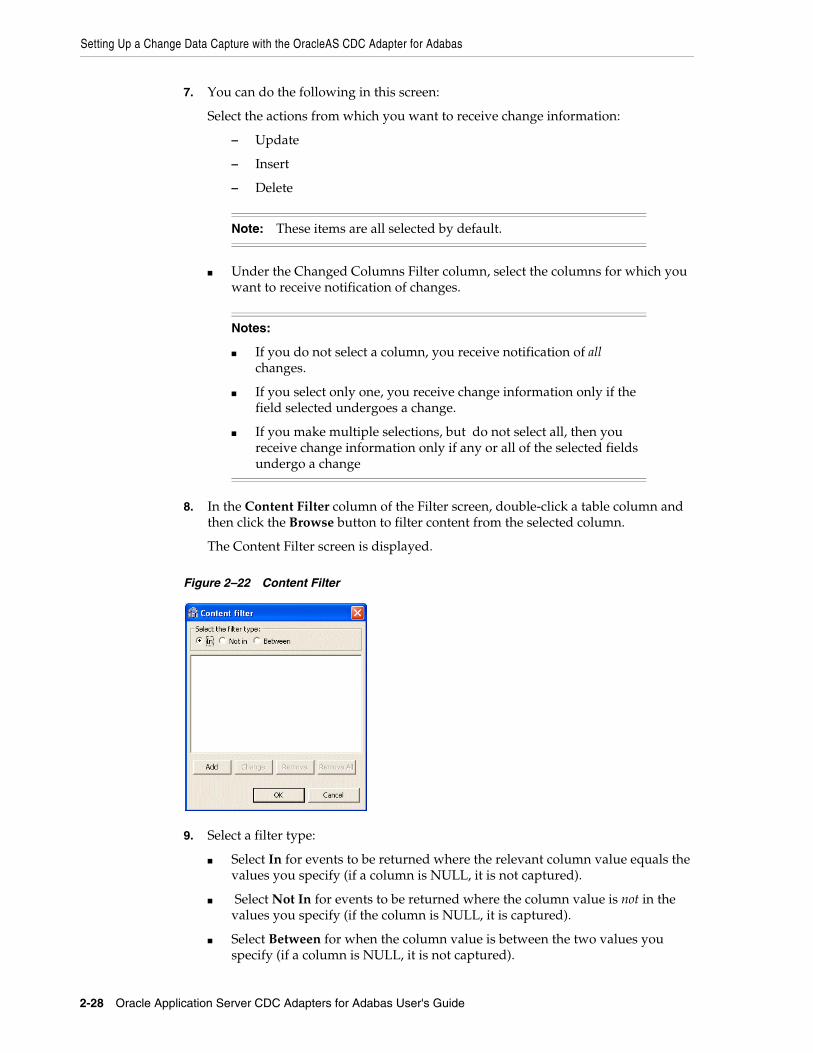
Setting Up a Change Data Capture with the OracleAS CDC Adapter for Adabas
2-28 Oracle Application Server CDC Adapters for Adabas User's Guide
7. You can do the following in this screen:
Select the actions from which you want to receive change information:
– Update
– Insert
– Delete
■ Under the Changed Columns Filter column, select the columns for which you want to receive notification of changes.
8. In the Content Filter column of the Filter screen, double-click a table column and then click the Browse button to filter content from the selected column.
The Content Filter screen is displayed.
Figure 2–22 Content Filter
9. Select a filter type:
■ Select In for events to be returned where the relevant column value equals the values you specify (if a column is NULL, it is not captured).
■ Select Not In for events to be returned where the column value is not in the values you specify (if the column is NULL, it is captured).
■ Select Between for when the column value is between the two values you specify (if a column is NULL, it is not captured).
Note: These items are all selected by default.
Notes:
■ If you do not select a column, you receive notification of all changes.
■ If you select only one, you receive change information only if the field selected undergoes a change.
■ If you make multiple selections, but do not select all, then you receive change information only if any or all of the selected fields undergo a change
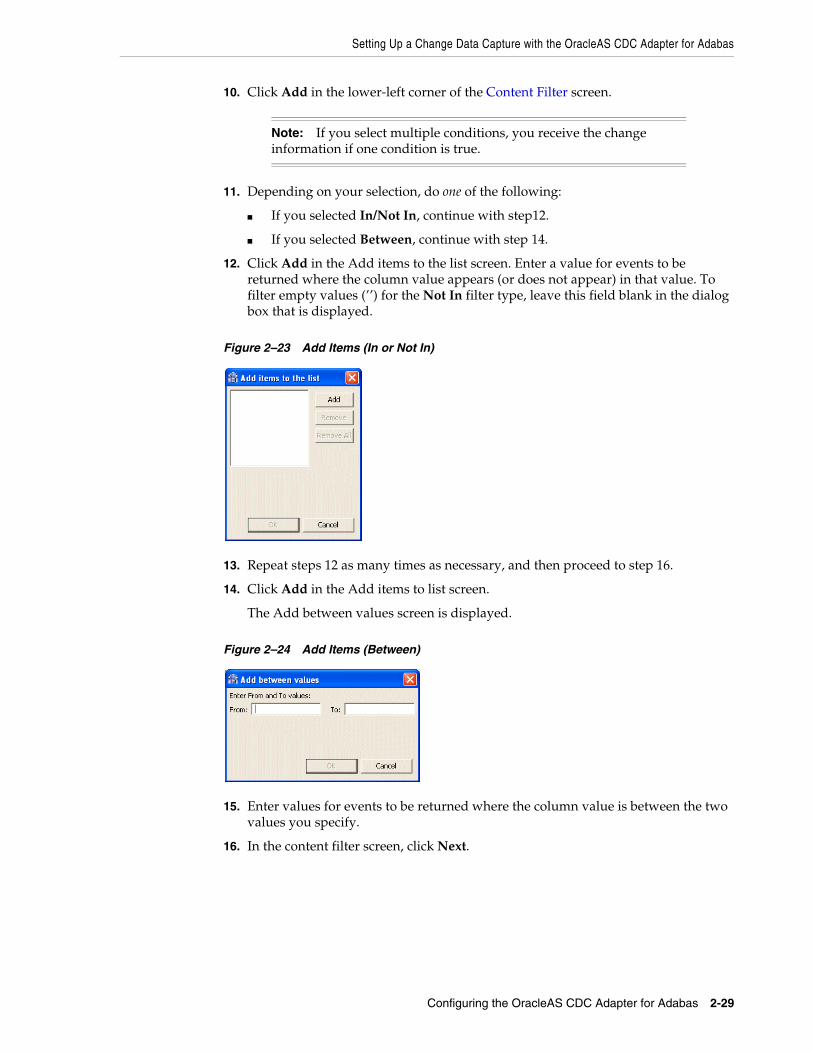
Setting Up a Change Data Capture with the OracleAS CDC Adapter for Adabas
Configuring the OracleAS CDC Adapter for Adabas 2-29
10. Click Add in the lower-left corner of the Content Filter screen.
11. Depending on your selection, do one of the following:
■ If you selected In/Not In, continue with step12.
■ If you selected Between, continue with step 14.
12. Click Add in the Add items to the list screen. Enter a value for events to be returned where the column value appears (or does not appear) in that value. To filter empty values (’’) for the Not In filter type, leave this field blank in the dialog box that is displayed.
Figure 2–23 Add Items (In or Not In)
13. Repeat steps 12 as many times as necessary, and then proceed to step 16.
14. Click Add in the Add items to list screen.
The Add between values screen is displayed.
Figure 2–24 Add Items (Between)
15. Enter values for events to be returned where the column value is between the two values you specify.
16. In the content filter screen, click Next.
Note: If you select multiple conditions, you receive the change information if one condition is true.
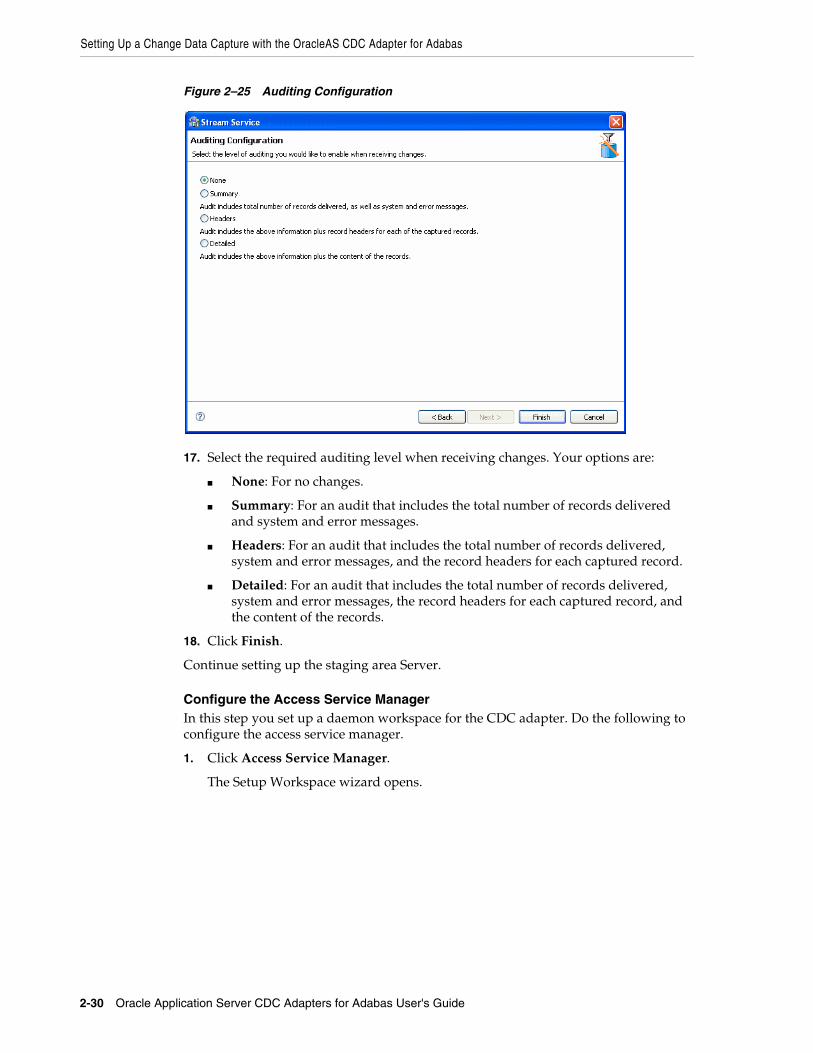
Setting Up a Change Data Capture with the OracleAS CDC Adapter for Adabas
2-30 Oracle Application Server CDC Adapters for Adabas User's Guide
Figure 2–25 Auditing Configuration
17. Select the required auditing level when receiving changes. Your options are:
■ None: For no changes.
■ Summary: For an audit that includes the total number of records delivered and system and error messages.
■ Headers: For an audit that includes the total number of records delivered, system and error messages, and the record headers for each captured record.
■ Detailed: For an audit that includes the total number of records delivered, system and error messages, the record headers for each captured record, and the content of the records.
18. Click Finish.
Continue setting up the staging area Server.
Configure the Access Service ManagerIn this step you set up a daemon workspace for the CDC adapter. Do the following to configure the access service manager.
1. Click Access Service Manager.
The Setup Workspace wizard opens.
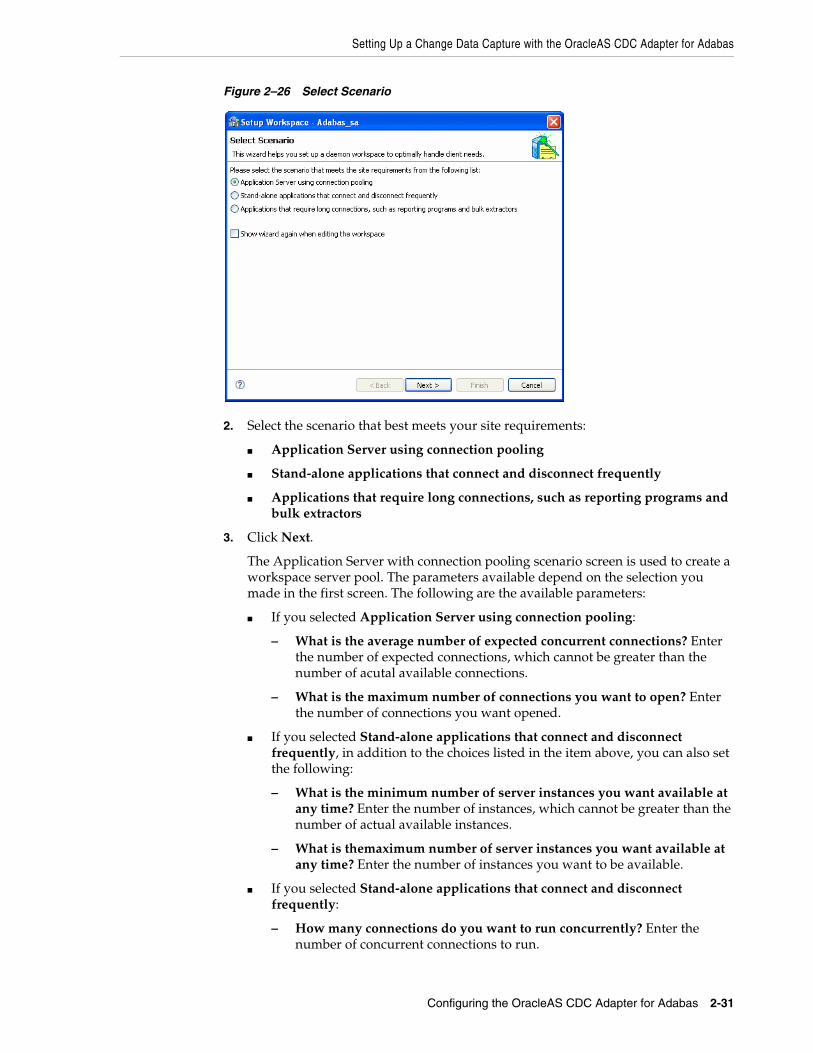
Setting Up a Change Data Capture with the OracleAS CDC Adapter for Adabas
Configuring the OracleAS CDC Adapter for Adabas 2-31
Figure 2–26 Select Scenario
2. Select the scenario that best meets your site requirements:
■ Application Server using connection pooling
■ Stand-alone applications that connect and disconnect frequently
■ Applications that require long connections, such as reporting programs and bulk extractors
3. Click Next.
The Application Server with connection pooling scenario screen is used to create a workspace server pool. The parameters available depend on the selection you made in the first screen. The following are the available parameters:
■ If you selected Application Server using connection pooling:
– What is the average number of expected concurrent connections? Enter the number of expected connections, which cannot be greater than the number of acutal available connections.
– What is the maximum number of connections you want to open? Enter the number of connections you want opened.
■ If you selected Stand-alone applications that connect and disconnect frequently, in addition to the choices listed in the item above, you can also set the following:
– What is the minimum number of server instances you want available at any time? Enter the number of instances, which cannot be greater than the number of actual available instances.
– What is themaximum number of server instances you want available at any time? Enter the number of instances you want to be available.
■ If you selected Stand-alone applications that connect and disconnect frequently:
– How many connections do you want to run concurrently? Enter the number of concurrent connections to run.
Setting Up a Change Data Capture with the OracleAS CDC Adapter for Adabas
2-32 Oracle Application Server CDC Adapters for Adabas User's Guide
4. Click Next. In the next screen you set time out parameters. These parameters should be changed if the system is slow or overloaded. The parameters are:
■ How long do you want to wait for a new connection to be established? Enter the amount of time you want to wait for a new connection to be established (in seconds).
■ How long do you want to wait for a response that is usually quick? Change this parameter if you have a fast connection. Enter the amount of time to wait for a response (in seconds).
5. Click Next. In the next screen you set security parameters. You should consult with the site security manager before changing these parameters.
Edit the following parameters in this screen:
■ Enter the operating system account (user name) used to start server instances.
■ Select Allow anonymous users to connect via this workspace, to allow this option.
■ Enter the permissions for the workspace. You can allow All users to access the workspace, or select Selected users only to allow only the selected users/groups to have exclusive access.
■ Select Do you want to access server instances via specific ports, to allow this option. If this option is cleared, the defaults are used.
If you select this option, indicate the From port and To port and ensure that you reserve these ports in the TCP/IP system settings.
Figure 2–27 Site Security
6. Click Next.
The summary screen opens.
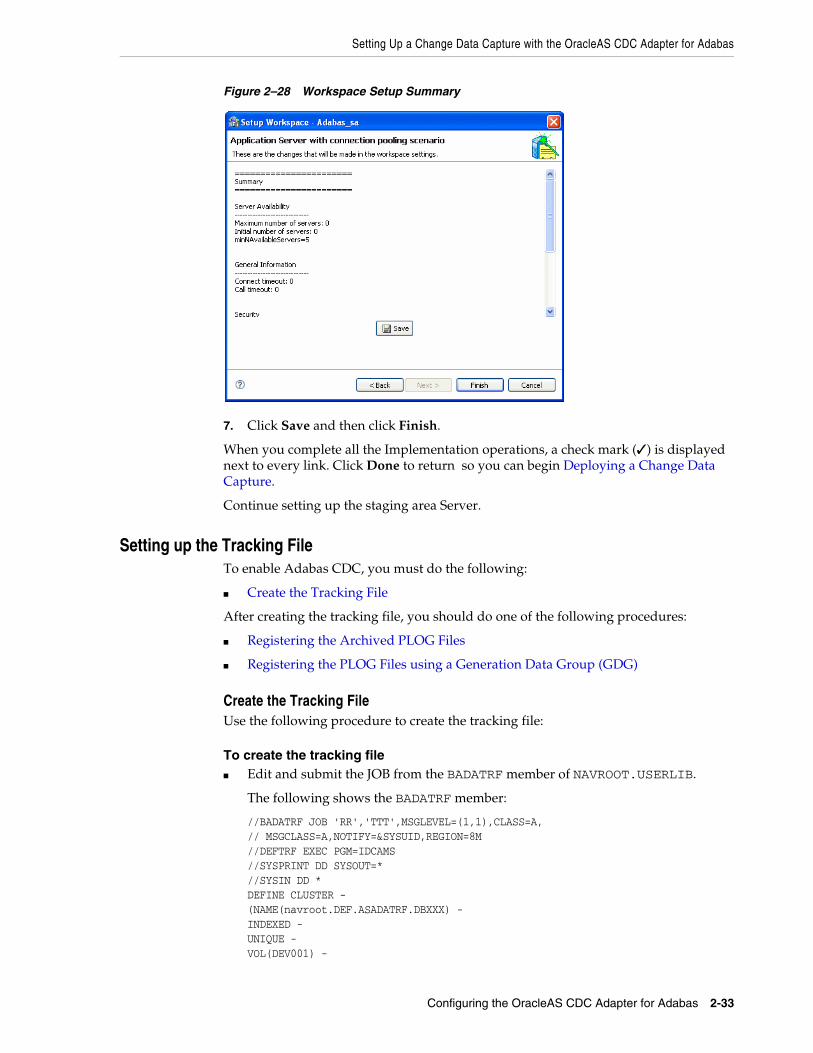
Setting Up a Change Data Capture with the OracleAS CDC Adapter for Adabas
Configuring the OracleAS CDC Adapter for Adabas 2-33
Figure 2–28 Workspace Setup Summary
7. Click Save and then click Finish.
When you complete all the Implementation operations, a check mark (✓) is displayed next to every link. Click Done to return so you can begin Deploying a Change Data Capture.
Continue setting up the staging area Server.
Setting up the Tracking FileTo enable Adabas CDC, you must do the following:
■ Create the Tracking File
After creating the tracking file, you should do one of the following procedures:
■ Registering the Archived PLOG Files
■ Registering the PLOG Files using a Generation Data Group (GDG)
Create the Tracking FileUse the following procedure to create the tracking file:
To create the tracking file■ Edit and submit the JOB from the BADATRF member of NAVROOT.USERLIB.
The following shows the BADATRF member:
//BADATRF JOB 'RR','TTT',MSGLEVEL=(1,1),CLASS=A,// MSGCLASS=A,NOTIFY=&SYSUID,REGION=8M//DEFTRF EXEC PGM=IDCAMS//SYSPRINT DD SYSOUT=*//SYSIN DD *DEFINE CLUSTER -(NAME(navroot.DEF.ASADATRF.DBXXX) -INDEXED -UNIQUE -VOL(DEV001) -
Setting Up a Change Data Capture with the OracleAS CDC Adapter for Adabas
2-34 Oracle Application Server CDC Adapters for Adabas User's Guide
TRACKS(10 1) -RECORDSIZE(256 1024) -KEYS(14 0) -SHAREOPTIONS(3 3)) -DATA -(NAME(navroot.DEF.ASADATRF.DBXXX.DATA)) -INDEX -(NAME(navroot.DEF.ASADATRF.DBXXX.INDEX))//VERTRF EXEC PGM=IDCAMS//SYSPRINT DD SYSOUT=*//SYSIN DD *LISTCAT ENTRIES('navroot.DEF.ASADATRF.DBXXX') ALL/*
■ To edit this file, you should:
– Change navroot to the used Oracle HLQ.
– Change DBXXX so that the XXX specifies the used Adabase database number.
– Change the JOB card according to your site demands.
Registering the Archived PLOG FilesYou must provide a procedure to save the archived PLOG files on DASD and register them in the tracking file. If the UE2 procedure used by Adabas saves the archived files on DASD, you can update this procedure as described in the following example. In other cases, you must provide your own procedure that copies the arechive files to DASD and registers them. In all cases, the registration step should be defined as follows:
//name EXEC PGM=UADATRF,PARM='<parameters>'//STEPLIB DD DISP=SHR,DSN=navroot.LOAD//ASADTRF DD DISP=SHR,DSN=<tracking file name>
The UADATRF program recieves two positional parameters:
■ The name of the archive file.
■ The length of the STCK (store clock). The value of this parameter depends on the Adabas version.
If using an Adabas version 7.4 or later, then set this parameter to a value of 8. This value indicates that the store clock uses 8 bytes.
For Adabas versions earlier than version 7.4, use a value of 4.
The following is an expample of the registration step in the UE2 procedure:
//ASUPDBSD EXEC PGM=UADATRF,// PARM='ADB.PLOG.D&SDATE..T&STIME 8'//STEPLIB DD DISP=SHR,DSN=Oracle.LOAD//ASADTRF DD DISP=SHR,DSN=Oracle.DEF.ADATRF.DB005
Registering the PLOG Files using a Generation Data Group (GDG)When you restore the archived PLOG files to DASD from cartridges or tapes, you must use GDG to store the archived PLOGS. In this case, always copy each archive log to GDG 0 generation. The UADATRF program translates the GDG data set name to its physical name and saves it in the tracking file.
The following is an example of the registration step:
//ASUPDBSD EXEC PGM=UADATRF,// PARM='ADB.GDG.PLOG(0) 8'
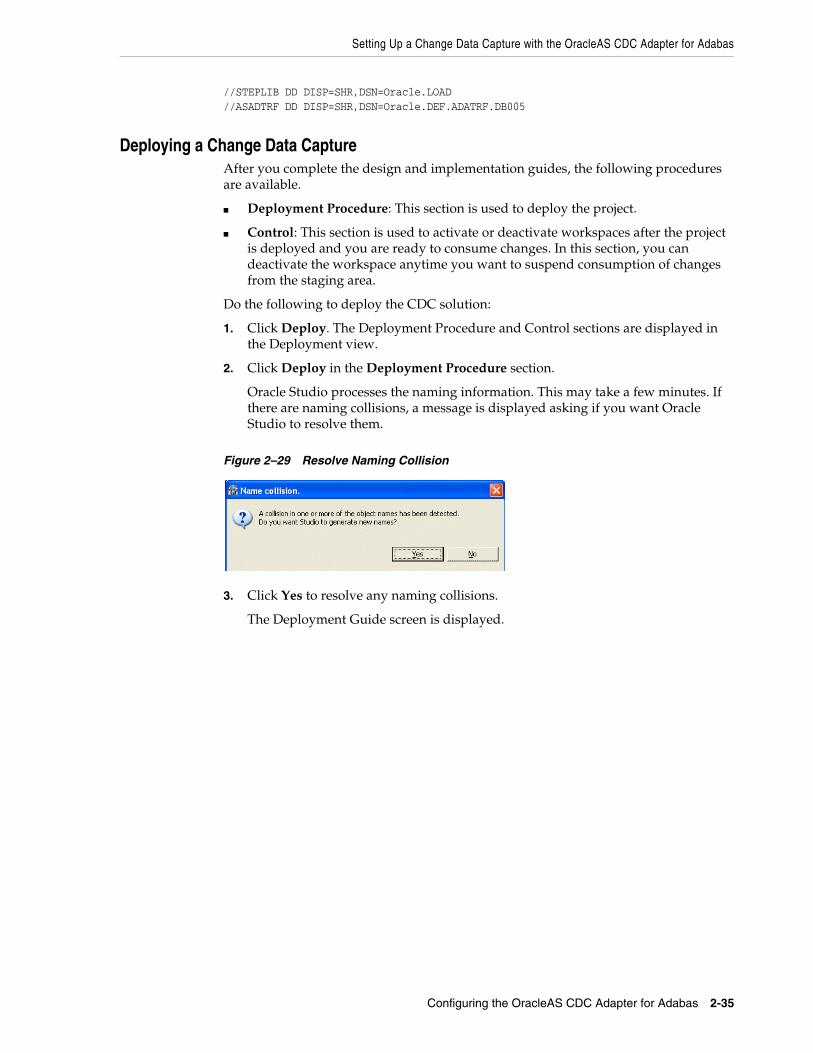
Setting Up a Change Data Capture with the OracleAS CDC Adapter for Adabas
Configuring the OracleAS CDC Adapter for Adabas 2-35
//STEPLIB DD DISP=SHR,DSN=Oracle.LOAD//ASADTRF DD DISP=SHR,DSN=Oracle.DEF.ADATRF.DB005
Deploying a Change Data CaptureAfter you complete the design and implementation guides, the following procedures are available.
■ Deployment Procedure: This section is used to deploy the project.
■ Control: This section is used to activate or deactivate workspaces after the project is deployed and you are ready to consume changes. In this section, you can deactivate the workspace anytime you want to suspend consumption of changes from the staging area.
Do the following to deploy the CDC solution:
1. Click Deploy. The Deployment Procedure and Control sections are displayed in the Deployment view.
2. Click Deploy in the Deployment Procedure section.
Oracle Studio processes the naming information. This may take a few minutes. If there are naming collisions, a message is displayed asking if you want Oracle Studio to resolve them.
Figure 2–29 Resolve Naming Collision
3. Click Yes to resolve any naming collisions.
The Deployment Guide screen is displayed.
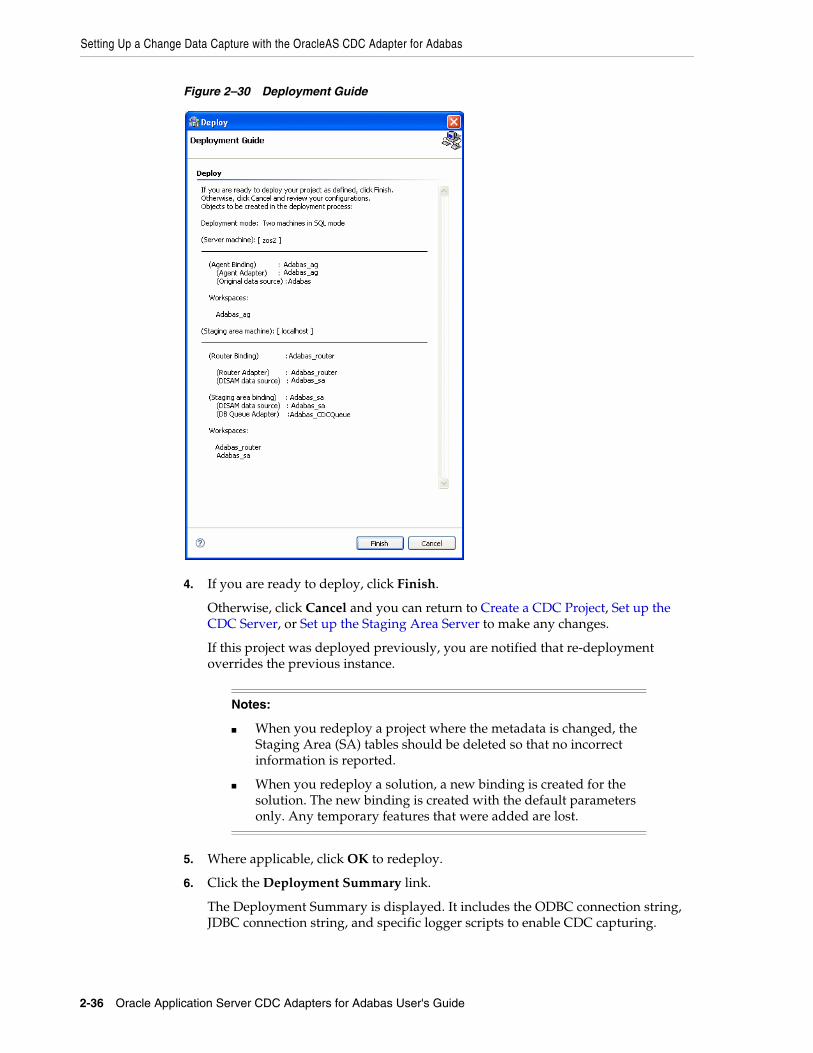
Setting Up a Change Data Capture with the OracleAS CDC Adapter for Adabas
2-36 Oracle Application Server CDC Adapters for Adabas User's Guide
Figure 2–30 Deployment Guide
4. If you are ready to deploy, click Finish.
Otherwise, click Cancel and you can return to Create a CDC Project, Set up the CDC Server, or Set up the Staging Area Server to make any changes.
If this project was deployed previously, you are notified that re-deployment overrides the previous instance.
5. Where applicable, click OK to redeploy.
6. Click the Deployment Summary link.
The Deployment Summary is displayed. It includes the ODBC connection string, JDBC connection string, and specific logger scripts to enable CDC capturing.
Notes:
■ When you redeploy a project where the metadata is changed, the Staging Area (SA) tables should be deleted so that no incorrect information is reported.
■ When you redeploy a solution, a new binding is created for the solution. The new binding is created with the default parameters only. Any temporary features that were added are lost.
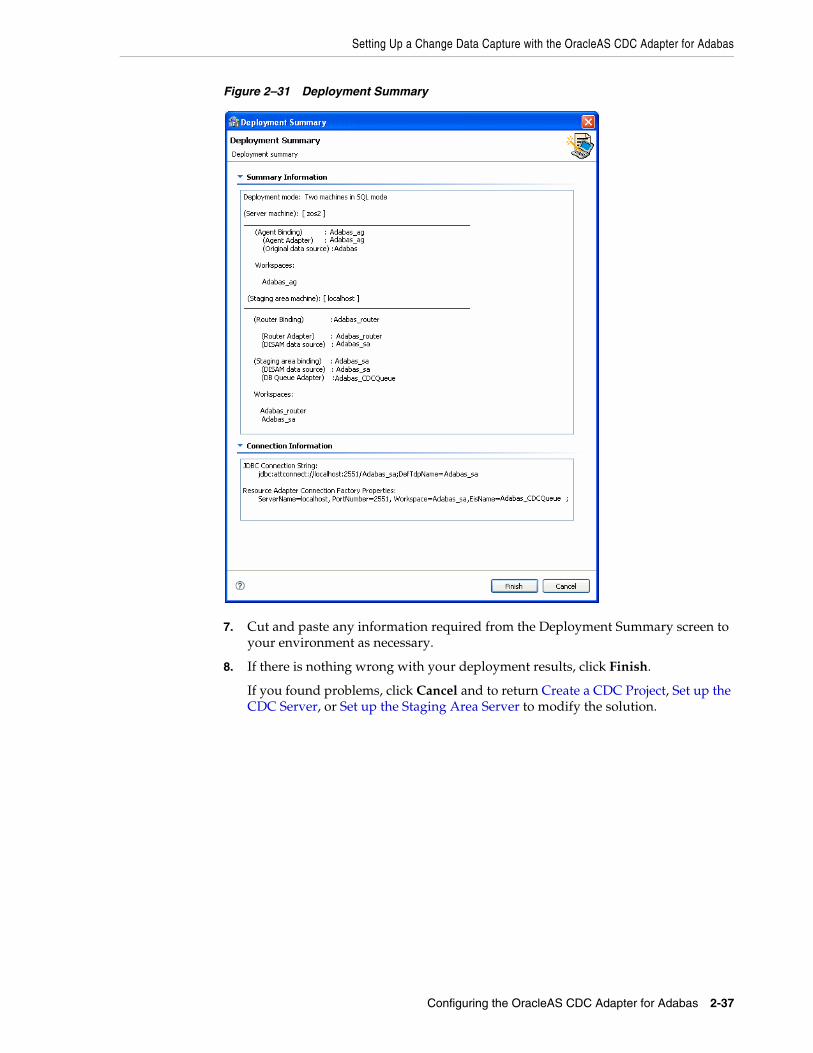
Setting Up a Change Data Capture with the OracleAS CDC Adapter for Adabas
Configuring the OracleAS CDC Adapter for Adabas 2-37
Figure 2–31 Deployment Summary
7. Cut and paste any information required from the Deployment Summary screen to your environment as necessary.
8. If there is nothing wrong with your deployment results, click Finish.
If you found problems, click Cancel and to return Create a CDC Project, Set up the CDC Server, or Set up the Staging Area Server to modify the solution.
Setting Up a Change Data Capture with the OracleAS CDC Adapter for Adabas
2-38 Oracle Application Server CDC Adapters for Adabas User's Guide
Activating and Deactivating Solution WorkspacesIn the Project guide for your OracleAS CDC Adapter solution, click Deploy, then do one of the following to activate or deactivate the workspaces for a solution
■ To activate workspaces, under the Control section iclick the Activate Workspaces link.
■ To deactivate workspaces, click the Deactivate Workspaces link.
During the activation/deactivation process, you may receive messages indicating that the daemon settings on one or more of the machines involved in your solution have changed. Click Yes to proceed.
Note: If you are redeploying a solution you must follow these directions to ensure that the context and adapter_context fields of the SERVICE_CONTEXT table are saved. Follow these directions to save the fields:
1. In the staging area data source run: select context, agent_context from SERVICE_CONTEXT; and save the returned values.
2. Delete the SERVICE_CONTEXT table physical files.
3. Redeploy the solution.
4. Activate the router to create the SERVICE_CONTEXT table.
5. Disable the router.
6. In the staging area data source run: insert into SERVICE_CONTEXT (context, agent_context) values('XXX', 'YYY'). This inserts the saved values to the SERVICE_CONTEXT table.
7. Activate the solution.
3
WebLogic Deployment and Adapter Integration 3-1
3WebLogic Deployment and AdapterIntegration
This chapter includes the following topics:
■ Configuring the Adabas CDC Adapter In the Application Server
■ Configuring the JCA Configuration Files for the OracleAS CDC Adapter for Adabas
Configuring the Adabas CDC Adapter In the Application ServerYou can use WebLogic application server to deploy the Oracle Connect CDC adapter. This section describes how to deploy the CDC adapter, set up the necessary connections, and build the CDC Stream Positions table.
This section includes the following topics:
■ CDC Stream Positions Table Definition
■ Configuring the Adabas CDC Adapter Connection Factory
CDC Stream Positions Table DefinitionYou should create one CDC Stream Position table for each CDC adapter. The CDC Stream Positions table contains one row for each CDC process (for each captured table) to control its stream position and XA transactions. The following SQL statement is used to define the table in an Oracle database:
create table CDC_STREAM_POSITIONS(TABLE_NAME varchar(127) not null,STREAM_POSITION varchar(127), PREPARED_STREAM_POSITION varchar(127),ROLLBACK_STREAM_POSITION varchar(127), NEW_STREAM_POSITION varchar(127),XID_FORMAT int, XID_BRANCH varchar(128), XID_GLOBAL varchar(128));create unique index CDC_STREAM_POSITIONS_INDEX on CDC_STREAM_POSITIONS(TABLE_NAME);You can use any table name, but you cannot change the column names.
The following table describes the CDC Stream Positions table columns.
Table 3–1 CDC Stream Positions Table
Column Description
TABLE_NAME The name of the CDC table.
You should not change the data in this column.
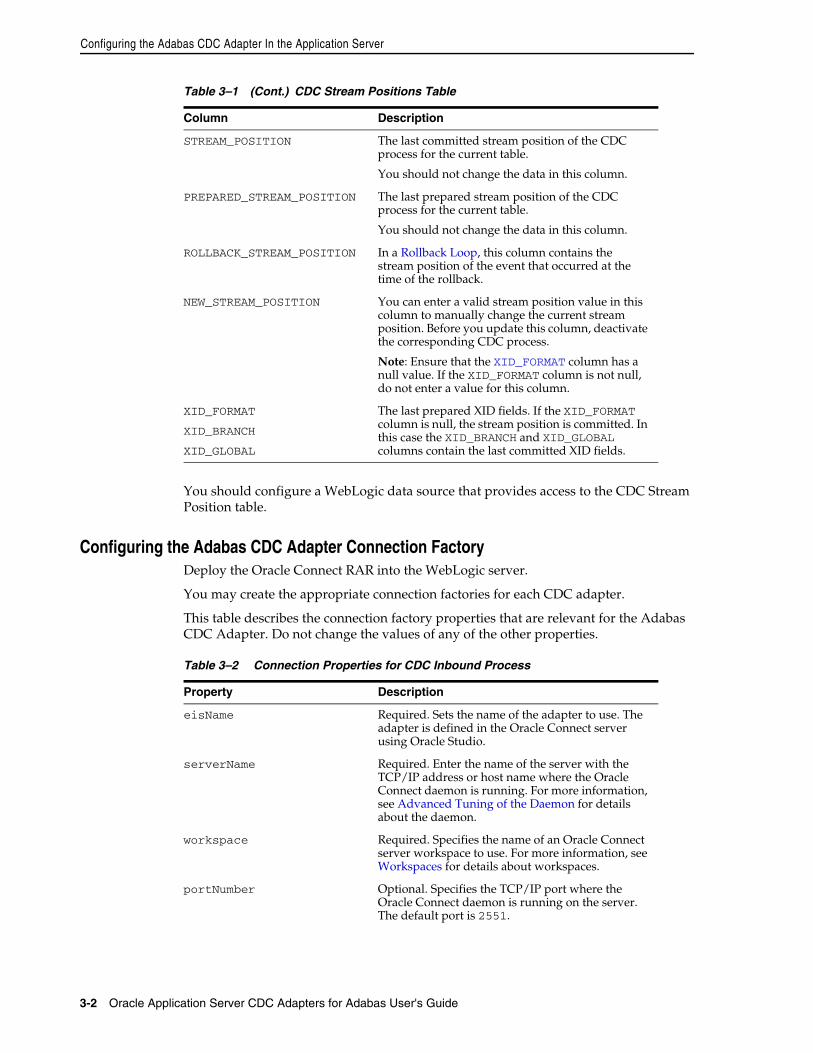
Configuring the Adabas CDC Adapter In the Application Server
3-2 Oracle Application Server CDC Adapters for Adabas User's Guide
You should configure a WebLogic data source that provides access to the CDC Stream Position table.
Configuring the Adabas CDC Adapter Connection FactoryDeploy the Oracle Connect RAR into the WebLogic server.
You may create the appropriate connection factories for each CDC adapter.
This table describes the connection factory properties that are relevant for the Adabas CDC Adapter. Do not change the values of any of the other properties.
STREAM_POSITION The last committed stream position of the CDC process for the current table.
You should not change the data in this column.
PREPARED_STREAM_POSITION The last prepared stream position of the CDC process for the current table.
You should not change the data in this column.
ROLLBACK_STREAM_POSITION In a Rollback Loop, this column contains the stream position of the event that occurred at the time of the rollback.
NEW_STREAM_POSITION You can enter a valid stream position value in this column to manually change the current stream position. Before you update this column, deactivate the corresponding CDC process.
Note: Ensure that the XID_FORMAT column has a null value. If the XID_FORMAT column is not null, do not enter a value for this column.
XID_FORMAT
XID_BRANCH
XID_GLOBAL
The last prepared XID fields. If the XID_FORMAT column is null, the stream position is committed. In this case the XID_BRANCH and XID_GLOBAL columns contain the last committed XID fields.
Table 3–2 Connection Properties for CDC Inbound Process
Property Description
eisName Required. Sets the name of the adapter to use. The adapter is defined in the Oracle Connect server using Oracle Studio.
serverName Required. Enter the name of the server with the TCP/IP address or host name where the Oracle Connect daemon is running. For more information, see Advanced Tuning of the Daemon for details about the daemon.
workspace Required. Specifies the name of an Oracle Connect server workspace to use. For more information, see Workspaces for details about workspaces.
portNumber Optional. Specifies the TCP/IP port where the Oracle Connect daemon is running on the server. The default port is 2551.
Table 3–1 (Cont.) CDC Stream Positions Table
Column Description
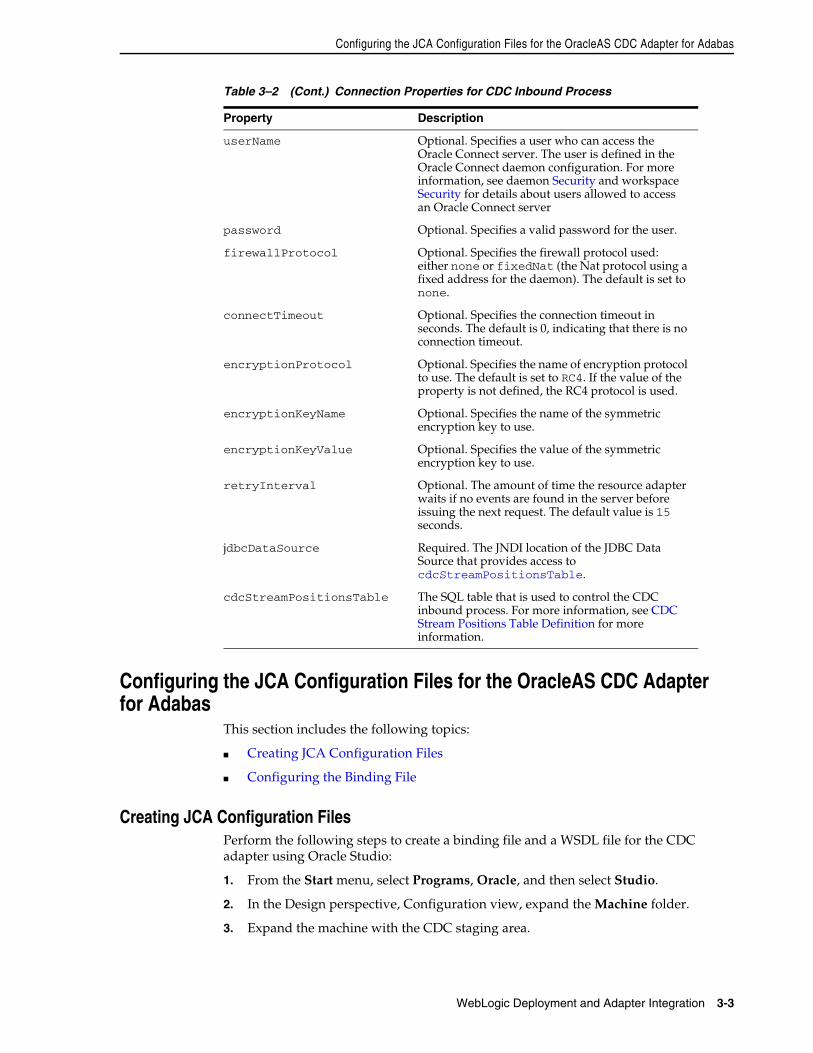
Configuring the JCA Configuration Files for the OracleAS CDC Adapter for Adabas
WebLogic Deployment and Adapter Integration 3-3
Configuring the JCA Configuration Files for the OracleAS CDC Adapter for Adabas
This section includes the following topics:
■ Creating JCA Configuration Files
■ Configuring the Binding File
Creating JCA Configuration FilesPerform the following steps to create a binding file and a WSDL file for the CDC adapter using Oracle Studio:
1. From the Start menu, select Programs, Oracle, and then select Studio.
2. In the Design perspective, Configuration view, expand the Machine folder.
3. Expand the machine with the CDC staging area.
userName Optional. Specifies a user who can access the Oracle Connect server. The user is defined in the Oracle Connect daemon configuration. For more information, see daemon Security and workspace Security for details about users allowed to access an Oracle Connect server
password Optional. Specifies a valid password for the user.
firewallProtocol Optional. Specifies the firewall protocol used: either none or fixedNat (the Nat protocol using a fixed address for the daemon). The default is set to none.
connectTimeout Optional. Specifies the connection timeout in seconds. The default is 0, indicating that there is no connection timeout.
encryptionProtocol Optional. Specifies the name of encryption protocol to use. The default is set to RC4. If the value of the property is not defined, the RC4 protocol is used.
encryptionKeyName Optional. Specifies the name of the symmetric encryption key to use.
encryptionKeyValue Optional. Specifies the value of the symmetric encryption key to use.
retryInterval Optional. The amount of time the resource adapter waits if no events are found in the server before issuing the next request. The default value is 15 seconds.
jdbcDataSource Required. The JNDI location of the JDBC Data Source that provides access to cdcStreamPositionsTable.
cdcStreamPositionsTable The SQL table that is used to control the CDC inbound process. For more information, see CDC Stream Positions Table Definition for more information.
Table 3–2 (Cont.) Connection Properties for CDC Inbound Process
Property Description
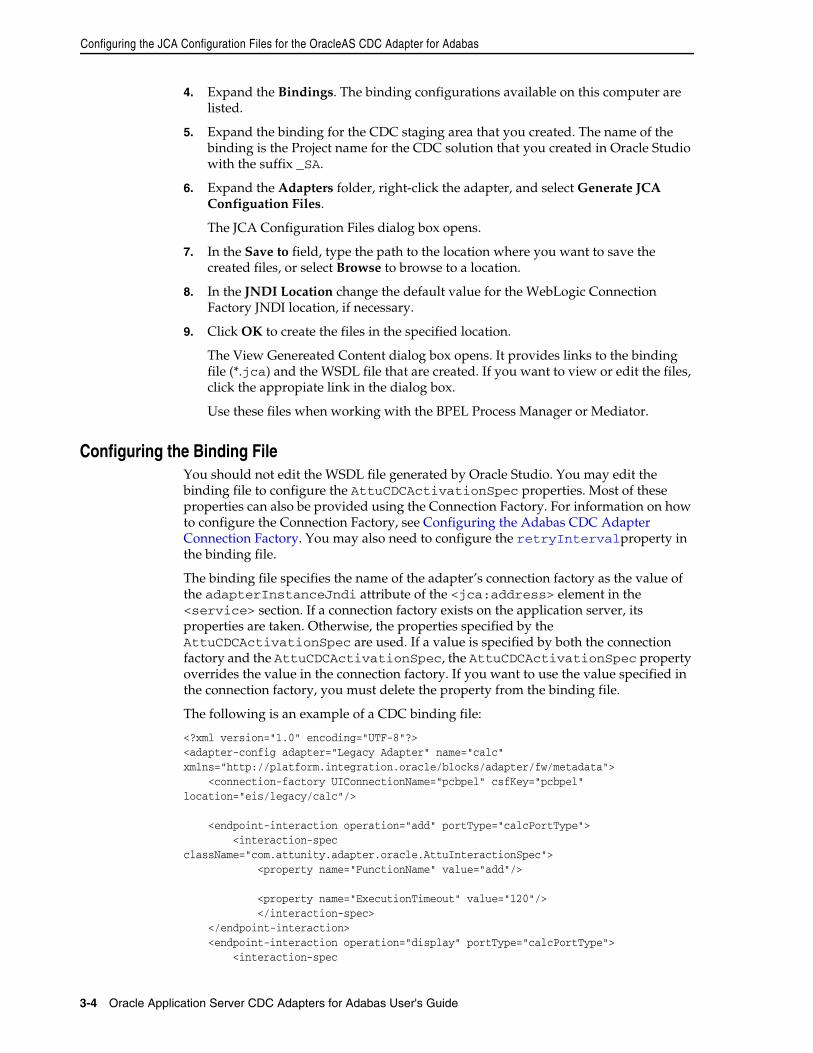
Configuring the JCA Configuration Files for the OracleAS CDC Adapter for Adabas
3-4 Oracle Application Server CDC Adapters for Adabas User's Guide
4. Expand the Bindings. The binding configurations available on this computer are listed.
5. Expand the binding for the CDC staging area that you created. The name of the binding is the Project name for the CDC solution that you created in Oracle Studio with the suffix _SA.
6. Expand the Adapters folder, right-click the adapter, and select Generate JCA Configuation Files.
The JCA Configuration Files dialog box opens.
7. In the Save to field, type the path to the location where you want to save the created files, or select Browse to browse to a location.
8. In the JNDI Location change the default value for the WebLogic Connection Factory JNDI location, if necessary.
9. Click OK to create the files in the specified location.
The View Genereated Content dialog box opens. It provides links to the binding file (*.jca) and the WSDL file that are created. If you want to view or edit the files, click the appropiate link in the dialog box.
Use these files when working with the BPEL Process Manager or Mediator.
Configuring the Binding FileYou should not edit the WSDL file generated by Oracle Studio. You may edit the binding file to configure the AttuCDCActivationSpec properties. Most of these properties can also be provided using the Connection Factory. For information on how to configure the Connection Factory, see Configuring the Adabas CDC Adapter Connection Factory. You may also need to configure the retryIntervalproperty in the binding file.
The binding file specifies the name of the adapter’s connection factory as the value of the adapterInstanceJndi attribute of the <jca:address> element in the <service> section. If a connection factory exists on the application server, its properties are taken. Otherwise, the properties specified by the AttuCDCActivationSpec are used. If a value is specified by both the connection factory and the AttuCDCActivationSpec, the AttuCDCActivationSpec property overrides the value in the connection factory. If you want to use the value specified in the connection factory, you must delete the property from the binding file.
The following is an example of a CDC binding file:
<?xml version="1.0" encoding="UTF-8"?><adapter-config adapter="Legacy Adapter" name="calc" xmlns="http://platform.integration.oracle/blocks/adapter/fw/metadata"> <connection-factory UIConnectionName="pcbpel" csfKey="pcbpel" location="eis/legacy/calc"/> <endpoint-interaction operation="add" portType="calcPortType"> <interaction-spec className="com.attunity.adapter.oracle.AttuInteractionSpec"> <property name="FunctionName" value="add"/> <property name="ExecutionTimeout" value="120"/> </interaction-spec> </endpoint-interaction> <endpoint-interaction operation="display" portType="calcPortType"> <interaction-spec
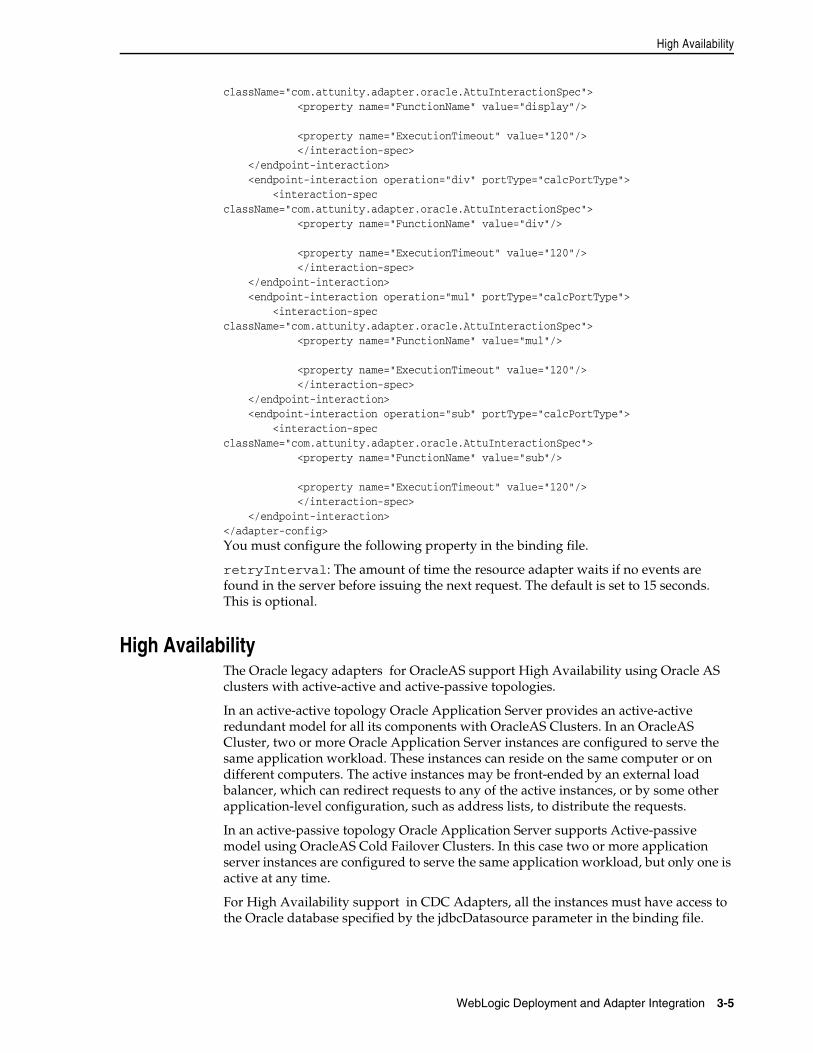
High Availability
WebLogic Deployment and Adapter Integration 3-5
className="com.attunity.adapter.oracle.AttuInteractionSpec"> <property name="FunctionName" value="display"/> <property name="ExecutionTimeout" value="120"/> </interaction-spec> </endpoint-interaction> <endpoint-interaction operation="div" portType="calcPortType"> <interaction-spec className="com.attunity.adapter.oracle.AttuInteractionSpec"> <property name="FunctionName" value="div"/> <property name="ExecutionTimeout" value="120"/> </interaction-spec> </endpoint-interaction> <endpoint-interaction operation="mul" portType="calcPortType"> <interaction-spec className="com.attunity.adapter.oracle.AttuInteractionSpec"> <property name="FunctionName" value="mul"/> <property name="ExecutionTimeout" value="120"/> </interaction-spec> </endpoint-interaction> <endpoint-interaction operation="sub" portType="calcPortType"> <interaction-spec className="com.attunity.adapter.oracle.AttuInteractionSpec"> <property name="FunctionName" value="sub"/> <property name="ExecutionTimeout" value="120"/> </interaction-spec> </endpoint-interaction></adapter-config>You must configure the following property in the binding file.
retryInterval: The amount of time the resource adapter waits if no events are found in the server before issuing the next request. The default is set to 15 seconds. This is optional.
High AvailabilityThe Oracle legacy adapters for OracleAS support High Availability using Oracle AS clusters with active-active and active-passive topologies.
In an active-active topology Oracle Application Server provides an active-active redundant model for all its components with OracleAS Clusters. In an OracleAS Cluster, two or more Oracle Application Server instances are configured to serve the same application workload. These instances can reside on the same computer or on different computers. The active instances may be front-ended by an external load balancer, which can redirect requests to any of the active instances, or by some other application-level configuration, such as address lists, to distribute the requests.
In an active-passive topology Oracle Application Server supports Active-passive model using OracleAS Cold Failover Clusters. In this case two or more application server instances are configured to serve the same application workload, but only one is active at any time.
For High Availability support in CDC Adapters, all the instances must have access to the Oracle database specified by the jdbcDatasource parameter in the binding file.
Troubleshooting Rollback Loops
3-6 Oracle Application Server CDC Adapters for Adabas User's Guide
Troubleshooting Rollback LoopsWhen a problem occurs in the CDC resource adapter work thread, the thread waits for a defined period (retryInterval) then retries the last operation. If you want to stop the adapter, you must deactivate the endpoint. The behavior of the resource adapter is different according to the type of rollback loop. In all cases, the resource adapter writes the corresponding error messages to the resource adapter log file and sends the message to the message listener onAlert method.
■ If the connection to Oracle Connect is lost, then the resource adapter always waits for a defined period (retryInterval) until the connection is reestablished.
■ In all other cases, the resource adapter retrys the last operation immediately and if the problem returns, the resource adapter waits for acsending periods of time, beginning with the retryInterval and doubling the wait time for each successive attempt, but not for more than one minute.
If the OracleAS resource manager invokes a rollback before a 2PC prepare operation, then the CDC resource adapter take steps to perform a special operation that assists you in troublshooting the problem. In this case, the resource adapter separately sends each event from the last event array to the BPEL endpoint, which saves the stream position of the last problematic event in the ROLLBACK_STREAM_POSITION column.
If you notice that a rollback loop occurs in the CDC resource adapter work thread, check the value of the ROLLBACK_STREAM_POSITION is not null. If the value is not null, check whether there was a data problem. You can select the problematic event from the staging area, using the current stream position value. In this way you can analyze the data to determine what the problem is. In addition, you can skip the problematic event. In this case you stop the endpoint and update the NEW_STREAM_POSITION column with the value of the ROLLBACK_STREAM_POSITION.
4
Configuring an Adabas CDC Adapter 4-1
4Configuring an Adabas CDC Adapter
This chapter provides an example for creating an OracleAS adapter for Adabas. To work with an OracleAS adapter for Adabas, you must also configure either a BPEL process or a Mediator process. For information on using BPEL or Mediator, see Creating the Project in JDeveloper Examples.
Creating Outbound Interactions with the OracleAS Adapter for AdabasTo work with the OracleAS Adapter for Adabas and create outbound interactions, you must create a new Adabas database and use the data to create a CDC Solution.
RequirementsThe following is required to perform the tasks described in this chapter:
■ Computer with Windows operating system
■ Mainframe computer with z/OS operating system
■ Oracle Connect v 11.1.1.2 installed on the Mainframe computer
■ Oracle Studio v 11.1.1.2 installed on the Windows computer.
Adding the Adabas Hospital Data SourceTo create an Adabas data source you must do the following:
■ Prepare the System
■ Set up Machine Access to Oracle Connect
Prepare the SystemIn your Adabas database, you should create a database called Hospital. In this database create the following files and fields as described in Table 4–1.
Table 4–1 Adabas Tables and Columns
Files Fields
HOSPITAL HOSPNAME
HOSP_ADDRESS
HOSP_PHONE
ADMIN
Adding the Adabas Hospital Data Source
4-2 Oracle Application Server CDC Adapters for Adabas User's Guide
Set up Machine Access to Oracle ConnectYou begin by configuring access to the Windows computer with your Adabas data. You configure this access with Oracle Connect. Open Oracle connect and follow the directions. Enter the following information in the Add machine dialog box:
■ Host name/IP address: Enter the name or IP address for the Mainframe computer with the Hospital database. This should be installed in the same directory as Oracle Connect.
■ Port: Enter the port number where the daemon is running. The default port is 2551.
■ Display name: Enter the display name (By default, the display name is the host name and the port number). It is not necessary to enter any information in this field.
■ User name: If the computer you are accessing needs an administrator password. If so enter the name of the computer’s administrator.
■ Password: If necessary, enter the computer administrator’s password.
PATIENT HOSPNAME
WARDNO
PATNAME
PATADRESS
PAT_PHONE
BEDIDENT
DATEADMT
PREV_STAY_FLAG
PREV_HOSP
PREV_DATE
PREV_REASON
SYMPTOM HOSPNAME
WARDNO
BEDIDENT
DIAGNOSE
SYMPDATE
PREV_TREAT_FLAG
TREAT_DESC
SYMP_DOCTOR
SYMP_DOCT_PHONE
WARD HOSPNAME
WARDNO
TOT_ROOMS
TOT_BEDS
BEDAVAIL
WARDTYPE
Table 4–1 (Cont.) Adabas Tables and Columns
Files Fields
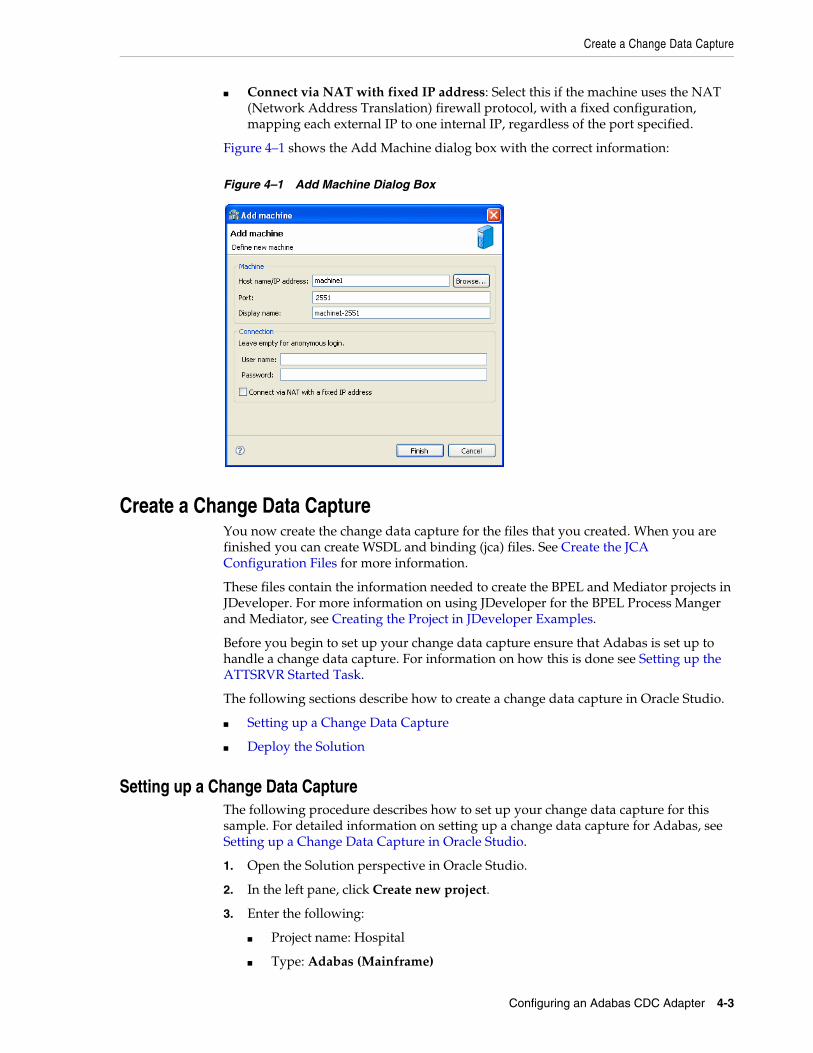
Create a Change Data Capture
Configuring an Adabas CDC Adapter 4-3
■ Connect via NAT with fixed IP address: Select this if the machine uses the NAT (Network Address Translation) firewall protocol, with a fixed configuration, mapping each external IP to one internal IP, regardless of the port specified.
Figure 4–1 shows the Add Machine dialog box with the correct information:
Figure 4–1 Add Machine Dialog Box
Create a Change Data CaptureYou now create the change data capture for the files that you created. When you are finished you can create WSDL and binding (jca) files. See Create the JCA Configuration Files for more information.
These files contain the information needed to create the BPEL and Mediator projects in JDeveloper. For more information on using JDeveloper for the BPEL Process Manger and Mediator, see Creating the Project in JDeveloper Examples.
Before you begin to set up your change data capture ensure that Adabas is set up to handle a change data capture. For information on how this is done see Setting up the ATTSRVR Started Task.
The following sections describe how to create a change data capture in Oracle Studio.
■ Setting up a Change Data Capture
■ Deploy the Solution
Setting up a Change Data CaptureThe following procedure describes how to set up your change data capture for this sample. For detailed information on setting up a change data capture for Adabas, see Setting up a Change Data Capture in Oracle Studio.
1. Open the Solution perspective in Oracle Studio.
2. In the left pane, click Create new project.
3. Enter the following:
■ Project name: Hospital
■ Type: Adabas (Mainframe)
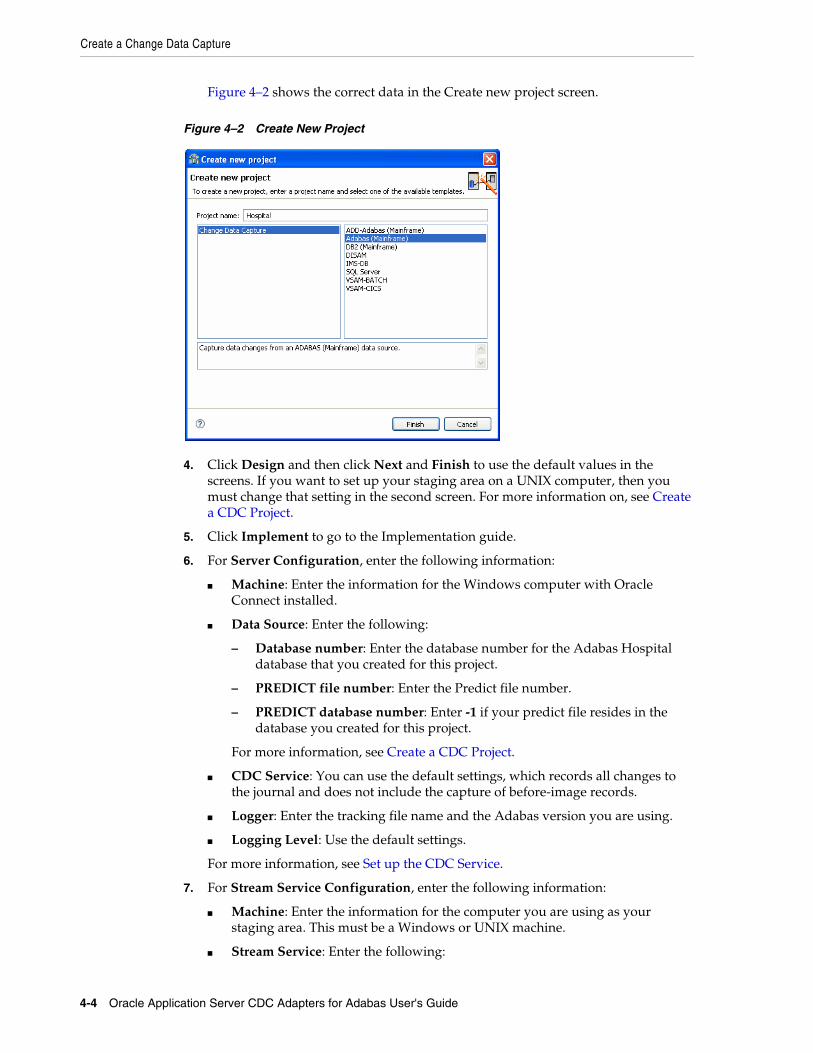
Create a Change Data Capture
4-4 Oracle Application Server CDC Adapters for Adabas User's Guide
Figure 4–2 shows the correct data in the Create new project screen.
Figure 4–2 Create New Project
4. Click Design and then click Next and Finish to use the default values in the screens. If you want to set up your staging area on a UNIX computer, then you must change that setting in the second screen. For more information on, see Create a CDC Project.
5. Click Implement to go to the Implementation guide.
6. For Server Configuration, enter the following information:
■ Machine: Enter the information for the Windows computer with Oracle Connect installed.
■ Data Source: Enter the following:
– Database number: Enter the database number for the Adabas Hospital database that you created for this project.
– PREDICT file number: Enter the Predict file number.
– PREDICT database number: Enter -1 if your predict file resides in the database you created for this project.
For more information, see Create a CDC Project.
■ CDC Service: You can use the default settings, which records all changes to the journal and does not include the capture of before-image records.
■ Logger: Enter the tracking file name and the Adabas version you are using.
■ Logging Level: Use the default settings.
For more information, see Set up the CDC Service.
7. For Stream Service Configuration, enter the following information:
■ Machine: Enter the information for the computer you are using as your staging area. This must be a Windows or UNIX machine.
■ Stream Service: Enter the following:
Create the JCA Configuration Files
Configuring an Adabas CDC Adapter 4-5
– In the Staging Area screen, enter a location for the change files on the computer you specified and the Staging Area computer.
– In the Changed Data Capture Table Selection, select all of the tables.
– In the remaining screens, click Next to use the default values.
■ Access Service Manager: Click Next in all of the screens to use the default values.
For more information, see Set up the CDC Server.
You must now Deploy the Solution.
Deploy the SolutionTo deploy the solution, click Activate Workspaces. Click OK in any screen that opens. If you get a message about a naming collision, you must resolve this first.
For information on deploying a change data capture, see Deploying a Change Data Capture.
Create the JCA Configuration FilesYou must create both a WSDL and JCA file to set up your connection with JDeveloper. You create the files using Oracle Studio before setting up the BPEL process or Mediator connections.
For information on how to create JCA configuration files, see Creating JCA Configuration Files. To create the files for the Hospital_CDCQueue adapter, do the following:
1. From the Configuration pane in Oracle Studio, expand the binding for the CDC staging area that you created. The name of the binding is the Project name for the CDC solution that you created in Oracle Studio with the suffix _SA.
2. Right-click the Hospital_CDCQueue adapter and select Generate JCA Configuration Files.
3. Save the files to a place you can find when you create the BPEL process or Mediator connection.

Create the JCA Configuration Files
4-6 Oracle Application Server CDC Adapters for Adabas User's Guide
5
Creating the Project in JDeveloper Examples 5-1
5 Creating the Project in JDeveloperExamples
This chapter contains the following topics:
■ Getting Started
■ Deploy a BPEL Inbound Process
■ Mediator Inbound Process
Getting StartedThis topic describes the components necessary to work with the samples and how to prepare your system. This section has the following topics:
■ Prerequisites
■ Beginning Tasks
PrerequisitesThe following are installation and configuration requirements for using the examples.
■ Personal computer running Microsoft Windows XP, Windows Vista, Windows Server 2003, or Windows Server 2008 with one GB of RAM.
■ The CDC adapter that you are using must be deployed to the Oracle Application Server.
■ OracleAS CDC Adapter must be configured for inbound processing. See Configuring the Adabas CDC Adapter In the Application Server.
■ Oracle JDeveloper must be installed.
■ CDC adapter must be deployed.
■ Oracle Studio with the necessary machines loaded. See Setting Up the IBM z/OS Platform in Oracle Studio.
This chapter provides examples of the configuration steps that are used when using BPEL and Mediator to work with the Oracle CDC adapters. You should be familiar with the following before working with these examples:
■ How to create J2CA connections. See Configuring the JCA Configuration Files for the OracleAS CDC Adapter for Adabas for more information.
Deploy a BPEL Inbound Process
5-2 Oracle Application Server CDC Adapters for Adabas User's Guide
■ How to configure the OracleAS CDC Adapters for Adabas using Oracle Studio. See Setting Up a Change Data Capture with the OracleAS CDC Adapter for Adabas for more information.
Integration between the OracleAS adapters for Adabas and BPEL has the following processes:
■ Design Time: The OracleAS adapters for Tuxedo are configured with Oracle Studio as described in Configuring an Adabas CDC Adapter.
■ Run time: After you deploy the BPEL process with JDeveloper, you can test your configurations. See Run-time Configuration.
Beginning TasksBefore you design the inbound process, you must perform the following:
■ Perform the tasks in Configuring an Adabas CDC Adapter to create the CDC Solution and the adapters necessary to create the JCA configuration files.
■ Configure the connection for the J2CA CDC resource adapter. You do this by creating a connection factory.
For more information, see Configuring the JCA Configuration Files for the OracleAS CDC Adapter for Adabas.
■ Create the WSDL and binding files for the interaction. You do this in Oracle Studio before you begin to build your endpoint in JDeveloper. Oracle Studio creates the WSDL and binding (jca) files automatically, based on the interaction you create. See Creating JCA Configuration Files for information on creating these files.
Deploy a BPEL Inbound ProcessThis section describes how to create a BPEL inbound process that connects to an Adabas CDC adapter. For information on how to configure an Adabas CDC adapter for inbound, see Setting Up a Change Data Capture with the OracleAS CDC Adapter for Adabas.
To configure a process with the BPEL process manager, you use JDeveloper. This section describes how to create a BPEL inbound process for Tuxedo adapters using JDeveloper. There are two configuration types necessary to perform this inbound sample.
■ Design-Time Configuration
■ Run-time Configuration
Before you design the inbound process, make sure to integrate and connect your OracleAS CDC adapter for Adabas with the BPEL process manager. See Configuring the Adabas CDC Adapter In the Application Server for more information.
You must also make sure to enter the value for the JdbcDataSource in the jca file. shows where you add this value to the jca file.
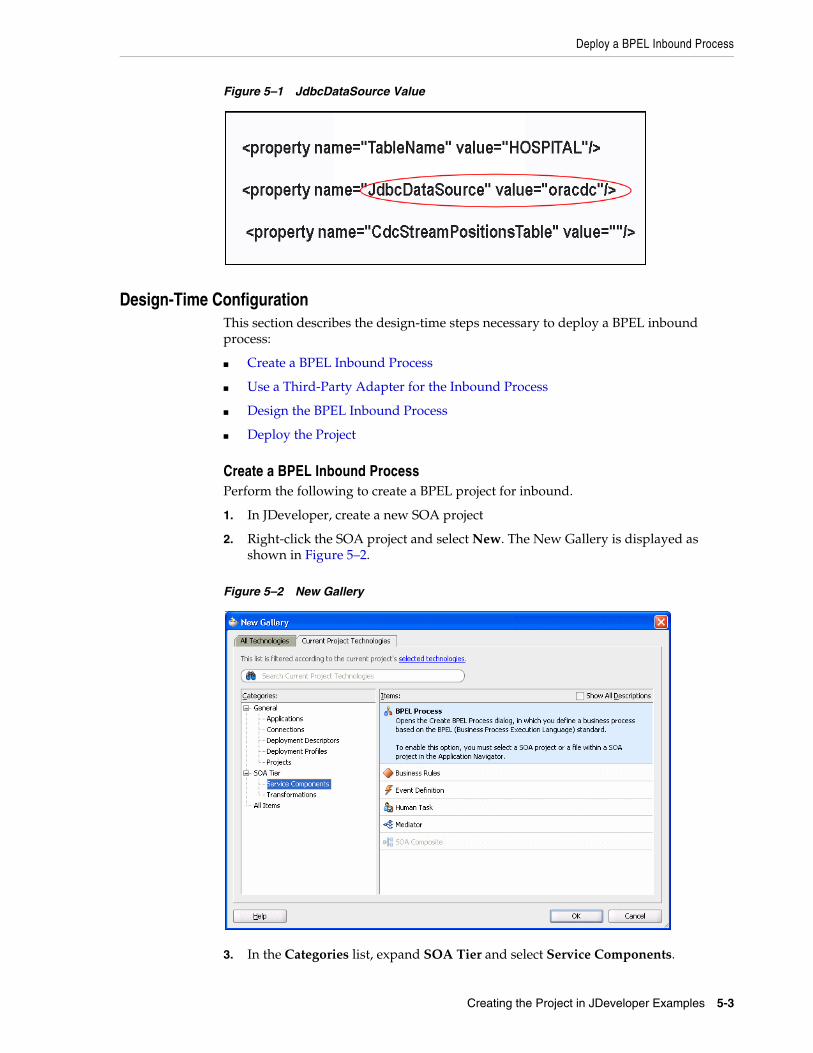
Deploy a BPEL Inbound Process
Creating the Project in JDeveloper Examples 5-3
Figure 5–1 JdbcDataSource Value
Design-Time ConfigurationThis section describes the design-time steps necessary to deploy a BPEL inbound process:
■ Create a BPEL Inbound Process
■ Use a Third-Party Adapter for the Inbound Process
■ Design the BPEL Inbound Process
■ Deploy the Project
Create a BPEL Inbound ProcessPerform the following to create a BPEL project for inbound.
1. In JDeveloper, create a new SOA project
2. Right-click the SOA project and select New. The New Gallery is displayed as shown in Figure 5–2.
Figure 5–2 New Gallery
3. In the Categories list, expand SOA Tier and select Service Components.
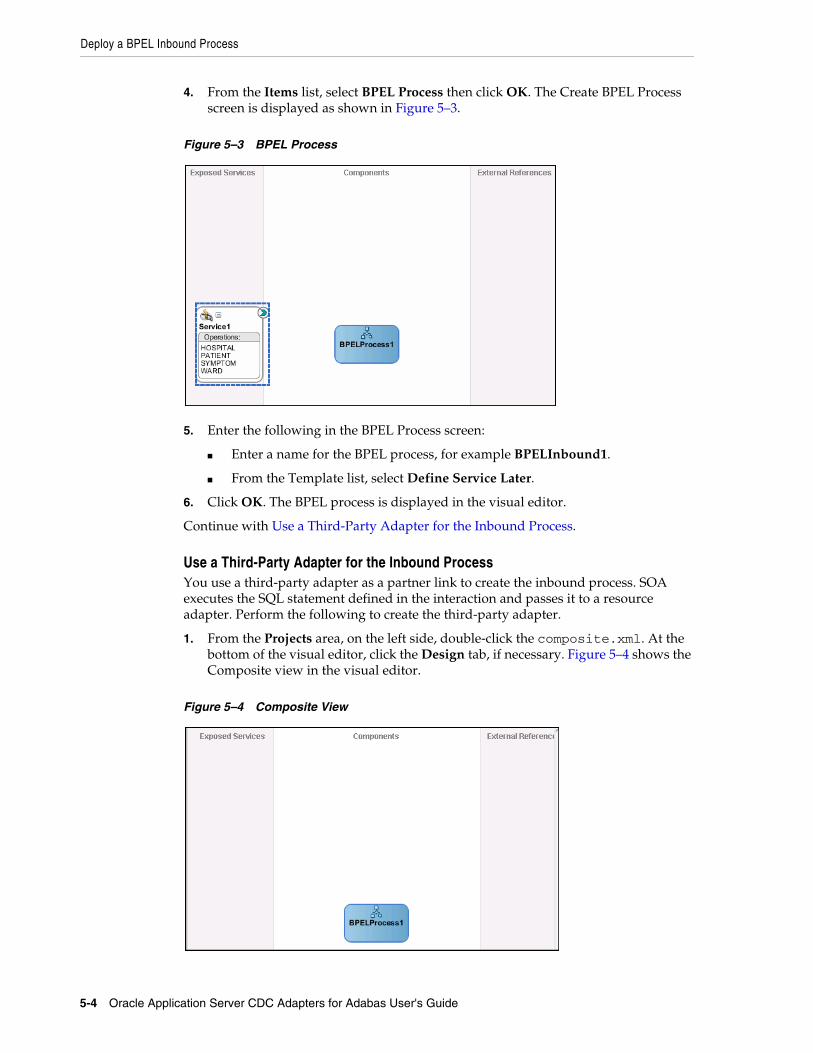
Deploy a BPEL Inbound Process
5-4 Oracle Application Server CDC Adapters for Adabas User's Guide
4. From the Items list, select BPEL Process then click OK. The Create BPEL Process screen is displayed as shown in Figure 5–3.
Figure 5–3 BPEL Process
5. Enter the following in the BPEL Process screen:
■ Enter a name for the BPEL process, for example BPELInbound1.
■ From the Template list, select Define Service Later.
6. Click OK. The BPEL process is displayed in the visual editor.
Continue with Use a Third-Party Adapter for the Inbound Process.
Use a Third-Party Adapter for the Inbound ProcessYou use a third-party adapter as a partner link to create the inbound process. SOA executes the SQL statement defined in the interaction and passes it to a resource adapter. Perform the following to create the third-party adapter.
1. From the Projects area, on the left side, double-click the composite.xml. At the bottom of the visual editor, click the Design tab, if necessary. Figure 5–4 shows the Composite view in the visual editor.
Figure 5–4 Composite View
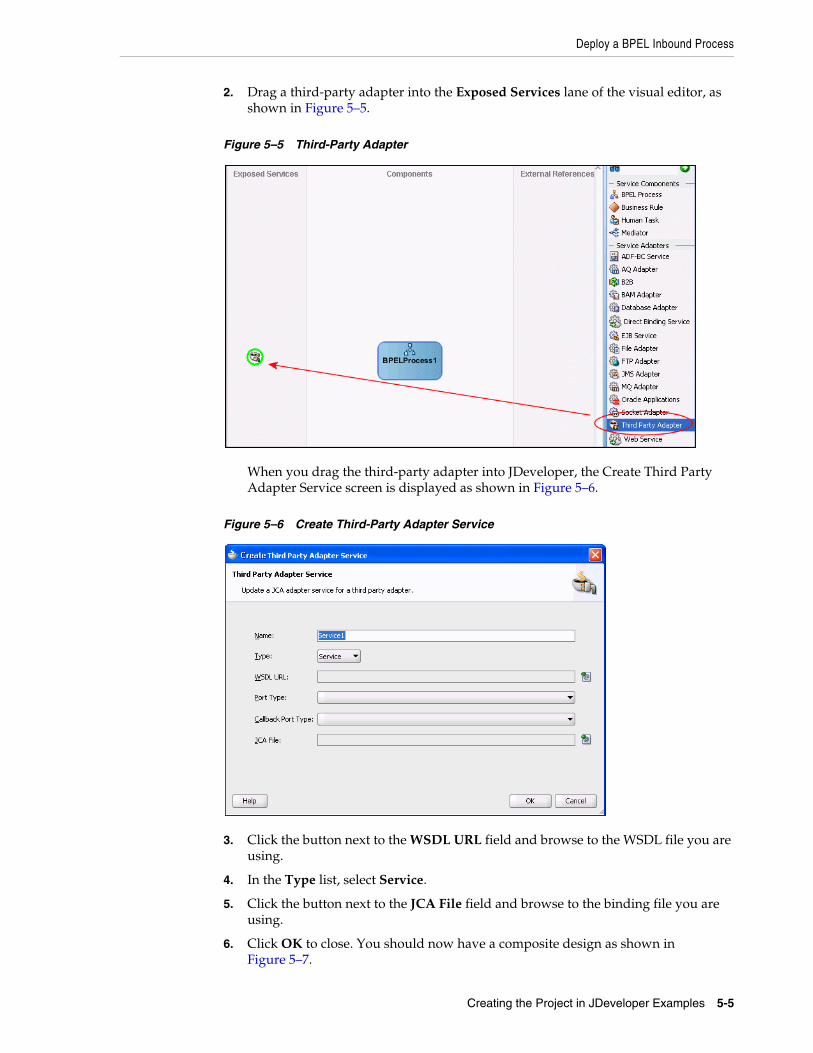
Deploy a BPEL Inbound Process
Creating the Project in JDeveloper Examples 5-5
2. Drag a third-party adapter into the Exposed Services lane of the visual editor, as shown in Figure 5–5.
Figure 5–5 Third-Party Adapter
When you drag the third-party adapter into JDeveloper, the Create Third Party Adapter Service screen is displayed as shown in Figure 5–6.
Figure 5–6 Create Third-Party Adapter Service
3. Click the button next to the WSDL URL field and browse to the WSDL file you are using.
4. In the Type list, select Service.
5. Click the button next to the JCA File field and browse to the binding file you are using.
6. Click OK to close. You should now have a composite design as shown in Figure 5–7.
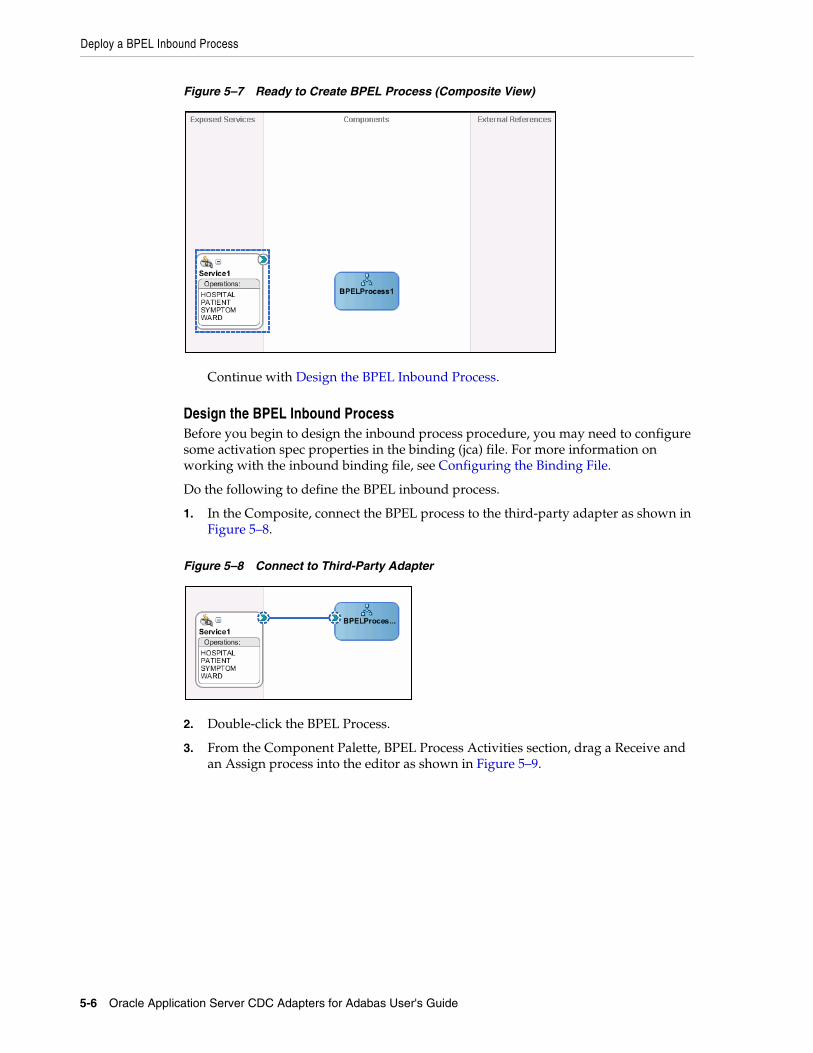
Deploy a BPEL Inbound Process
5-6 Oracle Application Server CDC Adapters for Adabas User's Guide
Figure 5–7 Ready to Create BPEL Process (Composite View)
Continue with Design the BPEL Inbound Process.
Design the BPEL Inbound ProcessBefore you begin to design the inbound process procedure, you may need to configure some activation spec properties in the binding (jca) file. For more information on working with the inbound binding file, see Configuring the Binding File.
Do the following to define the BPEL inbound process.
1. In the Composite, connect the BPEL process to the third-party adapter as shown in Figure 5–8.
Figure 5–8 Connect to Third-Party Adapter
2. Double-click the BPEL Process.
3. From the Component Palette, BPEL Process Activities section, drag a Receive and an Assign process into the editor as shown in Figure 5–9.
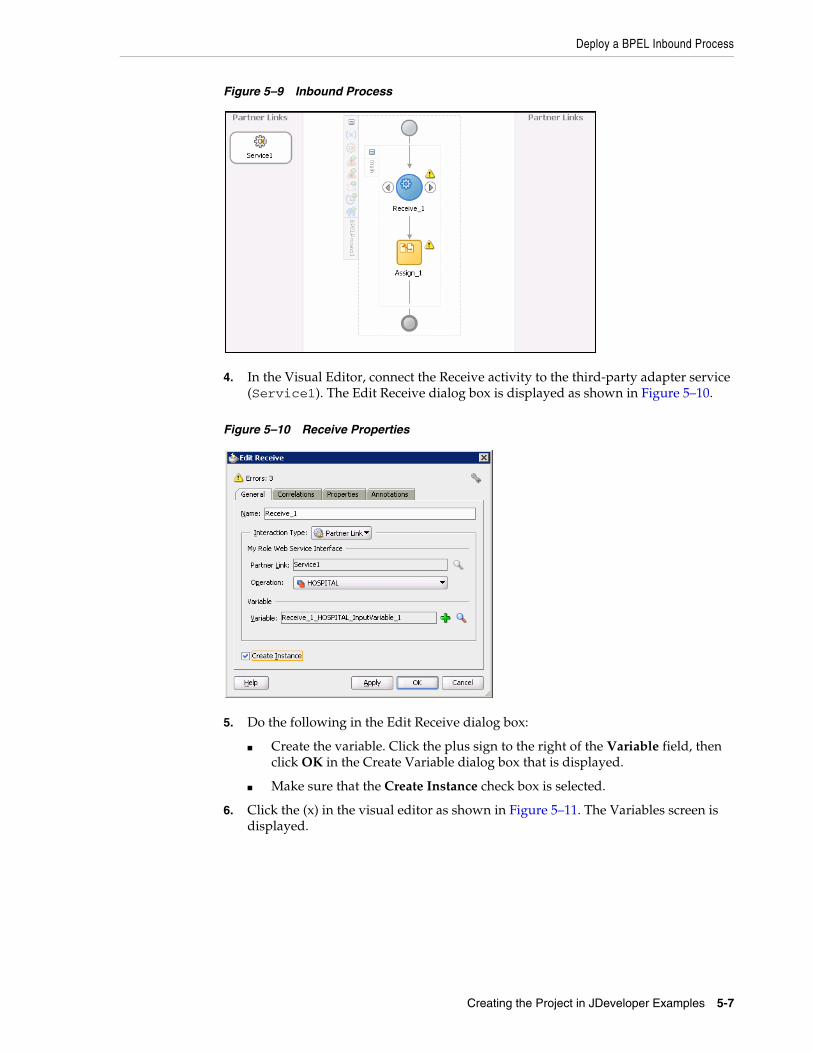
Deploy a BPEL Inbound Process
Creating the Project in JDeveloper Examples 5-7
Figure 5–9 Inbound Process
4. In the Visual Editor, connect the Receive activity to the third-party adapter service (Service1). The Edit Receive dialog box is displayed as shown in Figure 5–10.
Figure 5–10 Receive Properties
5. Do the following in the Edit Receive dialog box:
■ Create the variable. Click the plus sign to the right of the Variable field, then click OK in the Create Variable dialog box that is displayed.
■ Make sure that the Create Instance check box is selected.
6. Click the (x) in the visual editor as shown in Figure 5–11. The Variables screen is displayed.
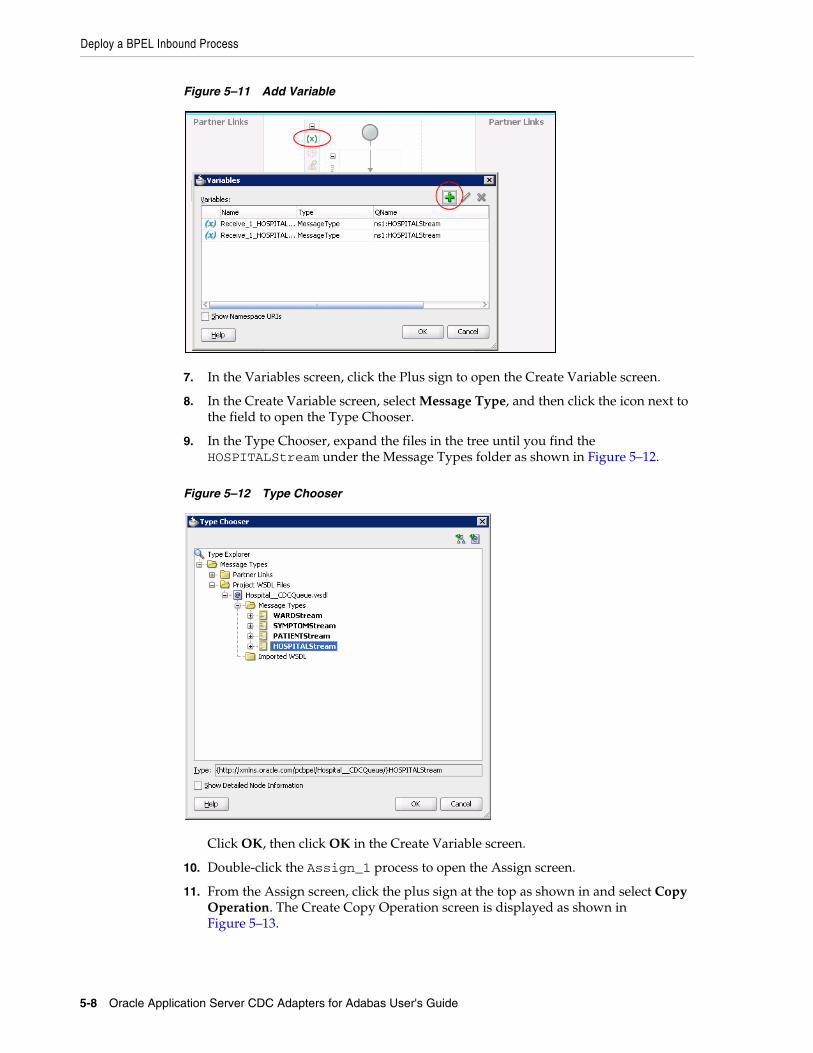
Deploy a BPEL Inbound Process
5-8 Oracle Application Server CDC Adapters for Adabas User's Guide
Figure 5–11 Add Variable
7. In the Variables screen, click the Plus sign to open the Create Variable screen.
8. In the Create Variable screen, select Message Type, and then click the icon next to the field to open the Type Chooser.
9. In the Type Chooser, expand the files in the tree until you find the HOSPITALStream under the Message Types folder as shown in Figure 5–12.
Figure 5–12 Type Chooser
Click OK, then click OK in the Create Variable screen.
10. Double-click the Assign_1 process to open the Assign screen.
11. From the Assign screen, click the plus sign at the top as shown in and select Copy Operation. The Create Copy Operation screen is displayed as shown in Figure 5–13.
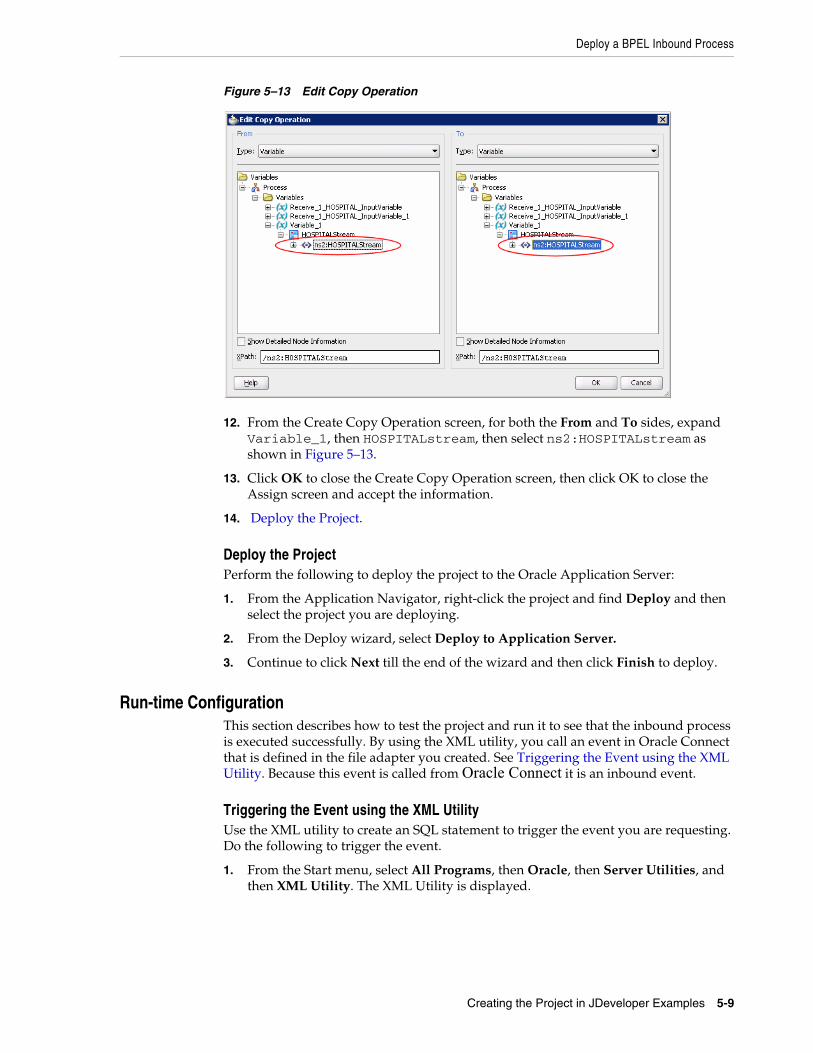
Deploy a BPEL Inbound Process
Creating the Project in JDeveloper Examples 5-9
Figure 5–13 Edit Copy Operation
12. From the Create Copy Operation screen, for both the From and To sides, expand Variable_1, then HOSPITALstream, then select ns2:HOSPITALstream as shown in Figure 5–13.
13. Click OK to close the Create Copy Operation screen, then click OK to close the Assign screen and accept the information.
14. Deploy the Project.
Deploy the ProjectPerform the following to deploy the project to the Oracle Application Server:
1. From the Application Navigator, right-click the project and find Deploy and then select the project you are deploying.
2. From the Deploy wizard, select Deploy to Application Server.
3. Continue to click Next till the end of the wizard and then click Finish to deploy.
Run-time ConfigurationThis section describes how to test the project and run it to see that the inbound process is executed successfully. By using the XML utility, you call an event in Oracle Connect that is defined in the file adapter you created. See Triggering the Event using the XML Utility. Because this event is called from Oracle Connect it is an inbound event.
Triggering the Event using the XML UtilityUse the XML utility to create an SQL statement to trigger the event you are requesting. Do the following to trigger the event.
1. From the Start menu, select All Programs, then Oracle, then Server Utilities, and then XML Utility. The XML Utility is displayed.
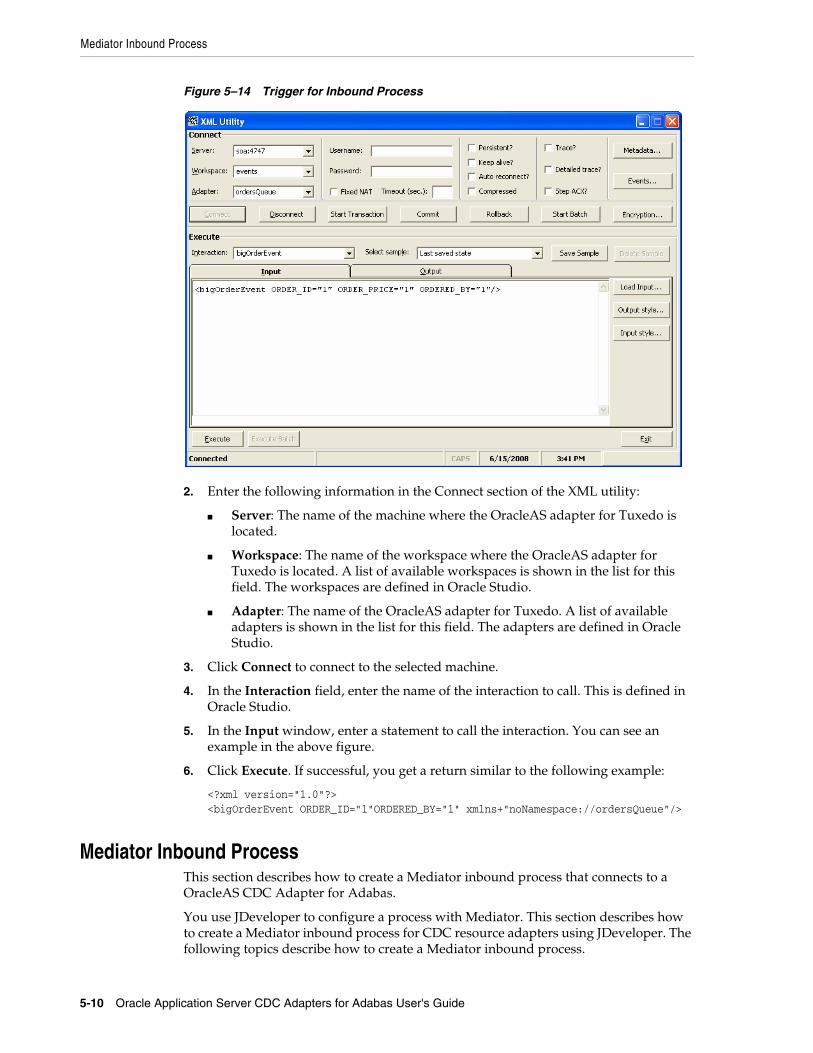
Mediator Inbound Process
5-10 Oracle Application Server CDC Adapters for Adabas User's Guide
Figure 5–14 Trigger for Inbound Process
2. Enter the following information in the Connect section of the XML utility:
■ Server: The name of the machine where the OracleAS adapter for Tuxedo is located.
■ Workspace: The name of the workspace where the OracleAS adapter for Tuxedo is located. A list of available workspaces is shown in the list for this field. The workspaces are defined in Oracle Studio.
■ Adapter: The name of the OracleAS adapter for Tuxedo. A list of available adapters is shown in the list for this field. The adapters are defined in Oracle Studio.
3. Click Connect to connect to the selected machine.
4. In the Interaction field, enter the name of the interaction to call. This is defined in Oracle Studio.
5. In the Input window, enter a statement to call the interaction. You can see an example in the above figure.
6. Click Execute. If successful, you get a return similar to the following example:
<?xml version="1.0"?><bigOrderEvent ORDER_ID="1"ORDERED_BY="1" xmlns+"noNamespace://ordersQueue"/>
Mediator Inbound ProcessThis section describes how to create a Mediator inbound process that connects to a OracleAS CDC Adapter for Adabas.
You use JDeveloper to configure a process with Mediator. This section describes how to create a Mediator inbound process for CDC resource adapters using JDeveloper. The following topics describe how to create a Mediator inbound process.
Mediator Inbound Process
Creating the Project in JDeveloper Examples 5-11
■ Beginning Tasks
■ Create a Mediator Inbound Process
■ Use a Third-Party Adapter for the Inbound Process
■ Create a File Adapter
■ Design an Inbound Mediator
■ Create Mapping Rules and Map the Files
■ Deploy the Project
Beginning TasksBefore you design the inbound process, you must perform the following:
■ Integrate the OracleAS CDC Adapter for Adabas. See Configuring the Adabas CDC Adapter In the Application Server for more information.
■ Configure the connection for the J2CA CDC resource adapter. You do this by creating a connection factory. See Configuring the Adabas CDC Adapter In the Application Server for information on how to do this.
■ Create the WSDL and binding file for the interaction. You do this in Oracle Studio before you begin to build your endpoint in JDeveloper. Oracle Studio creates the WSDL and binding (jca) files automatically based on the interaction you create. See Creating JCA Configuration Files for information on creating these files.
Create a Mediator Inbound ProcessPerform the following to create an inbound Mediator project.
1. In JDeveloper, create a new SOA project
2. Right-click the SOA project and select New. The New Gallery is displayed as shown in Figure 5–15.

Mediator Inbound Process
5-12 Oracle Application Server CDC Adapters for Adabas User's Guide
Figure 5–15 New Gallery
3. In the Categories list, expand SOA Tier and select Service Components.
4. From the Items list, select Mediator then click OK. The Create Mediator screen is displayed as shown in Figure 5–16.
Figure 5–16 Mediator
5. Enter the following in the BPEL Process screen:
■ Enter a name for the Mediator process, for example MedInbound1.
■ From the Template list, select Define Service Later.
6. Click OK. The Mediator process is displayed in the visual editor.
Continue with Use a Third-Party Adapter for the Inbound Process.
Mediator Inbound Process
Creating the Project in JDeveloper Examples 5-13
Use a Third-Party Adapter for the Inbound ProcessYou use a third-party adapter as a partner link to create the inbound Mediator. SOA executes the SQL statement defined in the interaction and passes it to a resource adapter. Perform the following to create the third-party adapter.
1. From the Projects area, on the left side, double-click the composite.xml. At the bottom of the visual editor, click the Design tab, if necessary. Figure 5–17 shows the Composite view in the visual editor.
Figure 5–17 Composite View
2. Drag a third-party adapter into the Exposed Services lane of the visual editor, as shown in Figure 5–18.
Figure 5–18 Third-Party Adapter
When you drag the third-party adapter into JDeveloper, the Create Third Party Adapter Service screen is displayed as shown in Figure 5–19.
Mediator Inbound Process
5-14 Oracle Application Server CDC Adapters for Adabas User's Guide
Figure 5–19 Create Third-Party Adapter Service
3. Click the button next to the WSDL URL field and browse to the WSDL file you are using.
4. In the Type list, select Service.
5. Click the button next to the JCA File field and browse to the binding file you are using.
6. Click OK to close. You should now have a composite design as shown in Figure 5–20.
Figure 5–20 Ready to Create Mediator (Composite View)
Continue with Create a File Adapter.
Create a File AdapterPerform the following to create a file adapter.
1. In the Composite, connect the Mediator to the third-party adapter.
Mediator Inbound Process
Creating the Project in JDeveloper Examples 5-15
2. From the component pallet, SOA section, on the right, drag a file adapter into the External References lane of the visual editor. The Adapter Configuration wizard is displayed.
3. In the first screen of the Adapter Configuration wizard, enter a name for the adapter service, and click Next.
4. In the Adapter Interface screen, select Import an existing WSDL. Select the same WSDL file as you selected in Use a Third-Party Adapter for the Inbound Process. Figure 5–21 shows the Adapter Interface screen.
Figure 5–21 File Adapter
5. In the Operation screen, select Write File as the Operation Type.
6. In the File Configuration screen, enter a path to the directory where the files are written, and also enter the file naming convention as shown in Figure 5–22.
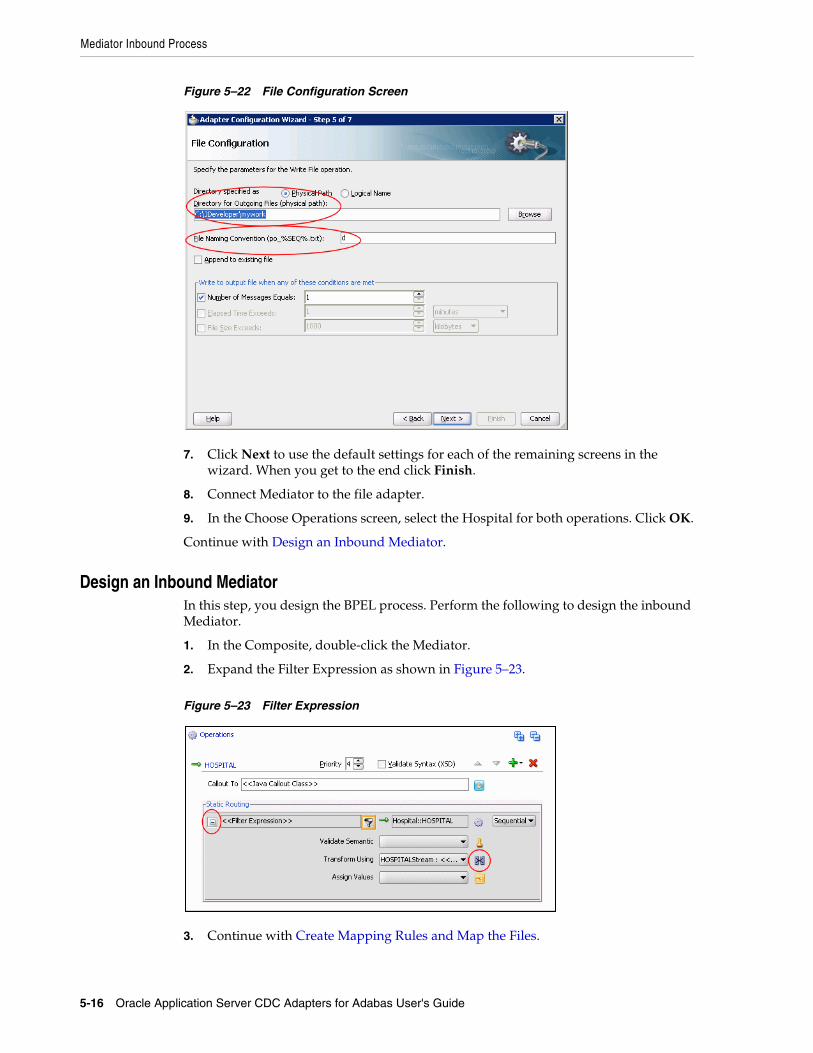
Mediator Inbound Process
5-16 Oracle Application Server CDC Adapters for Adabas User's Guide
Figure 5–22 File Configuration Screen
7. Click Next to use the default settings for each of the remaining screens in the wizard. When you get to the end click Finish.
8. Connect Mediator to the file adapter.
9. In the Choose Operations screen, select the Hospital for both operations. Click OK.
Continue with Design an Inbound Mediator.
Design an Inbound MediatorIn this step, you design the BPEL process. Perform the following to design the inbound Mediator.
1. In the Composite, double-click the Mediator.
2. Expand the Filter Expression as shown in Figure 5–23.
Figure 5–23 Filter Expression
3. Continue with Create Mapping Rules and Map the Files.
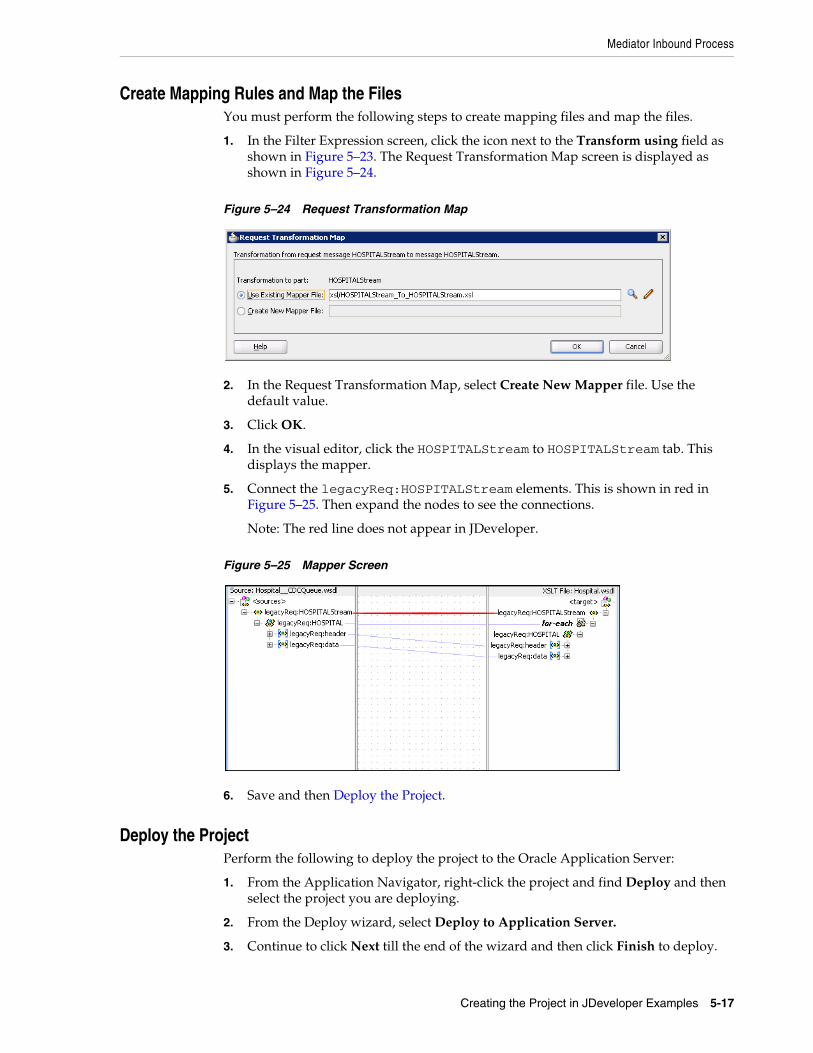
Mediator Inbound Process
Creating the Project in JDeveloper Examples 5-17
Create Mapping Rules and Map the FilesYou must perform the following steps to create mapping files and map the files.
1. In the Filter Expression screen, click the icon next to the Transform using field as shown in Figure 5–23. The Request Transformation Map screen is displayed as shown in Figure 5–24.
Figure 5–24 Request Transformation Map
2. In the Request Transformation Map, select Create New Mapper file. Use the default value.
3. Click OK.
4. In the visual editor, click the HOSPITALStream to HOSPITALStream tab. This displays the mapper.
5. Connect the legacyReq:HOSPITALStream elements. This is shown in red in Figure 5–25. Then expand the nodes to see the connections.
Note: The red line does not appear in JDeveloper.
Figure 5–25 Mapper Screen
6. Save and then Deploy the Project.
Deploy the ProjectPerform the following to deploy the project to the Oracle Application Server:
1. From the Application Navigator, right-click the project and find Deploy and then select the project you are deploying.
2. From the Deploy wizard, select Deploy to Application Server.
3. Continue to click Next till the end of the wizard and then click Finish to deploy.

Mediator Inbound Process
5-18 Oracle Application Server CDC Adapters for Adabas User's Guide
6
Run-time Tasks and Troubleshooting 6-1
6 Run-time Tasks and Troubleshooting
Run-time tasks are executed after you install and configure the OracleAS CDC Adapter for Adabas. This chapter describes how to perform basic maintenance tasks, and make changes to CDC solutions. These tasks include:
■ Adding and Removing Tables
■ Handling Metadata Changes
■ Staging Area Maintenance
■ Monitoring the Change Data Capture
■ Daemon Life-Cycle Tasks
■ Resolving Communication Errors
■ Resolving Specific Errors
Adding and Removing TablesAfter you deploy the OracleAS CDC Adapter solution and start working with it, you may want to change the tables that are being monitored. You do this in the CDC Solution perspective of Oracle Studio. The following describes the main steps that you must follow to make changes to the table. During this operation you must go back and change some configurations that you made when you set up the OracleAS CDC Adapter solution during design time. Do the following to change tables:
1. From the Start menu, select Start, Programs, Oracle, and then select Studio.
2. From the Window menu, click the Open Perspective button and select CDC Solution.
3. In the Getting Started pane, under Recent projects, click the OracleAS CDC solution that you are changing.
If you do not see the CDC solution you want to edit in the list under Recent projects, click Open an existing project and select your solution from the list in the dialog box that is displayed.
4. Click Implement.
5. Under the Stream Service Configuration section, click Stream Service.
6. In the first screen of the Stream Service wizard, you can change the location of the change files or click Next to make changes to the tables to be captured.
7. Select one or more tables from either pane.

Handling Metadata Changes
6-2 Oracle Application Server CDC Adapters for Adabas User's Guide
■ Select a table from the right pane then click the left arrow to move a selected table into the left pane and remove it from the list of tables to be captured.
■ Select a table from the left pane then click the right arrow to move a selected table into the right pane and add it to the list of tables to be captured.
8. Click Next, in the screen displayed, clear check boxes from the columns you no longer want to capture. Select check boxes from columns that are not currently included in the change data capture to include them.
9. Click Next, in the screen displayed, clear and select the check boxes to change the filters used in the change data capture.
10. Click Next, in the final screen you can make changes to the auditing configuration.
11. Click Finish to close the wizard and save the changes.
12. You must re-deploy the solution for the changes to be recognized at run-time. For more information, see Deploying a Change Data Capture.
For more information on configuring the Stream Service, see Set up the Stream Service.
Handling Metadata ChangesWhen you make changes to the way an application accesses an Adabas file, you must ensure that the solution recognizes the changes and works with them. This section provides you with a procedure to handle the metadata when working with an OracleAS CDC Adapter for Adabas solution if changes are made after deploying the solution. You should perform these steps at a time when there is little or no activity in the system. If you want to receive new events with a new structure, consume the changes for the table you are updating before carrying out any the steps in this process. Do the following to handle any changes to the metadata:
1. Deactivate the Solution workspaces using the CDC Solution perspective in Oracle Studio.
2. Update the metadata in the Adabas data source and Staging Area by doing one of the following:
■ If you made manual changes to the CDC solution after deployment, or if you do not want to redeploy the solution, then on the Router's (Staging Area) computer, do the following:
a. Run Oracle Studio, and open the Design perspective.
b. Edit the Metadata for the Router's Data source.
c. Expand the table list and edit the metadata for the table.
If you are adding a new column, ensure to add it to the end of the COL-UMN list. This operation can also be done using the Source view. Ensure you select the correct data type.
If you are modifying a data type, ensure that you select the corresponding data type when making the modification.
d. Save the metadata.
Note: When adding a new table, be sure to create a corresponding endpoint for capturing changes. For more information, see Creating JCA Configuration Files.
Staging Area Maintenance
Run-time Tasks and Troubleshooting 6-3
e. Repeat this procedure on the CDC adapter computer for the Adabas data source.
For more information, see Importing Metadata for the Adabas Data Source.
■ For cases where you can redeploy the solution:
a. Run Oracle Studio, and open the CDC Solution perspective.
b. Open the CDC solution project.
c. Click Implement and then click Stream Service.
d. Run the wizard. Ensure that you are using the modified metadata.
e. Redeploy the solution, but do not activate it.
For more information, see Deploying a Change Data Capture.
3. Delete the physical files that represent the modified tables from the Staging Area. Ensure not to delete the SERVICE_CONTEXT and CONTROL_TABLE files.
4. Reactivate the solution using Oracle Studio. For more information, see Activating and Deactivating Solution Workspaces.
Staging Area MaintenanceThe Staging Area files for the OracleAS CDC Adapter solution are DISAM files that store changes until the client application consumes them. When you delete old changed records they are actually only marked as deleted. New changes continue to be written to the deleted records.
In busy production sites the DISAM files can get very large, which can affect the performance of the system.
To ensure that system performance is not degraded, you should defragment the Staging Area files to better maintain the Staging Area repository. Use the following procedures and suggestions when you perform the defragmentation of the staging area:
■ Defragment the DISAM files at least once a week. The frequency can vary depending on the amount of changes in the staging area.
■ In addition to defragmenting the staging area files, you should also check for corrupt DISAM files.
■ You should perform the maitenance processes when the lowest possible activity in your system occurs.
To defragment and maintain the staging area, use the DCHECK and DPACK DISAM utilities. The DCHECK utility is used to check for corruption of DISAM files and rebuild the bad indexes and the DPACK utility defragments the DISAM files and rebuilds them without the deleted records. This reduces the size of the files and ensures that the DISAM files contain only active and relevant records.
Do the following to perform the maintenance activities:
1. Deactivate the OracleAS CDC Solution with the staging area you working with. For more information, see Activating and Deactivating Solution Workspaces.
2. Run the DCHECK utility on each file to ensure it is not corrupted. For example, at the command prompt enter the following to check the DIASM file that represents the table called employees.
dcheck employees
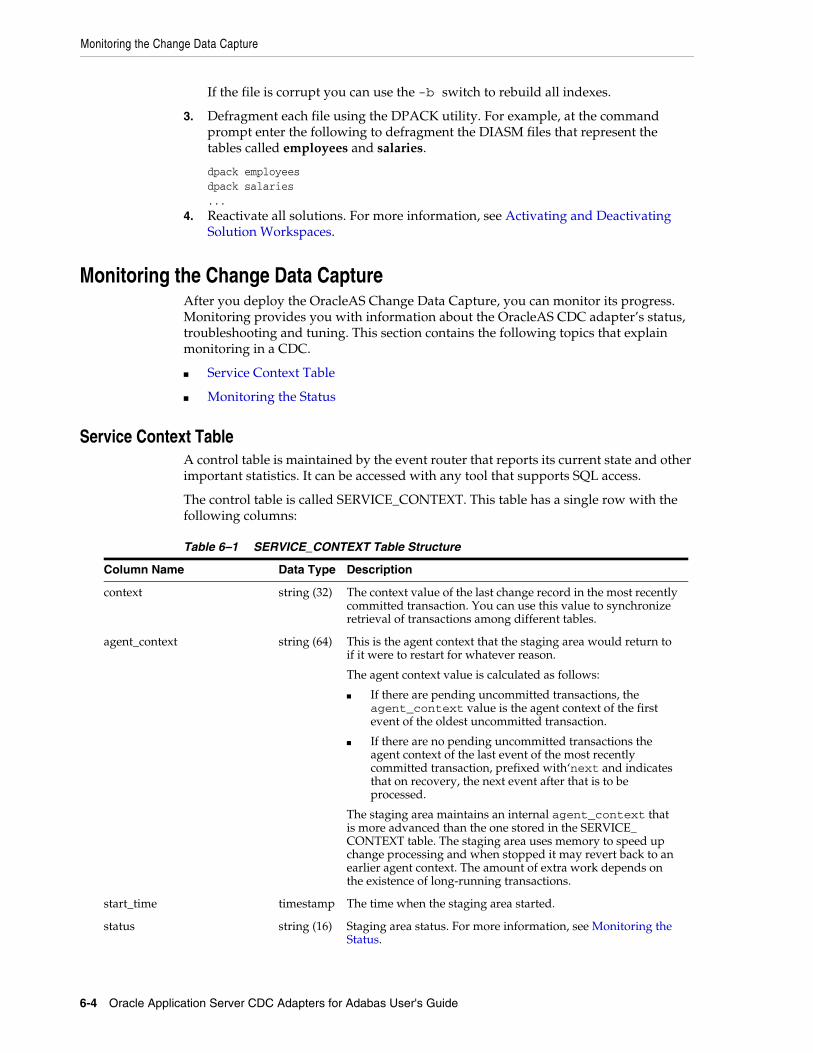
Monitoring the Change Data Capture
6-4 Oracle Application Server CDC Adapters for Adabas User's Guide
If the file is corrupt you can use the -b switch to rebuild all indexes.
3. Defragment each file using the DPACK utility. For example, at the command prompt enter the following to defragment the DIASM files that represent the tables called employees and salaries.
dpack employeesdpack salaries...
4. Reactivate all solutions. For more information, see Activating and Deactivating Solution Workspaces.
Monitoring the Change Data CaptureAfter you deploy the OracleAS Change Data Capture, you can monitor its progress. Monitoring provides you with information about the OracleAS CDC adapter’s status, troubleshooting and tuning. This section contains the following topics that explain monitoring in a CDC.
■ Service Context Table
■ Monitoring the Status
Service Context TableA control table is maintained by the event router that reports its current state and other important statistics. It can be accessed with any tool that supports SQL access.
The control table is called SERVICE_CONTEXT. This table has a single row with the following columns:
Table 6–1 SERVICE_CONTEXT Table Structure
Column Name Data Type Description
context string (32) The context value of the last change record in the most recently committed transaction. You can use this value to synchronize retrieval of transactions among different tables.
agent_context string (64) This is the agent context that the staging area would return to if it were to restart for whatever reason.
The agent context value is calculated as follows:
■ If there are pending uncommitted transactions, the agent_context value is the agent context of the first event of the oldest uncommitted transaction.
■ If there are no pending uncommitted transactions the agent context of the last event of the most recently committed transaction, prefixed with‘next and indicates that on recovery, the next event after that is to be processed.
The staging area maintains an internal agent_context that is more advanced than the one stored in the SERVICE_CONTEXT table. The staging area uses memory to speed up change processing and when stopped it may revert back to an earlier agent context. The amount of extra work depends on the existence of long-running transactions.
start_time timestamp The time when the staging area started.
status string (16) Staging area status. For more information, see Monitoring the Status.
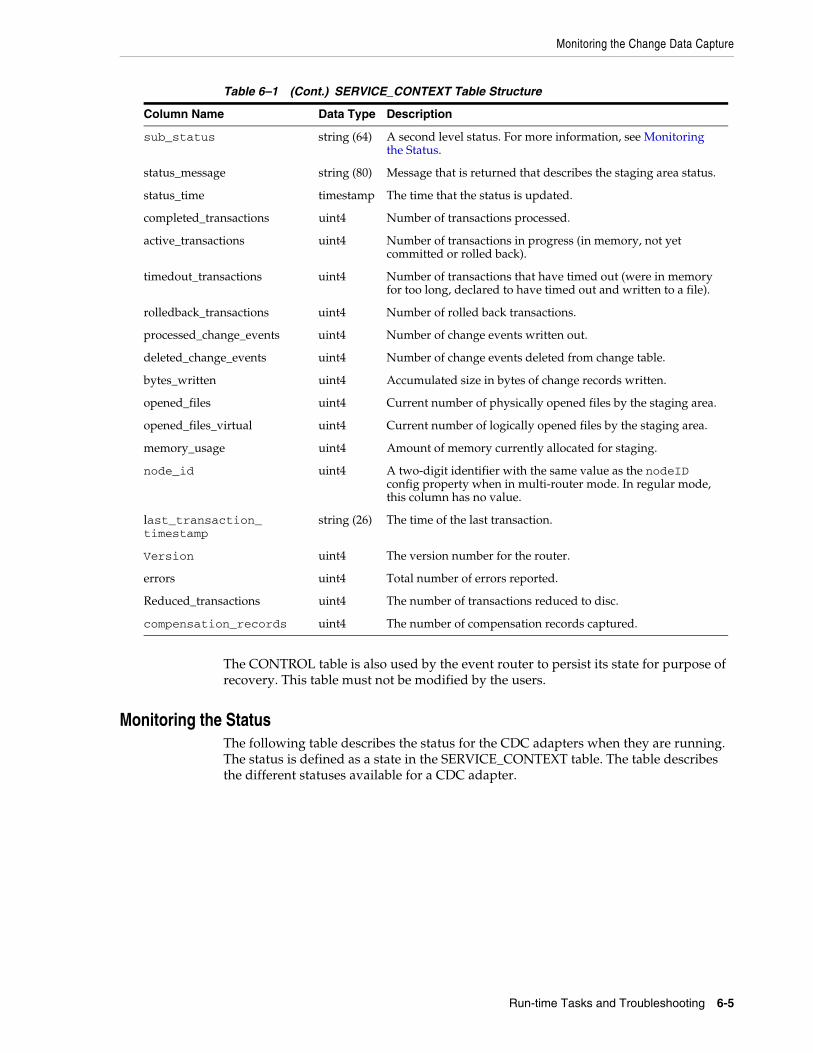
Monitoring the Change Data Capture
Run-time Tasks and Troubleshooting 6-5
The CONTROL table is also used by the event router to persist its state for purpose of recovery. This table must not be modified by the users.
Monitoring the StatusThe following table describes the status for the CDC adapters when they are running. The status is defined as a state in the SERVICE_CONTEXT table. The table describes the different statuses available for a CDC adapter.
sub_status string (64) A second level status. For more information, see Monitoring the Status.
status_message string (80) Message that is returned that describes the staging area status.
status_time timestamp The time that the status is updated.
completed_transactions uint4 Number of transactions processed.
active_transactions uint4 Number of transactions in progress (in memory, not yet committed or rolled back).
timedout_transactions uint4 Number of transactions that have timed out (were in memory for too long, declared to have timed out and written to a file).
rolledback_transactions uint4 Number of rolled back transactions.
processed_change_events uint4 Number of change events written out.
deleted_change_events uint4 Number of change events deleted from change table.
bytes_written uint4 Accumulated size in bytes of change records written.
opened_files uint4 Current number of physically opened files by the staging area.
opened_files_virtual uint4 Current number of logically opened files by the staging area.
memory_usage uint4 Amount of memory currently allocated for staging.
node_id uint4 A two-digit identifier with the same value as the nodeID config property when in multi-router mode. In regular mode, this column has no value.
last_transaction_timestamp
string (26) The time of the last transaction.
Version uint4 The version number for the router.
errors uint4 Total number of errors reported.
Reduced_transactions uint4 The number of transactions reduced to disc.
compensation_records uint4 The number of compensation records captured.
Table 6–1 (Cont.) SERVICE_CONTEXT Table Structure
Column Name Data Type Description
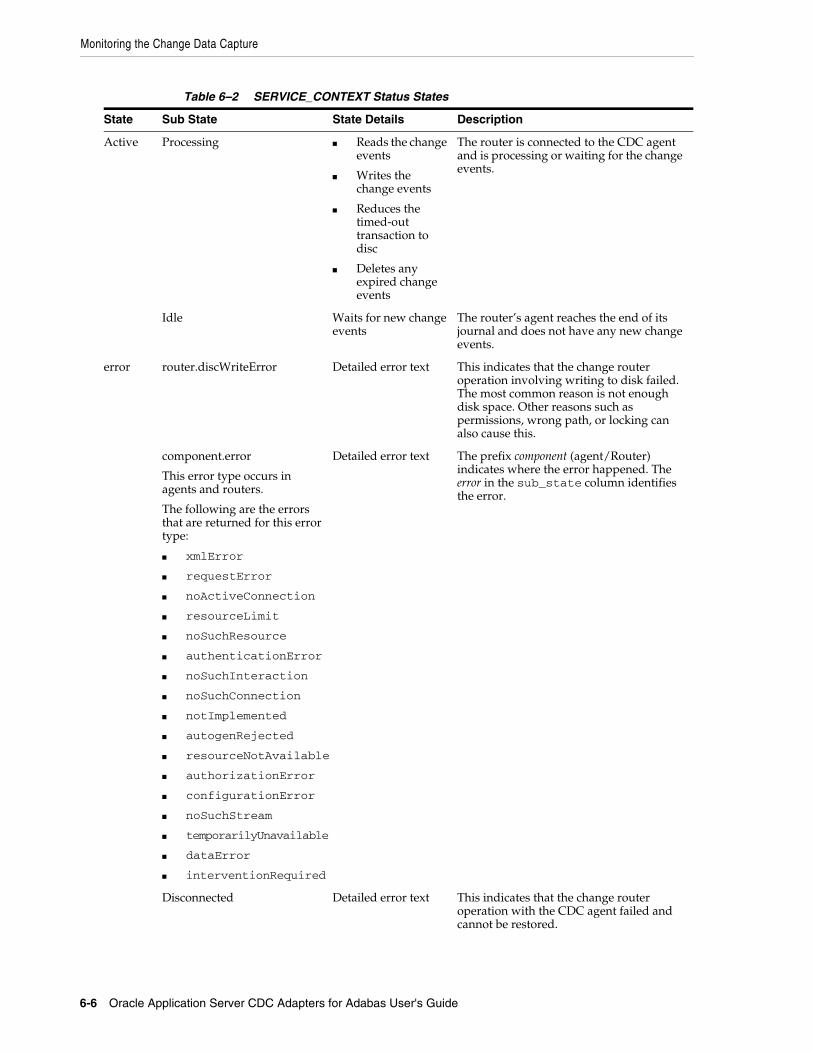
Monitoring the Change Data Capture
6-6 Oracle Application Server CDC Adapters for Adabas User's Guide
Table 6–2 SERVICE_CONTEXT Status States
State Sub State State Details Description
Active Processing ■ Reads the change events
■ Writes the change events
■ Reduces the timed-out transaction to disc
■ Deletes any expired change events
The router is connected to the CDC agent and is processing or waiting for the change events.
Idle Waits for new change events
The router’s agent reaches the end of its journal and does not have any new change events.
error router.discWriteError Detailed error text This indicates that the change router operation involving writing to disk failed. The most common reason is not enough disk space. Other reasons such as permissions, wrong path, or locking can also cause this.
component.error
This error type occurs in agents and routers.
The following are the errors that are returned for this error type:
■ xmlError
■ requestError
■ noActiveConnection
■ resourceLimit
■ noSuchResource
■ authenticationError
■ noSuchInteraction
■ noSuchConnection
■ notImplemented
■ autogenRejected
■ resourceNotAvailable
■ authorizationError
■ configurationError
■ noSuchStream
■ temporarilyUnavailable
■ dataError
■ interventionRequired
Detailed error text The prefix component (agent/Router) indicates where the error happened. The error in the sub_state column identifies the error.
Disconnected Detailed error text This indicates that the change router operation with the CDC agent failed and cannot be restored.
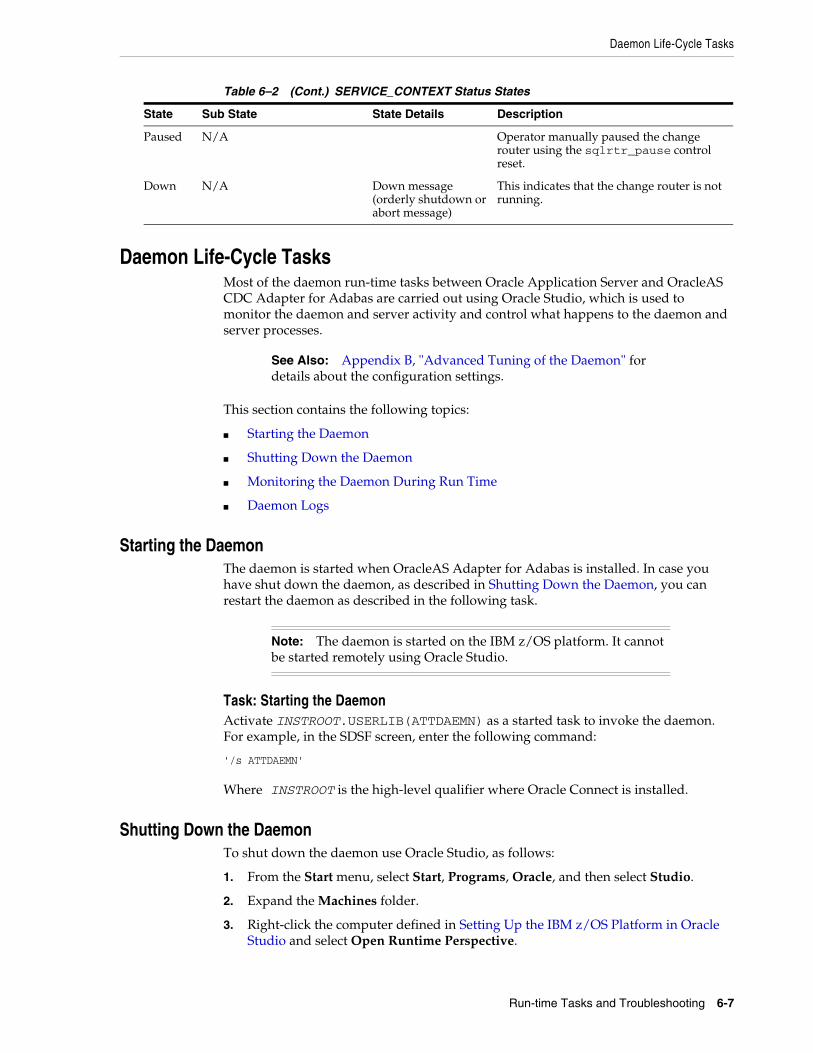
Daemon Life-Cycle Tasks
Run-time Tasks and Troubleshooting 6-7
Daemon Life-Cycle TasksMost of the daemon run-time tasks between Oracle Application Server and OracleAS CDC Adapter for Adabas are carried out using Oracle Studio, which is used to monitor the daemon and server activity and control what happens to the daemon and server processes.
This section contains the following topics:
■ Starting the Daemon
■ Shutting Down the Daemon
■ Monitoring the Daemon During Run Time
■ Daemon Logs
Starting the DaemonThe daemon is started when OracleAS Adapter for Adabas is installed. In case you have shut down the daemon, as described in Shutting Down the Daemon, you can restart the daemon as described in the following task.
Task: Starting the DaemonActivate INSTROOT.USERLIB(ATTDAEMN) as a started task to invoke the daemon. For example, in the SDSF screen, enter the following command:
'/s ATTDAEMN'
Where INSTROOT is the high-level qualifier where Oracle Connect is installed.
Shutting Down the DaemonTo shut down the daemon use Oracle Studio, as follows:
1. From the Start menu, select Start, Programs, Oracle, and then select Studio.
2. Expand the Machines folder.
3. Right-click the computer defined in Setting Up the IBM z/OS Platform in Oracle Studio and select Open Runtime Perspective.
Paused N/A Operator manually paused the change router using the sqlrtr_pause control reset.
Down N/A Down message (orderly shutdown or abort message)
This indicates that the change router is not running.
See Also: Appendix B, "Advanced Tuning of the Daemon" for details about the configuration settings.
Note: The daemon is started on the IBM z/OS platform. It cannot be started remotely using Oracle Studio.
Table 6–2 (Cont.) SERVICE_CONTEXT Status States
State Sub State State Details Description
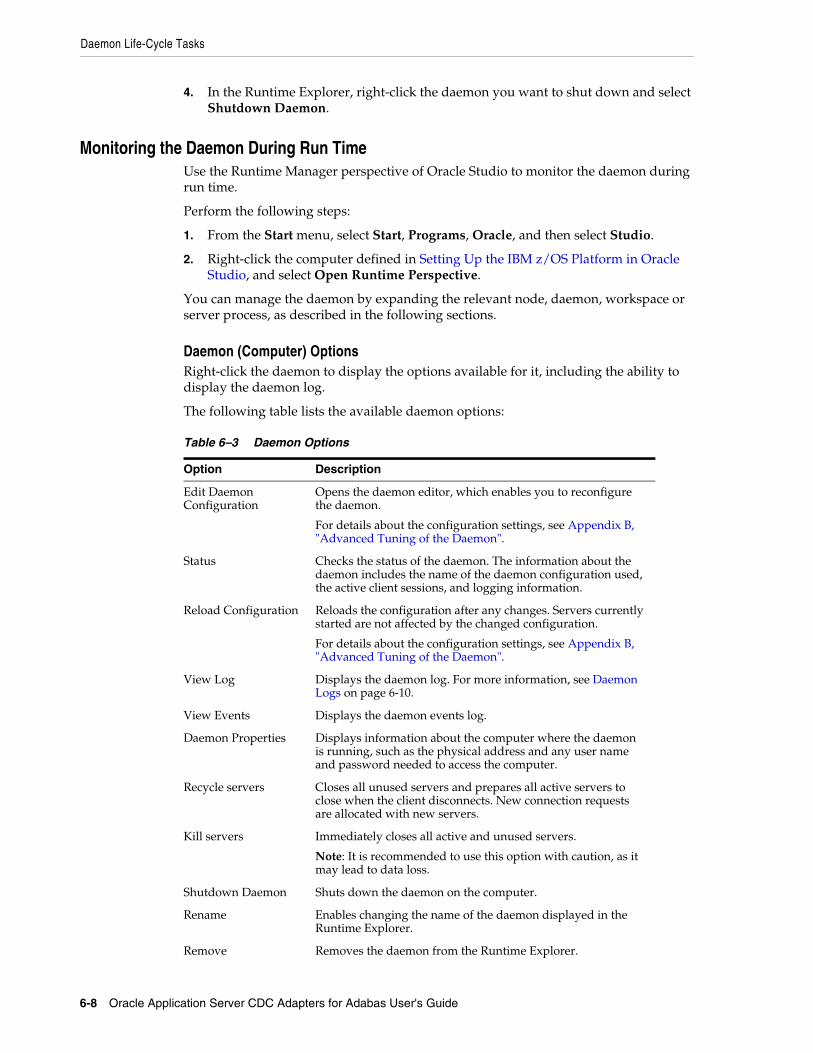
Daemon Life-Cycle Tasks
6-8 Oracle Application Server CDC Adapters for Adabas User's Guide
4. In the Runtime Explorer, right-click the daemon you want to shut down and select Shutdown Daemon.
Monitoring the Daemon During Run TimeUse the Runtime Manager perspective of Oracle Studio to monitor the daemon during run time.
Perform the following steps:
1. From the Start menu, select Start, Programs, Oracle, and then select Studio.
2. Right-click the computer defined in Setting Up the IBM z/OS Platform in Oracle Studio, and select Open Runtime Perspective.
You can manage the daemon by expanding the relevant node, daemon, workspace or server process, as described in the following sections.
Daemon (Computer) OptionsRight-click the daemon to display the options available for it, including the ability to display the daemon log.
The following table lists the available daemon options:
Table 6–3 Daemon Options
Option Description
Edit Daemon Configuration
Opens the daemon editor, which enables you to reconfigure the daemon.
For details about the configuration settings, see Appendix B, "Advanced Tuning of the Daemon".
Status Checks the status of the daemon. The information about the daemon includes the name of the daemon configuration used, the active client sessions, and logging information.
Reload Configuration Reloads the configuration after any changes. Servers currently started are not affected by the changed configuration.
For details about the configuration settings, see Appendix B, "Advanced Tuning of the Daemon".
View Log Displays the daemon log. For more information, see Daemon Logs on page 6-10.
View Events Displays the daemon events log.
Daemon Properties Displays information about the computer where the daemon is running, such as the physical address and any user name and password needed to access the computer.
Recycle servers Closes all unused servers and prepares all active servers to close when the client disconnects. New connection requests are allocated with new servers.
Kill servers Immediately closes all active and unused servers.
Note: It is recommended to use this option with caution, as it may lead to data loss.
Shutdown Daemon Shuts down the daemon on the computer.
Rename Enables changing the name of the daemon displayed in the Runtime Explorer.
Remove Removes the daemon from the Runtime Explorer.
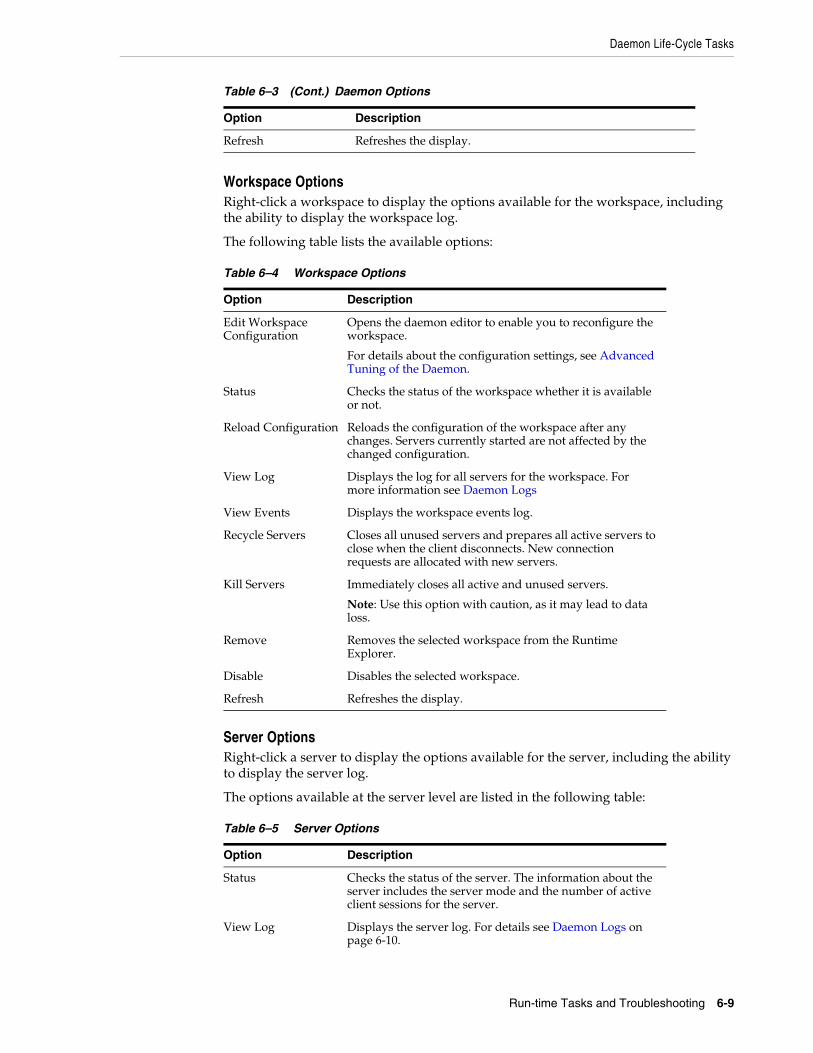
Daemon Life-Cycle Tasks
Run-time Tasks and Troubleshooting 6-9
Workspace OptionsRight-click a workspace to display the options available for the workspace, including the ability to display the workspace log.
The following table lists the available options:
Server OptionsRight-click a server to display the options available for the server, including the ability to display the server log.
The options available at the server level are listed in the following table:
Refresh Refreshes the display.
Table 6–4 Workspace Options
Option Description
Edit Workspace Configuration
Opens the daemon editor to enable you to reconfigure the workspace.
For details about the configuration settings, see Advanced Tuning of the Daemon.
Status Checks the status of the workspace whether it is available or not.
Reload Configuration Reloads the configuration of the workspace after any changes. Servers currently started are not affected by the changed configuration.
View Log Displays the log for all servers for the workspace. For more information see Daemon Logs
View Events Displays the workspace events log.
Recycle Servers Closes all unused servers and prepares all active servers to close when the client disconnects. New connection requests are allocated with new servers.
Kill Servers Immediately closes all active and unused servers.
Note: Use this option with caution, as it may lead to data loss.
Remove Removes the selected workspace from the Runtime Explorer.
Disable Disables the selected workspace.
Refresh Refreshes the display.
Table 6–5 Server Options
Option Description
Status Checks the status of the server. The information about the server includes the server mode and the number of active client sessions for the server.
View Log Displays the server log. For details see Daemon Logs on page 6-10.
Table 6–3 (Cont.) Daemon Options
Option Description
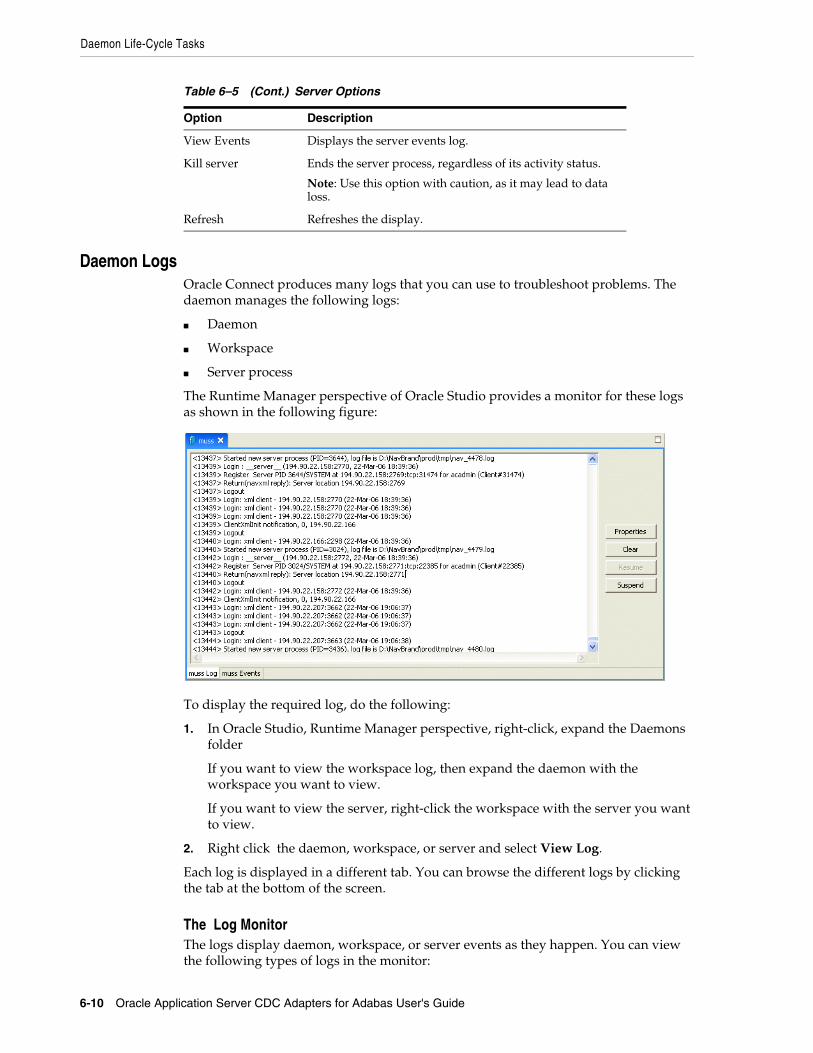
Daemon Life-Cycle Tasks
6-10 Oracle Application Server CDC Adapters for Adabas User's Guide
Daemon LogsOracle Connect produces many logs that you can use to troubleshoot problems. The daemon manages the following logs:
■ Daemon
■ Workspace
■ Server process
The Runtime Manager perspective of Oracle Studio provides a monitor for these logs as shown in the following figure:
To display the required log, do the following:
1. In Oracle Studio, Runtime Manager perspective, right-click, expand the Daemons folder
If you want to view the workspace log, then expand the daemon with the workspace you want to view.
If you want to view the server, right-click the workspace with the server you want to view.
2. Right click the daemon, workspace, or server and select View Log.
Each log is displayed in a different tab. You can browse the different logs by clicking the tab at the bottom of the screen.
The Log MonitorThe logs display daemon, workspace, or server events as they happen. You can view the following types of logs in the monitor:
View Events Displays the server events log.
Kill server Ends the server process, regardless of its activity status.
Note: Use this option with caution, as it may lead to data loss.
Refresh Refreshes the display.
Table 6–5 (Cont.) Server Options
Option Description
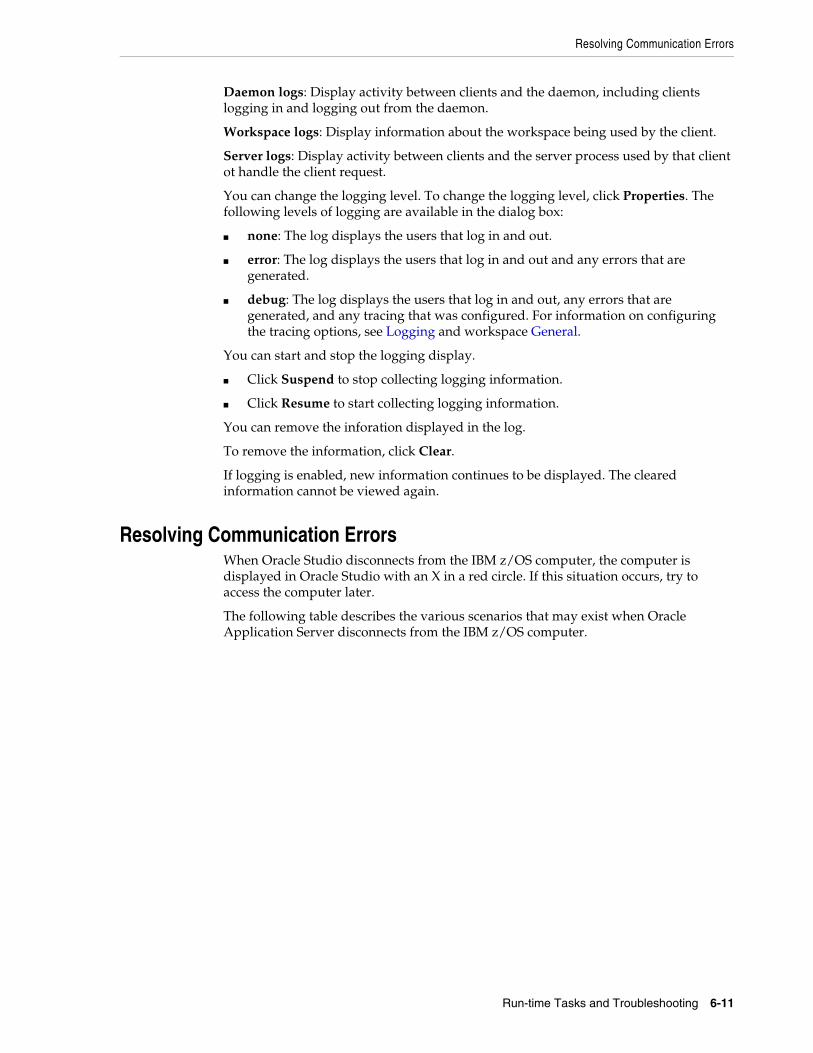
Resolving Communication Errors
Run-time Tasks and Troubleshooting 6-11
Daemon logs: Display activity between clients and the daemon, including clients logging in and logging out from the daemon.
Workspace logs: Display information about the workspace being used by the client.
Server logs: Display activity between clients and the server process used by that client ot handle the client request.
You can change the logging level. To change the logging level, click Properties. The following levels of logging are available in the dialog box:
■ none: The log displays the users that log in and out.
■ error: The log displays the users that log in and out and any errors that are generated.
■ debug: The log displays the users that log in and out, any errors that are generated, and any tracing that was configured. For information on configuring the tracing options, see Logging and workspace General.
You can start and stop the logging display.
■ Click Suspend to stop collecting logging information.
■ Click Resume to start collecting logging information.
You can remove the inforation displayed in the log.
To remove the information, click Clear.
If logging is enabled, new information continues to be displayed. The cleared information cannot be viewed again.
Resolving Communication ErrorsWhen Oracle Studio disconnects from the IBM z/OS computer, the computer is displayed in Oracle Studio with an X in a red circle. If this situation occurs, try to access the computer later.
The following table describes the various scenarios that may exist when Oracle Application Server disconnects from the IBM z/OS computer.
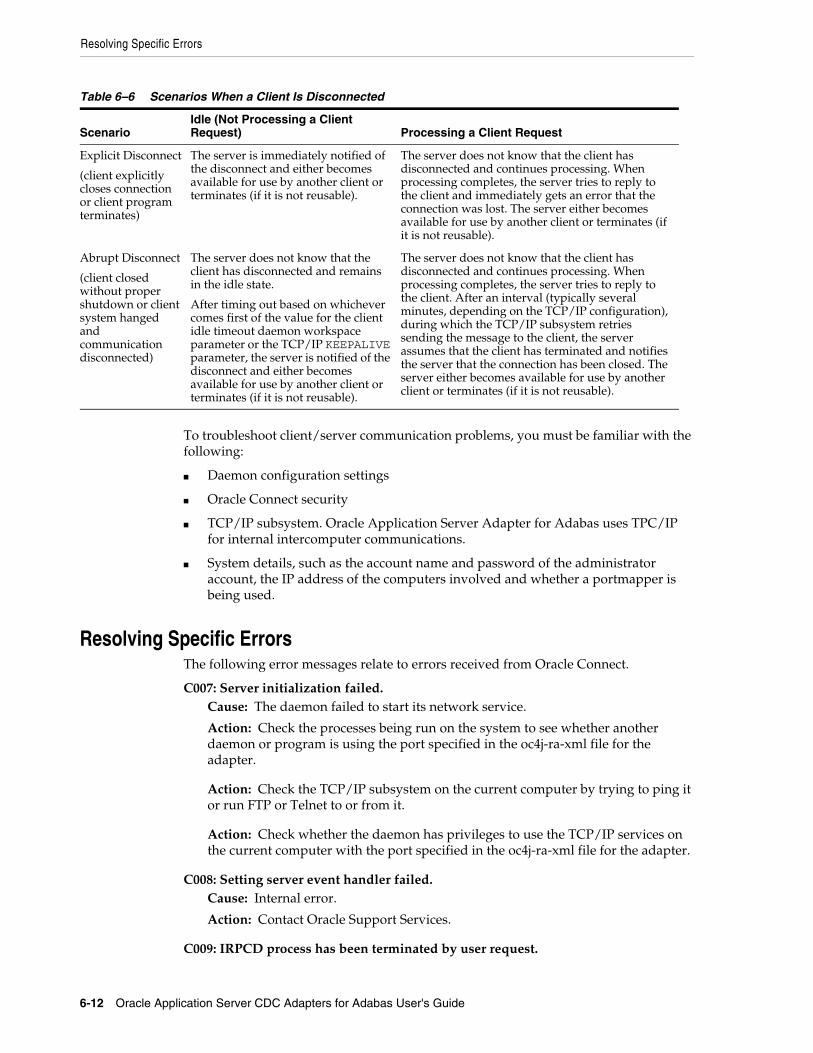
Resolving Specific Errors
6-12 Oracle Application Server CDC Adapters for Adabas User's Guide
To troubleshoot client/server communication problems, you must be familiar with the following:
■ Daemon configuration settings
■ Oracle Connect security
■ TCP/IP subsystem. Oracle Application Server Adapter for Adabas uses TPC/IP for internal intercomputer communications.
■ System details, such as the account name and password of the administrator account, the IP address of the computers involved and whether a portmapper is being used.
Resolving Specific ErrorsThe following error messages relate to errors received from Oracle Connect.
C007: Server initialization failed.Cause: The daemon failed to start its network service.
Action: Check the processes being run on the system to see whether another daemon or program is using the port specified in the oc4j-ra-xml file for the adapter.
Action: Check the TCP/IP subsystem on the current computer by trying to ping it or run FTP or Telnet to or from it.
Action: Check whether the daemon has privileges to use the TCP/IP services on the current computer with the port specified in the oc4j-ra-xml file for the adapter.
C008: Setting server event handler failed.Cause: Internal error.
Action: Contact Oracle Support Services.
C009: IRPCD process has been terminated by user request.
Table 6–6 Scenarios When a Client Is Disconnected
ScenarioIdle (Not Processing a Client Request) Processing a Client Request
Explicit Disconnect
(client explicitly closes connection or client program terminates)
The server is immediately notified of the disconnect and either becomes available for use by another client or terminates (if it is not reusable).
The server does not know that the client has disconnected and continues processing. When processing completes, the server tries to reply to the client and immediately gets an error that the connection was lost. The server either becomes available for use by another client or terminates (if it is not reusable).
Abrupt Disconnect
(client closed without proper shutdown or client system hanged and communication disconnected)
The server does not know that the client has disconnected and remains in the idle state.
After timing out based on whichever comes first of the value for the client idle timeout daemon workspace parameter or the TCP/IP KEEPALIVE parameter, the server is notified of the disconnect and either becomes available for use by another client or terminates (if it is not reusable).
The server does not know that the client has disconnected and continues processing. When processing completes, the server tries to reply to the client. After an interval (typically several minutes, depending on the TCP/IP configuration), during which the TCP/IP subsystem retries sending the message to the client, the server assumes that the client has terminated and notifies the server that the connection has been closed. The server either becomes available for use by another client or terminates (if it is not reusable).
Resolving Specific Errors
Run-time Tasks and Troubleshooting 6-13
Cause: This message is informational only. The daemon successfully shut down.
Action: No action required.
C00A: Application %s not found.Cause: The requested workspace does not exist.
Action: Check that the workspace defined in the oc4j-ra-xml file is also defined in the daemon configuration on the IBM z/OS platform. Use the Status option in the Runtime Manager perspective.
C00B: Invalid IRPCD client context.Cause: A non-Oracle Connect program is trying to connect to the daemon.
Action: Check the processes and stop the relevant process with a system command.
C00C: Daemon request requires a server login.Cause: A non-Oracle Connect server or program was trying to use a daemon service reserved for Oracle Connect servers.
Action: Check the processes and stop the relevant process with a system command.
C00D: Daemon request requires a client login.Cause: The requested daemon requires a valid client login, which was not supplied.
Action: Reissue the command and specify a user name and password.
Action: Edit the user profile in Oracle Studio to specify a valid user name and password for the IBM z/OS platform.
C00E: Daemon request requires an administrator login.Cause: The requested daemon service requires an administrative login.
Action: Edit the daemon security in Oracle Studio to specify a valid administrator user name and password.
C00F: Anonymous client logins are not allowed.Cause: The daemon is configured to require a valid user name and password, which were not supplied.
Action: Enable anonymous client access in daemon security in Oracle Studio.
Action: Edit the user profile in Oracle Studio to specify a valid user name and password for the IBM z/OS platform.
C010: Anonymous server logins are not allowed.
See Also: Setting Up Run-Time User Access to the IBM z/OS Platform.
See Also: Daemon Security.
See Also: Daemon Security.
See Also: Setting Up Run-Time User Access to the IBM z/OS Platform.
Resolving Specific Errors
6-14 Oracle Application Server CDC Adapters for Adabas User's Guide
Cause: Internal error.
Action: Contact Oracle Support Services.
C011: Client has already timed out.Cause: A server process was started on behalf of a client and the client has timed out before the server completed its startup.
Action: Increase the Connect timeout value for the server workspace in the workspace General.
C012: Invalid username/password.Cause: Invalid user name/password supplied when logging on to the daemon.
Action: See the daemon log file because the user name/password were not accepted.
Action: Edit the user profile in Oracle Studio to specify a valid user name and password for the IBM z/OS platform.
Action: Ensure the daemon is started from an APF-authorized account that is allowed to check for system user names and passwords.
C014: Client connection limit reached - try later.Cause: The maximum number of server processes for the workspace has been reached, and none of the active servers could accept the client connection.
Action: Increase the value of the Number of sub-tasks in the workspace Server Mode tab.
Action: Try running the command later.
C015: Failed to start server process.Cause: The Oracle Connect daemon failed to start a server process or the started server failed upon starting up.
Action: See the daemon and server logs for the reason the server did not start. For example, you might receive an message with a reason specified in the log file similar to the following: [C015] Failed to start NAVIGATOR server process: No server account name defined for anonymous client; code: -1601: SQL code: 0
Action: If you use impersonation, check the user profile on the client. Also see C069.
See Also: Workspace General.
See Also: Setting Up Run-Time User Access to the IBM z/OS Platform
See Also: Workspace Server Mode.
Resolving Specific Errors
Run-time Tasks and Troubleshooting 6-15
C016: Unexpected server state.Cause: Internal error.
Action: Contact Oracle Support Services.
C017: Active daemon clients exist. Shutdown canceled.Cause: One or more clients are still connected to the daemon.
Action: Wait until all the clients log off the daemon and then retry the shutdown operation.
C019: Request is not granted because someone else is locking it.Cause: A request to lock a resource managed by the daemon was denied because another user has locked the resource.
Action: Wait for the other user to release the resource.
C01A: Lock %s not found.Cause: A request to free a resource was denied because the caller did not lock that resource (for example, another user shut down the daemon you are working with).
Action: Contact Oracle Support Services.
C01B: Unexpected error in %s.Cause: Internal error.
Action: Contact Oracle Support Services.
C01C: Cannot update configuration without _APPLICATIONS lock.Cause: Internal error.
Action: Contact Oracle Support Services.
C01D: Need to lock the application first.Cause: Internal error.
Action: Contact Oracle Support Services.
C01F: Cannot set configuration of a deleted application.Cause: Internal error.
Action: Contact Oracle Support Services.
C020: Failed in looking up host name (gethostname())Cause: Cannot connect to the remote computer.
To set impersonation: APF authorize all the steplibs in the server script on z/OS computer. For example:
setprog... ada622-volume adavol CICS.CICS.SDFHEXCI - p390dx INSTROOT.load - 111111 INSTROOT.loadaut - 111111
INSTROOT is the high level qualifier where Oracle Connect is installed.
In the Security tab of the Navigator workspace, under the daemon node in the Configuration view, select Use specific workspace account and clear the Workspace account field of all values.

Resolving Specific Errors
6-16 Oracle Application Server CDC Adapters for Adabas User's Guide
Action: Check that the name specified for the computer in the oc4j-ra-xml file is correct.
Action: Check that a domain name server (DNS) is available to look up the host name.
Action: Check the TCP/IP subsystem on the computer by trying to ping it or run FTP or Telnet to or from it.
C021: Required variable %s not foundCause: An environment variable required by the Oracle Connect server was not defined when the server started up.
Action: Check whether the startup script makes any changes to the environment variables used by Oracle Connect.
Action: Check whether the system-defined environment size is sufficiently large for Oracle Connect.
C022: Server failed to connect and register with the daemon.Cause: An Oracle Connect server started by the daemon was not able to connect or register back with the daemon.
Action: Try to connect again.
Action: Increase the Connect timeout value for the server workspace in the Workspace Genreal tab.
Action: Check that the startup script for the workspace launches the correct version of Oracle Connect.
Action: Increase the value of the Set maximum number of servers and Maximum parameter for the Clients per server limit in the Workspace Server Mode tab.
C023: Call made to unregistered module %d.Cause: Internal error.
Action: Contact Oracle Support Services.
C024: Failed to create a socket.Cause: An error occurred within the TCP/IP subsystem.
Action: Check whether you have sufficient system privileges.
Action: Check the TCP/IP subsystem on the computer by trying to ping it or run FTP or Telnet to or from it.
C025: Failed to set socket option %sCause: An error occurred within the TCP/IP subsystem.
Action: Check whether you have sufficient system privileges.
Action: Check the TCP/IP subsystem on the computer by trying to ping it or run FTP or Telnet to or from it.
See Also: Workspace General.
See Also: Workspace Server Mode.
Resolving Specific Errors
Run-time Tasks and Troubleshooting 6-17
C026: Failed to bind server to port %sCause: An Oracle Connect server or daemon was not able to bind to the specified port.
Action: Check whether another program is holding the port that was specified in the oc4j-ra-xml file for the adapter.
Action: Check whether you have sufficient system privileges.
C027: Cannot create TCP service for %sCause: An error occurred within the TCP/IP subsystem
Action: Check the TCP/IP subsystem on the computer by trying to ping it or run FTP or Telnet to or from it.
C028: Unable to register (%s, %d, tcp)Cause: This error may happen when a portmapper is used (host:a) but the portmapper is not available.
Action: Enable the portmapper.
Action: Avoid using the portmapper (by not using :a when starting the daemon).
C029: Failed to create a server threadCause: Internal error.
Action: Contact Oracle Support Services.
C02A: Server thread failed to startCause: Internal error.
Action: Contact Oracle Support Services.
C02B: Stopping the %s server - no clientCause: A server that was started by the Oracle Connect daemon to service a client did not get a client connection request within one minute. The server terminates.
Action: In most cases, the client was terminated by a user request, so no specific action is required.
Action: If no client can connect to the server, it may be that the server has multiple network cards and the Oracle Connect daemon is not aware of this. In this case, start the daemon with an IP address.
C02C: Unexpected event - a termination signal interceptedCause: Internal error.
Action: Contact Oracle Support Services.
C02D: Modified transport, context unknown/lostCause: Internal error.
Action: Contact Oracle Support Services.
C02F: Corrupted arguments passed to procedureCause: Internal error.
Action: Contact Oracle Support Services.
C030: Unable to free arguments for %s() of %sCause: Internal error.
Resolving Specific Errors
6-18 Oracle Application Server CDC Adapters for Adabas User's Guide
Action: Contact Oracle Support Services.
C031: Cannot register a non-module RPC %sCause: Internal error.
Action: Contact Oracle Support Services.
C032: An IRPCD program is requiredCause: Internal error.
Action: Contact Oracle Support Services.
C033: An IRPCD super-server is required for module eventsCause: Internal error.
Action: Contact Oracle Support Services.
C034: An invalid super-server module ID was specified, %dCause: Internal error.
Action: Contact Oracle Support Services.
C035: Out of memoryCause: Not enough memory to service a client request.
Action: Increase process memory quota or add memory to the system.
C036: Failed to register RPC procedure module %sCause: Internal error.
Action: Contact Oracle Support Services.
C037: Failed to register an invalid RPC procedure number %xCause: Internal error.
Action: Contact Oracle Support Services.
C038: Cannot reregister RPC procedure number %xCause: Internal error.
Action: Contact Oracle Support Services.
C042: Remote call to %s failed; %sCause: Remote call to API failed.
Action: Check the daemon log file.
Action: If necessary, change the level of detail written to the log file to help resolve the problem.
C043: Failed to connect to host %s;%sCause: The remote host is not correctly defined to Oracle Connect or is not working.
Action: Check the remote computer definition in the oc4j-ra-xml file for the adapter.
Action: Check that the daemon is up on the IBM z/OS platform. Use the Status option in the Runtime Manager perspective.
See Also: Daemon Logging.
Resolving Specific Errors
Run-time Tasks and Troubleshooting 6-19
Action: Check the network connection by trying to ping the host computer or run FTP or Telnet to or from it.
C045: Failed to create a service threadCause: The server failed to create a thread to service a client request.
Action: A system or process quota limit has been exceeded. Either increase the quota or lower the Clients per server limit value in the Workspace Server Mode tab.
C047: %s out of memoryCause: Not enough memory was available to Oracle Connect to complete a requested operation.
Action: Terminate unnecessary processes running on the server.
Action: Add more memory to the system.
Action: Allow the process to use more memory.
Action: Limit the number of processes the daemon may start. If the demand for servers exceeds the number of available servers, clients get a message telling them the maximum number of servers has been reached and asking them to try again later.
C066: Communication error with the server%sCause: Connection to the Oracle Connect daemon or server failed, or an established session with a server has failed.
Action: Check the remote computer definition in the weblogic-ra-xml file.
Action: Check that the daemon is up on the IBM z/OS platform. Use the Status option in the Runtime Manager perspective.
Action: In case of a network problem, check the network connection by trying to ping the host computer or run ftp or telnet to or from it.
C067: Unexpected error occurred in server function %sCause: One of the server functions has exited with an exception (such as an abend, or an Invalid Instruction).
Action: Contact Oracle Support Services.
C068: Fail to login daemonCause: The daemon is not running on the server computer.
Action: Use the Status in Oracle Studio Runtime Manager perspective to check whether a daemon is running on the server
Action: Have the system administrator reinstall Oracle Connect on the server.
C069: Fail to get serverCause: The Oracle Connect daemon on the server computer could not start a server process to serve the client. A separate message provides more detail on why the server process could not start.
Action: There are many possible causes of this error. If the cause is not clear from the related message, see the Oracle Connect daemon log file on the server
See Also: Workspace Server Mode.
Resolving Specific Errors
6-20 Oracle Application Server CDC Adapters for Adabas User's Guide
Action: The resolution to this error is highly dependent on the particular cause. The following are some typical causes and resolutions.
Action: Some process creation quota was exceeded. Either try again later or increase the quota or the other relevant system resources.
Action: The server startup script failed.
Action: The user name given is not allowed to use the requested server. Use an authorized user name.
Action: A limit on concurrent clients for a server has been reached. Try again later.
Action: If you use impersonation, check the user profile on the client. Also see C015.
C06A: Failed to connect to serverCause: The server assigned to the client did not accept the client connection. A separate message provides more detail about why the server process did not accept the connection.
Action: See the daemon and server log files because the server was not available to accept its assigned client.
C06B: Disconnecting from serverCause: A network failure, or a server computer failure or a server program failure caused the connection to end. The currently active transaction is stopped as well.
Action: Oracle Connect automatically tries to reestablish a connection with a server upon the next SQL command issued against the server. Once the network or computer failure is corrected, the connection to the daemon is reestablished automatically.
C070: Server failed to send reply to the clientCause: Server terminated unexpectedly.
Action: Unless the client was intentionally stopped (for example, using Control-C), contact Oracle Support Services.
C071: Connection to server %s was disconnected. Cursors state was lost.Cause: Either a network failure, a server computer failure or a server program failure caused the connection to end. The currently active transaction is stopped as well.
Action: Normally, Oracle Connect automatically tries to create a session with the server upon the next attempt to access the server. If the network and server are accessible, the next operation should succeed. Otherwise, the network or server computer should be fixed before connection can be resumed.
Action: In case of a server failure not related to callable user code, contact Oracle Support Services.
C072: Reconnect to server %sCause: This is an informational message only. The client has reestablished its connection with the server.
Action: No action is required.
C073: The parameters passed to the admin server are invalid: %sCause: Internal error.
Resolving Specific Errors
Run-time Tasks and Troubleshooting 6-21
Action: Contact Oracle Support Services.
C074: No authorization to perform the requested operation (%s)Cause: User/account has insufficient privileges.
Action: Grant administrative privileges to the user/account using the Administrator parameter of the Daemon or Workspace Security tabs.
C075: Failed to register daemon in the TCP/IP service tableCause: Registration of the daemon in the TCP/IP services file has failed.
Action: Check that the account running the daemon has the permissions to update the TCP/IP services file.
E001: Failed in lock/release operationCause: A lock or release operation of a global resource has failed. A separate message provides more details. The separate message specifies the cause of this error.
Action: There are various causes for this error, including lack of sufficient privileges or a system resource shortage.
J0006: Operation on already closed connection was requestedCause: A request using a connection that was closed was attempted.
Action: Reopen the connection and try again.
J0028: Internal Error: Unknown XML tag %sCause: Internal error.
Action: Contact Oracle Support Services.
J0030: Internal Error: Method %s needs to be overwrittenCause: Internal error.
Action: Contact Oracle Support Services.
J0031: Internal Error: Required attribute %s not found in %s verbCause: Internal error.
Action: Contact Oracle Support Services.
J0032: Internal Error: %s ACP object was returned instead of %s as expectedCause: Internal error.
Action: Contact Oracle Support Services.
J0033: Internal Error: Attempt to work with closed socketCause: Internal error.
Action: Contact Oracle Support Services.
J0034: Internal Error: corrupted message; %s bytes read instead of %s as expectedCause: XML sent from the client to the server has become corrupted.
Action: Check compression settings for XML transferred from the client to the server. If the setting are OK, retry sending the request from the client to the server.
J0035: Internal Error: Invalid redirection address %s returned by daemonCause: Internal error.
See Also: Daemon Security or Workspace Security.
Resolving Specific Errors
6-22 Oracle Application Server CDC Adapters for Adabas User's Guide
Action: Contact Oracle Support Services.
J0036: %s: %sCause: One of the following errors was received from the server: 0 - server.internalError, 1 - client.xmlError, 2 - client.requestError, 3 - client.noActiveConnection, 4 - server.resourceLimit, 5 - server.redirect, 6 - client.noSuchResource, 7 - client.authenticationError, 8 - client.noSuchInteraction, 9 - client.noSuchConnection, 10 - server.notImplemented, 11 - server.xaProtocolError, 12 - server.xaUnknownXID, 13 - server.xaDuplicateXID, 14 - server.xaInvalidArgument, 15 - client.autogenRejected, 16 - server.xaTransactionTooFresh, 17 - server.resourceNotAvailable, 18 - client.authorizationError, 19 - server.configurationError
Action: Review the server log file to determine the problem.
J0037: Internal Error: No ACP response when %s was expectedCause: Internal error.
Action: Contact Oracle Support Services.
J0039: Internal Error: ACP root is not found in the XMLCause: Internal error.
Action: Contact Oracle Support Services.
J0040: Internal Error: Input record is required for interaction %s executionCause: Internal error.
Action: Contact Oracle Support Services.
J0048: Invalid metadata type %s is passed to %s functionCause: A request for metadata was not fulfilled.
Action: Check the validity of the request.
J0050: Key of the put method must be of type stringCause: In either a GET or PUT operation, the key must be a string.
Action: Change the key used in the operation to a valid key.
J0059: Value %s is invalid for attribute %sCause: A request for metadata was not fulfilled.
Action: Check the validity of the request.
J0068: Value must be of type stringCause: In a PUT operation, the value must be a string.
Action: Change the value used in the operation to a valid value.
J0069: Value must be of type MappedRecordCause: In a PUT operation, the value must be a mapped record.
Action: Change the value used in the operation to a valid value.
J0070: Value must be of type MappedRecord[]Cause: In a PUT operation, the value must be mapped record array.
Action: Change the value used in the operation to a valid value.
J0071: Bad key for mapped record, #element or #element[] is requiredCause: In a PUT operation, the value must be mapped record array.
Resolving Specific Errors
Run-time Tasks and Troubleshooting 6-23
Action: Change the key used in the record to a valid key.
J0072: Value must be of type Object[]Cause: In a PUT operation, the value must be mapped record array.
Action: Change the value used in the operation to a valid value.
J0078: In nonpersistent connection and the nonkeep alive encryption is not supported - ignoredCause: Encryption is not supported for nonpersistent connections.
Action: There is no action to take. This warning can be ignored.
J0079: Invalid argument passed to %s - Argument: %s, Value: %sCause: The value pass.
Action: Change the argument used to a number.

Resolving Specific Errors
6-24 Oracle Application Server CDC Adapters for Adabas User's Guide
7
Advanced Features of OracleAS CDC Adapter for Adabas 7-1
7 Advanced Features of OracleAS CDCAdapter for Adabas
Oracle Connect includes several tuning parameters that can improve performance. Specifically, the daemon can be configured to optimize communication between the IBM z/OS platform and a client. In addition, the binding environment can be tuned to optimize the request handling.
This chapter contains the following topics:
■ Configuring the Daemon for High Availability
■ Configuring a Binding Environment
■ Migration Considerations
■ Security Considerations
■ Transaction Support
Configuring the Daemon for High AvailabilityThe daemon workspace is responsible for allocating server processes to clients. You can configure a workspace to use a pool of server processes so that a server process is always available for a client request.
Use Oracle Studio to maintain the daemon and the daemon workspace parameters to control the allocation of server processes and their management in a pool.
You can also have several daemon workspace configurations. This lets you create individual workspaces for use with different adapters.
Adding a New Daemon Workspace ConfigurationUse Oracle Studio to add a new daemon configuration. You can set up different daemon configurations for different situations.
Carry out the following to add a new daemon workspace configuration:
1. From the Start menu, select Programs, Oracle, and then select Studio.
2. In the Design Perspective Configuration view, expand the Machines folder and then expand the machine where you want to add the workspace.
3. Expand the Daemons folder. The daemon available on this computer are listed.
4. Right-click IRPCD and select New Workspace. The New Daemon Workspace screen is displayed.

Configuring the Daemon for High Availability
7-2 Oracle Application Server CDC Adapters for Adabas User's Guide
5. Enter a name for the new workspace and then enter a description, if desired.
6. Select whether to use default settings or copy the properties of an existing workspace.
To copy the properties of an existing workspace, click the Browse button and select the workspace from which you want to copy the properties.
7. Click Next. The Select Scenario screen is displayed.
8. Select Application Server using connection pooling and click Next.
9. Continue through the wizard, entering the required values for the workspace.
10. Click Finish.
The workspace is displayed under the IRPCD daemon node.
Editing the WorkspaceYou edit a workspace by using the tabs described in the following table:
Use Oracle Studio to access these tabs, as follows:
1. From the Start menu, select Programs, Oracle, and then select Studio.
2. In the Design perspective Configuration view, expand the Machines folder and then expand the machine where you want to edit the workspace.
3. Expand the Daemons node. The daemon configurations available on this computer are listed.
4. Expand the IRPCD node. The daemon workspaces are listed.
5. Right-click the required workspace and select Open.
6. Select the tab that contains the information you want to edit. For full details of the tabs and the fields in these tabs, see Workspaces.
7. After editing the workspace, click Save.
Configuring the Server ModeThe server mode dictates how the daemon starts new processes. The daemon supports the following server modes:
Table 7–1 Workspace Properties tabs
Tab Description
General Specifies general information including the server type, the command procedure used to start the workspace, the binding configuration associated with this workspace (which dictates the data sources and applications that can be accessed) the timeout parameters, and logging information (which dictates the data sources and applications that can be accessed), the timeout parameters, and logging information.
Server Mode Contains the workspace server information including features that control the operation of the servers started up by the workspace and allocated to clients.
Security Specifies administration privileges, user access, ports available to access the workspace and workspace account specifications.

Configuring the Daemon for High Availability
Advanced Features of OracleAS CDC Adapter for Adabas 7-3
■ singleClient: Each client receives a dedicated server process. The account in which a server process runs is determined either by the client login information or by the specific server workspace.
This mode enables servers to run under a particular user account and isolates clients from each other (because each receives its own process). However, this server mode incurs a high overhead due to process startup times and may use a lot of server resources (because it requires as many server processes as concurrent clients).
■ multiClient: Clients share a server process and are processed serially. This mode has low overhead because the server processes are initialized. However, because clients share the same process, they may impact one another, especially if they issue lengthy queries.
The number of clients that share a process is determined by the Clients per server limit (the maximum number of concurrent clients a server process for the current workspace accepts).
■ reusable: This is an extension of the single client mode. Once the client processing finishes, the server process does not die and can be used by another client, reducing startup times and application startup overhead.
This mode does not have the high overhead of single client mode because the servers are initialized. However, this server mode may use a lot of server resources (because it requires as many server processes as concurrent clients).
The other modes can be set so that the server processes are reusable by setting the number of times a process can be reused with the Reuse limit value (the maximum number of times a particular server process can be reused or how many clients it can serve before it is retired). Reuse of servers enhances performance because it eliminates the need to repeat initializations. However, reuse runs a risk of higher memory leakage over time. The default value for the Reuse limit field is None, indicating that no reuse limit is enforced.
Set the server mode in the Server Mode tab of the daemon workspace editor as shown in the following figure:

Configuring the Daemon for High Availability
7-4 Oracle Application Server CDC Adapters for Adabas User's Guide
Figure 7–1 The Server Mode tab
When using any of the server modes you can specify a pool of server processes. These server processes are started when the daemon starts and are maintained in a pool. The server processes are available for use by new client requests from the pool, saving initialization time. Instead of starting a new server process each time one is requested by a client, the client receives a process immediately from the pool of available processes. When the client finishes processing, this server process either dies, or if reusable servers have been specified, it is returned to the pool.
You set up a pool of server processes by specifying the following parameters in the Server Mode tab.
■ Port Range: Select the range for specific firewall ports through which you access the workspace. Determines the range of ports available for this workspace when starting server processes. Use this option when you want to control the port number, so that Oracle Connect can be accessed through a firewall.
Enter the port range in the following fields:
■ From: Enter the highest numbered port in the range
■ To: Enter the lowest numbered port in the range
■ Use Default Port Range: Select the check box to use the port range that is defined in the daemon.
■ Maximum number of server processes: Enter the maximum number of server processes that can run at the same time.
■ Limit server reuse: Select the check box to limit the number of servers that can be reused. If this is selected, the Reuse limit parameter is available.
If Limit server reuse is selected, in the field next to the check box, enter the maximum number of times a server can be reused. Select the maximum of clients accepted in a server process.
Configuring the Daemon for High Availability
Advanced Features of OracleAS CDC Adapter for Adabas 7-5
A one-client server can be reused after its (single) client has disconnected. Reuse of servers enhances startup performance because it avoids the need to repeat initialization.
This parameter is not available if the Limit server reuse parameter is not selected.
This parameter is not available if the server mode value is singleClient.
■ Limit Concurrent clients per server: Select this to limit the number of clients that a server can accept for the current workspace process.
If this is not selected, the number of clients is unlimited.
If Limit concurrent clients per server is selected, in the field next to the check box, enter the maximum number of clients that a server process for the current workspace accepts. The default for this field is None, indicating that the number of clients for each server is unlimited. This field is available if the server mode value is multiClient or multiThreaded.
■ Specify Server Priority: Set the priority for servers. For example, a workspace for applications with online transaction processing can be assigned a higher priority than a workspace that requires only query processing. The lower the number, the higher the priority. For example, workspaces with a priority of 1 are given a higher priority than workspaces with a priority of 2.
Note: This is unavailable if Use default server priority is selected.
■ Use default server priority: Select the check box to set the priority to 0. There is no specific priority for this workspace. Clear this check box to set a priority in the Specify Server Priority parameter.
■ Keep when daemon ends: Select the check box to stop all servers started by that daemon when a daemon is shutdown, even if they are active. Select this if you want the servers for the workspace to remain active, even after the daemon has been shut down. If selected, it is the responsibility of the system operator or manager to ensure that the servers are eventually stopped. This must be done at the system level.
■ Number of prestarted servers in pool: The number of server processes that are prestarted for this workspace when the daemon starts. These are available for use by new client processes with minimal initialization time. Instead of starting a new server process each time one is requested by a client, the daemon immediately allocates (to the client) a server from a pool of available servers. When the number of available server processes drops lower than the value specified in the Minimum number of available servers field, the daemon again starts server processes until the specified number of available servers is reached. The default for this parameter is 0, meaning that no servers are prestarted for this workspace.
■ Number of spare servers: Enter the minimum number of server processes in the prestarted server's pool before the Oracle Connect daemon resumes creating new server processes (up to the number specified in the Initial number of servers field value, described earlier). If this parameter is set to a value greater than the Initial number of servers field value, the daemon considers the value to be the same as the value specified in the Initial number of servers field. In this case, a new server process is started and added to the pool each time a server process is removed from the pool and allocated to a client). The default for this parameter is 0, which means that new servers are created only when there are no other available servers.
■ Number of sub-tasks: Enter the number of sub-tasks for a server that are prestarted for this workspace when the daemon starts. In addition to setting up a pool of server processes as described earlier, you can set additional server
Configuring a Binding Environment
7-6 Oracle Application Server CDC Adapters for Adabas User's Guide
processes as sub-tasks by specifying this parameter. If you set 10 servers and 10 prestarted sub-tasks then 100 tasks are started (10 sub-tasks for each process).
Configuring a Binding EnvironmentEach binding configuration includes the following information:
■ Environment settings, which are used to configure the environment used by any of the adapters defined in the binding.
■ Application adapters on the current computer.
To configure environment settings in Oracle Studio, perform the following steps:
1. From the Start menu, select Programs, Oracle, and then select Studio.
2. In the Design perspective Configuration view, expand the Machine folder, then expand the machine where you want to configure the binding.
3. Expand the Bindings folder. The binding available on this computer are listed.
4. Right-click NAV and select Open.
5. In the Environment tab, edit the environment settings as needed. To edit an environment setting, expand the property category and click the value to edit.
The binding Environment tab is shown in the following figure:
Figure 7–2 The Binding Environment tab
The binding environment is divided into the following categories:
■ Debug
■ General
■ Language
Configuring a Binding Environment
Advanced Features of OracleAS CDC Adapter for Adabas 7-7
■ Modeling
■ ODBC
■ OLEDB
■ Optimizer
■ Parallel Processing
■ Query Processor
■ Transactions
■ Tuning
■ XML
DebugThe following table lists the parameters that define debugging and logging operations:
Table 7–2 Debug Parameters
Parameter Description
ACX trace Select this for the input xml sent to the back-end adapter and the output xml returned by the back-end adapter to be written to the log.
GDB Trace This parameter is not applicable for use with OracleAS CDC Adapter for Adabas.
General trace Select this to log general trace information. The default writes only error messages to the log.
Note: Changing the default setting can degrade performance.
Query warnings This parameter is not applicable for use with OracleAS CDC Adapter for Adabas.
Add timestamp to traced events
Select this to add a time stamp on each event row in the log.
Query processor trace This parameter is not applicable for use with OracleAS CDC Adapter for Adabas.
Binary XML Log Level Select the binary XML log level from the list. The following logging levels are available:
■ None
■ API
■ Info
■ Debug
Log file The high-level qualifier of the log file for messages. The following type of message are written to the log:
■ Error messages
■ Trace information and information about the query optimization strategy, if General Trace is selected.
Trace Directory This parameter is not applicable for use with OracleAS CDC Adapter for Adabas.
Optimizer trace This parameter is not applicable for use with OracleAS CDC Adapter for Adabas.
Configuring a Binding Environment
7-8 Oracle Application Server CDC Adapters for Adabas User's Guide
GeneralThe following table lists the parameters that defines operations in the directory where temporary files are written.
LanguageThe following table lists the parameters that define globalization support:
Transaction extended logging
Select this for the transaction manager to write additional information about transactions to the log.
Table 7–3 General Parameters
Parameter Description
Nav Utility Editor This parameter is not applicable for use with OracleAS Adapter for Adabas.
Temporary directory The directory where temporary files are written, including the temporary files created for use by hash joins and for sorting files. The default is the current high-level qualifier.
Year 2000 policy Determines the way 2-digit years are converted into 4-digit years. When the parameter year2000Policy is not set, or when it is set to a value outside the range of values defined for the policy, as described in the following paragraphs, a default value of 5 and the Sliding Base Year policy is used. Two policies are provided:
■ Fixed Base Year: year2000Policy is set to a value greater than, or equal to 1900. In this case, the value of year2000Policy is the first 4-digit year after 1900 that can be represented by a 2-digit year. For example, if year2000Policy is set to 1905, the years 2000->2004 is represented by 00->04. All other 2 digits are mapped to 19xx.
■ This solution is most required if there is live data at the low end (close to the year 1900), which the user wants to keep with the current 2-digit format.
■ The user probably changes the base date only after ensuring that these old dates have been deleted from the data source.
■ Sliding Base Year: year2000Policy is set to a positive value less than 100. In this case, the value of year2000Policy represents the number of years ahead of the current year that can be represented by a 2-digit number. With each passing year the earliest year that can be represented by a 2-digit number changes to a year later.
Cache buffer size Enter the number of bytes to be used for a memory buffer on a client computer, which is used by the Oracle Connect client/server to store read-ahead data. The default is 200000.
Table 7–2 (Cont.) Debug Parameters
Parameter Description

Configuring a Binding Environment
Advanced Features of OracleAS CDC Adapter for Adabas 7-9
ModelingThe modeling parameters are not applicale with OracleAS CDC Adapter for Adabas.
ODBCThe odbc parameters are not applicable for use with OracleAS CDC Adapter for Adabas.
OLEDBThe oledb parameters are not applicable for use with OracleAS CDCAdapter for Adabas.
OptimizerThe following parameters enable you to customize the performance:
Optimizer goal: The optimization policy. Select one of the following from the list to the right:
■ none (default): All row optimization is used.
■ first: First row optimization is performed based on the assumption that the results produced by the query are used as the rows are retrieved. The query optimizer uses a strategy that retrieves the first rows as fast as possible, which might result in a slower overall time to retrieve all the rows.
■ all: Optimization is performed based on the assumption that the results produced by the query are used after all the rows have been retrieved. The query optimizer uses a strategy that retrieves all the rows as fast as possible, which might result in a slower time to retrieve the first few rows.
Aggregate queries automatically use all row optimization, regardless of the value of this parameter.
All other optimizer parameters are not applicable for use with the OracleAS CDC Adapter for Adabas.
Table 7–4 Language Parameters
Parameter Description
Language Identifies the application language. A default code page is selected based on the value specified for this parameter. For more information, see Appendix E, "Globalization Settings".
Code Page For use with globalization support to identify the code page for the workspace. For more information, see Appendix E, "Globalization Settings".
NLS String Specifies the code page used by a field whose data type is defined as nlsString. Use this for a field whose code page is other than that of the computer code page. This parameter includes the following values:
■ The name of the code page.
■ Whether the character set reads from right to left (as in middle eastern character sets).
The default is false.
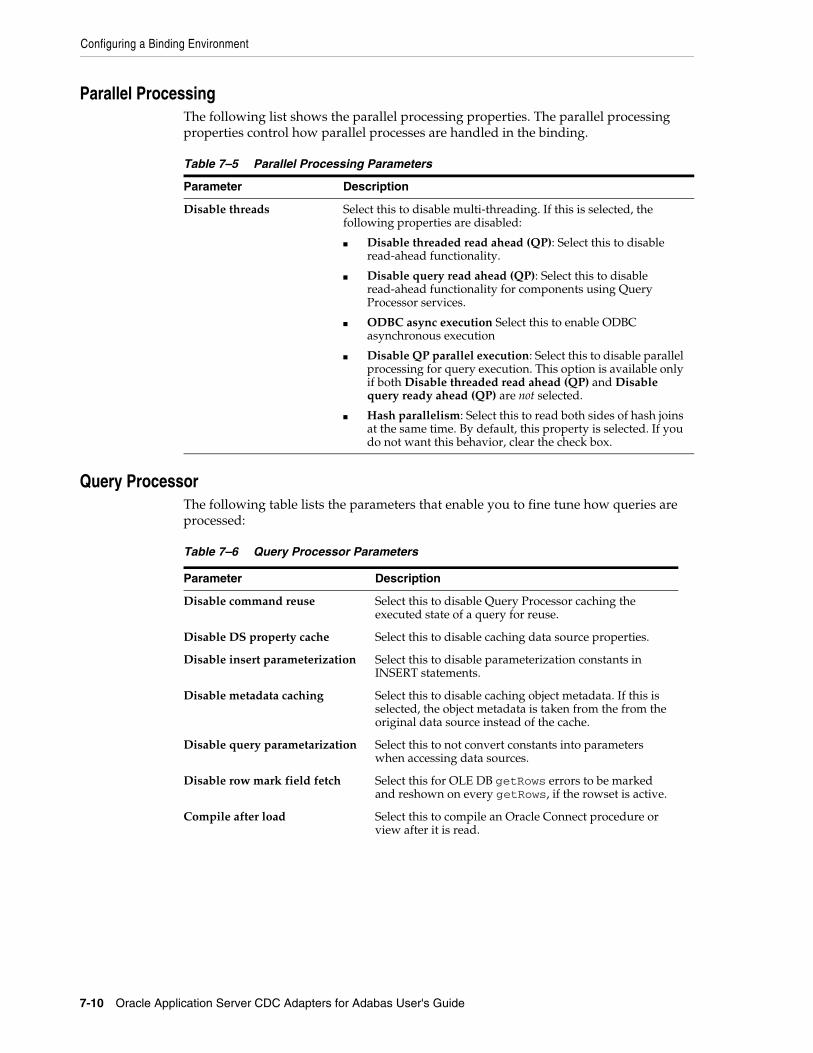
Configuring a Binding Environment
7-10 Oracle Application Server CDC Adapters for Adabas User's Guide
Parallel ProcessingThe following list shows the parallel processing properties. The parallel processing properties control how parallel processes are handled in the binding.
Query ProcessorThe following table lists the parameters that enable you to fine tune how queries are processed:
Table 7–5 Parallel Processing Parameters
Parameter Description
Disable threads Select this to disable multi-threading. If this is selected, the following properties are disabled:
■ Disable threaded read ahead (QP): Select this to disable read-ahead functionality.
■ Disable query read ahead (QP): Select this to disable read-ahead functionality for components using Query Processor services.
■ ODBC async execution Select this to enable ODBC asynchronous execution
■ Disable QP parallel execution: Select this to disable parallel processing for query execution. This option is available only if both Disable threaded read ahead (QP) and Disable query ready ahead (QP) are not selected.
■ Hash parallelism: Select this to read both sides of hash joins at the same time. By default, this property is selected. If you do not want this behavior, clear the check box.
Table 7–6 Query Processor Parameters
Parameter Description
Disable command reuse Select this to disable Query Processor caching the executed state of a query for reuse.
Disable DS property cache Select this to disable caching data source properties.
Disable insert parameterization Select this to disable parameterization constants in INSERT statements.
Disable metadata caching Select this to disable caching object metadata. If this is selected, the object metadata is taken from the from the original data source instead of the cache.
Disable query parametarization Select this to not convert constants into parameters when accessing data sources.
Disable row mark field fetch Select this for OLE DB getRows errors to be marked and reshown on every getRows, if the rowset is active.
Compile after load Select this to compile an Oracle Connect procedure or view after it is read.
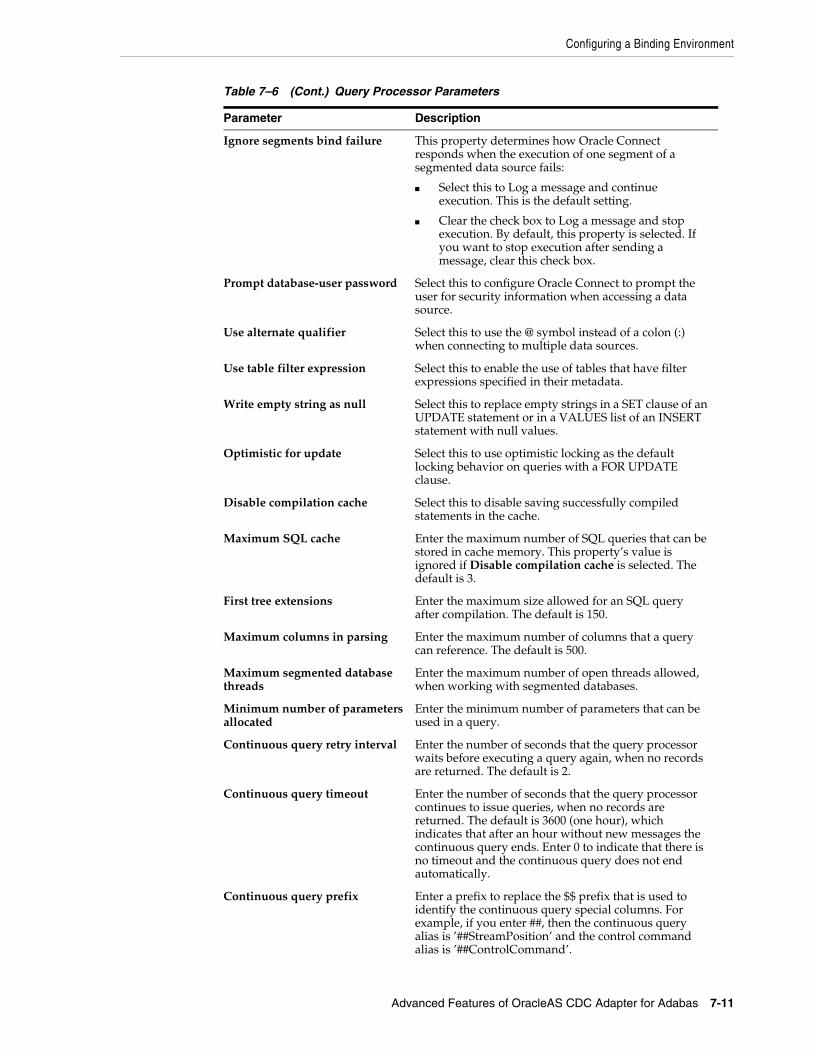
Configuring a Binding Environment
Advanced Features of OracleAS CDC Adapter for Adabas 7-11
Ignore segments bind failure This property determines how Oracle Connect responds when the execution of one segment of a segmented data source fails:
■ Select this to Log a message and continue execution. This is the default setting.
■ Clear the check box to Log a message and stop execution. By default, this property is selected. If you want to stop execution after sending a message, clear this check box.
Prompt database-user password Select this to configure Oracle Connect to prompt the user for security information when accessing a data source.
Use alternate qualifier Select this to use the @ symbol instead of a colon (:) when connecting to multiple data sources.
Use table filter expression Select this to enable the use of tables that have filter expressions specified in their metadata.
Write empty string as null Select this to replace empty strings in a SET clause of an UPDATE statement or in a VALUES list of an INSERT statement with null values.
Optimistic for update Select this to use optimistic locking as the default locking behavior on queries with a FOR UPDATE clause.
Disable compilation cache Select this to disable saving successfully compiled statements in the cache.
Maximum SQL cache Enter the maximum number of SQL queries that can be stored in cache memory. This property’s value is ignored if Disable compilation cache is selected. The default is 3.
First tree extensions Enter the maximum size allowed for an SQL query after compilation. The default is 150.
Maximum columns in parsing Enter the maximum number of columns that a query can reference. The default is 500.
Maximum segmented database threads
Enter the maximum number of open threads allowed, when working with segmented databases.
Minimum number of parameters allocated
Enter the minimum number of parameters that can be used in a query.
Continuous query retry interval Enter the number of seconds that the query processor waits before executing a query again, when no records are returned. The default is 2.
Continuous query timeout Enter the number of seconds that the query processor continues to issue queries, when no records are returned. The default is 3600 (one hour), which indicates that after an hour without new messages the continuous query ends. Enter 0 to indicate that there is no timeout and the continuous query does not end automatically.
Continuous query prefix Enter a prefix to replace the $$ prefix that is used to identify the continuous query special columns. For example, if you enter ##, then the continuous query alias is ’##StreamPosition’ and the control command alias is ’##ControlCommand’.
Table 7–6 (Cont.) Query Processor Parameters
Parameter Description

Configuring a Binding Environment
7-12 Oracle Application Server CDC Adapters for Adabas User's Guide
Arithmetic fixed precision Enter an integer determine the precision scale factor for floating decimal position. The default is 0, which indicates that the exact arithmetic function is not used.
When the value is set to a small positive integer, the special precise floating point arithmetic is used in the query processor. The value determines the precision scale factor (for example, a value of 2 indicates two digits decimal precision). Setting this parameter can be done at a workspace level and it affects all queries running in that workspace with no change to the query or to the underlying data source. The query processor ADD(), SUBTRACT() and SUM() functions that currently use double arithmetic for both floating and decimal types use this logic. When the value is set to the default, 0, the exact arithmetic function is not used.
This property is used to set the Exact Arithmetic function. The qpArithmeticFixedPrecision property is an integer value that determines the fixed precision the Oracle Connect query processor uses for precise floating point arithmetic. It is used to create an accurate result when using the SUM function. Because floating point data types are not accurate their results over time does not correspond to the expected arithmetic sum. In other words, in the floating point representation, values such as 0.7 cannot be represented precisely. If there are eight precision digits, there is usually imprecision in the least significant digit so the number is actually approximately 0.699999995. TheqpArithmeticFixedPrecision property corrects this imprecision by using an exact floating point.
Parser depth The maximum depth of the expression tree. The default is 500
Token size Enter the maximum length of a string in an SQL query. The minimum value is 64. The default value is 350.
Insert from select commit rate Enter the commit rate to use when executing an INSERT-FROM-SELECT operation. If a value more than 0 is entered, a commit is performed automatically after inserting the indicated number of rows. For example, if the value is 5,a commit is performed every time 5 rows are inserted.
Disable SQS cache Select this to always read compiled Oracle Connect procedures and views from a disk. In this case, they are not saved in the cache.
Procedures cache size Enter the number of stored queries created with a CREATE PROCEDURE statement that can be kept in cache memory. This property’s value is ignored if Disable SQS cache size is selected.
Expose XML fields Expose XML fields: Select this to display data returned for a query as XML, representing the true structure of the result. This is useful when querying a data source table that contains arrays or variants.
■ XML field name: Enter the name used in a query to indicate that the data is returned as XML, instead of the keyword XML. This is available only if Expose XML fields is selected.
Table 7–6 (Cont.) Query Processor Parameters
Parameter Description
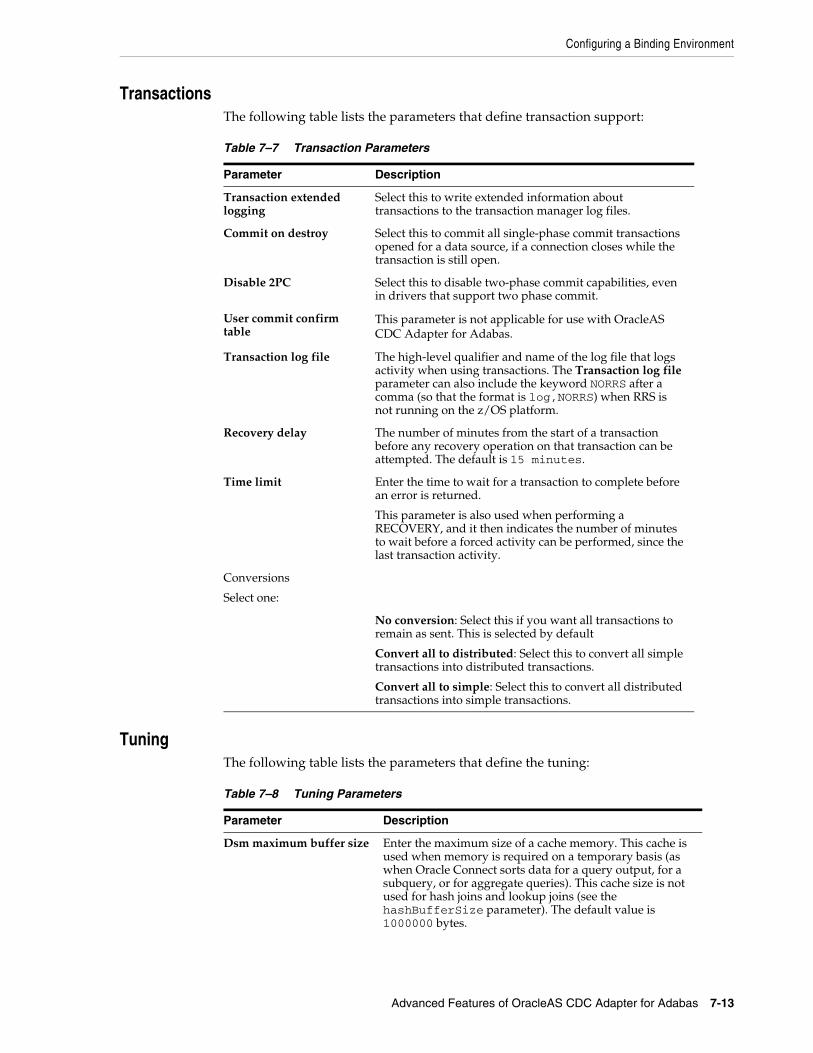
Configuring a Binding Environment
Advanced Features of OracleAS CDC Adapter for Adabas 7-13
TransactionsThe following table lists the parameters that define transaction support:
TuningThe following table lists the parameters that define the tuning:
Table 7–7 Transaction Parameters
Parameter Description
Transaction extended logging
Select this to write extended information about transactions to the transaction manager log files.
Commit on destroy Select this to commit all single-phase commit transactions opened for a data source, if a connection closes while the transaction is still open.
Disable 2PC Select this to disable two-phase commit capabilities, even in drivers that support two phase commit.
User commit confirm table
This parameter is not applicable for use with OracleAS CDC Adapter for Adabas.
Transaction log file The high-level qualifier and name of the log file that logs activity when using transactions. The Transaction log file parameter can also include the keyword NORRS after a comma (so that the format is log,NORRS) when RRS is not running on the z/OS platform.
Recovery delay The number of minutes from the start of a transaction before any recovery operation on that transaction can be attempted. The default is 15 minutes.
Time limit Enter the time to wait for a transaction to complete before an error is returned.
This parameter is also used when performing a RECOVERY, and it then indicates the number of minutes to wait before a forced activity can be performed, since the last transaction activity.
Conversions
Select one:
No conversion: Select this if you want all transactions to remain as sent. This is selected by default
Convert all to distributed: Select this to convert all simple transactions into distributed transactions.
Convert all to simple: Select this to convert all distributed transactions into simple transactions.
Table 7–8 Tuning Parameters
Parameter Description
Dsm maximum buffer size Enter the maximum size of a cache memory. This cache is used when memory is required on a temporary basis (as when Oracle Connect sorts data for a query output, for a subquery, or for aggregate queries). This cache size is not used for hash joins and lookup joins (see the hashBufferSize parameter). The default value is 1000000 bytes.
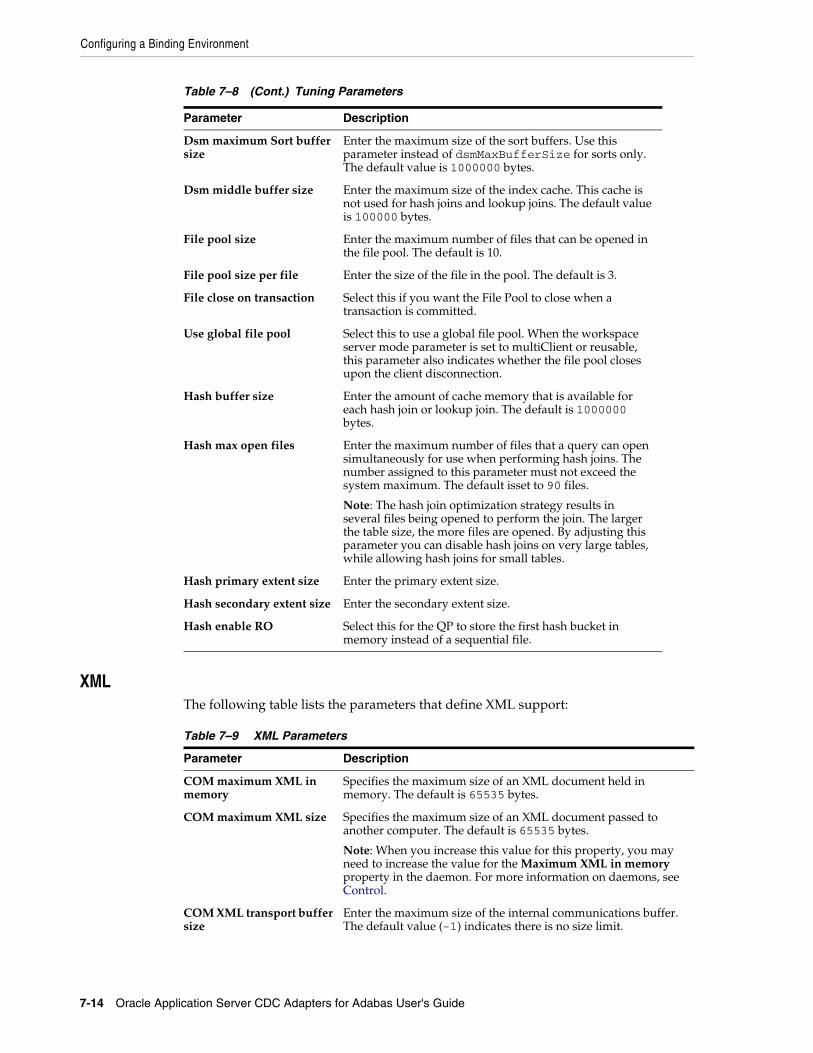
Configuring a Binding Environment
7-14 Oracle Application Server CDC Adapters for Adabas User's Guide
XMLThe following table lists the parameters that define XML support:
Dsm maximum Sort buffer size
Enter the maximum size of the sort buffers. Use this parameter instead of dsmMaxBufferSize for sorts only. The default value is 1000000 bytes.
Dsm middle buffer size Enter the maximum size of the index cache. This cache is not used for hash joins and lookup joins. The default value is 100000 bytes.
File pool size Enter the maximum number of files that can be opened in the file pool. The default is 10.
File pool size per file Enter the size of the file in the pool. The default is 3.
File close on transaction Select this if you want the File Pool to close when a transaction is committed.
Use global file pool Select this to use a global file pool. When the workspace server mode parameter is set to multiClient or reusable, this parameter also indicates whether the file pool closes upon the client disconnection.
Hash buffer size Enter the amount of cache memory that is available for each hash join or lookup join. The default is 1000000 bytes.
Hash max open files Enter the maximum number of files that a query can open simultaneously for use when performing hash joins. The number assigned to this parameter must not exceed the system maximum. The default isset to 90 files.
Note: The hash join optimization strategy results in several files being opened to perform the join. The larger the table size, the more files are opened. By adjusting this parameter you can disable hash joins on very large tables, while allowing hash joins for small tables.
Hash primary extent size Enter the primary extent size.
Hash secondary extent size Enter the secondary extent size.
Hash enable RO Select this for the QP to store the first hash bucket in memory instead of a sequential file.
Table 7–9 XML Parameters
Parameter Description
COM maximum XML in memory
Specifies the maximum size of an XML document held in memory. The default is 65535 bytes.
COM maximum XML size Specifies the maximum size of an XML document passed to another computer. The default is 65535 bytes.
Note: When you increase this value for this property, you may need to increase the value for the Maximum XML in memory property in the daemon. For more information on daemons, see Control.
COM XML transport buffer size
Enter the maximum size of the internal communications buffer. The default value (-1) indicates there is no size limit.
Table 7–8 (Cont.) Tuning Parameters
Parameter Description
Security Considerations
Advanced Features of OracleAS CDC Adapter for Adabas 7-15
Migration ConsiderationsYou can migrate an adapter configuration from one platform to another. The configuration information is stored in the Oracle Connect repository on the source platform and is exported to an XML file which can then be imported to the target platform.
Note that when migrating a configuration, file names and paths that are specific to the source platform must be changed to valid files on the target platform.
To migrate an adapter configuration using Oracle Studio, perform the following steps:
1. From the Start menu, select Programs, Oracle, and then select Studio.
2. In the Design perspective, Configuration view, expand the Machines folder.
3. Right-click the required computer, and select Export XML definitions.
4. In the File name field, type the path and name of the XML file where the XML representation of the computer and its complete configuration is stored.
5. Edit any paths in the XML definition to the paths required on the target platform. For example, the setting for the serverLogFile parameter may require changing, depending on the platform.
6. Set up the target platform in Oracle Studio in the same way you set up the source platform, as described in Setting Up the IBM z/OS Platform in Oracle Studio.
7. In the Configuration Explorer, right-click the target computer and select Import XML definitions.
8. Import the XML file to the target platform.
Security ConsiderationsOracle Connect works within the confines of the platform security system. For example, on an z/OS computer with RACF installed, and with the workspace server mode set to multi-tasking, a RACROUTE VERIFY is performed for each task in the address space, according to the client connection.
In addition, Oracle Connect provides the following security:
■ A binary XML encryption mechanism, which is activated as follows:
1. The client’s first message to the server includes a pre-defined shared key, including the key name and value in the connection string. The server gets the
XML date format Enter the date format to use for XML. The options are:
■ ISO (the default): The date format is: YY-MM-DDThh:mm:ss[.ss..]
■ ODBC: The date format is: YYYY-MM-DD HH:MM:SS[.NNN...]
Replace invalid XML characters
Select this to replace invalid XML characters with a ’?’. This property is used for diagnostic and troubleshooting purposes.
XML trim char columns Select this to enable padded spaces to be trimmed from XML string columns when the record format is fixed. By default this is selected, and padded spaces are trimmed for fixed size character columns. If you do not want this behavior, clear this check box.
Table 7–9 (Cont.) XML Parameters
Parameter Description
Security Considerations
7-16 Oracle Application Server CDC Adapters for Adabas User's Guide
key value for the key name passed from the client from the native object store (NOS).
2. The server generates a random 128-bit RC4 session key which is returned encrypted to the client, using the shared key. If no predefined shared key is provided, then a predefined, hardcoded key is used (this key is hardcoded on the client and on the server).
3. Passwords are always encrypted when passed over the wire, using an RC4, 128-bit session key, regardless of whether the entire session is encrypted or not.
4. If a predefined shared key was provided, then the entire session is encrypted. Otherwise, only the password exchange is encrypted (using the hardcoded key).
■ Credentials: Passwords and user names exchanged over the network are encrypted using a pre-defined, hardcoded, 128-bit RC4 session key.
■ Design Time: Security within Oracle Studio to grant access to Oracle Studio itself and to grant access to computers, user profiles and workspaces.
■ Run time: Security used to access Adabas, including controlling the daemon for the access.
Setting Design Time SecurityThe following sections describe how to set design time security:
■ Securing access to Oracle Studio is described in Setting Password Access to Oracle Studio.
■ Securing rights to configure a computer in Oracle Studio is described in Specifying Users with Administrative Rights.
■ Securing access to user profiles is accomplished by right-clicking the relevant user profile in Oracle Studio and selecting Change Master Password. In the dialog box that is displayed, specify a password that must be provided in the future to edit the specific user profile.
■ Securing access to workspaces is accomplished by right-clicking the relevant workspace in Oracle Studio and selecting Set Authorization. In the dialog box that is displayed, specify a valid user and password that must be provided in the future to edit the specific workspace.
Setting Run Time SecurityDuring run time, security considerations are implemented as follows:
■ When the client request accesses the legacy platform through the daemon, either anonymous access is allowed or a valid user name and password must be provided for the computer in the user profile. The userName and password properties in the J2CA 1.5 Adabas adapter are used at this stage to access the daemon.
Note: The user name used to access the daemon must also be the name of a user profile used.

Transaction Support
Advanced Features of OracleAS CDC Adapter for Adabas 7-17
■ Access by the client must be through a valid port, according to the port range entered in the Server section of the workspace Server Mode tab in Oracle Studio. For more information, see the explanation of the workspace Server Mode.
■ To be allocated a server process, the client must be granted anonymous access to the workspace or be listed in the Authorized Workspace Users section of the workspace Security tab in Oracle Studio. For more information, see the explanation of the workspace Security tab.
■ The ability to run commands on the daemon, such as starting or stopping a daemon or ending server processes is available only to administrators who have been registered in Oracle Connect as a daemon administrator. A client is registered as a valid daemon administrator in theAdministrator provileges section of the daemon Security tab in Oracle Studio. For more information, see explanation of the daemon Security tab.
Transaction SupportOracleAS CDC Adapter for Adabas supports global transactions and can fully participate in a distributed transaction if you access the Adabas data under CICS.
To work with global transactions, select Convert all to distributed in the Transaction section of the binding environemtal properties. For more information, see Transactions in the Configuring a Binding Environment section.
To use global transactions capability to access data on the z/OS computer, define every library in the ATTSRVR JCL as an APF-authorized library.
To define a DSN as APF-authorized, in the SDSF screen, enter the following command:
"/setprog apf,add,dsn=instroot.library,volume=ac002"
Where ac002 is the volume where you installed Oracle Connect and INSTROOT is the high level qualifier where Oracle Connect is installed.
If the Oracle Connect installation volume is managed by SMS, when defining APF-authorization, then enter the following command in the SDSF screen:
"/setprog apf,add,dsn=instroot.library,SMS"
Note: Access to the legacy platform through a firewall using the NAT protocol is specified when the computer is added to Oracle Studio.
Note: You can also specify administrators who can run commands only at the level of the workspace. Select these administrators in the workspace Security tab, as described in the explanation of the workspace Security.
Notes:
■ To use OracleAS CDC Adapter for Adabas with global transactions, you must have RRS installed and configured.
■ The rollback event is not supported, instead compensating records are supplied.
Transaction Support
7-18 Oracle Application Server CDC Adapters for Adabas User's Guide
Ensure that the library is APF-authorized, even after an IPL (restart) of the computer.
If RRS is not running, then OracleAS Adapter for Adabas can participate in a distributed transaction, as the only one-phase commit resource, if you enter the keyword NORRS, as shown in the in the Transaction log file property. The Transaction log file property is in the Transactions section in the Configuring a Binding Environment section.
Note: If a no log file is entered, then the format for the Transaction log file parameter when RRS is not running is: ,NORRS.
A
Advanced Tuning of the Metadata A-1
A Advanced Tuning of the Metadata
Oracle Studio enables you to define outbound adapter interactions. In addition, Oracle Studio defines input and output structures used for these interactions. The interactions and input and output structures are maintained as metadata by Oracle Studio in the Metadata tab of the Design perspective.
This appendix contains the following topics:
■ Metadata for the Adabas Data Source
■ Adapter Metadata
Metadata for the Adabas Data SourceThe location of the Adabas data source in Oracle Studio that you use to edit the metadata depends on whether you are using an Adabas data source with ADD data or an Adabas data source with Predict data.
Do the following to maintain the metadata for the Adabas (ADD) data source:
1. From the Start menu, select Programs, Oracle, and then select Studio.
2. Expand the Machines folder, then expand the machine with the metadata you are working with.
3. Expand the Bindings folder.
4. Expand the NAV binding.
5. Expand the Data sources folder to display the data sources.
6. Right-click the Adabas (ADD) data source and select Show Metadata View to display the Metadata view.
7. Right-click the table you want to view in the Metadata Explorer and select Edit.
The metadata editor opens, displaying the General tab, with general table details.
Do the following to maintain the metadata for the Adabas (Predict) data source:
1. From the Start menu, select Programs, Oracle, and then select Studio.
2. Expand the Machines folder, then expand the machine you defined when you Set up the CDC Server.
3. Expand the Bindings folder.
4. Expand the binding with the name of your CDC solution and the suffix _ag.
5. Expand the Data sources folder to display the data sources.
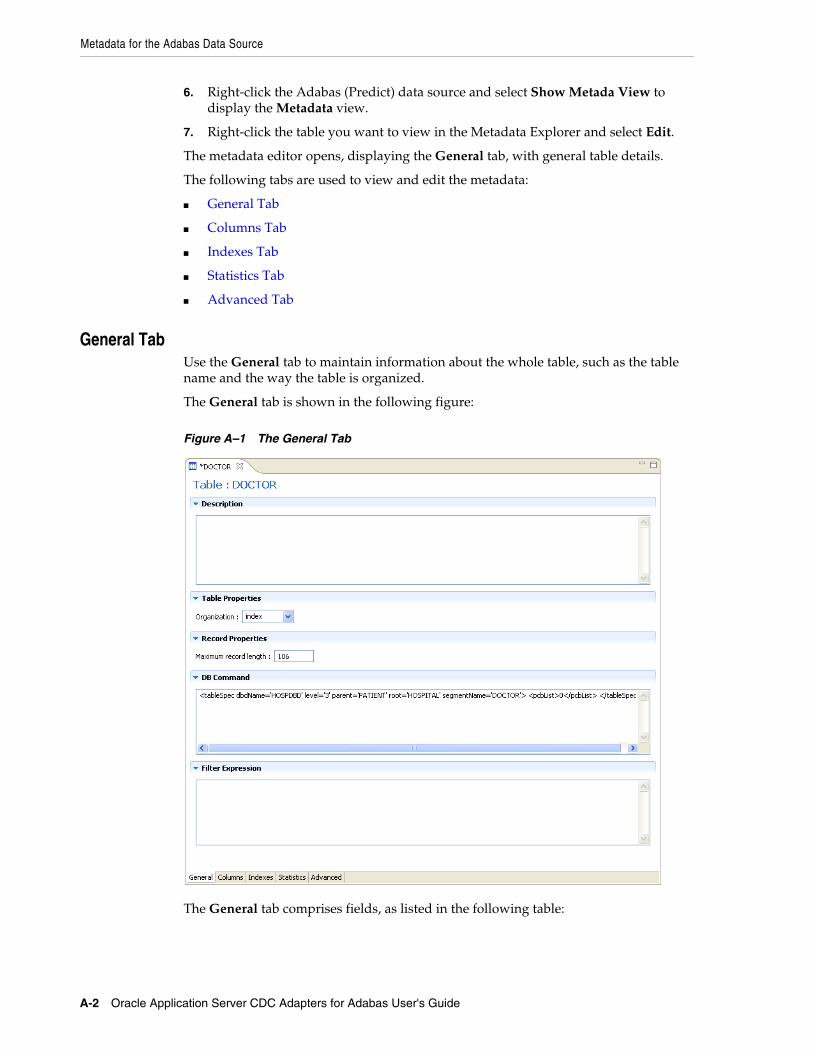
Metadata for the Adabas Data Source
A-2 Oracle Application Server CDC Adapters for Adabas User's Guide
6. Right-click the Adabas (Predict) data source and select Show Metada View to display the Metadata view.
7. Right-click the table you want to view in the Metadata Explorer and select Edit.
The metadata editor opens, displaying the General tab, with general table details.
The following tabs are used to view and edit the metadata:
■ General Tab
■ Columns Tab
■ Indexes Tab
■ Statistics Tab
■ Advanced Tab
General TabUse the General tab to maintain information about the whole table, such as the table name and the way the table is organized.
The General tab is shown in the following figure:
Figure A–1 The General Tab
The General tab comprises fields, as listed in the following table:
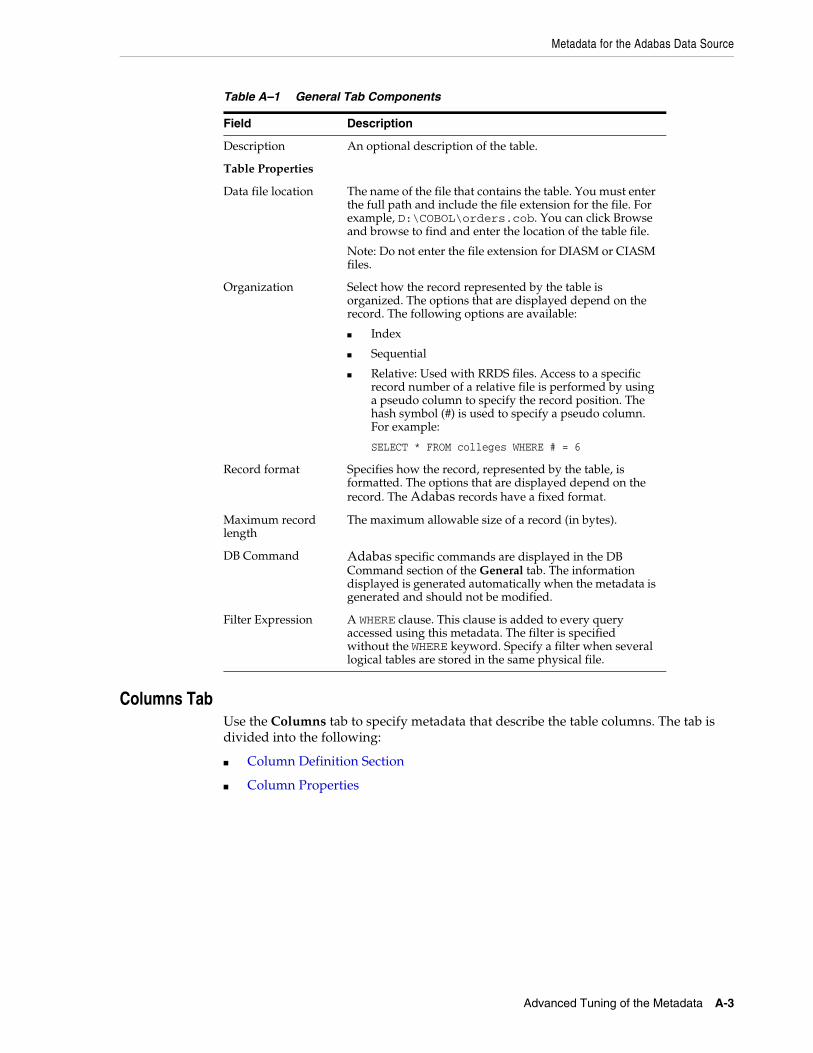
Metadata for the Adabas Data Source
Advanced Tuning of the Metadata A-3
Columns TabUse the Columns tab to specify metadata that describe the table columns. The tab is divided into the following:
■ Column Definition Section
■ Column Properties
Table A–1 General Tab Components
Field Description
Description An optional description of the table.
Table Properties
Data file location The name of the file that contains the table. You must enter the full path and include the file extension for the file. For example, D:\COBOL\orders.cob. You can click Browse and browse to find and enter the location of the table file.
Note: Do not enter the file extension for DIASM or CIASM files.
Organization Select how the record represented by the table is organized. The options that are displayed depend on the record. The following options are available:
■ Index
■ Sequential
■ Relative: Used with RRDS files. Access to a specific record number of a relative file is performed by using a pseudo column to specify the record position. The hash symbol (#) is used to specify a pseudo column. For example:
SELECT * FROM colleges WHERE # = 6
Record format Specifies how the record, represented by the table, is formatted. The options that are displayed depend on the record. The Adabas records have a fixed format.
Maximum record length
The maximum allowable size of a record (in bytes).
DB Command Adabas specific commands are displayed in the DB Command section of the General tab. The information displayed is generated automatically when the metadata is generated and should not be modified.
Filter Expression A WHERE clause. This clause is added to every query accessed using this metadata. The filter is specified without the WHERE keyword. Specify a filter when several logical tables are stored in the same physical file.
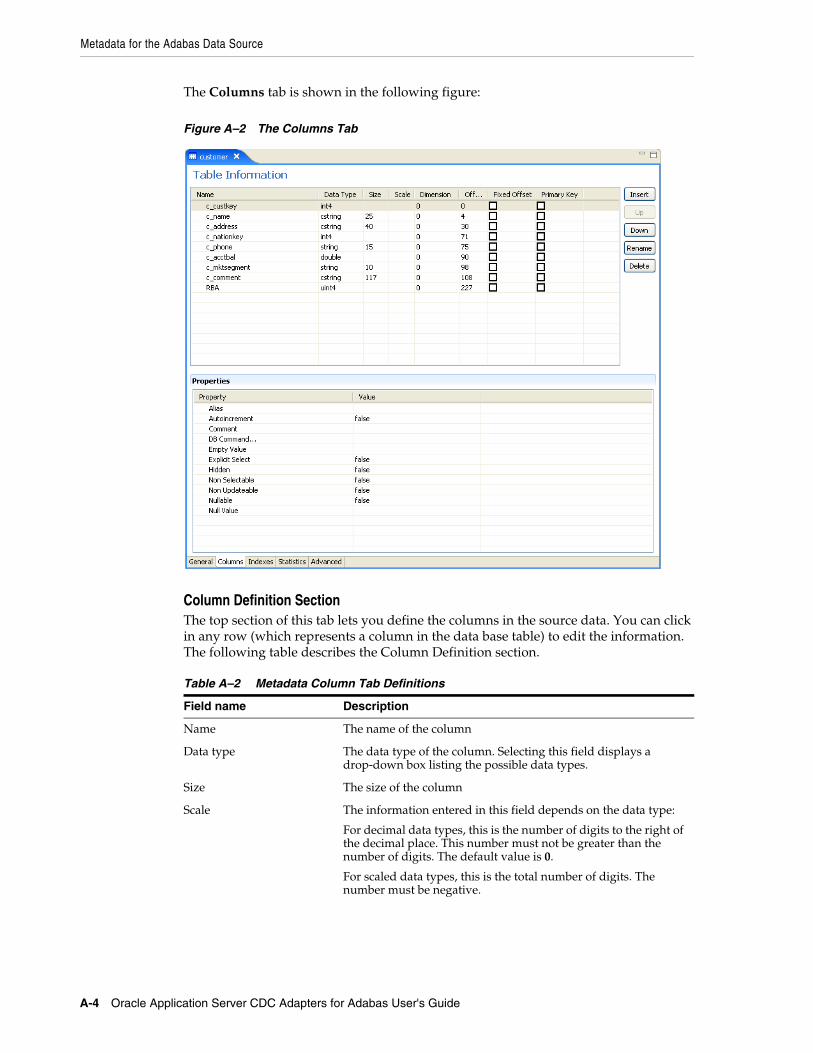
Metadata for the Adabas Data Source
A-4 Oracle Application Server CDC Adapters for Adabas User's Guide
The Columns tab is shown in the following figure:
Figure A–2 The Columns Tab
Column Definition SectionThe top section of this tab lets you define the columns in the source data. You can click in any row (which represents a column in the data base table) to edit the information. The following table describes the Column Definition section.
Table A–2 Metadata Column Tab Definitions
Field name Description
Name The name of the column
Data type The data type of the column. Selecting this field displays a drop-down box listing the possible data types.
Size The size of the column
Scale The information entered in this field depends on the data type:
For decimal data types, this is the number of digits to the right of the decimal place. This number must not be greater than the number of digits. The default value is 0.
For scaled data types, this is the total number of digits. The number must be negative.
Metadata for the Adabas Data Source
Advanced Tuning of the Metadata A-5
The buttons on the right side of the tab are used to manipulate the data in this section of the tab. The following table describes how you can move around in this section.
Column PropertiesYou can change the property value by clicking in the Value column. To display the column properties select a column from the Column Definition (top) section.
The properties for the column are displayed at the bottom of the tab.
The following table shows some properties available for selected columns.
Dimension The maximum number of occurrences of a group of columns that are included in an array.
The (+) to the left of a column indicates a group field. This type of field has a Dimension value. Click (+) to display the group members.
Offset An absolute offset for the field in a record.
Fixed offset This column lets you determine whether to calculate the offset. There are two options:
■ Calc offset: If you clear this check box, the absolute offset for each of the columns is calculated.
■ Fixed offset: When you select this check box, you have a fixed offset.
The offset of a field is usually calculated dynamically by the server at run time according the offset and size of the proceeding column. Select the check box in this column to override this calculation and specify a fixed offset at design time. This can happen if there is a part of the buffer that is skipped.
By selecting the check box, or by editing the offset value you pin the offset for that column. The indicated value is used at run time for the column instead of a calculated value. Note that the offset of following columns that do not have a fixed offset are calculated from this fixed position.
Primary Key Select this to indicate that this column is a primary key.
Table A–3 Definition Section Buttons
Button Description
Insert Inserts a column to the table. You can insert a new column. If the table has arrays, you can add a new child column.
Up Moves your selection to the column directly above where the currently selected column.
Down Moves your selection to the column directly below where the currently selected column
Rename Lets you rename the selected column.
Delete Deletes the selected column.
Find Click this button to open a list of all columns in the database. Select a column and click OK to select it in the table.
Table A–2 (Cont.) Metadata Column Tab Definitions
Field name Description
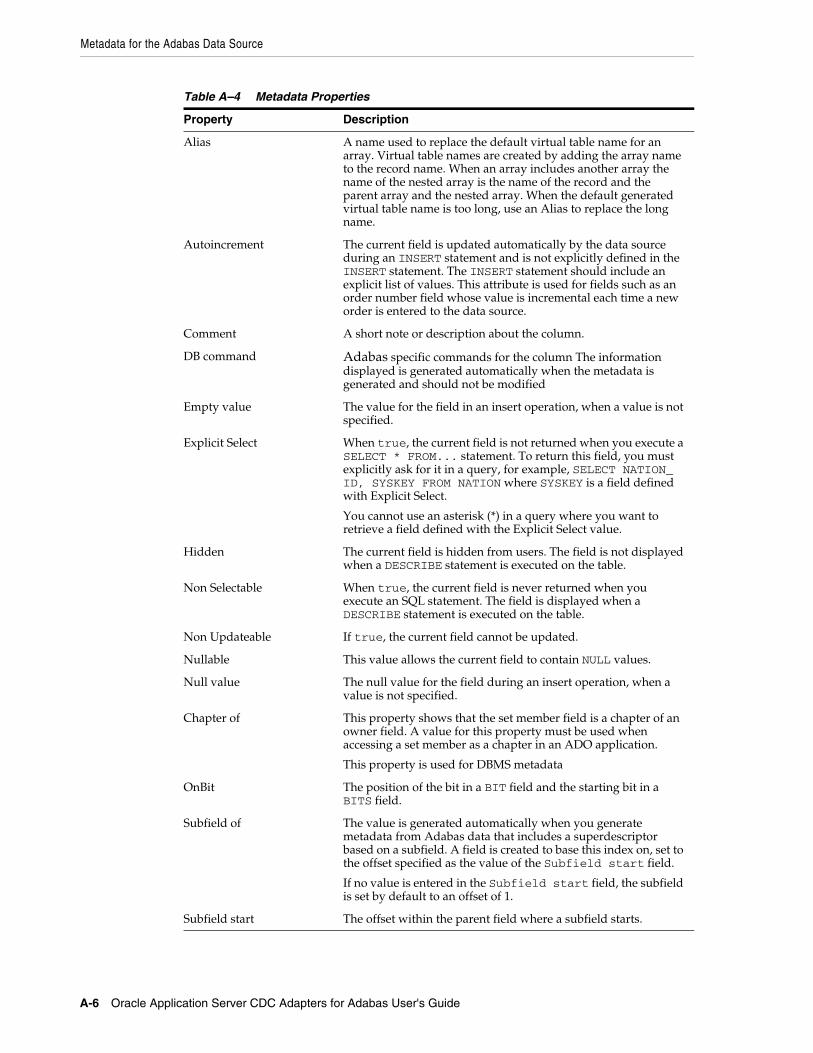
Metadata for the Adabas Data Source
A-6 Oracle Application Server CDC Adapters for Adabas User's Guide
Table A–4 Metadata Properties
Property Description
Alias A name used to replace the default virtual table name for an array. Virtual table names are created by adding the array name to the record name. When an array includes another array the name of the nested array is the name of the record and the parent array and the nested array. When the default generated virtual table name is too long, use an Alias to replace the long name.
Autoincrement The current field is updated automatically by the data source during an INSERT statement and is not explicitly defined in the INSERT statement. The INSERT statement should include an explicit list of values. This attribute is used for fields such as an order number field whose value is incremental each time a new order is entered to the data source.
Comment A short note or description about the column.
DB command Adabas specific commands for the column The information displayed is generated automatically when the metadata is generated and should not be modified
Empty value The value for the field in an insert operation, when a value is not specified.
Explicit Select When true, the current field is not returned when you execute a SELECT * FROM... statement. To return this field, you must explicitly ask for it in a query, for example, SELECT NATION_ID, SYSKEY FROM NATION where SYSKEY is a field defined with Explicit Select.
You cannot use an asterisk (*) in a query where you want to retrieve a field defined with the Explicit Select value.
Hidden The current field is hidden from users. The field is not displayed when a DESCRIBE statement is executed on the table.
Non Selectable When true, the current field is never returned when you execute an SQL statement. The field is displayed when a DESCRIBE statement is executed on the table.
Non Updateable If true, the current field cannot be updated.
Nullable This value allows the current field to contain NULL values.
Null value The null value for the field during an insert operation, when a value is not specified.
Chapter of This property shows that the set member field is a chapter of an owner field. A value for this property must be used when accessing a set member as a chapter in an ADO application.
This property is used for DBMS metadata
OnBit The position of the bit in a BIT field and the starting bit in a BITS field.
Subfield of The value is generated automatically when you generate metadata from Adabas data that includes a superdescriptor based on a subfield. A field is created to base this index on, set to the offset specified as the value of the Subfield start field.
If no value is entered in the Subfield start field, the subfield is set by default to an offset of 1.
Subfield start The offset within the parent field where a subfield starts.
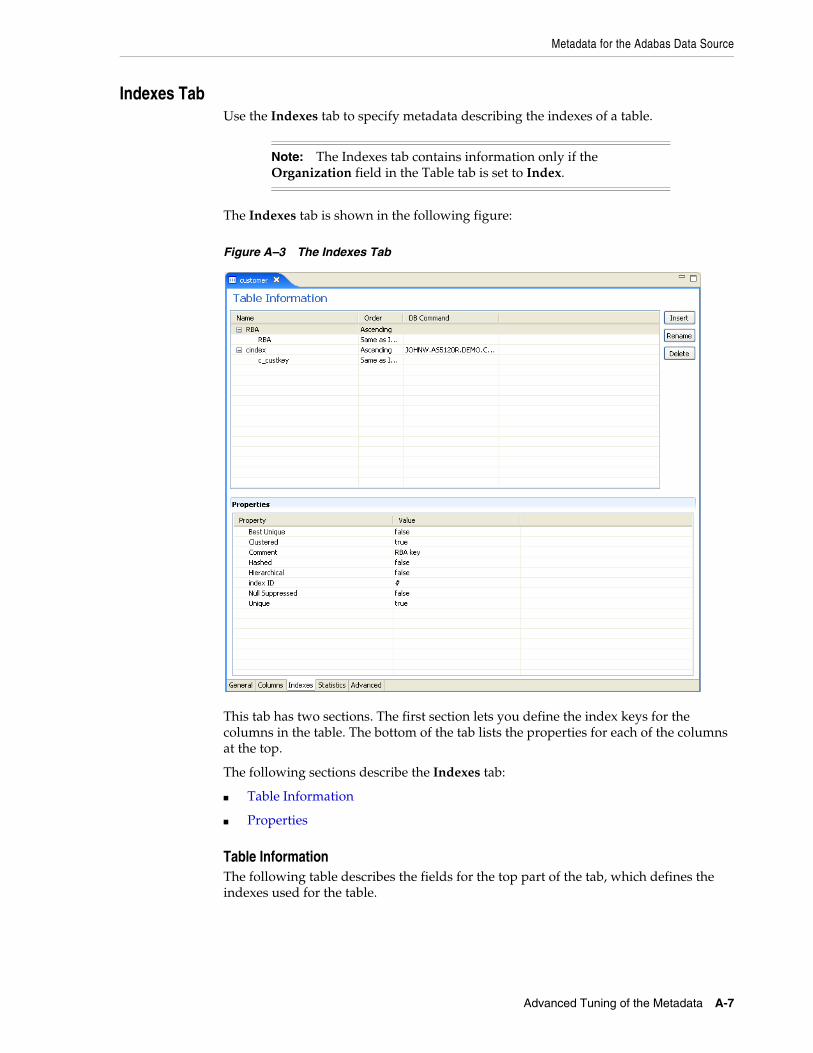
Metadata for the Adabas Data Source
Advanced Tuning of the Metadata A-7
Indexes TabUse the Indexes tab to specify metadata describing the indexes of a table.
The Indexes tab is shown in the following figure:
Figure A–3 The Indexes Tab
This tab has two sections. The first section lets you define the index keys for the columns in the table. The bottom of the tab lists the properties for each of the columns at the top.
The following sections describe the Indexes tab:
■ Table Information
■ Properties
Table InformationThe following table describes the fields for the top part of the tab, which defines the indexes used for the table.
Note: The Indexes tab contains information only if the Organization field in the Table tab is set to Index.
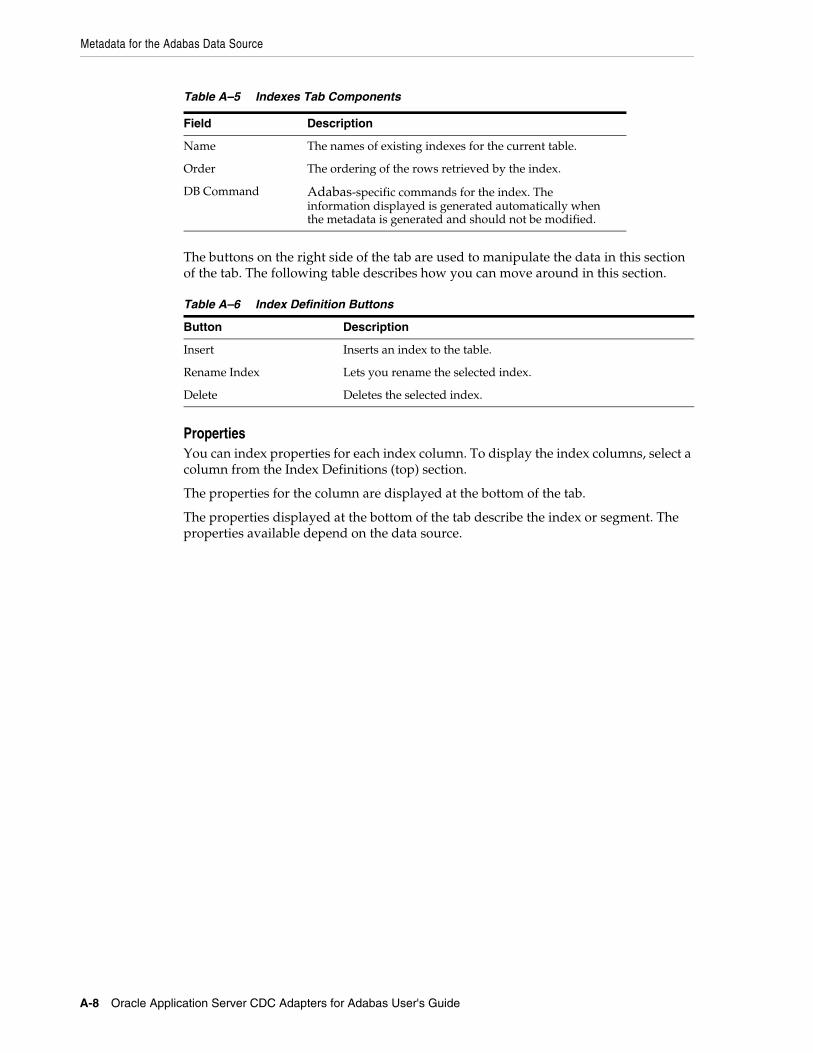
Metadata for the Adabas Data Source
A-8 Oracle Application Server CDC Adapters for Adabas User's Guide
The buttons on the right side of the tab are used to manipulate the data in this section of the tab. The following table describes how you can move around in this section.
PropertiesYou can index properties for each index column. To display the index columns, select a column from the Index Definitions (top) section.
The properties for the column are displayed at the bottom of the tab.
The properties displayed at the bottom of the tab describe the index or segment. The properties available depend on the data source.
Table A–5 Indexes Tab Components
Field Description
Name The names of existing indexes for the current table.
Order The ordering of the rows retrieved by the index.
DB Command Adabas-specific commands for the index. The information displayed is generated automatically when the metadata is generated and should not be modified.
Table A–6 Index Definition Buttons
Button Description
Insert Inserts an index to the table.
Rename Index Lets you rename the selected index.
Delete Deletes the selected index.
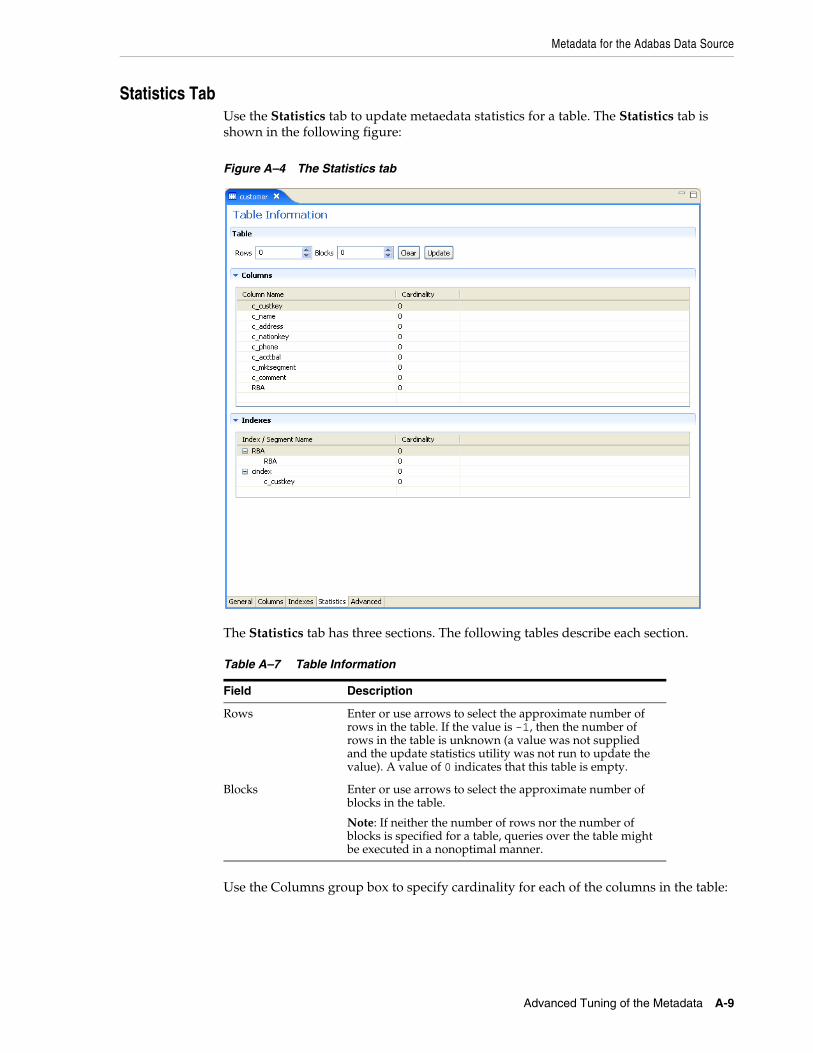
Metadata for the Adabas Data Source
Advanced Tuning of the Metadata A-9
Statistics TabUse the Statistics tab to update metaedata statistics for a table. The Statistics tab is shown in the following figure:
Figure A–4 The Statistics tab
The Statistics tab has three sections. The following tables describe each section.
Use the Columns group box to specify cardinality for each of the columns in the table:
Table A–7 Table Information
Field Description
Rows Enter or use arrows to select the approximate number of rows in the table. If the value is -1, then the number of rows in the table is unknown (a value was not supplied and the update statistics utility was not run to update the value). A value of 0 indicates that this table is empty.
Blocks Enter or use arrows to select the approximate number of blocks in the table.
Note: If neither the number of rows nor the number of blocks is specified for a table, queries over the table might be executed in a nonoptimal manner.
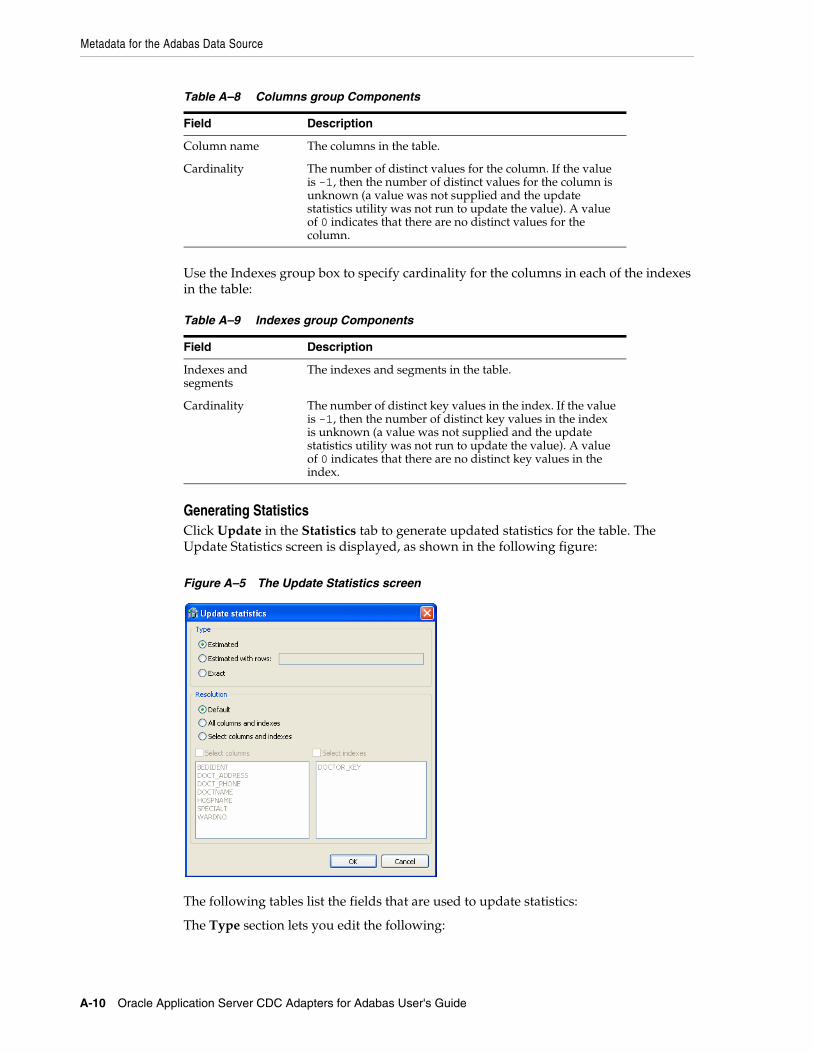
Metadata for the Adabas Data Source
A-10 Oracle Application Server CDC Adapters for Adabas User's Guide
Use the Indexes group box to specify cardinality for the columns in each of the indexes in the table:
Generating StatisticsClick Update in the Statistics tab to generate updated statistics for the table. The Update Statistics screen is displayed, as shown in the following figure:
Figure A–5 The Update Statistics screen
The following tables list the fields that are used to update statistics:
The Type section lets you edit the following:
Table A–8 Columns group Components
Field Description
Column name The columns in the table.
Cardinality The number of distinct values for the column. If the value is -1, then the number of distinct values for the column is unknown (a value was not supplied and the update statistics utility was not run to update the value). A value of 0 indicates that there are no distinct values for the column.
Table A–9 Indexes group Components
Field Description
Indexes and segments
The indexes and segments in the table.
Cardinality The number of distinct key values in the index. If the value is -1, then the number of distinct key values in the index is unknown (a value was not supplied and the update statistics utility was not run to update the value). A value of 0 indicates that there are no distinct key values in the index.

Metadata for the Adabas Data Source
Advanced Tuning of the Metadata A-11
The Resolution section lets you specify the statistical information returned:
Advanced TabThe Advanced tab lets you enter information about the virtual view policy for arrays. These parameters are valid only if you are using virtual array views. The
Table A–10 Type Components
Field Description
Estimated An estimation of the amount of statistical information returned.
Estimated with rows An estimation of the amount of statistical information returned. The estimate includes an estimation of the number of rows in the table. Specify the number in the text box. This number is used to shorten the time to produce the statistics, if the value specified here is the correct value, or close to the correct value.
Exact The exact statistical information returned. Note that this can be a lengthy task and can lead to disk space problems with large tables.
Table A–11 Resolution Components
Field Description
Default Only information about the table and indexes is collected. Information for partial indexes and columns is not collected.
All columns and indexes
Information about the table, indexes, partial indexes and columns is collected.
Select columns and indexes
Enables you to select the columns and indexes for which you want to collect statistics. In the enabled list of columns or indexes, left click those columns you want included (you can use shift-click and control-click to select multiple columns or indexes).
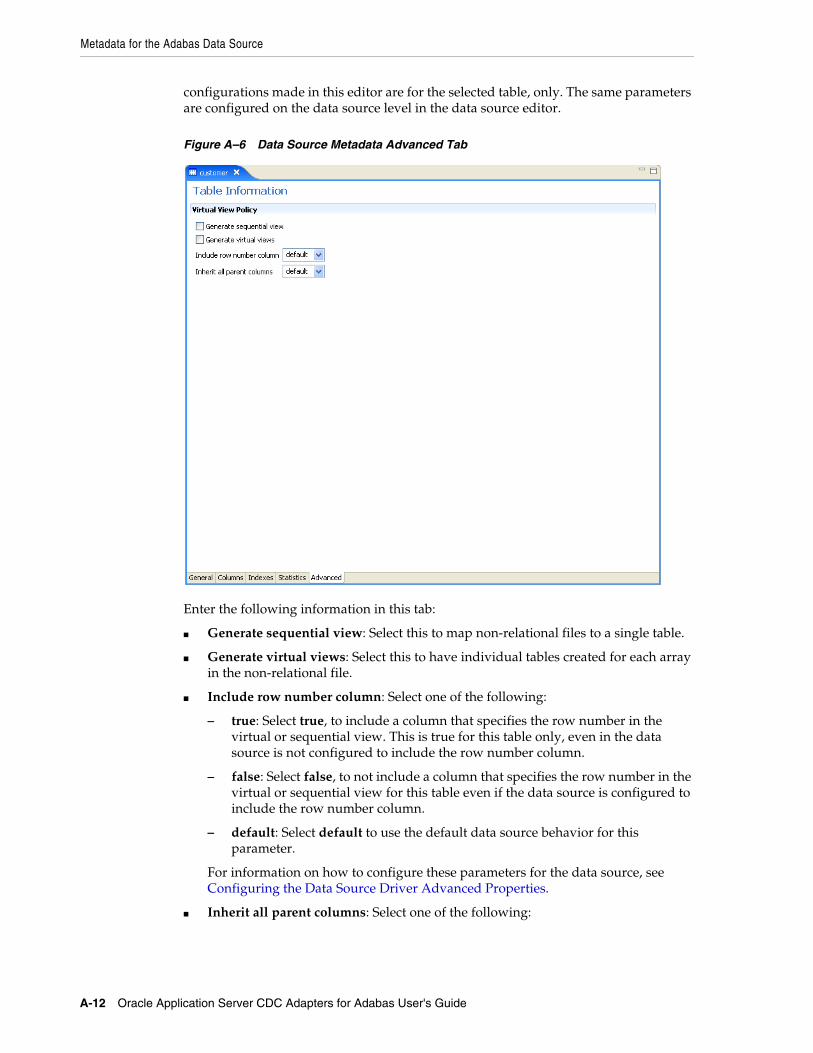
Metadata for the Adabas Data Source
A-12 Oracle Application Server CDC Adapters for Adabas User's Guide
configurations made in this editor are for the selected table, only. The same parameters are configured on the data source level in the data source editor.
Figure A–6 Data Source Metadata Advanced Tab
Enter the following information in this tab:
■ Generate sequential view: Select this to map non-relational files to a single table.
■ Generate virtual views: Select this to have individual tables created for each array in the non-relational file.
■ Include row number column: Select one of the following:
– true: Select true, to include a column that specifies the row number in the virtual or sequential view. This is true for this table only, even in the data source is not configured to include the row number column.
– false: Select false, to not include a column that specifies the row number in the virtual or sequential view for this table even if the data source is configured to include the row number column.
– default: Select default to use the default data source behavior for this parameter.
For information on how to configure these parameters for the data source, see Configuring the Data Source Driver Advanced Properties.
■ Inherit all parent columns: Select one of the following:
Adapter Metadata
Advanced Tuning of the Metadata A-13
– true: Select true, for virtual views to include all the columns in the parent record. This is true for this table only, even in the data source is not configured to include all of the parent record columns.
– false: Select false, so virtual views do not include the columns in the parent record for this table even if the data source is configured to include all of the parent record columns.
– default: Select default to use the default data source behavior for this parameter.
For information on how to configure these parameters for the data source, see Configuring the Data Source Driver Advanced Properties.
Adapter MetadataUse Oracle Studio to maintain the metadata for the CDC Queue adapter in your staging area.
1. From the Start menu, select Programs, Oracle, and then select Studio.
2. Expand the Machines folder, then expand the machine with your staging area.
3. Expand the Bindings folder.
4. Expand the binding for your CDC staging area (with the _sa suffix).
5. Expand the Adapters folder to display the adapters list.
6. Right-click the CDC Queue adapter for your solution, and select Show Metadata View to open the Metadata view.
You can create and edit the following adapter metadata properties:
■ Adapter Metadata General Properties: Enter and edit information about the adapter, such as the adapter name and the way in which you connect to the adapter. You make these changes in the Design perspective, Metadata view.
■ Adapter Metadata Interactions: Enter details of an interaction. The interaction Advanced tab is displayed for some adapters only, such as the Database adapter and includes more details about the interaction.
■ Adapter Metadata Schema Records: The input and output record structure for a record in the adapter definition.
Adapter Metadata General PropertiesYou can enter and edit information about the adapter, such as the adapter name and the way in which you connect to the adapter. You make these changes in the Design perspective, Metadata view. The following describes how to open the Adapter General Properties editor.
1. In Oracle Studio Design perspective, Metadata view, expand the Adapters folder.
2. Right-click the adapter to edit, and select Open.
The General properties editor is displayed.
The Adapter General Properties editor is shown in the following figure:
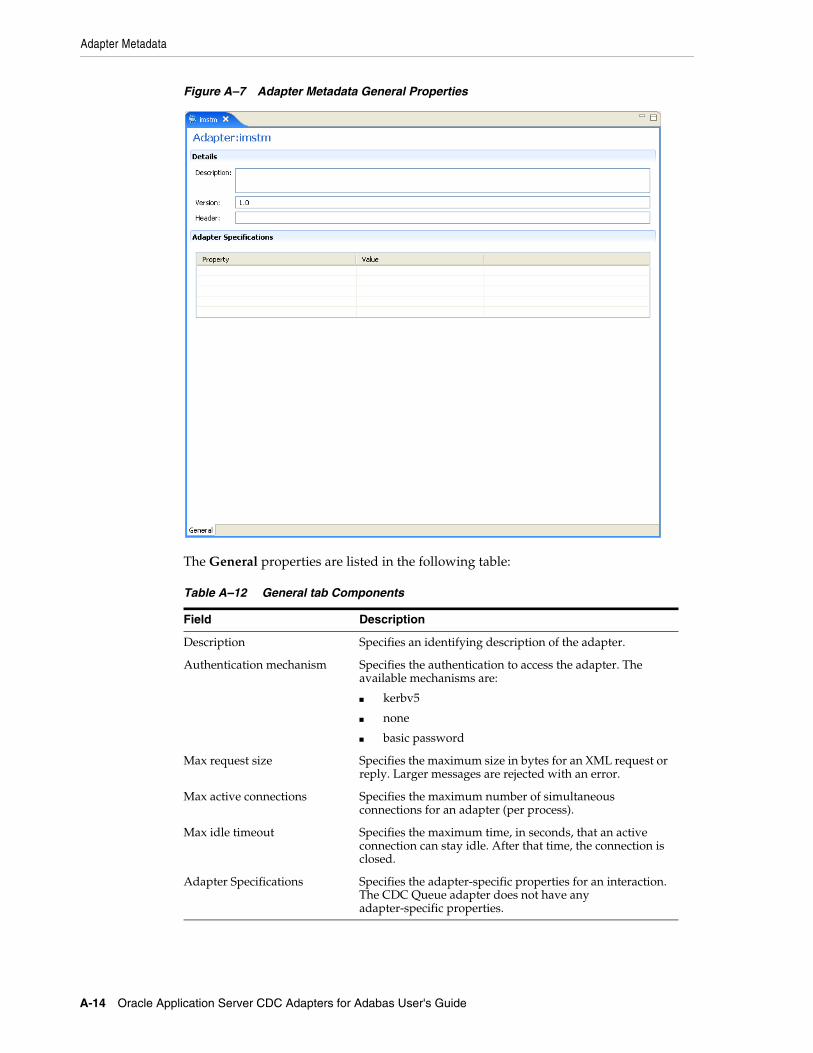
Adapter Metadata
A-14 Oracle Application Server CDC Adapters for Adabas User's Guide
Figure A–7 Adapter Metadata General Properties
The General properties are listed in the following table:
Table A–12 General tab Components
Field Description
Description Specifies an identifying description of the adapter.
Authentication mechanism Specifies the authentication to access the adapter. The available mechanisms are:
■ kerbv5
■ none
■ basic password
Max request size Specifies the maximum size in bytes for an XML request or reply. Larger messages are rejected with an error.
Max active connections Specifies the maximum number of simultaneous connections for an adapter (per process).
Max idle timeout Specifies the maximum time, in seconds, that an active connection can stay idle. After that time, the connection is closed.
Adapter Specifications Specifies the adapter-specific properties for an interaction. The CDC Queue adapter does not have any adapter-specific properties.

Adapter Metadata
Advanced Tuning of the Metadata A-15
Adapter Metadata InteractionsThe Adapter Metedata Interactions editor defines an interaction and its input and output definitions. The following describes how to open the Adapter Metadata editor.
1. In Oracle Studio Design perspective, Metadata view, expand the Adapters folder.
2. Expand the adapter with the interaction to edit.
3. Expand the Adapter folder.
4. Right-click the adapter you want to edit and select Open.
The Adapter Metadata Interactions editor is displayed.
The Adapter Metadata Interactions editor is shown in the following figure:
Figure A–8 Adapter Metadata Interactions
The Adapter Metadata Interaction properties are listed in the following table:
Table A–13 Interaction General tab Components
Field Description
Description Provides a descriptive identifier for the interaction.
Adapter Metadata
A-16 Oracle Application Server CDC Adapters for Adabas User's Guide
Interaction Advanced TabIn the Adapter Metadata Interactions editor, click Advanced at the bottom of the editor to open the Interaction Advanced tab. Use this to enter advanced details for the interaction or to create interaction manually.
The following figure shows the Interactions Advanced tab.
Mode Determines the interaction mode. The following interaction modes are available:
■ sync-send-receive: The interaction sends a request and expects to receive a response.
■ sync-send: The interaction sends a request and does not expect to receive a response.
■ sync-receive: The interaction expects to receive a response.
Input record Identifies an input record.
Output record Identifies an output record for the results of an interaction.
Interaction Specific Parameters
Specific properties for the interaction. When an Interaction Advanced tab is used, this section is not displayed. The parameters shown are for a Legacy Plug Adapter.
Table A–13 (Cont.) Interaction General tab Components
Field Description
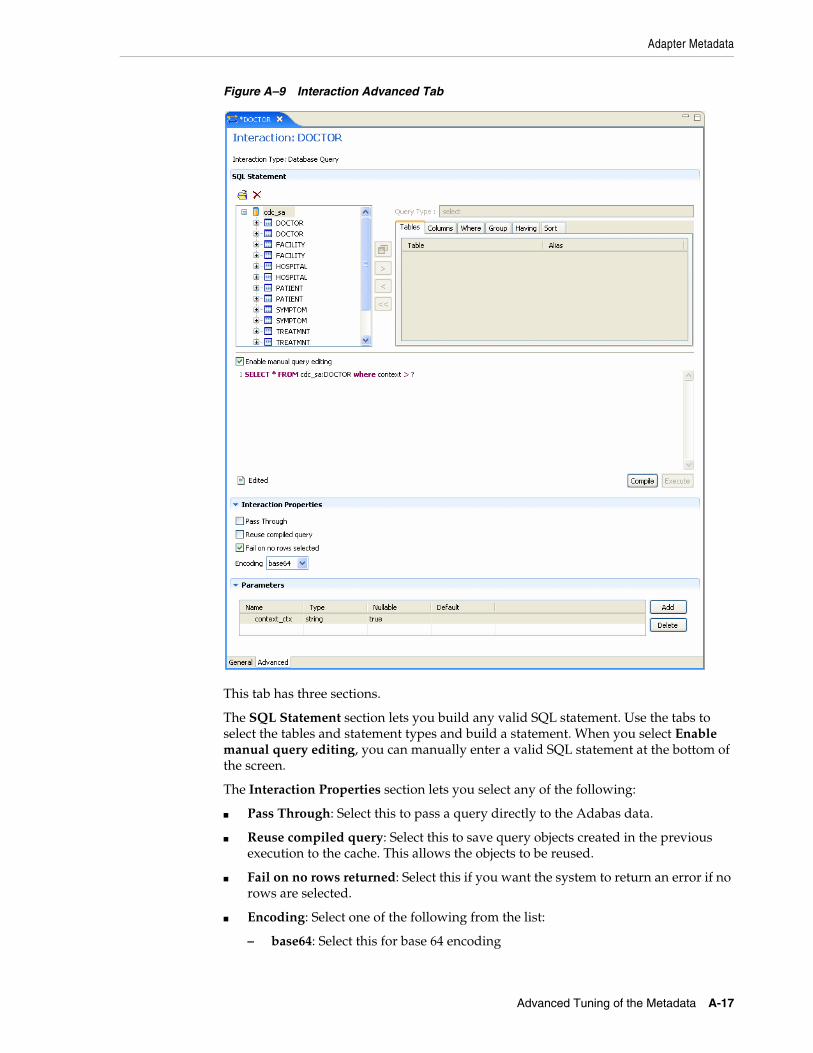
Adapter Metadata
Advanced Tuning of the Metadata A-17
Figure A–9 Interaction Advanced Tab
This tab has three sections.
The SQL Statement section lets you build any valid SQL statement. Use the tabs to select the tables and statement types and build a statement. When you select Enable manual query editing, you can manually enter a valid SQL statement at the bottom of the screen.
The Interaction Properties section lets you select any of the following:
■ Pass Through: Select this to pass a query directly to the Adabas data.
■ Reuse compiled query: Select this to save query objects created in the previous execution to the cache. This allows the objects to be reused.
■ Fail on no rows returned: Select this if you want the system to return an error if no rows are selected.
■ Encoding: Select one of the following from the list:
– base64: Select this for base 64 encoding
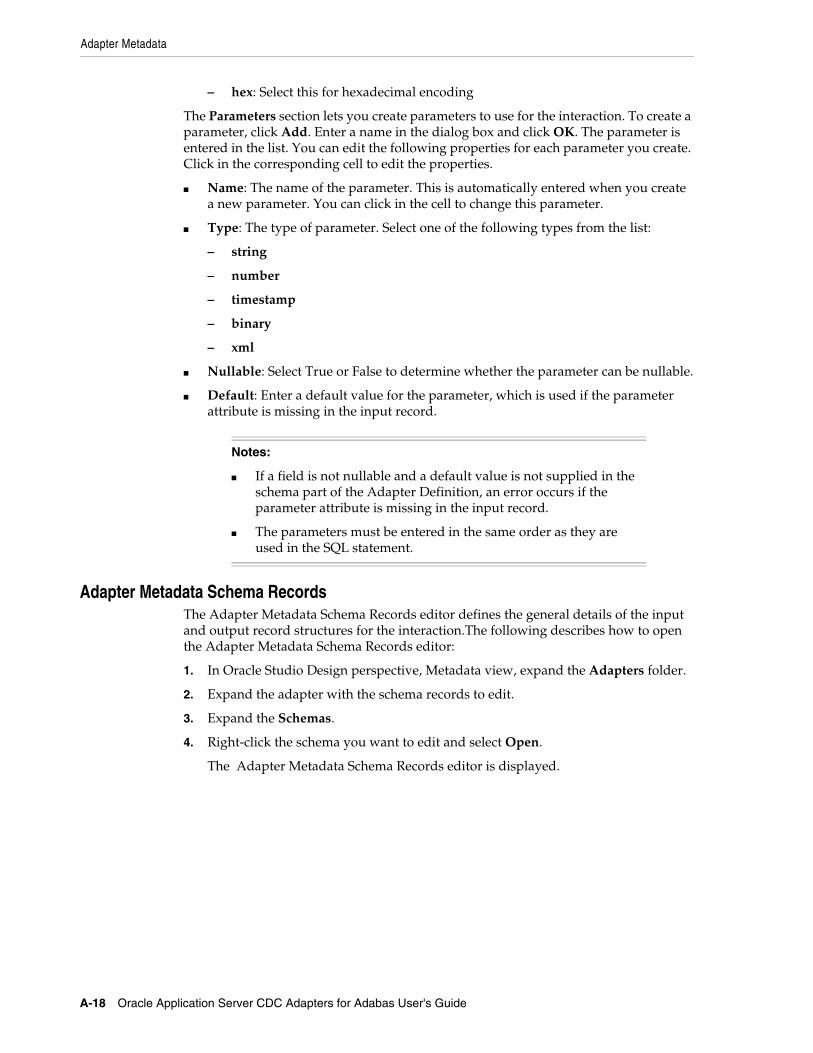
Adapter Metadata
A-18 Oracle Application Server CDC Adapters for Adabas User's Guide
– hex: Select this for hexadecimal encoding
The Parameters section lets you create parameters to use for the interaction. To create a parameter, click Add. Enter a name in the dialog box and click OK. The parameter is entered in the list. You can edit the following properties for each parameter you create. Click in the corresponding cell to edit the properties.
■ Name: The name of the parameter. This is automatically entered when you create a new parameter. You can click in the cell to change this parameter.
■ Type: The type of parameter. Select one of the following types from the list:
– string
– number
– timestamp
– binary
– xml
■ Nullable: Select True or False to determine whether the parameter can be nullable.
■ Default: Enter a default value for the parameter, which is used if the parameter attribute is missing in the input record.
Adapter Metadata Schema RecordsThe Adapter Metadata Schema Records editor defines the general details of the input and output record structures for the interaction.The following describes how to open the Adapter Metadata Schema Records editor:
1. In Oracle Studio Design perspective, Metadata view, expand the Adapters folder.
2. Expand the adapter with the schema records to edit.
3. Expand the Schemas.
4. Right-click the schema you want to edit and select Open.
The Adapter Metadata Schema Records editor is displayed.
Notes:
■ If a field is not nullable and a default value is not supplied in the schema part of the Adapter Definition, an error occurs if the parameter attribute is missing in the input record.
■ The parameters must be entered in the same order as they are used in the SQL statement.
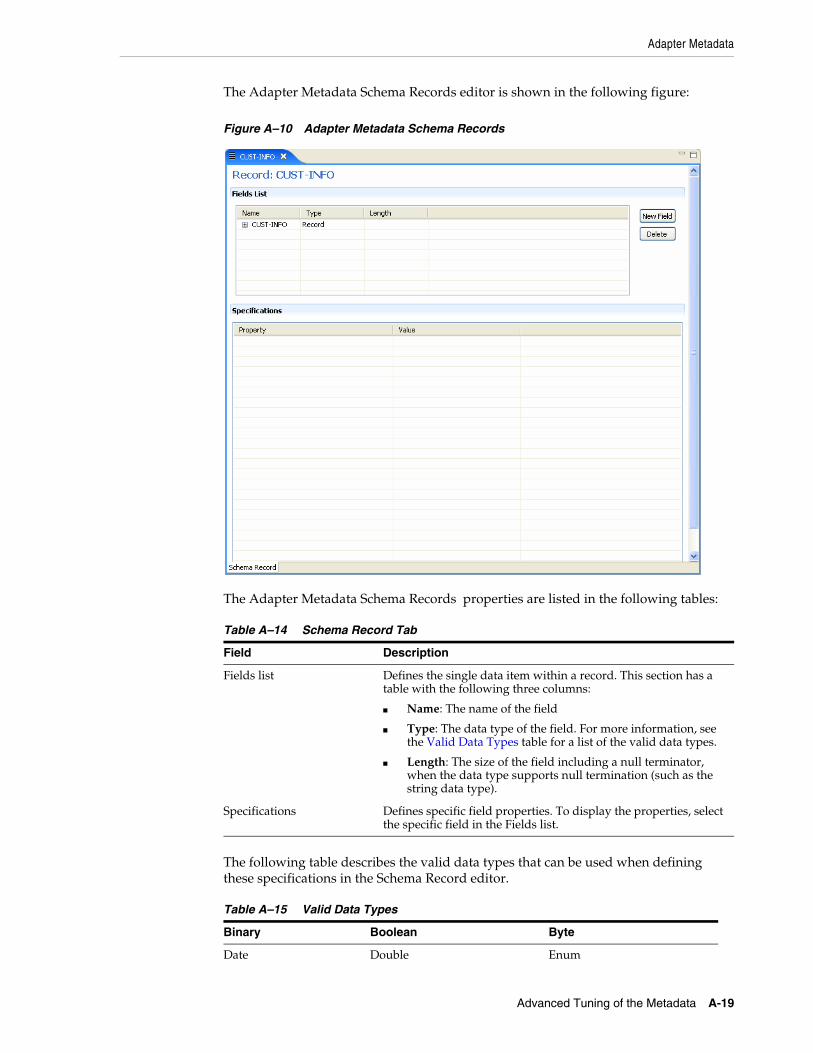
Adapter Metadata
Advanced Tuning of the Metadata A-19
The Adapter Metadata Schema Records editor is shown in the following figure:
Figure A–10 Adapter Metadata Schema Records
The Adapter Metadata Schema Records properties are listed in the following tables:
The following table describes the valid data types that can be used when defining these specifications in the Schema Record editor.
Table A–14 Schema Record Tab
Field Description
Fields list Defines the single data item within a record. This section has a table with the following three columns:
■ Name: The name of the field
■ Type: The data type of the field. For more information, see the Valid Data Types table for a list of the valid data types.
■ Length: The size of the field including a null terminator, when the data type supports null termination (such as the string data type).
Specifications Defines specific field properties. To display the properties, select the specific field in the Fields list.
Table A–15 Valid Data Types
Binary Boolean Byte
Date Double Enum
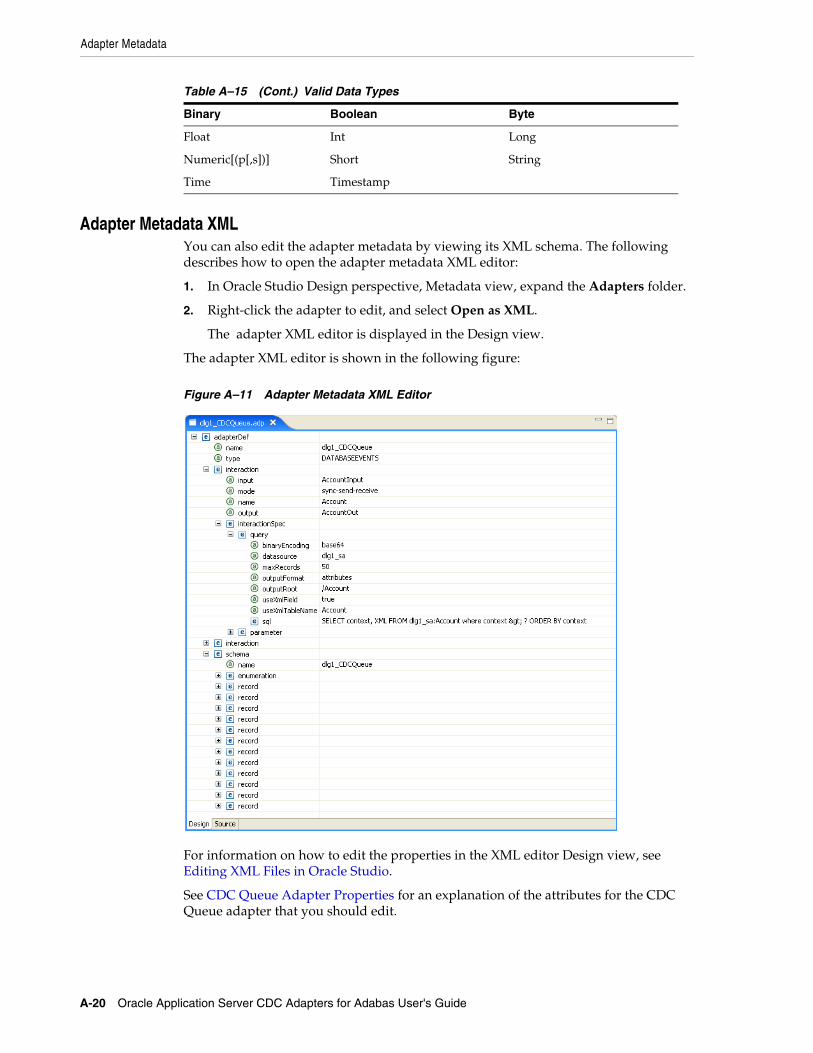
Adapter Metadata
A-20 Oracle Application Server CDC Adapters for Adabas User's Guide
Adapter Metadata XMLYou can also edit the adapter metadata by viewing its XML schema. The following describes how to open the adapter metadata XML editor:
1. In Oracle Studio Design perspective, Metadata view, expand the Adapters folder.
2. Right-click the adapter to edit, and select Open as XML.
The adapter XML editor is displayed in the Design view.
The adapter XML editor is shown in the following figure:
Figure A–11 Adapter Metadata XML Editor
For information on how to edit the properties in the XML editor Design view, see Editing XML Files in Oracle Studio.
See CDC Queue Adapter Properties for an explanation of the attributes for the CDC Queue adapter that you should edit.
Float Int Long
Numeric[(p[,s])] Short String
Time Timestamp
Table A–15 (Cont.) Valid Data Types
Binary Boolean Byte
B
Advanced Tuning of the Daemon B-1
B Advanced Tuning of the Daemon
The daemon configuration is managed using Oracle Studio. Daemon configuration is divided into the following groups:
■ Control
■ Logging
■ Security
■ Workspaces
ControlUsing the Control tab for the daemon, you define various daemon control options. The Daemon Control tab is accessed as follows:
1. From the Start menu, select Programs, Oracle, and then select Studio.
2. From the Design perspective Configuration view expand the Machines folder.
3. Right-click the computer and select Open Runtime Perspective.
4. Right-click the required daemon in the Runtime Explorer and select Edit Daemon Configuration. The Control tab for the damon is displayed in the editor.
5. After making changes to the daemon, right-click the daemon and select Reload Configuration.
The Control tab is shown in the following figure:
Note: You can also change daemon settings using the Configuration Explorer, by selecting a computer and scrolling the list to the required daemon. Right-click the daemon and select Edit Daemon.
Changes made to the daemon configuration are only implemented after the configuration is reloaded using the Reload Configuration option in the Runtime Manager perspective.
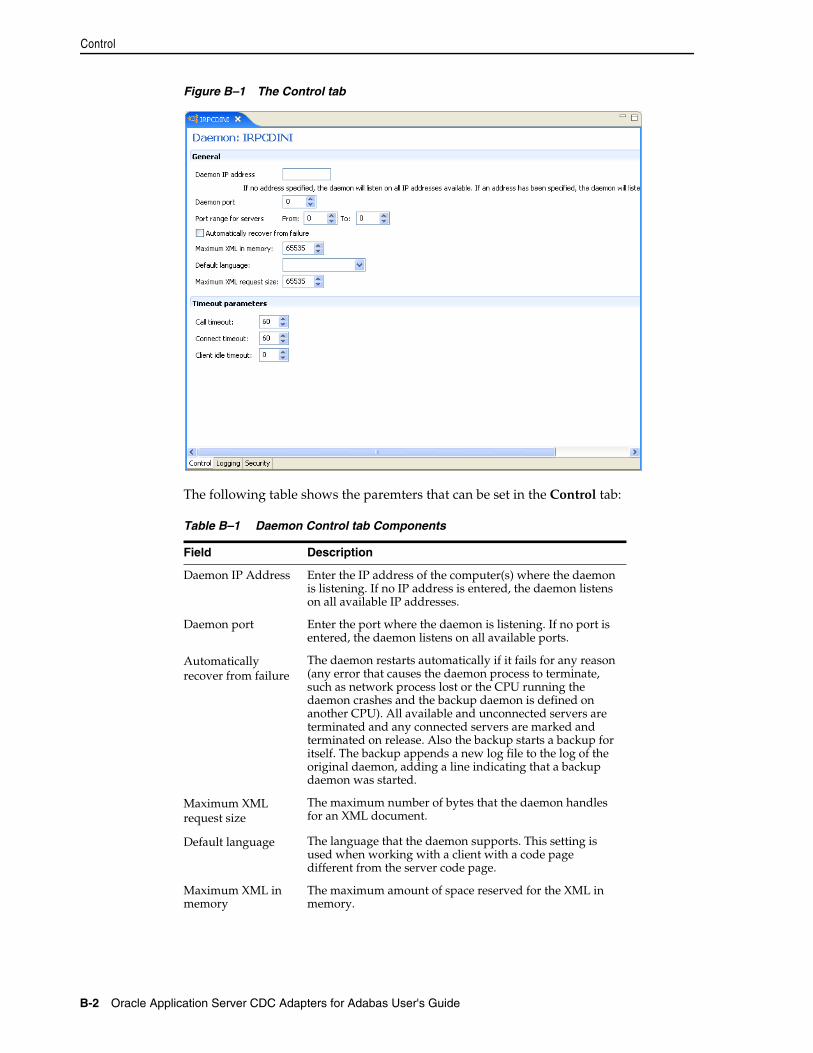
Control
B-2 Oracle Application Server CDC Adapters for Adabas User's Guide
Figure B–1 The Control tab
The following table shows the paremters that can be set in the Control tab:
Table B–1 Daemon Control tab Components
Field Description
Daemon IP Address Enter the IP address of the computer(s) where the daemon is listening. If no IP address is entered, the daemon listens on all available IP addresses.
Daemon port Enter the port where the daemon is listening. If no port is entered, the daemon listens on all available ports.
Automatically recover from failure
The daemon restarts automatically if it fails for any reason (any error that causes the daemon process to terminate, such as network process lost or the CPU running the daemon crashes and the backup daemon is defined on another CPU). All available and unconnected servers are terminated and any connected servers are marked and terminated on release. Also the backup starts a backup for itself. The backup appends a new log file to the log of the original daemon, adding a line indicating that a backup daemon was started.
Maximum XML request size
The maximum number of bytes that the daemon handles for an XML document.
Default language The language that the daemon supports. This setting is used when working with a client with a code page different from the server code page.
Maximum XML in memory
The maximum amount of space reserved for the XML in memory.
Logging
Advanced Tuning of the Daemon B-3
LoggingUsing the Logging tab, you define the daemon log file settings, the log file structure and the location where the log is saved. In addition, use it to define the data that is logged and traced in the file.
The following describes how to open the Logging tab.
1. From the Start menu, select Programs, Oracle, and then select Studio.
2. From the Design perspective Configuration view expand the Machines folder.
3. Right-click a computer and select Open Runtime Perspective.
4. Right-click the daemon in the Runtime Explorer and select Edit Daemon Configuration.
5. Click the Logging tab.
6. After making changes to the daemon, right-click the daemon and select Reload Configuration.
Call timeout The timeout period for short calls for all daemons. The definition of a short call is a call that should be completed in a few seconds. For example, most calls to a database such as DESCRIBE should be completed in a few seconds as opposed to call like a GETROWS call, which can take a long time. In heavily loaded or otherwise slow systems, even short calls such as calls to open a file, may take a significant amount of time. If a short call takes more than the specified time to complete, then the connection is stopped. The default value for this parameter is 60 seconds. Values of less than 60 seconds are considered to be 60 seconds.
Specifying the timeout in a workspace overrides the value set in this field for that workspace.
Connect timeout The time the client waits for a daemon server to start. If the daemon server does not start within this period, then the client is notified that the server did not respond. The value specified for this parameter serves as the default timeout for all the workspaces listed in the daemon configuration. The default value for this parameter is 60 seconds.
Notes:
■ Entering the timeout in a workspace overrides the value set in this field for that workspace.
■ Even if the XML source does not list this parameter in the workspace section, the workspace gets it using the default value. To prevent a workspace from using the default value, you must enter a value of zero for this parameter in the workspace section.
Client idle timeout The maximum amount of time any daemon client may be idle before the connection with the server is closed.
Specifying the timeout in a Workspace overrides this setting for that workspace.
Table B–1 (Cont.) Daemon Control tab Components
Field Description
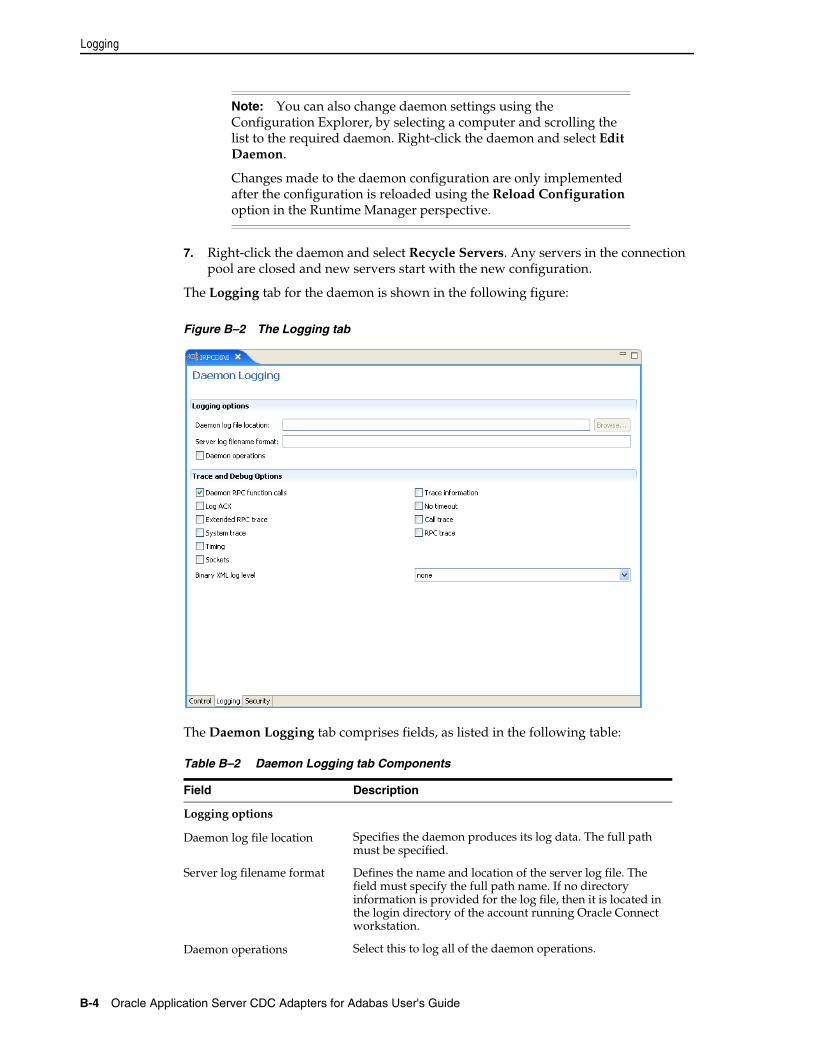
Logging
B-4 Oracle Application Server CDC Adapters for Adabas User's Guide
7. Right-click the daemon and select Recycle Servers. Any servers in the connection pool are closed and new servers start with the new configuration.
The Logging tab for the daemon is shown in the following figure:
Figure B–2 The Logging tab
The Daemon Logging tab comprises fields, as listed in the following table:
Note: You can also change daemon settings using the Configuration Explorer, by selecting a computer and scrolling the list to the required daemon. Right-click the daemon and select Edit Daemon.
Changes made to the daemon configuration are only implemented after the configuration is reloaded using the Reload Configuration option in the Runtime Manager perspective.
Table B–2 Daemon Logging tab Components
Field Description
Logging options
Daemon log file location Specifies the daemon produces its log data. The full path must be specified.
Server log filename format Defines the name and location of the server log file. The field must specify the full path name. If no directory information is provided for the log file, then it is located in the login directory of the account running Oracle Connect workstation.
Daemon operations Select this to log all of the daemon operations.
Security
Advanced Tuning of the Daemon B-5
The following tokens can appear in the log file template and are replaced accordingly:
■ %A: workspace name
■ %D: date (yymmdd)
■ %I: instance number of the given workspace server
■ %L: server account login directory
■ %P: server process ID
■ %T: time (hhmmss)
■ %U: server account name (user name)
For example, %L/server_%A%I.log may produce a log file such as: /usr/smith/server_sales15.log.
The default log file template is %L/server_%A%I.log.
SecurityThe following Security tab for the daemon is used to:
■ Grant administration rights for the daemon.
■ Determine access to the computer.
Tracing and debug options
Daemon RPC function calls Select this to log all daemon RPC function calls.
Log ACX Select this if you want to log requests and processes.
Extended RPC trace Generates a verbose message in the server log file for each low-level RPC function called. This is useful for troubleshooting the server.
System trace Generates system-specific tracing of various operations.
Timing Generates a time stamp for every entry to the server log file.
Sockets Generates a message in the server log file for each socket operation.
Trace information Select this to log low-level RPC operations.
No timeout Disables the standard RPC timeouts, setting them to a long duration (approximately an hour) to facilitate debugging.
Call trace Generates a message in the server log file for each RPC function called. This is useful for troubleshooting the server.
RPC trace Enables debugging messages on the server.
Binary XML log level Sets the binary XML log level. Your options are:
■ debug
■ none (the default)
■ api
■ info
Table B–2 (Cont.) Daemon Logging tab Components
Field Description
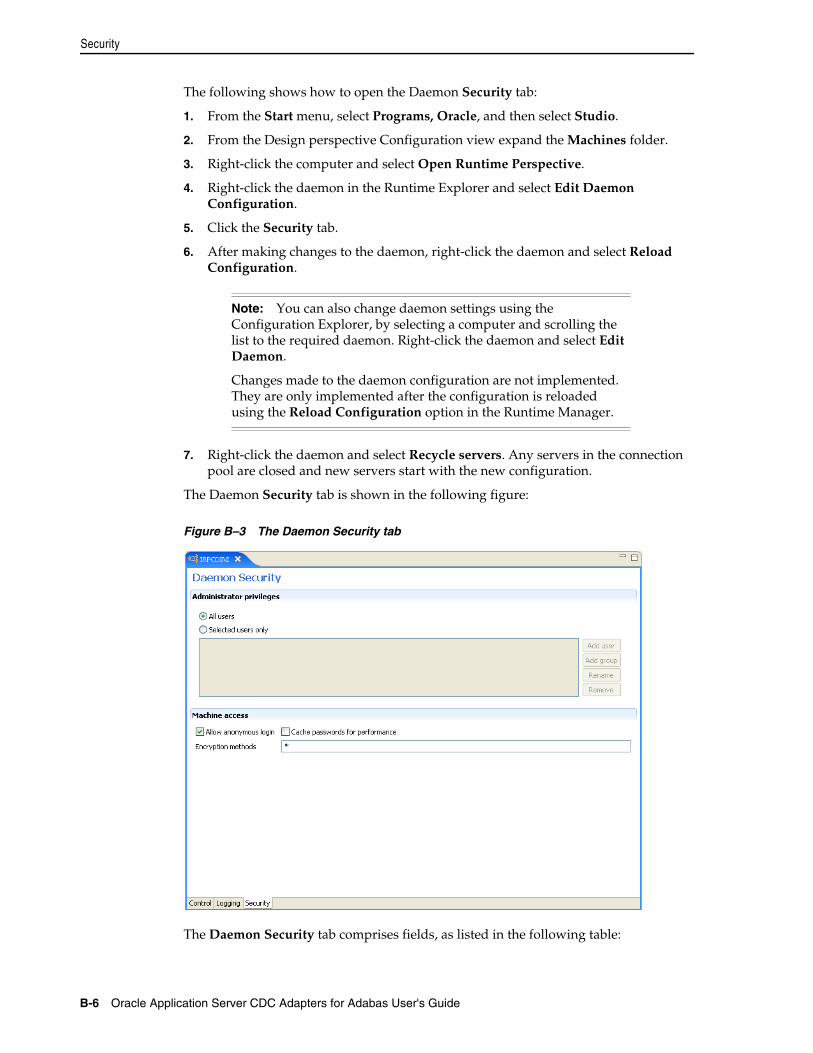
Security
B-6 Oracle Application Server CDC Adapters for Adabas User's Guide
The following shows how to open the Daemon Security tab:
1. From the Start menu, select Programs, Oracle, and then select Studio.
2. From the Design perspective Configuration view expand the Machines folder.
3. Right-click the computer and select Open Runtime Perspective.
4. Right-click the daemon in the Runtime Explorer and select Edit Daemon Configuration.
5. Click the Security tab.
6. After making changes to the daemon, right-click the daemon and select Reload Configuration.
7. Right-click the daemon and select Recycle servers. Any servers in the connection pool are closed and new servers start with the new configuration.
The Daemon Security tab is shown in the following figure:
Figure B–3 The Daemon Security tab
The Daemon Security tab comprises fields, as listed in the following table:
Note: You can also change daemon settings using the Configuration Explorer, by selecting a computer and scrolling the list to the required daemon. Right-click the daemon and select Edit Daemon.
Changes made to the daemon configuration are not implemented. They are only implemented after the configuration is reloaded using the Reload Configuration option in the Runtime Manager.
Workspaces
Advanced Tuning of the Daemon B-7
WorkspacesA daemon can include several workspaces. A workspace defines the server processes and environment that are used for the communication between the client and the server for the duration of the client request. Each workspace has its own definition. The workspace definition is divided into the following groups:
■ General
■ Server Mode
■ Security
GeneralUsing the General tab, you enter general information about the features that control the operation of the workspace, such as the server type, the command procedure used to start the workspace and the binding configuration associated with this workspace.
Do the following to open the General tab:
1. From the Start menu, select Programs, Oracle, and then select Studio.
2. From the Design perspective Configuration view, expand the Machines folder.
Table B–3 Daemon Security tab Components
Field Description
Administrators privileges
Identifies the users (accounts) allowed to perform administrative tasks (tasks that require administrative login).
All users Enables all users to access the daemon and change the settings.
Selected users only Identifies the names of users (accounts) and groups that can be administrators.1
If a user is not specified, the account from which the daemon was started is considered the administrator. Note that the daemon does not require the user to log in to the account on the system, but to log in to the daemon using the account name and password.
1 The name is prefixed with ’@’, to use the operating system GROUP feature.
Machine access Manages access to the computer.
Allow anonymous login
Whether workspaces allow anonymous logins (without user name/password entries). For the optimal level of security, keep this option unchecked and define a user name for the Daemon Administrators parameter. If unchecked, then no workspace can have an anonymous client. If checked, then a particular workspace allows anonymous clients.
Cached password Enables login passwords to be cached. This enhances performance by reducing login times for future connections from the same client in a session.
Encryption methods Specifies the encryption method used to send information across the network. The default is an asterisk (*), meaning that all methods are acceptable. If an encryption method is specified, it must be used. The RC4 and DES3 protocols are currently supported.
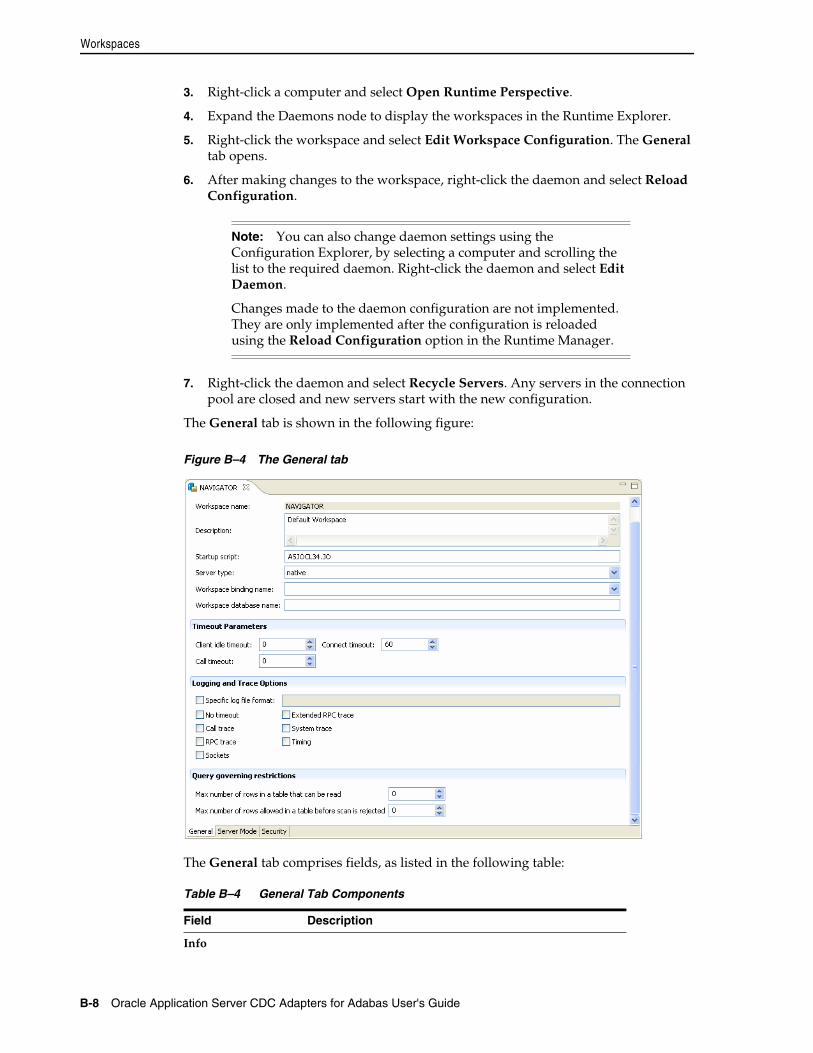
Workspaces
B-8 Oracle Application Server CDC Adapters for Adabas User's Guide
3. Right-click a computer and select Open Runtime Perspective.
4. Expand the Daemons node to display the workspaces in the Runtime Explorer.
5. Right-click the workspace and select Edit Workspace Configuration. The General tab opens.
6. After making changes to the workspace, right-click the daemon and select Reload Configuration.
7. Right-click the daemon and select Recycle Servers. Any servers in the connection pool are closed and new servers start with the new configuration.
The General tab is shown in the following figure:
Figure B–4 The General tab
The General tab comprises fields, as listed in the following table:
Note: You can also change daemon settings using the Configuration Explorer, by selecting a computer and scrolling the list to the required daemon. Right-click the daemon and select Edit Daemon.
Changes made to the daemon configuration are not implemented. They are only implemented after the configuration is reloaded using the Reload Configuration option in the Runtime Manager.
Table B–4 General Tab Components
Field Description
Info
Workspaces
Advanced Tuning of the Daemon B-9
Workspace name The name used to identify the workspace.
Note: The default configuration includes the default Navigator workspace. This workspace is automatically used if a workspace is not specified as part of the connection settings.
Description A description of the workspace.
Startup script The full path name of the script that starts the workspace server processes. The script specified here must always activate the nav_login procedure and then run the server program (svc). If you do not specify the directory, the startup procedure is taken from the directory where the daemon resides. Oracle Connect includes a default startup script, which it is recommended to use.
Server type This field is not applicable for use with OracleAS Adapters for Adabas.
Workspace binding name
This field is not applicable for use with OracleAS Adapters for Adabas.
Timeout parameters The time the client waits for the workspace server to start. If the workspace server does not start within this period, then the client is notified that the server did not respond. Specifying the timeout here overrides the default setting, specified in the Control section.
For more information, see Control for details about the Daemon Control section.
Client idle timeout The maximum amount of time a workspace client can be idle before the connection with the server is closed.
Connect timeout The time the client waits for a workspace server to start. If the workspace server does not start within this period, then the client is notified that the server did not respond.
Call timeout The timeout period for short calls for all daemons. The definition of a short call is a call that should be completed in a few seconds. For example, most calls to a database such as DESCRIBE should be completed in a few seconds as opposed to call like a GETROWS call, which can take a long time. In heavily loaded or otherwise slow systems, even short calls such as calls to open a file, may take a significant amount of time. If a short call takes more than the specified time to complete, then the connection is stopped. The default value for this parameter is 60 seconds. Values of less than 60 seconds are considered to be 60 seconds.
Specifying the timeout in a workspace overrides the value set in this field for that workspace.
Logging and Trace Options
Table B–4 (Cont.) General Tab Components
Field Description
Workspaces
B-10 Oracle Application Server CDC Adapters for Adabas User's Guide
Specific log file format
Defines the name and location of the server log file if you want the data written to a file instead of SYSOUT for the server process. The parameter must specify the name and the high level qualifier.
The following tokens can appear in the log file template and are replaced accordingly:
■ %A: workspace name
■ %D: date (yymmdd)
■ %I: instance number of the given workspace server
■ %L: server account's login directory
■ %P: server's process ID
■ %T: time (hhmmss)
■ %U: server's account name (user name)
Trace options Specifies the type of tracing to be performed. The following tracing options are available:
■ No timeout: Select this to disable the standard RPC timeouts, setting them to a long duration (approximately an hour) to facilitate debugging.
■ Call trace: Selecct this to generate a message in the server log file for each RPC function called. This is useful for troubleshooting the server.
■ RPC trace: Select this to enable debugging messages on the server.
■ Sockets: Select this to generate a message in the server log file for each socket operation. This is useful for troubleshooting client/server communication - providing a detailed trace of every client/server communication.
■ Extended RPC trace: Select this to generate a verbose message in the server log file for each low-level RPC function called. This is useful for troubleshooting the server.
■ System trace: Select this to generate operating system-specific tracing.
■ Timing: Select this to generate a time stamp for every entry to the server log file.
Query governing restrictions
Max number of rows in a table that can be read
Select the maximum number of table rows that are read in a query. When the number of rows read from a table exceeds the number stated the query returns an error.
Max number of rows allowed in a table before scan is rejected
Select the maximum number of table rows that can be scanned. This parameter has different behavior for query optimization and execution.
■ For query optimization, the value set is compared to the table cardinality. If the cardinality is greater than the value, the scan strategy is ignored as a possible strategy (unless it is the only available strategy).
■ For query execution, a scan is limited to the value set. When the number of rows scanned exceeds the number entered, the query returns an error.
Table B–4 (Cont.) General Tab Components
Field Description
Workspaces
Advanced Tuning of the Daemon B-11
Server ModeThe Server Mode tab lets you configure the features that control the operation of the servers started up by the workspace and allocated to clients.
For example, you can configure the workspace to start several servers for future use before any client request, instead of starting each server when a request is received from a client.
Do the following to open the Server Mode tab:
1. From the Start menu, select Programs, Oracle, and then select Studio.
2. From the Design Perspective Configuration view, expand the Machines folder.
3. Right-click the computer and select Open Runtime Perspective.
4. Expand the Daemons node to display the workspaces in the Runtime Explorer.
5. Right-click the workspace and select Edit Workspace Configuration.
6. Click the Server Mode tab.
7. After making changes to the workspace, right-click the daemon and select Reload Configuration.
8. Right-click the daemon and select Recycle Servers. Any servers in the connection pool are closed and new servers start with the new configuration.
The Server Mode tab is shown in the following figure:
Notes:
■ You can also change daemon settings using the Configuration Explorer, by selecting a computer and scrolling the list to the required daemon. Right-click the daemon and select Edit Daemon.
■ Changes made to the daemon configuration are not implemented. They are only implemented after the configuration is reloaded using the Reload Configuration option in the Runtime Manager.
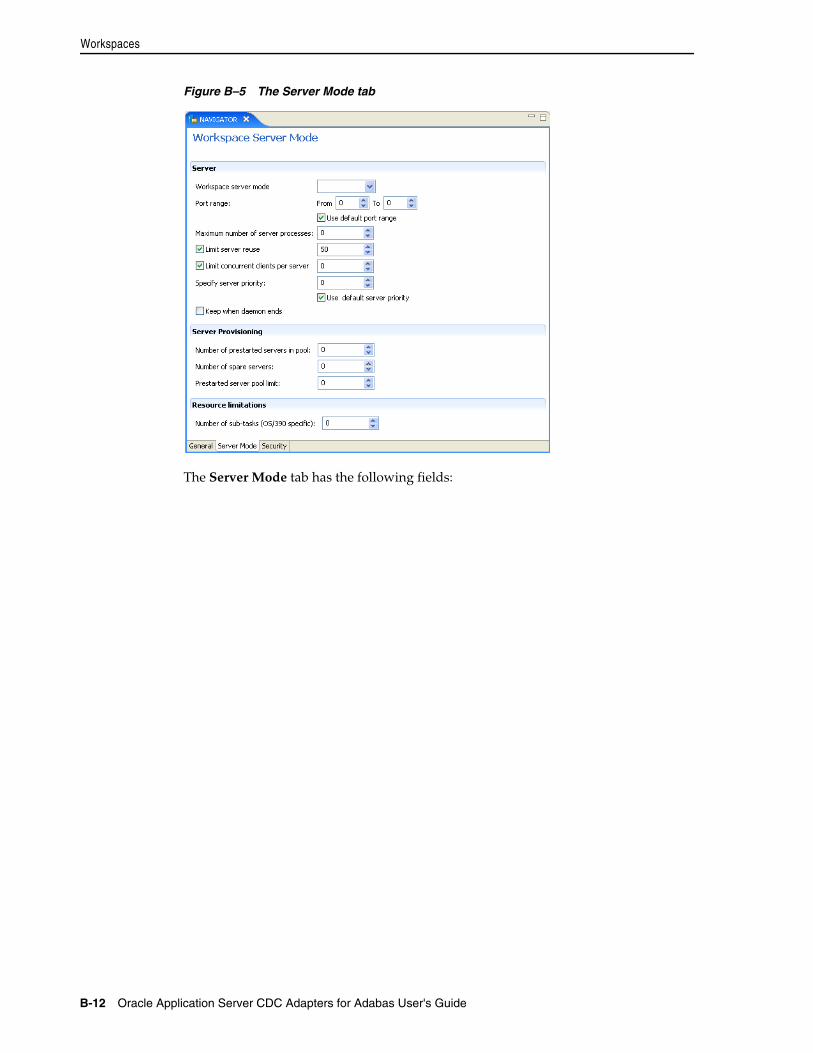
Workspaces
B-12 Oracle Application Server CDC Adapters for Adabas User's Guide
Figure B–5 The Server Mode tab
The Server Mode tab has the following fields:
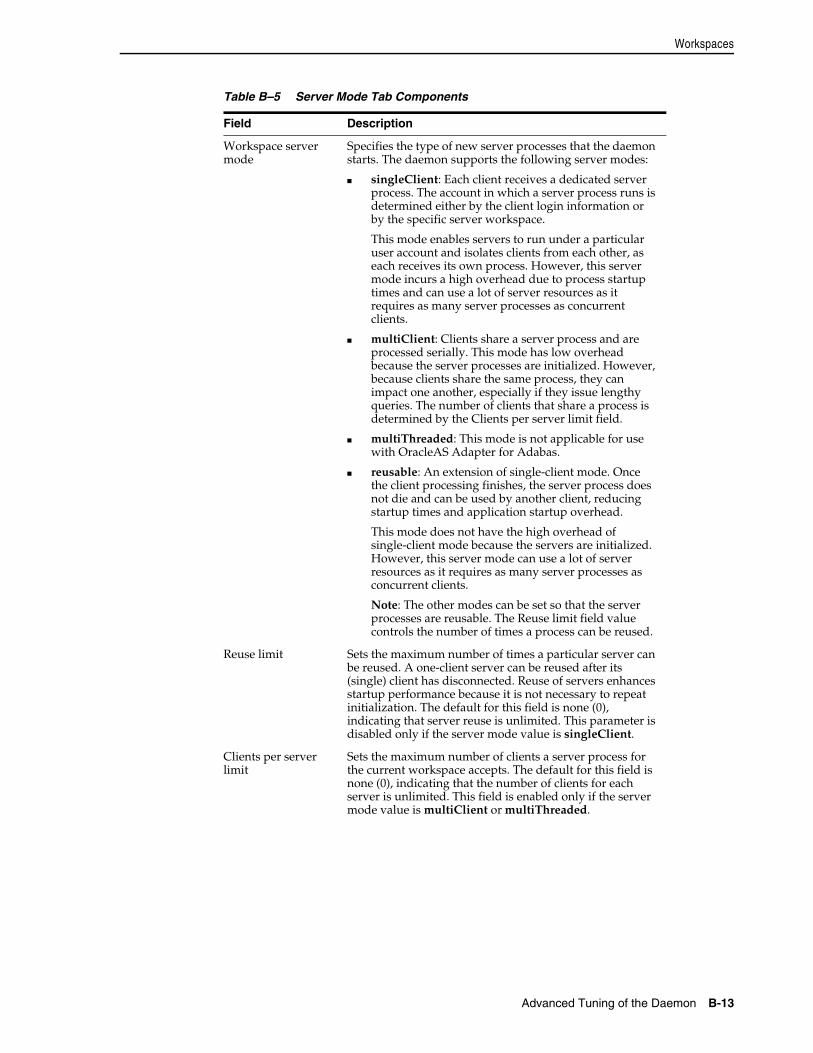
Workspaces
Advanced Tuning of the Daemon B-13
Table B–5 Server Mode Tab Components
Field Description
Workspace server mode
Specifies the type of new server processes that the daemon starts. The daemon supports the following server modes:
■ singleClient: Each client receives a dedicated server process. The account in which a server process runs is determined either by the client login information or by the specific server workspace.
This mode enables servers to run under a particular user account and isolates clients from each other, as each receives its own process. However, this server mode incurs a high overhead due to process startup times and can use a lot of server resources as it requires as many server processes as concurrent clients.
■ multiClient: Clients share a server process and are processed serially. This mode has low overhead because the server processes are initialized. However, because clients share the same process, they can impact one another, especially if they issue lengthy queries. The number of clients that share a process is determined by the Clients per server limit field.
■ multiThreaded: This mode is not applicable for use with OracleAS Adapter for Adabas.
■ reusable: An extension of single-client mode. Once the client processing finishes, the server process does not die and can be used by another client, reducing startup times and application startup overhead.
This mode does not have the high overhead of single-client mode because the servers are initialized. However, this server mode can use a lot of server resources as it requires as many server processes as concurrent clients.
Note: The other modes can be set so that the server processes are reusable. The Reuse limit field value controls the number of times a process can be reused.
Reuse limit Sets the maximum number of times a particular server can be reused. A one-client server can be reused after its (single) client has disconnected. Reuse of servers enhances startup performance because it is not necessary to repeat initialization. The default for this field is none (0), indicating that server reuse is unlimited. This parameter is disabled only if the server mode value is singleClient.
Clients per server limit
Sets the maximum number of clients a server process for the current workspace accepts. The default for this field is none (0), indicating that the number of clients for each server is unlimited. This field is enabled only if the server mode value is multiClient or multiThreaded.
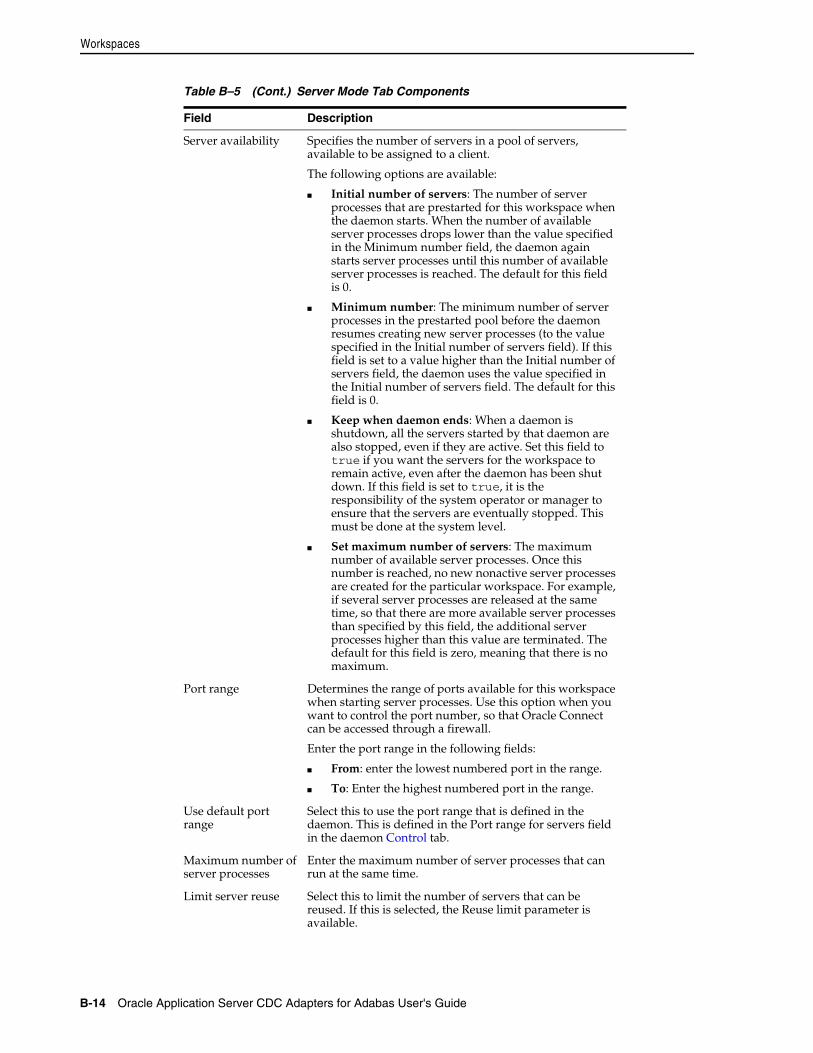
Workspaces
B-14 Oracle Application Server CDC Adapters for Adabas User's Guide
Server availability Specifies the number of servers in a pool of servers, available to be assigned to a client.
The following options are available:
■ Initial number of servers: The number of server processes that are prestarted for this workspace when the daemon starts. When the number of available server processes drops lower than the value specified in the Minimum number field, the daemon again starts server processes until this number of available server processes is reached. The default for this field is 0.
■ Minimum number: The minimum number of server processes in the prestarted pool before the daemon resumes creating new server processes (to the value specified in the Initial number of servers field). If this field is set to a value higher than the Initial number of servers field, the daemon uses the value specified in the Initial number of servers field. The default for this field is 0.
■ Keep when daemon ends: When a daemon is shutdown, all the servers started by that daemon are also stopped, even if they are active. Set this field to true if you want the servers for the workspace to remain active, even after the daemon has been shut down. If this field is set to true, it is the responsibility of the system operator or manager to ensure that the servers are eventually stopped. This must be done at the system level.
■ Set maximum number of servers: The maximum number of available server processes. Once this number is reached, no new nonactive server processes are created for the particular workspace. For example, if several server processes are released at the same time, so that there are more available server processes than specified by this field, the additional server processes higher than this value are terminated. The default for this field is zero, meaning that there is no maximum.
Port range Determines the range of ports available for this workspace when starting server processes. Use this option when you want to control the port number, so that Oracle Connect can be accessed through a firewall.
Enter the port range in the following fields:
■ From: enter the lowest numbered port in the range.
■ To: Enter the highest numbered port in the range.
Use default port range
Select this to use the port range that is defined in the daemon. This is defined in the Port range for servers field in the daemon Control tab.
Maximum number of server processes
Enter the maximum number of server processes that can run at the same time.
Limit server reuse Select this to limit the number of servers that can be reused. If this is selected, the Reuse limit parameter is available.
Table B–5 (Cont.) Server Mode Tab Components
Field Description
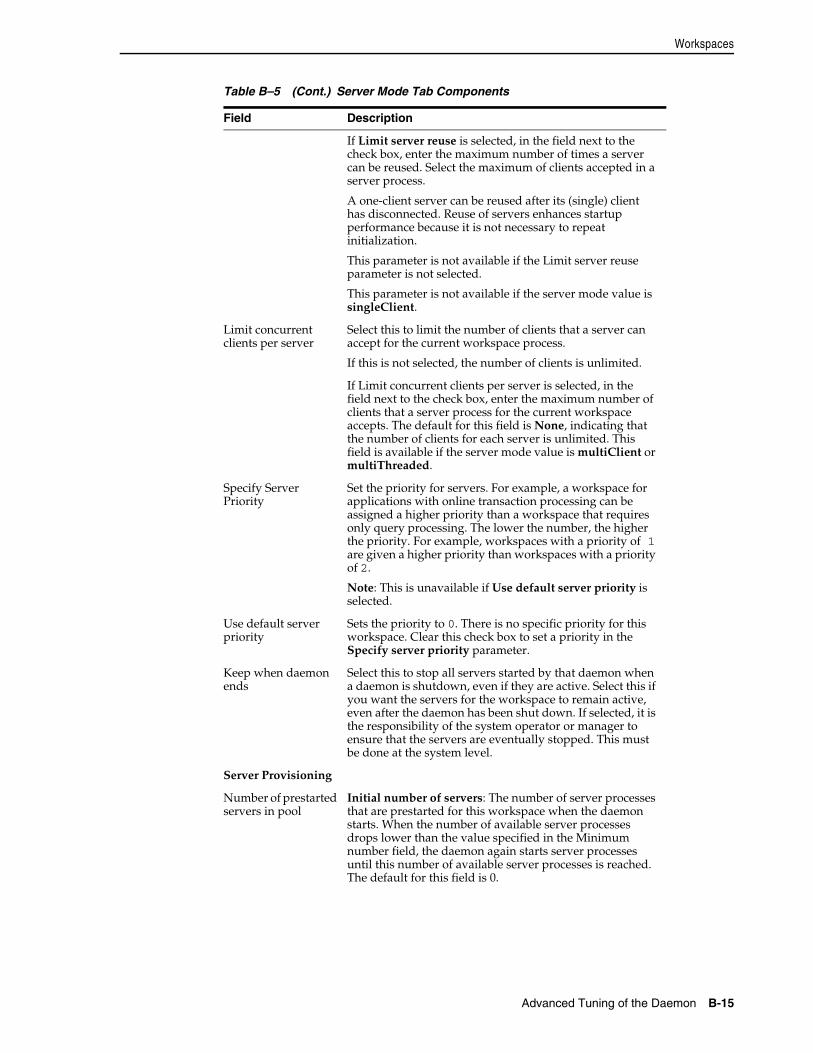
Workspaces
Advanced Tuning of the Daemon B-15
If Limit server reuse is selected, in the field next to the check box, enter the maximum number of times a server can be reused. Select the maximum of clients accepted in a server process.
A one-client server can be reused after its (single) client has disconnected. Reuse of servers enhances startup performance because it is not necessary to repeat initialization.
This parameter is not available if the Limit server reuse parameter is not selected.
This parameter is not available if the server mode value is singleClient.
Limit concurrent clients per server
Select this to limit the number of clients that a server can accept for the current workspace process.
If this is not selected, the number of clients is unlimited.
If Limit concurrent clients per server is selected, in the field next to the check box, enter the maximum number of clients that a server process for the current workspace accepts. The default for this field is None, indicating that the number of clients for each server is unlimited. This field is available if the server mode value is multiClient or multiThreaded.
Specify Server Priority
Set the priority for servers. For example, a workspace for applications with online transaction processing can be assigned a higher priority than a workspace that requires only query processing. The lower the number, the higher the priority. For example, workspaces with a priority of 1 are given a higher priority than workspaces with a priority of 2.
Note: This is unavailable if Use default server priority is selected.
Use default server priority
Sets the priority to 0. There is no specific priority for this workspace. Clear this check box to set a priority in the Specify server priority parameter.
Keep when daemon ends
Select this to stop all servers started by that daemon when a daemon is shutdown, even if they are active. Select this if you want the servers for the workspace to remain active, even after the daemon has been shut down. If selected, it is the responsibility of the system operator or manager to ensure that the servers are eventually stopped. This must be done at the system level.
Server Provisioning
Number of prestarted servers in pool
Initial number of servers: The number of server processes that are prestarted for this workspace when the daemon starts. When the number of available server processes drops lower than the value specified in the Minimum number field, the daemon again starts server processes until this number of available server processes is reached. The default for this field is 0.
Table B–5 (Cont.) Server Mode Tab Components
Field Description
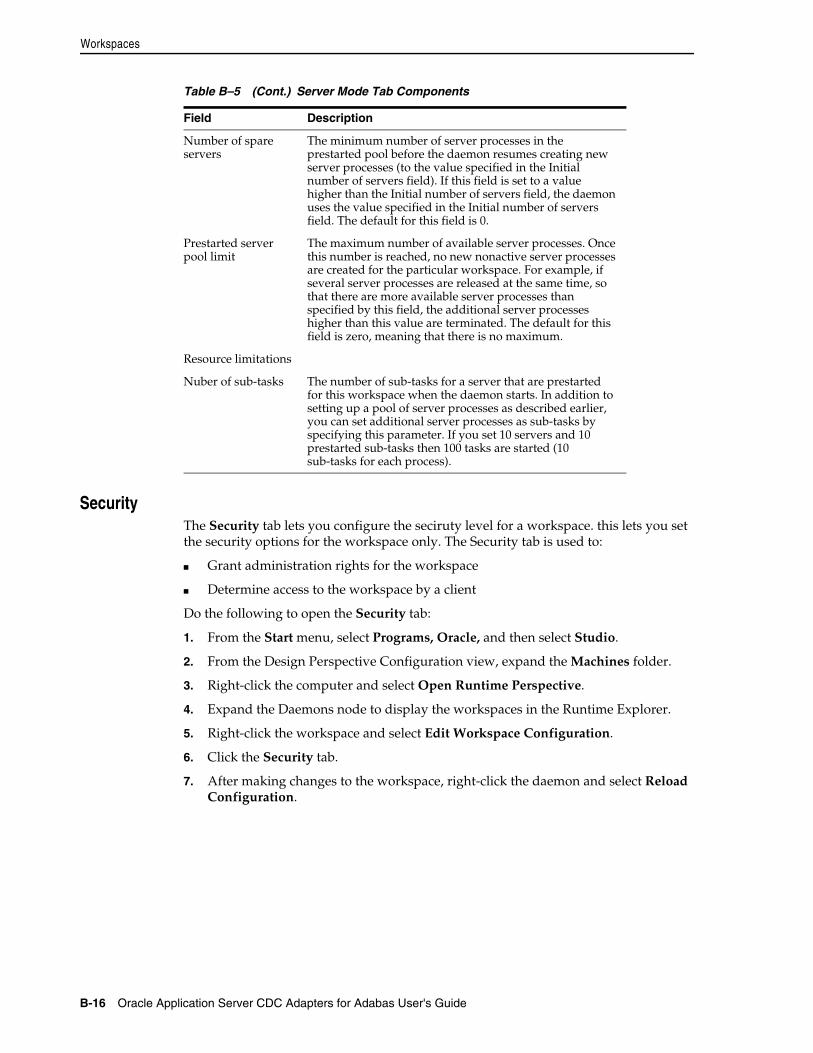
Workspaces
B-16 Oracle Application Server CDC Adapters for Adabas User's Guide
SecurityThe Security tab lets you configure the seciruty level for a workspace. this lets you set the security options for the workspace only. The Security tab is used to:
■ Grant administration rights for the workspace
■ Determine access to the workspace by a client
Do the following to open the Security tab:
1. From the Start menu, select Programs, Oracle, and then select Studio.
2. From the Design Perspective Configuration view, expand the Machines folder.
3. Right-click the computer and select Open Runtime Perspective.
4. Expand the Daemons node to display the workspaces in the Runtime Explorer.
5. Right-click the workspace and select Edit Workspace Configuration.
6. Click the Security tab.
7. After making changes to the workspace, right-click the daemon and select Reload Configuration.
Number of spare servers
The minimum number of server processes in the prestarted pool before the daemon resumes creating new server processes (to the value specified in the Initial number of servers field). If this field is set to a value higher than the Initial number of servers field, the daemon uses the value specified in the Initial number of servers field. The default for this field is 0.
Prestarted server pool limit
The maximum number of available server processes. Once this number is reached, no new nonactive server processes are created for the particular workspace. For example, if several server processes are released at the same time, so that there are more available server processes than specified by this field, the additional server processes higher than this value are terminated. The default for this field is zero, meaning that there is no maximum.
Resource limitations
Nuber of sub-tasks The number of sub-tasks for a server that are prestarted for this workspace when the daemon starts. In addition to setting up a pool of server processes as described earlier, you can set additional server processes as sub-tasks by specifying this parameter. If you set 10 servers and 10 prestarted sub-tasks then 100 tasks are started (10 sub-tasks for each process).
Table B–5 (Cont.) Server Mode Tab Components
Field Description
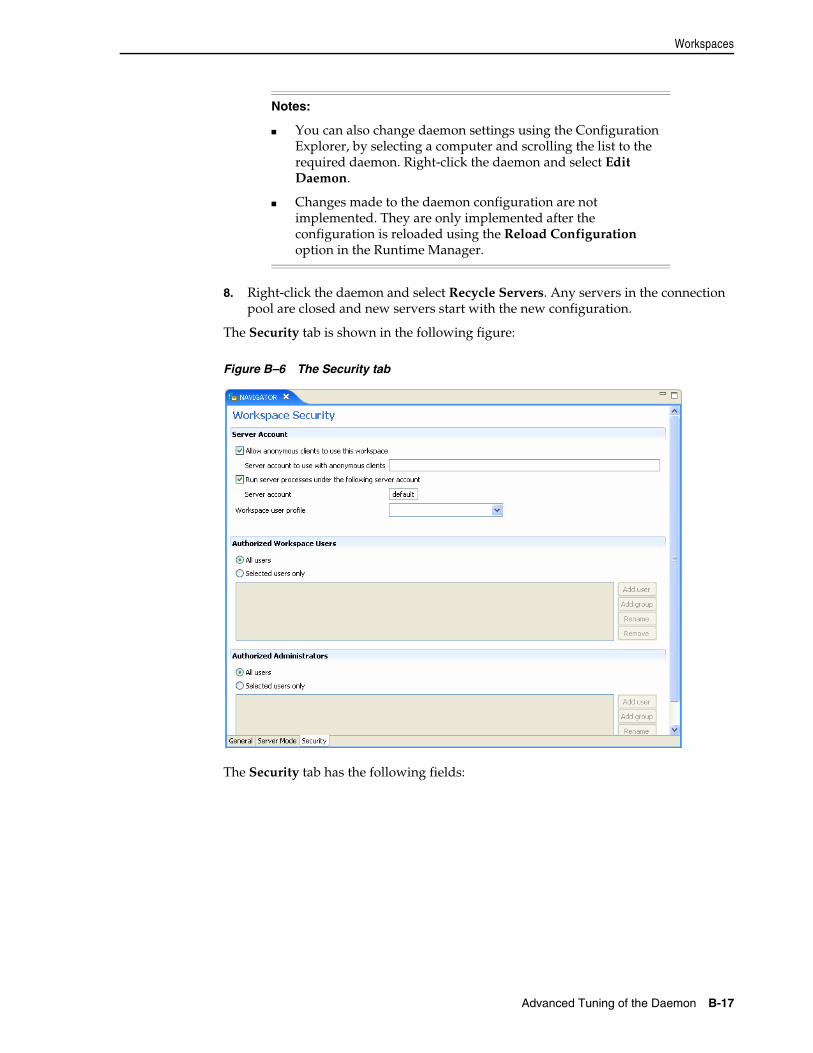
Workspaces
Advanced Tuning of the Daemon B-17
8. Right-click the daemon and select Recycle Servers. Any servers in the connection pool are closed and new servers start with the new configuration.
The Security tab is shown in the following figure:
Figure B–6 The Security tab
The Security tab has the following fields:
Notes:
■ You can also change daemon settings using the Configuration Explorer, by selecting a computer and scrolling the list to the required daemon. Right-click the daemon and select Edit Daemon.
■ Changes made to the daemon configuration are not implemented. They are only implemented after the configuration is reloaded using the Reload Configuration option in the Runtime Manager.
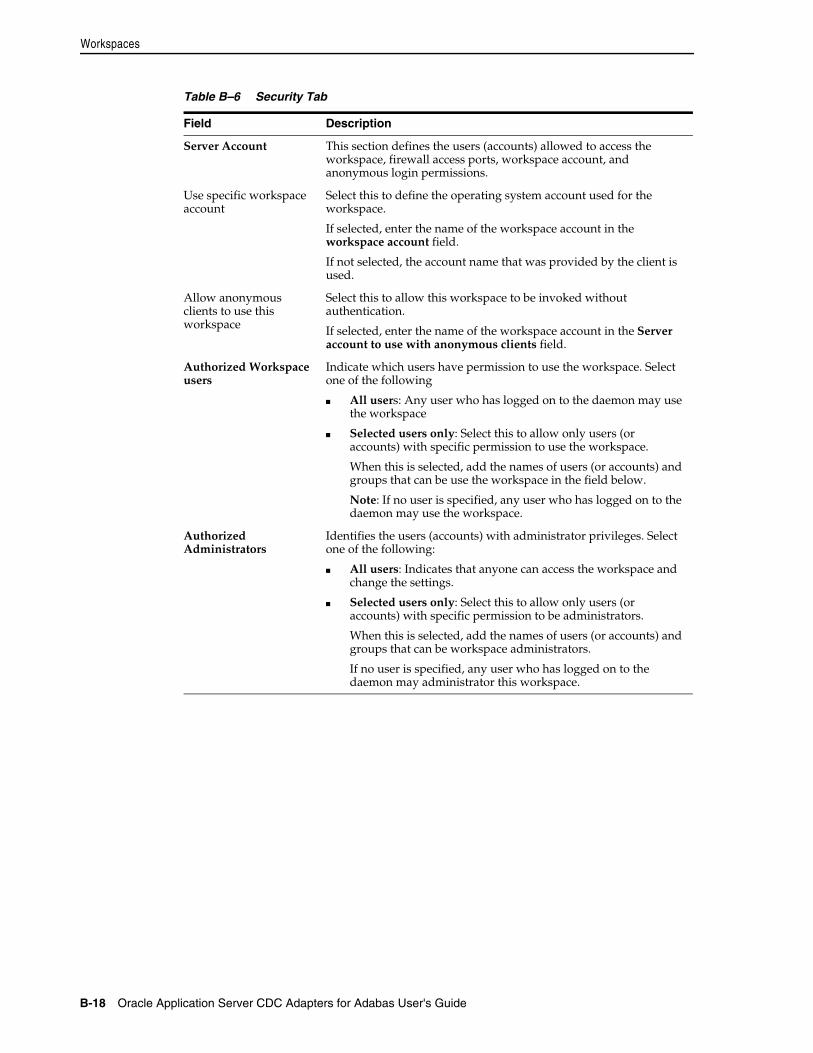
Workspaces
B-18 Oracle Application Server CDC Adapters for Adabas User's Guide
Table B–6 Security Tab
Field Description
Server Account This section defines the users (accounts) allowed to access the workspace, firewall access ports, workspace account, and anonymous login permissions.
Use specific workspace account
Select this to define the operating system account used for the workspace.
If selected, enter the name of the workspace account in the workspace account field.
If not selected, the account name that was provided by the client is used.
Allow anonymous clients to use this workspace
Select this to allow this workspace to be invoked without authentication.
If selected, enter the name of the workspace account in the Server account to use with anonymous clients field.
Authorized Workspace users
Indicate which users have permission to use the workspace. Select one of the following
■ All users: Any user who has logged on to the daemon may use the workspace
■ Selected users only: Select this to allow only users (or accounts) with specific permission to use the workspace.
When this is selected, add the names of users (or accounts) and groups that can be use the workspace in the field below.
Note: If no user is specified, any user who has logged on to the daemon may use the workspace.
Authorized Administrators
Identifies the users (accounts) with administrator privileges. Select one of the following:
■ All users: Indicates that anyone can access the workspace and change the settings.
■ Selected users only: Select this to allow only users (or accounts) with specific permission to be administrators.
When this is selected, add the names of users (or accounts) and groups that can be workspace administrators.
If no user is specified, any user who has logged on to the daemon may administrator this workspace.
C
Editing Properties for the OracleAS CDC Adapters for Adabas C-1
C Editing Properties for the OracleAS CDCAdapters for Adabas
The OracleAS CDC Adapter for Adabas has several configuration properties. You can edit the properties in Oracle Studio after Setting Up a Change Data Capture with the OracleAS CDC Adapter for Adabas. This chapter describes the configuration properties and how to edit them. It contains the following topics:
■ Editing Properties in Oracle Studio
■ Configuration Properties
■ Access to Change Events
■ Transaction Support
■ Security
Editing Properties in Oracle StudioAfter you create the OracleAS CDC solution, you can also edit the properties. The solution create two adapters, the adapter and the CDC Queue adapter. The adapter is created on the server computer and the CDC Queue adapter is created on the staging area computer. For more information, see Setting up a Change Data Capture in Oracle Studio.
Editing the OracleAS CDC Adapter PropertiesTo edit the CDC adapter properties, open the Oracle Studio Design perspective and find the binding for the CDC solution on the server computer. Then open the adapter, which contains the name of the CDC solution with the suffix _ag added to it. Changes to adapter properties are reset when the CDC solution is redeployed, therefore these changes must be reapplied following solution deployment. For information on deploying a solution, see Deploying a Change Data Capture.
Do the following to edit the CDC adapter properties.
1. From the Start menu, select, Programs, Oracle, and then select Studio.
2. Expand the Machines folder.
3. Expand the server machine that you created when Setting up a Change Data Capture in Oracle Studio.
4. Expand the Bindings folder, and then expand the binding the name of the CDC solution with the suffix _ag added to it.
5. Expand the Adapter folder.
Configuration Properties
C-2 Oracle Application Server CDC Adapters for Adabas User's Guide
6. Right-click the adapter the adapter with the name of the solution and the suffix _ag and select Open.
The adapter configuration editor opens in the editor, which displays the properties for the adapter.
7. Edit the adapter parameters as required.
For a description of the properties, see OracleAS CDC Adapter Configuration Properties.
Configuration PropertiesThis section describes the configuration properties for the OracleAS CDC Adapter for Adabas. You can edit the properties using Oracle Studio. The OracleAS CDC Adapter for Adabas has the following types of properties:
■ Data Source Properties
■ CDC Logger Properties
■ OracleAS CDC Adapter Configuration Properties
■ Change Router Properties
■ Referential Integrity Considerations
Data Source PropertiesThe following are the Data Source Properties:
■ dbNumber: The Adabas database number.
■ predictFileNumber: (Predict only) The Predict file number.
■ predictDbNumber: (Predict only) When the Predict file resides in a different database than the data indicate the database number in which the Predict file resides.
CDC Logger PropertiesTracking File name: The name of the mainframe file that is used to register the Adabas archive files. This must be the same name that is defined in the UE2 procedure. For more information, see The Tracking File.
Adabas Version: the version of Adabas you are using. All versions earlier than version 8 are supported.
The OracleAS CDC Adapter for Adabas also supports the standard CDC agent configuration properties. For more information, see Set up the CDC Service.
The Tracking FileThe OracleAS CDC Adatpter for Adabas CDC solution uses a tracking file to register the archive files. These files should be created on DASD directly by the UE2 procedure or restored from tapes or cartridges. The tracking file specifies the following information regarding each registered archived PLOG file:
■ The data set name.
■ The time stamp indicating the starting time of each archived PLOG.
■ The Adabas session number.
Configuration Properties
Editing Properties for the OracleAS CDC Adapters for Adabas C-3
■ The starting block counter.
For more information, see Setting up the Tracking File.
OracleAS CDC Adapter Configuration PropertiesThis section describes the common configuration properties for Oracle CDC adapters and the change router configuration properties, which is located on the staging area computer.
To edit the CDC adapter properties, open the Oracle Studio Design perspective and find the binding for the CDC solution you created. The binding contains the name of the CDC solution with the suffix _ag added to it. Open the adapter with the name of the solution and the suffix _ag to edit the properties. For information on how to edit adapter properties in Oracle Studio, see Editing the OracleAS CDC Adapter Properties. Changes to adapter properties are reset when the CDC solution is redeployed, therefore these changes must be reapplied following solution deployment.
See the following topics for a description of the configuration properties:
■ CDC Queue Adapter Properties
■ Common CDC Adapter Properties
CDC Queue Adapter PropertiesThe CDC Queue adapter is a data base adapter that is found in the staging area. It is created automatically when Setting up a Change Data Capture in Oracle Studio. It has three properties:
■ connectString
■ defaultDatasource
■ multipleResults
To ensure that the queue adapter works properly with your CDC solution, do not change the values for these properties.
The CDC Queue adapter may have additional properties that can be viewed in the adapter’s XML schema. For infomation on how to view the XML, see Adapter Metadata XML.
The following property, which is viewed in the XML only can be edited:
■ maxRecords: The maximum number of records that can be returned.
For information on how to edit XML records in Oracle Studio, see Advanced Tuning of the Metadata.
Common CDC Adapter PropertiesThe following table describes the common configuration properties for Oracle CDC adapters. The OracleAS CDC Adapter for Adabas uses only these properties.
Table C–1 CDC Adapter Configuration Properties
Parameter Type Default Description
datasource string The name of the data source for the OracleAS CDC adapter.

Configuration Properties
C-4 Oracle Application Server CDC Adapters for Adabas User's Guide
Change Router PropertiesThe following table describes the SQL-based change event router configuration parameters.
routers A list of users who can connect to the adapter and get change events from it for processing. If no routers are specified, any valid user for the workspace can get change events from the Oracle Connect adapter.
To add the list of users in Oracle Studio, expand the router property then right-click users. A new entry called Item(#) is added to the Property column. In the Value column, enter the User Name for this router.
retryInterval int 2 The polling interval for the database journal When no events are received in the database journal, the adapter waits for the amount of time (in seconds) that is indicated for this property.
getTransactionInfo boolean true When set to true, transaction information (begin, commit, rollback) is returned.
getBeforeImage boolean false When true, before image information is returned.
realTime boolean true When true, this reduces latency in getting change events, however it also increases the polling of the database journal.
The change router asks for N events from the adapter. If the adapter finds fewer than N events in the database journal and realTime is true, these events are immediately returned to the change router. If realTime is false, the adapter polls the journal again after waiting for the number of seconds indicated in the retryInterval.
logLevel The logging level. The following are the available log levels:
■ none
■ api
■ internalCalls
■ info
■ debug
checkTimeoutEveryNEvents int 100 The number of events that occur before the CDC adapter checks the timeout value. For example, if this property is set to 100, the adapter checks the timeout value after 100 events have taken place. If the amount of time set in the timeout property is past, the adapter times out.
Table C–1 (Cont.) CDC Adapter Configuration Properties
Parameter Type Default Description
Configuration Properties
Editing Properties for the OracleAS CDC Adapters for Adabas C-5
To edit the router properties, open the Oracle Studio Design perspective and find the binding for the CDC solution you created. The binding contains the name of the CDC solution with the suffix _router added to it. Open the adapter with the name of the solution and the suffix _router to edit the properties. For information on how to edit adapter properties in Oracle Studio, see Editing the OracleAS CDC Adapter Properties.
Table C–2 Change Router Configuration Parameters
Parameter Type Default Description
cdcDatasource string The OracleAS Change Data Source.
eliminateUncommittedChanges Boolean false When set to true, only committed change records are moved to the Change Table. If false, all change records are moved to the change tables (in which case, memory usage is minimal) hence the change table may contain rolled back data. For most adapters, following the RI considerations (see Referential Integrity Considerations) results in rolled-back changes eliminated naturally by compensating change records generated by the adapter in case of a rollback. Consult the respective CDC adapter documentation for details.
eventExpirationHours int 48 Indicates how long change records are kept in change tables within the staging area. After the indicated time, change records are deleted.
You can set a value between 0 and 50000.
A value of 0 means that the records are never deleted. A value of 1 indicates that the records are kept for one hour.
logLevel enum The logging level for the router. The following are the available log levels:
■ none
■ api
■ internalCalls
■ info
■ debug.
maxDeletedEventsInBatch int 500 Controls how many expired change records are delete in a single pass. This number may need to be lowered in some rare cases to reduce latency when a large number of change events is continuously being received.
maxOpenfiles int 200 Controls the number of physical files opened by the router.
Configuration Properties
C-6 Oracle Application Server CDC Adapters for Adabas User's Guide
maxTransactionMemory int (in Kb)
1000 Specifies how much memory can be stored in memory per transaction before it is off-loaded to disk. This number should be higher than the average transaction size so that the slower-than-memory disk is not used too often.
maxStagingMemory int (in Kb)
100000
Specifies how much memory in total can be used for storing active transactions (ones that have not yet committed or rolled back).
sourceEventQueue
■ server
■ workspace
■ adapter
■ eventWait
■ maxEventsAsBlocks
■ reconnectWait
■ fixedNat
Structure:
string
string
string
int
int
int
boolean
30
250
15
false
Connection information to the OracleAS CDC adapter.
stagingDirectory string Specifies the directory where the staging area change files are stored. This directory also stores off-loaded transactions, timed-out transactions, and error files.
transactionTimeout int (in seconds)
3600 Specifies how long can a transaction be active without getting new events. This parameter should be set according to the corresponding setting of the captured database. In particular, this setting must not be lower than the database’s transaction time out setting as this may lead to the loss of transactions.
useType enum sqlBbased Cdc
This parameter must be set to this value.
routers A list of users who can connect to the change event router and get change events from it for processing. If no routers are specified, any valid Oracle Connect user for the workspace may get change events from the adapter.
To add the list of users in Oracle Studio, expand the router property then right-click users. A new entry called Item(#) is added to the Property column. In the Value column, enter the User Name for this router.
Table C–2 (Cont.) Change Router Configuration Parameters
Parameter Type Default Description
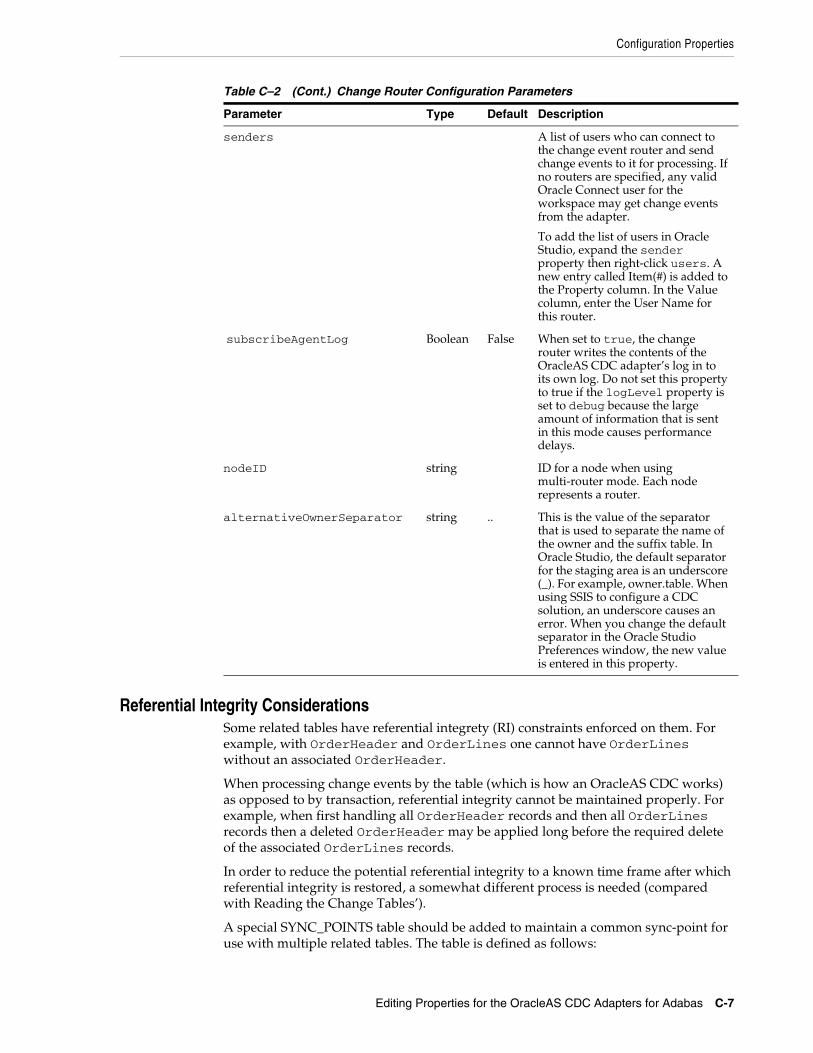
Configuration Properties
Editing Properties for the OracleAS CDC Adapters for Adabas C-7
Referential Integrity ConsiderationsSome related tables have referential integrety (RI) constraints enforced on them. For example, with OrderHeader and OrderLines one cannot have OrderLines without an associated OrderHeader.
When processing change events by the table (which is how an OracleAS CDC works) as opposed to by transaction, referential integrity cannot be maintained properly. For example, when first handling all OrderHeader records and then all OrderLines records then a deleted OrderHeader may be applied long before the required delete of the associated OrderLines records.
In order to reduce the potential referential integrity to a known time frame after which referential integrity is restored, a somewhat different process is needed (compared with Reading the Change Tables’).
A special SYNC_POINTS table should be added to maintain a common sync-point for use with multiple related tables. The table is defined as follows:
senders A list of users who can connect to the change event router and send change events to it for processing. If no routers are specified, any valid Oracle Connect user for the workspace may get change events from the adapter.
To add the list of users in Oracle Studio, expand the sender property then right-click users. A new entry called Item(#) is added to the Property column. In the Value column, enter the User Name for this router.
subscribeAgentLog Boolean False When set to true, the change router writes the contents of the OracleAS CDC adapter’s log in to its own log. Do not set this property to true if the logLevel property is set to debug because the large amount of information that is sent in this mode causes performance delays.
nodeID string ID for a node when using multi-router mode. Each node represents a router.
alternativeOwnerSeparator string .. This is the value of the separator that is used to separate the name of the owner and the suffix table. In Oracle Studio, the default separator for the staging area is an underscore (_). For example, owner.table. When using SSIS to configure a CDC solution, an underscore causes an error. When you change the default separator in the Oracle Studio Preferences window, the new value is entered in this property.
Table C–2 (Cont.) Change Router Configuration Parameters
Parameter Type Default Description
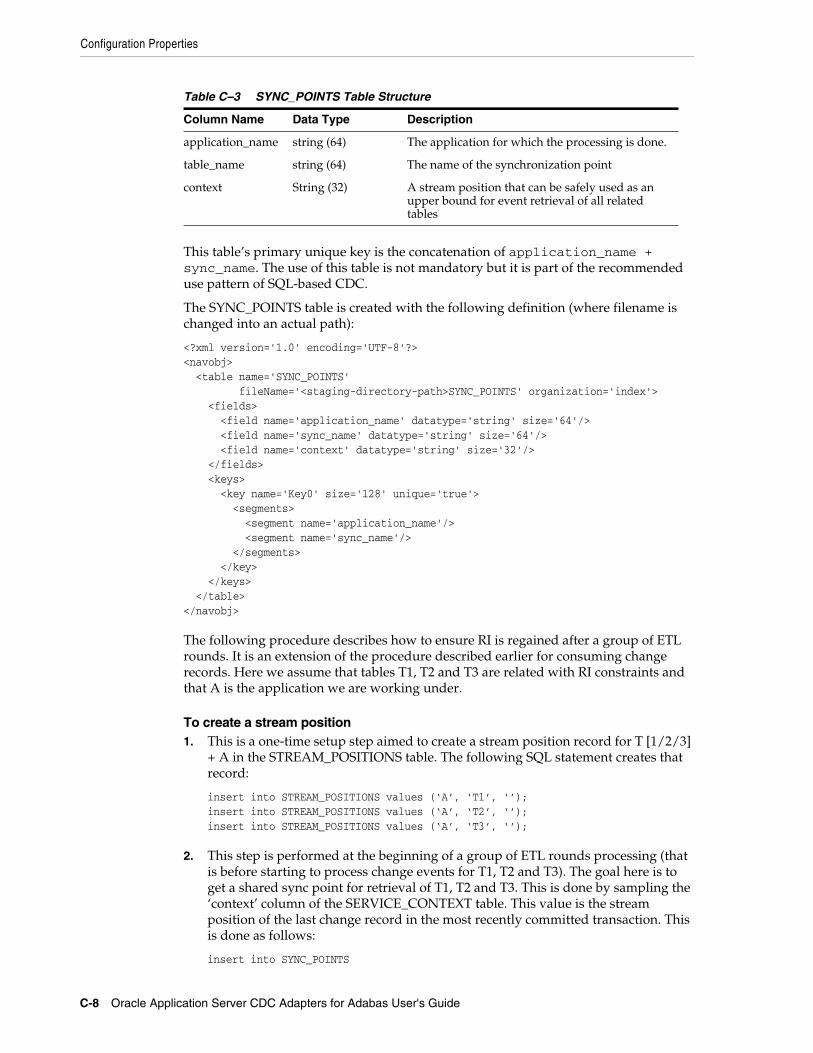
Configuration Properties
C-8 Oracle Application Server CDC Adapters for Adabas User's Guide
This table’s primary unique key is the concatenation of application_name + sync_name. The use of this table is not mandatory but it is part of the recommended use pattern of SQL-based CDC.
The SYNC_POINTS table is created with the following definition (where filename is changed into an actual path):
<?xml version='1.0' encoding='UTF-8'?><navobj> <table name='SYNC_POINTS' fileName='<staging-directory-path>SYNC_POINTS' organization='index'> <fields> <field name='application_name' datatype='string' size='64'/> <field name='sync_name' datatype='string' size='64'/> <field name='context' datatype='string' size='32'/> </fields> <keys> <key name='Key0' size='128' unique='true'> <segments> <segment name='application_name'/> <segment name='sync_name'/> </segments> </key> </keys> </table></navobj>
The following procedure describes how to ensure RI is regained after a group of ETL rounds. It is an extension of the procedure described earlier for consuming change records. Here we assume that tables T1, T2 and T3 are related with RI constraints and that A is the application we are working under.
To create a stream position1. This is a one-time setup step aimed to create a stream position record for T [1/2/3]
+ A in the STREAM_POSITIONS table. The following SQL statement creates that record:
insert into STREAM_POSITIONS values (‘A’, ‘T1’, ‘’);insert into STREAM_POSITIONS values (‘A’, ‘T2’, ‘’);insert into STREAM_POSITIONS values (‘A’, ‘T3’, ‘’);
2. This step is performed at the beginning of a group of ETL rounds processing (that is before starting to process change events for T1, T2 and T3). The goal here is to get a shared sync point for retrieval of T1, T2 and T3. This is done by sampling the ‘context’ column of the SERVICE_CONTEXT table. This value is the stream position of the last change record in the most recently committed transaction. This is done as follows:
insert into SYNC_POINTS
Table C–3 SYNC_POINTS Table Structure
Column Name Data Type Description
application_name string (64) The application for which the processing is done.
table_name string (64) The name of the synchronization point
context String (32) A stream position that can be safely used as an upper bound for event retrieval of all related tables
Access to Change Events
Editing Properties for the OracleAS CDC Adapters for Adabas C-9
select 'A' application_name, 'T123' sync_name, context from SERVICE_CONTEXT;
Here, T123 is the name chosen for the synchronization [points of tables T1, T2, and T3.
3. This step is where change data is actually read. It occurs on each ETL round.
select n.* from T t, STREAM_POSITIONS sp, SYNC_POINTS sy where sp.application_name = 'A' and sp.table_name = 'T' and sy.application_name = sp.application_name and sy.sync_name = 'T123' and n.context > sp.context and n.context <= sy.context order by n.context;
Note that “n.context <= sy.context” is used because the context represents a change record to be processed and processing should include the change record associated with sy.context, too.
This query retrieves change records starting from just after the last handled change record but stopping at a common sync point. “n.*” can be replaced with an explicit list of columns, however it is important that the ‘context’ column must be selected as this is the change record stream position which is required for the next step.
This step occurs after each ETL round when all change records were retrieved and processed for a table Ti. Let’s assume that the value of the ‘context’ column of the last change record was ‘C’. This value must be stored back into the STREAM_POSITION table for the next ETL round. This is done with:
update STREAM_POSITIONS set context=’C’ where application_name ‘A’ and table_name = ‘Ti’;
This value can be stored more frequently during the ETL process as needed. The general guideline is that once change record data has been committed to the target database, the stream position should be updated as well.
Access to Change EventsChanges are captured and maintained in a change table. The table contains the original table columns and CDC header columns. The header columns are described in the following table:
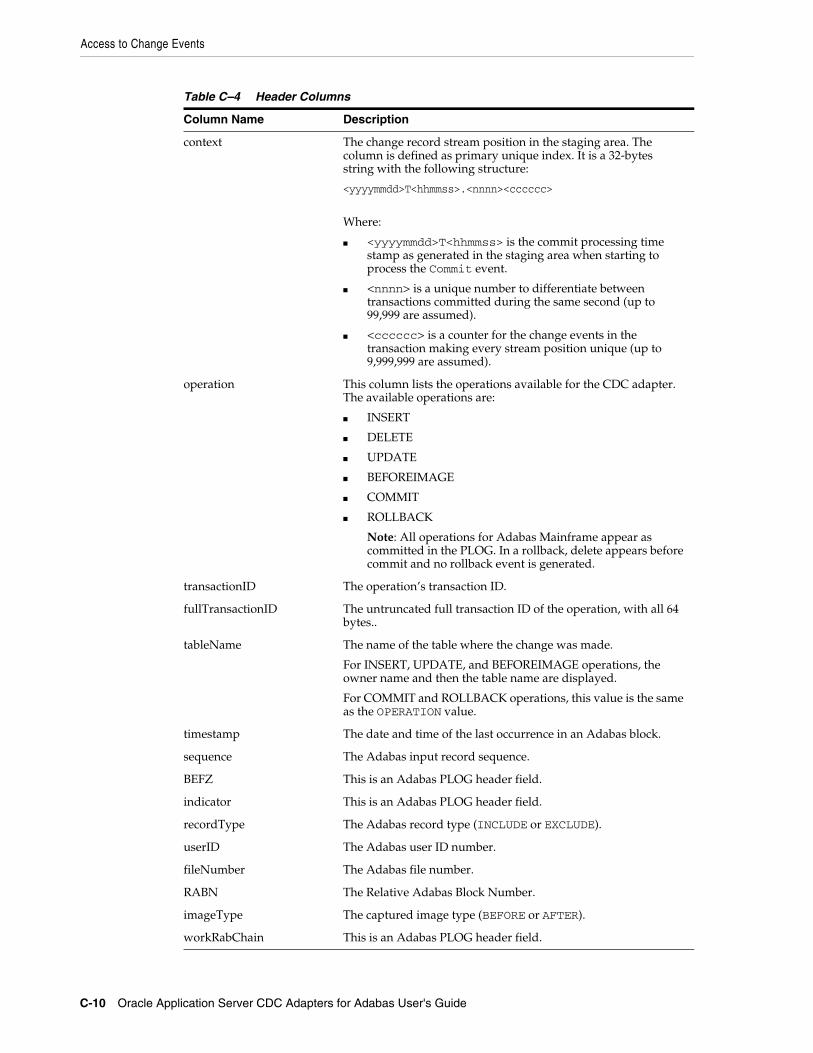
Access to Change Events
C-10 Oracle Application Server CDC Adapters for Adabas User's Guide
Table C–4 Header Columns
Column Name Description
context The change record stream position in the staging area. The column is defined as primary unique index. It is a 32-bytes string with the following structure:
<yyyymmdd>T<hhmmss>.<nnnn><cccccc>
Where:
■ <yyyymmdd>T<hhmmss> is the commit processing time stamp as generated in the staging area when starting to process the Commit event.
■ <nnnn> is a unique number to differentiate between transactions committed during the same second (up to 99,999 are assumed).
■ <cccccc> is a counter for the change events in the transaction making every stream position unique (up to 9,999,999 are assumed).
operation This column lists the operations available for the CDC adapter. The available operations are:
■ INSERT
■ DELETE
■ UPDATE
■ BEFOREIMAGE
■ COMMIT
■ ROLLBACK
Note: All operations for Adabas Mainframe appear as committed in the PLOG. In a rollback, delete appears before commit and no rollback event is generated.
transactionID The operation’s transaction ID.
fullTransactionID The untruncated full transaction ID of the operation, with all 64 bytes..
tableName The name of the table where the change was made.
For INSERT, UPDATE, and BEFOREIMAGE operations, the owner name and then the table name are displayed.
For COMMIT and ROLLBACK operations, this value is the same as the OPERATION value.
timestamp The date and time of the last occurrence in an Adabas block.
sequence The Adabas input record sequence.
BEFZ This is an Adabas PLOG header field.
indicator This is an Adabas PLOG header field.
recordType The Adabas record type (INCLUDE or EXCLUDE).
userID The Adabas user ID number.
fileNumber The Adabas file number.
RABN The Relative Adabas Block Number.
imageType The captured image type (BEFORE or AFTER).
workRabChain This is an Adabas PLOG header field.
Security
Editing Properties for the OracleAS CDC Adapters for Adabas C-11
The data portion is an exact copy of the back-end table layout.
Each change in the journal is captured as an event with the following format:
<event name=’table_name’ timestamp=’...’> <table_name> <header ...></header> <data ...></data> </table_name></event>
Transaction SupportThe OracleAS CDC Adapter for Adabas supports transactions.
The rollback event is not supported, instead compensating records are supplied.
SecurityThe user profile for Oracle Connect must have read privileges for the archive files.

Security
C-12 Oracle Application Server CDC Adapters for Adabas User's Guide
D
Back-end Adapter Data Type Support D-1
D Back-end Adapter Data Type Support
The OracleAS CDC Adapter for Adabas supports several data types that are used when defining metadata in Oracle Studio. The data types are mapped from the COBOL data types during the import procedure.
Data Type MappingThe COBOL data type COMP, in the table is an abbreviation for, and synonymous with, COMPUTATIONAL. Square brackets ([ ]) denote optional qualifiers for some COBOL compilers, which may not be allowed for other COBOL compilers.
Note: The mapping of data types between the OracleAS CDC Adapter for Adabas and Oracle Application Server is performed internally by Oracle Connect.
Table D–1 Data Type Mapping: COBOL and Oracle Connect Back-end Adapter
COBOL Data Type Oracle Connect Data Type
BINARY (with fractional data) string
BINARY (without fractional data) int
COMP (with fractional data) string
COMP (without fractional data) int
COMP-2 double
COMP-3 string
COMP-4 (with fractional data) string
COMP-4 (without fractional data) int
COMP-5 (with fractional data) string
COMP-5 (without fractional data) int
COMP-X (with fractional data) string
COMP-X (without fractional data) int
INDEX int
[SIGN [IS]] LEADING string
[SIGN [IS]] LEADING SEPARATE [CHARACTER]
string
NATIVE-2 int

Data Type Mapping
D-2 Oracle Application Server CDC Adapters for Adabas User's Guide
NATIVE-4 int
NATIVE-8 string
PACKED-DECIMAL string
POINTER int
[SIGN [IS]] TRAILING string
[SIGN [IS]] TRAILING SEPARATE [CHARACTER]
string
Table D–1 (Cont.) Data Type Mapping: COBOL and Oracle Connect Back-end Adapter
COBOL Data Type Oracle Connect Data Type

E
Globalization Settings E-1
E Globalization Settings
The OracleAS CDC Adapter for Adabas provides the globalization support for the following languages:
■ Arabic
■ English (the default)
■ French
■ German
■ Greek
■ Hebrew
■ Italian
■ Japanese
■ Korean
■ Portuguses
■ Simple Chinese
■ Spanish
■ Traditional Chinese
■ Turkish
This appendix describes how to define the language support.
Defining the Language and Code PageThe language and code page parameters are accessed from the computer where Oracle Studio is installed.
Perform the following steps to define the required language and code page:
1. From the Start menu, select Programs, Oracle, and then select Studio.
2. In the Design perspective Configuration view, expand the Machines folder.
3. Expand the machine for which you want to set the language.
4. Expand the Bindings folder and right-click the NAV binding.
5. Select Open.
6. Expand the Language Settings and do the following:
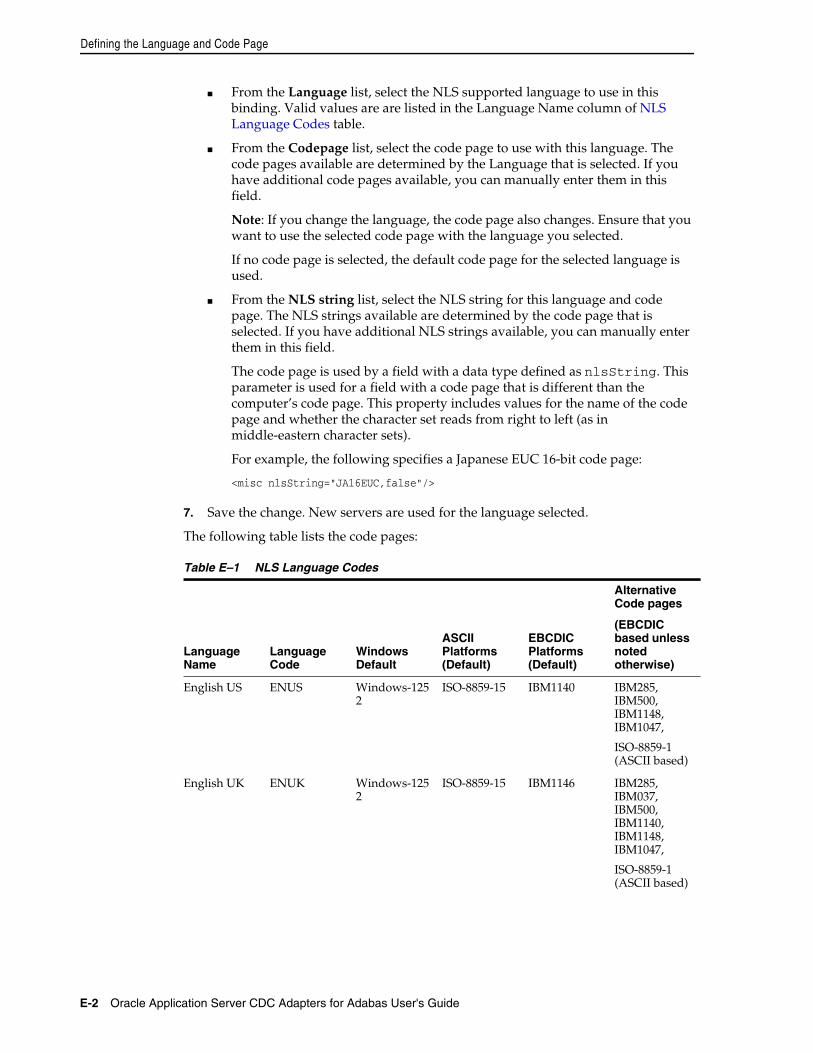
Defining the Language and Code Page
E-2 Oracle Application Server CDC Adapters for Adabas User's Guide
■ From the Language list, select the NLS supported language to use in this binding. Valid values are are listed in the Language Name column of NLS Language Codes table.
■ From the Codepage list, select the code page to use with this language. The code pages available are determined by the Language that is selected. If you have additional code pages available, you can manually enter them in this field.
Note: If you change the language, the code page also changes. Ensure that you want to use the selected code page with the language you selected.
If no code page is selected, the default code page for the selected language is used.
■ From the NLS string list, select the NLS string for this language and code page. The NLS strings available are determined by the code page that is selected. If you have additional NLS strings available, you can manually enter them in this field.
The code page is used by a field with a data type defined as nlsString. This parameter is used for a field with a code page that is different than the computer’s code page. This property includes values for the name of the code page and whether the character set reads from right to left (as in middle-eastern character sets).
For example, the following specifies a Japanese EUC 16-bit code page:
<misc nlsString="JA16EUC,false"/>
7. Save the change. New servers are used for the language selected.
The following table lists the code pages:
Table E–1 NLS Language Codes
Language Name
Language Code
Windows Default
ASCII Platforms (Default)
EBCDIC Platforms (Default)
Alternative Code pages
(EBCDIC based unless noted otherwise)
English US ENUS Windows-1252
ISO-8859-15 IBM1140 IBM285, IBM500, IBM1148, IBM1047,
ISO-8859-1 (ASCII based)
English UK ENUK Windows-1252
ISO-8859-15 IBM1146 IBM285, IBM037, IBM500, IBM1140, IBM1148, IBM1047,
ISO-8859-1 (ASCII based)
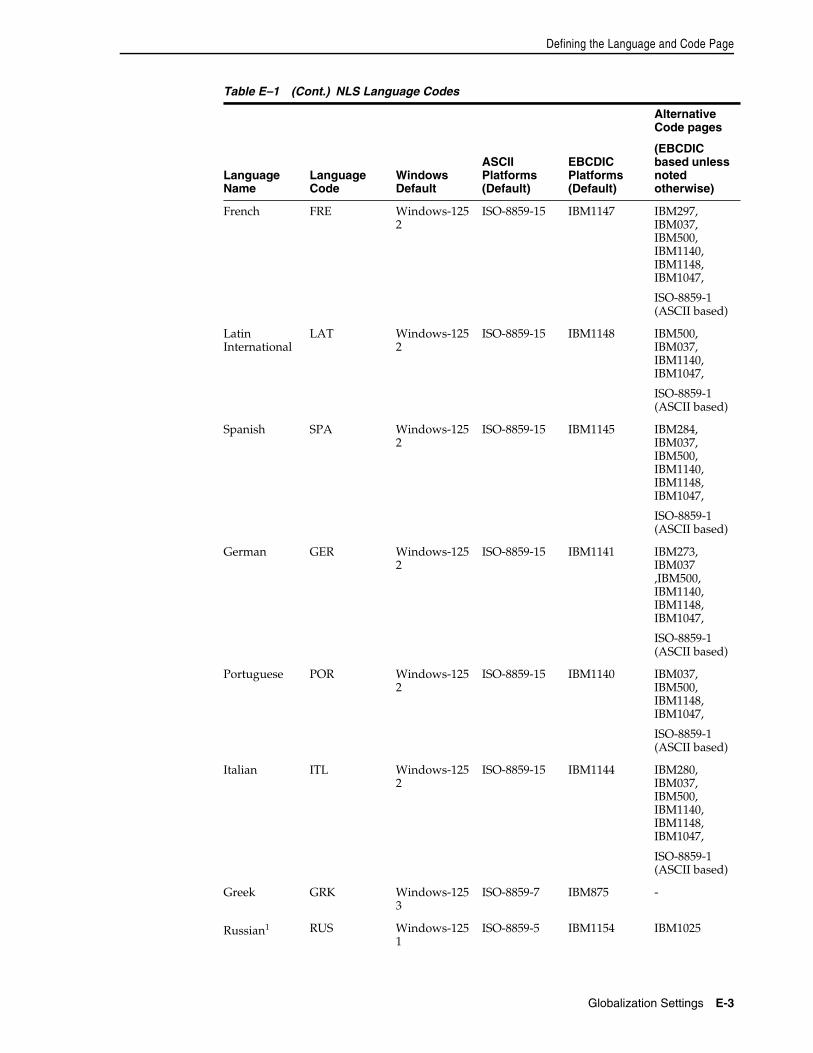
Defining the Language and Code Page
Globalization Settings E-3
French FRE Windows-1252
ISO-8859-15 IBM1147 IBM297, IBM037, IBM500, IBM1140, IBM1148, IBM1047,
ISO-8859-1 (ASCII based)
Latin International
LAT Windows-1252
ISO-8859-15 IBM1148 IBM500, IBM037, IBM1140, IBM1047,
ISO-8859-1 (ASCII based)
Spanish SPA Windows-1252
ISO-8859-15 IBM1145 IBM284, IBM037, IBM500, IBM1140, IBM1148, IBM1047,
ISO-8859-1 (ASCII based)
German GER Windows-1252
ISO-8859-15 IBM1141 IBM273, IBM037 ,IBM500, IBM1140, IBM1148, IBM1047,
ISO-8859-1 (ASCII based)
Portuguese POR Windows-1252
ISO-8859-15 IBM1140 IBM037, IBM500, IBM1148, IBM1047,
ISO-8859-1 (ASCII based)
Italian ITL Windows-1252
ISO-8859-15 IBM1144 IBM280, IBM037, IBM500, IBM1140, IBM1148, IBM1047,
ISO-8859-1 (ASCII based)
Greek GRK Windows-1253
ISO-8859-7 IBM875 -
Russian1 RUS Windows-1251
ISO-8859-5 IBM1154 IBM1025
Table E–1 (Cont.) NLS Language Codes
Language Name
Language Code
Windows Default
ASCII Platforms (Default)
EBCDIC Platforms (Default)
Alternative Code pages
(EBCDIC based unless noted otherwise)
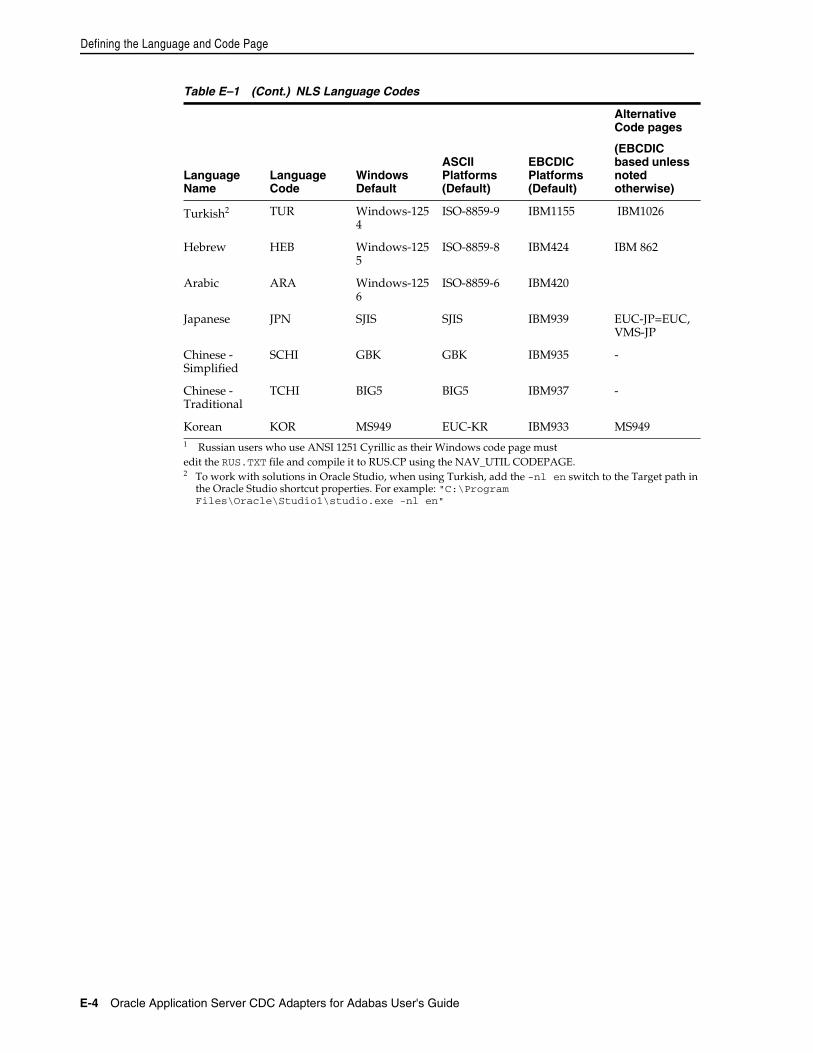
Defining the Language and Code Page
E-4 Oracle Application Server CDC Adapters for Adabas User's Guide
Turkish2 TUR Windows-1254
ISO-8859-9 IBM1155 IBM1026
Hebrew HEB Windows-1255
ISO-8859-8 IBM424 IBM 862
Arabic ARA Windows-1256
ISO-8859-6 IBM420
Japanese JPN SJIS SJIS IBM939 EUC-JP=EUC, VMS-JP
Chinese - Simplified
SCHI GBK GBK IBM935 -
Chinese - Traditional
TCHI BIG5 BIG5 IBM937 -
Korean KOR MS949 EUC-KR IBM933 MS9491 Russian users who use ANSI 1251 Cyrillic as their Windows code page mustedit the RUS.TXT file and compile it to RUS.CP using the NAV_UTIL CODEPAGE.2 To work with solutions in Oracle Studio, when using Turkish, add the -nl en switch to the Target path in
the Oracle Studio shortcut properties. For example: "C:\Program Files\Oracle\Studio1\studio.exe -nl en"
Table E–1 (Cont.) NLS Language Codes
Language Name
Language Code
Windows Default
ASCII Platforms (Default)
EBCDIC Platforms (Default)
Alternative Code pages
(EBCDIC based unless noted otherwise)

F
Editing XML Files in Oracle Studio F-1
FEditing XML Files in Oracle Studio
In many cases you must manually edit the metadata to configure parts of a solution or composition. Metadata is created in XML format. You define aspects of a solution by changing the values of the elements and attributes of the XML files that belong to the solution. Oracle Studio provides a graphical interface where you can define the various aspects of a solution. This interface lets you make changes easily without having to manually edit the XML file.
Preparing to Edit XML Files in Oracle StudioYou can edit XML files for the following items in Oracle Studio:
■ Machines
■ Bindings.
■ Daemons
■ Users
When you open an XML file, a graphical representation of the file is opened in the editor. The editor displays the elements and attributes in the file in the first column and their corresponding values in the second column. Each entry has an icon that indicates whether the entry is an element or an attribute. Click the Source tab to view the file in its native format. The following figure is an example of the editor’s view of an XML file.
Figure F–1 XML Graphical Display
Making Changes to the XML File
F-2 Oracle Application Server CDC Adapters for Adabas User's Guide
Do the following to edit an XML file in Oracle Studio
1. In the Design perspective, open the Navigator view.
2. In the Navigator view, find the item with the XML file to edit. This can be a machine, binding, daemon, or user.
3. Right-click the item and select Open as XML. A graphical list of the file’s elements and attributes opens in the editor.
4. Find the element or attribute (property) to change.
5. Click in the right column next to the property you are changing and edit or add the value.
6. Save the file, then select it again in the Project Explorer and press F5 to refresh.
The XML file is updated automatically.
Making Changes to the XML FileYou can also make the following changes to XML files in Oracle Studio:
■ Remove Objects
■ Add DTD Information
■ Edit Namespaces
■ Add Elements and Attributes
■ Replace an Element
Remove ObjectsYou can delete an element, attribute, or other object from the XML file.
Do the following to remove an object
1. Right-click an object from the list in the editor.
2. Select Remove.
Add DTD InformationYou can add DTD information to an element or attribute.
Do the following to add DTD Information
1. Right-click an element or attribute and select Add DTD Information. The Add DTD Information dialog box opens.

Making Changes to the XML File
Editing XML Files in Oracle Studio F-3
Figure F–2 Add DTD Information Dialog Box
2. Enter the information requested in the dialog box. The following table describes the Add DTD Information dialog box.
3. Save the file, then select it again in the Project Explorer and press F5 to refresh.
The XML file is updated automatically.
Edit NamespacesYou can make changes to the namespaces associated with an element or attribute.
Do the following to edit namespaces
1. Right-click an element or attribute and select Edit namespaces. The Edit Schema Information dialog box opens.
Table F–1 Add DTD Information
Field Description
Root element name The name of the XML root element.
Public ID The value in this field is the Public Identifier. It is used to associate the XML file (using an XML catalog entry) with a DTD file by providing a hint to the XML processor.
Click Browse to select an XML catalog entry from a list. An XML Catalog entry contains two parts, a Key (which represents a DTD or XML schema) and a URI (which contains information about a DTD or XML schema's location). Select the catalog entry you want to associate with your XML file.
System ID The value in this field is the DTD the XML file is associated with. You can change the DTD the file is associated with by editing this field. The XML processor trys to use the Public ID to locate the DTD, and if this fails, it uses the System ID to find it.
Click Browse to select a system ID. You can this in two ways:
■ Select the file from the workbench. In this case, update the with the import dialog box.
■ Select an XML catalog entry.
Making Changes to the XML File
F-4 Oracle Application Server CDC Adapters for Adabas User's Guide
Figure F–3 Edit Schema Information
2. Click a button to make any changes to this information.
Do the following to add a new namespace
1. From the Schema Information dialog box, click Add.
2. The Add Namespace Definitions dialog box opens. Select one of the following:
■ Select from registered namespaces. This selection is available when the dialog box opens. Select from the list of registered namespaces and then click OK. If no registered namespaces are available, the list is empty.
■ Specify new namespace. Enter the information described in the following table:
To edit a namespace1. From the Schema Information dialog box, click Edit.
2. Enter the information in the fields.
Table F–2 New Namespace
Field Description
Prefix The prefix is added to all qualified elements and attributes in the XML file.
Namespace Name The namespace of the XML file.
Location Hint The location of the XML schema of the XML file. An XML Catalog ID or a URI can be entered in this field.
Click Browse to search for the schema you want You can this in two ways:
■ Select the schema from the workbench. In this case, update the with the import dialog box.
■ Select an XML catalog entry.
The Namespace Name and Prefix fields are be filled with the appropriate values from the schema (you must leave the fields blank for this to occur).
Note: If you are creating an XML file from an XML schema, you cannot change the Namespace Name or Location Hint values.
Making Changes to the XML File
Editing XML Files in Oracle Studio F-5
Add Elements and AttributesYou can add additional elements and attributes to the XML file.
Do the following to add Elements and Attributes
1. Right-click an element.
2. Select one of the following:
■ Add Attribute to add an attribute under the selected element.
■ Add Child to add another element under the selected element
■ Add Before to add another element above the selected element
■ Add After to add another element below the selected element
3. Provide a name for the element or attribute if required. You may also select the element from a submenu. The element or attribute is added to the file.
4. Save the file, then select it again in the Project Explorer and press F5 to refresh.
The XML file is updated automatically.
Replace an ElementYou can replace an element with another legal element.
Do the following to replace an element
1. Right-click an element from the list in the editor.
2. Select Replace with.
3. Select an element from the submenu. Only legal elements are available.
4. The original element is replaced with the selected element.

Making Changes to the XML File
F-6 Oracle Application Server CDC Adapters for Adabas User's Guide
Index-1
Index
AACX trace parameter, 7-7Adabas, setting up, 2-6adapter inbound configuration, 3-1add timestamp to traced events parameter, 7-7Artithmetic fixed precision parameter, 7-12
Bbinary XML log level parameter, 7-7binding file
configuration, 3-4
Ccache
maximum queries, 7-11cache buffer size parameter, 7-8CDC
stream positions table, 3-1CDC adapter
connection factory, 3-2CDC stream positions table, 3-1code page parameter, 7-9COM maximum XML size in memory
parameter, 7-14COM maximum XML size parameter, 7-14COM XML transport buffer parameter, 7-14commit on destroy, 7-13configuring the binding file, 3-4connection factory, 3-2continuous query
prefix, 7-11retry interval, 7-11timeout, 7-11
continuous query prefix parameter, 7-11continuous query retry interval parameter, 7-11continuous query timeout parameter, 7-11creating JCA configuration files
JCA configuration filescreating, 3-3
Ddaemon
logging, B-3
security, B-5server modes, 7-2shutting down, 6-7starting, 6-7timeout, 6-12
data sources, disabling caching, 7-10data types
atomic metadata, D-1NLS string parameter, 7-9
debug parametersACX trace, 7-7add timestamp to traced events, 7-7environment, 7-7GDB trace, 7-7general trace, 7-7lbinary XML log level, 7-7log file, 7-7optimizer trace, 7-7query processor trace, 7-7query warnings, 7-7trace directory, 7-7Transaction extended logging, 7-8
disable 2PC, 7-13disable command reuse parameter, 7-10disable compilation cache parameter, 7-11disable DS property cache parameter, 7-10disable insert parameterization parameter, 7-10disable metadata caching parameter, 7-10disable query parameterization parameter, 7-10disable row mark fail fetch parameter, 7-10disable SQS cache parameter, 7-12disable threads parameter, 7-10disabling
parameterization of constants, 7-10parameterization of queries, 7-10
dsm maximum buffer size parameter, 7-13dsm middle buffer size parameter, 7-14dsmMaxSortBufferSize parameter, 7-14
Eenvironment parameters
ACX trace, 7-7add timestamp to traced events, 7-7Artithmetic fixed precision, 7-12cache buffer size, 7-8
Index-2
code page, 7-9COM maximum XML size, 7-14COM maximum XML size in memory, 7-14COM XML transport buffer, 7-14commit on destroy, 7-13continuous query prefix, 7-11continuous query retry interval, 7-11continuous query timeout, 7-11debug, 7-7disable 2PC, 7-13disable command reuse, 7-10disable compilation cache, 7-11disable DS property cache, 7-10disable insert parameterization, 7-10disable metadata caching, 7-10disable query parameterization, 7-10disable row mark fail fetch, 7-10disable SQS cache, 7-12disable threads, 7-10dsm maximum buffer size, 7-13dsm maximum sort buffer Size, 7-14dsm middle buffer size, 7-14expose XML fields, 7-12file close on transaction, 7-14file pool size, 7-14file pool size per file, 7-14first tree extensions, 7-11GDB trace, 7-7general, 7-8general trace, 7-7hash buffer size, 7-14hash enable RO, 7-14hash max open files, 7-14hash primary event size, 7-14hash secondary event size, 7-14ignore segment bind failure, 7-11insert from select commit rate, 7-12language, 7-8, 7-9log file, 7-7maximum columns in parsing, 7-11Maximum segmented database thread, 7-11maximum SQL cache, 7-11minimum number of parameters allocated, 7-11modeling, 7-9nav utility editor, 7-8NLS string, 7-9ODBC, 7-9OLEDB, 7-9optimistic for updates, 7-11optimizer, 7-9optimizer goal, 7-9optimizer trace, 7-7parallel processing, 7-10parser depth, 7-12procedures cache size, 7-12prompt database user pasword, 7-11query processor, 7-10query processor trace, 7-7query warnings, 7-7recovery delay, 7-13
Replace invalid XML characters, 7-15time limit, 7-13token size, 7-12trace directory, 7-7transaction conversions parameters, 7-13Transaction extended logging, 7-8transaction extended logging, 7-13transaction log file, 7-13transactions, 7-13ttemporary directory, 7-8tuning, 7-13use alternate qualifier, 7-11use global file pool, 7-14use table filter expression, 7-11user commit confirm table, 7-13write empty string as null, 7-11XML, 7-14XML date format parameter, 7-15XML trim char column, 7-15year 2000 policy, 7-8
error log, binary XML log level parameter, 7-7error log, log file parameter, 7-7exact arithmetic, 7-12expose XML fields parameter, 7-12
Ffile close on transaction, 7-14file pool size, 7-14file pool size per file, 7-14first row optimization, optimizer goal
parameter, 7-9first tree extensions parameter, 7-11floating point precision, 7-12
GGDB trace parameter, 7-7general parameters
cache buffer size, 7-8environment, 7-8nav utility editor, 7-8temporary directory, 7-8year 2000 policy, 7-8
general trace parameter, 7-7
Hhash buffer size, 7-14hash buffer size parameter, 7-14hash enable RO parameter, 7-14hash joins, 7-14hash max open files parameter, 7-14hash primary event size parameter, 7-14hash secondary event size parameter, 7-14
Iignore segment bind failure parameter, 7-11index cache
dsm middle buffer size parameter, 7-14
Index-3
insert from select commit rate parameter, 7-12
JJCA configuration files, 3-3
configuration, 3-3joins
hash buffer size parameter, 7-14hash max open files parameter, 7-14
Llanguage parameter, 7-9language parameters
code page, 7-9environment, 7-8, 7-9language, 7-9NLS string, 7-9
locking, optimistic, 7-11log file parameter, 7-7log files
binary XML log level parameter, 7-7daemon options, B-3log file parameter, 7-7
loggingdaemon configurations, B-3optimizer strategy, 7-7, 7-8
Mmaximum columns in parsing parameter, 7-11Maximum segmented database thread, 7-11maximum SQL cache parameter, 7-11memory
dsm maximum buffer size parameter, 7-13dsm maximum sort buffer Size parameter, 7-14dsm middle buffer size parameter, 7-14
metadataatomic data types, D-1disabling retrieval from cache, 7-10
minimum number of parameters allocated parameter, 7-11
modeling environment parameters, 7-9
Nnav utility editor parameter, 7-8nav utility editor, text editor, 7-8NLS string parameter, 7-9
OODBC environment parameters, 7-9OLEDB environment parameters, 7-9optimistic for updates parameter, 7-11optimizer
optimizer goal parameter, 7-9trace directory parameter, 7-7
optimizer environment parameters, 7-9optimizer goal parameter, 7-9optimizer trace parameter, 7-7
Pparallel processing environment parameters, 7-10parallel processing parameters
disable threads, 7-10parameterization of constants, disabling, 7-10parameterization of queries, disabling, 7-10parser depth parameter, 7-12password, setting automatic prompt, 7-11procedures cache size parameter, 7-12prompt database user pasword parameter, 7-11
Qqueries
disabling reuse, 7-10disabling saved compilation, 7-11enabling retrieval after failure, 7-10maximum cached in memory, 7-11maximum length of string, 7-12maximum size after compilation, 7-11
query optimizerlogging strategy, 7-7, 7-8optimizer goal parameter, 7-9trace directory parameter, 7-7
query processorenvironment parameters, 7-10
query processor parametersArtithmetic fixed precision, 7-12continuous query prefix, 7-11continuous query retry interval, 7-11continuous query timeout, 7-11disable command reuse, 7-10disable compilation cache, 7-11disable DS property cache, 7-10disable insert parameterization, 7-10disable metadata caching, 7-10disable query parameterization, 7-10disable row mark fail fetch, 7-10disable SQS cache, 7-12emptyStringISNull parameter, 7-11expose XML fields, 7-12first tree extensions, 7-11ignore segment bind failure, 7-11insert from select commit rate, 7-12maximum columns in parsing, 7-11Maximum segmented database thread
parameter, 7-11maximum SQL cache, 7-11minimum number of parameters allocated, 7-11optimistic for updates, 7-11parser depth, 7-12procedures cache size, 7-12prompt database user pasword, 7-11token size, 7-12use alternate qualifier, 7-11use table filter expression, 7-11
query processor trace parameter, 7-7query warnings parameter, 7-7

Index-4
Rrecovery delay, 7-13Replace invalid XML characters parameter, 7-15rollback loops
troubleshooting, 3-6row optimization, optimizer goal parameter, 7-9
Ssecurity
daemon configurations, B-5setting automatic prompt, 7-11
segmented data sources, response upon failure, 7-11servers
configuring modes, 7-2reusable, 7-3Reuse limit daemon parameter, 7-3, B-13
setting up Adabas, 2-6sort buffer, dsm maximum sort buffer size
parameter, 7-14staging area, 1-4stored queries, maximum in cache memory, 7-12stream positions table, 3-1
Ttemporary directory parameter, 7-8temporary files, 7-8threading model, 7-11time limit parameter, 7-13timeout
client idle, 6-12daemon, 6-12
token size parameter, 7-12trace directory parameter, 7-7trace information, logging, 7-7transaction conversions parameters, 7-13transaction extended logging, 7-13Transaction extended logging parameter, 7-8transaction log file, 7-13transactions environment parameters, 7-13transactions parameters
commit on destroy, 7-13disable 2PC, 7-13recovery delay, 7-13time limit, 7-13transaction conversions parameters, 7-13transaction extended logging, 7-13transaction log file, 7-13user commit confirm table, 7-13
tuning parametersdsm maximum buffer size, 7-13dsm maximum sort buffer Size, 7-14dsm middle buffer size, 7-14environment, 7-13file close on transaction, 7-14file pool size, 7-14file pool size per file, 7-14hash buffer size, 7-14hash enable RO, 7-14
hash max open files, 7-14hash primary event size, 7-14hash secondary event size, 7-14use global file pool, 7-14
Uuse alternate qualifier parameter, 7-11use global file pool, 7-14use table filter expression parameter, 7-11user commit confirm table, 7-13
WWeblogic
deployment, 3-1WebLogic deployment, 3-1Workspace server mode, B-13write empty string as null parameter, 7-11
XXML
environment parameters, 7-14XML date format parameter, 7-15XML parameters
COM maximum XML size, 7-14COM maximum XML size in memory, 7-14COM XML transport buffer, 7-14Replace invalid XML characters, 7-15XML date format parameter, 7-15XML trim char column, 7-15
XML trim char column parameter, 7-15
YY2K
See year 2000 policy parameteryear 2000 policy parameter, 7-8