oracle® business intelligence · oracle® business intelligence data warehouse administration...
TRANSCRIPT
Oracle® Business IntelligenceData Warehouse Administration Console Installation, Configuration, and Upgrade Guide
Release 10.1.3.4
E12653-02
October 2012
Explains how to install and configure the Data Warehouse Administration Console.
Oracle Business Intelligence Data Warehouse Administration Console Installation, Configuration, and Upgrade Guide Release 10.1.3.4
E12653-02
Copyright © 2008, 2012, Oracle and/or its affiliates. All rights reserved.
Primary Author: Jill Arehart
Contributing Author: Sam Myers
Contributors: Oracle Business Intelligence development, product management, and quality assurance teams.
This software and related documentation are provided under a license agreement containing restrictions on use and disclosure and are protected by intellectual property laws. Except as expressly permitted in your license agreement or allowed by law, you may not use, copy, reproduce, translate, broadcast, modify, license, transmit, distribute, exhibit, perform, publish, or display any part, in any form, or by any means. Reverse engineering, disassembly, or decompilation of this software, unless required by law for interoperability, is prohibited.
The information contained herein is subject to change without notice and is not warranted to be error-free. If you find any errors, please report them to us in writing.
If this is software or related documentation that is delivered to the U.S. Government or anyone licensing it on behalf of the U.S. Government, the following notice is applicable:
U.S. GOVERNMENT END USERS: Oracle programs, including any operating system, integrated software, any programs installed on the hardware, and/or documentation, delivered to U.S. Government end users are "commercial computer software" pursuant to the applicable Federal Acquisition Regulation and agency-specific supplemental regulations. As such, use, duplication, disclosure, modification, and adaptation of the programs, including any operating system, integrated software, any programs installed on the hardware, and/or documentation, shall be subject to license terms and license restrictions applicable to the programs. No other rights are granted to the U.S. Government.
This software or hardware is developed for general use in a variety of information management applications. It is not developed or intended for use in any inherently dangerous applications, including applications that may create a risk of personal injury. If you use this software or hardware in dangerous applications, then you shall be responsible to take all appropriate fail-safe, backup, redundancy, and other measures to ensure its safe use. Oracle Corporation and its affiliates disclaim any liability for any damages caused by use of this software or hardware in dangerous applications.
Oracle and Java are registered trademarks of Oracle and/or its affiliates. Other names may be trademarks of their respective owners.
Intel and Intel Xeon are trademarks or registered trademarks of Intel Corporation. All SPARC trademarks are used under license and are trademarks or registered trademarks of SPARC International, Inc. AMD, Opteron, the AMD logo, and the AMD Opteron logo are trademarks or registered trademarks of Advanced Micro Devices. UNIX is a registered trademark of The Open Group.
This software or hardware and documentation may provide access to or information on content, products, and services from third parties. Oracle Corporation and its affiliates are not responsible for and expressly disclaim all warranties of any kind with respect to third-party content, products, and services. Oracle Corporation and its affiliates will not be responsible for any loss, costs, or damages incurred due to your access to or use of third-party content, products, or services.
iii
Contents
Preface ................................................................................................................................................................. v
Audience....................................................................................................................................................... vDocumentation Accessibility ..................................................................................................................... vRelated Documents ..................................................................................................................................... viConventions ................................................................................................................................................. vi
1 What's New in This Release
What's New in Version 10.1.3.4 .................................................................................................... 1-1What's New in Version 10.1.3.4.1 .................................................................................................. 1-1
2 Installing DAC Using the Oracle Universal Installer
Prerequisites for Installing DAC ................................................................................................. 2-1Points to Consider Before You Install Oracle BI Application ..................................................... 2-2Launching the Oracle Universal Installer .................................................................................... 2-2Welcome Screen ............................................................................................................................ 2-2Specify Installation Location Screen ........................................................................................... 2-2Install Components Screen .......................................................................................................... 2-2Select Informatica Version Screen ............................................................................................... 2-3Specify Informatica 8.1.1 Location Screen ................................................................................... 2-3Specify Informatica 7.1.4 Location Screen ................................................................................... 2-3Pre-requisite Checks Screen ......................................................................................................... 2-3Installation Summary Screen ....................................................................................................... 2-4Installation Progress Screen ......................................................................................................... 2-4Installation Completed Screen ..................................................................................................... 2-4Installing DAC on a 64-bit System .............................................................................................. 2-4
3 Installing DAC on UNIX
4 Deinstalling DAC
Deinstalling DAC on Windows ................................................................................................... 4-1Deinstalling DAC on Linux ......................................................................................................... 4-1Deinstalling DAC on UNIX ......................................................................................................... 4-2
iv
5 Configuring DAC
System Configuration Handled by the Oracle Universal Installer ............................................ 5-1Installing JDBC Drivers for DAC Database Connectivity .......................................................... 5-2Logging into DAC for the First Time ........................................................................................... 5-3Configuring the Connection Between the DAC Server and DAC Repository ........................... 5-5How to Configure the DAC Server Repository Connection Using the DAC Client (Windows) ....5-5How to Configure the DAC Repository Connection Using serverSetupPrompt Scripts (Windows or
Linux) .......................................................................................................................................5-7About User Account Management ............................................................................................... 5-7Creating, Deleting and Inactivating User Accounts ...............................................................................5-8
Index
v
Preface
Oracle Business Intelligence Data Warehouse Administration Console (DAC) provides a centralized console for management, configuration, administration, loading, and monitoring of the Oracle Business Analytics Warehouse. It is designed specifically for organizations using Oracle Business Intelligence Applications Fusion Edition implementing Informatica PowerCenter as their ETL tool.
The Oracle Business Intelligence Data Warehouse Administration Console Installation, Configuration, and Upgrade Guide contains information about installing or upgrading DAC using the Oracle Universal Installer. It also describes the system configuration that is handled by the Oracle Universal Installer during the installation process and the configuration you need to perform.
Oracle recommends reading the Oracle Business Intelligence Data Warehouse Administration Console Release Notes before installing, using, or upgrading DAC. The Oracle Business Intelligence Data Warehouse Administration Console Release Notes are available:
■ On the Oracle Business Intelligence Data Warehouse Administration Console CD-ROM.
■ On the Oracle Technology Network at http://www.oracle.com/technetwork/middleware/bi-foundation/documentation/bi-dac-087220.html.
AudienceThis document is intended for the following audiences:
■ Data warehouse administrators
■ ETL developers and operators
■ Implementers of Oracle Business Intelligence Applications Fusion Edition
Documentation AccessibilityFor information about Oracle's commitment to accessibility, visit the Oracle Accessibility Program website at http://www.oracle.com/pls/topic/lookup?ctx=acc&id=docacc.
Access to Oracle SupportOracle customers have access to electronic support through My Oracle Support. For information, visit http://www.oracle.com/pls/topic/lookup?ctx=acc&id=info or visit
vi
http://www.oracle.com/pls/topic/lookup?ctx=acc&id=trs if you are hearing impaired.
Related DocumentsFor more information, see the following documents in the Oracle Business Intelligence Data Warehouse Administration Console Version 10.1.3.4 documentation set (available at http://www.oracle.com/technetwork/middleware/bi-foundation/documentation/bi-dac-087220.html):
■ Oracle Business Intelligence Data Warehouse Administration Console Release Notes
■ System Requirements and Supported Platforms for Oracle Business Intelligence Data Warehouse Administration Console
■ Oracle Business Intelligence Data Warehouse Administration Console User's Guide
ConventionsThe following text conventions are used in this document:
Convention Meaning
boldface Boldface type indicates graphical user interface elements associated with an action, or terms defined in text or the glossary.
italic Italic type indicates book titles, emphasis, or placeholder variables for which you supply particular values.
monospace Monospace type indicates commands within a paragraph, URLs, code in examples, text that appears on the screen, or text that you enter.
1
What's New in This Release 1-1
1What's New in This Release
This section lists changes described in this version of the documentation to support releases 10.1.3.4 and 10.1.3.4.1 of the software.
This section includes the following topics:
■ What's New in Release 10.1.3.4
■ What's New in Release 10.1.3.4.1
1.1 What's New in Release 10.1.3.4With this release, the Oracle Business Intelligence Data Warehouse Administration Console (DAC) is installed using the Oracle Universal Installer.
The Oracle Business Intelligence Data Warehouse Administration Console Installation, Configuration, and Upgrade Guide is a new guide.
For a list of new features in this release, see Oracle Business Intelligence Data Warehouse Administration Console User's Guide.
1.2 What's New in Release 10.1.3.4.1The Oracle Business Intelligence Data Warehouse Administration Console Installation, Configuration, and Upgrade Guide revision 1 includes the following new topics:
■ Installing DAC on UNIX
■ Installing DAC on a 64-bit System
■ Deinstalling DAC
What's New in Release 10.1.3.4.1
1-2 Data Warehouse Administration Console Installation, Configuration, and Upgrade Guide
2
Installing DAC Using the Oracle Universal Installer 2-1
2Installing DAC Using the Oracle UniversalInstaller
This section provides instructions for using the Oracle Universal Installer to install the DAC Client and Server on Windows and the DAC Server on Linux.
This section includes the following topics:
■ Section 2.1, "Prerequisites for Installing DAC"
■ Section 2.2, "Points to Consider Before You Install Oracle BI Applications"
■ Section 2.3, "Launching the Oracle Universal Installer"
■ Section 2.4, "Welcome Screen"
■ Section 2.5, "Specify Installation Location Screen"
■ Section 2.6, "Install Components Screen"
■ Section 2.7, "Select Informatica Version Screen"
■ Section 2.8, "Specify Informatica 8.1.1 Location Screen"
■ Section 2.9, "Specify Informatica 7.1.4 Location Screen"
■ Section 2.10, "Pre-requisite Checks Screen"
■ Section 2.11, "Installation Summary Screen"
■ Section 2.12, "Installation Progress Screen"
■ Section 2.13, "Installation Completed Screen"
■ Section 2.14, "Installing DAC on a 64-bit System"
2.1 Prerequisites for Installing DACPrerequisites for installing the DAC Client and Server on Windows and the DAC Server on Linux are the following:
■ Installation of Informatica 7.1.4 or Informatica 8.1.1.
■ The Informatica domains.infa file must reside on both the DAC Client and DAC Server machines. Copy this file from the machine hosting Informatica PowerCenter and paste it into the machines hosting the DAC Client and DAC Server. When you run the DAC installer, you will be asked for the location of this file.
Points to Consider Before You Install Oracle BI Applications
2-2 Data Warehouse Administration Console Installation, Configuration, and Upgrade Guide
2.2 Points to Consider Before You Install Oracle BI ApplicationsThis section contains points that you should consider when you are installing DAC.
■ Co-locate the DAC Server With the Informatica Server
When you use DAC in conjunction with Oracle Business Intelligence Applications, you need to ensure the DAC Server is co-located with the Informatica Server.
■ Informatica Static Parameter Files Need to Be Copied from Oracle Business Intelligence Applications Installation Folder to DAC Folder
After you install DAC, you need to copy the Informatica static parameter files named parameterfileDW.txt and parameterfileOLTP.txt from the Oracle BI Applications installation folder into the DAC folder.
1. Navigate to the Oracle BI Applications folder \OracleBI\DAC\Informatica\parameters\input.
2. Copy the static parameter files named parameterfileDW.txt and parameterfileOLTP.txt into the DAC folder \DAC\Informatica\parameters\input.
2.3 Launching the Oracle Universal InstallerTo launch the Oracle Universal Installer, access the installation files on the installation CD-ROM, and then run the program setup.exe.
Note: You need to invoke the DAC setup.exe file from the relevant platform directory on the installation CD-ROM.
For example, to install DAC on the Windows 32-bit version, you need to access the setup.exe file from the directory \dac\disk1\install\win32\setup.exe.
2.4 Welcome ScreenThe Welcome screen provides an introduction to installing the DAC using the Oracle Universal Installer.
Click Next to begin the installation.
2.5 Specify Installation Location ScreenIn the Specify Installation Location screen, provide the location of where DAC is to be installed. To specify the installation location, do the following:
1. Enter the absolute path for the Oracle Home location or use the Browse button to select an existing location.
The installation directory path can contain alphanumeric, underscore (_), hyphen (-) or dot (.) characters and must begin with an alphanumeric character.
Note: The DAC installer asks for the location of Oracle Home. The installer is actually asking for the location where DAC is to be installed, not for the location of the existing Oracle (Database) home.
2. Click Next.
2.6 Install Components ScreenThe Install Components screen is read only.
Pre-requisite Checks Screen
Installing DAC Using the Oracle Universal Installer 2-3
For Windows, the DAC Client and Server will be installed.
For Linux, the DAC Server will be installed.
Note: The DAC Client can only run on Windows. Therefore, to install a DAC Server on UNIX, you copy the \DAC folder from the Windows machine on which the DAC Client is installed to a UNIX machine. To complete this process, see Chapter 3, "Installing DAC on UNIX".
2.7 Select Informatica Version ScreenIn the Select Informatica Version screen, do the following:
1. Select the version of Informatica you are running.
■ Informatica 8.1.1
■ Informatica 7.1.4
2. Click Next.
2.8 Specify Informatica 8.1.1 Location ScreenIf you specified Informatica 8.1.1 as the version you are running, in the Specify Informatica 8.1.1 Location screen, do the following:
1. Enter or browse for the absolute path for the PowerCenter 8.1.1/server directory.
2. Enter or browse for the absolute path for the Informatica domain file.
3. Click Next.
2.9 Specify Informatica 7.1.4 Location ScreenIf you specified Informatica 7.1.4 as the version you are running, in the Specify Informatica 7.1.4 Location screen, do the following:
1. Enter or browse for the absolute path for the Informatica Server directory.
2. Enter or browse for the absolute path for the Informatica Repository Server directory.
3. Click Next.
2.10 Pre-requisite Checks ScreenThe Oracle Universal Installer automatically performs pre-requisite checks on your system. The Pre-requisite Checks screen indicates the progress of the checks.
■ If a check fails, you can click Retry to run the check again, or click Continue to proceed with the installation.
■ If all the checks passed, click Next to proceed with the installation.
Note: The directory paths for the Informatica PowerCenter 8.1.1/server and for the domain file cannot contain spaces.
Note: The directory paths for the Informatica Server and Repository Server cannot contain spaces.
Installation Summary Screen
2-4 Data Warehouse Administration Console Installation, Configuration, and Upgrade Guide
2.11 Installation Summary ScreenThe Installation Summary screen shows the components that will be installed, their installation location, how much disk space is required for the installation, and the disk space that will remain after the installation.
■ Click Save to save this information in a text file.
■ Click Install to accept this configuration and start the installation.
2.12 Installation Progress ScreenThe Installation Progress screen shows the percentage of the installation that is complete. When the installation process is complete, click Next.
2.13 Installation Completed ScreenThe Installation Completed screen shows the components that were installed, their location, and the remaining disk space.
■ Click Save to save this information in a text file.
■ Click Finish to exit from the installer.
2.14 Installing DAC on a 64-bit SystemThe following procedures describe how to install DAC on a 64-bit Windows system and on a 64-bit UNIX system.
To install DAC version 10g on a 64-bit Windows system:
1. Invoke the 32-bit installer that is located in the installation directory dac\Disk1\install\win32.
2. During the installation, at the "Prerequisite Checks" installer screen, you may receive a warning related to "Checking operating system certification," and you may receive an error related to "Checking service pack." Ignore this warning and error, and click Continue.
3. After the installation is complete, install a 64-bit Java Development Kit (JDK).
4. Edit the cofig.bat file to point to the 64-bit JDK:
a. Navigate to the \dac directory and open the config.bat file.
b. Set the following variables to point to the 64-bit JDK:
- JAVA_HOME
- JAVAW
- JAVA
Note: The JAVAW and JAVA variables appear in the config.bat file in a section below the instruction "DO NOT EDIT THE FILE BELOW THIS LINE." Ignore this instruction and edit these variables to point to the 64-bit JDK.
To install DAC version 10g on a 64-bit UNIX system:
1. Follow the instructions for installing DAC on a UNIX system, as described in Chapter 3, "Installing DAC on UNIX"
2. After the installation is complete, install a 64-bit JDK.
Installing DAC on a 64-bit System
Installing DAC Using the Oracle Universal Installer 2-5
3. Edit the cofig.sh file to point to the 64-bit JDK:
a. Navigate to the \dac directory and open the config.sh file.
b. Set the following variables to point to the 64-bit JDK:
- JAVA_HOME
- JAVA
Note: The JAVA variable appears in the config.sh file in a section below the instruction "DO NOT EDIT THE FILE BELOW THIS LINE." Ignore this instruction and edit this variable to point to the 64-bit JDK
Installing DAC on a 64-bit System
2-6 Data Warehouse Administration Console Installation, Configuration, and Upgrade Guide
3
Installing DAC on UNIX 3-1
3Installing DAC on UNIX
This section provides instructions for installing DAC in a UNIX environment.
The Oracle Universal Installer cannot install DAC on UNIX (that is, AIX, Solaris, HP). Therefore, to install a DAC Server on UNIX, you copy the \DAC folder from the Windows machine on which the DAC Client is installed to a UNIX machine, as described below.
To install the DAC on UNIX:
1. On the Windows machine on which the DAC is installed, create a temporary directory (for example, a directory named \OracleBI_UNIX\).
You will use this temporary directory to create a zip file for the UNIX/Solaris deployment.
2. Copy the \DAC\ directory to the temporary directory (for example, \OracleBI_UNIX\).
3. From the \DAC\ directory in the temporary directory, remove the \export and \icons sub-folders.
4. Zip up the temporary directory (for example, \OracleBI_Solaris\).
5. Copy the ZIP file to the target UNIX machine.
Note: If you use FTP to copy the zip file, use binary mode.
6. Before using the shell scripts, you may need to use a MS-DOS to UNIX conversion tool to convert the script files to UNIX format (that is, remove the carriage return and line feed characters). Alternatively, you can manually remove the carriage return and line feed characters from the script files.
7. On the UNIX machine copy the appropriate JDBC drivers to the /client/lib directory.
Note: DAC uses JDBC drivers for connectivity to source, target and repository databases. The JDBC drivers that are used should be for the databases supported. Since JDBC drivers show variations with different database versions, only drivers that are shipped with the database, or downloaded from the database vendor site and known to be certified for the given database version should be used.
8. Edit the config.sh file located in the /client directory to set the JAVA_HOME environment variable to point to the directory where the correct version of the Java JDK is installed.
9. Edit the dac_env.sh file to configure the following variables:
■ INFA_HOME
■ INFA_DOMAINS_FILE
3-2 Data Warehouse Administration Console Installation, Configuration, and Upgrade Guide
■ INFA_CMD_STYLE
10. If required, edit the config.sh or config.csh file located in the /DAC directory to point to the correct version of the Java JDK by setting the JAVA_HOME environment variable.
4
Deinstalling DAC 4-1
4Deinstalling DAC
This section describes how to deinstall DAC on Windows, Linux, and UNIX.
It contains the following topics:
■ Section 4.1, "Deinstalling DAC on Windows"
■ Section 4.2, "Deinstalling DAC on Linux"
■ Section 4.3, "Deinstalling DAC on UNIX"
4.1 Deinstalling DAC on WindowsYou can deinstall DAC using the Oracle Universal Installer or the silent deinstall command.
To deinstall DAC using the Oracle Universal Installer:
1. Go to%ORACLE_HOME%\oui\bin\setup.exe –deinstall to launch the installer.
Or launch the installer by accessing the Windows Start Menu, selecting Programs, and selecting DataWarehouse Administration Console 10g Oracle – OH<######>Uninstall.
2. Follow the information and directions presented to you on the installer dialogs.
To deinstall DAC using the silent deinstall command:
■ Use the following command:
%ORACLE_HOME%\oui\bin\setup.exe -ignoreSysPrereqs -silent -waitforcompletion -noconsole -nowait -deinstall OH_HOME_DEINSTALL=true
4.2 Deinstalling DAC on LinuxYou can deinstall DAC on Linux using the Oracle Universal installer or the silent deinstall command.
To deinstall DAC on Linux using the Oracle Universal Installer:
1. Go to $ORACLE_HOME/oui/bin/runInstaller -deinstalll to launch the installer.
2. Follow the information and directions presented to you on the installer dialogs.
Note: Since the DAC installer installs to ORACLE_HOME, you must select the first radio button (Deinstall Oracle Home) to properly deinstall DAC.
Deinstalling DAC on UNIX
4-2 Data Warehouse Administration Console Installation, Configuration, and Upgrade Guide
To deinstall DAC using the silent deinstall command:
■ Use the following command:
$ORACLE_HOME/oui/bin/runInstaller -ignoreSysPrereqs -sd OH_HOME_DEINSTALL=true
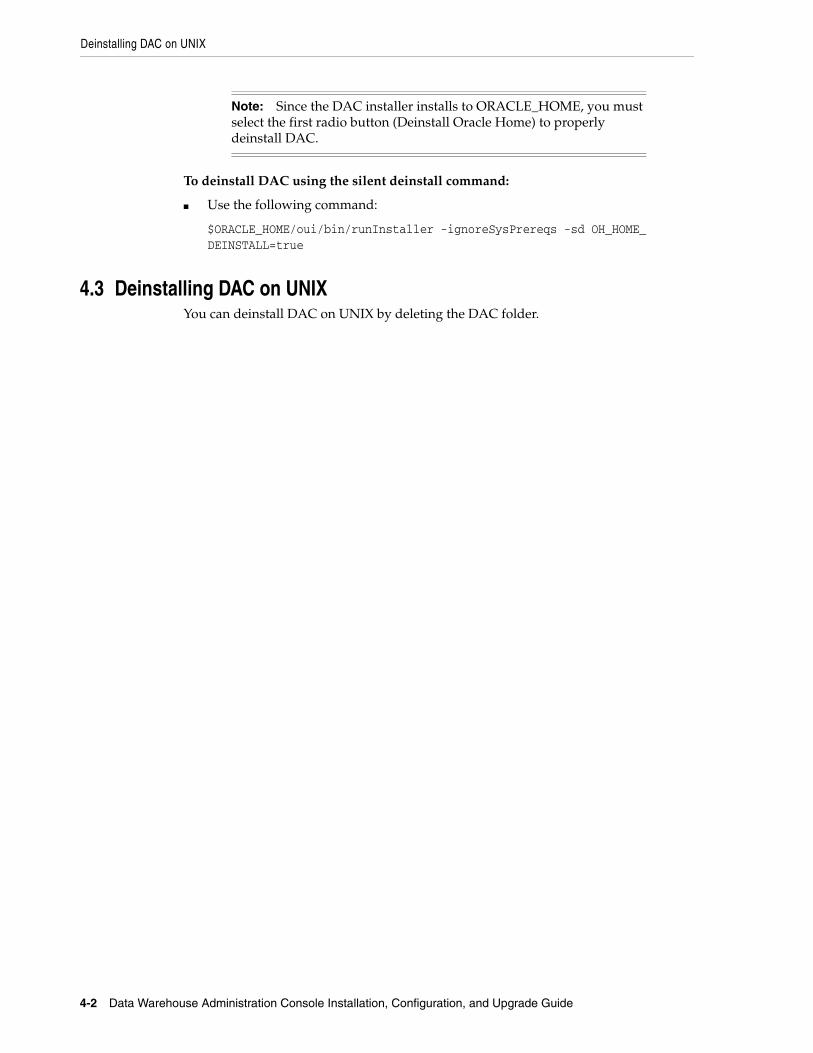
4.3 Deinstalling DAC on UNIXYou can deinstall DAC on UNIX by deleting the DAC folder.
Note: Since the DAC installer installs to ORACLE_HOME, you must select the first radio button (Deinstall Oracle Home) to properly deinstall DAC.
5
Configuring DAC 5-1
5Configuring DAC
This section provides a description of the system configuration that is handled by the Oracle Universal Installer during the installation process, instructions for the configuration you need to perform, and instructions for logging in to the DAC and upgrading the DAC Repository schema
This section includes the following topics:
■ Section 5.1, "System Configuration Handled by the Oracle Universal Installer"
■ Section 5.2, "Installing JDBC Drivers for DAC Database Connectivity"
■ Section 5.3, "Logging into DAC for the First Time"
■ Section 5.4, "Configuring the Connection Between the DAC Server and DAC Repository"
■ Section 5.5, "About User Account Management"
5.1 System Configuration Handled by the Oracle Universal InstallerThe following system configuration for Windows and Linux is handled by the Oracle Universal Installer during the installation process.
■ Configuration of config.bat (Windows) and config.sh (Linux).
On Windows this file is stored in $ORACLE_HOME\bifoundation\dac. On Linux, the directory is $ORACLE_HOME/bifoundation/dac. This file specifies the following:
– DAC_HOME. The directory where DAC is installed. For example, on Windows:
\orahome\10gR3_1\bifoundation\dac
– JAVA_HOME. The directory where the Java SDK is installed. For example, on Windows:
\orahome\10gR3_3\jdk
■ Configuration of dac_env_<Informatica version>.bat (Windows) and dac.env_<Informatica version>.sh (Linux).
On Windows this file is stored in $ORACLE_HOME\bifoundation\dac. On Linux, the directory is $ORACLE_HOME/bifoundation/dac. This file specifies the
Note: You must perform the procedures in Section 5.2 through Section 5.4 in the order they appear in this document.
Installing JDBC Drivers for DAC Database Connectivity
5-2 Data Warehouse Administration Console Installation, Configuration, and Upgrade Guide
installation directories of Informatica components. See the comments at the beginning of the file for more information.
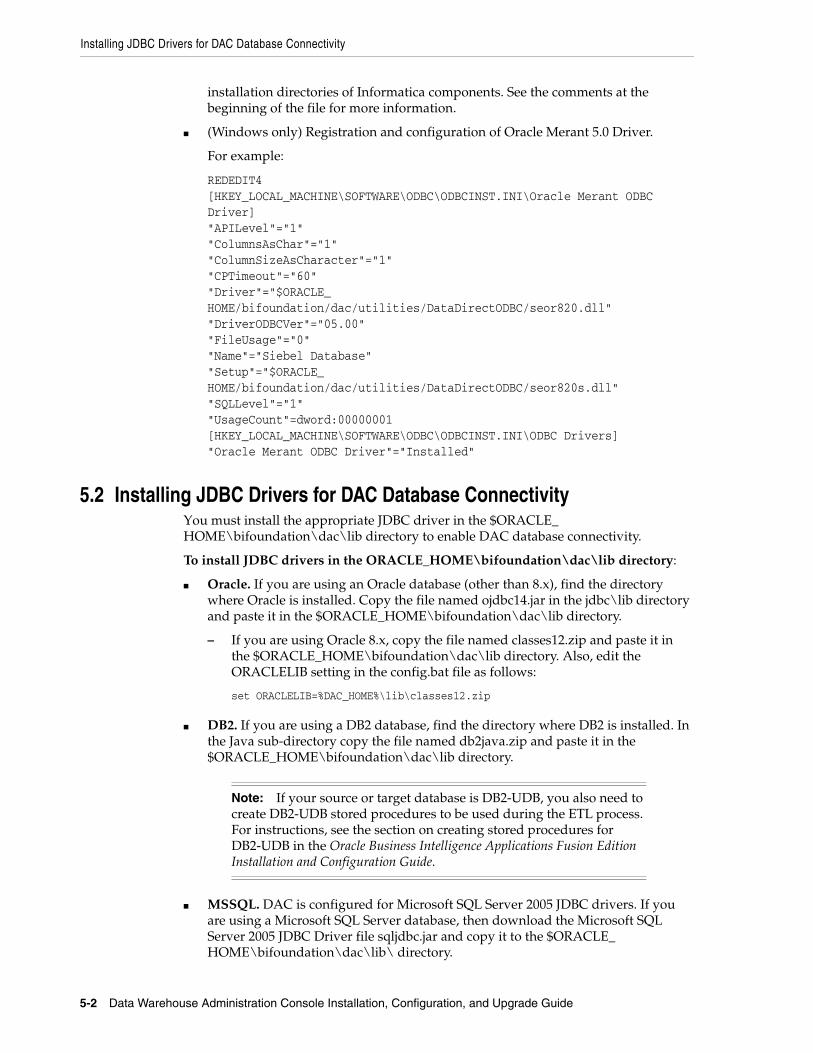
■ (Windows only) Registration and configuration of Oracle Merant 5.0 Driver.
For example:
REDEDIT4[HKEY_LOCAL_MACHINE\SOFTWARE\ODBC\ODBCINST.INI\Oracle Merant ODBC Driver]"APILevel"="1""ColumnsAsChar"="1""ColumnSizeAsCharacter"="1""CPTimeout"="60""Driver"="$ORACLE_HOME/bifoundation/dac/utilities/DataDirectODBC/seor820.dll""DriverODBCVer"="05.00""FileUsage"="0""Name"="Siebel Database""Setup"="$ORACLE_HOME/bifoundation/dac/utilities/DataDirectODBC/seor820s.dll""SQLLevel"="1""UsageCount"=dword:00000001[HKEY_LOCAL_MACHINE\SOFTWARE\ODBC\ODBCINST.INI\ODBC Drivers]"Oracle Merant ODBC Driver"="Installed"
5.2 Installing JDBC Drivers for DAC Database ConnectivityYou must install the appropriate JDBC driver in the $ORACLE_HOME\bifoundation\dac\lib directory to enable DAC database connectivity.
To install JDBC drivers in the ORACLE_HOME\bifoundation\dac\lib directory:
■ Oracle. If you are using an Oracle database (other than 8.x), find the directory where Oracle is installed. Copy the file named ojdbc14.jar in the jdbc\lib directory and paste it in the $ORACLE_HOME\bifoundation\dac\lib directory.
– If you are using Oracle 8.x, copy the file named classes12.zip and paste it in the $ORACLE_HOME\bifoundation\dac\lib directory. Also, edit the ORACLELIB setting in the config.bat file as follows:
set ORACLELIB=%DAC_HOME%\lib\classes12.zip
■ DB2. If you are using a DB2 database, find the directory where DB2 is installed. In the Java sub-directory copy the file named db2java.zip and paste it in the $ORACLE_HOME\bifoundation\dac\lib directory.
■ MSSQL. DAC is configured for Microsoft SQL Server 2005 JDBC drivers. If you are using a Microsoft SQL Server database, then download the Microsoft SQL Server 2005 JDBC Driver file sqljdbc.jar and copy it to the $ORACLE_HOME\bifoundation\dac\lib\ directory.
Note: If your source or target database is DB2-UDB, you also need to create DB2-UDB stored procedures to be used during the ETL process. For instructions, see the section on creating stored procedures for DB2-UDB in the Oracle Business Intelligence Applications Fusion Edition Installation and Configuration Guide.
Logging into DAC for the First Time
Configuring DAC 5-3
You can use the Microsoft SQL Server 2000 JDBC Driver files if you edit the \conf\connection_templates.xml file and un-comment the section that starts "<!-- THIS SECTION IS FOR SQL SERVER 2000. Comment this section while using SQL Server 2005.-->.
Download the SQL Server JDBC drivers for SQL Server 2000 from the Microsoft web site. Copy the Copy the files msbase.jar, mssqlserver.jar, and msutil.jar to the $ORACLE_HOME\bifoundation\dac\lib folder.
■ Teradata. If you are using a Teradata database, copy the files tdgssconfig.jar, TdgssUserConfigFile.xml, terajdbc4.jar, log4j.jar, and tdgssjava.jar from the Teradata installation directory to the $ORACLE_HOME\bifoundation\dac\lib directory. Depending on the Teradata JDBC version, you might not have some of the above files.
5.3 Logging into DAC for the First TimeWhen you log into DAC for the first time, you must first configure a connection to connect to the DAC Repository. DAC stores this connection information for subsequent logins.
After configuring a connection to the DAC Repository and logging in, the DAC will automatically prompt you to upgrade the repository schema.
DAC Repository Database Authentication FileWhen you configure a connection to the DAC Repository, the configuration process includes creating a new authentication file or selecting an existing authentication file. The authentication file authenticates the database in which the repository resides. If you create a new authentication file, you will specify the table owner and password for the database.
A user with the Administrator role must distribute the authentication file to any user account that needs to access the specified DAC Repository. For information about managing user accounts, see Section 5.5, "About User Account Management".
To log into DAC for the first time and upgrade the repository schema:
1. Start the DAC Client by navigating to the $ORACLE_HOME\bifoundation\dac directory and double-clicking the startclient.bat file.
The Login ... dialog box appears.
2. Click Configure.
3. In the Configuring ... dialog box, select Create Connection, and then click Next.
4. Enter the appropriate connection information:
Note: You need the Microsoft SQL Server 2005 JDBC Driver 1.1 for SQL Server 2000 or SQL Server 2005.
Field Required Value
Name Enter a unique name for the connection to the DAC Repository.
Connection type Select the type of database in which the DAC Repository will be stored.
Logging into DAC for the First Time
5-4 Data Warehouse Administration Console Installation, Configuration, and Upgrade Guide
5. To select an existing authentication file, do the following:
a. Click in the Authentication File field of the Configuring... dialog box.
b. In the Authentication File dialog box, select Choose existing authentication file.
c. Navigate to the appropriate folder, and select the authentication file. Click OK.
d. In the Configuring... dialog box, click Test Connection to confirm the connection works.
e. Click Apply, and then click Finish.
6. To create a new authentication file, do the following:
a. Click in the Authentication File field of the Configuring... dialog box.
b. In the Authentication File dialog box, select Create authentication file.
c. Navigate to the folder where you want to save the new authentication file, and click OK.
d. In the Create Authentication File dialog box, enter a unique name for the authentication file, and click OK.
e. Enter the Table Owner Name and Password for the database where the repository will reside.
Connection String, or Database name, or TNS Name, or Instance
Select the database name or database account name of the DAC Repository.
If you are using:
■ Oracle (OCI8), use the tnsnames entry.
■ Oracle (Thin), use the instance name.
■ SQL Server, use the database name.
■ DB2-UDB, use the connect string as defined in the DB2 configuration.
Database Host Enter the name of the machine where the DAC Repository will reside.
Database Port Enter the port number on which the database listens. For example, for an Oracle database the default port is 1521, or for a SQL Server database the default port is 1433.
Optional URL Can be used to override the standard URL for this connection.
Optional Driver Can be used to override the standard driver for this connection.
Authentication File Click in this field to do one of the following:
■ Select an existing authentication file.
■ Create a new authentication file.
Proceed to the next step for detailed instructions.
Note: You must distribute this authentication file to all user accounts that need to access this DAC Repository.
Field Required Value
Configuring the Connection Between the DAC Server and DAC Repository
Configuring DAC 5-5
f. In the Configuring... dialog box, click Test Connection to confirm the connection works.
g. Click Apply, and then click Finish.
7. In the Login... dialog box, do the following:
a. Select the appropriate Connection from the drop-down list.
b. Enter Administrator as the User Name.
c. Enter Administrator as the Password.
d. Click Login.
8. When asked whether you want to upgrade the DAC Repository schema, click Yes.
5.4 Configuring the Connection Between the DAC Server and DAC Repository
You must configure the connection between the DAC Server and the DAC Repository.
On Windows, you can use the DAC Client to configure a DAC Server that runs in the same $ORACLE_HOME\bifoundation\dac folder. Optionally, or to configure a DAC Server installed in another folder or on another Windows machine, use the serverSetupPrompt.bat file to configure the repository connection.
On Linux, use the serverSetupPrompt.sh or serverSetupPrompt.csh script to configure the connection between the DAC Server and the DAC Repository, as follows:
■ To configure the DAC Server repository connection using the DAC Client, see Section 5.4.1, "How to Configure the DAC Server Repository Connection Using the DAC Client (Windows)".
■ To configure the DAC Server repository connection using the serverSetupPrompt scripts, see Section 5.4.2, "How to Configure the DAC Repository Connection Using serverSetupPrompt Scripts (Windows or Linux)".
5.4.1 How to Configure the DAC Server Repository Connection Using the DAC Client (Windows)
If the DAC Server is co-located with a configured DAC Client in the same $ORACLE_HOME\bifoundation\dac folder, you can set the connection between the DAC Server and DAC Repository using the DAC Client, as described below.
To configure the connection between the DAC server and the DAC Repository using the DAC Client:
1. In the DAC Client, select Tools, then DAC Server Management, then DAC Server Setup.
Note: The DAC Repository that you connect to using the DAC Client is the one that will store the DAC Server repository connection information that you will specify in this procedure.
A confirmation dialog asks you to confirm that you want to configure the DAC Repository connection.
Note: You must distribute this authentication file to all user accounts that need to access this DAC Repository.
Configuring the Connection Between the DAC Server and DAC Repository
5-6 Data Warehouse Administration Console Installation, Configuration, and Upgrade Guide
2. Click Yes to display the Server Configuration dialog.
3. In the Repository Connection Information tab, enter the appropriate information, as described in the table below.
4. Click Test Connection to make sure the DAC Repository connection works.
5. Click Save.
Tip: If the DAC Server is running on the same machine as the DAC Client, click Populate from preconfigured client connection to populate the fields with connection details from the DAC Client.
Field Description
Connection type Select the type of database that you are using to store the DAC metadata repository. Depending on what type you select, the connection details below change (see Connection fields below).
Connection fields (for example, Instance, TNS Name, Connection string/Database name.
Specify connection details for the database that stores the DAC metadata repository.
■ If you select Oracle (Thin), you are prompted below for the following information:
■ Instance (for example, mymachinename).
■ Database Host (fully qualified, for example, mymachine.us.company.com).
■ Database Port (for example, 1521).
■ Table owner name, using the account that you created a database to store the DAC Repository.
■ Password (that is, for the above database account).
■ If you select Oracle (OCI8), you are prompted below for a TNS name (for example, [email protected]).
■ If you select DB2, you are prompted below for a Connection string.
■ If you select MS SQL Server, you are prompted below for a Database name.
Table owner name The database table name or instance that you created to store the DAC Repository.
Password The database or instance password (for example, DAC).
Note: The DAC Repository details that you specify here must match the DAC Repository details that you specified in the following tasks:
- When you created a database to store the DAC Repository.
- When you created a DAC connection.
About User Account Management
Configuring DAC 5-7
5.4.2 How to Configure the DAC Repository Connection Using serverSetupPrompt Scripts (Windows or Linux)
Use the serverSetupPrompt.sh or serverSetupPrompt.csh file to configure the connection between the DAC Server and the DAC Repository when the DAC Server is installed on Linux, as described below.
Use the serverSetupPrompt.bat file to configure the connection between the DAC Server and the DAC Repository when the DAC Server is installed on Windows, as described below.
To configure the connection between the DAC Server and the DAC Repository using the serverSetupPrompt files:
1. Run the serverSetupPrompt script, as follows:
■ On Windows, double-click the serverSetupPrompt.bat located in the \DAC directory.
■ On Linux, run serverSetupPrompt.sh or serverSetupPrompt.csh located in the /DAC directory.
2. Enter 1 in the 'Please make your selection' prompt to enter repository connection information.
3. Enter the number for the type of database storing the DAC Repository from the list of connection type choices.
4. Enter the connection information as described in the Connection Information table in section Section 5.4.2, "How to Configure the DAC Repository Connection Using serverSetupPrompt Scripts (Windows or Linux)".
5. Enter 2 to test the DAC Repository connection.
6. Enter 5 to save changes.
7. Enter 6 to exit.
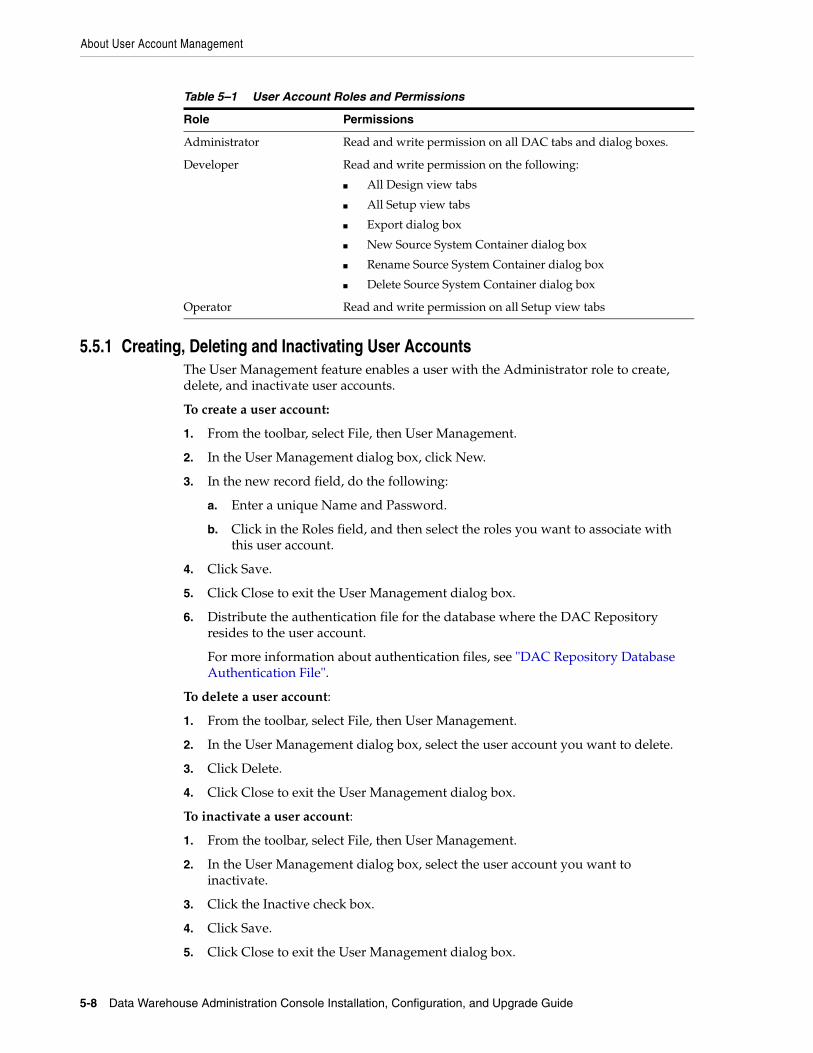
5.5 About User Account ManagementThe User Management feature includes three roles: Administrator, Developer, and Operator. As shown in Table 5–1, each role has a set of permissions that determines what DAC functionality the role can access.
The User Management dialog box enables a user with the Administrator role to manage user accounts. A user account includes a unique identifier, password, and one or more roles. The Administrator can also inactivate a user account. For instructions on managing user accounts, see "Creating, Deleting and Inactivating User Accounts".
Upon the initial login to a new DAC installation, a user account with the Administrator role is automatically created. This default user account name is Administrator, and the default password is Administrator. It is recommended that after the initial login, the user change the default password.
Note: A user with the Administrator role must distribute the DAC Repository database authentication file to user accounts that need to access the DAC Repository. For information about the authentication file, see "DAC Repository Database Authentication File".
About User Account Management
5-8 Data Warehouse Administration Console Installation, Configuration, and Upgrade Guide
5.5.1 Creating, Deleting and Inactivating User AccountsThe User Management feature enables a user with the Administrator role to create, delete, and inactivate user accounts.
To create a user account:
1. From the toolbar, select File, then User Management.
2. In the User Management dialog box, click New.
3. In the new record field, do the following:
a. Enter a unique Name and Password.
b. Click in the Roles field, and then select the roles you want to associate with this user account.
4. Click Save.
5. Click Close to exit the User Management dialog box.
6. Distribute the authentication file for the database where the DAC Repository resides to the user account.
For more information about authentication files, see "DAC Repository Database Authentication File".
To delete a user account:
1. From the toolbar, select File, then User Management.
2. In the User Management dialog box, select the user account you want to delete.
3. Click Delete.
4. Click Close to exit the User Management dialog box.
To inactivate a user account:
1. From the toolbar, select File, then User Management.
2. In the User Management dialog box, select the user account you want to inactivate.
3. Click the Inactive check box.
4. Click Save.
5. Click Close to exit the User Management dialog box.
Table 5–1 User Account Roles and Permissions
Role Permissions
Administrator Read and write permission on all DAC tabs and dialog boxes.
Developer Read and write permission on the following:
■ All Design view tabs
■ All Setup view tabs
■ Export dialog box
■ New Source System Container dialog box
■ Rename Source System Container dialog box
■ Delete Source System Container dialog box
Operator Read and write permission on all Setup view tabs
Index-1
Index
Cconfiguration
system, 5-1user, 5-1
DDAC
authentication file, 5-3logging in, 5-3
database connectivityinstalling JDBC drivers, 5-2
Iinstaller screens
Components, 2-2Installation Completed, 2-4Installation Progress, 2-4Installation Summary, 2-4Pre-requisite Checks, 2-3Select Informatica Version, 2-3Specify Informatica 7.1.4 Location, 2-3Specify Informatica 8.1.1 Location, 2-3Specify Installation Location, 2-2Welcome, 2-2
installing JDBC driversdatabase connectivity, 5-2
installing the DACprerequisites, 2-1
Llogging in
DAC, 5-3
OOracle Universal Installer
system configuration, 5-1
Ssystem configuration
database connectivity, 5-2JDBC drivers, 5-2
Oracle Merant 5.0 Driver, 5-1
Uuser account
creating, deleting, inactivating, 5-8management, 5-7

Index-2