oracle data integrator 12 creating a collocated agent · pdf fileoracle database (the...
TRANSCRIPT

2/1/2016 ODI 12c Collocated Agent
http://www.oracle.com/webfolder/technetwork/tutorials/obe/fmw/odi/odi_12c/odi12c_agent_collocated/index.html 1/14
Purpose
This tutorial walks you through the steps that are needed to use Oracle Data Integrator Studio (ODI Studio) graphical tools to create an agent collocated with WLS to support (among otherthings) scheduling of procedures.
Time to Complete
Approximately 40 minutes.
Introduction
A common task that is performed using ODI is to set up and install an ODI Agent. After the ODI scenarios are created, they can be scheduled and orchestrated using an ODI Agent, which isa lightweight Java process that orchestrates the execution of ODI scenarios. This tutorial walks you through the steps that are needed to set up and install the ODI Agent.
This is the third in a series of four OBEs in the Oracle Data Integrator 12c: Getting Started series.
Scenario
Linda works as a database administrator for Example Enterprise Corp (http://www.example.com). In Example Enterprise, Linda is responsible for performing database management andintegration tasks on various resources within the organization. In particular, Linda is responsible for data loading, transformation, and validation. To begin working on her projects, Lindacreated the new Master repository and Work repository. Linda also created the project and the procedure to create a relational table and populate it with data. Now Linda needs to set upand install an ODI Agent as a service. This agent will be used in the next OBE to schedule a later run of the procedure. Agents are used for many other tasks in addition to scheduling.
Hardware and Software Requirements
The following is a list of software requirements:
A supported operating system (the OS shown here is 64bit Oracle Enterprise Linux release 5.6 (Carthage), other versions such as Windows are supported as well)Oracle Database (the version shown here is Enterprise Edition 12.1.0, other versions are supported as well)Oracle WebLogic Server (WLS) 12c (other versions are supported as well). This OBE requires that WebLogic Server (WLS) is installed. If you do not have WLS installed, seealternate OBE here.Oracle Data Integrator 12c installed as ODI Enterprise (the version shown here is 12.1.2)
The following is a list of OPTIONAL software:
Oracle SQL Developer 12c (included with Database 12c install)
If WLS is present, it must be in the same Middleware HOME directories as ODI.
Prerequisites
Before starting this tutorial, you should have:
Started Oracle Database services and components such as the Listener.A Database user with DBA role privileges such as the SYS or SYSTEM account.Installed the HR schema included in the Oracle Database. The Sample Schemas Installation Guide is part of the Oracle Database documentation set, and is also available online at:http://otn.oracle.com.Already installed and configured ODI Master and Work repositories (instructions on how to do this are contained in the first of four OBEs in the Getting Started series).Already created an ODI project and mapping for a flat file to a relational table (instructions on how to do this are contained in the second of four OBEs in the Getting Started series).
The agent in this OBE runs in a domain that is very similar to (but not dependent on) WebLogic Server (WLS) domains. The GUI Configuration Wizard uses templates to determine whichcomponents are needed to support the function of the agent. There are three possible kinds of agents:
completely standalone agent (no WLS installed)standalone collocated agent (WLS is installed, but is not being used. The agent is started as its own binary. This OBE uses this kind of agent.)JEE agent (WLS installed and used. The domain, admin server, managed servers, node managers, and so on are started in the normal WLS way. The agent is one of many possibleJEE apps running in the domain. )
To create the domain using CAM, perform the following steps:
1.1 Basic Configuration
1. Start the Fusion Middleware (FMW) Configuration Wizard to create a domain for the agent. This is the Common Administration Model (CAM), though you may not see thatterm used anywhere. It bears a striking resemblance to the WebLogic Server (WLS) domain configurator.
OS Prompt
[myuser@myhost ~]$ cd $ODI_HOME/common/bin [myuser@myhost bin]$ pwd /u01/app/oracle/Middleware/Oracle_Home/odi/common/bin [myuser@myhost bin]$ ll total 44 ‐rwxr‐x‐‐‐ 1 oracle oinstall 483 Feb 6 09:14 clonedunpack.sh ‐rw‐r‐‐‐‐‐ 1 oracle oinstall 210 Jul 11 04:37 commons‐logging.properties ‐rwxr‐x‐‐‐ 1 oracle oinstall 471 Dec 19 2012 config.sh ‐rwxr‐x‐‐‐ 1 oracle oinstall 2312 Jul 11 04:37 generate_agent_wls_template.cmd ‐rwxr‐x‐‐‐ 1 oracle oinstall 1980 Jul 11 04:37 generate_agent_wls_template.sh ‐rw‐r‐‐‐‐‐ 1 oracle oinstall 286 Jul 11 04:37 jrf‐port‐config.properties ‐rw‐r‐‐‐‐‐ 1 oracle oinstall 5412 Jul 11 04:37 ODI‐logging‐config.xml ‐rwxr‐x‐‐‐ 1 oracle oinstall 467 Dec 19 2012 pack.sh ‐rwxr‐x‐‐‐ 1 oracle oinstall 471 Dec 19 2012 unpack.sh ‐rwxr‐x‐‐‐ 1 oracle oinstall 1748 Dec 19 2012 wlst.sh [myuser@myhost bin]$ ./config.sh
Overview
1. Creating the Domain for the Standalone Collocated Agent
Oracle Data Integrator 12c Creating a Collocated Agent

2/1/2016 ODI 12c Collocated Agent
http://www.oracle.com/webfolder/technetwork/tutorials/obe/fmw/odi/odi_12c/odi12c_agent_collocated/index.html 2/14
Note that there are other different versions of config.sh in other FMW directories, but this is the one you want for creating an ODI agent. The splash screen displays briefly.
2. For most of the nonAdvanced configuration, the defaults are adequate. On the Configuration Type panel, leave the defaults.
If you do not yet have a WLS domain, then the first one created will be called base_domain by default. You can rename it to something such as odi_agent or mydomain99, justmake sure that it remains in $FMW_HOME/user_projects/domains/. If you already have a domain named base_domain, then you cannot "create" another one, you wouldhave to rename it to base_domain2 or something else, or you could Update an existing domain. The particulars about updating an existing domain are outside the scope ofthis OBE, and are covered in the WLS curriculum.
Click Next to continue.
3. On the Templates panel, select Oracle Data Integrator Standalone Collocated Agent. It is “standalone” in the sense that it does not use WLS, but it is “collocated” in thesense that WLS is installed. Selecting this one option causes several other options to be selected for you.
CAUTION! Do NOT select Oracle Data Integrator Agent or it will not work!

2/1/2016 ODI 12c Collocated Agent
http://www.oracle.com/webfolder/technetwork/tutorials/obe/fmw/odi/odi_12c/odi12c_agent_collocated/index.html 3/14
Click Next to continue.
4. On the Administrator Account panel, enter your password twice. Standard password complexity is expected and enforced (see note in the message box below about “8alphanumeric characters with at least one number or special character.” For example, Welcome1 would qualify.)
Click Next to continue.
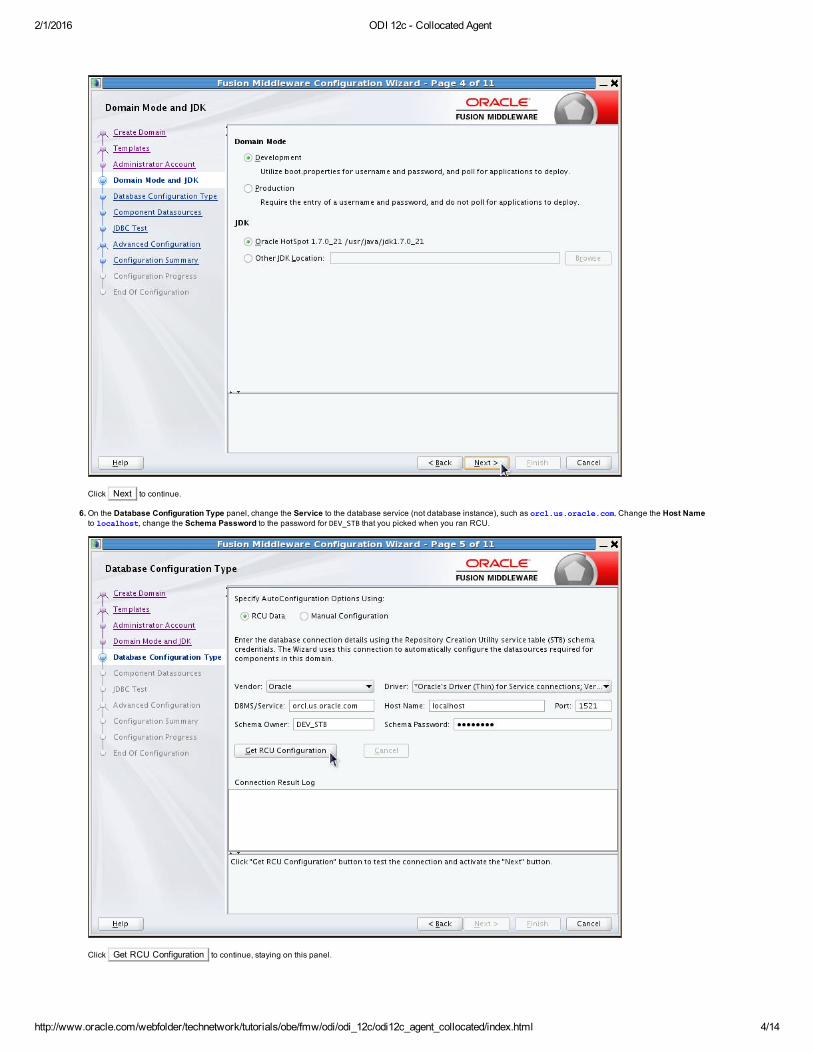
5. On the Domain Mode and JDK panel, leave the defaults.
2/1/2016 ODI 12c Collocated Agent
http://www.oracle.com/webfolder/technetwork/tutorials/obe/fmw/odi/odi_12c/odi12c_agent_collocated/index.html 4/14
Click Next to continue.
6. On the Database Configuration Type panel, change the Service to the database service (not database instance), such as orcl.us.oracle.com. Change the Host Nameto localhost, change the Schema Password to the password for DEV_STB that you picked when you ran RCU.
Click Get RCU Configuration to continue, staying on this panel.

2/1/2016 ODI 12c Collocated Agent
http://www.oracle.com/webfolder/technetwork/tutorials/obe/fmw/odi/odi_12c/odi12c_agent_collocated/index.html 5/14
The Connection Result Log should end with Successfully Done. Click Next to continue.
7. On the JDBC Component Schema panel, leave the defaults.
Click Next to continue.
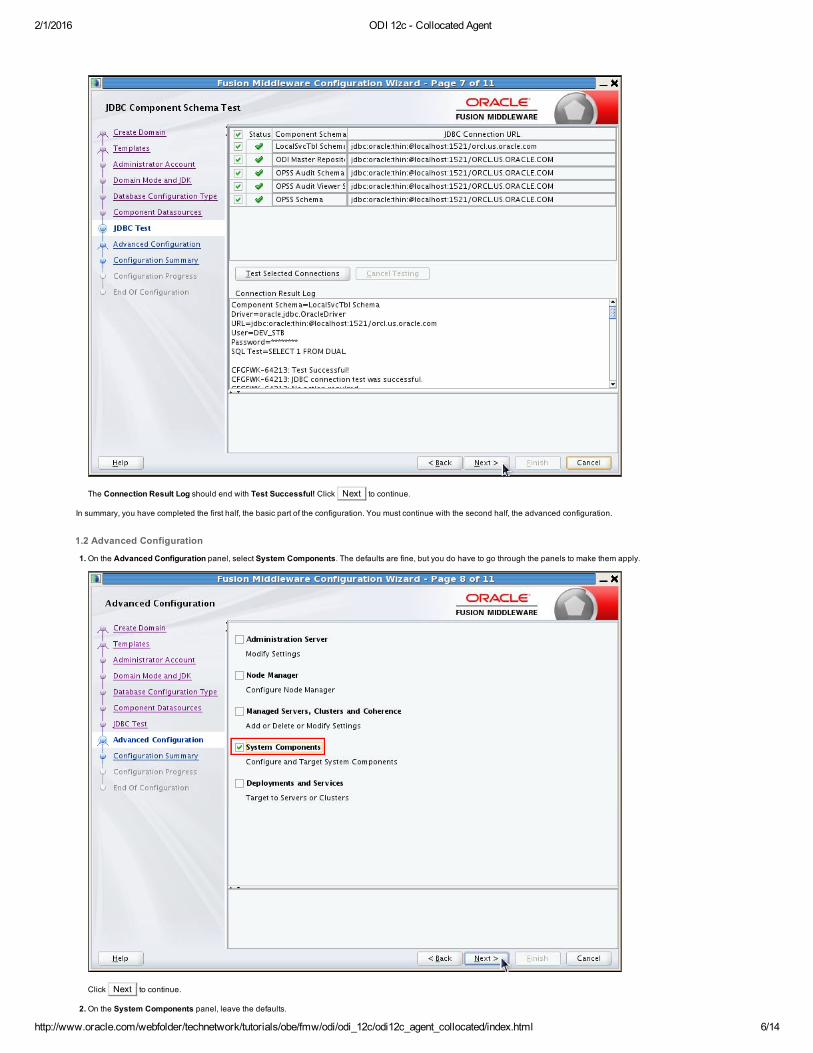
8. On the JDBC Component Schema Test panel, leave the defaults.
2/1/2016 ODI 12c Collocated Agent
http://www.oracle.com/webfolder/technetwork/tutorials/obe/fmw/odi/odi_12c/odi12c_agent_collocated/index.html 6/14
The Connection Result Log should end with Test Successful! Click Next to continue.
In summary, you have completed the first half, the basic part of the configuration. You must continue with the second half, the advanced configuration.
1.2 Advanced Configuration
1. On the Advanced Configuration panel, select System Components. The defaults are fine, but you do have to go through the panels to make them apply.
Click Next to continue.
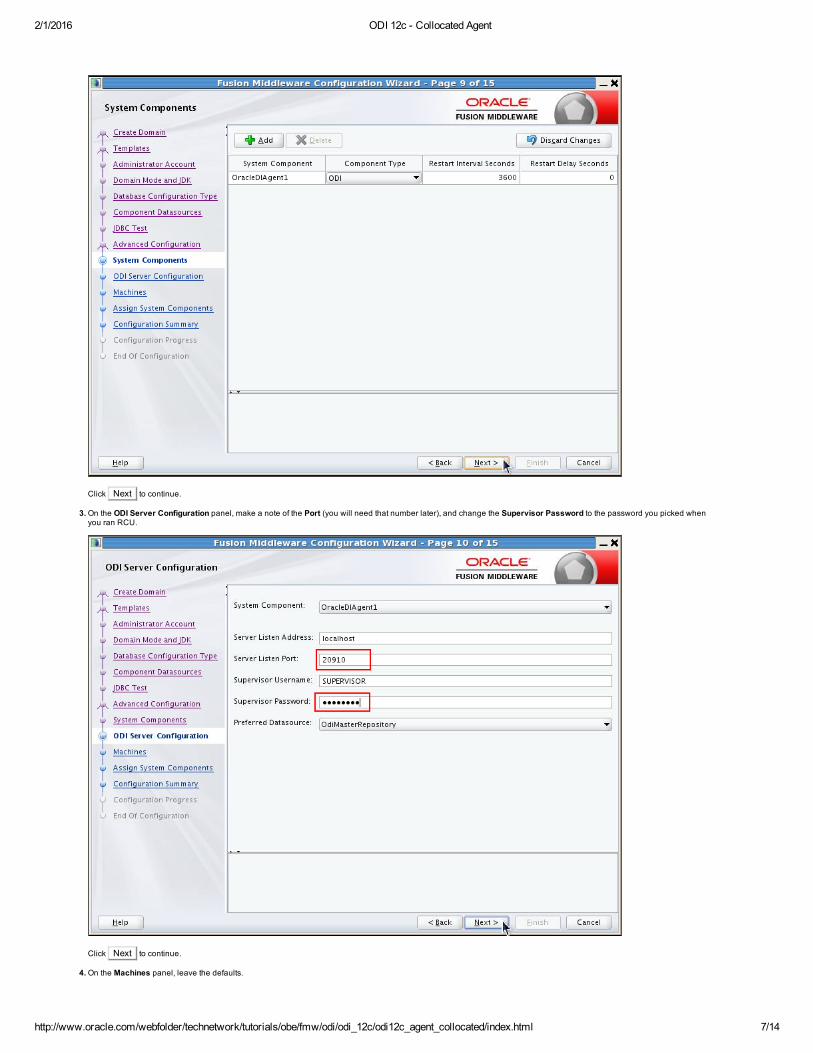
2. On the System Components panel, leave the defaults.
2/1/2016 ODI 12c Collocated Agent
http://www.oracle.com/webfolder/technetwork/tutorials/obe/fmw/odi/odi_12c/odi12c_agent_collocated/index.html 7/14
Click Next to continue.
3. On the ODI Server Configuration panel, make a note of the Port (you will need that number later), and change the Supervisor Password to the password you picked whenyou ran RCU.
Click Next to continue.
4. On the Machines panel, leave the defaults.

2/1/2016 ODI 12c Collocated Agent
http://www.oracle.com/webfolder/technetwork/tutorials/obe/fmw/odi/odi_12c/odi12c_agent_collocated/index.html 8/14
Click Next to continue.
5. On the Assign System Components to Machines panel, leave the defaults.
Click Next to continue.
6. On the Configuration Summary panel, leave the defaults.

2/1/2016 ODI 12c Collocated Agent
http://www.oracle.com/webfolder/technetwork/tutorials/obe/fmw/odi/odi_12c/odi12c_agent_collocated/index.html 9/14
Click Create to make the domain and continue.
7. On the Configuration Progress panel, there is nothing to do. Just make sure that it ends with the progress bar at 100%, and with the message, “Domain CreatedSuccessfully!”
Click Next to continue.
8. On the Configuration Success panel, there is nothing to do.

2/1/2016 ODI 12c Collocated Agent
http://www.oracle.com/webfolder/technetwork/tutorials/obe/fmw/odi/odi_12c/odi12c_agent_collocated/index.html 10/14
Click Finish to end the Configuration Wizard and return to the OS prompt.
In summary, you completed both halves of the domain configuration. This created several directories with configuration files and scripts.
The physical agent is a background OS process that communicates with ODI via TCP/IP ports.
To create, start, and test the physical agent, perform the following steps:
2.1 Creating a Physical Agent
1. Start ODI Studio by running odi.sh.
OS Prompt
[myuser@myhost ~]$ cd $ODI_HOME/studio [myuser@myhost studio]$ pwd /u01/app/oracle/Middleware/Oracle_Home/odi/studio [myuser@myhost studio]$ ./odi.sh
Oracle Fusion Data Integrator Studio 12c Copyright (c) 1997, 2013, Oracle and/or its affiliates. All rights reserved.
The splash screen and progress bar displays briefly.
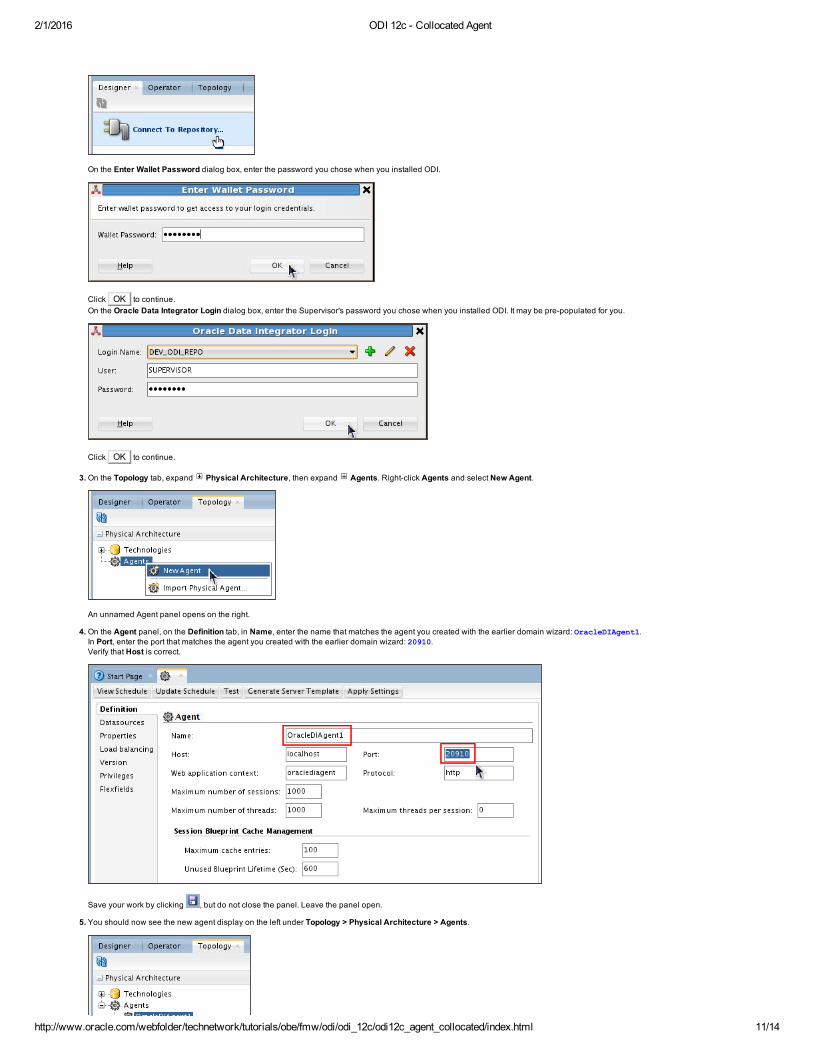
2. On the Designer or Topology tab, click Connect To Repository...
2. Creating a Physical Agent
2/1/2016 ODI 12c Collocated Agent
http://www.oracle.com/webfolder/technetwork/tutorials/obe/fmw/odi/odi_12c/odi12c_agent_collocated/index.html 11/14
On the Enter Wallet Password dialog box, enter the password you chose when you installed ODI.
Click OK to continue. On the Oracle Data Integrator Login dialog box, enter the Supervisor's password you chose when you installed ODI. It may be prepopulated for you.
Click OK to continue.
3. On the Topology tab, expand Physical Architecture, then expand Agents. Rightclick Agents and select New Agent.
An unnamed Agent panel opens on the right.
4. On the Agent panel, on the Definition tab, in Name, enter the name that matches the agent you created with the earlier domain wizard: OracleDIAgent1. In Port, enter the port that matches the agent you created with the earlier domain wizard: 20910. Verify that Host is correct.
Save your work by clicking , but do not close the panel. Leave the panel open.
5. You should now see the new agent display on the left under Topology > Physical Architecture > Agents.

2/1/2016 ODI 12c Collocated Agent
http://www.oracle.com/webfolder/technetwork/tutorials/obe/fmw/odi/odi_12c/odi12c_agent_collocated/index.html 12/14
In summary, you created the physical agent configuration for within ODI. This points to the executables created in the previous CAM steps.
2.2 Starting the Background Process
1. Change to the directory of the domain that contains the binary files. Start the agent using the agent name from the domain. Leave that window running (perhaps minimized orsent to the back of the desktop.)
OS Prompt
[myuser@myhost ~]$ cd $FMW_HOME/user_projects/domains/base_domain/bin [myuser@myhost bin]$ pwd /u01/app/oracle/Middleware/Oracle_Home/user_projects/domains/base_domain/bin [myuser@myhost bin]$ ls agent.sh server_migration startNodeManager.sh agentstop.sh service_migration startscen.sh diag setDomainEnv.sh startWebLogic.sh internal setODIDomainEnv.sh stopComponent.sh nodemanager setStartupEnv.sh stoploadplan.sh odi_credtool.sh startcmd.sh stopManagedWebLogic.sh oracle‐dfw‐0.tmp startComponent.sh stopsession.sh restartloadplan.sh startloadplan.sh stopWebLogic.sh restartsession.sh startManagedWebLogic.sh [myuser@myhost bin]$ ./agent.sh NAME=OracleDIAgent1 PORT=20910
The very first time you run this, you will get LOTS of output as Java initializes. Subsequent run times the messages will be fewer. The ‐PORT parameter is optional butrecommended.
OS Prompt
/u01/app/oracle/Middleware/Oracle_Home/odi/agent/internal/bin/commODIEnv.sh: line 111: /u01/app/oracle/Middleware/Oracle_Home/odi/agent/../../wlserver/modules/com.oracle.weblogic.security.encryption_1.0.0.0.jar: Permission denied /u01/app/oracle/Middleware/Oracle_Home/odi/agent/internal/bin/commODIEnv.sh: line 114: /u01/app/oracle/Middleware/Oracle_Home/odi/agent/../../oracle_common/modules/com.oracle.webservices.orasaaj‐api_12.1.2.jar: Permission denied /u01/app/oracle/Middleware/Oracle_Home/odi/agent/internal/bin/commODIEnv.sh: line 117: /u01/app/oracle/Middleware/Oracle_Home/odi/agent/../../wlserver/server/lib/wlthint3client.jar: Permission denied 2013‐08‐02 20:54:24.897 NOTIFICATION New data source: [DEV_ODI_REPO/*******@jdbc:oracle:thin:@localhost:1521/ORCL.US.ORACLE.COM] 2013‐08‐02 20:54:27.058 NOTIFICATION ODI‐1128 Agent OracleDIAgent1 is starting. Container: STANDALONE. Agent Version: 12.1.2 ‐ 11/07/2013. Port: 20910. JMX Port: 21910. Allowing : 127.0.0.1,10.216.4.175,127.0.0.1 2013‐08‐02 20:54:33.457 NOTIFICATION New data source: [DEV_ODI_REPO/*******@jdbc:oracle:thin:@(description=(address=(host=localhost)(protocol=tcp)(port=1521))(connect_data=(service_name=ORCL.US.ORACLE.COM)(server=dedicated)))]2013‐08‐02 20:54:34.186 NOTIFICATION ODI‐1111 Agent OracleDIAgent1 started. Agent version: 12.1.2 ‐ 11/07/2013. Port: 20910. JMX Port: 21910. 2013‐08‐02 20:54:34.187 NOTIFICATION ODI‐1136 Starting Schedulers on Agent OracleDIAgent1. 2013‐08‐02 20:54:35.678 NOTIFICATION ODI‐1137 Scheduler started for work repository workrep on Agent OracleDIAgent1.
You want to see at the bottom that the scheduler has started for the correct work repository.
In summary, you have started the external process associated with the ODI physical agent.
2.3 Testing the Physical Agent
1. You should have left the OracleDIAgent1 Agent panel open from step 2.1.4.
Click Test to test the agent now that the process is running outside of ODI.
2. The ODI Information dialog box should say, “Agent Test Successful.”
Click OK to continue. You may now close the OracleDIAgent1 tab.
2/1/2016 ODI 12c Collocated Agent
http://www.oracle.com/webfolder/technetwork/tutorials/obe/fmw/odi/odi_12c/odi12c_agent_collocated/index.html 13/14
Click OK to continue. You may now close the OracleDIAgent1 tab.
In summary, you have configured and started a physical agent.
Most components in ODI have a physical and logical side to them. You already created the physical agent with ports and names, the logical agent is much simpler and shorter.
To create a logical agent that corresponds with the previous physical agent, perform the following steps:
3.1 Creating a Logical Agent
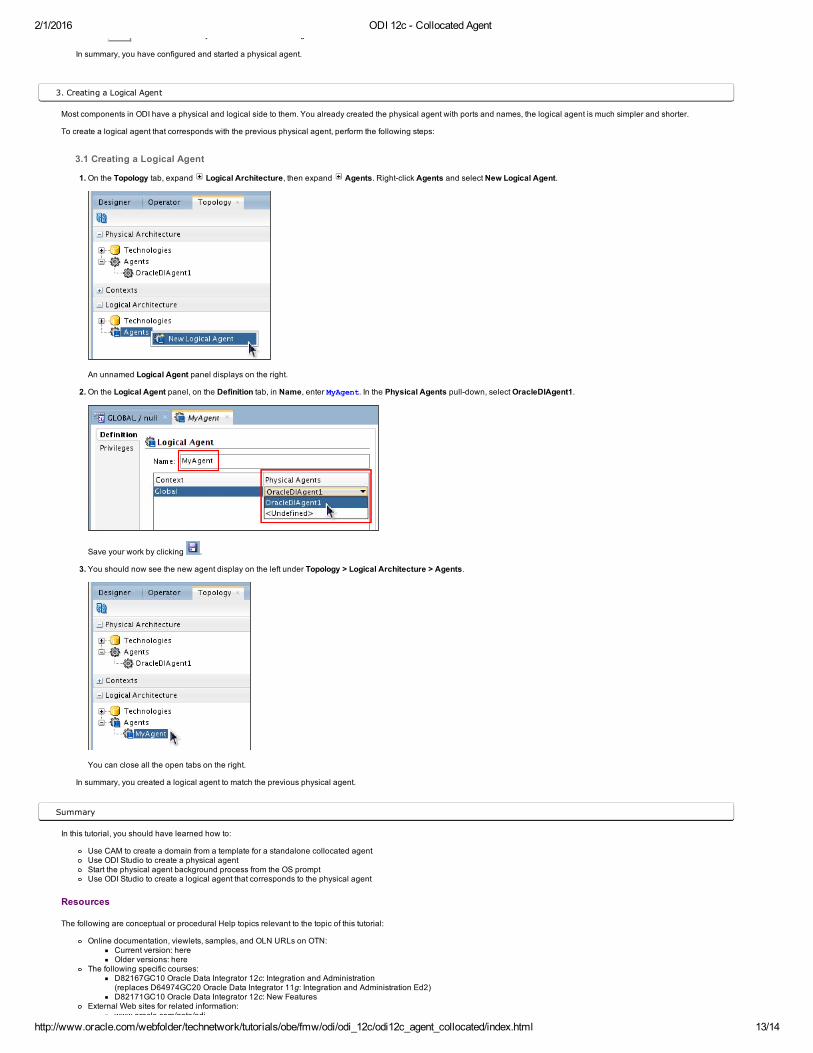
1. On the Topology tab, expand Logical Architecture, then expand Agents. Rightclick Agents and select New Logical Agent.
An unnamed Logical Agent panel displays on the right.
2. On the Logical Agent panel, on the Definition tab, in Name, enter MyAgent. In the Physical Agents pulldown, select OracleDIAgent1.
Save your work by clicking .
3. You should now see the new agent display on the left under Topology > Logical Architecture > Agents.
You can close all the open tabs on the right.
In summary, you created a logical agent to match the previous physical agent.
In this tutorial, you should have learned how to:
Use CAM to create a domain from a template for a standalone collocated agentUse ODI Studio to create a physical agentStart the physical agent background process from the OS promptUse ODI Studio to create a logical agent that corresponds to the physical agent
Resources
The following are conceptual or procedural Help topics relevant to the topic of this tutorial:
Online documentation, viewlets, samples, and OLN URLs on OTN:Current version: hereOlder versions: here
The following specific courses:D82167GC10 Oracle Data Integrator 12c: Integration and Administration (replaces D64974GC20 Oracle Data Integrator 11g: Integration and Administration Ed2)D82171GC10 Oracle Data Integrator 12c: New Features
External Web sites for related information:www.oracle.com/goto/odi
3. Creating a Logical Agent
Summary

2/1/2016 ODI 12c Collocated Agent
http://www.oracle.com/webfolder/technetwork/tutorials/obe/fmw/odi/odi_12c/odi12c_agent_collocated/index.html 14/14
www.oracle.com/goto/odiOTN Community Forums
To learn more about Oracle Data Integrator 12c, refer to additional OBEs in the Oracle Learning Library, or on the ODI Studio Start Page.
Credits
Lead Curriculum Developer: Steve FriedbergOther Contributors: Viktor Tchemodanov, Alex Kotopoulis, Julien Testut