oracle database 2 day + real application clusters · pdf fileoracle® database 2 day + real...
TRANSCRIPT

Oracle® Database2 Day + Real Application Clusters Guide
11g Release 1 (11.1)
B28252-06
February 2012

Oracle Database 2 Day + Real Application Clusters Guide 11g Release 1 (11.1)
Part No. B28252-06
Copyright © 2006, 2012, Oracle and/or its affiliates. All rights reserved.
Primary Author: Janet Stern
Contributing Author: Mark Bauer, Vivian Schupmann, Douglas Williams
Contributor: David Austin, Eric Belden, Jonathan Creighton, Sudip Datta, Prabhaker Gongloor, William Hodak, Sushil Kumar, Rich Long, Barb Lundhild, Venkat Maddali, Gaurav Manglik, Markus Michalewicz, Mughees Minhas, Joe Paradise, Hanlin Qian, Laurent Schneider, Uri Shaft, Jacqueline Sideri, Mark Townsend, Mike Zampiceni
This software and related documentation are provided under a license agreement containing restrictions on use and disclosure and are protected by intellectual property laws. Except as expressly permitted in your license agreement or allowed by law, you may not use, copy, reproduce, translate, broadcast, modify, license, transmit, distribute, exhibit, perform, publish, or display any part, in any form, or by any means. Reverse engineering, disassembly, or decompilation of this software, unless required by law for interoperability, is prohibited.
The information contained herein is subject to change without notice and is not warranted to be error-free. If you find any errors, please report them to us in writing.
If this is software or related documentation that is delivered to the U.S. Government or anyone licensing it on behalf of the U.S. Government, the following notice is applicable:
U.S. GOVERNMENT RIGHTS Programs, software, databases, and related documentation and technical data delivered to U.S. Government customers are "commercial computer software" or "commercial technical data" pursuant to the applicable Federal Acquisition Regulation and agency-specific supplemental regulations. As such, the use, duplication, disclosure, modification, and adaptation shall be subject to the restrictions and license terms set forth in the applicable Government contract, and, to the extent applicable by the terms of the Government contract, the additional rights set forth in FAR 52.227-19, Commercial Computer Software License (December 2007). Oracle America, Inc., 500 Oracle Parkway, Redwood City, CA 94065.
This software or hardware is developed for general use in a variety of information management applications. It is not developed or intended for use in any inherently dangerous applications, including applications that may create a risk of personal injury. If you use this software or hardware in dangerous applications, then you shall be responsible to take all appropriate fail-safe, backup, redundancy, and other measures to ensure its safe use. Oracle Corporation and its affiliates disclaim any liability for any damages caused by use of this software or hardware in dangerous applications.
Oracle and Java are registered trademarks of Oracle and/or its affiliates. Other names may be trademarks of their respective owners.
Intel and Intel Xeon are trademarks or registered trademarks of Intel Corporation. All SPARC trademarks are used under license and are trademarks or registered trademarks of SPARC International, Inc. AMD, Opteron, the AMD logo, and the AMD Opteron logo are trademarks or registered trademarks of Advanced Micro Devices. UNIX is a registered trademark of The Open Group.
This software or hardware and documentation may provide access to or information on content, products, and services from third parties. Oracle Corporation and its affiliates are not responsible for and expressly disclaim all warranties of any kind with respect to third-party content, products, and services. Oracle Corporation and its affiliates will not be responsible for any loss, costs, or damages incurred due to your access to or use of third-party content, products, or services.

iii
Contents
Preface ................................................................................................................................................................. xi
Audience....................................................................................................................................................... xiDocumentation Accessibility ..................................................................................................................... xiRelated Documents .................................................................................................................................... xiiConventions ................................................................................................................................................ xii
1 Introduction to Oracle Database 2 Day + Real Application Clusters Guide
About This Guide..................................................................................................................................... 1-1What This Guide Is Not..................................................................................................................... 1-1Related Materials................................................................................................................................ 1-1Oracle Real Application Clusters Documentation Overview...................................................... 1-2
Useful Oracle RAC Guides ........................................................................................................ 1-2About Oracle Clusterware and Oracle Real Application Clusters ................................................. 1-2About Automatic Storage Management .............................................................................................. 1-3Tools for Installing, Configuring, and Managing Oracle RAC ...................................................... 1-4
Installing Oracle RAC on Different Operating Systems............................................................... 1-5
2 Preparing Your Cluster
About Checking Requirements ............................................................................................................. 2-1About Checking Hardware Requirements..................................................................................... 2-1About Identifying Network Requirements .................................................................................... 2-3Verifying Operating System and Software Requirements........................................................... 2-4
Preparing the Server ................................................................................................................................ 2-5Configuring Operating System Users and Groups ....................................................................... 2-5Configuring Secure Shell................................................................................................................... 2-7
Generating RSA and DSA Keys ................................................................................................ 2-8Adding the Keys to an Authorized Key File........................................................................... 2-9
Configuring SSH User Equivalency ............................................................................................. 2-10About Configuring the Operating System Environment .......................................................... 2-11
Configuring the Network .................................................................................................................... 2-12Verifying the Network Configuration ......................................................................................... 2-14
Preparing the Operating System and Software............................................................................... 2-16About Setting the Time on Both Nodes ....................................................................................... 2-16About Configuring Kernel Parameters ........................................................................................ 2-17About Performing Platform-Specific Configuration Tasks....................................................... 2-17

iv
Configuring Installation Directories and Shared Storage ........................................................... 2-17About Deciding on a Shared Storage Solution ........................................................................... 2-18Configuring Block Devices for Oracle Clusterware Files.......................................................... 2-19Creating a Udev Permissions File for Oracle Clusterware ....................................................... 2-22About Choosing an Oracle Base Directory.................................................................................. 2-22About Choosing an Oracle Clusterware Home Directory ........................................................ 2-23
3 Installing and Configuring Oracle Clusterware and Oracle RAC
Preparing the Oracle Media Installation File ..................................................................................... 3-1Installing Oracle Clusterware 11g ........................................................................................................ 3-2
Configuring the Operating System Environment ......................................................................... 3-2Verifying the Configuration Using the Cluster Verification Utility ........................................... 3-3Using Oracle Universal Installer to Install Oracle Clusterware .................................................. 3-4Completing the Oracle Clusterware Configuration................................................................... 3-13
Configuring Automatic Storage Management in an ASM Home Directory ............................. 3-13Verifying Your ASM Installation .................................................................................................. 3-21
Installing the Oracle Database Software and Creating a Cluster Database ............................. 3-22Verifying Your Oracle RAC Database Installation..................................................................... 3-31Configuring the Operating System Environment for Database Management ...................... 3-32
Updating the oratab File ......................................................................................................... 3-32Reconfiguring the User Shell Profile ..................................................................................... 3-33
Performing Postinstallation Tasks ..................................................................................................... 3-34About Verifying the Oracle Clusterware Installation................................................................ 3-34About Backing Up the Voting Disk .............................................................................................. 3-35About Downloading and Installing RDBMS Patches ................................................................ 3-35Verifying Oracle Enterprise Manager Operations ..................................................................... 3-35Recommended Postinstallation Tasks.......................................................................................... 3-36
About Backing Up the root.sh Script .................................................................................... 3-36About Configuring User Accounts........................................................................................ 3-36
Converting an Oracle Database to an Oracle RAC Database ....................................................... 3-36Preparing for Database Conversion ............................................................................................. 3-37Overview of the Database Conversion Process Using Grid Control....................................... 3-37Overview of the Database Conversion Process Using rconfig............................................. 3-38
4 Administering Database Instances and Cluster Databases
About Oracle RAC Database Management......................................................................................... 4-1Oracle RAC and Enterprise Manager ................................................................................................... 4-2
Overview of Oracle Real Application Clusters: Oracle By Example Series.............................. 4-2Starting and Stopping Oracle RAC Databases and Database Instances ....................................... 4-3About Oracle RAC Initialization Parameters ..................................................................................... 4-4
Configuring Initialization Parameters for an Oracle RAC Database ........................................ 4-4Parameters that Must Have Identical Settings on All Instances .......................................... 4-5Parameters that Must Have Unique Settings on All Instances ............................................ 4-5Parameters that Should Have Identical Settings on All Instances....................................... 4-6
Editing Initialization Parameter Settings for an Oracle RAC Database..................................... 4-7Modifying the Initialization Parameter for Oracle RAC Using the Current Tab .............. 4-7Modifying the Initialization Parameter for Oracle RAC Using the SPFile Tab ................. 4-8

v
Example: Modifying the OPEN_CURSORS Parameter ....................................................... 4-8About Modifying the SERVICE_NAMES Parameter for Oracle RAC................................ 4-9
About the Server Parameter File for Oracle Real Application Clusters..................................... 4-9About Administering Storage in Oracle RAC .................................................................................... 4-9
About Automatic Undo Management in Oracle RAC............................................................... 4-10About Automatic Storage Management in Oracle RAC ........................................................... 4-10
About ASM Components in Oracle RAC............................................................................. 4-10About Disk Group Configurations for ASM in Oracle RAC............................................. 4-10About Standalone ASM Disk Group Management ............................................................ 4-11About ASM Instance and Disk Group Management Using Enterprise Manager .......... 4-11
About Administering Redo Logs in Oracle RAC ....................................................................... 4-11About Redo Log Groups and Redo Threads in Oracle RAC Databases.......................... 4-12Using Enterprise Manager to View and Create Online Redo Log Files .......................... 4-12
Exploring Your Cluster Database: Oracle By Example Series ...................................................... 4-13
5 Administering Oracle Clusterware Components
About Oracle Clusterware ...................................................................................................................... 5-1About Backing Up and Recovering Voting Disks ............................................................................. 5-2
Backing Up Voting Disks .................................................................................................................. 5-2Recovering Voting Disks................................................................................................................... 5-2
Adding and Removing Voting Disks ................................................................................................... 5-3About Backing Up and Recovering the Oracle Cluster Registry .................................................... 5-3
Viewing Available OCR Backups .................................................................................................... 5-3Backing Up the OCR.......................................................................................................................... 5-4About Recovering the OCR .............................................................................................................. 5-4
Checking the Status of the OCR................................................................................................ 5-4Restoring the OCR from Automatically Generated OCR Backups ..................................... 5-5Recovering the OCR from an OCR Export File ...................................................................... 5-5
About Changing the Oracle Cluster Registry Configuration .......................................................... 5-6Adding an OCR Location.................................................................................................................. 5-7Replacing an OCR .............................................................................................................................. 5-7Repairing an OCR Configuration on a Local Node ...................................................................... 5-8Removing an OCR ............................................................................................................................. 5-8
About Troubleshooting the Oracle Cluster Registry......................................................................... 5-9About the OCRCHECK Utility ........................................................................................................ 5-9Resolving Common Oracle Cluster Registry Problems ............................................................... 5-9
6 Administering Backup and Recovery
Overview of Oracle RAC Database Backup and Recovery.............................................................. 6-1About the Flash Recovery Area in Oracle RAC.................................................................................. 6-2About Archiving in Oracle RAC ........................................................................................................... 6-3
Configuring Archiving for Your Oracle RAC Database............................................................... 6-3About Instance Access to Archived Redo Log Files ..................................................................... 6-4
Credentials for Performing Enterprise Manager Backup and Recovery ...................................... 6-5About Configuring Backup Settings ............................................................................................... 6-5
Performing Backups of Your Oracle RAC Database ......................................................................... 6-5

vi
About Parallelism and Backups Across Multiple Channels ........................................................ 6-6Backing Up Archived Redo Log Files ............................................................................................. 6-7
About Preparing to Restore and Recover Your Oracle RAC Database .......................................... 6-7About Configuring Access to the Archive Log.............................................................................. 6-8About Putting the Oracle RAC Database Instances into the Correct State................................ 6-8
Recovering Your Oracle RAC Database ............................................................................................... 6-8Recovering the Oracle RAC Database Using Enterprise Manager ............................................. 6-9Recovering the Parameter File from an Automatic File Backup................................................. 6-9About Restoring Archived Redo Log File Files .......................................................................... 6-10About Performing Recovery Using Parallelism ......................................................................... 6-10
About Managing Your Database Backup Files................................................................................ 6-11Displaying Backup Reports for Your Oracle RAC Database........................................................ 6-11
7 Managing Database Workload Using Services
About Workload Management .............................................................................................................. 7-1About Oracle Services ....................................................................................................................... 7-2
About Configuring Services for High Availability ................................................................ 7-2About the Database Resource Manager.......................................................................................... 7-3About Oracle RAC High Availability Framework........................................................................ 7-4About Fast Application Notification (FAN)................................................................................... 7-4
About FAN Callouts................................................................................................................... 7-5About the Load Balancing Advisory............................................................................................... 7-6About Connection Load Balancing.................................................................................................. 7-7
Client-Side Load Balancing ....................................................................................................... 7-7Server-Side Load Balancing....................................................................................................... 7-8
About Runtime Connection Load Balancing ................................................................................. 7-8Creating Services ................................................................................................................................... 7-10
Configuring Oracle Net to Support Services .............................................................................. 7-14Administering Services ........................................................................................................................ 7-15
About Service Administration Using Enterprise Manager....................................................... 7-15Using the Cluster Managed Database Services Page.......................................................... 7-16Using the Cluster Managed Database Services Detail Page .............................................. 7-16
Configuring Service-Level Thresholds ........................................................................................ 7-18Configuring Clients for High Availability....................................................................................... 7-19
Configuring JDBC Clients.............................................................................................................. 7-19Universal Connection Pool ..................................................................................................... 7-21
Configuring OCI Clients ................................................................................................................ 7-21Configuring ODP.NET Clients...................................................................................................... 7-23
8 Monitoring Performance and Troubleshooting
About Monitoring Oracle RAC Database and Cluster Performance ............................................. 8-1Automatic Database Diagnostic Monitor and Oracle RAC Performance.................................. 8-2Viewing ADDM for Oracle RAC Findings..................................................................................... 8-4About the Cluster Database Performance Page............................................................................. 8-7
Viewing the Chart for Cluster Host Load Average .............................................................. 8-9Viewing the Chart for Global Cache Block Access Latency ................................................ 8-9Viewing the Chart for Average Active Sessions ................................................................ 8-12

vii
Viewing the Database Throughput Chart ............................................................................ 8-13Viewing the Services Chart .................................................................................................... 8-14Viewing the Active Sessions by Instance Chart .................................................................. 8-16
Viewing Other Performance Related Charts.................................................................................... 8-17Accessing the Cluster Cache Coherency Page ............................................................................ 8-17Accessing the Top Consumers Page............................................................................................. 8-20Accessing the Top Sessions Page .................................................................................................. 8-21Accessing the Top Activity Page................................................................................................... 8-22Accessing the Instance Activity Page........................................................................................... 8-22Accessing the Top Segments Page................................................................................................ 8-23Accessing the Database Locks Page ............................................................................................. 8-25
Viewing the Cluster Database Topology .......................................................................................... 8-26Monitoring Oracle Clusterware.......................................................................................................... 8-28
Accessing the Oracle Clusterware Information.......................................................................... 8-29Reviewing the Oracle Clusterware Home Page ......................................................................... 8-29About the Cluster Performance Page........................................................................................... 8-32About the Cluster Targets Page .................................................................................................... 8-34About the Cluster Interconnects Page.......................................................................................... 8-34About the Cluster Topology Page ................................................................................................ 8-37
Troubleshooting Configuration Problems in Oracle RAC Environments ................................. 8-37Using CRSCTL to Diagnose Cluster Issues ................................................................................. 8-38
Location of the Oracle Clusterware Alert Log..................................................................... 8-38Location of the Oracle Clusterware Component Log Files................................................ 8-39Checking the Status of the Oracle Clusterware Installation.............................................. 8-39Running the Oracle Clusterware Diagnostics Collection Script ....................................... 8-40Enabling Debugging of Oracle Clusterware Components ................................................ 8-40Enabling Debugging for an Oracle Clusterware Resource................................................ 8-41Enabling and Disabling Oracle Clusterware Daemons...................................................... 8-42
Using the Cluster Verification Utility to Diagnose Problems................................................... 8-42Verifying the Existence of Node Applications .................................................................... 8-42Verifying the Integrity of Oracle Clusterware Components ............................................. 8-43Verifying the Integrity of the Oracle Cluster Registry ....................................................... 8-43Verifying the Integrity of Your Entire Cluster..................................................................... 8-44Checking the Settings for the Interconnect .......................................................................... 8-44Enabling Tracing ...................................................................................................................... 8-45
Viewing Oracle RAC Database Alerts ......................................................................................... 8-45Viewing Oracle RAC Database Alert Log Messages ................................................................. 8-47
9 Adding and Deleting Nodes and Instances
About Preparing the New Node ............................................................................................................ 9-1Extending the Oracle Clusterware Home Directory.......................................................................... 9-2Extending the Automatic Storage Management Home Directory .................................................. 9-3Extending the Oracle RAC Home Directory ....................................................................................... 9-4Adding an Instance to the Cluster Database....................................................................................... 9-5Deleting an Instance From the Cluster Database............................................................................... 9-7

viii
10 Managing Oracle Software and Applying Patches
Configuring the Enterprise Manager Patch Interface .................................................................... 10-1About OracleMetaLink Credentials............................................................................................... 10-2Running the Refresh_From_Metalink Job ................................................................................... 10-2
Obtaining the Patch .............................................................................................................................. 10-3Preparing to Use OPatch ...................................................................................................................... 10-5
Checking the ORACLE_HOME Environment Variable............................................................ 10-5Performing a Backup ...................................................................................................................... 10-5Staging the Patch on Each Node ................................................................................................... 10-6Updating the PATH Environment Variable................................................................................ 10-6Configuring SSH User Equivalency ............................................................................................. 10-6
Applying Patches................................................................................................................................... 10-8All Node Patching........................................................................................................................... 10-8Rolling Patching ............................................................................................................................ 10-10Minimum Downtime Patching ................................................................................................... 10-13
Applying Patch Sets ............................................................................................................................ 10-15Troubleshooting Patch Deployment................................................................................................ 10-16
Updating the Node List for OPatch............................................................................................ 10-16About OPatch Log and Trace Files ............................................................................................. 10-17Resolving the "Not a valid patch area" Error ............................................................................ 10-17Resolving the "Unable to remove a partially installed interim patch" Error........................ 10-18
Index

ix
List of Tables
5–1 Common OCR Problems and Solutions ................................................................................. 5-98–1 Cluster Cache Coherency Charts.......................................................................................... 8-1810–1 Patching Oracle Home Directories ....................................................................................... 10-8

x

xi
Preface
Oracle Database 2 Day + Real Application Clusters Guide describes how to install, configure, and administer Oracle Clusterware and Oracle Real Application Clusters (Oracle RAC) on a two-node system using the Red Hat Linux system.
This guide covers topics that a reasonably knowledgeable Oracle database administrator (DBA) would need to know when moving from managing a single-instance Oracle Database environment to managing an Oracle RAC environment.
AudienceOracle Database 2 Day + Real Application Clusters Guide is an Oracle RAC database administration guide for DBAs who want to install and use Oracle RAC. This guide assumes you have already read Oracle Database 2 Day DBA. This guide is intended for DBAs who:
■ Want basic DBA skills for managing an Oracle RAC environment
■ Manage Oracle databases for small- to medium-sized businesses
To use this guide, you should be familiar with the administrative procedures described in Oracle Database 2 Day DBA.
Documentation AccessibilityFor information about Oracle's commitment to accessibility, visit the Oracle Accessibility Program website at http://www.oracle.com/pls/topic/lookup?ctx=acc&id=docacc.
Note: For Linux operating systems other then Red Hat Linux, see Oracle Real Application Clusters Installation Guide for Linux and UNIX. For other operating systems, see the platform-specific Oracle RAC installation guide.
Note: Some DBAs may be interested in moving the data from their single-instance Oracle Database to their Oracle RAC database. This guide also explains the procedures for doing this.

xii
Access to Oracle SupportOracle customers have access to electronic support through My Oracle Support. For information, visit http://www.oracle.com/pls/topic/lookup?ctx=acc&id=info or visit http://www.oracle.com/pls/topic/lookup?ctx=acc&id=trs if you are hearing impaired.
Related DocumentsFor more information, see the following in the Oracle Database 11g Release 1 documentation set:
■ Oracle Real Application Clusters Installation Guide for Linux and UNIX
■ Oracle Real Application Clusters Administration and Deployment Guide
■ Oracle Database 2 Day DBA
ConventionsThe following text conventions are used in this guide:
Convention Meaning
boldface Boldface type indicates graphical user interface elements associated with an action, or terms defined in text or the glossary.
italic Italic type indicates book titles, emphasis, or placeholder variables for which you supply particular values.
monospace Monospace type indicates commands within a paragraph, URLs, code in examples, text that appears on the screen, or text that you enter.

Introduction to Oracle Database 2 Day + Real Application Clusters Guide 1- 1
1Introduction to Oracle Database 2 Day + Real
Application Clusters Guide
This chapter provides an overview of Oracle Real Application Clusters (Oracle RAC) environments. This chapter includes the following sections:
■ About This Guide
■ About Oracle Clusterware and Oracle Real Application Clusters
■ About Automatic Storage Management
■ Tools for Installing, Configuring, and Managing Oracle RAC
About This GuideThis is an Oracle RAC database administration, task-oriented guide that shows you how to configure and manage the environment for Oracle Clusterware and Oracle RAC. This guide also explains how to create an Oracle RAC database and how to perform routine Oracle RAC database administrative tasks.
The goal of this guide is to help you understand the basic steps required to install and maintain an Oracle RAC environment, including how to perform basic troubleshooting, performance monitoring, and backup and recovery activities. This guide is based on Red Hat Linux, but you do not need to be a Linux expert to use this guide.
What This Guide Is NotThis guide is not a comprehensive description of Oracle RAC. It describes concepts only when necessary for completing a particular task.
Related MaterialsThis guide is part of a comprehensive set of learning materials for administering Oracle Databases, which includes a 2 Day DBA Oracle By Example (OBE) series (available on the Web) and Oracle University instructor-led classes.
Some of the chapters in this guide have an associated OBE lesson. The OBE lesson guides you through some of the tasks in the guide, or related tasks, and includes
See Also:
■ Oracle Database Concepts
■ Oracle Database Administrator's Guide

About Oracle Clusterware and Oracle Real Application Clusters
1-2 Oracle Database 2 Day + Real Application Clusters Guide
annotated screenshots. In some cases, the OBE lesson provides additional information to help you complete a task.
At the end of a section, you might find a link to that chapter's associated OBE lesson. The home page for the 2 Day + Real Application Clusters Oracle By Example series is
http://www.oracle.com/webfolder/technetwork/tutorials/obe/db/10g/r2/2day_dba/rac/rac.htm
Oracle Real Application Clusters Documentation OverviewThis guide describes how to install, configure, and manage Oracle RAC and Oracle Clusterware, and provides examples for how you could do this on a two-node cluster, using the Red Hat Linux operating system. This guide is for DBAs who have experience with single-instance Oracle environments and have read Oracle Database 2 Day DBA.
Useful Oracle RAC GuidesThe following is a list of other useful Oracle RAC or related documentation:
■ Oracle Real Application Clusters Administration and Deployment Guide
■ Oracle Clusterware Administration and Deployment Guide
■ Oracle Real Application Clusters Installation Guide for Linux and UNIX (or other operating system)
■ Oracle Clusterware Installation Guide for Linux (or other operating system)
About Oracle Clusterware and Oracle Real Application ClustersOracle RAC extends Oracle Database so that you can store, update, and efficiently retrieve data using multiple database instances on different servers at the same time. Oracle RAC provides the software that facilitates servers working together in what is called a cluster. The data files that make up the database must reside on shared storage that is accessible from all servers that are part of the cluster. Each server in the cluster runs the Oracle RAC software.
An Oracle Database database has a one-to-one relationship between datafiles and the instance. An Oracle RAC database, however, has a one-to-many relationship between datafiles and instances. In an Oracle RAC database, multiple instances access a single set of database files. The instances can be on different servers, referred to as hosts or nodes. The combined processing power of the multiple servers provides greater availability, throughput, and scalability than is available from a single server.
Each database instance in an Oracle RAC database uses its own memory structures and background processes. Oracle RAC uses Cache Fusion to synchronize the data stored in the buffer cache of each database instance. Cache Fusion moves current data blocks (which reside in memory) between database instances, rather than having one database instance write the data blocks to disk and requiring another database instance to reread the data blocks from disk. When a data block located in the buffer cache of one instance is required by another instance, Cache Fusion transfers the data block directly between the instances using the interconnect, enabling the Oracle RAC database to access and modify data as if the data resided in a single buffer cache.
Note: Additional information for this release may be available in the Oracle Database 11g Release 1 (11.1) README or Release Notes. You can locate these documents on your Oracle product installation media.

About Automatic Storage Management
Introduction to Oracle Database 2 Day + Real Application Clusters Guide 1- 3
Oracle RAC is also a key component for implementing the Oracle enterprise grid computing architecture. Having multiple database instances accessing a single set of datafiles prevents the server from being a single point of failure. Any packaged or custom application that ran well on a Oracle Database will perform well on Oracle RAC without requiring code changes.
You will learn more about the operation of the Oracle RAC database in a cluster, how to build the cluster, and the structure of an Oracle RAC database in other sections of this guide.
About Automatic Storage ManagementWith Oracle RAC, each instance must have access to the datafiles and recovery files for the Oracle RAC database. Using Automatic Storage Management (ASM) is an easy way to satisfy this requirement.
ASM is an integrated, high-performance database file system and disk manager. ASM is based on the principle that the database should manage storage instead of requiring an administrator to do it. ASM eliminates the need for you to directly manage potentially thousands of Oracle database files.
ASM groups the disks in your storage system into one or more disk groups. You manage a small set of disk groups and ASM automates the placement of the database files within those disk groups.
ASM provides the following benefits:
■ Striping—ASM spreads data evenly across all disks in a disk group to optimize performance and utilization. This even distribution of database files eliminates the need for regular monitoring and I/O performance tuning.
■ Mirroring—ASM can increase data availability by optionally mirroring any file. ASM mirrors at the file level, unlike operating system mirroring, which mirrors at the disk level. Mirroring means keeping redundant copies, or mirrored copies, of each extent of the file, to help avoid data loss caused by disk failures. The mirrored copy of each file extent is always kept on a different disk from the original copy. If a disk fails, ASM can continue to access affected files by accessing mirrored copies on the surviving disks in the disk group.
■ Online storage reconfiguration and dynamic rebalancing—ASM permits you to add or remove disks from your disk storage system while the database is operating. When you add a disk to a disk group, ASM automatically redistributes the data so that it is evenly spread across all disks in the disk group, including the new disk. The process of redistributing data so that it is also spread across the newly added disks is known as rebalancing. It is done in the background and with minimal impact to database performance.
■ Managed file creation and deletion—ASM further reduces administration tasks by enabling files stored in ASM disk groups to be managed by Oracle Database. ASM automatically assigns file names when files are created, and automatically deletes files when they are no longer needed by the database.
ASM is implemented as a special kind of Oracle instance, with its own System Global Area and background processes. The ASM instance is tightly integrated with the
See Also:
■ Oracle Real Application Clusters Administration and Deployment Guide
■ Oracle Clusterware Administration and Deployment Guide

Tools for Installing, Configuring, and Managing Oracle RAC
1-4 Oracle Database 2 Day + Real Application Clusters Guide
database instance. Every server running one or more database instances that use ASM for storage has an ASM instance. In an Oracle RAC environment, there is one ASM instance for each node, and the ASM instances communicate with each other on a peer-to-peer basis. Only one ASM instance is required for each node regardless of the number of database instances on the node.
Oracle recommends that you use ASM for your database file storage, instead of raw devices or the operating system file system. However, databases can have a mixture of ASM files and non-ASM files.
Tools for Installing, Configuring, and Managing Oracle RAC The following is a description of the tools used for installing, configuring, and managing an Oracle RAC database:
■ Oracle Universal Installer (OUI)–OUI installs the Oracle Clusterware and the Oracle Database software with Oracle RAC. After you configure the nodes that you want to use in your cluster, OUI installs the Oracle software on the specified nodes using a network connection.
■ Cluster Verification Utility (CVU)–The CVU is a command-line tool that you can use to verify a range of cluster and Oracle RAC components such as shared storage devices, networking configurations, system requirements, and Oracle Clusterware, as well as operating system groups and users. You can use the CVU for preinstallation as well as postinstallation checks of your cluster environment. The CVU is especially useful during preinstallation and during installation of Oracle Clusterware and Oracle RAC components. OUI runs the CVU after the Oracle Clusterware installation to verify your environment.
■ Oracle Enterprise Manager–Oracle Enterprise Manager has both the Database Control and Grid Control graphical user interfaces (GUIs) for managing single- instance and Oracle RAC environments.
■ Server Control (SRVCTL)–SRVCTL is a command-line interface that you can use to manage the resources defined in the Oracle Cluster Registry (OCR). These resources include the node applications, called nodeapps, that make up Oracle Clusterware, which includes the Oracle Notification Service (ONS), the Global Services Daemon (GSD), and the Virtual IP (VIP). Other resources that can be managed by SRVCTL include databases, instances, listeners, services, applications, and Oracle Enterprise Manager agents. Using SRVCTL you can start and stop nodeapps, databases, instances, listeners, and services, delete or move instances and services, add services, and manage configuration information.
■ Cluster Ready Services Control (CRSCTL)–CRSCTL is a command-line tool that you can use to manage Oracle Clusterware daemons. These daemons include Cluster Synchronization Services (CSS), Cluster-Ready Services (CRS), and Event Manager (EVM). You can use CRSCTL to start and stop Oracle Clusterware and to determine the current status of your Oracle Clusterware installation.
See Also:
■ Oracle Database 2 Day DBA
■ Oracle Database Storage Administrator's Guide
See Also:
■ Oracle Real Application Clusters Administration and Deployment Guide

Tools for Installing, Configuring, and Managing Oracle RAC
Introduction to Oracle Database 2 Day + Real Application Clusters Guide 1- 5
Installing Oracle RAC on Different Operating SystemsIf you plan to install and configure Oracle RAC on an operating system other than Red Hat Linux, you can still use this guide to obtain a general understanding about how to deploy Oracle RAC. You can also use this guide for deploying Oracle RAC on clusters with more than two nodes. For all environments that do not match the environment that this guide describes, modify the examples accordingly.
When installing Oracle RAC on a different platform or different operating system version than Red Hat Linux, refer to the installation and configuration guides for that platform. For example, if you are installing Oracle RAC on the Solaris operating system, then you would use the following guides:
■ Oracle Clusterware Installation Guide for Solaris Operating System
■ Oracle Real Application Clusters Installation Guide for Solaris Operating System
Oracle Clusterware and Oracle RAC do not support heterogeneous platforms in the same cluster. For example, you cannot have one node in the cluster running Red Hat Linux and another node in the same cluster running Solaris UNIX. All nodes must run the same operating system, that is, they must be binary compatible. Oracle RAC does not support machines having different chip architectures in the same cluster. However, you can have machines of different speeds and sizes in the same cluster.
See Also:
■ "Installing and Configuring Oracle Clusterware and Oracle RAC"
■ Oracle Real Application Clusters Administration and Deployment Guide

Tools for Installing, Configuring, and Managing Oracle RAC
1-6 Oracle Database 2 Day + Real Application Clusters Guide

Preparing Your Cluster 2-1
2Preparing Your Cluster
This chapter contains the information that your system administrator and network administrator need to help you, as the DBA, configure the two nodes in your cluster. This chapter assumes a basic understanding of the Red Hat Linux operating system. In some cases, you may need to refer to details in Oracle Real Application Clusters Installation Guide for Linux and UNIX. In addition, you must have root privileges to perform the tasks in this chapter.
This chapter includes the following sections:
■ About Checking Requirements
■ Preparing the Server
■ Configuring the Network
■ Preparing the Operating System and Software
■ Configuring Installation Directories and Shared Storage
About Checking RequirementsBefore you begin your installation, you should check to make sure that your system meets the requirements for Oracle Real Application Clusters (Oracle RAC). The requirements can be grouped into the following three categories:
■ About Checking Hardware Requirements
■ About Identifying Network Requirements
■ Verifying Operating System and Software Requirements
About Checking Hardware RequirementsEach node that you want to make part of your Oracle Clusterware, or Oracle Clusterware and Oracle RAC installation, must satisfy the minimum hardware requirements of the software. These hardware requirements can be categorized as follows:
■ Physical memory (at least 1 gigabyte (GB) of RAM)
■ Swap space (at least 2 GB of available swap space)
■ Temporary space (at least 400 megabytes (MB))
■ Processor type (CPU) that is certified with the version of the Oracle software being installed

About Checking Requirements
2-2 Oracle Database 2 Day + Real Application Clusters Guide
You will need at least 3.5 GB of available disk space for the Oracle Database home directory and at least 3.3 GB of available disk space for the Automatic Storage Management (ASM) home directory. You will also need 2 GB of disk available space for the Oracle Clusterware software installation. For best performance and protection, you should have multiple disks, each using a different disk controller.
An Oracle RAC database is a shared everything database. All datafiles, control files, redo log files, and the server parameter file (SPFILE) used by the Oracle RAC database must reside on shared storage that is accessible by all the Oracle RAC database instances. The Oracle RAC installation that is described in this guide uses ASM for the shared storage of the database files.
Oracle Clusterware achieves superior scalability and high availability by using the following components:
■ Voting disk–Manages cluster membership and arbitrates cluster ownership between the nodes in case of network failures. The voting disk is a file that resides on shared storage. For high availability, Oracle recommends that you have more than one voting disk, and that you have an odd number of voting disks. If you define a single voting disk, then use mirroring at the file system level for redundancy.
■ Oracle Cluster Registry (OCR)–Maintains cluster configuration information as well as configuration information about any cluster database within the cluster. The OCR contains information such as which database instances run on which nodes and which services run on which databases. The OCR also stores information about processes that Oracle Clusterware controls. The OCR resides on shared storage that is accessible by all the nodes in your cluster. Oracle Clusterware can multiplex, or maintain multiple copies of, the OCR and Oracle recommends that you use this feature to ensure high availability.
These Oracle Clusterware components require the following additional disk space:
■ Two Oracle Clusterware Registry files, 280 MB each, or 560 MB total disk space
■ Three voting disk files, 280 MB each, or 840 MB total disk space
For voting disk file placement, ensure that each voting disk is configured so that it does not share any hardware device or disk, or other single point of failure. See "Configuring Block Devices for Oracle Clusterware Files" on page 2-19 for more information about configuring Oracle Clusterware files.
Note: When you install the Oracle Database software, Oracle Universal Installer (OUI) automatically performs hardware prerequisite checks and notifies you if they are not met.
Note: Refer to the installation guides for your operating system for the actual disk space requirements. The amount of disk space used by the Oracle software can vary, and might be higher than what is listed in this guide.
Note: Both the voting disks and the OCR must reside on shared devices that you configure before you install Oracle Clusterware and Oracle RAC.

About Checking Requirements
Preparing Your Cluster 2-3
About Identifying Network RequirementsAn Oracle RAC cluster comprises two or more nodes that are linked by a private interconnect. The interconnect serves as the communication path between nodes in the cluster. Each cluster database instance uses the interconnect for messaging to synchronize the use of shared resources by each instance. Oracle RAC also uses the interconnect to transmit data blocks that are shared between the instances.
Oracle Clusterware requires that you connect the nodes in the cluster to a private network by way of a private interconnect. The private interconnect is a separate network that you configure between cluster nodes. The interconnect used by Oracle RAC is the same interconnect that Oracle Clusterware uses. This interconnect should be a private interconnect, meaning it is not accessible to nodes that are not members of the cluster.
When you configure the network for Oracle RAC and Oracle Clusterware, each node in the cluster must meet the following requirements:
■ Each node has at least two network interface cards, or network adapters. One adapter is for the public network and the other adapter is for the private network used by the interconnect. Install additional network adapters on a node if that node meets either of the following conditions:
– Does not have at least two network adapters
– Has two network interface cards but is using network attached storage (NAS). You should have a separate network adapter for NAS.
■ You must have at least three IP addresses available for each node:
1. An IP address with an associated host name (or network name) for the public interface.
2. A private IP address with a host name for each private interface.
3. One virtual IP address with an associated network name. Select a virtual IP (VIP) address that meets the following requirements:
– The VIP address and associated network name are currently unused.
See Also:
■ Your platform-specific Oracle Clusterware installation guide
■ "About Performing Platform-Specific Configuration Tasks"
■ "Preparing the Server"
■ "Configuring Installation Directories and Shared Storage"
Note: For the most current information about supported network protocols and hardware for Oracle RAC installations, refer to the Certify pages on OracleMetaLink, which is located at
https://metalink.oracle.com
Note: Oracle recommends that you use private network IP addresses for the private interfaces (for example: 10.*.*.* or 192.168.*.*).

About Checking Requirements
2-4 Oracle Database 2 Day + Real Application Clusters Guide
– The VIP is on the same subnet as your public interface.
■ Public interface names must be the same for all nodes. If the public interface on one node uses the network adapter eth0, then you must configure eth0 as the public interface on all nodes.
■ You should configure the same private interface names for all nodes as well. If eth1 is the private interface name for the first node, then eth1 should be the private interface name for your second node.
■ For the private network, the end points of all designated interconnect interfaces must be completely reachable on the network. There should be no node that is inaccessible by other nodes in the cluster using the private network.
To determine what interfaces are configured on a node running Red Hat Linux, use the following command as the root user:
# /sbin/ifconfig
You may need to work with your system or network administrator to obtain IP addresses for each node.
Verifying Operating System and Software RequirementsRefer to Oracle Clusterware and Oracle Real Application Clusters Installation and Configuration Guide for your platform for information about exact requirements. These requirements can include any of the following:
■ The operating system version
■ The kernel version of the operating system
■ Installed packages, patches, or patch sets
■ Installed compilers and drivers
■ Web browser type and version
■ Additional application software requirements
If you are currently running an operating system version that is not supported by Oracle Database 11g Release 1 (11.1), then you must first upgrade your operating system before installing Oracle Real Application Clusters 11g.
To determine if the operating system requirements for Red Hat Linux have been met:1. To determine which distribution and version of Linux is installed, run the
following command at the operating system prompt as the root user:
# cat /etc/issue
2. To determine if the required errata level is installed, use the following procedure as the root user:
# uname -r2.6.9-42.EL
See Also:
■ "Configuring the Network"
■ "About Checking Requirements"

Preparing the Server
Preparing Your Cluster 2-5
Like most software, the Linux kernel is updated to fix bugs in the operating system. These kernel updates are referred to as erratum kernels or errata levels.
The output in the previous example shows that the kernel version is 2.6.9, and the errata level (EL) is 22. Review the required errata level for your distribution. If the errata level is below the required minimum errata level, then install the latest kernel update for your operating system. The kernel updates are available from your operating system vendor.
3. To ensure there are no operating system issues affecting installation, make sure you have installed all the operating system patch updates and packages that are listed in Oracle Clusterware and Oracle Real Application Clusters Installation Guide for your platform. If you are using Red Hat Linux, you can determine if the required packages, or programs that perform specific functions or calculations, are installed by using the following command as the root user:
# rpm -q package_name
The variable package_name is the name of the package you are verifying, such as setarch. If a package is not installed, then install it from your Linux distribution media or download the required package version from your Linux vendor's Web site.
Preparing the ServerIn this section, you will perform the following tasks:
■ Configuring Operating System Users and Groups
■ Configuring Secure Shell
■ Configuring SSH User Equivalency
■ About Configuring the Operating System Environment
Configuring Operating System Users and GroupsDepending on whether or not this is the first time Oracle software is being installed on this server, you may need to create operating system groups.
See Also:
■ "Installing Oracle RAC on Different Operating Systems"
■ "Preparing the Server"
■ "Preparing the Operating System and Software"
■ "About Configuring the Operating System Environment"
■ "About Performing Platform-Specific Configuration Tasks"
■ Oracle Clusterware and Oracle Real Application Clusters Installation and Configuration Guide for your platform
See Also:
■ "Preparing the Operating System and Software"
■ "About Configuring Kernel Parameters"
■ "About Configuring the Operating System Environment"
■ "About Performing Platform-Specific Configuration Tasks"

Preparing the Server
2-6 Oracle Database 2 Day + Real Application Clusters Guide
The following operating system groups are used when installing Oracle software:
■ The OSDBA group (typically, dba) for Oracle Database authentication
■ The Oracle Inventory group (typically, oinstall) for all installations
■ (Optional) A separate OSASM group (for example, asm) for Automatic Storage Management (ASM) authentication. If this option is not chosen, then dba is the default OSASM group.
The following operating system users are required for all installations:
■ A user that owns the Oracle software (typically, oracle)
■ An unprivileged user (for example, the nobody user on Linux systems)
A single Oracle Inventory group is required for all installations of Oracle software on the system. After the first installation of Oracle software, you must use the same Oracle Inventory group for all subsequent Oracle software installations on that system. However, you can choose to create different users to own the Oracle software and use different operating system groups for authenticating administrative access to each software installation. If an operating system user (for example, oracle) is a member of an operating system group that is used for authenticating access to Oracle software (for example, the dba group), then that user have administrative access to the associated software.
By using different operating system groups for authenticating administrative access to each Oracle Database installation, members of the different groups have SYSDBA privileges for only one database, rather than for all the databases on the system. Also, if you configure a separate operating system group for ASM authentication, then you can have users that have SYSASM access to the ASM instances and do not have SYSDBA access to the database instances.
To create the required operating system user and groups on Red Hat Linux:1. To determine the groups that exist on your server, list the contents of the
/etc/group file.
cat /etc/group
2. If this is the first time Oracle software has been installed on your server, and the Oracle Inventory group does not exist, then create the Oracle Inventory group by entering a command as the root user that is similar to the following:
/usr/sbin/groupadd oinstall
3. Create an OSDBA group by entering a command as the root user that is similar to the following:
/usr/sbin/groupadd dba
4. If the user that owns the Oracle software does not exist on your server, you must create the user. Select a user ID (UID) that is currently not in use on all the nodes in your cluster. The following command shows how to create the oracle user and
Note: If installing Oracle RAC on Microsoft Windows, Oracle Universal Installer automatically creates the ORA_DBA group for authenticating SYSDBA access. It does not create an ORA_ASM group for authenticating SYSASM access. Also, if you install the Oracle RAC software while logged in to an account with administrative privileges, you do not need to create a separate user for the installation.

Preparing the Server
Preparing Your Cluster 2-7
the user's home directory (/home/oracle) with the default group as oinstall and the secondary group as dba, using a UID of 504:
useradd -u 504 –g oinstall -G dba -d /home/oracle -r oracle
To determine which users have already been created on your server, list the contents of the /etc/passwd file.
cat /etc/passwd
5. Set the password for the oracle account using the following command. Replace password with your own password.
passwd oracle
Changing password for user oracle.New UNIX password: password retype new UNIX password: passwordpasswd: all authentication tokens updated successfully.
6. Repeat Step 1 through Step 4 on each node in your cluster as needed.
7. Verify that the attributes of the user oracle are identical on both docrac1 and docrac2:
id oracle
The command output should be similar to the following:
uid=504(oracle) gid=500(oinstall) groups=500(oinstall),501(dba)
Configuring Secure ShellWhen installing Oracle RAC on UNIX and Linux platforms, the software is installed on one node, and OUI uses secure communication to copy the software binary files to the other cluster nodes. OUI uses the Secure Shell (SSH) for the communication. Various other components of Oracle RAC and Oracle Clusterware also use SSH for secure communication.
To configure SSH, you must first create Rivest-Shamir-Adleman (RSA) keys and Digital Signature Algorithm (DSA) keys on each cluster node. After you have created the private and public keys, you copy the keys from all cluster node members into an authorized keys file that is identical on each node. When this is done, you then start the SSH agent to load the keys into memory.
See Also:
■ "Configuring Installation Directories and Shared Storage"
■ "About Automatic Storage Management"
See Also:
■ Oracle Database Advanced Security Administrator's Guide for more information about data security using encryption keys
■ "Generating RSA and DSA Keys"
■ "Adding the Keys to an Authorized Key File"
■ "Configuring SSH User Equivalency"

Preparing the Server
2-8 Oracle Database 2 Day + Real Application Clusters Guide
Generating RSA and DSA KeysCreate the RSA and DSA keys on each cluster node as the first step in configuring SSH.
To configure the RSA and DSA keys on Red Hat Linux:1. Log out and then log back in to the operating system as the oracle user on
docrac1.
2. Determine if a .ssh directory exists in the oracle user's home directory. If not, create the .ssh directory and set the directory permission so that only the oracle user has access to the directory, as shown here:
$ ls -a $HOME$ mkdir ~/.ssh$ chmod 700 ~/.ssh
3. Create the RSA-type public and private encryption keys. Open a terminal window and run the following command:
/usr/bin/ssh-keygen -t rsa
At the prompts:
■ Accept the default location for the key file by pressing the Enter key.
■ When prompted for a pass phrase, enter and confirm a pass phrase that is different from the oracle user's password.
This command creates the public key in the /home/oracle/.ssh/id_rsa.pub file and the private key in the /home/oracle/.ssh/id_rsa file.
4. Create the DSA type public and private keys on both docrac1 and docrac2. In the terminal window for each node, run the following command:
/usr/bin/ssh-keygen -t dsa
At the prompts:
■ Accept the default location for the key file by pressing the Enter key.
■ When prompted for a pass phrase, enter and confirm a pass phrase that is different from the oracle user's password.
This command creates the public key in the /home/oracle/.ssh/id_dsa.pub file and the private key in the /home/oracle/.ssh/id_dsa file.
Note: Do not use the su command to switch from the root user to the oracle user for these steps. You must completely exit your operating system session as the root user and start a new session as oracle for these steps to succeed.
Caution: To protect the security of your system, never distribute the private key to anyone.
Caution: To protect the security of your system, never distribute the private key to anyone.

Preparing the Server
Preparing Your Cluster 2-9
5. Repeat Step 1 through Step 4 on each node that you intend to add to the cluster.
Adding the Keys to an Authorized Key FileAfter you have generated the keys, you copy the keys for each node to an authorized_keys file and copy this file to all nodes in the cluster.
To add the generated keys to an authorized keys file:1. On the local node, change directories to the .ssh directory in the oracle user
home directory.
cd ~/.ssh
2. Add the RSA and DSA keys to the authorized_keys file using the following commands, then list the contents of the .ssh directory:
$ cat id_rsa.pub >>authorized_keys$ cat id_dsa.pub >>authorized_keys$ ls
You should see the id_dsa.pub and id_rsa.pub keys that you generated, the id_dsa and id_rsa private key files, and the authorized_keys file.
3. Use Secure Copy (SCP) or Secure FTP (SFTP) to copy the authorized_keys file to the oracle user .ssh directory on a remote node. The following example uses SCP to copy the authorized_keys file to docrac2, and the oracle user path is /home/oracle:
[oracle@docrac1 .ssh]scp authorized_keys docrac2:/home/oracle/.ssh/The authenticity of host ’docrac2(143.46.43.101)’ can’t be established.RSA key fingerprint is 7z:ez:e7:f6:f4:f2:d1:a6:f7:4e:zz:me:a7:48:ae:f6:7e.Are you sure you want to continue connecting (yes/no)? yesoracle@docrac2’s password:
You are prompted to accept an RSA or DSA key. Enter yes.
When prompted, provide the password for the oracle user, which should be the same on all the nodes in the cluster. (Note: This is the user password, not the newly specified pass phrase.) The authorized_keys file is then copied to the remote node.
4. Using SSH, log in to the node where you copied the authorized_keys file, using the pass phrase you created. Then change to the .ssh directory, and using the cat command, add the RSA and DSA keys for the second node to authorized_keys file, as demonstrated here:
[oracle@docrac1 .ssh]$ ssh docrac2Enter passphrase for key '/home/oracle/.ssh/id_rsa':[oracle@docrac2 oracle]S cd .ssh[oracle@docrac2 ssh]$ cat id_rsa.pub >> authorized_keys[oracle@docrac2 ssh]$ cat id_dsa.pub >> authorized_keys
See Also:
■ Oracle Database Advanced Security Administrator's Guide for more information about data security using encryption keys
■ "Configuring SSH User Equivalency"
■ "Adding the Keys to an Authorized Key File"

Preparing the Server
2-10 Oracle Database 2 Day + Real Application Clusters Guide
5. If you have more than two nodes in your cluster, repeat Step 3 and Step 4 for each node you intend to add to your cluster. Copy the most recently updated authorized_keys file to the next node, then add the public keys for that node to the authorized_keys file.
6. When you have updated the authorized_keys file on all nodes, use SCP to copy the complete authorized_keys file from the last node to be updated to all the other cluster nodes, overwriting the existing version on the other nodes, for example:
[oracle@docrac2 .ssh]scp authorized_keys docrac1:/home/oracle/.ssh/The authenticity of host ’docrac1(143.46.43.100)’ can’t be established. RSA key fingerprint is 7e:62:60:f6:f4:f2:d1:a6:f7:4e:zz:me:b9:48:dc:e3:9c.Are you sure you want to continue connecting (yes/no)? yesoracle@docrac2’s password:Warning: Permanently added ’docrac1,143.46.43.100’ (RSA) to the list of knownhosts.oracle@docrac1’s password:authorized_keys 100% 1656 19.9MB.s 00:00
At this point, if you use SSH to log in to or run a command on another node, you are prompted for the pass phrase that you specified when you created the RSA and DSA keys.
Configuring SSH User EquivalencyUser equivalency exists in a cluster when the following occurs on all nodes in the cluster:
■ A given user has the same user name, user ID (UID), and password.
■ A given user belongs to the same groups.
■ A given group has the same group ID (GID).
On Linux systems, to enable Oracle Universal Installer to use the ssh and scp commands without being prompted for a pass phrase, you must configure SSH user equivalency.
To configure user SSH equivalency on Red Hat Linux:1. On the system where you want to run Oracle Universal Installer, log in to the
operating system as the oracle user.
2. Start the SSH agent and load the SSH keys into memory using the following commands:
$ exec /usr/bin/ssh-agent $SHELL$ /usr/bin/ssh-add
The ssh-add program prompts you to enter the pass phrase for each key that you generated when configuring SSH, for example:
See Also:
■ Oracle Database Advanced Security Administrator's Guide for more information about data security using encryption keys
■ "Configuring Secure Shell"
■ "Generating RSA and DSA Keys"
■ "Configuring SSH User Equivalency"

Preparing the Server
Preparing Your Cluster 2-11
[oracle@docrac1 .ssh]$ exec /usr/bin/ssh-agent $SHELL[oracle@docrac1 .ssh]$ /usr/bin/ssh-addEnter passphrase for /home/oracle/.ssh/id_rsaIdentity added: /home/oracle/.ssh/id_rsa (/home/oracle/.ssh/id_rsa)Identity added: /home/oracle/.ssh/id_dsa (/home/oracle/.ssh/id_dsa)
These commands start the ssh-agent program on the node, and load the RSA and DSA keys into memory so that you are not prompted to use pass phrases when issuing SSH commands.
If you have configured SSH correctly, then you can now use the ssh or scp commands without being prompted for a password or a pass phrase.
3. Complete the SSH configuration by using the ssh command to retrieve the date on each node in the cluster.
For example, in a two-node cluster, with nodes named docrac1 and docrac2, you would enter the following commands:
$ ssh docrac1 date$ ssh docrac2 date
The first time you use SSH to connect to one node from another node, you see a message similar to the following:
The authenticity of host ’docrac1(143.46.43.100)’ can’t be established.RSA key fingerprint is 7z:ez:e7:f6:f4:f2:d1:a6:f7:4e:zz:me:a7:48:ae:f6:7e.Are you sure you want to continue connecting (yes/no)? yes
Enter yes at the prompt to continue. You should not see this message again when you connect to this node from the other node. If you see any other messages or text, apart from the date, then the installation can fail.
If any node prompts for a password or pass phrase, then verify that the ~/.ssh/authorized_keys file on that node contains the correct public keys. Make any changes required to ensure that only the date is displayed when you enter these commands. You should also ensure that any parts of login scripts that generate output or ask any questions are modified so that they act only when the shell is an interactive shell.
After completing Step 1 through Step 3, each public host name for each node in the cluster should be registered in the known_hosts file for all other members of the cluster.
About Configuring the Operating System EnvironmentOn Red Hat Linux, you run Oracle Universal Installer (OUI) from the oracle account. Oracle Universal Installer obtains information from the environment variables
Note: Do not close this terminal window until you have completed the Oracle Clusterware and Oracle RAC software installation. If you must close this terminal window before the installation is complete, repeat Step 2 before starting or continuing the software installation.
See Also:
■ "Configuring Secure Shell"
■ "Configuring Operating System Users and Groups"

Configuring the Network
2-12 Oracle Database 2 Day + Real Application Clusters Guide
configured for the oracle user. Prior to running OUI, you should modify the oracle user environment variables to configure the following:
■ Set the default file mode creation mask (umask) to 022 in the shell startup file on Linux and UNIX systems.
■ Set the ORACLE_BASE environment variable to the location in which you plan to install the Oracle Database software. Refer to "About Choosing an Oracle Base Directory" on page 2-22 for more information about the ORACLE_BASE directory.
Also, if the /tmp directory has less than 400 MB of available disk space, but you have identified a different file system that has at least 400 MB of available space, you can set the TEMP and TMPDIR environment variables to specify the alternate temporary directory on this file system.
Prior to installing Oracle Clusterware, you can set the ORACLE_HOME variable to the location of the Oracle Clusterware home (also called the CRS home) directory. However, you must also specify the directory in which the software should be installed as part of the installation process. After Oracle Clusterware has been installed, the ORACLE_HOME environment variable will be modified to reflect the value of the Oracle Database home directory.
Configuring the NetworkOracle Clusterware requires that you connect the nodes in the cluster to a private network by way of a private interconnect. Each node in the cluster must also be accessible by way of the public network.
To configure the network and ensure that each node in the cluster is able to communicate with the other nodes in the cluster: 1. Determine your cluster name. The cluster name should satisfy the following
conditions:
■ The cluster name is globally unique throughout your host domain.
■ The cluster name is at least 1 character long and less than 15 characters long.
■ The cluster name consists of the same character set used for host names: underscores (_), hyphens (-), and single-byte alphanumeric characters (a to z, A to Z, and 0 to 9).
Note: Remove any stty commands from such files before you start the installation. On Linux systems, if there are hidden files (such as logon or profile scripts) that contain stty commands, when these files are loaded by the remote shell during installation, OUI indicates an error and stops the installation.
See Also:
■ "Configuring Operating System Users and Groups"
■ "Preparing the Operating System and Software"
■ "Configuring Installation Directories and Shared Storage"
■ "About Setting the Time on Both Nodes"
■ "About Performing Platform-Specific Configuration Tasks"

Configuring the Network
Preparing Your Cluster 2-13
■ If you use third-party vendor clusterware, then Oracle recommends that you use the vendor cluster name.
2. Determine the public node names, private node names, and virtual node names for each node in the cluster.
■ For the public node name, use the primary host name of each node. In other words, use the name displayed by the hostname command. This node name can be either the permanent or the virtual host name, for example: docrac1.
■ Determine a private node name or private IP address for each node. The private IP address is an address that is accessible only by the other nodes in this cluster. Oracle Database uses private IP addresses for internode, or instance-to-instance Cache Fusion communication. Oracle recommends that you provide a name in the format public_hostname-priv, for example: docrac1-priv.
■ Determine a virtual host name for each node. A virtual host name is a public node name that is used to reroute client requests sent to the node if the node is down. Oracle Database uses virtual IP addresses for client-to-database connections, so the VIP address must be publicly accessible. Oracle recommends that you provide a name in the format public_hostname-vip, for example: docrac1-vip.
3. Identify the interface names and associated IP addresses for all network adapters by running the following command on each node:
# /sbin/ifconfig
From the output, identify the interface name (such as eth0) and IP address for each network adapter that you want to specify as a public or private network interface.
4. On each node in the cluster, assign a public IP address with an associated network name to one network adapter, and a private IP address with an associated network name to the other network adapter.
The public name for each node should be registered with your domain name system (DNS). If you do not have an available DNS, then record the network name and IP address in the system hosts file, /etc/hosts. Use the /etc/hosts file on each node to associate the private network name for that host with its private IP address.
You can test whether or not an interconnect interface is reachable using a ping command.
5. On each node in the cluster, configure a third IP address that will serve as a virtual IP address. Use an IP address that meets the following requirements:
■ The virtual IP address and the network name must not be currently in use.
■ The virtual IP address must be on the same subnet as your public IP address.
The virtual host name for each node should be registered with your DNS. If you do not have an available DNS, then record the virtual host name and IP address in the system hosts file, /etc/hosts.
Note: When you install Oracle Clusterware and Oracle RAC, you will require this information.

Configuring the Network
2-14 Oracle Database 2 Day + Real Application Clusters Guide
6. When you complete the network configuration, the IP address and network interface configuration should be similar to what is shown in the following table (your node names and IP addresses might be different):
After you have completed the installation process, configure clients to use either the virtual IP address or the network name associated with the virtual IP address.
Verifying the Network ConfigurationAfter you have configured the network, perform verification tests to make sure it is configured properly. If there are problems with the network connection between nodes in the cluster, the Oracle Clusterware installation will fail.
To verify the network configuration on a two-node cluster that is running Red Hat Linux:1. As the root user, verify the configuration of the public and private networks.
Verify that the interfaces are configured on the same network on both docrac1 and docrac2.
In this example, eth0 is used for the public network and eth1 is used for the private network, which is used for Cache Fusion communications.
# /sbin/ifconfig eth0 Link encap:Ethernet HWaddr 00:0E:0C:08:67:A9 inet addr: 143.46.43.100 Bcast:143.46.43.255 Mask:255.255.240.0 UP BROADCAST RUNNING MULTICAST MTU:1500 Metric:1 RX packets:270332689 errors:0 dropped:0 overruns:0 frame:0 TX packets:112346591 errors:2 dropped:0 overruns:0 carrier:2 collisions:202 txqueuelen:1000 RX bytes:622032739 (593.2 MB) TX bytes:2846589958 (2714.7 MB) Base address:0x2840 Memory:fe7e0000-fe800000 eth1 Link encap:Ethernet HWaddr 00:04:23:A6:CD:59 inet addr: 10.10.10.11 Bcast: 10.10.10.255 Mask:255.255.240.0 UP BROADCAST RUNNING MULTICAST MTU:1500 Metric:1 RX packets:21567028 errors:0 dropped:0 overruns:0 frame:0 TX packets:15259945 errors:0 dropped:0 overruns:0 carrier:0 collisions:0 txqueuelen:1000 RX bytes:4091201649 (3901.6 MB) TX bytes:377502797 (360.0 MB) Base address:0x2800 Memory:fe880000-fe8a0000
Node Node Name Type IP Address Registered in
docrac1 docrac1 Public 143.46.43.100 DNS (if available, else the hosts file)
docrac1 docrac1-vip Virtual 143.46.43.104 DNS (if available, else the hosts file)
docrac1 docrac1-priv Private 10.10.10.11 Hosts file
docrac2 docrac2 Public 143.46.43.101 DNS (if available, else the hosts file)
docrac2 docrac2-vip Virtual 143.46.43.105 DNS (if available, else the hosts file)
docrac2 docrac2-priv Private 10.10.10.12 Hosts file
See Also:
■ "About Identifying Network Requirements"
■ Your platform-specific Oracle Clusterware installation guide

Configuring the Network
Preparing Your Cluster 2-15
lo Link encap:Local Loopback inet addr:127.0.0.1 Mask:255.0.0.0 UP LOOPBACK RUNNING MTU:16436 Metric:1 RX packets:52012956 errors:0 dropped:0 overruns:0 frame:0 TX packets:52012956 errors:0 dropped:0 overruns:0 carrier:0 collisions:0 txqueuelen:0 RX bytes:905082901 (863.1 MB) TX bytes:905082901 (863.1 MB)
2. As the root user, verify that the /etc/hosts file on the node docrac1 contains the host IP addresses, virtual IP addresses, and private network IP addresses from both nodes in the cluster, as follows:
# Do not remove the following line, or various programs# that require network functionality will fail.127.0.0.1 localhost.localdomain localhost143.46.43.100 docrac1.mycompany.com docrac1143.46.43.104 docrac1-vip.mycompany.com docrac1-vip10.10.10.11 docrac1-priv 143.46.43.101 docrac2.mycompany.com docrac2143.46.43.105 docrac2-vip.mycompany.com docrac2-vip10.10.10.12 docrac2-priv
If the /etc/hosts file is missing any of the preceding information, then edit the file to add the necessary information.
After the /etc/hosts file is configured on docrac1, edit the /etc/hosts file on docrac2 so it contains the same information for the cluster IP addresses.
3. As the root user, verify the network configuration by using the ping command to test the connection from docrac1 from docrac2 and the reverse. As the root user, run the following commands on each node:
# ping -c 3 docrac1.mycompany.com# ping -c 3 docrac1# ping -c 3 docrac1-priv # ping -c 3 docrac2.mycompany.com# ping -c 3 docrac2# ping -c 3 docrac2-priv
You will not be able to discover the nodes using the ping command for the virtual IPs (docrac1-vip, docrac2-vip) until after Oracle Clusterware is installed and running. If the ping commands for the public or private addresses fail, resolve the issue before you proceed.
4. Ensure that you can access the default gateway with a ping command. To identify the default gateway, use the route command, as described in the Red Hat Linux Help utility.
See Also:
■ "Checking the Settings for the Interconnect"
■ "Configuring the Network"
■ "About Identifying Network Requirements"

Preparing the Operating System and Software
2-16 Oracle Database 2 Day + Real Application Clusters Guide
Preparing the Operating System and SoftwareWhen you install the Oracle software on your server, Oracle Universal Installer expects the operating system to have specific packages and software applications installed.
This section covers the following topics:
■ About Setting the Time on Both Nodes
■ About Configuring Kernel Parameters
■ About Performing Platform-Specific Configuration Tasks
You must ensure that you have a certified combination of the operating system and the Oracle Database software by referring to OracleMetaLink certification, which is located at the following Web site
https://metalink.oracle.com
You can find this by clicking Certify & Availability and then selecting 1.View Certifications by Product.
About Setting the Time on Both NodesBefore starting the installation, ensure that the date and time settings on both nodes are set as closely as possible to the same date and time. Oracle strongly recommends using the Network Time Protocol (NTP) feature of most operating systems for this purpose.
NTP is a protocol designed to synchronize the clocks of servers connected by a network. When using NTP, each server on the network runs client software to periodically make timing requests to one or more servers, referred to as reference NTP servers. The information returned by the timing request is used to adjust the server's clock.
All the nodes in your cluster should use the same reference NTP server.
Note: Oracle Universal Installer verifies that your server and operating system meet the listed requirements. Check the requirements before you start Oracle Universal Installer, to ensure your server and operating system meet will meet the requirements.
See Also:
■ "Preparing the Server"
■ "Verifying Operating System and Software Requirements"
Note: If you use NTP, then, you must start the NTP daemon with the -x flag to prevent time from being adjusted backward.
See Also:
■ "Preparing the Server"
■ "Preparing the Operating System and Software"
■ Your platform-specific Oracle Clusterware installation guide

Configuring Installation Directories and Shared Storage
Preparing Your Cluster 2-17
About Configuring Kernel ParametersOUI checks the current settings for various kernel parameters to ensure they meet the minimum requirements for deploying Oracle RAC. For production database systems, Oracle recommends that you tune the settings to optimize the performance of your particular system.
About Performing Platform-Specific Configuration TasksYou may be required to perform special configuration steps that are specific to the operating system on which you are installing Oracle RAC, or for the components used with your cluster. The following list provides examples of operating-specific installation tasks:
■ Configure the use of Huge Pages on SUSE Linux Enterprise Server 9 or Red Hat Enterprise Linux 4.
■ Set shell limits for the oracle user on Red Hat Linux systems to increase the number of files and processes available to Oracle Clusterware and Oracle RAC.
■ Start the Telnet service on Microsoft Windows.
■ Create X library symbolic links on HP-UX.
■ Configure network tuning parameters on AIX Based Systems.
Configuring Installation Directories and Shared Storage This section describes the storage configuration tasks that you must complete before you start Oracle Universal Installer. It includes information about the following tasks:
■ About Deciding on a Shared Storage Solution
■ Configuring Block Devices for Oracle Clusterware Files
■ Creating a Udev Permissions File for Oracle Clusterware
■ About Choosing an Oracle Base Directory
■ About Choosing an Oracle Clusterware Home Directory
Note: If you find parameter settings or shell limit values on your system that are greater than the values mentioned in this section, then do not modify the parameter setting.
See Also:
■ "Preparing the Server"
■ "Preparing the Operating System and Software"
■ Your platform-specific Oracle Clusterware installation guide
See Also:
■ "Preparing the Server"
■ "Preparing the Operating System and Software"
■ "Installing Oracle RAC on Different Operating Systems"
■ Your platform-specific Oracle Clusterware installation guide

Configuring Installation Directories and Shared Storage
2-18 Oracle Database 2 Day + Real Application Clusters Guide
About Deciding on a Shared Storage SolutionEach node in a cluster requires external shared disks for storing the Oracle Clusterware (Oracle Cluster Registry and voting disk) files, and Oracle Database files. The supported types of shared storage depend upon the platform you are using, for example:
■ A supported cluster file system, such as OCFS2 for Linux, OCFS for Microsoft Windows, or General Parallel File System (GPFS) on IBM platforms
■ Network file system (NFS), which is not supported on AIX Based Systems, Linux on POWER, or on IBM zSeries Based Linux
■ Shared disk partitions consisting of block devices. Block devices are disk partitions that are not mounted using the Linux file system. Oracle Clusterware and Oracle RAC write to these partitions directly.
■ Automatic Storage Management for Oracle Database files (strongly recommended)
For all installations, you must choose the storage option that you want to use for Oracle Clusterware files and Oracle Database files.
If you decide to use OCFS2 to store the Oracle Clusterware files, you must use the proper version of OCFS2 for your operating system version. OCFS2 works with Red Hat Linux and kernel version 2.6
The examples in this guide, which are based on Red Hat Linux, use shared disk partitions to store the Oracle Clusterware files and ASM to store the Oracle database files. The Oracle Clusterware and Oracle RAC software will be installed on disks local to each node, not on a shared file system.
The following section describes how to configure the shared disk partitions for the Oracle Clusterware files on Red Hat Linux.
See Also:
■ "About Checking Requirements"
■ "Configuring Operating System Users and Groups"
■ "About Checking Hardware Requirements"
■ Your platform-specific Oracle Clusterware installation guide
Note: Oracle Clusterware files cannot be stored in ASM.
Note: For the most up-to-date information about supported storage options for Oracle RAC installations, refer to the Certify pages on OracleMetaLink
https://metalink.oracle.com
See Also:
■ Your platform-specific Oracle Clusterware installation guide if you are using a cluster file system or NFS
■ "Configuring Installation Directories and Shared Storage"
■ "About Checking Hardware Requirements"

Configuring Installation Directories and Shared Storage
Preparing Your Cluster 2-19
Configuring Block Devices for Oracle Clusterware FilesWith Oracle Clusterware release 10.2 and later, you can use block devices instead of raw devices with Red Hat Enterprise Linux 4.0. Oracle Clusterware files are configured by default to use direct I/O (O_DIRECT), which enables direct writes to the block devices.
Before you install Oracle Clusterware, you will need to configure 5 shared disk partitions:
■ 1 partition which is 280 MB in size for storing the Oracle Cluster Registry (OCR)
■ 1 partition which is 280 MB in size for storing a duplicate OCR file on a different disk, referred to as the OCR mirror
■ 3 partitions which are 280 MB in size, 1 for each voting disk location
To configure block devices if you are using Red Hat Enterprise Linux 4.0:1. Log in to the operating system as the root user.
2. To identify the device name for the disks that you want to use, enter the following command on the first node in your cluster, for example, docrac1:
# /sbin/fdisk -l
You can create the required disk partitions either on new block devices that you added or on previously partitioned devices that have unpartitioned available space. To identify devices that have unpartitioned available space, examine the start and end cylinder numbers of the existing partitions and determine whether or not the device contains unused cylinders.
3. Create two disk partitions, each 280 MB in size, for the OCR and its mirror, and three partitions, each 280 MB in size, for the Oracle Clusterware voting disks.
To create partitions on a block device, as the root user, enter a command similar to the following, where devicename is the name of a block device:
# /sbin/fdisk devicename
Use the following guidelines when creating partitions:
■ Use the p command to list the partition table of the device.
■ Use the n command to create a partition.
■ After you have created the required partitions on this device, use the w command to write the modified partition table to the device.
■ Refer to the fdisk entry in the Linux Help system for more information about creating partitions.
Note: When you create partitions using fdisk by specifying a device size, such as +256M, the actual device created may be smaller than the size requested, based on the cylinder geometry of the disk. This is due to current fdisk restrictions.
Oracle configuration software checks to ensure that devices contain a minimum of 256MB of available disk space. Therefore, Oracle recommends using at least 280MB for the device size. You can check partition sizes by using the command syntax fdisk -s partition.

Configuring Installation Directories and Shared Storage
2-20 Oracle Database 2 Day + Real Application Clusters Guide
The following example uses fdisk to create a 280 MB partition on the block device, /dev/sda, on the first node. This partition, or slice, will be used for the OCR disk. You will create another 280 MB partition on a different disk and disk controller for the OCR mirror. Each file should be on a different disk and disk controller. The bold text in the following example represents user-entered commands.
# /sbin/fdisk /dev/sdaThe number of cylinders for this disk is set to 1024.Command (m for help): p
Disk /dev/sdb: 1073 MB, 107341824 bytes34 heads, 61 sectors/track, 1011 cylindersUnits = cylinders of 2074 * 512 = 1061888 bytes
Device boot Start End Blocks ID System
Command (m for help): nCommand action e extended p primary partition (1-4)pPartition number (1-4): 1First cylinder (1-1011, default 1):Using default value 1Last cylinder of +size or +sizeM or +sizeK (1-1011, default 1011): +280M
Command (m for help): wThe partition table has been altered!
Calling ioctl() to re-read partition table.Syncing disks.#
4. Enter the following command to create a 280 MB partition on the second block device, /dev/sdb. This partition will be used for the OCR mirror. Use the same prompts as shown in the previous example.
fdisk /dev/sdb
5. Use the fdisk command to create a 280 MB partition on the block device /dev/sda. This partition will be used for the voting disk file. Each voting disk file should be on a different disk and controller.
# /sbin/fdisk /dev/sdaThe number of cylinders for this disk is set to 1024.Command (m for help): nCommand action e extended p primary partition (1-4)pPartition number (1-4): 2First cylinder (8-1024, default 8):Using default value 8Last cylinder of +size or +sizeM or +sizeK (8-1024, default 1024): +280M
Command (m for help): wThe partition table has been altered!
Calling ioctl() to re-read partition table.Syncing disks.

Configuring Installation Directories and Shared Storage
Preparing Your Cluster 2-21
#
6. Use the fdisk command to create a 280 MB partition on the block device /dev/sdb. This partition will be used for the voting disk file. Each voting disk file should be on a different disk and controller.
# /sbin/fdisk /dev/sdbThe number of cylinders for this disk is set to 1024.Command (m for help): nCommand action e extended p primary partition (1-4)pPartition number (1-4): 2First cylinder (8-1024, default 8):Using default value 8Last cylinder of +size or +sizeM or +sizeK (8-1024, default 1024): +280M
Command (m for help): wThe partition table has been altered!
Calling ioctl() to re-read partition table.Syncing disks.#
7. Use the fdisk command to create a 280 MB partition on the block device /dev/sdc. This partition will be used for the voting disk file.
# /sbin/fdisk /dev/sdc
When you run the command, use the same response as in Step 3, but specify a partition size of +280M.
8. On the node docrac2, as the root user, for each of the disks you used previously in Steps 3 through Step 7, you need to run the partprobe command. For example, if you configured disks /dev/sda, /dev/sdb, and /dev/sdc in the previous commands, then you would run the following commands:
# /sbin/partprobe /dev/sda# /sbin/partprobe /dev/sdb# /sbin/partprobe /dev/sdc
This forces the operating system on the other node in the cluster to refresh its kernel partition table for the shared storage device.
9. Change the ownership of the OCR partitions to the installation owner on all nodes in the cluster.
In the session where you run OUI, the OCR partitions must be owned by the installation owner (such as oracle) that performs the Oracle Clusterware installation. The installation owner must own the OCR partitions so that OUI can write to them. During installation, OUI changes ownership of the OCR partitions back to root.
See Also:
■ "About Deciding on a Shared Storage Solution"
■ "About Checking Hardware Requirements"
■ "Configuring Block Devices for Oracle Clusterware Files"

Configuring Installation Directories and Shared Storage
2-22 Oracle Database 2 Day + Real Application Clusters Guide
Creating a Udev Permissions File for Oracle ClusterwareWhen you restart a Red Hat Enterprise Linux 4.0 system, ownership and permissions on block devices revert by default to the root user. If you are using block devices with this operating system for your Oracle Clusterware files, then you need to override this default.
To create a permissions file if you are using Red Hat Enterprise Linux 4.0:1. Log in to the operating system as the root user.
2. Change to the /etc/udev/permissions.d directory.
3. Use a text editor to create a file named 49-oracle.permissions to ensure correct ownership of the block devices when the operating system is restarted.
The following is an example of the contents of the /etc/udev/permissions.d/49-oracle.permissions file:
# OCRsda1:root:oinstall:0640sdb1:root:oinstall:0640# Voting Diskssda2:oracle:oinstall:0640sdb2:oracle:oinstall:0640sdc1:oracle:oinstall:0640# ASMsdd:oracle:dba:0660sde:oracle:dba:0660
4. Save the file.
5. (Optional) After creating the oracle.permissions file, the permissions on the shared devices are set automatically the next time the system is restarted. To set permissions to take effect immediately, without restarting the system, use the chown and chmod commands:
chown root:oinstall /dev/sda1chmod 640 /dev/sda1chown root:oinstall /dev/sdb1chown 640 /dev/sdb1chown oracle:oinstall /dev/sda2chmod 640 /dev/sda2chown oracle:oinstall /dev/sdb2chown 640 /dev/sdb2chown oracle:oinstall /dev/sdc1chown 640 /dev/sdc1chown oracle:dba /dev/sddchown 660 /dev/sddchown oracle:dba /dev/sdechown 660 /dev/sde
6. Repeat these steps on each node in the cluster.
About Choosing an Oracle Base DirectoryOracle Universal Installer (OUI) creates the Oracle base directory for you in the location you specify. The Oracle base directory (ORACLE_BASE) acts as a top-level directory for Oracle software installations. Optimal Flexible Architecture (OFA) guidelines recommend that you use a path similar to the following for the Oracle base directory:

Configuring Installation Directories and Shared Storage
Preparing Your Cluster 2-23
/mount_point/app/oracle
In the preceding path example, the variable mount_point is the mount point directory for the file system where you intend to install the Oracle software.
The file system that you use for the Oracle base directory must have at least 7 GB of available disk space for installing the Oracle Database software. The path to the Oracle base directory must be the same on all nodes. The permissions on the Oracle base directory should be at least 750.
For Red Hat Linux systems, you can use the df -h command to determine the available disk space on each mounted file system. Choose a file system that has sufficient available space. For the sample installation described in this guide, the chosen mount point must have at least 7 GB of available space, for installing Oracle RAC and ASM in separate home directories. The examples in this guide use /opt/oracle/11gR1 for the Oracle base directory.
About Choosing an Oracle Clusterware Home DirectoryOUI installs Oracle Clusterware into a directory structure referred to as CRS_home. This home is separate from the home directories for other Oracle products installed on the same server. OUI creates the CRS home directory for you. Before you start the installation, you must have sufficient disk space on a file system for the Oracle Clusterware directory, and the CRS home directory you choose should be owned by the installation owner of Oracle Clusterware. The permissions for the Oracle Clusterware home directory should be at least 750.
The file system that you use for the CRS home directory must have at least 2 GB of available disk space. The path to the CRS home directory must be the same on all nodes.
For Red Hat Linux, you can use the df -h command to determine the available disk space on each mounted file system. Choose a file system that has appropriate available space. For the examples in this guide, the directory /u01/app/crs is used for the CRS home directory.
See Also:
■ "About Checking Hardware Requirements"
■ "About Deciding on a Shared Storage Solution"
■ "Configuring Block Devices for Oracle Clusterware Files"
Note: Ensure the CRS home directory is not a subdirectory of the Oracle base directory.
See Also:
■ "About Checking Hardware Requirements"
■ "About Deciding on a Shared Storage Solution"
■ "Configuring Block Devices for Oracle Clusterware Files"

Configuring Installation Directories and Shared Storage
2-24 Oracle Database 2 Day + Real Application Clusters Guide

Installing and Configuring Oracle Clusterware and Oracle RAC 3- 1
3Installing and Configuring Oracle
Clusterware and Oracle RAC
This chapter explains how to install Oracle Real Application Clusters (Oracle RAC) using Oracle Universal Installer (OUI). You must install Oracle Clusterware before installing Oracle RAC. After your Oracle Clusterware is operational, you can use OUI to install the Oracle Database software with the Oracle RAC components.
The example Oracle RAC environment described in this guide uses Automatic Storage Management (ASM), so this chapter also includes instructions on how to install ASM in its own home directory.
This chapter includes the following sections:
■ Preparing the Oracle Media Installation File
■ Installing Oracle Clusterware 11g
■ Configuring Automatic Storage Management in an ASM Home Directory
■ Installing the Oracle Database Software and Creating a Cluster Database
■ Performing Postinstallation Tasks
■ Converting an Oracle Database to an Oracle RAC Database
Preparing the Oracle Media Installation FileOracle Clusterware is installed as part of Oracle Database 11g. OUI installs Oracle Clusterware into a directory structure that is referred to as CRS_home. This home is separate from the home directories of other Oracle software products installed on the same server. Because Oracle Clusterware works closely with the operating system, system administrator access is required for some of the installation tasks. In addition, some of the Oracle Clusterware processes must run as the special operating system user, root.
The Oracle RAC database software is installed from the same Oracle Database 11g installation media. By default, the standard Oracle Database 11g software installation process installs the Oracle RAC option when OUI recognizes that you are performing the installation on a cluster. OUI installs Oracle RAC into a directory structure that is referred to as Oracle_home. This home is separate from the home directories of other Oracle software products installed on the same server.
To prepare the Oracle Media installation files:1. If you have the Oracle Database software on CD or DVD, insert the distribution
media for the database into a disk drive on your computer. Make sure the disk drive has been mounted at the operating system level.

Installing Oracle Clusterware 11g
3-2 Oracle Database 2 Day + Real Application Clusters Guide
If you do not have installation disks, but are instead installing from ZIP files, continue on to Step 2.
2. If the Oracle Database installation software is in one or more ZIP files, create a staging directory on one node, for example, docrac1, to store the unzipped files, as shown here:
mkdir -p /stage/oracle/11.1.0
3. Copy the ZIP files to this staging directory. For example, if the files were downloaded to a directory named /home/user1, and the ZIP file is named 11100_linux_db.zip, you would you use the following command to move the ZIP file to the staging directory:
cd /home/user1cp 11100_linux_db.zip /stage/oracle/11.1.0
4. As the oracle user on docrac1, unzip the Oracle media, as shown in the following example:
cd /stage/oracle/11.1.0unzip 11100_linux_db.zip
Installing Oracle Clusterware 11g The following topics describe the process of installing Oracle Clusterware:
■ Configuring the Operating System Environment
■ Verifying the Configuration Using the Cluster Verification Utility
■ Using Oracle Universal Installer to Install Oracle Clusterware
■ Completing the Oracle Clusterware Configuration
Configuring the Operating System EnvironmentYou run OUI from the oracle user account. Before you start OUI you must configure the environment of the oracle user. You must set the ORACLE_BASE environment variables to the directory in which you want the Oracle central inventory files located.
For example, if you want the central inventory files located on the mount point directory /opt/oracle, you might set ORACLE_BASE to the directory /opt/oracle/11gR1.
Prior to installing the Oracle Database software and creating an Oracle database, you should also set the ORACLE_HOME environment variable to the location in which you want to install the Oracle Database software. Optionally, you can also set the ORACLE_SID environment variable to the name you have chosen for your database.
To modify the user environment prior to installing Oracle Clusterware on Red Hat Linux:1. As the oracle user, execute the following commands:
[oracle]$ unset ORACLE_HOME
See Also:
■ "Configuring Installation Directories and Shared Storage"
■ "Configuring Operating System Users and Groups"

Installing Oracle Clusterware 11g
Installing and Configuring Oracle Clusterware and Oracle RAC 3-3
[oracle]$ unset ORACLE_SID[oracle]$ unset ORACLE_BASE[oracle]$ export ORACLE_BASE=/opt/oracle/11gR1
2. Verify the changes have been made by executing the following commands:
[oracle]$ echo $ORACLE_SID
[oracle]$ echo $ORACLE_HOME
[oracle]$ echo $ORACLE_BASE/opt/oracle/11gR1
To modify the user environment prior to installing Oracle Database on Red Hat Linux:1. As the oracle user, modify the user profile in the /home/oracle directory on
both nodes using the following commands:
[oracle] $ cd $HOME[oracle] $ vi .bash_profile
Add the following lines at the end of the file:
export ORACLE_SID=salesexport ORACLE_BASE=/opt/oracle/11gR1export ORACLE_HOME=/opt/oracle/11gR1/db
2. Read and implement the changes made to the .bash_profile file:
source .bash_profile
3. Verify the changes have been made by executing the following commands:
[oracle]$ echo $ORACLE_SIDsales[oracle]$ echo $ORACLE_HOME/opt/oracle/11gR1/db[oracle]$ echo $ORACLE_BASE/opt/oracle/11gR1
Verifying the Configuration Using the Cluster Verification UtilityIf you have not configured your nodes, network, and operating system correctly, your installation of the Oracle Clusterware or Oracle Database 11g software will not complete successfully.
To verify your hardware and operating system setup:1. As the oracle user, change directories to the staging directory for the Oracle
Clusterware software, or to the mounted installation disk. In the following example, staging_area represents the location of the installation media (for example, /home/oracle/downloads/11gR1/11.1.0 or /dev/dvdrom):
[oracle] $ cd /staging_area
2. Run the runcluvfy.sh script, as shown in the following example, where docrac1 and docrac2 are the name of the nodes in your cluster:
[oracle] $ ./runcluvfy.sh stage -pre crsinst -n docrac1,docrac2 -verbose

Installing Oracle Clusterware 11g
3-4 Oracle Database 2 Day + Real Application Clusters Guide
The preceding command instructs the Cluster Verification Utility (CVU) to verify that the system meets all the criteria for an Oracle Clusterware installation. It checks that all the nodes are reachable from the local nodes, proper user equivalence exists, connectivity exists between all the nodes through the public and private interconnects, the user has proper permissions to install the software, and that all system requirements (including kernel version, kernel parameters, memory, swap space, temporary directory space, and required software packages) are met.
Using Oracle Universal Installer to Install Oracle ClusterwareAs the oracle user on the docrac1 node, install Oracle Clusterware. Note that OUI uses Secure Shell (SSH) to copy the binary files from docrac1 to docrac2 during the installation. Make sure SSH is configured before starting the installer.
To install Oracle Clusterware:1. Use the following command to start OUI, where staging_area is the location of
the staging area on disk, or the location of the mounted installation disk:
cd /staging_area/Disk1./runInstaller
The Select a Product to Install window appears.
2. Select Oracle Clusterware from the list, then click Next.
See Also:
■ "About Checking Requirements"
■ "Verifying the Network Configuration"
■ Oracle Clusterware Administration and Deployment Guide for more information about resolving the CVU errors
Note: If you are installing Oracle Clusterware on a server that already has a single-instance Oracle Database 11g installation, then stop the existing ASM instances, if any. After Oracle Clusterware is installed, start the ASM instances again. When you restart the single-instance Oracle database and then the ASM instances, the ASM instances use the Cluster Synchronization Services Daemon (CSSD) instead of the daemon for the single-instance Oracle database.

Installing Oracle Clusterware 11g
Installing and Configuring Oracle Clusterware and Oracle RAC 3-5
The screenshot shows the Select a Product to Install window. There are three options to choose from:
■ Oracle Database 11g
■ Oracle Client
■ Oracle Clusterware
At the bottom of the window there is one button on the left side, which is labeled Help. On the right side, there four buttons labeled (in order from left to right) Back, Next, Install, and Cancel. The Back and Install buttons are grayed out.
End of description.
***********************************************************************************************
If you have not installed any Oracle software previously on this server, the Specify Inventory directory and credentials window appears.
3. Change the path for the inventory location, if required. Select oinstall for the operating system group name. Click Next.
The path displayed for the inventory directory should be the oraInventory subdirectory of your Oracle base directory. For example, if you set the ORACLE_BASE environment variable to /opt/oracle/11gR1 before starting OUI, then the path displayed is /opt/oracle/11gR1/oraInventory.

Installing Oracle Clusterware 11g
3-6 Oracle Database 2 Day + Real Application Clusters Guide
The screenshot shows the Specify Inventory directory and credentials windows. The first paragraph reads ’You are starting your first installation on this host. As part of this install, you need to specify a directory for installer files. This is called the "Inventory directory". Within the inventory directory, the installer automatically sets up subdirectories for each product to contain inventory data and will consume typically 150 Kilobytes per product.’ Following this text is a text entry field labeled Enter the full path of the inventory directory. To the right of the text field is a Browse button.
The second paragraph of text on the screenshot says ’You can specify an Operating System group that has write permissions to the above inventory directory. You can leave the field blank if you want to perform the above operations as a Superuser.’ This text is followed by a list labeled Specify Operating System group name. The list currently shows the entry oinstall, and has a down arrow to the right of the list.
At the bottom of the screenshot, from left to right, are the following buttons: Help, Installed Products..., Back, Next, Install (grayed out), and Cancel.
End of description.
***********************************************************************************************
The Specify Home Details window appears.
4. Accept the default value for the Name field, which is the name of the Oracle home directory for this product. For the Path field, click Browse. In the Choose Directory window Go up the path until you reach the root directory (/), click /u01/app/crs, then click Choose Directory.
After you have selected the path, click Next. The next window, Product-Specific Prerequisite Checks, appears after a short period of time.
5. When you see the message "Check complete. The overall result of this check is: Passed", as shown in the following screenshot, click Next.

Installing Oracle Clusterware 11g
Installing and Configuring Oracle Clusterware and Oracle RAC 3-7
The screenshot shows the Product-Specific Prerequisites Checks window. There is a list of the checks performed, a check box to indicate whether the check should be performed automatically, and the status of each check. Towards the bottom of the screen is a results window, which lists messages about the status of the prerequisites checks. In this example, the status window says "Check complete. The overall result of this check: Passed."
At the bottom of the screenshot, from left to right, are the following buttons: Help, Installed Products, Back, Next, Install (grayed out), and Cancel.
End of Description.
***********************************************************************************************
The Specify Cluster Configuration window appears.
6. Change the default cluster name to a name that is unique throughout your entire enterprise network. For example, you might choose a name that is based on the node names' common prefix. This guide will use the cluster name docrac.
The local node, docrac1, appears in the Cluster Nodes section. If the private node name includes the domain name, click Edit and remove the domain name from the private node name. For example, if the private node name is docrac1-priv.us.oracle.com, edit the entry so that it is displayed as docrac1-priv.
When you have finished removing the domain name in the "Modify a node in the existing cluster" window, click OK.
7. When you are returned to the Specify Cluster Configuration window, click Add.
8. In the "Add a new node to the existing cluster" dialog window, enter the second node's public name (docrac2.us.oracle.com), private name (docrac2-priv), and virtual IP name (docrac2-vip.us.oracle.com), and then click OK.

Installing Oracle Clusterware 11g
3-8 Oracle Database 2 Day + Real Application Clusters Guide
The Specify Cluster Configuration window now displays both nodes in the Cluster Nodes.
The screenshot shows the OUI "Specify Cluster Configuration" window. The top part of the screen contains the following text: "Enter a name for the cluster and select the nodes to be managed by the Oracle Clusterware. For each node, specify the name for the public IP address, the name for the private interconnect, and the name for the virtual IP address on the node. You can use a cluster configuration file to configure your cluster by clicking Use Cluster Configuration File instead of completing the Cluster Nodes box. The Use Cluster Configuration File option is helpful it you have many nodes."
Following this text is a text entry box labeled Cluster Name. The Cluster Name box contains the value docrac. Below the Cluster Name box is the Cluster Nodes table. This table contains the Public node name, the private node name, and the virtual host name for both nodes docrac1 and docrac2.
Below the Cluster Nodes table are four buttons. These buttons are, from left to right, Use Cluster Configuration File, Add, Edit, and Remove.
At the bottom of the screenshot are the following buttons, from left to right: Help, Installed Products, Back, Next, Install (grayed out), and Cancel.
End of description.
***********************************************************************************************
Click Next. The Specify Network Interface Usage window appears.
9. Verify eth0 and eth1 are configured correctly (proper subnet and interface type displayed), then click Next.
The Specify Oracle Cluster Registry (OCR) Location window appears.
10. Select Normal Redundancy for the OCR Configuration. You will be prompted for two file locations. In the Specify OCR Location field, enter the name of the device configured for the first OCR file, for example, /dev/sda1.

Installing Oracle Clusterware 11g
Installing and Configuring Oracle Clusterware and Oracle RAC 3-9
In the Specify OCR Mirror Location field, enter the name of the device configured for the OCR mirror file, for example /dev/sdb1. When finished, click Next.
During installation, the OCR data will be written to the specified locations.
The screenshot shows the OUI Specify Oracle Cluster Registry (OCR) Location window. The introductory text on this windows says "The Oracle Cluster Registry (OCR) stores cluster and database configuration information. Specify a cluster file system file or a shared raw device containing at least 256MB of free space that is accessible from all of the nodes in the cluster."
There are two available options to choose for OCR Configuration. The first option, Normal Redundancy, is followed by the text "Choose this option to enable the Oracle Clusterware to manage OCR mirroring. You will need an additional 100 MB of disk space for the mirrored copy." The second option, External Redundancy, is followed by the text "Choose this option if you are using your disk management system to provide OCR redundancy". The screenshot shows the Normal Redundancy option as selected.
Below the OCR Configuration options section, the Specify OCR Location text entry field contains the value /dev/sda1. The Specify OCR Mirror Location field has the value /dev/sdb1.
End of description.
At the bottom of the screenshot are the following buttons, from left to right: Help, Installed Products, Back, Next, Install (grayed out), and Cancel.
***********************************************************************************************
The Specify Voting Disk Location window appears.
11. Select Normal Redundancy for the voting disk location. You will be prompted for three file locations. For the Voting Disk Location, enter the name of the device configured for the first voting disk file, for example, /dev/sda2. Repeat this process for the other two Voting Disk Location fields.

Installing Oracle Clusterware 11g
3-10 Oracle Database 2 Day + Real Application Clusters Guide
The screenshot shows the OUI Specify Voting Disk Location screen. The introductory text on the screen says "The Oracle Clusterware voting disk contains cluster membership information and arbitrates cluster ownership among the nodes of your cluster in the event of network failures. Specify a cluster file system file or a shared raw device that is accessible by the same name from all of the nodes in the cluster. The Installer requires at least 20MB of free space for the voting disk that it creates."
Following the introductory paragraph is the Voting Disk Configuration section. There are two options. The first option, Normal Redundancy is followed by the text "Choose this option to enable the Oracle Clusterware to manage two additional copies of your voting disk. Each additional copy requires 20MB of disk space." The second option, External Redundancy, is followed by the text "Choose this option if you are using your disk management system to provide voting disk redundancy." The Normal Redundancy option is selected.
Below the Voting Disk Configuration section is the Voting Disk Location text entry field. The screen show shows this field as containing the value /dev/sda2. Next is the Additional Voting Disk 1 Location text entry field, which shows the value /dev/sdb2 followed by the Additional Voting Disk 2 Location text entry field displaying the value /dev/sdc1.
End of description.
At the bottom of the screenshot are the following buttons, from left to right: Help, Installed Products, Back, Next, Install (grayed out), and Cancel.
***********************************************************************************************
When finished, click Next. The OUI Summary window appears.
12. Review the contents of the Summary window and then click Install.
OUI displays a progress indicator during the installation process.
13. During the installation process, the Execute Configuration Scripts window appears. Do not click OK until you have run the scripts.

Installing Oracle Clusterware 11g
Installing and Configuring Oracle Clusterware and Oracle RAC 3-11
The screenshot shows the Execute Configuration Scripts window. At the top is the text ’The following configuration scripts need to be executed as the "root"user in each cluster node.’
There is a table in the middle titled Scripts to be executed. It lists two scripts. Script number 1 is /opt/oracle/11gR1/oraInventory/oraInstRoot.sh, and it should be run on nodes docrac1 and docrac2. Script number 2 is /crs/root.sh, and it should be run on nodes docrac1 and docrac2.
Below the Scripts to be executed table is the following text: ’To execute the configuration scripts: 1. Open a terminal window 2. Log in as "root" 3. Run the scripts in each cluster node 4. Return to this window and click "OK" to continue. Note: Do not run the scripts simultaneously on the listed nodes."
At the bottom of the screenshot are two buttons. Help on the left, and OK on the right.
End of description.
***********************************************************************************************
The Execute Configuration Scripts window shows configuration scripts, and the path where the configuration scripts are located. Run the scripts on all nodes as directed, in the order shown. For example, on Red Hat Linux you perform the following steps (note that for clarity, the examples show the current user, node and directory in the prompt):
a. As the oracle user on docrac1, open a terminal window, and enter the following commands:
[oracle@docrac1 oracle]$ cd /opt/oracle/11gR1/oraInventory[oracle@docrac1 oraInventory]$ su
b. Enter the password for the root user, and then enter the following command to run the first script on docrac1:
[root@docrac1 oraInventory]# ./orainstRoot.sh
c. After the orainstRoot.sh script finishes on docrac1, open another terminal window, and as the oracle user, enter the following commands:

Installing Oracle Clusterware 11g
3-12 Oracle Database 2 Day + Real Application Clusters Guide
[oracle@docrac1 oracle]$ ssh docrac2[oracle@docrac2 oracle]$ cd /opt/oracle/11gR1/oraInventory[oracle@docrac2 oraInventory]$ su
d. Enter the password for the root user, and then enter the following command to run the first script on docrac2:
[root@docrac2 oraInventory]# ./orainstRoot.sh
e. After the orainstRoot.sh script finishes on docrac2, go to the terminal window you opened in Step 15a. As the root user on docrac1, enter the following commands to run the second script, root.sh:
[root@docrac1 oraInventory]# cd /u01/app/crs[root@docrac1 crs]# ./root.sh
At the completion of this script, the following message is displayed:
The screenshot shows the output from the root.sh script. The output indicates the root.sh script formats the voting disks and starts the CRS processes. It then instructs the user to run the root.sh script on the other nodes in the cluster to start the CRS daemons.
End of description.
***********************************************************************************************
f. After the root.sh script finishes on docrac1, go to the terminal window you opened in Step 15c. As the root user on docrac2, enter the following commands:
[root@docrac2 oraInventory]# cd /u01/app/crs[root@docrac2 crs]# ./root.sh
After the root.sh script completes, return to the OUI window where the Installer prompted you to run the orainstRoot.sh and root.sh scripts. Click OK.
The Configuration Assistants window appears. When the configuration assistants finish, OUI displays the End of Installation window.
14. Click Exit to complete the installation process, then Yes to confirm you want to exit the installer.
If you encounter any problems, refer to the configuration log for information. The path to the configuration log is displayed on the Configuration Assistants window.
Note: Do not attempt to run the root.sh script on other nodes, or it might fail. Wait until the script finishes running on the local node.

Configuring Automatic Storage Management in an ASM Home Directory
Installing and Configuring Oracle Clusterware and Oracle RAC 3-13
Completing the Oracle Clusterware ConfigurationAfter you have installed Oracle Clusterware, verify that the node applications are running. Depending on which operating system you use, you may need to perform some postinstallation tasks to configure the Oracle Clusterware components properly.
To complete the Oracle Clusterware configuration on Red Hat Linux:1. As the oracle user on docrac1, check the status of the Oracle Clusterware
targets by entering the following command:
/u01/app/crs/bin/crs_stat -t
This command provides output showing if all the important cluster services, such as gsd, ons, and vip, are running on the nodes of your cluster.
The screenshot shows the output from the script command /crs/bin/crs_stat -t. The output is a table with columns labeled Name, Type, Target, State, and Host. The first three rows have Names ending in gsd, ons, and vip of Type application. The Target and State are ONLINE, and the host is docrac1. Lines 4 through 6 are the same, except the Host is docrac2.
End of description.
***********************************************************************************************
Configuring Automatic Storage Management in an ASM Home DirectoryThis section explains how to install the ASM software in its own home directory. Installing ASM in its own home directory enables you to keep the ASM home separate from the database home directory (Oracle_home). By using separate home directories, you can upgrade and patch ASM and the Oracle Database software independently, and you can deinstall Oracle Database software without affecting the ASM instance.
As the oracle user, install ASM by installing the Oracle Database 11g Release 1 software on the docrac1 node. Note that the Installer copies the binary files from docrac1 to docrac2 during the installation.
During the installation process, you are asked to configure ASM. You configure ASM by creating disk groups that become the default location for files created in the database. The disk group type determines how ASM mirrors files. When you create a disk group, indicate whether the disk group is a normal redundancy disk group (2-way mirroring for most files by default), or a high redundancy disk group (3-way mirroring), or an external redundancy disk group (no mirroring by ASM). Use an external redundancy disk group only if your storage system already provides mirroring at the hardware level, or if you have no need for redundant data. The default disk group type is normal redundancy.

Configuring Automatic Storage Management in an ASM Home Directory
3-14 Oracle Database 2 Day + Real Application Clusters Guide
To install ASM in a home directory separate from the home directory used by Oracle Database:1. Use the following commands to start OUI, where staging_area is the location
of the staging area on disk, or the location of the mounted installation disk:
cd /staging_area/database./runInstaller
When you start Oracle Universal Installer, the Select a Product to Install window appears.
2. Select Oracle Database 11g from the list, then click Next.
The screenshot shows the Select a Product to Install window. There are three options to choose from:
■ Oracle Database 11g (selected)
■ Oracle Client
■ Oracle Clusterware
At the bottom of the window there is one button on the left side, which is labeled Help. On the right side, there four buttons labeled (in order from left to right) Back, Next, Install, and Cancel. The Back and Install buttons are grayed out.
End of description.
***********************************************************************************************
The Select Installation Type window appears.
3. Select either Enterprise Edition or Standard Edition and then click Next.
4. In the Specify Home Details window, specify a name for the ASM home directory, for example, OraASM11g_home. Select a directory that is a subdirectory of your Oracle Base directory, for example, /opt/oracle/11gR1/asm. Click Browse to change the directory in which ASM will be installed.

Configuring Automatic Storage Management in an ASM Home Directory
Installing and Configuring Oracle Clusterware and Oracle RAC 3-15
The screenshot shows the Specify Home Details window. The introductory text say ’Destination: Enter or select a name for the installation and the full path where you want to install the product/" The Name field has the value OraASM11g_home and the Path field has the value /opt/oracle/11gR1/asm.
At the bottom of the screenshot are the following buttons, from left to right: Help, Installed Products, Back, Next, Install (grayed out), and Cancel.
End of description.
***********************************************************************************************
After you have specified the ASM home directory, click Next.
The Specify Hardware Cluster Installation Mode window appears.
5. Click Select All to select all nodes for installation, and then click Next.
If your Oracle Clusterware installation was successful, then the Specify Hardware Cluster Installation Mode window lists the nodes that you identified for your cluster, such as docrac1 and docrac2.
After you click Next, the Product-Specific Prerequisites Checks window appears.
6. When you see the message "Check complete. The overall result of this check is: Passed", as shown in the following screenshot, click Next.

Configuring Automatic Storage Management in an ASM Home Directory
3-16 Oracle Database 2 Day + Real Application Clusters Guide
The screenshot shows the Product-Specific Prerequisite Checks window. The introductory text says "The Installer verifies that your environment meets all of the minimum requirements for installing and configuring the products that you have chosen to install. You must manually verify and confirm the items that are flagged with warnings and items that require manual checks. For details about performing these checks, click the item and review the details in the box at the bottom of the window."
There is a list of the checks performed, a column that indicates whether the check is performed automatically or manually, a check box that indicates whether or not the check was completed, and the status of each check. Towards the bottom of the window is a results section, which lists messages about the status of the prerequisite checks. In this example, the status window says "Check complete. The overall result of this check: Passed."
At the bottom of the window, from left to right, are the following buttons: Help, Installed Products, Back, Next, Install (grayed out), and Cancel.
End of Description.
***********************************************************************************************
The Select Configuration Option window appears.
7. Select the Configure Automatic Storage Management (ASM) option to install and configure ASM. The ASM instance is managed by a privileged role called SYSASM, which grants full access to ASM disk groups.
Enter a password for the SYSASM user account. The passwords should be at least 8 characters in length and include at least one alphabetic and one numeric character.
Confirm the password by typing it in again in the Confirm ASM SYS Password field.
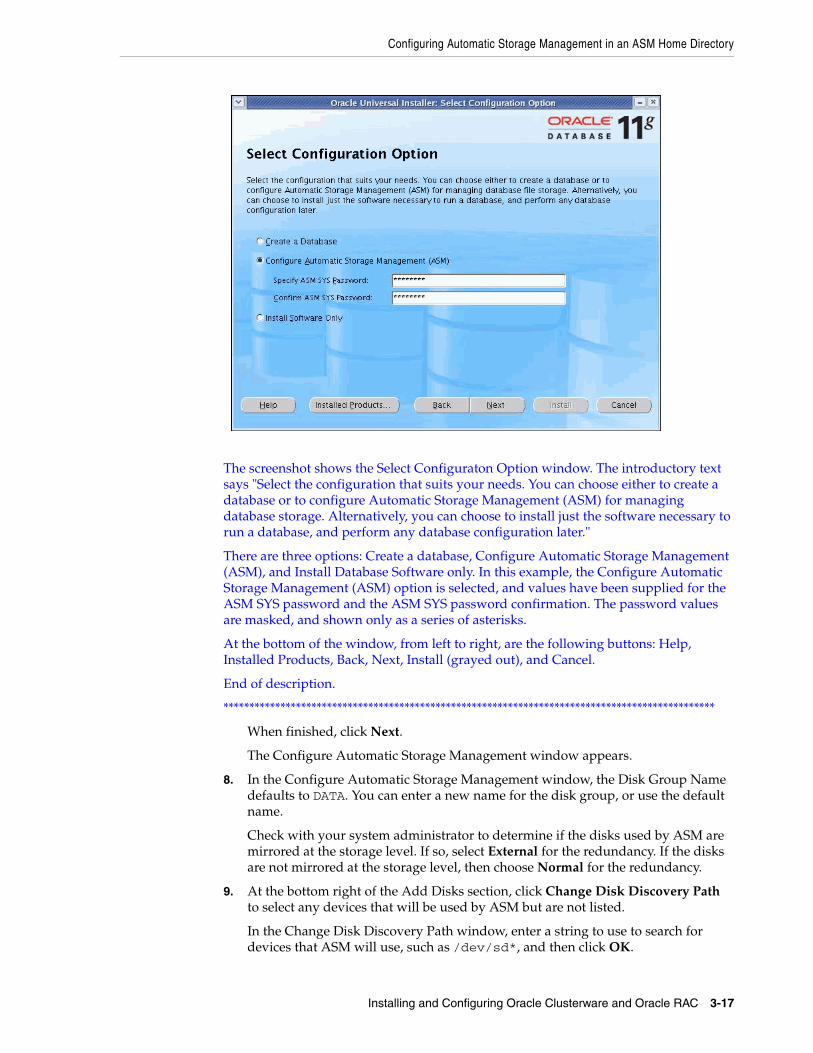
Configuring Automatic Storage Management in an ASM Home Directory
Installing and Configuring Oracle Clusterware and Oracle RAC 3-17
The screenshot shows the Select Configuraton Option window. The introductory text says "Select the configuration that suits your needs. You can choose either to create a database or to configure Automatic Storage Management (ASM) for managing database storage. Alternatively, you can choose to install just the software necessary to run a database, and perform any database configuration later."
There are three options: Create a database, Configure Automatic Storage Management (ASM), and Install Database Software only. In this example, the Configure Automatic Storage Management (ASM) option is selected, and values have been supplied for the ASM SYS password and the ASM SYS password confirmation. The password values are masked, and shown only as a series of asterisks.
At the bottom of the window, from left to right, are the following buttons: Help, Installed Products, Back, Next, Install (grayed out), and Cancel.
End of description.
***********************************************************************************************
When finished, click Next.
The Configure Automatic Storage Management window appears.
8. In the Configure Automatic Storage Management window, the Disk Group Name defaults to DATA. You can enter a new name for the disk group, or use the default name.
Check with your system administrator to determine if the disks used by ASM are mirrored at the storage level. If so, select External for the redundancy. If the disks are not mirrored at the storage level, then choose Normal for the redundancy.
9. At the bottom right of the Add Disks section, click Change Disk Discovery Path to select any devices that will be used by ASM but are not listed.
In the Change Disk Discovery Path window, enter a string to use to search for devices that ASM will use, such as /dev/sd*, and then click OK.

Configuring Automatic Storage Management in an ASM Home Directory
3-18 Oracle Database 2 Day + Real Application Clusters Guide
The screenshot shows the Change Disk Discovery Path window. The value /dev/sd* has been entered in the Disk Discovery Path field. The window has two buttons at the bottom right, labeled Ok and Cancel.
End of description.
***********************************************************************************************
You are returned to the Configure Automatic Storage Management window.
10. Select the disks to be used by ASM, for example, /dev/sdd and /dev/sde.
The screenshot shows the Configure Automatic Storage Management window. The Disk Group Name field has the value diskgroup1. There are thee options to choose for Redundacy: High, Normal, and External. The redundancy option Normal is selected.
Under the heading Add Disks, there are two options: Candidate Disks and All Disks. The Candidate Disks option is selected, and there are four disks displayed: /dev/sda4, with a size of 0 MB and status of CANDIDATE, /dev/sda7, with a size of 5726 MB and status of CANDIDATE, /dev/sda8, with a size of 5726 MB and status of CANDIDATE, and /dev/sda9, with a size of 5726 MB and status of CANDIDATE. The disk /dev/sda7 has been selected.

Configuring Automatic Storage Management in an ASM Home Directory
Installing and Configuring Oracle Clusterware and Oracle RAC 3-19
At the bottom of the window, from left to right, are the following buttons: Help, Installed Products, Back, Next, Install (grayed out), and Cancel.
End of description.
***********************************************************************************************
After you have finished selecting the disks to be used by ASM, click Next. The Privileged Operating Systems Groups window appears.
11. Select the name of the operating system group you created in the previous chapter for the OSDBA group, the OSASM group, and the database operator group. If you choose to create only the dba group, then you can use that group for all three privileged groups. If you created a separate asm group, then use that value for the OSASM group.
The screenshot shows the Privileged Operating System Groups page. There are three selection lists in the middle of the page: Database Administrator (OSDBA) group, which is currently set to the value of dba, Database Operator (OSOPER) Group, which is currently set to the value of oinstall, and ASM administrator (OSASM) Group, which is currently set to the value osasm.
At the bottom of the window, from left to right, are the following buttons: Help, Installed Products, Back, Next, Install (grayed out), and Cancel.
End of description.
***********************************************************************************************
After you have supplied values for the privileged groups, click Next. The Oracle Configuration Manager Registration window appears.
12. The Oracle Configuration Manager Registration window enables you to configure the credentials used for connecting to OracleMetaLink. You can provide this information now, or configure it after the database has been installed. Click Next to continue.
OUI displays the Summary window.

Configuring Automatic Storage Management in an ASM Home Directory
3-20 Oracle Database 2 Day + Real Application Clusters Guide
13. Review the information displayed in the Summary window. If any of the information appears incorrect, then click Back to return to a previous window and change it. When you are ready to proceed, click Install.
OUI displays a progress window indicating that the installation has started.
14. The installation takes several minutes to complete. During this time, OUI configures ASM on the specified nodes, and then configures a listener on each node.
After ASM has been installed, OUI runs the Configuration Assistants. When the assistants have finished successfully, click Next to continue.
The Execute Configuration Scripts window appears.
15. Run the scripts as instructed in the Execute Configuration scripts window. For the installation demonstrated in this guide, only one script, root.sh, must be run, and it must be run on both nodes.
The screenshot shows the Execute Configuration Scripts window. At the top is the introductory text ’The following configuration scripts need to be executed as the "root"user in each cluster node.’
There is a table in the middle titled Scripts to be executed. It lists one script, /opt/oracle/11gR1/asm/root.sh, and it should be run on nodes docrac3 and docrac4.
Below the Scripts to be executed table is the following text: ’To execute the configuration scripts: 1. Open a terminal window 2. Log in as "root" 3. Run the scripts in each cluster node 4. Return to this window and click "OK" to continue."
At the bottom of the screenshot are two buttons. Help on the left, and OK on the right.
End of description.
***********************************************************************************************
The following steps demonstrate how to complete this task on a Linux system (note that for clarity, the examples show the user, node name, and directory in the prompt):
a. Open a terminal window. As the oracle user on docrac1, change directories to the ASM home directory, and then switch to the root user:
[oracle@docrac1 oracle]$ cd /opt/oracle/11gR1/asm
Configuring Automatic Storage Management in an ASM Home Directory
Installing and Configuring Oracle Clusterware and Oracle RAC 3-21
[oracle@docrac1 oracle]$ su
b. Enter the password for the root user, and then run the script specified in the Execute Configuration scripts window:
[root@docrac1 oracle]# ./root.sh
c. As the root.sh script runs, it prompts you for the path to the local bin directory. The information displayed in the brackets is the information it has obtained from your system configuration. Press the Enter key each time you are prompted for input to accept the default choices.
d. After the script has completed, the prompt appears. Open another terminal window, and enter the following commands:
[oracle@docrac1 oracle]$ ssh docrac2Enter the passphrase for key ’/home/oracle/.ssh/id_rsa’:[oracle@docrac2 oracle]$ cd /opt/oracle/11gR1/asm[oracle@docrac2 asm]$ suPassword:
e. Enter the password for the root user, and then run the script specified in the Execute Configuration scripts window:
[root@docrac2 asm]# ./root.sh
f. Accept all default choices by pressing the Enter key.
g. After you finish executing the script on all nodes, return to the Execute Configuration Scripts window and click OK to continue.
OUI displays the End of Installation window.
16. Review the information in the End of Installation window. The Web addresses displayed are not used in this guide, but may be needed for your business applications.
17. Click Exit, and then click Yes to verify that you want to exit the installation.
Verifying Your ASM InstallationVerify that all the database services for ASM are up and running.
To verify ASM is operational following the installation:1. Change directories to the bin directory in the CRS home directory:
cd /u01/app/crs/bin
2. Run the following command as the oracle user, where docrac1 is the name of the node you want to check:
./srvctl status asm -n docrac1ASM instance +ASM1 is running on node docrac1.
The example output shows that there is one ASM instance running on the local node.
3. Repeat the command shown in Step 2, substituting docrac2 for docrac1 to verify the successful installation on the other node in your cluster.

Installing the Oracle Database Software and Creating a Cluster Database
3-22 Oracle Database 2 Day + Real Application Clusters Guide
Installing the Oracle Database Software and Creating a Cluster Database The next step is to install the Oracle Database 11g Release 1 software on the docrac1 node. OUI copies the binary files from docrac1 to docrac2, the other node in the cluster, during the installation process.
Before you start OUI you must configure the environment of the oracle user. You must set the ORACLE_SID, ORACLE_BASE, and ORACLE_HOME environment variables to the desired values for your environment.
For example, if you want to create a clustered database named sales and install the Oracle Database software in the /opt/oracle/11gR1/db directory, you would set ORACLE_SID to sales, ORACLE_BASE to the directory /opt/oracle/11gR1, and ORACLE_HOME to the directory /opt/oracle/11gR1/db. See "Configuring the Operating System Environment" on page 3-2 for more information on configuring the environment variables.
To install Oracle Database on your cluster:1. As the oracle user, use the following commands to start OUI, where
staging_area is the location of the staging area on disk, or the location of the mounted installation disk:
cd /staging_area/database./runInstaller
When you start Oracle Universal Installer, the Select a Product to Install window appears.
2. Select Oracle Database 11g from the list, then click Next.
The Select Installation Type window appears.
3. Select either Enterprise Edition or Standard Edition. The Enterprise Edition option is selected by default. When finished, click Next.
The Install Location window appears.
4. Specify a name for the Oracle home, for example, OraDb11g_home.
5. Select an Oracle home directory that is a subdirectory of your Oracle base directory, for example, /opt/oracle/11gR1/db_1.
You can click Browse to change the directory in which the Oracle Database software will be installed. After you have selected the directory, click Choose Directory to close the Choose Directory window.
If the directory does not exist, you can type in the directory path in the File Name field, and then click Choose Directory. If a window appears asking if you want to create the directory, click Yes.
Note: The value of ORACLE_SID cannot be more than 12 characters and can only contain alphanumeric characters.

Installing the Oracle Database Software and Creating a Cluster Database
Installing and Configuring Oracle Clusterware and Oracle RAC 3-23
The screenshot shows the Install Location window in the background and the Choose Directory window in the foreground. At the top of the Choose Directory window, there is a field titled Location, which shows the "base" directory. Next to this field are two buttons, one for navigating up one level, and one for the user’s home directory. Below this is a field titled File_Type, currently displaying the value [Dirs]*. On the next line below this field, on the right-hand side of the window are three buttons. They are, in order from left to right, an icon for Create a new folder, an icon for List, and an icon for Details.
In the Choose Directory window, there is a list of the file directories displayed for the 11gR1 location. The files are asm, db, and NewFolder. The db file is highlighted.
Below the list of files is a File Name text entry field, which currently displays db.
There are two buttons at the bottom of the window, Choose Directory and Cancel.
End of description.
***********************************************************************************************
After you have verified the information on the Install Location window, click Next.
The Specify Hardware Cluster Installation Mode window appears.
6. Select the nodes on which the Oracle Database software will be installed. You can also click Select All to select all available nodes. After you have selected the nodes on which to install the Oracle Database software, click Next.
The Product-Specific Prerequisite Checks window appears.
Note: In the Product-Specific Prerequisite Checks window, you might see a warning that says the host IP addresses are generated by the dynamic host configuration protocol (DHCP), which is not a recommended best practice. You can ignore this warning.

Installing the Oracle Database Software and Creating a Cluster Database
3-24 Oracle Database 2 Day + Real Application Clusters Guide
7. When you see the confirmation message that your system has passed the prerequisite checks, click Next.
The Select Configuration Option window appears.
8. In the Select Configuration Option window, accept the default option of Create a Database and click Next.
The Select Database Configuration window appears.
9. Select one of the following different types of databases to be created:
■ General Purpose
■ Transaction Processing
■ Data Warehouse
■ Advanced (for customized database creation)
The General Purpose database type is selected by default. Select the type of database that best suits your business needs. For the example used by this guide, the default value is sufficient. After you have selected the database type, click Next.
The Specify Database Configuration Options window appears.
10. In the Global Database Name field, enter a fully qualified name for your database, such as sales.mycompany.com. Ensure that the SID field contains the first part of the database name, for example, sales.
The screenshot shows the Specify Database Configuration Options window. It contains the following text: "An Oracle database is uniquely identified by a Global Database Name, typically of the form "name.domain". Below this is a text entry field labeled Global Database Name. This field is currently displaying the value sales.us.oracle.com.

Installing the Oracle Database Software and Creating a Cluster Database
Installing and Configuring Oracle Clusterware and Oracle RAC 3-25
Below this field is the text "A database is referenced by at least one Oracle instance which is uniquely identified from any other instance on this computer by an Oracle System Identifier (SID)." The text is followed by a text entry field labeled SID Prefix. This field contains the value sales.
At the bottom of the window, from left to right, are the following buttons: Help, Installed Products, Back, Next, Install (grayed out), and Cancel.
End of description.
***********************************************************************************************
After you have entered the database name and SID, click Next. The Specify Database Config Details window appears.
11. Check the settings on each of the tabs. If you are not sure what values to use, then accept the default values. On the Sample Schemas tab, if you want sample data and schemas to be created in your database, then select the Create database with sample schemas option. When finished, click Next to continue.
The Select Database Management Option window appears.
12. By default, the Use Database Control for Database Management option is selected instead of the Use Grid Control for Database Management option. The examples in this guide use Database Control, which is the default value.
Do not select the option Enable Email Notifications if your cluster is not connected to a mail server.
Note: The value for the system identifier (SID) will be used as a prefix for the instance names. Thus if the SID is set to sales, the instance names will be sales1, sales2, and so on.

Installing the Oracle Database Software and Creating a Cluster Database
3-26 Oracle Database 2 Day + Real Application Clusters Guide
The screenshot shows the Select Database Management Option screen. The introductory text says "Each Oracle Database 11g may be managed centrally using the Oracle Enterprise Manager 10g Grid Control or locally using the Oracle Enterprise Manager 10g Database Control. For Grid Control, specify the Oracle Management Service through which you will centrally manage your database. For Database Control, you may additionally indicate whether you want to receive email notifications for alerts. Select the management options for your instances."
There are two options:
Use Grid Control for Database Management. If you select this option, you must select a Management Service name from a list. In the screenshot, this option is not selected.
Use Database Control for Database Management. If you select this option, you can also select the option Enable Email Notifications. There are two text entry fields for email notifications: Outgoing Mail (SMTP) Server and Email Address. In this example, the option to use Database Control is selected. The option Enable Email Notifications is not selected and the two e-mail configuration fields are grayed out.
At the bottom of the window, from left to right, are the following buttons: Help, Installed Products, Back, Next, Install (disabled), and Cancel.
End of description.
***********************************************************************************************
After you have made your selections, click Next.
The Specify Database Storage Option window appears.
13. If you configured ASM on the cluster, select the option Automatic Storage Management (ASM) for the database storage. Otherwise, select File System and enter the location of your shared storage, then click Next.
The Specify Backup and Recovery Options window appears.
14. Select the default option Do not enable Automated backup, and then click Next. You can modify the backup settings at a later time.
If you selected ASM as your storage solution, the Select ASM Disk Group window appears.
15. The Select ASM Disk Group window shows you where the database files will be created. Select the disk group that was created during the ASM installation, and then click Next.
Note: If you want to use ASM as the backup area, you must create an additional ASM disk group when configuring ASM.

Installing the Oracle Database Software and Creating a Cluster Database
Installing and Configuring Oracle Clusterware and Oracle RAC 3-27
The screenshot shows the Select ASM Disk Group window. The introductory text says "An ASM instance with one or more Disk Groups already exists on this system. Select one of the existing Disk Groups to be used for storage of the database you are creating during this installation session. If there is not enough space available for storage of your database in the selected Disk Group, you will be prompted on the following screen to add disks to this existing Disk Group so that enough space is made available. If you wish to use multiple disk groups or create a new disk group for your database, you must go back and choose Advanced starter database configuration option."
There is a section in the middle of the window where you can choose from the available disk groups. This example shows only one disk group, DATA, which has been selected. The diskgroup is 137806 MB in size, has 136632 MB of free space, and has a redundancy type of EXTERN.
At the bottom of the window, from left to right, are the following buttons: Help, Installed Products, Back, Next, Install (disabled), and Cancel.
End of description.
***********************************************************************************************
The Specify Database Schema Passwords window appears.
16. Assign and confirm a password for each of the Oracle database schemas.
Unless you are performing a database installation for testing purposes only, do not select the Use the same password for all the accounts option, as this can compromise the security of your data. Each password should be at least 8 characters in length and include at least one alphabetic, one numeric, and one punctuation mark character.
When finished entering passwords, click Next. OUI displays the Privileged Operating System Groups window.
17. Select the name of the operating system group you created in the previous chapter for the OSDBA group, the OSASM group, and the database operator group. If you

Installing the Oracle Database Software and Creating a Cluster Database
3-28 Oracle Database 2 Day + Real Application Clusters Guide
choose to create only the dba group, then you can use that group for all three privileged groups. If you created a separate asm group, then use that value for the OSASM group.
The screenshot shows the Privileged Operating System Groups page. There are three selection lists in the middle of the page: Database Administrator (OSDBA) group, which is currently set to the value of dba, Database Operator (OSOPER) Group, which is currently set to the value of dba, and ASM administrator (OSASM) Group, which is currently set to the value osasm.
At the bottom of the window, from left to right, are the following buttons: Help, Installed Products, Back, Next, Install (grayed out), and Cancel.
End of description.
***********************************************************************************************
After you have supplied values for the privileged groups, click Next. The Oracle Configuration Manager Registration window appears.
18. The Oracle Configuration Manager Registration window enables you to configure the credentials used for connecting to OracleMetaLink. You can provide this information now, or configure it after the database has been installed. Click Next to continue.
OUI displays the Summary window.
19. Review the information displayed in the Summary window. If any of the information is incorrect, click Back to return to a previous window and correct it. When you are ready to proceed, click Install.
OUI displays a progress indicator to show that the installation has begun. This step takes several minutes to complete.
20. As part of the software installation process, the sales database is created. At the end of the database creation, you will see the Oracle Database Configuration

Installing the Oracle Database Software and Creating a Cluster Database
Installing and Configuring Oracle Clusterware and Oracle RAC 3-29
Assistant (DBCA) window with the URL for the Database Control console displayed.
The screenshot shows a pop-up window for the Database Configuration Assistant. The text on this window says:
Database creation complete. Check the log files at
/home/oracle/base/cfgtoollogs/dbca/sales for details.
Database information:
Global Database Name: sales.example.com
System Identifier(SID) Prefix: sales
Server Parameter Filename: +DATA/sales/spfilesales.ora
The Database Control URL is http://myrac1.example.com:1158/em
Note: All database accounts except SYS, SYSTEM, DBSNMP, and SYSMAN are locked. Select the Password Management button to view a complete list of locked accounts or to manage the database accounts (except DBSNMP and SYSMAN). From the Password Management window, unlock only the accounts you will use. Oracle Corporation strongly recommends changing the default passwords immediately after unlocking the account.
There is a button below the last paragraph of text labeled Password Management...
At the bottom of the window is the OK button.
End of description.
***********************************************************************************************

Installing the Oracle Database Software and Creating a Cluster Database
3-30 Oracle Database 2 Day + Real Application Clusters Guide
Make note of the URL, and then click OK. Wait for DBCA to start the cluster database and its instances.
21. After the installation, you are prompted to perform the postinstallation task of running the root.sh script on both nodes.
The screenshot shows the Execute Configuration scripts window. The text at the top of the window says "The following configuration scripts need to be executed as the 'root' user in each cluster node."
The window displays a list of the scripts to be executed. The only script displayed in this screenshot is /opt/oracle/11gR1/db_1/root.sh. For this script, there are two nodes listed, docrac1 and docrac2.
Below the Scripts to be executed table is the following text: ’To execute the configuration scripts: 1. Open a terminal window 2. Log in as "root" 3. Run the scripts in each cluster node 4. Return to this window and click "OK" to continue."
At the bottom of the screenshot are two buttons. Help on the left, and OK on the right.
End of description.
***********************************************************************************************
On each node, run the scripts listed in the Execute Configuration scripts window before you click OK. Perform the following steps to run the root.sh script:
a. Open a terminal window. As the oracle user on docrac1, change directories to your Oracle home directory, and then switch to the root user by entering the following commands:
[oracle@docrac1 oracle]$ cd /opt/oracle/11gR1/db_1[oracle@docrac1 db_1]$ su
b. Enter the password for the root user, and then run the script specified in the Execute Configuration scripts window:
[root@docrac1 db_1]# ./root.sh
c. As the root.sh script runs, it prompts you for the path to the local bin directory. The information displayed in the brackets is the information it has

Installing the Oracle Database Software and Creating a Cluster Database
Installing and Configuring Oracle Clusterware and Oracle RAC 3-31
obtained from your system configuration. Press the Enter key each time you are prompted for input to accept the default choices.
d. After the script has completed, the prompt appears. Enter the following commands:
[oracle@docrac1 oracle]$ ssh docrac2[oracle@docrac2 oracle]$ cd /opt/oracle/11gR1/db_1[oracle@docrac2 db_1]$ su
e. Enter the password for the root user, and then run the script specified in the Execute Configuration scripts window:
[root@docrac2 db_1]# ./root.sh
f. Accept all default choices by pressing the Enter key.
After you finish executing the script on all nodes, return to the Execute Configuration scripts window and click OK.
OUI displays the End of Installation window
22. Click Exit and then click Yes to verify that you want to exit OUI.
Verifying Your Oracle RAC Database InstallationAt this point, you should verify that all the database services are up and running.
To verify the Oracle RAC database services are running:1. Log in as the oracle user and go to the CRS_home/bin directory:
[oracle] $ cd /u01/app/crs/bin
2. Run the following command to view the status of the applications managed by Oracle Clusterware:
[oracle] $ ./crs_stat –t
The output of the command should show that the database instances are available (online) for each host.
See Also:
■ "Configuring Automatic Storage Management in an ASM Home Directory"
■ "Configuring the Operating System Environment"
■ "Verifying Your Oracle RAC Database Installation"
■ "Recommended Postinstallation Tasks"
■ "About Downloading and Installing RDBMS Patches"
■ Oracle Real Application Clusters Administration and Deployment Guide for more information about configuring disk groups in ASM

Installing the Oracle Database Software and Creating a Cluster Database
3-32 Oracle Database 2 Day + Real Application Clusters Guide
The screenshot shows the output from the script command /opt/oracle/crs/bin/crs_stat -t. The output is a table with columns labeled Name, Type, Target, State, and Host. The first 5 rows have Names ending in asm, lsnr, gsd, ons, and vip and show application in the Type column. Both the Target and State for the first 5 rows are ONLINE, and the host is docrac1. Lines 6 through 10 are the almost the same as the first 5 rows, except the Host is docrac2. Line 11 is ora.sales.db, application, ONLINE, ONLINE, docrac2. Lines 12 and 13 have the Name set to ora....s1.inst and ora....s2.inst, application for the Type, Target and State set to ONLINE, and the host set to docrac1 and docrac2, respectively.
End of description.
***********************************************************************************************
Configuring the Operating System Environment for Database ManagementAfter you have installed the Oracle RAC software and created a cluster database, there are two additional tasks to perform to configure your operating system environment for easier database management:
■ Updating the oratab File
■ Reconfiguring the User Shell Profile
Updating the oratab FileSeveral of the Oracle Database utilities use the oratab file to determine the available Oracle homes and instances on each node. The oratab file is created by the root.sh script and is updated by Oracle Database Configuration Assistant when creating or deleting a database.
The following is an example of the oratab file:
# This file is used by ORACLE utilities. It is created by root.sh# and updated by the Database Configuration Assistant when creating# a database.
# A colon, ':', is used as the field terminator. A new line terminates# the entry. Lines beginning with a pound sign, '#', are comments.## Entries are of the form:# $ORACLE_SID:$ORACLE_HOME:<N|Y>:## The first and second fields are the system identifier and home# directory of the database respectively. The third field indicates# to the dbstart utility that the database should, "Y", or should not, # "N", be brought up at system boot time.#

Installing the Oracle Database Software and Creating a Cluster Database
Installing and Configuring Oracle Clusterware and Oracle RAC 3-33
# Multiple entries with the same $ORACLE_SID are not allowed.##+ASM1:/opt/oracle/11gR1/asm:Nsales:/opt/oracle/11gR1/db_1:Nsales1:/opt/oracle/11gR1/db_1:N
To update the oratab file on Red Hat Linux after creating an Oracle RAC database:1. Open the /etc/oratab file for editing by using the following command on the
docrac1 node:
vi /etc/oratab
2. Add the Oracle_sid and Oracle_home for the local instance to the end of the /etc/oratab file, for example:
sales1:/opt/oracle/11gR1/db_1:N
3. Save the file and exit the vi editor.
4. Modify the /etc/oratab file on each node in the cluster, adding in the appropriate instance information.
Reconfiguring the User Shell ProfileThere are several environment variables that can be used with Oracle RAC or Oracle Database. These variables can be set manually in your current operating system session, using shell commands such as set and export.
You can also have these variables set automatically when you log in as a specific operating system user. To do this, modify the Bourne, Bash, or Korn shell configuration file (for example .profile or .login) for that operating system user.
To modify the oracle user’s profile for the bash shell on Red Hat Linux:1. As the oracle user, open the user profile in the /home/oracle directory for
editing using the following commands:
[oracle] $ cd $HOME[oracle] $ vi .bash_profile
2. Modify the following lines in the file so they point to the location of the newly created Oracle RAC database:
export ORACLE_BASE=/opt/oracle/11gR1export ORACLE_HOME=/opt/oracle/11gR1/db_1export PATH=$ORACLE_HOME/bin:$PATH
Note: In a single-instance database, setting the last field of each entry to N disables the automatic startup of a database when the server it runs on is restarted. For an Oracle RAC database, these fields are set to N because Oracle Clusterware starts the instances and processes, not the dbstart utility.

Performing Postinstallation Tasks
3-34 Oracle Database 2 Day + Real Application Clusters Guide
3. On each node, modify the .bash_profile file to set the ORACLE_SID environment variable to the name of the local instance. For example, on the host docrac1 you would add the following line to the .bash_profile file:
export ORACLE_SID=sales1
On the host docrac2 you would set ORACLE_SID to the value sales2.
4. Read and implement the changes made to the .bash_profile file on each instance:
source .bash_profile
5. On each client computer, configure user access to use a service name, such as sales, for connecting to the database.
Performing Postinstallation TasksAfter you have installed the Oracle RAC software, there are additional tasks that you can perform before your cluster database is ready for use. These steps are recommended, but are not required.
This section contains the following topics:
■ About Verifying the Oracle Clusterware Installation
■ About Backing Up the Voting Disk
■ About Downloading and Installing RDBMS Patches
■ Verifying Oracle Enterprise Manager Operations
■ Recommended Postinstallation Tasks
About Verifying the Oracle Clusterware InstallationAfter the Oracle Clusterware installation is complete, OUI automatically runs the cluvfy utility as a Configuration Assistant to verify that the Clusterware installation has been completed successfully.
If the CVU reports problems with your configuration, correct these errors before proceeding.
Note: For the RMAN utility to work properly, the $ORACLE_HOME/bin directory must appear in the PATH variable before the /usr/X11R6/bin directory on Linux platforms.
See Also:
■ Oracle Database Net Services Administrator's Guide for information on configuring client access to the cluster database
■ "Configuring the Operating System Environment for Database Management"
■ "Configuring the Operating System Environment"
■ Oracle Real Application Clusters Installation Guide for Linux and UNIX for information about configuring environmental variables on Linux systems

Performing Postinstallation Tasks
Installing and Configuring Oracle Clusterware and Oracle RAC 3-35
About Backing Up the Voting DiskAfter your Oracle Database 11g with Oracle RAC installation is complete, and after you are sure that your system is functioning properly, make a backup of the contents of the voting disk. Use the dd utility, as described in the section "About Backing Up and Recovering Voting Disks" on page 5-2.
Also, make a backup copy of the voting disk contents after you complete any node additions or deletions, and after running any deinstallation procedures.
About Downloading and Installing RDBMS PatchesPeriodically, Oracle issues bug fixes for its software called patches. Patch sets are a collection of bug fixes that were produced up to the time of the patch set release. Patch sets are fully tested product fixes. Application of a patch set affects the software residing in your Oracle home.
Ensure that you are running the latest patch set of the installed software. You might also need to apply patches that are not included in a patch set. Information about downloading and installing patches and patch sets is covered in Chapter 10, "Managing Oracle Software and Applying Patches".
Verifying Oracle Enterprise Manager OperationsWhen you create an Oracle RAC database and choose Database Control for your database management, the Enterprise Manager Database Control utility is installed and configured automatically.
To verify Oracle Enterprise Manager Database Control has been started in your new Oracle RAC environment:1. Make sure the ORACLE_SID environment variable is set to the name of the
instance to which you want to connect, for example sales1. Also make sure the ORACLE_HOME environment variable is set to the location of the installed Oracle Database software.
$ echo $ORACLE_SIDsales$ export ORACLE_SID=sales1$ echo $ORACLE_HOME/opt/oracle/11gR1/db_1
2. Go to the Oracle_home/bin directory.
3. Run the following command as the oracle user:
./emctl status dbconsole
See Also:
■ Oracle Clusterware Administration and Deployment Guide for more information about using the CVU and resolving configuration problems
See Also:
■ "About Backing Up and Recovering Voting Disks"
See Also:
■ "Configuring the Enterprise Manager Patch Interface"

Converting an Oracle Database to an Oracle RAC Database
3-36 Oracle Database 2 Day + Real Application Clusters Guide
The Enterprise Manager Control (EMCTL) utility displays the current status of the Database Control console on the current node.
4. If the EMCTL utility reports that Database Control is not started, use the following command to start it:
./emctl start dbconsole
5. Repeat Step 1 through Step 3 for each node in the cluster.
Recommended Postinstallation TasksOracle recommends that you complete the following tasks after installing Oracle RAC:
■ About Backing Up the root.sh Script
■ About Configuring User Accounts
About Backing Up the root.sh ScriptOracle recommends that you back up the root.sh script after you complete an installation. If you install other products in the same Oracle home directory, OUI updates the contents of the existing root.sh script during the installation. If you require information contained in the original root.sh script, then you can recover it from the root.sh backup copy.
About Configuring User AccountsThe oracle user operating system account is the account that you used to install the Oracle software. You can use different operating system accounts for accessing and managing your Oracle RAC database.
Converting an Oracle Database to an Oracle RAC DatabaseYou can use rconfig, or Oracle Enterprise Manager to assist you with the task of converting a single-instance database installation to an Oracle RAC database. The first of these, rconfig, is a command line utility. Oracle Enterprise Manager Grid Control database administration option, Convert to Cluster Database, provides a GUI conversion tool.
This section contains the following topics:
■ Preparing for Database Conversion
See Also:
■ Oracle Database 2 Day DBA
■ "Configuring the Enterprise Manager Patch Interface"
■ "Oracle RAC and Enterprise Manager"
See Also:
■ "Installing the Oracle Database Software and Creating a Cluster Database"
■ "Performing Postinstallation Tasks"
■ Oracle Database Administrator's Reference for Linux and UNIX for more information about setting up optional operating system user accounts that can be used to manage the database

Converting an Oracle Database to an Oracle RAC Database
Installing and Configuring Oracle Clusterware and Oracle RAC 3-37
■ Overview of the Database Conversion Process Using Grid Control
■ Overview of the Database Conversion Process Using rconfig
Preparing for Database ConversionBefore you start the process of converting your database to a cluster database, your database environment must meet certain prerequisites:
■ The existing database and the target Oracle RAC database must be on the same release of Oracle Database 11g and must be running on the same platform.
■ The hardware and operating system software used to implement your Oracle RAC database must be certified for use with the release of the Oracle RAC software you are installing.
■ You must configure shared storage for your Oracle RAC database.
■ You must verify that any applications that will run against the Oracle RAC database do not need any additional configuration before they can be used successfully with the cluster database. This applies to both Oracle applications and database features, such as Oracle Streams, and applications and products that do not come from Oracle.
■ Backup procedures should be available before converting from a single-instance Oracle Database to Oracle RAC.
■ For archiving in Oracle RAC environments, the archive log file format requires a thread number.
■ The archived redo log files from all instances of an Oracle RAC database are required for media recovery. Because of this, if you archive to a file and you do not use a cluster file system, or some other means to provide shared file systems, then you require a method of accessing the archived redo log files from all nodes on which the cluster database has instances.
Overview of the Database Conversion Process Using Grid ControlThe following list provides an outline of the process of converting a single-instance database to an Oracle RAC database using Oracle Enterprise Manager Grid Control:
■ Complete the prerequisite tasks for converting to an Oracle RAC database:
– Oracle Clusterware and Oracle Database software is installed on all target nodes.
– Oracle Clusterware is started.
– The Oracle Database binary is enabled for Oracle RAC on all target nodes.
– Shared storage is configured and accessible from all nodes.
– User equivalency is configured for the operating system user performing the conversion.
Note: Before using individual Oracle Database 11g database products or options, refer to the product documentation library, which is available in the DOC directory on the 11g Release 1 (11.1) installation media, or on the OTN Web site at http://www.oracle.com/technetwork/indexes/documentation/index.html

Converting an Oracle Database to an Oracle RAC Database
3-38 Oracle Database 2 Day + Real Application Clusters Guide
– Enterprise Manager agents are configured and running on all nodes, and are configured with the cluster and host information.
– The database being converted has been backed up successfully.
■ Access the Database Home page for the database you want to convert.
■ Go to the Server subpage and select Convert to Cluster Database.
■ Provide the necessary credentials.
■ Select the host nodes that will contain instances of the new database.
■ Provide listener and instance configuration information.
■ Specify the location of the shared storage to be used for the datafiles.
■ Submit the job.
■ Complete the post-conversion tasks.
Overview of the Database Conversion Process Using rconfigThe following list provides an outline of the process of converting a single-instance database to an Oracle RAC database using the rconfig utility:
■ Complete the prerequisite tasks for converting to an Oracle RAC database.
– Oracle Clusterware and Oracle Database software is installed on all target nodes.
– Oracle Clusterware is started.
– The Oracle Database binary is enabled for Oracle RAC on all target nodes.
– Shared storage is configured and accessible from all nodes.
– User equivalency is configured for the operating system user performing the conversion.
– The database being converted has been backed up successfully.
■ Modify the parameters in the Oracle_home/assistants/rconfig/sampleXMLs/ConvertToRAC.xml file as appropriate for your environment, then save the file.
■ Run the rconfig command, supplying the name of the modified ConvertToRAC.xml file as input.
■ Complete the post-conversion tasks.
See Also: Oracle Real Application Clusters Installation Guide for Linux and UNIX, or for a different platform, for a complete description of this process

Converting an Oracle Database to an Oracle RAC Database
Installing and Configuring Oracle Clusterware and Oracle RAC 3-39
Note: When converting a single-instance database to a Oracle RAC database using the rconfig utility, if the single-instance database has Database Control configured, Oracle recommends de-configuring Database Control prior to conversion so the converted database will have Oracle RAC Database Control configured.
Use the following steps:
■ De-configure Database Control on the single-instance database using the following command:
emca -deconfig dbcontrol db
■ Run rconfig utility to convert the single-instance database to an Oracle RAC database
■ Run DBCA to configure Database Control for Cluster Database
See Also: Oracle Real Application Clusters Installation Guide for Linux and UNIX, or for a different platform, for a complete description of this process

Converting an Oracle Database to an Oracle RAC Database
3-40 Oracle Database 2 Day + Real Application Clusters Guide

Administering Database Instances and Cluster Databases 4-1
4Administering Database Instances and
Cluster Databases
Web-based Oracle Enterprise Manager Database Control and Grid Control interfaces let you mange Oracle Real Application Clusters (Oracle RAC) databases. The Enterprise Manager console is a central point of control for the Oracle environment. Use the Database Control console to initiate cluster database management tasks. Use the Grid Control console to administer multiple Oracle RAC databases and cluster nodes.
This chapter describes how to administer your Oracle RAC environment. It explains the startup and shutdown tasks for database components and how to administer parameters and parameter files in Oracle RAC. This chapter includes the following sections:
■ About Oracle RAC Database Management
■ Oracle RAC and Enterprise Manager
■ Starting and Stopping Oracle RAC Databases and Database Instances
■ About Oracle RAC Initialization Parameters
■ About Administering Storage in Oracle RAC
■ Exploring Your Cluster Database: Oracle By Example Series
About Oracle RAC Database ManagementOracle RAC is technology that links one or more individual computers so that they function as one system. Oracle RAC enables each computer that is a member of a cluster, or node, to share access to the Oracle database. If one cluster node fails or is taken offline, then the other cluster nodes continue operating and the entire Oracle RAC database remains available. This means that two or more inexpensive computers can appear to applications as if they were a single, much more powerful and more expensive, computer.
To increase the performance of a two-node Oracle RAC database, you can add cluster nodes. Each additional node can help speed up application processing, support more users or processes, or both. In addition, you can also add cluster nodes to increase the availability and reliability of a two-node RAC database. The more nodes that your Oracle RAC environment has, the less the impact of the loss of any individual node on the database.

Oracle RAC and Enterprise Manager
4-2 Oracle Database 2 Day + Real Application Clusters Guide
An Oracle RAC database requires three components: cluster nodes, shared storage, and Oracle Clusterware. Although you can choose how many nodes your cluster should have and what type of shared storage to use, this guide describes one specific configuration for a two-node cluster. This two-node configuration uses Automatic Storage Management (ASM) for storage management and Recovery Manager (RMAN) for the backup and recovery strategy.
Most administration tasks are the same for Oracle single-instance and Oracle RAC databases. This guide provides additional instructions for some of the database administration tasks specific to Oracle RAC, as well as some recommendations for managing Oracle RAC databases.
Oracle RAC and Enterprise ManagerThe Web-based Oracle Enterprise Manager Database Control console and the Oracle Enterprise Manager Grid Control console let you manage Oracle RAC databases. Enterprise Manager is a central point of control for the Oracle environment that you access by way of a graphical user interface (GUI). You can use Enterprise Manager to create and modify services, and to start and stop the cluster database instances and the cluster database. Use Enterprise Manager Database Control for cluster database management tasks. Use Enterprise Manager Grid Control to administer your entire Oracle RAC environment, not just the Oracle RAC database.
When you log in to Enterprise Manager using a client browser, the Cluster Database Home page appears. The Cluster Database Home page is similar to a single-instance Database Home page. However, on the Cluster Database Home page, Enterprise Manager displays the system state and availability of the entire Oracle RAC environment. This includes a summary about alert messages and job activity, as well as the status of and links to all the database and Automatic Storage Management (ASM) instances. By clicking the cluster name on this page you can view the Cluster Home page, to view the status of and alerts for the underlying cluster.
Overview of Oracle Real Application Clusters: Oracle By Example SeriesOracle By Example (OBE) has a series of tutorials created for Oracle Database 2 Day DBA. Included in this series is an OBE tutorial that introduces you to the management of an Oracle RAC database using Enterprise Manager. To view this OBE tutorial, go to the following URL
Note: If you are using Oracle Database Standard Edition, your cluster must adhere to the license restrictions. See Oracle Database Licensing Information for specific details on these restrictions.
See Also:
■ Oracle Database 2 Day DBA
■ Chapter 9, "Adding and Deleting Nodes and Instances"
See Also:
■ Oracle Database 2 Day DBA
■ Oracle Real Application Clusters Administration and Deployment Guide for more information about monitoring Oracle RAC performance

Starting and Stopping Oracle RAC Databases and Database Instances
Administering Database Instances and Cluster Databases 4-3
http://www.oracle.com/webfolder/technetwork/tutorials/obe/db/10g/r2/2day_dba/rac/rac.htm
Starting and Stopping Oracle RAC Databases and Database InstancesTypically, you start up and shut down the cluster database from the Enterprise Manager Cluster Database Home page. By using this page for cluster database startup and shutdown operations, you ensure that all the instances that belong to the Oracle RAC database are in a consistent state. This enables you to more easily manage an Oracle RAC database.
You can also start and stop individual instances in an Oracle RAC database. However, starting and stopping one instance in an Oracle RAC database does not stop or start other instances. To completely stop an Oracle RAC database, you must shut down all of its instances.
To start and stop an entire Oracle RAC database, assuming you are using a server parameter file (SPFILE):1. Go to the following URL and log in to Enterprise Manager:
http://hostname:portnumber/em
For example, http://docrac1.mycompany.com:1158/em.
2. On the Cluster Database Home page, in the General section, click Startup if the database is down, or Shutdown if the database is started.
The Startup/Shutdown: Specify Credentials page appears.
3. Enter the cluster database host credentials for the database nodes. The host credentials are the user name and password for a user who is a member of the OSDBA or OSOPER operating system group.
The Startup/Shutdown: Select Operation page appears.
4. Click Startup All to start all the instances, or click Shutdown All to stop all the instances.
The Startup/Shutdown: Confirmation page appears.
5. Click Yes.
To start and stop individual instances, go to the Startup/Shutdown: Select Operation page and select the instance that you want to start or stop. Then start or stop the instance as needed.
You can also start up and shut down instances using SQL*Plus or Server Control (SRVCTL).
Note: You can start up and shut down individual instances from each instance's home page. However, it is easier to perform instance startup and shutdown operations directly from the Startup/Shutdown: Select Operation page.
See Also:
■ Oracle Real Application Clusters Administration and Deployment Guide for more information about using command-line interfaces to start and stop Oracle RAC database instances

About Oracle RAC Initialization Parameters
4-4 Oracle Database 2 Day + Real Application Clusters Guide
About Oracle RAC Initialization ParametersManaging initialization parameters for an Oracle RAC database is essentially the same as managing them for a single-instance Oracle database. Note the following differences for parameters in Oracle RAC databases:
■ Parameters that are cluster-specific have the value Cluster Database in the Category column.
■ Parameters that are the same on each instance in the Oracle RAC database are identified in the Instance column with an asterisk (*).
■ Parameters that are set to different values on each instance of an Oracle RAC database are listed by instance number.
The administration of initialization parameters in an Oracle RAC environment is slightly different from single-instance database parameter administration. For example, if you change a parameter setting that is marked by an asterisk, which indicates that the parameter is a clusterwide database initialization parameter, then you change that parameter's setting for all the instances in your Oracle RAC database. If you change an initialization parameter prefixed with an instance name, or an instance-specific initialization parameter, then the change affects only that instance; the change does not affect the parameter's settings on other database instances.
This section contains the following topics:
■ Configuring Initialization Parameters for an Oracle RAC Database
■ Editing Initialization Parameter Settings for an Oracle RAC Database
■ About the Server Parameter File for Oracle Real Application Clusters
Configuring Initialization Parameters for an Oracle RAC Database A server parameter file (SPFILE) is a type of repository for initialization parameters that is maintained on the server where the Oracle database server runs, or on shared storage for an Oracle RAC database. Initialization parameters stored in a server parameter file are persistent, in that any changes made to the parameters while an instance is running can persist across instance shutdown and startup.
An initialization parameter file is a text file that contains initialization parameter settings. In contrast to the SPFILE, this parameter file is not binary and does not need to be located on the database server. The text-based initialization parameter file can be read by the database, but it is not written to by the database.
By default, Oracle Database sets most parameters to a default value and this value is the same across all instances. However, many initialization parameters can also have different values on different instances as described in Oracle Database Reference. Other parameters must be either unique or identical across instances, as described in the following sections:
■ Parameters that Must Have Identical Settings on All Instances
■ Parameters that Must Have Unique Settings on All Instances
See Also:
■ Oracle Database 2 Day DBA
■ Oracle Real Application Clusters Administration and Deployment Guide for more information about initialization parameters in an Oracle RAC environment
About Oracle RAC Initialization Parameters
Administering Database Instances and Cluster Databases 4-5
■ Parameters that Should Have Identical Settings on All Instances
Parameters that Must Have Identical Settings on All InstancesCertain initialization parameters that are critical at database creation or that affect certain database operations must have the same value for every instance in an Oracle RAC database. Specify these parameter values in the SPFILE, or within the individual PFILEs for each instance. The following list contains the parameters that must be identical on every instance:
■ ACTIVE_INSTANCE_COUNT
■ CLUSTER_DATABASE
■ CLUSTER_DATABASE_INSTANCES
■ COMPATIBLE
■ CONTROL_FILES
■ DB_BLOCK_SIZE
■ DB_DOMAIN
■ DB_FILES
■ DB_NAME
■ DB_RECOVERY_FILE_DEST
■ DB_RECOVERY_FILE_DEST_SIZE
■ DB_UNIQUE_NAME
■ INSTANCE_TYPE (RDBMS or ASM)
■ PARALLEL_MAX_SERVERS
■ REMOTE_LOGIN_PASSWORDFILE
■ RESULT_CACHE_MAX_SIZE
■ UNDO_MANAGEMENT
The setting for DML_LOCKS must be identical on every instance only if set to zero.
Parameters that Must Have Unique Settings on All InstancesOracle RAC uses the INSTANCE_NUMBER parameter to distinguish among instances at startup. Oracle RAC uses the number value of the THREAD parameter to assign redo log groups to specific instances. To simplify administration, use the same number for both the THREAD and INSTANCE_NUMBER parameters for each instance.
If you use the ROLLBACK_SEGMENTS parameter to specify the names of the rollback segments to be used for storing the undo of each instance, then Oracle recommends you use the instance SID as part of each unique rollback segment name. If the parameter UNDO_MANAGEMENT is set to AUTO, automatic undo management mode is used by the Oracle RAC database, and the setting of the ROLLBACK_SEGMENTS parameter is ignored. When using automatic undo management, Oracle RAC generates unique names for the undo segments used by each instance.
If you use automatic undo management in your Oracle RAC database, then set the UNDO_TABLESPACE parameter to a different undo tablespace for each instance.

About Oracle RAC Initialization Parameters
4-6 Oracle Database 2 Day + Real Application Clusters Guide
Parameters that Should Have Identical Settings on All InstancesOracle recommends that you set the values for the following parameters to the same value on all instances. Although you can have different settings for these parameters on different instances, setting each parameter to the same value on all instances simplifies administration:
■ ARCHIVE_LAG_TARGET
Different values for instances in your Oracle RAC database are likely to increase overhead because of additional automatic synchronization performed by the database processing.
When using Oracle Streams with your Oracle RAC database, the value should be greater than zero.
■ CONTROL_MANAGEMENT_PACK_ACCESS
This parameter controls the use of the Diagnostics and Tuning Packs feature. You should set the value for this parameter on all instance to reflect whether or not you have not purchased the Diagnostics and Tuning Packs for your Oracle RAC database.
■ LICENSE_MAX_USERS
This parameter determines a databasewide limit on the number of user accounts defined in the database and it is useful to have the same value on all instances of your database so you can see the current value no matter which instance you are using. Setting different values may generate additional warning messages during instance startup, or cause commands related to database user account management to fail on some instances.
■ LOG_ARCHIVE_FORMAT
If you do not use the same value for all your instances, then you complicate media recovery. The recovering instance expects the required archive log file names to have the format defined by its own value of LOG_ARCHIVE_FORMAT, regardless of which instance created the archive log files.
Databases that support Oracle Data Guard, either to send or receive archive log files, must use the same value of LOG_ARCHIVE_FORMAT for all instances.
■ SPFILE
If this parameter does not identify the same file to all instances, then each instance may act differently and unpredictably in failover, load-balancing, or standard operations. Additionally, a change you make to the SPFILE using an ALTER SYSTEM SET or ALTER SYSTEM RESET command is saved only in the SPFILE used by the instance where you run the command. Your change will not be reflected in instances using different SPFILEs.
If the SPFILE values are different in instances for which the values were set by the server, then you should restart the instances that are not using the default SPFILE.
■ UNDO_RETENTION
By setting different values for UNDO_RETENTION in each instance, you are likely to reduce scalability and encounter unpredictable actions following a failover. Therefore, you should carefully consider whether or not you will accrue any benefits before you assign different values for this parameter to the instances in your Oracle RAC database.

About Oracle RAC Initialization Parameters
Administering Database Instances and Cluster Databases 4-7
Editing Initialization Parameter Settings for an Oracle RAC DatabaseYou can use Enterprise Manager to view and edit the initialization parameter settings for your Oracle RAC database.
To view or modify the initialization parameters using Enterprise Manager:1. On the Cluster Database Home page, while logged in as a SYSDBA user, click
Server.
The Server page appears.
2. Select Initialization Parameters under Database Configuration.
The Initialization Parameters page appears.
3. Select either the Current or SPFile subpage to modify the parameter settings.
Modifying the Initialization Parameter for Oracle RAC Using the Current TabThe Current subpage of the Initialization Parameters contains a list of configuration parameters for that instance and database. You can set these parameters to particular values to initialize many of the memory and process settings of an Oracle instance. When you modify initialization parameters using the Current tab, the changes are applied only to the running instances, not the SPFILE, unless the "Apply changes in current running instance(s) mode to SPFile" option is selected.
The Instance column shows the instances for which the parameter has the value listed in the table. An asterisk (*) indicates that the parameter has the same value for all remaining instances of the cluster database. For example, if open_cursors = 200 for docrac1 and docrac2, and open_cursors = 275 for docrac3, then the Instance column for open_cursors = 200 displays an asterisk, while displaying "docrac3" for open_cursors = 275. This shorthand saves space for cluster databases with many instances.
You can filter the Initialization Parameters page to show only those parameters that meet the criteria of the filter you enter in the Filter by name field. Optionally, you can select Show All to display on one page all parameters currently used by the running instance(s).
To modify parameter values using the Current tab:1. On the Cluster Database Home page, while logged in as a SYSDBA user, click
Server.
The Server page appears.
2. Select Initialization Parameters in the Database Configuration section.
The Initialization Parameters page appears.
3. Select Current.
4. Select a parameter from the Select column and do one of the following:
■ Click Add to add the selected parameter to a different instance. Enter a new instance name and value in the newly created row in the table.
■ Click Reset to reset the value of the selected parameter. Note that you may reset only parameters that do not have an asterisk in the Instance column. The value of the selected column is reset to the value of the remaining instances (that is, the row with the asterisk).

About Oracle RAC Initialization Parameters
4-8 Oracle Database 2 Day + Real Application Clusters Guide
For example, select the parameter OPEN_CURSORS, then click Add. In the new entry for OPEN_CURSORS, select docrac1 for the Instance, change the Value field to 250.
5. After you make changes to one or more of the parameters, click Apply to accept and invoke the changes.
Modifying the Initialization Parameter for Oracle RAC Using the SPFile TabSimilar to the Current tab, you can Add or Reset parameters using the SPFile tab. When you modify initialization parameters using the SPFile tab, the changes are applied only to the SPFILE, not the currently running instances, unless the "Apply changes in SPFile mode to the current running instance(s)" option is selected.
Note that resetting parameters using the SPFile tab is different than resetting the same parameters using the Current tab: Reset deletes the selected parameter entry from the SPFILE and applies to both asterisk and nonasterisk parameters.
■ If you reset a parameter with an asterisk in the Instance column, the entry will be deleted from both the SPFILE and the table. Only parameters without an asterisk (instance-specific parameters) will remain.
■ If you reset the only entry for a nonasterick parameter, it will be deleted from both the SPFILE and the table, but will be replaced by a dummy parameter with an empty value field and an asterisk in the Instance column; this enables you to specify a new value for the parameter, add new instance-specific entries for the parameter, and so on.
Resetting a parameter that is set for only one instance resets the value of that parameter.
To modify parameter values using the SPFile tab:1. On the Cluster Database Home page, while logged in as a SYSDBA user, click
Server.
The Server page appears.
2. Select Initialization Parameters in the Database Configuration section.
The Initialization Parameters page appears.
3. Select SPFile.
4. In the display, select a parameter from the Select column. Edit the entry to display to new value, then click Apply to apply the changes to the SPFILE.
5. For more information about each parameter, click the information icon in the Help column next to the parameter.
Example: Modifying the OPEN_CURSORS Parameter Suppose that the open_cursors parameter has two entries in the SPFILE:
*.open_cursors = 200 docrac1.open_cursors = 250
If you click Reset for *.open_cursors, then Enterprise Manager deletes that entry from both the SPFILE and the displayed list of parameters, leaving only docrac1.open_cursors = 250 displayed.
If you click Reset for docrac1.open_cursors, Enterprise Manager also deletes this parameter entry from both the SPFILE and the displayed list of parameters, but then a

About Administering Storage in Oracle RAC
Administering Database Instances and Cluster Databases 4-9
new entry, *.open_cursors = <EMPTY> is added to the displayed list of parameters in place of the reset parameter.
About Modifying the SERVICE_NAMES Parameter for Oracle RACThe SERVICE_NAMES initialization parameter specifies one or more names by which clients can connect to the instance. The instance registers its service names with the listener. When a client requests a service, the listener determines which instances offer the requested service and routes the client to the appropriate instance.
In an Oracle RAC database, you should not modify this parameter directly. Instead, define services for your database and database instances using the Clustered Managed Database Services page in Enterprise Manager. If you need to change a service, you can use either Enterprise Manager or SRVCTL.
About the Server Parameter File for Oracle Real Application ClustersWhen you create the database, Oracle creates an SPFILE in the file location that you specify. This location can be an ASM disk group, cluster file system file, or a shared raw device. In the environment described by this guide, the SPFILE is created on an ASM disk group.
All instances in the cluster database use the same SPFILE at startup. Oracle RAC uses a traditional parameter file only if an SPFILE does not exist or if you specify PFILE in your STARTUP command. Oracle recommends that you use an SPFILE to simplify administration, maintain parameter setting consistency, and to guarantee parameter setting persistence across database shutdown and startup events. In addition, you can configure RMAN to back up your SPFILE.
About Administering Storage in Oracle RACMost administration tasks for managing storage are the same for Oracle single-instance and Oracle RAC databases. This section provides additional information for using Enterprise Manager to manage some of the storage structures of an Oracle RAC database.
This section describes the following topics:
■ About Automatic Undo Management in Oracle RAC
■ About Automatic Storage Management in Oracle RAC
See Also:
■ Oracle Database 2 Day DBA
■ Oracle Real Application Clusters Administration and Deployment Guide for more information about using a server parameter file in an Oracle Real Application Clusters environment
See Also:
■ "About Oracle Services" on page 7-2
See Also:
■ Oracle Database 2 Day DBA
■ Oracle Real Application Clusters Administration and Deployment Guide for more information about using a server parameter file in an Oracle Real Application Clusters environment

About Administering Storage in Oracle RAC
4-10 Oracle Database 2 Day + Real Application Clusters Guide
■ About Administering Redo Logs in Oracle RAC
About Automatic Undo Management in Oracle RACOracle RAC automatically manages undo segments within a specific undo tablespace that is assigned to an instance. Only the instance assigned to the undo tablespace can modify the contents of that tablespace. However, each instance can read the undo data blocks created by any instance. Also, when performing transaction recovery, any instance can update any undo tablespace, as long as that undo tablespace is not currently being used by another instance for undo generation or transaction recovery.
You assign undo tablespaces in your Oracle RAC database by specifying a different value for the UNDO_TABLESPACE parameter for each instance in your SPFILE or individual PFILEs. You cannot simultaneously use automatic undo management and manual undo management in an Oracle RAC database. In other words, all instances of an Oracle RAC database must operate in the same undo mode.
About Automatic Storage Management in Oracle RACASM automatically optimizes storage to maximize performance by managing the storage configuration across the disks that ASM manages. ASM does this by evenly distributing the storage load across all the available storage within your cluster database environment. ASM partitions your total disk space requirements into uniformly sized units across all the disks in a disk group. ASM can also automatically mirror data to prevent data loss. Because of these features, ASM also significantly reduces your administrative overhead.
As in single-instance Oracle databases, using ASM in Oracle RAC does not require I/O tuning. The following topics describe ASM and ASM administration:
■ About ASM Components in Oracle RAC
■ About Disk Group Configurations for ASM in Oracle RAC
■ About Standalone ASM Disk Group Management
■ About ASM Instance and Disk Group Management Using Enterprise Manager
About ASM Components in Oracle RACWhen you create your database, Oracle Database creates one ASM instance on each node in your Oracle RAC environment if one does not already exist. Each ASM instance has either an SPFILE or PFILE type parameter file. For the environment described in this guide, the ASM instances use PFILEs.
About Disk Group Configurations for ASM in Oracle RACWhen you create a disk group for a cluster, or add new disks to an existing clustered disk group, you must prepare only the underlying physical storage on shared disks. The shared disk requirement is the only substantial difference between using ASM in
See Also:
■ Oracle Database 2 Day DBA for more information about managing the undo data for your database
See Also:
■ Oracle Database 2 Day DBA
■ "About Automatic Storage Management"

About Administering Storage in Oracle RAC
Administering Database Instances and Cluster Databases 4-11
an Oracle RAC database compared to using it in a single-instance Oracle database. ASM automatically rebalances the storage load after you add or delete a disk or disk group.
In a cluster, each ASM instance manages the metadata updates to the disk groups for the node on which it is running. In addition, each ASM instance coordinates disk group metadata with other nodes in the cluster. As in single-instance Oracle databases, you can use Enterprise Manager, Oracle Database Configuration Assistant (DBCA), SQL*Plus, and SRVCTL to administer disk groups for ASM in an Oracle RAC environment.
About Standalone ASM Disk Group ManagementWhen you create a database using DBCA and you select the ASM storage option, DBCA creates the ASM instances for you if they do not already exist. You can also manage ASM instances and disk groups independently. You do not have to create a new database to modify ASM storage properties.
About ASM Instance and Disk Group Management Using Enterprise ManagerYou can perform administrative operations on ASM disk groups using Enterprise Manager such as adding and deleting them. You can also monitor ASM disk group performance as well as control disk group availability at the instance level. For example, some of the Oracle RAC-specific features for ASM that are provided by Enterprise Manager are the following:
■ When you add a disk group, the disk group definition includes a check box to indicate whether or not the disk group is automatically mounted to all the cluster database instances.
■ The default Disk Group Performance page displays instance-level performance details when you click a performance characteristic such as Write Response Time or I/O Throughput.
■ When you mount and dismount ASM disk groups, you can use a check box to indicate which instances should mount or dismount a particular ASM Disk Group.
About Administering Redo Logs in Oracle RACManaging redo log files in Oracle RAC environments is similar to managing redo log files in single-instance Oracle Database environments. This section provides an
See Also:
■ Oracle Database 2 Day DBA
■ Oracle Database Storage Administrator's Guide for information about how to use SQL*Plus to administer ASM instances
See Also:
■ Oracle Database 2 Day DBA
■ Oracle Database Storage Administrator's Guide for information about how to use the Automatic Storage Management command-line utility
See Also:
■ Oracle Database Storage Administrator's Guide
■ Oracle Database 2 Day DBA

About Administering Storage in Oracle RAC
4-12 Oracle Database 2 Day + Real Application Clusters Guide
overview of some of the additional concepts and procedures for configuring redo log files in Oracle RAC environments.
About Redo Log Groups and Redo Threads in Oracle RAC DatabasesRedo logs contain a record of changes that have been made to datafiles. In a single-instance Oracle database, redo logs are stored in two or more redo log file groups. Each of these groups contains a redo log file and possibly one or more mirrored copies of that file. In an Oracle RAC database, each instance requires its own set of redo log groups, which is known as a redo thread. Mirrored copies of the redo log files provide your system with extra protection against data loss that is due to hardware failures or data corruption. If a redo log file is unreadable, then the Oracle Database attempts to access its mirrored copy. You should place the redo log file mirrors on different disk devices from the primary redo log files.
Each instance's redo thread must contain at least two redo log groups. Oracle recommends that each of your instances has a redo thread that contains the same number of redo log groups and, as with single-instance Oracle databases, each group should contain the same number of members. For example, in an Oracle RAC database with two instances, each instance could have a redo thread that contains five redo log groups. This is a total of 10 redo log groups for the database. Each of these redo log groups could contain two members: a redo log and its mirrored copy. If you create your Oracle RAC database using DBCA, then your Oracle RAC database automatically implements a configuration that meets the Oracle recommendations.
In an Oracle RAC database, each instance writes and archives the redo log groups in its redo thread in the same manner that single-instance Oracle databases do. However, in recovery mode, the instance performing the recovery is able to read and process all the redo threads for the database, regardless of which instance generated the redo thread. This enables a running instance to recover the work completed by one or more failed instances. This also enables users to continue their work without waiting for the failed instance to be restarted. For example, assume that you have an Oracle RAC database with two instances, instance A and instance B. If instance A is down, then instance B can read the redo log files for both instance A and B to ensure a successful recovery.
In an Oracle RAC database, all the redo log files reside on shared storage. In addition, each instance must have access to the redo log files of all the other instances in the cluster. If your Oracle RAC database uses ASM, then ASM manages the shared storage for the redo log files and the access to those files.
Using Enterprise Manager to View and Create Online Redo Log FilesOn the Redo Log Groups page, you can create additional redo log groups and add members to the redo log group. The Thread column identifies the instance, or redo thread, to which a redo log file belongs.
See Also:
■ Oracle Database 2 Day DBA
■ Oracle Database Storage Administrator's Guide
See Also:
■ Oracle Database 2 Day DBA
■ Oracle Database Storage Administrator's Guide

Exploring Your Cluster Database: Oracle By Example Series
Administering Database Instances and Cluster Databases 4-13
To access the redo log file groups Using Enterprise Manager:1. On the Cluster Database Home Page, select Server.
The Server page appears.
2. In the Storage section, select Redo Log Groups.
Exploring Your Cluster Database: Oracle By Example SeriesOracle By Example (OBE) has a series of tutorials for Oracle RAC databases. This OBE takes you through the basic administrative tasks for an Oracle RAC database and includes annotated screenshots.
To view the OBE, go to the following URL
http://www.oracle.com/webfolder/technetwork/tutorials/obe/db/10g/r2/2day_dba/rac/rac.htm
See Also:
■ Oracle Real Application Clusters Administration and Deployment Guide for additional information about redo threads in an Oracle RAC environment
■ Oracle Database Storage Administrator's Guide
■ Oracle Database 2 Day DBA for more information about creating online redo log files

Exploring Your Cluster Database: Oracle By Example Series
4-14 Oracle Database 2 Day + Real Application Clusters Guide
Administering Oracle Clusterware Components 5-1
5Administering Oracle Clusterware
Components
This chapter describes how to administer your Oracle Clusterware environment. It describes how to administer the voting disks and the Oracle Cluster Registry (OCR) in the following sections:
■ About Oracle Clusterware
■ About Backing Up and Recovering Voting Disks
■ Adding and Removing Voting Disks
■ About Backing Up and Recovering the Oracle Cluster Registry
■ About Changing the Oracle Cluster Registry Configuration
■ About Troubleshooting the Oracle Cluster Registry
About Oracle ClusterwareOracle Real Application Clusters (Oracle RAC) uses Oracle Clusterware as the infrastructure that binds together multiple nodes that then operate as a single server. Oracle Clusterware is a portable cluster management solution that is integrated with Oracle Database. In an Oracle RAC environment, Oracle Clusterware monitors all Oracle components (such as instances and listeners). If a failure occurs, Oracle Clusterware automatically attempts to restart the failed component and also redirects operations to a surviving component.
Oracle Clusterware includes a high availability framework for managing any application that runs on your cluster. Oracle Clusterware manages applications to ensure they start when the system starts. Oracle Clusterware also monitors the applications to make sure that they are always available. For example, if an application process fails, then Oracle Clusterware attempts to restart the process based on scripts that you customize. If a node in the cluster fails, then you can program application processes that typically run on the failed node to restart on another node in the cluster.
Oracle Clusterware includes two important components: the voting disk and the OCR. The voting disk is a file that manages information about node membership, and the OCR is a file that manages cluster and Oracle RAC database configuration information.
The Oracle Clusterware installation process creates the voting disk and the OCR on shared storage. If you select the option for normal redundant copies during the installation process, then Oracle Clusterware automatically maintains redundant copies of these files to prevent the files from becoming single points of failure. The normal redundancy feature also eliminates the need for third-party storage

About Backing Up and Recovering Voting Disks
5-2 Oracle Database 2 Day + Real Application Clusters Guide
redundancy solutions. When you use normal redundancy, Oracle Clusterware automatically maintains two copies of the OCR file and three copies of the voting disk file.
About Backing Up and Recovering Voting DisksHigh availability configurations have redundant hardware and software that maintain operations by avoiding single points of failure. When a component is down, Oracle Clusterware redirects its managed resources to a backup component.
The voting disk records node membership information. A node must be able to access more than half of the voting disks at any time. To avoid simultaneous loss of multiple voting disks, each voting disk should be on a storage device that does not share any components (controller, interconnect, and so on) with the storage devices used for the other voting disks.
For example, if you have five voting disks configured, then a node must be able to access at least three of the voting disks at any time. If a node cannot access the minimum required number of voting disks it is evicted, or removed, from the cluster. After the cause of the failure has been corrected and access to the voting disks has been restored, you can instruct Oracle Clusterware to recover the failed node and restore it to the cluster.
Backing Up Voting DisksBecause the node membership information does not usually change, you do not need to back up the voting disk every day. However, back up the voting disks at the following times:
■ After installation
■ After adding nodes to or deleting nodes from the cluster
■ After performing voting disk add or delete operations
When you use the dd command for making backups of the voting disk, the backup can be performed while the Cluster Ready Services (CRS) process is active; you do not need to stop the crsd.bin process before taking a backup of the voting disk.
To make a backup copy of the voting disk:1. Use the Linux dd command, as shown in the following example, where
voting_disk_name is the name of the active voting disk and backup_file_name is the name of the file to which you want to back up the voting disk contents:
dd if=voting_disk_name of=backup_file_name
Perform this operation on every voting disk as needed.
2. If your voting disk is stored on a raw device, use the device name in place of voting_disk_name, for example:
dd if=/dev/sdd1 of=/tmp/voting.dmp
Recovering Voting DisksIf a voting disk is damaged, and no longer usable by Oracle Clusterware, you can recover the voting disk if you have a backup file.

About Backing Up and Recovering the Oracle Cluster Registry
Administering Oracle Clusterware Components 5-3
To recover the voting disk from a backup:1. Run the following command, where backup_file_name is the name of the
voting disk backup file and voting_disk_name is the name of the active voting disk:
dd if=backup_file_name of=voting_disk_name
Adding and Removing Voting DisksYou can dynamically add and remove voting disks after installing Oracle RAC. Do this using the following commands where path is the fully qualified path for the additional voting disk. If the new voting disk is stored on a network file server (NFS), then create an empty voting disk file location with the correct owner and permissions before using the command to add a new voting disk.
To add or remove a voting disk:1. Run the following command as the root user to add a voting disk:
crsctl add css votedisk path
2. Run the following command as the root user to remove a voting disk:
crsctl delete css votedisk path
About Backing Up and Recovering the Oracle Cluster RegistryOracle Clusterware automatically creates OCR backups every 4 hours. At any one time, Oracle Clusterware always retains the latest 3 backup copies of the OCR that are 4 hours old, 1 day old, and 1 week old.
You cannot customize the backup frequencies or the number of files that Oracle Clusterware retains. You can use any backup software to copy the automatically generated backup files at least once daily to a different device from where the primary OCR file resides. The default location for generating backups on Red Hat Linux systems is CRS_home/cdata/cluster_name where cluster_name is the name of your cluster and CRS_home is the home directory of your Oracle Clusterware installation.
This section contains the following topics:
■ Viewing Available OCR Backups
■ Backing Up the OCR
■ About Recovering the OCR
Viewing Available OCR BackupsUse the ocrconfig utility to view the backups generated automatically by Oracle Clusterware.
Note: If your cluster is down, then you can use the -force option to modify the voting disk configuration when using either of these commands without interacting with active Oracle Clusterware daemons. However, you may corrupt your cluster configuration if you use the -force option while a cluster node is active.

About Backing Up and Recovering the Oracle Cluster Registry
5-4 Oracle Database 2 Day + Real Application Clusters Guide
To find the most recent backup of the OCR:1. Run the following command on any node in the cluster:
ocrconfig -showbackup
Backing Up the OCRBecause of the importance of OCR information, Oracle recommends that you use the ocrconfig utility to make copies of the automatically created backup files at least once a day.
In addition to using the automatically created OCR backup files, you should also export the OCR contents to a file before and after making significant configuration changes, such as adding or deleting nodes from your environment, modifying Oracle Clusterware resources, or creating a database. Exporting the OCR contents to a file lets you restore the OCR if your configuration changes cause errors. For example, if you have unresolvable configuration problems, or if you are unable to restart your cluster database after such changes, then you can restore your configuration by importing the saved OCR content from the valid configuration.
To export the contents of the OCR to a file:1. Log in as the root user.
2. Use the following command, where backup_file_name is the name of the OCR backup file you want to create:
[root]# ocrconfig -export backup_file_name
About Recovering the OCRThere are two methods for recovering the OCR. The first method uses automatically generated OCR file copies and the second method uses manually created OCR export files.
This section contains the following topics:
■ Checking the Status of the OCR
■ Restoring the OCR from Automatically Generated OCR Backups
■ Recovering the OCR from an OCR Export File
Checking the Status of the OCRIn event of a failure, before you attempt to restore the OCR, ensure that the OCR is unavailable.
To check the status of the OCR:1. Run the following command:
ocrcheck
2. If this command does not display the message 'Device/File integrity check succeeded' for at least one copy of the OCR, then both the primary OCR and the OCR mirror have failed. You must restore the OCR from a backup.
3. If there is at least one copy of the OCR available, you can use that copy to restore the other copies of the OCR.

About Backing Up and Recovering the Oracle Cluster Registry
Administering Oracle Clusterware Components 5-5
Restoring the OCR from Automatically Generated OCR BackupsWhen restoring the OCR from automatically generated backups, you first have to determine which backup file you will use for the recovery.
To restore the OCR from an automatically generated backup on a Red Hat Linux system:1. Log in as the root user.
2. Identify the available OCR backups using the ocrconfig command:
[root]# ocrconfig -showbackup3. Review the contents of the backup using the following ocrdump command, where
file_name is the name of the OCR backup file:
[root]# ocrdump -backupfile file_name
4. As the root user, stop Oracle Clusterware on all the nodes in your Oracle RAC cluster by executing the following command:
[root]# crsctl stop crs
Repeat this command on each node in your Oracle RAC cluster.
5. As the root user, restore the OCR by applying an OCR backup file that you identified in Step 1 using the following command, where file_name is the name of the OCR that you want to restore. Make sure that the OCR devices that you specify in the OCR configuration exist, and that these OCR devices are valid before running this command.
[root]# ocrconfig -restore file_name
6. As the root user, restart Oracle Clusterware on all the nodes in your cluster by restarting each node, or by running the following command:
[root]# crsctl start crs
Repeat this command on each node in your Oracle RAC cluster.
7. Use the Cluster Verification Utility (CVU) to verify the OCR integrity. Run the following command, where the -n all argument retrieves a list of all the cluster nodes that are configured as part of your cluster:
[root]# cluvfy comp ocr -n all [-verbose]
Recovering the OCR from an OCR Export FileThe ocrconfig -export command creates a backup of the OCR, enabling you to restore the OCR using the -import option if your configuration changes cause errors.
To restore the previous configuration stored in the OCR from an OCR export file:1. Place the OCR export file that you created previously using the ocrconfig
-export command in an accessible directory on disk.
See Also:
■ "About the OCRCHECK Utility"
■ "Repairing an OCR Configuration on a Local Node"
■ "Replacing an OCR"

About Changing the Oracle Cluster Registry Configuration
5-6 Oracle Database 2 Day + Real Application Clusters Guide
2. As the root user, stop Oracle Clusterware on all the nodes in your Oracle RAC cluster by executing the following command:
[root]# crsctl stop crs
Repeat this command on each node in your Oracle RAC cluster.
3. As the root user, restore the OCR data by importing the contents of the OCR export file using the following command, where file_name is the name of the OCR export file:
[root]# ocrconfig -import file_name
4. As the root user, restart Oracle Clusterware on all the nodes in your cluster by restarting each node, or by running the following command:
[root]# crsctl start crs
Repeat this command on each node in your Oracle RAC cluster.
5. Use the CVU to verify the OCR integrity. Run the following command, where the -n all argument retrieves a list of all the cluster nodes that are configured as part of your cluster:
[root]# cluvfy comp ocr -n all [-verbose]
About Changing the Oracle Cluster Registry ConfigurationThis section describes how to administer the OCR. The OCR contains information about the cluster node list, which instances are running on which nodes, and information about Oracle Clusterware resource profiles for applications that have been modified to be managed by Oracle Clusterware.
This section contains the following topics:
■ Adding an OCR Location
■ Replacing an OCR
■ Repairing an OCR Configuration on a Local Node
■ Removing an OCR
Note: You cannot use the ocrconfig command to import an OCR backup file, only an OCR export file.
See Also:
■ "Viewing Available OCR Backups"
■ "Backing Up the OCR"
Note: The operations in this section affect the OCR for the entire cluster. However, the ocrconfig command cannot modify OCR configuration information for nodes that are shut down or for nodes on which Oracle Clusterware is not running. Avoid shutting down nodes while modifying the OCR using the ocrconfig command.

About Changing the Oracle Cluster Registry Configuration
Administering Oracle Clusterware Components 5-7
Adding an OCR LocationYou can add an OCR location after an upgrade or after completing the Oracle RAC installation. If you already have a mirror of the OCR, then you do not need to add an OCR location; Oracle Clusterware automatically manages two OCRs when you configure normal redundancy for the OCR. Oracle RAC environments do not support more than two OCRs, a primary OCR and a secondary OCR.
To add a primary or secondary OCR location:1. Run the following command using either destination_file or disk to
designate the target location of the primary OCR:
ocrconfig -replace ocr destination_fileocrconfig -replace ocr disk
2. Run the following command using either destination_file or disk to designate the target location of the secondary OCR:
ocrconfig -replace ocrmirror destination_file ocrconfig -replace ocrmirror disk
Replacing an OCRIf you need to change the location of an existing OCR, or change the location of a failed OCR to the location of a working one, you can use the following procedure as long as one OCR file remains online.
To change the location of an OCR:1. Use the OCRCHECK utility to verify that a copy of the OCR other than the one
you are going to replace is online, using the following command:
ocrcheck
2. Use the following command to verify that Oracle Clusterware is running on the node on which the you are going to perform the replace operation:
crsctl check crs
3. Run the following command to replace the primary OCR using either destination_file or disk to indicate the target OCR location:
ocrconfig -replace ocr destination_fileocrconfig -replace ocr disk
4. Run the following command to replace a secondary OCR using either destination_file or disk to indicate the target OCR location:
ocrconfig -replace ocrmirror destination_fileocrconfig -replace ocrmirror disk
Note: You must be logged in as the root user to run the ocrconfig command.
Note: The OCR that you are replacing can be either online or offline.

About Changing the Oracle Cluster Registry Configuration
5-8 Oracle Database 2 Day + Real Application Clusters Guide
5. If any node that is part of your current Oracle RAC cluster is shut down, then run the following command on the stopped node to let that node rejoin the cluster after the node is restarted:
ocrconfig -repair ocr [device_name]
Repairing an OCR Configuration on a Local NodeYou may need to repair an OCR configuration on a particular node if your OCR configuration changes while that node is stopped. For example, you may need to repair the OCR on a node that was shut down while you were adding, replacing, or removing an OCR.
To repair an OCR configuration:1. Run the following command on the node on which you have stopped the Oracle
Clusterware daemon:
ocrconfig –repair ocrmirror [device_name]
This operation changes the OCR configuration only on the node from which you run this command.
For example, if the OCR mirror is on a disk named /dev/raw1, then use the following command to repair its OCR configuration:
ocrconfig -repair ocrmirror /dev/raw1
Removing an OCRTo remove an OCR location, at least one OCR must be online. You can remove an OCR location to reduce OCR-related overhead or to stop mirroring your OCR because you moved the OCR to a redundant storage system, such as a redundant array of independent disks (RAID).
To remove an OCR location from your Oracle RAC cluster:1. Use the OCRCHECK utility to ensure that at least one OCR other than the OCR
that you are removing is online.
ocrcheck
2. Run the following command on any node in the cluster to remove one copy of the OCR:
ocrconfig -replace ocr
Note: You cannot perform this operation on a node on which the Oracle Clusterware daemon is running.
Note: Do not perform this OCR removal procedure unless there is at least one active OCR online.

About Troubleshooting the Oracle Cluster Registry
Administering Oracle Clusterware Components 5-9
This command updates the OCR configuration on all the nodes on which Oracle Clusterware is running.
About Troubleshooting the Oracle Cluster RegistryThis section includes the following topics about troubleshooting the Oracle Cluster Registry (OCR):
■ About the OCRCHECK Utility
■ Resolving Common Oracle Cluster Registry Problems
About the OCRCHECK UtilityThe OCRCHECK utility displays the data block format version used by the OCR, the available space and used space in the OCR, the ID used for the OCR, and the locations you have configured for the OCR. The OCRCHECK utility calculates a checksum for all the data blocks in all the OCRs that you have configured to verify the integrity of each block. It also returns an individual status for each OCR file as well as a result for the overall OCR integrity check. The following is a sample of the OCRCHECK output:
Status of Oracle Cluster Registry is as follows : Version : 2 Total space (kbytes) : 262144 Used space (kbytes) : 16256 Available space (kbytes) : 245888 ID : 1918913332 Device/File Name : /dev/raw/raw1 Device/File integrity check succeeded Device/File Name : /oradata/mirror.ocr Device/File integrity check succeeded
Cluster registry integrity check succeeded
The OCRCHECK utility creates a log file in the following directory, where CRS_home is the location of the installed Oracle Clusterware software, and hostname is the name of the local node:
CRS_home/log/hostname/client
The log files have names of the form orcheck_nnnnn.log, where nnnnn is the process ID of the operating session that issued the ocrcheck command.
Resolving Common Oracle Cluster Registry ProblemsTable 5–1 describes common OCR problems and their corresponding solutions.
Table 5–1 Common OCR Problems and Solutions
Problem Solution
The OCR is not mirrored. Run the ocrconfig command with the -replace option as described in the section "Replacing an OCR" on page 5-7.
An OCR mirror has failed and you must replace it. Error messages are being reported in Enterprise Manager or the OCR log file.
Run the ocrconfig command with the -replace option as described in the section "Adding an OCR Location" on page 5-7.

About Troubleshooting the Oracle Cluster Registry
5-10 Oracle Database 2 Day + Real Application Clusters Guide
An OCR has been incorrectly updated.
Run the ocrconfig command with the -repair option as described in the section "Repairing an OCR Configuration on a Local Node" on page 5-8.
You are experiencing a severe performance effect from OCR processing, or you want to remove an OCR for other reasons.
Run the ocrconfig command with the -repair option as described in the section "Repairing an OCR Configuration on a Local Node" on page 5-8.
OCRCHECK does not find a valid OCR, or all copies of the OCR are corrupted
Run the ocrconfig command with the -restore option as described in the section "Restoring the OCR from Automatically Generated OCR Backups" on page 5-5.
See Also:
■ "About Verifying the Oracle Clusterware Installation"
■ "Replacing an OCR"
■ "Adding an OCR Location"
■ "Repairing an OCR Configuration on a Local Node"
Table 5–1 (Cont.) Common OCR Problems and Solutions
Problem Solution

Administering Backup and Recovery 6-1
6Administering Backup and Recovery
This chapter describes how to back up and recover an Oracle Real Application Clusters (Oracle RAC) database.
This chapter contains the following sections:
■ Overview of Oracle RAC Database Backup and Recovery
■ About the Flash Recovery Area in Oracle RAC
■ About Archiving in Oracle RAC
■ Credentials for Performing Enterprise Manager Backup and Recovery
■ Performing Backups of Your Oracle RAC Database
■ About Preparing to Restore and Recover Your Oracle RAC Database
■ Recovering Your Oracle RAC Database
■ About Managing Your Database Backup Files
■ Displaying Backup Reports for Your Oracle RAC Database
Overview of Oracle RAC Database Backup and RecoveryTo protect your Oracle RAC database from hardware failures or disasters, you need to have a physical copy of the database files. The files protected by the backup and recovery facilities built into Oracle Enterprise Manager include datafiles, control files, server parameter files (SPFILEs), and archived redo log files. Using these files, your database can be reconstructed. The backup mechanisms that work at the physical level protect against damage at the file level, such as the accidental deletion of a datafile or the failure of a disk drive. Database recovery involves restoring, or copying, the damaged files from backup and performing media recovery on the restored files. Media recovery is the application of redo logs or incremental backups to a restored datafile in order to update it to the current time or some other specified time.
The Oracle Database flashback features, such as Oracle Flashback Drop and Oracle Flashback Table, provide a range of physical and logical data recovery tools as efficient, easy-to-use alternatives to physical and logical backup operations. The flashback features enable you to reverse the effects of unwanted database changes without restoring datafiles from backup or performing media recovery.
See Also:
■ Oracle Database 2 Day DBA
■ Oracle Database Backup and Recovery User's Guide for more information about using the Recovery Manager utility

About the Flash Recovery Area in Oracle RAC
6-2 Oracle Database 2 Day + Real Application Clusters Guide
The Enterprise Manager physical backup and recovery features are built on the Recovery Manager (RMAN) command-line client. Enterprise Manager makes available many of the RMAN features, and provides wizards and automatic strategies to simplify and further automate RMAN-based backup and recovery.
The Enterprise Manager Guided Recovery capability provides a Recovery Wizard that encapsulates the logic required for a wide range of file restoration and recovery scenarios, including the following:
■ Complete restoration and recovery of the database
■ Point-in-time recovery of the database or selected tablespaces
■ Flashback Database
■ Other flashback features of Oracle Database for logical-level repair of unwanted changes to database objects
■ Media recovery at the block level for datafiles with corrupt blocks
If the database files are damaged or need recovery, Enterprise Manager can determine which parts of the database must be restored from a backup and recovered, including proactively detecting situations such as corrupted database files. Enterprise Manager guides you through the recovery process, prompting for needed information and performing the required recovery actions.
About the Flash Recovery Area in Oracle RACUsing a flash recovery area minimizes the need to manually manage disk space for your backup-related files and balance the use of space among the different types of files. Oracle recommends that you enable a flash recovery area to simplify your backup management.
The larger the flash recovery area is, the more useful it becomes. Ideally, the flash recovery area should be large enough to contain all the following files:
■ A copy of all datafiles
■ Incremental backups
■ Online redo logs
■ Archived redo log files that have not yet been backed up
■ Control files and control file copies
■ Autobackups of the control file and database initialization parameter file
The preferred configuration for Oracle RAC is to use Automatic Storage Management (ASM) for a recovery area using a different disk group for your recovery set than for your datafiles. Alternatively, you can use a cluster file system archiving scheme.
The location and disk quota must be the same on all instances. To accomplish this, Oracle recommends that you place the flash recovery area on the shared ASM disks. In
See Also:
■ "Performing Backups of Your Oracle RAC Database"
■ "Recovering Your Oracle RAC Database"
■ "About Managing Your Database Backup Files"
■ Oracle Database 2 Day DBA

About Archiving in Oracle RAC
Administering Backup and Recovery 6-3
addition, you must set the DB_RECOVERY_FILE_DEST and DB_RECOVERY_FILE_DEST_SIZE parameters to the same values on all instances.
To use the Flash Recovery feature, you must first configure the flash recovery area for each instance in your Oracle RAC cluster.
About Archiving in Oracle RACWhen you archive your redo log, you write redo log files to another location prior to their being overwritten. This location is called the archive log. These copies of redo log files extend the amount of redo data that can be saved and used for recovery. Archiving can be either enabled or disabled for the database, but Oracle recommends that you enable archiving.
When you use Oracle Database Configuration Assistant (DBCA) to create your Oracle RAC database, each instance is configured with at least two redo log files that are stored in the shared storage. If you use a cluster file system, then these files are shared file system files. If you do not have a cluster file system, then these files are raw devices. If you use ASM, then these files are stored on the ASM disk group.
Configuring Archiving for Your Oracle RAC DatabaseFor Oracle Real Application Clusters, each instance has its own thread of redo. The preferred configuration for Oracle RAC is to configure the flash recovery area using an ASM disk group that is separate from the ASM disk group used for your datafiles. Alternatively, you can use a cluster file system archiving scheme.
To configure archiving for your Oracle RAC database:1. On the Enterprise Manager Database Control Home page, while logged in as a
SYSDBA user, select Availability.
The Availability subpage appears.
2. In the Backup/Recovery section, under the heading Setup, select Recovery Settings.
The Recovery Settings page appears.
3. In the Media Recovery section, select the ARCHIVELOG mode option.
4. In the Log Archive Filename Format field, accept the default value, or enter the desired format, then click Apply.
For clustered databases, the format for the archive log file name should contain the %t modifier, to indicate which redo log thread the archived redo log file belongs to. As a best practice, the format for the archive log file name should also include the %s (log sequence number) and %r (resetlogs identifier) modifiers.
5. If the archive log destination is the same for all instances, then in the Archive Log Destination field, change the value to the location of the archive log destination for the cluster database.
For example, you might set it to +DATA if using ASM, or to /u01/oradata/arch if you want local archiving on each node.
If you need to configure a different archive log destination for any instance, you must go to the Initialization Parameters page and modify the LOG_ARCHIVE_DEST_1 parameter that corresponds to the instance for which you want to configure the archive log destination. The Instance column should display

About Archiving in Oracle RAC
6-4 Oracle Database 2 Day + Real Application Clusters Guide
the name of the instance, for example docrac1. Change the Value field to contain the location of the archive log destination for that instance.
6. If you want to configure more than one archive log destination for the database, on the Recovery Settings page, click Add Another Row under the Archive Log Destination field.
7. After you have finished configuring archiving, click Apply.
When prompted to restart the database, click Yes.
8. Enter the host and SYSDBA user credentials, then click Continue.
9. Wait a couple of minutes, then click Refresh.
If the database has been restarted, you are prompted to enter the login credentials.
About Instance Access to Archived Redo Log FilesAn instance does not need access to the archived redo log files from a different instance except when performing backup or recovery operations. When performing backup operations across instances, the archive log naming scheme that you use is important because when an instance writes to a log with a specific file name on its file system, that file must be readable by any instance that needs to access this archived redo log file.
Also, the backup and recovery strategy that you implement for your Oracle RAC database depends on how you configure the archiving destinations for each instance.
If you use ASM to store the archived redo log files for your Oracle RAC database, then each instance automatically has access to all the archived redo log files generated by the database. If you use shared storage or raw devices to store the archived redo log files on each node, then you must configure the operating system to grant access to those directories for each instance of the cluster database that needs access to them.
See Also:
■ "About Archiving in Oracle RAC"
■ "Configuring Initialization Parameters for an Oracle RAC Database"
■ "Editing Initialization Parameter Settings for an Oracle RAC Database"
■ Oracle Database 2 Day DBA
■ Oracle Real Application Clusters Administration and Deployment Guide for more information about configuring and managing archived redo log files for an Oracle RAC database
See Also:
■ "About Archiving in Oracle RAC"
■ "Configuring Archiving for Your Oracle RAC Database"
■ Oracle Database 2 Day DBA
■ Oracle Database Storage Administrator's Guide

Performing Backups of Your Oracle RAC Database
Administering Backup and Recovery 6-5
Credentials for Performing Enterprise Manager Backup and Recovery You must have the proper credentials to perform some of the configuration tasks for backup and recovery, and to schedule backup jobs and perform recovery. The following credentials may be required:
■ The Oracle database administrator user you use when you log in to Enterprise Manager
■ The host operating system user whose credentials you provide when performing backup and recovery tasks
To perform or schedule RMAN tasks, you must either log in to Enterprise Manager as a user with SYSDBA privileges, or provide host operating system credentials for a user who is a member of the dba group. The host operating system user must also have execute permission for the RMAN command-line client.
For tasks requiring host operating system credentials, a Host Credentials form appears at the bottom of the page used to perform the task. Enterprise Manager uses the credentials when it invokes RMAN to perform jobs you requested or scheduled.
The Host Credentials form always includes an option labeled Save as Preferred Credential. If you select this option before performing your action, then the provided credentials are stored persistently for the currently logged-in Oracle database user. The preferred credentials are reused by default whenever you log in as that user and perform operations requiring host credentials.
About Configuring Backup SettingsAssuming you have a flash recovery area configured, you can configure a number of settings and policies that determine how backups are stored, which data is backed up, and how long backups are retained before being purged from the flash recovery area. You can also configure settings to optimize backup performance for your environment.
Performing Backups of Your Oracle RAC DatabaseWhen you use ASM to manage database files, Oracle recommends that you use RMAN for creating backups. You must have both database (SYSDBA) privileges and host operating system (OSDBA) credentials to perform backup and recovery operations.
See Also:
■ "Configuring Operating System Users and Groups"
■ "About Configuring User Accounts"
■ Oracle Database 2 Day DBA
See Also:
■ "Configuring Archiving for Your Oracle RAC Database"
■ "Overview of Oracle RAC Database Backup and Recovery"
■ Oracle Database 2 Day DBA for more information about configuring backup policy settings
■ Oracle Database 2 Day DBA for more information about configuring backup settings

Performing Backups of Your Oracle RAC Database
6-6 Oracle Database 2 Day + Real Application Clusters Guide
If you log in to Enterprise Manager with SYSDBA privileges, any operating system user who has execute permission for the RMAN command-line client can perform backups of an Oracle RAC database. However, if you log in as a database user without SYSDBA privileges, then you must provide the name and password of an operating system user that is a member of the OSDBA group before you can perform the backup operation.
To back up an Oracle RAC database:1. On the Cluster Database Home page, select Availability.
The Cluster Database Availability page appears.
2. In the Backup/Recovery section, under the heading Manage, select Schedule Backup.
3. Follow the backup procedures outlined in Chapter 9, "Performing Backup and Recovery" of Oracle Database 2 Day DBA.
About Parallelism and Backups Across Multiple ChannelsRMAN depends on server sessions, processes that run on the database server, to perform backup and recovery tasks. Each server session in turn corresponds to an RMAN channel, representing one stream of data to or from a backup device. RMAN supports parallelism, which is the use of multiple channels and server sessions to carry out the work of a single backup job or file restoration task.
Because the control file, SPFILE, and datafiles are accessible by any instance, the backup operation of these files is distributed across all the allocated channels. For backups of archived redo log files, the actions performed by RMAN depend on the type of archiving scheme used by your Oracle RAC database.
If you use a local archiving scheme, then each instance writes the archived redo log files to a local directory. When multiple channels are allocated that have access to the archived redo logs, for each archived redo log file, RMAN determines which channels have access to that archived redo log file. Then, RMAN groups together the archived redo log files that can be accessed by a channel and schedules a backup job using that channel.
If each node in the cluster writes the archived redo log file files to ASM, a clustered file system, or other type of shared storage, then each instance has access to all the archived redo log file files. In this case, the backup of the archived redo log file files is distributed across all the allocated channels.
See Also:
■ "Configuring Operating System Users and Groups"
■ "Credentials for Performing Enterprise Manager Backup and Recovery"
■ Oracle Database 2 Day DBA for more information about configuring your database for backup and recovery
■ Oracle Database 2 Day DBA for more information about performing and scheduling backups using Enterprise Manager Database Control

About Preparing to Restore and Recover Your Oracle RAC Database
Administering Backup and Recovery 6-7
Backing Up Archived Redo Log FilesWhether only one node or all nodes perform archive log backups, ensure that all archived redo log files for all nodes are backed up. If you use a local archiving scheme, then allocate multiple channels to provide RMAN access to all the archived redo log files.
You can configure RMAN to automatically delete the archived redo log files from disk after they have been safely backed up. This feature helps to reduce the disk space used by your Oracle RAC database, and prevent an unnecessary outage that might occur if you run out of available disk space.
To configure RMAN to automatically delete the archived redo log file files from disk after they have been safely backed up, when creating or scheduling your database backups:1. Select Also back up all archived logs on disk if you are performing an online
backup. There is no need to back up archived redo log files when performing an offline backup because the database is in a consistent state at the time of backup and does not require media recovery if you restore.
2. Select Delete all archived logs from disk after they are successfully backed up if you are using shared storage for your archived redo log files.
About Preparing to Restore and Recover Your Oracle RAC DatabaseThe Enterprise Manager Guided Recovery capability provides a Recovery Wizard that encapsulates the logic required for a wide range of restore and recovery scenarios. Enterprise Manager can determine which parts of the database must be restored and recovered, including proactively detecting situations such as corrupted database files. Enterprise Managers takes you through the recovery process, prompting for information and performing required file restoration and recovery actions.
See Also:
■ "About Archiving in Oracle RAC"
■ "Performing Backups of Your Oracle RAC Database"
■ Oracle Database 2 Day DBA for more information about RMAN backups
■ Oracle Database 2 Day DBA for more information about configuring backup device settings
Note: Do not select Delete all archived logs from disk after they are successfully backed up if you are using a flash recovery area as your only archive log destination. In this case, archived redo log files that have been backed up are deleted automatically as space is needed for storage of other files.
See Also:
■ "Performing Backups of Your Oracle RAC Database"
■ "About Archiving in Oracle RAC"
■ Oracle Database 2 Day DBA

Recovering Your Oracle RAC Database
6-8 Oracle Database 2 Day + Real Application Clusters Guide
The node that performs the recovery of an Oracle RAC database must be able to restore all the required datafiles. That node must also be able to either read all the required archived redo log files on disk or be able to restore the archived redo log files from backup files.
This section contains the following topics:
■ About Configuring Access to the Archive Log
■ About Putting the Oracle RAC Database Instances into the Correct State
About Configuring Access to the Archive LogDuring recovery, as long as the archive log file destinations are visible from the node that performs the recovery, Oracle RAC can successfully access the archived redo log files during recovery.
If you do not use shared storage or a clustered file system to store the archived redo log files for your cluster database, then you need to make the archived redo log files available to the node performing the recovery.
About Putting the Oracle RAC Database Instances into the Correct StateRecovery of a failed instance in Oracle RAC is automatic. If an Oracle RAC database instance fails, then a surviving database instance processes the online redo logs generated by the failed instance to ensure that the database contents are in a consistent state. When recovery completes, Oracle Clusterware attempts to restart the failed instance automatically.
Media recovery is a manual process that occurs while a database is closed. A media failure is the failure of a read or write operation of a disk file required to run the database, due to a physical problem with the disk such as a head malfunction. Any database file can be vulnerable to a media failure. If a media failure occurs, then you must perform media recovery to restore and recover the damaged database files. Media recovery is always done by one instance in the cluster.
Before starting media recovery, the instance that will be performing the recovery should be started in MOUNT mode. The other instances should be started in NOMOUNT mode.
Recovering Your Oracle RAC DatabaseThis section discusses both instance recovery and media recovery. It contains the following topics:
■ Recovering the Oracle RAC Database Using Enterprise Manager
■ Recovering the Parameter File from an Automatic File Backup
■ About Restoring Archived Redo Log File Files
■ About Performing Recovery Using Parallelism
See Also:
■ "Starting and Stopping Oracle RAC Databases and Database Instances"
■ "About Preparing to Restore and Recover Your Oracle RAC Database"
■ Oracle Database 2 Day DBA

Recovering Your Oracle RAC Database
Administering Backup and Recovery 6-9
Recovering the Oracle RAC Database Using Enterprise ManagerWhen using Enterprise Manager and RMAN, the process of recovering and restoring an Oracle RAC database is essentially the same as for a single-instance Oracle databases, except that you access RMAN from the Availability page at the cluster database level, instead of at the instance level.
To use Enterprise Manager and RMAN to restore and recover an Oracle RAC database:1. On the Cluster Database Home Page, select Availability.
The Cluster Database Availability page appears.
2. In the Backup/Recovery section, under the heading Manage, select Perform Recovery.
3. Follow the recovery procedures outlined in Chapter 9 of Oracle Database 2 Day DBA
Recovering the Parameter File from an Automatic File BackupYou can use Enterprise Manager to recover a lost or damaged server parameter file (SPFILE).
To recover an SPFILE for an Oracle RAC database:1. Start the database in the MOUNT.
2. On the Cluster Database Home page, select Availability.
The Cluster Database Availability page appears.
3. In the Backup/Recovery section, under the heading Manager, select Perform Recovery.
When the database is not open, the Perform Recovery link takes you to the SPFILE restore page.
4. Specify the location of the flash recovery area, if configured.
5. In the Backup Information section, select Use Other Backup Information and Use an Autobackup.
6. On the Perform Recovery: Restore SPFILE page, specify a different location for the SPFILE to be restored to.
7. When finished selecting your options, click Restore, then click Yes to confirm you want to restore the SPFILE.
8. After the SPFILE is restored, you are prompted to login to the database again.
See Also:
■ "About Preparing to Restore and Recover Your Oracle RAC Database"
■ "Credentials for Performing Enterprise Manager Backup and Recovery"
■ Oracle Database 2 Day DBA for more information about performing user-directed recovery

Recovering Your Oracle RAC Database
6-10 Oracle Database 2 Day + Real Application Clusters Guide
About Restoring Archived Redo Log File FilesDuring a restore operation, RMAN automatically locates the most recent backups of the database that are available. A channel connected to a specific node attempts to restore files that were backed up only to that node. For example, assume that an archived redo log file with the sequence number 1001 is backed up to a device attached to the node docrac1, while the archived redo log file with sequence number 1002 is backed up to a device attached to the node docrac2. If you allocate channels that connect to nodes docrac1 and docrac2 for a restore operation, then the channel connected to docrac1 restores log sequence 1001, but not log sequence 1002. The channel connected to docrac2 can restore log sequence 1002, but not log sequence 1001.
If you use ASM or a clustered file system for storing the archived redo log files, then any instance can restore the archived redo log files.
About Performing Recovery Using ParallelismOracle RAC automatically selects the optimum degree of parallelism for instance failure and media recovery.
When using Enterprise Manager and RMAN to perform the recovery, Oracle RAC automatically makes parallel the following three stages of recovery:
■ Restoring Datafiles—When restoring datafiles, the number of channels you allocate in the RMAN recovery script effectively sets the parallelism that RMAN uses. For example, if you allocate five channels, you can have up to five parallel streams restoring datafiles.
■ Applying Incremental Backups—Similarly, when you are applying incremental backups, the number of channels you allocate determines the potential parallelism.
■ Applying Archived Redo Log Files—Using RMAN, the application of archived redo log files is performed in parallel. Oracle RAC automatically selects the optimum degree of parallelism based on available CPU resources.
See Also:
■ "Starting and Stopping Oracle RAC Databases and Database Instances"
■ "About the Server Parameter File for Oracle Real Application Clusters"
■ Oracle Database Backup and Recovery User's Guide for more information about recovering a server parameter file
See Also:
■ "About Archiving in Oracle RAC"
■ "Configuring Archiving for Your Oracle RAC Database"
■ Oracle Database Backup and Recovery User's Guide for more information about restoring archived redo log file files

Displaying Backup Reports for Your Oracle RAC Database
Administering Backup and Recovery 6-11
About Managing Your Database Backup FilesManaging RMAN backup files, with or without Enterprise Manager, consists of two tasks:
1. Managing the backup files for your database that are stored on disk or tape
2. Managing the record of those backup files in the RMAN repository
Enterprise Manager simplifies both backup file management tasks. Some of the other tasks involved in managing backup files include the following:
■ Searching for backup files
■ Validating the contents of backup sets or image copies
■ Cross-checking a backup
■ Deleting expired or obsolete backup files
■ Marking backup files as available or unavailable
Displaying Backup Reports for Your Oracle RAC DatabaseBackup reports contain summary and detailed information about past backup jobs run by RMAN, including backup jobs run through Enterprise Manager and the RMAN command-line client.
To view backup reports:1. On the Cluster Database Home page, select Availability.
The Availability page appears.
2. In the Backup/Recovery section, under the heading Manage, select Backup Reports.
The View Backup Report page appears, with a list of recent backup jobs.
3. In the Search section, specify any filter conditions and click Go to restrict the list to backups of interest.
You can use the Search section of the page to restrict the backups listed by the time of the backup, the type of data backed up, and the status of the jobs (whether it succeeded or failed, and whether or not warnings were generated during the job).
4. To view detailed information about any backup, click the backup job name in the Backup Name column.
See Also:
■ "Recovering Your Oracle RAC Database"
■ "Overview of Oracle RAC Database Backup and Recovery"
■ Oracle Database 2 Day DBA for more information about incremental backups of datafiles
■ Oracle Database 2 Day DBA for more information about configuring recovery settings
See Also:
■ Oracle Database 2 Day DBA for more information about these topics and details on how to perform these tasks

Displaying Backup Reports for Your Oracle RAC Database
6-12 Oracle Database 2 Day + Real Application Clusters Guide
The Backup Report page is displayed for the selected backup job. This page contains summary information about this backup job, such as how many files of each type were backed up, the total size of the data backed up, and the number, size, and type of backup files created.
The Backup Report page also contains a Search section that you can use to quickly run a search for another backup job or backup jobs from a specific date range. The resulting report contains aggregate information for backup jobs matching the search criteria.
See Also:
■ "About Managing Your Database Backup Files"
■ "Performing Backups of Your Oracle RAC Database"
■ "Overview of Oracle RAC Database Backup and Recovery"
■ Oracle Database 2 Day DBA

Managing Database Workload Using Services 7-1
7Managing Database Workload Using
Services
Using workload management, you can distribute the workload across database instances to achieve optimal database and cluster performance for users and applications. This chapter contains the following sections:
■ About Workload Management
■ Creating Services
■ Administering Services
■ Configuring Clients for High Availability
About Workload ManagementApplications using a clustered database generally want to load balance their workload across the cluster. Oracle Real Application Clusters (Oracle RAC) includes a highly available (HA) application framework that provides the necessary service and integration points between Oracle RAC and custom enterprise applications.
You can deploy Oracle RAC and single-instance Oracle database environments to use workload management features in many different ways. Depending on the number of nodes and your environment's complexity and objectives, your choices for the optimal workload management and high availability configuration depend on a variety of considerations, as described in this chapter.
To implement workload management for an Oracle Real Application Clusters (Oracle RAC) database, you can use a number of different features. This section contains the following topics:
■ About Oracle Services
■ About the Database Resource Manager
■ About Oracle RAC High Availability Framework
■ About Fast Application Notification (FAN)
■ About the Load Balancing Advisory
■ About Connection Load Balancing
■ About Runtime Connection Load Balancing

About Workload Management
7-2 Oracle Database 2 Day + Real Application Clusters Guide
About Oracle ServicesOracle Database 10g introduced an automatic workload management facility, called services. A service represents the workload of applications with common attributes, performance thresholds, and priorities. A single service can represent an application, multiple applications or a subset of a single application. A single service can be associated with one or more instances of an Oracle RAC database, and a single instance can support multiple services. Services provide the following benefits:
■ A single entity for managing applications that compete for the same resources
■ Allow each workload to be managed as a single unit
■ Hide the complexity of the cluster from the client
To manage workloads, you can define services that you assign to a particular application or to a subset of an application's operations. You can also use services to manage the workload for different types of work. For example, online users can use one service while batch processing can use a different service and reporting can use yet another service type.
Traditionally an Oracle database provided a single service and all users connected to the same service. A database will always have this default database service that is the database name. This service cannot be modified and will always allow you to connect to the database.
When a user or application connects to a database, Oracle recommends that you use a service for the connection. Applications and mid-tier connection pools select a service by using the service name in their connection data. For more flexibility in the management of the workload using the database, Oracle Database enables you to create multiple services and specify which database instances offer the services.
Services are integrated with the Database Resource Manager, which enables you to restrict the resources that are used by a service within an instance. In addition, Oracle Scheduler jobs can run using a service, as opposed to using a specific instance.
About Configuring Services for High AvailabilityWhen you create a service, you define which instances typically support that service. These are known as the preferred instances for that service. You can also define other instances to support a service if the service's preferred instances fail. These are known as available instances for a service.
When you specify a preferred instance for a service, the service runs on that instance during standard operation. Oracle Clusterware attempts to ensure that the service
Note: Do not use the default database service for application workloads. Create at least one service as described in "Creating Services".
See Also:
■ "Creating Services"
■ "Administering Services"
■ "About Workload Management"
■ Oracle Database 2 Day DBA
■ Oracle Database Administrator's Guide

About Workload Management
Managing Database Workload Using Services 7-3
always runs on all the preferred instances that have been configured for a service. If the instance fails, the service is randomly relocated to another preferred instance or one of the available instances. You can also manually relocate the service to an available instance. If you do not specify preferred or available instances when you create a service, then by default, every instance in the Oracle RAC database is a preferred instance for that service.
If a service fails over to an available instance, the service is not moved back to its preferred instance automatically. However, you can automate the relocation of a service to its preferred instance by using a callout. For more information about callouts, see "About FAN Callouts" on page 7-5. An example callout script is available in the Oracle Real Application Clusters section on Oracle Technology Network at http://www.oracle.com/technetwork/database/clustering/overview/awmrac11g-133673.pdf.
You do not have to specify available instances for a service. However, if you configure a preferred instance for a service, but do not specify at least one available instance for the service, then the service does not relocate to another instance if the preferred instance fails.
You can also specify an instance as Not Used. This setting means the service does not run on the instance, even if the preferred instance for the service fails.
About the Database Resource ManagerThe Database Resource Manager controls database resources allocated to users, applications, and services. This approach ensures that users, applications, and services receive their share of the available database resources. The Database Resource Manager enables an Oracle RAC database running on one or more nodes to support multiple applications and mixed workloads with optimal efficiency.
The Database Resource Manager provides the ability to prioritize work within an Oracle database or your Oracle RAC environment. For example, high priority users, such as online workers, would get more resources to minimize response time, while lower priority users, such as batch jobs or reports, would get fewer resources, and could take longer to run. This allows for more granular control over resources.
Resources are allocated to users according to a resource plan specified by the database administrator. The following terms are used in specifying a resource plan:
■ A resource plan specifies how the resources are to be distributed among various users (resource consumer groups).
■ Resource consumer groups allow the administrator to group user sessions together by resource requirements. Resource consumer groups are different from user roles; one database user can have different sessions assigned to different resource consumer groups.
■ Resource allocation methods are the methods or policies used by the Database Resource Manager when allocating for a particular resource. Resource allocation methods are used by resource consumer groups and resource plans. The database provides the resource allocation methods that are available, but the DBA determines which method to use.
See Also:
■ "About FAN Callouts"
■ "Creating Services"
■ "About Workload Management"

About Workload Management
7-4 Oracle Database 2 Day + Real Application Clusters Guide
■ Resource plan directives are a means of assigning consumer groups to particular plans and partitioning resources among consumer groups by specifying parameters for each resource allocation method.
■ Subplans, which the DBA can create within a resource plan, allow further subdivision of resources among different users of an application.
■ Levels provide a mechanism to specify distribution of unused resources among available users. Up to eight levels of resource allocation can be specified.
The Database Resource Manager enables you to map a resource consumer group to a service so that users who connect using that service are members of the specified resource consumer group, and thus restricted to the resources available to that resource consumer group.
About Oracle RAC High Availability FrameworkThe Oracle RAC high availability framework enables Oracle RAC to maintain the database, components, and applications in a running state at all times. If an instance, component, or application fails, it can be automatically restarted to keep Oracle Database operating at full capacity.
Oracle Database focuses on maintaining service availability. In Oracle RAC, Oracle services are designed to be continuously available with workloads shared across one or more instances. The Oracle RAC high availability framework maintains service availability by storing the configuration information for each service in the Oracle Cluster Registry (OCR). Oracle Clusterware recovers and balances services across instances based on the service definition.
About Fast Application Notification (FAN)One of the main requirements of a highly available application is for it to be quickly notified when something happens to critical system components. This allows the application to execute event-handling programs. The timely execution of such programs minimizes the time it takes to react to cluster resource organizations and the impact of cluster component failures by avoiding costly connection timeouts and application timeouts.
Fast Application Notification is a notification mechanism that Oracle RAC uses to notify other processes about cluster configuration and service-level information, including status changes such as UP or DOWN events. FAN UP and DOWN events can apply to instances, services, and nodes. FAN also publishes Load Balancing Advisory events.
FAN enables the automated recovery of applications when cluster components fail. For cluster configuration changes, the Oracle RAC high availability framework publishes a FAN event immediately when a change occurs regarding the state of the
See Also:
■ "About Workload Management"
■ Oracle Database Administrator's Guide for more information about the Database Resource Manager
See Also:
■ "About Oracle Clusterware"
■ "About Workload Management"

About Workload Management
Managing Database Workload Using Services 7-5
instances in the cluster. Instead of waiting for the application to query the database and detect a problem, applications can receive FAN events and react immediately.
FAN UP and DOWN events provide the following benefits:
■ For DOWN events, the disruption to the application can be minimized because sessions that are connected to the failed instance or node can be terminated. Incomplete transactions can be terminated and the application user notified immediately. Application users who request connections are directed to instances that are started and are providing the requested service.
■ For UP events, when services and instances are started, new connections can be created so that the application can immediately take advantage of the extra resources.
Oracle Clusterware and Oracle RAC utilize Oracle Notification Service (ONS) to propagate FAN messages both within the Oracle RAC cluster and to client or mid-tier machines. ONS is installed with Oracle RAC and the Oracle Clusterware resources to manage the ONS daemon are created automatically during the installation process. ONS daemons run locally sending messages to and receiving messages from a configured list of nodes (where other ONS daemons are active).
About FAN CalloutsFAN callouts are server-side executable files that Oracle RAC runs immediately when high availability events occur. A callout is essentially a shell script or precompiled executable written in any programming language. Some examples of how you can use FAN callouts to automate the actions performed when events occur in a cluster configuration are as follows:
■ Starting and stopping server-side applications
■ Relocating low-priority services when high-priority services come online
■ Sending text or numeric messages to pagers
■ Executing shell scripts
The executable files for FAN callouts are stored in the CRS_home/racg/usrco subdirectory. If this subdirectory does not exist in your CRS home, then you must create this directory with the same permissions and ownership as the CRS_home/racg/tmp subdirectory.
All executables in the directory CRS_home/racg/usrco are executed immediately, in an asynchronous fashion, when a FAN event received through the ONS. A copy of the executable files used by FAN callouts should be available on every node that runs Oracle Clusterware. Example callout scripts are available in the Oracle Real Application Clusters white papers on Oracle Technology Network at http://www.oracle.com/technetwork/database/clustering/overview/awmrac11g-133673.pdf.
See Also:
■ "About Connection Load Balancing"
■ "About the Load Balancing Advisory"
■ Oracle Real Application Clusters Administration and Deployment Guide for more information about configuring Fast Application Notification and FAN callouts

About Workload Management
7-6 Oracle Database 2 Day + Real Application Clusters Guide
About the Load Balancing AdvisoryThe Load Balancing Advisory provides information to applications or clients about the current service levels that the Oracle RAC database instances are providing. Applications can take advantage of the load balancing Fast Application Notification (FAN) events to direct work requests to the instance in the cluster that will provide the best performance based on the workload management directives that you have defined for that service. Also, when an instance is restarted, Oracle RAC uses FAN events to notify the application’s connection pool so that the connection pool can create connections to the recently started instance and take advantage of the additional resources that this instance provides.
The load balancing advisory is integrated with the Automatic Workload Repository built into Oracle Database 11g. The Automatic Workload Repository measures response time and CPU consumption for each service.
The advice given by the Load Balancing Advisory takes into account the power of the server as well as the current workload of the service on the server. Enabling the Load Balancing Advisory helps improve the throughput of applications by not sending work to instances that are overworked, running slowly, not responding, or have failed.
Your application can take advantage of the Load Balancing Advisory without any programmatic changes if you use an integrated Oracle client, one that has the Runtime Connection Load Balancing feature. Due to the integration with FAN, Oracle integrated clients are more aware of the current status of an Oracle RAC cluster. This prevents client connections from waiting or trying to connect to an instance that is no longer available. The integrated clients for FAN events include Oracle Database 11g JDBC, Oracle Database 11g ODP.NET, and Oracle Database 11g Oracle Call Interface (OCI).
You configure your Oracle RAC environment to use the Load Balancing Advisory by defining service-level goals for each service used. This enables the Load Balancing Advisory for that service and enables the publication of FAN load balancing events. There are two types of service-level goals for Runtime Connection Load Balancing:
■ Service Time—The Load Balancing Advisory attempts to direct work requests to instances according to their response time. Load Balancing Advisory data is based on the elapsed time for work done by connections using the service, as well as available bandwidth to the service. This goal is best suited for workloads that require varying lengths of time to complete, for example, an internet shopping system.
■ Throughput—The Load Balancing Advisory measures the percentage of the total response time that the CPU consumes for the service. This measures the efficiency of an instance, rather than the response time. This goal is best suited for workloads where each work request completes in a similar amount of time, for example, a trading system.
If you do not select the Enable Load Balancing Advisory option, the service-level goal is set to None, which disables load balancing for that service.

About Workload Management
Managing Database Workload Using Services 7-7
About Connection Load BalancingOracle Net is a software component that resides on the client and on the Oracle database server. It establishes and maintains the connection between the client application and the server, and exchanges messages between them using industry standard protocols. For the client application and a database to communicate, the client application must specify location details for the database it wants to connect to, and the database must provide some sort of identification or address.
On the database server, the Oracle Net Listener, commonly known as the listener, is a process that listens for client connection requests. The configuration file for the listener is the listener.ora.
You can use Net Configuration Assistant (NETCA) to create a net service name, a simple name for the database service. The net service name resolves to the connect descriptor, which is the network address of the database and the name of the database service. The address portion of the connect descriptor is actually the protocol address of the listener. The client uses a connect descriptor to specify the database or instance to which the client wants to connect.
When a net service name is used, establishing a connection to a database instance takes place by first mapping the net service name to the connect descriptor. This mapped information is stored in one or more repositories of information that are accessed using naming methods. The most commonly used naming method is Local Naming, where the net service names and their connect descriptors are stored in a localized configuration file named tnsnames.ora.
When the client connects to the cluster database using a service, you can use the Oracle Net connection load balancing feature to spread user connections across all the instances that are supporting that service. There are two types of load balancing that you can implement: client-side and server-side load balancing. In an Oracle RAC database, client connections should use both types of connection load balancing. When you create an Oracle RAC database using Oracle Database Configuration Assistant (DBCA), DBCA configures and enables server-side load balancing by default.
Client-Side Load BalancingClient-side load balancing balances the connection requests across the listeners. When the listener receives the connection request, the listener connects the user to an instance that the listener knows provides the requested service.
Client-side load balancing is defined in your client connection definition by setting the parameter LOAD_BALANCE=yes in the tnsnames.ora file. When you set this
See Also:
■ "About Fast Application Notification (FAN)"
■ "Configuring Clients for High Availability"
■ "Administering Services"
■ "About Workload Management"
■ Oracle Real Application Clusters Administration and Deployment Guide for more information about integrated Oracle clients
See Also:
■ "Configuring Oracle Net to Support Services"
■ Oracle Database 2 Day DBA
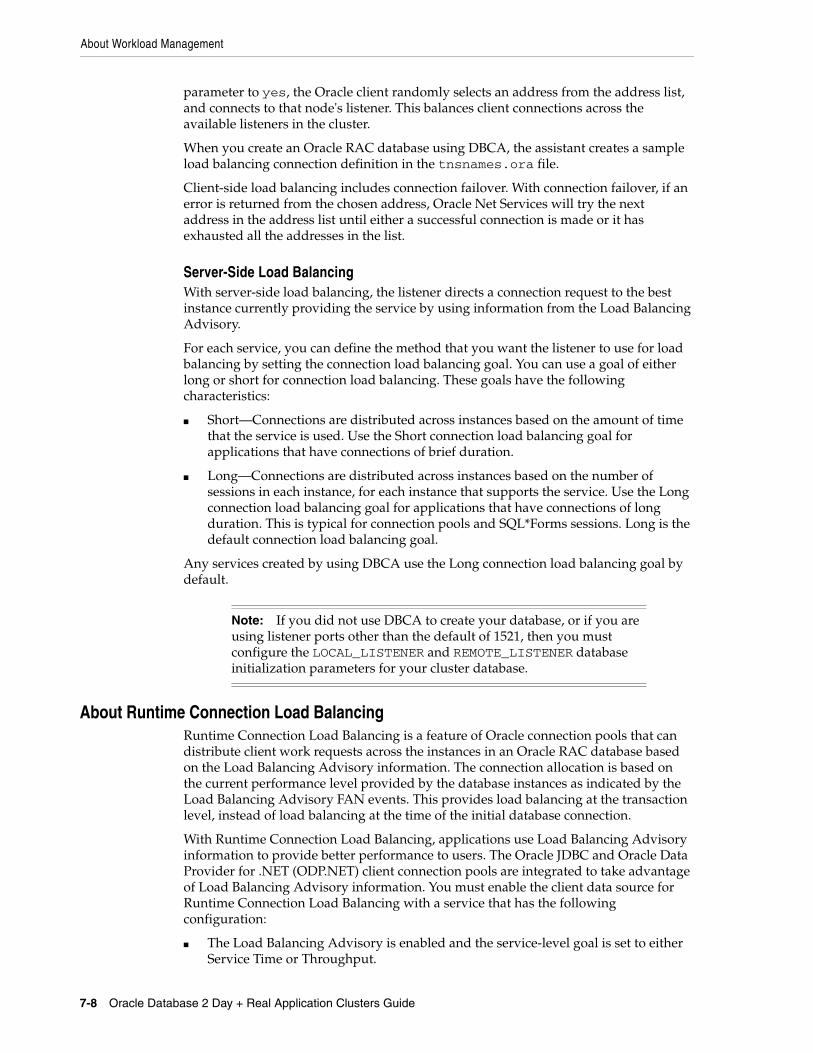
About Workload Management
7-8 Oracle Database 2 Day + Real Application Clusters Guide
parameter to yes, the Oracle client randomly selects an address from the address list, and connects to that node's listener. This balances client connections across the available listeners in the cluster.
When you create an Oracle RAC database using DBCA, the assistant creates a sample load balancing connection definition in the tnsnames.ora file.
Client-side load balancing includes connection failover. With connection failover, if an error is returned from the chosen address, Oracle Net Services will try the next address in the address list until either a successful connection is made or it has exhausted all the addresses in the list.
Server-Side Load BalancingWith server-side load balancing, the listener directs a connection request to the best instance currently providing the service by using information from the Load Balancing Advisory.
For each service, you can define the method that you want the listener to use for load balancing by setting the connection load balancing goal. You can use a goal of either long or short for connection load balancing. These goals have the following characteristics:
■ Short—Connections are distributed across instances based on the amount of time that the service is used. Use the Short connection load balancing goal for applications that have connections of brief duration.
■ Long—Connections are distributed across instances based on the number of sessions in each instance, for each instance that supports the service. Use the Long connection load balancing goal for applications that have connections of long duration. This is typical for connection pools and SQL*Forms sessions. Long is the default connection load balancing goal.
Any services created by using DBCA use the Long connection load balancing goal by default.
About Runtime Connection Load BalancingRuntime Connection Load Balancing is a feature of Oracle connection pools that can distribute client work requests across the instances in an Oracle RAC database based on the Load Balancing Advisory information. The connection allocation is based on the current performance level provided by the database instances as indicated by the Load Balancing Advisory FAN events. This provides load balancing at the transaction level, instead of load balancing at the time of the initial database connection.
With Runtime Connection Load Balancing, applications use Load Balancing Advisory information to provide better performance to users. The Oracle JDBC and Oracle Data Provider for .NET (ODP.NET) client connection pools are integrated to take advantage of Load Balancing Advisory information. You must enable the client data source for Runtime Connection Load Balancing with a service that has the following configuration:
■ The Load Balancing Advisory is enabled and the service-level goal is set to either Service Time or Throughput.
Note: If you did not use DBCA to create your database, or if you are using listener ports other than the default of 1521, then you must configure the LOCAL_LISTENER and REMOTE_LISTENER database initialization parameters for your cluster database.

About Workload Management
Managing Database Workload Using Services 7-9
■ The service connection load balancing goal is set to Short.
Figure 7–1, "Runtime Connection Load Balancing" illustrates Runtime Connection Load Balancing. In this illustration, the Oracle RAC database has three instances. Suppose that the Load Balancing Advisory indicates that Instance1 and Instance3 have the best performance, while Instance2 currently has less than optimal performance. When Runtime Connection Load Balancing is enabled on the implicit connection cache, the following process occurs:
1. A client requests a connection from the connection cache.
2. Runtime Connection Load Balancing selects the connection that belongs to the most efficient (best) instance from the connection cache. In Figure 7–1, there are three possible nodes to which the connection can be routed. Instance1, which has the least amount of CPU workload, is currently being assigned about 60 percent of the incoming connections. Instance2, which is currently overloaded, is only being assigned around 10 percent of the incoming connections. Instance3, which has a high workload, is being assigned around 30 percent of the incoming connections. The best instance to handle the connection request in this case would be Instance1.
3. The client receives the connection that would process the work request with the best response time.
Figure 7–1 Runtime Connection Load Balancing
The illustration shows a client connection request being sent to the connection cache. Below the conenction cache are the three possible targets: Instance1, Instance2, and Instance2.
Instance1 is sending back the message "CRM is bored" to the connection cache. There are six open connections in the connection cache for this instance, and the value 60% is shown above the connections.

Creating Services
7-10 Oracle Database 2 Day + Real Application Clusters Guide
Instance2 is sending back the message "CRM is very busy" to the connection cache. There is only one open connection in the connection cache for this instance. The value above the open connection is 10%.
Instance3 is sending back the message "CRM is busy" to the connection cache. There are three open connections in the connection cache for this instance. The value above the open connections is 30%.
All three instances access the same database.
End of description.
***********************************************************************************************
Oracle Database 11g introduces an additional flag in the load balancing advisory event called affinity hint. The affinity hint is automatic when load balancing advisory is turned on through setting the goal on the service. This flag is for temporary affinity that lasts for the duration of a web session. Web conversations often connect and disconnect a number of times during the entire session. During each of these connects, it may access the same or similar data, for example, a shopping cart, Siebel, and so on. Affinity can improve buffer cache efficiency, which lowers cpu usage and transaction latency. The Affinity Hint is a flag that indicates if Affinity is active or inactive for a particular instance and service combination. Different instances offerin the same service can have different settings for the Affinity Hint.
Oracle Database 11g Patchset 1 (11.1.0.7) introduces a new connection pool for Java called the Universal Connection Pool (UCP). UCP can be used against Oracle Database 10g or Oracle Database 11g. Applications using Oracle Database 11g and UCP, can take advantage of this new affinity feature. If the affinity flag is turned on in the Load Balancing Advisory event, then UCP will create an Affinity Context for the Web session such that when that session does a get connection from the pool, the pool will always try to give it a connection to the instance it connected to the first time it acquired a session. The choice of instance for the first connection is based on the current load balancing advisory information.
Creating ServicesYou can create a service using Oracle Enterprise Manager Database Control.
To create a service:1. On the Cluster Database Home page, click Availability.
The Availability page appears.

Creating Services
Managing Database Workload Using Services 7-11
This screenshot shows the Availability page for the tacdemo cluster database. The largest section shown in this image is the Backup/Recovery section, with headings titled Setup and Manage. To the right of this section is the Oracle Secure Backup Setting. Below the Backup/Recovery section on the left is the Services section. Under the heading Services is a single link titled Cluster Managed Database Services.
The links under the heading Setup in the Backup/Recovery section are Backup Settings, Recovery Settings, and Recovery Catalog Settings. The links under the heading Manage in the Backup/Recovery section are Schedule Backup, Manage Current Backups, Backup Reports, Manage Restore Points, Perform Recovery, and View and Manage Transactions.
The links in the Oracle Secure Backup section are "Oracle Secure Backup Device and Media" and "File System Backup and Restore".
At the top of the page are the following links for the accessing the subpages: Home, Performance, Availability (selected), Server, Schema, Data Movement, Software Support, and Topology. The user currently logged in is the SYSTEM user.
End of description.
***********************************************************************************************
2. Click Cluster Managed Database Services in the Services section. Enter or confirm the credentials for the Oracle RAC database and host operating system.
The Cluster Managed Database Services page appears.
This screenshot shows the Cluster Managed Database Services page. There is a Refresh button on the right of the screenshot, near the top, and a table of services at the bottom of the screenshot. On the top right of the services table is the Create Service button.
In this screenshot, the table of services has 8 columns and no rows. The column names are, from left to right: Select, Service Name, Status, Running Instances, Response Time (milliseconds)(Last 5 Minutes), Percent CPU Load (Last 5 Minutes), Service related alerts among all Instances, and Status Details.
End of description.
***********************************************************************************************
3. Click Create Service.
The Create Service page appears.
4. Enter the name of your service in the Service Name field, for example, DEVUSERS.
5. Select Start Service after creation if you want the service to be started after it is created.

Creating Services
7-12 Oracle Database 2 Day + Real Application Clusters Guide
The screenshot shows the top portion of the Create Service page. The text on the page says 'Define a highly available service by specifying preferred and available instances. You can also specify service properties to customize failover mechanisms, monitoring thresholds and resource management.'
The first field in the page is the Service Name field, which has the value DEVUSERS.
Under the Service Name field is the option "Start service after creation", which is selected.
At the bottom of the screenshot is the two-column High Availability Configuration table, which displays the instance names (sales1 and sales2) and their associated service policy. In the screenshot, the DEVUSERS service is configured as Available for the sales1 instance and Preferred for the sales2 instance.
Below the High Availability Configuration table is the following text: "TIP Must select at least one preferred instance."
End of description.
***********************************************************************************************
6. Choose whether the instance is a Preferred or Available instance for each instance displayed in the High Availability Configuration section for this service. If you do not want the service to run on a particular instance, select Not Used for the Service Policy.
7. Select Short for Connection Load Balancing Goal if you want to distribute the connection workload based on elapsed time instead of the overall number of connections. Otherwise, choose Long.
8. Select Enable Load Balancing Advisory under the heading Notification Properties on the Create Service page to enable the Load Balancing Advisory for this service, as shown in the following screenshot. Choose a service-level goal of either Service Time or Throughput.
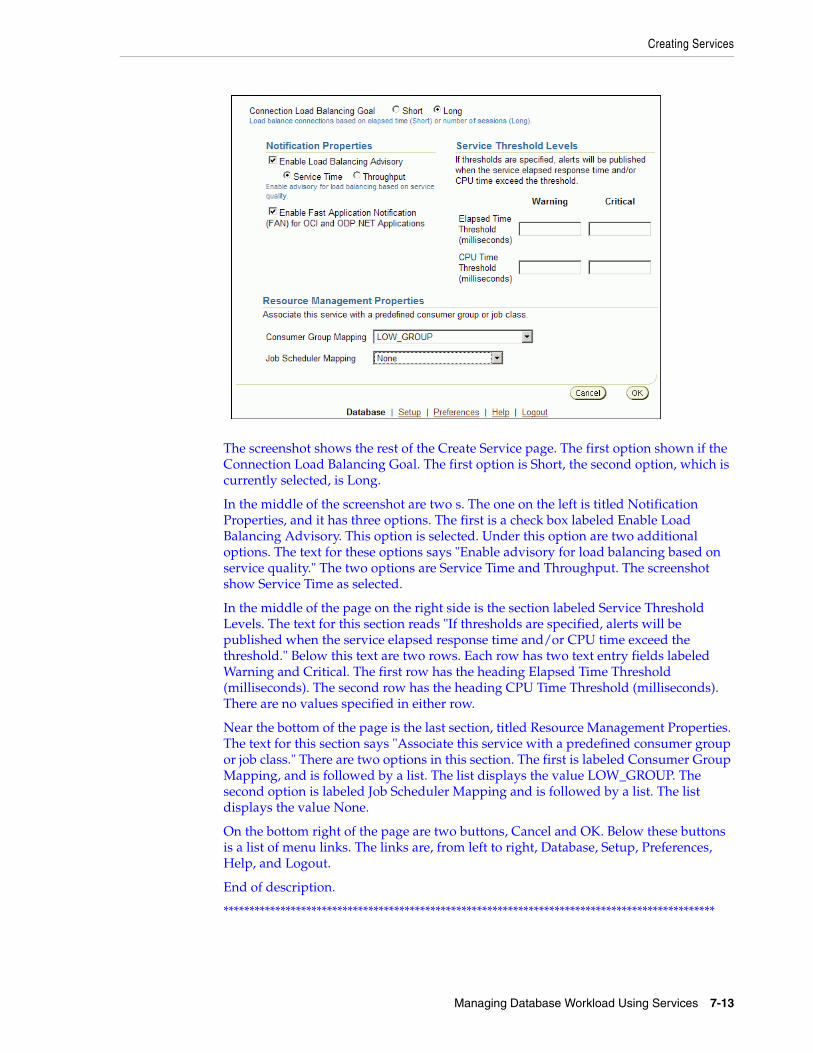
Creating Services
Managing Database Workload Using Services 7-13
The screenshot shows the rest of the Create Service page. The first option shown if the Connection Load Balancing Goal. The first option is Short, the second option, which is currently selected, is Long.
In the middle of the screenshot are two s. The one on the left is titled Notification Properties, and it has three options. The first is a check box labeled Enable Load Balancing Advisory. This option is selected. Under this option are two additional options. The text for these options says "Enable advisory for load balancing based on service quality." The two options are Service Time and Throughput. The screenshot show Service Time as selected.
In the middle of the page on the right side is the section labeled Service Threshold Levels. The text for this section reads "If thresholds are specified, alerts will be published when the service elapsed response time and/or CPU time exceed the threshold." Below this text are two rows. Each row has two text entry fields labeled Warning and Critical. The first row has the heading Elapsed Time Threshold (milliseconds). The second row has the heading CPU Time Threshold (milliseconds). There are no values specified in either row.
Near the bottom of the page is the last section, titled Resource Management Properties. The text for this section says "Associate this service with a predefined consumer group or job class." There are two options in this section. The first is labeled Consumer Group Mapping, and is followed by a list. The list displays the value LOW_GROUP. The second option is labeled Job Scheduler Mapping and is followed by a list. The list displays the value None.
On the bottom right of the page are two buttons, Cancel and OK. Below these buttons is a list of menu links. The links are, from left to right, Database, Setup, Preferences, Help, and Logout.
End of description.
***********************************************************************************************

Creating Services
7-14 Oracle Database 2 Day + Real Application Clusters Guide
9. Select Enable Fast Application Notification under the heading Notification Properties if this service is used by an Oracle Call Interface (OCI) or ODP.NET application, and you want to enable FAN.
10. In the Service Threshold Levels section, you can optionally set the service-level thresholds by entering a value in milliseconds for Warning and Critical thresholds for the Elapsed Time and CPU Time metrics.
11. If you want to use a Resource Plan to control the resources used by this service, select the name of the consumer group from the Consumer Group Mapping list in the Resource Management Properties section. For example, you might choose the LOW_GROUP consumer group to give development users low priority to database resources.
12. If this service is used by a specific Oracle Scheduler job class, you can specify the mapping by selecting the name from the Job Scheduler Mapping list in the Resource Management Properties.
13. Click OK to create the service.
Configuring Oracle Net to Support ServicesAlthough Enterprise Manager configures Oracle Clusterware resources for the newly created service, it does not generate the corresponding entries in your tnsnames.ora file.
To configure Oracle Net Services to support the newly created service:1. Determine if the listener on the local node recognizes the new service by using the
following command:
lsnrctl status
You should see a list for the new service, similar to the following:
Service "DEVUSERS.oracle.com" has 1 instance(s). Instance "sales1", status READY, has 2 handler(s) for this service...
Note: You cannot change the consumer group name for a service on the Edit Service page. This is because there may be several consumer groups associated with a given service. However, the Edit Service page contains a link to the Resource Consumer Group Mapping page, where you can modify the consumer group mapping for the service.
See Also:
■ "About Workload Management"
■ "About Connection Load Balancing"
■ "About the Load Balancing Advisory"
■ "About Fast Application Notification (FAN)"
■ "Configuring Service-Level Thresholds"
■ "Administering Services"
■ Oracle Database Administrator's Guide

Administering Services
Managing Database Workload Using Services 7-15
The displayed name for your newly created service, for example DEVUSERS.oracle.com, is the value you will use for the SERVICE_NAME parameter in the tnsnames.ora file.
2. Use a text editor to modify the tnsnames.ora file in the Oracle_home/network/admin directory on each node that contains an instance listed as a Preferred or Available instance for the service, and on each client that uses the service to connect to the database. Add an entry similar to the following, specifying the VIP address for each node:
DEVUSERS = (DESCRIPTION = (ADDRESS_LIST = Service (ADDRESS = (PROTOCOL = TCP)(HOST = docrac1-vip)(PORT = 1521)) (ADDRESS = (PROTOCOL = TCP)(HOST = docrac2-vip)(PORT = 1521)) (LOAD_BALANCE = yes) ) (CONNECT_DATA = (SERVICE_NAME = DEVUSERS.oracle.com)) )
In the previous example, the ADDRESS_LIST parameter contains one ADDRESS for each node that contains an instance configured as either Preferred or Available for the service.
3. Test the Oracle Net Services configuration by attempting to connect to the Oracle RAC database using SQL*Plus and the service name, for example:
$ sqlplus system@DEVUSERSEnter password: password
After you enter the password, you should see a message indicating you are successfully connected to the Oracle RAC database. If you get an error message, examine the tnsnames.ora file and verify the user name, password, and service name were typed in correctly and all the information is correct for your Oracle RAC environment.
4. Repeat these steps on the other nodes in your cluster that contain instances specified as either Preferred or Available for the newly created service.
Administering ServicesYou can create and administer services using Enterprise Manager. You can also use the DBMS_SERVICE PL/SQL package and the SRVCTL utility to perform most service administration tasks.
The following sections describe how to manage services for your cluster database:
■ About Service Administration Using Enterprise Manager
■ Configuring Service-Level Thresholds
About Service Administration Using Enterprise ManagerThe Cluster Managed Database Services page is the master page for beginning all tasks related to services. To access this page, go to the Cluster Database Maintenance page, then click Cluster Managed Database Services in the Services section. You can use this page and links from this page to do the following:
■ View a list of services for the cluster.
■ View the instances on which each service is currently running.

Administering Services
7-16 Oracle Database 2 Day + Real Application Clusters Guide
■ View the status for each service.
■ Create or edit a service.
■ Start or stop a service.
■ Enable or disable a service.
■ Perform instance-level tasks for a service.
■ Delete a service.
Using the Cluster Managed Database Services PageWhen managing services using Enterprise Manager, you use the Cluster Managed Database Services page.
On the Cluster Managed Database Services page you can perform the following tasks:
■ View a list of services for the cluster, the instances on which each service is currently running, and the status for each service.
■ Start or stop a service, or enable or disable a service.
■ Access the Create Service and Edit Service pages.
■ Access the Services Detail page to perform instance-level tasks for a service.
■ Test the connection for a service.
To access the Cluster Managed Database Services page:1. On the Cluster Database Home page, click the Availability tab.
2. On the Availability subpage, under the Services heading, click Cluster Managed Database Services.
The Cluster and Database Login page appears.
3. Enter credentials for the database and for the cluster that hosts the Oracle RAC database, then click Continue.
The Cluster Managed Database Services page appears and displays the services that are available on the cluster database instances.
Using the Cluster Managed Database Services Detail PageOn the Cluster Managed Database Services detail page for a service you can perform the following tasks:
■ View the status of a service on all of its Preferred and Available instances; the status can be Running, Stopped, or Disabled.
See Also:
■ "Administering Services"
■ "About Oracle Services"
■ "Creating Services"
See Also:
■ "About Service Administration Using Enterprise Manager"
■ "About Oracle Services"
■ "Creating Services"

Administering Services
Managing Database Workload Using Services 7-17
■ Stop or start a service for an instance of a cluster database.
■ Disable or enable a service for an instance of a cluster database.
■ Relocate a service to manually rebalance the services across database instances.
To access the Cluster Managed Database Services detail page:1. On the Cluster Database Home page, click the Availability tab.
2. On the Availability subpage, under the Services heading, click Cluster Managed Database Services.
The Cluster and Database Login page appears.
3. Enter credentials for the database and for the cluster that hosts the Oracle RAC database, then click Continue.
The Cluster Managed Database Services page appears and displays the services that are available on the cluster database instances.
4. Click the name of the service for which you want to view the details.
The Cluster Managed Database Service detail page for that service appears. In the following screenshot, the detail page for the DEVUSERS service is displayed.
The screenshot shows the Cluster Managed Database Service detail page for the DEVUSERS service. The introductory text on this page says "The service has been configured to run on the following instances. A service may have been stopped on an instance if the instance was down or the service was disabled. Starting a service on a down instance will first bring up the down instance."
Below this text is the following information about the service:
■ Service Status: Service is running on all preferred instances.
■ Percent CPU Load (Last 5 Minutes): 0
■ Transparent Application Failover (TAF) Policy: NONE
■ Top Consumers, followed by a link labeled Details.
■ Service Properties, followed by a link labeled Edit.
Below this information is the Instances table. At the top of the table on the right-hand side are buttons labeled Enable, Disable, Start, Stop, and Relocate. The table has 8 columns: Select, Instance Name, Service Status for Instance, Instance Status, Service

Administering Services
7-18 Oracle Database 2 Day + Real Application Clusters Guide
Policy, Response Time (per user call) (microseconds), CPU Time (per user call) (microseconds), and Status Details. There are 2 rows in the table. The rows contain the following values:
■ Selected, sales2, Running, Up (indicated by a green arrow pointing upwards), Preferred, 0, 0, and a green check mark
■ Not selected, sales1, Stopped, Down (indicated by a red arrow pointing downwards), Available, n/a, n/a, and a green check mark
On the top right-hand of the page near the top is the date and the Refresh button.
End of description.
***********************************************************************************************
Configuring Service-Level ThresholdsWhen you create a service, you can specify thresholds for measuring the performance of the service. If the specified threshold value is exceeded by the service, the Automatic Workload Repository (AWR) raises an alert that is displayed by Enterprise Manager.
Performance-related statistics, wait events, and active sessions are monitored at the service level. Also, the AWR enables you to monitor performance using services. It records the service performance, including SQL execution times, wait classes, and resources consumed by a service.
You can specify values for the Elapsed Time Threshold or the CPU Time Threshold when you create a service. You can specify Warning and Critical threshold values for these metrics.
To modify service-level thresholds:1. On the Cluster Database Home page, scroll down to the Instances section.
2. Click the name of the instance for which you want to modify the threshold values for these metrics.
The Cluster Database Instance Home page appears.
3. In the Related Links section at the bottom of the page, click Metric and Policy Settings.
The Metric and Policy Settings page appears.
4. Set the View to All metrics, then locate either the Service Response Time or the Service CPU Time threshold. Click the Edit icon for that threshold.
The Edit Advanced Settings page appears.
5. Enter a threshold value in milliseconds in the Warning Threshold or Critical Threshold field, then click Continue.
The Metric and Policy Settings page appears.
6. Edit the threshold values for another metric, or, if done, click OK.
See Also:
■ "About Service Administration Using Enterprise Manager"
■ "About Oracle Services"
■ "Creating Services"

Configuring Clients for High Availability
Managing Database Workload Using Services 7-19
Configuring Clients for High AvailabilityThere are two central elements to consider when automating failover for application clients. First, clients that are connected at the time of failure must be quickly and automatically notified that a failure has occurred to avoid waiting for TCP/IP network timeouts before attempting to connect to the new production database (such timeouts range anywhere from 8 minutes to 2 hours, depending on operating system). Oracle RAC configurations utilize Fast Application Notification (FAN) to notify JDBC clients, OCI clients, and ODP.NET clients. FAN event notifications and callouts enable automatic and fast redirection of clients in the event of primary site failure.
The second central element of client failover, is the redirection of clients to the new instance after a failover has occurred, which can be implemented using services. When you create services in an Oracle RAC database, if an instance to which you have assigned a service becomes unavailable, Oracle RAC relocates the service to an available instance in the database. Users will be able to access the service independent of the instance providing it because, using listener registration, all listeners in the cluster are aware of which instances are currently providing a service when a connection request comes in.
This section deals with configurating FAN notificaton for application clients, and contains the following topics:
■ Configuring JDBC Clients
■ Configuring OCI Clients
■ Configuring ODP.NET Clients
Configuring JDBC ClientsYour application can use the JDBC development environment for either thick or thin JDBC clients. You must use the JDBC Implicit Connection Cache to enable the FAN features of Fast Connection Failover and Runtime Connection Load Balancing.
The JDBC connection pool subscribes to the FAN Load Balancing events automatically when you configure fast connection failover. Instead of randomly assigning a free connection to a work request, the connection pool chooses the connect that will give the best service according to the latest information it has received. If a node becomes hung, the connection pool gradually shifts connections from the hung node to other nodes in the cluster.
To configure JDBC clients for Fast Connection Failover:1. Use the Cluster Managed Services page in Oracle Enterprise Manager Database
Control or Oracle Enterprise Manager Grid Control to create new services. See "Creating Services" on page 7-10 for more information about creating services.
See Also:
■ "About Oracle Services"
■ "Creating Services"
■ Oracle Database 2 Day DBA
See Also:
■ "About Fast Application Notification (FAN)"
■ "About Oracle Services"

Configuring Clients for High Availability
7-20 Oracle Database 2 Day + Real Application Clusters Guide
2. Enable fast connection failover for JDBC clients by setting the DataSource property FastConnectionFailoverEnabled to TRUE, as demonstrated in the following example:
OracleDataSource ods;ods = new OracleDataSource();...ods.setConnectionCachingEnabled(True);ods.setFastConnectionFailoverEnabled(True);ods.setConnectionCacheName("MyCache");ods.setConnectionCacheProperties(cp);
3. Set the oracle.net.ns.SQLnetDef.TCP_CONNTIMEOUT_STR property to a nonzero value on the data source (not on the implicit connection cache). When this property is set, if the JDBC client attempts to connect to a host that is unavailable, the connection attempt is bounded to the time specified for oracle.net.ns.SQLnetDef.TCP_CONNTIMEOUT_STR. After the specified time has elapsed and a successful connection has not been made, the client attempts to connect to the next host in the address list. Setting this property to a value of 3 seconds is sufficient for most installations.
4. Configure JDBC clients to use a connect descriptor that includes a list of the VIP addresses for each node in the cluster, and that connects to an existing service. The following example is for a two-node Oracle Real Application Clusters (Oracle RAC) cluster:
Sales_JDBC = (DESCRIPTION = (ADDRESS=(PROTOCOL=TCP)(HOST=docrac1_vip)(PORT=1521)) (ADDRESS=(PROTOCOL=TCP)(HOST=docrac2_vip)(PORT=1521)) (LOAD_BALANCE = yes) (CONNECT_DATA = (SERVER = DEDICATED) (SERVICE_NAME = Sales_JDBC) ) )
If you are using a JDBC thin driver, you must include the complete connect descriptor in the URL because the JDBC thin driver does not use Oracle Net.
5. Configure a remote Oracle Notification Services (ONS) subscription on the JDBC client so that an ONS daemon is not required on the client, as in the following example:
ods.setONSConfiguration("docrac1_vip:6200,docrac2_vip:6200");
The remote ONS subscription must contain every host that the client application can use for failover. In addition, use Secure Sockets Layer (SSL) for all ONS communications, as in the following example:
ods.setONSConfiguration("nodes=docrac1_vip:6200,docrac2_vip:6200 walletfile=/mydir/conf/Wallet");
Note: Do not configure Transparent Application Failover (TAF) with Fast Connection Failover for JDBC thick clients as TAF processing will interfere with FAN ONS processing.

Configuring Clients for High Availability
Managing Database Workload Using Services 7-21
6. When starting the JDBC application, ensure the ons.jar file (part of the Oracle Client installation) is located in the application CLASSPATH.
Universal Connection PoolOracle Database 11g (11.1.0.7) includes a new Java connection pool called the Universal Connection Pool (UCP). The Universal Connection Pool is a Java-based connection pool that supports any type of connection (JDBC, LDAP, JCA), to any type of database (Oracle or non-Oracle) with any middle tier (Oracle or non-Oracle). It also supports standalone deployments such as TopLink or BPEL. UCP includes integration features of Oracle Database such as Oracle RAC, including Fast Connection Failover, Runtime Connection Load Balancing, and Connection Affinity for Oracle RAC instances.
To take advantage of FCF and Runtime Connection Load Balancing, you must have both ucp.jar and ons.jar in the application CLASSPATH, and you need to set the UCP Datasource property for FastConnectionFailoverEnabled and ONSConfiguration as shown in the following code example:
PoolDataSource pds = PoolDataSourceFactory.getPoolDataSource();Pds.setConnnectionPoolName(“FCFSampleUCP”);pds.setONSConfiguration(“nodes=docrac1:4200,docrac2:4200”);pds.setFastConnectionFailoverEnabled(true);pds.setConnectionFactoryClassName(“oracle.jdbc.pool.OracleDataSource”);pds.setURL(“jdbc:oracle:thin:@DESCRIPTION= (LOAD_BALANCE=on) (ADDRESS=(PROTOCOL=TCP)(HOST=host1)(PORT=1521)) (ADDRESS=(PROTOCOL=TCP)(HOST=host2)(PORT=1521)) (ADDRESS=(PROTOCOL=TCP)(HOST=host3)(PORT=1521)) (ADDRESS=(PROTOCOL=TCP)(HOST=host4)(PORT=1521)) (CONNECT_DATA=(SERVICE_NAME=service_name)))”);
Configuring OCI ClientsThe Oracle Call Interface (OCI) provides integration with FAN and Load Balancing Advisory events. To take advantage of the Load Balancing Advisory, you need to enable the OCI Session pool. OCI clients can register to receive notifications about Oracle RAC high availability events and respond when events occur. This improves the connection failover response time in OCI and also removes terminated connections from connection and session pools. This feature works for all OCI client applications.
See Also:
■ "Creating Services"
■ "About Fast Application Notification (FAN)"
■ "Configuring Clients for High Availability"
■ Oracle Database JDBC Developer's Guide and Reference for more information about fast connection failover and configuring ONS
■ Oracle Database 2 Day + Java Developer's Guide for information about creating a method to authenticate users
■ Oracle Real Application Clusters Administration and Deployment Guide for information about configuring client failover
See Also: Oracle Universal Connection Pool for JDBC Developer's Guide for more information

Configuring Clients for High Availability
7-22 Oracle Database 2 Day + Real Application Clusters Guide
To configure OCI clients to receive FAN notifications:1. Use the Cluster Managed Services page in Oracle Enterprise Manager Database
Control or Oracle Enterprise Manager Grid Control to a create services for the OCI clients. See "Creating Services" on page 7-10 for more information about creating services.
You should configure the primary instance as preferred for that service. Under Service Properties, set the Transparent Application Failover Policy to Basic. For Notification Properties, choose "Enable Fast Application Notification for OCI and ODP.NET Applications".
See "Administering Services" on page 7-15 for more information about modifying services using Enterprise Manager.
2. Enable FAN for OCI clients by initializing the environment with the OCI_EVENTS parameter, as in the following example:
OCIEnvCreate(...OCI_EVENTS...)
3. Link the OCI client applications with thread library libthread or libpthread.
4. In your application, you will need to check if an event has occured, using code similar to the following example:
void evtcallback_fn(ha_ctx, eventhp)... printf("HA Event received.\n"); if (OCIHandleAlloc( (dvoid *)envhp, (dvoid **)&errhp, (ub4) OCI_HTYPE_ERROR, (size_t) 0, (dvoid **) 0)) return; if (retcode = OCIAttrGet(eventhp, OCT_HTYPE_EVENT, (dvoid *)&srvhp, (ub4 *)0, OCI_ATTR_HA_SRVFIRST, errhp)) checkerr (errhp, (sword)retcode; else { printf("found first server handle.\n"); /*get associated instance name */ if (retcode = OCIAttrGet(srvhp, OCI_HTYPE_SERVER, (dvoid *)&instname, (ub4 *)&sizep, OCI_ATTR_INSTNAME, errhp)) checkerr (errhp, (sword)retcode); else printf("instance name is %s.\n", instname);
5. After a HA event is received, clients and applications can register a callback that is invoked whenever a high availability event occurs, as shown in the following example:
/*Registering HA callback function */ if (checkerr(errhp, OCIAttrSet(envhp, (ub4) OCI_HTYPE_ENV, (dvoid *)evtcallback_fn, (ub4) 0, (ub4)OCI_ATTR_EVTCBK, errhp))) { printf("Failed to set register EVENT callback.\n"); return EX_FAILURE; } if (checkerr(errhp, OCIAttrSet(envhp, (ub4) OCI_HTYPE_ENV, (dvoid *)evtctx, (ub4) 0, (ub4)OCI_ATTR_EVTCTX, errhp))) { printf("Failed to set register EVENT callback context.\n"); return EX_FAILURE; }return EX_SUCCESS;

Configuring Clients for High Availability
Managing Database Workload Using Services 7-23
After registering an event callback and context, OCI will call the registered function once for each high availability event.
Configuring ODP.NET ClientsOracle Data Provider for .NET (ODP.NET) connection pools subscribe to FAN notifications from Oracle RAC that indicate when nodes are down and when services are up or down. Based on these notifications, ODP.NET connection pools make idle connections, connections that were previously connected to node that failed, available again. It also creates new connections to healthy nodes if possible.
ODP.NET provides Runtime Connection Load Balancing to provide enhanced load balancing of the application workload. Instead of randomly selecting an available conenction from the connection pool, it will choose the connection that will provide the best service based on the current workload information.
The procedures for enabling ODP.NET are similar to the procedures for enabling JDBC in that you must set parameters in the connection string to enable FCF. This section explains how to configure Oracle Data Provider for .NET (ODP.NET) clients for failover using FAN events.
To configure ODP.NET clients to receive FAN notifications:1. Use the Cluster Managed Services page in Oracle Enterprise Manager Database
Control or Oracle Enterprise Manager Grid Control to a create services for the ODP.NET clients. See "Creating Services" on page 7-10 for more information about creating services.
You should configure the primary instance as preferred for that service. Under Service Properties, set the Transparent Application Failover Policy to Basic. For Notification Properties, choose "Enable Fast Application Notification for OCI and ODP.NET Applications". Set the Connection Load Balancing Goal to Long.
2. Enable Fast Connection Failover for ODP.NET connection pools by subscribing to FAN high availability events. Do this by setting the ha events connection string attribute to true either at connection time or in the data source definition. Note that this only works if you are using connection pools (the pooling attribute is set to true).
You can also enable Runtime Connection Load Balancing by setting the load balancing connection string attribute to true.
Use code similar to the following, where username is the name of the database user to which you connect, password is the database password for that user, and the service name is odpserv:
See Also:
■ "Creating Services"
■ "About Fast Application Notification (FAN)"
■ "Configuring Clients for High Availability"
■ Oracle Call Interface Programmer's Guide for more information about event notification and user-registered callbacks
■ Oracle Real Application Clusters Administration and Deployment Guide for more information about configuring fast application notification for OCI clients.

Configuring Clients for High Availability
7-24 Oracle Database 2 Day + Real Application Clusters Guide
// C#using System;using Oracle.DataAccess.Client;class HAEventEnablingSample{ static void Main() { OracleConnection con = new OracleConnection();
// Open a connection using connection pooling // Also, enable "load balancing" con.ConnectionString = "User Id=username;Password=password;Data Source=odpserv;" + "Min Pool Size=10;Connection Lifetime=120;Connection Timeout=60;" + "HA Events=true";"Incr Pool Size=5;Decr Pool Size=2";
con.Open(); // Carry out work against the database here. con.Close(); // Dispose OracleConnection object con.Dispose(); } }
3. The HA events are published as messages in the SYS.SYS$SERVICE_METRICS queue. You must grant dequeue permission on this queue to the database user that the application uses to connect to the database.
Use a command similar to the following, where username represents the database user that the .NET application uses to connect to the database:
executedbms_aqadm.grant_queue_privilege('DEQUEUE','SYS.SYS$SERVICE_METRICS', username);
The username specified in this step is the same as the username used for the User Id argument in the previous step.
See Also:
■ "Creating Services"
■ "About Fast Application Notification (FAN)"
■ "Configuring Clients for High Availability"
■ Oracle Data Provider for .NET Developer's Guide for more information about event notification and user-registered callbacks
■ Oracle Real Application Clusters Administration and Deployment Guide for more information about configuring fast application notification for ODP.NET clients.

Monitoring Performance and Troubleshooting 8-1
8Monitoring Performance and
Troubleshooting
Performance tuning for an Oracle Real Application Clusters (Oracle RAC) database is very similar to performance tuning for a single-instance database. Many of the tuning tasks that you perform on single-instance Oracle databases can also improve performance of your Oracle RAC database. This chapter focuses on the performance tuning and monitoring tasks that are unique to Oracle RAC.
This chapter includes the following sections:
■ About Monitoring Oracle RAC Database and Cluster Performance
■ Viewing Other Performance Related Charts
■ Viewing the Cluster Database Topology
■ Monitoring Oracle Clusterware
■ Troubleshooting Configuration Problems in Oracle RAC Environments
About Monitoring Oracle RAC Database and Cluster PerformanceBoth Oracle Enterprise Manager Database Control and Oracle Enterprise Manager Grid Control are cluster-aware and provide a central console to manage your cluster database.
From the Cluster Database Home page, you can do all of the following:
■ View the overall system status, such as the number of nodes in the cluster and their current status. This high-level view capability means that you do not have to access each individual database instance for details if you just want to see inclusive, aggregated information.
See Also:
■ Oracle Database 2 Day DBA for more information about basic database tuning
■ Oracle Database 2 Day + Performance Tuning Guide for more information about general performance tuning
■ Oracle Real Application Clusters Administration and Deployment Guide for more information about diagnosing problems for Oracle Real Application Clusters components
■ Oracle Clusterware Administration and Deployment Guide for more information about diagnosing problems for Oracle Clusterware components

About Monitoring Oracle RAC Database and Cluster Performance
8-2 Oracle Database 2 Day + Real Application Clusters Guide
■ View alert messages aggregated across all the instances with lists for the source of each alert message. An alert message is an indicator that signifies that a particular metric condition has been encountered. A metric is a unit of measurement used to report the system's conditions.
■ Review issues that are affecting the entire cluster as well as those that are affecting individual instances.
■ Monitor cluster cache coherency statistics to help you identify processing trends and optimize performance for your Oracle RAC environment. Cache coherency statistics measure how well the data in caches on multiple instances is synchronized. If the data caches are completely synchronized with each other, then reading a memory location from the cache on any instance will return the most recent data written to that location from any cache on any instance.
■ Determine if any of the services for the cluster database are having availability problems. A service is deem to be a problem service if it is not running on all preferred instances, if it's response time thresholds are not met, and so on. Clicking on the link on the Cluster Database Home page will open the Cluster Managed Database services page where the service can be managed.
■ Review any outstanding Clusterware interconnect alerts.
Also note the following points about monitoring Oracle RAC environments:
■ Performance monitoring features, such as Automatic Workload Repository (AWR) and Statspack, are Oracle RAC-aware.
■ You can use global dynamic performance views, or GV$ views, to view statistics across instances. These views are based on the single-instance V$ views.
This section contains the following topics:
■ Automatic Database Diagnostic Monitor and Oracle RAC Performance
■ Viewing ADDM for Oracle RAC Findings
■ About the Cluster Database Performance Page
Automatic Database Diagnostic Monitor and Oracle RAC PerformanceThe Automatic Database Diagnostic Monitor (ADDM) is a self-diagnostic engine built into the Oracle Database. ADDM examines and analyzes data captured in the Automatic Workload Repository (AWR) to determine possible performance problems in Oracle Database. ADDM then locates the root causes of the performance problems, provides recommendations for correcting them, and quantifies the expected benefits. ADDM analyzes the AWR data for performance problems at both the database and the instance level.
An ADDM analysis is performed as each AWR snapshot is generated, which is every hour by default. The results are saved in the database and can be viewed by using Enterprise Manager. Any time you have a performance problem, you should first review the results of the ADDM analysis. An ADDM analysis is performed from the
Note: Instead of using Statspack, Oracle recommends that you use the more sophisticated management and monitoring features of the Oracle Database 11g Diagnostic and Tuning packs, which include AWR

About Monitoring Oracle RAC Database and Cluster Performance
Monitoring Performance and Troubleshooting 8-3
top down, first identifying symptoms, then refining the analysis to reach the root causes, and finally providing remedies for the problems.
For the cluster-wide analysis, Enterprise Manager reports two types of findings:
■ Database findings: An issue that concerns a resource that is shared by all instances in the cluster database, or an issue that affects multiple instances. An example of a database finding is I/O contention on the disk system used for shared storage.
■ Instance findings: An issue that concerns the hardware or software that is available for only one instance, or an issue that typically affects just a single instance. Examples of instance findings are high CPU load or sub-optimal memory allocation.
The screenshot shows the ADDM Performance Analysis section of the Cluster Database Instance home page. In this image there are 2 findings:
■ Top SQL by DB Time, with an Impact of 87.4%, and an occurrence rate of 1 of 6 times in the last 24 hours
■ Row Lock Waits, with an Impact of 87.2%, affecting 1 of 2 instances, and having an occurrence rate of 1 of 6 times in the last 24 hours
***********************************************************************************************
ADDM reports only the findings that are significant, or findings that take up a significant amount of instance or database time. Instance time is the amount of time spent using a resource due to a performance issue for a single instance and database time is the sum of time spent using a resource due to a performance issue for all instances of the database, excluding any Automatic Storage Management (ASM) instances.
An instance finding can be reported as a database finding if it relates to a significant amount of database time. For example, if one instance spends 900 minutes using the CPU, and the sum of all time spent using the CPU for the cluster database is 1040 minutes, then this finding would be reported as a database finding because it takes up a significant amount of database time.
A problem finding can be associated with a list of recommendations for reducing the impact of the performance problem. Each recommendation has a benefit that is an estimate of the portion of database time that can be saved if the recommendation is implemented. A list of recommendations can contain various alternatives for solving the same problem; you do not have to apply the recommendations.
Recommendations are composed of actions and rationales. You must apply all the actions of a recommendation to gain the estimated benefit of that recommendation. The rationales explain why the actions were recommended, and provide additional information to implement the suggested recommendation.

About Monitoring Oracle RAC Database and Cluster Performance
8-4 Oracle Database 2 Day + Real Application Clusters Guide
Viewing ADDM for Oracle RAC FindingsBy default, ADDM runs every hour to analyze snapshots taken by the AWR during that period. If the database finds performance problems, then it displays the results of the analysis under Diagnostic Summary on the Cluster Database Home page. The ADDM Findings link shows how many ADDM findings were found in the most recent ADDM analysis.
ADDM for Oracle RAC can be accessed in Enterprise Manager by the following methods:
■ On the Cluster Database Home Page, under Diagnostic Summary, click the ADDM Findings Link.
■ On the Cluster Database Performance, click the camera icons at the bottom of the Active Sessions Graph.
■ In the Related Links section on the Cluster Database Home page or the Performance, click Advisor Central. On the Advisor Central page, select ADDM. Choose the option Run ADDM to analyze past performance and specify an appropriate time period, then click OK.
To view ADDM findings from the Cluster Database Home page:1. On the Cluster Database Home page, under Diagnostic Summary, if a nonzero
number is displayed next to ADDM Findings, then click this link.
The screenshot shows the Diagnostic Summary section of the Cluster Database Home page. The Diagnostic Summary section displays the following information:
■ Interconnect Alerts : 0
■ ADD Findings : 2
■ Period Start Time : Jun 29, 2007 11:40:20 AM
■ Active Incidents: 0
End of description.
***********************************************************************************************
You can also view the ADDM findings per instance by viewing the Instances table on the Cluster Database Home page.
See Also:
■ "About Monitoring Oracle RAC Database and Cluster Performance"
■ "About Workload Management"
■ Oracle Database 2 Day + Performance Tuning Guide for more information about configuring and using AWR and ADDM
■ Oracle Database Performance Tuning Guide for more information about Automatic Database Diagnostic Monitor

About Monitoring Oracle RAC Database and Cluster Performance
Monitoring Performance and Troubleshooting 8-5
The screenshot shows the Instances table from the Cluster Database home page. There are 2 instances. The column headings in the table are, from left to right: Name (of the instance), Status, Alerts, Policy Violations, Compliance Score, ASM Instance, and ADDM Findings. The rows in the table contain the following data:
■ sales.us.oracle.com_sales1, UP, 0 critical alerts and 1 warning, 2 critical, 55 warning, and 1 informational policy violations, a 95 percent compliance score, +ASM2_pmrac2.us.oracle.com, with a status of UP and no alerts or warnings, and 2ADDM findings
■ sales.us.oracle.com_sales2, UP, 0 critical alerts and 2 warnings, 2 critical, 55 warning, and 1 informational policy violations, a 95 percent compliance score, +ASM1_pmrac1.us.oracle.com, with a status of UP and no alerts or warnings, and no ADDM findings
***********************************************************************************************
When you select the number of ADDM Findings, the Automatic Database Diagnostic Monitor (ADDM) page for the cluster database appears.
2. Review the results of the ADDM run.
The screenshot shows the Automatic Database Diagnostic Monitor (ADDM) page. At the top of the page on the right-hand side is the refresh date, Jun 29, 2007 7:24:39 PM PDT, followed by a Refresh button,

About Monitoring Oracle RAC Database and Cluster Performance
8-6 Oracle Database 2 Day + Real Application Clusters Guide
The first section on this page is the Database Activity section. This section contains a chart that graphs the number of active sessions over time. The time values range from 5:43 to 7:20, in 10 minute increments. There are three types of activity shown in the chart: Waits, User I/O, and CPU. In the chart, only Wait has a value above zero.
The next section on the page is the ADDM Performance Analysis. At the top of this section, under the title, is the Task Name, which is ADDM:499723071_8 in this image. On the right-hand side of the page are 3 buttons: Filters, View Snapshots, and View Report. Information about the task is then displayed. The information shown in this screenshot is:
■ Task Owner: SYS
■ Average Active Sessions: 0.7
■ Period Start Time: Jun 29, 2007 11:48:20 AM PDT
■ Period Duration (minutes): 11.8
■ Instance: sales.us.oracle.com
Next is the chart of ADDM Findings. There are 2 findings in this table. They are:
■ Top SQL by DB Time, with an impact of 87.4 percent, occurring in 2 out of 7 snapshots taken in the last 24 hours
■ Row Lock Waits, with an impact of 87.2 percent, affecting 1 of 2 instances, and occurring in 2 out of 7 snapshots collected in the last 24 hours
The next section on the page is the Informational Findings section. This is a list of findings, which is not expanded in this screenshot.
The next section displayed is the Affected Instances section, which contains a table of the available instances, the percentage to which each instance is affected, and the status of that instance. In this screenshot, the following information is displayed:
End of description.
■ Instance sales.us.oracle.com_sales1 has a 96.4 percent impact and a status of Analyzed
■ Instance sales.us.oracle.com_sales2 has a 3.6 percent impact and a status of Analyzed
End of description.
***********************************************************************************************
On the Automatic Database Diagnostic Monitor (ADDM) page, the Database Activity chart shows the database activity during the ADDM analysis period. Database activity types are defined in the legend based on its corresponding color in the chart. Each icon below the chart represents a different ADDM task, which in turn corresponds to a pair of individual Oracle Database snapshots saved in the Workload Repository.
In the ADDM Performance Analysis section, the ADDM findings are listed in descending order, from highest impact to least impact. The Informational Findings section lists the areas that do not have a performance impact and are for informational purpose only.
The Affected Instances chart shows how much each instance is impacted by these findings.
3. (Optional) Click the Zoom icons to shorten or lengthen the analysis period displayed on the chart.

About Monitoring Oracle RAC Database and Cluster Performance
Monitoring Performance and Troubleshooting 8-7
4. (Optional) To view the ADDM findings in a report, click View Report.
The View Report page appears.
You can click Save to File to save the report for later access.
5. On the ADDM page, in the Affected Instances table, click the link for the instance associated with the ADDM finding that has the largest value for Impact.
The Automatic Database Diagnostic Monitor (ADDM) page for that instance appears.
6. In the ADDM Performance Analysis section, select the name of a finding.
The Performance Findings Detail page appears.
7. View the available Recommendations for resolving the performance problem. Run the SQL Tuning Advisor to tune the SQL statements that are causing the performance findings.
About the Cluster Database Performance PageThe Cluster Database Performance page provides a quick glimpse of the performance statistics for a database. Enterprise Manager accumulates data from each instance over specified periods of time, called collection-based data. Enterprise Manager also provides current data from each instance, known as real-time data.
Statistics are rolled up across all the instances in the cluster database. Using the links next to the charts, you can get more specific information and perform any of the following tasks:
■ Identify the causes of performance issues.
■ Decide whether resources need to be added or redistributed.
■ Tune your SQL plan and schema for better optimization.
■ Resolve performance issues.
The following screenshot shows a partial view of the Cluster Database Performance page. You access this page by clicking the Performance tab from the Cluster Database Home page.

About Monitoring Oracle RAC Database and Cluster Performance
8-8 Oracle Database 2 Day + Real Application Clusters Guide
The screenshot shows the top portion of the Cluster Database Performance page, which contains from top to bottom the Cluster Host Load Average, Global Cache Block Access Latency, Average Active Sessions, and Database Throughput charts. Each chart has a title on the top left side of the chart, axis labels, a date at the bottom left side of the chart, and a legend box to the right of the chart. On each chart, the horizontal axis shows the time in five minute increments. Each chart has different lines on it to represent different performance statistics measured.
The Cluster Host Load Average chart has the label Runnable processes for the vertical axis. The legend for this chart lists Maximum, Average, and Minimum.
The Global Cache Block Access Latency chart has the label Milli-Seconds for the vertical axis. The legend for this chart lists Average Current Block Receive Time and Average CR Block Receive Time.
The Average Active Sessions chart has the label Active Sessions for the vertical axis. The legend for this chart lists Other, Cluster, Queueing, Network, Administrative, Configuration, Commit, Application, Concurrency, System I/O, User I/O, Scheduler, and CPU Used. The majority of the data on the chart is for the Other category, which is colored bright pink and fluctuates around the 2.0 mark.
The Database Throughput chart, of which only half is shown, has the label Per Second for the vertical axis. The legend for this chart lists Logons and Transactions. There is an option to change the vertical axis to display Per Transaction. At the top of the chart are the following tabs: I/O, Parallel Execution, Services, and Instances.
The text following the screenshot provides a description of the charts in a table, and lists the additional monitoring links that are available at the bottom of the Performance page, but not shown in the screenshot.

About Monitoring Oracle RAC Database and Cluster Performance
Monitoring Performance and Troubleshooting 8-9
End of description.
***********************************************************************************************
The charts on the Performance page are described in the following sections:
■ Viewing the Chart for Cluster Host Load Average
■ Viewing the Chart for Global Cache Block Access Latency
■ Viewing the Chart for Average Active Sessions
■ Viewing the Database Throughput Chart
Viewing the Chart for Cluster Host Load Average The Cluster Host Load Average chart in the Cluster Database Performance page shows potential problems that are outside the database. The chart shows maximum, average, and minimum load values for available nodes in the cluster for the previous hour.
If the load average is higher than the average of the total number of CPUs across all the hosts in the cluster, then too many processes are waiting for CPU resources. SQL statements that are not tuned often cause high CPU usage. Compare the load average values with the values displayed for CPU Used in the Average Active Sessions chart. If the sessions value is low and the load average value is high, then this indicates that something else on the host, other than your database, is consuming the CPU.
You can click any of the load value labels for the Cluster Host Load Average chart to view more detailed information about that load value. For example, if you click the label Average, the Hosts: Average Load page appears, displaying charts that depict the average host load for up to four nodes in the cluster.
You can select whether the data is displayed in a summary chart, combining the data for each node in one display, or using tile charts, where the data for each node is displayed in its own chart. You can click Customize to change the number of tile charts displayed in each row or the method of ordering the tile charts.
For more information about changing the data displayed on the Hosts: Average Load page, refer to the Enterprise Manager online Help.
Viewing the Chart for Global Cache Block Access Latency Each cluster database instance has its own buffer cache in its System Global Area (SGA). Using Cache Fusion, Oracle RAC environments logically combine each instance's buffer cache to enable the database instances to process data as if the data resided on a logically combined, single cache.
When a process attempts to access a data block, it first tries to locate a copy of the data block in the local buffer cache. If a copy of the data block is not found in the local buffer cache, a global cache operation is initiated. Before reading a data block from disk, the process attempts to find the data block in the buffer cache of another instance. If the data block is in the buffer cache of another instance, Cache Fusion transfers a version of the data block to the local buffer cache, rather than having one database instance write the data block to disk and requiring the other instance to reread the data block from disk. For example, after the sales1 instance loads a data block into its buffer cache, the sales2 instance can more quickly acquire the data block from the sales1 instance by using Cache Fusion rather than by reading the data block from disk.
The Global Cache Block Access Latency chart shows data for two different types of data block requests: current and consistent-read (CR) blocks. When you update data in the database, Oracle Database must locate the most recent version of the data block

About Monitoring Oracle RAC Database and Cluster Performance
8-10 Oracle Database 2 Day + Real Application Clusters Guide
that contains the data, which is called the current block. If you perform a query, only data committed before the query began is visible to the query. Data blocks that were changed after the start of the query are reconstructed from data in the undo segments, and the reconstructed data is made available to the query in the form of a consistent-read block.
The Global Cache Block Access Latency chart on the Cluster Database Performance page shows the latency for each type of data block request, that is the elapsed time it takes to locate and transfer consistent-read and current blocks between the buffer caches.
You can click either metric for the Global Cache Block Access Latency chart to view more detailed information about that type of cached block. For example, if you click the metric Average Current Block Receive Time, the Average Current Block Receive Time by Instance page appears, displaying a summary chart that depicts the average current block receive time for up to four nodes in the cluster. You can select whether the data is displayed in a summary chart or using tile charts. If you choose Summary chart, then, by default, the instances with the 4 highest receive times are displayed. If you choose Tile charts, then the data for each node is displayed in its own chart. You can customize which nodes are displayed in either the Summary or Tile chart display.
Also, on the Average Current Block Receive Time By Instance page or the Cluster Cache Coherency page, you can use the slider bar on the Active Session History chart to focus on a 5 minute window (time period) within the past 1 hour. This enables you to identify the top sessions, services, modules, actions, or SQL statements that were running during a period of high cache coherency activity.
At the top of the page, you can use the Metric list to change the metric displayed. The choices are:
■ Average CR Block Receive Time
■ Average Current Block Receive Time
■ GC Current Blocks Received
■ GC CR Blocks Received
■ Physical Reads
■ Global Cache Block Transfers
Each metric displays a monitoring page for that metric. On each metric monitoring page you can view the data for that metric in either a summary chart or using tile charts. You can also view the Maximum, Average, Minimum chart on the metric monitoring page to view the maximum, average, and minimum values for the metric for all active cluster database instances.

About Monitoring Oracle RAC Database and Cluster Performance
Monitoring Performance and Troubleshooting 8-11
The screenshot shows the Average CR Block Receive Time By Instance page, which contains two charts: Summary chart on the top, Maximum, Average, and Minimum chart on the bottom. Each chart has a title on the top left side of the chart, axis labels, a date at the bottom of the chart, and a legend box to the right of the chart. On each chart, the horizontal axis shows the time in ten minute increments. The Summary chart uses shaded areas to represent each instance, and the Maximum, Average, and Minimum chart uses lines to represent the different values.
The Summary chart has the label Milli-Seconds for the vertical axis. The legend for this chart lists the name of the two available instances, test1 and test2.
The Maximum, Average, Minimum chart has the numbers 0, 100, 200, and 300 for the vertical axis. The legend for this chart lists Maximum, Average, and Minimum.
In the top-left corner of the page is the Metric list, which can be used to change the metric displayed on the page. Currently it is set to Average CR Block Receive Time. Below this list are two options: Tile Chart and Summary Chart. Currently the option Summary Chart is selected.
In the top-right corner of the page is the View Data list, which is currently set to Real Time: 15 Second Refresh. Below this list is the Customize button.
End of description.
***********************************************************************************************
If the Global Cache Block Access Latency chart shows high latencies (high elapsed times), this can be caused by any of the following:
■ A high number of requests caused by SQL statements that are not tuned.
■ A large number of processes in the queue waiting for the CPU, or scheduling delays.
■ Slow, busy, or faulty interconnects. In these cases, check your network connection for dropped packets, retransmittals, or cyclic redundancy check (CRC) errors.
Concurrent read and write activity on shared data in a cluster is a frequently occurring activity. Depending on the service requirements, this activity does not usually cause performance problems. However, when global cache requests cause a performance problem, optimizing SQL plans and the schema to improve the rate at which data

About Monitoring Oracle RAC Database and Cluster Performance
8-12 Oracle Database 2 Day + Real Application Clusters Guide
blocks are located in the local buffer cache, and minimizing I/O is a successful strategy for performance tuning. If the latency for consistent-read and current block requests reaches 10 milliseconds, then your first step in resolving the problem should be to go to the Cluster Cache Coherency page for more detailed information.
Viewing the Chart for Average Active Sessions The Average Active Sessions chart in the Cluster Database Performance page shows potential problems inside the database. Categories, called wait classes, show how much of the database is using a resource, such as CPU or disk I/O. Comparing CPU time to wait time helps to determine how much of the response time is consumed with useful work rather than waiting for resources that are potentially held by other processes.
The chart displays the workload on the database or instance and identifies performance issues. At the cluster database level, this chart shows the aggregate wait class statistics across all the instances. For a more detailed analysis, you can click the clipboard icon at the bottom of the chart to view the ADDM analysis for the database for that time period.
Compare the peaks on the Average Active Sessions chart with those on the Database Throughput charts. If the Average Active Sessions chart displays a large number of sessions waiting, indicating internal contention, but throughput is high, then the situation may be acceptable. The database is probably also performing efficiently if internal contention is low but throughput is high. However, if internal contention is high and throughput is low, then consider tuning the database.
If you click the wait class legends beside the Average Active Sessions chart, you can view instance-level information stored in Active Sessions by Instance pages. You can use the Wait Class action list on the Active Sessions by Instance page to view the different wait classes. The Active Sessions by Instance pages show the service times for up to four instances. Using the Customize button you can select the instances that are displayed. You can view the data for the instances separately using tile charts, or you can combine the data into a single summary chart.
The screenshot shows the Active Sessions By Instance: CPU Used page. At the top of the page, under the title on the left-hand side, is the Wait Class action list. The value CPU Used is selected. Below this list are two options: Summary Chart and Tile Chart (selected). At the top of the page, on the right-hand side is the View Data list, with the

About Monitoring Oracle RAC Database and Cluster Performance
Monitoring Performance and Troubleshooting 8-13
value Real Time: 15 Second Refresh selected. Below this list is a button labeled Customize.
There are 2 charts displayed on the page, side by side. There is one chart for each instance. Only the chart for sales1 shows any activity.
Below the charts is the Instances Data table. The table has 2 rows, and 4 columns. The column names are, from left to right: Instance Name, Current Value, Average Over Last Hour, and Maximum Over Last Hour. The rows in the table contain the following values:
■ sales1 (hyperlinked), 0.02, 0.52, 3.87
■ sales2 (hyperlinked), 0.02, 0.01, 0.10
End of description.
***********************************************************************************************
If you need to diagnose and fix problems that are causing the higher number of wait events in a specific category, you can select an instance of interest and view the wait events, as well as the SQL, sessions, services, modules, and actions that are consuming the most database resources.
Viewing the Database Throughput ChartThe last chart on the Performance page monitors the usage of various database resources. By clicking the Throughput tab at the top of this chart you can view the Database Throughput chart.
The Database Throughput charts summarize any resource contention that appears in the Average Active Sessions chart, and also show how much work the database is performing on behalf of the users or applications. The Per Second view shows the number of transactions compared to the number of logons, and the amount of physical reads compared to the redo size per second. The Per Transaction view shows the amount of physical reads compared to the redo size per transaction. Logons is the number of users that are logged on to the database.
You can also obtain information at the instance level by clicking one of the legends to the right of the charts to access the Database Throughput by Instance page. This page shows the breakdown of the aggregated Database Throughput chart for up to four instances. Using the Customize button you can select the instances that are displayed. You can view the data for the instances separately using tile charts, or you can combine the data into a single summary chart. You can use this page to view the throughput for a particular instance, which may help you diagnose throughput problems.
You can drill down further on the Database Throughput by Instance page to see the sessions of an instance consuming the greatest resources. Click an instance name legend just under the chart to go to the Top Sessions subpage of the Top Consumers page for that instance.
See Also:
■ "About Monitoring Oracle RAC Database and Cluster Performance"
■ "About Oracle Clusterware and Oracle Real Application Clusters"
■ Oracle Database 2 Day + Performance Tuning Guide
■ Oracle Database 2 Day DBA for more information about tuning a database and instance

About Monitoring Oracle RAC Database and Cluster Performance
8-14 Oracle Database 2 Day + Real Application Clusters Guide
The screenshot shows the Top Consumers page. There are 6 subtabs on this page: Overview, Top Services, Top Modules, Top Actions, Top Clients, and Top Sessions (selected).
At the top of the Top Sessions subpage are 4 buttons. They are labeled, from left to right: Kill Session, View, Disable SQL Trace, and Enable SQL Trace. Below these buttons is the table of the top sessions in the database instance.
The portion of the table displayed has 13 columns and 6 rows. The columns are labeled, from left to right: Select, SID, DB User, CPU (1/100 sec), PGA Memory (bytes), Physical Reads, Logical Reads, Hard Parses, Total Parses, Disk Sorts, user commits, Status, and Program.
The first row in the table is selected. The SID is 52 (hyperlinked). The CPU is 0 and the PGA Memory is 1802544 bytes. It has 0 physical reads and 1273089 logical reads. It has no hard parses, total parses, disk sorts, or user commits. Its status is ACTIVE, and the program is [email protected] (TNS V1-V3). The other rows in the table contain similar data.
End of description.
***********************************************************************************************
For more information about the information on this page, refer to the Enterprise Manager Help system.
Viewing the Services ChartThe last chart on the Performance page monitors the usage of various database resources. By clicking the Services tab at the top of this chart you can view the Services chart.
See Also:
■ "About Monitoring Oracle RAC Database and Cluster Performance"
■ "About Oracle Clusterware and Oracle Real Application Clusters"
■ Oracle Database 2 Day + Performance Tuning Guide
■ Oracle Database 2 Day DBA for more information about tuning a database and instance
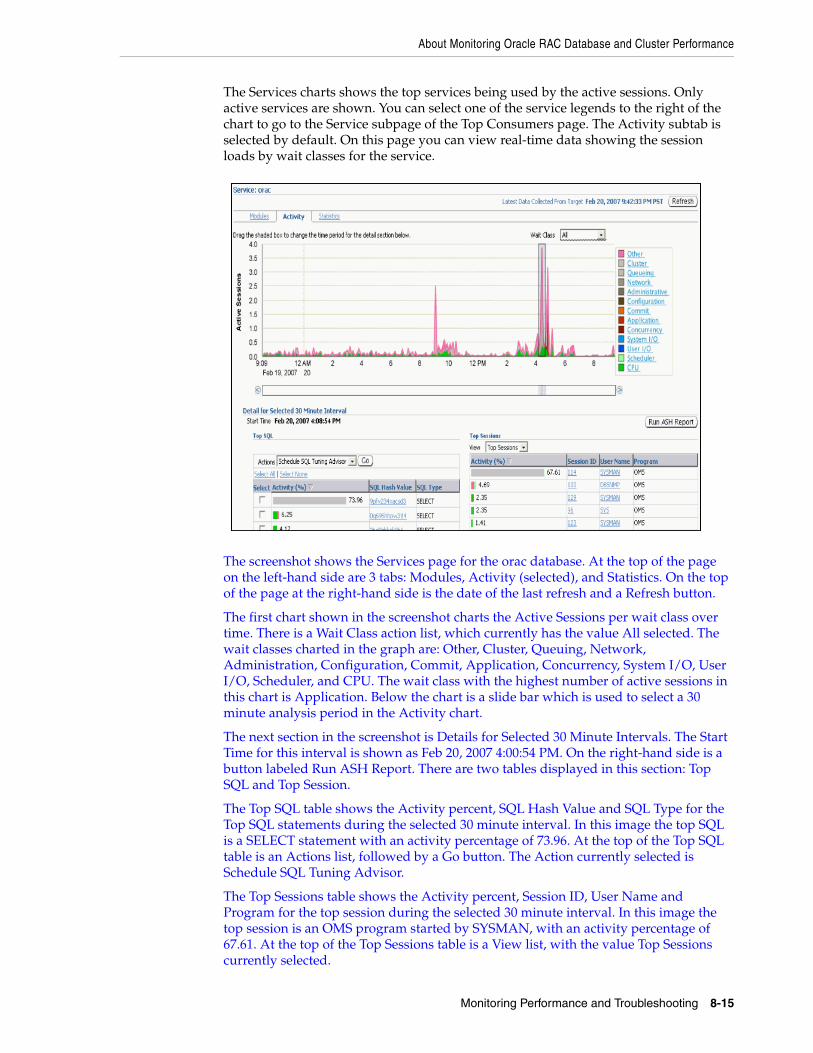
About Monitoring Oracle RAC Database and Cluster Performance
Monitoring Performance and Troubleshooting 8-15
The Services charts shows the top services being used by the active sessions. Only active services are shown. You can select one of the service legends to the right of the chart to go to the Service subpage of the Top Consumers page. The Activity subtab is selected by default. On this page you can view real-time data showing the session loads by wait classes for the service.
The screenshot shows the Services page for the orac database. At the top of the page on the left-hand side are 3 tabs: Modules, Activity (selected), and Statistics. On the top of the page at the right-hand side is the date of the last refresh and a Refresh button.
The first chart shown in the screenshot charts the Active Sessions per wait class over time. There is a Wait Class action list, which currently has the value All selected. The wait classes charted in the graph are: Other, Cluster, Queuing, Network, Administration, Configuration, Commit, Application, Concurrency, System I/O, User I/O, Scheduler, and CPU. The wait class with the highest number of active sessions in this chart is Application. Below the chart is a slide bar which is used to select a 30 minute analysis period in the Activity chart.
The next section in the screenshot is Details for Selected 30 Minute Intervals. The Start Time for this interval is shown as Feb 20, 2007 4:00:54 PM. On the right-hand side is a button labeled Run ASH Report. There are two tables displayed in this section: Top SQL and Top Session.
The Top SQL table shows the Activity percent, SQL Hash Value and SQL Type for the Top SQL statements during the selected 30 minute interval. In this image the top SQL is a SELECT statement with an activity percentage of 73.96. At the top of the Top SQL table is an Actions list, followed by a Go button. The Action currently selected is Schedule SQL Tuning Advisor.
The Top Sessions table shows the Activity percent, Session ID, User Name and Program for the top session during the selected 30 minute interval. In this image the top session is an OMS program started by SYSMAN, with an activity percentage of 67.61. At the top of the Top Sessions table is a View list, with the value Top Sessions currently selected.

About Monitoring Oracle RAC Database and Cluster Performance
8-16 Oracle Database 2 Day + Real Application Clusters Guide
End of description.
***********************************************************************************************
For more information about the information on this page, refer to the Enterprise Manager Help system.
Viewing the Active Sessions by Instance ChartThe last chart on the Performance page monitors the usage of various database resources. By clicking the Instances tab at the top of this chart you can view the Active Sessions by Instance chart.
The Active Sessions by Instance chart summarize any resource contention that appears in the Average Active Sessions chart. Using this chart you can quickly determine how much of the database work is being performed on each instance.
The screenshot shows bottom portion of the Enterprise Manager Database Control Performance page. There are two charts displayed: Average Active Sessions at the top and Active Sessions by Instance on the bottom.
In the Active Sessions by Instance chart graphs for two instances, orac1 and orac2 are displayed. The vertical axis measures the number of active sessions and the horizontal axis measures the time in intervals of 10 minutes, starting with 8:10 pm and ending with 9:00 pm. In this graph, the orac2 instance after 8:20pm is consistently showing more active sessions than the orac1 instance.
A red line is drawn horizontally across the chart delineating the value for 8.0 active sessions. This line is labeled Maximum CPU. Both the orac1 and orac2 instances start with a number of active sessions close to 8.0, and then, after 8:20 pm, the number of active sessions for each instance increases to values between 12.00 and 14.00, with at spike of just over 16.00 occurring at 8:35 pm.
End of description.
***********************************************************************************************

Viewing Other Performance Related Charts
Monitoring Performance and Troubleshooting 8-17
You can also obtain information at the instance level by clicking one of the legends to the right of the chart to access the Top Sessions page. On the Top Session page you can view real-time data showing the sessions that consume the greatest system resources.
For more information about the information on this page, refer to the Enterprise Manager Help system.
Viewing Other Performance Related ChartsIn the Additional Monitoring Links and Additional Instance Monitoring Links section of the Cluster Database Performance page, there are links to other charts that are useful in evaluating the performance of your cluster database.
This section contains the following topics:
■ Accessing the Cluster Cache Coherency Page
■ Accessing the Top Consumers Page
■ Accessing the Top Sessions Page
■ Accessing the Top Activity Page
■ Accessing the Instance Activity Page
■ Accessing the Top Segments Page
■ Accessing the Database Locks Page
Accessing the Cluster Cache Coherency PageThe Cluster Cache Coherency page contains summary charts for cache coherency metrics for the cluster.
Table 8–1 provides a description of the Cluster Cache Coherency charts and the actions to perform to access more comprehensive information for problem resolution.
See Also:
■ "About Monitoring Oracle RAC Database and Cluster Performance"
■ Oracle Database 2 Day + Performance Tuning Guide
■ Oracle Database 2 Day DBA for more information about tuning a database and instance

Viewing Other Performance Related Charts
8-18 Oracle Database 2 Day + Real Application Clusters Guide
To access the Cluster Cache Coherency page:1. On the Cluster Database Home page, select Performance.
The Performance subpage appears.
2. Click Cluster Cache Coherency in the Additional Monitoring Links section at the bottom of the page.
3. Alternatively, click either of the legends to the right of the Global Cache Block Access Latency chart.
The Cluster Cache Coherency page appears.
Table 8–1 Cluster Cache Coherency Charts
Name Description
Global Cache Block Access Latency
Shows the total elapsed time, or latency, for a block request. Click one of the legends to the right of the chart to view the average time it takes to receive data blocks for each block type (current or CR) by instance.
On the Average Block Receive Time by Instance page, you can click an instance legend under the chart to go to the Block Transfer for Local Instance page, where you can identify which block classes, such as undo blocks, data blocks, and so on, are subject to intense global cache activity. This page displays the block classes that are being transferred, and which instances are transferring most of the blocks.
Cache transfer indicates how many current and CR blocks for each block class were received from remote instances, including how many transfers incurred a delay (busy) or an unexpected longer delay (congested).
Global Cache Block Transfer Rate
Shows the total aggregated number of blocks received by all instances in the cluster by way of an interconnect.
Click one of the legends to the right of the chart to go to the Global Cache Blocks Received by Instance page for that type of block. From there, you can click an instance legend under the chart to go to the Segment Statistics by Instance page, where you can see which segments are causing cache contention.
Global Cache Block Transfers and Physical Reads
Shows the percentage of logical read operations that retrieved data from the buffer cache of other instances by way of Direct Memory Access and from disk. It is essentially a profile of how much work is performed in the local buffer cache, rather than the portion of remote references and physical reads, which both have higher latencies.
Click one of the legends to the right of the chart to go to the Global Cache Block Transfers vs. Logical Reads by Instance and Physical Reads vs. Logical Reads by Instance pages. From there, you can click an instance legend under the chart to go to the Segment Statistics by Instance page, where you can see which segments are causing cache contention.

Viewing Other Performance Related Charts
Monitoring Performance and Troubleshooting 8-19
The screenshot shows the Cluster Cache Coherency page. The introductory text on this page reads "Charts below show time spent by all instances waiting to receive database blocks, global cache transfer rate, and disk & network I/O activity in comparison to logical reads on this cluster database." The page contains the following graphs, from top to bottom: the Global Cache Block Access Latency chart, the Global Cache Block Transfer Rate chart, and the Global Cache Block Transfers and Physical Reads (vs. Logical Reads) chart. Each chart has a title on the top left side of the chart, axis labels, a date at the bottom left side of the chart, and a legend box to the right of the chart. On each chart, the horizontal axis shows the time in five minute increments. Each chart has different lines on it to represent different performance statistics measured.
The Global Cache Block Access Latency chart has the label Milli-seconds for the vertical axis. The legend for this chart lists Average CR Block Receive Time and Average Current Block Access Receive Time.
The Global Cache Block Transfer Rate chart has the label Block Per Second for the vertical axis. The legend for this chart lists GC CR Blocks Received and GC Current Blocks Received.
The Global Cache Block Treasurers and Physical Reads (vs. Logical Reads) chart has the label % for the vertical axis. The legend for this chart lists Global Cache Block Transfers and Physical Reads.
Below the last chart on the page is the following note: "TIP: The latencies for RAC operations should be monitored over time, and significant increases in the values should be investigated. The typical average receive time for a CR block is 5 milliseconds, and the upper bound is 10; the typical average receive time for a current block is 5 milliseconds, and the upper bound is 10."
The text preceding the screenshot explains how to access this page. The text following the screenshot explains how to access the Cluster Cache Coherency Instances page, and explains the purpose of the Cluster Cache Coherency page.
End of description.

Viewing Other Performance Related Charts
8-20 Oracle Database 2 Day + Real Application Clusters Guide
***********************************************************************************************
Accessing the Top Consumers PageThe Top Consumers page provides access to several tabs that enable you to view real-time or collection-based data for the services, modules, actions, clients, and sessions that are consuming the most system resources.
To access the Top Consumers page:1. On the Cluster Database Home page, select Performance.
The Performance subpage appears.
2. Click Top Consumers in the Additional Monitoring Links section at the bottom of the page.
When accessed this way, the Top Consumers page initially displays the Overview tab by default, which shows aggregated summary data for the highest resource consumers.
The screenshot shows the Top Consumers page. At the top of the page there are 6 subtabs: Overview, Top Services, Top Modules, Top Actions, Top Clients, and Top Sessions. The Overview subtab is selected.
There are 4 pie charts displayed in the screenshot: Top Services, Top Modules (by Service), Top Clients, and Top Actions (by Module) (by Service).

Viewing Other Performance Related Charts
Monitoring Performance and Troubleshooting 8-21
The Top Services chart has 50.3% for service2 and 49.2% for sales.us.oracle.com. The other services listed in the legend are SYS$BACKGROUND(0.4%) and SYS$USERS(0.1%).
The Top Modules chart has 50.3% for SQL*Plus (service2) and 48.9% for SQL*Plus (sales.us.oracle.com). The other modules listed in the legend are Unnamed (SYS$BACKGROUND) at 0.4%, OEM.DefaultPool (sales.us.oracle.com) at 0.3%, and Realtime Connection (SYS$USERS) at 0.1%.
The Top Clients chart has 99.7% for Unnamed and 0.3% for [email protected]@Mozilla/4.0 (compatible; MSIE 6.0; Windows).
The Top Actions chart has 50.3% for Unnamed (SQL*Plus) (service2) and 48.9% for Unnamed (SQL*Plus) (sales.us.oracle.com). The other actions listed in the legend are Unnamed (Unnamed) (SYS$BACKGROUND) at 0.4%, /rac/racSitemap (OEM.DefaultPool)(sales.us.oracle.com) at 0.3%, and Unnamed (Realtime Connection) (SYS$USERS) at 01.%.
End of description.
***********************************************************************************************
3. (Optional) Click the portion of a chart representing the consumer or click the link under the chart for that consumer to view instance-level information about that consumer.
The page that appears shows the running instances that are serving the consumer.
4. (Optional) Expand the names in the Action or Module column to show data for individual instances.
Accessing the Top Sessions PageThe Top Sessions page shows a real-time summary list of sessions based on aggregated data. You can see which sessions have consumed the greatest amount of system resources, referred to as the top sessions, and then decide whether or not you want to stop the sessions.
To access the Top Sessions page: 1. On the Cluster Database Home page, select Performance.
The Performance subpage appears.
2. Click Top Consumers in the Additional Monitoring Links section at the bottom of the page.
3. On the Top Consumers page, click the Top Sessions subtab.
See Also:
■ "About Monitoring Oracle RAC Database and Cluster Performance"
■ Oracle Database 2 Day + Performance Tuning Guide
See Also:
■ "About Monitoring Oracle RAC Database and Cluster Performance"
■ Oracle Database 2 Day + Performance Tuning Guide

Viewing Other Performance Related Charts
8-22 Oracle Database 2 Day + Real Application Clusters Guide
Accessing the Top Activity PageThe Top Activity page enables you to view the cluster database activity by waits, services and instances. Also, you can see the details for the Top SQL and Top Sessions for a specific 5 minute interval by moving the slider bar on the Top Activity chart.
In the Top SQL detail section, you can select problematic SQL statements and either schedule the SQL Tuning Advisor for those statements or create a SQL Tuning Set.
By default, the Top Sessions for the selected time period are shown. Using the View action list in this section you can change the display to one of the following:
■ Top Sessions
■ Top Services
■ Top Modules
■ Top Actions
■ Top Clients
■ Top Files
■ Top Objects
■ Top PL/SQL
■ Top Instances
To access the Top Activity page: 1. On the Cluster Database Home page, select Performance.
The Performance subpage appears.
2. Click Top Activity in the Additional Monitoring Links section at the bottom of the page.
The Top Activity page appears.
Accessing the Instance Activity PageThe Instance Activity page enables you to view instance activity for several metrics within general metric categories, such as cursors, transactions, sessions, logical I/O, physical I/O, and net I/O. You can view data for each second or transaction.
To access the Instance Activity page: 1. On the Cluster Database Home page, select Performance.
The Performance subpage appears.
2. Click Instance Activity in the Additional Monitoring Links section at the bottom of the page.
3. (Optional) Click a metric legend under the chart if in Graphic mode, or click a name in the summary table if in Tabular mode to access top sessions statistics for a particular metric.

Viewing Other Performance Related Charts
Monitoring Performance and Troubleshooting 8-23
The screenshot shows the Instance Activity page. At the top right-hand side of the page is the View Data list, which has the value Real Time: 15 Second Refresh selected. Below this list is the Switch Database Instance list, which has the value sales.us.oracle.com_sales1 selected. Next to the database instance name value is a Go button.
There are 8 subtabs on the Instance Activity page. They are: Cursors (selected), Transaction, Session, Logical I/O, Physical I/O, Net I/O, Table, and All. Below the Cursors subtab are 2 options: Graphic (selected) and Tabular. On the right-hand side of the page, under the subtabs, is the Metric Rate list, which has the value Per Second selected.
The graph displayed on the Cursors subpage tracks 7 different metrics related to cursors: opened cursors cumulative, cursor authentications, opened cursors current, parse count (total), session cursor cache hits, parse count (hard), and session cursor cache count. Each metric is represented by a line of a different color. The vertical axis measures the count, from 0 to 100 in intervals of 10. The horizontal axis measures the time.
End of description.
***********************************************************************************************
4. (Optional) Use the Switch Database Instance list to change the instance for which the data is displayed in the chart.
Accessing the Top Segments PageCollecting and viewing statistics at the segment level is an effective method for identifying frequently accessed tables or indexes in a database. The Top Segments page enables you to gather segment-level statistics to identify performance problems associated with individual segments. This page is particularly useful for Oracle RAC,
See Also:
■ "About Monitoring Oracle RAC Database and Cluster Performance"
■ Oracle Database 2 Day + Performance Tuning Guide

Viewing Other Performance Related Charts
8-24 Oracle Database 2 Day + Real Application Clusters Guide
because it also tracks the number of consistent-read and current blocks received by an object. A high number of current blocks received plus a high number of buffer waits may indicate potential resource contention.
To access the Top Segments page: 1. On the Cluster Database Home page, select Performance.
The Performance subpage appears.
2. Click Top Segments in the Additional Monitoring Links section at the bottom of the page.
You can view segments for all instances, or use a filter to see segments for a specific instance.
The screenshot shows a portion of the Top Segments page. At the top, on the right-hand side is the date at which the data was last collected, followed by a Refresh button. The introductory text on the screen says "This table contains statistics collected for each segment. Only the top 20 segments are listed based on the selected Order By statistic."
Below this text, on the left-hand side, is the Order By action list, which currently has the value GC Current Blocks Received selected. To its right is the View Instance action list, with the value All selected, and the View Data action list, with the value Real Time: 15 Second Refresh selected.
Below the Order By action list is the "Exclude segments owned by SYS (Recommended)" option, which is selected.
For the list of Top Segments, 6 columns are shown in the screenshot. They are: Object Name, Type, Instance Name, GC Current Blocks Received, GC CR Blocks Received, and GC Buffer Busy. There are 5 rows shown in the table. They are, from top to bottom:
■ Top Segments (expanded), and no other values
■ SYSMAN.MGMT_JOB_EXEC_IDX04 (unexpanded), INDEX, no value, 2.0, 0.0, and 0.0
■ SYSMAN.MGMT_JOB_EXEC_IDX01 (unexpanded), INDEX, no value, 2.0, 0.0, and 0.0
■ SYSMAN.MGMT_CURRENT_AVAILABILTY_PK (unexpanded), INDEX, no value, 1.0, 2.0, and 0.0

Viewing Other Performance Related Charts
Monitoring Performance and Troubleshooting 8-25
■ SYSMAN.MGMT_METRIC_DEPENDENCY (unexpanded), TABLE, no value, 1.0, 1.0, and 0.0
End of description.
***********************************************************************************************
Accessing the Database Locks PageUse the Database Locks page to determine if multiple instances are holding locks for the same object. The page shows user locks, all database locks, or locks that are blocking other users or applications. You can use this information to stop a session that is unnecessarily locking an object.
To access the Database Locks page: 1. On the Cluster Database Home page, select Performance.
The Performance subpage appears.
2. Click Database Locks in the Additional Monitoring Links section at the bottom of the page.
The screenshot shows the Database Locks page. At the top of the page, on the left-hand side, is the View action list, with the value Blocking Locks selected. At the top of the page, on the right-hand side, is the page refresh date and time, followed by a Refresh button.
At the top of the Database locks table are 4 buttons: Kill Session, Session Details, View Objects, and View SQL. The table has 16 columns. They are, from left to right: Select, Username, Sessions Blocked, Session ID, Serial Number, Process ID, SQL Hash Value, Lock Type, Mode Held, Mode Requested, Object Type, Object Owner, Object Name, ROWID, and Time in current mode (seconds). The table displayed in the screenshot has 5 rows. The rows contain the following values, from left to right:
■ not selectable, Blocking Locks (expanded), no other values.
■ Selected, DBSMP (expanded), 1, sales1, 54 (hyperlinked), 454, 6536, 786h4uy3jmhfg (hyperlinked), PS, SHARE, NONE, no value, no value, no value, no value, 84934
■ Not selected, a lock icon (indented), 0, no value, 50 (hyperlinked), 4655, 12867, no value, PS, NONE, EXCLUSIVE, no value, no value, no value, no value, 34
See Also:
■ "About Monitoring Oracle RAC Database and Cluster Performance"

Viewing the Cluster Database Topology
8-26 Oracle Database 2 Day + Real Application Clusters Guide
■ Not selected, DBSMP (expanded), 1, sales1, 58 (hyperlinked), 255, 20776, 786h4uy3jmhfg (hyperlinked), PS, SHARE, NONE, no value, no value, no value, no value, 84934
■ Not selected, a lock icon (indented), 0, sales2, 50 (hyperlinked), 4655, 12867, no value, PS, NONE, EXCLUSIVE, no value, no value, no value, no value, 34
Below the table is the following text: "TIP A locked session is indented below the session blocking it"
End of description.
***********************************************************************************************
Viewing the Cluster Database TopologyUsing Database Control you can view a graphical representation of your cluster environment. Using the topology view you can quickly see the components that make up your cluster database environment, such as database instances, listeners, ASM instances, hosts, and interfaces.
After you click the topology chart to activate the controls, you can mouse over a component to see the status and configuration details for that component. If you select a component in the topology chart, you can then right-click that component to view a set of menu actions specific for that component.
To view the topology for your cluster database environment:1. On the Cluster Database Home page, select Topology.
The Topology subpage appears.
See Also:
■ "About Monitoring Oracle RAC Database and Cluster Performance"
■ Oracle Database Administrator's Guide

Viewing the Cluster Database Topology
Monitoring Performance and Troubleshooting 8-27
The screenshot shows the Topology subpage for the Cluster Database sales.us.oracle.com. The introductory text says: "Cluster Database topology presents the host view of a cluster database. Database instances, ASM instances, listeners, and interfaces information is available. You can optionally view configuration information. These views can also be used to launch various administration and configuration functions." Below this text are two options: "Show Only Hosts With Instances" (selected) and "Show Configuration Details" (not selected). To the right side of these options is the View Data action list, with the value Manually currently selected.
On the left side of the page is the Overview section, which allows you to select the level of detail shown. Below this section is the Selection Details section, which displays the following information:
■ Name: sales.us.oracle.com_sales1 (hyperlinked)
■ Type: Database Instance (in bold font)
■ Host: pmrac1.us.oracle.com (hyperlinked)
■ Critical Alerts: 2 (hyperlinked)
■ Warning Alerts: 2 (hyperlinked)
■ Status: Up (hyperlinked)
■ ASM Instance: +ASM1_pmrac1.us.oracle.com (hyperlinked)
Below the Selection Details section is the Summary section. This section contains the following information:
■ Status: Up (hyperlinked)
■ Up Instances: 2 (hyperlinked), followed by a green arrow pointing upwards and the number 2, also hyperlinked.
■ Cluster: pmrac_cluster (hyperlinked)
■ Alerts: 4 (in red type, hyperlinked), 5 (in orange font, hyperlinked)

Monitoring Oracle Clusterware
8-28 Oracle Database 2 Day + Real Application Clusters Guide
To the right of the Overview section is the topology diagram. There are two boxes, one for each node. The node on the left is labeled pmrac1.us....(Up) and the node on the right is labeled pmrac2.us...(Up).
For the first node, the elements shown within the box are the Interface, and a Listener, which is connected to the +ASM1 instance and a database instance. The database instance is framed by a blue box and has a red X in the upper left corner.
For the second node, the elements shown within the box are the Interface, and a Listener, which is connected to the +ASM2 instance and a database instance. The database instance has a red X in the upper left corner.
End of description.
***********************************************************************************************
2. (Optional) Move the mouse cursor over any component in the topology diagram to display information about that component in a popup box.
3. Select any component in the topology diagram to change the information displayed in the Selection Details section.
4. (Optional) Click Legend at the bottom of the page, on the left-hand side, to display the Topology Legend page.
This page describes the icons used in Cluster Topology and Cluster Database Topology.
5. (Optional) Right-click the currently selected component to view the menu actions available for that component.
Monitoring Oracle ClusterwareUsing Enterprise Manager with Oracle Database 11g Release 1 you can monitor Oracle Clusterware. Some of the features now available include:
■ Viewing the status of Oracle Clusterware on each node of the cluster
■ Receiving notifications if there are any VIP relocations
■ Monitoring the overall throughput across the private interconnect
■ Receiving notifications if nodeapps go down or come up
■ Viewing alerts if a database instance is using the public interface instead of the VIP
■ Monitoring the Clusterware alert log for OCR or voting disk related issues, node evictions, and other clusterware errors
This section contains the following topics:
■ Accessing the Oracle Clusterware Information
■ Reviewing the Oracle Clusterware Home Page
■ About the Cluster Performance Page
■ About the Cluster Targets Page
■ About the Cluster Interconnects Page
■ About the Cluster Topology Page

Monitoring Oracle Clusterware
Monitoring Performance and Troubleshooting 8-29
Accessing the Oracle Clusterware InformationFrom the Cluster Database Home page, there a several ways to access Oracle Clusterware information.
To access Oracle Clusterware information:1. From the Cluster Database Home page, in the General section, click the link next
to Cluster to view the Cluster Home page.
Click the Database tab to return to the Cluster Database Home page.
2. Under Diagnostic Summary, click the number next to Interconnect Alerts to view the Interconnects subpage for the cluster.
Click the Database tab to return to the Cluster Database Home page.
3. In the High Availability section, click the number next to Problem Services to display the Cluster Home page.
Click the Database tab to return to the Cluster Database Home page.
4. Select Topology. Click one of the nodes in the graphical display to activate the controls. Click the Interface component. Right-click the Interface component, then choose View Details from the menu to display the Interconnects subpage for the cluster.
Reviewing the Oracle Clusterware Home PageThe Cluster Home page enables you to monitor the health and workload of your cluster. It provides a central place for general cluster state information and is updated periodically.
The various sections of the Cluster Home page provide information about the cluster environment and status of the hosts, targets, and clusterware components. For example, the Alerts and Diagnostic Summary sections warn you of errors and performance problems that are impacting the operation of your cluster. You can click the provided links to see more detail about the problem areas.
To monitor the general state of the cluster:1. From the Cluster Database Home page, in the General section, click the link next
to Cluster.
The Cluster Home page appears.

Monitoring Oracle Clusterware
8-30 Oracle Database 2 Day + Real Application Clusters Guide
The screenshot shows the Cluster: pmrac_cluster home page. The contents of the page are described in the text following this graphic.
End of description.
***********************************************************************************************
2. (Optional) Click the Refresh button to update the information displayed.
The date and time that data was last collected from the cluster is displayed to the left of the Refresh button.
3. Get a quick view of the cluster in the General section, which includes the following information:
■ Status of the cluster, Up or Down
Click the Status link to drill down to cluster availability details.

Monitoring Oracle Clusterware
Monitoring Performance and Troubleshooting 8-31
■ Number of hosts in the cluster
■ Cluster name
■ The status of Oracle Clusterware overall and by host
■ Oracle Clusterware version
■ Oracle Clusterware home directory.
4. In the Configuration section, use the View list to select which of the following information is displayed for the available hosts in the cluster:
■ Operating Systems (including Hosts and OS Patches)
■ Hardware (including hardware configuration and hosts)
Click the links under Host or OS Patches for detailed information.
5. View the Diagnostic Summary section which contains the number of active Interconnect alerts. Click the number of alerts to view the Interconnects subpage.
6. Investigate the Cluster Databases table to view the cluster databases associated with this cluster, their availability, any alerts or policy violations on those databases, their security compliance score, and the database software version.
7. View the Alerts section, which includes the following items:
■ Category list
Optionally choose a category from the list to view only alerts in that category
■ Critical
This is the number of metrics that have crossed critical thresholds plus the number of other critical alerts, such as those caused by incidents (critical errors).
■ Warning
This is the number of metrics that have crossed warning thresholds
■ Alerts table
The Alerts table provides information about any alerts that have been issued along with the severity rating of each. Click the alert message in the Message column for more information about the alert.
When an alert is triggered, the name of the metric for which the alert was triggered is displayed in the Name column. The severity icon for the alert (Warning or Critical) is displayed, along with the time the alert was triggered, the value of the alert, and the time the metric's value was last checked.
8. View the date of the Last Security Evaluation and the Compliance score for the cluster in the Security section.
The compliance score is a value between 0 and 100 where 100 is a state of complete compliance to the security policies. The compliance score calculation for each target and policy combination to a great extent is influenced by the severity of the violation and importance of the policy, and to a lesser extent by the percentage of violating rows over the total number of rows tested.
9. Review the status of any jobs submitted to the cluster within the last 7 days in the Job Activity section.
10. Determine if there are patches to be applied to Oracle Clusterware by reviewing the Critical Patch Advisories for Oracle Homes section.

Monitoring Oracle Clusterware
8-32 Oracle Database 2 Day + Real Application Clusters Guide
To view available patches, you must have first configured your OracleMetaLink Credentials as discussed in "Configuring the Enterprise Manager Patch Interface" on page 10-1.
11. View basic performance statistics for each host in the cluster in the Hosts table at the bottom of the page.
Click any link in this table to view further details about that statistic.
12. Use the subtabs at the top of the page to view detailed information for Performance, Targets, Interconnects, or Topology.
About the Cluster Performance PageThe Cluster Performance page displays utilization statistics, such as CPU, Memory, and Disk I/O, during the past hour for all hosts of a cluster, which is part of the greater Enterprise Manager environment. With this information, you can determine whether you need to add or redistribute resources.
The screenshot shows the Performance subpage for the cluster. At the top, right-hand side of the page is a View Data action list, with the value Real Time: 15 Second Refresh currently selected. Below this list is a Customize button.
On the left-hand side of the page, at the top, are two options: Summary Chart (selected) and Tile Chart (not selected).

Monitoring Oracle Clusterware
Monitoring Performance and Troubleshooting 8-33
There are 3 charts displayed in the screenshot: CPU Utilization, Memory Utilization, and Disk I/O Utilization.
The CPU Utilization chart measures the number of CPUs on the vertical axis and the time in increments of 2 minutes on the horizontal axis. There are two lines on the chart, each line representing a different host. The pmrac1.us.oracle.com host appears to be using slightly more CPU resources than the host pmrac2.us.oracle.com.
The Memory Utilization chart measures the percentage of memory utilized on the vertical axis and the time in 2 minute increments on the horizontal axis. There are two lines on the chart, each line representing a different host. Both of the lines are straight, with the host pmrac2.us.oracle.com showing a constant memory utilization of 80.00 and the host pmrac1.us.orale.com showing a constant memory utilization of 100.00 for the time period between 8:32 pm and 8:46pm on July 10, 2007.
The Disk I/O Utilization chart measures the disk I/O utilization on the vertical axis using values from 0.00 to 200.00, in increments of 50. The horizontal axis measures the time in increments of 2 minutes. There are two lines on the chart, each line representing a different host. The host pmrac1.us.oracle.com appears to be utilizing slightly more disk I/O than the host pmrac2.us.oracle.com.
End of description.
***********************************************************************************************
Using the charts on the Cluster Performance page, you can:
■ View the CPU, Memory, and Disk I/O charts for the cluster across all hosts.
■ View the CPU, Memory, and Disk I/O charts for each host individually by clicking the host name in the legend to the right of the chart.
The Cluster Performance page also contains a Hosts table. The Hosts table displays summary information for the hosts for the cluster, their availability, any alerts on those hosts, CPU and memory utilization percentage, and total input/output per second. You can click a host name in the Hosts table to go to the performance page for that host.
The screenshot shows the Hosts table. The table has 9 columns and 2 rows. The column names are, from left to right: Name, Status, Oracle Clusterware Status, Alerts, Policy Violations, Compliance Score (%), CPU Util (%), Mem Util (%), and Total IO/sec. The rows contain the following values, list in the same order as the columns:
■ pmrac1.us.oracle.com (hyperlinked), a circle containing a green arrow pointing upwards, a green arrow pointing upwards, 0 (hyperlinked and in red text) and 0 (hyperlinked and in orange text), 5 (hyperlinked and in red text) 1 (hyperlinked and in orange text) and 0, 76, 2.24 (hyperlinked), 98.21 (hyperlinked) followed by a green checkmark, and 130.89 (hyperlinked)
■ pmrac2.us.oracle.com (hyperlinked), a circle containing a rectangle in the backwards and a red X in the foreground, 0 (hyperlinked and in red text) and 0 (hyperlinked and in orange text), 5 (hyperlinked and in red text) 0 (in orange text) and 0, 82, 1.72 (hyperlinked), 81.07 (hyperlinked) followed by a green checkmark, and 118.12 (hyperlinked)

Monitoring Oracle Clusterware
8-34 Oracle Database 2 Day + Real Application Clusters Guide
End of description.
***********************************************************************************************
About the Cluster Targets PageThe Cluster Targets page provides a complete list of all targets on the cluster. The table includes the target name, type, host, and location, as well as the target's availability, warning and critical alerts, and last load time.
The screenshot shows a portion of the Cluster Targets page. It contains a table of targets, with 9 columns and 7 rows. The column names are, from left to right: Name, Host, Oracle Home, Availability, Alerts, Policy Violations, Compliance Score (%), Type, and Load Time. The rows show the targets for the pmrac1.us.oracle.com host. The type of targets displayed are Agent, Automatic Storage Management, Cluster, Cluster Database, Database Instance, Host, and Listener. The name of each target is hyperlinked, as is the location of that target’s Oracle Home and the values for each alert or policy violation.
End of description.
***********************************************************************************************
Click a target name to go to the home page for that target. Click the links in the table to get more information about that particular item, alert, or metric.
The Hosts table displays the hosts for the cluster, their availability, any alerts on those hosts, CPU and memory utilization percentage, and total input/output per second.
About the Cluster Interconnects PageThe Cluster Interconnects page is useful for monitoring the interconnect interfaces, determining configuration issues, and identifying transfer rate-related issues, including excess traffic. This page helps determine the load added by individual

Monitoring Oracle Clusterware
Monitoring Performance and Troubleshooting 8-35
instances and databases on the interconnect. Sometimes you can immediately identify interconnect delays that are due to applications outside Oracle.
You can use this page to perform the following tasks:
■ View all interfaces that are configured across the cluster.
■ View statistics for the interfaces, such as absolute transfer rates and errors.
■ Determine the type of interfaces, such as private or public.
■ Determine whether the instance is using a public or private network.
■ Determine which database instance is currently using which interface.
■ Determine how much the instance is contributing to the transfer rate on the interface.
The screenshot shows the Cluster Interconnects page. At the top, right-hand side of the page is the time of the Last Data Collected From Target, followed by a Refresh button.
At the beginning of the page is the following introductory text: "The interconnect configuration and internode communication will influence the performance of cluster databases. The tables below show network interfaces on all hosts and network interfaces currently in use by cluster databases. It is important that cluster databases are configured to use a private interconnect for message and block transfers."
Below this text, on the right-hand side is the View Data action list, with the value Manually currently selected.
There are 2 tables shown in the screenshot. They are the Interfaces by Hosts table and the Interfaces in Use by Cluster Databases table. Above the Interfaces by Hosts table the Private Interconnect Transfer Rate (MB/Sec) is displayed, which has the value of 0.105 *. The explanatory text that follows it reads "Transfer rate on the private network in the last 5 minutes."

Monitoring Oracle Clusterware
8-36 Oracle Database 2 Day + Real Application Clusters Guide
At the top of the Interfaces by Hosts table is the View action list, which has the value Private selected. Below this action list are two links: Expand All and Collapse All. The table has 6 columns and 5 rows. The column names, from left to right, are: Name, Type, Subnet, Interface Type, Total I/O Rate (MB/Sec) (Last 5 Minutes), and Total Error Rate (%) (Last 5 Minutes). The values contained in the rows are, from top to bottom:
■ pmrac_cluster (preceded by an icon indicating the entry has been expanded), Cluster, and no further values
■ pmrac1.us.oracle.com (hyperlinked, and preceded by an icon indicating the entry has been expanded, Host, and no further values
■ eth1 (hyperlinked), Interface, 10.10.8.0, Private, 0.1 (hyperlinked), and 0 (hyperlinked)
■ pmrac2.us.oracle.com (hyperlinked, and preceded by an icon indicating the entry has been expanded, Host, and no further values
■ eth1 (hyperlinked), Interface, 10.10.8.0, Private, 0.11 * (hyperlinked), and 0 * (hyperlinked)
The Interfaces in Use By Cluster Databases table has at the top two hyperlinks: Expand All and Collapse All. The table has 8 columns and 3 rows. The column names, from left to right, are: Name, Target Type, Interface Name, Host Name, IP Address, Interface Type, Source, and Transfer Rate (MB/Sec)(Last 5 Minutes). The rows contain the following values:
■ sales (hyperlinked and preceded by an icon indicating the entry has been expanded), Cluster Database, and no further values
■ sales1 (hyperlinked), Database Instance, eth1 (hyperlinked), pmrac1.us.oracle.com (hyperlinked), 10.10.10.1, Private (hyperlinked), Oracle Cluster Repository, 0.04 (hyperlinked)
■ sales2 (hyperlinked), Database Instance, eth1 (hyperlinked), pmrac2.us.oracle.com (hyperlinked), 10.10.10.2, Private (hyperlinked), Oracle Cluster Repository, 0.048 * (hyperlinked)
Below this table are two tips. They contain the following text:
■ TIP The Transfer Rate is the estimated traffic contributed by the instance assuming uniform block size in the database.
■ TIP * indicates the data that is more than 10 minutes old.
End of description.
***********************************************************************************************
The Private Interconnect Transfer Rate value shows a global view of the private interconnect traffic, which is the estimated traffic on all the private networks in the cluster. The traffic is calculated as the summary of the input rate of all private interfaces known to the cluster. For example, if the traffic rate is high, the values in the Total I/O Rate column in the Interfaces by Hosts table for private interfaces will also be high. If the values in this column are high, you should determine the cause of the high network usage. You can click a number to access the Network Interface Total I/O Rate page for historic statistics and metric values.
Using the Interfaces by Hosts table, you can drill down to the following pages:
■ Host Home
■ Hardware Details

Troubleshooting Configuration Problems in Oracle RAC Environments
Monitoring Performance and Troubleshooting 8-37
■ Network Interface Total I/O Rate
■ Network Interface Total Error Rate
Using the Interfaces in Use by Cluster Databases table, you can view the Total Transfer Rate. This value shows the network traffic generated by individual instances for the interfaces they are using as interconnects. The values indicate how frequently the instances are communicating with other instances.
Using the Interfaces in Use by Cluster Databases table, you can drill down to the following pages:
■ Cluster Database Home
■ Cluster Database Instance Home
■ Hardware Details
■ Host Home
■ Interface Type
■ Transfer Rate
About the Cluster Topology PageThe Oracle Enterprise Manager Topology Viewer enables you to visually see the relationships between target types in your cluster. You can zoom in or out, pan, and see selection details. Individually distinct icons are used to represent system target types, and standardized visual indicators, such as frames around selections, are used across all target types.
The Topology Viewer populates icons based on your system configuration. If a listener is serving an instance, a line connects the listener icon and the instance icon. If a cluster database is configured to use ASM, the relationship between the cluster ASM and cluster database appears in the topology.
If the Show Configuration Details option is unchecked, the topology shows the monitoring view of the environment, which includes general information such as alerts and overall status. If you select the Show Configuration Details option, additional details are shown in the Selection Details page, which are valid for any topology view. For instance, the listener component would also show the machine name and port number.
You can click an icon and then the right mouse button to display a menu of available actions. Several actions go to pages related to the target type where you can perform monitoring or tuning tasks.
Refer to the Enterprise Manager Online Help for more information about the contents of this page.
Troubleshooting Configuration Problems in Oracle RAC EnvironmentsProblems can occur when attempting to complete the installation or database creation process manually instead of using the Oracle Database management tools. Other problems occur due to the database administrator or system administrator missing important operating system or cluster configuration steps prior to installation. Both Oracle Clusterware and Oracle Database components have subcomponents that you can troubleshoot. The Cluster Ready Services Control (CRSCTL) command check
See Also: "Viewing the Cluster Database Topology" on page 8-26

Troubleshooting Configuration Problems in Oracle RAC Environments
8-38 Oracle Database 2 Day + Real Application Clusters Guide
enables you to determine the status of several Oracle Clusterware components at one time.
This section contains the following topics:
■ Using CRSCTL to Diagnose Cluster Issues
■ Using the Cluster Verification Utility to Diagnose Problems
■ Viewing Oracle RAC Database Alerts
■ Viewing Oracle RAC Database Alert Log Messages
Using CRSCTL to Diagnose Cluster IssuesYou can use CRSCTL commands as the root operating system user to diagnose problems with your Oracle Clusterware installation, or to enable dynamic debugging for Oracle Clusterware. This section contains the following topics:
■ Location of the Oracle Clusterware Alert Log
■ Location of the Oracle Clusterware Component Log Files
■ Checking the Status of the Oracle Clusterware Installation
■ Running the Oracle Clusterware Diagnostics Collection Script
■ Enabling Debugging of Oracle Clusterware Components
■ Enabling Debugging for an Oracle Clusterware Resource
■ Enabling and Disabling Oracle Clusterware Daemons
Location of the Oracle Clusterware Alert LogOracle Clusterware posts alert messages when important events occur. For example, you might see alert messages from the Cluster Ready Services (CRS) daemon process when it starts, if it aborts, if the failover process fails, or if automatic restart of a CRS resource failed.
Enterprise Manager monitors the Clusterware log file and posts an alert on the Cluster Home page if an error is detected. For example, if a voting disk is not available, a CRS-1604 error is raised, and a critical alert is posted on the Cluster Home page. You can customize the error detection and alert settings on the Metric and Policy Settings page.
The location of the Oracle Clusterware log file is CRS_home/log/hostname/alerthostname.log, where CRS_home is the directory in which Oracle Clusterware was installed and hostname is the host name of the local node.
See Also:
■ "Tools for Installing, Configuring, and Managing Oracle RAC"
■ "About Verifying the Oracle Clusterware Installation"
See Also:
■ "Tools for Installing, Configuring, and Managing Oracle RAC"
■ "Troubleshooting Configuration Problems in Oracle RAC Environments"

Troubleshooting Configuration Problems in Oracle RAC Environments
Monitoring Performance and Troubleshooting 8-39
Location of the Oracle Clusterware Component Log FilesOracle RAC uses a unified log directory structure to store all the Oracle Clusterware component log files. This consolidated structure simplifies diagnostic information collection and assists during data retrieval and problem analysis.
In each of the following log file locations, hostname is the name of the node, for example, docrac2 and CRS_home is the directory in which the Oracle Clusterware software was installed.
The log files for the CRS daemon, crsd, can be found in the following directory:
CRS_home/log/hostname/crsd/
The log files for the CSS daemon, cssd, can be found in the following directory:
CRS_home/log/hostname/cssd/
The log files for the EVM daemon, evmd, can be found in the following directory:
CRS_home/log/hostname/evmd/
The log files for the Oracle Cluster Registry (OCR) can be found in the following directory:
CRS_home/log/hostname/client/
The log files for the Oracle RAC high availability component can be found in the following directories:
CRS_home/log/hostname/racg/Oracle_home/log/hostname/racg
Each program that is part of the Oracle RAC high availability component has a subdirectory assigned exclusively for that program. The name of the subdirectory is the same as the name of the program.
Checking the Status of the Oracle Clusterware InstallationUse the CRSCTL check command to display the status of an Oracle Clusterware component or daemon.
See Also:
■ Oracle Clusterware Administration and Deployment Guide
■ "Verifying the Configuration Using the Cluster Verification Utility"
Note: If any of the Oracle Clusterware components generates a core dump file, it is located in a subdirectory of the log directory for that component.
See Also:
■ Oracle Clusterware Administration and Deployment Guide
■ "Verifying the Configuration Using the Cluster Verification Utility"

Troubleshooting Configuration Problems in Oracle RAC Environments
8-40 Oracle Database 2 Day + Real Application Clusters Guide
To determine the condition of your clusterware installation:1. Log in to the operating system as the root user in a command window.
2. Use CRSCTL to check the status of Oracle Clusterware using the following command:
# crsctl check crs
3. Check the status of an individual Oracle Clusterware daemon using the following syntax, where daemon is crsd, cssd, or evmd:
# crsctl check daemon
Running the Oracle Clusterware Diagnostics Collection ScriptThe Oracle Clusterware Diagnostics Collection script collects diagnostic information for your Oracle Clusterware installation. The diagnostics provide additional information so that Oracle Support Services can resolve problems. It displays the status of the Cluster Synchronization Services (CSS), Event Manager (EVM), and the Cluster Ready Services (CRS) daemons.
To run the Oracle Clusterware Diagnostics Collection script:1. In a command window, log in to the operating system as the root user.
2. Run the diagcollection.pl script from the operating system prompt as follows, where CRS_home is the home directory of your Oracle Clusterware installation:
# CRS_home/bin/diagcollection.pl --collect
Enabling Debugging of Oracle Clusterware ComponentsYou can enable debugging for the Oracle Cluster daemons, Event Manager (EVM), and their modules by running CRSCTL commands.
To enable debugging of Oracle Clusterware components:1. In a command window, log in to the operating system as the root user.
2. Use the following command to obtain the module names for a component, where component_name is crs, evm, css or the name of the component for which you want to enable debugging:
# crsctl lsmodules component_name
For example, viewing the modules of the css component might return the following results:
See Also:
■ Oracle Clusterware Administration and Deployment Guide
■ "Verifying the Configuration Using the Cluster Verification Utility"
See Also:
■ Oracle Clusterware Administration and Deployment Guide
■ "Verifying the Configuration Using the Cluster Verification Utility"

Troubleshooting Configuration Problems in Oracle RAC Environments
Monitoring Performance and Troubleshooting 8-41
# crsctl lsmodules cssThe following are the CSS modules :: CSSDCOMMCRSCOMMNS
3. Use CRSCTL as follows, where component_name is the name of the Oracle Clusterware component for which you want to enable debugging, module is the name of module, and debugging_level is a number from 1 to 5:
# crsctl debug log component module:debugging_level
For example, to enable the lowest level of tracing for the CSSD module of the css component, you would use the following command:
# crsctl debug log css CSSD:1
4. After you have obtained the needed trace information, disable debugging by setting the debugging_level to 0 for the module, as shown in the following example.
# crsctl debug log css CSSD:0
Enabling Debugging for an Oracle Clusterware ResourceYou can use CRSCTL commands to enable debugging for resource managed by Oracle Clusterware.
To enable debugging of an Oracle Clusterware resource:1. In a command window, log in to the operating system as the root user.
2. Obtain a list of the resources available for debugging by running the following command:
# crs_stat
3. Run the following command to enable debugging, where resource_name is the name of an Oracle Clusterware resource, such as ora.docrac1.vip, and debugging_level is a number from 1 to 5:
# crsctl debug log res resource_name:debugging_level
4. After you have obtained the needed trace information, disable debugging by setting the debugging_level to 0 for the resource, as shown in the following example.
# crsctl debug log res resource_name:0
See Also:
■ Oracle Clusterware Administration and Deployment Guide
■ "Verifying the Configuration Using the Cluster Verification Utility"
See Also:
■ Oracle Clusterware Administration and Deployment Guide
■ "Verifying the Configuration Using the Cluster Verification Utility"

Troubleshooting Configuration Problems in Oracle RAC Environments
8-42 Oracle Database 2 Day + Real Application Clusters Guide
Enabling and Disabling Oracle Clusterware DaemonsWhen the Oracle Clusterware daemons are enabled, they start automatically when the node is started. To prevent the daemons from doing this, you can disable them using crsctl commands.
To enable automatic startup for all Oracle Clusterware daemons:1. In a command window, log in to the operating system as the root user.
2. Run the following CRSCTL command:
# crsctl enable crs
To disable automatic startup for all Oracle Clusterware daemons:1. In a command window, log in to the operating system as the root user.
2. Run the following CRSCTL command:
# crsctl disable crs
Using the Cluster Verification Utility to Diagnose ProblemsThe Cluster Verification Utility (CVU) can assist you in diagnosing a wide variety of configuration problems. Refer to the example of using the CVU in "Verifying the Configuration Using the Cluster Verification Utility" on page 3-3.
This section contains the following topics:
■ Verifying the Existence of Node Applications
■ Verifying the Integrity of Oracle Clusterware Components
■ Verifying the Integrity of the Oracle Cluster Registry
■ Verifying the Integrity of Your Entire Cluster
■ Checking the Settings for the Interconnect
■ Enabling Tracing
Verifying the Existence of Node ApplicationsYou use the CVU comp nodeapp command to verify the existence of node applications, namely the virtual IP (VIP), Oracle Notification Services (ONS), and Global Service Daemon (GSD), on all the nodes.
To verify the existence of node applications:1. In a command window, log in to the operating system as the root user.
Note: The crsctl enable crs and crsctl disable crs commands are not supported on Microsoft Windows platforms.
See Also:
■ Oracle Clusterware Administration and Deployment Guide
■ "Verifying the Configuration Using the Cluster Verification Utility"

Troubleshooting Configuration Problems in Oracle RAC Environments
Monitoring Performance and Troubleshooting 8-43
2. Use the comp nodeapp command of the CVU, using the following syntax:
cluvfy comp nodeapp [ -n node_list] [-verbose]
where node_list represents the nodes to check.
3. If the cluvfy command returns the value of UNKNOWN for a particular node, the CVU cannot determine whether a check passed or failed. Determine if the failure was caused by one of the following reasons:
■ The node is down.
■ Executable files that the CVU requires are missing in the CRS_home/bin directory or the Oracle_home/bin directory.
■ The user account that ran the CVU does not have permissions to run common operating system executable files on the node.
■ The node is missing an operating system patch or required package.
■ The kernel parameters on that node were not configured correctly and the CVU cannot obtain the operating system resources required to perform its checks.
Verifying the Integrity of Oracle Clusterware ComponentsYou use the CVU comp crs command to verify the existence of all the Oracle Clusterware components.
To verify the integrity of Oracle Clusterware components:1. In a command window, log in to the operating system as the root user.
2. Use the comp crs command of the CVU, using the following syntax:
cluvfy comp crs [ -n node_list] [-verbose]
where node_list represents the nodes to check.
Verifying the Integrity of the Oracle Cluster RegistryYou use the CVU comp ocr command to verify the integrity of the Oracle Clusterware registry.
To verify the integrity of the Oracle Clusterware registry:1. In a command window, log in to the operating system as the root user.
2. Use the comp ocr command of the CVU, using the following syntax:
cluvfy comp ocr [ -n node_list] [-verbose]
See Also:
■ "Troubleshooting Configuration Problems in Oracle RAC Environments"
■ Oracle Clusterware Administration and Deployment Guide
See Also:
■ "Troubleshooting Configuration Problems in Oracle RAC Environments"
■ Oracle Clusterware Administration and Deployment Guide

Troubleshooting Configuration Problems in Oracle RAC Environments
8-44 Oracle Database 2 Day + Real Application Clusters Guide
where node_list represents the nodes to check.
Verifying the Integrity of Your Entire ClusterYou use the CVU comp clu command to check that all nodes in the cluster have the same view of the cluster configuration.
To verify the integrity of your Oracle RAC cluster:1. In a command window, log in to the operating system as the root user.
2. Use the comp clu command of the CVU, using the following syntax:
cluvfy comp clu [-verbose]
Checking the Settings for the InterconnectCache Fusion enhances the performance of Oracle RAC by utilizing a high-speed interconnect to send data blocks to another instance's buffer cache. The high-speed interconnect should be a private network with the highest bandwidth to maximize performance.
For network connectivity verification, the CVU discovers all the available network interfaces if you do not specify an interface on the CVU command line.
To check the settings for the interconnect:1. In a command window, log in to the operating system as the root user.
2. To verify the accessibility of the cluster nodes, specified by node_list, from the local node or from any other cluster node, specified by srcnode, use the component verification command nodereach as follows:
cluvfy comp nodereach -n node_list [ -srcnode node ] [-verbose]
When you issue the nodecon command as shown in the previous example, it instructs the CVU to perform the following tasks:
■ Discover all the network interfaces that are available on the cluster nodes.
■ Review the corresponding IP addresses and subnets for the interfaces.
■ Obtain the list of interfaces that are suitable for use as VIPs and the list of interfaces to private interconnects.
■ Verify the connectivity among all the nodes through those interfaces.
When you run the nodecon command in verbose mode, it identifies the mappings between the interfaces, IP addresses, and subnets.
See Also:
■ "Troubleshooting Configuration Problems in Oracle RAC Environments"
■ Oracle Clusterware Administration and Deployment Guide
See Also:
■ "Troubleshooting Configuration Problems in Oracle RAC Environments"
■ Oracle Clusterware Administration and Deployment Guide

Troubleshooting Configuration Problems in Oracle RAC Environments
Monitoring Performance and Troubleshooting 8-45
3. To verify the connectivity among the nodes through specific network interfaces, use the comp nodecon command with the -i option and specify the interfaces to be checked with the interface_list argument:
cluvfy comp nodecon -n node_list -i interface_list [-verbose]
For example, you can verify the connectivity among the nodes docrac1, docrac2, and docrac3, through the specific network interface eth0 by running the following command:
cluvfy comp nodecon -n docrac1, docrac2, docrac3 -i eth0 -verbose
Enabling TracingThe CVU does not generate trace files unless you enable tracing. The CVU trace files are created in the CRS_home/cv/log directory. Oracle RAC automatically rotates the log files, and the most recently created log file has the name cvutrace.log.0. You should remove unwanted log files or archive them to reclaim disk space, if needed.
To enable tracing using CVU:1. In a command window, log in to the operating system as the root user.
2. Set the environment variable SRVM_TRACE to true.
# set SRVM_TRACE=true; export SRVM_TRACE
3. Run the command that you want to trace.
4. After the command completes, and you have obtained the needed trace information, disable tracing by setting SRVM_TRACE to false, or by unsetting this environment variable.
# set SRVM_TRACE=false; export SRVM_TRACE
Viewing Oracle RAC Database AlertsAlert messages are displayed in Enterprise Manager. The Alerts table is similar to that shown for single-instance databases, but in a cluster database, it includes columns for the target name and target type. For example, if a user connected to the sales1 instance exceeded their allotted login time, you would see an alert message with the following values:
■ Target name: sales_sales1
■ Target type: Database instance
■ Category: Response
See Also:
■ "Troubleshooting Configuration Problems in Oracle RAC Environments"
■ Oracle Clusterware Administration and Deployment Guide
See Also:
■ "Troubleshooting Configuration Problems in Oracle RAC Environments"
■ Oracle Clusterware Administration and Deployment Guide

Troubleshooting Configuration Problems in Oracle RAC Environments
8-46 Oracle Database 2 Day + Real Application Clusters Guide
■ Name: User logon time
■ Message: User logon time is 10250 milliseconds
■ Alert triggered: Date and time when the alert condition occurred
To view the alert messages for an Oracle RAC database:1. On the Cluster Database Home page, scroll down to the section titled Alerts.
The section Related Alerts displays nondatabase alert messages, for example, alert messages for Oracle Net.
2. View the alerts for your database and database instances.
The following screenshot shows an example of the Alerts display for a clustered database named docrac.
The screenshot shows a table of Alert messages for a cluster database. The table contains the following columns: Severity, Target Name, Target Type, Category, Name, Message, and Alert Triggered. Above the table is the Category list, which currently has the selection All. Next to the Category list section are two counts. The first count is the number of Critical alerts, and the value displayed is 0. The second count is the number of Warning alerts, and the value displayed is 6. The number displayed for each type of count is hyperlinked.
The table contains the following rows:
Warning, docrac_docrac1, Database Instance, Response, User Logon Time (msec), User logon time is 10250 msecs., Sep 21, 2006 3:47:30 AM
Warning, docrac, Cluster Database, Invalid Objects by Schema, Owner’s Invalid Object Count, 3 object(s) are invalid in the SOE1 schema (hyperlinked), Aug 7 2005, 4:18:01 PM
Warning, docrac, Cluster Database, Invalid Objects by Schema, Owner’s Invalid Object Count, 10 object(s) are invalid in the CC schema (hyperlinked), Aug 7 2005, 4:18:01 PM
Warning, docrac, Cluster Database, Invalid Objects by Schema, Owner’s Invalid Object Count, 3 object(s) are invalid in the SOE schema (hyperlinked), Aug 7 2005, 4:18:01 PM
Below the Alerts table is the section heading Related Alerts. This contents of this section are not shown in the screenshot. At the top right of the Alerts table are the following items, from left to right: Previous link, list of available alert groups (currently showing alerts 1-5 of 6), and the Next link.
End of description.
***********************************************************************************************

Troubleshooting Configuration Problems in Oracle RAC Environments
Monitoring Performance and Troubleshooting 8-47
Viewing Oracle RAC Database Alert Log MessagesAn alert log is created for each instance in a cluster database.
To view the alert log for an Oracle RAC database instance:1. On the Cluster Database Home page, scroll down to the Instances section.
2. Click the name of the instance for which you want to view the alert log.
The Cluster Database Instance Home page appears.
3. In the Diagnostic Summary section, click the date string link next to the heading Alert Log to display the alert log entries containing ORA- errors.
The Alert Log Errors page appears.
4. (Optional) Click Alert Log Content in the Related Links section to view all the entries in the alert log.
Enterprise Manager displays the most recent alert log entries by default, but you can specify search criteria to display to alert log entries for a range of dates.
The following screenshot shows an example of the alert log entries for the docrac1 instance of a cluster database named docrac.
The screenshot shows the Most Recent Alert Log Entries page, with Search Criteria for the title. There are two fields for entering search criteria: Begin Date and End Date.
See Also:
■ "About Monitoring Oracle RAC Database and Cluster Performance"
■ "Troubleshooting Configuration Problems in Oracle RAC Environments"
■ Oracle Database 2 Day DBA
■ Oracle Database 2 Day + Performance Tuning Guide

Troubleshooting Configuration Problems in Oracle RAC Environments
8-48 Oracle Database 2 Day + Real Application Clusters Guide
Beneath the date search criteria fields is the text (example: Sep 22, 2005). Each date search criteria field has a calendar icon to its right that can be clicked to open a page for choosing the date. To the right of the calendar icon for each date search criteria field are fields for specifying the time. There are hour and minute lists and options for choosing AM or PM. Below the End date search criteria field is a button labeled Go.
After the Search Criteria fields is the Most Recent Alert Log Entries section. At the upper right part of this section is the Page Refreshed date. Below the refresh date is the text "This shows the last 100,000 bytes of the alert log. The log is constantly growing, so select the browser's Refresh button to see the most recent log entries."
Below this text is a line that states "Number of Lines Displayed 2,187". The display of alert log entries begins after this line.
The alert log entries consist of the following: a date marking the creation time of the entry, the entry text, and other information relevant to this entry. For example, the first entry displayed is:
Thu Aug 10 15:05:50 2006Thread 1 advanced to log sequence 130 Current log# 1 seq# 130 mem# 0: +DATA/docrac/onlinelog/group_1.262.59498 Current log# 1 seq# 130 mem# 0: +DATA/docrac/onlinelog/group_1.262.59498
End of description.
***********************************************************************************************
See Also:
■ Oracle Real Application Clusters Administration and Deployment Guide

Adding and Deleting Nodes and Instances 9-1
9Adding and Deleting Nodes and Instances
This chapter describes how to add nodes and instances in Oracle Real Application Clusters (Oracle RAC) environments. You can use these methods when configuring a new Oracle RAC cluster, or when scaling up an existing Oracle RAC cluster.
This chapter includes the following sections:
■ About Preparing the New Node
■ Extending the Oracle Clusterware Home Directory
■ Extending the Automatic Storage Management Home Directory
■ Extending the Oracle RAC Home Directory
■ Adding an Instance to the Cluster Database
■ Deleting an Instance From the Cluster Database
About Preparing the New NodeTo prepare the new node prior to installing the Oracle software, see Chapter 2, "Preparing Your Cluster".
It is critical that you follow the configuration steps in order for the following procedures to work. These steps include, but are not limited to the following:
1. Take a backup of your database.
2. Install the operating system on the new node. You must use the same version of the operating system that is being used by the other nodes in the cluster. Also install any operating system patches or packages required by Oracle.
3. Update the kernel parameters on the new node to support the Oracle software.
4. Add storage devices to the fstab file.
5. Add the public and private node names for the new node to the /etc/hosts file on the existing nodes, docrac1 and docrac2
Note: For this chapter, it is very important that you perform each step in the order shown.
See Also:
■ Oracle Real Application Clusters Administration and Deployment Guide for more information about adding and removing nodes from your cluster database

Extending the Oracle Clusterware Home Directory
9-2 Oracle Database 2 Day + Real Application Clusters Guide
6. Create the operating system groups and users.
7. Create a software owner that is an exact copy of the software owner on the other nodes in the cluster.
8. Verify the public node can be accessed (using the ping command) from the existing nodes
9. Configure SSH for the new node:
a. Create an authentication key for the oracle user.
b. Append the key information for the new node to the authorized_keys file on all nodes.
c. Copy the authorized_keys files from docrac1 to the new node.
d. Create an SSH connection between docrac1 and the new node for the public and private node names. Accept and register the keys when prompted.
10. Run the following command on either docrac1 or docrac2 to verify the new node has been properly configured
cluvfy stage -pre crsinst -n docrac1,docrac3
Extending the Oracle Clusterware Home DirectoryNow that the new node has been configured to support Oracle Clusterware, you use Oracle Universal Installer (OUI) to add a CRS home to the node being added to your Oracle RAC cluster. This section assumes that you are adding a node named docrac3 and that you have already successfully installed Oracle Clusterware on docrac1 in a nonshared home, where CRS_home represents the successfully installed Oracle Clusterware home.
To extend the Oracle Clusterware installation to include the new node:1. Verify the ORACLE_HOME environment variable on docrac1 directs you to the
successfully installed CRS home on that node.
2. Go to CRS_home/oui/bin and run the addNode.sh script.
cd /u01/app/crs/oui/bin./addNode.sh
OUI starts and first displays the Welcome window.
3. Click Next.
The Specify Cluster Nodes to Add to Installation window appears.
4. Select the node or nodes that you want to add, for example, docrac3. Make sure the public, private and VIP names are configured correctly for the node you are adding. Click Next.
5. Verify the entries that OUI displays on the Summary window and click OK.
The Cluster Node Addition Progress window appears. During the installation process, you will be prompted to run scripts to complete the configuration.
Note: Adding a new node to an Oracle RAC cluster is sometimes referred to as cloning.

Extending the Automatic Storage Management Home Directory
Adding and Deleting Nodes and Instances 9-3
6. Run the orainstRoot.sh script on docrac3, if prompted to do so.
7. Run the rootaddNode.sh script from the CRS_home/install/ directory on docrac1 as the root user when prompted to do so. For example:
[docrac1:oracle]$ su root[docrac1:root]# cd /u01/app/crs/install[docrac1:root]# ./rootaddNode.sh
This script adds the node applications of the new node to the Oracle Cluster Registry (OCR) configuration.
8. Run the orainstRoot.sh script on the node docrac3 if OUI prompts you to do so. When finished, click OK in the OUI window to continue with the installation.
Another window appears, prompting you to run the root.sh script.
9. Run the CRS_home/root.sh script as the root user on the node docrac3 to start Oracle Clusterware on the new node.
[docrac3:oracle]$ su root[docrac3:root]# cd /u01/app/crs[docrac3:root]# ./root.sh
10. Return to the OUI window after the script runs successfully, then click OK.
OUI displays the End of Installation window.
11. Exit the installer.
12. Add the new node's ONS configuration information to the shared OCR. From the CRS_home/bin directory on the node docrac1, run the ONS configuration utility as shown in the following example, where remote_port is the default port number 6251 (or another free port if port 6251 is unavailable), and docrac3 is the name of the node that you are adding:
[docrac1:oracle]$ ./onsconfig add_config docrac3:remote_port
You should now have Oracle Clusterware running on the new node. To verify the installation of Oracle Clusterware on the new node, you can run the following command as the root user on the newly configured node, docrac3, where /u01/app/crs/ is the location of the Oracle Clusterware home.
[docrac1:oracle]$ /u01/app/crs/bin/cluvfy stage -post crsinst -n docrac3 -verbose
Extending the Automatic Storage Management Home DirectoryTo extend an existing Oracle RAC database to a new node, you must configure the shared storage for the new database instances that will be created on new node. You must configure access to the same shared storage that is already used by the existing database instances in the cluster. For example, the sales cluster database in this guide uses Automatic Storage Management (ASM) for the database shared storage, so you must configure ASM on the node being added to the cluster.
See Also:
■ "Completing the Oracle Clusterware Configuration"
■ Oracle Real Application Clusters Administration and Deployment Guide for more information about adding and removing nodes from your cluster database

Extending the Oracle RAC Home Directory
9-4 Oracle Database 2 Day + Real Application Clusters Guide
Because you installed ASM in its own home directory, you must configure an ASM home on the new node using OUI. The procedure for adding an ASM home to the new node is very similar to the procedure you just completed for extending Oracle Clusterware to the new node.
To extend the ASM installation to include the new node:1. Ensure that you have successfully installed the ASM software on at least one node
in your cluster environment. In the following steps, ASM_home refers to the location of the successfully installed ASM software.
2. Go to the ASM_home/oui/bin directory on docrac1 and run the addNode.sh script.
3. When OUI displays the Node Selection window, select the node to be added (docrac3), and then click Next.
4. Verify the entries that OUI displays on the Summary window, and then click Next.
5. Run the root.sh script on the new node, docrac3, from the ASM home directory on that node when OUI prompts you to do so.
You now have a copy of the ASM software on the new node.
Extending the Oracle RAC Home DirectoryNow that you have extended the CRS home and ASM home to the new node, you must extend the Oracle home on docrac1 to docrac3. The following steps assume that you have already completed the previous tasks described in this section, and that docrac3 is already a member node of the cluster to which docrac1 belongs.
The procedure for adding an Oracle home to the new node is very similar to the procedure you just completed for extending ASM to the new node.
To extend the Oracle RAC installation to include the new node:1. Ensure that you have successfully installed the Oracle RAC software on at least
one node in your cluster environment. To use these procedures as shown, replace Oracle_home with the location of your installed Oracle home directory.
2. Go to the Oracle_home/oui/bin directory on docrac1 and run the addNode.sh script.
3. When OUI displays the Specify Cluster Nodes to Add to Installation window, select the node to be added (docrac3), and then click Next.
4. Verify the entries that OUI displays in the Cluster Node Addition Summary window, and then click Next.
Note: If the ASM home directory is the same as the Oracle home directory in your installation, then you do not need to complete the steps in this section.
See Also:
■ "Verifying Your ASM Installation"
■ Oracle Real Application Clusters Administration and Deployment Guide for more information about adding and removing nodes from your cluster database

Adding an Instance to the Cluster Database
Adding and Deleting Nodes and Instances 9-5
The Cluster Node Addition Progress window appears.
5. When prompted to do so, run the root.sh script as the root user on the new node, docrac3, from the Oracle home directory on that node.
6. Return to the OUI window and click OK. The End of Installation window appears.
7. Exit the installer.
After completing these steps, you should have the Oracle software in the specified Oracle home on the new node.
Adding an Instance to the Cluster DatabaseYou can use Enterprise Manager to add an instance to your cluster database. You must first configured the new node to be a part of the cluster and installed the software on the new node.
To add an instance to the cluster database:1. From the Cluster Database Home page, click Server.
2. Under the heading Change Database, click Add Instance.
The screenshot shows a portion of the Cluster Database Server subage. There are 6 sections: Storage, Database Configuration, Statistics Management, Resource Manager, Query Optimizer, and Change Database. In the Change Database section, there are two links: Add Instance and Delete Instance. The cursor is pointing to the Add Instance link.
End of description.
***********************************************************************************************
See Also:
■ "Verifying Your Oracle RAC Database Installation"
■ Oracle Real Application Clusters Administration and Deployment Guide for more information about adding and removing nodes from your cluster database

Adding an Instance to the Cluster Database
9-6 Oracle Database 2 Day + Real Application Clusters Guide
The Add Instance: Cluster Credentials page appears.
3. Enter the host credentials and ASM credentials, then click Next.
The Add Instance: Host page appears.
4. Select the node on which you want to create the new instance, verify the new instance name is correct, and then Next.
The screenshot shows the Add Instance: Host page. At the top of the page, on the left-hand side it says "Name of the database instance to be added". This is followed by a text entry box that contains the value sales2. On the right-hand side of the page, near the top, are 3 buttons: Cancel, Back, and Next. Between the Back and Next buttons is the text "Step 2 of 3".
Below the name of the instance to be added is the following explanatory text: "The following list of hosts have database software installed and are currently configured for this cluster. Select a host to which you want to add a database instance. This host should have access to the shared storage used by this database."
The text is followed by a table. The table has 3 columns: Select, Host, and Existing Database Instances. There are 2 rows in the table. The rows contain the following values:
■ Not selected, pmrac1, sales1
■ Selected, pmrac2, no value
Below the table is the following text: "TIP You can clone an Oracle Home to a host where database software is not installed. Clone Oracle Home (hyperlinked)"
End of description.
***********************************************************************************************
After the selected host has been validated, the Add Instance: Review page appears.
5. Review the information, then click Submit Job to proceed.
A confirmation page appears.
6. Click View Job to check on the status of the submitted job.
The Job Run detail page appears.
7. Click your browser’s Refresh button until the job shows a status of Succeeded or Failed.
If the job shows a status of Failed, you can click the name of the step that failed to view the reason for the failure.

Deleting an Instance From the Cluster Database
Adding and Deleting Nodes and Instances 9-7
8. Click the Database tab to return to the Cluster Database Home page.
The number of instances available in the cluster database is increased by one.
Deleting an Instance From the Cluster Database
To delete an instance from the cluster:1. From the Cluster Database Home page, click Server.
2. On the Server subpage, under the heading Change Database, click Delete Instance.
The screenshot shows a portion of the Cluster Database Server subage. There are 6 sections: Storage, Database Configuration, Statistics Management, Resource Manager, Query Optimizer, and Change Database. In the Change Database section, there are two links: Add Instance and Delete Instance. The cursor is pointing to the Delete Instance link.
End of description.
***********************************************************************************************
The Delete Instance: Cluster Credentials page appears.
3. Enter your cluster credentials and ASM credentials, then click Next.
The Delete Instance: Database Instance page appears
4. Select the instance you want to delete, then click Next.

Deleting an Instance From the Cluster Database
9-8 Oracle Database 2 Day + Real Application Clusters Guide
The screenshot shows the Delete Instance: Database Instance page. At the top of the page on the right-hand side are 3 buttons: Cancel, Back, and Next. Between the Back and Next buttons is the text "Step 2 of 3".
Below the page title is the following explanatory text: "The following list of database instances are currently part of this cluster database. Select the database instance to delete. All the files related to this database instance will be deleted."
The text is followed by a table. The table has 3 columns: Select, Database Instance, and Host. There are 2 rows in the table. The rows contain the following values:
■ Not selected, sales1, pmrac1
■ Selected, sales2, pmrac2
End of description.
***********************************************************************************************
The Delete Instance: Review page appears.
5. Review the information, and if correct, click Submit Job to continue. Otherwise, click Back and correct the information.
A Confirmation page appears.
6. Click View Job to view the status of the node deletion job.
A Job Run detail page appears.
7. Click your browser’s Refresh button until the job shows a status of Succeeded or Failed.
The screenshot shows the Job Run: DELETEINSTANCE_SALES.US.ORACLE.COM_000023 page. At the top of the page on the right-hand side are 3 buttons: Delete Run, Edit, and View Definition.
The Summary section displays the following information:
■ Status: Succeeded
■ Scheduled: Jun 28, 2007 1:46:26 PM (UTC-07:00)

Deleting an Instance From the Cluster Database
Adding and Deleting Nodes and Instances 9-9
■ Started: Jun 28, 2007 1:46:26 PM (UTC-07:00)
■ Ended: Jun 28, 2007 1:47:33 PM (UTC-07:00)
■ Elapsed Time: 67 seconds
■ Notification: No
■ Type: Delete Instance
■ Owner: SYS
■ Description: DeleteInstance Job:
■ Oracle Home: /ora/11g/base/db
Below this information is the Targets text entry field, which is empty in this image. Below the Targets field is the Status action list, which has the value All selected. Below the Status list is a Go button.
Below the Go button is a table of the steps performed by the job. There are 6 columns in this table: Name, Targets, Status, Started, Ended, and Elapsed Time (seconds). There are 2 rows in the table. The rows contain the following values:
■ "Execution: sales.us.oracle.com" (expanded), sales.us.oracle.com, Succeeded, "Jun 28, 2007 1:46:26 PM (UTC-07:00)", "Jun 28, 2007 1:47:33 PM (UTC-07:00)", 67
■ "Step: delete instance" (hyperlinked), sales.us.oracle.com, Succeeded, "Jun 28, 2007 1:46:31 PM (UTC-07:00)", "Jun 28, 2007 1:47:33 PM (UTC-07:00)", 61
End of description.
***********************************************************************************************
If the job shows a status of Failed, you can click the name of the step that failed to view the reason for the failure.
8. Click the Database tab to return to the Cluster Database Home page.
The number of instances available in the cluster database is reduced by one.

Deleting an Instance From the Cluster Database
9-10 Oracle Database 2 Day + Real Application Clusters Guide

Managing Oracle Software and Applying Patches 10-1
10Managing Oracle Software and Applying
Patches
Oracle issues product fixes for its software called patches. When you apply the patch to your Oracle software installation, a small collection of files is replaced to fix certain bugs. OPatch is a utility supplied by Oracle that facilitates Oracle software patching.
A group of patches form a patch set. When you apply a patch set, many different files and utilities are modified. This results in a version change for your Oracle software, for example, from Oracle Database 11.1.0.1.0 to Oracle Database 11.1.0.2.0. To apply a patch set, use Oracle Universal Installer (OUI).
This chapter describes how to manage Oracle software and apply patches in Oracle Real Application Clusters (Oracle RAC) environments using Oracle Enterprise Manager and the OPatch utility.
This chapter includes the following sections:
■ Configuring the Enterprise Manager Patch Interface
■ Obtaining the Patch
■ Preparing to Use OPatch
■ Applying Patches
■ Applying Patch Sets
■ Troubleshooting Patch Deployment
Configuring the Enterprise Manager Patch InterfaceEnterprise Manager Database Control enables you to find the latest patch release on the OracleMetaLink Web site, and to download it to your Oracle home. There are two steps in configuring the Enterprise Manager Patch interface:
■ About OracleMetaLink Credentials
■ Running the Refresh_From_Metalink Job
See Also:
■ Oracle Universal Installer and OPatch User's Guide for more information about using OPatch and applying patches to Oracle RAC
■ Oracle Database 2 Day DBA

Configuring the Enterprise Manager Patch Interface
10-2 Oracle Database 2 Day + Real Application Clusters Guide
About OracleMetaLink CredentialsTo download patches from OracleMetaLink using Enterprise Manager, you can give Enterprise Manager Database Control (Database Control) your login credentials so that it can log in to OracleMetaLink automatically and search for patch releases. You must set these credentials before you can run the Patch Wizard in Database Control.
Refer to Oracle Database 2 Day DBA for instructions on setting your OracleMetaLink credentials.
Running the Refresh_From_Metalink JobAfter you have configured the OracleMetaLink credentials, you can create a job to search for critical patch advisories for your installed software.
To create a job to search for critical patch advisories on OracleMetaLink:1. On the Cluster Database Home page, scroll down to the section titled Critical
Patch Advisories. Click RefreshFromMetalink.
The screenshot shows the Critical Patch Advisories section. There are three piece of information displayed. The first is the number of available Patch Advisories. This item is marked with a yellow triangle with an exclamation point in its center. The number of available critical patch advisories is 0. There is a warning message below this item which says “Patch advisory information may be stale. OracleMetaLink refresh job has not run successfully in 72 hours.”
The next item of information it the number of affected Oracle homes, which also displays the number 0.
The last piece of information is the job name, which is displayed as RefreshFromMetalink.
End of description.
***********************************************************************************************
When you click this link, Enterprise Manager creates the Refresh_From_Metalink_Job job, and then displays the Job Activity page.
See Also:
■ "Oracle RAC and Enterprise Manager" on page 4-2
■ Oracle Database 2 Day DBA
See Also:
■ "Configuring the Enterprise Manager Patch Interface" on page 10-1
■ Oracle Database 2 Day DBA

Obtaining the Patch
Managing Oracle Software and Applying Patches 10-3
2. On the Job Activity page, click Edit and then modify the scheduled execution time of the Refresh_From_Metalink_Job job to meet your business requirements. When finished, click Save.
3. Select the Refresh_From_Metalink_Job job and click Create Like.
4. Change the job name to Refresh_From_Metalink_Now, then click Schedule.
5. Select Immediately for the start time.
6. Select One Time Only for the Repeat interval, then click Submit and Save.
The Job Activity page appears.
7. Click REFRESH_FROM_METALINK_NOW.
The Job Run: REFRESH_FROM_METALINK_NOW page is displayed.
8. Refresh this page until the job status shows Succeeded.
9. Click the Database tab in the upper right-hand corner to return to the Cluster Database Home page.
Obtaining the PatchYou obtain patches and patch sets from OracleMetaLink, which is the Oracle Support Services Web site, at
https://metalink.oracle.com
You can view available patch releases at OracleMetaLink by using Enterprise Manager. Viewing these updates is the first step in the Patch Wizard, which you can use to download the patch to your Oracle home.
To start the Patch Wizard Using Enterprise Manager:1. On the Cluster Database Home page, scroll down to the Instances section.
2. Click the link for the first instance in your cluster, for example, sales.oracle.com_sales1.
The Database Instance Home page for the sales1 instance appears.
3. Select Software and Support at the top of the page.
4. In the Database Software Patching section, click Apply Patch.
The Select Patches page appears.
5. Click Add Patch.
The Search and Select Patches page appears.
6. Select the Search Metalink option.
7. Specify the Patch Type and Platform for your cluster, then click Go.
The search results that match the criteria are displayed by the most recent patch (or patch set) at the top of the list.
See Also:
■ "Configuring the Enterprise Manager Patch Interface" on page 10-1
■ Oracle Database 2 Day DBA

Obtaining the Patch
10-4 Oracle Database 2 Day + Real Application Clusters Guide
8. Select a patch and click View Details to view the patch details. Select a patch and click View ReadMe to view the README file for the patch, which includes a description of the bug fixes included in the patch and patch installation instructions. Return to the Patch Wizard by clicking the Patch locator link on the View Patch Details page.
9. Select the patch you are interested in, or select the most recent patch set if you are doing a periodic software update, and then click Next.
The Patch: Select Destination page appears.
10. Select the targets to apply the patch to by moving the target names from the Available Targets list to the Selected Targets list, and then click Next.
The Patch: Set Credentials page appears.
11. In the Username and Password fields, enter the operating system user name and password to enable Enterprise Manager to stage the patch in your Oracle home directory. Enterprise Manager requires these credentials for job scheduling. After you have entered the operating system credentials for each selected node, click Next.
The Patch: Stage or Apply page appears.
12. Enterprise Manager downloads the patch to the directory that is listed in the main box. Typically, this location is an Oracle home subdirectory called EMStagedPatches/patchnumber.
By default, Enterprise Manager only stages the patch. You can then manually apply the patch by following the directions given in the patch README file. The directions may include shutting down the database instances and your applications, or running scripts.
13. (Optional) Select the Run Script to Apply Patch option to have Enterprise Manager apply the patch for you. If you choose this option, you must modify the script displayed on this page so that it performs all the actions specified in the patch release notes.
14. When you are finished, click Next.
The Patch: Schedule page appears.
15. Specify the time when you want the patch to be downloaded from OracleMetaLink. If you selected the option Run Script to Apply Patch, then the patch apply script will run at this time. Click Next.
The Patch: Summary page appears.
16. Review the summary information on this page. If you need to modify any of the information displayed, click Back. When you are ready to submit the job, click Finish.
Note: This step is supported only for databases that do not contain the Enterprise Manager repository or for patches that do not require the repository database to be shut down. For example, if you are applying a patch that affects only SQL*Loader, then you can use Enterprise Manager to apply the patch.

Preparing to Use OPatch
Managing Oracle Software and Applying Patches 10-5
Preparing to Use OPatchBefore you apply the patch to your Oracle RAC database, your ASM installation, or to your Oracle Clusterware installation, there are a few steps to perform:
■ Checking the ORACLE_HOME Environment Variable
■ Performing a Backup
■ Staging the Patch on Each Node
■ Updating the PATH Environment Variable
■ Configuring SSH User Equivalency
Checking the ORACLE_HOME Environment VariableOPatch verifies if the Oracle home is present. You must ensure that the ORACLE_HOME environment variable is set to the Oracle home of the product you are trying to patch.
Check the respective vendor documentation for the details to set the environment variable.
To check the current setting of the ORACLE_HOME variable on Linux:1. In a command window, log in to the operating system as the oracle user.
2. Use the echo command to display the current setting of the ORACLE_HOME environment variable.
echo $ORACLE_HOME
Performing a BackupIt is highly recommended to back up the software directory you are patching before performing any patch operation. This applies to Oracle RAC, ASM, or Oracle Clusterware software installation directories.
See Also:
■ "Configuring the Enterprise Manager Patch Interface" on page 10-1
■ Oracle Database 2 Day DBA
See Also:
■ "Configuring the Enterprise Manager Patch Interface" on page 10-1
■ "Obtaining the Patch" on page 10-3
■ Oracle Database 2 Day DBA
See Also:
■ "Preparing to Use OPatch" on page 10-5
■ "Configuring the Operating System Environment" on page 3-2
■ Oracle Database 2 Day DBA

Preparing to Use OPatch
10-6 Oracle Database 2 Day + Real Application Clusters Guide
To back up the software installation:1. Back up the software installed in the specified Oracle home using:
a. An operating system utility, such as zip, cp -r, tar, or cpio, to back up the software in the Oracle home directory that is being patched to disk.
b. The Oracle Secure Backup utility to back up the software in the Oracle home directory that is being patched to tape.
Staging the Patch on Each NodeIf you use Enterprise Manager to download the patch, and you selected all the nodes in your cluster as targets for the patch, then the patch is automatically staged on those nodes.
If you manually downloaded the patch from OracleMetaLink, then you must copy the patch to each node.
Updating the PATH Environment VariableThe opatch binary file is located in the Oracle_home/OPatch directory. You can either specify this path when executing OPatch, or you can update the PATH environment variable to include the OPatch directory.
To update the PATH environment variable on Red Hat Linux systems:1. In a command window, log in to the operating system.
2. Use a shell command similar to the following to update the value of the PATH environment variable, where /opt/oracle/11gR1/db_1 is the location of your Oracle home directory:
$ export PATH=$PATH:/opt/oracle/11gR1/db_1/OPatch
You could also modify the shell profile script for the current user to have this variable configured every time you log in.
Configuring SSH User EquivalencyBefore you patch a system, make sure the user equivalency is working.
See Also:
■ "Preparing to Use OPatch" on page 10-5
■ "Configuring the Operating System Environment" on page 3-2
■ Oracle Universal Installer and OPatch User's Guide
See Also:
■ "Preparing to Use OPatch" on page 10-5
■ "Obtaining the Patch" on page 10-3
■ Oracle Database 2 Day DBA
See Also:
■ "Preparing to Use OPatch" on page 10-5
■ "Configuring the Operating System Environment" on page 3-2
■ Oracle Universal Installer and OPatch User's Guide

Preparing to Use OPatch
Managing Oracle Software and Applying Patches 10-7
To test SSH user equivalency:1. On the system where you want to run OPatch, log in as the oracle user.
2. Use the following command to test user equivalency:
[oracle@docrac1] $ ssh docrac2 date
If the date is returned, then user equivalency between the source and destination node has been configured.
3. If you see output similar to the following, then SSH user equivalency is not enabled:
Enter passphrase for key ’/home/oracle/.ssh/id_rsa’:
Enable SSH user equivalency before continuing with the patching operation.
To enable SSH user equivalency:1. On the system where you want to run OPatch, open a command window and log
in as the oracle user.
2. Start the SSH agent and load the SSH keys into memory using the following commands:
$ /usr/bin/ssh-agent $SHELL$ /usr/bin/ssh-add
These commands start the ssh-agent on the local node, and load the RSA and DSA keys into the current session’s memory so that you are not prompted to use pass phrases when issuing SSH commands.
3. At the prompt, enter the pass phrase for each key that you generated when configuring Secure Shell, for example:
[oracle@docrac1 .ssh]$ exec /usr/bin/ssh-agent $SHELL[oracle@docrac1 .ssh]$ /usr/bin/ssh-addEnter passphrase for /home/oracle/.ssh/id_rsaIdentity added: /home/oracle/.ssh/id_rsa (/home/oracle/.ssh/id_rsa)Identity added: /home/oracle/.ssh/id_dsa (/home/oracle/.ssh/id_dsa)
4. To test if you have configured SSH correctly, run the following command. If you have configured SSH correctly, then you will not be prompted for a password or a pass phrase.
[oracle@docrac1] $ ssh docrac2 date
Note: Do not close this command window until you have completed the patch installation. If you must close the command window in which you enabled SSH user equivalency before the patch installation is complete, repeat Step 1 to Step 4 before starting the patch installation.
See Also:
■ "Configuring SSH User Equivalency" on page 2-10
■ "Preparing to Use OPatch" on page 10-5

Applying Patches
10-8 Oracle Database 2 Day + Real Application Clusters Guide
Applying PatchesPatching in an Oracle RAC environment is slightly different compared to patching a single node. If OPatch detects a cluster, it uses Oracle Universal Installer (OUI) to query the software inventory to find the local node name and node list.
Before you install a patch, you must stop all the applications running from the software directory that is being patched. In an Oracle RAC cluster, you may have to shut down additional applications, depending upon which software is being patched. Table 10–1 lists the applications to stop when patching Oracle software.
You can patch Oracle RAC in three different ways:
■ All Node Patching
■ Rolling Patching
■ Minimum Downtime Patching
All Node PatchingIn all node patching, all the nodes in the cluster are initially shut down and the patch is applied on all the nodes. After all the nodes have been patched, then all the nodeapps on the nodes are restarted. This method is typically used for very critical patches and it leads to maximum downtime. OPatch uses this method if the patch cannot be applied in a rolling fashion, and you did not specify the minimize_downtime option.
To implement all node patching:1. Stop all user applications that use the Oracle home directory.
2. If you are patching only the Oracle RAC home directory, shut down all Oracle RAC instances on all nodes in the cluster. To shut down all Oracle RAC instances for a cluster database, enter the following command in a command window, where CRS_home is the location of the CRS home directory and sales is the name of the database:
$ CRS_home/bin/srvctl stop database -d sales
3. If you are patching the ASM home or CRS home directory, stop all single-instance databases that are running on the group of nodes being patched if they use the ASM installation that you are patching.
Table 10–1 Patching Oracle Home Directories
Oracle Home Directory Applications to Stop
Oracle RAC Database Oracle RAC database, Enterprise Manager Database Control, listener, and any other applications that are running from the Oracle RAC home directory
ASM Oracle RAC database, any single-instance databases that use the same ASM instance as the cluster database, listener (if running from the ASM home directory), ASM, and any other applications that are running from the ASM home directory
Oracle Clusterware Oracle RAC database, any single-instance databases that use the same ASM instance as the cluster database, ASM, all node applications, Oracle Clusterware, and any other applications that are running from the CRS home directory

Applying Patches
Managing Oracle Software and Applying Patches 10-9
4. If you are patching the ASM home directory, stop all user applications that use the ASM home directory on the group of nodes being patched.
5. If you are patching the ASM home or CRS home directory, you can use a single command to stop all the node applications on each node in the group. This command shuts down the Oracle RAC instances, the listener, the ASM instances, and the Oracle Clusterware node applications for the specified node. Use a command similar to the following, where CRS_home is the home directory of your Oracle Clusterware installation and node_name is the name of the node:
$ CRS_home/crs/bin/srvctl stop nodeapps -n node_name
Repeat the preceding command for each node in the cluster.
After you have stopped the nodeapps on each node in the cluster, use the crs_stat utility to verify that all the nodeapps were stopped on each node.
$ CRS_home/bin/crs_stat -t
6. If you are patching the CRS home directory, shut down the CRS daemons for all the nodes in the cluster by issuing the following command as the root user on each node, where CRS_home is the home directory of your Oracle Clusterware installation:
# CRS_home/bin/crsctl stop crs
Repeat this command on each node in the cluster.
7. Set your current directory to the directory where the patch is located, for example:
$ cd Oracle_home/EMStagedPatches/4519934/4519934
8. Make sure the ORACLE_HOME environment variable points to the software directory you want to patch, for example:
$ echo $ORACLE_HOME/opt/oracle/11gR1/db_1
9. Run OPatch by entering the following command:
opatch apply
10. If you applied the patch to the CRS home directory, restart the CRS daemons on all nodes by issuing the following command as the root user on each node, where CRS_home is the home directory of your Oracle Clusterware installation:
# CRS_home/bin/crsctl start crs
Repeat this command on each node in the cluster.
11. If you stopped the nodeapps on each node, after the patch has been applied, restart the nodeapps on all nodes. To start the nodeapps, enter a command similar to the following where CRS_home is the home directory of your Oracle Clusterware installation and docrac1 is one of the nodes in your cluster:
$ CRS_home/bin/srvctl start nodeapps -n docrac1 Repeat the preceding command for each node in the cluster.
After you have restarted the nodeapps on all nodes, use the crs_stat utility to verify that the nodeapps were restarted on each node.
$ CRS_home/bin/crs_stat -t
Applying Patches
10-10 Oracle Database 2 Day + Real Application Clusters Guide
If any of the node applications did not restart, use the SRVCTL utility to restart them. For example, you can use commands similar the following to restart various node applications, where CRS_home is the home directory of your Oracle Clusterware installation:
$ CRS_home/bin/srvctl start instance -d sales -i "sales1"$ CRS_home/bin/srvctl start listener -n docrac1$ CRS_home/bin/srvctl start asm -n docrac1
12. Run any post-patch scripts that are mentioned in the patch instructions, for example:
$ sqlplus /nolog SQL> connect sys/password@sales1 AS SYSDBASQL> @Oracle_home/cpu/CPUOct2007/catcpu.sqlSQL> @Oracle_home/rdbms/admin/utlrp.sqlSQL> exit
Rolling PatchingIn rolling patching, one group of nodes is shut down, the patch is applied to those nodes, and the nodes are brought back up. This is performed group by group, separately, until all the nodes in the cluster are patched. This is the most efficient means of applying an interim patch to an Oracle RAC, ASM, or Oracle Clusterware installation. By patching groups of nodes individually, there is zero downtime for the cluster database because at least one instance is available at all times on a different node.
While most patches can be applied in a rolling fashion, some patches cannot be applied in this fashion. The README file for the patch indicates whether or not you can apply the patch using the rolling patch method. If the patch cannot be applied using the rolling patch method, then you must use either "Minimum Downtime Patching" on page 10-13 or "All Node Patching" on page 10-8 to apply the patch.
To apply a patch using the rolling patch method:1. In a command window, change to the directory where the unzipped patch is
staged on disk, for example:
$ cd Oracle_home/EMStagedPatches/4519934/4519934
2. Stop all user applications that use the Oracle RAC home directory for the group of nodes being patched. For example, to stop Enterprise Manager Database Control on the local node, use the following command, where Oracle_home is the home directory for your Oracle RAC installation:
$ Oracle_home/bin/emctl stop dbconsole
See Also:
■ "Obtaining the Patch" on page 10-3
■ "Preparing to Use OPatch" on page 10-5
■ "Applying Patches" on page 10-8
■ "Applying Patch Sets" on page 10-15
■ "Troubleshooting Patch Deployment" on page 10-16
■ Oracle Universal Installer and OPatch User's Guide

Applying Patches
Managing Oracle Software and Applying Patches 10-11
3. If you are patching the ASM home or CRS home directory, stop all single-instance databases that are running on the group of nodes being patched if they use the ASM software you are patching.
4. If you are patching the ASM home directory, stop all user applications that use the ASM home directory on the group of nodes being patched.
5. If you are patching only the Oracle RAC home directory, shut down all Oracle RAC instances in the group of nodes being patched. To shut down an instance for an Oracle RAC database, enter a command similar to the following example, where CRS_home is the home directory for your Oracle Clusterware installation, sales is the name of the database, and sales1 is the name of the instance:
$ CRS_home/bin/srvctl stop instance -d sales -i "sales1"
Repeat the preceding command for each node in the group of nodes being patched.
6. If you are patching the ASM home or CRS home directory, you can use a single command to stop all the node applications on each node in the group. This command shuts down the Oracle RAC instances, the listener, the ASM instances, and the Oracle Clusterware node applications for the specified node. Use a command similar to the following, where CRS_home is the home directory of your Oracle Clusterware installation and docrac1 is one of the nodes in the group:
$ CRS_home/crs/bin/srvctl stop nodeapps -n docrac1
Repeat the preceding command for each node in the group of nodes being patched.
After you have stopped the nodeapps on each node in the group, use the crs_stat utility to verify that all the nodeapps were stopped on the group of nodes being patched.
$ CRS_home/bin/crs_stat -t
7. If you are patching the CRS home directory, shut down the CRS daemons for the nodes in the group by issuing the following command as the root user on each node in the group, where CRS_home is the home directory of your Oracle Clusterware installation:
# CRS_home/bin/crsctl stop crs
Repeat this command on each node in the group of nodes being patched.
8. Make sure the ORACLE_HOME environment variable points to the software directory you want to patch, for example:
$ echo $ORACLE_HOME/opt/oracle/11gR1/db_1
9. If you are patching nodes individually, use the following command to instruct OPatch to apply the patch to only the local node. If you run this command from the directory where the patch is located, you do not need to specify the patch ID.
$ opatch apply -local
If you are using a group of nodes, use a command similar to the following to instruct OPatch to apply the patch to the group of nodes being patched:
$ opatch apply -local_node docrac1 -remote_nodes docrac2,docrac3

Applying Patches
10-12 Oracle Database 2 Day + Real Application Clusters Guide
10. If you applied the patch to the CRS home directory, restart the CRS daemons for the nodes in the first group by issuing the following command as the root user on each node in the group, where CRS_home is the home directory of your Oracle Clusterware installation:
# CRS_home/bin/crsctl start crs
Repeat this command on each node in the group.
11. If you stopped the nodeapps for the group of nodes, after the patch has been applied, restart the nodeapps on those nodes. To start the nodeapps, enter a command similar to the following where CRS_home is the home directory of your Oracle Clusterware installation and docrac1 is one of the nodes in the group of nodes you recently patched:
$ CRS_home/bin/srvctl start nodeapps -n docrac1 Repeat the preceding command for each node in the group.
12. After you have restarted the nodeapps on each node in the group, use the crs_stat utility to verify that the nodeapps were restarted on each node in the group.
$ CRS_home/bin/crs_stat -t
If any of the node applications did not restart, use the SRVCTL utility to restart them. For example, you can use the following command to restart the sales1 instance for the sales cluster database:
$ CRS_home/bin/srvctl start instance -d sales -i "sales1"
13. Restart all single-instance databases that use the ASM software and all user applications that use the Oracle home or ASM home on each node in the group of nodes you recently patched.
14. Repeat Step 2 through Step 8 for the next group of nodes.
15. If you are patching nodes individually, use a command similar to the following to instruct OPatch to apply the patch to only the next node to be patched. If you run this command from the directory where the patch is located, you do not need to specify the patch ID.
$ opatch apply -remote_nodes docrac2
If you are patching a group of nodes, use a command similar to the following to instruct OPatch to apply the patch to the group of nodes being patched:
$ opatch apply -remote_nodes docrac4,docrac5,docrac6
16. If you applied the patch to the CRS home directory, restart the CRS daemons for the nodes in the group you recently patched by issuing the following command as the root user on each node in the group, where CRS_home is the home directory of your Oracle Clusterware installation:
# CRS_home/bin/crsctl start crs
Repeat this command on each node in the group.
17. If you stopped the nodeapps for the group of nodes, after the patch has been applied, restart the nodeapps on those nodes. To start the nodeapps, enter a command similar to the following where CRS_home is the home directory of your

Applying Patches
Managing Oracle Software and Applying Patches 10-13
Oracle Clusterware installation and docrac1 is one of the nodes in the group of nodes you recently patched:
$ CRS_home/bin/srvctl start nodeapps -n docrac1 Repeat the preceding command for each node in the group.
18. After you have restarted the nodeapps on each node in the group, use the crs_stat utility to verify that the nodeapps were restarted on each node in the group.
$ CRS_home/bin/crs_stat -t
If any of the node applications did not restart, use the SRVCTL utility to restart them. For example, you can use the following command to restart the sales2 instance for the sales cluster database:
$ CRS_home/bin/srvctl start instance -d sales -i "sales2"
19. Restart all single-instance databases that use the ASM software and all user applications that use the Oracle home or ASM home on each node in the group of nodes you recently patched.
20. If you have more than two groups of nodes to be patched, repeat Step 14 through Step 19 for each group of nodes until all the nodes in the cluster have been patched.
21. Run any post-patch scripts that are mentioned in the patch instructions, for example:
$ sqlplus /nolog SQL> connect sys/password@sales1 AS SYSDBASQL> @Oracle_home/cpu/CPUOct2007/catcpu.sqlSQL> @Oracle_home/rdbms/admin/utlrp.sqlSQL> exit
Minimum Downtime PatchingIn minimum downtime patching, one set of nodes is shut down and the patch is applied to those nodes. After the first set of nodes has been patched, the second set of nodes is shut down. The first set of nodes is then restarted and the patch is applied to the second set of nodes. After the patch has been applied to the second set of nodes, those nodes are restarted. This method leads to less downtime for Oracle RAC, compared to having all the nodes shut down at the same time.
When you use the minimum downtime patching method, the following actions occur:
■ The local node is always patched first.
■ The local node is used as a base to patch the other nodes.
See Also:
■ "Obtaining the Patch" on page 10-3
■ "Preparing to Use OPatch" on page 10-5
■ "Applying Patches" on page 10-8
■ "Applying Patch Sets" on page 10-15
■ "Troubleshooting Patch Deployment" on page 10-16
■ Oracle Universal Installer and OPatch User's Guide

Applying Patches
10-14 Oracle Database 2 Day + Real Application Clusters Guide
■ The user is prompted for the set of nodes to patch first from the remaining nodes.
■ For each node in this first set, the user is asked to stop the instance and then the patch is propagated to that node before continuing to the next node. When the initial set of nodes has been patched, the user is asked to shut down the remaining nodes.
■ After the local node is patched, the patch is propagated to the last set of nodes and the inventory is updated. The last instances are stopped on the remote nodes. You can then start up the patched nodes (the first set of nodes) before patching the remaining nodes.
To apply a patch to your cluster database using the minimum downtime method:1. Change to the directory where the unzipped patch is staged on disk, for example:
$ cd Oracle_home/EMStagedPatches/4519934/4519934
2. Stop all user applications that use the Oracle RAC home directory for the group of nodes being patched. For example, to stop Enterprise Manager Database Control on the local node, use the following command, where Oracle_home is the home directory for your Oracle RAC installation:
$ Oracle_home/bin/emctl stop dbconsole
3. Shut down all Oracle RAC instances on the local node. To shut down an instance for an Oracle RAC database, enter a command similar to the following example, where CRS_home is the home directory for your Oracle Clusterware installation, sales is the name of the database, and sales1 is the name of the instance:
$ CRS_home/bin/srvctl stop instance -d sales -i "sales1"
4. Make sure the ORACLE_HOME environment variable points to the software directory you want to patch, for example:
$ echo $ORACLE_HOME/opt/oracle/11gR1/db_1
5. Use the following command from within the patch directory:
$ opatch apply -minimize_downtime
If you run the OPatch command from the directory where the patch is staged on disk, you do not need to specify the patch ID.
OPatch asks if you are ready to patch the local node. After you confirm that the Oracle RAC instances on the local node have been shut down, OPatch applies the patch to the Oracle home directory on the local node. You are then asked to select the next nodes to be patched.
6. After you shut down the Oracle RAC instances on the other nodes in the cluster, you can restart the Oracle RAC instance on the local node. Then, instruct OPatch that you are ready to patch the remaining nodes.
7. After all the nodes have been patched, restart the Oracle RAC instances on the other nodes in the cluster. The following command shows how to start the sales2 instance for the Oracle RAC database named sales:
$ CRS_home/bin/srvctl start instance -d sales -i "sales1"
8. Verify that all the nodeapps were restarted on the nodes in the cluster.
$ crs_stat -t

Applying Patch Sets
Managing Oracle Software and Applying Patches 10-15
If any of the node applications did not restart, use the SRVCTL utility to restart them. For example, you can use commands similar the following to restart the listener on the docrac1 node, where CRS_home is the home directory of your Oracle Clusterware installation:
$ CRS_home/bin/srvctl start listener -n docrac1
9. Run any post-patch scripts that are mentioned in the patch instructions, for example:
$ sqlplus /nolog SQL> connect sys/password@sales1 AS SYSDBASQL> @Oracle_home/cpu/CPUOct2007/catcpu.sqlSQL> @Oracle_home/rdbms/admin/utlrp.sqlSQL> exit
Applying Patch SetsPatch sets are a mechanism for delivering fully tested and integrated product fixes. All the fixes in a patch set have been tested and are certified to work with each other. Because a patch set includes only low impact patches, it does not require you to certify applications or tools against the server.
For instructions on applying the latest patch set to your Oracle RAC database and Oracle Clusterware installations on Red Hat Linux, search for "Oracle 11g release 1(11.1) Support Status and Alerts" documentation on the OracleMetaLink Web site.
This document provides a summary of the patch sets available for Oracle 11g Release 1. Using this document, you can easily locate and view the Patch Set Notes for your platform. The Oracle Database Patch Set Notes document contains the following information:
■ System requirements and information about how to install or reinstall the patch set
■ A list of all bugs fixed to date that are specific to Oracle Database for specified platform
■ A list of known issues relating to Oracle Database for the specified platform
To locate the Patchset notes on OracleMetaLink:1. Log in to OracleMetaLink.
2. Select the Patches & Updates tab.
3. Select Quick Links to the Latest Patchsets, Mini Packs, and Maintenance Packs.
4. Under the heading Latest Oracle Server/Tools Patchsets, select Oracle Database.
See Also:
■ "Obtaining the Patch" on page 10-3
■ "Preparing to Use OPatch" on page 10-5
■ "Applying Patches" on page 10-8
■ "Applying Patch Sets" on page 10-15
■ "Troubleshooting Patch Deployment" on page 10-16
■ Oracle Universal Installer and OPatch User's Guide

Troubleshooting Patch Deployment
10-16 Oracle Database 2 Day + Real Application Clusters Guide
A list of operating systems appears.
5. Place your cursor over the entry that matches your operating system, or use the triangular arrows to search for your operating system.
When you place the cursor over the entry for your operating system, for example, Linux x86, a list of database versions appears.
6. Select 11.1.0
The Advanced Search page appears.
7. Scroll to the bottom of this page to see the list of available patchsets.
8. Select the number in the Patch column for the patchset you want to view or download.
The Patchset description and download page appears.
9. Click View Readme to see the patchset notes.
On this page you can also click Download to download the patch to your computer.
Troubleshooting Patch DeploymentThis section covers the following topics regarding troubleshooting patch deployment:
■ Updating the Node List for OPatch
■ About OPatch Log and Trace Files
■ Resolving the "Not a valid patch area" Error
■ Resolving the "Unable to remove a partially installed interim patch" Error
If you have problems applying a patch to your Oracle RAC database, review these solutions to common problems. If the problem you encountered is not listed, review the log and trace files.
Updating the Node List for OPatchIf OPatch does not automatically detect Oracle RAC or its nodes, investigate the contents of the inventory and ensure they are complete.
See Also:
■ "Preparing to Use OPatch"
■ "Applying Patches"
■ "Troubleshooting Patch Deployment"
■ Oracle Universal Installer and OPatch User's Guide
See Also:
■ Oracle Universal Installer and OPatch User's Guide
■ "Obtaining the Patch"
■ "Preparing to Use OPatch"
■ "Applying Patches"
■ Oracle Database 2 Day DBA

Troubleshooting Patch Deployment
Managing Oracle Software and Applying Patches 10-17
To update the node list for OPatch:If the list of nodes for your cluster is not complete, you can update it by using Oracle Universal Installer and the -updateNodeList flag, as demonstrated in the following example:
Oracle_home/oui/bin/runInstaller -updateNodeList ORACLE_ HOME=/opt/oracle/11gR1/db_1 CLUSTER_NODES=docrac1,docrac2,docrac3 -noClusterEnabled
About OPatch Log and Trace FilesLogging and tracing is a common aid for debugging. OPatch maintains logs for all apply, rollback, and lsinventory operations. The log files are located in the Oracle_home/cfgtoollogs/opatch directory. Each log file will be tagged with the time stamp of the operation. Log files are named as opatch_mm-dd-yyyy_hh-mm-ss.log, where mm-dd-yyyy is the current date and hh-mm-ss is the current time. Each time you run OPatch, a new log file is created.
For example, if a log file is created on May 17, 2007 at 11:55 PM, then it will be named as follows:
opatch_05-17-2007_23-55-00.log
OPatch also maintains an index of the commands processed by OPatch and the log files associated with it in the history.txt file located in the Oracle_home/cfgtoollogs/opatch directory. A sample of the history.txt file is as follows:
Date & Time : Tue Apr 26 23:00:55 PDT 2007Oracle Home : /opt/oracle/11gR1/db_1/OPatch Ver. : 11.1.0.0.0Current Dir : /scratch/oui/OPatchCommand : lsinventoryLog File : /opt/oracle/11gR1/db_1/cfgtoollogs/opatch/opatch-2007_Apr_26_23-00-55-PDT_Tue.log
Resolving the "Not a valid patch area" ErrorYou might get this error if the directory that the OPatch utility is using to do the patch does not match the template for what it is checking, or if the OPatch utility is run from an invalid directory.
The Patch_Shiphome directory should have the following structure:
■ An etc directory that has the metadata files
■ A files directory that has the patch files
See Also:
■ "Troubleshooting Patch Deployment"
■ Oracle Universal Installer and OPatch User's Guide for more information about Oracle product patching using OPatch
See Also:
■ "Troubleshooting Patch Deployment"
■ Oracle Universal Installer and OPatch User's Guide

Troubleshooting Patch Deployment
10-18 Oracle Database 2 Day + Real Application Clusters Guide
■ The etc/config/inventory file and the actions file under the same directory
To resolve the "Not a valid patch area" error:■ Perform one of the following actions:
a. Remove the patch shiphome directory and re-create it with the proper structure (by extracting the files again).
b. Start the OPatch utility from the directory where the patch to be installed has been unzipped and staged on disk.
c. Use the following command when starting OPatch:
opatch apply /Patch_Shiphome
where Patch_Shiphome is the location where the patch has been staged on disk.
Resolving the "Unable to remove a partially installed interim patch" ErrorIf the patching process is interrupted, you might get the error "Unable to remove a partially installed interim patch" when you try to install the patch a second time.
To resolve the partially installed patch error:1. Ensure that the environment variable ORACLE_HOME is set to the Oracle home
directory you are attempting to patch.
2. Go to the Oracle_home/.patch_storage/patch-id_timestamp directory and run the restore command as follows:
Oracle_home/.patch_storage/patch-id_timestamp/restore.sh
3. Use the Oracle_home/.patch_storage/patch-id_timestamp/make.txt file (if available) to modify your operating system environment, as follows:
/bin/sh make.txt
4. Attempt to apply the patch again.
See Also:
■ "Troubleshooting Patch Deployment"
■ Oracle Universal Installer and OPatch User's Guide
See Also:
■ "Troubleshooting Patch Deployment"
■ Oracle Universal Installer and OPatch User's Guide

Index-1
Index
Aadd instance, 9-5Adding OCR locations, 5-7Additional Real Application Clusters
documentation, 1-2additional Real Application Clusters
documentation, 1-2ADDM
See Automatic Database Diagnostic Monitoraffinity, 7-10alert log, 8-47all node patching, 10-8archive logs, 6-3
backing up, 6-6, 6-7deleting after backups, 6-7instance access to, 6-4, 6-8recovery, 6-8, 6-10
archivingconfiguring, 6-3enabling, 6-3
ASMSee Automatic Storage Management
Automatic Database Diagnostic Monitor (ADDM)database findings, 8-3description, 8-2instance findings, 8-3recommendations, 8-3
Automatic Storage Management (ASM)file management, 1-3managing, 4-10mirroring, 1-3operating system group requirements, 2-6rebalancing, 1-3striping, 1-3use of, 2-2use with Oracle RAC, 1-3
Bbackups
archive logs, 6-4, 6-7description of, 6-1managing backups, 6-11Oracle Cluster Registry (OCR), 5-3, 5-4Oracle software, 10-5
parallelism, 6-6performing using Enterprise Manager, 6-2, 6-5privileges, 6-5root.sh script, 3-36settings, 6-5storing in a flash recovery area, 6-2viewing backup reports, 6-11viewing OCR backups, 5-3voting disks, 3-35, 5-2
block devices, 2-18configuring partitions, 2-19required partition sizes for Oracle
Clusterware, 2-19blocks
cache tranfers of, 8-9cached, 1-2, 8-23corrupt, 6-2OCR format, 5-9request latency, 8-9 to 8-18undo, 4-10
buffer cache, 8-9
CCache Fusion
definition of, 1-2mechanism, 8-9
client-side load balancing, 7-7cluster database
adding a new node, 9-1ADDM findings, 8-3administration, 4-1alert log, 8-47alerts, 8-45and ASM, 4-10and the OCRand the private interconnect, 2-3archiving, 6-3backing up, 6-1, 6-6buffer cache, 8-9comparison of Oracle RAC to single-instance, 1-2configuring initialization parameters, 4-4connecting to, 7-7converting to, 3-36creating during installation, 3-22performance, 8-1

Index-2
recovery, 6-1, 6-9server parameter files, 4-9starting and stopping, 4-3topology, 8-26undo tablespaces, 4-10
Cluster Ready Services (CRS), 1-4checking daemon status, 8-40crsd.bin process, 5-2
Cluster Ready Services Control (CRSCTL)checking the Oracle Clusterware status, 5-7description of, 1-4using to add and remove voting disks, 5-3using to start Oracle Clusterware processes, 5-5using to stop Oracle Clusterware processes, 5-5using to troubleshoot Oracle Clusterware
issues, 8-39Cluster Synchronization Services (CSS), 1-4
checking daemon status, 8-40Cluster Verification Utility (CVU)
check postinstallation configuration, 9-3check preinstallation configuration, 3-3, 9-2description of, 1-4location of trace files, 8-45use by OUI, 3-34verify node applications, 8-42verifying network connectivity, 8-44verifying OCR integrity, 5-5
connect descriptor, 7-7connection load balancing, 7-7
goals, 7-8connection pools, 7-8control files
location, 2-2parallelized backups, 6-6
converting single-instance databases to Oracle RAC, 3-36
prerequisites, 3-37using Grid Control, 3-37using rconfig, 3-38
CRSSee Cluster Ready Services
CRS_homechoosing, 2-23
CRSCTLSee Cluster Ready Services Control
CSSSee Cluster Synchronization Services
CVUSee Cluster Verification Utility
Ddatabase
See cluster databasedatabase findings, 8-3Database Resource Manager, 7-3
terminology, 7-3 to 7-4datafiles
location, 2-2parallelized backups, 6-6
delete instance, 9-7diagcollection.pl script, 8-40documentation
Real Application Clusters, 1-2domain name system, 2-13DSA keys, 2-7
EEnterprise Manager
alerts, 8-45and OracleMetaLink, 10-1Average Active Sessions chart, 8-12backup and recovery, 6-2backup reports, 6-11Cluster Cache Coherency page, 8-17Cluster Database page, 8-1Cluster Database Performance page, 8-7Cluster Host Load Average chart, 8-9Cluster Managed Database Services page, 7-16Database Locks page, 8-25Database Throughput charts, 8-13description of, 1-4Global Cache Block Access Latency chart, 8-9Instance Activity page, 8-22Instances charts, 8-16Patch wizard, 10-3performing recovery, 6-9Recovery wizard, 6-2, 6-7refreshing the patch cache, 10-2Services charts, 8-15Top Consumers page, 8-20Top Segments page, 8-23Top Sessions page, 8-21
errata level, 2-5erratum kernel
See errata levelevent
FAN load balancing, 7-6UP and DOWN, 7-4use by FAN callouts, 7-5wait, 7-18
Event Managerchecking daemon status, 8-40
Event Manager (EVM), 1-4checking daemon status, 8-40
EVMSee Event Manager
external redundancy, 3-13
FFAN
See Fast Application NotificationFast Application Notification, 7-4
callouts, 7-5events, 7-5
flash recovery area, 6-2configuring, 6-2

Index-3
GGeneral Parallel File System (GPFS), 2-18Global Services Daemon (GSD), 1-4GSD
See Global Services Daemon
Hhardware requirements, 2-5high availability framework, 5-1
Iinitialization parameters
INSTANCE_NUMBER, 4-5ROLLBACK_SEGMENTS, 4-5SERVICE_NAMES, 4-9that must be identical on all instances, 4-5that must be unique on all instances, 4-5THREAD, 4-5UNDO_MANAGEMENT, 4-5UNDO_TABLESPACE, 4-5
instanceadding, 9-5deleting, 9-7
instance findings, 8-3instance management, 4-2INSTANCE_NUMBER initialization parameter, 4-5integrated clients, 7-6interconnects, 2-3
definition of, 1-2
Kkernel parameters
configuring on Linux x86 operating system, 2-17
LLinux x86 operating system
configuring kernel parameters, 2-17listener
and client-side load balancing, 7-7and server-side load balancing, 7-8checking status of, 7-14description of, 7-7service registration, 4-9
load balancingclient-side, 7-7connection goals, 7-8definition of, 7-7runtime connection, 7-8server-side, 7-8
Load Balancing Advisory, 7-6, 7-8
Mmembership
and the OCR, 2-2memory requirements, 2-5
minimum downtime patching, 10-13
Nnetwork adapters, 2-3network file system (NFS), 2-18
and voting disks, 5-3using for shared storage, 2-18
Network Time Protocol (NTP), 2-16NFS
See network file systemnodeapps
definition of, 1-4nodes
definition of, 1-2eviction, 5-2
normal redundancy, 3-13
OOCFS, 2-18OCFS2, 2-18OCR
See Oracle Cluster Registryocrcheck
description of, 5-9using to verify status of the OCR, 5-4
ONSSee Oracle Notification Service
onsconfig, 9-3OPatch
"Not a valid patch area" error, 10-17partially installed patch, 10-18preparing to use, 10-5updating the cluster node list, 10-16viewing log and trace files, 10-17
Oracle Cluster Registry (OCR)backing up, 5-3, 5-4changing the location of, 5-7definition of, 2-2definition of mirror, 2-19mirroring the OCR, 5-7multiplexing, 2-2recovering, 5-4recovering from export, 5-5removing a mirror, 5-8repairing, 5-8restoring from backup, 5-5status, 5-4troubleshooting, 5-9usage in Oracle RAC, 7-4viewing backups of, 5-3
Oracle Clusterwareand process control, 5-1monitoring using Enterprise Manager, 8-29use of, 5-1
Oracle Flashback, 6-1Oracle Net
configuration, 7-7Oracle Notification Service (ONS), 1-4, 7-5

Index-4
Oracle Real Application Clustershigh availability framework, 7-4installation on different platforms, 1-5overview of administration, 1-1, 3-1patching, 3-35
Oracle Universal Installer (OUI)database installation, 3-1description of, 1-4Oracle Real Application Clusters installation, 3-1
oracle usercreating, 2-6description of, 2-6modifying environment of, 2-11
ORACLE_BASE, 2-22ORACLE_HOME, 3-1
backing up, 10-5oratab file, 3-32OSASM group, 2-6OUI
See Oracle Universal Installer
Ppackages, 2-5parallel recovery, 6-10parameters
See initialization parameterspatch sets
applying, 10-15definition of, 10-1
Patch wizard, 10-3patches
all node patching method, 10-8applying, 10-8applying using Enterprise Manager, 10-4definition of, 10-1locating, 10-3minimum downtime patching, 10-13refreshing the Enterprise Manager patch
cache, 10-2rolling patching, 10-10staging, 10-6
permissions file, 2-22physical RAM requirements, 2-5private interconnects
and Oracle Clusterware, 2-3
RRAM requirements, 2-5rconfig, 3-36recovery
archive logs, 6-8, 6-10database, 6-9description of, 6-1enabling archiving, 6-3instance state during, 6-8of OCR from an export, 5-5Oracle Cluster Registry (OCR), 5-4parallelism, 6-10
privileges, 6-5restoring the OCR from backup, 5-5server parameter file, 6-9voting disks, 5-2with Enterprise Manager, 6-2
Recovery Manager (RMAN)channels, 6-6parallelism and backups, 6-6
redo logslocation, 2-2
redundancyexternal, 3-13normal, 3-13, 5-1
requirementshardware, 2-5network, 2-3 to 2-4software, 2-4storage, 2-2
resource managerSee Database Resource Manager
ROLLBACK_SEGMENTS initialization parameter, 4-5
rolling patch method, 10-10root.sh, 3-32, 3-36RSA keys, 2-7Runtime Connection Load Balancing
service-level goals, 7-6Runtime connection load balancing, 7-8
Ssecure shell
configuring, 2-7Server Control (SRVCTL)
description of, 1-4server parameter file, 4-9
description of, 4-4recovery, 6-9
server-side load balancing, 7-8SERVICE_NAMES initialization parameter, 4-9services
administration, 7-15available instance, 7-2creating, 7-10definition of, 7-2failover, 7-2performance-related thresholds, 7-18preferred instance, 7-2use with workload management, 7-2using for database connections, 7-7
shared storagesupported types, 2-18
sliceSee block devices, 2-20
software requirementschecking software requirements, 2-4
SPFILESee server parameter file
SSHSee secure shell

Index-5
swap spacerequirements, 2-5
System Global Area (SGA), 8-9
Ttablespaces
undo, 4-10temporary disk space
requirements, 2-5THREAD initialization parameter, 4-5tnsnames.ora file, 7-7, 7-14topology, 8-26Troubleshooting
alert log messages, 8-47interconnect settings, 8-44Using Cluster Ready Services Control
(CRSCTL), 8-38, 8-39Using Cluster Verification Utility (cluvfy), 8-42viewing cluster database alerts, 8-45
UUdev, 2-22undo segments, 4-10UNDO_MANAGEMENT initialization
parameter, 4-5UNDO_TABLESPACE initialization parameter, 4-5Universal Connection Pool (UCP), 7-10, 7-21user equivalence, 2-10, 10-6
VVIP
See Virtual IPVirtual IP (VIP), 1-4voting disks
adding and removing, 5-3backing up, 3-35, 5-2definition of, 2-2multiple, 2-2recovering, 5-2
Wwait events, 7-18workload management, 7-1

Index-6