oracle database high availability best practices
TRANSCRIPT

Oracle® DatabaseHigh Availability Best Practices
11g Release 1 (11.1)
B28282-02
December 2009

Oracle Database High Availability Best Practices 11g Release 1 (11.1)
B28282-02
Copyright © 2005, 2009, Oracle and/or its affiliates. All rights reserved.
Primary Authors: Lawrence To, Viv Schupmann
Contributors: Andrew Babb, Janet Blowney, Larry Carpenter, Timothy Chien, Jay Davison, Senad Dizdar, Ray Dutcher, Mahesh Girkar, Stephan Haisley, Holger Kalinowski, Nitin Karkhanis, Frank Kobylanski, Joydip Kundu, Barb Lundhild, Roderick Manalac, Pat McElroy, Robert McGuirk, Joe Meeks, Markus Michalewicz, Valarie Moore, Michael Nowak, Darryl Presley, Michael T. Smith, Vinay Srihari, Lawrence To, Douglas Utzig, James Viscusi, Vern Wagman, Steve Wertheimer, Shari Yamaguchi
This software and related documentation are provided under a license agreement containing restrictions on use and disclosure and are protected by intellectual property laws. Except as expressly permitted in your license agreement or allowed by law, you may not use, copy, reproduce, translate, broadcast, modify, license, transmit, distribute, exhibit, perform, publish, or display any part, in any form, or by any means. Reverse engineering, disassembly, or decompilation of this software, unless required by law for interoperability, is prohibited.
The information contained herein is subject to change without notice and is not warranted to be error-free. If you find any errors, please report them to us in writing.
If this software or related documentation is delivered to the U.S. Government or anyone licensing it on behalf of the U.S. Government, the following notice is applicable:
U.S. GOVERNMENT RIGHTS Programs, software, databases, and related documentation and technical data delivered to U.S. Government customers are "commercial computer software" or "commercial technical data" pursuant to the applicable Federal Acquisition Regulation and agency-specific supplemental regulations. As such, the use, duplication, disclosure, modification, and adaptation shall be subject to the restrictions and license terms set forth in the applicable Government contract, and, to the extent applicable by the terms of the Government contract, the additional rights set forth in FAR 52.227-19, Commercial Computer Software License (December 2007). Oracle USA, Inc., 500 Oracle Parkway, Redwood City, CA 94065.
This software is developed for general use in a variety of information management applications. It is not developed or intended for use in any inherently dangerous applications, including applications which may create a risk of personal injury. If you use this software in dangerous applications, then you shall be responsible to take all appropriate fail-safe, backup, redundancy, and other measures to ensure the safe use of this software. Oracle Corporation and its affiliates disclaim any liability for any damages caused by use of this software in dangerous applications.
Oracle is a registered trademark of Oracle Corporation and/or its affiliates. Other names may be trademarks of their respective owners.
This software and documentation may provide access to or information on content, products, and services from third parties. Oracle Corporation and its affiliates are not responsible for and expressly disclaim all warranties of any kind with respect to third-party content, products, and services. Oracle Corporation and its affiliates will not be responsible for any loss, costs, or damages incurred due to your access to or use of third-party content, products, or services.

iii
Contents
Preface ................................................................................................................................................................. xi
Audience....................................................................................................................................................... xiDocumentation Accessibility ..................................................................................................................... xiRelated Documents .................................................................................................................................... xiiConventions ................................................................................................................................................ xii
1 Introduction to High Availability Best Practices
1.1 Oracle Database High Availability Architecture.................................................................... 1-11.2 Oracle Database High Availability Best Practices.................................................................. 1-11.3 Oracle Maximum Availability Architecture ........................................................................... 1-21.4 Operational Best Practices ......................................................................................................... 1-2
2 Configuring for High Availability
2.1 Configuring Storage ................................................................................................................... 2-12.1.1 Evaluate Database Performance and Storage Capacity Requirements........................ 2-12.1.2 Use Oracle Storage Grid ..................................................................................................... 2-22.1.3 Use Automatic Storage Management (ASM) to Manage Database Files .................... 2-42.1.4 Use ASMLib On Platforms Where It Is Available........................................................... 2-52.1.5 Use a Simple Disk and Disk Group Configuration ........................................................ 2-52.1.6 Use Disk Multipathing Software to Protect from Path Failure ..................................... 2-72.1.7 Use Redundancy to Protect from Disk Failure................................................................ 2-82.1.8 Use Clustered Automatic Storage Management (ASM) to Enable the Storage Grid. 2-92.1.9 Configure a Separate Automatic Storage Management (ASM) Home ........................ 2-92.1.10 Allow Automatic Memory Management with MEMORY_TARGET Parameter ....... 2-92.1.11 Ensure Disks in the Same Disk Group Have the Same Characteristics .................... 2-102.1.12 Use SYSASM for ASM Authentication .......................................................................... 2-102.1.13 Use a Single Command to Mount Multiple Disk Groups .......................................... 2-102.1.14 Use a Single Command to Add or Remove Storage.................................................... 2-102.1.15 Use Failure Groups When Using ASM Redundancy .................................................. 2-112.1.16 Increase Allocation Units for Large Databases............................................................. 2-112.1.17 Use Disk Labels ................................................................................................................. 2-112.1.18 Check Disk Groups for Imbalance ................................................................................. 2-112.1.19 Set Rebalance to the Maximum Limit That Will Not Affect Service Levels............. 2-122.1.20 Use ASMCMD to Ease Manageability of ASM ............................................................ 2-122.1.21 Use Oracle Recovery Manager or Oracle Data Guard to Migrate to ASM .............. 2-12
iv
2.1.22 Set the DISK_REPAIR_TIME Disk Group Attribute Appropriately......................... 2-122.1.23 Proactively Mine Vendor Logs for Disk Errors............................................................ 2-132.2 Configuring Oracle Database 11g .......................................................................................... 2-132.2.1 Recommendations for High Availability and Fast Recoverability............................ 2-132.2.2 Recommendations to Improve Manageability ............................................................. 2-212.3 Configuring Oracle Database 11g with Oracle Clusterware ............................................. 2-252.3.1 Oracle Clusterware Best Practices .................................................................................. 2-252.3.2 Cold Failover Cluster Best Practices .............................................................................. 2-322.4 Configuring Oracle Database 11g with Oracle RAC........................................................... 2-322.4.1 Understand the Instance Recovery Target and Optimize (if Required) ................... 2-322.4.2 Maximize the Number of Processes Performing Transaction Recovery .................. 2-332.4.3 Ensure Asynchronous I/O Is Enabled........................................................................... 2-332.4.4 Redundant Dedicated Connection Between the Nodes.............................................. 2-332.5 Configuring Oracle Database 11g with Oracle RAC on Extended Clusters.................... 2-332.5.1 Spread the Workload Evenly Across the Sites in the Extended Cluster................... 2-342.5.2 Configure the Nodes to Be Within the Proximity of a Metropolitan Area .............. 2-342.5.3 Use Host-Based Storage Mirroring with ASM Normal or High Redundancy ........ 2-352.5.4 Add a Third Voting Disk to Host the Quorum Disk ................................................... 2-352.5.5 Additional Deployment Considerations for Extended Clusters................................ 2-362.6 Configuring Oracle Database 11g with Oracle Data Guard .............................................. 2-372.6.1 Determine Which Type of Standby Database Is Best for Your Application ............ 2-372.6.2 Choose the Appropriate Level of Data Protection....................................................... 2-382.6.3 Implement Multiple Standby Databases ....................................................................... 2-402.6.4 General Configuration Best Practices for Data Guard ................................................ 2-402.6.5 Redo Transport Services Best Practices ......................................................................... 2-462.6.6 Log Apply Services Best Practices.................................................................................. 2-492.6.7 Role Transition Best Practices ......................................................................................... 2-532.6.8 Best Practices for Snapshot Standby Database ............................................................. 2-592.6.9 Best Practices for Deploying Multiple Standby Databases......................................... 2-602.6.10 Best Practices for Real-Time Query (Oracle Active Data Guard Option)................. 2-612.6.11 Recommendations for Protecting Data Outside of the Database .............................. 2-642.6.12 Assess Data Guard Performance .................................................................................... 2-642.7 Configuring Backup and Recovery ....................................................................................... 2-662.7.1 Use Oracle Database Features and Products ................................................................ 2-662.7.2 Configuration and Administration ................................................................................ 2-682.7.3 Backup to Disk .................................................................................................................. 2-712.7.4 Backup to Tape.................................................................................................................. 2-732.7.5 Backup and Recovery Maintenance............................................................................... 2-742.8 Configuring Oracle Streams ................................................................................................... 2-752.8.1 Preparing Oracle Streams Configurations .................................................................... 2-752.8.2 Finalizing and Verifying the Oracle Streams Configuration...................................... 2-772.9 Configuring Fast Connection Failover.................................................................................. 2-772.9.1 Configure JDBC and OCI Clients for Failover ............................................................. 2-782.9.2 Configure Client Failover in an Oracle RAC Environment........................................ 2-792.9.3 Configure Failover in an Oracle Data Guard Environment ....................................... 2-792.9.4 Prevent Login Storms....................................................................................................... 2-792.10 Using Oracle Enterprise Manager Grid Control ................................................................. 2-80

v
3 Monitoring Using Oracle Grid Control
3.1 Overview of Monitoring and Detection for High Availability ............................................ 3-13.2 Using Oracle Grid Control for System Monitoring ............................................................... 3-13.2.1 Oracle Grid Control Home Page ....................................................................................... 3-23.2.2 Set Up Default Notification Rules for Each System........................................................ 3-33.2.3 Use Database Target Views to Monitor Health, Availability, and Performance........ 3-73.2.4 Use Event Notifications to React to Metric Changes...................................................... 3-83.2.5 Use Events to Monitor Data Guard System Availability ............................................... 3-93.3 Managing the High Availability Environment with Oracle Grid Control ......................... 3-93.3.1 Check Oracle Grid Control Policy Violations.................................................................. 3-93.3.2 Use Grid Control to Manage Oracle Patches and Maintain System Baselines ........... 3-93.3.3 Manage Database Availability with the High Availability Console ......................... 3-103.3.4 Configure High Availability Solutions with MAA Advisor ...................................... 3-12
4 Managing Unscheduled Outages
4.1 Overview of Unscheduled Outages ......................................................................................... 4-14.1.1 Managing Unscheduled Outages on the Primary Site ................................................... 4-14.1.2 Managing Unscheduled Outages on the Standby Site................................................... 4-34.2 Recovering from Unscheduled Outages.................................................................................. 4-44.2.1 Complete Site Failover ........................................................................................................ 4-44.2.2 Database Failover with a Standby Database.................................................................... 4-84.2.3 Oracle RAC Recovery for Unscheduled Outages ........................................................ 4-104.2.4 Application Failover......................................................................................................... 4-124.2.5 ASM Recovery After Disk and Storage Failures .......................................................... 4-124.2.6 Recovering from Data Corruption (Data Failures) ...................................................... 4-204.2.7 Recovering from Human Error....................................................................................... 4-254.2.8 Recovering Databases in a Distributed Environment ................................................. 4-324.3 Restoring Fault Tolerance ....................................................................................................... 4-334.3.1 Restoring Failed Nodes or Instances in Oracle RAC................................................... 4-344.3.2 Restoring a Standby Database After a Failover............................................................ 4-394.3.3 Restoring ASM Disk Groups after a Failure ................................................................. 4-424.3.4 Restoring Fault Tolerance After Planned Downtime on Secondary Site or Cluster 4-424.3.5 Restoring Fault Tolerance After a Standby Database Data Failure........................... 4-434.3.6 Restoring Fault Tolerance After the Primary Database Was Opened Resetlogs..... 4-444.3.7 Restoring Fault Tolerance After Dual Failures............................................................. 4-46
5 Managing Scheduled Outages
5.1 Overview of Scheduled Outages .............................................................................................. 5-15.1.1 Managing Scheduled Outages on the Primary Site ........................................................ 5-35.1.2 Managing Scheduled Outages On the Secondary Site ................................................... 5-45.2 Eliminating or Reducing Downtime for Scheduled Outages............................................... 5-55.2.1 Site, Hardware, and Software Maintenance Using Database Switchover................... 5-55.2.2 Online Patching.................................................................................................................... 5-85.2.3 Oracle RAC Database Patches ........................................................................................... 5-85.2.4 Storage Maintenance ........................................................................................................ 5-115.2.5 Database Upgrades........................................................................................................... 5-12

vi
5.2.6 Database Platform or Location Migration..................................................................... 5-185.2.7 Oracle Streams for Online Database Upgrade.............................................................. 5-225.2.8 Oracle Streams for Online Application Upgrades ....................................................... 5-235.2.9 Data Reorganization and Redefinition .......................................................................... 5-235.2.10 System Maintenance......................................................................................................... 5-26
6 Migrating to an MAA Environment
6.1 Moving Your Configuration to MAA ...................................................................................... 6-16.2 Using Oracle Enterprise Manager Grid Control .................................................................... 6-16.3 Using Manual Step-by-Step Instructions................................................................................. 6-26.3.1 Converting a Single-Instance Database to an Oracle RAC Database .......................... 6-36.3.2 Adding an Oracle Data Guard Configuration to an Oracle RAC Primary Database 6-3
A Database SPFILE and Oracle Net Configuration File Samples
A.1 SPFILE Samples.......................................................................................................................... A-2A.2 Oracle Net Configuration Files ................................................................................................ A-6A.2.1 SQLNET.ORA Example for All Hosts Using Dynamic Instance Registration .......... A-6A.2.2 LISTENER.ORA Example for All Hosts Using Dynamic Instance Registration ....... A-7A.2.3 TNSNAMES.ORA Example for All Hosts Using Dynamic Instance Registration.... A-7
Glossary
Index

vii

viii
List of Figures
2–1 Allocating Entire Disks .............................................................................................................. 2-62–2 Partitioning Each Disk................................................................................................................ 2-73–1 Oracle Grid Control Home Page............................................................................................... 3-23–2 Setting Notification Rules for Availability .............................................................................. 3-43–3 Setting Notification Rules for Metrics...................................................................................... 3-63–4 Database Home Page.................................................................................................................. 3-73–5 Monitoring a Primary Database in the HA Console........................................................... 3-113–6 Monitoring the Standby Database in the HA Console ....................................................... 3-123–7 MAA Advisor Page in Oracle Grid Control......................................................................... 3-134–1 Network Routes Before Site Failover ....................................................................................... 4-64–2 Network Routes After Site Failover ......................................................................................... 4-74–3 Enterprise Manager Reports Disk Failures .......................................................................... 4-154–4 Enterprise Manager Reports ASM Disk Groups Status ..................................................... 4-154–5 Enterprise Manager Reports Pending REBAL Operation.................................................. 4-164–6 Partitioned Two-Node Oracle RAC Database ..................................................................... 4-374–7 Oracle RAC Instance Failover in a Partitioned Database................................................... 4-384–8 Nonpartitioned Oracle RAC Instances ................................................................................. 4-394–9 Fast-Start Failover and the Observer Are Successfully Enabled....................................... 4-414–10 Reinstating the Original Primary Database After a Fast-Start Failover........................... 4-415–1 Using a Transient Logical Standby Database for Database Rolling Upgrade ................ 5-165–2 Database Object Reorganization Using Oracle Enterprise Manager................................ 5-24

ix
List of Tables
2–1 Parameter Values Set by the DB_ULTRA_SAFE Initialization Parameter..................... 2-172–2 Determining the Appropriate Data Protection Mode ...................................................... 2-392–3 Archiving Recommendations................................................................................................ 2-442–4 Parallel Recovery Coordinator Wait Events ....................................................................... 2-512–5 Parallel Recovery Slave Wait Events.................................................................................... 2-512–6 Comparing Fast-Start Failover and Manual Failover ........................................................ 2-562–7 Minimum Recommended Settings for FastStartFailoverThreshold................................ 2-592–8 Comparing Backup Options.................................................................................................. 2-722–9 Typical Wait Times for Client Failover................................................................................ 2-773–1 Recommendations for Monitoring Space ............................................................................... 3-53–2 Recommendations for Monitoring the Alert Log.................................................................. 3-63–3 Recommendations for Monitoring Processing Capacity ..................................................... 3-63–4 Recommended Notification Rules for Metrics ...................................................................... 3-83–5 Recommendations for Setting Data Guard Events ............................................................... 3-94–1 Recovery Times and Steps for Unscheduled Outages on the Primary Site....................... 4-24–2 Recovery Steps for Unscheduled Outages on the Secondary Site ...................................... 4-44–3 Types of ASM Failures and Recommended Repair ........................................................... 4-124–4 Recovery Options for Data Area Disk Group Failure ....................................................... 4-164–5 Recovery Options for Flash Recovery Area Disk Group Failure..................................... 4-184–6 Non Database Object Corruption and Recommended Repair ......................................... 4-214–7 Flashback Solutions for Different Outages.......................................................................... 4-264–8 Summary of Flashback Features........................................................................................... 4-264–9 Additional Processing When Restarting or Rejoining a Node or Instance .................... 4-354–10 Restoration and Connection Failback .................................................................................. 4-374–11 SQL Statements for Starting Standby Databases................................................................ 4-424–12 SQL Statements to Start Redo Apply and SQL Apply ...................................................... 4-424–13 Queries to Determine RESETLOGS SCN and Current SCN OPEN RESETLOGS ........ 4-444–14 SCN on Standby Database is Behind RESETLOGS SCN on the Primary Database ..... 4-444–15 SCN on the Standby is Ahead of Resetlogs SCN on the Primary Database................... 4-454–16 Re-Creating the Primary and Standby Databases.............................................................. 4-465–1 Scheduled Outages .................................................................................................................... 5-25–2 Solutions for Scheduled Outages on the Primary Site.......................................................... 5-35–3 Managing Scheduled Outages on the Secondary Site .......................................................... 5-45–4 Database Upgrade Options ................................................................................................... 5-125–5 Platform and Location Migration Options.......................................................................... 5-196–1 Starting Configurations Moving to an MAA Environment................................................. 6-2A–1 Generic Parameters for Primary, Physical Standby, and Logical Standby Databases.... A-2A–2 Oracle RAC Parameters for Primary, Physical Standby, and Logical Standby ............... A-3A–3 Data Guard Parameters for Primary, Physical Standby, and Logical Standby ............... A-4A–4 Data Guard Broker Parameters for Primary, and Physical and Logical Standbys.......... A-4A–5 Data Guard (No Broker) Parameters for Primary, and Physical and Logical Standby .. A-5A–6 Data Guard Parameters for Primary and Physical Standby Database Only.................... A-5A–7 Data Guard Parameters for Primary and Logical Standby Database Only...................... A-5A–8 Data Guard Parameters for Primary Database, Physical Standby Database, and Logical
Standby Database: Maximum Availability or Maximum Protection Modes A-6A–9 Data Guard Parameters for Primary Database, Physical Standby Database, and Logical
Standby Database: Maximum Performance Mode A-6

x

xi
Preface
This book provides high availability best practices for configuring and maintaining your Oracle Database system and network components.
AudienceThis book is intended for chief information technology officers and architects, as well as administrators that perform the following database, system, network, and application tasks:
■ Plan data centers
■ Implement data center policies
■ Maintain high availability systems
■ Plan and build high availability solutions
Documentation AccessibilityOur goal is to make Oracle products, services, and supporting documentation accessible to all users, including users that are disabled. To that end, our documentation includes features that make information available to users of assistive technology. This documentation is available in HTML format, and contains markup to facilitate access by the disabled community. Accessibility standards will continue to evolve over time, and Oracle is actively engaged with other market-leading technology vendors to address technical obstacles so that our documentation can be accessible to all of our customers. For more information, visit the Oracle Accessibility Program Web site at http://www.oracle.com/accessibility/.
Accessibility of Code Examples in DocumentationScreen readers may not always correctly read the code examples in this document. The conventions for writing code require that closing braces should appear on an otherwise empty line; however, some screen readers may not always read a line of text that consists solely of a bracket or brace.
Accessibility of Links to External Web Sites in DocumentationThis documentation may contain links to Web sites of other companies or organizations that Oracle does not own or control. Oracle neither evaluates nor makes any representations regarding the accessibility of these Web sites.

xii
Deaf/Hard of Hearing Access to Oracle Support ServicesTo reach Oracle Support Services, use a telecommunications relay service (TRS) to call Oracle Support at 1.800.223.1711. An Oracle Support Services engineer will handle technical issues and provide customer support according to the Oracle service request process. Information about TRS is available at http://www.fcc.gov/cgb/consumerfacts/trs.html, and a list of phone numbers is available at http://www.fcc.gov/cgb/dro/trsphonebk.html.
Related DocumentsFor more information, see the Oracle database documentation set. These books may be of particular interest:
■ Oracle Database High Availability Overview
■ Oracle Data Guard Concepts and Administration and Oracle Data Guard Broker
■ Oracle Database Storage Administrator's Guide
■ Oracle Clusterware Administration and Deployment Guide
■ Oracle Real Application Clusters Administration and Deployment Guide
■ Oracle Database Backup and Recovery User's Guide
■ Oracle Database Administrator's Guide
■ The Oracle High Availability Best Practice white papers that can be downloaded from the Oracle Technology Network (OTN) at
http://www.otn.oracle.com/goto/maa
■ The Oracle Enterprise Manager documentation library on OTN at
http://www.oracle.com/technology/documentation/oem.html
ConventionsThe following text conventions are used in this document:
Convention Meaning
boldface Boldface type indicates graphical user interface elements associated with an action, or terms defined in text or the glossary.
italic Italic type indicates book titles, emphasis, or placeholder variables for which you supply particular values.
monospace Monospace type indicates commands within a paragraph, URLs, code in examples, text that appears on the screen, or text that you enter.

Introduction to High Availability Best Practices 1-1
1Introduction to High Availability Best
Practices
Implementing Oracle best practices can provide high availability for the Oracle database and related technology.
This chapter contains these topics:
■ Oracle Database High Availability Architecture
■ Oracle Database High Availability Best Practices
■ Oracle Maximum Availability Architecture
■ Operational Best Practices
1.1 Oracle Database High Availability ArchitectureDesigning and implementing a high availability architecture can be a daunting task given the broad range of Oracle technologies and deployment options. A successful effort begins with clearly defined and thoroughly understood business requirements. Thorough analysis of the business requirements enables you to make intelligent design decisions and develop an architecture that addresses your business needs in the most cost effective manner. The architecture you choose must achieve the required levels of availability, performance, scalability, and security. Moreover, the architecture should have a clearly defined plan for deployment and ongoing management that minimizes complexity and business risk.
Once your business requirements are understood, you should begin designing your high availability architecture by reading the Oracle Database High Availability Overview to get a high-level view of the various Oracle high availability solutions that comprise the Oracle Maximum Availability Architecture (MAA). This should result in an architecture that can be validated and fully vetted by using the best practices that are documented in this book.
1.2 Oracle Database High Availability Best PracticesOracle high availability best practices help you deploy a highly available architecture throughout your enterprise. Having a set of technical and operational best practices helps you achieve high availability and reduces the cost associated with the implementation and ongoing maintenance. Also, employing best practices can optimize usage of system resources.
By implementing the high availability best practices described in this book, you can:

Oracle Maximum Availability Architecture
1-2 Oracle Database High Availability Best Practices
■ Reduce the implementation cost of an Oracle Database high availability system by following detailed guidelines on configuring your database, storage, application failover, backup and recovery as described in Chapter 2, "Configuring for High Availability"
■ Avoid potential downtime by monitoring and maintaining your database using Oracle Grid Control as described in Chapter 3, "Monitoring Using Oracle Grid Control"
■ Recover quickly from unscheduled outages caused by computer failure, storage failure, human error, or data corruption as described in Chapter 4, "Managing Unscheduled Outages"
■ Eliminate or reduce downtime that might occur due to scheduled maintenance such as database patches or application upgrades as described in Chapter 4, "Managing Unscheduled Outages"
1.3 Oracle Maximum Availability ArchitectureOracle Maximum Availability Architecture (MAA) is a best practices blueprint based on proven Oracle high availability technologies and recommendations. MAA involves high availability best practices for all Oracle products—Oracle Database, Oracle Application Server, Oracle Applications, Oracle Collaboration Suite, and Oracle Grid Control.
Some key attributes of MAA include:
■ Considering various business service level agreements (SLA) to make high availability best practices as widely applicable as possible
■ Using database grid servers and storage grid with low-cost storage to provide highly resilient, lower cost infrastructure
■ Using results from extensive performance impact studies for different configurations to ensure that the high availability architecture is optimally configured to perform and scale to business needs
■ Giving the ability to control the length of time to recover from an outage and the amount of acceptable data loss from any outage
■ Evolving with each Oracle version and is completely independent of hardware and operating system
For more information on MAA and documentation on best practices for all components of MAA, visit the MAA Web site at:
http://www.otn.oracle.com/goto/maa
1.4 Operational Best PracticesOne of the best ways to reduce downtime is incorporating operational best practices. You can often prevent problems and downtime before they occur by rigorously testing changes in your test environment, following stringent change control policies to guard your primary database from harm, and having a well-validated repair strategy for each outage type.
A monitoring infrastructure such as Grid Control is essential to quickly detect problems. Having an outage and repair decision tree and an automated repair facility reduces downtime by eliminating or reducing decision and repair times.
Key operational best practices include the following:

Operational Best Practices
Introduction to High Availability Best Practices 1-3
■ Document and communicate service level agreements (SLA)
■ Create test environments
A good test environment accurately mimics the production system to test changes and prevent problems before they can affect your business. Testing best practices should include thorough functional testing of the applications for correctness and replication of the production workload as a whole to ensure that system performance is acceptable.
■ Establish change control and security procedures
Change control and security procedures maintain the stability of the system and ensure that no changes are incorporated in the primary database unless they have been rigorously evaluated on your test systems.
■ Set up and follow security best practices
The biggest threat to corporate data comes from employees and contractors with internal access to networks and facilities. Corporate data can be at grave risk if placed on a system or database that does not have proper security measures in place. A well-defined security policy can help protect your systems from unwanted access and protect sensitive corporate information from sabotage. Proper data protection reduces the chance of outages due to security breaches.
■ Use Grid Control or another monitoring infrastructure to detect and react to potential failures and problems before they occur
– Monitor system, network, and database statistics
– Monitor performance statistics
– Create performance thresholds as early warning indicators of system or application problems
■ Use MAA recommended repair strategies and create an outage and repair decision tree for crisis scenarios using the recommended MAA matrix
■ Automate and optimize repair practices to minimize downtime by following MAA best practices

Operational Best Practices
1-4 Oracle Database High Availability Best Practices

Configuring for High Availability 2-1
2Configuring for High Availability
This chapter describes Oracle configuration best practices for Oracle Database and related components.
This chapter contains these topics:
■ Configuring Storage
■ Configuring Oracle Database 11g
■ Configuring Oracle Database 11g with Oracle Clusterware
■ Configuring Oracle Database 11g with Oracle RAC
■ Configuring Oracle Database 11g with Oracle RAC on Extended Clusters
■ Configuring Oracle Database 11g with Oracle Data Guard
■ Configuring Backup and Recovery
■ Configuring Oracle Streams
■ Configuring Fast Connection Failover
■ Using Oracle Enterprise Manager Grid Control
2.1 Configuring StorageThis section describes best practices for configuring a fault-tolerant storage subsystem that protects data while providing manageability and performance. These practices apply to all Oracle Database high availability architectures described in Oracle Database High Availability Overview.
2.1.1 Evaluate Database Performance and Storage Capacity RequirementsCharacterize your database performance requirements using different application workloads. Extract statistics during your target workloads by gathering the beginning and ending statistical snapshots. Some examples of target workloads include:
■ Average load
■ Peak load
■ Batch processing
■ Application workloads such as batch processing, Online Transaction Processing (OLTP), decision support systems (DSS) and reporting, Extraction, Transformation, and Loading (ETL)

Configuring Storage
2-2 Oracle Database High Availability Best Practices
Evaluating Database Performance RequirementsYou can gather the necessary statistics by using Automatic Workload Repository (AWR) reports or by querying the GV$SYSSTAT view. Along with understanding the database performance requirements, you must evaluate the performance capabilities of a storage array. You can use the DBMS_RESOURCE_MANAGER.CALIBRATE_IO PL/SQL procedure to determine the maximum capacity of your storage array.
Choosing StorageWhen you understand the performance and capacity requirements, choose a storage platform to meet those requirements. One example solution is Oracle Exadata Storage Servers that offer excellent performance and availability characteristics. Each Exadata cell can be viewed as a unit of I/O performance and capacity. Therefore, the only decision that must be made is how many cells are required.
2.1.2 Use Oracle Storage GridThe Oracle Storage Grid is implemented using either Oracle Automatic Storage Management (ASM) and Oracle Exadata Storage Server Software or ASM and third-party storage. The Oracle Storage Grid with Exadata seamlessly supports MAA-related technology, improves performance, provides unlimited I/O scalability, is easy to use and manage, and delivers mission-critical availability and reliability to your enterprise. The following sections provide best practice recommendations for Oracle Storage Grid using Exadata.
2.1.2.1 Oracle Storage Grid Best Practices for Unplanned OutagesUse the following list to protect storage against unplanned outages:
■ Set the DB_BLOCK_CHECKSUM initialization parameter to TYPICAL (default) or FULL
Makes sure the checksum is stored in the database blocks so that when it is received by Exadata Cell the Hardware Assisted Resilient Data (HARD) check can be performed on the blocks.
■ Choose ASM redundancy type (NORMAL or HIGH) based on your desired protection level and capacity requirements
The NORMAL setting stores two copies of ASM extents, while the HIGH setting stores three copies of ASM extents. Normal redundancy provides more usable capacity and high redundancy provides more protection.
■ Ensure the ASM default disk repair timer is set correctly
You can set a disk repair timer attribute on your disk group to specify how long disks remain offline before being dropped. The default disk repair time is 3.6 hours. The appropriate setting for your environment depends on how long you expect a typical transient type of failure to persist.
■ Monitor the ASM disk group balance to prevent allocation failures
You should monitor the disk group balance to avoid allocation failures. Allocation failures are possible if the disk group becomes out of balance. ASM generally ensures that the disk group stays balanced, but in some rare cases (such as a failed rebalance operation) the disk group can become imbalanced. Because disk group imbalance can cause performance or space exhaustion problems, it is an operational best practice to periodically check it.
■ Ensure I/O performance can be sustained after an outage

Configuring Storage
Configuring for High Availability 2-3
Ensure that you have enough Exadata cells to support your service-level agreement I/O requirements if a failure occurs. For example, a typical case for a Storage Grid with n cells would be to ensure that n-1 cells could support the application service levels (for example, to handle a cell failure).
2.1.2.2 Oracle Storage Grid Best Practices for Planned MaintenanceUse the following list of best practices for planned maintenance
■ Size I/O for performance first, and then set it for capacity
When building your Oracle Storage Grid, make sure you have enough Exadata Cells to support I/O's per second and MB/second to meet your service-level requirements. Then, make sure you also have enough capacity. This order is important because you do not want to buy enough Exadata Cells to support capacity but then find the system cannot meet your performance requirements.
■ Add Exadata cells to scale the Oracle Storage Grid
When you scale out or add performance to your Exadata system, add Exadata Cells. Exadata scales linearly. When you understand the amount of I/O resource available to you in Exadata Cells, then you know how many Exadata cells are necessary.
■ Employ Exadata configuration automation
Take advantage of the following Oracle Exadata Storage Server tools and features to automate and simplify configuration tasks:
– CELLCLI commands
* CREATE CELLDISK ALL—This CELLCLI command automatically creates celldisks on all available logical unit numbers (LUNs).
* CREATE GRIDDISK ALL PREFIX=prefix—This CELLCLI command automatically creates grid disks on all available Exadata cell disks.
Note that the name you provide for prefix should be the same as the disk group name. For example, to create grid disks for your ASM disk group DATA, use the CREATE GRIDDISK ALL PREFIX='DATA' com-mand. Because no size is specified in this example, the grid disk con-sumes the whole cell disk.
– ASM automated failure group naming
When creating ASM failure groups on Oracle Exadata Storage Server, grid disks in the same Oracle Exadata Storage Server cell are automatically placed in the same ASM failure group. There is no need to specify the failure group during disk group creation, which simplifies the CREATE DISKGROUP syntax.
– DCLI utility
Oracle Exadata Storage Server includes the DCLI utility on each cell. You can use the Dcli utility to execute commands or scripts in parallel across a defined set of cells. The Dcli tool simplifies any operations that must be run across a subset or all cells. Configuration of SSH user equivalency across all cells is an important prerequisite for optimizing the use of DCLI commands. DCLI provides the -k option to automate the distribution of SSH private keys into the AUTHORIZED_KEYS file.
– db.iscsi.sh script
The /opt/oracle.cellos/db.iscsi.sh script is available on the database servers to completely automate the error prone process of iSCSI

Configuring Storage
2-4 Oracle Database High Availability Best Practices
configuration, iSCSI device creation, and udev configuration. You can run this script on any Oracle Database Machine during the initial configuration. When complete, the iSCSI devices are available in the /dev/ocr* directory. (Note that these devices are used for the Oracle Clusterware OCR and voting device.)
■ Perform the following steps to use ASM disk resynchronization for Exadata Cell planned maintenance:
1. Take offline the failure group that corresponds with the Exadata cell.
This includes specifying the amount of offline time in the OFFLINE clause if the default DISK_REPAIR_TIME is not adequate. For example:
ALTER DISKGROUP diskgroup_name OFFLINE DISKS IN FAILGROUP failure group name DROP AFTER integer in hours or minutes
2. Perform the platform planned maintenance.
3. Place online the failure group that corresponds with the Exadata cell. For example:
ALTER DISKGROUP diskgroup_name ONLINE DISKS IN FAILGROUP failure group name
ASM tracks all of the changed extents while the failure group is offline and resynchronizes them when the failure group comes back online. Make sure that the time for planned maintenance operations does not exceed the disk repair time. Otherwise, the disks are dropped and must be re-added.
■ Set ASM power limit higher for faster rebalancing
After performing planned maintenance (for example, to add or remove storage), it is necessary to subsequently perform a rebalance to spread data across all of the disks. There is power limit associated with the rebalance. You can set a power limit from 1 and 11 to specify how many processes perform the rebalance. If you do not want the rebalance to impact applications, then set the power limit low. However, if you want the rebalance to finish as quickly as possible, then set the power limit high. To determine the default power limit for rebalances, check the value of the ASM_POWER_LIMIT initialization parameter in the ASM instance.
■ Set I/O Resource Management (IORM) to manage and meet service-level requirements. See the Oracle Exadata Storage Server Software User's Guide for instructions about setting up and configuring IORM.
2.1.3 Use Automatic Storage Management (ASM) to Manage Database FilesASM is a vertical integration of both the file system and the volume manager built specifically for Oracle database files. ASM extends the concept of stripe and mirror
See Also:
■ Oracle Database Storage Administrator's Guide
■ Oracle Exadata Best Practices in My Oracle Support (formerly OracleMetalink) note 757552.1
■ Oracle Exadata Storage Server Software User's Guide for instructions about setting up and configuring IORM
■ The MAA white paper "Best Practices for Migrating to Oracle Exadata Storage Server" at http://www.otn.oracle.com/goto/maa

Configuring Storage
Configuring for High Availability 2-5
everything (SAME) to optimize performance, while removing the need for manual I/O tuning (distributing the data file layout to avoid hot spots). ASM helps manage a dynamic database environment by letting you grow the database size without shutting down the database to adjust the storage allocation. ASM also enables low-cost modular storage to deliver higher performance and greater availability by supporting mirroring and striping.
Moreover, ASM manages the storage in the Exadata cell. For Exadata cells, ASM provides data protection against drive and cell failures, the best possible performance, and extremely flexible configuration and reconfiguration options. ASM automatically distributes the data across the Exadata Storage servers, and transparently and dynamically redistributes data when Exadata Storage servers are added or removed from the storage grid.
The recommended practice is to use ASM to manage all of your database files. You can phase ASM into your environment by initially supporting only the flash recovery area.
2.1.4 Use ASMLib On Platforms Where It Is AvailableTo improve manageability use ASMLib on platforms where it is available. ASMLib is a support library for ASM. Although ASMLib is not required to run ASM, using ASMLib is beneficial because ASMLib:
■ Eliminates the need for every Oracle process to open a file descriptor for each ASM disk, thus improving system resource usage.
■ Simplifies the management of disk device names, makes the discovery process simpler, and removes the challenge of having disks added to one node and not be known to other nodes in the cluster.
■ Eliminates the impact when the mappings of disk device names change upon system reboot.
2.1.5 Use a Simple Disk and Disk Group ConfigurationWhen using ASM for database storage, you should create at least two disk groups: one disk group for the database area and another disk group for the flash recovery area:
■ The database area contains active database files, such as data files, control files, online redo log files, standby redo log files, broker metadata files, and change tracking files used for RMAN incremental backups. For example:
CREATE DISKGROUP DATA DISK '/devices/lun01','/devices/lun02','/devices/lun03','/devices/lun04';
See Also:
■ Chapter 16 "Migrating Databases to and from ASM with Recovery Manager" in the Oracle Database Backup and Recovery User's Guide
■ The MAA white papers "Migration to Automatic Storage Management (ASM)" and "Best Practices for Creating a Low-Cost Storage Grid for Oracle Databases" at http://www.otn.oracle.com/goto/maa
■ Oracle Database Storage Administrator's Guide for more information about configuring ASM
See Also: Oracle ASMLib Web site at
http://www.oracle.com/technology/tech/linux/asmlib/index.html

Configuring Storage
2-6 Oracle Database High Availability Best Practices
■ The flash recovery area contains recovery-related files, such as a copy of the current control file, a member of each online redo log file group, archived redo log files, RMAN backup sets, and flashback log files. For example:
CREATE DISKGROUP RECO DISK '/devices/lun05','/devices/lun06','/devices/lun07','/devices/lun08','/devices/lun09','/devices/lun10','/devices/lun11','/devices/lun12';
■ If using ASMLib in a Linux environment, then create the disks using the ORACLEASM CREATEDISK command:
/etc/init.d/oracleasm createdisk lun1 /devices/lun01
■ Then, create the disk groups. For example:
CREATE DISKGROUP DATA DISK 'ORCL:lun01','ORCL:lun02','ORCL:lun03','ORCL:lun04';
To simplify file management, use Oracle managed files to control file naming. Enable Oracle managed files by setting these initialization parameters: DB_CREATE_FILE_DEST and DB_CREATE_ONLINE_LOG_DEST_n.
DB_CREATE_FILE_DEST=+DATADB_CREATE_ONLINE_LOG_DEST_1=+RECO
You have two options when partitioning disks for ASM use:
■ Allocate entire disks to the database area and flash recovery area disk groups
■ Partition each disk into two partitions, one for the database area and another for the flash recovery area
Figure 2–1 Allocating Entire Disks
Figure 2–1 illustrates allocating entire disks. The advantages of this option are:
■ Easier management of the disk partitions at the operating system level because each disk is partitioned as just one large partition.
■ Quicker completion of ASM rebalance operations following a disk failure because there is only one disk group to rebalance.
The disadvantage of this option is:
Flash Recovery AreaDatabase Area

Configuring Storage
Configuring for High Availability 2-7
■ Less I/O bandwidth, because each disk group is spread over only a subset of the available disks.
Figure 2–2 Partitioning Each Disk
The second partitioning option is illustrated in Figure 2–2. It requires partitioning each disk into two partitions: a smaller partition on the faster outer portion of each drive for the database area, and a larger partition on the slower inner portion of each drive for the flash recovery area. The ratio for the size of the inner and outer partitions depends on the estimated size of the database area and the flash recovery area.
The advantage of this approach is:
■ Higher I/O bandwidth is available, because both disk groups are spread over all available spindles. This advantage is considerable for the database area disk group for I/O intensive applications.
■ There is no need to create a separate disk group with special, isolated storage for online redo logs or standby redo logs if you have sufficient I/O capacity.
The disadvantages are:
■ A double disk failure may result in the loss of both disk groups, requiring the use of a standby database or tape backups for recovery.
■ An ASM rebalance operation following a disk failure is longer, because both disk groups are affected.
■ Higher initial administrative efforts are required to partition each disk properly.
2.1.6 Use Disk Multipathing Software to Protect from Path FailureDisk multipathing software aggregates multiple independent I/O paths into a single logical path. The path abstraction provides I/O load balancing across host bus adapters (HBA) and nondisruptive failovers when there is a failure in the I/O path. You should use disk multipathing software with ASM.
When specifying disk names during disk group creation in ASM, use the logical device representing the single logical path. For example, when using Device Mapper on Linux 2.6, a logical device path of /dev/dm-0 may be the aggregation of physical disks /dev/sdc and /dev/sdh. Within ASM, the ASM_DISKSTRING parameter should contain /dev/dm-* to discover the logical device /dev/dm-0, and that logical device is necessary during disk group creation:
See Also:
■ Oracle Database Backup and Recovery User's Guide for details about setting up and sizing the flash recovery area
■ Oracle Database Storage Administrator's Guide for details about ASM
Database Area
Flash Recovery
Area

Configuring Storage
2-8 Oracle Database High Availability Best Practices
asm_diskstring='/dev/dm-*'
CREATE DISKGROUP DATA DISK'/dev/dm-0','/dev/dm-1','/dev/dm-2','/dev/dm-3';
2.1.7 Use Redundancy to Protect from Disk FailureWhen setting up redundancy to protect from hardware failures, there are two options to consider:
■ Storage array based RAID
■ ASM redundancy
If you are using a high-end storage array that offers robust built-in RAID solutions, then Oracle recommends that you configure redundancy in the storage array by enabling RAID protection, such as RAID1 (mirroring) or RAID5 (striping plus parity). For example, to create an ASM disk group where redundancy is provided by the storage array, first create the RAID-protected logical unit numbers (LUNs) in the storage array, and then create the ASM disk group using the EXTERNAL REDUNDANCY clause:
CREATE DISKGROUP DATA EXTERNAL REDUNDANCY DISK '/devices/lun1','/devices/lun2','/devices/lun3','/devices/lun4';
If the storage array does not offer the desired level of redundancy, or if you must configure redundancy across multiple storage arrays, then use ASM redundancy. ASM provides redundancy with the use of failure groups, which are defined during disk group creation. ASM redundancy can be either normal redundancy, where extents are two-way mirrored, or high redundancy, where extents are three-way mirrored. After a disk group is created, the redundancy level cannot be changed.
Failure group definition is specific to each storage setup, but you should follow these guidelines:
■ If every disk is available through every I/O path, as would be the case if using disk multipathing software, then keep each disk in its own failure group. This is the default ASM behavior if creating a disk group without explicitly defining failure groups.
CREATE DISKGROUP DATA NORMAL REDUNDANCY DISK '/devices/diska1','/devices/diska2','/devices/diska3','/devices/diska4', '/devices/diskb1','/devices/diskb2','/devices/diskb3','/devices/diskb4';
■ For an array with two controllers where every disk is seen through both controllers, create a disk group with each disk in its own failure group:
CREATE DISKGROUP DATA NORMAL REDUNDANCY DISK '/devices/diska1','/devices/diska2','/devices/diska3','/devices/diska4', '/devices/diskb1','/devices/diskb2','/devices/diskb3','/devices/diskb4';
■ If every disk is not available through every I/O path, then define failure groups to protect against the piece of hardware that you are concerned about failing. Here are some examples:
– For an array with two controllers where each controller sees only half the drives, create a disk group with two failure groups, one for each controller, to protect against controller failure:
CREATE DISKGROUP DATA NORMAL REDUNDANCY FAILGROUP controller1 DISK

Configuring Storage
Configuring for High Availability 2-9
'/devices/diska1','/devices/diska2','/devices/diska3','/devices/diska4' FAILGROUP controller2 DISK '/devices/diskb1','/devices/diskb2','/devices/diskb3','/devices/diskb4';
– For a storage network with multiple storage arrays, you want to mirror across storage arrays, then create a disk group with two failure groups, one for each array, to protect against array failure:
CREATE DISKGROUP DATA NORMAL REDUNDANCY FAILGROUP array1 DISK '/devices/diska1','/devices/diska2','/devices/diska3','/devices/diska4' FAILGROUP array2 DISK '/devices/diskb1','/devices/diskb2','/devices/diskb3','/devices/diskb4';
When determining the proper size of a disk group that is protected with ASM redundancy, enough free space must exist in the disk group so that when a disk fails ASM can automatically reconstruct the contents of the failed drive to other drives in the disk group while the database remains online. The amount of space required to ensure ASM can restore redundancy following disk failure is in the column REQUIRED_MIRROR_FREE_MB in the V$ASM_DISKGROUP view. The amount of free space that you can use safely in a disk group (taking mirroring into account) and still be able to restore redundancy after a disk failure is in the USABLE_FILE_MB column in the V$ASM_DISKGROUP view. The value of the USABLE_FILE_MB column should always be greater than zero. If USABLE_FILE_MB falls below zero, then add more disks to the disk group.
2.1.8 Use Clustered Automatic Storage Management (ASM) to Enable the Storage GridYou can use clustered ASM with both Oracle single-instance databases and Oracle Real Application Clusters (Oracle RAC). In an Oracle RAC environment, there is one ASM instance for each node, and the ASM instances communicate with each other on a peer-to-peer basis. Only one ASM instance is required and supported for each node regardless of the number of database instances on the node. Clustering ASM instances provides fault tolerance, flexibility, and scalability to your storage pool.
2.1.9 Configure a Separate Automatic Storage Management (ASM) HomeInstalling ASM in its own home directory enables you to keep the ASM home separate from the database home directory. By using separate home directories, you can upgrade and patch ASM and the Oracle Database software independently, and you can deinstall Oracle Database software without affecting the ASM instance, thus increasing availability.
2.1.10 Allow Automatic Memory Management with MEMORY_TARGET ParameterUse the MEMORY_TARGET initialization parameter in the ASM instance to automate and simplify manageability of ASM process memory consumption. This is the only parameter that you must set for complete ASM memory management. Oracle recommends that you use automatic memory management for ASM.
See Also: Oracle Database Storage Administrator's Guide for more information about clustered ASM
See Also: Oracle Database 2 Day + Real Application Clusters Guide for information about installing ASM in a home directory separate from the home directory used by Oracle Database

Configuring Storage
2-10 Oracle Database High Availability Best Practices
Automatic memory management is enabled by default on an ASM instance, even when the MEMORY_TARGET parameter is not explicitly set. The default value used for MEMORY_TARGET is acceptable for most environments.
If you do not set a value for MEMORY_TARGET, but you do set values for other memory related parameters, Oracle internally calculates the optimum value for MEMORY_TARGET based on those memory parameter values. You can also increase MEMORY_TARGET dynamically, up to the value of the MEMORY_MAX_TARGET parameter, just as you can do for the database instance.
2.1.11 Ensure Disks in the Same Disk Group Have the Same CharacteristicsAlthough ensuring that all disks in the same disk group have the same size and performance characteristics is not required, doing so provides more predictable overall performance and space utilization. When possible, present physical disks (spindles) to ASM as opposed to Logical Unit Numbers (LUNs) that create a layer of abstraction between the disks and ASM.
If the disks are the same size, then ASM spreads the files evenly across all of the disks in the disk group. This allocation pattern maintains every disk at the same capacity level and ensures that all of the disks in a disk group have the same I/O load. Because ASM load balances workload among all of the disks in a disk group, different ASM disks should not share the same physical drive.
2.1.12 Use SYSASM for ASM AuthenticationThe ASM instance is managed by a privileged role called SYSASM, which grants full access to ASM disk groups. Using SYSASM enables the separation of authentication for the storage administrator and the database administrator. By configuring a separate operating system group for ASM authentication, you can have users that have SYSASM access to the ASM instances and do not have SYSDBA access to the database instances.
2.1.13 Use a Single Command to Mount Multiple Disk GroupsMounting multiple disk groups in the same command ensures that disk discovery is only run once, thereby increasing performance. Disk groups that are specified in the ASM_DISKGROUPS initialization parameter are mounted automatically at ASM instance startup. To mount disk groups manually, use the ALTER DISKGROUP...MOUNT statement and specify the ALL keyword:
ALTER DISKGROUP ALL MOUNT;
2.1.14 Use a Single Command to Add or Remove StorageASM permits you to add or remove disks from your disk storage system while the database is operating. When you add a disk to a disk group, ASM automatically
See Also: Oracle Database Storage Administrator's Guide for information about memory-related initialization parameters for ASM
See Also: Oracle Database Storage Administrator's Guide for complete information about administering ASM disk groups
See Also: Oracle Database Storage Administrator's Guide for information about authentication to access ASM instances
See Also: Oracle Database Storage Administrator's Guide for information about mounting and dismounting disk groups

Configuring Storage
Configuring for High Availability 2-11
redistributes the data so that it is evenly spread across all disks in the disk group, including the new disk. The process of redistributing data so that it is also spread across the newly added disks is known as rebalancing. By executing storage maintenance commands in the same command, you ensure that only one rebalance is required to incur minimal impact to database performance.
2.1.15 Use Failure Groups When Using ASM RedundancyUsing failure groups to define a common failure component ensures continuous access to data when that component fails. For maximum protection, use at least three failure groups for normal redundancy and at least five failure groups for high redundancy. Doing so allows ASM to tolerate multiple failure group failures and avoids the confusing state of having ASM running without full redundancy.
2.1.16 Increase Allocation Units for Large DatabasesFor large databases over 10 TB that run Oracle Database 10g, increase the ASM allocation unit to 16 MB and the stripe size to 1 MB. Doing this provides faster ASM file opens and efficiently supports the deployment of very large databases with sizes in the range from 10 TB to 1 PB. For more information about this procedure, see support note 368055.1 at http://support.oracle.com/.
If you have advanced the COMPATIBLE initialization parameter to Oracle Database 11g Release 1 (11.1), there is no need to increase the ASM allocation unit because Oracle Database 11g provides variable sized extents. Variable size extents enable support for larger ASM data files, reduce SGA memory requirements for very large databases, and improve performance for file CREATE and OPEN operations.
2.1.17 Use Disk LabelsDisk labels ensure consistent access to disks across reboots. ASMLib is the preferred tool for disk labeling.
2.1.18 Check Disk Groups for ImbalanceYou should periodically check disk groups for imbalance. Occasionally, disk groups can become unbalanced if certain operations fail, such as a failed rebalance operation. Periodically checking the balance of disk groups and running a manual rebalance, if needed, ensures optimal ASM space utilization and performance.
Use the following methods to check for disk group imbalance:
■ To check for an imbalance on all mounted disk groups, run the script available in support note 367445.1 at http://support.oracle.com/
■ To check for an imbalance from an I/O perspective, query the statistics in the V$ASM_DISK_IOSTAT view before and after running a large SQL*Plus statement. For example, if you run a large query that performs only read I/O, the READS and
See Also: Oracle Database Storage Administrator's Guide for information about
Note: If you have purchased a high-end storage array that has redundancy features built in, then use those features from the vendor to perform the mirroring protection functions and set the ASM diskgroup to external redundancy. Along the same lines, use ASM normal or high redundancy with low-cost storage.

Configuring Storage
2-12 Oracle Database High Availability Best Practices
READ_BYTES columns should be approximately the same for all disks in the disk group.
2.1.19 Set Rebalance to the Maximum Limit That Will Not Affect Service LevelsHigher ASM rebalance power limits make a rebalance operation run faster but can also affect application service levels. Rebalancing takes longer with lower power values, but consumes fewer processing and I/O resources that are shared by other applications, such as the database.
Set the power limit to the highest value that does not affect the application service levels. If the POWER clause is not specified in an ALTER DISKGROUP statement, or when rebalance is run implicitly when you add or drop a disk, then the rebalance power defaults to the value of the ASM_POWER_LIMIT initialization parameter. You can adjust the value of this parameter dynamically.
2.1.20 Use ASMCMD to Ease Manageability of ASMUse the ASMCMD utility to ease the manageability of day-to-day storage administration. The ASMCMD is a command-line utility that you can use to view and manipulate files and directories in ASM disk groups. ASMCMD can list the contents of disk groups, perform searches, create and remove directories and aliases, display space usage, and more. You cannot use ASMCMD to create or drop disk groups, or to add or drop disks in a disk group. You must use SQL*Plus commands to perform these operations.
2.1.21 Use Oracle Recovery Manager or Oracle Data Guard to Migrate to ASMUse Oracle Recovery Manager (RMAN) to migrate to ASM with very little downtime. You can also use Oracle Data Guard to migrate to ASM with even less downtime (occurs in approximately the same amount of time it takes to perform a switchover).
2.1.22 Set the DISK_REPAIR_TIME Disk Group Attribute AppropriatelyThe DISK_REPAIR_TIME disk group attribute specifies how long a disk remains offline before ASM drops the disk. If a disk is made available before the DISK_REPAIR_TIME parameter has expired, the storage administrator can issue the ONLINE DISK command and ASM resynchronizes the stale data from the mirror side. In Oracle Database 11g, the online disk operation does not restart if there is a failure of the instance on which the disk is running. You must reissue the command manually to bring the disk online.
Set the DISK_REPAIR_TIME disk group attribute to the maximum amount of time before a disk is definitely considered to be out of service.
See Also: Oracle Database Storage Administrator's Guide for more information about rebalancing ASM disk groups
See Also: Oracle Database Backup and Recovery User's Guide for complete information about performing ASM data migration
See Also: Oracle Database Storage Administrator's Guide for information about restoring the redundancy of an ASM disk group after a transient disk path failure

Configuring Oracle Database 11g
Configuring for High Availability 2-13
2.1.23 Proactively Mine Vendor Logs for Disk ErrorsYou should proactively mine vendor logs for disk errors and have ASM move data off the bad disk spots. Disk vendors usually provide disk-scrubbing utilities that notify you if any part of the disk is experiencing problems, such as a media sense error. When a problem is found, use the ASMCMD REMAP command to move ASM extents from the bad spot to a good spot.
Note that this is only applicable for data that is not accessed by the database or ASM instances, because in that case ASM automatically moves the extent experiencing the media sense error to a different location on the same disk. In other words, use the ASMCMD REMAP command to proactively move data from a bad disk spot to a good disk spot before that data is accessed by the application.
2.2 Configuring Oracle Database 11gThe best practices discussed in this section apply to Oracle Database release 11g architectures that are described in Oracle Database High Availability Overview:
■ Oracle Database
■ Oracle Database with Oracle Clusterware
■ Oracle Database with Oracle Real Application Clusters (Oracle RAC)
■ Oracle Database with Oracle RAC on Extended Clusters
■ Oracle Database with Oracle Data Guard
■ Oracle Database with Oracle Clusterware and Data Guard
■ Oracle Database with Oracle RAC and Oracle Data Guard
■ Oracle Database with Oracle Streams
The recommendations described in this section are identical for both the primary and standby databases in Oracle Data Guard configurations. It is necessary to adopt these practices to reduce or avoid outages, reduce risk of corruption, and improve recovery performance.
This section contains general best practices for configuring the database:
■ Recommendations for High Availability and Fast Recoverability
■ Recommendations to Improve Manageability
2.2.1 Recommendations for High Availability and Fast RecoverabilityUse the following best practices to reduce recovery time and increase database availability and redundancy:
❏ Enable ARCHIVELOG Mode
❏ Configure the Size of Redo Log Files and Groups Appropriately
❏ Use a Flash Recovery Area
❏ Enable Flashback Database
❏ Use Fast-Start Fault Recovery to Control Instance Recovery Time
❏ Configure to Protect from Data Corruption
See Also: Oracle Database Storage Administrator's Guide for information about the ASMCMD command-line utility

Configuring Oracle Database 11g
2-14 Oracle Database High Availability Best Practices
❏ Use the Data Recovery Advisor
❏ Set DISK_ASYNCH_IO
❏ Set LOG_BUFFER to at Minimum of 8 MB
❏ Use Automatic Shared Memory Management
❏ Disable Parallel Recovery for Instance Recovery
2.2.1.1 Enable ARCHIVELOG ModeARCHIVELOG mode enables online database backup and is necessary to recover the database to a point in time later than what has been restored. Features such as Oracle Data Guard and Flashback Database require that the production database run in ARCHIVELOG mode.
2.2.1.2 Configure the Size of Redo Log Files and Groups AppropriatelyUse Oracle log multiplexing to create multiple redo log members in each redo group, one in the data area and one in the flash recovery area. This protects against a failure involving the redo log, such as a disk or I/O failure for one member, or a user error that accidentally removes a member through an operating system command. If at least one redo log member is available, then the instance can continue to function.
All online redo log files should be the same size and configured to switch approximately once an hour during normal activity. They should not switch more frequently than every 20 minutes during peak activity.
There should be a minimum of four online log groups to prevent the logwriter process from waiting for a group to be available following a log switch. A group might be unavailable because a checkpoint has not yet completed or because the group has not yet been archived.
2.2.1.3 Use a Flash Recovery AreaThe flash recovery area is Oracle managed disk space that provides a centralized disk location for backup and recovery files.
The flash recovery area is defined by setting the following database initialization parameters:
■ DB_RECOVERY_FILE_DEST
This parameter specifies the default location for the flash recovery area.
See Also: Oracle Database Administrator's Guide for more information about using automatic archiving
Note: Do not multiplex the standby redo logs.
See Also:
■ Oracle Database Administrator's Guide for more information about managing redo logs
■ Oracle Data Guard Concepts and Administration for more information about online, archived, and standby redo log files
■ Section 2.6, "Configuring Oracle Database 11g with Oracle Data Guard" on page 2-37

Configuring Oracle Database 11g
Configuring for High Availability 2-15
■ DB_RECOVERY_FILE_DEST_SIZE
This parameter specifies (in bytes) the hard limit on the total space to be used by database recovery files created in the recovery area location.
The Oracle Suggested Backup Strategy described in the Oracle Database 2 Day DBA recommends using the flash recovery area as the primary location for recovery. When the flash recovery area is properly sized, files needed for repair are readily available. The minimum recommended disk limit is the combined size of the database, incremental backups, all archived redo logs that have not been copied to tape, and flashback logs.
2.2.1.4 Enable Flashback DatabaseFlashback Database provides an efficient alternative to point-in-time recovery for reversing unwanted database changes. Flashback Database enables you to rewind an entire database backward in time, reversing the effects of database changes within a time window. The effects are similar to database point-in-time recovery (DBPITR). You can flash back a database by issuing a single RMAN command or a SQL*Plus statement instead of using a complex procedure.
When configuring and enabling Flashback Database:
■ Ensure that the production database is running in ARCHIVELOG mode.
■ Ensure there is sufficient I/O bandwidth available to the flash recovery area to maintain flashback write throughput.
During normal run-time activities, Flashback Database buffers and writes the before images of data blocks into the flashback logs that reside in the flash recovery area. If flashback writes are slow (as indicated by the flashback free buffer waits wait event), then database throughput is affected. The amount of disk writes caused by Flashback Database varies depending on the workload and application profile. For a typical OLTP workload that is using a flash recovery area with sufficient disk spindles and I/O throughput, the overhead incurred by Flashback Database is less than two percent.
■ If you have a standby database, then set the DB_FLASHBACK_RETENTION_TARGET initialization parameter to the same value on both the primary and standby databases.
■ For large databases, set the LOG_BUFFER initialization parameter to at least 8 MB to ensure the database allocates maximum memory (typically 16 MB) for writing Flashback Database logs.
Note: Do not configure the archived redo log files for Oracle Streams capture to reside solely in the flash recovery area. Instead, configure a separate log archive destination that is independent of the flash recovery area for the Oracle Streams capture process for the database.
This is necessary because the archived redo log files in the flash recovery area may be removed automatically due to lack of disk space or RMAN may remove logs that no longer meet the backup retention policies, even though the log files are still required by Oracle Streams.
See Also: Oracle Database Backup and Recovery User's Guide for detailed information about sizing the flash recovery area and setting the retention period

Configuring Oracle Database 11g
2-16 Oracle Database High Availability Best Practices
Flashback Database can return a primary or standby database to a point in time before a role transition. In addition, you can use guaranteed restore points to flash back a database to a point in time before a RESETLOGS operation, thus providing more flexibility in detecting and correcting human errors.
Flashback Database or guaranteed restore points are required when using:
■ Fast-start failover—Requires Flashback Database so that the broker can automatically reinstate the primary database following an automatic failover. Bystander standby databases that may be disabled after a failover can only be reinstated when Flashback Database is enabled.
■ Snapshot standby database—Requires a guaranteed restore point to convert the snapshot standby database back to a physical standby database.
Flashback Database is optional but recommended when performing rolling database upgrades. You should create a guaranteed restore point before performing an upgrade to fall back in case the upgrade fails. Using this method to restore the database to the pre-upgrade state is substantially quicker than using the downgrade procedure. However, note that flashing back the database to the pre-upgrade state is practical only when no application data changes have been made.
In general, the performance effect of enabling Flashback Database is minimal. However, there are some application profiles that may require special tuning or additional considerations. See support note 565535.1 at http://support.oracle.com/ for additional Flashback Database considerations and specific application use cases.
There are several data analysis methods for monitoring the Flashback Database workload on your system such as using Automatic Workload Repository (AWR), or querying the V$FLASHBACK_DATABASE_STAT or the V$SYSSTAT views. For example, you can use AWR to compare AWR snapshots collected before and after the time that you enabled Flashback Database. You can also review AWR snapshots to pinpoint system usage caused by flashback logging. See the "Monitoring Flashback Database Performance Impact" section in the Oracle Database Backup and Recovery User's Guide for more monitoring and tuning techniques.
2.2.1.5 Use Fast-Start Fault Recovery to Control Instance Recovery TimeThe fast-start fault recovery feature reduces the time required to recover from a crash. It also makes the recovery bounded and predictable by limiting the number of dirty buffers and the number of redo records generated between the most recent redo record and the last checkpoint.
With this feature, the FAST_START_MTTR_TARGET initialization parameter simplifies the configuration of recovery time from instance or system failure. This parameter specifies a target for the expected recovery time objective (RTO), which is the time (in seconds) that it should take to start the instance and perform cache recovery. When you set this parameter, the database manages incremental checkpoint writes in an attempt to meet the target. If you have chosen a practical value for this parameter, then
See Also:
■ The following sections in Oracle Database Backup and Recovery User's Guide for more information about guaranteed restore points and Flashback Database:
"Configuring Oracle Flashback Database and Restore Points"
"Configuring the Environment for Optimal Flashback Database Performance"

Configuring Oracle Database 11g
Configuring for High Availability 2-17
you can expect your database to recover, on average, in approximately the number of seconds you have chosen.
Outage testing (such as for node or instance failures) during peak loads is recommended.
2.2.1.6 Configure to Protect from Data CorruptionBy default, Oracle always validates the data blocks that it reads from disk. You should also consider one or more of the following methods to provide additional prevention and detection against corruptions caused by underlying disks, storage systems, or the I/O system:
❏ Use Data Guard and Configure the DB_ULTRA_SAFE Initialization Parameter
❏ Configure Data Recovery Advisor
❏ Configure Oracle Recovery Manager (RMAN)
❏ Configure Oracle Secure Backup
❏ Use ASM Redundancy
Use Data Guard and Configure the DB_ULTRA_SAFE Initialization Parameter Use Data Guard and configure the DB_ULTRA_SAFE initialization parameter on both the primary and standby systems for the most comprehensive data corruption prevention and detection.
■ On the primary database, set the DB_ULTRA_SAFE=DATA_AND_INDEX initialization parameter to prevent and detect data corruptions in a timely manner, and thus provide critical data protection and high availability for the Oracle Database.
The DB_ULTRA_SAFE initialization parameter also controls other data protection behavior in Oracle Database, such as requiring ASM to perform sequential mirror write I/Os.
Table 2–1 describes the values that the DB_ULTRA_SAFE parameter automatically assigns to the DB_BLOCK_CHECKING, DB_BLOCK_CHECKSUM, or DB_LOST_WRITE_PROTECT parameters.
See Also:
■ Oracle Database Backup and Recovery User's Guide for more information about fast-start fault recovery
■ The MAA white paper "Optimizing Availability During Unplanned Outages Using Oracle Clusterware and RAC" for more best practices
Table 2–1 Parameter Values Set by the DB_ULTRA_SAFE Initialization Parameter
When you set DB_ULTRA_SAFE to ... Then ...
DATA_AND_INDEX (recommended) ■ DB_BLOCK_CHECKING is set to FULL.
■ DB_LOST_WRITE_PROTECT is set to TYPICAL.
■ DB_BLOCK_CHECKSUM is set to FULL.
DATA_ONLY ■ DB_BLOCK_CHECKING is set to MEDIUM.
■ DB_LOST_WRITE_PROTECT is set to TYPICAL.
■ DB_BLOCK_CHECKSUM is set to FULL.
Configuring Oracle Database 11g
2-18 Oracle Database High Availability Best Practices
■ On physical standby databases, specify the DB_BLOCK_CHECKSUM and DB_LOST_WRITE_PROTECT parameters:
– Set DB_BLOCK_CHECKSUM=FULL
If DB_BLOCK_CHECKSUM is set to FULL, then both disk corruption and in-memory corruption are detected and the block is not written to disk, thus preserving the integrity of the physical standby database. This parameter has minimal effect on Redo Apply performance.
– Set DB_LOST_WRITE_PROTECT=TYPICAL
Lost write protection prevents corruptions—due to stray or lost writes on the primary—from being propagated and applied to the standby database. Setting this parameter has a negligible effect on the standby database. Moreover, setting the DB_LOST_WRITE_PROTECT initialization parameter is recommended over employing the HARD solution, because HARD does not provide full stray and lost write protection and redo application validation.
A standby database is a database that is decoupled from the primary database and on which redo data is checked and verified. Redo Apply and SQL Apply processes perform another layer of validation on the standby database that can detect stray or lost writes and corrupted blocks caused by hardware, software, or network issues. Most of these issues cannot be detected on the primary database or may remain hidden on the primary database for a long period.
■ Enable the DB_BLOCK_CHECKING initialization parameter.
Consider setting the DB_BLOCK_CHECKING parameter only on the primary database. Enabling DB_BLOCK_CHECKING on the standby database incurs a much
Note: When you set the DB_ULTRA_SAFE parameter, it automatically integrates and controls the behavior (described in Table 2–1) of the following initialization parameters:
■ DB_BLOCK_CHECKING detects and prevents data block corruptions.
Block checking prevents memory and data corruptions, but it incurs some performance overhead on every block change. For many applications, the block changes are a small percentage compared to the blocks read (typically less than five percent), so the overall effect of enabling block checking is small.
■ DB_BLOCK_CHECKSUM detects redo and data block corruptions and can prevent most corruptions from happening on the physical standby database.
Redo and data block checksums detect corruptions on the primary database and protect the standby database. This parameter requires minimal CPU resources.
■ DB_LOST_WRITE_PROTECT detects stray and lost writes.
Lost write protection enables a physical standby database to detect lost write corruptions on both the primary and physical standby database.
However, if you explicitly set the DB_BLOCK_CHECKING, DB_BLOCK_CHECKSUM, or DB_LOST_WRITE_PROTECT parameters in the initialization parameter file, then the DB_ULTRA_SAFE parameter has no effect and no changes are made to the parameter values. Thus, if you specify the DB_ULTRA_SAFE parameter, do not explicitly set these underlying parameters.

Configuring Oracle Database 11g
Configuring for High Availability 2-19
higher overhead and can dramatically reduce Redo Apply performance. Testing is recommended to measure the effect on your environment.
Configure Data Recovery AdvisorConfigure Data Recovery Advisor to quickly diagnose and repair data failures for non Oracle RAC primary databases. Data Recovery Advisor periodically scans for data corruptions. See "Use the Data Recovery Advisor" on page 2-19.
Configure Oracle Recovery Manager (RMAN)Configure Oracle Recovery Manager (RMAN) to automate the backup and management of recovery-related files, calculate checksums when taking backups to ensure that all blocks being backed up are validated, and detect physical and logical corruptions. Periodically use the RMAN BACKUP VALIDATE CHECK LOGICAL... scan to detect corruptions. See "Configuring Backup and Recovery" on page 2-66.
Configure Oracle Secure BackupConfigure Oracle Secure Backup to integrate tape backup and management into your environment to provide local and remote data protection. See "Create Fast Tape Backups Using Oracle Secure Backup" on page 2-73.
Use ASM RedundancyUse ASM redundancy for disk groups to provide mirrored extents that can be used by the database in the event an I/O error or corruption is encountered. For continued protection in the event of a failure, ASM redundancy provides the ability to move an extent to a different area on a disk if an I/O error occurs. The ASM redundancy mechanism is useful if you have some bad sectors returning media sense errors.
2.2.1.7 Use the Data Recovery AdvisorUse the Data Recovery Advisor for non-Oracle RAC primary databases to quickly diagnose data failures, determine and present appropriate repair options, and execute repairs at the user's request. Data Recovery Advisor reduces downtime by eliminating confusion and automating detection and repair. It can diagnose failures based on symptoms, such as:
■ Components that are not accessible because they do not exist, do not have the correct access permissions, are taken offline, and so on
■ Physical corruptions such as block checksum failures, invalid block header field values, and so on
■ Logical corruptions caused by software bugs
■ Incompatibility failures caused by an incorrect version of a component
Note: Although enabling the DB_BLOCK_CHECKING parameter is recommended, doing so can significantly reduce the throughput of Redo Apply processes by as much as 50%.
During MAA internal testing, Redo Apply throughput doubled in Oracle Database 11g and reached 100 MB/sec for batch workloads and 50 MB/sec for OLTP workloads. The throughput dropped by 50% after enabling the DB_BLOCK_CHECKING parameter. However, for cases where the reduced throughput can still surpass peak redo rates on the primary database, enabling DB_BLOCK_CHECKING parameter is still advised to provide additional data corruption protection.

Configuring Oracle Database 11g
2-20 Oracle Database High Availability Best Practices
■ I/O failures such as a limit on the number of open files exceeded, channels inaccessible, network or I/O errors, and so on
■ Configuration errors such as an incorrect initialization parameter value that prevents the opening of the database
If failures are diagnosed, then they are recorded in the Automatic Diagnostic Repository (ADR). Data Recovery Advisor intelligently determines recovery strategies by:
■ Generating repair advice and repairing failures only after failures have been detected by the database and stored in ADR
■ Aggregating failures for efficient recovery
■ Presenting only feasible recovery options
■ Indicating any data loss for each option
Typically, Data Recovery Advisor presents both automated and manual repair options. If appropriate, you can choose to have Data Recovery Advisor automatically perform a repair, verify the repair success, and close the relevant repaired failures.
2.2.1.8 Set DISK_ASYNCH_IOUnder most circumstances, Oracle Database automatically detects if asynchronous I/O is available and appropriate for a particular platform, and enables asynchronous I/O through the DISK_ASYNCH_IO initialization parameter. However, for optimal performance, it is always a best practice to ensure that asynchronous I/O is actually being used. Query the V$IOSTAT_FILE view to determine whether asynchronous I/O is used:
SQL> select file_no,filetype_name,asynch_io from v$iostat_file;
To explicitly enable asynchronous I/O, set the DISK_ASYNCH_IO initialization parameter to TRUE:
ALTER SYSTEM SET DISK_ASYNCH_IO=TRUE SCOPE=SPFILE SID='*';
Note that if you are using ASM, it performs I/O asynchronously by default.
2.2.1.9 Set LOG_BUFFER to at Minimum of 8 MBFor large production databases, set the LOG_BUFFER initialization parameter to a minimum of 8 MB. This setting ensures the database allocates maximum memory for writing Flashback Database logs. If the database is configured to transport redo data to a standby database asynchronously, then you should size the LOG_BUFFER parameter large enough to accommodate the processes involved in the network send.
2.2.1.10 Use Automatic Shared Memory ManagementAutomatic Shared Memory Management (ASMM) to improve memory management. By setting the SGA_TARGET parameter to a nonzero value, the shared pool, large pool, Java pool, streams pool, and buffer cache are automatically and dynamically resized, as needed. See the Oracle Database Administrator's Guide for more information.
See Also: The chapter about diagnosing and repairing failures with Data Recovery Advisor in the Oracle Database Backup and Recovery User's Guide

Configuring Oracle Database 11g
Configuring for High Availability 2-21
2.2.1.11 Disable Parallel Recovery for Instance RecoveryWhen the value of RECOVERY_ESTIMATED_IOS in the V$INSTANCE_RECOVERY view is small (for example, < 5000), then the overhead of parallel recovery may outweigh any benefit. This typically occurs with a very aggressive setting of FAST_START_MTTR_TARGET. In this case, set RECOVERY_PARALLELISM to 1 to disable parallel recovery.
2.2.2 Recommendations to Improve ManageabilityUse the following best practices to improve Oracle Database manageability:
❏ Use Data Recovery Adviser to Detect, Analyze and Repair Data Failures
❏ Use Automatic Performance Tuning Features
❏ Use a Server Parameter File
❏ Use Automatic Undo Management
❏ Use Locally Managed Tablespaces
❏ Use Automatic Segment Space Management
❏ Use Temporary Tablespaces and Specify a Default Temporary Tablespace
❏ Use Resumable Space Allocation
❏ Use Database Resource Manager
2.2.2.1 Use Data Recovery Adviser to Detect, Analyze and Repair Data FailuresData Recovery Advisor automatically diagnoses data failures, determines and presents appropriate repair options, and executes repairs at the user's request. In this context, a data failure is a corruption or loss of persistent data on disk. By providing a centralized tool for automated data repair, Data Recovery Advisor improves the manageability and reliability of an Oracle database and thus helps reduce the MTTR.
2.2.2.2 Use Automatic Performance Tuning FeaturesEffective data collection and analysis is essential for identifying and correcting performance problems. Oracle provides several tools that gather information regarding database performance.
The Oracle Database automatic performance tuning features include:
■ Automatic Workload Repository (AWR)
■ Automatic Database Diagnostic Monitor (ADDM)
■ SQL Tuning Advisor
■ SQL Access Advisor
■ Active Session History Reports (ASH)
Note: In the current release, Data Recovery Advisor only supports single-instance databases. Oracle RAC and Oracle Data Guard databases are not supported.
See Also: The chapter about "Diagnosing and Repairing Failures with Data Recovery Advisor" in the Oracle Database Backup and Recovery User's Guide

Configuring Oracle Database 11g
2-22 Oracle Database High Availability Best Practices
When using AWR, consider the following best practices:
■ Set the AWR automatic snapshot interval to 10-20 minutes to capture performance peaks during stress testing or to diagnose performance issues.
■ Under usual workloads a 60-minute interval is sufficient.
2.2.2.3 Use a Server Parameter FileThe server parameter file (SPFILE) enables a single, central parameter file to hold all database initialization parameters associated with all instances of a database. This provides a simple, persistent, and robust environment for managing database parameters. An SPFILE is required when using the broker.
2.2.2.4 Use Automatic Undo ManagementWith automatic undo management, the Oracle Database server effectively and efficiently manages undo space, leading to lower administrative complexity and cost. When Oracle Database internally manages undo segments, undo block and consistent read contention are eliminated because the size and number of undo segments are automatically adjusted to meet the current workload requirement.
To use automatic undo management, set the following initialization parameters:
■ UNDO_MANAGEMENT
Set this parameter to AUTO.
■ UNDO_RETENTION
Specify the desired time in seconds to retain undo data. Set this parameter to the same value on all instances.
■ UNDO_TABLESPACE
Specify a unique undo tablespace for each instance.
Advanced object recovery features, such as Flashback Query, Flashback Version Query, Flashback Transaction Query, and Flashback Table, require automatic undo management. The success of these features depends on the availability of undo information to view data as of a previous point in time.
By default, Oracle Database automatically tunes undo retention by collecting database usage statistics and estimating undo capacity needs. Unless you enable retention guarantee for the undo tablespace (by specifying the RETENTION GUARANTEE clause on either the CREATE DATABASE or the CREATE UNDO TABLESPACE statement), Oracle Database may reduce the undo retention below the specified UNDO_RETENTION value.
See Also:
■ Oracle Database Administrator's Guide for information about managing initialization parameters with an SPFILE
■ Oracle Real Application Clusters Administration and Deployment Guide for information on initialization parameters with Real Application Clusters
■ Oracle Data Guard Broker for information on other prerequisites for using the broker
■ Appendix A, "Database SPFILE and Oracle Net Configuration File Samples"

Configuring Oracle Database 11g
Configuring for High Availability 2-23
If there is a requirement to use Flashback technology features, the best practice recommendations is to enable RETENTION GUARANTEE for the undo tablespace and set a value for UNDO_RETENTION based on the following guidelines:
1. Establish how long it would take to detect when erroneous transactions have been carried out. Multiply this value by two.
2. Use the Undo Advisor to compute the minimum undo tablespace size based on setting UNDO_RETENTION to the value recommended in step 1.
3. If the undo tablespace has the AUTOEXTEND option disabled, allocate enough space as determined in step 2 or reduce the value of the UNDO_RETENTION parameter.
4. If the undo tablespace has the AUTOEXTEND option enabled, make sure there is sufficient disk space available to extend the datafiles to the size determined in step 2. Make sure the autoextend MAXSIZE value you specified is large enough.
With the RETENTION GUARANTEE option, if the tablespace is configured with less space than the transaction throughput requires, then the following sequence of events occurs:
1. If you have an autoextensible file, then the file automatically grows to accommodate the retained undo data.
2. A warning alert reports the disk is at 85% full.
3. A critical alert reports the disk is at 97% full.
4. Transactions receive an out-of-space error.
2.2.2.5 Use Locally Managed TablespacesLocally managed tablespaces perform better than dictionary-managed tablespaces, are easier to manage, and eliminate space fragmentation concerns. Locally managed tablespaces use bitmaps stored in the data file headers and, unlike dictionary managed tablespaces, do not contend for centrally managed resources for space allocations and de-allocations.
Note: By default, ongoing transactions can overwrite undo data even if the UNDO_RETENTION parameter setting specifies that the undo data should be maintained. To guarantee that unexpired undo data is not overwritten, you must enable RETENTION GUARANTEE for the undo tablespace.
See Also: The section about "Computing the Minimum Undo Tablespace Size Using the Undo Advisor" in Oracle Database 2 Day DBA
See Also: Oracle Database Administrator's Guide for more information about the UNDO_RETENTION setting and the size of the undo tablespace
See Also: Oracle Database Administrator's Guide for more information about locally managed tablespaces

Configuring Oracle Database 11g
2-24 Oracle Database High Availability Best Practices
2.2.2.6 Use Automatic Segment Space ManagementAutomatic segment space management simplifies space administration tasks, thus reducing the chance of human error. An added benefit is the elimination of performance tuning related to space management. It facilitates management of free space within objects such as tables or indexes, improves space utilization, and provides significantly better performance and scalability with simplified administration. The automatic segment space management feature is enabled by default for all tablespaces created using default attributes.
2.2.2.7 Use Temporary Tablespaces and Specify a Default Temporary TablespaceTemporary tablespaces improve the concurrency of multiple sort operations, reduce sort operation overhead, and avoid data dictionary space management operations. This is a more efficient way of handling temporary segments, from the perspective of both system resource usage and database performance.
The best practice is to specify a default temporary tablespace for the entire database to ensure that temporary segments are used for the most efficient sort operations, whether individual users have been assigned a temporary tablespace.
Using the default temporary tablespace ensures that all disk sorting occurs in a temporary tablespace and that other tablespaces are not mistakenly used for sorting.
2.2.2.8 Use Resumable Space AllocationResumable space allocation provides a way to suspend and later resume database operations if there are space allocation failures. The affected operation is suspended instead of the database returning an error. No processes must be restarted. When the space problem is resolved, the suspended operation is automatically resumed.
To use resumable space allocation, you can set it at the system level with the RESUMABLE_TIMEOUT initialization parameter, or enable it at the session level using clauses of the ALTER SESSION statement (for example, issue the ALTER SESSION ENABLE RESUMABLE statement). The default for a new session is resumable mode disabled, unless you explicitly set the RESUMABLE_TIMEOUT initialization parameter to a nonzero value.
2.2.2.9 Use Database Resource ManagerThe Database Resource Manager gives database administrators more control over resource management decisions, so that resource allocation can be aligned with the business objectives of an enterprise. The Database Resource Manager provides the
See Also: Oracle Database Administrator's Guide for more information on segment space management
To Specify a Default Temporary Tablespace ... Then ...
When creating the database ... Use the DEFAULT TEMPORARY TABLESPACE clause of the CREATE DATABASE statement
After database creation ... Use the ALTER DATABASE statement
See Also: Oracle Database Administrator's Guide for more information about managing tablespaces
See Also: Oracle Database Administrator's Guide for more information about managing resumable space allocation

Configuring Oracle Database 11g with Oracle Clusterware
Configuring for High Availability 2-25
ability to prioritize work within the Oracle Database server. Availability of the database encompasses both its functionality and performance. If the database is available but users are not getting the level of performance they need, then availability and service level objectives are not being met. Application performance, to a large extent, is affected by how resources are distributed among the applications that access the database. The main goal of the Database Resource Manager is to give the Oracle Database server more control over resource management decisions, thus circumventing problems resulting from inefficient operating system management and operating system resource managers.
2.3 Configuring Oracle Database 11g with Oracle ClusterwareOracle Clusterware is software that manages the availability of user applications and Oracle databases. Oracle Clusterware is the only clusterware needed for most platforms on which Oracle RAC operates. You can also use clusterware from other vendors if the clusterware is certified for use with Oracle RAC. However, adding unnecessary layers of software for functionality that is provided by Oracle Clusterware adds complexity and cost and can reduce system availability, especially for planned maintenance.
Oracle Clusterware includes a high availability framework that provides an infrastructure to manage any application. Oracle Clusterware ensures the applications it manages start when the system starts. Oracle Clusterware also monitors the applications to make sure they are always available. For example, if a process fails, then Oracle Clusterware attempts to restart the process based on scripts that you customize. If a node in the cluster fails, then you can program processes that normally run on the failed node to restart on another node. The monitoring frequency, starting, and stopping of the applications and the application dependencies are configurable.
2.3.1 Oracle Clusterware Best PracticesUse the following configuration best practices for planned and unplanned maintenance activities. The following sections put these configuration best practices to use in an operational context:
■ Oracle Clusterware Release Compatibility
■ Capacity Planning
■ Use a Local Home for ASM, Oracle Database, and Oracle Clusterware
■ Out-of-Place Patch Set Installation with Cloning
■ Client Configuration and Migration
■ Use Separate Home Directory Locations for ASM and Oracle Database
■ Run the Listener Out of the Most Recent Oracle Home or ASM Home
■ Ensure Services are Highly Available
■ Connect to Database Using Services and Virtual Internet Protocol (VIP) Address
■ Use Client-Side and Server-Side Load Balancing
See Also: Oracle Database Administrator's Guide for more information about Database Resource Manager
See Also: Oracle Clusterware Administration and Deployment Guide for more information about managing application availability with Oracle Clusterware

Configuring Oracle Database 11g with Oracle Clusterware
2-26 Oracle Database High Availability Best Practices
■ Mirror Oracle Cluster Registry (OCR) and Configure Multiple Voting Disks
■ Regularly Back Up OCR to Tape or Offsite
■ Verify That Oracle Clusterware and Oracle RAC Use the Same Interconnect Network
2.3.1.1 Oracle Clusterware Release CompatibilityFollow these best practices when installing different software releases of Oracle Clusterware, ASM, and the Oracle Database on your cluster:
■ Install an Oracle Clusterware release that is equal to or higher than the release of the database and ASM.
■ Maintain the same release between the database, the clusterware, and ASM if possible. Supported mixed-release environments (as described in compatibility matrices) increase administration costs and require diligent planning before applying Oracle patches and patch sets.
2.3.1.2 Capacity PlanningProper capacity planning is a critical success factor for all aspects of Oracle clustering technology, but it is of particular importance for planned maintenance. You must ensure that the work a cluster is responsible for can be done when a small part of the cluster (for example, a node) is unavailable. If the cluster cannot keep up after a planned or unplanned outage, the potential for cascading problems is higher due to system resource starvation.
When sizing your cluster, ensure that n percentage of the cluster can meet your service levels where n percentage represents the amount of computing resource left over after a typical planned or unplanned outage. For example, if you have a four-node cluster and you want to apply patches in a rolling fashion—meaning one node is upgraded at a time—then three nodes can run the work requested by the application.
One other aspect to capacity planning that is important during planned maintenance is ensuring that any work being done as part of the planned maintenance is separated from the application work when possible. For example, if a patch requires that a SQL script is run after all nodes have been patched1, it is a best-practice to run this script on the last node receiving the patch before allowing the application to start using that node. This technique ensures that the SQL script has full use of the operating system resources on the node and it is less likely to affect the application.
2.3.1.3 Use a Local Home for ASM, Oracle Database, and Oracle ClusterwareAll rolling patch features require that the software home being patched is local, not shared. The software must be physically present in a local file system on each node in the cluster and it is not on a shared cluster file system.
The reason for this requirement is that if a shared cluster file system is used, patching the software on one node affects all of the nodes, and would require that you shut down all components using the software on all nodes. Using a local file system allows software to be patched on one node without affecting the software on any other nodes.
See Also: Your platform-specific Oracle Clusterware installation guide
1 An example of this is the CATCPU.SQL script that must be run after installing the CPU patch on all nodes.
Configuring Oracle Database 11g with Oracle Clusterware
Configuring for High Availability 2-27
2.3.1.4 Out-of-Place Patch Set Installation with CloningTraditionally, Oracle Database patch sets have been done in-place, which means that the new code was applied directly over the old code. There were a variety of reasons for applying patch sets in-place such as less space consumption and a simpler install. However, many of these reasons are no longer valid in today's IT environment. The downside to an in-place database patch set upgrade is that the application cannot connect to the database while new code is being copied in2. To avoid this availability impact, use a combination of Oracle cloning technology and an out-of-place patch set installation. Cloning technology allows the existing software to be copied to a new ORACLE_HOME after which a patch set may be applied.
An out-of-place patch set installation with cloning has the following advantages:
■ Applications remain available while software is upgraded in the new ORACLE_HOME.
■ The configuration inside the ORACLE_HOME is retained because the cloning procedure involves physically copying the software3.
The one disadvantage to an out-of-place patch set installation with cloning is that you must change any $ORACLE_HOME environment variable hard coded in application code and Oracle specific scripts.
If application availability is more important to you than changing customizations, consider performing an out-of-place patch set installation with cloning.
2.3.1.5 Client Configuration and MigrationThe ability to migrate client connections to and from the nodes on which you are working is a critical aspect of planned maintenance. Migrating client connections should always be the first step in any planned maintenance activity requiring software shutdown (for example, when performing a rolling upgrade). The potential for problems increases if there are still active database connections when the software shutdown commences.
Oracle provides services, FAN, FAN-integrated clients, client side load balancing, Fast Connection Failover, and run time connection load balancing to achieve this objective. Detailed information about client failover best practices in an Oracle RAC environment are available in the "Workload Management with Oracle Real Application Clusters" white paper on the Oracle Technology Network at
http://www.oracle.com/technology/products/database/clustering/pdf/awmrac11g.pdf
An example of a best-practice process for client redirection during planned maintenance is as follows (Note: the following example is specific to FAN ONS4):
2 A typical Oracle Database patch set installation can take a minimum of 20 minutes.3 Examples are files such as LISTENER.ORA, TNSNAMES.ORA, and INITSID.ORA.
Note: Oracle offers other solutions—such as SQL Apply Rolling Upgrade and Oracle Streams—to reduce downtime to seconds during upgrades. Using out-of-place patch set installations derive benefits that you can obtain without the extra steps and potential limitations associated when using these features. For example, SQL Apply rolling upgrade and Oracle Streams have datatype restrictions that may prevent their use.

Configuring Oracle Database 11g with Oracle Clusterware
2-28 Oracle Database High Availability Best Practices
■ FAN ONS integrated clients properly configured with run time connection load balancing and Fast Connection Failover.
■ Oracle Clusterware stops services on the instance to be brought down or relocates services to an alternate instance.
■ Oracle Clusterware returns a Service-Member-Down event.
■ FAN ONS integrated client receives the event and moves connections to other instances offering the service.
2.3.1.6 Use Separate Home Directory Locations for ASM and Oracle DatabaseWhile it is technically feasible to run ASM and Oracle Database instances out of the same ORACLE_HOME, it is not a preferred configuration. You should create an ORACLE_HOME for the database and an ASM home for ASM instances to enable more flexibility during patches and upgrades. For example, you want to avoid having to stop your volume manager (ASM) to apply a patch that fixes code exclusively used by the database. Doing so would require that you shut down all of the databases, including the ones that are not using the patched code.
2.3.1.7 Run the Listener Out of the Most Recent Oracle Home or ASM HomeIf you have many Oracle homes, then managing the listener or listeners in use can be a confusing and error-prone task. You should run the listener with the latest version when multiple versions are available. If you typically update your ASM software before your database software, then running the listener out of the ASM home simplifies the manageability of your network configuration and proactively avoids potential bugs in older listener code.
2.3.1.8 Ensure Services are Highly AvailableFor cases where a service only has one preferred instance, ensure that the service is started immediately on an available instance after it is brought down on its preferred instance. Starting the service immediately ensures that affected clients can instantaneously reconnect and continue working. Oracle Clusterware handles this responsibility and it is of utmost importance during unplanned outages.
Even though you can rely on Oracle Clusterware for to start the service during planned maintenance as well, it is safer to ensure that the service is available on an alternate instance by manually starting an alternate preferred instance ahead of time. Manually starting an alternate instance eliminates the single point of failure with a single preferred instance and you have the luxury to do this because it is a planned activity. Add at least a second preferred instance to the service definition and start the service before the planned maintenance. You can then stop the service on the instance where maintenance is being performed with the assurance that another service member is available. Adding one or more preferred instances does not have to be a permanent change. You can revert it back to the original service definition after performing the planned maintenance.
Manually relocating a service rather than changing the service profile is advantageous in cases such as the following:
■ If you are using Oracle XA, then use manual service relocation because running a service on multiple instances is not supported.
4 FAN OCI does not respond to service events in release 10.2.0.3. In this case, you can use the DBMS_SERVICE package to remove sessions from instances that are being worked on.

Configuring Oracle Database 11g with Oracle Clusterware
Configuring for High Availability 2-29
■ If an application is not designed to work properly with multiple service members, then application errors or performance issues can arise.
As with all configuration changes, you should test the effect of a service with multiple members to assess its viability and impact in a test environment before implementing the change in your production environment.
2.3.1.9 Connect to Database Using Services and Virtual Internet Protocol (VIP) AddressWith Oracle Database 11g, application workloads can be defined as services so that they can be individually managed and controlled. DBAs control which processing resources are allocated to each service during both normal operations and in response to failures. Performance metrics are tracked by service and thresholds set to automatically generate alerts should these thresholds be crossed. CPU resource allocations and resource consumption controls are managed for services using Database Resource Manager. Oracle tools and facilities such as Job Scheduler, Parallel Query, and Oracle Streams Advanced Queuing also use services to manage their workloads.
With Oracle Database 11g, you can define rules to automatically allocate processing resources to services. Oracle RAC in Oracle Database release 11g instances can be allocated to process individual services or multiple services, as needed. These allocation rules can be modified dynamically to meet changing business needs. For example, you could modify these rules after a quarter to ensure that there are enough processing resources to complete critical financial functions on time. You can also define rules so that when instances running critical services fail, the workload is automatically shifted to instances running less critical workloads. You can create and administer services with Oracle Enterprise Manager and the DBMS_SERVICE PL/SQL package.
You should make application connections to the database through a Virtual Internet Protocol (VIP) address to a service defined as part of the workload management facility to achieve the greatest degree of availability and manageability.
A VIP address is an alternate public address that client connections use instead of the standard public IP address. If a node fails, then the node's VIP address fails over to another node but there is no listener listening on that VIP, so a client that attempts to connect to the VIP address receives a connection refused error (ORA-12541) instead of waiting for long TCP connect timeout messages. This error causes the client to quickly move on to the next address in the address list and establish a valid database connection5. VIP addresses are configured using the Virtual Internet Protocol Configuration Assistant (VIPCA).
2.3.1.10 Use Client-Side and Server-Side Load BalancingClient-side load balancing evenly spreads connection requests across all listeners. It is defined in your client connection definition by setting the parameter LOAD_BALANCE to ON. (The default is ON for description lists). When this parameter is set to ON, Oracle Database randomly selects an address in the address list and connects to that node's listener. This provides a balancing of the number of client connections across the available listeners in the cluster. When the listener receives the connection request, it
5 New client connections can connect to a failed-over-VIP. but there is no listener running on that VIP so the no listener error message is returned to the clients. The clients traverse to the next address in the address list that has a non-failed-over VIP with a listener running on it.
See Also: Oracle Real Application Clusters Administration and Deployment Guide for more information about workload management

Configuring Oracle Database 11g with Oracle Clusterware
2-30 Oracle Database High Availability Best Practices
connects the user to an instance that it knows provides the requested service. To see what services a listener supports, run the LSNRCTL services command.
Server-side load balancing uses the current workload being run on the available instances for the database service requested during a connection request and directs the connection request to the least loaded instance on the least loaded node. Server-side connection load balancing requires each instance to register with all available listeners, which is accomplished by setting LOCAL_LISTENER and REMOTE_LISTENER parameters for each instance. These parameters are set by default when creating a database with DBCA.
To further enhance connection load balancing, use the load balancing advisor and define the connection load balancing goal for each service by setting the GOAL and CLB_GOAL attributes with the DBMS_SERVICE PL/SQL package:
■ When using connection pools without FAN integration, set CLB_GOAL to LONG.
■ When using connection pools with FAN integration, such as with Oracle Implicit Connection Cache (ICC), set CLB_GOAL to SHORT.
The CLB_GOAL=SHORT attribute setting is also required for the Runtime Connection Load Balancing feature of ICC and UCP (universal connection pool for Java), which use metrics from the database to properly distribute work to instances offering the application service.
2.3.1.11 Mirror Oracle Cluster Registry (OCR) and Configure Multiple Voting DisksThe OCR contains important configuration data about cluster resources. Always protect the OCR by using the ability of Oracle Clusterware to mirror the OCR. Oracle Database automatically manages two OCRs when it mirrors the OCR.
The voting disk must reside on a shared disk. For high availability, Oracle recommends that you have multiple voting disks on multiple storage devices across different controllers, where possible. Oracle Clusterware enables multiple voting disks, but you must have an odd number of voting disks, such as three, five, and so on. If you define a single voting disk, then you should use external redundant storage to provide redundancy.
2.3.1.12 Regularly Back Up OCR to Tape or OffsiteOracle Clusterware automatically creates OCR backups every four hours on one node in the cluster, which is the OCR master node. Oracle always retains the last three backup copies of OCR. The CRSD process that creates the backups also creates and retains an OCR backup for each full day and after each week. You should use Oracle Secure Backup, or standard operating-system tools, or third-party tools to back up the backup files created by Oracle Clusterware as part of the operating system backup.
See Also:
■ Oracle Real Application Clusters Administration and Deployment Guide for more information about workload management
■ Oracle Database Net Services Administrator's Guide for more information about configuring listeners
■ Oracle Database Reference for more information about the LOCAL_LISTENER and REMOTE_LISTENER parameters
See Also: Oracle Real Application Clusters Administration and Deployment Guide for more information about managing OCR and voting disks
Configuring Oracle Database 11g with Oracle Clusterware
Configuring for High Availability 2-31
In addition to using the automatically created OCR backup files, you can use the -manualbackup option on the ocrconfig command to perform a manual backup, on demand. For example, you can perform a manual backup before and after you make changes to the OCR such as adding or deleting nodes from your environment, modifying Oracle Clusterware resources, or creating a database. The ocrconfig -manualbackup command exports the OCR content to a file format. You can then backup the export files created by ocrconfig as a part of the operating system backup using Oracle Secure backup, standard operating-system tools, or third-party tools.
2.3.1.13 Verify That Oracle Clusterware and Oracle RAC Use the Same Interconnect NetworkFor the most efficient network detection and failover, Oracle Clusterware and Oracle RAC should use the same interconnect subnet so that they share the same view of connections and accessibility. Perform the following steps to verify the interconnect subnet:
1. To verify the interconnect subnet used by Oracle RAC, either check the instance startup section in the alert-log of an instance for an existing Oracle RAC database or run the Oracle ORADEBUG utility on one instance. For example:
SQL> ORADEBUG SETMYPIDStatement processed.SQL> ORADEBUG IPCInformation written to trace file.SQL> ORADEBUG tracefile_name/u01/app/oracle/admin/prod/udump/prod1_ora_24409.trc
2. In the trace file, examine the SSKGXPT section to determine the subnet used by Oracle RAC. In this example, the subnet in use is 192.168.0.3 and the protocol used is UDP:
SSKGXPT 0xd7be26c flags info for network 0 socket no 7 IP 192.168.0.3 UDP 14727
3. To verify the interconnect subnet used by the clusterware, examine the value of the keyname SYSTEM.css.node_numbers.noden.privatename in OCR:
prompt> ocrdump -stdout -keyname SYSTEM.css.node_numbers [SYSTEM.css.node_numbers.node1.privatename]ORATEXT : halinux03ic0 . . .[SYSTEM.css.node_numbers.node2.privatename]
Note: The default location for generating OCR backups on UNIX-based systems is CRS_HOME/cdata/cluster_name where cluster_name is the name of your cluster. The Windows-based default location for generating backups uses the same path structure. Backups are taken on the OCR master node. To list the node and location of the backup, issue the ocrconfig -showbackup command.
See Also: Oracle Clusterware Administration and Deployment Guide for more information about backing up the OCR

Configuring Oracle Database 11g with Oracle RAC
2-32 Oracle Database High Availability Best Practices
ORATEXT : halinux04ic0
4. Use operating system tools to verify that the hostnames (halinux03ic0 and halinux04ic0 in this example) match the subnet in the trace file produced by ORADEBUG (subnet 192.168.0.3). The following example is performed on Linux:
prompt> getent hosts halinux03ic0192.168.0.3 halinux03ic0.us.oracle.com halinux03ic0
2.3.2 Cold Failover Cluster Best PracticesUse Oracle Clusterware to make any application, including a single-instance database, highly available using cold failover cluster. You can find examples of using Oracle Clusterware to make applications highly available on Oracle Technology Network at
http://www.oracle.com/technology/products/database/clusterware/index.html
2.4 Configuring Oracle Database 11g with Oracle RACThe best practices discussed in this section apply to Oracle Database 11g with Oracle Real Application Clusters (Oracle RAC). These best practices build on the Oracle Database 11g configuration best practices described in Section 2.2, "Configuring Oracle Database 11g" on page 2-13 and Section 2.3, "Configuring Oracle Database 11g with Oracle Clusterware" on page 2-25. These best practices are identical for the primary and standby databases if they are used with Data Guard in Oracle Database 11g with Oracle RAC and Data Guard—MAA. Some best practices may use your system resources more aggressively to reduce or eliminate downtime. This can, in turn, affect performance service levels, so be sure to assess the impact in a test environment before implementing these practices in a production environment.
This section includes the following topics:
■ Understand the Instance Recovery Target and Optimize (if Required)
■ Maximize the Number of Processes Performing Transaction Recovery
■ Ensure Asynchronous I/O Is Enabled
■ Redundant Dedicated Connection Between the Nodes
2.4.1 Understand the Instance Recovery Target and Optimize (if Required)Instance recovery, which is the process of recovering the redo thread from the failed instance, is a critical component affecting availability. The availability of the database during instance recovery has greatly increased over the last few major releases of the Oracle Database.
When using Oracle RAC, the SMON process in one surviving instance performs instance recovery of the failed instance. This is different from crash recovery, which occurs when all instances accessing a database have failed. Crash recovery is the only type of recovery when an instance fails using a single-instance Oracle Database.
In both Oracle RAC and single-instance environments, checkpointing is the internal mechanism used to bound Mean Time To Recover (MTTR). Checkpointing is the process of writing dirty buffers from the buffer cache to disk. With more aggressive checkpointing, less redo is required for recovery after a failure. Although the objective
See Also: Oracle Real Application Clusters Administration and Deployment Guide

Configuring Oracle Database 11g with Oracle RAC on Extended Clusters
Configuring for High Availability 2-33
is the same, the parameters and metrics used to tune MTTR are different in a single-instance environment versus an Oracle RAC environment.
In a single-instance environment, you can set the FAST_START_MTTR_TARGET initialization parameter to the number of seconds the crash recovery should take. Note that crash recovery time includes the time to startup, mount, recover, and open the database.
Oracle provides several ways to help you understand the MTTR target your system is currently achieving and what your potential MTTR target could be, given the I/O capacity. See the MAA white paper "Best Practices for Optimizing Availability During Unplanned Outages Using Oracle Clusterware and Oracle Real Application Clusters" for more information.
2.4.2 Maximize the Number of Processes Performing Transaction RecoveryThe FAST_START_PARALLEL_ROLLBACK parameter determines how many processes are used for transaction recovery, which is done after redo application. Optimizing transaction recovery is important to ensure an efficient workload after an unplanned failure. As long as the system is not CPU bound, setting this parameter to HIGH is a best practice. This causes Oracle to use four times the CPU count (4 X cpu_count) parallel processes for transaction recovery. The default setting for this parameter is LOW, or two times the CPU count (2 X cpu_count). Set the parameter as follows:
ALTER SYSTEM SET FAST_START_PARALLEL_ROLLBACK=HIGH SCOPE=BOTH;
By employing this database configuration best practice along with the one described in Section 2.4.3, "Ensure Asynchronous I/O Is Enabled"it is possible to achieve approximately a 20% increase in total availability at the database level.
2.4.3 Ensure Asynchronous I/O Is EnabledUsing asynchronous I/O is a best practice that is recommended for all Oracle Databases. See Section 2.2.1.8, "Set DISK_ASYNCH_IO" for guidelines.
2.4.4 Redundant Dedicated Connection Between the NodesUse redundant dedicated connections and sufficient bandwidth for public traffic, Oracle RAC interconnects, and I/O.
Separate dedicated channels on one fibre may be needed, or you can optionally configure Dense Wavelength Division Multiplexing (referred to as DWDM) to allow communication between the sites without using repeaters and to allow greater distances (greater than 10 km6) between the sites. However, the disadvantage is that DWDM can be prohibitively expensive.
2.5 Configuring Oracle Database 11g with Oracle RAC on Extended Clusters
An Oracle RAC extended cluster is an architecture that provides extremely fast recovery from a site failure and allows for all nodes, at all sites, to actively process transactions as part of single database cluster. An extended cluster provides greater high availability than a local Oracle RAC cluster, but because the sites are typically in
6 For each 100 km add 1 ms latency with interconnect and I/O with 3 ms. LGWR is impacted by at least the network I/O. The sweet spot is within a metro area. 90%

Configuring Oracle Database 11g with Oracle RAC on Extended Clusters
2-34 Oracle Database High Availability Best Practices
the same metropolitan area, this architecture may not fulfill all disaster recovery requirements for your organization.
The best practices discussed in this section apply to Oracle Database 11g with Oracle RAC on extended clusters, and build on the best practices described in Section 2.4, "Configuring Oracle Database 11g with Oracle RAC" on page 2-32.
Use the following best practices when configuring an Oracle RAC database for an extended cluster environment:
❏ Spread the Workload Evenly Across the Sites in the Extended Cluster
❏ Configure the Nodes to Be Within the Proximity of a Metropolitan Area
❏ Use Host-Based Storage Mirroring with ASM Normal or High Redundancy
❏ Add a Third Voting Disk to Host the Quorum Disk
❏ Additional Deployment Considerations for Extended Clusters
2.5.1 Spread the Workload Evenly Across the Sites in the Extended ClusterA typical Oracle RAC architecture is designed primarily as a scalability and availability solution that resides in a single data center. To build and deploy an Oracle RAC extended cluster, the nodes in the cluster are separated by greater distances. When configuring an Oracle RAC database for an extended cluster environment, you must:
■ Configure one set of nodes at Site A and another set of nodes at Site B.
■ Spread the cluster workload evenly across both sites to avoid introducing additional contention and latency into the design. For example, avoid client/server application workloads that run across sites, such that the client component is in site A and the server component is in site B.
2.5.2 Configure the Nodes to Be Within the Proximity of a Metropolitan AreaExtended clusters provide the highest level of availability for server and site failures when data centers are in close enough proximity to reduce latency and complexity. The preferred distance between sites in an extended cluster is within a metropolitan area. High internode and interstorage latency can have a major effect on performance and throughput. Performance testing is mandatory to assess the impact of latency. In general, distances of 50 km or less are recommended.
Testing has shown the distance (greatest cable stretch) between Oracle RAC cluster nodes generally affects the configuration, as follows:
■ Distances less than 10 km can be deployed using normal network cables.
■ Distances equal to or more than 10 km require DWDM links.
See Also: ■
■ The white paper about extended clusters on the Oracle Real Application Clusters Web site at http://www.oracle.com/technology/products/database/clustering/
■ Oracle Database High Availability Overview for a high-level overview, benefits, and a configuration example

Configuring Oracle Database 11g with Oracle RAC on Extended Clusters
Configuring for High Availability 2-35
■ Distances from 10 to 50 km require storage area network (SAN) buffer credits to minimize the performance impact due to the distance. Otherwise, the performance degradation due to the distance can be significant.
■ For distances greater than 50 km, there are not yet enough proof points to indicate the effect of deployments. More testing is needed to identify what types of workloads could be supported and what the effect of the chosen distance would have on performance.
2.5.3 Use Host-Based Storage Mirroring with ASM Normal or High RedundancyUse host-based mirroring with ASM normal or high redundancy configured disk groups so that a storage array failure does not affect the application and database availability.
Oracle recommends host-based mirroring using ASM to internally mirror across the two storage arrays. Implementing mirroring with ASM provides an active/active storage environment in which system write I/Os are propagated to both sets of disks, making the disks appear as a single set of disks that is independent of location. Do not use array-based mirroring because only one storage site is active, which makes the architecture vulnerable to this single point of failure and longer recovery times.
The ASM volume manager provides flexible host-based mirroring redundancy options. You can choose to use external redundancy to defer the mirroring protection function to the hardware RAID storage subsystem. The ASM normal and high-redundancy options allow two-way and three-way mirroring, respectively.
Beginning with Oracle Database Release 11g, ASM includes a preferred read capability that ensures that a read I/O accesses the local storage instead of unnecessarily reading from a remote failure group. When you configure ASM failure groups in extended clusters, you can specify that a particular node reads from a failure group extent that is closest to the node, even if it is a secondary extent. This is especially useful in extended clusters where remote nodes have asymmetric access for performance, thus leading to better usage and lower network loading. Using preferred read failure groups is most useful in extended clusters.
The ASM_PREFERRED_READ_FAILURE_GROUPS initialization parameter value is a comma-delimited list of strings that specifies the failure groups that should be preferentially read by the given instance. This parameter is instance specific, and it is generally used only for clustered ASM instances. It's value can be different on different nodes. For example:
diskgroup_name1.failure_group_name1, ...
2.5.4 Add a Third Voting Disk to Host the Quorum DiskAdd a third voting disk to a third site to host the quorum (voting) disk7 at a location different from the main sites (data centers).
See Also: Oracle Database Storage Administrator's Guide for information about configuring preferred read failure groups with the ASM_PREFERRED_READ_FAILURE_GROUPS initialization parameter
7 Use standard NFS to support a third voting disk on an extended cluster. You can configure the quorum disk on inexpensive, low end, standard NFS mounted device somewhere on the network. Oracle recommends putting the NFS voting disk on a dedicated server, which belongs to a production environment. See the white paper about using standard Network File System (NFS) to support a third voting disk on a extended cluster configuration that is available on the Oracle Real Application Clusters Web site at http://www.oracle.com/technology/products/database/clustering/index.html

Configuring Oracle Database 11g with Oracle RAC on Extended Clusters
2-36 Oracle Database High Availability Best Practices
Most extended clusters have only two storage systems (one at each site). During normal processing, each node writes and reads a disk heartbeat at regular intervals, but if the heartbeat cannot complete, all affected nodes are evicted from the cluster using a forced reboot. Thus, the site that houses the majority of the voting disks is a potential single point of failure for the entire cluster. For availability reasons, you should add a third site that can act as the arbitrator in case either one site fails or a communication failure occurs between the sites.
In some cases, you can also use standard NFS to support a third voting disk on an inexpensive low-end standard NFS mounted device. For more information, see the Oracle Technology Network (OTN) white paper at http://www.oracle.com/technology/products/database/clustering/pdf/thirdvoteonnfs.pdf
If you have an extended cluster and do not configure a third site, you must make one site the primary site and make the other site a secondary site. Then, if the primary site fails, you must manually restart the secondary site.
2.5.5 Additional Deployment Considerations for Extended ClustersConsider the following additional factors when implementing an extended cluster architecture:
■ Network, storage, and management costs increase.
■ Write performance incurs the overhead of network latency. Test the workload performance to assess impact of the overhead.
■ Because this is a single database without Oracle Data Guard, there is no protection from data corruption or data failures.
■ The Oracle release, the operating system, and the clusterware used for an extended cluster all factor into the viability of extended clusters.
■ When choosing to mirror data between sites:
– Host-based mirroring requires a clustered logical volume manager to allow active/active mirrors and thus a primary/primary site configuration. Oracle recommends using ASM as the clustered logical volume manager.
– Array-based mirroring allows active/passive mirrors and thus a primary/secondary configuration.
■ Storage costs for this solution are very high, requiring a minimum of two full copies of the storage (one at each site).
■ Extended clusters need additional destructive testing, covering
– Site failure
– Communication failure
■ For full disaster recovery, complement the extended cluster with a remote Data Guard standby database, because this architecture:
– Maintains an independent physical replica of the primary database
– Protects against regional disasters
– Protects against data corruption and other potential failures
– Provides options for performing rolling database upgrades and patch set upgrades

Configuring Oracle Database 11g with Oracle Data Guard
Configuring for High Availability 2-37
2.6 Configuring Oracle Database 11g with Oracle Data GuardThe proper configuration of Oracle Data Guard Redo Apply and SQL Apply is essential to ensuring that all standby databases work properly and perform their roles within the necessary service levels after switchovers and failovers.
The best practices for Oracle Data Guard build on the ones described in Section 2.2, "Configuring Oracle Database 11g" on page 2-13. You can configure most Oracle Data Guard settings using Oracle Enterprise Manager and the broker. To set more advanced, less frequently used configuration parameters, use the DGMGRL command-line interface or SQL*Plus statements.
Oracle Data Guard enables you to use a physical standby database (Redo Apply), a snapshot standby database, the Active Data Guard option (real-time query), or a logical standby database (SQL Apply), real-time apply, or a combination of these.
■ A physical standby database provides a physically identical copy of the primary database, with on disk database structures that are identical to the primary database on a block-for-block basis. The database schemas, including indexes, are the same. A physical standby database is kept synchronized with the primary database by applying the redo data received from the primary database through media recovery. In addition, a physical standby database:
– Can be opened for read-only access (real-time queries) while Redo Apply is active if you purchase a license for the Oracle Active Data Guard option.
– Can be converted to a snapshot standby database for use as a testing database or cloning, and then later converted back to run in the physical standby database role.
– Can be temporarily converted into a transient logical standby database on which you can perform a rolling upgrade, incurring minimal downtime.
■ A logical standby database contains the same logical information as the primary database, although the physical organization and structure of the data can be different from the primary database. SQL Apply keeps the logical standby database synchronized with the primary database by transforming the redo data received from the primary database into SQL statements and then executing the SQL statements on the standby database. You can use a logical standby database for other business purposes in addition to disaster-recovery requirements.
2.6.1 Determine Which Type of Standby Database Is Best for Your ApplicationThis section differentiates physical and logical standby databases to help you determine which is the best solution for your business requirements.
Use a physical standby database when: ■ Simplicity and reliability of a physical replica is preferable.
■ The primary database has a very high redo generation rate.
■ The highest level of protection against corruption is required.
See Also:
■ Oracle Database High Availability Overview for a description of the high availability solutions and benefits provided by Oracle Data Guard and standby databases
■ Oracle Data Guard Concepts and Administration provides complete information about Oracle Data Guard

Configuring Oracle Database 11g with Oracle Data Guard
2-38 Oracle Database High Availability Best Practices
■ An up-to-date standby database that is open read-only can address planned uses of the standby database while it is running in the standby role. (Requires a license for the Oracle Active Data Guard option.)
■ You want to offload fast incremental backups to the standby database. (Requires a license for the Oracle Active Data Guard option.)
■ You want to use a snapshot standby database for quality assurance testing or other uses that require a database that is open read-write.
■ To perform rolling database upgrades using a transient logical standby database.
Use a logical standby database when:■ You want to run reporting applications that require read/write access to the
standby database.
Note: You cannot modify the data maintained by a logical standby database.
■ You want to add tables, additional schemas, indexes, and materialized views to your standby database that do not exist on your primary database.
■ You will perform a rolling database upgrade from a database currently running an Oracle Database 10g release.
Note: If your database is already running Oracle Database 11g, use a physical standby database and the transient logical standby database rolling upgrade process.
In addition, use a logical standby database if you have any of the preceding requirements and any of the following characteristics:
■ You require basic one-way replication of the entire database.
Note: If you have more complex replication requirements (for example, multimaster, many-to-one, transformations, and so on) then use Oracle Streams (see Section 2.8).
■ You do not have any unsupported data type, or for which EDS8 is not a viable workaround.
■ You meet other prerequisites of a logical standby database.
■ Performance tests confirm that logical standby databases can handle peak workloads.
2.6.2 Choose the Appropriate Level of Data ProtectionIn some situations, a business cannot afford to lose data at any cost. In other situations, the availability of the database might be more important than protecting data. Some applications require maximum database performance and can tolerate a potential loss of data if a disaster occurs.
Based on your business requirements, choose one of the following protection modes:
■ Maximum protection mode guarantees that no data loss occurs if the primary database fails. To ensure that data loss cannot occur, the primary database shuts down if a fault prevents it from writing the redo stream to at least one standby database.
8 You can use Extended Datatype Support (EDS) to accommodate several more advanced data types. See the MAA white paper "Extended Datatype Support: SQL Apply and Streams" at http://www.oracle.com/technology/deploy/availability/pdf/maa_edtsoverview.pdf for more details.

Configuring Oracle Database 11g with Oracle Data Guard
Configuring for High Availability 2-39
■ Maximum availability mode provides the highest level of data protection that is possible without compromising the availability of the primary database.
■ Maximum performance mode (the default mode) provides the highest level of data protection that is possible without affecting the performance of the primary database. This is accomplished by allowing a transaction to commit as soon as the redo data needed to recover that transaction is written to the local online redo log.
The redo data stream of the primary database is also written to at least one standby database, but that redo stream is written asynchronously with the commitment of the transactions that create the redo data. When network links with sufficient bandwidth are used, this mode provides a level of data protection that approaches that of maximum availability mode, with minimal effect on primary database performance.
To determine the appropriate data protection mode for your application, perform the following steps:
1. Compare your business requirements to the data loss scenarios in Table 2–2.
2. Consider the effect of latency on application throughput:
When using maximum protection mode or maximum availability mode, consider how the latency might affect application throughput. The distance between sites and the network infrastructure between the sites determine the network latency, and therefore determine the protection mode that can be used. In general, latency increases and bandwidth decreases with distance:
■ For a low-latency, high bandwidth network, use maximum protection or maximum availability protection mode.
In this case, the effect on performance is minimal and you can achieve zero data loss.
■ For a high-latency network, use maximum performance mode with the ASYNC transport.
In this case, the performance effect on the primary database is minimal, and you can usually limit data loss to seconds. You can still use the maximum availability mode and maximum protection mode with the SYNC transport, but you must assess if the additional COMMIT latency might exceed your application performance requirements. In some cases, the response time or throughput overhead is zero or within acceptable requirements. Large batch applications or a message queuing applications are good examples where maximum availability with SYNC is still applicable across a high-latency network.
Bandwidth must be greater than the maximum redo generation rate. A guideline for two-way communication is for bandwidth to be 50% of the stated network
See Also: Oracle Data Guard Concepts and Administration
Table 2–2 Determining the Appropriate Data Protection Mode
If data loss is not acceptable during ... Then ...
A primary site failure, failure of one or all standby sites, or any network failure
Use maximum protection mode.
A primary site failure Use maximum availability mode. Otherwise, use maximum performance mode.

Configuring Oracle Database 11g with Oracle Data Guard
2-40 Oracle Database High Availability Best Practices
capacity, but also consider the network usage of other applications. Using the maximum performance mode with the ASYNC redo transport mitigates the effect on performance.
2.6.3 Implement Multiple Standby DatabasesYou should deploy multiple standby databases for any of the following purposes:
■ To provide continuous protection following failover
The standby databases in a multiple standby configuration that are not the target of the role transition (these databases are referred to as bystander standby databases) automatically apply redo data received from the new primary database.
■ To achieve zero data loss protection while also guarding against widespread geographic disasters that extend beyond the limits of synchronous communication
For example, one standby database that receives redo data synchronously is located 200 miles away, and a second standby database that receives redo data asynchronously is located 1,500 miles away from the primary.
■ To perform rolling database upgrades while maintaining disaster protection throughout the rolling upgrade process
■ To perform testing and other ad-hoc tasks while maintaining disaster-recovery protection
When desired, use some standby databases for such purposes while reserving at least one standby database to serve as the primary failover target.
2.6.4 General Configuration Best Practices for Data GuardUse the following configuration best practices for Data Guard:
❏ Use Recovery Manager to Create Standby Databases
❏ Enable Flashback Database for Reinstatement After Failover
❏ Use FORCE LOGGING Mode
❏ Use the Data Guard Broker
❏ Use a Simple, Robust Archiving Strategy and Configuration
❏ Use Standby Redo Logs and Configure Size Appropriately
See Also:
■ Oracle Database High Availability Overview Section 4.1.5.2 "Overview of Multiple Standby Database Architectures" for multiple standby database implementations and examples
■ Section 2.6.9, "Best Practices for Deploying Multiple Standby Databases" on page 2-60
■ The MAA white paper "Multiple Standby Databases Best Practices" at http://www.otn.oracle.com/goto/maa
See Also: Appendix A, "Database SPFILE and Oracle Net Configuration File Samples" for detailed examples of initialization parameter settings, including SPFILE samples and Oracle Net configuration files

Configuring Oracle Database 11g with Oracle Data Guard
Configuring for High Availability 2-41
2.6.4.1 Use Recovery Manager to Create Standby DatabasesOracle recommends that you use the Recovery Manager (RMAN) utility to simplify the process of creating a physical standby database.
You can either create a standby database from backups of your primary database, or create a standby database over the network:
■ Use the RMAN DUPLICATE TARGET DATABASE FOR STANDBY command to create a standby database from backups of your primary database.
You can use any backup copy of the primary database to create the physical standby database if the necessary archived redo log files to completely recover the database are accessible by the server session on the standby host. RMAN restores the most recent datafiles unless you execute the SET UNTIL command.
■ Use the RMAN FROM ACTIVE DATABASE option to create the standby database over the network if a preexisting database backup is not accessible to the standby system.
RMAN copies the data files directly from the primary database to the standby database. The primary database must be mounted or open.
You must choose between active and backup-based duplication. If you do not specify the FROM ACTIVE DATABASE option, then RMAN performs backup-based duplication. Creating a standby database over the network is advantageous because:
■ You can transfer redo data directly to the remote host over the network without first having to go through the steps of performing a backup on the primary database. (Restoration requires multiple steps including storing the backup locally on the primary database, transferring the backup over the network, storing the backup locally on the standby database, and then restoring the backup on the standby database.)
■ With active duplication you can backup a database (as it is running) from ASM, and restore the backup to a host over the network and place the files directly into ASM.
Before this feature, restoration required you to backup the primary and copy the backup files on the primary host file system, transfer the backup files over the network, place the backup files on the standby host file system, and then restore the files into ASM.
2.6.4.2 Enable Flashback Database for Reinstatement After FailoverEnable Flashback Database on both the primary and standby database so that, in case the original primary database has not been damaged, you can reinstate the original primary database as a new standby database following a failover. If there is a failure during the switchover process, then it can easily be reversed when Flashback Database is enabled.
See Also:
■ The chapter about "Using RMAN to Back Up and Restore Files" in Oracle Data Guard Concepts and Administration
■ The appendix about "Creating a Standby Database with Recovery Manager" in Oracle Data Guard Concepts and Administration
■ Oracle Database Backup and Recovery User's Guide

Configuring Oracle Database 11g with Oracle Data Guard
2-42 Oracle Database High Availability Best Practices
2.6.4.3 Use FORCE LOGGING ModeWhen the primary database is in FORCE LOGGING mode, all database data changes are logged. FORCE LOGGING mode ensures that the standby database remains consistent with the primary database. If this is not possible because you require the load performance with NOLOGGING operations, then you must ensure that the corresponding physical standby data files are subsequently synchronized. To synchronize the physical standby data files, either apply an incremental backup created from the primary database or replace the affected standby data files with a backup of the primary data files taken after the nologging operation. Before the file transfer, you must stop Redo Apply on the physical standby database.
For logical standby databases, when SQL Apply encounters a redo record for an operation performed with the NOLOGGING clause, it skips over the record and continues applying changes from later records. Later, if an attempt is made to access a record that was updated with NOLOGGING in effect, the following error is returned: ORA-01403 no data found. To recover after the NOLOGGING clause is specified for a logical standby database, re-create one or more tables from the primary database, as described in Oracle Data Guard Concepts and Administration in the section about "Adding or Re-Creating Tables On a Logical Standby Database."
You can enable force logging immediately by issuing an ALTER DATABASE FORCE LOGGING statement. If you specify FORCE LOGGING, then Oracle waits for all ongoing unlogged operations to finish.
2.6.4.4 Use the Data Guard BrokerUse the broker to create, manage, and monitor a Data Guard configuration. The benefits of using broker include:
■ Integration with Oracle RAC
The broker is integrated with Cluster Ready Services (CRS)9 so that database role changes occur smoothly and seamlessly. This is especially apparent for a planned role switchover (for example, when a physical standby database is directed to take over the primary role while the original primary database assumes the role of standby). The broker and CRS work together to temporarily suspend service availability on the primary database, accomplish the actual role change for both databases during which CRS works with the broker to properly restart the instances as necessary, and then resume service availability on the new primary database. The broker manages the underlying Data Guard configuration and its database roles while CRS manages service availability that depends upon those roles. Applications that rely on CRS for managing service availability see only a temporary suspension of service as the role change occurs in the Data Guard configuration.
■ Automated creation of a Data Guard configuration
See Also: Section 2.2.1.4, "Enable Flashback Database" on page 2-15 for more information about Flashback Database and for information about enabling Flashback Database
See Also:
■ Oracle Database Administrator's Guide
■ Oracle Data Guard Concepts and Administration
9 Cluster Ready Services (CRS) is the primary program for managing high availability operations in Oracle Clusterware.
Configuring Oracle Database 11g with Oracle Data Guard
Configuring for High Availability 2-43
Oracle Enterprise Manager provides a wizard that automates the complex tasks involved in creating a broker configuration, including:
– Adding an existing standby database, or a new standby database created from existing backups taken through Enterprise Manager
– Configuring the standby control file, server parameter file, and data files
– Initializing communication with the standby databases
– Creating standby redo log files
– Enabling Flashback Database if you plan to use fast-start failover
Although the Data Guard command-line interface (DGMGRL) cannot automatically create a standby database, you can use DGMGRL commands to configure and monitor an existing standby database, including those created using Enterprise Manager.
■ Simplified switchover and failover operations
The broker simplifies switchovers and failovers by allowing you to invoke them using a single key click in Oracle Enterprise Manager or a single command at the DGMGRL command-line interface (using DGMGRL is referred to in this documentation as manual failover). For lights-out administration, you can enable fast-start failover to allow the broker to determine if a failover is necessary and initiate the failover to a pre-specified target standby database automatically, with no need for DBA intervention and with little or no loss of data.
Fast-start failover enables you to increase availability with less need for manual intervention, thereby reducing management costs. Manual failover gives you control over exactly when a failover occurs and to which target standby database. Regardless of the method you choose, the broker coordinates the role transition on all databases in the configuration.
■ Fast Application Notification (FAN) after failovers
The broker automatically publishes FAN/AQ (Advanced Queuing) notifications after a failover. Properly configured clients that are also configured for Fast Connection Failover can use these notifications to connect to the new primary database to resume application processing.
■ Built-in monitoring and alert and control mechanisms
The broker provides built-in validation that monitors the health of all databases in the configuration. From any system in the configuration connected to any database, you can capture diagnostic information and detect obvious and subtle problems quickly with centralized monitoring, testing, and performance tools. Both Enterprise Manager and DGMGRL retrieve a complete configuration view of the progress of redo transport services on the primary database and the progress of Redo Apply or SQL Apply on the standby database.
The ability to monitor local and remote databases and respond to events is significantly enhanced by the broker health check mechanism and by its tight integration with the Enterprise Manager event management system.
2.6.4.5 Use a Simple, Robust Archiving Strategy and ConfigurationThis archiving strategy is based on the following assumptions:
■ Each database uses a flash recovery area.
■ The primary database instances archive remotely to only one apply instance.
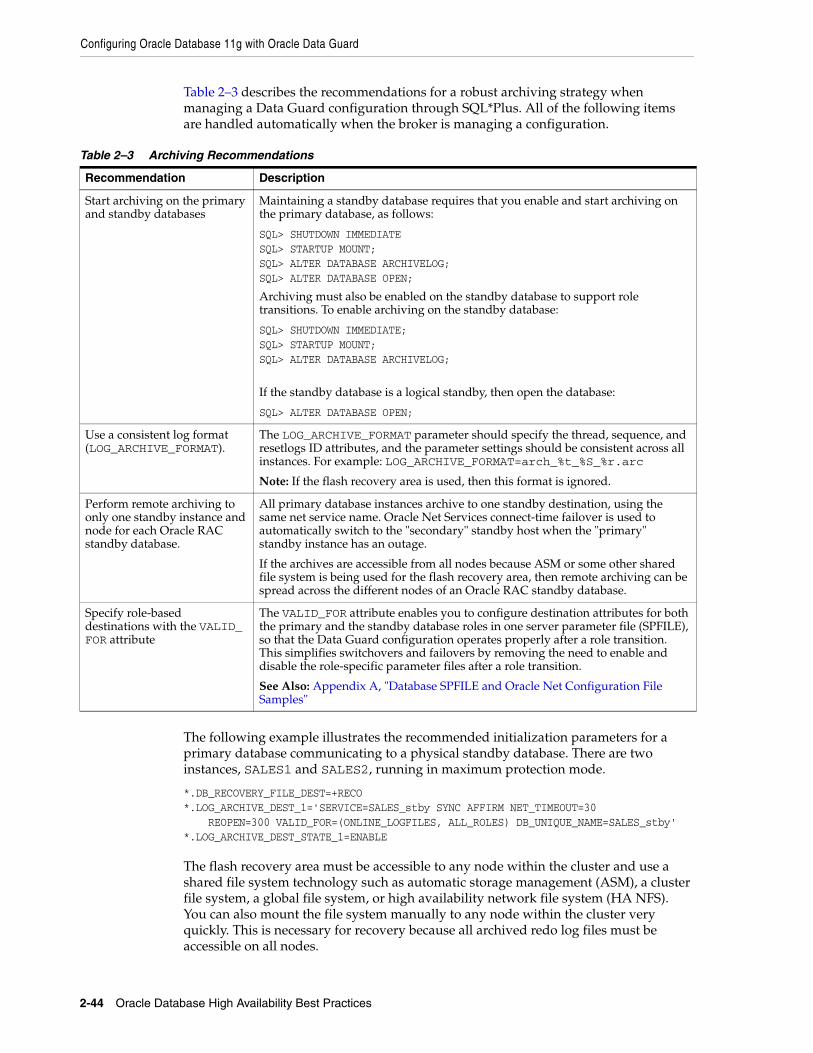
Configuring Oracle Database 11g with Oracle Data Guard
2-44 Oracle Database High Availability Best Practices
Table 2–3 describes the recommendations for a robust archiving strategy when managing a Data Guard configuration through SQL*Plus. All of the following items are handled automatically when the broker is managing a configuration.
The following example illustrates the recommended initialization parameters for a primary database communicating to a physical standby database. There are two instances, SALES1 and SALES2, running in maximum protection mode.
*.DB_RECOVERY_FILE_DEST=+RECO*.LOG_ARCHIVE_DEST_1='SERVICE=SALES_stby SYNC AFFIRM NET_TIMEOUT=30 REOPEN=300 VALID_FOR=(ONLINE_LOGFILES, ALL_ROLES) DB_UNIQUE_NAME=SALES_stby'*.LOG_ARCHIVE_DEST_STATE_1=ENABLE
The flash recovery area must be accessible to any node within the cluster and use a shared file system technology such as automatic storage management (ASM), a cluster file system, a global file system, or high availability network file system (HA NFS). You can also mount the file system manually to any node within the cluster very quickly. This is necessary for recovery because all archived redo log files must be accessible on all nodes.
Table 2–3 Archiving Recommendations
Recommendation Description
Start archiving on the primary and standby databases
Maintaining a standby database requires that you enable and start archiving on the primary database, as follows:
SQL> SHUTDOWN IMMEDIATESQL> STARTUP MOUNT;SQL> ALTER DATABASE ARCHIVELOG;SQL> ALTER DATABASE OPEN;
Archiving must also be enabled on the standby database to support role transitions. To enable archiving on the standby database:
SQL> SHUTDOWN IMMEDIATE;SQL> STARTUP MOUNT;SQL> ALTER DATABASE ARCHIVELOG;
If the standby database is a logical standby, then open the database:
SQL> ALTER DATABASE OPEN;
Use a consistent log format (LOG_ARCHIVE_FORMAT).
The LOG_ARCHIVE_FORMAT parameter should specify the thread, sequence, and resetlogs ID attributes, and the parameter settings should be consistent across all instances. For example: LOG_ARCHIVE_FORMAT=arch_%t_%S_%r.arc
Note: If the flash recovery area is used, then this format is ignored.
Perform remote archiving to only one standby instance and node for each Oracle RAC standby database.
All primary database instances archive to one standby destination, using the same net service name. Oracle Net Services connect-time failover is used to automatically switch to the "secondary" standby host when the "primary" standby instance has an outage.
If the archives are accessible from all nodes because ASM or some other shared file system is being used for the flash recovery area, then remote archiving can be spread across the different nodes of an Oracle RAC standby database.
Specify role-based destinations with the VALID_FOR attribute
The VALID_FOR attribute enables you to configure destination attributes for both the primary and the standby database roles in one server parameter file (SPFILE), so that the Data Guard configuration operates properly after a role transition. This simplifies switchovers and failovers by removing the need to enable and disable the role-specific parameter files after a role transition.
See Also: Appendix A, "Database SPFILE and Oracle Net Configuration File Samples"

Configuring Oracle Database 11g with Oracle Data Guard
Configuring for High Availability 2-45
On the standby database nodes, recovery from a different node is required when a failure occurs on the node applying redo and the apply service cannot be restarted. In that case, any of the existing standby instances residing on a different node can initiate managed recovery. In the worst case, when the standby archived redo log files are inaccessible, the managed recovery process (MRP) or logical standby process (LSP) on the different node fetches the archived redo log files using the FAL server to retrieve from the primary node directly.
When configuring hardware vendor shared file system technology, verify the performance and availability implications. Investigate the following issues before adopting this strategy:
■ Is the shared file system accessible by any node regardless of the number of node failures?
■ What is the performance impact when implementing a shared file system?
■ Is there any effect on the interconnect traffic?
2.6.4.6 Use Standby Redo Logs and Configure Size AppropriatelyYou should configure standby redo logs on both sites for improved availability and performance. To determine the recommended number of standby redo logs, use the following formula:
(maximum # of logfile groups +1) * maximum # of threads
For example, if a primary database has two instances (threads) and each thread has two online log groups, then there should be six standby redo logs ((2 + 1) * 2 = 6). Having one more standby log group for each thread (that is, one greater than the number of the online redo log groups for the primary database) reduces the likelihood that the logwriter process for the primary instance is blocked because a standby redo log cannot be allocated on the standby database.
The following statements create two standby log members for each group, and each member is 10 MB. One member is created in the directory specified by the DB_CREATE_FILE_DEST initialization parameter, and the other member is created in the directory specified by DB_RECOVERY_FILE_DEST initialization parameter. Because this example assumes that there are two online redo log groups in two threads, the next group is group five.
SQL> ALTER DATABASE ADD STANDBY LOGFILE THREAD 1GROUP 5 SIZE 10M,GROUP 6 SIZE 10M,GROUP 7 SIZE 10M;
SQL> ALTER DATABASE ADD STANDBY LOGFILE THREAD 2GROUP 8 SIZE 10M,GROUP 9 SIZE 10M,GROUP 10 SIZE 10M;
Consider the following additional guidelines when creating standby redo logs:
■ Create the same number of standby redo logs on both the primary and standby databases.
■ Create all online redo logs and standby redo logs for both primary and standby databases so that they are the same size.
■ Create standby redo logs in the Data Area protected through ASM or external redundancy.

Configuring Oracle Database 11g with Oracle Data Guard
2-46 Oracle Database High Availability Best Practices
■ In an Oracle RAC environment, create standby redo logs on a shared disk.
■ In an Oracle RAC environment, assign the standby redo log to a thread when the standby redo log is created. In the above example, three standby redo logs are assigned to each thread.
■ Do not multiplex the standby redo logs.
To check the number and group numbers of the redo logs, query the V$LOG view:
SQL> SELECT * FROM V$LOG;
To check the results of the ALTER DATABASE ADD STANDBY LOGFILE THREAD statements, query the V$STANDBY_LOG view:
SQL> SELECT * FROM V$STANDBY_LOG;
You can also see the members created by querying the V$LOGFILE view:
SQL> SELECT * FROM V$LOGFILE;
2.6.5 Redo Transport Services Best PracticesThis section discusses best practices for planning and implementing redo transport services for Data Guard.
2.6.5.1 Conduct Performance Assessment with Proposed Network ConfigurationOracle recommends that you conduct a performance assessment with your proposed network configuration and current (or anticipated) peak redo rate. The network effect between the primary and standby databases, and the effect on the primary database throughput, must be understood. Because the network between the primary and standby databases is essential for the two databases to remain synchronized, the infrastructure must have the following characteristics:
■ Sufficient bandwidth to accommodate the maximum redo generation rate
■ If using the SYNC transport, then minimal latency is necessary to reduce the performance impact on the primary database
■ Multiple network paths for network redundancy
In configurations that use a dedicated network connection the required bandwidth is determined by the maximum redo rate of the primary database and the efficiency of the network. Depending on the data protection mode, there are other recommended practices and performance considerations. Maximum protection mode and maximum availability mode require SYNC transport. The maximum performance protection mode uses the ASYNC transport option.
Unlike the ASYNC transport mode, the SYNC transport mode can affect the primary database performance due to the incurred network latency. Distance and network configuration directly influence latency, while high latency can slow the potential transaction throughput and quicken response time. The network configuration, number of repeaters, the overhead of protocol conversions, and the number of routers also affect the overall network latency and transaction response time.
See Also: The section about "Configuring an Oracle Database to Receive Redo Data" in Oracle Data Guard Concepts and Administration
See Also: Section 2.6.2, "Choose the Appropriate Level of Data Protection" on page 2-38

Configuring Oracle Database 11g with Oracle Data Guard
Configuring for High Availability 2-47
2.6.5.2 Best Practices for Primary Database ThroughputThe following sections describe the behavior of the SYNC and ASYNC transport modes on primary database throughput, and setting the LOG_ARCHIVE_MAX_PROCESSES parameter.
2.6.5.2.1 The SYNC Transport Configure the SYNC redo transport for a high degree of synchronization between the primary and standby databases.
When sending redo data to a standby database using the SYNC attribute, a transaction on the primary database does not return a commit completed message to the foreground process until the redo associated with that transaction has been written both locally and remotely.
The commit time when using SYNC is directly affected by the network latency and bandwidth, and the I/O capacity on the standby database. The total commit time is comprised of the primary database's local write (log file parallel write) and the following factors that are captured through the LNS wait event on SENDREQ: network time + standby write (this is the RFS write I/O obtained from the V$SYSTEM_EVENT view on the standby database) + network acknowledgment.
Effect of the SYNC Transport on the Primary Database: How much the primary database is affected depends on the application profile. In general, batch updates with infrequent commits and message queuing applications may not observe any noticeable difference.
2.6.5.2.2 The ASYNC Transport Configure the ASYNC redo transport for minimal impact on the primary database, but with a lower degree of synchronization.
When sending redo data to a standby database using the ASYNC attribute, transactions on the primary database continue to be processed without waiting for the network I/O for requests to complete.
There is little effect on the primary database throughput (redo bytes per second) as network latency increases. The log writer process writes to the local online redo log file, while the network server processes (one for each destination) read redo from the log buffer and asynchronously transmit the redo to remote destinations. If redo transport services transmit redo to multiple remote destinations, then the network server processes initiate the network I/O to all of the destinations in parallel.
Effect of the ASYNC Transport on the Primary Database: The effect on primary database throughput is minimal due to the true asynchronous behavior of ASYNC redo transport.
2.6.5.2.3 Best Practices for Setting the LOG_ARCHIVE_MAX_PROCESSES Parameter Because the network connections used in multiple streams are initiated by the archiver process, take care when setting the LOG_ARCHIVE_MAX_PROCESSES initialization parameter. The value of the LOG_ARCHIVE_MAX_PROCESSES initialization parameter must be at least one greater than the total number of all remote destinations. Use the following equation when setting the LOG_ARCHIVE_MAX_PROCESSES parameter for highly available environments:
Note: The network server processes read from the log buffer unless the redo data has been flushed from the log buffer, in which case the network server processes read the redo data from the online redo log. The network server processes only read from the online redo log when changes cannot be found in the log buffer.

Configuring Oracle Database 11g with Oracle Data Guard
2-48 Oracle Database High Availability Best Practices
LOG_ARCHIVE_MAX_PROCESSES = sum(remote_destinations) + count(threads)
You can adjust these parameter settings after evaluating and testing the initial settings in your production environment.
2.6.5.3 Best Practices for Network Configuration and Highest Network Redo RatesThe following sections include best practices for network configuration and highest redo network redo rates.
2.6.5.3.1 Properly Configure TCP Send / Receive Buffer Sizes To achieve high network throughput, especially for a high-latency, high-bandwidth network, the minimum recommended setting for the sizes of the TCP send and receive socket buffers is the bandwidth delay product (BDP) of the network link between the primary and standby systems. Settings higher than the BDP may show incremental improvement. For example, in the MAA Linux test lab, simulated high-latency, high-bandwidth networks realize small, incremental increases in throughput when using TCP send and receive socket buffers settings up to three times the BDP.
BDP is product of the network bandwidth and latency. Socket buffer sizes should be set using the Oracle Net parameters RECV_BUF_SIZE and SEND_BUF_SIZE, so that the socket buffer size setting affects only Oracle TCP connections. The operating system may impose limits on the socket buffer size that must be adjusted so Oracle can use larger values. For example, on Linux, the parameters net.core.rmem_max and net.core.wmem_max limit the socket buffer size and must be set larger than RECV_BUF_SIZE and SEND_BUF_SIZE.
For example, if bandwidth is 622 Mbits and latency is 30 ms, then you would calculate the minimum size for the RECV_BUF_SIZE and SEND_BUF_SIZE parameters as follows: 622,000,000 / 8 x 0.030 = 2,332,500 bytes.
In this example, you would set the initialization parameters as follows:
RECV_BUF_SIZE=2,332,500
SEND_BUF_SIZE=2,332,500
2.6.5.3.2 Increase SDU Size With Oracle Net Services, it is possible to control data transfer by adjusting the size of the Oracle Net setting for the session data unit (SDU). Oracle internal testing indicates that setting the SDU to its maximum value of 32767 can improve performance. You can set SDU on a per connection basis using the SDU parameter in the local naming configuration file (TNSNAMES.ORA) and the listener configuration file (LISTENER.ORA), or you can set the SDU for all Oracle Net connections with the profile parameter DEFAULT_SDU_SIZE in the SQLNET.ORA file.
2.6.5.3.3 Ensure TCP.NODELAY is YES To preempt delays in buffer flushing in the TCP protocol stack, disable the TCP Nagle algorithm by setting TCP.NODELAY to YES in the SQLNET.ORA file on both the primary and standby systems.
See Also: The MAA white paper "Data Guard Redo Transport & Network Configuration" at http://www.otn.oracle.com/goto/maa
See Also: Oracle Database Net Services Reference for more information on the SDU and DEFAULT_SDU_SIZE parameters
See Also: Oracle Database Net Services Reference for more information about the TCP.NODELAY parameter

Configuring Oracle Database 11g with Oracle Data Guard
Configuring for High Availability 2-49
2.6.5.4 Best Practices for Redo Transport CompressionBeginning in Oracle Database 11g, Oracle Data Guard provides the ability to compress redo data as it is transmitted over the network. This compression can be performed while resolving redo gaps with the archive ARCn process or while shipping redo data during run time using the LGWR ASYNC transport. In certain environments, enabling compression of redo data can:
■ Reduce network utilization
■ Provide faster resolution of gaps in archived redo log files
■ Reduced redo transfer time
Redo transport compression is a feature of the Oracle Advanced Compression option for which you must purchase a license before using the redo transport compression feature.
When to Use CompressionIn general, compression is most beneficial when used over low bandwidth networks. As the network bandwidth increases, the benefit is reduced. Compressing redo in a Data Guard environment is beneficial if:
■ Sufficient CPU resources are available for the compression processing.
■ The database redo rate is being throttled by a low bandwidth network.
Before enabling compression, assess the available CPU resources and decide if enabling compression is feasible. For complete information about enabling compression for gap resolution and the LGWR ASYNC transport mode, see support note 729551.1 at http://support.oracle.com/.
2.6.6 Log Apply Services Best PracticesThis section discusses the best practices for Data Guard log apply services for both physical and logical standby databases.
2.6.6.1 Redo Apply Best Practices for Physical Standby DatabasesTo use Redo Apply with a physical standby database, or to use any media recovery operation effectively, tune your database recovery by following these best practices:
1. Maximize I/O rates on standby redo logs and archived redo logs.
Measure read I/O rates on the standby redo logs and archived redo log directories. Concurrent writing of shipped redo on a standby database might reduce the redo read rate due to I/O saturation. The overall recovery rate is always bounded by the rate at which redo can be read; so ensure that the redo read rate surpasses your required recovery rate.
2. Assess recovery rate.
To obtain the history of recovery rates, use the following query to get a history of recovery progress:
SELECT * FROM V$RECOVERY_PROGRESS;
If your ACTIVE APPLY RATE is greater than the maximum redo generation rate at the primary database or twice the average generation rate at the primary database, then no tuning is required; otherwise follow the tuning tips below. The redo generation rate for the primary database can be monitored from Grid Control or

Configuring Oracle Database 11g with Oracle Data Guard
2-50 Oracle Database High Availability Best Practices
extracted from AWR reports under statistic REDO SIZE. If CHECKPOINT TIME PER LOG is greater than ten seconds, then investigate tuning I/O and checkpoints.
3. Use defaults for DB_BLOCK_CHECKING and set DB_BLOCK_CHECKSUM=FULL
Change DB_BLOCK_CHECKSUM from TYPICAL (the default setting) to FULL. Block checking is always recommended on the primary database and might be enabled on the standby database if the recovery rate meets expectations.
The default setting for DB_BLOCK_CHECKSUM is TYPICAL. Block checksum should always be enabled for both primary and standby databases. It catches most block corruption while incurring negligible overhead.
Set the DB_LOST_WRITE_PROTECT parameter to FULL on the standby database to enable Oracle to detect writes that are lost in the I/O subsystem. The impact on media recovery is very small and generally less than 2 percent.
4. Set DB_CACHE_SIZE to a value greater than that for the primary database. Set DB_KEEP_CACHE_SIZE and DB_RECYCLE_CACHE_SIZE to 0.
Having a large database cache size can improve media recovery performance by reducing the amount of physical data block reads. Because media recovery does not require DB_KEEP_CACHE_SIZE and DB_RECYCLE_CACHE_SIZE or require a large SHARED_POOL_SIZE, the memory can be reallocated to the DB_CACHE_SIZE.
Before converting the standby database into a primary database, reset these parameters to the primary database settings.
5. Assess database wait events
With the Active Data Guard option and real-time query, you can use Statspack from the primary database to collect data from a standby database that is opened read-only and performing recovery. Any tuning or troubleshooting exercise should start with collecting Standby Statspack reports. See support note 454848.1 at http://support.oracle.com/ for complete details about installing and using Standby Statspack.
If you do not have a license for the Active Data Guard option, you can determine the top system and session wait events by querying the standby database's V$SYSTEM_EVENTS, V$SESSION_WAITS, and V$EVENT_HISTOGRAM and looking for the largest TIME_WAITED value. You may have to capture multiple snapshots of the query results and manually extract the difference to accurately assess a certain time period.
If recovery is applying a lot of redo data efficiently, the system is I/O bound and the I/O wait should be reasonable for your system. The vast majority of wait events related to parallel recovery coordinators and slaves apply to the coordinator. Slaves are either applying changes (clocking on CPU) or waiting for
Note: To check for block corruption that was not preventable through the DB_BLOCK_CHECKING parameter, use one of the following methods:
■ RMAN BACKUP command with the VALIDATE option
■ DBVERIFY utility
■ ANALYZE TABLE tablename VALIDATE STRUCTURE CASCADE SQL statement

Configuring Oracle Database 11g with Oracle Data Guard
Configuring for High Availability 2-51
changes to be passed from the coordinator. The database wait events are shown in Table 2–4 and Table 2–5.
When dealing with recovery slave events, it is important to know how many slaves were started. Divide the wait time for any recovery slave event by the number of slaves. Table 2–5 describes the parallel recovery slave wait events.
6. Tune I/O operations.
DBWR must write out modified blocks from the buffer cache to the data files. Always use native asynchronous I/O by setting DISK_ASYNCH_IO to TRUE (default). In the rare case that asynchronous I/O is not available, use DBWR_IO_SLAVES to improve the effective data block write rate with synchronous I/O.
Ensure that you have sufficient I/O bandwidth and that I/O response time is reasonable for your system either by doing some base I/O tests, comparing the I/O statistics with those for the primary database, or by looking at some historical I/O metrics. Be aware that I/O response time may vary when many applications share the same storage infrastructure such as with a Storage Area Network (SAN) or Network Attached Storage (NAS).
7. Assess system resources.
Table 2–4 Parallel Recovery Coordinator Wait Events
Wait Name Description
Log file sequential read
The parallel recovery coordinator is waiting on I/O from the online redo log or the archived redo log.
Parallel recovery read buffer free
This event indicates that all read buffers are being used by slaves, and usually indicates that the recovery slaves lag behind the coordinator.
Parallel recovery change buffer free
The parallel recovery coordinator is waiting for a buffer to be released by a recovery slave. Again, this is a sign the recovery slaves are behind the coordinator.
Datafile init write The parallel recovery coordinator is waiting for a file resize to finish, as would occur with file auto extend.
Parallel recovery control message reply
The coordinator has sent a synchronous control messages to all slaves, and is waiting for all slaves to reply.
Table 2–5 Parallel Recovery Slave Wait Events
Wait Name Description
Parallel recovery slave next change
The parallel recovery slave is waiting for a change to be shipped from the coordinator. This is in essence an idle event for the recovery slave. To determine the amount of CPU a recovery slave is using, divide the time spent in this event by the number of slaves started and subtract that value from the total elapsed time. This may be close, because there are some waits involved.
DB File Sequential Read
A parallel recovery slave (or serial recovery process) is waiting for a batch of synchronous data block reads to complete.
Checkpoint completed Recovery is waiting for checkpointing to complete, and Redo Apply is not applying any changes currently.
Recovery read A parallel recovery slave is waiting for a batched data block I/O.

Configuring Oracle Database 11g with Oracle Data Guard
2-52 Oracle Database High Availability Best Practices
Use system commands such as UNIX sar and vmstat commands, or use system monitoring tools to assess the system resources. Alternatively, you can monitor using Oracle Enterprise Manager, AWR reports, or performance views such as V$SYSTEM_EVENT, V$ASM_DISK and V$OSSTAT.
a. If there are I/O bottlenecks or excessive wait I/O operations, then investigate operational or application changes that increased the I/O volume. If the high waits are due to insufficient I/O bandwidth, then add more disks to the relevant ASM disk group. Verify that this is not a bus or controller bottleneck or any other I/O bottleneck. The read I/O rate from the standby redo log should be greater than the expected recovery rate.
b. Check for excessive swapping or memory paging.
c. Check to ensure the recovery coordinator or MRP is not CPU bound during recovery.
8. Increase redo log size for the primary and standby databases.
Increase the online redo log size for the primary database and the standby redo log size for the standby database to a minimum of 1 GB. Oracle Database does a full checkpoint and updates all the file headers (in an optimized manner) at each log file boundary during media recovery. To reduce the frequency of a full database checkpoint and the file header updates, increase the redo log size so that a log switch is occurring at a minimum of 20-minute intervals on a heavily loaded system. Otherwise, once every hour should be sufficient.
To ensure that the crash recovery time for the primary database is minimized even with very large redo log sizes, set the FAST_START_MTTR_TARGET initialization parameter to a nonzero value to enable fast-start fault recovery. If the parameter is not set, then set it to 3600. This initialization parameter is relevant only for the primary database.
9. Try different degrees of recovery parallelism.
Parallel recovery is enabled by default for media and crash recovery with the default degree of parallelism set to the number of CPUs available. In most cases this is the optimal setting. However, in some circumstances, you may obtain faster recovery by using a degree of parallelism that is different (higher or lower) than the default. To override the default setting, explicitly specify parallel recovery using the following SQL*Plus statement:
RECOVER MANAGED STANDBY DATABASE PARALLEL number_of_CPUs;
2.6.6.2 SQL Apply Best Practices for Logical Standby DatabasesThis section discusses recommendations for Data Guard SQL Apply and logical standby databases.
This section contains these topics:
■ Set the MAX_SERVERS Initialization Parameter
■ Set the PRESERVE_COMMIT_ORDER Parameter
■ Skip SQL Apply for Unnecessary Objects
2.6.6.2.1 Set the MAX_SERVERS Initialization Parameter Set the initial value of the MAX_SERVERS parameter to be eight times the number of CPUs. For example:
See Also: The MAA white paper "Data Guard Redo Apply and Media Recovery" at http://www.otn.oracle.com/goto/maa

Configuring Oracle Database 11g with Oracle Data Guard
Configuring for High Availability 2-53
SQL> EXECUTE DBMS_LOGSTDBY.APPLY_SET('MAX_SERVERS', <8 x CPUs>);
SQL Apply automatically distributes the server processes. There is always one process for the Reader, Builder, and Analyzer roles, but usually you need a varied number of Preparer and Applier processes. By setting the MAX_SERVERS parameter to a default setting of eight times the number of CPUs, you can avoid performing a lot of initial tuning. The previous default of 9 was much too low for an application with large transactions or a lot of concurrent transactions. A higher default setting results in more PGA memory utilization.
2.6.6.2.2 Set the PRESERVE_COMMIT_ORDER Parameter The PRESERVE_COMMIT_ORDER parameter controls the order in which transactions are applied to the standby database. When set to TRUE (the default), unrelated transactions are applied in the same order they were committed on the primary database. Dependent transactions are always committed in the correct sequence, regardless of the setting.
Follow these guidelines for setting the PRESERVE_COMMIT_ORDER parameter:
■ Set PRESERVE_COMMIT_ORDER to FALSE if you are using the logical standby database only for disaster-recovery purposes or if the reporting application using the standby database can accommodate transactions being applied out of sequence.
Most third-party replication solutions tolerate this relaxed COMMIT processing. For OLTP applications, setting the parameter to FALSE can potentially double the SQL Apply rates. MAA testing has shown that OLTP workload performance improves by 40% or greater when PRESERVE_COMMIT_ORDER is set to FALSE.
■ Set PRESERVE_COMMIT_ORDER to TRUE for a reporting or decision-support system.
However, if the standby database has fallen behind the primary database, then you can temporarily set the PRESERVE_COMMIT_ORDER parameter to FALSE when you want the logical standby database to quickly catch up to the primary database. For example:
SQL> EXECUTE DBMS_LOGSTDBY.APPLY_SET('PRESERVE_COMMIT_ORDER', 'FALSE');
Reset the parameter to TRUE after the gap has been resolved.
2.6.6.2.3 Skip SQL Apply for Unnecessary Objects use the DBMS_LOGSTDBY.SKIP procedure to skip database objects that do not require replication to the standby database. Skipping such objects reduces the processing of SQL Apply.
2.6.7 Role Transition Best PracticesWith proper planning and execution, Data Guard role transitions can effectively minimize downtime and ensure that the database environment is restored with minimal impact on the business. Whether using physical standby or logical standby databases, MAA testing has determined that switchover and failover times with Oracle Data Guard 11g have been reduced to seconds. This section describes best practices for both switchover and failover.
See Also: The MAA white paper "SQL Apply Best Practices: Oracle Data Guard 11g Release 1" for examples that show the effect of setting the PRESERVE_COMMIT_ORDER parameter for different situations
Configuring Oracle Database 11g with Oracle Data Guard
2-54 Oracle Database High Availability Best Practices
2.6.7.1 SwitchoversA database switchover performed by Oracle Data Guard is a planned transition that includes a series of steps to switch roles between a standby database and a primary database. Following a successful switchover operation, the standby database assumes the primary role and the primary database becomes a standby database. Switchovers are typically completed in only seconds to minutes10.
Data Guard enables you to change these roles dynamically by:
■ Using Oracle Enterprise Manager
■ Using the broker's DGMGRL command-line interface
■ Issuing SQL statements, as described in Section 5.2.1.3.1, "Using SQL*Plus for Data Guard Switchover to a Physical Standby Database" and Section 5.2.1.3.2, "Using SQL*Plus for Data Guard Switchover to a Logical Standby Database"
2.6.7.1.1 Switchover Best Practices To optimize switchover processing, perform the following best practices before performing a switchover:
■ Disconnect all sessions possible using the ALTER SYSTEM KILL SESSION SQL*Plus command.
■ Stop job processing by setting the AQ_TM_PROCESSES parameter to 0.
■ Cancel any specified apply delay by using the NODELAY keyword to stop and restart log apply services on the standby database.
– On a physical standby database:
ALTER DATABASE RECOVER MANAGED STANDBY DATABASE CANCEL;ALTER DATABASE RECOVER MANAGED STANDBY DATABASE USING CURRENT LOGFILE NODELAY;
– On a logical standby database:
ALTER DATABASE STOP LOGICAL STANDBY APPLY;ALTER DATABASE START LOGICAL STANDBY APPLY IMMEDIATE NODELAY;
You can view the current delay setting on the primary database by querying the DELAY_MINS column of the V$ARCHIVE_DEST view.
■ For logical standby databases:
– Determine an optimal SQL Apply rate using the "SQL Apply Best Practices" white paper at http://www.otn.oracle.com/goto/maa.
– When performing a switchover using SQL*Plus statements, you should first build the LogMiner Data Dictionary by issuing the ALTER DATABASE PREPARE TO SWITCHOVER SQL*Plus statement.
– Verify the LogMiner Data Dictionary was received by the primary database by querying the SWITCHOVER_STATUS column of the V$DATABASE fixed view on the primary database. When the query returns the TO LOGICAL STANDBY value, you can proceed with the switchover. See the discussion about
10 At times the term switchback is also used within the scope of database role management. A switchback operation is a subsequent switchover operation to return the roles to their original state.
See Also: Oracle Data Guard Broker for information about using Enterprise Manager or the broker's DGMGRL command-line interface to perform database switchover

Configuring Oracle Database 11g with Oracle Data Guard
Configuring for High Availability 2-55
"Switchovers Involving a Logical Standby Database" in Oracle Data Guard Concepts and Administration
■ For physical standby databases in an Oracle RAC environment, ensure there is only one instance active for each primary and standby database. (A switchover involving a logical standby database does not require that only one instance is active.)
■ Configure the standby database to use real-time apply and, if possible, ensure the databases are synchronized before the switchover operation to optimize switchover processing.
For the fastest switchover, use real-time apply so that redo data is applied to the standby database as soon as it is received, and the standby database is synchronized with the primary database before the switchover operation to minimize switchover time. To enable real-time apply:
– For a physical standby database, use the following SQL*Plus statement:
ALTER DATABASE RECOVER MANAGED STANDBY DATABASE DISCONNECT USING CURRENT LOGFILE;
– For a logical standby database, use the following SQL*Plus statement:
ALTER DATABASE START LOGICAL STANDBY APPLY IMMEDIATE;
■ Enable Flashback Database so that if a failure occurs during the switchover, the process can be easily reversed.
■ For a physical standby database, reduce the number of archiver (ARCn) processes to the minimum needed for both remote and local archiving. Additional archiver processes can take additional time to shut down, thereby increasing the overall time it takes to perform a switchover. After the switchover has completed you can reenable the additional archiver processes.
■ Set the LOG_FILE_NAME_CONVERT initialization parameter to any valid value for the environment, or if it is not needed set the parameter to null.
As part of a switchover, the standby database must clear the online redo log files on the standby database before opening as a primary database. The time needed to complete the I/O can significantly increase the overall switchover time. By setting the LOG_FILE_NAME_CONVERT parameter, the standby database can pre-create the online redo logs the first time the MRP process is started. You can also pre-create empty online redo logs by issuing the SQL*Plus ALTER DATABASE CLEAR LOGFILE statement on the standby database.
2.6.7.2 FailoversA failover is typically used only when the primary database becomes unavailable, and there is no possibility of restoring it to service within a reasonable period. During a failover the primary database is taken offline at one site and a standby database is brought online as the primary database.
With Data Guard the process of failover can be completely automated using fast-start failover, or it can be a manual, user driven process. Oracle recommends using fast-start failover to eliminate the uncertainty inherent in a process that requires manual intervention. It automatically executes a failover within seconds of an outage being detected.
See Also: The MAA white paper "Switchover and Failover Best Practices" at http://www.otn.oracle.com/goto/maa

Configuring Oracle Database 11g with Oracle Data Guard
2-56 Oracle Database High Availability Best Practices
2.6.7.2.1 Comparing Fast-Start Failover and Manual Failover There are two distinct types of failover: manual failover and fast-start failover. An administrator initiates manual failover when the primary database fails. In contrast, Data Guard automatically initiates a fast-start failover without human intervention after the primary database has been unavailable for a set period (fast-start failover threshold).
Table 2–6 contrasts the characteristics of fast-start failover and manual failover.
Table 2–6 Comparing Fast-Start Failover and Manual Failover
Points of Comparison Fast-Start Failover Manual Failover
Benefits Allows you to increase availability with less need for manual intervention, thereby reducing management costs.
Gives you control over exactly when a failover occurs and to which target standby database.
Failover triggers
The following conditions automatically trigger a fast-start failover:
■ Database instance failure (or last instance failure in a Oracle RAC configuration).
■ Shutdown abort (or a shutdown abort of the last instance in a Oracle RAC configuration).
■ Specific conditions that are detected through the database health-check mechanism (for example, data files taken offline due to I/O errors).
Fast-start failover can be enabled for these conditions (ENABLE FAST_START FAILOVER CONDITION) and ORA errors raised by the Oracle server when they occur.
See Oracle Data Guard Broker for a full list of conditions.
■ Both the observer and the standby database lose their network connection to the primary database.
■ Application initiated fast-start failover using the DBMS_DG.INITIATE_FS_FAILOVER PL/SQL procedure.
A manual failover is user initiated and involves performing a series of steps to convert a standby database into a primary database. A manual failover should be performed due to an unplanned outage such as:
■ Site disaster which results in the primary database becoming unavailable (all instances of an Oracle RAC primary database).
■ User errors that cannot be repaired in a timely fashion.
■ Data failures, which impact the production application.
Management Use the following tools to manage fast-start failover failovers:
■ Oracle Enterprise Manager
■ The broker command-line interface (DGMGRL)
See Section 5.2.1.3, "How to Perform Data Guard Switchover" on page 5-6.
Use the following tools to perform manual failovers:
■ Oracle Enterprise Manager
■ The broker command-line interface (DGMGRL)
■ SQL statements
See Section 4.2.2.3, "Best Practices for Performing Manual Failover" on page 4-10.

Configuring Oracle Database 11g with Oracle Data Guard
Configuring for High Availability 2-57
2.6.7.2.2 General Best Practices for Failovers To optimize failover processing, use the following best practices:
■ Use fast-start failover
The MAA tests running Oracle Database 11g show that failovers performed using the broker and fast-start failover offer a significant improvement in availability. For a comprehensive review of Oracle Data Guard failover best practices, see:
– Oracle Data Guard Broker
– "Data Guard Fast-Start Failover" MAA white paper at http://www.otn.oracle.com/goto/maa
– Section 2.6.7.2.3, "Fast-Start Failover Best Practices" on page 2-58
■ Enable Flashback Database to reinstate the failed primary databases after a failover operation has completed. Flashback Database facilitates fast point-in-time recovery, if needed.
■ Use real-time apply with Flashback Database to apply redo data to the standby database as soon as it is received, and to quickly rewind the database should user error or logical corruption be detected.
■ Consider configuring multiple standby databases to maintain data protection following a failover.
■ For logical standby databases, see the MAA white paper "SQL Apply Best Practices" to obtain an optimal SQL Apply rate.
■ For physical standby databases:
– See the MAA white paper "Oracle Data Guard Redo Apply and Media Recovery" to optimize media recovery for Redo Apply on the MAA Web site at http://www.otn.oracle.com/goto/maa.
Restoring the original primary database after failover
Following a fast-start failover, the broker can automatically reconfigure the original primary database as a standby database upon reconnection to the configuration (FastStartFailoverAutoReinstate), or you can delay the reconfiguration to allow diagnostics on the failed primary. Automatic reconfiguration enables Data Guard to restore disaster protection in the configuration quickly and easily, returning the database to a protected state as soon as possible.
After manual failover, you must reinstate the original primary database as a standby database to restore fault tolerance.
Restoring bystander standby databases after failover
The broker coordinates the role transition on all databases in the configuration.
Bystanders that do no require reinstatement are available as viable standby databases to the new primary. Bystanders that require reinstatement are automatically reinstated by the observer.
A benefit of using the broker is that it provides the status of bystander databases and indicates whether a database must be reinstated. Status information is not readily available when using SQL*Plus statements to manage failover.
See Section 4.3.2, "Restoring a Standby Database After a Failover" on page 4-39.
Application failover
The broker automatically publishes FAN/AQ (Advanced Queuing) notifications after a failover. Clients that are also configured for Fast Connection Failover can use these notifications to connect to the new primary database. You can also use the DB_ROLE_CHANGE system event to help user applications locate services on the primary database. (These events are also available for manual failovers performed by the broker. See Oracle Data Guard Broker.)
To configure fast client failover so applications can be available to the business after a failover, see Section 2.9, "Configuring Fast Connection Failover" on page 2-77. You can also configure clients for Fast Connection Failover after a manual failover.
Table 2–6 (Cont.) Comparing Fast-Start Failover and Manual Failover
Points of Comparison Fast-Start Failover Manual Failover
Configuring Oracle Database 11g with Oracle Data Guard
2-58 Oracle Database High Availability Best Practices
– Go directly to the OPEN state from the MOUNTED state instead of restarting the standby database (as required in previous releases).
– When transitioning from read-only mode to Redo Apply (recovery) mode, restart the database.
■ Set the LOG_FILE_NAME_CONVERT parameter. As part of a failover, the standby database must clear its online redo logs before opening as the primary database. The time needed to complete this I/O can add significantly to the overall failover time. By setting the LOG_FILE_NAME_CONVERT parameter, the standby pre-creates the online redo logs the first time the MRP process is started. You can also pre-create empty online redo logs by issuing the SQL*Plus ALTER DATABASE CLEAR LOGFILE statement on the standby database.
2.6.7.2.3 Fast-Start Failover Best Practices Fast-start failover automatically, quickly, and reliably fails over to a designated standby database in the event of loss of the primary database, without requiring manual intervention to execute the failover. You can use fast-start failover only in an Oracle Data Guard configuration that is managed by the broker
The Oracle Data Guard configuration can be running in either the maximum availability or maximum performance mode with fast-start failover. When fast-start failover is enabled, the broker ensures fast-start failover is possible only when the configured data loss guarantee can be upheld. Maximum availability mode provides an automatic failover environment guaranteed to lose no data. Maximum performance mode provides an automatic failover environment guaranteed to lose no more than the amount of data (in seconds) specified by the FastStartFailoverLagLimit configuration property.
Use the following fast-start failover best practices in addition to the generic best practices listed in the "General Best Practices for Failovers" section on page 2-57:
■ Run the fast-start failover observer process on a host that is not located in the same data center as the primary or standby database.
Ideally, you should run the observer on a system that is equally distant from the primary and standby databases. The observer should connect to the primary and standby databases using the same network as any end-user client. If the designated observer fails, Enterprise Manager can detect it and automatically restart the observer. If the observer cannot run at a third site, then you should install the observer on the same network as the application. If a third, independent location is not available, then locate the observer in the standby data center on a separate host and isolate the observer as much as possible from failures affecting the standby database.
■ Make the observer highly available by using Oracle Enterprise Manager to configure the original primary database to be automatically reinstated as a standby database when a connection to the database is reestablished. Also, Enterprise Manager enables you to define an alternate host on which to restart the observer.
After the failover completes, the original primary database is automatically reinstated as a standby database when a connection to it is reestablished, if you set the FastStartFailoverAutoReinstate configuration property to TRUE.
■ Set the value of the FastStartFailoverThreshold property according to your configuration characteristics, as described in Table 2–7.

Configuring Oracle Database 11g with Oracle Data Guard
Configuring for High Availability 2-59
Test your configuration using the settings shown in Table 2–7 to ensure that the fast-start failover threshold is not so aggressive that it induces false failovers, or so high it does not meet your failover requirements.
2.6.7.2.4 Manual Failover Best Practices You should perform a manual failover, which is user-driven, only in case of an emergency and the failover should be initiated due to an unplanned outage such as:
■ Site disaster that results in the primary database becoming unavailable
■ User errors that cannot be repaired in a timely fashion
■ Data failures, to include widespread corruption, which affects the production application
Use the following manual failover best practices in addition to the generic best practices listed in the "General Best Practices for Failovers" section on page 2-57:
■ Reinstate the original primary database as a standby database to restore fault tolerance to your environment. The standby database can be quickly reinstated by using Flashback Database. See Section 4.3.2, "Restoring a Standby Database After a Failover" on page 4-39.
■ For manual failovers that involve Oracle RAC, issue the SHUTDOWN ABORT statement on all secondary Oracle RAC instances on the standby database before performing a failover.
■ For physical standby databases see the MAA white paper "Oracle Data Guard Redo Apply and Media Recovery" at http://www.otn.oracle.com/goto/maa
2.6.8 Best Practices for Snapshot Standby DatabaseBeginning with Oracle Database release 11g, you can convert a physical standby database into a fully updatable standby database called a snapshot standby database.
To convert a physical standby database into a snapshot standby database, issue the SQL*Plus ALTER DATABASE CONVERT TO SNAPSHOT STANDBY statement. This command causes Oracle Data Guard to perform the following actions:
1. Recover all available redo data
2. Create a guaranteed restore point
3. Activate the standby database as a primary database
4. Open the database as a snapshot standby database
To convert the snapshot standby back to a physical standby, issue the ALTER DATABASE CONVERT TO PHYSICAL STANDBY statement. This command causes the
Table 2–7 Minimum Recommended Settings for FastStartFailoverThreshold
Configuration Minimum Recommended Setting
Single-instance primary, low latency, and a reliable network
15 seconds
Single-instance primary and a high latency network over WAN
30 seconds
Oracle RAC primary Reconfiguration time + 30 seconds 1
1 For configurations running Oracle Database software earlier than release 10.2.0.3, calculate a minimum reconfiguration time using this equation: Oracle RAC miscount + reconfiguration time + 30 seconds
Configuring Oracle Database 11g with Oracle Data Guard
2-60 Oracle Database High Availability Best Practices
physical standby database to be flashed back to the guaranteed restore point that was created before the ALTER DATABASE CONVERT TO SNAPSHOT STANDBY statement was issued. Then, you must perform the following actions:
1. Restart the physical standby database
2. Restart Redo Apply on the physical standby database
Follow these best practices when creating and managing snapshot standby databases:
■ Automate the conversion steps using the broker to expedite the process of reverting a snapshot standby database to the physical standby database role. This is helpful because you can use a snapshot standby database for a switchover or failover only by first reverting it to a physical standby.
■ Create multiple standby databases if your business requires a fast recovery time objective (RTO).
■ Ensure the physical standby database that you convert to a snapshot standby is caught up with the primary database, or has a minimal apply lag. See Section 2.6.6.1, "Redo Apply Best Practices for Physical Standby Databases" for information about tuning media recovery.
■ Configure a flash recovery area and ensure there is sufficient I/O bandwidth available. This is necessary because snapshot standby databases use guaranteed restore points.
2.6.9 Best Practices for Deploying Multiple Standby DatabasesThe Oracle Database High Availability Overview describes how a multiple standby database architecture is virtually identical to that of single standby database architectures. Therefore, the configuration guidelines for implementing multiple standby databases described in this section complement the existing best practices for physical and logical standby databases.
When deploying multiple standby databases, use the following best practices:
■ Use the broker (described in Chapter 3, "Monitoring Using Oracle Grid Control") to manage your configuration and perform role transitions. However, if you choose to use SQL*Plus statements, see the MAA white paper "Multiple Standby Databases Best Practices" for best practices.
■ Use Flashback Database to quickly reinstate the original primary as the standby after a failover instead of re-creating the entire standby database from backups or from the primary database. Set the DB_FLASHBACK_RETENTION_TARGET initialization parameter to the same value on all databases in the configuration. If you are using Flashback Database for the sole purpose of reinstating databases following a failover, a DB_FLASHBACK_RETENTION_TARGET of 60 minutes is the minimum recommended value.
■ Enable supplemental logging in configurations containing logical standby databases. When creating a configuration with both physical and logical standby databases, issue the ALTER DATABASE ADD SUPPLEMENTAL LOG DATA statement to enable supplemental logging in the following situations:
■ When adding a logical standby database to an existing configuration consisting of all physical standby databases, you must enable supplemental logging on all existing physical standby databases in the configuration.
See Also: Oracle Data Guard Concepts and Administration for complete information about creating a snapshot standby database

Configuring Oracle Database 11g with Oracle Data Guard
Configuring for High Availability 2-61
■ When adding a physical standby database to an existing configuration that contains a logical standby database, you must enable supplemental logging on the physical standby database when you create it.
Supplemental logging is enabled on the primary database when the logical standby dictionary is built. Enabling supplemental logging is a control file change and therefore the change is not propagated to each physical standby database. Supplemental logging is enabled automatically on a logical standby database when it is first converted from a physical standby database to a logical standby database as part of the dictionary build process.
To enable supplemental logging, issue the following SQL*Plus statement when connected to a physical standby database:
SQL> ALTER DATABASE ADD SUPPLEMENTAL LOG DATA (PRIMARY KEY, UNIQUE INDEX) COLUMNS;
■ If logical standby databases are not configured to perform real-time queries, then consider configuring SQL Apply to delay applying redo data to the logical standby database. By delaying the application of redo, you can minimize the need to manually reinstate the logical standby database after failing over to a physical standby database.
To set a time delay, use the DELAY=minutes attribute of the LOG_ARCHIVE_DEST_n initialization parameter.
2.6.10 Best Practices for Real-Time Query (Oracle Active Data Guard Option)If you have a license for the Oracle Active Data Guard option (available starting in Oracle Database 11g Release 1), then you can open a physical standby database for read-only access while Redo Apply on the standby database continues to apply redo data received from the primary database. All queries reading from the physical standby database execute in real time and return current results, providing more efficient use of system resources without compromising data protection or extending recovery time in the event a failover is required. Hence, this capability is referred to as real-time query.
This section summarizes the best practices for deploying real-time query:
■ Use the generic best practices described previously:
– Section 2.6.4, "General Configuration Best Practices for Data Guard"
– Section 2.6.5, "Redo Transport Services Best Practices"
– Section 2.6.6, "Log Apply Services Best Practices"
– Section 2.6.7, "Role Transition Best Practices"
■ Tune the network following the guidelines in Section 2.6.5, "Redo Transport Services Best Practices"
■ Use real-time apply on the standby database so that changes are applied as soon as the redo data is received.
■ For configurations running Oracle Database 11g release 11.1.0.6, shut down the standby instance and Redo Apply cleanly so that upon restart you can open the standby database directly in read-only mode.
See Also: Oracle Database High Availability Overview to learn about the benefits of using multiple standby database and for implementation examples

Configuring Oracle Database 11g with Oracle Data Guard
2-62 Oracle Database High Availability Best Practices
■ Configure clients for efficient failover:
– Connect both the primary database and the reporting applications using an Oracle Net alias that contains all hosts (both primary and standby) in the ADDRESS_LIST.
– Connect the primary database and reporting applications with a role-specific service.
Reporting applications that connect to the standby database, and primary applications that connect to the primary database, must connect to the database with the correct database role.
– Start and stop services based on the database role.
For example, the following automates starting and stopping the service using an after startup trigger that checks the database role and starts the appropriate service:
CREATE OR REPLACE TRIGGER manage_serviceafter startup on database DECLARE role VARCHAR(30); BEGIN SELECT DATABASE_ROLE INTO role FROM V$DATABASE; IF role = 'PRIMARY' THEN DBMS_SERVICE.START_SERVICE('sales_rw'); ELSE DBMS_SERVICE.START_SERVICE('sales_ro'); END IF;END;
■ Monitor standby performance by using Standby Statspack.
See support note 454848.1 at http://support.oracle.com/ for complete details about installing and using Standby Statspack.
■ Query the CURRENT_SCN column of the V$DATABASE view to monitor how far behind Redo Apply on the standby database is lagging behind the primary database. See Section 2.6.10.2, "Monitoring Real-Time Query" on page 2-63 for more information.
2.6.10.1 Enabling Real-Time Query On a Consistent Standby DatabaseThe following instructions describe how to enable real-time query on a standby database that is transactionally consistent with the primary database.
If the standby database instance and Redo Apply have been cleanly shut down, then you can open a standby database directly to the read-only state. When open, you can start Redo Apply to enable real-time query.
See Also: The MAA white paper "Oracle Active Data Guard: Oracle Data Guard 11g Release 1" at
http://www.otn.oracle.com/goto/maa
Note: For an inconsistent standby database, you must make the standby consistent with the primary database before opening the standby for read-only access. A step-by-step description is provided in the "Oracle Active Data Guard 11g Release 1" MAA white paper.
Configuring Oracle Database 11g with Oracle Data Guard
Configuring for High Availability 2-63
Perform the following steps to enable a consistent physical standby database:
1. Start the standby instance read-only.
SQL> STARTUP
It is unnecessary to include the READ ONLY keyword (the default start-up state) on the STARTUP command because the keyword is included implicitly when you issue an OPEN command on a standby database.
Note: If the standby database is an Oracle RAC database, then you must first open one standby instance read-only and start Redo Apply before opening additional standby instances in read-only mode.
2. After the database is open, start Redo Apply:
SQL> RECOVER MANAGED STANDBY DATABASE DISCONNECT USING CURRENT LOGFILE;
If you are using the broker to manage the Data Guard configuration, then the default state for the standby database is APPLY ON and Redo Apply starts automatically. If this default has been changed, then start Redo Apply by issuing the following command:
DGMGRL> EDIT DATABASE 'RTQ' SET STATE='APPLY-ON'
If the standby database is mounted and Redo Apply is running, stop Redo Apply, open the standby database for read-only access, and restart Redo Apply.
2.6.10.2 Monitoring Real-Time QueryReal-time query allows you to query data as it is being applied to a standby database while guaranteeing a transactionally consistent view of the data. Oracle provides a read-consistent view of the data through a query SCN. The query SCN on the standby database is advanced by the recovery process after all dependent changes have been applied. As it is advanced, the new query SCN is propagated to all instances in an Oracle RAC standby. Once published to all standby instances, the query SCN is exposed to the user via the CURRENT_SCN column of the V$DATABASE view on the standby database.
The query SCN on the standby database is equivalent to the CURRENT_SCN on the primary database. This allows applications connected to the standby database instances to use the query SCN as a snapshot of where the data is in relation to the primary database. Queries on the primary and standby databases return identical results as of a particular CURRENT SCN.
To determine how far behind the query results on the standby database are lagging the primary database, compare the CURRENT SCN column on the primary database to the CURRENT SCN on the standby database. For example, in a configuration for which there is a dblink on the primary database that points to a standby database called RTQ_STBY, issue the following query on the primary database:
SQL> SELECT SCN_TO_TIMESTAMP((SELECT CURRENT_SCN FROM V$DATABASE))-SCN_TO_TIMESTAMP((SELECT CURRENT_SCN FROM V$DATABASE@RTQ_STBY)) FROM DUAL;
The value returned from the query indicates the number of seconds that data on the standby database lags behind the current position of the primary database. To determine an approximate query lag on the standby without connecting to. or using, the primary database, use the APPLY LAG metric from the V$DATAGUARD_STATS view. Note that the APPLY LAG metric is valid only for the time that it was computed and not at the moment the query against the V$DATAGUAD_STATS view was issued.

Configuring Oracle Database 11g with Oracle Data Guard
2-64 Oracle Database High Availability Best Practices
Use the COMPUTED_TIME column to determine the last computed time for the apply lag.
2.6.11 Recommendations for Protecting Data Outside of the DatabaseIn a highly available environment, you must protect nondatabase files along with database files. Oracle Secure Backup provides data protection for heterogeneous UNIX, Linux, Windows, and Network Attached Storage (NAS) environments. Additionally, for disaster recovery purposes, some third-party tools enable remote synchronization between a set of local and remote files. For example, you can use tools such as rsync, csync2, and DRDB for remote synchronization. These tools are available for download on the internet. The following list provides recommendations regarding these tools:
■ For software updates, use rsync to synchronize the standby system with the changes made to software on the primary system.
■ For configuration files, use rsync daily or after a change, or use csync2.
■ For important log files, trace files, or debugging files, use rsync daily or hourly, or use DRDB to synchronize the entire file system. However, do not overwrite the existing standby log or trace directories.
■ For transaction logs or metadata files that must be synchronized with the database, use rsync or csync2 frequently, or use a block synchronization tool such as DRDB, a third-party mirroring utility, or remote synchronization tool.
2.6.12 Assess Data Guard PerformanceTo accurately assess the primary database performance after adding Data Guard standby databases, obtain a history of statistics from the V$SYSMETRIC_SUMMARY view or Automatic Workload Repository (AWR) snapshots before and after deploying Oracle Data Guard with the same application profile and load.
To assess the application profile, compare the following statistics:
■ Physical reads per transaction
■ Physical writes per transaction
■ CPU usage per transaction
■ Redo generated per transaction
To assess the application performance, compare the following statistics:
■ Redo generated per second or redo rate
■ User commits per second or transactions per second
■ Database time per second
■ Response time per transaction
■ SQL service response time
See Also: The MAA white paper "Oracle Active Data Guard: Oracle Data Guard 11g Release 1" at
http://www.otn.oracle.com/goto/maa
See Also: Oracle Secure Backup Administrator's Guide

Configuring Oracle Database 11g with Oracle Data Guard
Configuring for High Availability 2-65
If the application profile has changed between the two scenarios, then this is not a fair comparison. Repeat the test or tune the database or system with the general principles outlined in the Oracle Database Performance Tuning Guide.
If the application profile is similar and you observe application performance changes on the primary database because of a decrease in throughput or an increase in response time, then assess these common problem areas:
■ CPU utilization
If you are experiencing high load (excessive CPU usage of over 90%, paging and swapping), then tune the system before proceeding with Data Guard. Use the V$OSSTAT view or the V$SYSMETRIC_HISTORY view to monitor system usage statistics from the operating system.
■ Higher I/O wait events
If you are experiencing higher I/O waits from the log writer or database writer processes, then the slower I/O effects throughput and response time. To observe the I/O effects, look at the historical data of the following wait events:
– Log file parallel writes
– Log file sequential reads
– Log file parallel reads
– Data file parallel writes
– Data file sequential reads parallel writes
With SYNC transport, commits take more time because of the need to guarantee that the redo data is available on the standby database before foreground processes get an acknowledgment from the log writer (LGWR) background process that the commit has completed. A LGWR process commit includes the following wait events:
■ Log File Parallel Write (local write for the LGWR process)
■ LGWR wait on SENDREQ
This wait event includes:
– Time to put the packet into the network
– Time to send the packet to the standby database
– RFS write or standby write to the standby redo log, which includes the RFS I/O wait event plus additional overhead for checksums
– Time to send a network acknowledgment back to the primary database (for example, single trip latency time)
Longer commit times for the LGWR process can cause longer response time and lower throughput, especially for small time-sensitive transactions. However, you may obtain sufficient gains by tuning the log writer local write (Log File Parallel Write wait event) or the different components that comprise the LGWR wait on SENDREQ wait event.
To tune the disk write I/O (Log File Parallel Write or the RFS I/O), add more spindles or increase the I/O bandwidth.
To reduce the network time:
■ Tune the Oracle Net send and receive buffer sizes
■ Set SDU=32K

Configuring Backup and Recovery
2-66 Oracle Database High Availability Best Practices
■ Increase the network bandwidth if there is saturation
■ Possibly find a closer site to reduce the network latency
With ASYNC transport, the LGWR process never waits for the network server processes to return before writing a COMMIT record to the current log file. However, if the network server processes has fallen behind and the redo to be shipped has been flushed from the log buffer, then the network server process reads from the online redo logs. This causes more I/O contention and possibly longer wait times for the log writer process writes (Log File Parallel Write). If I/O bandwidth and sufficient spindles are not allocated, then the log file parallel writes and log file sequential reads increase, which may affect throughput and response time. In most cases, adding sufficient spindles reduces the I/O latency.
2.7 Configuring Backup and RecoveryWhile it is prudent that every database has a good backup, consider your Recovery Time Objective (RTO) and Recovery Point Objective (RPO) when designing a backup and recovery strategy. While many recoveries involve restoring a backup, Oracle provides other database features such as Oracle Data Guard and Flashback Technology to minimize the recovery time from a database outage.
This section discusses the best practices for maintaining a good database backup, and other backup options and strategies made possible by the available Oracle database features.
2.7.1 Use Oracle Database Features and ProductsOracle has multiple database features and products to facilitate Backup and Recovery operations, including Recovery Manager (RMAN), Oracle Secure Backup, the flash recovery area, Flashback Database and restore points.
2.7.1.1 Use Recovery Manager to Back Up Database FilesRecovery Manager (RMAN) is Oracle's utility to backup and recover the Oracle Database. Because of its tight integration with the database, RMAN determines automatically what files must be backed up. But more importantly, RMAN knows what files must be restored for media-recovery operations. RMAN uses server sessions to perform backup and recovery operations and stores metadata about backups in a repository. RMAN offers many advantages over typical user-managed backup methods, including:
■ Online database backups without placing tablespaces in backup mode
■ Incremental backups
Note: To enable most of the statistical gathering and advisors, ensure the STATISTICS_LEVEL initialization parameter is set to TYPICAL (recommended) or ALL.
See Also:
■ Oracle Database Performance Tuning Guide for general performance tuning and troubleshooting best practices
■ The MAA white paper "Data Guard Redo Transport & Network Best Practices" at http://www.otn.oracle.com/goto/maa

Configuring Backup and Recovery
Configuring for High Availability 2-67
■ Data block integrity checks during backup and restore operations
■ Test backups and restores without actually performing the operation
RMAN automates backup and recovery. User-managed methods require you to locate backups for each data file, copy them to the correct place using operating system commands, and choose which logs to apply. RMAN manages these tasks automatically.
There are also capabilities of Oracle backup and recovery that are only available when using RMAN, such as automated tablespace point-in-time recovery and block media recovery.
2.7.1.2 Use Oracle Secure Backup for Backups to TapeOracle Secure Backup provides data protection for heterogeneous UNIX, Linux, Windows, and Network Attached Storage (NAS) environments. Oracle Secure Backup provides tape data protection for the entire Oracle environment:
■ Oracle Database through integration with RMAN
■ Seamless support of Oracle Real Application Clusters (Oracle RAC)
■ File system data protection of distributed servers including:
– Oracle Application Servers
– Oracle Collaboration Suites
– Oracle home and binaries
The combination of RMAN and Oracle Secure Backup provides an end-to-end tape backup solution, eliminating the need for third-party backup software.
2.7.1.3 Use Restore PointsOracle restore points protect against logical failures at risky points during database maintenance. Creating a normal restore point assigns a restore point name to a specific point in time or SCN. The restore point name is used with Flashback Table, Flashback Database, and all RMAN recovery-related operations.
Guaranteed restore points are recommended for database-wide maintenance such as database or application upgrades, or running batch processes. Guaranteed restore points enable Flashback Database and retain all flashback logs that are necessary to ensure the database can be flashed back to the restore point. After maintenance activities complete and the results are verified, you should delete guaranteed restore points that are no longer needed.
See Also: The following chapters in Oracle Database Backup and Recovery User's Guide:
■ "Performing Block Media Recovery"
■ "Performing RMAN Tablespace Point-in-Time Recovery (TSPITR)"
See Also: The Oracle Secure Backup Web site at http://www.oracle.com/database/secure-backup.html
See Also: Oracle Database Backup and Recovery User's Guide for more information about Flashback Database

Configuring Backup and Recovery
2-68 Oracle Database High Availability Best Practices
2.7.2 Configuration and AdministrationThis section describes best practices for using backups, performing backups, using the RMAN recovery catalog, enabling block change tracking, and so on.
2.7.2.1 Understand When to Use BackupsUsing backups to resolve an unscheduled outage of a production database may not allow you to meet your RTO or service-level requirements. For example, some outages are handled best by using Flashback Database or a standby database. However, some situations require using database backups, including the following:
Setting Up the Initial Data Guard Environment During initial setup of a standby database, you can either use a backup of the primary database at the secondary site to create the initial standby database., or use network-enabled database duplication to perform active database duplication without the need for pre-existing database backup. In either case, you connect to the primary database and use the DUPLICATE command to create a physical standby database. To trigger an over-the-network duplication, you must also include the FROM ACTIVE DATABASE option.
Recovering from Data Failures Using File or Block Media Recovery When a block corruption, media failure, or other physical data failure occurs in an environment that does not include Data Guard, the only method of recovery is to restore from existing backups.
Resolving a Double Failure A double failure scenario affects the availability of both the production and standby databases. An example of a double failure scenario is a site outage at the secondary site, which eliminates fault tolerance, followed by a media failure on the production database. Whether the standby must be re-created depends on the type of outage at the secondary site. If the secondary site outage was temporary and did not involve the physical destruction of files, then after the secondary site is brought back online it can continue to receive redo data from the production database. Otherwise, the resolution of this situation is to re-create the production database from an available backup and then re-create the standby database.
Some multiple failures, or more appropriately disasters (such as a primary site outage followed by a secondary site outage), might require the use of backups that exist only in an offsite location. Developing and following a process to deliver and maintain backup tapes at an offsite location is necessary to restore service in the most dire of circumstances.
2.7.2.2 Determine a Backup FrequencyIt is important to determine a backup frequency policy and to perform regular backups. A backup retention policy helps ensure that needed data is not destroyed too soon.
Factors Determining Backup Frequency Frequent backups are essential for any recovery scheme. You should base the frequency and content of backups on the following criteria:
See Also:
■ Oracle Data Guard Concepts and Administration for information about creating a standby database
■ Oracle Database Backup and Recovery User's Guide for information about the DUPLICATE command

Configuring Backup and Recovery
Configuring for High Availability 2-69
■ Criticality of the data: The RPO determines how much data your business can acceptably lose in the event of a failure. The more critical the data, the lower the RPO and the more frequent data should be backed up. You must determine which part of the database is most critical to the business.
■ Estimated repair time: The RTO determines the acceptable amount of time needed for recovery. Repair time is dictated by restore time plus recovery time. The lower the RTO the higher the frequency of backups to reduce the time it takes to recover.
■ Volume of changed data: The rate of database change effects how often data is backed up:
– For read-only data, perform backups frequently enough to adhere to retention policies.
– For frequently changing data, perform backups more often to reduce the RTO.
To simplify database backup and recovery, the Oracle suggested backup strategy implements the flash recovery area while using incremental backups and incrementally updated backup features.
Establishing a Backup Retention Policy A backup retention policy is a rule set regarding which backups must be retained (on disk or other backup media) to meet recovery and other requirements. It may be safe to delete a specific backup because it has been superseded by more recent backups or because it has been stored on tape. You may also have to retain a specific backup on disk for other reasons such as archival or regulatory requirements. A backup that is no longer needed to satisfy the backup retention policy is said to be obsolete.
Base your backup retention policy on redundancy or on a recovery window:
■ In a redundancy-based retention policy, specify a number n such that you always keep at least n distinct backups of each file in your database.
■ In a recovery window-based retention policy, specify an earlier time interval (for example, one week or one month) and keep all backups required to let you perform point-in-time recovery to any point during that window.
Keeping Archival Backups Some businesses must maintain archival (long-term) backups that may be needed years into the future. Rather than becoming obsolete according to the database's backup retention policy, archival backups become obsolete when their time limit expires.
Moreover, you can use the RMAN BACKUP command with the KEEP FOREVER option to retain backups that are exempt from the retention policy and never expire, providing the ability to restore and recover the database to any point in time. It is required that you use a recovery catalog for the RMAN repository so that backup metadata is not lost due to lack of space, which may occur when using the target database control file for the RMAN repository. Beginning in Oracle Database in 11g, only the archived redo log files required to make an archival backup consistent are retained.
See Also: "Using the Oracle Suggested Backup Strategy" in Oracle Database 2 Day DBA
See Also: The section about "Making Database Backups for Long-Term Storage" in Oracle Database Backup and Recovery User's Guide

Configuring Backup and Recovery
2-70 Oracle Database High Availability Best Practices
2.7.2.3 Use an RMAN Recovery CatalogTo protect and keep backup metadata for even longer periods of time, you can create an additional RMAN repository in a separate database schema called the recovery catalog. You should create the recovery catalog schema in a standalone database that is dedicated to this purpose. Do not locate the recovery catalog with other production data. If you use Oracle Enterprise Manager, Oracle recommends creating the recovery catalog schema in the Enterprise Manager repository database.
The advantages of using a recovery catalog include:
■ Stores backup information long term.
■ Stores metadata for multiple databases.
■ Restores an available backup onto another system.
■ Allows you to offload backups to a physical standby database and use those backups to restore and recover the primary database. Similarly, you can back up a tablespace on a primary database and restore and recover it on a physical standby database. Note that backups of logical standby databases are not usable at the primary database.
Another reason to use a recovery catalog is the limited maximum size of the target database control file. If the control file is too small to hold additional backup metadata, then existing backup information is overwritten, making it difficult to restore and recover using those backups.
2.7.2.4 Create Backups in NOCATALOG Mode and RESYNC CATALOG AfterwardsWhen creating backups to disk or tape, use the target database control file as the RMAN repository, so that backup success does not depend on the availability of the database holding the RMAN repository. To use the target database control file as the RMAN repository, run RMAN with the NOCATALOG option. Immediately after the backup is complete, the new backup information stored in the target database control file should be resynchronized with the recovery catalog using the RESYNC CATALOG command.
2.7.2.5 Enable Block Change Tracking for Incremental BackupsOracle Database includes a change tracking feature for incremental backups, which improves incremental backup performance by recording changed blocks in each data file in a change tracking file. If change tracking is enabled, then RMAN uses the change tracking file to identify which blocks to include in an incremental backup. This avoids the need to scan every block in the data file, reducing the number of disk reads during backup.
Starting with Oracle Database 11g, you can enable change tracking on both the primary and standby databases. You should enable change tracking for any database where incremental backups are being performed. For example, if backups have been completely offloaded to a physical standby database, then block change tracking should be enabled for that database. If backups are being performed on both the primary and standby databases, then enable change tracking for both databases.
See Also: Oracle Database Backup and Recovery User's Guide for more information on RMAN repository
See Also: Oracle Database Backup and Recovery Reference for more information about the RESYNC CATALOG command

Configuring Backup and Recovery
Configuring for High Availability 2-71
2.7.2.6 Enable Autobackup for the Control File and Server Parameter FileConfigure RMAN to automatically back up the control file and server parameter file (SPFILE) whenever the database structure metadata in the control file changes or when a backup record is added. The autobackup enables RMAN to recover the database even if the current control file, catalog, and SPFILE are lost. The RMAN autobackup feature is enabled with the CONFIGURE CONTROLFILE AUTOBACKUP ON statement.
You should enable autobackup for both the primary and standby databases. For example, after connecting to the primary database (as the target database) and the recovery catalog, issue the following command:
CONFIGURE CONTROLFILE AUTOBACKUP ON;
2.7.2.7 Offload Backups to a Physical Standby DatabaseIn an Oracle Data Guard configuration, you can offload the process of backing up control files, data files, and archived redo log files to a physical standby database system, thereby minimizing the effect of performing backups on the primary system. These backups can be used to recover the primary or standby database. Note that backups of logical standby databases are not usable on the primary database.
2.7.3 Backup to DiskWhen selecting a backup mechanism, use the following priorities to drive your backup strategy:
■ Overall backup time
■ Impact to resource consumption
■ Space used by the backup
■ Recovery time
Table 2–8 compares different backup alternatives against the different priorities you might have. The table guides you to choose the best backup approach for your specific business requirements. You might want to minimize backup space while sacrificing recovery time. Alternatively, you might choose to place a higher priority on recovery and backup times while space is not an issue.
See Also: Oracle Database Backup and Recovery Basics for more information about block change tracking
See Also: The MAA white paper "Using Recovery Manager with Oracle Data Guard"and Oracle Database Backup and Recovery User's Guide for more information about autobackup
See Also: The chapter about using RMAN to back up and restore files in Oracle Data Guard Concepts and Administration

Configuring Backup and Recovery
2-72 Oracle Database High Availability Best Practices
Best Practices for Optimizing Recovery Times If restore time is your primary concern, then perform either a database copy or an incremental backup with roll forward immediately. These are the only options that provide an immediately usable backup of the database, which you then need to recover only to the time of the failure using archived redo log files created since the last backup was performed.
Best Practices for Minimizing Space Usage If space usage is your primary concern, then perform an incremental backup with a deferred roll forward. If you perform a cumulative level 1 incremental backup, then it stores only those blocks that have been changed since the last level 0 backup:
■ With a cumulative incremental backup, apply only the last level 1 backup to the level 0 backup.
■ With a differential incremental backup, apply all level 1 backups to the level 0 backup.
A cumulative incremental backup usually consumes more space in the flash recovery area than a differential incremental backup.
Best Practices for Minimizing System Resource Consumption (I/O and CPU) If system resource consumption is your primary concern, then an incremental backup with a block change tracking enabled consumes the least amount of resources on the database.
ExampleFor many applications, only a small percentage of the entire database is changed each day even if the transaction rate is very high. Frequently, applications modify a same set of blocks frequently; so, the total dirty block set is small.
For example, a database contains about 600 GB of user data, not including temp files and redo logs. Every 24 hours, approximately 2.5% of the database is changed, which
Table 2–8 Comparing Backup Options
Backup Option
Overall Backup Time
1: Fastest5: Slowest
Impact on Resource Consumption
1: Lowest5: Highest
Space Used by Backup
1: Least5: Most
Recovery Time
1: Fastest5: Slowest
Full data file copy 5 5 5 1 1
1 No restore (switch to flash recovery area copy)
Full or level 0 backup set 4 4 3 3
Differential incremental backup set (level 1); applied to previous level 0 and level 1 backups during recovery
1 1 1 5
Cumulative incremental backup set (level 1); applied to previous level 0 backup during recovery
2 2 2 4
Incrementally updated backup (level 1); immediately applied to image copies during backup
3 1 5 11

Configuring Backup and Recovery
Configuring for High Availability 2-73
is approximately 15 GB of data. In this example, MAA testing recorded the following results:
■ Level 0 backup takes 180 minutes, including READs from the data area and WRITEs to the flash recovery area
■ Level 1 backup takes 20 minutes, including READs from the data area and WRITEs to the flash recovery area
■ Rolling forward and merging an existing image copy in the flash recovery area with a newly created incremental backup takes only 45 minutes, including READs and WRITEs from the flash recovery area.
In the last case in which a level 0 backup is taken and then rolled forward with incremental backups, the initial backup takes 180 minutes (which is the same amount of time it takes to perform a full backup). Subsequent backups are level 1 (incremental), which take 20 minutes, so the potential impact on the data area is reduced. That backup is then applied to the existing level 0 backup, which takes 45 minutes. This process does not perform I/O to the data area, so there is no impact (if the flash recovery area and data area use separate storage). The total time to create the incremental backup and apply it to the existing level 0 backup is 65 minutes (20+45).
The result is the same is both cases—a full image backup of the database is performed. The incremental approach takes 115 minutes less time (64% less) than simply creating a full backup. And the amount of I/O performed to reach the same end point is less, particularly against the data area, which should have less detrimental effect on performance of the production database.
Thus, for this example, when you compare always taking full backups versus starting with a level 0 backup, performing only incremental backups, and then rolling forward the level 0 backup, the net savings are:
■ 115 minutes or 64% time savings to create a complete backup
■ Reduced I/O on the database during backups
For bigger databases, MAA testing recorded even larger gains.
2.7.4 Backup to TapeThis section describes how to create tape backups, Oracle Secure backup, and maintaining offsite backups.
2.7.4.1 Create Tape Backups from the Flash Recovery AreaUse the RMAN command BACKUP RECOVERY FILES to copy disk backups created in the flash recovery area to tape. Using a single command, all files that have not been backed up to tape are backed up. This prevents you from backing up files more than once and wasting tape, or keeping track of files that were not backed up previously. Use tape backups to handle certain outage scenarios and for offsite and long-term storage.
2.7.4.2 Create Fast Tape Backups Using Oracle Secure BackupOracle Secure Backup delivers the fastest Oracle database backup to tape. Oracle Secure Backup has intimate access and integration with Recovery Manager (RMAN) that is not available with non Oracle tape backup systems. Using Oracle Secure
See Also: The "Backing Up the Database" chapter in Oracle Database Backup and Recovery User's Guide

Configuring Backup and Recovery
2-74 Oracle Database High Availability Best Practices
Backup Release 10.2 and Oracle Database 11g provides the following key performance optimizations:
■ Eliminates backup of committed undo, thus increasing backup performance and reducing tape consumption. Only noncommitted undo is backed up.
■ Optimizes SBT buffer allocation using a shared buffer between SBT and tape (Oracle Secure Backup). In past releases, RMAN writes data to the SBT buffer then the media manager copies data from the SBT buffer to the tape buffer. Oracle testing results indicate that using a shared buffer (Oracle Secure Backup and RMAN only) reduces CPU overhead by up to 30%.
For configurations running Oracle Database 10g Release 2 (10.2) and Oracle Secure Backup Release 10.1, Oracle Secure Backup backs up and reads only the blocks that are currently allocated to database objects. Blocks that are not allocated are neither read nor backed up.
2.7.4.3 Maintain Offsite BackupsRegardless of the architecture deployed—including the existence of a standby database—it is still important to have offsite backups for business requirements, to protect against disasters, and to follow legal and regulatory requirements such as the Securities and Exchange Commission (SEC) and Health Insurance Portability and Accountability Act (HIPPA).
2.7.5 Backup and Recovery MaintenanceThis section describes checking data files for corruption, using Data Recovery Advisor, testing recovery procedures, and backing up the recovery catalog database.
2.7.5.1 Regularly Check Database Files for CorruptionUse the RMAN VALIDATE command to regularly check database files for block corruption that has not yet been reported by a user session or by normal backup operations. RMAN scans the specified files and checks for physical and logical errors, but does not actually perform the backup or recovery operation. Oracle Database records the address of the corrupt block and the type of corruption in the control file. Access these records through the V$DATABASE_BLOCK_CORRUPTION view, which can be used by RMAN block media recovery.
To detect all types of corruption that are possible to detect, specify the CHECK LOGICAL option.
2.7.5.2 Periodically Test Recovery ProceduresComplete, successful, and tested backups are fundamental to the success of any recovery. Create test plans for different outage types. Start with the most common outage types and progress to the least probable. Using the RMAN DUPLICATE command is a good way to perform recovery testing, because it requires restoring from backups and performing media recovery.
See Also: The Oracle Secure Backup documentation set available on the Oracle Technology Network at
http://www.oracle.com/technology/products/secure-backup/index.html
See Also: The chapter in Oracle Database Backup and Recovery User's Guide that describes validating database files and backups

Configuring Oracle Streams
Configuring for High Availability 2-75
Monitor the backup procedure for errors, and validate backups by testing your recovery procedures periodically. Also, validate the ability to restore the database using the RMAN command RESTORE...VALIDATE.
2.7.5.3 Regularly Backup the Recovery Catalog DatabaseInclude the recovery catalog database in your backup and recovery strategy. If you do not back up the recovery catalog and a disk failure occurs that destroys the recovery catalog database, then you may lose the metadata in the catalog. Without the recovery catalog contents, recovery of your other databases is likely to be more difficult.
2.8 Configuring Oracle StreamsThe Oracle Database High Availability Overview describes many high availability benefits available when you configure Oracle Streams. Oracle Streams is a very flexible and powerful database feature that includes capabilities such as fine-grained replication, multimaster replication, many-to-one replication, data transformation, hub and spoke replication, and message queuing.
This section summarizes the best practices for configuring Oracle Streams for both downstream capture and upstream (local) capture.
■ Downstream capture is typically used to replicate a full database, to offload processing from the source database to the target database, or to reduce data loss with ASYNC or SYNC redo transport.
■ Upstream capture, which is also referred to as local capture, occurs when the Oracle Streams capture process captures changes on the source database. Then, a propagation process dequeues the LCRs from the local buffered queue and propagates them to a destination database where they are enqueued into another buffered queue where typically an apply process is configured. Local capture can be used when source and target databases are on different platforms, different character sets, and with in limits, different database versions.
2.8.1 Preparing Oracle Streams ConfigurationsThe general configuration tasks in the following list are relevant for all Oracle Streams databases, whether the implementation is for downstream or local capture:
■ Use Oracle Database 11g or Oracle Database 10g release 2 (10.2.0.4 or later) and apply all relevant patches.
■ Verify that the source and capture sites run on the same platform if you plan to use downstream capture.
■ Prepare the source and target database redo logs for Oracle Streams:
– Configure the source and target databases in ARCHIVELOG mode.
– Configure the local archive destination, LOG_ARCHIVE_DEST_1, parameter and do not use a flash recovery area.
See Also: The chapter in Oracle Database Backup and Recovery User's Guide that describes managing a recovery catalog
See Also: The MAA white paper "Oracle Streams Configuration Best Practices" at
http://www.oracle.com/technology/deploy/availability/pdf/MAA_10gr2_streams_configuration.pdf

Configuring Oracle Streams
2-76 Oracle Database High Availability Best Practices
■ Create a tablespace dedicated to Oracle Streams.
■ Create the Oracle Streams administrator database user.
■ Grant Oracle Streams authorization and DBA privileges.
■ Set key initialization parameters (AQ_TM_PROCESSES, DB_NAME, DB_DOMAIN, GLOBAL_NAME=TRUE, JOB_QUEUE_PROCESSES, TIMED_STATISTICS=TRUE, STATISTICS_LEVEL=TYPICAL, SHARED_POOL_SIZE, STREAMS_POOL_SIZE).
■ Create database links between the source and target databases.
■ Set up directory objects.
■ Account for object or tablespace name differences when replicating DDLs.
Recommendations for Oracle Streams Downstream CaptureIn addition to the previous general configuration tasks, the following list summarizes the tasks you must perform to prepare the source database to ship redo to a downstream database and prepare the target database to receive and apply the redo.
When configuring for Oracle Streams downstream capture:
1. Specify initialization parameters (such as LOG_ARCHIVE_DEST_n) on the source and target databases.
2. On the downstream database, configure standby redo logs.
3. Enable the remote archived redo log destinations.
4. Run the relevant DBMS_STREAMS_ADM subprogram (MAINTAIN_SCHEMAS, MAINTAIN_TABLES, MAINTAIN_TTS, and so on) to replicate that object on the downstream database.
5. Run the DBMS_CAPTURE_ADM.SET_PARAMETER procedure to configure the Oracle Streams capture process to perform real-time mining of the redo log that is shipped from the source database.
6. Query the V$STANDBY_LOG view on the downstream capture database to verify the downstream database is active.
Note: An Oracle Streams capture process is not run on the source database.
Recommendations for Oracle Streams Local CaptureIn addition to the general configuration tasks, the following list summarizes the tasks you should perform to configure local capture.
When configuring Oracle Streams for local capture:
1. Specify initialization parameters (such as LOG_ARCHIVE_DEST_n) on the source and target databases
2. Run the relevant DBMS_STREAMS_ADM subprogram (MAINTAIN_SCHEMAS, MAINTAIN_TABLES, MAINTAIN_TTS, and so on) to replicate that object on the database where the capture process runs, which in this case is the source database.
3. Monitor the progress by reviewing the ALERT.LOG file on both databases. The source database's ALERT.LOG shows LogMiner mining the local archive and the online redo log files. After the procedure starts to execute, you can monitor the procedure's actions by querying the DBA_RECOVERABLE_SCRIPT view or by viewing the ALERT.LOG files of both databases.
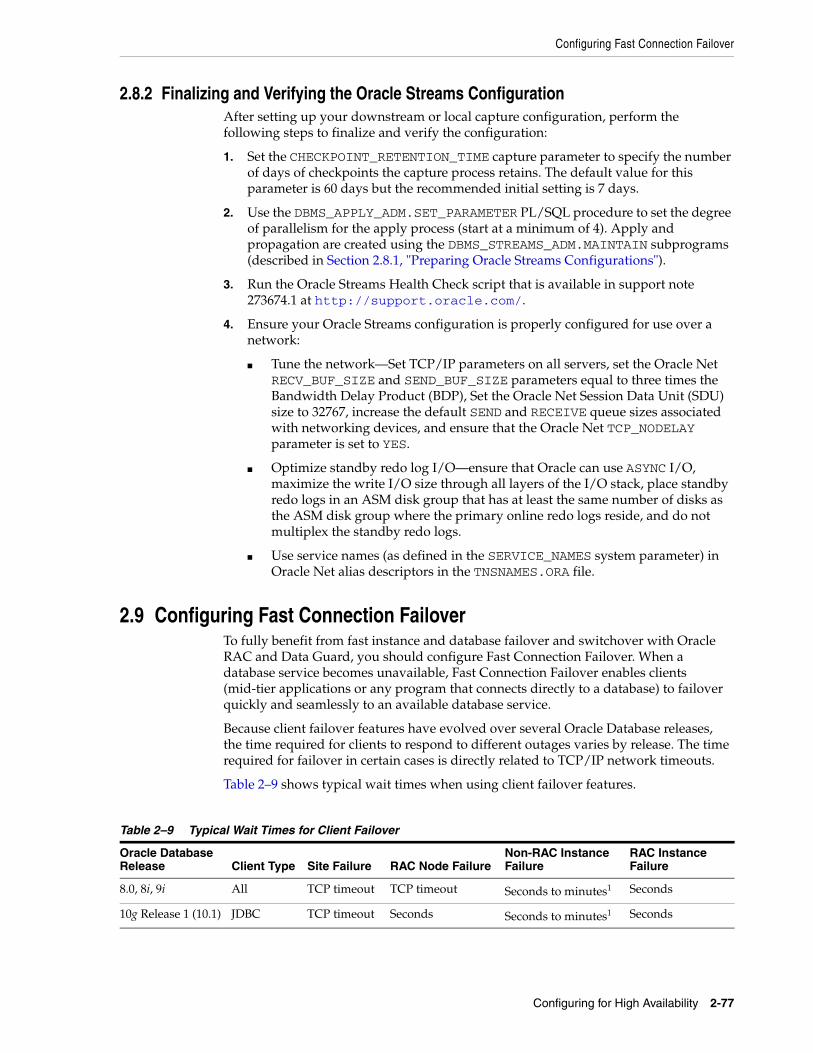
Configuring Fast Connection Failover
Configuring for High Availability 2-77
2.8.2 Finalizing and Verifying the Oracle Streams ConfigurationAfter setting up your downstream or local capture configuration, perform the following steps to finalize and verify the configuration:
1. Set the CHECKPOINT_RETENTION_TIME capture parameter to specify the number of days of checkpoints the capture process retains. The default value for this parameter is 60 days but the recommended initial setting is 7 days.
2. Use the DBMS_APPLY_ADM.SET_PARAMETER PL/SQL procedure to set the degree of parallelism for the apply process (start at a minimum of 4). Apply and propagation are created using the DBMS_STREAMS_ADM.MAINTAIN subprograms (described in Section 2.8.1, "Preparing Oracle Streams Configurations").
3. Run the Oracle Streams Health Check script that is available in support note 273674.1 at http://support.oracle.com/.
4. Ensure your Oracle Streams configuration is properly configured for use over a network:
■ Tune the network—Set TCP/IP parameters on all servers, set the Oracle Net RECV_BUF_SIZE and SEND_BUF_SIZE parameters equal to three times the Bandwidth Delay Product (BDP), Set the Oracle Net Session Data Unit (SDU) size to 32767, increase the default SEND and RECEIVE queue sizes associated with networking devices, and ensure that the Oracle Net TCP_NODELAY parameter is set to YES.
■ Optimize standby redo log I/O—ensure that Oracle can use ASYNC I/O, maximize the write I/O size through all layers of the I/O stack, place standby redo logs in an ASM disk group that has at least the same number of disks as the ASM disk group where the primary online redo logs reside, and do not multiplex the standby redo logs.
■ Use service names (as defined in the SERVICE_NAMES system parameter) in Oracle Net alias descriptors in the TNSNAMES.ORA file.
2.9 Configuring Fast Connection FailoverTo fully benefit from fast instance and database failover and switchover with Oracle RAC and Data Guard, you should configure Fast Connection Failover. When a database service becomes unavailable, Fast Connection Failover enables clients (mid-tier applications or any program that connects directly to a database) to failover quickly and seamlessly to an available database service.
Because client failover features have evolved over several Oracle Database releases, the time required for clients to respond to different outages varies by release. The time required for failover in certain cases is directly related to TCP/IP network timeouts.
Table 2–9 shows typical wait times when using client failover features.
Table 2–9 Typical Wait Times for Client Failover
Oracle Database Release Client Type Site Failure RAC Node Failure
Non-RAC Instance Failure
RAC Instance Failure
8.0, 8i, 9i All TCP timeout TCP timeout Seconds to minutes1 Seconds
10g Release 1 (10.1) JDBC TCP timeout Seconds Seconds to minutes1 Seconds

Configuring Fast Connection Failover
2-78 Oracle Database High Availability Best Practices
Use the best practices in the following sections to configure client failover:
■ Configure JDBC and OCI Clients for Failover
■ Configure Client Failover in an Oracle RAC Environment
■ Configure Failover in an Oracle Data Guard Environment
■ Prevent Login Storms
2.9.1 Configure JDBC and OCI Clients for FailoverDelays caused by TCP/IP network timeouts can be overcome for both JDBC clients and OCI clients by using Fast Connection Failover. With Fast Connection Failover, a trigger on the standby database is invoked by the DB_ROLE_CHANGE system event when the standby database transitions to the primary role. The trigger calls a publisher program that notifies clients that the database service is available on the new primary, breaking stalled clients out of their TCP timeout.
For JDBC clients, follow these best practices:
1. Enable Fast Connection Failover for JDBC clients by setting the DataSource property FastConnectionFailoverEnabled to TRUE.
2. Configure JDBC clients to use a connect descriptor that includes an address list that includes the VIP address for each node in the cluster and connects to an existing service.
3. Configure a remote Oracle Notification Service (ONS) subscription on the JDBC client so that an ONS daemon is not required on the client.
10g Release 1 (10.1) OCI TCP timeout TCP timeout Seconds to minutes1 Seconds
10g Release 2 (10.2)
11g Release 1 (11.1)
JDBC Seconds Seconds Seconds Seconds
10g Release 2 (10.2)
11g Release 1 (11.1)
OCI Seconds2 Seconds Seconds Seconds
1 The wait times required in non RAC instance failures are determined by how much time is needed to activate the standby database as the primary database and for the client to establish a connection.
2 Excluding ODP.NET clients that suffer an outage equal to that of TCP timeout.
Note: Clients that cannot take advantage of FAN can achieve fast failover by configuring timeouts and application retries, as follows:
■ Configure timeouts using either operating system TCP parameters or custom application timeouts.
■ Configure applications to automatically attempt to reconnect in the event that an exception is generated from a timeout.
See Also: The MAA white paper "Client Failover Best Practices for Highly Available Oracle Databases" at http://www.oracle.com/technology/deploy/availability/pdf/MAA_WP_10gR2_ClientFailoverBestPractices.pdf
Table 2–9 (Cont.) Typical Wait Times for Client Failover
Oracle Database Release Client Type Site Failure RAC Node Failure
Non-RAC Instance Failure
RAC Instance Failure

Configuring Fast Connection Failover
Configuring for High Availability 2-79
For OCI clients, follow these best practices:
1. Enable Fast Application Notification (FAN) for OCI clients by initializing the environment with the OCI_EVENTS parameter.
2. Link the OCI client applications with the thread library.
3. Set the AQ_HA_NOTIFICATIONS parameter to TRUE and configure the transparent application failover (TAF) attributes for services.
2.9.2 Configure Client Failover in an Oracle RAC EnvironmentFor client failover in an Oracle RAC database, use these best practices:
1. Use Oracle Enterprise Manager to create services.
2. Add all hosts in the cluster to the Oracle RAC ONS configuration.
2.9.3 Configure Failover in an Oracle Data Guard EnvironmentThe process of configuring for client failover in a Data Guard environment consists of the following general tasks:
Service relocation: The database service that the primary application uses to connect to the database should be active only on the primary database. In the event of a failover or switchover, this service should be migrated automatically to the new primary database and stopped on the original primary database.
Client notification: Once the failover has completed and the service is available on the new primary database, the application should be notified that a failover has occurred and connections should be migrated to the new primary database.
Efficient reconnection: The sessions being migrated and any new connections should quickly be located to the new primary database; clients should not stall due to waiting for timeouts on unavailable hosts or networks.
2.9.4 Prevent Login StormsThe process of failing over an application that has a large number of connections may create a login storm. A login storm is a sudden spike in the number of connections to a database instance, which drains CPU resources. As CPU resources are depleted, application timeouts and application response times are likely to increase.
To control login storms:
■ Implement the Connection Rate Limiter
The primary method of controlling login storms is to implement the Connection Rate Limiter feature of the Oracle listener. This feature limits the number of connections that can be processed in seconds. Slowing down the rate of connections ensures that CPU resources remain available and that the system remains responsive.

Using Oracle Enterprise Manager Grid Control
2-80 Oracle Database High Availability Best Practices
■ Configure Oracle Database for shared server operations
In addition to implementing the Connection Rate Limiter, some applications can control login storms by configuring Oracle Database for shared server operations. By using shared server, the number of processes that must be created at failover time are greatly reduced, thereby avoiding a login storm.
■ Adjust the maximum number of connections in the mid tier connection pool
If such a capability is available in your application mid tier, try limiting the number of connections by adjusting the maximum number of connections in the mid tier connection pool.
2.10 Using Oracle Enterprise Manager Grid ControlUse Oracle Enterprise Manager 10g Grid Control Release 10.2.0.5 or later to configure your entire high availability environment. Grid Control is Oracle's single, integrated solution for managing all aspects of the Oracle Grid and the applications running on it. Grid Control couples top-down monitoring for applications with automated configuration management, provisioning, and administration. This powerful combination provides unequaled management for any size Oracle data center.
Using Enterprise Manager Grid Control you can perform any configuration task. For example, you can:
■ Migrate to Oracle Automatic Storage Management (ASM)
■ Migrate a single-instance Oracle Database to Oracle Clusterware and Oracle Real Application Clusters (Oracle RAC)
■ Create Oracle Data Guard standby databases
■ Configure backup and recovery
■ Configure Oracle Streams
■ Use the MAA Advisor to implement Oracle's best practices and achieve a high availability architecture
See Also:
■ The "Oracle Net Listener Connection Rate Limiter" white paper for information about the Connection Rate Limiter at
http://www.oracle.com/technology/products/oraclenet/files/OracleNetServices_ConnectionRateLimiter.pdf
■ The "Best Practices for Optimizing Availability During Unplanned Outages Using Oracle Clusterware and Oracle Real Application Clusters" white paper for information and examples about listener connection rate throttling at
http://www.oracle.com/technology/deploy/availability/pdf/MAA_WP_10gR2_FastRecoveryOracleClusterwareandRAC.pdf
See Also: Oracle Database Administrator's Guide for more information about configuring and controlling shared server operations

Using Oracle Enterprise Manager Grid Control
Configuring for High Availability 2-81
See Also:
■ Section 3.3.4, "Configure High Availability Solutions with MAA Advisor"
■ Oracle Enterprise Manager Grid Control online help system, and the Grid Control documentation set available at: http://www.oracle.com/technology/software/products/oem/index.html

Using Oracle Enterprise Manager Grid Control
2-82 Oracle Database High Availability Best Practices

Monitoring Using Oracle Grid Control 3-1
3Monitoring Using Oracle Grid Control
This chapter provides best practices for using Oracle Grid Control to monitor and maintain a highly available environment across all tiers of the application stack.
This chapter contains these topics:
■ Overview of Monitoring and Detection for High Availability
■ Using Oracle Grid Control for System Monitoring
■ Managing the High Availability Environment with Oracle Grid Control
3.1 Overview of Monitoring and Detection for High AvailabilityContinuous monitoring of the system, network, database operations, application, and other system components, ensures early detection of problems. Early detection improves the user's system experience because problems can be avoided or resolved faster. In addition, monitoring captures system metrics to indicate trends in system performance growth and recurring problems. This information can facilitate prevention, enforce security policies, and manage job processing. For the database server, a sound monitoring system must measure availability and detect events that can cause the database server to become unavailable, and provide immediate notification about critical failures to responsible parties.
The monitoring system itself must be highly available and adhere to the same operational best practices and availability practices as the resources it monitors. Failure of the monitoring system leaves all monitored systems unable to capture diagnostic data or alert the administrator about problems.
Oracle Grid Control provides management and monitoring capabilities with many different notification options. Recommendations are available for methods of monitoring the environment's availability and performance, and for using the tools in response to changes in the environment.
3.2 Using Oracle Grid Control for System MonitoringA major benefit of Oracle Grid Control is its ability to manage components across the entire application stack, from the host operating system to a user or packaged application. Oracle Grid Control treats each of the layers in the application as a target. Targets—such as databases, application servers, and hardware—can then be viewed along with other targets of the same type, or can be grouped by application type. You can also review all targets in a single view from the HA Console (described in more detail in Section 3.3.3, "Manage Database Availability with the High Availability Console"). Each target type has a default generated home page that displays a

Using Oracle Grid Control for System Monitoring
3-2 Oracle Database High Availability Best Practices
summary of relevant details for a specific target. You can group different types of targets by function; that is, as resources that support the same application.
Every target is monitored by an Oracle Management Agent. Every Management Agent runs on a system and is responsible for a set of targets. The targets can be on a system that is different from the one that the Management Agent is on. For example, a Management Agent can monitor a storage array that cannot host an agent natively. When a Management Agent is installed on a host, the host is automatically discovered along with other targets that are on the machine.
Moreover, to help you implement the Maximum Availability Architecture (MAA) best practices, Grid Control provides the MAA Advisor (described in detail in Section 3.3.4, "Configure High Availability Solutions with MAA Advisor"). The MAA Advisor page recommends Oracle solutions for most outage types and describes the benefits of each solution.
3.2.1 Oracle Grid Control Home PageThe Oracle Grid Control home page shown in Figure 3–1 provides a picture of the availability of all discovered targets.
Figure 3–1 Oracle Grid Control Home Page
The Oracle Grid Control home page shows the following major kinds of information:
■ A snapshot of the current availability of all targets. The pie chart associated with availability gives the administrator an immediate indication of any target that is Available (Up), unavailable (Down), or has lost communication with the console (Unknown).
■ An overview of how many alerts (for events) and problems (for jobs) are known in the entire monitored system. You can display detailed information by clicking the links, or by navigating to Alerts from the upper right portion of any Oracle Grid Control page.
■ A view of the severity and total number of policy violations for all managed targets. Drill down to determine the source and type of violation.

Using Oracle Grid Control for System Monitoring
Monitoring Using Oracle Grid Control 3-3
■ An overview of what is actually discovered in the system. This list can be shown at the hardware level and the Oracle level.
■ All Targets Jobs lists the number of scheduled, running, suspended, and problem (stopped/failed) executions for all Enterprise Manager jobs. Click the number next to the status group to view a list of those jobs.
Alerts are generated by a combination of factors and are defined on specific metrics. A metric is a data point sampled by a Management Agent and sent to the Oracle Management Repository. It could be the availability of a component through a simple heartbeat test, or an evaluation of a specific performance measurement such as "disk busy" or percentage of processes waiting for a specific wait event.
There are four states that can be checked for any metric: error, warning, critical, and clear. The administrator must make policy decisions such as:
■ What objects should be monitored (databases, nodes, listeners, or other services)?
■ What instrumentation should be sampled (such as availability, CPU percent busy)?
■ How frequently should the event be sampled?
■ What should be done when the metric exceeds a predefined threshold?
All of these decisions are predicated on the business needs of the system. For example, all components might be monitored for availability, but some systems might be monitored only during business hours. Systems with specific performance problems can have additional performance tracing enabled to debug a problem.
3.2.2 Set Up Default Notification Rules for Each SystemNotification Rules are defined sets of alerts on metrics that are automatically applied to a target when it is discovered by Oracle Grid Control. For example, an administrator can create a rule that monitors the availability of database targets and generates an e-mail message if a database fails. After that rule is generated, it is applied to all existing databases and any database created in the future. Access these rules by navigating to Preferences and then choosing Rules.
The rules monitor problems that require immediate attention, such as those that can affect service availability, and Oracle or application errors. Service availability can be affected by an outage in any layer of the application stack: node, database, listener, and critical application data. A service availability failure, such as the inability to connect to the database, or the inability to access data critical to the functionality of the application, must be identified, reported, and reacted to quickly. Potential service outages such as a full archive log directory also must be addressed correctly to avoid a system outage.
Oracle Grid Control provides a series of default rules that provide a strong framework for monitoring availability. A default rule is provided for each of the preinstalled target types that come with Oracle Grid Control. You can modify these rules to conform to the policies of each individual site, and you can create rules for site-specific targets or applications. You can also set the rules to notify users during specific time periods to create an automated coverage policy.
Use the following best practices:
■ Modify each rule for high-value components in the target architecture to suit your availability requirements by using the rules modification wizard. For the database rule, set the events in Table 3–1, Table 3–2, and Table 3–3 for each target. The
See Also: Oracle Enterprise Manager Concepts for more information about monitoring and using metrics in Oracle Grid Control

Using Oracle Grid Control for System Monitoring
3-4 Oracle Database High Availability Best Practices
frequency of the monitoring is determined by the service-level agreement (SLA) for each component.
■ Use Beacon functionality to track the performance of individual applications. A Beacon can be set to perform a user transaction representative of normal application work. Enterprise Manager can then break down the response time of that transaction into its component pieces for analysis. In addition, an alert can be triggered if the execution time of that transaction exceeds a predefined limit.
■ Add Notification Methods and use them in each Notification Rule. By default, the easiest method for alerting an administrator to a potential problem is to send e-mail. Supplement this notification method by adding a callout to an SNMP trap or operating system script that sends an alert by some method other than e-mail. This avoids the problem that might occur if a component of the e-mail system has failed. Set additional Notification Methods by using the Set-up link at the top of any Oracle Grid Control page.
■ Modify Notification Rules to notify the administrator when there are errors in computing target availability. This might generate a false positive reading on the availability of the component, but it ensures the highest level of notification to system administrators.
Figure 3–2 shows the Edit Notification Rule property page for choosing availability states, with the Down option chosen.
Figure 3–2 Setting Notification Rules for Availability
In addition, modify the metrics monitored by the database rule to report the metrics shown in Table 3–1, Table 3–2, and Table 3–3. This ensures that these metrics are captured for all database targets and that trend data is available for future analysis. All
See Also:
■ Oracle Enterprise Manager Concepts for conceptual information about Beacons
■ Oracle Enterprise Manager Advanced Configuration for information about configuring service tests and Beacons

Using Oracle Grid Control for System Monitoring
Monitoring Using Oracle Grid Control 3-5
events described in Table 3–1, Table 3–2, and Table 3–3 can be accessed from the Database Homepage by choosing Metrics and Policy Settings.
Use the events shown in Table 3–1 to monitor space management conditions that have the potential to cause a service outage.
From the Alert Log Metric group, set Oracle Grid Control to monitor the alert log for errors as shown in Table 3–2.
Table 3–1 Recommendations for Monitoring Space
Metric Recommendation
Tablespace Space Used (%) Set this database-level metric to check the Available Space Used (%) for each tablespace. For cluster databases, this metric is monitored at the cluster database target level and not by member instances. This metric enables the administrator to choose the threshold percentages that Oracle Grid Control tests against, and the number of samples that must occur in error before a message is generated and sent to the administrator. If the percentage of used space is greater than the values specified in the threshold arguments, then a warning or critical alert is generated.
The recommended default settings are 85% for a warning and 97% for a critical space usage threshold, but you should adjust these values appropriately, depending on system usage. Also, you can customize this metric to monitor specific tablespaces. For example, set this metric to monitor critical tablespaces such as SYSTEM, SYSAUX, UNDO, TEMP, and critical tablespaces for application data. Start with 20% space remaining for Warning Threshold, 10% space remaining for Critical Threshold, and possibly 5 or 2% space remaining for immediate action on the critical tablespaces.
Set this metric and similar events in the Tablespace Full metric group.
Archiver Hung
Alert Log Error
Set this metric to monitor the alert log for ORA-00257 errors, which indicate a full archived redo log directory.
Set this metric in the Alert Log Error Status metric group.
Dump Area Used (%) Set this metric to monitor the dump directory destinations. Dump space must be available so that the maximum amount of diagnostic information is saved the first time an error occurs. The recommended default settings are 70% for a warning and 90% for an error, but these should be adjusted depending on system usage.
Set this metric in the Dump Area metric group.
Recovery Area Free Space (%)
This is a database-level metric that is evaluated by the server every 15 minutes or during a file creation, whichever occurs first. The metric is also printed in the alert log. For cluster databases, this metric is monitored at the cluster database target level and not by member instances.
The Critical Threshold is set for < 3% and the Warning Threshold is set for < 15%. You cannot customize these thresholds. An alert is returned the first time the alert occurs, and the alert is not cleared until the available space rises above 15%.
See Also: Support note 467653.1 at http://support.oracle.com/ for more information about setting the Recovery Area Free Space metric.
File System Available(%) By default, this metric monitors the root file system per host. The default warning level is 20% and the critical warning is 5%.
Archive Area Used (%) Set this metric to return the percentage of space used on the archive area destination. If the space used is more than the threshold value given in the threshold arguments, then a warning or critical alert is generated.
If the database is not running in ARCHIVELOG mode or all archive destinations are standby databases for Oracle8i, this metric fails to register. The default warning threshold is 80%, but consider using 70% full to send a warning, 90% for the critical threshold, and 98% for immediate action required.

Using Oracle Grid Control for System Monitoring
3-6 Oracle Database High Availability Best Practices
Monitor the system to ensure that the processing capacity is not exceeded. The warning and critical levels for these events should be modified based on the usage pattern of the system. Set the events from the Database Limits metric group using the recommendations in Table 3–3.
Figure 3–3 shows the Metric and Policy settings page for setting and editing metrics. The online help contains complete reference information for every metric. To access reference information for a specific metric, use the online help search feature.
Figure 3–3 Setting Notification Rules for Metrics
Table 3–2 Recommendations for Monitoring the Alert Log
Metric Recommendation
Alert Set this metric to send an alert when an ORA-6nn, ORA-1578 (database corruption), or ORA-0060 (deadlock detected) error occurs. If any other error is recorded, then a warning message is generated.
Data Block Corruption Set this metric to monitor the alert log for ORA-01157 and ORA-27048 errors. They signal a corruption in an Oracle Database datafile.
Table 3–3 Recommendations for Monitoring Processing Capacity
Metric Recommendation
Process limit Set thresholds for this metric to warn if the number of current processes approaches the value of the PROCESSES initialization parameter.
Session limit Set thresholds for this metric to warn if the instance is approaching the maximum number of concurrent connections allowed by the database.

Using Oracle Grid Control for System Monitoring
Monitoring Using Oracle Grid Control 3-7
3.2.3 Use Database Target Views to Monitor Health, Availability, and PerformanceThe Database Targets page in Figure 3–4 shows the Database home page with system performance, space usage, and the configuration of important availability components such as archived redo log status, flashback log status, and estimated instance recovery time. Alerts are displayed immediately. You can configure each of the alert values using the links on this page.
Figure 3–4 Database Home Page
Many of the metrics from the Oracle Grid Control pertain to performance. A system that is not meeting performance service-level agreements is not meeting HA system requirements. While performance problems seldom cause a major system outage, they can still cause an outage to a subset of customers. Outages of this type are commonly referred to as application service brownouts. The primary cause of brownouts is the intermittent or partial failure of one or more infrastructure components. IT managers must be aware of how the infrastructure components are performing (their response time, latency, and availability), and how they are affecting the quality of application service delivered to the end user.
A performance baseline, derived from normal operations that meet the service-level agreement, should determine what constitutes a performance metric alert. Baseline data should be collected from the first day that an application is in production and should include the following:
■ Application statistics (transaction volumes, response time, Web service times)
See Also:
■ Oracle Database 2 Day DBA for information about setting up notification rules and metric thresholds
■ Oracle Enterprise Manager Framework, Host, and Services Metric Reference Manual for information about available metrics

Using Oracle Grid Control for System Monitoring
3-8 Oracle Database High Availability Best Practices
■ Database statistics (transaction rate, redo rate, hit ratios, top 5 wait events, top 5 SQL transactions)
■ Operating system statistics (CPU, memory, I/O, network)
You can use Oracle Grid Control to capture a snapshot of database performance as a baseline. Oracle Grid Control compares these values against system performance and displays the result on the database Target page. It can also send alerts if the values deviate too far from the established baseline.
Set the database notification rule to capture the metrics listed in Table 3–4 for all database targets. You can then analyze these parameters using one tool. Historical data is also available.
3.2.4 Use Event Notifications to React to Metric ChangesThere are many operating system events that can be used to supplement a suggested metric. Such operating system events are not required for each host and instance. All metrics defined here can be set individually by instance or database using the Manage Metrics link at the bottom of the navigation bar on the object target page. The values that trigger a warning or critical alert can be changed here, and an operating system
Table 3–4 Recommended Notification Rules for Metrics
Metric Recommendation
Disk I/O per Second This is a database-level metric that monitors I/O operations done by the database. It sends an alert when the number of operations exceeds a user-defined threshold. Use this metric with operating system-level events that are also available with Oracle Grid Control.
Set this metric based on the total I/O throughput available to the system, the number of I/O channels available, network bandwidth (in a SAN environment), the effects of the disk cache if you are using a storage array device, and the maximum I/O rate and number of spindles available to the database.
CPU Utilization (%) For UNIX-based platforms, this metric represents the amount of CPU utilization as a percentage of total CPU processing power available. For Windows, this metric represents the percentage of time the CPU spends to execute a non-Idle thread. CPU Utilization (%) is the primary indicator of processor activity.
This metric is set to automatically warn at 80 percent and to show a critical alert at 95 percent. The Consecutive Number of Occurrences Preceding Notification column indicates the consecutive number of times the comparison against thresholds should hold TRUE before an alert is generated. This usage might be normal at peak periods, but it might also be an indication of a runaway process or of a potential resource shortage.
% Wait Time Excessive idle time indicates that a bottleneck for one or more resources is occurring. Set this metric based on the system wait time when the application is performing as expected.
Network Bytes per Second This metric reports network traffic that Oracle generates. It can indicate a potential network bottleneck. Set this metric based in actual usage during peak periods.
Total Parses per Second This metric measures SQL performance. It can indicate an application change or change in usage that has created a shortage of resources. Set it based on peak periods.
See Also:
■ Oracle Database Performance Tuning Guide for more information about performance monitoring
■ Oracle Database 2 Day DBA for more information about monitoring and tuning using Enterprise Manager

Managing the High Availability Environment with Oracle Grid Control
Monitoring Using Oracle Grid Control 3-9
script can be activated to respond to an metric threshold, in addition to the standard alert being generated to the Oracle Grid Control.
3.2.5 Use Events to Monitor Data Guard System AvailabilitySet Oracle Grid Control metrics to monitor the availability of logical and physical Data Guard configurations. Table 3–5 shows the events that are available for monitoring Data Guard databases.
3.3 Managing the High Availability Environment with Oracle Grid ControlUse Oracle Grid Control as a proactive part of administering any system and for problem notification and analysis. This section includes the following recommendations:
■ Check Oracle Grid Control Policy Violations
■ Use Grid Control to Manage Oracle Patches and Maintain System Baselines
■ Manage Database Availability with the High Availability Console
■ Configure High Availability Solutions with MAA Advisor
3.3.1 Check Oracle Grid Control Policy ViolationsOracle Grid Control comes with a pre-installed set of policies and recommendations of best practices for all databases. These policies are checked by default, and the number of violations is displayed on the Targets page shown in Figure 3–4. To see a list of all violations, select Policy Violations from the Targets page.
3.3.2 Use Grid Control to Manage Oracle Patches and Maintain System BaselinesYou can use Oracle Grid Control to download and manage patches from My Oracle Support (formerly OracleMetalink) at http://support.oracle.com/ for any monitored system in the application environment. A job can be set up to routinely check for patches that are relevant to the user environment. Those patches can be downloaded and stored directly in the Management Repository. Patches can be staged from the Management Repository to multiple systems and applied during maintenance windows.
Table 3–5 Recommendations for Setting Data Guard Events
Metric Recommendation
Data Guard Status Notifies you about system problems in a Data Guard configuration.
Apply Lag Displays (in seconds) how far the standby is behind the primary database. This metric generates an alert on the standby database if it falls behind more than the user-specified threshold (if any).
Estimated Failover Time Displays the approximate number of seconds required to failover to this standby database.
Redo Apply Rate Displays the Redo Apply rate in KB/second on this standby database.
Transport Lag Displays the approximate number of seconds of redo that is not yet available on this standby database. The lag may be because the redo data has not yet been transported or there may be a gap. This metric generates an alert on the standby database if it falls behind more than the user-specified threshold (if any).
See Also: Oracle Enterprise Manager Policy Reference Manual for definitions of existing policies

Managing the High Availability Environment with Oracle Grid Control
3-10 Oracle Database High Availability Best Practices
You can examine patch levels for one system and compare them between systems in either a one-to-one or one-to-many relationship. In this case, a system can be identified as a baseline and used to demonstrate maintenance requirements in other systems. This can be done for operating system patches and database patches.
3.3.3 Manage Database Availability with the High Availability ConsoleThe High Availability (HA) Console is a one stop, dashboard-style page for monitoring the availability of each database. You can use it on any database and if a database is part of a Data Guard configuration, the HA Console allows you to switch your view from the primary database to any of the standby databases.
You can use the HA Console to:
■ Display high availability events including events from related targets such as standby databases
■ View the high availability summary that includes the status of the database
■ View the last backup status
■ View the Flash Recovery Area Usage, if configured
■ If Oracle Data Guard is configured: View the Data Guard summary, set up Data Guard standby databases for any database target, manage switchover and failover of database targets other than the database that contains the Management Repository, and monitor the health of a Data Guard configuration at a glance
■ If Oracle RAC is configured: View the Oracle RAC Services summary including Top Services
The HA Console requires Oracle Enterprise Manager's Management Agents release 10.2.0.5 Agent as well as Grid Control release 10.2.0.5.
The following HA Console screenshot shows summary information, details, and historical statistics for the primary database. The example page shows the standby databases for the primary target, various Data Guard standby performance metrics and settings, and the data protection mode.
See Also: Oracle Enterprise Manager Grid Control Quick Start Guide and the Oracle Enterprise Manager Concepts for operational requirements to run Grid Control release 10.2.0.5 and for help establishing standard administrative settings

Managing the High Availability Environment with Oracle Grid Control
Monitoring Using Oracle Grid Control 3-11
Figure 3–5 Monitoring a Primary Database in the HA Console
The Availability Summary shows that the primary database is up and its availability is currently 99.09%. Notice that the availability percentage is further broken down by Day, Week, and Month in a horizontal bar graph in the Availability History on the far right side of the page. Because this database is an Oracle RAC database (in the cluster dglnx-cl1), the Availability Summary also shows instance status. ASM status would also appear if ASM was configured for this database. The Availability Events section shows specific high availability events (alerts). You can click the error to obtain more details (or to suppress the event). To set up, manage, and configure a specific solution area for this database, click MAA Advisor Details to go to the Maximum Availability Architecture (MAA) Advisor page (described in more detail in Section 3.3.4, "Configure High Availability Solutions with MAA Advisor").
The Backup and Recovery Summary displays the Last Backup and Next Backup information. The Flash Recovery Area Usage chart indicates about 1.35% of the flash recovery area is currently used. The Used (Non-reclaimable) Flash Recovery Area (%) chart shows the usage over the last 2 hours. You can click on the chart to display the page with the metric details.
The Data Guard Summary shows the primary database is running in Maximum Performance mode and has Fast-Start Failover enabled. You can click the link next to Protection Mode to modify the data protection mode. In the Standby Databases table, the physical standby database (west) is caught up with the primary database (Apply/Transport Lag) metrics, and the Used Flash Recovery Area (FRA) is 0.5%. The Primary Database Redo Rate chart shows the redo trend over the past 2 hours. Note that if Data Guard is not configured, the "Switch To" box in the upper right corner of the console is not displayed.
The Services Summary shows details for the customers, orders, and sales services.

Managing the High Availability Environment with Oracle Grid Control
3-12 Oracle Database High Availability Best Practices
Figure 3–6 Monitoring the Standby Database in the HA Console
The description for Figure 3–6 is the same as Figure 3–5 except for the Data Guard Summary section and charts at the lower right side of the page. Figure 3–6 shows information for the standby database (west), which is a physical standby database running real-time query. In the Standby Databases table, the Apply/Transport Lag metrics indicate that the physical standby database is caught up with the primary database, and the Used Flash Recovery Area (FRA) is 0.5%. The Standby Database Apply Lag chart shows there has been zero lag over the past two hours. Note that if Data Guard is not configured, the "Switch To" box in the upper right corner of the console is not displayed.
3.3.4 Configure High Availability Solutions with MAA AdvisorThe goal of the MAA Advisor is to help you implement Oracle's best practices to achieve the optimal high availability architecture.
From the Availability Summary section on the High Availability Console, you can link to the MAA Advisor to:
■ View recommended Oracle solutions for each outage type (site failures, computer failures, storage failures, human errors, and data corruptions)
■ View the configuration status and use the links in the Oracle Solution column to go to the Enterprise Manager page where the solution can be configured.
■ Understand the benefits of each solution
■ Link to the MAA Web site for white papers, documentation, and other information
The MAA Advisor page contains a table that lists the outage type, Oracle solutions for each outage, configuration status, and benefits. The MAA Advisor allows you to view HA solutions in the following ways:
■ Primary Database Recommendations Only—This condensed view shows only the recommended solutions (the default view) for the primary database.

Managing the High Availability Environment with Oracle Grid Control
Monitoring Using Oracle Grid Control 3-13
■ All Primary Database Solutions— This expanded view of the table shows all configuration recommendations and status for primary databases.
■ All Database Solutions (including standbys)—This expanded view of the table shows all configuration recommendations and status for all primary and standby databases in this configuration. It includes an extra column "Target Name/Role that provides the database name and shows the role (primary, physical, or logical) of the database.
Figure 3–7 shows an example of the All Primary Database Solutions view.
Figure 3–7 MAA Advisor Page in Oracle Grid Control
You can click the link in the Oracle Solution column to go to a page where you can set up, manage, and configure the specific solution area. Once a solution has been configured, click Refresh to update the configuration status on the page. Once the page is refreshed, click Advisor Details on the Console page to see the updated values.

Managing the High Availability Environment with Oracle Grid Control
3-14 Oracle Database High Availability Best Practices

Managing Unscheduled Outages 4-1
4Managing Unscheduled Outages
This chapter describes unscheduled outages and the Oracle operational best practices that can tolerate or manage each outage type and minimize downtime.
This chapter contains these topics:
■ Overview of Unscheduled Outages
■ Recovering from Unscheduled Outages
■ Restoring Fault Tolerance
4.1 Overview of Unscheduled OutagesThis section complements Table 1-1 in Oracle Database High Availability Overview that describes unscheduled outages that affect the primary or secondary site components. This section also describes the recommended methods to repair or minimize the downtime associated with each outage.
Unscheduled outages are unanticipated failures in any part of the technology infrastructure that supports the application, including the following components:
■ Hardware
■ Software
■ Network infrastructure
■ Naming services infrastructure
■ Database
Your monitoring and high availability infrastructure should provide rapid detection and recovery from downtime. Chapter 3, "Monitoring Using Oracle Grid Control" describes detection, while this chapter focuses on reducing downtime.
The best practice recommendations for reducing unscheduled outages on the primary site and the secondary site, estimated recovery times, and recovery steps appear in the following sections:
■ Managing Unscheduled Outages on the Primary Site
■ Managing Unscheduled Outages on the Standby Site
4.1.1 Managing Unscheduled Outages on the Primary SiteSolutions for unscheduled outages are critical for maximum availability of the system.
See Also: Chapter 5 for information about scheduled outages

Overview of Unscheduled Outages
4-2 Oracle Database High Availability Best Practices
Table 4–1 compares the most common Oracle high availability architectures and summarizes the recovery steps for unscheduled outages on the primary site. For outages that require multiple recovery steps, the table includes links to the detailed descriptions in Section 4.2, "Recovering from Unscheduled Outages" that starts on page 4-4.
Table 4–1 Recovery Times and Steps for Unscheduled Outages on the Primary Site
Outage Scope
Oracle Database 11g
Oracle Database 11g with RAC and Clusterware
Oracle Database 11g with Data Guard Oracle Database 11g MAA
site failure
Hours to days
1. Restore site.
2. Restore from tape backups.
3. Recover database.
Hours to days
1. Restore site.
2. Restore from tape backups.
3. Recover database.
Seconds to 5 minutes1
1. Database Failover with a Standby Database on page 4-8
2. Complete Site Failover on page 4-4
3. Application Failover on page 4-12
Seconds to 5 minutes1
1. Database Failover with a Standby Database on page 4-8
2. Complete Site Failover on page 4-4
3. Application Failover on page 4-12
clusterwide failure
Not applicable Hours to days
1. Restore cluster or restore at least one node.
2. Optionally restore from tape backups if the data is lost or corrupted.
3. Recover database.
Not applicable Seconds to 5 minutes
1. Database Failover with a Standby Database on page 4-8
2. Application Failover on page 4-12
computer failure (node)
Minutes to hours2
1. Restart node and restart database.
2. Reconnect users.
No downtime3
Managed automatically by Oracle RAC Recovery for Unscheduled Outages
Seconds to 5 minutes2
1. Database Failover with a Standby Database on page 4-8
2. Application Failover on page 4-12
No downtime3
Managed automatically by Oracle RAC Recovery for Unscheduled Outages on page 4-10
computer failure (instance)
Minutes2
1. Restart instance.
2. Reconnect users.
No downtime3
Managed automatically by Oracle RAC Recovery for Unscheduled Outages
Minutes2
1. Restart instance.
2. Reconnect users.
or
Seconds to 5 minutes1
1. Database Failover with a Standby Database on page 4-8
2. Application Failover on page 4-12
No downtime3
Managed automatically by Oracle RAC Recovery for Unscheduled Outages on page 4-10

Overview of Unscheduled Outages
Managing Unscheduled Outages 4-3
4.1.2 Managing Unscheduled Outages on the Standby SiteFor most cases, you can manage outages on the secondary site without affecting availability of the primary database. However, if the Data Guard configuration is in maximum protection mode, then unscheduled outages on the last surviving standby database that is running in SYNC mode incurs outages on the primary database. This is necessary to ensure there is no data loss when failing over to the standby database. After downgrading the data protection mode, you can restart the primary database even without accessibility to the standby databases. Outages on the secondary site might affect the maximum time to recovery (MTTR) if there are concurrent failures on the primary site.
Table 4–2 summarizes the recovery steps for unscheduled outages of the standby database on the secondary site. For outages that require multiple recovery steps, the table includes links to the detailed descriptions in Section 4.2, "Recovering from Unscheduled Outages" that starts on page 4-4.
storage failure
No downtime4
ASM Recovery After Disk and Storage Failures on page 4-12
No downtime4
ASM Recovery After Disk and Storage Failures on page 4-12
No downtime4
ASM Recovery After Disk and Storage Failures on page 4-12
No downtime4
ASM Recovery After Disk and Storage Failures on page 4-12
human error
< 30 minutes5
Recovering from Human Error on page 4-25
< 30 minutes5
Recovering from Human Error on page 4-25
<30 minutes5
Recovering from Human Error on page 4-25
< 30 minutes5
Recovering from Human Error on page 4-25
hangs or slow down
See Oracle Database High Availability Overview) solutions for unplanned downtime
Application Failover on page 4-12
See Oracle Database High Availability Overview solutions for unplanned downtime
Application Failover on page 4-12
See Oracle Database High Availability Overview solutions for unplanned downtime
Application Failover on page 4-12
See Oracle Database High Availability Overview solutions for unplanned downtime
Application Failover on page 4-12
1 Recovery time indicated applies to database and existing connection failover. Network connection changes and other site-specific failover activities may lengthen overall recovery time.
2 Recovery time consists largely of the time it takes to restart the failed system.3 Database is still available, but portion of application connected to failed system is temporarily affected.4 Storage failures are prevented by using ASM with mirroring and its automatic rebalance capability.5 Recovery times from human errors depend primarily on detection time. If it takes seconds to detect a malicious DML or DLL
transaction, then it typically only requires seconds to flash back the appropriate transactions, if properly rehearsed. Referential or integrity constraints must be considered.
Table 4–1 (Cont.) Recovery Times and Steps for Unscheduled Outages on the Primary Site
Outage Scope
Oracle Database 11g
Oracle Database 11g with RAC and Clusterware
Oracle Database 11g with Data Guard Oracle Database 11g MAA

Recovering from Unscheduled Outages
4-4 Oracle Database High Availability Best Practices
4.2 Recovering from Unscheduled OutagesThis section describes best practices for recovering from various types of unscheduled outages.
This section contains these topics:
■ Complete Site Failover
■ Database Failover with a Standby Database
■ Oracle RAC Recovery for Unscheduled Outages
■ Application Failover
■ ASM Recovery After Disk and Storage Failures
■ Recovering from Data Corruption (Data Failures)
■ Recovering from Human Error
■ Recovering Databases in a Distributed Environment
4.2.1 Complete Site FailoverWith complete site failover, the database, the middle-tier application server, and all user connections fail over to a secondary site that is prepared to handle the production load.
4.2.1.1 When to Use Complete Site FailoverIf the standby site meets the prerequisites, then complete site failover is recommended for the following scenarios:
■ Primary site disaster, such as natural disasters or malicious attacks
■ Primary network-connectivity failures
■ Primary site power failures
Table 4–2 Recovery Steps for Unscheduled Outages on the Secondary Site
Outage Type Recovery Steps for Single-Instance or Oracle RAC Standby Database
Computer failure (instance) 1. Restart node and standby instance when they are available.
2. Restart recovery.
The broker automatically restarts the log apply services.
Note: If there is only one standby database and if maximum database protection is configured, then the primary database shuts down to ensure that there is no data divergence with the standby database.
Note: If this is an Oracle RAC standby database, then there is no affect on primary database availability if you configured the primary database Oracle Net descriptor to use connect-time failover to an available standby instance. If you are using the broker, connect-time failover is configured automatically.
Data corruption Restoring Fault Tolerance After a Standby Database Data Failure on page 4-43
Primary database opens with RESETLOGS because of Flashback Database operations or point-in-time media recovery
Restoring Fault Tolerance After the Primary Database Was Opened Resetlogs on page 4-44

Recovering from Unscheduled Outages
Managing Unscheduled Outages 4-5
4.2.1.2 Best Practices for Complete Site FailoverSite failover can be expedited in minutes by using the following practices:
■ Use the Data Guard configuration best practices in Section 2.6.4, "General Configuration Best Practices for Data Guard"
■ Use Data Guard fast-start failover to automatically fail over to the standby database, with a recovery time objective (RTO) of less than 30 seconds (described in Section 2.6.7.2.3, "Fast-Start Failover Best Practices")
■ Maintain a running middle-tier application server on the secondary site to avoid the startup time, or redirect existing applications to the new primary database using the Fast Connection Failover best practices described in:
– Section 2.9, "Configuring Fast Connection Failover" on page 2-77
– The MAA white paper: "Client Failover for Highly Available Oracle Databases" at http://www.otn.oracle.com/goto/maa
■ Automate the DNS failover procedure
Data loss is dependent on the Oracle Data Guard configuration and the use of synchronous or asynchronous redo transport.
4.2.1.3 Repair SolutionA wide-area traffic manager on the primary and secondary sites provides the site failover function. The wide-area traffic manager can redirect traffic automatically if the primary site, or a specific application on the primary site, is not accessible. It can also be triggered manually to switch to the secondary site for switchovers. Traffic is directed to the secondary site only when the primary site cannot provide service due to an outage or after a switchover. If the primary site fails, then user traffic is directed to the secondary site automatically.
Figure 4–1 illustrates the possible network routes before site failover:
1. Client requests enter the client tier of the primary site and travel by the WAN traffic manager.
2. Client requests are sent through the firewall into the demilitarized zone (DMZ) to the application server tier.
3. Requests are forwarded through the active load balancer to the application servers.
4. Requests are sent through another firewall and into the database server tier.
5. The application requests, if required, are routed to a Oracle RAC instance.
6. Responses are sent back to the application and clients by a similar path.

Recovering from Unscheduled Outages
4-6 Oracle Database High Availability Best Practices
Figure 4–1 Network Routes Before Site Failover
Figure 4–2 illustrates the network routes after site failover. Client or application requests enter the secondary site at the client tier and follow the same path on the secondary site that they followed on the primary site.
Heartbeat hb
Firewall
hb
WANTraffic
Manager
Router Router
Primary Site
Primary
Client
Tier 1 - Client
Tier 2 - Application Server
Firewall Firewall hb
WANTraffic
Manager
Router Router
Secondary Site
Secondary
Firewall Firewall
Hardware-based load
balancer
Switches
IMAPServers
Application/Web Servers
Application/Web Servers
LDAPServers
Standby
Hardware-based loadbalancer
hb
hb hb
Firewall Firewall
Switches
Hardware-based load
balancer
Switches
IMAPServers
LDAPServers
Standby
Hardware-based loadbalancer
Active
hbFirewall Firewall
Switches
Firewall
Tier 3 - Database Server
Switches
RACInstance
RACInstance
RouterSwitches SwitchesRouter Switches
hbhb RAC
DatabaseRAC
Database
RACInstance
RACInstance
hbhb
Internet Standby Components
Active

Recovering from Unscheduled Outages
Managing Unscheduled Outages 4-7
Figure 4–2 Network Routes After Site Failover
The following steps describe the effect of a failover or switchover on network traffic:
1. The administrator has failed over or switched over the primary database to the secondary site. This is automatic if you are using Data Guard fast-start failover.
2. The administrator starts the middle-tier application servers on the secondary site, if they are not running.
3. The wide-area traffic manager selection of the secondary site can be automatic for an entire site failure. The wide-area traffic manager at the secondary site returns the virtual IP address of a load balancer at the secondary site and clients are directed automatically on the subsequent reconnect. In this scenario, the site failover is accomplished by an automatic domain name system (DNS) failover.
Alternatively, a DNS administrator can manually change the wide-area traffic manager selection to the secondary site for the entire site or for specific applications. The following is an example of a manual DNS failover:
a. Change the DNS to point to the secondary site load balancer:
Heartbeat hb
Firewall
hb
WANTraffic
Manager
Router Router
Primary Site
Primary
Client
Tier 1 - Client
Tier 2 - Application Server
Firewall Firewall hb
WANTraffic
Manager
Router Router
Secondary Site
Secondary
Firewall Firewall
Hardware-based load
balancer
Switches
IMAPServers
Application/Web Servers
Application/Web Servers
LDAPServers
Standby
Hardware-based loadbalancer
hb
hb hb
Firewall Firewall
Switches
Hardware-based load
balancer
Switches
IMAPServers
LDAPServers
Standby
Hardware-based loadbalancer
hbFirewall Firewall
Switches
Firewall
Tier 3 - Database Server
Switches
RACInstance
RACInstance
RouterSwitches SwitchesRouter Switches
hbhb RAC
DatabaseRAC
Database
RACInstance
RACInstance
hbhb
Internet Standby Components
Active Active

Recovering from Unscheduled Outages
4-8 Oracle Database High Availability Best Practices
The master (primary) DNS server is updated with the zone information, and the change is announced with the DNS NOTIFY announcement.
The slave DNS servers are notified of the zone update with a DNS NOTIFY announcement, and the slave DNS servers pull the zone information.
b. Clear affected records from caching DNS servers.
A caching DNS server is used primarily for performance and fast response. The caching server obtains information from an authoritative DNS server in response to a host query and then saves (caches) the data locally. On a second or subsequent request for the same data, the caching DNS server responds with its locally stored data (the cache) until the time-to-live (TTL) value of the response expires. At this time, the server refreshes the data from the zone master. If the DNS record is changed on the primary DNS server, then the caching DNS server does not pick up the change for cached records until TTL expires. Flushing the cache forces the caching DNS server to go to an authoritative DNS server again for the updated DNS information.
Flush the cache if the DNS server being used supports such a capability. The following is the flush capability of common DNS BIND versions:
BIND 9.3.0: The command rndc flushname name flushes individual entries from the cache.
BIND 9.2.0 and 9.2.1: The entire cache can be flushed with the command rndc flush.
BIND 8 and BIND 9 up to 9.1.3: Restarting the named server clears the cache.
c. Refresh local DNS service caching.
Some operating systems might cache DNS information locally in the local name service cache. If so, this cache must also be cleared so that DNS updates are recognized quickly.
Solaris: nscd
Linux: /etc/init.d/nscd restart
Microsoft Windows: ipconfig /flushdns
Apple Mac OS X: lookupd -flushcache
d. The secondary site load balancer directs traffic to the secondary site middle-tier application server.
e. The secondary site is ready to take client requests.
Failover also depends on the client's Web browser. Most browser applications cache the DNS entry for a period. Consequently, sessions in progress during an outage might not fail over until the cache timeout expires. To resume service to such clients, close the browser and restart it.
4.2.2 Database Failover with a Standby DatabaseFailover is the operation of transitioning one standby database to the role of primary database. A failover operation is invoked when an unplanned failure occurs on the
Note: The master and slave servers are authoritative name servers. Therefore, they contain trusted DNS information.

Recovering from Unscheduled Outages
Managing Unscheduled Outages 4-9
primary database and there is no possibility of recovering the primary database in a timely manner.
With Oracle Data Guard, you can automate the failover process using the broker and fast-start failover, or you can perform the failover manually:
■ Fast-start failover eliminates the uncertainty of a process that requires manual intervention and automatically executes a zero loss or minimum-loss failover (that you configure using the FastStartFailoverLagLimit property) within seconds of an outage being detected. See Section 2.6.7.2.3, "Fast-Start Failover Best Practices" for configuration best practices.
■ Manual failover allows for a failover process where decisions are user driven using any of the following methods:
– Oracle Enterprise Manager
– The broker command-line interface (DGMGRL)
– SQL*Plus statements
See Section 4.2.2.3, "Best Practices for Performing Manual Failover" on page 4-10.
A database failover is accompanied by an application failover and, in some cases, preceded by a site failover. After the Data Guard failover, the secondary site hosts the primary database. You must reinstate the original primary database as a new standby database to restore fault tolerance of the configuration. See Section 4.3.2, "Restoring a Standby Database After a Failover" on page 4-39.
A failover operation typically occurs in under a minute, and with little or no data loss.
4.2.2.1 When To Perform a Data Guard FailoverWhen a primary database failure cannot be repaired in time to meet your Recovery Time Objective (RTO) using local backups or Flashback technology, you should perform a failover using Oracle Data Guard.
You should perform a failover manually due to an unplanned outage such as:
■ A site disaster, which results in the primary database becoming unavailable
■ Damage resulting from user errors that cannot be repaired in a timely fashion
■ Data failures, which impact the production application
A failover requires that you reinstate the initial primary database as a standby database to restore fault tolerance to your environment. You can quickly reinstate the standby database using Flashback Database provided the original primary database has not been damaged. See Section 4.3.2, "Restoring a Standby Database After a Failover" on page 4-39.
See Also:
■ Oracle Data Guard Concepts and Administration.for a complete description of failover processing
■ The following MAA best practice white papers available at http://www.otn.oracle.com/goto/maa
"Data Guard Fast-Start Failover"
"Data Guard Switchover and Failover"

Recovering from Unscheduled Outages
4-10 Oracle Database High Availability Best Practices
4.2.2.2 Best Practices for Implementing Fast-Start FailoverA fast-start failover is completely automated and requires no user intervention.
There are no procedural best practices to consider when performing a fast-start failover. However, it is important to address all of the configuration best practices described in Section 2.6.7.2.3, "Fast-Start Failover Best Practices" on page 2-58.
4.2.2.3 Best Practices for Performing Manual FailoverWhen performing a manual failover:
■ Follow the configuration best practices outlined in Section 2.6.7.2.4, "Manual Failover Best Practices" on page 2-59.
■ Choose one of the following methods:
– Oracle Enterprise Manager
See Oracle Data Guard Broker for complete information about how to perform a manual failover using Oracle Enterprise Manager. The procedure is the same for both physical and logical standby databases.
– Oracle Data Guard broker command-line interface (DGMGRL)
See Oracle Data Guard Broker for complete information about how to perform a manual failover using Oracle Enterprise Manager. The procedure is the same for both physical and logical standby databases.
– SQL*Plus statements:
* Physical standby database: Follow the steps for "Performing a Failover to a Physical Standby Database" in Oracle Data Guard Concepts and Administration.
* Logical standby databases: Follow the steps for "Performing a Failover to a Logical Standby Database" in Oracle Data Guard Concepts and Administration.
4.2.3 Oracle RAC Recovery for Unscheduled OutagesThis solution is used automatically when there is a node or instance failure. Surviving instances automatically recover the failed instances and potentially aid in the automatic client failover. Recover times can be bounded by adopting the database and Oracle RAC configuration best practices and can usually lead to instance recovery times of seconds to minutes in very large busy systems, with no data loss.
Use the following recovery methods:
■ Automatic Instance Recovery for Failed Instances
■ Automatic Service Relocation
■ Oracle Cluster Registry
4.2.3.1 Automatic Instance Recovery for Failed InstancesInstance failure occurs when software or hardware problems disable an instance. After instance failure, Oracle automatically uses the online redo log file to perform database recovery as described in this section.
See Also: The MAA white paper "Data Guard Switchover and Failover Best Practices" at http://www.otn.oracle.com/goto/maa

Recovering from Unscheduled Outages
Managing Unscheduled Outages 4-11
Instance recovery in Oracle RAC does not include restarting the failed instance or the recovery of applications that were running on the failed instance. Applications that were running continue by using service relocation and fast application notification (as described in Section 4.2.3.2, "Automatic Service Relocation" on page 4-11).
When one instance performs recovery for another instance, the recovering instance:
■ Reads redo log entries generated by the failed instance and uses that information to ensure that committed transactions are recorded in the database. Thus, data from committed transactions is not lost
■ Rolls back uncommitted transactions that were active at the time of the failure and releases resources used by those transactions
When multiple node failures occur, as long as one instance survives, Oracle RAC performs instance recovery for any other instances that fail. If all instances of an Oracle RAC database fail, then on subsequent restart of any one instance a crash recovery occurs and all committed transactions are recovered. If Data Guard is available, you can fail over automatically with Data Guard fast-start failover after all instances are down.
4.2.3.2 Automatic Service RelocationService reliability is achieved by configuring and failing over among redundant instances. More instances are enabled to provide a service than would otherwise be needed. If a hardware failure occurs and adversely affects a Oracle RAC database instance, then CRS automatically moves any services on that instance to another available instance, as configured with DBCA or Enterprise Manager. Then, Cluster Ready Services (CRS) attempt to restart the failed nodes and instances.
CRS recognizes when a failure affects a service and automatically fails over the service and redistributes the clients across the surviving instance supporting the service. In parallel, CRS attempts to restart and integrate the failed instances and dependent resources back into the system. Notification of failures using fast application notification (FAN) events occur at various levels within the Oracle Server architecture. The response can include notifying external parties through Oracle Notification Service (ONS), advanced queueing, or FAN callouts, recording the fault for tracking, event logging, and interrupting applications. Notification occurs from a surviving node when the failed node is out of service. The location and number of nodes serving a service is transparent to applications. Auto restart and recovery are automatic, including all the subsystems, such as the listener and the ASM instance, not just database.
4.2.3.3 Oracle Cluster RegistryLoss of the Oracle Cluster Registry (OCR) file affects the availability of Oracle RAC and Oracle Clusterware. The OCR file can be restored from a physical backup that is automatically created or from an export file that is manually created by using the ocrconfig tool. Additionally, starting with Oracle Database 10g Release 10.2, Oracle can optionally mirror the OCR so that a single OCR device failure can be tolerated. Ensure the OCR mirror is on a physically separate device and preferably on a separate controller.
See Also: "Administering Storage in Real Application Clusters" in Oracle Real Application Clusters Administration and Deployment Guide

Recovering from Unscheduled Outages
4-12 Oracle Database High Availability Best Practices
4.2.4 Application FailoverWith proper configuration, applications can receive fast and efficient notification when application services become unavailable. When notified, application connections occur transparently to surviving instances of an Oracle RAC database or to a standby database that has assumed the primary role following a failover.
In an Oracle RAC configuration, services are essential to achieving fast and transparent application failover. If a service becomes unavailable for a particular instance because of an instance or node failure, the service fails over to an available instance in the cluster, thereby allowing applications to continue processing. Clients are notified of the service relocation through Fast Application Notification (FAN).
In an Oracle Data Guard configuration, you can configure services for client failover across sites. After a site failure in a Data Guard configuration, the new primary database can automatically publish the production service while notifying affected clients (through FAN events) that the services are no longer available on the failed primary database.
For hangs or situations in which the response time is unacceptable, you can configure Oracle Enterprise Manager or a custom application heartbeat to detect application or response time slowdown and react to these situations. For example, you can configure the Enterprise Manager Beacon to monitor and detect application response times. Then, after a certain time threshold expires, Enterprise Manager can call the Oracle Data Guard DBMS_DG.INITIATE_FS_FAILOVER PL/SQL procedure to initiate a database failover immediately followed by an application failover using FAN notifications and service relocation.
FAN notifications and service relocation enable automatic and fast redirection of clients in the event of any failure or planned maintenance that results in an Oracle RAC or Oracle Data Guard fail over.
4.2.5 ASM Recovery After Disk and Storage FailuresThe impacts and recommended repairs for various ASM failure types are summarized in Table 4–3.
See Also:
■ The MAA white paper "Client Failover for Highly Available Oracle Databases" at http://www.otn.oracle.com/goto/maa
■ The section "Application Initiated Fast-Start Failover" in Oracle Data Guard Broker for more information about the DBMS_DG.INITIATE_FS_FAILOVER PL/SQL procedure
Table 4–3 Types of ASM Failures and Recommended Repair
Failure Description Impact Recommended Repair
ASM instance failure
ASM instance fails
All database instances accessing ASM storage from the same node shut down.
Automatic Oracle RAC Recovery for Unscheduled Outages on page 4-10
If Oracle RAC is not used, use Data Guard failover (see Section 4.2.2.2, "Best Practices for Implementing Fast-Start Failover" on page 4-10)
If Oracle RAC and Data Guard are not used, fix the underlying problem and then restart ASM and the database instances

Recovering from Unscheduled Outages
Managing Unscheduled Outages 4-13
4.2.5.1 ASM Instance FailureIf the ASM instance fails, then database instances accessing ASM storage from the same node shut down. The following list describes failover processing:
■ If the primary database is an Oracle RAC database, then application failover occurs automatically and clients connected to the database instance reconnect to remaining instances. Thus, the service is provided by other instances in the cluster and processing continues. The recovery time typically occurs in seconds.
■ If the primary database is not an Oracle RAC database, then an ASM instance failure shuts down the entire database.
■ If the configuration uses Oracle Data Guard and fast-start failover is enabled, a database failover is triggered automatically and clients automatically reconnect to the new primary database after the failover completes. The recovery time is the amount of time it takes to complete an automatic Data Guard fast-start failover operation. If fast-start failover is not configured, then you must recover from this outage by either restarting the ASM and database instances manually, or by performing a manual Data Guard failover.
■ If the configuration includes neither Oracle RAC nor Data Guard, then you must manually restart the ASM instance and database instances. The recovery time depends on how long it takes to perform these tasks.
4.2.5.2 ASM Disk FailureIf the ASM disk fails, then failover processing is as follows:
ASM disk failure
One or more ASM disks fail, but all disk groups remain online.
All data remains accessible. This is possible only with normal or high redundancy disk groups.
ASM automatically rebalances to the remaining disk drives and reestablishes redundancy. There must be enough free disk space in the remaining disk drives to restore the redundancy or the rebalance may fail with an ORA-15041 (See Section 2.1.2.2, "Oracle Storage Grid Best Practices for Planned Maintenance")
Note: External redundancy disk groups should use mirroring in the storage array to protect from disk failure. Disk failures should not be exposed to ASM.
Data area disk-group failure
One or more ASM disks fail, and data area disk group goes offline.
Databases accessing the data area disk group shut down.
Perform Data Guard failover or local recovery as described in Section 4.2.5.3, "Data Area Disk Group Failure" on page 4-16
Flash recovery area disk-group failure
One or more ASM disks fail, and the flash recovery area disk group goes offline.
Databases accessing the flash recovery area disk group shut down.
Perform local recovery or Data Guard failover as described in Section 4.2.5.4, "Flash Recovery Area Disk Group Failure" on page 4-18
Table 4–3 (Cont.) Types of ASM Failures and Recommended Repair
Failure Description Impact Recommended Repair

Recovering from Unscheduled Outages
4-14 Oracle Database High Availability Best Practices
■ External redundancy
If an ASM disk group is configured as an external redundancy type, then a failure of a single disk is handled by the storage array and should not be seen by the ASM instance. All ASM and database operations using the disk group continue normally.
However, if the failure of an external redundancy disk group is seen by the ASM instance, then the ASM instance takes the disk group offline immediately, causing Oracle instances accessing the disk group to crash. If the disk failure is temporary, then you can restart ASM and the database instances and crash recovery occurs after the disk group is brought back online.
■ Normal or a high-redundancy
If an ASM disk group is configured as a normal or a high-redundancy type, then disk failure is handled transparently by ASM and the databases accessing the disk group are not affected.
An ASM instance automatically starts an ASM rebalance operation to distribute the data on one or more failed disks to alternative disks in the ASM disk group. While the rebalance operation is in progress, subsequent disk failures may affect disk group availability if the disk contains data that has yet to be remirrored. When the rebalance operation completes successfully, the ASM disk group is no longer at risk in the event of a subsequent failure. Multiple disk failures are handled similarly, provided the failures affect only one failure group in an ASM disk group.
The failure of multiple disks in multiple failure groups where a primary extent and all of its mirrors have been lost cause the disk group to go offline.
This following recovery methods can be used:
■ Using Enterprise Manager to Repair ASM Disk Failure
■ Using SQL to Add Replacement Disks Back to the Disk Group
4.2.5.2.1 Using Enterprise Manager to Repair ASM Disk Failure
Figure 4–3 shows Enterprise Manager reporting disk failures. Three alerts appear at 11:19:29. The first alert is an Offline Disk Count. The second and third alerts are Disk Status messages for data area disk DATA.XBBT1D06_DATA and recovery area disk RECO.XBBT1D06_RECO:
2 disks are offlineDisk DATA.XBBT1D06_DATA is offline.Disk RECO.XBBT1D06_RECO is offline.
See Also: Section 4.2.5.3, "Data Area Disk Group Failure" on page 4-16 and Section 4.2.5.4, "Flash Recovery Area Disk Group Failure" on page 4-18 for details

Recovering from Unscheduled Outages
Managing Unscheduled Outages 4-15
Figure 4–3 Enterprise Manager Reports Disk Failures
Figure 4–4 shows Enterprise Manager reporting the status of data area disk group DATA and recovery area disk group RECO. The red arrows under Member Disks indicate that one disk has failed in each disk group. The numbers under Pending Operations indicate that one operation is pending for each disk group.
Figure 4–4 Enterprise Manager Reports ASM Disk Groups Status
Figure 4–5 shows Enterprise Manager reporting a pending REBAL operation on the DATA disk group. The operation is about one-third done, as shown in % Complete, and the Remaining Time is estimated to be 16 minutes.

Recovering from Unscheduled Outages
4-16 Oracle Database High Availability Best Practices
Figure 4–5 Enterprise Manager Reports Pending REBAL Operation
4.2.5.2.2 Using SQL to Add Replacement Disks Back to the Disk Group Perform these steps after one or more failed disks have been replaced, and access to the storage has been restored:
1. Add the one or more replacement disks to the failed disk group with the following SQL command:
ALTER DISKGROUP disk_group ADD FAILGROUP failure_group DISK 'disk1','disk2',...;
2. Check the progress of the operation:
SELECT * FROM V$ASM_OPERATION;
4.2.5.3 Data Area Disk Group FailureA data area disk group failure should occur only when there have been multiple failures. For example, if the data-area disk group is defined as external redundancy, a single-disk failure should not be exposed to ASM. However, multiple disk failures in a storage array may be seen by ASM causing the disk group to go offline. Similarly, multiple disk failures in different failure groups in a normal or high-redundancy disk group may cause the disk group to go offline.
When one or more disks fail in a normal or high redundancy disk group, but the ASM disk group is accessible, there is no loss of data and no immediate loss of accessibility. An ASM instance automatically starts an ASM rebalance operation to distribute the data on the one or more failed disks to alternative disks in the ASM disk group. When the rebalance operation completes successfully, the ASM disk group is no longer at risk in the event of a second failure. There must be enough disk space on the remaining disks in the disk group for the rebalance to complete successfully.
Table 4–4 summarizes the possible solutions for recovering from a data area disk group failure.
If Data Guard is being used and fast-start failover is configured, then an automatic failover occurs when the database shuts down due to the data-area disk group going offline. If fast-start failover is not configured, then perform a manual failover.
Table 4–4 Recovery Options for Data Area Disk Group Failure
Recovery Option Recovery Time Objective (RTO) Recovery Point Objective (RPO)
Data Guard failover
Five minutes or less Varies depending on the data protection level chosen
Local recovery Database restore and recovery time Zero

Recovering from Unscheduled Outages
Managing Unscheduled Outages 4-17
If you decide to perform a Data Guard failover, then the recovery time objective (RTO) is expressed in terms of minutes or seconds, depending on the presence of the Data Guard observer process and fast-start failover. However, if a manual failover occurs and not all data is available on the standby site, then data loss might result.
After Data Guard failover has completed and the application is available, you must resolve the data area disk group failure. Continue with the following "Local Recovery Steps" procedure to resolve the ASM disk group failure.
The RTO for local recovery only is based on the time required to:
1. Repair and replace the failed storage components
2. Restore and recover the database
Because the loss affects only the data-area disk group, there is no loss of data. All transactions are recorded in the Oracle redo log members that reside in the flash recovery area, so complete media recovery is possible.
If you are not using Data Guard, then perform the following local recovery steps. The time required to perform local recovery depends on how long it takes to restore and recover the database. There is no data loss when performing local recovery.
Local Recovery StepsPerform these steps after one or more failed disks have been replaced and access to the storage has been restored:
1. Rebuild the ASM disk group using the new storage location by issuing the following SQL*Plus statement on the ASM instance:
SQL> CREATE DISKGROUP DATA NORMAL REDUNDANCY DISK 'path1','path2',...;
2. Start the instance NOMOUNT by issuing the following RMAN command:
RMAN> STARTUP FORCE NOMOUNT;
3. Restore the control file from the surviving copy located in the recovery area:
RMAN> RESTORE CONTROLFILE FROM 'recovery_area_controlfile';
4. Start the instance MOUNT:
RMAN> STARTUP FORCE MOUNT;
5. Restore the database:
RMAN> RESTORE DATABASE
6. Recover the database:
RMAN> RECOVER DATABASE;
7. If you use block change tracking, then disable and reenable the block change tracking file using SQL*Plus statements:
Note: If you have performed an Oracle Data Guard failover to a new primary database, then you can now use the following procedure to reintroduce the database into the Data Guard environment. Also, see Section 4.3.2, "Restoring a Standby Database After a Failover" on page 4-39.
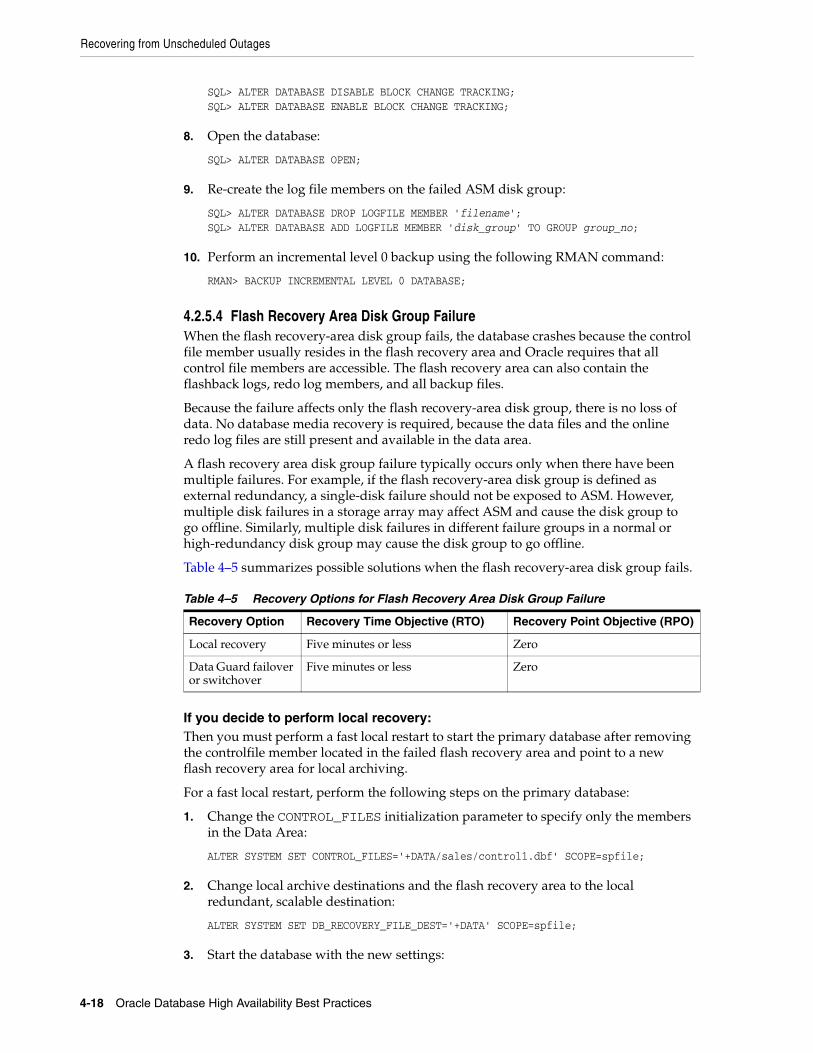
Recovering from Unscheduled Outages
4-18 Oracle Database High Availability Best Practices
SQL> ALTER DATABASE DISABLE BLOCK CHANGE TRACKING;SQL> ALTER DATABASE ENABLE BLOCK CHANGE TRACKING;
8. Open the database:
SQL> ALTER DATABASE OPEN;
9. Re-create the log file members on the failed ASM disk group:
SQL> ALTER DATABASE DROP LOGFILE MEMBER 'filename';SQL> ALTER DATABASE ADD LOGFILE MEMBER 'disk_group' TO GROUP group_no;
10. Perform an incremental level 0 backup using the following RMAN command:
RMAN> BACKUP INCREMENTAL LEVEL 0 DATABASE;
4.2.5.4 Flash Recovery Area Disk Group FailureWhen the flash recovery-area disk group fails, the database crashes because the control file member usually resides in the flash recovery area and Oracle requires that all control file members are accessible. The flash recovery area can also contain the flashback logs, redo log members, and all backup files.
Because the failure affects only the flash recovery-area disk group, there is no loss of data. No database media recovery is required, because the data files and the online redo log files are still present and available in the data area.
A flash recovery area disk group failure typically occurs only when there have been multiple failures. For example, if the flash recovery-area disk group is defined as external redundancy, a single-disk failure should not be exposed to ASM. However, multiple disk failures in a storage array may affect ASM and cause the disk group to go offline. Similarly, multiple disk failures in different failure groups in a normal or high-redundancy disk group may cause the disk group to go offline.
Table 4–5 summarizes possible solutions when the flash recovery-area disk group fails.
If you decide to perform local recovery:Then you must perform a fast local restart to start the primary database after removing the controlfile member located in the failed flash recovery area and point to a new flash recovery area for local archiving.
For a fast local restart, perform the following steps on the primary database:
1. Change the CONTROL_FILES initialization parameter to specify only the members in the Data Area:
ALTER SYSTEM SET CONTROL_FILES='+DATA/sales/control1.dbf' SCOPE=spfile;
2. Change local archive destinations and the flash recovery area to the local redundant, scalable destination:
ALTER SYSTEM SET DB_RECOVERY_FILE_DEST='+DATA' SCOPE=spfile;
3. Start the database with the new settings:
Table 4–5 Recovery Options for Flash Recovery Area Disk Group Failure
Recovery Option Recovery Time Objective (RTO) Recovery Point Objective (RPO)
Local recovery Five minutes or less Zero
Data Guard failover or switchover
Five minutes or less Zero

Recovering from Unscheduled Outages
Managing Unscheduled Outages 4-19
STARTUP MOUNT:
4. If the flashback logs were damaged or lost, it may be necessary to disable and reenable Flashback Database:
ALTER DATABASE FLASHBACK OFF;ALTER DATABASE FLASHBACK ON;ALTER DATABASE OPEN;
However, this is a temporary fix until you create a flash recovery area to replace the failed storage components. Oracle recommends using the "Local Recovery Steps" section on page 4-19.
If you decide to perform a Data Guard role transition:Then the RTO can be expressed in terms of seconds or minutes, depending on the presence of the Data Guard observer process and fast-start failover.
If the protection level is maximum performance or the standby database is unsynchronized with the primary database, then:
1. Temporarily start the primary database by removing the controlfile member and pointing to a temporary flash recovery area (file system) in the SPFILE.
2. Perform a Data Guard switchover to ensure no data loss.
3. After the switchover has completed and the application is available, resolve the flash recovery area disk group failure.
4. Shut down the affected database and continue by using the instructions in the "Local Recovery Steps" section on page 4-19 to resolve the ASM disk group failure.
Local Recovery Steps
1. Replace or get access to storage that can be used as a flash recovery area
2. Rebuild the ASM disk group using the storage location by issuing the following SQL*Plus statement:
SQL> CREATE DISKGROUP RECO NORMAL REDUNDANCY DISK 'path1','path2',...;
3. Start the instance NOMOUNT using the following RMAN command:
RMAN> STARTUP FORCE NOMOUNT;
4. Restore the control file from the surviving copy located in the data area:
RMAN> RESTORE CONTROLFILE FROM 'data_area_controlfile';
5. Start the instance MOUNT:
RMAN> STARTUP FORCE MOUNT;
Note: If you performed an Oracle Data Guard failover to a new primary database, then you cannot use this procedure to reintroduce the original primary database as a standby database. This is because Flashback Database log files that are required as part of reintroducing the database have been lost. You must perform a full reinstatement of the standby database.

Recovering from Unscheduled Outages
4-20 Oracle Database High Availability Best Practices
6. If you use Flashback Database, then disable it with the following SQL*Plus statement:
SQL> ALTER DATABASE FLASHBACK OFF;
7. Open the database and allow instance recovery to complete:
SQL> ALTER DATABASE OPEN;
8. Issue the following statements only if Flashback Database is required:
SQL> SHUTDOWN IMMEDIATE;SQL> STARTUP MOUNT;SQL> ALTER DATABASE FLASHBACK ON;SQL> ALTER DATABASE OPEN;
9. Re-create the log file members on the failed ASM disk group:
SQL> ALTER DATABASE DROP LOGFILE MEMBER 'filename';SQL> ALTER DATABASE ADD LOGFILE MEMBER 'disk_group' TO GROUP group_no;
10. Synchronize the control file and the flash recovery area using the following RMAN commands:
RMAN> CATALOG RECOVERY AREA;RMAN> CROSSCHECK ARCHIVELOG ALL;RMAN> CROSSCHECK BACKUPSET;RMAN> CROSSCHECK DATAFILECOPY ALL;RMAN> LIST EXPIRED type;RMAN> DELETE EXPIRED type;
In the example, the type variable is a placeholder for both LIST EXPIRED BACKUP and LIST EXPIRED COPY commands, and also for the DELETE EXPIRED BACKUP and DELETE EXPIRED COPY commands. You should run all of these commands now.
11. Assuming that data has been lost in some way, perform a backup:
RMAN> BACKUP INCREMENTAL LEVEL 0 DATABASE;
4.2.6 Recovering from Data Corruption (Data Failures)Recovering from data corruption is an unscheduled outage scenario. Data corruption is usually—but not always—caused by some activity or failure that occurs outside the database, even though the problem might be evident within the database.
Data corruption in data files has two categories:
■ Data file block corruption
A corrupt data file block can be accessed, but the contents in the block are invalid or inconsistent. The typical cause of data file corruption is a faulty hardware or software component in the I/O stack, which includes, but is not limited to, the file system, volume manager, device driver, host bus adapter, storage controller, and disk drive.
The database usually remains available when corrupt blocks have been detected, but some corrupt blocks might cause widespread problems, such as corruption in a file header or with a data dictionary object, or corruption in a critical table that renders an application unusable.

Recovering from Unscheduled Outages
Managing Unscheduled Outages 4-21
A data fault is detected when it is recognized by the user, administrator, RMAN backup, or application because it has affected the availability of the application. For example:
– A single corrupt data block in a user table that cannot be read by the application because of a bad spot of the physical disk
– A single corrupt data block because of block inconsistencies detected by Oracle. The block is marked corrupted and any application accessing the block receives an ORA-1578 error.
– A database that automatically shuts down because of the invalid blocks of a data file in the SYSTEM tablespace caused by a failing disk controller
■ Media failure
This category of data corruption results from a physical hardware problem or user error. The system cannot successfully read or write to a file that is necessary to operate the database.
RMAN block media recovery provides the highest application availability if targeted blocks are not critical to application functionality. Data Guard switchover or failover to standby database provides the fastest predictable RTO.
Other outages that result in database objects becoming unavailable or inconsistent are caused by human error, such as dropping a table or erroneously updating table data. Information about recovering from human error can be found in Section 4.2.7, "Recovering from Human Error" on page 4-25.
If the data corruption affects nondata files, then the repair may be slightly different. Table 4–6 provides a matrix of the key non database object corruption and the recommended repair.
Table 4–6 Non Database Object Corruption and Recommended Repair
Object or Component Affected Impact Repair
Any control file Database fails Data Guard fast-start failover automatically fails over to the standby database.
Redo log member None 1. Investigate failure and check system.
2. Drop and re-create redo log member.
Active redo log group
Database fails 1. If the database is still running and the lost active redo log is not the current log, then issue the ALTER SYSTEM CHECKPOINT statement.
2. If checkpoint is possible, then clear the redo log group.
3. If a checkpoint is not possible, use a solution described in the next table row (Active or current redo log group that is still needed for crash recovery).
See Also Oracle Database Backup and Recovery User's Guide for more information about recovering from the loss of active logs.

Recovering from Unscheduled Outages
4-22 Oracle Database High Availability Best Practices
You can resolve a data corruption outage by using any of following methods:
■ Use Data Recovery Advisor to Automate Failure Diagnosis and Repair
■ Use Data Guard to Recover From Data Corruption and Data Failure
■ Use RMAN Block Media Recovery
■ Use RMAN Data File Media Recovery
■ Re-Create Objects Manually
Active or current redo log group that is still needed for crash recovery
Database fails Use one of the following solutions:
■ Oracle Data Guard failover.
■ Flashback Database—either flashback the database to a consistent time and then issue an OPEN RESETLOGS statement, or flashback to a time before the damaged log.
■ Begin incomplete media recovery, recovering up through the log before the damaged log.
Ensure that the current name of the lost redo log can be used for a newly created file. If not, then rename the members of the damaged online redo log group to a new location. For example, enter the following:
ALTER DATABASE RENAME FILE "/disk1/oradata/trgt/redo01.log" TO "/tmp/redo01.log";
ALTER DATABASE RENAME FILE "/disk1/oradata/trgt/redo01.log" TO "/tmp/redo02.log";
Then, open the database using the OPEN RESETLOGS option:
ALTER DATABASE OPEN RESETLOGS;
Incomplete media recovery and Flashback Database are equivalent solutions. However, Flashback Database is typically faster.
Archived redo log file1
None 1. Create a database backup.
2. If the standby database did not already receive redo data through the LGWR SYNC and ASYNC transport, then refresh the standby database by applying an incremental backup, by re-creating the standby database from the primary database, or by using a backup of the primary database.
SPFILE None Restore SPFILE from a backup and revise it.1 Assumes loss or corruption of all copies of an archived redo log (if multiple archive destinations were
specified).
Table 4–6 (Cont.) Non Database Object Corruption and Recommended Repair
Object or Component Affected Impact Repair

Recovering from Unscheduled Outages
Managing Unscheduled Outages 4-23
4.2.6.1 Use Data Recovery Advisor to Automate Failure Diagnosis and RepairData Recovery Advisor automatically diagnoses data failures, determines and presents appropriate repair options, and executes repairs at the user's request. By automating data repair, Data Recovery Advisor improves the manageability and reliability of an Oracle database and thus helps reduce the MTTR.
Data Recovery Advisor has both a command-line and a GUI interface. The GUI interface is available in Oracle Enterprise Manager Database Control and Grid Control. To navigate to the recovery page in the GUI, you can click Perform Recovery in the Availability tab of the Database Home page. In the RMAN command-line interface, the Data Recovery Advisor commands include LIST FAILURE, ADVISE FAILURE, REPAIR FAILURE, and CHANGE FAILURE.
4.2.6.2 Use Data Guard to Recover From Data Corruption and Data FailureFailover is the operation of transitioning the standby databases to the primary database role. A database switchover is a planned transition in which a standby database and a primary database switch roles. Either of these operations can occur in less than five minutes and with no data loss.
Use Data Guard switchover or failover for data corruption or data failure when:
■ The database is down or when the database is up but the application is unavailable because of data corruption or failure, and the time to restore and recover locally is long or unknown.
■ Recovering locally takes longer than the business service-level agreement or RTO.
4.2.6.3 Use RMAN Block Media RecoveryBlock media recovery recovers one block or a set of data blocks marked "media corrupt" in a data file by using the RMAN RECOVER BLOCK command. When a small number of data blocks are marked media corrupt and require media recovery, you can selectively restore and recover damaged blocks rather than whole data files. This results in lower RTO because only blocks that need recovery are restored and only necessary corrupt blocks are recovered. Block media recovery minimizes redo application time and avoids I/O overhead during recovery. It also enables affected data files to remain online during recovery of the corrupt blocks. The corrupt blocks, however, remain unavailable until they are completely recovered.
Use block media recovery when:
Note: The initial release of Data Recovery Advisor does not support Oracle RAC. In addition, while you can use Data Recovery Advisor when managing a primary database in a Data Guard configuration, you cannot use Data Recovery Advisor to troubleshoot a physical standby database. Data Recovery Advisor only takes the presence of a standby database into account when recommending repair strategies if you are using Enterprise Manager 10g Grid Control.
See Also: The chapter about "Diagnosing and Repairing Failures with Data Recovery Advisor" in Oracle Database Backup and Recovery User's Guide
See Also: Site, Hardware, and Software Maintenance Using Database Switchover on page 5-5 and Database Failover with a Standby Database on page 4-8

Recovering from Unscheduled Outages
4-24 Oracle Database High Availability Best Practices
■ A small number of blocks require media recovery and you know which blocks need recovery. If a significant portion of the data file is corrupt, or if the amount of corruption is unknown, then use a different recovery method.
■ Blocks are marked corrupt (you can verify this with the RMAN VALIDATE CHECK LOGICAL command).
■ The backup file for the corrupted data file is available locally or can be retrieved from a remote location, including from a physical standby database.
Do not use block media recovery to recover from the following outages:
■ User error or software bugs that cause logical corruption where the data blocks are intact. See Section 4.2.7, "Recovering from Human Error" on page 4-25 for additional details for this type of recovery.
■ Changes caused by corrupt redo data. Block media recovery requires that all available redo data be applied to the blocks being recovered. If the redo data is corrupted, the suspicious changes are reintroduced during the recovery process.
For example, to recover a specific corrupt block using RMAN block media recovery:
RMAN> RECOVER BLOCK DATAFILE 7 BLOCK 3;
When the corruption is detected, it would be easy to recover this block through Grid Control.
4.2.6.4 Use RMAN Data File Media RecoveryData file media recovery recovers an entire data file or set of data files for a database by using the RMAN RECOVER command. When a large or unknown number of data
Note: When using block media recovery on databases running a release before release 11.1.0.7, the backup for the corrupted data file must be located on the primary database. If the backup is located on a standby database, you must move the backup to the primary database.
Note: When using Active Data Guard, block media recovery performs as follows:
■ When performing user-initiated block media recovery at a primary database, it attempts to fetch a good copy of the blocks from the standby before searching backups for the blocks.
■ When performing user-initiated block media recovery at a standby database, it attempts to fetch a good copy of the blocks from the primary before searching backups for the blocks.
See Also:
■ Oracle Database Backup and Recovery User's Guide
■ The white paper "Using Recovery Manager with Oracle Data Guard in Oracle Database 10g" at http://www.oracle.com/technology/deploy/availability/pdf/RMAN_DataGuard_10g_wp.pdf

Recovering from Unscheduled Outages
Managing Unscheduled Outages 4-25
blocks are marked "media corrupt" and require media recovery, or when an entire file is lost, you must restore and recover the applicable data files.
Use RMAN file media recovery when the following conditions are true:
■ The number of blocks requiring recovery is large. Use the RMAN VALIDATE CHECK LOGICAL command to find out exactly how many blocks are corrupted.
■ Block media recovery is not available (for example, if incomplete recovery is required).
4.2.6.5 Re-Create Objects ManuallySome database objects, such as small look-up tables or indexes, can be recovered quickly by manually re-creating the object instead of doing media recovery.
Use manual object re-creation when:
■ You must re-create a small index because of media corruption. Creating an index online enables the base object to be used concurrently.
■ You must re-create a look-up table or when the scripts to re-create the table are readily available. Dropping and re-creating the table might be the fastest option.
4.2.7 Recovering from Human ErrorOracle Flashback technology revolutionizes data recovery. Before Flashback technology, it took seconds to damage a database but from hours to days to recover it. With Flashback technology, the time to correct errors can be as short as the time it took to make the error. Fixing human errors that require rewinding the database, table, transaction, or row level changes to a previous point in time is easy and does not require any database or object restoration. Flashback technology provides fine-grained analysis and repair for localized damage such as erroneous row deletion. Flashback technology also enables correction of more widespread damage such as accidentally running the wrong application batch job. Furthermore, Flashback technology is exponentially faster than a database restoration.
Flashback technologies are applicable only to repairing the following human errors:
■ Erroneous or malicious update, delete or insert transactions
■ Erroneous or malicious DROP TABLE statements
■ Erroneous or malicious batch job or wide-spread application errors
Flashback technologies cannot be used for media or data corruption such as block corruption, bad disks, or file deletions. See Section 4.2.6, "Recovering from Data Corruption (Data Failures)" on page 4-20 and Section 4.2.2, "Database Failover with a Standby Database" on page 4-8 to repair these outages.
Table 4–7 summarizes the Flashback solutions for outage varying in scope from destroying a row (such as through a bad update) to destroying a whole database (such as by deleting all the underlying files at the operating system level).
See Also: "Advanced User-Managed Recovery Scenarios" in Oracle Database Backup and Recovery User's Guide and the white paper titled "Using Recovery Manager with Oracle Data Guard in Oracle Database 10g" available at http://www.oracle.com/technology/deploy/availability/pdf/RMAN_DataGuard_10g_wp.pdf

Recovering from Unscheduled Outages
4-26 Oracle Database High Availability Best Practices
Table 4–8 summarizes each Flashback feature.
Flashback Database uses the Oracle Database flashback logs, while all other features of flashback technology use the Oracle Database unique undo and multiversion read consistency capabilities. See the configuration best practices for the database—as
Table 4–7 Flashback Solutions for Different Outages
Outage Scope Examples of Human Errors Flashback Solutions See Also
Row or transaction Accidental deletion of row
Erroneous transaction
Flashback Query
Flashback Version Query
Flashback Transaction Query
Flashback Transaction
See Also: "Resolving Row and Transaction Inconsistencies" on page 4-28
Table Dropped table
Erroneous transactions affecting one table or a set of tables
Flashback Drop
Flashback Table
See Also:"Resolving Table Inconsistencies" on page 4-27
Tablespace or database
Erroneous batch job affecting many tables or an unknown set of tables
Series of database-wide malicious transactions
Enable Flashback Database or use multiple Flashback Table commands
See Also: "Resolving Database-Wide Inconsistencies" on page 4-31
Single tablespace or a subset of tablespaces
Erroneous transactions affecting a small number of tablespaces
RMAN Tablespace Point-in-Time Recovery (TSPITR)
See Also: "Resolving One or More Tablespace Inconsistencies" on page 4-32
Table 4–8 Summary of Flashback Features
Flashback Feature DescriptionChanges are propagated to ...
Flashback Query Flashback Query enables you to view data at an earlier point in time. You can use it to view and reconstruct lost data that was deleted or changed by accident. Developers can use this feature to build self-service error correction into their applications, empowering end users to undo and correct their errors.
Physical and logical standby databases
Flashback Version Query
Flashback Version Query uses undo data stored in the database to view the changes to one or more rows along with all the metadata of the changes.
Physical and logical standby databases
Flashback Transaction Query
Flashback Transaction Query enables you to examine changes to the database at the transaction level. As a result, you can diagnose problems, perform analysis, and audit transactions.
Physical and logical standby databases
Flashback Transaction
Flashback Transaction provides a way to roll back one or more transactions and their dependent transactions, while the database remains online.
Physical and logical standby databases
Flashback Drop Flashback Drop provides a way to restore accidentally dropped tables. Physical standby databases
Flashback Table Flashback Table enables you to quickly recover a table to an earlier point in time without restoring a backup.
Physical and logical standby databases
Flashback Database Flashback Database enables you to quickly return the database to an earlier point in time by undoing all of the changes that have taken place since that time. This operation is fast because you do not have to restore the backups.
Physical and logical standby databases

Recovering from Unscheduled Outages
Managing Unscheduled Outages 4-27
documented in Section 2.2, "Configuring Oracle Database 11g" on page 2-13—for configuring Flashback technologies to ensure that the resources from these solutions are available at a time of failure.
In general, the recovery time when using Flashback technologies is equivalent to the time it takes to cause the human error plus the time it takes to detect the human error.
Flashback technologies allow recovery up to the point that the human error occurred.
Use the following recovery methods:
■ Resolving Table Inconsistencies
■ Resolving Row and Transaction Inconsistencies
■ Resolving Database-Wide Inconsistencies
■ Resolving One or More Tablespace Inconsistencies
4.2.7.1 Resolving Table Inconsistencies Dropping or deleting database objects by accident is a common mistake. Users soon realize their mistake, but by then it is too late and there has been no way to easily recover the dropped tables and its indexes, constraints, and triggers. Objects once dropped were dropped forever. Loss of very important tables or other objects (like indexes, partitions or clusters) required DBAs to perform a point-in-time recovery, which can be time-consuming and lead to loss of recent transactions.
Oracle provides the following statements to help resolve table inconsistencies:
■ Flashback Table statement to restore a table to a previous point in the database
■ Flashback Drop statement to recover from an accidental DROP TABLE statement
■ Flashback Transaction statement to roll back one or more transactions and their dependent transactions, while the database remains online
Flashback TableFlashback Table provides the ability to quickly recover a table or a set of tables to a specified point in time. In many cases, Flashback Table alleviates the more complicated point-in-time recovery operations. For example:
FLASHBACK TABLE orders, order_items TO TIMESTAMP TO_DATE('28-Jun-08 14.00.00','dd-Mon-yy hh24:mi:ss');
This statement rewinds any updates to the ORDERS and ORDER_ITEMS tables that have been done between the current time and a specified timestamp in the past. Flashback Table performs this operation online and in place, and it maintains referential integrity constraints between the tables.
Flashback DropFlashback Drop provides a safety net when dropping objects in Oracle Database 10g or later releases. When a user drops a table, Oracle places it in a recycle bin. Objects in the recycle bin remain there until the user decides to permanently remove them or until
See Also: Oracle Database Administrator's Guide, Oracle Database Backup and Recovery User's Guide, and Oracle Database Concepts for more information about Flashback technology and automatic undo management
Recovering from Unscheduled Outages
4-28 Oracle Database High Availability Best Practices
space limitations begin to occur on the tablespace containing the table. The recycle bin is a virtual container where all dropped objects reside. Users view the recycle bin and undrop the dropped table and its dependent objects. For example, the employees table and all its dependent objects would be undropped by the following statement:
FLASHBACK TABLE employees TO BEFORE DROP;
Flashback TransactionOracle Flashback Transaction increases availability during logical recovery by easily and quickly backing out a specific transaction or set of transactions and their dependent transactions, while the database remains online.
Use the DBMS_FLASHBACK.TRANSACTION_BACKOUT() PL/SQL procedure to roll back a transaction and its dependent transactions. This procedure uses undo data to create and execute the compensating transactions that return the affected data to its pre-transaction state.
4.2.7.2 Resolving Row and Transaction Inconsistencies Resolving row and transaction inconsistencies might require a combination of Flashback Query, Flashback Version Query, Flashback Transaction Query, and the compensating SQL statements constructed from undo statements to rectify the problem. This section describes a general approach using a human resources example to resolve row and transaction inconsistencies caused by erroneous or malicious user errors.
Flashback QueryFlashback Query enables an administrator or user to query any data from some earlier point in time. Use this feature to view and reconstruct data that might have been deleted or changed by accident.
Developers can use Flashback Query to build self-service error correction into their applications, empowering end users to undo and correct their errors without delay, and freeing database administrators from having to perform this task. Flashback Query is easy to manage because the database automatically keeps the necessary information to reconstruct data for a configurable time into the past.
The following partial statement displays rows from the EMPLOYEES table starting from 2:00 p.m. on June 28, 2008.
SELECT * FROM EMPLOYEES AS OF TIMESTAMP TO_DATE('28-Jun-08 14:00','DD-Mon-YY HH24:MI')WHERE ...
Flashback Version QueryFlashback Version Query provides a way to view changes made to the database at the row level. It is an extension to SQL and enables the retrieval of all the different versions of a row across a specified time interval. For example:
SELECT * FROM EMPLOYEES
See Also:
■ The "Using Flashback Transaction" section in Oracle Database Advanced Application Developer's Guide
■ DBMS_FLASHBACK.TRANSACTION_BACKOUT() in Oracle Database PL/SQL Packages and Types Reference

Recovering from Unscheduled Outages
Managing Unscheduled Outages 4-29
VERSIONS BETWEEN TIMESTAMP TO_DATE('28-Jun-08 14:00','dd-Mon-YY hh24:mi') AND TO_DATE('28-Jun-08 15:00','dd-Mon-YY hh24:mi')WHERE ...
This statement displays each version of the row, each entry changed by a different transaction, between 2 and 3 p.m. on June 28, 2008. A database administrator can use this to pinpoint when and how data is changed and trace it back to the user, application, or transaction. This enables the database administrator to track down the source of a logical corruption in the database and correct it. It also enables application developers to debug their code.
Flashback Transaction QueryFlashback Transaction Query provides a way to view changes made to the database at the transaction level. It is an extension to SQL that enables you to see all changes made by a transaction. For example:
SELECT UNDO_SQLFROM FLASHBACK_TRANSACTION_QUERY WHERE XID = '000200030000002D';
This statement shows all of the changes that resulted from this transaction. In addition, compensating SQL statements are returned and can be used to undo changes made to all rows by this transaction. Using a precision tool like Flashback Transaction Query, the database administrator and application developer can precisely diagnose and correct logical problems in the database or application.
Consider a human resources (HR) example involving the SCOTT schema. The HR manager reports to the database administrator that there is a potential discrepancy in Ward's salary. Sometime before 9:00 a.m., Ward's salary was increased to $1875. The HR manager is uncertain how this occurred and wishes to know when the employee's salary was increased. In addition, he instructed his staff to reset the salary to the previous level of $1250. This was completed around 9:15 a.m.
The following steps show how to approach the problem.
1. Assess the problem.
Fortunately, the HR manager has provided information about the time when the change occurred. You can query the information as it was at 9:00 a.m. using Flashback Query.
SELECT EMPNO, ENAME, SAL FROM EMP AS OF TIMESTAMP TO_DATE('28-JUN-08 09:00','dd-Mon-yy hh24:mi') WHERE ENAME = 'WARD';
EMPNO ENAME SAL ---------- ---------- ---------- 7521 WARD 1875
You can confirm that you have the correct employee by the fact that Ward's salary was $1875 at 09:00 a.m. Rather than using Ward's name, you can now use the employee number for subsequent investigation.
2. Query previous rows or versions of the data to acquire transaction information.
Although it is possible to restrict the row version information to a specific date or SCN range, you might want to query all the row information that is available for the employee WARD using Flashback Version Query.

Recovering from Unscheduled Outages
4-30 Oracle Database High Availability Best Practices
SELECT EMPNO, ENAME, SAL, VERSIONS_STARTTIME, VERSIONS_ENDTIME, VERSIONS_XID FROM EMP VERSIONS BETWEEN TIMESTAMP MINVALUE AND MAXVALUE WHERE EMPNO = 7521 ORDER BY NVL(VERSIONS_STARTSCN,1);
EMPNO ENAME SAL VERSIONS_STARTTIME VERSIONS_ENDTIME VERSIONS_XID----- ------ --- ---------------------- -------------------- --------------- 7521 WARD 1250 28-JUN-08 08.48.43 AM 28-JUN-08 08.54.49 AM 0006000800000086 7521 WARD 1875 28-JUN-08 08.54.49 AM 28-JUN-08 09.10.09 AM 0009000500000089 7521 WARD 1250 28-JUN-08 09.10.09 AM 000800050000008B
You can see that WARD's salary was increased from $1250 to $1875 at 08:54:49 the same morning and was subsequently reset to $1250 at approximately 09:10:09.
Also, you can see that the ID of the erroneous transaction that increased WARD's salary to $1875 was "0009000500000089".
3. Query the erroneous transaction and the scope of its effect.
With the transaction information (VERSIONS_XID pseudocolumn), you can now query the database to determine the scope of the transaction, using Flashback Transaction Query.
SELECT UNDO_SQL FROM FLASHBACK_TRANSACTION_QUERY WHERE XID = HEXTORAW('0009000500000089');
UNDO_SQL ---------------------------------------------------------------------------- update "SCOTT"."EMP" set "SAL" = '950' where ROWID = 'AAACV4AAFAAAAKtAAL'; update "SCOTT"."EMP" set "SAL" = '1500' where ROWID = 'AAACV4AAFAAAAKtAAJ'; update "SCOTT"."EMP" set "SAL" = '2850' where ROWID = 'AAACV4AAFAAAAKtAAF'; update "SCOTT"."EMP" set "SAL" = '1250' where ROWID = 'AAACV4AAFAAAAKtAAE'; update "SCOTT"."EMP" set "SAL" = '1600' where ROWID = 'AAACV4AAFAAAAKtAAB'; 6 rows selected.
You can see that WARD's salary was not the only change that occurred in the transaction. The information that was changed for the other four employees at the same time as WARD can now be passed back to the HR manager for review.
4. Determine if the corrective statements should be executed.
If the HR manager decides that the corrective changes suggested by the UNDO_SQL column are correct, then the database administrator can execute the statements individually.
5. Query the FLASHBACK_TRANSACTION_QUERY view for additional transaction information. For example, to determine the user that performed the erroneous update, issue the following query:
SELECT LOGON_USER FROM FLASHBACK_TRANSACTION_QUERYWHERE XID = HEXTORAW('0009000500000089');
LOGON_USER----------------------------MSMITH
In this example, the query shows that the user MSMITH was responsible for the erroneous transaction.

Recovering from Unscheduled Outages
Managing Unscheduled Outages 4-31
4.2.7.3 Resolving Database-Wide InconsistenciesTo bring an Oracle database to a previous point in time, the traditional method is point-in-time recovery. However, point-in-time recovery can take hours or even days, because it requires the whole database to be restored from backup and recovered to the point in time just before the error was introduced into the database. With the size of databases constantly growing, it takes hours or even days just to restore the whole database.
Flashback Database is a strategy for doing point-in-time recovery. It quickly rewinds an Oracle database to a previous time to correct any problems caused by logical data corruption or user error. Flashback logs are used to capture old versions of changed blocks. When recovery must be performed the flashback logs are quickly replayed to restore the database to a point in time before the error and just the changed blocks are restored. It is extremely fast and reduces recovery time from hours to minutes. In addition, it is easy to use. A database can be recovered to 2:05 p.m. by issuing a single statement. Before the database can be recovered, all instances of the database must be shut down and one instance subsequently mounted. The following is an example of a FLASHBACK DATABASE statement.
FLASHBACK DATABASE TO TIMESTAMP SYSDATE-1;
No restoration from tape, no lengthy downtime, and no complicated recovery procedures are required to use it. You can also use Flashback Database and then open the database in read-only mode and examine its contents. If you determine that you flashed back too far or not far enough, then you can reissue the FLASHBACK DATABASE statement or continue recovery to a later time to find the proper point in time before the database was damaged. Flashback Database works with a primary database, a physical standby database, or a logical standby database.
These steps are recommended for using Flashback Database:
1. Determine the time or the SCN to which to flash back the database.
2. Verify that there is sufficient flashback log information.
SELECT OLDEST_FLASHBACK_SCN, TO_CHAR(OLDEST_FLASHBACK_TIME, 'mon-dd-yyyy HH:MI:SS') FROM V$FLASHBACK_DATABASE_LOG;
3. Flash back the database to a specific time or SCN. (The database must be mounted to perform a Flashback Database.)
FLASHBACK DATABASE TO SCN scn;
or
FLASHBACK DATABASE TO TIMESTAMP TO_DATE date;
4. Open the database in read-only mode to verify that it is in the correct state.
ALTER DATABASE OPEN READ ONLY;
If more flashback data is required, then issue another FLASHBACK DATABASE statement. (The database must be mounted to perform a Flashback Database.)
If you want to move forward in time, then issue a statement similar to the following:
RECOVER DATABASE UNTIL [TIME date | CHANGE scn];
5. Open the database:
Recovering from Unscheduled Outages
4-32 Oracle Database High Availability Best Practices
ALTER DATABASE OPEN RESETLOGS;
Other considerations when using Flashback Database are as follows:
■ If there are not sufficient flashback logs to flash back to the target time, then use one of the following alternatives:
– Use Data Guard to recover to the target time if the standby database lags behind the primary database or flash back to the target time if there's sufficient flashback logs on the standby.
– Restore from backups.
■ After flashing back a database, any dependent database such as a standby database must be flashed back. See Section 4.3, "Restoring Fault Tolerance" on page 4-33.
Flashback Database does not automatically fix a dropped tablespace, but it can be used to significantly reduce the downtime. You can flash back the primary database to a point before the tablespace was dropped and then restore a backup of the corresponding data files from the affected tablespace and recover to a time before the tablespace was dropped. See support note 783471.1 for a step-by-step procedure you can use to repair a dropped tablespace.
4.2.7.4 Resolving One or More Tablespace InconsistenciesRecovery Manager (RMAN) automatic tablespace point-in-time recovery (TSPITR) enables you to quickly recover one or more tablespaces in a database to an earlier time without affecting the rest of the tablespaces and objects in the database. You can only use TSPITR on tablespaces whose data is completely segregated from the rest of the database. This usually means that TSPITR is something for which you must plan in advance.
RMAN TSPITR is most useful for the following situations:
■ To recover a logical database to a point different from the rest of the physical database, when multiple logical databases exist in separate tablespaces of one physical database. For example, you maintain logical databases in the Orders and Personnel tablespaces. An incorrect batch job or DML statement corrupts the data in only one tablespace.
■ To recover data lost after DDL operations that change the structure of tables. You cannot use Flashback Table to rewind a table to before the point of a structural change such as a truncate table operation.
■ To recover a table after it has been dropped with the PURGE option.
■ To recover from the logical corruption of a table.
You perform TSPITR by using the RMAN RECOVER TABLESPACE command.
4.2.8 Recovering Databases in a Distributed EnvironmentSome applications may update multiple databases and participate in distributed transactions. Global consistency between the participating databases may be expected and crucial to the application.
If one database in a distributed database environment requires recovery to an earlier time, it is often necessary to recover all other databases in the configuration to the
See Also: Oracle Database Backup and Recovery User's Guide for detailed information about performing RMAN TSPITR

Restoring Fault Tolerance
Managing Unscheduled Outages 4-33
same point in time when global data consistency is required by the application. To achieve coordinated, time-based, distributed database recovery, perform the following steps:
1. Recover the database that requires the recovery operation using time-based recovery.
For example, if a database must be recovered because of a media failure, then recover this database first using time-based recovery. Do not recover the other databases at this point.
2. After you have recovered the database and opened it with the RESETLOGS option, search the alert_SID.log of the database for the RESETLOGS message. Your next step depends on the message that you find in the log file, as described in following table:
3. Recover or flash back all other databases in the distributed database system using change-based recovery, specifying the change number (SCN) that you recorded in Step 2.
4.3 Restoring Fault ToleranceWhenever a component in a high availability architecture fails, then the full protection—or fault tolerance—of the architecture is compromised and possible single points of failure exist until the component is repaired. Restoring the high availability architecture to full fault tolerance to reestablish full Oracle RAC, Data Guard, or MAA protection requires repairing the failed component. While full fault tolerance might be sacrificed during planned downtime, the method of repair is well understood because
If the message returned is ... Then ...
"RESETLOGS after complete recovery through change nnn"
Recovery is complete. You have applied all the changes in the database and performed complete recovery. Do not recover any of the other databases in the distributed system because this unnecessarily removes database changes.
"RESETLOGS after incomplete recovery UNTIL CHANGE nnn"
You have successfully performed an incomplete recovery. Record the change number from the message and proceed to the next step.
Note: If a database that is participating in distributed transactions fails, in-doubt distributed transactions may exist in the participating databases. If the failed database recovers completely and communications resume between the databases, then the in-doubt transactions is automatically resolved by the Oracle recoverer process (RECO) process. If you cannot wait until the failed database becomes available, you can also manually commit or rollback in-doubt transactions.
See Also:
■ Oracle Database Backup and Recovery User's Guide for more information about performing time-based recovery
■ Oracle Database Administrator's Guide for information about how to handle in-doubt transactions and about recovery from distributed transaction failures

Restoring Fault Tolerance
4-34 Oracle Database High Availability Best Practices
it is planned, the risk is controlled, and it ideally occurs at times best suited for continued application availability. However, for unplanned downtime, the risk of exposure to a single point of failure must be clearly understood.
This section provides the following topics that describe the steps needed to restore database fault tolerance:
■ For Oracle Database 11g with Oracle RAC
– Restoring Failed Nodes or Instances in Oracle RAC
■ For Oracle Database 11g with Data Guard and Oracle Database 11g with Oracle RAC and Data Guard - MAA
– Restoring a Standby Database After a Failover
– Restoring ASM Disk Groups after a Failure
– Restoring Fault Tolerance After Planned Downtime on Secondary Site or Cluster
– Restoring Fault Tolerance After a Standby Database Data Failure
– Restoring Fault Tolerance After the Primary Database Was Opened Resetlogs
– Restoring Fault Tolerance After Dual Failures
4.3.1 Restoring Failed Nodes or Instances in Oracle RACEnsuring that application services fail over quickly and automatically in a Oracle RAC cluster—or between primary and secondary sites—is important when planning for both scheduled and unscheduled outages. To ensure that the environment is restored to full fault tolerance after any errors or issues are corrected, it is also important to understand the steps and processes for restoring failed instances or nodes within a Oracle RAC cluster or databases between sites.
Adding a failed node back into the cluster or restarting a failed Oracle RAC instance is easily done after the core problem that caused the specific component to originally fail has been corrected. However, you should also consider:
■ When to perform these tasks to incur minimal or no effect on the current running environment
■ Resetting network components (such as load balancer) which were modified for failover and now must be reset
■ Failing back or rebalancing existing connections
After the problem that caused the initial node or instance failure has been corrected, a node or instance can be restarted and added back into the Oracle RAC environment at any time. Processing to complete the reconfiguration of a node may require additional system resources.
Table 4–9 summarizes additional processing that may be required when adding a node.

Restoring Fault Tolerance
Managing Unscheduled Outages 4-35
Use the following recovery methods:
■ Recovering Service Availability
■ Considerations for Client Connections After Restoring an Oracle RAC Instance
4.3.1.1 Recovering Service AvailabilityAfter a failed node has been brought back into the cluster and its instance has been started, Cluster Ready Services (CRS) automatically manages the virtual IP address used for the node and the services supported by that instance automatically. A particular service might or might not be started for the restored instance. The decision by CRS to start a service on the restored instance depends on how the service is configured and whether the proper number of instances are currently providing access for the service. A service is not relocated back to a preferred instance if the service is still being provided by an available instance to which it was moved by CRS when the initial failure occurred. CRS restarts services on the restored instance if the number of instances that are providing access to a service across the cluster is less than the number of preferred instances defined for the service. After CRS restarts a service on a restored instance, CRS notifies registered applications of the service change.
For example, suppose the HR service is defined with instances A and B as preferred and instances C and D as available in case of a failure. If instance B fails and CRS starts up the HR service on C automatically, then when instance B is restarted, the HR service remains at instance C. CRS does not automatically relocate a service back to a preferred instance.
Suppose a different scenario in which the HR service is defined with instances A, B, C, and D as preferred and no instances defined as available, spreading the service across all nodes in the cluster. If instance B fails, then the HR service remains available on the remaining three nodes. CRS automatically starts the HR service on instance B when it rejoins the cluster because it is running on fewer instances than configured. CRS notifies the applications that the HR service is again available on instance B.
Table 4–9 Additional Processing When Restarting or Rejoining a Node or Instance
Action Additional Resources
Restarting a node or rejoining a node into a cluster
When using only Oracle Clusterware, there is no impact when a node joins the cluster.
When using vendor clusterware, there may be performance degradation while reconfiguration occurs to add a node back into the cluster. The impact on current applications should be evaluated with a full test workload.
Restarting or rejoining a Oracle RAC instance
When you restart a Oracle RAC instance, there might be some potential performance impact while lock reconfiguration takes place. The impact on current applications is usually minimal, but it should be evaluated with a full test workload.
See Also:
■ Your vendor-specified cluster management documentation for detailed steps on how to start and join a node back into a cluster
■ Oracle Real Application Clusters Administration and Deployment Guide for more information about restarting a Oracle RAC instance
See Also: Oracle Real Application Clusters Administration and Deployment Guide

Restoring Fault Tolerance
4-36 Oracle Database High Availability Best Practices
4.3.1.2 Considerations for Client Connections After Restoring an Oracle RAC InstanceAfter a Oracle RAC instance has been restored, additional steps might be required, depending on the current resource usage and system performance, the application configuration, and the network load balancing that has been implemented.
Existing connections (that might have failed over or started as a new session) on the surviving Oracle RAC instances, are not automatically redistributed or failed back to an instance that has been restarted. Failing back or redistributing users might or might not be necessary, depending on the current resource utilization and the capability of the surviving instances to adequately handle and provide acceptable response times for the workload. If the surviving Oracle RAC instances do not have adequate resources to run a full workload or to provide acceptable response times, then it might be necessary to move (disconnect and reconnect) some existing user connections to the restarted instance.
Connections are started as they are needed, on the least-used node, assuming connection load balancing has been configured. Therefore, the connections are automatically load-balanced over time.
An application service can be:
■ Managed with services running on a subset of Oracle RAC instances
■ Nonpartitioned so that all services run equally across all nodes
This is valuable for modularizing application and database form and function while still maintaining a consolidated data set. For cases where an application is partitioned or has a combination of partitioning and nonpartitioning, you should consider the response time and availability aspects for each service. If redistribution or failback of connections for a particular service is required, then:
■ You can rebalance workloads automatically using Oracle Universal Connection Pool (UCP). If you are using UCP, then connections are automatically redistributed to the new node.
■ You can rebalance workloads manually with the DBMS_SERVICE.DISCONNECT_SESSION PL/SQL procedure. You can use this procedure to disconnect sessions associated with a service while the service is running.
For load-balancing application services across multiple Oracle RAC instances, Oracle Net connect-time failover and connection load balancing are recommended. This feature does not require changes or modifications for failover or restoration. It is also possible to use hardware-based load balancers. However, there might be limitations in distinguishing separate application services (which is understood by Oracle Net Services) and restoring an instance or a node. For example, when a node or instance is restored and available to start receiving connections, a manual step might be required to include the restored node or instance in the hardware-based load balancer logic, whereas Oracle Net Services does not require manual reconfiguration.
Table 4–10 summarizes the considerations for new and existing connections after an instance has been restored. The considerations differ depending on whether the application services are partitioned, nonpartitioned, or are a combination of both. The
Note: Oracle Universal Connection Pool (UCP) provides fast and automatic detection of connection failures and removes terminated connections for any Java application using, Fast Connection Failover, and FAN events

Restoring Fault Tolerance
Managing Unscheduled Outages 4-37
actual redistribution of existing connections might or might not be required depending on the resource utilization and response times.
Figure 4–6 shows a two-node partitioned Oracle RAC database. Each instance services a different portion of the application (HR and Sales). Client processes connect to the appropriate instance based on the service they require.
Figure 4–6 Partitioned Two-Node Oracle RAC Database
Figure 4–7 shows what happens when one Oracle RAC instance fails.
Table 4–10 Restoration and Connection Failback
Application Services Failback or Restore Existing Connections Failback or Restore New Connections
Partitioned Existing sessions are not automatically relocated back to the restored instance. Use DBMS_SERVICE.DISCONNECT_SESSION to manually disconnect sessions and allow them to be reestablished on a remaining instance that provides the service.
Automatically routes to the restored instance by using the Oracle Net Services configuration.
Nonpartitioned No action is necessary unless the load must be rebalanced, because restoring the instance means that the load there is low. If the load must be rebalanced, then the same problems are encountered as if application services were partitioned.
Automatically routes to the restored instance (because its load should be lowest) by using the Oracle Net Services configuration
Heartbeat hb
hbhb
Node 1 Node 2
Oracle Net Services Client Access
RACDatabase
Instance 1 Instance 2
Application / Web Servers
HR
Sales
HR
Sales
HR Service Sales Service

Restoring Fault Tolerance
4-38 Oracle Database High Availability Best Practices
Figure 4–7 Oracle RAC Instance Failover in a Partitioned Database
If one Oracle RAC instance fails, then the service and existing client connections can be automatically failed over to another Oracle RAC instance. In this example, the HR and Sales services are both supported by the remaining Oracle RAC instance. In addition, you can route new client connections for the Sales service to the instance now supporting this service.
After the failed instance has been repaired and restored to the state shown in Figure 4–6 and the Sales service is relocated to the restored instance, then you might need to identify and failback any failed-over clients and any new clients that had connected to the Sales service on the failed-over instance. Client connections that started after the instance has been restored should automatically connect back to the original instance. Therefore, over time, as older connections disconnect, and new sessions connect to the Sales service, the client load migrates back to the restored instance. Rebalancing the load immediately after restoration depends on the resource utilization and application response times.
Figure 4–8 shows a nonpartitioned application. Services are evenly distributed across both active instances. Each instance has a mix of client connections for both HR and Sales.
Sales Service
Heartbeat hb
hbhb
Node 1 Node 2
Oracle Net Services Client Access
RACDatabase
Instance 1 Instance 2
Application / Web Servers
HR
Sales
HR
Sales
HR Service

Restoring Fault Tolerance
Managing Unscheduled Outages 4-39
Figure 4–8 Nonpartitioned Oracle RAC Instances
If one Oracle RAC instance fails, then CRS moves the services that were running on the failed instance. In addition, new client connections are routed only to the available Oracle RAC instances that offer that service.
After the failed instance has been repaired and restored to the state shown in Figure 4–8, some clients might have to be moved back to the restored instance. For nonpartitioned applications, identifying appropriate services is not required for rebalancing the client load among all available instances. Also, this is necessary only if a single-instance database is not able to adequately service the requests.
Client connections that started after the instance has been restored should automatically connect back to the restored instance because it has a smaller load. Therefore, over time, as older connections disconnect and new sessions connect to the restored instance, the client load evenly balances again across all available Oracle RAC instances. Rebalancing the load immediately after restoration depends on the resource usage and application response times.
4.3.2 Restoring a Standby Database After a FailoverFollowing unplanned downtime on a primary database that requires a failover, full fault tolerance is compromised until the standby database is reestablished. Full database protection should be restored as soon as possible. The steps for restoring fault tolerance differ slightly between physical and logical standby databases.
Reinstating databases is automated if you are using Data Guard fast-start failover. After a fast-start failover completes, the observer automatically attempts to reinstate
Sales Service
Heartbeat hb
hbhb
Node 1 Node 2
Oracle Net Services Client Access
RACDatabase
Instance 1 Instance 2
Application / Web Servers
HR
Sales
HR
Sales
HR Service

Restoring Fault Tolerance
4-40 Oracle Database High Availability Best Practices
the original primary database as a standby database. Reinstatement restores high availability to the broker configuration so that, in the event of a failure of the new primary database, another fast-start failover can occur. The reinstated database can act as the fast-start failover target for the primary database, making a subsequent fast-start failover possible. The standby database is a viable target of a failover when it begins applying redo data received from the new primary database. If you want to prevent automatic reinstatement (for example, to perform diagnostic or repair work after failover has completed), set the FastStartFailoverAutoReinstate configuration property to FALSE.
The FastStartFailoverAutoReinstate configuration property controls whether the observer should automatically reinstate the original primary after a fast-start failover occurred because a fast-start failover was initiated due to the primary database being isolated for longer than the number of seconds specified by the FastStartFailoverThreshold property. In some cases, an automatic reinstatement might not be wanted until further diagnostic or recovery work is done.
To reinstate the original primary database, the database must be started and mounted, but it cannot be opened. The broker reinstates the database as a standby database of the same type (physical or logical) as the original standby database.
If the original primary database cannot be reinstated automatically, you can manually reinstate it using either the DGMGRL REINSTATE command or Enterprise Manager. Step-by-step instructions for manual reinstatement are described in Oracle Data Guard Broker.
Standby databases do not have to be re-created if you use the Oracle Flashback Database feature. Flashback Database has the following advantages:
■ Saves hours of database restoration time
■ Reduces overall complexity in restoring fault tolerance
■ Reduces the time that the system is vulnerable because the standby database is re-created more quickly
This section includes the following topics:
■ Reinstating the Original Primary Database After a Fast-Start Failover
■ Reinstating a Standby Database Using Enterprise Manager After a Failover
4.3.2.1 Reinstating the Original Primary Database After a Fast-Start FailoverFollowing a fast-start failover, the observer periodically attempts to reconnect to the original primary database. When the observer regains network access to the original primary database, it initiates a request for the broker to automatically reinstate it as a standby database to the new primary. This quickly restores disaster protection and high availability for the configuration.
You can enable fast-start failover from any site, including the observer site, in Enterprise Manager while connected to any database in the broker configuration. The
See Also: The following topics in Oracle Data Guard Concepts and Administration:
■ Flashing Back a Failed Primary Database into a Physical Standby Database
■ Flashing Back a Failed Primary Database into a Logical Standby Database

Restoring Fault Tolerance
Managing Unscheduled Outages 4-41
broker simplifies switchovers and failovers by allowing you to invoke them using a single key click in Oracle Enterprise Manager, as shown in Figure 4–9.
Figure 4–9 Fast-Start Failover and the Observer Are Successfully Enabled
4.3.2.2 Reinstating a Standby Database Using Enterprise Manager After a FailoverFurthermore, you can use Enterprise Manager to reinstate the original primary as the new standby. Figure 4–10 shows an example of the warning message that shows in Enterprise Manager when a reinstatement is needed.
Figure 4–10 Reinstating the Original Primary Database After a Fast-Start Failover

Restoring Fault Tolerance
4-42 Oracle Database High Availability Best Practices
4.3.3 Restoring ASM Disk Groups after a FailureFollow the steps in Section 4.2.5.3, "Data Area Disk Group Failure" on page 4-16 or Section 4.2.5.4, "Flash Recovery Area Disk Group Failure" on page 4-18.
4.3.4 Restoring Fault Tolerance After Planned Downtime on Secondary Site or ClusterAfter performing the planned maintenance on the secondary site, the standby database and log apply services must be restarted, and then the Data Guard redo transport services automatically catch up the standby database with the primary database. You can use Enterprise Manager and the broker to monitor the Data Guard state.
The following steps are required to restore full fault tolerance after planned downtime on a secondary site or clusterwide outage:
1. Start the standby database
You might have to restore the standby database from local backups, local tape backups, or from the primary site backups if the data in the secondary site has been damaged. Re-create the standby database from the new primary database by following the steps for creating a standby database in Oracle Data Guard Concepts and Administration.
After the standby database has been reestablished, start the standby database.
2. Start Redo Apply (physical standby) or SQL Apply (logical standby):
3. Verify redo transport services on the primary database
You might have to reenable the primary database remote archive destination. Query the V$ARCHIVE_DEST_STATUS view first to see the current state of the archive destinations:
SELECT DEST_ID, DEST_NAME, STATUS, PROTECTION_MODE, DESTINATION, ERROR, SRL FROM V$ARCHIVE_DEST_STATUS;ALTER SYSTEM SET LOG_ARCHIVE_DEST_STATE_n=ENABLE; ALTER SYSTEM ARCHIVE LOG CURRENT;
Note: The following steps can be accomplished manually (as described below) or automatically using Enterprise Manager.
Table 4–11 SQL Statements for Starting Standby Databases
Type of Standby Database SQL Statement
Physical STARTUP MOUNT;
Logical STARTUP;
Active Data Guard STARTUP;
Table 4–12 SQL Statements to Start Redo Apply and SQL Apply
Type of Standby Database SQL Statement
Physical (or Active Data Guard) RECOVER MANAGED STANDBY DATABASE DISCONNECT;
Logical ALTER DATABASE START LOGICAL STANDBY APPLY;

Restoring Fault Tolerance
Managing Unscheduled Outages 4-43
Verify redo transport services between the primary and standby databases by checking for errors. Query the V$ARCHIVE_DEST and V$ARCHIVE_DEST_STATUS views:
SELECT STATUS, TARGET, LOG_SEQUENCE, TYPE, PROCESS, REGISTER, ERROR FROM V$ARCHIVE_DEST; SELECT * FROM V$ARCHIVE_DEST_STATUS WHERE STATUS!='INACTIVE';
4. Verify that recovery is progressing on standby database
■ For a physical standby database, verify that there are no errors from the managed recovery process and that the recovery has applied the redo from the archived redo log files:
SELECT MAX(SEQUENCE#), THREAD# FROM V$LOG_HISTORY GROUP BY THREAD;SELECT PROCESS, STATUS, THREAD#, SEQUENCE#, CLIENT_PROCESS FROM V$MANAGED_STANDBY;
■ For a logical standby database, verify that there are no errors from the logical standby process and that the recovery has applied the redo from the archived redo logs:
SELECT THREAD#, SEQUENCE# SEQ# FROM DBA_LOGSTDBY_LOG LOG, DBA_LOGSTDBY_PROGRESS PROG WHERE PROG.APPLIED_SCN BETWEEN LOG.FIRST_CHANGE# AND LOG.NEXT_CHANGE# ORDER BY NEXT_CHANGE#;
5. Restore primary database protection mode
If you had to change the protection mode of the primary database from maximum protection to either maximum availability or maximum performance because of the standby database outage, then change the primary database protection mode back to maximum protection depending on your business requirements.
ALTER DATABASE SET STANDBY DATABASE TO MAXIMIZE [PROTECTION | AVAILABILITY];
4.3.5 Restoring Fault Tolerance After a Standby Database Data FailureFollowing unplanned downtime on the standby database that requires a full or partial data file restoration (such as data or media failure), full fault tolerance is compromised until the standby database is brought back into service. Full database protection should be restored as soon as possible.
To repair data corruption and data failures on a logical standby database, you require a backup of the logical standby file and not a backup from the primary database. Otherwise, you must reinstate or re-create the relevant objects affected by the corruption.
To repair data corruption or data failures on the standby database, you can use the following repair solutions:
■ Use RMAN Block Media Recovery (described in Section 4.2.6.3 on page 4-23)
■ Use RMAN Data File Media Recovery (described in Section 4.2.6.4 on page 4-24)
■ Re-Create Objects Manually for logical standby databases only (described in Section 4.2.6.5 on page 4-25)
If you had to change the protection mode of the primary database from maximum protection to either maximum availability or maximum performance because of the
See Also: Oracle Data Guard Concepts and Administration

Restoring Fault Tolerance
4-44 Oracle Database High Availability Best Practices
standby database outage, then change the primary database protection mode back to maximum protection (depending on your business requirements).
ALTER DATABASE SET STANDBY DATABASE TO MAXIMIZE [PROTECTION | AVAILABILITY];
4.3.6 Restoring Fault Tolerance After the Primary Database Was Opened ResetlogsIf the primary database is activated because it was flashed back to correct a logical error or because it was restored and recovered to a point in time, then the corresponding standby database might require additional maintenance. No additional work is required if the primary database did complete recovery with no resetlogs.
After opening the primary database with the RESETLOGS option, execute the queries shown in Table 4–13.
Table 4–14 shows the actions you take to restore fault tolerance if the standby database is behind the primary database's resetlogs SCN.
Table 4–15 shows the actions you take to restore fault tolerance if the standby database is ahead of the primary database's resetlogs SCN.
Table 4–13 Queries to Determine RESETLOGS SCN and Current SCN OPEN RESETLOGS
Database Query
Primary SELECT TO_CHAR(RESETLOGS_CHANGE# - 2) FROM V$DATABASE;
Physical standby SELECT TO_CHAR(CURRENT_SCN) FROM V$DATABASE;
Logical standby SELECT APPLIED_SCN FROM DBA_LOGSTDBY_PROGRESS;
Table 4–14 SCN on Standby Database is Behind RESETLOGS SCN on the Primary Database
Database Action
Physical standby 1. Ensure that the standby database has received an archived redo log file from the primary database.
See Also: "Verify redo transport services on the primary database" on page 4-42
2. Restart Redo Apply.
Logical standby Ensure that the standby database has received an archived redo log file from the primary database.
See Also: "Verify redo transport services on the primary database" on page 4-42

Restoring Fault Tolerance
Managing Unscheduled Outages 4-45
Table 4–15 SCN on the Standby is Ahead of Resetlogs SCN on the Primary Database
Database Action
Physical standby 1. Ensure that the standby database has received an archived redo log file from the primary database.
See Also: "Verify redo transport services on the primary database" on page 4-42
2. Issue the SHUTDOWN IMMEDIATE statement, if necessary.
3. Issue the STARTUP MOUNT statement.
4. Issue the FLASHBACK DATABASE TO SCN flashback_scn statement where flashback_scn is the SCN returned from the primary database query in Table 4–13. The SCN returned from the primary database query is 2 less than the RESETLOGS_CHANGE#.
Issue the FLASHBACK DATABASE TO SCN resetlogs_change#_minus_2 statement.
5. Restart Redo Apply with or without real-time apply:
With real-time apply:
ALTER DATABASE RECOVER MANAGED STANDBY DATABASE USING CURRENT LOGFILE DISCONNECT;
Without real-time apply:
ALTER DATABASE RECOVER MANAGED STANDBY DATABASE DISCONNECT;
Logical standby 1. Determine the SCN at the primary database.
On the primary database, use the following query to obtain the value of the system change number (SCN) that is 2 SCNs before the RESETLOGS operation occurred on the primary database:
SQL> SELECT TO_CHAR(RESETLOGS_CHANGE# - 2) AS FLASHBACK_SCN FROM V$DATABASE;
2. Determine the target SCN for flashback operation at the logical standby:
SQL> SELECT DBMS_LOGSTDBY.MAP_PRIMARY_SCN (PRIMARY_SCN => FLASHBACK_SCN)2> AS TARGET_SCN FROM DUAL;
3. Flash back the logical standby to the TARGET_SCN returned.
Issue the following SQL statements to flash back the logical standby database to the specified SCN, and open the logical standby database with the RESETLOGS option:
SQL> SHUTDOWN;SQL> STARTUP MOUNT EXCLUSIVE;SQL> FLASHBACK DATABASE TO SCN TARGET_SCN;SQL> ALTER DATABASE OPEN RESETLOGS;
4. Start SQL Apply:
SQL> ALTER DATABASE START LOGICAL STANDBY APPLY IMMEDIATE;

Restoring Fault Tolerance
4-46 Oracle Database High Availability Best Practices
4.3.7 Restoring Fault Tolerance After Dual FailuresIf a dual failure affecting both the standby and primary databases occurs, then you must re-create the primary database first. Because the sites are identical, the primary database can be created wherever the most recent backup resides.
Table 4–16 summarizes the recovery strategy depending on the type of backups that are available.
Table 4–16 Re-Creating the Primary and Standby Databases
Available Backups Re-Creating the Primary Database
Local backup on primary and standby databases
Restore backup from the primary database. Recover and activate the database as the new primary database.
Local backup only on standby database. Tape backups on standby database.
Restore the local standby backup to the standby database. Recover and activate the database as the new primary database.
Tape backups only Restore tape backups locally. Recover the database and activate it as the new primary database.
See Also: After the primary database is re-created, follow the steps for creating a standby database that are described inOracle Data Guard Concepts and Administration

Managing Scheduled Outages 5-1
5Managing Scheduled Outages
This chapter describes scheduled outages and the Oracle operational best practices that can tolerate or manage each outage type and minimize downtime.
This chapter contains these topics:
■ Overview of Scheduled Outages
■ Eliminating or Reducing Downtime for Scheduled Outages
5.1 Overview of Scheduled OutagesScheduled outages are required for regular maintenance of the technology infrastructure that supports the application, including tasks such as:
■ Hardware maintenance, repair, and upgrades
■ Software upgrades and patching
■ Application (programmatic) changes, patches, and upgrades
■ Changes to improve performance and manageability of systems
You can implement many of these tasks while maintaining continuous application availability.
Table 5–1 describes scheduled outages that affect either the primary or secondary site.
See Also: Chapter 4 for information about unscheduled outages

Overview of Scheduled Outages
5-2 Oracle Database High Availability Best Practices
The following sections provide best practice recommendations for reducing scheduled outages on the primary and secondary sites:
Table 5–1 Scheduled Outages
Outage Scope Description Examples
Site-wide The entire site where the current primary database resides is unavailable. Usually known well in advance.
Scheduled power outages
Site maintenance
Regular planned switchovers to test infrastructure
Hardware maintenance (node impact)
Hardware maintenance on a database server. Restricted to a node of the database cluster.
Repair of a failed component such as a memory card or CPU board
Addition of memory or CPU to an existing node in the database tier
Hardware maintenance (clusterwide impact)
Hardware maintenance on a database server cluster
Some cases of adding a node to the cluster
Upgrade or repair of the cluster interconnect
Upgrade to the storage tier that requires downtime on the database tier
System software maintenance (node impact)
System software maintenance on a database server. The scope of the downtime is restricted to a node.
Upgrade of a software component such as the operating system
Changes to the configuration parameters for the operating system
System software maintenance (clusterwide impact)
System software maintenance on a database server cluster
Upgrade or patching of the cluster software
Upgrade of the volume management software
Oracle patch upgrade for the database
Scheduled outage for installation of an Oracle patch
Patch Oracle software to fix a specific customer issue
Oracle patch set or software upgrade for the database
Scheduled outage for Oracle patch set or software upgrade
Patching Oracle software with a patch set
Upgrading Oracle software
Database object reorganization or redefinition
Changes to the logical structure or the physical organization of Oracle Database objects, primarily to improve performance or manageability.
Changes to the data or schema.
Using the Oracle Database online redefinition feature enables objects to be available during the reorganization or redefinition.
Moving an object to a different tablespace
Converting a table to a partitioned table
Add, modify, or drop one or more columns in a table or cluster
Storage maintenance Maintenance of storage where database files reside
Converting to ASM
Adding or removing storage
Platform migration Changing operating system platform of the primary and standby databases
Moving to the Linux operating system
Location migration Changing physical location of the primary database
Moving the primary database from one data center to another
Programmatic changes May include data changes, schema, and other programmatic changes.
Application upgrades

Overview of Scheduled Outages
Managing Scheduled Outages 5-3
■ Managing Scheduled Outages on the Primary Site
■ Managing Scheduled Outages On the Secondary Site
5.1.1 Managing Scheduled Outages on the Primary SiteTable 5–2 shows the preferred solutions for performing scheduled outages on the primary site. The table includes links to detailed descriptions in Section 5.2, "Eliminating or Reducing Downtime for Scheduled Outages" beginning on page 5-5.
Table 5–2 Solutions for Scheduled Outages on the Primary Site
Planned Maintenance Preferred Oracle Solution Estimated Downtime
Site maintenance 1. Site, Hardware, and Software Maintenance Using Database Switchover on page 5-5
2. Complete Site Failover on page 4-4
3. Application Failover on page 4-12
< 5 minutes
Hardware maintenance or system software maintenance (clusterwide impact)
1. Site, Hardware, and Software Maintenance Using Database Switchover on page 5-5
2. Application Failover on page 4-12
< 5 minutes
Hardware maintenance or system software maintenance (node impact)
Oracle RAC service relocation (see Section 5.2.10, "System Maintenance")
No downtime
Oracle RAC Cluster Ready Service (CRS) Upgrades
Oracle CRS rolling patch upgrade (see your platform-specific Oracle Clusterware Installation Guide for complete details)
No downtime
Oracle patch upgrade for the database, Critical Patch Updates (CPUs)
Oracle RAC rolling patch upgrade using opatch (see Section 5.2.3, "Oracle RAC Database Patches")
No downtime
Oracle diagnostic "one-off" patches
Online Patching on page 5-8 No downtime
ASM upgrades Online ASM upgrade (see the section "Using ASM Rolling Upgrades" in the Oracle Database Storage Administrator's Guide)
No downtime
Oracle patch set or software upgrade for the database
Oracle Database rolling upgrade with Data Guard SQL Apply (see Section 5.2.5, "Database Upgrades")
< 5 minutes
Database object reorganization or redefinition
Online object reorganization with DBMS_REDEFINITION (see Section 5.2.9, "Data Reorganization and Redefinition")
No downtime
Database storage maintenance Online storage maintenance using ASM (see Section 5.2.4, "Storage Maintenance")
No downtime
Database platform or location maintenance
Database Platform or Location Migration on page 5-18
< 5 minutes
Application changes "Oracle Streams for Online Database Upgrade" on page 5-22
< 5 minutes
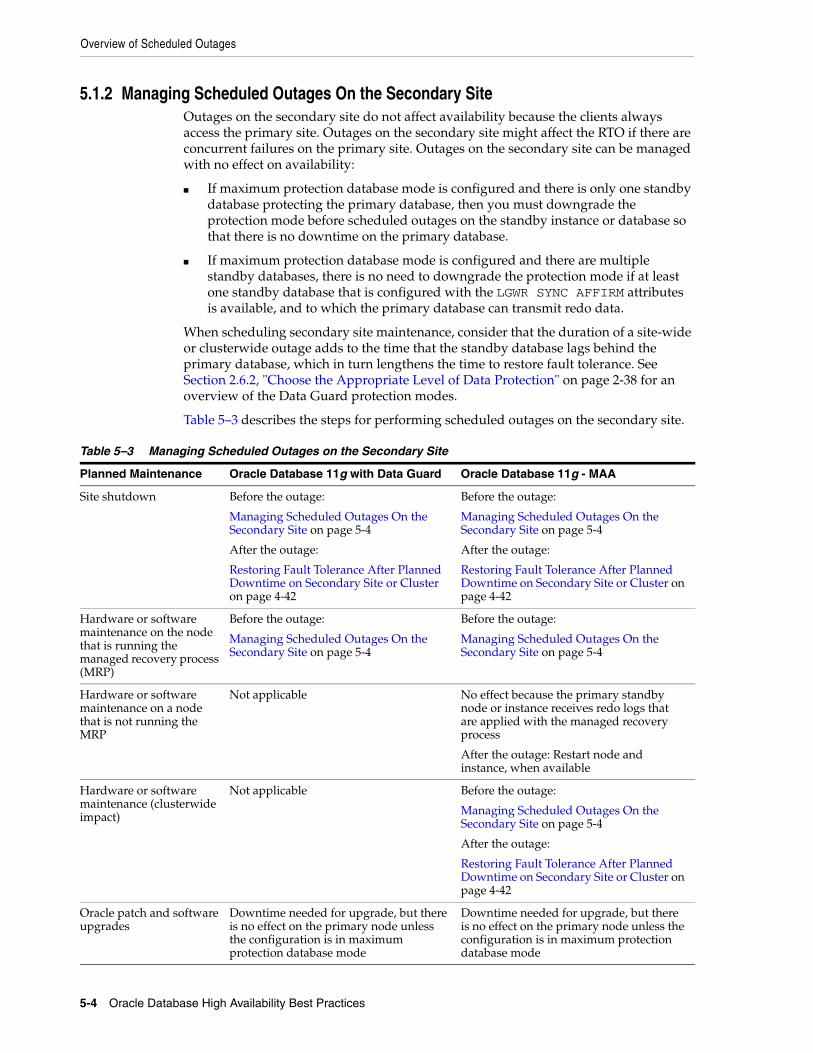
Overview of Scheduled Outages
5-4 Oracle Database High Availability Best Practices
5.1.2 Managing Scheduled Outages On the Secondary SiteOutages on the secondary site do not affect availability because the clients always access the primary site. Outages on the secondary site might affect the RTO if there are concurrent failures on the primary site. Outages on the secondary site can be managed with no effect on availability:
■ If maximum protection database mode is configured and there is only one standby database protecting the primary database, then you must downgrade the protection mode before scheduled outages on the standby instance or database so that there is no downtime on the primary database.
■ If maximum protection database mode is configured and there are multiple standby databases, there is no need to downgrade the protection mode if at least one standby database that is configured with the LGWR SYNC AFFIRM attributes is available, and to which the primary database can transmit redo data.
When scheduling secondary site maintenance, consider that the duration of a site-wide or clusterwide outage adds to the time that the standby database lags behind the primary database, which in turn lengthens the time to restore fault tolerance. See Section 2.6.2, "Choose the Appropriate Level of Data Protection" on page 2-38 for an overview of the Data Guard protection modes.
Table 5–3 describes the steps for performing scheduled outages on the secondary site.
Table 5–3 Managing Scheduled Outages on the Secondary Site
Planned Maintenance Oracle Database 11g with Data Guard Oracle Database 11g - MAA
Site shutdown Before the outage:
Managing Scheduled Outages On the Secondary Site on page 5-4
After the outage:
Restoring Fault Tolerance After Planned Downtime on Secondary Site or Cluster on page 4-42
Before the outage:
Managing Scheduled Outages On the Secondary Site on page 5-4
After the outage:
Restoring Fault Tolerance After Planned Downtime on Secondary Site or Cluster on page 4-42
Hardware or software maintenance on the node that is running the managed recovery process (MRP)
Before the outage:
Managing Scheduled Outages On the Secondary Site on page 5-4
Before the outage:
Managing Scheduled Outages On the Secondary Site on page 5-4
Hardware or software maintenance on a node that is not running the MRP
Not applicable No effect because the primary standby node or instance receives redo logs that are applied with the managed recovery process
After the outage: Restart node and instance, when available
Hardware or software maintenance (clusterwide impact)
Not applicable Before the outage:
Managing Scheduled Outages On the Secondary Site on page 5-4
After the outage:
Restoring Fault Tolerance After Planned Downtime on Secondary Site or Cluster on page 4-42
Oracle patch and software upgrades
Downtime needed for upgrade, but there is no effect on the primary node unless the configuration is in maximum protection database mode
Downtime needed for upgrade, but there is no effect on the primary node unless the configuration is in maximum protection database mode

Eliminating or Reducing Downtime for Scheduled Outages
Managing Scheduled Outages 5-5
5.2 Eliminating or Reducing Downtime for Scheduled OutagesThis section describes best practices for eliminating or reducing downtime due to scheduled outages. This section contains the following topics:
■ Site, Hardware, and Software Maintenance Using Database Switchover
■ Online Patching
■ Oracle RAC Database Patches
■ Storage Maintenance
■ Database Upgrades
■ Database Platform or Location Migration
■ Oracle Streams for Online Application Upgrades
■ Data Reorganization and Redefinition
■ System Maintenance
In general, online patching is the recommended solution for avoiding downtime when applying debug patches and interim patches where the scope of the upgrade is small. If you cannot perform your upgrade using online patching, then Oracle RAC is the next recommended solution before using Oracle Data Guard, next is transportable tablespaces, and then Oracle Streams. Regardless of the method you use, be sure to follow the guidelines and recommendations provided in the Oracle Database Upgrade Guide and its companion document, the Oracle 11g Upgrade Companion that is available in support note 601807.1 at http://support.oracle.com/. Also, before performing any rolling upgrade, Oracle recommends you perform extensive testing.
5.2.1 Site, Hardware, and Software Maintenance Using Database SwitchoverA switchover is a planned transition that includes a series of steps to switch database roles between the primary and standby databases. Following a successful switchover operation, the standby database assumes the primary role and the primary database becomes a standby database1. Data Guard enables you to change these roles dynamically by using Oracle Enterprise Manager and the broker, or manually by issuing SQL*Plus statements.
Switchovers are useful in many situations when performing site maintenance, and hardware or software maintenance such as database upgrades.
5.2.1.1 When to Perform a Data Guard Switchover Switchover can occur whenever a primary database is started, the target standby database is available, and all the archived redo logs are available.
Switchovers are useful in the following situations:
■ Scheduled maintenance such as hardware maintenance or firmware patches on the primary host
■ Resolution of data failures when the primary database is still opened
■ Testing and validating the secondary resources, as a means to test disaster recovery readiness
1 At times the term switchback is also used within the scope of database role management. A switchback operation is a subsequent switchover operation to return the standby databases to their original roles.

Eliminating or Reducing Downtime for Scheduled Outages
5-6 Oracle Database High Availability Best Practices
■ When using SQL Apply to perform a rolling upgrade (see Section 5.2.5.2, "Data Guard SQL Apply or Transient Logical Standby Database")
Switchover is not possible or practical under the following circumstances:
■ Archived redo log files that are needed for apply are missing
■ A point-in-time recovery is required
■ The primary database is not open and cannot be opened
5.2.1.2 Best Practices for Configuring Data Guard SwitchoverBefore performing a switchover, employ the configuration best practices in Section 2.6.7.1.1, "Switchover Best Practices" on page 2-54.
5.2.1.3 How to Perform Data Guard SwitchoverYou should perform switchovers dynamically using Oracle Enterprise Manager. If you are not using Oracle Enterprise Manager, then you can perform switchovers manually using the DGMGRL command-line interface or SQL*Plus statements:
■ Using Oracle Enterprise Manager, as described in Oracle Data Guard Broker
■ Using the DGMGRL command-line interface, as described in Oracle Data Guard Broker
■ Using SQL*Plus:
– Using SQL*Plus for Data Guard Switchover to a Physical Standby Database
– Using SQL*Plus for Data Guard Switchover to a Logical Standby Database
5.2.1.3.1 Using SQL*Plus for Data Guard Switchover to a Physical Standby Database This section describes the switchover steps at a high-level. See Oracle Data Guard Concepts and Administration for detailed steps.
Follow these steps to perform a switchover to a physical standby database:
1. If possible, disconnect user sessions and disable or stop application processing.
2. If the primary database is an Oracle RAC, then shut down all primary instances except one. To expedite this operation, issue a SHUTDOWN ABORT statement.
3. Issue the following SQL statement on the primary database to convert it to the standby database role:
ALTER DATABASE COMMIT TO SWITCHOVER TO STANDBY WITH SESSION SHUTDOWN;
4. If the standby database is an Oracle RAC, then shut down all standby instances except one. To expedite this operation, issue a SHUTDOWN ABORT statement.
5. Check if the standby database has ever been open read-only:
a. On the standby database, query the V$DATAGUARD_STATS view:
SELECT VALUE FROM V$DATAGUARD_STATS WHERE NAME='standby has been open';
b. If the query returns Y, then the standby database was opened in read-only mode and you must shut down and restart the standby database:
SHUTDOWN IMMEDIATESTARTUP MOUNT
6. Issue the following SQL statement on the original standby database to perform switchover:

Eliminating or Reducing Downtime for Scheduled Outages
Managing Scheduled Outages 5-7
ALTER DATABASE COMMIT TO SWITCHOVER TO PRIMARY;
7. Open the new primary database:
ALTER DATABASE OPEN;
8. On the new standby database (original primary database), bring it to the mount state and start Redo Apply. You can issue the following commands at the same time the new primary database is opening:
SHUTDOWN IMMEDIATESTARTUP MOUNTALTER DATABASE RECOVER MANAGED STANDBY DATABASE USING CURRENT LOGFILE DISCONNECT;
9. Restart user sessions and application processing.
10. If the production and standby databases are configured in an Oracle RAC, then start all instances on the primary and standby databases.
5.2.1.3.2 Using SQL*Plus for Data Guard Switchover to a Logical Standby Database This section describes the switchover steps at a high-level. See Oracle Data Guard Concepts and Administration for detailed steps.
When performing a switchover using SQL*Plus commands it is possible for the original standby database that is to become the primary database to build and transmit the LogMiner dictionary to the current primary database (the new standby database) before performing the switchover. This reduces the total time needed to perform the switchover. The following steps describe how to perform this optimized method:
1. Issue the following SQL statement on the primary database to enable receipt of redo from the current standby database:
ALTER DATABASE PREPARE TO SWITCHOVER TO LOGICAL STANDBY;
2. On the current logical standby database, build the LogMiner dictionary and transmit this dictionary to the current primary:
ALTER DATABASE PREPARE TO SWITCHOVER TO PRIMARY;
3. If possible, disconnect user sessions and disable or stop application processing.
4. When the SWITCHOVER_STATUS column of the V$DATABASE view returns TO LOGICAL STANDBY, convert the primary database to a standby by issuing:
ALTER DATABASE COMMIT TO SWITCHOVER TO LOGICAL STANDBY WITH SESSION SHUTDOWN;
5. Issue the following statement on the original standby database:
Note:
■ Beginning with Oracle Database 10g Release 2, you can open the new primary database directly from the mount state only if the standby database was not opened read-only since the last time the database was started. If the database has been opened read-only, you must restart the database.
■ You may notice an increase in I/O while the new primary database's standby redo logs are cleared.

Eliminating or Reducing Downtime for Scheduled Outages
5-8 Oracle Database High Availability Best Practices
ALTER DATABASE COMMIT TO SWITCHOVER TO PRIMARY;
6. Restart user sessions and application processing.
5.2.2 Online PatchingBeginning with Oracle Database 11g there is support for online patching for some qualified interim patches. Online patching provides the ability to patch the processes in an Oracle instance without bringing the instance down. Each process associated with the instance checks for patched code at a safe execution point, and then copies the code into its process space. Thus, the processes being patched may not necessarily pick up the new code at the exact same time.
A key difference between traditional patching and online patching is that traditional patching is implemented at the software level and online patching is implemented at the software or Oracle instance level. In other words, instances using an ORACLE_HOME that receives a traditional patch always use the patched code whereas instances using an ORACLE_HOME that receives an online patch receive the patched code only if the instance is specified when the patch is applied.
Online patching is the preferred solution for debug patches and interim patches where the scope of the fix is small. The same restrictions that apply to rolling patches also apply to online patches, plus some additional restrictions.
The best practices for online patching include the following points:
■ Apply the patch to one instance at a time.
■ When rolling back online patches, ensure all patched instances are included.
■ Avoid the dangerous and confusing situation of having different software across instances using the same $ORACLE_HOME.
■ Assess memory impact on a test system before deploying to production (for example: the pmap command).
■ Never remove the $ORACLE_HOME/hpatch directory.
5.2.3 Oracle RAC Database PatchesWith Oracle RAC, you can apply certain database patches to one node or instance at a time, which enables continual application and database availability. "One-off" patches, interim patches, and Critical Patch Updates (CPUs) to database software are usually applied to implement known fixes for software problems an installation has encountered or to apply diagnostic patches to gather information regarding a problem. Such patch application is often carried out during a scheduled maintenance outage.
See Also:
■ The MAA white paper "Best Practices for Optimizing Availability during Planned Maintenance using Oracle Clusterware and Oracle RAC" for more details about online patching: http://www.oracle.com/technology/deploy/availability/pdf/MAA_WP_10gR2_PlannedMaintwithClusterwareandRAC.pdf
■ Support note 761111.1 at http://support.oracle.com for the most up-to-date information about online patching

Eliminating or Reducing Downtime for Scheduled Outages
Managing Scheduled Outages 5-9
Oracle now provides the capability to do rolling patch upgrades with Oracle RAC with little or no database downtime. The tool used to achieve this is the opatch command-line utility.
The advantage of a Oracle RAC rolling upgrade is that it enables at least some instances of the Oracle RAC installation to be available during the scheduled outage required for patch upgrades. Only the Oracle RAC instance that is currently being patched must be brought down. The other instances can continue to remain available. Thus, the effect on the application downtime required for such scheduled outages is further minimized. Oracle's opatch utility enables the user to apply the patch successively to the different instances of the Oracle RAC installation.
Rolling upgrade is available only for patches that have been certified by Oracle to be eligible for rolling upgrades. Typically, patches that can be installed in a rolling upgrade include:
■ Patches that do not affect the contents of the database such as the data dictionary
■ Patches that are not related to Oracle RAC internode communication
■ Patches that are not related to client-side tools such as SQL*PLUS, Oracle utilities, development libraries, and Oracle Net
■ Patches that do not change shared database resources such as data file headers, control files, and common header definitions of kernel modules
Rolling upgrade of patches is currently available for one-off patches only. It is not available for patch sets.
Rolling patch upgrades are not available for deployments where the Oracle Database software is shared across the different nodes. This is the case where the Oracle home is on Cluster File System (CFS) or on shared volumes provided by file servers or NFS-mounted drives. The feature is only available where each node has its own copy of the Oracle Database software.
5.2.3.1 Best Practices to Minimize Downtime for All Database Patch UpgradesUse the following recommended practices for all database patch upgrades:
■ Always confirm with Oracle Support Services that the patch is valid for your problem and for your deployment environment.
■ Have a plan for applying the patch and a plan for backing out the patch.
■ Apply the patch to your test environment first and verify that it fixes the problem.
■ When you plan the elapsed time for applying the patch, include time for starting up and shutting down the other tiers of your technology stack if necessary.
■ If the patch is not a candidate for Oracle RAC rolling upgrade and you can incur the downtime for applying the patch, go to Section 5.2.5, "Database Upgrades" on page 5-12 to assess whether other solutions are feasible.
5.2.3.2 Best Practices to Minimize Downtime for Database Rolling UpgradesThe following are additional recommended practices for Oracle RAC rolling upgrades.
■ If multiple instances share an Oracle home, then all of them are affected by application of a patch. Administrators should verify that this does not cause unintentional side effects. Also, you must shut down all such instances on a node during the patch application. You must take this into account when scheduling a planned outage. As a best practice, only similar applications should share an Oracle home on a node. This provides greater flexibility for patching.

Eliminating or Reducing Downtime for Scheduled Outages
5-10 Oracle Database High Availability Best Practices
■ The Oracle inventory on each node is a repository of the Oracle Database software installed on the node. The inventory is node-specific. It is shared by all Oracle software installed on the node. It is similar across nodes only if all nodes are the same in terms of the Oracle Database software deployed, the deployment configuration, and patch levels. Because the Oracle inventory greatly aids the patch application and patch management process, it is recommended that its integrity be maintained. Oracle inventory should be backed up after each patch installation to any Oracle software on a specific node. This applies to the Oracle inventory on each node of the cluster.
■ Use the Oracle Universal Installer to install all Oracle database software. This creates the relevant repository entries in the Oracle inventory on each node of the cluster. Also, use the Oracle Universal Installer to add nodes to an existing Oracle RAC cluster.
However, if this was not done or is not feasible for some reason, adding information about an existing Oracle database software installation to the Oracle inventory can be done with the attach option of the opatch utility. Node information can be also added with this option.
■ The nature of the Oracle rolling patch upgrade enables it to be applied to only some nodes of the Oracle RAC cluster. So an instance can be operating with the patch applied, while another instance is operating without the patch. This is not possible for nonrolling patch upgrades. Apply nonrolling patch upgrades to all instances before the Oracle RAC deployment is activated. A mixed environment is useful if a patch must be tested before deploying it to all the instances. Applying the patch with the -local option is the recommended way to do this.
In the interest of keeping all instances of the Oracle RAC cluster at the same patch level, it is strongly recommended that after a patch has been validated, it should be applied to all nodes of the Oracle RAC installation. When instances of a Oracle RAC cluster have similar patch software, services can be migrated among instances without running into the problem a patch might have fixed.
■ Maintain all patches (including those applied by rolling upgrades) online and do not remove them after they have been applied. Keeping the patches is useful if a patch must be rolled back or applied again.
Store the patches in a location that is accessible by all nodes of the cluster. Thus all nodes of the cluster are equivalent in their capability to apply or roll back a patch.
■ Perform rolling patch upgrades, just like any other patch upgrade, when no other patch upgrade or Oracle installation is being performed on the node. The application of multiple patches is a sequential process, so plan the scheduled outage accordingly.
■ If you must apply multiple patches at the same time but only some patches are eligible for rolling upgrade, then apply all of the patches in a nonrolling manner. This reduces the overall time required to accomplish the patching process.
■ For patches that are not eligible for rolling upgrade, the next best option for Oracle RAC deployments is the MINIMIZE_DOWNTIME option of the APPLY command.
■ Perform the rolling upgrade when system usage is low to ensure minimal disruption of service for the end users.
See Also: Oracle Universal Installer and OPatch User's Guide for more information about the opatch utility

Eliminating or Reducing Downtime for Scheduled Outages
Managing Scheduled Outages 5-11
5.2.4 Storage MaintenanceUse the following procedure when adding or upgrading storage on the system. The procedures in the following sections assume that you are adding storage to an ASM disk group.
■ Migrating to ASM Storage
■ Adding and Removing Storage
■ Upgrading ASM Nodes
5.2.4.1 Migrating to ASM StorageIf you have an existing Oracle database that stores database files on a file system or on raw devices, you can migrate some or all of these database files to ASM. To minimize downtime, use a physical standby database to migrate data to ASM storage.
5.2.4.2 Adding and Removing StorageDisks can be added to and removed from ASM with no downtime. When disks are added or removed, ASM automatically starts a rebalance operation to evenly spread the disk group contents over all drives in the disk group.
The best practices for adding or removing storage include:
■ Make sure your host operating system and storage hardware can support adding and removing storage with no downtime before using ASM to do so.
■ Use a single ALTER DISKGROUP command when adding or removing multiple disk drives.
For example, if the storage maintenance is to add drives and remove existing drives, use a single ALTER DISKGROUP command with the ADD DISK clause to add the drives, and the DROP DISK clause to remove the existing drives. For example:
ALTER DISKGROUP data DROP DISK diska5 ADD FAILGROUP failgrp1 DISK '/devices/diska9' NAME diska9;
■ When dropping disks from a disk group, specify the WAIT option in the REBALANCE clause so the ALTER DISKGROUP statement does not return until the contents of the drives being dropped have been moved to other drives. After the statement completes, the drives can be safely removed from the system. For example:
ALTER DISKGROUP dataDROP DISK diska5ADD FAILGROUP failgrp1 DISK '/devices/diska9' NAME diska9REBALANCE WAIT;
■ When dropping disks in a normal or high redundancy disk group, ensure there is enough free disk space in the disk group to reconstruct full redundancy.
See Also:
■ The MAA white paper: "Minimal Downtime Migration to ASM" at
http://www.otn.oracle.com/goto/maa
■ Oracle Database Backup and Recovery User's Guide for information about performing ASM data migration using RMAN

Eliminating or Reducing Downtime for Scheduled Outages
5-12 Oracle Database High Availability Best Practices
■ Monitor the progress of rebalance operations using Enterprise Manager or by querying V$ASM_OPERATION.
■ For long-running rebalance operations that occur during periods of low database activity, increase the rebalance power limit to reduce the rebalance time.
5.2.4.3 Upgrading ASM NodesPerform an ASM rolling upgrade to independently upgrade or patch clustered ASM nodes without affecting database availability, thus providing greater uptime. You can use ASM rolling upgrades only to upgrade clustered ASM instances for environments running Oracle Database 11g or later releases.
5.2.5 Database UpgradesThe following Oracle features are available to perform database upgrades:
■ Database Upgrade Assistant
■ Data Guard SQL Apply or Transient Logical Standby Database
■ Oracle Streams
■ Transportable Tablespaces
The method you choose to perform database upgrades can vary depending on the following considerations:
■ Downtime required to complete the upgrade
■ Setup time and effort required before the downtime
■ Temporary additional resources necessary (for example, disk space or CPU)
■ Complexity of the steps allowed to complete the upgrade
Table 5–4 lists the methods that can be used for database upgrades, and recommends what method to use.
Regardless of the upgrade method you use, you should follow the guidelines and recommendations provided in the Oracle Database Upgrade Guide and its companion
See Also: Oracle Database Storage Administrator's Guide
See Also: The section about "Using ASM Rolling Upgrades" in Oracle Database Storage Administrator's Guide for complete information
Table 5–4 Database Upgrade Options
Upgrade Method Use This Method When...
Database Upgrade Assistant
Recommended method when the maintenance window is sufficient or when data type constraints prohibit the use of the other methods in this table.
Data Guard SQL Apply or Transient Logical Standby Database
DBUA cannot finish within the maintenance window and the database is not a candidate for Oracle RAC rolling patch upgrade.
Use a transient logical standby when the configuration has only a physical standby database.
Oracle Streams This is a Streams implementation or when Data Guard SQL Apply rolling upgrade does not support the database versions in use.
Transportable Tablespaces
The database is using data types unsupported by Data Guard SQL Apply or Oracle Streams, and the user schemas are simple.

Eliminating or Reducing Downtime for Scheduled Outages
Managing Scheduled Outages 5-13
document, the Oracle 11g Upgrade Companion that is available at support note 601807.1. at http://support.oracle.com/
5.2.5.1 Database Upgrade AssistantDatabase Upgrade Assistant (DBUA) is used to upgrade a database in place from an earlier software version.
When deciding if DBUA is the proper tool to use when performing a database upgrade with minimal downtime, consider the following:
■ DBUA upgrades the database dictionary and all components (for example: Java, XDB, Streams, and so on) that have been installed while the database is unavailable for normal user activity.
■ Downtime required for a database upgrade when using DBUA is determined by the time needed to:
– Upgrade all database dictionary objects to the new version
– Restart the database
– Upgrade all database dictionary objects
– Recompile all PL/SQL
– Reconnect the clients to the upgraded database
■ To reduce the amount of downtime required for a database upgrade when using DBUA:
– Remove any database options that are not being used.
DBUA upgrades all of the installed database options, whether they are required by an application. By reducing the number of options that must be upgraded, you can reduce the overall upgrade time.
– Remove unused user-supplied PL/SQL procedures.
All PL/SQL routines in the database are invalidated and recompiled as part of the upgrade process. By reducing the amount of recompilation required during the upgrade, you can reduce the overall upgrade time.
Use DBUA for a database upgrade when the time to perform the upgrade with this method fits within the maintenance window.
5.2.5.2 Data Guard SQL Apply or Transient Logical Standby DatabaseUse Data Guard SQL Apply or a transient logical standby database to upgrade a database with minimal downtime using a process called a rolling upgrade. Data Guard currently supports homogeneous environments where the primary and standby databases run on the same platform.
See Also:
■ Oracle Database Upgrade Guide for more information on DBUA and upgrading your Oracle Database software
■ Oracle Database 11g Upgrade Companion in support note 601807.1 at http://support.oracle.com/ to upgrade from Oracle9i to Oracle Database 11g

Eliminating or Reducing Downtime for Scheduled Outages
5-14 Oracle Database High Availability Best Practices
SQL Apply Rolling UpgradesUse Data Guard SQL Apply for rolling database upgrade when a conventional upgrade cannot complete the upgrade within the maintenance window and the application does not use user-defined types.
Note the following points when deciding if SQL Apply is the appropriate method for minimizing downtime during a database upgrade:
■ SQL Apply and Oracle Streams share the same log mining infrastructure and therefore both features have the same data type restrictions on user-defined types, such as object types, REF values, varrays, and nested tables. SQL Apply has some data type restrictions (see Oracle Data Guard Concepts and Administration for a list of the restrictions). If there are data type restrictions, consider implementing Extended Datatype Support (EDS).
EDS enables SQL Apply to replicate changes to tables that contain some data types not natively supported from one database to another. Beginning with Oracle Database 10g Release 2 (10.2.0.4) Patch Set 3, SQL Apply supports the ability for triggers to fire on the logical standby database, which provides the basis of EDS. For an overview of EDS, see the MAA white paper "Extended Datatype Support: with SQL Apply and Oracle Streams" available at
http://www.oracle.com/technology/deploy/availability/pdf/maa_edtsoverview.pdf
For examples using EDS to support data types that are not natively supported by SQL Apply, see support note 559353.1 at http://support.oracle.com/.
■ You can perform a SQL Apply rolling upgrade for any upgrade, including a major release upgrade if the source release is Oracle Database 10g release 1 (10.1.0.3) or higher. Before you begin, review the detailed steps for a SQL Apply rolling upgrade and verify the supported data types in Oracle Data Guard Concepts and Administration.
■ Downtime required for a database upgrade (rolling upgrade) when using Data Guard SQL Apply is determined by the time needed to:
– Perform a Data Guard switchover
– Reconnect the clients to the new database
Transient Logical Standby Database Rolling UpgradesYou can use a transient logical standby database to perform a rolling database upgrade using your current physical standby database by temporarily converting it to a logical standby database. Use a transient logical standby when your configuration only has a physical standby database. Performing a rolling upgrade using a transient
See Also: Support note 413484.1 at http://support.oracle.com/ for exceptions that are specific to heterogeneous environments, and for other late-breaking information about rolling upgrades with SQL Apply
See Also:
■ Oracle Data Guard Concepts and Administration
■ The MAA white paper "Database Rolling Upgrade Using Data Guard SQL Apply Oracle Database 11g and 10gR2" at http://www.otn.oracle.com/goto/maa

Eliminating or Reducing Downtime for Scheduled Outages
Managing Scheduled Outages 5-15
logical standby is similar to the standard SQL Apply rolling upgrade with the following differences:
■ A guaranteed restore point is created on the primary database to flash the database back to a physical standby database after the switchover.
■ The conversion of a physical standby database to a logical standby database uses the KEEP IDENTITY clause to retain the same DB_NAME and DBID as that of its primary database.
■ The ALTER DATABASE CONVERT TO PHYSICAL STANDBY statement converts the original primary database from a logical standby to a physical standby database.
■ The original primary database is actually upgraded through Redo Apply after it is converted from the transient logical standby database role to a physical standby database.
Figure 5–1 shows the flow of processing that occurs when you perform a rolling upgrade with a transient logical standby database.

Eliminating or Reducing Downtime for Scheduled Outages
5-16 Oracle Database High Availability Best Practices
Figure 5–1 Using a Transient Logical Standby Database for Database Rolling Upgrade
This procedure is documented in Oracle Data Guard Concepts and Administration in the section about "Performing a Rolling Upgrade With an Existing Physical Standby Database."
See Also: The MAA white paper "Rolling Database Upgrades for Physical Standby Databases Using Transient Logical Standby 11g" at
http://www.oracle.com/technology/deploy/availability/pdf/maa_wp_11g_transientlogicalrollingupgrade.pdf
ProductionDatabaseRelease x
LogicalStandbyDatabaseRelease x
PhysicalStandbyDatabaseRelease y
ProductionDatabaseRelease y
Convert to Physical Standby Database Upgrade Automatically During Redo Apply
PhysicalStandbyDatabaseRelease x
LogicalStandbyDatabaseRelease x
ProductionDatabaseRelease y
ProductionDatabaseRelease y
PhysicalStandbyDatabaseRelease y
LogicalStandbyDatabaseRelease y
Upgrade
Synchronize
Switchover and Synchronize
Switchover and Synchronize

Eliminating or Reducing Downtime for Scheduled Outages
Managing Scheduled Outages 5-17
5.2.5.3 Oracle StreamsUse Oracle Streams to upgrade the database software from one version to another with minimal downtime. This is because Oracle Streams supports a configuration in which the primary database and its replica run on different database versions.
Note the following points when deciding if Oracle Streams is an appropriate method for a database upgrade:
■ Oracle Streams does not support user-defined types, such as object types, REF values, varrays, and nested tables. However, if there are data type restrictions, consider implementing Extended Datatype Support (EDS).
EDS enables Streams to replicate changes to tables that contain some data types not natively supported from one database to another. For an overview of EDS, see the MAA white paper "Extended Datatype Support" available at
http://www.oracle.com/technology/deploy/availability/pdf/maa_edtsoverview.pdf
For examples using EDS to support data types that are not natively supported by SQL Apply, see support note To obtain additional information about EDS for Oracle Streams, see support note 556742.1. at http://support.oracle.com/.
■ The source database must be running Oracle9i release 2 or higher.
■ More administrative effort may be required to set up and maintain the Oracle Streams environment for a database upgrade.
■ For Oracle Streams local capture, there might be a performance effect on the source database while the source and target databases run in parallel as changes are propagated to the target database.
■ Downtime required for a database upgrade when using Oracle Streams is determined by the time needed to reconnect the clients to the new database.
Consider using Oracle Streams when the following situations exist:
■ If the application uses Oracle Streams.
■ The upgraded (target) database can apply changes faster than they are being generated at the source.
5.2.5.4 Transportable TablespacesUse transportable tablespaces to accomplish a database upgrade by transporting all user data files into a pre-created, prepared target database.
Note the following points when deciding if transportable tablespaces is the appropriate method for performing a database upgrade:
■ The SYSTEM tablespace cannot be moved with transportable tablespaces. The target database SYSTEM tablespace contents, including user definitions and objects necessary for the application, must be built manually. Use Data Pump to move the contents of the SYSTEM tablespace.
■ Downtime required for a database upgrade when using transportable tablespaces is determined by the time needed to:
– Place the source database tablespaces in read-only mode.
See Also: Oracle Streams Concepts and Administration for more information about database upgrading using Oracle Streams

Eliminating or Reducing Downtime for Scheduled Outages
5-18 Oracle Database High Availability Best Practices
– Perform a network import of the transportable metadata.
– If the target database is on a remote system, then include the time to transfer all data files from the source system to the target system. However, note that using transportable tablespaces to perform a database upgrade is useful only if the data files can be used in their current location. Using the transportable tablespace method is not recommended if doing so requires that you copy the data files to the target location.
The time it takes to transfer the data files can be reduced significantly by using a storage infrastructure that can make the data files available to the target system without physically moving the files, or by using a physical standby database.
Using transportable tablespaces to perform a database upgrade is recommended when:
■ The data files can be used in their current location to avoid copying data files as part of the transport process. If the target database is on a different machine, this requires that the storage is accessible to both the source and target systems.
■ DBUA cannot complete within the maintenance window.
■ Oracle Streams or Data Guard SQL Apply cannot be used due to data type restrictions.
■ The Oracle database has a simple schema.
5.2.6 Database Platform or Location MigrationThe following Oracle features are available to perform platform migrations and upgrades:
■ Transportable Database for Platform Migration
■ Oracle Streams for Platform Migration
■ Oracle Data Pump for Platform Migration
■ Transportable Tablespaces for Platform Migration
■ Data Guard Redo Apply (Physical Standby Database) for Location Migration
The method you choose to perform these database maintenance tasks depends on the following considerations:
■ Downtime required to complete the maintenance operations
■ Setup time and effort required before the downtime
■ Amount of temporary additional resources necessary, such as disk space or CPU
■ Complexity of the steps allowed to complete maintenance operations
Table 5–5 summarizes the methods you can use for platform migrations and database upgrades, and recommends which method to use for each operation.
See Also:
■ Oracle Database Administrator's Guide
■ The MAA white paper "Database Upgrade Using Transportable Tablespaces" available at http://www.otn.oracle.com/goto/maa

Eliminating or Reducing Downtime for Scheduled Outages
Managing Scheduled Outages 5-19
5.2.6.1 Physical Standby Databases for Platform MigrationThe recommended approach for platform migration is to create a physical standby and perform a switchover. Physical standby databases support certain heterogeneous platform combinations. See support note 413484.1 for an up-to-date list.
Oracle Data Guard and physical standby databases are the recommended solution for performing system and cluster upgrades that are not upgradeable using Oracle RAC rolling upgrades. For example, Data Guard is also recommended for:
■ System upgrades that cannot be upgraded using Oracle RAC rolling upgrades due to system restrictions.
■ Migrations to ASM, to Oracle RAC from a nonclustered environment, to 64-bit systems, to a different platform with the same endian format or to a different platform with the same processor architecture, or to Windows from Linux or to Linux from Windows.
■ When you have a primary database with 32-bit Oracle binaries on Red Hat 32-bit, and a physical standby database with 64-bit Oracle binaries on Red Hat 64-bit. Such configurations must follow additional procedures during Data Guard role transitions (switchover and failover) as described in support note 414043.1.
5.2.6.2 Transportable Database for Platform MigrationTransportable database, available beginning in Oracle Database 10g Release 2 (10.2), is the recommended solution for migrating an entire database to another platform that
Table 5–5 Platform and Location Migration Options
Operation Recommended Method Alternate Methods
Platform migration to same endian platform
Physical Standby Databases for Platform Migration
1. Use Transportable Database for Platform Migration when a cross-platform physical standby database is not available for the platform combination to be migrated.
2. Use Oracle Streams for Platform Migration transportable database cannot finish within the maintenance window.
Platform migration to different endian platform
Oracle Data Pump for Platform Migration
1. Use Oracle Streams for Platform Migration when Data Pump cannot finish within the maintenance window.
2. Use Transportable Tablespaces for Platform Migration when the database is using data types unsupported by Oracle Streams.
Location Migration Only
Data Guard Redo Apply (Physical Standby Database) for Location Migration
None.
Note: Query the V$TRANSPORTABLE_PLATFORM view to determine the endian format of all platforms. Query the V$DATABASE view to determine the platform ID and platform name of the current system.
See Also: Support notes 413484.1 and 414043.1 at http://support.oracle.com/
Eliminating or Reducing Downtime for Scheduled Outages
5-20 Oracle Database High Availability Best Practices
has the same endian format, but only when a cross-platform physical standby database is not available for the source/target platform combination to be migrated.
Consider the following points when deciding if transportable database is the appropriate method to use when moving a database to another platform:
■ Transportable database supports moving databases between platforms with the same endian format.
■ Downtime required for a platform migration when using transportable database is determined by the time needed to:
– Place the source database in read-only mode.
– Convert all data files with UNDO only. See support note 415884.1 at http://support.oracle.com/ for more details.
– Transfer all data files from the source system to the target system.
You can significantly reduce the amount of downtime by using a storage infrastructure that can make the data files available to the target system without physically moving the files.
5.2.6.3 Oracle Streams for Platform MigrationYou can use Oracle Streams to move a database from one platform to another with minimal downtime. This is because Oracle Streams supports a configuration in which the primary database and its replica run on different platforms.
Consider using Oracle Streams if transportable database cannot perform the migration quickly enough, when the application does not use user-defined types, and you can carry out any extra administrative effort required to perform the migration.
Note the following points when deciding if Oracle Streams is an appropriate method for performing a platform migration:
■ Oracle Streams does not support user-defined types, such as object types, REF values, varrays, and nested tables. If there are data type restrictions, consider implementing Extended Datatype Support (EDS).
EDS enables Streams to replicate changes to tables that contain some data types not natively supported from one database to another. For an overview of EDS, see the MAA white paper "Extended Datatype Support: SQL Apply and Streams" at
http://www.otn.oracle.com/goto/maa
For examples using EDS to support data types that are not natively supported, see support note 556742.1. at http://support.oracle.com/.
■ To perform an upgrade using Oracle Streams, the source database must be running Oracle9i release 2 or higher.
■ Extra administrative effort may be required to set up and maintain the Oracle Streams environment.
See Also:
■ Oracle Database Backup and Recovery User's Guide for more information about cross platform use of transportable database
■ The MAA white paper "Platform Migration Using Transportable Database" at http://www.otn.oracle.com/goto/maa

Eliminating or Reducing Downtime for Scheduled Outages
Managing Scheduled Outages 5-21
■ For Oracle Streams local capture, there might be a performance impact on the source database while the source and target databases run in parallel as changes are propagated to the target database.
■ Downtime required for a platform migration when using Oracle Streams is determined by the time needed to apply the remaining transactions in the queue and to reconnect clients to the new database.
5.2.6.4 Oracle Data Pump for Platform MigrationOracle Data Pump technology enables very high-speed movement of data and metadata from one database to another, across different platforms and different database versions.
Note the following points when deciding if Data Pump is an appropriate method for a platform migration:
■ Oracle Data Pump is available only on Oracle Database 10g Release 1 (10.1) and later releases.
■ Downtime required for a platform migration when using Data Pump is determined by the time needed to perform a full database network import. A network import uses a database link between the target system and the remote source system to retrieve data and write it directly into the target system, without the use of dump files.
Use Data Pump when moving a database to a platform with different endian format when the network import time is acceptable.
5.2.6.5 Transportable Tablespaces for Platform MigrationTransportable tablespaces accomplish a platform migration by transporting all user data files into a pre-created, prepared target database. Use transportable tablespaces when the database is using data types unsupported by Oracle Streams and the user schemas are simple.
Note the following points when deciding if transportable tablespaces is the appropriate method for performing a platform migration:
■ The SYSTEM tablespace cannot be moved with transportable tablespaces. the target database SYSTEM tablespace contents, including user definitions and objects necessary for the clients, must be built manually. Use Data Pump to move the necessary contents of the SYSTEM tablespace.
■ Downtime required for a platform migration or database upgrade when using transportable tablespaces is determined by the time needed to:
– Place the source database tablespaces in read-only mode.
– Perform a network import of the transportable metadata.
– Transfer all data files from the source system to the target system.
See Also: Oracle Streams Concepts and Administration
See Also:
■ Oracle Database Utilities for more information about Oracle Data Pump and the Export and Import utilities
■ Oracle Database Upgrade Guide for more information about upgrading your Oracle Database software

Eliminating or Reducing Downtime for Scheduled Outages
5-22 Oracle Database High Availability Best Practices
This time can be reduced significantly by using a storage infrastructure that can make the data files available to the target system without the physically moving the files.
– Convert all data files to the new platform format using RMAN.
Use transportable tablespaces to migrate to a platform when Oracle Data Pump cannot complete within the maintenance window, and Oracle Streams or Data Guard SQL Apply cannot be used due to data type restrictions.
5.2.6.6 Data Guard Redo Apply (Physical Standby Database) for Location MigrationData Guard Redo Apply can be used to change the location of a database to a remote site with minimal downtime by setting up a temporary standby database at a remote location and performing a switchover operation.
The downtime required for a location migration when using Data Guard Redo Apply is determined by the time required to perform a switchover operation.
5.2.7 Oracle Streams for Online Database UpgradeAn Oracle database upgrade is the process of transforming an existing, prior release of an Oracle Database system into the current release of the Oracle Database system and can be a very lengthy process.
If using Data Guard SQL Apply or Transient Logical Standby Database to upgrade your database is not applicable and you require zero-to-minimum downtime while performing the database or application upgrade, then configure Oracle Streams to perform a database upgrade with little or no downtime. To do so, use an Oracle Streams single-source replication environment with the following databases:
■ Source Database: The original database that is being upgraded.
■ Destination Database: The copy of the source database where an apply process applies changes made to the source database during the upgrade process. The apply process can apply changes to the same or different schema and object structure.
The following general steps describe how to perform a database upgrade while the database is online:
1. Create an empty destination database.
2. Configure an Oracle Streams single-source replication environment where the original database is the source database and a copy of the database is the destination database for the changes made at the source.
3. Perform the database upgrade on the destination database. During this time the original source database is available online.
4. Use Oracle Streams to apply the changes made at the source database to the destination database.
5. When the destination database has caught up with the changes made at the source database, take the source database offline and make the destination database available for applications and users.
See Also: Oracle Database Administrator's Guide for more information about transportable tablespaces
See Also: Oracle Data Guard Concepts and Administration for more information on Redo Apply and physical standby databases

Eliminating or Reducing Downtime for Scheduled Outages
Managing Scheduled Outages 5-23
If the schema or object structure is different at the destination database, then you must incorporate Streams transformations to manipulate the change to its new structure.
5.2.8 Oracle Streams for Online Application UpgradesAn application upgrade may include a database upgrade plus any required application code and schema changes. If you require zero-to-minimum downtime while performing the database or application upgrade, then configure Oracle Streams to perform a database upgrade with little or no downtime. (See also Section 5.2.7, "Oracle Streams for Online Database Upgrade" on page 5-22.)
The process for upgrading user-created applications using Oracle Streams can involve modifying and creating the schema objects at the destination database after instantiation. To account for differences between the source database and destination database, you can use one or more declarative rule-based transformations and DML handlers at the destination database to process changes.
In general, declarative rule-based transformations are easier to use than DML handlers. Therefore, when modifications to row LCRs are required, try to configure a declarative rule-based transformation first before using a DML handler. If row LCRs for tables that contain one or more LOB columns must be modified, then you should use a DML handler and LOB assembly.
Before you begin the database maintenance operation, you should follow the instructions in Oracle Streams Concepts and Administration in Appendix C "Online Database Maintenance with Oracle Streams" to:
1. Prepare your declarative rule-based transformations or DML handlers.
2. Determine the declarative rule-based transformations and DML handlers you need at your destination database. Your determination depends on the modifications to the schema objects required by your upgraded applications.
3. Create the PL/SQL procedures necessary for any DML handlers during the database maintenance operation.
4. Use LOB assembly if row LCRs for tables that contain one or more LOB columns must be modified.
5. Handle logical dependencies if an apply process requires additional information to detect dependencies in row LCRs that are being applied in parallel (such as if the application rather than the database enforces logical dependencies, or if schema objects have been modified to support the application upgrade and a DML handler modifies row LCRs to account for differences between the source and destination databases).
5.2.9 Data Reorganization and RedefinitionMany scheduled outages related to the data server involve some reorganization of the database objects. The Online Reorganization and Redefinition feature of Oracle Database enables data reorganization to be performed even while the underlying data is being modified. This feature enhances availability and manageability by allowing users full access to the database during a data reorganization operation.
See Also: Appendix B "Online Database Upgrade with Oracle Streams" in Oracle Streams Concepts and Administration
See Also: Appendix E "Online Database Maintenance with Oracle Streams" in Oracle Streams Concepts and Administration

Eliminating or Reducing Downtime for Scheduled Outages
5-24 Oracle Database High Availability Best Practices
The ability to modify table physical attributes and transform both data and table structure has been available since Oracle8i. See the Oracle Database High Availability Overview for a comprehensive table of data reorganization capabilities.
In highly available systems, it is occasionally necessary to redefine large tables that are constantly accessed to improve the performance of queries or DML. Using Online Reorganization and Redefinition, administrators have the flexibility to modify table physical attributes and transform both data and table structure at the same time users have full access to the database. This capability improves data availability, query performance, response time, and disk space usage, all of which are important in a mission-critical environment. Plus, Online Reorganization and Redefinition can make the application upgrade process easier, safer and faster.
The recommended best practice is to reorganize tables using the DBMS_REDEFINITION PL/SQL package, because it provides a significant increase in availability compared to traditional methods of redefining tables that require tables to be taken offline. Whether you call DBMS_REDEFINITION manually at the command line or automatically through Oracle Enterprise Manager, the entire reorganization process occurs while users have full access to the table, thus ensuring system availability.
Figure 5–2 shows the Reorganize Objects Wizard in Oracle Enterprise Manager that you can use as an alternative to calling the DBMS_REDEFINITION package at the SQL*Plus command line. After you answer a few questions in the wizard, it automatically generates the script and performs the reorganization.
Figure 5–2 Database Object Reorganization Using Oracle Enterprise Manager
Using the DBMS_REDEFINITION approach, an interim table is created that contains all the desired attributes. The reorganization begins by calling the procedure START_REDEF_TABLE, which is where the column mappings between the current and new version of the table are described. All the dependent objects such as triggers, constraints and indexes are automatically copied to the interim table using the procedure COPY_TABLE_DEPENDENTS. During the reorganization, any changes made to the original table are added to the interim table by calling the procedure SYNC_INTERIM_TABLE. The reorganization is complete when the procedure FINISH_REDEF_TABLE is called and the interim table is renamed as the main table.

Eliminating or Reducing Downtime for Scheduled Outages
Managing Scheduled Outages 5-25
You can rename a tablespace beginning in Oracle Database 10g, similar to the ability to rename a column, table and data file. Previously, the only way to change a tablespace name was to drop and re-create the tablespace, but this meant that the contents of the tablespace had to be dropped and rebuilt later. With the ability to rename a tablespace online, there is no interruption to the users.
ALTER TABLESPACE USERS RENAME TO new_tablespace_name;
Tablespace altered.
Additionally, consider the following when performing data reorganization:
■ Minimize concurrent activity on the table during an online operation.
During an online operation, Oracle recommends users minimize activities on the base table. Database activities should affect less than 10% of the table while an online operation is in progress. Also the database administrator can use the Database Resource Manager to minimize the affect of the data reorganization to users by allocating enough resources to the users.
■ Oracle does not recommend running online operations at peak times or running a batch job that modifies large amount of data during an online data reorganization.
In fact, parallel DML, direct load and import/export cannot be performed during an online operation.
■ Rebuild indexes online versus dropping an index and then re-creating an index online.
Rebuilding an index online requires additional disk space for the new index during the operation, whereas dropping an index and then re-creating an index does not require additional disk space.
■ Coalesce an index online versus rebuilding an index online.
Online index coalesce is an in-place data reorganization operation, hence does not require additional disk space like index rebuild does. Index rebuild requires temporary disk space equal to the size of the index plus sort space during the operation. Index coalesce does not reduce the height of the B-tree. It only tries to reduce the number of leaf blocks. The coalesce operation does not free up space for users but does improve index scan performance.
If a user must move an index to a new tablespace, use online index rebuild.
■ Perform online maintenance of local and global indexes.
Oracle Database 11g supports both local and global partitioned indexes with online operations. When tables and indexes are partitioned, this allows administrators to perform maintenance on these objects, one partition at a time, while the other partitions remain online.
See Also:
■ Oracle Database Administrator's Guide for more information about redefining tables online
■ The "Online Data Reorganization and Redefinition" white paper at
http://www.oracle.com/technology/deploy/availability/techlisting.html

Eliminating or Reducing Downtime for Scheduled Outages
5-26 Oracle Database High Availability Best Practices
5.2.10 System MaintenanceFor a scheduled outage that requires an instance, node, or other component to be isolated, Oracle RAC provides the ability to relocate, disable, and enable services. Relocation migrates a service to another instance. Services and instances can be selectively disabled while repair, change, or upgrade is performed on hardware or system software and reenabled after the maintenance is complete. This ensures that the service or instance is not started during the maintenance outage. The service and instance is disabled at the beginning of the planned outage. It is then enabled after the maintenance outage.
When using Oracle RAC, Oracle Clusterware daemons start automatically at the time the node is started. When performing maintenance that requires one or more system reboots or requires that all non-operating system processes be shut down, use the crsctl command to stop and disable the startup of the Oracle Clusterware daemons. After maintenance is complete, enable and start the Oracle Clusterware daemons with crsctl commands.
See Also:
■ Oracle Real Application Clusters Administration and Deployment Guide for information about administering services with Enterprise Manager, DBCA, PL/SQL, and SRVCTL
■ The MAA white paper: "Optimizing Availability During Planned Maintenance Using Oracle Clusterware and Oracle RAC" at
http://www.otn.oracle.com/goto/maa
See Also: Oracle Real Application Clusters Administration and Deployment Guide for information about using the crsctl command

Migrating to an MAA Environment 6-1
6Migrating to an MAA Environment
This chapter provides the best practice recommendations for moving your current configuration to an Maximum Availability Architecture (MAA) environment to create a redundant, reliable system and database, without sacrificing simplicity and performance.
This chapter contains these topics:
■ Moving Your Configuration to MAA
■ Using Oracle Enterprise Manager Grid Control
■ Using Manual Step-by-Step Instructions
6.1 Moving Your Configuration to MAAMAA combines the scalability and availability advantages of Oracle Real Application Clusters (Oracle RAC) with the data and site protection capabilities of Oracle Data Guard.
An MAA environment consists of a site containing an Oracle RAC primary database and a second site containing a cluster that minimally hosts at least one physical or logical standby database, but ideally hosts a combination of logical and physical standby databases. This environment provides the most comprehensive solution for both unplanned and unplanned outages because it inherits the capabilities and advantages of both Oracle Database 11g with Oracle RAC and Oracle Data Guard.
However, while the ideal MAA configuration includes an Oracle RAC primary database with an Oracle RAC standby database, business requirements or other considerations might indicate that you choose a different ending configuration or that you perform a phased transition to MAA. That is, some ending configurations could actually be intermediate steps in a phased implementation to an Oracle RAC primary with Oracle RAC standby configuration.
6.2 Using Oracle Enterprise Manager Grid ControlThe best practice for moving your configuration to an MAA environment is to use Oracle Enterprise Manager 10g Grid Control (release 10.2.0.5 or later).
Chapter 3 showed how the point-and-click nature of Grid Control allows you to take an existing configuration that is at any level of implementation and attain a complete MAA architecture (including Data Guard, Oracle RAC, and ASM) with minimal downtime. You can perform virtually all steps within the Grid Control environment.
Grid Control enables:

Using Manual Step-by-Step Instructions
6-2 Oracle Database High Availability Best Practices
■ Creation and extension of a high availability MAA environment with minimal downtime. These capabilities include:
– Moving to more robust and available storage (for example, file system to ASM) through creation of a physical standby database. Downtime incurred is limited to the time it takes to perform a switchover to the standby database.
– Moving from an exclusive single-instance database to clustering by converting a physical standby database to Oracle RAC. Downtime incurred is limited to the time it takes to perform a switchover to the standby database.
– Extension of an existing Oracle RAC database to include more instances or nodes. Zero downtime is incurred.
■ Complete, repeatable steps to deploy both single instance and Oracle Clusterware, ASM, and Oracle RAC software into either a new or an existing environment. The processing handles all steps necessary for installation and configuration in a single lights-out, scheduled execution.
■ Complete, repeatable steps with zero downtime to add additional nodes to an existing Oracle Clusterware, ASM, and Oracle RAC environment. The processing handles all steps necessary for installation and configuration, using the current cluster environment as the source for the extension in a single lights-out, scheduled execution.
6.3 Using Manual Step-by-Step InstructionsIf you cannot use Grid Control to move your configuration to an MAA architecture, then you can perform the steps manually using SQL*Plus statements.
The setup of your current configuration determines which topics in this section you should complete. For example, Table 6–1 describes instructions for some possible starting configurations.
See Also:
■ The Oracle Enterprise Manager documentation set at http://www.oracle.com/technology/documentation/oem.html
■ The "HA Best Practices for Grid Control" MAA white paper at http://www.otn.oracle.com/goto/maa
Table 6–1 Starting Configurations Moving to an MAA Environment
IF your starting configuration includes ... THEN ...
A single-instance primary database
Convert the primary database to Oracle RAC using the instructions in"Converting a Single-Instance Database to an Oracle RAC Database" on page 6-3.
A single-instance standby database
Convert the standby database to Oracle RAC using the instructions in "Converting a Single-Instance Database to an Oracle RAC Database" on page 6-3.
A single-instance Data Guard configurations
Convert the primary and/or standby databases to Oracle RAC using the instructions in "Converting a Single-Instance Database to an Oracle RAC Database" on page 6-3.
An Oracle RAC primary database, but no Data Guard configuration
See "Adding an Oracle Data Guard Configuration to an Oracle RAC Primary Database" on page 6-3 to add a single-instance standby or an Oracle RAC standby database to the configuration.

Using Manual Step-by-Step Instructions
Migrating to an MAA Environment 6-3
6.3.1 Converting a Single-Instance Database to an Oracle RAC Database The process of adding nodes to form an Oracle RAC database involves first creating a cluster by installing Oracle Clusterware and Oracle RAC software on the nodes and then adding Oracle RAC instances. Basically, the steps include the following tasks:
1. Connect nodes to the cluster.
2. Install Oracle Clusterware on all nodes that are a part of the cluster.
3. Prepare storage for Oracle RAC on new nodes.
4. Add nodes at the Oracle RAC database layer.
5. Add database instances to new nodes.
6.3.2 Adding an Oracle Data Guard Configuration to an Oracle RAC Primary DatabaseA series of MAA white papers have been published that provide step-by-step instructions on how to create either a single-instance Data Guard standby database, or an Oracle RAC standby database. The following sections describe the high-level tasks you must perform and provide links to the white papers for detailed instructions.
6.3.2.1 Creating an Oracle RAC Physical Standby Database for an Oracle RAC Primary DatabaseCreating an Oracle RAC standby database from an existing Oracle RAC primary database involves the following basic tasks:
1. Gather files and perform back up.
2. Configure Oracle Net on the standby database.
3. Create the standby instances and database.
4. Configure the primary database for Data Guard.
5. Verify the Data Guard configuration.
For step-by-step instructions, see the "MAA / Data Guard 10g Setup Guide—Creating an Oracle RAC Standby for an Oracle RAC Primary" white paper at
http://www.oracle.com/technology/deploy/availability/pdf/MAA_WP_10g_RACPrimaryRACPhysicalStandby.pdf
6.3.2.2 Creating a Single-instance Standby Database for an Oracle RAC PrimaryCreating a single-instance standby database for an Oracle RAC primary database involves the following basic tasks:
1. Gather files and perform back up.
2. Configure Oracle Net on the physical standby database.
A single-instance database or an Oracle RAC database without ASM
Migrate the database to ASM using the instructions in the MAA white paper: "Migration to Automatic Storage Management" at http://www.otn.oracle.com/goto/maa.
See Also: Your platform-specific Oracle RAC installation guide for complete step-by-step information
Table 6–1 (Cont.) Starting Configurations Moving to an MAA Environment
IF your starting configuration includes ... THEN ...

Using Manual Step-by-Step Instructions
6-4 Oracle Database High Availability Best Practices
3. Create the physical standby instances and database.
4. Configure the primary database for Data Guard.
5. Verify the Data Guard configuration.
For step-by-step instructions, see the "MAA / Data Guard 10g Setup Guide—Creating a Single-Instance Standby for an Oracle RAC Primary" white paper at
http://www.oracle.com/technology/deploy/availability/pdf/MAA_WP_10g_RACPrimarySingleInstancePhysicalStandby.pdf
6.3.2.3 Creating an Oracle RAC Logical Standby for an Oracle RAC Primary DatabaseCreating an Oracle RAC logical standby database from an existing Oracle RAC physical standby database involves the following basic tasks:
1. Prepare the physical standby database environment.
2. Convert the physical standby database to a logical standby database.
3. Verify the Data Guard configuration.
For step-by-step instructions, see the "MAA/ Data Guard 11g Setup Guide—Creating an Oracle RAC Logical Standby for an Oracle RAC Primary Database" white paper at
http://www.oracle.com/technology/deploy/availability/pdf/MAA_WP_10gR2_RACPrimaryRACLogicalStandby.pdf

Database SPFILE and Oracle Net Configuration File Samples A-1
ADatabase SPFILE and Oracle Net
Configuration File Samples
The tables and file samples in this appendix are included to illustrate the best practices as they relate to different high availability architectures. These samples also clarify how the database server parameter file (SPFILE) relates to the Oracle Net configuration for dynamic service registration.
This appendix includes the following tables and sample files:
■ SPFILE Samples
– Table A–1, " Generic Parameters for Primary, Physical Standby, and Logical Standby Databases"
– Table A–2, " Oracle RAC Parameters for Primary, Physical Standby, and Logical Standby"
– Table A–3, " Data Guard Parameters for Primary, Physical Standby, and Logical Standby"
– Table A–4, " Data Guard Broker Parameters for Primary, and Physical and Logical Standbys"
– Table A–5, " Data Guard (No Broker) Parameters for Primary, and Physical and Logical Standby"
– Table A–6, " Data Guard Parameters for Primary and Physical Standby Database Only"
– Table A–7, " Data Guard Parameters for Primary and Logical Standby Database Only"
– Table A–8, " Data Guard Parameters for Primary Database, Physical Standby Database, and Logical Standby Database: Maximum Availability or Maximum Protection Modes"
– Table A–9, " Data Guard Parameters for Primary Database, Physical Standby Database, and Logical Standby Database: Maximum Performance Mode"
■ Oracle Net Configuration Files
– SQLNET.ORA Example for All Hosts Using Dynamic Instance Registration
– LISTENER.ORA Example for All Hosts Using Dynamic Instance Registration
– TNSNAMES.ORA Example for All Hosts Using Dynamic Instance Registration
The tables and files are shown for the following configuration:

SPFILE Samples
A-2 Oracle Database High Availability Best Practices
■ ORACLE_BASE=/mnt/app/oracle
■ Database flash recovery area is /flash_recovery
A.1 SPFILE SamplesThe tables in this section represent the database, Oracle RAC, and Data Guard parameter file values. Some parameters appear in both the generic database parameter table and the Oracle RAC parameter table. If Oracle RAC is being used, then use the value in the Oracle RAC parameter table instead of the value in the generic database parameter table.
The parameters show the configuration for a database in New York City and an option for a physical standby database and a logical standby database in Boston. The primary database is the SALES database. For a single-instance database, the ORACLE_SID parameter values are SALES, SALES_PHYS, and SALES_LOG. In an Oracle RAC configuration, the corresponding instance number is appended to each of the ORACLE_SID parameter values.
Table A–1 shows generic best practice SPFILE parameters for primary, physical standby, and logical standby databases.
Table A–1 Generic Parameters for Primary, Physical Standby, and Logical Standby Databases
NewYork (Primary Database) Boston (Physical Standby) Boston (Logical Standby)
*.COMPATIBLE='11.1.0' Same as NewYork Same as NewYork
*.CONTROL_FILES='_+DATA/SALES/controlfiles/control.265.263563526', '+RECO/SALES/controlfiles/control.276.263563526'
*.CONTROL_FILES='+DATA/SALES/controlfiles/backup.474.3736463483', '+RECO/SALES/cnortolfiles/backup.363.3736463483'
*.CONTROL_FILES='+DATA/SALES_LOG/controlfiles/backup.354.25365373', '+RECO/SALES_LOG/controlfiles/backup.352.25365373'
*.CONTROL_FILE_RECORD_KEEP_TIME=10 Same as NewYork Same as NewYork
*.DB_NAME='SALES' Same as NewYork *.DB_NAME='SALES_LOG'
*.DB_CREATE_FILE_DEST=+DATA Same as NewYork Same as NewYork
*.DB_RECOVERY_FILE_DEST=+RECO Same as NewYork Same as NewYork
*.DB_RECOVERY_FILE_DEST_SIZE=100G Same as NewYork Same as NewYork
*.DB_FLASHBACK_RETENTION_TARGET=240 Same as NewYork Same as NewYork
*.BACKGROUND_CORE_DUMP=FULL Same as NewYork Same as NewYork
*.DIAGNOSTIC_DEST='/mnt/app/oracle'
Same as NewYork Same as NewYork
*.DB_ULTRA_SAFE=DATA_AND_INDEX1 Same as NewYork Same as NewYork
*.LOG_ARCHIVE_FORMAT='arch_%t_%S_%r.log'
Same as NewYork Same as NewYork
*.LOG_ARCHIVE_TRACE=0 Same as NewYork Same as NewYork
*.FAST_START_MTTR_TARGET=300 Same as NewYork Same as NewYork
*.FAST_START_PARALLEL_ROLLBACK=HIGH
Same as NewYork Same as NewYork
*.STATISTICS_LEVEL=TYPICAL Same as NewYork Same as NewYork
*.LOCAL_LISTENER='SALES_lsnr' Same as NewYork Same as NewYork

SPFILE Samples
Database SPFILE and Oracle Net Configuration File Samples A-3
Table A–2 shows Oracle RAC best practice SPFILE parameters for primary, physical standby, and logical standby databases.
Table A–3 shows Data Guard best practice SPFILE parameters for primary, physical standby, and logical standby databases. You must set these parameters whether or not you use the broker.
*.REMOTE_LISTENER='SALES_remotelsnr_NEWYORK'
*.REMOTE_LISTENER='SALES_remotelsnr_BOSTON'
*.REMOTE_LISTENER='SALES_remotelsnr_BOSTON'
*.UNDO_MANAGEMENT=AUTO Same as NewYork Same as NewYork
*.UNDO_RETENTION=900 Same as NewYork Same as NewYork
*.UNDO_TABLESPACE='UNDOTBS' Same as NewYork Same as NewYork
*.RESUMABLE_TIMEOUT=900 Same as NewYork Same as NewYork
*.LOG_ARCHIVE_DEST_1='location=USE_DB_RECOVERY_FILE_DESTmandatory valid_for=(ONLINE_LOGFILES,ALL_ROLES) db_unique_name=SALES_NEWYORK'
*.LOG_ARCHIVE_DEST_1='location=USE_DB_RECOVERY_FILE_DEST mandatory valid_for=(ONLINE_LOGFILES,ALL_ROLES) db_unique_name=SALES_BOSTON'
*.LOG_ARCHIVE_DEST_1='location=USE_DB_RECOVERY_FILE_DEST max_failure=0 mandatory valid_for=(ONLINE_LOGFILES,ALL_ROLES) db_unique_name=SALES_BOSTON_LOG'
1Turn off DB_ULTRA_SAFE by setting DB_BLOCK_CHECKING=FALSE if recovery performance is adversely affected. See "Use Data Guard and Configure the DB_ULTRA_SAFE Initialization Parameter" on page 2-17.
Table A–2 Oracle RAC Parameters for Primary, Physical Standby, and Logical Standby
NewYork (Primary Database) Boston (Physical Standby) Boston (Logical Standby)
*.CLUSTER_DATABASE=TRUE Same as NewYork Same as NewYork
SALES1.THREAD=1 SALES_PHYS1.THREAD=1 SALES_LOG1.THREAD=1
SALES2.THREAD=2 SALES_PHYS2.THREAD=2 SALES_LOG2.THREAD=2
SALES1.INSTANCE_NUMBER=1 SALES_PHYS1.INSTANCE_NUMBER=1 SALES_LOG1.INSTANCE_NUMBER=1
SALES2.INSTANCE_NUMBER=2 SALES_PHYS2.INSTANCE_NUMBER=2 SALES_LOG2.INSTANCE_NUMBER=2
SALES1.INSTANCE_NAME=SALES_NEWYORK1
SALES_PHYS1.INSTANCE_NAME=SALES_BOSTON1
SALES_LOG1.INSTANCE_NAME=SALES_BOSTON_LOG1
SALES2.INSTANCE_NAME=SALES_NEWYORK2
SALES_PHYS2.INSTANCE_NAME=SALES_BOSTON2
SALES_LOG2.INSTANCE_NAME=SALES_BOSTON_LOG2
SALES1.UNDO_TABLESPACE='UNDOTBS1'
SALES_PHYS1.UNDO_TABLESPACE='UNDOTBS1'
SALES_LOG1.UNDO_TABLESPACE='UNDOTBS1'
SALES2.UNDO_TABLESPACE='UNDOTBS2'
SALES_PHYS2.UNDO_TABLESPACE='UNDOTBS2'
SALES_LOG2.UNDO_TABLESPACE='UNDOTBS2'
Table A–1 (Cont.) Generic Parameters for Primary, Physical Standby, and Logical Standby Databases
NewYork (Primary Database) Boston (Physical Standby) Boston (Logical Standby)
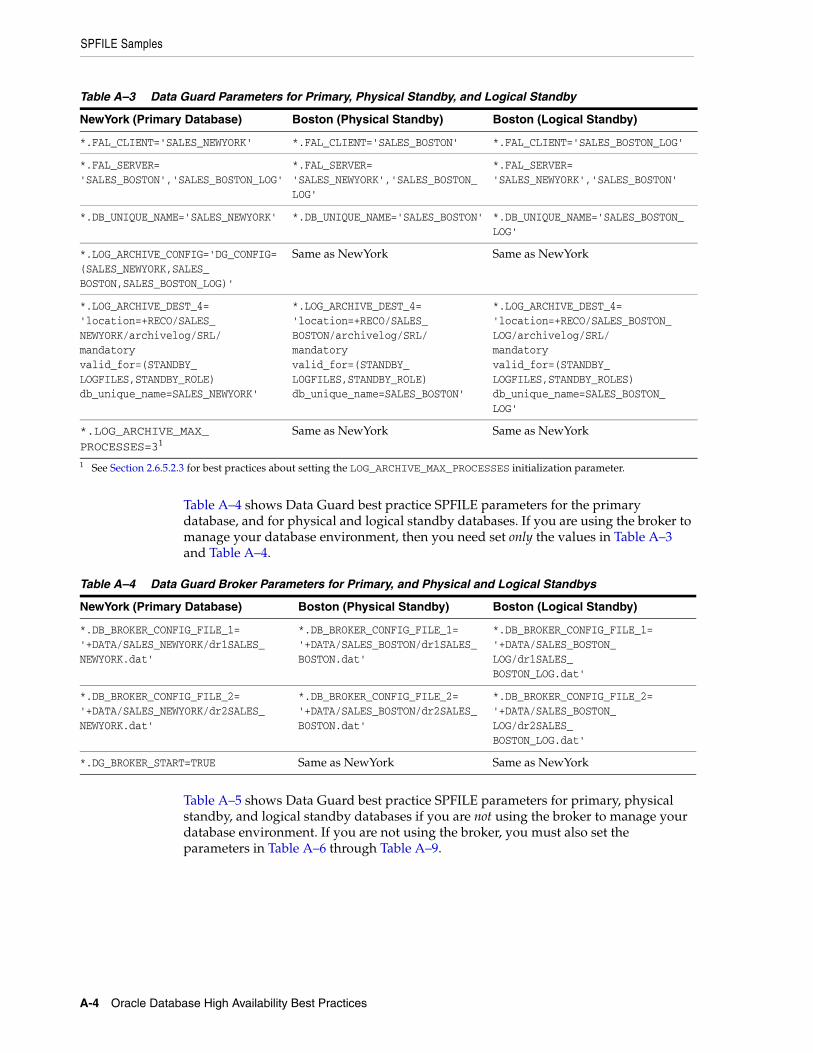
SPFILE Samples
A-4 Oracle Database High Availability Best Practices
Table A–4 shows Data Guard best practice SPFILE parameters for the primary database, and for physical and logical standby databases. If you are using the broker to manage your database environment, then you need set only the values in Table A–3 and Table A–4.
Table A–5 shows Data Guard best practice SPFILE parameters for primary, physical standby, and logical standby databases if you are not using the broker to manage your database environment. If you are not using the broker, you must also set the parameters in Table A–6 through Table A–9.
Table A–3 Data Guard Parameters for Primary, Physical Standby, and Logical Standby
NewYork (Primary Database) Boston (Physical Standby) Boston (Logical Standby)
*.FAL_CLIENT='SALES_NEWYORK' *.FAL_CLIENT='SALES_BOSTON' *.FAL_CLIENT='SALES_BOSTON_LOG'
*.FAL_SERVER='SALES_BOSTON','SALES_BOSTON_LOG'
*.FAL_SERVER='SALES_NEWYORK','SALES_BOSTON_LOG'
*.FAL_SERVER='SALES_NEWYORK','SALES_BOSTON'
*.DB_UNIQUE_NAME='SALES_NEWYORK' *.DB_UNIQUE_NAME='SALES_BOSTON' *.DB_UNIQUE_NAME='SALES_BOSTON_LOG'
*.LOG_ARCHIVE_CONFIG='DG_CONFIG=(SALES_NEWYORK,SALES_BOSTON,SALES_BOSTON_LOG)'
Same as NewYork Same as NewYork
*.LOG_ARCHIVE_DEST_4='location=+RECO/SALES_NEWYORK/archivelog/SRL/ mandatory valid_for=(STANDBY_LOGFILES,STANDBY_ROLE) db_unique_name=SALES_NEWYORK'
*.LOG_ARCHIVE_DEST_4='location=+RECO/SALES_BOSTON/archivelog/SRL/ mandatory valid_for=(STANDBY_LOGFILES,STANDBY_ROLE) db_unique_name=SALES_BOSTON'
*.LOG_ARCHIVE_DEST_4='location=+RECO/SALES_BOSTON_LOG/archivelog/SRL/ mandatory valid_for=(STANDBY_LOGFILES,STANDBY_ROLES) db_unique_name=SALES_BOSTON_LOG'
*.LOG_ARCHIVE_MAX_PROCESSES=31
1 See Section 2.6.5.2.3 for best practices about setting the LOG_ARCHIVE_MAX_PROCESSES initialization parameter.
Same as NewYork Same as NewYork
Table A–4 Data Guard Broker Parameters for Primary, and Physical and Logical Standbys
NewYork (Primary Database) Boston (Physical Standby) Boston (Logical Standby)
*.DB_BROKER_CONFIG_FILE_1='+DATA/SALES_NEWYORK/dr1SALES_NEWYORK.dat'
*.DB_BROKER_CONFIG_FILE_1='+DATA/SALES_BOSTON/dr1SALES_BOSTON.dat'
*.DB_BROKER_CONFIG_FILE_1='+DATA/SALES_BOSTON_LOG/dr1SALES_BOSTON_LOG.dat'
*.DB_BROKER_CONFIG_FILE_2='+DATA/SALES_NEWYORK/dr2SALES_NEWYORK.dat'
*.DB_BROKER_CONFIG_FILE_2='+DATA/SALES_BOSTON/dr2SALES_BOSTON.dat'
*.DB_BROKER_CONFIG_FILE_2='+DATA/SALES_BOSTON_LOG/dr2SALES_BOSTON_LOG.dat'
*.DG_BROKER_START=TRUE Same as NewYork Same as NewYork

SPFILE Samples
Database SPFILE and Oracle Net Configuration File Samples A-5
Table A–6 shows Data Guard best practice SPFILE parameters for primary and physical standby databases only. You must set these parameters if you are not using the broker to manage your database environment.
Table A–7 shows Data Guard best practice SPFILE parameters for primary and logical standby databases only. You must set these parameters if you are not using the broker to manage your database environment.
Table A–8 applies to a Data Guard environment running in either maximum availability mode or maximum protection mode.
Table A–5 Data Guard (No Broker) Parameters for Primary, and Physical and Logical Standby
NewYork (Primary Database) Boston (Physical Standby) Boston (Logical Standby)
*.LOG_FILE_NAME_CONVERT=' ',' ' Same as NewYork Same as NewYork
*.STANDBY_FILE_MANAGEMENT=AUTO Same as NewYork Same as NewYork
*.REMOTE_LOGIN_PASSWORDFILE=EXCLUSIVE Same as NewYork Same as NewYork
Table A–6 Data Guard Parameters for Primary and Physical Standby Database Only
NewYork (Primary Database) Boston (Physical Standby Database)
*.FAL_CLIENT='SALES_NEWYORK' *.FAL_CLIENT='SALES_BOSTON'
*.FAL_SERVER='SALES_BOSTON' *.FAL_SERVER='SALES_NEWYORK'
*.LOG_ARCHIVE_DEST_2='service=SALES_BOSTON sync affirm net_timeout=30 valid_for=(ONLINE_LOGFILES,PRIMARY_ROLE) db_unique_name=SALES_BOSTON'
*.LOG_ARCHIVE_DEST_2='service=SALES_NEWYORK sync affirm net_timeout=30 valid_for=(ONLINE_LOGFILES,PRIMARY_ROLE) db_unique_name=SALES_NEWYORK'
Table A–7 Data Guard Parameters for Primary and Logical Standby Database Only
NewYork (Primary Database) Boston (Logical Standby Database)
*.FAL_CLIENT='SALES_NEWYORK' *.FAL_CLIENT='SALES_BOSTON_LOG'
*.FAL_SERVER='SALES_BOSTON_LOG' *.FAL_SERVER='SALES_NEWYORK'
*.LOG_ARCHIVE_DEST_2='service=SALES_BOSTON_LOG reopen=15 max_failure=10 sync affirm net_timeout=30 valid_for=(ONLINE_LOGFILES,PRIMARY_ROLE) db_unique_name=SALES_BOSTON_LOG'
*.LOG_ARCHIVE_DEST_2='service=SALES_NEWYORK sync affirm net_timeout=30 valid_for=(ONLINE_LOGFILES,PRIMARY_ROLE) db_unique_name=SALES_NEWYORK'
*.LOG_ARCHIVE_DEST_3='location=+RECO/SALES_NEWYORK/archivelog/SRL/max_failure=0 mandatoryvalid_for=(STANDBY_LOGFILES,STANDBY_ROLE)db_unique_name=SALES_NEWYORK'
*.LOG_ARCHIVE_DEST_3='location=+RECO/SALES_BOSTON/archivelog/SRL/ max_failure=0 mandatory valid_for=(STANDBY_LOGFILES,STANDBY_ROLE) db_unique_name=SALES_BOSTON_LOG'

Oracle Net Configuration Files
A-6 Oracle Database High Availability Best Practices
Table A–9 shows how to change the parameters for a Data Guard environment that is running in maximum performance mode.
A.2 Oracle Net Configuration FilesThis section contains examples of the following Oracle Net configuration file settings:
■ SQLNET.ORA Example for All Hosts Using Dynamic Instance Registration
■ LISTENER.ORA Example for All Hosts Using Dynamic Instance Registration
■ TNSNAMES.ORA Example for All Hosts Using Dynamic Instance Registration
A.2.1 SQLNET.ORA Example for All Hosts Using Dynamic Instance Registration# Set dead connection time SQLNET.EXPIRE_TIME = 1
Table A–8 Data Guard Parameters for Primary Database, Physical Standby Database, and Logical Standby Database: Maximum Availability or Maximum Protection Modes
NewYork (Primary Database) Boston (Physical Standby) Boston (Logical Standby)
*.LOG_ARCHIVE_DEST_2='service=SALES_BOSTON sync affirm net_timeout=30 valid_for=(ONLINE_LOGFILES,PRIMARY_ROLE) db_unique_name=SALES_BOSTON'
*.LOG_ARCHIVE_DEST_2='service=SALES_NEWYORK syncaffirm net_timeout=30 valid_for=(ONLINE_LOGFILES,PRIMARY_ROLE) db_unique_name=SALES_NEWYORK'
Not applicable
*.LOG_ARCHIVE_DEST_3='service=SALES_BOSTON_LOGsync affirm net_timeout=30 valid_for=(ONLINE_LOGFILES,PRIMARY_ROLE) db_unique_name=SALES_BOSTON_LOG'
*.LOG_ARCHIVE_DEST_3='service=SALES_BOSTON_LOG sync affirm net_timeout=30 valid_for=(ONLINE_LOGFILES,PRIMARY_ROLE) db_unique_name=SALES_BOSTON_LOG'
*.LOG_ARCHIVE_DEST_3='service=SALES_NEWYORKsync affirm net_timeout=30 valid_for=(ONLINE_LOGFILES,PRIMARY_ROLE) db_unique_name=SALES_NEWYORK'
Table A–9 Data Guard Parameters for Primary Database, Physical Standby Database, and Logical Standby Database: Maximum Performance Mode
NewYork (Primary Database) Boston (Physical Standby) Boston (Logical Standby)
*.LOG_ARCHIVE_DEST_2='service=SALES_BOSTON async net_timeout=30 valid_for=(ONLINE_LOGFILES,PRIMARY_ROLE) db_unique_name=SALES_BOSTON'
*.LOG_ARCHIVE_DEST_2='service=SALES_NEWYORK async net_timeout=30 valid_for=(ONLINE_LOGFILES,PRIMARY_ROLE) db_unique_name=SALES_NEWYORK'
Not applicable
*.LOG_ARCHIVE_DEST_3='service=SALES_BOSTON_LOG async net_timeout=30 valid_for=(ONLINE_LOGFILES,PRIMARY_ROLE) db_unique_name=SALES_BOSTON_LOG'
*.LOG_ARCHIVE_DEST_3='service=SALES_BOSTON_LOG async net_timeout=30 valid_for=(ONLINE_LOGFILES,PRIMARY_ROLE) db_unique_name=SALES_BOSTON_LOG'
*.LOG_ARCHIVE_DEST_3='service=SALES_NEWYORK async net_timeout=30 valid_for=(ONLINE_LOGFILES,PRIMARY_ROLE) db_unique_name=SALES_NEWYORK'

Oracle Net Configuration Files
Database SPFILE and Oracle Net Configuration File Samples A-7
# Disable Nagle's algorithmTCP.NODELAY=yes# Set default SDU for all connections DEFAULT_SDU_SIZE=32767
A.2.2 LISTENER.ORA Example for All Hosts Using Dynamic Instance RegistrationFor an Oracle RAC environment, listeners must be listening on the virtual IP addresses (VIP), rather than the local host name.
lsnr_SALES = (DESCRIPTION_LIST = (DESCRIPTION = (ADDRESS_LIST= (ADDRESS=(PROTOCOL=tcp)(HOST=local_host_name) (PORT=1513) (QUEUESIZE=1024)))))PASSWORDS_lsnr_SALES = 876EAE4513718ED9 # Prevent listener administration ADMIN_RESTRICTIONS_lsnr_SALES=ON
A.2.3 TNSNAMES.ORA Example for All Hosts Using Dynamic Instance RegistrationIn an Oracle RAC environment, you configure VIP addresses in the address list of the TNSNAMES.ORA file. Configure a VIP address for each database connection definition to enable connectivity to the database instance. The following example uses VIP
See Also: The MAA white paper "Oracle Database 10g Release 2 Best Practices: Data Guard Redo Apply and Media Recovery" located on the MAA Web site at http://www.otn.oracle.com/goto/maa
This white paper contains instructions for calculating the bandwidth delay
Note: If you are using the broker to manage your database environment, then you can enable DGMGRL to restart instances during broker operations. Do this by statically registering the service with a specific name with the local listener of each instance. For example:
SID_LIST_LISTENER=(SID_LIST_LSNR_SALES=(SID_DESC=(SID_NAME=sidname) (GLOBAL_DBNAME=db_unique_name_DGMGRL.db_domain) (ORACLE_HOME=oracle_home)))
The value for the GLOBAL_DBNAME attribute must be set to a concatenation of DB_UNIQUE_NAME and DB_DOMAIN in the following format:
db_unique_name_DGMGRL.db_domain
See Also:
■ Oracle Database Net Services Administrator's Guide for more information about listener password protection
■ Oracle Data Guard Broker for more information about setting the GLOBAL_DGNAME attribute to register with the local listener

Oracle Net Configuration Files
A-8 Oracle Database High Availability Best Practices
addresses newyork_host1-vip, newyork_host2-vip, boston_host1-vip, and boston_host2-vip.
# Used for database parameter local_listener SALES_lsnr = (DESCRIPTION=(ADDRESS=(PROTOCOL=tcp)(PORT=1513))) SALES_remotelsnr_NEWYORK = (DESCRIPTION= (ADDRESS_LIST= (ADDRESS=(PROTOCOL=tcp)(PORT=1513)(HOST=newyork_host1-vip)) (ADDRESS=(PROTOCOL=tcp)(PORT=1513)(HOST=newyork_host2-vip))) SALES_remotelsnr_BOSTON = (DESCRIPTION= (ADDRESS_LIST= (ADDRESS=(PROTOCOL=tcp)(PORT=1513)(HOST=boston_host1-vip)) (ADDRESS=(PROTOCOL=tcp)(PORT=1513)(HOST=boston_host2-vip))) # Net service used for communication with SALES database in NewYork SALES_NEWYORK = (DESCRIPTION= (ADDRESS_LIST= (SEND_BUF_SIZE=4665000)(RECV_BUF_SIZE=4665000) (ADDRESS=(PROTOCOL=tcp)(PORT=1513)(HOST=newyork_host1-vip)) (ADDRESS=(PROTOCOL=tcp)(PORT=1513)(HOST=newyork_host2-vip))) (CONNECT_DATA=(SERVICE_NAME=SALES_NEWYORK))) # Net service used for communication with SALES database in Boston SALES_BOSTON = (DESCRIPTION= (ADDRESS_LIST= (SEND_BUF_SIZE=4665000)(RECV_BUF_SIZE=4665000) (ADDRESS=(PROTOCOL=tcp)(PORT=1513)(HOST=boston_host1-vip)) (ADDRESS=(PROTOCOL=tcp)(PORT=1513)(HOST=boston_host2-vip))) (CONNECT_DATA=(SERVICE_NAME=SALES_BOSTON))) # Net service used for communication with Logical Standby SALES database in Boston SALES_BOSTON_LOG = (DESCRIPTION= (ADDRESS_LIST= (SEND_BUF_SIZE=4665000)(RECV_BUF_SIZE=4665000) (ADDRESS=(PROTOCOL=tcp)(PORT=1513)(HOST=boston_host1-vip)) (ADDRESS=(PROTOCOL=tcp)(PORT=1513)(HOST=boston_host2-vip))) (CONNECT_DATA=(SERVICE_NAME=SALES_BOSTON_LOG)))

Glossary-1
Glossary
Oracle Active Data Guard option
A physical standby database can be open for read-only access while Redo Apply is active if a license for the Oracle Active Data Guard option has been purchased. This capability, known as real-time query, also provides the ability to have block-change tracking on the standby database, thus allowing incremental backups to be performed on the standby.
clusterwide failure
The whole cluster hosting the Oracle RAC database is unavailable or fails. This includes failures of nodes in the cluster, and any other components that result in the cluster being unavailable and the Oracle database and instances on the site being unavailable.
computer failure
An outage that occurs when the system running the database becomes unavailable because it has crashed or is no longer accessible.
data corruption
A corrupt block is a block that has been changed so that it differs from what Oracle Database expects to find. Block corruptions fall under two categories: physical and logical block corruptions.
hangs or slow down
Hang or slow down occurs when the database or the application cannot process transactions because of a resource or lock contention. Perceived hang can be caused by lack of system resources.
human error
An outage that occurs when unintentional or malicious actions are committed that cause data in the database to become logically corrupt or unusable. The service level impact of a human error outage can vary significantly depending on the amount and critical nature of the affected data.
logical unit numbers (LUNs)
Three-bit identifiers used on a SCSI bus to distinguish between up to eight devices (logical units) with the same SCSI ID.

lost write
Glossary-2
lost write
A lost write is another form of data corruption that can occur when an I/O subsystem acknowledges the completion of the block write, while in fact the write did not occur in the persistent storage. No error is reported by the I/O subsystem back to Oracle.
MAA environment
The Maximum Availability architecture provides the most comprehensive set of solutions for both unplanned and because it inherits the capabilities and advantages of both Oracle Database 11g with Oracle RAC and Oracle Database 11g with Data Guard.
MAA involves high availability best practices for all Oracle products across the entire technology stack—Oracle Database, Oracle Application Server, Oracle Applications, Oracle Collaboration Suite, and Oracle Grid Control.
network server processes
The Data Guard network server processes, also referred to as LNSn processes, on the primary database perform a network send to the RFS process on the standby database. There is one network server process for each destination.
real-time query
If a license for the Oracle Active Data Guard option has been purchased, you can open a physical standby database while Redo Apply continues to apply redo data received from the primary database.
recovery point objective (RPO)
The maximum amount of data an IT-based business process may lose before causing harm to the organization. RPO indicates the data-loss tolerance of a business process or an organization in general. This data loss is often measured in terms of time, for example, five hours or two days worth of data loss.
recovery time objective (RTO)
The maximum amount of time that an IT-based business process can be down before the organization suffers significant material losses. RTO indicates the downtime tolerance of a business process or an organization in general.
site failure
An outage that occurs when an event causes all or a significant portion of an application to stop processing or slow to an unusable service level. A site failure may affect all processing at a data center, or a subset of applications supported by a data center.
snapshot standby database
An updatable standby database that you create from a physical standby database. A snapshot standby database receives and archives redo data received from the primary database, but the snapshot standby database does not apply redo data from the primary database while the standby database is open for read/write I/O. Thus, the snapshot standby typically diverges from the primary database over time. Moreover, local updates to the snapshot standby database cause additional divergence. However, a snapshot standby protects the primary database because the snapshot standby can be converted back into a physical standby database.
storage failure
An outage that occurs when the storage holding some or all of the database contents becomes unavailable because it has shut down or is no longer accessible.

transient logical standby database
Glossary-3
transient logical standby database
A transient logical standby database is a physical standby database that has been temporarily converted into a logical standby database to perform a rolling database upgrade.

transient logical standby database
Glossary-4

Index-1
Index
AActive Data Guard option
assessing database waits, 2-50Active Session History Reports (ASH), 2-21Advanced Queuing (AQ), 2-43after failovers, 2-43alerts
Enterprise Manager, 3-2allocation units
increasing for large database, 2-11large databases, 2-11
ALTER DATABASE CONVERT TO SNAPSHOT STANDBY statement, 2-59
ALTER DATABASE statementspecifying a default temporary tablespace, 2-24
ALTER DISKGROUP ALL MOUNT statement, 2-10ALTER SESSION ENABLE RESUMABLE
statement, 2-24ANALYZE TABLE tablename VALIDATE
STRUCTURE CASCADE, 2-50application failover
DBMS_DG.INITIATE_FS_FAILOVER, 4-12in an Oracle Data Guard configuration, 4-12
application failover, in an Oracle RAC configuration, 4-12
application workloadsdatabase performance requirements for, 2-1
applicationsdefining as services, 2-29failover, 4-12Fast Application Notification (FAN), 4-12fast failover, 2-77 to 2-80login storms, 2-79monitor response times, 4-12service brownouts, 3-7tracking performance with Beacon, 3-4upgrades, 5-23
Apply Lagevent in Grid Control, 3-9
architecturehigh availability, 1-1
archival backupskeeping, 2-69
ARCHIVELOG mode, 2-14archiver (ARCn) processes
reducing, 2-55archiving strategy, 2-43ASM, 2-12
See Automatic Storage Management (ASM)ASM home
separate from Oracle home, 2-28ASM_DISKGROUPS initialization parameter, 2-10asm_diskstring parameter, 2-7ASM_POWER_LIMIT initialization parameter
rebalancing ASM disk groups, 2-12ASM_PREFERRED_READ_FAILURE_GROUPS
initialization parameterin extended clusters, 2-35
ASMCMD command-line utilitystorage management, 2-12
ASMLib, 2-5ASMLIB disks
disk labels, 2-11asynchronous disk I/O, 2-20asynchronous I/O
enabling, 2-33V$IOSTAT_FILE view, 2-20
AUTOBACKUP statementRMAN, 2-71
Automatic Database Diagnostic Monitor (ADDM), 2-21
automatic performance tuning, 2-21automatic segment space management, 2-24
using, 2-24Automatic Shared Memory Management, 2-20Automatic Storage Management (ASM)
allocation units, 2-11asm_diskstring parameter, 2-7ASMLib, 2-5clustering to enable the storage grid, 2-9database file management, 2-4disk device allocation, 2-6disk failures, 4-13disk group size, 2-9, 2-10failure groups, 2-35failure groups and redundancy, 2-11handling disk errors, 2-13HARD-compliant storage, 2-11imbalanced disk groups, 2-11managing memory with MEMORY_TARGET
parameter, 2-9

Index-2
managing with ASMCMD, 2-12migrating databases to and from, 2-5, 5-11multiple disk failures, 4-18power limit for faster rebalancing, 2-4REBALANCE POWER, 2-12rebalancing, 2-10rebalancing disks after a failure, 4-14recovery, 4-12redundancy, 2-8redundancy disk groups, 2-19server-based mirroring, 2-35SYSASM role, 2-10using disk labels, 2-11using normal or high redundancy, 2-35variable size extents, 2-11volume manager, 2-35with disk multipathing software, 2-7
automatic tablespace point-in-time recovery TSPITR, 4-32
automatic undo managementdescribed, 2-22
Automatic Workload Repository (AWR), 2-21best practices, 2-22evaluating performance requirements, 2-2
AWRSee Automatic Workload Repository (AWR)
Bbackup and recovery
best practices, 2-66 to 2-75checksums calculated during, 2-19enabling with ARCHIVELOG mode, 2-14recommendations, 2-66
backup filesflash recovery area disk group failure, 4-18
backup optionscomparing, 2-72
backupsautomatic, 2-71configuring, 2-66 to 2-75creating and synchronizing, 2-70determine a retention policy, 2-68keeping archival (long term), 2-69maintaining offsite, 2-74OCR, 2-30Oracle Secure Backup, 2-73performing regularly, 2-75RMAN recovery catalog, 2-70
Beacons, 3-4configuring, 3-4
benefitsData Guard broker, 2-42Grid Control, 1-2high availability best practices, 1-1
best practices, 1-1AWR, 2-22backup and recovery, 2-66 to 2-75Data Guard configurations, 2-37 to 2-66failover (fast-start), 2-58, 4-10
failover (manual), 2-59, 4-10operational, 1-2 to 1-3Oracle RAC configurations, 2-32, 2-32 to 2-36security policy, 1-3storage subsystems, 2-1switchover, 2-54, 5-6upgrades, 5-9
block checksums, 2-18block media recovery, 4-23broker
benefits, 2-42using FAN/AQ, 2-43
brownouts, 3-7
Ccapacity planning, 2-26change tracking
for incremental backups, 2-70checkpointing
bind Mean Time To Recover (MTTR), 2-32CLB_GOAL attribute of the DBMS_SERVICE PL/SQL
package, 2-30client connections
migrating to and from nodes, 2-27client failover
best practices, 2-79clients
application failover, 4-12configuring for failover, 2-78load balancing, 2-29
cluster file systemusing shared during software patching, 2-26
Cluster Ready Services (CRS)described, 4-35moving services, 4-11recovering service availability, 4-35relationship to OCR, 4-11
clustered ASMenabling the storage grid, 2-9
clustersextended, 2-34
clusterwide outagerestoring the standby database after, 4-42
cold failover clusters, 2-32compatibility
software releases in an Oracle Clusterware environment, 2-26
complete site failoverrecovery time objective (RTO), 4-5
compressionredo transport, 2-49
configurationsOracle RAC, 2-32Oracle Streams, 2-75
configuring databases for high availabilitywith the MAA Advisor, 3-12
configuring Oracle Database for shared server, 2-80connection load balancing
setting goals for each service, 2-30

Index-3
connection poolsadjusting number of, 2-80
Connection Rate Limiterlistener, 2-79
connect-time failover, 4-36control files
in a flash recovery area disk group failure, 4-18coordinated, time-based, distributed database
recovery, 4-33corruptions
checking database files, 2-74DB_BLOCK_CHECKSUMS, 2-18detecting in-memory, 2-18preventing with Data Recovery Advisor, 2-19preventing with OSB, 2-19recovery, 4-20
crash recoveryunderstanding, 2-32
CREATE DISKGROUP statementexamples, 2-5, 2-6, 2-8
CRSSee Cluster Ready Services (CRS)
CRSD processOCR backups, 2-30
cumulative incremental backup set, 2-72
DDark Fiber
Dense Wavelength Division Multiplexing (DWDM), 2-33
datacriticality and RPO, 2-69protecting outside of the database, 2-64recovering backups and RTO, 2-69
data area disk group failurerecovery options, 4-16
data corruptionsdetecting and correcting with Flashback
Database, 2-16preventing with DB_LOST_WRITE_
PROTECT, 2-18protection through ASM redundancy disk
groups, 2-19recovery with Data Guard, 4-23recovery with Data Recovery Advisor, 4-23
data failuremanual re-creation, 4-25recovery, 4-20, 4-23restoring fault tolerance on standby
database, 4-43RMAN block media recovery, 4-23RMAN data file media recovery, 4-24
data file block corruptionrecovery, 4-20
data filesfast open for large databases, 2-11
Data Guardadding to an Oracle RAC primary, 6-3archiving strategies, 2-43
broker, 2-42failover
best practices (fast-start), 2-58best practices (manual), 2-59recovery for data area disk group
failures, 4-16when to perform, 4-9
log apply services, 2-49 to 2-53managing targets, 3-10monitoring, 3-9multiple standby databases, 2-60performance, 2-64recovery from data corruption and data
failure, 4-23redo transport services, 2-46 to 2-49restoring standby databases, 4-39role transitions, 2-53 to 2-59snapshot standby databases, 2-59switchover
best practices, 2-54using SQL*Plus, 5-6 to 5-8
Data Guard Statusevents in Grid Control, 3-9
data protection modes, 2-38 to 2-40Data Pump
moving the contents of the SYSTEM tablespace, 5-21
Data Recovery Advisordetect and prevent data corruption, 2-19recovery from data corruption, 4-23
data retaining backups, 2-68data type restrictions
resolving with Extended Datatype Support (EDS), 5-14, 5-20
data-area disk group failureSee Also Data Guard failover, fast-start failover,
local recoverydatabase area
contents, 2-5disk partitioning, 2-6
database configurationrecommendations, 2-13
database filesASM integration, 2-4management optimizations, 2-4recovery-related, 2-6
database patch upgradesrecommendations, 5-9
Database Resource Manager, 2-24Database Upgrade Assistant (DBUA), 5-13databases
checking files for corruption, 2-74configuring with the MAA Advisor, 3-12evaluating performance requirements, 2-1migration, 5-19object reorganization, 5-23recovery in a distributed environment, 4-32resolving inconsistencies, 4-31switching primary and standby roles among, 5-5upgrades, 5-12

Index-4
DB_BLOCK_CHECKSUM initialization parameterdetecting redo and data block corruptions, 2-18
DB_CACHE_SIZE initialization parameter, 2-50DB_CREATE_FILE_DEST initialization parameter
enabling Oracle managed files (OMF), 2-6DB_CREATE_ONLINE_LOG_DEST_n initialization
parameterlocation of Oracle managed files, 2-6
DB_FLASHBACK_RETENTION_TARGET initialization parameter, 2-15
DB_KEEP_CACHE_SIZE initialization parameter, 2-50
DB_LOST_WRITE_PROTECT initialization parameterpreventing corruptions due to lost writes, 2-18
DB_RECOVERY_FILE_DEST initialization parameterflash recovery area, 2-14
DB_RECOVERY_FILE_DEST_SIZE initialization parameter
limit for flash recovery area, 2-15DB_RECYCLE_CACHE_SIZE initialization
parameter, 2-50DBCA
balancing client connections, 2-30DBMS_DG.INITIATE_FS_FAILOVER PL/SQL
procedureapplication failover, 4-12
DBMS_LOGSTDBY.SKIP procedureskipping database objects, 2-53
DBMS_REDEFINITION PL/SQL package, 5-24DBMS_RESOURCE_MANAGER.CALIBRATE_IO
PL/SQL procedure, 2-2DBMS_SERVICE PL/SQL package
GOAL and CLB_GOAL attributes, 2-30DBVERIFY utility, 2-50decision support systems (DSS)
application workload, 2-1decision-support systems
setting the PRESERVE_COMMIT_ORDER parameter, 2-53
default temporary tablespacespecifying, 2-24
DEFAULT TEMPORARY TABLESPACE clauseCREATE DATABASE statement, 2-24
Dense Wavelength Division Multiplexing (DWDM or Dark Fiber), 2-33
Device Mapperdisk multipathing, 2-7
differential incremental backup set, 2-72disabling parallel recovery, 2-21disaster-recovery site
distanced from the primary site, 2-39disk backup methods, 2-71disk devices
ASMLIB disk name defaults, 2-11configuration, 2-5, 2-8, 2-10disk labels, 2-11multipathing, 2-7naming
asm_diskstring parameter, 2-7ASMLib, 2-5
partitioning for ASM, 2-6protecting from failures, 2-8
disk errorsmining vendor logs, 2-13
disk failuresprotection from, 2-8restoring redundancy after, 2-9
disk groupschecking with V$ASM_DISK_IOSTAT view, 2-11configuration, 2-5determining proper size of, 2-9determining size of, 2-9, 2-10failure of flash recovery area, 4-18imbalanced, 2-11mounting, 2-10offline after failures, 4-18SYSASM access to ASM instances, 2-10
disk multipathing, 2-7DISK_ASYNCH_IO initialization parameter, 2-20,
2-51disks
ASM failures, 4-13distances
between the disaster-recovery site and the primary site, 2-39
distributed databasesrecovering, 4-32
DNS failover, 4-7downtime
reducing, 1-2dropped tablespace
fix using Flashback Database, 4-32dropping database objects, 4-27dual failures
restoring, 4-46DWDM
Dense Wavelength Division Multiplexing., 2-33dynamic instance registration
LISTENER.ORA file example, A-7SQLNET.ORA file example, A-6TNSNAMES.ORA file example, A-7
Eendian format
determining, 5-19Enterprise Manager
alerts, 3-2Database Targets page, 3-7managing patches, 3-9metrics, 3-3, 3-8notification rules, 3-3, 3-8performance, 3-7
Enterprise Manager Beaconapplication failover, 4-12
equationsstandby redo log files, 2-45
Estimated Failover Timeevent in Grid Control, 3-9
events

Index-5
setting for Data Guard in Grid Control, 3-9Exadata Cell, 2-2extended clusters
configuring a third site for a voting disk, 2-35overview, 2-34setting the ASM_PREFERRED_READ_FAILURE_
GROUPS parameter, 2-35extents
ASM mirrored, 2-19external redundancy
ASM disk failures, 4-14ASM server-based mirroring, 2-35
EXTERNAL REDUNDANCY clauseon the CREATE DISKGROUP statement, 2-8
Extraction, Transformation, and Loading (ETL)application workload, 2-1
Ffailovers
application, 4-12comparing manual and fast-start failover, 2-56complete site, 4-4defined, 4-8described, 4-10effect on network routes, 4-5Fast Application Notification (FAN), 2-43Fast Connection Failover, 2-77 to 2-80nondisruptive, 2-7restoring standby databases after, 4-39
failovers (manual)best practices, 2-59when to perform, 2-56, 4-9
failure detectionCRS response, 4-11
failure groupsASM redundancy, 2-11defining, 2-8multiple disk failures, 4-18specifying in an extended cluster, 2-35
failuresrebalancing ASM disks, 4-14space allocation, 2-24
Fast Application Notification (FAN), 4-12after failovers, 2-43
Fast Connection Failover, 2-77 to 2-80fast local restart
after flash recovery area disk group failure, 4-18FAST_START_MTTR_TARGET initialization
parameter, 2-21, 2-52controlling instance recovery time, 2-16setting in a single-instance environment, 2-33
FAST_START_PARALLEL_ROLLBACK initialization parameter
determining how many processes are used for transaction recovery, 2-33
fast-start failovercomparing to manual failover, 2-56require Flashback Database, 2-16
fast-start fault recovery
instance recovery, 2-16FastStartFailoverAutoReinstate configuration
property, 4-40fault tolerance
configuring storage subsystems, 2-1restoring, 4-33 to 4-46restoring after OPEN RESETLOGS, 4-44
filesopening faster ASM, 2-11
flash recovery areacontents, 2-6disk group failures, 4-18disk partitioning, 2-6local recovery steps, 4-19using, 2-14
Flashback Database, 4-26, 4-31detecing and correcting human errors, 2-16enabling, 2-15for rolling upgrades, 2-16for switchovers, 2-55in Data Guard configurations, 2-41required by snapshot standby databases, 2-16required for fast-start failover, 2-16setting maximum memory, 2-20
Flashback Drop, 4-26, 4-27flashback logs
flash recovery area disk group failure, 4-18Flashback Query, 4-26, 4-28Flashback Table, 4-26, 4-27flashback technology
example, 4-29recovering from user error, 4-25resolving database-wide inconsistencies, 4-31resolving tablespace inconsistencies, 4-32solutions, 4-25
Flashback Transaction, 4-26Flashback Transaction Query, 4-26, 4-29Flashback Version Query, 4-26, 4-28FORCE LOGGING mode, 2-42full data file copy, 2-72full or level 0 backup set, 2-72
Ggap resolution
compression, 2-49setting the PRESERVE_COMMIT_ORDER
parameter, 2-53GOAL attribute
of the DBMS_SERVICE PL/SQL package, 2-30Grid Control
migrating to MAA, 6-1See Also Oracle Grid Control, Enterprise Manager
guaranteed restore pointfor snapshot standby databases, 2-16
guaranteed restore pointsrolling upgrades, 2-16
GV$SYSSTAT viewgathering workload statistics, 2-2

Index-6
HHardware Assisted Resilient Data (HARD)
when using ASM, 2-11hardware RAID storage subsystem
deferring mirroring to, 2-35high availability
described, 1-1restoring after fast-start failover, 4-40
High Availability (HA) Consolemonitoring databases, 3-10
high redundancyASM disk failures, 4-14
home directoriescreating separate, 2-28
host bus adapters (HBA)load balancing across, 2-7
hostsusing dynamic instance registration
LISTENER.ORA file example, A-7SQLNET.ORA file example, A-6TNSNAMES.ORA file example, A-7
HR servicescenarios, 4-35
human errorsdetecting and correcting with Flashback
Database, 2-16recovery, 4-25
Iimbalanced disk groups
checking, 2-11incremental backups
block change tracking, 2-70incrementally updated backup, 2-72initialization parameters
primary and physical standby example, 2-44in-memory corruption
detecting, 2-18installations
out-of-place patch set, 2-27instance failures
recovery, 2-16single, 4-11
instance recoverycontrolling with fast-start fault recovery, 2-16versus crash recovery, 2-32
interconnect subnetverification with Oracle ORADEBUG utility, 2-31verifying, 2-31
interim patches, 5-8I/O operations
load balancing, 2-7tuning, 2-51
I/O Resource Management (IORM)usage with Storage Grid, 2-4
Llibrary
ASMLib support for ASM, 2-5licensing
Oracle Advanced Compression, 2-49listener connection rate throttling, 2-80LISTENER.ORA file sample, A-7listeners
balancing clients across, 2-29Connection Rate Limiter, 2-79LISTENER.ORA file example, A-7running, 2-28SQLNET.ORA file example, A-6TNSNAMES.ORA file example, A-7
load balancingclient connections, 2-29I/O operations, 2-7through disk multipathing, 2-7
LOAD_BALANCE parameterbalancing client connections, 2-29
load-balancing application services, 4-36local homes
use during rolling patches, 2-26local recovery
after flash recovery area disk group failure, 4-18for data area disk group failures, 4-17for flash recovery area disk group failures, 4-19
locally managed tablespaces, 2-23described, 2-23
location migration, 5-18log apply services
best practices, 2-49 to 2-53LOG_ARCHIVE_FORMAT initialization
parameter, 2-44LOG_ARCHIVE_MAX_PROCESSES initialization
parametersetting in a multiple standby environment, 2-47setting in an Oracle RAC, 2-47
LOG_BUFFER initialization parameter, 2-20LOG_FILE_NAME_CONVERT initialization
parameter, 2-55logical standby databases
effect of the MAX_SERVERS parameter, 2-52failover, 4-10setting the PRESERVE_COMMIT_ORDER
parameter, 2-53skipping database objects, 2-53switchover, 5-7upgrades on, 5-13when to use, 2-38
logical unit numbers (LUNs), 2-8defined, Glossary-1
login stormscontrolling with shared server, 2-80preventing, 2-79
low bandwidth networkscompression on, 2-49
low-cost storage subsystems, 2-2LUNs
See Also logical unit numbers (LUNs)See logical unit numbers (LUNs), 2-8

Index-7
MMAA
See Oracle Maximum Availability Architecture (MAA)
manageabilityimproving, 2-21 to 2-25
managing scheduled outages, 5-3 to 5-4manual failover
best practices, 2-59, 4-10comparing to fast-start failover, 2-56when to perform, 2-56, 4-9
MAX_SERVERS initialization parameter, 2-52Maximum Availability Architecture (MAA) Advisor
page, 3-12maximum availability mode
described, 2-39redo transport requirements, 2-46when to use, 2-39
maximum number of connectionsadjusting in the mid tier connection pool, 2-80
maximum performance modedescribed, 2-39redo transport requirements, 2-46when to use, 2-39
maximum protection modedescribed, 2-38initialization parameter example, 2-44when to use, 2-39
Mean Time To Recover (MTTR)checkpointing, 2-32reducing with Data Recovery Advisor, 2-21
media failurerecovery, 4-20
memory consumptionmanaging with MEMORY_TARGET
parameter, 2-9memory management, 2-20MEMORY_TARGET initialization parameter, 2-9metrics
Enterprise Manager, 3-3mid tier connection pool
adjusting maximum number of connections, 2-80migrating
Data Guard to an Oracle RAC primary, 6-3databases to and from ASM, 2-5to MAA, 6-1to Oracle RAC from a single instance, 6-3transportable database, 5-19
migrationto MAA using Grid Control, 6-1
minimizing space usage, 2-72minimizing system resource consumption, 2-72mining vendor logs for disk errors, 2-13mirrored extents
protection from data corruptions, 2-19mirroring
across storage arrays, 2-9deferring to RAID storage subsystem, 2-35
monitoringapplication response time, 4-12
Oracle Grid Control, 1-2, 3-1rebalance operations, 5-12
mounting disk groups, 2-10multipathing (disks)
path abstraction, 2-7multiple disk failures, 4-18
NNetwork Attached Storage (NAS), 2-51network detection and failover
Oracle Clusterware and Oracle RAC, 2-31network routes
after site failover, 4-6before site failover, 4-5
network server processes (LNSn), Glossary-2NOCATALOG Mode
creating backups, 2-70node failures
multiple, 4-11nodes
migrating client connections, 2-27non database object corruption and recommended
repair, 4-21nondisruptive failovers, 2-7normal redundancy
ASM disk failures, 4-14NORMAL REDUNDANCY clause
on the CREATE DISKGROUP statement, 2-8notification rules
recommended, 3-8service-level requirement influence on
monitoring, 3-4notifications
application failover, 4-12
OOCR
backups of, 2-30described, 2-30recovering, 4-11
ocrconfig -showbackup command, 2-31offsite backups, 2-74OMF
See Oracle managed filesonline log groups
minimum, 2-14online patching, 5-8online redo log files
multiplex, 2-14Online Reorganization and Redefinition, 5-24Online Transaction Processing (OLTP)
application workload, 2-1opatch command-line utility, 5-9operational best practices, 1-2 to 1-3optimizing
recovering times, 2-72Oracle Advanced Compression option, 2-49Oracle Cluster Registry (OCR)

Index-8
failure of, 4-11See OCR
Oracle Clusterwarecapacity planning, 2-26cold failover clusters, 2-32configuring a third site for a voting disk, 2-35OCR mirroring, 2-30software release compatibility, 2-26system maintenance, 5-26verifying the interconnect subnet, 2-31
Oracle Data Pumpplatform migrations, 5-21
Oracle Database 11gconfiguration recommendations, 2-13
Data Guard, 2-37extended cluster configurations, 2-34Oracle RAC configuration
recommendations, 2-32Oracle Enterprise Manager
High Availability (HA) Console, 3-10MAA Advisor page, 3-12
Oracle Enterprise Manager Grid Controlmigrating to MAA, 6-1
Oracle Exadata Storage Server Software, 2-2Oracle Flashback Database
restoring fault tolerance to configuration, 4-40Oracle Grid Control
benefits, 1-2home page, 3-2managing Data Guard targets, 3-10monitoring, 3-1Policy Violations, 3-9
Oracle homesmixed software versions, 2-26separate from ASM, 2-28
Oracle Implicit Connection Cache (ICC), 2-30Oracle managed files (OMF)
database file management, 2-6disk and disk group configuration, 2-6flash recovery area, 2-14
Oracle Management Agent, 3-2monitoring targets, 3-2
Oracle Maximum Availability Architecture (MAA)defined, Glossary-2described, 1-2environment, 6-1Web site, 1-2
Oracle Netconfiguration file examples, A-6 to A-8
Oracle Notification Service (ONS)after failovers, 2-43
Oracle ORADEBUG utilityverifying interconnect subnet, 2-31
Oracle Real Application Clusters (Oracle RAC)adding Data Guard, 6-3adding disks to nodes, 2-5application failover, 4-12client failover, 2-79configurations, 2-32extended clusters, 2-34
LISTENER.ORA file sample for, A-7migrating from a single instance, 6-3network detection and failover, 2-31preparing for switchovers, 2-55recovery from unscheduled outages, 4-10restoring failed nodes or instances, 4-34rolling upgrades, 5-8setting LOG_ARCHIVE_MAX_PROCESSES
initialization parameter, 2-47SQLNET.ORA file sample for, A-6system maintenance, 5-26TNSNAMES.ORA file sample for, A-7using redundant dedicated connections, 2-33verifying the interconnect subnet, 2-31voting disk, 2-30
Oracle Secure BackupOCR backups, 2-30protecting data outside of the database, 2-64
Oracle Secure Backup (OSB)fast tape backups, 2-73preventing corruptions, 2-19
Oracle Storage Grid, 2-2Oracle Streams
configuring, 2-75database migration, 5-20upgrades using, 5-17
Oracle Universal Installer, 5-10outages
scheduled, 5-1unscheduled, 4-1
out-of-place patch set installation, 2-27
Pparallel recovery
disabling, 2-21partitions
allocating disks for ASM use, 2-6patch sets
out of place, 2-27out-of-place installations, 2-27rolling upgrades, 5-9
patchesmanaging with Enterprise Manager, 3-9rolling, 2-26using shared cluster file system, 2-26
path failuresprotection from, 2-7
performanceapplication, tracking with Beacon, 3-4asynchronous disk I/O, 2-20automatic tuning, 2-21Data Guard, 2-64database, gathering requirements, 2-1
PGA memoryusage, 2-52
physical standby databasesas snapshot standby databases, 2-59failover, 4-10location migrations, 5-22

Index-9
real-time query, 2-61switchover, 5-6when to use, 2-37
planned maintenanceIORM, 2-4
platform migrationendian format for, 5-19
platform migrations, 5-12, 5-18point-in-time recovery
TSPITR, 4-32pool
resizing, 2-20power limit
setting for rebalancing, 2-4preferred read failure groups
specifying ASM, 2-35PRESERVE_COMMIT_ORDER initialization
parameter, 2-53preventing login storms, 2-79primary database
distance from the disaster-recovery site, 2-39reinstating after a fast-start failover, 4-40restoring fault tolerance, 4-44
protection modesdescribed, 2-38determining appropriate, 2-39See Also data protection modes, maximum
protection mode, maximum availability mode, maximum performance mode
Qquery SCN, 2-63
RRAID protection, 2-8real-time apply
configuring for switchover, 2-55real-time query
Active Data Guard option, 2-61rebalance operations, 2-12
ASM disk partitions, 2-6, 2-7monitoring, 5-12
REBALANCE POWERlimits, 2-12
rebalancing, 2-10ASM disks after failure, 4-14setting ASM power limit, 2-4
rebalancing ASM disk groups, 2-11recommendations
database configuration, 2-13recovery
coordinated, time-based, distributed database recovery, 4-33
options for flash recovery area, 4-18testing procedures, 2-74
recovery catalogincluding in regular backups, 2-75RMAN repository, 2-70
recovery filescreated in the recovery area location, 2-15
Recovery Manager (RMAN)creating standby databases, 2-41TSPITR, 4-32
recovery point objective (RPO)criticality of data, 2-69defined, Glossary-2for data area disk group failures, 4-16solutions for disk group failures, 4-18
recovery steps for unscheduled outages, 4-2recovery time objective (RTO)
defined, Glossary-2described, 4-5for data-area disk group failures, 4-16recovery time, 2-69solutions for disk group failures, 4-18
recovery timesoptimizing, 2-72
RECOVERY_ESTIMATED_IOS initialization parameter
for parallel recovery, 2-21RECOVERY_PARALLELISM initialization
parameter, 2-21recycle bin, 4-27Redo Apply
real-time query, 2-61Redo Apply Rate
event in Grid Control, 3-9redo data
compressing, 2-49redo log files and groups
size, 2-14redo log members
flash recovery area disk group failure, 4-18redo transport mode
setting for compression, 2-49redo transport services
best practices, 2-46 to 2-49redundancy
CREATE DISKGROUP DATA statement, 2-8dedicated connections, 2-33disk devices, 2-8restoring after disk failures, 2-9
reinstatement, 4-40FastStartFailoverAutoReinstate property, 4-40
remote archiving, 2-44reporting systems
setting the PRESERVE_COMMIT_ORDER parameter, 2-53
resetlogs on primary databaserestoring standby database, 4-44
resource consumptionminimizing, 2-72
resource managementusing Database Resource Manager, 2-24
response timesdetecting slowdown, 4-12
restore pointsfor rolling upgrades, 2-16

Index-10
restoringclient connections, 4-36failed instances, 4-34failed nodes, 4-34services, 4-35
resumable space allocation, 2-24space allocation
failures, 2-24RESUMABLE_TIMEOUT initialization
parameter, 2-24RESYNC CATALOG command
resynchronize backup information, 2-70RETENTION GUARANTEE clause, 2-22retention policy for backups, 2-68RMAN
calculates checksums, 2-19recovery catalog, 2-70
RMAN BACKUP VALIDATE command, 2-50, 4-24RMAN block media recovery, 4-23RMAN data file media recovery, 4-24RMAN RECOVER BLOCK command, 4-23role transitions
best practices, 2-53 to 2-59role-based destinations, 2-44rolling patches, 2-26rolling upgrades
Flashback Database and guaranteed restore points, 2-16
patch set, 5-9row and transaction inconsistencies, 4-28RPO
See recovery point objective (RPO)RTO
See recovery time objective (RPO)
SSALES scenarios
setting initialization parameters, 2-44SAME
See stripe and mirror everything (SAME)scenarios
ASM disk failure and repair, 4-14fast-start failover, 4-41HR service, 4-35object reorganization, 5-24recovering from human error, 4-28SALES, 2-44verifying interconnect subnet, 2-31
scheduled outagesdescribed, 5-1 to 5-4recommended solutions, 5-3 to 5-4reducing downtime for, 5-5 to 5-26types of, 5-1See Also unscheduled outages
secondary site outagerestoring the standby database after, 4-42
securityrecommendations, 1-3
server parameter file
See SPFILEserver-based mirroring
ASM, 2-35service availability
recovering, 4-35service level agreements (SLA), 1-2
effect on monitoring and notification, 3-4operational best practices, 1-3
service tests and Beaconsconfiguring, 3-4
servicesautomatic relocation, 4-11making highly available, 2-28Oracle RAC application failover, 4-12Oracle RAC application workloads, 2-29relocation after application failover, 4-12tools for administration, 2-29
SGA_TARGET initialization parameter, 2-20shared server
configuring Oracle Database, 2-80site failover
network routes, 4-6skipping
database objects that do not require replication to the standby database, 2-53
SLA See service level agreements (SLA)
SMON processin a surviving instance, 2-32
snapshot standby databasesguaranteed restore points, 2-16require Flashback Database, 2-16
sort operationsimproving, 2-24
space management, 2-24space usage
minimizing, 2-72SPFILE
samples, A-2 to A-6SQL Access Advisor, 2-21SQL Tuning Advisor, 2-21SQLNET.ORA file sample, A-6standby databases
choosing physical versus logical, 2-37configuring multiple, 2-60creating, 2-41distance from the primary site, 2-39restoring, 4-39
standby redo log filesdetermining number of, 2-45
Statspackassessing database waits, 2-50
storagemirroring to RAID, 2-35Oracle Exadata Storage Server Software, 2-2
Storage Area Network (SAN), 2-51storage arrays
determining maximum capacity of, 2-2mirroring across, 2-9multiple disk failures in, 4-18

Index-11
storage gridthrough clustered ASM, 2-9
storage migration, 2-12storage subsystems, 2-1 to 2-13
configuring ASM, 2-4configuring redundancy, 2-8performance requirements, 2-1
stripe and mirror everything (SAME), 2-4switchovers
configuring real-time apply, 2-55described, 5-5in Oracle RAC, 2-55preparing Flashback Database, 2-55querying V$DATAGUARD_STATS view, 5-6reducing archiver (ARCn) processes, 2-55See Also Data Guardsetting the LOG_FILE_NAME_CONVERT
initialization parameter, 2-55to a logical standby database, 5-7to a physical standby database, 5-6
SYSASM roleASM Authentication, 2-10
system failurerecovery, 2-16
system maintenance, 5-26system resources
assessing, 2-51SYSTEM tablespace
moving the contents of, 5-21
Ttable inconsistencies, 4-27tablespace point-in-time recovery (TSPITR), 4-32tablespaces
locally managed, 2-23renaming, 5-25resolving inconsistencies, 4-32temporary, 2-24
targetsin Oracle Grid Control, 3-1monitoring, 3-2
TCP Nagle algorithmdisabling, 2-48
temporary tablespaces, 2-24test environments
operational best practices for, 1-2third site
for a voting disk, 2-35TNSNAMES.ORA file sample, A-7transaction recovery
determining how many processes are used, 2-33Transport Lag
event in Grid Control, 3-9transportable database, 5-19transportable tablespaces
database upgrades, 5-17platform migration, 5-21
Uundo retention
tuning, 2-23undo space
managing, 2-22UNDO_MANAGEMENT initialization parameter
automatic undo management, 2-22UNDO_RETENTION initialization parameter
automatic undo management, 2-22UNDO_TABLESPACE initialization parameter
automatic undo management, 2-22unscheduled outages
described, 4-1 to 4-3Oracle RAC recovery, 4-10recovery from, 4-1, 4-4 to 4-33types, 4-1See Also scheduled outages
upgradesapplication, 5-23applying interim patches, 5-8best practices, 5-9Database Upgrade Assistant (DBUA), 5-13methods, 5-12online patching, 5-8
USABLE_FILE_MB columnon the V$ASM_DISKGROUP view, 2-9
user errorflashback technology, 4-25
VV$ASM_DISK view, 2-52V$ASM_DISK_IOSTAT view
checking disk group imbalance, 2-11V$ASM_DISKGROUP
REQUIRED_MIRROR_FREE_MB column, 2-9V$ASM_DISKGROUP view
REQUIRED_MIRROR_FREE_MB column, 2-9USABLE_FILE_MB column, 2-9
V$ASM_OPERATION viewmonitoring rebalance operations, 5-12
V$DATAGUARD_STATS viewquerying during switchover, 5-6
V$EVENT_HISTOGRAM view, 2-50V$INSTANCE_RECOVERY view
tuning recovery processes, 2-21V$IOSTAT_FILE view
asynchronous I/O, 2-20V$OSSTAT view, 2-52V$SESSION_WAITS view, 2-50V$SYSTEM_EVENT view, 2-52V$SYSTEM_EVENTS view, 2-50VALID_FOR attribute, 2-44VALIDATE option
on the RMAN BACKUP command, 2-50validation
checksums during RMAN backup, 2-19variable size extents, 2-11
large ASM data files, 2-11verifying the interconnect subnet, 2-31

Index-12
VIP addressconnecting to applications, 2-29described, 2-29during recovery, 4-35workload management, 2-29
Virtual Internet Protocol (VIP) AddressSee VIP address
Virtual Internet Protocol Configuration Assistant (VIPCA)
configuration, 2-29volume manager
ASM, 2-35voting disk (Oracle RAC)
best practices, 2-30configuring a third site, 2-35
Wwait events
assessing with Active Data Guard and Statspack, 2-50
Web sitesASMLib, 2-5MAA, 1-2
workload managementconnecting through VIP address, 2-29
workloadsexamples, 2-1gathering statistics, 2-2