oracle® enterprise data quality for product data · oracle® enterprise data quality for product...
TRANSCRIPT

Oracle® Enterprise Data Quality for Product DataOracle DataLens Server Administration Guide
Release 11g R1 (11.1.1.6)
E29138-02
February 2013
Oracle Enterprise Data Quality for Product Data Oracle DataLens Server Administration Guide, Release 11g R1 (11.1.1.6)
E29138-02
Copyright © 2001, 2013, Oracle and/or its affiliates. All rights reserved.
Primary Author: Lorna Vallad
This software and related documentation are provided under a license agreement containing restrictions on use and disclosure and are protected by intellectual property laws. Except as expressly permitted in your license agreement or allowed by law, you may not use, copy, reproduce, translate, broadcast, modify, license, transmit, distribute, exhibit, perform, publish, or display any part, in any form, or by any means. Reverse engineering, disassembly, or decompilation of this software, unless required by law for interoperability, is prohibited.
The information contained herein is subject to change without notice and is not warranted to be error-free. If you find any errors, please report them to us in writing.
If this is software or related documentation that is delivered to the U.S. Government or anyone licensing it on behalf of the U.S. Government, the following notice is applicable:
U.S. GOVERNMENT RIGHTS Programs, software, databases, and related documentation and technical data delivered to U.S. Government customers are "commercial computer software" or "commercial technical data" pursuant to the applicable Federal Acquisition Regulation and agency-specific supplemental regulations. As such, the use, duplication, disclosure, modification, and adaptation shall be subject to the restrictions and license terms set forth in the applicable Government contract, and, to the extent applicable by the terms of the Government contract, the additional rights set forth in FAR 52.227-19, Commercial Computer Software License (December 2007). Oracle America, Inc., 500 Oracle Parkway, Redwood City, CA 94065.
This software or hardware is developed for general use in a variety of information management applications. It is not developed or intended for use in any inherently dangerous applications, including applications that may create a risk of personal injury. If you use this software or hardware in dangerous applications, then you shall be responsible to take all appropriate fail-safe, backup, redundancy, and other measures to ensure its safe use. Oracle Corporation and its affiliates disclaim any liability for any damages caused by use of this software or hardware in dangerous applications.
Oracle and Java are registered trademarks of Oracle and/or its affiliates. Other names may be trademarks of their respective owners.
Intel and Intel Xeon are trademarks or registered trademarks of Intel Corporation. All SPARC trademarks are used under license and are trademarks or registered trademarks of SPARC International, Inc. AMD, Opteron, the AMD logo, and the AMD Opteron logo are trademarks or registered trademarks of Advanced Micro Devices. UNIX is a registered trademark of The Open Group.
This software or hardware and documentation may provide access to or information on content, products, and services from third parties. Oracle Corporation and its affiliates are not responsible for and expressly disclaim all warranties of any kind with respect to third-party content, products, and services. Oracle Corporation and its affiliates will not be responsible for any loss, costs, or damages incurred due to your access to or use of third-party content, products, or services.
iii
Contents
Preface ................................................................................................................................................................ vii
Audience...................................................................................................................................................... viiDocumentation Accessibility .................................................................................................................... viiRelated Documents .................................................................................................................................... viiConventions ............................................................................................................................................... viii
1 Introduction
Administration Web Page ....................................................................................................................... 1-1Elements of the Administration Page ............................................................................................. 1-4
2 Administering the Server
Managing Data Lenses ............................................................................................................................ 2-1Viewing Data Lens Details and Managing Deployment.............................................................. 2-3
Data Lens Component Details for Data Lens Name Panel................................................... 2-3History Chronology Panel ......................................................................................................... 2-4
Viewing and Deleting Data Lens Groups ........................................................................................... 2-5Managing Data Service Applications................................................................................................... 2-5
Promoting DSA Packages ................................................................................................................. 2-6Viewing DSA History Chronology.................................................................................................. 2-7
Managing StatSim Indexes..................................................................................................................... 2-8Accessing Reports .................................................................................................................................... 2-9
Generating Data Lens Reports ......................................................................................................... 2-9Generating DSA Reports................................................................................................................ 2-10
3 Using Server Jobs
Scheduling DSA Jobs .............................................................................................................................. 3-1Editing, Deleting, and Running Scheduled Jobs ............................................................................... 3-3Viewing Job Status................................................................................................................................... 3-4
Viewing Job Details............................................................................................................................ 3-7
4 Configuring the Server
Configuring Server Constants ............................................................................................................... 4-1Managing Server Groups and Server Configurations ...................................................................... 4-4
Adding a New Server Group ........................................................................................................... 4-5

iv
Viewing and Editing a Server Group.............................................................................................. 4-6Adding a Server to a Server Group ................................................................................................. 4-6Viewing and Editing a Server ....................................................................................................... 4-10
Managing User and Group Roles....................................................................................................... 4-10Changing User Roles ...................................................................................................................... 4-12Changing Group Roles ................................................................................................................... 4-13
Managing FTP Connections ................................................................................................................ 4-14Creating a New FTP Connection .................................................................................................. 4-15Testing the FTP Connection........................................................................................................... 4-16
Managing Database Connections ...................................................................................................... 4-16Creating a New Standard Database Connection ........................................................................ 4-18Creating a New Operational Database Connection ................................................................... 4-19Creating a StatSim Database Connection .................................................................................... 4-20Manually Creating a Database Connections ............................................................................... 4-21
Managing Web Services ....................................................................................................................... 4-21Creating a Web Service .................................................................................................................. 4-22Testing and Updating Web Services ............................................................................................ 4-22
5 Setting User Access
Setting Data Lens Access ........................................................................................................................ 5-1Setting DSA Access.................................................................................................................................. 5-2Additional Asset Information................................................................................................................ 5-3
6 Using the Dashboard
Returning to the Default Administration Page .................................................................................. 6-1Viewing the Administration Server Log.............................................................................................. 6-1Setting Packet Tracing ............................................................................................................................. 6-2
7 Troubleshooting
Web Pages Do Not Render...................................................................................................................... 7-1Unable to Resolve Server Hostname .................................................................................................... 7-1Unable to Obtain a Database Connection Lock ................................................................................. 7-1Memory Allocation Problems on Clients ............................................................................................ 7-2Problems Starting a Non-Administration Oracle DataLens Server ............................................... 7-3
A Configuration Files
Server.cfg................................................................................................................................................... A-1Web.xml ..................................................................................................................................................... A-2
B Server Configuration
Copying the Repository ......................................................................................................................... B-1Copy the Directories ......................................................................................................................... B-1Configure the New Server ............................................................................................................... B-1
Job Continuation ..................................................................................................................................... B-2Expected Results................................................................................................................................ B-2
v
C Tuning Your Server
Checking the Job Results....................................................................................................................... C-1Oracle DataLens Server Options .......................................................................................................... C-1
Load-Balancing the Servers ............................................................................................................. C-1Round Robin Calls ..................................................................................................................... C-1
Ensure Tracing is Turned Off .......................................................................................................... C-1DSA Optimization .................................................................................................................................. C-2
Jobs Time Out .................................................................................................................................... C-2Simplify the Data Service Application Process Steps .................................................................. C-2Running Ultra High-Priority Jobs................................................................................................... C-2Run Jobs at the Correct Priority ...................................................................................................... C-2File Writing Between Steps.............................................................................................................. C-2
Data Lens Optimization ......................................................................................................................... C-3Caching the Data Lenses .................................................................................................................. C-3Do Not Load Data Lenses That Are Not Being Used .................................................................. C-3Tuning Multiple Parameterized Domains..................................................................................... C-3
Optimizing Hardware and Operating Systems................................................................................. C-4Windows Memory and Application Servers ................................................................................ C-4Linux and Unix Memory, Windows Memory, and Java Servers............................................... C-4
Database Query Tuning ......................................................................................................................... C-4
D Installing East Asian Language Support Files for Windows XP

vi

vii
Preface
This purpose of this document is to describe the administration of an Oracle DataLens Administration Server.
To understand all of the features presented, you must use this guide in conjunction with the Oracle Enterprise Data Quality for Product Data documents listed "Related Documents" on page 2-vii.
AudienceA thorough understanding of the material in this guide is required for the following customer personnel:
■ IT Administrators responsible for configuring and tuning Oracle Product Data
Quality.
■ Oracle DataLens Server Administrators that manage the configuration of the system, such as setting up database connections, job control, and setting up users and assigning roles.
Documentation AccessibilityFor information about Oracle's commitment to accessibility, visit the Oracle Accessibility Program website at http://www.oracle.com/pls/topic/lookup?ctx=acc&id=docacc.
Access to Oracle SupportOracle customers have access to electronic support through My Oracle Support. For information, visit http://www.oracle.com/pls/topic/lookup?ctx=acc&id=info or visit http://www.oracle.com/pls/topic/lookup?ctx=acc&id=trs if you are hearing impaired.
Related DocumentsFor more information, see the following documents in the documentation set:
■ The Oracle Enterprise Data Quality for Product Data Getting Started Guide provides information about how to get started with EDQP.
viii
■ The Oracle Enterprise Data Quality for Product Data Oracle DataLens Server Installation Guide provides detailed Oracle DataLens Server installation instructions.
■ The Oracle Enterprise Data Quality for Product Data Security Guide provides information about how to securely install and configure your EDQP environment.
■ The Oracle Enterprise Data Quality for Product Data Application Studio Reference Guide provides information about creating and maintaining Data Service Applications (DSAs).
■ The Oracle Enterprise Data Quality for Product Data AutoBuild Reference Guide provides information about creating initial an data lens based on existing product information and data lens knowledge.
■ The Oracle Enterprise Data Quality for Product Data Knowledge Studio Reference Guide provides information about creating and maintaining data lenses.
■ The Oracle Enterprise Data Quality for Product Data Governance Studio Reference Guide provides information about building projects to analyze your transformed data, create reports to show the quality of your data, and identify missing attributes.
■ The Oracle Enterprise Data Quality for Product Data Task Manager Reference Guide provides information about managing tasks created with the Task Manager or Governance Studio applications.
See the latest version of this and all documents in the Oracle Enterprise Data Quality for Product Data Documentation Web site at
http://docs.oracle.com/cd/E35636_01/index.htm
ConventionsThe following text conventions are used in this document:
Convention Meaning
boldface Boldface type indicates graphical user interface elements associated with an action, or terms defined in text or the glossary.
italic Italic type indicates book titles, emphasis, or placeholder variables for which you supply particular values.
monospace Monospace type indicates commands within a paragraph, URLs, code in examples, text that appears on the screen, or text that you enter.
monospace Boldface, monospace type indicates commands or text that you enter.

1
Introduction 1-1
1Introduction
Enterprise DQ for Product (EDQP) is a web browser-based, graphical user interface you use to manage provides network-wide access to Oracle DataLens Servers. The Oracle DataLens Administration Server is used for archiving data lenses and Data Service Applications (DSAs) while Oracle DataLens Transform Servers are used for processing large amounts of data using data lenses and DSAs.
Each Oracle DataLens Server is comprised of the following components:
■ Servlet Engine
■ Configuration Repository
■ Oracle DataLens Server Administration Web Application Engine
■ Oracle DataLens Web Application Engine
■ Oracle DataLens Server Group Engine
The Oracle DataLens Server provides an HTTP service operating on a dedicated port (default port 2229), executing the Server Web Application. The Knowledge Studio and Administration Server web page both communicate with the Enterprise DQ for Product using HTTP SOAP requests.
In a typical enterprise environment where everything is within your Local Area Network (LAN), it is unnecessary to use the HTTPS option. In an environment where client applications are communicating across less secure networks back to the Oracle DataLens Servers, it is recommended that you enable HTTPS. For more information about securing your EDQP environment, see Oracle Enterprise Data Quality for Product Data Security Guide.
Administration Web PageAll of the administration for the Oracle DataLens Server topology is managed using the Administration web page accessed on the Administration Server. The Administration web page provides basic information about the server.
To use the Administration web page, use one of the supported Web browsers for your environment, see Oracle Enterprise Data Quality for Product Data Certification Matrix at
http://www.oracle.com/technetwork/middleware/ias/downloads/fusion-certification-100350.html
Locate Oracle Enterprise Data Quality in the Product Area column and then click the System Requirements and Supported Platforms for Oracle Enterprise Data Quality for Product Data 11gR1 (11.1.1.x) Certification Matrix (xls) link.
To start the Administration web page:

Administration Web Page
1-2 Oracle DataLens Server Administration Guide
1. Start an Administration Server.
2. Open one of the supported Web browsers to one of the following URLs:
On the server, browse to:
http://localhost:2229/datalens
Or remotely browse to
http://server:2229/datalens
The server is the name of your Oracle DataLens Server. If you configured the Administration Server to use Secure Socket Layer (SSL) you must add s after http as follows:
Figure 1–1 EDQP Login Page
3. Enter the user name and the password you used to start the Administration Server, and then click Sign In.
Note: Each server installation results in a separate WebLogic Server instance. When installing an Oracle DataLens Administration Server and a Transform Server, separate WebLogic Server instances are created for each and the login credentials are not shared across the two servers. Logging into a Transform Server requires the Administration Server user name and password. A best practice is to install both WebLogic instances for the Administration and Transform Servers with the same administrator user, for example, dlsadmin.
Administration Web Page
Introduction 1-3
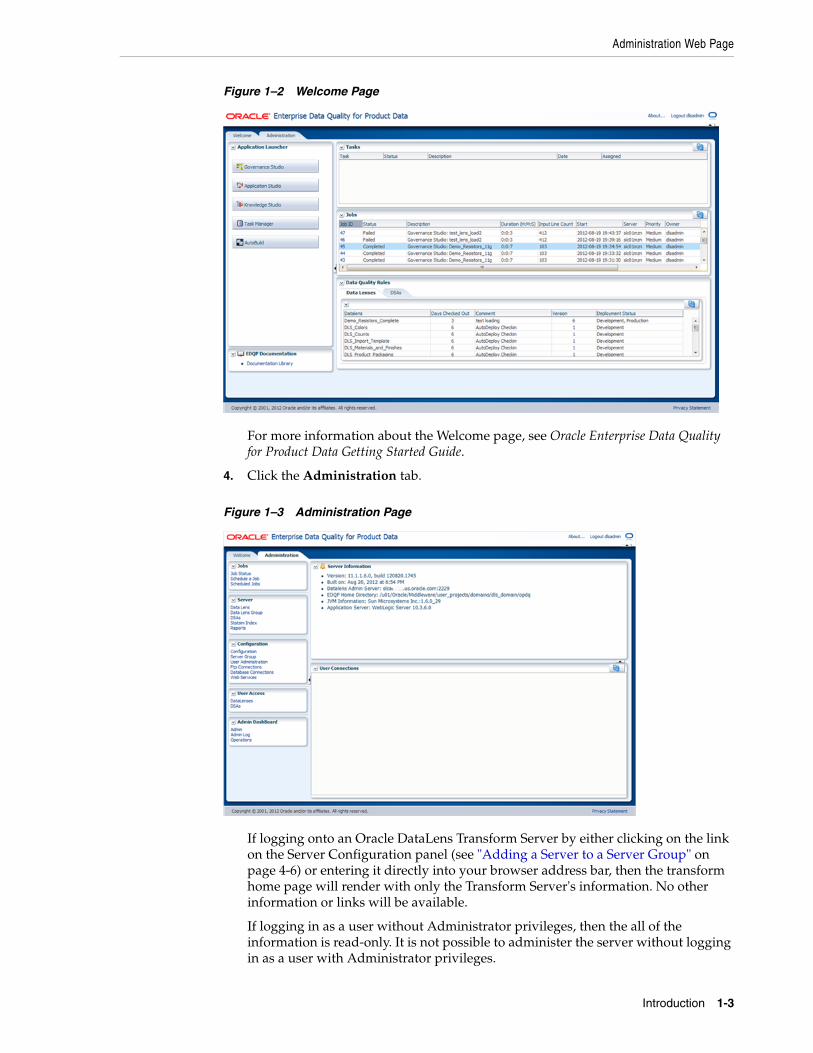
Figure 1–2 Welcome Page
For more information about the Welcome page, see Oracle Enterprise Data Quality for Product Data Getting Started Guide.
4. Click the Administration tab.
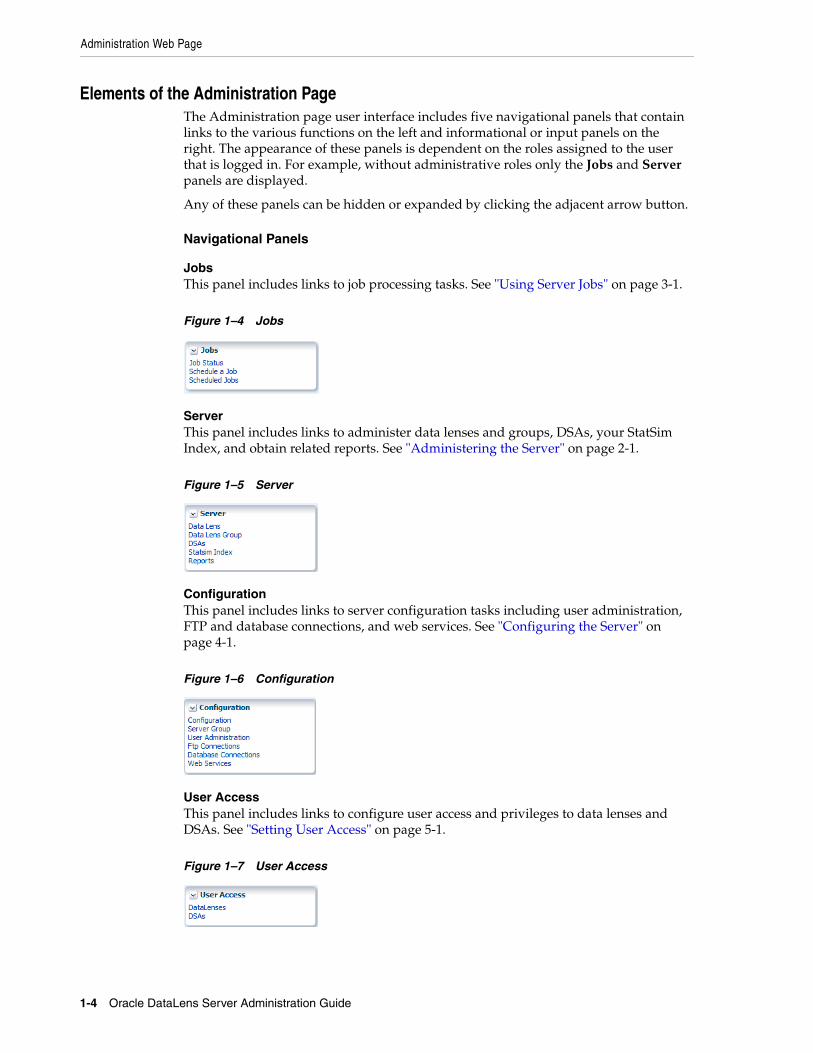
Figure 1–3 Administration Page
If logging onto an Oracle DataLens Transform Server by either clicking on the link on the Server Configuration panel (see "Adding a Server to a Server Group" on page 4-6) or entering it directly into your browser address bar, then the transform home page will render with only the Transform Server's information. No other information or links will be available.
If logging in as a user without Administrator privileges, then the all of the information is read-only. It is not possible to administer the server without logging in as a user with Administrator privileges.
Administration Web Page
1-4 Oracle DataLens Server Administration Guide
Elements of the Administration PageThe Administration page user interface includes five navigational panels that contain links to the various functions on the left and informational or input panels on the right. The appearance of these panels is dependent on the roles assigned to the user that is logged in. For example, without administrative roles only the Jobs and Server panels are displayed.
Any of these panels can be hidden or expanded by clicking the adjacent arrow button.
Navigational Panels
JobsThis panel includes links to job processing tasks. See "Using Server Jobs" on page 3-1.
Figure 1–4 Jobs
ServerThis panel includes links to administer data lenses and groups, DSAs, your StatSim Index, and obtain related reports. See "Administering the Server" on page 2-1.
Figure 1–5 Server
ConfigurationThis panel includes links to server configuration tasks including user administration, FTP and database connections, and web services. See "Configuring the Server" on page 4-1.
Figure 1–6 Configuration
User AccessThis panel includes links to configure user access and privileges to data lenses and DSAs. See "Setting User Access" on page 5-1.
Figure 1–7 User Access
Administration Web Page
Introduction 1-5
Admin DashboardThis panel includes links to review server information and logs, as well as configuring package tracing administration. See "Using the Dashboard" on page 6-1.
Figure 1–8 Admin Dashboard
Informational PanelsAll informational panels appear to the right of navigational panels and display the information related each of the navigational panel links.
Any of these panels can be hidden or expanded by clicking the adjacent arrow button. The informational panels that contain columns allow you to resize the columns.
Additionally, the blue, double-arrow Refresh button in the informational and input panels allows you to either provide the initial set of information or refresh the information being displayed with the latest from the server.
Use the navigational panels on the left to return to a given page rather than the back or forward buttons in your browser. Using these browser buttons may produce unexpected results.
Many of the informational panels contain an Action column that enables you perform the following actions on the selected object (data lens, DSA, server group, and so forth) as follows:
View or Edit Click to review or edit the parameters of the given object.
Delete Click to delete the object. The list is refreshed once the object has been deleted from the server.
Run Click to run the object immediately regardless of the configured object frequency.
View Log Click to view the log associated with the object in the panel. You can download the log to review independent of the Administration Server web page by clicking Download Log.
The following two panels are the default informational panels of the Administration Server web page.
Server InformationThe EDQP product version, server name and port, home directory, and JVM and WebLogic versions are listed. The Administration Server home directory is defined with the environmental variable, EDQP_HOME, which is created and set during the installation process. See Oracle Enterprise Data Quality for Product Data Oracle DataLens Server Installation Guide.
Connected UsersAny users are currently connected to the server from the EDQP Client applications such as the Knowledge Studio and the Application Studio are listed. Initially no user connections are displayed; you must click the refresh to view the currently connected users.

Administration Web Page
1-6 Oracle DataLens Server Administration Guide
This is useful if you want to restart the server, run a backup, or make substantial changes to the server configuration and wants to know what users may be currently using the server. You should also check the server jobs to see which users are running real-time or batch jobs against the server.
ToolbarThe tool bar at the top right of the page includes the following elements:
Toolbar Element Description
About... Click to view the release information and access the EDQP product website.
Logout username Click log out of the Welcome Launch Pad page.

2
Administering the Server 2-1
2Administering the Server
Data lenses and DSAs are stored on an Oracle DataLens Server of your choosing for use by an Oracle DataLens Administration Server. The Administration Server contains information about the different versions of the data lenses and DSAs and instances of the versions themselves. Only users of the Knowledge Studio and users using the Administration web page for the Administration Server can directly manipulate these data lenses. There is no direct access to the repository from the Oracle DataLens Servers. These data lenses are checked into the server from the Knowledge Studio.
Oracle DataLens Server data lenses and DSAs are those that are under version control by the Administration Server for shared use by different team members. This prevents possible problems with more than one user updating a data lens at the same time and possibly losing work. This also provides a single location for backing up the valuable data lenses. These data lenses can be checked out for editing or as read-only by users of the Knowledge Studio that have the correct privileges.
Once these are in the Administration Server repository, any of the data lenses and DSAs can be edited and upgraded when needed.
This chapter describes the following functions contained in the Server panel:
■ Managing Data Lenses
■ Viewing and Deleting Data Lens Groups
■ Managing Data Service Applications
■ Managing StatSim Indexes
■ Accessing Reports
Managing Data LensesFrom the Server panel, select Data Lens to begin managing the data lenses in your Administration Server.

Managing Data Lenses
2-2 Oracle DataLens Server Administration Guide
Figure 2–1 Data Lens Administration
The columns contain the following information:
Data Lens NameThis is the name of the data lens and is a link to the complete history information for the data lens. Click the link to review the data lens details. See "Viewing Data Lens Details and Managing Deployment" on page 2-3.
Action ItemsThe action buttons that may be active, left to right, are used as follows:
View or Manage
Click to review or edit the parameters of the given data lens and you are advanced to the Data Lens Component Details for the given data lens panel. See "Viewing Data Lens Details and Managing Deployment" on page 2-3.
Lock and Unlock
Click to lock or unlock the data lens. The icon toggles from a locked lock to an unlocked lock based on the state of the data lens. You are prompted for a user name when unlocking a data lens to identify who unlocked it. When the user logged in does not have administrative permissions, this button is not displayed.
Typically, the user locks on data lenses are created by users of the Knowledge Studio. Occasionally, these locks need to be overridden by an administrator.
For example, a user might be on vacation and left a data lens locked that is needed by another user or a user inadvertently started editing a data lens in the Knowledge Studio and failed to lock it first. This user would not want to check out the data lens to lock it because that would overwrite the work the user has done on the data lens.
Administrators must be careful when resetting locks to ensure that the latest data lens version is held intact.
Delete Click to delete the data lens. This button is active when the data lens is not deployed, is unlocked, and the user logged in has administrator privileges. Once deleted, the data lens is no longer on the Administration Server and cannot be used by any user.
Development, QA, and Production Deployed RevisionThe revision number of the deployed data lens to the Development (or the Administration/development), Quality Assurance (QA), or Production Servers. The development column is always displayed because it is the default for all data lens. However, the QA and Production columns are displayed when there are one or more data lenses deployed to these types of servers.
Managing Data Lenses
Administering the Server 2-3
Administration Server User LockThe Knowledge Studio user that has locked this data lens for exclusive access or the last administrator that locked it. When the field is blank, it means that the data lens is available for checkout by any Knowledge Studio user with access privileges.
DescriptionThe initial description of the data lens when it was first checked into the repository. This description can be updated from the Application Studio when checking the data lens into the Administration Server.
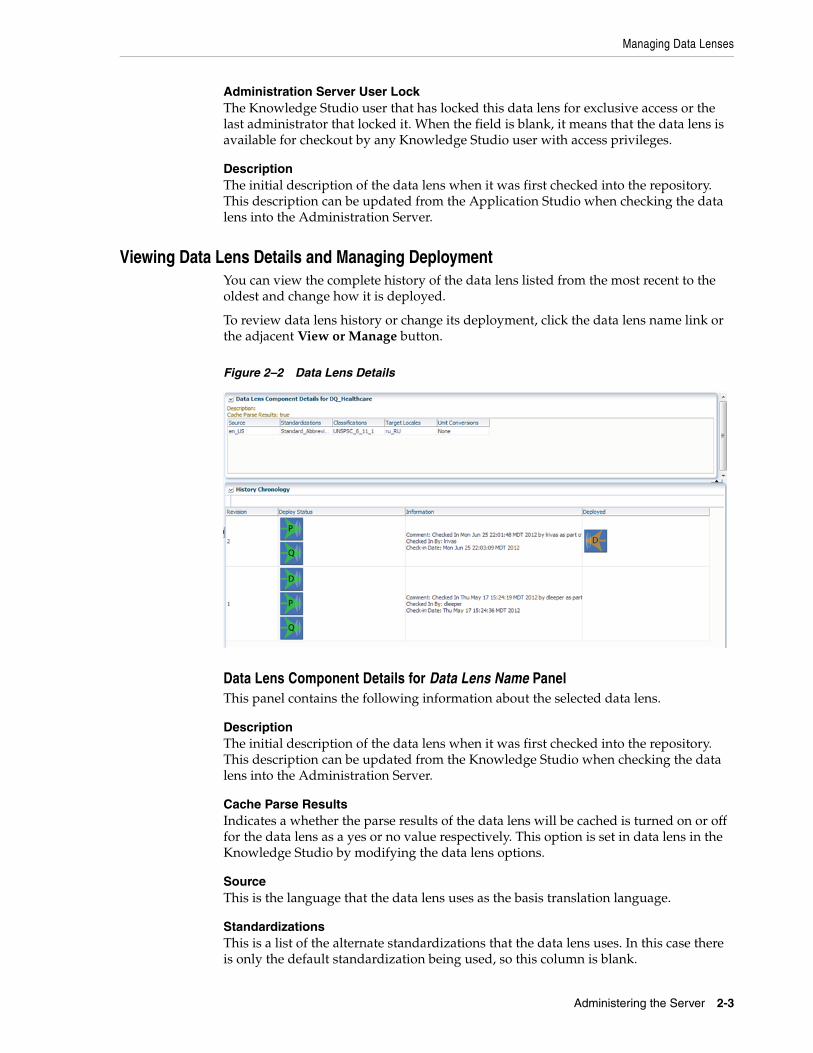
Viewing Data Lens Details and Managing DeploymentYou can view the complete history of the data lens listed from the most recent to the oldest and change how it is deployed.
To review data lens history or change its deployment, click the data lens name link or the adjacent View or Manage button.
Figure 2–2 Data Lens Details
Data Lens Component Details for Data Lens Name PanelThis panel contains the following information about the selected data lens.
DescriptionThe initial description of the data lens when it was first checked into the repository. This description can be updated from the Knowledge Studio when checking the data lens into the Administration Server.
Cache Parse ResultsIndicates a whether the parse results of the data lens will be cached is turned on or off for the data lens as a yes or no value respectively. This option is set in data lens in the Knowledge Studio by modifying the data lens options.
SourceThis is the language that the data lens uses as the basis translation language.
StandardizationsThis is a list of the alternate standardizations that the data lens uses. In this case there is only the default standardization being used, so this column is blank.

Managing Data Lenses
2-4 Oracle DataLens Server Administration Guide
ClassificationsThis is a list of the classifications that the data lens uses. In this case there are two separate classifications that are being used by the data lens.
Target LocalesThis is a list of the languages that the data lens can be translated to.
Unit ConversionsThis is a list of the numeric conversions that have been defined for this data lens.
History Chronology PanelThis panel enables you to view the deployment status of a data lens, as well as deploy and undeploy it. It contains the following information and tasks.
RevisionThe particular revision, starting from one, listed in reverse order so the latest revision is always at the top of the list. In this example there are two revisions.
Deploy StatusSelect an icon (P, Q, or D, which indicate Production, QA, and Development respectively) to deploy a particular version of this data lens to the Administration Server or Oracle DataLens Server. This means that the data lens will be listed as a data lens available for loading on the Administrator or Oracle DataLens Server. The icons displayed are based on the configured server groups.
InformationThis shows the revisions of the data lens including:
■ Comments about what the Knowledge Studio user changed in the data lens in each revision.
■ The name of the Knowledge Studio user that made the revision.
■ The date/time that the revision was checked into the Administration Server.
DeployedThese icons show how the data lens is currently deployed to the Administration and Oracle DataLens Servers.
Undeploy from Development
This will undeploy a data lens from the Development Server, which means it will not be listed as a data lens to be loaded as well. This button is only available for the version that is deployed to the Administration Server.
Undeploy from Production
This will undeploy a data lens from the Oracle DataLens Server, which means it will not be listed as a data lens to be loaded as well. This button is not available if the data lens is not currently deployed to the Oracle DataLens Server.
Undeploy from QA
If there is a QA server group defined, then there will be a button to undeploy or deploy to the QA area.
It is recommended that data lens only be deployed to the development area. Data lens deployment to the QA and Production areas can be done more easily by using the package deployment of DSAs, and the packages give a level of version tracking that cannot be done by manual data lens deployment.
Managing Data Service Applications
Administering the Server 2-5
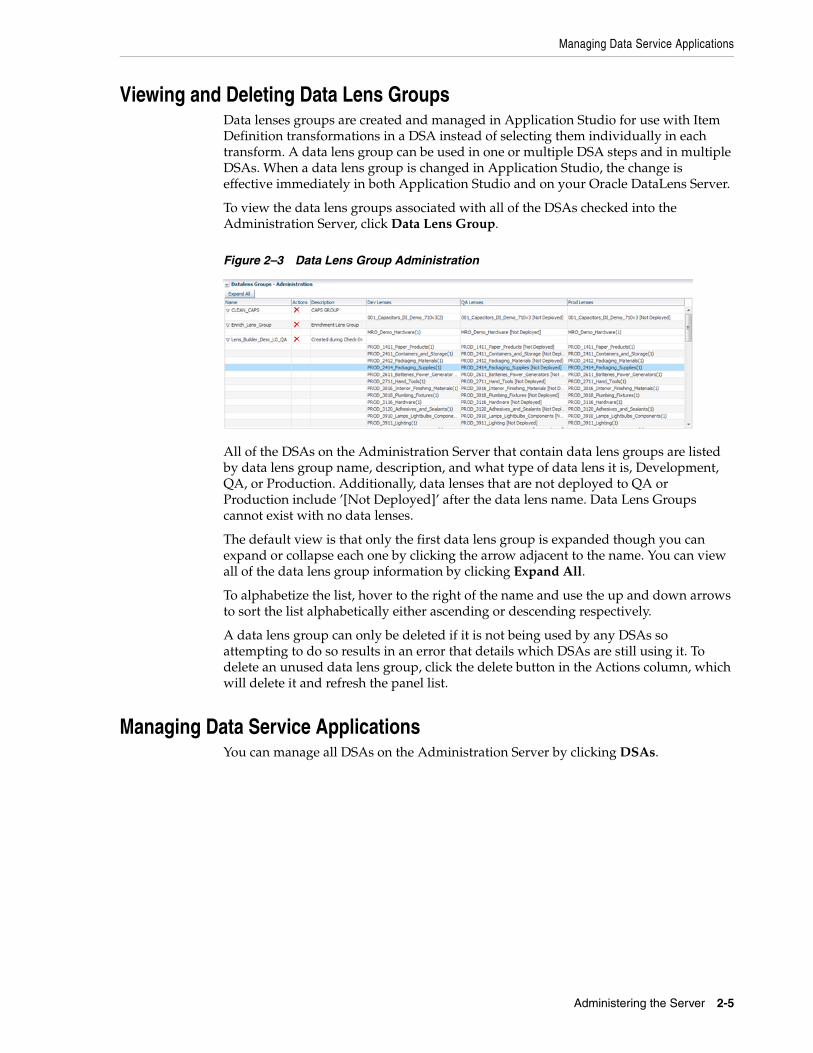
Viewing and Deleting Data Lens GroupsData lenses groups are created and managed in Application Studio for use with Item Definition transformations in a DSA instead of selecting them individually in each transform. A data lens group can be used in one or multiple DSA steps and in multiple DSAs. When a data lens group is changed in Application Studio, the change is effective immediately in both Application Studio and on your Oracle DataLens Server.
To view the data lens groups associated with all of the DSAs checked into the Administration Server, click Data Lens Group.
Figure 2–3 Data Lens Group Administration
All of the DSAs on the Administration Server that contain data lens groups are listed by data lens group name, description, and what type of data lens it is, Development, QA, or Production. Additionally, data lenses that are not deployed to QA or Production include ’[Not Deployed]’ after the data lens name. Data Lens Groups cannot exist with no data lenses.
The default view is that only the first data lens group is expanded though you can expand or collapse each one by clicking the arrow adjacent to the name. You can view all of the data lens group information by clicking Expand All.
To alphabetize the list, hover to the right of the name and use the up and down arrows to sort the list alphabetically either ascending or descending respectively.
A data lens group can only be deleted if it is not being used by any DSAs so attempting to do so results in an error that details which DSAs are still using it. To delete an unused data lens group, click the delete button in the Actions column, which will delete it and refresh the panel list.
Managing Data Service ApplicationsYou can manage all DSAs on the Administration Server by clicking DSAs.

Managing Data Service Applications
2-6 Oracle DataLens Server Administration Guide
Figure 2–4 DSA Administration
This DSA - Administration panel operates in a similar manner to the Data Lens Administration panel, see "Viewing Data Lens Details and Managing Deployment" on page 2-3. The following sections describe the DSA specific functions.
Promoting DSA PackagesThe one exception is the additional Promote column, which allows you to create and promote DSA packages, with the data lenses contained within, from development status to Production or QA for users to check out. DSA packages include the data lenses and data lens groups associated with the DSA.
To create a production or QA DSA package:
1. Click the green arrow in the Promote column for your DSA.
Figure 2–5 Promote a DSA Package
2. (Optional) Change the Tag Name that will identify the package.
3. Enter a description for the package to aid in identification.
4. Select whether or not the package configuration has been tested in Application Studio with either true or false.
5. Click the appropriate link to view the promoted package, QA or Production.
Managing Data Service Applications
Administering the Server 2-7
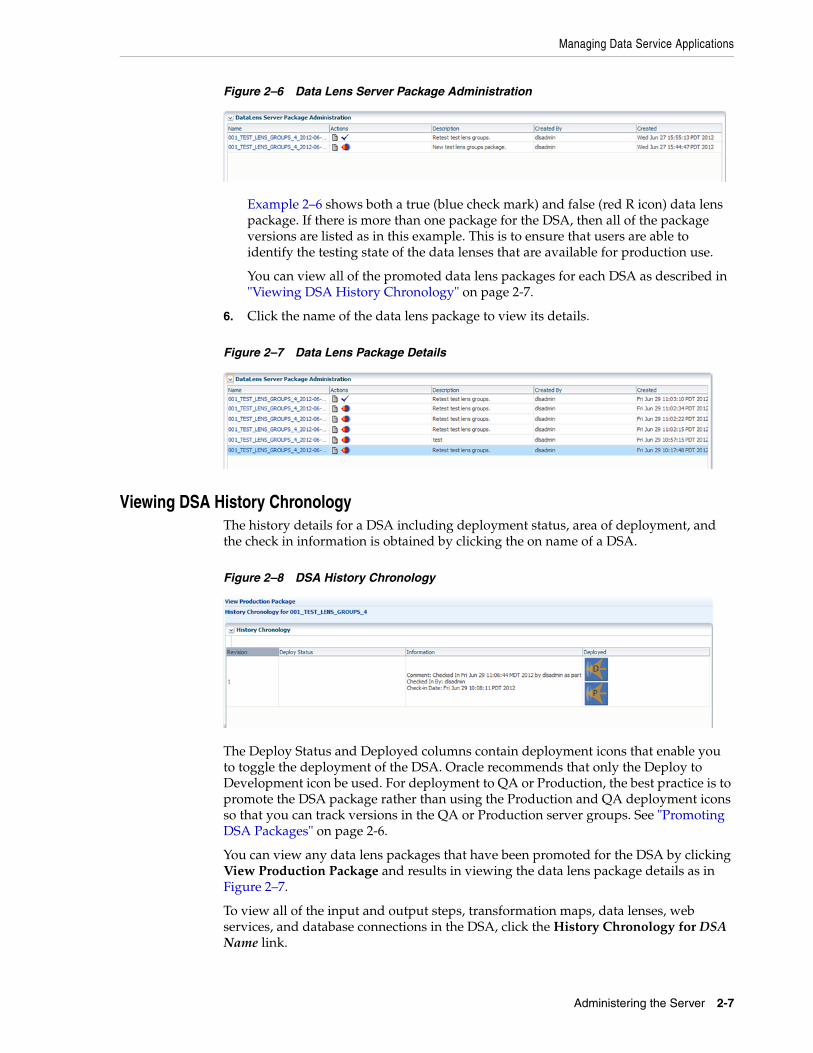
Figure 2–6 Data Lens Server Package Administration
Example 2–6 shows both a true (blue check mark) and false (red R icon) data lens package. If there is more than one package for the DSA, then all of the package versions are listed as in this example. This is to ensure that users are able to identify the testing state of the data lenses that are available for production use.
You can view all of the promoted data lens packages for each DSA as described in "Viewing DSA History Chronology" on page 2-7.
6. Click the name of the data lens package to view its details.
Figure 2–7 Data Lens Package Details
Viewing DSA History ChronologyThe history details for a DSA including deployment status, area of deployment, and the check in information is obtained by clicking the on name of a DSA.
Figure 2–8 DSA History Chronology
The Deploy Status and Deployed columns contain deployment icons that enable you to toggle the deployment of the DSA. Oracle recommends that only the Deploy to Development icon be used. For deployment to QA or Production, the best practice is to promote the DSA package rather than using the Production and QA deployment icons so that you can track versions in the QA or Production server groups. See "Promoting DSA Packages" on page 2-6.
You can view any data lens packages that have been promoted for the DSA by clicking View Production Package and results in viewing the data lens package details as in Figure 2–7.
To view all of the input and output steps, transformation maps, data lenses, web services, and database connections in the DSA, click the History Chronology for DSA Name link.
Managing StatSim Indexes
2-8 Oracle DataLens Server Administration Guide
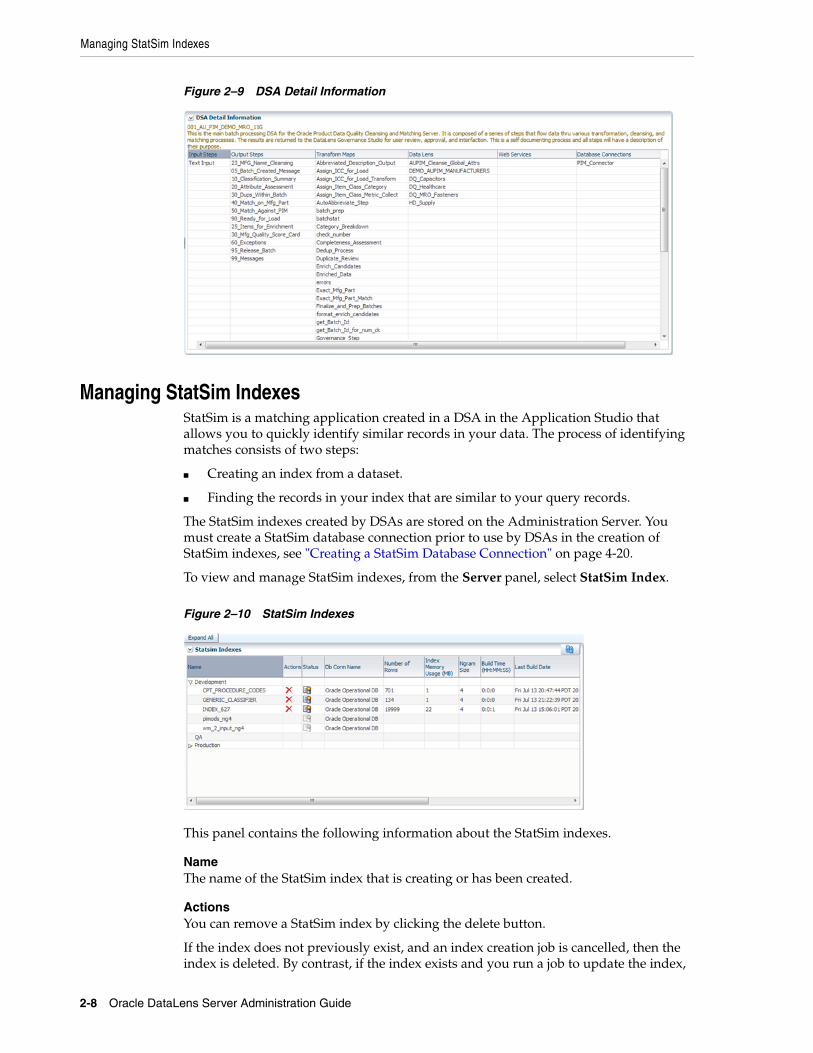
Figure 2–9 DSA Detail Information
Managing StatSim IndexesStatSim is a matching application created in a DSA in the Application Studio that allows you to quickly identify similar records in your data. The process of identifying matches consists of two steps:
■ Creating an index from a dataset.
■ Finding the records in your index that are similar to your query records.
The StatSim indexes created by DSAs are stored on the Administration Server. You must create a StatSim database connection prior to use by DSAs in the creation of StatSim indexes, see "Creating a StatSim Database Connection" on page 4-20.
To view and manage StatSim indexes, from the Server panel, select StatSim Index.
Figure 2–10 StatSim Indexes
This panel contains the following information about the StatSim indexes.
NameThe name of the StatSim index that is creating or has been created.
ActionsYou can remove a StatSim index by clicking the delete button.
If the index does not previously exist, and an index creation job is cancelled, then the index is deleted. By contrast, if the index exists and you run a job to update the index,

Accessing Reports
Administering the Server 2-9
the original index is automatically deleted. In other words, the original index is not left intact.
StatusYou can view the status of the StatSim index as it is being created and after successful completion. Click the refresh button to ensure that you are viewing the current progress. The progress icon is dimmed until the StatSim index creation has completed. The green arrow icon means the database connection is responsive, but no StatSim indexes are present. The red arrow means that the database connection is unresponsive and the StatSim index status is unknown.
You can also view the job process status by selecting Job Status in the Jobs panel.
Db Conn NameThe database connection used to retrieve the dataset.
Number of RowsThe number of data rows processed to create the StatSim index.
Index Memory Usage (MB)Reports how much memory was required to build the index.
Ngram SizeThe number of Ngram characters set in the DSA.
Build Time (HH:MM:SS)Reports the amount of time required to build the StatSim index.
Last Build DateReports the last time that the StatSim index was built.
Accessing ReportsFrom the Server panel, select Reports to access the data lens and DSA reports.
Figure 2–11 Administrative Reports
Generating Data Lens ReportsUse the options in the Data Lens Reports panel as follows:
Data Lens Repository HistoryClick to view the data lens version history and the transformation types and revisions in this comprehensive repository history report. All deployment types are included in this report.

Accessing Reports
2-10 Oracle DataLens Server Administration Guide
Data Lens UsageSelect a Datalens and a deployment Area from these list options, then click Datalens Usage to view how a the selected data lens is being used in the selected deployment area.
Production Data LensesClick to view only the Production deployed data lens version history and the transformation types and revisions in this production specific repository history.
Generating DSA ReportsUse the options in the DSA Reports panel as follows:
DSA Repository HistoryClick to view a comprehensive repository history of all the DSAs on the Administration Server.
DSA BOM Bill of MaterialsSelect a DSA, the type of report you want (deployed DSA or repository), and a deployment Area from these list options, then click DSA BOM to view the data lenses and database connections that are used by the selected DSA.

3
Using Server Jobs 3-1
3Using Server Jobs
From the Administration server, you can schedule, run, and view the status of DSA jobs that are scheduled to run, are running, or have run on your Oracle DataLens Server.
This chapter describes the following functions contained in the Jobs panel:
■ Scheduling DSA Jobs
■ Editing, Deleting, and Running Scheduled Jobs
■ Viewing Job Status
All users are able for view job status, history, and informational logs though may be restricted from other job functions based on the user’s security settings. For more information, See "Managing User and Group Roles" on page 4-10.
Scheduling DSA JobsAdministrators can run a DSA job directly from the Administration web pages. You must have System Administration permissions to run a job.
To schedule a DSA job to run:
1. From the Jobs panel, select Schedule a Job to set up a DSA job to execute.
2. Select the Server Group that you want to process your DSA job.

Scheduling DSA Jobs
3-2 Oracle DataLens Server Administration Guide
The actual server that is selected in the server group is randomly selected by the Administration Server as part of the round-robin server selection process.All the servers in the group are potential candidates to be the server that is selected to run the DSA This means that it is important that all the servers in the group be setup to Load Data Service Applications. See "Managing Server Groups and Server Configurations" on page 4-4.
3. Enter a description for your job.
4. Select a DSA from the drop-down list.
5. Select a Run-Time Locale from the drop-down list.
6. (Optional) Select the Job Output check box if you want the results returned to the Governance Studio.
7. (Optional) In the Sample Percent field, enter a value for the percentage of the input file to sample, rather than using the entire file. The default of 0 will process the entire input file.
If you have a huge file but only want to run a small test, change the sample percent to 1. This will randomly sample your input file, only sending 1% of the contents of the file to the server for processing.
8. (Optional) Select the Job Priority priority to change it from the default, Medium. Large jobs should be sent with a priority of Low and small jobs where you want the results immediately should be sent with a priority of high. If there are not multiple simultaneous jobs running on the server, then this will not matter.
9. In the Input File field, enter the full universal naming convention (UNC) path name to a file on your network. Make sure that the directory with the file is shared and available on the network. A non-UNC path name will write to a directory on the Administration Server.
If the input required by the selected DSA is a database, the DB Parameters field is active. Enter a "|" between values for the separated list of database parameters. The other input options are inactive when the input is a database.
10. (Optional) Select the Input Encoding to match the type of input file encoding used in your input file.
Note: UTF-8 also includes ASCII so most text files will work with this encoding
11. (Optional) Select the Separator character to match the type of field separator used in your input file.
12. (Optional) In the Output Directory field, enter the full universal naming convention (UNC) path name to a file on your network. Make sure that the directory with the file is shared and available on the network. A non-UNC path name will write to a directory on the Administration Server.
13. (Optional) Select the Output Encoding to match the type of input file encoding used in your input file.
14. (Optional) In the Email Address field, enter an email address to send the results to.
15. Select one of the Scheduled Recurrence options to set when frequency that this job will run.

Editing, Deleting, and Running Scheduled Jobs
Using Server Jobs 3-3
■ Manual - The job will only run when manually started. See "Editing, Deleting, and Running Scheduled Jobs" on page 3-3.
■ Every Day - The job is run every day at the scheduled time
■ Every Weekday - The job is run every weekday (no weekends), starting with the initial run day.
■ Every Week - The job is run once per week on the day that the initial job is run.
■ Every Month (day) - The job is run on a particular day every month that you specify with the Scheduled Duration.
■ Every Month (date) - The job is run on a particular day every month hat you specify with the Scheduled Duration. For example, the 23rd for example.
16. Enter the Scheduled Duration Start to set the specific day, month and year and time of day that the job is to start. Click the calendar to select the date and time using a calender UI.
This option is inactive if the Scheduled Reoccurrence is set to Manual.
17. Enter the Scheduled Duration End to set the specific day, month and year that the job is to end. Leave blank if the job scheduling has no termination date. Click the calendar to select the date and time using a calender UI.
This option is inactive if the Scheduled Reoccurrence is set to Manual.
18. Click the Schedule This Job button to schedule the job.
You are advanced to the list of scheduled jobs.
Editing, Deleting, and Running Scheduled JobsFrom the Jobs panel, select the Scheduled Jobs to edit, delete, or run a job that is set up to run.
Figure 3–1 Defined Scheduled Jobs
To set up a new job, click Schedule a Job. See "Scheduling DSA Jobs" on page 3-1.
The columns in the Scheduled Jobs Currently Defined panel display:
ActionThe three action buttons, left to right, are used as follows:
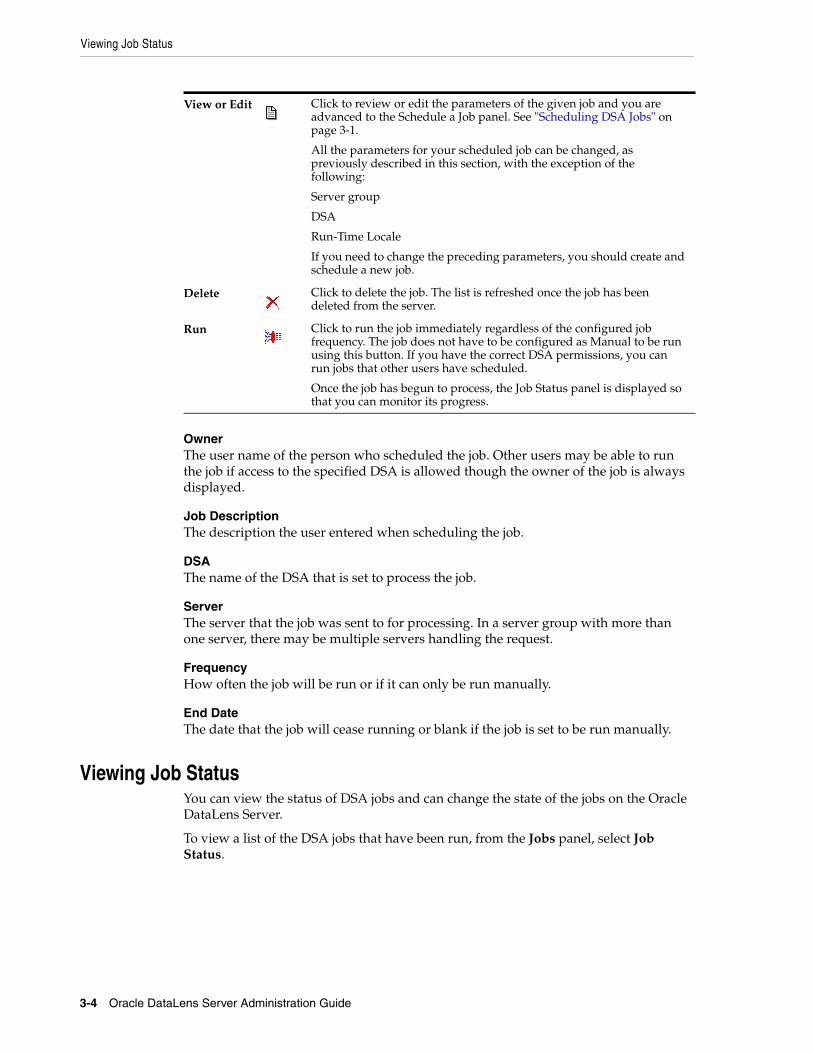
View or Edit Click to review or edit the parameters of the given job and you are advanced to the Schedule a Job panel. See "Scheduling DSA Jobs" on page 3-1.
All the parameters for your scheduled job can be changed, as previously described in this section, with the exception of the following:
Server group
DSA
Run-Time Locale
If you need to change the preceding parameters, you should create and schedule a new job.
Delete Click to delete the job. The list is refreshed once the job has been deleted from the server.
Run Click to run the job immediately regardless of the configured job frequency. The job does not have to be configured as Manual to be run using this button. If you have the correct DSA permissions, you can run jobs that other users have scheduled.
Once the job has begun to process, the Job Status panel is displayed so that you can monitor its progress.
Viewing Job Status
3-4 Oracle DataLens Server Administration Guide
OwnerThe user name of the person who scheduled the job. Other users may be able to run the job if access to the specified DSA is allowed though the owner of the job is always displayed.
Job DescriptionThe description the user entered when scheduling the job.
DSAThe name of the DSA that is set to process the job.
ServerThe server that the job was sent to for processing. In a server group with more than one server, there may be multiple servers handling the request.
FrequencyHow often the job will be run or if it can only be run manually.
End DateThe date that the job will cease running or blank if the job is set to be run manually.
Viewing Job StatusYou can view the status of DSA jobs and can change the state of the jobs on the Oracle DataLens Server.
To view a list of the DSA jobs that have been run, from the Jobs panel, select Job Status.

Viewing Job Status
Using Server Jobs 3-5
Figure 3–2 Job Status
The page is separated into three types of DSA jobs.
■ Those Active DSA Jobs that are currently running.
■ Those Pending DSA jobs currently waiting in the queue to run when a resource becomes available.
■ The DSA Job History containing information on all DSA jobs that have successfully completed, have been cancelled, or have failed.
The server interleaves multiple jobs so the jobs can run concurrently and a single very large batch job will not take control of the server.
The maximum number of concurrent jobs is controlled as part of the server configuration as described in "Configuring Server Constants" on page 4-1.
An administrator can do two things with currently active batch jobs. The first is to look at the details of the job and the other is to cancel the job. The columns in the Job Status panel are:
Job IdThe Job Id number is assigned by the system during job submission.
OwnerThis field shows the user name of the person who scheduled the job. Other users may be able to run the job if access to the specified DSA is allowed though the owner of the job is always displayed.
StatusThis field shows the status of the job. Status definitions are as follows:
■ Running
The job is currently running.
■ Pending
The job has not started, but will start as soon as a slot becomes available. By default, only two jobs of each job priority (low, medium, and high) can run concurrently on the Oracle DataLens Server. To change these job defaults, see "Viewing and Editing a Server" on page 4-10.

Viewing Job Status
3-6 Oracle DataLens Server Administration Guide
Jobs submitted while two jobs are already running are designated as "Pending" and will start in order of submission as the others jobs finish processing.
■ Completed
The job has successfully finished processing.
■ Cancelled
The Administrator canceled the job during processing or before processing started.
■ Failed
The job failed. This status means that something went wrong during the submission or processing of the data. Failed jobs will yield an entry in the Oracle DataLens Server Log.
StartShows the date and time the job started in YYYY-MM-DD HH:MM:SS format.
Input Line CountThis field shows the number of records processed so far for the DSA job. If a job is in "Running" status, this number will update when you click the Refresh button.
DurationThis shows the total time in hours/minutes/seconds for a completed job.
DescriptionThe description the user entered when scheduling the job. Additionally, jobs that are run from the Governance Studio or Services for Excel are identified as such.
ServerThe server that the job was sent to for processing. In a server group with more than one server, there may be multiple servers handling the request.
PriorityThe priority that the job was given.
■ Low priority
Jobs are large batch-type jobs processing tens of thousands and millions of lines of data.
■ Medium priority
Jobs are jobs where the results should be obtained while any low priority job is running.
■ High priority
Jobs are jobs with just a few lines to process, or jobs run from an interactive user environment, where the results need to be returned immediately.
ActionThis is available for running or pending jobs. Two action buttons are available.
■ Cancel
This allows an administrator to cancel a running or pending job. The job may be on the incorrect data set or may be too large to run during the day when other users are also accessing the server.
Viewing Job Status
Using Server Jobs 3-7
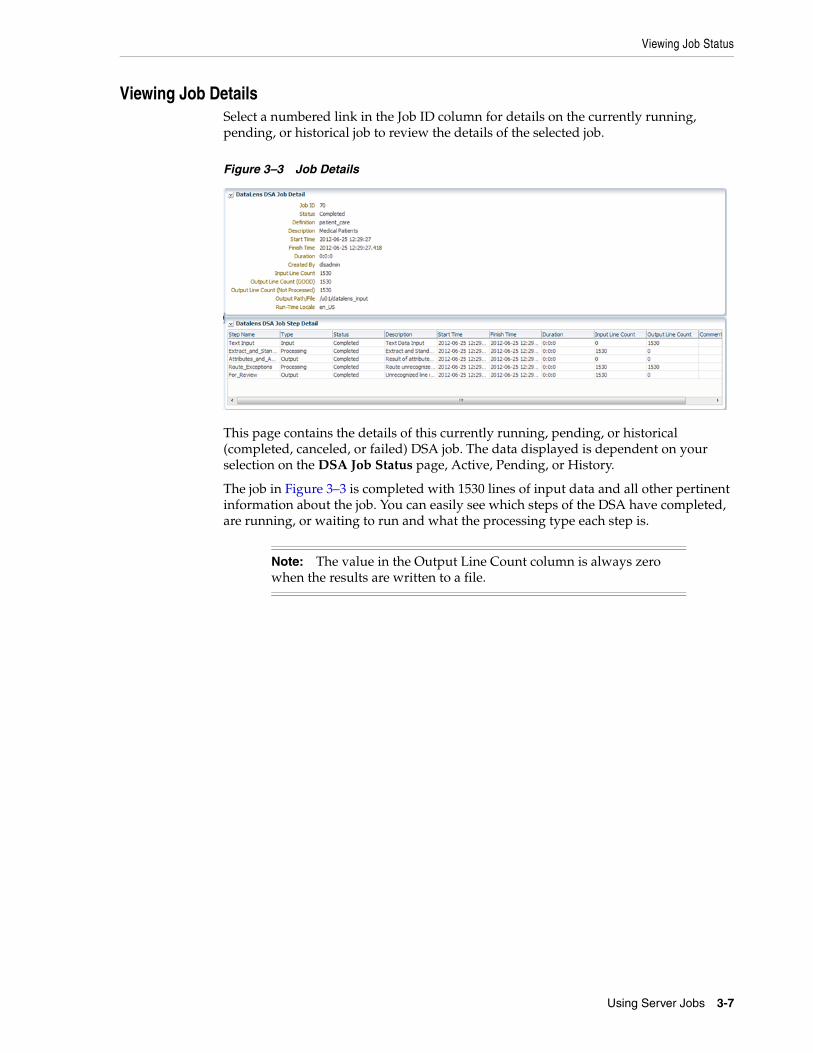
Viewing Job DetailsSelect a numbered link in the Job ID column for details on the currently running, pending, or historical job to review the details of the selected job.
Figure 3–3 Job Details
This page contains the details of this currently running, pending, or historical (completed, canceled, or failed) DSA job. The data displayed is dependent on your selection on the DSA Job Status page, Active, Pending, or History.
The job in Figure 3–3 is completed with 1530 lines of input data and all other pertinent information about the job. You can easily see which steps of the DSA have completed, are running, or waiting to run and what the processing type each step is.
Note: The value in the Output Line Count column is always zero when the results are written to a file.

Viewing Job Status
3-8 Oracle DataLens Server Administration Guide
4
Configuring the Server 4-1
4Configuring the Server
You can configure and administer various Administration Server related elements.
This chapter describes the following functions contained in the Configuration panel:
■ Configuring Server Constants
■ Managing Server Groups and Server Configurations
■ Managing User and Group Roles
■ Managing FTP Connections
■ Managing Database Connections
■ Managing Web Services
The administration of the Administration Server and all other Oracle DataLens Servers are controlled from the Administration Server.
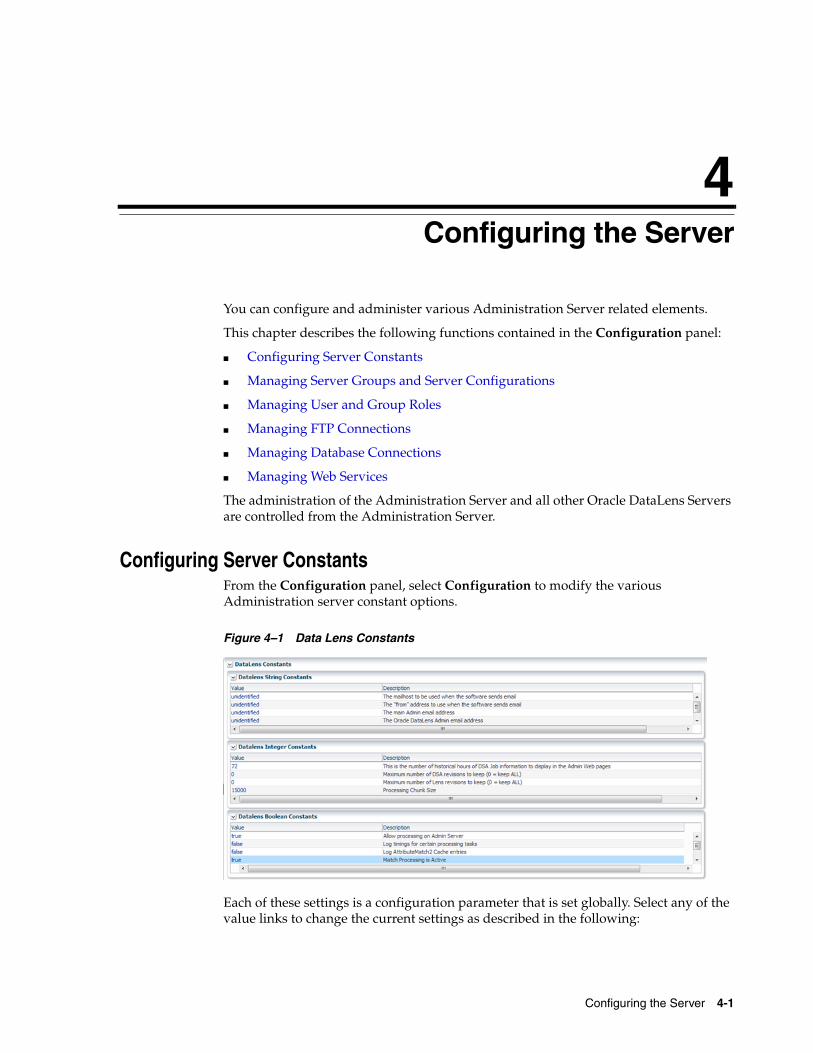
Configuring Server ConstantsFrom the Configuration panel, select Configuration to modify the various Administration server constant options.
Figure 4–1 Data Lens Constants
Each of these settings is a configuration parameter that is set globally. Select any of the value links to change the current settings as described in the following:
Configuring Server Constants
4-2 Oracle DataLens Server Administration Guide
DataLens String Constants
Default Value Description What It Does
unidentified The "from" address to use when the software sends email
The sending email address that will be used when EDQP sends email to defined recipients and should be the Administrator of your Oracle DataLens Administration Server. This value is not validated so ensure that you have entered the text string correctly. For example, [email protected].
Some email programs can misdirect this type of email to a junk or spam folder so you should ensure that this address is added to your safe email sender list.
unidentified The main Admin email address
The main Oracle DataLens Administration Server Administrator's email address and will likely be the same as the above constant value. All administrative change alerts are emailed to this recipient including user and role changes, DSA and data lens check-ins and check-outs, and server group changes. For example, [email protected].
An email alias can be used to alert a group of administrators. This value is not validated so ensure that you have entered the text string correctly.
unidentified The Oracle DataLens Admin email address
The data lens Administrator's email address. This recipient receives alerts about actions to data lenses only. This value is not validated so ensure that you have entered the text string correctly. For example, [email protected].
unidentified The DSA Admin email address
The DSA Administrator's email address. This recipient receives alerts about actions to DSAs only. This value is not validated so ensure that you have entered the text string correctly. For example, [email protected].
unidentified System User The data lens and DSA system user that is used for check-ins and autodeployments.
DataLens Numeric Constants Administration
Default Value Description What It Does
72 This is the number of historical hours of DSA Job information to display in the Admin web pages
This is the number of historical hours of DSA Job information to display in the Administration web pages though all history is logged for review. This value can be changed to dynamically view more or less hours of history. For example, setting to 720 will give you about 30 days of history. To view the transactional history, click the Job Status link.
0 Maximum number of DSA revisions to keep (0 = keep ALL)
Sets the maximum number of DSAs that will be retained on the Administration Server and displayed in the list of DSAs displayed in each deployment area. The default is zero, which retains all revisions of all DSAs. See "Managing Data Service Applications" on page 2-5.
Configuring Server Constants
Configuring the Server 4-3
DataLens Boolean Constants Administration
0 Maximum number of Lens revisions to keep (0 = keep ALL)
Sets the maximum number of data lens that will be retained on the Administration Server and displayed in the list of data lenses displayed in each deployment area. The default is zero and this value should be changed with caution, which retains all revisions of all data lenses. See "Managing Data Lenses" on page 2-1.
Warning: Changing the Maximum number of Lens revisions to keep (0 = keep ALL) value can result in a currently deployed data lens being deleted when the maximum revision value is reached. If an older revision is deployed within the maximum revision threshold, it can result in the deployed data lens deletion. This occurs in rare instances so should be consider before changing this value.
15000 Processing Chunk Size
Sets the number of records (lines of data) that are processed within each DSA step. For example, if 45,000 lines are sent into a DSA step for processing when this value is set to the default of 15,000 then the server will create chunks of 15000 records to process. The server processes each chuck one record at a time until all of the records are processed.
Value Description What It Does
true Allow processing on Admin Server
Allow job processing on the Oracle DataLens Administration Server. To ensure good performance of this server, job processing should take place on production and development servers. When this is the case, this value should be set to false.
If set to true, then the Oracle DataLens Administration Server will also function as a development server.
false Log timings for certain processing tasks
Log timings for certain processing tasks. Oracle recommends that you use the default value.
false Log AttributeMatch2 Cache entries
Log AttributeMatch2 Cache entries. Oracle recommends that you use the default value.
Default Value Description What It Does

Managing Server Groups and Server Configurations
4-4 Oracle DataLens Server Administration Guide
Managing Server Groups and Server ConfigurationsThis section describes how to:
■ create and manage server groups
■ configure and add servers to server groups.
Server groups allow Oracle DataLens Servers to be grouped together for use in the following scenarios.
■ Development
■ Production
■ Quality Assurance Testing
Each Server in the group will participate in automatic server load balancing within the group. The servers can also be used for round robin checking from client applications to determine which server in the group is running and available to handle requests. It is important for the QA server group to match the Production server group so realistic stress testing, load balancing, and performance monitoring can occur.
The Oracle DataLens Servers do not have a "type" until they are assigned to a server group. The type of server will depend on the type of group that the server is assigned to.
To administer your server groups, from the Configuration panel, select Server Group.
Figure 4–2 Data Lens Server Group Administration
You can add a server group, see "Adding a New Server Group" on page 4-5 or add a server to an existing server group, see "Adding a Server to a Server Group" on page 4-6. You can view all of the server group information by clicking Expand All.
The options and informational columns are described as follows:
NameThe server group name and the names of the servers in that group.
ActionsYou can take the following actions using the buttons in this column:
true Match Processing is Active
Allow matching component processing on Oracle DataLens Servers.
This value should only be set to true when a valid license has been purchased. For more information, contact Oracle.
When this value is changed, all Oracle DataLens Servers must be restarted to enable match processing.
Value Description What It Does
View or Edit Click to review or edit the parameters of the given server group.
Delete Click to delete the server group. The list is refreshed once the server group has been deleted from the server. You cannot delete a server group if there are servers are in the group. You must delete all servers first, then the delete action icon appears so that the Server Group delete is possible.
View Log Click to view the log associated with the server group in the panel. You can download the log to review independent of the Administration Server web page by clicking Download Log. A text file of the log is downloaded locally.
Managing Server Groups and Server Configurations
Configuring the Server 4-5
Status Reports whether the server is on line or off line. You can click on the On-Line link to log into the given server.
DescriptionA description of the server group and is defined when the server group is created though it can be changed using the View or Edit action.
Number of ServersReports the total number of servers in the group.
Created and Created ByThese columns report when the server group was created or the server added to the group and by which user.
Updated and Updated ByThese columns report when the server group was updated and by which user. If the server group or server has not been updated then NA is displayed.
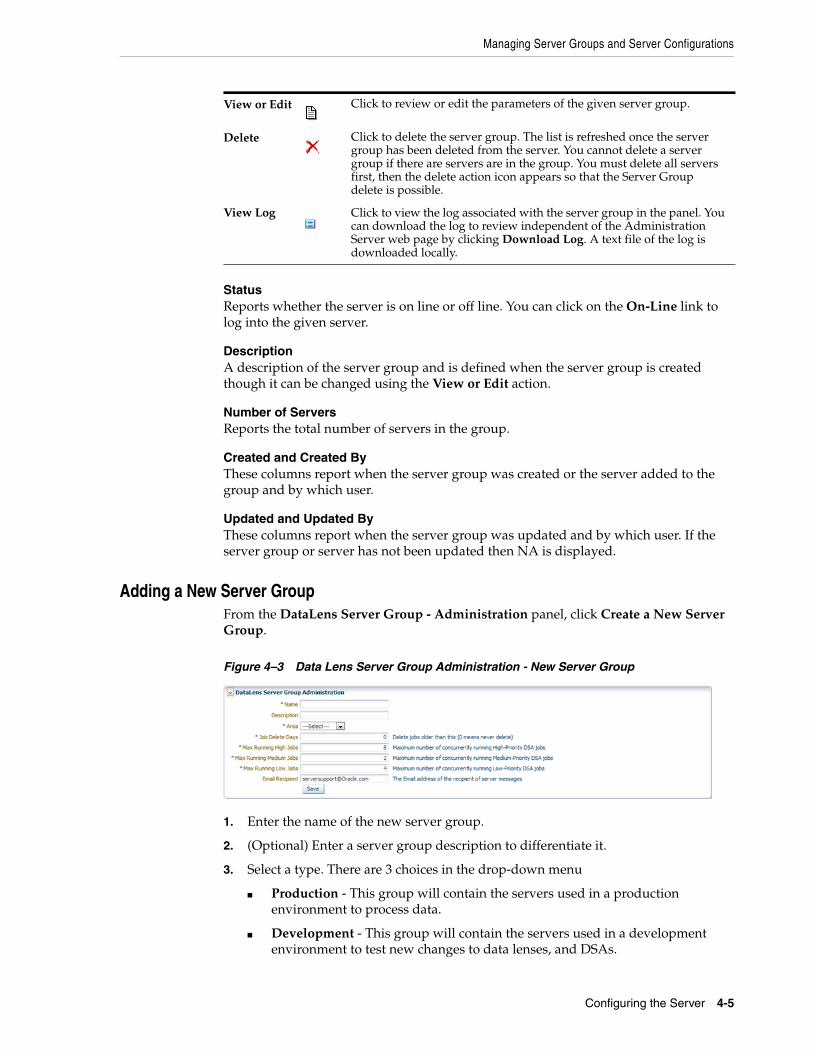
Adding a New Server GroupFrom the DataLens Server Group - Administration panel, click Create a New Server Group.
Figure 4–3 Data Lens Server Group Administration - New Server Group
1. Enter the name of the new server group.
2. (Optional) Enter a server group description to differentiate it.
3. Select a type. There are 3 choices in the drop-down menu
■ Production - This group will contain the servers used in a production environment to process data.
■ Development - This group will contain the servers used in a development environment to test new changes to data lenses, and DSAs.
Managing Server Groups and Server Configurations
4-6 Oracle DataLens Server Administration Guide
■ QA - This group will contain the servers used in a Quality Assurance environment to test the work done by the developers, prior to their use in a production group.
4. Set the parameters for this server group.
■ Max Running High Jobs
This is the maximum number of high-priority jobs that will be run simultaneously on this server group.
■ Max Running Medium Jobs
This is the maximum number of medium-priority jobs that will be run simultaneously on this server group.
■ Max Running Low Jobs
This is the maximum number of low-priority jobs that will be run simultaneously on this server group.
These parameters can be increased as new servers are added to the group.
5. (Optional) Enter the Email Recipient email address of the administrator that is notified when warnings or errors occur at a server group level from the Oracle DataLens Server.
6. Select Save to create the new server group.
Viewing and Editing a Server GroupFrom the DataLens Server Group - Administration panel, click the name of the server group or the View or Edit button in the adjacent Actions column.
All of the options can be edited as described in "Adding a New Server Group" on page 4-5.
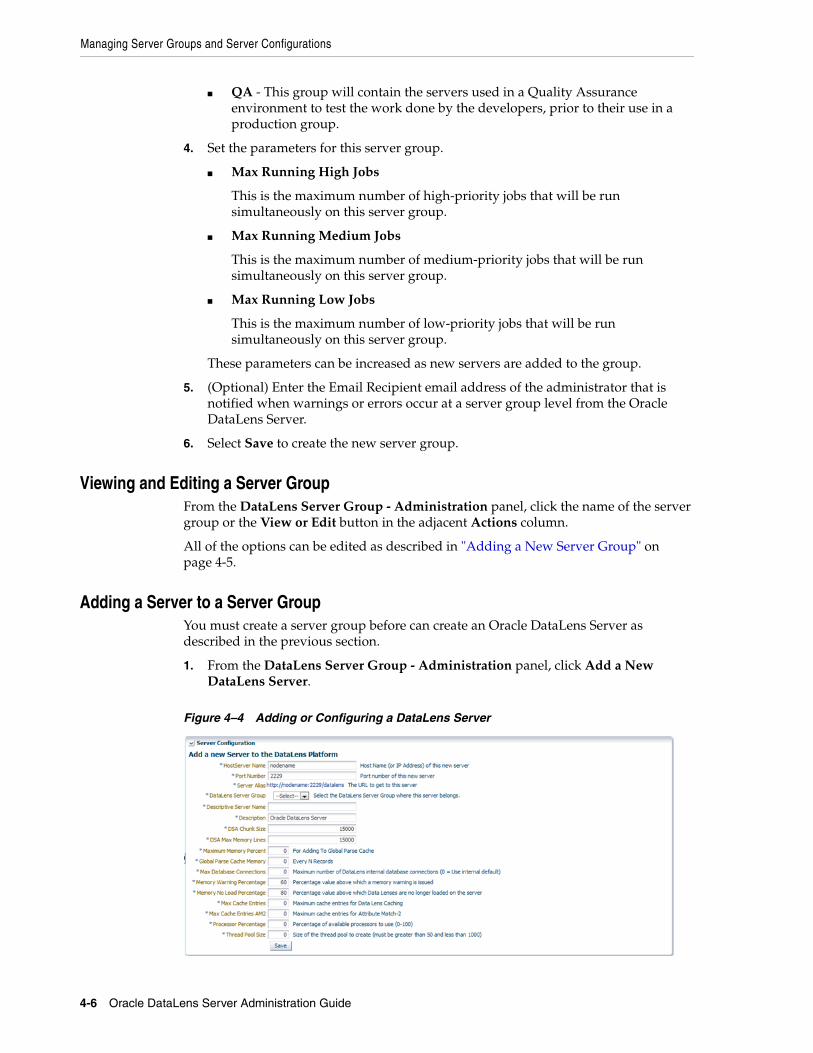
Adding a Server to a Server GroupYou must create a server group before can create an Oracle DataLens Server as described in the previous section.
1. From the DataLens Server Group - Administration panel, click Add a New DataLens Server.
Figure 4–4 Adding or Configuring a DataLens Server

Managing Server Groups and Server Configurations
Configuring the Server 4-7
2. Enter or select the following information:
■ Host Server Name
The name or IP of the server you want to add.
■ Port Number
The port number on which this server communicates.
■ Server Alias
The server alias link is automatically updated with the name and port number you enter in the preceding fields.
■ Data Lens Server Group
The server group in which you want this server to operate.
■ Descriptive Server Name
A unique description of how this server will be identified.
■ DSA Chunk Size
Sets the number of records (lines of data) that are processed within each DSA step and held in memory. For example, if 45,000 lines are sent into a DSA step for processing when this value is set to the default of 15,000 then the server will create chunks of 15000 records to process. The server processes each chuck one record at a time until all of the records are processed.
■ DSA Max Memory Lines
Sets the number of records (lines of data) that held in memory within each DSA step.
■ Maximum Memory Percent
Sets the portion of the total global Java Heap memory allocated for the Global Parse Cache. This total includes the memory already allocated at server startup for DSA, data lens, user, and role information needed for processing. The difference between the memory allocated at server startup and the threshold value is the Global Parsing Cache. The heap memory above this threshold is available for run time processing for each DSA step (all Transformation and Decision Maps). Setting this value to zero turns it off, which turns off the Global Parse Cache Memory option. This global constant is most useful when your data contains the literally the same strings of repeating data. This global constant and the next are used in conjunction to tune your data so the values set will be unique to your environment. If memory allocation errors occur, see "Configuring the Server" on page 4-1.
■ Global Parse Cache Memory
Sets the frequency, every N records, to check how close the Maximum Memory Percent for adding to Global Parse Cache constant is to its defined value. Setting this value too low can use valuable memory and processing while setting it to high can result in exceeding the allocated memory.
The Global Parse Cache Memory and Max Cache Entries are controlled by the Java Heap as follows:
Managing Server Groups and Server Configurations
4-8 Oracle DataLens Server Administration Guide
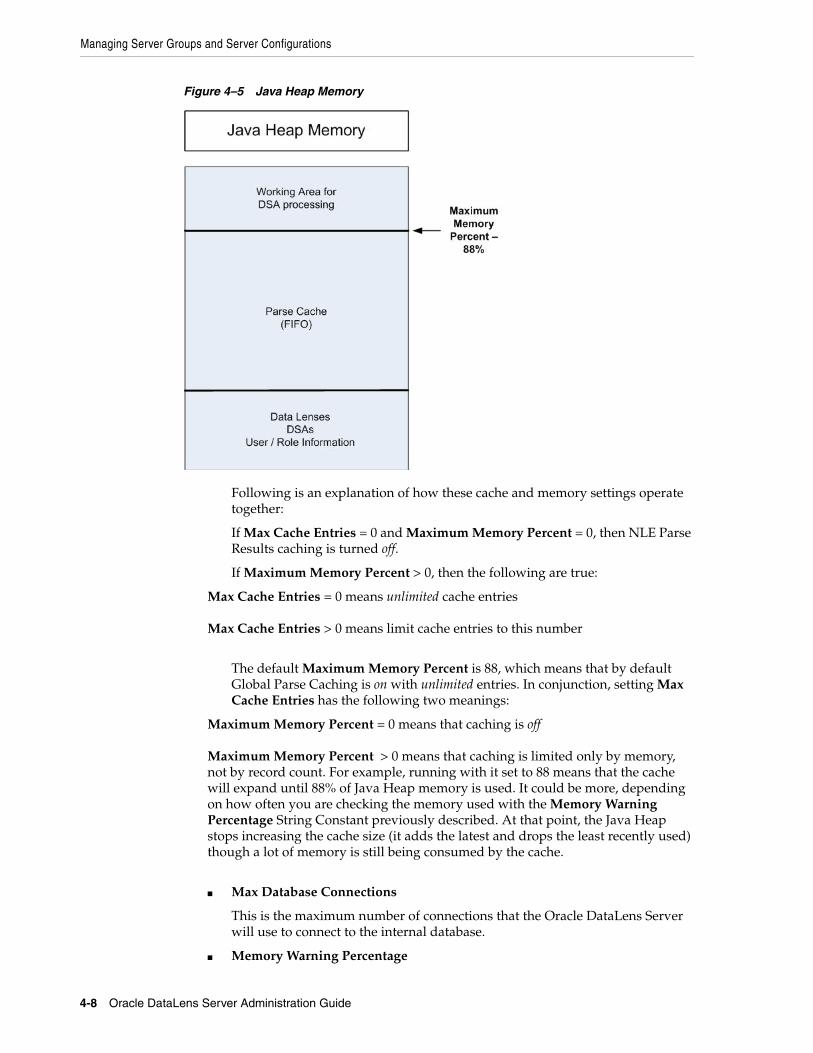
Figure 4–5 Java Heap Memory
Following is an explanation of how these cache and memory settings operate together:
If Max Cache Entries = 0 and Maximum Memory Percent = 0, then NLE Parse Results caching is turned off.
If Maximum Memory Percent > 0, then the following are true:
Max Cache Entries = 0 means unlimited cache entries Max Cache Entries > 0 means limit cache entries to this number
The default Maximum Memory Percent is 88, which means that by default Global Parse Caching is on with unlimited entries. In conjunction, setting Max Cache Entries has the following two meanings:
Maximum Memory Percent = 0 means that caching is off
Maximum Memory Percent > 0 means that caching is limited only by memory, not by record count. For example, running with it set to 88 means that the cache will expand until 88% of Java Heap memory is used. It could be more, depending on how often you are checking the memory used with the Memory Warning Percentage String Constant previously described. At that point, the Java Heap stops increasing the cache size (it adds the latest and drops the least recently used) though a lot of memory is still being consumed by the cache.
■ Max Database Connections
This is the maximum number of connections that the Oracle DataLens Server will use to connect to the internal database.
■ Memory Warning Percentage
Managing Server Groups and Server Configurations
Configuring the Server 4-9
This is a value from 0 to 100. If the memory currently being used by the web server and the Oracle DataLens Server exceeds this value, then a warning is issued to the main Administration and server group email recipients. See "Configuring Server Constants" on page 4-1 and "Managing Server Groups and Server Configurations" on page 4-4.E
■ Memory No Load Percentage
This is a value from 0 to 100. If the memory currently is being used by the Application Server and the Oracle DataLens Server exceeds this value, then no more data lenses will be loaded into memory on this particular server. Email alerts are sent to the main Administration and server group email recipients. See "Configuring Server Constants" on page 4-1 and "Managing Server Groups and Server Configurations" on page 4-4.
■ Max Cache Entries
This is an integer value. It sets the maximum number of parsed lines of data that a data lens will cache. This cache is a Least Recently Used Cache, so when the maximum is reached, the least recently used entry is dropped and the newly parsed data is added as an entry. The default value, zero, indicates that caching will occur to the maximum amount of memory percentage set by the Maximum Memory Percent for adding to Global Parse Cache Numeric Constant. For more information about this constant, see "Configuring Server Constants" on page 4-1.
■ Max Cache Entries AM2
This is an integer value. It sets the maximum number of entries in the Attribute Match 2 Cache. This cache is a Least Recently Used Cache, so when the maximum is reached, the least recently used entry is dropped and the new data retrieved from a database query is added as an entry. The default value, zero, indicates that no caching will occur; the higher the value the more memory is allotted for caching.
Note: The behavior of this value is the opposite of the Max Cache Entries value.
■ Processor Percentage
This is a value from 0 to 100. It sets how DSA processing distribution is distributed across all CPUs in the server by percentage. If this value is set to 0, processing distribution is off; this is the default. If the value is > 0, processing is distributed to CPUs as calculated by the defined percentage value rounding to the nearest whole number though never less than 1. For example, if the server contains eight CPUs and you set the value to 87, processing is distributed to seven of the eight CPUs. To distribute processing to all eight CPUs, you would set this value to 100.
■ Thread Pool Size
This is an integer value from 50 to 1000. It sets the thread pool boundary on the number of threads in the pool that can be running on the Oracle DataLens Server. Because the server can run numerous jobs simultaneously and each job can start multiple threads to distribute the work across processors, a thread pool is created so that the server does not run out of threads. The default value is 500. Any value less than 50 is set to 50; any value greater than 1000 is set to 1000.

Managing User and Group Roles
4-10 Oracle DataLens Server Administration Guide
The following algorithm is intended to aid you in calculating the thread pool size value:
(Number of jobs running simultaneously * (Number of Lens Transform Maps in the DSA) + (Number of DB Update Transform Maps in the DSA) + (a few spare)
3. Click Save to add the server to the server group.
Viewing and Editing a ServerFrom the DataLens Server Group - Administration panel, click the name of the server or the View or Edit button in the adjacent Actions column.
All of the options can be edited as described in "Adding a Server to a Server Group" on page 4-6. In addition, the list of deployed data lenses and loaded on the server is displayed. The set of check boxes for all the data lenses that are deployed to the Oracle DataLens Servers enables the system administrator further control over which data lenses are loaded on each particular Oracle DataLens Server. This is the most important consideration because the bulk of the processing usually takes place in the data lenses, and the data lenses take up the most memory on the server as well.
This is not applicable to the Oracle DataLens Administration Server because data lenses are loaded on demand. In other words, data lenses are loaded when needed for job processing.
Note: If all of the servers in a server group are set to deploy all of the data lenses, then the Oracle DataLens Administration Server will manage the load-balancing of datalens job processing across all the servers in the server group.
Managing User and Group RolesEDQP users, both client and administrative, are added to Oracle DataLens Servers by adding them to your EDQP WebLogic Server domain.
WebLogic domains contain one or more Security Realms that provide user authentication and authorization within the WebLogic security framework. A user can be a person, such as application end user, or a software entity, such as a client application, or other instances of WebLogic Server. As a result of authentication, each user is given a unique identity within the security realm and placed into groups that are associated with security roles, or can be directly associated with security roles. In addition, applications deployed in the WebLogic domain may be configured to use the Security Realm. For more information about WebLogic Server security, see Oracle Fusion Middleware Understanding Security for Oracle WebLogic Server 11g Release 1 (10.3.6).
Caution: The use of Oracle Virtual Directory in combination with Microsoft Directory Server is not supported. Do not use this combination.
You create and manage all users in the Security Realm of EDQP WebLogic domain that you created when you installed your Administration server. These users are populated in your Administration server for you to configure how users will use EDQP. For
Managing User and Group Roles
Configuring the Server 4-11
information about adding users to your WebLogic Server, see Oracle Fusion Middleware Oracle WebLogic Server Administration Console Online Help 11g Release 1 (10.3.6) at
http://docs.oracle.com/cd/E23943_01/apirefs.1111/e13952/taskhelp/security/DefineUsers.html
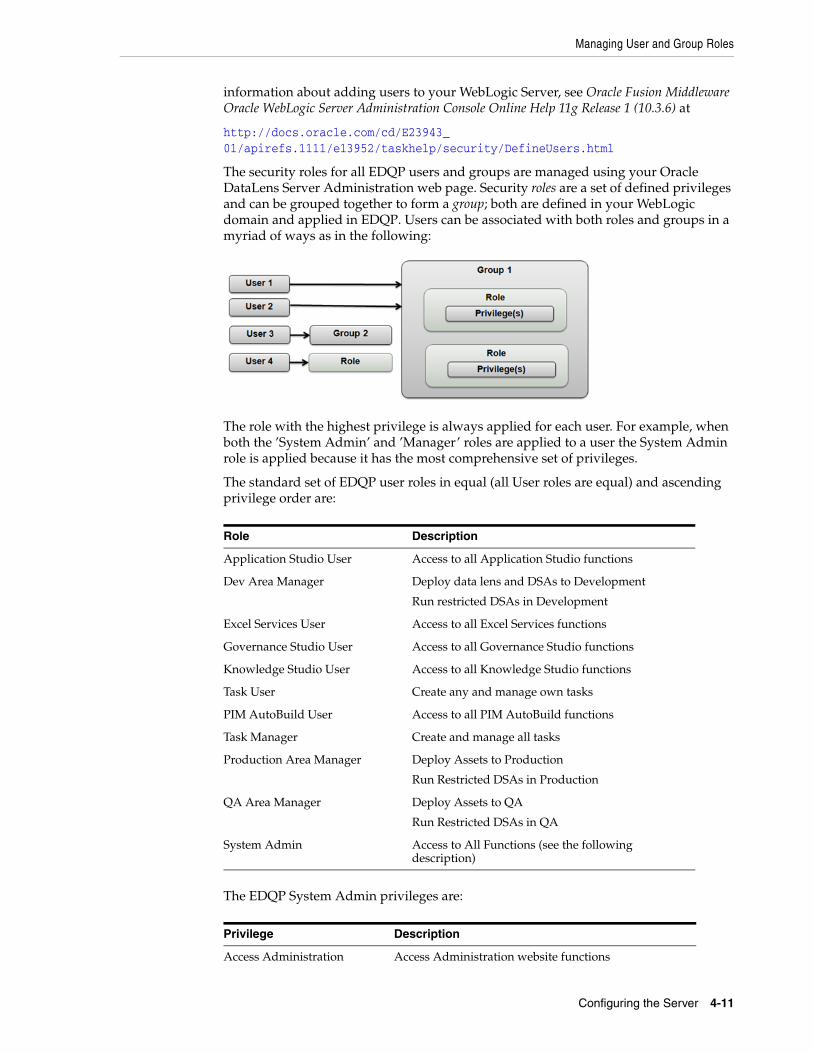
The security roles for all EDQP users and groups are managed using your Oracle DataLens Server Administration web page. Security roles are a set of defined privileges and can be grouped together to form a group; both are defined in your WebLogic domain and applied in EDQP. Users can be associated with both roles and groups in a myriad of ways as in the following:
The role with the highest privilege is always applied for each user. For example, when both the ’System Admin’ and ’Manager’ roles are applied to a user the System Admin role is applied because it has the most comprehensive set of privileges.
The standard set of EDQP user roles in equal (all User roles are equal) and ascending privilege order are:
Role Description
Application Studio User Access to all Application Studio functions
Dev Area Manager Deploy data lens and DSAs to Development
Run restricted DSAs in Development
Excel Services User Access to all Excel Services functions
Governance Studio User Access to all Governance Studio functions
Knowledge Studio User Access to all Knowledge Studio functions
Task User Create any and manage own tasks
PIM AutoBuild User Access to all PIM AutoBuild functions
Task Manager Create and manage all tasks
Production Area Manager Deploy Assets to Production
Run Restricted DSAs in Production
QA Area Manager Deploy Assets to QA
Run Restricted DSAs in QA
System Admin Access to All Functions (see the following description)
The EDQP System Admin privileges are:
Privilege Description
Access Administration Access Administration website functions

Managing User and Group Roles
4-12 Oracle DataLens Server Administration Guide
From the Configuration panel, select the User Administration link to view all of the users.
Figure 4–6 User Administration Panel
There are two tabs in the User Administration panel and are described in the following sections:
■ Users - Allows you to set roles for individual users created in your WebLogic Server Administration Console; these are direct roles.
■ Enterprise Groups - Allows you to change the roles assigned to the groups created in your WebLogic Server Administration Console; these are indirect roles.
Changing User RolesThe Users tab allows you to select a user and assign roles that control how that user is authorized to use EDQP components and is the default tab for user administration.
The options and informational columns in Figure 4–6 are described as follows:
User Name and SearchYou can search for a specific user or set of users by entering a string value, which can include an asterisk (*) wildcard, in the field adjacent to the Search button. Leaving this field blank in your search results in a list of all available users.
Filter your search by selecting one of the following from the drop-down list:
■ CONTAINS - The default that searches for a name that contains the search string.
■ STARTS WITH - Searches for a name that starts with the search string.
■ ENDS WITH - Searches for a name that ends with the search string.
Click Search to view the results.
Administer configurations Change settings and server configurations
Administer data lenses Unlock and lock
Administer DSAs Unlock and lock
Rename assets Rename both data lenses and DSAs
Run reports Reports and dashboard
Administer jobs Schedule, edit, delete, and run jobs
Cancel jobs Cancel running jobs
Change job priorities Change running jobs priority
View log entries* View all types of log entries, including administration entries
Privilege Description

Managing User and Group Roles
Configuring the Server 4-13
User ID and NameThe user id that was set when the user was created in the WebLogic Server Administration Console.
Direct RolesThese roles are assigned to individual users using the Users tab. All direct roles are displayed in square braces. For example, [Application Studio User, Excel Services User, Knowledge Studio User].
Indirect RolesThese roles are assigned to a group of users using the Enterprise Groups tab; these are indirect roles because they are inherited from the groups configured in your WebLogic Server Administration Console. Indirect roles are indicated with the name of the role and the indirect roles and the name of the group the roles are from in square brackets. For example, System Admin,[From Group: Administrators]Governance Studio User, PIM AutoBuild User, Task Manager[From Group: Monitors]
To change the roles for a user:
1. From the Configuration panel, select User Administration.
2. Click on the User ID name link of the user you want to modify.
3. Select one or more of the Available EDQP Roles then click the right arrow to add the role or the left arrow to remove it. You can add all roles with the double right arrow button or remove all roles with the double left arrow button.
4. Click Save to save your changes.
A message that your roles were saved is displayed above the Available EDQP Roles list.
Changing Group RolesThe groups that you have configured in your WebLogic Server Administration Console allows you to conveniently group users together to assign similar permissions from the Enterprise Groups tab.
Figure 4–7 Roles for Groups
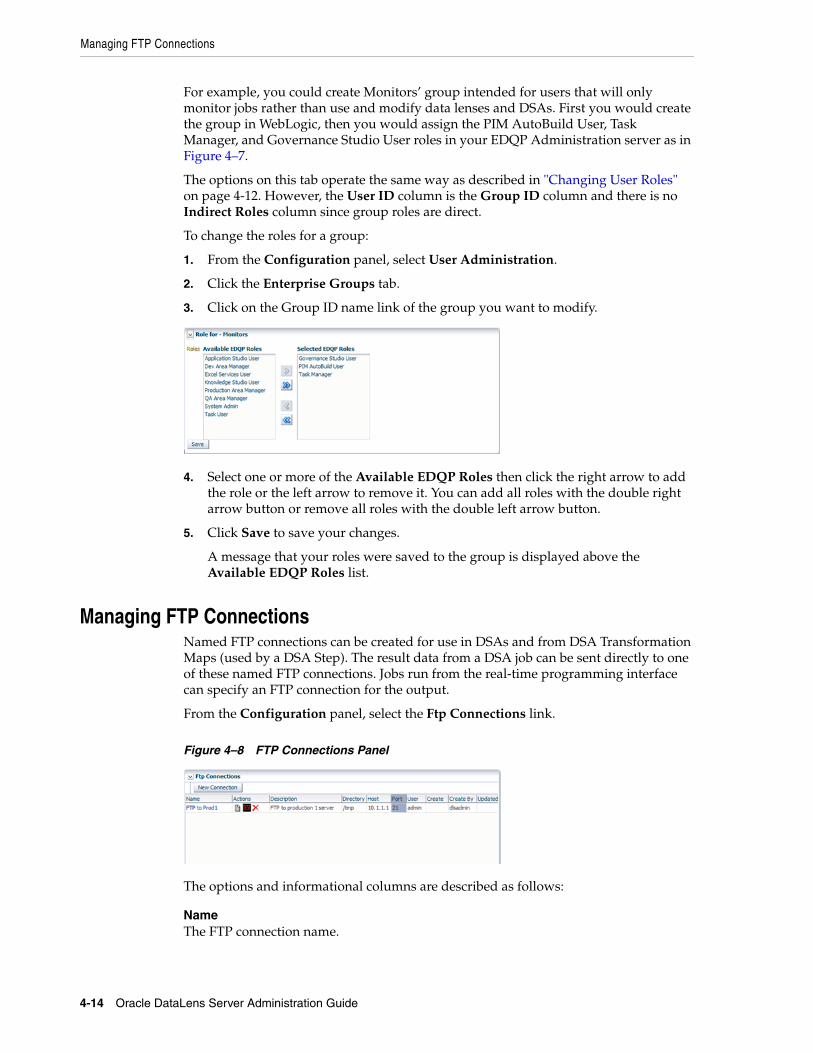
Managing FTP Connections
4-14 Oracle DataLens Server Administration Guide
For example, you could create Monitors’ group intended for users that will only monitor jobs rather than use and modify data lenses and DSAs. First you would create the group in WebLogic, then you would assign the PIM AutoBuild User, Task Manager, and Governance Studio User roles in your EDQP Administration server as in Figure 4–7.
The options on this tab operate the same way as described in "Changing User Roles" on page 4-12. However, the User ID column is the Group ID column and there is no Indirect Roles column since group roles are direct.
To change the roles for a group:
1. From the Configuration panel, select User Administration.
2. Click the Enterprise Groups tab.
3. Click on the Group ID name link of the group you want to modify.
4. Select one or more of the Available EDQP Roles then click the right arrow to add the role or the left arrow to remove it. You can add all roles with the double right arrow button or remove all roles with the double left arrow button.
5. Click Save to save your changes.
A message that your roles were saved to the group is displayed above the Available EDQP Roles list.
Managing FTP ConnectionsNamed FTP connections can be created for use in DSAs and from DSA Transformation Maps (used by a DSA Step). The result data from a DSA job can be sent directly to one of these named FTP connections. Jobs run from the real-time programming interface can specify an FTP connection for the output.
From the Configuration panel, select the Ftp Connections link.
Figure 4–8 FTP Connections Panel
The options and informational columns are described as follows:
NameThe FTP connection name.

Managing FTP Connections
Configuring the Server 4-15
ActionsYou can take the following actions using the buttons in this column:
View or Edit Click to review or edit the parameters of the given FTP connection.
Test Click to test the FTP connection. See "Testing the FTP Connection" on page 4-16.
Delete Click to delete the FTP connection. The list is refreshed once the FTP connection has been deleted from the server.
DescriptionA description of the FTP connection and is defined when the connection is created though it can be changed using the View or Edit action.
DirectoryThe directory to which files will be transferred on the remote server.
HostThe name or IP of the server you want to transfer files to.
PortThe port number on which this server communicates.
UserThe user that is used to log in to the remote server that has permissions to FTP files to the directory.
Created and Created ByThese columns report when the FTP connection was created and by which user.
Updated and Updated ByThese columns report when the FTP connection was updated and by which user.
Creating a New FTP ConnectionTo create a new FTP connection:
1. From the Configuration panel, select the Ftp Connections link.
2. Click New Connection.
3. Enter a name for the connection.
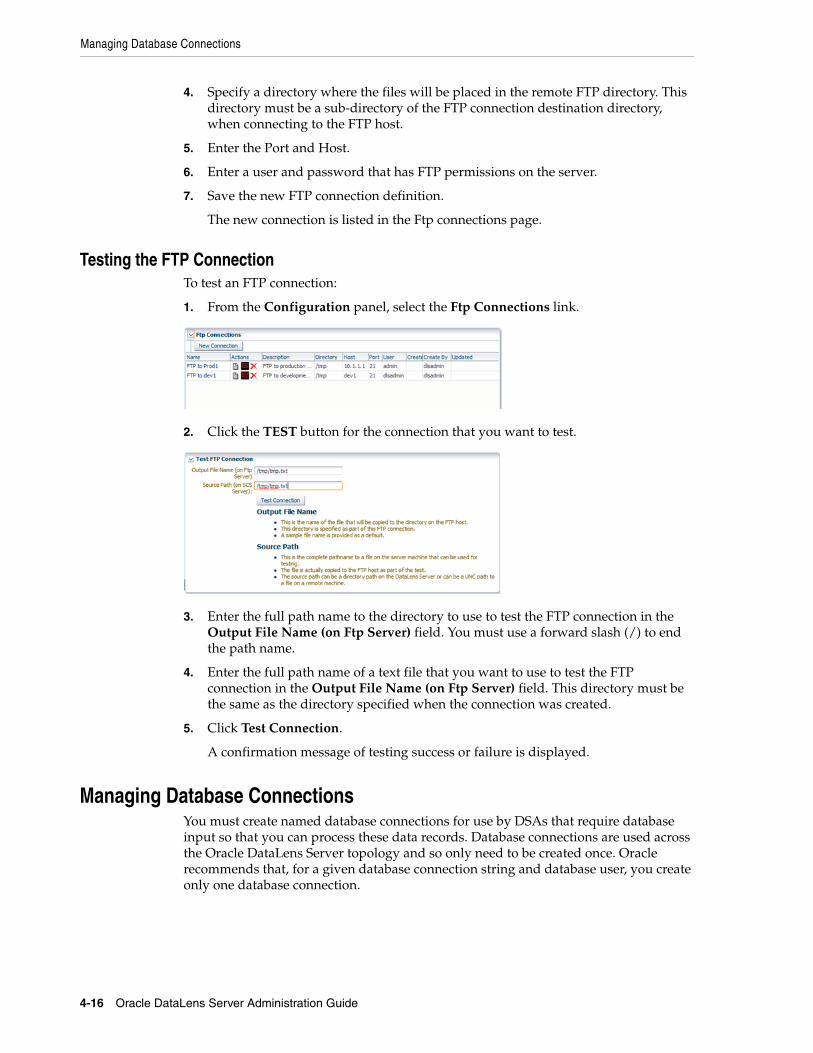
Managing Database Connections
4-16 Oracle DataLens Server Administration Guide
4. Specify a directory where the files will be placed in the remote FTP directory. This directory must be a sub-directory of the FTP connection destination directory, when connecting to the FTP host.
5. Enter the Port and Host.
6. Enter a user and password that has FTP permissions on the server.
7. Save the new FTP connection definition.
The new connection is listed in the Ftp connections page.
Testing the FTP ConnectionTo test an FTP connection:
1. From the Configuration panel, select the Ftp Connections link.
2. Click the TEST button for the connection that you want to test.
3. Enter the full path name to the directory to use to test the FTP connection in the Output File Name (on Ftp Server) field. You must use a forward slash (/) to end the path name.
4. Enter the full path name of a text file that you want to use to test the FTP connection in the Output File Name (on Ftp Server) field. This directory must be the same as the directory specified when the connection was created.
5. Click Test Connection.
A confirmation message of testing success or failure is displayed.
Managing Database ConnectionsYou must create named database connections for use by DSAs that require database input so that you can process these data records. Database connections are used across the Oracle DataLens Server topology and so only need to be created once. Oracle recommends that, for a given database connection string and database user, you create only one database connection.
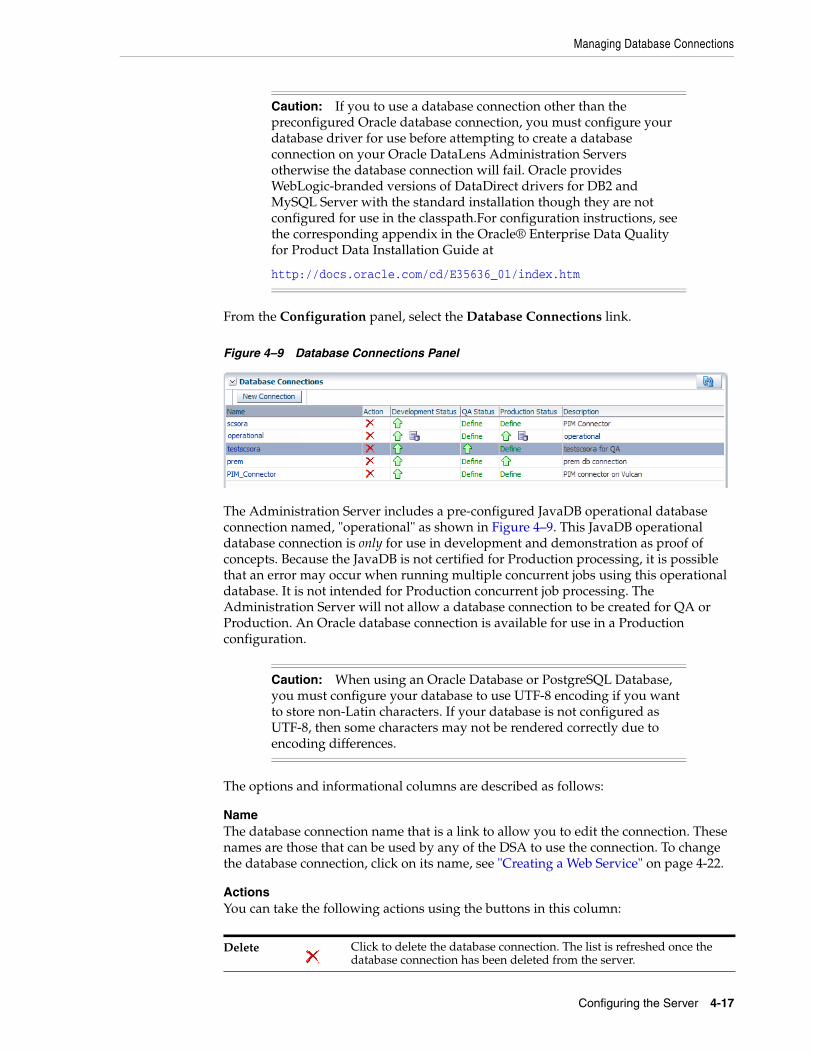
Caution: If you to use a database connection other than the preconfigured Oracle database connection, you must configure your database driver for use before attempting to create a database connection on your Oracle DataLens Administration Servers otherwise the database connection will fail. Oracle provides WebLogic-branded versions of DataDirect drivers for DB2 and MySQL Server with the standard installation though they are not configured for use in the classpath.For configuration instructions, see the corresponding appendix in the Oracle® Enterprise Data Quality for Product Data Installation Guide at
http://docs.oracle.com/cd/E35636_01/index.htm
Managing Database Connections
Configuring the Server 4-17
From the Configuration panel, select the Database Connections link.
Figure 4–9 Database Connections Panel
The Administration Server includes a pre-configured JavaDB operational database connection named, "operational" as shown in Figure 4–9. This JavaDB operational database connection is only for use in development and demonstration as proof of concepts. Because the JavaDB is not certified for Production processing, it is possible that an error may occur when running multiple concurrent jobs using this operational database. It is not intended for Production concurrent job processing. The Administration Server will not allow a database connection to be created for QA or Production. An Oracle database connection is available for use in a Production configuration.
Caution: When using an Oracle Database or PostgreSQL Database, you must configure your database to use UTF-8 encoding if you want to store non-Latin characters. If your database is not configured as UTF-8, then some characters may not be rendered correctly due to encoding differences.
The options and informational columns are described as follows:
NameThe database connection name that is a link to allow you to edit the connection. These names are those that can be used by any of the DSA to use the connection. To change the database connection, click on its name, see "Creating a Web Service" on page 4-22.
ActionsYou can take the following actions using the buttons in this column:
Delete Click to delete the database connection. The list is refreshed once the database connection has been deleted from the server.

Warning: If you delete an operational database connection then subsequently want to reconnect to the identical connection, you must recreate it as described in "Creating a New Operational Database Connection" on page 4-19. To ensure accurate versioning, the database is dropped, the connection recreated, and tested when you create the database schema. However, you must recreate the data associated with this operational database connection (for example, all you StatSim indexes.)
Managing Database Connections
4-18 Oracle DataLens Server Administration Guide
Development, QA, and Production StatusThe status in each of these columns for the given database connection is displayed. The default when creating a new connection is Development so that column is always populated. Use the Refresh button to ensure that you are viewing the most current status of all connections. The status icons are as follows:
■ A green up arrow indicates that the connection is responsive.
■ A red down arrow indicates that the connection is unresponsive.
■ The double blue refresh arrows indicate that you should refresh the page using the Refresh button.
■ The data/database icon indicates that it is an operational connection rather than a standard database connection.
DescriptionA description of the database connection that is defined when the connection is created though it can be changed.
Creating a New Standard Database ConnectionTo create a new standard connection to a database:
1. From the Configuration panel, select the Database Connections link.
2. Enter a name and description for this connection.
3. Select Standard as the Connection Type.
4. Select a Database Type to pre-populate the Connection and Driver fields. There is default connection information for the following databases:
■ User Defined
■ Oracle
■ MySQL

Managing Database Connections
Configuring the Server 4-19
■ SQL Server 2008
■ SQL Server 2005
■ PostgreSQL
■ DB2
Additionally, the User Defined option allows you to enter any connection information for alternate databases.
5. Edit the Connection field as needed to define your server name, port, and database name (SID).
6. Edit the Driver field as needed to define your Oracle database driver parameters. The default installation driver configuration is the default.
7. Enter the database user in the Db User field. Enter that user’s password, if necessary, in the DB Password field.
8. (Optional) You can use the default settings if you are unsure what values to use for the other options on this page or you can modify the remaining connection values.
9. Click Save to save your connection.
10. Click Test to test the connection.
The connection is created and tested for successful connection. Any connection errors encountered are reported so that you can correct them. If you need to modify your connection to operate correctly, you must click Save to save your changes.
Once a database connection is successfully created, you can select it from the list of database connections and return to the Create DB Connection page. You can modify any of the parameters with the exception of the Area, then retest and save it.
Additionally, you can use the Development schema to create either a QA or Production schema by clicking Create for QA and Create for Production respectively. Both of these actions advance you to the Create DB Connection page and automatically changes the Area to the new schema you selected, QA or Production. You modify the parameters, such as the Description, and use the form as described in this section.
Creating a New Operational Database ConnectionTo create a new operational connection to a database:
1. From the Configuration panel, select the Database Connections link.
2. Enter a name and description for this connection.
3. Select Operational as the Connection Type.

Managing Database Connections
4-20 Oracle DataLens Server Administration Guide
The Database Type option is populated with Oracle and the Connection and Driver fields are pre-populated with the corresponding information.
4. Edit the Connection field as needed to define your server name, port, and database name (SID).
5. Edit the Driver field as needed to define your Oracle database driver parameters. The default installation driver configuration is the default.
6. Enter the database user in the Db User field. Enter that user’s password, if necessary, in the DB Password field.
7. (Optional) You can use the default settings if you are unsure what values to use for the other options on this page or you can modify the remaining connection values.
8. Click Create Schema to create and validate the operational database schema.
9. Click Save to save your connection and add it to the list of database connections.
10. Click Test to test the connection.
The connection is created and tested for successful connection. Any connection errors encountered are reported so that you can correct them. If you need to modify your connection to operate correctly, you must click Save to save your changes.
Once a database connection is successfully created, you can select it from the list of database connections and return to the Create DB Connection page. You can modify any of the parameters with the exception of the Area, then retest and save it.
Additionally, you can use the Development schema to create either a QA or Production schema by clicking Create for QA and Create for Production respectively. Both of these actions advance you to the Create DB Connection page and automatically changes the Area to the new schema you selected, QA or Production. You modify the parameters, such as the Description, and use the form as described in this section.
Creating a StatSim Database ConnectionYou must have an Oracle database configured and operating on a server to enable you to configure your DSAs to create StatSim indexes on your Administration Server. An operational database connection to your Oracle database must then be created as described in "Creating a New Operational Database Connection" on page 4-19.

Managing Web Services
Configuring the Server 4-21
Manually Creating a Database ConnectionsYou can edit the DbConnectionTemplates.xml file and modify the defaults to create new database connections. Mirror the syntax provided in the file to create one or more connections. You must manually test these connections though the connections and corresponding status can be viewed as in Figure 4–9.
Managing Web ServicesNamed Web Services Description Language (WSDL) connections are created and configured for use in a DSA and its Transformation Maps within a step. These connections can be configured differently for Development, QA, and Production servers though all share a common name. This allows the web services to be different in different environments and DSAs never need to change based on the deployment environment.
Note: The web service that is being called must only return a single string. All Transformation Maps in the Application Studio are expected to return a single string and this includes the web service calls.
Web services that return multiple fields (such as in the following example), return the multiple fields as character-separated data (such as a vertical bar) within the single string. In the Application Studio, you could then use the Get Field add-in function to extract the individual fields in the returned data.
From the Configuration panel, select the Web Services link.
Figure 4–10 Web Services Panel
The options and informational columns are described as follows:
The initial page is empty as in Figure 4–10 and this list is updated when a web service is updated.
NameThe web service name that is a link to allow you to edit the service. These names are those that can be used by any of the DSA to use the web service. To change the web service, click on its name, see "Creating a Web Service" on page 4-22.
ActionsYou can take the following actions using the buttons in this column:
View or Edit Click to review or edit the parameters of the given web service.
Delete Click to delete the web service. The list is refreshed once the web service has been deleted from the server.

Managing Web Services
4-22 Oracle DataLens Server Administration Guide
DescriptionA description of the web service that is defined when the service is created though it can be changed. See "Creating a Web Service" on page 4-22.
Creating a Web ServiceYou can create a web service in one of two ways, using the EDQP pre-configured WSDL or by manually entering all of the parameters for the WSDL of your choosing. All of the same parameters are configured as described in the following process.
To create a web service:
1. From the Configuration panel, click Web Services.
2. Click Create New Web Service or Create New Web Service Manually.
3. Enter a name and description for the web service.
4. Ensure that the WSDL field is populated with the correct server name and port for the server that contains your WSDL file. In this example, the Administration server hostname and port is pre-populated.
5. Select the service that you want from the Service drop-down list or enter it.
6. Select the port that you want from the Port drop-down list or enter it.
7. Select the operation that you want from the Operation drop-down list or enter it.
In this example, the parameters are populated automatically from the web service
8. For the EDQP WSDL the Parameters Description, Namespace, and End Point options are pre-populated and should not be changed.
If you are manually creating a web service, enter the appropriate information in these options.
9. Select the Area that you want to use this web service in, Development, QA, or Production.
10. Click Save to save this web service.
Testing and Updating Web ServicesAfter creating a web service you should test it to ensure that it is operational. Additionally, you can update the description and parameter description.
1. From the Configuration panel, click Web Services.
2. Click on the name of one the currently defined web services to test it.

Managing Web Services
Configuring the Server 4-23
3. Enter the test data for the web service into the Test Data input field. The test data is space delimited and must follow the parameter input requirements defined in the Parameter Description field. In this example of the EDQP WSDL, you would enter 1 17.0 TRUE "Test Web Service" to test it.
4. Click Test to test the connection by processing the data with the EDQP web service.
A successful test results in messages similar to the following is displayed:
Test Output
1 times 17.0 = 17, Test Web Service
The web service is now ready for use by DSAs.
5. (Optional) Update the Description field or the Parameter Description fields, and then click Update to save your changes.

Managing Web Services
4-24 Oracle DataLens Server Administration Guide
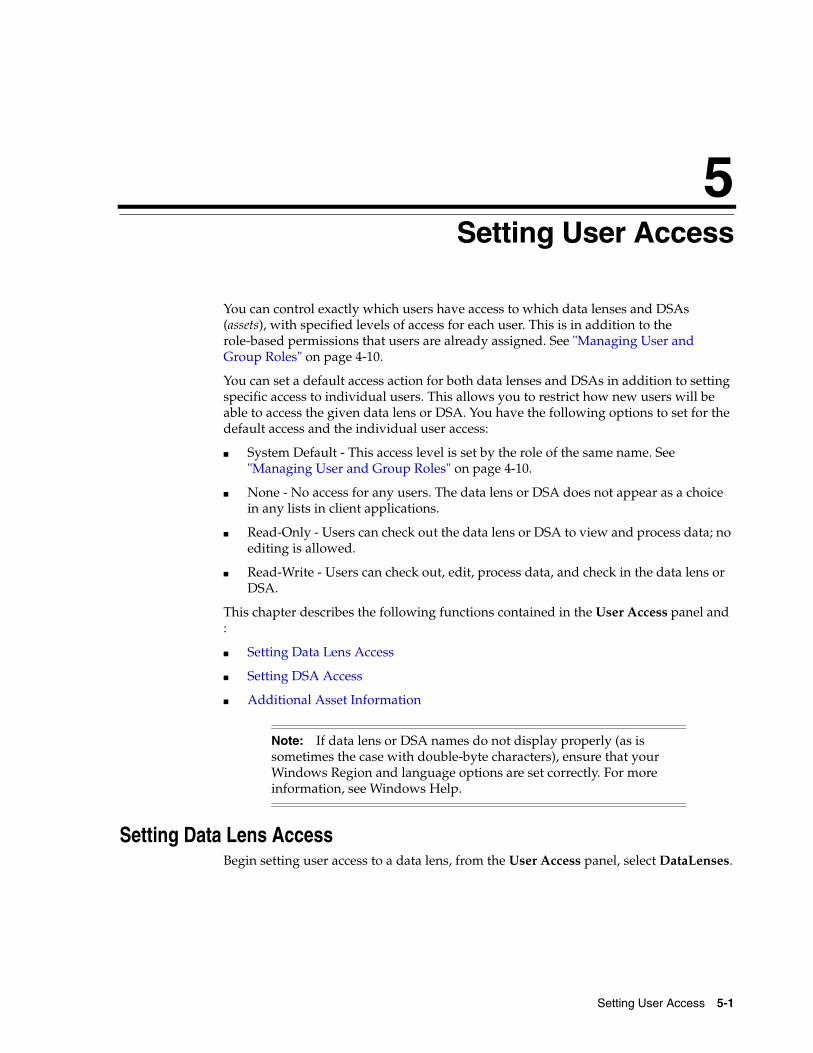
5
Setting User Access 5-1
5Setting User Access
You can control exactly which users have access to which data lenses and DSAs (assets), with specified levels of access for each user. This is in addition to the role-based permissions that users are already assigned. See "Managing User and Group Roles" on page 4-10.
You can set a default access action for both data lenses and DSAs in addition to setting specific access to individual users. This allows you to restrict how new users will be able to access the given data lens or DSA. You have the following options to set for the default access and the individual user access:
■ System Default - This access level is set by the role of the same name. See "Managing User and Group Roles" on page 4-10.
■ None - No access for any users. The data lens or DSA does not appear as a choice in any lists in client applications.
■ Read-Only - Users can check out the data lens or DSA to view and process data; no editing is allowed.
■ Read-Write - Users can check out, edit, process data, and check in the data lens or DSA.
This chapter describes the following functions contained in the User Access panel and :
■ Setting Data Lens Access
■ Setting DSA Access
■ Additional Asset Information
Note: If data lens or DSA names do not display properly (as is sometimes the case with double-byte characters), ensure that your Windows Region and language options are set correctly. For more information, see Windows Help.
Setting Data Lens AccessBegin setting user access to a data lens, from the User Access panel, select DataLenses.

Setting DSA Access
5-2 Oracle DataLens Server Administration Guide
Figure 5–1 Data Lenses Access - Administration Panel
The columns in the Data Lenses Access - Administration panel display:
Data Lens NameThis is the name of the data lens and is a link to the setting user access to the data lens.
DescriptionThe description that was entered when the data lens was checked into the Administration server.
Set access to a data lens:
1. From the Data Lenses Access - Administration panel, click the name of the data lens you want to modify.
2. Select the default access setting for this data lens using the drop-down list adjacent to the name of the data lens.
3. For one or more users, select the type of access you want to grant them from the drop-down list in the Individual User Permissions column.
4. Click Submit to effect the access changes.
The changes are saved and you are returned to the Data Lenses Access - Administration panel.
Setting DSA AccessBegin setting user access to a data lens, from the User Access panel, select DSAs.
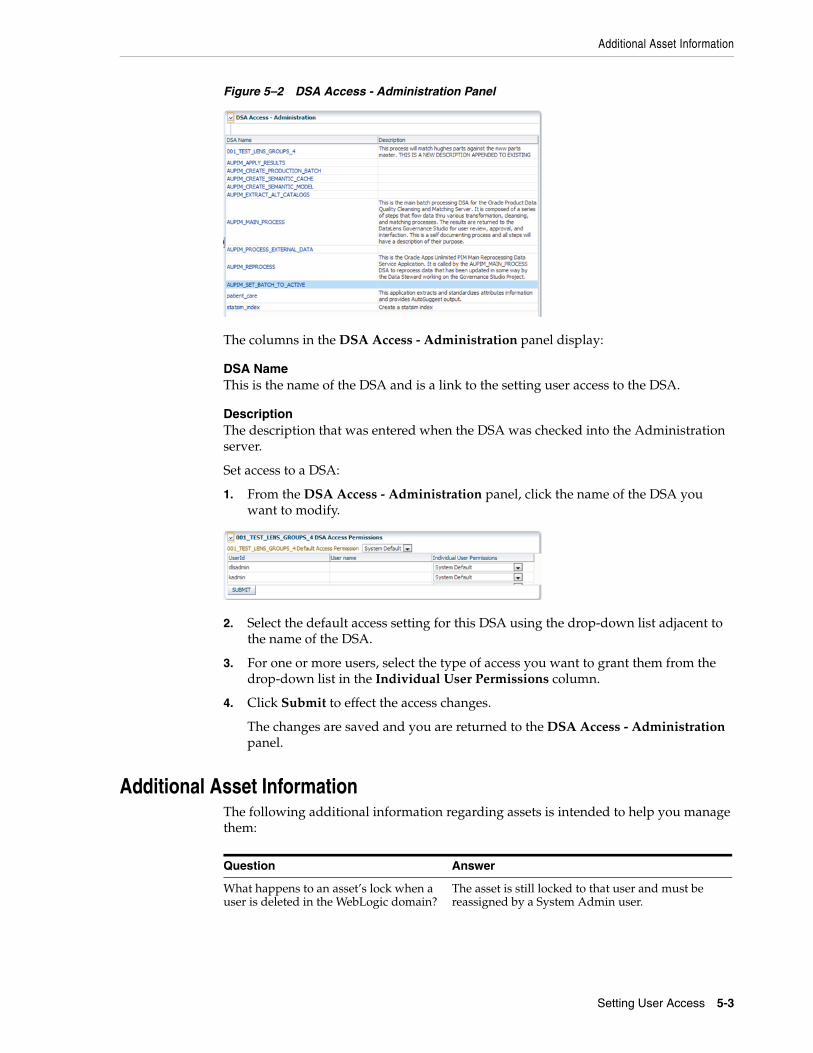
Additional Asset Information
Setting User Access 5-3
Figure 5–2 DSA Access - Administration Panel
The columns in the DSA Access - Administration panel display:
DSA NameThis is the name of the DSA and is a link to the setting user access to the DSA.
DescriptionThe description that was entered when the DSA was checked into the Administration server.
Set access to a DSA:
1. From the DSA Access - Administration panel, click the name of the DSA you want to modify.
2. Select the default access setting for this DSA using the drop-down list adjacent to the name of the DSA.
3. For one or more users, select the type of access you want to grant them from the drop-down list in the Individual User Permissions column.
4. Click Submit to effect the access changes.
The changes are saved and you are returned to the DSA Access - Administration panel.
Additional Asset InformationThe following additional information regarding assets is intended to help you manage them:
Question Answer
What happens to an asset’s lock when a user is deleted in the WebLogic domain?
The asset is still locked to that user and must be reassigned by a System Admin user.
Additional Asset Information
5-4 Oracle DataLens Server Administration Guide
What happens to an asset’s lock if the user has all roles removed?
When all roles for a user are removed, the user is not displayed in the User Role page though the user still exists. You can search for that user to reapply roles.
The asset is still locked to that user and must be reassigned by System Admin user.
What happens to a user’s roles if the user is deleted from the WebLogic domain prior to removing the roles?
The roles are still present and are displayed if the user is re-added to the WebLogic domain.
A System Admin user should remove the roles first then remove the user from the WebLogic domain.
Question Answer
6
Using the Dashboard 6-1
6Using the Dashboard
From an Administration server, you can view server information, the log, and set package tracing options.
This chapter describes the following functions are contained in the Admin Dashboard panel, which is active only when you are logged into an Administration Server:
■ Returning to the Default Administration Page
■ Viewing the Administration Server Log
■ Setting Packet Tracing
Returning to the Default Administration PageYou can return to the default Administration page from the Admin Dashboard panel by clicking Admin. For a detailed description of this page, see "Elements of the Administration Page" on page 1-4.
Viewing the Administration Server LogYou can view an HTML formatted version of the Administration Server log from the Admin Dashboard panel by clicking Admin Log.
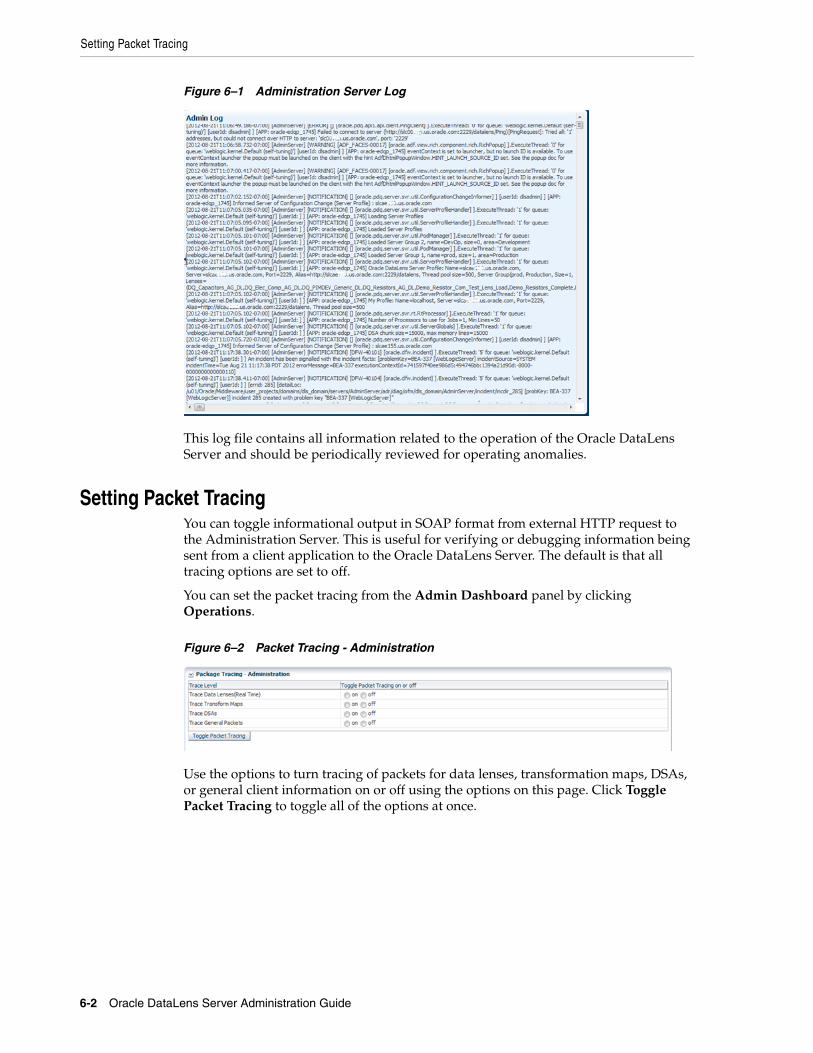
Setting Packet Tracing
6-2 Oracle DataLens Server Administration Guide
Figure 6–1 Administration Server Log
This log file contains all information related to the operation of the Oracle DataLens Server and should be periodically reviewed for operating anomalies.
Setting Packet TracingYou can toggle informational output in SOAP format from external HTTP request to the Administration Server. This is useful for verifying or debugging information being sent from a client application to the Oracle DataLens Server. The default is that all tracing options are set to off.
You can set the packet tracing from the Admin Dashboard panel by clicking Operations.
Figure 6–2 Packet Tracing - Administration
Use the options to turn tracing of packets for data lenses, transformation maps, DSAs, or general client information on or off using the options on this page. Click Toggle Packet Tracing to toggle all of the options at once.
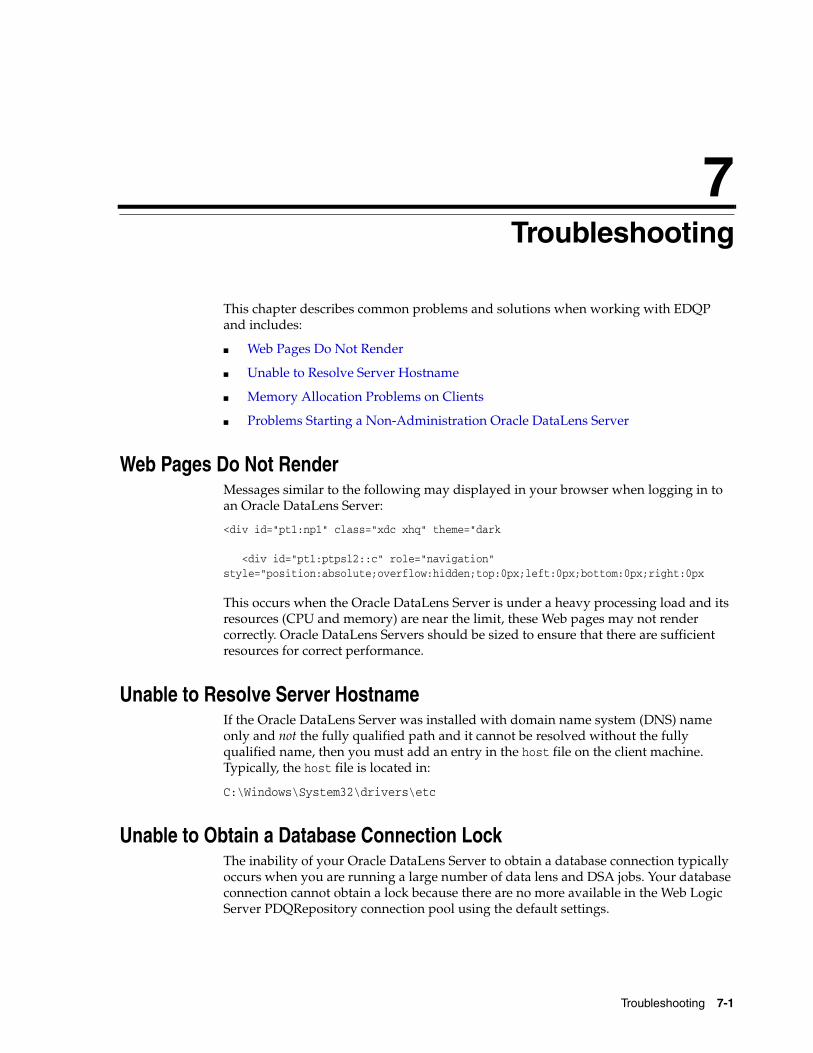
7
Troubleshooting 7-1
7Troubleshooting
This chapter describes common problems and solutions when working with EDQP and includes:
■ Web Pages Do Not Render
■ Unable to Resolve Server Hostname
■ Memory Allocation Problems on Clients
■ Problems Starting a Non-Administration Oracle DataLens Server
Web Pages Do Not RenderMessages similar to the following may displayed in your browser when logging in to an Oracle DataLens Server:
<div id="pt1:np1" class="xdc xhq" theme="dark <div id="pt1:ptpsl2::c" role="navigation" style="position:absolute;overflow:hidden;top:0px;left:0px;bottom:0px;right:0px
This occurs when the Oracle DataLens Server is under a heavy processing load and its resources (CPU and memory) are near the limit, these Web pages may not render correctly. Oracle DataLens Servers should be sized to ensure that there are sufficient resources for correct performance.
Unable to Resolve Server HostnameIf the Oracle DataLens Server was installed with domain name system (DNS) name only and not the fully qualified path and it cannot be resolved without the fully qualified name, then you must add an entry in the host file on the client machine. Typically, the host file is located in:
C:\Windows\System32\drivers\etc
Unable to Obtain a Database Connection LockThe inability of your Oracle DataLens Server to obtain a database connection typically occurs when you are running a large number of data lens and DSA jobs. Your database connection cannot obtain a lock because there are no more available in the Web Logic Server PDQRepository connection pool using the default settings.

Memory Allocation Problems on Clients
7-2 Oracle DataLens Server Administration Guide
You must adjust the following PDQRepository settings to the values shown:
For more information about changing these settings, see Oracle Fusion Middleware Oracle WebLogic Server Administration Console Online Help 11g Release 1 (10.3.6) at
http://docs.oracle.com/cd/E23943_01/apirefs.1111/e13952/taskhelp/jdbc/jdbc_datasources/ConfigureConnectionCapacity.html
Memory Allocation Problems on ClientsIf memory allocation problems are experienced on client machines, an additional environment variable must be created for use by the EDQP Java Web Start client.
To add the necessary system environment variable and invoke it:
1. Right-click Computer, and then select Properties.
2. Click Advanced system settings.
3. Click Environment Variables.
4. From the System variables section, click New.
5. Enter JAVAWS_VM_ARGS as the Variable name.
6. Enter the Variable value to set the memory allocation values for the client using the following syntax:
-Xms256m -Xmx2048m
Where 256 is the minimum and 2048 is the maximum.
Set these minimum and maximum memory values as appropriate for your client system.

Problems Starting a Non-Administration Oracle DataLens Server
Troubleshooting 7-3
7. Click OK to close all dialogs.
8. Invoke the increased memory allocation for the EDQP client applications, by initiating a connection and downloading the client software by browsing to:
http://server:2229/datalens/datalens.jnlp
Where server is the hostname of the Oracle DataLens Server.
Note: If you have setup a different port number for your application server other than 2229, you must use that port number in the following URL when browsing to the Oracle DataLens Server to download the client applications.
The application download and verification begins.
Note: If you receive a File Download message indicating that the .jnlp file is not associated with a program, you do not have the supported JRE installed. Click Cancel, install the supported JRE, and then return to this step.
After the verification completes, the installation begins. Enterprise DQ for Product files are digitally signed by a trusted source and a security warning is displayed:
Problems Starting a Non-Administration Oracle DataLens ServerTwo ports on the Administration Server need to be accessible from the Oracle DataLens Servers. These are
■ 2229 - The IANA assigned port for the Oracle DataLens Server.
■ 1527 - The port that is needed to connect to the data lens configuration information.
The following are the steps needed (on Windows) to open up these ports on the firewall if needed.
From the Windows Control Panel, start the Windows Firewall.
Select the Allow a program through the Windows Firewall link.
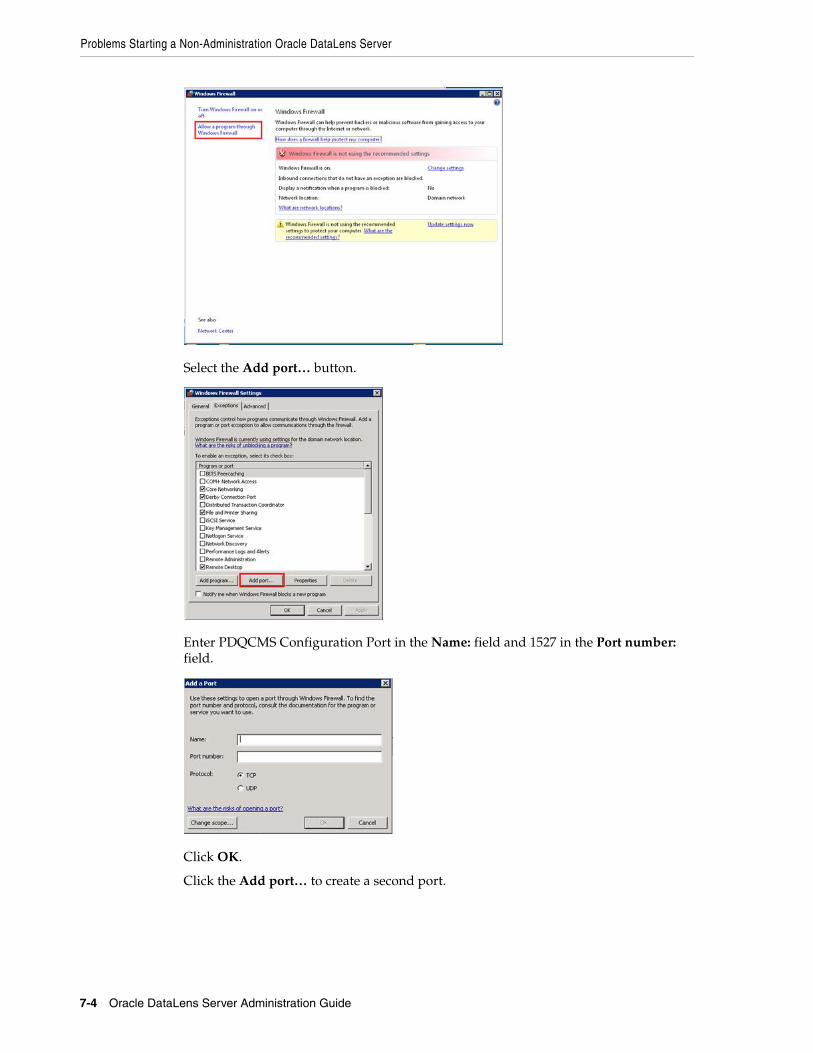
Problems Starting a Non-Administration Oracle DataLens Server
7-4 Oracle DataLens Server Administration Guide
Select the Add port… button.
Enter PDQCMS Configuration Port in the Name: field and 1527 in the Port number: field.
Click OK.
Click the Add port… to create a second port.
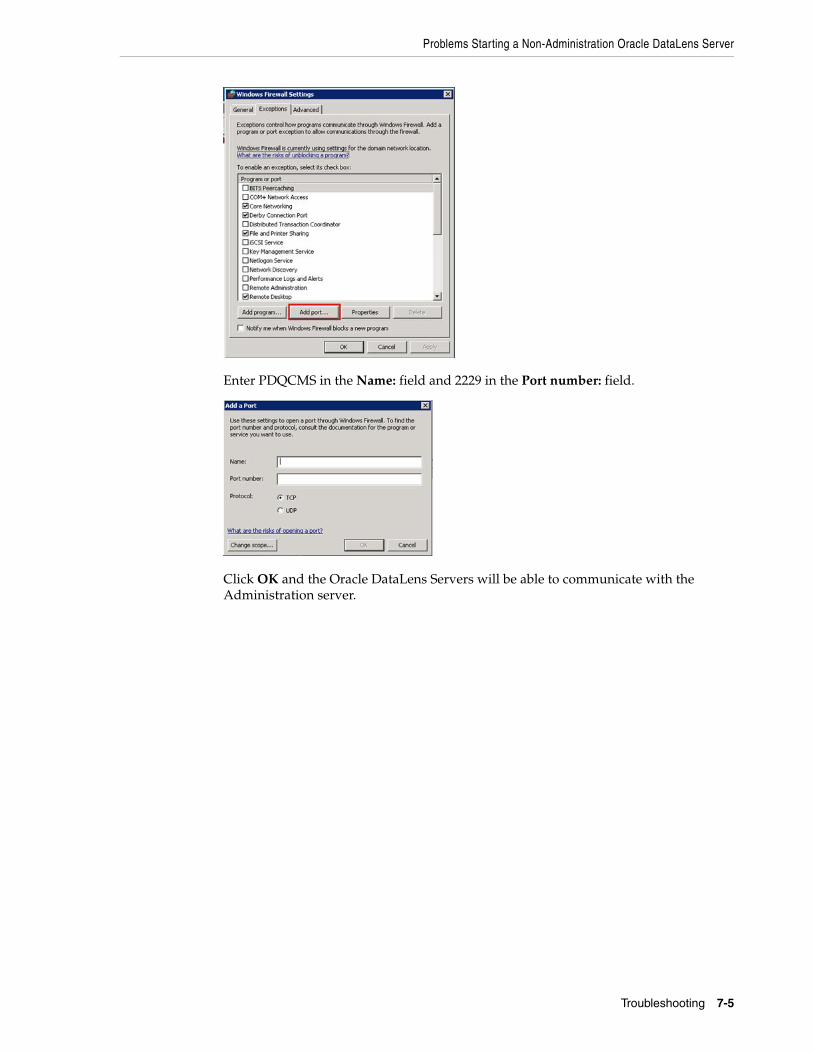
Problems Starting a Non-Administration Oracle DataLens Server
Troubleshooting 7-5
Enter PDQCMS in the Name: field and 2229 in the Port number: field.
Click OK and the Oracle DataLens Servers will be able to communicate with the Administration server.

Problems Starting a Non-Administration Oracle DataLens Server
7-6 Oracle DataLens Server Administration Guide

A
Configuration Files A-1
AConfiguration Files
This appendix describes updating the configuration file(s) changes the Oracle DataLens Server configuration and requires a server restart before the change will take effect.
Server RestartStop and re-start the server using the platform specific commands. During the Oracle DataLens Server downtime, active clients may fail to complete the current request.
File TypesOracle recommends that you use the default properties in this file. Configuration files residing within the Oracle DataLens Server installation define the Oracle DataLens Server configuration. The Java Property file and XML document configuration file formats are used.
Server.cfgThis file is a Java property file. Unlike typical Java properties files, where properties are identified by a simple "key", data lens configuration files utilize a "path" based property specification. The path is a dot-separated list of names identifying the object. Lower case names in the path correspond to the application logical object structure, and the leaf element (starting with a capital letter) specifies the property name. The property value is separated from the property identifier by an equal sign.
For example, the following property file fragment may be used to configure the Administration web pages Statistics display:
# Any Production or Administration Server can send statistics if this flag is# turned on. The Transform server will not send statistics.Server.send.statistics=true
Some useful options for the server.cfg file are displayed in the following table.
Server.send.statistics=true Any Oracle DataLens Server will send statistics if this flag is turned on.
Server.qi.failure.count=100 Shows the number of failures that will be accumulated by project. 0 or no entry means do not accumulate at all.
Server.cookie.life.minutes=60 Lifetime of login information stored in local cookies (default is 1 hour).
statistics.chart.bgcolor=#FFFFCC Background color to use for the charts and chart keys.
Web.xml
A-2 Oracle DataLens Server Administration Guide
Web.xmlThe web.xml file defines the specifics of the Oracle DataLens Server application and is used to route requests to Oracle DataLens Server Servlets. It is located in the WAR file.
This file should not be changed.
server.nle.instances=3 Set the number of parameterized domain instances that will be loaded into memory. A single domain with two instances might want to set instances to 3. 1 for the first parameterized domain, another for the second, and a third for both in memory.
wfg.maxmemorylines=15000 Set the number of lines of data to keep in memory between the steps of a DSA. If the number of lines of data is greater than this parameter, then the data is written to disk between each step of the DSA, which hinders performance. This is the Processing Chunk Size value, see "Configuring Server Constants" on page 4-1.

B
Server Configuration B-1
BServer Configuration
Copying the RepositoryThis scenario may occur if there is a complete test system that needs to be copied to a production environment.
Note: In a topology with a central Oracle DataLens Administration Server and development and/or production server groups, then this is not needed because the package deployment executes this.
Prior to starting this procedure, stop the application server service for the target server.
Copy the DirectoriesBasically, the repository files need to be copied from the test system to the production system. The repository contains the following directories that will need to be copied.
Simply copy the data directory from the Oracle DataLens Administration Server data directory; defaults to EPDQ_HOME/data. For example, C:\Oracle\Middleware\opdq\server_hostname\data.
This data directory contains the following subdirectory:
■ repository
For example, you have a test server with the data repository in the root DataLensData directory.
You want to copy the repository to the prod server. You need to copy the data directory listed from the //test/datalens/server directory to the //prod/datalens/server directory.
Configure the New ServerIn the server with the newly copied directories, change the configuration to point to these new directories. Edit the file SvrPaths.xml file if you have deviated from the standard directory location used in the test system.
Edit the EDQP_HOME\data\shared\config\DbInfo.xml .
Change the name of the server to the new server hosting the production server.
Now, the target server can be restarted with the new data directories.

Job Continuation
B-2 Oracle DataLens Server Administration Guide
Browse to the Administration Server web page and re-create the following:
■ The database connections that are needed in the target system.
■ The FTP definitions that are needed.
■ User accounts, privileges and roles that will be used.
Job ContinuationThe Job Continuation feature allows large batch jobs to continue to run and new API jobs to start and run even when Transform servers lose connectivity with the internal database repository (Administration server is down). When this occurs, you can identify what step the DSA was processing by reviewing the job details.
To view a list of the DSA jobs that have been run, from the Jobs panel, select Job Status, and the select the numbered link for the job in the Job ID column.
The job detail status indicates that the job has lost connectivity with ’Lost DB’. In addition, the step that was running when the Transform Server lost connectivity is identified as the first step ’Waiting’ in the Status column. These status indicators are transient and can be set to ’Completed’ or ’Failed’ if the server is restarted because the job may run again.
Expected ResultsThe following table outlines the expected results for each job type and the DB connection status.
Db down at startup Db down - Interrupted
Reconnect
Governance Studio fail run run
Scheduled Jobs fail run run
Java API run run run
COM API run run run
DB down at startup:Means that the Transform Servers do not have access to the database.
Note: If there is no database connection when the job is started, all new jobs will get a JobID of a negative number. The JobID's negative number range is based on the server profile id * 100,000.
Job Continuation
Server Configuration B-3
DB down - Interrupted:Means that the Transform Server had access to the database when the job began, but lost access to the database at some point during the running of the job.
Note the following:
■ Submitted from Services for Excel, Governance Studio, or from the Job Status panel the text results are not retrievable. If the results are persisted in the file system or database, they are placed there by the job itself and those results are available.
■ Once the Administration server is back up, the Job Status panel will be incorrect for interrupted jobs in two ways. The job will be considered running and will have to be canceled to clear the job from the running list and it will have incomplete step information because the transform server could not write back the results to the database.
Reconnect:Means that the Transform Server access to the database has been fully re-established.

Job Continuation
B-4 Oracle DataLens Server Administration Guide

C
Tuning Your Server C-1
CTuning Your Server
This appendix describes steps that can be taken to improve the throughput of the servers. The emphasis is on running DSA jobs as fast as possible.
Checking the Job ResultsThe most accurate way to check the timing is to place a timer around the calls to run the DSA. Another way is to look at the results of the job in the Administration Server web page and check the duration of the job. See "Viewing Job Status" on page 3-4.
Oracle DataLens Server OptionsThis section contains suggestions about tuning your Oracle DataLens Server.
Load-Balancing the ServersWhen you have created a server group of two or more Oracle DataLens Servers in a single server group, the server group provides automatic load balancing and fail-over for all servers within that server group.
When running the application, be certain to call a production servers in the server group and do not call the Administration Server.
Manual load balancing can be performed for the servers in a single server group by selecting which data lenses are loaded by each server. Additionally, servers can be set to load DSA on a server-by-server basis. It is recommended that each server be setup with all the data lenses and DSAs and allow the Oracle DataLens Server to control the load balancing internally.
Round Robin CallsWhen running DSA jobs from an application using the API, the Ping Servlet can be used to check for an active Oracle DataLens Server within a server group before making the call.
Ensure Tracing is Turned OffThis is turned off by default. Tracing is only turned on to trace information flow in the system. See "Setting Packet Tracing" on page 6-2.
Additionally, there are a set of scs.trace.network flags that should be omitted or set to false in the server.cfg configuration file. See "Server.cfg" on page A-1.

DSA Optimization
C-2 Oracle DataLens Server Administration Guide
DSA OptimizationThis section contains suggestions about tuning the how your DSAs operate on your server.
Jobs Time OutIf your jobs do not process to completion, it is possible that the WebLogic Server domain Java Transaction API (JTA) setting is set to low so that the job is unable to respond in the proper amount of time. The error that is displayed for the failed job is similar to the following. See "Viewing Job Details" on page 3-7.
javax.ejb.EJBException: BEA1-05C6C56E971728FAABAA: weblogic.transaction.internal.TimedOutException: Transaction timed out after 32 seconds
You can correct this in your WebLogic Server Administration Console by changing the Timeout Seconds option in the JTA configuration of your WebLogic Server domain. For more information about setting this option, see Oracle Fusion Middleware Oracle WebLogic Server Administration Console Online Help 11g Release 1 (10.3.6) at
http://docs.oracle.com/cd/E23943_01/apirefs.1111/e13952/taskhelp/jta/ConfigureDomainJTA.html
Simplify the Data Service Application Process StepsEach step in a DSA incurs additional overhead. This is because there is job information stored in the RDBMS repository for each the step of a DSA. Additionally there is overhead to package-up and ship the SOAP data contents from the DSA to each step during processing. What this means is that simplifying the DSA structure and placing as much of the process flow inside of Decision Maps will improve the speed of execution. We have observed timing improvements of up to .2 seconds for each DSA step that is replaced with a Decision Map.
Running Ultra High-Priority JobsUltra-high priority jobs are supported. These DSA jobs do not store the step information in the RDBMS repository. The overhead of job execution is eliminated at the expense of job information and details of completed jobs. Especially for single-line jobs, ultra-high priority makes sense because the job execution will be as fast as possible and job details on thousands of single-line jobs will congest the DSA Job Status panel.
Run Jobs at the Correct PriorityThe rule is that huge jobs should be run with a low priority, giving processing cycles to smaller medium and tiny high priority jobs. DSA jobs with a small number of input records and jobs where the user is waiting for a response need to be run at a high priority to get the fastest response time.
File Writing Between StepsBy default, when a DSA is being processed by the Oracle DataLens Server, all data will be held in memory, unless there are more than 5000 records being processed in a single DSA job. The speed of execution of these large jobs can be increased by setting the number of data records that are held in memory between these processing steps. This is controlled in the Oracle DataLens Server.cfg file with the following line:
Data Lens Optimization
Tuning Your Server C-3
wfg.maxlines=150000
Data Lens OptimizationThis section contains suggestions about tuning your data lenses.
Caching the Data LensesIndividual data lenses can cache parsing rules in memory for re-use without re-loading the rule each time. This is mostly useful for data processing by data lenses that reuse the same data repeatedly. Examples of this would be manufacturer names, redundant data, part numbers that are reused often. Data lenses that are not a good candidate are those that process things like descriptions that are different each time and would require a different parse tree for each line.
The cache should be large enough that the most often repeated lines are allowed to stay in memory (using a LRU Queue where the least often used rules will drop out of memory). For instance if there are 300 manufacturer names that are often reused among several thousand names, then the cache should be set to 1000 or perhaps 2000 depending on the frequency of use, to ensure that the 300 most often used names continue to reside in memory.
This is change is required for each data lens that need the caching.
■ Check out the data lens to the client
■ Go to the C:\Datalens\Applications\data\user_name\project\data_lens_name\config directory
■ Edit the project.xml file and modify the following line to the cache size
<parseTreeCacheSize>0</parseTreeCacheSize>
■ Save and check-in the project after making this change.
Do Not Load Data Lenses That Are Not Being UsedWhen running in a production environment, the number of data lenses is controlled by the lenses that are deployed to Production. Do not deploy data lenses to Production if they are not going to be used for actual production DSA jobs.
Fine-tuning of which data lens are used by a particular server can be controlled by undeploying the particular data lenses that are loaded by a particular Production Oracle DataLens Server. See "Viewing Data Lens Details and Managing Deployment" on page 2-3.
Tuning Multiple Parameterized DomainsSet the number of parameterized domain instances that will be loaded into memory. A single domain with two instances should set instances to three to maximize performance when using these domains.
■ One for the first parameterized domain
■ Another for the second
■ A third for both in memory
This is set in the server.cfg file as follows:
server.nle.instances=3

Optimizing Hardware and Operating Systems
C-4 Oracle DataLens Server Administration Guide
Optimizing Hardware and Operating SystemsThis section contains information about optimizing hardware and operating systems for improved performance.
Windows Memory and Application ServersFor information on the memory limitations of Windows machines, see "Memory Allocation Problems on Clients" on page 7-2.
Linux and Unix Memory, Windows Memory, and Java ServersLinux and Unix running on 64-bit hardware does not have the 1.6 GB memory limitation for Java Web Server that we have observed on 32-bit Microsoft Windows servers. Windows 64-bit servers do not have this memory limitation either.
Important: In an Enterprise DQ for Product production environment, only run on a 64-bit server running a 64-bit installation of Java. Never try to run a production environment on any 32-bit servers.
Database Query TuningIn database-intensive DSAs, major performance improvements can be made by tuning the database DDL statements. Simple things like indexing fields that are being searched on and reducing the number of tables in computationally intensive SQL joins can be very effective in improving the performance of the DSAs.
These tuning tasks are very dependent on the particular database schema and should be examined by a database professional.
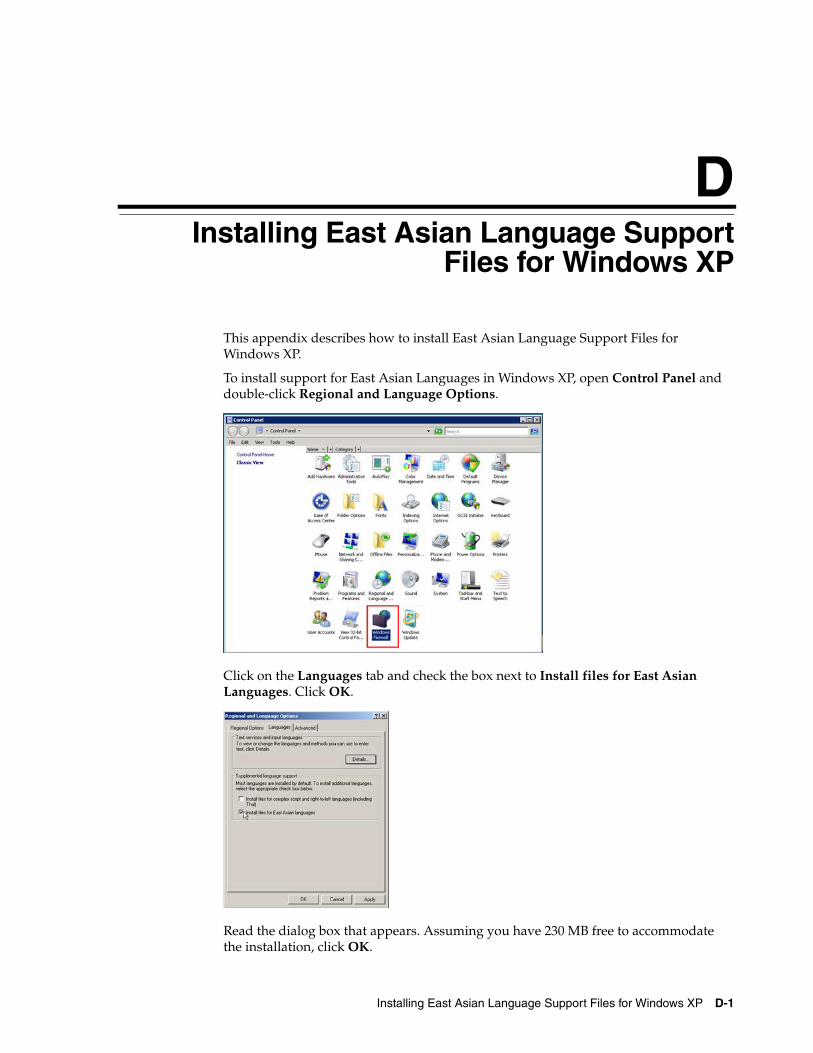
D
Installing East Asian Language Support Files for Windows XP D-1
DInstalling East Asian Language Support Files for Windows XP
This appendix describes how to install East Asian Language Support Files for Windows XP.
To install support for East Asian Languages in Windows XP, open Control Panel and double-click Regional and Language Options.
Click on the Languages tab and check the box next to Install files for East Asian Languages. Click OK.
Read the dialog box that appears. Assuming you have 230 MB free to accommodate the installation, click OK.

D-2 Oracle DataLens Server Administration Guide
Back on the Regional and Language Options dialog box click OK or Apply to begin the installation.
If prompted for installation media, click OK.
Browse to DRIVE:\i386\lang where DRIVE represents the location of the installation media. Click OK.
Depending on your system, you may be prompted a second time to insert your installation CD. If so, browse to DRIVE:\i386 where DRIVE represents the location of the installation media. Click OK.
When asked to restart your computer, click OK. The installation is now complete.
The process to remove East Asian Languages support files from your system is simply the reverse of the installation process