oracle® field service · evolve over time, and oracle is actively engaged with other...
TRANSCRIPT

Oracle® Field ServiceUser GuideRelease 12Part No. B25725-03
December 2007

Oracle Field Service User Guide, Release 12
Part No. B25725-03
Copyright © 2002, 2007, Oracle. All rights reserved.
Primary Author: Jan Lineberry
The Programs (which include both the software and documentation) contain proprietary information; they are provided under a license agreement containing restrictions on use and disclosure and are also protected by copyright, patent, and other intellectual and industrial property laws. Reverse engineering, disassembly, ordecompilation of the Programs, except to the extent required to obtain interoperability with other independently created software or as specified by law, is prohibited.
The information contained in this document is subject to change without notice. If you find any problems in the documentation, please report them to us in writing. This document is not warranted to be error-free. Except as may be expressly permitted in your license agreement for these Programs, no part of these Programs may be reproduced or transmitted in any form or by any means, electronic or mechanical, for any purpose.
If the Programs are delivered to the United States Government or anyone licensing or using the Programs on behalf of the United States Government, the following notice is applicable:
U.S. GOVERNMENT RIGHTSPrograms, software, databases, and related documentation and technical data delivered to U.S. Government customers are "commercial computer software" or "commercial technical data" pursuant to the applicable Federal Acquisition Regulation and agency-specific supplemental regulations. As such, use, duplication, disclosure, modification, and adaptation of the Programs, including documentation and technical data, shall be subject to the licensing restrictions set forth in the applicable Oracle license agreement, and, to the extent applicable, the additional rights set forth in FAR 52.227-19, Commercial Computer Software--Restricted Rights (June 1987). Oracle Corporation, 500 Oracle Parkway, Redwood City, CA 94065.
The Programs are not intended for use in any nuclear, aviation, mass transit, medical, or other inherently dangerous applications. It shall be the licensee's responsibility to take all appropriate fail-safe, backup, redundancy and other measures to ensure the safe use of such applications if the Programs are used for such purposes, and we disclaim liability for any damages caused by such use of the Programs.
The Programs may provide links to Web sites and access to content, products, and services from third parties. Oracle is not responsible for the availability of, or any content provided on, third-party Web sites. You bear allrisks associated with the use of such content. If you choose to purchase any products or services from a third party, the relationship is directly between you and the third party. Oracle is not responsible for: (a) the qualityof third-party products or services; or (b) fulfilling any of the terms of the agreement with the third party, including delivery of products or services and warranty obligations related to purchased products or services.Oracle is not responsible for any loss or damage of any sort that you may incur from dealing with any third party.
Oracle is a registered trademark of Oracle Corporation and/or its affiliates. Other names may be trademarks of their respective owners.
iii
Contents
Send Us Your Comments
Preface
Part 1 Field Service
1 Understanding Field ServiceIntroduction to the Field Service Suite..................................................................................... 1-1Field Service Integration with the E-Business Suite................................................................ 1-4Field Service Business Models..................................................................................................1-6Preventive Maintenance Programs......................................................................................... 1-10Task Status and Task Assignment Status Flow......................................................................1-11
2 Administrative SetupSetting Up Technicians and Dispatchers..................................................................................2-1Creating Human Resources Employee Records....................................................................... 2-2Importing Resource Records..................................................................................................... 2-3Maintaining Technician Addresses and Sub-inventories........................................................2-4Assigning Skills and Skill Levels to Technicians.................................................................... 2-6Adding Role Type, Role, and Application User ID..................................................................2-7Adding the Dispatcher Resource Record to a Planner Group..................................................2-8Assigning Territories to a Planner Group................................................................................ 2-8Associating Territories to a Dispatcher.................................................................................... 2-9Populating the Dispatch Center Setup................................................................................... 2-10Purging Field Service Data......................................................................................................2-12

iv
3 Creating Service Requests and Field Service TasksOverview: Service Request and Task Creation........................................................................ 3-1Overview: Dispatch Center....................................................................................................... 3-2Marking Tasks for Customer Confirmation............................................................................. 3-4Defining Customer Access and After Hours Constraints........................................................ 3-5Creating Task Dependencies.................................................................................................... 3-7Assigning Skills to Tasks.......................................................................................................... 3-9Overview: Parts Requirements................................................................................................. 3-9Creating Parts Requirements Automatically for Tasks.......................................................... 3-10Viewing and Manually Creating Parts Requirements........................................................... 3-11
4 Scheduling Field Service TasksOverview: Call Center Booking ............................................................................................... 4-1Overview: Schedule Task Window ..........................................................................................4-2Accessing the Schedule Task Window..................................................................................... 4-3Specifying Preferences for Scheduling Tasks.......................................................................... 4-4Selecting a Scheduler Option....................................................................................................4-5Scheduling Tasks Automatically.............................................................................................. 4-5Launching Autonomous Scheduler.......................................................................................... 4-6Using Interactive Scheduling.................................................................................................... 4-7Scheduling Using the Intelligent Option................................................................................. 4-7Scheduling Using the Window to Promise Option.................................................................. 4-9Scheduling Using the Assisted Option.................................................................................. 4-10Supporting Location Time Zones........................................................................................... 4-11
5 Managing Field Service Task SchedulesIntroducing the Dispatch Center.............................................................................................. 5-2Populating the Dispatch Center Tasks List.............................................................................. 5-3Working with the Tasks View................................................................................................ 5-11Viewing Service Request Details............................................................................................5-18Viewing Resource Details....................................................................................................... 5-18Viewing Service History......................................................................................................... 5-19Working with the Plan Board View........................................................................................ 5-20Working with the Gantt View................................................................................................ 5-24Working with the Map View.................................................................................................. 5-27Releasing Work to the Field - Interactive Process.................................................................. 5-28Releasing Work to the Field - Concurrent Program............................................................... 5-29Manage Field Service Technician Availability...................................................................... 5-29Viewing Technicians' HTML Calendars................................................................................ 5-30
v
Blocking Technician Trips...................................................................................................... 5-31Unblocking Technician Trips................................................................................................. 5-31Unscheduling Tasks from a Blocked Trip.............................................................................. 5-32Reserving Technician Personal Time..................................................................................... 5-34Working with Tasks Rejected by Autonomous Scheduler ................................................... 5-35Overview: Invalid Addresses.................................................................................................. 5-36Submitting the Find Invalid Addresses Concurrent Program............................................... 5-36Correcting and Validating Addresses..................................................................................... 5-38Overview: Rescheduling Tasks...............................................................................................5-38Rescheduling a Scheduled Task from the Plan Board........................................................... 5-39Rescheduling a Scheduled Task from the Gantt View.......................................................... 5-39Rescheduling Tasks Longer Than a Shift............................................................................... 5-40Canceling a Scheduled Task................................................................................................... 5-43Recalculating a Trip................................................................................................................ 5-44Recalculating All Trips........................................................................................................... 5-45Optimizing a Trip.................................................................................................................... 5-46
6 Integrating With Google Maps Through the Field Service Dispatch CenterUnderstanding the Google Maps Integration.......................................................................... 6-1Viewing a Resource Trip on Google Maps...............................................................................6-2Viewing Tasks on Google Maps............................................................................................... 6-3Viewing Tasks of Selected Territories on Google Maps..........................................................6-3Using Guided Google Map in Field Service............................................................................ 6-4Understanding the Tool Tip Details......................................................................................... 6-6
7 Receiving and Accepting Work AssignmentsExplaining the Elements of the Dashboard.............................................................................. 7-2Explaining Quick Links to Key Processes................................................................................ 7-4Customizing Dashboard Views................................................................................................ 7-5Personalizing an Existing View................................................................................................ 7-5Creating a New View................................................................................................................ 7-6Viewing the Technicians Calendar........................................................................................... 7-8Viewing Tasks on Google Maps............................................................................................... 7-9Receiving Work Tasks............................................................................................................... 7-9Overview: Task Updates......................................................................................................... 7-10Understanding the Update Task Page.................................................................................... 7-11Updating Task Assignment Status......................................................................................... 7-15Accepting or Rejecting Tasks.................................................................................................. 7-16Ordering Parts for Trunk Stock.............................................................................................. 7-17Ordering Parts for a Specific Task.......................................................................................... 7-19

vi
Receiving Shipments...............................................................................................................7-21Starting Work.......................................................................................................................... 7-22Viewing Service Request Details............................................................................................7-22Viewing Parts Requirements.................................................................................................. 7-23Creating Service Requests....................................................................................................... 7-23
8 Debriefing Work CompletionUnderstanding Debrief Procedures.......................................................................................... 8-2Capturing Travel Information.................................................................................................. 8-2Adding a Labor Line..................................................................................................................8-3Adding a Material Line............................................................................................................. 8-5Using Loaner Transactions........................................................................................................ 8-9Adding an Expense Line........................................................................................................... 8-9Recording Counter Readings.................................................................................................. 8-11Updating Task Details and Notes........................................................................................... 8-12Viewing a Pro Forma Invoice.................................................................................................. 8-13Searching e-Record Evidence Store........................................................................................ 8-13Updating Owned Asset Install Base Records......................................................................... 8-16Return Excess or Defective Parts............................................................................................. 8-18Returning Excess Parts............................................................................................................ 8-18Returning Defective Parts....................................................................................................... 8-20Creating Follow-Up Tasks...................................................................................................... 8-21
9 Reviewing Debrief and BillingOverview: Administrator Portal Dashboard............................................................................ 9-1Querying Technician Schedules............................................................................................... 9-4Reviewing and Correcting Debrief Information...................................................................... 9-5Reviewing, Correcting, and Submitting Charges.....................................................................9-7

vii
Send Us Your Comments
Oracle Field Service User Guide, Release 12Part No. B25725-03
Oracle welcomes customers' comments and suggestions on the quality and usefulness of this document. Your feedback is important, and helps us to best meet your needs as a user of our products. For example:
• Are the implementation steps correct and complete? • Did you understand the context of the procedures? • Did you find any errors in the information? • Does the structure of the information help you with your tasks? • Do you need different information or graphics? If so, where, and in what format? • Are the examples correct? Do you need more examples?
If you find any errors or have any other suggestions for improvement, then please tell us your name, the name of the company who has licensed our products, the title and part number of the documentation andthe chapter, section, and page number (if available).
Note: Before sending us your comments, you might like to check that you have the latest version of the document and if any concerns are already addressed. To do this, access the new Applications Release Online Documentation CD available on Oracle MetaLink and www.oracle.com. It contains the most current Documentation Library plus all documents revised or released recently.
Send your comments to us using the electronic mail address: [email protected]
Please give your name, address, electronic mail address, and telephone number (optional).
If you need assistance with Oracle software, then please contact your support representative or Oracle Support Services.
If you require training or instruction in using Oracle software, then please contact your Oracle local officeand inquire about our Oracle University offerings. A list of Oracle offices is available on our Web site at www.oracle.com.

ix
Preface
Intended AudienceWelcome to Release 12 of the Oracle Field Service User Guide.
This guide is designed for users, administrators, and implementors, of the Oracle Field Service application. It assumes that you have a working knowledge of the principles and customary practices of your business area, along with specific application knowledge of the Oracle Field Service suite of products.
See Related Information Sources on page xi for more Oracle Applications product information.
TTY Access to Oracle Support ServicesOracle provides dedicated Text Telephone (TTY) access to Oracle Support Services within the United States of America 24 hours a day, seven days a week. For TTY support, call 800.446.2398.
Documentation AccessibilityOur goal is to make Oracle products, services, and supporting documentation accessible, with good usability, to the disabled community. To that end, our documentation includes features that make information available to users of assistive technology. This documentation is available in HTML format, and contains markup to facilitate access by the disabled community. Accessibility standards will continue to evolve over time, and Oracle is actively engaged with other market-leading technology vendors to address technical obstacles so that our documentation can be accessible to allof our customers. For more information, visit the Oracle Accessibility Program Web site at http://www.oracle.com/accessibility/ .
x
Accessibility of Code Examples in DocumentationScreen readers may not always correctly read the code examples in this document. The conventions for writing code require that closing braces should appear on an otherwise empty line; however, some screen readers may not always read a line of text that consists solely of a bracket or brace.
Accessibility of Links to External Web Sites in DocumentationThis documentation may contain links to Web sites of other companies or organizationsthat Oracle does not own or control. Oracle neither evaluates nor makes any representations regarding the accessibility of these Web sites.
Structure1 Understanding Field ServiceThis chapter provides an overview of the Oracle Field Service Suite and integrated applications, and then describes how these integrated applications can be used to automate Field Service business processes.
2 Administrative SetupThis chapter covers ongoing administrative setup procedures, such as setting up new dispatchers, setting up new technicians, and purging selected obsolete data.
3 Creating Service Requests and Field Service TasksRequests for field service, whether for planned work generated by a preventive maintenance program, or as the result of customer calls for break/fix issues, trigger a sequence of integrated business processes. These processes are described at a high level in the introductory chapter to this User Guide titled: "Understanding Field Service".
The scope for this chapter picks up at a point where several steps involving upstream integrated applications have already been completed. At this stage, one or more service requests have been entered through a TeleService Service Request, or iSupport Customer Contact Center, or have been generated by a preventive maintenance program. The requests have been screened for entitlement, and priority. The service problems have been described, and it has been determined that field service technician visits are necessary.
4 Scheduling Field Service TasksThis chapter describes the functionality of he Schedule Tasks window
5 Managing Field Service Task SchedulesThis chapter describes how to use the Dispatch Center window to monitor field service activities and modify schedules as necessary to react to unplanned events.
6 Integrating With Google Maps Through the Field Service Dispatch CenterThis chapter explains an optional feature on how to render and invoke Google Maps from the Field Service Dispatch Center.
7 Receiving and Accepting Work Assignments

xi
This chapter explains how field service technicians use the Field Service Technician Portal to change task assignment status, view service request details, and create parts requirements.
8 Debriefing Work CompletionField service technicians use the Debrief module to view their task assignment details, accept or reject assignments, update task statuses, capture travel related information, and report on material, labor time, and expenses for their individual task assignments. Data gathered is used for generating customer invoices, updating the installed base, and maintaining the service vehicle trunk stock.
Field service managers use Debrief to capture, access, and update debrief information on behalf of field service technicians.
This topic group provides procedures for performing Debrief using the Field Service Technician Portal Dashboard.
This chapter describes elements comprising the Field Service Technician Portal Dashboard, provides procedures for configuring the Dashboard, and provides procedures for using the Field Service Technician Portal Dashboard for ordering and receiving service parts, updating tasks, performing debrief, and scheduling tasks.
9 Reviewing Debrief and BillingThe Administrator Portal is implemented as a separate menu under the Field Service Administrator Portal Responsibility. The Administrator Portal replaces and extends Oracle Application Windows Enterprise Debrief functionality. The portal provides field service managers and administrators with the ability to review and correct field technician debrief reports.
Related Information SourcesOracle Field Service Implementation Guide
Oracle Wireless Option for Service Concepts and Procedures
Oracle Field Service/Palm™ Devices Concepts and Procedures
Oracle Field Service/Laptop Concepts and Procedures
Oracle Advanced Scheduler Concepts and Procedures
Oracle Self–Service Web Applications Implementation Guide
Oracle Common Application Components User Guide
Integration RepositoryThe Oracle Integration Repository is a compilation of information about the service endpoints exposed by the Oracle E-Business Suite of applications. It provides a complete catalog of Oracle E-Business Suite's business service interfaces. The tool lets users easily discover and deploy the appropriate business service interface for integration with any system, application, or business partner.

xii
The Oracle Integration Repository is shipped as part of the E-Business Suite. As your instance is patched, the repository is automatically updated with content appropriate for the precise revisions of interfaces in your environment.
Do Not Use Database Tools to Modify Oracle Applications DataOracle STRONGLY RECOMMENDS that you never use SQL*Plus, Oracle Data Browser, database triggers, or any other tool to modify Oracle Applications data unless otherwise instructed.
Oracle provides powerful tools you can use to create, store, change, retrieve, and maintain information in an Oracle database. But if you use Oracle tools such as SQL*Plus to modify Oracle Applications data, you risk destroying the integrity of your data and you lose the ability to audit changes to your data.
Because Oracle Applications tables are interrelated, any change you make using an Oracle Applications form can update many tables at once. But when you modify Oracle Applications data using anything other than Oracle Applications, you may change a row in one table without making corresponding changes in related tables. If your tables get out of synchronization with each other, you risk retrieving erroneous information and you risk unpredictable results throughout Oracle Applications.
When you use Oracle Applications to modify your data, Oracle Applications automatically checks that your changes are valid. Oracle Applications also keeps track of who changes information. If you enter information into database tables using database tools, you may store invalid information. You also lose the ability to track whohas changed your information because SQL*Plus and other database tools do not keep arecord of changes.

Part 1Field Service

Understanding Field Service 1-1
1Understanding Field Service
This chapter provides an overview of the Oracle Field Service Suite and integrated applications, and then describes how these integrated applications can be used to automate Field Service business processes.
This chapter covers the following topics:
• Introduction to the Field Service Suite
• Field Service Integration with the E-Business Suite
• Field Service Business Models
• Preventive Maintenance Programs
• Task Status and Task Assignment Status Flow
Introduction to the Field Service SuiteThe Oracle Field Service suite supports automated processes for managing field service operations.
Field Service provides specialized functionality for scheduling and dispatching tasks to field technicians, and monitoring the progress and status of those tasks through to completion. The application has a full range of debrief capabilities to support call closure, and reporting time, parts and expenses associated with the execution of the task. The application also includes street level routing capabilities through Oracle Advanced Scheduler when used in conjunction with spatial data. Oracle Spares Management provides logistics and inventory planning features. A Preventative Maintenance module is included for planned work.
Dispatch CenterThe dispatch center is a one-stop service task resource scheduling and monitoring dashboard in the Oracle Field Service product. Dispatchers use the dispatch center to schedule, release, and monitor field service activities. Dispatchers can view incoming service requests, schedule and release work to technicians, and create daily work routes,

1-2 Oracle Field Service User Guide
or trips, for each service technician. They can also monitor progress of filed service tasks, and adjust or reschedule tasks if necessary.
The dispatch center Plan Board and Gantt views support monitoring service techniciansprogress against their schedules. Dispatchers can change schedules to react to unplanned events. If spatial data is loaded, dispatchers can use the dispatch center Mapto view the technicians status and location.
On behalf of technicians, dispatchers can enter debrief details for a task with respect to time spent, material consumed, and expenses incurred.
Debrief The Debrief component of the Oracle Field Service product provides the ability for reporting day-to-day service activities performed at customer sites. Data related to a specific task, such as task status, labor, expenses, parts used and recovered, and counterreadings captured in Oracle Field Service or Mobile applications are displayed. You can view and update debrief information prior to uploading to Oracle Inventory and OracleInstall Base. When the task status is set to Completed, the Install Base, and spares sub-inventories are updated, and charges are created.
Technician PortalThe Field Service Technician Portal is a personalized, Web-enabled module that enablesfield technicians to access, update, and report on their individual task assignments. The Technician Portal also enables technicians to view their calendar, order spare parts, return excess parts, receive shipments, add notes, create follow-up tasks, and initiate new service requests.
The Technician Portal integrates with other Oracle applications such as TeleService, Install Base, Knowledge Management, Service Contracts, Spares Management, as well as key components of CRM Foundation, such as Notes, Calendar, and Task Manager.
Administrator PortalThe Web-enabled Field Service Administrator Portal module provides field service managers and administrators with the ability to view, update and report on the individual task assignments on behalf of the technicians. They can also order parts, return excess parts, receive shipments, create service requests, and create follow-up tasks.
Preventive Maintenance (PM)The Preventive Maintenance solution in Field Service supports planned maintenance and inspection programs. PM programs can be defined and linked to the install base through Contracts. PM schedules, based on either usage activity or time, can be automatically created along with the service request and task required for execution.
Understanding Field Service 1-3
Advanced Scheduler OptionOracle Advanced Scheduler is an optional Field Service product that not only supports both interactive and automated task scheduling for field service operations, but also handles complex scheduling with street-level routing and drive time and schedule optimization. It takes into account skills, driving time and distance, resource availability, overtime, cost factors, service level agreement response times, customer preferred technicians, and customer site access hours. Advanced Scheduler also handlescomplex scheduling scenarios such as scheduling a task that is greater than a shift duration and scheduling tasks with dependencies.
Integration with Oracle Spares Management enables Advanced Scheduler to also consider spare parts availability while evaluating scheduling options.
Spares Management OptionOracle Spares Management includes both logistics and inventory planning functionalityneeded to manage a service parts inventory across the Field Service supply chain. Integration with Oracle Advanced Scheduler provides you with the capability to coordinate parts availability with technician schedules. Spares logistics processes include:
• Processing of orders.
• Managing excess inventory.
• Tracking and managing of parts repair activity for internal and external repair suppliers.
Complete integration with Oracle Depot Repair is included for internal repair suppliers.
Spares inventory planning covers technician and warehouse inventories. Automated min-max planning for technician sub-inventories includes specialized features to handleplanning scenarios unique to field service, such as planning for the new or transferred technician. Automated time-phased planning for the warehouse includes integration with internal and external repair.
Mobile and Wireless OptionsAfter tasks are committed to field technicians, the schedules are then communicated to field service technicians through the following Oracle Mobile Field Service optional products:
• Mobile Field Service (Store and Forward) - Laptop
• Mobile Field Service (Store and Forward) - Pocket PC Devices

1-4 Oracle Field Service User Guide
• Mobile Field Service - Wireless and Voice
Oracle Mobile Field Service (Store and Forward) runs on laptop or pocket personal computer devices. Service requests and associated task related information are stored locally on the disconnected device.
The Oracle Mobile Field Service (Wireless and Voice) module provides real-time wireless access to the enterprise applications. Using a wireless device, technicians can remotely access the latest information critical to performing their work. Additionally, they can use the wireless device to create service requests and tasks, and self schedule them.
The Mobile Field Service module includes a voice-activated application providing access to enterprise information through a land line or cell telephones. Input modes include keypad and voice recognition.
Field Service Integration with the E-Business SuiteOracle Field Service integrates with these Oracle Applications.
CRM FoundationField Service relies on information set up in the following CRM Foundation components:
Resource Manager
You define service technicians and dispatchers individually in the Resource Manager. To be able to access the Oracle Field Service dispatch center, you must also define dispatchers as part of a dispatcher group created in the Resource Manager.
Territory Manager
Territory Manager is used for two purposes:
• Populating technicians in the dispatch center Plan Board and Gantt views.
• Identifying qualified engineers for task scheduling.
Task and Escalation Manager
You use the Task and Escalation Manager for setting up task types, statuses, templates, priority, escalation, and so on.
Knowledge Base
Knowledge Base is a repository of information useful for resolution of repetitively reported service issues.
Calendar
For each technician you need to define working hours, shifts, and non-available working hours such as public holidays or vacations. This information is used for

Understanding Field Service 1-5
scheduling.
Notes
Notes provide a text area for entering information about a customer, product, service, or anything related to the service report that may be helpful for other service technicians or customers. After creating a note, it can be attached to the task, sent to the customer, and submitted to the knowledge base for reuse. Notes functionality is accessible from Debrief.
Trading Community ArchitectureTrading Community Architecture (TCA) provides information about parties and contacts. Field Service relies on information set up in the following Trading CommunityArchitecture components:
InventoryInventory provides information used by the service request to determine the items that are serviceable. Inventory is also used to track inventory balances and is tightly integrated with debrief to process inventory transactions reported by the technician in task closure. Spares Management uses on-hand and available inventory balances for inventory planning and Advanced Scheduler integration.
Install BaseInstall Base provides information used by the service request to indicate the items that are installed base items. It provides input to the dispatch center and Advanced Scheduler as to which service technicians are preferred to perform the field visit. Finally, Install Base provides information that is sent to the Mobile applications, and then used by service technicians when servicing the asset or customer-owned product.
You can update a customers Install Base from Debrief. Updating the Install Base results in an update of the items of the customers Install Base. After you report information in Debrief that information cannot be modified after it is transmitted to the Install Base.
TeleServiceA service request is created when a customer calls for assistance. Tasks are created when it is determined that a service technician must visit the customer site.
Service Requests
Service requests are initiated by entering information through Self Service iSupport, the Contact Center window, or the Teleservice Service Request window that are delivered with the base Field Service product.
Charges
You can update Charges with parts usage, counter information, labor time, and

1-6 Oracle Field Service User Guide
expenses for a task from Debrief. Recorded information transmits to the Charges database when you update a transaction. In Charges, this information is checked against contracts. Charges are then sent to Order Management, and an invoice is generated.
After you report information in Debrief that information cannot be modified after it has been transmitted to Charges.
Service ContractsContracts and Service Contracts
The contracted response time for a service request is used for task scheduling. The Contracts Labor Billing Schedule is also used to automatically generate labor charges from labor debrief records.
Field Service Business ModelsThe Oracle Field Service solution supports two business processes: break/fix and planned work. The break/fix process applies to repair operations for unplanned equipment outages, or annoyances and cosmetic issues that are saved up over time. Theplanned work process applies to preventive maintenance and field inspections. Many field service operations employ both processes.
Preventive maintenance requires some additional ongoing setup activities, such as defining time-based and usage-based PM programs, and forecasting usage rates. These periodic processes are discussed later. See Preventive Maintenance Programs, page 1-10.
This section includes the following topics:
• Field Service Business Processes, page 1-6
• Preventive Maintenance Programs, page 1-10
Field Service Business ProcessesField service business processes are initiated by field service requests, generated by a preventive maintenance program, or as the result of communication with a customer.
When service visits are necessary, field service tasks are created and scheduled to qualified and available service technicians. Required service parts are reserved or ordered. Technicians report completion of tasks along with time, parts and expenses used. Charges are recorded, and invoices are created. This process is driven by service request and task status changes.
Field service business processes are described in more detail below:
1. Initiating field service requests and verifying entitlement

Understanding Field Service 1-7
Customers initiate field service requests through the Web, e-mail, or by dialing into a call center. As requests are received, the customer, product, and service contract are checked in the entitlement step. At this point, the Service Level Agreement (SLA) Respond By and Resolve By dates and times are stamped on the service request.
For preventive maintenance programs, the solution generates service requests and tasks automatically.
This process relates to the following applications:
• Oracle TeleService Service Request window: Service requests are initiated by call center agents or dispatchers from the Contact Center or Service Request windows.
• Oracle Service Contracts: Customer entitlements and SLAs are applied.
• Oracle iSupport: Service requests initiated by customers or agents through the Web.
• Oracle E-mail Center: A service request arrives through the e-mail inbox.
• Oracle Mobile Field Service: Service requests and tasks created by Field Service technicians.
• Oracle Field Service Preventive Maintenance: System generates service requests.
2. Screening Field Service requests
After a service request is created, it is screened to determine whether a field visit can be avoided. Analysts search the Knowledge Base for solutions to previously reported similar service issues. Possible outcomes from this process include: closingthe request, shipping a replacement part to the customer, or authorizing the customer to return the defective product for exchange or depot repair. When field visits are required, predefined tasks can be used based on problem descriptions andactions needed to resolve the issues. Service parts and skills can also be defined for a task.
This process relates to the following user interfaces:
• Service Request: Access the Knowledge Base.
• Knowledge Base: Search for previously reported similar issues for a solution.
3. Scheduling tasks to service technicians
Task scheduling is the core functionality of the Field Service application. Task assignment in Oracle Field Service is assisted by the Schedule Task window. Advanced Scheduler functionality is used for enhanced task scheduling, either in

1-8 Oracle Field Service User Guide
interactive or automatic mode. Advanced scheduling is based on decision factors such as required skills, service territory, customer site access hours, preferred technician, and spare parts inventory.
This process relates to the following applications:
• Oracle Field Service: Use the dispatch center to schedule, monitor, and dispatchtasks.
• Oracle Advanced Scheduler: Provides comprehensive scheduling capabilities and enables the optimization and recalculation of scheduling tasks to qualified resources.
• Oracle Spares Management : Use the Spares Management application to order spare parts. When Advanced Scheduler is installed, and there is a parts requirement, the parts are automatically reserved or ordered at task assignment.
4. Scheduling service technician trips
Service trips are planned, based on factors such as travel time and distance, service level agreement priority, and overtime costs. When this step is done, task schedules are released to the service technicians. Optionally, the service technician may acceptor reject task assignments, or unplanned events could require that committed schedules be changed.
This process relates to the following applications:
• Oracle Mobile Field Service (Laptop and Handheld Devices): After synchronization, the schedule is received on the mobile devices.
• Oracle Mobile Field Service (Wireless): Similar to Laptop and Handheld Devices, however real time schedule information is available from the wireless connected mobile device.
5. Executing services
Service technicians deliver services at the customers sites according to the assigned task schedule. Technicians indicate progress by advancing the task status.
This process relates to the following user interfaces:
• Knowledge Base: Search for related information.
• Field Service Technician Portal: Drill to task details and notes.
6. Monitoring service visits
Dispatchers use the dispatch center to monitor execution of scheduled task activities and make adjustments or reschedule tasks if necessary. For example, a

Understanding Field Service 1-9
dispatcher responds when conditions of a Service Level Agreement are not being met for a particular service request.
This process relates to the following applications:
• Oracle Field Service dispatch center: Plan Board, Gantt chart, and Map.
• Oracle Service Contracts: Service Level Agreements (SLA).
7. Debriefing service visits
Technicians report time, expense, and service parts they install or recover from the site. They can also report additional information which includes counter readings and notes describing how the problem was resolved. Technicians can create follow-up tasks or new service requests if, for example, the problem was not resolved during this visit, or additional service issues are discovered.
This process relates to the following applications:
• Oracle Mobile Field Service (Laptop, Handheld Devices, and Wireless): Technicians report time, material, expenses, and counter readings.
• Oracle Field Service Debrief: Information from mobile devices is received and consolidated in Debrief. This information is then used to update Inventory, Install Base, and Charges.
8. Completing and closing tasks
As service technicians complete tasks, they advance the task status to "Completed". No additional reporting is enabled at the "Completed" task status. Advancing the task status to "Closed" initiates updates to Inventory and Install Base and automatically generates charges.
This process relates to the following page:
• Field Service Technician Portal: Update Task Status.
9. Billing for field service visits
The Field Service Manager or Administrator can validate service contract and warranty coverage information. They can review and change debriefing and charges information, initiate an invoice process, and update Inventory and Install Base information.
This process relates to the following applications:
• Oracle Field Service Administrator Portal: Review and change debriefing and charges information.
• Oracle Charges: Invoices are automatically generated and reviewed for billable expenses.

1-10 Oracle Field Service User Guide
10. Managing service parts inventory
The Spares Management component plans service part inventory for field service warehouses and technicians, creates priority and replenishment orders, manages excess parts, and facilitates recovery, consolidation, and repair of defective parts.
This process relates to the following applications:
• Oracle Spares Management: Logistics and inventory planning.
Preventive Maintenance Programs
Define Preventive Maintenance (PM) ProgramsYou can define PM programs for products that need planned inspection and maintenance. PM programs track customer products, installations, and usage. PM programs are defined either as usage-based or time-based. For usage-based PM programs, a usage forecast is required.
1. Defining PM Programs
Maintenance Engineering defines PM requirements and programs. This setup is implemented in Oracle Field Service Preventive Maintenance, and in Oracle Service Contracts.
2. Authoring Contracts
Service Marketing creates PM contract offerings, which define contract price and the financial coverage of work done, PM service requests, labor coverage, parts coverage, and so on.
Sell Maintenance ContractsPM contracts are sold to customers and define which products in the Install Base are covered. Instances of products, coverage, and program schedules are maintained by the service contracts department to track and plan for PM activities.
Service contracts can be authored for serviceable products and incorporate fixed, or date based, preventive maintenance schedules. Service coverage templates can be created to include PM program and activities with patterns of maintenance schedules.
The PM program and activity schedules are automatically instantiated from the predefined coverage templates.
Generate PM Service Requests and Tasks• PM Planning
Understanding Field Service 1-11
PM planning occurs in two phases:
First, a general PM schedule is generated for the length of the program. PM schedules can be based on forecasted or actual usage, or can be based on appointed service due dates. For usage-based PM programs, the schedule is based on actual counter readings and forecasted usage. For time-based PM programs, the schedule is defined in the contract itself.
Second, service requests and tasks are generated over a time frame that can be defined by the user. A concurrent program is used to automatically generate PM service requests and tasks.
• PM Execution
Once PM programs are established, standard Field Service execution is used for scheduling, reserving or allocating resources, capturing customer confirmation, delivering PM activities, and billing the customer.
Note: The following additional processes are unique to PM task completion:
1. When PM tasks are completed, Debrief updates the PM schedule with task accomplish dates.
2. If the PM program is usage-based, Debrief updates counter readings. When the PM schedule is updated, the forecast usage rate adjusts for the actual usage recorded in Debrief.
For detailed information on setting up preventive maintenance, see the Oracle Field Service Implementation Guide.
Task Status and Task Assignment Status FlowTask Status
Changes to task status drive the Field Service processes. Depending on the current status, different subsequent actions, transitions, and statuses are possible.
Task Assignment Status
When the task is assigned to a resource, a task assignment is created. A task assignment consists of a resource and a related task. Oracle Advanced Scheduler only supports assignment of a single technician to a task. One task can have multiple task assignments, if multiple resources are assigned to the task.
After task assignment, dispatchers can still modify a schedule until the moment the schedule is committed. The commit process releases the work to the technicians. When the schedule is committed, task status changes to 'Assigned'. Task assignments are then available to the field service technicians, and sent to their mobile devices. Service
1-12 Oracle Field Service User Guide
technicians report on task assignment status.
Task assignment status displays in the Resources tab. Task status displays on the Plan Board, Gantt chart, and across all tabs in the upper region of the dispatch center.
Task statuses and task assignment statuses that display in the dispatch center enable thedispatcher to monitor progress. When a task is created, it typically enters the dispatch center at a status of 'In planning'.
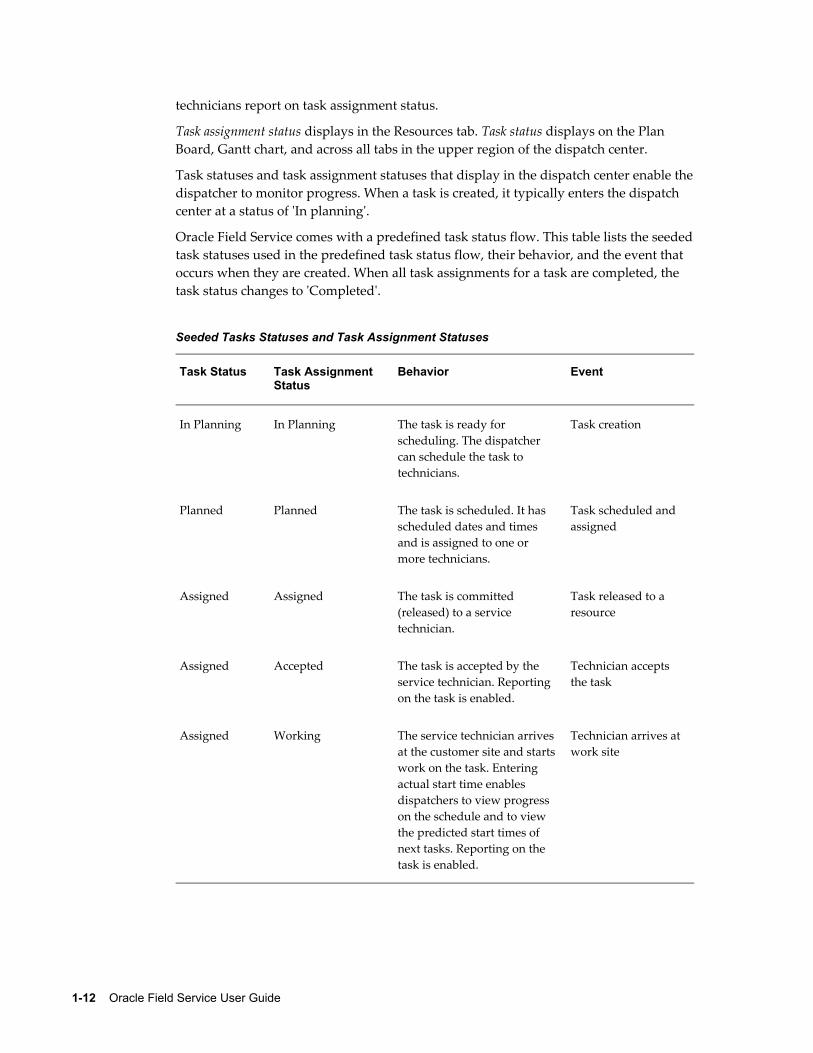
Oracle Field Service comes with a predefined task status flow. This table lists the seededtask statuses used in the predefined task status flow, their behavior, and the event that occurs when they are created. When all task assignments for a task are completed, the task status changes to 'Completed'.
Seeded Tasks Statuses and Task Assignment Statuses
Task Status Task Assignment Status
Behavior Event
In Planning In Planning The task is ready for scheduling. The dispatcher can schedule the task to technicians.
Task creation
Planned Planned The task is scheduled. It has scheduled dates and times and is assigned to one or more technicians.
Task scheduled and assigned
Assigned Assigned The task is committed (released) to a service technician.
Task released to a resource
Assigned Accepted The task is accepted by the service technician. Reporting on the task is enabled.
Technician accepts the task
Assigned Working The service technician arrives at the customer site and starts work on the task. Entering actual start time enables dispatchers to view progress on the schedule and to view the predicted start times of next tasks. Reporting on the task is enabled.
Technician arrives at work site

Understanding Field Service 1-13
Task Status Task Assignment Status
Behavior Event
Completed Completed Work on the task is done. No further updates or reporting on the task is allowed. Reporting on the task is enabled.
Task is complete. Technician departs from work site.
Closed Closed Debrief for the task is reviewed and sent to Charges.Install Base and Knowledge Base are updated.
After review, the service request associated to the task is closed.
Important: You can define additional task statuses and modify the task flow. For the Preventive Maintenance module, you must define a Task Status of 'Confirm.'
For more information, see Setting Up Task Status and Transition Rule in the Oracle Field Service Implementation Guide.
Close Task AutomationUnder certain circumstances, tasks are closed automatically upon closure of the service request for which they are associated. Oracle Field Service makes several validations to ensure that only appropriate tasks are closed automatically. The validation of the automated closure ensures that the tasks comply with the field service state transitions applied to tasks during setup.
Conditions that must be met to enable automated closure:
• The Task Type must have the Rule set to 'Dispatch' and have the 'Schedulable' check box selected on the Task Types window (Field Service Setup > CRM Foundation > Task and Escalation Manager > Setup > Define Task Type).
• The task must be at one of these statuses: Assigned, Working, Schedulable, Accepted, Rejected, On Hold, Approved, Completed, or Canceled.
• The Task must not have an open debrief line.
• For tasks that need to be closed but have not been scheduled yet, there is no debrief line check.
• Scheduled tasks that need to be closed and have only the scheduled start date are unplanned during the close task automation process as long as no debrief

1-14 Oracle Field Service User Guide
lines exist.
For more information on setting up tasks and task types, see the Oracle Field Service Implementation Guide.

Administrative Setup 2-1
2Administrative Setup
This chapter covers ongoing administrative setup procedures, such as setting up new dispatchers, setting up new technicians, and purging selected obsolete data.
This chapter covers the following topics:
• Setting Up Technicians and Dispatchers
• Creating Human Resources Employee Records
• Importing Resource Records
• Maintaining Technician Addresses and Sub-inventories
• Assigning Skills and Skill Levels to Technicians
• Adding Role Type, Role, and Application User ID
• Adding the Dispatcher Resource Record to a Planner Group
• Assigning Territories to a Planner Group
• Associating Territories to a Dispatcher
• Populating the Dispatch Center Setup
• Purging Field Service Data
Setting Up Technicians and DispatchersUse these groups of procedures to set up technicians and dispatchers. A few of the setup steps are the same when creating a technician and a dispatcher but several of the setup steps are different.
Setting Up TechniciansSetting up a Field Service technician requires these procedures:
1. Creating a Human Resources Employee Record, page 2-2.

2-2 Oracle Field Service User Guide
2. Importing Resource Records, page 2-3 in Customer Relationship Management.
3. Assigning a Resource to a Calendar. (Field Service Setup > CRM Foundation > Calendar > Calendar Setup > Assign Resources)
4. Assigning a Resource to a Territory. (Field Service Setup > CRM Foundation > Territory Manager > Territory Administration)
5. Setting up Resource Addresses and Assigning Sub-inventories. See Maintaining Technician Addresses and Sub-inventories, page 2-4.
6. Assigning Skills and Skill Levels to Technicians. See Assigning Skills and Skill Levels to Technicians, page 2-6.
Setting Up DispatchersSetting up a new Field Service dispatcher requires these procedures:
1. Creating a Human Resources Employee Record, page 2-2
2. Importing Resource Records, page 2-3 in Customer Relationship Management
3. Adding Role Type, Role, and Application User ID, page 2-7 to the Dispatcher Resource record
4. Adding the Dispatcher Resource Record to a Planner Group, page 2-8
5. Assigning Territories to Planner Group, page 2-8
6. Associating Territories to a Dispatcher, page 2-9
Creating Human Resources Employee RecordsField Service dispatchers and technicians are employee resources. Use this procedure to create employee records in the Oracle Human Resources application:
Prerequisites❒ Refer to the Field Service Implementation Guide for more information about setting up
the following items:
• User ID (Navigator path: System Administrator > Security > User > Define)
• Responsibilities (Navigator path: System Administrator > Security > Responsibility > Define)
Administrative Setup 2-3
• Groups (Navigator path: CRM Administrator >Resource Manager > Maintain Resources)
• Role Types (Navigator path: CRM Administrator > Resource Manager > Setup >Role Types)
• Roles (Navigator path: CRM Administrator > Resource Manager > Setup > Roles)
Steps:1. Navigate to the People window of the Human Resources application (US HRMS
Manager: People > Enter and Maintain).
The Find Person window appears.
2. Click New.
The People window appears, ready for creating a new record.
3. Enter the Name and Gender.
4. Choose Create Employment from the Action list of values.
The Person Type window appears.
5. Choose Employee from the Person Type list of values, and then click OK.
6. Enter the birth date and social security number. These are required in the US HRMSapplication.
7. To save the record, click Save from the Tool bar, or Choose File > Save from the Menu.
8. (Optional) To enter an address, click Address.
The Address window appears.
9. Enter the address number, street, city, state, and zip code.
10. Save your work.
Importing Resource RecordsUse this procedure to create dispatcher and technician resources in Oracle Customer Relationship Management by importing the Oracle Human Resources employee record created in the Creating Human Resource Employee Records procedure.

2-4 Oracle Field Service User Guide
Prerequisites❒ Set up the employee record in the Oracle Human Resources application.
Steps:1. Navigate to the Select Resources to Import window (CRM Administrator: CRM
Administrator > Resource Manager > Maintain Resources > Import Resources
The Select Resources to Import window appears
2. Select Employee from the Resource Category list of values. Employee appears by default.
3. Enter the employee name or number, and then click Search.
The employee displays in the Search Results table.
4. Select the check box corresponding to the employee record to be imported, and thenclick Start Import.
The Set Resource Attributes window appears.
5. Click OK.
The Review and Import Selected resources window appears, with the resource listed in a table.
6. Click Save Resource.
The Note window appears, with the message: The selected resources have been imported successfully.
7. Click OK.
Maintaining Technician Addresses and Sub-inventoriesA field service organization may have hundreds or thousands of field service technicians that require shipment of parts for either replenishment or task requirements. The Resource Addresses and Subinventories window provides an efficient method for creating, changing, and viewing field service technician ship to addresses and sub-inventories.
Prerequisites❒ Field service technicians are set up as employees, or supply contract resources.
❒ Sub-inventories are defined.
Administrative Setup 2-5
❒ Oracle Spares Management is installed and set up.
Steps:
Viewing Technician Addresses and Sub-Inventories1. Navigate to the Resource Addresses and Sub-inventories window (Field Service
Manager: Field Service Dispatcher > Dispatch Center).
• From the tool bar, select Navigate > Resource Addresses and Sub-inventories, or
• From the Plan Board view, right-click Resource > Resource Addresses and Sub-inventories
2. To query a new resource, from the tool bar, choose Query By Example > Enter, and then enter a partial value for the Resource Type or Resource Name.
3. Navigate to Query By Example, and select Run.
The window populates with the resource information. There are two tabs of information: Addresses and Sub-inventories.
Changing Technician Addresses and Sub-InventoriesYou can add, delete, and update information.
4. In the Addresses tab, you can configure the Address style (by country) and create the address, the time zone, and whether this is the primary address. You can also make an existing address inactive.
5. In the Sub-inventories tab, you can select sub-inventories to assign to the resource. You can also select the start and end date and the condition for the sub-inventory.
• The technician can have multiple sub-inventories assigned or the sub-inventory can have multiple technicians assigned. Normally a technician has two sub-inventories assigned. One for usable parts and one for defective parts.
• The condition of the sub-inventory, usable or defective, can also be assigned if not previously defined.
• The owner of the sub-inventory can also be defined. When the sub-inventory has more than one technician assigned, the owner administers the sub-inventory for excess returns processing.

2-6 Oracle Field Service User Guide
• The district the technician is assigned to can also be defined. The district is primarily used for DBI reporting.
• The return to organization and sub-inventory can be defined for both excess and defective returns. These fields are used in the excess and defective returns process to facilitate the creation of return orders.
6. Save your work.
Assigning Skills and Skill Levels to TechniciansIf a task has skills assigned, Oracle Advanced Scheduler can take these skills into account when searching for resources to perform the job. Use this procedure to assign skills and skill levels to resources.
Steps:1. Navigate to the Dispatch Center window (Field Service Manager: Field Service
Dispatcher > Dispatch Center).
The Field Service Dispatch Center window appears.
2. Select either the Plan Board or Gantt view of the Dispatch Center window.
3. Right-click the Resource Name of the technician, and then select Resource Skills Management from the right-click menu.
The Skill Management window for the selected resource appears.
4. To assign skills to the resource, on the Resources Tab, highlight an empty row in theSkills region.
5. Select a Skills Type from the list of values.
6. Select the Skill Name.
7. For the Skill Type of Product skills, select the Inventory Item ID number for the product that the technician is qualified to service.
8. Select a Skill Level from the list of values.
9. The current system date appears by default in the From Date field. You can override this value to indicate a start date for this Skill Level that is later than today.Use the To Date field to inactivate this Skill Level.

Administrative Setup 2-7
10. Save your work.
Adding Role Type, Role, and Application User IDAfter importing the employee record from Oracle Human Resources, use this procedureto add role type, role, and application user ID to the new dispatchers record.
Prerequisites❒ The dispatchers user ID is set up. (Navigator path: System Administrator > Security
> User > Define)
❒ The dispatchers employee record has been imported from Human Resources.
Steps:1. Navigate to the Resource window (CRM Administrator: CRM Administrator >
Resource Manager > Maintain Resources > Resources).
The Find Resources window appears
2. Query the Employee Resource Record. Choose Employee from the Category list of values. Enter the name, or a partial value in the Name field, and then click Find.
The Resource Search Results window appears.
3. Select the employee.
The Resource window header populates with information set up for this dispatcher.
4. In the User Name field, enter the application user ID. This User ID is same as the prerequisite setup, which is created for this dispatcher by the System Administrator(System Administrator > Security > User > Define).
Important: This association to the user ID is done explicitly (not automatically based on prerequisite setup by the System Administrator). Based on the user ID set up here, the CSF: Selected Territories Profile Option, which is set at the user level, and during later setup, the Dispatch Center populates the Plan Board, Gantt, and Map views with information for the appropriate subset of field service technicians.
5. On the Roles tab, in the Role Type column, enter 'Field Service Dispatchers', or the equivalent role type set up for Field Service dispatchers during implementation.
6. On the Roles tab, in the Role column, enter 'Field Service Dispatchers', or the

2-8 Oracle Field Service User Guide
equivalent role set up for Field Service dispatchers during implementation.
7. Save your work.
Adding the Dispatcher Resource Record to a Planner GroupUse the following procedure to add the new dispatcher to a planner (dispatcher) group:
Prerequisites❒ The role type, role, and application user ID have been added to the dispatchers
imported employee record.
Steps:1. Navigate to the Define Groups window (CRM Administrator: CRM Administrator >
Resource Manager > Maintain Resources > Groups).
The Define Groups window appears.
2. Use the Name field to query the planner group.
The Members tab populates with names of dispatchers.
3. Highlight a row, and then click the New record.
A blank row appears in the table.
4. Choose Employee from the Category list of values.
5. Enter the Employee number or Name. Press the tab key.
Information for the dispatcher displays in the remaining columns on the Members tab.
6. Click the Roles tab to verify previously set up role type and role.
7. Save your work.
Assigning Territories to a Planner GroupUse this procedure to assign territories to planner (dispatcher) groups.
Prerequisites❒ Add the dispatcher resource record to a planner group.
Administrative Setup 2-9
❒ One or more territories with assigned service technicians set up in Territory Manager (Navigator path: CRM Administrator >Territory Manager > Territory Administration).
Steps:1. Navigate to the Assign Territories to Planner Groups window (Field Service
Manager: Field Service Setup > Assign Territories to Planner Groups).
The Select Planner Group window appears.
2. Use the Find functionality to select a planner group. For example, in the Find field, enter 'Dispatch%'. Click Find.
A list of planner groups that begin with 'Dispatch' appear.
3. Select a Planner Group, and then click OK.
The Assign Territories to Planner Groups window appears.
4. In the Territories area, place the cursor in an empty line. Select a Territory from the list of values, and then click OK.
The selected territory is added to the list.
5. Save your work.
Associating Territories to a DispatcherThis procedure completes the required connections by associating one or more territories to each dispatcher. This connection is accomplished by selecting from the list of territories that were assigned to the planner group in the Assigning Territories to a Planner Group procedure.
When the dispatcher logs in, based on the user ID and values in the profile option CSF: Selected Territories, the Dispatch Center populates the Plan Board, Gantt, and Map views with information for technicians working in the selected territories.
Prerequisites❒ Set up a user ID for each dispatcher. (Navigator path: System Administrator >
Security > User > Define)
❒ Assign individual dispatchers to planner groups. See Adding the Dispatcher Resource Record to a Planner Group, page 2-8.
❒ Assign territories to dispatcher groups. See Assigning Territories to a Planner Group, page 2-8.
2-10 Oracle Field Service User Guide
❒ Assign technicians to service territories. (Navigator path: CRM Administrator > Territory Manager > Territory Administration).
Steps:1. Navigate to the Field Service Dispatch Center window (Field Service Dispatcher:
Field Service Dispatcher > Dispatch Center).
The Tasks view appears by default.
2. From any dispatch center view, navigate to the Select Dispatch Center Territories window.
Menu > Navigate > Select Dispatch Center Territories
The Select Dispatch Center Territories window appears.
3. The Territories region provides two columns titled: 'Unselected' and 'Selected'. The 'Unselected' column lists territories assigned to the dispatcher, but not currently selected for display of associated technicians in the Plan Board, Gantt, and Map views. To populate the Plan Board, Gantt, and Map view with information about the technicians assigned to specific territories, move one or more territories to the 'Selected' column, and then click OK.
Note: To view all territories, including the ones not assigned to this dispatcher, select the Show All Territories check box.
Service technicians assigned to the selected territories display on the Plan Board, Gantt chart, and Map.
Note: After the initial selection of territories, the CSF: Selected Territories profile option is updated. The selected configuration becomes the default view for this dispatcher going forward. The profile option is automatically updated, and the default view changed, whenever the dispatcher uses the Select Dispatch Center Territories window to change the selection of territories.
Populating the Dispatch Center SetupIn this section, we summarize the previous setup, and then explain how the Dispatch Center populates with the subset of information of interest to the logged in dispatcher.
The setup summary includes:
• The System Administrator sets up each dispatcher and technician with a unique user ID.
Administrative Setup 2-11
• Dispatchers and technicians are set up as employees in the Oracle Human Resources application.
• Employee records are imported to Oracle Field Service.
• In Oracle Field Service, dispatchers are identified with the dispatcher resource type and role.
• Each technician is assigned to a territory.
• Each dispatcher is assigned to a planner (dispatcher) group. See Adding the Dispatcher Resource Record to a Planner Group, page 2-8.
• Each territory is assigned to a planner group. See Assigning Territories to a Planner Group, page 2-8.
• Subsets of territories within a planner group are associated to specific dispatchers within the same planner group.
When the Dispatch Center window is invoked by the dispatcher user for the first time:
• From the log-in application user ID, the dispatchers employee record is identified.
• Based on the employee record, the dispatchers planner group is identified
• Based on the planner group, all territories assigned to the planner group are known.
• The user-level profile option CSF: Selected Territories is not yet populated.
• All technicians in all territories assigned to the planner group display.
• The dispatcher selects the appropriate territories to administer tasks. See Associating Territories to a Dispatcher, page 2-9.
• Plan Board, Gantt, and Map views populate with resources from the associated territories.
• The value in the profile option CSF: Selected Territories is updated accordingly for this user.
For the subsequent log-ins by this user, the Dispatch Center window is invoked using thefollowing process:
• From the log-in application user ID, the dispatchers territories are identified from the user-level setting of Profile CSF: Selected Territories.
• Field Service Dispatch Center Plan Board, Gantt, and Map views populate with resources from the associated territories.
2-12 Oracle Field Service User Guide
When the dispatcher selects or clears territories using the Select Territories window, the value in the profile option CSF: Selected Territories updates accordingly for this user. This setting is honored for subsequent log-ins by that user.
Purging Field Service DataDatabase size increases with the number of transactional records. As the database size increases, system performance and the time required for backup are adversely impacted. To address these adverse effects, the Field Service Administrator should periodically run the Service Request Purge Program to:
• Validate whether the service requests can be purged.
• If yes, then delete service request and task data based upon parameter values specified for the concurrent manager program..
• Purge refers to the action of deleting a record from the database. Purged records cannot be accessed or viewed in the future.
• Archive refers to storing deleted data in non-transactional tables that can then be retrieved through a backup mechanism. Archiving deleted service request records is not within the scope for this release.
• After the Debrief header, lines, notes, and task part requirements have been successfully purged, a 'Success' message is returned to the Service Management API. If unable to purge, an appropriate error message is returned.
• Purge of service requests with tasks other than Type: Dispatch, and their related and dependent objects is handled by the Oracle Customer Support (TeleService) application.
Caution: Electronic Signatures created as part of the ERES enabled process for CFR Part 11 Compliance should not be purged. The software does not prevent the purging of these records.
This concurrent request is set up to delete Field Service tasks of type: Dispatch that are Closed, Completed, or Canceled, along with their task assignment records, task notes, task access hours, and task dependencies.
Steps:1. From the Field Service Administrator Responsibility, navigate: Field Service

Administrative Setup 2-13
Dispatcher > Service Request > Others > Submit Requests.
The Submit a New Request window appears.
2. Click the Single Request radio button, and then click OK.
The Submit Request window appears.
3. In the Name field, enter the concurrent request name: Service Request Data Purge.
4. Click the Parameters field.
The Parameters window appears.
5. Complete the following parameter values to specify criteria for purging records:
• Number: Service Request number
• Status: Closed, Canceled, or Completed
• Type: Dispatch
• Created From – To (dates)
• Updated From – To (dates)
• Not Updated Since [LOV]
• Customer Number [LOV]
• Customer Account [LOV]
• Item Category [LOV]
• Item Number [LOV]
• Retain Customer Requests [Yes/No]
• Number of Workers: [LOV] (4 recommended)
• Purge Batch Size [LOV] (1000 recommended)
• Non Field Service Tasks [LOV]
• Maintain Purge Audit [LOV]
6. Click OK.
The Parameters window closes.

2-14 Oracle Field Service User Guide
7. On the Submit Request window, click Submit.

Creating Service Requests and Field Service Tasks 3-1
3Creating Service Requests and Field Service
Tasks
Requests for field service, whether for planned work generated by a preventive maintenance program, or as the result of customer calls for break/fix issues, trigger a sequence of integrated business processes. These processes are described at a high level in the introductory chapter to this User Guide titled: "Understanding Field Service".
The scope for this chapter picks up at a point where several steps involving upstream integrated applications have already been completed. At this stage, one or more service requests have been entered through a TeleService Service Request, or iSupport Customer Contact Center, or have been generated by a preventive maintenance program. The requests have been screened for entitlement, and priority. The service problems have been described, and it has been determined that field service technician visits are necessary.
This chapter covers the following topics:
• Overview: Service Request and Task Creation
• Overview: Dispatch Center
• Marking Tasks for Customer Confirmation
• Defining Customer Access and After Hours Constraints
• Creating Task Dependencies
• Assigning Skills to Tasks
• Overview: Parts Requirements
• Creating Parts Requirements Automatically for Tasks
• Viewing and Manually Creating Parts Requirements
Overview: Service Request and Task CreationSelf-service Web portals built with Oracle iSupport make it possible for customers and

3-2 Oracle Field Service User Guide
employees to log and monitor their service requests. Oracle TeleService agents can publish service requests for the customers to view, suggest knowledge base solutions, and communicate with customers through notes. To understand how customers interact with the service organization through a self-service Web-portal see the Oracle iSupport User Guide.
Refer to the Oracle TeleService User Guide for more information about the following topics:
• Managing service requests from the Contact Center.
• Creating and updating service requests (from the Contact Center).
• Creating service requests (from the TeleService Service Request window).
• Creating tasks for a service request manually.
• Using Auto Task Generation (to create tasks automatically).
• Creating tasks using a template.
• Searching the Knowledge Base for solutions (to a service request).
• Selecting task owners and assignees.
Overview: Dispatch CenterThe Oracle Field Service dispatch center is a one stop dashboard and workbench for dispatchers. It assists with planning, scheduling, committing, monitoring, and adjustingfield service activities and schedules.
When the dispatch center is invoked by the dispatcher user for the first time tasks for all technicians in all territories assigned to the dispatchers planner group appear.
For more information about populating the dispatch center with the subset of information of interest to the logged in dispatcher, see Populating the Dispatch Center Setup, page 2-10.
To select the appropriate territories to display when a dispatcher invokes the dispatch center, see Associating Territories to a Dispatcher, page 2-9.

Creating Service Requests and Field Service Tasks 3-3
Task View
The Dispatch Center Task view is composed of a task list on the left, active task details across the top of the window, several tabs located below the header region that organize detail information, and four icons at the lower left for switching between the Tasks, Plan Board, Gantt, and Map views.
Task ListYou can populate the task list by selecting a query from the View By list of values. Somequeries are seeded and delivered with the application. For example, you can view tasks that are at the 'Escalated' status.
Alternatively, you can launch the Advanced Find window, and then define a custom query to find tasks that match combinations of specified criteria. Custom queries also appear in the View By list of values.
See Populating the Dispatch Center Tasks List, page 5-3
Plan Board, Gantt, and Map ViewsYou can access other views of the dispatch center, by clicking the Plan Board, Gantt, or Map icons at the bottom of the page.
The Dispatch Center Plan Board and Gantt chart support monitoring progress against service technician schedules. Dispatchers can change schedules to react to unplanned events. If spatial data is loaded, dispatchers can use the Dispatch Center Map to view a
3-4 Oracle Field Service User Guide
technicians status and location.
Marking Tasks for Customer ConfirmationCall center agents and dispatchers can mark a task to indicate that a customer requires confirmation prior to a technician arriving on site. Field Service provides a process for the dispatcher to record the customer confirmation requirement prior to scheduling the task. Confirmation must be received before the task can be committed. See Releasing Work to the Field - Interactive Process, page 5-28.
A customer confirmed visit can not be modified without the approval of the customer, although the dispatcher can change the task status from confirmation 'Confirmed' back to confirmation 'Required'. When the task status is set to 'Confirmed', the task cannot bedirectly rescheduled, canceled, or unplanned. Before proceeding, the dispatcher first must undo the customer confirmation. This ensures that confirmed tasks cannot be changed accidentally.
Customer confirmation is a three-step process:
1. Capture the customer confirmation requirement.
2. Record receipt of the confirmation prior to committing the task.
3. Reschedule if customer confirmation is received and later rescinded.
In the break/fix mode, the customer confirmation requirement can be captured in the call center. For preventive maintenance work, the customer confirmation requirement iscaptured in the contract. The customer confirmation requirement is stamped on the taskwhen the preventive maintenance service request is created.
Once recorded, if the Confirmed status is reversed, the Field Service application recordswhether the customer or the field service operation initiated the change. Business practice modifications may be indicated if an audit trail reveals that changes by the service provider are too frequent.
Use the following procedures to add a customer confirmation to a task, to record a confirmation, and to undo a previously required customer confirmation.
Steps:1. Navigate to the Customer Confirmation window. (Field Service Manager or Field
Service Dispatcher: Field Service Dispatcher > Dispatch Center > Navigate > Customer Confirmation
Alternative navigation paths:
• Field Service Dispatcher > Dispatch Center > Right-click on task in Task list
• Field Service Dispatcher > Dispatch Center > Plan Board or Gantt view> Right-click on task

Creating Service Requests and Field Service Tasks 3-5
• Field Service Dispatcher > Dispatch Center > Task Details > (B) Customer Confirmation. The dynamic label toggles to Customer Confirmation Received when a confirmation is obtained and recorded.
• Field Service Dispatcher > Service Request > Service Request > Task tab
Adding a Confirmation Requirement2. In the Customer Confirmation region, if customer confirmation has not been set to
yes, the field displays 'Not Required'. To set to 'Required', click Set to Required.
After a task has a customer confirmation of 'Required' the dispatcher must receive this confirmation to commit the task (release the work).
The button located on the Overview tab of the Task Details view of the dispatch center will dynamically display the label 'Customer Confirmation Received', once the confirmation is recorded.
3. The dispatcher can change the confirmation back to 'Not Required' by clicking Set to No.
A popup window with the following message: "Are you sure this task does not require customer confirmation?" appears. Click Yes.
Indicating Confirmation4. After a dispatcher receives a customer confirmation, click Set to Received.
Alternatively, from the Overview tab of the Task Details view of the dispatch center, click Customer Confirmation Received. This button is enabled as a result of Step 2.
At this time, the task can be committed.
Important: If confirmation is received for a parent or a child task, all the related parent and child tasks are confirmed.
Reversing Confirmed Status5. Once a confirmation is received, a dispatcher can reverse this status, by clicking Set
to Required.
A popup window asks whether this action is requested by the customer. If yes, thenthe Customer Confirmation Counter does not record the action. If no, then this change increments the counter.
Defining Customer Access and After Hours ConstraintsSome customers restrict access to their site to times when work on a task would not

3-6 Oracle Field Service User Guide
intrude on normal business operations. To facilitate this scenario, Oracle Field Service enables you to define periods during all days in a week when a technician can arrive and start working. When access hours are defined, Oracle Advanced Scheduler automatically considers this constraint when it is identifying options.
Alternatively, you can also indicate that a task needs to be scheduled 'After Hours'. Youenter the After Hours constraint as free form text and it is treated as 'Special Instructions for field visit'. When the After Hours mechanism is invoked, the task must be scheduled interactively. The dispatcher can view and schedule an After Hours task by making a query in the task list that identifies those tasks carrying the After Hours attribute.
Use this procedure to create access hours and after hours constraints for a particular task.
Steps:1. Navigate to the Access Hours window (Field Service Manager or Field Service
Dispatcher: Field Service Dispatcher > Dispatch Center > Navigation > Access Hours).
The Access Hours window appears. The task details for the task that you want to create access hours or after hours requirements for are displayed. Boxes appear for each of the seven days of the week. There are four boxes available for each day of the week, so you can schedule two different Access Hour time slots for each day.
Setting Up Access Hours2. To create Access Hours, select the Active Access Hours check box.
This disables the After Hours check box. The two actions are mutually exclusive.
3. Fill in the access hours that are available for scheduling service tasks. For example, Monday 09:00-11:00.
Hours must be entered in military time.
4. Save your work.
After Hours5. To create After Hours, select the After Hours check box.
This disables the Access Hours check box.
6. In the text box to the right of the check box, enter any instructions regarding the after hours scheduling that you want the dispatcher to consider.
7. Save your work.

Creating Service Requests and Field Service Tasks 3-7
RestrictionsAlthough you can change Access Hours, even if the task status is 'Planned' or 'Assigned',you cannot remove Access Hours once the task status changes to 'Working' or 'Completed'.
Creating Task DependenciesTo work more effectively with customers having multiple related tasks, you can create and view task dependencies from the dispatch center.
The purpose of the dependency relationship is to store time-based dependencies between tasks. For example, if two network specialists need to test cell telephone communication quality between two remote areas, you can create a 'Starts together with' dependency relationship between these two related tasks.
When you select a task to create a task dependency, the Task Dependencies window displays task details, including number, planned start and end, task type, status, and priority. It also displays check boxes indicating whether customer confirmation is required, whether there are specific access or after hours requirements, and whether parts are required.
If a task that is in a dependency relationship is canceled, the dependency is automatically deleted.
Currently, dependencies are not considered by Oracle Advanced Scheduler. The

3-8 Oracle Field Service User Guide
dispatcher must manually schedule and monitor the execution of the dependent tasks to ensure the relationship is met.
Prerequisites❒ The task must have a status of 'In Planning', or 'Planned' to create a dependency.
Note: This window e is read only for tasks carrying a status other than 'In Planning' or 'Planned'.
Steps:1. Navigate to the Task Dependencies window.
Field Service Manager or Field Service Dispatcher: Field Service Dispatcher > Dispatch Center > Navigate > Task Dependencies
Field Service Manager or Field Service Dispatcher: Field Service Dispatcher > Dispatch Center > Right-click a task in the task-list, or from the Gantt or Plan Board,right-click a task
The Task Dependencies window appears.
2. After you navigate to the Task Dependencies window, and the task-related information displays, enter one of the following Dependency Types:
• Starts after: This creates a relationship where the active task cannot start until the related task finishes.
• Starts together with: This creates a relationship where both tasks must start at the same time.
• Finishes together with: This creates a relationship where both tasks must finishat the same time.
• Finishes before: This creates a relationship where the active task cannot finish until the related task starts.
3. In the Related Task Field, select the task number of the task for which you want to create the dependency.
This action populates some of the dependency fields with task-related information for the dependent task, such as Subject, Task Type, Status, and Planned Effort, Scheduled Start and End Date.
4. Save your work.

Creating Service Requests and Field Service Tasks 3-9
Assigning Skills to TasksAfter skills and skill levels are set up, use this procedure to assign skills and skill levels to tasks.
Steps:1. Navigate to the Skill Assignment window (Field Service Manager: Field Service
Dispatcher > Skill Assignment).
When navigating to the Skill Assignment window, use the Find Task functionality to find a task if an active task is not already displayed. If an active task is already displayed, the Skill Assignment window appears. See Populating the Dispatch Center Tasks List, page 5-3.
2. If you searched for a task, select a task by double-clicking one of the Results lines, orby selecting a line, and then clicking OK.
The Skills Assignment window appears for the selected task. Task details display inthe header part of the window.
3. Select the Task tab.
4. Select the Skill Type from the Skill Type list of values.
5. Select the Skill Name from the Skill Name list of values.
The Skill Description displays.
6. Select the Skill Level from the Skill Level list of values.
7. Select the Disable Skill check box only if Advanced Scheduler should not take this skill into account.
8. Save your work.
9. Click Next to continue assigning skills for the next task from the Results window.
10. Click Previous to continue assigning skills for the previous task from the Results window.
11. Click the flashlight to reopen the Find Tasks window.
Overview: Parts RequirementsA parts requirement defines specific parts needed for a task. Advanced Scheduler functionality uses parts requirements and availability information from Spares

3-10 Oracle Field Service User Guide
Management to schedule and assign tasks to technicians based on both technician and parts availability. Parts availability in Advanced Scheduler acts as a constraint to prevent the task from being scheduled before parts are available.
When additional parts are needed to complete a task, technicians or dispatchers can create a follow-up task with parts requirements. The Parts requirement can also be created automatically when the task is created from a template that has parts requirements preassigned to the task using the Task Parts functionality in Spares Management.
Optional functionality provided in the Spares Management Parts Requirement window generates an internal order for the required parts. The Spares tab in the dispatch center provides an overview of parts required to complete a task.
There are two methods for creating parts requirements:
• Create Parts Requirements Automatically, page 3-10
• Create Parts Requirements Manually, page 3-11
For more information about using the Parts Requirement window, see the Oracle Spares Management User Guide.
Creating Parts Requirements Automatically for TasksMany field service operations execute certain tasks frequently, and the required parts for these tasks are known.
In the Spares Management Task Parts, you can predefine parts required for a task template and product. When you create a service request for that product and a task from a template linked to the product with parts defined, a parts requirement generates automatically. For details, see the Task Template and Task Parts setup sections in the Oracle Field Service Implementation Guide.
You define spare parts associated with a product and a task template during Field Service implementation. For more information on creating a service request and creating tasks from a task template, see the Oracle TeleSupport User Guide.
Prerequisites❒ Task templates have been predefined.
❒ Task parts definitions have been created in Spares Management for the product andtask template.
❒ Sub-inventories have been defined and assigned to specific organizations.

Creating Service Requests and Field Service Tasks 3-11
Steps:1. Navigate to the Service Request window (Field Service Manager: Field Service
Dispatcher > Service Request > Service Requests > Create Service Request).
The Service Request window appears.
2. To create a service request using the task template functionality, create a basic service request, navigate to the Tasks tab, and then click Use Template.
The Create Tasks from Template Group window appears.
3. In the Create Tasks from Template Group window, select the Template Group that corresponds to the task template you want to use.
The parts requirement creates automatically when parts have been predefined for the product from the service request and the task template used to create the task.
Viewing and Manually Creating Parts RequirementsIn this scenario, a technician or dispatcher determines that some parts required for the task are not in stock. The dispatcher or field manager manually creates a parts requirement, and then uses the parts requirement information for creating an internal order.
For details about creating an internal order, see Creating an Internal Order or a Parts Reservation in the Oracle Spares Management User Guide.

3-12 Oracle Field Service User Guide
The Parts Requirement window is divided into four parts:
• Header Information: Service Request or Repair Order, Task, Resource Type, Resource Name, Requirement Number, Destination Organization, Destination Sub-inventory, Need-by Date, and Order Type.
• Ship To Address region: Engineer (technician), Customer, or Special address.
• A tabbed region: On the Requirement tab, you specify items to be added to the parts requirement. The Source tab provides the supplier organization and source sub-inventory. The Order tab provides order status information.
• The final region contains fields for Item Description and Item Scratch pad.
Note: When an Inventory item number is unknown, technicians canenter a designated placeholder part number previously set up in Oracle Inventory in the Required Item field of the Requirement tab.Then enter descriptive details in the Item Scratch pad field, such as supplier and supplier part number. This information can be used tosearch the Inventory Item Master to find the actual item or set up a new item.
Creating Service Requests and Field Service Tasks 3-13
Use this procedure to view an existing, or manually create a parts requirement:
Prerequisites❒ Destination organization is setup.
❒ Inventory items are setup.
Steps:1. Navigate to the View Parts Order Status window (Field Service Manager or Field
Service Technician: Field Service Dispatcher > Spares Management > Spares Logistics > Parts Requirement).
The View Parts Order Status window appears.
2. To search for existing part requirements, use the View Parts Order Status window and the Find function. Enter search criteria, and then click Find.
You can inquire by Order number, order Status, Item ID number, Source Organization, Service Request number, Resource Type, Resource name, Requirement number, Task number, Waybill, and Carrier. Other search criteria include Order By, Need By, and Promise dates.
3. To create a new parts requirement, from the View Parts Order Status window, click New.
This closes the View Parts Order Status window, and the Part Requirements window appears.
4. If you are creating the parts requirement for a specific service request or task, enter the Service Request number. If you know the Task number, enter it.
• If the Task number is entered, the Service Request number attached to the task is automatically entered.
• If the Service Request is entered, the Task can be selected from the list of values of tasks associated with the service request.
• If a resource has been assigned to the task, the Resource Type and Resource Name fields are automatically populated.
• If they have been set up for the resource, the Destination Organization, Destination Sub-inventory, and address are automatically entered.
5. Select a Destination Organization and Destination Sub-inventory.
The destination organization and sub-inventory automatically populate when a technician is assigned to the task and the technician has a usable sub-inventory

3-14 Oracle Field Service User Guide
assigned. If the technician has more than one usable sub-inventory assigned, then the technicians default sub-inventory is used.
6. Enter a date in the Need By Date field.
The Order Type field appears by default from the order type defined in the profile option CSP: Order Type. You can override the default setting by selecting a different Order Type from the list of values.
7. In the Ship To region, select the option for the address that you want to ship the parts to: Engineer, Customer, or Special.
Engineer appears selected by default, and the engineers default address is displayed.
8. If you select the Special option, enter the Country, Address, and Time Zone fields, and then click Save.
This address joins the engineers list of addresses.
9. To change addresses, click the Addresses button, and then select the new ship to address from the list of values. Click OK.
10. In the Required Item field of the Requirement tab, enter the item number you want to assign to this parts requirement.
11. In the Required Quantity field, enter the quantity needed for the parts requirement.
12. Repeat steps 10-11 for each item to be added to the parts requirement.
13. (Optional) Select the Order tab to view order details such as Supplied Item, Source Type, and Document Number.
14. Click Save to create a parts requirement.
This creates a Requirement Number for accessing the parts requirement record at a later time.
Scheduling Field Service Tasks 4-1
4Scheduling Field Service Tasks
This chapter describes the functionality of he Schedule Tasks window
This chapter covers the following topics:
• Overview: Call Center Booking
• Overview: Schedule Task Window
• Accessing the Schedule Task Window
• Specifying Preferences for Scheduling Tasks
• Selecting a Scheduler Option
• Scheduling Tasks Automatically
• Launching Autonomous Scheduler
• Using Interactive Scheduling
• Scheduling Using the Intelligent Option
• Scheduling Using the Window to Promise Option
• Scheduling Using the Assisted Option
• Supporting Location Time Zones
Overview: Call Center Booking The process for booking appointments for field service requests in the call center generally follows this sequence:
1. Access the Schedule Task window from the Service Request Task tab.
2. Choose a mode of scheduling assistance.
3. Depending on assistance mode, specify scheduling preferences and parameters.
4. Launch one of several scheduling process alternatives.
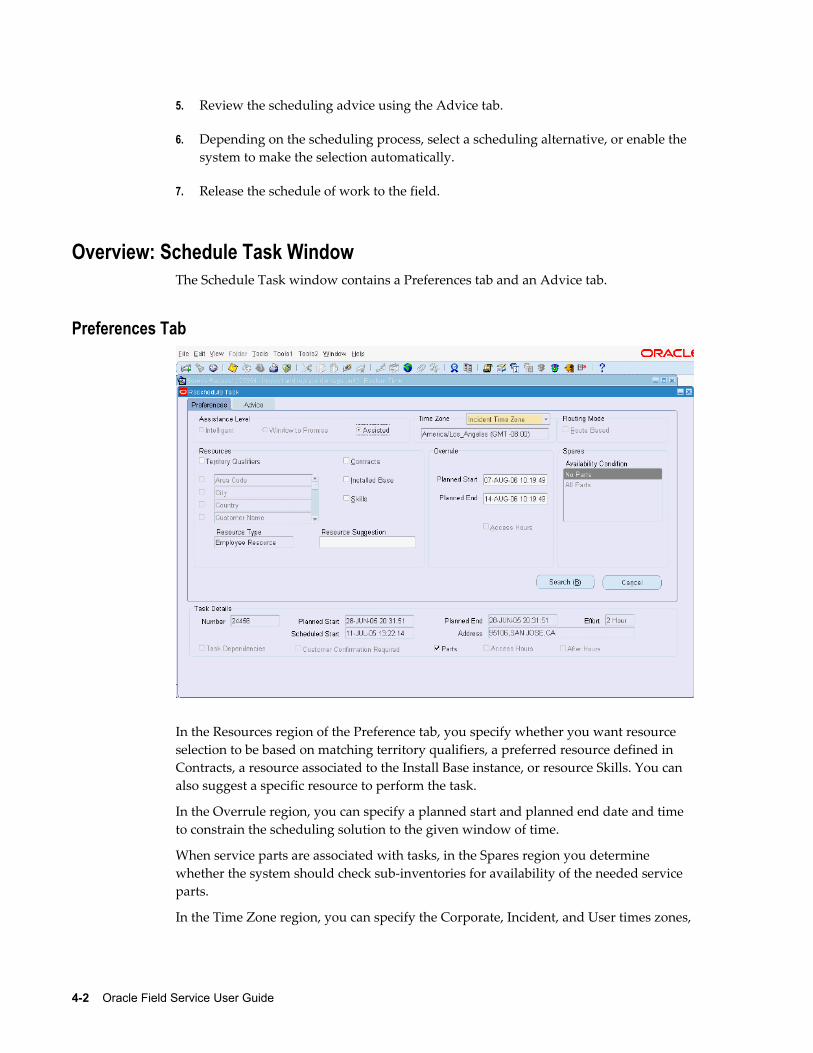
4-2 Oracle Field Service User Guide
5. Review the scheduling advice using the Advice tab.
6. Depending on the scheduling process, select a scheduling alternative, or enable the system to make the selection automatically.
7. Release the schedule of work to the field.
Overview: Schedule Task Window The Schedule Task window contains a Preferences tab and an Advice tab.
Preferences Tab
In the Resources region of the Preference tab, you specify whether you want resource selection to be based on matching territory qualifiers, a preferred resource defined in Contracts, a resource associated to the Install Base instance, or resource Skills. You can also suggest a specific resource to perform the task.
In the Overrule region, you can specify a planned start and planned end date and time to constrain the scheduling solution to the given window of time.
When service parts are associated with tasks, in the Spares region you determine whether the system should check sub-inventories for availability of the needed service parts.
In the Time Zone region, you can specify the Corporate, Incident, and User times zones,
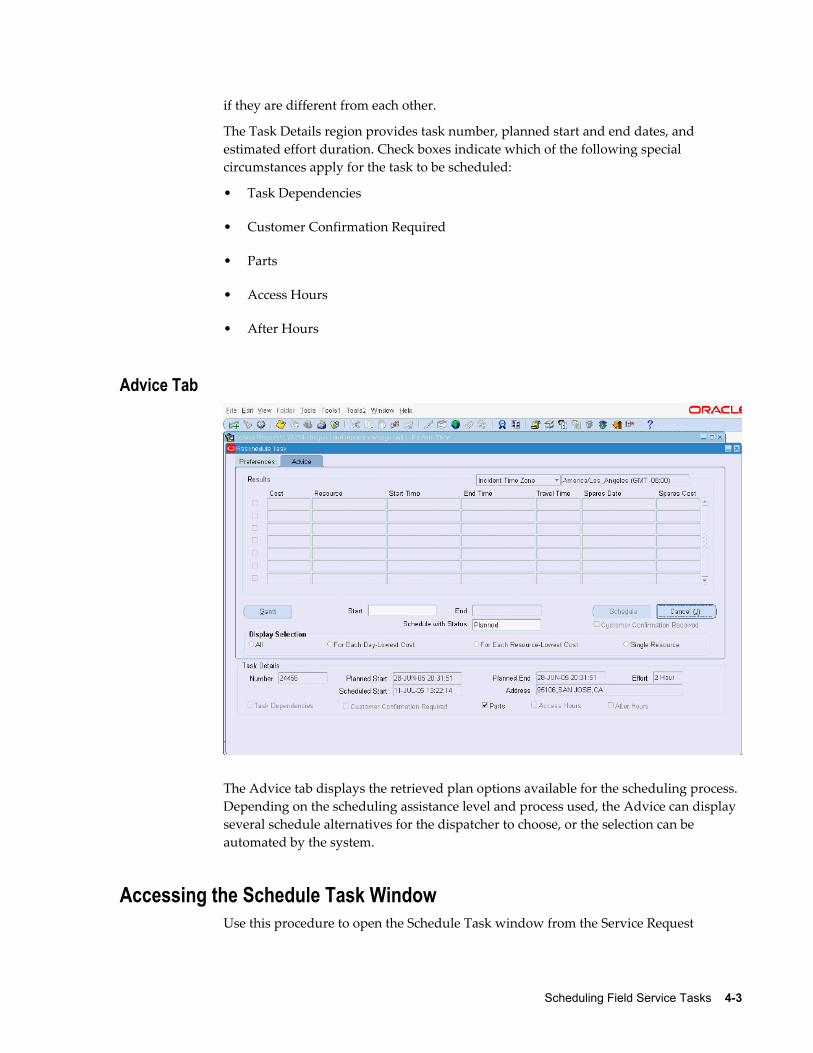
Scheduling Field Service Tasks 4-3
if they are different from each other.
The Task Details region provides task number, planned start and end dates, and estimated effort duration. Check boxes indicate which of the following special circumstances apply for the task to be scheduled:
• Task Dependencies
• Customer Confirmation Required
• Parts
• Access Hours
• After Hours
Advice Tab
The Advice tab displays the retrieved plan options available for the scheduling process. Depending on the scheduling assistance level and process used, the Advice can display several schedule alternatives for the dispatcher to choose, or the selection can be automated by the system.
Accessing the Schedule Task WindowUse this procedure to open the Schedule Task window from the Service Request
4-4 Oracle Field Service User Guide
window Tasks tab.
Prerequisites❒ The status of the selected task is 'Open' or 'Planned'.
Steps:1. Navigate to the Service Request window Task tab (Field Service Dispatcher >
Service Request > Service Requests > Find Service Request).
The Find Service Request window opens.
2. Find a task that has not already been assigned.
The Service Request window appears with information populated for the task.
3. Select the Tasks tab.
The Task tab appears.
4. Click the Schedule Task icon located next to the Assignee field.
The Schedule Task window appears displaying the Preferences tab.
Specifying Preferences for Scheduling TasksIn the Resources region of the Schedule Task - Preferences tab, you specify whether youwant resource selection to be based on matching territory qualifiers, a preferred resource defined in Contracts, a resource recommended from Install Base, or resource Skills.
Steps:1. Navigate to the Schedule Task window (Field Service Dispatcher > Dispatch Center
> right-click on a Task List task > Schedule).
The Schedule Task window appears displaying the Preferences tab in front of the Advice tab.
2. In the Resources region, select the Territory Qualifiers, Contracts, Installed Base, or Skills check box. Select a check box to indicate resource selection based on matchingterritory qualifiers, a preferred resource defined in Contracts, a resource associated to the Install Base instance, or resource Skills.
3. When you select the Territory Qualifiers check box, the table of attributes is enabled. Select as many attributes as desired for consideration during territory qualification.

Scheduling Field Service Tasks 4-5
4. To suggest a specific technician to be assigned, in the Resource Type field, select Employee Resource from the list of values. In the Resource Suggestion field, select the technicians Resource Name from the list of values.
Selecting a Scheduler OptionThe Preferences tab of the Schedule Task window contains an Assistance Level region. The Assistance Level region offers three Assistance modes.
• Intelligent
• Window to Promise
• Assisted
Use this procedure to select an assistance mode for scheduling tasks.
Steps:1. Navigate to the Dispatch Center window (Field Service Dispatcher > Dispatch
Center).
2. From the dispatch center, populate the Tasks list with tasks. SeePopulating the Dispatch Center Tasks List, page 5-3
3. To schedule tasks interactively, access the Schedule Task window. In the Tasks list section, right-click on the task you want to schedule, and then select Schedule from the popup menu.
The Schedule Task window appears.
4. Select one of the three Assistance Level options to indicate which option you want to use for scheduling the selected task. For more information see:
• Scheduling Using the Intelligent Option, page 4-7
• Scheduling Using the Window to Promise Option, page 4-9
• Scheduling Using the Assisted Option, page 4-10
Scheduling Tasks AutomaticallyYou can automatically schedule a single task or multiple tasks directly from the Dispatch Center window. The applied scheduling criteria comes from the Advanced Scheduler default settings.
Use this procedure to schedule a single task or multiple tasks automatically from the
4-6 Oracle Field Service User Guide
dispatch center.
Prerequisites❒ Advanced Scheduler is installed.
Steps:1. Navigate to the Dispatch Center window (Field Service Manager Responsibility:
Field Service Dispatcher > Dispatch Center).
2. From the Dispatch Center, populate the Tasks list with tasks. See Populating the Dispatch Center Tasks List, page 5-3.
3. Select the check boxes located next to the tasks that you want to schedule. To check all tasks at once, choose the Select All check box located near the bottom of the Task List region.
4. Click Auto Schedule.
The dynamic button label changes to 'Busy'.
Note: While the autonomous scheduling process is running, you can continue to perform other work.
5. Click Refresh to update the Plan Board and Gantt chart.
6. Run the Rejected Task query in the Task List region to verify that all of the selected tasks were scheduled.
Caution: If one or more tasks are rejected, you must resolve the issue for the rejected tasks. Then the Auto Schedule process needs to be re-initiated to schedule the remainder of the tasks. See Working with Tasks Rejected by Autonomous Scheduling, page 5-35
7. The alternative method is to run the Autonomous Scheduler concurrent program to schedule tasks automatically 'in the background', in other words, without user intervention. Autonomous Scheduler is setup during implementation.
Launching Autonomous SchedulerFollow this procedure to run the Autonomous Scheduler concurrent program:
Scheduling Field Service Tasks 4-7
Steps:1. Navigate to the Submit Requests window (Field Service Setup > Autonomous
Scheduler).
The Parameters window appears in the foreground of the Search and Schedule Auto window.
2. In the Parameters window, select a Task List Query from the list of values. Click OK.
The Parameters window closes. The selected query appears in the Parameters field of the Search and Schedule Auto window.
3. Click Submit.
Using Interactive SchedulingInteractive scheduling includes the following Scheduling modes:
• Intelligent
• Window to Promise
• Assisted
as well as choosing the Auto Schedule background process after selecting tasks in the task list. See
• Scheduling Using the Intelligent Option, page 4-7
• Scheduling Using the Window to Promise Option, page 4-9
• Scheduling Using the Assisted Option, page 4-10
Scheduling Using the Intelligent OptionThe Intelligent option is only available when Oracle Advanced Scheduler is installed. Use the Intelligent option to assign a task to a resource based on selected criteria.
Prerequisites❒ Oracle Advanced Scheduler is installed.
Steps:1. Navigate to the Schedule Task window from the Field Service Dispatch Center
4-8 Oracle Field Service User Guide
window (Field Service Dispatcher > Dispatch Center. Right click on a task in the Task List section and then select Schedule from the right-click menu.
The Schedule Task window appears.
2. Select the Preferences tab.
The Preferences tab appears in front of the Advice tab.
3. Select the Intelligent option in the Assistance Level region.
4. In the Resources region, select the Territory Qualifiers, Contracts, Installed Base, or Skills check box. Select a check box to indicate resource selection based on matchingterritory qualifiers, a preferred resource defined in Contracts, a resource recommended from Installed Base, and resource Skills.
5. When you select the Territory Qualifiers check box, the table of attributes is enabled. Select as many attributes as desired for consideration during territory qualification.
6. If you want a specific technician to be considered in addition to those matching the previously specified criteria, in the Resource Suggestion field, select a Resource Name from the list of values.
7. (Optional) If service parts are associated with the task, in the Spares region, indicatewhether you want the system to check sub-inventories for parts availability as part of the resource selection. Select one of the following Availability Conditions:
• No Parts
• All Parts
For more information regarding conditions for enabling the Spares region of the Preferences tab, see the Oracle Spares Management User Guide.
8. Click Search.
The list of qualified resources displays in the Advice tab.
9. Select the check box next to a resource (technician) to indicate your resource choice.
The Start and End fields are populated with the scheduled date.
10. Click Schedule.
The task is scheduled to the selected technician. The Plan Board and Gantt views are refreshed.
Scheduling Field Service Tasks 4-9
Scheduling Using the Window to Promise OptionThe Window to Promise option is only available when Oracle Advanced Scheduler is installed. This feature is useful if the service representative or dispatcher is talking directly with the customer. The Window to Promise option provides the ability to find available time slots (predefined time windows) of technicians based on a selection criteria using Advanced Scheduler functionality. Possible time slots, along with related cost, display for you to offer to the customer.
After using the Window to Promise option to assign a task, a time slot is reserved for a customer and the Planned Start and End dates are set accordingly. A time slot is also assigned to a resource at the time of scheduling. Later in the process, you can assign the task to another resource, or use Advanced Scheduler algorithm to optimize the trip.
Prerequisites❒ Advanced Scheduler is installed.
Steps:1. Navigate to the Schedule Task window from the Field Service Dispatch Center
window (Field Service Dispatcher > Dispatch Center. Right click on a task in the Task List section and then select Schedule from the right-click menu).
The Schedule Task window appears.
2. Select the Preferences tab.
3. Select the Window to Promise option in the Assistance Level region.
4. In the Resources region select the Territory Qualifiers, Contracts, Installed Base, or Skills check box. Select a check box to indicate resource selection based on matchingterritory qualifiers, a preferred resource defined in Contracts, a resource recommended from Installed Base, and resource Skills. Also select if you want to check resources availability.
5. When you select the Territory Qualifiers check box, the table of attributes is enabled. Select as many attributes as desired for consideration during territory qualification.
6. If you want a specific technician to be considered in addition to those matching to the previously specified criteria, in the Resource Suggestion field, select a Resource Name from the list of values.
7. In the Spares region choose an Availability Condition from the list of values.
4-10 Oracle Field Service User Guide
8. Click Search.
The plan options with available time slots and related cost display in the Advice tab.
9. (Optional) Select from View Window list of values to view only the options for a certain time slot. For example, if the customer requests a morning appointment. Select Morning from the list of values, and only the available morning time slots display for selection.
10. Select the check box next to a time slot to indicate the time slot of your choice.
The Planned Start and End date for the task is set accordingly.
11. Click Schedule.
A task assignment is created. The Plan Board and Gantt views are refreshed.
Scheduling Using the Assisted OptionUse the Assisted option to assign a task to a resource based on a selection of criteria using the Schedule Task user interface functionality. Spare parts availability is not takeninto account. This means that if parts are required for the task, you need to order them separately.
Steps:1. Navigate to the Schedule Task window from the Field Service Dispatch Center
window (Field Service Dispatcher > Dispatch Center. Right click on a task in the Task List section and then select Schedule from the right-click menu).
The Schedule Task window appears.
2. Select the Preferences tab.
3. Select the Assisted option in the Assistance Level region.
4. In the Resources region select the Territory Qualifiers, Contracts, Installed Base, or Skills check box. Select a check box to indicate resource selection based on matchingterritory qualifiers, a preferred resource defined in Contracts, a resource recommended from Installed Base, and resource Skills. Also select if you want to check resources availability.
5. If you want a specific technician to be considered in addition to those matching the previously specified criteria, in the Resource Suggestion field, select a Resource Name from the list of values.
6. Click Search.

Scheduling Field Service Tasks 4-11
The list of qualified resources displays in the Advice tab. Already assigned tasks appear in blue, and schedule options in green.
7. Select a check box next to a resource to indicate your resource choice.
The Start and End fields are populated with the scheduled date.
8. Click Schedule.
A task assignment is created and the Plan Board and Gantt chart are refreshed.
Supporting Location Time ZonesWhen customers and service personnel are located in different time zones, it is useful tocommunicate dates and times in the time zone where the service task is performed, without having to manually convert the dates and times displayed on their windows. All Field Service and related products provide, where appropriate, full support for customer, incident, and technician time zones.
With this capability, call center agents, dispatchers, managers, and administrators can communicate with customers and field technicians in their local times without having to make mental conversions. This reduces scheduling mistakes and improves the customer experience.
This time zone functionality supports customer and incident address time zone, technician time zone, and daylight savings time.
The Field Service windows that support incident address time zone are:
• Schedule Advice Popup – Advice Tab Table View
• Schedule Advice Popup – Advice Tab Gantt View – Task Tool Tip
Since the Gantt Chart displays tasks for many different incidents against a single time line, it is not feasible to support incident address time zones in the Gantt graphical display. However, incident time zone is supported in the Task Tool Tip.
• Dispatch Center – All Views – Active Task Details Line Planned Start and End Dates and Times
• Dispatch Center – Task Detail View – Overview Tab Scheduled Dates and Times
• Service Administrators Portal – All Date and Time Fields
Definitions• The Service Request Incident Address is the location where service was performed on
an asset or customer product.

4-12 Oracle Field Service User Guide
• The Task Address appears by default from the Service Incident Address, and the dispatcher can correct it.

Managing Field Service Task Schedules 5-1
5Managing Field Service Task Schedules
This chapter describes how to use the Dispatch Center window to monitor field service activities and modify schedules as necessary to react to unplanned events.
This chapter covers the following topics:
• Introducing the Dispatch Center
• Populating the Dispatch Center Tasks List
• Working with the Tasks View
• Viewing Service Request Details
• Viewing Resource Details
• Viewing Service History
• Working with the Plan Board View
• Working with the Gantt View
• Working with the Map View
• Releasing Work to the Field - Interactive Process
• Releasing Work to the Field - Concurrent Program
• Manage Field Service Technician Availability
• Viewing Technicians' HTML Calendars
• Blocking Technician Trips
• Unblocking Technician Trips
• Unscheduling Tasks from a Blocked Trip
• Reserving Technician Personal Time
• Working with Tasks Rejected by Autonomous Scheduler
• Overview: Invalid Addresses
• Submitting the Find Invalid Addresses Concurrent Program

5-2 Oracle Field Service User Guide
• Correcting and Validating Addresses
• Overview: Rescheduling Tasks
• Rescheduling a Scheduled Task from the Plan Board
• Rescheduling a Scheduled Task from the Gantt View
• Rescheduling Tasks Longer Than a Shift
• Canceling a Scheduled Task
• Recalculating a Trip
• Recalculating All Trips
• Optimizing a Trip
Introducing the Dispatch CenterUsing the dispatch center for scheduling tasks involves:
• Populating the dispatch center with information for the appropriate subset of technicians. See Setup for Populating the Dispatch Center, page 2-10.
• Selecting tasks to be scheduled.
• Completing one of the following task scheduling methods:
• See Scheduling Tasks Automatically, page 4-5
• See Using Interactive Scheduling, page 4-7
Opening a Different View of the Dispatch CenterTo switch between dispatch center views, click the appropriate Tasks, Plan Board, Gantt, or Map icons located near the bottom left of the window.
Using the Dispatch Center Navigate MenuYou can access many other features and functions from the dispatch center tool bar Navigate menu:
• Schedule Management
• Access Hours
• Task Dependencies
• Parent and Child
Managing Field Service Task Schedules 5-3
• Skills Assignment
• Parts Requirement
• Source Document
• Customer Confirmation
• Select Territories and Task Owners
• Resource Addresses and Sub-inventories
• Resource Skills Management
• Service History
• Spares Management
Populating the Dispatch Center Tasks ListThe dispatch center provides two methods to search for tasks: Basic search and Advanced search. Basic search criteria include task details, customer details, task owner,dates, and whether the task can be scheduled.
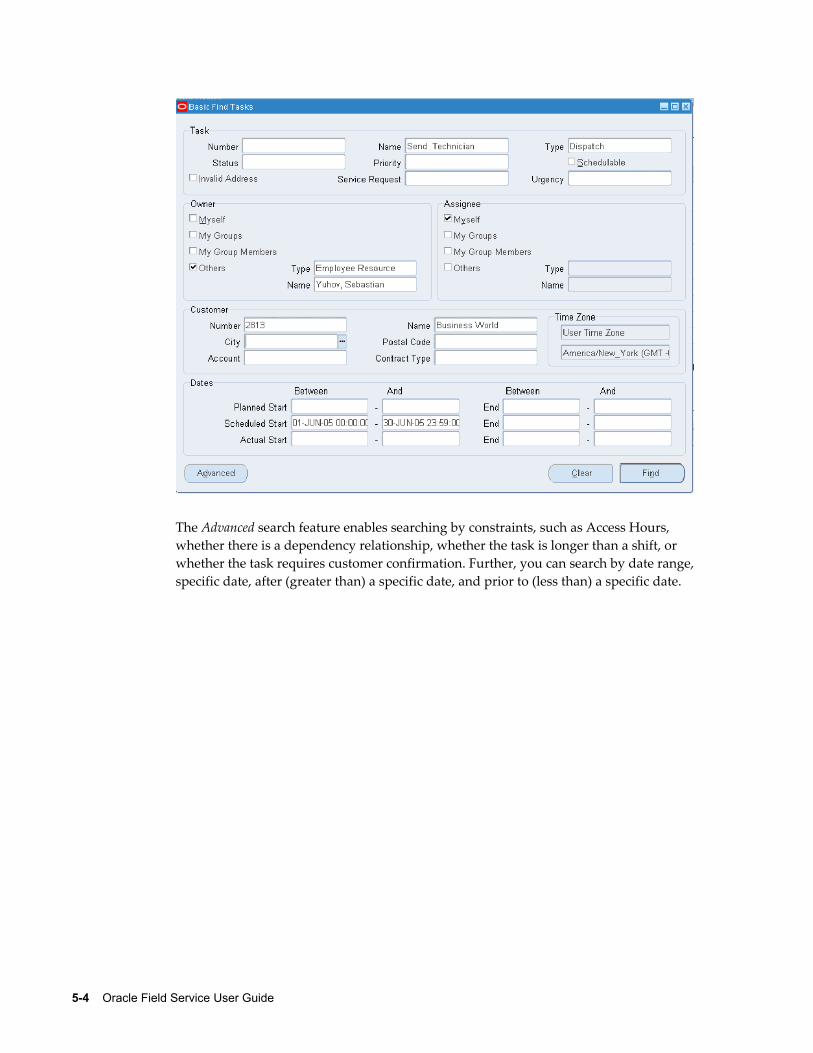
5-4 Oracle Field Service User Guide
The Advanced search feature enables searching by constraints, such as Access Hours, whether there is a dependency relationship, whether the task is longer than a shift, or whether the task requires customer confirmation. Further, you can search by date range,specific date, after (greater than) a specific date, and prior to (less than) a specific date.

Managing Field Service Task Schedules 5-5
Seeded Task Query Definitions
Query Name Description
All Open All tasks that are available for planning and can be scheduled.
Assigned All tasks that are already assigned to a resource. These tasks have an assigned schedule start date and the 'Assigned' attribute is set to 'Yes.'
Auto Rejected All tasks that are rejected by the Autonomous Advanced Scheduler (status: Auto Rejected).
Auto Scheduling All tasks that can be scheduled by the Autonomous Advanced Scheduler.
Closed All Closed tasks. These Tasks have Closed status set to 'Yes'
Escalated All tasks that are marked as 'Escalated' and are not 'Closed'.
Inbox All tasks created today (current date) that have task type and status that allow scheduling, and the schedule start date is NULL.

5-6 Oracle Field Service User Guide
Query Name Description
Invalid Address All tasks with an address marked as Invalid. These tasks have the VALIDATED_FLAG set to 'No.'
My Inbox All tasks owned by this dispatcher. These tasks are owned by the current application USER ID and Resource Type 'Employee'.
Non Schedulable All tasks that cannot be scheduled.
Query Selection for Task Owner Enforcement
For information about setting up Query - Task Owner Enforcement (Field Service Setup > Task Owner Enforcement for Queries) see the Oracle Field Service Implementation Guide.
Use this procedure to populate the Tasks List in the dispatch center.
Steps:
Using a Predefined Query to Populate the Tasks List1. Navigate to the Dispatch Center window (Field Service Manager: Dispatcher >
Dispatch Center).
The Dispatch Center window appears to the Tasks view.
2. To use a predefined query to search for tasks, make a selection from the 'View By' list of values located near the top of the Tasks region. Seeded queries are described in the previous table.
The Task List populates with tasks matching the predefined query.
Using Basic Search to Define a Query3. To use basic search functionality to find tasks that do not conform to one of the
predefined queries, click the flashlight icon on the tool bar.
The Advanced Find Tasks window appears.
4. Click Basic at the bottom of the window to open the Basic Find Tasks window.
The Basic Find Tasks window appears.
In the Basic Find Tasks window, you can create queries based on combinations of the following search criteria:
• Task or service request number
• Task or service request name

Managing Field Service Task Schedules 5-7
• Tasks that you own
• Tasks that are assigned to you
• Tasks for a specific customer
• Tasks that need to be scheduled
• Tasks that have been scheduled
• Tasks that have been started for a selected date or date range
5. Enter search criteria in the available fields, and then click Find.
The Tasks list of the dispatch center populates with tasks matching the basic query definition you specified.
Using Advanced Search to Define a Query6. To use advanced search functionality to find tasks that do not conform to one of the
predefined queries:
• From the Field Service Dispatch Center window, click the flashlight icon on the tool bar, or
• From the Basic Find Tasks window, click Advanced.
The Advanced Find Tasks window appears.
7. On the General tab of the Advanced Find Tasks window, select a check box to indicate whether you want the search to return tasks that match any of the specified criteria, or retrieve only those tasks that match all of the specified criteria.
8. Next, on the General tab specify any combination of search criteria: followed by constraints, such as Access Hours, whether there is a dependency relationship, whether the task is longer than a shift, or whether the task requires customer confirmation. Further, you can search by date range, specific date, after (greater than) a specific date, and prior to (less than) a specific date.
• Tasks Region
• (Task) Number
• Name
• Type
• Status
5-8 Oracle Field Service User Guide
• Priority
• Skill
• Planned Effort
• Invalid Address
• (Task) Dependent
• (Customer) Confirmation
• (Effort duration) Greater than Shift
• Access Hours
• After Hours
• Scheduleable
• Owner
• Assignee
• Date Expression
• Attribute (such as Actual End Date)
• Condition (such as Before or Equal to)
• Sub Attribute (such as Scheduled End Date)
• Literal Value (calendar date)
• Offset (number)
• UOM (such as days, or weeks)
9. Select the Service Request tab and select any combination of service request information.
• Service Request region
• Number
• Urgency

Managing Field Service Task Schedules 5-9
• Type
• Preferred Resource - Installed Base or Contract
• Customer region
• Type
• Name
• Number
• Site Name
• Site Number
• Postal Code
• City
• Account
• Contract Type
10. Select the Product/Spares tab and select a combination of product and spares information.
• Product region
• Item
• Item Description
• Item Instance
• Serial Number
• Lot
• Revision
• Spares region
• Required Item
• Required Item Description
5-10 Oracle Field Service User Guide
• Internal Order Status
11. Click Find.
The Tasks list of the dispatch center populates with tasks matching the advanced query definition you specified.
Saving and Editing Query Definitions12. To add this query definition to the View By list of values for the Tasks list, select
Save Query As from the Tools menu on the tool bar.
The Save Query As window appears.
13. Enter a Name and Description for the query. Select the Public check box if you wantthis query to be accessible to all. Click OK.
The query is added to the list of values that appears when View By is selected from the Tasks region.
14. To edit a query, select Edit Query from the Tools menu on the tool bar.
The Edit Query window appears.
You cannot modify the query information, but you can enter an End Date for an obsolete query. When the Active End date is reached, the query disappears from thelist of values that display when you select View By from the Tasks region. Repeat steps 3 through 11 or define a new query, and then add it to the View By list of values.
Sorting the Task List15. You can use the task list sort functionality to organize the list of retrieved tasks into
ascending or descending order for up to three ranks of criteria.
For example, set the primary sort to be by planned effort in descending order. The longest task appears first in the list. Then set the secondary sort to be by planned start date in ascending order. Tasks of equal effort are further sorted with the task having the earliest planned start date appearing first. Finally set the tertiary sort to be by actual end date in descending order. Tasks having the same effort and planned start date are further sorted so that the task with the latest completion date appears first.
Click Sort Tasks.
The Sort Tasks window appears.
16. In the Sort By section, select the primary sort criterion from the list of values, and then click the radio button to indicate whether to sort in ascending or descending order.
Managing Field Service Task Schedules 5-11
17. (Optional) Specify the secondary and tertiary sort criteria and sort order.
18. Click OK.
The Task List sorts according to the specification.
19. To view the source document associated with a task, right-click the task in the Taskslist.
The right-click menu appears.
20. Select 'Source Document' from the right-click menu.
Note: It is not necessary to also select the task by checking the check box .
The source document, for example, the Service Request window appears. See Viewing Service Request Details, page 5-18.
21. To display the window listing the required parts for a task, select Parts Requirement from the right-click menu.
The Parts Requirement window appears. It is possible to add parts requirements at this time. See Viewing and Creating Parts Requirements, page 7-23
22. To assign the task, select Schedule from the right-click menu.
The Schedule Task window appears. Open the Advice tab. See Scheduling Tasks, page 4-1
When the task cannot be scheduled, this option is not available.
Working with the Tasks ViewOnce the dispatch center populates with tasks, you can review or schedule them. Tasks shown in bold font style can be scheduled. Tasks that appear in italic font style are the parent in a parent and child task relationship.
Active Task Details HeaderThe header region of the dispatch center provides basic information for an active task selected from the Tasks list.
Dispatch Center Header Fields
Field Description

5-12 Oracle Field Service User Guide
User Time Zone The time zone for the logged in user.
Incident Time Zone The time zone at the customer site or location.
Number Task identification number
Type Task type, such as 'Dispatch'
Start and End Promised beginning and end time, displayed for the time zone of the logged in user
Incident Start and End
Promised beginning and end time, displayed for the time zone at the customer site
Effort Duration time for the task estimated at the time the task is created.
TabsThe tabbed area provides additional detailed information. The following describes the information available on each tab. The information displayed in these tabs is view only and cannot be updated:
Overview TabThe Overview tab displays the task description, customer information, task urgency, and date details as described in the following table.
Overview Tab Fields
Field Description
Subject Descriptive name given to the task
Task Number Task number, generated at task creation
Task Type Task type definition. For tasks that can be scheduled, the task type definition must be Dispatch. This setting is defined during implementation.
Task Status Task Status
Priority The degree of urgency assigned to the task.

Managing Field Service Task Schedules 5-13
Field Description
Respond By Date and time agreed with the customer either by contract or other means of communication to respond to the reported issue. If the response time is not met, the task becomes non conforming and an escalation notification is created.
Owner The person or Dispatcher Group taking ownership for this task.
Assignee Technician assigned to provide service. See also the Assignee field on the Resource tab.
Scheduled Start The time a service technician is scheduled to arrive at the customer site.
Scheduled End Either the Start Date plus the Effort time, or
when scheduled with Window to Promise, the End Date of the time window offered to the customer.
Planned Effort This estimate made at the time a task is created indicates the planned amount of time needed to complete the task.
Actual Start and Actual End
These fields display the actual start and end times of the task work.
Actual Effort This indicates the actual effort of the task.
Access Hours Check box indicating the task has access hours assigned.
After Hours Check box indicating the task is planned for after business hours.
Parent Check box indicating the task is a parent task.
Child Check box indicating the task is a child task.
Parts Check box indicating spare parts need to be ordered. When AdvancedScheduler is installed this is done at task assignment.
Dependency Check box indicating the task is part of a dependency relationship with another task.
Customer Customer's name.

5-14 Oracle Field Service User Guide
Field Description
Telephone Customer's telephone number.
Fax Customer's fax number.
Incident Time Zone The customer site time zone.
Scheduled Start and Scheduled End
The time range that technicians are planned to be present at the customer site, adjusted for the customer site time zone.
Actual Start and Actual End
The time range that technicians actually work at the customer site, adjusted for the customer site time zone.
Customer Confirmation
The dynamic button label indicates whether customer confirmation is required, not needed, or received. Click the Customer Confirmation button to open the Customer Confirmation window.
Service Request TabWhen the task originates from a service request, details for the service request are displayed in the Service Request tab, as described in the following table.
Service Request Tab Fields
Field Description
Number Service request number.
Double-click the service request number in the Results block to open apopup menu to access the service request form.
Request Right-click the Request field to open a popup menu to access the source document (the Service Request user interface).
Created On Date the service request was created.
Summary Brief summary describing the service request.
Unit The service request belongs to this organization unit.
Problem A problem description for the service request.
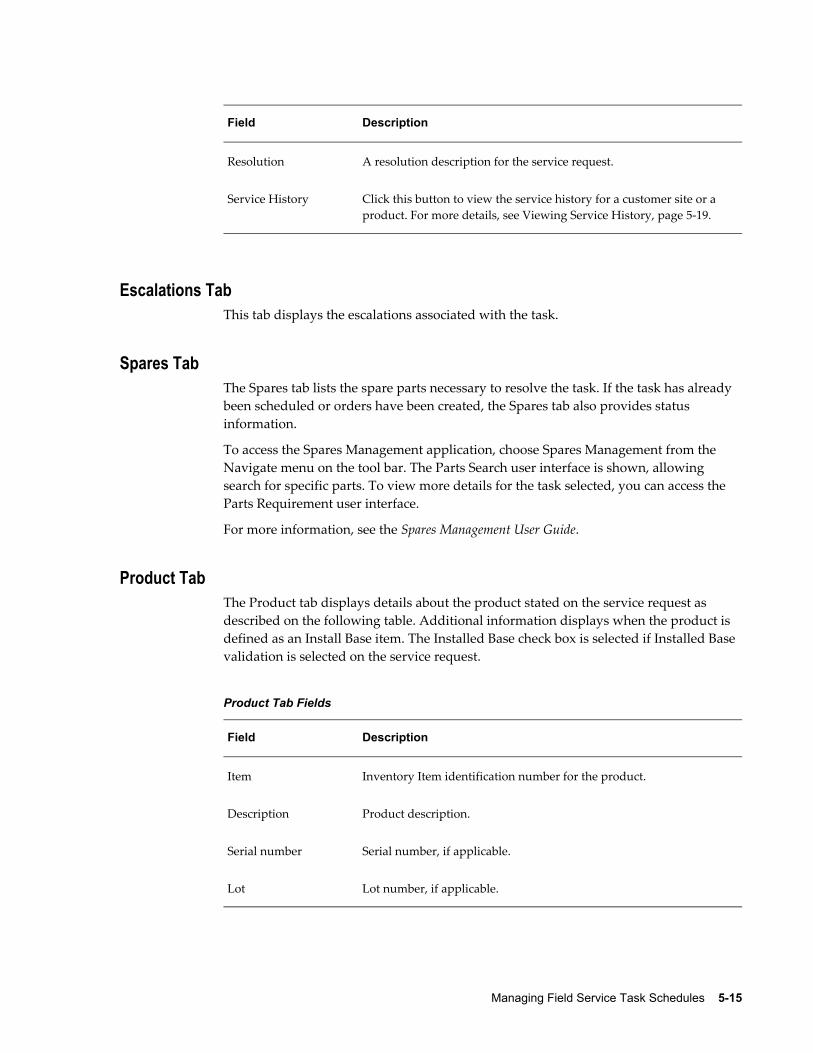
Managing Field Service Task Schedules 5-15
Field Description
Resolution A resolution description for the service request.
Service History Click this button to view the service history for a customer site or a product. For more details, see Viewing Service History, page 5-19.
Escalations TabThis tab displays the escalations associated with the task.
Spares TabThe Spares tab lists the spare parts necessary to resolve the task. If the task has already been scheduled or orders have been created, the Spares tab also provides status information.
To access the Spares Management application, choose Spares Management from the Navigate menu on the tool bar. The Parts Search user interface is shown, allowing search for specific parts. To view more details for the task selected, you can access the Parts Requirement user interface.
For more information, see the Spares Management User Guide.
Product TabThe Product tab displays details about the product stated on the service request as described on the following table. Additional information displays when the product is defined as an Install Base item. The Installed Base check box is selected if Installed Base validation is selected on the service request.
Product Tab Fields
Field Description
Item Inventory Item identification number for the product.
Description Product description.
Serial number Serial number, if applicable.
Lot Lot number, if applicable.
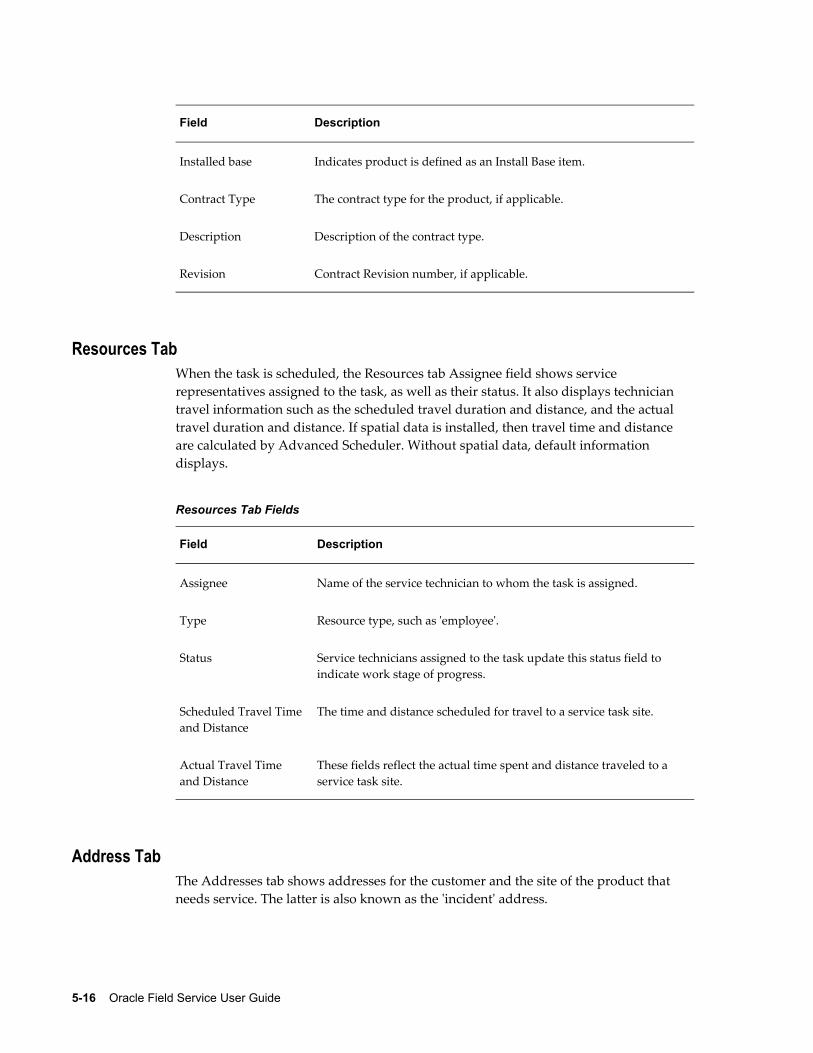
5-16 Oracle Field Service User Guide
Field Description
Installed base Indicates product is defined as an Install Base item.
Contract Type The contract type for the product, if applicable.
Description Description of the contract type.
Revision Contract Revision number, if applicable.
Resources TabWhen the task is scheduled, the Resources tab Assignee field shows service representatives assigned to the task, as well as their status. It also displays technician travel information such as the scheduled travel duration and distance, and the actual travel duration and distance. If spatial data is installed, then travel time and distance are calculated by Advanced Scheduler. Without spatial data, default information displays.
Resources Tab Fields
Field Description
Assignee Name of the service technician to whom the task is assigned.
Type Resource type, such as 'employee'.
Status Service technicians assigned to the task update this status field to indicate work stage of progress.
Scheduled Travel Time and Distance
The time and distance scheduled for travel to a service task site.
Actual Travel Time and Distance
These fields reflect the actual time spent and distance traveled to a service task site.
Address TabThe Addresses tab shows addresses for the customer and the site of the product that needs service. The latter is also known as the 'incident' address.

Managing Field Service Task Schedules 5-17
Contacts TabThe Contacts tab shows the title, first name, last name, telephone number and extension, and e-mail address of the contact person. This can be the contact person of the service request or the contact person of the task, because these can be different. You can select the Source from the list of values. By default, the contact person of the service request is shown.
Skills TabThe Skills tab shows required skills for the task: Skill Type, Skill Name and Skill Level. If a skill is disabled in the Assign Skills to Task module, the Disabled check box is checked.
Access Hours TabThis tab displays the customer access hours that are available for a task. This information is useful when, for business reasons, a customer needs to restrict the hours of access to perform a task. These hours are determined during task setup. There are two check boxes, one for Active Access Hours and one for After Hours. A task can be associated to either of these, but not both. If the After Hours check box is selected, a textbox is activated where the technician or dispatcher can enter any additional details. Hour fields are displayed for each day of the week.
Task Dependencies TabThis tab displays whether a task is part of a dependency relationship.
For example, if a task requires the completion of a different task before it can begin, thatrelationship is noted. The information displayed includes, dependency type, related task, subject, task type, status, scheduled start, scheduled end, planned effort, assignee, actual start, actual end, and actual effort. The possible dependency options are Starts After, Finishes Before, Finishes Together With, and Starts Together With.
Parent/Child TabThis tab displays the relationship of a set of tasks. When the effort of the task is longer than a regular work shift, Oracle Advanced Scheduler splits that task, called the "Parent" task, into multiple "Child" tasks, to accommodate and execute within the regular work shift of technicians. Parent task information is displayed on the top of the form and Child task information is displayed in a table below.
For example, a parent task effort is 12 hours. The parent task propagates two child tasks, one for an eight hour shift, and another for a four hour task.
5-18 Oracle Field Service User Guide
Note: In the task list block on the dispatch center task view, if a task number appears in italics, it indicates that a task has a related parent or child task.
To navigate to the Parent/Child user interface, and then either cancel or reschedule all or parts of the child tasks and the original parent task, see Rescheduling Tasks Longer Than a Shift, page 5-40.
Viewing Service Request DetailsWhen the task originates from a service request, the Oracle TeleService Service Request window can be accessed to view details from the dispatch center.
For more information on Service Requests, see the Oracle TeleService User's Guide.
Use this procedure to access the Service Request window.
Steps:1. Navigate to the Service Request window, using one of these options:
• Field Service Manager: Field Service Dispatcher > Dispatch Center > Task List > Right-click Task > Source Document
• Field Service Manager: Field Service Dispatcher > Dispatch Center > Navigation> Source Document
• Field Service Manager: Field Service Dispatcher > Dispatch Center > Plan Board view or Gantt view > Right-click Task > Show Source Document
Note: When you navigate to the Service Request window from the dispatch center, the Tasks tab appears by default.
The Service Request window displays information associated with the service request for which the task is assigned.
2. The user can make updates to the service request at this time, such as adding notes, and editing dates.
Viewing Resource DetailsNavigate to the Resource Information window.
Right-click the name in the column heading for a Resource. From the right-click menu, choose Resource Information.

Managing Field Service Task Schedules 5-19
Steps:1. Right-click the name in the column heading for a Resource.
2. Choose Resource Information.
The Resource Information window appears.
3. View name, telephone, and e-mail information. Click Close.
Viewing Service HistoryService history is valuable when determining whether to increase or decrease a customer service agreement and to determine whether multiple calls are related. It can be used to detect whether hardware or software failures are leading to multiple service requests.
Oracle Field Service provides a search mechanism to view service history relating to several areas of interest, including customer, site, product, problem, or resolution. Furthermore, you can make text searches based on key words for both summaries and notes.
After you perform a search, the results display in the Results table. In this table, you canview request number, creation date, item, item description, customer name and number, item instance, problem and resolution codes, summary, request type, status, severity, urgency, and contact name.
You can click the service request number for any of the service requests you want to view. The Service Request window appears.
Profile option CSF: Default Service History DisplayFrom the dispatch center, you can query service history for a particular customer linkedto an open task. The profile option CSF: Default Service History Display determines which query is executed.
For example, if you have the profile option set to Customer, all service requests associated with the particular customer appear. Other possible values include: Site, Item, or Instance.
Profile option CSF: Service History Time Frame Number and Profile Option CSF: Service History Time Frame UOM
Two other profile options, CSF: Service History Time Frame Number and CSF: Service History Time Frame UOM (unit of measure), determine the default amount of time for which you want to retrieve the service history.
For example, if you set 30 for the number, and Days for UOM, then your default service

5-20 Oracle Field Service User Guide
history search covers the past 30 days. UOM values include: days, weeks, months, and years.
Steps:Use the following procedure to query and view service history:
1. Navigate to the Service History window using any one of these options:
• Field Service Manager: Field Service Dispatcher > Dispatch Center > (T) Service Request > (B) Service History, or
• Field Service Manager: Field Service Dispatcher > Dispatch Center > (M) Navigate > Service History, or
• Field Service Manager: Field Service Dispatcher > Service History
2. Specify the search criteria. If you select more than one search criterion, for example, customer name and item, both criteria must be met to return a value.
3. Click Search.
The Results table populates with service requests that meet your search criteria.
4. To view a particular service request, click the Service Request number link.
5. To perform a search using different criteria, click Clear.
6. Enter the new criteria, and then click Search.
7. To change the time frame of the search, modify the Number and UOM fields.
Working with the Plan Board ViewThe Oracle Field Service Dispatch Center Plan Board contains a grid populated with service technician names as column headings and technician service trip information in the associated column cells. By default, information displays for the service technicians and the territories the user selected during the previous visit to the dispatch center. A trip consists of departure tasks, arrival tasks, and scheduled, as well as assigned service tasks.

Managing Field Service Task Schedules 5-21
Dispatchers use the Plan Board to monitor progress against the daily schedules of technicians. The primary methods for monitoring that are available to the dispatcher arethe Field Service Plan Board cell color and letter codes.
Cell Color CodesTask type, task status, task priority, and whether the task has been escalated drive color coding. Color code setup is performed during implementation. For more information on color setup, see the Oracle Field Service Implementation Guide.
Letter CodesWithin each Plan Board cell, Field Service letter codes identify whether a task has specific attributes. When these letters appear in a Plan Board cell, then the corresponding task attribute is in effect. Letter codes are positioned from left to right within a cell by priority. This list explains letter codes and cell positions:
1. In first position: A (Access Hours) or F (After Hours)
2. In second position: C (Customer Confirmation Required), or V (Customer Confirmation Received)
3. In third position: S (Spares)
4. In fourth position: M (Parent), D (Child)

5-22 Oracle Field Service User Guide
5. In fifth position: R (Task Dependency)
6. In sixth position: N (Notes)
Use the following procedures to work with the Plan Board.
Prerequisites❒ Populate the Plan Board view.
❒ The Plan Board view appears displaying information for the same technicians previously accessed by this user by default. You can use the Navigate menu (Navigate > Select Dispatch Center Territories) to populate the Plan Board, Gantt, and Map views with territories of service technicians other than the ones currently displayed. See Associating Territories to a Dispatcher, page 2-9.
Steps:
Monitoring Technician TripsDispatchers monitor trips of service technicians from the dispatch center Plan Board view.
1. Navigate to the dispatch center Plan Board view.
Field Service Dispatcher > Dispatch Center
Click the Plan Board icon.
The Plan Board view appears.
2. The plan for the current date appears by default. You can also use the forward and backward buttons located on either side of the Date field to change the date displayed. To select a different date from the calendar, click the Date field.
The Calendar window appears.
3. Select a date from the Calendar, and then click OK.
The Calendar window closes.
4. Click Refresh.
The display of the Plan Board is updated to display information for the selected date.
5. To focus on a specific service technician, click Goto.
The Resources window appears.
6. Use the Find field to locate a resource name from the list of values. Alternatively,

Managing Field Service Task Schedules 5-23
use the scroll bar to find the service technician that you want to select. Click OK.
The selected service technicians name is highlighted on the Plan Board view.
7. To view other service technicians, select Select Territories and Task Owners from the Navigate menu on the tool bar. See Associating Territories to a Dispatcher, page2-9.
Auto Schedule a Task8. Selecting one or more tasks in the Task List region that are at a status that can be
scheduled enables the Auto Schedule button.
Click Auto Schedule to automatically schedule tasks to resources using the criteria set up in Advanced Scheduler, if installed.
Right-Click Menu Options for Resources9. Right-click the Service Technicians Name on the Plan Board to display the list of
options available. Selecting an option from the right-click menu opens a related popup window.
• Select Commit Schedule to commit the resources schedule. See Releasing Work to the Field - Interactive Process, page 5-28
• Select Schedule Management to view the resources current schedule. From the Schedule Management popup window, you can either 'Unschedule' or Reschedule tasks, and Block or Unblock trips for a specified day. See Manage Field Service Technician Availability, page 5-29.
• Select Resource Information to view the resources details such as name, phone number, and e-mail address. See Viewing Resource Details, page 5-18.
• Select Resource Addresses and Sub-inventories to view the resources addresses and sub-inventories. You can add an address for the resource at this time. See Adding and Changing Technician Addresses and Sub-inventories, page 2-4.
• Select Resource Skills Management to view technician skills and skill levels. TheResources tab of the Skill Management window appears for the selected resource. You can also navigate to the Skills and Skill Levels tabs for related information. See Assigning Skills and Skill Levels to Technicians, page 2-6.
• Select Calendar menu option to view the technicians calendar for the upcoming month. See Viewing Technicians' HTML Calendars, page 5-30.
Right-Click Menu Options for Tasks10. Right-click the task name on the Plan Board to display the list of options available.
Selecting an option opens a related popup window.

5-24 Oracle Field Service User Guide
• Select Source Document to have the window for the originating document associated with the task appear. See Viewing Service Request Details, page 5-18
• Select Debrief to report on or view a report of a performed task. See Debriefing Work Completion, page 8-2
• Select Send Message to send a message to another user.
• Select Parts Requirement to view the required parts for the selected task.
The Parts Requirement window appears for the selected task. See Viewing and Creating Parts Requirements, page 7-23
Right-Click Menu Options for Departure Tasks11. Right-click the Departure Task on the Plan Board to display the list of options
available. Selecting an option opens a related popup window.
• Select Block to cause the trip to not be available when scheduling tasks. This function is available only for empty trips. Empty trips do not contain any tasks.
• Alternatively, if the trip is blocked, you can select Unblock to remove the block. This function is also available only for empty trips.
• Select Optimize to cause Advanced Scheduler to evaluate all possible sequencesof a trip. If Scheduler finds a trip with a cheaper cost factor, it recalculates the trip. This might affect the task sequence. This function is available only when Advanced Scheduler is installed.
• Select Recalculate to rearrange the tasks of a trip. This function is used whenever a new task is included in the trip, or an existing task is eliminated from the trip.
• Select Commit to commit the tasks in a trip.
Working with the Gantt ViewDispatchers use the Gantt chart to view the schedules of several technician across multiple days, and to schedule or reschedule tasks. The Gantt chart view is a graphical overview of the scheduled tasks mapped to a time line. The date range shown by default is two days prior to the actual date and two weeks that follow it. The date range is adjustable. Use the scroll bars in the Resource section of the Gantt chart to view more details or dates. The Gantt chart uses the same color coding scheme that is available in the Plan Board view to help dispatchers monitor the days progress.

Managing Field Service Task Schedules 5-25
The Gantt chart displays a service technicians shift, assigned tasks, and if Advanced Scheduler is installed, the travel time between tasks. The right-click menus in the Gantt Chart are identical to those that the user can access through the Plan Board.
The Gantt chart features icons for accessing additional task details, such as whether the task is in a parent and child relationship. Icons are ranked in importance during set up, and then appear in the Gantt cell accordingly. The following business functions have related Gantt icons:
• Access Hours
• After Hours
• Customer Confirmation Required
• Customer Confirmation Received
• Parts Requirement
• Task Dependencies
For information about setting up Gantt chart icons (Field Service Setup > Scheduling Chart Setup) see the Oracle Field Service Implementation Guide.
Another key feature of the Gantt chart is the ability to use drag-and-drop functionality to schedule and reschedule tasks. Scheduler automatically performs the following validations during this process:
5-26 Oracle Field Service User Guide
• Skills are checked when drag-and-drop is performed.
• Tasks with parts attached are not allowed to be scheduled through drag-and-drop functionality.
• Tasks with access hours or after hours constraints are not allowed to be scheduled through drag-and-drop functionality.
Use this procedure to explore the Gantt view tools and options available for task management.
Steps:
Specify Viewed Information1. From the Field Service Manager Responsibility, navigate to the Gantt view.
Field Service Dispatcher > Dispatch Center
2. From the Dispatch Center, click the Gantt icon.
The Gantt view appears displaying information about service technicians, their shifts, and assigned tasks.
3. Specify From and To dates to define the date range that you want to view, if different from the default display.
The Gantt view displays information for the specified date range.
4. Right-click the date or time on the Gantt chart column header to change the scale of the Gantt chart. You can select from one of these options: 15 Minutes, 30 Minutes, Hours, Three Hours, Six Hours or Days.
5. To focus on a specific service technicians schedule, click Goto
The service technicians name is highlighted and visible.
View Task Details6. To view a task description using the "tool tip" feature, pause the mouse over a task.
7. To view task-related details, position the mouse over the task bar that you want to view, right-click, and then select Task Related Information from the right-click menu to view task details.
The Task Related Information window appears displaying information relating to the specific task, including product, task customer, and required skills. It also contains both planned and actual start and end dates and times.
8. To view the source document associated with a task, double-click the task.

Managing Field Service Task Schedules 5-27
The source document appears, displaying the task details. For example, for a task created from a service request task, the Service Request window appears.
Reschedule Tasks9. (Optional) You can reassign a task from one service technician to another by
dragging and dropping the task.
Caution: When using the drag-and-drop feature, no check is performed to assure that this new configuration is the best option, or even a possible option.
When you reassign a task using drag-and-drop, scheduler checks for availability, skills, and parts. If tasks have access hours or after hours constraints, or if parts are attached, the task cannot be reassigned using the drag-and-drop method.
Working with the Map ViewThe dispatch center provides a geographical representation of service areas for service technicians. You can use the Map for monitoring purposes. The Map provides a geographical view of a service technicians location when a task is in a status of 'working.' The date shown for the Map is the actual date.
The dispatch center Map facility enables dispatchers to view a range of views that vary in detail. At the highest level, the Map displays countries and states outlined, major roads and waterways, and label names of state capitols and major cities. At the most detailed level, the Map displays roads with names, including on and off ramps, city boundaries, regional features, and major landmarks. You can zoom in and zoom out using the buttons located on the right side of the map display area.
Prerequisites❒ A spatial product must be installed and running.
❒ Data pertaining to the road network must be loaded into the spatial scheme.
Steps:1. Navigate to the Oracle Field Service Dispatch Center Map view (Field Service
Manager: Field Service Dispatcher > Dispatch Center)
2. Click the Map icon to access the Map view.
The service technicians you are managing display on a service area Map.
3. Profile Option - CSF: eLocation Map last used service area number

5-28 Oracle Field Service User Guide
The Map opens to the default view based on the value of this profile option. When the dispatcher saves a Map view, that view updates the profile option, and becomesthe default view for the next time this user accesses the Map view. The first time a user accesses the Map, it is blank, since there is no value set for the user in this profile option.
4. To view a Map, select a service map from a list of values in the Service Area region of the window.
The selected tasks, along with their locations, are shown on the Map.
5. (Optional) To control the detail of the area of the Map display use the In and Out buttons in the Zoom section. Alternatively, use the mouse to draw a box on the Map.
The Map level of detail changes as specified.
6. (Optional) To adjust the area displayed within the Map, use the left, right. up, and down arrows.
7. To show the Map in its entirety when a fragment of the selected service area is shown, click Reset.
8. To change the Map, select a new option from the list of values in the Service Area region.
9. To save your current Map settings, click Save.
Saved settings determine the default opening display the next time you use the Map.
Releasing Work to the Field - Interactive ProcessWhen you commit the schedule it is communicated to the service technicians. Also at commitment, parts orders are created for all parts requirements in the task.
Use this procedure to interactively commit a schedule and release the corresponding task assignments to the technician.
Steps:1. Navigate to the Commit Schedule window.
The Commit Schedule window appears displaying the default dates.
2. In the Time Frame section, indicate the date range of the schedule to be committed. The date can indicate schedules created in the past hour, but also can cover one or more days.

Managing Field Service Task Schedules 5-29
When the commit schedule function has been accessed by right-clicking a resource name in the Plan Board, the 'From' date field contains the active date of the Plan Board. When the commit schedule function has been accessed by selecting the Commit Schedule Option from the Navigate Menu, the 'From' date contains the current date.
In both cases, the default 'To' date is the 'From' date plus one entire day.
3. In the Resource section, the Resource Type and the Resource Name fields display the technician for whom you want to commit the schedule.
When starting the function by right-clicking a Resource Name in the Plan Board, the Resource Name is filled in automatically.
4. Click OK.
The schedule is committed. Once this procedure is completed, the task status is updated to 'Assigned'.
Releasing Work to the Field - Concurrent ProgramFor automatic schedule commitment, you can run a concurrent program called Auto Commit Tasks in the background. The Auto Commit Tasks program is set up at implementation or can be launched at any time. When you run this concurrent program, you can optionally enter the task query that you want the program to use in the Parameters popup window. For example, to auto commit all tasks in the in box, choose the 'Inbox ' query from the list of values in the Task List Query parameters field.
Steps1. Navigate to the Auto Commit Schedule window.
(Field Service Manager: Field Service Dispatcher > Field Service Setup > Auto Commit Tasks (concurrent program)).
The Parameters window appears in the foreground of the Auto-Commit Schedule window.
2. In the Parameters window, select a Task List Query from the list of values. Click OK.
The Parameters window closes. The selected query appears in the Parameters field of the Auto-Commit Schedule window.
3. Click Submit.
Manage Field Service Technician AvailabilityIn the event that one or more field technicians unexpectedly become unavailable,

5-30 Oracle Field Service User Guide
dispatchers can use Schedule Management functionality to 'unschedule' tasks, and then temporarily block technicians trips to prevent the Advanced Scheduler from automatically scheduling further tasks to those technicians.
Schedule Management functions include:
• Blocking Technician Trips, page 5-31
• Unblocking Technician Trips, page 5-31
• Unscheduling Tasks, page 5-32
Viewing Technicians' HTML CalendarsA dispatcher has the ability to access the calendar of each technician in an HTML format that can viewed in a daily, weekly, or monthly format. This calendar also contains trip information that can be accessed, including arrival, departure, and task details. The calendar can be refreshed to update the current information and it can be printed as well.
Use this procedure to access a technicians calendar.
A dispatcher can launch multiple calendars at the same time.
Note: After a calendar is launched in HTML format, it remains open until it is manually closed. If the dispatch center is closed, it does not effect the calendar.
Steps:1. Navigate to either the Plan Board or the Gantt chart, and then right-click the name
of the technician for whom you want to view the calendar.
Dispatch Center > Plan Board
Dispatch Center > Gantt Chart
2. From the drop-down list, select Calendar.
The technicians calendar launches in HTML format in the monthly view.
3. To view a single day of the technicians calendar, click the Daily date link.
You can change the daily view by changing the parameters in the View fields.
4. To view task, arrival, or departure details for a particular trip, click the appropriate link.
5. To print the calendar, click Printable Page and then use standard print options on
Managing Field Service Task Schedules 5-31
your browser.
6. To close the calendar, click the Close Window link.
Blocking Technician TripsFrom the Schedule Management window, a dispatcher can block one or more trips. Thisaction prevents new assignments for the technician, and temporarily freezes the task assignments in the blocked trip.
Use the following procedure to block a trip.
Steps:1. Navigate to the Schedule Management window.
Field Service Manager: Field Service Dispatcher > Dispatch Center > (M) Navigate > Schedule Management, or
Field Service Manager: Field Service Dispatcher > Dispatch Center > Plan Board or Gantt view > Right-click Resource Name > Schedule Management
Note: If you navigate to the Schedule Management window from the Plan Board or the Gantt view, only the selected resource displays.
The Schedule Management window appears.
2. Select the check boxes next to the resource names for technicians that you want to block trips. You can select multiple check boxes to block trips for multiple technicians. If you want to block trips for all technicians, select the Select All check box.
3. In the Trips section, select the Start and End dates and times for the trips you want to block.
4. In the Actions section of the window, select Block in the Trips field.
5. Click OK.
The trips for the date range you specified are blocked in the Plan Board and the Gantt views.
Unblocking Technician TripsYou can unblock trips that have previously been blocked. You can also unblock trips fora specified date range, and for multiple technicians. When you unblock a trip, all tasks

5-32 Oracle Field Service User Guide
in that trip return to a task status of 'Planned.'
Use this procedure to unblock trips.
Steps:1. Navigate to the Schedule Management window.
Field Service Dispatcher > Dispatch Center > (M) Navigate > Schedule Management,or
Field Service Dispatcher > Dispatch Center > Plan Board or Gantt view > Right-click Resource Name > Schedule Management
Note: If you navigate to the Schedule Management window from the Plan Board or the Gantt view, only the selected resource displays.
The Schedule Management window appears.
2. To unblock a trip, select the check box located next to the resource name for the technician schedule that you want to unblock. You can select multiple check boxes to unblock trips for multiple technicians. If you want to unblock trips for all technicians, select the Select All check box.
3. In the Trips section, select the Start and End dates and times for the trips that you want to unblock.
4. In the Actions section of the window, select Unblock in the Trips field.
5. Click OK.
The trips for the date range you specified are unblocked and the task status changesare reflected in the Plan Board and the Gantt views. Once unblocked, the technicians that were previously blocked become available for task and trip assignments, including automatic scheduling by the Advanced Scheduler.
Unscheduling Tasks from a Blocked TripIf a task assignment has not been completed or closed, it can be 'unscheduled' from the Schedule Management window, even if the task has been committed to a field technician. Unscheduling a task cancels the task assignments and changes the task status back to 'In Planning'.
Use this procedure to unschedule tasks.
Managing Field Service Task Schedules 5-33
Prerequisites❒ The task must be scheduled and assigned to a technician.
❒ The task must have a status other than 'Completed' or 'Closed'.
Steps:1. Navigate to the Schedule Management window.
Field Service Dispatcher > Dispatch Center > (M) Navigate > Schedule Management,or
Field Service Dispatcher > Dispatch Center > Plan Board or Gantt view > Right-click Resource Name > Schedule Management
2. Select the check boxes located next to resource names for those technicians that you want to unschedule tasks. You can select multiple check boxes to unschedule tasks for multiple technicians. If you want to unschedule tasks for all technicians, select the Select All check box.
3. In the Trips section, select the Start and End dates and times for the tasks you want to unschedule.
The entirety of the task must fall within the start and end dates and times that you select.
4. In the Actions section, select Unschedule in the Tasks field.
Note: You can block trips and unschedule tasks for the same specified period at the same time by selecting Block and Unschedule in the respective Actions fields.
5. Click OK.
A popup window displays a message confirming that one or more tasks are to be unscheduled.
6. Click OK.
A second message confirms the number of tasks you successfully unscheduled.
7. Click OK.
The window closes. The tasks are unscheduled.
5-34 Oracle Field Service User Guide
Reserving Technician Personal TimePersonal time for appointments and vacations can be reserved to prevent task assignments during that time. Dispatchers can enter the personal time off requested by a technician.
Steps:1. Navigate to the Tasks window (Field Service Representative: Field Service
Dispatcher > Task Management).
The Find Tasks window appears in the foreground of the Tasks window.
2. Click New.
The Find Tasks window closes.
3. On the Tasks window, create a task for personal time. Enter the Subject field.
4. Select the type of time off in the Type field. For example appointment.
5. Select the status of Assigned in the task Status field.
6. Select the Owner Type and Owner of the individual requesting the personal time.
7. In the Dates section, enter the planned and scheduled start date and time of the personal time.
8. In the Effort section, enter the planned effort and duration of the personal time.
9. Save the task.
The task number is automatically assigned. The status for the task is Assigned.
10. Click the More button.
The Task Details window appears.
11. Under the Assignments section, enter the type and name of the individual requesting the personal time and a status of Assigned.
12. Click OK and then save the task again.
13. Navigate to the Dispatch Center (Field Service Dispatcher > Dispatch Center).
14. Access the Plan Board or Gantt view by clicking the Plan Board or Gantt icons.
The personal task appears on the technicians schedule.
The Advanced Scheduler will take into consideration technicians personal time off

Managing Field Service Task Schedules 5-35
when scheduling tasks to technicians.
Note: The personal time task will not appear in the Task List section of the Dispatch Center because the personal time task is not associated to a Field Service task type.
Working with Tasks Rejected by Autonomous Scheduler When the autonomous scheduler engine cannot schedule a task, the task status changes to 'Auto Reject'. The 'Auto Reject' status helps dispatchers find rejected tasks. Dispatchers can review the log and output file generated by the Search and Auto Schedule (Autonomous Scheduler) concurrent program to find problem description details for each rejected task. From the dispatch center, dispatchers can run a task queryto identify all tasks with the 'Auto Reject' status.
Prerequisites❒ Advanced Scheduler is installed.
Steps:1. Navigate to View Requests (Field Service Manager: Field Service Dispatcher > Other
> View Requests).
The Find Requests window appears.
2. Find the relevant log entry for the Search and Schedule Task Automatically (Autonomous Scheduler) concurrent program to identify errors that require attention.
3. Navigate to the dispatch center (Field Service Manager: Field Service Dispatcher > Dispatch Center).
The Field Service Dispatch Center window appears.
4. To find tasks rejected by the Autonomous Scheduler, in the Tasks section, select Auto Rejected from the View By list of values.
The Task section populates with the list of rejected tasks.
5. Make the appropriate changes to the rejected tasks to fix the errors.
6. Change the task status back to 'In Planning.'
7. Run the Autonomous Scheduler concurrent program again to process the tasks accordingly.

5-36 Oracle Field Service User Guide
You can also schedule the rejected tasks interactively, if necessary.
Overview: Invalid AddressesWhen the customer address in the system is invalid, Oracle Advanced Scheduler can not associate a technician with the task. The task remains unplanned.
To address this issue, Field Service provides a background process (concurrent program) that identifies invalid addresses in the system for a date range, and then enables a dispatcher to correct the found invalid addresses. This option is only availableif you have geo-spatial data loaded for your application.
Field Service takes into account the following criteria when determining whether an address is invalid:
• Address
• City
• State
• Zip code
• Country
Identifying and changing invalid addresses is a three-step process:
• Submitting the Invalid Addresses Concurrent Program, page 5-36
• Identify invalid addresses in the Change Invalid Address window
• Correcting and Validating Addresses, page 5-38
Submitting the Find Invalid Addresses Concurrent ProgramAll Field Service tasks that are yet to be scheduled are candidates for the Find Invalid Addresses program.
To run the Find Invalid Addresses concurrent program, follow these steps.
Prerequisites❒ Task Status: In Planning
❒ Task Planned Start Date is within the date range specified.
Managing Field Service Task Schedules 5-37
Steps:1. Use one of these two methods to navigate to the Find Invalid Addresses program.
• Field Service Manager: Field Service Dispatcher > Find Invalid Address
• From the dispatch center, choose Find Invalid Addresses from the Tools menu.
The Parameters window appears in the foreground of the Find Invalid Address window.
2. (Optional) Enter the planned start and end date range for the address records that you want the system to check. If no date range is specified, there is no validation based on planned start date.
3. Click OK.
The Parameters window closes. The date range, if entered will appear in the Parameters field.
4. In the 'At these times' region, you can schedule the program to run automatically, or on demand.
5. Click Submit.
If the profile option CSR: Create Location is set to 'YES', then the Location finder routine is invoked. For each candidate task selected, the Location Finder attempts toresolve addresses having no associated geo codes (latitude and longitude).
• If resolved successfully, the HZ_LOCATIONS table updates with geo codes for the task incident or resource address.
• If the Location Finder fails to resolve the address, then the erroneous geo code entries in the HZ_LOCATIONS table are cleared.
6. The Decision popup window appears to display the concurrent request number, and asks whether you want to submit another request.
7. Note the request number, and then click No.
8. Check the status of the concurrent program by navigating to View > Requests in thetool bar.
9. When the request is completed, click View Output to see the report of invalid addresses.
The concurrent program generates the output file with the list of tasks having invalid addresses, the error messages, and a detailed error log.
5-38 Oracle Field Service User Guide
Correcting and Validating AddressesTo change or correct the invalid addresses, follow this procedure.
Prerequisites❒ You must run the Find Invalid Addresses concurrent program. See Submitting the
Find Invalid Addresses Concurrent Program, page 5-36.
Steps:1. Use one of these methods to navigate to the Change Invalid Address window:
• From the Field Service Dispatch Center window, select Change Invalid Addresses from the Tools menu.
• Field Service Manager: Field Service Dispatcher > Change Invalid Address
The Change Invalid Address window appears.
• If invoked from the dispatch center, the table displays the invalid address of thetask currently in focus. If the Address is valid, then this option is disabled.
• If invoked from the Navigator, the table contains all tasks with addresses marked as invalid by the Find Invalid Addresses concurrent program.
2. Select the task for which you want to change the address.
In the Address tab, the current invalid address is displayed.
3. Click the Logged Errors tab.
A detailed error message regarding the invalid address appears.
4. In the Addresses tab, make the appropriate corrections to the addresses.
5. After you have made changes, click Validate Address to ensure that the new values you entered can be geo-coded.
After you have changed and validated the address, the task is removed from the table that displays invalid addresses.
Overview: Rescheduling TasksUse one of these procedures to move an already assigned task from one service technicians schedule to another.
Managing Field Service Task Schedules 5-39
• Rescheduling a Scheduled Task from the Plan Board, page 5-39
• Rescheduling a Scheduled Task from the Gantt chart, page 5-39
Rescheduling a Scheduled Task from the Plan BoardUse this procedure to reschedule a task from the Plan Board.
Steps:1. Navigate to the dispatch center (Field Service Dispatcher > Dispatch Center).
The dispatch center Task view appears (by default).
2. From the Task view, click the Plan Board icon to switch to the Plan Board view.
The Plan Board view appears.
3. Right-click the task you want to reschedule, and then select Reschedule selected Task from the right-click menu.
The Reschedule Task window appears. You can reschedule the task using all the available options and normal scheduling filters.
Rescheduling a Scheduled Task from the Gantt ViewDispatchers can reschedule tasks from the Gantt chart either by using drag-and-drop functionality or by right-clicking on the tasks that they want to reschedule.
A key feature of the Gantt view of the dispatch center is the ability to use drag-and-drop functionality to reschedule or make adjustments to existing tasks. Scheduler automatically performs the following validations during this process:
• Skills are checked when drag-and-drop is performed.
• Tasks with parts attached are not allowed to be scheduled through drag-and-drop functionality.
• Tasks with access hours or after hours constraints are not allowed to be scheduled through drag-and-drop functionality.
You can reschedule a task from one service technician to another by dragging and dropping the task. For information about scheduling a task, see Working with the GanttView, page 5-24.
Drag-and-Drop Steps:This procedure documents how to use drag-and-drop functionality to reschedule a task from the Gantt view.
5-40 Oracle Field Service User Guide
Caution: When using drag-and-drop, no check is performed to assure that the new configuration is the best option, or even a possible option. Scheduler does check for matching skills and whether parts are associated to the task.
1. Navigate to the dispatch center (Field Service Dispatcher > Dispatch Center).
The Dispatch Center Task view appears (by default).
2. From the Task view, click the Gantt icon to switch to the Gantt view.
3. Select the task to be moved by placing the cursor on the cell. Click and hold down the left mouse button while you drag the task to its new position in the Gantt view. The reschedule can call for a different time as well as a different technician.
4. Release the left mouse button.
5. To cancel the drag and drop action, click Undo.
6. Refresh the Gantt view.
The task is rescheduled to the technician and time slot indicated on the refreshed Gantt view.
Right-Click Steps:This procedure documents how to use the right-click menu to reschedule a task from the Gantt view.
1. From the Task view, click the Gantt icon to switch to the Gantt view.
2. Select and right-click a task, and then select Reschedule selected Task from the right-click menu.
The Reschedule Task window appears. You can reschedule the task using all the available options and normal scheduling filters.
Rescheduling Tasks Longer Than a ShiftWhen the effort for a task takes longer than a standard work shift, for scheduling purposes, Advanced Scheduler automatically splits this (parent) task and creates multiple child tasks with durations that are equal to, or shorter than a standard shift.
During initial scheduling of a task with a duration that is longer than a standard shift, Advanced Scheduler looks for a single technician who has availability in contiguous time slots. A parent task is created with planned effort that exceeds the standard work shift. After that task is scheduled, either through autonomous scheduling functionality or interactively, the parent task is split and related child tasks are created that fit into

Managing Field Service Task Schedules 5-41
the standard shift, each with a unique task number. Each child task is then assigned a Planned Effort time, in hours, that adds up to the total task time of the parent task.
For example, if the planned effort for a task is 20 hours, and a standard work shift is eight hours, the parent task propagates three related child tasks; two with eight hour durations, and one a four hour duration.
This table describes whether attributes or functions are associated with the parent task or the child tasks. For example, the Assignee attribute is associated only with the Child tasks, and not the Parent task. Skills assigned to the Parent task are copied to the Child tasks, thus all child tasks require the same set of skills as the Parent task. The Parent task cannot be debriefed. Only Child tasks are debriefed.
Attributes of tasks longer than a shift:
Attribute or Function Parent Task Child Task
Assignee No Yes
Skills Yes Yes, copied from Parent
Parts Yes No
Owner Yes Yes, default value is from Parent
Debrief No Yes
Dispatch Center Task List
Appears in italic font Appears in standard font
Dispatch Center Plan Board
Yes Yes
Dispatch Center Plan Board Split Flag
"M" appears in the Plan Board cell, 4th position.
"D" appears in the Plan Board cell, 4th position.
Dispatch Center Gantt view
No Yes
Schedule Task Advice Tab
Yes Yes, for reschedule only
Planned Dates Yes, as created Always set equal to Scheduled dates

5-42 Oracle Field Service User Guide
Scheduled Dates Always synchronized to Child dates:
• Start = Earliest Child Start
• End = Latest Child End
Yes, as scheduled
The Parent task displays in italic font in the task list, and the Parent check box is selected. Child tasks displays in standard font in the task list, and the Child check box isselected.
All technician recorded work, such as actual work time, and debrief, is executed againstthe child tasks. The relationships between the parent and child tasks are created and maintained automatically by the Field Service functionality.
When using assisted scheduling in the dispatch center, only the first possible position inthe schedule displays. When using the Intelligent scheduling mode, multiple possible scheduling scenarios display, ranked by cost.
In the event that the parent task or one or more of the child tasks needs to be rescheduled or canceled, you can do this through the Parent/Child window, which is accessible from the dispatch center.
Use the following procedure to navigate to the Parent/Child window, and then either cancel or reschedule all or parts of the child tasks and the original parent task.
Prerequisites❒ The task must have a Planned Effort greater than the default shift duration.
Steps:1. To reschedule, navigate to the Task Parent/Child window by either selecting the
parent or one of the child tasks in one of these navigation paths.
Field Service Manager or Field Service Dispatcher: Dispatcher Center > Navigate > Parent/Child
Alternative navigation paths:
• Dispatch Center > Tasks view > right-click Task in Tasks list
• Dispatch Center > Gantt view > right-click Task in Tasks list
• Dispatch Center > Plan Board view> Right-click Task cell
The task details for the selected task display in the top region of the window. Belowthat parent task information displays in the Parent region and information relating
Managing Field Service Task Schedules 5-43
to the child tasks appear in the Child region.
2. To make changes to the Parent task, click the Parent Number field of the Parent section.
This enables the following buttons: Cancel Parent Task, Unschedule Parent Task, and Reschedule Parent Task.
3. If you click Cancel Parent Task, all related Child tasks are canceled as well. If you click Unschedule Parent Task, all the child tasks are unplanned, but the dependencies are maintained. If you click Reschedule Parent Task, all the child tasks are rescheduled to correspond to the new parent task schedule.
4. You can also perform similar functions against any one or all of the child tasks. To enable the child task buttons, click any of the child tasks in the Child section.
The available buttons for child tasks are: Cancel Selected Task, Cancel Starting Selected Task, Reschedule Selected Task, Reschedule Starting Selected Task.
5. To cancel a single task, select the task you want to cancel and click Cancel Selected Task.
The child task is removed.
6. You can also cancel all tasks that follow a selected task in the hierarchy. To cancel a set of tasks, select the task that you want to begin the cancellation process with and click Cancel Starting Selected Task.
This function is not available for the first or last task in the set. Canceling the initial task and all that follows requires that you perform this function at the Parent level. This button also is not available for the last task in the sequence because no tasks follow it.
7. To reschedule a selected task, select the child task you want to reschedule and click Reschedule Selected Task.
This function enables you to shift the task to another technician, for example, in the case of illness or some other unexpected development.
8. To reschedule a child task and all the subsequent child tasks, select the task you want to begin rescheduling and click Reschedule Starting Selected Task.
This functionality addresses a situation where a technician is not available for future work, but the parent task is not completed.
Canceling a Scheduled TaskTo cancel a scheduled task you need to cancel all task assignments for the task. After a task is canceled, you can choose to schedule it again, or close it. If a task is part of a
5-44 Oracle Field Service User Guide
parent and child task relationship, you can also choose to cancel all tasks beginning with a selected task.
Use this procedure to cancel a scheduled task or task assignment.
Steps:1. Navigate to the dispatch center Plan Board or Gantt view (Field Service Dispatcher
> Dispatch Center).
The dispatch center Task view appears (by default).
2. From the Task view, click the Gantt icon to switch to the Gantt view, or click the Plan Board icon to switch to the Plan Board view.
The Plan Board or Gantt view appears.
3. Select and right-click the task number for the task that you want to cancel.
4. Select Cancel selected Task from the right-click menu.
Alternatively, select Cancel starting at selected Task. If a task is part of a parent and child relationship, this option cancels all tasks beginning with the task selected.
Warning messages, if any, appear in a popup window. For example, a warning message appears if the task you want to cancel is part of a parent and child relationship, and the scheduled start time has passed.
5. Click Continue.
The task is canceled.
6. Click Refresh. The task status changes accordingly.
Recalculating a TripWhen an additional task has been added to a trip, or a task has been removed from an existing trip, the dispatcher can use the recalculate trip functionality to recalculate the travel time of every task on a particular trip. See Recalculating All Trips, page 5-45.
Recalculating a trip takes into account the planned start date and time of the task, scheduled end date and time of the previous task, and travel time. This feature also enables a user to manually make changes to the trip without invoking Advanced Scheduler.
Use the following procedure to recalculate a service trip after task assignment, but before task commitment.

Managing Field Service Task Schedules 5-45
Prerequisites❒ Advanced Scheduler is implemented.
Steps:1. Navigate to the dispatch center (Field Service Dispatcher > Dispatch Center).
2. From the dispatch center, click the Plan Board icon.
The Plan Board view appears to display technician trips and tasks.
3. Select and right-click a departure task.
The right-click menu appears.
4. Select Recalculate from the right-click menu.
Gaps or overlaps in the trip are removed and travel times are recalculated.
Recalculating All TripsThe Recalculate all trips functionality of Field Service recalculates the trips of all resources displayed on the Plan Board. Time gaps and overlaps are removed and travel times are recalculated, but the sequences of tasks within trips are not altered.
Use this procedure to update and optimize all service technicians trips that display on the Plan Board after task assignment, and before task commitment.
Prerequisites❒ Advanced Scheduler must be installed.
Steps:1. Navigate to the Plan Board view (Field Service Dispatcher > Dispatch Center > Plan
Board view).
2. From the dispatch center, click the Plan Board icon to open the Plan Board view.
The Plan Board view appears to display technician trips and tasks.
3. From the Tools menu, select Recalculate All Trips.
The process is performed immediately. A window appears to report the number of updated trips, and whether errors occurred.

5-46 Oracle Field Service User Guide
Optimizing a TripThe Field Service optimize trip functionality rearranges "schedulable" tasks and recalculates travel time for each task in a trip for a single resource so as to minimize total costs. Cost parameters set up in Advanced Scheduler influence task priority.
During optimization, Advanced Scheduler unplans all tasks in the trip. Then it reschedules the tasks, one by one, to the most cost effective position in the trip sequence. Therefore, it is possible that the sequence of tasks within the trip can change.
Use this procedure to optimize a service trip.
Prerequisites❒ Advanced Scheduler is implemented.
Steps:1. Navigate to the Optimize Trip window (Field Service Dispatcher > Dispatch
Center).
The Dispatch Center window appears to the Task view.
2. Click the Plan Board icon.
The Plan Board view appears to display technician trips and tasks.
3. Right-click a departure task, and then select Optimize from the right-click menu.
The process is performed immediately.
Integrating With Google Maps Through the Field Service Dispatch Center 6-1
6Integrating With Google Maps Through the
Field Service Dispatch Center
This chapter explains an optional feature on how to render and invoke Google Maps from the Field Service Dispatch Center.
This chapter covers the following topics:
• Understanding the Google Maps Integration
• Viewing a Resource Trip on Google Maps
• Viewing Tasks on Google Maps
• Viewing Tasks of Selected Territories on Google Maps
• Using Guided Google Map in Field Service
• Understanding the Tool Tip Details
Understanding the Google Maps IntegrationThe Oracle Field Service application provides customers with an option to view and track information about technicians, task status, and task incident address locations in a more interactive way through Google Maps. Google Maps integration makes it easy for the dispatchers to visualize key business information on maps. With this new functionality, the Field Service application enables customers with or without spatial data information, to have a pictorial view of the tasks, task status, and technicians location details on the Google Map. Google Maps provides a high performance, visuallyappealing, and interactive map viewing experience, with all the capabilities built-in such as, zooming in and out, panning or scrolling, and printing maps.
For more information on implementing and setting up Google Maps, see Setting Up Google Maps in the Oracle Field Service Implementation Guide.
For more information on the Google Maps integration with the Field Service Technician Portal, see Viewing Tasks on Google Maps, page 7-9.

6-2 Oracle Field Service User Guide
PrerequisitesRendering technician trips, task location, tasks within a region, and tasks fetched by executing the task query onto Google maps requires that the addresses and locations be geo-coded. Oracle Advanced Scheduler geo-codes tasks whose locations have not been previously geo-coded, by leveraging the geo-spatial dataset loaded within Oracle Field Service schema.
The geo-coder, which is part of the Oracle Advanced Scheduler, has been extended to support country specific address formats and currently provides support for more than 70 countries which includes, North America (Canada, United States, and Mexico), and European & World Markets datasets.
For more information, please see the Oracle Advanced Scheduler User Guide.
Viewing a Resource Trip on Google MapsUse this procedure to view a resource trip on Google Maps.
Prerequisites❒ Set up Google Maps.
❒ Task addresses and locations must be geo-coded.
Oracle Advanced Scheduler geo-codes tasks whose locations have not been previously geo-coded, by leveraging the geo-spatial dataset loaded within the Oracle Field Service schema.
Steps:1. Navigate to the Field Service Dispatch Center (Field Service Manager: Field Service
Dispatcher > Dispatch Center).
2. Perform one of these options:
• Right click on a Resource Name in the Plan Board.
• Right click on a Resource Name in the Gantt chart.
3. Select View Resource Trip on Google Map
The trip of the resource starting from his home till his return back to home for the date viewed in the Plan Board or the Gantt chart is plotted on the Google Map. Markers are plotted at the customer incident addresses, with the sequence number marked, depicting the order of the task in the trip. This is also the order in which the technician is supposed to visit the customer, based on the scheduled start times of the tasks.
Integrating With Google Maps Through the Field Service Dispatch Center 6-3
Viewing Tasks on Google MapsUse this procedure to view one or more tasks on Google Maps.
Prerequisites❒ Set up Google Maps.
❒ Task addresses and locations must be geo-coded.
Oracle Advanced Scheduler geo-codes tasks whose locations have not been previously geo-coded, by leveraging the geo-spatial dataset loaded within the Oracle Field Service schema.
Viewing One Task on Google Maps:1. Navigate to the Field Service Dispatch Center (Field Service Manager: Field Service
Dispatcher > Dispatch Center).
2. Perform one of these options:
• Right click on a task in the Task List section of the Dispatch Center.
• Right click on a task in the Plan Board.
• Right click on a task in the Gantt chart.
3. Select View Task on Google Map
This invokes the Google Map plotting the incident address of the task. The tool tip displays additional information about the task.
Viewing Multiple Tasks on Google Maps:1. Navigate to the Field Service Dispatch Center (Field Service Manager: Field Service
Dispatcher > Dispatch Center).
2. Select multiple tasks in the Task List section of the Dispatch Center.
3. From the Tools menu, select View Selected Task(s) on Google Map
Viewing Tasks of Selected Territories on Google MapsUse this procedure to view tasks of selected territories on Google Maps.
Using this procedure you have the option to view all the tasks scheduled to the technicians that are displayed in the Plan Board or Gantt chart for the particular date

6-4 Oracle Field Service User Guide
entered in either the Plan Board or Gantt chart.
Prerequisites❒ Set up Google Maps.
❒ Task addresses and locations must be geo-coded.
Oracle Advanced Scheduler geo-codes tasks whose locations have not been previously geo-coded, by leveraging the geo-spatial dataset loaded within the Oracle Field Service schema.
Steps:1. Navigate to the Field Service Dispatch Center (Field Service Manager: Field Service
Dispatcher > Dispatch Center).
2. From the Tools menu, select View all Territory Task(s) on Google Map
This invokes the Google Map for the selected territory resources in the Plan Board or Gantt chart. This option does not plot the departure and arrival tasks of the technicians.
If the information regarding tasks, incidents, and technicians location has a valid geometry then the tasks and locations are rendered on the Google Map. The Task Marker Icon reflects the color of the corresponding task status, as per the color scheme set up. A tool tip is enabled for the task (marker/icon displayed on the map)with two tabs 'Task Info' and 'Address' when you click on the marker of the task plotted. If no geometry is available against the tasks, Oracle transfers the task address to Google to resolve. If Google Geo-coder can resolve the address then the task is marked on the Google Map. A tool tip with three tabs 'Task Info', 'Address' and 'Resolved Address' is displayed when you click on the marker of the task plotted. The Resolved Address section has the exact address information to which Google was able to resolve the given address. If the address of the task marked on the Google Map, is not resolved either by Oracle Geo-coder or by Google, then the task is listed in the Unresolved section of the Google Map.
Using Guided Google Map in Field ServiceYou can invoke Google Map in a standalone mode by navigating to the Field Service Dispatch Center window. The Google Map window is capable of displaying task related information based on the guided search options and filters provided on the window.
Navigation: Field Service Dispatcher > Dispatch Center > Tools > Launch Google Map
This window enables you to plot tasks on a Google Map based on:

Integrating With Google Maps Through the Field Service Dispatch Center 6-5
• Resources
• Task List Query
• Territories
Tasks are plotted on the Google Map for the resources and territories criteria considering the date selected. For task list query, date has no effect.
Viewing Tasks Belonging to Selected Resources on Google MapsThe resources are populated in the Available Resources section, based on the territories that have been selected in the Dispatch Center or the territories that have been assigned to the dispatcher. To plot the tasks for those technicians and for a specific date (selected on the Map) that you are interested in, you can move the desired technicians to the 'Selected' section. Once the selection is complete, clicking the Refresh button will plot the resolved tasks scheduled to the selected resources on the Google Map. The departure and arrival task information for the selected resources also displays on the Google Map.
When there are multiple resources plotted on the Google Map, upon selecting a resource name in the drop-down list box field, all the tasks scheduled to that resource alone are plotted on the Google Map.
Viewing Tasks in a Task List Query on Google MapsAll task list queries available in the Field Service Dispatch Center are listed here. Upon selecting a task list query, the tasks retrieved by executing the query are rendered on the Google Map.
Viewing Tasks Belonging to All Technicians of Selected Territories on Google MapsThe territories are populated in the Available Territories section, based on the territoriesthat have been selected in the Dispatch Center or the territories that have been assigned to the logged in dispatcher. You can move the desired territories to the 'Selected' sectionto plot the tasks for those territory resources alone for the date selected on the Google Map. After the selection is done, clicking Refresh will plot all the resolved tasks scheduled to the selected territory resources on the Google Map. If the 'Show Complete Trip' check box is selected, the departure and arrival task along with the other scheduled tasks for the selected resources are displayed on the Google Map. If the checkbox is not selected, only the tasks scheduled for the selected resources are displayed on the Google Map.
When multiple tasks are plotted on the Google Map, there is an option to zoom into the tasks plotted on the Google Map by selecting the task in the drop-down list box field. To view the location of the task with tool tip information you can search for the task number in the Find task text field displayed in the Google Map area.
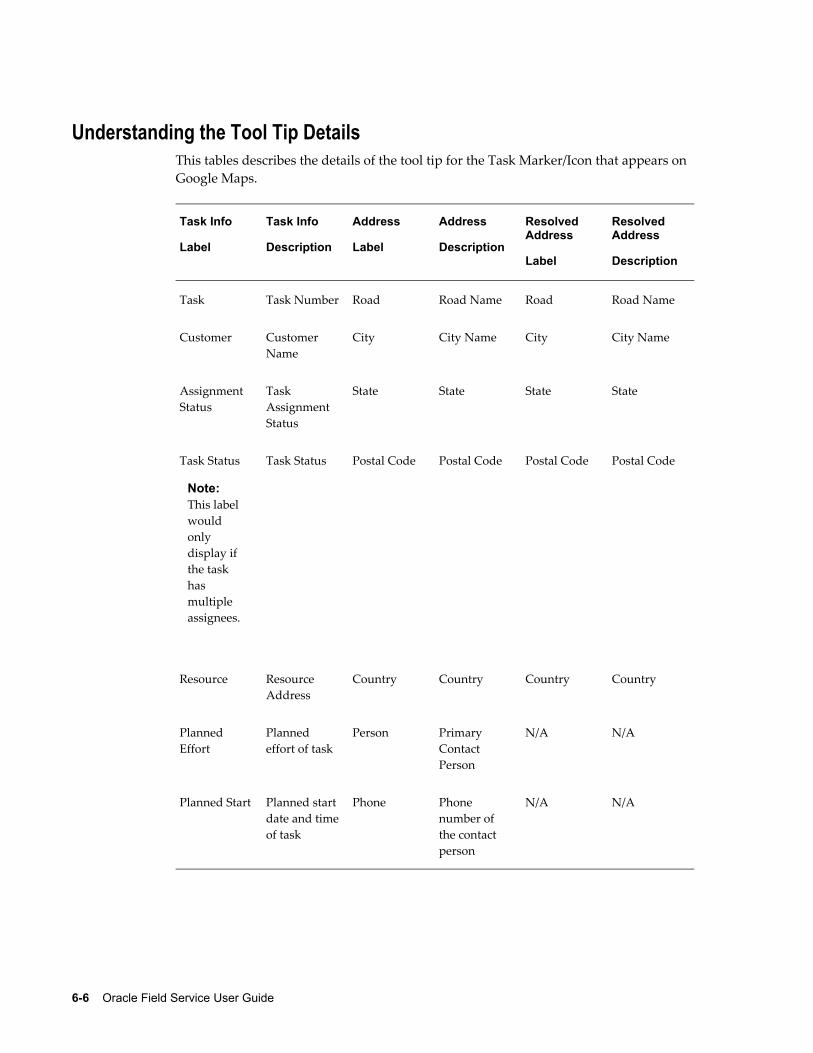
6-6 Oracle Field Service User Guide
Understanding the Tool Tip DetailsThis tables describes the details of the tool tip for the Task Marker/Icon that appears on Google Maps.
Task Info
Label
Task Info
Description
Address
Label
Address
Description
Resolved Address
Label
Resolved Address
Description
Task Task Number Road Road Name Road Road Name
Customer Customer Name
City City Name City City Name
Assignment Status
Task Assignment Status
State State State State
Task Status
Note: This label would only display if the task has multiple assignees.
Task Status Postal Code Postal Code Postal Code Postal Code
Resource Resource Address
Country Country Country Country
Planned Effort
Planned effort of task
Person Primary Contact Person
N/A N/A
Planned Start Planned start date and timeof task
Phone Phone number of the contact person
N/A N/A

Integrating With Google Maps Through the Field Service Dispatch Center 6-7
Task Info
Label
Task Info
Description
Address
Label
Address
Description
Resolved Address
Label
Resolved Address
Description
End Planned end date and timeof task
Travel Duration
Time required to travel to this task from the previous task (in minutes)
N/A N/A
Scheduled Start
Scheduled start date andtime of task
Distance Distance to travel to this task from the previous task (in Kilometers)
N/A N/A
End Scheduled end date and time of task
N/A N/A N/A N/A


Receiving and Accepting Work Assignments 7-1
7Receiving and Accepting Work Assignments
This chapter explains how field service technicians use the Field Service Technician Portal to change task assignment status, view service request details, and create parts requirements.
This chapter covers the following topics:
• Explaining the Elements of the Dashboard
• Explaining Quick Links to Key Processes
• Customizing Dashboard Views
• Personalizing an Existing View
• Creating a New View
• Viewing the Technicians Calendar
• Viewing Tasks on Google Maps
• Receiving Work Tasks
• Overview: Task Updates
• Understanding the Update Task Page
• Updating Task Assignment Status
• Accepting or Rejecting Tasks
• Ordering Parts for Trunk Stock
• Ordering Parts for a Specific Task
• Receiving Shipments
• Starting Work
• Viewing Service Request Details
• Viewing Parts Requirements
• Creating Service Requests
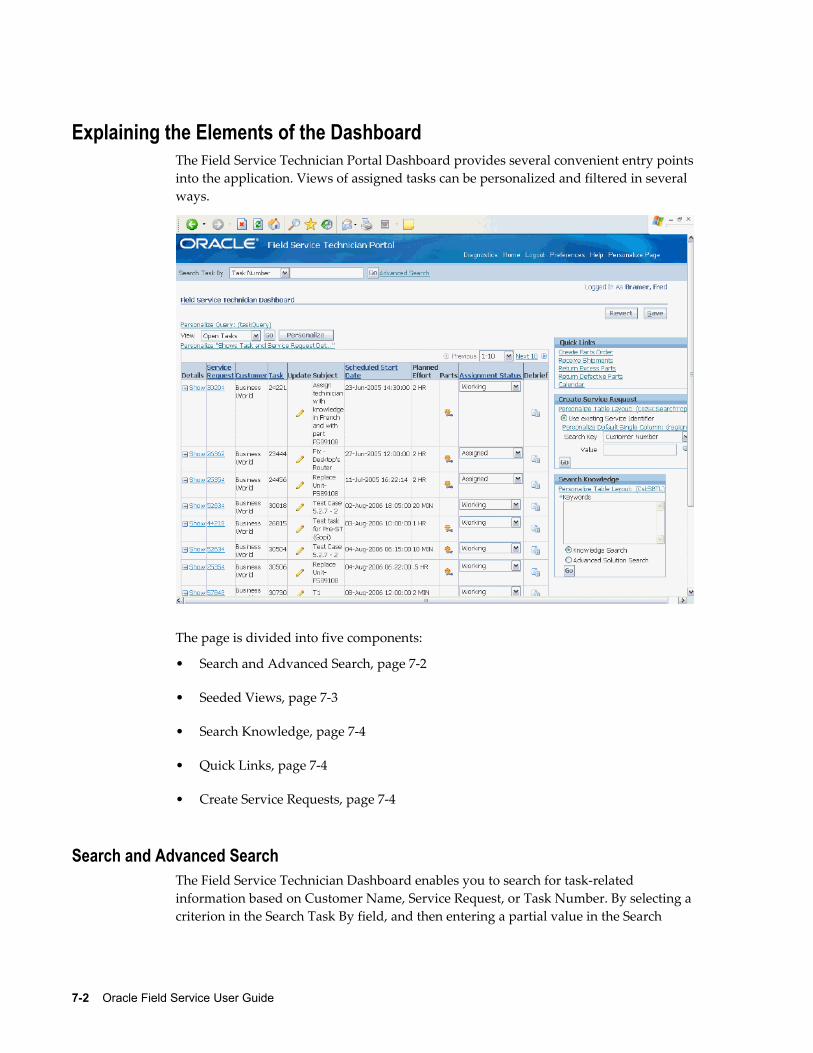
7-2 Oracle Field Service User Guide
Explaining the Elements of the DashboardThe Field Service Technician Portal Dashboard provides several convenient entry pointsinto the application. Views of assigned tasks can be personalized and filtered in several ways.
The page is divided into five components:
• Search and Advanced Search, page 7-2
• Seeded Views, page 7-3
• Search Knowledge, page 7-4
• Quick Links, page 7-4
• Create Service Requests, page 7-4
Search and Advanced SearchThe Field Service Technician Dashboard enables you to search for task-related information based on Customer Name, Service Request, or Task Number. By selecting acriterion in the Search Task By field, and then entering a partial value in the Search
Receiving and Accepting Work Assignments 7-3
Criteria field, technicians can quickly retrieve specific task information.
Advanced Search functionality is also available. By clicking the Advanced Search link, the Search Task page appears, where more detailed criteria can be entered. For example,a search based on a specified task Scheduled Start Date.
Seeded ViewsThe Field Service Technician Dashboard has three seeded views:
• Escalated Tasks
• Open Tasks
• Today's Tasks
In each of these, the search criteria and the display columns cannot be modified. The seeded views display the following information in the table:
• Task details
• Service Request number
• Customer name
• Task number
• Update task icon
• Subject
• Scheduled Start Date
• Planned Effort
• Parts icon (if any)
• Assignment status
• Debrief icon
The summary table associated with a view displays relevant task information for each task that fits the search criteria for the technician. For example, the Open Tasks view displays all tasks assigned to the technician that have not been canceled or closed.
Updating a task, can be performed directly from the dashboard view. Technicians can drill down to task details, view service request details, and open a debrief. Additionally,the technician can view parts associated with the task, view Install Base details, and if Google Maps is implemented they can invoke and render the tasks associated with the view on Google Maps.
7-4 Oracle Field Service User Guide
Personalized Views display selected columns containing information related to those tasks. Technicians can access any of the seeded or personalized views, and can select a view that will appear by default.
Search KnowledgeThe Field Service Technician Dashboard enables easy access to the Oracle Knowledge Management application. A user can perform either a simple keyword search or an advanced solution search from the Field Service Technician Dashboard. This functionality enables a technician to access existing solutions for task-related problems.
You can also access Knowledge Management through the Update Task page. In this case, the Service Request Summary appears by default in the keyword search field, although it can be modified as needed.
Quick LinksThe Quick Links section provides navigation links to critical field service processes:
• Create Parts Order
• Receive Shipments
• Return Excess Parts
• Return Defective Parts
• Search eRecord Evidence Store
• Calendar
Create Service RequestTechnicians sometimes discover that a new service request must be logged to address a customer issue that was not addressed in the original service request. The Field Service Technician Dashboard provides a direct link to create a new service request by using existing service identifiers, such as part serial number, tag number, instance address, account name, and so on.
Explaining Quick Links to Key ProcessesThe Field Service Technician Dashboard provides quick access to key processes needed to perform these day-to-day material management activities:
• Create Parts Order
• Ordering Parts for Sub-inventories, page 7-17
Receiving and Accepting Work Assignments 7-5
• Ordering Parts for a Specific Task, page 7-19
• Receive Shipments, page 7-21
• Return Excess Parts, page 8-18
• Return Defective Parts, page 8-20
• Search eRecord Evidence Store, page 8-13
• Calendar
• View Technician's Calendar, page 7-8
Customizing Dashboard ViewsField technicians can arrange their Field Service Technician Dashboard to meet their specific needs. The Field Service Technician Dashboard comes with three seeded views, which contain a preselected sequence of display columns. The number of tasks displayed per page is set as well. Technicians can duplicate, and then modify the seededviews to personalize them, or they can create an entirely new view in which the task search criteria are determined by the technician.
Personalizing an Existing ViewYou can personalize any of the views in the dashboard by duplicating the view under a different name, and then changing the parameters for the duplicated view to fit your needs.
Use this procedure to personalize an existing view.
Steps:1. Navigate to the Field Service Technician Dashboard (Field Service Technician
Portal: Field Service Technician Dashboard).
2. From the main dashboard window, click Personalize.
3. In the table, select the Select option next to the view that you want to personalize.
4. Click Duplicate.
The Duplicate View page appears. In this page, all the values of the original view are selected and displayed in the various fields and dialog boxes. You can modify any or all of the display fields.
7-6 Oracle Field Service User Guide
5. In the View Name field, enter a name for the new view.
6. You can change any of the settings in the General Properties section (rows displayed, whether to set the view as the default, and the description.)
7. Modify the columns that you want appear in your view. To remove a column, moveit from the Columns Displayed dialog box to the Available Columns dialog box. To add a column to the view, move it from the Available Columns dialog box into the Columns Displayed dialog box.
8. (Optional) To rename the columns, click Rename Columns/Totaling.
9. Change the column names as desired, and then click Apply.
10. Define new Sort Settings, if applicable.
11. You can add additional task search parameters to the view in the Search Query to Filter Data in your Table section.
12. When you have finished modifying the view, click Apply.
Creating a New ViewYou can create a new view for the dashboard that displays the data you want to view. New views are added to the list of existing views, and you can modify or display them at any time.
When creating a view, you can set the number of tasks to display, designate the new view as your default view, determine which columns to display and the column sequence, and define task search criteria.
Use these steps to create a new view for use on the dashboard.
Steps:1. Navigate to the Field Service Technician Dashboard (Field Service Technician
Portal: Field Service Technician Dashboard).
2. From the main dashboard page, click Personalize.
The Personalize Views page appears. This page displays a table of existing views.
3. Click Create View.
The Create View page appears.
4. In the General Properties region, enter the View Name.
5. Select the Number of Rows Displayed from the drop-down list.

Receiving and Accepting Work Assignments 7-7
This field determines how many tasks display for the view.
6. If you want this to be your default view, select the Set as Default check box.
7. Enter a brief description of the view.
In the Column Properties section, all the columns that can appear in the view are listed in the Columns Displayed dialog box.
8. Select the columns that you do not want to appear in your view from the Columns Displayed dialog box and remove them to the Available Columns dialog box.
You can rearrange the order of the columns by using the up and down arrows to move them into the desired order.
9. In the Sort Settings region, select the column you want to sort by, and then select whether the sort order should be in ascending or descending order.
You can sort up to three columns. There is no sort order selected by default.
10. In the "Search Query to Filter Data in your Table" region, set your criteria for the task search.
By selecting the appropriate option, you can specify that a search match requires all search parameters be met, or any of the parameters be met.
11. Select a search parameter. The four default search parameters are service request, customer, task, and scheduled start date. You can use one or any combination of these parameters.
12. After you select a search parameter, choose the qualifier you want to use to filter theparameter.
The following search qualifiers are available: is, is not, contains, starts with, ends with.
13. Enter a value in the value field.
ExampleFor example, if you want to set up a view that only displays tasks associated with a particular customer. Use the following search criteria construction:
Search Criteria Example
Parameter Search Qualifier Value
Customer is <Customer Name>
7-8 Oracle Field Service User Guide
14. (Optional) Add another search parameter by selecting it from the list of values in the Add Another drop-down list, and then click Add.
15. To save the view, click Apply.
Viewing the Technicians CalendarThe Oracle Field Service Technician Dashboard provides a quick link to the technicians calendar. The technician has the ability to view the calendar in a daily, weekly, or monthly mode. Additionally, the technicians can also drill down to task details from thecalendar.
Use this procedure to view the calendar:
Steps:
Opening the Calendar1. Navigate to the Field Service Technician Dashboard (Field Service Technician
Portal: Field Service Technician Dashboard).
2. From the Quick Links section, click the Calendar link.
The technicians calendar appears in the daily view for the current date by default.
Calendar Navigation3. To view the previous or next day, click the Previous Day or Next Day buttons.
4. To view the calendar in Weekly or Monthly format, select the Weekly or Monthly tab.
The Weekly or Monthly calendar format appears to display the current week or month, depending on which tab was selected.
5. On the Weekly tab, to view the previous or next week, click the Previous Week or Next Week buttons.
6. On the Monthly tab, to view the previous or next month, select a different month and year in the View fields. Click the Current Month button to display the current month.
7. To view the calendar for a specific day, click the calendar date link from the Weeklyor Monthly tab.
The Daily tab appears for the date selected.
View Task Details8. To view task details click the corresponding task link that appears on the calendar.

Receiving and Accepting Work Assignments 7-9
9. To return to the calendar, click the calendar link at the top left of the page.
Printable page10. To print the calendar, click the Printable Page button and then use standard print
options on your browser.
Closing the Calendar11. To close the calendar, click the Field Service Technician Dashboard link in the top
left of the page.
Viewing Tasks on Google MapsIf you have installed and set up Google Maps you have the ability to invoke and render the tasks that appear for the view that you select on the Field Service Technician portal on Google Maps.
The Show Tasks on Google Map button will appear at the top of the task summary tableof the Field Service Technician Dashboard portal. When you click this button, a new window will appear and all the tasks associated with the view are rendered on the Google Map
For more information on installing and setting up Google Maps, see Setting Up Google Maps in the Oracle Field Service Implementation Guide.
For more information on the integration of Google Maps with the Field Service Dispatch Center, see Understanding the Google Maps Integration, page 6-1.
Receiving Work TasksThe commit process releases work to the technicians. See Releasing Work to the Field, page 5-28. When the schedule is committed, the task status changes to 'Assigned'. Work assignments are then available to field service technicians through the Field Service Technician Dashboard.
Task status set up in the Task and Escalation Status window determines whether tasks at a given status are sent to the Field Service Technician Dashboard, and whether those tasks can be updated from the Dashboard.
On the Task and Escalation Status window (Field Service Setup > CRM Foundation > Task and Escalation Manager > Setup > Define Task Status) if the check box in the 'Assigned' column is selected for a given task status, then you can work with tasks at that status from the Dashboard. Selecting the corresponding 'Schedulable' check box enables scheduling in Oracle Field Service and makes task information available to the technician dashboard in view only mode.
For more information about Task Statuses and Transition Rules, see the Setting Up TaskStatus and Transition Rule section of theOracle Field Service Implementation Guide.

7-10 Oracle Field Service User Guide
For more information on the task status check boxes, see the Defining Task Statuses andStatus Transition Rules section of the Oracle Common Applications Components Implementation Guide.
For more information on the task types check boxes, see the Defining Task Types section of the Oracle Common Applications Components Implementation Guide.
Service technicians report on task assignment status. The Field Service Technician Dashboard opens to the default view designated by the technician. The technician can select other existing views from the list of values, create custom views, and designate a different default view. The view determines which columns of information appear. The view can be set up to filter the displayed tasks. For example the technician can define a view to display only tasks that are at Task Assignment Status: 'Assigned'. In this way, when the technician opens the dashboard, all assigned tasks appear. See Customizing Dashboard Views, page 7-5.
Steps:1. Navigate to the Field Service Technician Dashboard (Field Service Technician
Portal: Field Service Technician Dashboard).
The Field Service Technician Dashboard for the logged in technician appears to the view designated as the default view.
2. Select a view that displays tasks having the Task Assignment Status filter set to 'Assigned'.
To create a personalized view, see Customizing Dashboard Views, page 7-5..
All tasks assigned to the technician appear in the dashboard.
Overview: Task UpdatesThe Field Service Technicians Portal Dashboard displays the tasks assigned to the technician in the task summary table. Details display according to the selected view. Technicians update existing tasks by clicking the Update icon for the appropriate task inthe table view. The user can click either the Parts icon, which appears when parts are associated with the task, or the Debrief icon to navigate to the corresponding sub-tab onthe Update Task page.
Debrief enables the following:
• Update Task Assignment Status, page 7-15
• Debrief Procedures, page 8-2, such as capturing travel, labor, material and expense details
• Update Task Details and Notes, page 8-12
• Create a Follow-Up Task, page 8-21.
Receiving and Accepting Work Assignments 7-11
Understanding the Update Task Page
Update Task: TitleThe Task Name and sequentially generated Task Number appear in the title of the Update Task page.
Update Task: HeaderThe header region of the Update Task page contains the following information:
Update Task Header Fields
Field Label Description
Task Type The category of the task, such as Diagnostic, Dispatch, or Callback.
Task Status The phase of the task, such as Assigned, Accepted, Approved, Canceled, or Working.
Priority The urgency of the task, such as high, medium, or low.
Assignment Status The assignment status for the task, such as Assigned, Accepted, Canceled, or Working.
Escalation The escalation level of the task.
Planned Effort The estimated time required to complete the task.
Update Task: Show Service RequestThe details of the service request associated with the task can be viewed and updated. To view the details, click the +/- button to the left of the Show Service Request heading.
Once expanded, the following information can be viewed:
• Service request number (link)
• Severity
• Customer Name
• Incident Address

7-12 Oracle Field Service User Guide
• Contact Name
• Communication
• Item (link)
• Item Description
• Problem Summary
• Resolution Summary
• Problem (problem code)
• Resolution (resolution code)
• Attachments
• Status
• Type
• Purchase Order Number
• Contract Number
• Serial Number
• Service Tag
At the time the service request is created, the problem code is selected from a list of predefined lookups. Similarly, the resolution code is selected from a list of values at the time the task is completed at the customer site. At any time, the technician can modify problem code, resolution code, and enter resolution summary information detailing the issue addressed at the customer site.
The Pro forma invoice displays information only after debrief lines have been sent to Charges for posting. Click Pro Forma Invoice to view the detail report of charges entered for the task performed.
Update Task: TabsWithin the Update Task page, there are several sub tabs and expandable sections that the technician can view and update. The following sections describe the sub tabs and associated actions available to the technician:

Receiving and Accepting Work Assignments 7-13
Update Task: Details Tab
• View and add the description associated with the task.
• View existing notes and create new notes for the task.
• View planned and scheduled start and end dates.
• View owner and assignee for a task.
Update Task: Details Fields
Field Label Description
Description This field displays the description for the task.
For a step-by-step procedure for updating task details, see Updating Task Details and Notes, page 8-12.
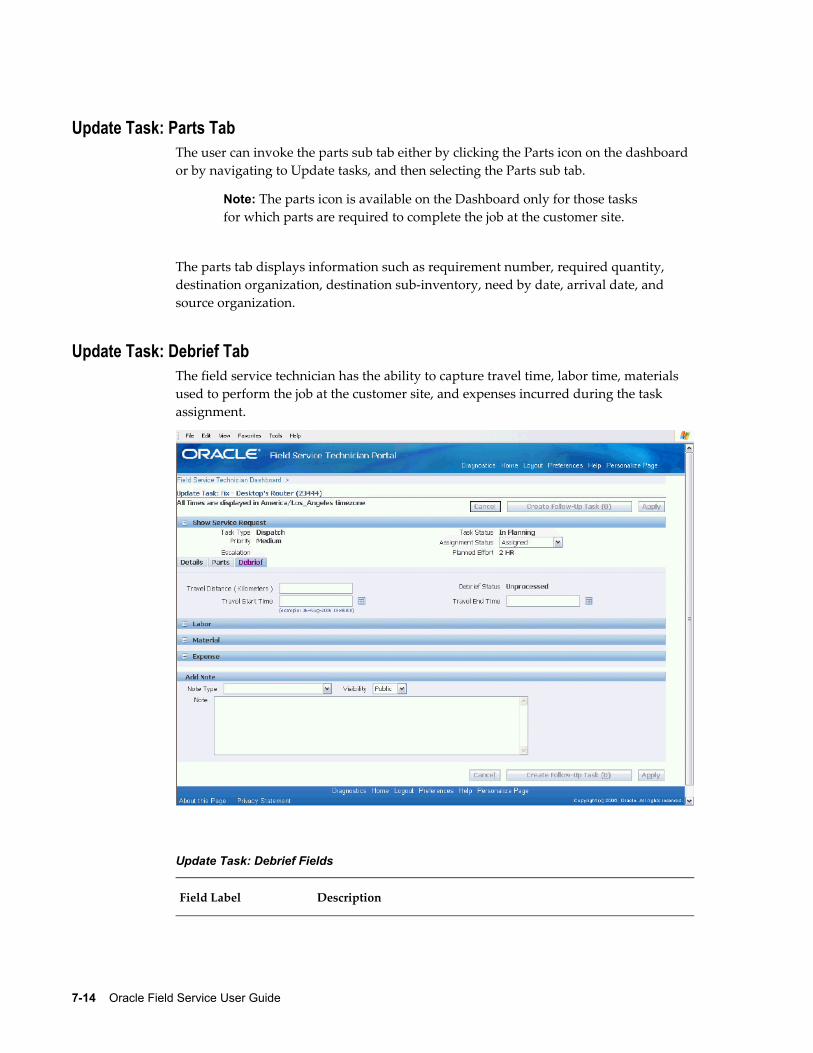
7-14 Oracle Field Service User Guide
Update Task: Parts TabThe user can invoke the parts sub tab either by clicking the Parts icon on the dashboard or by navigating to Update tasks, and then selecting the Parts sub tab.
Note: The parts icon is available on the Dashboard only for those tasks for which parts are required to complete the job at the customer site.
The parts tab displays information such as requirement number, required quantity, destination organization, destination sub-inventory, need by date, arrival date, and source organization.
Update Task: Debrief TabThe field service technician has the ability to capture travel time, labor time, materials used to perform the job at the customer site, and expenses incurred during the task assignment.
Update Task: Debrief Fields
Field Label Description
Receiving and Accepting Work Assignments 7-15
Travel Distance (Optional) Enabled by a profile option, this field captures distance traveled between task assignments.
Travel Start Time (Optional) This field can be enabled at the profile option level and allows the user to track the time traveled between task assignments.
Travel End Time (Optional) Enabled by a profile option, this field tracks the time traveled between task assignments.
Updating Task Assignment StatusUse this procedure to update the Task Assignment Status and send information to Oracle Inventory, Install Base, and Charges.
Prerequisites❒ A service request and task to report on exist.
❒ Status transition engine must be set up for tasks.
Steps:1. Navigate to the Field Service Technician Dashboard (Field Service Technician
Portal: Field Service Technician Dashboard).
2. From the Dashboard main window, locate the task you want to work with.
3. In the Assignment Status column select an assignment status you want to update the task to.
With service requests created against a product that has an associated counter, upon completion of the task assignment, debrief generates an alert reminder to the technician that the product has a counter. Debrief generates this alert when a task assignment is changed to 'Completed' or 'Closed.'
If there are multiple task assignments related to a task, then all task assignments must be closed in order for the task to be closed. This occurs when multiple field service technicians are assigned to the same task.
Note: For more information about Task Assignment Status, see Task Status and Task Assignment Status Flow, page 1-11.
4. Click Save.

7-16 Oracle Field Service User Guide
If the concurrent program "CSF: Update Debrief Lines" is enabled. The concurrent program sends information to inventory, installed base, and charges only if the taskstatus has one of the following statuses enabled in the tasks status setup window:
• Completed
• Closed
• Canceled
• On Hold
• Rejected
5. (Optional) You can run the Update Debief Lines program manually by specifying the debrief number.
The debrief status can have the following values:
• Complete: Indicates the debrief lines have been sent to inventory, installed base,and charges successfully.
• Running: Iindicates the concurrent program is still running.
• Pending: Indicates the concurrent program is still running.
• Completed with errors: The concurrent program completed with error. Error information can be viewed in the error column for debrief lines.
6. Verify by logging into inventory, installed base, and charges to view the processed information.
Accepting or Rejecting TasksUse this procedure to accept or reject assigned work.
Steps:1. Navigate to the Field Service Technician Dashboard (Field Service Technician
Portal: Field Service Technician Dashboard).
The Field Service Technician Dashboard for the logged in technician appears to the view designated as the default view.
2. Select a view that displays tasks having the Task Assignment Status filter set to 'Assigned'.
All tasks assigned to the technician appear in the dashboard.

Receiving and Accepting Work Assignments 7-17
3. To accept a task, select the seeded value: 'Accepted' from the Assignment Status list of values, or select any custom status that has the 'Accepted' check box selected on the Task and Escalation Status window. Click Save.
4. To reject a task, select the seeded value: 'Rejected' from the Assignment Status list ofvalues, or select any custom status that has the 'Rejected' check box selected on the Task and Escalation Status window. Click Save.
Ordering Parts for Trunk StockBased on the sourcing rules and availability of parts within the technicians trunk stock, the parts ordering functionality results in creating one of the following:
• Purchase Requisition
• Internal Order
• Reservation
To create a parts order for trunk stock sub-inventory, follow these steps:
Steps:1. Navigate to the Field Service Technician Dashboard (Field Service Technician
Portal: Field Service Technician Dashboard).
The Dashboard appears.
2. From the Quick links section, click the Create Parts Order link.
The Create Parts Order: Destination page appears. A temporary Parts Requirement number is automatically created for the order. This Parts Requirement number is saved when you click Finish to complete the transaction. See Step 14.
3. Verify the Address.
4. Confirm the Destination Sub-inventory is correct. If it is not correct, choose the correct sub-inventory from the list of values.
5. Select a Need By Date for the parts order.
6. Click Next.
The Create Parts Order: Parts page appears. This page displays all the information you have already added to the parts order in a display-only mode.
7. Enter the Required Item for the parts order or search for it in the available lookup table.

7-18 Oracle Field Service User Guide
The unit of measure default value for the item appears after the item is selected.
8. Enter the Required Quantity.
9. (Optional) Enter the Ship Set value.
A ship set is a group of order lines, linked by a common number. Set this value to specify that the full quantity of certain items must be shipped together.
10. Click Next.
The Create Parts Order: Options page appears and displays the various options available to you to create the parts requirement.
11. Select the sourcing options for the parts order.
This chart details the fields and their respective definitions during this step:
Create Parts Order Field Definitions
Field Name Definition
Required Item This field displays all Inventory items that can be used to create the parts requirement.
Required Quantity
This field indicates the quantity required to create the parts requirement.
Supplied Item If the required quantity for the item is not available, then the system checks for alternate parts like substitutes or superseded items based on the item setups and sourcing rule. If alternate items are available, then the order is created for them instead of the required item.
Item Type The field indicates whether the supplied item is a substitute or superseded item
Available Quantity
This field displays the available quantity of the required item in the source organization based on the sourcing rule.
Source Type This field indicates whether the order source is an outside vendor or an internal warehouse/inventory.
Source This field refers to the source organization for internal orders and reservations, or the field is null in the case of a purchase order.

Receiving and Accepting Work Assignments 7-19
Field Name Definition
Shipping Method Based on the delivery times and shipping methods set up, this field populates with the shipping method to be used to ship the order.
Arrival Date Based on the lead times of shipping method and the order date, this field populates with the arrival date for the shipment.
12. Enter the Order Quantity for the sourcing option you want to use for the parts order.
13. Click Finish to complete the transaction.
This action validates and saves the Parts Requirement number created in step 1, creates the order number (document), and generates a parts order confirmation.
14. Click OK to return back to the Field Service Technician Dashboard.
Ordering Parts for a Specific TaskTo order a part specific to a task:
Steps:1. Navigate to the Field Service Technician Dashboard (Field Service Technician
Portal: Field Service Technician Dashboard).
The Field Service Technician Dashboard appears.
2. From the Dashboard, click the Update Task icon for a task.
3. Select the Parts tab.
4. Click Create Parts Order.
The Create Parts Order: Destination page appears.
The service request number and task number fields appear by default from the task you selected.
5. Enter the Need By Date.
6. Click Next.
The Create Parts Order: Parts page appears.
7. Enter the Required Item for the parts order or search for it in the available lookup

7-20 Oracle Field Service User Guide
table.
The UOM (unit of measure) default value for the item appears after the item is selected.
8. Enter the Required Quantity.
9. (Optional) Enter the Ship Set value.
A ship set is a group of order lines, linked by a common number. Set this value to specify that the full quantity of certain items must be shipped together.
10. Click Next.
The Create Parts Order: Options page appears and displays the various options available to you to create the parts requirement.
11. Enter the Order Quantity for the sourcing options for the parts order.
The following chart details the fields and their respective definitions during this step:
Create Parts Order Field Definitions
Field Name Definition
Required Item This field displays all Inventory items that can be used to create the parts requirement.
Required Quantity
This field indicates the quantity required to create the parts requirement.
Supplied Item If the required quantity for the item is not available, then the system checks for alternate parts like substitutes or superseded items based on the item setups and sourcing rule. If alternate items are available, then the order is created for them instead of the required item.
Item Type The field indicates whether the supplied item is a substitute or superseded item
Available Quantity
This field displays the available quantity of the required item in the source organization based on the sourcing rule.
Source Type This field indicates whether the order source is an outside vendor or an internal warehouse/inventory.

Receiving and Accepting Work Assignments 7-21
Field Name Definition
Source This field refers to the source organization for internal orders and reservations, or the field is null in the case of a purchase order.
Shipping Method Based on the delivery times and shipping methods set up, this field populates with the shipping method to be used to ship the order.
Arrival Date Based on the lead times of shipping method and the order date, this field populates with the arrival date for the shipment.
12. Enter the Order Quantity for the sourcing option you want to use for the parts order.
13. Click Finish to complete the transaction.
Receiving ShipmentsThe Oracle Field Service Technician Portal receive shipments functionality supports receiving and delivering a shipment to a destination sub-inventory in one transaction. This transaction receives the "as shipped" quantity to a default destination sub-inventory. The technician can update a shipment to receive it into a different sub-inventory.
The Receive Shipments page lists all shipments from a supplier for a given purchase order. The corresponding Carrier, Shipment Number, Waybill, and Packing Slip number display.
Steps:1. Navigate to the Field Service Technician Dashboard (Field Service Technician Portal
> Field Service Technician Dashboard).
The Field Service Technician Dashboard appears.
2. From the Quick Links section, click the Receive Shipments link.
The Receive Shipments page appears. The table displays incoming orders and includes pertinent information associated to the orders, such as Order Type, VendorNumber, PO Number, Shipment Number, Shipped Date, Expected Receipt Date, Waybill Number, and Freight Carrier.
3. Click the Receive icon in the Receive column for the order you want to receive.
The Shipment Details page appears. This page displays the item number and

7-22 Oracle Field Service User Guide
description of the item along with other details associated with the order.
4. To receive the shipment, select the Select option next to the item.
5. In the Quantity field, verify that the number displayed is consistent with the quantity of the item you want to receive. You can edit this number to reflect the actual quantity received.
6. Verify that the sub-inventory into which you are receiving the order is correct. If it is not, change this field to reflect the correct sub-inventory.
7. Click the Apply button to receive the shipment.
Starting WorkUse this procedure to change the task assignment status to indicate that work has begunon a task. When a task is at the 'Working' status, reporting on the task is enabled.
Steps:1. Navigate to the Field Service Technician Dashboard (Field Service Technician
Portal: Field Service Technician Dashboard).
The Field Service Technician Dashboard for the logged in technician appears to the view designated as the default view.
2. Access the task you are going to work on.
3. In the row for the task, open the list of values in the Assignment Status column. Select the seeded value: 'Working' from the Assignment Status list of values, or select any custom status that has the 'Working' check box selected on the Task and Escalation Status window.
4. Click Save.
Viewing Service Request Details
Steps:1. Navigate to the Field Service Technician Dashboard (Field Service Technician
Portal: Field Service Technician Dashboard).
2. Locate the task you want to view the service request details for.
3. In the Service Request column of the dashboard, click the service request number link, which will take you to the Service Request Summary page.
Receiving and Accepting Work Assignments 7-23
4. From there, you can view service request details, such as status, customer profile, incident address, related service requests, attachments, and notes.
Viewing Parts RequirementsTasks having associated spare parts display an icon in the Parts column. Use this procedure to view parts requirements for a specified task. To create parts requirements, see Ordering Parts for a Specific Task, page 7-19.
Steps:1. Navigate to the Field Service Technician Dashboard (Field Service Technician
Portal: Field Service Technician Dashboard).
The dashboard appears to the default view.
2. Select a view that displays the parts column. For information about personalized views, see Customizing Dashboard Views, page 7-5.
3. From the dashboard, click the Parts icon in the row for the task that you want to view the associated service parts.
• The Update Task page appears to the Parts sub tab. Under the Parts sub tab all the parts requirement for the task display.
• Click the Details show link to view all the detail information for the parts requirement.
Creating Service RequestsField service technicians can create a new service request from the dashboard using the Create Service Request region. The Create Service Request page includes regions for contact information, product information, problem description, and service information.
For more information about logging a service request, see the Oracle TeleService User Guide.
Use this procedure to create a service request.
Prerequisites❒ Oracle TeleService must be installed.

7-24 Oracle Field Service User Guide
Steps:1. Navigate to the Field Service Technician Dashboard (Field Service Technician
Portal: Field Service Technician Dashboard).
2. From the Create Service Request region in the dashboard main page, select a Service Identifier from the list of values in the Search Key field.
Some examples of possible identifiers are customer name, instance serial number, service request number, instance service tag, and so on.
3. Enter a Value for the search identifier.
If you do not know the complete value, enter a partial value followed by a wildcardcharacter (%), and then use the search functionality to locate the value.
4. Click Go.
The Create Service Request page appears and displays key information such as the service identifier and related values.
Contact InformationThe Contact Information region provides the following fields:
• Contact Type
• Name
• Contact By
• Account
• Time zone
• Current time
• Language
5. To enter information for a new contact person, in the Contact Information region, click Create Contact.
The Create Contact page appears.
6. Complete the provided fields with available information about the new contact person, such as name, job title, location and e-mail addresses, telephone and mobile telephone numbers, and tax ID information.
7. Click Apply.

Receiving and Accepting Work Assignments 7-25
8. To update Contact Information for an existing Contact person, use the Name field to search for and retrieve the existing contact data.
The fields populate with the existing information for the contact and an Update Contact button appears.
9. Click Update Contact.
The Party Information page appears.
10. Update the contact information.
11. Click Save, and then click Apply to return to the Create Service Request page.
Product Information12. To log Product Information, enter values for the applicable fields in the following
list:
• Category
• Item
• Item Description
• Item Instance
• Component
• Sub-Component
• Revision
• Lot number
• Serial number
13. To create a new instance, click Create Instance.
The Create Item Instance page appears.
14. Complete the required and applicable fields in the Item, Instance Specific Attributes, Owner, Current Location, Install Location, Other, and Flex Field regions.
15. Click Apply to return to the Create Service Request page.
Update Instance and Change Owner buttons appear in the Product Information region of the Create Service Request page.

7-26 Oracle Field Service User Guide
Problem Description16. In the Problem Description region, enter a Summary for the service request.
17. (Optional) Enter notes.
Issues18. In the Issues region, select a Request Type from the list of values. For example, Field
Service.
19. Select a Status, such as Open, or Working.
20. Select the Internal Severity level of the service request.
21. (Optional) Provide information such as Problem Type, Customer's Urgency, Error Message (text), Help desk Number, and Project number.
The system date appears by default in the Incident Date field, but the date can be changed.
22. Select the assignment strategy for the Service Request by selecting the appropriate option. The options are:
• Automatically Assign
• Assign to my Group
• Assign to me and my Group
Contractual Coverage23. If there is contractual coverage associated with the service request, provide values
for the following fields: Contract, Expected Response Date, Expected Resolution Date.
Incident Address24. Enter the incident address for the service request.
Retrieve an existing address or enter a new address. In the Select field select Existing Address or New Address.
25.
Shipping Information26. In the Shipping Information region, verify existing values, or select from the list of
values for the following fields: Customer, Contact, Account, and Address.
27. To create a new address, click Create Address.
Receiving and Accepting Work Assignments 7-27
The Create Address page appears.
28. Enter address information.
29. In the Address Purposes region, select Ship To from the Purpose list of values.
30. Click Apply.
31. To update an address, click Update Address.
The Update Address page appears.
32. Update the address information.
33. In the Address Purposes region, verify that the Ship To purpose is listed. If that purpose is not listed, click Add Another Row, and then select Ship To from the list of values for the new row.
34. Click Apply.
Create Service Request35. To create the service request, click Apply.

Debriefing Work Completion 8-1
8Debriefing Work Completion
Field service technicians use the Debrief module to view their task assignment details, accept or reject assignments, update task statuses, capture travel related information, and report on material, labor time, and expenses for their individual task assignments. Data gathered is used for generating customer invoices, updating the installed base, and maintaining the service vehicle trunk stock.
Field service managers use Debrief to capture, access, and update debrief information on behalf of field service technicians.
This topic group provides procedures for performing Debrief using the Field Service Technician Portal Dashboard.
This chapter describes elements comprising the Field Service Technician Portal Dashboard, provides procedures for configuring the Dashboard, and provides procedures for using the Field Service Technician Portal Dashboard for ordering and receiving service parts, updating tasks, performing debrief, and scheduling tasks.
This chapter covers the following topics:
• Understanding Debrief Procedures
• Capturing Travel Information
• Adding a Labor Line
• Adding a Material Line
• Using Loaner Transactions
• Adding an Expense Line
• Recording Counter Readings
• Updating Task Details and Notes
• Viewing a Pro Forma Invoice
• Searching e-Record Evidence Store
• Updating Owned Asset Install Base Records
8-2 Oracle Field Service User Guide
• Return Excess or Defective Parts
• Returning Excess Parts
• Returning Defective Parts
• Creating Follow-Up Tasks
Understanding Debrief ProceduresA technician accesses Debrief by clicking the Debrief icon on the Field Service Technician Dashboard, or by clicking the Update Tasks icon on the dashboard and then clicking the Debrief tab.
This action brings up the Update Task page to the Debrief sub tab, where the technicians can view or create new labor, material, and expense lines.
After the required information is entered on the Debrief sub tab, the user can either click Apply to commit the record details that were just entered, or click Add Another Row to create additional lines.
After these debrief lines have been created, the user has the option to either update or delete these lines, as long as they have not been submitted to charges.
The Oracle Field Service Technician Portal enables several debrief procedures:
• Capture Travel Information, page 8-2
• Add a Labor Line, page 8-3
• Add a Material Line, page 8-5
• Add an Expense Line, page 8-9
• Record Counter Readings, page 8-11
• Update Task Details and Notes, page 8-12
• Create a Follow-Up Task, page 8-21
Capturing Travel InformationThe Field Service Technician Portal enables capture of travel related information for technicians individual task assignments.
Profile Option - CSF: Capture Travel InformationYou enable this feature by setting the CSF: Capture Travel Information profile option.
This profile can be set with one of these values:

Debriefing Work Completion 8-3
• None
• Time
• Distance
• Time and Distance
The Update Task page, Debrief sub tab displays fields relating to the profile option value selected. For example, if the profile option is set to 'Time', then the page displays the start and end time fields, but not the distance field.
The fields rendered for capturing travel time are not mandatory. This means, for example, that even though the profile is set to 'Time', the user is not required to enter the start and end time, even though these fields display on the page.
Use this procedure to enter travel time and distance.
Steps:1. Navigate to the Field Service Technician Dashboard (Field Service Technician
Portal: Field Service Technician Dashboard).
The dashboard appears to the selected default view.
2. In the row for the task to be debriefed, click the Debrief icon.
The Update Task page appears displaying the Debrief sub tab.
3. (Optional) In the header region of the Debrief sub tab, enter the Travel Distance, Travel Start Time, and Travel End Time.
4. Click Apply.
Adding a Labor LineUse Debrief labor line functionality to record time spent on a task.
You can create multiple labor lines for a task assignment. Labor lines are uploaded to Charges when the CSF: Update Debrief Lines concurrent program completes successfully. The technician cannot modify labor lines after they have been submitted toCharges. Technicians can however, still add new labor lines for the task as long as the task assignment status is not 'Closed'.
For more information about Task Assignment Status, see Task Status and Task Assignment Status Flow, page 1-11.
Profile Option - CSF: Allow Overlapping Labor LinesBy default, a technician cannot enter overlapping actual start and end times for various
8-4 Oracle Field Service User Guide
assignments during a work shift. If you want to enable overlapping labor times, set the CSF: Allow Overlapping Labor Lines profile option to 'Yes'.
Use this procedure to add a debrief labor line to a task:
Steps:1. Navigate to the Field Service Technician Dashboard (Field Service Technician
Portal: Field Service Technician Dashboard).
2. From the Dashboard, click the Debrief icon for the task for which you want to add debrief lines.
The Update Task page appears displaying the Debrief sub tab.
3. Click the "+" icon to expand the labor region.
4. In the Labor region, click Add Another Row.
This expands the Labor region, where the technician can enter information to create a labor line. Existing labor lines associated with this task assignment appear in the summary table of the labor region.
5. In a new labor line, choose a Service Activity code from the drop down list of values.
6. The schedule start and end times appear by default in the Start Time and End Time fields. The technician can modify the start and end times.
• The start date and time must be greater than the earlier of the incident report date and time or the service request creation date and time.
• The start date and time must be less than or equal to the system date.
7. (Optional) Override the time spent working in the Duration field.
The end time recalculates according to the start time plus the duration time.
8. The planned effort unit of measure for the task appears by default in the UOM field.The technician can choose a different unit of measure from the list of values.
9. (Optional) Enter an item that the labor line is being logged against, if applicable.
The Item Description appears.
10. (Optional) Enter a Reason for the labor line.
11. The schedule start date appears by default in the Service Date field. The technician can select a different date.

Debriefing Work Completion 8-5
• The service date and time must be greater than the earlier of the incident report date and time or the service request creationdate and time.
• The service date and time must be less than or equal to the system date.
12. To save the labor line, click Apply.
Adding a Material LineReporting of items installed and recovered is necessary to plan for the supply of service parts, to maintain the installed base, and to generate an invoice for material used. Material information is entered at the line level, and updates Oracle Inventory, Install Base, and Charges for that specific line.
You can create multiple material lines for a task assignment. The technician cannot modify material lines that have been submitted to Charges. Technicians can however, still add new material lines for the task as long as the task assignment status is not 'Closed'.
Replacements need two material transaction lines, one for the part taken out or removed, and one for the part put back in or installed.
The Material line region of the Update Task Debrief sub tab area is divided into two parts: Install and Return.
• The Install section is used to capture debrief lines with a line type of 'Order' for all transactions where the item is installed at the customer site.
• The Return section is used to capture debrief lines with a line type of 'Return' for transactions where items are removed from the customer site. If the technician has an assigned default defective sub-inventory assigned, the item appears by default inthat sub-inventory field for return transactions.
Use this procedure to add a Debrief Material line:
Prerequisites❒ At least one service request and task to report on exist.
❒ Resources have sub-inventories assigned to them.
❒ Setups for the Business Process and Service Activity Code are complete.
• Profile Option - CSF: Default Business Process
8-6 Oracle Field Service User Guide
• Profile Option - CSF: Default Debrief Service Activity Code
❒ Item setups are complete:
• The Service Billable attribute is set to 'Material'.
• The Item Transactable check box is selected.
• In the case of trackable items, the instance numbers are generated.
• Price lists are associated with the items.
Steps:1. Navigate to Field Service Technician Dashboard Field Service Technician Portal:
Field Service Technician Dashboard).
2. From the Dashboard, click the Debrief icon for the task for which you want to add debrief lines.
The Update Task page appears displaying the Debrief sub tab.
3. Click the "+" icon to expand the Material region.
This action expands the Material region to reveal two parts: Install and Return.
Reporting Installed Material4. Existing Material - Install lines associated with this task assignment appear in the
summary table of the Material - Install section. Click Add Another Row.
This expands the Material - Install section, where the technician can enter information to create a material line.
5. Select a Business Process.
• The Business Process default value appears when the Service Request Type has an associated Business Process.
• If no Business Process is associated, then the Business Process default value is set to the value of the profile option CSF: Default Business Process.
• If no Business Process is associated, and if the profile option CSF: Default Business Process is not set, then the technician must select the Business Process from the list of values.
6. Select a Service Activity code.
This is the activity for the material you are reporting. The Item you select is filtered
Debriefing Work Completion 8-7
based upon the Service Activity code and sub-inventory you choose.
• If the profile option CSF: Default Service Activity Code is set with a value that has the Line Type: 'Order', then that value is the default for this field.
• If the profile option CSF: Default Service Activity Code is not set, then the technician must select the Service Activity code from the list of Service Activity codes that are associated to the Business Process selected in the previous step.
7. The list of values for the Sub-inventory field depends on the Line Category Code defined in the Service Activity Code setup window.
• If the Line Category Code is defined as 'Order' the sub-inventory populates with the default usable sub-inventory. The list of values displays all usable sub-inventories.
• If the Line Category Code is 'Return' the sub-inventory populates with the default defective sub-inventory. If the default defective sub-inventory is not identified, then the default usable sub-inventory is populated. The list of values for the Sub-inventory field displays both usable and defective sub-inventories.
8. Select the Item number.
The list of values for the Item field depends on Service Activity code setup:
• If the Update IB check box is checked for the selected Service Activity Code in the IB transactions subtype, then the Item list of values displays both trackable and non trackable items. Otherwise, the Item list of values displays only non trackable items.
• In case an item is Installed Base trackable and the Line Category Code on the Service Activity Code setup window is 'Order', the Parent Instance and the Recovered Instance fields are enabled.
• The Parent Instance field displays the list of all the instances installed at the customer location.
• Additionally, the operational status of the part or asset instances being installed into another piece of equipment (the parent) automatically inherit the operational status of the parent instance.
• When the part or asset installed is without reference to a parent, in other words, it is a stand alone part or asset, then the technician needs the ability to enter and update its Install Base operational status. The operation status contains these values:
- Not Used
- Installed

8-8 Oracle Field Service User Guide
- In Service
- Out of Service
The operational status of the part or asset being installed is updated when the Material Debrief is posted.
• In case of line category code 'Return,' the Recovered Instance field is enabled.
9. The Disposition, UOM, and Service Date fields default once you select the Item.
• The UOM field appears by default from the selected item UOM attribute. You can select a different unit of measure from the list of values, if necessary.
• The Service Date appears by default from the system date and time. The technician can select a Service Date from the date list of values.
• The service date and time must be greater than the earlier of the incident report date and time or the service request creation date and time.
• The service date and time must be less than or equal to the system date.
10. Enter the quantity for the item installed in the Quantity field.
In the case of serialized items, Quantity is set equal to 1, and the Quantity field is disabled.
11. Enter the Serial Number, Lot, Locator, Revision, and Instance Number details depending on the item attributes.
The list of values for these fields are validated based upon the item and sub-inventory combination.
12. (Optional) Select a Reason for the material transaction from the list of values.
Reporting Returned MaterialThe Material - Return section is similar to the Material - Install section. The Return section includes a Return Reason field, (in addition to the Reason field), which is required to be completed if a return is being processed.
13. In the Material section - Return, click Add Another Row.
This expands the Material - Return region, where the technician can enter information to create a material line.

Debriefing Work Completion 8-9
14. Repeat steps 5 through 12 for the returned material.
15. Enter the return reason.
16. Click Apply.
The material line is saved.
Using Loaner TransactionsSome field service operations provide temporary parts to a customer in place of a part that must be repaired. There is no change of ownership, as the loaned part is still ownedby inventory and not by the customer. Field Service Debrief supports this scenario by capturing equipment usage details of loaner equipment.
Loaner transactions are identified in Debrief based upon the Service Activity code assigned to them. When a technician logs a material line with a Service Activity code that supports a loaner transaction, such as Type 'Loaner', the material line has an enabled Return Date field. The technician enters the expected date that the loaned part should be retrieved from the customer.
Once the material line is logged, the installed base is updated to reflect that the "instance" owner is still inventory, but the location is the customer site.
Prerequisites❒ A service request and task to report on.
❒ The setup for Service Activity Code is complete.
❒ The item setup is complete and the items have the Service Billable attribute set to 'Material'.
❒ The Return Required check box in Installed Base Transaction type is enabled to identify the Service Activity Code as a loaner.
❒ The Change Owner must be cleared and the Change Owner To field must be blank.
Steps:The steps to log a material line for a loaner part are the same as those used to log a regular material line. See Adding a Material Line, page 8-5.
Adding an Expense LineYou can create multiple expense lines for a task assignment. The technician cannot modify expense lines that have been submitted to Charges. Technicians can however,

8-10 Oracle Field Service User Guide
still add new expense lines for the task as long as the task assignment status is not 'Closed'.
Use this procedure to add a debrief expense line:
Prerequisites❒ A task having a status that enables reporting expenses.
Steps:1. From the Dashboard, click the Debrief icon in the row for the task for which you
want to add debrief lines.
The Update Task page appears.
2. Click the "+" icon to expand the Expense region.
Existing expense lines associated with this task assignment appear in the summary table of the expense region.
3. Click Add Another Row.
This expands the Expense region, where the technician can enter information to create an expense line.
4. Select a Business Process.
• The Business Process default value appears when the Service Request Type has an associated Business Process.
• If no Business Process is associated, then the Business Process default value is set to the value of the profile option CSF: Default Business Process.
• If no Business Process is associated, and if the profile option CSF: Default Business Process is not set, then the technician must select the Business Process from the list of values.
5. Choose an Activity from the list of values associated to the business process selected in the preceding step. This is the activity you are going to perform for the expense you are reporting on.
6. Select the Item for which you are going to create an expense line.
The Item Description field populates with an extended description for the item. Theunit of measure is defaulted after selection.
7. Enter either the Quantity and UOM, or the Amount and Currency. Quantity and Amount are mutually exclusive.

Debriefing Work Completion 8-11
8. The Currency field default value is based on the currency set for the profile option: JTF_PROFILE_DEFAULT_CURRENCY. You can change it, if necessary.
9. Select a Service Date from the date list of values.
The system date appears by default.
10. (Optional) Choose a Justification for the expense from the list of values.
11. To temporarily save the expense line to your debrief, click Add Another Row.
12. To save this line to the permanent record, click Apply.
Recording Counter ReadingsOptionally, you can record counter readings. Counter readings can only be recorded forcustomer products defined in the installed base that have a counter assigned to them. When no counter is associated with the product, the counters region does not display.
For Service Requests created against a product that has a counter associated with it, upon completion of the task assignment, debrief generates an alert reminder to the technician that the product has a counter. Debrief generates this alert when the task assignment status is changed to either 'Completed' or 'Closed'.
In the case where a single task has been assigned to multiple resources, the alert message is displayed as long as the counters have not been updated between the scheduled start time and the system time by any one of the assigned resources.
Use this procedure to capture counter readings.
Prerequisites❒ The installed base item against which a service request has been created must have
a counter group setup and counters associated with it.
Steps:1. From the Dashboard main page, click the Debrief icon in the row for the task that
you want to add debrief lines.
2. In the Counters region, click the "+" icon to expand the Counters region.
This displays counters available for the item in the service request.
3. Enter a value for the counter reading.
4. To roll over the counter value, select the Roll over check box.
8-12 Oracle Field Service User Guide
Details5. Click the Show/Hide link in the Details column.
6. (Optional) Enter comments for the new reading.
7. To enter adjustment details for the counter reading, select the adjustment type, and then enter the adjustment value.
8. To reset the counter reading, enter the reset value.
9. (Optional) Enter comments for the reset.
10. To include the target reset, check the Include target check box.
11. Click Apply.
Updating Task Details and NotesAt any time during the processes of scheduling service requests, assigning tasks, or debriefing, a field service technician or call center agent can add a note to a task. A field service technician can not only add a note to a task, but can also view notes that have been associated with a service request. This feature enables a consolidated view of a task and all the related notes added during the task life cycle.
The user also has an option to search for additional notes by clicking the Find on the menu, and then specifying search criteria. For example, to search on Install Base notes, enter the source as "installed base", and then click Enter.
Use this procedure to update task details and notes.
Steps:1. From the dashboard, click the Update icon in the row for the task you want to
update.
The Update Task page appears displaying the Details sub-tab.
2. If you want to add or change the description for the task, enter text in the Description text box.
3. To add a note, in the Add Note region select a Note Type from the list of values (forexample, Callback, General Note, and so on).
4. Select the Visibility level for the note from the list of values. Options include: Public,Private, or Publish.
5. Enter the text of the note in the Note text box.
Debriefing Work Completion 8-13
6. Click Apply to save your work.
7. To view your note or any other notes attached to the task, expand the Notes Historyregion (click the + sign to the left of heading).
This expands the note. From there, you can modify the Note Type or Visibility level of the note.
Viewing a Pro Forma InvoiceInvoking a Pro Forma Invoice enables technicians to review a report that details all the charges entered for the tasks performed at a customer site. The report includes details such as the customers name, bill to address, service request number, item name, quantity, and amount. You can print the report to send hard copy to the customer.
Use this procedure to access the Pro Forma Invoice.
Prerequisites❒ A task must be completed.
❒ For this report to have significance, charges must be entered.
Steps:1. Navigate to the Update Task page (Field Service Technician Portal: Field Service
Technician Dashboard and then click the Update Task icon next to a completed task).
2. From the Update Task page, expand the Show Service Request region.
3. Click Pro Forma Invoice.
The Service Request Charges Report page appears. In the header information, this report displays service request information. It also displays charges-related information, such as a summary of the charges and details of the charges, including estimate charges, submitted charges, and non submitted charges.
4. To print this page, use the browser's print functionality.
Searching e-Record Evidence StoreOracle Field Service supports electronic records and approvals so service providers can comply with the US FDA's CFR Part 11 regulation. The basic FDA requirements are to store electronic records of key application transactions, and to retrieve the records during FDA audits. More specifically, CFR Part 11 is the FDA guideline for trustworthy

8-14 Oracle Field Service User Guide
electronic records that requires companies to employ procedures and controls designed to ensure the authenticity, integrity, and where appropriate, the confidentiality of electronic records, and to ensure that the signer cannot readily repudiate the signed record as not genuine. CFR Part 11 applies to the manufacture and service of certain medical devices, such as heart valves and X-Ray machines.
Support for electronic records and approvals is provided in the Administrator and Technician Portals. This entails creation of eRecords and capturing the approvers ID and password. The key application transaction being recorded is task debrief and closure.
When Field Service technicians complete work on medical devices, they report labor, material, and expenses used, and mark the tasks as complete. The next steps are: approving work performed, capturing an electronic signature of the approver, and closing the task.
Stored records can be reviewed by selecting the Search Erecord Evidence Store link within the Quick Links region of the Field Service Technician Portal or the Field Service Administrator Portal.
When enabled, this functionality creates an electronic record at task closure with the following components:
• The Service Request, Task, and Debrief record, known as the Task Closure Record
• The electronic signature of the approver
• Acknowledgement details
• Additional information
• Related E-Records
• This Task Closure Record, with the approvers signature, can subsequently be recalled from the Oracle Electronic Records and Electronic Signatures (ERES) system.
• The application supports CFR Part 11 Compliance for Debrief initiated through the Portals.

Debriefing Work Completion 8-15
Process FlowThe process is executed as follows:
• When the debrief begins Labor, Material and Expense debrief details are captured.
• Once these details are captured, the debrief is posted as 'Completed', 'Canceled', 'Closed', or 'Rejected'.
• When the Debrief is posted it invokes the Applications Programming Interface to

8-16 Oracle Field Service User Guide
raise a business event.
• If the Business event is not raised, then an error has occurred.
• If the Business event is raised, then the Service Erecord is created.
• Service Erecord creation evaluates the Approval Management Engine rule.
• When the debrief is approved, capture the approvers ID and password as the electronic signature.
• Signature capture ends this process.
SetupSetting up this feature in the Field Service Administrator Portal and in the Field Service Technician Portal requires these key setup steps:
• Set profile option EDR: E-records and E-Signatures value to 'Yes'
• Set transaction variables 'eRecord Required' and 'eSignature Required' values to 'Yes'
• Enable the ERES work flow business event
• Enable the ERES work flow business event subscription and set in 'Synchronous' mode
• Define one rule for the Approval Management Engine. When the task assignment status is changed to either 'Completed', 'Rejected', or 'Closed', the approval process succeeds with the approval process showing the list of approvers matching the defined Approval Management Engine rule.
For more information about the Oracle Electronic Records and Electronic Signatures System, see the Oracle E-Records Implementation Guide.
Updating Owned Asset Install Base RecordsSome field service organizations provide service for assets owned by the organization, as well as customer products. Typical examples include product based assets, such as trade show, demonstration, and training equipment, and dispersed or mobile assets, such as cell towers and mobile MRI vans.
Support for Non Trading Community Party AddressesTo support this requirement, the TeleService Service Request window supports creationof Field Service tasks when the incident addresses are not associated to a party or

Debriefing Work Completion 8-17
customer.
Direct Access to Update Install Base RecordsThe Technician and Administrator Portals provide access to the Install Base page to directly update the Install Base record referenced on the service request for the equipment being serviced. This functionality streamlines owned asset and customer product moves and operational status tracking. You can also record the operational status of parts and equipment being installed or recovered.
Prerequisites❒ Service request and task with reference to an instance number of an item must exist.
Steps:1. When an item instance is associated with a service request, an icon displays in the
Field Service Technician Dashboard Install Base column. To invoke a view only page of the instance record, click the Install Base icon.
2. To access the Install Base page for recording location changes, updating instance status, or making corrections, click the Update Task icon.
The Update Task page appears. In the header region of the Update Task page, there are two drop down lists located to the right of the Instance Action field label.
3. To perform an action on the instance associated with the service request, in the first (left) of the two fields, select 'This Instance' from the drop down list of values.
4. From the second (right) drop down menu, select the desired action, such as 'Put into Service', 'Take Out of Service', 'Install', 'Move', or 'Uninstall'.
5. Click Go.
The Install Base page appears.
6. To update the operational status of instances at this location that are installed or recovered through material debrief, in the first (left) of the two fields, select 'All Instances' from the drop down list of values.
7. Click Go.
8. Search for and select the instance.
9. For an installed instance, select one of the following operational statuses:
• Installed

8-18 Oracle Field Service User Guide
• In Service
• Out of Service
• Not Used
10. In the case of recovered instances, the value of the operational status is seeded as: 'Out of Service'.
Return Excess or Defective PartsThe Oracle Field Service Technician Portal provides functionality to return excess parts, such as parts shipped to a technician for a task, and then not used. Parts exceeding the authorized stock level can be returned to a central warehouse.
The process for returning defective parts is similar to that for returning usable excess parts. Differences are in the definition of excess inventory level and in the application ofbusiness rules. Since subinventories for defective parts do not have min-max levels, all inventory is considered to be excess. Business rules for excess inventory do not apply to defective parts.
For information about returning excess parts, see Returning Excess Parts., page 8-18
For information about returning defective parts, see Returning Defective Parts., page 8-20
Returning Excess PartsThe Oracle Field Service Technician Portal provides a quick link to the process for returning excess parts to a warehouse for repair or disposal.
Prerequisites❒ The Create Excess List concurrent program must be run to identify items where the
inventory balance is greater than the authorized stock level. This program generatesthe list of excess parts, which you can access through the Field Service Technician Dashboard.
Steps:1. Navigate to the Field Service Technician Dashboard (Field Service Technician
Portal: Field Service Technician Dashboard).
2. From the Quick Links section, click the Return Excess Parts link.
The Return Excess Parts: Parts page appears. This page displays a table of excess

Debriefing Work Completion 8-19
items associated with the technicians sub-inventories.
3. Select the Select check box next to the item that you want to return.
4. Verify that the quantity to be returned is correct. If it is not correct, for example, if you only want to return a portion of the excess, edit this field to reflect the quantity you want to return.
5. Click Next.
The Return Excess Parts: Details window appears. This table displays pertinent information, such as the source organization, source sub-inventory, item number, unit of measure, and return quantity.
6. If the parts are serialized, choose the serial numbers to be returned.
7. (Optional) Enter Locator, Lot Number, and Revision Number, if your part is using these features from Oracle Inventory.
These fields are enabled only when the item is serialized, lot controlled, or has a revision number.
8. Click Next.
If there are serial numbers or locator or lot numbers associated with the item, a second line appears in the table, which you can fill out at this time. Otherwise, the Return Excess Parts: Destination page appears.
9. Enter a Waybill number, if applicable. This field enables the technician to enter a waybill number in case of in-transit excess returns.
10. Verify the destination organization, or change it, if necessary.
11. Verify the destination sub-inventory, or select one, if necessary.
12. (Optional) Select a Carrier name from the list of values.
This field enables the technician to select a Carrier in case of in-transit excess returns.
13. Enter the Shipment number for the excess part.
14. Click Finish.
This confirms the transfer and returns you to the Field Service Technician Dashboard.
8-20 Oracle Field Service User Guide
Returning Defective PartsThe Oracle Field Service Technician Portal provides a quick link to the process for returning defective parts to a warehouse for repair or disposal.
Steps:1. Navigate to the Field Service Technician Dashboard (Field Service Technician
Portal: Field Service Technician Dashboard).
The Dashboard appears.
2. From the Quick Links section, click the Return Defective Parts link.
The Return Defective Parts: Parts page appears. This page displays a table of defective items associated with the technicians sub-inventories.
3. Select the Select check box next to the defective part you want to return.
4. Verify the quantity of defective parts you are returning, or change the quantity, if necessary.
5. Click Next.
The Return Defective Parts: Details page appears.
6. If the parts are serialized, choose the serial numbers to be returned.
7. (Optional) Enter Locator, Lot Number, and Revision Number, if your part is using these features from Oracle Inventory.
8. Click Next.
If there are serial numbers or locator or lot numbers associated with the item, a second line appears in the table, which you can fill out at this time. Otherwise, the Return Excess Parts: Destination page appears.
9. Enter a Waybill number, if applicable.
10. Verify the destination organization, or change it, if necessary.
11. Verify the destination sub-inventory, or select one, if necessary.
12. (Optional) Select a Carrier name from the list of values.
13. Enter the Shipment number for the defective part.
14. Click Finish.
Debriefing Work Completion 8-21
This confirms the transfer and returns you to the Field Service Technician Dashboard.
Creating Follow-Up TasksField Service technicians can create follow-up tasks from the Update Tasks window.
Use this procedure to create a follow-up task.
Prerequisites❒ A task must be assigned to the technician.
Steps:1. Navigate to the Update Task page (Field Service Technician Portal: Field Service
Technician Dashboard and then click the Update Task icon for a task).
2. From the Update Task page, click Create Follow-Up Task.
The Create Follow-Up Task page appears.
For field definitions see the table: Update Task Field Definitions, page 7-11
3. Enter a Subject for the task.
4. Select a task Status such as Assigned or In Planning.
5. Select the Type of task from the list of values, such as Diagnostic, Dispatch, or Callback.
6. Choose a Priority level for the task, such as high, medium, or low.
7. Enter Planned Start time and Planned End time.
8. Enter the estimated time for the task in Planned Effort fields.
In this field, enter a numeric value in the free text field and then choose a qualifier from the list of values, such as minutes, hours, or days.
9. Enter a Description of the task.
10. (Optional) To add a note, choose a Note Type from the list of values.
11. Choose a Visibility level from the list of values.
12. Enter the note in the text box.

8-22 Oracle Field Service User Guide
13. To save the task, click Apply

Reviewing Debrief and Billing 9-1
9Reviewing Debrief and Billing
The Administrator Portal is implemented as a separate menu under the Field Service Administrator Portal Responsibility. The Administrator Portal replaces and extends Oracle Application Windows Enterprise Debrief functionality. The portal provides field service managers and administrators with the ability to review and correct field technician debrief reports.
This chapter covers the following topics:
• Overview: Administrator Portal Dashboard
• Querying Technician Schedules
• Reviewing and Correcting Debrief Information
• Reviewing, Correcting, and Submitting Charges
Overview: Administrator Portal DashboardThe Field Service Support Dashboard is the entry point for administrators or managers to perform multiple functions on behalf of their reporting field technicians. The Field Service Support Dashboard is similar to the Field Service Technician Dashboard. Using the Field Service Support Dashboard you can query on task-related information for a specific resource.
The Field Service Support Dashboard consists of:
• Simple Search (based on service request number, task number, and customer), Advanced Search, and Resource Search, page 9-2 fields
• Quick Links, page 9-2 region
• Create Service Request, page 9-3 region
• Search Knowledge Base, page 9-3 region
• Main View, page 9-3

9-2 Oracle Field Service User Guide
Resource SearchThe manager can search for information related to tasks assigned to a specific resource by selecting a Resource Type, and then providing a complete or partial value in the Resource Name search field. See Querying Technician Schedules, page 9-4.
Quick LinksThe Quick Links region provides access to pages where the manager can:
• Create parts orders for a technicians sub-inventory.
• Receive shipments into a technicians sub-inventory.
• Return excess parts from a technicians sub-inventory.
• Return defective parts from a technicians sub-inventory.
• View the calendar for a specific technician.
Note: The Field Service Administrator Portal does not support viewing on-hand quantity information, which is supported in enterprise debrief.

Reviewing Debrief and Billing 9-3
Create Service RequestIn the Create Service Request region, the manager or administrator can select a service identifier from the Search Key list of values, enter a value, and then launch the Create Service Request page.
Search KnowledgeIn the Search Knowledge region, the manager can enter keywords, and then conduct either a Knowledge Search or an Advanced Solution Search.
Main ViewIn the Main View, managers and administrators can select from the list of seeded views,and can create additional personalized views to display selected columns of information in the desired sequence.
Show/Hide Details column
The Details column displays for every seeded and personalized view. After task-related information is retrieved for a specific resource, click the Show link or "+" icon to:
• View the details of the service request associated with a task.
• View the details of a repair order associated with a task, when the task is from a repair order.
An Update icon appears in each row. Clicking the Update icon opens the Update Task page to the Details tab, where the manager can:
• Update task details.
• Click the Create Follow-Up Task button to create a follow-up task to the current task.
A Debrief icon also appears in each row. Clicking the Debrief icon opens the Update Task page to the Debrief tab, where the manager can:
• Update labor, material, expense, and counter readings.
• Compose notes.
• Capture travel time and distance information.
A Parts icon appears in rows for tasks having associated service parts. Clicking the Parts icon opens the Update Task page to the Parts tab, where the manager can create a parts order for a specific task.

9-4 Oracle Field Service User Guide
Pro Forma Invoice ButtonAfter the debrief is completed and posted, view the pro forma invoice, by clicking the Pro Forma Invoice button in the Show Service Request region in the Update Task page.
Supported Features• Display time in incident time zones.
• Service for owned assets installed at location addresses other than party sites.
• Debrief for Depot Repair order tasks.
• Capture electronic signatures for compliance with CFR part 11 regulations.
Querying Technician SchedulesUse this procedure to load information about a specific technicians schedule into the Administrator Portal:
Steps:1. Navigate to the Field Service Support Dashboard (Field Service Administrator
Portal: Field Service Administrator Dashboard).
The Field Service Support Dashboard appears displaying the default view of task-related information.
2. To search for specific task-related information, begin by selecting either Employee Resource or Supplier Contact from the Resource Type list of values. Technicians areusually employee resources of the service organization.
3. Next, provide partial or complete values in the Resource Name field.
• Enter the technicians name in the Resource Name field, or
• Enter part of the technicians name into the Resource Name field, and then click the Tab key.
The Search and Select page appears displaying names that contain the entered search string. For example, type 'bram' in the Resource Name field, and then press the Tab key. Resource Names: George Abrams, Fred Bramer, and Balasubramani Jones are retrieved. Click the Quick Select icon in the row for the Resource Name that you want to have return to the Dashboard, or
• If you do not have any partial information for the Resource Name, leave the Resource Name field blank, and then click the Go button.

Reviewing Debrief and Billing 9-5
The Search and Select window appears. Click Go. All resource names of the selected resource type are listed. Click the Quick Select icon in the row for the resource name that you want to have return to the Field Service Support Dashboard.
4. To filter the tasks that display, select a view from the View list of values, and then click Go.
The Dashboard appears with tasks assigned to the selected resource, and that also match the View filter.
Note: To create a personalized View, click Personalize. See Personalizing the View Display, page 7-5.
Tip: When selecting columns to display in a personalized view, keep in mind that many details are available by displaying the Details column. Therefore you can decrease screen clutter by selecting only the frequently needed information for the personalized view, and then Show details if needed.
5. To view details for a task, in the row for a task, click the Show/Hide link in the Details column.
Details appear below the selected row.
Reviewing and Correcting Debrief InformationUse this procedure to review and correct debrief transaction details previously submitted by field service technicians:
See also Debrief Procedures, page 8-2.
Prerequisites❒ Debriefs for one or more tasks have been created.
❒ The debriefed task is not at a status of 'Closed'.
❒ The debrief lines are not posted to Charges.
Steps:
Accessing Debrief1. Navigate to the Field Service Support Dashboard (Field Service Administrator
9-6 Oracle Field Service User Guide
Portal: Field Service Administrator Dashboard).
2. Click the Debrief icon for the task that you want to update.
The Update Task page appears displaying the Debrief tab.
3. Expand, and then update information in the Travel, Labor, Material, Expense, Counters, and Notes regions.
4. Click Apply.
Updating Task Assignment Status5. Select the new task Assignment Status from the list of values.
6. Click Apply.
Updating Debrief Lines7. Changing the Task Assignment Status to one of the following triggers the
concurrent program CSF: Update Debrief Lines:
• Rejected
• On Hold
• Completed
• Canceled
• Closed
8. The concurrent program CSF: Update Debrief Lines sends debrief line information to Oracle Inventory, Install Base, and Charges.
The Update Debrief Lines concurrent program can have the following values:
• Pending: Indicates the concurrent program is waiting for computing resources.
• Running: Indicates the concurrent program is running but not yet completed.
• Complete: Indicates the debrief lines have been sent to Oracle Inventory, Install Base, and Charges successfully.
• Completed with errors: Indicates the concurrent program encountered at least one error. Error information can be viewed in the error column for the debrief lines.
The concurrent program CSF: Update Debrief Lines sends information to Oracle Inventory, Install Base, and Charges only if the task status has one of the following
Reviewing Debrief and Billing 9-7
check boxes selected in the Task and Escalation Status window:
• Rejected
• On Hold
• Completed
• Canceled
• Closed
Note: Navigation path to the Task and Escalation Status window:
Field Service Setup > CRM Foundation > Task and Escalation Manager > Setup > Define Task Status
Reviewing, Correcting, and Submitting ChargesReviewing, correcting, and submitting charges to Order Management for invoicing is accomplished using the Charges tab of the Service Request window.
Use this procedure to review, correct, and submit charges:
Prerequisites❒ The CSF: Update Debrief Lines concurrent program completed successfully for at
least one labor, material, or expense line.
Steps:1. Navigate to the Service Request window (Field Service Manager: Field Service
Dispatcher > Service Request > Service Requests > Create Service Requests).
The Service Request window appears.
2. Query for the service request you want to work with.
View > Query By Example > Enter
3. Enter the service request number in the Number field, and then run the query.
View > Query By Example > Run
The service request appears on the Service Request window.
4. Select the Charges tab.
Charges information displays for the service request.

9-8 Oracle Field Service User Guide
5. Review and correct charges information as appropriate.
6. To submit charges to Order Management, click Submit.