oracle financial services transaction filtering ... · oracle financial services transactions...
TRANSCRIPT

Oracle Financial Services Transactions FilteringAdministrator Guide
Release 8.0.7.0.0 Jan 2019


Oracle Financial Services Transactions FilteringAdministrator Guide
Release 8.0.7.0.0Jan 2019
Part Number: E91799-01
Oracle Financial Services Software, Inc.1900 Oracle Way Reston, VA 20190

Part Number: E91799-01Second Edition (Jan 2019)
Copyright © 2017, Oracle and/or its affiliates. All rights reserved.Printed in U.S.A. No part of this publication may be reproduced, stored in a retrieval system, or transmitted in any form or by any means, electronic, mechanical, photocopying, recording, or otherwise without the prior written permission.
TrademarksOracle is a registered trademark of Oracle Corporation and/or its affiliates.Other names may be trademarks of their respective owners.
Oracle Financial Services Software, Inc.1900 Oracle WayReston, VA 20190Phone: (703) 478-9000Fax: (703) 318-6340Internet: www.oracle.com/financialservices

Revision History
Revision HistoryThe following table describes the revision history of the Administration Guide.
Date Edition Description
October 2017
8.0.5 Created the Administration Guide.
January 2018
8.0.5.0.2 Added the following content: DJAC,DJW and WC as new watchlists and content for each watchlist in Chapter 4, Preparing Watch List Data
Note for false positive counter in Chapter 4, Configuring Application Level Parameters
Configuring watchlists, filter settings and property files in Chapter 4, Configuring Watch List Management and Transaction Filtering
Feb 2018 8.0.5.0.3 Added the white list table name in section Adding, Editing or Deleting Good Guy Records in Chapter 4, Configuring EDQ, Application Parameters, Message and Screening. Updated the Application Parameters Configuration Tab to include the four eyes section in section Configuring Application Level Parameters in Chapter 4, Configuring EDQ, Application Parameters, Message and Screening. Added the navigation to view the PMF process flow for standard and four-eyes in section System Configuration and Identity Management Tab in Chapter 2, Getting Started. Added content for the configuring transaction currency for four-eyes in section Configuring the Transaction Currency in Chapter 4, Configuring EDQ, Application Parameters, Message and Screening.
June 2018 8.0.5.0.5 Updated section Configuring Operating Model - Multi Jurisdiction and Multi Business Unit Implementation in Chapter 4, Configuring EDQ, Application Parameters, Message and Screening.
Jan 2019 8.0.5.0.12 Added the MT 110 message type in Chapter 4, Configuring EDQ, Application Parameters, Message and Screening and Chapter 5, Configuring Risk Scoring Rules. Updated the EU reference data content in Appendix A, Watch Lists.
Feb 2019 8.0.5.0.14 Added a new Watchlist Management Job, Load List data from Stg to Processed table, in the Configuring Jobs section.
Administration Guide v

Revision History
May 2018 8.0.6.0.0 Added the new Message Type Configurations in Chapter 4, Configuring EDQ, Application Parameters, Message and Screening. Added a new section, Populating Data for the Trade Goods and Trade Port Webservices, for the EDQ job for Goods and Port matching in Chapter 4, Configuring EDQ, Application Parameters, Message and Screening. Added content for the Accuity watchlist in Appendix A, Watch Lists. Changed the screens to display the new login page, navigation and home page in Chapter 2, Getting Started. Updated Chapter 2, Getting Started.
Changed the screens to display the new tabs in Chapter 4, Configuring EDQ, Application Parameters, Message and Screening.
Added the screen for Goods Screening Configuration which is different from the other webservices in Chapter 4, Configuring EDQ, Application Parameters, Message and Screening.
Added sections for Goods Prohibition Reference Data and Ports Prohibition Reference Data in Chapter 4, Configuring EDQ, Application Parameters, Message and Screening.
Changed the screens to display the new UI Chapter 5, Configuring Risk Scoring Rules.
July 2018 8.0.6.0.1 Added the List Approval Parameter Configuration page in Chapter 4, Configuring EDQ, Application Parameters, Message and Screening.
Added Adding, Editing or Deleting Good Guy Records in Chapter 4, Configuring EDQ, Application Parameters, Message and Screening.
Jan 2019 8.0.6.0.3 Updated the EU Reference Data section in Appendix A, Watch Lists.
Feb 2019 8.0.6.0.4 Added the MT 110 message type in Chapter 4, Configuring EDQ, Application Parameters, Message and Screening and Chapter 5, Configuring Risk Scoring Rules. Updated the EU Reference Data section in Appendix A, Watch Lists.
Jan 2019 8.0.7.0.0 Added the tables in which reference data is available in the Prohibition Screening section, Chapter 4, Configuring EDQ, Application Parameters, Message and Screening.
Updated the EDQ Configuration Process Flow steps to include the command area paths in Chapter 4, Configuring EDQ, Application Parameters, Message and Screening.
Date Edition Description
vi Administration Guide

About this Guide
This guide provides comprehensive instructions for proper system administration and the daily operations and maintenance of Oracle Financial Services Transaction Filtering. The logical architecture provides details of the Transaction Filtering process for a better understanding of the pre-configured application, which allows you to make site-specific enhancements using OFSAAI. This section focuses on the following topics:
Who Should Use this Guide
How this Guide is Organized
Where to Find More Information
Conventions Used in this Guide
Who Should Use this Guide
This Administration Guide is designed for use by the Implementation Consultants and System Administrators. Their roles and responsibilities, as they operate within Oracle Financial Services Transaction Filtering, include the following:
Implementation Consultants: Installs and configures Oracle Financial Services Transaction Filtering at a specific deployment site. The Implementation Consultant also installs and upgrades any additional Oracle Financial Services solution sets, and requires access to deployment-specific configuration information (For example, machine names and port numbers).
System Administrator: Configures, maintains, and adjusts the system, and is usually an employee of a specific Oracle customer. The System Administrator maintains user accounts and roles, configures the EDQ, archives data, loads data feeds, and performs post-processing tasks.
How this Guide is Organized
The Oracle Financial Services Transaction Filtering Administration Guide, includes the following chapters:
About Oracle Financial Services Transaction Filtering, provides a brief overview of the Oracle Financial Services Transaction Filtering application.
Getting Started, provides information on how to log on to the Transaction Filtering application and the tab available on the home page.
Managing User Administration, provides information on the user administration of the Oracle Financial Services Transaction Filtering application.
Configuring EDQ, Application Parameters, Message and Screening, describes how to configure the EDQ and the SWIFT message and screening parameters in the Oracle Financial Services Transaction Filtering application.
Configuring Risk Scoring Rules , describes how to configure business rules in OFS Inline Processing Engine.
Administration Guide vii
Where to Find More InformationAbout This Guide
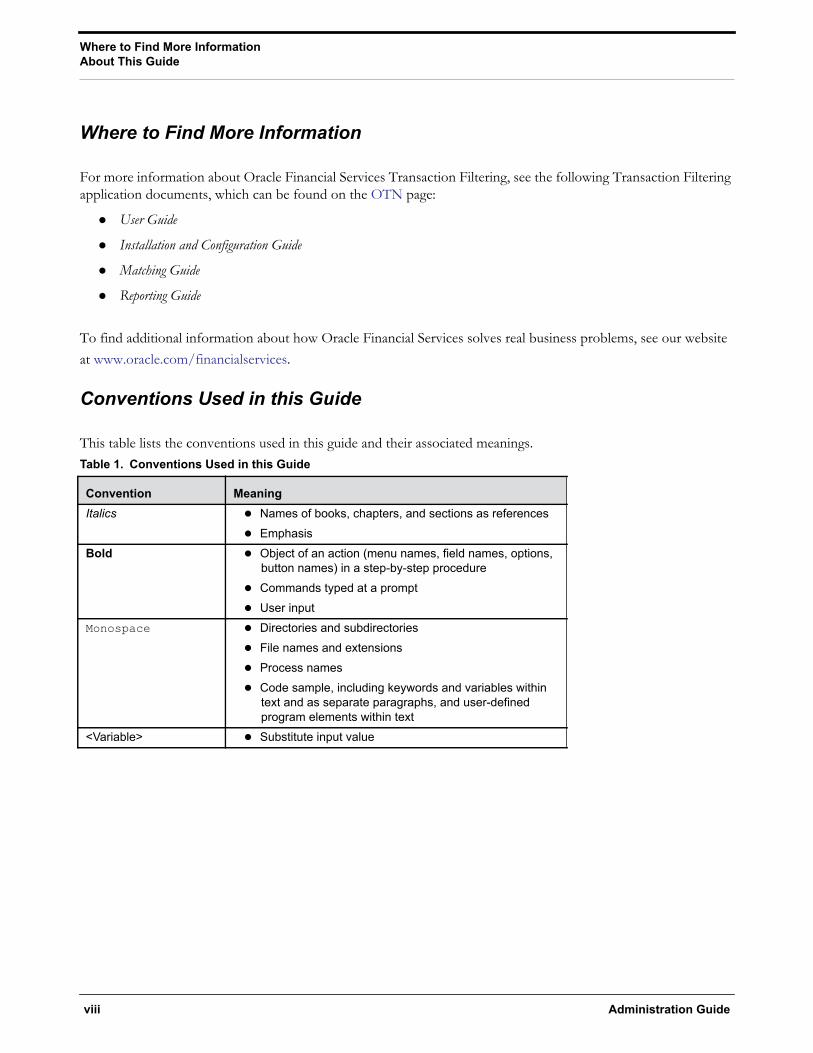
Where to Find More Information
For more information about Oracle Financial Services Transaction Filtering, see the following Transaction Filtering application documents, which can be found on the OTN page:
User Guide
Installation and Configuration Guide
Matching Guide
Reporting Guide
To find additional information about how Oracle Financial Services solves real business problems, see our websiteat www.oracle.com/financialservices.
Conventions Used in this Guide
This table lists the conventions used in this guide and their associated meanings.Table 1. Conventions Used in this Guide
Convention MeaningItalics Names of books, chapters, and sections as references
EmphasisBold Object of an action (menu names, field names, options,
button names) in a step-by-step procedure Commands typed at a prompt User input
Monospace Directories and subdirectories File names and extensions Process names Code sample, including keywords and variables within
text and as separate paragraphs, and user-defined program elements within text
<Variable> Substitute input value
viii Administration Guide

Contents
Table of Contents
Revision History............................................................................................................... v
About this Guide ............................................................................................................ vii
Who Should Use this Guide ............................................................................................................................................. viiHow this Guide is Organized ........................................................................................................................................... viiWhere to Find More Information................................................................................................................................... viiiConventions Used in this Guide ..................................................................................................................................... viii
List of Figures ............................................................................................................... xiii
List of Tables .................................................................................................................. xv
CHAPTER 1 About Oracle Financial Services Transaction Filtering ............... 1About Oracle Financial Services Transaction Filtering .................................................................................................. 1Oracle Transaction Filtering Process Flow ...................................................................................................................... 2
CHAPTER 2 Getting Started................................................................................. 5Accessing OFSAA Applications ........................................................................................................................................ 5Managing OFSAA Application Page................................................................................................................................. 6
Transaction Filtering Admin Tab ............................................................................................................................... 6SWIFT Configuration Admin Tab............................................................................................................................. 8Process Modeller Tab ................................................................................................................................................... 9
Configuring the Transaction Currency ....................................................................................................................... 10Process Monitor Tab .................................................................................................................................................. 12List Management Tab................................................................................................................................................. 13Inline Processing Tab ................................................................................................................................................. 14
Troubleshooting Your Display......................................................................................................................................... 15Enabling JavaScript..................................................................................................................................................... 15Enabling Cookies ........................................................................................................................................................ 16Enabling Temporary Internet Files .......................................................................................................................... 16Enabling File Downloads .......................................................................................................................................... 16Setting Printing Options ............................................................................................................................................ 16Enabling Pop-Up Blocker.......................................................................................................................................... 17Setting Preferences...................................................................................................................................................... 17
CHAPTER 3 Managing User Administration..................................................... 19About User Administration .............................................................................................................................................. 19
Administration Guide ix

Contents
Managing User Administration ........................................................................................................................................ 19Creating and Authorizing a User............................................................................................................................. 19Mapping a User with a User Group......................................................................................................................... 20
CHAPTER 4 Configuring EDQ, Application Parameters, Message and Screening ....................................................................................... 21
Configuring Application Level Parameters..................................................................................................................... 21Configuring Good Guy Matching Parameters............................................................................................................... 23Configuring the SWIFT Message Parameters ................................................................................................................ 24
Adding or Updating a New Message Type ............................................................................................................. 26Configuring Message and Transaction References ................................................................................................ 27
Screening Configuration for Goods Screening ............................................................................................................. 31Enabling or disabling a Webservice........................................................................................................................... 31Updating and Removing a Webservice ...................................................................................................................... 32Populating Data for the Trade Goods and Trade Port Webservices ........................................................................... 32
Adding, Editing or Deleting Good Guy Records.......................................................................................................... 33Adding a Good Guy Record ..................................................................................................................................... 33Editing a Good Guy Record ..................................................................................................................................... 34Deleting a Good Guy Record ................................................................................................................................... 34
EDQ Configurations.......................................................................................................................................................... 35About EDQ ................................................................................................................................................................. 35EDQ Configuration Process Flow........................................................................................................................... 36
Changing the EDQ URL ....................................................................................................................................... 38General EDQ Configurations................................................................................................................................... 38
Importing the OFS Transaction Filtering Projects ..................................................................................................... 39Configuring Watch List Management and Transaction Filtering............................................................................... 39
Preparing Watch List Data .......................................................................................39Setting Up Private Watch List...................................................................................40Showing Watch List Staged Data/Snapshots in the Server Console UI ...........................41Configuring Match Rules..........................................................................................41Configuring Jobs ....................................................................................................41
Filtering Watch List Data ....................................................................................................................................... 42Enabling Watch List Filtering....................................................................................42Configuring Watch List Filtering................................................................................43Filtering World Check Data ......................................................................................44
Setting Filtering options in the Run Profiles .............................................................................................................. 45Setting Primary Filters and Linked Profiles in the Watchlist Management project .............45 Setting Secondary Filters in the Transaction Filtering project.......................................45Screening All Data Using Sanctions Rules ..................................................................46
Prohibition Screening ................................................................................................................................................ 46Configuring Prohibition Screening.............................................................................46Extending Prohibition Screening ...............................................................................50
Generating Email for Different Statuses ........................................................................................................................ 51Notification Email....................................................................................................................................................... 51Task Email.................................................................................................................................................................... 51
Configuring Operating Model - Multi Jurisdiction and Multi Business Unit Implementation .............................. 52Jurisdiction ................................................................................................................................................................... 52Business Unit/ Line of Business............................................................................................................................... 53
x Administration Guide

Contents
Configuring Jurisdictions and Business Domains.................................................................................................. 53
CHAPTER 5 Configuring Risk Scoring Rules..................................................... 1Configuring Rules in IPE .................................................................................................................................................... 2
CHAPTER 6 Creating JSON ................................................................................. 1Structure of a JSON............................................................................................................................................................. 2Creating JSON for SWIFT Messages with Sequences ................................................................................................... 5
Creating Message Elements......................................................................................................................................... 5Configuring SWIFT Message Blocks ......................................................................................................................... 5
Configuring the Basic Header Block ........................................................................................................................... 5Configuring the Application Header Block ................................................................................................................. 6Configuring the User Header Block ............................................................................................................................ 8Configuring the Text Block ........................................................................................................................................ 9Configuring the Trailer Block ................................................................................................................................... 11
Example of MT101 with Sequences ........................................................................................................................ 12Creating JSON for SWIFT Messages without Sequences............................................................................................ 12
Creating Message Elements....................................................................................................................................... 12Configuring SWIFT Message Blocks ....................................................................................................................... 12
Configuring the Text Block ...................................................................................................................................... 12Example of MT101 without Sequences................................................................................................................... 13
Creating JSON for SWIFT messages with the List of Values (LOV) Attribute ...................................................... 13
APPENDIX A Watch Lists .................................................................................... 15HM Treasury Reference Data........................................................................................................................................... 15OFAC Reference Data ...................................................................................................................................................... 15EU Reference Data ............................................................................................................................................................ 16UN Reference Data............................................................................................................................................................ 16World-Check ....................................................................................................................................................................... 16Dow Jones Watchlist.......................................................................................................................................................... 17Dow Jones Anti-Corruption List ..................................................................................................................................... 17Accuity Reference Data ..................................................................................................................................................... 18
Using the Accuity Group File ................................................................................................................................... 18New Alerts Resulting from Use of the Group File................................................................................................ 19
PLI Reference Data............................................................................................................................................................ 19Individual private watch list input attributes........................................................................................................... 20Entity Private Watch List Input Attributes............................................................................................................. 23
APPENDIX B Match Score Rules ........................................................................ 27
APPENDIX C Host Configuration ....................................................................... 29
Administration Guide xi

Contents
APPENDIX D System Audit Logging Information ............................................. 31Activities for System Audit ............................................................................................................................................... 31Steps for System Audit Activities..................................................................................................................................... 32
Index.................................................................................................................................. 1
xii Administration Guide
List of Figures
List of FiguresFigure 1. Oracle Transaction Filtering Process Flow ............................................................................................................. 2Figure 2. OFSAA Login Page .................................................................................................................................................... 6Figure 3. Applications Tab ......................................................................................................................................................... 7Figure 4. Financial Services Sanctions Pack Link ................................................................................................................... 7Figure 5. Transaction Filtering Link.......................................................................................................................................... 8Figure 6. Applications Tab ......................................................................................................................................................... 8Figure 7. Financial Services Sanctions Pack Link ................................................................................................................... 9Figure 8. SWIFT Configuration Link ....................................................................................................................................... 9Figure 9. Process Modeller Page.............................................................................................................................................. 10Figure 10. Application Rule...................................................................................................................................................... 11Figure 11. Edit API Details Page............................................................................................................................................. 12Figure 12. Process Monitor Page............................................................................................................................................. 13Figure 13. Applications Tab ..................................................................................................................................................... 13Figure 14. Financial Services Sanctions Pack Link ............................................................................................................... 14Figure 15. List Management Link............................................................................................................................................ 14Figure 16. Inline Processing Page............................................................................................................................................ 15Figure 17. Preference screen. ................................................................................................................................................... 18Figure 18. Application Parameters Configuration Tab ........................................................................................................ 22Figure 19. Good Guy/Matching Configuration Tab ........................................................................................................... 24Figure 20. Parser Configuration Tab....................................................................................................................................... 25Figure 21. Message Type Configuration Screen .................................................................................................................... 26Figure 22. Message Type Attachment Details ....................................................................................................................... 27Figure 23. Reference Configuration Button........................................................................................................................... 28Figure 24. <Message Type> Subfield Level Configuration Screen ................................................................................... 28Figure 25. <Message Type> Screening Configuration Screen............................................................................................ 30Figure 26. Screening Configuration for Goods Screening................................................................................................... 31Figure 27. <Message Type> Other Field/Subfield Configuration Screen ....................................................................... 33Figure 28. Adding a Good Guy Record ................................................................................................................................. 34Figure 29. EDQ Configuration Process Flow....................................................................................................................... 36Figure 30. Updating the Schema Details ................................................................................................................................ 37Figure 31. Edit Task .................................................................................................................................................................. 38Figure 32. Watchlist_Managament-<patch number> Project ............................................................................................ 42Figure 33. Inline Processing Page.............................................................................................................................................. 2Figure 34. Import Entity ............................................................................................................................................................. 3Figure 35. Business Entities Sub-Menu .................................................................................................................................... 4Figure 36. Add a Business Entity............................................................................................................................................... 5Figure 37. Business Entity Details............................................................................................................................................. 5Figure 38. Inline Datasets Sub-Menu........................................................................................................................................ 6Figure 39. Adding an Inline Dataset ......................................................................................................................................... 6Figure 40. Traversal Paths Sub-Menu....................................................................................................................................... 7
Administration Guide xiii

List of Figures
Figure 41. Adding a Traversal Path ........................................................................................................................................... 7Figure 42. Expressions Menu..................................................................................................................................................... 8Figure 43. Adding the First Expression.................................................................................................................................... 9Figure 44. Adding the Second Expression............................................................................................................................... 9Figure 45. Apply Function To Group .................................................................................................................................... 10Figure 46. Evaluations Menu ................................................................................................................................................... 13Figure 47. Adding an Evaluation ............................................................................................................................................. 13Figure 48. Adding an Evaluation ............................................................................................................................................. 13Figure 49. Assessments Menu.................................................................................................................................................. 14Figure 50. Adding an Assessment ........................................................................................................................................... 15Figure 51. Edit Data Store ........................................................................................................................................................ 19
xiv Administration Guide

List of Tables
List of TablesTable 1. Conventions Used in this Guide ............................................................................................................................ viiiTable 1. Administration Process Flow................................................................................................................................... 19Table 2. Roles and User Groups ............................................................................................................................................ 20Table 3. <Message Type> Subfield Level Configuration Details ..................................................................................... 28Table 4. <Message Type> Screening Configuration Details ............................................................................................. 30Table 5. Screening Configuration for Goods Screening ..................................................................................................... 31Table 6. <Message Type> Other Field/Subfield Details ................................................................................................... 33Table 7. Sample Data for BICs............................................................................................................................................... 47Table 8. Sample Data for Blacklisted Cities.......................................................................................................................... 48Table 9. Sample Data for Blacklisted Countries .................................................................................................................. 48Table 10. Sample Data for Stop Keywords .......................................................................................................................... 49Table 11. Sample Data for Prohibited Goods...................................................................................................................... 50Table 12. Sample Data for Prohibited Ports......................................................................................................................... 50Table 13. Business Entity Fields............................................................................................................................................... 3Table 14. Risk-Currency VS Amount Threshold Evaluation............................................................................................. 10Table 15. Risk-High Risk Destination Country Evaluation ............................................................................................... 11Table 16. Risk-High Risk Originator Country Evaluation ................................................................................................. 11Table 17. Risk-Currency VS Destination Country Evaluation .......................................................................................... 12Table 18. Risk-High Risk Destination Country Evaluation ............................................................................................... 12Table 19. Risk- High Risk Party Evalution ........................................................................................................................... 12Table 20. Assessment Details.................................................................................................................................................. 14Table 21. Private List for Individuals..................................................................................................................................... 20Table 22. Private List for Individuals..................................................................................................................................... 23Table 23. Activities for System Audit .................................................................................................................................... 31Table 24. Steps for System Audit Activities.......................................................................................................................... 32
Administration Guide xv

List of Tables
xvi Administration Guide

CHAPTER 1 About Oracle Financial Services Transaction Filtering
This chapter provides a brief overview of Oracle Financial Services Transaction Filtering in terms of its architecture and process flow.
This section covers the following topics:
About Oracle Financial Services Transaction Filtering
Oracle Transaction Filtering Process Flow
About Oracle Financial Services Transaction Filtering
The Oracle Financial Services (OFS) Transaction Filtering application is a real-time filtering system that identifies financial transactions done by blacklisted, sanctioned, and restricted individuals, entities, cities, countries, ships, vessels and so on. The application can interface with any clearing systems, payment systems, or source systems. The application accepts messages from the source systems in real time and scans them against different watch lists maintained within the system to identify any blacklisted data present within the transaction message, which is in a SWIFT format. The OFS Transaction Filtering application is built using three components: a scoring engine (EDQ), a user interface and a rule engine (IPE).
Financial institutions use OFS Transaction Filtering for the following tasks:
Identify transactions done by customers, organizations, and countries which are sanctioned.
Perform daily checks of customers’ names and filter customers’ transactions against the OFAC and HMT sanctions lists.
Generate risk scores for entities with whom businesses or transactions are prohibited.
Administration Guide 1

Oracle Transaction Filtering Process FlowChapter 1—About Oracle Financial Services Transaction Filtering
Oracle Transaction Filtering Process Flow
Figure 1 describes the Oracle Transaction Filtering Process Flow:
Figure 1. Oracle Transaction Filtering Process Flow
The following steps describe the Transaction Filtering process flow:
1. The Transaction Filtering application receives the transaction message from a JMS queue. The message is in a SWIFT format. The following formats are supported:
MT101
MT103
MT202
MT202 COV
MT700
MT701
MT707
Note:
All message definitions are SWIFT 2018 compliant.
All field details of the message are stored within the application.
2 Administration Guide

Oracle Transaction Filtering Process FlowChapter 1—About Oracle Financial Services Transaction Filtering
2. The transaction message is screened against a watch list through the Enterprise Data Quality (EDQ) platform. The message is sent to the EDQ platform, and the EDQ sends back a response. The watch list checks for any blacklisted or suspicious data using a matching logic.
Note: There may be more than one transaction present within a message. In this case, each transaction is screened against external and internal watch lists.
3. For every match, a match score is generated through the IPE platform. If a match is not found, then the system generates a zero score.
Note: Different scores can also be assigned to different watch list using rules. All scores are based on multiple rules set up in the application and are configurable. In case of multiple scores, the logic is used to take the maximum score out of all the scores, and the score is treated as a final score for any given transaction.
Note: For information on IPE, see OFS Inline Processing Engine User Guide.
4. The final score is checked against a threshold limit set within the application. If the score is greater than the threshold limit, then the transaction is treated as a suspicious transaction. If the score is lesser than the threshold limit, then the transaction is treated as a clean transaction.
Note: If all the transactions within a message are clean, then a feedback message is sent back to the central banking system with a CLEAN status. The message contains the status, message reference ID, and transaction reference ID. If any transaction within a message is found to be suspicious, then the complete message is moved into a HOLD status and is available for user action. For more information, see OFS Transaction Filtering User Guide.
Administration Guide 3

Oracle Transaction Filtering Process FlowChapter 1—About Oracle Financial Services Transaction Filtering
4 Administration Guide

CHAPTER 2 Getting Started
This chapter provides step-by-step instruction to login to the Transaction Filtering System and different features of the Oracle Financial Services Analytical Applications (OFSAA) Application page.
This chapter discusses the following topics:
Accessing OFSAA Applications
Managing OFSAA Application Page
Troubleshooting Your Display
Accessing OFSAA Applications
Access to the Oracle Financial Services Transaction Filtering application depends on the Internet or Intranet environment. Oracle Financial Services Transaction Filtering is accessed through Google Chrome. The system administrator provides the intranet address uniform resource locator (URL), User ID, and Password. Login to the application through the Login page. You will be prompted to change your password on your first login. You can change your password whenever required by logging in. For more information, see the Troubleshooting Your Display section.
To access the Oracle Financial Services Analytical Application, follow these steps:
1. Enter the URL into your browser using the following format:<scheme/ protocol>://<ip address/ hostname>:<port>/<context-name>/login.jsp
For example: https://myserver:9080/ofsaaapp/login.jsp
The OFSAA Login page is displayed.
Administration Guide 5

Managing OFSAA Application PageChapter 2—Getting Started
Figure 2. OFSAA Login Page
2. Select the Language from the Language drop-down list. This allows you to use the application in the language of your selection.
3. Enter your User ID and Password in the respective fields.
4. Click Login. The Oracle Financial Services Analytical Applications page is displayed.
Managing OFSAA Application Page
This section describes the options available for system configuration in the OFSAA Application page.The OFSAA Application page has the following tab:
Transaction Filtering Admin Tab
SWIFT Configuration Admin Tab
Process Modeller Tab
Process Monitor Tab
List Management Tab
Inline Processing Tab
Transaction Filtering Admin TabThe Transaction Filtering Admin tab allows the system administrator to configure the application level parameters and the parameters against which the records are matched.To do this, follow these steps:
6 Administration Guide

Managing OFSAA Application PageChapter 2—Getting Started
1. Click the icon.
Figure 3. Applications Tab
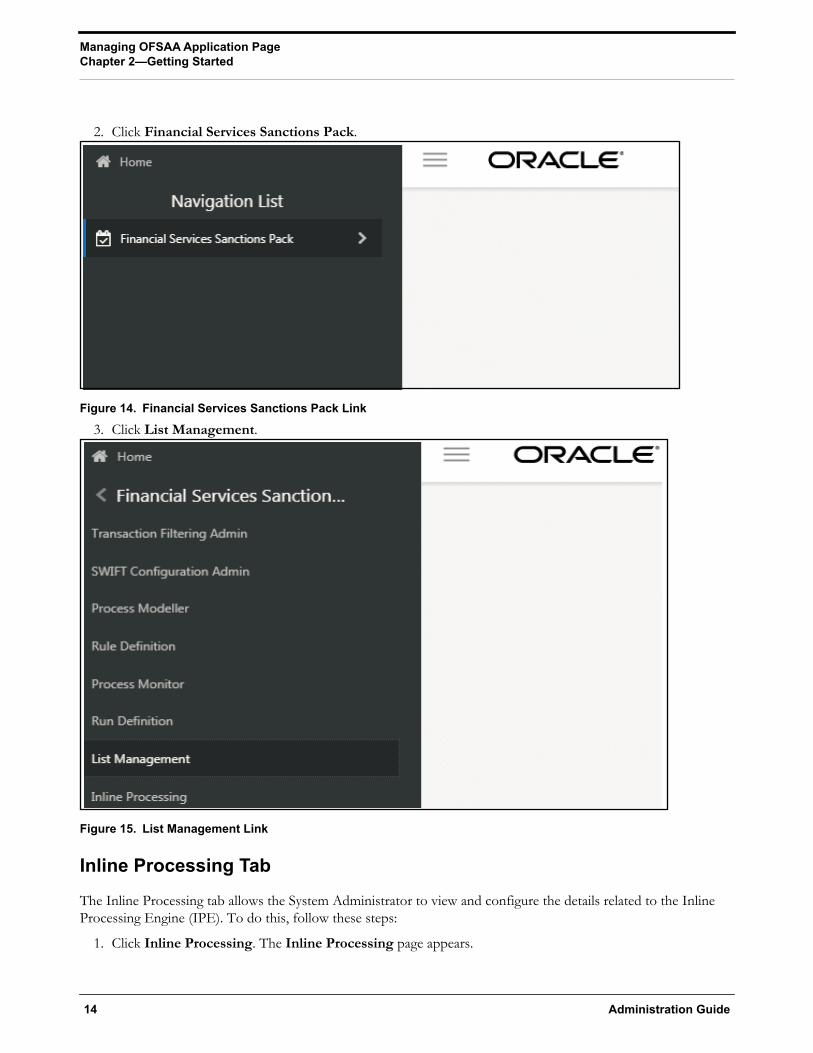
2. Click Financial Services Sanctions Pack.
Figure 4. Financial Services Sanctions Pack Link
Administration Guide 7

Managing OFSAA Application PageChapter 2—Getting Started
3. Click Transaction Filtering Admin.
Figure 5. Transaction Filtering Link
SWIFT Configuration Admin TabThe SWIFT Configuration Admin tab allows the system administrator to configure the SWIFT parser parameters.To do this, follow these steps:
1. Click the icon.
Figure 6. Applications Tab
8 Administration Guide
Managing OFSAA Application PageChapter 2—Getting Started
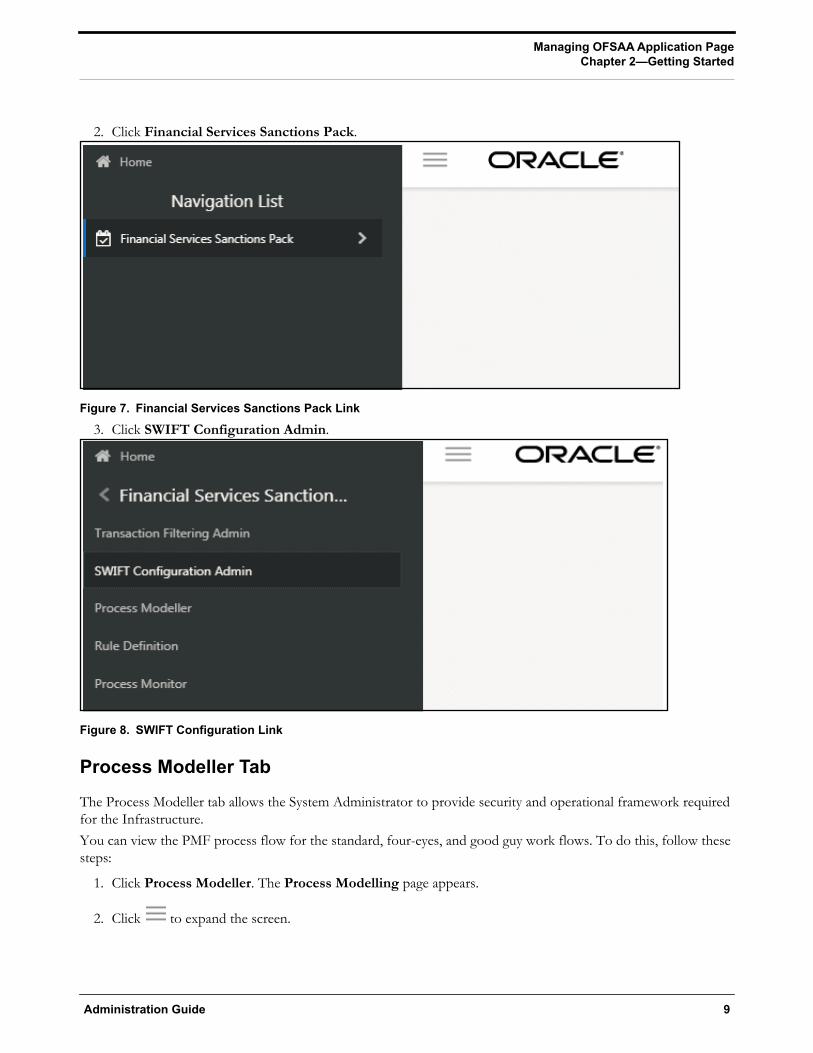
2. Click Financial Services Sanctions Pack.
Figure 7. Financial Services Sanctions Pack Link
3. Click SWIFT Configuration Admin.
Figure 8. SWIFT Configuration Link
Process Modeller TabThe Process Modeller tab allows the System Administrator to provide security and operational framework required for the Infrastructure.You can view the PMF process flow for the standard, four-eyes, and good guy work flows. To do this, follow these steps:
1. Click Process Modeller. The Process Modelling page appears.
2. Click to expand the screen.
Administration Guide 9

Managing OFSAA Application PageChapter 2—Getting Started
3. Select the OFS_SAC Process Id for the standard and four-eye flows and OFS_SAC_LIST for the good guy flow.
Figure 9. Process Modeller Page
4. Click Edit .
The PMF process flow is displayed.
Configuring the Transaction CurrencyYou can change the default transaction currency (USD) to another currency. To configure the currency, follow these steps:
1. In the Process Modeller page, select the OFS_SAC Process Id.
2. Click Edit .
3. Click the Application Rule tab.
10 Administration Guide
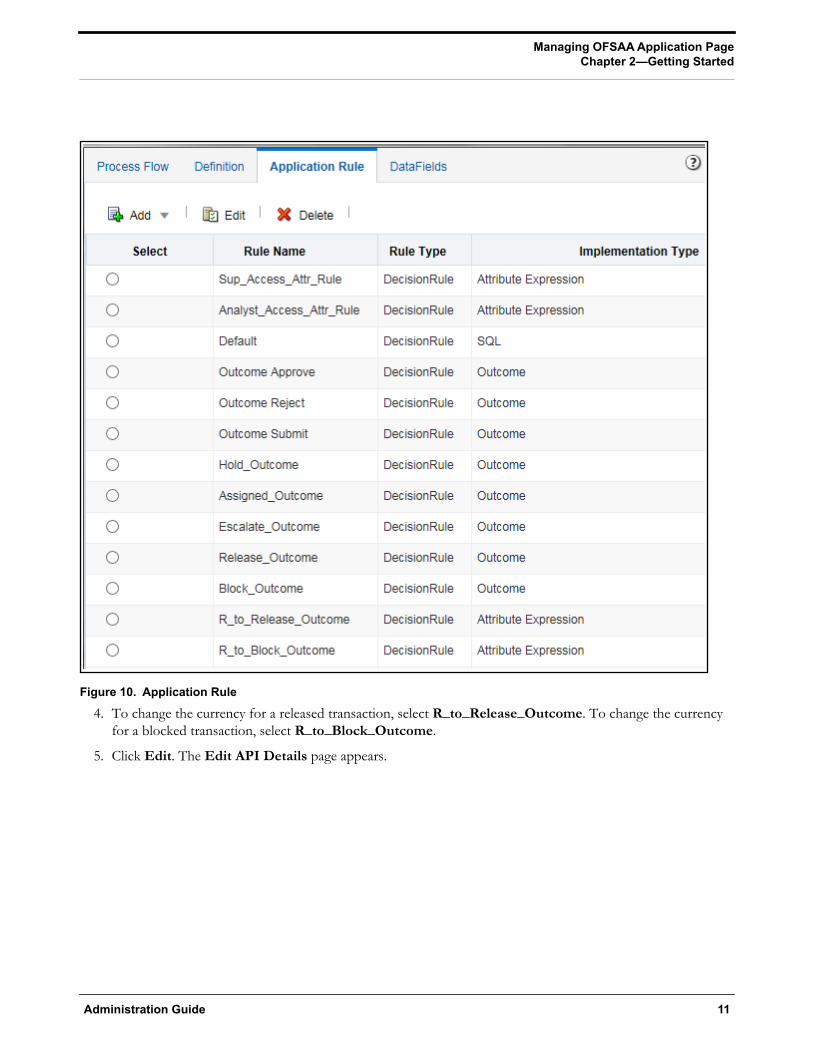
Managing OFSAA Application PageChapter 2—Getting Started
Figure 10. Application Rule
4. To change the currency for a released transaction, select R_to_Release_Outcome. To change the currency for a blocked transaction, select R_to_Block_Outcome.
5. Click Edit. The Edit API Details page appears.
Administration Guide 11

Managing OFSAA Application PageChapter 2—Getting Started
Figure 11. Edit API Details Page
6. In the Edit API Details page, click inside the TF_Currency field and select the required currency.
7. Click Save.
Process Monitor TabThe Process Modeller tab allows the System Administrator to configure the work flow for a particular process. To do this, follow these steps:
1. Click Process Monitor. The Process Monitor page appears.
2. Click to expand the screen.
12 Administration Guide

Managing OFSAA Application PageChapter 2—Getting Started
3. Click the Entity ID link. The work flow for the process appears.
Figure 12. Process Monitor Page
List Management TabThe SWIFT Configuration Admin tab allows the system administrator to configure the SWIFT parser parameters.To do this, follow these steps:
1. Click the icon.
Figure 13. Applications Tab
Administration Guide 13
Managing OFSAA Application PageChapter 2—Getting Started
2. Click Financial Services Sanctions Pack.
Figure 14. Financial Services Sanctions Pack Link
3. Click List Management.
Figure 15. List Management Link
Inline Processing TabThe Inline Processing tab allows the System Administrator to view and configure the details related to the Inline Processing Engine (IPE). To do this, follow these steps:
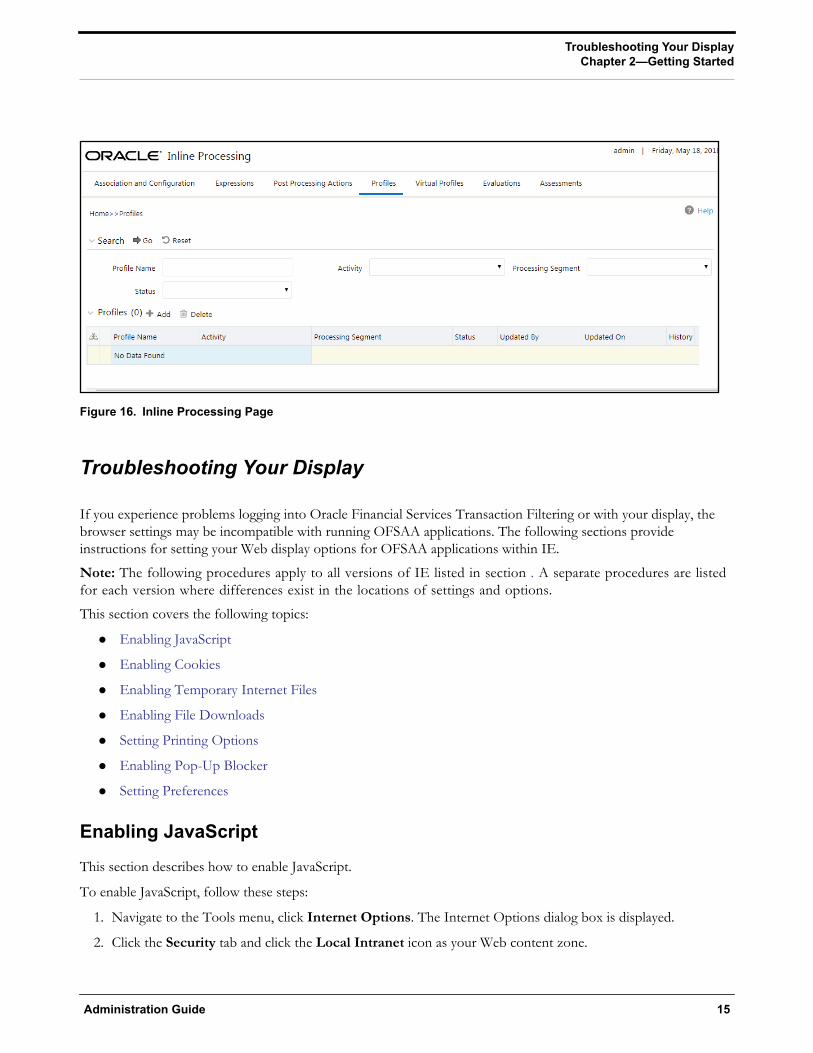
1. Click Inline Processing. The Inline Processing page appears.
14 Administration Guide
Troubleshooting Your DisplayChapter 2—Getting Started
Figure 16. Inline Processing Page
Troubleshooting Your Display
If you experience problems logging into Oracle Financial Services Transaction Filtering or with your display, the browser settings may be incompatible with running OFSAA applications. The following sections provide instructions for setting your Web display options for OFSAA applications within IE.
Note: The following procedures apply to all versions of IE listed in section . A separate procedures are listed for each version where differences exist in the locations of settings and options.
This section covers the following topics:
Enabling JavaScript
Enabling Cookies
Enabling Temporary Internet Files
Enabling File Downloads
Setting Printing Options
Enabling Pop-Up Blocker
Setting Preferences
Enabling JavaScriptThis section describes how to enable JavaScript.
To enable JavaScript, follow these steps:
1. Navigate to the Tools menu, click Internet Options. The Internet Options dialog box is displayed.
2. Click the Security tab and click the Local Intranet icon as your Web content zone.
Administration Guide 15

Troubleshooting Your DisplayChapter 2—Getting Started
3. Click Custom Level. The Security Settings dialog box displays.
4. In the Settings list and under the Scripting setting, enable all options.
5. Click OK, then click OK again to exit the Internet Options dialog box.
Enabling CookiesCookies must be enabled. If you have problems troubleshooting your display, contact your System Administrator.
Enabling Temporary Internet FilesTemporary Internet files are pages that you view on the Internet and store in a folder for quick viewing later. You must adjust this setting to always check for new versions of a stored page. To adjust your Temporary Internet File settings, follow these steps:
1. Navigate to the Tools menu, click Internet Options. The Internet Options dialog box is displayed.
2. On the General tab, click Settings. The Settings dialog box displays.
3. Click the Every visit to the page option.
4. Click OK, then click OK again to exit the Internet Options dialog box.
Enabling File DownloadsThis section describes how to enable file downloads.
To enable file downloads, follow these steps:
1. Navigate to the Tools menu, click Internet Options. The Internet Options dialog box is displayed.
2. Click the Security tab and then click the Local Intranet icon as your Web content zone.
3. Click Custom Level. The Security Settings dialog box displays.
4. Under the Downloads section, ensure that Enable is selected for all options.
5. Click OK, then click OK again to exit the Internet Options dialog box.
Setting Printing OptionsThis section explains the how to enable printing background colors and images must be enabled.
To enable this option, follow these steps:
1. Navigate to the Tools menu, click Internet Options. The Internet Options dialog box is displayed.
2. Click the Advanced tab. In the Settings list, under the Printing setting, click Print background colors and images.
3. Click OK to exit the Internet Options dialog box.
Tip: For best display results, use the default font settings in your browser.
16 Administration Guide
Troubleshooting Your DisplayChapter 2—Getting Started
Enabling Pop-Up BlockerYou may experience difficulty running the Oracle Financial Services Transaction Filtering application when the IE Pop-up Blocker is enabled. It is recommended to add the URL of the application to the Allowed Sites in the Pop-up Blocker Settings in the IE Internet Options.To enable Pop-up Blocker, follow these steps:
1. Navigate to Tools menu, click Internet Options. The Internet Options dialog box is displayed.
2. Click the Privacy tab. In the Pop-up Blocker setting, select the Turn on Pop-up Blocker option. The Settings enable.
3. Click Settings to open the Pop-up Blocker Settings dialog box.
4. In the Pop-up Blocker Settings dialog box, enter the URL of the application in the text area.
5. Click Add. The URL appears in the Allowed site list.
6. Click Close, then click Apply to save the settings.
7. Click OK to exit the Internet Options dialog box.
Setting PreferencesThe Preferences section enables you to set your OFSAA Home Page. To access this section, follow these steps:
1. Click Preferences from the drop-down list in the top right corner, where the user name is displayed.The Preferences page is displayed.
Administration Guide 17

Troubleshooting Your DisplayChapter 2—Getting Started
Figure 17. Preference screen.
2. In the Property Value drop-down list, select the application which you want to set as the Home Page.
Note: Whenever new application is installed, the related value for that application is found in the drop-down list.
3. Click Save to save your preference.
18 Administration Guide
CHAPTER 3 Managing User Administration
This chapter provides instructions for performing the user administration of Oracle Financial Services (OFS) Transaction Filtering.
This chapter focuses on the following topics:
About User Administration
Managing User Administration
About User Administration
User administration involves creating and managing users and providing access rights based on their roles. Thissection discusses the following:
Administrator permissions
Creating roles and granting and authorizing a user
Managing User Administration
This section allows you to create and authorize a user and map the users to user groups in the Transaction Filtering application.
This section covers the following topics:
Creating and Authorizing a User
Mapping a User with a User GroupThe following table lists the various actions and associated descriptions of the user administration process flow:
Creating and Authorizing a User
The sysadmn user creates a user and the sysauth user authorizes a user in the Transaction Filtering application. For more information on creating and authorizing a user, see Oracle Financial Services Analytical Applications Infrastructure User Guide.
Table 1. Administration Process Flow
Action DescriptionCreating and Authorizing a User
Create a user. This involves providing a user name, user designation, and the datesbetween which the user is active in the system.
Mapping a User with a User Group
Map a user to a user group. This enables the user to have certain privileges that themapped user group has.
Administration Guide 19
Managing User AdministrationChapter 3—Managing User Administration
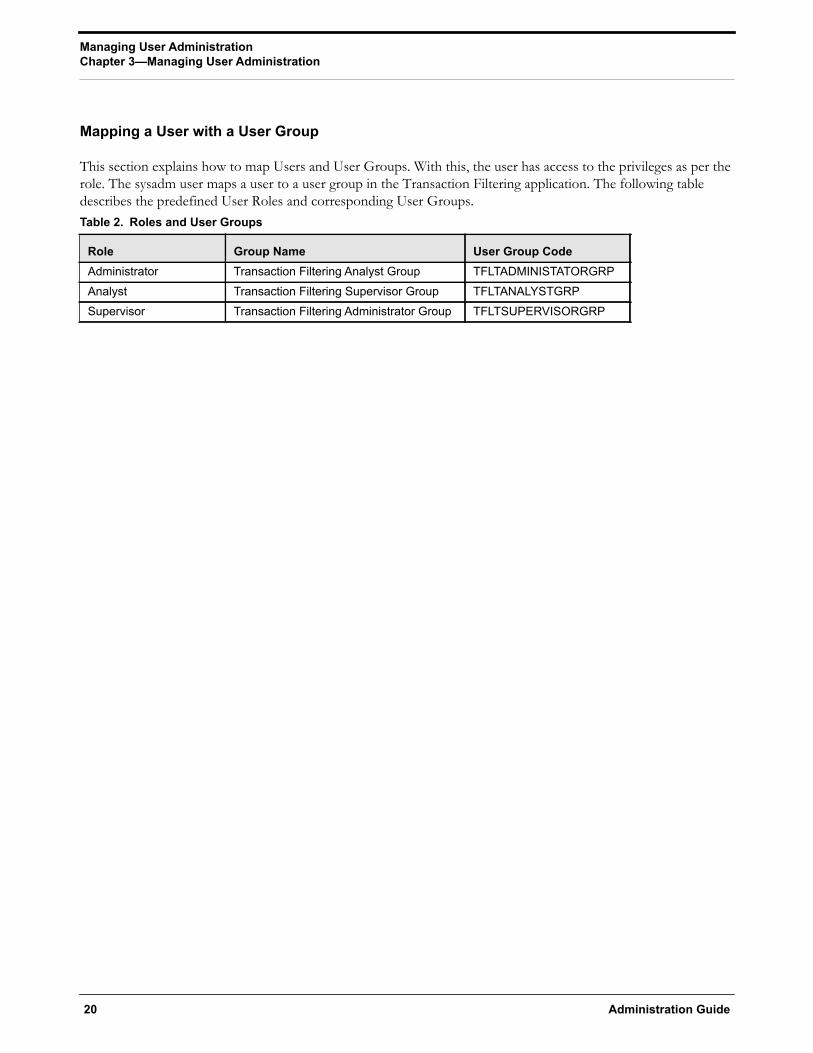
Mapping a User with a User Group
This section explains how to map Users and User Groups. With this, the user has access to the privileges as per the role. The sysadm user maps a user to a user group in the Transaction Filtering application. The following table describes the predefined User Roles and corresponding User Groups. Table 2. Roles and User Groups
Role Group Name User Group CodeAdministrator Transaction Filtering Analyst Group TFLTADMINISTATORGRPAnalyst Transaction Filtering Supervisor Group TFLTANALYSTGRPSupervisor Transaction Filtering Administrator Group TFLTSUPERVISORGRP
20 Administration Guide

CHAPTER 4 Configuring EDQ, Application Parameters, Message and Screening
This chapter explains how to import the .dxi files into the Enterprise Data Quality (EDQ) application, run the EDQ jobs, and change the EDQ URL for the Transaction Filtering application. It also explains about configuring Application parameters, Message and Screening parameters, four-eyes parameters, and the good guy list details.
This chapter focuses on the following topics:
Configuring Application Level Parameters
Configuring Good Guy Matching Parameters
Configuring the SWIFT Message Parameters
Adding, Editing or Deleting Good Guy Records
EDQ Configurations
Generating Email for Different Statuses
Configuring Operating Model - Multi Jurisdiction and Multi Business Unit Implementation
Configuring Application Level Parameters
To configure Application level parameters, follow these steps:
1. Navigate to the Oracle Financial Services Sanctions application home page.
2. Click Transaction Filtering Admin. The Application Parameters Configuration tab appears.
Administration Guide 21

Configuring Application Level ParametersChapter 4—Configuring EDQ
Figure 18. Application Parameters Configuration Tab
3. In the Audit section, select Yes to view the Debug details or select No to view the Info details.
22 Administration Guide

Configuring Good Guy Matching ParametersChapter 4—Configuring EDQ
If you select Yes, then all the steps are logged in the system irrespective of the value in the Status column. If you select No, then only those steps for which the value is Y in the Status column are logged in the system.
Note: For more information on the values in the Status column, see System Audit Logging Information.
4. In the 4 Eyes section, select Yes to enable the four-eyes work flow and select No to disable the four-eyes work flow. To configure the four-eyes flow using the Process Modeller Framework (PMF), see Process Modeller Tab.
5. In the EDQ section, provide the following values:
EDQ URL in this format:
<http>: <Hostname of the server in which EDQ is installed>: Port Number
EDQ user name
EDQ password
6. In the FEEDBACK section, enter the URL where we need to post messages for HOLD, RELEASE, CLEAN, BLOCK in the feedback Queue.
7. In the UI section, provide the following values:
Refresh interval required for viewing the notification (false positive) count in the Transaction Filtering screen.
Note: This is the time period required to configure the cut-off time for transactions, and is in milliseconds.
Note:
This time is in minutes.
The notification count is reset to zero every day at midnight.
8. Click Save. The following confirmation message is displayed: Records Updated Successfully.
Configuring Good Guy Matching Parameters
To configure parameters matched during matching, follow these steps:
1. Navigate to the Oracle Financial Services Sanctions application home page.
2. Click Transaction Filtering Admin. The Good Guy/Matching Configuration tab appears.
Administration Guide 23
Configuring the SWIFT Message ParametersChapter 4—Configuring EDQ
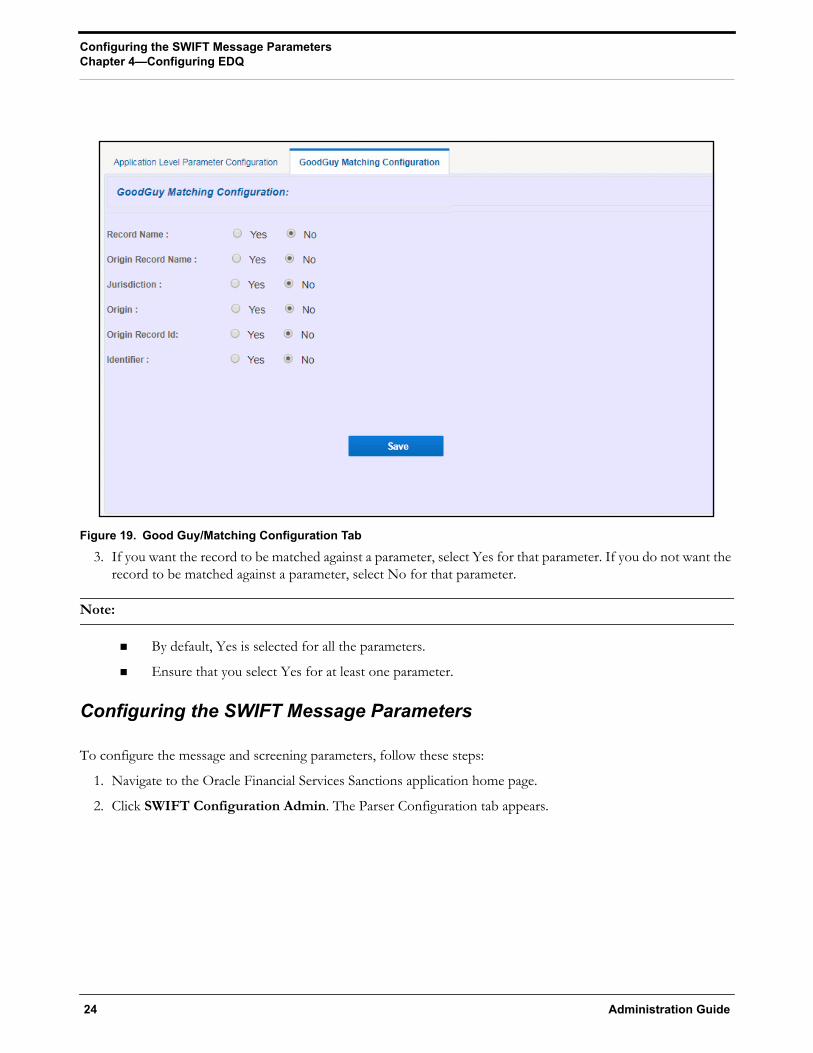
Figure 19. Good Guy/Matching Configuration Tab
3. If you want the record to be matched against a parameter, select Yes for that parameter. If you do not want the record to be matched against a parameter, select No for that parameter.
Note:
By default, Yes is selected for all the parameters.
Ensure that you select Yes for at least one parameter.
Configuring the SWIFT Message Parameters
To configure the message and screening parameters, follow these steps:
1. Navigate to the Oracle Financial Services Sanctions application home page.
2. Click SWIFT Configuration Admin. The Parser Configuration tab appears.
24 Administration Guide

Configuring the SWIFT Message ParametersChapter 4—Configuring EDQ
Figure 20. Parser Configuration Tab
This tab has four screens:
1. Message Type Configuration Screen: This screen allows you to edit the status, field names, and expres-sions of the different parameters in the message.
In the Message Type Configuration field, select the SWIFT message format. The following formats are sup-ported:
MT101
MT 110
MT103
MT202
MT202 COV
MT700
MT701
MT707
Note: All message definitions are SWIFT 2018 compliant.
Each message format has five blocks: Basic Header Block, Application Header Block, User Header Block, Text Block, and Trailer Block. The fields in the Text Block may change depending on the message format. The fields in the following blocks remain the same regardless of the message format.
Administration Guide 25
Configuring the SWIFT Message ParametersChapter 4—Configuring EDQ
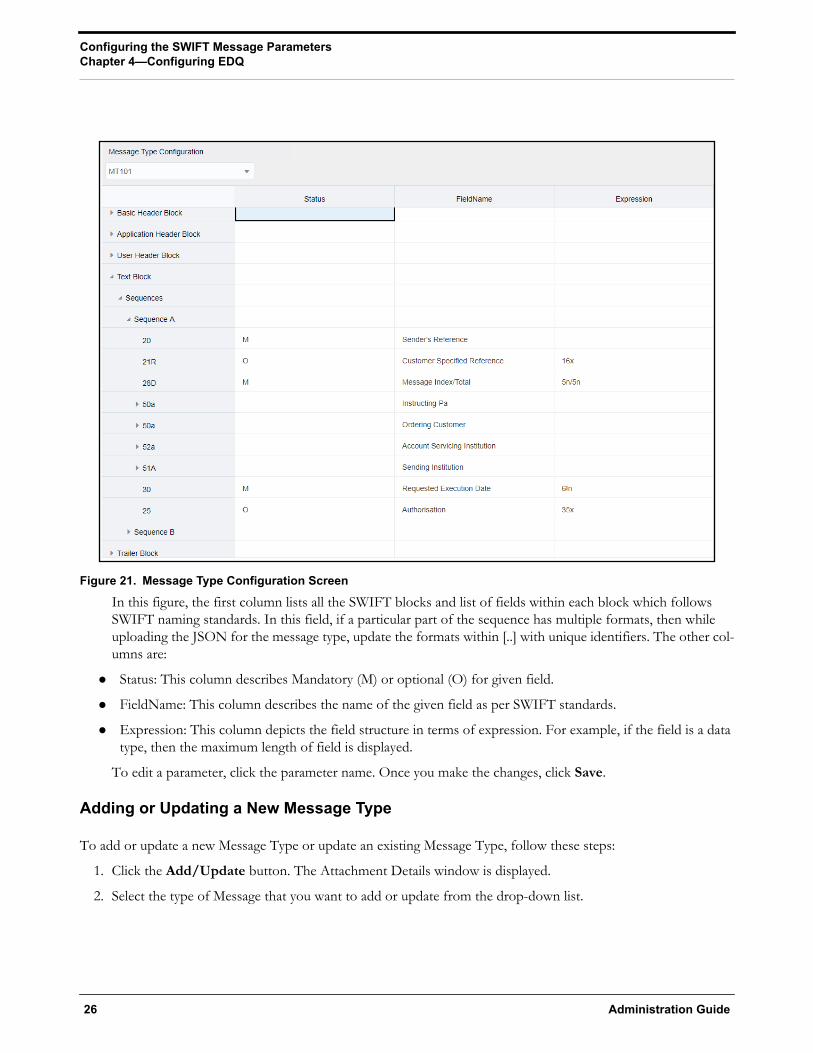
Figure 21. Message Type Configuration Screen
In this figure, the first column lists all the SWIFT blocks and list of fields within each block which follows SWIFT naming standards. In this field, if a particular part of the sequence has multiple formats, then while uploading the JSON for the message type, update the formats within [..] with unique identifiers. The other col-umns are:
Status: This column describes Mandatory (M) or optional (O) for given field.
FieldName: This column describes the name of the given field as per SWIFT standards.
Expression: This column depicts the field structure in terms of expression. For example, if the field is a data type, then the maximum length of field is displayed.
To edit a parameter, click the parameter name. Once you make the changes, click Save.
Adding or Updating a New Message Type
To add or update a new Message Type or update an existing Message Type, follow these steps:
1. Click the Add/Update button. The Attachment Details window is displayed.
2. Select the type of Message that you want to add or update from the drop-down list.
26 Administration Guide

Configuring the SWIFT Message ParametersChapter 4—Configuring EDQ
Figure 22. Message Type Attachment Details
3. Choose a file to upload from the Select file to upload field.
Note: This file should be of the format .json or .txt.
4. Click Upload.
5. Click Submit. The Message is displayed in the below table as <Message Type_draft>.
Fore more information, see the section JSON Upload Configuration in OFS Transaction Filtering Technical Integration Guide.
Configuring Message and Transaction References
Any message which contains message references or transaction references or both need to be configured. To view and change the message reference or transaction reference, click the Reference Configuration button.
Administration Guide 27

Configuring the SWIFT Message ParametersChapter 4—Configuring EDQ
Figure 23. Reference Configuration ButtonFor the Message Reference field, a unique identifier must be configured at the message level for all message formats. For the Transaction Reference field, a unique identifier must be configured at the transaction level only if applicable for the specific message format.
2. <Message Type> Subfield Level Configuration Screen: This screen allows you to add a subfield to a particular field in the Message Type Configuration Screen.
Figure 24. <Message Type> Subfield Level Configuration Screen
To add a subfield, provide the required values in the fields shown in the screen and click Add. Enter values in the following fields:
Table 3. <Message Type> Subfield Level Configuration Details
Fields Field DescriptionExpression Identifier Enter a unique identifier which must start with alpha and should not contain any
spaces.Note: This is a mandatory field.
Expression Name Enter the name of the Expression. It should be inline with the Expression Identifier. It should be in capital letters.Note: This is a mandatory field.
28 Administration Guide
Configuring the SWIFT Message ParametersChapter 4—Configuring EDQ
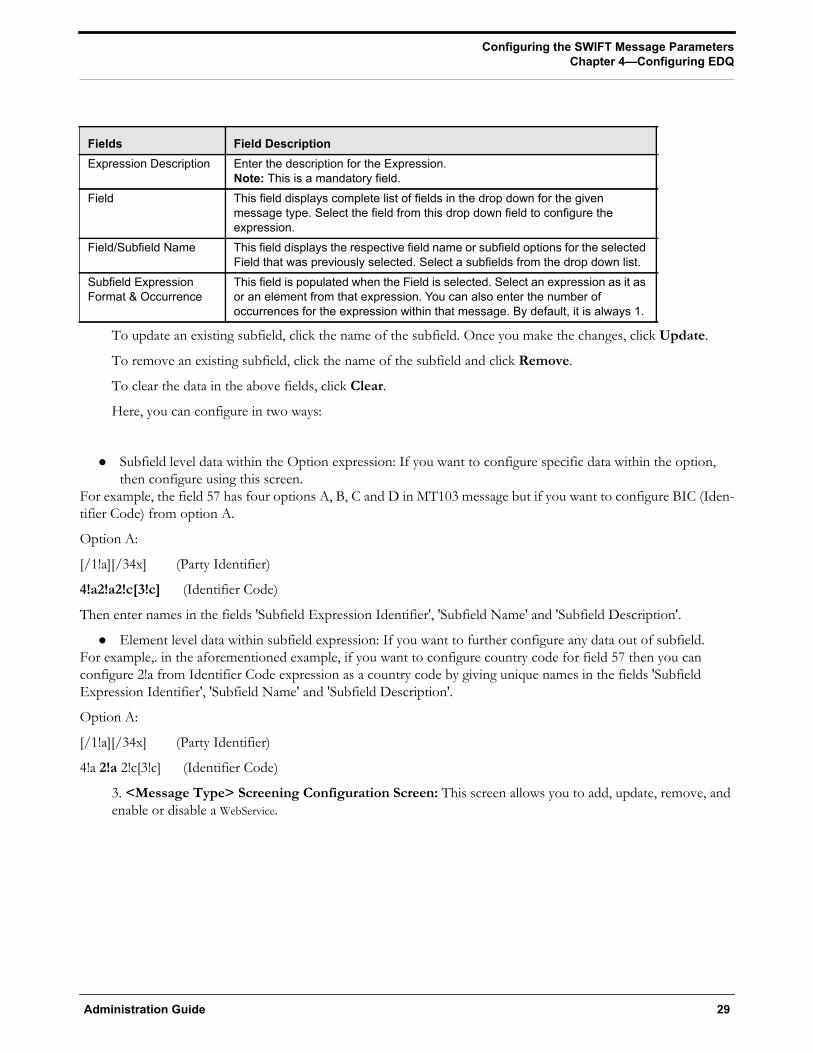
To update an existing subfield, click the name of the subfield. Once you make the changes, click Update.
To remove an existing subfield, click the name of the subfield and click Remove.
To clear the data in the above fields, click Clear.
Here, you can configure in two ways:
Subfield level data within the Option expression: If you want to configure specific data within the option, then configure using this screen.
For example, the field 57 has four options A, B, C and D in MT103 message but if you want to configure BIC (Iden-tifier Code) from option A.
Option A:
[/1!a][/34x] (Party Identifier)
4!a2!a2!c[3!c] (Identifier Code)
Then enter names in the fields 'Subfield Expression Identifier', 'Subfield Name' and 'Subfield Description'.
Element level data within subfield expression: If you want to further configure any data out of subfield. For example,. in the aforementioned example, if you want to configure country code for field 57 then you can configure 2!a from Identifier Code expression as a country code by giving unique names in the fields 'Subfield Expression Identifier', 'Subfield Name' and 'Subfield Description'.
Option A:
[/1!a][/34x] (Party Identifier)
4!a 2!a 2!c[3!c] (Identifier Code)
3. <Message Type> Screening Configuration Screen: This screen allows you to add, update, remove, and enable or disable a WebService.
Expression Description Enter the description for the Expression.Note: This is a mandatory field.
Field This field displays complete list of fields in the drop down for the given message type. Select the field from this drop down field to configure the expression.
Field/Subfield Name This field displays the respective field name or subfield options for the selected Field that was previously selected. Select a subfields from the drop down list.
Subfield Expression Format & Occurrence
This field is populated when the Field is selected. Select an expression as it as or an element from that expression. You can also enter the number of occurrences for the expression within that message. By default, it is always 1.
Fields Field Description
Administration Guide 29

Configuring the SWIFT Message ParametersChapter 4—Configuring EDQ
Figure 25. <Message Type> Screening Configuration Screen
To view a particular WebService, enter values in the following fields:
Table 4. <Message Type> Screening Configuration Details
Fields Field DescriptionScreening WebService Select a Screening WebService from the dropdown list. This field lists all the
supported matching WebServices within the system. The following WebServices are available: BIC Country and City Goods Screening Name and Address Narrative or Free Text Information Port ScreeningThis is a mandatory field.
Expression (ID-Name) Select the Expression that was defined in the previous page. This automatically displays the fields in the next two fields.
Field Select the field name.Field/Subfield Name Select the Subfield Name. This displays the Expression.Enable Select Yes to enable the WebService. Select No to disable the WebService.Message Direction Select INBOUND(o) and OUTBOUND(i) based on the screening requirement
from the drop-down list. If a particular field has to be screened only for inbound then select INBOUND(o), otherwise select OUTBOUND(i). If that field has to be screened for both inbound and outbound then select ANY.
Add button To add a WebService, provide the required values in the fields shown above and click Add.
Update button To update a WebService, select the WebService that you want to update and click Update.
Remove button To remove a WebService, select the WebService that you want to remove and click Remove.
30 Administration Guide

Configuring the SWIFT Message ParametersChapter 4—Configuring EDQ
Screening Configuration for Goods ScreeningFor the Goods Screening web service, You can provide the goods amount and the currency used, the country from where the goods are being imported, the country to where the goods are being exported, the message direction, and whether the message direction is enabled or disabled.
Figure 26. Screening Configuration for Goods Screening
Table 5. Screening Configuration for Goods Screening
Enabling or disabling a WebserviceBy default, every Webservice is enabled. You can change the message configuration by disabling a particular Webservice. when you do this, the selected Webservice is not evaluated.
You can enable or disable a webservice using the Enable field. If you want to disable all the webservices, run the following command:
UPDATE FSI_RT_MATCH_SERVICE SET F_ENABLED = 'N' WHERE N_WEBSERVICE_ID IN ([WEBSERVICE_IDS])
Replace the [WEBSERVICE_IDS] placeholder with 1,2, 3, 4, 5, 6. To enable all the webservices, change ‘N’ to ‘Y’.
To enable or disable one or more webservices, replace the [WEBSERVICE_IDS] placeholder with the corresponding webservice ID. The webservices and the corresponding IDs are shown below:
Enable All button To enable all WebServices, click Enable All.Disable All button To disable all WebServices, click Disable All.
Fields Field DescriptionExpression Identifier Select the Expression for the good.Tag Select the tag related to the good. Based on the tag selected, the field name is
populated.Field Name The field name is populated based on the tag selected.Message Direction Select INBOUND(o) and OUTBOUND(i) based on the screening requirement
from the drop-down list. If a particular field has to be screened only for inbound then select INBOUND(o), otherwise select OUTBOUND(i). If that field has to be screened for both inbound and outbound then select ANY.
Enable Select Yes to enable the message in a particular direction. Select No to disable the message in a particular direction.
Fields Field Description
Administration Guide 31

Configuring the SWIFT Message ParametersChapter 4—Configuring EDQ
1. Name and Address
2. BIC
3. Country and City
4. Narrative or Free Text Information
5. Port Screening
6. Goods Screening
Updating and Removing a WebserviceTo update an existing web service, click the name of the web service. The fields are populated with the web service parameters. Once you make the changes, click Update.
To remove an existing web service, click the name of the web service and click Remove.
Populating Data for the Trade Goods and Trade Port WebservicesData for the Trade goods and Trade port webservices are taken from a reference table. In order to populate data for these webservices, do this:
1. In the EDQ Server Console, go to the Watch List management project.
2. Right-click on the Reference Data Refresh job.
3. Click Run. Provide a unique Run Label and a Run Profile.
When you run this job, the port and goods reference data is refreshed at the same time.
4. Go to the Transaction Filtering project.
5. Right-click on the MAIN-Shutdown Real-time Screening job to shut down all webservices.
6. Click Run.
7. Right-click on the MAIN job to restart all webservices.
Click Run.
4. <Message Type> Other Field/Subfield Configuration Screen: This screen allows you to update the other fields which are required for the application. It displays the list of fixed business data/names for the required fields to run the system end to end for given any message type. You can select each business data to configure source of data/fields for a give message type based on SWIFT knowledge.
32 Administration Guide

Adding, Editing or Deleting Good Guy RecordsChapter 4—Configuring EDQ
Figure 27. <Message Type> Other Field/Subfield Configuration Screen
To update the parameter, click the parameter name. The fields are populated with the field parameters. The fol-lowing fields are displayed in this screen:
Table 6. <Message Type> Other Field/Subfield Details
Once you make the changes, click Update.
Adding, Editing or Deleting Good Guy Records
You can add, edit or delete a Good Guy record from the Good Guy List Details page.
Adding a Good Guy Record
Apart from adding a Good Guy record using the process detailed in section Good Guy/White List Matching in the Oracle Transaction Filtering User Guide, you can also manually add a record to the FCC_WHITELIST table. For example, if the record is a trusted customer. To add a record, do this:
Fields Field DescriptionGeneric Business Data This field displays the Business Name of the record that is selected.Message Direction Select ‘Inbound’ or ‘Outbound’ depending on how the screening is done.Expression (ID-Name) Select the Expression that was defined in the previous page. This
automatically displays the fields in the next two fields.Field If you have not selected from the previous field, then select the Field.Field/Subfield Name Select the Subfield Name. This displays the Expression.
Administration Guide 33
Adding, Editing or Deleting Good Guy RecordsChapter 4—Configuring EDQ
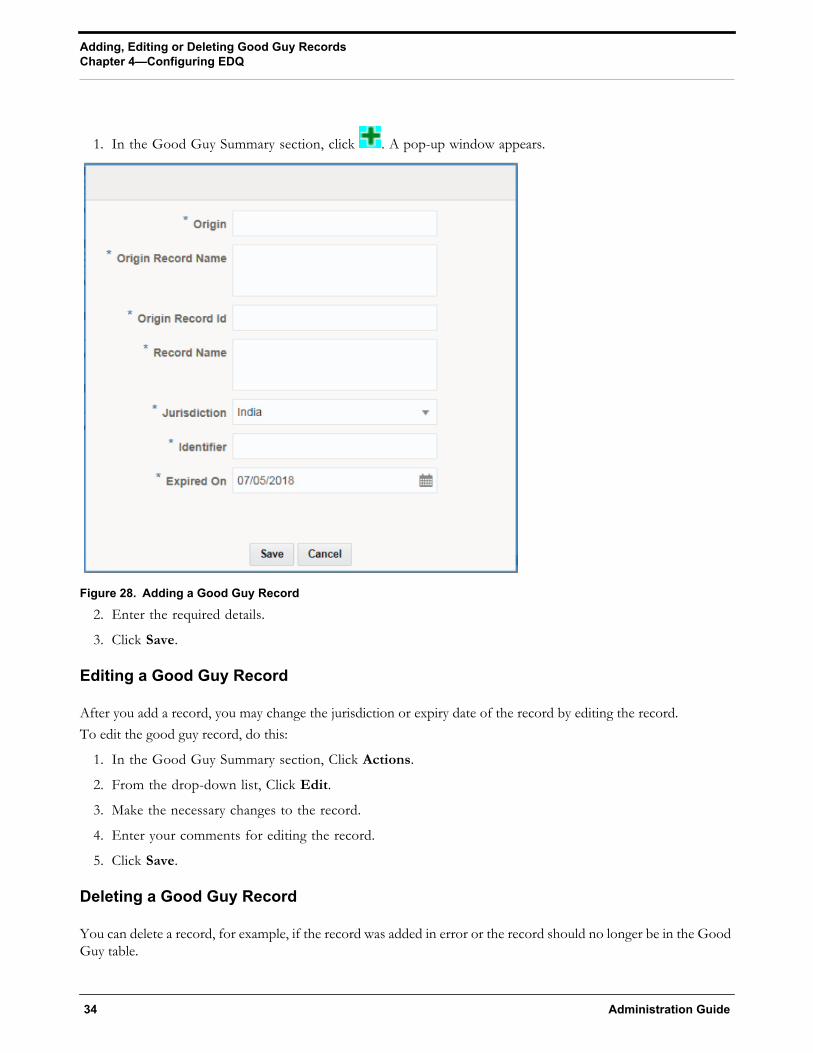
1. In the Good Guy Summary section, click . A pop-up window appears.
Figure 28. Adding a Good Guy Record
2. Enter the required details.
3. Click Save.
Editing a Good Guy Record
After you add a record, you may change the jurisdiction or expiry date of the record by editing the record.To edit the good guy record, do this:
1. In the Good Guy Summary section, Click Actions.
2. From the drop-down list, Click Edit.
3. Make the necessary changes to the record.
4. Enter your comments for editing the record.
5. Click Save.
Deleting a Good Guy Record
You can delete a record, for example, if the record was added in error or the record should no longer be in the Good Guy table.
34 Administration Guide
EDQ ConfigurationsChapter 4—Configuring EDQ
To delete the good guy record, do this:
1. In the Good Guy Summary section, Click Actions.
2. From the drop-down list, Click Delete.
3. Enter your comments for deleting the record.
4. Click Save.
Note: The following columns in the FCC_WHITELIST table are used for matching. This match can be against a single column or column combinations:
V_ORIGIN: This column contains the watchlist name.
V_WHITE_ENTITY_NAME: This column contains the watchlist record name.
V_WHITE_NAME: This column contains the input message name.
V_IDENTIFIER_CODE: This column contains the ID of the party name present in the V_WHITE_NAME column, and comes from the input message.
N_RECORD_ID: This column contains the watch list record id.
V_JURISDICTION: This column contains the watch list jurisdiction.
D_EXPIRE_ON: This column contains the date after which the record is no checked against the records in the FCC_WHITELIST table.
EDQ Configurations
This section consists of the following topics:
About EDQ
EDQ Configuration Process Flow
General EDQ Configurations
About EDQ
The Oracle Financial Services Transactions Filtering application is built using EDQ as a platform. EDQ provides a comprehensive data quality management environment that is used to understand, improve, protect and govern data quality. EDQ facilitates best practices such as master data management, data integration, business intelligence, and data migration initiatives. EDQ provides integrated data quality in customer relationship management and other applications.
EDQ has the following key features:
Integrated data profiling, auditing, and cleansing and matching
Browser-based client access
Ability to handle all types of data (for example, customer, product, asset, financial, and operational)
Connection to any Java Database Connectivity (JDBC) compliant data sources and targets
Multi-user project support (Role-based access, issue tracking, process annotation, and version control)
Administration Guide 35

EDQ ConfigurationsChapter 4—Configuring EDQ
Representational State Transfer Architecture (ReST) support for designing processes that may be exposed to external applications as a service
Designed to process large data volumes
A single repository to hold data along with gathered statistics and project tracking information, with shared access
Intuitive graphical user interface designed to help you solve real world information quality issues quickly
Easy, data-led creation and extension of validation and transformation rules
Fully extensible architecture allowing the insertion of any required custom processing
Note: For information on configuring a host in the Transaction Filtering application, see Host Configuration.
Note: For more information on EDQ, see Oracle Enterprise Data Quality Documentation.
EDQ Configuration Process Flow
The following image shows the EDQ configuration process flow:
Figure 29. EDQ Configuration Process Flow
To configure the EDQ, follow these steps:
36 Administration Guide

EDQ ConfigurationsChapter 4—Configuring EDQ
1. Import the WatchList management.dxi file from the FIC_HOME/SanctionsCommon path and the Transaction screening.dxi file from the FIC_HOME/Transaction_Processing path.
2. Enter the organization-specific Atomic schema details as shown below:
Figure 30. Updating the Schema Details
3. Load the Reference data. For more information on Reference data, see Configuring Prohibition Screening.
4. Update the command area path in the below locations: Watchlist_Management project>External Tasks>WatchListLoadPreparedData.
Transaction_Screening project>External Tasks>WatchListLoadData.
Transaction_Screening project>External Tasks>SanctionedListRefLoadData
Administration Guide 37

EDQ ConfigurationsChapter 4—Configuring EDQ
Figure 31. Edit Task
5. Run the following jobs under the Transaction List management project:
Analyze Reference data quality
Download Prepare & filter export list data
Generate StopPhrases
6. Run the Transaction Filtering job under the Transaction Screening project.
7. Change the EDQ URL in the Transaction Filtering application. This is done the first time you set up the Transaction Filtering application as the application needs to know the location of the EDQ.
8. Configure the message and screening parameters, if required.
Changing the EDQ URLTo change the EDQ URL, see Configuring Application Level Parameters.
General EDQ Configurations
This section consists of the following topics:
Importing the OFS Transaction Filtering Projects
Configuring Watch List Management and Transaction Filtering
Filtering Watch List Data
Prohibition Screening
Generating Email for Different Statuses
38 Administration Guide

EDQ ConfigurationsChapter 4—Configuring EDQ
Importing the OFS Transaction Filtering ProjectsSee OFS Sanctions Installation Guide for information on importing OFS Transaction Filtering projects.
Configuring Watch List Management and Transaction FilteringThe Oracle Financial Services Transaction Filtering distribution contains two Run Profiles for configuring watch list management and screening: watchlist-management.properties and watchlist-screening.properties.
Run Profiles are optional templates that specify a number of 'override' configuration settings for externalized options when a Job is run. They offer a convenient way of saving and reusing a number of configuration overrides, rather than specifying each override as a separate argument.
Run Profiles may be used when running jobs either from the Command Line Interface, using the 'runopsjob' command, or in the Server Console UI.
The watchlist-management.properties Run Profile controls:
which watch lists are downloaded, and the configuration of the download process;
whether filtering is applied to the watch lists; and
whether Data Quality Analysis is applied to the watch lists.Additionally, the watchlist-management.properties Run Profile controls:
Real-Time and Batch Screening set up;
Screening reference ID prefixes and suffixes;
Watch list routing; and
configuration of match rules.
Note: The properties controlling match rules are not included in the watchlist-screening.properties Run Profile by default. See Configuring Match Rules for further information.
This section consists of the following topics:
Preparing Watch List Data
Setting Up Private Watch List
Showing Watch List Staged Data/Snapshots in the Server Console UI
Configuring Match Rules
Configuring Jobs
Preparing Watch List Data
Oracle Financial Services Transaction Filtering is pre-configured to handle reference data from the following sources:
HM Treasury
OFAC
EU consolidated list
UN consolidated list
Administration Guide 39

EDQ ConfigurationsChapter 4—Configuring EDQ
World-Check
Dow Jones Watchlist
Dow Jones Anti-Corruption List
Accuity Reference Data
For information on the watch lists, see Appendix A, “Watch Lists,”.
Setting Up Private Watch List
Oracle Financial Services Transaction Filtering is pre-configured to work with a number of commercially-available and government-provided watch lists. However, you can also screen against your own private watch lists. On installation, screening is configured to run against a sample private watch list with minimal additional configuration, allowing the installation to be validated quickly. The sample private watch list is provided in two files - privateindividuals.csv and privateentities.csv- in the config/landingarea/Private folder.
The OEDQ Config Folder:
Your OEDQ instance's config folder might not be named 'config'. The choice of the config folder's name is made when OEDQ is installed - in some cases a name is automatically allocated. OEDQ release 11g and later has both a 'base' and a 'local' config folder. The base config folder is often called 'oedqhome', and the local config folder is often called 'oedqlocalhome'. In some cases, dots or underscores may be inserted into these names (for example: 'oedq_local_home'). Whenever you see a file path in this document that begins with config, this always refers to your OEDQ instance's local config folder.
The first step in screening against your own private watch list is to replace the data in the supplied files with your own data. To do this:
1. Transform your private watch list data into the format specified by the Private List Interface. For more information on Private Watch Lists, see PLI Reference Data.
2. Replace the data in the privateindividuals.csv and privateentities.csv files with your transformed private watch list data.
Note: The files must be saved in UTF-8 format.
Note: To screen against multiple private watch lists, consolidate them into the the two files: privateindividuals.csv and privateentities.csv. These two files can also be used to hold data from external watch lists that Oracle Financial Services Transaction Filtering is not pre-configured to work with.
The second and final step is to enable the staging and preparation of the private watch list in the watchlist-management.properties Run Profile. To stage your private watch list set the following value to Y:phase.PRIV\ -\ Stage\ reference\ lists.enabled
Once you have done this, set the following value to Y to prepare the private watch list without filtering:phase.PRIV\ -\ Prepare\ without\ filtering.enabled
Or set both of the following values to Y to prepare the private watch list with filtering:
phase.PRIV\ -\ Prepare\ with\ filtering\ (Part\ 1).enabledphase.PRIV\ -\ Prepare\ with\ filtering\ (Part\ 2).enabled
40 Administration Guide

EDQ ConfigurationsChapter 4—Configuring EDQ
Showing Watch List Staged Data/Snapshots in the Server Console UI
Certain types of staged data and snapshots are hidden in the Server Console UI by default. These are:
Watch list snapshots
Intermediate filtered watch list staged data
Centralized Reference Data staged data/snapshots
To display this data, set the corresponding visibility property value(s) in the relevant Run Profile(s) to Y.
For example, to make all HM Treasury watch list snapshots generated during Watchlist Management visible, set the following properties in the watchlist-management.properties Run Profile: stageddata.ACY\ Sources.visible = Y
stageddata.ACY_All.visible = Y
stageddata.ACY_Sources.visible = Y
Configuring Match Rules
Match rules - and also match clusters - can be configured and controlled by adding a property to the watchlist-screening.properties Run Profile.
Note: Ensure that data is available in the ref_port_cntry table before you begin the matching process. This table contains the port code for a particular port name and the corresponding port country.
For example, to disable the Exact name only rule for Batch and Real-Time Sanctions screening, add the following property to the Run Profile:phase.*.process.*.[I010O]\ Exact\ name\ only.san_rule_enabled = false
Note: Capitalization must be respected and characters must be escaped as required.
The * character denotes a wildcard, and therefore specifies that the above rule applies to all phases and all processes. If disabling the rule for Batch screening only, the property would read:phase.Batch\ screening.process.*.[I010O]\ Exact\ name\ only.san_rule_enabled = false
Note: For further details on tuning Match rules, please refer to the Oracle Financial Services Transaction Filtering Matching Guide.
Configuring Jobs
To configure a job, it must be configured in the .properties file and on the Admin screen to enable or disable the webservices.
The WatchListLoadPreparedData process is disabled by default. To enable the process:
Administration Guide 41
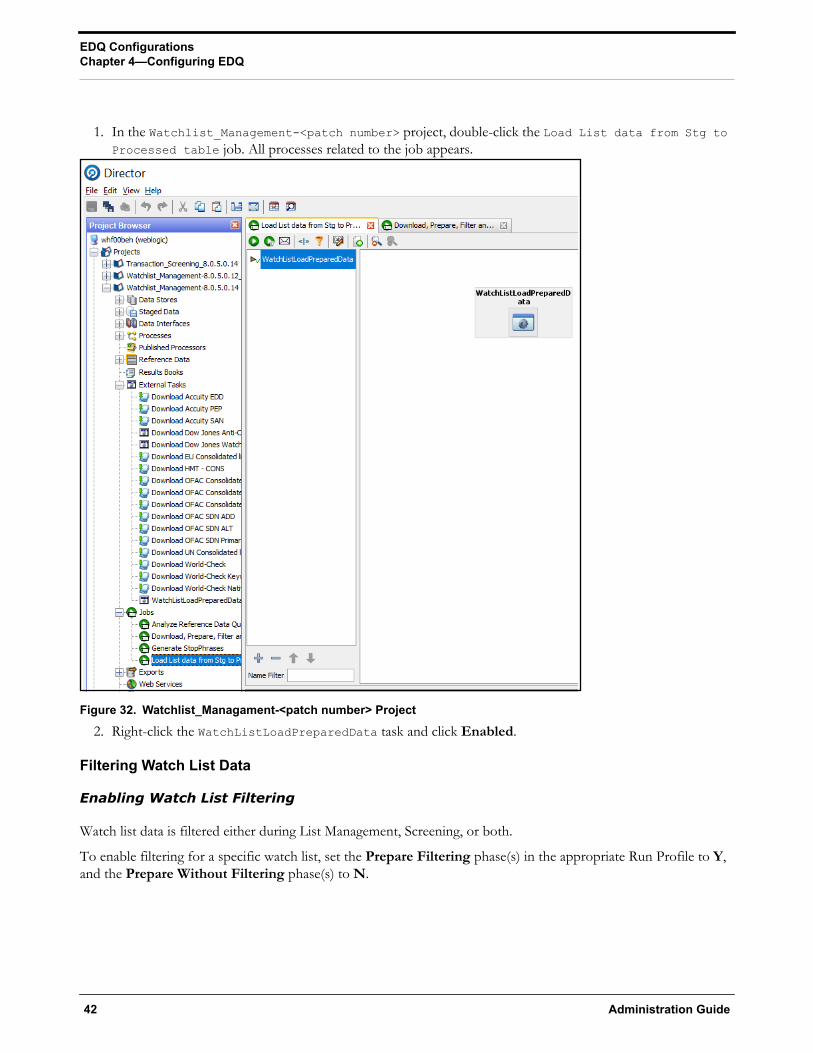
EDQ ConfigurationsChapter 4—Configuring EDQ
1. In the Watchlist_Management-<patch number> project, double-click the Load List data from Stg to Processed table job. All processes related to the job appears.
Figure 32. Watchlist_Managament-<patch number> Project
2. Right-click the WatchListLoadPreparedData task and click Enabled.
Filtering Watch List Data
Enabling Watch List Filtering
Watch list data is filtered either during List Management, Screening, or both.
To enable filtering for a specific watch list, set the Prepare Filtering phase(s) in the appropriate Run Profile to Y, and the Prepare Without Filtering phase(s) to N.
42 Administration Guide

EDQ ConfigurationsChapter 4—Configuring EDQ
Configuring Watch List Filtering
Watchlist filtering is controlled by configuring reference data in the Watchlist projects.
Note: Once data is filtered out, it is not possible to filter it back in. E.g. if all entities are filtered out in Watchlist Management, even if the Transaction Filtering project is configured to include entities, they will not show up in results data.
The top level of filtering is controlled by editing the Filter - Settings reference data:
All the reference data filters are set to Y by default, except Linked Profiles which is set to N. Unless these settings are changed, no actual filtering is performed on watch list data.
Note: In the Filter - Settings reference data, a value of Y indicates that all records should be included - in other words, no filter should be applied.
Broadly speaking, watch list filtering falls into four categories:
By list and list sub key.
By list record origin characteristics.
By list profile record characteristics.
By linked profiles.
Primary and Secondary Filtering, and Linked Records
Primary filtering - These filters are used to return all profiles that match the criteria specified.
Administration Guide 43

EDQ ConfigurationsChapter 4—Configuring EDQ
Linked Profiles - If this value is set to Y, then all profiles linked to those captured by Primary filters are also captured; an example of use is a filter configured to capture all Sanctions and their related PEPs.
Secondary filtering - These filters are applied to further filter any linked profiles that are returned.
Note: Only the World-Check and DJW watch lists can provide Linked Profiles.
Setting Multiple Values for Primary and Secondary FiltersThe following filter options require further configuration in additional reference data:
Origins
Origin Regions
Origin Statuses
Primary and Secondary Name Qualities
Primary and Secondary Name Types
Primary and Secondary PEP Classifications
To filter using one or more of these options, set the relevant value in the Filter - Settings reference data to N, and then make further changes to the corresponding reference data.
Note: The effect of setting a value in the Filter - Settings reference data to N is that only records that match values set in the corresponding reference data will be included. For example, if you set the value of All name qualities (Primary)? to N in Filter - Settings, then, in the Filter - Primary Name Qualities reference data you could determine which name qualities should be included for each watch list. For instance, if you include a row for High quality names in the EU watch list, but you do not include rows for medium and low quality names for this watch list, then only records with high quality names will be included for this watch list.
Some of these reference data sets are pre-populated with rows, to be edited or removed as required. These rows contain data (generally, but not always) supplied by each watch list provider, and are all contained within the Watchlist Management project.
For example, to view all possible keywords for World-Check data, open the WC Keyword reference data in the Watchlist Management project. See the following example for further details.
Filtering World Check Data
This example describes configuring filtering on the World-Check Sanctions list in the Watchlist Management project, and setting further filters in the Transaction Filtering project. Specifically:
enabling filtering in the Run Profiles;
configuring the Primary filters in the Watchlist Management project to return only active records for sanctioned individuals (not entities) originating from the EU list;
enabling the filtering of Linked Profiles in the Watchlist Management project; and
configuring the Secondary filters in the Transaction Filtering project to further filter out all Linked Profiles of deceased individuals.
44 Administration Guide

EDQ ConfigurationsChapter 4—Configuring EDQ
Setting Filtering options in the Run ProfilesIn the watchlist-management.properties Run Profile, set the World-Check filtering phases as follows:
phase.WC\ -\ Prepare\ without\ filtering.enabled = N
phase.WC\ -\ Prepare\ with\ filtering\ (Part\ 1).enabled = Y
phase.WC\ -\ Prepare\ with\ filtering\ (Part\ 2).enabled = YIn the watchlist-screening.properties Run Profile, set the World-Check filtering phases as follows:
phase.WC\ -\ Load\ without\ filtering.enabled = N
phase.WC\ -\ Load\ with\ filtering\ (Part\ 1).enabled = Y
phase.WC\ -\ Load\ with\ filtering\ (Part\ 2).enabled = Y
Setting Primary Filters and Linked Profiles in the Watchlist Management project
To set primary filters, follow these steps:
1. In Director, open the Watchlist Management project and expand the Reference Data node.
2. Locate the Filter - Settings reference data, and double-click to open it.
3. Ensure the List/sub-list (Primary)? value in the WC-SAN row is set to Y.
4. Set the Entities (Primary)? value in the WC-SAN row to N.
5. Set the Inactive (Primary)? value in the WC-SAN row to N.
6. Set the All Origins (Primary)? value in the WC-SAN row to N.
7. Ensure all other values in the WC-SAN row are set to Y.
8. Click OK to close the reference data and save changes.
9. Locate the Filter - Origins reference data and double-click to open it.
10. Add a new row with the following values:
List Key - WC
List Sub Key - WC-SAN
Origin - EU
11. Change the Linked Profiles? value in the WC-SAN row to Y.
12. Click OK to close the Filter Settings reference data and save changes.
Setting Secondary Filters in the Transaction Filtering project
To set secondary filters, follow these steps:
1. Open the Transaction Filtering project, and expand the reference data link.
2. Locate the Filter - Settings reference data file, and double-click to open it.
3. Set the Deceased (Secondary)? value in the WC-SAN row to N.
4. Click OK to close the reference data and save changes.
Administration Guide 45

EDQ ConfigurationsChapter 4—Configuring EDQ
Screening All Data Using Sanctions Rules
By default, watch list records are routed to the different screening processes depending on their record type, that is, SAN, PEP or EDD. This allows different rules, and hence different levels of rigor, to be applied to the list data according to risk appetite.
However, if you want to use the same screening logic for all list records, and do not want the overhead of maintaining separate rule sets, the system can be configured to reroute all list records to the SAN screening processes. To do this, set the phase.*.process.*.Screen\ all\ as\ SAN? value in the watchlist-screening.properties Run Profile to Y.
Prohibition ScreeningThis section consits of the following topics:
Configuring Prohibition Screening
Extending Prohibition Screening
Configuring Prohibition Screening
This section consists of the following topics:
Bad BICs Reference Data
Blacklisted Cities Reference Data
Blacklisted Countries Reference Data
Stop Keywords Reference Data
Goods Prohibition Reference Data
Ports Prohibition Reference Data
Note: Previously, all reference data was available in EDQ. From 807, only data related to name and address is in EDQ. All other reference data is available in the database in the following tables:
Goods prohibition reference data is available in fcc_prohibiton_goods_ref_data
Ports prohibition reference data is available in fcc_port_ref_data
Bad BICs reference data is available in dim_sanctioned_bic
Stop Keywords reference data is available in dim_stop_keywords
Blacklisted Cities reference data is available in dim_sanctioned_city
Blacklisted Countries reference data is available in dim_sanctioned_country
Bad BICs Reference DataThe following columns are available in the template for BICs:
Record ID: This column displays the record serial number for the blacklisted BIC. The record ID is unique for every BIC.
BIC: This column displays the name of the BIC.
Details of BIC: This column displays the details of the BIC.
46 Administration Guide

EDQ ConfigurationsChapter 4—Configuring EDQ
Data Source: This column displays the source of the data for the BIC.
Risk Score: This column displays the risk score for the BIC.Sample Data for Sanctioned BICs
The following table provides examples based on BICs:
Table 7. Sample Data for BICs
Blacklisted Cities Reference DataThe following columns are available in the template for blacklisted cities:
Record ID: This column displays the record serial number for the blacklisted city. The record ID is unique for every city.
Country: This column displays the name of the country of the blacklisted city.
City: This column displays the name of the blacklisted city.
ISO City Code: This column displays the ISO code of the blacklisted city.
Data Source: This column displays the source of the data for the blacklisted city.
Risk Score: This column displays the risk score for the blacklisted city.
Sample Data for Sanctioned Cities
The following table provides examples for blacklisted cities:
Record ID BIC Details of BIC Data Source Risk Score1 SIIBSYDA NA OFAC (Office of
Foreign Assets Control)
85
2 FTBDKPPY NA OFAC (Office of Foreign Assets Control)
90
3 DCBKKPPY NA OFAC (Office of Foreign Assets Control)
85
4 ROSYRU2P NA OFAC (Office of Foreign Assets Control)
90
5 INAKRU41 NA OFAC (Office of Foreign Assets Control)
90
6 SBBARUMM NA OFAC (Office of Foreign Assets Control)
90
Administration Guide 47

EDQ ConfigurationsChapter 4—Configuring EDQ
Table 8. Sample Data for Blacklisted Cities
Blacklisted Countries Reference DataThe following columns are available in the template for blacklisted countries:
Record ID: This column displays the record serial number for the blacklisted country. The record ID is unique for every country.
Country: This column displays the name of the blacklisted country.
ISO Country Code: This column displays the ISO code of the blacklisted country.
Country Synonyms: This column displays the synonyms of the blacklisted country.
Data Source: This column displays the source of the data for the blacklisted country.
Risk Score: This column displays the risk score for the blacklisted country.
Sample Data for Sanctioned Countries
The following table provides sample data for blacklisted countries:
Table 9. Sample Data for Blacklisted Countries
Record ID Country City ISO City Code Data Source Risk Score1 IRAQ ARBIL ABL OFAC (Office of
Foreign Assets Control)
90
2 IRAQ ABU AL FULUS
ALF OFAC (Office of Foreign Assets Control)
90
3 IRAQ AMARA (AL-AMARAH)
AMA OFAC (Office of Foreign Assets Control)
85
4 IRAQ ARAK ARK OFAC (Office of Foreign Assets Control)
90
Record ID Country
ISO Country Code Country Synonyms Data Source Risk Score
1 IRAQ IQ IRAK, REPUBLIC OF IRAQ, AL JUMHURIYAH AL IRAQIYAH, AL IRAQ
OFAC (Office of Foreign Assets Control)
90
2 DEMOCRATIC REPUBLIC OF THE CONGO
CD CONGO, THE DEMOCRATIC REPUBLIC OF THE
OFAC (Office of Foreign Assets Control)
90
3 AFGHANISTAN AF NA ITAR (International Traffic in Arms Regulations)
85
48 Administration Guide

EDQ ConfigurationsChapter 4—Configuring EDQ
Stop Keywords Reference DataThe following columns are available in the template for keywords:
Record ID: This column displays the record serial number for the keyword.
Stop keyword: This column displays the keyword.
Risk Score: This column displays the risk score for the keyword.
Sample Data for Sanctioned Stop Keywords
The following table provides examples based on keywords:
Table 10. Sample Data for Stop Keywords
Goods Prohibition Reference DataThe following columns are available in the template for prohibited goods:
Record ID: This column displays the record serial number for the prohibited good. The record ID is unique for every good.
Good Code: This column displays the code of the prohibited good.
Good Name: This column displays the name of the prohibited good.
Good Description: This column displays the description of the prohibited good.
Sample Data for Prohibited Goods
The following table provides sample data for prohibited goods:
4 ZIMBABWE ZW NA ITAR (International Traffic in Arms Regulations)
90
5 CENTRAL AFRICAN REPUBLIC
CF NA EAR (Export Administration Regulations)
85
6 BELARUS BY NA EAR (Export Administration Regulations)
80
Record ID Stop KeyWords Risk Score1 EXPLOSIVE 802 DIAMOND 903 TERROR 804 TERRORIST 855 ARMS 806 NUCLEAR 90
Record ID Country
ISO Country Code Country Synonyms Data Source Risk Score
Administration Guide 49
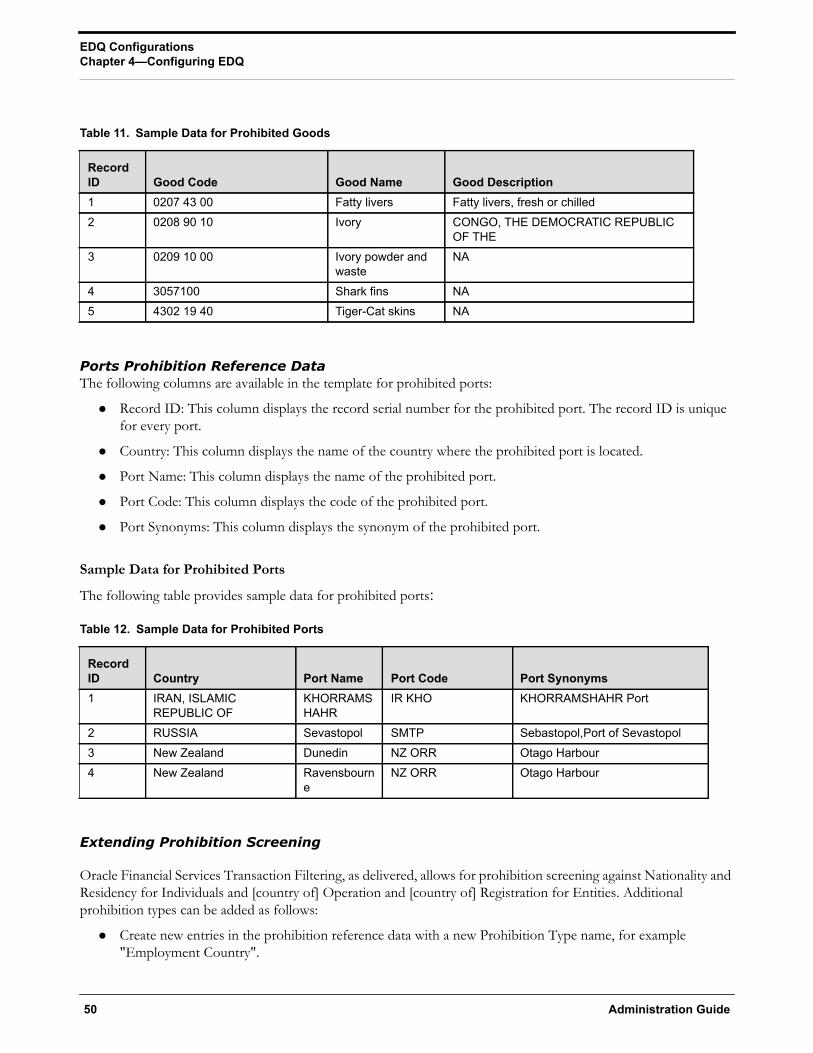
EDQ ConfigurationsChapter 4—Configuring EDQ
Table 11. Sample Data for Prohibited Goods
Ports Prohibition Reference DataThe following columns are available in the template for prohibited ports:
Record ID: This column displays the record serial number for the prohibited port. The record ID is unique for every port.
Country: This column displays the name of the country where the prohibited port is located.
Port Name: This column displays the name of the prohibited port.
Port Code: This column displays the code of the prohibited port.
Port Synonyms: This column displays the synonym of the prohibited port.
Sample Data for Prohibited Ports
The following table provides sample data for prohibited ports:
Table 12. Sample Data for Prohibited Ports
Extending Prohibition Screening
Oracle Financial Services Transaction Filtering, as delivered, allows for prohibition screening against Nationality and Residency for Individuals and [country of] Operation and [country of] Registration for Entities. Additional prohibition types can be added as follows:
Create new entries in the prohibition reference data with a new Prohibition Type name, for example "Employment Country".
Record ID Good Code Good Name Good Description1 0207 43 00 Fatty livers Fatty livers, fresh or chilled2 0208 90 10 Ivory CONGO, THE DEMOCRATIC REPUBLIC
OF THE3 0209 10 00 Ivory powder and
wasteNA
4 3057100 Shark fins NA5 4302 19 40 Tiger-Cat skins NA
Record ID Country Port Name Port Code Port Synonyms1 IRAN, ISLAMIC
REPUBLIC OFKHORRAMSHAHR
IR KHO KHORRAMSHAHR Port
2 RUSSIA Sevastopol SMTP Sebastopol,Port of Sevastopol3 New Zealand Dunedin NZ ORR Otago Harbour4 New Zealand Ravensbourn
eNZ ORR Otago Harbour
50 Administration Guide

Generating Email for Different StatusesChapter 4—Configuring EDQ
[Batch screening only] Extend the customer data preparation process to create a new attribute, for example dnEmploymentCountryCode.
Edit the appropriate screening process(es), to create the necessary match rules and clusters for the new attribute.
Generating Email for Different Statuses
An Email is generated for a transaction depending on its status.
Following are the types of Email generated:
Notification Email
Task Email
Notification Email
A Notification Email is generated for Blocked and Released transactions and the template is as follows:
Subject: Notification-<id>-Issue Identified - New issue assigned to you
Hi TFSUPERVISOR,
This is to inform you that a Notification is generated for you in your inbox for
Notification ID: <id>
Transaction Type: <Message Type>
Message Reference: <Message Reference>
Status: <Blocked/Released>
User Comments: <User comments>
Received On: 2017-07-25 12:03:19.0
Please access the below link to logon to Transaction Filtering System.
<Application URL>
Regards,
Admin
Task Email
A Task Email is generated for Hold and Escalated transactions and the template is as follows:
Subject: Taskid-<id>-Issue Identified - New issue assigned to you
Administration Guide 51

Configuring Operating Model - Multi Jurisdiction and Multi Business Unit ImplementationChapter 4—Configuring EDQ
Hi TFSUPERVISOR/TFANALYST,
This is to inform you that a Notification is generated for you in your inbox for
Task ID: <id>
Transaction Type: <Message Type>
Message Reference: <Message Reference>
Status: <Hold/Escalated>
User Comments: <User comments> applicable to escalated only
Received On: 2017-07-25 12:03:19.0
Please access the below link to logon to Transaction Filtering System.
<Application URL>
Regards,
Admin
Configuring Operating Model - Multi Jurisdiction and Multi Business Unit Implementation
Alerts are segregated based on the following two dimensions:
Jurisdiction
Business Unit/ Line of Business
Configuring Jurisdictions and Business Domains
Jurisdiction
Jurisdictions are used to limit user access to data in the database. The user must load all jurisdictions and associate user groups to jurisdictions in the tables as specified in Configuring Operating Model - Multi Jurisdiction and Multi Business Unit Implementation. User groups can be associated with one or more jurisdictions.
Note: All jurisdictions in the system reside in the FCC_SWIFT_JSRDSN_MAP table.
In the Investigation User interface system, users can view only data or alerts associated with jurisdictions to which they have access. You can use a jurisdiction to divide data in the database. For example:
Geographical: Division of data based on geographical boundaries, such as countries, states, and so on.
Organizational: Division of data based on different legal entities that compose the client’s business.
Other: Combination of geographic and organizational definitions. In addition, it can be customized.
The definition of jurisdiction varies from between users. For example, a user can refer to a branch BIC as jurisdiction and another user can refer to customer ID as jurisdiction.
52 Administration Guide

Configuring Operating Model - Multi Jurisdiction and Multi Business Unit ImplementationChapter 4—Configuring EDQ
Business Unit/ Line of Business
Business domains are used to limit data access. Although the purpose is similar to jurisdiction, they have a different objective. The business domain is used to identify records of different business types such as Private Client verses Retail customer, or to provide more granular restrictions to data such as employee data.
The user must load all business domains and associate user groups to business domains in the tables as specified in Configuring Operating Model - Multi Jurisdiction and Multi Business Unit Implementation.
If a user has access to any of the business domains that are on a business record, the user can view that record.
Note: All business domains in the system reside in the FCC_SWIFT_BUS_DMN_MAP table.
Configuring Jurisdictions and Business Domains
The default Sanctions groups are tfanalytgroup and tfsupervisorgrp. According to the ready-to-use product, these groups get all alerts and notifications for all jurisdictions and business domains. To configure the alerts:
1. Load all the jurisdictions. To do this, run the query SELECT * FROM FCC_SWIFT_JSRDSN_MAP and load the jurisdictions in the V_JRSDCN_CD column in the FCC_SWIFT_JSRDSN_MAP table.
The following columns are provided in order to populate any additional information:
2. Load all the business domains in the V_BUS_DMN_CD column in the FCC_SWIFT_BUS_DMN_MAP table.
The following columns are provided in order to populate any additional information:
Column Data Type and LengthV_EXTRACTED_SWIFT_FIELD VARCHAR2(100 CHAR)V_JRSDCN_CD VARCHAR2(40 CHAR)V_CUST_COLUMN_1 VARCHAR2(4000 CHAR)V_CUST_COLUMN_2 VARCHAR2(4000 CHAR)V_CUST_COLUMN_3 VARCHAR2(4000 CHAR)V_CUST_COLUMN_4 VARCHAR2(4000 CHAR)N_CUST_COLUMN_1 NUMBER(20)N_CUST_COLUMN_2 NUMBER(20)N_CUST_COLUMN_3 NUMBER(20)N_CUST_COLUMN_4 NUMBER(20)
Column Data Type and LengthV_EXTRACTED_SWIFT_FIELD VARCHAR2(100 CHAR)V_JRSDCN_CD VARCHAR2(40 CHAR)V_CUST_COLUMN_1 VARCHAR2(4000 CHAR)V_CUST_COLUMN_2 VARCHAR2(4000 CHAR)V_CUST_COLUMN_3 VARCHAR2(4000 CHAR)V_CUST_COLUMN_4 VARCHAR2(4000 CHAR)N_CUST_COLUMN_1 NUMBER(20)N_CUST_COLUMN_2 NUMBER(20)
Administration Guide 53

Configuring Operating Model - Multi Jurisdiction and Multi Business Unit ImplementationChapter 4—Configuring EDQ
3. Map user groups to the appropriate jurisdiction and business domain. To do this, run the query SELECT * FROM DOMAIN_JUR_GRP_MAP and do the maping in the DOMAIN_JUR_GRP_MAP table.
In the case of multiple jurisdictions to a single user group, create as many rows as the number of jurisdictions and add the new jurisdiction in each row for the same user group.
In the case of multiple business domains for the same user group and same jurisdiction, create as many rows as the number of business domains and add the new business domain in each row for the same user group and jurisdiction.
4. Put the appropriate SQL query in the Message_jurisdiction and Message_Business_Domain rows to derive the jurisdiction and business domain respectively in the Setup_Rt_Params table.
This step is required to define the source of jurisdiction and business domain from the message or an external source.
The definition and source of jurisdiction and business domain is different for each customer. In this way, the Transaction Filtering application gives the flexibility to the user to pick any attribute of the message to define the jurisdiction and business domain. For example, jurisdiction can be the BIC present in block 1/block 2 of the SWIFT message or the branch ID present in the SWIFT GPI header.
The ready-to-use application has the ability to extract some of the key fields of the message, which are available in the fsi_rt_al_msg_tag table. If the customer wants to use any field as a jurisdiction or business domain from this table, then an SQL query must be written in the Setup_Rt_Param table to extract the respective col-umn.
When a message is posted, the system updates the jurisdiction and business domains extracted in step 4 in the FSI_RT_RAW_DATA and FSI_RT_ALERTS tables.
N_CUST_COLUMN_3 NUMBER(20)N_CUST_COLUMN_4 NUMBER(20)
Column Data Type and Length
54 Administration Guide

CHAPTER 5 Configuring Risk Scoring Rules
This chapter provides a brief overview on configuring Risk Scoring Rules for OFS Transaction Filtering. These rules are configured in OFS Inline Processing Engine (IPE).
This section covers the following topic:
Configuring Rules in IPE
Administration Guide 1

Configuring Rules in IPEChapter 5—About Oracle Financial Services Transaction Filtering
Configuring Rules in IPE
OFS Transaction Filtering has a few business rules pre-configured. The following steps show the pre-configured business rules. Additionally, you can create your business rules based on the requirements using the same procedure.
Note: The screenshots shown for the steps below are taken for existing tables. You can perform similar steps for newly added tables.
To configure rules in IPE, follow these steps:
1. Navigate to the Oracle Financial Services Sanctions application home page.
2. Click Inline Processing. The Inline Processing page appears.
Figure 33. Inline Processing Page
3. Import data model tables to Inline Processing. To import a Table, follow these steps:
a. Click the Business Entities sub-menu in the Association and Configuration menu.
b. Click Import Entity.
By default, all the tables defined in the data model are displayed. The Entity name is displayed in the format <Logical Name>-<Physical Name>.
2 Administration Guide
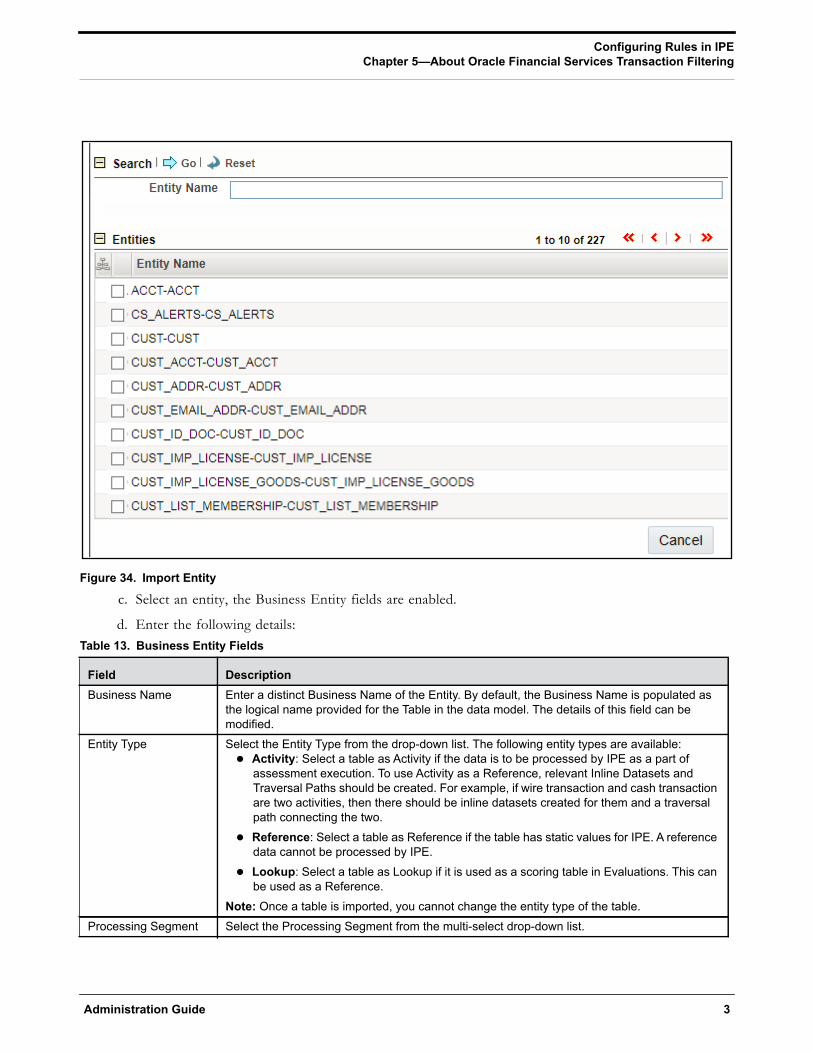
Configuring Rules in IPEChapter 5—About Oracle Financial Services Transaction Filtering
Figure 34. Import Entity
c. Select an entity, the Business Entity fields are enabled.
d. Enter the following details:Table 13. Business Entity Fields
Field DescriptionBusiness Name Enter a distinct Business Name of the Entity. By default, the Business Name is populated as
the logical name provided for the Table in the data model. The details of this field can be modified.
Entity Type Select the Entity Type from the drop-down list. The following entity types are available: Activity: Select a table as Activity if the data is to be processed by IPE as a part of
assessment execution. To use Activity as a Reference, relevant Inline Datasets and Traversal Paths should be created. For example, if wire transaction and cash transaction are two activities, then there should be inline datasets created for them and a traversal path connecting the two.
Reference: Select a table as Reference if the table has static values for IPE. A reference data cannot be processed by IPE.
Lookup: Select a table as Lookup if it is used as a scoring table in Evaluations. This can be used as a Reference.
Note: Once a table is imported, you cannot change the entity type of the table.Processing Segment Select the Processing Segment from the multi-select drop-down list.
Administration Guide 3

Configuring Rules in IPEChapter 5—About Oracle Financial Services Transaction Filtering
e. Click Save.
4. Add a business entity.To do this, follow these steps:
a. Click the Business Entities sub-menu in the Association and Configuration menu.
Figure 35. Business Entities Sub-Menu
b. Select the newly added table from drop down 'Entity Name'.
Set Primary Key Attribute
Select the Primary Key Attribute from the drop-down list. This shows all the columns of the table. This is a unique attribute of the table which is imported. It is a mandatory field.Note: Composite Primary Keys are not supported.
Set Sequence ID Attribute
Select the sequence ID attribute from the drop-down list.This is a unique attribute that helps in identifying the ID of the Activity Table. The results of IPE will provide the Sequence ID. This is a mandatory field if it is an activity. The Sequence ID will be auto-populated by the IPE Engine if it is a real time mode. In batch mode, this value is pre-populated and should be unique.Note: This field is enabled if you select Activity as the Entity Type.
DB Sequence Name Enter the DB sequence name. A DB Sequence has to be created in the Atomic Schema. The name of that Sequence has to be provided in this field. It is not a mandatory field and it is applicable for Real time processing.Note: This field is enabled if you select Activity as the Entity Type.
Set Processing StatusAttribute
Select the processing status attribute from the drop-down list. This attribute will be updated by IPE to indicate the result of the assessments, if it has passed or failed. It is not a mandatory field and it is applicable for Real time processing.Note: This field is enabled if you select Activity as the Entity Type.
Set Processing PeriodAttribute
Select the processing period attribute from the drop-down list. This attribute defines the date or time when the activity has occured. For example, Transaction Time.Note: This field is enabled if you select Activity as the Entity Type.
Score Attribute Select the Score Attribute from the drop-down list. This attribute can be used in evaluation scoring.Note: This field is enabled if you select Lookup as the Entity Type.
Table 13. Business Entity Fields
Field Description
4 Administration Guide

Configuring Rules in IPEChapter 5—About Oracle Financial Services Transaction Filtering
Figure 36. Add a Business Entity
c. Click Add.
d. Enter the name, processing segment, and score attribute for the business entity.
Figure 37. Business Entity Details
e. Click Add. The new parameter is added to the list of Business Entities in the Business Entities page.
5. Add the following joins in IPE from the Inline Datasets sub-menu in the Association and Configuration menu:
Message Tag to Rule Configuration Table. This is required to associate the real time raw data to the Rule Configuration tables
Raw Message to Message Tag table. This is required to associate the real time raw data to the Message Tag table.
Raw Message to Screening Response Table: This is required to associate the real time raw data to the Screening Response table.
To add a join, follow these steps:
a. In the Inline Datasets page, click Add.
Administration Guide 5

Configuring Rules in IPEChapter 5—About Oracle Financial Services Transaction Filtering
Figure 38. Inline Datasets Sub-Menu
b. Enter a name for the inline dataset.
c. In the Start Table field, select Real Time Raw Data.
d. In the End Table field, select Rule Configuration Table.
Figure 39. Adding an Inline Dataset
e. Click Add.
f. Select the values for the dataset condition as shown in the figure.
g. Click Save. The new dataset is added to the list of Inline Datasets in the Inline Datasets page.
Note: To view the results of the newly added values, use Search.
6. Add a traversal path for each join defined in the Inline Datasets sub-menu.
To add a traversal path, follow these steps:
a. Click the Traversal Paths sub-menu in the Association and Configuration menu.
b. In the Traversal Paths page, click Add.
6 Administration Guide

Configuring Rules in IPEChapter 5—About Oracle Financial Services Transaction Filtering
Figure 40. Traversal Paths Sub-Menu
c. Enter a name for the traversal path.
d. In the Start Table field, select Real Time Raw Data.
e. In the End Table field, select Rule Configuration Table.
Figure 41. Adding a Traversal Path
f. Click Add.
g. Select the values for the traversal path flow as shown in the figure.
h. Click Save. The new path is added to the list of traversal paths in the Traversal Paths page.
7. Add an Expression on the risk score column of the newly created business entity which is to be scored as a risk parameter from the Expressions menu. Two expressions need to be created:
The first expression is for the column which holds the value of the new risk parameter
The second expression is for the calculations that are needed to derive the risk score
To add an expression, follow these steps:
a. Click the Expressions menu.
b. In the Expressions page, click Add.
Administration Guide 7

Configuring Rules in IPEChapter 5—About Oracle Financial Services Transaction Filtering
Figure 42. Expressions Menu
8 Administration Guide
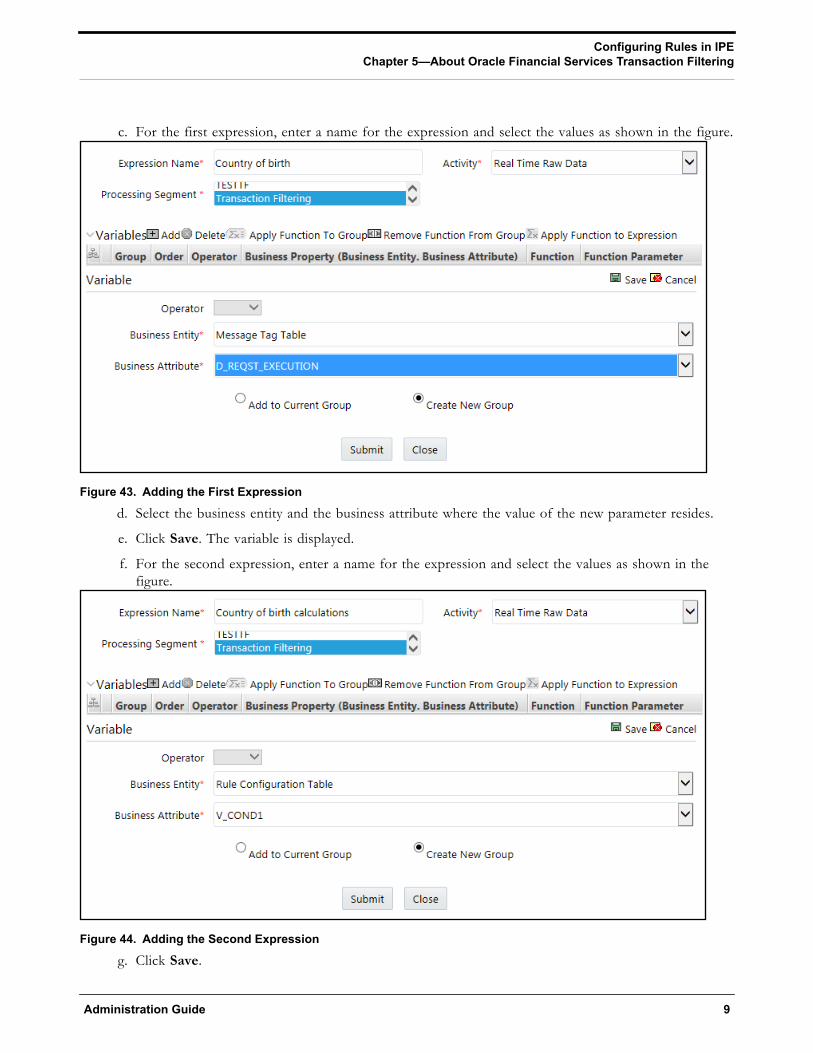
Configuring Rules in IPEChapter 5—About Oracle Financial Services Transaction Filtering
c. For the first expression, enter a name for the expression and select the values as shown in the figure.
Figure 43. Adding the First Expression
d. Select the business entity and the business attribute where the value of the new parameter resides.
e. Click Save. The variable is displayed.
f. For the second expression, enter a name for the expression and select the values as shown in the figure.
Figure 44. Adding the Second Expression
g. Click Save.
Administration Guide 9

Configuring Rules in IPEChapter 5—About Oracle Financial Services Transaction Filtering
h. Select the Group 1 radio button.
i. Click Apply Function To Group.
j. Select the required values and click Submit.
Figure 45. Apply Function To Group
k. Click Submit. The new expression is added to the list of expressions in the Expressions page.
8. Add the following five evaluations from the Evaluations Menu. There are five pre-configured evalutions as sample risk rules. You can define new rules according to your requirement using the expressions defined in previous steps:
a. Risk-Currency VS Amount Threshold Evaluation
For all filters conditions mentioned in the table below, if the filter values are met as configured then add a risk score of 25.
Note: This score is configurable.
Table 14. Risk-Currency VS Amount Threshold Evaluation
Sl.No Filter Name Filter Clause1 Amount 10000
2 Currency USD
3 Jurisdiction CHASUS33XXX
4 Direction 'INBOUND','OUTBOUND'
5 Message Type 'MT101', 'MT103', 'MT202COV', 'MT202'
10 Administration Guide

Configuring Rules in IPEChapter 5—About Oracle Financial Services Transaction Filtering
b. Risk-High Risk Destination Country Evaluation
For all filters conditions mentioned in the table below, if the filter values are met as configured then add a risk score of 20.
Note: This score is configurable.
Table 15. Risk-High Risk Destination Country Evaluation
c. Risk-High Risk Originator Country Evaluation
For all filters conditions mentioned in the table below, if the filter values are met as configured then add a risk score of 20.
Note: This score is configurable.
Table 16. Risk-High Risk Originator Country Evaluation
d. Risk-Watchlist Screening Evaluation
This evaluation/risk rule returns the match score generated from matching engine. In case of multiple matches for a given message, it returns the maximum match score.
Note: Matching rules are configured with different match scores in EDQ.
e. Risk-Currency VS Destination Country Evaluation
For all filters conditions mentioned in the table below, if the filter values are met as configured then add a risk score of 20.This evaluation works with reference table 'SETUP_RULE_CONFIGURATION', which is another way of configuring evaluation/risk scoring rule. This evaluation is done using one of the lookup tables from the database. Similarly, you can add more rules using the same table where columns are generalized.
Sl.No Filter Name Filter Clause1 Amount 10000
2 Currency EUR
3 Destination Country CHASUS33XXX
4 Direction 'INBOUND','OUTBOUND'
5 Message Type 'MT101', 'MT103', 'MT202COV', 'MT202'
Sl.No Filter Name Filter Clause1 Amount 10000
2 Currency EUR
3 Originator Country 'TH', 'PK'
4 Direction 'INBOUND'
5 Message Type 'MT101', 'MT103', 'MT202COV', 'MT202'
Administration Guide 11

Configuring Rules in IPEChapter 5—About Oracle Financial Services Transaction Filtering
Table 17. Risk-Currency VS Destination Country Evaluation
f. Risk-High Risk Destination Country Evaluation
For all filters conditions mentioned in the table below, if the filter values are met as configured then add a risk score of 20.
Table 18. Risk-High Risk Destination Country Evaluation
g. Risk- High Risk Party Evaluation
For all filters conditions mentioned in the table below, if the filter values are met as configured then add a risk score of 40.
Table 19. Risk- High Risk Party Evalution
To add an evaluation, follow these steps:
a. Click the Evaluations menu.
b. In the Evaluations page, click Add.
Sl.No Filter Name Filter Clause1 Rule Name 'TF_CCY_CTRY_RSK'
2 Currency A value present in the column 'V_COND1' in table 'SETUP_RULE_-CONFIGURATION'
3 Destination Country A value present in the column 'V_COND2' in table 'SETUP_RULE_-CONFIGURATION
4 Direction 'INBOUND','OUTBOUND'
5 Message Type 'MT101', 'MT103', 'MT202COV', 'MT202'
Sl.No Filter Name Filter Clause1 Amount 10000
2 Currency ‘EUR’
3 Destination Country ‘TH’, ‘PK’
4 Direction 'OUTBOUND'
5 Message Type 'MT101', 'MT103', 'MT202COV', 'MT202'
Sl.No Filter Name Filter Clause1 Beneficiary Account Number Rule Configuration Table:V_COND1
2 Rule Name 'TF_HIGH_RSK_PARTY'
3 Message Type 'MT700'
4 Direction 'INBOUND', 'OUTBOUND'
12 Administration Guide

Configuring Rules in IPEChapter 5—About Oracle Financial Services Transaction Filtering
Figure 46. Evaluations Menu
c. Enter a name for the evaluation.
d. Select the Activity Real Time Raw Data and Processing Segment Transaction Filtering.
Figure 47. Adding an Evaluation
e. To add filters for the evaluation, click Add.
f. Select the values according to the below figure and click Save:
Figure 48. Adding an Evaluation
g. Select the expression that you have created for the calculation of the risk score.
h. Click Save.
9. Create an Assessment for the above five Evaluations.
Administration Guide 13

Configuring Rules in IPEChapter 5—About Oracle Financial Services Transaction Filtering
There are five evaluations preconfigured under a single assessment 'Transaction Filtering Assessment' and all five evaluations are enabled by default for the risk scoring. You can choose the number of evaluation for the risk score calculation. This risk score is displayed in the investigation UI for the given message.
Note: You can adjust the risk score for any given evaluation dependingon the requirement but it should be within 40, because match rule score configuration starts with 45 and match score should always have high weightage than individual evaluation risk score.
Risk score calculation at Assessment level is as follows:
Total risk score of a message is the sum of all risk scores derived from configured evaluations/risk rules including match score.
In case of multiple transactions, risk score is the sum of all risk scores derived from different evaluations across transactions.
If same evaluation is true for multiple transactions within a message then the score is considered once and the maximum one is considered.
If different evaluations are true for different transactions then it sums up all the risk scores across transactions within a message.
To add an Assessment, follow these steps:
a. Click the Assessments menu.
b. In the Assessments page, click Add.
Figure 49. Assessments Menu
c. Add the Assessment details according to the following table and the following figure:
Table 20. Assessment Details
Sl.No Evaluation Name Score1 Risk-Currency VS Amount Threshold Evaluation 25
2 Risk-High Risk Destination Country Evaluation 20
3 Risk-High Risk Originator Country Evaluation 20
4 Risk-Watchlist Screening Evaluation Maximum of match score returned from matching engine
5 Risk-High Risk Destination Country Evaluation 20 (driven from reference table)
6 Risk- High Risk Party Evaluation 40 (driven from reference table)
14 Administration Guide

Configuring Rules in IPEChapter 5—About Oracle Financial Services Transaction Filtering
Figure 50. Adding an Assessment
7 Risk-Currency VS Destination Country Evaluation 20
Administration Guide 15

Configuring Rules in IPEChapter 5—About Oracle Financial Services Transaction Filtering
16 Administration Guide

CHAPTER 6 Creating JSON
OFS Transaction Filtering allows you to add new SWIFT message types and configure the messages by uploading a JSON for a given message type followed by few configurations using admin UI screen. A new JSON is required for each new SWIFT message type and for editing any existing message type. JSON follows SWIFT message standards given in SWIFT document. JSON file should be .txt or .json extensions only.
This chapter provides information on how to create a JSON for SWIFT messages with sequences and for SWIFT messages without sequences. This chapter covers the following topics:
Structure of a JSON
Creating JSON for SWIFT Messages with Sequences
Creating JSON for SWIFT Messages without Sequences
Creating JSON for SWIFT messages with the List of Values (LOV) Attribute
Note: For information on how to upload a JSON, see Adding or Updating a New Message Type.
Administration Guide 1

Structure of a JSONChapter 6—Creating JSON
Structure of a JSON
An example of a JSON is shown below:
{
"message": [
{
"attr": {
"id": "t1",
"field": "Basic Header Block",
"status": "",
"fieldName": "",
"expression": "",
"editable": "N"
},
"children": [
{
"attr": {
"id": "t1:1",
"field": "",
"status": "",
"fieldName": "Block Identifier",
"expression": "",
"editable": "Y",
"size": "1"
}
}
]
}
]
}
Each JSON should start with a "message" element. Every "message" element is a list of "attr" elements.
Each field/tag in the JSON should be represented by "attr". Every "attr" element in the JSON can have the below mentioned properties.
id: A unique value that identifies each element
field: Name of the element as per the Swift document, used at parent level.
status: It can hold either "M" or "O" ("M" - mandatory ,"O" - optional)
2 Administration Guide

Structure of a JSONChapter 6—Creating JSON
fieldName: Name of the element as per the Swift document, used at child level.
expression: Swift expression as per the Swift document
editable: It can hold either "Y" or "N" ("Y" - editable in Admin UI,"N" - non editable in Admin UI)
size: This property is applicable for Swift Block 1, Swift Block 2 where data is only positional i.e there is no swift expression for the element
For example:
An attr element which represents the Swift Block Name is shown below:{
"attr":
{
"id":"t1",
"field":"Basic Header Block",
"status":"",
"fieldName":"",
"expression":"",
"editable":"N"
}
}
An attr element which represents the Swift Block Tag with a size property is shown below:
Note: The expression property should be blank for elements that are positional.
{
"attr":
{
"id":"t1:1",
"field":"",
"status":"",
"fieldName":"Block Identifier",
"expression":"",
"editable":"Y",
"size":"1"
}
}
An attr element which represents the Swift Block Tag with an expression property is shown below:
Administration Guide 3

Structure of a JSONChapter 6—Creating JSON
{
"attr":
{
"id":"t4:1:2:5:2:1",
"field":"",
"status":"",
"fieldName":"Party Identifier",
"expression":"35x",
"editable":"Y"
}
}
Each attr element in the JSON can have one or more child attributes. Children is used as a notation to identify the children of a particular attr element.
{
"attr": {
"id": "t1",
"field": "Basic Header Block",
"status": "",
"fieldName": "",
"expression": "",
"editable": "N"
},
"children": [
{
"attr": {
"id": "t1:1",
"field": "",
"status": "",
"fieldName": "Block Identifier",
"expression": "",
"editable": "Y",
"size": "1"
}
},
..........
4 Administration Guide

Creating JSON for SWIFT Messages with SequencesChapter 6—Creating JSON
]
}
Creating JSON for SWIFT Messages with Sequences
To create a JSON, follow these steps:
1. Create Message Elements.
2. Configure SWIFT Message Blocks
Creating Message Elements
To create a message element, use the sample code below:
{
"message": [
{
Requires tags ...
}
]
}
Configuring SWIFT Message Blocks
To configure a SWIFT message block, follow these steps:
1. Configure the Basic Header Block. See Configuring the Basic Header Block.
2. Configure the Application Header Block. See Configuring the Application Header Block.
3. Configure the User Header Block. See Configuring the User Header Block.
4. Configure the Text Block. See Configuring the Text Block.
5. Configure the Trailer Block. See Configuring the Trailer Block.
Configuring the Basic Header BlockTo configure a User Header Block, follow these steps:
1. Create an attr element node with fieldName property as Basic Header Block and editable property as N.
2. Create a children element with the required attr elements that should be part of Basic Header Block.{
"attr": {
"id": "t1",
"field": "Basic Header Block",
Administration Guide 5

Creating JSON for SWIFT Messages with SequencesChapter 6—Creating JSON
"status": "",
"fieldName": "",
"expression": "",
"editable": "N"
},
"children": [
{
"attr": {
"id": "t1:1",
"field": "",
"status": "",
"fieldName": "Block Identifier",
"expression": "",
"editable": "Y",
"size": "1"
}
},
..........
]
}
Configuring the Application Header BlockTo configure an Application Header Block, follow these steps:
1. Create an attr element node with fieldName property as Application Header Block and editable property as N.
2. Create a children element with two attr elements with fieldName property as Application Header - Input and Application Header - Output and editable property as N.
3. Create a children element with the required attr elements that should be part of Application Header - Input and Application Header - Output.
{
"attr": {
"id": "t2",
"field": "Application Header Block",
"status": "",
"fieldName": "",
"expression": "",
"editable": "N"
},
6 Administration Guide

Creating JSON for SWIFT Messages with SequencesChapter 6—Creating JSON
"children": [
{
"attr": {
"id": "t2:1",
"field": "Application Header - Input",
"status": "",
"fieldName": "",
"expression": "",
"editable": "N"
},
"children": [
{
"attr": {
"id": "t2:1:1",
"field": "",
"status": "",
"fieldName": "Block Identifier",
"expression": "",
"editable": "Y",
"size": "1"
}
},
...................
]
},
{
"attr": {
"id": "t2:2",
"field": "Application Header - Output",
"status": "",
"fieldName": "",
"expression": "",
"editable": "N"
},
"children": [
{
"attr": {
Administration Guide 7

Creating JSON for SWIFT Messages with SequencesChapter 6—Creating JSON
"id": "t2:2:1",
"field": "",
"status": "",
"fieldName": "Block Identifier",
"expression": "",
"editable": "Y",
"size": "1"
}
},
...................
]
}
]
}
Configuring the User Header BlockTo configure a User Header Block, follow these steps:
1. Create an attr element node with fieldName property as User Header Block and editable property as N.
2. Create a children element with the required attr elements that should be part of User Header Block.{
"attr": {
"id": "t3",
"field": "User Header Block",
"status": "",
"fieldName": "",
"expression": "",
"editable": "N"
},
"children": [
{
"attr": {
"id": "t3:1",
"field": "",
"status": "",
"fieldName": "Block Identifier",
"expression": "",
"editable": "Y"
}
8 Administration Guide

Creating JSON for SWIFT Messages with SequencesChapter 6—Creating JSON
},
...................
]
}
Configuring the Text BlockTo configure a Text Block, follow these steps:
1. Create an attr element node with fieldName property as Text Block and editable property as N.
2. Create a children element with attr element having fieldName property as Sequences and editable property as N.
3. Create a children element with the required attr elements that represent individual Sequence (that is, Sequence <X>, where X can be A, B, or C) that should be part of Sequences.
{
"attr": {
"id": "t4",
"field": "Text Block",
"status": "",
"fieldName": "",
"expression": "",
"editable": "N"
},
"children": [
{
"attr": {
"id": "t4:1",
"field": "Sequences",
"status": "",
"fieldName": "",
"expression": "",
"editable": "N"
},
"children": [
{
"attr": {
"id": "t4:1:1",
"field": "Sequence A",
"status": "",
"fieldName": "",
Administration Guide 9
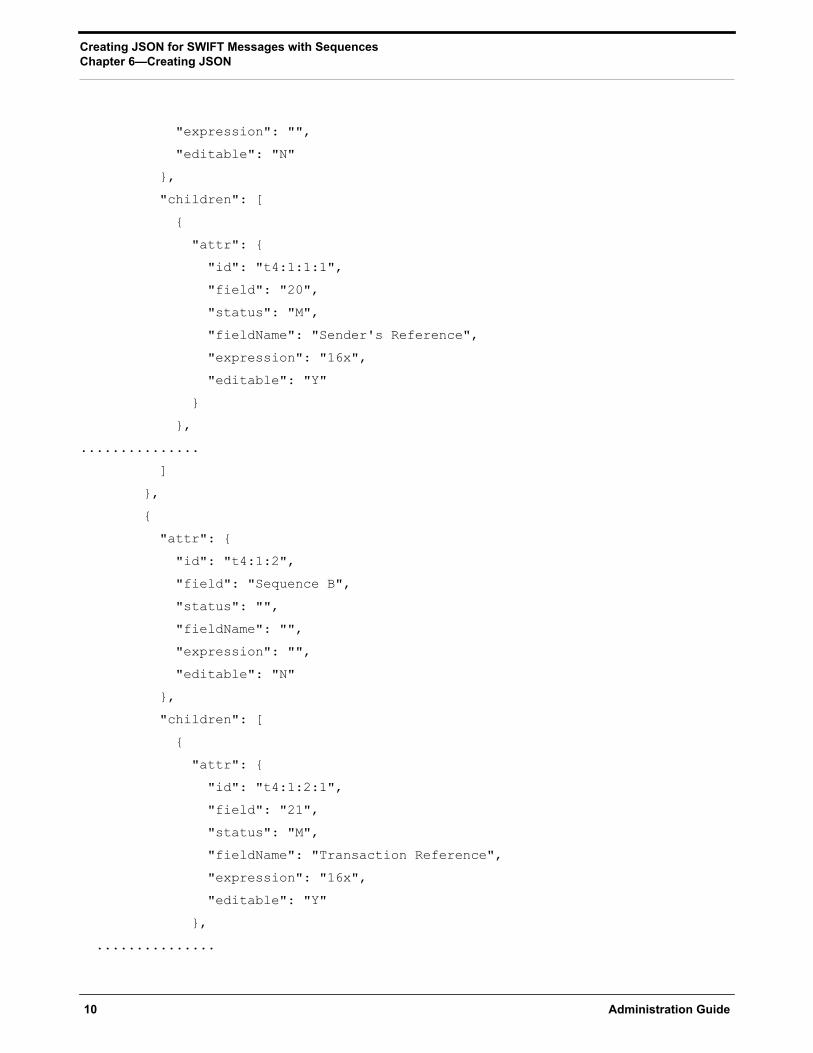
Creating JSON for SWIFT Messages with SequencesChapter 6—Creating JSON
"expression": "",
"editable": "N"
},
"children": [
{
"attr": {
"id": "t4:1:1:1",
"field": "20",
"status": "M",
"fieldName": "Sender's Reference",
"expression": "16x",
"editable": "Y"
}
},
...............
]
},
{
"attr": {
"id": "t4:1:2",
"field": "Sequence B",
"status": "",
"fieldName": "",
"expression": "",
"editable": "N"
},
"children": [
{
"attr": {
"id": "t4:1:2:1",
"field": "21",
"status": "M",
"fieldName": "Transaction Reference",
"expression": "16x",
"editable": "Y"
},
...............
10 Administration Guide

Creating JSON for SWIFT Messages with SequencesChapter 6—Creating JSON
}
]
}
]
}
]
}
Configuring the Trailer BlockTo configure the Trailer Block, follow these steps:
1. Create an attr element node with fieldName property as Trailer Block and editable property as N.
2. Create a children element with the required attr elements that should be part of Trailer Block.
{
"attr": {
"id": "t5",
"field": "Trailer Block",
"status": "",
"fieldName": "",
"expression": "",
"editable": "N"
},
"children": [
{
"attr": {
"id": "t5:1",
"field": "CHK",
"status": "M",
"fieldName": "Checksum",
"expression": "",
"editable": "Y"
}
},
..............
]
}
Administration Guide 11

Creating JSON for SWIFT Messages without SequencesChapter 6—Creating JSON
Example of MT101 with Sequences
To see examples of MT101 with sequences, see MOS Document 2329509.1.
Creating JSON for SWIFT Messages without Sequences
To create a JSON, follow these steps:
1. Create Message Elements.
2. Configure SWIFT Message Blocks
Creating Message Elements
To create a message element, use the sample code below:
{
"message": [
{
Requires tags ...
}
]
}
Configuring SWIFT Message Blocks
To configure a SWIFT message block, follow these steps:
1. Configure the Basic Header Block. See Configuring the Basic Header Block.
2. Configure the Application Header Block. See Configuring the Application Header Block.
3. Configure the User Header Block. See Configuring the User Header Block.
4. Configure the Text Block. See Configuring the Text Block.
5. Configure the Trailer Block. See Configuring the Trailer Block.
Configuring the Text BlockTo configure the text block, follow these steps:
1. Create an attr element node with fieldName property as Text Block and editable property as N.
2. Create a children element with the required attr elements that should be part of Text Block.{
"attr": {
"id": "t4",
"field": "Text Block",
"status": "",
12 Administration Guide

Creating JSON for SWIFT messages with the List of Values (LOV) AttributeChapter 6—Creating JSON
"fieldName": "",
"expression": "",
"editable": "N"
},
"children": [
{
"attr": {
"id": "t4:1",
"field": "20",
"status": "M",
"fieldName": "Sender's Reference",
"expression": "16x",
"editable": "Y"
}
},
..........
]
}
Example of MT101 without Sequences
To see examples of MT101 with sequences, see MOS Document 2329509.1.
Creating JSON for SWIFT messages with the List of Values (LOV) Attribute
According to SWIFT standards, if there is a tag which contains predefined codes, then we must prepare a List of Values (LOV) attribute for the SWIFT tag. An example of a JSON with an LOV attribute is shown below:
{
"attr": {
"id": "t4:14:2:2",
"field": "",
"status": "",
"fieldName": "Code",
"expression": "14x",
"regex": "",
"editable": "Y",
"lov": [
"BY ACCEPTANCE",
"BY DEF PAYMENT",
Administration Guide 13

Creating JSON for SWIFT messages with the List of Values (LOV) AttributeChapter 6—Creating JSON
"BY MIXED PYMT",
"BY NEGOTIATION",
"BY PAYMENT"
]
}
}
14 Administration Guide

APPENDIX A Watch Lists
This appendix contains details of each of the pre-configured watch lists that can be used by Oracle Transaction Filtering and contains the following topics:
HM Treasury Reference Data
OFAC Reference Data
EU Reference Data
UN Reference Data
World-Check
Dow Jones Watchlist
Dow Jones Anti-Corruption List
Accuity Reference Data
PLI Reference Data
HM Treasury Reference Data
The HM Treasury publishes a sanctions list that can be used for screening in Oracle Transaction Filtering. The sanctions list provides a consolidated list of targets listed by the United Nations, European Union and United Kingdom under legislation relating to current financial sanctions regimes.
The HM Treasury website provides more details about the list at the following location:
https://www.gov.uk/government/publications/financial-sanctions-consolidated-list-of-targets
Oracle Transaction Filtering uses the list in a semi-colon delimited form. It can be downloaded from the following location:
http://hmt-sanctions.s3.amazonaws.com/sanctionsconlist.csv
OFAC Reference Data
The US Treasury website states that The US Treasury's Office of Foreign Assets Control (OFAC) administers and enforces economic and trade sanctions based on US foreign policy and national security goals against targeted foreign countries, terrorists, international narcotics traffickers, and those engaged in activities related to the proliferation of weapons of mass destruction. More details on the OFAC list can be found on the US Treasury website available at the following location:
http://www.treasury.gov/ofac/
Oracle Transaction Filtering supports two lists that are produced by OFAC. The OFAC Specially Designated Nationals (SDN) list, which is available for download in three separate parts from the following links:
https://www.treasury.gov/ofac/downloads/sdn.csv
Administration Guide 15

EU Reference DataAppendix A—Watch Lists
https://www.treasury.gov/ofac/downloads/add.csv
https://www.treasury.gov/ofac/downloads/alt.csv
The OFAC Consolidated Sanctions List, which can be downloaded in three separate parts from the following links:
https://www.treasury.gov/ofac/downloads/consolidated/cons_prim.csv
https://www.treasury.gov/ofac/downloads/consolidated/cons_add.csv
https://www.treasury.gov/ofac/downloads/consolidated/cons_alt.csv
EU Reference Data
The European Union applies sanctions or restrictive measures in pursuit of the specific objectives of the Common Foreign and Security Policy (CFSP) as set out in Article 11 of the Treaty on European Union.
The European Commission offers a consolidated list containing the names and identification details of all persons, groups and entities targeted by these financial restrictions. See the European Commission website for more details:
http://eeas.europa.eu/cfsp/sanctions/index_en.htm
To download the consolidated list:
1. Go to https://webgate.ec.europa.eu/europeaid/fsd/fsf#!/account and create a user name and password to the site.
2. Navigate to https://webgate.ec.europa.eu/europeaid/fsd/fsf#!/files and open show settings for crawler/robot.
3. Copy the URL for 1.0 XML (Based on XSD). This will be in the format https://webgate.ec.europa.eu/europeaid/fsd/fsf/public/files/xmlFullSanctionsList/content?token=[username]. You must replace the [username] placeholder with the user name you have created.
4. Enter this URL in your run profile or download task.
UN Reference Data
The United Nations consolidated list includes all individuals and entities subject to sanctions measures imposed by the Security Council.
Details are here:
https://www.un.org/sc/suborg/en/sanctions/un-sc-consolidated-list
Download link is:
https://www.un.org/sc/suborg/sites/www.un.org.sc.suborg/files/consolidated.xml
World-Check
World-Check provides a subscription based service, offering a consolidated list of PEPs (Politically Exposed Persons) and entities and individuals appearing on the HM Treasury, OFAC, and other world lists. Three levels of subscription are provided: Standard, Premium and Premium+. Some features of the World-Check lists are only available to users with a higher subscription level.
16 Administration Guide

Dow Jones WatchlistAppendix A—Watch Lists
To download the World-Check Premium+ feed, set values in the WC Setup section of the watchlist-management.properties Run Profile as follows:
phase.WC\ -\ Download.enabled = Y
phase.WC\ -\ Download\ native\ aliases.enabled = Y
phase.WC\ -\ Stage\ reference\ lists.enabled = Y
phase.*.snapshot.*.use_native_aliases = 1
To download the Standard or Premium feeds, set values in the WC Setup section of the watchlist-management.properties Run Profile as follows:
phase.WC\ -\ Download.enabled = Y
phase.WC\ -\ Download\ native\ aliases.enabled = N
phase.WC\ -\ Stage\ reference\ lists.enabled = Y
phase.*.snapshot.*.use_native_aliases = 0
See the World-Check website for more details: https://risk.thomsonreuters.com/en/products/third-party-risk/world-check-know-your-customer.html
Note: If your instance of Oracle Transaction Filtering uses the WebLogic application server, and you are screening against the World-Check watch list, then, in order to download the World-Check reference data successfully, you must add the following to the 'Server Start' arguments of your EDQ managed server: -DUseSunHttpHandler=true. This is only required if you are using the WebLogic application server and screening against the World-Check watch list.
Dow Jones Watchlist
Dow Jones provide a subscription based service offering a consolidated list of PEPs (Politically Exposed Persons) and entities and individuals appearing on the various sanctions lists. See the Dow Jones website for more details:
http://www.dowjones.com/products/risk-compliance/
The Dow Jones Watchlist automated download task uses one of two script files that are provided with Oracle Transaction Filtering to provide further configuration of the download process. These script files are:
download-djw.sh (for use on Unix platforms)
download-djw.bat (for use on Windows platforms)The script files are invoked by the automated task and will download the data files and copy them to the appropriate sub-folder of the OEDQ landing area.
Dow Jones Anti-Corruption List
Dow Jones provides a subscription based service containing data to help you assess, investigate and monitor third-party risk with regard to anti-corruption compliance regulation. See the Dow Jones website for more details:
http://www.dowjones.com/products/risk-compliance/
Administration Guide 17

Accuity Reference DataAppendix A—Watch Lists
The Dow Jones Anti-Corruption List automated download task uses one of two script files that are provided with Oracle Transaction Filtering to provide further configuration of the download process. These script files are:
download-djac.sh (for use on Unix platforms)
download-djac.bat (for use on Windows platforms)The script files are invoked by the automated task and will download the data files and copy them to the appropriate sub-folder of the OEDQ landing area.
Accuity Reference Data
The Accuity Global Watchlist is a subscription based service. The Accuity website states:Accuity's proprietary collection of watch list screening databases is an aggregation of specially designated individuals and entities compiled from dozens of regulatory and enhanced due diligence lists from around the world. Global WatchList provides the ideal framework for your customer screening and interdiction filtering processes.
Accuity provides their aggregated data as a set of three lists, as follows:
The Regulatory Due Diligence (RDD) Lists, covering sanctioned entities and individuals. The Accuity Group File can also be used in conjunction with this list. For more information, see Using the Accuity Group File
Enhanced Due Diligence (EDD) Lists, covering entities and individuals who are not part of the regulatory sanctions lists, but whose activities may need to be monitored
The Politically Exposed Persons (PEPs) Due Diligence Database, and covering PEPsAny or all of the lists can be downloaded and used separately or in conjunction with each other.For more information, see http://www.accuity.com/compliance/.
Using the Accuity Group File
The Accuity Global Watchlist is created by aggregating many other lists. As such, any given individual or entity may be represented in the list by multiple entries.The group file, GROUP.XML, provides a way to work with a data set of this type in Transaction Filtering. All records which represent the same individual or entity are collected into groups, and each group is assigned a unique group ID. The group ID is used with a prefix to indicate the fact that this is a group ID, in place of the original record identifier in Case Management. Records which are not included in a group use their original Accuity record ID, with a different prefix to indicate that they are single records.
Note: The group file only applies to Transaction Filtering. That is, only entities and individuals on the Regulatory Due Diligence (RDD) Lists are included in the group file.
18 Administration Guide
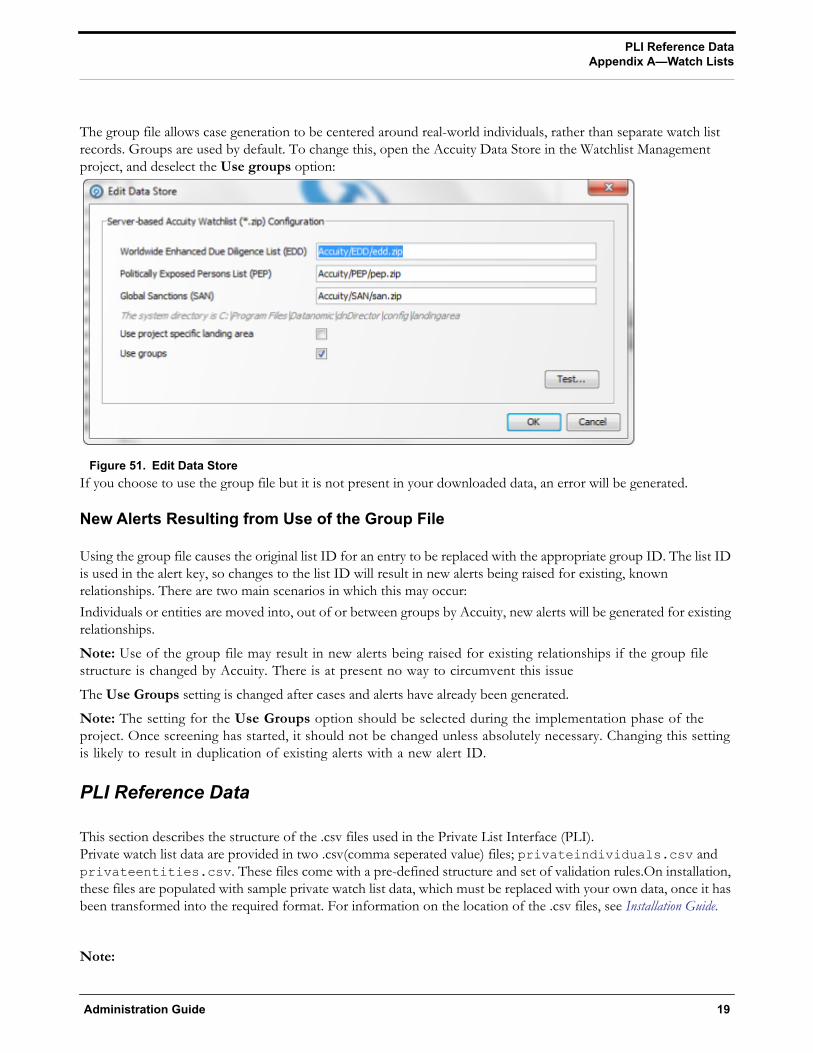
PLI Reference DataAppendix A—Watch Lists
The group file allows case generation to be centered around real-world individuals, rather than separate watch list records. Groups are used by default. To change this, open the Accuity Data Store in the Watchlist Management project, and deselect the Use groups option:
Figure 51. Edit Data StoreIf you choose to use the group file but it is not present in your downloaded data, an error will be generated.
New Alerts Resulting from Use of the Group File
Using the group file causes the original list ID for an entry to be replaced with the appropriate group ID. The list ID is used in the alert key, so changes to the list ID will result in new alerts being raised for existing, known relationships. There are two main scenarios in which this may occur:Individuals or entities are moved into, out of or between groups by Accuity, new alerts will be generated for existing relationships.
Note: Use of the group file may result in new alerts being raised for existing relationships if the group file structure is changed by Accuity. There is at present no way to circumvent this issue
The Use Groups setting is changed after cases and alerts have already been generated.
Note: The setting for the Use Groups option should be selected during the implementation phase of the project. Once screening has started, it should not be changed unless absolutely necessary. Changing this setting is likely to result in duplication of existing alerts with a new alert ID.
PLI Reference Data
This section describes the structure of the .csv files used in the Private List Interface (PLI).Private watch list data are provided in two .csv(comma seperated value) files; privateindividuals.csv and privateentities.csv. These files come with a pre-defined structure and set of validation rules.On installation, these files are populated with sample private watch list data, which must be replaced with your own data, once it has been transformed into the required format. For information on the location of the .csv files, see Installation Guide.
Note:
Administration Guide 19

PLI Reference DataAppendix A—Watch Lists
It is recommended that you keep a copy of the sample private watch list files, as they can be used to verify the correct functioning of your installation on a known data set.
The files must be saved in UTF-8 format.
Three types of attributes are used in the PLI for screening:
Mandatory attributes: These attributes are tagged in the PLI tables with the [Mandatory attribute] tag, and are mandatory for screening.
Recommended attributes: These attributes are used in matching, typically to either eliminate false positive matches which may occur if the mandatory fields alone were used or to reinforce the likelihood of a possible match. They are tagged in the PLI tables with the [Recommended attribute] tag.
Optional attributes: These attributes are not used in matching. Information provided in these fields may be of use in processes downstream of the match process.
This chapter covers the following areas:
Individual private watch list input attributes
Entity Private Watch List Input Attributes
Individual private watch list input attributes
This section lists the PLI fields used for individuals. In addition to the prescribed fields, fifty customizable input attributes are available for individual private watch lists, out of which forty are string attributes, five are date attributes and five are number attributes. They are available for any additional inputs required by your private watch list. The following table lists the individual PLI fields in order, the data format expected for each field, and notes on their use in screening:Table 21. Private List for Individuals
Field Name Expected Data Format NotesListSubKey String This field is used to identify the source list of the watch list record
(for example, Private List, Accounting Private List, Financial Private List and so on). It is included in the alert key.
ListRecordType StringListRecordOrigin String This field is used to record the provenance of a record when it is
part of a consolidated list.ListRecordId String [Mandatory attribute] This attribute is not used as part of the
matching process, but it must be populated with a unique identifier.PassportNumber String This is an optional field that may be used to capture the passport
numbers of customers or individuals for use in the review process. Note: Passport numbers are not used in the default screening rules.
NationalId String This is an optional field that may be used to capture customer National IDs where known for use in the review process. Note: The National IDs of customers and individuals must not used in the default screening rules.
20 Administration Guide

PLI Reference DataAppendix A—Watch Lists
Title String This field should contain the titles of customers or individuals (such as Mr/Mrs/Dr/Herr/Monsieur). It is used to derive gender values where the gender is not already stated, and is used during the review process. Note: Avoid putting titles in the name fields.
FullName String [Mandatory attribute] The individual matching process is based primarily on the name supplied for the individual. Either a full name, a pair of given and family names, or an original script name must be submitted to the screening process for screening to proceed.
GivenName StringFamilyName String
NameType String This is an optional field used in the review process only. Multiple names may exist for the same person. The Name Type therefore denotes if the name is the primary name of the listed party, or an additional name (such as an Alias, or Alternate Spelling). If twoprivate list records were derived from a single source with multiple names (such as Mrs Louise Wilson née Hammond being split into two records, Louise Wilson and Louise Hammond) you may wish to denote one as the primary name and one as a maiden or alias name.
NameQuality String This field may be assigned a value of Low, Medium or High to indicate the quality of the individual name. High is used for Primary names and specified good/high quality aliases.
PrimaryName String For alias records, this field indicates the main name for that record.
OriginalScriptName String [Mandatory attribute] The individual matching process is based primarily on the name supplied for the individual. Either a full name, a pair of given and family names, or an original script name must be submitted to the screening process for screening to proceed. If you populate the OriginalScriptName, then you will also need to enable two facets of Match processor configuration that are disabled by default: the Original Script Name Cluster and some or all of the Match Rules that include Original script name in their name. To adapt Match Processor configuration, you will need to open the Transaction screening project within the Director user interface, and make the changes to every process used during the Transaction Filtering installation.
Gender String The value supplied should be either ‘M’ or ‘F’. The gender is not used directly in the matching process, but optionally, the value of the Gender field can be used by the elimination rules to eliminate poor matches.
Occupation String This is an optional field that may be used to eliminate records with "safe" occupations, in the review process and in risk scoring. Note that customer occupations are not matched against list occupations using the default screening rules.
DateofBirth String, representing a date, in the format'YYYYMMDD'; day, month and year are required.
[Recommended attribute] Birth date information can be used in matching to identify particularly strong matches, or to eliminate matches that are too weak.
YearofBirth String, in the format 'YYYY'.
Table 21. Private List for Individuals (Continued)
Field Name Expected Data Format Notes
Administration Guide 21

PLI Reference DataAppendix A—Watch Lists
Deceased Flag String If populated, this optional field should contain either Y or N.DeceasedDate String, representing a
date, in the format'YYYYMMDD'.
If populated, this optional field should contain either the current date or a date in the past.
Address1 String These are optional fields that may be used in the review process.Address2 StringAddress3 StringAddress4 StringCity String [Recommended attribute] City data is used to strengthen potential
match information.State StringPostal Code StringAddressCountryCode String; ISO 2-character
country code.[Recommended attribute] Address country data is used to strengthen potential match information.
ResidencyCountryCode
String; ISO 2-character country code.
[Recommended attribute] The country of residence can be used in optional country prohibition screening.
CountryOfBirthCode String; ISO 2-character country code.
[Recommended attribute]
NationalityCountryCodes
String; commaseparatedlist ofISO 2-charactercountry codes.
[Recommended attribute] The nationality can be used in optional country prohibition screening.
ProfileHyperlink String; a hyperlink to an Internet or intranet resource for the record.
This field may contain a hyperlink to an Internet or intranet resource that can provide reviewers with additional information about the individual.
RiskScore Number, between 0 and 100
This field is included where the risk score for a customer is calculated externally.
RiskScorePEP Number, between 0 and 100
A number indicating the relative ‘riskiness’ of theindividual, considered as a PEP. The risk score isexpressed as an integer between 1 and 100, withhigher numbers indicating a higher risk.
AddedDate String, representing adate, in the format'YYYYMMDD'
These are optional fields for use in the review process.
LastUpdatedDate String, representing adate, in the format'YYYYMMDD'
DataConfidenceScore
Number, between0 and 100
DataConfidenceComment
String
InactiveFlag String If populated, this optional field should contain either Y or N.InactiveSinceDate String, representing a
date, in the format'YYYYMMDD'
If populated, this optional field should contain either the current date or a date in the past.
Table 21. Private List for Individuals (Continued)
Field Name Expected Data Format Notes
22 Administration Guide

PLI Reference DataAppendix A—Watch Lists
Entity Private Watch List Input Attributes
This section lists the PLI fields used for entities. In addition to the prescribed fields, fifty customizable input attributes are available for individual private watch lists, out of which forty are string attributes, five are date attributes and five are number attributes. They are available for any additional inputs required by your private watch list. The following table lists the individual PLI fields in order, the data format expected for each field, and notes on their use in screening:
PEPclassification String This field can be used to indicate the type of PEP (for example, whether the individual is part of an international organization or government, and at what level). It can be used to filter watch list records, and is primarily used by the World-Check watch list, but could be used by a private watch list if required.
customString1 tocustomString40
String Fifty custom fields are provided in the private list data interface for individuals. Forty of these are intended to hold string data, five hold dates and five numeric data. Note: The interface file is a comma-separated value (.csv) file, and so all fields intrinsically contain strings. However, during the processing of Private watch lists, the custom date and number fields are checked to ensure that they include appropriate data, and warning messages are provided as output if they do not.
customDate1 tocustomDate5
String, representing adate, in the format'YYYYMMDD'
customNumber1 tocustomNumber5
Number
Table 22. Private List for Individuals
Field Name Expected Data Format NotesListSubKey String This field is used to identify the source list of the watch list record
(for example, Private List, Accounting Private List, Financial Private List and so on). It is included in the alert key.
ListRecordType String [Mandatory attribute]This field is used when filtering alerts, to determine whether the record is a sanctions or PEP record. It must contain a value of SAN, PEP, or a combination of these values. If you want to include a combination of values, the values should be comma-separated, and enclosedby double quotation marks. For example: "SAN, PEP".
ListRecordOrigin String This field is used to record the provenance of a record when it is part of a consolidated list.
ListRecordId String [Mandatory attribute] This attribute is not used as part of the matching process, but it must be populated with a unique identifier.
RegistrationNumber String This is an optional field that may be used to capture entity registration numbers where known for use in the review process. Note that entity registration numbers are not used for matching in the default screening rules.
EntityName String [Mandatory attribute] The entity matching process is based primarily on the name supplied for the entity. An entity name or original script name must be submitted to the screening process for screening to proceed.
Table 21. Private List for Individuals (Continued)
Field Name Expected Data Format Notes
Administration Guide 23

PLI Reference DataAppendix A—Watch Lists
NameType String This is an optional field used in the review process only. Multiple names may exist for the same person. The Name Type therefore denotes if the name is the primary name of the listed party, or an additional name (such as an Alias, or Alternate Spelling). If twoprivate list records were derived from a single source with multiple names (such as Mrs Louise Wilson née Hammond being split into two records, Louise Wilson and Louise Hammond) you may wish to denote one as the primary name and one as a maiden or alias name.
NameQuality String This field may be assigned a value of Low, Medium or High to indicate the quality of the individual name. High is used for Primary names and specified good/high quality aliases.
PrimaryName String For alias records, this field indicates the main name for that record.
OriginalScriptName String [Mandatory attribute] The individual matching process is based primarily on the name supplied for the individual. Either a full name, a pair of given and family names, or an original script name must be submitted to the screening process for screening to proceed. If you populate the OriginalScriptName, then you will also need to enable two facets of Match processor configuration that are disabled by default: the Original Script Name Cluster and some or all of the Match Rules that include Original script name in their name. To adapt Match Processor configuration, you will need to open the Transaction screening project within the Director user interface, and make the changes to every process used during the Transaction Filtering installation.
AliasIsAcronym String If this field is set to Y, this flags an alias as an acronym as opposed to a full entity name. Leaving the field blank or setting it to any other value has no effect (that is, an alias is assumed to be a full entity name). Note: This flag is used during matching.
VesselIndicator String This field should be set to Y if the entity is a vessel (a ship). It should be left empty or set to N if the entity is not a vessel.
VesselInfo String If the entity is a vessel, you can populate this field with information about it: for example, its call sign, type, tonnage, owner, flag and so on.
Address1 String These are optional fields that may be used in the review process.Address2 StringAddress3 StringAddress4 StringCity String [Recommended attribute] City data is used to strengthen potential
match information.State StringPostal Code StringAddressCountryCode String; ISO 2-character
country code.[Recommended attribute] Address country data is used to strengthen potential match information.
Table 22. Private List for Individuals (Continued)
Field Name Expected Data Format Notes
24 Administration Guide

PLI Reference DataAppendix A—Watch Lists
ResidencyCountryCode
String; ISO 2-character country code.
[Recommended attribute] The entity's registrationcountry can be used in optional country prohibitionscreening.
OperatingCountryCodes
String; ISO 2-character country code.
[Recommended attribute] Any of the entity'soperating countries can be used in optional countryprohibition screening.
ProfileHyperlink String; a hyperlink to an Internet or intranet resource for the record.
This field may contain a hyperlink to an Internet or intranet resource that can provide reviewers with additional information about the individual.
RiskScore Number, between 0 and 100
This field is included where the risk score for a customer is calculated externally.
RiskScorePEP Number, between 0 and 100
A number indicating the relative ‘riskiness’ of theindividual, considered as a PEP. The risk score isexpressed as an integer between 1 and 100, withhigher numbers indicating a higher risk.
AddedDate String, representing adate, in the format'YYYYMMDD'
These are optional fields for use in the review process.
LastUpdatedDate String, representing adate, in the format'YYYYMMDD'
DataConfidenceScore
Number, between0 and 100
DataConfidenceComment
String
InactiveFlag String If populated, this optional field should contain either Y or N.InactiveSinceDate String, representing a
date, in the format'YYYYMMDD'
If populated, this optional field should contain either the current date or a date in the past.
PEPclassification String This field can be used to indicate the type of PEP (for example, whether the individual is part of an international organization or government, and at what level). It can be used to filter watch list records, and is primarily used by the World-Check watch list, but could be used by a private watch list if required.
customString1 tocustomString40
String Fifty custom fields are provided in the private list data interface for individuals. Forty of these are intended to hold string data, five hold dates and five numeric data. Note: The interface file is a comma-separated value (.csv) file, and so all fields intrinsically contain strings. However, during the processing of Private watch lists, the custom date and number fields are checked to ensure that they include appropriate data, and warning messages are provided as output if they do not.
customDate1 tocustomDate5
String, representing adate, in the format'YYYYMMDD'
customNumber1 tocustomNumber5
Number
Table 22. Private List for Individuals (Continued)
Field Name Expected Data Format Notes
Administration Guide 25
PLI Reference DataAppendix A—Watch Lists
26 Administration Guide

APPENDIX B Match Score Rules
See Oracle Financial Services Transaction Filtering Matching Guide for information on Match Score Rules.
Administration Guide 27
Appendix B—Match Score Rules
28 Administration Guide

APPENDIX C Host Configuration
This appendix contains information on how to configure a host in the Transaction Filtering application.
To configure the Transaction Filtering application for a particular host location, add the following details:
Host name of the location
Port number of the location
User name and password of the location
Administration Guide 29

Appendix C—Host Configuration
30 Administration Guide
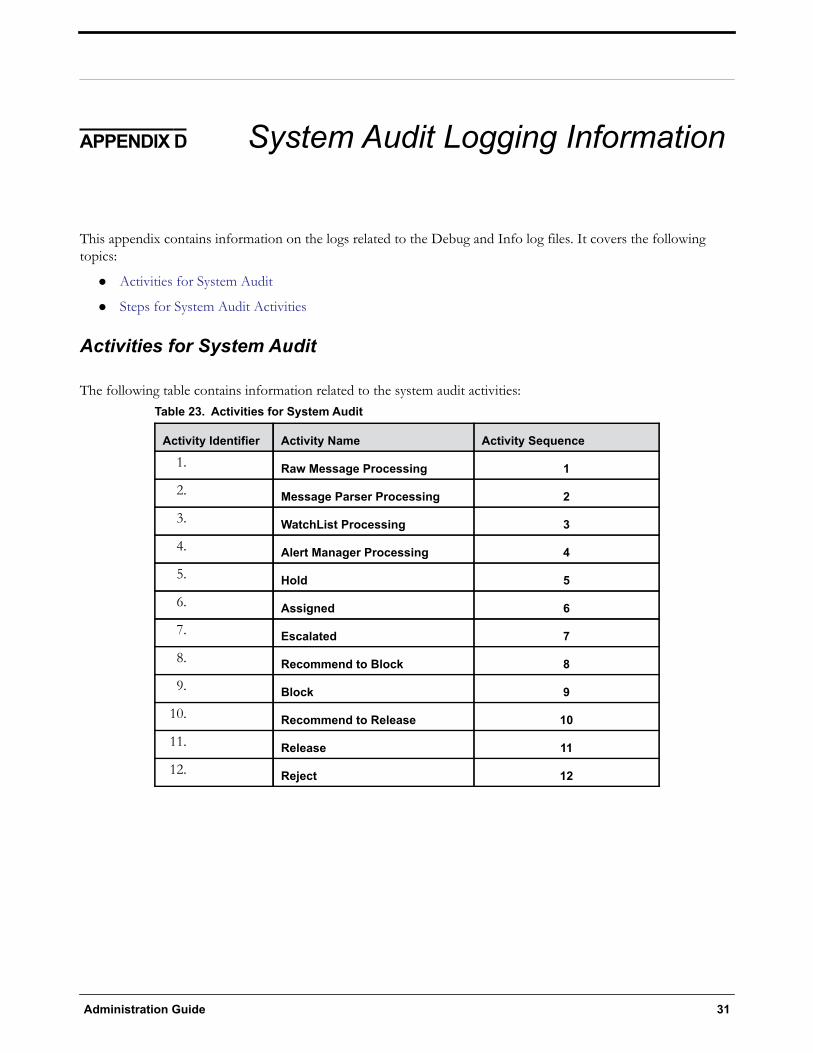
APPENDIX D System Audit Logging Information
This appendix contains information on the logs related to the Debug and Info log files. It covers the following topics:
Activities for System Audit
Steps for System Audit Activities
Activities for System Audit
The following table contains information related to the system audit activities:Table 23. Activities for System Audit
Activity Identifier Activity Name Activity Sequence
1. Raw Message Processing 1
2. Message Parser Processing 2
3. WatchList Processing 3
4. Alert Manager Processing 4
5. Hold 5
6. Assigned 6
7. Escalated 7
8. Recommend to Block 8
9. Block 9
10. Recommend to Release 10
11. Release 11
12. Reject 12
Administration Guide 31
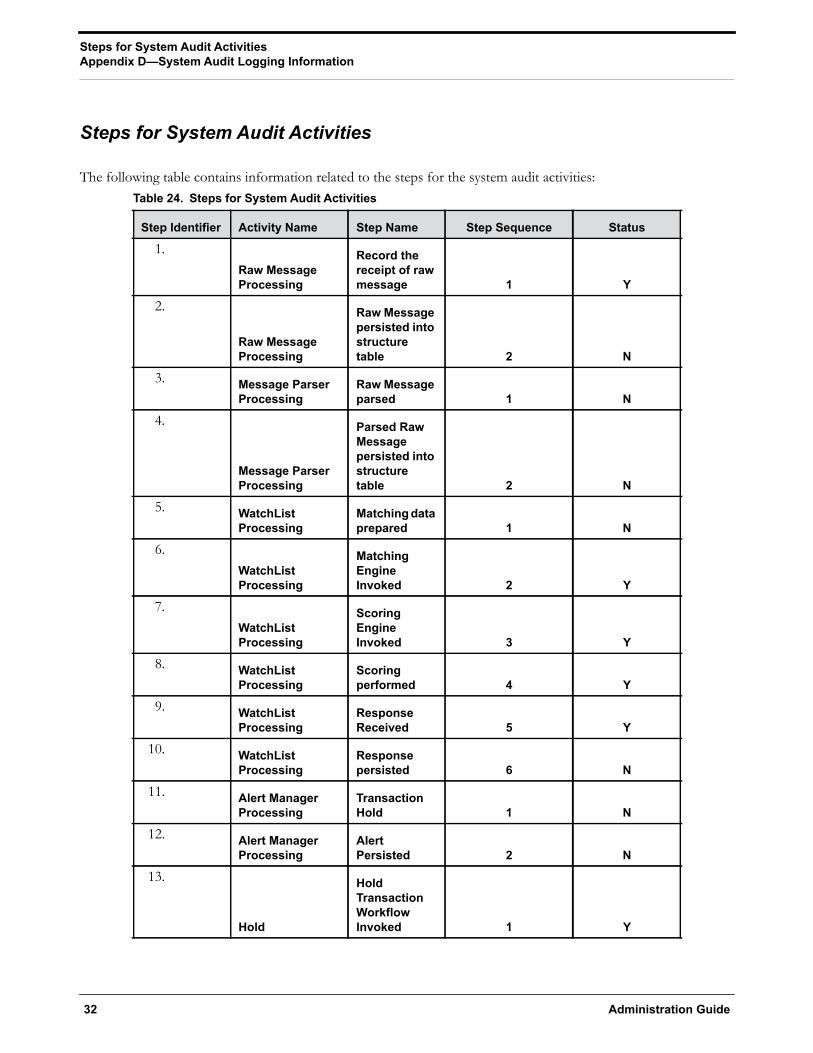
Steps for System Audit ActivitiesAppendix D—System Audit Logging Information
Steps for System Audit Activities
The following table contains information related to the steps for the system audit activities:Table 24. Steps for System Audit Activities
Step Identifier Activity Name Step Name Step Sequence Status
1.Raw Message Processing
Record the receipt of raw message 1 Y
2.
Raw Message Processing
Raw Message persisted into structure table 2 N
3. Message Parser Processing
Raw Message parsed 1 N
4.
Message Parser Processing
Parsed Raw Message persisted into structure table 2 N
5. WatchList Processing
Matching data prepared 1 N
6.WatchList Processing
Matching Engine Invoked 2 Y
7.WatchList Processing
Scoring Engine Invoked 3 Y
8. WatchList Processing
Scoring performed 4 Y
9. WatchList Processing
Response Received 5 Y
10. WatchList Processing
Response persisted 6 N
11. Alert Manager Processing
Transaction Hold 1 N
12. Alert Manager Processing
Alert Persisted 2 N
13.
Hold
Hold Transaction Workflow Invoked 1 Y
32 Administration Guide

Steps for System Audit ActivitiesAppendix D—System Audit Logging Information
14.
Hold
Hold Transaction Workflow completed 2 Y
15.
Assigned
Assigned Transaction Workflow Invoked 1 Y
16.
Assigned
Assigned Transaction Workflow completed 2 Y
17.
Escalate
Escalated Transaction Workflow Invoked 1 Y
18.
Escalate
Escalated Transaction Workflow completed 2 Y
19. Recommend to Block
20.
Block
Blocked Transaction Workflow Invoked 1 Y
21.
Block
Blocked Transaction Workflow completed 2 Y
22. Recommend to Release
23.
Release
Released Transaction Workflow Invoked 1 Y
24.
Release
Released Transaction Workflow completed 2 Y
25. Reject
Table 24. Steps for System Audit Activities (Continued)
Step Identifier Activity Name Step Name Step Sequence Status
Administration Guide 33

Steps for System Audit ActivitiesAppendix D—System Audit Logging Information
34 Administration Guide
Index
IndexA
About Oracle Financial Services Transaction Filtering, 1, 2Activities for System Audit, 31
C
Configuring EDQ, 21cookies, 16
F
file download, 16
J
javascript, 15
O
Oracle Financial Services Alert Managementlogging, 5logging using an EAM Tool, 15
Oracle Financial Services Enterprise Case Managementlogging, 5
P
printing, 16
R
rolesSystem Administrator, vii
S
Steps for System Audit Activities, 32
T
temporary internet files, 16troubleshooting, 15
enabling cookies, 16enabling file download, 16
enabling javascript, 15enabling temporary internet files, 16setting print, 16
U
user ID, 5
W
Watch Lists, 15Where to Find More Information, viiiWho Should Read this Guide, vii
Administration Guide 1

Index
2 Administration Guide

