oracle white paper - oracle | integrated cloud … maximum availability architecture database...
TRANSCRIPT
An Oracle White Paper
Dec 2011
Database Cloning Using Oracle Sun ZFS Storage Appliance and Oracle Recovery Manager
Oracle Maximum Availability Architecture Database Cloning Using Oracle ZFS Appliance and Oracle Recovery Manager
Overview of Oracle Database Cloning ............................................... 5
Database Cloning Procedure: Oracle RMAN and Sun ZFSSA .......... 6
Configuring the Production Database Server and Performing a Backup 7
Performing the Storage-Based Snapshot and Cloning Operation .. 9
Configuring the Clone Database Server ...................................... 10
Refreshing the Backup Data ........................................................ 10
Reference Test and Development Setup ......................................... 11
Benefits of Database Cloning with Sun ZFS Storage Appliances..... 13
Sizing Considerations for the Cloning Solution ................................ 18
Capacity and Protection ............................................................... 18
Network Connectivity ................................................................... 19
Optimized IOPS and Throughput ................................................. 19
General Recommendations ............................................................. 20
Cloning Non-Database Components ............................................... 21
Cloning the ORACLE_HOME Directory ....................................... 21
Setting Up an Oracle Home Master Location ............................... 22
Creating a Storage Snapshot and Clone of the ORACLE_HOME 23
Configuring and Preparing the Cloned Environment .................... 23
Using the Cloned Oracle Home ................................................... 23
Benefits of Using Cloning in the Sun ZFS Storage Appliance .......... 24
Conclusion ...................................................................................... 25
Appendix A. Resources ................................................................... 26
Appendix B. About the Sun ZFS Storage Appliance ........................ 27
Appendix C. Storage and Host Configurations ................................. 30
Appendix D. Commands and Scripts ............................................... 34
Configuring the Production Database Server for an Oracle RMAN Incremental Backup ........................................................................................ 34
Oracle RMAN Script for Performing Level 0 and Level 1 Backups 34
Performing a Snapshot Operation in the Sun ZFS Storage Appliance 36
Performing a Cloning Operation in the Sun ZFS Storage Appliance36
Configuring the Clone Database Server ...................................... 38
Oracle Maximum Availability Architecture Database Cloning Using Oracle ZFS Appliance and Oracle Recovery Manager
Complete Script for Cloning a Snapshot ...................................... 43
Appendix E. Procedure to Clone an Oracle_Home Environment ..... 48

Oracle Database Cloning Solution Using Oracle Recovery Manager and Sun ZFS Storage Appliance
3
Introduction Database administrators are faced with the challenge of efficiently duplicating large mission-
critical databases to support continuous demands for application development, testing, and
training purposes. This challenge is compounded when multiple clones of databases are
required to support the many development and test activities associated with large production
systems. These duplicated databases must be refreshed frequently to enable the testing and
development to be performed with the latest set of data and data structures.
Mission critical databases are often deployed on Fibre Channel (FC) protocol-based SAN
environments using the Oracle Automatic Storage Management (ASM) integrated file system
and volume manager. However, development, QA, and training environments typically require
a less demanding service level agreement (SLA) compared to that required for the production
database. Thus, these environments do not require the same expensive SAN infrastructure,
which may not provide support for quickly creating multiple, writeable copies of database(s)
with little-to-no impact on the production database. The requirements for these environments
can be met using the Sun ZFS Storage Appliance with network-attached storage (NAS), which
provides optimal performance and ease of use with cost efficiency and can be easily plugged
into an existing Ethernet infrastructure.
The Oracle Recovery Manager (Oracle RMAN) utility for managing the backup and recovery of
Oracle databases offers a number of ways to duplicate the Oracle databases. This Maximum
Availability Architecture Best Practices paper describes how to use the Oracle RMAN
incrementally updated backup feature to back up a SAN-based ASM database into a Network
File System (NFS) protocol-based database stored on the Sun ZFS Storage Appliance. The
snapshot and cloning features of the storage appliance are then used to duplicate or clone the
Oracle RMAN backup. The cloning procedure explained in this document is performed at the
production site.
For database duplication solution using a remote site or disaster recovery (standby) site, refer
to the white paper Oracle Database Cloning Solution Using Oracle's Sun ZFS Storage
Appliance and Oracle Data Guard at:
http://www.oracle.com/technetwork/database/features/availability/maa-db-clone-szfssa-
172997.pdf.

Oracle Database Cloning Solution Using Oracle Recovery Manager and Sun ZFS Storage Appliance
4
The solution described in this paper can be implemented using the operating systems and
Oracle database versions shown in Table 1.
TABLE 1. SUPPORTED VERSIONS
PARAMETER VERSION
Operating system Oracle Solaris 10 operating system (Sparc, X86)
Red Hat Linux 4.x, 5,x (and higher)
Oracle Enterprise Linux 4.x, 5.x (and higher)
Oracle database 10.2.0.1 (and higher)
Production: Single instance / RAC. (ASM or non-ASM)
Clone: Single Instance
Oracle Recovery Manager
Hybrid Columnar Compression (HCC) supported with Sun ZFS Storage Appliance with
Oracle Database Enterprise Edition 11.2.0.3 and above.
Production database storage Any storage
Cloned database storage Sun ZFS Storage Appliance
Protocol NFSv3, NFSv4
Connectivity supported 1 GbE, 10 GbE
Cloned database server Cloned instances served from a separate host (preferred)
Cloned instances served by the production host
.
This document is written for Oracle database administrators, storage/system administrators,
and technical sales personnel. It is assumed that the reader is familiar with the Oracle RMAN
utility. For a detailed procedure for creating a file system on the Sun ZFS Storage Appliance,
refer to the documents listed in Appendix A. Resources.
Oracle Database Cloning Solution Using Oracle Recovery Manager and Sun ZFS Storage Appliance
5
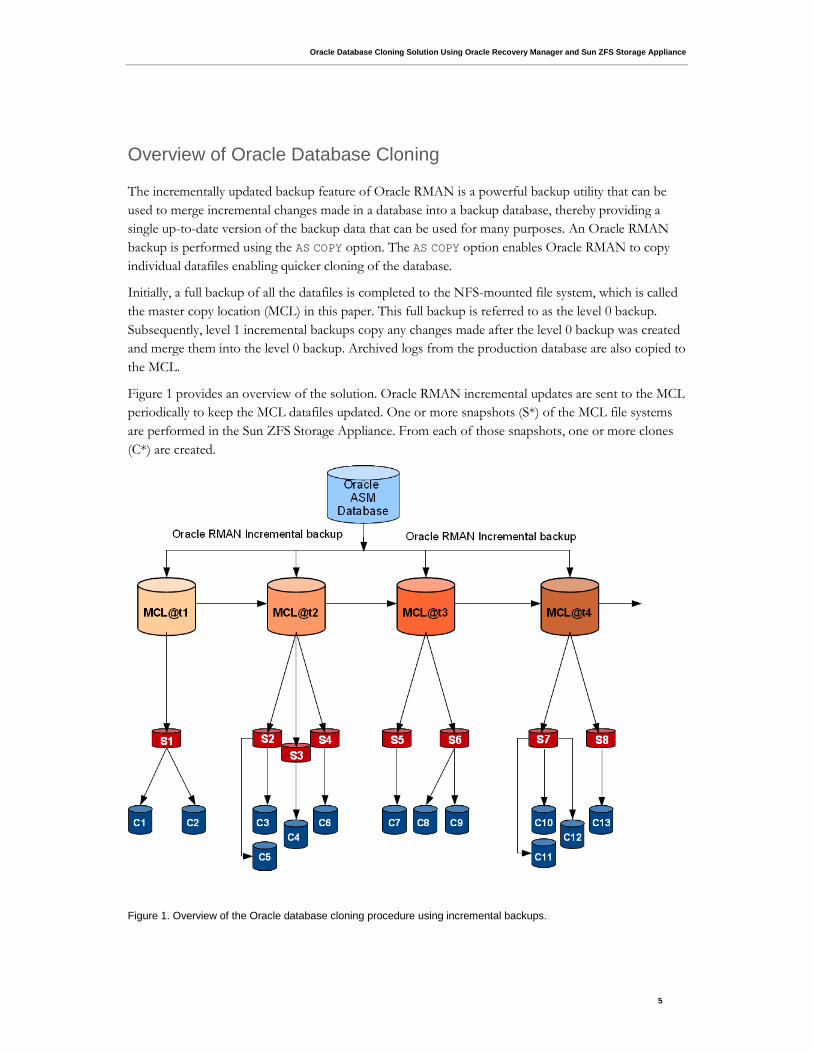
Overview of Oracle Database Cloning
The incrementally updated backup feature of Oracle RMAN is a powerful backup utility that can be
used to merge incremental changes made in a database into a backup database, thereby providing a
single up-to-date version of the backup data that can be used for many purposes. An Oracle RMAN
backup is performed using the AS COPY option. The AS COPY option enables Oracle RMAN to copy
individual datafiles enabling quicker cloning of the database.
Initially, a full backup of all the datafiles is completed to the NFS-mounted file system, which is called
the master copy location (MCL) in this paper. This full backup is referred to as the level 0 backup.
Subsequently, level 1 incremental backups copy any changes made after the level 0 backup was created
and merge them into the level 0 backup. Archived logs from the production database are also copied to
the MCL.
Figure 1 provides an overview of the solution. Oracle RMAN incremental updates are sent to the MCL
periodically to keep the MCL datafiles updated. One or more snapshots (S*) of the MCL file systems
are performed in the Sun ZFS Storage Appliance. From each of those snapshots, one or more clones
(C*) are created.
Figure 1. Overview of the Oracle database cloning procedure using incremental backups.
Oracle Database Cloning Solution Using Oracle Recovery Manager and Sun ZFS Storage Appliance
6
Database Cloning Procedure: Oracle RMAN and Sun ZFSSA
The procedure to create a cloned Oracle database environment uses the Oracle RMAN backup utility
and the snapshot and cloning features of the Sun ZFS Storage Appliance. The database cloning
procedure comprises four steps:
1. Configure and perform an Oracle RMAN backup from the production database server, which
is stored in ASM disk groups.
2. Perform a storage-based snapshot and cloning operation.
3. Configure the clone database server and open the database.
4. Continue refreshing the backup datafiles by doing incrementally updated backups of
modifications made to the production database.
These steps are described in more detail in the following sections.
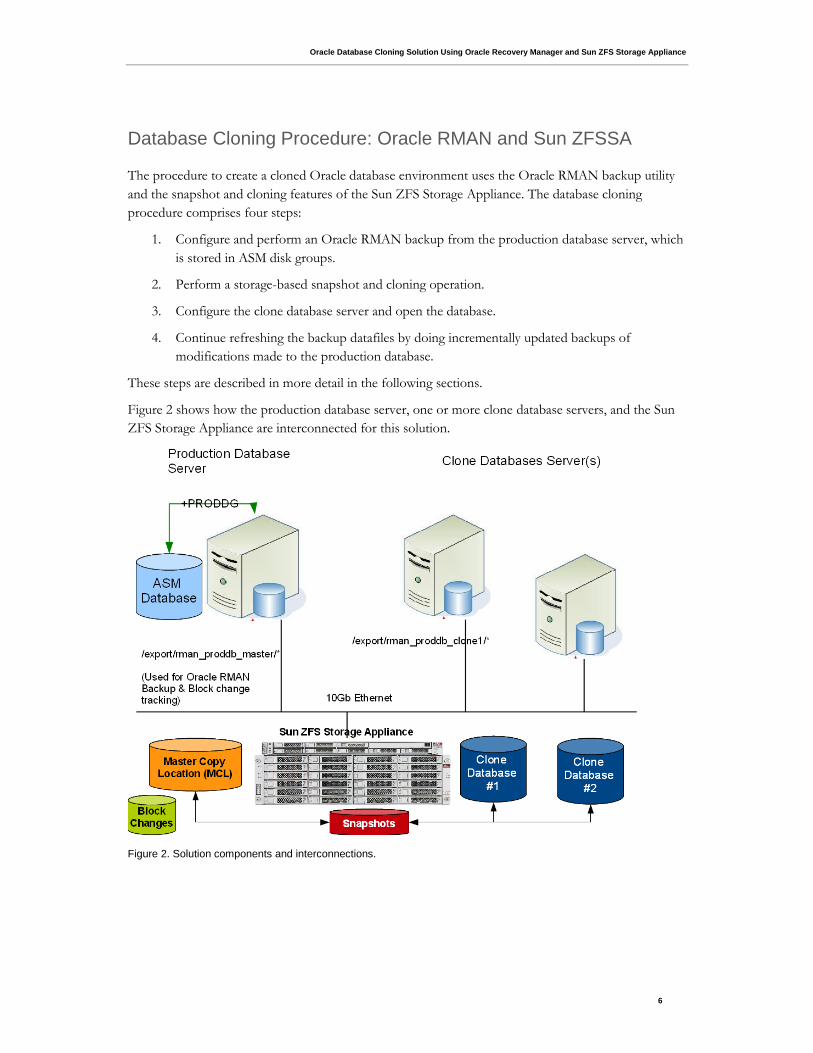
Figure 2 shows how the production database server, one or more clone database servers, and the Sun
ZFS Storage Appliance are interconnected for this solution.
Figure 2. Solution components and interconnections.
Oracle Database Cloning Solution Using Oracle Recovery Manager and Sun ZFS Storage Appliance
7
Configuring the Production Database Server and Performing a Backup
For this solution, the primary production system is assumed to be based on an Oracle ASM database
served by the instance PRODDB. The datafiles, redo logs, and control files are all stored in the ASM disk
group +PRODDG using FC storage. The log archive format for the production database is set to
%t_%s_%r.arc.
The MCL is used by Oracle RMAN only to perform incremental backups and merge operations. The
datafiles from the MCL are not directly used by any instances.
The database server is connected to the Sun ZFS Storage Appliance over 10 Gb Ethernet. The storage
pool is configured with RAID-Z2 layout.
A project called rman_prod_master is created for storing the datafile copies and archived log copies.
Under this project, four file systems are created, called datafiles, archive, redologs, and alerts.
The redologs and alerts file systems are created simply to enable faster automated cloning using
scripts.
The default mount points at the project level are changed to /export/rman_proddb_master so that
each file system mount point is unique. The record size of the file system datafiles is changed from
the default 128 KB to 8 KB to match the database block size. For all the shares, the logbias property
is set to latency (logbias=latency).
Only the file systems datafiles and archive are mounted in the production database server under
the /oradata/rman_master/PRODDB directory. Change the ownership of the directory to
oracle:dba.
This section provides an overview of the steps to configure the production database server and
perform an initial Oracle RMAN level 0 backup. Additional details are provided in Appendix D.
Commands and Scripts.
The steps are:
1. Enable the block change tracking feature for the production database.
The changes to the blocks for the production database are tracked to enable faster
incrementally updated backups by Oracle RMAN using the file incremental.f. The change
tracking file is typically stored in the same ASM disk group as that of the database for optimal
performance. If this file is stored in the appliance, make sure the file system utilizes the flash
devices. In this example, the tracking file is stored in the MCL location on the Sun ZFS
Storage Appliance.
$ sqlplus / as sysdba
SQL > alter database enable block change tracking using file
'/oradata/rman_master/PRODDB/incremental.f' ;
Oracle Database Cloning Solution Using Oracle Recovery Manager and Sun ZFS Storage Appliance
8
The block change tracking file information can be monitored using the
SQL command shown below:
SQL> select substr(filename,1,40) "FILENAME", status, bytes from
v$block_change_tracking ;
FILENAME STATUS BYTES
---------------------------------------- ---------- ----------
/oradata/rman_master/PRODDB/incremental. ENABLED 11599872
2. Configure the MCL NFS file system on the Sun ZFS Storage Appliance. For details, see
the section Configuring the Production Database Server for an Oracle RMAN Incremental
Backup in Appendix D.
3. Perform a level 0 backup of the database to the MCL target using the AS COPY option.
A full copy of the database files to the MCL is performed using Oracle RMAN. This copy
serves as the level 0 backup. In this example, eight channels are used. The number of channels
selected is based on the available network and throughput. The format %b is used so that the
filename in the NFS storage system is the same as that used in the ASM-based production
database (/oradata/rman_master/%d/datafiles/%b).
The tag zfssa_clone is used to indicate that the Oracle RMAN backup was performed
specifically for cloning purposes. If an attempt is made to perform a level 1 copy before a
level 0 backup has been completed, Oracle RMAN detects that no level 0 full backup exists
and initiates an implicit level 0 backup to the MCL datafiles location. The Oracle RMAN
command syntax to perform the backup is shown below:
backup incremental level 1
for recover of copy with tag 'zfssa_clone' database reuse;
recover copy of database with tag 'zfssa_clone';
The channels are pre-configured to copy the data files to the MCL location stored on the Sun
ZFS Storage Appliance. For more details about completing this step, see the section Oracle
RMAN Script for Performing Level 0 and Level 1 Backups in Appendix D.
4. Copy the archived logs to the MCL. The latest redo logs are archived and then all the
archived logs are copied to the MCL archive location.
BACKUP AS COPY skip inaccessible (archivelog all) ;
At this point, a complete copy of the database is available for cloning. For more details about
completing this step, see the section Oracle RMAN Script for Performing Level 0 and Level 1
Backups in Appendix D.
5. Periodically perform an Oracle RMAN level 1 backup and merge the changes into the
backup copy of the datafile that resides on the MCL.
Refer to the section Configuring the Production Database Server for an Oracle RMAN
Incremental Backup in Appendix D for a detailed step-by-step procedure.

Oracle Database Cloning Solution Using Oracle Recovery Manager and Sun ZFS Storage Appliance
9
Performing the Storage-Based Snapshot and Cloning Operation
To perform a snapshot of the database backup and create one or more clones of the snapshot,
complete the steps below. Additional details are provided in Appendix D. Commands and Scripts.
1. Create a separate project in the Sun ZFS Storage Appliance to host the cloned
database.
2. Perform a snapshot of the project under which the MCL files systems are mounted in
the storage appliance.
Snapshots are point-in-time image copies of the file system from which clones will be created.
The snapshot operation is performed at the project level so that snapshots are performed on
all the file systems under the project in a consistent manner. Snapshots are read-only, so
cannot be used for database operations.
Taking a snapshot snap_0 of the project rman_proddb_master creates snapshots of all the
files systems in the rman_proddb_master project. This can be done using either the storage
appliance graphical user interface or command line interface.
It is recommended that this operation be performed at a time when the backup is not being
performed. Otherwise, the cloned file systems may not have enough data to successfully
recover the database.
For more details see the section Performing a Snapshot Operation in the Sun ZFS Storage
Appliance in Appendix D.
3. Clone the snapshot and store the file systems under a project created for the cloned
database.
Clones are created in the storage appliance from the snapshot snap_0 created in step 2.A
clone is a read/write-able copy of the snapshot which can be accessed by the database. Each
cloned file system is independent with respect to accessibility but depends on the base
snapshot. So, clones can be destroyed and re-created from a single snapshot. However,
deleting the snapshot destroys all the clones created from the snapshot. In the example in this
paper, a project called rman_proddb_clone1 is created to store the first clone of the
database PRODDB.
These conditions must be met when performing a cloning operation:
Each project that is cloned must have a unique name.
The cloned project must be created in the same storage pool as the snapshot.
The exported mount points must be unique in the storage appliance.
At this point, a cloned copy of the database created from MCL data is available for database
access. For a detailed procedure, see the section Performing a Cloning Operation in the Sun
ZFS Storage Appliance in Appendix D.

Oracle Database Cloning Solution Using Oracle Recovery Manager and Sun ZFS Storage Appliance
10
4. To create more than one snapshot or clone, repeat steps 1-3.
Configuring the Clone Database Server
The clone database server is configured by completing the following steps. Additional details are
provided in Appendix D. Commands and Scripts.
1. Mount the file systems from the Sun ZFS Storage Appliance in the database server.
For details, see the section Configuring the Clone Database Server in Appendix D.
2. Perform instance creation, control file creation, and recovery using the archived logs and
then open the database using the resetlogs option.
The version of Oracle database binaries on this server is the same as the version on the
production database server. The Sun ZFS Storage Appliance is connected to this database
server with a 10 Gb Ethernet connection. The cloned file systems from the storage appliance
are mounted in the database server.
First, four directories are created called datafiles, redologs, archive, and alerts and
the NFS file systems mounted under these directories. Then the following procedures are
completed by the oracle user:
The oracle instance CLONE1 is started in the nomount state using initCLONE1.ora.
A script to generate a control file is created from the production database using the
BACKUP TO TRACE command. The SQL command is then modified to suit the cloned
database environment.
A control file is created with the new datafile location, /oradata/clone1/datafiles/,
using the control file creation script.
The database is recovered using the RECOVER UNTIL CANCEL command. All the archived
logs required by the instance are applied until the last archived log is reached. Then
CANCEL is entered to end the recovery process.
The database is opened with the RESETLOGS option, which creates online redo logs under
/oradata/clone1/redologs as specified in the control file.
Temporary files are created.
Network configuration files, such as listener.ora and tnsnames.ora, are updated so
that the clients can connect to the database.
The cloned database is now a fully operational database and can be used for test, development, QA,
backup, or any other purpose. For a detailed step-by-step procedure, see the section Complete Script
for Cloning a Snapshot in Appendix D.
Refreshing the Backup Data
Oracle Database Cloning Solution Using Oracle Recovery Manager and Sun ZFS Storage Appliance
11
Oracle RMAN incremental updates are typically performed as scheduled but can also be performed on
demand. The RMAN incremental update command is used to copy and merge the changes to the MCL
datafiles. The tag zfssa_clone that was used for the level 0 backup is used for subsequent level 1
updates. The recent redo logs are then archived and all the archived logs backed up to the MCL.
Additional details are provided in the section Oracle RMAN Script for Performing Level 0 and Level 1
Backups in Appendix D.
Reference Test and Development Setup
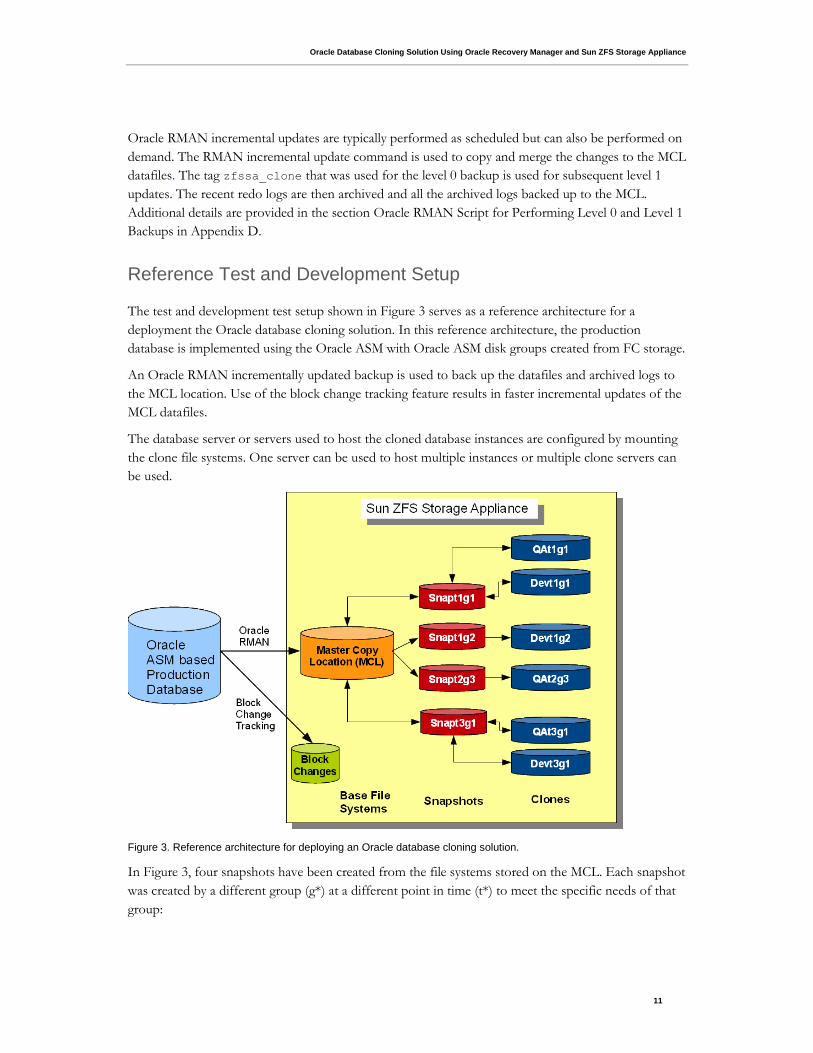
The test and development test setup shown in Figure 3 serves as a reference architecture for a
deployment the Oracle database cloning solution. In this reference architecture, the production
database is implemented using the Oracle ASM with Oracle ASM disk groups created from FC storage.
An Oracle RMAN incrementally updated backup is used to back up the datafiles and archived logs to
the MCL location. Use of the block change tracking feature results in faster incremental updates of the
MCL datafiles.
The database server or servers used to host the cloned database instances are configured by mounting
the clone file systems. One server can be used to host multiple instances or multiple clone servers can
be used.
Figure 3. Reference architecture for deploying an Oracle database cloning solution.
In Figure 3, four snapshots have been created from the file systems stored on the MCL. Each snapshot
was created by a different group (g*) at a different point in time (t*) to meet the specific needs of that
group:

Oracle Database Cloning Solution Using Oracle Recovery Manager and Sun ZFS Storage Appliance
12
Snapt1dg is a snapshot taken by group 1 (g1) at time t1 after the level 0 backup.
Snapt1g2 is a snapshot taken by group 2 (g2) at time t1 after the level 0 backup.
Snapt2g3 is a snapshot taken by group 3 (g3) at time t2 after the first incrementally updated
backup operation is complete.
Snapt3g1 is a snapshot taken by group 1 at time t3 after the second incrementally updated backup
operation is complete.
In this setup, group 1 has taken two snapshots while group 2 and group 3 have each taken one
snapshot.
Clones have been created from these snapshots to enable read/write operations to be performed on
the database for a specific purpose by a group:
Qat1g1 is a clone created from Snapt1g1 snapshot to be used for QA purposes by group 1.
Devt1g1 is a clone created from the same Snapt1g1 snapshot to be used for development
purposes of group 1.
Devt1g2 is a clone created from Snapt1g2 to be used for development purposes by group 2.
Qat2g3 is a clone created from Snapt2g3 to be used for QA purposes by group 3.
Qat3g1 is a clone created from Snapt3g1 to be used for QA purposes by group 1.
Devt3g1 is a clone created from Snapt3g1 to be used for development purposes by group 1.
After the snapshot Snapt3g1 has been taken by group 1 and the clones Qat3g1 and Devt3g1 created,
snapshot Snaptlg1 may no longer be needed by the group. If they discard Snapt1g1, its clones Qat1g1
and Devt1g1 will also be destroyed.

Oracle Database Cloning Solution Using Oracle Recovery Manager and Sun ZFS Storage Appliance
13
Benefits of Database Cloning with Sun ZFS Storage Appliances
Sun ZFS Storage Appliance capabilities can be used to implement a flexible, efficient solution for
cloning production databases with the benefits described below.
Oracle-tested and validated solution
The procedure described in this document has been tested and validated by Oracle. The provided
solution description and script samples will help you accelerate test and development cycles, yielding
faster time to deployment.
While this paper describes a solution using an ASM-based production database, the procedures can be
used, with slight changes, in any production database environment. This solution can be used with an
Oracle Exadata Database Machine as Hybrid Columnar Compression (HCC) is supported with ZFS
Storage Appliance with Oracle database version 11.2.0.3.
Easy Integration into Existing Infrastructure
The Sun ZFS Storage Appliance will easily fit into an existing SAN/NAS infrastructure without
disturbing a pre-existing setup. While incremental changes are being updated to the MCL datafiles,
users can continue to work on their cloned databases.
Accelerate Deployment of applications
With the unique and comprehensive insight offered by DTrace Analytics, which is a powerful graphical
interface performance monitoring tool that comes bundled with the Sun ZFS Storage Appliance (refer
to Appendix B. About the Sun ZFS Storage Appliance for more details). Using this feature,
organizations can more quickly deploy application upgrades, patch releases, and speed development.
Ease of deployment and management
With multi-protocol support, the Sun ZFS Storage Appliance fits into any infrastructure. The user
interface provides intuitive and convenient ways to manage the storage appliance. The entire database
cloning solution can be scripted and executed repeatedly, reducing the time and resources required for
the cloning operation.
Efficient backup, business continuity, and disaster recovery
All the data services, such as replication, snapshots, or cloning, are included in the price of the storage
appliance. There is no additional cost involved for enabling any feature or protocol. All these features
can be used in combinations to meet specific needs for easier backup (certified with a number of
leading backup applications), business continuity for almost instantaneous restores, and remote
replication for disaster recovery purposes.
Efficient space utilization
Many traditional methods are available to perform the duplication of the production Oracle database.
Traditional methods create a full, point-in-time copy (or clone) of the database. These methods,
Oracle Database Cloning Solution Using Oracle Recovery Manager and Sun ZFS Storage Appliance
14
however, are time-consuming and require huge amounts of storage. For example, cloning six copies of
a 1 TB database would require nearly six times more storage space.
When the snapshot is taken, no space is initially allocated. Likewise, when the clone is created from the
snapshot, new blocks are written only when changes are made. So, when accessing the clone, the data
may be referencing to the data block of the original RMAN image copy. This enables efficient space
utilization when deploying more clones.
Flexibility with Unlimited Snapshots and Clones
A complex test and development environment can be deployed with full flexibility. The MCL master
file systems are kept nearly up-to-date through regular incrementally updated backups of changes made
in the production database. An unlimited number of snapshots can be created from the MCL at
different points in time, and an unlimited number of clones can be created from each of those
snapshots. Thus, each developer can be provided with their own database, enabling more test cycles to
be completed in the same amount of time. If something goes wrong with a cloned instance, the clone
can be destroyed and recreated at any time without impacting other snapshots and clones.
The possibilities are endless for creating cloned versions of the database. A snapshot can be taken of
the MCL at any time and any number of clones created from the snapshot. In addition, while every
clone is dependent on a snapshot, a snapshot can be made of any clone and clones created from that
snapshot.
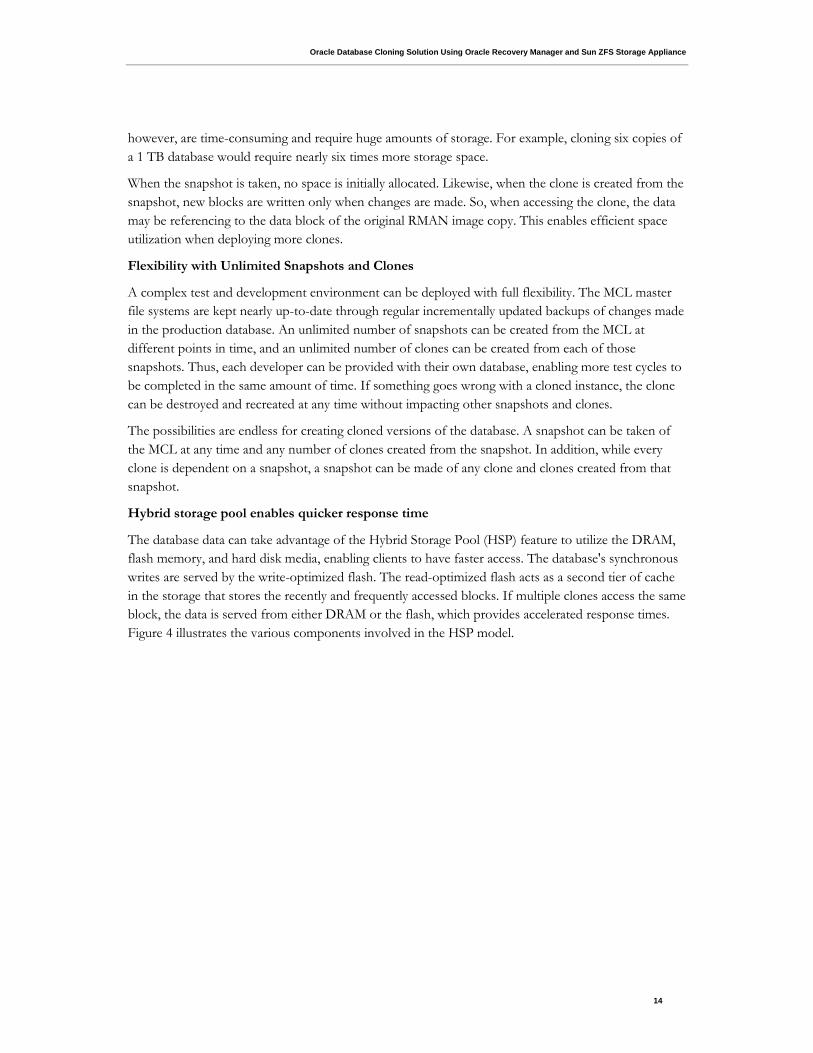
Hybrid storage pool enables quicker response time
The database data can take advantage of the Hybrid Storage Pool (HSP) feature to utilize the DRAM,
flash memory, and hard disk media, enabling clients to have faster access. The database's synchronous
writes are served by the write-optimized flash. The read-optimized flash acts as a second tier of cache
in the storage that stores the recently and frequently accessed blocks. If multiple clones access the same
block, the data is served from either DRAM or the flash, which provides accelerated response times.
Figure 4 illustrates the various components involved in the HSP model.
Oracle Database Cloning Solution Using Oracle Recovery Manager and Sun ZFS Storage Appliance
15
Figure 4. Sun ZFS Storage Appliance Hybrid Storage Pool used for database cloning.
Analytics for faster resolution and planning
The Analytics feature of the ZFS storage appliance provides a helpful graphical representation of the
performance of the various components of the storage appliance. Information provided by the
Analytics feature helps you:
Understand how newly developed code impacts overall IO performance, enabling a faster test
cycle and leading to accelerated deployment of new code.
Understand the overall health of the storage appliance.
Observe the IOPS, response time, and throughput of the storage appliance.
Understand the client(s) access pattern for supporting SLA agreements.
Address capacity planning requirements.
Identify and resolve problems by comparing performance data at the client and at the storage
appliance.
Export historical data for analysis.
Several examples of information provided by the Analytics feature are provided in the following
figures.
Oracle Database Cloning Solution Using Oracle Recovery Manager and Sun ZFS Storage Appliance
16
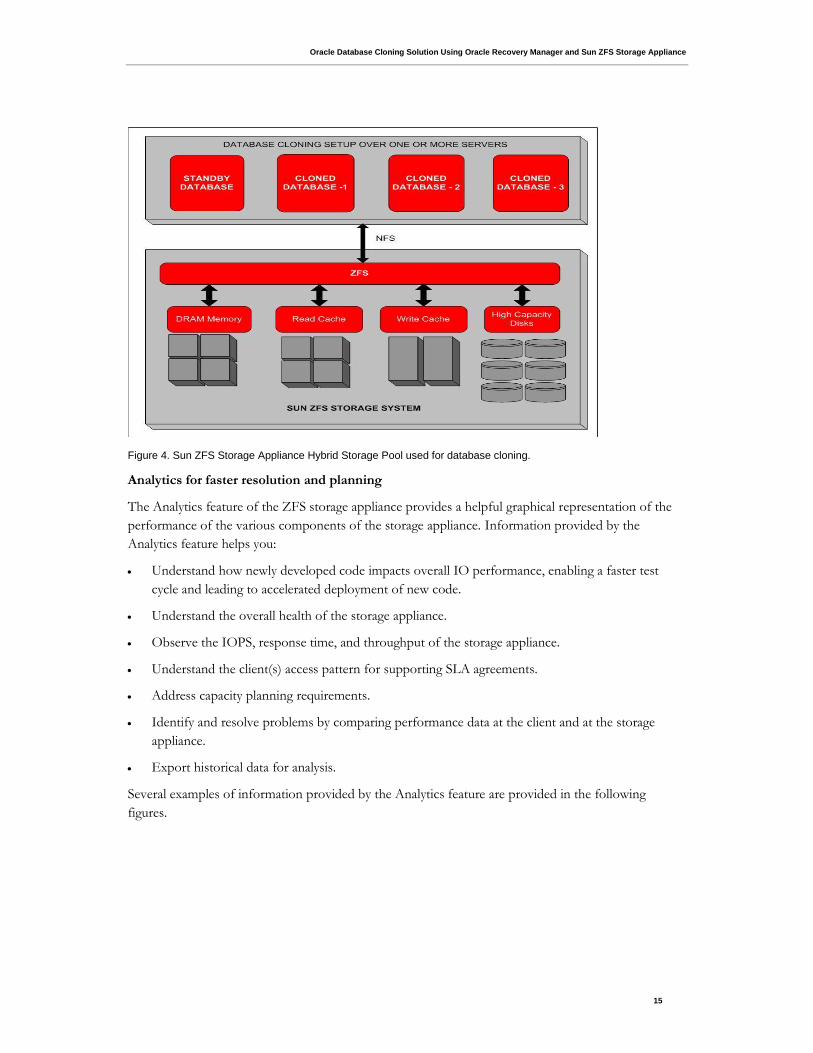
The Sun ZFS Storage Appliance Dashboard provides an overview of the status of system components.
The screen in Figure 5 shows space utilization and activity for the different protocols used.
Figure 5. Dashboard showing space utilization and activity for the different protocols used.
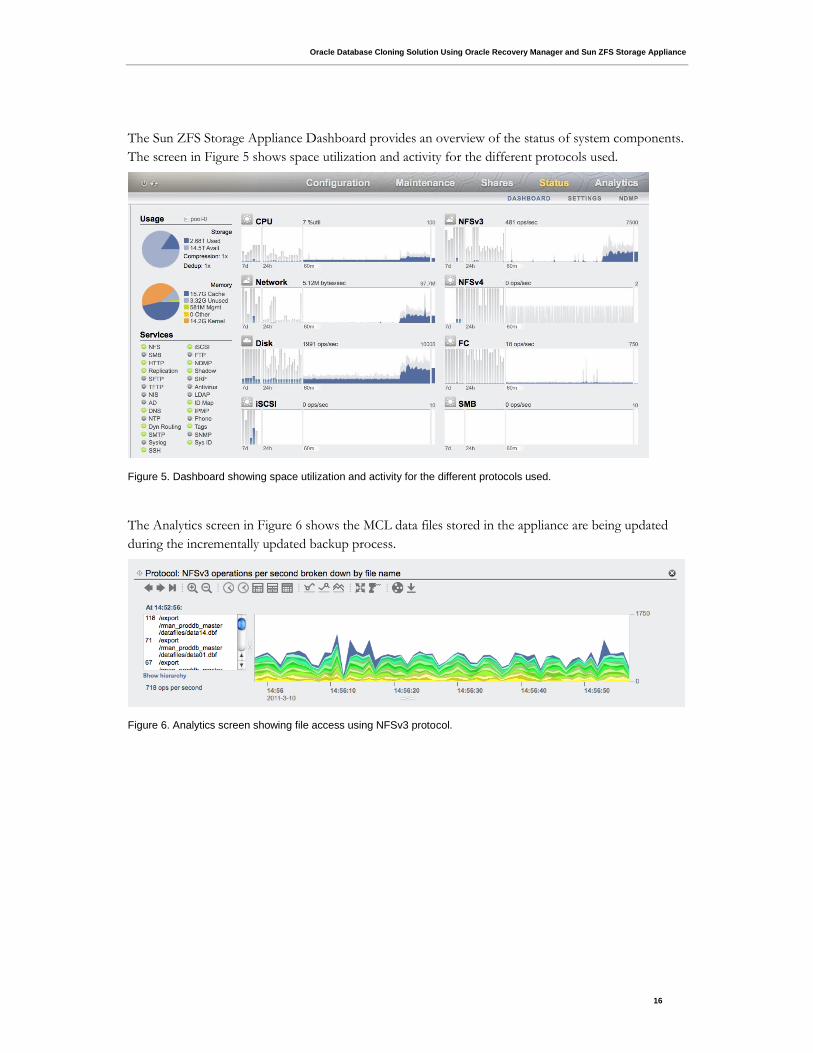
The Analytics screen in Figure 6 shows the MCL data files stored in the appliance are being updated
during the incrementally updated backup process.
Figure 6. Analytics screen showing file access using NFSv3 protocol.
Oracle Database Cloning Solution Using Oracle Recovery Manager and Sun ZFS Storage Appliance
17
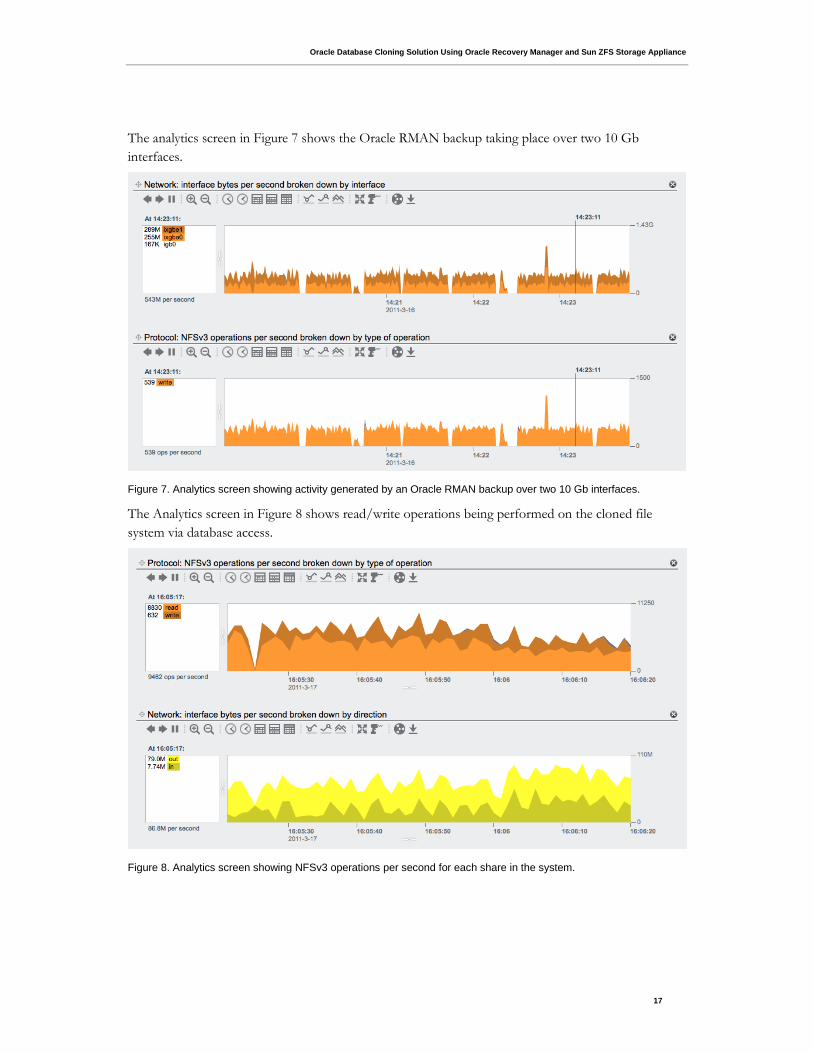
The analytics screen in Figure 7 shows the Oracle RMAN backup taking place over two 10 Gb
interfaces.
Figure 7. Analytics screen showing activity generated by an Oracle RMAN backup over two 10 Gb interfaces.
The Analytics screen in Figure 8 shows read/write operations being performed on the cloned file
system via database access.
Figure 8. Analytics screen showing NFSv3 operations per second for each share in the system.
Oracle Database Cloning Solution Using Oracle Recovery Manager and Sun ZFS Storage Appliance
18
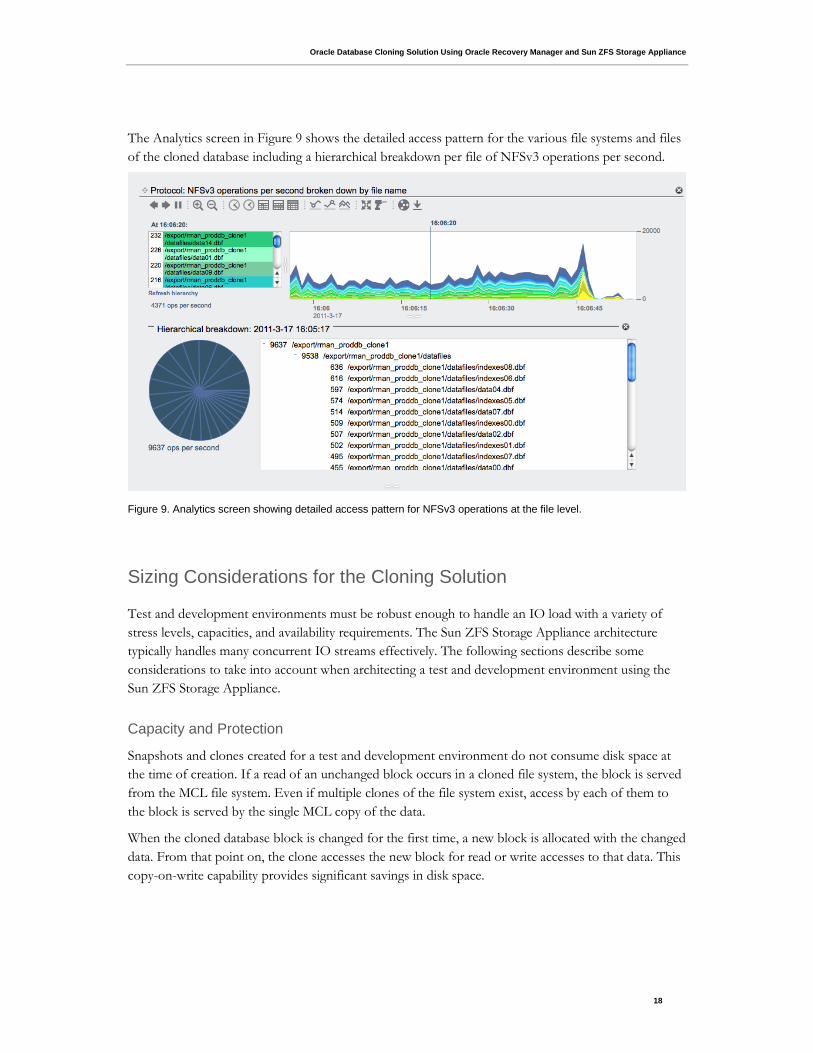
The Analytics screen in Figure 9 shows the detailed access pattern for the various file systems and files
of the cloned database including a hierarchical breakdown per file of NFSv3 operations per second.
Figure 9. Analytics screen showing detailed access pattern for NFSv3 operations at the file level.
Sizing Considerations for the Cloning Solution
Test and development environments must be robust enough to handle an IO load with a variety of
stress levels, capacities, and availability requirements. The Sun ZFS Storage Appliance architecture
typically handles many concurrent IO streams effectively. The following sections describe some
considerations to take into account when architecting a test and development environment using the
Sun ZFS Storage Appliance.
Capacity and Protection
Snapshots and clones created for a test and development environment do not consume disk space at
the time of creation. If a read of an unchanged block occurs in a cloned file system, the block is served
from the MCL file system. Even if multiple clones of the file system exist, access by each of them to
the block is served by the single MCL copy of the data.
When the cloned database block is changed for the first time, a new block is allocated with the changed
data. From that point on, the clone accesses the new block for read or write accesses to that data. This
copy-on-write capability provides significant savings in disk space.
Oracle Database Cloning Solution Using Oracle Recovery Manager and Sun ZFS Storage Appliance
19
To determine the capacity utilization for a cloned file system, it is important to understand the rate of
change resulting from the creation of new blocks of data in response to writes to the database. In the
worst case, in which all the blocks of all the files change, the cloned file system will grow to the size of
the base volume itself.
The Sun ZFS Storage Appliance offers a number of RAID levels, such as mirrored, single parity
RAID-Z, dual parity RAID-Z2, etc. The RAID levels applicable in the test and development
environment are discussed below :
Mirroring is used for storage for general purpose applications, databases, etc., that require optimal
performance. With mirroring, total raw capacity is reduced by 50 percent.
RAID-Z offers 50 percent higher capacity than mirroring with reasonable performance and can
tolerate a single disk failure. RAID-Z is suitable when optimal capacity is required.
RAID-Z2 reduces capacity and performance compared to RAID-Z, but with the benefit of higher
availability. RAID-Z2 is ideal for streaming data.
For test and development environments, either mirrored or RAID-Z can be used.
Network Connectivity
The solution describe in this paper is based in NFS protocol. The type of connectivity used between
the production database server and the Sun ZFS Storage Appliance is selected based on the
requirements of the Oracle RMAN backup operation. Likewise, the connectivity between the cloned
database server and the Sun ZFS Storage Appliance is dependent on on SLA requirements for the test
and development environments. In both the cases, using one or more 1 Gb or 10 Gb Ethernet
connections is recommended. Optionally, IPoIB can be deployed for connectivity between an Oracle
Exadata Storage Server and the Sun ZFS Storage Appliance.
Optimized IOPS and Throughput
The Sun ZFS Storage Appliance offers read-optimized SSDs to enhance read throughput and
input/output operations per second (IOPS) performance. With these SSDs, a response time of less
than 5 ms can be achieved for read requests. Each storage appliance can be populated with up to six of
these large capacity devices (512 GB each) – comprising a total cache of 3 TB, in addition to the
DRAM in the system.
In addition, if a data block is referenced by a user of one clone and the same data block is then
requested by a user of another clone, it is likely that the data will be residing in either DRAM or read-
optimized SSD. This translates to faster response time and enhancement of the overall end user
experience.
Write operations take place on the datafiles on the MCL, during the incrementally updated backup
operations, and on cloned databases. Write-optimized SSDs are used to absorb the latency sensitive
writes typically performed by databases. Each write optimized SSD is limited to 100 MB/sec
bandwidth and provides a response time of less than 1 ms. Striping the write SSDs provides the best
Oracle Database Cloning Solution Using Oracle Recovery Manager and Sun ZFS Storage Appliance
20
bandwidth. For example, striping across four write SSDs provides a write throughput of up to 400
MB/sec.
During an Oracle RMAN backup, if the number of write SSDs proves to be a bottleneck, consider
changing the value of the logbias property to throughput instead of latency. This will cause the
write SSDs to be bypassed. However, this mode only works favorably when there are a large number
of write requests, such as for multichannel Oracle RMAN backups.
General Recommendations
Listed below are some general recommendations for optimizing this solution.
Configure Oracle RMAN with multiple channels for the backups to the MCL.
While this solution shows a single location for MCL data files, it is recommended that as many file
systems be created for the data files in the MCL as the number of RMAN channels.
Set the record size for each datafile file system to 8 KB to match the Oracle database block
size. This is critical for efficient incrementally updated and storage of cloned database datafiles.
Enable the Oracle Direct NFS feature, which provides better Oracle RMAN throughput.
Name the snapshots and clones clearly.
Delete unused clones and snapshots.
If the number of write SSDs is identified as the limiting factor, change the value of the logbias
property to throughput.
It is recommended that either a Sun ZFS Storage Appliance 7320 or a Sun ZFS Storage Appliance
7420 be used for this solution with appropriate memory, connectivity, read SSDs, write SSDs and
number of disks. The solution can be architected based on requirements.
If a clone needs to be refreshed, destroy the clone, perform a snapshot on MCL, and create the
clone again. If all the clones of a snapshot need to be refreshed, first delete the snapshot, which in
turn destroys all its child clones.
Exadata HCC enabled tables can be directly accessed from ZFS Storage Appliance using database
version 11.2.0.3 and above.
The cloned database server operating system is chosen based on the production database server's
operating system to match the endianness (byte order).
The same cloning solution is applicable in the RAC environment with appropriate changes in the
initialization parameter file and configuring online redo logs.
Oracle Database Cloning Solution Using Oracle Recovery Manager and Sun ZFS Storage Appliance
21
Cloning Non-Database Components
In some situations, such as when a specific Oracle patch needs to be tested before it is applied to the
production site, it may be necessary to clone the entire Oracle database environment rather than just
the database. Use the standard Sun ZFS Storage appliance snapshot and cloning procedure for non-
database components such as ORACLE_HOME. Thus a copy of the entire Oracle database
environment including the database and any associated binaries and applied patches can be created at
any point in time.
Cloning the ORACLE_HOME Directory
The Oracle database has a built-in capability to clone the ORACLE_HOME directory. The cloning process
copies all the files from the source Oracle home location to a target Oracle home location and registers
the new Oracle home with the Oracle home inventory.
Each time a clone of the ORACLE_HOME directory is created, the files under ORACLE_HOME are
physically copied again. Thus, for example, if you are creating ten copies of the ORACLE_HOME
directory to test different patches, and the ORACLE_HOME directory is the typical size of roughly 10 GB,
you will need to allocate 100 GB of space.
Using the Sun ZFS Storage appliance simplifies the cloning procedure and minimizes the amount of
space used for copies. In place of physically copying the files each time they are needed, a clone can be
created based on the stored binaries. Since a clone consumes space only when a change is made to it,
space consumption is significantly reduced.
In the Sun ZFS Storage Appliance, clones can be created of a file system independent of the type of
data stored in the file system. If the ORACLE_HOME directory is already stored in the Sun ZFS Storage
appliance, clones can be created from it directly. If not, the binaries are first copied to a master Oracle
Home location, and then clones are created from that image. The procedure to snapshot and clone the
ORACLE_HOME directory can be synchronized with the creation of a database clone to provide a
complete copy of the database environment.
The procedure to clone the ORACLE_HOME directory comprises the three steps summarized below and
described in detail in the following sections:
1. Set up an Oracle home master location in storage to serve as the source for clones.
2. Perform a storage-based snapshot and cloning procedure.
3. Configure and deploy the cloned environment by mounting the cloned file system and
running an Oracle clone perl script.
For additional details, refer to the Oracle document ID300062.1.
Oracle Database Cloning Solution Using Oracle Recovery Manager and Sun ZFS Storage Appliance
22
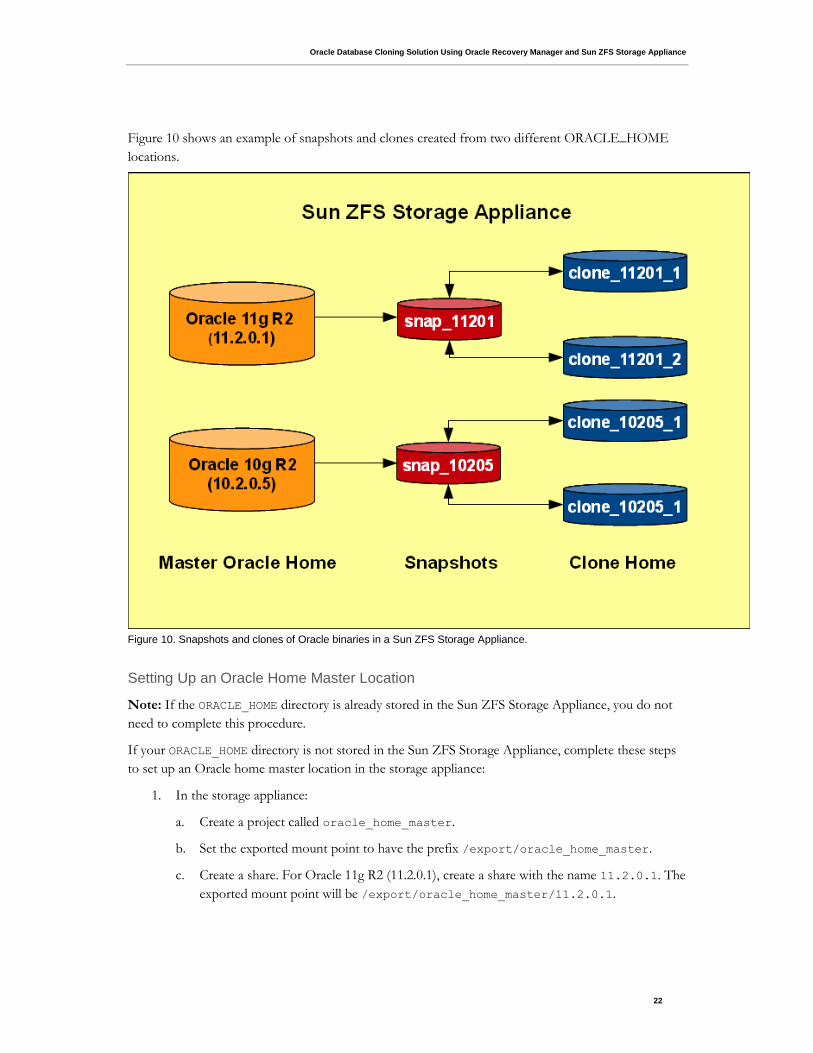
Figure 10 shows an example of snapshots and clones created from two different ORACLE_HOME
locations.
Figure 10. Snapshots and clones of Oracle binaries in a Sun ZFS Storage Appliance.
Setting Up an Oracle Home Master Location
Note: If the ORACLE_HOME directory is already stored in the Sun ZFS Storage Appliance, you do not
need to complete this procedure.
If your ORACLE_HOME directory is not stored in the Sun ZFS Storage Appliance, complete these steps
to set up an Oracle home master location in the storage appliance:
1. In the storage appliance:
a. Create a project called oracle_home_master.
b. Set the exported mount point to have the prefix /export/oracle_home_master.
c. Create a share. For Oracle 11g R2 (11.2.0.1), create a share with the name 11.2.0.1. The
exported mount point will be /export/oracle_home_master/11.2.0.1.
Oracle Database Cloning Solution Using Oracle Recovery Manager and Sun ZFS Storage Appliance
23
2. Mount the master location from the source host. For example,
/export/home/oracle/master_home.
3. As root, tar the $ORACLE_HOME to be cloned.
4. Copy the tar file to the location /export/home/oracle/master_home.
5. Untar the tar file in the master_home directory.
6. Set the proper permissions and ownership for certain binary files such as the oradism utility.
See Appendix E. Procedure to Clone an Oracle_Home for details.
Creating a Storage Snapshot and Clone of the ORACLE_HOME
To create a snapshot and clone of the master ORACLE_HOME and store the clone in a project, complete
the steps below:
1. Create a project called oracle_home_clone.
2. Define an NFS exception to allow root access for the hosts that will use the cloned binaries.
3. Set the exported mount point prefix to be /export/oracle_home_clone.
4. Perform a snapshot of the share 11.2.0.1.
5. Create a clone from the snapshot and store it under the cloned oracle_home_clone project
created in step 1.
Configuring and Preparing the Cloned Environment
To configure the cloned environment and prepare it for use, complete the steps below:
1. Mount the cloned file system in the target host under the mount point that is usually under
the ORACLE_BASE location. For example, under
/export/home/oracle/products/clone/11.2.0.1/db
2. From the cloned ORACLE_HOME/clone/bin directory, run the clone.pl command with the
parameters for the Oracle Universal Installer (OUI) set to perform an install, relink, and
register the new ORACLE_HOME in the central inventory which is typically stored in the
ORACLE_BASE directory.
Using the Cloned Oracle Home
To use the cloned environment, complete these steps:
1. Change the environment variables ORACLE_HOME and PATH to include the cloned binaries.
2. Modify the listener.ora and tnsnames.ora configuration files as necessary.
The cloned Oracle home is now ready use with the regular or a cloned database.
Oracle Database Cloning Solution Using Oracle Recovery Manager and Sun ZFS Storage Appliance
24
Benefits of Using Cloning in the Sun ZFS Storage Appliance
Using the snapshot and cloning features of the Sun ZFS Storage Appliance offer benefits such as:
Multiple clones can be created from the same master.
The cloning process is almost instantaneous.
A clone reserves no space until a change is made, providing significant space conservation.
Snapshots and clones created from the cloned file system can be used for testing additional
patches.
The entire database environment, including database, binaries, configuration files, external
BFILEs, and other content, can be cloned at any point in time.
Clones can be destroyed and recreated from the same snapshot instantaneously, which is especially
useful in testing environments.
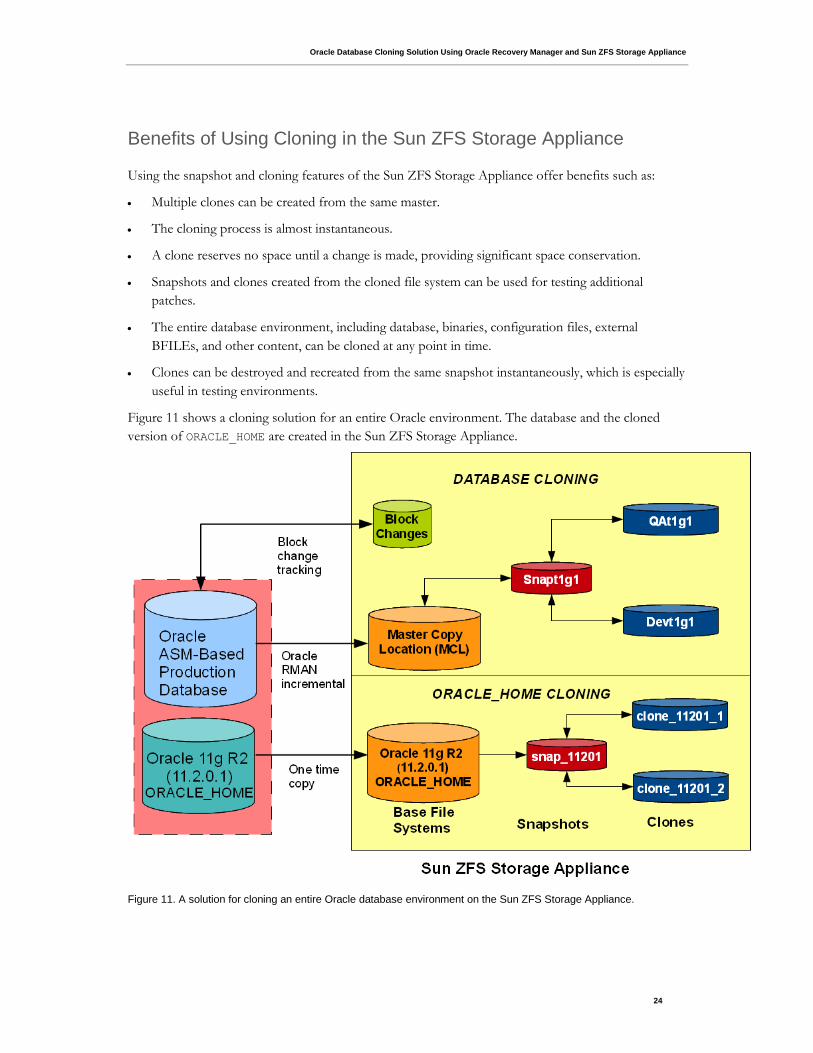
Figure 11 shows a cloning solution for an entire Oracle environment. The database and the cloned
version of ORACLE_HOME are created in the Sun ZFS Storage Appliance.
Figure 11. A solution for cloning an entire Oracle database environment on the Sun ZFS Storage Appliance.
Oracle Database Cloning Solution Using Oracle Recovery Manager and Sun ZFS Storage Appliance
25
Conclusion
Sun ZFS Storage Appliance provides an ideal platform for performing database cloning. The appliance
comes with a user-friendly interface for ease of management, a full set of data services for business
continuity and disaster recovery purposes, multi-protocol support to cater to any infrastructure,
analytics for monitoring and resolution purposes, and a hybrid storage pool for faster response time
for test, development, and QA activities.
With unlimited snapshots and cloning possibilities, many concurrent database instances can be
launched for various purposes without impacting the production database. All of this makes Sun ZFS
Storage Appliance the preferred solution platform for database cloning purposes.
Oracle Database Cloning Solution Using Oracle Recovery Manager and Sun ZFS Storage Appliance
26
Appendix A. Resources
Oracle Maximum Availability Architecture Web site
http://www.oracle.com/technetwork/database/features/availability/maa-best-practices-155366.html
Oracle Database High Availability Overview (Part #B14210)
http://otn.oracle.com/pls/db111/db111.to_toc?partno=b28281
Oracle Database High Availability Best Practices (Part B25159)
http://otn.oracle.com/pls/db111/db111.to_toc?partno=b28282
Oracle Data Guard with 11g Release 2 Technical White Paper
http://www.oracle.com/technetwork/database/features/availability/twp-dataguard-11gr2-1-
131981.pdf
Sun ZFS Storage Appliance Documentation
http://wikis.sun.com/display/FishWorks/Documentation
Deploying Oracle Databases Using NFS on Sun Storage 7000 Unified Storage
http://www.sun.com/bigadmin/features/articles/7000_oracle_deploy_2009q3.jsp
Configuring Sun Storage 7000 for Oracle Databases
http://wikis.sun.com/display/SystemsComm/Configuring+Sun+Storage+7000+Unified+Storage+Sy
stems+for+Oracle+Databases
Backup and Recovery of Oracle Databases with Snapshot Feature of Sun Storage 7000 Unified Storage System
http://www.sun.com/bigadmin/features/articles/oracle_7000_snapshot.jsp
Oracle Database Cloning Solution Using Oracle Recovery Manager and Sun ZFS Storage Appliance
27
Appendix B. About the Sun ZFS Storage Appliance
This section provides an overview of the Sun ZFS Storage Appliance. For additional information
about features, functions, and platform offerings, refer to Oracle’s Sun Unified Storage website at
http://www.oracle.com/us/products/servers-storage/storage/unified-storage/index.html
Architecture Overview
The Sun ZFS Storage Appliance offers ease of management, connectivity using a variety of protocols,
and data services for business continuity in a single storage appliance. The appliance supports NFS,
Common Internet File System (CIFS), Internet Small Computer System Interface (iSCSI), InfiniBand
(IB), and Fibre Channel (FC) protocols. The appliance is available as single head or a clustered head.
For backup and recovery purposes, the appliance supports the Network Data Management Protocol
(NDMP).
At the core of the Sun ZFS Storage Appliance is the Oracle Solaris operating system, with the Oracle
Solaris ZFS file system and Sun ZFS Storage Appliance data management capabilities, which powers all
the data storage, management, and data services. These services are accessed using an intuitive user
interface or command line interface (CLI).
The ZFS storage architecture utilizes Hybrid Storage Pools (HSPs), in which DRAM, flash memory,
and physical disks are seamlessly integrated for efficient data placement. Based on the type and pattern
of user IO requests, the movement of data between these tiers is automatically handled by the storage
appliance. The appliance also includes a powerful performance monitoring tool, called Analytics, that
provides details about the performance of system components, such as the network, storage, file
systems, and client access, including many drill-down options. For example, the Analytics tool provides
metrics that can show which clients are accessing which file systems and files, network and disk
latencies and response times, size of data transfers, along with many other metrics.
Available Platforms
The Sun ZFS Storage Appliance is available in four models to meet customer requirements for price,
performance, capacity, and protection capabilities. The mid- to high-end platforms offer up to 2 TB of
read cache, enabling a read response time that is typically in the low single-digit milliseconds. The
write-optimized flash on all four platforms enables a synchronous write response time of less than a
millisecond.
Oracle Database Cloning Solution Using Oracle Recovery Manager and Sun ZFS Storage Appliance
28
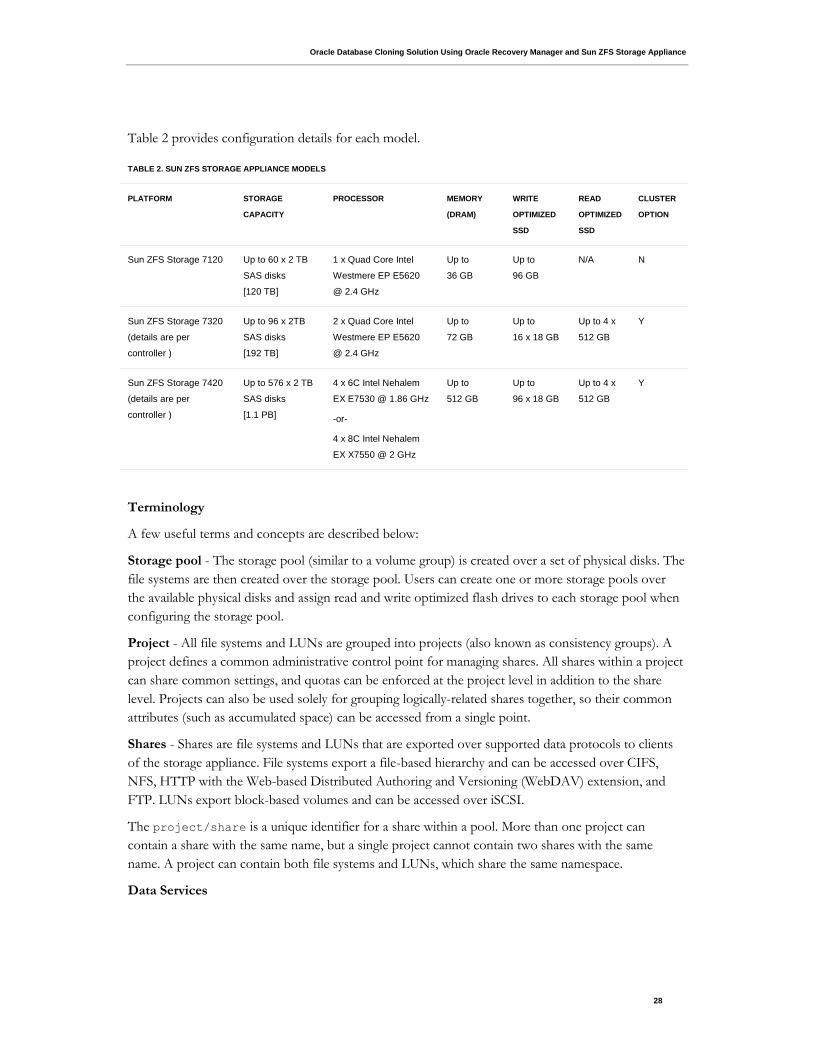
Table 2 provides configuration details for each model.
TABLE 2. SUN ZFS STORAGE APPLIANCE MODELS
PLATFORM STORAGE
CAPACITY
PROCESSOR MEMORY
(DRAM)
WRITE
OPTIMIZED
SSD
READ
OPTIMIZED
SSD
CLUSTER
OPTION
Sun ZFS Storage 7120 Up to 60 x 2 TB
SAS disks
[120 TB]
1 x Quad Core Intel
Westmere EP E5620
@ 2.4 GHz
Up to
36 GB
Up to
96 GB
N/A N
Sun ZFS Storage 7320
(details are per
controller )
Up to 96 x 2TB
SAS disks
[192 TB]
2 x Quad Core Intel
Westmere EP E5620
@ 2.4 GHz
Up to
72 GB
Up to
16 x 18 GB
Up to 4 x
512 GB
Y
Sun ZFS Storage 7420
(details are per
controller )
Up to 576 x 2 TB
SAS disks
[1.1 PB]
4 x 6C Intel Nehalem
EX E7530 @ 1.86 GHz
-or-
4 x 8C Intel Nehalem
EX X7550 @ 2 GHz
Up to
512 GB
Up to
96 x 18 GB
Up to 4 x
512 GB
Y
Terminology
A few useful terms and concepts are described below:
Storage pool - The storage pool (similar to a volume group) is created over a set of physical disks. The
file systems are then created over the storage pool. Users can create one or more storage pools over
the available physical disks and assign read and write optimized flash drives to each storage pool when
configuring the storage pool.
Project - All file systems and LUNs are grouped into projects (also known as consistency groups). A
project defines a common administrative control point for managing shares. All shares within a project
can share common settings, and quotas can be enforced at the project level in addition to the share
level. Projects can also be used solely for grouping logically-related shares together, so their common
attributes (such as accumulated space) can be accessed from a single point.
Shares - Shares are file systems and LUNs that are exported over supported data protocols to clients
of the storage appliance. File systems export a file-based hierarchy and can be accessed over CIFS,
NFS, HTTP with the Web-based Distributed Authoring and Versioning (WebDAV) extension, and
FTP. LUNs export block-based volumes and can be accessed over iSCSI.
The project/share is a unique identifier for a share within a pool. More than one project can
contain a share with the same name, but a single project cannot contain two shares with the same
name. A project can contain both file systems and LUNs, which share the same namespace.
Data Services
Oracle Database Cloning Solution Using Oracle Recovery Manager and Sun ZFS Storage Appliance
29
A number of data services are bundled with the Sun ZFS Storage Appliance and are available license
free. The following are some of the key data services relevant to the database cloning procedure
described in this paper:
Snapshots – The Sun ZFS Storage Appliance supports unlimited snapshot capability. A snapshot is a
read-only, point-in-time copy of a file system. It is instantaneously created and no space is allocated
initially. Blocks are allocated as changes are made to the base file system (copy-on-write). The
snapshots are either initiated manually or can be automated by scheduling at specific intervals. The
snapshot data can be directly accessed for any backup purposes.
A read to a snapshot block is served by the corresponding base file system block. When a change is
made in the base file system, the original block is referenced by the snapshot and a new block with the
change is referenced by the file system.
Performing a project snapshot is the equivalent of performing snapshots for all the shares within the
project.
Clones - The Sun ZFS Storage Appliance supports an unlimited number of clones. A clone is an
instantaneously created read-writable copy of a snapshot. One or more clones are created from a single
snapshot. These clones are presented to users as a normal file system(s). All regular operations are
allowed on clones including taking a snapshot from the clone. Clones are typically used in test,
development, QA, and backup environments.
Similarly to when a snapshot is created, when the clone is created, no space is allocated. A read to a
block in the clone is served by the corresponding base file system block. A changed block is allocated
only when the block is changed in the clone. Since space is shared between snapshots and clones, and
since a snapshot has multiple clones, a snapshot cannot be destroyed without also destroying any active
clones.
From the perspective of the client, a clone file system appears as though it is an independent file
system. No special requirement is needed to access a clone.
Snapshot rollback - Snapshot rollback is the process of bringing the base file system back to the point
in time at which the snapshot was taken.
A detailed description of the data services available with the Sun ZFS Storage Appliance can be found
in the Sun ZFS Storage Appliance documentation at
http://wikis.sun.com/display/FishWorks/Documentation
Remote replication - Data is asynchronously replicated to the targets, which can then be used for
disaster recovery purposes. The replication can be set to happen continuously, according to a user-
defined schedule or on demand. The Sun ZFS Storage Appliance supports remote replication of data
from one storage appliance to one or more appliances.

Oracle Database Cloning Solution Using Oracle Recovery Manager and Sun ZFS Storage Appliance
30
Appendix C. Storage and Host Configurations
The tables in this section describe the storage and host configurations used for the Oracle database
cloning solution described in this paper.
Table 3 describes the production site configuration.
TABLE 3: PRODUCTION SITE CONFIGURATION
PARAMETER VALUE
Hostname aie-6300b
System configuration Sun Blade T6300 / UltraSPARC-T1 32 core CPU / 16 GB
Operating system Solaris 10 U 8 (SPARC)
Connectivity to storage FC – 500 GB LUNS
Oracle database 11.2.0.1 / Single instance / ASM
Oracle instance name PRODDB
ASM diskgroup +PRODDG
Data, redo, control files +PRODDG/data/*
+PRODDG/logs/*
Oracle RMAN block changes tracking
file
/oradata/rman_master/PRODDB/incremental.f
NFS mount points for Oracle RMAN
incremental copy
/oradata/rman_proddb_master/datafiles
/oradata/rman_proddb_master/archive
NFS mount options rw,bg,hard,nointr,rsize=131072,wsize=131072,proto=tcp,vers=3
Oracle Database Cloning Solution Using Oracle Recovery Manager and Sun ZFS Storage Appliance
31
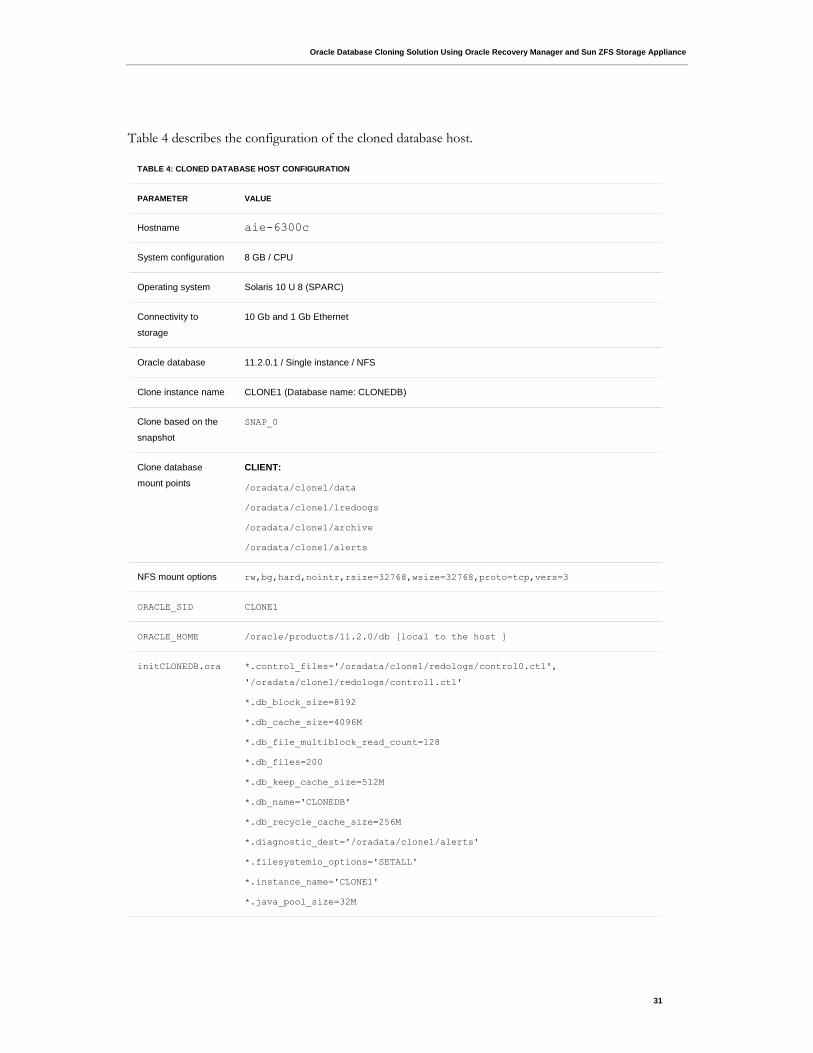
Table 4 describes the configuration of the cloned database host.
TABLE 4: CLONED DATABASE HOST CONFIGURATION
PARAMETER VALUE
Hostname aie-6300c
System configuration 8 GB / CPU
Operating system Solaris 10 U 8 (SPARC)
Connectivity to
storage
10 Gb and 1 Gb Ethernet
Oracle database 11.2.0.1 / Single instance / NFS
Clone instance name CLONE1 (Database name: CLONEDB)
Clone based on the
snapshot
SNAP_0
Clone database
mount points
CLIENT:
/oradata/clone1/data
/oradata/clone1/lredoogs
/oradata/clone1/archive
/oradata/clone1/alerts
NFS mount options rw,bg,hard,nointr,rsize=32768,wsize=32768,proto=tcp,vers=3
ORACLE_SID CLONE1
ORACLE_HOME /oracle/products/11.2.0/db [local to the host ]
initCLONEDB.ora *.control_files='/oradata/clone1/redologs/control0.ctl',
'/oradata/clone1/redologs/control1.ctl'
*.db_block_size=8192
*.db_cache_size=4096M
*.db_file_multiblock_read_count=128
*.db_files=200
*.db_keep_cache_size=512M
*.db_name='CLONEDB'
*.db_recycle_cache_size=256M
*.diagnostic_dest='/oradata/clone1/alerts'
*.filesystemio_options='SETALL'
*.instance_name='CLONE1'
*.java_pool_size=32M
Oracle Database Cloning Solution Using Oracle Recovery Manager and Sun ZFS Storage Appliance
32
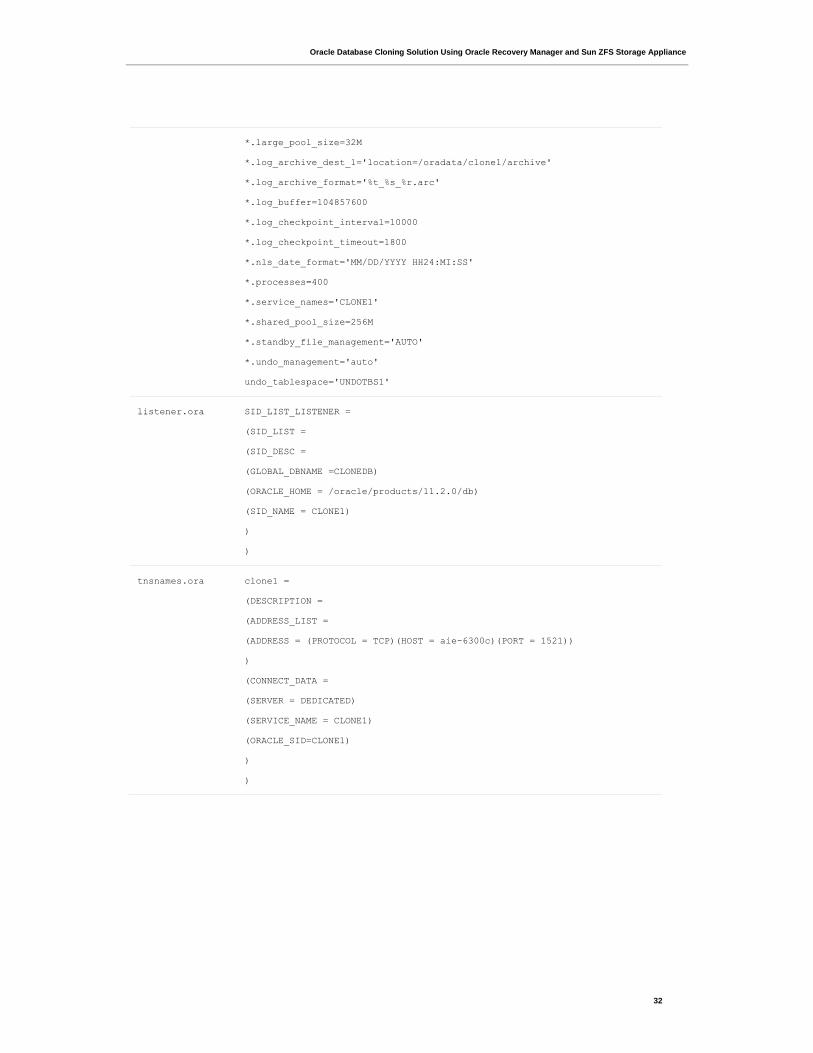
*.large_pool_size=32M
*.log_archive_dest_1='location=/oradata/clone1/archive'
*.log_archive_format='%t_%s_%r.arc'
*.log_buffer=104857600
*.log_checkpoint_interval=10000
*.log_checkpoint_timeout=1800
*.nls_date_format='MM/DD/YYYY HH24:MI:SS'
*.processes=400
*.service_names='CLONE1'
*.shared_pool_size=256M
*.standby_file_management='AUTO'
*.undo_management='auto'
undo_tablespace='UNDOTBS1'
listener.ora SID_LIST_LISTENER =
(SID_LIST =
(SID_DESC =
(GLOBAL_DBNAME =CLONEDB)
(ORACLE_HOME = /oracle/products/11.2.0/db)
(SID_NAME = CLONE1)
)
)
tnsnames.ora clone1 =
(DESCRIPTION =
(ADDRESS_LIST =
(ADDRESS = (PROTOCOL = TCP)(HOST = aie-6300c)(PORT = 1521))
)
(CONNECT_DATA =
(SERVER = DEDICATED)
(SERVICE_NAME = CLONE1)
(ORACLE_SID=CLONE1)
)
)

Oracle Database Cloning Solution Using Oracle Recovery Manager and Sun ZFS Storage Appliance
33
Table 5 shows the configuration of the Sun ZFS Storage Appliance.
TABLE 5: SUN ZFS STORAGE APPLIANCE CONFIGURATION
PARAMETER VALUE
Hostname aie-7320a
System configuration Sun ZFS Storage 7320 / 72GB Memory
Connectivity 10 Gb Ethernet for data
1 Gb Ethernet for management
Oracle RMAN master copy location
(MCL) project
PROJECT NAME: rman_proddb_master
/export/rman_proddb_master/datafiles
/export/rman_proddb_master/redologs
/export/rman_proddb_master/archive
/export/rman_proddb_master/alerts
RECORD SIZE
8KB
128KB
128KB
128KB
Cloned project and file systems PROJECT NAME: rman_proddb_clone1
/export/rman_proddb_clone1/datafiles
/export/rman_proddb_clone1/redologs
/export/rman_proddb_clone1/archive
/export/rman_proddb_clone1/alerts
Table 6 shows the configurations of the network and storage switches used in the solution.
TABLE 6: SWITCH CONFIGURATION
PARAMETER VALUE
Network Switch (for storage, management) Extreme X350-48t, 48 ports
Cisco WS-X6708-10G-3C, 8 ports
Storage Switch (for FC) Brocade 4100
32 ports full fabric
4GB SWL SFPs
Fabric OS: v6.1.0
Oracle Database Cloning Solution Using Oracle Recovery Manager and Sun ZFS Storage Appliance
34
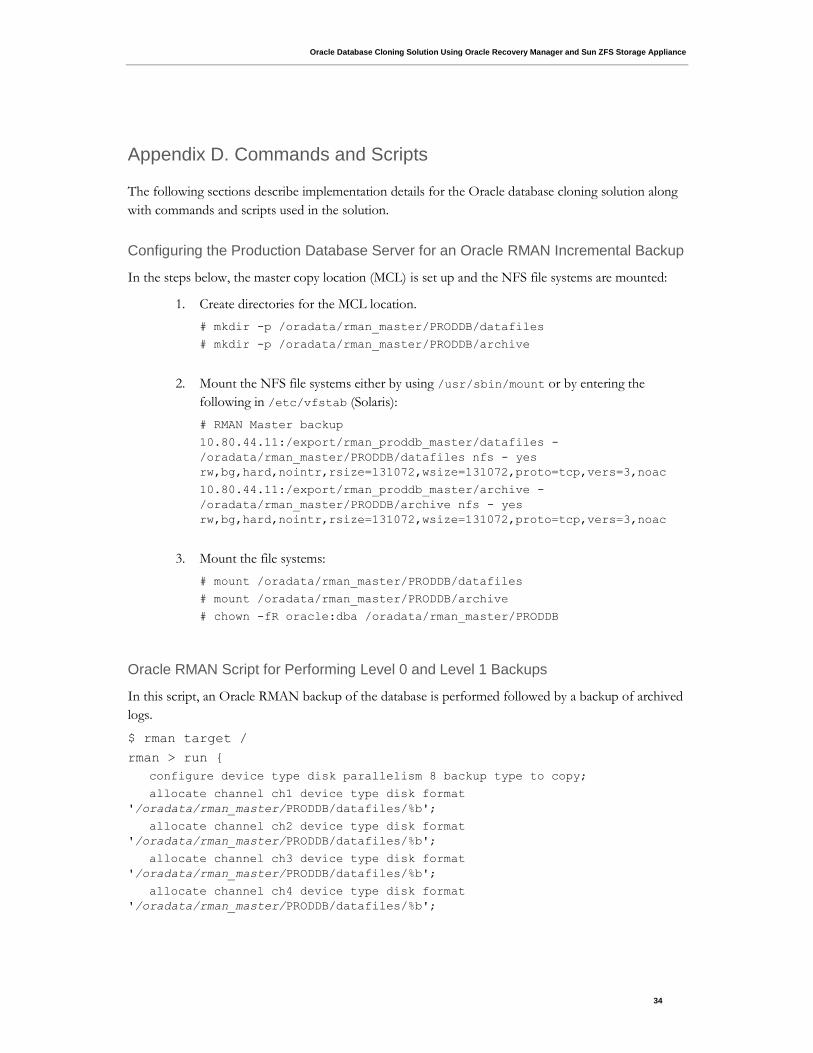
Appendix D. Commands and Scripts
The following sections describe implementation details for the Oracle database cloning solution along
with commands and scripts used in the solution.
Configuring the Production Database Server for an Oracle RMAN Incremental Backup
In the steps below, the master copy location (MCL) is set up and the NFS file systems are mounted:
1. Create directories for the MCL location.
# mkdir -p /oradata/rman_master/PRODDB/datafiles
# mkdir -p /oradata/rman_master/PRODDB/archive
2. Mount the NFS file systems either by using /usr/sbin/mount or by entering the
following in /etc/vfstab (Solaris):
# RMAN Master backup
10.80.44.11:/export/rman_proddb_master/datafiles -
/oradata/rman_master/PRODDB/datafiles nfs - yes
rw,bg,hard,nointr,rsize=131072,wsize=131072,proto=tcp,vers=3,noac
10.80.44.11:/export/rman_proddb_master/archive -
/oradata/rman_master/PRODDB/archive nfs - yes
rw,bg,hard,nointr,rsize=131072,wsize=131072,proto=tcp,vers=3,noac
3. Mount the file systems:
# mount /oradata/rman_master/PRODDB/datafiles
# mount /oradata/rman_master/PRODDB/archive
# chown -fR oracle:dba /oradata/rman_master/PRODDB
Oracle RMAN Script for Performing Level 0 and Level 1 Backups
In this script, an Oracle RMAN backup of the database is performed followed by a backup of archived
logs.
$ rman target /
rman > run {
configure device type disk parallelism 8 backup type to copy;
allocate channel ch1 device type disk format
'/oradata/rman_master/PRODDB/datafiles/%b';
allocate channel ch2 device type disk format
'/oradata/rman_master/PRODDB/datafiles/%b';
allocate channel ch3 device type disk format
'/oradata/rman_master/PRODDB/datafiles/%b';
allocate channel ch4 device type disk format
'/oradata/rman_master/PRODDB/datafiles/%b';
Oracle Database Cloning Solution Using Oracle Recovery Manager and Sun ZFS Storage Appliance
35
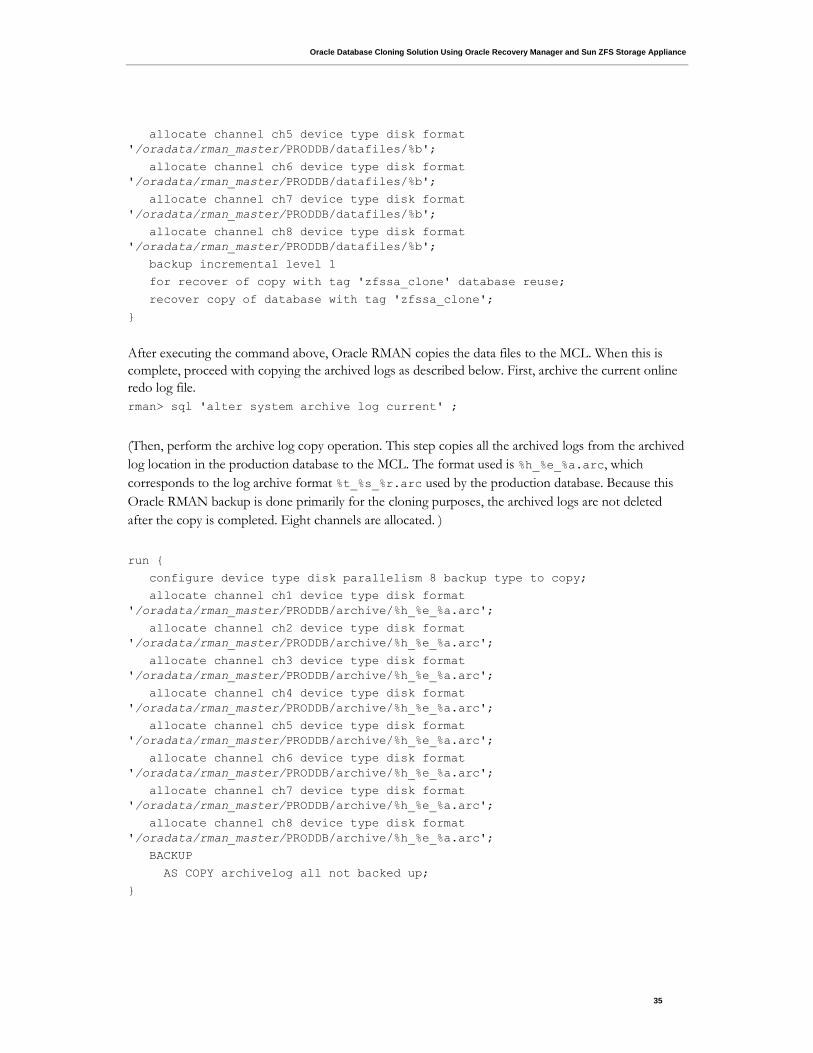
allocate channel ch5 device type disk format
'/oradata/rman_master/PRODDB/datafiles/%b';
allocate channel ch6 device type disk format
'/oradata/rman_master/PRODDB/datafiles/%b';
allocate channel ch7 device type disk format
'/oradata/rman_master/PRODDB/datafiles/%b';
allocate channel ch8 device type disk format
'/oradata/rman_master/PRODDB/datafiles/%b';
backup incremental level 1
for recover of copy with tag 'zfssa_clone' database reuse;
recover copy of database with tag 'zfssa_clone';
}
After executing the command above, Oracle RMAN copies the data files to the MCL. When this is
complete, proceed with copying the archived logs as described below. First, archive the current online
redo log file.
rman> sql 'alter system archive log current' ;
(Then, perform the archive log copy operation. This step copies all the archived logs from the archived
log location in the production database to the MCL. The format used is %h_%e_%a.arc, which
corresponds to the log archive format %t_%s_%r.arc used by the production database. Because this
Oracle RMAN backup is done primarily for the cloning purposes, the archived logs are not deleted
after the copy is completed. Eight channels are allocated. )
run {
configure device type disk parallelism 8 backup type to copy;
allocate channel ch1 device type disk format
'/oradata/rman_master/PRODDB/archive/%h_%e_%a.arc';
allocate channel ch2 device type disk format
'/oradata/rman_master/PRODDB/archive/%h_%e_%a.arc';
allocate channel ch3 device type disk format
'/oradata/rman_master/PRODDB/archive/%h_%e_%a.arc';
allocate channel ch4 device type disk format
'/oradata/rman_master/PRODDB/archive/%h_%e_%a.arc';
allocate channel ch5 device type disk format
'/oradata/rman_master/PRODDB/archive/%h_%e_%a.arc';
allocate channel ch6 device type disk format
'/oradata/rman_master/PRODDB/archive/%h_%e_%a.arc';
allocate channel ch7 device type disk format
'/oradata/rman_master/PRODDB/archive/%h_%e_%a.arc';
allocate channel ch8 device type disk format
'/oradata/rman_master/PRODDB/archive/%h_%e_%a.arc';
BACKUP
AS COPY archivelog all not backed up;
}
Oracle Database Cloning Solution Using Oracle Recovery Manager and Sun ZFS Storage Appliance
36
Performing a Snapshot Operation in the Sun ZFS Storage Appliance
You can create a snapshot of the MCL master project in the Sun ZFS Storage Appliance using either
the appliance user interface or command line interface.
From the user interface:
1. Click Shares to display the Shares screen. Then click Projects and select the
rman_proddb_master project. The shares in the project are listed at the right.
2. Click Snapshots and then the + icon. Enter a name for the snapshot (in this example,
snap_0).
The snapshot snap_0 is now available from which to perform clones.
--OR--
From the CLI:
2. Login in to the storage appliance via ssh.
3. To create a snapshot, enter the sequence of operations below:
$ ssh root@<appliance>
appliance:> cd /
appliance:> shares
appliance:> set pool=[pool name]
appliance:> select rman_proddb_master
appliance:> snapshots snapshot snap_0
Performing a Cloning Operation in the Sun ZFS Storage Appliance
To create a clone from a snapshot, complete these steps using the Sun ZFS Storage Appliance user
interface ,or run the script shown later in this section:
1. From the storage appliance user interface, click Shares>Projects and then the + icon to create
a project rman_proddb_clone1. Set the default mount point to
/export/rman_proddb_clone1.
2. For each share in the rman_proddb_master project:
Click Snapshots and then click the + icon next to the snapshot snap_0 to display the
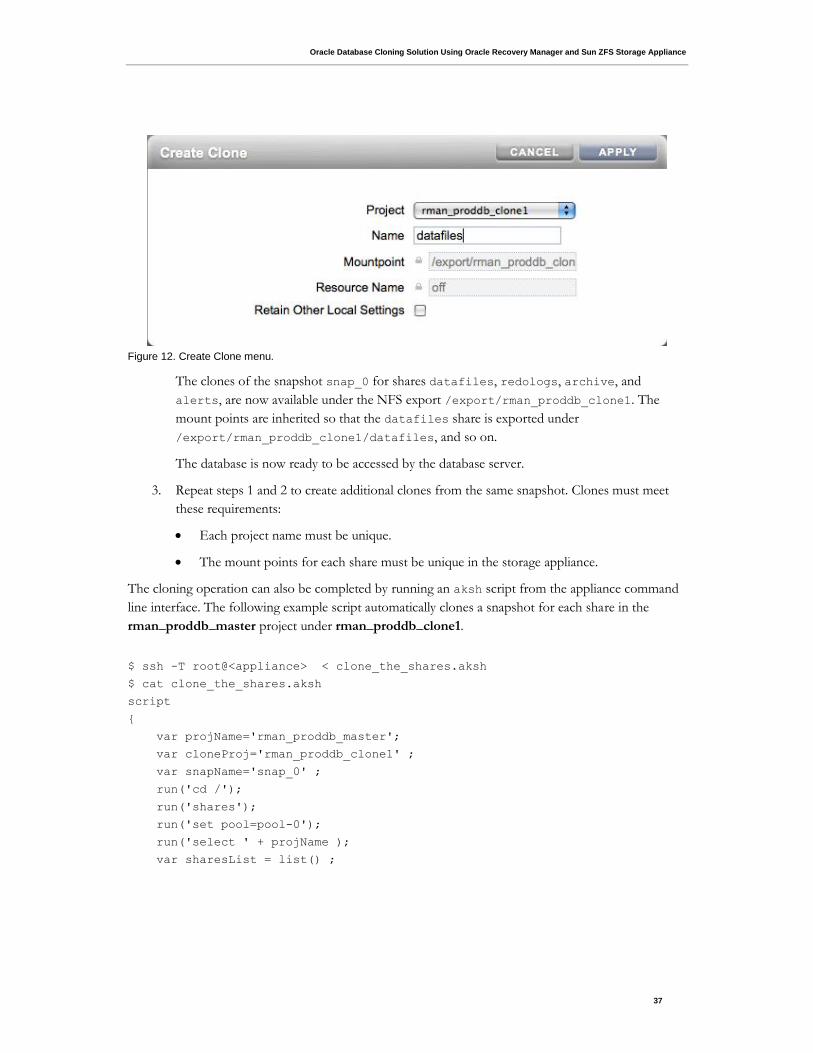
Create Clone menu as shown in Figure 12.
Choose rman_proddb_clone1 to be the destination project.
Click Apply.
Oracle Database Cloning Solution Using Oracle Recovery Manager and Sun ZFS Storage Appliance
37
Figure 12. Create Clone menu.
The clones of the snapshot snap_0 for shares datafiles, redologs, archive, and
alerts, are now available under the NFS export /export/rman_proddb_clone1. The
mount points are inherited so that the datafiles share is exported under
/export/rman_proddb_clone1/datafiles, and so on.
The database is now ready to be accessed by the database server.
3. Repeat steps 1 and 2 to create additional clones from the same snapshot. Clones must meet
these requirements:
Each project name must be unique.
The mount points for each share must be unique in the storage appliance.
The cloning operation can also be completed by running an aksh script from the appliance command
line interface. The following example script automatically clones a snapshot for each share in the
rman_proddb_master project under rman_proddb_clone1.
$ ssh -T root@<appliance> < clone_the_shares.aksh
$ cat clone_the_shares.aksh
script
{
var projName='rman_proddb_master';
var cloneProj='rman_proddb_clone1' ;
var snapName='snap_0' ;
run('cd /');
run('shares');
run('set pool=pool-0');
run('select ' + projName );
var sharesList = list() ;
Oracle Database Cloning Solution Using Oracle Recovery Manager and Sun ZFS Storage Appliance
38
for (var i = 0; i < sharesList.length; i++) {
run('select '+ sharesList[i]);
run('snapshots select ' + snapName );
printf("Cloning the share %s \n", sharesList[i]);
run('clone ' + cloneProj + ' ' + sharesList[i]);
run('set mountpoint=/export/'+ cloneProj + '/' + sharesList[i]);
run('commit') ;
run('cd ..');
run('cd ..');
run('cd ..');
}
printf("Cloning the project completed..\n");
}
Configuring the Clone Database Server
To configure the clone database server, complete the following steps as the root user.
# mkdir -p /oradata/clone1/datafiles
# mkdir /oradata/clone1/redologs
# mkdir /oradata/clone1/archive
# mkdir /oradata/clone1/alerts
Entries are made in the /etc/vfstab (Solaris) or /etc/fstab (Linux). Alternatively, these NFS
shares can be mounted interactively using mount command.
The entries below are made in /etc/vfstab (Solaris) or /etc/fstab (Linux), or the NFS shares can
be mounted interactively using the mount command.
# RMAN Clone
10.80.44.11:/export/rman_proddb_clone1/datafiles - \
/oradata/clone1/datafiles nfs - yes \
rw,bg,hard,nointr,rsize=131072,wsize=131072,proto=tcp,vers=3,noac
10.80.44.11:/export/rman_proddb_clone1/archive - \
/oradata/clone1/archive nfs - yes \
rw,bg,hard,nointr,rsize=131072,wsize=131072,proto=tcp,vers=3,noac
10.80.44.11:/export/rman_proddb_clone1/redologs - \
/oradata/clone1/redologs nfs - yes \
rw,bg,hard,nointr,rsize=131072,wsize=131072,proto=tcp,vers=3,noac
10.80.44.11:/export/rman_proddb_clone1/alerts - \
/oradata/clone1/alerts nfs - yes \
rw,bg,hard,nointr,rsize=131072,wsize=131072,proto=tcp,vers=3,noac
Oracle Database Cloning Solution Using Oracle Recovery Manager and Sun ZFS Storage Appliance
39
The file systems are mounted as follows:
# mount /oradata/clone1/datafiles
# mount /oradata/clone1/redologs
# mount /oradata/clone1/archive
# mount /oradata/clone1/alerts
The datafiles and the archived logs based on the MCL point-in-time snapshot snap_0 are now
available to the cloned database server.
At this point, no redo logs or control files are available yet. So the control file must be created and
then the database recovered and opened in resetlogs mode. As the oracle user:
Set the ORACLE_SID environment to CLONE1.
$ export ORACLE_SID=CLONE1
Create an initCLONE1.ora file with appropriate values for starting the cloned
database instance. An example initCLONE1.ora file is shown below:
-bash-3.00$ cat initCLONE1.ora
*.control_files='/oradata/clone1/redologs/control0.ctl','/oradata/clone
1/redologs/control1.ctl'
*.db_block_size=8192
*.db_cache_size=4096M
*.db_file_multiblock_read_count=128
*.db_files=200
*.db_keep_cache_size=512M
*.db_name='CLONEDB'
*.db_recycle_cache_size=256M
*.diagnostic_dest='/oradata/clone1/alerts'
*.filesystemio_options='SETALL'
*.instance_name='CLONE1'
*.java_pool_size=32M
*.large_pool_size=32M
*.log_archive_dest_1='location=/oradata/clone1/archive'
*.log_archive_format='%t_%s_%r.arc'
*.log_buffer=104857600
*.log_checkpoint_interval=10000
*.log_checkpoint_timeout=1800
*.nls_date_format='MM/DD/YYYY HH24:MI:SS'
*.processes=400
*.service_names='CLONE1'
*.shared_pool_size=256M
*.standby_file_management='AUTO'
*.undo_management='auto'
undo_tablespace='UNDOTBS1'

Oracle Database Cloning Solution Using Oracle Recovery Manager and Sun ZFS Storage Appliance
40
Start the database instance in the nomount state using initCLONE1.ora.
$ sqlplus / as sysdba
SQL > startup nomount pfile=initCLONE1.ora
ORACLE instance started.
Total System Global Area 5547376640 bytes
Fixed Size 2157664 bytes
Variable Size 335549344 bytes
Database Buffers 5100273664 bytes
Redo Buffers 109395968 bytes
SQL>
Create the control file using the following SQL command. This file was originally created
using the ALTER DATABASE BACKUP CONTROLFILE TO TRACE command on the
production database. The location of the redologs and datafiles is changed to the NFS
location.
-bash-3.00$ cat create_control.sql
STARTUP NOMOUNT PFILE=initCLONE1.ora
CREATE CONTROLFILE SET DATABASE "CLONEDB" REUSE RESETLOGS ARCHIVELOG
MAXLOGFILES 16
MAXLOGMEMBERS 3
MAXDATAFILES 64
MAXINSTANCES 2
MAXLOGHISTORY 292
LOGFILE
GROUP 1 '/oradata/clone1/redologs/redo00-a.log' SIZE 512M BLOCKSIZE
512,
GROUP 2 '/oradata/clone1/redologs/redo01-a.log' SIZE 512M BLOCKSIZE
512,
GROUP 3 '/oradata/clone1/redologs/redo02-a.log' SIZE 512M BLOCKSIZE
512,
GROUP 4 '/oradata/clone1/redologs/redo03-a.log' SIZE 512M BLOCKSIZE
512
-- STANDBY LOGFILE
DATAFILE
'/oradata/clone1/datafiles/system00.dbf',
'/oradata/clone1/datafiles/sysaux00.dbf',
'/oradata/clone1/datafiles/undo00_a.dbf',
'/oradata/clone1/datafiles/undo01_a.dbf',
'/oradata/clone1/datafiles/data00.dbf',
'/oradata/clone1/datafiles/data01.dbf',
'/oradata/clone1/datafiles/data02.dbf',
'/oradata/clone1/datafiles/data03.dbf',
'/oradata/clone1/datafiles/data04.dbf',
'/oradata/clone1/datafiles/data05.dbf',
Oracle Database Cloning Solution Using Oracle Recovery Manager and Sun ZFS Storage Appliance
41
'/oradata/clone1/datafiles/data06.dbf',
'/oradata/clone1/datafiles/data07.dbf',
'/oradata/clone1/datafiles/data08.dbf',
'/oradata/clone1/datafiles/data09.dbf',
'/oradata/clone1/datafiles/data10.dbf',
'/oradata/clone1/datafiles/data11.dbf',
'/oradata/clone1/datafiles/data12.dbf',
'/oradata/clone1/datafiles/data13.dbf',
'/oradata/clone1/datafiles/data14.dbf',
'/oradata/clone1/datafiles/indexes00.dbf',
'/oradata/clone1/datafiles/indexes01.dbf',
'/oradata/clone1/datafiles/indexes02.dbf',
'/oradata/clone1/datafiles/indexes03.dbf',
'/oradata/clone1/datafiles/indexes04.dbf',
'/oradata/clone1/datafiles/indexes05.dbf',
'/oradata/clone1/datafiles/indexes06.dbf',
'/oradata/clone1/datafiles/indexes07.dbf',
'/oradata/clone1/datafiles/indexes08.dbf',
'/oradata/clone1/datafiles/indexes09.dbf',
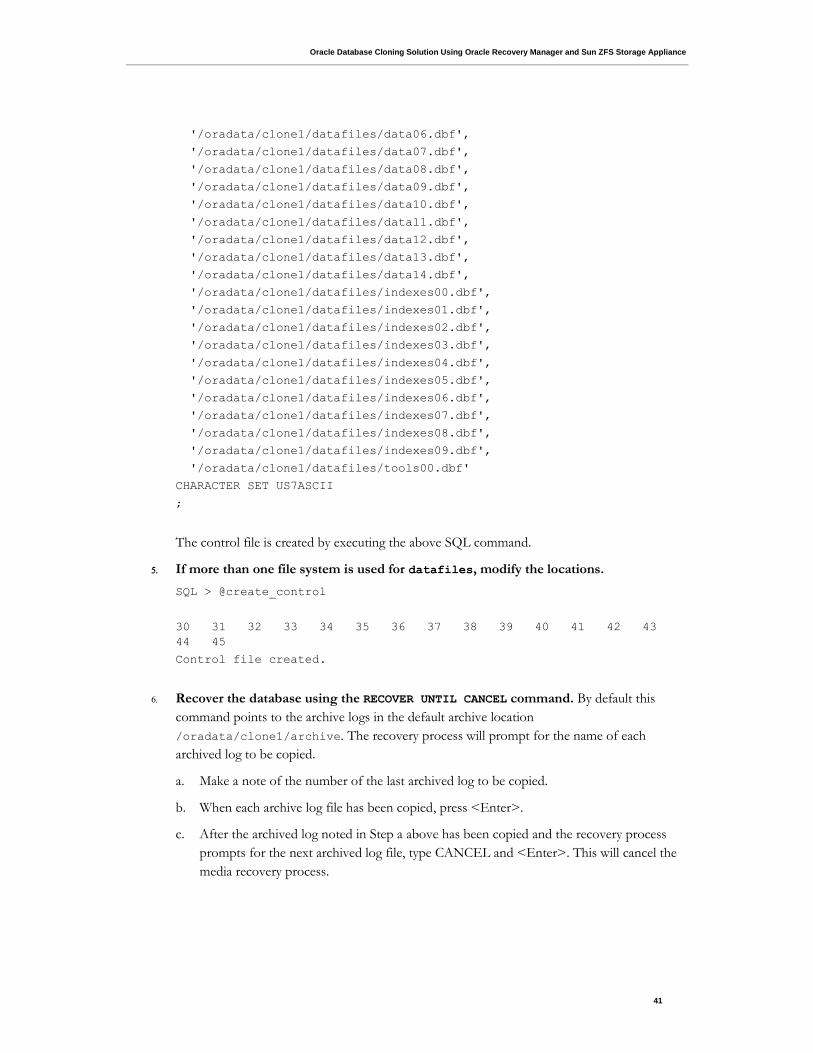
'/oradata/clone1/datafiles/tools00.dbf'
CHARACTER SET US7ASCII
;
The control file is created by executing the above SQL command.
If more than one file system is used for datafiles, modify the locations.
SQL > @create_control
30 31 32 33 34 35 36 37 38 39 40 41 42 43
44 45
Control file created.
Recover the database using the RECOVER UNTIL CANCEL command. By default this
command points to the archive logs in the default archive location
/oradata/clone1/archive. The recovery process will prompt for the name of each
archived log to be copied.
a. Make a note of the number of the last archived log to be copied.
b. When each archive log file has been copied, press <Enter>.
c. After the archived log noted in Step a above has been copied and the recovery process
prompts for the next archived log file, type CANCEL and <Enter>. This will cancel the
media recovery process.
Oracle Database Cloning Solution Using Oracle Recovery Manager and Sun ZFS Storage Appliance
42
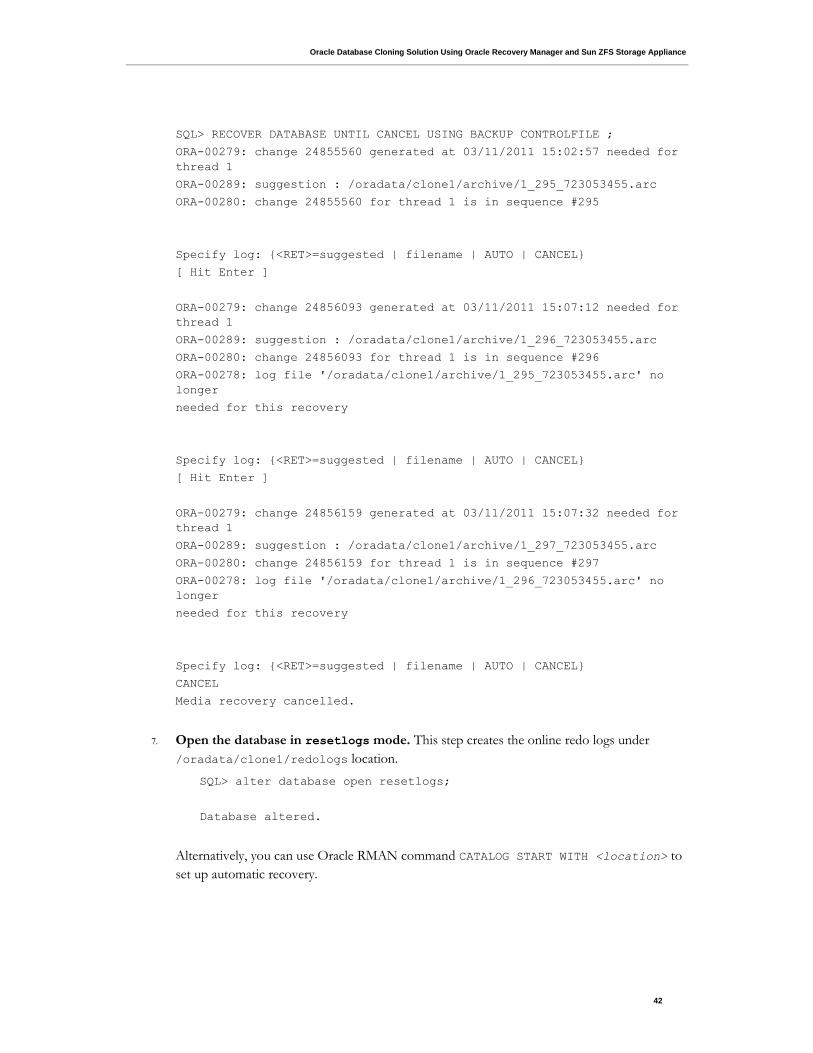
SQL> RECOVER DATABASE UNTIL CANCEL USING BACKUP CONTROLFILE ;
ORA-00279: change 24855560 generated at 03/11/2011 15:02:57 needed for
thread 1
ORA-00289: suggestion : /oradata/clone1/archive/1_295_723053455.arc
ORA-00280: change 24855560 for thread 1 is in sequence #295
Specify log: {<RET>=suggested | filename | AUTO | CANCEL}
[ Hit Enter ]
ORA-00279: change 24856093 generated at 03/11/2011 15:07:12 needed for
thread 1
ORA-00289: suggestion : /oradata/clone1/archive/1_296_723053455.arc
ORA-00280: change 24856093 for thread 1 is in sequence #296
ORA-00278: log file '/oradata/clone1/archive/1_295_723053455.arc' no
longer
needed for this recovery
Specify log: {<RET>=suggested | filename | AUTO | CANCEL}
[ Hit Enter ]
ORA-00279: change 24856159 generated at 03/11/2011 15:07:32 needed for
thread 1
ORA-00289: suggestion : /oradata/clone1/archive/1_297_723053455.arc
ORA-00280: change 24856159 for thread 1 is in sequence #297
ORA-00278: log file '/oradata/clone1/archive/1_296_723053455.arc' no
longer
needed for this recovery
Specify log: {<RET>=suggested | filename | AUTO | CANCEL}
CANCEL
Media recovery cancelled.
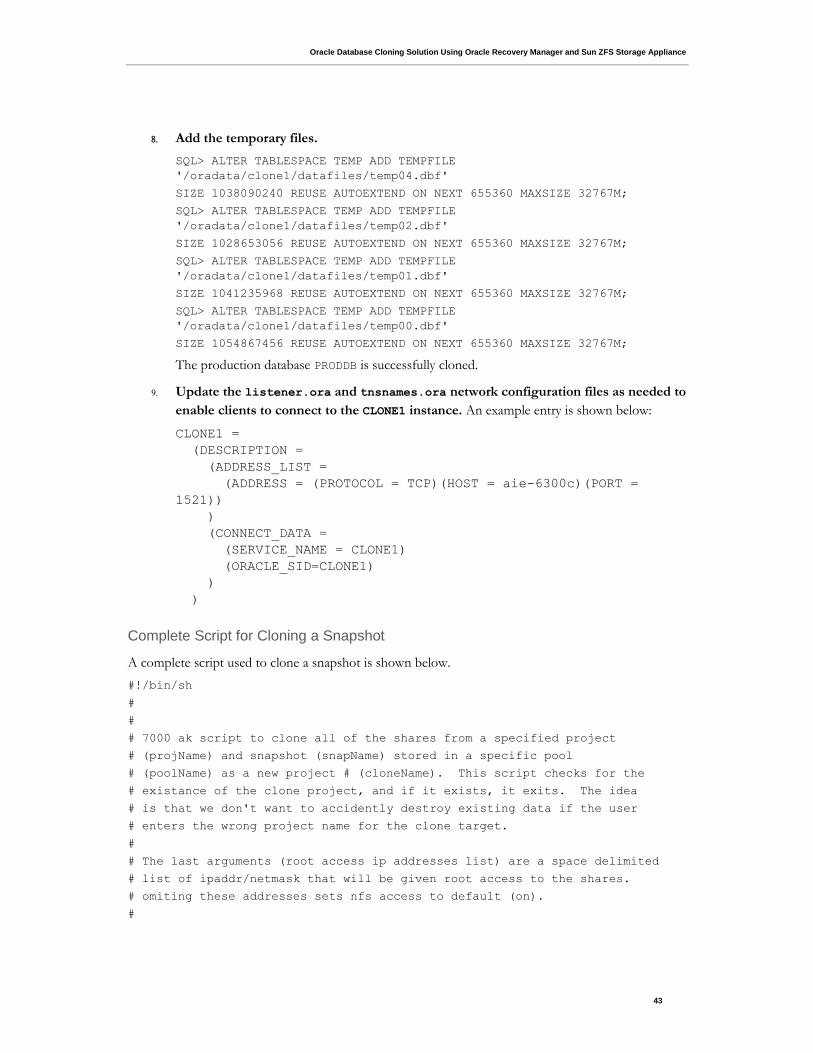
Open the database in resetlogs mode. This step creates the online redo logs under
/oradata/clone1/redologs location.
SQL> alter database open resetlogs;
Database altered.
Alternatively, you can use Oracle RMAN command CATALOG START WITH <location> to
set up automatic recovery.
Oracle Database Cloning Solution Using Oracle Recovery Manager and Sun ZFS Storage Appliance
43
Add the temporary files.
SQL> ALTER TABLESPACE TEMP ADD TEMPFILE
'/oradata/clone1/datafiles/temp04.dbf'
SIZE 1038090240 REUSE AUTOEXTEND ON NEXT 655360 MAXSIZE 32767M;
SQL> ALTER TABLESPACE TEMP ADD TEMPFILE
'/oradata/clone1/datafiles/temp02.dbf'
SIZE 1028653056 REUSE AUTOEXTEND ON NEXT 655360 MAXSIZE 32767M;
SQL> ALTER TABLESPACE TEMP ADD TEMPFILE
'/oradata/clone1/datafiles/temp01.dbf'
SIZE 1041235968 REUSE AUTOEXTEND ON NEXT 655360 MAXSIZE 32767M;
SQL> ALTER TABLESPACE TEMP ADD TEMPFILE
'/oradata/clone1/datafiles/temp00.dbf'
SIZE 1054867456 REUSE AUTOEXTEND ON NEXT 655360 MAXSIZE 32767M;
The production database PRODDB is successfully cloned.
Update the listener.ora and tnsnames.ora network configuration files as needed to
enable clients to connect to the CLONE1 instance. An example entry is shown below:
CLONE1 =
(DESCRIPTION =
(ADDRESS_LIST =
(ADDRESS = (PROTOCOL = TCP)(HOST = aie-6300c)(PORT =
1521))
)
(CONNECT_DATA =
(SERVICE_NAME = CLONE1)
(ORACLE_SID=CLONE1)
)
)
Complete Script for Cloning a Snapshot
A complete script used to clone a snapshot is shown below.
#!/bin/sh
#
#
# 7000 ak script to clone all of the shares from a specified project
# (projName) and snapshot (snapName) stored in a specific pool
# (poolName) as a new project # (cloneName). This script checks for the
# existance of the clone project, and if it exists, it exits. The idea
# is that we don't want to accidently destroy existing data if the user
# enters the wrong project name for the clone target.
#
# The last arguments (root access ip addresses list) are a space delimited
# list of ipaddr/netmask that will be given root access to the shares.
# omiting these addresses sets nfs access to default (on).
#
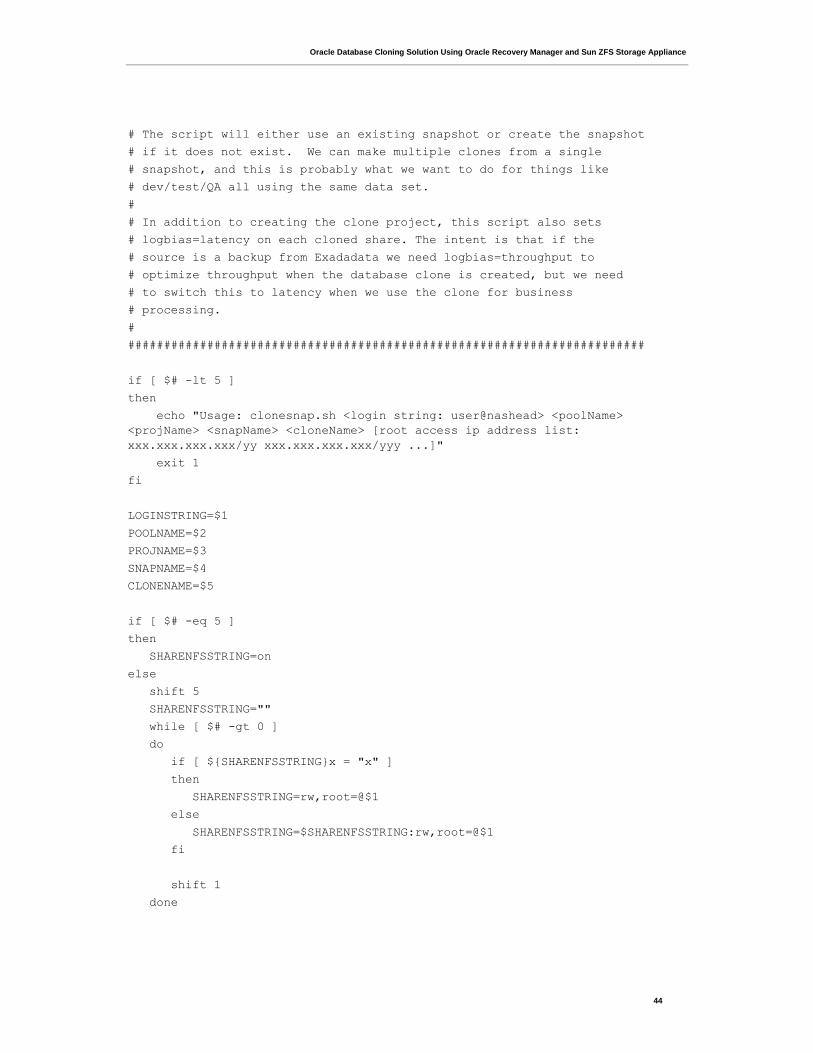
Oracle Database Cloning Solution Using Oracle Recovery Manager and Sun ZFS Storage Appliance
44
# The script will either use an existing snapshot or create the snapshot
# if it does not exist. We can make multiple clones from a single
# snapshot, and this is probably what we want to do for things like
# dev/test/QA all using the same data set.
#
# In addition to creating the clone project, this script also sets
# logbias=latency on each cloned share. The intent is that if the
# source is a backup from Exadadata we need logbias=throughput to
# optimize throughput when the database clone is created, but we need
# to switch this to latency when we use the clone for business
# processing.
#
########################################################################
if [ $# -lt 5 ]
then
echo "Usage: clonesnap.sh <login string: user@nashead> <poolName>
<projName> <snapName> <cloneName> [root access ip address list:
xxx.xxx.xxx.xxx/yy xxx.xxx.xxx.xxx/yyy ...]"
exit 1
fi
LOGINSTRING=$1
POOLNAME=$2
PROJNAME=$3
SNAPNAME=$4
CLONENAME=$5
if [ $# -eq 5 ]
then
SHARENFSSTRING=on
else
shift 5
SHARENFSSTRING=""
while [ $# -gt 0 ]
do
if [ ${SHARENFSSTRING}x = "x" ]
then
SHARENFSSTRING=rw,root=@$1
else
SHARENFSSTRING=$SHARENFSSTRING:rw,root=@$1
fi
shift 1
done
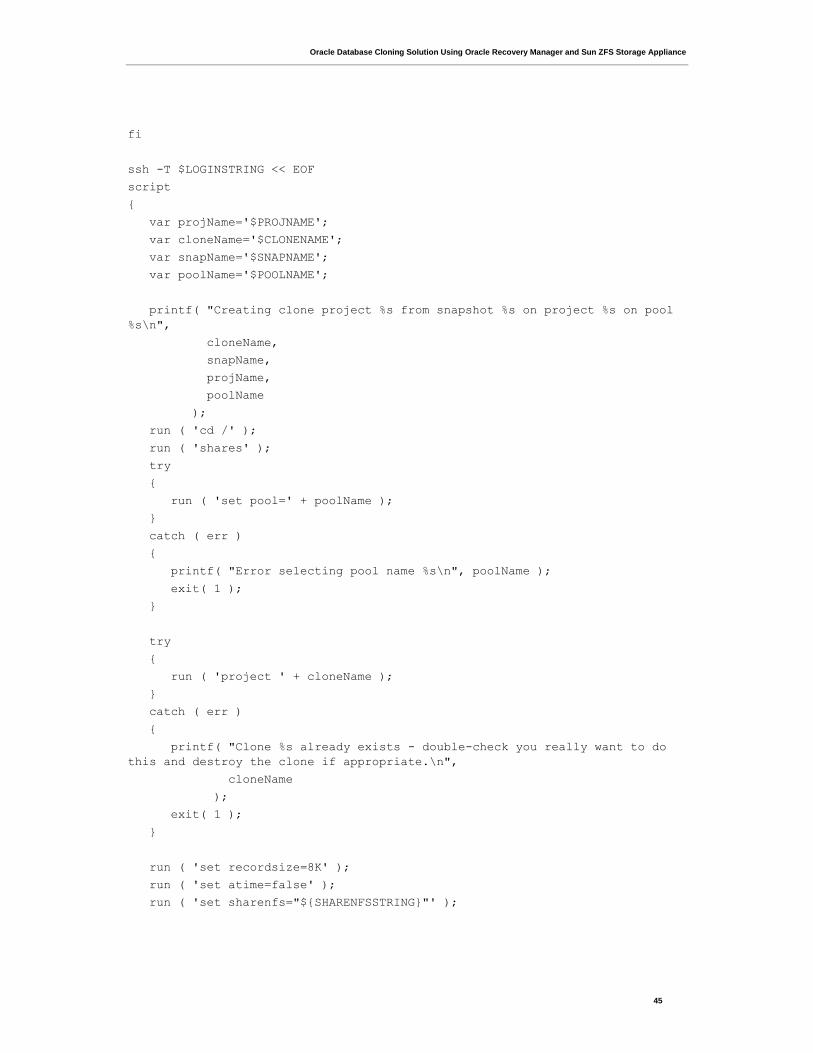
Oracle Database Cloning Solution Using Oracle Recovery Manager and Sun ZFS Storage Appliance
45
fi
ssh -T $LOGINSTRING << EOF
script
{
var projName='$PROJNAME';
var cloneName='$CLONENAME';
var snapName='$SNAPNAME';
var poolName='$POOLNAME';
printf( "Creating clone project %s from snapshot %s on project %s on pool
%s\n",
cloneName,
snapName,
projName,
poolName
);
run ( 'cd /' );
run ( 'shares' );
try
{
run ( 'set pool=' + poolName );
}
catch ( err )
{
printf( "Error selecting pool name %s\n", poolName );
exit( 1 );
}
try
{
run ( 'project ' + cloneName );
}
catch ( err )
{
printf( "Clone %s already exists - double-check you really want to do
this and destroy the clone if appropriate.\n",
cloneName
);
exit( 1 );
}
run ( 'set recordsize=8K' );
run ( 'set atime=false' );
run ( 'set sharenfs="${SHARENFSSTRING}"' );
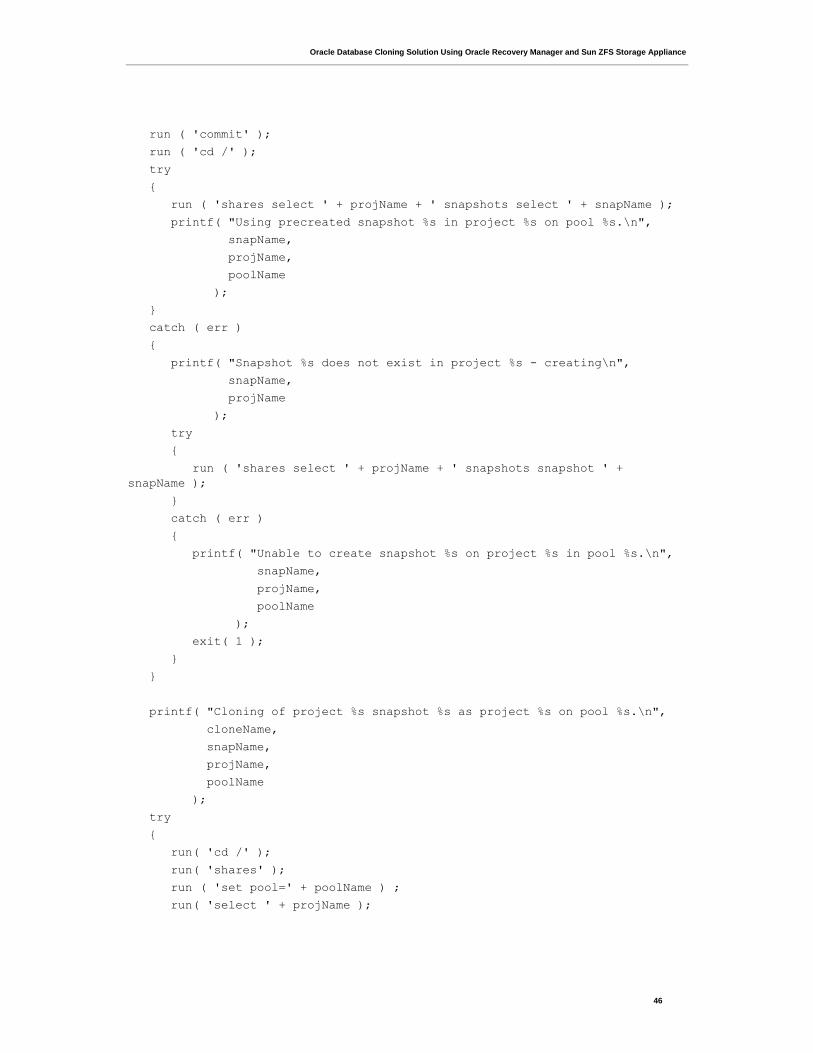
Oracle Database Cloning Solution Using Oracle Recovery Manager and Sun ZFS Storage Appliance
46
run ( 'commit' );
run ( 'cd /' );
try
{
run ( 'shares select ' + projName + ' snapshots select ' + snapName );
printf( "Using precreated snapshot %s in project %s on pool %s.\n",
snapName,
projName,
poolName
);
}
catch ( err )
{
printf( "Snapshot %s does not exist in project %s - creating\n",
snapName,
projName
);
try
{
run ( 'shares select ' + projName + ' snapshots snapshot ' +
snapName );
}
catch ( err )
{
printf( "Unable to create snapshot %s on project %s in pool %s.\n",
snapName,
projName,
poolName
);
exit( 1 );
}
}
printf( "Cloning of project %s snapshot %s as project %s on pool %s.\n",
cloneName,
snapName,
projName,
poolName
);
try
{
run( 'cd /' );
run( 'shares' );
run ( 'set pool=' + poolName ) ;
run( 'select ' + projName );
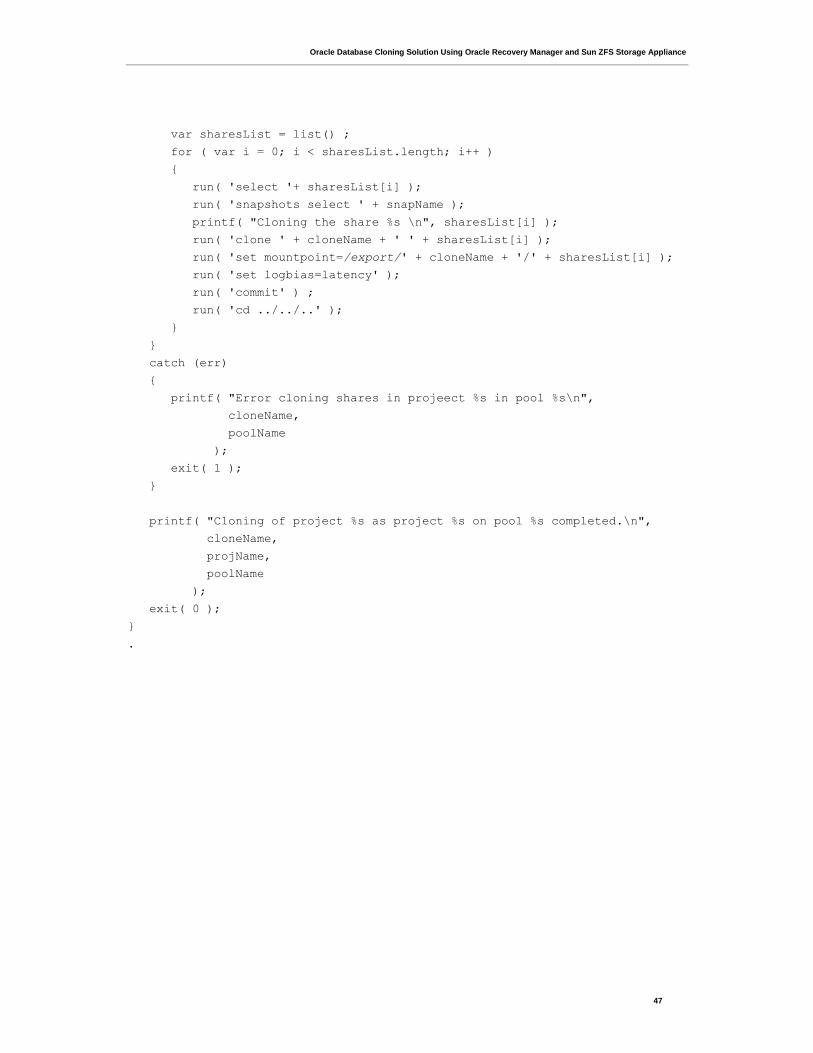
Oracle Database Cloning Solution Using Oracle Recovery Manager and Sun ZFS Storage Appliance
47
var sharesList = list() ;
for ( var i = 0; i < sharesList.length; i++ )
{
run( 'select '+ sharesList[i] );
run( 'snapshots select ' + snapName );
printf( "Cloning the share %s \n", sharesList[i] );
run( 'clone ' + cloneName + ' ' + sharesList[i] );
run( 'set mountpoint=/export/' + cloneName + '/' + sharesList[i] );
run( 'set logbias=latency' );
run( 'commit' ) ;
run( 'cd ../../..' );
}
}
catch (err)
{
printf( "Error cloning shares in projeect %s in pool %s\n",
cloneName,
poolName
);
exit( 1 );
}
printf( "Cloning of project %s as project %s on pool %s completed.\n",
cloneName,
projName,
poolName
);
exit( 0 );
}
.
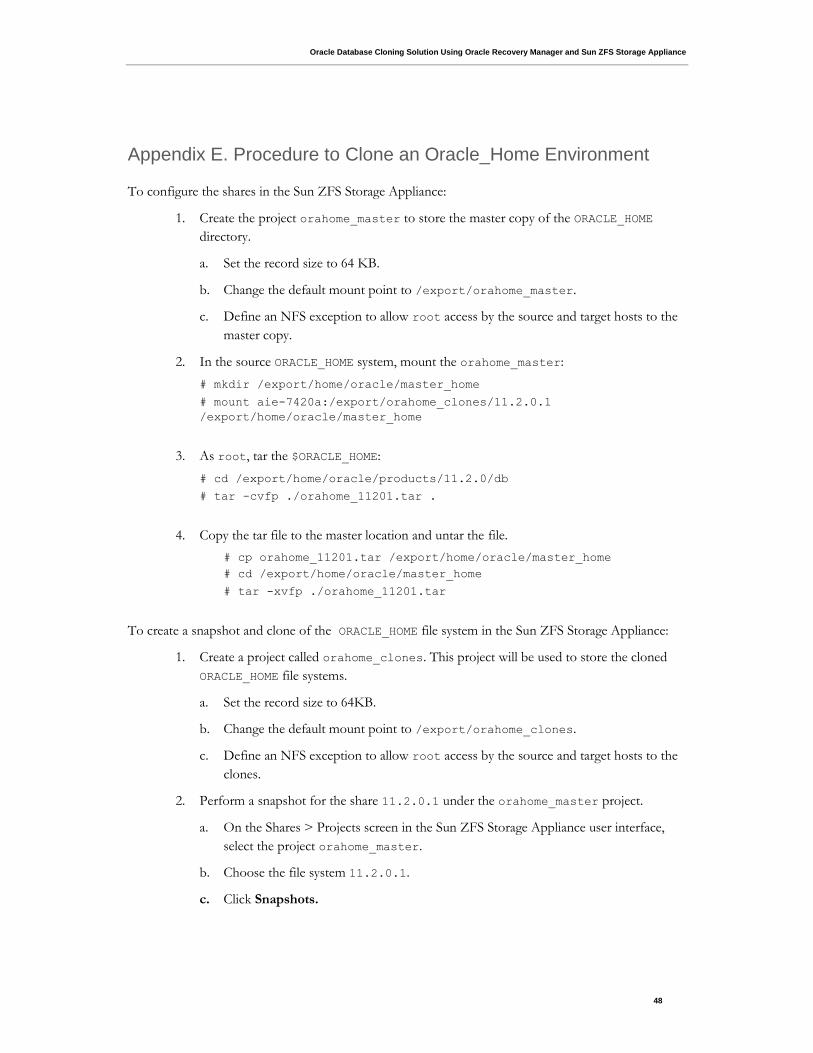
Oracle Database Cloning Solution Using Oracle Recovery Manager and Sun ZFS Storage Appliance
48
Appendix E. Procedure to Clone an Oracle_Home Environment
To configure the shares in the Sun ZFS Storage Appliance:
1. Create the project orahome_master to store the master copy of the ORACLE_HOME
directory.
a. Set the record size to 64 KB.
b. Change the default mount point to /export/orahome_master.
c. Define an NFS exception to allow root access by the source and target hosts to the
master copy.
2. In the source ORACLE_HOME system, mount the orahome_master:
# mkdir /export/home/oracle/master_home
# mount aie-7420a:/export/orahome_clones/11.2.0.1
/export/home/oracle/master_home
3. As root, tar the $ORACLE_HOME:
# cd /export/home/oracle/products/11.2.0/db
# tar -cvfp ./orahome_11201.tar .
4. Copy the tar file to the master location and untar the file.
# cp orahome_11201.tar /export/home/oracle/master_home
# cd /export/home/oracle/master_home
# tar -xvfp ./orahome_11201.tar
To create a snapshot and clone of the ORACLE_HOME file system in the Sun ZFS Storage Appliance:
1. Create a project called orahome_clones. This project will be used to store the cloned
ORACLE_HOME file systems.
a. Set the record size to 64KB.
b. Change the default mount point to /export/orahome_clones.
c. Define an NFS exception to allow root access by the source and target hosts to the
clones.
2. Perform a snapshot for the share 11.2.0.1 under the orahome_master project.
a. On the Shares > Projects screen in the Sun ZFS Storage Appliance user interface,
select the project orahome_master.
b. Choose the file system 11.2.0.1.
c. Click Snapshots.

Oracle Database Cloning Solution Using Oracle Recovery Manager and Sun ZFS Storage Appliance
49
d. Click the + icon to create a new snapshot. Give it the name snap_11201.
3. Clone the snapshot.
a. Click the + icon next to the snap_11201 snapshot of the share 11.2.0.1.
b. Choose the project orahome_clones under which to store this clone.
c. Name the clone 11.2.0.1. The exported mount point for the clone is
/export/orahome_clones/11.2.0.1.
The ORACLE_HOME file system is now cloned in the Sun ZFS Storage Appliance. To configure and
deploy the cloned ORACLE_HOME file system in the target system:
1. In the target system, make the following entry in /etc/vfstab:
aie-7310b:/export/orahome/clone/11.2.0.1 -
/export/home/oracle/products/clone_11.2.0.1/db nfs - yes
rw,bg,hard,nointr,rsize=131072,wsize=131072,proto=tcp,vers=3,suid
2. Create a directory for mounting the cloned Oracle home file system and mount it.
# mkdir -p /export/home/oracle/products/clone_11.2.0.1/db
# mount /export/home/oracle/products/clone_11.2.0.1/db
# df -k | grep oracle
aie-7310b:/export/orahome_master/11.2.0.1
7390226981 10276074 7379950906 1%
/export/home/oracle/master_home
aie-7310b:/export/orahome_clones/11.2.0.1
7390226981 10276074 7379950906 1%
/export/home/oracle/products/clone/11.2.0.1/db
3. If this is the first ORACLE_HOME location in this host, manually create an oraInst.loc
file. Refer to the Oracle support document ID300062.1 available at My Oracle Support
for more information about cloning Oracle RDBMS installations using the Oracle
Universal Installer (OUI).
-bash-3.00$ cat /var/opt/oracle/oraInst.loc
inventory_loc=/export/home/oracle/products/oraInventory
inst_group=dba
4. Run the Oracle database clone.pl script from the location of the cloned Oracle home.
$ cd /export/home/oracle/products/clone/11.2.0.1/db/clone/bin
$ perl clone.pl
ORACLE_HOME="/export/home/oracle/products/clone/11.2.0.1/db"
ORACLE_HOME_NAME="CLONE1" ORACLE_BASE="/export/home/oracle/products"
OSDBA_GROUP="dba" OSOPER_GROUP="dba"
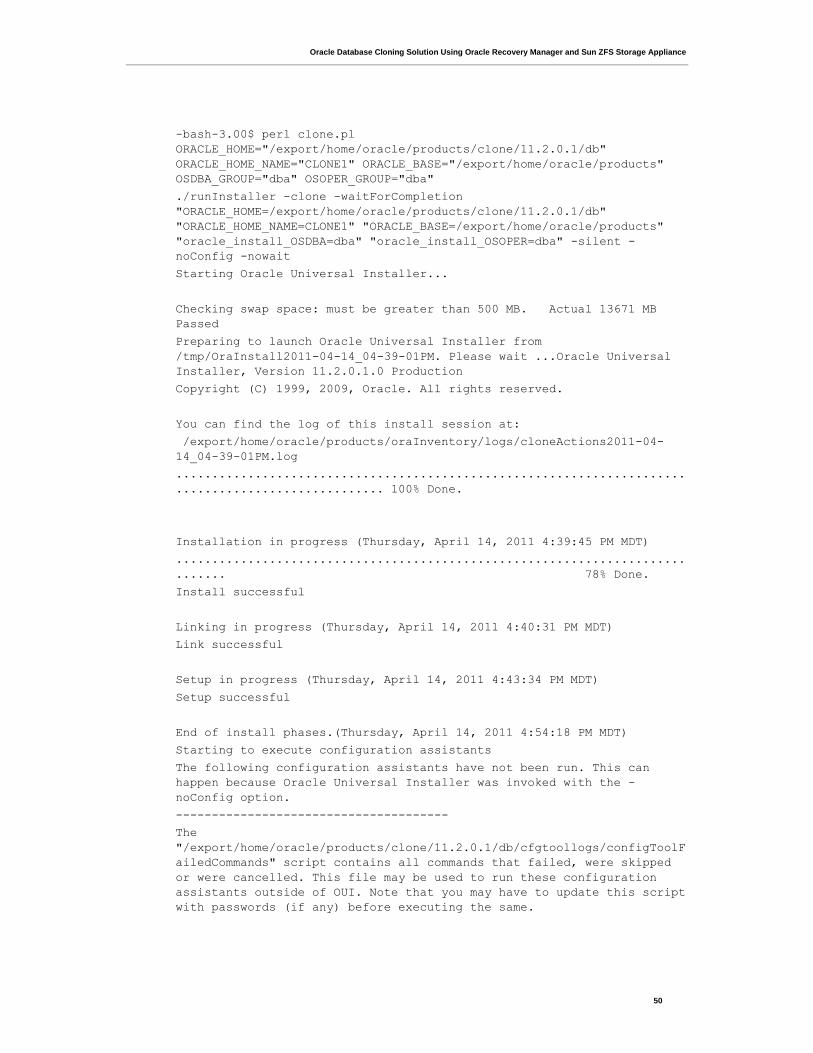
Oracle Database Cloning Solution Using Oracle Recovery Manager and Sun ZFS Storage Appliance
50
-bash-3.00$ perl clone.pl
ORACLE_HOME="/export/home/oracle/products/clone/11.2.0.1/db"
ORACLE_HOME_NAME="CLONE1" ORACLE_BASE="/export/home/oracle/products"
OSDBA_GROUP="dba" OSOPER_GROUP="dba"
./runInstaller -clone -waitForCompletion
"ORACLE_HOME=/export/home/oracle/products/clone/11.2.0.1/db"
"ORACLE_HOME_NAME=CLONE1" "ORACLE_BASE=/export/home/oracle/products"
"oracle_install_OSDBA=dba" "oracle_install_OSOPER=dba" -silent -
noConfig -nowait
Starting Oracle Universal Installer...
Checking swap space: must be greater than 500 MB. Actual 13671 MB
Passed
Preparing to launch Oracle Universal Installer from
/tmp/OraInstall2011-04-14_04-39-01PM. Please wait ...Oracle Universal
Installer, Version 11.2.0.1.0 Production
Copyright (C) 1999, 2009, Oracle. All rights reserved.
You can find the log of this install session at:
/export/home/oracle/products/oraInventory/logs/cloneActions2011-04-
14_04-39-01PM.log
.......................................................................
............................. 100% Done.
Installation in progress (Thursday, April 14, 2011 4:39:45 PM MDT)
.......................................................................
....... 78% Done.
Install successful
Linking in progress (Thursday, April 14, 2011 4:40:31 PM MDT)
Link successful
Setup in progress (Thursday, April 14, 2011 4:43:34 PM MDT)
Setup successful
End of install phases.(Thursday, April 14, 2011 4:54:18 PM MDT)
Starting to execute configuration assistants
The following configuration assistants have not been run. This can
happen because Oracle Universal Installer was invoked with the -
noConfig option.
--------------------------------------
The
"/export/home/oracle/products/clone/11.2.0.1/db/cfgtoollogs/configToolF
ailedCommands" script contains all commands that failed, were skipped
or were cancelled. This file may be used to run these configuration
assistants outside of OUI. Note that you may have to update this script
with passwords (if any) before executing the same.

Oracle Database Cloning Solution Using Oracle Recovery Manager and Sun ZFS Storage Appliance
51
The
"/export/home/oracle/products/clone/11.2.0.1/db/cfgtoollogs/configToolA
llCommands" script contains all commands to be executed by the
configuration assistants. This file may be used to run the
configuration assistants outside of OUI. Note that you may have to
update this script with passwords (if any) before executing the same.
--------------------------------------
WARNING:
The following configuration scripts need to be executed as the "root"
user.
/export/home/oracle/products/clone/11.2.0.1/db/root.sh
To execute the configuration scripts:
1. Open a terminal window
2. Log in as "root"
3. Run the scripts
The cloning of CLONE1 was successful.
Please check
'/export/home/oracle/products/oraInventory/logs/cloneActions2011-04-
14_04-39-01PM.log' for more details.
5. Run the root.sh command.
# /export/home/oracle/products/clone/11.2.0.1/db/root.sh
The cloned Oracle binaries are now ready to be used.
6. Set the ORACLE_HOME environment variable to point to the new location, set the PATH
environment variable to point to the ORACLE_HOME binaries:
$ export ORACLE_HOME=/export/home/oracle/products/clone/11.2.0.1/db
$ export PATH=$ORACLE_HOME/bin:$PATH
-bash-3.00$ which sqlplus
/export/home/oracle/products/clone/11.2.0.1/db/bin/sqlplus
-bash-3.00$ sqlplus
SQL*Plus: Release 11.2.0.1.0 Production on Fri Apr 15 10:16:23 2011
Copyright (c) 1982, 2009, Oracle. All rights reserved.
EOF

Oracle Database Cloning Solution Using Oracle
Recovery Manager and Sun ZFS Storage
Appliance
May 2011, Version 1.1
Author: Sridhar Ranganathan
Contributing Authors: David Krenik
Oracle Corporation
World Headquarters
500 Oracle Parkway
Redwood Shores, CA 94065
U.S.A.
Worldwide Inquiries:
Phone: +1.650.506.7000
Fax: +1.650.506.7200
oracle.com
Copyright © 2011, Oracle and/or its affiliates. All rights reserved. This document is provided for information purposes only and the
contents hereof are subject to change without notice. This document is not warranted to be error-free, nor subject to any other
warranties or conditions, whether expressed orally or implied in law, including implied warranties and conditions of merchantability or
fitness for a particular purpose. We specifically disclaim any liability with respect to this document and no contractual obligations are
formed either directly or indirectly by this document. This document may not be reproduced or transmitted in any form or by any
means, electronic or mechanical, for any purpose, without our prior written permission.
Oracle and Java are registered trademarks of Oracle and/or its affiliates. Other names may be trademarks of their respective owners.
AMD, Opteron, the AMD logo, and the AMD Opteron logo are trademarks or registered trademarks of Advanced Micro Devices.
Intel and Intel Xeon are trademarks or registered trademarks of Intel Corporation. All SPARC trademarks are used under license
and are trademarks or registered trademarks of SPARC International, Inc. UNIX is a registered trademark licensed through X/Open
Company, Ltd. 1010
