orbix 6.3 - micro focus supportline · pdf fileto set the orbix environment associated with...
TRANSCRIPT

Orbix 6.3.9
CORBA Tutorial: C++

ii
Micro FocusThe Lawn22-30 Old Bath RoadNewbury, Berkshire RG14 1QNUK
http://www.microfocus.comCopyright © Micro Focus 2017. All rights reserved.
MICRO FOCUS, the Micro Focus logo, and Micro Focus product names are trademarks or registered trademarks of Micro Focus Development Limited or its subsidiaries or affiliated companies in the United States, United Kingdom, and other countries. All other marks are the property of their respective owners.
1/10/17
Contents
Getting Started with Orbix ....................................................1Creating a Configuration Domain.................................................................1Setting the Orbix Environment....................................................................9Hello World Example ...............................................................................10Development from the Command Line .......................................................11
Index ..................................................................................17
Orbix CORBA Tutorial for C++ i i i

iv Orbix CORBA Tutorial for C++

Getting Started with OrbixYou can use the CORBA Code Generation Toolkit to develop an Orbix application quickly.
Given a user-defined IDL interface, the toolkit generates the bulk of the client and server application code, including makefiles. You then complete the distributed application by filling in the missing business logic.
Creating a Configuration DomainThis section describes how to create a simple configuration domain, simple, which is required for running basic demonstrations. This domain deploys a minimal set of Orbix services.
PrerequisitesBefore creating a configuration domain, the following prerequisites must be satisfied:• Orbix is installed.• Some basic system variables are set up (in particular, the
IT_PRODUCT_DIR, IT_LICENSE_FILE, and PATH variables).Fore more details, please consult the Installation Guide.
LicensingThe location of the license file, licenses.txt, is specified by the IT_LICENSE_FILE system variable. If this system variable is not already set in your environment, you can set it now.
StepsTo create a configuration domain, simple, perform the following steps:1. Run itconfigure.2. Choose the domain type.3. Specify service startup options.4. Specify security settings.5. Specify fault tolerance settings.6. Select services.7. Confirm choices.8. Finish configuration.
Orbix CORBA Tutorial for C++ 1
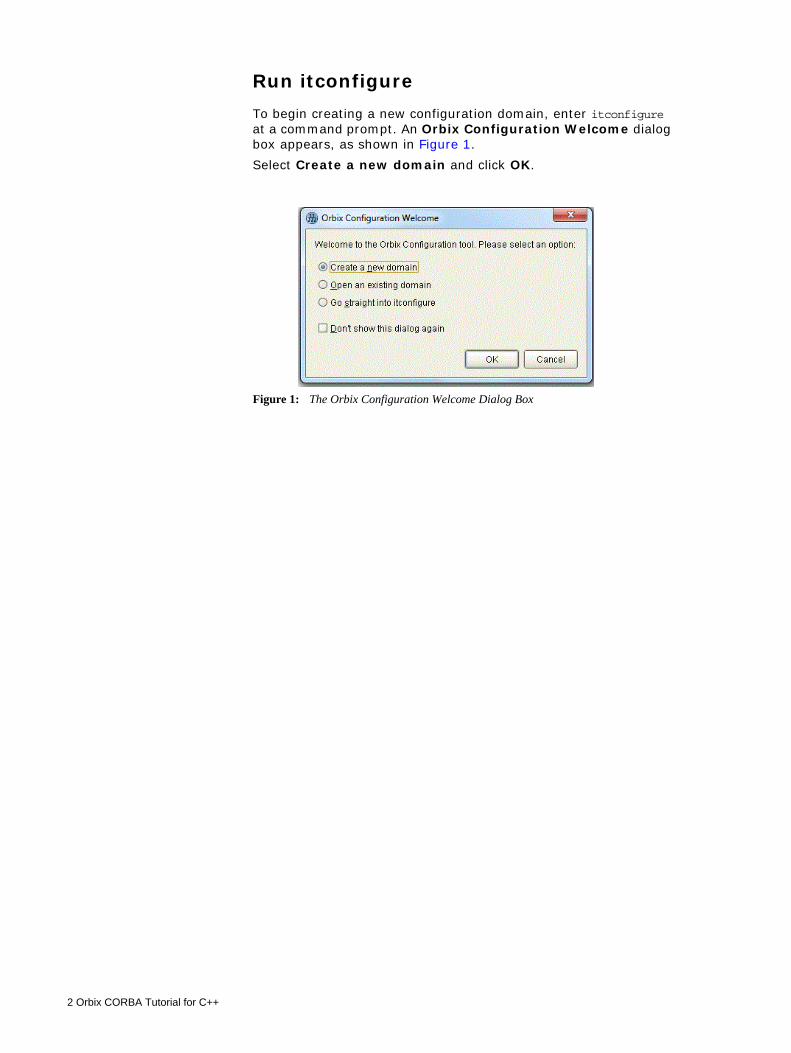
Run itconfigureTo begin creating a new configuration domain, enter itconfigure at a command prompt. An Orbix Configuration Welcome dialog box appears, as shown in Figure 1.Select Create a new domain and click OK.
Figure 1: The Orbix Configuration Welcome Dialog Box
2 Orbix CORBA Tutorial for C++

Choose the domain typeA Domain Type window appears, as shown in Figure 2.In the Configuration Domain Name text field, type simple. Under Configuration Domain Type, click the Select Services radiobutton.Click Next> to continue.
Figure 2: The Domain Type Window
Orbix CORBA Tutorial for C++ 3

Specify service startup optionsA Service Startup window appears, as shown in Figure 3.You can leave the settings in this Window at their defaults.Click Next> to continue.
Figure 3: The Service Startup Window
4 Orbix CORBA Tutorial for C++

Specify security settingsA Security window appears, as shown in Figure 4.You can leave the settings in this Window at their defaults (no security).Click Next> to continue.
Figure 4: The Security Window
Orbix CORBA Tutorial for C++ 5

Specify fault tolerance settingsA Fault Tolerance window appears, as shown in Figure 5.You can leave the settings in this Window at their defaults.Click Next> to continue.
Figure 5: The Fault Tolerance Window
6 Orbix CORBA Tutorial for C++

Select servicesA Select Services window appears, as shown in Figure 6.In the Select Services window, select the following services and components for inclusion in the configuration domain: Location, Node daemon, Management, CORBA Interface Repository, CORBA Naming, and demos.Click Next> to continue.
Confirm choicesYou now have the opportunity to review the configuration settings in the Confirm Choices window, Figure 7. If necessary, you can use the <Back button to make corrections.
Figure 6: The Select Services Window
Orbix CORBA Tutorial for C++ 7

Click Next> to create the configuration domain and progress to the next window.
Finish configurationThe itconfigure utility now creates and deploys the simple configuration domain, writing files into the OrbixInstallDir/etc/bin, OrbixInstallDir/etc/domain, OrbixInstallDir/etc/log, and OrbixInstallDir/var directories.If the configuration domain is created successfully, you should see a Summary window with a message similar to that shown in Figure 8.
Figure 7: The Confirm Choices Window
8 Orbix CORBA Tutorial for C++

Click Finish to quit the itconfigure utility.
Setting the Orbix Environment
PrerequisitesBefore proceeding with the demonstration in this chapter you need to ensure:• The CORBA developer’s kit is installed on your host.• Orbix is configured to run on your host platform.• Your configuration domain is set (see “Setting the domain”).The Administrator’s Guide contains more information on Orbix configuration, and details of Orbix command line utilities.
Figure 8: Configuration Summary
Note: OS/390, both native and UNIX system services, do not support the code generation toolkit and distributed genies. For information about building applications in a native OS/390 environment, see the readme files and JCL that are supplied in the DEMO data sets of your iPortal OS/390 Server product installation.
Orbix CORBA Tutorial for C++ 9

Setting the domainThe scripts that set the Orbix environment are associated with a particular domain, which is the basic unit of Orbix configuration. See the Installation Guide, and the Administrator’s Guide for further details on configuring your environment.To set the Orbix environment associated with the domain-name domain, enter:
Windows
UNIX
config-dir is the root directory where the Appliation Server Platform stores its configuration information. You specify this directory while configuring your domain. domain-name is the name of a configuration domain.
Hello World ExampleThis chapter shows how to create, build, and run a complete client/server demonstration with the help of the CORBA code generation toolkit. The architecture of this example system is shown in Figure 9.
The client and server applications communicate with each other using the Internet Inter-ORB Protocol (IIOP), which sits on top of TCP/IP. When a client invokes a remote operation, a request message is sent from the client to the server. When the operation returns, a reply message containing its return values is sent back to the client. This completes a single remote CORBA invocation.All interaction between the client and server is mediated via a set of IDL declarations. The IDL for the Hello World! application is:
> config-dir\etc\bin\domain-name_env.bat
% . config-dir/etc/bin/domain-name_env
Figure 9: Client makes a single operation call on a server
Client Machine
Client Application
IDL Interface
Server Application
Server Machine
ORB ORB
Code Code
Operation Call
Result
CORBAObject
//IDLinterface Hello { string getGreeting();};
10 Orbix CORBA Tutorial for C++

The IDL declares a single Hello interface, which exposes a single operation getGreeting(). This declaration provides a language neutral interface to CORBA objects of type Hello.The concrete implementation of the Hello CORBA object is written in C++ and is provided by the server application. The server could create multiple instances of Hello objects if required. However, the generated code generates only one Hello object.The client application has to locate the Hello object—it does this by reading a stringified object reference from the file Hello.ref. There is one operation getGreeting() defined on the Hello interface. The client invokes this operation and exits.
Development from the Command LineStarting point code for CORBA client and server applications can also be generated using the idlgen command line utility.The idlgen utility can be used on Windows and UNIX platforms.You implement the Hello World! application with the following steps:1. Define the IDL interface, Hello.2. Generate starting point code.3. Complete the server program by implementing the single IDL
getGreeting() operation.4. Complete the client program by inserting a line of code to
invoke the getGreeting() operation.5. Build the demonstration.6. Run the demonstration.
Define the IDL interfaceCreate the IDL file for the Hello World! application. First of all, make a directory to hold the example code:
Windows
UNIX
Create an IDL file C:\OCGT\HelloExample\hello.idl (Windows) or OCGT/HelloExample/hello.idl (UNIX) using a text editor.Enter the following text into the file hello.idl:
This interface mediates the interaction between the client and the server halves of the distributed application.
> mkdir C:\OCGT\HelloExample
% mkdir -p OCGT/HelloExample
//IDLinterface Hello { string getGreeting();};
Orbix CORBA Tutorial for C++ 11

Generate starting point codeGenerate files for the server and client application using the CORBA Code Generation Toolkit.In the directory C:\OCGT\HelloExample (Windows) or OCGT/HelloExample (UNIX) enter the following command:
This command logs the following output to the screen while it is generating the files:
You can edit the following files to customize client and server applications:
Client:client.cxx
Server:server.cxxHelloImpl.hHelloImpl.cxx
Complete the server programComplete the implementation class, HelloImpl, by providing the definition of the HelloImpl::getGreeting() function . ThisC++ function provides the concrete realization of the Hello::getGreeting() IDL operation.
idlgen cpp_poa_genie.tcl -all hello.idl
hello.idl:cpp_poa_genie.tcl: creating it_servant_base_overrides.hcpp_poa_genie.tcl: creating it_servant_base_overrides.cxxcpp_poa_genie.tcl: creating HelloImpl.hcpp_poa_genie.tcl: creating HelloImpl.cxxcpp_poa_genie.tcl: creating server.cxxcpp_poa_genie.tcl: creating client.cxxcpp_poa_genie.tcl: creating call_funcs.hcpp_poa_genie.tcl: creating call_funcs.cxxcpp_poa_genie.tcl: creating it_print_funcs.hcpp_poa_genie.tcl: creating it_print_funcs.cxxcpp_poa_genie.tcl: creating it_random_funcs.hcpp_poa_genie.tcl: creating it_random_funcs.cxxcpp_poa_genie.tcl: creating Makefile
12 Orbix CORBA Tutorial for C++

Edit the HelloImpl.cxx file, and delete most of the generated boilerplate code occupying the body of the HelloImpl::getGreeting() function. Replace it with the line of code highlighted in bold font below:
The function CORBA::string_dup() allocates a copy of the "Hello World!" string on the free store. It would be an error to return a string literal directly from the CORBA operation because the ORB automatically deletes the return value after the function has completed. It would also be an error to create a copy of the string using the C++ new operator.
Complete the client programComplete the implementation of the client main() function in the client.cxx file. You must add a couple of lines of code to make a remote invocation of the getGreeting() operation on the Hello object.Edit the client.cxx file and search for the line where the call_Hello_getGreeting() function is called. Delete this line and replace it with the two lines of code highlighted in bold font below:
The object reference Hello1 refers to an instance of a Hello object in the server application. It is already initialized for you.
//C++//File ’HelloImpl.cxx’...char *HelloImpl::getGreeting() throw( CORBA::SystemException){ char * _result;
_result = CORBA::string_dup("Hello World!");
return _result;}...
//C++//File: ‘client.cxx’... if (CORBA::is_nil(Hello1)) { cerr << "Could not narrow reference to interface " << "Hello" << endl; } else { CORBA::String_var strV = Hello1->getGreeting(); cout << "Greeting is: " << strV << endl;
}...
Orbix CORBA Tutorial for C++ 13

A remote invocation is made by invoking getGreeting() on the Hello1 object reference. The ORB automatically establishes a network connection and sends packets across the network to invoke the HelloImpl::getGreeting() function in the server application.The returned string is put into a C++ object, strV, of the type CORBA::String_var. The destructor of this object will delete the returned string so that there is no memory leak in the above code.
Build the demonstrationThe Makefile generated by the code generation toolkit has a complete set of rules for building both the client and server applications.To build the client and server complete the following steps:1. Open a command line window.2. Go to the ../OCGT/HelloExample directory.3. Enter:
Windows
UNIX
Run the demonstrationRun the application as follows:1. Run the Orbix services (if required).
If you have configured Orbix to use file-based configuration, no services need to run for this demonstration. Proceed to step 2.If you have configured Orbix to use configuration repository based configuration, start up the basic Orbix services.Open a DOS prompt in Windows, or xterm in UNIX. Enter:
Where domain-name is the name of the configuration domain.2. Set the Application Server Platform’s environment.
3. Run the server program.Open a DOS prompt, or xterm window (UNIX). From the C:\OCGT\HelloExample directory enter the name of the
> nmake
% make -e
start_domain-name_services
> domain-name_env
14 Orbix CORBA Tutorial for C++

executable file—server.exe (Windows) or server (UNIX).The server outputs the following lines to the screen:
The server performs the following steps when it is launched:♦ It instantiates and activates a single Hello CORBA object.♦ The stringified object reference for the Hello object is
written to the local Hello.ref file.♦ The server opens an IP port and begins listening on the
port for connection attempts by CORBA clients.4. Run the client program.
Open a new DOS prompt, or xterm window (UNIX). From the C:\OCGT\HelloExample directory enter the name of the executable file—client.exe (Windows) or client (UNIX).The client outputs the following lines to the screen:
The client performs the following steps when it is run:♦ It reads the stringified object reference for the Hello
object from the Hello.ref file.♦ It converts the stringified object reference into an object
reference.♦ It calls the remote Hello::getGreeting() operation by
invoking on the object reference. This causes a connection to be established with the server and the remote invocation to be performed.
5. When you are finished, terminate all processes.Shut down the server by typing Ctrl-C in the window where it is running.
6. Stop the Orbix services (if they are running).From a DOS prompt in Windows, or xterm in UNIX, enter:
The passing of the object reference from the server to the client in this way is suitable only for simple demonstrations. Realistic server applications use the CORBA naming service to export their object references instead.
Initializing the ORBWriting stringified object reference to Hello.refWaiting for requests...
Client using random seed 0Reading stringified object reference from Hello.refGreeting is: Hello World!
stop_domain-name_services
Orbix CORBA Tutorial for C++ 15

16 Orbix CORBA Tutorial for C++

Index
AApplication
running 14
CClient
generating 12implementing 13
Code generation toolkitidlgen utility 12
cpp_poa_genie.tcl 12
HHello World! example 10
MMemory management
string type 13
OObject reference
passing as a string 11
SServer
generating 12implementing 12
Services 14, 15string_dup() 13String_var 14
Orbix CORBA Tutorial for C++ 17

18 Orbix CORBA Tutorial for C++