organic site prep xerces - university of minnesota
TRANSCRIPT

Sarah Foltz Jordan, Jessa Kay Cruz, Kelly Gill, Jennifer Hopwood,
Jarrod Fowler, Eric Lee-Mäder, and Mace Vaughan
Organic Site PreparationFor Wildflower Establishment

ORGANIC SITE PREPARATION For Wildflower Establishment
Sarah Foltz JordanJessa Kay Cruz
Kelly GillJennifer Hopwood
Jarrod FowlerEric Lee-MäderMace Vaughan
The Xerces Society for Invertebrate Conservation
www.xerces.org

The Xerces Society for Invertebrate Conservation is a nonprofit organization that protects wildlife through the conservation of invertebrates and their habitat. Established in 1971, the Society is at the forefront of invertebrate protection, harnessing the knowledge of scientists and enthusiasm of citizens to implement conservation programs worldwide. The Society uses advocacy, education, and applied research to promote invertebrate conservation.
The Xerces Society for Invertebrate Conservation628 NE Broadway Ste. 200 , Portland, OR 97232
tel 503.232.6639 • fax 503.233.6794 • www.xerces.org
Regional offices across the United States.
The Xerces Society is an equal opportunity employer and provider. Xerces® is a trademark registered in the U.S. Patent and Trademark Office
AcknowledgmentsThis material is based upon work supported by the Natural Resources Conservation Service, U.S. Department of Agriculture, under Conservation Innovation Grant number 69-3A75-12-253. Any opinions, findings, conclusions, or recommendations expressed in this publication are those of the author(s) and do not necessarily reflect the views of the U.S. Department of Agriculture.
Additional support provided by Cascadian Farm, Ceres Trust, Cheerios, CS Fund, Disney Conservation Fund, The Dudley Foundation, Endangered Species Chocolate, Gaia Fund, General Mills, Irwin Andrew Porter Foundation, J. Crew, National Co+op Grocers, Nature Valley, Sarah K. de Coizart Article TENTH Perpetual Charitable Trust, Turner Foundation, Inc., The White Pine Fund, Whole Foods Market and its vendors, Whole Systems Foundation, and Xerces Society members.
The authors would like to thank Betsy Allister and Andrew Ehrmann of Spring Winds Farm, Deirdre Birmingham of The Cider Farm, David Bohnhoff, Anna Jones-Crabtree & Doug Crabtree of Vilicus Farms, Ben Doherty & Erin Johnson of Open Hands Farm, Jolie Goldentz Dollar, Joe Fahey of Peck & Bushel Fruit Company, Keith Fredericks at Minnesota Native Landscapes, the Heidel Family of Heidel Family Farms, Ken Mandley, Jennifer Miller, Joan and Nick Olson of Prairie Drifter Farm, Mike Sommer and Tim Sommer of Purple Sage Farms, the Stettler Family of Longdale Farm, Del and Mary Stubbs of Del’s Orchard, Ron Tadlock, USDA–NRCS Cape May Plant Materials Center, Aaron Wills of Little Hill Berry Farm, and Sarah Woutat and Vivian Wauters of Uproot Farm.
Editing: Sara Morris and Matthew Shepherd. Layout: Sara Morris and Jamie Tibbetts.
Printing: Print Results, Portland, OR.
PhotographsCovers: front—pollinator planting integrated into organic farm; back—seeding native wildflower habitat into a well-prepared seed bed (photographs by Sarah Foltz Jordan, The Xerces Society).
We are grateful to the photographers for allowing us to use their wonderful photographs. The copyright for all photographs is retained by the photographers. None of the photographs may be reproduced without permission from the photographer. If you wish to contact a photographer, please contact the Xerces Society at the address above.
Additional copiesA copy of these guidelines may be downloaded for free from the Xerces Society website, available at: http://www.xerces.org/. Hard copies are also available for purchase through the Xerces Store at: http://www.xerces.org/store/.
vThe Xerces Society for Invertebrate Conservation
Contents
Introduction 1Site Preparation, page 3
Organic Site Preparation Methods Overview 4
2 Solarization 6Table 2.1: Solarization Overview, page 6How It Works, page 7Timing/Duration, page 7
In cooler climates, page 7In warmer climates, page 7
Basic Instructions, page 8Table 2.2: Selecting the Right Plastic, page 10Table 2.3: Solarization Timeline–Cooler Regions (e.g., Upper Midwest, Northeast), page 11Table 2.4: Solarization Timeline–Warmer/Semi-Arid Regions (e.g., California), page 11
3 Smother Cropping 12Table 3.1: Smother Cropping Overview, page 12How It Works, page 13Timing/Duration, page 13
Sites with moderate to high weed pressure, page 13Sites with low weed pressure, page 13
Basic Instructions, page 14Buckwheat Smother Crop, page 14Lacy Phacelia Smother Crop, page 16
Table 3.2: Ideal Conditions for/Characteristics of Buckwheat & Lacy Phacelia, page 17Table 3.3: Buckwheat Smother Crop Timeline & Checklist—East/Midwest, page 18Table 3.4: Lacy Phacelia Smother Crop Timeline & Checklist—East/Midwest, page 19Table 3.5: Lacy Phacelia Smother Crop Timeline & Checklist—West, page 20Table 4.1: Repeated Shallow Cultivation Overview, page 21How It Works, page 21
4 Repeated Shallow Cultivation 21Timing/Duration, page 22
Sites with low weed pressure, page 22Sites with moderate weed pressure, page 22
Basic Instructions, page 22Table 4.2: Repeated Shallow Cultivation Timeline, page 23
5 Sheet Mulching 24Table 5.1: Sheet Mulching Overview, page 24How It Works, page 24Timing/Duration, page 24Basic Instructions, page 25Table 5.2: Sheet Mulching Timeline, page 26

vi Organic Site Preparation for Wildflower Establishment
Table 5.3: Sheet Mulching Checklist, page 26Figure 5.3: Sheet Mulching Example, page 27Mulching Materials Approved for Organic Use, page 27
Carbon-based materials, page 27Nitrogen-based materials, page 27
6 Soil Inversion 28Table 6.1: Soil Inversion Overview, page 28How It Works, page 28Timing/Duration, page 29Basic Instructions, page 29Table 6.2: Soil Inversion Timeline, page 29
7 Organic Herbicide Applications 30Table 7.1: Organic Herbicide Applications Overview, page 30How It Works, page 30Timing/Duration, page 31
Sites with low weed pressure, page 31Sites with moderate weed pressure, page 31
Basic Instructions, page 31Table 7.2: Organic Herbicide Applications Timeline, page 31
8 Sod Removal 32Table 8.1: Sod Removal Overview, page 32How It Works, page 32Timing/Duration, page 33Basic Instructions, page 33Table 8.2: Sod Removal Timeline, page 33
Appendix A: How To Get The Most Out Of Mechanical Weed Control 34Know Your Weeds, page 34Timing and Weed Type/Stage, page 34Diversified Weed Management, page 34During Wet Conditions, page 35During Dry Conditions, page 35
Appendix B: Useful Common Cultivation/Weed Management Tools 36
Appendix C: Additional Resources 38Guidelines For Implementing Conservation Measures, page 38Pesticide Protection, page 39Cover Crops, page 39Technical and Financial Assistance, page 40
Additional Acknowledgments 41Photographs, page 41
1The Xerces Society for Invertebrate Conservation
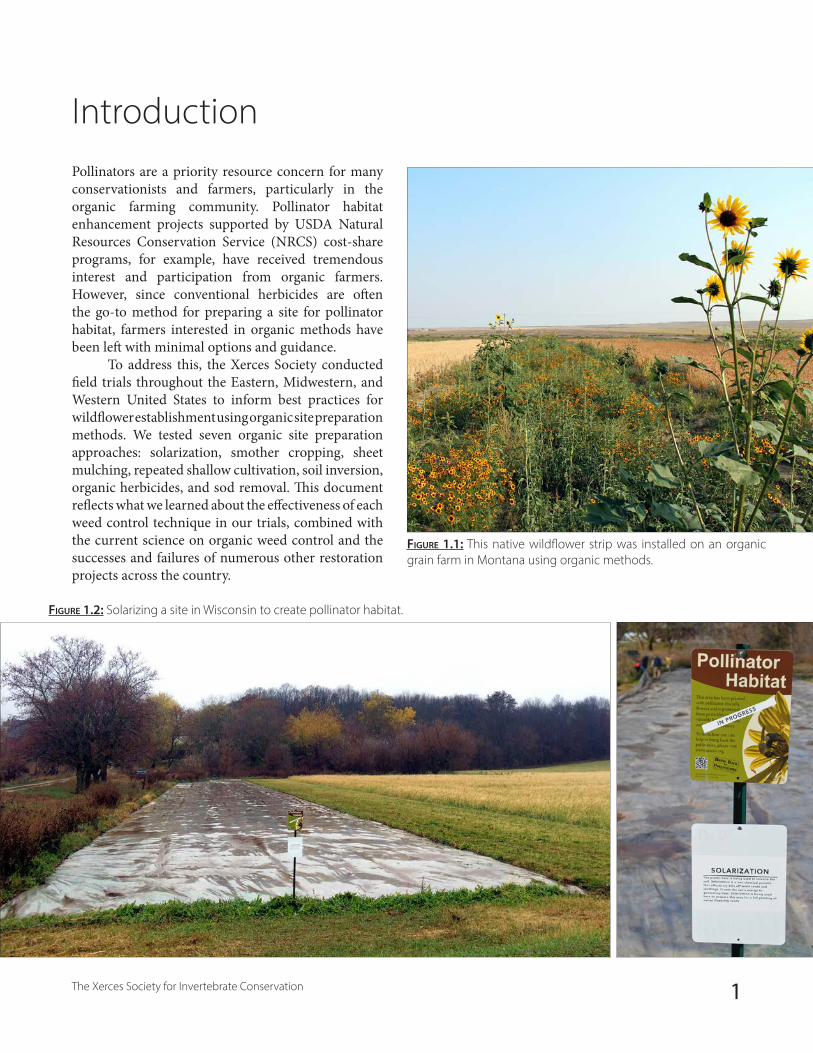
IntroductionPollinators are a priority resource concern for many conservationists and farmers, particularly in the organic farming community. Pollinator habitat enhancement projects supported by USDA Natural Resources Conservation Service (NRCS) cost-share programs, for example, have received tremendous interest and participation from organic farmers. However, since conventional herbicides are often the go-to method for preparing a site for pollinator habitat, farmers interested in organic methods have been left with minimal options and guidance.
To address this, the Xerces Society conducted field trials throughout the Eastern, Midwestern, and Western United States to inform best practices for wildflower establishment using organic site preparation methods. We tested seven organic site preparation approaches: solarization, smother cropping, sheet mulching, repeated shallow cultivation, soil inversion, organic herbicides, and sod removal. This document reflects what we learned about the effectiveness of each weed control technique in our trials, combined with the current science on organic weed control and the successes and failures of numerous other restoration projects across the country.
Figure 1.1: This native wildflower strip was installed on an organic grain farm in Montana using organic methods.
Figure 1.2: Solarizing a site in Wisconsin to create pollinator habitat.
2 Organic Site Preparation for Wildflower Establishment
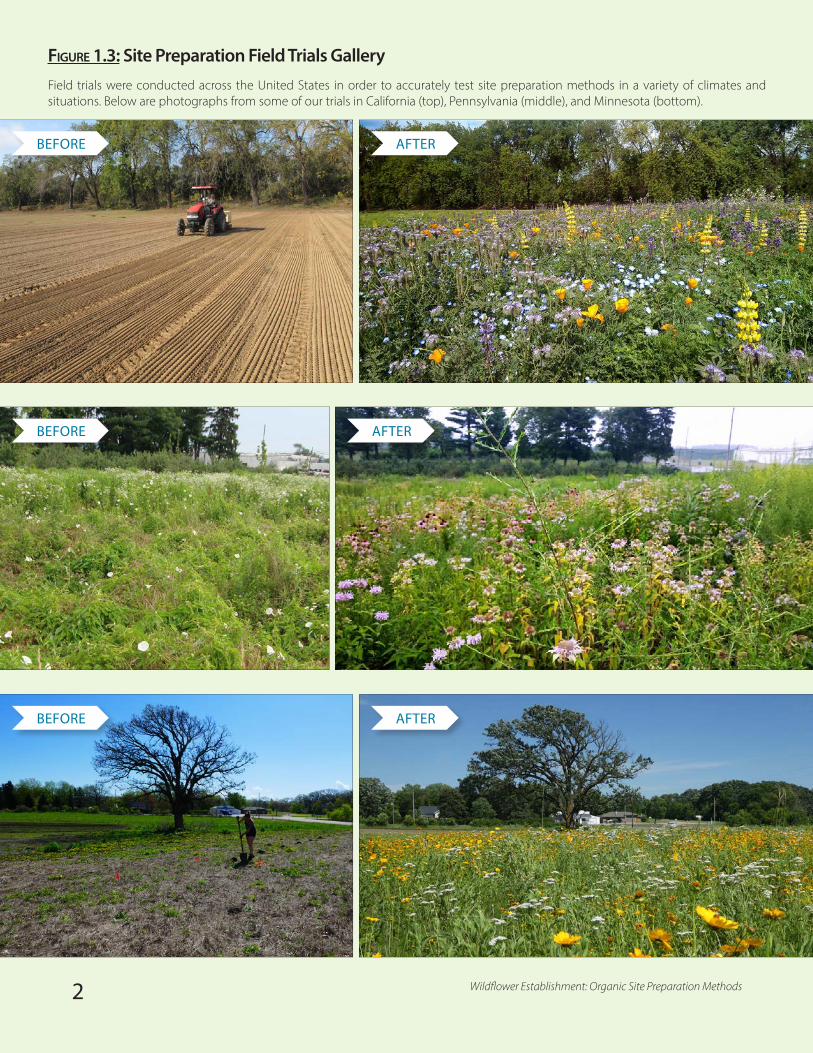
Figure 1.3: Site Preparation Field Trials GalleryField trials were conducted across the United States in order to accurately test site preparation methods in a variety of climates and situations. Below are photographs from some of our trials in California (top), Pennsylvania (middle), and Minnesota (bottom).
2 Wildflower Establishment: Organic Site Preparation Methods
BEFORE AFTER
BEFORE AFTER
BEFORE AFTER
3The Xerces Society for Invertebrate Conservation
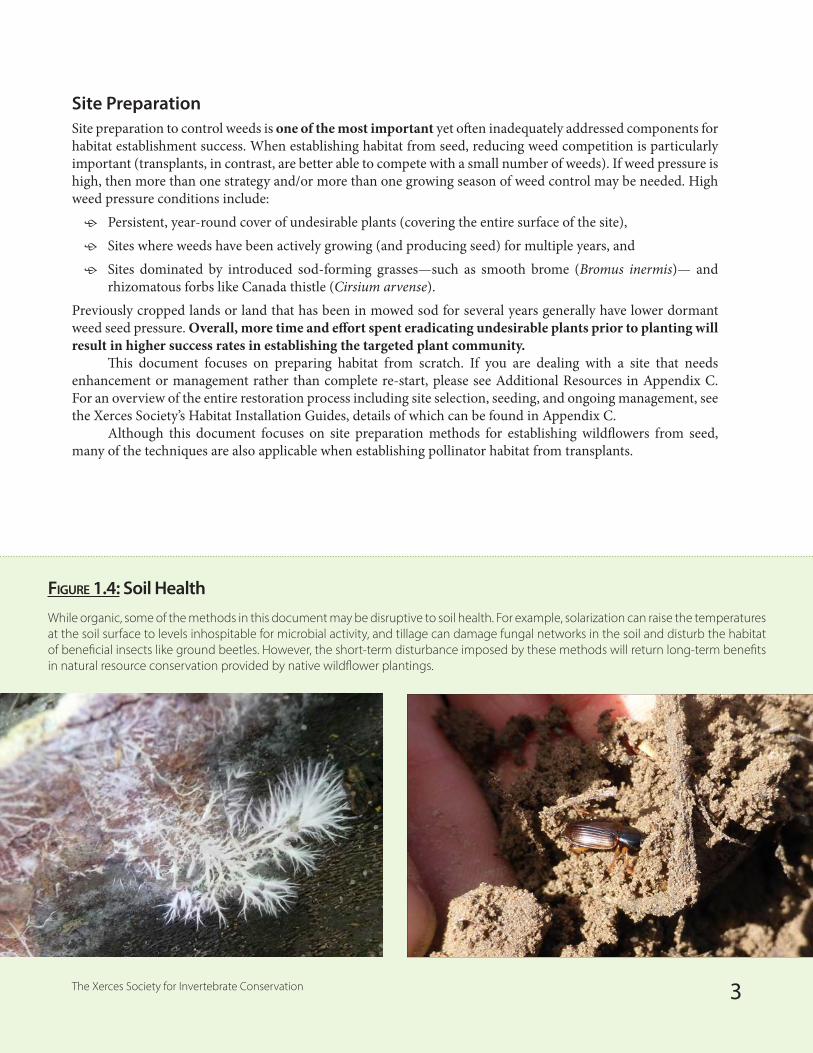
Figure 1.4: Soil HealthWhile organic, some of the methods in this document may be disruptive to soil health. For example, solarization can raise the temperatures at the soil surface to levels inhospitable for microbial activity, and tillage can damage fungal networks in the soil and disturb the habitat of beneficial insects like ground beetles. However, the short-term disturbance imposed by these methods will return long-term benefits in natural resource conservation provided by native wildflower plantings.
Site PreparationSite preparation to control weeds is one of the most important yet often inadequately addressed components for habitat establishment success. When establishing habitat from seed, reducing weed competition is particularly important (transplants, in contrast, are better able to compete with a small number of weeds). If weed pressure is high, then more than one strategy and/or more than one growing season of weed control may be needed. High weed pressure conditions include:
ӧ Persistent, year-round cover of undesirable plants (covering the entire surface of the site), ӧ Sites where weeds have been actively growing (and producing seed) for multiple years, and ӧ Sites dominated by introduced sod-forming grasses—such as smooth brome (Bromus inermis)— and
rhizomatous forbs like Canada thistle (Cirsium arvense).Previously cropped lands or land that has been in mowed sod for several years generally have lower dormant weed seed pressure. Overall, more time and effort spent eradicating undesirable plants prior to planting will result in higher success rates in establishing the targeted plant community.
This document focuses on preparing habitat from scratch. If you are dealing with a site that needs enhancement or management rather than complete re-start, please see Additional Resources in Appendix C. For an overview of the entire restoration process including site selection, seeding, and ongoing management, see the Xerces Society’s Habitat Installation Guides, details of which can be found in Appendix C.
Although this document focuses on site preparation methods for establishing wildflowers from seed, many of the techniques are also applicable when establishing pollinator habitat from transplants.
3The Xerces Society for Invertebrate Conservation
4 Organic Site Preparation for Wildflower Establishment
METHOD WHEN TO USE WHEN NOT TO USE HOW IT WORKS COMMENTS EQUIPMENT NEEDED
SOLARIZATION
ཟ Flat or gently sloping sites with low risk of erosion ཟ Sunny sites ཟ Small sites, ≤1/2 ac (see page 10 for solarization options for large
sites) ཟ Cultivation equipment is unavailable ཟ Used clear UV-stable plastic is available or new is affordable ཟ Minimal maintenance of the site during summer is desired
ལ Steep slopes or areas with microtopography ལ Shady or wet sites ལ Large sites (>1/2 ac) ལ Regions where average summer temperatures are low ལ Clear UV-stable plastic is unavailable or unaffordable ལ Sites where deer pressure is high, as deer can easily puncture plastic
Kills existing vegetation by heat and smothering;Reduces weed seed bank by heat;Reduces weed seed by flushing plants from soil
ӹ Consistently out-performed other site preparation methods in our trials
ӹ Can kill soil-dwelling plant pathogens ӹ Ideal in hot climates ӹ Plastic can be re-used for multiple seasons
ӹ Clear UV-stable plastic (4 or 6 mil thickness) ӹ Greenhouse repair tape ӹ Mower ӹ Cultivation equipment (cultivation recommended in most situations) ӹ Equipment to dig and backfill trench around perimeter; ӹ and/or hoes and shovels to dig and backfill trench by hand
RELATIVE COST OF MATERIALS*—HIGH; new UV-stable plastic is very costly (note: this method is low-cost if used plastic can be obtained)
SMOTHER CROPPING
ཟ Flat or gently sloping, sunny, and well-drained sites ཟ Cover crop rotations are already used or easily fit into existing
operations ཟ Weed pressure is low to moderate ཟ Timelines can be strictly followed throughout entire site prep
process ཟ Proper equipment is available and can be calibrated and
operated specifically for cover-cropping ཟ Irrigation is available and can be used as needed ཟ Minimal maintenance of the site during summer is desired
ལ Steep slopes/sites with high erosion potential or poor drainage ལ Cover crop rotations are not used or do not fit into farm plan ལ Weed pressure is high (i.e., fallow fields) ལ Timelines cannot be strictly followed (see text) ལ Proper equipment for planting and termination are not available ལ Irrigation is not available or easily accessed ལ In designated wetlands or area with poorly drained soil ལ Where planting non-native plants is prohibited or native plants may
be threatened by the unintentional escape of non-native/cultivated species
Prevents weeds from spreading;Reduces weeds by cultivation and smothering
ӹ Improves soil health ӹ Gives wildlife temporary forage and cover ӹ Planting and termination dates vary by region
ӹ Mower ӹ Cultivation equipment and implements (see Appendix B) ӹ Irrigation system or water tank and water source ӹ Seeding equipment (broadcast seeder, seed drill) ӹ Cover crop termination equipment /implement (disk, mower, roller-
crimper)
RELATIVE COST OF MATERIALS*—LOW; if cultivation equipment is available; seed for smother cropping is generally inexpensive
REPEATED SHALLOW
CULTIVATION
ཟ Flat or gently sloping, sunny or shady sites ཟ Transitioning crop fields or sites with low weed pressure ཟ Proper equipment is available and can be used for this purpose ཟ Irrigation is available ཟ Timelines can be strictly followed throughout entire site
preparation process
ལ Steep slopes ལ Where erosion is of concern ལ Site is fallowed or weed pressure is medium to high ལ Shallow tillage equipment is unavailable (see Appendix B) ལ Irrigation is unavailable ལ Designated wetlands or areas with poorly drained or fragile soil
Kills weeds by cutting and dislodging;Reduces weed seed bank by repeated disturbance;Weakens weed root systems
ӹ Diminishes soil health ӹ May expose dormant weed seeds and cause future
weed pressure ӹ Must remain shallow and only disturb top layer of
soil
ӹ Mower or brushhog ӹ Cultivation equipment and implements (see Appendix B). ӹ Cultipacker or lawn barrel (tow behind or push) ӹ Irrigation system or water tank and water source
RELATIVE COST OF MATERIALS*—LOW; if appropriate cultivation equipment is available
SHEET MULCHING
ཟ Flat or gently sloping, sunny or shady, and humid sites ཟ Small sites, up to ~1/2 ac ཟ Cultivation is impractical (e.g., rocky conditions, weed pressure,
etc.) ཟ Minimal maintenance of the site is desired ཟ Mulching materials are available or affordable ཟ Solarization is impractical (e.g., plastic unavailable/unaffordable,
shady)
ལ Steep slopes or arid sites without irrigation ལ Large sites (>1/2 ac) ལ Arid or semi-arid climates without access to irrigation ལ Site contains aggressive or persistent deep-rooted, perennial,
rhizomatous or woody weeds ལ Mulching materials are unavailable or unaffordable (see text)
Kills existing vegetation by smothering;Prevents seeds from germinating by smothering
ӹ Can be used for seeds, but is ideal for transplants ӹ Can prepare new habitat, or enhance existing
habitat ӹ Performs well in shady or rocky sites ӹ On organic certified land, mulching materials that
are free from synthetic chemicals and weed seeds are required
ӹ Mower, no-till roller/crimper, scythe, or string-trimmer ӹ Core or spike lawn aerator or spading fork ӹ Irrigation system or water tank and water source ӹ Carbon- and nitrogen-based mulching materials (see text)
RELATIVE COST OF MATERIALS*—MODERATE; mulching materials can be moderately costly, unless they are available as farm products/by-products
SOIL INVERSION
ཟ Flat/gently sloping sites; sites where soil erosion is not a concern
ཟ Large sites, >1/2 ac ཟ Sites with medium to high weed pressure or dense grass sod ཟ Effective on sunny or shady sites ཟ Moldboard plow is available or affordable and an experienced
operator is available
ལ Steep slopes ལ Erosion concerns are very high ལ Moldboard plow is unavailable or unaffordable ལ Abundant deep-rooted perennial weeds (less susceptible to
method) ལ Weed pressure is low and other methods can be used
Kills weeds by burying in weed-free and nutrient poor subsoil;Reduces seed bank germination;Weakens weed root systems
ӹ Effectively breaks up grass sod ӹ Provides wildflowers with a competitive advantage
over weeds ӹ Reduces soil compaction and increases water
infiltration ӹ This method will not always kill deep-rooted
perennial weeds like nut sedge or bermuda grass
ӹ Mower ӹ Moldboard plow ӹ Cultivation equipment and implements
RELATIVE COST OF MATERIALS*—LOW; if appropriate cultivation equipment is available
ORGANIC HERBICIDE
APPLICATIONS
ཟ Flat to sloping, sunny or shady sites ཟ Cultivation is impractical (e.g., rocky conditions or conservation
concerns) ཟ Targeted weeds are annual broadleaf species (see text) ཟ Targeted weeds are at seedling stage
ལ Application equipment is unavailable or unaffordable ལ Targeted weeds are monocots (grasses), succulents, or perennials ལ Targeted weeds are taller than 6” ལ Water pollution concerns are high
Weakens weeds with chemicals;Reduces weed seed bank by repeatedly damaging germinated weeds
ӹ Burns plant tissues by direct-contact, not translocated through plants
ӹ Requires repeated applications for effective control ӹ May be ineffective against grasses and many
broad-leaf weeds ӹ This method was the least effective in our trials
ӹ May require special equipment that can tolerate caustic herbicides or herbicides that can clog nozzles
ӹ Backpack sprayer or tractor/ATV and spray rig
RELATIVE COST OF MATERIALS*—HIGH; most organic herbicides are significantly more expensive than conventional herbicides
SOD REMOVAL ཟ Sites composed of dense sod, regularly mowed for several years ཟ Small sites (<1/8 ac) where sod removal is feasible
ལ Large sites where sod removal would be impractical Kills existing weeds by cutting roots and removing sod in large sheets from site
ӹ Excellent method for converting small areas of lawn to native wildflowers
ӹ Manual sod cutter (“kick-type”), or gas-powered sod cutter
RELATIVE COST OF MATERIALS*—LOW; if equipment is available (note: if not, rental can be costly)
Organic Site Preparation Methods Overview

5The Xerces Society for Invertebrate Conservation
METHOD WHEN TO USE WHEN NOT TO USE HOW IT WORKS COMMENTS EQUIPMENT NEEDED
SOLARIZATION
ཟ Flat or gently sloping sites with low risk of erosion ཟ Sunny sites ཟ Small sites, ≤1/2 ac (see page 10 for solarization options for large
sites) ཟ Cultivation equipment is unavailable ཟ Used clear UV-stable plastic is available or new is affordable ཟ Minimal maintenance of the site during summer is desired
ལ Steep slopes or areas with microtopography ལ Shady or wet sites ལ Large sites (>1/2 ac) ལ Regions where average summer temperatures are low ལ Clear UV-stable plastic is unavailable or unaffordable ལ Sites where deer pressure is high, as deer can easily puncture plastic
Kills existing vegetation by heat and smothering;Reduces weed seed bank by heat;Reduces weed seed by flushing plants from soil
ӹ Consistently out-performed other site preparation methods in our trials
ӹ Can kill soil-dwelling plant pathogens ӹ Ideal in hot climates ӹ Plastic can be re-used for multiple seasons
ӹ Clear UV-stable plastic (4 or 6 mil thickness) ӹ Greenhouse repair tape ӹ Mower ӹ Cultivation equipment (cultivation recommended in most situations) ӹ Equipment to dig and backfill trench around perimeter; ӹ and/or hoes and shovels to dig and backfill trench by hand
RELATIVE COST OF MATERIALS*—HIGH; new UV-stable plastic is very costly (note: this method is low-cost if used plastic can be obtained)
SMOTHER CROPPING
ཟ Flat or gently sloping, sunny, and well-drained sites ཟ Cover crop rotations are already used or easily fit into existing
operations ཟ Weed pressure is low to moderate ཟ Timelines can be strictly followed throughout entire site prep
process ཟ Proper equipment is available and can be calibrated and
operated specifically for cover-cropping ཟ Irrigation is available and can be used as needed ཟ Minimal maintenance of the site during summer is desired
ལ Steep slopes/sites with high erosion potential or poor drainage ལ Cover crop rotations are not used or do not fit into farm plan ལ Weed pressure is high (i.e., fallow fields) ལ Timelines cannot be strictly followed (see text) ལ Proper equipment for planting and termination are not available ལ Irrigation is not available or easily accessed ལ In designated wetlands or area with poorly drained soil ལ Where planting non-native plants is prohibited or native plants may
be threatened by the unintentional escape of non-native/cultivated species
Prevents weeds from spreading;Reduces weeds by cultivation and smothering
ӹ Improves soil health ӹ Gives wildlife temporary forage and cover ӹ Planting and termination dates vary by region
ӹ Mower ӹ Cultivation equipment and implements (see Appendix B) ӹ Irrigation system or water tank and water source ӹ Seeding equipment (broadcast seeder, seed drill) ӹ Cover crop termination equipment /implement (disk, mower, roller-
crimper)
RELATIVE COST OF MATERIALS*—LOW; if cultivation equipment is available; seed for smother cropping is generally inexpensive
REPEATED SHALLOW
CULTIVATION
ཟ Flat or gently sloping, sunny or shady sites ཟ Transitioning crop fields or sites with low weed pressure ཟ Proper equipment is available and can be used for this purpose ཟ Irrigation is available ཟ Timelines can be strictly followed throughout entire site
preparation process
ལ Steep slopes ལ Where erosion is of concern ལ Site is fallowed or weed pressure is medium to high ལ Shallow tillage equipment is unavailable (see Appendix B) ལ Irrigation is unavailable ལ Designated wetlands or areas with poorly drained or fragile soil
Kills weeds by cutting and dislodging;Reduces weed seed bank by repeated disturbance;Weakens weed root systems
ӹ Diminishes soil health ӹ May expose dormant weed seeds and cause future
weed pressure ӹ Must remain shallow and only disturb top layer of
soil
ӹ Mower or brushhog ӹ Cultivation equipment and implements (see Appendix B). ӹ Cultipacker or lawn barrel (tow behind or push) ӹ Irrigation system or water tank and water source
RELATIVE COST OF MATERIALS*—LOW; if appropriate cultivation equipment is available
SHEET MULCHING
ཟ Flat or gently sloping, sunny or shady, and humid sites ཟ Small sites, up to ~1/2 ac ཟ Cultivation is impractical (e.g., rocky conditions, weed pressure,
etc.) ཟ Minimal maintenance of the site is desired ཟ Mulching materials are available or affordable ཟ Solarization is impractical (e.g., plastic unavailable/unaffordable,
shady)
ལ Steep slopes or arid sites without irrigation ལ Large sites (>1/2 ac) ལ Arid or semi-arid climates without access to irrigation ལ Site contains aggressive or persistent deep-rooted, perennial,
rhizomatous or woody weeds ལ Mulching materials are unavailable or unaffordable (see text)
Kills existing vegetation by smothering;Prevents seeds from germinating by smothering
ӹ Can be used for seeds, but is ideal for transplants ӹ Can prepare new habitat, or enhance existing
habitat ӹ Performs well in shady or rocky sites ӹ On organic certified land, mulching materials that
are free from synthetic chemicals and weed seeds are required
ӹ Mower, no-till roller/crimper, scythe, or string-trimmer ӹ Core or spike lawn aerator or spading fork ӹ Irrigation system or water tank and water source ӹ Carbon- and nitrogen-based mulching materials (see text)
RELATIVE COST OF MATERIALS*—MODERATE; mulching materials can be moderately costly, unless they are available as farm products/by-products
SOIL INVERSION
ཟ Flat/gently sloping sites; sites where soil erosion is not a concern
ཟ Large sites, >1/2 ac ཟ Sites with medium to high weed pressure or dense grass sod ཟ Effective on sunny or shady sites ཟ Moldboard plow is available or affordable and an experienced
operator is available
ལ Steep slopes ལ Erosion concerns are very high ལ Moldboard plow is unavailable or unaffordable ལ Abundant deep-rooted perennial weeds (less susceptible to
method) ལ Weed pressure is low and other methods can be used
Kills weeds by burying in weed-free and nutrient poor subsoil;Reduces seed bank germination;Weakens weed root systems
ӹ Effectively breaks up grass sod ӹ Provides wildflowers with a competitive advantage
over weeds ӹ Reduces soil compaction and increases water
infiltration ӹ This method will not always kill deep-rooted
perennial weeds like nut sedge or bermuda grass
ӹ Mower ӹ Moldboard plow ӹ Cultivation equipment and implements
RELATIVE COST OF MATERIALS*—LOW; if appropriate cultivation equipment is available
ORGANIC HERBICIDE
APPLICATIONS
ཟ Flat to sloping, sunny or shady sites ཟ Cultivation is impractical (e.g., rocky conditions or conservation
concerns) ཟ Targeted weeds are annual broadleaf species (see text) ཟ Targeted weeds are at seedling stage
ལ Application equipment is unavailable or unaffordable ལ Targeted weeds are monocots (grasses), succulents, or perennials ལ Targeted weeds are taller than 6” ལ Water pollution concerns are high
Weakens weeds with chemicals;Reduces weed seed bank by repeatedly damaging germinated weeds
ӹ Burns plant tissues by direct-contact, not translocated through plants
ӹ Requires repeated applications for effective control ӹ May be ineffective against grasses and many
broad-leaf weeds ӹ This method was the least effective in our trials
ӹ May require special equipment that can tolerate caustic herbicides or herbicides that can clog nozzles
ӹ Backpack sprayer or tractor/ATV and spray rig
RELATIVE COST OF MATERIALS*—HIGH; most organic herbicides are significantly more expensive than conventional herbicides
SOD REMOVAL ཟ Sites composed of dense sod, regularly mowed for several years ཟ Small sites (<1/8 ac) where sod removal is feasible
ལ Large sites where sod removal would be impractical Kills existing weeds by cutting roots and removing sod in large sheets from site
ӹ Excellent method for converting small areas of lawn to native wildflowers
ӹ Manual sod cutter (“kick-type”), or gas-powered sod cutter
RELATIVE COST OF MATERIALS*—LOW; if equipment is available (note: if not, rental can be costly)
*This refers to the cost of materials using this site preparation method, relative to the other methods. It does not include the cost of the time/labor involved, nor the cost of the planting itself (e.g., native seed). Prices of materials may vary.
The table below provides a comparative overview of seven organic site preparation methods for wildflower plantings. Use this table to determine which method(s) are most appropriate for your situation; for example, consider the scale of your site, weed pressure, the timeline you are working with, the equipment you have available, and other factors.
6 Organic Site Preparation for Wildflower Establishment
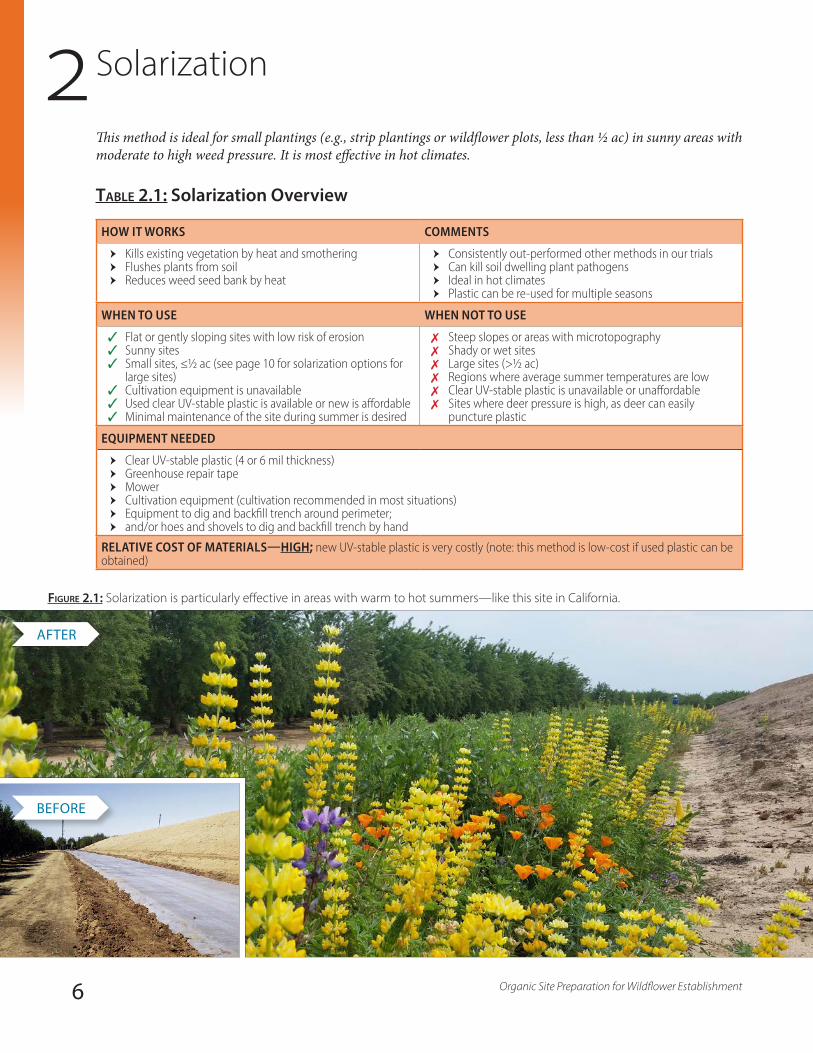
This method is ideal for small plantings (e.g., strip plantings or wildflower plots, less than ½ ac) in sunny areas with moderate to high weed pressure. It is most effective in hot climates.
Table 2.1: Solarization Overview
HOW IT WORKS COMMENTS
ӹ Kills existing vegetation by heat and smothering ӹ Flushes plants from soil ӹ Reduces weed seed bank by heat
ӹ Consistently out-performed other methods in our trials ӹ Can kill soil dwelling plant pathogens ӹ Ideal in hot climates ӹ Plastic can be re-used for multiple seasons
WHEN TO USE WHEN NOT TO USE
ཟ Flat or gently sloping sites with low risk of erosion ཟ Sunny sites ཟ Small sites, ≤1/2 ac (see page 10 for solarization options for
large sites) ཟ Cultivation equipment is unavailable ཟ Used clear UV-stable plastic is available or new is affordable ཟ Minimal maintenance of the site during summer is desired
ལ Steep slopes or areas with microtopography ལ Shady or wet sites ལ Large sites (>1/2 ac) ལ Regions where average summer temperatures are low ལ Clear UV-stable plastic is unavailable or unaffordable ལ Sites where deer pressure is high, as deer can easily
puncture plastic
EQUIPMENT NEEDED
ӹ Clear UV-stable plastic (4 or 6 mil thickness) ӹ Greenhouse repair tape ӹ Mower ӹ Cultivation equipment (cultivation recommended in most situations) ӹ Equipment to dig and backfill trench around perimeter; ӹ and/or hoes and shovels to dig and backfill trench by hand
RELATIVE COST OF MATERIALS—HIGH; new UV-stable plastic is very costly (note: this method is low-cost if used plastic can be obtained)
Figure 2.1: Solarization is particularly effective in areas with warm to hot summers—like this site in California.
BEFORE
AFTER
2 Solarization

Weed Response To SolarizationWhile some weed species seeds or plants are very sensitive to solarization, others are moderately to highly resistant. Solarization can be less effective against perennial weeds with deep roots and rhizomes that may resprout, or species that require very high temperatures (>140ºF) for seed viability to be impacted. In cool climates (e.g., Upper Midwest), you can expect to see abundant weed growth following solarization. That said, solarization can often be used in cooler climates to change the weed community such that native plants are easier to establish. We have seen solarization remove dense stands of smooth brome grass (Bromus inermis), leaving lambs quarters (Chenopodium album), purslane (Portulaca oleracea), and other annual weeds that are much easier to manage. In other cases, solarization has been found to be ineffective against weeds like Canada thistle (Cirsium arvense) and yellow nutsedge (Cyperus esculentus)—especially in wetter soils, and when cultivated prior to solarizing. Research into the response of different weed species to solarization is ongoing.
How To Maximize HeatHigh temperatures under the plastic are what make solarization so effective at killing weed seed. There are several steps you can take to maximize heat under the plastic. Since airflow dramatically decreases temperatures, it is important to pull the plastic as taut as possible, seal in all of the edges with dirt, and patch any holes or rips as soon as they occur (Figure 2.6). Soil moisture also impacts seed viability; if soil is too dry, seeds will be less vulnerable to the high temperatures .
In our solarization trials throughout the U.S., we have experienced maximum summer temperatures under the plastic ranging from ~125–145ºF, a few inches below the soil surface. While solarization may not be effective against all types of weed seed in your system, it should impact a majority of weeds and set back the weed community sufficiently for native plantings to take hold.
How It WorksSolarization is a non-herbicidal method of controlling weeds by placing a clear plastic sheet on moist soil during periods of high ambient temperature. The clear plastic allows for the transfer of the sun’s radiant energy to the soil, where it becomes trapped under the plastic and heats the upper levels of the soil. Solarization during the hot summer months can increase soil temperatures to levels that not only kill existing vegetation but also impact the viability of weed seeds in the top few inches of soil. This is effective since the majority of weeds found growing in significant numbers typically emerge from the non-dormant seeds located in the top of the soil profile (~top 2").
Solarization can also flush weed seed out of the system during the cooler parts of the season by providing favorable conditions for weed seed germination under the plastic, following which the new seedlings are killed by heat and smothering. Solarization is impractical for large areas, since the cost of plastic is expensive, and since large pieces can be difficult to maneuver, store, and dispose of.
Timing/Duration(See page 11 for timelines)
In cooler climates: ӧ Total time: typically 5–6 months, but may be up
to 12 months ӧ Begin: early to late spring ӧ Plant: late fall or winter (dormant season)
In warmer climates: ӧ Total time: 2–5 months ӧ Begin: spring or early summer ӧ Plant: fall
7The Xerces Society for Invertebrate Conservation
SOLARIZATIO
N
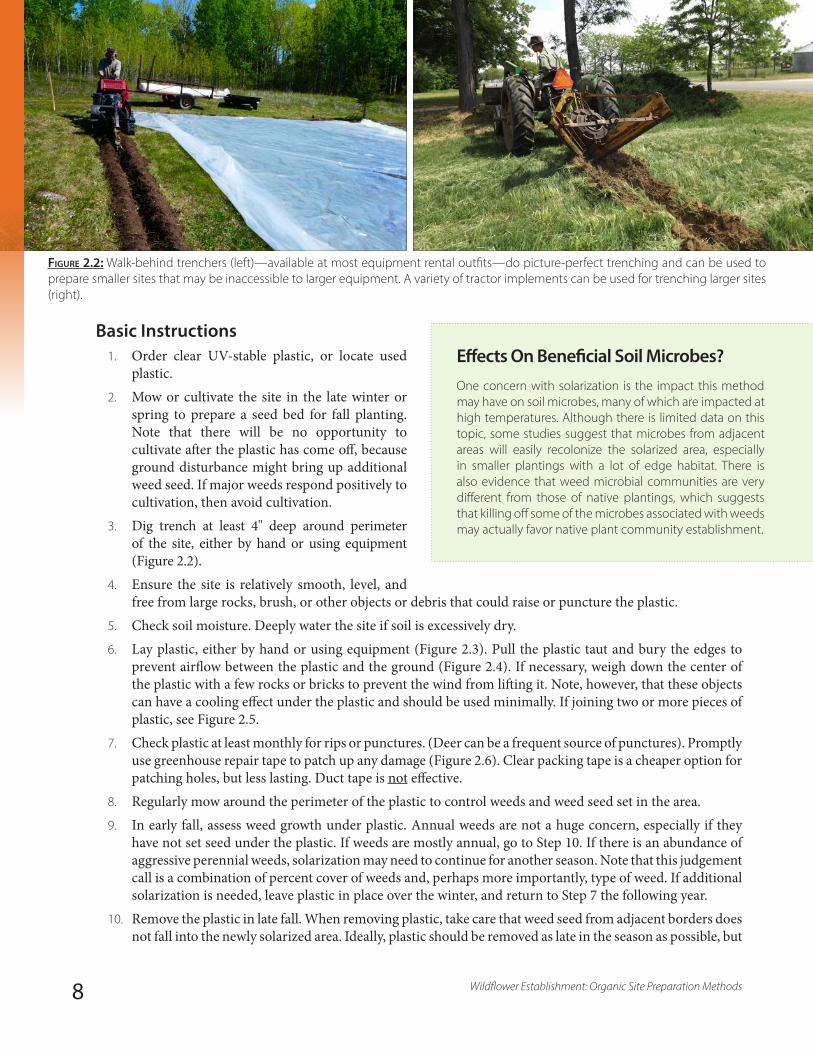
Figure 2.2: Walk-behind trenchers (left)—available at most equipment rental outfits—do picture-perfect trenching and can be used to prepare smaller sites that may be inaccessible to larger equipment. A variety of tractor implements can be used for trenching larger sites (right).
Basic Instructions1. Order clear UV-stable plastic, or locate used
plastic. 2. Mow or cultivate the site in the late winter or
spring to prepare a seed bed for fall planting. Note that there will be no opportunity to cultivate after the plastic has come off, because ground disturbance might bring up additional weed seed. If major weeds respond positively to cultivation, then avoid cultivation.
3. Dig trench at least 4" deep around perimeter of the site, either by hand or using equipment (Figure 2.2).
4. Ensure the site is relatively smooth, level, and free from large rocks, brush, or other objects or debris that could raise or puncture the plastic.
5. Check soil moisture. Deeply water the site if soil is excessively dry.6. Lay plastic, either by hand or using equipment (Figure 2.3). Pull the plastic taut and bury the edges to
prevent airflow between the plastic and the ground (Figure 2.4). If necessary, weigh down the center of the plastic with a few rocks or bricks to prevent the wind from lifting it. Note, however, that these objects can have a cooling effect under the plastic and should be used minimally. If joining two or more pieces of plastic, see Figure 2.5.
7. Check plastic at least monthly for rips or punctures. (Deer can be a frequent source of punctures). Promptly use greenhouse repair tape to patch up any damage (Figure 2.6). Clear packing tape is a cheaper option for patching holes, but less lasting. Duct tape is not effective.
8. Regularly mow around the perimeter of the plastic to control weeds and weed seed set in the area.9. In early fall, assess weed growth under plastic. Annual weeds are not a huge concern, especially if they
have not set seed under the plastic. If weeds are mostly annual, go to Step 10. If there is an abundance of aggressive perennial weeds, solarization may need to continue for another season. Note that this judgement call is a combination of percent cover of weeds and, perhaps more importantly, type of weed. If additional solarization is needed, leave plastic in place over the winter, and return to Step 7 the following year.
10. Remove the plastic in late fall. When removing plastic, take care that weed seed from adjacent borders does not fall into the newly solarized area. Ideally, plastic should be removed as late in the season as possible, but
Effects On Beneficial Soil Microbes?One concern with solarization is the impact this method may have on soil microbes, many of which are impacted at high temperatures. Although there is limited data on this topic, some studies suggest that microbes from adjacent areas will easily recolonize the solarized area, especially in smaller plantings with a lot of edge habitat. There is also evidence that weed microbial communities are very different from those of native plantings, which suggests that killing off some of the microbes associated with weeds may actually favor native plant community establishment.
8 Wildflower Establishment: Organic Site Preparation Methods
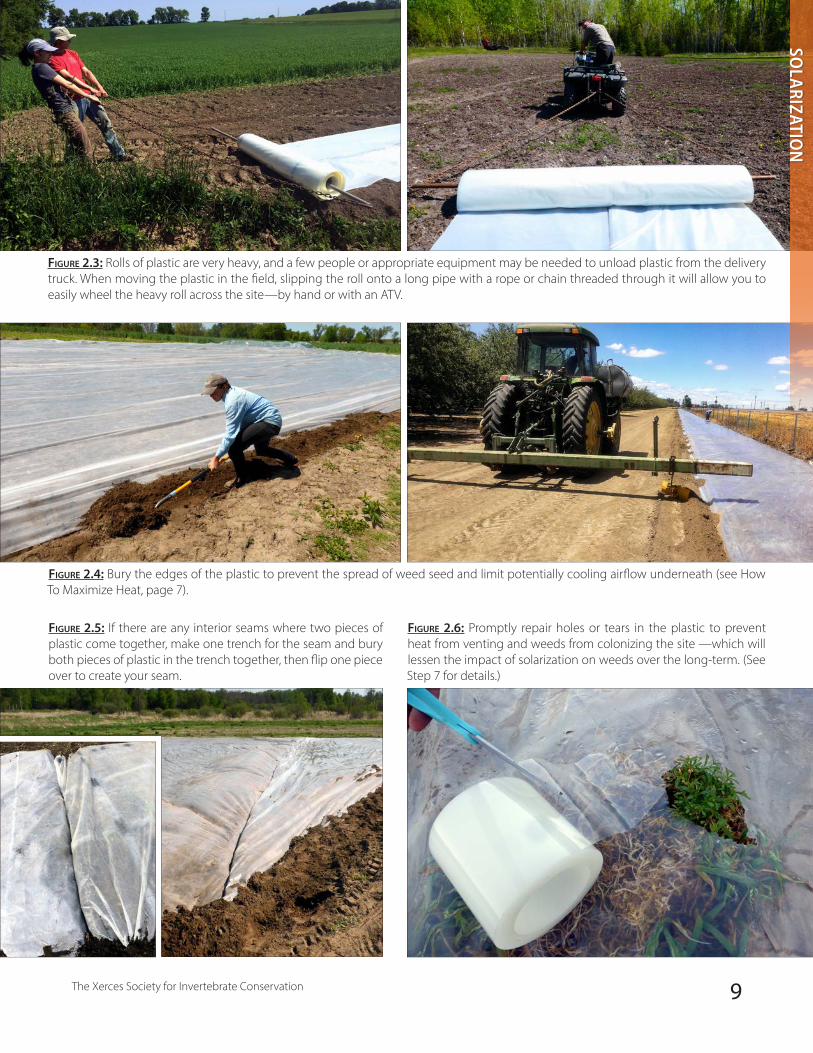
Figure 2.5: If there are any interior seams where two pieces of plastic come together, make one trench for the seam and bury both pieces of plastic in the trench together, then flip one piece over to create your seam.
Figure 2.6: Promptly repair holes or tears in the plastic to prevent heat from venting and weeds from colonizing the site —which will lessen the impact of solarization on weeds over the long-term. (See Step 7 for details.)
Figure 2.4: Bury the edges of the plastic to prevent the spread of weed seed and limit potentially cooling airflow underneath (see How To Maximize Heat, page 7).
Figure 2.3: Rolls of plastic are very heavy, and a few people or appropriate equipment may be needed to unload plastic from the delivery truck. When moving the plastic in the field, slipping the roll onto a long pipe with a rope or chain threaded through it will allow you to easily wheel the heavy roll across the site—by hand or with an ATV.
9The Xerces Society for Invertebrate Conservation
SOLARIZATIO
N
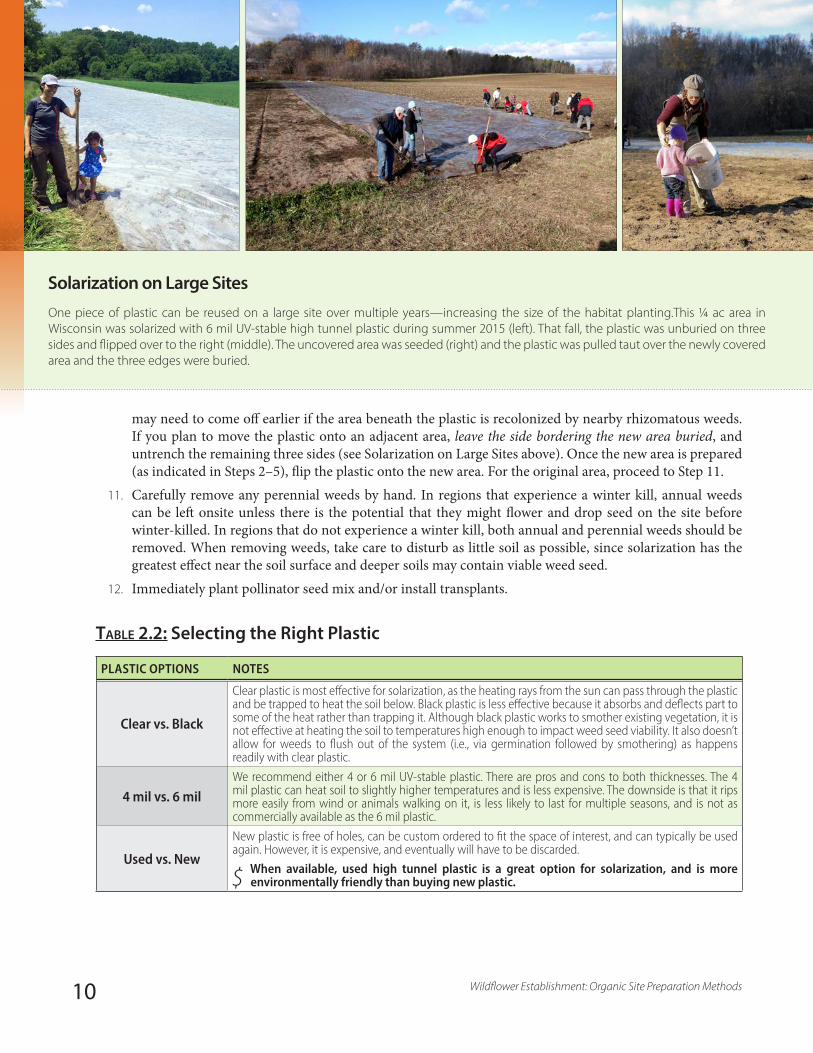
Solarization on Large SitesOne piece of plastic can be reused on a large site over multiple years—increasing the size of the habitat planting.This ¼ ac area in Wisconsin was solarized with 6 mil UV-stable high tunnel plastic during summer 2015 (left). That fall, the plastic was unburied on three sides and flipped over to the right (middle). The uncovered area was seeded (right) and the plastic was pulled taut over the newly covered area and the three edges were buried.
may need to come off earlier if the area beneath the plastic is recolonized by nearby rhizomatous weeds. If you plan to move the plastic onto an adjacent area, leave the side bordering the new area buried, and untrench the remaining three sides (see Solarization on Large Sites above). Once the new area is prepared (as indicated in Steps 2–5), flip the plastic onto the new area. For the original area, proceed to Step 11.
11. Carefully remove any perennial weeds by hand. In regions that experience a winter kill, annual weeds can be left onsite unless there is the potential that they might flower and drop seed on the site before winter-killed. In regions that do not experience a winter kill, both annual and perennial weeds should be removed. When removing weeds, take care to disturb as little soil as possible, since solarization has the greatest effect near the soil surface and deeper soils may contain viable weed seed.
12. Immediately plant pollinator seed mix and/or install transplants.
Table 2.2: Selecting the Right Plastic
PLASTIC OPTIONS NOTES
Clear vs. Black
Clear plastic is most effective for solarization, as the heating rays from the sun can pass through the plastic and be trapped to heat the soil below. Black plastic is less effective because it absorbs and deflects part to some of the heat rather than trapping it. Although black plastic works to smother existing vegetation, it is not effective at heating the soil to temperatures high enough to impact weed seed viability. It also doesn’t allow for weeds to flush out of the system (i.e., via germination followed by smothering) as happens readily with clear plastic.
4 mil vs. 6 milWe recommend either 4 or 6 mil UV-stable plastic. There are pros and cons to both thicknesses. The 4 mil plastic can heat soil to slightly higher temperatures and is less expensive. The downside is that it rips more easily from wind or animals walking on it, is less likely to last for multiple seasons, and is not as commercially available as the 6 mil plastic.
Used vs. New
New plastic is free of holes, can be custom ordered to fit the space of interest, and can typically be used again. However, it is expensive, and eventually will have to be discarded.
$ When available, used high tunnel plastic is a great option for solarization, and is more environmentally friendly than buying new plastic.
10 Wildflower Establishment: Organic Site Preparation Methods
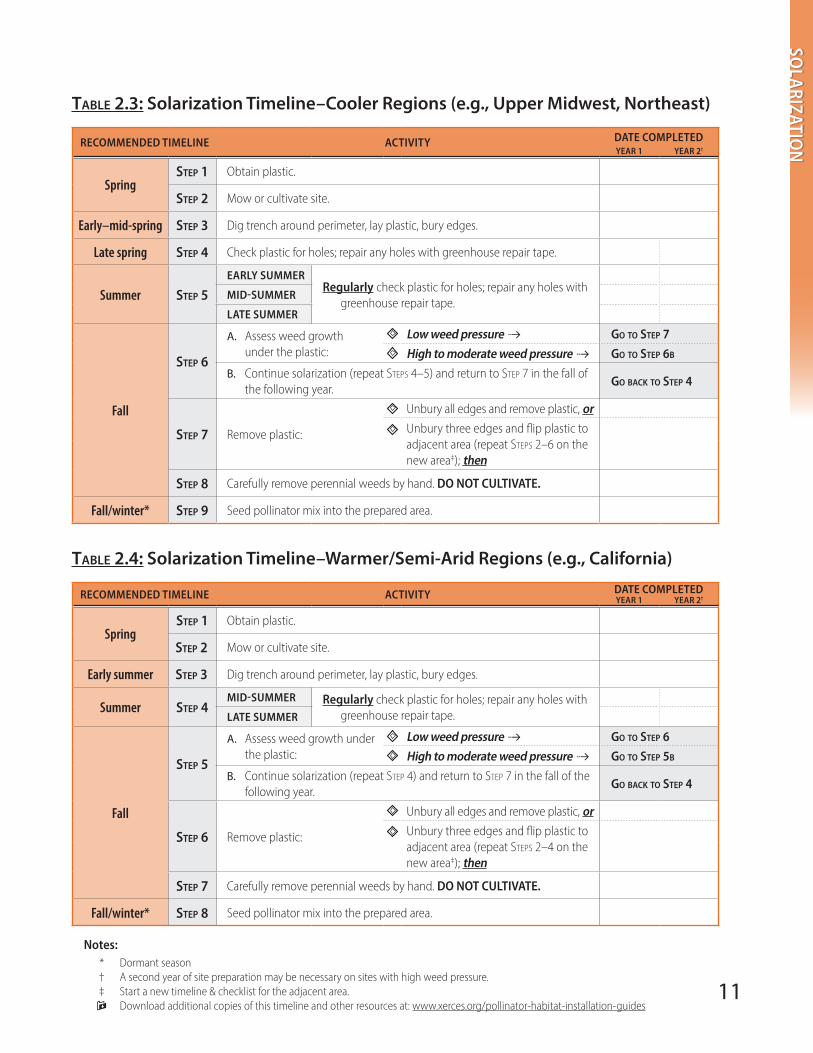
Table 2.3: Solarization Timeline–Cooler Regions (e.g., Upper Midwest, Northeast)
RECOMMENDED TIMELINE ACTIVITY DATE COMPLETEDYEAR 1 YEAR 2†
SpringStep 1 Obtain plastic.
Step 2 Mow or cultivate site.
Early–mid-spring Step 3 Dig trench around perimeter, lay plastic, bury edges.
Late spring Step 4 Check plastic for holes; repair any holes with greenhouse repair tape.
Summer Step 5EARLY SUMMER
Regularly check plastic for holes; repair any holes with greenhouse repair tape.
MID-SUMMER
LATE SUMMER
Fall
Step 6
A. Assess weed growth under the plastic:
Low weed pressure � Go to Step 7High to moderate weed pressure � Go to Step 6b
B. Continue solarization (repeat StepS 4–5) and return to Step 7 in the fall of the following year.
Go back to Step 4
Step 7 Remove plastic:
Unbury all edges and remove plastic, orUnbury three edges and flip plastic to adjacent area (repeat StepS 2–6 on the new area‡); then
Step 8 Carefully remove perennial weeds by hand. DO NOT CULTIVATE.
Fall/winter* Step 9 Seed pollinator mix into the prepared area.
Table 2. 4: Solarization Timeline–Warmer/Semi-Arid Regions (e.g., California)
RECOMMENDED TIMELINE ACTIVITY DATE COMPLETEDYEAR 1 YEAR 2†
SpringStep 1 Obtain plastic.
Step 2 Mow or cultivate site.
Early summer Step 3 Dig trench around perimeter, lay plastic, bury edges.
Summer Step 4MID-SUMMER Regularly check plastic for holes; repair any holes with
greenhouse repair tape.LATE SUMMER
Fall
Step 5
A. Assess weed growth under the plastic:
Low weed pressure � Go to Step 6High to moderate weed pressure � Go to Step 5b
B. Continue solarization (repeat Step 4) and return to Step 7 in the fall of the following year.
Go back to Step 4
Step 6 Remove plastic:
Unbury all edges and remove plastic, orUnbury three edges and flip plastic to adjacent area (repeat StepS 2–4 on the new area‡); then
Step 7 Carefully remove perennial weeds by hand. DO NOT CULTIVATE.
Fall/winter* Step 8 Seed pollinator mix into the prepared area.
Notes:* Dormant season
† A second year of site preparation may be necessary on sites with high weed pressure. ‡ Start a new timeline & checklist for the adjacent area. Download additional copies of this timeline and other resources at: www.xerces.org/pollinator-habitat-installation-guides
11
SOLARIZATIO
N

12 Organic Site Preparation for Wildflower Establishment
Figure 3.1: In addition to being an excellent smother crop, lacy phacelia (Phacelia tanacetifolia) is highly attractive to pollinators, providing them with high-value forage during the site's establishment phase.
Figure 3.2: Buckwheat (Fagopyrum esculentum) smother crop blooming in late August before being terminated on a site in New York.
This method is ideal for larger areas of low to moderate weed pressure on farms where cultivation equipment is available, and farmers/operators are already experienced with successful cover cropping. Access to irrigation is important in some climates.
Table 3.1: Smother Cropping Overview
HOW IT WORKS COMMENTS
ӹ Prevents weeds from spreading ӹ Reduces weeds by cultivation and smothering
ӹ Improves soil health ӹ Gives wildlife temporary forage and cover ӹ Planting and termination dates vary by region
WHEN TO USE WHEN NOT TO USE
ཟ Flat or gently sloping, sunny, and well-drained sites ཟ Cover crop rotations are already used or easily fit into
existing operations ཟ Weed pressure is low to moderate ཟ Timelines can be strictly followed throughout entire site
prep process ཟ Proper equipment is available and can be calibrated and
operated specifically for cover-cropping ཟ Irrigation is available and can be used as needed ཟ Minimal maintenance of the site during summer is desired
ལ Steep slopes/sites with high erosion potential or poor drainage
ལ Cover crop rotations are not used or do not fit into farm plan
ལ Weed pressure is high (i.e., fallow fields) ལ Timelines cannot be strictly followed (see text) ལ Proper equipment for planting and termination are not
available ལ Irrigation is not available or easily accessed ལ In designated wetlands or area with poorly drained soil ལ Where planting non-native plants is prohibited or native
plants may be threatened by the unintentional escape of non-native/cultivated species
EQUIPMENT NEEDED
ӹ Mower ӹ Cultivation equipment and implements (see Appendix B) ӹ Irrigation system or water tank and water source
ӹ Seeding equipment (broadcast seeder, seed drill) ӹ Cover crop termination equipment /implement (disk,
mower, roller-crimper)RELATIVE COST OF MATERIALS—LOW; if cultivation equipment is available; seed for smother cropping is generally inexpensive
3 Smother Cropping
13
SMO
THER CRO
PPING
How It WorksSmother cropping is a method of weed control in which temporary cover crops are grown for the purpose of weed suppression. Cover crops that grow quickly, produce large amounts of above-ground biomass, and have a competitive advantage against weeds are ideal “smother crops.” These plants suppress weeds through direct competition for resources (e.g., nutrients, moisture, sunlight, space, etc.), allelopathy (i.e., compounds exuded from roots that inhibit growth of other plants), and altering soil microclimate or microbial communities. After a smother crop is terminated (i.e., tilled-in, mowed, rolled, crimped, grazed, or left to die naturally), plant residues can also be managed to provide further weed control. Smother crop residues suppress weeds by creating physical barriers that prevent seedling emergence, releasing allelopathic substances during decomposition, or altering availability of nutrients in the soil. The mode of weed suppression varies among different smother crop species, but the overall goal in smother cropping is to create field conditions that put weeds at a disadvantage.
It is critical that smother crops be timed to the season in which the most rapid growth occurs, so that a dense stand is established. The timing and duration of smother cropping varies by smother crop species, plant hardiness zone, and existing cultural practices. Monitoring weather and taking advantage of optimal conditions and cultural practices that promote rapid and dense growth of smother crops will ensure smother crops have an advantage over weeds.
Timing/Duration(See pages 18–19 for timelines)
Sites with moderate to high weed pressure: ӧ Total time: 12–24 months ӧ Begin: fall or spring, depending on region ӧ Plant: fall (one or two years after beginning)
Sites with low weed pressure: ӧ Total time: 5–12 months ӧ Begin: fall or spring, depending on region ӧ Plant: fall (one year or less after beginning)
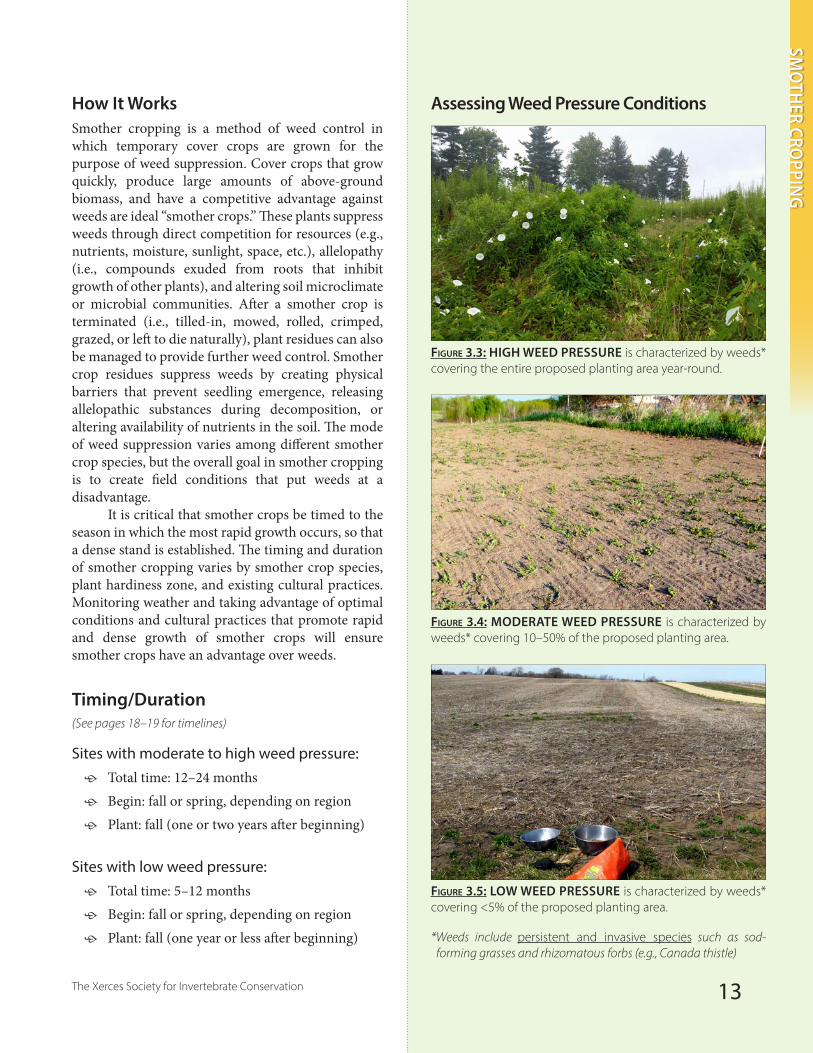
Assessing Weed Pressure Conditions
Figure 3.3: HIGH WEED PRESSURE is characterized by weeds* covering the entire proposed planting area year-round.
Figure 3.4: MODERATE WEED PRESSURE is characterized by weeds* covering 10–50% of the proposed planting area.
Figure 3.5: LOW WEED PRESSURE is characterized by weeds* covering <5% of the proposed planting area.
* Weeds include persistent and invasive species such as sod-forming grasses and rhizomatous forbs (e.g., Canada thistle)
The Xerces Society for Invertebrate Conservation
Basic InstructionsSmother crop selection: This guide focuses on two options for smother crops; buckwheat (Fagopyrum esculentum) and lacy phacelia (Phacelia tanacetifolia). In addition to vigorous and rapid growth, these flowering, broadleaf plants provide temporary, high-quality foraging habitat for a huge diversity of pollinators and other beneficial insects as sites are prepared for permanent wildflower establishment. The added value to native bee conservation, as well as benefits to beekeepers managing hives of honey bees for honey production (these species are rated as top honey plants), makes these species ideal choices. Table 3.2 (page 17) lists plant characteristics for each species, to help guide selection of a smother crop that best fits site conditions.
Buckwheat Smother Crop(See page 18 for timeline)
1. Lightly disk in early spring as soon as field is accessible and soil moisture levels are appropriate (i.e., dry enough) to be free of clods. Time tillage to prevent cool season (winter/spring) annual weeds from flowering. Minimize soil disturbance by setting equipment to most shallow depths possible, but deep enough (e.g., 1–2") to work up soil adequately.
2. Wait least 2–3 weeks after initial till to allow existing organic matter time to decompose. Then use shallow cultivation (harrow, tine weeder, sweep cultivator) to break up clumps and eliminate emerging weed seedlings. Minimize soil disturbance by using cultivation equipment that can be set to cultivate at shallow depths (≤2").
3. Prepare for seeding smother crop in late spring when as soon as soil temperatures are at least 65°F. Lightly harrow (drag/chain harrow) or rake the soil surface to remove thatch/remaining vegetation and create a smooth, clean seedbed then immediately seed buckwheat smother crop. Monitor weather and avoid/delay planting immediately before periods of cool, wet weather. A. If drill seeding: Use a seeding rate of 50–60 lb/ac and drill seed at 0.5–1" depth in 6–8" rows.B. If broadcast seeding: Increase seeding rate to a minimum of 70 lb/ac. Higher seeding rates (up to 96
lb/ac) should be used for rapid development of canopy, especially in drought-prone soils. Spread seed uniformly onto a firm seedbed using a hand-held broadcast seeder or tractor-mounted seeder (e.g., spin spreader), and then scratch the seed into the soil surface with a light harrow.
C. Make sure there is adequate moisture. If soil is very dry, irrigate planting area before seeding. Do not seed when soil is saturated. If soil is saturated (from either irrigation or heavy rainfall) delay planting a few days, as seed is susceptible to rot if soil is saturated or poorly drained. Additional irrigation may be required in the absence of natural rainfall. Note: Requires adequate moisture for establishment, irrigate as needed until germination; occasional irrigation after germination may be needed; plants may wilt mid-day in warm weather, even with adequate soil moisture (due to shallow roots), but recover overnight—do not over irrigate.
4. One week after planting buckwheat, evaluate establishment and broadcast additional seed over any gaps in the planting to suppress weed growth. Do not leave any gaps.
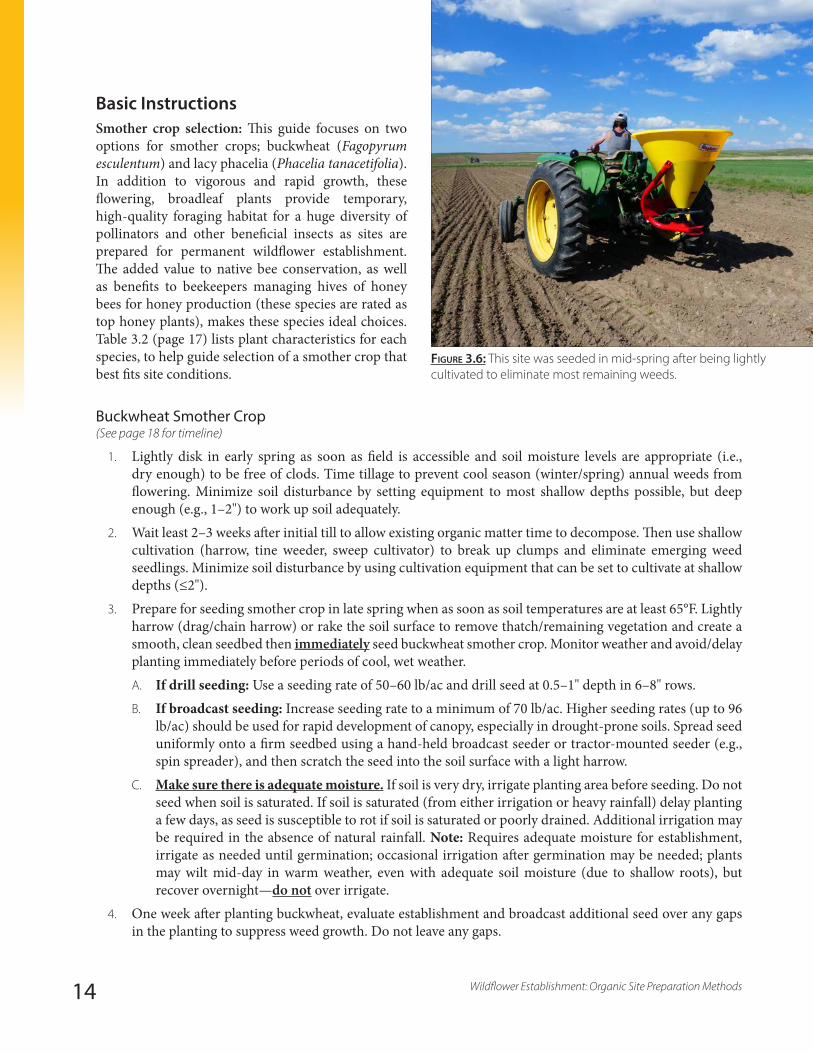
Figure 3.6: This site was seeded in mid-spring after being lightly cultivated to eliminate most remaining weeds.
14 Wildflower Establishment: Organic Site Preparation Methods

Smothering Cool Season WeedsBoth buckwheat and phacelia smother crops are most effective against warm season weeds. If cool season weeds are a primary concern, consider seeding a winter/spring cover crop (e.g., rye, oats, hairy vetch) before buckwheat or phacelia (see Other Common Smother Crops below).
Figure 3.7: A mixed cool season cover crop of rye and hairy vetch is terminated in early spring.
5. Six weeks after seeding buckwheat, terminate buckwheat crop. Termination should occur after flowering (to provide forage for insects), and could even occur after seed set in this situation (since a second seeding immediately follows). To terminate, mow down and remove debris/thatch.
6. Before seeding the second buckwheat crop, assess weed pressure. If rhizomatous perennial weeds are present, cultivate lightly to bring up roots and allow them to desiccate before the second seeding of buckwheat.
7. Re-seed a second buckwheat crop a few days later. Again, make sure there is enough moisture.
8. Wait another six weeks and terminate second buckwheat crop. Mow and leave residue on soil surface or incorporate into soil via disking or a roller. To avoid re-seeding/volunteers, terminate before buckwheat before seed matures.
9. After a full season of smother cropping, select the most appropriate option below based on current site conditions and level of weed control achieved (see Assessing Weed Pressure Conditions, page 13).A. For sites with moderate to high weed
pressure: Repeat the smother crop process in the following growing season (year 2). More time spent eradicating weeds before planting will result in more successful establishment of wildflower mixes. Seed the wildflower mix in late fall (year 2) or spring (year 3). Fall dormant seeding is recommended.
B. For sites with low weed pressure: The wildflower mix can be seeded after one season of smother cropping (year 1). Fall dormant seeding is recommended.
C. For sites where erosion is a concern: Sow nurse crop of oats between August 15th–September 15th. Oats will frost-kill with a hard freeze. In late fall, seed wildflower mix into standing oats. Do not rake or drag. Frost action will work the seed into the soil surface. Dead oats will form a mat on the soil during the winter, helping to prevent soil erosion and providing good conditions for spring germination of wildflowers.
Other Common Smother CropsSudangrass (Sorghum bicolor) and sorghum-Sudangrass (Sorghum bicolor x Sorghum bicolor var. sudanense) are both fast-growing, warm-season crops that require good soil fertility and moisture to perform well. Under these conditions, the vigorous growth of Sudangrass or sorghum-Sudangrass generates large amounts of biomass, with aboveground growth reaching heights of 5–12', providing excellent weed suppression. The massive amount of plant material can be difficult to cut and incorporate. Growth can be regulated by mowing to 6" when the crop reaches a height of 3' (~mid-season) and allowing regrowth before the crop winter-kills, or by adjusting planting date to ~7 weeks before frost and allowing it to winter-kill.
Japanese millet (Echinochloa esculenta) is a warm season crop that puts on rapid growth if planted after early June. Japanese millet does not grow as tall or coarse as sorghum-Sudangrass, making it easier to incorporate in the fall or following spring. It also tolerates wet soils.
Oats (Avena spp.), rye (Secale cereale), and hairy vetch (Vicia villosa) are cool-season crops that can be used to smother weeds, especially cool-season weeds. They may die back as temperatures warm and thus be ineffective at smothering warmer-season broadleaf weeds, but if enough residue remains it can prolong weed control.
15The Xerces Society for Invertebrate Conservation
SMO
THER CRO
PPING
16 Organic Site Preparation for Wildflower Establishment
Lacy Phacelia Smother Crop(See page 19 for timelines)
1. Lightly disk in fall (warmer climates) or early spring as soon as field is accessible (cooler climates). Time tillage to appropriate soil moisture levels (i.e., moist/dry enough) to be free of clods and to prohibit winter/spring annual weeds from flowering. Minimize soil disturbance by setting equipment to most shallow depth possible but deep enough to work up soil adequately (e.g., 1–2").
2. Wait at least 2–3 weeks after initial tillage to allow existing organic matter time to decompose. If needed, use shallow cultivation (harrow, tine weeder, sweep cultivator) to break up clumps and eliminate emerging weed seedlings. Minimize soil disturbance by using cultivation equipment that can be set to cultivate at shallow depths (≤2").
3. Prepare for seeding smother crop. Phacelia requires a finely prepared seedbed. Lightly harrow (drag/chain harrow) or rake the soil surface to remove thatch/remaining vegetation and create a smooth, weed-free seedbed then immediately seed phacelia smother crop. Monitor weather and avoid/delay planting immediately before heavy rains (seed before the winter monsoon period, where applicable). Do not seed when soil is saturated.A. In warmer climates: seed in early fall. Supplemental irrigation may be needed prior to planting
to create a moist seedbed, after planting to maintain adequate moisture for germination, and after germination to ensure continued growth throughout the summer. This supplemental irrigation and early fall planting will ensure early germination, fast-growth, and continuous dense cover needed to smother weeds.
B. In cooler climates: seed late winter/early spring (30–10 days before average last spring frost date). Lightly irrigate until germination. Modest, occasional irrigation after germination may be required in the prolonged absence of natural rainfall. Do not over irrigate.
C. If drill seeding: Use a seeding rate of 7–12 lb/ac with drill at 1/4" depth.D. If broadcast seeding: Use a seeding rate to 10–18 lb/ac. Higher seeding rates will increase weed
suppression. Spread uniformly onto firm seedbed using a hand-held broadcast seeder or tractor-mounted seeder (e.g., spin spreader). Incorporate with cultipacker, ring-roller, harrow, or rake to ensure seed-soil contact. Do not bury seed.
4. For spring planting, evaluate establishment one week after planting phacelia, and broadcast additional seed over any gaps in the planting to suppress weed growth. Do not leave any gaps.
5. Throughout the growing season, monitor the smother crop and irrigate occasionally (e.g., twice per month in absence of rainfall) as needed. If there is significant weed germination with phacelia smother crop, high-mow weeds before they set seed. Note: be careful to avoid damaging the growing tips of the phacelia.
6. After a full season/year of smother cropping, select the most appropriate option below based on current site conditions and level of weed control achieved.A. For sites with moderate to high weed pressure: Repeat the smother crop process in the following
growing season (year 2). More time spent eradicating weeds before planting will result in more successful establishment of wildflower mixes.
B. For sites that started with low weed pressure: The wildflower mix can be seeded after one season/year of smother cropping. Fall seeding is recommended.
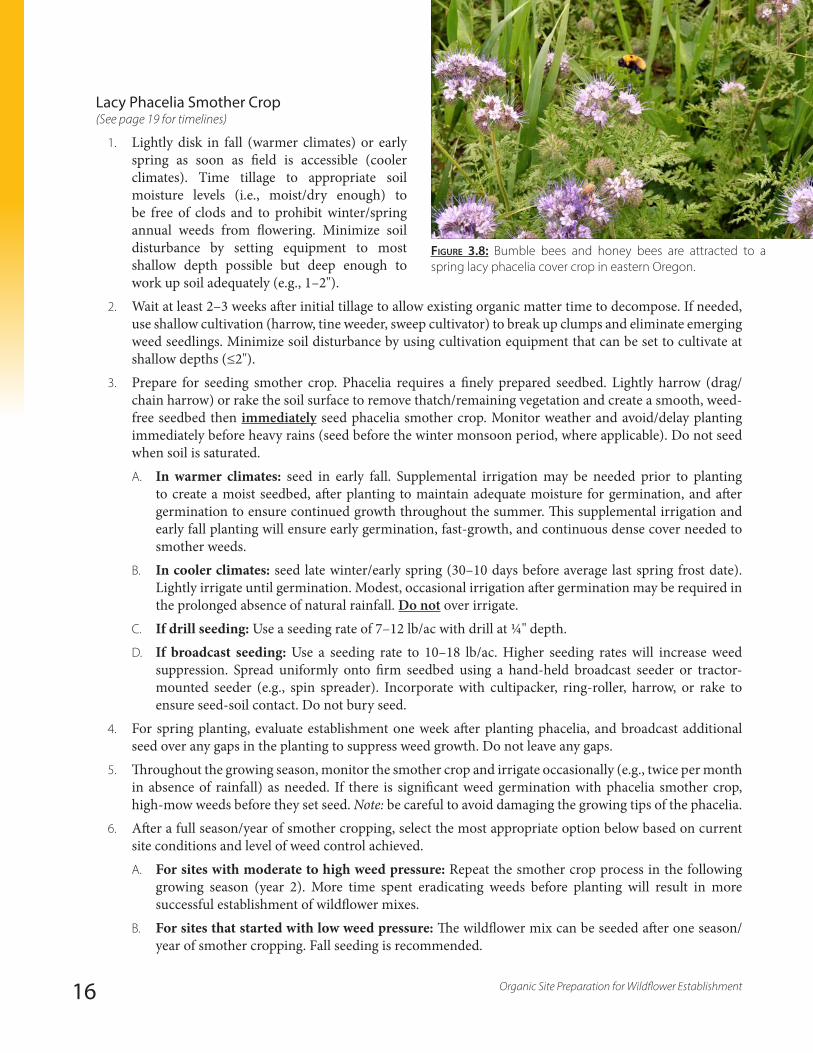
Figure 3.8: Bumble bees and honey bees are attracted to a spring lacy phacelia cover crop in eastern Oregon.
17The Xerces Society for Invertebrate Conservation
SMO
THER CRO
PPING
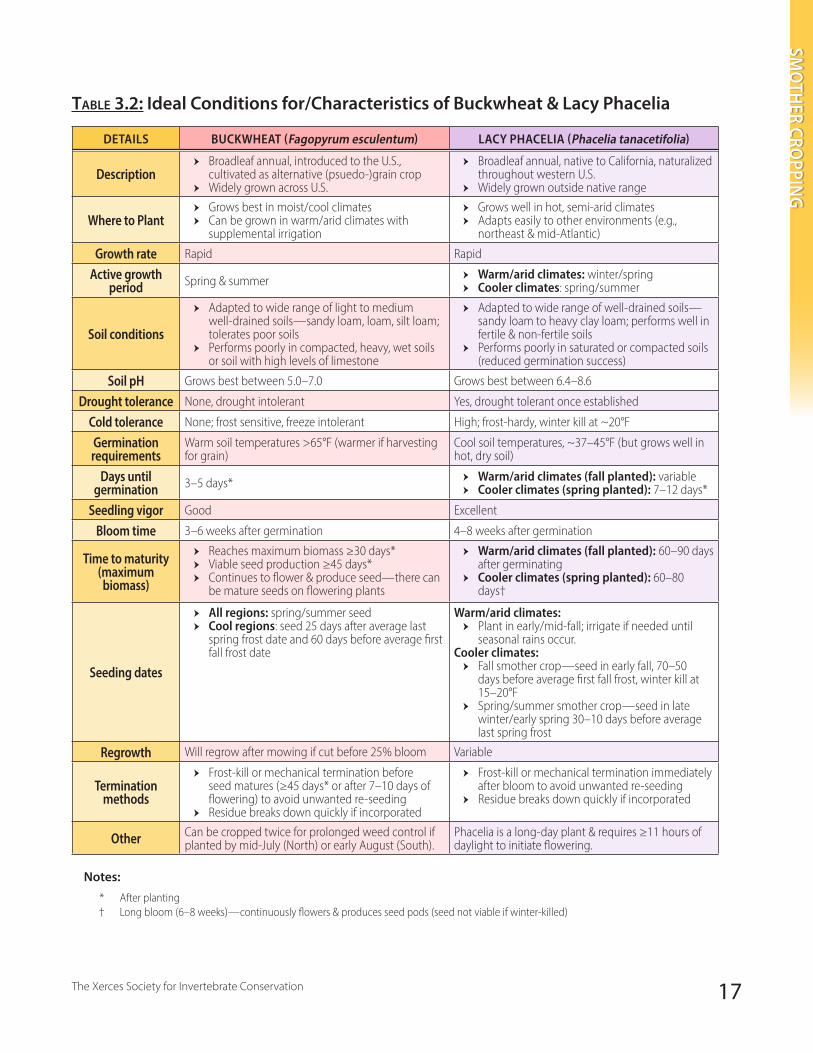
Table 3.2: Ideal Conditions for/Characteristics of Buckwheat & Lacy Phacelia
DETAILS BUCKWHEAT (Fagopyrum esculentum) LACY PHACELIA (Phacelia tanacetifolia)
Description ӹ Broadleaf annual, introduced to the U.S.,
cultivated as alternative (psuedo-)grain crop ӹ Widely grown across U.S.
ӹ Broadleaf annual, native to California, naturalized throughout western U.S.
ӹ Widely grown outside native range
Where to Plant ӹ Grows best in moist/cool climates ӹ Can be grown in warm/arid climates with
supplemental irrigation
ӹ Grows well in hot, semi-arid climates ӹ Adapts easily to other environments (e.g.,
northeast & mid-Atlantic)
Growth rate Rapid Rapid
Active growth period Spring & summer ӹ Warm/arid climates: winter/spring
ӹ Cooler climates: spring/summer
Soil conditions
ӹ Adapted to wide range of light to medium well-drained soils—sandy loam, loam, silt loam; tolerates poor soils
ӹ Performs poorly in compacted, heavy, wet soils or soil with high levels of limestone
ӹ Adapted to wide range of well-drained soils—sandy loam to heavy clay loam; performs well in fertile & non-fertile soils
ӹ Performs poorly in saturated or compacted soils (reduced germination success)
Soil pH Grows best between 5.0–7.0 Grows best between 6.4–8.6
Drought tolerance None, drought intolerant Yes, drought tolerant once established
Cold tolerance None; frost sensitive, freeze intolerant High; frost-hardy, winter kill at ~20°F
Germination requirements
Warm soil temperatures >65°F (warmer if harvesting for grain)
Cool soil temperatures, ~37–45°F (but grows well in hot, dry soil)
Days until germination 3–5 days* ӹ Warm/arid climates (fall planted): variable
ӹ Cooler climates (spring planted): 7–12 days*
Seedling vigor Good Excellent
Bloom time 3–6 weeks after germination 4–8 weeks after germination
Time to maturity (maximum biomass)
ӹ Reaches maximum biomass ≥30 days* ӹ Viable seed production ≥45 days* ӹ Continues to flower & produce seed—there can
be mature seeds on flowering plants
ӹ Warm/arid climates (fall planted): 60–90 days after germinating
ӹ Cooler climates (spring planted): 60–80 days†
Seeding dates
ӹ All regions: spring/summer seed ӹ Cool regions: seed 25 days after average last
spring frost date and 60 days before average first fall frost date
Warm/arid climates: ӹ Plant in early/mid-fall; irrigate if needed until
seasonal rains occur.Cooler climates:
ӹ Fall smother crop—seed in early fall, 70–50 days before average first fall frost, winter kill at 15–20°F
ӹ Spring/summer smother crop—seed in late winter/early spring 30–10 days before average last spring frost
Regrowth Will regrow after mowing if cut before 25% bloom Variable
Termination methods
ӹ Frost-kill or mechanical termination before seed matures (≥45 days* or after 7–10 days of flowering) to avoid unwanted re-seeding
ӹ Residue breaks down quickly if incorporated
ӹ Frost-kill or mechanical termination immediately after bloom to avoid unwanted re-seeding
ӹ Residue breaks down quickly if incorporated
Other Can be cropped twice for prolonged weed control if planted by mid-July (North) or early August (South).
Phacelia is a long-day plant & requires ≥11 hours of daylight to initiate flowering.
Notes:
* After planting † Long bloom (6–8 weeks)—continuously flowers & produces seed pods (seed not viable if winter-killed)
18 Organic Site Preparation for Wildflower Establishment
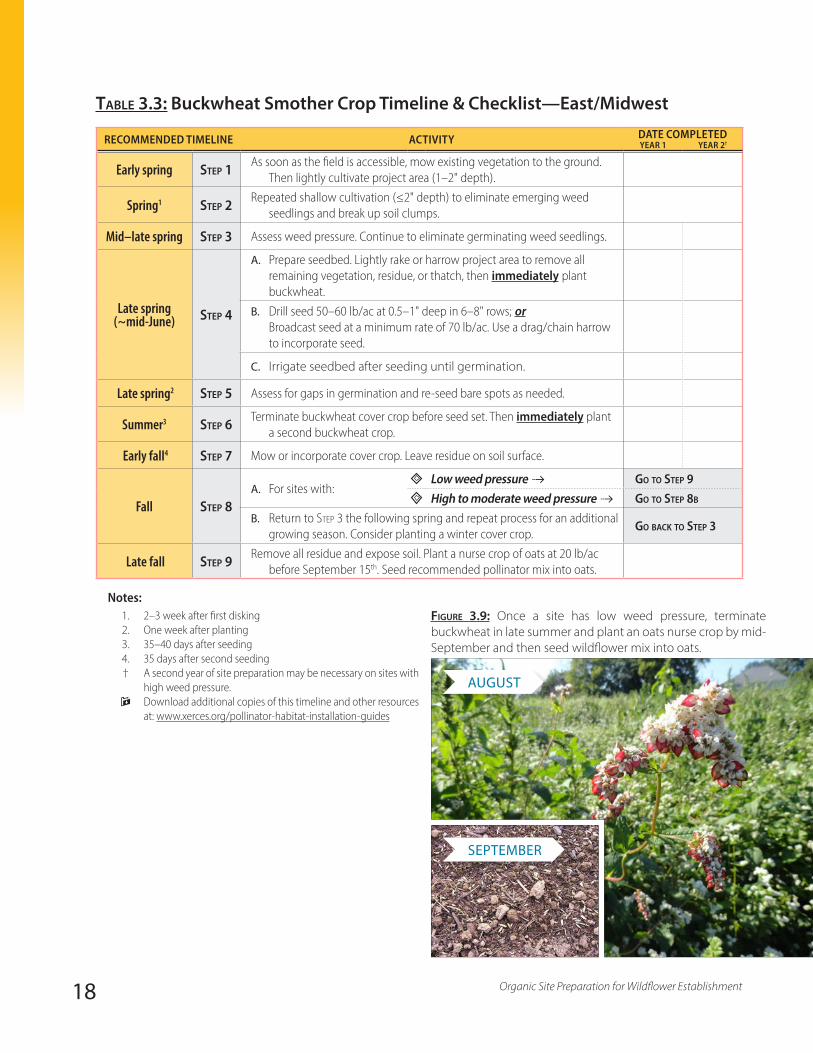
Table 3.3: Buckwheat Smother Crop Timeline & Checklist—East/Midwest
RECOMMENDED TIMELINE ACTIVITY DATE COMPLETEDYEAR 1 YEAR 2†
Early spring Step 1 As soon as the field is accessible, mow existing vegetation to the ground. Then lightly cultivate project area (1–2" depth).
Spring1 Step 2 Repeated shallow cultivation (≤2" depth) to eliminate emerging weed seedlings and break up soil clumps.
Mid–late spring Step 3 Assess weed pressure. Continue to eliminate germinating weed seedlings.
Late spring (~mid-June) Step 4
A. Prepare seedbed. Lightly rake or harrow project area to remove all remaining vegetation, residue, or thatch, then immediately plant buckwheat.
B. Drill seed 50–60 lb/ac at 0.5–1" deep in 6–8" rows; or Broadcast seed at a minimum rate of 70 lb/ac. Use a drag/chain harrow to incorporate seed.
C. Irrigate seedbed after seeding until germination.
Late spring2 Step 5 Assess for gaps in germination and re-seed bare spots as needed.
Summer3 Step 6 Terminate buckwheat cover crop before seed set. Then immediately plant a second buckwheat crop.
Early fall4 Step 7 Mow or incorporate cover crop. Leave residue on soil surface.
Fall Step 8A. For sites with:
Low weed pressure � Go to Step 9High to moderate weed pressure � Go to Step 8b
B. Return to Step 3 the following spring and repeat process for an additional growing season. Consider planting a winter cover crop.
Go back to Step 3
Late fall Step 9 Remove all residue and expose soil. Plant a nurse crop of oats at 20 lb/ac before September 15th. Seed recommended pollinator mix into oats.
Notes:1. 2–3 week after first disking2. One week after planting3. 35–40 days after seeding4. 35 days after second seeding
† A second year of site preparation may be necessary on sites with high weed pressure.
Download additional copies of this timeline and other resources at: www.xerces.org/pollinator-habitat-installation-guides
Figure 3.9: Once a site has low weed pressure, terminate buckwheat in late summer and plant an oats nurse crop by mid-September and then seed wildflower mix into oats.
SEPTEMBER
AUGUST
19The Xerces Society for Invertebrate Conservation
SMO
THER CRO
PPING
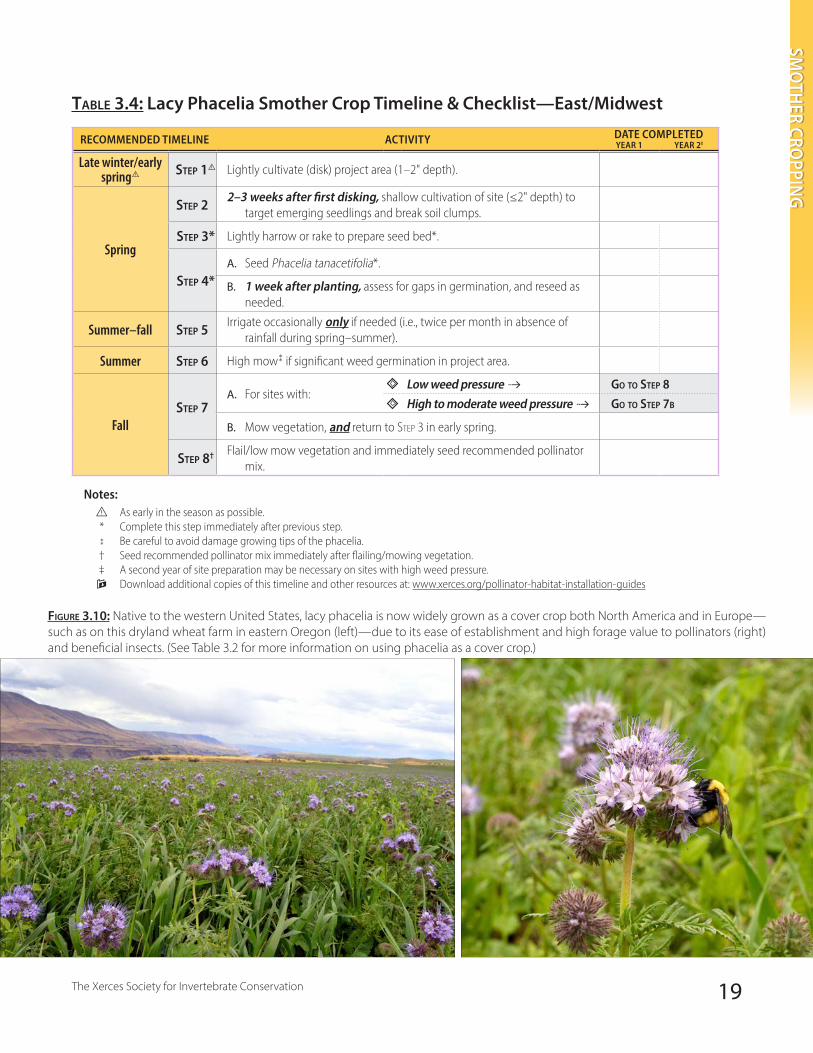
Table 3.4: Lacy Phacelia Smother Crop Timeline & Checklist—East/Midwest
RECOMMENDED TIMELINE ACTIVITY DATE COMPLETEDYEAR 1 YEAR 2‡
Late winter/early spring⚠ Step 1⚠ Lightly cultivate (disk) project area (1–2" depth).
Spring
Step 2 2–3 weeks after first disking, shallow cultivation of site (≤2" depth) to target emerging seedlings and break soil clumps.
Step 3* Lightly harrow or rake to prepare seed bed*.
Step 4*A. Seed Phacelia tanacetifolia*.
B. 1 week after planting, assess for gaps in germination, and reseed as needed.
Summer–fall Step 5 Irrigate occasionally only if needed (i.e., twice per month in absence of rainfall during spring–summer).
Summer Step 6 High mow⁑ if significant weed germination in project area.
FallStep 7
A. For sites with: Low weed pressure � Go to Step 8High to moderate weed pressure � Go to Step 7b
B. Mow vegetation, and return to Step 3 in early spring.
Step 8† Flail/low mow vegetation and immediately seed recommended pollinator mix.
Notes: ྇ As early in the season as possible.
* Complete this step immediately after previous step. ⁑ Be careful to avoid damage growing tips of the phacelia. † Seed recommended pollinator mix immediately after flailing/mowing vegetation. ‡ A second year of site preparation may be necessary on sites with high weed pressure. Download additional copies of this timeline and other resources at: www.xerces.org/pollinator-habitat-installation-guides
Figure 3.10: Native to the western United States, lacy phacelia is now widely grown as a cover crop both North America and in Europe—such as on this dryland wheat farm in eastern Oregon (left)—due to its ease of establishment and high forage value to pollinators (right) and beneficial insects. (See Table 3.2 for more information on using phacelia as a cover crop.)

20 Organic Site Preparation for Wildflower Establishment
Table 3.5: Lacy Phacelia Smother Crop Timeline & Checklist—West
RECOMMENDED TIMELINE ACTIVITY DATE COMPLETEDYEAR 1 YEAR 2‡
Early OctoberStep 1⚠ A. Pre-irrigate site as needed.
Step 2 B. Lightly cultivate (disk) project area (≤2" depth).
Early/mid-October
Step 3* Lightly harrow or rake to prepare seed bed*.
Step 4* Seed Phacelia tanacetifolia*.
October–February Step 5 Irrigate occasionally in absence of rainfall.
March–August Step 6
MARCHIrrigate if necessary⁑; and High mow† if significant weed germination in project area.
APRILIrrigate if necessary; and High mow if significant weed germination in project area.
MAYIrrigate if necessary; and High mow if significant weed germination in project area.
JUNEIrrigate if necessary; and High mow if significant weed germination in project area.
JULYIrrigate if necessary; and High mow if significant weed germination in project area.
AUGUSTIrrigate if necessary; and High mow if significant weed germination in project area.
October Step 7A. For sites with:
Low weed pressure � Go to Step 8High to moderate weed pressure � Go to Step 7b
B. Mow vegetation, and return to Step 3 in early spring.
November Step 8A. Flail/low mow vegetation; and
B. Seed recommended pollinator mix.
Notes: ྇ As early in the season as possible.
* Complete this step immediately after previous step. ⁑ Even in absence of rainfall during spring–summer, do not irrigate more than twice a month from March to August. † Be careful to avoid damage growing tips of the phacelia. ‡ A second year of site preparation may be necessary on sites with high weed pressure. Download additional copies of this timeline and other resources at: www.xerces.org/pollinator-habitat-installation-guides
Figure 3.11: This site in California was lightly cultivated before being seeded with a lacy phacelia smother crop in November. (See Figure A3 on page 35 for additional photos.)
21The Xerces Society for Invertebrate Conservation
REPEATED SH
ALLOW
CULTIVATIO
N
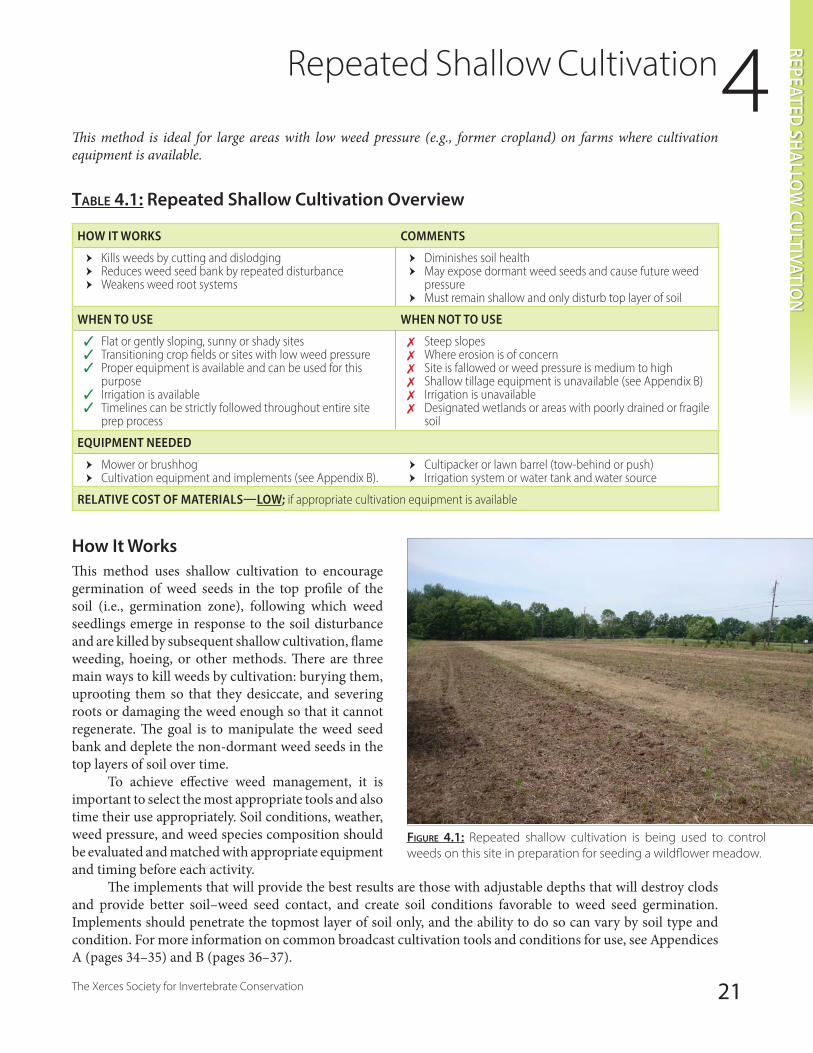
This method is ideal for large areas with low weed pressure (e.g., former cropland) on farms where cultivation equipment is available.
Table 4.1: Repeated Shallow Cultivation Overview
HOW IT WORKS COMMENTS
ӹ Kills weeds by cutting and dislodging ӹ Reduces weed seed bank by repeated disturbance ӹ Weakens weed root systems
ӹ Diminishes soil health ӹ May expose dormant weed seeds and cause future weed
pressure ӹ Must remain shallow and only disturb top layer of soil
WHEN TO USE WHEN NOT TO USE
ཟ Flat or gently sloping, sunny or shady sites ཟ Transitioning crop fields or sites with low weed pressure ཟ Proper equipment is available and can be used for this
purpose ཟ Irrigation is available ཟ Timelines can be strictly followed throughout entire site
prep process
ལ Steep slopes ལ Where erosion is of concern ལ Site is fallowed or weed pressure is medium to high ལ Shallow tillage equipment is unavailable (see Appendix B) ལ Irrigation is unavailable ལ Designated wetlands or areas with poorly drained or fragile
soil
EQUIPMENT NEEDED
ӹ Mower or brushhog ӹ Cultivation equipment and implements (see Appendix B).
ӹ Cultipacker or lawn barrel (tow-behind or push) ӹ Irrigation system or water tank and water source
RELATIVE COST OF MATERIALS—LOW; if appropriate cultivation equipment is available
How It WorksThis method uses shallow cultivation to encourage germination of weed seeds in the top profile of the soil (i.e., germination zone), following which weed seedlings emerge in response to the soil disturbance and are killed by subsequent shallow cultivation, flame weeding, hoeing, or other methods. There are three main ways to kill weeds by cultivation: burying them, uprooting them so that they desiccate, and severing roots or damaging the weed enough so that it cannot regenerate. The goal is to manipulate the weed seed bank and deplete the non-dormant weed seeds in the top layers of soil over time.
To achieve effective weed management, it is important to select the most appropriate tools and also time their use appropriately. Soil conditions, weather, weed pressure, and weed species composition should be evaluated and matched with appropriate equipment and timing before each activity.
The implements that will provide the best results are those with adjustable depths that will destroy clods and provide better soil–weed seed contact, and create soil conditions favorable to weed seed germination. Implements should penetrate the topmost layer of soil only, and the ability to do so can vary by soil type and condition. For more information on common broadcast cultivation tools and conditions for use, see Appendices A (pages 34–35) and B (pages 36–37).
Figure 4.1: Repeated shallow cultivation is being used to control weeds on this site in preparation for seeding a wildflower meadow.
4 Repeated Shallow Cultivation
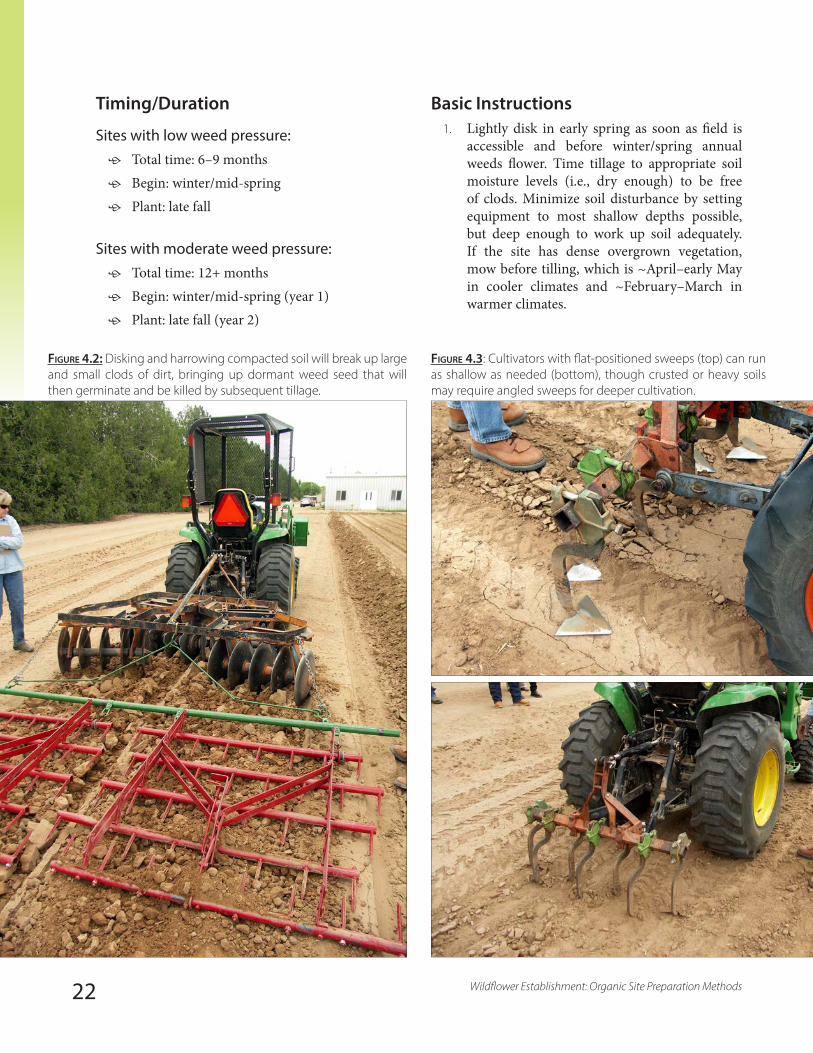
Figure 4.2: Disking and harrowing compacted soil will break up large and small clods of dirt, bringing up dormant weed seed that will then germinate and be killed by subsequent tillage.
Timing/Duration
Sites with low weed pressure: ӧ Total time: 6–9 months ӧ Begin: winter/mid-spring ӧ Plant: late fall
Sites with moderate weed pressure: ӧ Total time: 12+ months ӧ Begin: winter/mid-spring (year 1) ӧ Plant: late fall (year 2)
22 Wildflower Establishment: Organic Site Preparation Methods
Basic Instructions1. Lightly disk in early spring as soon as field is
accessible and before winter/spring annual weeds flower. Time tillage to appropriate soil moisture levels (i.e., dry enough) to be free of clods. Minimize soil disturbance by setting equipment to most shallow depths possible, but deep enough to work up soil adequately. If the site has dense overgrown vegetation, mow before tilling, which is ~April–early May in cooler climates and ~February–March in warmer climates.
Figure 4.3: Cultivators with flat-positioned sweeps (top) can run as shallow as needed (bottom), though crusted or heavy soils may require angled sweeps for deeper cultivation.
23The Xerces Society for Invertebrate Conservation
REPEATED SH
ALLOW
CULTIVATIO
N
2. Wait least 2–3 weeks after initial till to allow existing organic matter time to decompose.3. Then begin shallow cultivation to encourage weed seed germination. Minimize soil disturbance by using
cultivation equipment that can be set to cultivate at shallow depths (≤2"). Select cultivation tools based on site conditions (see Appendix B).
4. Evaluate effectiveness of cultivation implements and adjust as necessary.5. After cultivation, smooth and firm the soil (cultipacker, tow-behind, or push lawn roller) to enhance seed-
soil contact, as weed seeds germinate more readily with good seed–soil contact.6. Repeat mechanical shallow cultivation (flame cultivation can be an alternative) at 3–5 week intervals (or
before weeds reach 4" tall) for an entire growing season. Irrigate as needed to encourage weed germination and growth. Continue to lightly pack soil as necessary to ensure seed-soil contact.
7. After a full season of shallow cultivation, select the most appropriate option below based on current site conditions and level of weed control achieved (see Assessing Weed Pressure Conditions, page 13).A. For sites with low weed pressure: The wildflower mix can be seeded after one season of repeated
shallow cultivation (year 1). Fall dormant seeding is recommended.B. For sites with moderate weed pressure: Repeat the shallow cultivation process in the following
growing season (year 2). More time spent eradicating weeds before planting will result in more successful establishment of wildflower mixes. Seed the wildflower mix in late fall (year 2) or spring (year 3). Fall dormant seeding is recommended. Optional: Plant a nurse crop of oats (20 lb/ac) before September 15th.
Table 4.2: Repeated Shallow Cultivation Timeline
RECOMMENDED TIMELINE ACTIVITY DATE COMPLETED
Early springStep 1 As soon as the field is accessible, mow existing vegetation to the ground.
Step 2 Follow mowing with a one-time treatment of deep cultivation before winter/spring annual weeds go to flower.
Mid-May Step 3 First treatment of shallow cultivation (disturbing only top 2" of soil) using a disk/tine harrow or sweep cultivator.
June Step 4 Repeat shallow cultivation, as needed.
July Step 5 Repeat shallow cultivation, as needed.
August Step 6 Repeat shallow cultivation, as needed.
SeptemberStep 7 Repeat shallow cultivation, as needed.
Step 8 Optional: Plant a nurse crop of oats (20 lb/ac) before September 15th.
November Step 9 Seed recommended pollinator mix into oats.
Notes: Download additional copies of this timeline and other resources at: www.xerces.org/pollinator-habitat-installation-guides

24 Organic Site Preparation for Wildflower Establishment
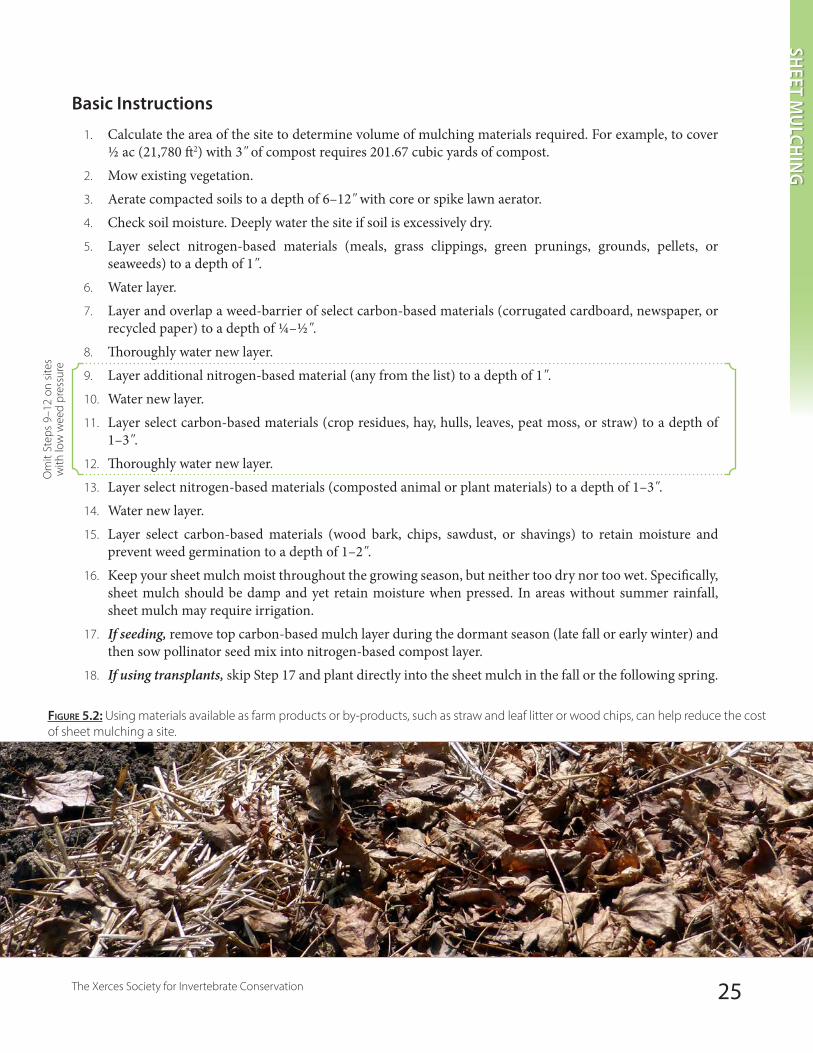
Figure 5.1: It's important to water each layer before applying the next layer. Here, straw is being applied on top of well-watered cardboard.
This method is ideal for small sites on farms where appropriate mulching materials (e.g., straw and composted animal manure) are readily available.
Table 5.1: Sheet Mulching Overview
HOW IT WORKS COMMENTS
ӹ Kills existing vegetation by smothering ӹ Prevents seeds from germinating by smothering
ӹ Can be used for seeds, but is ideal for transplants ӹ Can prepare new habitat, or enhance existing habitat ӹ Performs well in shady or rocky sites ӹ If used on land certified as USDA organic, requires OMRI-
approved mulching materials that are free from synthetic chemicals and weed seeds
WHEN TO USE WHEN NOT TO USE
ཟ Flat or gently sloping, sunny or shady, and humid sites ཟ Small sites, up to ~1/2 ac ཟ Cultivation is impractical (e.g., rocky conditions, weed
pressure, etc.) ཟ Minimal maintenance of the site is desired ཟ Mulching materials are available or affordable ཟ Solarization is impractical (e.g., plastic unavailable/
unaffordable, shady)
ལ Steep slopes ལ Large sites (>1/2 ac) ལ Arid or semi-arid climates without access to irrigation ལ Site contains aggressive or persistent deep-rooted,
perennial, rhizomatous, or woody weeds ལ Mulching materials are unavailable or unaffordable (see
text)
EQUIPMENT NEEDED
ӹ Mower, no-till roller/crimper, scythe, or string-trimmer ӹ Core or spike lawn aerator or spading fork
ӹ Irrigation system or water tank and water source ӹ Carbon- and nitrogen-based mulching materials (see text)
RELATIVE COST OF MATERIALS—MODERATE; mulching materials can be moderately costly, unless they are available as farm products/by-products
How It WorksSheet mulching is a low-maintenance and no-till method of weed management that kills existing vegetation and prevents seed bank germination by smothering. Weed growth is suppressed by creating a barrier of layered carbon- and nitrogen-rich mulch (see Figure 5.1). If mulching materials are layered at a C:N ratio of 25–30:1, then natural soil conditions can be mimicked, resulting in improved plant and soil health, plus increased nutrient and water retention.
Timing/Duration ӧ Total time: 3–24 months ӧ Begin: winter to late spring ӧ Plant: fall or winter (dormant season)
5 Sheet Mulching
Basic Instructions
1. Calculate the area of the site to determine volume of mulching materials required. For example, to cover ½ ac (21,780 ft2) with 3" of compost requires 201.67 cubic yards of compost.
2. Mow existing vegetation. 3. Aerate compacted soils to a depth of 6–12" with core or spike lawn aerator.4. Check soil moisture. Deeply water the site if soil is excessively dry.5. Layer select nitrogen-based materials (meals, grass clippings, green prunings, grounds, pellets, or
seaweeds) to a depth of 1". 6. Water layer.7. Layer and overlap a weed-barrier of select carbon-based materials (corrugated cardboard, newspaper, or
recycled paper) to a depth of 1/4–½". 8. Thoroughly water new layer.9. Layer additional nitrogen-based material (any from the list) to a depth of 1".10. Water new layer.11. Layer select carbon-based materials (crop residues, hay, hulls, leaves, peat moss, or straw) to a depth of
1–3".12. Thoroughly water new layer. 13. Layer select nitrogen-based materials (composted animal or plant materials) to a depth of 1–3".14. Water new layer.15. Layer select carbon-based materials (wood bark, chips, sawdust, or shavings) to retain moisture and
prevent weed germination to a depth of 1–2".16. Keep your sheet mulch moist throughout the growing season, but neither too dry nor too wet. Specifically,
sheet mulch should be damp and yet retain moisture when pressed. In areas without summer rainfall, sheet mulch may require irrigation.
17. If seeding, remove top carbon-based mulch layer during the dormant season (late fall or early winter) and then sow pollinator seed mix into nitrogen-based compost layer.
18. If using transplants, skip Step 17 and plant directly into the sheet mulch in the fall or the following spring.
Om
it St
eps
9–12
on
sites
w
ith lo
w w
eed
pres
sure
25The Xerces Society for Invertebrate Conservation
Figure 5.2: Using materials available as farm products or by-products, such as straw and leaf litter or wood chips, can help reduce the cost of sheet mulching a site.
SHEET M
ULCH
ING
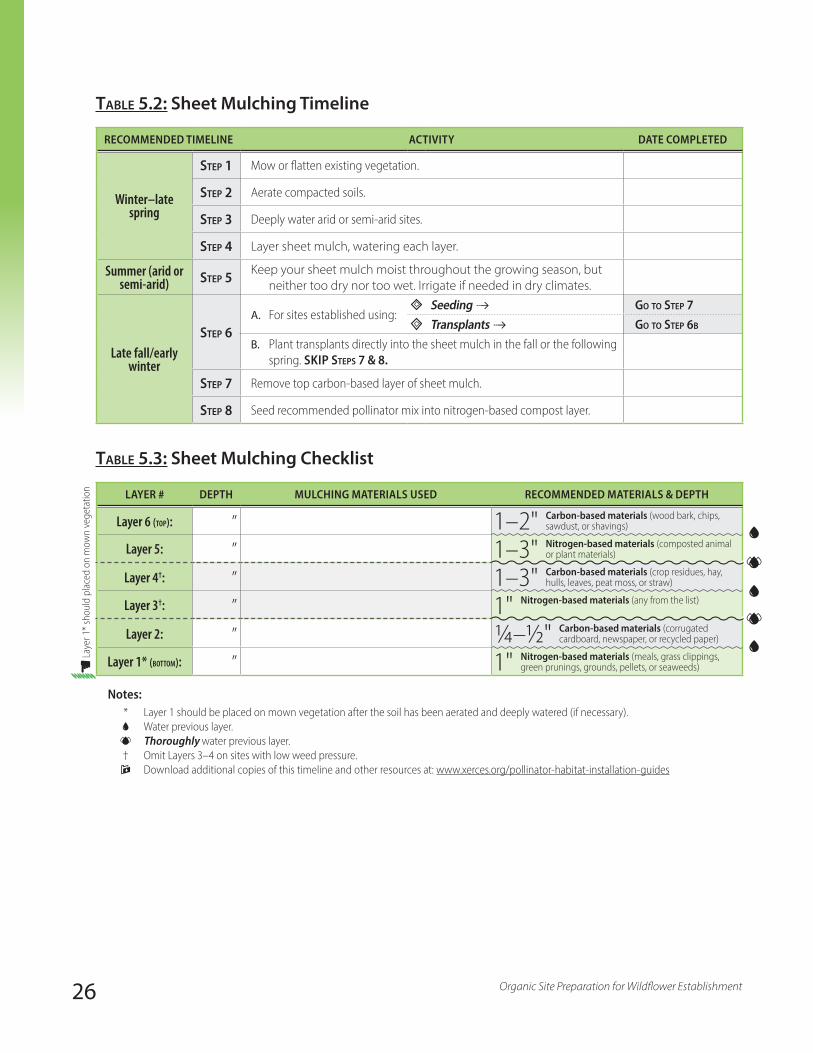
26 Organic Site Preparation for Wildflower Establishment
Table 5.2: Sheet Mulching Timeline
RECOMMENDED TIMELINE ACTIVITY DATE COMPLETED
Winter–late spring
Step 1 Mow or flatten existing vegetation.
Step 2 Aerate compacted soils.
Step 3 Deeply water arid or semi-arid sites.
Step 4 Layer sheet mulch, watering each layer.
Summer (arid or semi-arid) Step 5 Keep your sheet mulch moist throughout the growing season, but
neither too dry nor too wet. Irrigate if needed in dry climates.
Late fall/early winter
Step 6A. For sites established using:
Seeding � Go to Step 7Transplants � Go to Step 6b
B. Plant transplants directly into the sheet mulch in the fall or the following spring. SKIP StepS 7 & 8.
Step 7 Remove top carbon-based layer of sheet mulch.
Step 8 Seed recommended pollinator mix into nitrogen-based compost layer.
Table 5.3: Sheet Mulching Checklist
LAYER # DEPTH MULCHING MATERIALS USED RECOMMENDED MATERIALS & DEPTH
Layer 6 (top): ” 1–2" Carbon-based materials (wood bark, chips, sawdust, or shavings)
Layer 5: ” 1–3" Nitrogen-based materials (composted animal or plant materials)
Layer 4†: ” 1–3" Carbon-based materials (crop residues, hay, hulls, leaves, peat moss, or straw)
Layer 3†: ” 1" Nitrogen-based materials (any from the list)
Layer 2: ” ¼–1/2" Carbon-based materials (corrugated cardboard, newspaper, or recycled paper)
Layer 1* (bottom): ” 1" Nitrogen-based materials (meals, grass clippings, green prunings, grounds, pellets, or seaweeds)
Notes:* Layer 1 should be placed on mown vegetation after the soil has been aerated and deeply watered (if necessary).
> Water previous layer. T Thoroughly water previous layer.
† Omit Layers 3–4 on sites with low weed pressure. Download additional copies of this timeline and other resources at: www.xerces.org/pollinator-habitat-installation-guides
Laye
r 1* s
houl
d pl
aced
on
mow
n ve
geta
tion
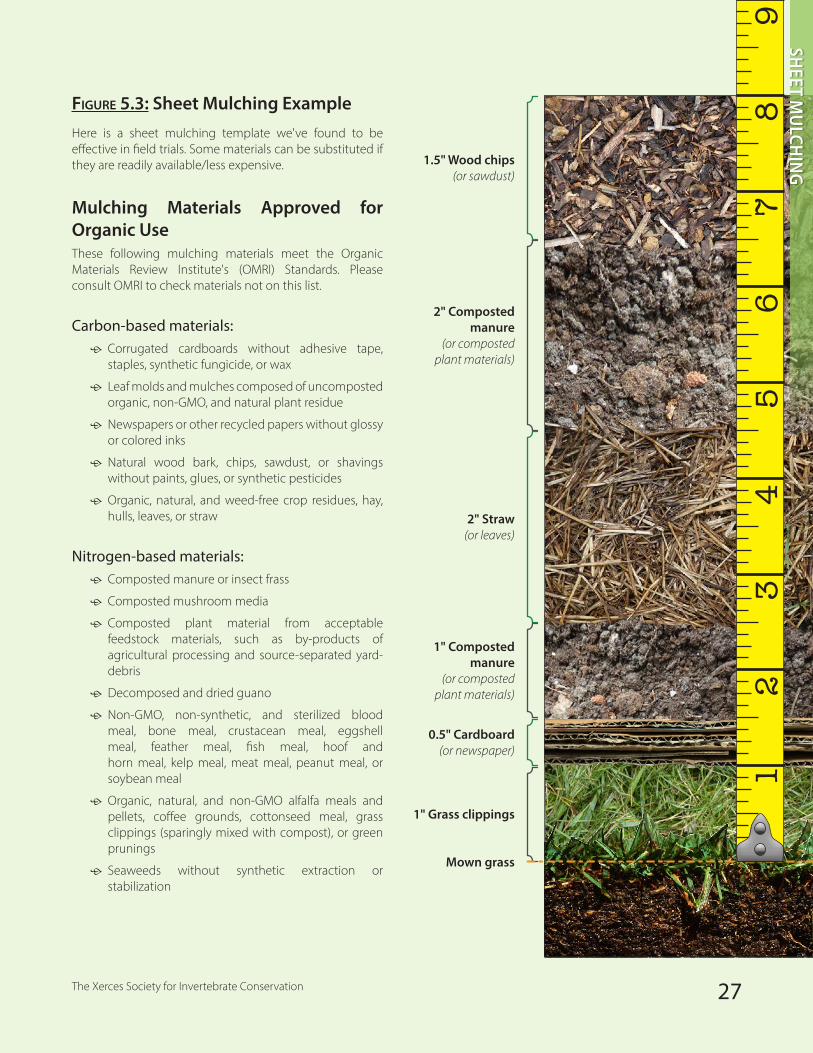
Figure 5.3: Sheet Mulching ExampleHere is a sheet mulching template we've found to be effective in field trials. Some materials can be substituted if they are readily available/less expensive.
Mulching Materials Approved for Organic UseThese following mulching materials meet the Organic Materials Review Institute's (OMRI) Standards. Please consult OMRI to check materials not on this list.
Carbon-based materials: ӧ Corrugated cardboards without adhesive tape, staples, synthetic fungicide, or wax
ӧ Leaf molds and mulches composed of uncomposted organic, non-GMO, and natural plant residue
ӧ Newspapers or other recycled papers without glossy or colored inks
ӧ Natural wood bark, chips, sawdust, or shavings without paints, glues, or synthetic pesticides
ӧ Organic, natural, and weed-free crop residues, hay, hulls, leaves, or straw
Nitrogen-based materials:
ӧ Composted manure or insect frass
ӧ Composted mushroom media
ӧ Composted plant material from acceptable feedstock materials, such as by-products of agricultural processing and source-separated yard-debris
ӧ Decomposed and dried guano
ӧ Non-GMO, non-synthetic, and sterilized blood meal, bone meal, crustacean meal, eggshell meal, feather meal, fish meal, hoof and horn meal, kelp meal, meat meal, peanut meal, or soybean meal
ӧ Organic, natural, and non-GMO alfalfa meals and pellets, coffee grounds, cottonseed meal, grass clippings (sparingly mixed with compost), or green prunings
ӧ Seaweeds without synthetic extraction or stabilization
1.5" Wood chips (or sawdust)
2" Composted manure
(or composted plant materials)
2" Straw (or leaves)
1" Composted manure
(or composted plant materials)
0.5" Cardboard (or newspaper)
1" Grass clippings
Mown grass
1 3
24
65
7 9
8
27The Xerces Society for Invertebrate Conservation
SHEET M
ULCH
ING
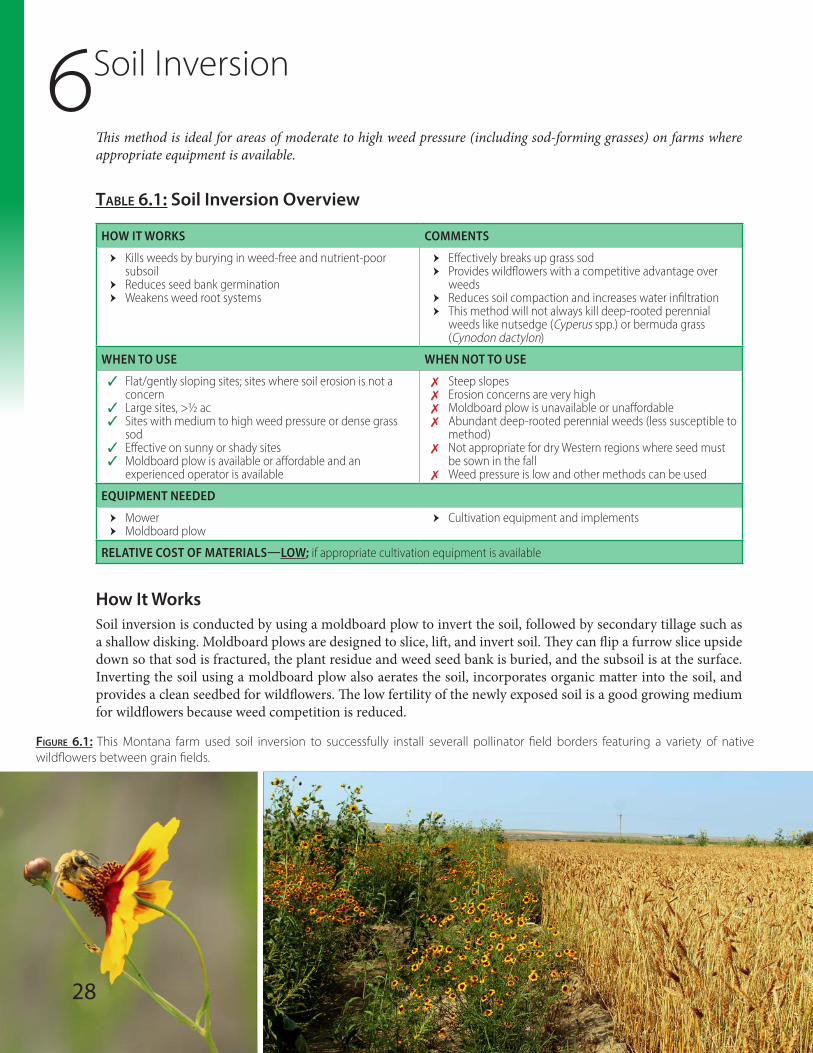
Figure 6.1: This Montana farm used soil inversion to successfully install severall pollinator field borders featuring a variety of native wildflowers between grain fields.
This method is ideal for areas of moderate to high weed pressure (including sod-forming grasses) on farms where appropriate equipment is available.
Table 6.1: Soil Inversion Overview
HOW IT WORKS COMMENTS
ӹ Kills weeds by burying in weed-free and nutrient-poor subsoil
ӹ Reduces seed bank germination ӹ Weakens weed root systems
ӹ Effectively breaks up grass sod ӹ Provides wildflowers with a competitive advantage over
weeds ӹ Reduces soil compaction and increases water infiltration ӹ This method will not always kill deep-rooted perennial
weeds like nutsedge (Cyperus spp.) or bermuda grass (Cynodon dactylon)
WHEN TO USE WHEN NOT TO USE
ཟ Flat/gently sloping sites; sites where soil erosion is not a concern
ཟ Large sites, >1/2 ac ཟ Sites with medium to high weed pressure or dense grass
sod ཟ Effective on sunny or shady sites ཟ Moldboard plow is available or affordable and an
experienced operator is available
ལ Steep slopes ལ Erosion concerns are very high ལ Moldboard plow is unavailable or unaffordable ལ Abundant deep-rooted perennial weeds (less susceptible to
method) ལ Not appropriate for dry Western regions where seed must
be sown in the fall ལ Weed pressure is low and other methods can be used
EQUIPMENT NEEDED
ӹ Mower ӹ Moldboard plow
ӹ Cultivation equipment and implements
RELATIVE COST OF MATERIALS—LOW; if appropriate cultivation equipment is available
How It WorksSoil inversion is conducted by using a moldboard plow to invert the soil, followed by secondary tillage such as a shallow disking. Moldboard plows are designed to slice, lift, and invert soil. They can flip a furrow slice upside down so that sod is fractured, the plant residue and weed seed bank is buried, and the subsoil is at the surface. Inverting the soil using a moldboard plow also aerates the soil, incorporates organic matter into the soil, and provides a clean seedbed for wildflowers. The low fertility of the newly exposed soil is a good growing medium for wildflowers because weed competition is reduced.
28
6 Soil Inversion
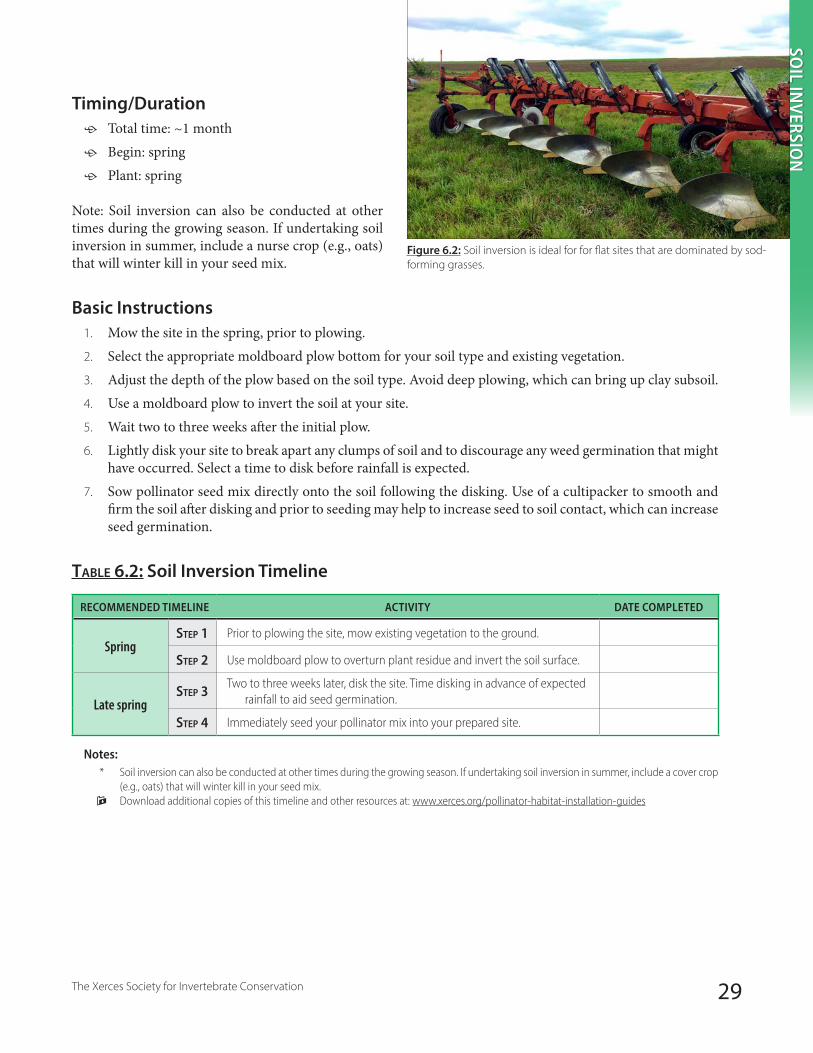
29The Xerces Society for Invertebrate Conservation
SOIL IN
VERSION
Timing/Duration ӧ Total time: ~1 month ӧ Begin: spring ӧ Plant: spring
Note: Soil inversion can also be conducted at other times during the growing season. If undertaking soil inversion in summer, include a nurse crop (e.g., oats) that will winter kill in your seed mix.
Basic Instructions1. Mow the site in the spring, prior to plowing.2. Select the appropriate moldboard plow bottom for your soil type and existing vegetation. 3. Adjust the depth of the plow based on the soil type. Avoid deep plowing, which can bring up clay subsoil.4. Use a moldboard plow to invert the soil at your site. 5. Wait two to three weeks after the initial plow.6. Lightly disk your site to break apart any clumps of soil and to discourage any weed germination that might
have occurred. Select a time to disk before rainfall is expected.7. Sow pollinator seed mix directly onto the soil following the disking. Use of a cultipacker to smooth and
firm the soil after disking and prior to seeding may help to increase seed to soil contact, which can increase seed germination.
Table 6.2: Soil Inversion Timeline
RECOMMENDED TIMELINE ACTIVITY DATE COMPLETED
SpringStep 1 Prior to plowing the site, mow existing vegetation to the ground.
Step 2 Use moldboard plow to overturn plant residue and invert the soil surface.
Late springStep 3 Two to three weeks later, disk the site. Time disking in advance of expected
rainfall to aid seed germination.
Step 4 Immediately seed your pollinator mix into your prepared site.
Notes:* Soil inversion can also be conducted at other times during the growing season. If undertaking soil inversion in summer, include a cover crop
(e.g., oats) that will winter kill in your seed mix. Download additional copies of this timeline and other resources at: www.xerces.org/pollinator-habitat-installation-guides
Figure 6.2: Soil inversion is ideal for for flat sites that are dominated by sod-forming grasses.
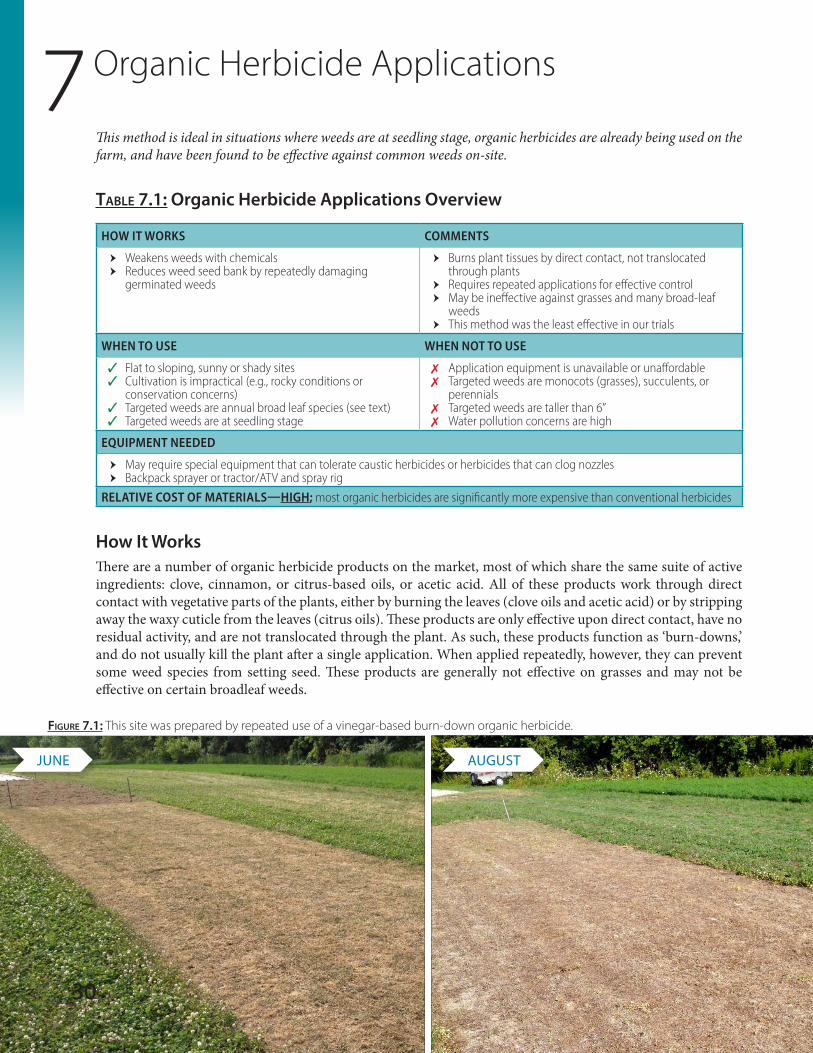
Figure 7.1: This site was prepared by repeated use of a vinegar-based burn-down organic herbicide.
JUNE AUGUST
This method is ideal in situations where weeds are at seedling stage, organic herbicides are already being used on the farm, and have been found to be effective against common weeds on-site.
Table 7.1: Organic Herbicide Applications Overview
HOW IT WORKS COMMENTS
ӹ Weakens weeds with chemicals ӹ Reduces weed seed bank by repeatedly damaging
germinated weeds
ӹ Burns plant tissues by direct contact, not translocated through plants
ӹ Requires repeated applications for effective control ӹ May be ineffective against grasses and many broad-leaf
weeds ӹ This method was the least effective in our trials
WHEN TO USE WHEN NOT TO USE
ཟ Flat to sloping, sunny or shady sites ཟ Cultivation is impractical (e.g., rocky conditions or
conservation concerns) ཟ Targeted weeds are annual broad leaf species (see text) ཟ Targeted weeds are at seedling stage
ལ Application equipment is unavailable or unaffordable ལ Targeted weeds are monocots (grasses), succulents, or
perennials ལ Targeted weeds are taller than 6” ལ Water pollution concerns are high
EQUIPMENT NEEDED
ӹ May require special equipment that can tolerate caustic herbicides or herbicides that can clog nozzles ӹ Backpack sprayer or tractor/ATV and spray rig
RELATIVE COST OF MATERIALS—HIGH; most organic herbicides are significantly more expensive than conventional herbicides
How It WorksThere are a number of organic herbicide products on the market, most of which share the same suite of active ingredients: clove, cinnamon, or citrus-based oils, or acetic acid. All of these products work through direct contact with vegetative parts of the plants, either by burning the leaves (clove oils and acetic acid) or by stripping away the waxy cuticle from the leaves (citrus oils). These products are only effective upon direct contact, have no residual activity, and are not translocated through the plant. As such, these products function as ‘burn-downs,’ and do not usually kill the plant after a single application. When applied repeatedly, however, they can prevent some weed species from setting seed. These products are generally not effective on grasses and may not be effective on certain broadleaf weeds.
3030
7 Organic Herbicide Applications
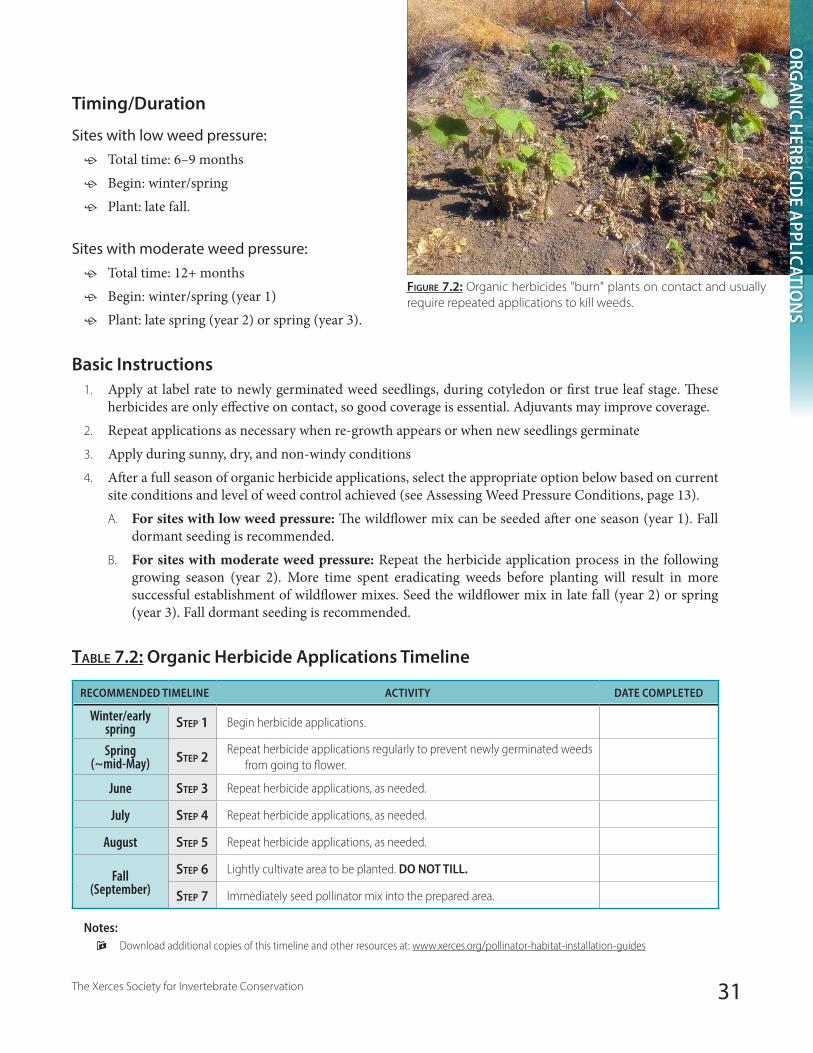
Timing/Duration
Sites with low weed pressure: ӧ Total time: 6–9 months ӧ Begin: winter/spring ӧ Plant: late fall.
Sites with moderate weed pressure: ӧ Total time: 12+ months ӧ Begin: winter/spring (year 1) ӧ Plant: late spring (year 2) or spring (year 3).
Basic Instructions1. Apply at label rate to newly germinated weed seedlings, during cotyledon or first true leaf stage. These
herbicides are only effective on contact, so good coverage is essential. Adjuvants may improve coverage.2. Repeat applications as necessary when re-growth appears or when new seedlings germinate 3. Apply during sunny, dry, and non-windy conditions 4. After a full season of organic herbicide applications, select the appropriate option below based on current
site conditions and level of weed control achieved (see Assessing Weed Pressure Conditions, page 13).A. For sites with low weed pressure: The wildflower mix can be seeded after one season (year 1). Fall
dormant seeding is recommended.B. For sites with moderate weed pressure: Repeat the herbicide application process in the following
growing season (year 2). More time spent eradicating weeds before planting will result in more successful establishment of wildflower mixes. Seed the wildflower mix in late fall (year 2) or spring (year 3). Fall dormant seeding is recommended.
Table 7.2: Organic Herbicide Applications Timeline
RECOMMENDED TIMELINE ACTIVITY DATE COMPLETED
Winter/early spring Step 1 Begin herbicide applications.
Spring(~mid-May) Step 2 Repeat herbicide applications regularly to prevent newly germinated weeds
from going to flower.
June Step 3 Repeat herbicide applications, as needed.
July Step 4 Repeat herbicide applications, as needed.
August Step 5 Repeat herbicide applications, as needed.
Fall(September)
Step 6 Lightly cultivate area to be planted. DO NOT TILL.
Step 7 Immediately seed pollinator mix into the prepared area.
Notes: Download additional copies of this timeline and other resources at: www.xerces.org/pollinator-habitat-installation-guides
Figure 7.2: Organic herbicides "burn" plants on contact and usually require repeated applications to kill weeds.
31The Xerces Society for Invertebrate Conservation
ORG
ANIC H
ERBICIDE APPLICATIO
NS
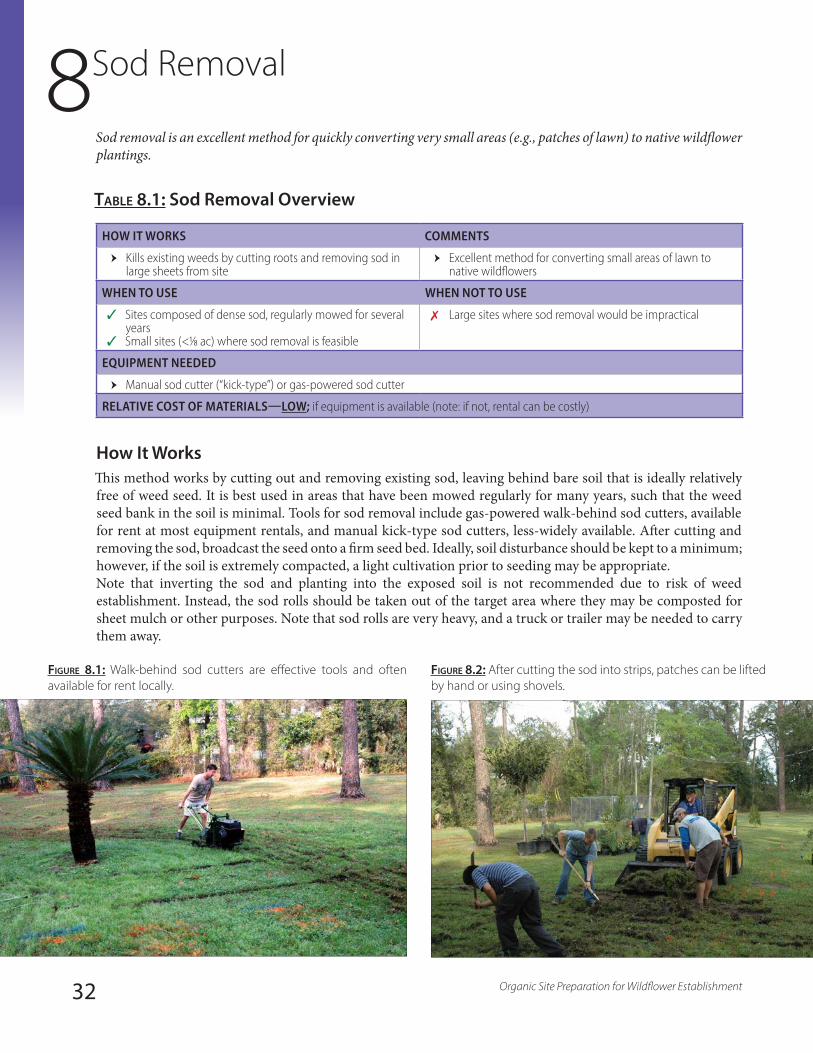
32 Organic Site Preparation for Wildflower Establishment
Sod removal is an excellent method for quickly converting very small areas (e.g., patches of lawn) to native wildflower plantings.
Table 8.1: Sod Removal Overview
HOW IT WORKS COMMENTS
ӹ Kills existing weeds by cutting roots and removing sod in large sheets from site
ӹ Excellent method for converting small areas of lawn to native wildflowers
WHEN TO USE WHEN NOT TO USE
ཟ Sites composed of dense sod, regularly mowed for several years
ཟ Small sites (<1/8 ac) where sod removal is feasible
ལ Large sites where sod removal would be impractical
EQUIPMENT NEEDED
ӹ Manual sod cutter (“kick-type”) or gas-powered sod cutter
RELATIVE COST OF MATERIALS—LOW; if equipment is available (note: if not, rental can be costly)
How It WorksThis method works by cutting out and removing existing sod, leaving behind bare soil that is ideally relatively free of weed seed. It is best used in areas that have been mowed regularly for many years, such that the weed seed bank in the soil is minimal. Tools for sod removal include gas-powered walk-behind sod cutters, available for rent at most equipment rentals, and manual kick-type sod cutters, less-widely available. After cutting and removing the sod, broadcast the seed onto a firm seed bed. Ideally, soil disturbance should be kept to a minimum; however, if the soil is extremely compacted, a light cultivation prior to seeding may be appropriate. Note that inverting the sod and planting into the exposed soil is not recommended due to risk of weed establishment. Instead, the sod rolls should be taken out of the target area where they may be composted for sheet mulch or other purposes. Note that sod rolls are very heavy, and a truck or trailer may be needed to carry them away.
Figure 8.1: Walk-behind sod cutters are effective tools and often available for rent locally.
Figure 8.2: After cutting the sod into strips, patches can be lifted by hand or using shovels.
8 Sod Removal
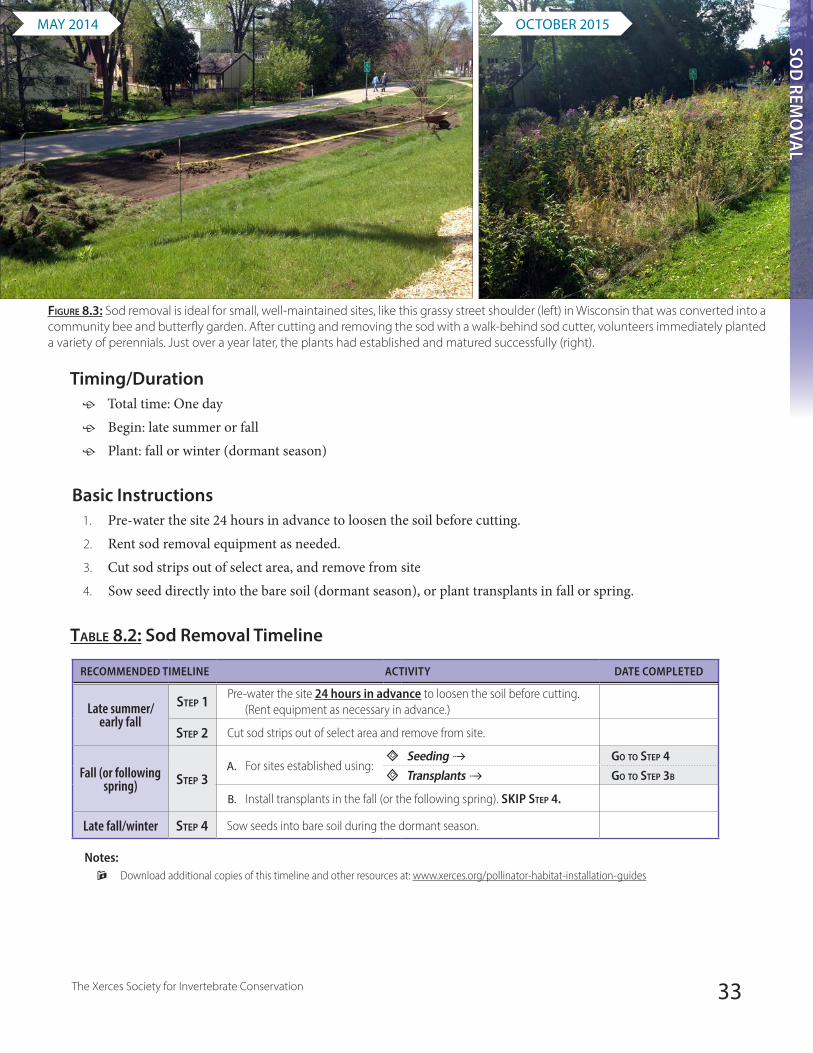
Timing/Duration ӧ Total time: One day ӧ Begin: late summer or fall ӧ Plant: fall or winter (dormant season)
Basic Instructions1. Pre-water the site 24 hours in advance to loosen the soil before cutting.2. Rent sod removal equipment as needed.3. Cut sod strips out of select area, and remove from site 4. Sow seed directly into the bare soil (dormant season), or plant transplants in fall or spring.
Table 8.2: Sod Removal Timeline
RECOMMENDED TIMELINE ACTIVITY DATE COMPLETED
Late summer/ early fall
Step 1 Pre-water the site 24 hours in advance to loosen the soil before cutting. (Rent equipment as necessary in advance.)
Step 2 Cut sod strips out of select area and remove from site.
Fall (or following spring) Step 3
A. For sites established using:Seeding � Go to Step 4Transplants � Go to Step 3b
B. Install transplants in the fall (or the following spring). SKIP Step 4.
Late fall/winter Step 4 Sow seeds into bare soil during the dormant season.
Notes: Download additional copies of this timeline and other resources at: www.xerces.org/pollinator-habitat-installation-guides
Figure 8.3: Sod removal is ideal for small, well-maintained sites, like this grassy street shoulder (left) in Wisconsin that was converted into a community bee and butterfly garden. After cutting and removing the sod with a walk-behind sod cutter, volunteers immediately planted a variety of perennials. Just over a year later, the plants had established and matured successfully (right).
MAY 2014 OCTOBER 2015
33The Xerces Society for Invertebrate Conservation
SOD
REMO
VAL
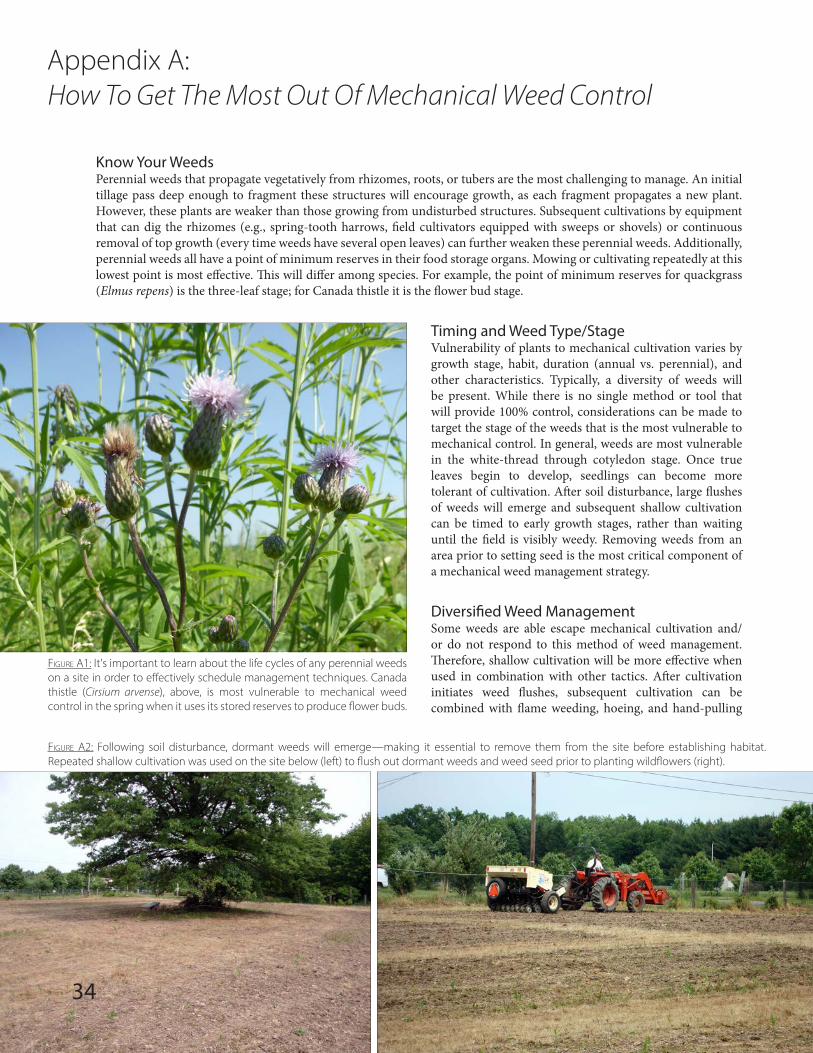
Figure A2: Following soil disturbance, dormant weeds will emerge—making it essential to remove them from the site before establishing habitat. Repeated shallow cultivation was used on the site below (left) to flush out dormant weeds and weed seed prior to planting wildflowers (right).
34
Know Your Weeds Perennial weeds that propagate vegetatively from rhizomes, roots, or tubers are the most challenging to manage. An initial tillage pass deep enough to fragment these structures will encourage growth, as each fragment propagates a new plant. However, these plants are weaker than those growing from undisturbed structures. Subsequent cultivations by equipment that can dig the rhizomes (e.g., spring-tooth harrows, field cultivators equipped with sweeps or shovels) or continuous removal of top growth (every time weeds have several open leaves) can further weaken these perennial weeds. Additionally, perennial weeds all have a point of minimum reserves in their food storage organs. Mowing or cultivating repeatedly at this lowest point is most effective. This will differ among species. For example, the point of minimum reserves for quackgrass (Elmus repens) is the three-leaf stage; for Canada thistle it is the flower bud stage.
Timing and Weed Type/StageVulnerability of plants to mechanical cultivation varies by growth stage, habit, duration (annual vs. perennial), and other characteristics. Typically, a diversity of weeds will be present. While there is no single method or tool that will provide 100% control, considerations can be made to target the stage of the weeds that is the most vulnerable to mechanical control. In general, weeds are most vulnerable in the white-thread through cotyledon stage. Once true leaves begin to develop, seedlings can become more tolerant of cultivation. After soil disturbance, large flushes of weeds will emerge and subsequent shallow cultivation can be timed to early growth stages, rather than waiting until the field is visibly weedy. Removing weeds from an area prior to setting seed is the most critical component of a mechanical weed management strategy.
Diversified Weed ManagementSome weeds are able escape mechanical cultivation and/or do not respond to this method of weed management. Therefore, shallow cultivation will be more effective when used in combination with other tactics. After cultivation initiates weed flushes, subsequent cultivation can be combined with flame weeding, hoeing, and hand-pulling
Figure A1: It's important to learn about the life cycles of any perennial weeds on a site in order to effectively schedule management techniques. Canada thistle (Cirsium arvense), above, is most vulnerable to mechanical weed control in the spring when it uses its stored reserves to produce flower buds.
Appendix A: How To Get The Most Out Of Mechanical Weed Control
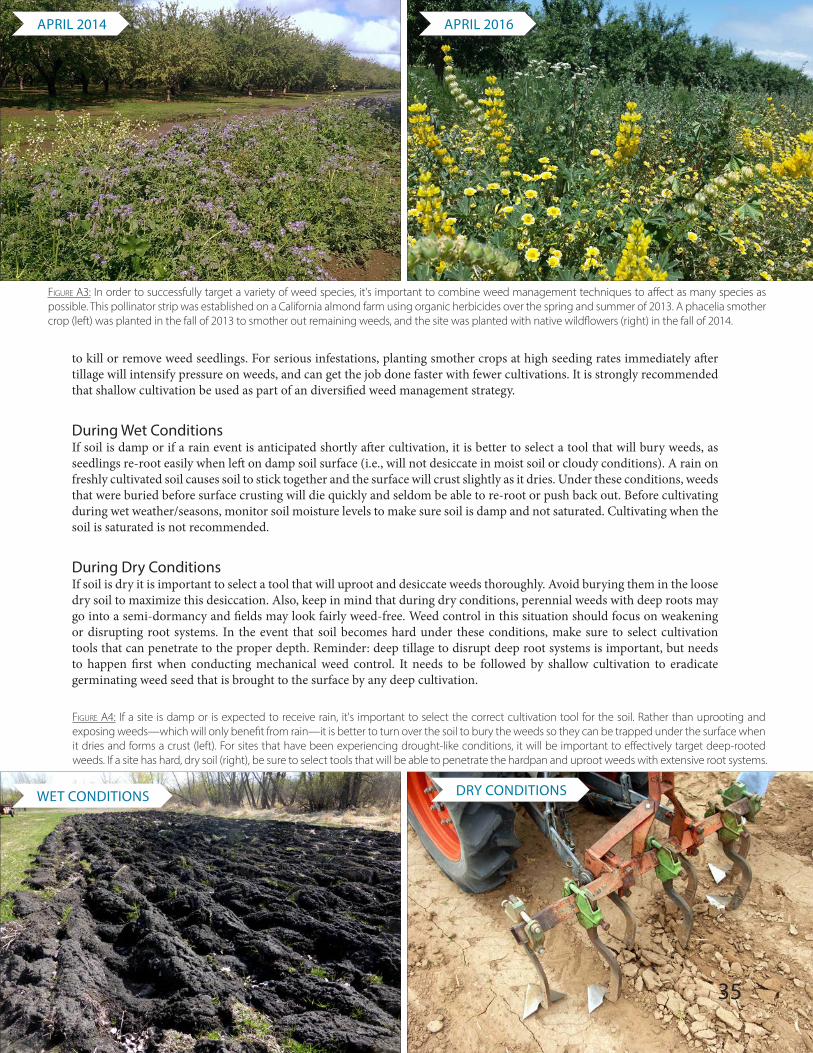
Figure A4: If a site is damp or is expected to receive rain, it's important to select the correct cultivation tool for the soil. Rather than uprooting and exposing weeds—which will only benefit from rain—it is better to turn over the soil to bury the weeds so they can be trapped under the surface when it dries and forms a crust (left). For sites that have been experiencing drought-like conditions, it will be important to effectively target deep-rooted weeds. If a site has hard, dry soil (right), be sure to select tools that will be able to penetrate the hardpan and uproot weeds with extensive root systems.
WET CONDITIONS DRY CONDITIONS
to kill or remove weed seedlings. For serious infestations, planting smother crops at high seeding rates immediately after tillage will intensify pressure on weeds, and can get the job done faster with fewer cultivations. It is strongly recommended that shallow cultivation be used as part of an diversified weed management strategy.
During Wet ConditionsIf soil is damp or if a rain event is anticipated shortly after cultivation, it is better to select a tool that will bury weeds, as seedlings re-root easily when left on damp soil surface (i.e., will not desiccate in moist soil or cloudy conditions). A rain on freshly cultivated soil causes soil to stick together and the surface will crust slightly as it dries. Under these conditions, weeds that were buried before surface crusting will die quickly and seldom be able to re-root or push back out. Before cultivating during wet weather/seasons, monitor soil moisture levels to make sure soil is damp and not saturated. Cultivating when the soil is saturated is not recommended.
During Dry ConditionsIf soil is dry it is important to select a tool that will uproot and desiccate weeds thoroughly. Avoid burying them in the loose dry soil to maximize this desiccation. Also, keep in mind that during dry conditions, perennial weeds with deep roots may go into a semi-dormancy and fields may look fairly weed-free. Weed control in this situation should focus on weakening or disrupting root systems. In the event that soil becomes hard under these conditions, make sure to select cultivation tools that can penetrate to the proper depth. Reminder: deep tillage to disrupt deep root systems is important, but needs to happen first when conducting mechanical weed control. It needs to be followed by shallow cultivation to eradicate germinating weed seed that is brought to the surface by any deep cultivation.
Figure A3: In order to successfully target a variety of weed species, it's important to combine weed management techniques to affect as many species as possible. This pollinator strip was established on a California almond farm using organic herbicides over the spring and summer of 2013. A phacelia smother crop (left) was planted in the fall of 2013 to smother out remaining weeds, and the site was planted with native wildflowers (right) in the fall of 2014.
APRIL 2014 APRIL 2016
35
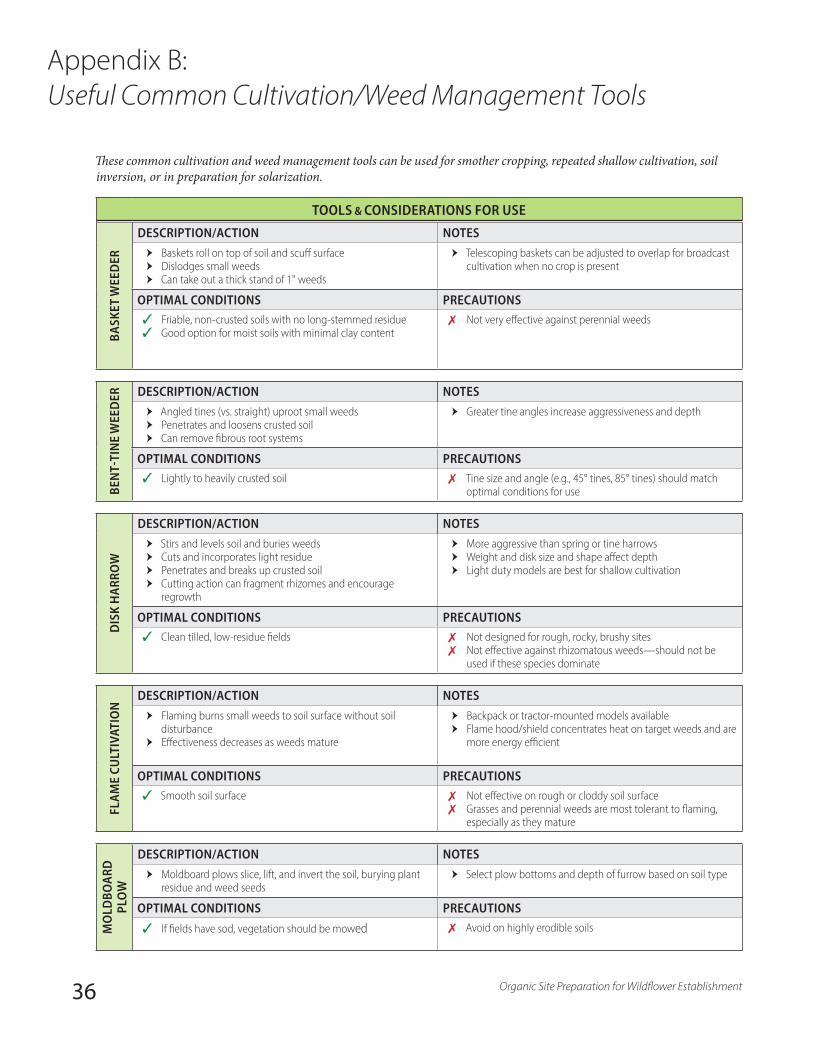
36 Organic Site Preparation for Wildflower Establishment
TOOLS & CONSIDERATIONS FOR USE
BASK
ET W
EED
ER
DESCRIPTION/ACTION NOTES ӹ Baskets roll on top of soil and scuff surface ӹ Dislodges small weeds ӹ Can take out a thick stand of 1" weeds
ӹ Telescoping baskets can be adjusted to overlap for broadcast cultivation when no crop is present
OPTIMAL CONDITIONS PRECAUTIONS ཟ Friable, non-crusted soils with no long-stemmed residue ཟ Good option for moist soils with minimal clay content
ལ Not very effective against perennial weeds
BEN
T-TI
NE
WEE
DER DESCRIPTION/ACTION NOTES
ӹ Angled tines (vs. straight) uproot small weeds ӹ Penetrates and loosens crusted soil ӹ Can remove fibrous root systems
ӹ Greater tine angles increase aggressiveness and depth
OPTIMAL CONDITIONS PRECAUTIONS ཟ Lightly to heavily crusted soil ལ Tine size and angle (e.g., 45° tines, 85° tines) should match
optimal conditions for use
DIS
K H
ARRO
W
DESCRIPTION/ACTION NOTES ӹ Stirs and levels soil and buries weeds ӹ Cuts and incorporates light residue ӹ Penetrates and breaks up crusted soil ӹ Cutting action can fragment rhizomes and encourage
regrowth
ӹ More aggressive than spring or tine harrows ӹ Weight and disk size and shape affect depth ӹ Light duty models are best for shallow cultivation
OPTIMAL CONDITIONS PRECAUTIONS ཟ Clean tilled, low-residue fields ལ Not designed for rough, rocky, brushy sites
ལ Not effective against rhizomatous weeds—should not be used if these species dominate
FLAM
E CU
LTIV
ATIO
N DESCRIPTION/ACTION NOTES
ӹ Flaming burns small weeds to soil surface without soil disturbance
ӹ Effectiveness decreases as weeds mature
ӹ Backpack or tractor-mounted models available ӹ Flame hood/shield concentrates heat on target weeds and are
more energy efficient
OPTIMAL CONDITIONS PRECAUTIONS ཟ Smooth soil surface ལ Not effective on rough or cloddy soil surface
ལ Grasses and perennial weeds are most tolerant to flaming, especially as they mature
MO
LDBO
ARD
PL
OW
DESCRIPTION/ACTION NOTES ӹ Moldboard plows slice, lift, and invert the soil, burying plant
residue and weed seeds ӹ Select plow bottoms and depth of furrow based on soil type
OPTIMAL CONDITIONS PRECAUTIONS ཟ If fields have sod, vegetation should be mowed ལ Avoid on highly erodible soils
These common cultivation and weed management tools can be used for smother cropping, repeated shallow cultivation, soil inversion, or in preparation for solarization.
Appendix B: Useful Common Cultivation/Weed Management Tools
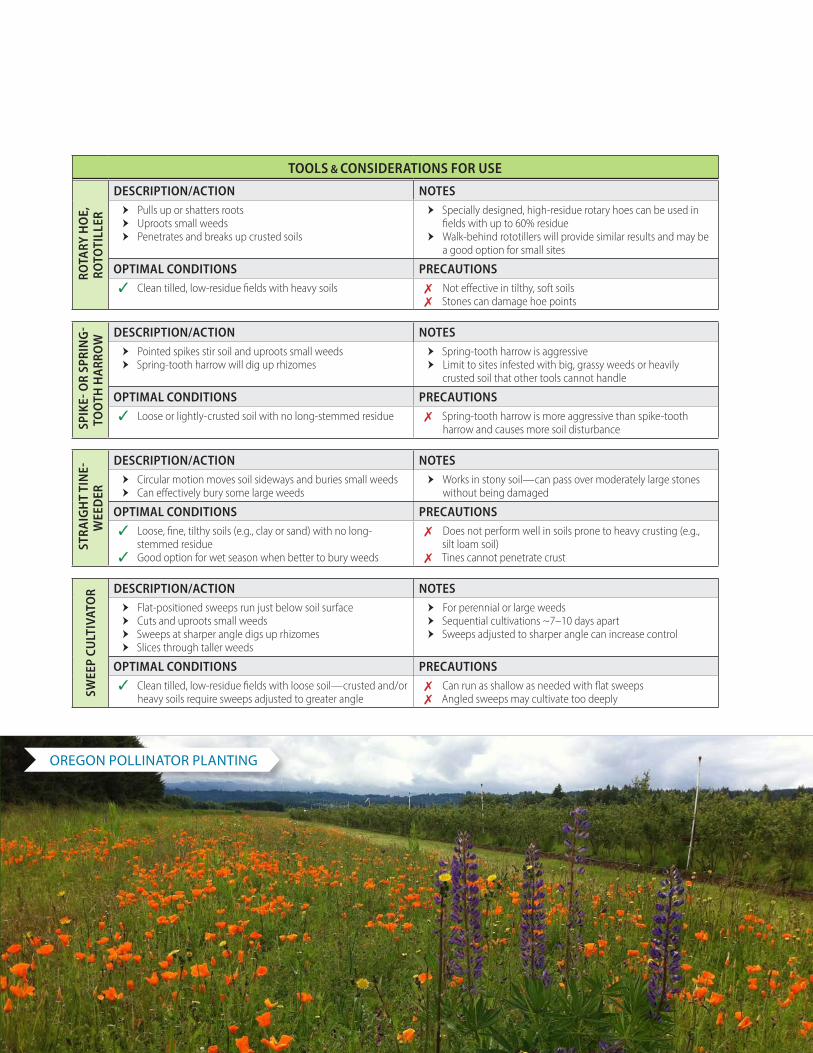
37The Xerces Society for Invertebrate Conservation 37The Xerces Society for Invertebrate Conservation
TOOLS & CONSIDERATIONS FOR USE
ROTA
RY H
OE,
RO
TOTI
LLER
DESCRIPTION/ACTION NOTES ӹ Pulls up or shatters roots ӹ Uproots small weeds ӹ Penetrates and breaks up crusted soils
ӹ Specially designed, high-residue rotary hoes can be used in fields with up to 60% residue
ӹ Walk-behind rototillers will provide similar results and may be a good option for small sites
OPTIMAL CONDITIONS PRECAUTIONS ཟ Clean tilled, low-residue fields with heavy soils ལ Not effective in tilthy, soft soils
ལ Stones can damage hoe points
SPIK
E- O
R SP
RIN
G-
TOO
TH H
ARRO
W DESCRIPTION/ACTION NOTES
ӹ Pointed spikes stir soil and uproots small weeds ӹ Spring-tooth harrow will dig up rhizomes
ӹ Spring-tooth harrow is aggressive ӹ Limit to sites infested with big, grassy weeds or heavily
crusted soil that other tools cannot handle
OPTIMAL CONDITIONS PRECAUTIONS ཟ Loose or lightly-crusted soil with no long-stemmed residue ལ Spring-tooth harrow is more aggressive than spike-tooth
harrow and causes more soil disturbance
STRA
IGH
T TI
NE-
WEE
DER
DESCRIPTION/ACTION NOTES ӹ Circular motion moves soil sideways and buries small weeds ӹ Can effectively bury some large weeds
ӹ Works in stony soil—can pass over moderately large stones without being damaged
OPTIMAL CONDITIONS PRECAUTIONS ཟ Loose, fine, tilthy soils (e.g., clay or sand) with no long-
stemmed residue ཟ Good option for wet season when better to bury weeds
ལ Does not perform well in soils prone to heavy crusting (e.g., silt loam soil)
ལ Tines cannot penetrate crust
SWEE
P CU
LTIV
ATO
R DESCRIPTION/ACTION NOTES ӹ Flat-positioned sweeps run just below soil surface ӹ Cuts and uproots small weeds ӹ Sweeps at sharper angle digs up rhizomes ӹ Slices through taller weeds
ӹ For perennial or large weeds ӹ Sequential cultivations ~7–10 days apart ӹ Sweeps adjusted to sharper angle can increase control
OPTIMAL CONDITIONS PRECAUTIONS ཟ Clean tilled, low-residue fields with loose soil—crusted and/or
heavy soils require sweeps adjusted to greater angle ལ Can run as shallow as needed with flat sweeps ལ Angled sweeps may cultivate too deeply
OREGON POLLINATOR PLANTING

38 Organic Site Preparation for Wildflower Establishment38 Wildflower Establishment: Organic Site Preparation Methods
Guidelines For Implementing Conservation Measures
Appendix C: Additional Resources
Pollinator Conservation Resource Center The Xerces Society's Pollinator Conservation Resource Center is a compilation of information from Xerces and other leading conservation organizations and agencies. Select your region of the country to find region-specific lists of native plants useful for pollinator habitat enhancement efforts, as well as habitat conservation guides, nest management instructions, bee identification and monitoring resources, and a directory of native pollinator plant nurseries. xerces.org/pollinator-resource-center
Project Integrated Crop PollinationThis ongoing research project is investigating the performance, economics, and farmer perceptions of different pollination strategies in various fruit and vegetable crops, and is producing a number of resources and tools for growers.projecticp.org
Pollinator and Beneficial Insect Habitat Assessment Form and Guides
Use these tools to assess specific habitat features for value to pollinators or beneficial insects for pest control, and evaluate and prioritize future habitat enhancements.xerces.org/habitat-assessment-guides
Habitat Installation GuidesThese regional installation guides include in-depth guidance on installing and maintaining pollinator habitat in the form of wildflower meadow plantings or hedgerows of flowering shrubs, and include example seed mixes and plant list recommendations. xerces.org/pollinator-habitat-installation-guides
Attracting Native PollinatorsA complete guide to pollinators, including profiles of commonly encountered bee genera and more than 50 pages of fully-illustrated plant lists that enable you to choose the best plants for your region. xerces.org/announcing-the-publication-of-attracting-native-pollinators
Farming with Native Beneficial InsectsThis comprehensive guide describes how to recognize beneficial insects and their habitat, and how to evaluate, design, and improve habitat for them. Close-up photography and in-depth profiles familiarize you with more than 20 beneficial insects and their kin. Step-by-step illustrated instructions detail specific solutions including native plant field borders, mass insectary plantings, hedgerows, cover crops, buffer strips, beetle banks, and brush piles. xerces.org/farming-with-native-beneficial-insects
Farming for BeesFarming for Bees outlines ways to protect and enhance habitat for native crop pollinators in the farm landscape. This publication contains a wealth of information about common groups of native bees, their habitat requirements, conservation strategies, extensive pesticide risk reduction guidance, and case studies from across the United States. xerces.org/guidelines-farming-for-bees
Conserving Bumble Bees: Guidelines for Creating and Managing Habitat for America’s Declining Pollinators
A publication to help landowners and managers create, protect, and restore habitat for bumble bee populations. xerces.org/bumblebees/guidelines
CALIFORNIA POLLINATOR PLANTING

39The Xerces Society for Invertebrate Conservation 39
Pesticide ProtectionWindbreaks (Inside Agroforestry)
From the National Agroforestry Center, this special issue of Inside Agroforestry describes how to design windbreaks with pollinators in mind to provide bees and other pollinators with habitat and food resources or protection from pesticide drift. http://nac.unl.edu/documents/insideagroforestry/vol20issue1.pdf
Conservation Buffers: Design Guidelines for Buffers, Corridors, and Greenways
This guide by the U.S. Forest Service includes extensive information on hedgerows and windbreaks. http://nac.unl.edu/buffers/docs/conservation_buffers.pdf
Organic-Approved Pesticides: Minimizing Impacts to BeesThis 6-page guide gives an overview of commonly available organic-approved insecticides and reviews their impact on bees and other beneficial insects. It includes guidelines for selecting the least toxic option and application methods to reduce the effects on nontarget species.www.xerces.org/organic-farms
Oregon TilthThe organic certifier Oregon Tilth has worked with many partners to develop guidance to help organic farmers understand and implement buffers on organic farms. Beneficial insect habitat can be a valuable result if buffers are designed correctly. https://tilth.org/resource_topic/buffers/
Cover CropsBuckwheat Cover Crop Handbook: A Precise Tool for Weed Management on Northeastern Farms
This handbook is based on extensive grower surveys, gathering knowledge held by successful growers, material printed in obscure old extension and farm publications, as well as original research to answer new questions. The instructions have been tested by cooperating farmers to make sure they work. www.sare.org/content/download/68436/970837/buckwheat_cover_crop_handbook.pdf
Managing Cover Crops Profitably. 3rd Ed.Explores how and why cover crops work and provides all the information needed to build cover crops into any farming operation. Revised and updated in 2007, the 3rd edition includes new chapters on brassicas and mustards, six new farm profiles, as well as a comprehensive chapter on the use of cover crops in conservation tillage systems. www.sare.org/publications/covercrops.htm
Cover Cropping for Pollinator and Other Beneficial InsectsFlowering cover crops can fulfill their original purpose as a conservation practice while at the same time providing valuable forage for wild bees and beneficial insects. This added benefit can be significantly enhanced with some fine-tuning of management practices and thoughtful plant selection. This 16-page bulletin will help you use cover crops to encourage populations of pollinators and beneficial insects on your farm while you address your other resource concerns. www.sare.org/Learning-Center/Bulletins/Cover-Cropping-for-Pollinators-and-Beneficial-Insects
BUMBLE BEE ON BUCKWHEAT BUCKWHEAT SMOTHER CROP
40 Organic Site Preparation for Wildflower Establishment
Technical and Financial AssistanceUSDA's Natural Resource Conservation Service (NRCS)
The NRCS provides financial and technical assistance to support conservation efforts for pollinators and other wildlife on farms. For information on NRCS conservation programs, contact your local NRCS or conservation district office. http://offices.sc.egov.usda.gov/locator/app
NRCS Documents for Pollinator Conservation and Enhancement
The 2008 and 2014 Farm Bills both made pollinators a priority for all USDA conservation programs. These technical documents include plant lists, fact sheets, and other general guidance such as technical notes, habitat installation guides, and habitat assessment guides that provide additional information to improve planning and implementation of conservation practices or broaden understanding of a practice’s value. www.plants.usda.gov/pollinators/NRCSdocuments.html
Using 2014 Farm Bill Programs for Pollinator Conservation Biology Technical Note No. 78, 2nd Ed.
This technical note outlines opportunities within current Farm Bill conservation programs that benefit pollinators and summarizes the existing pollinator conservation guidance developed by and for most NRCS State offices in the United States. h t t p : / / d i r e c t i v e s . s c . e g o v . u s d a . g o v /OpenNonWebContent.aspx?content=37370.wba
USDA–NRCS Plants Database: Introduced, Invasive, and Noxious Plants
Federal and state noxious weed lists, invasive plant lists, and introduced plant lists, with links to more information. These plants are weedy or invasive, or have the potential to become weedy or invasive, in all or part of their U.S. range. Most are introduced to the United States, but some are harmful in parts of this country, and valuable natives in others. www.plants.usda.gov/java/noxiousDriver
MINNESOTA POLLINATOR PLANTING

41The Xerces Society for Invertebrate Conservation
NEW JERSEY POLLINATOR PLANTING
Additional Acknowledgments
PhotographsWe are grateful to the photographers for allowing us to use their wonderful photographs. The copyright for all photographs is retained by the photographers. None of the photographs may be reproduced without permission from the photographer:
Susan Dill: Figures 2.2 (left), 5.1
Garrett Duyck, NRCS–Oregon [flickr.com/nrcs_oregon/]: Figures 3.8, 3.10.
Joe Fahey, Peck & Bushel Fruit Company: Figure 7.2
Garden Solutions, University of Florida Extension Service [flickr.com/gardeninginaminute]: Figures 8.1–2
Sidy Guisse—Figure 3.11
David LeZaks [flickr.com/davidzaks]: Figure 8.3
Kerry Lynch: Figure 2.7 (middle, right)
Wayne Mitchell [flickr.com/wayneandwax]: Figure 3.9 "August," photographed at Belmont Acres Farm
Northern Onondaga Public Library [flickr.com/noplibrary]: Figure 3.9 "September," photographed at the LibraryFarm
Oregon State University Extension Service [flickr.com/oregonstateuniversity]: Figure 5.2 "Mown grass"
SARE Outreach [flickr.com/sare-outreach]: Figure 3.7
The Xerces Society/Nancy Lee Adamson—Appendix C "Bumble bee on buckwheat"
The Xerces Society/Jessa Kay Cruz—Figures 1.3 California "Before" and "After," 2.1, 2.4 (right), 7.1; Appendix A3
The Xerces Society/Sarah Foltz Jordan—Cover (front, back); Figures 1.2 (left), 1.3 Minnesota "Before" and "After," 1.4, 2.2–6, 2.7 (left), 3.4–5, 3.6, 5.2, 5.3 "Wood chips," "Composted manure," "Straw," "Grass clippings," 6.2 inset; Appendices A1, A4 "Wet conditions," C "Minnesota pollinator planting"
The Xerces Society/Kelly Gill—Figures 1.3 Pennsylvania "Before" and "After," 3.2–3, 4.1; Appendices A2, C "Buckwheat smother crop," D "New Jersey pollinator planting"
The Xerces Society/Thelma Heidel-Baker—Figure 1.2 (right); Appendix C "California pollinator planting"
The Xerces Society/Jennifer Hopwood—Figures 1.1, 3.1, 4.16, 6.1
The Xerces Society/Eric Lee-Mäder—Appendix B "Oregon pollinator planting"
The Xerces Society/Sara Morris—Figure 5.3 "Cardboard"
The Xerces Society/Mace Vaughan—Figures 4.2–3; Appendix A4 "Dry conditions"

628 NE Broadway, Suite 200, Portland, OR 97232Tel (855) 232-6639 Fax (503) 233-6794
www.xerces.org
16-027_02