original instructions - chemical analysis, life sciences, … this guide 2 centrifuge with loader...
TRANSCRIPT

s1
Centrifuge with Loader
Quick GuideOriginal Instructions

Notices© Agilent Technologies, Inc. 2014
No part of this manual may be reproduced in any form or by any means (including electronic storage and retrieval or translation into a foreign language) without prior agreement and written consent from Agilent Technologies, Inc. as governed by United States and international copyright laws.
User Guide Part Number
G5405-90007
Edition
Revision A, January 2014
Contact Information
Agilent Technologies Inc. Automation Solutions 5301 Stevens Creek Blvd. Santa Clara, CA 95051 USA
Technical Support: 1.800.979.4811 (US only) or +1.408.345.8011 (rest of the world) [email protected]
Customer Service: 1.866.428.9811 or +1.408.345.8356 [email protected]
European Service: +44 (0)8457125292 [email protected]
Documentation feedback: [email protected]
Web: www.agilent.com/lifesciences/ automation
Acknowledgements
Microsoft® and Windows® are either registered trademarks or trademarks of the Microsoft Corporation in the United States and other countries.
Warranty
The material contained in this docu-ment is provided “as is,” and is sub-ject to being changed, without notice, in future editions. Further, to the max-imum extent permitted by applicable law, Agilent disclaims all warranties, either express or implied, with regard to this manual and any information contained herein, including but not limited to the implied warranties of merchantability and fitness for a par-ticular purpose. Agilent shall not be liable for errors or for incidental or consequential damages in connection with the furnishing, use, or perfor-mance of this document or of any information contained herein. Should Agilent and the user have a separate written agreement with warranty terms covering the material in this document that conflict with these terms, the warranty terms in the sep-arate agreement shall control.
Technology Licenses
The hardware and/or software described in this document are furnished under a license and may be used or copied only in accordance with the terms of such license.
Restricted Rights Legend
If software is for use in the performance of a U.S. Government prime contract or sub-contract, Software is delivered and licensed as “Commercial computer soft-ware” as defined in DFAR 252.227-7014 (June 1995), or as a “commercial item” as defined in FAR 2.101(a) or as “Restricted computer software” as defined in FAR 52.227-19 (June 1987) or any equivalent agency regulation or contract clause. Use, duplication or disclosure of Software is subject to Agilent Technologies’ standard commercial license terms, and non-DOD Departments and Agencies of the U.S. Gov-ernment will receive no greater than Restricted Rights as defined in FAR 52.227-19(c)(1-2) (June 1987). U.S. Government users will receive no greater than Limited Rights as defined in FAR 52.227-14
(June1987) or DFAR 252.227-7015 (b)(2) (November 1995), as applicable in any technical data.
Safety Notices
A WARNING notice denotes a hazard. It calls attention to an operating procedure, practice, or the like that, if not correctly performed or adhered to, could result in personal injury or death. Do not proceed beyond a WARNING notice until the indicated conditions are fully understood and met.
A CAUTION notice denotes a hazard. It calls attention to an operating procedure, practice, or the like that, if not correctly performed or adhered to, could result in damage to the product or loss of important data. Do not proceed beyond a CAUTION notice until the indicated conditions are fully understood and met.
1
s1
Centrifuge with Loader Quick Guide
This guide contains the following topics:
• “About this guide” on page 2
• “Safety information” on page 2
• “Hardware overview” on page 4
• “Workflows” on page 5
• “Starting up and shutting down” on page 7
• “Opening Centrifuge Loader Diagnostics” on page 9
• “Setting the load and unload parameters” on page 10
• “Loading and unloading microplates and counterweights” on page 12
• “Setting the spin parameters” on page 13
• “Spinning the labware” on page 14
• “Centrifuge Loader Diagnostics — Control tab reference” on page 16

About this guide
2 Centrifuge with Loader Quick Guide
About this guide
This guide summarizes the Centrifuge with Loader operator instructions.
This guide assumes the following:
• The Centrifuge with Loader is installed correctly. For installation instructions, see the Automated Centrifuge Loader User Guide.
• The device profiles for the Centrifuge and the Loader are already created and the teachpoints for both devices are already set. For setup instructions, see the Microplate Centrifuge User Guide and the Automated Centrifuge Loader User Guide.
• You are familiar with the VWorks Automation Control software. See the VWorks Automation Control User Guide.
If you are using another lab automation system software, see the user documentation for the software.
For user information about related products, you can search the product knowledge base or download the latest version of a PDF file from the Agilent Technologies website at:
www.agilent.com/chem/askb
Safety information
Before using the Centrifuge with Loader
Before using the Centrifuge with Loader, your organization should make sure that you are properly trained in:
• General laboratory safety
• The correct and safe operation of the Centrifuge with Loader
• The correct and safe operation of lab automation systems or components used in combination with the Centrifuge with Loader
The Centrifuge with Loader has a safety interlock circuit that must be closed for it to operate. The Machinery Directive requires that you always connect the safety interlock to a safety guard, light curtain, or enclosure.
General safety precautions
For general safety precautions, intended product use statement, and the list of safety labels, see the Automation Solutions Products General Safety Guide. If the Centrifuge with Loader is installed in a BioCel System, see the BioCel System Safety Guide.
WARNING Operating the Centrifuge with Loader without safety guards or an enclosure connected to the safety interlock circuit increases the risk of injury.

00090VSpinaccess
0009
0
3
Safety information
Centrifuge with Loader Quick Guide
Moving-parts hazards
Figure Centrifuge with Loader moving parts
The Centrifuge will not spin unless:
• The door is closed and locked.
• The buckets are unlocked.
• The bucket payloads are balanced.
• The appropriate software command is sent.
The Centrifuge automatically closes and locks the door whenever you start a spin or spin cycle. The Centrifuge door will not unlock or open if the rotor is moving.
WARNING The Loader has many moving parts that can cause possible pinching, piercing, or bruising. Keep away from the Centrifuge with Loader while it is in motion.
WARNING The Centrifuge door closes automatically when you load labware or start a spin. Keep away from the Centrifuge door while it is opening or closing. The door can cause possible pinching, piercing, or bruising if your hand is in the opening when it closes.
WARNING Do not attempt to manually unlock the door while the rotor is moving. Although no longer powered, the buckets might still be rotating at a dangerous speed.
WARNING Keep away from the Centrifuge while it is in motion. Not all circumstances can be foreseen and serious injury is possible. It is the responsibility of every operator to follow warnings and safety labels.
WARNING Do not operate the Centrifuge if any of its components or accessories are damaged or have been modified in any manner not authorized by Agilent Technologies. Do not operate the Centrifuge if objects or liquids are trapped within the chamber. Discontinue use if the Centrifuge vibrates or emits noise above normal levels.
WARNING Each Centrifuge bucket can hold a microplate or counterweight that weighs up to 250 g (8.82 oz). Placing heavier microplates or counterweights in the Centrifuge can cause the device to malfunction during operation, damaging the device and causing severe injury.

00157VSpinisometric view
Centrifuge00
157
1
2
43
5
00077VSpinfront
CentrifugeCentrifuge
00108VSpinRotor assembly - bucket rotated
0010
8
Hardware overview
4 Centrifuge with Loader Quick Guide
Hardware overview
The following figure shows the primary hardware components. For detailed information about these components, see the Automated Centrifuge Loader User Guide.
Figure Centrifuge with Loader components
Inside the Centrifuge are two buckets that can host microplates. The following figure shows a close-up view of the buckets.
Note: Only one bucket is visible from the doorway.
Figure Centrifuge buckets
1 Centrifuge
2 Loader
3 Centrifuge door
4 Loader plate stage (shown with a microplate)
5 Gripper head with gripper fingers
5
Workflows
Centrifuge with Loader Quick Guide
Workflows
About the workflows
There are two ways you can use the Centrifuge with Loader to spin microplates:
• In a lab automation system, where you run a protocol containing Centrifuge tasks to spin multiple microplates in one or more spin cycles. See “Workflow for running a protocol” on page 5.
• As a standalone device, where you use commands in Centrifuge Loader Diagnostics to spin an individual microplate. See “Workflow for using Centrifuge Loader Diagnostics” on page 6.
Workflow for running a protocol
You can start one or more spin cycles when you run a protocol containing Centrifuge tasks. During the run, the lab automation system robot will place sample microplates on the Loader stage, the Loader will load and unload the microplates in the Centrifuge, and the Centrifuge will spin the microplates based on the parameters specified in the Centrifuge tasks.
The workflow for starting a run is as follows:
Step For this task... See...
1 Start up the lab automation system.
Lab automation system user guide, such as the BioCel System User Guide
2 Open the form or protocol that contains the Centrifuge tasks.
VWorks Automation Control User Guide
3 Make sure the spin parameters are set correctly.
VWorks Automation Control User Guide
4 Determine whether you need to load the counterweight in bucket 2 before the run.
VWorks Automation Control User Guide
5 Load the counterweight in the Centrifuge if required.
“Setting the load and unload parameters” on page 10
“Loading and unloading microplates and counterweights” on page 12
6 Start the protocol run. VWorks Automation Control User Guide
Workflows
6 Centrifuge with Loader Quick Guide
Workflow for using Centrifuge Loader Diagnostics
You can use parameters and commands in Centrifuge Loader Diagnostics to spin an individual microplate. Doing so allows you to spin a microplate without having to run a protocol.
In Centrifuge Loader Diagnostics, you can spin microplates in one of two ways:
• Complete cycle. Performs a cycle that consists of the load step, the spin step, and the unload step.
• Spin only. Performs the spin only and assumes that the labware and counterweight are already loaded.
Complete cycle workflow
Spin only workflow
Step For this task... See...
1 Start up the Centrifuge with Loader.
“Starting up and shutting down” on page 7
2 Place the counterweight on the Loader stage.
—
3 Open Centrifuge Loader Diagnostics.
“Opening Centrifuge Loader Diagnostics” on page 9
4 Set the load and unload parameters.
“Setting the load and unload parameters” on page 10
5 Set the spin parameters. “Setting the spin parameters” on page 13
6 Start the spin cycle, which consists of the load, spin, and unload steps.
“Spinning the labware” on page 14
Step For this task... See...
1 Start up the Centrifuge with Loader.
“Starting up and shutting down” on page 7
2 Place the counterweight on the Loader stage.
—
3 Open Centrifuge Loader Diagnostics.
“Opening Centrifuge Loader Diagnostics” on page 9
4 Set the load and unload parameters.
“Setting the load and unload parameters” on page 10
5 Load the counterweight, place the sample microplate on the Loader stage, and then load the microplate.
“Loading and unloading microplates and counterweights” on page 12
6 Set the spin parameters. “Setting the spin parameters” on page 13

00123VSpinVSpin back
0012
3
7
Starting up and shutting down
Centrifuge with Loader Quick Guide
Starting up and shutting down
Starting up the Centrifuge with Loader
The Centrifuge feeds power to the Loader. Turning on the Centrifuge turns on the Loader. In addition, initializing the Loader automatically initializes the Centrifuge.
To start up the Centrifuge with Loader:
1 Verify that the air supply is turned on.
2 On the back of the Centrifuge, press the power switch to the on position (I).
Figure Power switch on the back of the Centrifuge with Loader
3 Turn on the computer and the monitor. The Microsoft Windows operating system starts.
4 Start the VWorks software.
5 Open the device file.
6 Turn off the simulation mode.
7 In the Devices area, select the Centrifuge Loader device.
8 In the Centrifuge Loader Properties area, make sure the correct profile is selected.
7 Start the spin. “Spinning the labware” on page 14
8 Unload the microplate and counterweight.
“Loading and unloading microplates and counterweights” on page 12
Step For this task... See...
WARNING Components of the Loader move when you initialize the device. The moving parts can cause possible pinching, piercing, or bruising. Keep away from the Loader while it is initializing.

Starting up and shutting down
8 Centrifuge with Loader Quick Guide
9 Click Initialize selected devices.
The Loader components move to their home positions. The Centrifuge opens its door.
Shutting down the Centrifuge with Loader
Shut down the Centrifuge with Loader before you perform any routine maintenance or service the device.
To shut down the Centrifuge with Loader:
1 Remove any labware or counterweight that is in the Centrifuge. For unloading instructions, see “Setting the load and unload parameters” on page 10 and “Loading and unloading microplates and counterweights” on page 12.
2 Close the Centrifuge Loader Diagnostics dialog box.
3 In the device file, select the Loader you want to shut down, and then click Close selected devices.

9
Opening Centrifuge Loader Diagnostics
Centrifuge with Loader Quick Guide
4 Exit the VWorks software.
5 Turn off the computer and monitor.
6 On the back of the Centrifuge, press the power switch to the off position (o).
7 Turn off the air supply to the Centrifuge with Loader.
Opening Centrifuge Loader Diagnostics
To open Centrifuge Loader Diagnostics:
1 In the device file, select the Centrifuge Loader device, and then click Device diagnostics.

Vstackplate and stacking thickness00022
Setting the load and unload parameters
10 Centrifuge with Loader Quick Guide
2 In the Centrifuge Loader Diagnostics dialog box, click the Control tab. Notice that the loading, unloading, and spin parameters and commands are in the Control tab.
For a description of the status information at the bottom half of the Centrifuge Loader Diagnostics dialog box, see “Centrifuge Loader Diagnostics — Control tab reference” on page 16.
Setting the load and unload parameters
To set the load or unload parameters:
1 In the Bucket to load or Bucket to unload list, select the bucket you want to use for loading or unloading.
If you are preloading a counterweight for a protocol run, be sure to load the counterweight in bucket 2.
2 In the Gripper Z offset box, type the distance, in millimeters, from the bottom of the microplate to where the Loader can grip the microplate.
Vstackplate and stacking thickness00022
11
Setting the load and unload parameters
Centrifuge with Loader Quick Guide
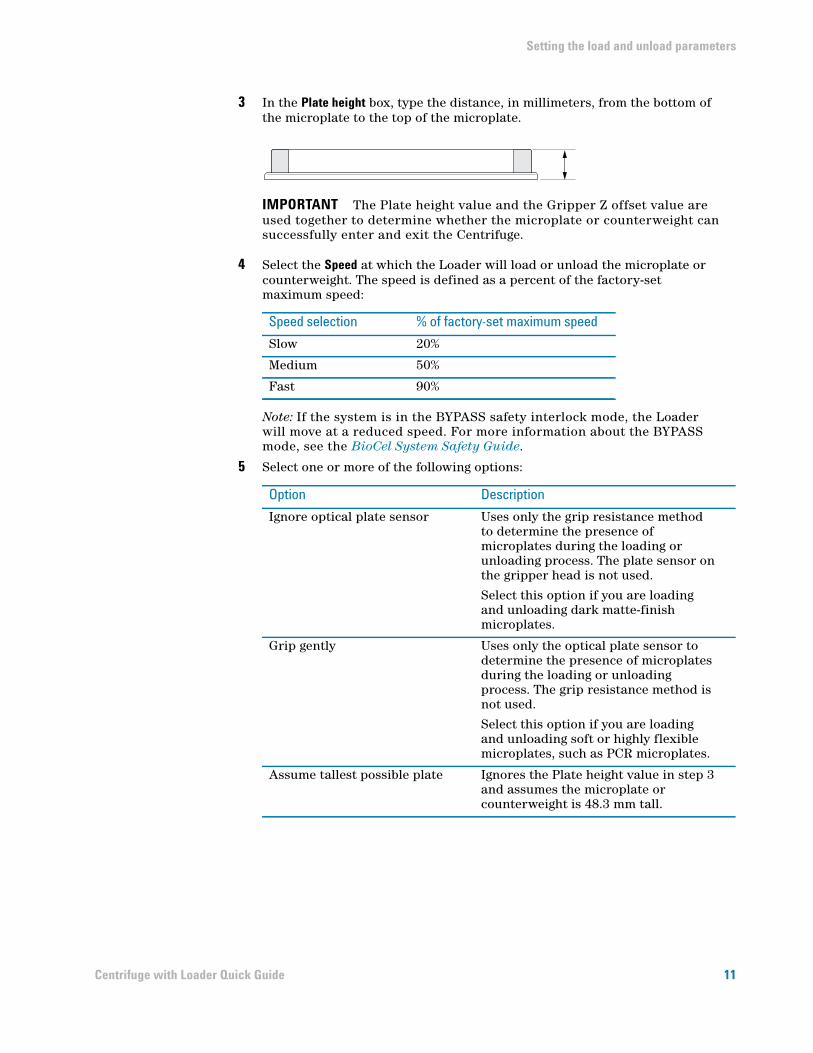
3 In the Plate height box, type the distance, in millimeters, from the bottom of the microplate to the top of the microplate.
IMPORTANT The Plate height value and the Gripper Z offset value are used together to determine whether the microplate or counterweight can successfully enter and exit the Centrifuge.
4 Select the Speed at which the Loader will load or unload the microplate or counterweight. The speed is defined as a percent of the factory-set maximum speed:
Note: If the system is in the BYPASS safety interlock mode, the Loader will move at a reduced speed. For more information about the BYPASS mode, see the BioCel System Safety Guide.
5 Select one or more of the following options:
Speed selection % of factory-set maximum speed
Slow 20%
Medium 50%
Fast 90%
Option Description
Ignore optical plate sensor Uses only the grip resistance method to determine the presence of microplates during the loading or unloading process. The plate sensor on the gripper head is not used.
Select this option if you are loading and unloading dark matte-finish microplates.
Grip gently Uses only the optical plate sensor to determine the presence of microplates during the loading or unloading process. The grip resistance method is not used.
Select this option if you are loading and unloading soft or highly flexible microplates, such as PCR microplates.
Assume tallest possible plate Ignores the Plate height value in step 3 and assumes the microplate or counterweight is 48.3 mm tall.

Loading and unloading microplates and counterweights
12 Centrifuge with Loader Quick Guide
Loading and unloading microplates and counterweights
Before you start
Make sure:
• You understand the Centrifuge balance requirements. The contents of the Centrifuge buckets must be within 10 g of each other. For details, see the Microplate Centrifuge User Guide.
• You place the microplate or counterweight on the Loader stage. You can place it onto the stage manually or using the lab automation system robot. For instructions on how to use the robot to place the microplate or counterweight, see the robot user documentation.
• You set the load or unload parameters. See “Setting the load and unload parameters” on page 10.
Procedure
To load or unload a microplate or counterweight:
Click Load plate or Unload plate.
WARNING The Loader has many moving parts that can cause possible pinching, piercing, or bruising. Keep away from the Loader while it is in motion.
WARNING The Centrifuge door closes automatically when you load labware or start a spin. Keep away from the Centrifuge door while it is opening or closing. The door can cause possible pinching, piercing, or bruising if your hand is in the opening when it closes.

13
Setting the spin parameters
Centrifuge with Loader Quick Guide
Setting the spin parameters
To set the spin parameters:
1 In the Velocity box, type the rotor speed, as a percent of factory-set maximum speed.
2 In the Acceleration box, type the rate of centrifugation, as a percent of the factory-set maximum acceleration.
3 In the Deceleration box, type the deceleration of the centrifuge, as a percent of the factory-set maximum deceleration.
4 In the Timer mode list, select one of the following to specify how the software should count the spin time:
5 In the Time box, type the length of total time or time at speed in seconds.
6 Spin only. In the Present bucket list, select the bucket that should be moved to the door when the Centrifuge stops spinning.
This parameter is applicable only if you use the Spin only command. It is ignored if you use the Complete cycle command.
Timer mode selection Description
Total time The total spin time, including acceleration and deceleration.
Time at speed The length of time during which the Centrifuge is spinning at the target speed. The time does not include acceleration and deceleration.

Spinning the labware
14 Centrifuge with Loader Quick Guide
Spinning the labware
Before you start
If you are running a spin only, make sure you preload both the labware and counterweight in the Centrifuge. See “Setting the load and unload parameters” on page 10 and “Loading and unloading microplates and counterweights” on page 12.
If you are running a complete spin cycle, make sure you do the following:
• Load the counterweight in the Centrifuge. See “Setting the load and unload parameters” on page 10 and “Loading and unloading microplates and counterweights” on page 12.
• Place the sample microplate on the Loader stage. You can place it onto the stage manually or using the lab automation system robot. For instructions on how to use the robot to place the microplate or counterweight, see the robot user documentation.
• Set the spin parameters. See “Setting the spin parameters” on page 13.
Procedure
Two spin commands are available in the Centrifuge Loader Diagnostics Control tab:
WARNING The Loader has many moving parts that can cause possible pinching, piercing, or bruising. Keep away from the Loader while it is in motion.
WARNING The Centrifuge door closes automatically when you load labware or start a spin. Keep away from the Centrifuge door while it is opening or closing. The door can cause possible pinching, piercing, or bruising if your hand is in the opening when it closes.

15
Spinning the labware
Centrifuge with Loader Quick Guide
To spin preloaded labware and counterweight:
1 Click Spin only. The Centrifuge closes and locks the door, and then starts to spin. When it is finished, the Centrifuge unlocks and opens the door. The bucket selected in the Spin Parameters Present bucket list is visible in the doorway.
2 To unload the microplate and counterweight, see “Setting the load and unload parameters” on page 10 and “Loading and unloading microplates and counterweights” on page 12.
To start a spin cycle where the counterweight is already loaded:
1 Click Complete cycle. The Loader moves the microplate on its stage into the Centrifuge. The Centrifuge spins the microplate. When it is finished, the Loader moves the microplate from the Centrifuge to the Loader stage.
2 To spin another microplate, place it on the Loader stage and repeat step 1.
3 After you are finished, unload the counterweight. See “Setting the load and unload parameters” on page 10 and “Loading and unloading microplates and counterweights” on page 12.
Spin command Description
Spin only The Centrifuge performs the spin using the spin parameters you specified and assumes that the labware and counterweight are already loaded. (The Loader does not move.)
Complete cycle The Centrifuge with Loader performs a spin cycle using the load, unload, and spin parameters you specified. The complete spin cycle consists of the load step, the spin step, and the unload step.
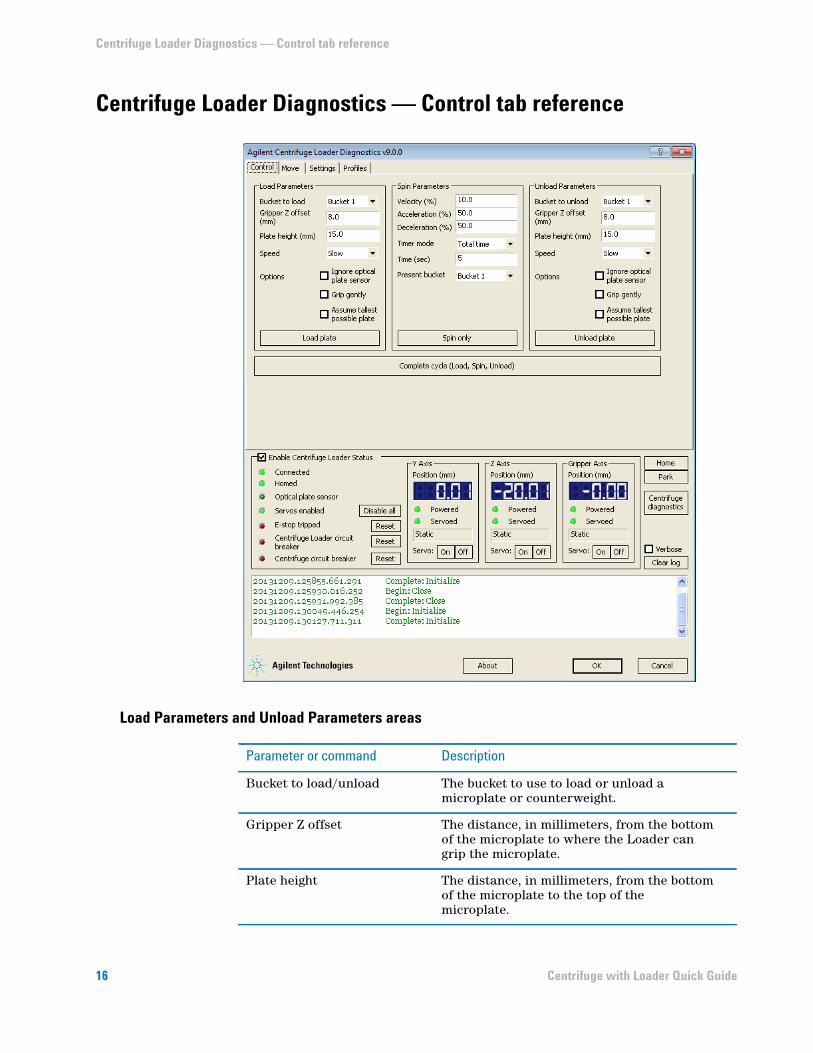
Centrifuge Loader Diagnostics — Control tab reference
16 Centrifuge with Loader Quick Guide
Centrifuge Loader Diagnostics — Control tab reference
Load Parameters and Unload Parameters areas
Parameter or command Description
Bucket to load/unload The bucket to use to load or unload a microplate or counterweight.
Gripper Z offset The distance, in millimeters, from the bottom of the microplate to where the Loader can grip the microplate.
Plate height The distance, in millimeters, from the bottom of the microplate to the top of the microplate.

17
Centrifuge Loader Diagnostics — Control tab reference
Centrifuge with Loader Quick Guide
Spin Parameters area
Speed The speed at which the Loader will load or unload the microplate or counterweight. The speed is defined as a percent of the factory-set maximum speed: Slow, Medium, and High.
Ignore optical plate sensor The option to use only the grip resistance method to determine the presence of microplates during the loading or unloading process. The plate sensor on the gripper head is not used.
Grip gently The option to use only the optical plate sensor to determine the presence of microplates during the loading or unloading process. The grip resistance method is not used.
Assume tallest possible plate The option to ignore the Plate height value and assume the microplate or counterweight is 48.3 mm tall.
Load/Unload plate The command to load or unload a microplate or counterweight in the Centrifuge.
Parameter or command Description
Parameter or command Description
Velocity The rotor speed, as a percent of maximum factory-set maximum speed.
Acceleration The rate of centrifugation, as a percent of the factory-set maximum acceleration.
Deceleration The deceleration of the centrifuge, as a percent of the factory-set maximum deceleration.
Timer mode How the software should count the spin time:
• Total time. The total spin time, including acceleration and braking.
• Time at speed. The length of time during which the Centrifuge is spinning at the target speed. The time does not include acceleration and braking.
Time The length of total time or time at speed, in seconds.
Present bucket The bucket that should be moved to the door when the Centrifuge stops spinning.
This selection is applicable only if you use the Spin only command.

Centrifuge Loader Diagnostics — Control tab reference
18 Centrifuge with Loader Quick Guide
Complete cycle command
Performs a complete spin cycle, which consists of the load, spin, and unload steps.
Enable Centrifuge Loader Status area
Y, Z, and Gripper Axis areas
Spin only The command that starts the spin.
Parameter or command Description
Status or command Description
Enable Centrifuge Loader Status
Activates the Enable Centrifuge Loader Status area. If you clear the check box, the status area grays out, and no status is presented.
Connected Indicates whether the Loader is connected its power source.
Homed Indicates whether the Loader components are in their home positions.
Optical plate sensor Indicates whether the optical sensor is in use.
Servos enabled
Enable/Disable all
Indicates whether the gripper head motors are enabled. You can enable or disable the motors by clicking Enable all or Disable all.
E-stop tripped
Reset
Indicates whether the emergency-stop button has been pressed. To recover the Centrifuge with Loader from the emergency stop, click Reset.
Centrifuge Loader circuit breaker
Reset
Indicates whether the Loader circuit breaker has been tripped. To reset the circuit breaker, click Reset.
Centrifuge circuit breaker
Reset
Indicates whether the Centrifuge circuit breaker has been tripped. To reset the circuit breaker, click Reset.
Status or command Description
Position The current position of the Loader along the y-, z-, or gripper axis.
Powered The indicator that shows whether the motor power is on.
Servoed The indicator that shows whether the motor is in error state.
19
Centrifuge Loader Diagnostics — Control tab reference
Centrifuge with Loader Quick Guide
Commands
Log area
Displays the events and errors that occurred.
Servo The power switch to the axis motor. To turn on or turn off a motor, click On or Off.
Command Description
Home Sends the Loader components to their home positions.
Park Sends the Loader to the park position.
Centrifuge Diagnostics Opens the Centrifuge Diagnostics dialog box.
For information about Centrifuge Diagnostics, see the Microplate Centrifuge Quck Guide or the Microplate Centrifuge User Guide.
Status or command Description
Option or command Description
Verbose Displays detailed log information.
Clear log Removes existing log information from the log area.

Centrifuge Loader Diagnostics — Control tab reference
20 Centrifuge with Loader Quick Guide


Agilent Technologies
Quick Guide
G5405-90007
Revision A, January 2014