orion design challenge - audentia-gestion.fr
TRANSCRIPT

Orion Design Challenge
Teacher Notes
Mike Cimino
Science Coach, Heritage Middle School, Volusia County Schools
T3 (Teachers Teaching with Technology™) Instructor

Orion Design Challenge: Teacher
Notes
Objective: Students will design, create and test an Orion capsules
capabilities of its heat shield and landing.
Phase 1 (DAY 1) Engage: Design the Orion
Capsule
Materials needed: Youtube Video
NASA Article
Something to make capsule out of. Plastic plate or card stock recommended for the base and side of the capsule.
Tape to attach the pieces together
1. Before beginning, show students the YouTube video explaining what the Orion Capsule is @
http://www.youtube.com/watch?v=mEwshFC03EQ
2. Have students read page 2 in the “Orion book” (http://www.nasa.gov/pdf/491544main_orion_book_web.pdf)
and answer questions on lab sheet.
3. Review the power point slides through the “guide to building the design” slides; which include the slide
below.
4. Teachers will receive a blueprint for a cut out of an Orion capsule (see attachment 1). Students will first
measure the surface area of the design, record the data on their lab, then cut and tape the materials together.
Guide to building the design:
Step 1: Cut out the template and find the surface area of your design
Find the surface area of the large circle (L2), and then find the surface area of the small circle (L1). Subtract one from the other (L2-L1) for the total surface area of the capsule.
Surface Area= πr2
When you see this slide (before you begin the model) here are some
talking points with your students.
- How long can a crew be supported by the capsule? (600 days)
- What temps can the heat shield withstand? (6000 C)
- How fast can Orion travel? (27,000 mph)
- How does the speed of Orion compare to the space shuttle?
(27,000 mph compared to 17,000 mph)
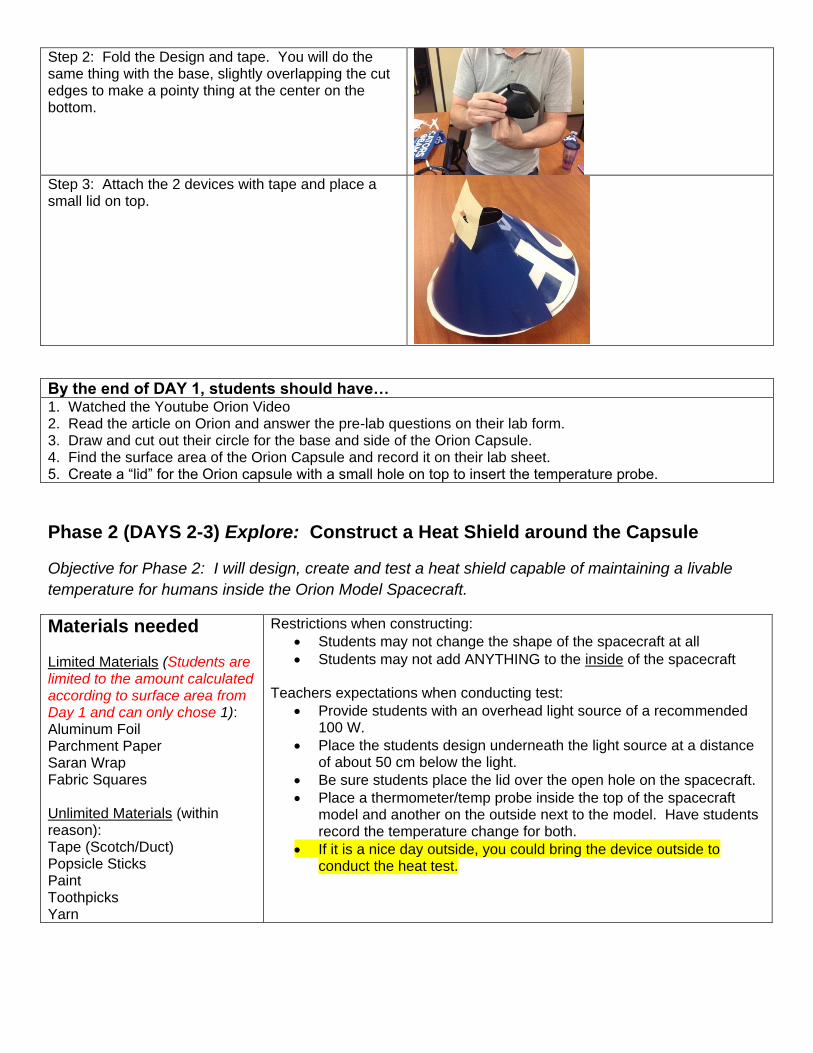
Step 2: Fold the Design and tape. You will do the same thing with the base, slightly overlapping the cut edges to make a pointy thing at the center on the bottom.
Step 3: Attach the 2 devices with tape and place a small lid on top.
By the end of DAY 1, students should have… 1. Watched the Youtube Orion Video 2. Read the article on Orion and answer the pre-lab questions on their lab form. 3. Draw and cut out their circle for the base and side of the Orion Capsule. 4. Find the surface area of the Orion Capsule and record it on their lab sheet. 5. Create a “lid” for the Orion capsule with a small hole on top to insert the temperature probe.
Phase 2 (DAYS 2-3) Explore: Construct a Heat Shield around the Capsule
Objective for Phase 2: I will design, create and test a heat shield capable of maintaining a livable
temperature for humans inside the Orion Model Spacecraft.
Materials needed Limited Materials (Students are limited to the amount calculated according to surface area from Day 1 and can only chose 1): Aluminum Foil Parchment Paper Saran Wrap Fabric Squares Unlimited Materials (within reason): Tape (Scotch/Duct) Popsicle Sticks Paint Toothpicks Yarn
Restrictions when constructing:
Students may not change the shape of the spacecraft at all
Students may not add ANYTHING to the inside of the spacecraft Teachers expectations when conducting test:
Provide students with an overhead light source of a recommended 100 W.
Place the students design underneath the light source at a distance of about 50 cm below the light.
Be sure students place the lid over the open hole on the spacecraft.
Place a thermometer/temp probe inside the top of the spacecraft model and another on the outside next to the model. Have students record the temperature change for both.
If it is a nice day outside, you could bring the device outside to conduct the heat test.
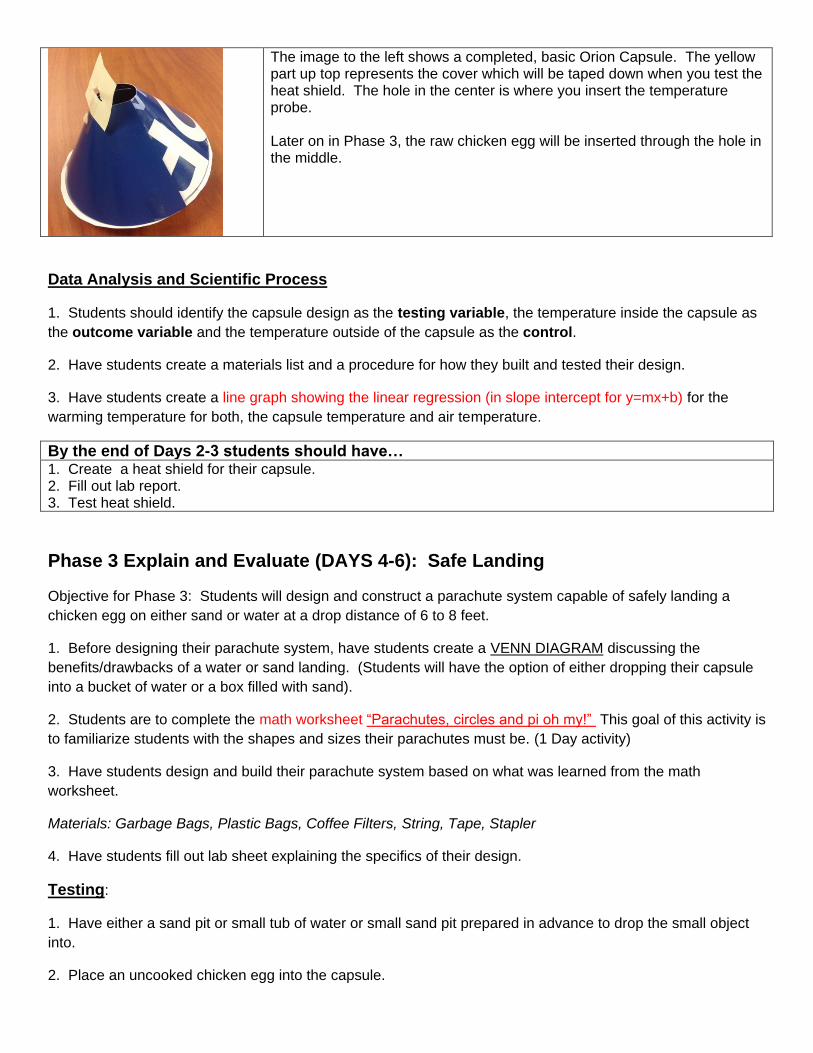
The image to the left shows a completed, basic Orion Capsule. The yellow part up top represents the cover which will be taped down when you test the heat shield. The hole in the center is where you insert the temperature probe. Later on in Phase 3, the raw chicken egg will be inserted through the hole in the middle.
Data Analysis and Scientific Process
1. Students should identify the capsule design as the testing variable, the temperature inside the capsule as
the outcome variable and the temperature outside of the capsule as the control.
2. Have students create a materials list and a procedure for how they built and tested their design.
3. Have students create a line graph showing the linear regression (in slope intercept for y=mx+b) for the
warming temperature for both, the capsule temperature and air temperature.
By the end of Days 2-3 students should have… 1. Create a heat shield for their capsule. 2. Fill out lab report. 3. Test heat shield.
Phase 3 Explain and Evaluate (DAYS 4-6): Safe Landing
Objective for Phase 3: Students will design and construct a parachute system capable of safely landing a
chicken egg on either sand or water at a drop distance of 6 to 8 feet.
1. Before designing their parachute system, have students create a VENN DIAGRAM discussing the
benefits/drawbacks of a water or sand landing. (Students will have the option of either dropping their capsule
into a bucket of water or a box filled with sand).
2. Students are to complete the math worksheet “Parachutes, circles and pi oh my!” This goal of this activity is
to familiarize students with the shapes and sizes their parachutes must be. (1 Day activity)
3. Have students design and build their parachute system based on what was learned from the math
worksheet.
Materials: Garbage Bags, Plastic Bags, Coffee Filters, String, Tape, Stapler
4. Have students fill out lab sheet explaining the specifics of their design.
Testing:
1. Have either a sand pit or small tub of water or small sand pit prepared in advance to drop the small object
into.
2. Place an uncooked chicken egg into the capsule.

3. Drop the capsule from a pre-determined height between 6 and 8 feet (teacher’s discretion).
4. Record the data as to what happened to the egg inside.
REMEMBER: Students may not modify the inside of the capsule. All they may do is tape the egg down.

Attachment 1
(Side of Capsule)
Attachment 1
2.5 inches or 6.5 cm
cm
3 1/8 inches or 8 cm
cm
2.5 inches or 6.5 cm
cm
Cut out inner circle

Bottom of Capsule
Circle has a diameter of 5 in or 13 cm
Name:____________________________________________________
Date:____________________________
Orion Design Capsule Lab Sheet
Objective for Day 1: I will understand the differences between the Space Shuttle and Orion program, along
with creating a model of the Orion Capsule.
1. How is the Orion program different from the space shuttle?
2. How is the Orion space craft similar to the space shuttle?
3. What measures were put into place to enhance crew safety?
4. What is the purpose of the service module?
Cut out your capsule and record the surface area. Remember the formula for surface area is πr2
Surface area of bottom of capsule: _______________________
Surface area of side of capsule: __________________________
Total surface area added together: _______________________
Objective for Phase 2: I will design, create and test a heat shield capable of maintaining a livable
temperature for humans inside the Orion Model Spacecraft.
Remember, some materials are limited! (Aluminum Foil, Parchment Paper, Fabric Squares
and Saran Wrap are limited according to your surface area identified earlier.
Materials I used Procedure on how it was built

Data:
Total time elapsed during test in seconds: ___________
Initial Temperature of capsule: ___________
Final Temperature of capsule: ___________
Total temperature change: ______________
Below, create a temperature versus time graph showing the temperature change inside your capsule.
What was the rate of change for the temperature inside the capsule?
(For example, the temperature _______ every _____________seconds)

Objective for phase 3: I will design and construct a parachute system capable of safely landing a chicken egg
on either sand or water at a drop distance of 6 to 8 feet.
Complete the Venn Diagram discussing the benefits and drawbacks of a water landing versus a sand
landing for your Orion capsule.
Which type of landing would be best and why?
________________________________________________________________________________________
__________
________________________________________________________________________________________
__________
________________________________________________________________________________________
__________
________________________________________________________________________________________
__________
________________________________________________________________________________________
__________

Explain your parachute recovery system through words and images. Be sure to provide the size of your
parachutes, length of the string used attached to the parachutes. Include what ideas you used from the
parachutes worksheet you completed earlier.
________________________________________________________________________________________
__________
________________________________________________________________________________________
__________
________________________________________________________________________________________
__________
________________________________________________________________________________________
__________
________________________________________________________________________________________
__________
________________________________________________________________________________________
__________
________________________________________________________________________________________
__________
My Orion Capsule Landing Data Sheet
Type of landing chosen:…………………………………………………………………………………….. _______
Sand _______Water
Height Lander was dropped from:……………………………………………………………………………………..
__________________meters
Total amount of time elapsed from drop height until it hit the ground……………………………….
__________________seconds
Average Speed of
Capsule:…………………………………………………………………………………………………….
____________________m/s
Did the egg break?................................................................................................... ________Yes
_______ No
What improvements could be made to the landing system?
________________________________________________________________________________________
__________
________________________________________________________________________________________
__________
________________________________________________________________________________________
__________
Did you choose the correct surface to land on? Why or why not?
________________________________________________________________________________________
__________
________________________________________________________________________________________
__________
________________________________________________________________________________________
__________

What type of parachute system works best?
________________________________________________________________________________________
__________
________________________________________________________________________________________
__________
________________________________________________________________________________________
__________
Did the mass of your design have an effect on the egg drops performance?
________________________________________________________________________________________
__________
________________________________________________________________________________________
__________
________________________________________________________________________________________
__________
Group
Members:_____________________________________________________________
__
(optional) Make the Lab a Competition Score Sheet
Lowest Score Wins!
Phase 1: Calculate the Surface Area
(Absolute Value of difference)
Actual Answer: 478.85 cm2 - Students Answer____________________ = _______________
Phase 2: Heat Shield
Final Temperature: ___________ - Students Initial Temperature____________=___________________
Phase 3: Egg Drop
No crack in egg= Add 0 points

Small Crack in egg= Add 20 points
Large Crack in egg = Add 50 points
Final Score (Add Day 1 + Day 2 + Day 3): ________________________________