ortho magix - opalsky.com.au · in this example, i will use “napa ounty airport” in alifornia....
TRANSCRIPT

© Copyright 2015 ISDG and Opalsky
Ortho MagiX
Community Scenery Tool for X-Plane from ISDG
USER GUIDE
This software is designed for the Microsoft Windows platform, to be used in conjunction with WED
scenery editor and X-Plane. You use this software at your own risk. Please ensure you download it
from www.opalsky.com.au or from the ISDG web site, and check the supplied MD5 signature is
correct before installing it.
OrthoMagiX make use of a lot of open source software from GDAL and OSGEO under GPL licensing.
Tamas Szekeres at gisinternals has also compiled and packaged many of the components.
www.gdal.org
www.osgeo.org
http://www.gisinternals.com/
The open source code, including c# wrappers is used as compiled by the custodians of the code.
About ISDG
ISDG is group of people that share some common core beliefs. We believe that choosing to take on a
task is choosing to do a good job, and that means researching, learning and listening to others.
Making mistakes and rework is part of that too. We also believe in sharing - not that everything
needs to be free, but that not everything needs to be priced.
Community is built on giving more than you receive, and with the X-Plane community we are still in
debt. Finally, we believe in respect. We respect each other's opinions and respect the feedback we
receive from outside of the team. Particularly important is that we respect the intellectual property
rights of other developers - we deliberately spend a great deal of effort to ensure that we comply
with each component license used in our work.
Minimum System Requirements:
Windows 7
8 Gb RAM
85Mb Disk, plus 3 x ortho-images size

© Copyright 2015 ISDG and Opalsky

© Copyright 2015 ISDG and Opalsky
What Does OrthoMagiX Do?
OrthoMagiX transforms ortho-imagery (GeoTiff) files into a size and shape that can be used by X-
Plane. It creates the tiles and the polygons (.pol files) needed by WED, and injects the overlays into
WED ready for your use. You can “Export Scenery” from WED and see the results straight away, but
of course you’ll want to add objects to your scenery, and perhaps edit the ortho images.
What doesn’t it do?
OrthoMagiX leaves off a couple of steps that you as a scenery developer should do after finishing the
processing.
1. You may want to edit the “edge” tiles to blend them in the X-Plane scenery. For example,
fade sharp edges, or even better, use a transparency brush tool to make the visible tile edge
under a road, at a river, or some other natural boundary.
2. You may need to ajust the exposure or gamma of your PNG tile images, as they are typically
over-exposed, and too light or too green/red/yellow etc. If altering the image gamma, make
sure you apply the same adjustments to every tile.
3. Finally, you should convert your PNG tile images to DDS format. Laminar provide a tool for
this (DDSTool) that can be used from the command line, or via a GUI interface called
XGrinder. Check here for the tools: http://developer.x-plane.com/tools/xptools/ and for a
manual, here: http://wiki.x-plane.com/X-Grinder_manual . We also have a tools here that
you may prefer: http://www.opalsky.com.au/?page_id=5 (Windows DDSTool Helper).
Remove the PNG files from you project before you publish your scenery package.
Step 1: Create an Airport Scenery Package in WED
Start WED and create a project for your scenery. OrthoMagiX will work OK with an existing project,
but the main point of this step is that you will need an earth.wed.xml file with ONE airport defined in
it.
If you have not created the airport yet, add one (import apt.dat) and save it. The following example
is for KAPC Napa Country Airport. Exit WED.
Backup your earth.wed.xml file!

© Copyright 2015 ISDG and Opalsky
Step 2: Acquiring GeoTiff Ortho Imagery
Currently, this is probably the easiest step, but we hope that OrthoMagiX will make the processing of
imagery so easy that this step will become the most difficult step. And it really isn’t that difficult. It
involves finding an ortho image, and downloading it from the internet.
There are many sources of quality ortho imagery, but very few images are available for free. The one
shining exception to this is the USGS, who provide ortho imagery for almost all of the USA
completely freely. It really is a fantastic resource.
Because of this, we will use this source as our example case for acquiring ortho imagery. To get
started, visit http://earthexplorer.usgs.gov and register an account. Login to your account:
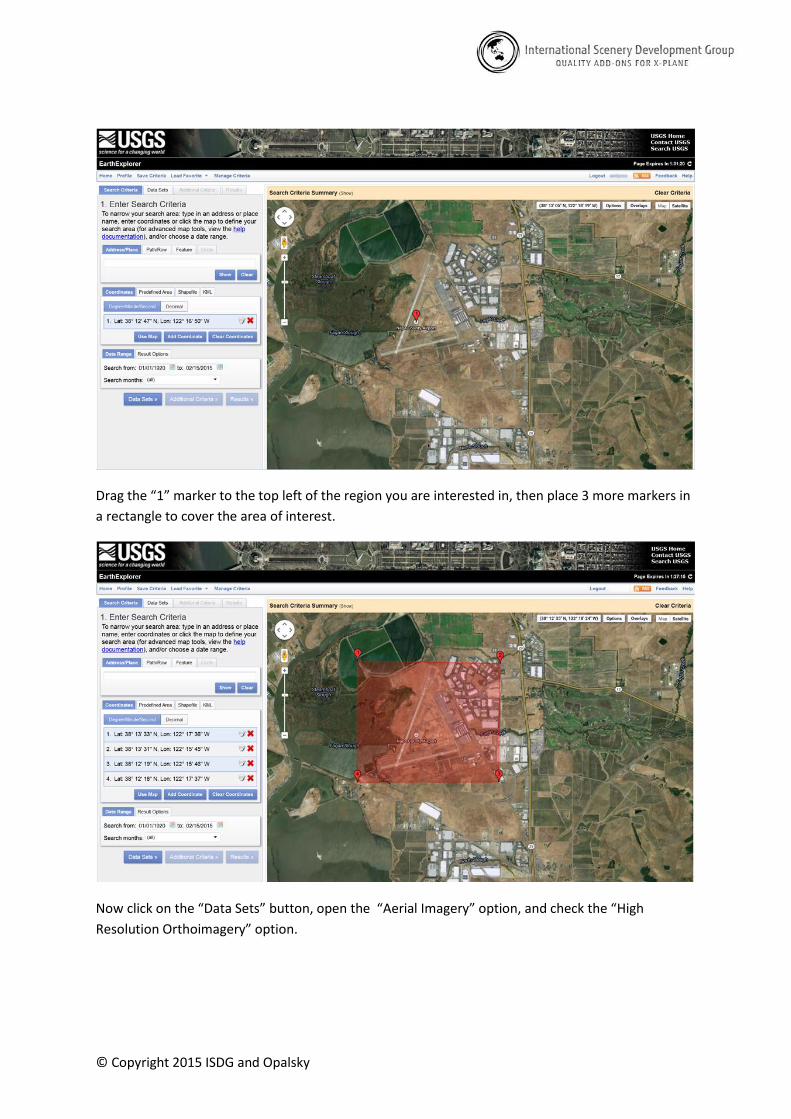
Type in the name of the airport you want ortho imagery for. In this example, I will use “Napa County
Airport” in California. After the search, click of the required result. You will see a red location marker
that you can zoom into on the map.
© Copyright 2015 ISDG and Opalsky
Drag the “1” marker to the top left of the region you are interested in, then place 3 more markers in
a rectangle to cover the area of interest.
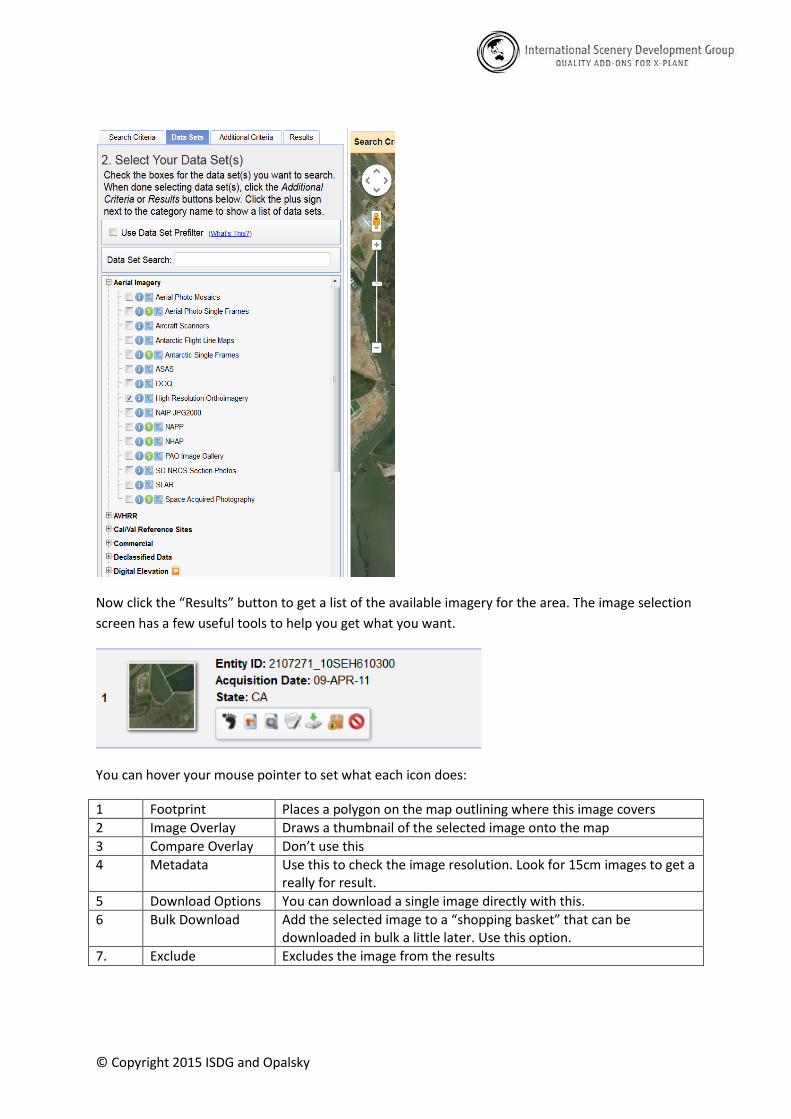
Now click on the “Data Sets” button, open the “Aerial Imagery” option, and check the “High
Resolution Orthoimagery” option.
© Copyright 2015 ISDG and Opalsky
Now click the “Results” button to get a list of the available imagery for the area. The image selection
screen has a few useful tools to help you get what you want.
You can hover your mouse pointer to set what each icon does:
1 Footprint Places a polygon on the map outlining where this image covers
2 Image Overlay Draws a thumbnail of the selected image onto the map
3 Compare Overlay Don’t use this
4 Metadata Use this to check the image resolution. Look for 15cm images to get a really for result.
5 Download Options You can download a single image directly with this.
6 Bulk Download Add the selected image to a “shopping basket” that can be downloaded in bulk a little later. Use this option.
7. Exclude Excludes the image from the results
© Copyright 2015 ISDG and Opalsky
There is a set of images for this airport at 15cm resolution. There is also a set at 30cm resolution, so
be careful to avoid those. Once you have selected the Bulk Download option for each image you
want for your scenery, click the “View Item Basket” button. Check your results, then click the
“Proceed To Checkout” button. Lastly, click the “Submit Order” button to complete the process.
To bulk download the imagery, you need the “Bulk Download Application”, available at
http://earthexplorer.usgs.gov/bulk/ . Note, you’ll need to have Java installed (www.java.com).
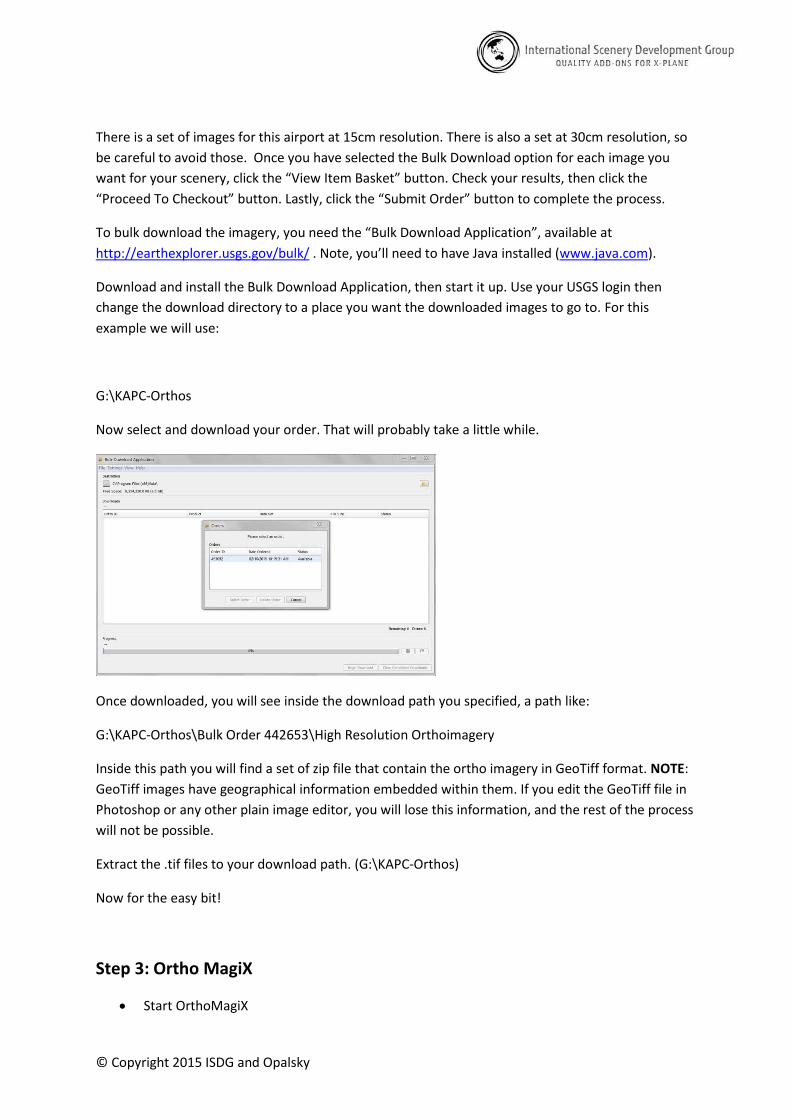
Download and install the Bulk Download Application, then start it up. Use your USGS login then
change the download directory to a place you want the downloaded images to go to. For this
example we will use:
G:\KAPC-Orthos
Now select and download your order. That will probably take a little while.
Once downloaded, you will see inside the download path you specified, a path like:
G:\KAPC-Orthos\Bulk Order 442653\High Resolution Orthoimagery
Inside this path you will find a set of zip file that contain the ortho imagery in GeoTiff format. NOTE:
GeoTiff images have geographical information embedded within them. If you edit the GeoTiff file in
Photoshop or any other plain image editor, you will lose this information, and the rest of the process
will not be possible.
Extract the .tif files to your download path. (G:\KAPC-Orthos)
Now for the easy bit!
Step 3: Ortho MagiX
Start OrthoMagiX

© Copyright 2015 ISDG and Opalsky
Click the “Add GeoTIFF Files” and select the set of ortho images you just downloaded (select
all the images at once). You should see the list of images appear in the lower left list. You can
click on an entry here to see a thumbnail of the image.
Go to Options tab and:
o Specify the location of your project WED file (earth.wed.xml).
o Adjust POL file settings (Layer Group, Decal and Surface)
o Check “Blend Edges” if you want OrthoMagiX to fade the outer tile edges into the
scenery
o Adjust image gamma (exposure) if required: 1 = do nothing, 1.1 to 1.5 to darken, less
than 1 to lighten.
Select Home tab
Click “Do MagiX”. Time to get a coffee. This step may take a while, and use a bit of disk
space. Progress is shown as this step merges all the images into one big image, converts it
the WGS84 projection (for WED), then chops it into tiles that can be used in WED and X-
Plane. A list of the tiles created appears in the “Tiles” list.
Click “Create POL files”. This step creates an “orthos” directory in the same location as your
earth.wed.xml file, then creates PNG files from the Tif files, and associated polygon files in
this new directory.
Click the “Inject into WED” button. This creates all the entries WED needs to use the ortho
tiles.
© Copyright 2015 ISDG and Opalsky
Select “File -> Save Project”.
Now start WED and load your project. You should see all the tiles, with the runways/taxiways on top.
You can now add objects to the scene, and select File -> Export Scenery Package to create the
apt.dat and dsf files.
Start X-Plane to check the results.
Post-OrthoMagiX
As mentioned previously, there are a couple of additional things you will want to do to finish off the
tiles:
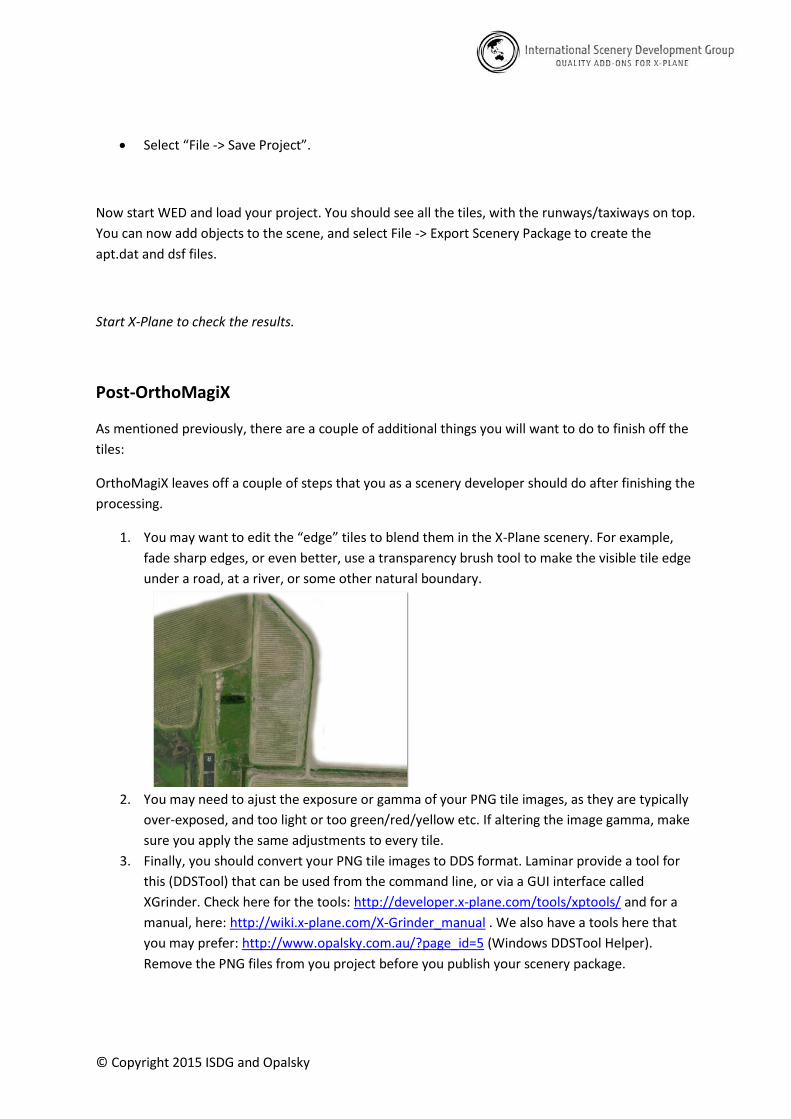
OrthoMagiX leaves off a couple of steps that you as a scenery developer should do after finishing the
processing.
1. You may want to edit the “edge” tiles to blend them in the X-Plane scenery. For example,
fade sharp edges, or even better, use a transparency brush tool to make the visible tile edge
under a road, at a river, or some other natural boundary.
2. You may need to ajust the exposure or gamma of your PNG tile images, as they are typically
over-exposed, and too light or too green/red/yellow etc. If altering the image gamma, make
sure you apply the same adjustments to every tile.
3. Finally, you should convert your PNG tile images to DDS format. Laminar provide a tool for
this (DDSTool) that can be used from the command line, or via a GUI interface called
XGrinder. Check here for the tools: http://developer.x-plane.com/tools/xptools/ and for a
manual, here: http://wiki.x-plane.com/X-Grinder_manual . We also have a tools here that
you may prefer: http://www.opalsky.com.au/?page_id=5 (Windows DDSTool Helper).
Remove the PNG files from you project before you publish your scenery package.

© Copyright 2015 ISDG and Opalsky