otr o ange - c.searspartsdirect.com · otr o ange user manua the poss_b_lut_es ... your oven...
TRANSCRIPT

otr o angeuser manua
u u u mthe poss_b_lut_esThank you for purchasing this Samsung product,To receivemore comdete service, please registeryour product at
www.samsung.com/global/register

Enhanced convenience. Better cooking. Easy maintenance. Your new electric range has been designed tobring you these benefits and more.
The latest in heat-distribution technology
Other ranges with just one fan tend to make a swirl of heat that fails to cover the whole inside ofthe oven. This means uneven heat distribution and uneven cooking. Your new range has SurroundAirvection TM, which Samsung innovated by adding a third heating element and a multi-fan systemthat circulates the heat evenly in all directions. You get more efficient energy consumption andmore even cooking.
Steam Quick cleaning
Thanks to Steam Quick TM, Samsung's unique technology for light-duty cleaning jobs, keepingyour oven spick-and-span is a snap -- no hassle, no odor, no chemicals. Steam Quick TM cleansthe inside of your range with high-temperature steam in just 20 minutes.
Bigger is better
With a capacity of 5.7 cubic feet, your new range is equipped with more space than any of itscompetitors in the U.S. market. This means greater convenience for you when cooking for theholidays or when entertaining.
A cooktop with 5 burners
Four main burners with two that dial heat up to different pot sizes.
A smaller warming burner in the center of the range top.
S
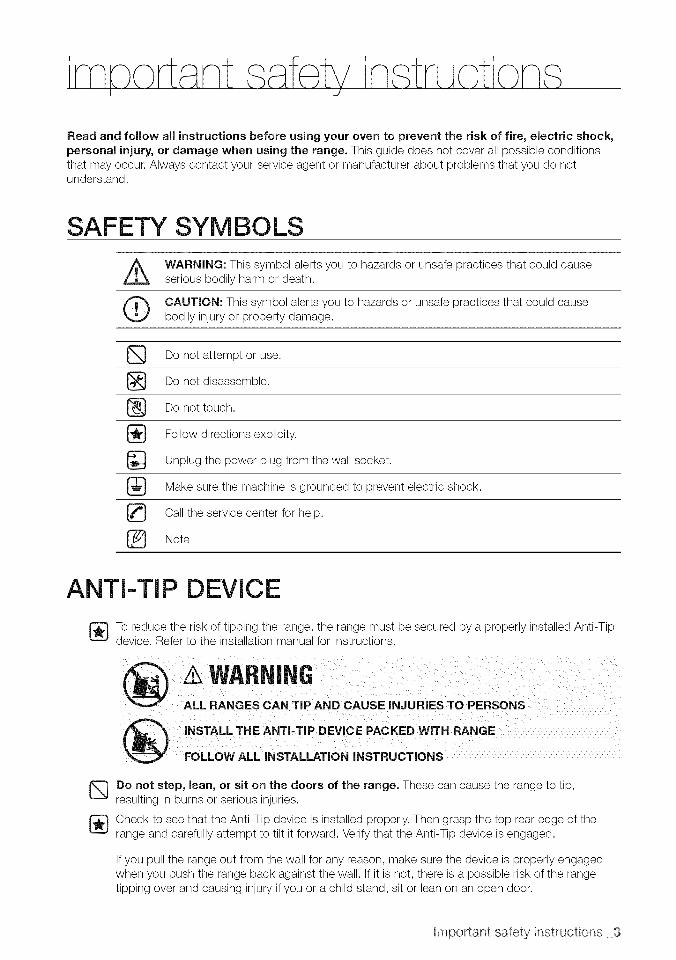
Read and follow all instructions before using your oven to prevent the risk of fire, electric shock,personal injury, or damage when using the range. This guide does not cover all possible conditionsthat may occur. Always contact your service agent or manufacturer about problems that you do notunderstand.
SAFETY SYMBOLS
WARNING: This symbol alerts you to hazards or unsafe practices that could causeserious bodily harm or death.
O CAUTION: This symbol alerts you to hazards or unsafe practices that could causebodily injury or property damage.
Do not attempt or use.
Do not disassemble.
Do not touch.
Follow directions explicity.
Unplug the power plug from the wall socket.
Make sure the machine is grounded to prevent electric shock.
Call the service center for help.
_ Note
ANTI-TIP DEVICE
To reduce the risk of tipping the range, the range must be secured by a properly installed Anti-Tipdevice. Refer to the installation manual for instructions.
@ wARNI.6iNSTALL TH E ANTI_TIPD EvIO E PAC KED WiTH RAN GEroL,oWA,, NSTALLAT ON NSTRUCT ONS
Do not step, lean, or sit on the doors of the range. These can cause the range to tip,resulting in burns or serious injuries.
[_ heck to see that the Anti-Tip device is installed properly. Then grasp the top rear edge of therange and carefully attempt to tilt it forward. Verify that the Anti-Tip device is engaged.
If you pull the range out from the wall for any reason, make sure the device is properly engagedwhen you push the range back against the wall. If it is not, there is a possible risk of the rangetipping over and causing injury if you or a child stand, sit or lean on an open door.
Hmportant safety instructions 3
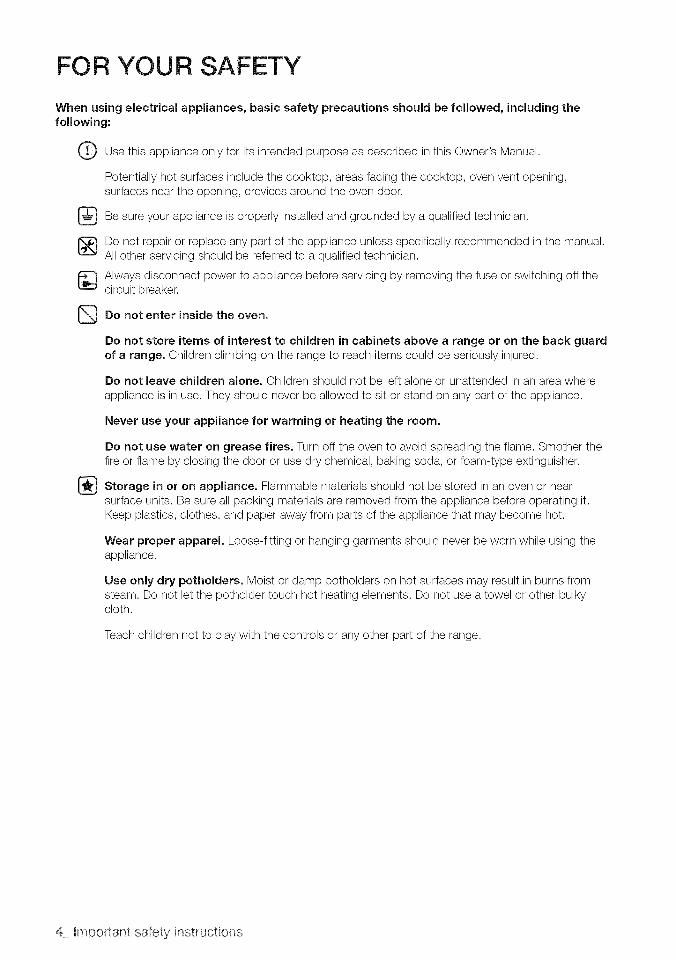
FOR YOUR SAFETY
When using electrical appliances, basic safety precautions should be followed, including thefollowing:
Use this appliance only for its intended purpose as described in this Owner's Manual.
Potentially hot surfaces include the cooktop, areas facing the cooktop, oven vent opening,surfaces near the opening, crevices around the oven door.
sure your appliance properly grounded by a qualifiedBe is installed and technician.
[_ o not repair or replace any part of the appliance unless specifically recommended in the manual.All other servicing should be referred to a qualified technician.
_} lways disconnect power to appliance before servicing by removing the fuse or switching off thecircuit breaker.
Do not enter inside the oven.
Do not store items of interest to children in cabinets above a range or on the back guardof a range. Children climbing on the range to reach items could be seriously injured.
Do not leave children alone. Children should not be left alone or unattended in an area where
appliance is in use. They should never be allowed to sit or stand on any part of the appliance.
Never use your appliance for warming or heating the room.
Do not use water on grease fires. Turn off the oven to avoid spreading the flame. Smother thefire or flame by closing the door or use dry chemical, baking soda, or foam-type extinguisher.
Storage in or on appliance. Flammable materials should not be stored in an oven or nearsurface units. Be sure all packing materials are removed from the appliance before operating it.Keep plastics, clothes, and paper away from parts of the appliance that may become hot.
Wear proper apparel. Loose-fitting or hanging garments should never be worn while using theappliance.
Use only dry potholders. Moist or damp potholders on hot surfaces may result in burns fromsteam. Do not let the potholder touch hot heating elements. Do not use a towel or other bulkycloth.
Teach children not to play with the controls or any other part of the range.
4 Hmportant safety instructions

SURFACE COOKING UNITS
_ ever leave surface units unattended at high heat settings. Boilovers cause smoking andgreasy spillovers that may ignite.
Do not lift the cooktop. Lifting the cooktop can lead to damage and improper operation of therange.
Do not operate the cooktop when there is no cookware. If the cooktop operates without acookware, the control knob will become hot.
Never use the glass cooktop surface as a cutting board.
Use care when touching the cooktop. The glass surface of the cooktop will retain heat afterthe controls have been turned off.
Be careful when placing spoons or other stirring utensils on glass cooktop surface whenit is in use. They may become hot and could cause burns.
Use proper pan sizes. This appliance is equipped with surface units of different size. Selectutensils having flat bottoms large enough to cover the surface unit heating element. The use ofundersized utensils will expose a portion of the heating element to direct contact and may result inignition of clothing. Proper relationship of utensil to burner will also improve efficiency.
Glazed cooking utensils. Only certain types of glass, glass/ceramic, ceramic,earthenware,or other glazed utensils are suitable for range-top service without breaking due to the suddenchange in temperature.
Utensil handles should be turned inward and not extend over adjacent surface units. Toreduce the risk of burns, ignition of flammable materials, and spillage due to unintentional contactwith the utensil, the handle of a utensil should be positioned so that it is turned inward, and doesnot extend over adjacent surface units.
Read and follow all instructions and warnings on the cleaning cream labels.
Be sure you know which control knob operates each surface unit. Make sure you turned on thecorrect surface unit.
Always turn the surface units off before removing cookware.
When preparing flaming foods under the hood, turn the fan on.
Keep an eye on foods being fried at high or medium high heat settings.
Hmportant safety instructions 5

OVEN
DO NOT TOUCH HEATING ELEMENTS OR INTERIOR SURFACES OF THE OVEN. Heatingelements may be hot even though they are dark in color. Interior surfaces of an oven becomehot enough to cause burns. During and after use, do not touch or let clothing or other flammablematerials contact heating elements or interior surfaces of oven until they have had sufficient timeto cool. Other surfaces of the appliance may become hot enough to cause burns. Among thesesurfaces are oven vent openings and surfaces near these openings, oven doors, and windows ofoven doors.
Do not heat unopened food containers. Build-up of pressure may cause container to burstand result in injury.
Do not use the oven to dry newspapers. If overheated, they can catch on fire.
Do not use the oven for a storage area. Items stored in an oven can ignite.
Use care when opening door, Let hot air or steam escape before you remove or replace food inthe oven.
Protective liners. Do not use aluminum foil to line the oven bottoms, except as suggested in themanual. Improper installation of these liners may result in a risk of electric shock or fire.
Keep oven vent ducts unobstructed. The oven vent is located above the right rear surfaceunit. this area could become hot during oven use. Never block this vent and never place plastic orheat-sensitive items on vent
Placement of oven racks. Always place oven racks in the desired location while the oven iscool. If the rack must be moved while oven is hot, do not let the potholder come in contact withthe hot heating element in the oven.
Do not allow aluminum foil or meat probe to contact heating elements.
WARMING DRAWER
[] O NOT TOUCH THE HEATING ELEMENT OR THE INTERIOR SURFACE OF THEDRAWER. These surfaces may be hot enough to burn.REMEMBER: The inside surface of the drawer may be hot when the drawer is opened.
_} he purpose of the warming drawer is to hold hot cooked foods at serving temperature.Always start with hot food; cold food cannot be heated or cooked in the warming drawer.
Use care when opening the drawer. Open the drawer a crack and let hot air or steam escapebefore removing or replacing food. Hot air or steam which escapes can cause burns to hands,face and/or eyes.
Do not use the drawer to dry newspapers. If overheated, they can catch on fire.
Do not use aluminum foil to line the drawer. Foil is an excellent heat insulator and will trapheat beneath it. This will upset the performance of the drawer and it could damage the interiorfinish.
Do not leave paper products, plastics, canned food or combustible materials in the drawer.
Never leave jars or cans of fat drippings in or near your drawer.
Do not warm food in the drawer for more than three hours.
6 Hmportant safety instructions

SELF-CLEANING OVENS
Do not clean door gasket. The door gasket is essential for a good seal. Care should be takennot to rub, damage, or move the gasket.
_ Never keep pet birds in the kitchen. The health of birds is extremely sensitive to the fumesreleased during an oven self-clean cycle. Fumes may be harmful or fatal to birds. Move birds to awell-ventilated room.
Clean in the self-clean cycle only parts listed in this manual. Before self-clean the oven,remove the broil pan, rack, utensils, and food.
No commercial oven cleaner or oven liner protective coating of any kind should be used in oron the outside of the oven. Use only a ceramic cooktop cleaner or the cleaner supplied with thisappliance on the glass cooktop.
Nickel oven shelves should be removed from the oven before beginning the self-cleaning cycle, orthey may discolor.
If the self-clean mode malfunctions, turn the oven off and disconnect the power supply. Have itserviced by a qualified technician.
VENTILATING HOOD
,Z} lean ventilating hoods frequently. Grease should not be allowed to accumulate on the hoodor filter.
When flaming foods under the hood, turn the fan on.
GLASS/CERAMIC COOKING SURFACES
®
DO NOT TOUCH SURFACE UNITS OR AREAS NEAR UNITS. Surface units may be hot eventhough they are dark in color. Areas near surface units may become hot enough to cause burns.During and after use, do not touch, or let clothing or other flammable materials contact surfaceunits or areas near units until they have had sufficient time to cool. Among these areas are thecook-top and facing the cook-top.
Do not cook on broken cooktop. If cooktop should break, cleaning solutions and spilloversmay penetrate the broken cook-top and create a risk of electric shock. Contact a qualifiedtechnician immediately.
Clean cooktop with caution. If a wet sponge or cloth is used to wipe spills on a hot cookingarea, be careful to avoid steam burn. Some cleaners can produce noxious fumes if applied to ahot surface.
BEFORE YOU BEGIN
(_Z!) Clean the oven thoroughly before using for the first time. Remove accessories and operatethe oven at the bake setting at 400°F for 1 hour before using. There will be a distinctive odor; thisis normal, but ensure your kitchen is well ventilated during this conditioning period.
Hmportant safety instructions 7

content INTRODUCING YOUR NEW RANGE
'(S
SURFACECOOKING
2 ¸
USING THE WARMING DRAWER
i
OPERATING THE OVEN
MAINTAiNiNG YOUR APPLIANCE
TROUBLESHOOTING
WARRANTY
9 Overview
9 What's included with your range
10 About surface cooking
12 How to set the appliance for surfacecooking
14 Using the proper cookware
14 Choosing the proper cookware
15 Protecting the smoothtop surface
16 About the warming drawer
17 Turning the warming drawer on or off
18 The oven control panel
19 Setting the clock
20 Minimum and maximum settings
20 Setting the kitchen timer
21 Using the oven racks
22 Baking
23 Convection baking
25 Convection roasting
27 Timed cooking
28 Delay timed cooking
29 Broiling
31 Using the custom cook feature
32 Proofing
33 Using the keep warm function
33 Turning the oven light on and off34 Extra features
38
4O
41
43
45
46
47
48 Troubleshooting
Self-cleaning
Steam-cleaning
Care and cleaning of the oven
Care and cleaning of the glass cooktop
Removing and replacing the oven door
Removing and replacing the warmingdrawer
Changing the oven light
8 Contents

OVERVIEW
Surface controm knobs
See page 11 for mereinfermatien
Oven control
See page 18 for mere
infermatien
Automatic oven
light switch
Oven light
Self/steam clean latch
i •
Gmass surface
Over door
_g drawer
Gasket
Convection fan
Shelf position _--
WHAT'S INCLUDED WITH YOUR RANGE
Wire racks Broil pan Broil pan insert Cleaner &
cleaning pad
htroducing your new range 9

ABOUT SURFACE COOKING
BEFORE COOKING
oAuT,o," DOnot use the glass cooktoD sJrface as a cutting board.
• Do hot olace or store items that can melt or catcn fire on the glass cooktoD, evenwnen t s not being used.
• Turn the surface units on onw after placing the cool<ware.
Do not store heavy items above the cooktop surface. They could fall and damage it.
®CAUTIOk
DURING COOKING
o Do hot olace aluminum foil or olast c items such as salt and pepper snaKers, spoon
noiaers, or Dlastlc wrappings on the range when it s in use. The hot air from the ventcould melt plastics or ignite f ammable _tems
• Make sure the correct sb'face unit s turned on
o Never COOKdirectly on the glass. Always use COOKware.
• Always place the Dan n the center of the surface unit you are COOKingon.
o Never eave surface units unattended Wnlle using a nign neat setting. Boilovers causesmoKing and greasy splllovers that may catch on fire.
o Turn the surface units off before removing COOKware.
• Do not use DlaStlCwrap to cover food. Plastic may melt onto the surface and be vet',difficult to remove.
AFTER COOKING
oAuT,o,_ DOnot touch the surface units until they nave coo_ea down.
• The surface may be still be hot and bb'ns may occur if the glass surface is toJcneebefore it has coolea down sufficiently ....
• mmediately c ean sD s cq the cool<_ngarea to orevent a tougn c_ean_ngchore later.
f cabinet storage _sprowaea a_rec[_yabove the cool<_ngsurface, maKe sure that theterns are nfrequenuy usea and can be safely stored in an area suqected to heatTemPeratures ma_ be unsafe for items such as volatile lioulas, cleaners or aerosol
sprays.
About the radiant surface elements
The temperature rises gradually and evenly. As the temperature rises, the radiant element will glowred. To maintain the selected setting, the element will cycle on and off. The heating element retainsenough heat to provide a uniform and consistent heat during the off cycle. For efficient cooking,turn off the element several minutes before cooking is complete. This will allow residual heat tocomplete the cooking process.
% Radiant elements have a limiter that allows the element to cycle ON and OFF, even at the HIsetting. This helps to prevent damage to the ceramic cooktop. Cycling at the HI setting isnormal and can occur if the cookware is too small for the radiant element or if the cookwarebottom is not flat.
10 Surface cookng
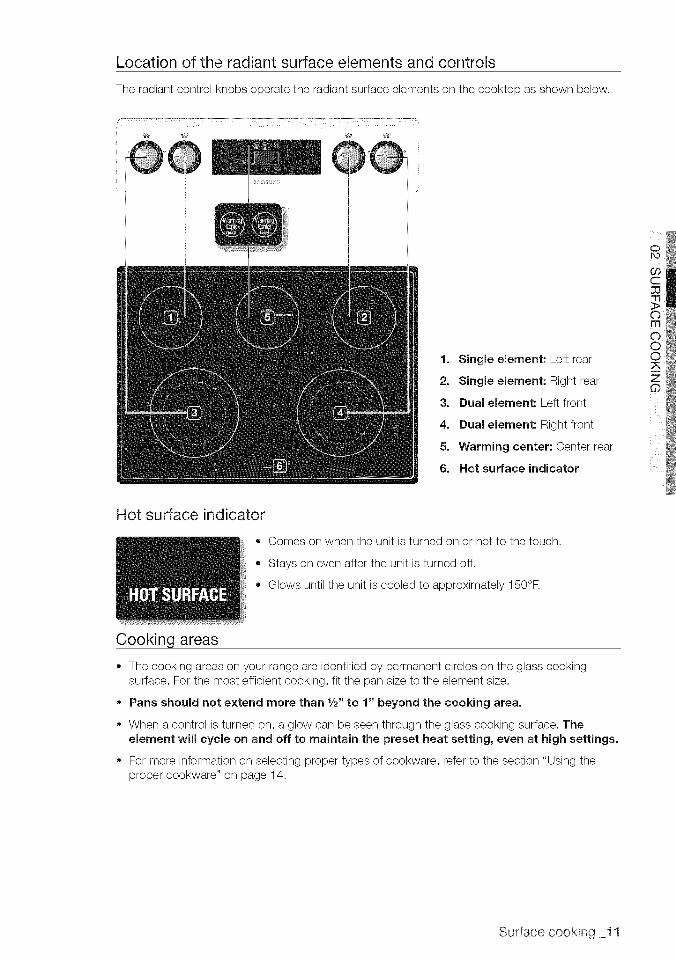
Location of the radiant surface elements and controls
The radiant control knobs operate the radiant surface elements on the cooktop as shown below.
/- ..........................., __ [
1. Single element: Left rear
2. Single element: Right rear
3. Dual element: Left front
4. Dual element: Right front
5. Warming center: Center rear
6. Hot surface indicator
Hot surface indicator
o
®
o
Cooking areas
Comes on when the unit is turned on or hot to the touch.
Stays on even after the unit is turned off.
Glows until the unit is cooled to approximately 150°F.
• The cooking areas on your range are identified by permanent circles on the glass cookingsurface. For the most efficient cooking, fit the pan size to the element size.
• Pans should not extend more than 1/2" to 1" beyond the cooking area.
= When a control is turned on, a glow can be seen through the glass cooking surface. Theelement will cycle on and off to maintain the preset heat setting, even at high settings.
For more information on selecting proper types of cookware, refer to the section "Using theproper cookware" on page 14.
Surface cookng 11

HOW TO SET THE APPLIANCE FOR SURFACE COOKING
• The surface elements may be hot and burns may occur. Do not touch surfaceo;..... elements unt they have cooled down sufficient y.
_, At high or medium-high settings, never leave fooa unattended. Bo overs causesm 3KIng and greasy Splllovers may catch on fire.
,, Be sure you turn the control knob to OFF when you finish cooking
e The area between the higq and off settings, are not appropriate for cooking.
Single surface unit control knob (left rear, right rear)
1. Push the knob in.
2. Turn in either direction to the setting you want.
• At both the off and high settings, the knob clicks into position.
®CO©@
Dual surface unit control knob (left front, right front)
The dual surface unit has 2 cooking sizes to select from so youcan match the size of the unit to the size of the cookware you areusing.
1. Push the knob in.
2. Turn in either direction to the setting you want.
To use the small surface unit, turn the control knob to the
small burner (A} settings.
To use the large surface unit, turn the control knob to thelarge burner (B) settings.
000e©
©
[_ When changing from a high heat setting to a lower heat setting, the surface unit may stopglowing. This is normal.
Recommended settings
HiGH
MEDIUM HiGH
MEDIUM
MEDIUM LOW
LOW
Starting most foods, bringing water to a boil, pan broiling
Continuing a rapid boil, frying, deep fat frying
Maintaining a slow boil, thickening sauces and gravies, steamingvegetables
Keeping foods cooking, poaching, stewing
Keeping warm, melting, simmering
12 Surface cookng

Using the warming center
The warming center, located in the back center of the glass surface, will keep hot, cooked foodat serving temperature.
= Do not warm food on the warming center for more than two hours.oA°T,oN" Use onlyCOOKwareanaalsnesrecommenaeaassafeforovenanaCOOK[ODJse.
® Alwa', s use Dotholders or oven mitts when remov ng fooa from the warming center asCOOKwareana plates will be hot
• When warm ng pastries and breads the cover snoula nave an opening to allowmoisture to escaDe.
Do not use DlastJcwrap to cover foods. Plastic may melt onto the surface and be verydifficult to clean.
• Food snou_a De keDt _n_tscontainer ana covered with a lid or aum_num foil to
maintain food quality.
• Always start with h3t food. Eating uncooked or cold food placed on the warmingcenter could result n mness.
1. Turn the warming center on.
Press the WARMING CENTER ON/OFF pad.
c
om
oo
2. Select the power setting you want.
3,
Pressing the WARMING CENTER LEVEL pad once will set it tothe level 1 setting. Press the pad twice for the level 2 setting, 3times for level 3.
Turn the warming center off.
Press the WARMING CENTER ON/OFF pad.
® • Pressing the CLEAR/OFF pad does not turn the warming center off.
The surface warmer will not glow red like the cooking elements.
For best results, all foods on the warming center should be covered with a lid oraluminum foil. When warming pastries or breads, the cover should be vented to allowmoisture to escape.
Recommended settings
Surface cookng 13

USING THE PROPER COOKWARE
Using the right cookware can prevent many problems, such as uneven cooking or extendedcooking times. Using the proper pans will reduce cooking times and cook food more evenly.
Check for flatness byrotating a ruler across thebottom of the cookware.
Flat bottom and straight sides.
• Tight fitting lids.
Weight of handle does not tiltpan.
Pan is well balanced.
Pan size matches the amount
of food to be preparedand the size of the surfaceelement.
,, Made of a material thatconducts heat well.
Always match pot diameter toelement surface diameter.
Curved and warped panbottoms.
JL-
Pan overhangs element by morethan one-half inch.
Pan is smaller than element.
Heavy handle tilts pan.
CHOOSING THE PROPER COOKWARE
What your cookware is made of determines how evenly and quickly heat is transferred from thesurface element to the pan bottom.
ALUMINUM - Excellent heat conductor. Some types of food will cause the aluminum todarken. (Anodized aluminum cookware resists staining & pitting.). If aluminum pans are slidacross the ceramic cooktop, they may leave metal marks that resemble scratches. Removethese marks immediately.
COPPER - Excellent heat conductor but discolors easily. May leave metal marks on ceramicglass (see above).
STAINLESS STEEL - Slow heat conductor with uneven cooking results. Is durable, easy toclean and resists staining.
CAST IRON - A poor conductor; retains heat very well. Cooks evenly once cookingtemperature is reached. Not recommended for use on ceramic cooktops.
,, ENAMELWARE - Heating characteristics will vary depending on base material. Porcelain-enamel coating must be smooth to avoid scratching ceramic cooktops.
GLASS - Slow heat conductor. Not recommended for ceramic cooktop surfaces because itmay scratch the glass.
14 Surface cookng

PROTECTING THE SMOOTHTOP SURFACE
Cleaning
• Clean the cooktop before using it for the first time.
Clean your cooktop daily or after each use. This will keep your cooktop looking good and canprevent damage.
If a spillover occurs while cooking, immediately clean the spill from the cooking area while it ishot to prevent a tough cleaning chore later. Using extreme care, wipe the spill with a clean drytowel.
Do not allow spills to remain on the cooking area or the cooktop trim for a long period of time.
• Do not use abrasive cleansing powders or scouring pads, which will scratch the cooktop.
Do not use chlorine bleach, ammonia, or other cleansers not specifically recommended for useon a glass-ceramic surface.
Preventing marks and scratches
Do not use glass cookware. They may scratch the cooktop.
Do not place a trivet or wok ring between the cooktop and the pan. These items can mark orscratch the cooktop.
Make sure the cooktop and the pan bottom are clean.
Do not slide metal pans across the cooktop.
Preventinq stains
Do not use a soiled dish cloth or sponge to clean the cooktop surface. A film will remain, whichmay cause stains on the cooking surface after the area is heated.
,, Continuously cooking on a soiled surface may/will result in a permanent stain.
Preventing other damage
Do not allow plastic, sugar, or foods with high sugar content to melt onto the hot cooktop.Should this happen, clean immediately.
Do not let a pan boil dry as this will damage the cooktop, and the pan.
• Do not use the cooktop as a work surface or cutting board.
Do not cook food directly on the cooktop without the proper cookware.
Surface cookng 15

ABOUT THE WARMING DRAWER
The warming drawer will keep hot,cooked foods warm. Always start with hotfood. Do not use to heat cold food other
than crisping crackers, chips or dry cereal.
Allow approximately 25 minutes for thewarming drawer to preheat.
• Do not line the warming drawer or pan with aluminum foil. Foil is an excellent heatinsulator and will trap heat beneath it. This will upset the performance of the drawerand could damage the interior finish.
• Do not put liquid or water in the warming drawer.
All foods placed in the warming drawer should be covered with a lid or aluminum foil. Whenwarming pastries or breads, the cover should be vented to allow moisture to escape.
Remove serving spoons, etc., before placing containers in the warming drawer.
Food should be kept hot in its cooking container or transferred to a heat-safe serving dish.
O lastic containers or plastic wrap will melt if in direct Contact with the drawer, pan or a_AUT,O"hot utenSi!: Melied plastic may n0t be iem0vab!e and iSn0t covered Undei y0ur warianty:
16 Using the warming drawer

TURNING THE WARMING DRAWER ON OR OFF
1. Set the warming drawer to the heat level you want.
Press the WARMING DRAWER pad once for low, twice formedium, or 3 times for high.
The warming drawer starts automatically once you have finishedselecting the level you want.
2. Turn the warming drawer off.
Press the WARMING DRAWER pad when the warming level ishigh.
• Pressing the CLEAR/OFF pad does not turn the warming drawer off.
,, The warming drawer cannot be used during a self-cleaning cycle.
Recommended settings
Rolls (soft), empty dinner plates
Gravies, eggs, biscuits, pastries, casseroles, vegetables, rolls (hard),roasts (beef, pork, lamb)
Bacon, poultry, pizza, hamburger patties, pork chops, fried foods
% Different types of food may be placed in the warming drawer at the same time. For bestresults, do not leave foods in the warming drawer for longer than 1 hour. Do not leavesmaller quantities or heat-sensitive foods, such as eggs, for longer than 30 minutes.
The warming drawer will shut off automatically after 3 hours.
Using the warming drawer 17

na the ovenI
THE OVEN CONTROL PANEL
READ THE INSTRUCTIONS CAREFULLY BEFORE USING THE OVEN. For satisfactory useof your oven, become familiar with the various features and functions of the oven as describedbelow. Detailed instructions for each feature and function follow later in this user manual.
1. DISPLAY: Shows the time of day, oven temperature, whether the oven is in the bake, broil orself-cleaning mode, and the times set for the timer or automatic oven operations.
2. NUMBER PADS: Use to set any function requiring numbers such as the time of day on theclock, the timer, the oven temperature, the start time and length of operation for timed baking.
3. SET/START: Must be pressed to start any cooking or cleaning function.
4. CLEAR/OFF: Press to cancel all oven operations except the clock and timer, warming center,warming drawer.
5. CLOCK AM/PM: Press to set the time of day.
6. OVEN LIGHT: Press to turn the oven light on or off.
7. CUSTOM COOK: Press to record and recall your favorite recipe setting.
8. KITCHEN TIMER ON/OFF: Press to select the timer feature.
9. SELF CLEAN: Press to select self-cleaning function.
10. STEAM CLEAN: Press to select steam-cleaning function.
11. DELAY START: Use along with Bake, Conv. Bake, Conv. Roast, Cooking Time, and SelfClean pads to set the oven to start and stop automatically at a time you set.
12. COOKING TIME: Press and then use the number pads to set the amount of time you wantyour food to cook. The oven will shut off when the cooking time has run out.
13. BROIL: Press to select the broil function.
14. BAKE: Press to select the bake function.
15. CONVECTION BAKE: Press to select baking with the convection function.
16. CONVECTION ROAST: Press to select roasting with the convection function.
17. KEEP WARM: Press to keep cooked foods warm.
18. PROOF: Press to select a warm environment useful for rising yeast-leavened products.
18 Operating the oven

SETTING THE CLOCK
The clock must be set to the correct time of day for the automatic oven timing functions to workproperly.
,, The time of day cannot be changed during a timed cooking, a delay-timed cooking or a self-cleaning cycle.
• You can choose between a 12-hour or 24-hour display. The default is 12-hour.
How to set the clock
1. Start the set up.
Press the CLOCK AM/PM pad.
2. Select AM or PM.
Press the CLOCK AM/PM pad again, once to select AM or twiceto select PM.
This step is skipped in the 24-hours display mode.
3. Enter the present time.
Enter the current time in hours and minutes on the number pad,eg. 1,3, 0, for 1:30.
4. Exit the set up.
Press the SET/START or CLOCK AM/PM pad.
oi
How to change between a 12-hour and 24-hour display
1.
2,
3,
Start the set up.
Press CLOCK AM/PM and 0 on the number pad at the sametime for 3 seconds.
The display will show the present mode (eg. 12 hour).
Select the display mode you want.
Press 0 on the number pad to select 12 hour or 24 hour.
Pressing 0 on the number pad changes the display between 12hour and 24 hour.
Exit the set up.
Press the SET/START pad.
Operat ng the oven 19

MINIMUM AND MAXIMUM SETTINGS
All of the features listed have minimum and maximum time or temperature settings.
A beep will sound each time a pad on the control panel is pressed and the entry is accepted. Anerror tone will sound in the form of a long beep if the entered temperature or time is below theminimum or above the maximum setting for the feature.
Bake
Broi
(_ Self Clean
Convection Bake
Convection Roast
(_) Keep Warm
Warming Center
(_ Warming Drawer
Proof
®
ji)iii!iii!!iiiiiiliiii i ! i )!iii i gi gi!iii!!ii i!iiiii i i i i i!iii!ili i!i iii150°F (65°C)
LO (375°F)
2 Hr.
175°F (80°0)
175°F (80°0)
Steam Clean 20 Min.
SETTING THE KITCHEN TIMER
550°F (285°C)
HI (480°F)
4 Hr.
550°F (285°0)
550°F (285°0)
3 Hr.
3 Hr.
3 Hr.
12 Hr.
20 Min.
The kitchen timer serves as an extra timer that will beep when the set time has elapsed. Itdoes not start or stop cooking functions. The feature can be used during any of the other ovenfunctions.
How to set the timer
1. Turn the timer on.
Press the KITCHEN TIMER ON/OFF pad.
2. Select the unit of time you want.
Press the KITCHEN TIMER ON/OFF pad once to select hours/minutes, twice to select seconds or three times to turn the kitchentimer off.
3. Enter the amount of time you want.
4,
5,
Enter the amount of time you want using the number pad, eg. 1,5. The timer can be set for any amount of time from 1 minute to 9hours and 99 minutes or 1 second to 99 minutes and 99 seconds.
If you make a mistake, press the KITCHEN TIMER ON/OFF padand start again.
Start the timer.
Press the KITCHEN TIMER ON/OFF pad.
When the set time has elapsed, the oven will beep and the displaywill show End until you press the KITCHEN TIMER ON/OFF pad.You can cancel the timer at any time by pressing the KITCHENTIMER ON/OFF pad.
20 Operating the oven

USING THE OVEN RACKS
Oven rack positions
-
I_ - _
The oven has 7 rack positions (1-7).
Frozen pies
Angel f00d cake
BUndt or pound cakes .......
BiScuits, muffinsi broWnies,CookieSl cupcakesl layer Cakeslpies
casseroles
Small roast, ham
Turkey, large roast
4
2
3
4
2
1
Baking layer cakes
Centering the baking pans in the oven as much as possible will produce better results. If bakingwith more than one pan, place the pans so each has at least 1" to 11/3 of air space around it.
If cooking on multiple racks, place the oven racks in positions 2 and 5. Place the cookware asshown in the figures below.
Fig. 1 Fig. 2
Before using the racks
The oven has two racks.
Each rack has stops that need to be placed correctly on the supports. These stops will keep therack from coming completely out.
oDo not cover a rack with aluminum foil or place on the oven bottom, This will disturb_'. the heat CiCulationl iesUlting in poor bakingl and may damage the oven b0ttoml
o Arrange the oven racks only when the oven is cool;
Operat ng the oven 21

BAKING
The oven can be programmed to bake at any temperature from 150°F to 550°F.
How to set the thermostat
1. Start the set up.
Press the BAKE pad. The default temperature is 350°F.
2. Enter the temperature you want on the number pad, eg. 3, 7, 5.
3. Start the bake function.
4,
Press the SET/START pad. The temperature display will start tochange once the oven temperature reaches 150°R
If you want to cancel baking or if you have finished Dress theCLEAR/OFF pad.
Place food in the oven after preheating if the recipe calls for it. Preheating is very importantfor good results when baking cakes, cookies, pastry, and breads. After the oven hasreached the desired temperature, a long beep will sound 6 times.
How to adjust the thermostat while cooking
1. Start the set up.
Press the BAKE pad. The display will show the presenttemperature, eg. 375°R
2. Enter the temperature you want, eg. 425°F, by using the numberpad.
3. Complete the entry by pressing the SET/START pad.
22 Operating the oven

CONVECTION BAKING
By using the convection bake feature, you will be ableto cook faster. You can program the oven for convectionbaking at any temperature between 175°F and 550°F.
Convection baking uses a fan to circulate the oven's heatevenly and continuously within the oven. This improvedheat distribution allows for even cooking and excellentresults using multiple racks at the same time. Foodscooked on a single oven rack will generally cook fasterand more evenly with convection baking. Multiple oven
rack cooking may slightly increase cook times for some foods, but the overall result is time saved.Breads and pastries brown more evenly.
Tips for convection baking
The amount of time you save will vary depending on the amount and type of food you arecooking. When baking cookies or biscuits, you should use pans with no sides or very low sidesto allow the heated air to circulate around the food. Using a pan with a dark finish will allow fastercooking times.
When using convection baking with a single rack, place the oven rack in position 4. If cooking onmultiple racks, place the oven racks in positions 2 and 5.
When baking a cake, using the bake mode will produce better results.
How to set the oven for convection baking
1. Start the convection baking mode.
Press the CONY. BAKE pad. The default temperature is 350°F.
2. Enter the temperature you want, eg. 400°F, by using the numberpad.
3. Press the SET/START pad to begin convection baking.
4,
Conv. Bake and the adjusted oven temperature, eg. 375°F, willappear in the display for 2 seconds.
The temperature display will start to change once the oventemperature reaches 150°F.
A beep will sound 6 times when the adjusted oven temperature,eg. 375°F, is reached and the display will show the auto-convertedoven temperature.
Turn off or cancel convection baking by pressing the CLEAR/OFFpad.
In convection baking mode, the oven automatically reduces the set regular bakin¢temperature by 25°F to the appropriate conversion temperature.
The convection oven fan shuts off when the oven door is opened.DO NOT leave the door open for long periods of time while using convection cooking oryou may shorten the life of the convection heating element.
Operat ng the oven 23

Recommended convection baking guide
Cake
Cupcakes
Bundt Cake
Angel Food
2 crust, fresh, 9"
2 crust, frozen fruit, 9"
Cookies
Chocolate Chip
Brownies
Breads
Yeast bread, loaf, 9x5
Yeast rolls
Quick Bread, loaf, 8x4
Biscuits
4
3
2
3
3
4
4
4
3
4
3
4
4
325
325
325
350-400
35O
325-350
325-350
325
35O
350-375
325-350
350-375
4OO
17-19
35-43
35-39
45-55
68-78
12-17
14-18
29-36
18-22
13-18
45-55
9-14
15-19Muffins
Pizza
Frozen 4 375-425 23-26
Fresh 4 400-425 12-15
[_ * The convection bake temperature is 25°F less recommended on packages or recipes.The temperature in this chart has been reduced 25°F.
Actual times depend on the mixes or recipes baked. Follow recipe or packagedirections and reduce temperature appropriately.
24 Operating the oven

CONVECTION ROASTING
Convection roasting is good for cooking large tender cuts of meat, uncovered.
Heat comes from the top heating element. The convection fan circulates the heated air evenlyover and around the food. Meat and poultry are browned on all sides as if they were cooked on arotisserie. The heated air seals in juices quickly for a moist and tender product while, at the sametime, creating a rich golden brown exterior.
How to set the oven for convection roasting
1. Start the convection roasting mode.
Press the CONY. ROAST pad. The default temperature is 350°F.
2. Enter the temperature you want, eg. 400°F, by using the numberpad.
3. Press the SET/START pad to begin convection roasting.
4,
®
Conv. Roast and the adjusted oven temperature, eg. 375°F, willappear in the display for 2 seconds.
The temperature display will start to change once the oventemperature reaches 150°F.
A beep will sound 6 times when the adjusted oven temperature,eg. 375°F, is reached and the display will show the auto-convertedoven temperature.
Turn off or cancel convection roasting by pressing the CLEAR/OFF pad.
In the convection roasting mode, the oven will automatically reduce the set regular bakingtemperature by 25°F to the appropriate conversion temperature.
The convection oven fan shuts off when the oven door is opened.DO NOT leave the door open for long periods of time while using convection cooking oryou may shorten the life of the convection heating element.
When you use the convection roasting feature, it isimportant that you use the broil pan and insert. Thepan is used to catch grease spills and the grid isused to prevent grease spatters.
2m
o<
Operat ng the oven 25

Recommended convection roasting guide
Beef
Rib R0ast
Rib Eye Roast,(boneless)
Rump, Eye; TipSirloin(boneless)
Tenderloin Roast
Pork
Loin Roast
(boneless or
Shoulder
Poultry
Chicken- whole
Turkey,:unstuffed**
Turkey,/unstuffed**
unstuffed**
Turkey Breast
Cornish Hen
Lamb
Half Leg
Whole Leg
®
4-6
4-6
325
325
325
325
25-28
28-32
24-29
29-34
25-30
28-35
28-38
145 (med/rare)
160 (medium)
145 (med/rare)
160 (medium)
145 (med/rare)
160 (medium)
145 (med/rare)
5-8
3-6
3-4
12-15
16-20
21-25
3-8
1-11/2
3-4
6-8
35O
35O
375
325
325
325
325
35O
15-25
20-30
17-23
12-16
11-15
8-12
20-25
45-75 (total time)
170
16O
18O
18O
18O
18O
17O
18O
325
325
25-30
30-35
25-30
30-35
160 (medium)
170 (well)
160 (medium)
170 (well)
* Roasting times are approximate and may vary depending on the shape of the meat.
The convection roast temperature is 25°F less recommended on packages or recipes.The temperature in this chart has been reduced 25°R
** Stuffed turkey requires additional roasting time. The minimum safe temperature forstuffing in poultry is 165°R
26 Operating the oven

TIMED COOKING
In a timed cooking, the oven turns on immediately and cooks for the length of time you select. Atthe end of the cooking time, the oven turns off automatically.
• You can use the timed cooking feature only with another cooking operation (bake, convectionbake, or convection roast).
You can set the oven for a timed cooking before setting other cooking operations.
The clock must be set for the correct time of day.
How to set the oven for timed cooking
1. Enter the set up.
Press the pad for the cooking operation you want, eg. BAKE. Thedefault temperature is 350°F.
2. Enter the temperature you want, eg. 375°F, by using the numberpad.
3. Press the COOKING TIME pad.
4, Enter the cooking time you want, eg. 45 rain, by using the numberpad.
You can set the cooking time for any amount from 1 minute to 9hours and 99 minutes.
5. Press the SET/START pad to begin cooking operation.
6,
The temperature display will start to change once the oventemperature reaches 150°F.
The oven will continue to cook until the set amount of time has
elapsed, then turn off automatically unless the keep warm featurewas set. (Refer to the section on the keep warm feature on page33.)
You can cancel a timed cooking at any time by pressing theCLEAR/OFF pad.
[_ Place food in the oven after preheating if the recipe calls for it. Preheating is important forgood results when baking cakes, cookies, pastry, and breads. After the oven has reachedthe desired temperature, a long beep will sound 6 times.
O USe caution with the timed cooking Or delay timed COOking features . use thesecAu,,o,features when Cooking cured or frozen meats and m0st fruits and vegetables. Foods
that can easilyspeil such as milk eggs, fishl meat or poultry should be chilled in therefrigerator first. Even when chilledi they should not stand in the oven for more than! h0ur before co0king begins, and should be rem0ved pr0mptly when eo0king is ............completedl Eating spoiled food can result in sickness from food poisoning.
Operating the oven _27

DELAY TIMED COOKING
In a delay timed cooking, the oven's timer turns the oven on and off at times you select inadvance.
,, You can use the delay timed c ooking feature only with another cooking operation (bake,convection bake, convection roast and self clean).
• You can set the oven for a delay timed cooking before setting other cooking operations.
The clock must be set for the correct time of day.
How to set the oven for delay timed cooking
1. Position the oven rack(s) and place the food in the oven.
2. Enter the set up.
Press the pad for the cooking operation you want, eg. BAKE. Thedefault temperature is 350°R
3. Use the number pads to enter the temperature you want, eg.375°R
4. Press the COOKING TIME pad.
5. Enter the cooking time you want, eg. 45 rain, by using the numberpad.
You can set the cooking time for any amount of time from 1 minuteto 9 hours and 99 minutes.
6. Press the DELAY START pad.
"AM, PM" is not displayed in 24 hour mode.
7. Select AM or PM.
Press the CLOCK AM/PM pad once to select AM or twice toselect PM.
This step is skipped in the 24-hour display mode.
8. Enter the time you want the oven to turn on, eg. 4:30, by using thenumber pad.
9. Press the SET/START pad.
At the set time, a short beep will sound. The oven will begin tobake. When the oven has reached the desired temperature, a longbeep will sound 6 times and the oven lamp will flash.
_} Place food in the oven after preheating if the recipe calls for it. Preheating is important forgood results when baking cakes, cookies, pastry, and breads. After the oven has reachedthe desired temperature, a long beep will sound 6 times.
28 Operating the oven

BROILING
Broil stop position
Using the broil pan
Leave the door open to the broil stop position. The door willstay open by itself, yet the proper temperature is maintainedin the oven.
The broil pan and the insert allow grease to drain and bekept away from the high heat of the broiler.
,, Do not use the pan without the insert.
,, Do not cover the insert with foil; the exposed greaseCOUla ignite,
Should an oven fire occur, close the oven aoor and turn the oven off. h'the fire continues........ throw baking soda on the fire or use a foam-b De fire extinguisher. Do not put water or
flour on the fire. Flour may De explosive and water can cause a grease fire to sareaa anacause oersonal Injury.
How to set the oven for broiling
1.
2,
3,
Select the broil setting you want.
Press the BROIL pad once for HI or twice for LO.
Use LO to cook foods such as poultry or thick cuts of meatthoroughly without over-browning them.
Start the broiling function.
Press the SET/START pad.
Broil on one side until food is browned; turn and cook on the otherside.
Press the CLEAR/OFF pad once you have finished cooking or ifyou want to cancel broiling.
Operat ng the oven 29

Recommended broiling guide
The size, weight, thickness, starting temperature, and your preference of doneness will affectbroiling times.
This guide is based on meats at refrigerator temperature.
Ground Beef 1 lb. (4 patties) Space evenly. Up to 87 8-10 4-6 patties may be broiled at
Well Done 1/2to sA" thick once.
Beef Steaks
Rare
Medium
Well Done
Medium
Well Done
1" thick1 to 11/2Ibs.
1 whole cut up2 to 21/2Ibs.,
7
7
7
6
6
6
8
10
12
14
16
19
23-28
3-5
4-6
5-7
7-9
8-11
11-13
13-18
Steaks less than 1" thick
cook through beforebrowning.
Pan frying isrecommended.
Slash fat.
Chicken split lengthwise
2 Breasts
Lobster Tails
Fish Fillets
Hamslices
(precooked)
Pork Chops
Well Done
Lamb Chops
Medium
We!!
Medium
Well Done
Salmon
Steaks
2-410 to 12 oz.
each
1/4to 1/2"thick
1/2"thick
2 (1/2"thick)
2 (1" thick)about 1 lb.
2 (1" thick)about 10 to
12 oz.
2 (11/2"thick)about 1 lb.
2 (1" thick)
4 (1" thick)about 1 lb.
6
5
6
6
6
6
6
13-18
14-18
5-9
5-7
7
9-10
6
8
11
13
8
5-10
Do not turnover.
3-4
3-5
4-6
7-9
9
9-11
3-4
4-6
Broil skin-side-down first.
Cut through back of shell.Spread open.
Brush with melted butter
before broiling and afterhalf of broiling time.
Handle and turn verycarefully. Brush withlemon butter before and
during cooking, if desired.
Increase time 5 to 10
minutes per side for 11/2"thick or home-cured ham.
Slash fat.
Slash fat.
Grease pan. Brush steakswith melted butter.
30 Operating the oven

USING THE CUSTOM COOK FEATURE
By using the custom cook feature, you can record up to 3 different recipe settings. The featuremay be used for baking, convection baking, or convection roasting. It will not work with any otherfunction, including the delay start feature.
How to record a recipe setting
1,
2.
3.
Press the pad for the cooking operation you want to store, eg.BAKE. The default temperature is 350°F.
Use the number pad to enter the temperature you want, eg.375°F.
Press the CUSTOM COOK pad the number of timescorresponding to where you want to store the setting, eg. forrecipe setting 2, press the CUSTOM COOK pad twice.
Recipe settings may be stored at 1,2, or 3.
4. Press the SET/START pad.
How to recall a setting
1. Press the CUSTOM COOK pad the number of timescorresponding to where the recipe setting is stored, eg. for recipesetting 2, press the CUSTOM COOK pad twice.
Recipe settings may be stored at 1,2, or 3.
2, Start the stored cooking operation.
Press the SET/START pad.
Operat ng the oven 31

PROOFING
The proofing feature maintains a warm environment useful for rising yeast-leavened products.
How to set the oven for proofinq
1. Enter the proofing mode.
Press the PROOF pad.
2. Start the proofing function.
Press the SET/START pad.
The proofing feature automatically provides the optimumtemperature for the proof process, and therefore does not have atemperature adjustment.
3. Press the CLEAR/OFF pad at any time to turn off the proofingfeature.
®
o
o
If you press the PROOF pad when the oven temperature is above 100°F, Hot will appearin the display. Because these functions produce the best results when started whilethe oven is cool, we recommend that you wait until the oven has cooled down and Hotdisappears from the display.
To avoid lowering the oven temperature and lengthening proofing time, do not open theoven door unnecessarily.
Check bread products early to avoid over-proofing.
Do not use the proofing mode for warming food or keeping food hot. The proofing oventemperature is not hot enough to hold foods at safe temperatures. Use the keep warmfeature to keep food warm.
For best results, cover the dough with a cloth or with plastic wrap (the plastic may needto be anchored underneath the container so the oven fan will not blow it off).
32 Operating the oven

USING THE KEEP WARM FUNCTION
The keep warm feature will maintain an oven temperature of 170°F. You should not use this featureto reheat cold foods. The keep warm feature will keep cooked food warm for serving up to 3hours after cooking has finished.
After 3 hours, the feature will shut the oven off automatically. The feature may be used without anyother cooking operations or may be set to activate after a timed or delay timed cooking operation.
How to use the keep warm feature
1. Press the KEEP WARM pad.
2. Press the SET/START pad.
3. Press the CLEAR/OFF pad at any time to turn the feature off.
How to set the oven to activate the keep warm mode after a timedcooking
1. Press the KEEP WARM pad during a cooking operation, eg.baking.
The oven is now programmed to activate the keep warm modeautomatically after completing the cooking operation.
2. Press the CLEAR/OFF pad at any time to turn the feature off.
TURNING THE OVEN LIGHT ON AND OFF
oi
• The oven light turns on automatically when the door is opened.
The oven light turns off automatically when the door is closed.
You can turn the oven light on and off manually by pressing the OVEN LIGHT pad.
The oven light will not turn on during a self-cleaning cycle.
Operat ng the oven 33

EXTRA FEATURES
12 hour energy saving
With this feature, should you forget and leave the oven on, the control will automatically turn offthe oven after 12 hours during baking functions or after 3 hours during a broil function.
How to turn 12 hour energy saving feature on or off
1. Press COOKING TIME and 0 on the number pad at the sametime for 3 seconds.
The display will show 12 Hr (12 hour shut-off) or -- Hr (no shut-off).
The default is 12 Hr.
2. Press 0 on the number pad to select OFF or ON.
Pressing 0 on the number pad changes the mode between 12 Hrand -- Hr.
3. Press the SET/START pad..
Fahrenheit or Celsius temperature selection
The oven control can be programmed to display temperatures in Fahrenheit or Centigrade. Theoven has been preset at the factory to display in Fahrenheit.
How to change the display from Fahrenheit to Centigrade or from Centigradeto Fahrenheit
1. Press BROIL and 0 on the number pad at the same time for 3seconds.
The display shows F (Fahrenheit) or C (Centigrade).
The default is R
2. Press 0 on the number pad to select F or C.
Pressing 0 on the number pad changes the display between F andC.
3. Press the SET/START pad.
34 Operating the oven

Convection auto conversion feature
When using convection bake, the convection auto conversion feature will automatically convertentered regular baking temperatures to convection baking temperatures.
This feature is activated so that the display will show the actual converted (reduced) temperature.For example, if you enter a regular recipe temperature of 350°F and press the Set/Start pad, thedisplay will show the converted temperature of 325°F.
How to disable or enable the auto conversion feature
1. Press CONV. BAKE and 0 on the number pad at the same timefor 3 seconds.
The display will show Con On (enabled) or Con OFF (disabled).
The default setting is Con On.
2. Press 0 on the number pad to select Con On or Con OFR
Pressing 0 on the Number pad changes the mode between ConOn and Con OFR
3. Press the SET/START pad.
Thermostat adjustment
The temperature in the oven has been preset at the factory. When first using the oven, be sure tofollow recipe times and temperatures. If you think the oven is too hot or too cool, the temperaturein the oven can be adjusted. Before adjusting, test a recipe by using a temperature setting that ishigher or lower than the recommended temperature. The baking results should help you to decidehow much of an adjustment is needed.
The oven temperature can be adjusted _+35°F(_+19°C).
How to adjust the oven temperature
1. Press BAKE and 0 on the number pad at the same time for 3seconds.
The display will show AdJ 0.
2, Enter the adjustment you want, eg. 20°F, by using the numberpad.
You can adjust the temperature to lower than the factory setting bypressing the BAKE pad.
3. Press the SET/START pad.
[_ This adjustment will not affect the broiling or the self-cleaning temperatures. The adjustmentwill be retained in memory after a power failure.
Operat ng the oven 35

Sound on/off
By using this feature, you can set the oven controls to operate silently.
How to turn the sound on or off
1. Press Oven Light and 0 on the number pad at the same time for3 seconds.
The display will show Snd On (sound on) or Snd OFF (sound off).
The default setting is Snd On.
2. Press 0 on the number pad to select OFF or ON.
Pressing 0 on the number pad changes the mode between SndOn and Snd OFF.
3. Press the SET/START pad.
Control lockout
This feature will allow you to lock the buttons on the touch pad so they cannot be activatedaccidentally.
How to activate the control lockout feature
1. Press the CLEAR/OFF pad for 3 seconds.
The display will show Loo and an icon of a lock continuously andthe time of day if not blacked out.
All functions must be cancelled before the control lockout isactivated.
This function is available under 400°F.
How to unlock the controls
1. Press the CLEAR/OFF pad for 3 seconds.
Loc and the lock icon will disappear from the display.
36 Operating the oven
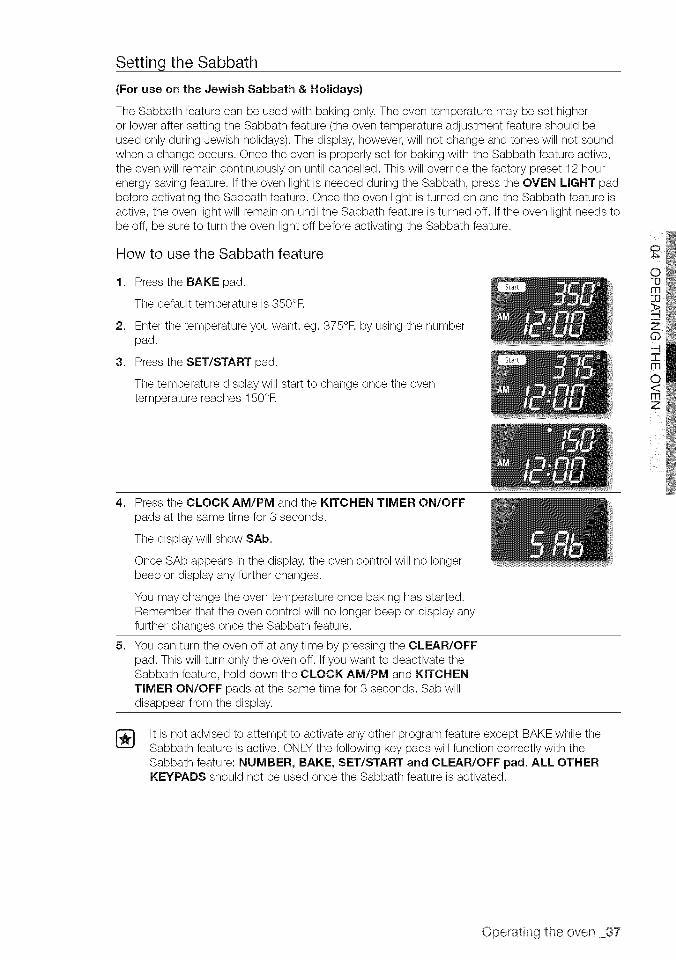
Setting the Sabbath
(For use on the Jewish Sabbath & Holidays}
The Sabbath feature can be used with baking only. The oven temperature may be set higheror lower after setting the Sabbath feature (the oven temperature adjustment feature should beused only during Jewish holidays). The display, however, will not change and tones will not soundwhen a change occurs. Once the oven is properly set for baking with the Sabbath feature active,the oven will remain continuously on until cancelled. This will override the factory preset 12 hourenergy saving feature. If the oven light is needed during the Sabbath, press the OVEN LIGHT padbefore activating the Sabbath feature. Once the oven light is turned on and the Sabbath feature isactive, the oven light will remain on until the Sabbath feature is turned off. If the oven light needs tobe off, be sure to turn the oven light off before activating the Sabbath feature.
How to use the Sabbath feature
1. Press the BAKE pad.
The default temperature is 350°R
2. Enter the temperature you want, eg. 375°F, by using the numberpad.
3. Press the SET/START pad.
The temperature display will start to change once the oventemperature reaches 150°R
4,
5,
Press the CLOCK AM/PM and the KITCHEN TIMER ON/OFF
pads at the same time for 3 seconds.
The display will show SAb.
Once SAb appears in the display, the oven control will no longerbeep or display any further changes.
You may change the oven temperature once baking has started.Remember that the oven control will no longer beep or display anyfurther changes once the Sabbath feature.
You can turn the oven off at any time by pressing the CLEAR/OFFpad. This will turn only the oven off. If you want to deactivate theSabbath feature, hold down the CLOCK AM/PM and KITCHENTIMER ON/OFF pads at the same time for 3 seconds. Sab willdisappear from the display.
It is not advised to attempt to activate any other program feature except BAKE while theSabbath feature is active. ONLY the following key pads will function correctly with theSabbath feature: NUMBER, BAKE, SET/START and CLEAR/OFF pad. ALL OTHERKEYPADS should not be used once the Sabbath feature is activated.
iii_ i
Operat ng the oven 37

SELF-CLEANING
A self-cleaning oven uses high temperatures (well above cooking temperatures) to burn off leftovergrease and residue completely or reduce them to a finely powdered ash that you can wipe awaywith a damp cloth.
o During the self-cleaning cycle, the outside of the range can become ver_ hot to toucn.o;...... Do not eave sma oh dren unattended near the aDD ance.
• The health of some birds is extremely sensitive to the fumes g_ven off dur ng the self-c_eanmgcycle of any range. Move birds to another we -vent lated room.
Do not ne the oven wans. racKs, bottom or any other part of the range wltnaluminum foil. Doing so will result _ Door heat distribution. Droauce poor DaKIngresults and cause permanent damage to the oven interior aluminum foil will melt tothe intenor surface of the oven_.
Do not force the oven door ooen. This can damage the automatic door lockingsystem. Use care wnen opening the oven door after the self-cleaning cycle iscomplete. Stand to the side of the oven wnen opening the door to allow hot air orsteam to escaoe. The oven _na still be VERY HOT.
Before a self-cleaning cycle
Fig. I
Don't hand
clean theoven door
gasket,
the door.
o
o
We recommend venting your kitchen with an open windowor using a ventilation fan or hood during the self-cleaningcycle.
Remove the wire rack, broil pan, broil pan insert, allcookware and any aluminum foil from the oven.
Wipe up debris from the oven bottom. (Fig. 1)
The silver-colored oven racks can be self-cleaned, but theywill darken, lose their luster and become hard to slide.
Residue on the front frame of the range and outside thegasket on the door will need to be cleaned by hand. Cleanthese areas with hot water, soap-filled steel-wool pads orcleansers such as Soft Scrub. Rinse well with clean water
and dry.
Do not clean the gasket. The fiberglass material of the ovendoor gasket cannot withstand abrasion. It is essential forthe gasket to remain intact. If you notice it becoming wornor frayed, replace it. (Fig. 2)
Make sure the oven light bulb cover is in place and theoven light is off.
The health of some birds is extremely sensitive to the fumes given off during the self-cleaning cycle of any range. Move birds to another well ventilated room.
38 Maintainng your app ance

How to set the oven for self-cleaning
1,
2,
Select the length of time for the self-cleaning operation, eg. 3hours.
Press the SELF CLEAN pad once for a 3 hour clean time, twicefor a 4 hour clean time, or 3 times for a 2 hour clean time.
The default setting is 3 hours.
Start the self-cleaning cycle.
Press the SET/START pad. The motor-driven door lock willengage automatically.
[_ • You will not be able to start a self-cleaning cycle if the control lockout feature is activatedor if the oven's temperature is too hot.
• The oven door locks automatically. The display will show the clean time remaining. Itis not be possible to open the oven door until the temperature drops to a safe/cooltemperature.
The self-cleaning feature will not operate when warming center or warming drawer is on.
How to turn off the self-cleaning feature
When the self-cleaning cycle is done, End will show in the display and abeep will sound 6 times.
1. Press the CLEAR/OFF pad.
2. You will be able to open the oven door once the oven has cooled down for approximately 1hour.
You may find it necessary to stop or interrupt a self-cleaning cycle due toexcessive smoke or fire in the oven.
1. Press the CLEAR/OFF pad.
2. You will be able to open the oven door once the oven has cooled down for approximately 1hour.
After a self-cleaninq cycle
You may notice some white ash in the oven. Wipe it up with a damp cloth after the oven cools.(If white spots remain, remove them with a soap-filled steel wool pad and rinse thoroughly witha vinegar and water mixture.)
If the oven is not clean after one cycle, repeat the cycle.
You cannot set the oven for cooking until the oven is cool enough for the door to unlock.
Mantanng yourappance 39

STEAM-CLEANING
How to set the oven for steam-cleaning
Steam-cleaning saves time and energy for light cleaning. For heavier-duty cleaning of debris andgrease, use the self-cleaning function.
1. Remove all accessories from the oven.
2. Pour approximately 10 oz. (300 ml) of water onto the bottom ofthe empty oven and close the oven door.
Use normal water only, no distilled water.
3. Press the STEAM CLEAN pad.
4. Press the SET/START pad.
When the operation is complete, the display will blink and a beepwill sound.
5. Press the CLEAR/OFF pad.
6. Clean the oven's interior.
There will be a significant amount of water remaining on thebottom of the oven after a steam-cleaning cycle. Remove theresidual water with a sponge or soft dry cloth.
When steam-cleaning, use exactly 10 oz. of water since this produces the best results.
If you press the STEAM CLEAN pad when the oven temperature is above 100°F, Not willappear in the display. Because these functions produce the best results when started whilethe oven is cool, we recommend that you wait until the oven has cooled down and Hotdisappears from the display.
After a steam-cleaninq cycle
• Take care when opening the door before a steam-cleaning procedure has ended; the water onthe bottom is hot.
o
o
Open the oven door and remove the remaining water with a sponge. Do not leave the residualwater in the oven for any length of time. Wipe the oven clean and dry with a soft cloth (do notforget to wipe under the oven door seal).
Use a detergent-soaked sponge, a soft brush, or a nylon scrubber to wipe the oven interior.Remove stubborn residue with a nylon scourer. You can remove lime deposits with a clothsoaked in vinegar.
If the oven remains dirty, you can repeat the procedure once the oven has cooled.
For heavy residue, such as grease left over from roasting, we recommend that you rubdetergent into the residue before activating the steam-cleaning function.
After cleaning, leave the oven door ajar at a 15° angle to allow the interior enamel surface to drythoroughly.
40 Maintainng your app ance

CARE AND CLEANING OF THE OVEN
w_Q • Be sure all controls are OFF and all surfaces are COOL before cleaning anypart of the range.
if your range is removed for cleaning, servicing or
any reason, be sure the Anti-Tip device is re-engaged _properly when the range is replaced. Failure to take _ _ J _ _ .Jthis precaution could result in tipping of the range and _cause injury.
Oven vent
Ovenvent• The oven vent is located above the
right rear surface unit.
• This area could become hot duringoven use.
It is normal for steam to come outof the vent.
The vent is important for proper aircirculation. Never block this vent.
Cleaning painted parts and decorative trim
For general cleaning, use a cloth with hot and soapy water.
For more difficult residue and built-up grease, apply a liquid detergent directly onto the area andleave for 30 to 60 minutes. Wipe with a damp cloth and dry. Do not use abrasive cleaners onany of these surfaces; they can scratch.
Cleaning stainless steel surfaces
1. Shake the bottle of Stainless Steel Appliance Cleaner or polish well.
2. Place a small amount of stainless steel appliance cleaner or polish on a damp cloth or damppaper towel.
3. Clean a small area, rubbing with the grain of the stainless steel if applicable.
4. Dry and buff with a clean, dry paper towel or soft cloth.
5. Repeat as necessary.
• Do not use a steel-wool pad; it will scratch the surface.
,, If a mineral oil-based stainless steel appliance cleaner has been used before to cleanthe appliance, wash the surface with dishwashing liquid and water prior to using theStainless Steel Appliance Cleaner or polish.
Maintanng your app ance 41

Cleaning the broil pan and insert
o
o
Do not attempt to clean the broil pan or insert byleaving it in the oven during a self-cleaning cycle.
After broiling, remove the broil pan from the oven.Remove the insert from the pan. Carefully pour out thegrease from the pan into a proper container.
Wash and rinse the broil pan and grid in hot waterwith a soap-filled scouring pad.
Soaking the pan will remove burned-on foods.
Both the broil pan and insert may be cleaned with acommercial oven cleaner and are dishwasher-safe.
Do not store a soiled broil pan and insertanywhere in the range.
Oven racks
If the racks are left in the oven during a self-cleaning cycle, their color will turn slightly blue andthe finish will be dull. After the self-cleaning cycle is complete and the oven has cooled, rub thesides of the racks with wax paper or a cloth containing a small amount of oil. This will help theracks glide more easily into their tracks.
Oven door
Dorft hand
door,
Use soap & water to thoroughly clean the top, sides,and front of the oven door. Rinse well. You may use aglass cleaner on the outside glass of the oven door. DONOT immerse the door in water. DO NOT spray orallow water or the glass cleaner to enter the doorvents. DO NOT use oven cleaners, cleaning powders,or any harsh abrasive cleaning materials on the outsideof the oven door.
DO NOT clean the oven door gasket. The ovendoor gasket is made of a woven material which isessential for a good seal. Care should be taken not torub, damage or remove this gasket.
42 Maintainng your app ance

CARE AND CLEANING OF THE GLASS COOKTOP
Normal daily use cleaning
Use only a ceramic cooktop cleaner or the cleaner supplied with this appliance on the glasscooktop. Other creams may not be as effective.
By following these steps, you can maintain and protect the surface of your glass cooktop.
1. Before using the cooktop for the first time, clean it with a ceramic cooktop cleaner or theincluded cleaner. This helps protect the top and makes cleanup easier.
2. Daily use of a ceramic cooktop cleaner or the included cleaner will help keep the cooktoplooking new.
3. Shake the cleaning cream well. Apply a few drops of cleaner directly to the cooktop.
4. Use a paper towel or a cleaning pad for ceramic cooktops to clean the entire cooktop surface.
5. Use a dry cloth or paper towel to remove all cleaning residue. No need to rinse.
DAMAG E t° your glass surface may occur if you use scrub pads other than thoserecommended:
Removing burned=on residue
1. Allow the cooktop to cool.
2. Spread a few drops of ceramic cooktop cleaneron the entire burned residue area.
3,
4,
5,
Using the included cleaning pad for ceramiccooktops, rub the residue area, applying pressureas needed.
If any residue remains, repeat the steps listedabove as needed.
For additional protection, after all residue has beenremoved, polish the entire surface with ceramiccooktop cleaner and a paper towel.
Removing heavy, burned=on residue
1,
2.
3,
4,
Allow the cooktop to cool.
Use the single-edge razor-blade scraper atapproximately a 45° angle against the glasssurface and scrape the soil. It will be necessary toapply pressure in order to remove the residue.
After scraping with the razor scraper, spread a fewdrops of ceramic cooktop cleaner on the entireburned residue area. Use the included cleaningpad to remove any remaining residue. (Do notscrape the seal.)
For additional protection, after all residue hasbeen removed, polish the entire surface with theincluded cooktop cleaner and a paper towel.
Mantanng yourappance 43

Removing metal marks and scratches
1,
2,
Be careful not to slide pots and pans across your cooktop. It will leave marks on the cooktopsurface. You can remove these marks by applying ceramic cooktop cleaner or the includedcleaner with a cleaning pad for ceramic cooktops.
If pots with a thin overlay of aluminum or copper are allowed to boil dry, the overlay may leaveblack discoloration on the cooktop. You should remove this discoloration immediately or it maybecome permanent.
carefully check the b0ttoms of pans f0r roughness that may scratCh the Co0ktoplWARNING
Cleaning the cooktop seal
To clean the seal around the edges of the glass, lay awet cloth on it for a few minutes, then wipe clean witha nonabrasive cleaner.
Potential for permanent damage to the glass surface
Sugary spillovers (such as jellies, fudge, candy, syrups) or melted plastics can cause pittingof the surface of your cooktop. This is not covered under the warranty. You should clean thespill while it is still hot. Take special care when removing hot substances. Refer to the followingsection.
• When using a scraper, be sure it is new and the razor blade is still sharp; do not use a dull ornicked blade.
Cleaning sugary spills and melted plastic
1. Turn off all surface units. Remove hot pans.
2. Wearing an oven mitt, use a single-edge razor-blade scraper to move the spill to a cool area ofthe cooktop. Remove the spill with paper towels.
3. Any remaining spillover should be left until the surface of the cooktop has cooled.
4. Don't use the surface units again until all of the residue has been completely removed.
[_ If pitting or indentation in the glass surface has already occurred, the cooktop glass willhave to be replaced. In this case, service will be necessary.
44 Maintainng your app ance

REMOVING AND REPLACING THE OVEN DOOR
How to remove the door
e The door is Very heaw. Be careful when removing and lifting the door. DO not lift the
A do0i by ihe handle:OAUTION
o Turn the power OFF before removing the door.
1. Open the door completely.
2. Pull the hinge locks down toward the door frame to the unlocked position.
"-Hinge lock
3,
4.
5,
Firmly grasp both sides of the door at the top.
Close the door to the door removal position, which is approximately 5 degrees from vertical(Fig. 1).
Lift door up and out until the hinge arm is clear of the slot (Fig. 2).
Unlocked positionLocked position
Fig. 1 Fig. 2
How to replace the door
1,
2.
Firmly grasp both sides of the door at the top.
With the door at the same angle as the removal position, slide the indentation of the hinge arminto the bottom edge of the hinge slot. The notch in the hinge arm must be fully inserted intothe bottom of the slot.
Bottom Indentation
edge of slot
Mantanng yourappance 45

3. Open the door fully. If the door will not open fully, the indentation is not inserted correctly in thebottom edge of the slot.
4. Push the hinge locks up against the front frame of the oven cavity to the locked position.
5. Close the oven door.
REMOVING AND REPLACING THE WARMING DRAWER
the PoWer ©EE laefoie removing the waiming diawer:CAUTION
How to remove the warming drawer
1. Open the drawer to the fully opened position.
2. Locate the glide lever on each side of the drawer; push down on the left glide lever and pull upon the right glide lever.
_ Lever
Push down on the left guide
3. Pull the warming drawer away from the range.
How to replace the warming drawer
1.
2.
3.
4.
Pull up on the right guide
Replace the shield on the right glide of the drawer body.
Pull the bearing glides to the front of the chassis glide.
Align the glide on each side of the drawer with the glide slots on the range.
Push the drawer into the range until levers click (approximately 2 inches). Pull the drawer openagain to seat bearing glides into position. If you do not hear the levers click or the bearingglides do not feel seated, remove the drawer and repeat steps 1-This will minimize possibledamage to the bearing glides.
46 Maintainng your app ance

CHANGING THE OVEN LIGHT
The oven light is a standard 40-watt appliance bulb. It will come on when the oven door is open.When the oven door is closed, press the OVEN LIGHT pad to turn it on or off. It will not workduring a self-cleaning cycle.
1. Make sure the oven and the bulb are cool.
2. Unplug the range or disconnect power.
3. Turn the glass bulb cover in the back of the oven counterclockwise to remove.
4. Turn the bulb counterclockwise to remove it from its socket.
f
Remove Replace
Glass bulb cover Bulb
5. Replace the light bulb and glass bulb cover by turning them clockwise.
6. Plug in the range or reconnect power.
(_ Before changing your oven light bulbl disconnect the electrical power to the range at thei.uT,o main fuse or circuit breaker panel; Make sure the oven and the bulb are cooll
z
Mantanng yourappance 47

TROUBLESHOOTING
Samsung works hard to ensure that you don't have problems with your new electric range. If you run intounexpected trouble, look first for a solution in the table below. If, after trying the suggested solution, you'restill having trouble, call Samsung at 1-800-SAMSUNG (1-800-726-7864).
The range is not The appliance has been installedimproperly.
,, Place the oven rack in the center of theoven. Place a level on the oven rack.
Adjust the leveling legs at the base of therange until the oven rack is level.
• Insure the floor is level and strong andstable enough to adequately support the
range.The floor is sagging or sloping. • Contact a carpenter to correct the
situation.
The kitchen cabinets are not • Insure the cabinets are square and provideproperly aligned and make the sufficient room for installation.range appear to be not level.
The appliance The kitchen cabinets are not • Contact a builder or installer to make themust be accessed square and built too tightly in to the appliance accessible.for servicing and appliance.
cannot be moved The carpet is interfering with ,,easily, movement of the range.
The oven control You have a function error code. ,,beeps and displaysan F error code. CODE _USE
-SE- Shorted key
Provide sufficient space so the range canbe lifted over the carpet.
Press the CLEAR/OFF pad and restartthe oven. If the problem persists,disconnect all power to the range for atleast 30 seconds and then reconnect the
power. If this does not solve the problem,call for service.
oven sensor openedE-28 Oven sensor shorted
E-g8 Oven heating error
E-OA Oven heating over
E-OE Door locking error
The surface units Improper cookware is being used. ,, Use pans which are flat and match thewill not maintain diameter of the surface unit selected.
a rolling boil or In some areas, the power (voltage) • Cover the pan with a lid until the desiredwill not cook fast may be low. heat is obtained.enough.
The surface units A fuse in your home may be blown ,, Replace the fuse or reset the circuit
will not turn on. or the circuit breaker tripped, breaker.The cooktop controls are set • Check to see the correct control is set forimproperly, the surface unit you are using.
The surface unit This is normal. The unit is still on and hot.
stops glowing whenchanged to a lowersetting.

Areas ofdiscoloration on the
cooktop
The surface unit
frequently cycles onand off.
The oven will notturn on,
The appliance willnot turn on.
Food spillover was not cleaned.
The surface is hot and the model
features a light-colored cooktop.
This is normal.
The range is not completelyplugged into the electrical outlet.
A fuse in your home may be blownor the circuit breaker tripped.
The oven controls have been set
improperly.
The oven is too hot.
The appliance is not completelyplugged into the electrical outlet ora fuse in your home may be blownor the circuit breaker tripped.
Incomplete service wiring.
Power outage.
The light bulb is loose or defective.
The switch operating light isbroken.
• Refer to the section on care and cleaningof the glass cooktop on page 43.
This is normal. The surface may appeardiscolored when it is hot. This is temporaryand will disappear as the glass cools.
The element will cycle on and off tomaintain the heat setting.
Make sure the electrical plug is insertedinto a live, properly grounded outlet.
Replace the fuse or reset the circuitbreaker.
See the chapter on operating the oven.
Allow the oven to cool.
o Make sure the power cord is plugged intoa live, properly grounded outlet. Check thefuse and circuit breakers.
Call for service.
Check to see if the house lights will turnon. If required, call your local electriccompany for service.
The oven light will ,, Tighten or replace the bulb.
not turn on. • Call for service.
Oven smokes The control has not been set ,, Refer to the section on setting ovenexcessively during properly, controls.
broiling. • Make sure the oven door is opened to the
broil stop position.
The meat has been placed too = Reposition the rack to provide properclose to the element, clearance between the meat and the
element. Preheat the broil element for
searing.
The meat has not been properly = Remove the excess fat from the meat. Cutprepared, away fatty edges that may curl, leaving the
lean intact.
The insert on the broiler pan has • Position the insert on the pan so thatbeen positioned upside down, the ribs are up and the slots are down,preventing the grease from allowing the grease to drip into the pan.draining.
Grease has built up on oven ,, Regular cleaning is necessary whensurfaces, broiling frequently.
Food does not bake The oven controls have not been ,, See the chapter on operating the oven.or roast properly, set correctly.
The oven rack has been positionedincorrectly or is not level.
Incorrect cookware or cookware of
improper size being used.
The oven sensor needs to be
adjusted.
See the section on using the oven rackson page 21.
See the section on adjusting thethermostat on page 35.
Troubleshooting 49

Food does not broil The oven controls have been set • Press the BROIL pad.properly, incorrectly.
The rack has not been properly • See the broiling guide on page 30._ositioned.
Cookware not suited for broiling. • Use suitable cookware.
Aluminum foil used on the broiling • See the section on broiling on page 29.pan and grid has not been fittedproperly and slit as recommended.
In some areas the power (voltage) • Preheat the broil element for 10 minutes.may be low.
,, See the broiling guide on page 30.
The oven The oven sensor needs to be • See the section on adjusting thetemperature is too adjusted, thermostat on page 35.hot or too cold.
Scratches or The cooktop is being cleaned ,,abrasions on improperly.cooktop surface
oCookware with rough bottomswere used on the cooktop orthere were coarse particles (eg.salt or sand) present between thecookware and the surface of the
cooktop.
Cookware has been slid across the
cooktop surface.
Boilovers have been cooked ontothe surface.
Excessive smokingduring a self-cleaning cycle
Scratches are not removable. Tinyscratches will become less visible in time
as a result of cleaning.
To avoid scratches, use the recommendedcleaning procedures. Make sure bottomsof cookware are clean before use, and usecookware with smooth bottoms.
Brown streaks or • Use the blade scraper to remove soil.specks
,, See the section on care and cleaning ofthe glass cooktop on page 43.
Areas of Mineral deposits from water and ,, Remove using a ceramic-glass cooktopdiscoloration with food have been left on the surface cleaning cream.metallic sheen of the cooktop.
Use cookware with clean, dry bottoms.
The oven will not The oven temperature is too high • Allow the range to cool and reset theself-clean, to set a self-clean operation, controls.
The oven controls have been set ,, See the section on self-cleaning on pageincorrectly. 38.
A self-cleaning cycle cannot be started if the oven lockout feature has beenactivated or if a radiant surface element is on.
"Crackling" or This is the sound of the metal • This is normal."popping" sound heating and cooling during
both the cooking and cleaningfunctions.
There is excessive soiling in theoven.
The oven door will The oven is too hot. ,,
not open after aself-cleaning cycle.
Press the CLEAR/OFF pad. Open thewindows to rid the room of smoke. Wait
until the self-cleaning cycle is cancelled.Wipe up the excessive soil and reset theoven for self-cleaning.
Allow the oven to cool.

Oven not clean after The oven controls were not set • See the section on self-cleaning on pagea serif-cleaning cycie correctly. 38.
The oven was heavily soiled. • Wipe up heavy spillovers before startingthe self-cleaning cycle. Heavily soiledovens may need to self-clean again or fora longer period of time.
Steam from the vent = This is normal.When using the convectionfeature, it is normal to see steam
coming out of the oven vent.
As the number of racks or amount
of food being cooked increases,the amount of visible steam willincrease.
This is normal in a new oven and
will disappear in time.Burning or oily odor = To speed the process, set a self-cleaningemitting from the cycle for a minimum of 3 hours.vent
See the section on self-cleaning on page38.
Strong odor • This is temporary.
This is normal.
Apply a small amount of vegetable oil toa paper towel and wipe the edges of theoven racks with the paper towel.
Replace the fuse or reset the circuitbreaker.
Reset the clock.
o
Fan noise
Oven racks aredifficuHt to snide.
DispHay goes bNank.
Display flashes.
Drawer does not
slide smoothHy ordrags.
Warming drawer willnot work.
Excessivecondensation in thedrawer
Food dries out in
the warming drawer.
An odor from the insulation aroundthe inside of the oven is normalfor the first few times the oven isused.
A convection fan may automaticallyturn on and off.
The shiny, silver-colored rackswere cleaned in a self-cleaningcycle.
A fuse in your home may be blownor the circuit breaker tripped.
There was a power failure.
The drawer is out of alignment.
The drawer is over-loaded or theload is unbalanced.
A fuse in your home may be blownor the circuit breaker tripped.
The controls are not set correctly.
There is liquid present in thedrawer.
Uncovered foods.
The temperature is set too high.
Moisture is escaping.
The drawer is not fully closed.
Fully extend the drawer and push it all theway in. See the page 46.
Reduce weight. Redistribute drawercontents.
Replace the fuse or reset the circuitbreaker.
See the chapter on using the warmingdrawer on page 16.
Remove the liquid.
Cover food with a lid or aluminum foil.
Adjust the temperature to a lower setting.
Cover food with a lid or aluminum foil.
Push the drawer in until the latch engages.
rflco
Troubleshooting 51

PLEASE DO NOT DISCARD THiS REPLACES THE WARRANTY PAGE iN THE USE & CARE GUIDE
SAMSUNG ELECTRIC RANGE
This SAMSUNG brand product, as supplied and distributed by SAMSUNG ELECTRONICSAMERICA, INC. (SAMSUNG)and deliverednew, in the original carton to the original consumer purchaser, is warranted by SAMSUNG against manufacturing defects in materialsand workmanship for a limited warranty period of:
One (1) Year Parts and Labor, Five {5} Years Parts WarrantyFor Glass Cooktop and Radiant Surface Unit
During this limited additional four-year warranty, you will responsible for any labor or in-home service.
This limited warranty begins on the originaldate of purchase, and isvalid only on products purchased and used inthe United States. Toreceivewarranty service, the purchaser must contact SAMSUNG for problem determination and service procedures. Warranty servicecan only be perlormed by a SAMSUNG authorized service center. The original dated bill of sale must be presented upon request asproof of purchase to SAMSUNG or SAMSUNG'sauthorized service center. Samsung will provide in-homeservice during the warrantyperiod at no charge subject to availabilitywithin the contiguous United States. Inhome service is not available inall areas. Toreceive inhome serviceproduct must be unobstructed and accessible to the service agent. If service is not availableSamsung mayelect to providetransportation of the product to and from an authorized service center.
SAMSUNG will repair or replace this product, at our option and at no charge as stipulated herein, with new or reconditioned partsor products if found to be defective during the limited warranty period specified above. All replaced parts and products become theproperty of SAMSUNG and must be returned to SAMSUNG. Replacement parts and products assume the remaining original warranty,or ninety (90) days, whichever islonger.
This limitedwarranty covers manufacturing defects in materials and workmanship encountered in normal, noncommercial use of thisproduct and shall not apply to the following: damage which occurs inshipment; deliveryand installation;applications and uses for whichthis product was not intended; altered product or serial numbers; cosmetic damage or exterior finish; accidents, abuse, neglect, fire,water, lightningor other acts of nature; use of products, equipment, systems, utilities,services, parts, supplies, accessories, applications,installations, repairs, external wiring or connectors not supplied or authorized by SAMSUNG which damage this product or resultin service problems; incorrect electrical linevoltage, fluctuations and surges; customer adjustments and failure to follow operatinginstructions, maintenance and environmental instructionsthat are covered and prescribed in the instructionbook; product removaland reinstallation;problems caused by pest infestations,and overheating or overcooking by user. This limitedwarranty shall not covercasesof incorrect electric current, voltage or supply, lightbulbs, house fuses, housewiring, cost of a servicecall for instructions,or fixinginstallationerrors. Furthermore,damage to the glasscooklop caused by the useof cleaners other than the recommended cleanersandpads, damageto the glasscook top caused by hardened spillsof sugary materialsor melted plastic that arenot cleaned according to thedirections inthe useand care guide arenot covered. SAMSUNG does not warrant uninterrupted or error-freeoperation of the product.EXCEPT AS SET FORTH HEREIN THERE ARE NO WARRANTIES ON THIS PRODUCT EITHER EXPRESS OR IMPLIED AND
SAMSUNG DISCLAIMSALL WARRANTIESINCLUDING,BUT NOT LIMITEDTO, ANY IMPLIEDWARRANTIESOF MERCHANTABILITY,INFRINGEMENTOR FITNESSFOR A PARTICULARPURPOSE. NO WARRANTYOR GUARANTY GIVEN BYANY PERSON, FIRMORCORPORATIONWITH RESPECTTO THIS PRODUCTSHALL BE BINDING ON SAMSUNG. SAMSUNG SHALL NOT BE LIABLEFOR
LOSS OF REVENUEOR PROFITS, FAILURETO REALIZESAVINGSOR OTHER BENEFITS,OR ANY OTHER SPECIAL, INCIDENTALOR CONSEQUENTIAL DAMAGES CAUSED BY THE USE, MISUSE OR iNABILiTYTO USE THIS PRODUCT, REGARDLESS OFTHE LEGALTHEORY ON WHICH THE CLAIM IS BASED, AND EVEN IF SAMSUNG HAS BEEN ADVISEDOF THE POSSIBILIW OFSUCH DAMAGES. NOR SHALL RECOVERYOF ANY KIND AGAINST SAMSUNG BE GREATERIN AMOUNT THAN THE PURCHASEPRICEOF THE PRODUCT SOLD BY SAMSUNG AND CAUSING THE ALLEGED DAMAGE. WITHOUT LIMITINGTHE FOREGOING,PURCHASER ASSUMES ALL RiSK AND LIABILITY FOR LOSS, DAMAGE OR INJURY TO PURCHASER AND PURCHASER'SPROPERTYAND TO OTHERSAND THEIR PROPERTYARISING OUT OF THE USE, MISUSEOR INABILITYTO USE THIS PRODUCT.THiS LIMITEDWARRANTYSHALL NOT EXTENDTO ANYONE OTHERTHAN THE ORIGINAL PURCHASEROF THIS PRODUCT,ISNONTRANSFERABLEAND STATESYOUR EXCLUSIVEREMEDY.
Some states do not allow limitations on how long an impliedwarranty lasts, or the exclusion or limitation of incidental or consequentialdamages, so the above limitations or exclusions may not apply to you. This warranty givesyou specific legal rights, and you may alsohaveother rights which vary from state to state.
To obtain warranty service,please contact SAMSUNGat:

QUESTIONS OR COMMENTS?
IN THE US 800-SAMSUNG (800-726--7864) www.samsung,com
IN CANADA 800-SAMSUNG (800-726--7864) www.samsung,com/ca
DG68-00104A