outback stx - shortline agshortlineag.com/stx manual.pdf · outback stx user guide 2 pn...
TRANSCRIPT

Outback STXUser Guide
Part No. 875-0331-000 Rev A1

This device complies with part 15 of the FCC Rules. Operation is subject to the following two conditions:
(1) This device may not cause harmful interference, and(2) this device must accept any interference received, including interference that may cause undesired operation.
Copyright NoticeCopyright Hemisphere GPS, Inc. (2013). All rights reserved.
No part of this manual may be reproduced, transmitted, transcribed, stored in a retrieval system or translated into any language or computer language, in any form or by any means, electronic, mechanical, magnetic, optical, chemical, manual or otherwise, without the prior written permission of Hemisphere GPS.
TrademarksAirStarTM, AirTracTM, AutoMateTM, BantamTM, BaseLineHDTM, BaseLineXTM, eDrive®, eDriveTCTM, eDriveVSiTM, eDriveXTM, G4TM, HQTM, IntelliFlow®, IntelliGateTM, IntelliStarTM, IntelliTracTM, Just Let GoTM, LiteStar IITM, M3TM, MapStar®, OutbackTM, Outback 360TM, Outback Guidance CenterTM, Outback Guidance®, Outback HitchTM, Outback MAXTM, Outback STM, Outback S2TM, Outback S3TM, Outback S-LiteTM, Outback StsTM, Outback STXTM, Outback Steering GuideTM, Satloc®, and the Satloc logo are proprietary trademarks of Hemisphere GPS, Inc. Other trademarks are the properties of their respective owners.
PatentsHemisphere GPS products may be covered by one or more of the following patents:
Other U.S. and foreign patents pending.
Notice to CustomersContact your local dealer for technical assistance. To find the authorized dealer near you:
[email protected]: (800) 247-3808
Technical SupportIf you need to contact Outback Guidance Customer Service:
North America Australia
Outback Guidance Outback AustraliaAgJunction Unit 2, 305 Montague Road2207 Iowa Street West End, QLD 4101Hiawatha, KS 66434 Phone: (07) 3004 6789Phone: (800) 247-3808 Fax: (07) 3004 6799Fax: (785) 742-4584
Outback Canada326 Saulteaux CrescentWinnipeg, MB R3J 3T2Phone: (866) 888-4472Fax: (204) 888-0991
U.S. Patents Australia Patents6111549 6876920 7400956 8000381 8214111 20022445396397147 7142956 7429952 8018376 8217833 20023256456469663 7162348 7437230 8085196 8265826 20043204016501346 7277792 7460942 8102325 82711946539303 7292185 7689354 8138970 83075356549091 7292186 7808428 8140223 83116966711501 7373231 7835832 8174437 83348046744404 7388539 7885745 8184050 RE413586865465 7400294 7948769 8190337


Contents
Chapter 1 Getting Started . . . . . . . . . . . . . . . . . . . . . . . . . . . . 1Overview . . . . . . . . . . . . . . . . . . . . . . . . . . . . . . . . . . . . . . . . . . . . . . . 2
Parts Included in Your Kit . . . . . . . . . . . . . . . . . . . . . . . . . . . . . . . . . 3
STX Terminal Overview . . . . . . . . . . . . . . . . . . . . . . . . . . . . . . . . . . 5
Connection Diagram . . . . . . . . . . . . . . . . . . . . . . . . . . . . . . . . . . . . . 7
Installing STX . . . . . . . . . . . . . . . . . . . . . . . . . . . . . . . . . . . . . . . . . . . 8
Mounting the Antenna . . . . . . . . . . . . . . . . . . . . . . . . . . . . . . . 8
Routing the Antenna Cable . . . . . . . . . . . . . . . . . . . . . . . . . . . . 9
Installing Optional Parts . . . . . . . . . . . . . . . . . . . . . . . . . . . . . . 9
Attaching the Power Cable to a Power Source and Routing the Cable into the Cab . . . . . . . . . . . . . . . . . . . . . . . . . . . . . . . . . . 10
Connecting the Cables to the STX Terminal . . . . . . . . . . . . . 10
Mounting the STX Terminal . . . . . . . . . . . . . . . . . . . . . . . . . . 11
Powering Up STX . . . . . . . . . . . . . . . . . . . . . . . . . . . . . . . . . . . . . . . 12
Starting STX . . . . . . . . . . . . . . . . . . . . . . . . . . . . . . . . . . . . . . . . . . . 13
Powering Down STX . . . . . . . . . . . . . . . . . . . . . . . . . . . . . . . . . . . . 14
Chapter 2 Display Overview and Basic Configuration . . . . . 15STX Display . . . . . . . . . . . . . . . . . . . . . . . . . . . . . . . . . . . . . . . . . . . 16
Control Buttons . . . . . . . . . . . . . . . . . . . . . . . . . . . . . . . . . . . . 19
Editing Field Data . . . . . . . . . . . . . . . . . . . . . . . . . . . . . . . . . . . 23
Viewing GPS Signal Information . . . . . . . . . . . . . . . . . . . . . . . . . . 24
Configuring STX . . . . . . . . . . . . . . . . . . . . . . . . . . . . . . . . . . . . . . . . 25
System Settings . . . . . . . . . . . . . . . . . . . . . . . . . . . . . . . . . . . . 25
Display Settings . . . . . . . . . . . . . . . . . . . . . . . . . . . . . . . . . . . . 26
GPS Settings . . . . . . . . . . . . . . . . . . . . . . . . . . . . . . . . . . . . . . 27
Vehicle and Implement Settings . . . . . . . . . . . . . . . . . . . . . . . 27
Steering Settings . . . . . . . . . . . . . . . . . . . . . . . . . . . . . . . . . . . 28
Status Bar . . . . . . . . . . . . . . . . . . . . . . . . . . . . . . . . . . . . . . . . . . . . . 29
Map Screen Elements . . . . . . . . . . . . . . . . . . . . . . . . . . . . . . . . . . . 30
Exporting Log Files . . . . . . . . . . . . . . . . . . . . . . . . . . . . . . . . . . . . . 31
Communicating with Third-Party Applications . . . . . . . . . . . . . . . 32
Capturing Screen Images . . . . . . . . . . . . . . . . . . . . . . . . . . . . . . . . 32
Chapter 3 Autosteering Overview and Setup . . . . . . . . . . . . 33eDriveTC . . . . . . . . . . . . . . . . . . . . . . . . . . . . . . . . . . . . . . . . . . . . . . 34
Performing a Steering Test . . . . . . . . . . . . . . . . . . . . . . . . . . . 34
Antenna Position . . . . . . . . . . . . . . . . . . . . . . . . . . . . . . . . . . . 35
Calibrating the Tilt Sensor . . . . . . . . . . . . . . . . . . . . . . . . . . . 35
Steering Options . . . . . . . . . . . . . . . . . . . . . . . . . . . . . . . . . . . 36
Outback STX User Guide iii PN 875-0331-000 Rev A1

Contents
eDriveX . . . . . . . . . . . . . . . . . . . . . . . . . . . . . . . . . . . . . . . . . . . . . . . 37
Performing a Steering Test . . . . . . . . . . . . . . . . . . . . . . . . . . . 37
Antenna Pivot . . . . . . . . . . . . . . . . . . . . . . . . . . . . . . . . . . . . . . 39
Antenna Offset . . . . . . . . . . . . . . . . . . . . . . . . . . . . . . . . . . . . . 39
Vehicle Calibration Considerations . . . . . . . . . . . . . . . . . . . . 45
Steering Options . . . . . . . . . . . . . . . . . . . . . . . . . . . . . . . . . . . 49
Chapter 4 Working with Vehicles and Implements . . . . . . . . 51Working with Vehicles . . . . . . . . . . . . . . . . . . . . . . . . . . . . . . . . . . . 52
Adding a Vehicle . . . . . . . . . . . . . . . . . . . . . . . . . . . . . . . . . . . 53
Vehicle Setup and Calibration . . . . . . . . . . . . . . . . . . . . . . . . 54
Editing a Vehicle . . . . . . . . . . . . . . . . . . . . . . . . . . . . . . . . . . . 59
Loading a Vehicle . . . . . . . . . . . . . . . . . . . . . . . . . . . . . . . . . . . 60
Exporting a Vehicle . . . . . . . . . . . . . . . . . . . . . . . . . . . . . . . . . 61
Importing a Vehicle . . . . . . . . . . . . . . . . . . . . . . . . . . . . . . . . . 62
Deleting a Vehicle . . . . . . . . . . . . . . . . . . . . . . . . . . . . . . . . . . 63
Working with Implements . . . . . . . . . . . . . . . . . . . . . . . . . . . . . . . . 64
Implement Offsets . . . . . . . . . . . . . . . . . . . . . . . . . . . . . . . . . . 64
Adding an Implement . . . . . . . . . . . . . . . . . . . . . . . . . . . . . . . 70
Setting Up an Implement . . . . . . . . . . . . . . . . . . . . . . . . . . . . 71
Editing an Implement . . . . . . . . . . . . . . . . . . . . . . . . . . . . . . . 72
Loading an Implement . . . . . . . . . . . . . . . . . . . . . . . . . . . . . . 73
Exporting an Implement . . . . . . . . . . . . . . . . . . . . . . . . . . . . . 74
Importing an Implement . . . . . . . . . . . . . . . . . . . . . . . . . . . . . 75
Deleting an Implement . . . . . . . . . . . . . . . . . . . . . . . . . . . . . . 76
Chapter 5 Jobs . . . . . . . . . . . . . . . . . . . . . . . . . . . . . . . . . . . 77Jobs Overview . . . . . . . . . . . . . . . . . . . . . . . . . . . . . . . . . . . . . . . . . 78
What is a Job? . . . . . . . . . . . . . . . . . . . . . . . . . . . . . . . . . . . . . 78
Job Numbering . . . . . . . . . . . . . . . . . . . . . . . . . . . . . . . . . . . . 78
Before You Start a Job . . . . . . . . . . . . . . . . . . . . . . . . . . . . . . 78
Working with Jobs at Startup . . . . . . . . . . . . . . . . . . . . . . . . . . . . . 79
Working with Jobs Using the Job Screens . . . . . . . . . . . . . . . . . . 80
Starting a New Job . . . . . . . . . . . . . . . . . . . . . . . . . . . . . . . . . 80
Entering Job Notes . . . . . . . . . . . . . . . . . . . . . . . . . . . . . . . . . 81
Loading a Job . . . . . . . . . . . . . . . . . . . . . . . . . . . . . . . . . . . . . . 82
Exporting a Job . . . . . . . . . . . . . . . . . . . . . . . . . . . . . . . . . . . . 84
Importing a Job . . . . . . . . . . . . . . . . . . . . . . . . . . . . . . . . . . . . 85
Closing a Job . . . . . . . . . . . . . . . . . . . . . . . . . . . . . . . . . . . . . . 86
Deleting a Job . . . . . . . . . . . . . . . . . . . . . . . . . . . . . . . . . . . . . 86
Working with Job Templates . . . . . . . . . . . . . . . . . . . . . . . . . . . . . 88
Creating a Job Template . . . . . . . . . . . . . . . . . . . . . . . . . . . . . 88
Using a Job Template . . . . . . . . . . . . . . . . . . . . . . . . . . . . . . . 88
Outback STX User Guide iv PN 875-0331-000 Rev A1

Contents
Exporting and Importing Job Templates . . . . . . . . . . . . . . . . 89
Deleting a Job Template . . . . . . . . . . . . . . . . . . . . . . . . . . . . . 89
Chapter 6 Guidance Operations . . . . . . . . . . . . . . . . . . . . . . 91Map Screen Overview . . . . . . . . . . . . . . . . . . . . . . . . . . . . . . . . . . . 92
Displaying the Map Screen . . . . . . . . . . . . . . . . . . . . . . . . . . . 92
Map Modes and Views . . . . . . . . . . . . . . . . . . . . . . . . . . . . . . 93
Zooming In and Out on the Map Screen . . . . . . . . . . . . . . . . 95
Steering Guide Lightbar . . . . . . . . . . . . . . . . . . . . . . . . . . . . . 96
Field Guidance Basics . . . . . . . . . . . . . . . . . . . . . . . . . . . . . . . . . . . 97
Adjusting Guidance Lines . . . . . . . . . . . . . . . . . . . . . . . . . . . . 97
Before You Set Guidance Lines . . . . . . . . . . . . . . . . . . . . . . . 98
Straight Guidance . . . . . . . . . . . . . . . . . . . . . . . . . . . . . . . . . . . . . . 99
Map Screen Line Display Options . . . . . . . . . . . . . . . . . . . . . 99
Setting Straight Lines . . . . . . . . . . . . . . . . . . . . . . . . . . . . . . 101
Pivot Guidance . . . . . . . . . . . . . . . . . . . . . . . . . . . . . . . . . . . . . . . . 110
Setting the Pivot Circle . . . . . . . . . . . . . . . . . . . . . . . . . . . . . 110
Using a Previously Defined Pivot . . . . . . . . . . . . . . . . . . . . . 112
Shifting a Pivot Line . . . . . . . . . . . . . . . . . . . . . . . . . . . . . . . . 113
Snapping a Pivot Line to the Current Location . . . . . . . . . . 114
Contour Guidance . . . . . . . . . . . . . . . . . . . . . . . . . . . . . . . . . . . . . 115
Creating an Initial Contour Pass . . . . . . . . . . . . . . . . . . . . . . 115
Guiding on Subsequent Passes . . . . . . . . . . . . . . . . . . . . . . 116
Making a New First Pass . . . . . . . . . . . . . . . . . . . . . . . . . . . . 116
Contour Lock . . . . . . . . . . . . . . . . . . . . . . . . . . . . . . . . . . . . . 116
Chapter 7 Advanced Features . . . . . . . . . . . . . . . . . . . . . . . 119Boundaries . . . . . . . . . . . . . . . . . . . . . . . . . . . . . . . . . . . . . . . . . . . 120
About Boundaries . . . . . . . . . . . . . . . . . . . . . . . . . . . . . . . . . 120
Setting a Boundary . . . . . . . . . . . . . . . . . . . . . . . . . . . . . . . . 120
Using Marks . . . . . . . . . . . . . . . . . . . . . . . . . . . . . . . . . . . . . . . . . . 123
Marking a Single Point . . . . . . . . . . . . . . . . . . . . . . . . . . . . . 123
Returning to an Existing Point . . . . . . . . . . . . . . . . . . . . . . . . . . . 124
eTurns . . . . . . . . . . . . . . . . . . . . . . . . . . . . . . . . . . . . . . . . . . . . . . . 126
Calibrating eTurns . . . . . . . . . . . . . . . . . . . . . . . . . . . . . . . . . 127
Setting Up and Making eTurns . . . . . . . . . . . . . . . . . . . . . . . 129
eTurns and Speed . . . . . . . . . . . . . . . . . . . . . . . . . . . . . . . . . 133
e-Dif . . . . . . . . . . . . . . . . . . . . . . . . . . . . . . . . . . . . . . . . . . . . . . . . . 135
Selecting e-Dif as the Differential Correction Type . . . . . . . 135
Initialization of e-Dif on Powerup . . . . . . . . . . . . . . . . . . . . . 136
Updating e-Dif . . . . . . . . . . . . . . . . . . . . . . . . . . . . . . . . . . . . 137
Appendix A STX Screens Reference . . . . . . . . . . . . . . . . . . . 139Tools Screens . . . . . . . . . . . . . . . . . . . . . . . . . . . . . . . . . . . . . . . . . 140
Outback STX User Guide v PN 875-0331-000 Rev A1

Contents
System Screen . . . . . . . . . . . . . . . . . . . . . . . . . . . . . . . . . . . . 140
Display Screen . . . . . . . . . . . . . . . . . . . . . . . . . . . . . . . . . . . . 144
Codes Screen . . . . . . . . . . . . . . . . . . . . . . . . . . . . . . . . . . . . . 146
GPS Screens . . . . . . . . . . . . . . . . . . . . . . . . . . . . . . . . . . . . . . . . . . 148
Setup Screen . . . . . . . . . . . . . . . . . . . . . . . . . . . . . . . . . . . . . 148
Status Screen . . . . . . . . . . . . . . . . . . . . . . . . . . . . . . . . . . . . . 150
Diag Screen . . . . . . . . . . . . . . . . . . . . . . . . . . . . . . . . . . . . . . 152
Config Screen . . . . . . . . . . . . . . . . . . . . . . . . . . . . . . . . . . . . . 153
EDif Screen . . . . . . . . . . . . . . . . . . . . . . . . . . . . . . . . . . . . . . . 154
Radio Screen . . . . . . . . . . . . . . . . . . . . . . . . . . . . . . . . . . . . . 155
RTK Screen . . . . . . . . . . . . . . . . . . . . . . . . . . . . . . . . . . . . . . . 156
Omni Screen . . . . . . . . . . . . . . . . . . . . . . . . . . . . . . . . . . . . . . 157
Vehicle Screens . . . . . . . . . . . . . . . . . . . . . . . . . . . . . . . . . . . . . . . 159
Main Screen . . . . . . . . . . . . . . . . . . . . . . . . . . . . . . . . . . . . . . 160
Steer Screen - eDriveTC . . . . . . . . . . . . . . . . . . . . . . . . . . . . 161
Steer Screen - eDriveX . . . . . . . . . . . . . . . . . . . . . . . . . . . . . 164
Tilt Setup Screen . . . . . . . . . . . . . . . . . . . . . . . . . . . . . . . . . . 165
Details Screen . . . . . . . . . . . . . . . . . . . . . . . . . . . . . . . . . . . . 166
Status Screen . . . . . . . . . . . . . . . . . . . . . . . . . . . . . . . . . . . . . 168
Implement Screens . . . . . . . . . . . . . . . . . . . . . . . . . . . . . . . . . . . . 169
Main Screen . . . . . . . . . . . . . . . . . . . . . . . . . . . . . . . . . . . . . . 169
Setup Screen . . . . . . . . . . . . . . . . . . . . . . . . . . . . . . . . . . . . . 170
Job Screens . . . . . . . . . . . . . . . . . . . . . . . . . . . . . . . . . . . . . . . . . . 172
Setup Screen . . . . . . . . . . . . . . . . . . . . . . . . . . . . . . . . . . . . . 172
Notes Screen . . . . . . . . . . . . . . . . . . . . . . . . . . . . . . . . . . . . . 173
Map Screen . . . . . . . . . . . . . . . . . . . . . . . . . . . . . . . . . . . . . . . . . . . 174
Index . . . . . . . . . . . . . . . . . . . . . . . . . . . . . . . . . . . . . . . . . . . . . . 175
End User License Agreement . . . . . . . . . . . . . . . . . . . . . . . . . . . 181
Warranty Notice . . . . . . . . . . . . . . . . . . . . . . . . . . . . . . . . . . . . . 184
Outback STX User Guide vi PN 875-0331-000 Rev A1

Chapter 1: Getting StartedOverview
Parts Included in Your Kit
STX Terminal Overview
Connection Diagram
Installing STX
Powering Up STX
Starting STX
Powering Down STX
Outback STX User Guide 1 PN 875-0331-000 Rev A1

Chapter 1: Getting Started
Thank you for your purchase of Outback STX™. This chapter provides an overview of Outback STX and the following:
• Parts included in your kit
• Basic connection diagram
• Information on installing Outback STX
• Information on powering up and powering down Outback STX
• Information on starting Outback STX
Read this chapter thoroughly before beginning the installation.
OverviewThe Outback STX Guidance System combines RTK capability in an autosteer-ready, value-based terminal. STX is compatible with the full line of field-proven Outback autosteer systems—including eDriveX™ with the eTurns™ automated turn solution. STX is RTK-capable when used in conjunction with an Outback MAX™ rover radio and Outback RTK base stations.
STX features a high-resolution touchscreen, multi-language support, and clear, easy-to-read job data and system status information in real time. STX provides the following features:
• Integrated receiver offering scalability from L1 GPS to L1/L2 GNSS
• GLONASS ready (unlock required—contact Outback Guidance Customer Service for more information)
• Compatible with Outback's entire autosteer product line including eDriveX and eDriveTC™
• Supports various differential correction types (SBAS, RTK, and L-band), with RTK correctors through a combination of the Outback MAX rover and any one of Outback's portable or fixed base stations, such as A321™, A221™, and BaselineX™.
STX also supports Hemisphere GPS’ patented Extended Differential (e-Dif®) software enables STX to perform with differential-like accuracy for extended periods of time without the use of a differential service. See “e-Dif” on page 135 for information on setting up and using e-Dif.
As either a first-time or experienced user of Outback products, you should acquaint yourself with the instructions contained in this user guide. You will find many useful tips and suggestions to help you get the most from your investment.
For more information on the differential corrections available for your STX system, contact Outback Guidance Customer Service.
Outback STX User Guide 2 PN 875-0331-000 Rev A1

Chapter 1: Getting Started
Parts Included in Your KitUnpack your STX terminal kit and identify the parts as shown in Table 1-1.
Table 1-1: Parts list
Part Number Qty Description Photograph
802-1079-000# 1 Terminal, Outback STX
604-0013-000# 1 RAM ball mounting hardware
• Round base
• Square base
• Double socket arm mount
• U-bolt and related nuts
051-0364-000# 1 Cable, power, ECU, 4.5 m
Connects ECU to cable 051-0351-000#
051-0351-000# 1 Cable, circular (female) 10 - power, CAN
Connects terminal to power, run/hold foot switch, and ECU cable 051-0364-000#
Outback STX User Guide 3 PN 875-0331-000 Rev A1

Chapter 1: Getting Started
051-0353-000# 1 Cable, circular (female) 14 - power, ethernet, rover
Connects terminal to rover radio
This part is only included in and intended for the Outback STX RTK kit.
804-3044-000# 1 Antenna, A50, wide band, N-type
720-0033-00A 1 Antenna mounting kit
• Base, magnet, round, 3.2” OD, 5/8-tap, black
• Disk, 3 x 3/8” x 3/16, zinc
• Screw, hex, 5/8”-11, 7/8” long, set screw steel, cup end, zinc plated
• Insulation tape
• Adhesive foam pad
050-0033-002# 1 Antenna cable, N-type male 90º to TNC male 90º, 26 ft
Connects terminal antenna port to antenna 804-3044-000#
750-1079-000 1 USB flash drive, 2 GB
720-0035 1 Run/hold foot switch (optional, purchased separately)
Table 1-1: Parts list (continued)
Part Number Qty Description Photograph
Outback STX User Guide 4 PN 875-0331-000 Rev A1

Chapter 1: Getting Started
STX Terminal OverviewFigure 1-1 shows the front, side, and rear views of the STX terminal and Table 1-2 on page 6 describes the features shown in Figure 1-1 For specific cable/port connections, refer to “Connection Diagram” on page 7.
Figure 1-1: STX terminal (front, side, and rear views)
051-0352-000# 1 Cable, GSI (optional, purchased separately)
Table 1-1: Parts list (continued)
Part Number Qty Description Photograph
1
2
3
6
4
5
710
98
Outback STX User Guide 5 PN 875-0331-000 Rev A1

Chapter 1: Getting Started
Table 1-2: STX terminal feature descriptions
Item Description
1 Power button (also functions as a screenshot button—see “Capturing Screen Images” on page 32)
2 USB port
3 Display touchscreen
4 Serial port
5 Model/serial number
6 Mounting holes
7 RADIO port
14-pin, connects to optional rover radio (only for use with STX RTK kit)
The cable for this port is color coded blue to match the port.
8 GSI/CAN2 port
9-pin, connects to GSI device
The cable for this port is color coded yellow to match the port.
9 PWR/CAN1 port
10-pin, connects to power source, autosteer ECU (eDriveX or eDriveTC) and optional run/hold foot switch
The cable for this port is color coded red to match the port.
10 ANTENNA port
TNC, connects to antenna
Outback STX User Guide 6 PN 875-0331-000 Rev A1

Chapter 1: Getting Started
Connection Diagram
PW
R/C
AN
1A
NTE
NN
AG
SI/C
AN
2R
AD
IO
051-
0353
-000
#Ra
dio
cabl
e
051-
0352
-000
#G
SI/C
AN
2 ca
ble
(opt
iona
l)
GSI
050-
0033
-002
#A
nten
na c
able
802-
1079
-000
#ST
X te
rmin
al
804-
3044
-000
#A
nten
na
051-
0351
-000
#Po
wer
/CA
N1
cabl
e05
1-03
64-0
00#
ECU
pow
er c
able
720-
0035
Run/
hold
foot
sw
itch
(eD
riveX
or e
Driv
eTC)
Rove
r rad
io
(Unu
sed)
Outback STX User Guide 7 PN 875-0331-000 Rev A1

Chapter 1: Getting Started
Installing STX
The following steps represent the typical installation order; however, you may install components in your preferred order.
1. Mount the antenna.
2. Install any optional parts (eDriveTC/eDriveX, run/hold foot switch, rover radio) and then route the appropriate cables into the cab for connection to the terminal.
3. Install the terminal mounting hardware (RAM ball mount) to both the cab and the terminal.
4. Connect the appropriate cables to the terminal.
5. Connect the terminal to the mounting hardware (RAM ball mount).
Mounting the AntennaYou should install the GPS antenna on the vehicle’s left/right centerline and front/back pivot point. If you cannot install the antenna at the exact centerline and/or pivot point, see Chapter 3, “Autosteering Overview and Setup” for instructions on entering offset values.
1. Clean and dry the vehicle surface where you will attach the antenna mounting plate.
2. Remove the paper backing from the adhesive on the back of the mounting plate.
3. Position the mounting plate and press down hard for proper adhesion.
4. Attach the antenna to the antenna mounting base.
Note: Proper installation is critical for safe and optimal STX operation.
Note: If there are separate installation instructions for any parts (such as for installing eDriveX or eDriveTC) those instructions are included with their part or kit.
Note: Do not place the antenna within two feet of a transmitting radio antenna (such as for a 2-way or business band radio).
Outback STX User Guide 8 PN 875-0331-000 Rev A1

Chapter 1: Getting Started
5. Place the magnetic mounted antenna on the plate and on the vehicle’s centerline and pivot point (similar to photo at right).
Routing the Antenna CableWhen routing the antenna cable:
• Ensure the STX terminal is powered off before attaching the cables
• Do not bend the cable to a radius of less than 6 inches
• Do not route the cable within 12 inches of radio wires, power generator wires, a heat source or moving parts
• Coil excess cable in a protected location and secure the installation with tie straps
To route the antenna cable:
1. Securely attach one end of the antenna cable (050-0033-002#) to the GPS antenna.
2. Route the cable through a cab opening where rubber protection exists that will protect the cable (see photo at right).
3. Attach the other end of the cable to the terminal (see Figure 1-1 on page 5 and “Connection Diagram” on page 7).
Installing Optional PartsFor information on installing eDriveTC/eDriveX, refer to the installation instructions included with your kit. For information on installing the run/hold foot switch or rover radio, see the following sections.
Installing the Run/Hold Foot Switch
You can use the run/hold foot switch as a remote to pause or restart STX’s mapping/data logging function. Using Figure 1-1 on page 5 and “Connection Diagram” on page 7 install the run/hold foot switch as follows:
1. Connect one end of run/hold foot switch cable 051-0281-000# to power cable 051-0351-000#.
2. Remove the cap from the run/hold connector on power cable and connect to run/hold foot switch 770-0035.
3. Connect the other end of the foot switch cable to the run/hold foot switch.
4. Install the run/hold foot switch in an easily accessible position.
Outback STX User Guide 9 PN 875-0331-000 Rev A1

Chapter 1: Getting Started
Installing the Rover Radio
You should mount the rover radio on top of the vehicle cab to ensure line-of-sight to the RTK base station. The bottom of the rover radio includes a built-in magnet for easy placement on the included mounting plate.
1. Clean and dry the vehicle surface where you will attach the rover radio mounting plate.
2. Remove the paper backing from the adhesive strips on the back of the mounting plate (see photo at right).
3. Position the mounting plate and press down hard for proper adhesion.
4. Place the rover radio on the plate.
5. Screw the rover radio antenna onto the rover radio antenna mount until snug.
Attaching the Power Cable to a Power Source and Routing the Cable into the Cab
1. Connect the red and black leads of power cable 051-0364-000# to a reliable 12 VDC power source—red lead to positive and black lead to negative (red lead shown at right).
2. Route power cable 051-0364-000# into the cab to connect to the power connector on power cable 051-0351-000#.
3. Coil excess cable in a protected location and secure the installation with tie straps.
Connecting the Cables to the STX TerminalUsing Figure 1-1 on page 5, “Connection Diagram” on page 7, and the photo at right as guides, connect the appropriate cables to the STX terminal. The cables and the ports on the terminal are color coded to make connections easier.
RedBlue Yellow
Outback STX User Guide 10 PN 875-0331-000 Rev A1

Chapter 1: Getting Started
Mounting the STX TerminalBefore you mount the terminal select an appropriate mounting location. The terminal should be located within easy reach and visibility of the driver; normally, this is in the front, right corner of the cab. Additionally, make sure you allow enough room for any optional equipment, such as the lightbar and/or switchbox.
Do not mount the terminal in a location where it interferes with seeing other information, controls, or the field. Looking at the screen for too long while operating the vehicle can cause a crash.
To mount the STX terminal:
1. If necessary, loosen the knob on the arm mount and remove the ball mounts from the RAM ball mount assembly.
2. Attach the round base to the back of the terminal using the screws provided (shown at right).
3. Attach the bar mount base to your selected location using the included U-bolt hardware (shown at right).
4. Place one end of the arm mount over the ball of the bar mount base and then tighten the knob enough to keep the arm mount attached.
5. Position the terminal so the round base fits in the open end of the arm mount and tighten the knob securely (similar to shown at right).
6. Adjust the terminal to the desired viewing angle.
Outback STX User Guide 11 PN 875-0331-000 Rev A1

Chapter 1: Getting Started
Powering Up STXDepending on the components of your system you may have to power up more than one component. For example, if your STX system includes eDriveX you must power up both the STX terminal and the eDriveX ECU.
1. Power up the STX terminal.
The STX terminal power button is located at the top of the left side of the terminal (circled at right).
Press and hold the power button for approximately three seconds until the screen illuminates and the AgJunction logo appears.
2. Power up eDriveX or eDriveTC (optional component).
• eDriveX
Turn the eDriveX power switch to the ON position (top photo at right). eDriveX will establish communication with the STX terminal and wait for the DGPS signal to be acquired.
The red power LED (outer - nearest the edge) indicates power when illuminated (bottom photo at right).
• eDriveTC
Turn the eDriveTC power switch to the ON position. eDriveTC will establish communication with the STX terminal and wait for the DGPS signal to be acquired. The S PRESENT light on the eDriveTC console indicates communication has been established.
Note: Refer to the installation guide (for eDriveX or eDriveTC) specific to your vehicle make and model for information on installing eDriveX or eDriveTC.
Outback STX User Guide 12 PN 875-0331-000 Rev A1

Chapter 1: Getting Started
Starting STXTo start STX:
1. Power up STX. If you have any additional components connected to STX power them up as well. Upon powerup STX completes a self test and the screen below appears.
2. Press Accept. The window at right appears.
Upon startup STX starts acquiring a DGPS signal (as long as the antenna has a clear view of the sky)—this may take several minutes, during which time the vehicle can be moving and you can perform certain functions.
• Upon achieving a GPS signal, the satellite icon turns from red to orange and “3d” appears indicating a 3-dimensional solution.
• Upon acquiring a DGPS position, the satellite icon turns green and “3D” appears indicating a differentially corrected 3-dimensional solution.
• Upon acquiring an RTK position (with optional RTK equipment) “RTK” appears.
The first time you start STX the Continue job and List jobs buttons are unavailable (gray—as are all Job buttons until you have a GPS position).
Press the buttons as follows:
• New job - STX automatically assigns a job name (number) and this number appears on the Job screen button and on the Setup (Job) screen (see “Setup Screen” on page 172).
• Continue job - STX automatically loads the most recently closed job and displays the Map screen.
Note: STX must have a GPS position to begin a job and provide guidance.
Outback STX User Guide 13 PN 875-0331-000 Rev A1

Chapter 1: Getting Started
• List jobs - STX displays a jobs window, from which you can load a previous job (see “Loading a Job” on page 82).
• Cancel - Starts STX with no job.
Powering Down STXDepending on the components of your system you may have to power down more than one component. For example, if your STX system includes eDriveX you must power down both the STX terminal and the eDriveX ECU. Refer to “Powering Up STX” on page 12 for photos of the power buttons/switches of the STX terminal, eDriveTC, and eDriveX.
1. Power down the STX terminal by pressing and holding the STX terminal power button for approximately five seconds until the screen goes blank.
2. Power down any additional components:
• eDriveX - turn the eDriveX power switch to the OFF position.
• eDriveTC - turn the eDriveTC power switch to the OFF position (toggle switch down).
Note: See “STX Display” on page 16 for more information on navigating the display using buttons, screens, and tabs.
Outback STX User Guide 14 PN 875-0331-000 Rev A1

Chapter 2: Display Overview and BasicConfiguration
STX Display
Viewing GPS Signal Information
Configuring STX
Status Bar
Map Screen Elements
Exporting Log Files
Communicating with Third-Party Applications
Capturing Screen Images
Outback STX User Guide 15 PN 875-0331-000 Rev A1

Chapter 2: Display Overview and Basic Configuration
STX DisplayThe STX display consists of screen buttons, screen tabs, and control buttons. Figure 2-1 shows (top) the Setup (GPS) screen and (bottom) the Map screen in Machine mode and Top Down view.
Figure 2-1: STX display
You navigate the display using screen buttons and screen tabs. Press a screen button to access a single screen or a set of screens. For example, the top figure in Figure 2-1 shows the result of pressing the GPS screen button—three tabs are displayed, the Setup screen is visible (Setup tab is orange), and the two blue tabs provide access to the Status and Diag screens.
Screen buttons Control buttonsStatus bar
Press anywhere in the map background to toggle full screen view on/off
Map screen
Buttons
Fields Screen tabs
(this hides most of the buttons on the left and right of the disply)
ECU state and critical status
Outback STX User Guide 16 PN 875-0331-000 Rev A1

Chapter 2: Display Overview and Basic Configuration
Use fields to edit settings and buttons to adjust settings or activate functionality. You can use a button that is blue and edit a field with a thin outline around it; however, if a button is gray or a field has no thin outline around it, you cannot use/edit it (see “Editing Field Data” on page 23). Use control buttons to perform such tasks as engaging automated steering and setting paths. An orange screen/control button or tab is active. You can swap the location of the screen buttons and control buttons (see the Controls button in Table A-2 on page 144).
The status bar shows the eDriveX ECU state and critical status and the current vehicle’s speed, heading, cross track (Xtrack) error, and pass number.
Table 2-1 describes the STX screen buttons and provides links to more detailed information elsewhere within this manual.
Table 2-1: Screen buttons and screens
Screen Button Description
Setup screen button - provides access to other screen buttons:
• When the button is blue with an up arrow, press to display the Vehicle, Implement, and Tools screen buttons (after you press the blue Setup screen button it changes to orange—left figure shown at right)
• When the button is orange with a down arrow, press to display the Map, Job, and Marks screen buttons (after you press the orange Setup screen button it changes to blue—right figure shown at right)
GPS screen button - provides access to the following screens (depending on your installed components):
• Setup - view read-only system information and set such items as message output rates, correction type, and time
• Status - view read-only GPS information
• Diag - view read-only diagnostic information
• Config (eDif-only screen) - view e-Dif point data, save points, and update the e-Dif solution
• EDif (eDif-only screen) - view read-only e-Dif information
• Radio (RTK-only screen) - view/set radio information
• RTK (RTK-only screen) - view RTK information
• Omni (OmniSTAR-only screen) - view read-only OmniSTAR information
See “GPS Screens” on page 148 for more detailed information on the fields/buttons on the GPS screens.
Outback STX User Guide 17 PN 875-0331-000 Rev A1

Chapter 2: Display Overview and Basic Configuration
Vehicle screen button - provides access to the following Vehicle screens:
• Main - add, edit (name and color), load, import, export, and delete vehicles
• Steer - steering controller information and settings:
– eDriveTC - enter settings and view read-only information
– eDriveX - enter settings
• Tilt Setup - enter/set eDriveTC tilt related information
• Details - view read-only eDriveX related information
• Status - view read-only eDriveX status information
See “Working with Vehicles” on page 52 for more information.
Implement screen button - provides access to the following Implement screens:
• Main - add, edit, load, import, export, and delete implements
• Setup - set implement width, overlap, and offset information
• eTurn Calibrate - calibrate your implement for eTurns (eDriveX only)
• eTurn Setup - set up eTurns for your implement (eDriveX only)
See “Working with Implements” on page 64 for more information.
Tools screen button - provides access to three Tools screens:
• System - view read-only system information, export data, update the ECU, and set the language
• Display - settings for your display, such as screen brightness and units of measure
• Codes - view current subscriptions and enter new subscription codes
Job screen button - provides access to two Job screens:
• Setup - create new jobs, continue a previous job, use templates, and import or export job data
• Notes - record job specific data such as the farm, field, and operator ID as well as view system-generated current job number for quick reference
See “Jobs Overview” on page 78 for more information on jobs.
This button also displays the current (active or open) job number.
Table 2-1: Screen buttons and screens (continued)
Screen Button Description
Outback STX User Guide 18 PN 875-0331-000 Rev A1

Chapter 2: Display Overview and Basic Configuration
Control ButtonsControl buttons enable you to perform such tasks as engaging automated steering, displaying the lightbar, and activating Contour guidance.
Map screen button - displays the Map screen and toggles between sets of map-related buttons.
• Map screen - moving graphical representation of the field operation
• Map-related buttons - use to zoom in and out on the Map screen, toggle between Machine mode and Field mode, and toggle between Top Down view and 3D view
See “Map Screen Overview” on page 92 for more information on the Map screen button other map features.
This button also displays the applied/recorded area in either acres or hectares (7.1 acres in button at left).
Mark/Boundary/Return to Point screen button - set boundaries, drop and manage marks (flags), and return to a previous point.
Note; This manual makes a distinction between control buttons (that appear along the left or right side of the display) and buttons that appear on each screen. If you have to press a control button the text will specifically say “control button.”
Table 2-1: Screen buttons and screens (continued)
Screen Button Description
Outback STX User Guide 19 PN 875-0331-000 Rev A1

Chapter 2: Display Overview and Basic Configuration
Table 2-2 describes each control button.
Table 2-2: Control buttons
Control Button Description
Steering button
• If eDriveTC is connected, TC appears on the button
• If eDriveX is connection, X appears on the button
For eDriveTC:
If you set Engage to Auto on the Steer screen, an A appears on the Engage button (see Table 2-3 on page 22). The color of the Engage button indicates the following:
• Gray - Not all auto steering criteria are met.
• Blue - All auto steering criteria are met. Press the button when blue to engage auto steering (the button turns orange).
• Orange - Auto steering is engaged and active (that is, it is auto steering). If you take control at any time, such as at the end of a pass, auto steer disengages. The button will turn blue again when conditions are met but you must press the button to re-engage auto steering (button turns orange).
For eDriveX:
Note: eDriveX does not support auto engage—the Engage button on the Steer screen is disabled (gray).
The color of the Engage button indicates the following:
• Gray - Not all auto steering criteria are met.
• Blue - All auto steering criteria are met. Press the button when blue to engage auto steering (the button turns orange).
• Orange - Auto steering is engaged and active (that is, it is auto steering). If you take control at any time, such as at the end of a pass, auto steer disengages. If you press the Engage button during auto steering (button is orange, auto steering is disengaged and the button turns blue).
Apply
Select to have STX log application or coverage data for the current job. Press this button (or press the run/hold foot switch) to stop or hold logging job data. Blue indicates no data logging; orange indicates data logging.
eDriveTC(VSi)
eDriveX(VSi or no VSi)
eDriveTC(no VSi)
Outback STX User Guide 20 PN 875-0331-000 Rev A1

Chapter 2: Display Overview and Basic Configuration
Contour Guidance
Activate Contour (free-form) guidance mode, where guidance is relative to any previous pass. Contour mode differs from Straight (A=B, A + Direction) and Pivot guidance modes, where Straight and Pivot guidance modes follow predefined guidelines and Contour guidance mode follows previously defined paths. Blue indicates Contour guidance mode is inactive; orange indicates it is active.
This button also enables and disables Contour Lock. When using Contour guidance, STX constantly searches for the nearest swath from which to provide guidance. If passes of different contour definitions occur close enough together and Contour Lock is not enabled, STX might display guidance for a pass of a different contour definition from the one you are on. Contour Lock enables you to stop the STX’s search for the closest swath.
Straight Guidance (Pivot Guidance)
Display the Straight Guidance window, where you can create linear or pivot (circular) parallel guidance passes, or return to point guidance. Blue indicates Straight guidance mode is inactive; orange indicates it is active.
This button changes to the Pivot Guidance button when in Pivot guidance mode.
eTurns
eTurns is a subscription-only eDriveX feature that enables the vehicle to automatically execute a turn at the end of a swath (you determine which swath to turn onto).
Note: You must have eDriveX installed and have a valid eTurns subscription to use eTurns. Contact your local Outback Guidance dealer or Outback Guidance Customer Service to obtain an eTurns subscription.
Table 2-2: Control buttons (continued)
Control Button Description
Outback STX User Guide 21 PN 875-0331-000 Rev A1

Chapter 2: Display Overview and Basic Configuration
Table 2-3 shows how the Steering button appears if eDriveTC is installed and Auto-Engage is set to AUTO (on)—see “Steer Screen - eDriveTC” on page 161 for information on setting Auto-Engage (the Engage button) to AUTO.
Table 2-3: Steering button status Auto-Engage set to Auto (On)
Button Indicates Condition Details
‘Not ready’. Auto-steering (so auto-engage) not possible.
Initially: The criteria for auto-steering are not met. Any or all of these are out of limit:
• Heading
• Distance (crosstrack)
• Speed
Subsequently: Auto-steering has ceased because manual steering has occurred (to make a turn for example) and has not been able to (re)auto-engage within 45 seconds. See Flashing below.
Auto-steering available (ready) - auto-engage on.
All criteria are met and auto-steering will begin when you press the button. The Map screen will show you approaching this point. This means that, initially, even though auto-engage is on, you still have to engage auto-steering manually when you first approach a wayline (as if auto-engage was set to manual).
(Subsequently, auto-steering will (re)auto-engage when you are back within the limits, after a turn for example. See Flashing below.)
Auto-steering has auto-engaged.
Initially because you have pressed the blue button when within the limits. Subsequently after manual steering when back within limits and manual steering has ceased (see Flashing below).
Flashing
Ready to (re)auto-engage.
Flashing: Button flashes between blue and orange when you begin manual steering during auto-engaged steering (to make a turn for example). If auto-steering cannot (re)auto-engage within 45 seconds, flashing ceases and the auto-steering status reverts to ‘not ready’ (gray).
Note: Steering auto (re)engages two seconds after you release manual steering when back within the limits.
Outback STX User Guide 22 PN 875-0331-000 Rev A1

Chapter 2: Display Overview and Basic Configuration
Editing Field DataIf a field has a line around it you press the field to display a window to edit the current value. For example, if you press the Enter code field the Enter Code window appears (Figure 2-2). Use the buttons in the window to enter a value and press Apply to accept the value and close the window. If a button is gray or a field has no outline around it, it is not available (you cannot use the button or edit the field’s value).
Figure 2-2: Entering field data
EditableNot editable
Outback STX User Guide 23 PN 875-0331-000 Rev A1

Chapter 2: Display Overview and Basic Configuration
Viewing GPS Signal InformationThe GPS screen button displays GPS signal information (Figure ) for quick reference. If the button is orange the button is active (you are displaying the set of GPS screens). Table 2-4 describes what is displayed on the button.
Table 2-4: GPS screen button information
Button Element Description
Signal Status Satellite icon color indicates the following:
• Red = no fix on a GPS signal
• Orange = tracking satellites
• Green = receiving a DGPS signal
Signal Strength Vertical bars indicate the quality of the GPS signal related to the standard deviation of the solution:
• SBAS, 3 to 4 bars are typical
• RTK, 4 bars are typical
Signal (Correction) Type
STX is receiving the following signals:
• No signal type (blank) = not receiving a GPS signal
• 3d = 3 dimensional signal
• 3D = 3 dimensional differential signal (DGPS)
• RTK = real time kinematic corrections
Differential (Diff) Age Age of the corrections used in the DGPS correction:
• SBAS, typically 6 to 10 seconds
• RTK, optimal operating values are < 5 seconds
Signalstatus Signal
strengthSignaltype
Differentialage
Outback STX User Guide 24 PN 875-0331-000 Rev A1

Chapter 2: Display Overview and Basic Configuration
Configuring STXSTX has several screens/tabs on which you accept default values/options or select alternative values/or options to configure STX before you start a job. For information on all buttons and fields on all screens see Appendix A, “STX Screens Reference.”
System SettingsThe System screen (Figure 2-3) enables you to view hardware and software information, change the system language, export log data, and update the ECU software.
Figure 2-3: System screen
To change system settings:
1. Press the Tools screen button, and, if the System screen is not displayed, press the System tab.
2. Press the Language field and select a language from the drop-down list.
For information on all buttons and fields on the System screen, including how to export log data and update ECU software, see “System Screen” on page 140.
Outback STX User Guide 25 PN 875-0331-000 Rev A1

Chapter 2: Display Overview and Basic Configuration
Display SettingsThe Display screen has various settings that affect the way the system displays and records information.
Figure 2-4: Display screen
To configure display settings:
1. Press the Tools screen button then the Display tab.
2. Change the settings as follows:
• For the buttons on the screen, press a button to toggle/cycle through available options. The lightbar sensitivity button (right Lightbar button, showing High in Figure 2-4) is unavailable if the lightbar function button (left Lightbar button, showing Steering in Figure 2-4) is set to Off.
• For the Grid Spacing field, press the field, enter a value in the Grid Spacing field, and then press Apply. The Grid Spacing field is available only when you set Lines to Grid.
For information on all buttons and fields on the Display screen see “Display Screen” on page 144.
Outback STX User Guide 26 PN 875-0331-000 Rev A1

Chapter 2: Display Overview and Basic Configuration
GPS SettingsThe GPS Setup screen has various settings that relate to the type of GPS differential correction the system uses. The fields at the top of the screen are read-only and provide useful diagnostic information.
Figure 2-5: Setup screen
To configure GPS settings:
1. Press the GPS screen button then the Setup tab.
2. Change the settings as follows:
• For the Local Time, press the up/down arrows to increase/decrease the time in half-hour increments.
• For Serial and SBAS, press each button to display a window where you select the preferred values.
• For the Correction Type, press a button to select that correction type.
For information on all buttons and fields on the Setup screen see “Setup Screen” on page 148.
Vehicle and Implement SettingsSee Chapter 4, “Working with Vehicles and Implements” and “Vehicle Screens” on page 159, and “Implement Screens” on page 169 for information on vehicle and implement settings.
Outback STX User Guide 27 PN 875-0331-000 Rev A1

Chapter 2: Display Overview and Basic Configuration
Steering SettingsSTX uses the settings on the Steer screen when you use an optional automated steering control unit, such as eDriveTC or eDriveX. Figure 2-6 shows the Steer screen when either eDriveTC or eDriveX is connected.
Figure 2-6: Steering screen - with eDriveTC or eDriveX connected
To configure steering settings:
1. Press the Vehicle screen button then the Steer tab.
2. Refer to “Steer Screen - eDriveTC” on page 161 or “Steer Screen - eDriveX” on page 164 for information on changing steering settings. For specific instructions on performing a steering test, see “Performing a Steering Test” on page 34 (eDriveTC) and “Performing a Steering Test” on page 37 (eDriveX).
eDriveTC eDriveX
Outback STX User Guide 28 PN 875-0331-000 Rev A1

Chapter 2: Display Overview and Basic Configuration
Status BarThe Status bar (Figure 2-7) displays eDriveX ECU and commonly-used vehicle information:
• ECU state (full circle) - current state of ECU (when connected)
– Orange = startup
– Red = shutdown
– Light green = connecting
– Green = guidance
– Purple = install
– Blue = service
• ECU critical status:
– Green with check mark = OK
– Red with X = errors
• Speed - rate at which the vehicle is traveling.
• Heading - direction of travel in degrees.
• Xtrack (cross track) error - perpendicular distance from your current driving position to your guidance line. For example, if you are driving an A=B and you veer to the right and are off your line by 6 inches, then your cross track error is 6 inches.
• Pass number - once the A=B line is set, all passes are numbered. Pass 1 is one side of the original A=B line; Pass -1 is to the other side.
Figure 2-7: Status bar
Note: For ECU errors see “Status Screen” on page 168.
ECUstate
ECUcritical status
Outback STX User Guide 29 PN 875-0331-000 Rev A1

Chapter 2: Display Overview and Basic Configuration
Map Screen ElementsTable 2-5 describes the elements of the STX Map screen.
Table 2-5: STX Map screen elements
Screen Item Description
Steering Guide lightbar
Shows the vehicle’s position relative to the guidance line.
• Top arc shows heading
• Bottom bar shows crosstrack
• When the steering guide indicators are centered (indicated by vertical yellow arrows), the vehicle is aligned with (heading correct) and on (crosstrack 0) the current pass.
To make accurate steering corrections, steer either left or right as indicated by the lighted heading arrows.
You can display the full lightbar (top two figures at left) or display just the cross track bar (bottom figure at left). See “Steering Guide Lightbar” on page 96.
Zoom buttons
• Press the zoom in (plus) button to zoom in on the field (vehicle appears larger)
• Press the zoom out (minus) button to zoom out on the field (vehicle appears smaller)
Press either button as many times as necessary to obtain your preferred zoom level.
Vehicle and implement indicators
Representation of selected vehicle and selected implement. The width of actual implement is indicated by width of implement indicator (for example, a wider implement will appear wider onscreen than a narrower implement).
See “Working with Vehicles” on page 52 and “Vehicle Screens” on page 159 and “Working with Implements” on page 64 and “Implement Screens” on page 169.
Headland alert indicator
Indicator that appears in the upper left of the Map screen when the headland alert indicator is set to ON (see HL Alert button in Table A-2 on page 144) and the implement crosses into a previously applied area.
Zoom distance (lower left corner of screen)
This is the distance between the grid lines on the screen (value increases or decreases as you zoom in or out).
Outback STX User Guide 30 PN 875-0331-000 Rev A1
Chapter 2: Display Overview and Basic Configuration
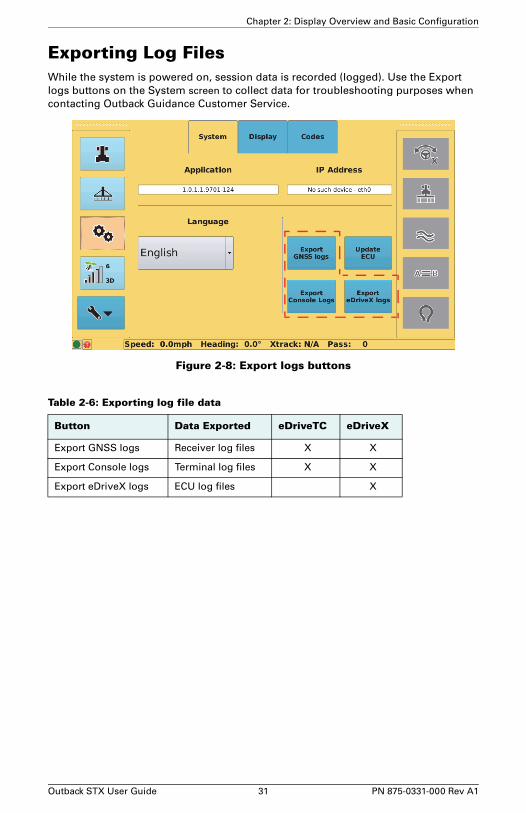
Exporting Log FilesWhile the system is powered on, session data is recorded (logged). Use the Export logs buttons on the System screen to collect data for troubleshooting purposes when contacting Outback Guidance Customer Service.
Figure 2-8: Export logs buttons
Table 2-6: Exporting log file data
Button Data Exported eDriveTC eDriveX
Export GNSS logs Receiver log files X X
Export Console logs Terminal log files X X
Export eDriveX logs ECU log files X
Outback STX User Guide 31 PN 875-0331-000 Rev A1

Chapter 2: Display Overview and Basic Configuration
Communicating with Third-Party ApplicationsAny application designed to receive DGPS signals from an external receiver over an RS-232 serial interface using either NMEA 0183 or RTCM messages will work with STX. NMEA 2000 messages are also available over the CAN bus. Various connecting cables and kits are available for specific applications such as yield monitors, rate controllers, laptop PCs, and PDAs. For successful communication, you must configure both STX and the external application to communicate in the same manner. Many applications can use the default communication protocol; however, some applications may require alteration from the default settings. See Table A-5 on page 148 for information on changing NMEA message rates and the baud rate.
Capturing Screen ImagesIf you notice something on the touchscreen that you either do not understand or want to save for later review you can take a screen capture of the entire display. Simply insert a USB flash drive (with an “S700” folder at the root level of the drive) into the terminal and press the power button to capture the image on the display. Each time you press the power button, STX saves a capture of the entire screen as a .png file in the S700 folder on the flash drive.
Caution: Hold down the power button for only two or three seconds to capture a screen image. Holding down the power button for approximately five seconds powers down the terminal.
Outback STX User Guide 32 PN 875-0331-000 Rev A1

Chapter 3: Autosteering Overview and SetupeDriveTC
eDriveX
Outback STX User Guide 33 PN 875-0331-000 Rev A1

Chapter 3: Autosteering Overview and Setup
This chapter applies only if you have automated steering (eDriveTC or eDriveX) installed and connected to your STX system. Before you add a vehicle, review the information in this chapter. Table 3-1 provides a summary of the required steps to properly set up automated steering for your system.
eDriveTCReview the information in this section before adding a vehicle.
Performing a Steering TestPerform a steering test to check the connectivity of the system. Test the steering with the vehicle moving at no more than 4 kph (2.5 mph).
To perform a steering test with eDriveTC connected:
1. Press the Vehicle screen button then the Steer tab. The Steer screen appears.
2. Press the left Steering Test button and confirm the vehicle steers to the left. Press Stop as soon as the direction is confirmed.
Table 3-1: Automated steering setup for eDriveTC and eDriveX
Setup Steps eDriveTC eDriveX
Performing a steering test X X
Antenna position X
Steering options X X
Calibrating the tilt sensor X
Antenna pivot X
Antenna offset X
Vehicle calibration X
Outback STX User Guide 34 PN 875-0331-000 Rev A1

Chapter 3: Autosteering Overview and Setup
Press the right Steering Test button and confirm the vehicle steers to the right. Press Stop as soon as the direction is confirmed.
3. If the system passes the steering test, continue with the next section. If the system does not pass the steering test see the table below and re-check your installation; if you are still unable to perform a successful steering test after troubleshooting, contact your local Outback Guidance dealer or Outback Guidance Customer Service.
Antenna PositionFor eDriveTC place the antenna at the pivot point—see Figure 3-1 for the recommended antenna placement for different vehicle types. There is no compensation for the antenna not being at the pivot point—you cannot enter an antenna offset for eDriveTC.
Figure 3-1: Antenna position for eDriveTC
Calibrating the Tilt SensorAfter completing the initial STX startup sequence, calibrate the tilt sensor before starting field operations. Calibration of your tilt sensor enables STX to eliminate position errors that would otherwise occur due to the degree of tilt at which you are working.
Problem Solution
Wheels move into left or right lock position, but direction is switched
Swap the two cables connected to the solenoids of the eDriveTC hydraulic block
Wheels do not move Check the eDriveTC installation for:
HydraulicsElectronic componentseDriveTC harnessCorrect valve type
Note: Make sure the vehicle is parked on a level surface before calibrating the tilt sensor. If necessary, use a long bubble level against a rigid vehicle surface to verify that it is level.
Sprayer
Combine
Standard tractorArticulated tractor
Tracked tractor
Outback STX User Guide 35 PN 875-0331-000 Rev A1

Chapter 3: Autosteering Overview and Setup
To calibrate the tilt sensor:
1. Press the Vehicle screen button then the Tilt Setup tab. The Tilt Setup screen appears.
2. If the TC button displays OFF, press the TC button to change tilt compensation to ON.
3. Press Antenna height, enter a value in the window that appears and press Apply.
4. Press Calibrate tilt. The following occur:
• All existing calibration data is deleted.
• The Calibrate tilt button flashes blue/orange to indicate the system is in tilt calibration mode.
• The Tilt angle field displays the true angle that is measured by the system (taking into account mounting errors of the sensor inside the eDriveTC console and errors introduced by the position of the tractor).
The true angle in the Tilt angle field must be within ±2° before the system can be calibrated. If the displayed angle is not within ±2°, you must change the installation angle of the console (for example, with shims). The closer to 0, the better the tilt compensation.
5. Press Calibrate tilt again to complete the calibration. The Calibrate tilt button stops flashing and the angle displayed in the Tilt Angle field should be very close to 0. Your tilt sensor is now calibrated and your position reporting will be accurate while working on sloping terrain.
Steering OptionsFor information the following steering options, see “Steer Screen - eDriveTC” on page 161:
• Sensitivity
• Dampening
• Maximum turn rate
• Steering speed
Outback STX User Guide 36 PN 875-0331-000 Rev A1

Chapter 3: Autosteering Overview and Setup
eDriveXReview the information in this section before adding a vehicle.
Performing a Steering TestPerform a steering test to check the connectivity of the system. Test the steering with the vehicle moving at no more than 4 kph (2.5 mph). Make sure the eDriveX power switch in the ‘STEER’ position.
To perform a steering test with eDriveX connected:
1. Press the Vehicle screen button, press the Steer tab, then press Calibrate eDriveX. The Calibration screen appears.
2. Press Steering Test. The Steering Test screen appears.
3. Press Left and confirm the vehicle steers to the left. Press Stop as soon as the direction is confirmed.
Press Right and confirm the vehicle steers to the right. Press Stop as soon as the direction is confirmed.
Outback STX User Guide 37 PN 875-0331-000 Rev A1

Chapter 3: Autosteering Overview and Setup
4. If the system passes the steering test, continue with the next section. If the system does not pass the steering test see the table below and re-check your installation; if you are still unable to perform a successful steering test after troubleshooting, contact your local Outback Guidance dealer or Outback Guidance Customer Service.
Problem Solution
Wheels move into left or right lock position, but the direction is switched
Swap the two cables that are connected to the solenoids of the eDriveX hydraulic block.
Wheels do not move Check the eDriveX installation for:
HydraulicsWheel angle sensorElectronic componentseDriveX harnessCorrect valve type
Outback STX User Guide 38 PN 875-0331-000 Rev A1

Chapter 3: Autosteering Overview and Setup
Antenna PivotAntenna pivot is the perpendicular distance of the antenna’s center in front of or behind the vehicle’s pivot point. The vehicle’s pivot point depends on the vehicle type: standard tractor, articulated tractor, sprayer, combine or tracked tractor. Figure 3-2 shows how the antenna pivot dimension (and other dimensions) are measured for each vehicle type.
Figure 3-2: Dimensions - wheel, articulated, sprayer, combine, track
Antenna OffsetTo achieve optimum steering accuracy you must determine the antenna offset in the field. However, you need to have completed the calibration procedure before you can conduct the field tests, and to complete vehicle calibration, you need to enter the antenna offset values on the Vehicle Dimensions screen (see step 8, page 43). Since you do not have an accurate antenna offset when working through calibration, enter an estimated ‘provisional’ offset value (make sure this value is within eight inches of the actual value).
Note: Measure the antenna pivot as accurately as practical, as this measurement has some impact on the accuracy of the vehicle guidance and is also the reference point from which the implement offset is calculated. Unlike the Antenna L/R (offset), there is really no field method to verify or improve the antenna pivot measurement.
ArticulatedSprayer
Combine
tractor
Trackedtractor
Standardtractor
Outback STX User Guide 39 PN 875-0331-000 Rev A1

Chapter 3: Autosteering Overview and Setup
When you have completed the vehicle calibration and determined the actual antenna offset, you can revisit vehicle dimensions and add the actual value (see “Completing Vehicle Calibration Steps in Sequence” on page 46).
To enter a provisional antenna offset:
1. Measure the perpendicular distance of the center of the antenna from the centerline of the vehicle.
2. Enter the value as the antenna offset on the Dimensions screen (step 8, page 43).
“Antenna Offset (L/R) Overview” below provides general information on antenna offsets and “Determining Antenna Offset Overview” on page 41 describes two methods for determining the antenna offset.
Antenna Offset (L/R) Overview
Antenna offset is the lateral (perpendicular) distance between the center of the GPS antenna and the centerline of the vehicle. When ‘calibrating an antenna offset’ you are actually compensating for a physical antenna offset. To compensate for physical antenna offset you:
• Measure the effect of the uncompensated antenna offset
• Calculate the offset adjustment required
• Enter the calculated adjustment to compensate for the physical antenna offset
An offset—for which you will compensate—comprises a measured distance (the amount of the offset) and a direction (left or right of vehicle centerline). In Figure 3-3 on page 40, the offset distance (or amount) is X, the direction is right.
Figure 3-3: Antenna offset (distance= X, direction = right)
Because it is difficult to measure the antenna offset on the vehicle, you must determine the antenna offset in the field to ensure maximum steering accuracy. However, you need to have completed the calibration before you can conduct the field tests, and to complete vehicle calibration, you need to enter the antenna offset. This
Antenna L/R Offset
Antenna
X
Antenna
Outback STX User Guide 40 PN 875-0331-000 Rev A1

Chapter 3: Autosteering Overview and Setup
initial—or provisional—setting enables you to complete vehicle calibration so you can conduct the field test for an exact antenna offset. See “Antenna Pivot” on page 39.
Calibration is required if the system shows an offset while driving up and down on a guidance line without an implement after calibrating the roll bias.
Determining Antenna Offset Overview
There are two ways to determine the antenna offset:
• Track method (preferred): This method measures the track difference, in at least three places, during two passes (one in each direction) on the same A=B line. The method requires a surface where the vehicle clearly leaves tracks.
• Marker method: This method measures the offset using at least three flags (or other marks) to mark the center of the vehicle (hitch pin point) during two runs (one in each direction) on the same A=B line. If using the mark method, use at least three measurement points on the A=B line.
Whichever method you use, the antenna offset (the physical offset on the vehicle and the compensating offset value you enter in the system) is half the measured difference in the track of the vehicle over the two runs.
Determining Antenna Offset - Track Method
Figure 3-4: Determining antenna offset (example 6/2 = 3 cm left)
Note: If the center of your antenna is exactly on the centerline of the vehicle, you have no antenna offset and no compensation is required. When you carry out the procedures for determining the offset, the result will be a measured offset of zero and no further action will be required.
Note: ‘Track’ in this context means wheel or track marks on the ground. The track method for determining antenna offset is suitable for wheel and track vehicles.
Pass 1Pass 2
A=B Line
Vehiclecenterline (Pass 1)
Vehiclecenterline (Pass 2)
Antenna Offset (T/2)For example 3 cm
Track Difference (T)For example, 6 cm (measure in atleast three places along A=B line)
Outback STX User Guide 41 PN 875-0331-000 Rev A1

Chapter 3: Autosteering Overview and Setup
To determine the antenna offset (track method):
1. Set up a straight A=B line.
2. Maintaining a speed of 5 kph (3 mph) engage steering and let the system steer you along the guideline for at least 100 m.
3. Perform a keyhole turn, re-engage the steering, and let the system steer you down the same guideline.
4. In three different places along the A=B line, measure the distance between the corresponding track marks (inside edges, outside edges or centers, whichever are easiest to see and measure, see Figure 3-4). If there is variation, calculate the average difference. In Figure 3-4 the track difference is 6 cm, measured at the outside edges of the track marks at one point on the A=B line.
Halve the measurement (3 cm). This is the amount of the physical antenna offset—the offset you need to compensate for and need to enter as the antenna offset (in meters, 0.03 m) at step 9 (next page).
5. Determine the direction of the offset. This is the direction in which the vehicle would have to move for the second pass to track exactly over the first pass (this tells you if the antenna center is to the left or the right of the vehicle centerline). In Figure 3-4, the vehicle would need to move to the left for Pass 2 to be exactly on Pass 1.
6. Press the Vehicle screen button, press the Steer tab, then press Calibrate eDriveX. The Calibration screen appears.
7. After you have selected the vehicle and valve types, the Dimensions button is blue (available).
Note: Take your measurements where the vehicle was travelling with a cross track of between 0-1, that is, not just after re-acquiring the A=B line after your turn (this is sometimes referred to as ‘allowing settling time’).
Note: The direction of the offset can also be described as the left or right direction of the antenna’s centerline relative to the vehicle centerline when viewed in the direction of travel.
Outback STX User Guide 42 PN 875-0331-000 Rev A1

Chapter 3: Autosteering Overview and Setup
8. Press Dimensions. The Vehicle Dimensions screen appears.
9. Enter the antenna offset:
a. Press the Antenna L/R field. The Antenna L/R window appears.
b. Press Left or Right (enter the direction of the offset as it exists—do not enter what you think the compensating offset direction needs to be: STX will do that).
c. Enter an offset value then press Apply. The value is entered and the window closes.
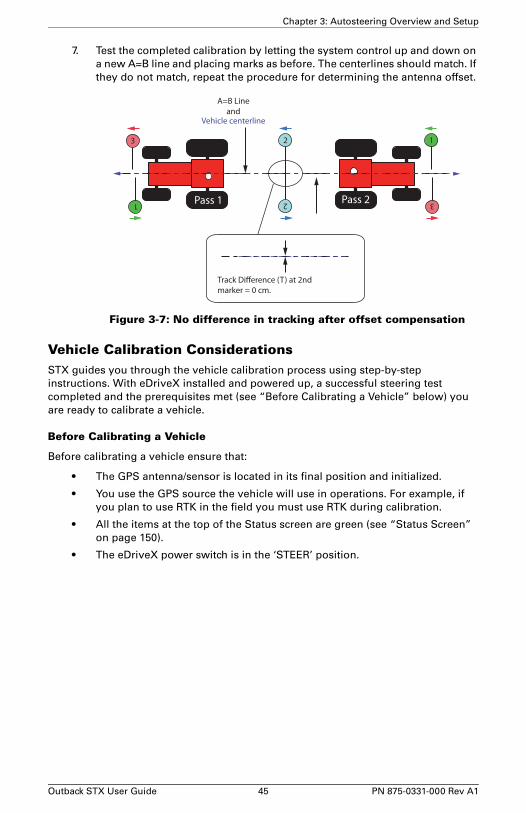
10. Test the completed calibration by letting the system control up and down on a new A=B line. The tracks should match. If they do not match, repeat the procedure for determining the antenna offset.
Figure 3-5: No difference in tracking after offset compensation
Pass 1 Pass 2
A=B Line andvehicle centerline
Track Difference (T) = 0
Outback STX User Guide 43 PN 875-0331-000 Rev A1

Chapter 3: Autosteering Overview and Setup
Determining Antenna Offset - Marker Method
Figure 3-6: Determining the antenna offset (example 6/2 = 3 cm left)
To determine antenna offset (marker method):
1. Set up a straight A=B line.
2. Maintaining a speed of 5 kph (3 mph) engage steering and let the system steer you along the wayline for at least 100 m. When the cross track has stabilized (0-1), place marks along the A=B line—at least three—on the centerline of the vehicle (the hitch pin point).
3. Perform a keyhole turn, re-engage the steering, and let the system steer you down the same wayline. When the cross track is stabilized (0-1), place more marks close to those placed on the first pass.
4. Measure the distance between corresponding marks. In Figure 3-6 the centerline difference is 6 cm.
Halve the measurement (3 cm). This is the amount of the physical offset of the antenna—the offset you need to compensate for and need to enter as the antenna offset (in meters, 0.03 m).
5. Determine the direction of the offset. This is the direction in which the vehicle would have to move for the second pass to track exactly over the first pass (this tells you if the antenna center is to the left or the right of the vehicle centerline). In Figure 3-6 the vehicle would need to move to the left for Pass 2 to be exactly on Pass 1.
6. Complete steps 6 through 9 in the track method (starts at page 41).
Note: Place your marks while the vehicle is travelling with a cross track of between 0-1, that is, not just after re-acquiring the A=B line after your turn (this is sometimes referred to as ‘allowing settling time’).
Note: The direction of the offset can also be described as the left or right direction of the antenna’s centerline relative to the vehicle centerline when viewed in the direction of travel.
Track Difference (T) at 2ndmarker. For example 6 cm.
Pass 1 Pass 2Vehicle centerline(Pass 2)
Vehicle centerline(Pass 1)
2
2
A=B Line
A=B Line
13
1 3
Antenna Offset (T/2)For example 3 cm.
Outback STX User Guide 44 PN 875-0331-000 Rev A1
Chapter 3: Autosteering Overview and Setup
7. Test the completed calibration by letting the system control up and down on a new A=B line and placing marks as before. The centerlines should match. If they do not match, repeat the procedure for determining the antenna offset.
Figure 3-7: No difference in tracking after offset compensation
Vehicle Calibration ConsiderationsSTX guides you through the vehicle calibration process using step-by-step instructions. With eDriveX installed and powered up, a successful steering test completed and the prerequisites met (see “Before Calibrating a Vehicle” below) you are ready to calibrate a vehicle.
Before Calibrating a Vehicle
Before calibrating a vehicle ensure that:
• The GPS antenna/sensor is located in its final position and initialized.
• You use the GPS source the vehicle will use in operations. For example, if you plan to use RTK in the field you must use RTK during calibration.
• All the items at the top of the Status screen are green (see “Status Screen” on page 150).
• The eDriveX power switch is in the ‘STEER’ position.
Track Difference (T) at 2ndmarker = 0 cm.
Pass 1 Pass 2
2
2
Vehicle centerline
A=B Lineand
13
1 3
Outback STX User Guide 45 PN 875-0331-000 Rev A1

Chapter 3: Autosteering Overview and Setup
Calibration Steps and Different Vehicle Types
The calibration steps you complete are based on the type of vehicle you select. In STX you can select from several vehicle types (see top right).
Within each vehicle type there are subsets of valve types. Some of the subsets are included in all vehicle types; however, some subtypes are only for specific vehicle types. The valve types shown at bottom right are for the Articulated Tractor vehicle type.
The following calibration screens provide an example of the different calibration steps for different vehicle/valve combinations.
Completing Vehicle Calibration Steps in Sequence
Because the calibration steps must be completed in sequence, the step buttons are not available (gray) until you can perform that step. For example, if you just completed the WAS calibration step, you must complete the Min. Radius step (blue) before completing the steps that follow it (unavailable gray buttons).
If you need to change a step you have already completed, you may need to redo all the subsequent steps that were also completed.
Note: The calibration steps and step labels (names) will change for certain valve types, track machines and electric steering (valve type VSi).
Vehicle: Standard TractorValve: HGPS Standard Flow
Vehicle: Tracked TractorValve: VSi
Outback STX User Guide 46 PN 875-0331-000 Rev A1

Chapter 3: Autosteering Overview and Setup
About Engine Speed During Calibration
Some calibration steps should be carried out at full hydraulic pressure. Because some hydraulic systems need higher engine speeds than others to achieve full hydraulic pressure, it is recommend that you execute those calibration steps with a minimum engine speed of 1500 rev/min. This is indicated as a requirement where it applies.
Converging Filters
Filters are an important part of the data processing that enables precision guidance and autosteering. To be effective, filters need to be converged. Filters may be either converged (for immediate use) or converged with convergence data stored (for immediate and subsequent reuse). Certain driving routines will result in convergence but you need to meet more conditions for convergence data to be stored.
On the Status (Vehicle) screen a check mark next to Filters converged indicates that filters have been converged (Figure ). It does not, however, indicate that the convergence data is stored (although it may be - see “Filter Self-Convergence” on page 48).
Initial Convergence or Re-convergence
Initial filter convergence (and re-convergence if required) is achieved through a driving pattern. The driving sequences executed manually or automatically during the calibration process are normally enough for filters to converge. If the calibration driving sequences are enough, the convergence status will show as checked. You will then have to meet the requirements for convergence data storage (see “Manual Driving Sequence” on page 48).
If the driving sequences within the calibration process do not result in filter convergence, or a full calibration in not required, execute the ‘manual’ sequence described on the next page (and then the additional storage driving requirements detailed on page 48). See also “Re-converging Filters” on page 48.
Note - vehicle/valve combination: Convergence data, if stored, is stored for each vehicle/valve type combination. If you change the vehicle/valve type combination to a combination for which there is no stored convergence data, you will need to repeat the appropriate convergence and convergence data storage requirements.
Note - antenna position: Filter convergence includes a calculation of the antenna position. If there is a difference of more than 1 m between the calculated antenna position and the entered antenna fore/aft (‘pivot’) dimension, the filters will converge but the filter data will not be stored. To avoid this situation, ensure you have accurately entered the antenna pivot dimension when adding a new vehicle (see “Adding a Vehicle” on page 53).
Outback STX User Guide 47 PN 875-0331-000 Rev A1

Chapter 3: Autosteering Overview and Setup
Manual Driving Sequence
Drive the vehicle at slow speed (typically 5-7 kph) as follows (in order) to achieve filter convergence:
To store the newly acquired convergence data you must drive at least three minutes (recommended minimum) under autosteering and bring the vehicle to a stop (the point at which the data is stored). This can be cumulative—you do not have to immediately drive under autosteer for three minutes and stop. Provided you have three minutes of autosteering (for which filters must be converged) and come to a halt before you power off eDriveX, the convergence data will be stored (but see Note - antenna position on page 47).
Filter Self-Convergence
On system startup, the filters converged status always indicates filters are not converged: this is normal. After you drive forward for at least 10 seconds, the status should become checked indicating the use of stored convergence data. If the status does not change, it indicates convergence data is not stored. Refer to “Re-converging Filters” below.
Re-converging Filters
Filters will need to be re-converged—and the new convergence data stored—if:
• The filter convergence data was never stored
• The antenna calibrated (entered) dimension is changed by more than 0.1 m
• The vehicle/valve type combination is changed to one that has not been used before (meaning there is no convergence data for the combination - see Note: vehicle/valve combination, page 47).
If re-convergence is required, establish the reason and, accordingly, reset the antenna data, complete the calibration process, and/or complete the driving requirements for convergence and convergence data storage as detailed in the preceding sections.
• 100 m in a straight line
• Two complete circles at near full lock (in either direction - the second can be the same as the first, not as shown for illustrative purposes in Figure 3-8)
• 100 m in a straight line (the filters will most likely have converged before this step)
Figure 3-8: Manual filter conver-gence driving sequence
Outback STX User Guide 48 PN 875-0331-000 Rev A1

Chapter 3: Autosteering Overview and Setup
Steering OptionsSteering adjustment options include:
• Sensitivity - determines how aggressively the vehicle steers on the guidance line when in close proximity
• Attack - determines how aggressively the vehicle steers onto the guidance line when approaching it from a distance
• Smoothing - determines the amount of smoothing of contours
Steering Sensitivity
Steering sensitivity determines how aggressively the vehicle steers onto the guidance line when approaching it from close proximity. Depending on preference and needs, you can adjust sensitivity to between 1 and 20. The default setting 7 is a good value to start with on most vehicles. Use Table 3-2 as a guide to setting the sensitivity.
Adjust the sensitivity setting during vehicle calibration to maintain the GPS guideline accurately without rapidly overshooting or responding too slowly.
• If the steering corrections are too rapid, causing the machine to jerk erratically back and forth across the line, the sensitivity setting is too high.
• If the machine slowly weaves down the guideline, the sensitivity setting is too low (see Figure 3-9).
Figure 3-9: eDriveX control at different sensitivity settings
The best sensitivity setting for optimized machine control will depend on different parameters, such as vehicle type, implement, working speed, and field conditions.
Table 3-2: Sensitivity settings
Setting Performance
Low value Smooth steering adjustments, eventual lack of cross track accuracy (in this sense, cross track is the real-time, constantly changing horizontal offset of the vehicle to the desired position on the guidance line).
Medium value Good compromise between smooth steering and cross track accuracy.
High value Aggressive steering adjustments with the wheels being very active, ‘twitchy’. Highest cross track accuracy.
Vehicle Path Vehicle Path
1 m = 3’~ 1 m = 3’~
Outback STX User Guide 49 PN 875-0331-000 Rev A1

Chapter 3: Autosteering Overview and Setup
Steering Attack
Steering attack determines how aggressively the vehicle steers onto the guidance line when approaching it from a distance. Depending on preference and needs, you can set attack to between 1 and 10. The default setting 10 (maximum) is a good value to start with on most vehicles. Use Table 3-3 as a guide to setting the attack.
Steering Smoothing
Steering smoothing determines the amount of smoothing of contours. The smoothing applied to the current contour is based on the smoothing setting that was active during the preceding pass.
Depending on preference and needs, smoothing can be adjusted to None (the default), Low, Medium, or High. For example, it might be necessary to adjust the smoothing setting if a vehicle/implement combination does not allow turning within a tight radius. In addition, a very sharp curvature might not be desired during high-speed operation. Use Table 3-4 as a guide to setting the smoothing.
Table 3-3: Attack settings
Setting Performance
Low value Very slow line acquisition (the vehicle will not overshoot the guidance line during approach).
Medium value Good compromise between a fast line acquisition and some overshoot.
High value Fast line acquisition with the potential for the vehicle to overshoot the guidance line until the system catches up.
Table 3-4: Smoothing settings
Setting Performance
None (default) The system tries to follow every contour, even if the contour has a very tight curvature but may disengage when following a very tight turn.
Low The system applies minimum smoothing.
Medium The system applies medium smoothing.
High The system generates optimized control paths for high-speed operation where the minimum curvature for each turn is large. It is not suitable for tight-turn operations as unwanted coverage gaps may occur.
Outback STX User Guide 50 PN 875-0331-000 Rev A1

Chapter 4: Working with Vehicles andImplements
Working with Vehicles
Working with Implements
Outback STX User Guide 51 PN 875-0331-000 Rev A1

Chapter 4: Working with Vehicles and Implements
Working with VehiclesA vehicle in STX refers to a machine you drive in the field, such as a sprayer, combine, or tractor. You can add as many vehicles to STX as you want and then select the one you need for your job. The first time you start STX there is one vehicle: the default vehicle. After adding a vehicle (or vehicles), upon powerup STX uses the vehicle that was used prior to the terminal being powered down.
STX includes several types of vehicle from which to select for your job. The automated steering system you have connected to STX determines the vehicle types you can select.
The Map screen always displays a vehicle as shown at right, whether it is the default vehicle or a vehicle that you add.
You can perform the following vehicle tasks:
• Add, set up, edit, and delete vehicles
• Load a previous (existing) vehicle
• Import and export vehicles
Outback STX User Guide 52 PN 875-0331-000 Rev A1

Chapter 4: Working with Vehicles and Implements
Adding a VehicleWhen you add a vehicle it remains in memory, even if you move the terminal to another vehicle. For example, if you add a vehicle, move the terminal to another vehicle for use, and then reinstall the terminal in the original vehicle, your original vehicle in STX will still be there.
The steps below for adding a vehicle create a vehicle with a name and color you determine. After creating a vehicle, you then set up and calibrate the vehicle to differentiate it from the default vehicle (see “Vehicle Setup and Calibration” on page 54).
To add a vehicle:
1. Press the Vehicle screen button then the Main tab. The Main screen appears.
2. Press New. The Vehicle Name window appears.
3. Enter a name and press Apply. The window closes and the name you entered appears in the Vehicle Name field on the Main screen.
Outback STX User Guide 53 PN 875-0331-000 Rev A1

Chapter 4: Working with Vehicles and Implements
4. Press Color. The Color window appears.
5. Press a color in the window. The window closes and the new color appears on the vehicle on the Map screen (you can verify color selections in the Map screen).
Vehicle Setup and CalibrationThe procedure for setting up and calibrating a vehicle is different depending on whether you are using eDriveTC or eDriveX.
Vehicle Setup and Calibration - eDriveTC
When you select the vehicle type (step 1a below) STX populates the vehicle profile with default values.
Before you begin, review the following topics:
• “eDriveTC” on page 34
• “Calibrating the Tilt Sensor” on page 35
• “Steer Screen - eDriveTC” on page 161
To set up and calibrate a vehicle with eDriveTC:
1. Press the Vehicle screen button then the Steer tab. The Steer screen appears.
The fields/buttons at the bottom of the Steer screen (dotted outline above) change depending on the vehicle type you select.
a. Select the vehicle type: Press the Type button to cycle through the available vehicle types: WHEEL, VSi WHEEL, TRACK, or ARTICULATED.
Outback STX User Guide 54 PN 875-0331-000 Rev A1

Chapter 4: Working with Vehicles and Implements
b. Turn auto-reengage on or off: Press the Engage button to toggle between MANUAL (auto-reengage off) and AUTO (auto-reengage on).
c. (Wheel and VSI types only) Set dampening to on or off: Press the Dampen button to toggle between ON (enable dampening) and OFF (disable dampening). Dampening provides a smoothing effect to machines that have large amounts of body roll that might induce erratic steering.
d. (VSI type only) Enable articulation: Press the Articulated button to toggle between ON and OFF. VSi applies to two tractor types: wheel (non-articulated) and wheel (articulated). Set to ON for vehicles that use articulation for steering.
e. (Wheel and Articulated types only) Set the sensitivity: Press the Sensitivity buttons to adjust the sensitivity of eDriveTC (sensitivity prevents over-reaction in difficult-to-control machines). Press the up arrow button to increase sensitivity (more reaction) and the down arrow button to decrease it (less reaction).
f. (Track and VSI types only) Set the steering speed: Press the Steering Speed field, and in the window that appears enter a value and press Apply. This setting determines how much time it takes a vehicle to make a steering correction—a high number is more aggressive (takes less time) and a low number is less aggressive (takes more time).
g. (Track type only) Set the maximum turn rate: Press the Maximum turn rate field, and in the window that appears enter a value and press Apply. This setting determines how aggressive the track machine steers left or right (in degrees/sec).
h. Perform a steering test: See “eDriveTC” on page 34.
2. Press the Tilt Setup tab. The Tilt Setup screen appears. Complete the following steps if you will be using tilt compensation on eDriveTC. Tilt compensation enables you to see the current angle measurement (Tilt angle field) of the tilt sensor for mounting adjustment and to enter a zero calibration point.
a. Set the antenna height: Press the Antenna height field, and in the window that appears enter a value and press Apply.
b. Enable tilt compensation: If the TC button displays OFF, press it to change it to ON.
Outback STX User Guide 55 PN 875-0331-000 Rev A1

Chapter 4: Working with Vehicles and Implements
c. Calibrate the eDriveTC tilt sensor: See “Calibrating the Tilt Sensor” on page 35.
Vehicle Setup and Calibration - eDriveX
When you select the vehicle type (step 8 on the next page) STX populates the vehicle profile with default values.
Before you begin, review the following topics:
• “eDriveTC” on page 34
• “Antenna Offset” on page 39
• “Steering Options” on page 49
• “Steer Screen - eDriveX” on page 164
To set up and calibrate a vehicle with eDriveX:
1. Press the Vehicle screen button then the Steer tab. The Steer screen appears.
2. Set the sensitivity: Press the Sensitivity buttons to adjust the sensitivity of eDriveX (sensitivity prevents over-reaction in difficult-to-control machines). Press the up arrow button to increase sensitivity and press the down arrow button to decrease sensitivity.
3. Set the attack level: Press the Attack buttons to adjust the attack level of eDriveX (attack is how aggressive a vehicle will try to acquire the line). Press the up arrow button to increase the level and press the down arrow button to decrease the level.
4. Set the smoothing level: Press the Smoothing button to cycle through smoothing settings (None, Low, Medium, and High). Steering smoothing determines the amount of smoothing of contours. The smoothing applied to the current contour is based on the smoothing setting that was active during the preceding pass.
5. Set the projection mode: Press the Projection button to toggle between 2D mode and 3D mode. The projection mode relates to the effect of the earth's curvature on guidance accuracy. The default is 2D. Select 3D as the A=B projection mode for wide field operations or interoperability with third party guidance systems that also use 3D guidance line projection.
Outback STX User Guide 56 PN 875-0331-000 Rev A1

Chapter 4: Working with Vehicles and Implements
6. Press Calibrate eDriveX. The Calibration screen appears.
7. Perform a steering test: Press Steering Test and following the instructions under “Performing a Steering Test” on page 37. When finished, return to this page and go to step 8 (next step).
8. Select the vehicle and valve type:
a. Press Vehicle Valve. The Vehicle Valve screen appears.
b. Press the Vehicle Type field and select a type from the drop-down.
c. Press the Valve Type field and select a type from the drop-down.
d. Press OK.
Note: The remaining buttons on the Calibration screen fall into two groups:
• The first three buttons after Steering Test (Vehicle Valve, Dimensions, eDriveX Orientation) require you to select/enter values.
• The buttons after eDriveX Orientation require you to perform certain tasks based on the information displayed on the screen.
Note: After you change the vehicle or valve type, STX may prompt you to restart the ECU (eDriveX) for the changes to take effect. Press OK to acknowledge the message then reboot the ECU.
Outback STX User Guide 57 PN 875-0331-000 Rev A1

Chapter 4: Working with Vehicles and Implements
9. Enter vehicle dimensions: Press Vehicle Dimensions to display the Vehicle Dimensions window.
Complete the following then press OK.
• Antenna Pivot: Press Antenna Pivot twice, press Fore (antenna in front of vehicle pivot point) or Aft (antenna behind vehicle pivot point), enter a value, then press Apply.
See “Antenna Pivot” on page 39 for more information on this setting.
• Antenna Height: Press Antenna Height twice, enter a value, then press Apply.
• Antenna L/R: Press Antenna L/R twice, press Left (antenna left of vehicle centerline) or Right (antenna right of vehicle centerline), enter a value, then press Apply.
See “Antenna Offset (L/R) Overview” on page 40 for more information on this setting.
• Wheelbase: Press Wheelbase twice, enter a value (for the distance between the centers of the vehicle’s two axles), then press Apply.
Note: For the four dimension fields, press the field once to activate it and visually illustrate its measurement on the vehicle on the screen then press again to display the related data entry window.
Note: The Antenna Height, Antenna L/R, and Wheelbase fields display similar windows when pressed.
Note: You can leave this as 0.00 when first working through this step of vehicle setup. See “Antenna Offset” on page 39.
Outback STX User Guide 58 PN 875-0331-000 Rev A1

Chapter 4: Working with Vehicles and Implements
10. Set the orientation of the eDriveX console:
a. Press eDriveX Orientation. The eDriveX Orientation screen appears. You set the orientation of the top of the eDriveX console (the face with the cooling fins) and of the two connectors. The connector orientation options are dependent on the orientation of the eDriveX console’s top so you set the top position first.
b. Press the Top drop-down and select an option, press the Connector drop-down and select an option, and then press OK.
11. Press WAS and follow the onscreen instructions. When you have completed the WAS calibration step, the terminal beeps (as it does after each successful calibration step) and the next button becomes blue—press this blue button and follow the onscreen instructions. You will repeat this process for the remaining gray calibration buttons (in order) to complete the eDriveX calibration.
Editing a VehicleYou can only edit the current vehicle. To edit an existing vehicle, first load the vehicle (see “Loading a Vehicle”following) then edit any of the settings on the Main screen and all but the eDriveX calibration settings on the Steer screen.
Note: The screens that appear for certain calibration steps have a speed bar that indicates if you have met the conditions for that step. For example, if the step instructs you to drive less than a certain speed the bar shows red if you are driving too slow or too fast and shows green if you are driving within the correct range. Pay attention to color on the bar to help guide you through the calibration process.
When instructed to center the steering aim at a specific landmark to ensure that your are driving the vehicle in a straight line.
Green - within range
Red - outside range
Outback STX User Guide 59 PN 875-0331-000 Rev A1

Chapter 4: Working with Vehicles and Implements
Loading a VehicleEach vehicle you create in STX is saved to memory creating a list of vehicles. You can then load the appropriate vehicle from this list. When you load a vehicle, that vehicle’s color, calibration parameters, and settings are loaded as well. For example, if you load a previous tractor named Standard2 that is blue, the tractor on the Map screen is blue.
To load a vehicle:
1. Press the Vehicle screen button then the Main tab. The Main screen appears.
2. Press the Previous button. In the vehicles window that appears select the vehicle you want to load. If you select the current vehicle the Load and Delete buttons are unavailable (bottom figure below); otherwise, all four buttons are available (top figure below).
3. Press Load. The window closes and the name of the loaded vehicle appears in the Vehicle Name field on the Main screen.
Note: You may be required to reboot eDriveX after loading a profile.
Selected vehicle is not the current vehicle
Selected vehicle is the current vehicle
Outback STX User Guide 60 PN 875-0331-000 Rev A1

Chapter 4: Working with Vehicles and Implements
Exporting a VehicleYou must have a USB drive plugged into the terminal to export a vehicle; otherwise, the functionality is disabled and the Export button is unavailable (gray). When you export a vehicle to a USB drive STX creates a 'vehicles' folder on the USB drive (if one does not already exist) and copies the VEHICLE file to that folder. For example, if you have a vehicle profile named 'TestVehicle1' and export that vehicle to a USB drive it will appear as follows: TestVehicle1.vehicle
To export a vehicle:
1. Press the Vehicle screen button then the Main tab. The Main screen appears.
2. Press the Export button. A vehicles window appears with a list of vehicles.
3. To export one vehicle, select the vehicle and then press Export.
or
To export all vehicles, press Export all.
Note: If the USB drive already contains a vehicle of the same name you are exporting, STX prompts you to confirm or cancel the export of that vehicle. Confirming the export will overwrite the vehicle on the USB drive.
Outback STX User Guide 61 PN 875-0331-000 Rev A1

Chapter 4: Working with Vehicles and Implements
Importing a VehicleOnce you import a vehicle it will appear in the vehicles window when you press Previous (see “Loading a Vehicle” on page 60 and “Deleting a Vehicle” on page 63) or Export (see “Exporting a Vehicle” on page 61).
You must have a USB drive plugged into the terminal to import a vehicle; otherwise, the functionality is disabled and the Import button is unavailable (gray). The USB drive must contain a 'vehicles' folder and all vehicle files must be in this folder. For example, if your USB drive is drive M on your PC then your vehicle files should be in the following folder: M:\vehicles
To import a vehicle:
1. Press the Vehicle screen button then the Main tab. The Main screen appears.
2. Press the Import button. A vehicles window appears with a list of vehicles.
3. To import one vehicle, select the vehicle and then press Import.
or
To import all vehicles, press Import all.
Outback STX User Guide 62 PN 875-0331-000 Rev A1

Chapter 4: Working with Vehicles and Implements
Deleting a VehicleCaution: Deleting a vehicle permanently removes the vehicle and its calibrations—you cannot retrieve a deleted vehicle.
To delete a vehicle:
1. Press the Vehicle screen button then the Main tab. The Main screen appears.
2. Press Previous. A vehicles window appears with a list of vehicles.
3. To delete one vehicle, select the vehicle and then press Delete. In the confirmation message that appears, press Yes.
or
To delete all vehicles (including the current vehicle), press Delete all. In the confirmation message that appears, press Yes.
Outback STX User Guide 63 PN 875-0331-000 Rev A1

Chapter 4: Working with Vehicles and Implements
Working with ImplementsAn implement in STX refers to machinery attached to your vehicle, such as sprayer, planter, or tillage equipment. You can add as many implements to STX as you want and then select the one you need for your job. Implements store information about the implement geometry as well as eTurns Setup information (see Note below).
The selected implement appears on the Map screen with the selected vehicle.
The distance between the implement and the vehicle is determined by the fore/aft offset. The implement may also appear left or right of the vehicle; this distance is determined by the swath offset. See “Implement Offsets” below for more information.
You can perform the following implement tasks:
• Add, set up, edit, and delete implements
• Load a previous (existing) implement
• Import and export implements
Implement OffsetsIn STX you can set two offsets for your implement:
• Swath (left or right) offset
• Fore/Aft (front or back) offset
See the following sections for an overview of each type of offset as well as instructions on how to set the implement offsets.
Swath Offset
The swath offset is the lateral (perpendicular) distance between the center of the implement and the centerline of the vehicle. When ‘calibrating a swath offset’ you are actually compensating for a physical implement offset. And to compensate for physical implement offset you:
• Measure the effect of the uncompensated implement offset
• Calculate the offset adjustment required
• Enter the calculated adjustment to compensate for the physical implement offset
Calibration is required if the vehicle successfully repeats its passes while driving up and down on a straight A=B line without an implement, but still shows an offset (skip or overlap) during field work with an implement attached. In this case it is likely that the implement is not centered in relation to the centerline of the vehicle. To compensate for this you need to complete a swath offset calibration for each implement that is used with STX.
Note: If eDriveX is connected to STX and you entered a valid eTurns subscription, the eTurn Calibrate screen is available (tab is blue) when you press the Implement screen button. The eTurn Setup screen becomes available (tab is blue) after you calibrate eTurns. With eDriveX connected but without a valid eTurns subscription, these tabs are gray and the screens are unavailable. See “eTurns” on page 126 for information on eTurns functionality.
Outback STX User Guide 64 PN 875-0331-000 Rev A1

Chapter 4: Working with Vehicles and Implements
The swath offset—for which you will compensate—comprises a measured distance (the amount of the offset) and a direction (left or right of vehicle centerline). In the figure at right, the offset distance (or amount) is X, the direction is right.
Because it is difficult to measure the swath offset on the vehicle/implement combination, you must determine the offset in the field to ensure maximum field work accuracy.
There are two ways to determine the swath offset. The following section describes the preferred method. There is a brief description of the other method after the following step-by-step guidance through the preferred method. See also “Setting the Swath Offset - Alternative Method” on page 68.
Setting the Swath Offset - Preferred Method
This method for determining the swath offset is the preferred method because it eliminates the possibility of errors caused by an incorrect vehicle width (see “Adding a Vehicle” on page 53).
Figure 4-1: Determining the effect of swath offset
To determine the swath offset:
1. Set up a straight A=B line.
2. Maintaining a speed of 5 kph (3 mph) engage steering and, with good cross track and with the implement straight, let the system steer you along the
Note: The calibration only compensates for a static swath offset that is caused by the physical dimensions of the implement. It does not prevent offsets that are caused by dynamic movements of the implement, like drift on a slope, for example.
X
Implement
Pass 1
Vehicle centerline (Pass 1)
Implement centerline
Implement isoffset to the left
Effect of offsetExample 1.00 m
Implementcenterline
Vehiclecenterline
(Pass 1)
Pass 2
Outback STX User Guide 65 PN 875-0331-000 Rev A1
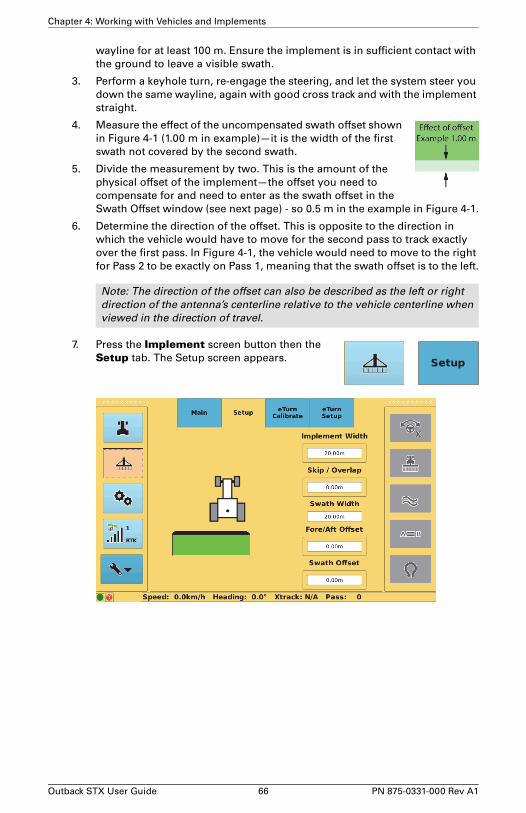
Chapter 4: Working with Vehicles and Implements
wayline for at least 100 m. Ensure the implement is in sufficient contact with the ground to leave a visible swath.
3. Perform a keyhole turn, re-engage the steering, and let the system steer you down the same wayline, again with good cross track and with the implement straight.
4. Measure the effect of the uncompensated swath offset shown in Figure 4-1 (1.00 m in example)—it is the width of the first swath not covered by the second swath.
5. Divide the measurement by two. This is the amount of the physical offset of the implement—the offset you need to compensate for and need to enter as the swath offset in the Swath Offset window (see next page) - so 0.5 m in the example in Figure 4-1.
6. Determine the direction of the offset. This is opposite to the direction in which the vehicle would have to move for the second pass to track exactly over the first pass. In Figure 4-1, the vehicle would need to move to the right for Pass 2 to be exactly on Pass 1, meaning that the swath offset is to the left.
7. Press the Implement screen button then the Setup tab. The Setup screen appears.
Note: The direction of the offset can also be described as the left or right direction of the antenna’s centerline relative to the vehicle centerline when viewed in the direction of travel.
Outback STX User Guide 66 PN 875-0331-000 Rev A1

Chapter 4: Working with Vehicles and Implements
8. Enter the left or right swath offset:
a. Press the Swath Offset field. The Swath Offset window appears.
b. Press Right or Left (enter the direction of the offset as it exists—do not enter what you think the compensating offset direction needs to be: STX will do that).
c. Enter an offset value then press Apply. The value is entered and the window closes.
9. Display the Map screen. The new implement position is indicated on the map (right swath offset shown at right).
10. Test the completed calibration by letting the system control up and down on a new A=B line. The second swath should overlay the first exactly. If it does not, repeat the calibration.
If test results still show skips or overlaps after calibrating both the antenna and swath offsets, make sure the Implement Width value is correct.
SwathPass 1 Implement
centerline
SwathPass 2
Outback STX User Guide 67 PN 875-0331-000 Rev A1

Chapter 4: Working with Vehicles and Implements
Setting the Swath Offset - Alternative Method
With this method, instead of driving two passes on the same wayline—one in each direction—you drive three passes on adjacent waylines. Depending on the direction of your swath offset (left or right), you will get a skip or an overlap on the second pass and the opposite on the third pass.
Figure 4-2: Three-Pass method for determining swath offset
The amount of skip and overlap will be the same. Whichever you measure (2X) divide it in half and enter the result as the swath offset (X) along with the direction of the offset, which is left in the example (start at step 7 of the previous section “Setting the Swath Offset - Preferred Method”).
Note: If the offset was to the right, Pass 2 would produce overlap, Pass 3 would produce skip.
Vehiclecenterline
Pass 1 Pass 2 Pass 3
2X 2X
Implementcenterline
Vehiclecenterline
Implementcenterline isto the left of
the vehiclecenterline
when viewedin direction of
travel (DOT)
No implement offset entered. Skips andoverlaps occur (2X). Direction of offset isLeft when viewed in direction of travel.
Outback STX User Guide 68 PN 875-0331-000 Rev A1

Chapter 4: Working with Vehicles and Implements
Fore/Aft Offset Overview
The fore/aft offset is the perpendicular distance between the vehicle's pivot point and the application line (for example, spray impact point or seed drop point) of the implement.
Setting the Fore/Aft Offset
If the application line of the implement is in front of the vehicle pivot point, measure the distance from the antenna pivot point to the application line and enter this value as the Fore Offset—the implement will be in front of the vehicle on the Map screen.
If the application line of the implement is behind the vehicle pivot point, measure the distance from the antenna pivot point to the application line and enter this value as the Aft Offset—the implement will trail behind the vehicle on the Map screen.
To set the fore/aft offset:
1. Press the Implement screen button then the Setup tab. The Setup screen appears.
Fore offset Aft offset
Outback STX User Guide 69 PN 875-0331-000 Rev A1

Chapter 4: Working with Vehicles and Implements
2. Enter the fore/aft offset:
a. Press the Fore/Aft Offset field. The Fore/Aft Offset window appears.
b. Press Fore or Aft, enter an offset value, and then press Apply. The value is entered and the window closes.
3. Display the Map screen. The new implement position is indicated on the map (aft offset shown at right).
Adding an ImplementWhen you add an implement it remains in memory, even if you move the terminal to another vehicle.
To add an implement:
1. Press the Implement screen button then the Main tab. The Main screen appears.
Note: Based on the location of the application line of the implement, you may need to set a combination of left/right and front/back offsets on the implement.
Outback STX User Guide 70 PN 875-0331-000 Rev A1
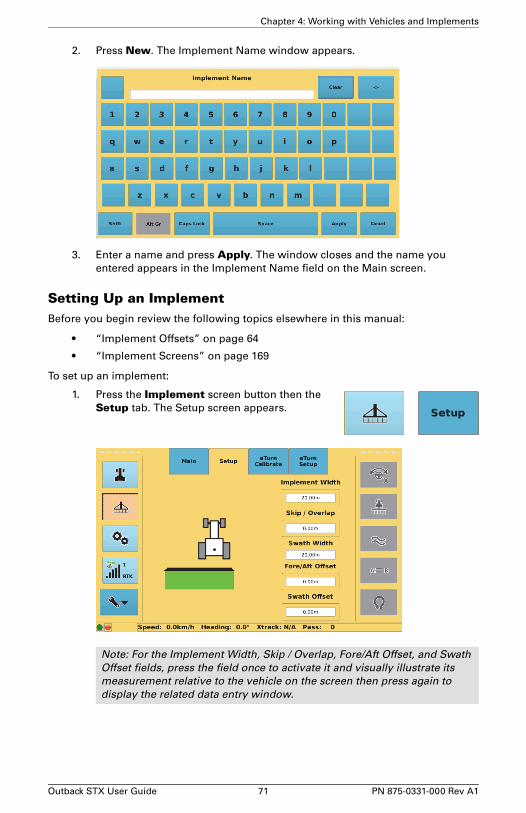
Chapter 4: Working with Vehicles and Implements
2. Press New. The Implement Name window appears.
3. Enter a name and press Apply. The window closes and the name you entered appears in the Implement Name field on the Main screen.
Setting Up an ImplementBefore you begin review the following topics elsewhere in this manual:
• “Implement Offsets” on page 64
• “Implement Screens” on page 169
To set up an implement:
1. Press the Implement screen button then the Setup tab. The Setup screen appears.
Note: For the Implement Width, Skip / Overlap, Fore/Aft Offset, and Swath Offset fields, press the field once to activate it and visually illustrate its measurement relative to the vehicle on the screen then press again to display the related data entry window.
Outback STX User Guide 71 PN 875-0331-000 Rev A1

Chapter 4: Working with Vehicles and Implements
2. For the Implement Width and Swath Offset fields:
a. Press the field twice. A data entry window for the field appears (Implement Width window shown at right).
b. Enter a value and press Apply.
STX computes the Swath Width value by taking the Implement Width and adding the Skip value or subtracting the Overlap value.
3. For the Skip / Overlap and Fore/Aft Offset fields:
a. Press the field twice. A data entry window for the field appears (Skip / Overlap window shown at right).
b. Press the appropriate button for the type of value you want to enter (Skip or Overlap, or Fore or Aft).
c. Enter a value and press Apply.
Editing an ImplementYou can only edit the current implement. To edit an existing implement, first load the implement (see “Loading an Implement”following) then edit any of the settings on the Main and Setup screens.
Note: If you have an eTurns subscription see “eTurns” on page 126 for information on using the eTurn Calibrate and eTurn Setup screens to calibrate and set up eTurns, respectively.
Outback STX User Guide 72 PN 875-0331-000 Rev A1

Chapter 4: Working with Vehicles and Implements
Loading an ImplementEach implement you create in STX is saved to memory creating a list of implements. You can then load the appropriate implement from this list.
To load an implement:
1. Press the Implement screen button then the Main tab. The Main screen appears.
2. Press Previous. An implements window appears with a list of implements.
3. Select the implement you want to load. If you select the current implement the Load and Delete buttons are unavailable (bottom figure below); otherwise, all four buttons are available (top figure below).
4. Press Load. The window closes and the name of the loaded implement appears in the Implement Name field on the Main screen.
Selected implement is not the current implement
Selected implement is the current implement
Outback STX User Guide 73 PN 875-0331-000 Rev A1

Chapter 4: Working with Vehicles and Implements
Exporting an ImplementExporting an implement allows you to send the implement setup information to other STX terminals. You must have a USB drive plugged into the terminal to export an implement; otherwise, the functionality is disabled and the Export button is unavailable (gray). When you export an implement to a USB drive STX creates an 'implements' folder on the USB drive (if one does not already exist) and copies the IMPL file to that folder. For example, if you have an implement named 'TestImplement1' and export that implement to a USB drive it will appear as follows: TestImplement1.impl
To export an implement:
1. Press the Implement screen button then the Main tab. The Main screen appears.
2. Press the Export button. An implements window appears with a list of implements.
3. To export one implement, select the implement and then press Export.
or
To export all implements, press Export All.
Note: If the USB drive already contains an implement of the same name you are exporting, STX prompts you to confirm or cancel the export of that implement. Confirming the export will overwrite the implement on the USB drive.
Outback STX User Guide 74 PN 875-0331-000 Rev A1

Chapter 4: Working with Vehicles and Implements
Importing an ImplementImporting implements allows you to import setup information for implements already set up in another STX terminal. Once you import an implement it will appear in the implements window when you press Previous (see “Loading an Implement” on page 73 and “Deleting an Implement” on page 76) or Export (see “Exporting an Implement” on page 74).
You must have a USB drive plugged into the terminal to import an implement; otherwise, the functionality is disabled and the Import button is unavailable (gray). The USB drive must contain an 'implements' folder and all implement files must be in this folder. For example, if your USB drive is drive M on your PC then your implement files should be in the following folder: M:\implements
To import an implement:
1. Press the Implement screen button then the Main tab. The Main screen appears.
2. Press the Import button. An implements window appears with a list of implements.
3. To import one implement, select the implement and then press Import.
or
To import all implements, press Import all.
Outback STX User Guide 75 PN 875-0331-000 Rev A1

Chapter 4: Working with Vehicles and Implements
Deleting an ImplementCaution: Deleting an implement permanently removes the implement—you cannot retrieve a deleted implement.
To delete an implement:
1. Press the Implement screen button then the Main tab. The Main screen appears.
2. Press Previous. An implements window appears with a list of implements.
3. To delete one implement, select the implement and then press Delete. In the confirmation message that appears, press Yes.
or
To delete all implements, press Delete all. In the confirmation message that appears, press Yes.
Outback STX User Guide 76 PN 875-0331-000 Rev A1

Chapter 5: JobsJobs Overview
Working with Jobs at Startup
Working with Jobs Using the Job Screens
Working with Job Templates
Outback STX User Guide 77 PN 875-0331-000 Rev A1

Chapter 5: Jobs
This chapter provides an overview of jobs in STX and instructions on working with jobs and job templates.
Jobs OverviewThis section describes what a job is, how STX numbers jobs, and what needs to occur before you start a job.
What is a Job?A job is a field task you perform, such as spraying, tilling, or harvesting. A job is required to perform guidance or autosteering.
You can work with jobs in two ways:
• Using the Getting Started window after powering on STX (see section following)
• Using the Job screen button to display the Setup and Notes screens (see “Working with Jobs Using the Job Screens” on page 80)
You can also create job templates from existing jobs and use these templates to create similar new jobs.
Job NumberingWhen you start a new job STX automatically assigns it a job number. The job number is based on the current date and the order of the job number. For example, STX names the first job you start on April 2, 2013 as 13040201.log, where:
• 13 = year (2013)
• 04 = month (April, fourth month)
• 02 = day
• 01 = first new job on this date
If you start more than one new job on this date, STX uses the same year, month, and day and orders the last two digits. For example, if you start three new jobs on April 2, 2013, STX autonumbers them as follows:
• 13040201.log
• 13040202.log
• 13040203.log
Before You Start a JobBefore you start a job verify you have a GPS position. On the GPS screen button, verify the satellite indicator is green. If the satellite indicator is green the New and Continue buttons on the Setup (Job) screen are enabled and you can start, continue, or load a job; otherwise, the New and Continue buttons on the Setup (Job) screen are disabled and you cannot start, continue, or load a job.
See “Viewing GPS Signal Information” on page 24 for GPS signal information.
Outback STX User Guide 78 PN 875-0331-000 Rev A1

Chapter 5: Jobs
Working with Jobs at StartupAfter you start STX and press Accept at the Warning screen, STX displays the Getting Started window.
If this is the first time you are starting STX the Continue job and List jobs buttons are unavailable (gray—as are all Job buttons until you have a GPS position). If you are restarting STX and you have previously worked with a job then all four buttons are blue.
Press the buttons as follows:
• New job - STX automatically assigns a job name (number) and this number appears on the Job screen button and on the Setup (Job) screen. See “Starting a New Job” on page 80.
• Continue job - STX automatically loads the most recently closed job and displays the Map screen. “Loading a Job” on page 82.
• List jobs - STX displays a jobs window, from which you can load a previous job (see “Loading a Job” on page 82). “Loading a Job” on page 82.
• Cancel - STX starts with no job.
Outback STX User Guide 79 PN 875-0331-000 Rev A1

Chapter 5: Jobs
Working with Jobs Using the Job ScreensYou work with jobs using the two Job screens (Setup and Notes) as shown in Figure 5-1.
Figure 5-1: Setup and Notes screens (Job)
Starting a New JobSee “Before You Start a Job” (previous section) for information on what you need to do before staring a job. When you start a job STX automatically creates a job number for the job (see “Job Numbering” on the previous page for more information). When you start a new job STX automatically closes the current job.
To start a new job:
1. Press the Job screen button then the Setup tab. The Setup screen appears.
Outback STX User Guide 80 PN 875-0331-000 Rev A1

Chapter 5: Jobs
2. Press the New button. STX starts a new job and the job number appears in the Job name field and on the Job screen button.
Entering Job NotesWhen a job is open you can add job notes using the Notes screen, shown in Figure 5-2. Notes are not required; however, you may find it useful to enter information for some or all of the fields. Any information you enter is saved with the current (open) job, so that when you load that job the Notes information is loaded as well.
Figure 5-2: Notes (Job) screen
Outback STX User Guide 81 PN 875-0331-000 Rev A1

Chapter 5: Jobs
If no job is open the Notes screen is unavailable (gray), as shown in Figure 5-3.
Figure 5-3: Notes screen unavailable
To enter job notes:
1. Press the Job screen button then the Notes tab. The Notes screen appears.
2. Enter field information:
a. Press the field for which you want to add information.
b. In the window that appears for that field, enter the desired information.
c. Press Apply. The window closes and the field on the Notes screen displays the value you entered.
d. Repeat steps a through c for each additional field for which you want to enter notes.
Loading a JobThere are two ways to load a job:
• Load a job from a list of previous jobs
• Continue (load) the most recently closed job to quickly continue the most recent job without having to search for that job from a list of jobs
You can load a previous job if another job is already open—loading the job automatically closes the currently open job. However, no jobs can be open if you want to continue with the most recent job—the Continue button is gray (unavailable) if a job is already open and blue (available) if no job is open. Also, although loading a job from a list of jobs closes the current job, you cannot continue that closed job—you can only continue a job that you closed with the Close button (see “Closing a Job” on page 86 for more information).
When you load a job:
• The job number appears in the Job name field and on the Job screen button
• Information associated with the job (such as swath lines, marks, and sprayed areas) appears on the Map screen
Outback STX User Guide 82 PN 875-0331-000 Rev A1

Chapter 5: Jobs
To load a previous job from the list of existing jobs:
1. Press the Job screen button then the Setup tab. The Setup screen appears.
2. Press the Jobs button. A jobs window appears with jobs sorted from newest (top) to oldest (bottom).
3. Select the job you want to load and press Load. STX loads the job and the job number appears in the Job name field and on the Job screen button.
To continue a job:
1. Press the Job screen button then the Setup tab. The Setup screen appears.
The Previous job field shows the most recently closed job (the job you closed with the Close button).
Outback STX User Guide 83 PN 875-0331-000 Rev A1

Chapter 5: Jobs
2. Press Continue. STX continues (loads) the most recent job and the job number appears in the Job name field and on the Job screen button.
Exporting a JobYou can export two types of job files: job log files and job template files (see “Working with Job Templates” on page 88 for more information on job templates).
You must have a USB drive plugged into the USB port on the terminal to export a job; otherwise, the functionality is disabled and the Export button is gray (not available).
When you export a job to a USB drive STX creates an 'S3jobs' folder on the drive and copies the text file (.Log for job logs) and/or template (.tem for job templates) to that folder. For example, if you export job number 13041101 to a USB drive it will appear as follows: 13041101.Log
You cannot export the current job—that is, you cannot export a job unless it has been closed. For example, you have three jobs and one of the jobs is open (current). When you display the jobs window the current job does not appear in the jobs list.
Outback STX User Guide 84 PN 875-0331-000 Rev A1

Chapter 5: Jobs
To export a job:
1. Press the Job screen button then the Setup tab. The Setup screen appears.
2. Press Export. A jobs window appears, showing all the jobs and templates you can export.
3. To export a single job or template, select an item and press Export.
or
To export all jobs and templates, press Export All.
Importing a JobYou can import two types of job files: job log files and job template files (see “Working with Job Templates” on page 88 for more information on job templates).
You must have a USB drive plugged into the USB port on the terminal to import a job; otherwise, the functionality is disabled and the Import button is gray (not available).
The USB drive must contain an 'S3Jobs' folder at the root level of the drive and all job files must be in this folder. For example, if your USB drive is drive M on your PC then your job files should be in the M:\S3Jobs folder.
To import a job:
1. Press the Job screen button then the Setup tab. The Setup screen appears.
2. Press Import. A jobs window appears, showing all the jobs and templates you can import.
Outback STX User Guide 85 PN 875-0331-000 Rev A1
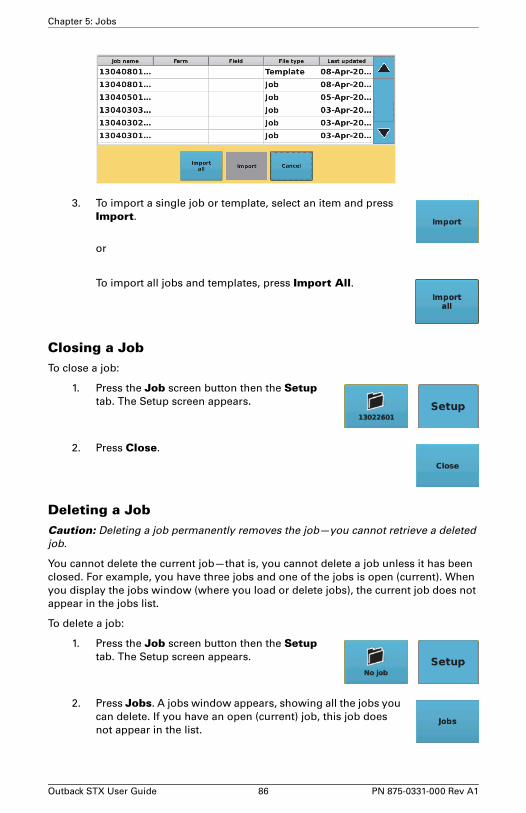
Chapter 5: Jobs
3. To import a single job or template, select an item and press Import.
or
To import all jobs and templates, press Import All.
Closing a JobTo close a job:
1. Press the Job screen button then the Setup tab. The Setup screen appears.
2. Press Close.
Deleting a JobCaution: Deleting a job permanently removes the job—you cannot retrieve a deleted job.
You cannot delete the current job—that is, you cannot delete a job unless it has been closed. For example, you have three jobs and one of the jobs is open (current). When you display the jobs window (where you load or delete jobs), the current job does not appear in the jobs list.
To delete a job:
1. Press the Job screen button then the Setup tab. The Setup screen appears.
2. Press Jobs. A jobs window appears, showing all the jobs you can delete. If you have an open (current) job, this job does not appear in the list.
Outback STX User Guide 86 PN 875-0331-000 Rev A1

Chapter 5: Jobs
3. To delete a single job:
a. Select the job and press Delete. A confirmation window appears, asking if you want to delete the selected job.
b. Press Yes to confirm the deletion.
c. Press Cancel to close the jobs window.
To delete all jobs:
a. Press Delete All. A confirmation window appears, asking if you want to delete all jobs.
b. Press Yes to confirm the deletion. All jobs are deleted and the jobs window closes.
Outback STX User Guide 87 PN 875-0331-000 Rev A1

Chapter 5: Jobs
Working with Job TemplatesA job template enables you to reuse certain parameters of a job log file. For example, if you have a job log file with a specific client, farm, or wayline (A=B, pivot, or boundary) and you want to reuse that information for a different field or for another job in the same field, you can save the original job log file as a template. When you then start a new job from a template you will already have the client and farm information entered. Items that are stored in a template are boundaries (include and exclude), A=B lines, pivots, guidance around a boundary, marks/flags, and client, farm, and field names.
Creating a Job TemplateYou can create a job template from any existing job except the current job—that is, you cannot create a job template from a job unless that job is closed. For example, you have three jobs and one of the jobs is open (current). When you display the list of job templates list window the current job does not appear in the jobs list.
To create a job template:
1. Press the Job screen button then the Setup tab. The Setup screen appears.
2. Press the Make template button. A jobs window appears, showing all the jobs you can use to create a template.
3. Select the job you want to use to create the template and press Template. STX creates the template and the jobs list window closes.
Using a Job TemplateUsing a template starts a new job based on the job template you select.
To use a job template:
1. Press the Job screen button then the Setup tab. The Setup screen appears.
Outback STX User Guide 88 PN 875-0331-000 Rev A1

Chapter 5: Jobs
2. Press Template. A job templates window appears, showing all the templates you can use to create a new job.
3. Select the template you want to use for the new job and press Load. STX creates a new job based on the selected job template and the jobs list window closes.
Exporting and Importing Job TemplatesYou export and import job templates using the same window you use to export and import jobs. See “Exporting a Job” on page 84 and “Importing a Job” on page 85 for more information.
Deleting a Job TemplateCaution: Deleting a job template permanently removes the job template—you cannot retrieve a deleted job template.
To delete a job template:
1. Press the Job screen button then the Setup tab. The Setup screen appears.
2. Press Template. A job templates window appears, showing all the templates you can delete.
3. To delete a single job template:
Outback STX User Guide 89 PN 875-0331-000 Rev A1

Chapter 5: Jobs
a. Select the job template and press Delete. A confirmation window appears, asking if you want to delete the selected job.
b. Press Yes to confirm the deletion.
c. Press Cancel to close the jobs window.
To delete all jobs:
a. Press Delete All. A confirmation window appears, asking if you want to delete all jobs.
b. Press Yes to confirm the deletion. All jobs are deleted and the jobs window closes.
Outback STX User Guide 90 PN 875-0331-000 Rev A1

Chapter 6: Guidance OperationsMap Screen Overview
Field Guidance Basics
Straight Guidance
Pivot Guidance
Contour Guidance
Outback STX User Guide 91 PN 875-0331-000 Rev A1

Chapter 6: Guidance Operations
This chapter discusses Map screen basics and the types of guidance STX provides. Some of the guidance procedures outlined in this chapter include steps for both manual and automated steering.
Map Screen OverviewAfter you perform such tasks as creating a vehicle and implement, selecting your differential source, and starting a job, you can perform field guidance operations. However, you should first have a good understanding of how the Map screen functions.
This overview describes how to display the Map screen, the different ways to view your field and vehicle, displaying the Map screen in full-screen view, zooming in an out on the field, and understanding the Steering Guide lightbar.
Displaying the Map ScreenYou will most likely spend most of your time in the field with the Map screen displayed. Review the information on the Setup screen button in Table 2-1 on page 17.
To display the Map screen:
• If the Setup screen button is blue with a down arrow, you are viewing one of the Vehicle, Implement, or Tools screens or the GPS screen. Press the Setup screen button to switch to display the Map screen.
For example, the figure at right shows the Display (Tools) screen—the Setup screen button is blue with a down arrow.
• If the Setup screen button is blue with an up arrow and the Map screen is not displayed (such as when viewing a Job screen), press the Map screen button (blue with a down arrow).
For example, the figure at right shows the Setup (Job) screen—the Setup screen button is blue with an up arrow.
Outback STX User Guide 92 PN 875-0331-000 Rev A1

Chapter 6: Guidance Operations
Map Modes and ViewsMap modes and views work together to provide you with different ways to view your vehicle and field. There are two map modes (Machine and Field) and two map views (Top Down and 3D). The map mode determines whether the vehicle appears stationary and the map moves or the map appears stationary and the vehicle moves, while the map view refers to the angle at which you view the map (see Table 6-1)
When first using STX select different mode/view combinations to become familiar with how they appear on the screen. You should also note the following combinations:
• Machine / Top Down: valid
• Machine / 3D: valid
• Field / Top Down: valid
• Field / 3D: invalid(If you are in Field / Top Down and you select 3D the map mode automatically changes to Machine. Also, if you are in Machine / 3D and you select Field the view automatically changes to Top Down).
Both map modes display the vehicle's position on the field and direction of travel.
Table 6-1: Map views and perspectives
Map Option Description
Map Mode Machine Use Machine mode to “follow” the vehicle while work is in progress. In this mode the map moves while the vehicle appears stationary on the screen. The vehicle is always pointing ‘up’ toward the top of the screen and the field adjusts.
Field In this mode, the vehicle appears to move while the map appears stationary on the screen. You can pan to a specific area on the map by pressing the screen and dragging the area into view. The field is oriented with North at the top of the screen and the vehicle points in its actual direction. For example, if the vehicle is driving southwest then it will point toward the bottom left of the screen.
Map View Top Down Provides a bird’s eye view of the job
3D Provides a three-dimensional view down the field in the direction of travel
Outback STX User Guide 93 PN 875-0331-000 Rev A1

Chapter 6: Guidance Operations
The following examples illustrate different mode/view combinations.
Machine / Top Down
Machine / 3D
Field / Top Down
Outback STX User Guide 94 PN 875-0331-000 Rev A1

Chapter 6: Guidance Operations
To set the map mode/view:
1. Display the Map screen (see “Displaying the Map Screen” on page 92).
2. Press the orange Map screen button (with the down arrow). The map-related buttons appear below the Map screen button.
3. Press the Mode and/or View buttons to select your preferred mode and view.
Zooming In and Out on the Map ScreenYou can zoom out on the Map screen to display more of your field and guidelines or zoom in to provide more detail on certain areas of your field.
1. Display the Map screen (see “Displaying the Map Screen” on page 92).
2. Press the orange Map screen button (with the down arrow). The map-related buttons appear below the Map screen button.
3. Press the zoom buttons to zoom in or out.
Zoom in
Zoom out
Outback STX User Guide 95 PN 875-0331-000 Rev A1

Chapter 6: Guidance Operations
Steering Guide LightbarThe Steering Guide lightbar shows the vehicle’s position relative to the guidance line. The arch shows heading and the horizontal bar shows cross track (in dotted outlines in examples below).
When the Steering Guide indicators are centered (indicated by a yellow column of arrows), the vehicle is aligned with (heading correct) and on (cross track 0) the current pass. To make accurate steering corrections, steer either left or right as indicated by the lighted arrows.
The lightbar buttons on the Display (Setup) screen determine how the lightbar appears on the Map screen and how sensitive the lightbar is to vehicle movement.
You can display the full lightbar, just the cross track portion, or no lightbar at all. You can also set the sensitivity to low, medium, or high level.
Outback STX User Guide 96 PN 875-0331-000 Rev A1

Chapter 6: Guidance Operations
Field Guidance BasicsField guidance in STX refers to working with guidance lines—lines you follow while driving your vehicle. STX supports three types of field guidance:
• Straight guidance
– A=B line—an imaginary straight line that passes through two points that you set (Point A and Point B) to define the first pass
– A + Direction line - where you define a beginning point (Point A) and enter a heading angle (the direction)
• Pivot (circular) guidance
• Contour (free-form) guidance
You can switch between any of the STX guidance modes by pressing the appropriate control button (and if necessary, pressing the appropriate button in the Straight Guidance window or Pivot Guidance window).
Adjusting Guidance LinesWhile operating in Straight or Pivot guidance mode, you can adjust a guidance line while stationary or on-the-go without interrupting normal guidance operation. This feature is especially useful to correct for DGPS drift over time.
• Snap: You can “snap” a guidance line to the vehicle’s current location parallel to the original guidance line. This feature is best used to insert a required gap between consecutive parallel swaths (for example, a conservation barrier strip).
The original definition of lat/long/heading of the guidance line is not changed and displaying a previous A=B or pivot displays the original lines.
• Shift: You can shift a guidance line left or right in small increments rather than re-establishing a new guidance line.
If your guidance lines are not exactly where you want them, you can shift them to the left or right—for Straight guidance lines this applies to the red guidance line as well as the black swath lines on both sides of the guidance line. The original definition of lat/long/heading of the guidance line is not changed and displaying a previous A=B or pivot displays the original lines.
• Update B Point: If you need to correct the B point, you can adjust the A=B line by moving the existing B point to a new position on the map. You can update the B point any time you are on its A=B line, that is, during the initial pass or after returning to it.
When you update a point B, its number does not increment. For example, if you are creating a second A=B line and, having set point A2 and point B2, you use the Update B function, the new B point is still B2.
Note: This chapter provides alternative steps depending on whether you have automated steering (eDriveTC or eDriveX) installed. If no automated steering is installed you will manually perform steps that automated steering does for you.
Outback STX User Guide 97 PN 875-0331-000 Rev A1

Chapter 6: Guidance Operations
• New A=B / Previous A=B: You can set a new A=B line at any point during the job. You can also use previously defined A=B or pivot lines for guidance. All A=B and pivot lines previously defined for a job are available for that job.
• Return Points: You can return to a previously recorded point, including any A or B point in the current job, marks (flags), or the last apply point.
Before You Set Guidance LinesBefore you can set a guidance line you must have a GPS position and have an active (open) job. On the GPS screen button verify the satellite indicator is green and verify a job number appears on the Job screen button—the control buttons used to work with paths are then enabled (top figure below). If you have no GPS position or no job open, the same control buttons are gray (bottom figure below). See “Viewing GPS Signal Information” on page 24 and Chapter 5, “Jobs”.
Note: All path adjustments are removed when you close a job and the original guidelines are restored when you continue the job.
Note: The Apply, Contour, and A=B control buttons are always available if you have a GPS position and an open job. The Steering control button is available but will appear gray until you meet certain criteria (see the Steering button description in Table 2-2 on page 20). The eTurns control button is only available if you have eDriveX installed and have entered a valid eTurns subscription.
Open job?Yes
Open job?No
GPS position?Yes
GPS position?Yes
Controlbuttonsactive?Yes
Controlbuttonsactive?No
Outback STX User Guide 98 PN 875-0331-000 Rev A1

Chapter 6: Guidance Operations
Straight GuidanceThe following steps illustrate how you work with in Straight guidance mode in STX with and without automated steering.
Map Screen Line Display OptionsGuidance lines provide a regular pattern over an area by which you can drive your passes. You can set how Straight guidance lines appear on the Map screen. There are three display options: A=B, Grid, and Off (Figure 6-1):
Figure 6-1: Grid lines: A=B, Grid, and Off
Manual Steering Automated Steering
1. Create straight line (A=B line or A + Direction line).
2. STX starts Straight guidance.
3. Steer along guidance line using screen and lightbar.
1. Create straight line (A=B line or A + Direction line).
2. STX starts Straight guidance.
3. Engage automated steering.
4. STX automatically steers you along guidance line.
Off (figure at left)Display the A=B line without any additional guidance lines
Grid (figure at right)Display the A=B line, guidance lines parallel to and on both sides of A=B line, and perpendicular grid lines. The guidance lines are spaced a swath width apart (see step 2 of “Setting Up an Implement” on page 71 for information on how STX calculates the swath width.
The distance between grid lines is based on the value in the Grid Spacing field (see procedure following). Grid lines are useful if you need to guide from point to point on a grid in successive order for such tasks as soil sampling, tree planting, or staking out regular areas.
A=B (figure at left)Display the A=B line and guidance lines parallel to and on both sides of the A=B line. The guidance lines are spaced a swath width apart (see step 2 of “Setting Up an Implement” on page 71 for information on how STX calculates the swath width.
Outback STX User Guide 99 PN 875-0331-000 Rev A1

Chapter 6: Guidance Operations
To set Map screen line display options:
1. Press the Tools screen button then the Display tab. The Display screen appears.
2. Press the Lines button to cycle through the settings (A=B, Grid, Off) until you display the preferred setting.
3. If you selected Grid, press the Grid Spacing field. The Grid Spacing window appears.
4. Enter a value and press Apply.
Outback STX User Guide 100 PN 875-0331-000 Rev A1

Chapter 6: Guidance Operations
Setting Straight LinesYou can establish the first pass either along a straight side of the field or by dividing the field with a straight swath working out each side. Either way, all passes are perfectly and uniformly spaced across the field.
The A=B line is an imaginary line that passes through two points to define the first pass. All other passes are perfectly spaced on both sides of the first pass.
You can define an A=B line either by marking Point A and Point B, or by marking a Point A and entering the required heading.
This section describes how to:
• Set an A=B line
• Set an A + Direction line
• Return to a previously recorded point
• Define a new additional A=B line
• Use a previously defined A=B line
Outback STX User Guide 101 PN 875-0331-000 Rev A1

Chapter 6: Guidance Operations
Setting an A=B Line
Before setting an A=B line enter the implement width and, if necessary, a skip or overlap value as required to create a swath width different from the implement width (see “Setting Up an Implement” on page 71).
1. Position the vehicle at the beginning of the first pass then display the Map screen.
2. Press the Straight Guidance control button. The Straight Guidance window appears.
3. Press New A=B. Set A Point appears on the button.
4. Press Set A Point. A1 appears on the map at the location of the vehicle and Set Point B appears on the button.
5. If you want to log data, press the Apply button.
6. Start driving the first pass then press Set Point B. The Straight Guidance window closes and the Map screen shows the following:
• B1 at the point where you pressed Point B
• Red (closest) guidance line through Points A and B
• Black guidance lines on both sides of and parallel to the red guidance line
Automated steering installed: STX automatically begins Straight guidance and, after you press the Steering button on the Map screen to engage steering, steers your vehicle along the A=B line. The Steering button must be in a state of “ready to engage” before you press it to engage automated steering.
No automated steering installed: Drive the first pass using the lightbar (onscreen or external) to help you drive along the guidance line.
Outback STX User Guide 102 PN 875-0331-000 Rev A1

Chapter 6: Guidance Operations
7. At the end of the current pass turn around and steer your vehicle toward the next line you want. This may be the black guidance line adjacent to the original red guidance line or the next black guidance line after that (if you are skipping rows). As you get close to your preferred black guidance line, STX changes the line from black to red and you will steer along this line.
Automated steering installed: Press the Steering button to engage steering. STX automatically steers your vehicle along the A=B line.
No automated steering installed: Drive the pass using the lightbar (onscreen or external) to help you drive along the guidance line.
Setting an A + Direction Line
Before setting an A + Direction line enter the implement width and, if necessary, a skip or overlap value as required to create a swath width different from the implement width (see “Setting Up an Implement” on page 71).
1. Position the vehicle at the beginning of the first pass then display the Map screen.
2. Press the Straight Guidance control button. The Straight Guidance window appears.
3. Press New A=B. Set A Point appears on the button.
4. Press Set A Point. A1 appears on the map at the location of the vehicle and Set Point B appears on the button.
5. Press the A=B angle field, and in the A=B angle window enter an angle and press Apply. The A=B angle window closes and the Map screen shows the following:
• Red (closest) guidance line through Point A at the angle you entered
Note: If you are using eTurns to have STX automatically turn your vehicle for you and start the next pass see “eTurns” on page 126.
Outback STX User Guide 103 PN 875-0331-000 Rev A1

Chapter 6: Guidance Operations
• Black guidance lines on both sides of and parallel to the red guidance line
Automated steering installed: STX automatically begins Straight guidance and, after you press the Steering button on the Map screen to engage steering, steers your vehicle along the A + Direction line. The Steering button must be in a state of “ready to engage” before you press it to engage automated steering.
No automated steering installed: Drive the first pass using the lightbar (onscreen or external) to help you drive along the guidance line.
6. At the end of the current pass turn around and steer your vehicle toward the next line you want. This may be the black guidance line adjacent to the original red guidance line or the next black guidance line (if you are skipping rows). As you get close to the next guidance line, STX changes the line from black to red and this becomes your new guidance line.
Automated steering installed: Press the Steering button to engage steering. STX automatically steers your vehicle along the A + Direction line.
No automated steering installed: Drive the pass using the lightbar (onscreen or external) to help you drive along the guidance line.
Note: If you are using eTurns to have STX automatically turn your vehicle for you and start the next pass see “eTurns” on page 126.
Outback STX User Guide 104 PN 875-0331-000 Rev A1

Chapter 6: Guidance Operations
Defining a New Additional A=B Line
You can set a new A=B line at any point during the job.
1. Press the Straight Guidance control button. The Straight Guidance window appears.
2. Press New A=B. Set A Point appears on the button.
3. Press Set A Point. A2 appears on the map at the location of the vehicle and Set Point B appears on the button.
4. If you want to log data, press the Apply button.
5. Drive the first pass.
6. At the end of the pass, press Set Point B. The Straight Guidance window closes and the Map screen shows the following:
• B2 at the point where you pressed Point B
• Red (closest) guidance line through Points A and B
• Black guidance lines on both sides of and parallel to the red guidance line
Automated steering installed: STX automatically begins Straight guidance and, after you press the Steering button on the Map screen to engage steering, steers your vehicle along the A=B line. The Steering button must be in a state of “ready to engage” before you press it to engage automated steering.
No automated steering installed: Drive the first pass using the lightbar (onscreen or external) to help you drive along the guidance line.
7. At the end of the current pass turn around and steer your vehicle toward the next line you want. This may be the black guidance line adjacent to the original red guidance line or the next black guidance line (if you are skipping rows). As you get close to the next guidance line, STX changes the line from black to red and this becomes your new guidance line.
Outback STX User Guide 105 PN 875-0331-000 Rev A1

Chapter 6: Guidance Operations
Automated steering installed: Press the Steering button to engage steering. STX automatically steers your vehicle along the A=B line.
No automated steering installed: Drive the pass using the lightbar (onscreen or external) to help you drive along the guidance line.
Using a Previously Defined A=B Line
STX stores all straight paths you create per job. If necessary, you can use a previously defined A=B line for the current job for guidance.
To use a previously defined A=B line:
1. Position the vehicle at the beginning of the first pass then display the Map screen.
2. Press the Straight Guidance control button. The Straight Guidance window appears.
3. Press Previous A=B. A window appears showing all previous A=B line for the current job.
4. Select an A=B line and press OK. The Straight Guidance window closes and guidance lines for the previous A=B line appear on the Map screen.
STX populates the map with the guidance lines it generated when you first defined the A=B line you just selected, with the closest guidance in red.
Note: If you are using eTurns to have STX automatically turn your vehicle for you and start the next pass see “eTurns” on page 126.
Outback STX User Guide 106 PN 875-0331-000 Rev A1

Chapter 6: Guidance Operations
Updating Point B
You can use your current location as the new Point B based on the following:
• You must be travelling on the A=B line in the direction A to B. The Update B Point button is not available if you are travelling on the A=B line in the direction B to A.
• You must be within a half swath width of the original A=B line. Once your vehicle moves more than 1/2 swath width from the original guideline (Pass 0) and the original guideline shifts right or left, the Update B Point button is no longer available (dimmed).
• You can move Point B as many times as you need.
To update Point B:
1. While in Straight guidance mode, press the Straight Guidance control button. The Straight Guidance window appears.
2. Press Update B Point to move Point B to its new location. The new Point B appears on the Map screen at your current location and the Straight Guidance window closes.
Outback STX User Guide 107 PN 875-0331-000 Rev A1

Chapter 6: Guidance Operations
Shifting an A=B Line
You can use the shift function to have STX move the guideline position by the specified distance (in increments of 0.01 m or 0.1 ft). Shifting the A=B line does not change the original A=B line (the lat/lon/heading specification remains unchanged).
To shift an A=B line:
1. While in Straight guidance mode, press the Straight Guidance control button. The Straight Guidance window appears.
2. Press the appropriate Shift button to shift the guidance line to the left or to the right, relative to the direction of travel. As you press either button the shift value above the buttons changes and the guidance line on the Map screen shifts by this value.
The screens below show a vehicle before shifting the guidance line (left screen below) and after shifting the guidance line (right screen below) to the right (pressing the right arrow button).
3. Press the Straight Guidance control button to close the Straight Guidance window.
4. Steer onto the shifted guidance line.
Before shift After shift
Outback STX User Guide 108 PN 875-0331-000 Rev A1

Chapter 6: Guidance Operations
Snapping the A=B Line to the Current Location
You can use the snap function to have STX move the A=B line to the vehicle’s current position.
To snap an A=B line:
1. While in Straight guidance mode, press the Straight Guidance control button. The Straight Guidance window appears.
2. Press Snap. The nearest A=B guideline is snapped (moved) to the vehicle’s current position and the distance moved appears on the Snap button.
The screen at right shows a vehicle after driving to the right of the original guidance line then snapping the guidance line to the vehicle’s position.
3. Press the Straight Guidance control button to close the Straight Guidance window.
If you snap the nearest guidance line for the A=B line you selected, to your current position, the set of guidance lines moves the snapped distance—including the A=B line itself. This does not, however, change the definition of the A=B line. If you view its position in the previous A=B lines list they are unchanged. Therefore, if you select that A=B line again (using Previous A=B) you will get the original array of guidelines back (you will have unsnapped from the guideline).
Outback STX User Guide 109 PN 875-0331-000 Rev A1

Chapter 6: Guidance Operations
Pivot Guidance
Pivot guidance is similar to Straight guidance except that you define the circumference of a circle rather than a straight line with A and B points. To do so, drive as much of the circumference of a representative circle as possible. The more of the circumference you drive, the better the accuracy.
Turning Apply on or off as required, steer along the required guidance line using the lightbar to maintain the correct heading and cross track. The nearest guidance line is always shown in red and its pass number is shown below the Map screen.
Figure 6-2: Pivot guidance on second pass
Setting the Pivot CircleTo set the pivot circle:
1. Position the vehicle at the beginning of the first pass.
2. Press the Straight Guidance control button. The Straight Guidance window appears.
Note: You must have a GPS position and an active job to use Pivot guidance.
Outback STX User Guide 110 PN 875-0331-000 Rev A1

Chapter 6: Guidance Operations
3. Press the Pivot Guidance button. The Straight Guidance control button changes to the Pivot Guidance button and the Pivot Guidance window appears.
4. Press Start pivot. STX starts logging pivot data and the Start pivot button label changes to Logging pivot (gray).
5. Start driving the circle.
When you have driven enough of the circle for STX to complete it, the Logging pivot button changes to End pivot.
6. When you are satisfied you have driven enough of the circle to get an accurate pivot, press End Pivot.
You do not get an array of guidance lines (circles) with Pivot guidance as with Straight guidance. However, STX displays a new, current guidance circle (Pass +1 or Pass -1) when you approach its position inside or outside of the original pivot circle.
When traveling on or near a pivot guideline, the nearest guideline is shown on the map as a red circular line (similar to the guideline used in other guidance modes).
Automated steering installed: STX automatically begins Pivot guidance and, after you press the Steering button on the Map screen to engage steering, steers your vehicle along the pivot line. The Steering button must be in a state of “ready to engage” (blue) before you press it to engage automated steering.
No automated steering installed: Turn the steering wheel in the direction indicated by the pivot line to remain centered on the pivot line and drive the first circle using the Steering Guide lightbar to help you drive along the guidance line.
7. When you have finished one circle move to either the right or left of the original circle and steer your vehicle to the next guidance line.
Automated steering installed: Press the Steering button to engage steering. STX automatically steers your vehicle along the circle.
No automated steering installed: Drive the circle using the Steering Guide lightbar to help you drive along the guidance line.
Outback STX User Guide 111 PN 875-0331-000 Rev A1

Chapter 6: Guidance Operations
Numbering Passes
After you establish the pivot log, STX numbers all passes. Pass +1 is always to the right of the original circle and Pass -1 to the left, where (see Figure 6-3):
• If you drive the circle counterclockwise Pass +1 is on the outside.
• If you drive the circle clockwise, Pass +1 is on the inside of the original circle.
You can work passes in either order.
Figure 6-3: Pivot guidance pass numbering
Using a Previously Defined PivotYou can access a previously defined pivot line while in Straight guidance mode or Pivot guidance mode. This functionality (and the Previous pivot button noted in the steps that follow) is only available if the current job has at least one previous pivot defined.
To use a previously defined pivot:
1. If in Straight guidance mode, press the Straight Guidance control button, and then in the Straight Guidance window press the Pivot Guidance button. The Pivot Guidance window appears.
If in Pivot guidance mode, press the Pivot Guidance control button. The Pivot Guidance window appears.
2. Press the Previous pivot button. The Pivots window appears.
3. Select the pivot you want to use guidance lines for and press OK.
End Pivot
Start Pivot+1
0
-1
Pass numbers
Start Pivot
End Pivot-1
0
+1
Pass numbers
Counterclockwise Pivot guidance Clockwise Pivot guidance
Outback STX User Guide 112 PN 875-0331-000 Rev A1

Chapter 6: Guidance Operations
STX populates the map with the pivot point showing and a guidance line nearest to your vehicle’s current position. The pass number is based on the pivot point you selected.
Whichever defined pivot point you select, your current position will be on or near a pass based on that pivot. The pass number for that pivot is displayed; if you switch between pivot points, the pass number updates for the current pivot point.
Shifting a Pivot LineYou can use the shift function to have STX move the pivot line by the specified distance (in increments of 0.01 m or 0.1 ft) and the current pass number.
To shift a pivot line:
1. While in Pivot guidance mode, press the Pivot Guidance control button. The Pivot Guidance window appears.
2. Press the appropriate Shift button to shift the pivot line in or out. As you press either button the shift value above the buttons changes and the guidance line on the Map screen shifts by this value.
The screens below show a vehicle before shifting the pivot line (left screen) and after shifting the pivot line (right screen).
3. Start driving the circle (see steps 5 - 7 of “Setting the Pivot Circle” on page 110).
Before shift After shift
Outback STX User Guide 113 PN 875-0331-000 Rev A1

Chapter 6: Guidance Operations
Snapping a Pivot Line to the Current LocationIn Pivot guidance mode you can snap (move) the guidance line to the vehicle’s current location parallel to the original guidance line. While in Pivot guidance mode, the Pivot Guidance button is displayed instead of the Straight Guidance control button.
If you defined your initial pivot in a clockwise direction, where inner passes are positive and outer passes negative, and snap a new guidance circle inward, the distance will be positive. If you snap the circle outward, it will be negative. See the previous section (“Numbering Passes”).
When you snap a pivot line, its originally calculated position, does not change. Thus, if after snapping, you use the Previous Pivot function, all pivot lines revert to their original positions.
To snap a pivot guidance line to the current location:
1. Position the vehicle at the beginning of the first pass.
2. Press the Pivot Guidance control button. The Pivot Guidance window appears.
3. Press Snap. The nearest pivot guideline is snapped (moved) to the vehicle’s current position and the distance moved appears on the Snap button.
The screen at right shows a vehicle after driving to the right of the original pivot line then snapping the pivot line to the vehicle’s position.
4. Start driving the circle (see steps 5 - 7 of “Setting the Pivot Circle” on page 110).
Outback STX User Guide 114 PN 875-0331-000 Rev A1

Chapter 6: Guidance Operations
Contour GuidanceUse Contour guidance mode to follow any previous applied paths/areas (straight, pivot, or free form). Contour mode differs from Straight and Pivot guidance modes:
• Straight and Pivot guidance modes follow predefined guidelines
• Contour guidance mode follows previously defined paths
At any time during Contour guidance you can switch to Straight or Pivot guidance by pressing the A=B button and following the procedures detailed in “Straight Guidance” on page 99 and “Pivot Guidance” on page 110.
When operating in Contour mode, a red guideline appears on the Map screen for additional guidance support (see below).
Figure 6-4: Map screen showing red Contour guidance line
Creating an Initial Contour PassIn Contour guidance mode STX is either logging an initial pass or guiding from a previous applied pass. You generally use Contour guidance mode for working with borders, turn areas, or following the contours created by obstacles.
After selecting Contour guidance, proceed by making the initial pass during which the Steering Guide lightbar is not active and cannot be used. Later, when attempting to follow a previous pass, you must steer your vehicle within an implement’s width of the guidance line, at which point the Steering button becomes enabled (ready to engage) and the lightbar provides guidance. You can then press the Steering button and STX engages on the guidance line.
To create an initial contour pass:
1. Press the Contour Guidance control button before beginning the initial pass. The button turns orange.
Note: Apply must be active (Apply button orange) to record a contour. If Apply is not On, STX cannot know that you completed the defining pass for the contour and are driving back to start a new pass based on that definition.
Outback STX User Guide 115 PN 875-0331-000 Rev A1

Chapter 6: Guidance Operations
2. Drive to where you want to start logging your contour and press Apply to turn logging on. The button turns orange.
3. Make the initial pass (the Steering Guide lightbar is not active during the initial pass).
4. At the end of the initial pass, turn around and begin the next pass. When you are within half a swath of the previous contour, STX provides a guidance line parallel to that previous contour. The lightbar becomes active to provide guidance.
Guiding on Subsequent PassesAny time your vehicle is within a half swath width of a previously logged pass, STX automatically begins to guide. In Contour guidance mode, STX can guide from any previous pass, even those made in Straight guidance mode.
If using eDriveX and the angle of attack is within limits, you can engage STX automated steering. See “Steering Attack” on page 50 for more information on steering attack.
Making a New First PassOccasionally a situation arises during a job when you need to make a pass that follows a different path than the previous passes. Simply drive the new path with Apply ON as require. Subsequent passes are guided from this newly defined pass.
Contour LockWhen using Contour guidance, STX constantly searches for the nearest swath from which to provide guidance. If passes of different contour definitions occur close enough together and Contour Lock is not enabled, STX might display guidance for a pass of a different contour definition from the one you are on. Contour Lock enables you to stop the STX’s search for the closest swath. In the Contour Lock mode, guidance:
• Remains locked on its current swath until you manually unlock it
• Automatically unlocks if you drive offline by the lesser of 2 m or 10% of the swath width, and then begins searching for the closest swath again
Contour Lock is helpful when you use guidance in close proximity to multiple swaths, such as when working with “point-rows.” In these situations without Contour Lock, guidance could jump around and guide you on the wrong path whenever other swaths come close to your current one (see Note following). With Contour Lock, you can decide if you want to stay on the current swath all the way until the end of the field or let STX continue searching for the closest swath.
Note: STX, when searching for the closest path and not in Contour Lock mode, will only pick up a different path if it is at a small angle to the path you are on. For example, if you cross a path at right angles, the system will not ‘find’ the crossed path and switch guidance to it. Only paths at a small angle (close to parallel) to the path you are on may be selected. Contour Lock prevents this.
Outback STX User Guide 116 PN 875-0331-000 Rev A1

Chapter 6: Guidance Operations
To use Contour Lock:
1. In Contour guidance mode, when you are on or approaching the required guidance contour, press the Contour Guidance control button. This puts you in Contour Lock mode (Contour Lock engaged) and a locked padlock appears on the Contour Lock control button (Contour Lock active). STX stops searching for, and providing guidance on, passes for other defined contours.
If you move more than 2m (or 10 percent of your current swath width) off the current guidance line, Contour Lock, while still engaged, becomes inactive and the padlock appears unlocked. STX resumes its contour search and Contour Lock becomes active again when you are within 2 meters of any guidance line.
2. To disengage Contour Lock mode, press the Contour Guidance control button. The padlock disappears. Contour Lock can be active (padlock locked) or inactive (padlock unlocked) when you disengage it.
Outback STX User Guide 117 PN 875-0331-000 Rev A1


Chapter 7: Advanced FeaturesBoundaries
Using Marks
Returning to an Existing Point
eTurns
e-Dif
Outback STX User Guide 119 PN 875-0331-000 Rev A1

Chapter 7: Advanced Features
This chapter describes how to set a boundary within a field, use marks (flags) to create sub-areas within a field, and use the optional eTurns functionality.
BoundariesSTX enables you to record a field boundary and save it as a template for future operations. This way, boundary information remains consistent from job to job, season after season.
About BoundariesNormally, you complete the first operational pass to set and record the boundary of the field.
You can include multiple boundaries in a single job. When a field is divided into multiple areas, STX adds the areas defined by the boundaries to calculate the total job area.
You can also exclude boundaries. For example, if there is an obstacle in the field, such as a body of water, you may want to exclude it from the total area calculation. Use the same boundary function, except press Exclude—the resulting excluded area is deducted from the total job area calculation.
Setting a BoundaryTo set a boundary:
1. Drive to the starting position of the field.
2. Press the Mark screen button. The Mark window appears.
Note: To record the boundary for future use as a template, make sure you have selected the Apply control button. While the Apply feature is activated, STX records all job data including the boundary.
Outback STX User Guide 120 PN 875-0331-000 Rev A1

Chapter 7: Advanced Features
3. Press the Boundary button. The Boundary window appears.
4. Press the middle button to cycle through the following options to specify where the boundary is marked relative to the vehicle/implement:
• LEFT - boundary calculations start from left edge of the swath width
• CENTER - boundary calculations start from center of the swath width
• RIGHT - boundary calculations start from right edge of the swath width
5. Press the bottom button to toggle between the following:
• INCLUDE - calculate the total area
• EXCLUDE - subtract the defined area from the total area calculation
6. Press the START button. The START button changes to display FINISH and the lower two buttons are unavailable (gray).
7. Drive the boundary you want to define as accurately as possible. As you drive a black, studded line on the Map screen shows the boundary as STX defines it and the current boundary value shows on the FINISH button.
Note: You can perform actual work while creating the boundary (Apply On) or drive around the field with Apply Off. STX creates the boundary from the current swath edge or center, regardless of whether Apply is On or Off.
Outback STX User Guide 121 PN 875-0331-000 Rev A1

Chapter 7: Advanced Features
8. When you are ready to close the boundary press the FINISH button. Alternatively, drive to within half a machine width of the boundary start point to have STX automatically close (finish) the boundary for you. The closing line runs from your current position to the start position.
Note: You should close the boundary as close to the starting point as possible (auto close).
Closing line
Closing lineStart and finishof boundary
Manual close Auto close
Outback STX User Guide 122 PN 875-0331-000 Rev A1

Chapter 7: Advanced Features
Using MarksYou can best use marks (flags) to create sub-areas before and after any changes. A typical use of marks is when applying treatment that requires several refills—you create a mark between each refill and from those marks you can create separate maps of each load. You can also use marks when changing seed depth during planting—drop a mark when you make the change and you can later analyze the two separate areas for yield differences.
Marking a Single PointYou can use marks to record a single point, such as a rock patch. If necessary, you can add a name to a mark (create a custom mark). It is good practice to record pertinent information about the mark on a note pad.
1. Drive to the point where you want to place a mark.
2. Press the Mark screen button. The Mark window appears.
3. Press either of the two top mark buttons. STX places a mark (flag) of the color you selected at the vehicle’s current position.
or
To place a custom mark (using the mark color on the Custom button):
a. Press the Custom mark field.
b. On the data entry screen that appears enter a name for the customer mark and then press Apply. The screen closes and the new name appears in the Custom mark field.
For example, if you want to mark a rock pile you can name the Custom mark as Rocks.
c. Press the Custom button. STX places the custom mark at the vehicle’s current location. In the “Rocks” example, your flag would appear as shown at right.
Note: You do not have to use the different color flags in any particular order; you can use the same color to mark an area of a particular type. Flags are numbered consecutively regardless of their color.
Outback STX User Guide 123 PN 875-0331-000 Rev A1

Chapter 7: Advanced Features
Returning to an Existing PointSTX can provide guidance to an existing point in the current job—the last apply point, any A or B point, or any dropped mark.
This feature does not automatically take you to a point; however, it does provide guidance to a point. When returning to a point the Steering Guide lightbar changes to display just the arch (heading indicator) and the following guidance information (see example):
• Return point ID (see the Label column in the figure in step 2 on the following page)—this is a unique identifier for each return point
– Mark number (Red 1 in example,) - consecutively numbered identifiers for the three default mark colors (for example, if you drop three red marks, STX names them Red 1, Red 2, Red 3)
– Custom mark name (such as “Rocks” or “Tree”)
– Last Apply
– A or B point with number (such as B2 for point B in the second A=B line you create for a job)
• Bearing to the point (109° in example)
• Distance to the point (593.97 ft in example)
Note: There is only ever one Last Apply return point—it is always the end of the last time you turn Apply Off.
Outback STX User Guide 124 PN 875-0331-000 Rev A1

Chapter 7: Advanced Features
To return to a point:
1. Press the Mark screen button. The Mark window appears.
2. Press Return to Point. The Return To Point window appears.
3. Select a return point and press OK. The Return to Point window closes and the Map screen displays the Steering Guide lightbar arch and additional guidance information (see example on previous page).
Outback STX User Guide 125 PN 875-0331-000 Rev A1

Chapter 7: Advanced Features
eTurns
eTurns enables the vehicle to automatically execute a turn at the end of a swath (you determine which swath to turn onto).
The key points about eTurns are:
• eTurns are only applicable to straight line A=B operations (A=B lines and A + Direction lines)
• The eTurns button (bottom right of screen) is not active until you have calibrated eTurns (see “Calibrating eTurns” on page 127) and are engaged on a straight line (A=B or A + Direction)
• eTurns calibration is required for each implement
• You can operate with a fixed turn configuration or change the configuration in real time for individual turns
• eTurns guides the vehicle turning path, not the implement’s turning path
• The headland prompt, if used, is based on the vehicle position, not the implement’s position
Note: eTurns is a subscription-only eDriveX feature—you must have eDriveX installed on your system and have a valid eTurns subscription to use eTurns. Contact your local Outback Guidance dealer or Outback Guidance Customer Service to obtain an eTurns subscription. To enter your eTurns authorization code see “Codes Screen” on page 146. If you do not have a valid eTurns subscription and you press the eTurns button the following message appears.
Note: It is recommended that you calibrate your autosteering system before you calibrate eTurns (see “Steering Options” on page 49). Also, eTurns calibration is required for each implement (unless implements are identical - see Warning in the next section).
Outback STX User Guide 126 PN 875-0331-000 Rev A1
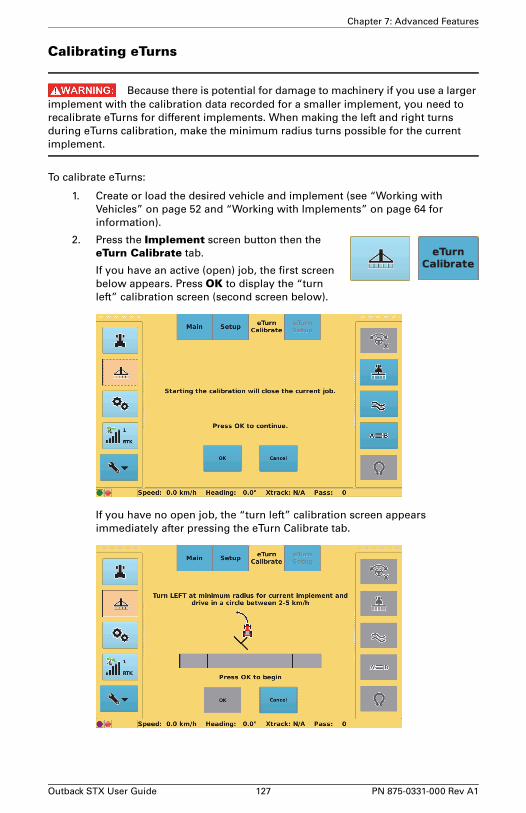
Chapter 7: Advanced Features
Calibrating eTurns
Because there is potential for damage to machinery if you use a larger implement with the calibration data recorded for a smaller implement, you need to recalibrate eTurns for different implements. When making the left and right turns during eTurns calibration, make the minimum radius turns possible for the current implement.
To calibrate eTurns:
1. Create or load the desired vehicle and implement (see “Working with Vehicles” on page 52 and “Working with Implements” on page 64 for information).
2. Press the Implement screen button then the eTurn Calibrate tab.
If you have an active (open) job, the first screen below appears. Press OK to display the “turn left” calibration screen (second screen below).
If you have no open job, the “turn left” calibration screen appears immediately after pressing the eTurn Calibrate tab.
Outback STX User Guide 127 PN 875-0331-000 Rev A1

Chapter 7: Advanced Features
3. Perform the left calibration:
a. Maintaining the recommended speed, steer to the left at the minimum radius for the current implement (tightest possible or practical turn for the current implement).
When you are driving within the required speed range, the OK button becomes available.
b. Press OK. STX indicates that calibration is in progress and the OK button becomes unavailable (gray).
c. When the left calibration step is complete the OK button becomes available. Press OK. The right calibration screen appears.
4. Perform the right calibration.
a. Maintaining the recommended speed, steer to the right at the minimum radius for the current implement (tightest possible or practical turn for the current implement).
When you are driving within the required speed range, the OK button becomes available.
Note: The “left” and “right” calibration screens that follow have a speed bar that indicates if you are driving within the required speed range. Use the speed bar to ensure you stay within the speed range. When instructed to center the steering, aim at a specific landmark to ensure you are driving the vehicle in a straight line.
Outback STX User Guide 128 PN 875-0331-000 Rev A1

Chapter 7: Advanced Features
b. Press OK. STX indicates that calibration is in progress and the OK button becomes unavailable (gray).
c. When the right calibration step is complete, the calibration complete screen appears and you can perform eTurns setup (the tab is blue).
Setting Up and Making eTurnsAfter you have completed eTurns calibration, you initially configure eTurns using the eTurn Setup screen.
Figure 7-1: eTurn Setup screen
Table 7-1 describes each of the eTurns setup parameters.
Table 7-1: eTurns setup parameters
Parameter Description
Speed
Speed at which you want your vehicle to execute the eTurn. The Speed and the Headland Distance combine to determine the linear distance from the headland that the prompt appears. If, during an eTurn, you exceed the speed you set (here or on the eTurns Control panel), automated steering (so the eTurn also) will disengage.
Outback STX User Guide 129 PN 875-0331-000 Rev A1

Chapter 7: Advanced Features
After setting up eTurns and after you are engaged on an A=B line or A + Direction line, press the eTurns control button to make an eTurn—the eTurns window (at right) appears along the left of the display, showing the first turn, next pass, and eTurn speed parameters and the speed bar.
You can accept the parameters you set on the eTurn Setup screen or change them here (except for Headland Prompt and Headland Distance). You may also need to vary your current speed: if the speed bar is red you are driving too fast or too slow. When the speed bar is green, the Go button becomes active and you can make your eTurn.
When you make adjustments to your eTurn in the eTurns window, the Map screen shows the predicted eTurn path in blue. When you make the eTurn, the Map screen shows the actual eTurn path in red (see steps 6 and 7 in the following procedure for examples).
To set up eTurns:
1. Press the Implement screen button:
• If the eTurn Setup tab is not blue, calibrate eTurns (see “Calibrating eTurns” on page 127) then press the eTurn Setup tab.
• If the eTurn Setup tab is blue, press the tab.
Next pass
Order in which rows are worked (or ‘steered to’ - also known as the ‘swath pattern’). Pressing the up arrow or down arrow displays the following options:
• Current row - automatically turn back onto the current row
• Next row - automatically turn onto the adjacent row
• Skip rows: # - skip the number of adjacent rows specified (for example, for Skip Rows: 1, the vehicle will automatically turn on the pattern 1, 3, 5, 7 etc.)
First Turn
Direction to turn (left or right)
Headland Prompt
When set to On, during operation the eTurns window automatically appears (as if you pressed the eTurns control button) as you approach the headland (previously applied area).
Headland Distance
Distance to headland when eTurns window automatically appears when Headland Prompt set to On.
Table 7-1: eTurns setup parameters (continued)
Parameter Description
Outback STX User Guide 130 PN 875-0331-000 Rev A1

Chapter 7: Advanced Features
The eTurn Setup screen appears.
2. Make your selections:
a. Press the Speed down arrow (decrease speed) or up arrow (increase speed) to set your maximum eTurn speed.
b. Press the Next pass (Current row in screen above) down arrow or up arrow. The down arrow decreases pass numbers and the up arrow increases pass numbers.
c. Press the First Turn left arrow (eTurn to left) or right arrow (eTurn to right).
d. Press the preferred Headland Prompt button (On or Off).
e. If you set Headland Prompt to On, press Headland Distance, and in the data entry window enter a value and press Apply.
To make an eTurn:
1. In an active job, set a straight line (A=B or A + Direction).
2. When eDriveX is ready to engage press the Steering button (blue). STX engages on the guideline, the Steering button turns from blue to orange, and the eTurns control button turns from gray to blue.
Outback STX User Guide 131 PN 875-0331-000 Rev A1

Chapter 7: Advanced Features
3. Press the eTurns control button. The eTurns window appears.
4. Adjust the parameters (if necessary). As you make any changes to the first turn (direction), next pass, or eTurn speed parameters, STX shows the changes on the Map screen (predicted eTurn path in blue).
Steeringbutton
eTurnscontrolbutton
Make eTurn to the left, skip one row
Make eTurn to the right, next row (do not skip rows)
Outback STX User Guide 132 PN 875-0331-000 Rev A1

Chapter 7: Advanced Features
5. Make sure the speed bar is green (you are not driving too fast or too slow) then press Go. STX starts making the eTurn (actual eTurn path in red).
If you set the Headland Prompt to On and you have an applied area around your field, from this point on you do not need to press the eTurns control button to display the eTurns window—this will occur automatically.
eTurns and SpeedThe predicted and actual turn eTurn paths are determined by the speed at which you set the eTurn to be made (and the curvature calibration for the tractor/implement combination). Figure 7-2 shows how speed determines the eTurn path.
Note: If you exceed the set speed during the eTurn (beyond a small buffer value), automated steering disengages. This applies to the speed you set on the eTurn Setup screen or the speed you set (override) in the eTurns window.
eTurn in progress, eTurns control button orange
eTurn complete, eTurns control button blue
Outback STX User Guide 133 PN 875-0331-000 Rev A1

Chapter 7: Advanced Features
Figure 7-2: eTurns and speed
Slower speed, sharper turn
Faster speed, wider turn
Outback STX User Guide 134 PN 875-0331-000 Rev A1

Chapter 7: Advanced Features
e-DifExtended Differential (e-Dif) software enables STX to perform with differential-like accuracy for extended periods of time without the use of a differential service. e-Dif models the effects of ionosphere, troposphere, and timing errors for extended periods by computing its own set of pseudo-corrections.
e-Dif may be used anywhere geographically and is especially useful where SBAS networks have not yet been installed, such as South America, Africa, Australia, and Asia.
Selecting e-Dif as the Differential Correction TypeTo select e-Dif as the differential correction type:
1. Press the GPS screen button then the Setup tab. The Setup screen appears.
2. Press the eDif button. All four correction type buttons turn gray, the e-Dif related tabs appear, an audible beep sounds, then the eDif button turns orange.
Outback STX User Guide 135 PN 875-0331-000 Rev A1

Chapter 7: Advanced Features
Initialization of e-Dif on PowerupAfter powerup STX must track GPS satellites for approximately 10 minutes before it can generate differential corrections. The vehicle must be stationary during this time and the antenna should have a clear view of the sky.
When STX has finished tracking, the eDif Response field displays “OK.”
To view e-Dif status information and verify e-Dif is working correctly:
1. Press the GPS screen button then the EDif tab. The EDif screen appears.
2. Confirm the eDif Response field displays “OK.”
Outback STX User Guide 136 PN 875-0331-000 Rev A1

Chapter 7: Advanced Features
Updating e-DifIf a job is interrupted and suspended, for hours or days for example, you need to be able to restart the job at the point (exact location) at which it was suspended. In e-Dif you can return to the point and update e-Dif.
You record (and physically mark as a backup) the point at which the job is suspended. When you are ready to resume the job, you use STX guidance to return to that point (which you can confirm with a physical mark). Once at that point, you update the e-Dif correction and restart where you left off.
1. At the point at which the job is suspended (where you stop your vehicle and turn Apply Off):
a. Press the GPS screen button then the Config tab. The Config screen appears.
b. Press the Save point button. STX records the vehicle’s exact location and populates the Latitude and Longitude fields with this location.
c. Place a physical marker at the exact location (recommended).
2. Press the Job screen button then the Setup tab. The Setup screen appears.
Outback STX User Guide 137 PN 875-0331-000 Rev A1

Chapter 7: Advanced Features
3. Press the Close button to save the current job.
4. When you are ready, load the job (see “Loading a Job” on page 82).
5. Select the Last Apply point (see “Returning to an Existing Point” on page 124).
STX guides you back to the point where it last logged any job data. Since it is important to return to the exact physical location, you should use STX guidance and your physical marker to return to that exact location.
6. When you reach the return point, stop the vehicle and confirm STX is not logging data.
7. Press the GPS screen button then the Config tab to display the Config screen. Confirm you have reached the exact location using the Distance to Point field.
8. Press the Update eDif button. STX resets the e-Dif correction.
9. Resume guidance by pressing either the Straight Guidance control button or the Contour Guidance control button.
Outback STX User Guide 138 PN 875-0331-000 Rev A1

Appendix A: STX Screens ReferenceTools Screens
GPS Screens
Vehicle Screens
Implement Screens
Job Screens
Map Screen
Outback STX User Guide 139 PN 875-0331-000 Rev A1

Appendix A: STX Screens Reference
This appendix provides descriptions of each STX screen/tab (including descriptions of each button and field on the tabs). Your screens/tabs may vary depending on the application and/or system components (such as eDriveTC/eDriveVSi or eDriveX) being used.
Tools ScreensThe Tools screen button provides access to the System, Display, and Codes screens.
System Screen
Table A-1: System (Tools) screen button/field descriptions
Button/Field Function/Description
Version of the application software STX is running.
Future use
Language currently in use on STX.
Outback STX User Guide 140 PN 875-0331-000 Rev A1

Appendix A: STX Screens Reference
Export GNSS logs to a USB flash drive inserted into the STX terminal. STX creates a folder name based on the current UTC date and time.
For example, if you export GNSS logs on Saturday, March 9, 2013 at 16:11:49 UTC, the folder is named “Sat_Mar_9_16_11_49_2013.”
When you press the button the following status screen appears.
When the process is complete a ‘complete’ message appears and the OK button is blue.
Press OK to close the screen and return to the System screen.
Table A-1: System (Tools) screen button/field descriptions (continued)
Button/Field Function/Description
Outback STX User Guide 141 PN 875-0331-000 Rev A1
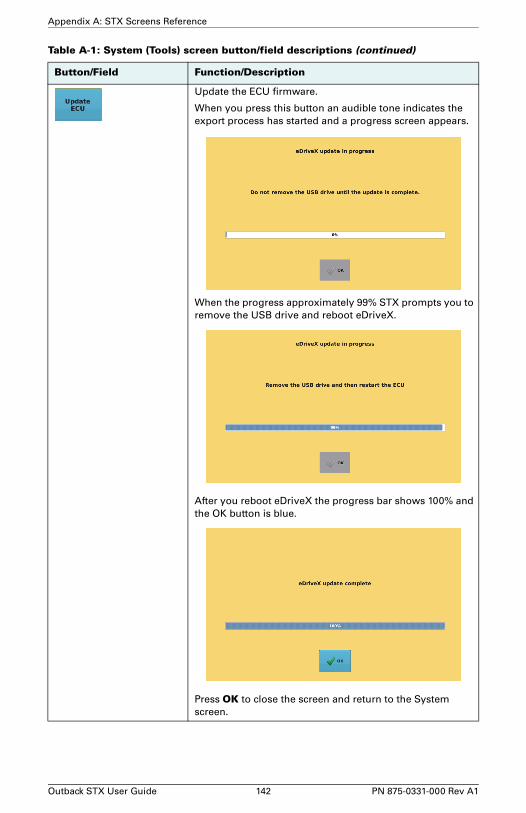
Appendix A: STX Screens Reference
Update the ECU firmware.
When you press this button an audible tone indicates the export process has started and a progress screen appears.
When the progress approximately 99% STX prompts you to remove the USB drive and reboot eDriveX.
After you reboot eDriveX the progress bar shows 100% and the OK button is blue.
Press OK to close the screen and return to the System screen.
Table A-1: System (Tools) screen button/field descriptions (continued)
Button/Field Function/Description
Outback STX User Guide 142 PN 875-0331-000 Rev A1

Appendix A: STX Screens Reference
Export console logs to a USB flash drive inserted into the STX terminal. STX creates a folder name based on the current UTC date and time.
For example, if you exported console logs on Saturday, March 9, 2013 at 16:12:51 UTC, the folder is named “Sat_Mar_9_16_12_51_2013.”
When you press the button the following status screen appears.
When the process is complete a ‘complete’ message appears and the OK button is blue.
Press OK to close the screen and return to the System screen.
Export eDriveX logs to a USB flash drive inserted into the eDriveX ECU.
eDriveX creates a "logs" folder and creates a subfolder based on the MAC address of the eDriveX ECU (for example, 00d0c9bb25b4).
Table A-1: System (Tools) screen button/field descriptions (continued)
Button/Field Function/Description
Outback STX User Guide 143 PN 875-0331-000 Rev A1

Appendix A: STX Screens Reference
Display Screen
Table A-2: Display (Tools) screen button/field descriptions
Button/Field Function/Description
Toggle between US or Metric, setting the unit of measurement in which STX displays and records all measurements.
Set the clock to either a 12-hour or 24-hour format.
Display the control buttons on either the left or the right side of the screen.
Toggle headland alert on/off
A headland alert occurs when the implement enters a headland—a previously applied area.
The alert is both an audible tone and an indicator (red circle with a line through it) that appears in the upper left of the screen.
Outback STX User Guide 144 PN 875-0331-000 Rev A1

Appendix A: STX Screens Reference
Toggle between daytime (Day) mode or nighttime (Night) mode—Night mode shown below. When you switch modes a “switching mode” message appears briefly.
Rebooting the terminal resets the terminal to Day mode.
Cycle through the display brightness from 1 (dim) to 10 (bright).
• Function (left) button - cycle between Steering, XTrack (cross track), and Off
• Sensitivity (right) button:
• When left button is Steering or XTrack, cycle through High, Medium, and Low sensitivity
• When left button is Off, right button is gray (unavailable)
Table A-2: Display (Tools) screen button/field descriptions (continued)
Button/Field Function/Description
Outback STX User Guide 145 PN 875-0331-000 Rev A1

Appendix A: STX Screens Reference
Codes Screen
• Lines button - cycle through A=B, Grid, and Off.
• Grid Spacing field (only available when you set Lines to Grid) - display the Grid Spacing data entry window where you enter the grid spacing.
Table A-3: Codes (Tools) screen button/field descriptions
Button/Field Function/Description
• Serial number - serial number of the STX terminal.
• GPS subscriptions - current subscriptions.
Table A-2: Display (Tools) screen button/field descriptions (continued)
Button/Field Function/Description
Outback STX User Guide 146 PN 875-0331-000 Rev A1

Appendix A: STX Screens Reference
• eTurns Status - status of eTurns subscription (Authorized or Not Authorized).
• eTurns Expiry - expiration date of eTurns subscription.
Display the Enter code data entry window where you enter a subscription code for both subscriptions and feature licenses.
Table A-3: Codes (Tools) screen button/field descriptions
Button/Field Function/Description
Outback STX User Guide 147 PN 875-0331-000 Rev A1

Appendix A: STX Screens Reference
GPS ScreensThe GPS screen buttons provides access to the various screens depending on the correction type you select (see Table A-4).
Setup Screen
Table A-4: GPS screens depending on selected correction type
Correction Type
Setup Status Diag Config EDif Radio RTK OMNI
SBAS X X X
eDif X X X X X
RTK X X X X X
OMNI X X X X
Table A-5: Setup (GPS) screen button/field descriptions
Button/Field Function/Description
GNSS receiver type.
GNSS applications loaded on the terminal.
Receiver application version.
Version of software that enables you to update the receiver firmware.
Serial number of the terminal.
Active application (of the applications displayed in the Application field).
Outback STX User Guide 148 PN 875-0331-000 Rev A1

Appendix A: STX Screens Reference
Available receiver output.
Currently subscribed applications.
Increase the time (up arrow) or decrease the time (down arrow) in half-hour increments. The time field below the buttons shows the current time and is read-only.
Display the NMEA window where you press the individual NMEA message buttons to cycle through the available message rates.
• Press Save to save settings for the current session and after rebooting STX.
• Press Exit to change settings only for the current session; changes will revert after rebooting STX.
For example, press the GGA button to cycle through OFF, 0.2 Hz, 1 Hz, 5 Hz, and 10 Hz.
Note: NMEA message rates vary based on your subscription.
Display the SBAS PRN window, where you select the SBAS satellites (AUTO or specific PRNs) used in STX’s position calculation. The default value for each SBAS setting is Auto (STX automatically selects from the available satellites).
If you change any of these settings and then set any of them back to Auto all three are automatically set back to Auto (you cannot have a mix of manual and auto settings).
Select the desired correction type. The correction type you select determines what GPS screens are available (in addition to Config, Status, and Diag).
Table A-5: Setup (GPS) screen button/field descriptions (continued)
Button/Field Function/Description
Outback STX User Guide 149 PN 875-0331-000 Rev A1

Appendix A: STX Screens Reference
Status Screen
Status (GPS) screen button/field descriptions
Button/Field Function/Description
Current time.
Vehicle’s current latitude.
Vehicle’s current longitude.
Vehicle’s current altitude.
Status of the GPS receiver to receive GPS differential corrections (FIX, FLT, DIF, AUT, or NO).
Type of differential correction being used:
• SBAS (SBAS)
• RTK (ROX, CMR, or RTCM v3)
• eDif (e-Dif)
• OMNI (OmniSTAR VBS, XP, HP, or G2)
Age of the corrections used in the DGPS calculation (values > 120 seconds require acquisition of a new RTK lock; for SBAS, Diff Age is typically 6 to 10 seconds).
Pseudo-estimate of the DGPS solution accuracy determined as the RMS value of the positional residual errors. STDEV is valid only if six or more satellites are used in the solution calculation. Typical values for SBAS correction are 0.5 ft – 1.5 ft (0.15 m – 0.45 m). Typical values for RTK corrections are < 0.1 ft (3 cm).
Ionospheric scintillation, values are:
• 0 (little or no scintillation - does not adversely affect RTK solution).
• 1-100 (scintillation detected - adversely affects RTK solution).
Outback STX User Guide 150 PN 875-0331-000 Rev A1

Appendix A: STX Screens Reference
Relative strength of the correction satellites. For WAAS, two numbers are shown separated by a hyphen. The number can be from 0 to 500, (0 is the best, 500 is the worst). If BER > 20 verify the antenna has a clear view of the sky to properly find/track correction satellites. STX tracks multiple correction satellites, each satellite has a different BER, and the value in the BER field represents each value separated by a hyphen.
For example, a BER of 8-500 means STX has a very good signal on one satellite (BER=8) and is not receiving corrections from the other satellite (BER=500, the lowest reception value). Only one satellite must have a low BER value (< 20) to provide differential corrections.
ID of correction station.
Number of GNSS satellites used to calculate the position.
GNSS signals being used:
• GPS - L1, L2
• GLONASS - G1, G2
Satellites used by SBAS.
Quality of GNSS signals.
Differential corrections the receiver is getting.
Differential corrections the receiver is not using (excluded from the differential solution).
Current operating modes that control various GPS tracking parameters.
RTK accuracy status value.
Status (GPS) screen button/field descriptions (continued)
Button/Field Function/Description
Outback STX User Guide 151 PN 875-0331-000 Rev A1

Appendix A: STX Screens Reference
Diag ScreenThe fields on the Diag screen are the same regardless of the selected correction type on the Setup screen (see “Setup Screen” on page 148). The Diag screen is mainly used for troubleshooting purposes or when providing information to Outback Guidance Customer Service.
Table A-6: Diag (GPS) screen button/field descriptions
Button/Field Function/Description
SNR values of L1 GPS signals. The value in the box on the right is the maximum value of the SNR values.
SNR values of L2 GPS signals. The value in the box on the right is the maximum value of the SNR values.
SNR values of SBAS signals. The value in the box on the right is the maximum value of the SNR values.
SNR values of L1 GLONASS signals. The value in the box on the right is the maximum value of the SNR values.
SNR values of L2 GLONASS signals. The value in the box on the right is the maximum value of the SNR values.
Information transmitted in PSAT,RTKSTAT message.
Information transmitted in GPGGA message.
Outback STX User Guide 152 PN 875-0331-000 Rev A1

Appendix A: STX Screens Reference
Config ScreenThe Config screen is only displayed when you select e-Dif as the correction type (see Table A-4 on page 148).
Table A-7: Config (GPS) screen button/field descriptions
Button/Field Function/Description
Distance from the vehicle’s current position to the last point that e-Dif was saved.
Latitude of the point where e-Dif was last saved.
Longitude of the point where e-Dif was last saved.
Save the current location as a reference point.
Update the e-Dif solution with the current location.
Outback STX User Guide 153 PN 875-0331-000 Rev A1

Appendix A: STX Screens Reference
EDif ScreenThe EDif screen is only displayed when you select e-Dif as the correction type (see Table A-4 on page 148).
Table A-8: EDif (GPS) screen button/field descriptions
Button/Field Function/Description
Latitude of the reference point in decimal degrees.
Longitude of the reference point in decimal degrees.
Ellipsoidal height of the reference point.
Distance from saved e-Dif point.
e-Dif status; possible values are:
• OK
• FAILED Not Enough Stable Satellite Tracks
Age of the corrections used in the DGPS calculation.
ID of correction station.
Outback STX User Guide 154 PN 875-0331-000 Rev A1

Appendix A: STX Screens Reference
Radio ScreenThe Radio screen is only displayed when you select RTK as the correction type (see Table A-4 on page 148).
Table A-9: Radio (GPS) screen button/field descriptions
Button/Field Function/Description
Radio frequency.
Radio channel.
Radio mode (press to cycle through available options).
Radio type in the rover receiver.
Received signal strength indicator - actual power in the received radio signal (in dBm).
Save any changes on this screen (Frequency/Channel and/or Mode).
Screen above is for 400 MHz radio option; fields at right appear on screen for 900 MHz radio option.
Outback STX User Guide 155 PN 875-0331-000 Rev A1

Appendix A: STX Screens Reference
RTK ScreenThe RTK screen is only displayed when you select RTK as the correction type (see Table A-4 on page 148).
Table A-10: RTK (GPS) screen button/field descriptions
Button/Field Function/Description
Active (current) application.
Age of the corrections used in the DGPS calculation.
ID of correction station.
• Type - radio type in the rover receiver.
• Mode - current radio mode.
• RSSI - received signal strength indicator (actual power in the received radio signal in dBm).
• Latitude - base station latitude, in decimal degrees.
• Longitude - base station longitude, in decimal degrees.
• Altitude - base station altitude, in feet or meters.
• Distance To Base - distance between base and rover radio.
• Heading To Base - direction from rover to base, in degrees.
Outback STX User Guide 156 PN 875-0331-000 Rev A1

Appendix A: STX Screens Reference
Omni ScreenThe Omni screen is only displayed when you select OmniSTAR (OMNI) as the correction type (see Table A-4 on page 148).
Table A-11: Omni (GPS) screen button/field descriptions
Button/Field Function/Description
Version of service.
Current OmniSTAR status level.
Subscription expiration date.
OmniSTAR tracking status.
Frequency of OmniSTAR satellite.
Satellite location (longitude) that covers the area in which you will be working.
Elevation of OmniSTAR satellite.
Azimuth of OmniSTAR satellite.
Bit error rate - relative strength of the correction satellite. The number can be from 0 to 500, with 0 being the best and 500 being the worst. If BER > 20 verify the antenna has a clear view of the sky to properly find and track correction satellites. For OmniSTAR the numbers before and after the hyphen will be the same.
Outback STX User Guide 157 PN 875-0331-000 Rev A1

Appendix A: STX Screens Reference
Current status level (possible values are FIX, FLT, DIF, AUT).
Differential correction in use: VBS, XP, HP, or G2.
GNSS serial number.
Age of the corrections used in the DGPS calculation.
ID of correction station.
Table A-11: Omni (GPS) screen button/field descriptions (continued)
Button/Field Function/Description
Outback STX User Guide 158 PN 875-0331-000 Rev A1

Appendix A: STX Screens Reference
Vehicle ScreensThe Vehicle screen button provides access to the following screens:
• Main (eDriveX and eDriveTC)
• Steer (different fields/buttons for eDriveX and eDriveTC)
• Tilt Setup (eDriveTC only)
• Details (eDriveX only)
• Status (eDriveX only)
Outback STX User Guide 159 PN 875-0331-000 Rev A1

Appendix A: STX Screens Reference
Main Screen
Table A-12: Main (Vehicle) screen button/field descriptions
Button/Field Function/Description
Display the Vehicle Name screen where you edit the current vehicle name.
Display the color selection window where you select a color for the current vehicle.
Display the Vehicle Name screen where you enter a name for a new vehicle.
Display a vehicle list window where you load a vehicle, delete a vehicle, or delete all vehicles.
Note: You cannot delete the ‘default’ vehicle or the current vehicle.
Display a vehicle list window where you can import one or all vehicles from a USB flash drive.
Note: Vehicle files must be in 'vehicles' folder on the USB drive.
Display a vehicle list window where you can export one or all vehicles to a USB flash drive.
Note: Vehicle files are exported to a 'vehicles' folder on the USB drive. STX automatically creates this folder (if it does not already exist) during the export process.
Outback STX User Guide 160 PN 875-0331-000 Rev A1

Appendix A: STX Screens Reference
Steer Screen - eDriveTC
The fields/buttons in the lower center of the Steer screen change depending on the vehicle type you select, as shown in Figure A-1.
Figure A-1: Main screen fields dependent on Type selection
Table A-13: Steer (Vehicle-eDriveTC) screen button/field descriptions
Button/Field Function/Description
Type of automated steering control unit currently connected to STX (displays ‘eDrive’ when eDriveTC is connected).
Wheel (VSi) Wheel (hydraulic)
Track (hydraulic) Articulated (wheel or track)
Outback STX User Guide 161 PN 875-0331-000 Rev A1

Appendix A: STX Screens Reference
eDriveTC connection status:
• Connected - eDriveTC connected and powered on
• None - not connected or powered on, or connection error
eDriveTC firmware version
Note: For firmware updates contact your local Outback Guidance dealer or Outback Guidance Customer Service.
Select the vehicle type: WHEEL, VSi WHEEL, TRACK, or ARTICULATED.
Toggle between MANUAL (disable Auto-Engage) and AUTO (enable Auto-Engage). Default is Manual. This enables you to set eDriveTC to automatically engage steering control or for you to engage it manually.
(Wheel and VSI types only)
Toggle between ON and OFF. When set to ON, dampening provides a smoothing effect to machines that have large amounts of body roll that might induce erratic steering. Set this feature to OFF to disable dampening. Default is OFF.
(VSi only)
Toggle between ON and OFF. VSi applies to two tractor types: wheel (non-articulated) and wheel (articulated). Set to ON for vehicles that use articulation for steering.
(Track and VSI types only)
Adjust how much time it takes a vehicle to make a steering correction. A high number is more aggressive (takes less time), while a low number is less aggressive (takes more time). Press the field to display a data entry window, enter a value, and then press Apply.
The range is 0 (least aggressive) to 100 (most aggressive). Default is 35.
(Wheel and Articulated types only)
Adjust the sensitivity of eDriveTC to prevent over-reaction in difficult-to-control machines—press the up arrow button to increase sensitivity and press the down arrow button to decrease sensitivity. The range is 1 to 20 (1 is lowest, 20 is highest). Default is 20.
Table A-13: Steer (Vehicle-eDriveTC) screen button/field descriptions (continued)
Button/Field Function/Description
Outback STX User Guide 162 PN 875-0331-000 Rev A1

Appendix A: STX Screens Reference
(Track type only)
Display a data entry window where you select the value that determines how aggressive the track machine steers left or right (in degrees/sec).
The valid range is 0 to 100. Default is 100.
Test and set the steering control rate after installing eDriveTC.
Press the left arrow to move vehicle steering to the left and then press Stop to stop at left extreme. Press the right arrow to move vehicle steering to the right and then press Stop to stop at right extreme.
See “eDriveTC” on page 34 for more information.
Table A-13: Steer (Vehicle-eDriveTC) screen button/field descriptions (continued)
Button/Field Function/Description
Outback STX User Guide 163 PN 875-0331-000 Rev A1

Appendix A: STX Screens Reference
Steer Screen - eDriveX
Table A-14: Steer (Vehicle-eDriveX) screen button/field descriptions
Button/Field Function/Description
Adjust the sensitivity of eDriveX to prevent over-reaction in difficult-to-control machines—press the up arrow button to increase sensitivity and press the down arrow button to decrease sensitivity. The valid range is 1 to 10 (1 is lowest, 10 is highest). Default is 10.
Adjust the attack of eDriveX to determine how aggressively the vehicle steers onto the guidance line when approaching it from a distance
Cycle through smoothing settings (None, Low, Medium, and High). Steering smoothing determines the amount of smoothing of contours. The smoothing applied to the current contour is based on the smoothing setting that was active during the preceding pass.
Not available for eDriveX (eDriveTC feature only)
Toggle between 2D and 3D projection. The projection mode relates to the effect of the earth's curvature on guidance accuracy. Select 3D as the A=B projection mode for wide field operations or interoperability with third party guidance systems that also use 3D guidance line projection.
Start the eDriveX calibration process.
Outback STX User Guide 164 PN 875-0331-000 Rev A1

Appendix A: STX Screens Reference
Tilt Setup Screen
Table A-15: Tilt Setup (Vehicle-eDriveTC) screen button/field descriptions
Button/Field Function/Description
For proper tilt compensation, you need to input the distance from the ground to the GPS antenna in feet or meters (depending on the selected units of measurement). You must input the distance from the ground to the GPS antenna in feet or meters (depending on the unit of measure mode) for proper tilt compensation. Default is 10 feet.
Current tilt of the machine.
Toggle tilt sensor functionality on/off. Set to ON to enable tilt sensor functionality. Set to OFF to disable tilt sensor. Default is OFF.
Only available if Tilt Compensation is On (button is disabled if Tilt Compensation is Off, button is enabled if Tilt Compensation is On)
Enables you to see the current angle measurement (Tilt Angle field) of the tilt sensor for mounting adjustment and to enter a zero calibration point.
Press the Calibrate tilt button to start the tilt calibration process. The button flashes between blue and orange during calibration.
You can only zero the tilt sensor if you are +/- 2°. Retry when < 2°
Outback STX User Guide 165 PN 875-0331-000 Rev A1

Appendix A: STX Screens Reference
Details ScreenThe Details screen provides read-only eDriveX information. Except for Controller, Firmware, and Status this screen displays information you enter or STX calculates when calibrating your vehicle.
Table A-16: Details (Vehicle-eDriveX) screen button/field descriptions
Button/Field Function/Description
Controller connected to STX (will show None or eDriveX).
Current eDriveX firmware version.
Connection status of eDriveX ECU.
ECU top orientation.
ECU connector orientation.
Height of the antenna above ground.
Antenna distance from fore/aft centerline.
Antenna distance from left/right centerline.
Wheelbase of current vehicle.
Outback STX User Guide 166 PN 875-0331-000 Rev A1

Appendix A: STX Screens Reference
Wheel angle sensor counts at left lock, center, and right lock.
Maximum lateral acceleration - eTurns will be limited to the calibrated maximum g-force.
eTurns minimum radius (left/right) - turning circle of the vehicle with the implement attached.
Minimum and maximum currents left and right for steering valve.
Time it takes for the machine to go from full lock left to full lock right (Lock Right) and from full lock right to full lock left (Lock Left).
Scaling factor applied to the current to optimize wheel response (Current only, not Lock-to-Lock).
Mounting bias of the eDriveX ECU.
Table A-16: Details (Vehicle-eDriveX) screen button/field descriptions (continued)
Button/Field Function/Description
Outback STX User Guide 167 PN 875-0331-000 Rev A1

Appendix A: STX Screens Reference
Status ScreenThe Status screen shows the hardware, calibration, and run time status of the eDriveX system.
There are some variations between the status screens for hydraulic steering and electric steering (valve type VSi).
Each item’s status will show as good (green/checked, see above) or an alert (red/exclamation point, see at right). The alert indicates an error or limitation of some kind.
If a status item has a box around it (such as Filters converged shown above) and that status item has an alert status, press the field to display instructions on how to resolve the error and then press OK to close the instructions window.
Outback STX User Guide 168 PN 875-0331-000 Rev A1

Appendix A: STX Screens Reference
Implement Screens
Main Screen
Table A-17: Main (Implement) screen button/field descriptions
Button/Field Function/Description
Display the Implement Name screen where you edit the current implement name.
Display the Implement Name screen where you enter a name for a new implement.
Display a implement list window where you load an implement, delete an implement, or delete all implements.
Note: You cannot delete the ‘default’ implement or the current implement.
Display an implement list window where you can import one or all implements from a USB flash drive.
Note: Implement files must be in 'implements' folder on the USB drive.
Display an implement list window where you can export one or all implements to a USB flash drive.
Note: Implement files are exported to a 'implements' folder on the USB drive. STX automatically creates this folder (if it does not already exist) during the export process.
Outback STX User Guide 169 PN 875-0331-000 Rev A1
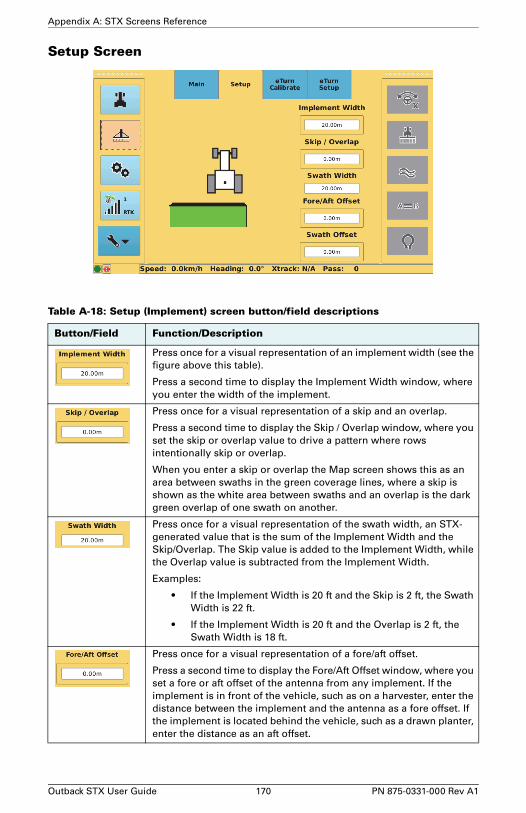
Appendix A: STX Screens Reference
Setup Screen
Table A-18: Setup (Implement) screen button/field descriptions
Button/Field Function/Description
Press once for a visual representation of an implement width (see the figure above this table).
Press a second time to display the Implement Width window, where you enter the width of the implement.
Press once for a visual representation of a skip and an overlap.
Press a second time to display the Skip / Overlap window, where you set the skip or overlap value to drive a pattern where rows intentionally skip or overlap.
When you enter a skip or overlap the Map screen shows this as an area between swaths in the green coverage lines, where a skip is shown as the white area between swaths and an overlap is the dark green overlap of one swath on another.
Press once for a visual representation of the swath width, an STX-generated value that is the sum of the Implement Width and the Skip/Overlap. The Skip value is added to the Implement Width, while the Overlap value is subtracted from the Implement Width.
Examples:
• If the Implement Width is 20 ft and the Skip is 2 ft, the Swath Width is 22 ft.
• If the Implement Width is 20 ft and the Overlap is 2 ft, the Swath Width is 18 ft.
Press once for a visual representation of a fore/aft offset.
Press a second time to display the Fore/Aft Offset window, where you set a fore or aft offset of the antenna from any implement. If the implement is in front of the vehicle, such as on a harvester, enter the distance between the implement and the antenna as a fore offset. If the implement is located behind the vehicle, such as a drawn planter, enter the distance as an aft offset.
Outback STX User Guide 170 PN 875-0331-000 Rev A1

Appendix A: STX Screens Reference
Press once for a visual representation of a swath offset.
Press a second time to display the Swath Offset window, where you set a right or left swath offset. A swath offset corrects for an antenna that is not installed on the vehicle or implement centerline. The offset is equal to the distance between the GPS antenna centerline and the vehicle or implement centerline and corrects for this distance from the centerline.
Table A-18: Setup (Implement) screen button/field descriptions (continued)
Button/Field Function/Description
Outback STX User Guide 171 PN 875-0331-000 Rev A1

Appendix A: STX Screens Reference
Job Screens
Setup Screen
Table A-19: Setup (Job) screen button/field descriptions
Button/Field Function/Description
Begin a new job. The number in the Job name field and on the bottom of the Job screen button changes.
Continue the most recent job. The most recently closed job (and all its data) is activated. The Continue button is only available (blue) when there is no open (active) job; otherwise, the Continue button is unavailable (gray).
Display a job list window where you can export one or all jobs to a USB flash drive.
Note: Job files are exported to an 'S3jobs' folder on the USB drive. STX automatically creates this folder (if it does not already exist) during the export process.
Display a job list window where you can import one or all jobs from a USB flash drive.
Note: Job files must be in 'S3jobs' folder on the USB drive.
Display a job list window where you load a job, delete a job, or delete all jobs.
Note: You cannot delete the current job.
Load templates to or delete templates from STX.
Close and save the current job.
Create a template from a selected job, saving job data to provide an outline for future jobs.
Outback STX User Guide 172 PN 875-0331-000 Rev A1

Appendix A: STX Screens Reference
Notes Screen
Table A-20: Notes (Job) screen button/field descriptions
Button/Field Function/Description
Set name or number of the farm where the job is performed.
Set the type of crop being worked.
Set the direction of the wind during the job.
Set the name or ID # of the machine operator.
Set the type of operation performed (planting, tilling, etc.).
Set the wind speed during the job.
Set name or number of the field where the job is performed.
Set the outside temperature.
Set the name or ID# of the machine.
Outback STX User Guide 173 PN 875-0331-000 Rev A1

Appendix A: STX Screens Reference
Map Screen
Set the humidity during the job.
Clear all fields.
Table A-21: Map screen button descriptions
Button/Field Function/Description
Zoom in and zoom out of the view.
Select the mode; available modes are:
• Machine (can use with Top Down view or 3D view)
• Field (can use Top Down view only)
Select the view; available views are:
• Top Down (can use with Machine mode or Field mode)
• 3D (can use Machine mode only)
Table A-20: Notes (Job) screen button/field descriptions (continued)
Button/Field Function/Description
Zoom in Zoom out
Outback STX User Guide 174 PN 875-0331-000 Rev A1

Index
Numerics3D (map view) 93
AA + Direction line 103A=B display option (Map screen) 99A=B line 102
defining new line 105shifting 108snapping 109using previously defined A=B line
106A221 2A321 2adding
implement 70vehicle 53
adjusting guidance lines 97antenna
cable 4cable routing 9clear view of sky 13height 58mounting 8mounting kit 4offset (eDriveX) 34, 39parts list 4pivot (eDriveX) 34, 39, 58port on terminal 6position (eDriveTC) 34, 35routing cable 9
antenna offset L/Rdetermining 41marker method 44overview 40track method 41
Apply control button 20attack, see steering attack
BBaselineX 2before you start a job 78boundary
closing (auto and manual close)122
estimated area displayed 121exclude area 120include area 120
setting 120Brightness button 145
Ccables 3
attaching power cable to powersource 10
connecting to terminal 10routing antenna cable 9
calibrationeTurns 127vehicle (eDriveTC) 54vehicle (eDriveX) 45, 56
Clock button 144closing a job 86configuring
display settings 26eTurns 129GPS settings 27steering settings 28system settings 25
connecting cables to terminal 10connection diagram 7Console logs 31console logs 143continuing a job 83Contour guidance
Contour Lock, using 116creating initial contour pass 115guiding on subsequent passes
116making new first pass 116
Contour Guidance control button 21contour pass (initial) 115control button
Apply 20Contour Guidance 21eTurns 21Pivot Guidance 21Steering 20Straight Guidance 21
converging filtersinitial or re-convergence 47manual driving sequence 48overview 47re-converging 48
creating a job template 88
Outback STX User Guide 175 PN 875-0331-000 Rev A1

Index
Ddefining new A=B line 105deleting
implement 76job 86vehicle 63
diagram, connections 7differential age indicator 24dimensions (vehicle) 58display settings 26
EECU
updating 142ECU orientation 59e-Dif 2
Config screen overview 153EDif screen overview 154selecting 135updating 137
editingimplement 72vehicle 59
editing field data 23eDriveTC
powering down 14powering up 12
eDriveXpowering down 14powering up 12
eDriveX logs 31engine speed - during calibration 47eTurns
calibration 127configuring 129Headland Distance setting 130Headland Prompt setting 130making 129Next Pass setting 130overview 126speed 133Speed setting 129
eTurns control button 21exclude area 120exporting
Console logs 31console logs 143eDriveX logs 31GNSS logs 31, 141implement 74job 84job template 89log files 31
vehicle 61
Ffeatures 2Field (map mode) 93fields, editing 23filters
converging 47self-convergence 48
flags, see marksfore/aft offset
setting 69fore/aft offset, implement 69
GGLONASS 2GNSS logs 31, 141GPS 2
settings 27signal information 24
GPS position 13, 78, 79, 98, 110GPS settings 27Grid display option (Map screen) 99guidance lines
A-B line, shifting- Pivot Guidancemode 113
adjusting 97
Hheadland alert indicator 30Headland Distance setting (eTurns)130Headland Prompt setting (eTurns) 130height (antenna) 58
Iimplement
adding 70deleting 76editing 72exporting 74importing 75loading 73offset overview 64overview 64setup 71swath offset, alternative method
68swath offset, overview 64swath offset, preferred method
65implement offset
overview 64
Outback STX User Guide 176 PN 875-0331-000 Rev A1

Index
importingimplement 75job 85job template 89vehicle 62
include area 120indicator
differential age 24headland alert 30signal status 24signal strength 24signal type 24zoom distance 30
installation 10optional parts 9overview 8rover radio 10run/hold foot switch 9terminal 11
Jjob
before you start 78closing 86continuing 83deleting 86entering notes 81exporting 84importing 85loading 82starting a new job 80
job notes, entering 81job template
creating 88exporting 89importing 89using 88
Kkit parts 3
LL/R offset
antenna 40last apply point 124L-band 2lightbar, see Steering Guide lightbarloading
implement 73job 82vehicle 60
log files, exporting 31, 141, 143
MMachine (map mode) 93making eTurns 129making new first pass (Contour guid-ance) 116manual driving sequence for converg-ing filters 48map
zooming in and out 95map modes 93Map screen
display options 99displaying 92elements 30
map views 93mark
overview 123single point 123
marker method, antenna offset 44mounting
antenna 8terminal 11
NNext Pass setting (eTurns) 130numbering pass (Pivot guidance) 112
OOff display option (Map screen) 99offset
antenna 39antenna L/R determining 41antenna L/R entering value 58antenna L/R marker method 44antenna L/R overview 40antenna, marker method 44antenna, track method 41antenna, track method, track and
wheel vehicles 41implement, overview 64swath, alternative method 68swath, preferred method 65
optional partsinstalling 9run/hold foot switch 9
orientation, ECU 59Outback MAX 2
Pparts 3pivot circle 110Pivot guidance
numbering passes 112
Outback STX User Guide 177 PN 875-0331-000 Rev A1

Index
setting pivot circle 110shifting pivot line 97, 113snapping pivot line 97, 114using previously defined pivot
112Pivot Guidance control button 21point B, updating 107power cable 10powering down
eDriveTC 14eDriveX 14terminal 14
powering upeDriveTC 12eDriveX 12terminal 12
previously defined A=B line 106previously defined pivot 112
Rradio, see rover radiore-converging filters 48returning to a point 124routing
antenna cable 9power cable 10
rover radio 10RTK 2run/hold foot switch 6, 8, 20
installation 9parts list 4
SSBAS 2self-convergence, filters 48sensitivity, see steering sensitivitysetting
A + Direction line 103A=B line 102boundary 120fore/aft offset 69pivot circle 110
setupimplement 71vehicle (eDriveTC) 54vehicle (eDriveX) 56
shiftingA=B line 97, 108pivot line 97, 113
signal status indicator 24signal strength indicator 24signal type indicator 24smoothing, see steering smoothing
snappingA=B line 97, 109pivot line 97, 114
speedengine speed during calibration
47eTurns 133
Speed setting (eTurns) 129starting
new job 80STX 13
Steering control button 20Steering Guide lightbar 96steering options
eDriveTC 36, 161eDriveX 49, 164sensitivity (eDriveTC) 36steering attack 50steering sensitivity 49steering smoothing 50
steering settings 28steering test
eDriveTC 34eDriveX 37
Straight guidanceA + Direction line 103A=B line 102new A=B line 105previously defined A=B line 106shifting A=B line 97, 108snapping A=B line 97, 109updating point B 97, 107
Straight Guidance control button 21subsequent passes (Contour guid-ance) 116swath offset
alternative method 68overview 64preferred method 65
system settings 25
Tterminal 3
connecting cables 10mounting 11overview 5powering down 14powering up 12
Top Down (map view) 93
Uupdating
ECU 142
Outback STX User Guide 178 PN 875-0331-000 Rev A1

Index
updating point B 97, 107using a job template 88
Vvehicle
adding 53calibration considerations
(eDriveX) 45calibration steps for vehicle types
46deleting 63dimensions 58editing 59exporting 61importing 62loading 60overview 52setup and calibration (eDriveTC)
54setup and calibration (eDriveX)
56wheelbase 58
Wwheelbase 58
Zzoom buttons 30zoom distance indicator 30zooming in and out on Map screen 95
Outback STX User Guide 179 PN 875-0331-000 Rev A1

End User License AgreementIMPORTANT - This is an agreement (the "Agreement") between you, the end purchaser ("Licensee") and Hemisphere GPS Inc. ("Hemisphere") which permits Licensee to use the Hemisphere software (the "Software") that accompanies this Agreement. This Software may be licensed on a standalone basis or may be embedded in a Product. Please read and ensure that you understand this Agreement before installing or using the Software Update or using a Product.
In this agreement any product that has Software embedded in it at the time of sale to the Licensee shall be referred to as a "Product". As well, in this Agreement, the use of a Product shall be deemed to be use of the Software which is embedded in the Product.
BY INSTALLING OR USING THE SOFTWARE UPDATE OR THE PRODUCT, LICENSEE THEREBY AGREES TO BE LEGALLY BOUND BY THE TERMS OF THIS AGREEMENT. IF YOU DO NOT AGREE TO THESE TERMS, (I) DO NOT INSTALL OR USE THE SOFTWARE, AND (II) IF YOU ARE INSTALLING AN UPDATE TO THE SOFTWARE, DO NOT INSTALL THE UPDATE AND PROMPTLY DESTROY IT.
HEMISPHERE PROVIDES LIMITED WARRANTIES IN RELATION TO THE SOFTWARE. AS WELL, THOSE WHO USE THE EMBEDDED SOFTWARE DO SO AT THEIR OWN RISK. YOU SHOULD UNDERSTAND THE IMPORTANCE OF THESE AND OTHER LIMITATIONS SET OUT IN THIS AGREEMENT BEFORE INSTALLING OR USING THE SOFTWARE OR THE PRODUCT.
1. LICENSE. Hemisphere hereby grants to Licensee a non-transferable and non-exclusive license to use the Software as embedded in a Product and all Updates (collectively the "Software"), solely in binary executable form.
2. RESTRICTIONS ON USE. Licensee agrees that Licensee and its employees will not directly or indirectly, in any manner whatsoever:
a. install or use more copies of the Software than the number of copies that have been licensed;
b. use or install the Software in connection with any product other than the Product the Software was intended to be used or installed on as set out in the documentation that accompanies the Software.
c. copy any of the Software or any written materials for any purpose except as part of Licensee's normal backup processes;
d. modify or create derivative works based on the Software;
e. sub-license, rent, lease, loan or distribute the Software;
f. permit any third party to use the Software;
g. use or operate Product for the benefit of any third party in any type of service outsourcing, application service, provider service or service bureau capacity;
h. reverse engineer, decompile or disassemble the Software or otherwise reduce it to a human perceivable form;
i. Assign this Agreement or sell or otherwise transfer the Software to any other party except as part of the sale or transfer of the whole Product.
3. UPDATES. At Hemisphere's discretion Hemisphere may make Updates available to Licensee. An update ("Update") means any update to the Software that is made available to Licensee including error corrections, enhancements and other modifications. Licensee may access, download and install Updates during the Warranty Period only. All Updates that Licensee downloads, installs or uses shall be deemed to be Software and subject to this Agreement. Hemisphere reserves the right to modify the Product without any obligation to notify, supply or install any improvements or alterations to existing Software.
4. SUPPORT. Hemisphere may make available directly or through its authorized dealers telephone and email support for the Software. Contact Hemisphere to find the authorized dealer near you. As well, Hemisphere may make available user and technical documentation regarding the Software. Hemisphere reserves the right to reduce and limit access to such support at any time.
5. BACKUPS AND RECOVERY. Licensee shall back-up all data used, created or stored by the Software on a regular basis as necessary to enable proper recovery of the data and related systems and processes in the event of a malfunction in the Software or any loss or corruption of data caused by the Software. Licensee shall assume all risks of loss or damage for any failure to comply with the foregoing.
6. OWNERSHIP. Hemisphere and its suppliers own all rights, title and interest in and to the Software and related materials, including all intellectual property rights. The Software is licensed to Licensee, not sold.
7. TRADEMARKS. “AgJunction”, “Outback Guidance”, “Satloc” and the associated logos are trademarks of Hemisphere. Other trademarks are the property of their respective owners. Licensee may not use any of these trademarks without the consent of their respective owners.
8. LIMITED WARRANTY. Hemisphere warrants solely to the Licensee, subject to the exclusions and procedures set forth herein below, that for a period of one (1) year from the original date of purchase of the Product in which it is embedded (the "Warranty Period"), the Software, under normal use and maintenance, will conform in all material respects to the documentation provided with the Software and any media will be free of defects in materials and workmanship. For any Update, Hemisphere warrants, for 90 days from performance or delivery, or for the balance of the original Warranty Period, whichever is greater, that the Update, under normal use and maintenance, will conform in all material respects to the documentation provided with the Update and any media will be free of defects in materials and workmanship. Notwithstanding the foregoing, Hemisphere does not warrant that the Software will meet Licensee's requirements or that its operation will be error free.
9. WARRANTY EXCLUSIONS. The warranty set forth in Section (8) will not apply to any deficiencies caused by (a) the Product not being used as described in the documentation supplied to Licensee, (b) the Software having been altered, modified or converted in any way by anyone other than Hemisphere approved by Hemisphere, (c) any malfunction of Licensee's equipment or other software, or (d) damage occurring in transit or due to any accident, abuse, misuse, improper installation, lightning (or other electrical discharge) or neglect other than that caused by Hemisphere. Hemisphere does not warrant or guarantee the precision or accuracy of positions obtained when using the Software (whether standalone or embedded in a Product). The Product and the Software is not intended and should not be used as the primary means of navigation or for use in safety of life applications. The potential

positioning and navigation accuracy obtainable with the Software as stated in the Product or Software documentation serves to provide only an estimate of achievable accuracy based on specifications provided by the US Department of Defense for GPS positioning and DGPS service provider performance specifications, where applicable.
10. WARRANTY DISCLAIMER. EXCEPT AS EXPRESSLY SET OUT IN THIS AGREEMENT, HEMISPHERE MAKES NO REPRESENTATION, WARRANTY OR CONDITION OF ANY KIND TO LICENSEE, WHETHER VERBAL OR WRITTEN AND HEREBY DISCLAIMS ALL REPRESENTATIONS, WARRANTIES AND CONDITIONS OF ANY KIND INCLUDING FITNESS FOR A PARTICULAR PURPOSE, MERCHANTABILITY, ACCURACY, RELIABILITY OR THAT THE USE OF THE SOFTWARE WILL BE UNINTERRUPTED OR ERROR-FREE AND HEREBY DISCLAIMS ALL REPRESENTATIONS, WARRANTIES AND CONDITIONS ARISING AS A RESULT OF CUSTOM, USAGE OR TRADE AND THOSE ARISING UNDER STATUTE.
11. LIMITS ON WARRANTY DISCLAIMER. Some jurisdictions do not allow the exclusion of implied warranties or conditions, so some of the above exclusions may not apply to Licensee. In that case, any implied warranties or conditions which would then otherwise arise will be limited in duration to ninety (90) days from the date of the license of the Software or the purchase of the Product. The warranties given herein give Licensee specific legal rights and Licensee may have other rights which may vary from jurisdiction to jurisdiction.
12. CHANGE TO WARRANTY. No employee or agent of Hemisphere is authorized to change the warranty provided or the limitation or disclaimer of warranty provisions. All such changes will only be effective if pursuant to a separate agreement signed by senior officers of the respective parties.
13. WARRANTY CLAIM. In the event Licensee has a warranty claim Licensee must first check for and install all Updates that are made available. The warranty will not otherwise be honored. Proof of purchase may be required. Hemisphere does not honor claims asserted after the end of the Warranty Period.
14. LICENSEE REMEDIES. In all cases which involve a failure of the Software to conform in any material respect to the documentation during the Warranty Period or a breach of a warranty, Hemisphere's sole obligation and liability, and Licensee's sole and exclusive remedy, is for Hemisphere, at Hemisphere's option, to (a) repair the Software, (b) replace the Software with software conforming to the documentation, or (c) if Hemisphere is unable, on a reasonable commercial basis, to repair the Software or to replace the Software with conforming software within ninety (90) days, to terminate this Agreement and thereafter Licensee shall cease using the Software. Hemisphere will also issue a refund for the price paid by Licensee less an amount on account of amortization, calculated on a straight-line basis over a deemed useful life of three (3) years.
15. LIMITATION OF LIABILITY. IN NO EVENT WILL HEMISPHERE BE LIABLE TO LICENSEE FOR ANY INCIDENTAL, CONSEQUENTIAL, SPECIAL OR INDIRECT DAMAGES INCLUDING ARISING IN RELATION TO ANY LOSS OF DATA, INCOME, REVENUE, GOODWILL OR ANTICIPATED SAVINGS EVEN IF HEMISPHERE HAS BEEN INFORMED OF THE POSSIBILITY OF SUCH LOSS OR DAMAGE. FURTHER, IN NO EVENT WILL HEMISPHERE'S TOTAL CUMULATIVE LIABILITY HEREUNDER, FROM ALL CAUSES OF ACTION OF ANY KIND, EXCEED THE TOTAL AMOUNT PAID BY LICENSEE TO HEMISPHERE TO PURCHASE THE PRODUCT. THIS LIMITATION AND EXCLUSION APPLIES IRRESPECTIVE OF THE CAUSE OF ACTION, INCLUDING BUT NOT LIMITED TO BREACH OF CONTRACT, NEGLIGENCE, STRICT LIABILITY, TORT, BREACH OF WARRANTY, MISREPRESENTATION OR ANY OTHER LEGAL THEORY AND WILL SURVIVE A FUNDAMENTAL BREACH.
16. LIMITS ON LIMITATION OF LIABILITY. Some jurisdictions do not allow for the limitation or exclusion of liability for incidental or consequential damages, so the above limitation or exclusion may not apply to Licensee and Licensee may also have other legal rights which may vary from jurisdiction to jurisdiction.
17. BASIS OF BARGAIN. Licensee agrees and acknowledges that Hemisphere has set its prices and the parties have entered into this Agreement in reliance on the limited warranties, warranty disclaimers and limitations of liability set forth herein, that the same reflect an agreed-to allocation of risk between the parties (including the risk that a remedy may fail of its essential purpose and cause consequential loss), and that the same forms an essential basis of the bargain between the parties. Licensee agrees and acknowledges that Hemisphere would not have been able to sell the Product at the amount charged on an economic basis without such limitations.
18. PROPRIETARY RIGHTS INDEMNITY. Hemisphere shall indemnify, defend and hold harmless Licensee from and against any and all actions, claims, demands, proceedings, liabilities, direct damages, judgments, settlements, fines, penalties, costs and expenses, including royalties and attorneys' fees and related costs, in connection with or arising out of any actual infringement of any third party patent, copyright or other intellectual property right by the Software or by its use, in accordance with this Agreement and documentation, PROVIDED THAT: (a) Hemisphere has the right to assume full control over any action, claim, demand or proceeding, (b) Licensee shall promptly notify Hemisphere of any such action, claim, demand, or proceeding, and (c) Licensee shall give Hemisphere such reasonable assistance and tangible material as is reasonably available to Licensee for the defense of the action, claim, demand or proceeding. Licensee shall not settle or compromise any of same for which Hemisphere has agreed to assume responsibility without Hemisphere's prior written consent. Licensee may, at its sole cost and expense, retain separate counsel from the counsel utilized or retained by Hemisphere.
19. INFRINGEMENT. If use of the Software may be enjoined due to a claim of infringement by a third party then, at its sole discretion and expense, Hemisphere may do one of the following: (a) negotiate a license or other agreement so that the Product is no longer subject to such a potential claim, (b) modify the Product so that it becomes non-infringing, provided such modification can be accomplished without materially affecting the performance and functionality of the Product, (c) replace the Software, or the Product, with non-infringing software, or product, of equal or better performance and quality, or (d) if none of the foregoing can be done on a commercially reasonable basis, terminate this license and Licensee shall stop using the Product and Hemisphere shall refund the price paid by Licensee less an amount on account of amortization, calculated on a straight-line basis over a deemed useful life of three (3) years.
The foregoing sets out the entire liability of Hemisphere and the sole obligations of Hemisphere to Licensee in respect of any claim that the Software or its use infringes any third party rights.
20. INDEMNIFICATION. Except in relation to an infringement action, Licensee shall indemnify and hold Hemisphere harmless from any and all claims, damages, losses, liabilities, costs and expenses (including reasonable fees of lawyers and other professionals) arising out of or in connection with Licensee's use of the Product, whether direct or indirect, including without limiting the foregoing, loss of data, loss of profit or business interruption.

21. TERMINATION. Licensee may terminate this Agreement at any time without cause. Hemisphere may terminate this Agreement on 30 days notice to Licensee if Licensee fails to materially comply with each provision of this Agreement unless such default is cured within the 30 days. Any such termination by a party shall be in addition to and without prejudice to such rights and remedies as may be available, including injunction and other equitable remedies. Upon receipt by Licensee of written notice of termination from Hemisphere or termination by Licensee, Licensee shall at the end of any notice period (a) cease using the Software; and (b) return to Hemisphere (or destroy and provide a certificate of a Senior Officer attesting to such destruction) the Software and all related material and any magnetic or optical media provided to Licensee. The provisions of Sections 6), 7), 8), 9), 10), 15), 21), 26) and 27) herein shall survive the expiration or termination of this Agreement for any reason.
22. EXPORT RESTRICTIONS. Licensee agrees that Licensee will comply with all export control legislation of Canada, the United States, Australia and any other applicable country's laws and regulations, whether under the Arms Export Control Act, the International Traffic in Arms Regulations, the Export Administration Regulations, the regulations of the United States Departments of Commerce, State, and Treasury, or otherwise as well as the export control legislation of all other countries.
23. PRODUCT COMPONENTS. The Product may contain third party components. Those third party components may be subject to additional terms and conditions. Licensee is required to agree to those terms and conditions in order to use the Product.
24. FORCE MAJEURE EVENT. Neither party will have the right to claim damages as a result of the other's inability to perform or any delay in performance due to unforeseeable circumstances beyond its reasonable control, such as labor disputes, strikes, lockouts, war, riot, insurrection, epidemic, Internet virus attack, Internet failure, supplier failure, act of God, or governmental action not the fault of the non-performing party.
25. FORUM FOR DISPUTES. The parties agree that the courts located in the State of Kansas and the courts of appeal there from will have exclusive jurisdiction to resolve any disputes between Licensee and Hemisphere concerning this Agreement or Licensee's use or inability to use the Software and the parties hereby irrevocably agree to attorn to the jurisdiction of those courts. Notwithstanding the foregoing, either party may apply to any court of competent jurisdiction for injunctive relief.
26. APPLICABLE LAW. This Agreement shall be governed by the laws of the State of Kansas, exclusive of any of its choice of law and conflicts of law jurisprudence.
27. CISG. The United Nations Convention on Contracts for the International Sale of Goods will not apply to this Agreement or any transaction hereunder.
28. GENERAL. This is the entire agreement between Licensee and Hemisphere relating to the Product and Licensee's use of the same, and supersedes all prior, collateral or contemporaneous oral or written representations, warranties or agreements regarding the same. No amendment to or modification of this Agreement will be binding unless in writing and signed by duly authorized representatives of the parties. Any and all terms and conditions set out in any correspondence between the parties or set out in a purchase order which are different from or in addition to the terms and conditions set forth herein, shall have no application and no written notice of same shall be required. In the event that one or more of the provisions of this Agreement is found to be illegal or unenforceable, this Agreement shall not be rendered inoperative but the remaining provisions shall continue in full force and effect.

Warranty NoticeCOVERED PRODUCTS: This warranty covers all products manufactured by Hemisphere GPS and purchased by the end purchaser (the "Products"), unless otherwise specifically and expressly agreed in writing by Hemisphere GPS.
LIMITED WARRANTY: Hemisphere GPS warrants solely to the end purchaser of the Products, subject to the exclusions and procedures set forth below, that the Products sold to such end purchaser and its internal components shall be free, under normal use and maintenance, from defects in materials, and workmanship and will substantially conform to Hemisphere GPS’s applicable specifications for the Product, for a period of 12 months from delivery of such Product to such end purchaser (the ”Warranty Period”). Repairs and replacement components for the Products are warranted, subject to the exclusions and procedures set forth below, to be free, under normal use and maintenance, from defects in material and workmanship, and will substantially conform to Hemisphere GPS’s applicable specifications for the Product, for 90 days from performance or delivery, or for the balance of the original Warranty Period, whichever is greater.
EXCLUSION OF ALL OTHER WARRANTIES. The LIMITED WARRANTY shall apply only if the Product is properly and correctly installed, configured, interfaced, maintained, stored, and operated in accordance with Hemisphere GPS’s relevant User’s Manual and Specifications, AND the Product is not modified or misused. The Product is provided “AS IS” and the implied warranties of MERCHANTABILITY and FITNESS FOR A PARTICULAR PURPOSE and ALL OTHER WARRANTIES, express, implied or arising by statute, by course of dealing or by trade usage, in connection with the design, sale, installation, service or use of any products or any component thereof, are EXCLUDED from this transaction and shall not apply to the Product. The LIMITED WARRANTY is IN LIEU OF any other warranty, express or implied, including but not limited to, any warranty of MERCHANTABILITY or FITNESS FOR A PARTICULAR PURPOSE, title, and non-infringement.
LIMITATION OF REMEDIES. The purchaser’s EXCLUSIVE REMEDY against Hemisphere GPS shall be, at Hemisphere GPS’s option, the repair or replacement of any defective Product or components thereof. The purchaser shall notify Hemisphere GPS or a Hemisphere GPS’s approved service center immediately of any defect. Repairs shall be made through a Hemisphere GPS approved service center only. Repair, modification or service of Hemisphere GPS products by any party other than a Hemisphere GPS approved service center shall render this warranty null and void. The remedy in this paragraph shall only be applied in the event that the Product is properly and correctly installed, configured, interfaced, maintained, stored, and operated in accordance with Hemisphere GPS’s relevant User’s Manual and Specifications, AND the Product is not modified or misused. NO OTHER REMEDY (INCLUDING, BUT NOT LIMITED TO, SPECIAL, INDIRECT, INCIDENTAL, CONSEQUENTIAL OR CONTINGENT DAMAGES FOR LOST PROFITS, LOST SALES, INJURY TO PERSON OR PROPERTY, OR ANY OTHER INCIDENTAL OR CONSEQUENTIAL LOSS) SHALL BE AVAILABLE TO PURCHASER, even if Hemisphere GPS has been advised of the possibility of such damages. Without limiting the foregoing, Hemisphere GPS shall not be liable for any damages of any kind resulting from installation, use, quality, performance or accuracy of any Product.
HEMISPHERE IS NOT RESPONSIBLE FOR PURCHASER’S NEGLIGENCE OR UNAUTHORIZED USES OF THE PRODUCT. IN NO EVENT SHALL HEMISPHERE GPS BE IN ANY WAY RESPONSIBLE FOR ANY DAMAGES RESULTING FROM PURCHASER’S OWN NEGLIGENCE, OR FROM OPERATION OF THE PRODUCT IN ANY WAY OTHER THAN AS SPECIFIED IN HEMISPHERE GPS’S RELEVANT USER’S MANUAL AND SPECIFICATIONS. Hemisphere GPS is NOT RESPONSIBLE for defects or performance problems resulting from (1) misuse, abuse, improper installation, neglect of Product; (2) the utilization of the Product with hardware or software products, information, data, systems, interfaces or devices not made, supplied or specified by Hemisphere GPS; (3) the operation of the Product under any specification other than, or in addition to, the specifications set forth in Hemisphere GPS’s relevant User’s Manual and Specifications; (4) damage caused by accident or natural events, such as lightning (or other electrical discharge) or fresh/salt water immersion of Product; (5) damage occurring in transit; (6) normal wear and tear; or (7) the operation or failure of operation of any satellite-based positioning system or differential correction service; or the availability or performance of any satellite-based positioning signal or differential correction signal.
THE PURCHASER IS RESPONSIBLE FOR OPERATING THE VEHICLE SAFELY. The purchaser is solely responsible for the safe operation of the vehicle used in connection with the Product, and for maintaining proper system control settings. UNSAFE DRIVING OR SYSTEM CONTROL SETTINGS CAN RESULT IN PROPERTY DAMAGE, INJURY, OR DEATH. The purchaser is solely responsible for his/her safety and for the safety of others. The purchaser is solely responsible for maintaining control of the automated steering system at all times. THE PURCHASER IS SOLELY RESPONSIBLE FOR ENSURING THE PRODUCT IS PROPERLY AND CORRECTLY INSTALLED, CONFIGURED, INTERFACED, MAINTAINED, STORED, AND OPERATED IN ACCORDANCE WITH HEMISPHERE GPS’S RELEVANT USER’S MANUAL AND SPECIFICATIONS. Hemisphere GPS does not warrant or guarantee the positioning and navigation precision or accuracy obtained when using Products. Products are not intended for primary navigation or for use in safety of life applications. The potential accuracy of Products as stated in Hemisphere GPS literature and/or Product specifications serves to provide only an estimate of achievable accuracy based on performance specifications provided by the satellite service operator (i.e. US Department of Defense in the case of GPS) and differential correction service provider. Hemisphere GPS reserves the right to modify Products without any obligation to notify, supply or install any improvements or alterations to existing Products.
GOVERNING LAW. This agreement and any disputes relating to, concerning or based upon the Product shall be governed by and interpreted in accordance with the laws of the State of Arizona.
OBTAINING WARRANTY SERVICE. In order to obtain warranty service, the end purchaser must bring the Product to a Hemisphere GPS approved service center along with the end purchaser's proof of purchase. Hemisphere GPS does not warrant claims asserted after the end of the warranty period. For any questions regarding warranty service or to obtain information regarding the location of any of Hemisphere GPS approved service center, contact Hemisphere GPS at the following address:
Hemisphere GPS8444 N. 90th Street, Suite 130Scottsdale, AZ 85258Phone: 480-348-9919 Fax: [email protected]

www.AgJunction.com