outlook tips and tricks - earthbound farm intranet pagemail.ebfarm.com/intranet/email/tips and...
TRANSCRIPT

1
OutlookTips and Tricks

2
Great to know!
1. Booking a conference room in Outlook
2. Sending emails to a distribution list
3. Resetting rules in Outlook
4. Accessing email from a shared computer
5. Creating an email signature in OWA
6. Setting out-of-office assistant in OWA
7. Updating profile information
8. Adding a picture to your profile
9. Setting spell-check
10. Creating folders to organize your inbox
11. Creating a frequently used email group distribution list
12. Setting SPAM Filters

1) Booking a conference room in Outlook
3
1. Open Outlook and click the Calendar tab at the bottom right to enter your calendar mode.2. To schedule a new meeting, click the icon on the top that reads New Meeting>Scheduling
Assistant>Add Rooms> find the room you are looking for by scrolling or entering the name3. If you would like to check multiple rooms, you can enter them in as well.
Follow these simple steps to book rooms and add them into the calendar when scheduling meetings...

1) Booking a conference room in Outlook con’t
4
• Accounting
• Sales
• Operations
Conference rooms bookable by all employees
Executive
Main
HR Training Room
Human Resources
SAP Project Site Rooms –Fresh & Wave
Conference rooms requiring approval (through Outlook)
Note: To book a conference room requiring approval, add it to the invite as you would any other conference room. You will receive a confirmation when your request is approved.

2) Sending emails to a distribution list
5
1. Begin by creating a new Email.2. Click the To…. Box3. The Offline Global Address List will appear. To find a distribution list that would have been
used prior to March 23rd, simply type EBF (space) > name of list
In order to effectively merge the distribution lists between Earthbound and WhiteWave, naming had to be adjusted. The following will show you
how to find frequently used distribution lists.
3) Resetting rules in Outlook
6
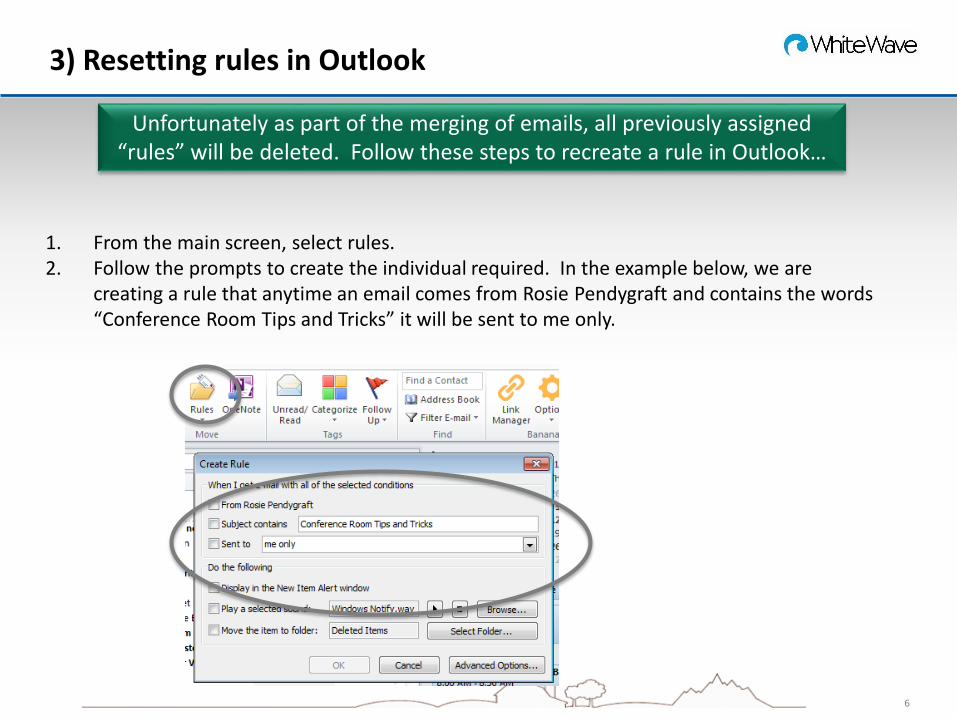
1. From the main screen, select rules.2. Follow the prompts to create the individual required. In the example below, we are
creating a rule that anytime an email comes from Rosie Pendygraft and contains the words “Conference Room Tips and Tricks” it will be sent to me only.
Unfortunately as part of the merging of emails, all previously assigned “rules” will be deleted. Follow these steps to recreate a rule in Outlook…

4) Accessing Email from a shared computer
7
To access email from a shared computer visit: mail.ebfarm.com• Click Outlook Web Access• Once selected, you will be routed to
the Microsoft Office 365 site
ORTo access email from a computer away from the network visit: portal.microsoftonline.com
Note:Once you enter your username ([email protected]) and either click tab or on the password box, the system will pause and Redirect you to the WhiteWave account.

4) Accessing Email from a shared computer con’t
8
Once you have logged onto OWA, your main screen will appear.
To generate a new email, simply click
The main screen will have the same functionality you are accustomed to, the look will be a little different though.

5) Create an email signature in OWA
9
Would you like to set an automatic signature for your email? If so, follow these simple steps…
1. From your inbox, click on the gear icon in top right corner of the main screen > Automatic replies
2. Check the box that reads Options3. Select Mail>Email signature

6) Setting out-of-office assistant in OWA
10
1. From your inbox, click on the gear icon in top right corner of the main screen > Automatic replies
2. Check the box that reads Send automatic replies and input text below. When complete, click
Planning to be out of the office for a period of time? Want to notify only internal employees, only external contacts (or both)? Follow these steps to set your out-of-office assistant…

7) Updating profile information
11
Click the Avatar or picture icon in the top-right corner. A drop down box will appear. Click >About me
On the next screen, you can click >edit your profile
Information has been pre-loaded into your Outlook account. If you would like to make any changes, simply update the About me.

8) Adding a picture to your profile
12
Adding a picture to your profile is a fun way to personalize your account!
To add a picture of yourself to the account:1. From your inbox click on the avatar
image on the top right corner of the screen.
2. A drop-down box will appear. Click Change underneath the avatar
3. From the next screen, click the document icon to browse the directory for the image you would like to upload.
4. Click
When selecting an image, keep in mind the image used represents WhiteWave Foods and YOU. Please choose accordingly.

9) Setting spell-check
13
Note: Outlook 2013 is not automatically configured to check the spelling of e-mail messages.
To set the spell-check option in Outlook 2013 follow these steps:1. From your inbox, right the FILE tab
on the top ribbon>Options>Mail2. Check the box that reads Always
check spelling before sending
Note: Outlook’s spell-check feature will wait until you click send to notify the user of any spelling errors (i.e. words will not be underlined and identified while typing)

10) Creating folders to organize your inbox
14
To set-up folders within the inbox:1. Right-click on Inbox>NewFolder…2. Type the name of the new folder and
click enter
If you would like to create folders to organize your inbox in Outlook 2013, the steps are super easy.

11) Creating a frequently used group email distribution list
15
1. From your inbox, click the icon to the right of Quick Steps.
2. A pop-up box will appear. Click Team Email>New3. Enter the name of the distribution list and click on
the To…4. Enter the names of individuals to be included in the
group email>OK>Finish5. When you are done, the name of the distribution
list will appear in the top ribbon. When you click on that icon, an email box will open with all of the recipients attached.
Do you have a need to send multiple emails to the same distribution list? Follow these steps to create a personalized group distribution list

12) Setting Spam Filters
16
1. From your inbox, right click on any email>Junk>Junk E-mail Options.
2. The system is set up with No Automatic Filtering. We recommend clicking High.
Do you want to set your spam filters to clean up you inbox? If so, follow these steps:

12) Setting Spam Filters (con’t)
17
While in the spam filters box, you can add rules for spam. For example, if you click on the tabs at the top, you can allow for emails to be received from certain senders.
It is recommended to click the Safe Senders tab and check the box that reads Also trust e-mail from my Contacts.
*As a reminder, don’t forget to check your Junk Email folder periodically to ensure email that you need/want is not being categorized as junk.