overview - globe.uni-koeln.de
TRANSCRIPT

Overview
This module provides step-by-step instructions in how to do the Bulk Density Protocol.
Learning Objectives:
• After completing this module, you will be able to:
• Explain why bulk density is worth measuring
• Take samples of known volume correctly
• Measure bulk density
• Relate bulk density measurements to soil particle density and porosity
• Report these data to GLOBE
• Visualize these data using GLOBE’s Visualization Site
2

Introduction to Soil Bulk Density
Soil bulk density is a measure of how tightly packed or dense the soil is and is measured by the mass of dry soil in a unit of volume (g/mL or g/cm3). Soil bulk density depends on the composition of the soil, structure of the soil peds, the distribution of sand, silt, and clay particles, the volume of pore space, and how tightly the particles are packed.
The bulk density measured using this protocol is a property of the soil. It differs from the sample bulk density measured in the SMAP Block Pattern Soil Moisture Protocol that is used to convert gravimetric soil moisture measurements to volumetric soil moisture measurements. In this protocol the rocks and roots are removed from the soil sample.
To determine bulk density, a sample of known volume must be collected. This requires that one be able to push a can into a soil horizon. To do this requires the horizon to be exposed. So, one cannot measure bulk density for subsurface horizons in auger profiles. Bulk density determination for soil layers below the surface requires a soil pit of other exposed profile such as a road cut.
To access the Bulk Density Protocol on the GLOBE website, click on this link.
3

Why Measure Bulk Density?
Bulk density gives information on the ease with which roots can grow and water will filter through the different soil horizons of a profile.
Bulk density is also used when converting between mass and volume for a soil sample. If we know the mass of a soil sample, we can calculate its volume and learn a great deal about the composition of that soil and its individual horizons.
4

Protocol at a GlanceWhere Soil Characterization Site
Time 2 or 3 (50 minute) class periods
Frequency Once for a soil profileCollected and prepared soil samples can be stored forstudy and analyses at any time during the school year
Prerequisites Soil Characterization Protocol
Protocol Bulk Density Protocol
Field Guides Soil Bulk Density Field and Lab Guide
Data Sheets Bulk Density Data SheetSoil Characterization Site Definition Sheet
5

Materials and Instruments Required for Fieldwork
• 4-Liter (1 quart) size sealable bags or containers
• 3 or more Sampling Cans
• Wood Block
• Hammer
• Trowel or shovel
• marker
See the Defining a Soil Characterization Sample Site Slide Set for a complete list of all required equipment for soil characterization field work and sampling for lab analysis.
Where to find specifications for instruments used in GLOBE investigations:
Where to find scientific instruments needed for this protocol:
6

Taking Samples of Known VolumeFor each horizon in your soil profile, push a can or pipe (you will measure the cans’ mass and volume later) into the side of the horizon. If necessary, wet the soil first so that the can will go in easily. Stop when the can is even with the soil’s surface. (Remember, you will collect three samples from each horizon in your profile.)
If it is still difficult to push the can into the soil, you may need to place a piece of wood over the can and hit the wood with the hammer to spread the force of the hammer blow to all edges of the can at once and to minimize denting the can.
Some denting is allowed in the procedure, but if the can dents too badly, consider taking only a surface bulk density sample or wait until after rain when the soil might be softer.
7

Remove Samples from the Soil Horizon
Using a trowel or shovel, remove the can and the soil surrounding it. Trim the soil from around the can until it is flat against the edges of the can so that the volume of the soil is the same as the volume of the can.
If a rock or other object sticks out of the top of the sample, return the sample to the ground, wipe the can clean and take a new sample near the same location. Make sure you sample in undisturbed soil.
8

Materials and Instruments Required for Lab Work
• Drying oven
• Graduated cylinder
• Water (or possibly alcohol of soil samples contain twigs
• #10 Sieve (2 mm mesh openings)
• Latex globes
• Pater to catch sieved soil
• Rolling pin, hammer, or other utensil for crushing peds and separating particles
• Paper or cloth wipe towel
9

Labeling Sample Cans for Transport to the Lab
• Label the side of each can with its sample location, sample number, sample date, horizon number, and top and bottom horizon depths.
• Take 3 samples of each horizon.
• Cover the labeled cans with the lids or other covers and return them to the classroom.
10

Measuring Wet Mass
Calibrate the balance according to the manufacturer’s instructions.
Zero the balance.
Measure the wet mass of each sample (soil + water) by weighing it in its can (without the lid)
Record this wet mass on the Data Entry App or Bulk Density Data Sheet.
11

Drying Soil Samples in a Soil Drying Oven
Place the samples in the soil drying oven until the soils are dry (at least 10 hours at 105° C).
Weigh the dry sample.
12

Drying Soil Samples using a heat lamp
If using heat lamps to dry the sample transfer all the soil sample to a clear plastic bag and label the bag
Dry the sample under the lights for two to three days.
Weigh the dried sample.
Check that the sample is dry by drying it for another hour and weighing it again. If the mass changes by 0.3 g or less, considered it dry.
13
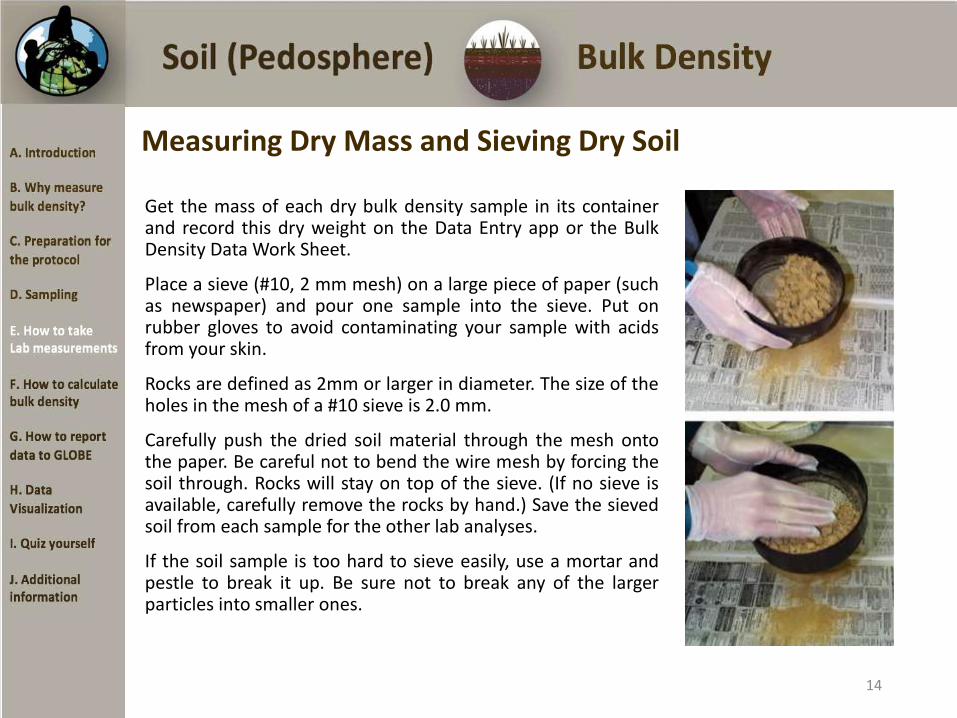
Measuring Dry Mass and Sieving Dry Soil
Get the mass of each dry bulk density sample in its containerand record this dry weight on the Data Entry app or the BulkDensity Data Work Sheet.
Place a sieve (#10, 2 mm mesh) on a large piece of paper (suchas newspaper) and pour one sample into the sieve. Put onrubber gloves to avoid contaminating your sample with acidsfrom your skin.
Rocks are defined as 2mm or larger in diameter. The size of theholes in the mesh of a #10 sieve is 2.0 mm.
Carefully push the dried soil material through the mesh ontothe paper. Be careful not to bend the wire mesh by forcing thesoil through. Rocks will stay on top of the sieve. (If no sieve isavailable, carefully remove the rocks by hand.) Save the sievedsoil from each sample for the other lab analyses.
If the soil sample is too hard to sieve easily, use a mortar andpestle to break it up. Be sure not to break any of the largerparticles into smaller ones.
14
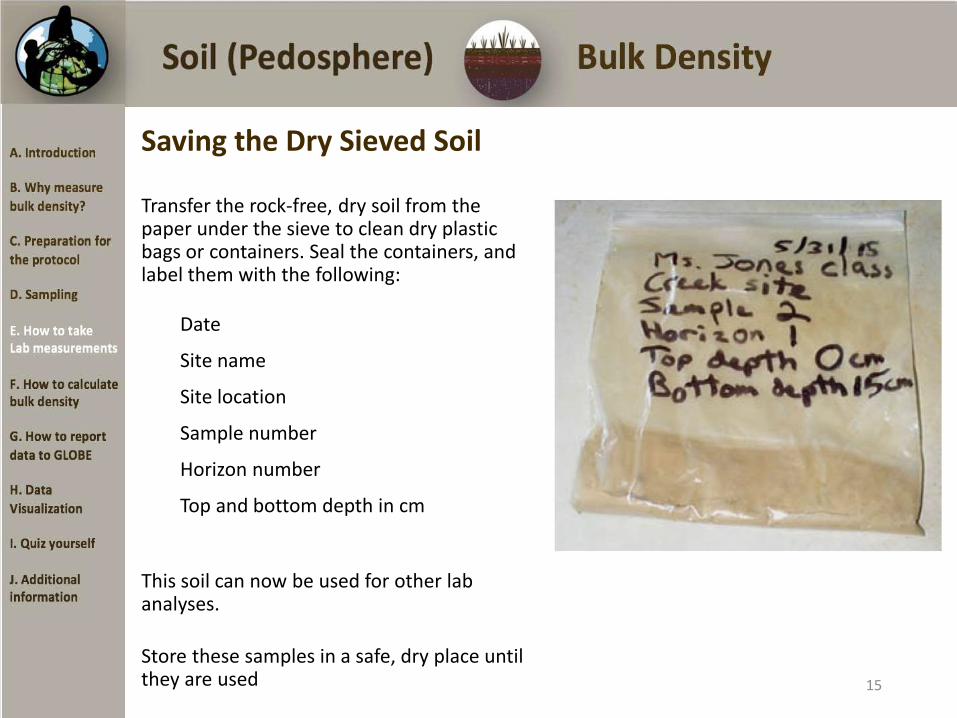
Saving the Dry Sieved Soil
Transfer the rock-free, dry soil from the paper under the sieve to clean dry plastic bags or containers. Seal the containers, and label them with the following:
Date
Site name
Site location
Sample number
Horizon number
Top and bottom depth in cm
This soil can now be used for other lab analyses.
Store these samples in a safe, dry place until they are used 15

Measuring Sampling Can Mass
Calibrate the balance according to the manufacturer’s directions.
If using an electronic balance, check that the balance is measuring in grams and is zeroed properly.
Wipe the inside of the can or pipe with a wipe towel. Measure the mass of the can or pipe without the lid on and record this mass on the Data Entry app or Data Sheet.
Obtain the mass in grams of each sampling can/pipe to the nearest 0.1 g.
Write the mass of the empty can on the outside of the can in permanent marker.
16

Measuring Sampling Can Volume
• Clean off the rim of the graduated cylinder to avoid unaccounted water drops entering your can.
• To find the volume of the clean, dry can: fill a graduated cylinder with water. Record the initial volume.
• Pour the water into the can until it fills the can to the brim. Make sure the can has a flat surface.
• Remember to read the bottom of the meniscus.
17

How to Determine Volume If Filling the Container Requires More Than One Cylinder Full of Water
If the water in the graduated cylinder does not fill the can entirely,record the first volume of the graduated cylinder as volume 1. Refillthe graduated, and pour this additional water into the sample can.Record this value as volume 2. Repeat if necessary, recording initialvolume 3, etc. Fill the can to the brim and record the final volume ofwater left in the graduated cylinder. Use the equation below to findthe volume of the can.
Volume of Can formula:
Vcan
= V1
+ V2
– Vfor V
can = V
1 + V
2 + V
3 – V
f
Measure the volume of each can 3 times and record theresults on the Data Entry app or Data Sheet.
18

Measuring Sampling Pipe Mass and Volume
If you are using a sampling pipe, get its mass by following the mass instructions for the can.
Then, calculate the pipe’s volume using the following equation:
Volume pipe = π x r2 x h
• where π is the mathematical constant approximately equal to 3.141592654
• r is the radius of the base of the pipe (cm)
• h is the height of the pipe (cm)
• 1 cm3 = 1 mL so your answer is the same in either unit of measurement.
19

Measuring the Mass of Rocks
Weigh the rocks that are left on top of the sieve, and record this weight on the Data Entry app or the Bulk Density Data Entry Sheet.
If your sample contains roots or sticks, weigh these together with the rocks.
20

Measuring the Volume of Rocks
Place 30 mL of water in a 100 mL graduated cylinder.
Without spilling, add the rocks to the water.
After all the rocks have been added, read the level of the water and enter this value and the original volume of water on the Bulk Density Data Sheet of the Data Entry app.
As you add the rocks, if the volume of the water comes close to 100 mL, record the volume, empty the cylinder and repeat the procedure for the remaining rocks. In this case, you must record the sum of the water volumes with the rocks and the sum of the water volumes without the rocks.
If your sample contains roots or sticks, they usually will float in water. To measure their volume, substitute alcohol for water in the graduated cylinder. (Alcohol has a lighter density than water.)
21
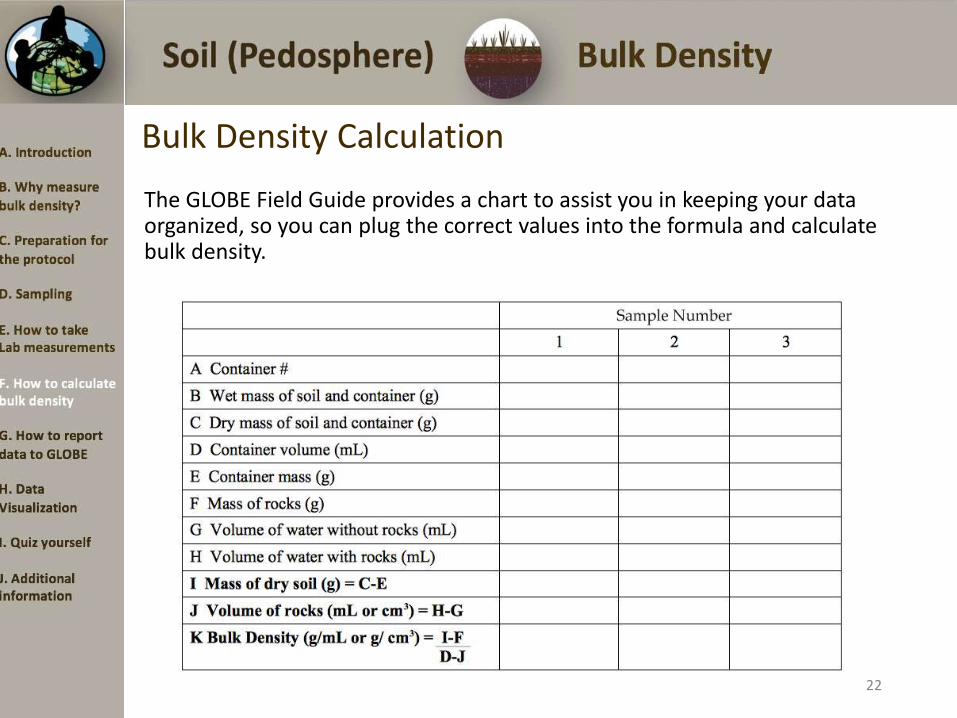
Bulk Density Calculation
The GLOBE Field Guide provides a chart to assist you in keeping your data organized, so you can plug the correct values into the formula and calculate bulk density.
22

Bulk Density Data Entry
• Select “Live Data Entry.” Under Soil Characterization, click “New Observation.”
• This will bring up the Data Entry page on the GLOBE website
23

Bulk Density Data Entry Example
• Enter the Bulk Density Data on this page
24

Submit Data• If your data are entered correctly, click Send Data
25

Bulk Density Data Visualization
• Visualization for the first horizon shows the Bulk Density Values
26

Quiz Yourself
Are you ready for your quiz? Test your knowledge with some sample questions. When you are ready to take the quiz, click on the quiz box next to where you downloaded this slide set.
1. What are some of the factors that contribute to the bulk density measurement of a soil?
2. T/F Bulk density is a factor that influences how easily roots can grow through soil and influences how water filters down a soil profile.
3. How many samples do you take of each horizon?
4. How do you determine the volume of your sampling can?
5. How do you measure the volume of rocks in your sample?
6. Would you expect a horizon with high organic content to have high or low bulk density?
7. Why do you want to sample in areas that are not driven on by cars or on a path?
27

Frequently Asked Questions-1
What were the results of your data?
If the bulk density for a soil sample is <1.0, it has a very low density and may have a high organic matter content. In order to identify organic matter, look for a dark color and the presence of roots. Many times, soil horizons on the surface are high in organic matter.
If the bulk density for a soil sample is near 2.0 or greater, it is a very dense soil. Soils become dense if they have been compacted and do not have a high organic matter content. This is common in surface soils on which people
walk or where machinery has compressed the soil. Soils with massive or single grained structure will have higher densities than soils with granular or blocky structure. The texture of the soil can also affect the bulk density. In general, sandy soils have a higher bulk density than clayey or silty soils, because the porosity is lower although the size of the pores is larger in sandy soils.
If the bulk densities of soil samples do not seem to be consistent with the other properties of the same horizon (color, structure, texture, depth in the profile, root content), then there may be an error in the measurement. The methodology and calculations should be checked for errors.
• soil
28

Frequently Asked Questions-2
Are the data reasonable?
Typical bulk density values for soils average around 1.3 g/mL (g/cm3) for soils composed mostly of mineral particles. However, they can be as high as 2.0 g/mL (g/cm3) for very dense horizons, and as low as 0.5 g/mL (g/cm3) or lower for organic soils.
To calculate the bulk density of a soil sample complete the calculations on the Soil Bulk Density Data Sheet.
What do scientists look for in these data?
Many different scientists use information about soil bulk density, particle density, and porosity. They use bulk density to estimate how tightly packed the soil components are in each horizon.
• soil
29

Some Questions for Further Investigation
1. What human activities could change the bulk density of the soil?
2. What natural changes could alter the bulk density of a horizon?
3. How does bulk density affect the types of vegetation that can grow on a soil?
4. How does bulk density affect root growth and distribution?
5. How are soil texture and bulk density related?
6. How are soil structure and bulk density related?
7. How does bulk density affect the flow of water or heat in soil?
30

Please provide us with feedback about this module. This is a community project and we welcome your comments, suggestions and edits! Comment here: eTraining Feedback
Credits:
Slides: Izolda Trachtenberg, Dixon Butler, Russanne Low
Photographs: Izolda Trachtenberg
Cover Art: Jenn Glaser, ScribeArts
More Information:
The GLOBE Program
NASA Wavelength NASA’s Digital Library for Earth and Space Science Education
NASA Global Climate Change: Vital Signs of the Planet
The GLOBE Program is sponsored by these organizations:
31