overview -...
TRANSCRIPT

IST346: Lab Last Update: 9/24/2010 2:07 PM
LAB: WORKSTATIONS
OVERVIEW
This lab will help you understand the management issues associated with computer workstations operating systems and demonstrate how to issue commands to maintain them.
LEARNING OBJECTIVES
Upon completion of this lab, you should be able to
Demonstrate and explain the user security models used by the Windows and Linux operating systems Understand the steps required to patch and update these operating systems. Define configuration management with an eye towards how it is used in practice. Understand how the Windows and Linux operating systems handle configuration data internally.
LAB BREAKDOWN
This lab consists of 3 parts:
1. Explore OS configuration management 2. Introduce the user security models used by these Operating Systems.3. Learn to patch and update Operating Systems
REQUIREMENTS
Before you start this lab you will need:
1. A Windows computer with a Lab Manager compatible web browser. See https://answers.syr.edu/display/ischool/Lab+Manager+Browser+Requirements for details. If you’re doing this in the iSchool computer labs, you’re all set.
2. An account with access to vLab (iSchool’s instance of VMware vCenter Lab Manager) https://vlab.ischool.syr.edu
3. Your own deployed configuration of the IST346 base lab. Please review the lab prerequisite on your class website for details.
4. The following virtual machines powered on from your configuration:a. Centos5
i. When the logon prompt appears, logon as root with password SU2orange!ii. Open the Bash prompt: Applications Accessories Terminal
b. Win7 i. When the logon prompt appears, logon as User with password SU2orange!
ii. Open the windows Command prompt: Start All Programs Accessories Command Prompt.
c. You make keep the remaining virtual machine (win2008) powered off.
Page 1
IST346: Lab Last Update: 9/24/2010 2:07 PM
PART 1 – CONFIGURATION MANAGEMENT
This section will introduce and demonstrate how the Windows and Linux operating systems deal with configuration data internals.
ALL COMPUTER OPERATING SYSTEMS NEED CONFIGURATION DATA.
Operating systems contain a lot of files to support the kernel, device drivers, command shells, GUI shells and various utilities. For each of these items there are settings. These settings tweak the behavior of the operating system components. Where are those settings stored and how can they be administered on a larger scale? These settings (from the system side of things, anyway) is the underlying theme of this section.
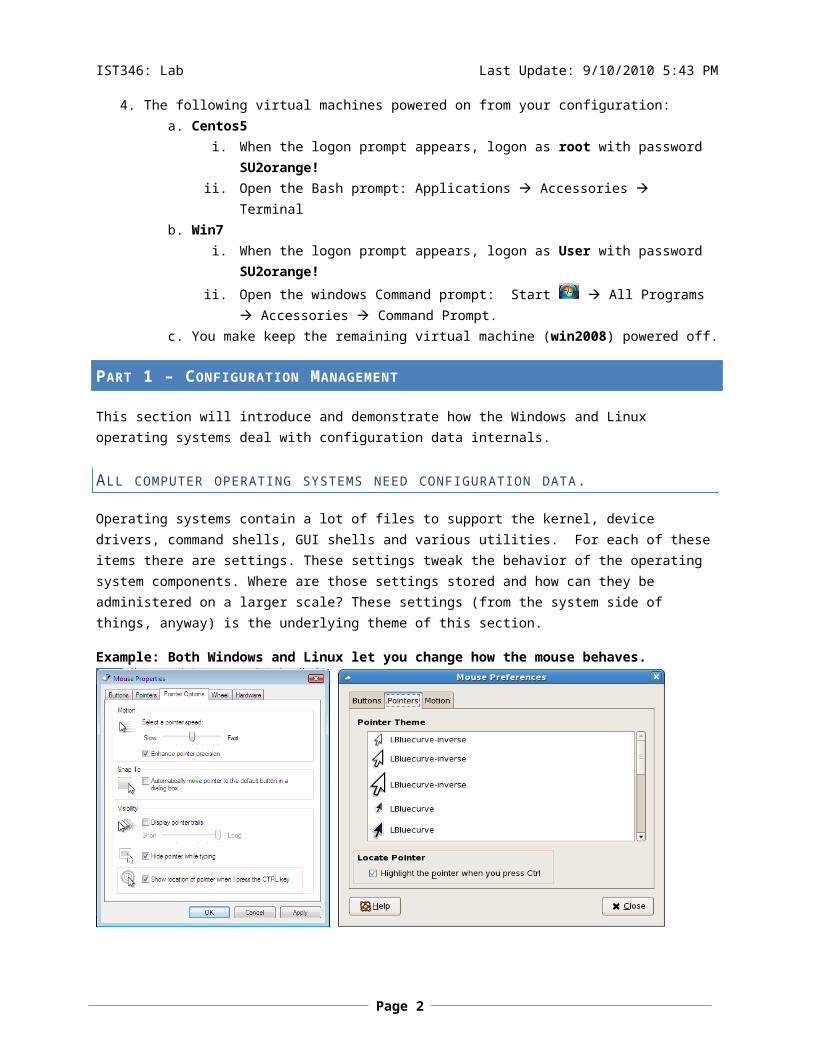
Example: Both Windows and Linux let you change how the mouse behaves.
You might wonder – why should we care? After all, can’t we just use the “control panel” dialogs of the operating system to configure these settings? Isn’t that the reason they exist in the first place? Sure but again we must come back to scale - what if you had to change the highlighted setting in the example above on 400 lab computers? I guess you could do a little “sneaker net” and pay a visit to each computer, but as the infomercials claim “there’s got to be a better way.”
HOW L INUX AND W INDOWS STORE CONFIGURATION DATA:
The Linux operating system stores configuration data in the /etc folders on the filesystem. These folders are /etc for system settings and /usr/etc or /usr/local/etc for user settings. In addition, user settings associated with the user’s profile are stored in hidden directories in the user’s home folder. In Linux hidden directories begin with a period “.”
Since Linux settings are simply files and folders they’re easy to backup and copy from one system to the next. There is a lack of uniformity among the settings files, which can make the learning curve a little steep.
Page 2

IST346: Lab Last Update: 9/24/2010 2:07 PM
The Windows operating system stored its configuration data in the Registry (For details about the registry, see http://en.wikipedia.org/wiki/Windows_Registry). The Registry is simply a hierarchical database of configuration settings for users, computers and system services.
The Windows Registry is a massive complex beast, but at least it has uniform consistency among the settings for various applications and services. One major knock on the registry is that since it is a database it is difficult to simply backup and restores single settings. The registry can also get corrupted leading to problems as well.
Do deal with the complexity of the windows registry and the myriad of settings that go with it, SA’s use tools like Group policy to control the settings on multiple machines. Group policy is so complex; you could probably dedicate an entire course to the subject! This Url: http://support.microsoft.com/kb/307882 has a step-by step walk-through of local group policy settings if you’re interested in a 10 minute sidebar.
PART 1A: EXAMPLE: IP CONFIGURATION SETTINGS IN L INUX
We learned last week that the ifconfig command will report the computer’s IP address, MAC address, etc. Where is this configuration data stored in Linux?
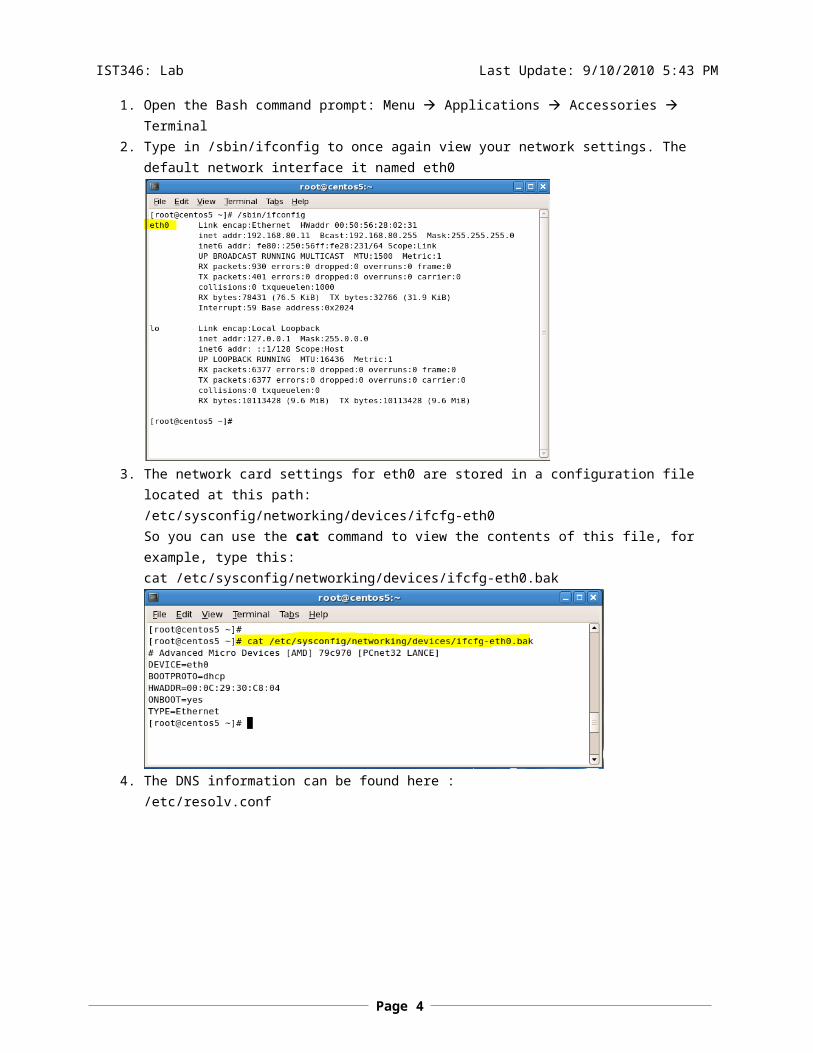
1. Open the Bash command prompt: Menu Applications Accessories Terminal2. Type in /sbin/ifconfig to once again view your network settings. The default network interface it
named eth0
3. The network card settings for eth0 are stored in a configuration file located at this path: /etc/sysconfig/networking/devices/ifcfg-eth0
Page 3
IST346: Lab Last Update: 9/24/2010 2:07 PM
So you can use the cat command to view the contents of this file, for example, type this:cat /etc/sysconfig/networking/devices/ifcfg-eth0.bak
4. The DNS information can be found here : /etc/resolv.conf So type cat /etc/resolv.conf to view it.
5. And the name of the Centos5 computer can be found in the /etc/hosts file.
As you can see the Linux configuration information is spread all over the place, but at least the files are easy to backup and copy, since all the configuration information is stored in files, mostly in the /etc/ folder.
PART 1B: IP CONFIGURATION SETTINGS IN W INDOWS
The ipconfig windows command displays the computer IP information. Where is this configuration data stored in Windows?
1. Switch to your Windows 7 virtual machine.
Page 4

IST346: Lab Last Update: 9/24/2010 2:07 PM
2. Click on Start In the search box, type in regedit to run the registry editor. You will see this box:
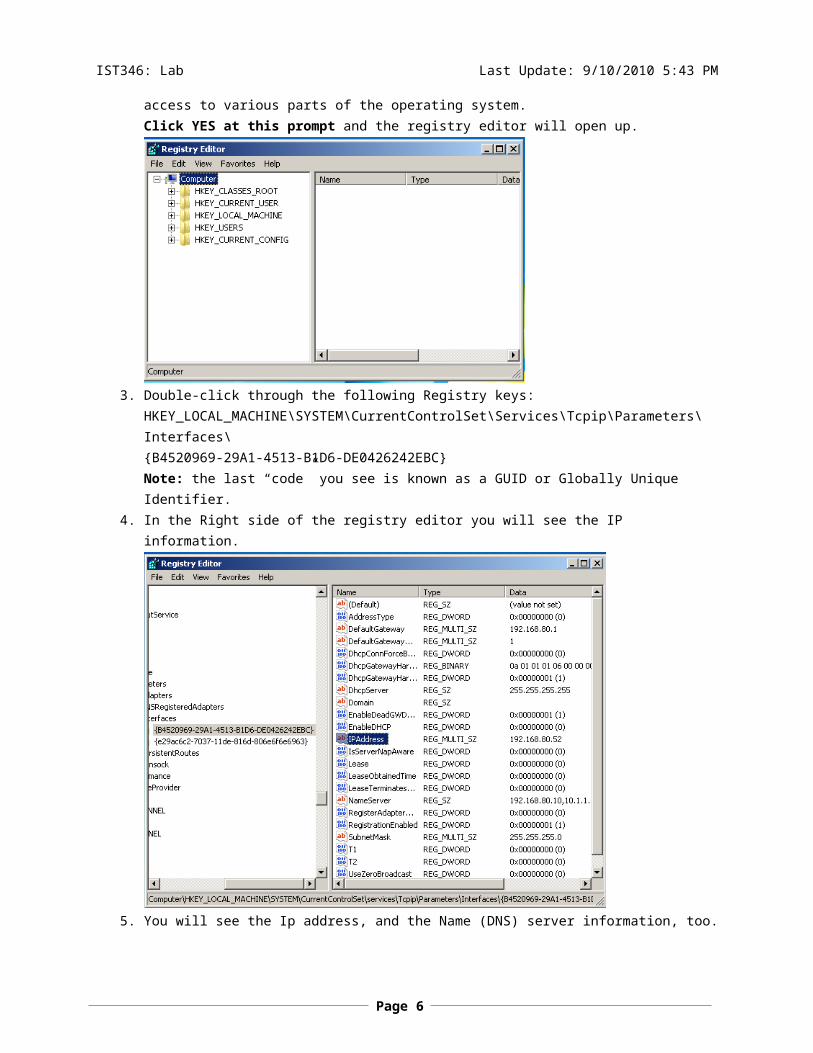
What gives?Whenever you see this box, Windows is switching from user mode to kernel mode. It’s warning you that a program you’re about to run has privileged access to various parts of the operating system.Click YES at this prompt and the registry editor will open up.
3. Double-click through the following Registry keys:HKEY_LOCAL_MACHINE\SYSTEM\CurrentControlSet\Services\Tcpip\Parameters\Interfaces\{B4520969-29A1-4513-B1D6-DE0426242EBC} Note: the last “code” you see is known as a GUID or Globally Unique Identifier.
Page 5
IST346: Lab Last Update: 9/24/2010 2:07 PM
4. In the Right side of the registry editor you will see the IP information.
5. You will see the Ip address, and the Name (DNS) server information, too.
All of the Windows information is consolidated into one large database, known as the registry. Convenient, but locating a specific setting can akin to trying to find a needle in a haystack!
QUESTIONS
Q 1.1 What is the IP Address of your Windows Win7 virtual machine?
Q 1.2 What is the IP Address of your Linux Cetnos5 virtual machine?
Q 1.3 What is the nameserver (DNS server used by your Windows Win7 virtual machine)?
Q 1.4 What is the nameserver (DNS server used by your Linux Centos5 virtual machine)?
Q1.4 What Linux command could you type to make a backup copy of the resolv.conf file called resolv.conf.bak
PART 2 – USER SECURITY MODELS
LEAST PRIVILEGE
Just like you don’t need to be a mechanic to drive a car, you don’t need to be an SA to use a computer. But some IT shops give their end-users full administrative access to their systems, which is akin to dolling out a repair manual and complete toolbox with every car! In most circumstances the knowledge and task workers that use their office computers should not need administrative rights to their own systems, and those that do will suffer “entropy” or “system degradation” at a more rapid pace than those who do not. Why? It is far too easy to inadvertently change
Page 6
IST346: Lab Last Update: 9/24/2010 2:07 PM
your system or install unwanted software without your knowledge when you’re an administrator. In fact, surfing the web as admin makes it far too easy for attackers to infect your computer with malware (http://en.wikipedia.org/wiki/Malware).
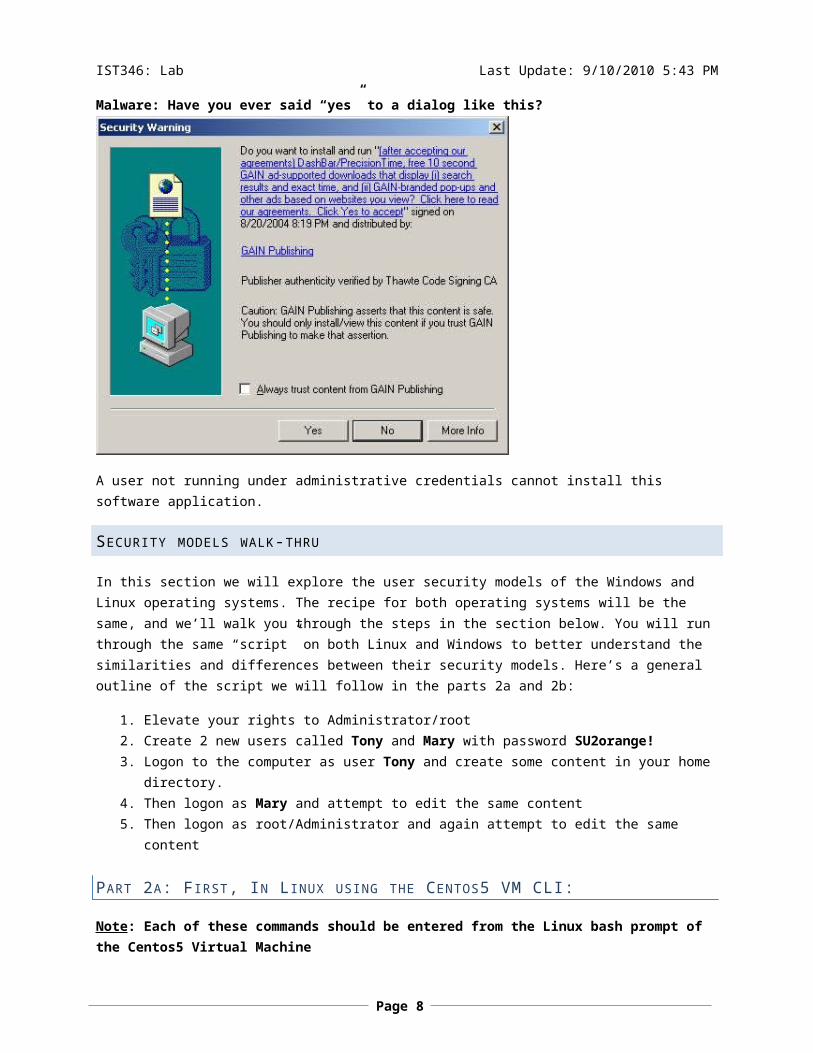
Malware: Have you ever said “yes” to a dialog like this?
A user not running under administrative credentials cannot install this software application.
SECURITY MODELS WALK-THRU
In this section we will explore the user security models of the Windows and Linux operating systems. The recipe for both operating systems will be the same, and we’ll walk you through the steps in the section below. You will run through the same “script” on both Linux and Windows to better understand the similarities and differences between their security models. Here’s a general outline of the script we will follow in the parts 2a and 2b:
1. Elevate your rights to Administrator/root2. Create 2 new users called Tony and Mary with password SU2orange!3. Logon to the computer as user Tony and create some content in your home directory.4. Then logon as Mary and attempt to edit the same content5. Then logon as root/Administrator and again attempt to edit the same content
PART 2A: F IRST, IN L INUX USING THE CENTOS5 VM CLI:
Note: Each of these commands should be entered from the Linux bash prompt of the Centos5 Virtual Machine
THE SETUP: ADDING THE TONY AND MARY ACCOUNTS
Page 7
IST346: Lab Last Update: 9/24/2010 2:07 PM
1. Who are you? Type: whoami to get the effective username of the current running user. You should be a user named root. In the Unix world, the root account is the highest level of privilege, and as root you can do anything.
2. Users don’t have full rights to the system. For example as a normal user, you cannot create another user, but as root you can so let’s get down to business. Create 2 users and set their passwords to SU2orange!: Enter each of these commands into the bash prompt, one at a time.useradd tony useradd marypasswd tonypasswd maryNote: the passwd command will prompt you to enter a password, enter SU2orange!
3. Now that you’ve made the Tony and Mary accounts it is time to hang up your administrative hat.
UNDERSTANDING HOW USER SECURITY WORKS IN LINUX
1. Now it’s time to experience first-hand how the Linux user security model works. First login as user Tony, type: su –l tony (It’s an “L” not a “1”) Verify you’re logged in as tony by typing whoami :
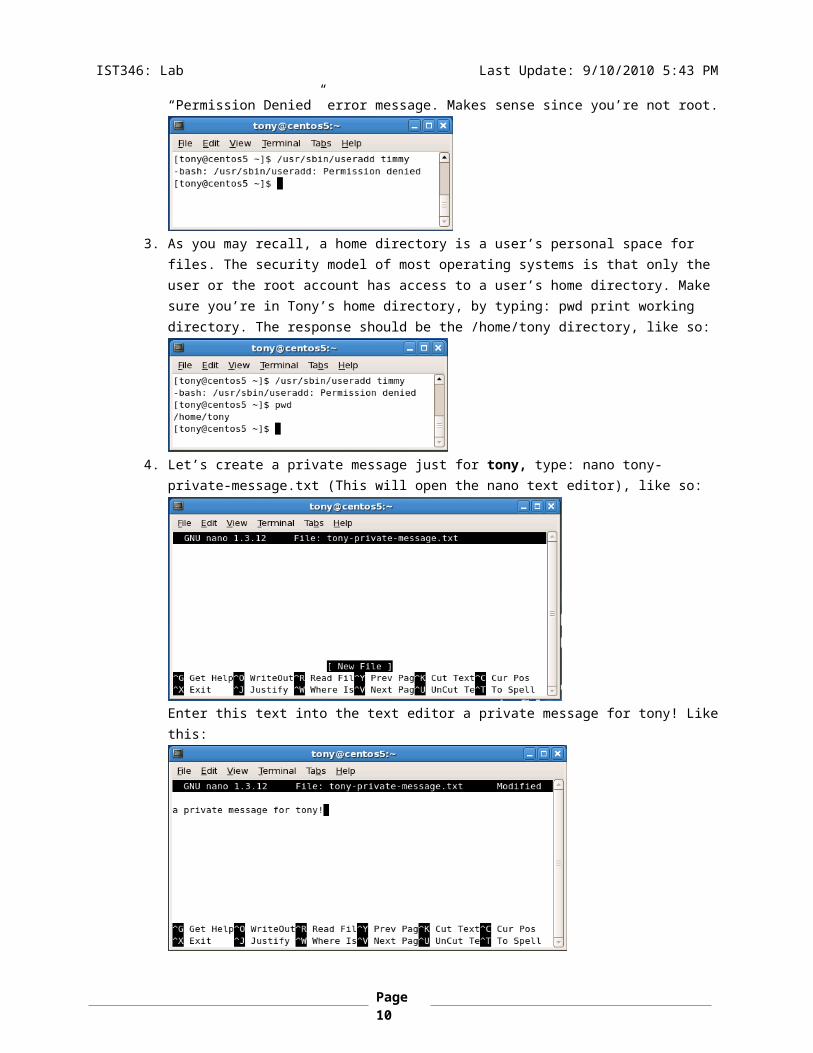
2. Now tony is not root. He’s tony, just an average user. So let’s try and do something a normal user cannot do. Let’s try and add another person, timmy type: /usr/sbin/useradd timmy and you’ll get a cryptic “Permission Denied” error message. Makes sense since you’re not root.
3. As you may recall, a home directory is a user’s personal space for files. The security model of most operating systems is that only the user or the root account has access to a user’s home directory. Make sure you’re in Tony’s home directory, by typing: pwd print working directory. The response
Page 8

IST346: Lab Last Update: 9/24/2010 2:07 PM
should be the /home/tony directory, like so:
4. Let’s create a private message just for tony, type: nano tony-private-message.txt (This will open the nano text editor), like so:
Enter this text into the text editor a private message for tony! Like this:
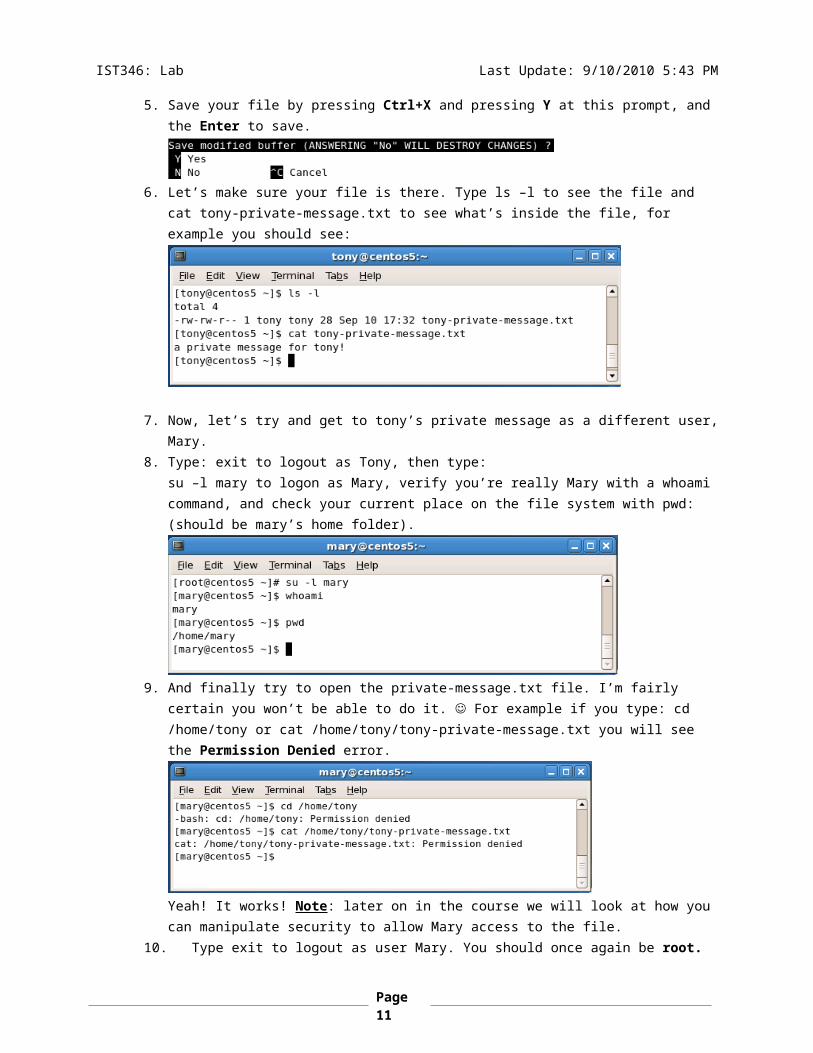
5. Save your file by pressing Ctrl+X and pressing Y at this prompt, and the Enter to save.
6. Let’s make sure your file is there. Type ls –l to see the file and cat tony-private-message.txt to see what’s inside the file, for example you should see:
Page 9
IST346: Lab Last Update: 9/24/2010 2:07 PM
7. Now, let’s try and get to tony’s private message as a different user, Mary. 8. Type: exit to logout as Tony, then type:
su –l mary to logon as Mary, verify you’re really Mary with a whoami command, and check your current place on the file system with pwd: (should be mary’s home folder).
9. And finally try to open the private-message.txt file. I’m fairly certain you won’t be able to do it. For example if you type: cd /home/tony or cat /home/tony/tony-private-message.txt you will see the Permission Denied error.
Yeah! It works! Note: later on in the course we will look at how you can manipulate security to allow Mary access to the file.
10. Type exit to logout as user Mary. You should once again be root.
PART 2B: W INDOWS W IN7 VM CLI:
Note: Each of these commands should be entered from the command prompt in your Win7 vm.
Windows Vista (the precursor to Windows 7) introduces a new security concept called User Account Control or UAC. The design behind UAC is to elevate account access from user mode into Kernel mode on demand. The has to confirm this switch, which makes it possible for viruses and malware to automate this process. It is important to note that the existing user’s rights are elevated as opposed to assuming the identity of another user as in the case of the su command on Linux. UAC avoids the need to even use the Administrator account in the Windows operating system, and this account is actually disabled in default installations. UAC can be turned off, and when it
Page 10
IST346: Lab Last Update: 9/24/2010 2:07 PM
is off the security model behaves like the Linux example in Part 2a. You can learn more about UAC by visiting: http://technet.microsoft.com/en-us/library/cc709691%28WS.10%29.aspx
Note: We will leave UAC enabled in our Windows operating systems to present a different perspective on security.
Let’s get it started…
1. From your windows command prompt, type whoami you should be logged on as User. Try to add the user Tony, by typing net user tony /add you will see the cryptic system error 5 access is denied. Bummer. But expected.
2. What we need to do is elevate the User account to the Administrator level so that we can run the administrative commands. To do this, we need to re-launch the command prompt in a special way: Start
All Programs Accessories Right-click on Command Prompt. And choose Run at Administrator from the context-menu. You should now have two command prompts, one of which is at the Administrator level:Tale of two command prompts (notice both are logged on as user):
4. Now from the Administrator: Command Prompt, let’s make some user magic, type:net user tony /addnet user mary /addnet user tony *net user mary *Once Again: Be sure to enter SU2orange! For Tony’s and Mary’s password. You may now close the Administrator: Command Prompt by typing the exit command.
5. Now back in the “regular” command prompt, to logon as Tony and open a command prompt, type: runas /profile /user:tony cmd.exe and enter Tony’s password SU2orange! You’ll see yet another windows that’s all about Tony.
6. Change into Tony’s home directory: cd %userprofile% and type cd to verify you’re in the correct place: c:\Users\Tony
Page 11

IST346: Lab Last Update: 9/24/2010 2:07 PM
7. Next, let’s make Tony’s private message: notepad private-message.txt and type in some text and save and close notepad. You can verify the file (and its contents) are there by typing: type c:\users\tony\private-message.txt if the file is present, type: exit to logout as Tony.
8. Back at the regular command prompt, let’s logon as mary, type: runas /profile /user:tony cmd.exe and for grins try to open the private message enter the command: type c:\users\tony\private-message.txt bet you can’t do it! You should see Access is Denied… and that’s a good thing.
9. Final note in mary’s command prompt type: tasklist /v | find “cmd.exe” you should see 2 cmd.exe ‘s running one as WIN7\user and the other as WIN7\mary, of course!
QUESTIONS
Q2.1 Through these exercises you added 2 users. What is the problem with using this approach to add 1000 users?
Q2.2 What is the Linux command to set a user’s password?
Q2.3 Why doesn’t the useradd command work unless you’re logged in as the user root?
Q2.4 We added the Tony account to both Windows and Linux Hosts do you foresee any maintenance issues with having one user with two separate logons?
Q2.5 When you run something as administrator using UAC which user’s credentials are used to run the program - the users’ or the administrators’?
Q2.6 What command do you enter at the windows command prompt to find all the processes being run by the user Mary? Hint: See Part 3b Step 11
Q2.7 What command do you type at the Linux bash prompt to find all processes being run by the user Mary? Hint: Linux equivalent to Part 3b Step 11
THIS CONCLUDES OUR LAB.
Page 12