owner’s manualdl.owneriq.net/3/38e65e84-26a6-4337-adfc-e9c43aa4ec3d.pdf · 1/2 tbsp. olive oil...
TRANSCRIPT
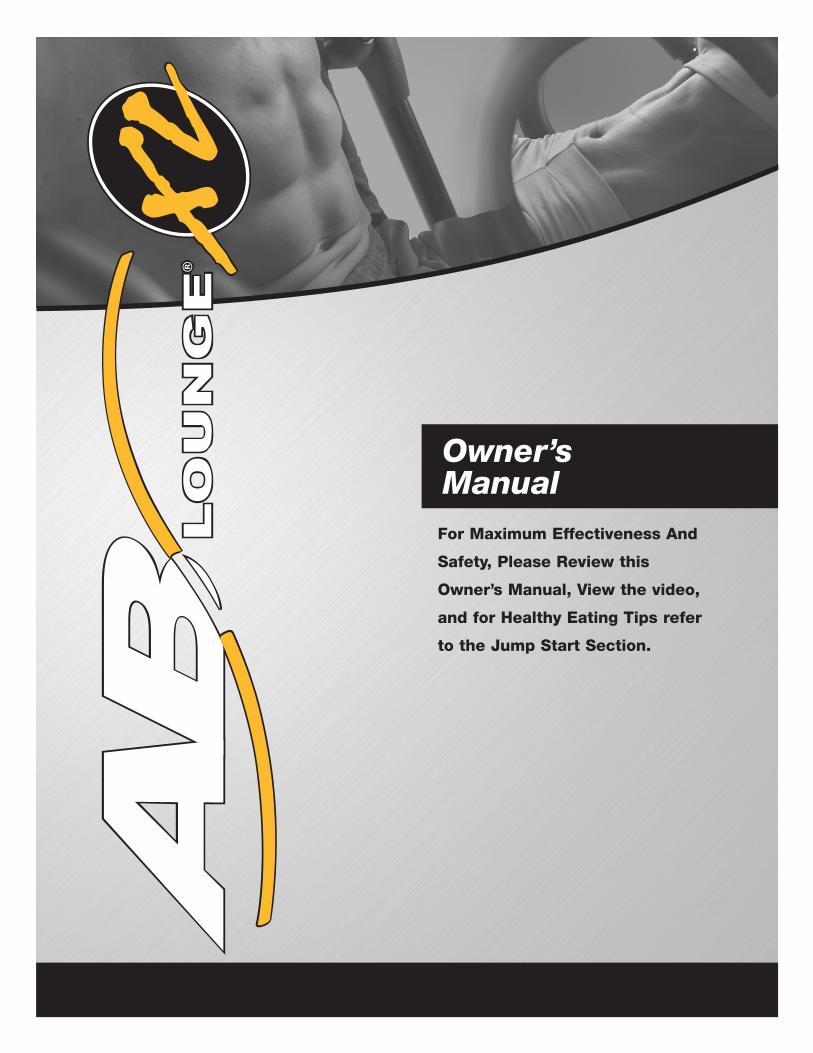
Owner’sManualFor Maximum Effectiveness And
Safety, Please Review this
Owner’s Manual, View the video,
and for Healthy Eating Tips refer
to the Jump Start Section.
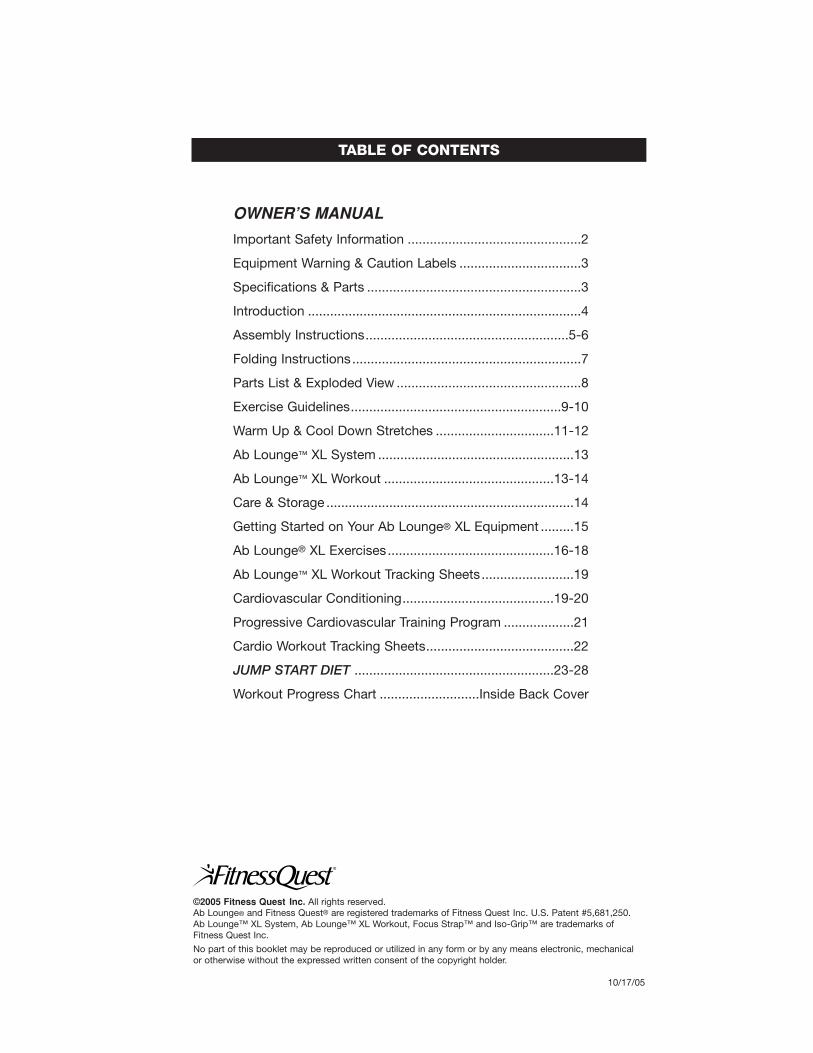
TABLE OF CONTENTS
®
©2005 Fitness Quest Inc. All rights reserved. Ab Lounge® and Fitness Quest® are registered trademarks of Fitness Quest Inc. U.S. Patent #5,681,250.Ab Lounge™ XL System, Ab Lounge™ XL Workout, Focus Strap™ and Iso-Grip™ are trademarks ofFitness Quest Inc.
No part of this booklet may be reproduced or utilized in any form or by any means electronic, mechanical or otherwise without the expressed written consent of the copyright holder.
10/17/05
OWNER’S MANUAL
Important Safety Information ...............................................2
Equipment Warning & Caution Labels .................................3
Specifications & Parts ..........................................................3
Introduction ..........................................................................4
Assembly Instructions.......................................................5-6
Folding Instructions..............................................................7
Parts List & Exploded View ..................................................8
Exercise Guidelines.........................................................9-10
Warm Up & Cool Down Stretches ................................11-12
Ab Lounge™ XL System .....................................................13
Ab Lounge™ XL Workout ..............................................13-14
Care & Storage ...................................................................14
Getting Started on Your Ab Lounge® XL Equipment .........15
Ab Lounge® XL Exercises.............................................16-18
Ab Lounge™ XL Workout Tracking Sheets.........................19
Cardiovascular Conditioning.........................................19-20
Progressive Cardiovascular Training Program ...................21
Cardio Workout Tracking Sheets........................................22
JUMP START DIET ......................................................23-28
Workout Progress Chart ...........................Inside Back Cover

-------- 2 --------
IMPORTANT SAFETY INFORMATION
1) Before starting this or any other exercise program, consult your physician. Your physicianshould assist you in determining the target heart ratezone appropriate for your age and physical condition.Certain exercise programs or types of equipment maynot be appropriate for all people. This is especiallyimportant for people over the age of 35, pregnantwomen, or those with pre-existing health problems or balance impairments. If you are taking medicationwhich may affect your heart rate, a physician's adviceis absolutely essential.
2) Start out slowly and progress sensibly. Even if you are an experienced exerciser, start with thebasic workout and become familiar with all of the exer-cises before moving on to more advanced workouts orexercises. For best results, perform all of the exercisesat the tempo demonstrated in the video.
3) Do not overexert yourself with this or any otherexercise program. Listen to your body and respond toany reactions you may be having. You must learn todistinguish “good” pain, like fatigue, from “bad” pain,which hurts. If you experience any pain or tightnessin your chest, an irregular heartbeat, dizziness, nausea, or shortness of breath, stop exercising atonce and consult your physician immediately.
4) Warm up before any exercise program by doing 5 to 10minutes of aerobic activity, followed by stretching.
5) Inspect the equipment. Before EACH use, visuallyinspect the equipment including stitching, fabric, frameand pivot area. Do not use unit if you detect any tearing, fraying or cuts on fabric. Do not use unit if any pivoting assembly is not working properly.NEVER operate the equipment if the equipment is not functioning properly.
6) USE CARE when getting on and off the equipment.Set up and use your equipment on a solid, level, carpeted surface. Follow the instructions demonstratedin your video and on page 15 in this manual for properentry and exit techniques.
7) Use this equipment ONLY for the intended use as described in this manual. Do not modify the equipment or use attachments not recommended by the manufacturer.
8) Have plenty of clearance behind and in front ofyour equipment. It is important to keep children, pets, furniture and other objects out of the way when
using your equipment. You should have a minimum of 3 feet of clearance both in front of and behind your equipment.
9) Wear appropriate clothing when exercising.Workout clothing should be comfortable and lightweight, and should allow freedom of movement.Wear comfortable athletic shoes made of good support with non-slip soles, such as running or aerobic shoes. Do not use this product with bare feet or when wearing only socks or stockings.
10) THIS EQUIPMENT IS NOT FOR USE BY CHILDREN.To prevent injuries, keep this and all fitness equipment out of the reach of children. Follow these simple rules:
– Keep children out of rooms where you haveyour exercise equipment.
– Store exercise equipment in a room that can be locked.
– Know exactly where your children are when you work out.
– If you have small children at home, don’t wearheadphones while you work out.
– Talk to your kids about the dangers of exerciseequipment.
11) Breathe naturally, never holding your breath duringan exercise. Avoid over training, you should be able tocarry on a conversation while exercising.
12) Cool down after an exercise session, with 5 to10 minutes of slow walking, followed by stretching.
13) Handicapped or disabled people must have medical approval before using this equipment andshould be under close supervision when using anyexercise equipment.
14) Only one person at a time should use this equipment.
15) DO NOT put hands, feet, or any foreign objects on or near this equipment when in use by others. Use caution not to pinch fingers or hands in moving parts when folding, setting up, or using the equipment.
WARNINGYOU AND OTHERS CAN BE SERIOUSLY INJURED
OR KILLED IF WARNINGS ON THE EQUIPMENT, IN THISOWNER’S MANUAL AND VIDEO ARE NOT FOLLOWED.
Go to www.fitnessquest.com or call 1-800-497-5831 for
replacement labels, manuals or video(s).
-------- 27 --------
JUMP START DIET
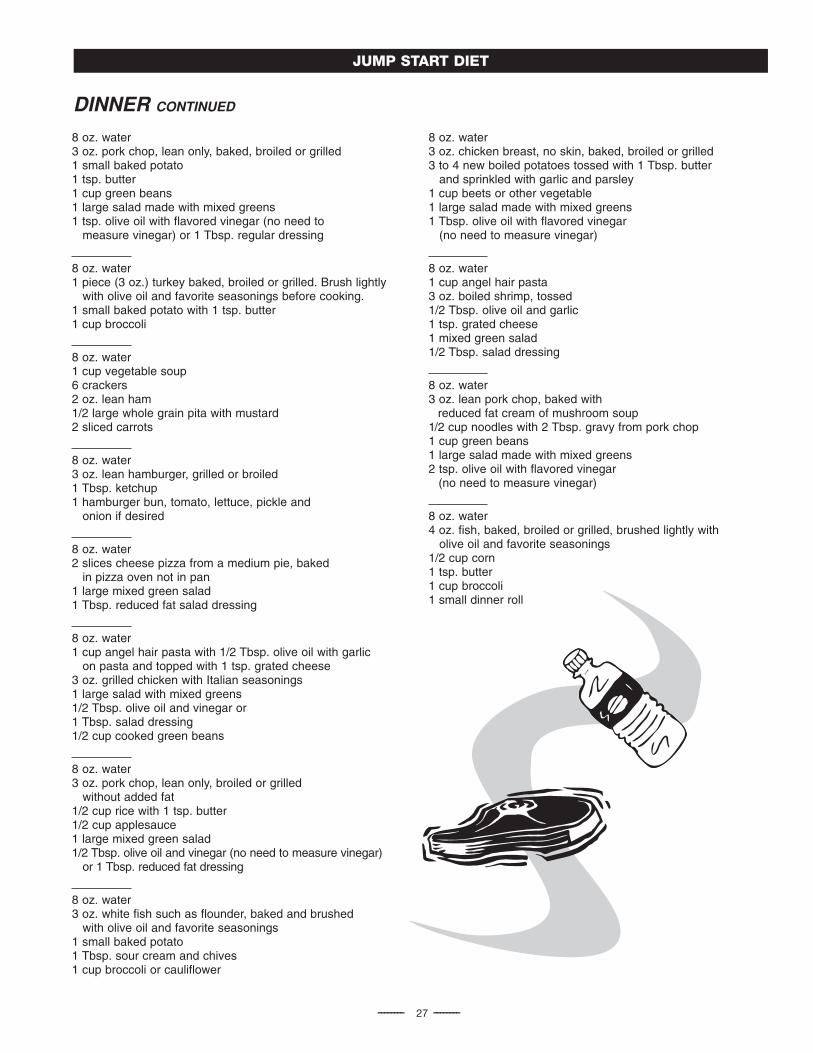
DINNER CONTINUED
8 oz. water3 oz. pork chop, lean only, baked, broiled or grilled1 small baked potato1 tsp. butter 1 cup green beans1 large salad made with mixed greens1 tsp. olive oil with flavored vinegar (no need to
measure vinegar) or 1 Tbsp. regular dressing
8 oz. water1 piece (3 oz.) turkey baked, broiled or grilled. Brush lightly
with olive oil and favorite seasonings before cooking.1 small baked potato with 1 tsp. butter 1 cup broccoli
8 oz. water1 cup vegetable soup6 crackers2 oz. lean ham 1/2 large whole grain pita with mustard2 sliced carrots
8 oz. water3 oz. lean hamburger, grilled or broiled 1 Tbsp. ketchup1 hamburger bun, tomato, lettuce, pickle and
onion if desired
8 oz. water2 slices cheese pizza from a medium pie, baked
in pizza oven not in pan1 large mixed green salad1 Tbsp. reduced fat salad dressing
8 oz. water1 cup angel hair pasta with 1/2 Tbsp. olive oil with garlic
on pasta and topped with 1 tsp. grated cheese3 oz. grilled chicken with Italian seasonings1 large salad with mixed greens1/2 Tbsp. olive oil and vinegar or 1 Tbsp. salad dressing 1/2 cup cooked green beans
8 oz. water3 oz. pork chop, lean only, broiled or grilled
without added fat1/2 cup rice with 1 tsp. butter 1/2 cup applesauce1 large mixed green salad1/2 Tbsp. olive oil and vinegar (no need to measure vinegar)
or 1 Tbsp. reduced fat dressing
8 oz. water3 oz. white fish such as flounder, baked and brushed
with olive oil and favorite seasonings1 small baked potato1 Tbsp. sour cream and chives1 cup broccoli or cauliflower
8 oz. water3 oz. chicken breast, no skin, baked, broiled or grilled3 to 4 new boiled potatoes tossed with 1 Tbsp. butter
and sprinkled with garlic and parsley1 cup beets or other vegetable1 large salad made with mixed greens1 Tbsp. olive oil with flavored vinegar
(no need to measure vinegar)
8 oz. water1 cup angel hair pasta3 oz. boiled shrimp, tossed1/2 Tbsp. olive oil and garlic1 tsp. grated cheese1 mixed green salad1/2 Tbsp. salad dressing
8 oz. water3 oz. lean pork chop, baked with
reduced fat cream of mushroom soup1/2 cup noodles with 2 Tbsp. gravy from pork chop1 cup green beans1 large salad made with mixed greens2 tsp. olive oil with flavored vinegar
(no need to measure vinegar)
8 oz. water 4 oz. fish, baked, broiled or grilled, brushed lightly with
olive oil and favorite seasonings1/2 cup corn1 tsp. butter 1 cup broccoli1 small dinner roll

-------- 3 --------
EQUIPMENT WARNING & CAUTION LABELS
WARNINGFAILURE TO READ AND FOLLOW THE SAFETY INSTRUCTIONS STATED IN THE OWNER’S MANUAL
AND VIDEO MAY RESULT IN POSSIBLE SERIOUS INJURY OR DEATH. KEEP CHILDREN AWAY. MAXIMUMUSER WEIGHT 275 LBS. REPLACE THIS LABEL IF DAMAGED, ILLEGIBLE OR REMOVED. CLASS HC.
WARNING LABEL 1
DETACH THIS END OF BAND FROM FRAME BEFORE FOLDING. FAILURE TO DO SO MAY RESULT IN INJURY.
WARNING LABEL 2 (2 locations)
CRUSH HAZARD. Keep hands clearduring folding. Failure to do so,could result in crushed fingers.
WARNING LABEL 3 (4 locations)
WARNINGPlace hand here when folding.Keep hand outside of tubes to
prevent pinched fingers.
CAUTION LABEL 1 (4 locations)
CAUTION
Ab Lounge® XL Specifications:
Product Weight: Approx. 35 lbs.Length: 54”Width: 31-3/4”Height: 45-1/2”Note: Dimensions are based
on unit set up for use.Maximum user weight: 275 lbs.
SPECIFICATIONS AND PARTS
Also Includes aWorkout DVD
The following parts are located in the Parts Box. Please make sure you have all of the parts beforebeginning assembly of your equipment.
X15908-8short band
X15906 foot restassembly
X15908-1handlebar
X15907seat
X15903-1 seat support frame
X15901-1 front frame
X15901-8locking
arm
X15908-7long band
X15901-2rear frame
X15905-3 head rest frame
X15901-8 locking armmechanism
X15905-4 Focus Strap™ withIso-Grip™ handles
2 - handlebars with locking knobs
1 - short band
X15908 PARTS BOX:
1 - long band
WARNINGLABEL 1
LOCATED ONBOTH SIDESOF FRAME
WARNINGLABEL 3
WARNINGLABEL 2
LOCATED ON BOTH SIDES OF FRAME
CAUTIONLABEL 1
LOCATED ON BOTHSIDES OF FRAME
CAUTIONLABEL 1
WARNINGLABEL 2
X15908-6adjustment
knob
X15902-1foot rest receiver
1 - adjustmentknob
IMPORTANT: See below for placement of the followingWarning/Caution Labels onyour unit.
WARNING

-------- 4 --------
Congratulations on your purchase of the Ab Lounge® XL unit. You have taken an important steptoward your fitness goals. Whether that means toning your abs, or strengthening and stretchingyour core abdominal muscles, the Ab Lounge® XL unit can help you get the results you want.
Working out on comfortable, efficient equipment that allows you to start and progress at thelevel that’s appropriate for you is a vital element in sticking with a program of regular exercise.With your Ab Lounge® XL unit, you’ll use the abdominal muscles in smooth natural motions.You’ll be able to adjust the equipment to fit your body and begin your workout right away - justwhat you need to improve your fitness the healthy, easy way!
Just 30 minutes a week – three enjoyable 10 minute sessions – is all it takes to begin experi-encing the toning and stretching benefits of your Ab Lounge® XL unit. With regular use of yourequipment, consistent aerobic exercise and a proper diet, you may soon notice some important changes in yourself, such as:
• More endurance and stamina• Less body fat and excess weight • Improved abdominal muscle tone• Increased energy for daily tasks• Less stress and a more positive outlook
With a minimal time commitment, you’ll receive an impressive return on your investment!
We’re so sure that you will be completely satisfied with your Ab Lounge® XL unit that weencourage you to write or call our Customer Service Specialists at the address or phone number listed below or contact us on our website. As always, you have our personal assurance that we want your complete satisfaction. After all, your success is our success too!
Sincerely,
Karla Williamson, Customer Service
Ab Lounge® XL, Customer Service Department248 Fitness Quest Plaza, Canton, OH 44750-1001
Call Toll Free: 1-800-321-9236 • Monday – Friday, 8:30am to 8:00pm, EST Email: [email protected] • www.fitnessquest.com
Please do not call the above number for Parts. See Ordering Missingor Defective Parts section below.
IMPORTANT: This owner's manual is the authoritative source of information about your Ab Lounge XL unit. Please read it carefully and follow all the instructions.
INTRODUCTION
Ordering Missing or Defective PartsWhen ordering parts, please contact our Parts Department, toll free at 1-800-497-5831Monday through Friday, 8:30am to 8:00pm, Eastern Standard Time.
IMPORTANT: You must have your serial number, date of purchase, and this manualready when calling for parts.
Serial #: _____________________________
If you would like a FREE VHS* copy of your DVD, simply give us a call. All you have to do is pay $3.95 for shipping and handling.
*Offer valid for a limited time. Limit one video per customer. Additional shipping and handling charges may applyto deliveries outside the continental U.S.

-------- 5 --------
ASSEMBLY INSTRUCTIONS
Step 1. Remove the Main Assembly and all parts from packingand place them on floor as shown in Figure 1.
Occasionally our products contain components that are pre-lubricated at the factory. We recommendthat you protect flooring, or anything else the parts may contact, with newspaper or cloth.
FIGURE 2
X15901-2Rear FrameX15901-1
Front Frame
X15901-8Locking Arm
Step 2. Lift and place the unit on its right side with the left side and LockingArm facing up as shown in Figure 2.Open the unit by grasping the bottom ofthe Front and Rear Frames and spreadthem apart.
Swing the Locking Arm, located on theLeft Front Frame, around so the notchlines up with the pin on the Left RearFrame. Push down on the button on the Locking Arm Mechanism and slide it back while you hook the notch over the pin.
X15901Main Assembly
FIGURE 1
X15908-7Long Band
X15908-8 Short Band
X15908-1Handlebar with Locking Knob
X15901-8 Locking ArmMechanism
X15906Foot Rest Assembly
Pin
Attaching the Locking Arm Mechanism
NOTE: All location references, such as front, rear, leftor right, made in these instructions are from the user
sitting on the unit and facing forward.

-------- 6 --------
Step 4. Pull the Seat Support Frame towardyou and locate the two holes on the top.Hook the Long Band over andattach to the lower hole of theSeat Support Frame. Hook theother end of the Long Band intothe hole on the Rear Frame.Make sure hooks are insertedcompletely as shown here.
NOTE: The chair will pivot easily at thispoint. Make sure you hold the Frame firmly in place as you attach the Bands.
Step 5. Place the Short Band Hook into the upperhole on the Seat Support Frame and hook theother end into the hole on the Front Frame.
Step 3a. While standingbetween the two frames,PUSH the Foot RestReceiver out away from youthrough the front frame asshown in 3a.
Step 3b. The Seat andBack will start to separate(open up). Continue push-ing outward until the Seatand Back are approximately2 feet apart as shown in 3b.
Step 7. Remove the Locking Knobs from theHandlebars. Slide the Handlebars into the holes at the top of the Main Assembly with the curves facing down. Align mounting hole and secure eachHandlebar with the Locking Knobs you just removed.
X15902-1Foot Rest Receiver
Seat and Back will separate (open up).Open to approximately 2 feet apart.
Stand Here AndPUSH Open With
Your Hands
4
54
5
4
X15901-9Cable
Long Bandin Rear
X15903-1Seat Support Frame
X15901-2Rear Frame
X15901-1Front Frame
Seat
Seat
Seat
3a 3b
Check all bolts and nuts to be surethey are tight before using your unit.
ASSEMBLY IS NOW COMPLETE.
Step 6. Partially screw the Adjustment Knob into theunderside of the Foot Rest Receiver at the front of theunit. Pull down the Adjustment Knob and slide the FootRest Assembly into the Receiver. Once the Foot RestAssembly is in the Receiver, let the Adjustment Knobretract making sure it is secure in one of the holes on theFoot Rest Assembly. Screw the Adjustment Knob byturning clockwise until tight. X15908-6
Adjustment Knob
X15906Foot Rest Assembly
X15902-1Foot Rest Receiver
SET UNIT UPRIGHT
Back
BackREARFRONT
X15908-5Locking
Knob
Handlebar
Short Bandin Front

-------- 7 --------
FOLDING INSTRUCTIONS
The Ab Lounge® XL unit has been designed to fold for convenient travel and storage.The Locking Arm Mechanism is removable by hand, no special tools required. For maximum
effectiveness and safety, always review these instructions prior to folding the unit.
Folding the Ab Lounge® XL Unita) Lay the unit on its right side as shown. Unhook the Short Band from the
Front Frame and the Long Band from the Rear Frame. Leave both Bandsconnected to the Seat Support Frame for storage.
b) Pull the Back toward the Seat until it aligns with the Front Frame.
c) Unhook the Locking Arm Mechanism by pushing down on the button andsliding it back and unhooking the Left Rear Frames (reverse assemblyStep 2).
d) Rotate the Locking Arm towards the Front Frame.
e) Grasp the Front Frame with one hand and the Rear Frame with the otherhand and slowly pull them together.
IMPORTANT: Place hands on Caution Labels when folding,and be careful not to pinch your fingers between the Front and Rear Frames.
f) For your unit to store flat you must fold the Handlebars in. To do this,loosen the Handlebar Knobs and turn Handlebars inward toward the unitand tighten Knobs to keep in place.
IMPORTANT: Before using your unit, be sure Handlebars are back in correct position and the Knobs are securely tightened.
CAUTIONLABEL
CAUTIONLABEL
X15901-1Front Frame
X15901-2Rear Frame
Back
X15901-2Rear Frame
X15903-1Seat Support
FrameX15901-1
Front Frame
X15908-8Short Band
Seat
X15908-7Long Band
LOCATED ON BOTHSIDES OF FRAME
LOCATED ON BOTHSIDES OF FRAME
X15901-8Locking Arm Mechanism
X15901-8 Locking Arm

-------- 8 --------
PART NO. PARTS NAME QTY.X15906-1 foot rest assembly (5) 1X15906-2 foot extension tube (6) 1X15905-3 head rest frame (7) 1X15908-1 handlebars (9) 2X15901-8 locking arm (11) 1X15901-7 M10 x 20mm carriage bolt (21) 2X15906-4 M10 x 145mm hex bolt (22) 1X15901-10 M6 x 43mm phillips bolt (23) 2X15905-5 M6 x 20mm phillips bolt (24) 2X15902-6 M10 large nylon nut (26) 5X15903-2 M10 thin nylon nut (27) 2X15901-12 M6 acorn nut (28) 5X15901-11 M6 small washer (31) 7X15905-6 M6 large washer (32) 5X15906-9 M6 spring washer (33) 2X15901-4 M5 x 19mm phillips screw (34) 4X15906-8 M6 x 15mm phillips bolt (35) 2X15908-6 adjustment knob (38) 1X15901-3 rubber foot (45) 4X15902-7 M10 large nut cap (46) 7
PART NO. PARTS NAME QTY.X15906-5 M10 small nut cap (47) 1X15906-3 plastic bushing (48) 2X15905-2 end plug (49) 6X15908-3 plug (50) 2X15908-8 short band (55) 1X15908-7 long band (56) 1X15908-2 grip (58) 2X15908-4 locking washer (59) 2X15908-5 locking knob (60) 2X15906-7 pedal (64) 2X15906-6 spacer (65) 2X15906-10 plug (66) 2X15901-9 cable (67) 1X15905-4 focus strap with Iso-grip handles (68) 1X15901-13 M6 x 45mm phillips bolt (69) 1
X15910 literature pack 1X15911T top box 1X15911B bottom box 1X15912 accessory kit 1X15909D workout video 1
PARTS LIST AND EXPLODED VIEW
-------- 9 --------
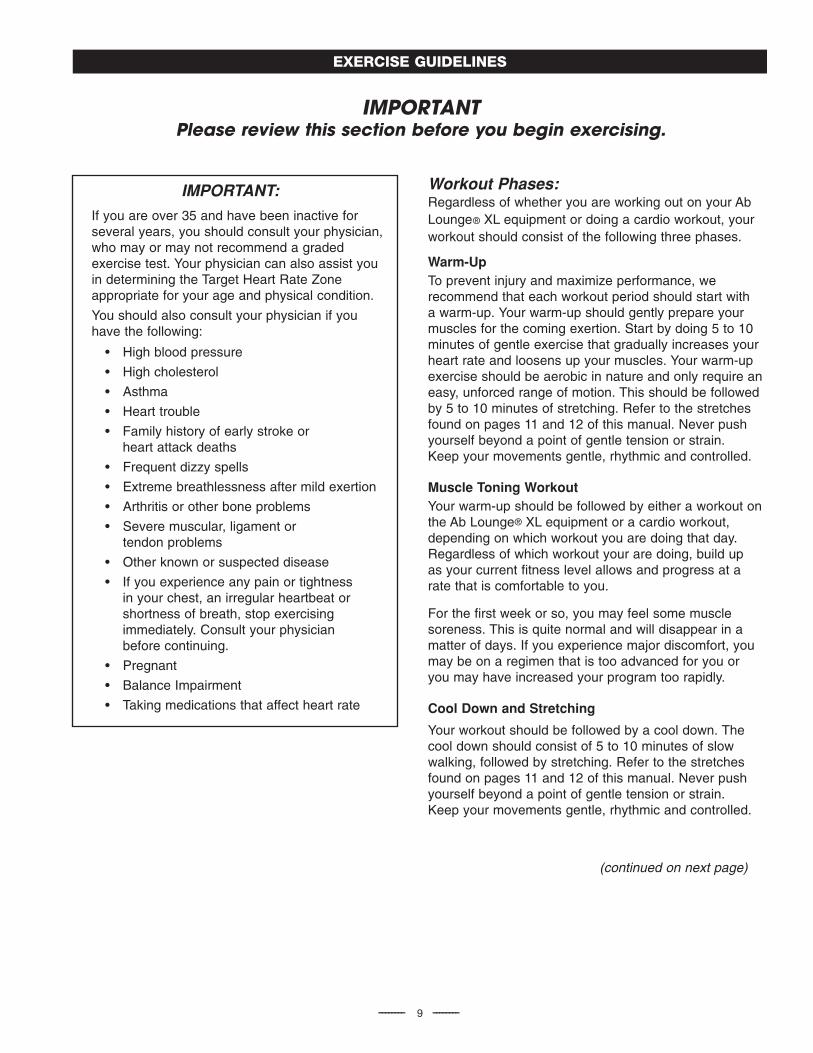
EXERCISE GUIDELINES
IMPORTANT:
If you are over 35 and have been inactive for several years, you should consult your physician,who may or may not recommend a graded exercise test. Your physician can also assist youin determining the Target Heart Rate Zoneappropriate for your age and physical condition.
You should also consult your physician if youhave the following:
• High blood pressure
• High cholesterol
• Asthma
• Heart trouble
• Family history of early stroke orheart attack deaths
• Frequent dizzy spells
• Extreme breathlessness after mild exertion
• Arthritis or other bone problems
• Severe muscular, ligament or tendon problems
• Other known or suspected disease
• If you experience any pain or tightness in your chest, an irregular heartbeat or shortness of breath, stop exercising immediately. Consult your physician before continuing.
• Pregnant
• Balance Impairment
• Taking medications that affect heart rate
(continued on next page)
IMPORTANT Please review this section before you begin exercising.
Workout Phases:Regardless of whether you are working out on your AbLounge® XL equipment or doing a cardio workout, yourworkout should consist of the following three phases.
Warm-UpTo prevent injury and maximize performance, we recommend that each workout period should start with a warm-up. Your warm-up should gently prepare yourmuscles for the coming exertion. Start by doing 5 to 10minutes of gentle exercise that gradually increases yourheart rate and loosens up your muscles. Your warm-upexercise should be aerobic in nature and only require aneasy, unforced range of motion. This should be followedby 5 to 10 minutes of stretching. Refer to the stretchesfound on pages 11 and 12 of this manual. Never pushyourself beyond a point of gentle tension or strain. Keep your movements gentle, rhythmic and controlled.
Muscle Toning WorkoutYour warm-up should be followed by either a workout onthe Ab Lounge® XL equipment or a cardio workout,depending on which workout you are doing that day.Regardless of which workout your are doing, build up as your current fitness level allows and progress at arate that is comfortable to you.
For the first week or so, you may feel some muscle soreness. This is quite normal and will disappear in amatter of days. If you experience major discomfort, youmay be on a regimen that is too advanced for you or you may have increased your program too rapidly.
Cool Down and Stretching
Your workout should be followed by a cool down. Thecool down should consist of 5 to 10 minutes of slowwalking, followed by stretching. Refer to the stretchesfound on pages 11 and 12 of this manual. Never pushyourself beyond a point of gentle tension or strain. Keep your movements gentle, rhythmic and controlled.

-------- 10 --------
When to ExerciseThe hour just before the evening meal is a popular timefor exercise. The late afternoon workout provides a welcome change of pace at the end of the work day andhelps dissolve the day's worries and tensions.
Another popular time to work out is early morning,before the work day begins. Advocates of the early startsay it makes them more alert and energetic on the job.
Among the factors you should consider in developingyour workout schedule are personal preference, job andfamily responsibilities, availability of exercise facilitiesand weather. It's important to schedule your workouts fora time when there is little chance that you will have tocancel or interrupt them because of other demands onyour time.
You should not exercise strenuously during extremelyhot, humid weather or within two hours after eating. Heat and/or digestion both make heavy demands on thecirculatory system, and in combination with exercise canbe an over-taxing double load.
Measuring Your Heart RateWhen checking Heart Rate during a workout, take yourpulse within five seconds after interrupting exercisebecause it starts to go down once you stop moving.Count pulse for 10 seconds and multiply by six to get the per-minute rate.
Target Heart RateAerobic intensity guidelines for healthy adults are generally set at 40 to 85 percent of heart rate. But, ifyou’re out of shape, remember that moderate to lowlevel and consistent cardiovascular training – well below the standard recommendations set forth – canresult in substantial and beneficial effects to your healthand can greatly improve cardiovascular endurance.
You can use the following calculation to determine whatpercentage of your heart rate you are working at:
% heart rate = (220 - age) x %.
Using this calculation, a 70% heart rate for a 40 year oldwould be (220 - 40) x 70% or 126. Thus, this individualwould need to reach 126 beats per minute to equal a70% heart rate.
The above are guidelines, people with any medical limitations should discuss this formula with their physician.
ClothingAll exercise clothing should be loose-fitting to permit freedom of movement, and should make the wearer feel comfortable and self-assured.
Never wear rubberized or plastic clothing, such garments interfere with the evaporation of perspira-tion and can cause body temperature to rise to dangerous levels.
We recommend wearing comfortable athletic shoesmade of good support with non-slip soles. Do notuse this equipment with bare feet or when wearingonly socks or stockings.
Tips to Keep You Going1) Adopt a specific plan and write it down.
2) Keep setting realistic goals as you go along, and remind yourself of them often.
3) Keep a log to record your progress and make sure to keep it up-to-date. See charts in this booklet.
4) Include weight and/or percent body fat measures in your log. Extra pounds can easily creep back.
5) Enlist the support and company of your family and friends.
6) Update others on your successes.
7) Avoid injuries by pacing yourself and including a warm up and cool down period as part of every workout.
8) Reward yourself periodically for a job well done!

-------- 11 --------
WARM UP & COOL DOWN STRETCHES
When performing these stretches, your movements should be slow and smooth,with no bouncing or jerking. Move into the stretch until you feel a slight tension,not pain, in the muscle and hold the stretch for 20 to 30 seconds. Breathe slowlyand rhythmically. Be sure not to hold your breath. Remember that all stretchesmust be done for both sides of your body.
1. Quadriceps StretchStand close to a wall, chair or other solid object. Use one hand toassist your balance. Bend the opposite knee and lift your heel towardsyour buttocks. Reach back and grasp the top of your foot with thesame side hand. Keeping your inner thighs close together, slowly pullyour foot towards your buttocks until you feel a gentle stretch in thefront of your thigh. You do not have to touch your buttocks with yourheel. Stop pulling when you feel the stretch. Keep your kneecap pointing straight down and keep your knees close together. (Do not let the lifted knee swing outward.)
Hold for 20 to 30 seconds. Repeat for the other leg.
2. Calf and Achilles StretchStand approximately one arms length away from a wall or chair withyour feet hip-width apart. Keeping your toes pointed forward, moveone leg in close to the chair while extending the other leg behind you.Bending the leg closest to the chair and keeping the other leg straight,place your hands on the chair. Keep the heel of the back leg on theground and move your hips forward. Slowly lean forward from theankle, keeping your back leg straight until you feel a stretch in yourcalf muscles.
Hold for 20 to 30 seconds. Repeat for the opposite leg.
3. Overhead/Triceps StretchStand with your feet shoulder width apart and your knees slightly bent.Lift one arm overhead and bend your elbow, reaching down behindyour head with your hand toward the opposite shoulder blade. Walkyour fingertips down your back as far as you can. Hold this position.Reach up with your opposite hand and grasp your flexed elbow.Gently assist the stretch by pulling on the elbow.
Hold for 20 to 30 seconds. Repeat for the opposite arm.

-------- 12 --------
4. Back StretchStand with your legs shoulder width apart and your knees slightlybent. Bend forward from your waist with your arms extending looselyin front of your body. Gently bend from the waist flexing your body asfar forward as it will go.
Hold for 20 to 30 seconds. Straighten up and repeat.
5. Standing Hamstrings StretchStand with your legs hip-width apart. Extend one leg out in front of you and keep that foot flat against the ground. With your handsresting lightly on your thighs, bend your back leg and lean forwardslightly from your hips until you feel a stretch in the back of your thigh. Be sure to lean forward from the hip joint rather than bending at your waist.
Hold for 20 to 30 seconds. Repeat for the opposite leg.
6. Buttocks, Hips and Abdominal StretchLay flat on your back with your hips relaxed against the floor. Bendone leg at the knee. Keeping both shoulders flat on the floor, gentlygrasp the bent knee with your hands and pull it over your body and towards the ground. You should feel a stretch in your hips,abdominals and lower back.
Hold for 20 to 30 seconds and release. Repeat for opposite side.
7. Inner Thigh StretchSit on the floor and bend your legs so that the soles of your feet aretogether. Place your elbows on your knees. Lean forward from thewaist and press down lightly on the inside of your knees. You shouldfeel a stretch in the muscles of your inside thigh.
Hold for 20 to 30 seconds and release.
8. Arm PullbackStand with your feet shoulder width apart and toes pointing forwardand with your knees slightly bent. Let your arms hang relaxed oneither side of your body. Expand your chest and pull your shouldersback. Bend your elbows slightly and clasp your hands behind yourback. Slowly straighten your arms as you lift your hands upward.Raise your hands upward until you feel mild tension in your shoulderand chest region.
Hold for 20 to 30 seconds. Lower your arms to their original positionand bend your elbows. Release your hands and return them to yoursides.
-------- 13 --------
AB LOUNGE™ XL SYSTEM
The Ab Lounge® XL is more than just a machine; it is atotal body exercise and nutrition system. It is a “fitnessfor life” plan that goes hand in hand with an overallhealthy lifestyle. This includes regular check-ups, healthyeating habits and exercise for the rest of your life.
Today, all fitness research recommends both cardiovas-cular exercise and strength conditioning to achieve balanced fitness. By improving your cardiovascular fit-ness you will strengthen your heart and lungs, increaseyour stamina and endurance, and help with weight loss.Strength conditioning adds lean muscle to your body,which increases your body’s metabolism. And we allknow that a healthy eating plan is an important part ofany balanced fitness program.
The Ab Lounge™ XL System is designed to help youachieve a balanced fitness program. The system consists of three parts:
1) Strength Conditioning. The Ab Lounge® XL unit wasdesigned to help you tone and strengthen your upperabdominal muscles, your lower abdominal musclesand your obliques. We recommend that you workoutfor at least 30 minutes, 3 times a week. However, thefrequency and duration of your workouts will dependon your current fitness level and goals. Please refer to the Ab Lounge® XL Workout section of this bookletto determine the workout that is appropriate for you.
2) Cardiovascular Exercise. The Ab Lounge™ XLSystem includes a cardio workout program. You canachieve an effective cardio workout from a variety ofactivities, such as walking, hiking, swimming and jog-ging. We recommend that you do a cardio workoutfor at least 30 minutes, 3 times a week. You can easily alternate days for your Ab Lounge™ XL andcardio workouts. Again, the frequency and duration of your workouts will depend on your current fitnesslevel and goals. Please refer to the CardiovascularWorkout section of this booklet to determine the workout that is appropriate for you.
3) Nutrition. The Ab Lounge™ XL System includes theJump Start Diet which is designed to ‘jump start’ yourtotal fitness program. The Jump Start Diet will allowyou, in just 14 days, to begin to form habits to helpyou reach your fitness goals faster and easier thanever before. Please refer to your Jump Start Dietincluded in this booklet for an easy-to-follow, 2-weekmenu plan, full of healthy eating choices. Once youcomplete the 2-week diet, you can continue your sensible diet with the eating plans in the FitnessQuest Eating Plan booklet or the Low Carbohydrate,Heart Healthy Menu Plan booklet which are alsoincluded with the system.
AB LOUNGE™ XL WORKOUT
is a recommended speed for toning exercises. Working at a fast pace is not recommended, and may compromise your safety and results.
5. You may not be able to complete all of the repetitionssuggested at first. When you feel your muscles fatigu-ing, or are unable to work with good form and tech-nique, take a short break and rest.
6. Keep track of how many repetitions of each exerciseyou are able to do at first. You will be surprised at how quickly you progress. In just a few weeks you’llprobably be able to complete all of the repetitions atthe workout level you choose.
7. Progress slowly. If you are very sore and tired afteryour workout you are working at a level that is toohard. Great results can be obtained by working at a level that challenges you, but doesn’t create soreness and excessive fatigue.
1. Once your equipment is assembled, make sure it ison a solid, level, carpeted surface with a minimum of 3 feet of clearance space behind and in front of the unit. Practice getting on and off your unit a fewtimes until you are comfortable with this movement.
2. Review this Owner’s Manual and the video completelybefore you begin your exercise program. Rememberto follow the instructions exactly – they have beendeveloped with your health and safety in mind.
3. Pay careful attention to the techniques and range of motion that are described and illustrated in this manual and the video. This is essential for safety, andfor isolating and targeting the appropriate muscles.
4. Perform the exercises at a slow and controlled speed. About one or two seconds into the movement,a one to two second pause at the end range ofmotion, and a slow return to the starting position
(continued on next page)
IMPORTANT EXERCISE AND SAFETY TIPS
-------- 14 --------
8. It is important that you know how to work out safelyand properly. These safety steps are for your benefitand you should follow them closely to maximize theeffectiveness of your workout routine.
9. You should begin to feel results within one to twoweeks of working out with your equipment. Look forbetter posture and the feeling of more strength andefficiency in your core abdominal muscles.
Developing Your Ab Lounge™ XL WorkoutThe choices you make about the frequency (howoften), the duration (how long), and intensity (how hard) at which you will workout, will directly influ-ence your results.
Before beginning any workouts on the Ab Lounge® XLunit, you should first determine your current fitness level. The following are guidelines that you can use to determine your fitness level, butremember these are just guidelines. You must always listen to your body. Start out at a level that is comfortable to you and progress sensibly.
Beginner – No previous exercise experience, or have not exercised in a long time.
Intermediate – Have been performing abdominalexercises regularly for three months or more.
Advanced – Have been performing abdominal exercises regularly for six months or more.
How Often, How Long, How HardBeginners should start out slowly and only do as manyexercises as you can with good form and technique.Your Ab Lounge™ XL System includes Rosalie Brown’sAb Blasting DVD. The DVD includes a 10 minute
Ab Lounge™ XL Workout that is perfect for most begin-ners. Start by doing the Ab Blasting workout (or as much of the workout as you can comfortably perform)once a day, every other day. Then gradually increasethe number of workouts you do every other day until you can comfortably complete three workouts everyother day with good form.
Intermediates should strive to complete three AbBlasting workouts every other day. Once you can comfortably complete these workouts with good formand technique, you should begin to increase the frequency and duration of your workouts. But, youshould only increase one of these elements at a time.Once you are familiar with the Ab Blasting workout, youmay want to develop your own workout for variety. Youcan incorporate the exercises found on pages 16 - 18 ofthis booklet into your own customized exercise routine.Start out by doing 10 repetitions of the Basic Exercisesduring each workout until you can complete all of the repetitions with good form. When you can complete one set of 10 repetitions of each Basic Exercise, then you are ready to add the Bonus Exercises to your workout or perform additional sets of your basicroutine. Use the Workout Tracking Sheets on page 19 to record the number of repetitions and sets that you are able to do with each workout. Using the WorkoutProgress Chart at the end of this manual will also help you keep track of your progress.
Advanced should strive for a long term goal of completing a 30 to 60 minute workout on the Ab Lounge® XL unit most days of the week. This can beaccomplished by repeating the Ab Blasting workout,developing your own workout or a combination of both.But remember, always work and progress at a pace thatis comfortable to you and make sure you can completeeach exercise with good form and technique.
CARE & STORAGE
Care directionsYour equipment has been carefully designed to require minimum maintenance. To ensure this, we recommendthat you do the following:
• Keep your equipment clean. Wipe sweat, dust orother residue off the seat, foot rest and handlebarswith a soft, clean cloth after each use.
• Before each use, check the bands, fabric, and stitching for signs of fraying. If you notice any wear, stop using the equipment immediately.Call our Parts Department to order replacementparts. Refer to the front of this Manual for How toOrder Missing or Defective Parts.
• To protect your equipment from stains and dirt, you may want to spray the fabric with any type of protective fabric spray.
• Before each use, check the frame and pivot assembly to be sure that it is in proper working order.Also check all nuts and bolts to be sure that they aretight. If the unit is not in proper working order, stop using the equipment immediately.
Storage directions• Store your equipment in a dry area away from
children and high traffic areas.

-------- 15 --------
GETTING STARTED ON YOUR AB LOUNGE® XL EQUIPMENT
FIG. 2 FIG. 4FIG. 3
FIG. 5
Getting On Your Ab Lounge® XL EquipmentStand next to the unit, near the foot rest. See Fig. 1.Place one hand lightly on the handlebar and carefullystep over the bar that connects the seat and foot rest.See Fig. 2. Facing the foot rest, slowly sit down on theseat. See FIG. 3. When the hips feel centered, leanback into the unit in a comfortable reclining position. Liftthe feet, one at a time, and place them on the foot rests.Reach overhead and grasp the Iso-Grip™ handles witha light grip. See FIG. 4.
Adjusting the Ab Lounge® XL Equipmentfor Your BodyThe unit is easy to adjust, and allows a comfortable fitfor almost any body size.
To adjust the foot rest, grasp the adjustment knob onthe under side of the foot rest receiver. Pull the pin outand slide the foot rest closer to or further away from theseat. Replace the pin into one of the holes in the footrest. Make sure the pin is secured before placing thefeet on the foot rest. See FIG. 5. The foot rest should beadjusted to a point where the knees are bent about 90degrees, or at a right angle, when the feet are restingon the foot rest. See FIG. 6.
To Get Out Of Your Ab Lounge® XLEquipmentRelease the hands from the Iso-Grip™ handles and lean forward until you are sitting upright. Lower the feetone at a time until they are flat on the floor. Stand upslowly, using the handlebars on the sides of the unit, and carefully step back over the bar to one side of the unit.
FIG. 6
FIG. 1
-------- 16 --------
2. Oblique Jackknife
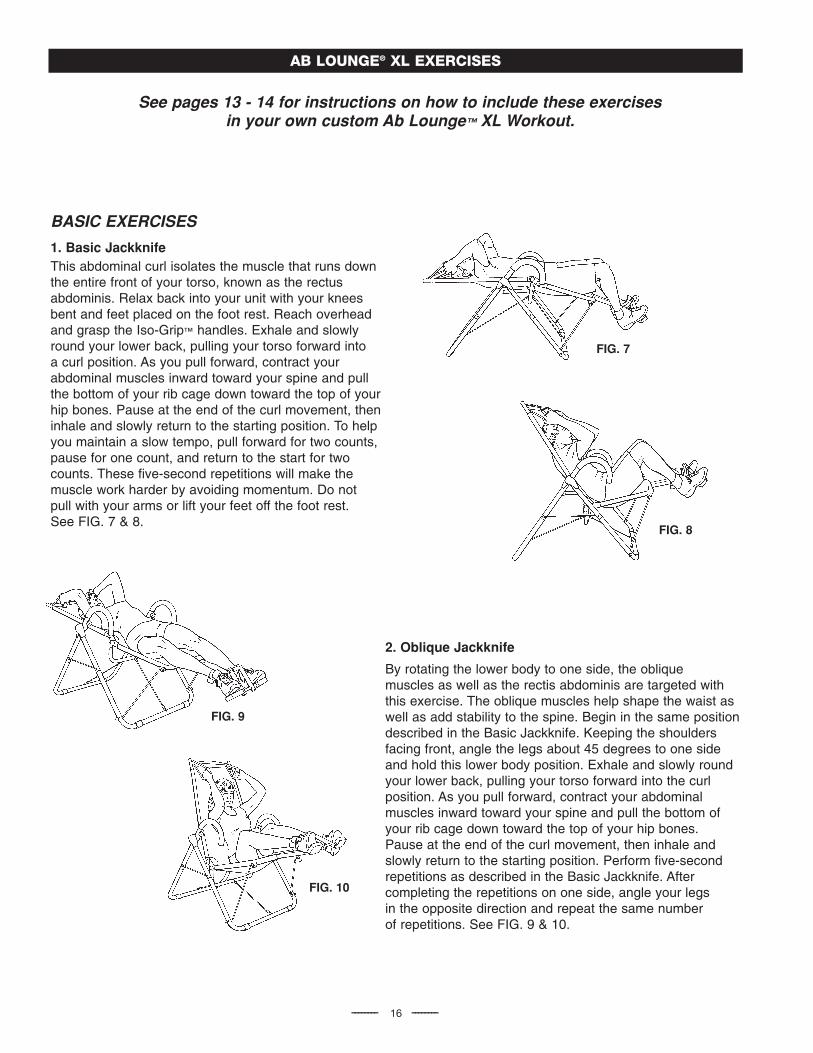
By rotating the lower body to one side, the oblique muscles as well as the rectis abdominis are targeted withthis exercise. The oblique muscles help shape the waist aswell as add stability to the spine. Begin in the same positiondescribed in the Basic Jackknife. Keeping the shoulders facing front, angle the legs about 45 degrees to one sideand hold this lower body position. Exhale and slowly roundyour lower back, pulling your torso forward into the curl position. As you pull forward, contract your abdominal muscles inward toward your spine and pull the bottom ofyour rib cage down toward the top of your hip bones. Pause at the end of the curl movement, then inhale andslowly return to the starting position. Perform five-secondrepetitions as described in the Basic Jackknife. After completing the repetitions on one side, angle your legs in the opposite direction and repeat the same number of repetitions. See FIG. 9 & 10.
FIG. 9
FIG. 10
AB LOUNGE® XL EXERCISES
FIG. 7
FIG. 8
See pages 13 - 14 for instructions on how to include these exercises in your own custom Ab Lounge™ XL Workout.
BASIC EXERCISES
1. Basic JackknifeThis abdominal curl isolates the muscle that runs downthe entire front of your torso, known as the rectus abdominis. Relax back into your unit with your kneesbent and feet placed on the foot rest. Reach overheadand grasp the Iso-Grip™ handles. Exhale and slowlyround your lower back, pulling your torso forward into a curl position. As you pull forward, contract your abdominal muscles inward toward your spine and pullthe bottom of your rib cage down toward the top of yourhip bones. Pause at the end of the curl movement, theninhale and slowly return to the starting position. To helpyou maintain a slow tempo, pull forward for two counts,pause for one count, and return to the start for twocounts. These five-second repetitions will make the muscle work harder by avoiding momentum. Do not pull with your arms or lift your feet off the foot rest. See FIG. 7 & 8.

-------- 17 --------
5. Extended Leg Jackknife
This exercise targets the rectus abdominis and,like the Extended Arm Jackknife, is a little higherintensity than the Basic Jackknife. Begin in thesame position described in the Basic Jackknife.Then, straighten both legs, resting the ankles orcalves on the foot rest. Exhale and slowly roundyour lower back, pulling your torso forward into acurl position. As you pull forward, contract yourabdominal muscles inward toward your spineand pull the bottom of your rib cage downtoward the top of your hip bones. Pause at theend of the curl movement, then inhale and slow-ly return to the starting position. Perform five-second repetitions as described in the BasicJackknife. Do not pull with the arms or lift thelegs as you Jackknife. See FIG. 15 & 16.
FIG. 15
FIG. 16
FIG. 11
FIG. 12
4. Extended Arm Jackknife
This exercise targets the rectus abdominis, and isa little higher intensity than the Basic Jackknife.Begin in the same position described in the BasicJackknife. Then, straighten both arms until theforearms are behind the Focus Strap™. Exhale andslowly round your lower back, pulling your torsoforward into a curl position. As you pull forward,contract your abdominal muscles inward towardyour spine and pull the bottom of your rib cagedown toward the top of your hip bones. Pause atthe end of the curl movement, then inhale andslowly return to the starting position. Perform five-second repetitions as described in the BasicJackknife. Do not lift your legs as you crunch.See FIG. 13 & 14.
FIG. 13
FIG. 14
3. Jackknife With Leg Lift
This exercise targets the rectus abdominis as well asthe hip flexor muscles of the lifting leg. Begin in thesame position described in the Basic Jackknife. Exhaleand slowly round your lower back, pulling your torsoforward into a curl position. Simultaneously, lift one legand pull the knee up and toward the chest. Pause atone end of the curl movement, then inhale and slowlyreturn the leg and torso to the starting position. Repeatthe Jackknife, lifting the opposite leg. Alternate legswith each Jackknife. Perform five-second repetitions asdescribed in the Basic Jackknife. Do not pull with yourarms as you Jackknife and lift the leg. See FIG. 11 & 12.
-------- 18 --------
BONUS EXERCISES
7. Advanced Jackknife
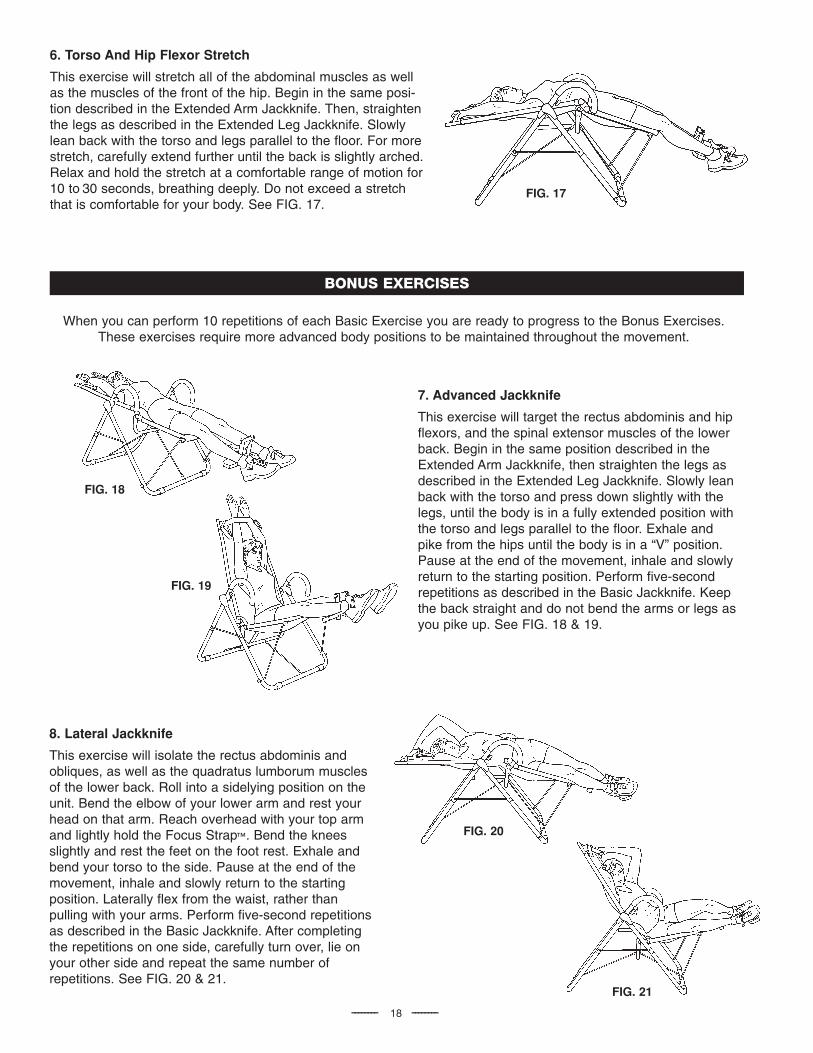
This exercise will target the rectus abdominis and hipflexors, and the spinal extensor muscles of the lowerback. Begin in the same position described in theExtended Arm Jackknife, then straighten the legs asdescribed in the Extended Leg Jackknife. Slowly leanback with the torso and press down slightly with thelegs, until the body is in a fully extended position withthe torso and legs parallel to the floor. Exhale andpike from the hips until the body is in a “V” position.Pause at the end of the movement, inhale and slowlyreturn to the starting position. Perform five-secondrepetitions as described in the Basic Jackknife. Keepthe back straight and do not bend the arms or legs asyou pike up. See FIG. 18 & 19.
When you can perform 10 repetitions of each Basic Exercise you are ready to progress to the Bonus Exercises.These exercises require more advanced body positions to be maintained throughout the movement.
FIG. 18
FIG. 19
8. Lateral Jackknife
This exercise will isolate the rectus abdominis andobliques, as well as the quadratus lumborum musclesof the lower back. Roll into a sidelying position on theunit. Bend the elbow of your lower arm and rest yourhead on that arm. Reach overhead with your top armand lightly hold the Focus Strap™. Bend the kneesslightly and rest the feet on the foot rest. Exhale andbend your torso to the side. Pause at the end of themovement, inhale and slowly return to the startingposition. Laterally flex from the waist, rather thanpulling with your arms. Perform five-second repetitionsas described in the Basic Jackknife. After completingthe repetitions on one side, carefully turn over, lie onyour other side and repeat the same number of repetitions. See FIG. 20 & 21.
FIG. 20
FIG. 21
6. Torso And Hip Flexor Stretch
This exercise will stretch all of the abdominal muscles as wellas the muscles of the front of the hip. Begin in the same posi-tion described in the Extended Arm Jackknife. Then, straightenthe legs as described in the Extended Leg Jackknife. Slowlylean back with the torso and legs parallel to the floor. For morestretch, carefully extend further until the back is slightly arched.Relax and hold the stretch at a comfortable range of motion for10 to 30 seconds, breathing deeply. Do not exceed a stretchthat is comfortable for your body. See FIG. 17.
FIG. 17
-------- 19 --------
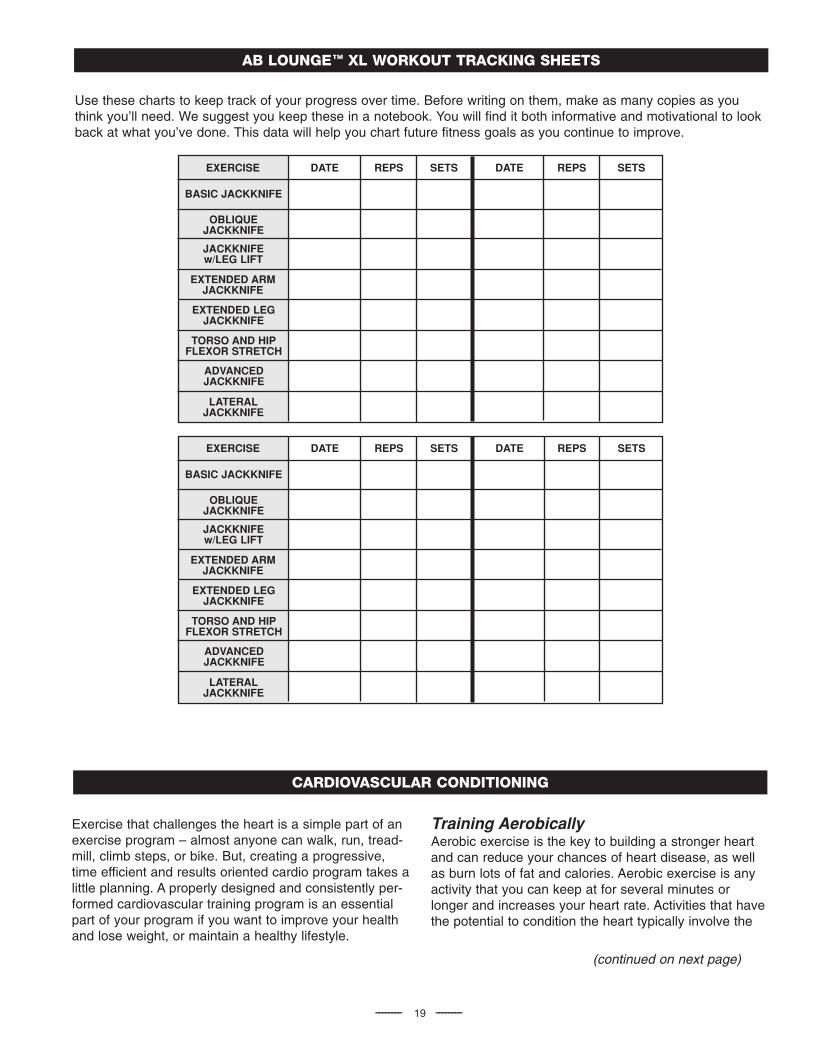
EXERCISE DATE REPS SETS DATE REPS SETS
BASIC JACKKNIFE
OBLIQUEJACKKNIFE
JACKKNIFEw/LEG LIFT
EXTENDED ARM JACKKNIFE
EXTENDED LEG JACKKNIFE
TORSO AND HIPFLEXOR STRETCH
ADVANCEDJACKKNIFE
LATERALJACKKNIFE
EXERCISE DATE REPS SETS DATE REPS SETS
BASIC JACKKNIFE
OBLIQUEJACKKNIFE
JACKKNIFEw/LEG LIFT
EXTENDED ARM JACKKNIFE
EXTENDED LEG JACKKNIFE
TORSO AND HIPFLEXOR STRETCH
ADVANCEDJACKKNIFE
LATERALJACKKNIFE
Use these charts to keep track of your progress over time. Before writing on them, make as many copies as youthink you’ll need. We suggest you keep these in a notebook. You will find it both informative and motivational to lookback at what you’ve done. This data will help you chart future fitness goals as you continue to improve.
AB LOUNGE™ XL WORKOUT TRACKING SHEETS
CARDIOVASCULAR CONDITIONING
Exercise that challenges the heart is a simple part of anexercise program – almost anyone can walk, run, tread-mill, climb steps, or bike. But, creating a progressive,time efficient and results oriented cardio program takes alittle planning. A properly designed and consistently per-formed cardiovascular training program is an essentialpart of your program if you want to improve your healthand lose weight, or maintain a healthy lifestyle.
Training AerobicallyAerobic exercise is the key to building a stronger heartand can reduce your chances of heart disease, as wellas burn lots of fat and calories. Aerobic exercise is anyactivity that you can keep at for several minutes orlonger and increases your heart rate. Activities that havethe potential to condition the heart typically involve the
(continued on next page)
-------- 20 --------
large muscles of the hips, thighs, and buttocks.Examples include walking, hiking, jogging, running,cycling, in-line skating, swimming, cross-country skiing,and stair stepping.
Benefits of Aerobic TrainingHealth benefits of aerobic exercise include the following:
1. A stronger and healthier heart.
2. Increased HDL. This “good” cholesterol helps keepyour arteries unplugged and healthy.
3. Decreased total cholesterol. This is the debris inyour blood that can clog your arteries.
4. Reduced blood pressure. Even moderate exercisecan help.
5. Reduced risk for heart attack and stroke.
6. Decreased body fat and an ability to help you reach your desirable weight. You’ll become a betterfat-burner and burn a lot of calories every session.
7. Decreased risk for diabetes.
8. Reduced feelings of anxiety, tension, and depression.
9. Improved sleep.
10. Higher levels of energy. Efficient delivery and useof blood and oxygen is the key to increased vigorand performance.
Warming Up And Cooling Down Warming up and cooling down are essential to a balanced and safe exercise program. A proper warm-up and cool-down can:
• Make your workouts safe and easier to do,
• Limit the risk of unnecessary stress on your heart,
• Get you ready for your activity,
• Improve your stamina and endurance (you won’t tire as quickly),
• Decrease your risk for injury,
• Increase enjoyment of your workouts, and
• Help you stick with your health and fitness program.
Warm-Up
To prevent injury and maximize performance, we recommend that each workout period should start with a warm-up. Your warm-up should gently prepare yourmuscles for the coming exertion. Start by doing 5 to 10minutes of gentle exercise that gradually increases yourheart rate and loosens up your muscles. Your warm-upexercise should be aerobic in nature and only require aneasy, unforced range of motion. This should be followedby 5 to 10 minutes of stretching. Refer to the stretchesfound on pages 11 and 12 of this manual. Never pushyourself beyond a point of gentle tension or strain. Keep your movements gentle, rhythmic and controlled.
Cool Down and Stretching
Your workout should be followed by a cool down. Thecool down should consist of 5 to 10 minutes of slowwalking followed by stretching. Refer to the stretchesfound on pages 11 and 12 of this manual. Never pushyourself beyond a point of gentle tension or strain. Keep your movements gentle, rhythmic and controlled.
How Often, How Long, and How Hard
The choices you make about the frequency (how often),duration (how long), and intensity (how hard) at whichyou will train, will directly influence your training results.
How often. If you want to see serious improvements inyour fitness, lose weight and develop a good trainingbase, you need to do cardio workouts three to six timesper week.
If you are just starting a program or out of shape, don’tlet these recommendations discourage or mislead you.Realize that doing cardio training two to three times perweek will still result in significant fitness improvementand health benefits. Your long-term goal is to build up toexercising your heart on most days of the week.
How long. How long you work out depends on your current level of fitness. Again, if you’re just starting aprogram or out of shape, don’t follow strict textbook recommendations. Instead, start with 5 to 10 minutesonce or twice per day. You will see significant fitnessimprovement. Your long-term goal is to build to a duration of 30 to 60 minutes of cardiovascular activity on most days of the week.
How hard. Aerobic intensity guidelines for healthy adultsare generally set at 40 to 85 percent of heart rate. But, ifyou’re out of shape, remember that moderate to lowlevel and consistent cardiovascular training – well belowthe standard recommendations set forth – can result insubstantial and beneficial effects to your health and cangreatly improve cardiovascular endurance.
You can use the following calculation to determine whatpercentage of your heart rate you are working at:
% heart rate = (220 - age) x %.
Using this calculation, a 70% heart rate for a 40 year oldwould be (220 - 40) x 70% or 126. Thus, this individualwould need to reach 126 beats per minute to equal a70% heart rate.
Refer to the “Measuring Your Heart Rate” section onpage 10 of this manual for information on how to measure your heart rate.
The above are guidelines, people with any medical limitations should discuss this formula with their physician.

-------- 21 --------
WEEK HOW OFTEN(times per week)
HOW HARD(% heart rate)
HOW LONG(minutes)
HOW HARD(RPE)* RPE DESCRIPTIVE RATING
1
2
3
4
5
6
2 - 3
2 - 3
2 - 3
2 - 3
3
3 - 4
2 - 4
2 - 4
2 - 4
2 - 4
2 - 4
2 - 4
Somewhat easy to somewhat hard
Somewhat easy to somewhat hard
Somewhat easy to somewhat hard
Somewhat easy to somewhat hard
Somewhat easy to somewhat hard
Somewhat easy to somewhat hard
5 - 15
5 - 15
10 - 17
10 - 17
15 - 20
15 - 20
40 - 50
40 - 50
40 - 50
50 - 60
50 - 60
50 - 60
PROGRESSIVE CARDIOVASCULAR TRAINING PROGRAM
The training program that follows is a progressive training program for cardiovascular conditioning. It can be used for any aerobic activity you choose. But remember, these are only guidelines.
People with medical conditions should discuss this training program with their physician.
MOVINGBEYOND
BASE-LEVELFITNESS
CONDITIONINGBASE
MAINTENANCE
*RPE = rating of perceived exertion; this means you match up a numerical rating (RPE) of 1-10, with how youfeel (RPE descriptive rating in chart above). A rating of 2 -3 is equal to a warm-up or recovery level of effort; 4 -5equates to moderate to somewhat challenging; 6 -10 represents effort that is somewhat hard, to very hard.
Smart ProgressionIn regard to progressing to a higher intensity level,longer duration, or more frequent sessions, it makesgood sense to change only one of these elements at a time. You run a higher risk of overuse injury if yousimultaneously increase more than one of these elements. A conservative yet effective guideline is toincrease intensity or duration by no more than about 5 percent. You should adapt to this increase over a period of a week or two, and then consider changingone of the other variables (frequency, duration or intensity) or further progressing the one you’ve adapted to.
Top Aerobic ExerciseNo one cardiovascular activity is better than another!Manipulating how hard (intensity), how often (duration),and how long (frequency) you participate in a particularaerobic activity determines its effectiveness or lackthereof. And of course, you have to like what you’redoing. Choose the type of aerobic activity that is right foryou by identifying one or more types of cardio exercisethat you can see yourself sticking to, and enjoying, for the rest of your life. Often, the best aerobic exercisewill be not one, but several activities that are fun andfeel good to your body. Excellent cardiovascular activitiesinclude, but are not limited to, walking, swimming, waterfitness, jogging, running, cross-country skiing, in-lineskating, lateral movement training (slide), cycling, mountain biking, and step training.
WEEK HOW OFTEN(times per week)
HOW HARD(% heart rate)
HOW LONG(minutes)
HOW HARD(RPE)* RPE DESCRIPTIVE RATING
7 - 9
10 - 13
14 - 16
17 - 19
20 - 23
24 - 27
3 - 4
3 - 4
3 - 4
3 - 5
3 - 5
3 - 6
3 - 4
4 - 5
4 - 5
4 - 5
4 - 5
4 - 5
Moderate to somewhat hard
Somewhat hard to hard
Somewhat hard to hard
Somewhat hard to hard
Somewhat hard to hard
Somewhat hard to hard
20 - 25
21 - 25
26 - 30
26 - 30
31 - 35
31 - 35
60 - 65
65 - 70
65 - 70
70 - 75
70 - 75
70 - 75
WEEK HOW OFTEN(times per week)
HOW HARD(% heart rate)
HOW LONG(minutes)
HOW HARD(RPE)* RPE DESCRIPTIVE RATING
After 4-6months 3 - 6 3 - 6 Easy - Moderate to somewhat hard30 - 60 40 - 85

-------- 22 --------
CARDIO WORKOUT TRACKING SHEETS
ACTIVITY DATE HOW LONG(minutes) HEART RATE HOW HARD
(RPE)*
Use these charts to keep track of your progress over time. Before writing on them, make as many copies as youthink you’ll need. We suggest you keep these in a notebook. You will find it both informative and motivational tolook back at what you’ve done. This data will help you chart future fitness goals as you continue to improve.
*RPE = rating of perceived exertion; this means you match up a numerical rating (RPE) of 1-10, with how you feel(RPE descriptive rating in chart above). A rating of 2 -3 is equal to a warm-up or recovery level of effort; 4 -5equates to moderate to somewhat challenging; 6 -10 represents effort that is somewhat hard, to very hard.
ACTIVITY DATE HOW LONG(minutes) HEART RATE HOW HARD
(RPE)*

-------- 23 --------
Using Healthy Eating Choices
JUMPSTARTDIET
Table of Contents
Introduction . . . . . . . . . . . . . . . . . . . . . . . . . 24
The Jump Start Diet . . . . . . . . . . . . . . . . . . . 24
Breakfast Choices . . . . . . . . . . . . . . . . . . . . 25
Morning Snack . . . . . . . . . . . . . . . . . . . . . . . 25
Lunch . . . . . . . . . . . . . . . . . . . . . . . . . . . . . . 26
Afternoon Snack . . . . . . . . . . . . . . . . . . . . . . 26
Dinner . . . . . . . . . . . . . . . . . . . . . . . . . . . 26-27
Evening Snack . . . . . . . . . . . . . . . . . . . . . . . 28
-------- 24 --------
JUMP START DIET
The Jump Start DietThis 2-week menu plan is based on 1200 to 1300 calories. We have con-sciously used real food and have even put in some foods often thought ofas "off limits" when trying to lose weight. The plan is nutritionally sound andoffers a variety of foods from all food categories. You may substitute onefood within a food group for another, such as a pear for an apple or 3 oz. of chicken for 3 oz. lean beef. The most important thing to remember is topay attention to portion sizes. When it says 1 cup, you need to measure out 1 cup, etc.
The plan is extremely simple to follow. Simply pick one selection for eachmeal as your day goes along. Note that your lunch will consist of a LeanCuisine® meal. This is done so that you have a realistic option to eat atwork or on the go. (If you don't find Lean Cuisine® meals at your local grocer, other options are Healthy Choice® and Weight Watchers® lunches.)
We have also built in a special treat at the end of most days. This isbecause people have the biggest success when they are allowed to havesome of their favorite foods. They do not feel deprived and are not temptedto binge. Success comes because they are able to stick with the plan, loseweight and meet their goals without feeling like they were "on a diet". Theimportant thing to remember is to use only the portion size given, do not goback for more or guess on your portion size.
If you do not wish to eat the snack after your evening meal, or feel that youcannot limit your portion size, it can be omitted.
Foods and condiments that can be used without adding significant caloriesinclude:
• Non-caloric beverages, this includes diet carbonated drinks• Fat free condiments such as mustard, ketchup and vinegar • Seasonings such as onion, garlic and herbs• Artificial sweeteners• Coffee, tea and herbal teas
IntroductionThis program is designed to "jump start" you on your way to better healthand fitness. In just 2 weeks, just 14 short days, you will begin to form habitsto help you reach your fitness goals faster and easier than ever before.
-------- 25 --------
JUMP START DIET
MORNING SNACK (CHOOSE JUST ONE OPTION)
8 oz. water1 cup fat free yogurt
8 oz. water1 cup sugar free hot chocolate
made with skim milk
8 oz. water1 pear
8 oz. water1 orange
8 oz. water1 apple
8 oz. water1 cereal bar (about 140 calories)
8 oz. water1 kiwi
8 oz. water1/2 cup oatmeal, cooked1 cup skim milk
1/2 banana8 oz. water2 pancakes (4 inches across)1 Tbsp. maple syrup1/2 cup orange juice
8 oz. water1 slice french toast1/2 cup fresh blueberries1 cup skim milk
8 oz. water1/2 english muffin1 egg poached1/2 cup fruit juice
8 oz. water1 slice whole grain bread1 egg scrambled 1 cup cubed melon
8 oz. water1 cup fat free yogurt1/3 cup low fat granola cereal1 cup sliced strawberries
8 oz. water3/4 cup cereal 1 cup skim milk1/2 cup sliced strawberries
8 oz. water3/4 cup cereal and 2 Tbsp.
crushed walnuts1/2 cup skim milk4 oz. orange juice
8 oz. water1 slice whole grain bread1 egg scrambled or poached4 oz. orange juice
8 oz. water1 slice cinnamon bread1 tsp. butter4 oz. orange juice
BREAKFAST CHOICES (CHOOSE JUST ONE OPTION)

-------- 26 --------
DINNER (CHOOSE JUST ONE OPTION)
8 oz. water3 oz. sirloin steak, lean only, broiled or grilled
without added fat1/2 cup rice with 1 tsp. butter 1/2 cup cooked carrots1 large mixed green salad with1 Tbsp. reduced fat dressing
8 oz. water3 oz. baked ham1 cup noodles1 tsp. butter 2 cups applesauce1 cup mixed vegetables
8 oz. water3 oz. steak, (lean only) broiled or baked1 cup noodles with 1 tsp. butter1/2 cup applesauce1 cup mixed vegetables
8 oz. watersalad with romaine lettuce 1/4 cup mandarin oranges1/4 cup sliced strawberries2 Tbsp. chopped walnuts1 Tbsp. raspberry vinaigrette dressing3 oz. white meat chicken1 oz. crumbled feta cheese
8 oz. water1 cup cooked pasta1/2 cup spaghetti sauce1 tsp. grated cheese3 oz. lean ground beef in sauce
8 oz. water1 cup angel hair pasta1 clove garlic topped with green and red peppers
sautéed with 1 Tbsp. olive oil 3 oz. grilled shrimp 1 tsp. grated cheese
AFTERNOON SNACK (CHOOSE JUST ONE OPTION)
8 oz. water1 cup strawberries
8 oz. water1 oz. low fat cheese6 saltine crackers
8 oz. water1 banana
8 oz. water1 cup low fat, flavored yogurt with1 Tbsp. low fat granola cereal on top
8 oz. water1 tsp. peanut butter6 saltine crackers1 apple
8 oz. water1 cup low fat chocolate milk
8 oz. water1 cup vegetable soup6 crackers
8 oz. water3 cups light popcorn
8 oz. water15 grapes
8 oz. water1 cereal bar (about 140 calories)
JUMP START DIET
LUNCHChoose a Lean Cuisine® meal of your choice! (If you have difficultyfinding Lean Cuisine® meals at your local grocer, another option is meals from Healthy Choice® or Weight Watchers®.)
YOGURT

-------- 28 --------
1/2 cup chocolate or vanilla pudding made with skim milk
hot chocolate made with skim milk
8 oz. water5 ginger snaps or vanilla wafers
8 oz. water3 small mint patties or
3 Hershey’s Miniatures®
3 cups light microwave popcorn
2 small cookies (about 50 calories each)8 oz. water
1 oz. pretzels1 cup skim milk
8 oz. water 2 tsp. peanut butter 6 crackers1 cup skim milk
1/2 cup cereal1/2 skim milk8 oz. water
EVENING SNACK(CHOOSE JUST ONE OPTION)
RULES for eating your evening snack:Have it in a relaxed setting where you can enjoy them as a child would.
Do nothing while having your snack, do not read, write or watch TV.Make your snack last 20 minutes.
DO NOT go back for seconds.
JUMP START DIET
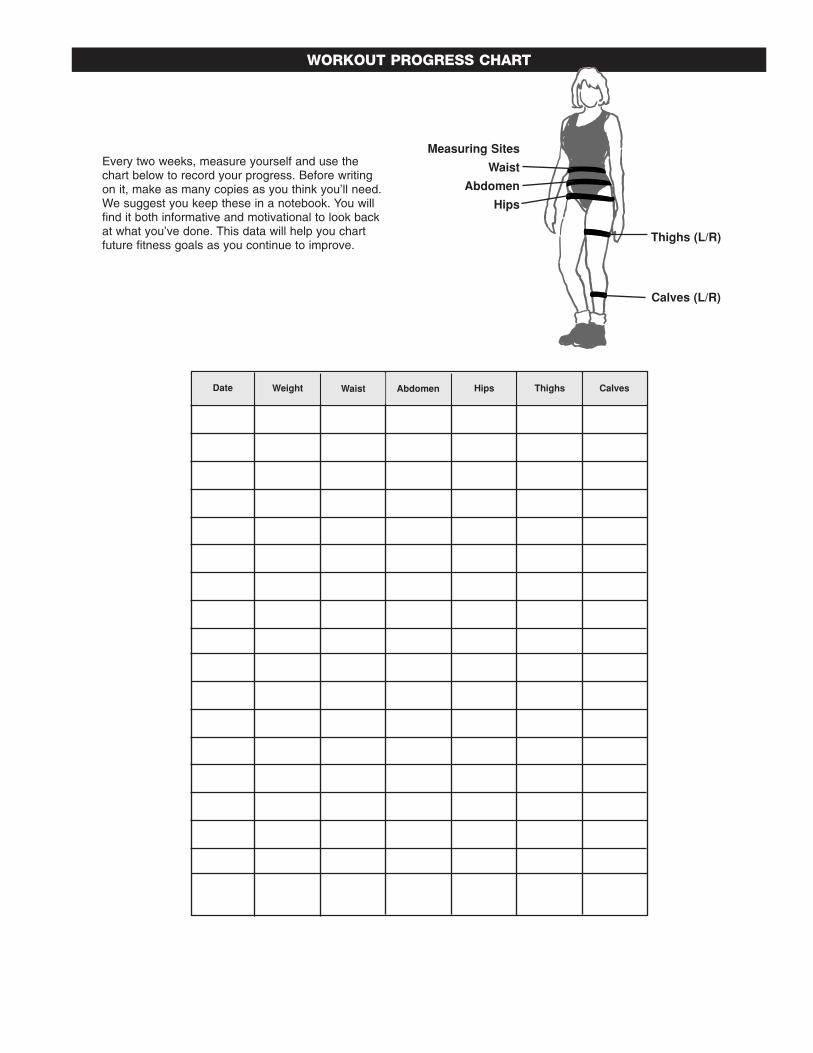
WORKOUT PROGRESS CHART
Every two weeks, measure yourself and use thechart below to record your progress. Before writingon it, make as many copies as you think you’ll need.We suggest you keep these in a notebook. You willfind it both informative and motivational to look backat what you’ve done. This data will help you chartfuture fitness goals as you continue to improve.
CalvesThighsHipsAbdomenWaistWeightDate
Measuring Sites
Waist
Abdomen
Hips
Thighs (L/R)
Calves (L/R)

®
We warrant this product to be free from all defects in material and workmanship when used
according to the manufacturer’s instructions. See Limited Warranty Card for details.
Save your sales receipt.
(You may wish to staple it into this manual.)
Dedication to Quality
10/17/05