owner’s manual - bowtech archery€¦ · 1 thank you congratulations on being the proud new owner...
TRANSCRIPT

C O C K L O A D S Q U E E Z E G A M E O V E R>> >> >>
OWNER’S MANUAL
1
THANK YOU Congratulations on being the proud new owner of the Stryker Crossbow. The Stryker Crossbow is designed to be a safe and fun product. However, as with any shooting sports product, safety rules must be observed. Before using your new Stryker Crossbow, read and understand the material outlined in this manual. Failure to follow any of these warnings and instructions can damage the crossbow and may cause serious injury to yourself and/or others.
Keep the owner’s manual in a safe place for future reference. If you have any questions, please call 888-689-1289.
TABLE OF CONTENTS
WARNINGS AND PRECAUTIONS
Warnings and Precautions . . .1-2Installing the Scope . . . . . . . . . 2Parts List . . . . . . . . . . . . . . . . . . 3Exploded View . . . . . . . . . . . . . 3Sighting the Scope . . . . . . . . . . 4Loading a Bolt . . . . . . . . . . . . . 4Firing the Stryker . . . . . . . . . .4-5De-Cocking the Stryker . . . . . . 5Limited Lifetime Warranty . . .5-6 Exclusions . . . . . . . . . . . . . . 5
Turnaround Time . . . . . . . . . 5 Warranty Service . . . . . . . . . 5 Disclaimer of Liability . . . . . 6String and Cables . . . . . . . . . . . 6 String Replacement . . . . . .6-7 Care of String and Cables . . 7Crossbow Maintenance & Troubleshooting . . . . . . . . . . 7Notes . . . . . . . . . . . . . . . . . . . . 8Purchase Records . . . . . . . . . . . 8
ADULT SUPERvISION REqUIREDADULT SUPERVISION OF ALL CHILDREN UNDER THE AGE
OF 18 IS REQUIRED . THE STRYKER CROSSBOW IS NOT RECOM- MENDED FOR CHILDREN UNDER TWELVE (12) YEARS OF AGE .
Your new Stryker Crossbow is a highly tuned, precise shooting machine. It requires special care and handling to achieve and maintain peak performance. The string, cables, and limbs are under extreme tension, which create an incredible source of energy that must not be taken for granted. Please respect this power and use it properly.
1. Never allow your fingers or thumb to extend above the flight rail or into the release path of the string and cables . Doing so will cause personal injury upon firing the crossbow . Always keep fingers firmly on the stock forearm below the protective flange .
2. The Stryker Crossbow is not a toy . Misuse or careless use may result in serious injury or death. For maximum safety and enjoyment, always exercise caution, common sense, and safety rules when shoot-ing any crossbow.
3. Never aim or draw any crossbow in the direction of a person . Aim and draw ONLY in the direction of an appropriate target. ALWAYS have a full view of the path to the target and beyond when shooting.
4. ALWAYS use an appropriate backstop for maximum safety . An appropriate backstop must be constructed of a durable material and must extend beyond the perimeter of the target. The recommended backstop size is determined by the accuracy and ability of the shooter. The lower the level of accuracy, the larger the perimeter required.
5. Never play with your Stryker Crossbow . It is a potentially dan-gerous weapon that can cause serious harm or death.
2
6. Never rely on a “safety” to protect you from unsafe handling . A safety is a mechanical device, not a substitute for common sense and good safety procedures.
7. Never leave a Stryker Crossbow unattended or where it could fail and fire.
8. Check your target and beyond your target. Be sure all persons are well clear of the target area before you shoot. Check behind and beyond your target to be certain you have a safe backstop and that no person or property could be endangered.
9. Always inspect bolts and fletching prior to shooting for imperfec-tions such as cracks, splits, or splinters. Damaged bolts must not be used and should be destroyed.
10. Never retrieve bolts or allow anyone else to do so until all bolts have been shot.
11. Never remove the foot stirrup .
12. Learn how to handle, load, unload, operate, fire and care for your Stryker Crossbow.
13. Keep your finger off the trigger until you are actually aiming at the target and ready to shoot.
14. Avoid ricochet. Never shoot at a flat hard surface or at the surface of water. Bolts can ricochet off of water just like a skipped rock.
15. Keep the rail clear. Never let anything obstruct the rail of your crossbow.
16. Store the crossbow and bolts separately beyond the reach of children. Make sure the crossbow and bolts are locked and secured so children and untrained individuals will be denied access.
17. Lead-off shots should be taken at closer ranges until the shooter is more accurate and comfortable at longer distances.
18. Do not attach anything to the cables or string that could cause them to wear or become cut. This will void the warranty.
19. Do not, under any circumstances, change a cam bearing yourself. Any resulting damage would void the warranty. See an Authorized Stryker Dealer for proper repair and/or replacement.
INSTALLING THE SCOPEThe Stryker Crossbow comes preassembled except for the targeting scope. Follow these steps to correctly mount the scope to your cross-bow:
1. Position the scope (7) on top of the crossbow’s elevated scope mount rail so the screw holes from the scope are aligned with the holes on the rail.
2. Using manual pressure, tighten the two thumbscrews from the scope to secure the scope to the rail.
WARNINGS AND PRECAUTIONS CONT.

3
4
1
8
13
18
16
17
19
15
1211
10
21
5
6
9
14
2
22
7 24
23
20
3
STRYKER PARTS LIST
1 . Riser
2 . Cams
3 . Split Limbs
4 . Foot Stirrup
5 . Cables
6 . String
7 . Scope
8 . Weaver Mount Rail
9 . Foregrip
10 . Rail
11 . String Carrier & Hook
12 . Bolt Hold Down Spring
13 . Bolt Sensor
14 . Trigger
15 . Thumb Pawl
16 . Safety Button
17 . Stock
18 . Crank Handle
19 . Crank Handle Ports
20 . Cheek Plate
21 . Harnessed String Changer
22 . Press Pulley
23 . Cable Rollers
24 . Fail Safe Jam
4
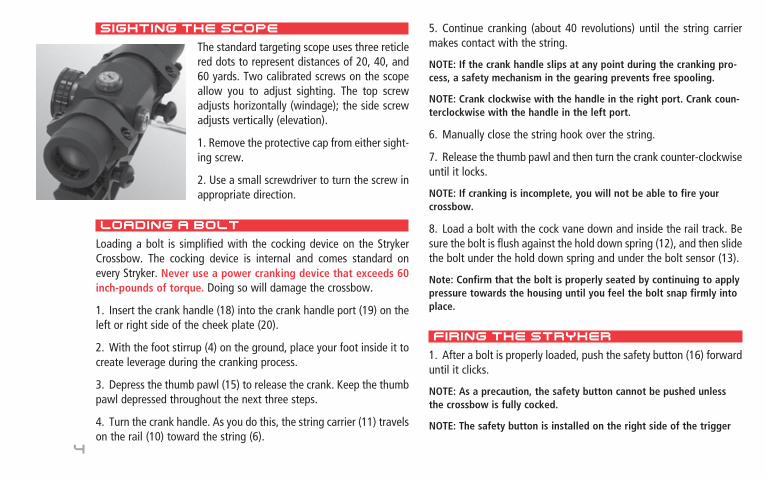
SIGHTING THE SCOPEThe standard targeting scope uses three reticle red dots to represent distances of 20, 40, and 60 yards. Two calibrated screws on the scope allow you to adjust sighting. The top screw adjusts horizontally (windage); the side screw adjusts vertically (elevation).
1. Remove the protective cap from either sight-ing screw.
2. Use a small screwdriver to turn the screw in appropriate direction.
LOADING A BOLTLoading a bolt is simplified with the cocking device on the Stryker Crossbow. The cocking device is internal and comes standard on every Stryker. Never use a power cranking device that exceeds 60 inch-pounds of torque . Doing so will damage the crossbow.
1. Insert the crank handle (18) into the crank handle port (19) on the left or right side of the cheek plate (20).
2. With the foot stirrup (4) on the ground, place your foot inside it to create leverage during the cranking process.
3. Depress the thumb pawl (15) to release the crank. Keep the thumb pawl depressed throughout the next three steps.
4. Turn the crank handle. As you do this, the string carrier (11) travels on the rail (10) toward the string (6).
5. Continue cranking (about 40 revolutions) until the string carrier makes contact with the string.
NOTE: If the crank handle slips at any point during the cranking pro-cess, a safety mechanism in the gearing prevents free spooling .
NOTE: Crank clockwise with the handle in the right port . Crank coun-terclockwise with the handle in the left port .
6. Manually close the string hook over the string.
7. Release the thumb pawl and then turn the crank counter-clockwise until it locks.
NOTE: If cranking is incomplete, you will not be able to fire your crossbow .
8. Load a bolt with the cock vane down and inside the rail track. Be sure the bolt is flush against the hold down spring (12), and then slide the bolt under the hold down spring and under the bolt sensor (13).
Note: Confirm that the bolt is properly seated by continuing to apply pressure towards the housing until you feel the bolt snap firmly into place .
FIRING THE STRYKER1. After a bolt is properly loaded, push the safety button (16) forward until it clicks.
NOTE: As a precaution, the safety button cannot be pushed unless the crossbow is fully cocked .
NOTE: The safety button is installed on the right side of the trigger

5
housing plate at the factory . If you prefer, it can be unscrewed and mounted on to the left side of the trigger housing plate .
2. You are now ready to fire.
DE-COCKING THE STRYKERYou can safely de-cock your crossbow after full draw with a loaded bolt.
1. Remove the bolt . This moves the bolt sensor, which automatically reengages the safety.
2. Depress the thumb pawl and keep it depressed throughout the next step.
3. Turn the crank handle until the string is fully de-cocked.
LImITED LIFETImE WARRANTYStryker warrants the Stryker Crossbow with a Limited Lifetime Warranty to the original owner with the following exclusions.
ExCLUSIONSOriginal Owner . Warranty applies to the original owner only and is non-transferable.
Components Not Covered . Cables, strings, wheel bushings, bear-ings, anodized and/or pattern finishes are not included in warranty.
Damage Not Covered . Damage caused by abuse, mishandling, dry-firing, alteration or modification to original product, may render the warranty void.
Warranty Card . For the Warranty to be in effect, the Warranty card must be completed and properly returned to Stryker, with a copy of the purchase receipt, within 30 days of purchase.
Authorized Dealer . The Warranty covers only Stryker Crossbows purchased from Authorized Dealers. Contact Stryker to confirm that the person you are buying from is an authorized dealer.
TURNAROUND TImEOur goal at Stryker with all warranty returns is to have the returned product out the door and shipped on it’s way back to you within 72 hours of receiving it at our facility. You are our greatest asset and we will give you the highest quality, most efficient service in the industry.
WARRANTY SERvICEAll products returned for warranty service should be returned to the dealer first for inspection and determination of any problem. Your authorized dealer representative will help you determine if factory service is required or if they can repair the problem. The Stryker owner is responsible for the freight to Stryker, and Stryker will in turn, pay for the return freight of the repaired product. In the event that a crossbow must be returned for factory service, a Return Authorization (RA) number must first be obtained through your authorized dealer.
Crossbows returned to the factory without an RA number will be refused . All crossbows must include the following:
>> A large, readable RA number on the outside of the box.
>> A copy of the original sales receipt.
>> Must be sent freight prepaid. No COD shipments will be accepted.
6
LImITED LIFETImE WARRANTY CONT.
>> Do not include accessories unless otherwise instructed. Stryker will not be responsible for loss or damage to any accessory left on the crossbow when shipped.
>> All methods of shipping by UPS or Federal Express only. Sender should insure all shipments.
>> If your crossbow cannot be repaired, we reserve the right to replace your crossbow with a newer model.
>> Stryker reserves the right to make parts substitutions on warranty coverage at Stryker’s sole discretion and for any reason.
Any alteration from the factory specifications or the adjustments outlined herein will void the factory warranty . ALL maintenance
must be performed at an Authorized Stryker Dealer .
DISCLAImER OF LIABILITYBy accepting a Stryker product, buyer agrees to hold harmless Stryker and all associated parties from liability for any damage to persons or property, which may result, for any reason, from the use of this product.
If you have any questions about the safety or use of any Stryker product, contact an Authorized Stryker Dealer or call Stryker direct at (541) 888-689-1289.
STRING AND CABLES Your Stryker package includes a new replacement string and a string changing harness. They are manufactured to provide long string life and absolute consistency, shot after shot when properly maintained.
CHECK YOUR STRINGIf the crossbow cannot be safely drawn back and is not shootable due to a worn, cut or frayed string, DO NOT ATTEMPT TO REPLACE THE STRING . Take your crossbow to your Authorized Stryker Dealer
who can perform the replacement in a safe environment .
STRING REPLACEmENT1. Crank the string carrier (11) forward and close the hook over the existing string.
2. Crank the string backwards until it reaches the second screw just behind the bolt hold down spring (12).
3. Attach the harness (21), ensuring the loops are completely around and fully into the groove of the four press pulleys (22). WARNING: Never place your hands through, or into the release path of the string . Your hands should always remain behind or in front of the launch area .
4. Begin cranking the string down.
5. As you notice the transfer of tension from the string to the har-ness, stop cranking and verify that the string changer is holding the tension and the harness loops are still in place. Once verified, continue cranking the string down.
6. The Fail Safe Jam (24) has a hook behind the String Carrier to disengage the String Hook. Pull on the hook to disengage the Fail Safe Jam behind
7
the string hook and the hook will open.
7. Carefully remove the used string. You need to install your new string exactly like the used string you are replacing, so pay attention to the way it is currently installed.
8. Take care not to twist or untwist your new string. Your Stryker string is manufactured to an exact length with a pre-set number of twists for maximum performance.
9. Once you have replaced the string check to ensure that the string and cables are in the appropriate cam grooves and the cables are positioned correctly in the cable rollers (23).
10. Close the string hook over the new string and begin cranking it back. As the tension begins to transfer from the harness to the string, stop and double check that the string and cables are in the cam grooves and the cables are still in the cable rollers. Also, check that the strings and cables are still fully secured to their cam posts.
11. Once the string and cable positions are confirmed, continue cranking the string back to the second screw, past the bolt hold down spring.
12. Remove the string changer with out reaching through the string launching area.
13. Make a final cam track and roller check of the string and cables, then crank the string forward.
WARNING: Never attempt to replace the cables yourself . Consult your Authorized Stryker Dealer who is trained to perform the cable replacement procedure .
CARE OF STRINGS AND CABLESWax the string often. We recommend BCYML 6 synthetic string wax or an equivalent product. To wax the string, apply wax liberally to entire length of string. Rub briskly with fingers until the string appears slick. Remove all excess wax with a clean cloth.
CROSSBOW mAINTENANCE & TROUBLESHOOTING
>> Examine your crossbow for wear and tear before you shoot (axles, bushings, cables, cable slide, e-clips, and string). If any one of these items shows excessive wear, contact your Authorized Stryker Dealer for authorized repair or return authorization (RA) number if necessary. This keeps your crossbow shooting consistently without voiding your warranty.
>> Keep your Stryker in a dry environment and be sure to keep it lubricated. Proper lubrication of the axles, bearings, and chain limits wear and tear. Add enough lubricant to these areas to create a bar-rier between each working part and to optimize the performance of
the crossbow. NOTE: A 10- to 15-weight oil is recommended. DO NOT USE WD-40.
>> Rail lubrication. It is recommended to occasionally apply a light coating of string wax or silicone lube to the top of the flight rail. This will keep your crossbow operating smoothly and free from rust.
>> Any accessories added to the bowstring cause the crossbow to lose speed.
If you need assistance with setting up, tuning, or solving a bolt flight problem, contact your Authorized Stryker Dealer .

8
SERIAL NUmBER:
DATE PURCHASED:
AUTHORIzED DEALER:
Stryker manufacturing90554 HWY 99 N
Eugene, OR 97402877-447-0293
NOTES