owner’s manual - browning crossbows · 6 one tw o keep these safety guidelines in mind during...
TRANSCRIPT

OWNER’S MANUAL

1BROWNINGCROSSBOWS.COM
TABLE OF CONTENTS
Product Introduction ..................................................................................................2
Product Specifications .................................................................................................3
Package Contents ........................................................................................................3
Crossbow Breakdown ..................................................................................................4
Warnings & Safety Guidelines ....................................................................................5
Disassembly/Assembly Instructions ...........................................................................7
Crank Cocking Device Safety Guidelines ................................................................10
Crank Cocking Device Components ...................................................................12
Crank Cocking Device Operation Instructions ..................................................13
Rope Cocking Device Safety Guidelines ..................................................................16
Rope Cocking Device Components .....................................................................18
Rope Cocking Device Operation Instructions ....................................................19
Shooting Operations ..................................................................................................21
Equipment Selection..................................................................................................23
Crossbow Care & Maintenance .................................................................................24
Troubleshooting .........................................................................................................25
Warranty/Registration Information .........................................................................26
Notes ...........................................................................................................................28

2 TWOONE
PRODUCT INTRODUCTION
Browning Crossbows is the culmination of years of design and testing. Dedicated to excellence, the quality of the ZeroSeven™ series is second to none. The Browning OneSixTwo provides more than enough power to manage any situation and features:
• Browning Comfort Ledge Palm Rest
• Flight Track Hook Groove for Rope Cocking Device and Crank Cocking Device
• Left and Right Side Picatinny Rails
• Browning Soft-Sound String Suppressors
• Premium Browning Quiver
• Cross® 1.5-5 x 32 mm Illuminated Crossbow Scope
• 3 - 22” Carbon ZeroSeven™Arrows
• Custom Laminated Limbs
• Forged Aluminum Riser
TWOONE

3BROWNINGCROSSBOWS.COM
PRODUCT SPECS/PACKAGE CONTENTS
FT. PER SECOND 370 (400 grain arrow)
POWER STROKE 14.625”
KINETIC ENERGY 121.6 ft. lbs.
DRAW WEIGHT 145 lbs.
OVERALL WEIGHT 7.2 lbs.
LENGTH 36.75” (with stirrup)
WIDTH 21.875” (uncocked)
HEIGHT 9.6” (with scope)
BRACE HEIGHT 4.063”
ARROW LENGTH 22”
QTY ITEM
1 OneSixTwo™ (Fully Assembled)
1 Cross® 1.5-5 x 32 mm Scope
1 Total Protection System Case
1 Browning Crank Cocking Device
1 Quiver
QTY ITEM
3 22” ZeroSeven™ Carbon Arrows
3 Field Points
6 Hex Keys (5/64”, 3/32”, 7/64”, 1/8”, 5/32”, 3/16”)
1 String & Cable Lubrication Wax
Take a moment to organize the following items included with your Browning crossbow. If any of the parts are missing or damaged, please contact Browning customer service at 844-283-7250.

4 TWOONE
CROSSBOW BREAKDOWN
1 Integrated Crank Cocking Device
2 Anti-Dry Fire Safety Mechanism
3 Arrow Retention Brush
4 Cams
5 Limbs
6 Quiver
7 Scope
8 Stock Assembly
9 Flight Track
10 Crossbow Arrow
11 String
12 Cables
13 Front End/Riser Assembly
14 Foot Stirrup
4
5
6
1087 9
32
1
12
11
14
13

5BROWNINGCROSSBOWS.COM
WARNINGS & SAFETY GUIDELINES
Extreme caution should be used at all times when handling a crossbow. Failure to follow these instructions may result in damage to your bow
and/or personal injury.
KEEP FINGERS AND THUMBS CLEAR OF THE CROSSBOW RAIL AND BOW STRING.Never place any objects or limbs in the way of the string to avoid serious personal injury, including thumb or finger amputation, and equipment damage.
Never dry fire your crossbow. Doing so will void your warranty, and could result in serious injury to you or others, as well as damage to the crossbow. Dry firing means firing the crossbow without a recommended arrow properly loaded into the crossbow receiver. Should a dry fire occur, your crossbow must be completely inspected by a qualified technician for damage to its components before any further use.
Browning crossbows are equipped with an automatic anti-dry fire safety mechanism, which engages every time the crossbow is cocked. An arrow must be loaded into the flight track to release the safety and the safety must be disengaged or in the “off/fire” position before each shot. This, as with any other mechanical device, does not guarantee total safety, as no safety device is a substitute for common sense and safe handling. The crossbow trigger is only to be pulled when the safety is in the “off ” position and never when it is in the “on” position or anywhere between “on” and “off ”. Do not attempt to alter or modify the safety or trigger mechanism.
6 TWOONE
Keep these safety guidelines in mind during operation and maintenance:
• Always inspect the crossbow and arrows before firing. Bent or damaged arrows/nocks are not safe to fire and should be discarded or repaired. Never use a damaged arrow or nock.
• Always keep your fingers below the flight track and out of the path of the string and cables when firing the crossbow. The velocity of the string striking your fingers as the string travels forward could cause severe personal injury.
• Never dry fire the crossbow (shoot without a properly loaded arrow) or use incorrect nocks, non-reg nocks, or damaged nocks. Dry firing will void the warranty and can result in damage to the string, cables, and limbs, possibly causing personal injury.
• Never fire the crossbow until you are sure of your target and always use an adequate target and backstop when target shooting.
• Always use crossbow arrows of the proper length, which have a half-moon or moon nock classification. Browning crossbows are never to be used with arrows, which have flat nocks. Never use wooden arrows, under any circumstances. Arrows of improper stiffness or mass weight (under 400 grains) may damage the string, cables, and limbs, voiding the warranty and possibly causing personal injury. Too light of an arrow can cause a dry fire/misfire.
• Always wear safety glasses when assembling, cleaning, cocking, loading, or shooting the crossbow.
• Do not stalk with, transport or carry a loaded crossbow.

7BROWNINGCROSSBOWS.COM
DISASSEMBLY/ASSEMBLY INSTRUCTIONS
ARROW QUIVER INSTALLATION
Your Browning crossbow comes with a state-of-the-art arrow quiver system. Unlike traditional arrow quivers, the Browning quiver allows you to position your arrows parallel to the flight track/barrel assembly. By allowing the quiver to tuck in tight to the stock, the overall profile of the crossbow is reduced, providing a more compact shooting platform in the field. Also, you are able to lay the crossbow in your lap while hunting without interference with the quiver and arrows.
In addition, your new Browning quiver is ambidextrous. It can be mounted on either side (L or R) of the picatinny rail by simply loosening/removing the 7/64” cap screw (wrench provided) and swapping the mounting bracket from one picatinny rail side to the other (i.e., shooter’s preference).
1. Depress the quiver mount button.2. Insert the two quiver posts into the receiver.3. Release the quiver mount button. Reverse these steps to remove.
1.A 1.B 1.C
Depress QuiverMount Button
Insert Posts Into Receiver Release QuiverMount Button
ADJUSTING QUIVER MOUNTING ANGLE
Your Browning arrow quiver’s mounting angle can be adjusted to increase grip space along the crossbow’s forearm. This feature helps accommodate large-handed shooters, as well as gloved hands. To adjust the quiver angle, simply loosen/remove the button screw with the provided 5/64” hex key as shown in Figure 1.D and rotate the quiver angle to accommodate your particular style of shooting. Once adjusted, replace and re-tighten
1.D
Adjust QuiverMounting Angle

8 TWOONE
NOTE: The cables are under tension in the cable track. MAKE NOTE OF THEIR POSITION prior to removing as they will require returning to this track upon reassembly.
Remove Socket HeadCap Screw
Gently Rotate RiserBack and Forth
Lift String OverString Dampeners
2.A 2.B 2.C
REMOVING/INSTALLING THE FRONT END
DETACHING THE FRONT END
1. Check to ensure the crossbow is in the uncocked position and is unloaded. Using the 3/16” wrench (provided) loosen and remove the socket head cap screw which secures the riser to the arrow track/barrel assembly by turning the wrench counterclockwise as shown in Figure 2.A.
2. With the socket head cap screw removed, gently rotate the riser assembly back and forth to unseat it from the arrow track/barrel assembly as shown in Figure 2.B.
3. With the riser loose, gently lift the crossbow string over the string dampers and slide the riser off as shown in Figure 2.C.
Your Browning crossbow comes assembled and ready-for-use. However, some hunters who travel may desire to remove the crossbow’s “front end” (i.e., riser, limb, string and cable assembly) for easy stowage in bow or rifle cases. The following steps should be followed when removing and/or installing your Browning crossbow front end.
TIP: You may choose to shoot/hunt with the quiver on or off. Both of these options are of personal preference. Hunting with the quiver on allows for easy access to your arrows should a second shot opportunity present itself. Hunting with the quiver detached lightens the crossbow slightly and reduces the wind’s affect on your aiming. We suggest shooting your crossbow configured both ways to determine which is best suited for your shooting and hunting style.
the button screw with the provided 5/64” hex key.
9BROWNINGCROSSBOWS.COM
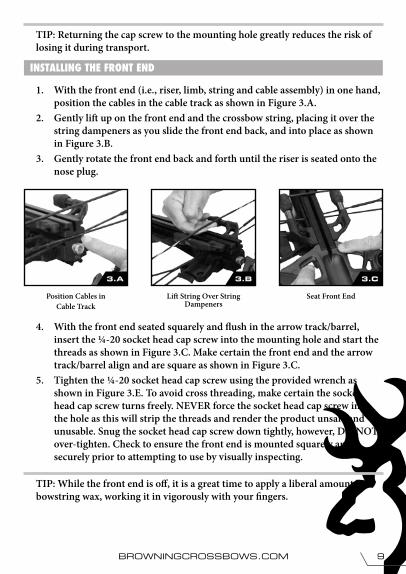
INSTALLING THE FRONT END
1. With the front end (i.e., riser, limb, string and cable assembly) in one hand, position the cables in the cable track as shown in Figure 3.A.
2. Gently lift up on the front end and the crossbow string, placing it over the string dampeners as you slide the front end back, and into place as shown in Figure 3.B.
3. Gently rotate the front end back and forth until the riser is seated onto the nose plug.
TIP: Returning the cap screw to the mounting hole greatly reduces the risk of losing it during transport.
Position Cables inCable Track
3.A
Lift String Over String Dampeners
3.B
Seat Front End
3.C
4. With the front end seated squarely and flush in the arrow track/barrel, insert the ¼-20 socket head cap screw into the mounting hole and start the threads as shown in Figure 3.C. Make certain the front end and the arrow track/barrel align and are square as shown in Figure 3.C.
5. Tighten the ¼-20 socket head cap screw using the provided wrench as shown in Figure 3.E. To avoid cross threading, make certain the socket head cap screw turns freely. NEVER force the socket head cap screw into the hole as this will strip the threads and render the product unsafe and unusable. Snug the socket head cap screw down tightly, however, DO NOT over-tighten. Check to ensure the front end is mounted squarely and securely prior to attempting to use by visually inspecting.
TIP: While the front end is off, it is a great time to apply a liberal amount of bowstring wax, working it in vigorously with your fingers.

10 TWOONE
The integrated Browning Crank Cocking Device (CCD) is designed, engineered, and built to offer years of trouble-free service. When used properly, it will deliver outstanding performance in the field, while increasing your level of shooting satisfaction by making this Browning crossbow easier to cock. To avoid damaging the CCD, or injuring yourself during its operation or use, you must carefully read these instructions completely, and heed all warnings for use. Failure to follow these instructions may result in damage to your crossbow, personal injury, and/or property damage.
Under no circumstances should you attempt to use your CCD to uncock your crossbow. Attempting to do so will put you at immediate risk of personal injury and will result in catastrophic damage to your CCD and the crossbow. Instructions for unloading the crossbow are found in the “Shooting Operations” section of this manual.
Prior to each use, inspect the CCD cord to ensure it is not frayed or damaged in any way. A frayed or damaged draw cord may break and result in catastrophic damage to your CCD and/or the crossbow and result in serious personal injury. If it shows any signs of wear, DO NOT use the CCD. Contact your dealer or a Browning customer service representative at 844-283-7250 for CCD replacement instructions.
NEVER attempt to cock your crossbow with the cocking control lever set to the “freespool” position. Operating the CCD in the “freespool” position may result in the handle slipping from your hand and spinning uncontrollably resulting in serious personal injury, catastrophic crossbow/CCD damage, and/or property damage.
CRANK COCKING DEVICE SAFETY GUIDELINES
Insert Front End Socket Head Cap Screw
Tighten Socket HeadCap Screw
3.E3.D
11BROWNINGCROSSBOWS.COM
NEVER leave the string hooks engaged once the crossbow has been cocked. Attempting to operate the crossbow with the string hooks engaged will result in serious personal injury, catastrophic crossbow/CCD damage, and/or property damage. YOU MUST return the string hooks to their stowed position once the crossbow has been cocked.
NEVER place your foot in the foot stirrup when operating the CCD. Should the cocking cord inadvertently break, the string hooks may become projectiles causing personal injury.
Should you experience any sensation of binding while attempting to use the CCD, stop cranking IMMEDIATELY. Check the limbs, cams, strings and cables, and/or the CCD for any signs of interference. Attempting to cock a crossbow which is bound or is binding, in any manner, will result in serious personal injury, catastrophic crossbow/CCD damage, and/or property damage. If you discover any binding or interference, immediately contact your dealer or a Browning customer service representative at 844-283-7250 for instructions.
NEVER over-crank a CCD. Once the crossbow has been cocked (i.e., the crossbow string is engaged in the trigger mechanism tumbler), DO NOT continue to crank the CCD handle. Over-cranking the CCD will result in serious personal injury, catastrophic crossbow/CCD damage, and/or property damage.
NEVER attempt to operate the CCD with a power drill or any other type of powered appliance. Doing so will result in serious personal injury, catastrophic crossbow/CCD damage, and/or property damage.
NEVER mechanically modify the CCD in any manner. This includes, but is not limited to, cutting the cocking cords, removing the string hooks, lengthening or shortening the cocking cords, knotting the cocking cords, etc. Doing such, or likewise, may result in serious personal injury, catastrophic crossbow/CCD damage, and/or property damage; it also immediately voids the Browning warranty.NEVER attempt to cock this Browning product(s) without the assistance of the CCD or a Browning branded rope cocking device (RCD) specifically designed for use with this Browning crossbow model. Attempting to cock this Browning product(s) by hand (i.e., without the CCD or a Browning RCD) is dangerous. This Browning product(s) was designed to be cocked using the factory CCD.
NEVER substitute another manufacturer’s rope cocking device or mechanical

12 TWOONE
TIP: Apply a liberal coat of crossbow string wax to the cocking cord, working it in by running your fingers up and down its length. This practice keeps the cocking cord supple and reduces the possibility of it drying out or fraying.
cranking device, or homemade cocking device when attempting to cock this Browning product(s). Attempting to hand cock this Browning product(s) will result in serious personal injury, catastrophic crossbow damage, and/or property damage; it also immediately voids the Browning warranty.
CRANK COCKING DEVICE COMPONENTS
2
34
5
6
78
9
1
1 Access Door Button
2 Crank Handle
3Integrated Crank Cocking Device (Located Underneath Access Door)
4 Access Door
5 Crank Handle Port
6 Cocking Cord
7 String Hooks
8 String Hook Ports
9 Flight Track Hook Groove
13BROWNINGCROSSBOWS.COM
6
7
85
4
1
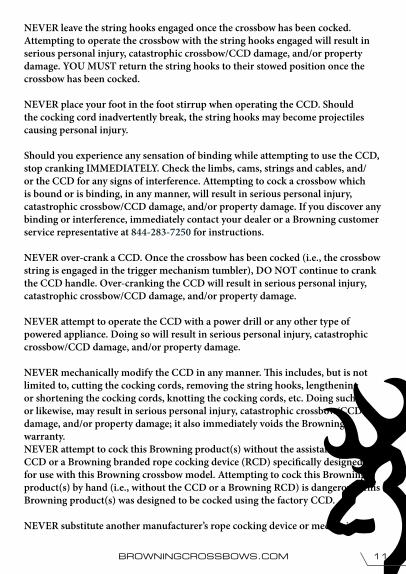
CCD COMPONENTS SHOWN EXPOSED
3
2
FREESPOOL
CRANK
1 Cocking Control Lever
2 Freespool/Payout Position
3 Cocking/Cranking Position
4 Access Door Button
5 Ambidextrous Crank Handle Hub
6 Tightening Ring
7 Crank Handle (Uninstalled)
8 Crank Handle Port
Remove Crank Handle Open CCD Access Door Shift to “Freespool” Position
CRANK COCKING DEVICE OPERATION INSTRUCTIONS
1. Remove the crank handle from the crank handle port by depressing the round button in the center of the handle as shown in Figure 4.A.
2. Open the CCD access door by depressing the CCD access door button as shown in Figure 4.B.
4.A 4.B 4.C

14 TWOONE
Disengage String Hooks Place String Hook GuidesInto Flight Track Grooves
Slide Forward and Engage Crossbow String
3. Shift the cocking control lever into the “free spool” position as shown in Figure 4.C.
4.F4.E4.D
NOTE: The string hooks MUST be engaged in the track to operate correctly. DO NOT attempt to operate the CCD without the string hook guides engaged in the cranking cord track as shown in Figure 4.E.
4. Disengage the string hooks from the string hook ports as shown in Figure 4.D.
5. Slip the string hook guides into the cranking cord track as shown in Figure 4.E.
6. Push the string hooks forward down the track until there is enough slack for the string hooks to engage the crossbow string as shown in Figure 4.F. Make certain the string hooks are facing upward when engaging the crossbow string. If the string hooks are not facing upward, you DO NOT have the string hooks engaged in the cranking cord track correctly.
String Cocked/Tumbler Engaged
Shift to “Freespool” PositionSwitch Cocking Control Level to the “Crank” Position
4.G 4.H 4.I
7. Shift the cocking control lever into the “cocking/cranking” position as shown in Figure 4.G.

15BROWNINGCROSSBOWS.COM
NOTE: The crank handle hub was designed to be ambidextrous. The side of the crossbow the handle is mounted (into the crank handle hub) will determine which direction the handle should be rotated in order to cock the crossbow. If the handle is mounted to the right side of the crossbow, counter-clockwise is the proper cranking direction and clockwise will relieve tension; visa versa for a crank handle mounted on the left side of the crossbow.
8. Engage the crank handle into the crank handle hub by depressing the round button. To achieve proper engagement with the crank handle, the tightening ring must be snug against the handle. Twist the tightening ring in the opposite direction so that it is now snug to the hub. With the crank handle engaged, crank counter-clockwise to remove any slack from the cocking cords. Make certain the string hooks are engaged with the crossbow string and string hook guides are seated in the cranking cord track as you crank. Continue to crank until the crossbow string engages the string tumbler as shown in Figure 4.H.
CHANGING THE CRANK HANDLE PORT ORIENTATION
The crank handle port may be mounted on the left (L) or right (R) side of the crossbows honeycomb stock insert. To change its orientation, simply remove the two socket head cap screws using the 3/32” wrench (provided) and move the assembly to the desired location. Reinstall the two socket head cap screws and tighten using the 3/32” wrench.
9. With the crossbow string captured in the “cocked” position, and while keeping tension on the crank handle (NEVER RELEASE THE HANDLE UNTIL THE COCKING CYCLE IS COMPLETE), shift the cocking control lever to the “free spool” position as shown in Figure 4.I. Gently rotate the crank handle clockwise until all tension is removed from the cocking cord and string hooks.
10. Remove the string hooks from the crossbow string and return them to the string hook ports on the sides of the crossbow. Once engaged, move the cocking control lever back to the “cocking/cranking” position and gently remove any slack from the cocking cord. DO NOT OVER-CRANK THE STRING HOOKS as they will break under undue force and become unusable.
You are now ready to load an arrow into your crossbow. Continue to the “Shooting Operations” section of the manual for arrow loading, proper shooting techniques and full safety guidelines.

16 TWOONE
The Browning Rope Cocking Device (RCD) is designed, engineered, and built to offer years of trouble-free service. It is designed to deliver outstanding performance in the field, while helping to simplify the crossbow cocking process. To avoid damaging the RCD or injuring yourself during its operation or use, you must carefully read these instructions completely, and heed all warnings for its use. Failure to follow these instructions may result in damage to your crossbow, personal injury and/or property damage.
Under no circumstances should you attempt to use your RCD to uncock your crossbow. Attempting to do so will put you at immediate risk of personal injury and will result in catastrophic damage to your crossbow. Instructions for unloading the crossbow are found in the “Shooting Operations” section of this Instruction Manual.
Prior to each use, inspect the RCD cord to ensure it is not frayed or damaged in any way. A frayed or damaged cocking cord may break and result in catastrophic damage to your crossbow or may result in serious personal injury. If the RCD shows any signs of wear, DO NOT use the RCD. Contact your local dealer or a Browning customer service representative at 844-283-7250 for RCD replacement instructions.
NEVER leave the string hooks engaged once the crossbow has been cocked. Attempting to operate the crossbow with the string hooks engaged will result in serious personal injury, catastrophic crossbow/RCD damage, and/or property damage. You must remove the RCD once the crossbow has been cocked.
Should you experience any sensation of binding while attempting to use the RCD, stop immediately. Check the limbs, cams, strings and cables for any signs of binding. Attempting to cock a crossbow which is bound in any manner will result in serious personal injury, catastrophic crossbow damage, and/or property damage. If you discover any binding/interference, immediately contact your dealer or a Browning customer service representative at 844-283-7250 for instructions.
NEVER attempt to cock this Browning product(s) without the assistance of the RCD or an optional Crank Cocking Device (CCD) (visit browningcrossbows.
ROPE COCKING DEVICE SAFETY GUIDELINES

17BROWNINGCROSSBOWS.COM
com for more information). Attempting to cock this Browning product by hand (i.e., without an RCD or CCD) is dangerous. This Browning product(s) was designed to be cocked using the factory supplied RCD. NEVER substitute another manufacturer’s RCD or cranking device, or homemade cocking device when attempting to cock this Browning product(s). Doing so will result in serious personal injury, catastrophic crossbow damage, and/or property damage; it also immediately voids the Browning warranty.
DO NOT attempt to manually cock a crossbow if you have a history of back or spinal cord injury, hip, knee, shoulder and/or elbow ailments, pains or aches. DO NOT attempt to manually cock a crossbow if you are not in good physical health and capable of performing a mildly strenuous physical activity.
Proper footwear should always be worn when cocking a crossbow. Bare feet, flip flops, house shoes, socks/stockings or open-toed shoes are not recommended.
Failure to follow these instructions may result in serious injury.
18 TWOONE
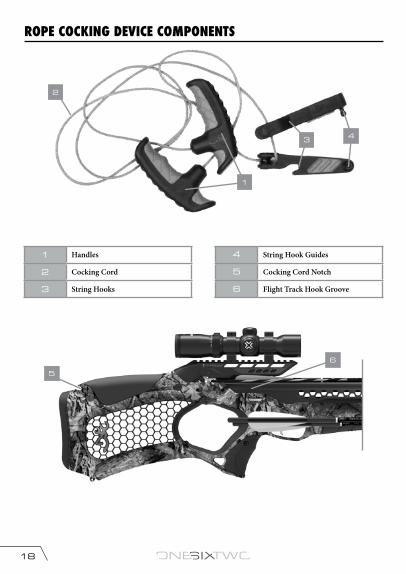
ROPE COCKING DEVICE COMPONENTS
2
1
3 4
5
6
1 Handles
2 Cocking Cord
3 String Hooks
4 String Hook Guides
5 Cocking Cord Notch
6 Flight Track Hook Groove
19BROWNINGCROSSBOWS.COM
ROPE COCKING DEVICE OPERATION INSTRUCTIONS
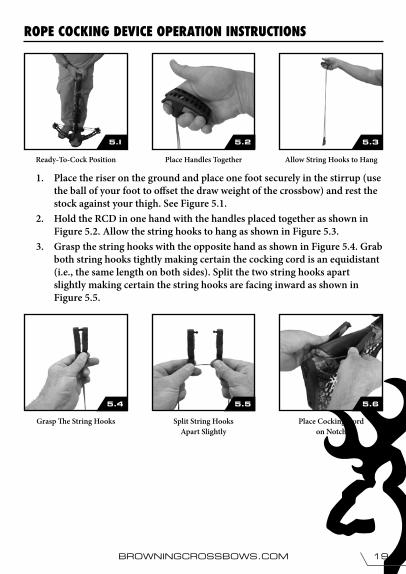
Ready-To-Cock Position Place Handles Together
Split String HooksApart Slightly
Allow String Hooks to Hang
Place Cocking Cordon Notch
1. Place the riser on the ground and place one foot securely in the stirrup (use the ball of your foot to offset the draw weight of the crossbow) and rest the stock against your thigh. See Figure 5.1.
2. Hold the RCD in one hand with the handles placed together as shown in Figure 5.2. Allow the string hooks to hang as shown in Figure 5.3.
3. Grasp the string hooks with the opposite hand as shown in Figure 5.4. Grab both string hooks tightly making certain the cocking cord is an equidistant (i.e., the same length on both sides). Split the two string hooks apart slightly making certain the string hooks are facing inward as shown in Figure 5.5.
5.I
Grasp The String Hooks
5.4 5.5 5.6
5.2 5.3
20 TWOONE
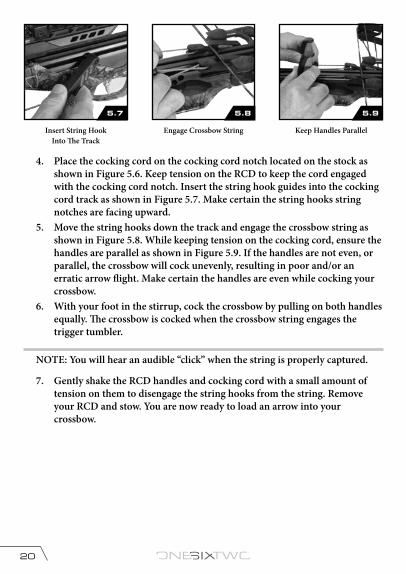
4. Place the cocking cord on the cocking cord notch located on the stock as shown in Figure 5.6. Keep tension on the RCD to keep the cord engaged with the cocking cord notch. Insert the string hook guides into the cocking cord track as shown in Figure 5.7. Make certain the string hooks string notches are facing upward.
5. Move the string hooks down the track and engage the crossbow string as shown in Figure 5.8. While keeping tension on the cocking cord, ensure the handles are parallel as shown in Figure 5.9. If the handles are not even, or parallel, the crossbow will cock unevenly, resulting in poor and/or an erratic arrow flight. Make certain the handles are even while cocking your crossbow.
6. With your foot in the stirrup, cock the crossbow by pulling on both handles equally. The crossbow is cocked when the crossbow string engages the trigger tumbler.
Insert String HookInto The Track
Engage Crossbow String Keep Handles Parallel
NOTE: You will hear an audible “click” when the string is properly captured.
7. Gently shake the RCD handles and cocking cord with a small amount of tension on them to disengage the string hooks from the string. Remove your RCD and stow. You are now ready to load an arrow into your crossbow.
5.7 5.8 5.9

21BROWNINGCROSSBOWS.COM
When loading an arrow onto the flight track, be sure that the odd colored fletching (i.e. cock vane) is placed down in the flight groove and that the concave portion (i.e., the notch) of the nock is perfectly parallel to the string. ALWAYS make sure the arrow is properly loaded before firing.
Be sure to slide the arrow back fully into the trigger mechanism. Failure to do so may simulate a dry fire.
When properly loaded, the arrow should lie flat on the flight track with the odd color fletching facing down in the flight groove. The arrow retainer is self-adjusting for downward pressure; there is no adjustment required. The arrow retainer should only exert enough pressure to hold the arrow in place. Ensure that the tension of the arrow retainer does not lift the front of the arrow off the flight track.
Point the crossbow towards the ground and ensure that the arrow will not slide forward on the flight track. If the arrow retainer is damaged or not exerting enough pressure to retain the arrow, the brush assembly should be replaced.
SHOOTING OPERATIONS
LOADING THE CROSSBOW
ARROW RETENTION SYSTEM
IMPORTANT: Browning recommends only using crossbow arrows with half moon nocks. Flat nocked arrows are never to be used.
Failure to follow these instructions may result in damageto your bow and/or personal injury.

22 TWOONE
FIRING & UNLOADING/DECOCKING THE CROSSBOW
To fire an arrow from your crossbow:
1. Point the crossbow in a safe direction. Take caution not to target any solid object as the arrow may ricochet, potentially harming you or others.
2. Make sure the arrow retainer has maintained the arrow’s fully loaded position into the trigger mechanism.
3. Push the safety forward to the “off ” position.
Keep your fingers below the stock fore-end (flight track) while shooting. This will prevent your hands from being struck by the string as it travels forward. The velocity of the string hitting your fingers can cause severe injury.
NOTE: The arrow must be fully loaded to disengage the anti-dry fire mechanism.
4. The crossbow will now fire when the trigger is pulled. The safety MUST be disengaged in this manner prior to every shot.
KEEP FINGERS AND THUMBS CLEAR OF THE CROSSBOW RAIL AND BOW STRING.Never place any objects or limbs in the way of the string to avoid serious personal injury, including thumb or finger amputation, and equipment damage.

23BROWNINGCROSSBOWS.COM
Due to the inconsistent properties of wooden shafts (which have a tendency to warp, vary in spine stiffness, density, and moisture absorption - all of which could result in inaccuracy), Browning does not recommend their use under any circumstance. Possible injury could result from shaft breakage, etc. We accept no responsibility or liability arising from the use of wooden shaft arrows.
The greatest variable in a crossbow’s accuracy is the arrows, as they differ greatly and can have completely different flight characteristics. When practicing with field points, generally speaking, target arrows are more accurate than hunting arrows.
There are many factors to consider when choosing an arrow: speed, kinetic energy, down range penetration, accuracy and potential wear that the arrow weight puts on the bow.
• Heavier arrows carry more energy down range and lighter arrows may be faster, but carry less energy at longer distances.
• WARNING: Never use less than 400 grain arrows (this includes a 100 grain field point/broadhead). Lighter arrows can simulate a dry fire condition and will result in damage to the crossbow, voiding the warranty.
Due to the unique design of your Browning crossbow, it is imperative that only specified arrows are used. Browning’s carbon arrows are correctly “spined” (arrow stiffness) and weighted to absorb the high energy generated by the compound design. Lighter arrows simulate a dry fire condition and will result in damage to the crossbow, voiding the warranty. The minimum recommended arrow weight for Browning crossbows is 400 grains, which includes a 100 grain field point. We recommend the use of Browning arrows manufactured specifically for your Browning crossbow.
EQUIPMENT SELECTION
ARROW SELECTION & PROPER FLIGHT
24 TWOONE
Fixed-blade broadheads used in hunting, due to their large surface area, have a tendency to “plane.” To help overcome this, it is recommended to practice well in advance of hunting season with the type of arrows and broadheads that will be used to achieve consistent groupings. Mechanical broadheads that simulate the flight of a field point may be used where legal. The recommended fixed blade broadheads can be any three-blade, low-profile broadheads with a cutting diameter no larger than 1-3/16”. Always handle broadheads with extreme care.
BROADHEAD SELECTION
CROSSBOW CARE & MAINTENANCE
With reasonable care of your equipment and diligent practice, your crossbow will remain an accurate, highly efficient hunting weapon.
Every time the bow is used, perform a complete inspection of cables, cams, screws and arrows before shooting. Never shoot a damaged crossbow or arrow.
Inspect the string and cables for signs of wear. Strings and cables showing wear should be replaced immediately by an authorized service center or the factory before further use.
To extend the life of your cables, it is important to apply lube wax to all of the non-served areas of the cables. Apply lube wax every 5-10 shots to the non-served area of the string, or when white fuzz begins to appear. If the crossbow has been exposed to excessive moisture, lube wax may need to be applied more often. Keep the flight track and the string’s center serving waxed to reduce friction.
Avoid exposing the crossbow to extreme heat, such as closed, hot vehicles, near heat sources or in cold environments. Always store the crossbow in a safe, dry place.
EQUIPMENT INSPECTION
CARE OF STRING & CABLES
STORAGE

25BROWNINGCROSSBOWS.COM
TROUBLESHOOTING
Please check that the nock on the arrow has not been damaged.WARNING: Do not continue trying to load a damaged arrow into the crossbow as this can cause dry fire. Dry firing can damage your crossbow.
If your string is jumping the arrow, It might be some of the early signs of your string being damaged or broken. In this case, we recommend the strings be changed using Browning string with a proper strength rating. Contact Browning’s consumer care department for more information about ordering new strings and cables.
Make sure to use lube wax on the center string and flight track every 5-10 shots and on the cables when needed. Keep the trigger mechanism and flight track free of obstruction. Check for any metal burs on the flight track and arrow end caps.
Dry firing of the crossbow can cause the limbs to crack. Check the limbs for any possible damage and/or cracks. If damage is evident, have your crossbow inspected and repaired by a qualified technician before further use. If there is no visible damage, check that you are using Browning string and it is the correct length. Short strings will damage your crossbow.
Check that the cams are properly lubricated with lightweight machine oil. Reduce friction by keeping the flight track and the string serving waxed.
Browning does not recommend that the bow is left in the cocked position for periods longer than four hours.
MY STRING IS NOT CATCHING OR IS JUMPING THE ARROW
MY STRING OR CABLES ARE FRAYING
MY CROSSBOW HAS WEAK LIMBS AND IS LOSING POWER
26 TWOONE
WARRANTY INFORMATION
Subject to the terms, conditions and limitations below, Browning Crossbows guarantees that the stock, trigger mechanism and limbs of its crossbows will be free from defects in materials and workmanship that adversely affect the operation of the crossbow for the lifetime of the original owner. Covered expenses are parts and labor for repair. Browning reserves the right to replace any part or crossbow that cannot reasonably be repaired, at its sole discretion.
The following parts are not covered by this warranty: strings, cables, arrows, accessories, damage to the finish or scratches, normal wear and tear. Transportation charges/shipping charges to and from Browning’s service center are also not covered.
Important, the warranty is VOID if any of the following apply: (1) damage is caused by abuse, misuse, neglect, or failure to precisely follow the instructions in the Owner’s Manual and all warning labels; (2) the crossbow or any of its parts or accessories have been modified or altered; (3) there was a failure to perform normal recommended maintenance or repairs; (4) any safety features were disabled, modified or removed; (5) damage is determined by Browning to have been caused by dry firing or by using anything other than the recommended arrows and nocks; (6) the crossbow is not properly registered, within 10 days of purchase; (7) the crossbow is not an authentic Browning crossbow or it is determined to have, at any time, been stolen or misappropriated from its rightful owner.
This is the sole and exclusive warranty and there are no warranties which extend beyond the description on the face hereof. The implied warranties of merchantability and fitness for a particular purpose are expressly disclaimed. All disclaimers and limitations of liability apply even if the remedy of repair and replacement fails of its essential purpose. Except as may be prohibited by state law, Browning Crossbows assumes no liability for incidental, consequential, or special damages or expenses of any kind.
The sole and exclusive remedy pursuant to this warranty is the repair or replacement of the defective part(s) at Browning’s sole discretion.
LIMITED WARRANTY

27BROWNINGCROSSBOWS.COM
To register your crossbow, please visit browningcrossbows.com/warranty. NOTE: Crossbows must be registered online 10 days after purchase to validate the warranty.
Contact our service department at 844-283-7250 for a return authorization number (RA#) prior to sending the unit. Write the RA# on the outside of the package along with the words “Service Return”. Attach a note to the product containing your name, address, telephone number and a description of the problem. Carefully package and return the product, transportation charges prepaid, to the factory. Collect shipments will not be accepted. Shipments without an RA# issued and listed on the outside of the shipping box will not be accepted.
The warranties and guarantees contained herein are non-transferable and non-assignable. All warranties and guarantees contained herein shall be null and void in the event the original purchaser sells, assigns, or conveys the product.
PRODUCT REGISTRATION
TO OBTAIN SERVICE

28 TWOONE
NOTES

BROWNINGCROSSBOWS.COM844-283-7250
955 Live Oak Street, Tarpon Springs, FL 34689MANUAL VERSION 2
Browning® Trademarks Licensed from Browning®