owner's manual - c.searspartsdirect.com · the "i'vnci_ connect the antenna wire to...
TRANSCRIPT

Owner's Manual
Im )ortant!
Return yourwithin

Once your PHILIPS purchase is registered, you're eligible to receive all the privileges of owning aPHILIPS product. So complete and return the Warranty Registration Card enclosed with your pur-chase at once.And take advantage of these important benefits.
Warranty OwnerVerification ConfirmationRegisteringyour productwithin10daysconfirmsyour right to max-
imumprotectionunder the
terms andconditionsof your
PHILIPSwarranty.
Your completedWarrantyRegistrationCard servesas
verification of ownership !n theeventof product theft or loss.
Model
RegistrationReturningyourWarrantyRegistrationCard right awayguaran-
teesyou'llreceiveall the information
andspecialoffers which you qualify
for asthe owner of your model.
PHILIPS
Congratulations on your purchase, andwelcome to the "family!"
Dear F_FllLIPS product owner:
Thank you for your confidence in PHILIPS.You've selected one ofthe best-built,best-backed products availabletoday.And we'll doeverything in our power to keep you happywith your purchase formany years to come.As a member of the PHILIPS "family" you're entitled to protectionby one of the most comprehensivewarranties and outstanding ser-vice networks in the industry.What's more, your purchaseguarantees you'll receive all the infor-mation and special offers for which you qualify, plus easy accesstoaccessories from our convenient home shopping network.And most importantly you can count on our uncompromisingcommitment to your total satisfaction.All of this is our way of sayingwelcome-and thanks for investing ina PHILIPS product.
Sincerely,
Robert MinkhorstPresident and Chief Executive Officer
RS. Remember, to get the most from your PHILIPS prod-uct, you must return your Warranty RegistrationCard within 10 days, So please mailit to us right nowl
Know these
safetysymbols
kqBID_, _FER E_ TOOLI_JF',_D_re_ p_W_Am4_.
A This "bolt of lightning"indi-cates uninsulated materialwithin your unit may cause anelectrical shock. For the safety_f everyone in your household,_lease do not remove productcovering.
A The "exclamation point"calls attention to features
for which )_oushould read theenclosed hterature closely toprevent operating and mainte-nance problems.WARNING: TO PREVENTFIRE OR SHOCK HAZARD,DO NOT EXPOSE THISEQUIPMENT TO RAIN ORMOISTURE.
CAUTION: To prevent elec-tric shock, match wide blade ofplug to wide slot,fully insert.ATTENTION: Pour _viter leschoc _lectriques, introduire lalame la plus large de la fichedans la borne correspondantede la prise et pousser usquaufond.
For Customer UseEnterbelow the SerialNo.which islocated on the rear ofthe cabinet.Retain this infor-mation for future reference.Model No.Serial No.

Introduction3• moo • .QQI ..• • .Q • .Q • .Q • • • • t,I • .Q • .° • • .O • °oo .°, •., • • 1•• • • .•• •oft • .• • .O • 1•• • .•• • ._ • o6• • .•• • .tQ • IQO • .•• • • *OI ••°t°° •
Welcome to yourTV/VCR owner's manual.This manualhas sevensections: Setting Up YourTV/VCR; Description of Controls; BasicOperations;Recording Options; PlayingOptions;Additional Features;and Information You May Need.The instructionsexplain all of the TV/VCR's features, which are listed below.
FeaturesA-B Repeat PlayAutomatic Channel SetupAutomatic Head CleanerAutomatic Operation FeaturesAutomatic Tracking AdjustmentBlue BackgroundClosed CaptionDaylight-SavingsTimeHigh Quality (HQ) System19 micron head, improves the picture qualityduring playback of SLPtapes
• On-screen displays in English or Spanish• On-screen Menu Programming, accessiblewith
remote control or front panel buttons
One-Touch RecordingReal-Time CounterRemote ControlRepeat PlayS-VHS Quasi Play Back (SQPB)ShowGuard TM - IndefiniteTimer Recording memorySleep TimerSmartCIock TM
SmartLock TM
Special Effects Playback: Forward and ReverseSearching; Still; SlowTimer RecordingWake Up Timer
Safety PrecautionsWarning:To prevent fire or shock hazard,do not expose thisequipment to rain or moisture.FederalCommunications Commission (FCC)Warning:Any unau-thorized changes or modifications to this equipment void theuser'sauthority to operate it.This TV/VCR, equipped with a High Quality (HQ) system, is com-patible with existingVideo Home System (VHS) equipment.
Philips Consumer Electronics recommends that you use onlyvideo cassette tapes that are labeled with the _ mark. Theuse of other tapes may result in poor picture quality and excessivedeposits on the video heads,which may not be covered by thewarranty if damageoccurs.
Note to the Cable'lV System Installer: This reminder is pro-vided to call the Cable TV system installersattention to Article820-40 of the National Electrical Code, which provides guidelinesfor proper grounding - in particular, specifyingthat the cableground shall be connected to the grounding system of the building,as close to the point of cable entry as possible.
Declaration of ConformityModel Number: CCBI93ATTrade Name: PhilipsResponsibleParty: PhilipsConsumer Electronics
P.O.Box 14810Knoxville,TN 37914-1810(865) 521-4316
_As an ENERGYSTAR®Partner, Philips ConsumerElectronics has determined that this product meets the
---- ENERGYSTAR®guidelines for energy efficiency. ENERGYSTAR®is a U.S. registered mark.Using products with the ENERGYSTAR® label can save energy. Savingenergy reduces air pollution and lowers utility bills.
SmartCIock TM, SmartLock", and ShowGuard TM are trademarks ofPhilips Consumer Electronics.Copyright 2000 Philips Consumer Electronics. All rights reserved.
Before doing anything else, recordthe TV/VCR's model and serial num-
bers in the spaces provided on pagetwo.These numbers will help us
assist you if you ever call for help.
Your new product, its packaging, andthis manual contain materials that
can be recycled and reused.Specialized companies can recycle
your product to increase theamount of reusable materials andto minimize the amount that needs
to be properly disposed.
Your product uses batteries thatshould not be thrown away when
depleted but should be disposed ofas small chemical waste.
Please find out about the local regu-
lations on disposal of your old prod-uct, batteries, manual, and packag-
ing whenever you replace existingequipment.

4 TableofContents
Setting Up Your TV/VCRIntroduction .......................................................... 3Table of Contents ...................................................... 4Before Using the TV/VCR ................................................ 5Hooking Up the TV/VCR ............................................... 6-7Turning On the TV/VCR ................................................. 8Language Selection ..................................................... 9Automatic Channel Setup ............................................ I0- I ISetting the Clock ................................................... 12-17Daylight-Savings Time .................................................. 18Time Zone .......................................................... 19
Description of ControlsFront Panel .......................................................... 20Rear Panel ........................................................... 21Remote Control Buttons ............................................. 22-23
Adjusting the Picture Controls ......................................... 24-25On-Screen Status Displays ............................................... 26I_eminder ........................................................... 27
Basic OperationsPlaying .............................................................. 28Recording ........................................................... 29
Recording OptionsOne-Touch Recording .................................................. 30Rerecording (Tape Duplication) ........................................... 31Timer Recording ................................................... 32-35Defeat Recording ..................................................... 36
Playing OptionsRepeat Play .......................................................... 37A-B Repeat Play .................................................... 38-39Real-Time Counter Memory ............................................. 40Playback Options ..................................................... 41
Additional FeaturesSmartLock ........................................................ 42-45Blue Background ...................................................... 46SleepTimer .......................................................... 47Wake Up Timer ....................................................... 48Volume Bar .......................................................... 49Closed Caption .................................................... 50-5 IAutomatic Operation Features ........................................... 52
InformationYou May NeedSpecifications ......................................................... 53Helpful Hints ...................................................... 54-55Glossary ............................................................ 56Limited Warranty ..................................................... 57Index ............................................................... 58Accessories .......................................................... 60

BeforeUsingtheTV/VCR5Putting Batteries in the Remote Control
IRemove the battery compartment lid on the bottom ofthe remote control by sliding it in the direction of thearrow.
2Place two AA batteries inside the battery compartment
with their + and - ends aligned as indicated.
3 %3Replace the battery compartment lid.
Recording Prevention
Video cassette tapes have record tabs to ensure that recordingsare' not accidentally erased.
ITo prevent accidental recording, break off the tab with ascrewdriver.
I
2
To record again, cover the hole with cellophane tape. _ • 2Using the Remote Control• Point the remote control at theTVNCR's remote sensor.
• Do not put objects between the remote control and theTVNCR.
TV/VCR Maintenance
• In this TVNCR, use only tapes with the _ mark.• Make sure any light adhesive stick-on notes are removed from
the video cassette tape before putting the tape in the TVNCR.Removable labels like these can jam the TVNCR.
• Periodic maintenance is required to maintain yourTVNCR'sexcellent performance.This TV/VCR hasan automatic headcleaning system.However, the video heads will eventually requirecleaning or replacement. Only an authorized service centershould perform this service.
• The remote control and its batteries
are supplied.• Do not mix alkaline and man-
i, ganese batteries.Do not mix old and new batteries.
6 H00kingUptheTV/VCR
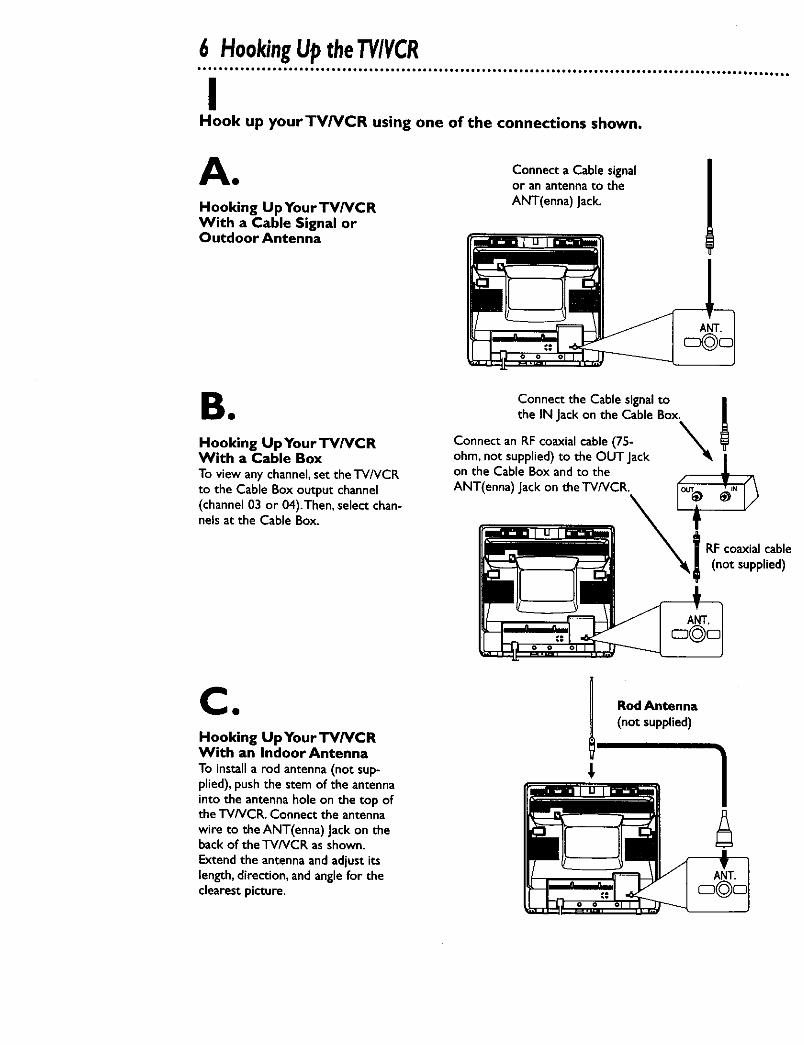
IHook up yourTV/VCR using one of the connections shown.
A Connect a Cable signalI or an antenna to the
Hooking Up Your'rV/VC R ANT(enna) Jack.With a Cable Signal orOutdoor Antenna
Be
Hooking Up Your TV/VCRWith a Cable BoxTo view any channel,set the TV/VCRtotheCabLeBox outputchannel(channel03 or 04).Then, select chan-nels at the Cable Box.
Connect the Cable signalto jthe IN Jackon the Cable Box. |
Connect an RFcoaxial cable (75- _
ohm, not supplied) to the OUT Jack •on the Cable Box and to the
ANT(enna) Jack on the TV/VCR.
I F_Fcoaxial cabL_(not supplied)
CQ
Hooking tJp Your TV/VCRWith an Indoor Antenna
To installa rod antenna(not sup-plied),pushthe stem of the antennainto the antennahole on the top ofthe "I'VNCI_ Connect the antennawire to the ANT(enna) Jack on thebackof the TV/VCR asshown.Extend the antennaand adjustitslength, direction,andanglefor theclearestpicture.
I Rod Antenna(not supplied)

DO
Hooking UpYourTV/VCR to AnotherVideo Source(VCR or Camcorder)You may need this connectionif you want to copy tapes.Detailsare on page3 h
AUDIO/VIDEO OUTJackson VCR
Use an Audio cable to connect the AUDIO
OUT Jack on the VCR to the AUDIO In Jackon the front of the TV/VCR.
AUDIONIDEO In
Jacks on front ofTV/VCR
Use aVideo cable to connect theVIDEO OUT Jack on theVCR to theVIDEO In Jack on the front of the TV/VCR.
2Plug in the TV/VCR's power cord.
3Before you turn on theTV/VCR, go to page eight.
Helpful Hints
Before connecting an antenna or cable signal to the ANT(enna) Jack, make sure the pin is not bent. If the pin is
bent, straighten it as illustrated, then connect the antenna or cable signal to the ANT(enna) Jack.
• Audio and video cables are not supplied.
Crooked PinBent pin
Straight Pin

8 TurningOntheTV/VCR°.. °o. o, oo, °°oo oo o °o °° °°° °, ° ,°o °, ° o ° ° °o• _*o o** o_* *w 0. _ io* .otoeoe *ll _o o*m.** _t_ee* *.lJ_* .t* *0 • to • * • •
Before you turn on the'rV/VCR, make sure batteries are in the
remote control and the TV/VCR is hooked up correctly.The instructions on this page work only when you turn on theTV/VCR for the first time.
IPress the POWER button. The TV/VCR will come on and the
screen shown below will appear.
> ENGLISH ON
ESPANOL
SELECT &V OR
ESS MENU TO CONTINU
2Press the PLAY/A button or the STOP/v button to select
F-_glish or Spanish on-screen displays and menus.
3Press the MENU button. The screen shown below will appear.
TO TVCR
THEN PRESS!1_
END PRESSEXIT
4Press the F.FWD/_ button to begin automatic channelsetup, The TV/VCR will memorize allavailablechannels.Whenchannels are set, CHANNELS ARE SETwill appear on the screenbriefly.Then the TV/VCR will go to the lowest channel pro-grammed.(If you try to set up channelswhen there is no antenna or cableconnected to the TV/VCR, programming will appear to take place,but eventually a NO TV SIGNALS ,.. messagewill appear on thescreen. Connect an antenna or cable to the ANT(enna) jack on theTV/VCR, then pressthe EFWD/I_ button again.You may need tofollow the steps on page 10instead.)
5Use the CH(annel) _/_ button or the Number buttonson the remote control to select aTV/VCR channel. Use
the VOL(ume) _/_ button to adjust the sound.
Helpful Hints
If you do not see any on-screen dis-
plays when you turn on the TVIVCR,
check your hookups, then try again.If you still do not see any on-screen
displays, follow the steps on pagesnine-10 to select a language and
set up channels.To skip step 2, press the MENUbutton. All on-screen displays will be
in English.To skip step 4, press theSTATUS/EXIT button. Channels will
not be set up, and CHANNELS NOT
SET will appear on the screen
briefly.You cannot set up channels if you
are using a Cable Box.Line Input mode will always bestored in the TV/VCR's memory as
channel 00.When you select chan-nel 00,A/V IN will appear on the
screen briefly. Press the CH(annel)_/'_7 button or the Number but-tons to select another channel.
LanguageSelection9QI..Qe..OgOO...OI'Q00QO..eQ..,..6..Qg*O0.,O..6 ° ...6., ° 66 °°° .6,06. • 6..6.,I ° 6Q.66.. °°° , ° tO..66.6*W..666*J066,, . 66
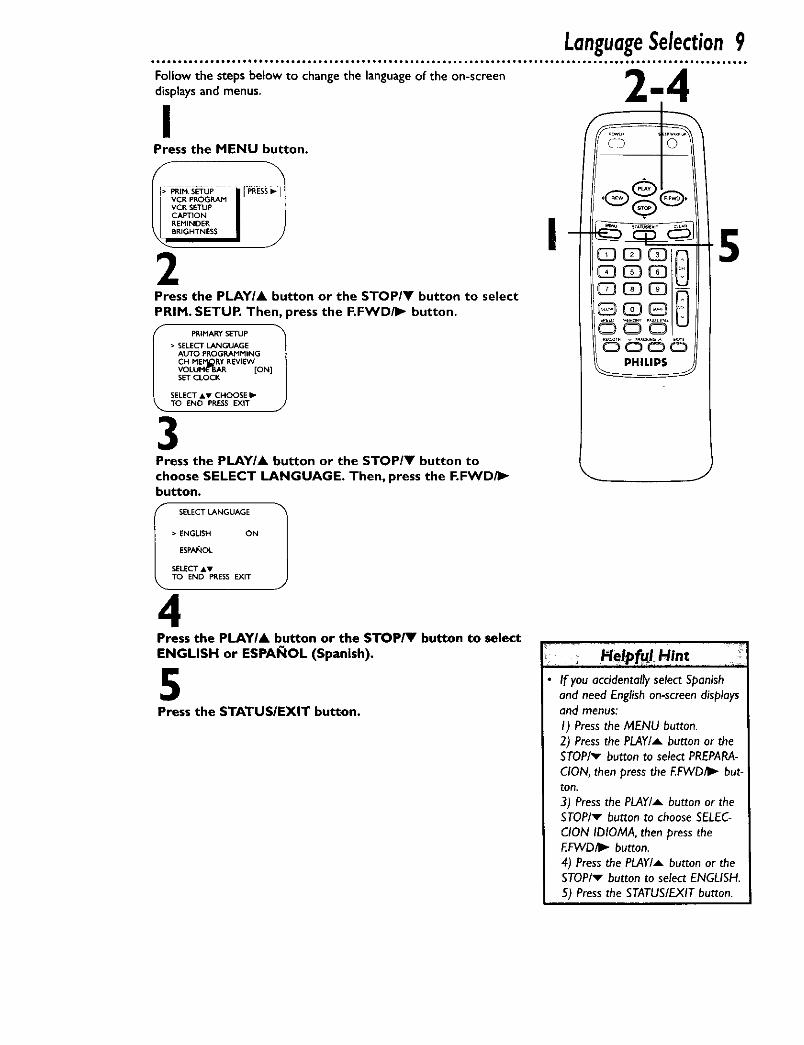
Follow the steps below to change the language of the on-screen
displaysand menus.
IPress the MENU button.
l:;_RtMS_TUP FR_Ssb-
L-I) iBRIGHTNESS
2
i SET CLOCKSELECT &V CHOOSE li"
TO END PRESS EXIT
Press the PLAY/A button or the STOP/Y button to select
PRIM. SETUP. Then, press the F.FWD/I_ button.
PRIMARY SETUP _]
• SELECT LANGUAGEAUTO PROG_E_IMING
CH ME _ REVIEWVoLuEHi_R [ON]
J
3Press the PLAY/A button or the STOPIV button tochoose SELECT LANGUAGE. Then, press the F.FWD/I_button.
J
f" ELECT LANGUAGE 1
• ENGLISH ON
ESPAF_OL
SELECT _,VTO END PRESS EXIT
4Press the PLAY/A button or the STOPIV button to selectENGLISH or ESPAI_IOL (Spanish).
5Press the STATUS/EXIT button.
Flel_aful Hint
If you accidentally select Spanish
and need English on-screen displaysand menus_
I) Press the MENU button.2) Press the PLAY/A button or theSTOP/v button to select PREPARA-
CION, then press the EF'WDII_ but-ton,
3) Press the PLAY/A button or theSTOP/v button to choose SELEC-
CION IDIOMA, then press theF.FWD/I_" button.
4) Press the PLAY/_ button or theSTOP/v button to select ENGLISH.
5) Press the STATUS/EXIT button.

Although the TV/VCR may automatically memorize the channels
you receive when you turn it on for the first time, you may set upchannels again by following the steps below.
IPress the MENU button.
VCR PROGRAM
CAPTION
REMINDER
RIGHTNESS
2Press the PLAY/. button or the STOP/V button to select
PRIM. SETUP, then press the F.FWD,_ button.
SELECT LANGUAGEAUTO PROGRAMMINGCH MEMORY REVIEWVOLUME BAR [ON 1SET CLOCK
SELECT &v CHOOSE I_O END PRESS EXIT
3Press the PLAY/A button or the STOPIV button to selectAUTO PROGRAMMING, then press the F,FWD/II_ but-ton. AUTO CH PROGRAMMING ... will appear on the screen.The TV/VCR distinguishes between TV channels and cable channelsautomatically, and the TV/VCR will memorize its available channels.
,QOC) ,
C3 C3 CD _CD CD E3
OCDO O L
Wait for theTV/VCR to set upchannels.
4Wait for a few minutes, When setup is complete, CHANNELS
ARE SET will appear on the screen.Then the programming of thelowest channel number placed in the TV/VCR's memory will
appear on the screen. Now, when you press the CH(annel) _/_button, you will scan only through channels you receive.
Helpful Hints
• Line Input mode will always bestored in the TV/VCR's memory aschannel 00.You cannot delete it.
• You can not select AUTO PRO-
GRAMMING at step 3 if you are inLine Input mode.

AutomaticChannelSetup(cont'd)IIa.61,=.6oloo=oooto • .6ot4 • ol,oloto • =*eoo.o6eq_o6g_oQ,toooeot,ligoooe. • ooe_o • • • o_ool..o*_o,eeQ_ •. ,_** Jt_oelo •
Adding/Deleting Channels
Pr!ss the MENU button. 2,4
_HXNNEL i SAyI SPIARTI.OCK! P,EVIEW
I EXITi PRIM SETUP
2Press the PLAY/_ button or the STOP/v button to selectCHANNEL.
CHI23T_>cT_cADJUSTHANNELPRESS_11I_
I I SMARTLOCK I /', REV1EW
EXIT
L__PP'IM SETUP _/]
3Press the CH(annel) _/_7 button to select the channelyou want to add or delete.
53
CR PROGRAM
4Press the F.FWD/I_ button or the REW(ind)/11 button toselect SAVED (to add that channel) or DELETED (todelete that channel).Repeat steps 3-4 to add or delete other channels.
5Press the STATUS/EXIT button.
Programming of the channel you added or deleted will appear.
Helpful Hint
To review the channels memorized
by the TV/VCR, follow these steps.I) Pressthe MENU button.2) Press the PLAY/.&.button or theSTOP/V button to select PRIM.
SETUP.Press the I_FWD/I_ button.
3) Press the PLAY/A button or theSTOP/Y button to select CH MEM-
ORY REVIEW. Press the F.FWD/I_
button.A list of programmed chan-nels will appear on the screen.4) If all the programmed channels
don't fit on the screen, press the
EFWD/I_ button. If you do notpress the EFWD_I_ button within
10 seconds, the remaining channelswill appear on the screen. (If there
are no remaining channels, the pre-vious menu will appear.) Or pressthe REW(ind)/_l button to see theprevious screen of channels.
5) Press the STATUS/EXIT buttononce or twice.

12SettingtheClockThere are three ways to set the clock: Manually,with AutomaticPBSChannel Selection, or with Manual PBSChannel Selection.With manual clock setting,you tell the TV/VCR the current time.With Automatic or Manual PBSChannel Selection, the TV/VCRg_etsthe time from your local PBSstation.If you use either Manual PBSChannel Selection or Automatic PBS
,Channel Selection,follow the steps on page 19 to have theTV/VCR maintain the clock according to yourTime Zone.Cable Box users must set the clock manually.To set the clock manually,follow the steps on pages 12-13.To setthe clock usingAutomatic PBSChannel Selection, follow the stepson pages 14-15.To set the clock using Manual PBSChannelSelection, follow the steps on pages 16-17.Before you begin, make sure:_ TheTV/VCR is hooked up and turned on.
Channels are set up.You make each entry within 60 seconds of the previous entry.
Manual Clock Setting
IPress the MENU button,
PRI_ETUP _ESS_VCR SETUPCAPTIONREMINDER
-_ RIGHTNESS
2Press the PLAY/A button or the STOPIV button to selectPRIM. SETUP. Then, press the RFWD/IP- button.
• SELECT IJ_,NGUAGEAUTO PROGRAMMINGCH MEMORY REVIE_V
VOLUME BAR [ON]SET CLOCK
SELECT &Y CHOOSE I_O END PRESS EXIT
3Press the PLAY/A button or the STOP/V button to selectSET CLOCK.Then, press the F.FWD_ button,
SET CLOCK
• AUTO CLOCK {ON]SET MANUAL CLOCK
DAYLIGHT $VG TIME [ON]SET TIME ZONE
[AUTOI
TO CONTINUE PRESS MENU
SELECT AV CHOOSE I_TO END PRESS EXIT
• Entriesthat do not matchtheTV/VCR'sclockor calendarwillcausea questionmark (?) to appearon the screen.
• To makecorrectionswhile you aresettingthe clock,pressthe CLEARbutton until the informationyouwant to correct is flashing.Thenenter the correctinformation.

4Press the PLAYIA button or the STOPIv button to select
SET MANUAL CLOCK, then press the F.FWDi_ button.
S'_ET i'IANUAL CLOCK 1
TiME ....
DATE - - / - - I
TO END PRESSEXIT
5Press two Number buttons for the hour(s) and two
Number buttons for the minute(s).Then press I forAMor 2 for PM. For example, for 9:30 PM, press 09, 30, 2.
I MANL_L CLOCK
TIME 09:30 PM __
MONTH - - I - - I ....
TO CORRECT PRESS CLEAREND PRESS EXIT
6Press two Number buttons for the month, two Number
buttons for the clay, and two Number buttons for the year.
For example, for July I, 2000, press 07, 0 I, 00.The day of the week
will appear automatically.
SET NANUAL CLOCK _,_
IO TIME 09:30 PM
DATE 07 I 01 / 20005J_'rORDAY
TO CORRECT pRESSCLEAREND PRESSEXIT
©
c37
7Press the STATUS/EXIT button.

14SettingtheClock(cont'd)• •• • • ,• •1 • • • •l • J••••,• • •• •oo •o• •oJ o,, •• •,.°. .. • °° .°° ..°°°°°°.° .o° °° ,,°° °.° • ° ° ° .. °° ,,. .° ° .. °°°.°.
Automatic PBS Channel Selection
IPress the MENU button.
•pR_MSETUP I PRESS1_B CRPROGRAM
VCRSETUP
CAPTION
REMINDER
RIGHTNESS
2Press the PLAYI& button or the $TOP/Y button to select
PRIM. SETUP.Then, press the F.FWDII_ button.
• SELECT LANGUAGE
AUTO PROGRAMMING
CH MEMORY REVIEW
VOLUME BAR [ON]SET CLOCK
SELECT AV CHOOSE _"O END PRESS EXIT
3Press the PLAY/A button or the STOP/V button to select
SET CLOCK.Then, press the F.FWD/_ button.
SET CLOCK
• AUTO CLOCK [ON]DN]I
SET MANUAL CLOCK
DAYLIGHT SVG TIME {ON]
SET T_ME ZONE
[AUTO]
TO CONTINUE PRESS MENU
SELECT AV CHOOSE I_
TO END PRESS EXIT
4If ON appears beside AUTO CLOCK, press the MENU but-ton,if OFF appears beside AUTO CLOCK, press the PLAYI_button or the STOP/v button to selectAUTO CLOCK,then press the F.FWD/I_ button so that ON appears to the
right of AUTO CLOCK.Then, press the MENU button.
IS T AUTO CLOCK
AUTO CLOCK USES
PBS CHANNEL DATA
> SET PBS CH AUTO
SET PBS CH MANUAL
SELECT &y CHOOSE Ib-
O END PRESS EXIT
I

5Press the PLAY/A button or the STOPIY button to select
SET PRS CH.AUTO.Then, press the F.FWD_ button.
SIo TKIEAUTOCLOCK: t
DATE I / ....
NOW SEARCHING
END PRESS EXIT
6NOW SEARCHING flashes on the TV/VCR screen.
7When the TV/VCR finds the PBS channel, the time will
appear on the screen. Press the STATUS/EXIT button.
Ao,ogocK 1
TIME 06:30 PH
DATE 07/01 /2000SATURDAY
O END PRESSEXIT
• If CANNOT FIND CLOCK DATA flashes on theTV/VCR
screen, you will be prompted to turn off theTV/VCR.Turnoft the TV/VCR. Leave it off for several minutes.When you turn
on theTV/VCR again, the clock wilt be set
Wait for theTV/VCR to findthe time.
7
PHILIPS
SETAUTO CLOCK "_
IO IME
DATE - - / - - / ....
CANNOT FINO CLOCK DATA
END PRESSEXIT
To display the time on the TVIVCR
screen, press the STATUSIEXIT but-ton. Details are on page 26.
• You cannot use the AUTO CLOCK
feature if you don't receive a PBSchannel that carries a time signal in
your area. Set the clock manually.

16SettingtheClock(cont'd).. ° °. • ..° • • ..° . ..° .°. .° °°° .° ° ° . • °.,oo,,o,6, oo4_o_ ooo e,t_oltoll,o* _oleo _o_ oo o_o o* _,1 ool le_ eJl i_li,_oo mo _, • o • *_.w
Manual PBS Channel Selection
IPress the MENU button.
VCR PROGRAM
I VCR SETUPCA_TION
i REt4_NDERBRIGHTNESS
2Press the PLAY/A button or the STOP/Y button to select
PRIM. SETUP. Then, press the F.FWD/I_ button.
;• SELECT LANGUAGEAUTO PROGRAMMINGCH MEMORY REVIEWVOLUME BAR [ON 1SET CLOCK
SELECT &_Y CHOOSE I_O _END PRESS EXIT
3Press the PLAY/A button or the STOP/Y button to select
SET CLOCK.Then, press the F.FWD/I_ button.
I
SET CLOCK
SET MANUAL CLOCKDAYLIGHT SVG TIMESETTIME ZONE
[AUTO]
TO END PRESS EXIT
4If ON appears beside AUTO CLOCK, press the MENU but-ton.If OFF appears beside AUTO CLOCK, press the PLAY/_button or the STOP/v button to selectAUTO CLOCK,then press the F.FWDil_ button so that ON appears to theright of AUTO CLOCK.Then, press the MENU button.
I_. AUTO CLOCK 1
AUTO CLOCK USESPBS CHANNEL DATA
• SET PBS CH AUTOSET PBS CH. MANUAL
SELECT AV CHOOSEO END PRESS EXiT
PHILIPS

5Press the PLAY/A button or the STOPIY button to select elf Wait for the TV/VCR to
SET PRS CH. MANUAL.Then, press the F.FWD/I_ but- / find the time.ton.
SELECT CHANNEL NUMBEREND PRESSEXIT
6Use the Number buttons to select your PBS station.
7NOW SEARCHING flashes on the TV/VCR screen.
8When the TV/VCR finds the clock data, the time will
appear on the screen. Press the STATUS/EXIT button.
_AUTO CLOCK (PBS)CH _2
TIHE 06 : 30 PM
OATE 07 / 01 / 2000SATURDAY
TO END PRESSEXIT
• If CANNOT FIND CLOCK DATA flashes on the
TV/VCR screen and you know another PBS channel,press the PLAYIA button or the STOPIV button tochoose SELECT NEW PBS CH.Then, press the
F.FWD/I_ button. Repeat step 6.• If CANNOT FIND CLOCK DATA flashes on the
TVIVCR screen and you do not know another channel,press the PLAYIA button or the STOP/Y button to
select SET PBS CH.AUTO. Then, press the RFWD/_button. The TV/VCR will search for the PBS channel automati-
cally.
• If the PBS channel is found, the time will appear on the screen.• If the PBS channel is not found, you will be prompted to turnoff the TVNCR. Leave it off for several minutes.When you turn
on the TV/VCR again, the time will be set.
6
5
Helpful Hints
If you have an Antenna hookup, you
may select channels 2-69 at step 6.If you have a cable connection, youmay select channels 1-125 at step6. Details about available memo-
rized channels are on page I I.To display the time on the TV/VCRscreen, press the STATUS/EXIT but-
ton. Details are on page 26.
18 Daylight.SavingsTime• • , • • • .. • . • .,,. • . . ., • . . • • .o0* ,Do •Doll ,* _,, •Do•oDin* • • •0 •Do • • •_61o •llo6oiJ,.tolot61mooto•ool ••ooo6 •l • • • • •o,_ *,_o,_
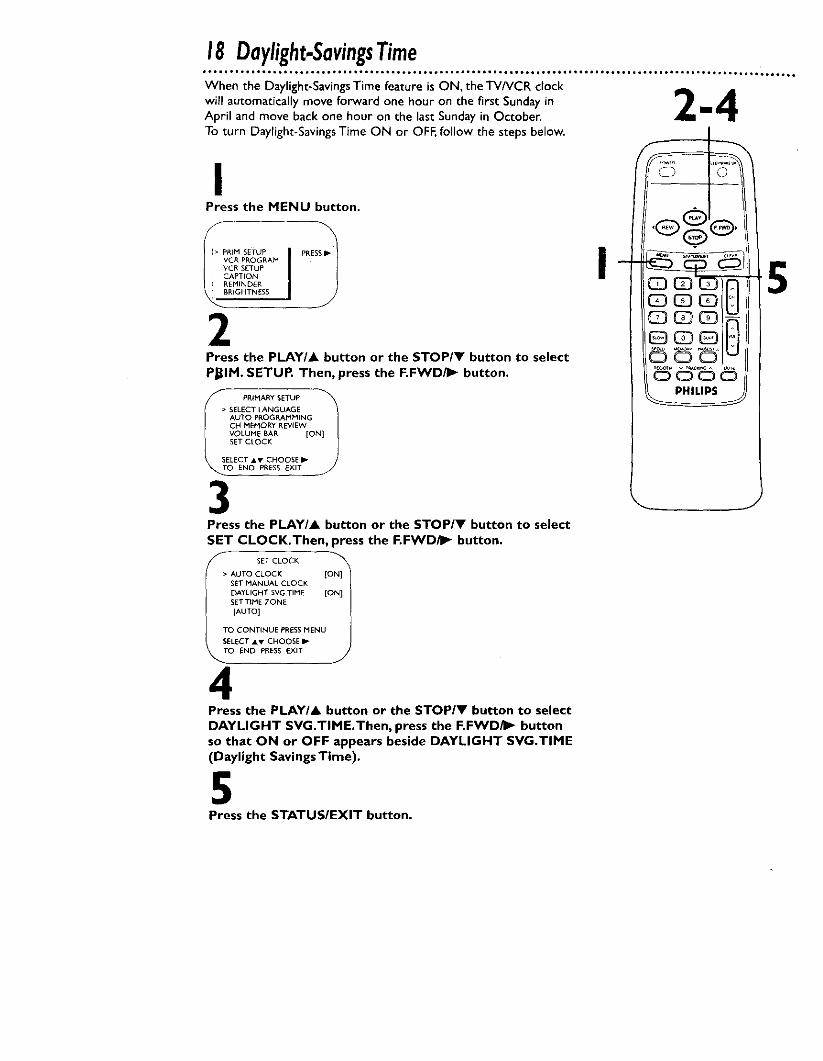
When the Daylight-Savings Time feature is ON, the TV/VCR clock 81
will automatically move forward one hour on the first Sunday in "" _llApril and move back one hour on the last Sunday in October. L- mR
To turn Daylight-Savings Time ON or OFF, follow the steps below.
IPress the MENU button.
• PRpM SETUP I PRESS1V_RR PROGRAM
VCR SETUP
CAPTION: REMINDER
IGHTNESS
J
2Press the PLAY/. button or the STOP/Y button to select
PRIM. SETUP. Then, press the EFWD,_ button.
• SELECT LANGUAGEAUTO PROGRAMMING
CH MEMORY REVIEWVOLUME BAR [ON]SET CLOCK
SELECT AV CHOOSE _"O ENO PRESS EXIT
3Press the PLAY/A button or the STOP/Y button to select
NET CLOCK.Then, press the F.FWD_P- button.
_- SET CLOCK
• AUTO CLOCK [ON]SET MANUAL CLOCK
DAYLIGHT SVG TIME [ON]SET TIME ZONE
[AUTO]
TO CONTINUE PRESSMENU
SELECT AV CHOOSE il_TO END PRESS EXIT
4Press the PLAY/A button or the STOP/V button to select
DAYLIGHT SVG.TIME.Tben, press the F.FWD/I_ buttonso that ON or OFF appears beside DAYLIGHT SVG.TIME(Daylight Savings Time).
5Press the STATUS/EXIT button.

TimeZone19O,600ttO0, • OO0_IOOJOOO*iIItQOW_OQIJO6t_IOtOIOtOOllg,tI,,OOO_,OmlO_tJ =o. meO,*, =. OOe_O= = I_OI = .01 = • o,, _**l .=o.. i_
When you set the clock usingAUTO CLOCK, specify your time zone.The TV/VCR will maintain the clock according to your time zone.
IPress the MENU button.
!i_ PV_ s_TR_PAM ; IPRES_REM'NDERCAPT,ON
62 'Press the PLAY/A button or the STOP/Y button to select IPRIM. SETUR Then, press the F.FWD/I_ button.
PRtMA_SETUP
• SELECT LANGUAGEAUTO PROGRAMMINGCH MEMORY REVIEWVOLUME BAR [ON]SET CL_K
S_X ._ LECT "" CHOOSE • JO END PRESS EXIT
3Press the PLAYIA button or the STOPIY button to select
SET CLOCK.Then, press the F.FWD/_ button.
SETCLOCK• AUTO CLOCK {ON])N] I
SET MANUAL CLOCK
DAYLIGHT SVG TIME [ON}31
SETTIME ZONE
[AUTOI
TO CONTINUE PRESSMENU
SELECT &V CHOOSE •
_ TO END PRESS EXIT
4Press the PLAYI41, button or the STOPIV button to select
SET TIME ZONE.Then, press the F.FWD/_ button.
_ET TIME ZONE
• AUTO [ON]ATLANTICEASTERNCENTRALMOUNTAINPACIFICALASKAHAWAIi
SELECT AV
_O CONTINUE PRESS MENU
5Press the PLAY/A button or the STOPIV button to select
your time zone.
6Press the MENU button, then press the STA-_'US/EXITbutton.
C_ CD CD 0G3 C_3C_
CDCDS_3 --DoL
(::)o o _
J
If you select AUTO at step 5, theTVIVCR will set the clock accordingto the time zone data of the PBS
station it finds.You cannot select SETTIME ZONE
at step 4 if AUTO CLOCK is set toOFF.
You may need to turn off theTV/VCR for several minutes toenable the TV/VCR to reset the
clock according to your time zone.

20 FrontPanel
Cassette Compartment
Insert a video cassette tape here.
Wireless Remote Sensor
Receivesa signalfrom your remote control soyou canoperate the'I'V/VCR from a distance.
STOP/EJECT ButtonPressonce to stop the tape.When playbackisstopped,pressto eject the tape. Presstoselect an item in the menu.
VIDEO In JackConnect this jack to the video out jack of acamcorder or aVCR. Detailsare onpage31.AUDIO In JackConnect this jack to the audio out jackof acamcorder or aVCR. Details are on page31.EARPHONE JackConnect earphones(not supplied) here forpersonallistening.REW(ind) ButtonWhen tape playbackis stopped, pressto rewindthe tape at high speed. Duringplayback,presstorewind the tape while the picture stayson thescreen.Pressto changea setting of a pop upmenu item (for example,to adjust the BRIGHT-NESS)or to return to a previous menu.PLAY ButtonPressto play a tape. Details are on page 28.Pressto release Slow,Search or Still modeand return to normal playback.Details are onpage41. Pressto select an item in the menu.
F,EVVD ButtonWhen tape playbackis stopped, pressto fastforward the tape at high speed.Duringplay-back,pressto fast forward the tape while thepicturestayson the screen.Pressto changeasetting of a menu item (for example,to adjustthe BRIGHTNESS)or to advanceto the nextmenu.
REC(ord)/OTR ButtonPressonce to start a recording. Detailsare onpage29. Pressrepeatedly to start a One-TouchRecording (an immediatetimedrecording, 30 minutes to eighthours long)ofthe channelyou are watching.Detailsare onpage30.
RECORD LightThis lightappearsduringa recording. It flashesslowly whenthe "I'V/VCR power is turned off to set a timer recording. Itblinksrapidly when a recording is pausedor when the poweris off for a timer recording, but there is no tape in the"I'V/VCR.It will blink rapidly two minutesbefore a timerrecording is set to beginif the "I-V/VCR power is on.
VOLUME AI_ButtonsPressto adjustthesoundlevel.Pressthe CHANNEL
button and theVOLUME _ buttonon the TV/VCR atthe same time todisplaythe pop upmenu.Pressagaintoremove the pop upmenu,
-CHANNEL _1_ButtonsPress to scanthroughthe "I-V/VCRchannels.
During tape playback,pressto adjustthetracking, Detailsare onpage52.Press the CHANNEL
button and theVOLUME _ buttonon the TV/VCR atthe same time todisplay the pop upmenu.Press againtoremove the pop upmenu,
POWER ButtonPressto turn the power on or off.

RearPanel21
AC Power CordConnect to a standardAC outlet tosupplypower to theTV/VCR.
ANT(enna) JackConnect your antennaor cablehere.Detailsare onpagesix.
Antenna Hole
Connect the stem of an indoor antenna
here. Details are on page six.

22 RemoteControlButtonstQotooo i,oo • t6ag ooool io.,, • Bo.. • • t6* • ° 6_,_o ... • o_o • ° .. • _*. = .t_ • • 0.. • • ,tl iott,_ • ,mt_o_ • _0oo_ • • oeoJ • • •o6o.o._° o
F.FWD/I_ Button
When tape playback is stopped, press to fast forward the tape athigh speed. During tape playback, press to fast forward the tape
while the picture stays on the screen. Details are on page 41.Press to change the setting of an item in the on-screen menu orpress to proceed to the next menu.
SLEEP/VVAKE UP Button.Pressto set the SleepTimer. Detailsare on page47. Pressto setthe Wake Up Timer. Details are on page48.
POWER ButtonPressto turn on or off the TV/VCR.
PLAY/A ButtonPressto play a tape. Details are on page28. Pressto release Slow,Searchor Still mode and return to normal playback.Details are onpage41. Pressto select an item in the menu.
CLEAR Button
Press to erase incorrect data when programmingTV/VCR func-
ticks. Also, press to reset the real-time counter to 0:00:00. Detailsare on page 40.Number Buttons
Use to select channels and to program TV/VCR functions (such as
setting the clock).O Cable Users
Enter channel numbers as a two-digit number for the quickestresults. For example, to select channel 6, press 0,6. If you only press
the Number 6 button, channel 6 will be selected after a brief delay.(There also may be a brief delay when you select channels 10, I I,
and 12.) If you want to select channels IO0 and above, enter channelnumbers as a three-digit number. For example, to select channelI 17,press I, I, 7.• Antenna Users
Enter channel numbers as a two-digit number for the quickestresults.You may only select channels 2-69. For example, to selectchannel S, press 0,S. If you only press the Number S button, channel
S will be selected after a brief delay.
SPEED Button.
Press to select the recording speed (SP or SLP).
SURF Button
Press to return to the'iV channel you were viewing immediately
before switching to your current channel.
MUTE ButtonPressto eliminate the'rV/VCR's sound.Pressagainto return tothe previousvolume level.
VOL(ume) z_P_ ButtonPressto adjustthe soundlevel. If you pressthe VOL(ume)button when the sound is muted, the sound will be restored.
HelpfulHint• Buttons that are shaded in the illustration light up for five seconds when you press any button on the remotecontrol.

RemoteControlButtons(cont'd)23
STOPIV Button
Press to stop the tape. Press to select an item in the menu.
REW(ind)/_l ButtonWhen tape playback is stopped, press to rewind the tape at highspeed. During tape playback,press to rewind the tape while thepicture stayson the screen. Details are on page 41.Pressto change a setting of a pop up menu item or to return to aprevious menu.
STATUSIEXIT Button
Press to see the status display. Press again to remove the statusdisplay. Details are on page 26. Press to remove the menu.
MENU ButtonPressto display the pop up menu.You also mayusethe buttons onthe front_anel of the TV/VCR to accessthe pop up menu, Detailsare on page 20.
CH(annel) L_,¢7 ButtonPress to scan through theTV/VCR's channels.
SLOW Button
During tape playback, press to view the picture in slow motion. Details areon page 4 I.
REC(ord)/OTR ButtonPress once to start a recording. Details are on page29. Or, pressrepeatedly to start a One-Touch Recording (an immediatetimedrecording, 30 minutes to eight hours long) of the channel you arewatching. Details are on page30.
MEMORY ButtonPressto memorize a tape position at which the real-time counterwas set to 0:00:00. Details are on page40. Or, press to memorizethe start and end positions on a tape when setting up A-B RepeatPlay.Details are on pages38-39.
TRACKING z_ ButtonsPressduring tape playbackto adjust the tracking. Detailsare onpage 52.
PAUSEISTILL ButtonDuring recording, press to temporarily stop the recording. Pressagain to resume recording. Details are on page 29. You cannotpausea One-Touch Recording.During tape playback,press to freeze the picture (still). Pressagainto resume playback.Details are on page41.
L
i
J
I Helpful Hint• Buttons that are shaded in the illustratJon light up for five seconds when you press any button on the remote
control.

24 AdjustingthePictureControls• ,.., * • *..** ,,.. * • . ** ,.*... *•, ,, .,.*• • ,...* ......, .. . •• ***l • •*l •* •*. • ol***l • •. •o •1 i*••l 1.* **• • • *l* • • 00 1, **61***
Follow these steps to adjust theTV/VCR's brightness, picture,color, tint, and sharpness.
IPress the MENU button.
TO ADJUST PRESS _ / I_
• BRPGHTNESS IIIIIIIHnNmPICTUR_ • •COLORTJNT
_ ____SHARPNESS
2Press the PLAY/A, button or the STOP/V button to selectthe desired control (BRIGHTNESS, for example).
pr3_essthe REW(ind)/_l button or the F.FWD/I_ button to
adjust the control. (Refer to the chart on page 25.)
4When you finish, press the STATUS/EXIT button.
I
J
,Helpful Hints
The on-screen menus shown on
page 25 will disappear if no adjust-ments are made within 60 seconds.
The original settings will probably
give you the best picture quality.To reset the picture controls to the
original settings, press the MENUbutton, then press the PLAY/A but-ton or the STOP/Y button to select
TV RESET,then press the F.FWDtII_button. TV RESET COMPLETED will
appear on the screen briefly.

BRIGHTNESS
PICTURE
COLOR
TINT
SHARPNESS
Decrease
decreased brightness
decreased contrast
paler
more purple
softer
Increase
increased brightness
increased contrast
more brilliant
more greenclearer
Press the REW(ind)/<lbutton to decrease a
picture control. Pressthe F.FWD/I_ button
to increase a picturecontrol.
Ib
ifT -:
I
J
•B! i _i T-N_S- IllUlllllilli tl_ BRIGHTNESSPICTURE i 4 / PICTURE |
COLOR COLOR •
TINT _ TINTARPNESS _ HAP, PNESS
_ TO ADJUST PRESS _1 / I_" _'_
i _PICTURE! , CoLoRI /, TINT ] _ _"
!> SHARPNFSS IIIIIIluliul
i[_. _Ti RESET •
TO ADJUST PRESS <11 I_
I PICTURE
!> COLOR IlUlnlllnil
TINT • •
SHARPNESS
TO'_"OJUSTPP'eSs<'" u_|| / /BRIGHTNESS
PICTURE
COLOR
_ J• TINT Illllllllnlll
-_ Press the STOP/Ybutton
Press the PLAY/I,button

26 On-ScreenStatusDisplays• .o.. • .°° °.. °..o.....°. oo.. °o.. °.°.o°.°° .. .. .. .. .°°. . . . . oJ* .oo .* e* ***ol • • • oo*ll*_l _*l _l J_*.eo_o._ tJool_mo _o. • • •
A status display wifl appear when you press the STATUS/EXIT but-ton or certain function buttons.The contents of the status display
will vary.To choose the status display mode, follow the stepsbelow.
If you select STATUS ON, then select COUNTER ONLY CurrentOFF: Channel Tape
Function
Whenever you press the STOP/v button or the PLAY/A but- _TimeLN_u/ I !°1
ton, the status display will appear for five seconds. Portions of
the status display also may appear when you press other func- i/_ition buttons. /2:0OAM S
If you select STATUS ON, then select COUNTER ONLYON:
Whenever you press the PLAY/A button, the status display willappear for five seconds.After five seconds, only the counter willremain on the screen. Portions of the status display also may M 1:23:45
when you press other function buttons. IappearIIf you select STATUS OFF:
The status display will not appear when you press function but- Tape Counter
tons.You must press the STATUS/EXIT button to see the status Speed andCounter
_jsplay. Memory
IPress the MENU button.
2Press the PLAY/A button or the STOP/V button to select
VCR SETUP, then press the F.FWD/I_ button.
3Press the PLAYI& button or the STOP/Y button to select
ON-SCREEN MODE, then press the F.FWD/I_ button.
4Press the PLAY/A button or the STOP/v button to select
STATUS, then press the F.FWD/II_ button so that ON orOFF appears beside STATUS.
Ii ON-SCP.EENMODE
• STATUS {ON]
COUNTER ONLY [OFF]
SELECT &v CHOOSE I_0 END PRESS EXIT
5If you set STATUS to OFF, go to step 6. If you set STATUSto ON, press the PLAY/A button or the STOP/v buttonto select COUNTER ONLY, then press the F.FWD/II_ but-ton so that ON or OFF appears beside it.
6Press the STATUS/EXIT button.
Helpful Hints
if You cannot view closed captions dur-
ing recording or tape playback ifCOUNTER ONLY is set to ON.
Details are on pages 50-51.If STATUSis set to ON, closed cap-
tions will be interrupted when you
insert, operate, or remove a tape.
Reminder27Q ...tt ..o..Q..oge...t ...t,...Qo .o.g.eooQg.lt O0.0000t,BQ* ,Q. B,O.*661....It ...Q...Ot 1.*.6.11*...oe....ll, ..001 ..
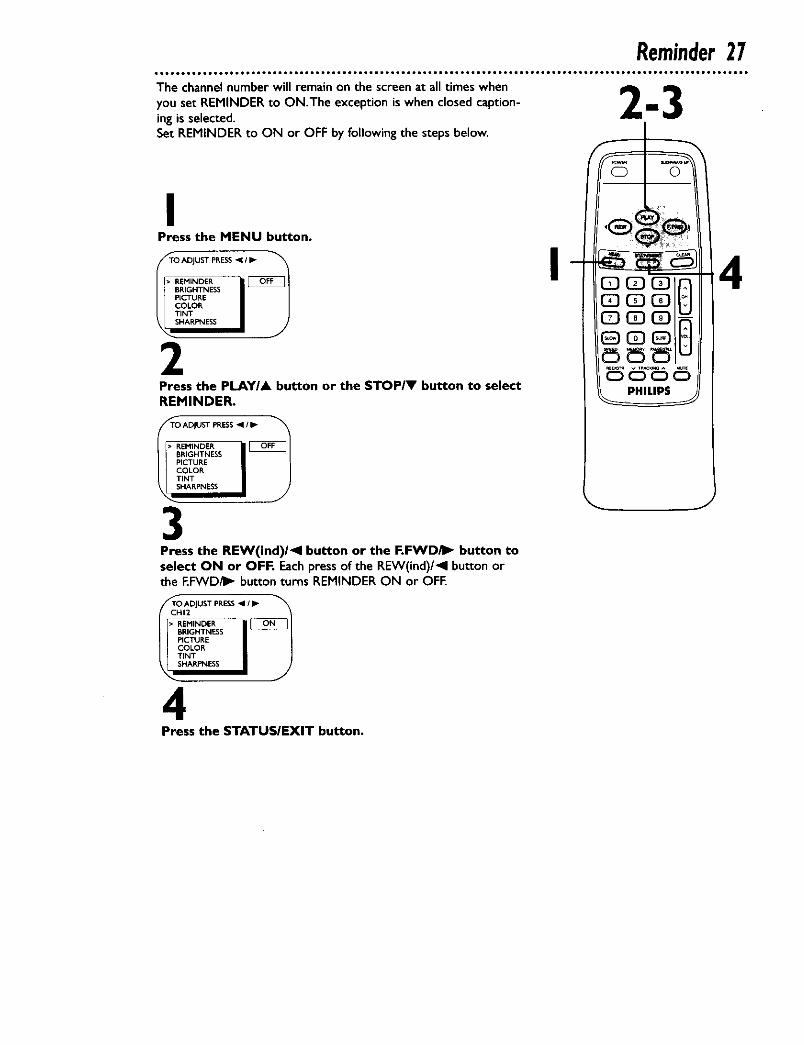
The channel number will remain on the screen at all times when _ Jib
you set REMINDER to ON.The exception is when closed caption- Z innJing is selected.Set REMINDER to ON or OFF by following the steps below.
IPress the MENU button.
I_•T _ ADJUST PRESS ;/_• REMINDERBRIGHTNESS
COLORTINTSHARPNESS
2Press the PLAY/. button or the STOP/V button to selectREMINDER.
T_TO ADJUST PRESS ;/_• REMINDER OFFBRIGHTNESS
COLORTINTSHARPNESS
3Press the REW(ind)/_l button or the F.FWD/I_ button toselect ON or OFE Each press of the REW(ind)/_l button orthe EFWD_ button turns REMINDER ON or OFE
_cTHORI_CHI2TOADJUST PRESS 41_/I_"
BRIGHTNESS
I_CTURECOLORTiNT
4Press the STATUSIEXIT button.
I
PHILIPS

28 Playing• o•oo °°6 ° °°o °°o ° ° °6 °o ° .°° ° °o•°o °o o° • °•o°°°°o ° • °° •• ° °
Follow the steps below to play a tape.
IInsert a tape in the TV/VCR. The power will come on. If thetape's record tab has been removed, playback should s_art auto-matically.
I insert a tape in theTVNCR.
Press the STOP/EJECT buttonon the TV/VCR.
f
2If playback does not start automatically, press the PLAY/A
button to start playback. _
3Press the STOPIY button on the remote control or the
STOP/EJECT button on theTVIVCR once to stop play-back.
4Press the REW(ind)/41 button to rewind the tape.
When the tape has finished rewinding, press the
STOP/EJECT button on theTV/VCR to remove the tape.
3
S-VHS Quasi Play Back (SQPB)
This unit has a SQPB function that allows you to view a taperecorded in S-VHS format.A tape recorded in S-VHS format will
play the same as a tape recorded in normal format.This unitdetects whether the tape is recorded in S-VHS format or innormal format.
Helpful HintsJ,m,
If the tape you want to play isalready in the TV/VCR, turn on the
TV/VCR power, then press thePLAY/A button.
Playback features and options areon pages 3 7-4 I.
When you play a tape recorded inS.VHS format on this unit, you can
not get the high resolution thatwould be available on an S-VHS
VCR.Noise lines (black and white
streaks) may appear on the picture.

Recording29** o* ******** *o **g ° *** °*°*°** *** *° ********ll ° ***** *° i************l °**°°°*o ii** ° i****l °° *********** ° ********** °**
Read and follow the steps below to record a'lV program.
IPlace a tape with its record tab intact (see page five) in theTV/VCR. The power will come on. Or, if the tape is already intheTV/VCR, press the POWER button to turn on the
TV/VCR, if necessary.
2Press the SPEED button until the desired tape speed
appears on the TV/VCR screen. Details about tape speed are givenbelo_
3Use the CH(annel) _/_ button or the Number buttons toselect the channel to be recorded. (Channels cannot be changedduring recording.)
4Press the REC(ord)/OTR button once to start recording.TheRECORD light will glow.• If there is not a tape in the "I-V/VCR,NO CASSETTEflasheson the
screen briefly.e If the tape does not havea record tab,PROTECTED CASSETTE
CANNOT RECORD flasheson the screen briefly.TheTV/VCRwill eject the tape. Insert another tape.
5To pause the recording (for example, during commercials),press the PAUSE/STILL button. The RECORD lightwill flash.Toresume recording, press the PAUSE/STILL button again orthe REC(ord)/OTR button. The RECORD lightwill glow.
6To stop recording, press the STOPIV button.
Tape SpeedsThis chart shows the recording/playback time for three types of
video cassettes (T160,T 120, and T60).There are three playbackspeeds: SP,LR and SLR During playback, theVCR selects the tapespeed automatically.When recording, you can change the tapespeed using the SPEED button.You cannot record in LP speed.
Tape Speed
SP(StandardPlay)
LP(LongPlay)
(playbackonly)SLP(SuperLong Play)
Cassette type / Playback TimeT 160 T 120 T60
2 hrs.2 hrs. I hr.
40 rains.
5 hrs.4 hrs. 2 hrs.
20 mins.
8 hrs. 6 hrs. 3 hrs.
You cannot record one channel while
watching another.Recording options are on pages30-36.
You cannot record if DEFEAT
RECORDING is set to ON. (REC
DEFEATED will flash on the screen.)Details are on page 36.
If you pause a recording for morethan five minutes, the TV/VCR will
switch to Stop mode automaticallyto protect the video cassette tape
from damage.You can change the tape speed withthe SPEEDbutton while a recording
is in progress, but some distortionmay appear on the tape.

30 One-TouchRecording• o•.o• o. o • °o•°o• ° o o. • °• o . °°•oo •° •• • o • • •ll,lJoo • •l .00 .ooJ.ooo. •,t • •0 .oo•1o •,.•••..•1 •o 0• ,•••to•••••• ••• o •• o • • • ••
The One-Touch Recording (OTR) function allows you to program animmediate timed recording from 30 minutes to eight hours longwithout setting the timer.Before you begin,make sure:• Channelsare set up.• There is a tape in theTV/VCR.The record tab mustbe intact.
IUse the CH(annel) _lv button or the Number buttons toselect the channel you want to record.
2Press the SPEED button until the desired recording speed
(SP or SLP) appears on the screen, Details are on page 29.
,
Press the REC(ord)/OTR button repeatedly until the desired
recording length appears in the upper right corner of the screen.Recording will begin immediately.The RECORD light will appear.
_OOTR LENGTH 030 1CHF2L_NGTH PRES_ OTRCANCEL PRES_ CLEAR
_ J
4To stop an OTR before recording is finished, press theSTOP/EJECT button on theTV/VCR.
Or, press the REC(ord)/OTR button, then press the CLEAR
button, then press the STOP/V button on the remote con-trol.
4
23
Helpful Hints
To check the time remaining for an
OTR after the OTRhas been set,press the STATUS/EXIT button.
To change the recording length while
an OTR is in progress, press theREC(ord)/OTR button until the
desired recording length appears onthe screen.
You can not pause an OTR.To cancel an OTR but continue
recording, press the REC(ord)/OTRbutton, then press the CLEAR but-ton.
Youcannot record if DEFEATRECORDING is set to ON. Details
are on page 36.You can change the tape speed withthe SPEEDbutton while a recording
is in progress, but some distortion
may appear on the tape.If the end of the tape is reachedduring an OTR, the TV/VCR will ejectthe tape and turn itself of_

Rerecording(TapeDuplication)31• i,*l,to*l e.j•• • •11 •toe• ••t,• •, •tt • to• t 1oo iJ t*• •ol • • •,••ooJ_ •lJo• oo..•. • .o. • ,. • o ,o, , • • o,,.• o• .o.,,. oo • ,o .,,, o. •
AUDIO and VIDEO OUT Jacks on source unit
(VCR or Camcorcler)
Audio Cable (white) fromAUDIO OUT to AUDIO In
_! I --J-
wo_o _01o
°°°°°°°°°°°°°°°°oo0ooooQooooooooooooooooooooooooo
ooooooooooooooaoo
ooooooooao_oooooooooooooooooooooooooooooooooooooo
-L
Video Cable (yellow) fromVIDEO OUT to VIDEO In
AUDIO and VIDEO In
Jacks on TV/VCR
IMake the connections shown above, using audio and video
cables. Connect the source unit (VCR or camcorder) to a
power source after connections are made.
2The source unit will play your tape. Insert a prerecorded tape in
the source unit. If playback begins, press the STOP button on theunit.
3The TV/VCR will record your tape. Insert a blank tape in the
TV/VCR. Make sure the tape's record tab is intact.The TV/VCR
power will turn on automatically.
4Point the TV/VCR remote control at the TV/VCR. Press
Number buttons 0, 0 so that A/V IN appears on the screen.
5Point theTV/VCR remote control at theTV/VCR. Press the
SPEED button until the desired tape speed (SP or SLP)appears on the screen.
6Press the PLAY button on the source unit and the
REC(ord)/OTR button on yourTV/VCR at the same time.
Copying will begin.
7To stop copying, press the STOPIEJECT button on the
TV/VCR, then stop the tape on the source unit (VCR orcamcorder).
elpful Hin sUnauthorized recording of copy-righted television programs, video
tapes, or other materials mayinfringe on the rights of copyright
owners and violate copyright laws.
Different brands of equipment mayoperate differently.Make sure all connections are
secure. Otherwise, you may notrecord both picture and sound.
• Audio and video cables are notincluded.
• Programs that are copyright protect-
ed may not record clearly.

32 TimerRecordingFollow the steps below to program the TVNCR to record'iV pro-grams while you're away from home.The TV/VCR will turn itself
on, record, and turn itself off automatically. Before you begin, makesure:
• The clock is set. If not, CLOCK. MUST BE SET appears, fol-lowed by the SET CLOCK. menu.
• Channels are set up.
There is a tape in theTV/VCR. (Make sure the tape's record tab
is intact and the tape is long enough to record the program.)
Complete each step within 60 seconds of completing theprevious step. If you don't, you may start again at step I.
IPress the MENU button.
i LtI VC R pROGRAM '
VCR SETUPCAPTmN
i REM;NDERBRIGHTNESS
2Press the PLAY/A button or the STOP/Y button to select
VCR PROGRAM, then press the F.FWD/_ button.
CDG ] 0[D CD
3 --Q0 0_ PoL
VCRPROGRAM
• ONCEDAILY(MON-FRI)WEEKLYPROGRAi_I REVIEW
SELECT &V CHOOSE I_TO END PRESS EXIT
J
3Press the PLAY/A button or the STOPIY button to select
a ONCE, DAILY, ORWEEKLY recording.Then, press theF.FWD/I_ button.
• ONCE: The TV/VCR will record aTV program on any day youchoose, up to 12 months away.
• DAILY: The TV/VCR will record every day from Monday to
Friday - starting at the same time and recording the same channelfor the same length of time.
• WEEKLY: The TV/VCR will record the same channel on the
same day, at the same time, and for the same length of timeevery week.
Daily PROGRAM-i _3_s67s
Recording(example)
SELECT PROGRAM NUMBER
END PRESSEXIT
Helpfql Hints
With ShowGuard, you don't have to
worry about losing your timer
recordings. If the power fails, pro-grammed timer recordings will berestored when the clock is reset.
(The clock will reset itself automati-cally if you are using the AUTOCLOCK feature. Details are on
pages 14-17. If you are not usingthe AUTO CLOCK feature, reset the
clock manually. Details are on pages12-13.) The timer recording will not
occur only if the timer recording wasscheduled to take place during thepower failure.
Youcannot set a timer recording ifDEFEAT RECORDING is set to ON.
Details are on page 36.

TimerRecording(cont'd)33o,,o., , o .oo. ,o° o. , ,,,, ,.o,.,o . ,. ,o..,, ,., o ..° o,., o,• oJ m o_o • • o*, •,* • •_ ,oo,_• *o, •o _• 1_• •* •o =•_•o_ •1 •
4Use the Number buttons (I-8) to select a position inwhich to store the timer recording. Flashing numbers indi-cate an open position (one in which a timer recording has notbeen stored yet).
NOTE: If you select a number that already has been used to store a
timer recording, PREVIOUSLYSET PROGRAM will appear on the screen
for a few seconds.Then information about the program in that positionwill appear on the screen. If this happens, press the STATUS/EXIT but-
ton. Then use the Number buttons to select another position.
5Use the Number buttons to enter the channel of theTVprogram you want to record.
If you are recording from line input, press 0, 0.A/V IN willappear on the screen.
If you are recording using a Cable Box, enter the Cable Box
output channel (03 or 04). Be sure to select the channel of theTV program at the Cable Box and leave the Cable Box on for
the timer recording.
O_E T_MEPROGRAM 1
PROGRAM I
CHANNEL -
TO CORRECT PRESSCLEAREND PRESSEXIT
J
6Press two Number buttons for the hour(s) you want therecording to begin. Press two Number buttons for the
minute(s) you want the recording to begin. Press I forAM
or 2 for PM. For example, for 9:30 PM, press 09, 30, 2.
PROG_AM I
CHANNEL 10
TIME ON - - : - -
TO CORRECT PF,ESSCLEAREND PRESS EXIT
7Follow the instructions in step 6 to set the recording's
stop time. (AM or PIN will be set automatically.)_ONE TIME PROGRAH
PROGRA M I
CHANNEL 10
TtME ON 09:30 PMTIME OFF - -
TO CORRECT PRESSCLEARTO END PRESS EXIT
Instructions continue on page 34.
'QQ G,
i
J
Helpful Hints
If the numbers entered do notmatch the TV/VCR's clock or calen-
dar, the entry will be rejected and a
question mark will appear on thescreen,
To make corrections while you are
programming a timer recording,press the CLEAR button until the
information you want to change isflashing. Then enter the correctinformation.

34 TimerRecording(cont'd)
8 II 10Press the Number I button to record in SP speed orpress the Number 2 button to record in SLP speed. Details
about tape speed arc on page 29. You cannot use the SPEED buttonat this time.
O_f_N E TIM E PROGRA M _"
PROGRAM I
CHANNEL 10
TIME ON 0930 PM
TIME OFF I 1(30 pM
REC SPEED SLP
Sp=I SLP=2
TO CORRECTPRESSCLEARTO END PRESSEXIT
9Press two Number buttons for the month and two
Number buttons for the day you want the program torecordS. For example, for July 10, 2000, press 07, 10.The day of
the week and the year will be displayed automatically. (You cannotprogram the TV/VCR to record more than one year in advance.)If you selected a DALLY recording at step 3, you can not enter a
date that is a Saturday or Sunday.
_ONE T_ME PROGRAM
PROGRAM I
CHANNEL l0
TIME ON 09:30 PM
TIME OFF I I:00 PM
REC SPEED SLP
START DATE 07/10/2000
MONDAY
TO CORRECT PRESSCLEAR
_TO END PRESS EXIT
10Press the STATUS/EXIT button. PROGRAM WAS COM-PLETED PLEASETURN OFF FORTIMER RECORDING will
appear on the screen.• If there is not a tape in the'I'VNCR, PLEASE INSERT CASSETTE
also appears on the screen.I If there is a tape without a record tab in the'1"VNCR, PLEASE
REMOVE CASSETTE also appears on the screen. If this happens,insert a different tape.
• If PROGRAM NOT COMPLETED appears, start again at step I.
IIPress the POWER button to turn off the TVIVCR power.The RECORD light will flash slowly if a tape is in theTVNCR.If you forget to turn off the TV/VCR, PLEASE TURN OFF FOR
TIMER RECORDING appears on the TVNCR screen two minutesbefore a timer recording is scheduled to begin.
8
Turn off the TV/VCR
for the recording.
Insert a tape in
the TV/VC R.
Leave the Cable
Box/DBS on
(if applicable).
Helpful Hints
PROGRAM NOT COMPLETED /
CLASH may appear on the screenwhen you finish setting a timer
recording. This means that the timerrecording you just programmed and
another timer recording overlap, andthus the current timer recording willnot be carried out.
To stop a timer recording that is in
progress,press the STOP/EJECTbut-ton on the TV/VCR.Tocompletelyclear the timer recording so it will not
resume when the TV/VCR power isturned off, see page 35.
Please see page 54 for moreHelpful Hints.

Checking or ClearingTimer Recordings
IWith the TV/VCR on, press the MENU button.
2Press the PLAY/A button or the STOP/Y button to select
VCR PROGRAM, then press the F.FWD/I_ button.
3Press the PLAYIA button or the STOP/V button to select
PROGRAM REVIEW, then press the F.FWD/I_ button. The
timer recording information for the program in the lowest num-
bered position will appear on the screen. If no timer recordingsare programmed, nothing will happen when you select PROGRAMREVIEW and press the EFWD/I_ button.
4Press the F.FWD/I_ button to display information about
the next programmed timer recording. (If you do not pressa button within 10 seconds, information about the next pro-grammed timer recording will appear.)This will continue until all
positions have been displayed.Then, the menu will disappear.You
can exit the Program Review at any time by pressing the STA-TUS/EXIT button.
5To cancel the timer recording displayed, press the CLEAR
button. Either the display will disappear or information about
other timer recordings will appea_ If you do not press any otherbuttons, the display will disappear after all timer recordings havebeen displayed.
6Repeat steps I-4 to make sure you have cleared the cor-rect position.
i m
C3 CZ3QCS3
© L
5
Helpful Hint :'__
With ShowGuard, you don't have toworry about losing your timer
recordings. If the power fails, pro-gram/ned timer recordings will berestored when the clock is reset.
(The clock will reset itself automati-
cally if you are using the AUTOCLOCK feature. Details are on
pages 14-17. If you are not usingthe AUTO CLOCK feature, reset the
clock manually. Details are on pages12-13.) The timer recording will not
occur only if the timer recording wasscheduled to take place during thepower failure.

36 DefeatRecording• .• ..•..•.. ° °°.° • °°. ° ° ° ° ° ° ° . ° ° .oo • .to• m•• • oDD. ••o1 Jio JQ..o.o...too•.ooooo Do• 1• •tooqo •1.•o too• ..oo•l. ooooot to iol
Follow the steps below to prevent accidental recording.
IPress the MENU button.
VCR PROGRAM ' iVCR SETUPCAPTION
i REMINDERBRIGHTNESS
2 I-Press the PLAY/A button or the STOP/V button to select
VCR SETUP, then press the F,FWD/I_ button.
'_ VCR SETUP 1
• ONE TIME PLA.y [ON]
RE._SC ] pLAYO REEN MODE
_T DEFEAT RECORDING [OFF]
BLUE BACKGROUND [ON]
SELECT &V CHOOSE I_O END PRESS EXIT
3Press the PLAY/A button or the STOP/V button to select
DEFEAT RECORDING, then press the F.FWD/_ buttonso that ON appears beside DEFEAT RECORDING.
ONE TIME PLaY [ON]REPEAT PLAYON-SCREEN MODE
• DEFEAT RECORDING [ON]BLUE BACKGROUND [ON]
SELECT AY CHOOSE IPO END PRESSEXIT
4Press the STATUS/EXIT button.
5Now, REC DEFEATED will flash on the screen when youpress the REC(ord)/OTR button.
C DEFEATED 1
v
C) C:_C)C:_
• If you set DEFEATRECORDING toON after a timer recording has
been set, the timer recording will notOccur.
You can not program a timer record-ing if DEFEAT RECORDING is set toON.
To set DEFEAT RECORDING to OFF,
repeat steps I-2 above.At step 3,press the PLAY/A button or theSTOP/v button to select DEFEAT
RECORDING, then press theEFWDiI_ button so that OFF
appears beside DEFEAT RECORD-ING. Press the STATUS/EXITbutton.

RepeatPlay37eo.i oo De, °o,°o ,e** , • o •• o ol•o,•o ° _••••l_••,•• ° oQ•••lo••••o,,•••*• ,o o. o ,•_ o°°°oo •0•,• °, _• o ,• ° ,••, ° ,,••, o°° • o. • ° • o
Follow tEe steps below to program the TV/VCR to play a tapeover and over
IPress the MENU button.
• p_tMSETUp PRESS_ i
__i VCR PROGRAM
VCR SETUPCAPTION
' REMINDER
2Press the PLAY/A button or the STOP/Y button to select
VCR SETUP, then press the F.FWD/I_ button.
_TEO VCR SETUP 1
• O1_ T_ME PLAY [ON]REPEAT PLAYON-SCREEN MODEDEFEAT RECORDING [OFF)BLUE BACKGROUND [ON]
SELECT AV CHOOSE i_END PRESSEXIT
3Press the pLAy/A button or the STOP/V button to select
REPEAT PLAY, then press the F.FWD/I_ button so that
ON appears beside REPEAT PLAY.
_T_O VCR SETUP 1
ONETIME PLAY
• REPEAT PLAY [ON]ON SCREEN MODE
DEFEAT RECORDING [OFF)BLUE BACKGROUND [ON]
SELECT AV CHOOSE I_END PP,ESSEXIT
4Press the STATUS/EXIT button. Now, when a tape has fin-
ished playing, the'l'V/VCR will rewind it and start playback again.
('iV programming will appear while the tape is rewinding.)
The TVIVCR will stay in Repeat Playmode until you set ONE TIME PLAYto ON, even if the TV/VCRis turnedof_ To set ONE TIME PLAYto ON,
follow steps I-2 above.Then, pressthe pLAY/A button or the STOP/vbutton to select ONE TIME PLAY.
Pressthe F.FWDfJ,, button so that
ON appears beside ONE TIME PLAY.
Then,press the STATUS/EXIT button.The real-time counter memory will
not function during Repeat Playmode.

38 A.BRepeatPlayi,.eo. ,_, o 116,e_. °o toe_o o°oo tt,._,m , i.tooo oo let6oqooQQtt*,t_om ,°oo,o t_oel oo Je_6 o°°°oo t6to_ • IOOOOle_O ° • ° le• °° ,_ •
Follow the steps below to program the'rV/VCR to play the mater-ial between two specified points (A and B) on a tape over and | Insert a tape in the TV/VCR.over again. I
IInsert a tape in the TV/VCR.
2Press the MENU button.
VCR SETUP
CAPTION
REMINDER
• BRIGHTNESS
3Press the PLAY/& button or the STOP/V button to selectVCR SETUP, then press the F.FWDfI_ button.
• ONE TIME PL_.Y [ON]REPEAT PLAYON-SCREEN MODEDEFEAT RECORDING [OFF]BLUE BACKGROUND [ON)
SELECT &V CHOOSE I1_O END PRESSEXIT
4Press the PLAY/. button or the STOPIV button to selectREPEAT PLAY.
ONETIME PLAY [ON]• REPEAT PLAY
ON-SCREEN I_iOD E
DEFEAT RECORDING [OFF]GLUE BACKGROUND {ON]
SELECT &V CHOOSE I I_END PRESS EXISt
5Press the F.FWD/I_ button repeatedly so that A-Bappears beside REPEAT PLAY.
I=T VCR SETUP 1
ONETIME PLAy• REPEAT PLAy [A-B]
ON-SCREEN MODEDEFEAT RECORDtNG [OFF]BLUE _*ACKGROUND [ON]
SELECT AV CHOOSE IPO END PRESSEXIT
2
... j
TocancelA-B Repeat Play,set ONETIME PLAYto ON.To set ONETIME
PLAYto ON, fonow steps 2-3 above.Then,press the PLAY/A button or theSTOP/v button to select ONETIME
PLAY.Pressthe EFWD/II_ button so
that ON appears beside ONE TIMEPLAY.Then,press the STATUS/EXITbutton.
The end posr,Jon (B) must be later onthe tape than the start position (A).
A-BRepeatPlay(cont'd)39• ,o•et, _• • • • II ,• ,• tl, ,Jr 1, • *oe,• • _l •_t÷oee, t_eJ.,.° °,°°. °° .. °°,°..°°°° ° ,o.°° .°,o° °°.,°,° o° °° °° ,..,.°°,°° °° .. ,, •
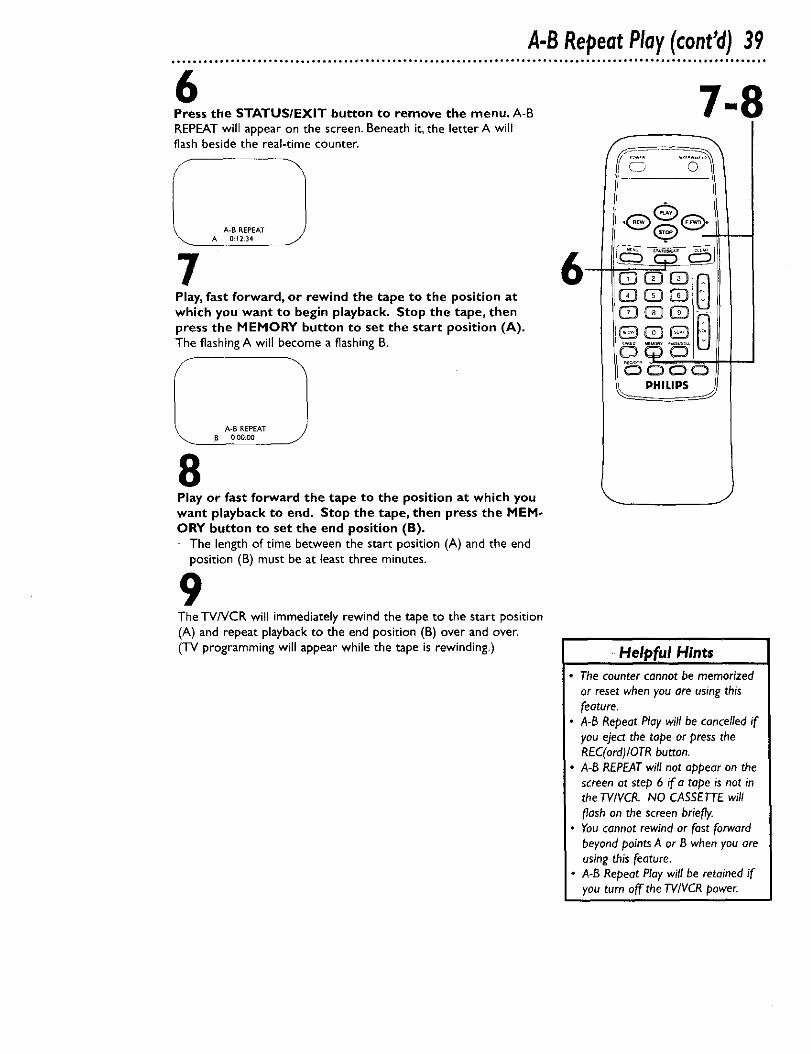
6 78Press the STATUS/EXIT button to remove the menu, A-B m
REPEAT will appear on the screen. Beneath it, the letter A willflash beside the real-time counter.
A-BREPEATA 0 _2:34 j
7Play, fast forward, or rewind the tape to the position at
which you want to begin playback. Stop the tape, thenpress the MEMORY button to set the start position CA).The flashing A will become a flashing B.
I A-B REPEAT 1
B 0:00:O0
8Play or fast forward the tape to the position at which you
want playback to end. Stop the tape, then press the MEM-ORY button to set the end position (B).
The length of time between the start position (A) and the endposition (B) must be at least three minutes.
9The TV/VCR will immediatelyrewind the tape to the start positionCA)and repeat playback to the end position (B) over and over.(TV programming will appear while the tape is rewinding,) Helpful Hints
i i
The counter cannot be memorized
or reset when you are using this
feeture.
A-B Repeat Play will be cancelled ifyou eject the tape or press the
REC(ord)/OTR button.A-B REPEATwill not appear on thescreen at step 6 if a tape is not inthe TV/VCR. NO CASSETTE will
flash on the screen briefly.Youcannot rewind or fast forward
beyond points A or B when you are
• using this feature.A-B Repeat Play will be retained if
you turn off the TV/VCR power.

40 Real-TimeCounterMemory• • .° •° ° • ° °°•.° °• 6***1 ***ooo*** *,l*** ******to************ .**************m ***.46 i****tl .6._***_,, *****tj*,,i.***.
Follow the stepsbelow to reset the real-time counter to zero at atape location you want to refer to later.
IPlay, fast forward, or rewind a tape to the location thatyou would like to refer to later. Stop the tape.
2Press the STATUS/EXIT button. The real-time counter willappear on the screen.
CHI0
P I :23:45
3While the counter remains on the screen, press theCLEAR button to reset the real-time counter to zero.
4While the counter remains on the screen, press the MEM-ORY button so that M appears on the screen. To erase areal-time counter memory,pressthe MEMORY button so that theM disappearsfrom the screen.
M 0:00:_
J
5To go to a tape location where the real-time counter wasreset to zero, press the REW(ind)/_l button or theF.FWD/I_ button when playback is stopped.When thetape reaches the point at which the counter was set tozero, the tape will stop. Press the PLAY/A button towatch the tape.
PHILIPS
HelpfulHan ......The real-time counter memory will
not function during Repeat Playmode. Details are on page 37.
-Youmay only set one real-timecounter memory at a time. If youset the real-time counter to zero at
a second location, the previous real-time counter to zero setting will be10st.

Forward and Reverse Searching (SP/LP/SLP)
IDuring tape playback, press and release the EFWD/_ button orthe REW(ind)/11 button.A fast forward or reverse picture search
will begin.
2To return to normal playback, press the PLAY/A button.
Super High Speed Searching (LP/SLP)
IDuring tape playback,press the EFWD/I_ button or theREW(ind)/_l button, then press again.TheTV/VCR will nowsearch_insuper high speed.
2To return to normal playback,press the PLAY/A button.
f
Q ©
Viewing a Still Picture
IDuring tape playback,press the PAUSE/STILLbutton.A still picturewill appearon the screen.
2To release the still picture and return to normal playback,pressthe PLAY/A button or press the PAUSE/STILLbutton again.
Viewing a Slow Motion Picture
IDuring tape playback,pressthe SLOW button. The tape will play inslow motion.
2To releaseSlow mode and return to normal playback,pressthePLAY/A button.
Slow and Still modes will automati-
cally switch to Stop mode after fiveminutes to protect the TV/VCR and
the tape from damage.SP/LP/SLPmeans this feature will
work with tapes recorded in
Standard Play, Long Play, or SuperLong Play. For details about tapespeed, see page 29.LP/SLPmeans this feature will work
with tapes recorded in Long Playand Super Long Play. For details on
tape speed, see page 29.During forward and reverse search-ing, horizontal noise bars will
appear on the TV/VCR screen.

42 SmartLock
SmartLock enables parents to prevent their children from watch-ing inappropriate material on'IV.SmartLock reads the ratings for programming (except for newsand sports programs, unedited movies on premium cable channels,and EmergencyBroadcast System signals),then denies accesstoprogramming if the program's rating meets or exceeds the limita-tions you select.The ratings are defined on page45.To block ratings, follow the steps below.
IPress the MENU button.
EvEwI 'Ess1SMARTLOCK
! Ii VCR SETUP |
2Press the PLAYIA button or the STOPIY button to selectSMARTLOCK.Then, press the F.FWD/I_ button.
I SMARTLOCK 1Enter Your Access Code
3Use the Number buttons to enter your access code.The default code is 071 I. If you havenot set upyour personalaccesscode, you shoulduse 071 I. (To set up your personalaccesscode,see page44.)The SMARTLOCK menu will appear.
$MARTLOCK "IEnterYour Access Code
4Press the PLAYIA button or the STOPIY button to select
BLOCK.Then, press the F.FWD/_ button.
IT SMARTLOCK
• BLOCK
CHANGE CODE
SELECT Ay CHOOSE IJ-
O END PRESS EXrT
If the "Incorrect AccessCode..." mes-
sage appears after step 3, enter thecorrect accesscode.
Programming may be rated by theMo_on PictureAssociation of America
(MPAA) or according to the TelevisionParental Guidelines. In order to block
any inappropriate programming, set
your lim_ in both places (MovieRatJngsand Parental Guidelines).Youwill complete steps 1-7 twice,
choosingMovie Ratings at step 5 thefirst time, then choosing Parental
Guidelines at step 5 the second tJme.Youcan not view tape playback if theratJngof the tape is blocked.
If you enter the accesscode once,you may change channels without
seeing the "CHANNEL XXBLOCKED" message again. If you
turn off the TV/VCRpower, you will beasked for the accesscode again when
you tune to a blocked channel.

SmartLock(cont'd)43• • •• o• • , ..• • °. • • , ,,..,°..,. .. . • • . • ,. ,.. , . o•
5 5-6Press the PLAY/A button or the STOP/Y button to select
Movie Ratings or Parental Guidelines. Then, press theF.FWD/I_ button.
_T BLOCK
Movie Ra_mgsParent_l Guldehnes
SELECT .V CHOOSE _"O END PRESS EXiT
f MOVIE RATINGS _'
PG [ON 1PG- _3 [ONJ
{ON]NCq7 [ON]x [ON]
SELECT A_" CHOOSE I_
_TO END PRESS EXIT J
6Press the PLAYIA button or the STOP/Y button to select
the rating you want to block.Then, press the F.FWD/I_
button so that ON appears beside the rating.For example, if you set PG to ON, you may not view PG program-
ming because the block is on. Programs with a PG or higher ratingwill be_blocked.A"CHANNEL XX BLOCKED..." message will
appear when someone tries to access such programming.
f PARENTAL GUIDELINES
IT TV-Y {OFF]
TV.Y7 •
T_G [OFF !TV-PG •TV. J4 •
TV-MA •
SELECT AT CHOOSE _"0 ENZ) PRESS EXIT
More specific sub-ratings are available for TV-Y7,TV-PG,TV- 14,
and TV-MA. (See example below.) When you press the EFWD/_button to turn on rv-Y7,TV-PG,TV- 14 or TV-MA, additional sub-
ratings will appear.tf you select the rating category, such as TV-PG, and turn it on or
off, the specific sub-ratings, such asV for Violence, will turn on oroff automatically.You can always turn specific sub-ratings on or
off by selecting them individually. However, you may only set asub-rating to ON if the rating category is set to ON.
• Ratings are defined on page 45.
Exampleof specificsub-ratings
• IV PG [ON]
D [ON]L [ON]S [OFF]
v [OFF]
SELECT AT CHOOSE I_END PRESS EXiT
7Press the STATUS/EXIT button.
Helpful H!ntS
If the "CHANNEL XX BLOCKED..."or "PLAYBACKBLOCKED..." message
appears and you want to view thisprogramming, enter your accesscode. The channel (or tape play-back) will remoin blocked until youenter the correct code. If you do notknow the code, you will have toselect another channel (using theCH(annel) _/_7 buttons) or pressthe STOP/'_, button.
Ratings will remain blocked evenafter a power failure.
• Youcannot access the menu whenthe "CHANNEL XX BLOCKED..." or
"PLAYBACKBLOCKED..." message
appears.

To change the access code, follow these steps.
I
:_SMARTLOCK
REVIE_V
EXIT
PRIM SETUP
: VCR PROGRAM
VCR SETUP
Press the MENU button.
iPRESS_
2Press the PLAY/A button or the STOP/Y button to select i
SMARTLOCK.Then, press the F.FWD/_" button.
_ SMARTLOCK _ 5Enter Your Access Code
3Use the Number buttons to enter your old access code.
The default code is 071 I. If you have never set up your personalaccess code, use 071 I now.
After you enter the code, the SMARTLOCK menu will appear.
Enter Your Access Code
4Press the PLAYtA button or the STOPIV button to selectCHANGE CODE,Then, press the EFWD_ button.
BLOCK
• CHANGE CODE
SELECT AV CHOOSE I_
END PRESS EXIT
5Use the Number buttons to enter your desired access code
in the New Code space.Then, enter the same code in the
Confirm Code space.Your new access code should be recorded.You will return to the
SMARTLOCK menu.
nt'rm Code
6Press the STATUS/EXIT button.
24
6
i
In order to protect the privacy ofthe access code, an X will appearon the screen instead of the num-
ber you enter.
•If a "Wrong Code..." message
appears on the screen after youcomplete step 5, you entered thewrong numbers in the Confirm Code
space. Repeat the steps on this
page.Youcannot use the default code
after you set up your personalaccess code.
If a power failure occurs, the defaultcode, 071 I, will be the active access
code again.
If you connect the power cord to anAC outlet that is controlled by a wallswitch, your personal access code
will be erased every time you turnoff the power at the wall switch.Thedefault code will be the active code
again.

To check the SmartLock settings, follow these steps.
IPress the MENU button.
i P_IM SETUP
I VCP, SETUP
2Press the PLAY/& button or the STOP/V button to select
REVIEW.Then, press the F.FWD/I_ button so that the
SmartLock settings appear.
Ratings that are blocked will appear on the screen.An "X" will appear if a specific sub-rating is blocked, such asV for
Violence in the "IV- 14 category.
B_OCKED P,ATIN GS
Movie P,a{ings
G PG-13 NC-17Parental G_idetines
......_-Y_.........TV-G D L S V
TV.PG x xTV_i4 x x x x
_TV.MA x x ×
3Press the STATUS/EXIT button.
I
PHILIPS
RATING EXPLANATIONSFor Movie Ratings
G - General Audience
PG - Parental Guidance suggested.PG-13 - Unsuitable for children under 13
R - Restricted; under 17 requires accompanying parent or adultguardianNC-17 - No one under 17 admitted
X - Mature audience only
:or Parental Guidelines• V-Violence• S - Sexual situations
L- LanguageD - Inappropriate dialogueFV - FantasyViolence may frighten children under seven;TV-Y7category only. Some cartoons may have this rating.TV-Y - Appropriate for all childrenTV-Y7 - Appropriate for children sevenand olderTV-G - General AudienceTV-PG - Parental Guidance suggested.TV-14 - Unsuitable for children under 14TV-MA - Mature audience only

46 BlueBackground
If you want the TV screen to be solid blue when a weak signal isreceived, set BLUE BACKGROUND to ON.The screen will beblue and the sound will be muted. Or, if you want to receive theweak signal,set BLUE BACKGROUND to OFF.When you select achannel that is receiving a weak signal,you will see and hear thestatic in the TV programming.To set BLUE BACKGROUND to ON or OFF,follow the stepsbelow.
IPress the MENU button.
•PR"SE O 1_/_R CR PROGRAM! VCR SETUP
CAPTION
EMINDER
[_ BRIGHTNESS
2
I
Press the PLAYIA button or the STOP/v button to select
VCR SETUP, then press the P.FWD_ button.
• ONETIME PLAY [ON]REPEAT PLAYON-SCREEN MODE
DEFEAT RECORDING [OFF]BLUE BACKGROUND [OFF]
SELECT &V CHOOSE •O END PRESSEXIT
3Press the PLAYIA button or the STOP/v button to select
BLUE BACKGROUND.Then, press the F.FWD/_ button
repeatedly so that OFF (or ON) appears beside BLUE BACK-GROUND.
; VC'ESETUP 1
ONE TIME PLAY [ON}REPEAT PLAYON-SCREEN MODE
DEFEAT RECORDING [OFF]• BLUE BACKGROUND [ON]
SELECT &V CHOOSE •O END PRESS EXIT
4Press the STATUSIEXIT button.
Helpful Hint
A blue screen may appear briefly
between channel changes if BLUEBACKGROUND is set to ON.To
avoid having the brief blue screen,set BLUE BACKGROUND to OFF.

SleepTimer47Use the SleepTimer to program the'I-V/VCR to shut off in a cer-tain amount of time.
IPress the SLEEP/_fAKE UP button.
TO ADJUST PRESS_1_
• SLEEP OFF"_
z zIPress the PLAY/A button or the STOP/_ button to select _.mSLEEP.Then press the REW(ind)/_l button or theF.FWD/II_ button to select 30 MIN(utes), 60 MIN(utes), 90MIN(utes), or 120 MIN(utes). (Youcan not set the SleepTimerduringa recording.)
3Press the STATUS/EXIT button. The TV/VCR will shut itselfoff after the specifiedamount of time.One minute before the TV/VCR shutsitselfoff,the secondswillcount down on the screen.
GOOD NIGHT appearson theTV/VCR screen 10secondsbeforethe TV/VCR shutsitselfoff.
I
PHILIPS
J
To cancel the SleepTimer, press theSLEEP/WAKE UP button. Press the
PLAY/_ button or the STOPS" but-
ton to select SLEEP,then press theREW(ind)/_l button or theEFWD/I_ button to select OFF.Press the STATUS/EXIT button.To see how much time remains
before the TV/VCR shuts itse/f off,
press the SLEEP/WAKE UP button
once. If necessary, press the PLAY/Abutton or the STOP/_ button to
select SLEEP.The remaining time willappear beside SLEEP.Toremove thedisplay, press the STATUS/EXIT but-ton.
The Sleep Timer will be cancelled ifyou make a recording after you set
the SleepTimer.

48 WakeUpTimerThe Wake Up Timer turns on the TV/VCR automaticallyat a speci-fied time within the next 24 hours.You may set the'I'V/VCR toturn on at a'lV channel (the channel at which the'rV/VCR was setlast) or with VCR playback.To set the Wake Up Timer, follow thesteps below. Before you begin:• Make sure the clock is set. If the clock has never been set,
CLOCK MUST BE SETwill appear on the screen at step 2.Thenthe SET CLOCK menu will appear.
• Make sure a tape is in the TV/VCR if you want the TV/VCR tostart tape playback at the specified time.
• Make sure no timer recordings are set for the time at which youwant the TV/VCR power to come on.
IPress the SLEEP/_/AKE UP button.
TO ADJUST PRESS_I_Io
: WAKE UPIr_"-T"E I •\r i J2Press the PLAY/A button or the STOP/v button to selectWAKE UP. Then, press the REW(ind)/_l button or theF.FWD/II_ button to selectTV ON orVCR ON.
SLEEPI <EUPI S
3
_ -I
J
Press the PLAYIA button or the STOP/_ button to selectON-TIME. Then, press the REW(ind)/_l button or theF,FWD/_ button to select your desired wake up time.Eachpress of the EFVVD/_ button or the REW(ind)/_l buttonwill increase (or decrease) the time by 10 minutes.
TO ADJUST PRESS
-TIN_R
SLEEPWAKE UP
4Press the STATUS/EXIT button.
5Press the POWER button to turn off the TVIVCR.TheTV/VCR will turn itself on at the specified time.
To cancel the Wake Up Timer, pressthe SLEEPIWAKE UP button. Pressthe PLAY/A button or the STOP/v
button to select WAKE UP.Then,
press the REW(ind)/_l button orthe F.FWD/I_" button to select OFF.Press the STATUS/EXIT button.

VolumeBar49
Usually,the volume bar appearswhen you pressthe VOL(ume)z_/_7 button. If you do not need it, set theVOLUME BAR to OFEFor example, when you watch a program that is being broadcastwith closed captions, you may choose to set the VOLUME BAR toOFF so the captions can remain on the screen.The captions willremain on the screen even when you press theVOL(ume) _/_7button or the MUTE button.
IPress the MENU button.
VCl_ PROGRAMVCR SETUPCAPTIONREMINDERBRIGHTNESS
2Press_the PLAY/& button or the STOP/V button to select
PRIM. SETUP. Then, press the F.FWD_I,- button.
_ PRIMARY SETUP _']
• SELECT LANGUAGEAUTO PP,OGI_AMMIN GCH MEMORY REVIEVVVOLUME BAR [OFF}SET CLOCK
SELECT &v CHOOSE I_
_ TO END PRESS EXIT
3Press the PLAY/A button or the STOP/V button to selectVOLUME BAR, then press the F.FWD/I_ button. Eachpressof the EFWD_I_ button will turn theVOLUME BAR ON orOFE
'/- f3RIt'IARY SETUP _x
SELECT LANGUAGE JAUTO PROGRAMMINGCH MEMORY REVIEW
• VOLUME BAR [ON]SET CLOCK
SELECT &V CHOOSE b-
_. TO END PRESS EXIT
4
Ic3ooiHCZ)C_ C_ _
4
Press the STATUSIEXIT button.

50 ClosedCaptionWhen you watch a program that is being broadcast with closedcaptions, you can access on-screen boxes containing the pro-
gram's dialogue (for example, what a character is saying), dialoguein a foreign language, or information (such as a channel guide,
schedule, or announcements). Follow the steps below to selectclosed captions.
Not all TV programs and commercials are broadcast with closed rollcaptions. Similarly, all types of closed captions (second language, .$half-screen text, etc.) are not always broadcast. If closed caption-
ing is not broadcast, you cannot receive it.This does not indicatea problem with the TV/VCR. Refer to your area's TV program list-ings for the shows offered with dosed captions. | --
!IPress the MENU button.
:_ PRIM SETUP -- PP,ESS_ i
VCR TUPI I rI )
2Press the PLAY/A button or the STOP/Y button to selectCAPTION.
3Press the REW(ind)/_l button or the F.FWDil_ button to
select your desired mode.
The selected closed caption mode will appear beside CAPTIONon the screen.
• CAPTION I displays standard closed captions (what a characteris saying).
• CAPTION2 displays foreign language closed captions (foreignlanguage words showing what a character is saying).
TEXTI and TEXT2 display half-screen text (such as a channelguide, schedule, or announcement).
• OFF turns closed captions off. Captions will not appear on thescreen.
Q ©
c_ c:_ c:) c:) j
2
F_T_ 4__ Example:
TO ADIUST PRESS
XpTi6N j _ CAPTION I! REMINDER
i BRIGHTNESS i Menu
i PICTURE
COLOR Screen
To cancel closed captions, follow
steps I-2.At step 3, press theREW(ind)/_l button or theF.FWD/I_ button to select OFF.Press the STATUS/EXIT button.

4Press the STATUS/EXIT button.The type of closed captionsyou selected at step 3 will appear on the screen if available.
Standard Closed Captions
Half-screen text
©
You cannot view closed captions dur-
ing recording or tape playback ifCOUNTER ONLY is set to ON.
Details are on page 26.
Abbreviations, symbols, and othergrammatical shortcuts are often
used in order to keep pace with theon-screen action.This does not indi-
cate a problem with the TV/VCR.When you change channels, the
closed captions may be delayed fora few seconds.
When you adjust the volume or
mute the volume, closed captionsmay be delayed for a few seconds.Details are on page 49.If STATUSis sat to ON, closed cap-
tions will be it__.rrupted when youinsert, operate, or remove a tape.
Details are on page 26.

52 AutomaticOperationFeatures• • • • • • • • • • • • • • • • • • • • • • • • • • • • • • • • • • • • • • • • • • • • • • • • • • • • • • • • • • •• • • • • • • • •• • • •tQ • •It • e e•• • e,e • e eeeo • e ote_ooe o oeeeQQt •
The followingplaybackfeatureswill alwaysoperate.
Automatic PlaybackWhen you put a tape in the'i'VNCE, the power will come onautomatically.If the tape's record tab is missing,playbackwillbegin.If a timer recording is set, the power will not come on auto-maticallywhen you insert a tape with the record tab intact.If atimer recording is set and the'I'V/VCR power is off,the'l'V/VCRwill eject the tape if the record tab is missing.
Automatic Rewind, Eject, OffWhen a tape is played,fastforwarded,or recorded to its end,the"I'V/VCR will rewind the tape, stop,turn itselfoff,and eject thetape. If a real-time counter memory is set,the "I'V/VCRmayonlyrewind the tape to the point at which the real-time counter is setto zero.TheTV/VCR will not turn itselfoff or eject the tape.
Memory Rewind, Power OffWhen the POWER button is pressedwhile the'l'V/VCR is rewind-inga _ape,RE'W --* POWER OFF will appearon the screen.TheTV/VCE will turn itselfoff when the tape hasfinishedrewinding.If a real-time counter memory is set,the'i-V/VCR may only rewindthe tape to the point at which the counter was set to zero, thenturn itself off.
Tape EjectA tape can be ejected with the TV/VCR power on or off (but theTV/VCR must be pluggedin). If a timer recording is programmed,a tape can not be ejected when the power is off. Turn on theTV/VCE power, then eject the tape. Be sure to insert a tape andturn off the TV/VCE power for the timer recording.
Automatic Tracking AdjustmentTheTV/VCR automaticallyadjuststhe tracking to giveyou thebestpossiblepicture quality.With some recordings, however,youmayget a better pictureusingthe manual trackingcontrols(seebelow).
Manual TrackingTo adjustthe tracking manually,press the CHANNEL A/v but-tons on theTV/VCR or theTRACKING _/_7 buttons on theremote control.
Trackingreturnsto Automatic TrackingAdjustment when a tape isinserted or when the STOP/v button is pressed.
Before
TrackingAdjustment
After
TrackingAdjustment

Specifications53Genera|
CRT: 19-inchin line gunTelevisionsystem:NTSC-MClosed captionsystem:SectionIS.119,FCC
(FederalCommunicationsCommission) StandardVideo Heads:Four heads
Tapewidth: 1/2 inch (12.65 ram)Tape speed
SP:33.35 ram/set.LP: 16.67 mm/sec.SLP: I 1.12 mm/sec.
OperatingTemperature:41°F (5°C) to 104°F(40°C)Relative Humidity: 10%to 75%Power requirement:AC 120V,60HzPower consumption: 90WSound output: IWDimensions:
19-5/8" (H) x 19-3/8" (VV) x 18-11/16" (D)498mm x 492mm x 474mm
Weigbr_44. I Ibs (20.0 kg)
Tuner Broadcast ChannelsVHF 2-13, UHF 14-69
Cable TV Channels1-12S
TerminalsAntenna In:VHF/UHF 75 ohmsunbalancedVideo In:RCA connectorAudio In:RCA connectorEarphone:3.5 mm CES
Electrical SpecificationsVideo input level:0.5-2.0Vp-pAudio input level:- I0dBvVideo SIN ratio
SP:More than 42dBIJAudio S/N ratio
SP:More than 38dB
Designsand specificationsare subjectto changewithoutno_r.eandwithoutourlegalobligatJon.

54 HelpfulHints
If you are having problems with your product, check this list of problems and possible solutions beforerequesting service.You may be able to solve the problem yourself.If you need to call a customer service representative, please know the model number and serial number of
your product before you call.This information is displayed on the back of the producLAIso, please take a
moment to identify the problem you are having,and be prepared to explain this to the representative. If youbelieve the representative will need to help you with operations, please stay near the product. Our represen-tatives will be happy to assistyou.
Location
For safeoperationandsatisfactory performanceof your TV/VCR, remember the following:• Shield it from direct sunlightand keep it awayfrom sources of intense heac• Avoid dusty or humid places.• Avoid placeswith insufficient ventilation.Do not block the ventilation openingsat the top and bottom of
the "I-V/VCR.Do not placethe'I-V/VCR on a carpet, as this will block the ventilation openings.• Avoid locations subject to strong vibrations.• Do not place the TV/VCR near strong magneticfields.• Do not move theTV/VCR from a cold placeto a hot place,or vice versa.
Electrical Shock and Fire Hazards• D_. not handlethe power cord with wet hands.• Do not pull the power cord when disconnectingtheTV/VCR from theAC (alternatingcurrent)wall outlet.
Grasp it by the plug.• If water isspilled on the TV/VCR, unplugthe power cord immediatelyand take the TV/VCR to an autho-
rized service center.
• Do not put your fingersor objectsinto theTV/VCR cassettecompartment.• Do not placeanythingon top of the'I'V/VCR.
Dew Warning (Moisture Condensation)• Moisture maycondense insidethe unit when it is movedfrom a cold placeto awarm place,after heating a
cold room, or when the humidity is high.There is no warningthat moisture hasaccumulatedinyourTV/VCR. If you try to playa tape in aTV/VCR in whichmoisture hasaccumulated,the tape and the"i-V/VCR could be damaged.If you think moisture mayhaveaccumulatedinsidethe'l'V/VCR, keep the"i-V/VCR power on (butdo not playa tape) for at leasttwo hours.Thiswi!lallowtheTV/VCR to dry.
TV/VCR will not perform a timer recording.• Makesure the recording start and stop times are set correctly. Detailsareon pages32-35.Midnight is 12
a.m.Noon is 12p.m.• Makesure the'l'V/VCR power is off.• Makesure the clockisset Detailsare onpages 12-17.• Makesure there is a tape in theTV/VCR.The tape must havea record tab.• With ShowGuard,you don't haveto worry aboutlosingyour timer recordings.If the power fails,pro-
grammedtimer recordings will be restored when the clock is reset (The clockwill reset itselfautomatical-ly if youare usingthe AUTO CLOCK feature.Detailsare onpages 14-17.If youare not usingthe AUTOCLOCK feature, reset the clockmanually.Detailsare 0npages 12-13.)The timer recording will not occuronlyif the timer recording was scheduledto take placeduringthe power failure.
• Makesure DEFEATRECORDING is set to OFEDetailsare onpage36.
"rv/vcR will not record.
• Make surethe tape has a record tab.Detailsareonpage five.• Make sure DEFEATRECORDING is set to OFE Detailsare onpage36.• Plugthe power cord into anactive AC outlet. Detailsare onpageseven.• Check your hookups.Detailsare anpagessix-seven.• Set up the channels.Detailsareon page 10.
"rv/vcR has no power,• Make sure the power plugis completely connected to anAC (alternatingcurrent) outlet.

HelpfulHints(cont'd)55eeoleQoleeot e,.o,ooQo oeell *o,l.oeQoooee_lo_lewoee_t t oo_ J J,,IwleQo ooeo_ Jo61,.oeeeolloDleeeel IJJQQ,,OQ_JOteOO_I,O
The remote control is not available, or the remote control will not accessthe pop up menu.• Use the buttonson the front panel of theTV/VCR to accessthe pop up menu.Youcan not enter numbers
(for example,to program a timer recording) usingthe front panelbuttons. Detailsare onpage20.
"I'V/VCR power shuts off after 15 minutes.• To saveenergy,the TV/VCR will shut itselfoff after IS minutes when it is on a channelthat is not receivinga
broadcastsignal(for example,a stationthat hasgone offthe air for the night).This isnormal.
Channel reception is poor.• Check connections,then set up the channelsagain.Detailsareon page 10.
TV/VCR does not have a picture.
• Adjust the antenna. Details are on page six.• Adjust the'I'V/VCR picture controls. Details are on pages 24-25.
TV/VCR has poor sound or no sound.• Adjust the volume.• Pressthe MUTE button to restore the volume.
Tape playback is poor or tape is destroyed.• Adjust the tracking. Detailsare onpage52.• If moisture hasaccumulatedinyourTV/VCR, keep the power on for at leasttwo hours, butdo not try to
playa tape.Detailsare onpage54.
"rv/vcR does not display closed captions.• Makesure COUNTER ONLY is set to OFE Detailsare onpage26.• Makesure closed captioningis availablefor the program.Refer to the'IV listingsinyour localnewspaper.
Remote control does not operateTV/VCR.• Aim the remote control directly at the'l'V/VCR's remote sensor.Detailsare onpageslive and20.• Remove all obstacles between the remote control and the'I-V/VCR.• Inspect and replace the batteries in the remote control. Detailsare on pagefive.
Number buttons won't work for channels above 69.• Enter channelnumbers asa two-digit number. If you want to select channels 100andabove,enter channel
numbers asa three-digit number.Detailsare onpage22.• If youare usingan antenna,only channels2-69 will be available.
A tape can't be inserted into tbe'I'V/VCR.• Insert the tape window side up,with the record tab facingyou.• Make sure a tape isn'talreadyin theTV/VCR by pressingthe STOP/EJECTbuttonon theTV/VCR.• Gently pushon the centerof the tape.Never force a tape into the TV/VCR.• If a timer recording is set and the TV/VCR power isoff,the'I-V/VCR will eject the tape if the record tab is
missing.
A tape cant be removed from the'rV/VCR.• Makesure the power plug iscompletely connected to anAC (alternatingcurrent) outlet.• If a timer recording isprogrammed,turn on the TV/VCR power,theneject the tape.Be sureto inserta tape
andturn off the TV/VCR powerfor the timer recording.
TV/VCR ejects the tape when you try to start a recording,• Make sure the tape hasa record tab. Detailsare onpage five.
The cylinder rotates when tape playback is stopped.• To enable the quick play mechanism, the cylinder will rotate for about five minutes.This is normal.The quick
play mechanism switches the tape mechanism from Stop to Play in just one second.

56 Glossary• • .• • • •o • • • • • • • • • • • • • • • • • • • • • • • • • • • • •• • • • • i o • • • •e • • • ••• • • l i. • • o ol • o aQo • e oee • O OOOOQQOO • o oe_e •e • o tto_Qoe • • • O OQQ.O
AUDIO In lack: jack locatedon the front of theTV/VCR whichis used to record audiofrom another source.
Automatic Channel S_tup: processin whichthe'rV/VCRscansallavailablechannelsand placesthe onesyou receive in itsmemory.Then, when you pushthe CH(annel) A/v buttons,youonly scanthroughchannels you receive.
Bands."settingsthat allow you to tune channels.• Antenna -VHF (very highfrequency;channels
2-13) and UHF (ultra highfrequency;channels14-69).
• Cable - all standard channels can be received without a CableBox.
_htness: adjustingincreasesor decreasesthe brightnessofthe color on the screen.
Color: adjusting pales or brightens the TV/VCR color.
Dubbin_ copying a tape using aVCR.
HO: high quality; a feature in the TV/VCR circuitry which pro-vides enhanced picture detail.
Line Input: The channel to which you set your TV/VCR duringdubbing.The line input channel is always channel 00 (AN IN).
a TV/VCR operation.
OTR: One-Touch Recording; a timed recording that _starts imme-
diately and records for 30 minutes to eight hours, whichever youspecif'/.
Picture: adjusting increases or decreases the contrast of the pic-ture on the screen.
adjustingsoftensor clarifiesthe pictureon the screen.
Tape Speeds: how fast the tape travels duringplaybackorrecording.• SP (standard play)- fastesttape speed(recordingtime for a
TI20 tape isapproximatelytwo hours);best picturequality.• LP (long play)- averagetape speed;playbackonly.• SLP (super longplay)- slowesttape speed(recordingtime for
aT I20 tape isapproximatelysix hours).
Tint adjustingchangesthe tintsof the pictureon theTV/VCR frompurpleto green.
VIDEO In lack: jack located on the front of the TV/VCR whichis usedto record videofrom another source.

LimitedWarranty57....................................... fi "6"i "......................................
90 Days Free LahorlOne Year Free Parts Exchange (Two YearsFree Exchange on Color PictureTube)This product must be carried in for repair.
WHO IS COVERED?You must have proof of purchase to receive warrantyservice.A sales receipt or other document showingthat you purchased the product is considered proofof purchase.
WHAT IS COVERED?Warranty coverage begins the day you buy your prod-uct. For 90 days thereafter, all parts will be repaired orreplaced, and labor is free. From90 days to one yearfrom the day of purchase, all parts will be repaired orreplaced, but you pay for all labor charges.Fromone totwo years from the day of purchase, you pay for thereplacement or repair of all parts except the picturetube, and for all labor charges. Al_er two years from theday of purchase, you pay for the replacement or repairof all parts, and for all labor charges.
All parts, including repaired and replaced parts, are
covere_L only for the original warranty period.Whenthe warrant'/on the product expires, the warranty onall replaced and repaired parts also expires.
WHAT IS EXCLUDED?
Your warranty does not cover:• labor charges for installation or setup of the prod-
uct, adjustment of customer controls on the prod-uct, and installation or repair of antenna systemsoutside of the product.
• product repair and/or part replacement because ofmisuse, accident, unauthorized repair or othercause not within the control of Phiiips ConsumerElectronics.
• reception problems caused by signal conditions orcable or antenna systems outside the unit.
• a product that requires modificatio0 or adaptationto enable it to operate in any country other thanthe country for which it was designed, manufac-tured, approved and/or authorized, or repair ofproducts damaged by these modifications.
• incidental or consequential damages resulting fromthe product. (Some states do not allow the exclu-sion of incidental or consequential damages, so theabove exclusion may not apply to you.Thisincludes, but is not limited to, prerecorded materi-al, whether copyrighted or not copyrighted.)
• damage caused by the use of non-VHS tapes ortapes that have not been tested and labeled for usein two, four, six, and eight hourVHS recorders.
• a product that is used for commercial or institu-tional purposes.
WHERE IS SERVICE AVAILABLE?
Warranty service is available in all countries wherethe product is officially distributed by PhilipsConsumer Electronics. In countries where PhilipsConsumer Electronics does not distribute the prod-uct, the local Philips service organization will attemptto provide service (although there may be a delay if
the appropriate spare parts and technical manual(s)are not readily available).
MAKE SURE YOU KEEP...
Please keep your sales receipt or other documentshowing proof of purchase.Attach it to this owner'smanual and keep both nearby.Also keep the originalbox and packing material in case you need to returnyour product.
BEFORE REQUESTING SERVICE..,Please check your owner's manual before requestingservice. Adjustments of the controls discussed theremay save you a service call.
TO GET WARRANTY SERVICE IN U.S.A., PUERTORICO OR U.S. VIRGIN ISLANDS...Take the product to a Philips factory service center(see enclosed list) or authorized service center forrepair.When the product has been repaired, you mustpick up the unit at the center. Centers may keepdefective parts.
(In U.S.A., Puerto Rico and U.S.Virgin Islands, allimplied warranties, including implied warranties ofmerchantability and fitness for a particular purpose,are limited in duration to the duration of this expresswar.ranty. But, because some states do not allow _imi-tations on how long an implied warranty may last, thislimitation may not apply to you.)
TO GET WARRANTY SERVICE IN CANADA...
Please contact Philips at:
1-800-661-6162 (French Speaking)1-800-363-7278 (English Speaking)
(In Canada, this warranty is given in lieu of all otherwarranties. No other warranties are expressed orimplied_including any implied warranties of mer-chantability or fitness for a particular purpose. Philipsis not liable under any circumstances for any direct,indirect, special,incidental or consequential damages,howsoever incurred, even if notified of the possibilityof such damages.)
REMEMBER...Please record below the model and serial numbers
found on the product.Also, please fill out and mailyour warranty registration card promptly. It will beeasier for us to notify you if necessary.
MODEL#
SERIAL#
This warranty gives you specific legal rights. Youmay haveother rights which vary from state to state.
EL4963EO06 / MAC 61081 03-00

58 Index
a-b repeat play .......... 38-39accessories............... 60ant(enna)jack ........... 6, 2Iaudio in jack ......... 7, 20, 3Iautomatic
playback............... 52rewind ................ 52
batteries .................. 5
blue background ........... 46brightness, adjusting ...... 24-25
channelabove IO0 ............. 22
adding ................ I Ibuttons .......... 20, 23, 52deleting ............... I Ireviewing .............. I Isetup ................. I0
clear _utton .............. 22clock ................. 12-17closed caption system .... 50-5 Icolor, adjusting .......... 24-25connections ........... 6-7, 3Icontents, table of ........... 4controls
remote ............. 22-23tv/vcr ................. 20
counter only mode ....... 26
daylight-savingstime ...... 18defeat recording ......... 36duplication ............... 31
earphone jack ............. 20
fast forward search......... 4 If.fwdlll_ button ......... 22,4 If.fwd button .............. 20
front panel ............... 20
glossary ................. 56
helpful hints ............ 54-55hookups .............. 6-7, 31
languageselection ........... 9line inputmode ...... I0, 3 I, 56long play .............. 29, 56Ip ................... 29, 56
memorybutton ........... 23.39-40real-time counter ....... 40
rewind, power off ....... 52menu
button ............... 23
front panel button access . .20mute button .............. 22
number buttons ........... 22
one-touch recording........ 30
pause/still button ........ 23, 4 Ipicture,adjusting ........ 24-25play button ............ 20, 22playbackoptions ........... 4 Iplaying ................. .28power
button ............. 20, 22cord ................ 7, 21
real-time counter memory ...40rear panel ................ 2 Iredotr button .......... 20, 23record light .............. 20recording ................ 29recording prevention ........ 5reminder ................ 27remote
controJbuttons .......... 22-23
using ................ 5sensor ................ 20
repeat play ............... 37
rerecording ............... 3 Irew(ind) button ........... 20
rew(ind)/_l button ...... 23, 4 Irewinding ................ 4 I
safety precautions ........... 3searching ................ 4 Isensor (remote) ........... 20
sharpness, adjusting ...... 24-25showguard .......... 32, 35, 54
sleep timer ............... 47slow
button ............. 23, 4 I
motion playback ......... 4 Isip ................... 29, 56
smai-tclock............. 14-17smardock ............. 42-45sp ................... 29, 56specifications ............. 53sqpb .................... 28standardplay ........... 29, 56statusdisplay ............. 26status/exitbutton ....... 23, 26still picture ............... 4 Istop/V button ............ 23stop/eject button .......... 20super high speed searching...41super long play ......... 29, 56sun_button ............... 22
table of contents ........... 4tape
duplication ............. 3 I
eject .................. 20speed .............. 29, 56
time
setting .............. 12-17zone .................. 19
timer recording
cancelling .............. 35
reviewing .............. 35setting .............. 32-34
tint, adjusting ........... 24-25tracking ................. 52
video in jack ......... 7, 20, 3 Ivolume bar ............... 49
wake up timer ............ 48warranty ................. 57

The following items are supplied with your TV/VCR; they
are provided to help you use or set up your TV/VCR.
Remote Control 4835 218 37289
TwoAA Batteries 4835 138 17012
The following additional items are not provided with yourTV/VCR, but they are designed for use with your new TV/VCR.To order these optional accessories, contact us at:
Philips Parts & Accessories Marketing Department401 East OId Andrew Johnson Highway
RO. Box 555
Jefferson City, TN 377601-800-851-8885.
VH5 Cassette Rewinder
#H61117
Three CassetteStorage Cases(plastic)FitsVHS and Beta cassettes
#H61104
Thls owner's m_l Is rnade of n_clab[e rn_te_als.Remmmbe_ to _'-ic ks!
._s in ENEItGYSTAR*Partner. Phllip_Consumer Elecra_nks his
_ etermined that this product meeel th_Et_B_Y STIU_*_uldellnes for _er_ e_lclency._GY STY* is a U,S.re_stemd mark.
MonauralAudio andVideo Cables (6 feet)
Color-coded for easyconnection#H61103
Six High-grade,VHS,T-120 Cassettes_IHG 1206
IB8228E001
Printed qnMexico0EPINOI681 ITTI63UP ***=*