owner’s manual - honda2wheelersindia.com · honda motor co., ltd. reserves the ... honda shop...
TRANSCRIPT

NAVI
OWNER’S MANUAL
© Honda Motor Co., Ltd. 2016

Honda Motorcycle & Scooter India Pvt. Ltd.
IMPORTANT INFORMATION ● RIDER AND PASSENGER
This vehicle is designed to carry the rider and one passenger. Never exceed the maximum weight capacity.
● ON-ROAD USE This vehicle is designed to be used only on the road.
● READ THIS OWNER’S MANUAL CAREFULLYPay special attention to the safety messages that appear throughout the manual.
These messages are fully explained in the “A Few Words About Safety” section which appears before the contents page.
This manual should be considered as a permanent part of the vehicle and should remain with the vehicle when resold.

Honda Motorcycle & Scooter India Pvt. Ltd.
NAVIOWNER’S MANUAL
All information in this publication is based on the latest production information available at the time of approval for printing. Honda Motor Co., Ltd. reserves the right to make changes at any time without notice and without incurring any obligation.
No part of this publication may be reproduced without written permission.

Honda Motorcycle & Scooter India Pvt. Ltd.
WELCOMEThe vehicle presents you a challenge to master the machine, a challenge to adventure. You ride through the wind, linked to the road by a vehicle that responds to your commands as no other does. Unlike an automobile, there is no metal cage around you. Like an air plane, a pre-ride inspection and regular maintenance are essential to your safety. Your reward is freedom.
To meet the challenges safely, and to enjoy the adventure fully, you should become thoroughly familiar with this owner’s manual BEFORE YOU RIDE THE VEHICLE.
As you read this manual, you will find information that is preceded by a NOTICE symbol. This information is intended to help you avoid damage to your vehicle, other property, or the environment.
When service is required, remember that your Honda dealer knows your vehicle. If you have the required mechanical “know-how” and tools, your dealer can supply you an official Honda shop manual on paid basis to help you perform many maintenance and repair tasks.
Accessories shown in the illustration are not part of the standard equipment.
For any query or assistance, please call Customer Care No.:
1800 103 3434 (Toll free)
Pleasant riding, and thank you for choosing a Honda!
● The specifications may vary with each locale.

Honda Motorcycle & Scooter India Pvt. Ltd.
A FEW WORDS ABOUT SAFETYYour safety, and the safety of others, is very important. Operating this vehicle safely is an important responsibility.
To help you make informed decisions about safety, we have provided operating procedures and other information on labels in this manual. This information alerts you to potential hazards that could hurt you or others.
Of course, it is not practical or possible to warn you about all hazards associated with operating or maintaining a vehicle. You must use your own good judgment.
You will find important safety information in a variety of forms, including :
● Safety labels - on the vehicle.
● Safety messages - preceded by a safety alert symbol ! and one of three signal words: DANGER, WARNING, or CAUTION.
These signal words mean:

Honda Motorcycle & Scooter India Pvt. Ltd.
You WILL be KILLED or SERIOUSLY HURT if you don’t follow instructions.
You CAN be KILLED or SERIOUSLY HURT if you don’t follow instructions.
You CAN be HURT if you don’t follow instructions.
● Safety Heading - such as Important Safety Reminders or Important Safety Precautions.
● Safety Section – such as vehicle Safety.
● Instructions – how to use this vehicle correctly and safely.
This entire manual is filled with important safety information–please read it carefully.
CAUTION
DANGER
WARNING
!
!
!

Honda Motorcycle & Scooter India Pvt. Ltd.
CONTENTSPage
1 VEHICLE SAFETY
1 Important Safety Information
2 Protective Apparel
5 Load Limits and Guidelines
9 PARTS LOCATION
12 Instruments and Indicators
13 MAJOR COMPONENTS (Important Information to operate this vehicle)
13 Brakes
14 Fuel
18 Engine Oil
19 Tyres
Page
22 ESSENTIAL INDIVIDUAL COMPONENTS
22 Ignition Switch
22 Right Handlebar Controls
23 Left Handlebar Controls
24 FEATURES (Not required for operation)
24 Steering Lock
24 Seat Removal
25 Helmet Holder
26 Center Compartment
26 Fuel Tank Cover
27 Right Side Cover
28 Rear view Mirror
28 Headlight Aim Vertical Adjustment

Honda Motorcycle & Scooter India Pvt. Ltd.
Page
29 OPERATION
29 Pre-ride Inspection
30 Starting the Engine
32 Running-in
32 Riding
37 Parking
38 Anti-theft Tips
39 MAINTENANCE
39 The Importance of Maintenance
39 Maintenance Safety
40 Safety Precautions
41 Tool Kit
42 Maintenance Schedule
45 Serial Numbers
46 Color Code
46 Air Cleaner
47 Secondary Air Supply System
Page
48 Crankcase Breather
49 Engine Oil
51 Engine Oil Strainer Screen
52 Spark Plug
54 Engine Idle Speed
55 Wheel Removal
58 Brake Shoe Wear
59 Battery
61 Fuse Replacement
63 Bulb Replacement
66 CLEANING
68 STORAGE GUIDE
68 Storage
69 Removal from Storage
70 SPECIFICATIONS
73 CATALYTIC CONVERTER

Honda Motorcycle & Scooter India Pvt. Ltd. 1
VEHICLE SAFETYIMPORTANT SAFETY INFORMATIONYour vehicle can provide many years of service and pleasure – if you take responsibility for your own safety and understand the challenges that you can meet on the road.
There is much that you can do to protect yourself when you ride. You’ll find many helpful recommendations throughout this manual. Following are a few that we consider most important.
Always Wear a Helmet
It’s a proven fact: Helmets significantly reduce the number and severity of head injuries. So always wear a helmet and make sure your passenger does the same. We also recommend that you wear eye protection, sturdy boots, gloves and other protective gear (page 2).
Make Yourself Easy to see
Some drivers do not see vehicles because they are not looking for them. To make yourself more visible, wear bright reflective clothing, position yourself so other drivers can see you, signal before turning or changing lanes, and use your horn when required, it will help others notice you.
Don’t Drink and Ride
Alcohol and riding don’t mix. Even one drink can reduce your ability to respond to changing conditions, and your reaction time gets worse with every additional drink. So don’t drink and ride, and don’t let your friends drink and ride either.

Honda Motorcycle & Scooter India Pvt. Ltd.2
Ride Within Your Limits
Pushing the limits is another major cause of vehicle accidents. Never ride beyond your personal abilities or faster than conditions warrant. Remember that alcohol, drugs, fatigue and inattention can significantly reduce your ability to make good judgements and ride safely.
Keep Your Vehicle in Safe Condition
For safe riding, it is important to inspect your vehicle before every ride and perform all recommended maintenance. Never exceed load limits, and only use accessories that have been approved by Honda for this vehicle. See page 5 for more details.
!Not wearing a helmet increases the chance of serious injury or death in a crash.
Be sure you and your passenger always wear a helmet, eye protection and other protective apparel when you ride.
WARNING
PROTECTIVE APPARELFor your safety, we strongly recommend that you always wear an approved vehicle helmet, eye protection, boots, gloves, long pants and a long-sleeved shirt or jacket whenever you ride. Although complete protection is not possible, wearing proper gear can reduce the chance of injury when you ride.
Following are suggestions to help you choose proper gear.

Honda Motorcycle & Scooter India Pvt. Ltd. 3
Additional Riding Gear
In addition to a helmet and eye protection, we also recommend:
• Sturdy boots with non-slip soles to help protect your feet and ankles.
• Leather gloves to keep your hands warm and help prevent blisters, cuts, burns and bruises.
• A vehicle riding suit or jacket for comfort as well as protection. Bright-colored and reflective clothing can help make you more noticeable in traffic. Be sure to avoid loose clothes that could get caught on any part of your vehicle.
Helmets and Eye Protection
Your helmet is your most important piece of riding gear because it offers the best protection against head injuries. A helmet should fit your head comfortably and securely. A bright-colored helmet can make you more noticeable in traffic, as can reflective strips.
An open-face helmet offers some protection, but a full-face helmet offers more. Always wear a face shield or goggles to protect your eyes and help your vision.

Honda Motorcycle & Scooter India Pvt. Ltd.4
ALWAYS wear a helmet. You should also wear a face shield or goggles.ges”kk gsYesV igusaA p”esa vFkok psgjs dks <+dus okys dop dk Á;ksx djuk pkfg;sA
Wear bright or reflective clothing.pednkj rFkk jks”kuh dks ÁfrfcfEcr djus okys diMs+ igusaA
Clothes should be close fitting.“kjhj ds fQfVax ds diMs+ gh igusaA
Wear gloves.nLrkus igusaA
Shoes should be close-fitting, have low heels and offer ankle protection.lgh uki] de ghy rFkk V[kuksa dks lqj{kk nsus okys twrs igusaA

Honda Motorcycle & Scooter India Pvt. Ltd. 5
LOAD LIMITS AND GUIDELINESYour vehicle has been designed to carry you, one passenger and a limited amount of cargo. When you add cargo or carry a passenger, you may feel some difference during acceleration and braking. But so long as you keep your vehicle well-maintained, with good tyres and brakes, you can safely carry loads within the given limits and guidelines.
However, exceeding the weight limit or carrying an unbalanced load can seriously affect your vehicle’s handling, braking and stability. Non-Honda accessories, improper modifications, and poor maintenance can also reduce your safety margin.
The following pages give more specific information on loading, accessories and modifications.
! WARNING
Loading
How much weight you put on your vehicle, and how you load it, are important to your safety. Anytime you ride with a passenger or cargo you should be aware of the following information.
Overloading or improper loading can cause a crash and you can be seriously hurt or killed.
Follow all load limits and other loading guidelines in this owner’s manual.

Honda Motorcycle & Scooter India Pvt. Ltd.6
Load Limits
Following are the load limits for your vehicle:
Maximum weight capacity:
153 kg (337 lbs)
Includes the weight of the rider, passenger, all cargo and all accessories.
Loading Guidelines
Your vehicle is primarily intended for transporting you and a passenger.
If you wish to carry more cargo, check with your Honda dealer for advice, and be sure to read the information regarding accessories on page 7.
Improperly loading your vehicle can affect its stability and handling. Even if your vehicle is properly loaded, you should ride at reduced speeds whenever carrying cargo.
Follow these guidelines whenever you carry a passenger or cargo:
• Check that both tyres are properly inflated.
• To prevent loose items from creating a hazard, make sure that all cargo is securely tied down before you ride away.
• Place cargo weight as close to the center of the vehicle as possible.
• Balance cargo weight evenly on both sides.

Honda Motorcycle & Scooter India Pvt. Ltd. 7
! WARNINGImproper accessories or modifications can cause a crash in which your can be seriously hurt or killed.
Follow all instructions in this owner’s manual regarding accessories and modifications.
Accessories
We strongly recommend that you use only genuine Honda accessories that have been specifically designed and tested for your vehicle. Because Honda cannot test all other accessories, you must be personally responsible for proper selection, installation and use of non-Honda accessories.
Accessories and Modifications
Modifying your vehicle or using non-Honda accessories can make your vehicle unsafe. Before you consider making any modifications or adding an accessory, be sure to read the following information.

Honda Motorcycle & Scooter India Pvt. Ltd.8
Check with your dealer for assistance and always follow these guidelines:
• Make sure the accessory does not obscure any lights, reduce ground clearance and banking angle, limit suspension travel or steering travel, alter your riding position or interfere with operating any controls.
• Be sure not to use any non-genuine electrical equipment or equipment having capacity exceeding vehicle’s electrical system capacity (page 72). A blown fuse can cause a loss of lights or engine power.
• Do not pull a trailer or sidecar with your vehicle. This vehicle is not designed for these attachments, and their use can seriously impair your vehicle’s handling.
Modifications
We strongly advise you not to remove any original equipment or modify your vehicle in any way that would change its design or operation. Such changes could seriously impair your vehicle handling, stability and braking, making it unsafe to ride.
Removing or modifying your lights, mufflers, emission control system or other equipment can also make your vehicle illegal.

Honda Motorcycle & Scooter India Pvt. Ltd. 9
PARTS LOCATION
Rear view mirrorfj;j O;w fejj
Brake lock levercszd ykWd yhoj
Rear brake leverfj;j czsd yhoj
Headlight dimmer switch
gSMykbV fMEej fLop
Turn signal switchVuZ flx~uy fLop
Horn switchgkWuZ fLop
Choke leverpksd yhoj
Ignition switch
bfXu“ku fLop
Starter switch LVkVZj fLop
Headlight switchgSMykbV fLop
Throttle gripFkzkSVy fxzi
Front Brake LeverÝaV czsd yhoj
Rear view mirrorfj;j O;w fejj
SpeedometerLihMksehVj
Turn signal indicator
VuZ flXuy bafMdsVj

Honda Motorcycle & Scooter India Pvt. Ltd.10
Oil filler cap/dipstickvkW;y fQyj dSi@fMifLVd
Passenger footpeg;k=h QqViSx
FootpegQqViSx
Fuse box¶;wt ckWDlBattery
cSVjhCenter compartment
lSaVj dEikVZesaV
Steering lock
LVh;fjax ykWd
Rear gripfj;j fxzi
Front turn signal Indicator
ÝaV VuZ flx~uy bafMdsVj
Rear turn signal Indicator
fj;j VuZ flx~uy bafMdsVj

Honda Motorcycle & Scooter India Pvt. Ltd. 11
Document compartmentMkWD;wesaV dEikVZesaV
Tool KitVwy fdV
Seat locklhV ykWd
Air cleaner assembly,;j Dyhuj ,lsEcyh
Kick starter pedalfdd LVkVZj iSMy
Center standlSaVj LVSaM
Passenger footpeg;k=h QqViSx
FootpegQqViSx
Fuel knob
¶;wy ukWc
Fuel filler cap¶;wy fQyj dSi
First aid kitçkFkfed fpfdRlk fdV

Honda Motorcycle & Scooter India Pvt. Ltd.12
(1) Speedometer ¼LihMksehVj½(2) Odometer ¼vkWMksehVj½(3) Right and left turn signal indicator
¼nk¡;k v©j ck¡;k VuZ flXuy bafMdsVj½(4) High beam indicator ¼gkbZ che bafMdsVj½
INSTRUMENTS AND INDICATORSThe indicators are contained in the instrument panel. Their functions are described in the tables on the following pages.
(Ref. No.) Description Function
(1) Speedometer Shows riding speed.
(2) Odometer Shows accumulated mileage.
(3) Right and Left turn signal indicator(green) Flashes when the turn signal operates.
(4) High beam indicator(blue)
Lights when the headlight is glowing on high beam.
(1)(2)
(4)
(3)

Honda Motorcycle & Scooter India Pvt. Ltd. 13
MAJOR COMPONENTS(Important information to operate this vehicle)
BRAKESBrakes are items of personal safety and should always be maintained with proper adjustment.
Free playThe free effortless movement of brake levers until the brakes start operating is termed as free play.
Measured at the tip of the brake levers, freeplay should be maintained at:
10 - 20 mm (0.4 - 0.8 in) (1)
(1)(1)
(2) (2)
(2)
(3)
(3)
(1) Front brake lever ¼ÝaV czsd yhoj½(2) Rear brake lever ¼fj;j cszd yhoj½
Adjustment:
1. Make freeplay adjustments by turning the adjusting nut (1) at the brake arm (2).
Make sure the cut-out on the adjusting nut is seated on the brake arm pin (3) after making final freeplay adjustment.
(1) Adjusting nut ¼,MtfLVax uV½(2) Brake arm ¼czssd vkeZ½(3) Brake arm Pin ¼czssd vkeZ fiu½(A) Increase freeplay¼Ýh&Iys c<+k,sa½(B) Decrease freeplay¼Ýh&Iy ?kVk,sa½
Front Rear
(A)
(A)(B)
(B)

Honda Motorcycle & Scooter India Pvt. Ltd.14
cut-out correctly seated
cut-out not correctly seated
Other Checks
Check the brake cable for kinks or signs of wear that could cause sticking or failure.Lubricate the brake cable with a commercially available cable lubricant to prevent premature wear and corrosion.Make sure the brake arm, spring and fasteners are in good condition.
FUELFuel KnobThe three way Fuel knob (1) is on the left side below the fuel tank.
ONWith the Fuel knob in the ON position, fuel will flow from the main fuel supply to the carburetor.
OFF
With the Fuel knob in the OFF position, fuel cannot flow from the tank to the carburetor. Turn the valve to OFF position whenever the vehicle is not in use.
2. Apply the brake several times and check for free wheel rotation after the brake lever is released.
If proper adjustment cannot be obtained by this method see your Honda dealer.
(1) Adjusting nut ¼,MtfLVax uV½(2) Brake arm Pin ¼czssd vkeZ fiu½
(1)(2)

Honda Motorcycle & Scooter India Pvt. Ltd. 15
RESWith the Fuel knob in this RES position, fuel will flow from the reserve fuel supply to the carburetor. Use the reserve fuel only when the main supply is gone. Refill the tank as soon as possible after switching to RES. Switch the fuel knob to ON position after refuelling adequate quantity of fuelThe reserve fuel supply is:0.9 Ltr. (0.24 US gal , 0.20 Imp gal)Remember to check that the Fuel knob is in the ON position each time you refuel. If the valve is left in the RES position, you may run out of fuel with no reserve.
(1) Fuel knob ¼¶;wy uksc½RES
(1)
OFFONON
OFF
RES
ON
OFF
RES
ON
OFF
RES
Fuel Tank
The fuel tank capacity including the reserve supply is:3.8 Ltr. (1.00 US gal, 0.84 Imp gal)
Insert the ignition key (1) and turn it clockwise to unlock the fuel tank lid (2).
(1) Ignition key ¼bfXu”ku dh½(2) Fuel tank lid ¼¶;wy VSad fyM½
(2)
(1)

Honda Motorcycle & Scooter India Pvt. Ltd.16
(3) Fuel filler cap ¼¶;wy fQyj dSi½(4) Filler neck ¼fQyj uSd½ (5) Arrow marks ¼,sjks ekDZl½
(5)
(3)(4)
! WARNINGPetrol is highly flammable and explosive. You can be burned or seriously injured when handling fuel.• Stop the engine and keep heat, sparks and flame away.• Refuel only outdoors.
• Wipe out spills immediately.
Remove the fuel filler cap (3) by turning it counterclockwise.Do not over fill the tank. There should be no fuel in the filler neck (4).After refuelling, be sure to tighten the fuel filler cap firmly by turning it clockwise.Make sure that the arrow marks (5) on the fuel filler cap and fuel tank is aligned.
While refuelling petrol put fuel filler cap upside down on the fuel tank cover as shown in illustration.
! CAUTION

Honda Motorcycle & Scooter India Pvt. Ltd. 17
Use unleaded petrol with a research octane number of 88 or higher.
The use of leaded petrol will cause premature damage to the catalytic converter.
NOTICE
If “spark knock” or “pinking” occurs at a steady engine speed under normal load, change brands of petrol. If spark knock or pinking persists, consult your Honda dealer. Failure to do so is considered misuse, and damage caused by misuse is not covered by Honda’s Limited Warranty.
Petrol Containing Alcohol
If you decide to use a petrol containing alcohol (gasohol), be sure it’s octane rating is at least as high as that recommended by Honda.
• When certain types of petrol containing alcohol are used, problems such as hard starting, poor performance, etc. may occur.
• If you notice any undesirable operating symptoms while using a petrol that contains alcohol, or one that you think contains alcohol, try another station or switch to another brand of petrol.
• When a problem resulting from the use of petrol containing alcohol occurs, contact your Honda dealer.
• Use of fuel containing alcohol higher than the recommended limit is considered misuse and damage caused by misuse is not covered by Honda’s Limited Warranty.
! WARNINGAdulterated fuel not to be used. It causes damage to the engine parts and considered as misuse, damage caused by misuse is not covered under Honda warranty.

Honda Motorcycle & Scooter India Pvt. Ltd.18
ENGINE OILEngine Oil level Check
Check the engine oil level each day before riding the vehicle.The level must be maintained between the upper (1) and lower (2) level marks on the oil filler cap/dipstick (3).
1. Start the engine and let it idle for 3 – 5 minutes.
2. Stop the engine and put the vehicle on its center stand on level ground.
3. After 2–3 minutes, remove the oil filler cap/dipstick, wipe it clean, and reinsert the oil filler cap/dipstick without screwing it in. Remove the oil filler cap/dipstick. The oil level should be between the upper and lower marks on the oil filler cap/dipstick.
4. If required, add the specified oil (Ref. page 49) up to the upper level mark. Do not overfill.
5. Reinstall the oil filler cap/ dipstick. Check for oil leaks.
(1) Upper level mark ¼Åijh Lrj fpUg~½(2) Lower level mark ¼fupyk Lrj fpUg~½(3) Oil filler cap/dipstick ¼vkW;y fQyj dSi@fMifLVd½
(3)
(1)
(2)
NOTICERunning the engine with insufficient oil quantity may cause serious engine damage.
If engine oil level is below from ‘Min.’ mark, please contact Honda Authorised Dealer.

Honda Motorcycle & Scooter India Pvt. Ltd. 19
! WARNING
TYRESTo safely operate your vehicle, your tyres must be the proper type and size, in good condition with adequate tread, and correctly inflated for the load you are carrying. The following pages give more detailed information on how and when to check your air pressure, how to inspect your tyres for damage, and what to do when your tyres need to be repaired or replaced.
Using tyres that are excessively worn or improperly inflated can cause a crash in which you can be seriously hurt or killed.Follow all instructions in this owner’s manual regarding tyre inflation and maintenance.
Air Pressure
Keeping your tyres properly inflated provides the best combination of handling, tread life and riding comfort. Generally, under inflated tyres wear unevenly, adversely affect handling, and are more likely to fail from being overheated.
Overinflated tyres make your vehicle ride more harsh, are more prone to damage from road hazards and wear unevenly.
We recommend that you visually check your tyres before every ride and use a gauge to measure air pressure at least once a month or any time you think the tyres air pressure might be low.
Always check air pressure when tyres are “cold”– when the vehicle has been parked for at least three hours. If you check air pressure when tyres are “warm”- When the vehicle has been ridden for even a few miles the readings will be higher than if the tyres were “cold”. This is normal so do not let air out of the tyres to match the recommended

Honda Motorcycle & Scooter India Pvt. Ltd.20
cold air pressures given below. If you do, the tyres will be under inflated.
The recommended “Cold” tyre air pressures are: kPa (kgf/cm², psi)
Driver Front 150 (1.50, 22)
only Rear 200 (2.00, 29)
Driver and Front 150 (1.50, 22)
one passenger Rear 250 (2.50, 36)
This vehicle is fitted with tubeless tyres in both wheels. Compared with ordinary tube tyre, the tubeless tyre releases slow air leak when punctured by a nail or other similar object. For this reason, even though they remain fully inflated, it is important to regularly check the tyre for embedded objects.
Inspection
Whenever you check the tyre pressures, you should also examine the tyre treads and side walls for wear, damage, and foreign objects:
Look for:• Bumps or bulges in the side of the tyre
or the tread. Replace the tyre if you find any bumps or bulges.
• Cuts, splits or cracks in the tyre. Replace the tyre if you can see fabric or cord.
• Excessive tread wear.
Also, if you hit a pothole or hard object, pull to the side of the road as soon as you safely can and carefully inspect the tyres for damage.
Tread Wear
Inspect the wear indicator (1) to check for insufficient tread depth. If the wear indicator is visible, the tyre should be replaced.
(1) Wear indicator ¼oh;j bfUMdsVj½(2) Wear indicator location mark ¼oh;j bfUMdsVj dk yksds”ku ekdZ½
(1)
(2)

Honda Motorcycle & Scooter India Pvt. Ltd. 21
!
!
WARNING
CAUTION
Tyre Repair
If a tubeless tyre is punctured or damaged, Please visit nearest tyre manufacture dealer and follow his recommendation for repair or replacement.
Repair/Replacement of tubeless tyre by unauthorized person may render the tyre useless or tyre can fail while driving.
Tyre Replacement
The tyres that came on your vehicle were designed to match the performance capabilities of your vehicle and provide the best combination of handling, braking, durability and comfort.
Installing improper tyres on your vehicle can affect handling and stability. This can cause a crash in which you can be seriously hurt or killed.
Always use the size and type of tyres recommended in this owner’s manual.
The recommended tyres for your vehicle are:
Front : 90/90-12 54J
Rear : 90/100-10 53J
Whenever you replace a tyre, use one that is equivalent to the original and be sure the wheel is balanced after the new tyre is installed.

Honda Motorcycle & Scooter India Pvt. Ltd.22
ESSENTIAL INDIVIDUAL COMPONENTSIGNITION SWITCHThe ignition switch (1) is on the right side of speedometer.
(1) Ignition switch ¼bfXu”ku fLop½
(1)ONOFF
RIGHT HANDLEBAR CONTROLSStarter ButtonThe starter button (1) is next to the throttle grip.When the starter button is pressed,the starter motor cranks the engine.(Ref. page 30 for the starting procedure.)
(1) Starter button ¼LVkVZj cVu½
(1) Key Function Key Position Removal
OFF Engine and lights Key can be can not be operated. removed
ON Engine and lights Key cannot can be operated be removed

Honda Motorcycle & Scooter India Pvt. Ltd. 23
(1)
(1) Headlight switch ¼gSMykbV fLop½(2) Headlight dimmer switch ¼gSMykbV fMej fLop½(3) Turn signal switch ¼VuZ flXuy fLop½ (4) Horn button ¼gkWuZ cVu½
(3)
LEFT HANDLEBAR CONTROLSHeadlight Switch (1)
The headlight switch has three positions;
, and .
:Headlight, position light, taillight and meter lights on.
:Position light, taillight and meter lights on.
:Headlight, Position light, taillight and meter lights off.
The headlight, Position light, taillight and meter lights operates only when the engine is running.
Headlight Dimmer Switch (2)
Push the dimmer switch to (HI) to select high beam or to (LO) to select low beam.
Turn Signal Switch (3)
Move to (L) to signal a left turn, (R) to signal a right turn. Press to turn signal off.
(4)
(2)
Horn Button (4)
Press the button to sound the horn.

Honda Motorcycle & Scooter India Pvt. Ltd.24
(1) Steering lock ¼LVh;fjax ykWd½(2) Ignition Key ¼bfXu”ku dh½(A) Turn to lock ¼ykWd djsa½(B) Turn to unlock ¼vuykWd djssa½
(2)(1)
(1)
FEATURES(NOT required for operation)
STEERING LOCKMove the handle towards left to lock the steering (1), turn the ignition key (2) clockwise direction. Remove the key. To unlock the steering, turn ignition key to anticlockwise direction.
SEAT REMOVALThe seat (1) must be removed to access the battery, fuses and storage compartment.
Insert the ignition key (2) in to the seat lock (3) and turn it clockwise to unlock.
To lock the seat, align the prong (4) under the front of seat with the recess (5) on the frame. Slide the seat into position and push down on the rear of the seat until it locks. Make sure the seat is secure before riding.
(3)
(4)
(5)
(2)
(A)
(B)
(1) Seat ¼lhV½ (2) Ignition key ¼bfXu”ku dh½(3) Seat lock ¼lhV ykWd½ (4) Prong ¼izk¡x½(5) Recess ¼jsfll½

Honda Motorcycle & Scooter India Pvt. Ltd. 25
(1)
(2)
HELMET HOLDERThe helmet holder (1) is on the left side below the seat. Hang the helmet D-ring (2) on the holder hook. The helmet holder is designed to secure your helmet while parked.
Riding with a helmet attached to the holder can interfere with the suspension and could cause a crash in which you can be seriously hurt or killed.
Use the helmet holder only while parked. Do not ride with a helmet secured by the holder.
! WARNING
(1) Helmet holder ¼gSYesV gksYMj½(2) Helmet D-ring ¼gSYesV Mh&fjax½

Honda Motorcycle & Scooter India Pvt. Ltd.26
(3)(4)
(1)
(2) (1)
(2)
CENTER COMPARTMENTThe center compartment (1) is below the seat. Remove the seat (Ref. page 24)This compartment is for light weight items.The first aid kit (2), tool kit (3), owner’s manual and other documents (4) should be stored in this compartment.
FUEL TANK COVERUnlock the fuel tank lid (page 15).
Open the fuel tank cover (1) by removing the screws (2) 6 nos as shown in the illustration.
Installation can be done in the reverse order of removal.
(1) Fuel tank cover ¼¶;wy VSad doj½(2) Screws ¼LØwt½
(1) Center Compartment ¼lSaVj dEikVZesaV½(2) First Aid Kit ¼çkFkfed fpfdRlk fdV½(3) Tool kit ¼Vwy fdV½(4) Document ¼MkWD;wesaV½
Do not wash the center compartment, only wipe with cloth.
! CAUTION

Honda Motorcycle & Scooter India Pvt. Ltd. 27
(3)
(5)
(2)
RIGHT SIDE COVERThe right side cover (1) must be removed for secondary air filter maintenance.
Removal
1. Remove the Fuel tank cover (page 26).
2. Remove the trim clips (2) 2 nos from right side cover.
3. Remove the screws (3) 7 nos from right side cover.
4. Remove the right side cover bosses (4) from the grommets(5). Remove the right side cover.
Installation
Installation can be done in the reverse order of removal.
(1)
(4)
(1) Right side cover ¼jkbV lkbM doj½(2) Trim clips ¼fVªe fDyi½(3) Screws ¼LØw½(4) Bosses ¼ckWlsl½(5) Grommets ¼xzkWesVl½

Honda Motorcycle & Scooter India Pvt. Ltd.28
(1) Bolt ¼cksYV½(A) Up ¼Åij½(B) Down ¼uhpsa½
(1)
(2)(2)
(3)(1)
(A)(B)
REAR VIEW MIRRORRemoval :1. Pull the dust cover (1).2. Loosen the lock nut (2) until it will no
longer turn.3. Remove the rear view mirror (3).
Installation :1. Install the rear view mirror until it will
no longer turn.2. Loosen the rear view mirror
approximately 2 turns.3. Adjust the rear view mirror.4. Tighten the lock nut.
HEADLIGHT AIM VERTICAL ADJUSTMENTVertical adjustment can be made by turning the bolt (1) up or down as necessary.
(Obey local laws and regulations)
(1) Dust cover ¼MLV doj½ (2) Lock nut ¼ykWd uV½(3) Rear view mirror ¼fj;j O;w fejj½

Honda Motorcycle & Scooter India Pvt. Ltd. 29
OPERATIONPRE-RIDE INSPECTIONFor your safety, it is very important to take few moments before each ride to walk around your vehicle and check its condition. If you detect any problem, be sure you take care of it, or have it corrected by your Honda dealer.
! WARNINGImproperly maintaining this vehicle or failing to correct a problem before riding can cause a crash in which you can be seriously hurt or killed.Always perform a pre-ride inspection before every ride and correct all problems.
1. Engine oil level - add engine oil if required (Ref. page 18). Check for leaks.
2. Fuel level - fill fuel tank, when necessary (Ref. page 15). Check for leaks.
3. Front and rear brakes - check operation and if necessary, adjust freeplay (Ref. pages 13-14).
4. Tyres – check condition and pressure (Ref. pages 19–21).
5. Throttle – check for smooth opening and full closing in all steering positions.
6. Lights and horn – check that headlight, tail/brake light, turn signal indicators and horn are functioning properly.

Honda Motorcycle & Scooter India Pvt. Ltd.30
Always follow the proper starting procedure described below.1. Place the vehicle on its center stand.2. Lock the rear wheel by pressing the rear
brake lever (1) and setting the brake lock lever (2).
! CAUTION
STARTING THE ENGINE Engine can be started using:
(1) Electric starter
(2) Kick starter
To protect the catalytic converter in your vehicle’s exhaust system, avoid extending idling and the use of leaded petrol.
Your vehicle’s exhaust contains poisonous carbon monoxide gas. High levels of carbon monoxide can accumulate rapidly in enclosed areas such as a garage. Do not run the engine with garage door closed. Even with the door open run the engine only long enough to move your vehicle out of the garage.
Contact with the spinning rear wheel can hurt.
Set the parking brake when the vehicle is on its center stand.
! CAUTION• Always wear a helmet.• Read owner’s manual before riding.• No foot brake.
REAR - LEFT RIGHT - FRONTBRAKE OPERATION
(1) Rear brake lever ¼fj;j cszd yhoj½(2) Brake lock lever ¼czsd ykWd yhoj½
(1)
(2)

Honda Motorcycle & Scooter India Pvt. Ltd. 31
5(a). Using electric starter (i) Ensure the application of front/ rear brake lever. (ii) Press the electric start button
NOTICEDo not use the electric starter for more than 5 seconds at a time. Release the starter button for approximately 10 seconds before pressing it again.
(b). Using kick starter (i) To start the engine hold the rear grip
from back side and lightly depress the kickstarter until resistance is felt. Then let the kickstarter return to the top of its stroke.
(3) Ignition switch ¼bXuh”ku fLop½
Rear grip
(3)
The electric starter will work when the front brake or rear brake lever is pressed in.
3. Turn the ignition switch (3) to ON.
4(a). In case of Cold Engine (i) Move the choke lever (1) left all
the way to Fully ON (A).
(1) Choke lever ¼pkWd fyoj½ (A) Fully ON ¼iwjk [kqyk½ (B) Fully OFF ¼iwjk can½
(1)
(A)(B)
(b). In case of Warm Engine (i) Do not use the choke (ii) Turn throttle 1/8.

Honda Motorcycle & Scooter India Pvt. Ltd.32
NOTICEExtended use of the choke may impair piston and cylinder wall lubrication and damage the engine.Do not “BLIP” the throttle (open and close rapidly) as the vehicle will move forward suddenly, causing possible loss of control.Do not leave the vehicle unattended while the engine is warming up.
NOTICE
Operate the kickstarter or starter button for slightly longer than usual without opening the throttle if the vehicle has been left standing for a long time or when the fuel tank has been just refilled.
(ii) With the throttle closed, operate the kick starter. Kick from the top of the stroke through to the bottom with a rapid, continuous motion.
(iii) Do not allow the kickstarter to snap back freely against the pedal stop as engine case can get damaged.
(iv) Raise the kickstarter pedal after the kickstarter pedal is returned to the stop.
RUNNING-INHelp assure your vehicle’s future reliability and performance by paying extra attention to how you ride during the first 500 km.
During this period, avoid full-throttle starts and rapid acceleration.
RIDINGReview Vehicle Safety (Ref. pages 1–8) before you ride.Make sure flammable material such as dry grass or leaves do not come in contact with the exhaust system when riding, idling or parking your vehicle.
Continue warming up the engine until it runs smoothly and responds to the throttle when the choke lever is at Fully OFF (B). Close the choke lever by pressing it.

Honda Motorcycle & Scooter India Pvt. Ltd. 33
1. Make sure the throttle is closed and the rear brake lever is locked before moving the vehicle off the center stand.
The rear wheel must be locked when moving the vehicle off the center stand or loss of control may result.
2. Stand on the left side of the vehicle and push it forward and off the center stand.
(1) Rear brake lever ¼fj;j cszd yhoj½(2) Brake lock lever ¼czsd ykWd yhoj½
(1) (2)

Honda Motorcycle & Scooter India Pvt. Ltd.34
(1) Rear brake lever ¼fj;j cszd yhoj½(2) Brake lock lever ¼czsd ykWd yhoj½
(1)
(2)
3. Mount the vehicle from the left side keeping at least one foot on the ground to steady the vehicle.
4. Unlock the rear wheel by releasing the rear brake lever (1).
5. Before starting off, indicate your direction with the turn signals, and check for safe traffic conditions.
Grasp handlebars firmly with both hands. Never attempt one-handed operation; loss of vehicle control could result.
6. To accelerate, open the throttle (3) gradually; the vehicle will move forward.
! CAUTIONDo not “BLIP” the throttle (open and close rapidly) as the vehicle will move forward suddenly, causing possible loss of control.

Honda Motorcycle & Scooter India Pvt. Ltd. 35
(3)
(4)
(5)
(3) Throttle ¼FkzkWVy½
CLOSE OPEN(3)
7. To decelerate, close throttle.
8. When slowing down the vehicle coordination of the throttle (3), front brake lever (4) and rear brake lever (5) is most important.
Both front and rear brakes should be applied together. Independent use of only the front or rear brake reduces stopping performance.
Excessive brake application may cause either wheels to lock, or loss of control on vehicle.
(3) Throttle ¼FkzkWVy½(4) Front brake lever ¼ÝaV czsd yhoj½(5) Rear brake lever ¼fj;j cszd yhoj½
! CAUTIONDo not accelerate while applying brakes. This may result severe damage of the related parts

Honda Motorcycle & Scooter India Pvt. Ltd.36
11. When descending a steep grade, close the throttle (3) fully and apply front brake (4) and rear brake (5) to slow the vehicle.
Avoid continuous use of the brakes, which may result in overheating and reduction of braking efficiency.
(3)(5)
(4)
(3) Throttle ¼FkzkWVy½(4) Front brake ¼ÝaV czsd½ (5) Rear brake ¼fj;j cszd½
(3) Throttle ¼FkzkWVy½(4) Front brake ¼ÝaV czsd½ (5) Rear brake ¼fj;j cszd½
(3)
(4)
(5)
9. When approaching a corner or turn, close the throttle (3) fully, and slow the vehicle down by applying both front brake lever (4) and rear brake lever (5) at the same time.
10. After completing the turn, open the throttle gradually to accelerate the vehicle.
12. When riding on wet or loose surfaces, special caution should be taken.

Honda Motorcycle & Scooter India Pvt. Ltd. 37
When riding in wet or rainy conditions or on loose surface, the ability to controlled movement and stop will be reduced. For your safety:• Exercise extreme caution when braking,
accelerating or turning.• Ride at slower speeds and allow for
extra stopping distance.• Keep the vehicle as upright as possible.• Use extreme caution when riding over
slippery surfaces such as railroad tracks, iron plates, manhole covers, painted lines, etc.
PARKING1. After stopping the vehicle turn the
ignition switch to the “OFF” position and remove the key. Turn the Fuel knob OFF.
2. Use the center stand to support the vehicle while parked.
Park the vehicle on firm, level ground to prevent it from falling over.
If you must park on a slight incline, aim the front of the vehicle uphill to reduce the possibility of rolling off the center stand or overturning.
3. Lock the steering to help prevent theft, turn the ignition switch to the “Lock” position and remove the key. (Ref. page 38).
The exhaust pipe and muffler become very hot during operation and remain sufficiently hot to inflict burns if touched even after shutting off the engine.
Make sure flammable material such as dry grass or leaves do not come in contact with the exhaust system when parking your vehicle.
HOW TO USE CENTER STAND

Honda Motorcycle & Scooter India Pvt. Ltd.38
(1)
(A)
(B)
ANTI-THEFT TIPS1. Always lock the steering.
2. Never leave the key in the ignition switch or in the steering lock. This sounds simple but people do forget.
3. Be sure the registration information for your vehicle is accurate and current.
4. Park your vehicle in a locked garage, whenever possible.
5. Use an additional anti-theft device of good quality (without tampering any part of the vehicle).
6. Put your name, address, phone number and key number in this Owner’s Manual and keep it on your vehicle at all times.
Many times stolen vehicles are identified by information in the Owner’s Manuals.
NAME:_________________________
ADDRESS:______________________
______________________________
PHONE NO: ______________________
KEY NO: ________________________
LOCK STEERING
(1) Ignition Key ¼bfXu”ku dh½(A) Turn to lock ¼ykWd djsa½(B) Turn to unlock ¼vuykWd djssa½

Honda Motorcycle & Scooter India Pvt. Ltd. 39
! WARNING
MAINTENANCETHE IMPORTANCE OF MAINTENANCEA well-maintained vehicle is essential for safe, economical and trouble-free riding. It will also help reduce air pollution.
To help you proper care for your vehicle, the following pages include a Maintenance Schedule (Ref. page 43 to 44) and a Maintenance Record for regular scheduled maintenance.
These instructions are based on the assumption that the vehicle will be used exclusively for its designed purpose. Sustained high speed operation or operation in unusually wet or dusty conditions will require more frequent service than specified in the Maintenance Schedule. Consult your Honda dealer for recommendations applicable to your individual needs and use.
Improperly maintaining this vehicle or failing to correct a problem before you ride can cause a crash in which you can be seriously hurt or killed.
Always follow the inspection and maintenance recommendations and schedule in this owner’s manual.
MAINTENANCE SAFETYThis section includes instructions on some important maintenance tasks. You can perform some of these tasks with the tools provided – if you have basic mechanical skills.
If your vehicle overturns or becomes involved in a crash, be sure your Honda dealer inspects all major parts, even if you are able to make some repairs.

Honda Motorcycle & Scooter India Pvt. Ltd.40
Other tasks that are more difficult and require special tools are best performed by professionals. Wheel removal should normally be handled only by a Honda technician or other qualified mechanic; instructions are included in this manual only to assist in emergency service.
Followings are some of the most important safety precautions. However, we cannot warn you of every conceivable hazard that can arise in performing maintenance. Only you can decide whether or not you should perform a given task.
! WARNINGFailure to properly follow maintenance instructions and precautions can cause you to be seriously hurt or killed.
Always follow the procedure and precautions in this owner’s manual.
SAFETY PRECAUTIONS• Make sure the engine is off before you
begin any maintenance or repairs. This will help eliminate several potential hazards:
• Carbon monoxide poisoning from engine exhaust
Be sure there is adequate ventilation whenever you operate the engine.
• Burns from hot parts
Let the engine and exhaust system cool before touching.
• Injury from moving parts
Do not run the engine unless instructed to do so.
Read the instructions before you begin, and make sure you have the tools and skills required.
To help prevent the vehicle from falling over, park it on a firm, level surface, using the center stand to provide support.

Honda Motorcycle & Scooter India Pvt. Ltd. 41
(1) Tool kit ¼Vwy fdV½ (2) Center compartment ¼laSVj dEikVZesaV½
(1)
(2)
• Be sure the rear brake lock is set before running the engine while the vehicle is supported by the center stand. This will prevent the rear wheel from spinning and avoid the possibility of someone being injured from contacting the wheel.
• To reduce the possibility of a fire or explosion be careful when working around petrol or batteries. Use only nonflammable solvent, not petrol, to clean parts. Keep cigarettes, sparks and flames away from the battery and all fuel-related parts.
Remember that your Honda dealer knows your vehicle best and is fully equipped to maintain and repair it.
To ensure the best quality and reliability use only new genuine Honda parts or their equivalents for repair and replacement.
TOOL KITThe tool kit (1) is located in the center compartment (2).
Some road side repairs, minor adjustments and parts replacement can be performed with the tools contained in the kit.• Driver screw (No.2 +/-) • Grip• Wrench plug (16)• Spanner 12X14 • Tool bag

Honda Motorcycle & Scooter India Pvt. Ltd.42
MAINTENANCE SCHEDULEPerform the pre-ride Inspection (Ref. page 29) at each scheduled maintenance period.
I:INSPECT, CLEAN, ADJUST, LUBRICATE OR REPLACE IF NECESSARY
C:CLEAN R:REPLACE A:ADJUST L:LUBRICATE.
The following items require some mechanical knowledge. Certain item (particularly those marked * and **) may require more technical information and tools. Consult your Honda dealer.
* Should be serviced by your Honda dealer, unless the owner has the proper tools and service data and is mechanically qualified. Refer to the Official Honda Shop Manual.
** In the interest of safety, we recommend these items be serviced only by your Honda dealer.
Honda recommends that the customer should road test your vehicle after each periodic
maintenance is carried out.
NOTES: (1) At higher odometer reading, repeat at the frequency interval established here.
(2) Service more frequently when riding in unusually wet or dusty areas.
(3) Service more frequently when riding in rain or at full throttle.
(4) Replace every 2 years. Replacement requires mechanical skill.

Honda Motorcycle & Scooter India Pvt. Ltd. 43
FREQUENCY
NOTE PRE-RIDE CHECK
ODOMETER READING (NOTE 1)X1000KM 1 4 8 12 16 20 24
ANNUAL CHECK
REGULAR REPLACE
REFER TO
PAGEX1000MI 0.6 2.5 5 7.5 10 12.5 15MONTHS 1 4 8 12 16 20 24
* FUEL LINE I I I I I I I -FUEL LEVEL I -
* FUEL STRAINER SCREEN C C C C C C
* THROTTLE OPERATION I I I I I I I I -
* CHOKE OPERATION I I I I I I I 31
* AIR CLEANER (NOTE 2) R 46CRANKCASE BREATHER (NOTE 3) C C C C C C C 48SPARK PLUG I R I R I R 52
* VALVE CLEARANCE I I I I I I I -ENGINE OIL I R R R R R R R R 49ENGINE OIL STRAINER SCREEN C C C 51
* ENGINE IDLE SPEED I I I I I I I I 54
* SECONDARY AIR SUPPLY SYSTEM I I I 47
*SECONDARY AIR SUPPLY SYSTEM AIR FILTER (NOTE 2) C C 47
The vehicle must be serviced at every 4000 kms or within 4 months whichever is earlier from the date of previous service. For NOTES refer page 42.
ITEM

Honda Motorcycle & Scooter India Pvt. Ltd.44
FREQUENCY
NOTE PRE-RIDE CHECK
ODOMETER READING (NOTE 1)X1000KM 1 4 8 12 16 20 24
ANNUAL CHECK
REGULAR REPLACE
REFER TO
PAGEX1000MI 0.6 2.5 5 7.5 10 12.5 15MONTHS 1 4 8 12 16 20 24
* DRIVE BELT I I R -
* FINAL DRIVE OIL (NOTE 4) 2 YEARS -BRAKE SHOES WEAR I I I I I I I I 58
BRAKE SYSTEM I I I I I I I I I 13-14
* BRAKE LOCK OPERATION I I I I I I I -
BATTERY VOLTAGE I I I I I I I I I -
HEADLIGHT AIM I I I I I I I 28
LIGHTS/HORN I -
** CLUTCH SHOES WEAR I I I -
* SUSPENSION I I I I I I I -
* NUTS, BOLTS, FASTENERS I I I I I -
** WHEELS/TIRES I I I I I I I I 19, 55
** STEERING HEAD BEARINGS I I I I -
ITEM
The vehicle must be serviced at every 4000 kms or within 4 months whichever is earlier from the date of previous service. For NOTES refer page 42.

Honda Motorcycle & Scooter India Pvt. Ltd. 45
(1) Frame number ¼Ýse uEcj½
(1)
(2)
(2) Engine number ¼batu uEcj½
SERIAL NUMBERSThe frame and engine serial numbers are required when registering your vehicle. They may also be required by your dealer when ordering replacement parts.
Record the numbers here for your reference.
The frame number (1) is stamped on the right side of the frame body.
FRAME NO._____________________
The engine number (2) is stamped on the left side of the crankcase.
ENGINE NO.____________________

Honda Motorcycle & Scooter India Pvt. Ltd.46
(1) Air cleaner cover ¼,;j Dyhuj doj½(2) Screws ¼LØwl½ (3) Air cleaner ¼,;j Dyhuj½
(1)
(3)
(2)
S.No. Color Color code
1. Patriot Red R232
2. Hopper Green R GY152
3. Black NH1
4. Shasta White NH138
5. Sparky Orange R YR340
COLOR CODEThe color table is attached below.It is useful during ordering the replacement parts.
The above color code table helps in providing the correct color part as per your vehicle color.
AIR CLEANERRefer to the Safety Precautions on page 40.The air cleaner element should be replaced at regular intervals (Ref. page 43). Replace more frequently when riding in unusually wet or dusty areas.
1. Remove the air cleaner cover (1) by removing the screws (2) - 6 nos.
2. Remove the Air cleaner (3).

Honda Motorcycle & Scooter India Pvt. Ltd. 47
! CAUTION3. Viscous type air filters should be replaced regularly. Do not reuse it by cleaning with solvent to remove dust.
The special oil will be lost and filter becomes dry. As the base filter paper is coarse, it cannot block fine dust when it becomes dry.
4. Replace the air cleaner element if it is excessively dirty, torn or damage. Use the Honda genuine air cleaner element or an equivalent air cleaner element specified for your model. Using the wrong Honda air cleaner element or a non-Honda air cleaner element which is not of equivalent quality may cause premature engine wear or performance problems.
5. Install the removed parts in the reverse order of removal.
Do not use air, oil, water for cleaning of air cleaner element. Replacement should be done at regular intervals.
SECONDARY AIR SUPPLY SYSTEMRefer to the Safety Precautions on page 40.
Secondary Air filter cleaning
The secondary air filter should be serviced at regular intervals (Ref. page 43). Service more frequently when riding in unusually wet or dusty areas.
1. Remove the right side cover (page 27).
2. Remove the secondary air filter housing cover (1) by removing the screw (2).

Honda Motorcycle & Scooter India Pvt. Ltd.48
(1) Secondary Air filter housing cover ¼lSds.Mªh ,;j fQYVj gkmftxa doj½(2) Screw ¼LØw½(3) Secondary Air filter ¼lSds.Mªh ,;j fQYVj½
(3)
(2)
(1) Clamp ¼dySEi½(2) Crankcase breather tube ¼Øsaddsl czhnj V;wc½
(1)
(2)
3. Remove the secondary air filter (3).4. Wash the secondary air filter in clean,
nonflammable or high flash point solvent and let it dry thoroughly.
Never use gasoline or low flash point solvents for cleaning the secondary air filter. Fire or explosion could result.5. Soak the secondary air-cleaner in engine
oil (SAE 10W-30) until saturated, then squeeze out the excess oil.
6. Install the removed parts in the reverse order of removal.
(1)
CRANKCASE BREATHERRefer to the Safety Precautions on Page 40.
1. Open the clamp (1) and remove crankcase breather tube (2) from the air cleaner and drain deposits into a suitable container .
2. Periodically clean up breather oil from breather tube.
3. Reinstall the crankcase breather tube.
Service more frequently when riding in rain, at full throttle, or after the vehicle is washed or overturned. Service if the deposit level can be seen in the transparent section of the drain tube.

Honda Motorcycle & Scooter India Pvt. Ltd. 49
ENGINE OILRefer to the Safety Precautions on page 40.
Engine Oil
Good engine oil has many desirable qualities. Use only high detergent, quality motor oil certified on the container to meet or exceed requirements for API Service Classification MA.
Viscosity:
Viscosity grade of engine oil should be based on average atmospheric temperature in your riding area. The following provides a guide to the selection of the proper grade or viscosity of oil to be used at various atmospheric temperatures.
ENGINE OILEngine oil quality is the chief factor affecting engine service life. Change the engine oil as specified in the maintenance schedule (Ref. page 43).
When running in very dusty conditions, oil changes should be performed more frequently than specified in the maintenance schedule.
Please dispose of used engine oil in a manner that is compatible with the environment. We suggest you take it in a sealed container to your local recycling center or service station for reclamation. Do not throw it in the trash or pour it on the ground or down a drain.
Used engine oil may cause skin cancer if repeatedly left in contact with the skin for prolonged periods. Although this is unlikely unless you handle used oil on a daily basis, it is still advisable to thoroughly wash your hands with soap and water as soon as possible after handling used oil.If a torque wrench is not used for this

Honda Motorcycle & Scooter India Pvt. Ltd.50
(1) Oil drain bolt ¼vkW;y Mªsu cksYV½(2) Sealing washer ¼lhfyax ok”kj½
(2)
installation, see your Honda dealer as soon as possible to verify proper assembly.Change the engine oil from the engine at normal operating temperature and the vehicle on its center stand to assure complete and rapid draining.1. Start the engine and let it idle for 3-5
minutes.2. Stop the engine. Turn the ignition off
and to be on safer side remove the ignition key from ignition switch.
3. Place an oil drain pan under the crankcase. Remove the oil filler cap/dipstick, oil drain bolt (1) and sealing washer (2).
4. After the engine oil has been drained out hold the vehicle upright for 10-15 seconds to assure complete draining.
5. Operate the kickstarter several times to aid in complete draining of the remaining oil.
6. Check that the sealing washer (2) on the drain bolt is in good condition and install the bolt. Replace the sealing washer every other time the oil is changed, or each time if necessary.
Oil Drain Bolt Torque: 24 N.m (2.5 kgf.m, 18 lbf.ft)
7. Fill the crankcase with recommended grade oil;
0.7L (0.7 US qt, 0.6 Imp qt)
8. Reinstall the oil filler cap/dipstick.9. Start the engine and let it idle for 3-5
minutes.10. Stop the engine and wait 2-3 minutes.
Check that the oil level is at the upper level mark on the dipstick with the vehicle upright on firm, level ground.
Make sure there are no oil leaks.
(1)

Honda Motorcycle & Scooter India Pvt. Ltd. 51
(1) Oil strainer screen cap ¼vkW;y LVªsauj LØhu dSi½
(1)
ENGINE OIL STRAINER SCREEN1. To drain the oil, remove the oil filler
cap/ dipstick, oil drain bolt and sealing washer (Ref. page 50).
2. Remove the oil strainer screen cap (1), spring (2) and oil strainer screen (3).
Oil Strainer Screen Cap Torque:
20 N.m (2.0 kgf.m, 14 lbf.ft)
3. Clean the oil strainer screen.
4. Check that the oil strainer screen, sealing rubber and O-ring (4) are in good condition.
5. Install the oil strainer screen spring,
O-ring and oil strainer screen cap.
6. Fill the crankcase with the recommended grade oil;
0.7L (0.7 US qt, 0.6 Imp qt)
7. Reinstall the oil filler cap/dipstick.
8. Start the engine and let it idle for 3-5 minutes.
(2) Spring ¼fLizax½(3) Oil strainer screen ¼vkW;y LVªsauj LØhu½ (4) O-ring ¼O&fjax½
(2)(4) (3)

Honda Motorcycle & Scooter India Pvt. Ltd.52
(1)
(2)
9. Stop the engine and wait for 2-3 minutes. Check that the oil level is at the upper level mark on the oil filler cap/dipstick with the vehicle upright on firm, level ground. Make sure that there are no oil leaks.
SPARK PLUGRefer to the Safety Precautions on page 40. Recommended spark plug for standard performance:
Standard:
MR7C-9N (NGK)
(Part No. 31917-KWP-D01)
NOTICE
Never use a spark plug with an improper heat range. Severe engine damage could result.
1. Remove the cover center (1) by removing screws (2) 3 nos.
(1) Cover center ¼doj lSaVj½(2) Screw ¼LØw½

Honda Motorcycle & Scooter India Pvt. Ltd. 53
(3) Spark plug cap ¼LikdZ Iyx dSi½(4) Spark plug ¼LikdZ Iyx½
(4)
(3)
(5) Spark plug Gap ¼LikdZ Iyx xSi½(6) Side Elecrode ¼lkbM bySDVªksM½
(6)
(5)
5. Inspect the electrodes and center porcelain for deposits, erosion or carbon fouling. If the erosion or deposit is heavy, replace the plug. Clean a carbon or wet fouled plug with a plug cleaner, otherwise use a wire brush.
6. Check the spark plug gap (5) using a wire gauge. If adjustment is necessary, bend the side electrode (6) carefully.
The gap should be:
0.80–0.90 mm (0.031–0.035 in)
2. Disconnect the spark plug cap (3) from the spark plug (4).
3. Clean any dirt from around the spark plug base.
4. Remove the spark plug using the spark plug wrench furnished in the tool kit.

Honda Motorcycle & Scooter India Pvt. Ltd.54
ENGINE IDLE SPEEDRefer to the Safety Precautions on page 40.The engine must be at normal operating temperature for accurate idle speed adjustment. 10 minutes of stop-and-go riding is sufficient.1. Warm up the engine, and place the
vehicle on its center stand.2. Connect a tachometer to the engine.3. Adjust idle speed with the throttle stop
screw (1). Idle speed (In neutral) : 1,700 ± 100 min-1 (rpm)
(1) Throttle stop screw ¼FkzkWVy LVkWi LØq½(A) Increase ¼c<+kuk½ (B) Decrease ¼?kVkuk½
(1)
(A)
(B)
7. With the plug washer attached thread the spark plug in by hand prevent cross-threading.
8. Tighten the spark plug: • If the old plug is good, tighten it
1/8 turn after it seats.
• If installing a new plug, tighten it twice to prevent loosening:
a) First tighten the plug:
NGK:3/4 turn after it seats.
b) Then loosen the plug.
c) Next, tighten the plug again:
1/8 turn after it seats.
NOTICE
Improperly tightened of spark plug may damage the engine.
9. Reinstall the spark plug cap.

Honda Motorcycle & Scooter India Pvt. Ltd. 55
WHEEL REMOVALRefer to the Safety Precautions on Page 40.
Front Wheel Removal
1. Place the vehicle on its center stand.
2. Raise the front wheel off the ground by pressing from rear side.
3. Remove the front fork cover (1) from both side by removing screw (2).
4. Remove the speedometer cable (3) by pushing the tab (4).
5. Remove the front brake adjusting nut (5) and remove the front brake cable (6) from the brake arm (7).
6. Remove the front axle nut (8).
7. Remove the front axle shaft (9), collar (10) and the wheel.
(1) Front fork cover ¼ÝaV QksdZ doj½(2) Screw ¼LØw½(3) Speedometer cable ¼LihMksehVj dscy½ (4) Tab ¼VSc½(5) Front brake adjusting nut ¼ÝaV czsd ,MtfLVxa uV½(6) Front brake cable ¼ÝaV czsd dscy½(7) Brake arm ¼cszd vkeZ½(8) Front axle nut ¼ÝaV ,Dly uV½(9) Front axle shaft ¼ÝaV ,Dly “kk¶V½(10)Collar ¼dkWyj½
(2)
(6)
(8)
(9)(4)
(3)
(5)(10)
(7)
(1)

Honda Motorcycle & Scooter India Pvt. Ltd.56
(12)
(11)
Front Wheel Installation
1. Position the wheel between the fork legs and insert the front axle from the left side, through the left fork leg, wheel hub, collar and right fork leg.
Make sure that the tang (11) on the left front fork leg is located in the slot (12) in the brake panel.
2. Tighten the front axle nut to the specified torque.
59 N.m (6.0 kgf.m, 43 lbf.ft)
3. Adjust the brake (page 13 - 14).
4. After installing the wheel, apply the brake several times and then check if the wheel rotates freely. Recheck the wheel if the brake drags or if the wheel does not rotate freely.
If a torque wrench was not used for installation, see your Honda dealer as soon as possible to verify proper assembly. Improper assembly may lead to loss of braking capacity.
(11) Tang ¼VSax½(12) Slot ¼LykWV½

Honda Motorcycle & Scooter India Pvt. Ltd. 57
(1) Fender RR inner ¼QSaMj vkj vkj bUuj½(2) Bolts ¼cksYV½
(2)
(1)(3)
(4)
Rear Wheel Removal/Installation
1. Place the vehicle on its center stand.
2. Remove the rear wheel fender RR inner (1) by removing 4 bolts (2).
3. Remove the rear wheel nut (3) and washer (4) by applying rear brake.
4. Remove the rear wheel.
5. Installation is in the reverse order of removal
(3) Nut ¼uV½(4) Washer ¼ok”kj½

Honda Motorcycle & Scooter India Pvt. Ltd.58
(1) Arrow mark ¼,Sjks ekdZ½ (2) Brake arm ¼czsd vkeZ½ (3) Reference mark ¼jsQjsUl ekdZ½(4) Brake panel ¼czsd iSuy½
(1) (1)(3) (3)
(2)(4)
(4)Front RearBRAKE SHOE WEAR
Refer to the Safety Precautions on page 40.
The front and rear brakes are equipped with brake wear indicators.
When the brake is applied, an arrow mark (1) attached to the brake arm (2) moves toward a reference mark (3) on the brake panel (4). If the arrow aligns with the reference mark on full application of the brake, the brake shoes must be replaced. See your Honda dealer for this service.
When the brake service is necessary, see your Honda dealer. Use only genuine Honda parts or its equivalent.

Honda Motorcycle & Scooter India Pvt. Ltd. 59
BATTERYRefer to the safety precautions on page 40.
It is not necessary to check the battery electrolyte level or add distilled water as the battery is a maintenance-free (sealed) type. If your battery seems weak and/or is leaking electrolyte (causing hard starting or other electrical troubles), contact your Honda dealer or battery manufacturer.
! WARNING
NOTICEBattery contains lead, which is a hazardous material and if improperly disposed, can be harmful to the environment and human health.
The battery gives off explosive hydrogen gas during normal operation.
A spark or flame can cause the battery to explode with enough force to kill or seriously hurt you.
Wear protective clothing and a face shield or have a skilled mechanic do the battery maintenance.
Keep children away from the battery.
Always return the used maintenance-free
battery to the Honda dealer.
This symbol on the battery means that this product must not be treated as household waste.
NOTICEYour battery is maintenance-free type and can be permanently damaged if the cap strip is removed.

Honda Motorcycle & Scooter India Pvt. Ltd.60
(1) Battery cover ¼cSVjh doj½(2) Screw ¼LØw½(3) Negative (–) terminal lead ¼uSxsfVo (-) VfeZuy yhM½(4) Positive (+) terminal lead ¼ikWftfVo (+) VfeZuy yhM½(5) Battery ¼cSVjh½
(2)
(5)
(3)
(1)
(4)
Battery Removal1. Remove the seat (Ref. page 24).
2. Remove the battery cover (1) by removing screw (2).
3. Disconnect the negative (–) terminal lead (3) from the battery first, then disconnect the positive (+) terminal lead (4).
4. Remove the battery (5).5. Installation can be done in the reverse
order of removal.

Honda Motorcycle & Scooter India Pvt. Ltd. 61
Blown fuse ¼Cyksu ¶;wt½
FUSE REPLACEMENTRefer to the Safety Precautions on page 40.
When frequent fuse failure occurs, it usually indicates a short circuit or an overload in the electrical system. See your Honda dealer for repair.
NOTICE
Never use a fuse with a different rating from that specified. Serious damage to the electrical system or a fire may result, causing a dangerous loss of lights or engine power.
Fuse Holder:
The fuse box (1) is located near the battery. The specified fuse is:
Main fuse 10 A
Sub fuse 7.5 A
Removal
1. Turn the ignition switch OFF before checking or replacing the fuses to prevent an accidental short-circuit.
2. Remove the battery cover (page 60).
(1) Fuse box ¼¶;wt cksDl½
(1)

Honda Motorcycle & Scooter India Pvt. Ltd.62
NOTICEReplacing a fuse with one that has a higher rating greatly increases the chance of damage to the electrical system.
If the replacement fuse of the same rating burns out in a short time, there is probably a serious electrical problem on your vehicle. Leave the blown fuse in that circuit and have your vehicle checked by your Honda dealer.
3. Open the fuse box cover (2) and lift out the fuse (3) from the fuse box. If fuse blown, install a new fuse.
4. The spare fuse (4) is located in the fuse box.
(2) Fuse box cover ¼¶;wt cksDl doj½ (3) Fuse ¼¶;wt½ (4) Spare fuse ¼Lis;j ¶;wt½
(2)
(4)
(3)
Install the fuse properly. A loose fuse could cause damage to the electrical system and even cause a fire.
5. Close the fuse box cover properly, after replacing the fuse.
6. Install the battery cover.
If you do not have a replacement fuse with the proper rating for the circuit, install one with a lower rating.

Honda Motorcycle & Scooter India Pvt. Ltd. 63
POSITION LIGHT BULB1. Remove the front cowl (1) by removing
4 screws (2). Carefully hold it from the lower end.
2. Disconnect the connectors (3).3. Remove the position light bulb (4) by
pulling it .4. Install a new bulb in the reverse order
of removal.
BULB REPLACEMENTRefer to the Safety Precautions on page 40.
The light bulb becomes very hot while the light is ON, and remain hot for a while after it is turned OFF. Be sure to let it cool down before servicing.• Be sure to turn the ignition switch OFF
when replacing the bulb.• Do not use bulbs other than those
specified.• After installing a new bulb, check that
the light operates properly.
(3)(4)
(2) (1)
(1) Front cowl ¼ÝaV dkmy½(2) Screw ¼LØw½(3) Connector ¼dusDVj½(4) Position light Bulb ¼iksft”ku ykbZV cYc½

Honda Motorcycle & Scooter India Pvt. Ltd.64
HEADLIGHT BULB1. Remove the front cowl (page 63).2. Remove the dust cover (1).3. Remove the headlight bulb (2) while
pressing down the locking pin (3).4. Install a new bulb in the reverse order
of removal.• Install the dust cover with its “TOP”mark
(4) facing up.
(2)
(3)
(1)
(4)
(1) Dust cover ¼MLV doj½(2) Headlight bulb ¼gsMykbZV cYc½(3) Locking Pin ¼ykWfdxa fiu½(4) “Top” mark ¼VkWi ekdZ½

Honda Motorcycle & Scooter India Pvt. Ltd. 65
STOP/TAIL LIGHT BULB1. Remove the seat (page 24).
2. Remove the bulb holder (1) by turning it counterclockwise.
3. Remove the bulb (2) from bulb holder by pressing in and turning counterclockwise.
4. Install a new bulb in the reverse order of removal.
(2)
(1)
(1) Bulb holder ¼cYc gksYMj½(2) Bulb ¼cYc½
FRONT/REAR TURN SIGNAL BULB1. Remove the turn signal lens (1) by
removing the screw (2).
2. Remove the bulb (3) from bulb holder by pressing in and turning counterclockwise.
3. Install a new bulb in the reverse order of removal.
(1)
(2)
(3)
(1) Turn signal lens ¼VuZ flXuy cYc gksYMj½(2) Screw ¼LØw½(3) Bulb ¼cYc½

Honda Motorcycle & Scooter India Pvt. Ltd.66
CLEANING Clean your vehicle regularly to protect the surface finishes and inspect for damage, wear, and oil leakage.
Avoid cleaning products that are not specifically designed for vehicle or automobile surfaces.
They may contain harsh detergents or chemical solvents that could damage the metal, paint, and plastic on your vehicle.
If your vehicle is still warm from recent operation, give the engine and exhaust system time to cool off.
We recommend avoiding the use of high pressure water spray (typical in coin operated car washes).
NOTICE
High pressure water (or air) can damage certain parts of the vehicles.
Washing the vehicle
1. Rinse the vehicle thoroughly with cool water to remove loose dirt.
2. Clean the vehicle with a sponge or soft cloth using cool water.
Avoid directing water to muffler outlets and electrical parts.
3. Clean the plastic parts using a cloth or sponge dampened with a solution of mild detergent and water. Rub the soiled area gently rinsing it frequently with fresh water.
Take care to keep chemical solvents off the vehicle. They will damage the plastic and painted surfaces.
The inside of the headlight lens, tail lamp, indicators etc. May be clouded immediately after washing the vehicle. Moisture condensation inside the headlight lens will disappear gradually by lighting the headlight in high beam. Run the engine while keeping the headlight on.
4. After cleaning, rinse the vehicle thoroughly with plenty of clean water. Strong detergent residue can corrode alloy parts.

Honda Motorcycle & Scooter India Pvt. Ltd. 67
5. Dry the vehicle start the engine, and let it run for several minutes.
Anticipate longer stopping distance to avoid a possible accident.
Finishing Touches
After washing your vehicle, consider using a commercially-available spray cleaner/ polish or quality liquid or paste wax to finish the job. Use only a nonabrasive polish or wax
6. Test the brakes before riding the vehicle. Several applications may be necessary to restore normal braking performance.
Braking efficiency may be temporarily impaired immediately after washing the vehicle.
Do not wash the center compartment, only wipe with cloth.
! CAUTION
Rear brake lever
fj;j czsd yhoj
Front Brake Lever
ÝaV czsd yhoj

Honda Motorcycle & Scooter India Pvt. Ltd.68
made specifically for automobiles. Apply the polish or wax according to the instructions on the container.
Removing Road SaltThe salt contained in the road surface freezing prevention medicine which a road was sprayed with in winter, and the seawater becomes the cause which rust occurs in.Wash your vehicle by the following point after it runs through such a place.1. Clean the vehicle using cool water (Ref.
page 66-67). Do not use warm water. This worsens the effect of the salt.2. Dry the vehicle and the surface of the
metal is protected with the wax.
STORAGE GUIDEExtended storage, such as for winter, requires that you take certain steps to reduce the effects of deterioration from non-use of the vehicle. In addition necessary repairs should be made BEFORE storing the vehicle, otherwise, these repairs
may be forgotten by the time the vehicle is removed from storage.
STORAGE1. Change the engine oil.2. Empty the fuel tank into an approved
petrol container using a commercially available hand siphon or an equivalent method. Spray the inside of the tank with an aerosol rust-inhibiting oil.
Reinstall the fuel filler cap on the tank.
If storage will last more than one month carburetor draining is very important, to assure proper performance after storage.
! WARNINGPetrol is highly flammable and explosive. You can be burned or seriously injured while handling the same.• Stop the engine and keep heat, sparks, and flame away.• Refuel only outdoors.
• Wipe up spills immediately.

Honda Motorcycle & Scooter India Pvt. Ltd. 69
3. To prevent rusting in the cylinder, perform the following :
• Remove the spark plug cap from the spark plug. Using tape or string, secure the cap to any convenient plastic body part so that it is positioned away from the spark plug.
• Remove the spark plug from the engine and store it in a safe place. Do not connect the spark plug to the spark plug cap.
• Pour a tablespoon (15-20 cm³) of clean engine oil into the cylinder and cover the spark plug hole with a piece of cloth.
• Crank the engine several times to distribute the oil.
• Reinstall the spark plug and spark plug cap.
4. Remove the battery. Store in an area protected from freezing temperatures and direct sunlight.
5. Wash and dry the vehicle. Wax all painted surfaces. Coat chrome with rust inhibiting oil.
6. Inflate the tyres to their recommended pressures. Place the vehicle on blocks to raise both tyres off the ground.
7. Cover the vehicle (don’t use plastic or other coated materials) and store in an unheated area, free of dampness with a minimum of daily temperature variation. Do not store the vehicle in direct sunlight.
REMOVAL FROM STORAGE 1. Uncover and clean the vehicle. Change the engine oil if more than 4
months have passed since the start of storage.
2. Check the battery voltage and charge the battery as required. Install the battery.
3. Drain any excess aerosol rust-inhibiting oil from the fuel tank. Fill the fuel tank with fresh petrol.
4. Perform all Pre-ride Inspection checks (Ref. page 29).
Test ride the vehicle at low speeds in a safe riding area away from traffic.
Honda Motorcycle & Scooter India Pvt. Ltd.70
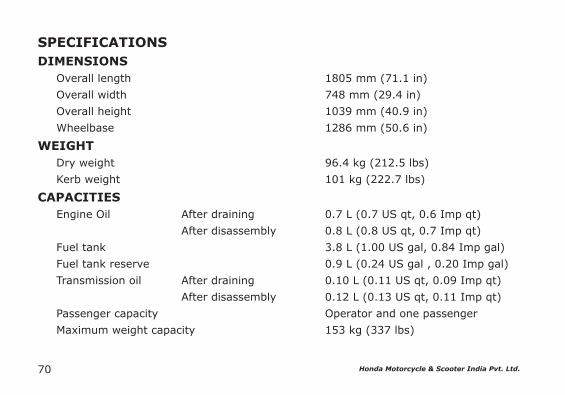
SPECIFICATIONSDIMENSIONS Overall length 1805 mm (71.1 in)
Overall width 748 mm (29.4 in)
Overall height 1039 mm (40.9 in)
Wheelbase 1286 mm (50.6 in)
WEIGHT Dry weight 96.4 kg (212.5 lbs)
Kerb weight 101 kg (222.7 lbs)
CAPACITIES Engine Oil After draining 0.7 L (0.7 US qt, 0.6 Imp qt)
After disassembly 0.8 L (0.8 US qt, 0.7 Imp qt)
Fuel tank 3.8 L (1.00 US gal, 0.84 Imp gal)
Fuel tank reserve 0.9 L (0.24 US gal , 0.20 Imp gal)
Transmission oil After draining 0.10 L (0.11 US qt, 0.09 Imp qt)
After disassembly 0.12 L (0.13 US qt, 0.11 Imp qt)
Passenger capacity Operator and one passenger
Maximum weight capacity 153 kg (337 lbs)

Honda Motorcycle & Scooter India Pvt. Ltd. 71
ENGINE Bore and stroke 50.0 x 55.6 mm (1.97 x 2.19 in)
Compression ratio 9.5 : 1
Displacement 109.19 cm³ (6.66 cu-in)
Spark Plug
Standard MR7C-9N (NGK)
(Part No. 31917-KWP-D01)
Spark plug gap 0.80 - 0.90 mm (0.031 - 0.035 in)
Idle speed 1,700 ± 100 min-1 (rpm)
CHASSIS AND SUSPENSION Caster 27°30’
Trail 81.5 mm (3.2 in)
Tyre size, Front 90/90-12 54J
Tyre size, Rear 90/100-10 53J
POWER TRANSMISSION Primary drive type V-Belt
Final reduction 10.117

Honda Motorcycle & Scooter India Pvt. Ltd.72
ELECTRICAL Battery 12V - 3Ah (MF)
Generator 0.13kW/5,000 min-1 (rpm)
LIGHT Headlight 12V-35/35W
Position light 12V-5Wx1
Stop/tail light 12V-21/5W
Turn signal light Front 12V-10Wx2
Rear 12V-10Wx2
Speedometer light 12V-1.7Wx1
Turn signal indicator 12V-1.7Wx1
High beam indicator 12V-1.7Wx1
FUSE Main fuse 10A
Sub fuse 7.5A

Honda Motorcycle & Scooter India Pvt. Ltd. 73
CATALYTIC CONVERTERThis Vehicle is equipped with a catalytic converter.
The catalytic converter contains precious metals that serve as catalysts. Promoting chemical reactions to convert the exhaust gasses without affecting the metals.
The catalytic converter acts on HC, CO, and NOx. A replacement unit must be an original Honda part or its equivalent.
The catalytic converter must operate at a high temperature for the chemical reactions to take place. It can set on fire any combustible materials that come near it. Mark your vehicle away from high grasses, dry leaves, or other flammables.
A defective catalytic converter contributes to air pollution, and can impair your engine’s performance. Follow these guidelines to protect your vehicle’s catalytic converter.
• Always use unleaded petrol. Even a small amount of leaded petrol can contaminate the catalyst metals, making the catalytic converter ineffective.
• Keep the engine tuned-up.
• Have your vehicle diagnosed and replaced if it is misfiring, backfiring stalling or otherwise not running properly.

Honda Motorcycle & Scooter India Pvt. Ltd.74

Honda Motorcycle & Scooter India Pvt. Ltd. 75
Warranty PolicyHonda Motorcycle & Vehicle India (Pvt.) Ltd. (HMSI) gives the following warranty in respect of vehicle “NAVI” manufactured by them.
Proper care and precaution has been taken to ensure the best quality in respect of the material and workmanship in manufacturing “NAVI”.
HMSI would repair or replace at its discretion, those part(s) found to have manufacturing defects during examination. This repair or replacement of part(s) would be done free of charge at their authorised workshop, within a warranty period of 24 months from the date of sale or until the vehicle has covered 24000kms, whichever comes first.
Warranty claims in respect of proprietary parts like tyres and battery are warranted by their respective manufacturers and should be claimed on them directly by customer.
NOTE: Battery Warranty is applicable from 21 months from Date Of Charging at manufacturer or 18 Months from the Date Of Sale or 20000 Kms whichever is earlier.
In all such cases the decision of the respective manufacturer will be final and binding.
HMSI shall not be liable in any manner to replace them though their dealers will give full assistance in preferring such claims on their manufacturers.
HMSI undertake no liability in the matter of consequential loss or damage caused due to the failure of the parts. Delay, if any, at the repairing workshop in carrying out repair to vehicle shall not be a ground for extending the warranty period nor shall it give any right to the customer for claiming any compensation for damages.
HMSI reserves the right either to repair or replace the defective part.
Valid in India only

Honda Motorcycle & Scooter India Pvt. Ltd.76
Where a defective part can replaced by part/s of alternative brand/s, which are normally used by HMSI in the course of manufacturing, HMSI reserves the right to carry out the replacement by a part or parts of any such alternative brands.
This warranty and any claim arising there from is subject to Gurgaon jurisdiction only.
No claim for exchange or repair can be consider unless the customer:
a. Ensures that immediately upon discovery of the defect, he approaches any nearest authorised dealer of HMSI with the concerned vehicle and enables him to remove and dispatch the part/parts attributing to manufacturing defect to the company.
b. Produces Owner’s Manual in original, to enable that dealer to verify the details. It must be expressly understood that claims forwarded directly to us by the owner/customer will not be entertained at all and such defective part/parts thus forwarded by them will lie at our factory at their own risk, and this warranty shall not be enforceable.
Further this warranty is not applicable to:
1. Any “NAVI” on which any free and paid services has not been carried out, as per schedule given in Owner’s Manual.
2. Normal maintenance operations like valve adjustment, cleaning of fuel system, engine tune-up or such other adjustments.
3. HMSI does not warrant normal wear and tear items like Weight Set Clutch, Roller Set Weight, Wheel Rim (in case of misalignment and bent), Bushes, Fasteners, Washers and Electrical Items like Bulbs, Rubber and Plastic Components like Grommets, O-Rings,Bellows as well as Packings, Gaskets, Oil Seals and Consumables like Fuel Filter, Air
Valid in India only

Honda Motorcycle & Scooter India Pvt. Ltd. 77
Cleaner Element, Engine Oil, Grease, Suspension Grease and other items as specified by HMSI.
4. Fasteners and clips which needs replacement during maintenance/service will not be covered under warranty.
5. If there is any damage to the painted surface due to industrial pollution or other extraneous factors.
6. Any damage resulting from unavoidable natural disaster i.e fire collision, earthquake, flood etc.
7. Any damage caused by exposure of the product to soot and smoke, chemical agents, bird-droppings, sea water, sea breeze, or other environmental phenomenon.
8. If there is any damage caused due to usage of improper oil/grease, non genuine parts.
9. For two-wheelers, which have been used for any commercial purposes as taxi etc.
10. For maintenance repairs required due to misuse while driving or due to adulteration of oil, petrol or due to bad road conditions.
11. Recommended fuel quality not used.12. Parts of the vehicle that have been
subjected to misuse, accident, negligent treatment or which have been used in conjunction with parts and an equipment not manufactured or recommended for use by HMSI if in the sole judgment of HMSI, such use prematurely affects the performance and reliability of the vehicle.
13. Parts of the vehicle that have been altered or modified or replaced in unauthorized manner, and which in the sole judgment of HMSI affect its performance and reliability.
14. The vehicle that has not been serviced by HMSI authorised dealer as per the service schedule or which have not been operated or maintained in accordance with instructions mentioned in the Owner’s Manual.
Valid in India only

Honda Motorcycle & Scooter India Pvt. Ltd.78
15. The vehicles used for any competition or race and/or for attempting to set up any kind of record HMSI reserves the right to make any changes in design or to add any improvement on the vehicle at any time without incurring any obligations to install the same on a vehicle previously supplied and sold. Also the conditions of this warranty are subject to alteration without any notice.
This warranty is entirely written warranty given by HMSI for “NAVI” and no other person, including the dealer or its or his agent or employee is authorised to extend or enlarge this warranty.
This warranty is given in lieu of and excludes every condition or warranty whether statutory or otherwise not herein expressly set out.
EMISSION WARRANTY
Subject to other terms of the warranty policy and other conditions and obligations laid down hereunder, the manufacturer certifies that the components liable to affect the emission of the gaseous pollutants in the vehicle in normal use despite the use to which it may be subjected, comply with provisions of rule 115(2) of the Central Motor Vehicle Rules, 1989 and further warrants that if on examination by a service center duly authorized by the manufacturer, the vehicle is discovered to be failing to meet the emission standard as specified in the said rule, the authorized service center shall take such corrective measures as may be necessary and shall at its sole discretion replace free of charge such components of emission control system as are specified in schedule.
Valid in India only

Honda Motorcycle & Scooter India Pvt. Ltd. 79
A. Conditions
1. This warranty will be in addition to and run parallel to the product warranty given by the manufacturer and will apply to components as mentioned later. This warranty is applicable in Delhi, Mumbai, Kolkata and Chennai with effective from 1st July 2001. Other places when included will be covered under warranty accordingly.
2. The period of the vehicle’s emission warranty will be determined starting from the date of the vehicle sale. The period of time and kilometers that are covered under the provisions of warranty may vary but should not be less than the minimum warranty period based on the vehicle category.
For a two-wheeler the emission warranty period is 30,000 kms or 3 years whichever is earlier.
3. Warranty claim for the components under Emission warranty as per annexure–II will be admitted, for a prima facie examination, in the event of failure of the vehicle to meet the emission standard as specified in sub-rule (2) of Rule No 115 of the Central Motor vehicle Rules.
4. The warranty claim will be accepted only after the examinations carried out by Authorized Service Centers leads to a firm conclusion that none of the original settings have been tampered with and that the components as mentioned in annexure-II has/have a manufacturing defect, and/or, that the vehicle is unable to meet the in-use emission standard, in spite of the vehicle being maintained and used in accordance with the instructions in the owner’s manual.
Valid in India only

Honda Motorcycle & Scooter India Pvt. Ltd.80
5. The methods of examination to determine the warrantable condition of the components will be at the sole discretion of manufacturers and or their Authorized service centers and results of such examination will be final and binding. If, on examination, a warrantable condition is not established, the manufacturers will have to charge all, or part, of the cost of such examination.
6. In case of a vehicle in which the components covered under Emission warranty, the manufacturer will replace, at Authorized centers free of charge, the components which are covered as mentioned in Annexure–II, but the consumables as mentioned in Owner’s Manual shall be charged as per actuals.
7. In case of a vehicle in which the components covered under Emission warranty or the associated parts are not independently replaceable on account of their being integral parts of a complete assembly, the manufacturer
will have the sole discretion to replace either the entire assembly or by using some of the parts of the system through suitable repairs or modifications.
8. Any consequential repairs or replacement of parts which may be found necessary to establish compliance to in-use emission standards, in addition to replacement of the parts covered under emission warranty, will not be made free of cost unless such parts are also found to be in a warrantable condition within the scope and limit of the product warranty. The consumables shall be charged as per actuals during such repairs or replacement of parts.
9. All the parts removed for replacement under warranty will be the property of the manufacturer.
10 The manufacturer will not be responsible for the cost of transportation of the vehicle to the nearest Authorized Service center or any loss due to non-
Valid in India only

Honda Motorcycle & Scooter India Pvt. Ltd. 81
availability of the vehicle during the period of lodging of a warranty claim and examination by the manufacturer and repairs.
11. The manufacturer will not be responsible for any penalties that may be charged by statutory authorities on account of failure to comply with the in use emission standards.
12. Emission warranty will be applicable irrespective of the change of ownership of the vehicle provided all the conditions as laid down in this document are met from the date of original sale of the vehicle.
13. The emission warranty will be applicable only if:
a. Observes all the important instructions and any other precautions listed in the Owner’s Manual for use of the vehicle.
b. Under all circumstances uses lubricants and fuel as recommended by manufacturer.
c. Regularly obtains and carries out maintenance in accordance with the manufacturers guidelines and enters the details in the Logbook.
d. Immediately approaches the nearest authorized service center upon discovery of failure to comply with the in use emission standards in spite of having maintained and used the vehicle in accordance with the instructions in the Owner’s Manual and having carried out such repairs and adjustments as may be required with a view to establish such compliance.
e. Produces the ‘Pollution Under Control’ certificate valid for the period immediately preceding the test during which the failure is
Valid in India only

Honda Motorcycle & Scooter India Pvt. Ltd.82
discovered, the test having been carried out either for obtaining a new certificate, or pursuant upon being directed by an officer as referred to in sub-rule(2) of Rule 116 of the Central Motor Vehicle Rules.
f. Produces the Owner’s Manual and Log book for verification details.
g. Produces receipts covering maintenance of the vehicle as specified in the Owner’s Manual from the date of original purchase of the vehicle.
h. Produces valid certificate of insurance and RTO registration.
14. Conditions under which warranty is not applicable:
A valid ‘Pollution Under Control’ certificate as described in customer obligation D(6) above is not produced.
A vehicle which is not serviced by Authorized service center as per the service schedule described in the maintenance chart given in the Owner’s Manual.
A vehicle, which has been subjected to abnormal use, abuse, neglect and improper maintenance or has met with an accident. Use of replacement parts not specified and approved by the manufacturer.
A vehicle, or parts thereof, which has been altered, tampered with or modified or replaced in an unauthorized manner.
A vehicle on which the odometer is not functioning or the odometer has been changed/tampered with so that the actual mileage cannot be readily determined.
A vehicle which has been used for competitions, races, rallies or for the purpose of establishing records.
Valid in India only

Honda Motorcycle & Scooter India Pvt. Ltd. 83
Examination by the manufacturers or his Authorized Service Centers of the vehicle shows that any of the conditions stipulated in the Owner’s Manual with regard to use and maintenance have been violated.
A vehicle, which has been run on, adulterated fuel, leaded fuel or lubricant or fuel/lubricants other than those specified by the manufacturer in the Owner’s Manual with regard to use and maintenance have been violated.
SCOPE AND LIMITS
1. This emission warranty is in addition to product warranty and shall run parallel to the product warranty for the vehicle as per the scope and limit described in the Owner’s Manual and all conditions described there in will apply in addition to those exclusively stipulated in this warranty.
Valid in India only
2. The emission warranty covers only compliance with the emission standard as specified in the sub rule (2) of rule 115 of CMVR. It does not cover any other performance of these parts or routine test and consequent maintenance or adjustments to establish compliance to the in use emission standard as applicable to the state, in which the vehicle is registered and is in use.
The parts, which are covered under emission warranty, are carburetor and internal parts, intake manifold, distributor and internal parts, ignition coil, muffler etc.
NOTE: The emission warranty is applicable only when a customer enters into emission warranty contract.